Embed Size (px)
Citation preview
1
e-DECA 2.0
www.e-deca2.org
Introduction and Instruction Manual
July, 2014
2
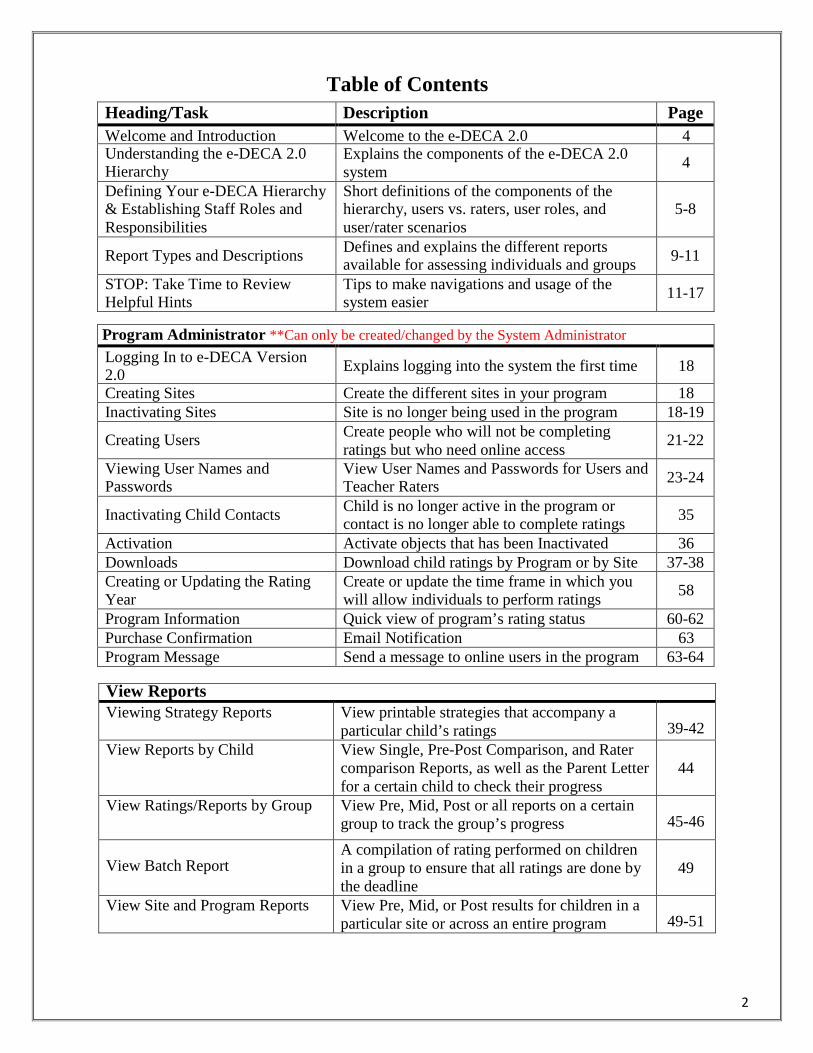
Table of Contents
Heading/Task Description Page Welcome and Introduction Welcome to the e-DECA 2.0 4 Understanding the e-DECA 2.0 Hierarchy
Explains the components of the e-DECA 2.0 system
4
Defining Your e-DECA Hierarchy & Establishing Staff Roles and Responsibilities
Short definitions of the components of the hierarchy, users vs. raters, user roles, and user/rater scenarios
5-8
Report Types and Descriptions Defines and explains the different reports available for assessing individuals and groups
9-11
STOP: Take Time to Review Helpful Hints
Tips to make navigations and usage of the system easier
11-17
Program Administrator **Can only be created/changed by the System Administrator Logging In to e-DECA Version 2.0
Explains logging into the system the first time
18
Creating Sites Create the different sites in your program 18 Inactivating Sites Site is no longer being used in the program 18-19
Creating Users Create people who will not be completing ratings but who need online access
21-22
Viewing User Names and Passwords
View User Names and Passwords for Users and Teacher Raters
23-24
Inactivating Child Contacts Child is no longer active in the program or contact is no longer able to complete ratings
35
Activation Activate objects that has been Inactivated 36 Downloads Download child ratings by Program or by Site 37-38 Creating or Updating the Rating Year
Create or update the time frame in which you will allow individuals to perform ratings
58
Program Information Quick view of program’s rating status 60-62 Purchase Confirmation Email Notification 63 Program Message Send a message to online users in the program 63-64
View Reports Viewing Strategy Reports View printable strategies that accompany a
particular child’s ratings 39-42 View Reports by Child View Single, Pre-Post Comparison, and Rater
comparison Reports, as well as the Parent Letter for a certain child to check their progress
44
View Ratings/Reports by Group View Pre, Mid, Post or all reports on a certain group to track the group’s progress 45-46
View Batch Report A compilation of rating performed on children in a group to ensure that all ratings are done by the deadline
49
View Site and Program Reports View Pre, Mid, or Post results for children in a particular site or across an entire program 49-51
3
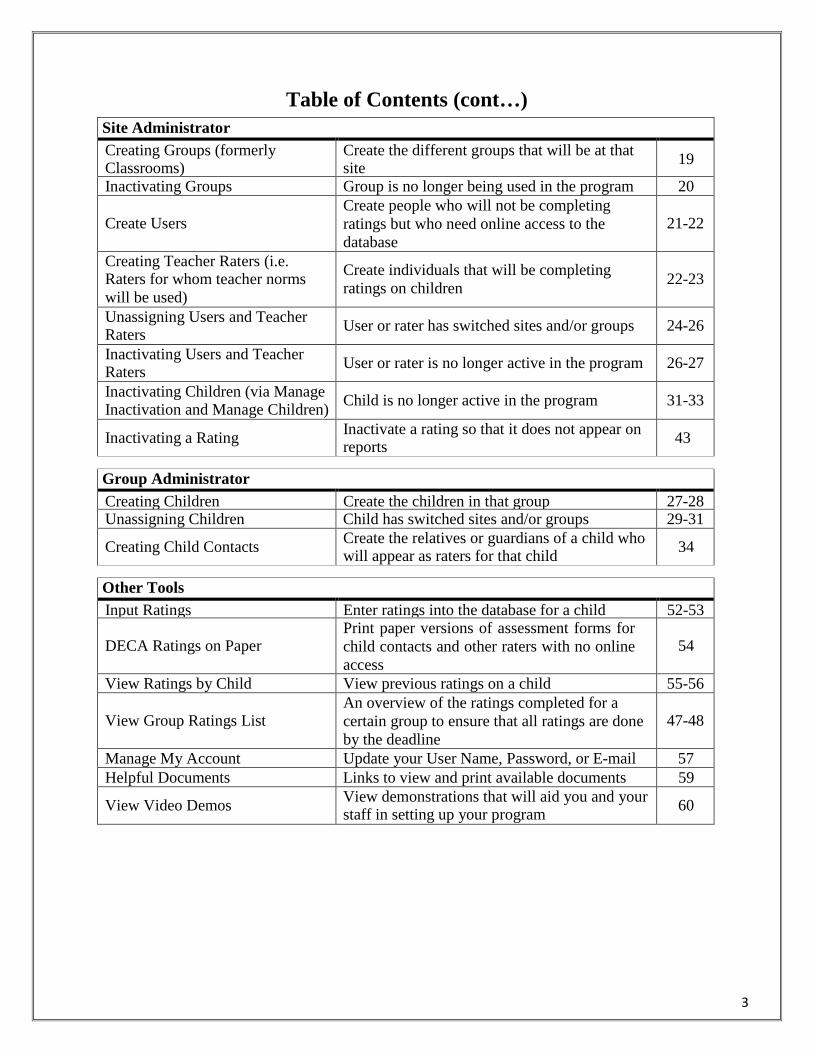
Table of Contents (cont…)
Site Administrator Creating Groups (formerly Classrooms)
Create the different groups that will be at that site
19
Inactivating Groups Group is no longer being used in the program 20 Create Users
Create people who will not be completing ratings but who need online access to the database
21-22
Creating Teacher Raters (i.e. Raters for whom teacher norms will be used)
Create individuals that will be completing ratings on children
22-23
Unassigning Users and Teacher Raters
User or rater has switched sites and/or groups
24-26
Inactivating Users and Teacher Raters
User or rater is no longer active in the program
26-27
Inactivating Children (via Manage Inactivation and Manage Children)
Child is no longer active in the program
31-33
Inactivating a Rating Inactivate a rating so that it does not appear on reports
43
Group Administrator Creating Children Create the children in that group 27-28 Unassigning Children Child has switched sites and/or groups 29-31
Creating Child Contacts Create the relatives or guardians of a child who will appear as raters for that child
34
Other Tools Input Ratings Enter ratings into the database for a child 52-53
DECA Ratings on Paper
Print paper versions of assessment forms for child contacts and other raters with no online access
54
View Ratings by Child View previous ratings on a child 55-56 View Group Ratings List
An overview of the ratings completed for a certain group to ensure that all ratings are done by the deadline
47-48
Manage My Account Update your User Name, Password, or E-mail 57 Helpful Documents Links to view and print available documents 59
View Video Demos View demonstrations that will aid you and your staff in setting up your program
60
4
e-DECA Version 2.0 (www.e-deca2.org)
Welcome and Introduction
Kaplan Early Learning Company and the Devereux Early Childhood Initiative are delighted to announce the release of the e-DECA 2.0, the new web-based version of the Devereux Early Childhood Assessment. The e-DECA 2.0 application provides programs with the ability to administer, score, save and report on the infant, toddler and preschool DECA assessments on one database platform.
This document is designed for e-DECA Program Administrators, those individuals responsible
for setting up and maintaining their assessment data, and is designed to provide the information needed to set-up and maintain a program on e-DECA 2.0.
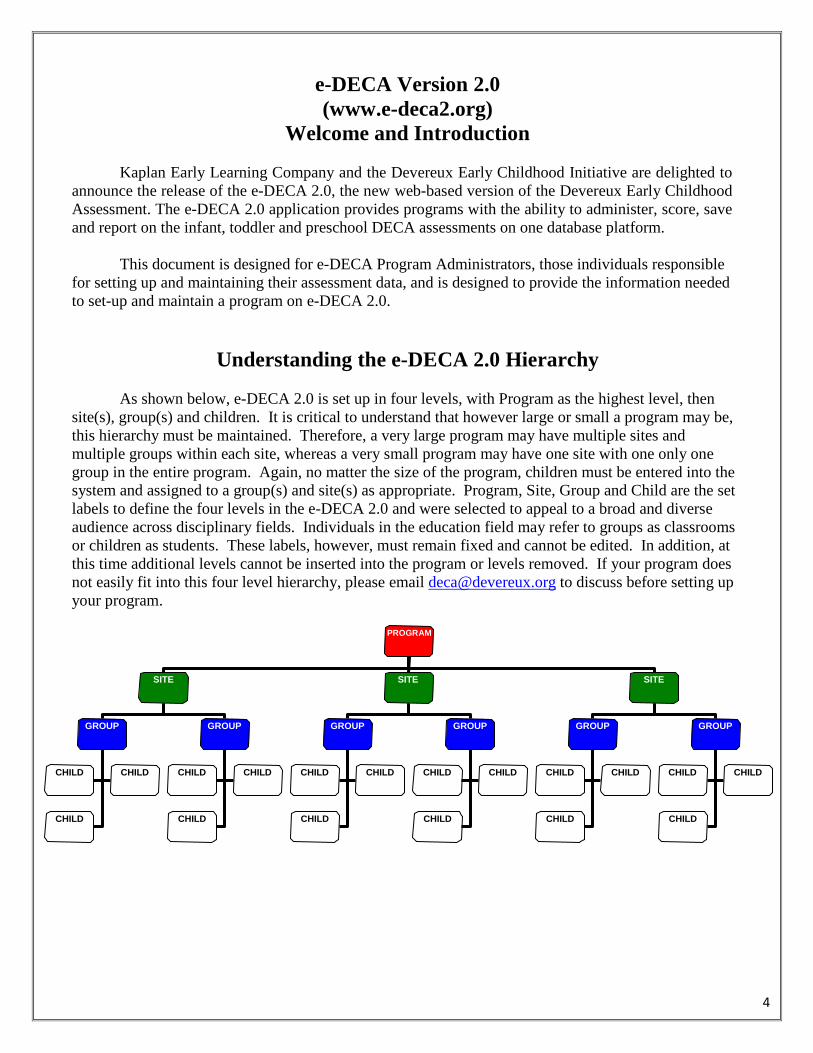
Understanding the e-DECA 2.0 Hierarchy
As shown below, e-DECA 2.0 is set up in four levels, with Program as the highest level, then site(s), group(s) and children. It is critical to understand that however large or small a program may be, this hierarchy must be maintained. Therefore, a very large program may have multiple sites and multiple groups within each site, whereas a very small program may have one site with one only one group in the entire program. Again, no matter the size of the program, children must be entered into the system and assigned to a group(s) and site(s) as appropriate. Program, Site, Group and Child are the set labels to define the four levels in the e-DECA 2.0 and were selected to appeal to a broad and diverse audience across disciplinary fields. Individuals in the education field may refer to groups as classrooms or children as students. These labels, however, must remain fixed and cannot be edited. In addition, at this time additional levels cannot be inserted into the program or levels removed. If your program does not easily fit into this four level hierarchy, please email [email protected] to discuss before setting up your program.
PROGRAM
SITE SITE SITE
GROUP GROUP GROUP GROUP GROUP GROUP
CHILD CHILD CHILD CHILD CHILD CHILD CHILD CHILD CHILD CHILD CHILD CHILD
CHILD CHILD CHILD CHILD CHILD CHILD
5
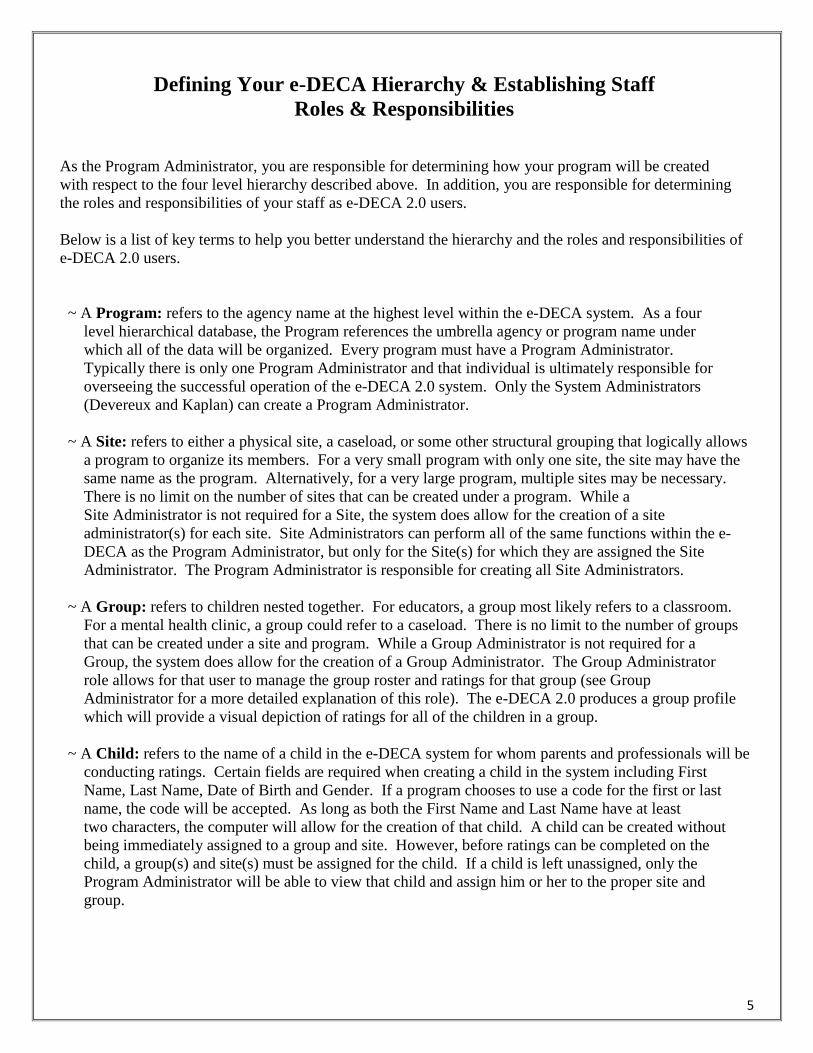
Defining Your e-DECA Hierarchy & Establishing Staff Roles & Responsibilities
As the Program Administrator, you are responsible for determining how your program will be created with respect to the four level hierarchy described above. In addition, you are responsible for determining the roles and responsibilities of your staff as e-DECA 2.0 users.
Below is a list of key terms to help you better understand the hierarchy and the roles and responsibilities of e-DECA 2.0 users.
~ A Program: refers to the agency name at the highest level within the e-DECA system. As a four level hierarchical database, the Program references the umbrella agency or program name under which all of the data will be organized. Every program must have a Program Administrator. Typically there is only one Program Administrator and that individual is ultimately responsible for overseeing the successful operation of the e-DECA 2.0 system. Only the System Administrators (Devereux and Kaplan) can create a Program Administrator.
~ A Site: refers to either a physical site, a caseload, or some other structural grouping that logically allows
a program to organize its members. For a very small program with only one site, the site may have the same name as the program. Alternatively, for a very large program, multiple sites may be necessary. There is no limit on the number of sites that can be created under a program. While a Site Administrator is not required for a Site, the system does allow for the creation of a site administrator(s) for each site. Site Administrators can perform all of the same functions within the e-DECA as the Program Administrator, but only for the Site(s) for which they are assigned the Site Administrator. The Program Administrator is responsible for creating all Site Administrators.
~ A Group: refers to children nested together. For educators, a group most likely refers to a classroom.
For a mental health clinic, a group could refer to a caseload. There is no limit to the number of groups that can be created under a site and program. While a Group Administrator is not required for a Group, the system does allow for the creation of a Group Administrator. The Group Administrator role allows for that user to manage the group roster and ratings for that group (see Group Administrator for a more detailed explanation of this role). The e-DECA 2.0 produces a group profile which will provide a visual depiction of ratings for all of the children in a group.
~ A Child: refers to the name of a child in the e-DECA system for whom parents and professionals will be
conducting ratings. Certain fields are required when creating a child in the system including First Name, Last Name, Date of Birth and Gender. If a program chooses to use a code for the first or last name, the code will be accepted. As long as both the First Name and Last Name have at least two characters, the computer will allow for the creation of that child. A child can be created without being immediately assigned to a group and site. However, before ratings can be completed on the child, a group(s) and site(s) must be assigned for the child. If a child is left unassigned, only the Program Administrator will be able to view that child and assign him or her to the proper site and group.

6
~ A Child Contact: is an adult family member whose rating of a child needs to be entered in the e-
DECA2.0. Child Contacts include a child’s mother, father, grandparent, guardian, foster parent, or other relative. A child must first be created in the system before a child’s contact can be created and the child contact must be in the system before that their rating can be entered into the system. ** Please note that parents or other family members who conduct a rating on a child do not have IDs and passwords to be online users of the system. A paper version of the assessment forms is available for these raters to complete, upon which a staff member can transfer the results into the system and generate a score. Alternatively, if a parent is at a program with online access and a staff member can get them set up directly on the rating page, a parent/family member could enter their assessment directly on the computer.
~ Users and Raters:
Raters: It is important to understand the different between a “User” and a “Rater”. A “rater” is a person (professional or parent) who will be conducting a rating (i.e. answering the DECA questions) about a child. When the DECA was nationally standardized, both family members and professionals were included as potential raters of children, and the standardization results revealed that family members and professionals did score children differently. As such, there are two sets of rater norms for the DECA assessments, family member norms (i.e. parent norms) and professional rater norms (i.e. teacher norms). Throughout the e-DECA 2.0 system these two groups are referred to as Teacher Raters (those adults for whom teacher norms are used) and Parent Raters (those adults for whom parent norms are used). In order for the e-DECA 2.0 to score a rater’s assessment results, the rater must first be created in e-DECA 2.0 as a rater.
As described above for a Child Contact, a Parent Rater is created as a Child Contact. Specific instructions for creating a Child Contact can be found on page 34 of this document.
Alternatively, a Teacher Rater (teacher or other professional) is created under the Manage User button. Specific instructions for creating a Teacher Rater can be found on pages 22 through 23. Because Teacher Raters are also often (although not required) to be set up as Users in the system, the process for creating Teacher Raters and Users takes place on the same page in the e-DECA 2.0 system. See pages 21 through 23 for detailed instructions about how to create Teacher Raters/Users.
7
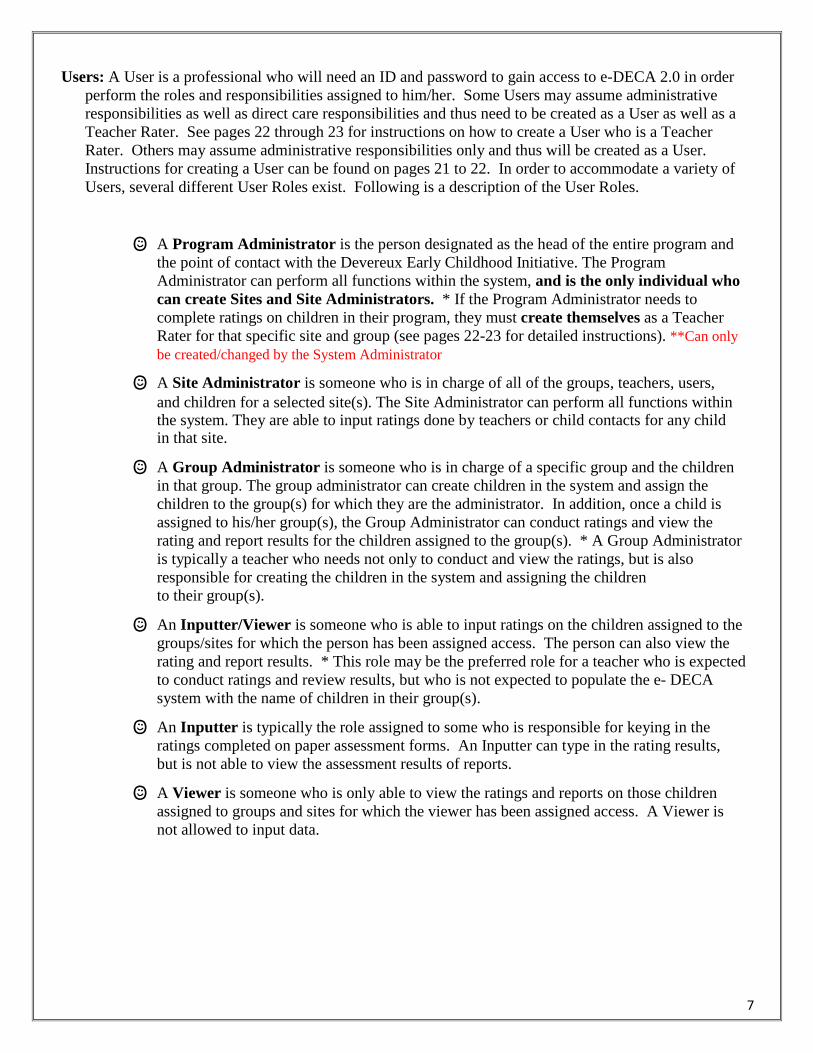
Users: A User is a professional who will need an ID and password to gain access to e-DECA 2.0 in order perform the roles and responsibilities assigned to him/her. Some Users may assume administrative responsibilities as well as direct care responsibilities and thus need to be created as a User as well as a Teacher Rater. See pages 22 through 23 for instructions on how to create a User who is a Teacher Rater. Others may assume administrative responsibilities only and thus will be created as a User. Instructions for creating a User can be found on pages 21 to 22. In order to accommodate a variety of Users, several different User Roles exist. Following is a description of the User Roles.
A Program Administrator is the person designated as the head of the entire program and the point of contact with the Devereux Early Childhood Initiative. The Program Administrator can perform all functions within the system, and is the only individual who can create Sites and Site Administrators. * If the Program Administrator needs to complete ratings on children in their program, they must create themselves as a Teacher Rater for that specific site and group (see pages 22-23 for detailed instructions). **Can only be created/changed by the System Administrator
A Site Administrator is someone who is in charge of all of the groups, teachers, users, and children for a selected site(s). The Site Administrator can perform all functions within the system. They are able to input ratings done by teachers or child contacts for any child in that site.
A Group Administrator is someone who is in charge of a specific group and the children
in that group. The group administrator can create children in the system and assign the children to the group(s) for which they are the administrator. In addition, once a child is assigned to his/her group(s), the Group Administrator can conduct ratings and view the rating and report results for the children assigned to the group(s). * A Group Administrator is typically a teacher who needs not only to conduct and view the ratings, but is also responsible for creating the children in the system and assigning the children to their group(s).
An Inputter/Viewer is someone who is able to input ratings on the children assigned to the
groups/sites for which the person has been assigned access. The person can also view the rating and report results. * This role may be the preferred role for a teacher who is expected to conduct ratings and review results, but who is not expected to populate the e- DECA system with the name of children in their group(s).
An Inputter is typically the role assigned to some who is responsible for keying in the
ratings completed on paper assessment forms. An Inputter can type in the rating results, but is not able to view the assessment results of reports.
A Viewer is someone who is only able to view the ratings and reports on those children assigned to groups and sites for which the viewer has been assigned access. A Viewer is not allowed to input data.
8
User/Rater Roles Scenarios: Scenario #1: Ms. B is a teacher in the Little Angels classroom in the Western Site. Ms. B needs to be able to conduct her assessments of children online and in addition, her supervisor wants her to be responsible for entering her roster of children into the e-DECA 2.0 system (i.e. typing in the names of her children and creating them in the e-DECA).
In this scenario Ms. B.’s User Role would be Group Administrator and she would also need to be created as rater in the Little Angels classroom.
Scenario #2: Ms. Nancy is a teacher in the Yellow Room in the Western site. In addition to teaching responsibilities in the Yellow Classroom, she has also be delegated the responsibility of overseeing and maintaining the e-DECA 2.0 for the Western site.
In this scenario, Ms. Nancy’s User Role will be Site Administrator and she will also need to be created as a rater for the Yellow Room.
Scenario #3: Ms. Jones is a teacher in Classroom #2 in the East Site. The East Site is a rural site with no Internet access. Until the location gets online, she is not expected to conduct the DECA assessments online, but rather, a PDF of the assessments will be printed for her to enter her results on a paper form. The paper assessments will then be picked up and taken back to the central office where Internet access does exist and where a data entry clerk, Mr. Burns, will be responsible for keying in the answers and thus allowing the e-DECA 2.0 to score the results.
In this scenario, Ms. Jones does not need a User role since she is not going to be actually using the computer system. However, in order for her assessment results to be keyed, she will need to be created as a Rater for Classroom #2. In addition, the data clerk, Mr. Burns, will need a User Role of: Inputter. This role allows him to key in the assessment results, without allowing him to view the results.
9
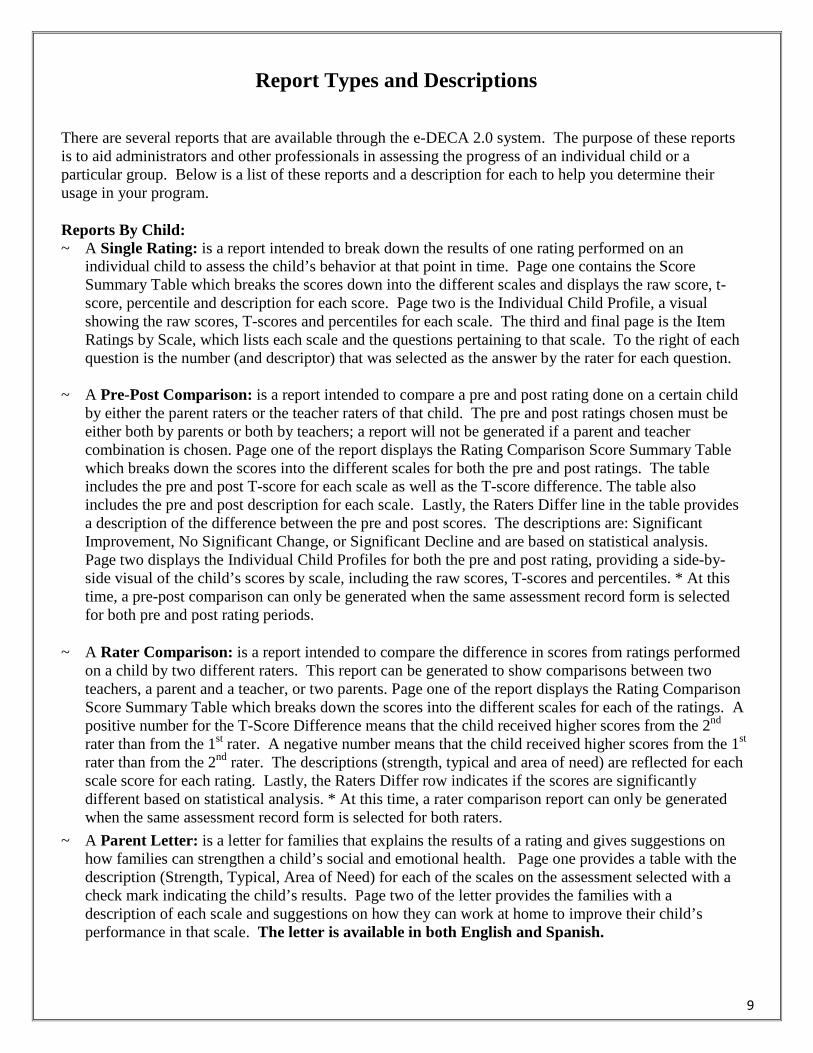
Report Types and Descriptions There are several reports that are available through the e-DECA 2.0 system. The purpose of these reports is to aid administrators and other professionals in assessing the progress of an individual child or a particular group. Below is a list of these reports and a description for each to help you determine their usage in your program.
Reports By Child: ~ A Single Rating: is a report intended to break down the results of one rating performed on an
individual child to assess the child’s behavior at that point in time. Page one contains the Score Summary Table which breaks the scores down into the different scales and displays the raw score, t- score, percentile and description for each score. Page two is the Individual Child Profile, a visual showing the raw scores, T-scores and percentiles for each scale. The third and final page is the Item Ratings by Scale, which lists each scale and the questions pertaining to that scale. To the right of each question is the number (and descriptor) that was selected as the answer by the rater for each question.
~ A Pre-Post Comparison: is a report intended to compare a pre and post rating done on a certain child
by either the parent raters or the teacher raters of that child. The pre and post ratings chosen must be either both by parents or both by teachers; a report will not be generated if a parent and teacher combination is chosen. Page one of the report displays the Rating Comparison Score Summary Table which breaks down the scores into the different scales for both the pre and post ratings. The table includes the pre and post T-score for each scale as well as the T-score difference. The table also includes the pre and post description for each scale. Lastly, the Raters Differ line in the table provides a description of the difference between the pre and post scores. The descriptions are: Significant Improvement, No Significant Change, or Significant Decline and are based on statistical analysis. Page two displays the Individual Child Profiles for both the pre and post rating, providing a side-by-side visual of the child’s scores by scale, including the raw scores, T-scores and percentiles. * At this time, a pre-post comparison can only be generated when the same assessment record form is selected for both pre and post rating periods.
~ A Rater Comparison: is a report intended to compare the difference in scores from ratings performed
on a child by two different raters. This report can be generated to show comparisons between two teachers, a parent and a teacher, or two parents. Page one of the report displays the Rating Comparison Score Summary Table which breaks down the scores into the different scales for each of the ratings. A positive number for the T-Score Difference means that the child received higher scores from the 2nd
rater than from the 1st rater. A negative number means that the child received higher scores from the 1st
rater than from the 2nd rater. The descriptions (strength, typical and area of need) are reflected for each scale score for each rating. Lastly, the Raters Differ row indicates if the scores are significantly different based on statistical analysis. * At this time, a rater comparison report can only be generated when the same assessment record form is selected for both raters.
~ A Parent Letter: is a letter for families that explains the results of a rating and gives suggestions on how families can strengthen a child’s social and emotional health. Page one provides a table with the description (Strength, Typical, Area of Need) for each of the scales on the assessment selected with a check mark indicating the child’s results. Page two of the letter provides the families with a description of each scale and suggestions on how they can work at home to improve their child’s performance in that scale. The letter is available in both English and Spanish.
10
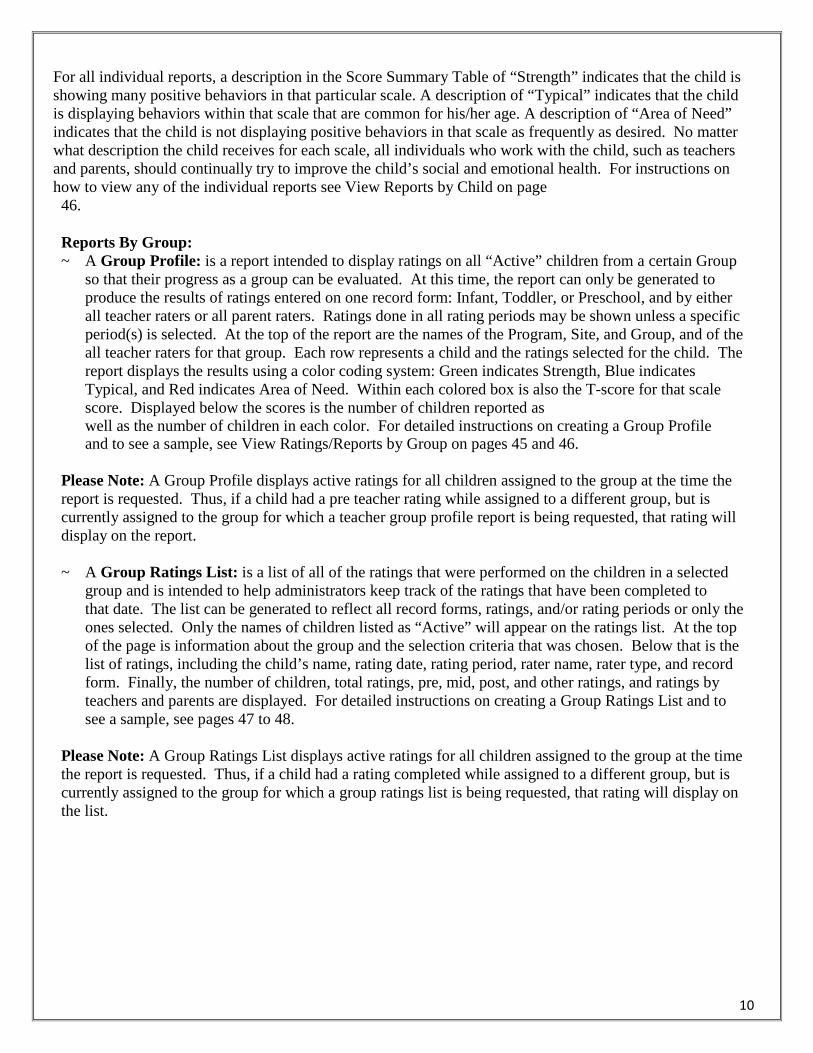
For all individual reports, a description in the Score Summary Table of “Strength” indicates that the child is showing many positive behaviors in that particular scale. A description of “Typical” indicates that the child is displaying behaviors within that scale that are common for his/her age. A description of “Area of Need” indicates that the child is not displaying positive behaviors in that scale as frequently as desired. No matter what description the child receives for each scale, all individuals who work with the child, such as teachers and parents, should continually try to improve the child’s social and emotional health. For instructions on how to view any of the individual reports see View Reports by Child on page 46.
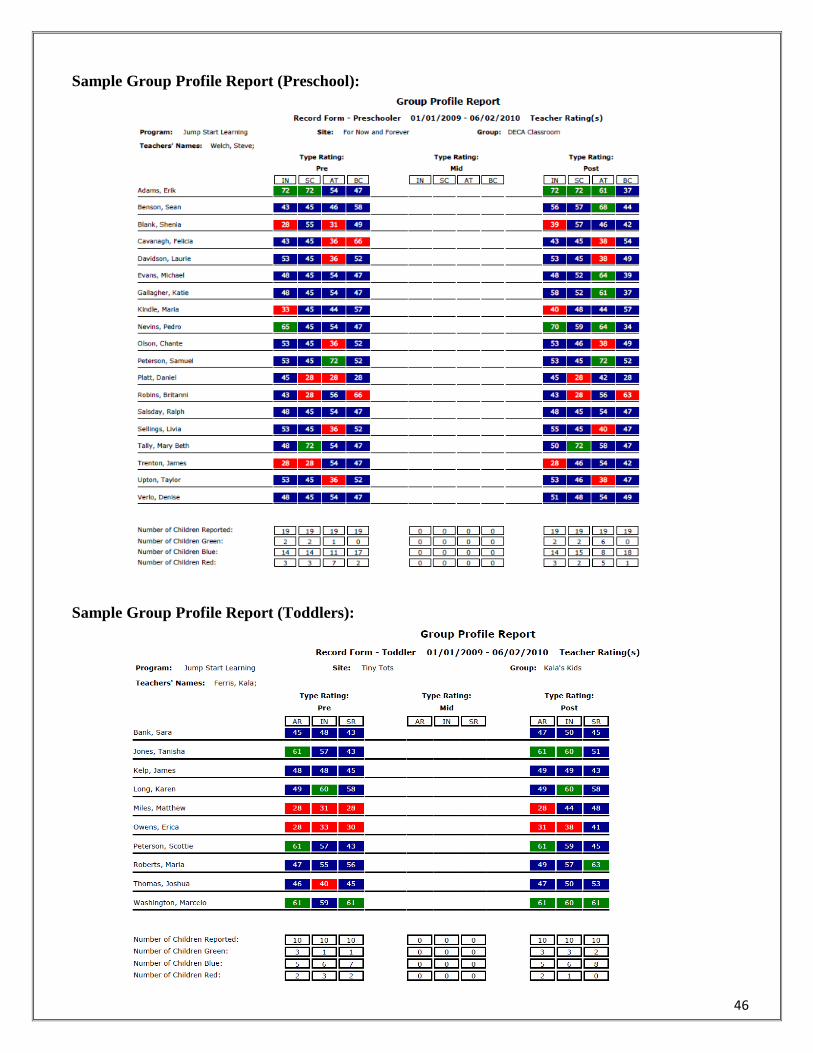
Reports By Group: ~ A Group Profile: is a report intended to display ratings on all “Active” children from a certain Group
so that their progress as a group can be evaluated. At this time, the report can only be generated to produce the results of ratings entered on one record form: Infant, Toddler, or Preschool, and by either all teacher raters or all parent raters. Ratings done in all rating periods may be shown unless a specific period(s) is selected. At the top of the report are the names of the Program, Site, and Group, and of the all teacher raters for that group. Each row represents a child and the ratings selected for the child. The report displays the results using a color coding system: Green indicates Strength, Blue indicates Typical, and Red indicates Area of Need. Within each colored box is also the T-score for that scale score. Displayed below the scores is the number of children reported as well as the number of children in each color. For detailed instructions on creating a Group Profile and to see a sample, see View Ratings/Reports by Group on pages 45 and 46.
Please Note: A Group Profile displays active ratings for all children assigned to the group at the time the report is requested. Thus, if a child had a pre teacher rating while assigned to a different group, but is currently assigned to the group for which a teacher group profile report is being requested, that rating will display on the report.
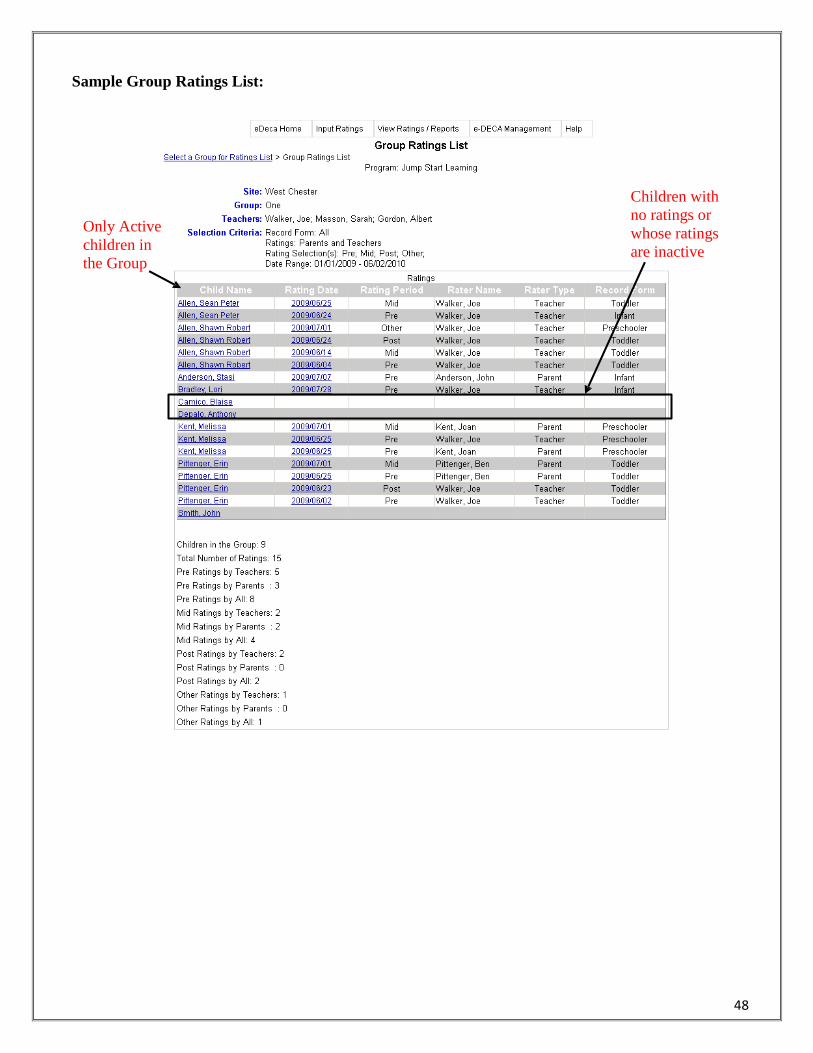
~ A Group Ratings List: is a list of all of the ratings that were performed on the children in a selected
group and is intended to help administrators keep track of the ratings that have been completed to that date. The list can be generated to reflect all record forms, ratings, and/or rating periods or only the ones selected. Only the names of children listed as “Active” will appear on the ratings list. At the top of the page is information about the group and the selection criteria that was chosen. Below that is the list of ratings, including the child’s name, rating date, rating period, rater name, rater type, and record form. Finally, the number of children, total ratings, pre, mid, post, and other ratings, and ratings by teachers and parents are displayed. For detailed instructions on creating a Group Ratings List and to see a sample, see pages 47 to 48.
Please Note: A Group Ratings List displays active ratings for all children assigned to the group at the time the report is requested. Thus, if a child had a rating completed while assigned to a different group, but is currently assigned to the group for which a group ratings list is being requested, that rating will display on the list.
11
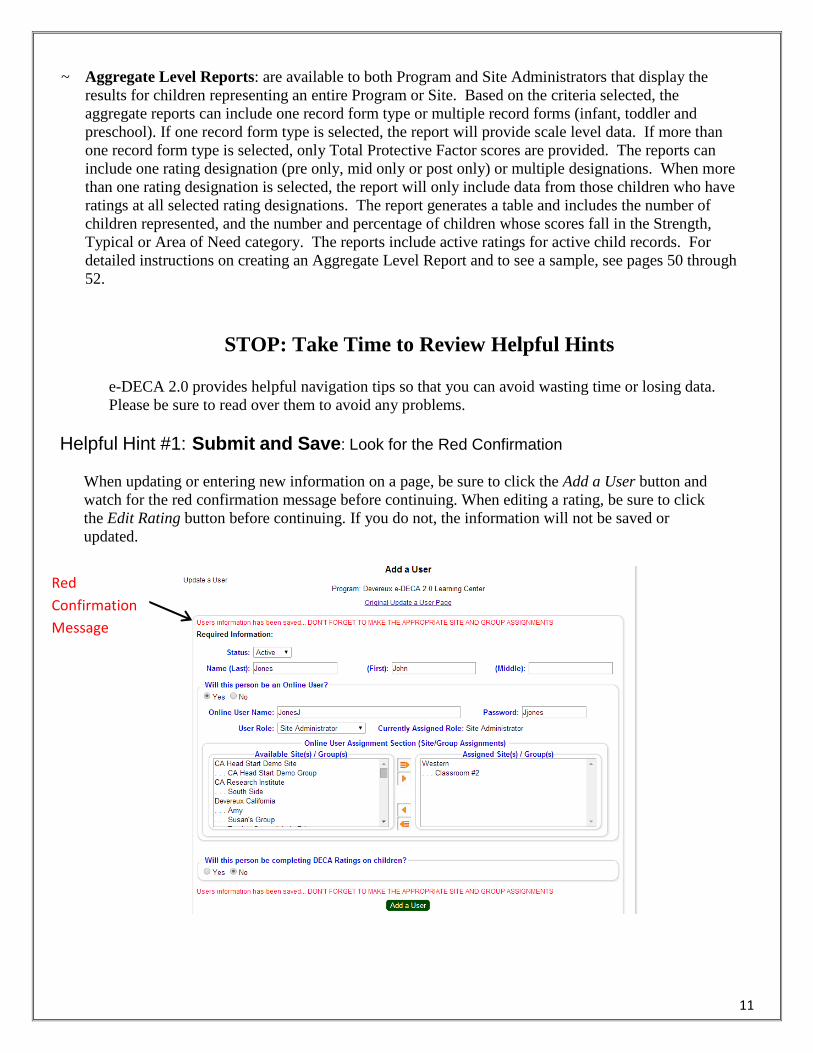
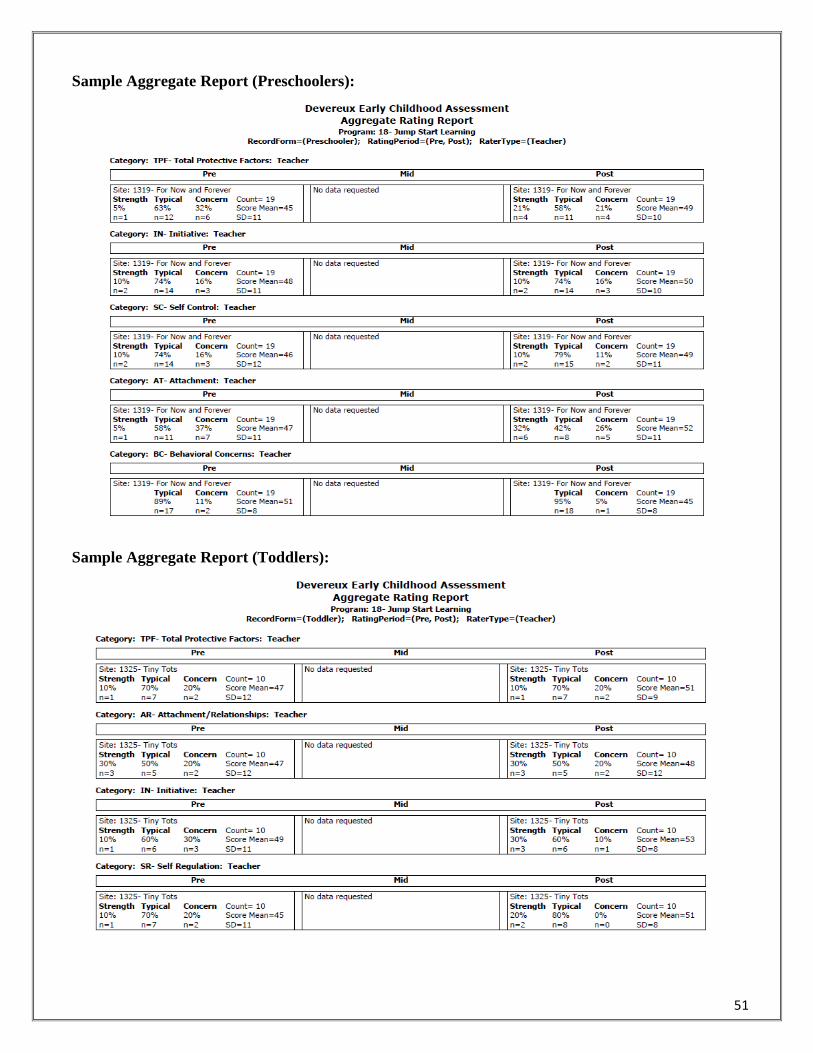
~ Aggregate Level Reports: are available to both Program and Site Administrators that display the results for children representing an entire Program or Site. Based on the criteria selected, the aggregate reports can include one record form type or multiple record forms (infant, toddler and preschool). If one record form type is selected, the report will provide scale level data. If more than one record form type is selected, only Total Protective Factor scores are provided. The reports can include one rating designation (pre only, mid only or post only) or multiple designations. When more than one rating designation is selected, the report will only include data from those children who have ratings at all selected rating designations. The report generates a table and includes the number of children represented, and the number and percentage of children whose scores fall in the Strength, Typical or Area of Need category. The reports include active ratings for active child records. For detailed instructions on creating an Aggregate Level Report and to see a sample, see pages 50 through 52.
STOP: Take Time to Review Helpful Hints
e-DECA 2.0 provides helpful navigation tips so that you can avoid wasting time or losing data. Please be sure to read over them to avoid any problems.
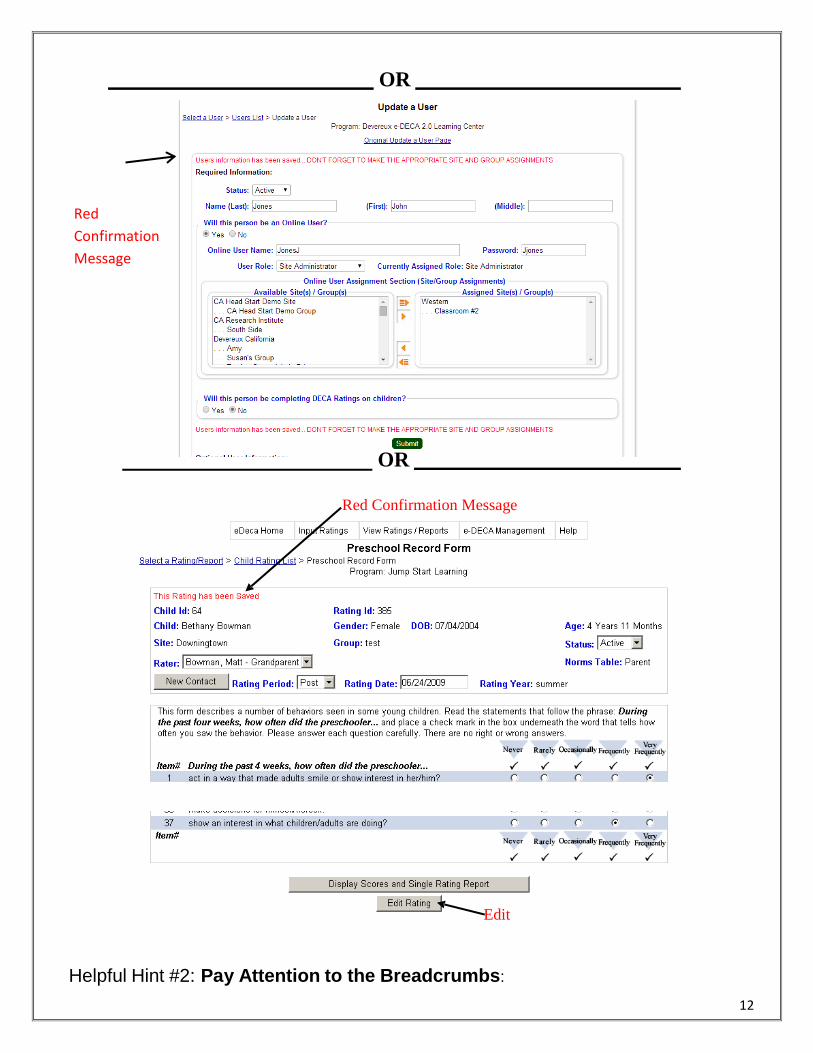
Helpful Hint #1: Submit and Save: Look for the Red Confirmation
When updating or entering new information on a page, be sure to click the Add a User button and watch for the red confirmation message before continuing. When editing a rating, be sure to click the Edit Rating button before continuing. If you do not, the information will not be saved or updated.
Red Confirmation Message
12
OR
OR
Red Confirmation Message
Edit
Helpful Hint #2: Pay Attention to the Breadcrumbs:
Red Confirmation Message
13
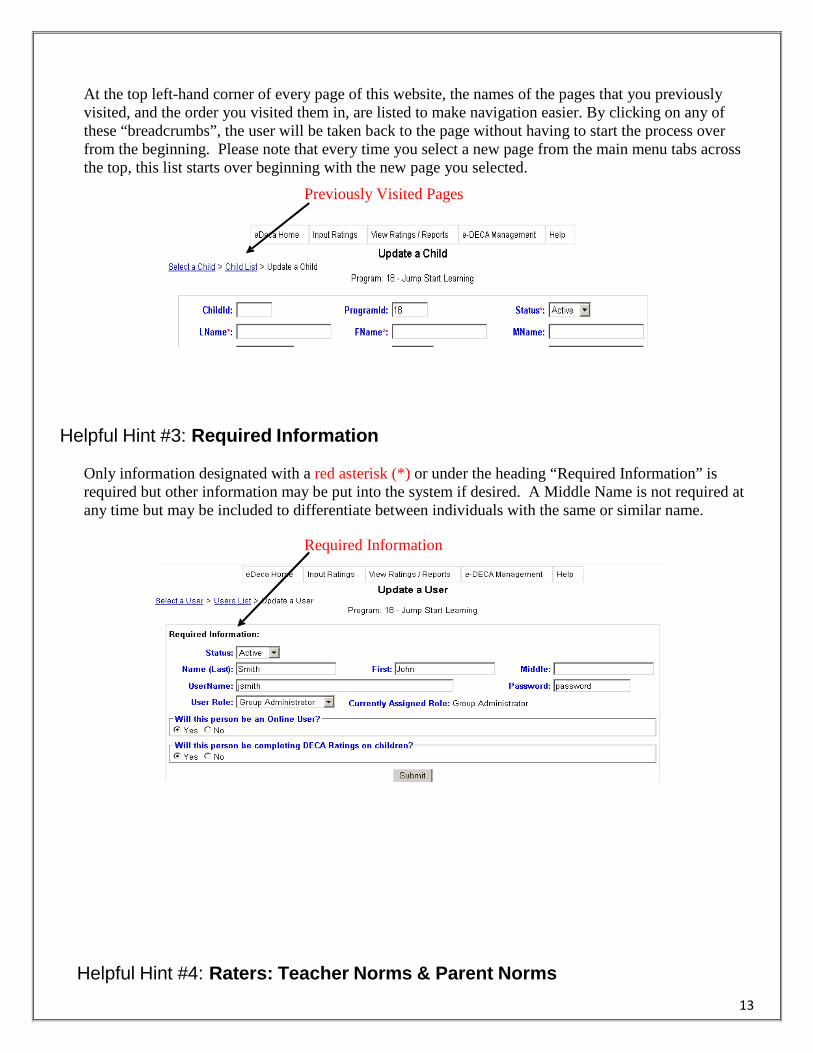
At the top left-hand corner of every page of this website, the names of the pages that you previously visited, and the order you visited them in, are listed to make navigation easier. By clicking on any of these “breadcrumbs”, the user will be taken back to the page without having to start the process over from the beginning. Please note that every time you select a new page from the main menu tabs across the top, this list starts over beginning with the new page you selected.
Previously Visited Pages
Helpful Hint #3: Required Information
Only information designated with a red asterisk (*) or under the heading “Required Information” is required but other information may be put into the system if desired. A Middle Name is not required at any time but may be included to differentiate between individuals with the same or similar name.
Required Information
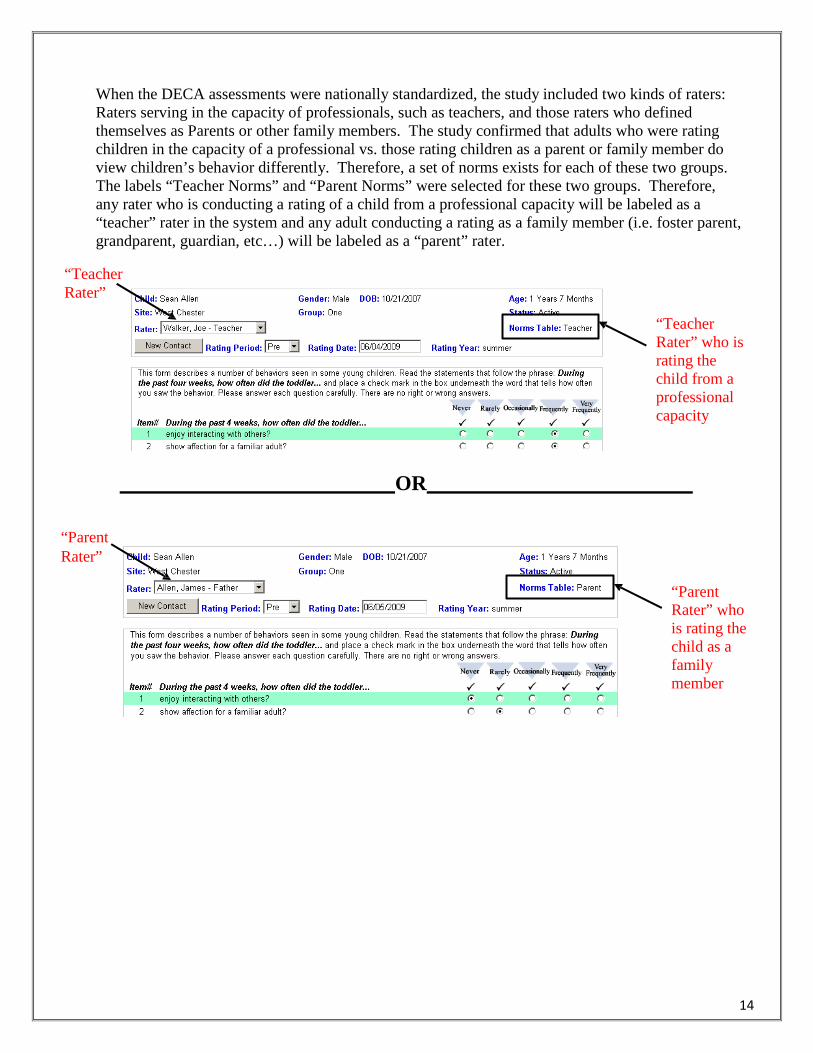
Helpful Hint #4: Raters: Teacher Norms & Parent Norms
14
When the DECA assessments were nationally standardized, the study included two kinds of raters: Raters serving in the capacity of professionals, such as teachers, and those raters who defined themselves as Parents or other family members. The study confirmed that adults who were rating children in the capacity of a professional vs. those rating children as a parent or family member do view children’s behavior differently. Therefore, a set of norms exists for each of these two groups. The labels “Teacher Norms” and “Parent Norms” were selected for these two groups. Therefore, any rater who is conducting a rating of a child from a professional capacity will be labeled as a “teacher” rater in the system and any adult conducting a rating as a family member (i.e. foster parent, grandparent, guardian, etc…) will be labeled as a “parent” rater.
“Teacher Rater”
“Teacher Rater” who is rating the child from a professional capacity
OR “Parent Rater”
“Parent Rater” who is rating the child as a family member
15
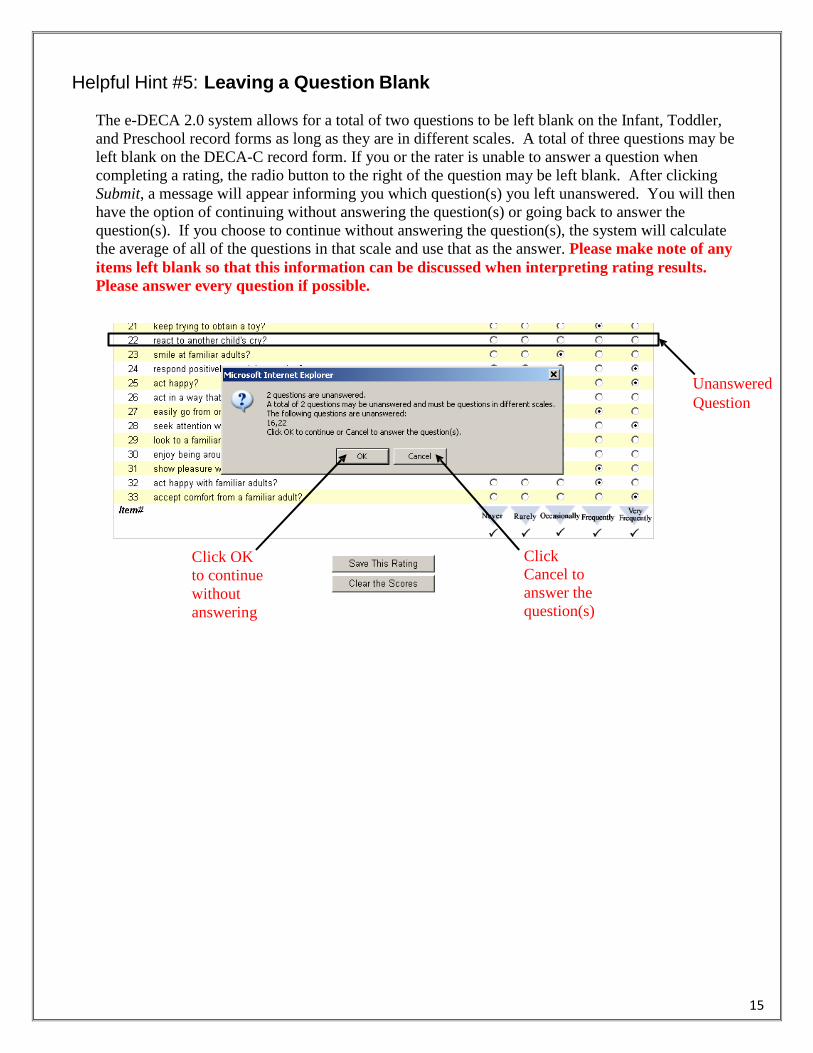
Helpful Hint #5: Leaving a Question Blank
The e-DECA 2.0 system allows for a total of two questions to be left blank on the Infant, Toddler, and Preschool record forms as long as they are in different scales. A total of three questions may be left blank on the DECA-C record form. If you or the rater is unable to answer a question when completing a rating, the radio button to the right of the question may be left blank. After clicking Submit, a message will appear informing you which question(s) you left unanswered. You will then have the option of continuing without answering the question(s) or going back to answer the question(s). If you choose to continue without answering the question(s), the system will calculate the average of all of the questions in that scale and use that as the answer. Please make note of any items left blank so that this information can be discussed when interpreting rating results. Please answer every question if possible.
Unanswered Question
Click OK to continue without answering
Click Cancel to answer the question(s)
16
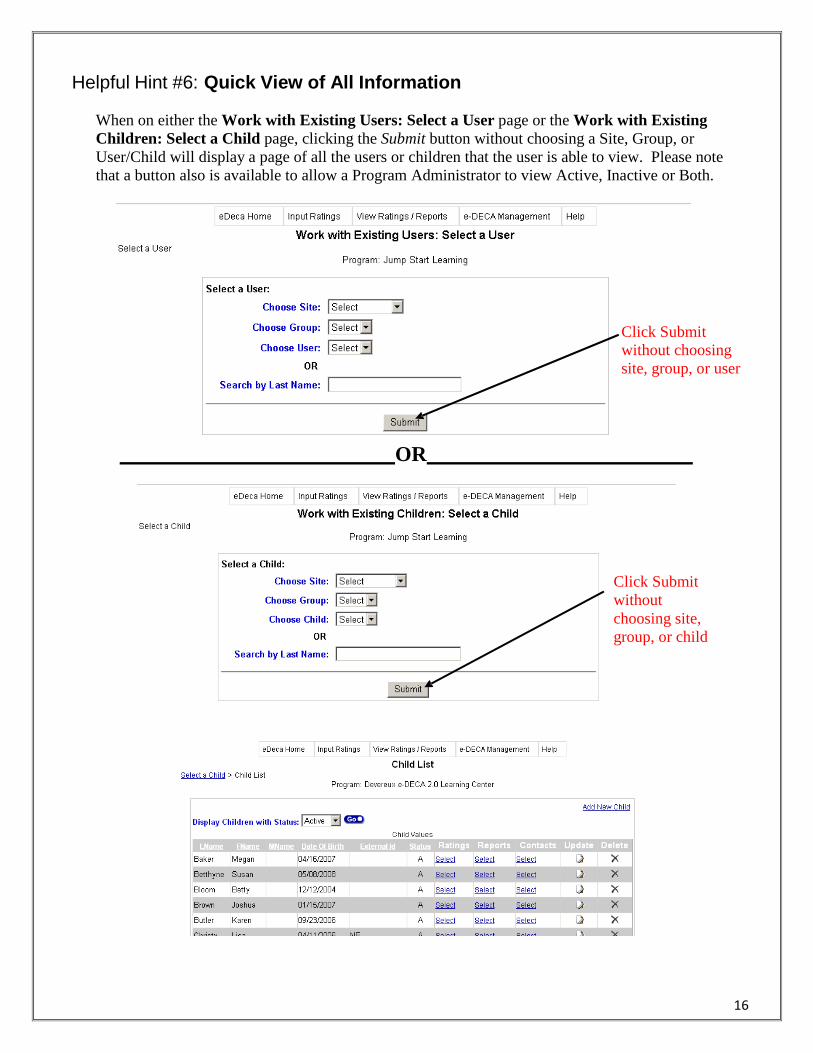
Helpful Hint #6: Quick View of All Information
When on either the Work with Existing Users: Select a User page or the Work with Existing Children: Select a Child page, clicking the Submit button without choosing a Site, Group, or User/Child will display a page of all the users or children that the user is able to view. Please note that a button also is available to allow a Program Administrator to view Active, Inactive or Both.
Click Submit without choosing site, group, or user
OR
Click Submit without choosing site, group, or child
17
Helpful Hint #7: Turn Off Pop-Up Blockers
All reports and other available documents, such as the printable assessment forms, manuals, and user’s guides, in the e-DECA 2.0 system are viewed in pop-up windows. In order to be able to view these documents, please remember to turn off any pop-up blockers that may be installed on your web browser. The procedure to turn off pop-up blockers varies according to the web browser being used. If you experience any difficulties with pop-up blockers, please seek information about your specific web browser.
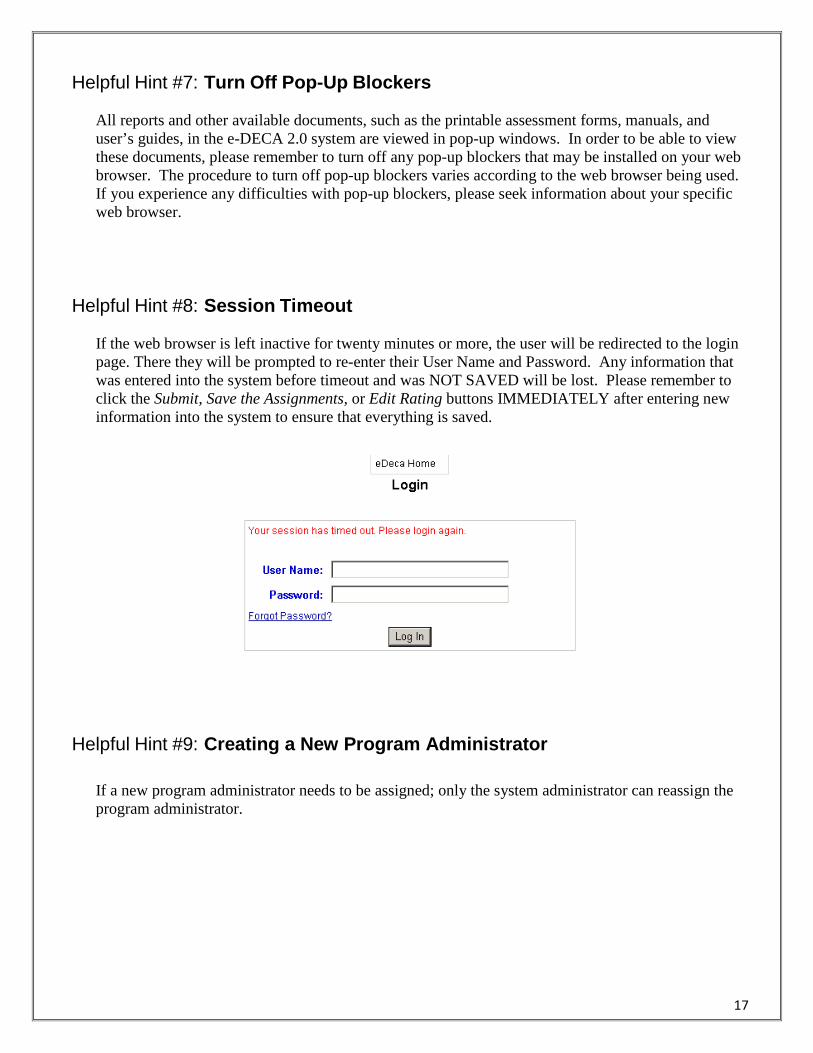
Helpful Hint #8: Session Timeout
If the web browser is left inactive for twenty minutes or more, the user will be redirected to the login page. There they will be prompted to re-enter their User Name and Password. Any information that was entered into the system before timeout and was NOT SAVED will be lost. Please remember to click the Submit, Save the Assignments, or Edit Rating buttons IMMEDIATELY after entering new information into the system to ensure that everything is saved.
Helpful Hint #9: Creating a New Program Administrator
If a new program administrator needs to be assigned; only the system administrator can reassign the program administrator.
18
Key: Bold = a page/screen or specific location on a page/screen Italics = a button Underline = a specific field
I. Logging In to e-DECA Version 2.0 www.e-DECA2.org
1. On the website for e-DECA Version 2.0, click the Login button near the top of the page.
2. Enter the User Name and Password that were given to you by the System Administrator who
set up your account and click Log In.
3. You will then be asked to review an Acceptance Agreement, select Accept, and then click
Submit.
II. Creating Sites
1. Go to the e-DECA Management tab, Manage Sites, and select Create a New Site.
2. On the Update a Site page, enter the Site Name, and click Submit.
III. Inactivating Sites
1. Go to the e-DECA Management tab, Manage Sites, and select Work with Existing Sites.
2. On the Site List, click the Update button to the right of the site you wish to inactivate.
19
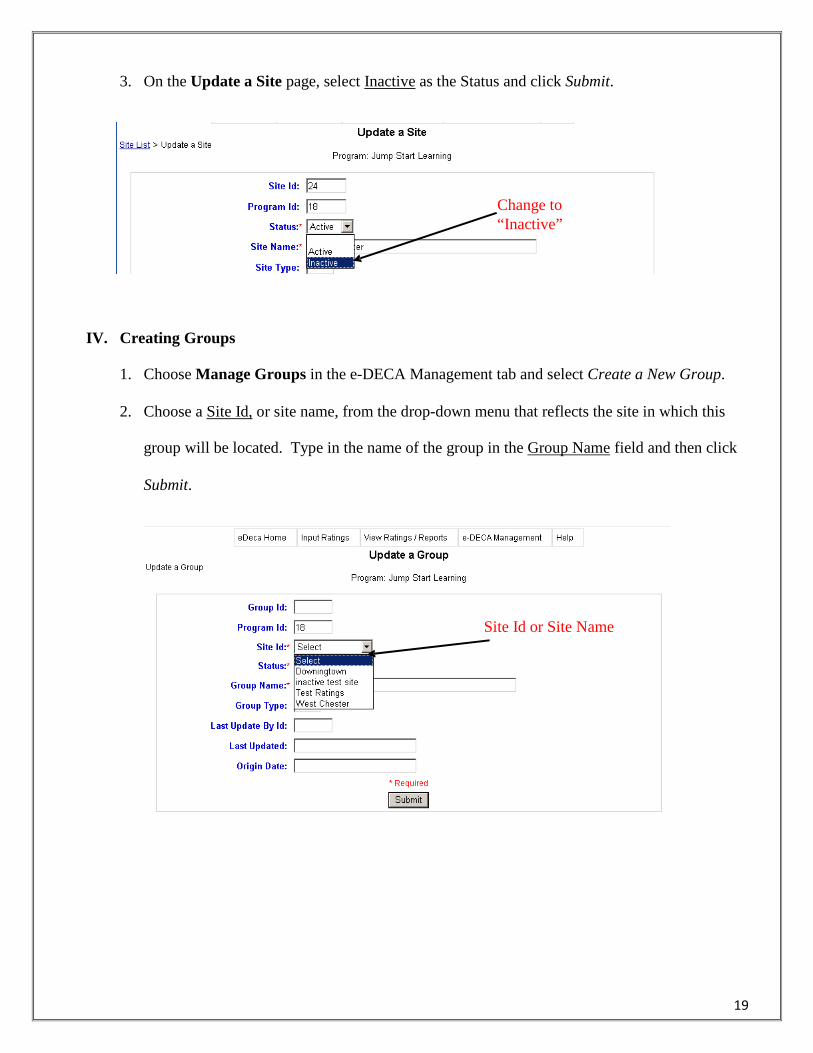
3. On the Update a Site page, select Inactive as the Status and click Submit.
Change to “Inactive”
IV. Creating Groups
1. Choose Manage Groups in the e-DECA Management tab and select Create a New Group.
2. Choose a Site Id, or site name, from the drop-down menu that reflects the site in which this
group will be located. Type in the name of the group in the Group Name field and then click
Submit.
Site Id or Site Name
20
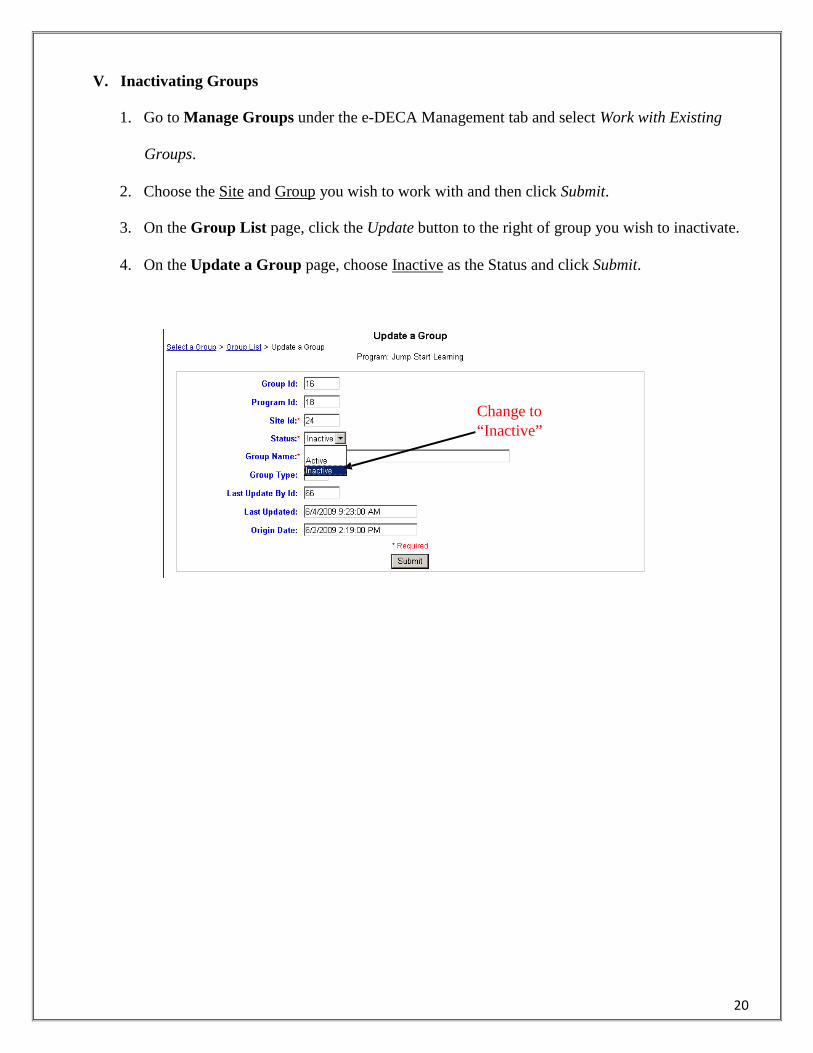
V. Inactivating Groups
1. Go to Manage Groups under the e-DECA Management tab and select Work with Existing
Groups.
2. Choose the Site and Group you wish to work with and then click Submit.
3. On the Group List page, click the Update button to the right of group you wish to inactivate.
4. On the Update a Group page, choose Inactive as the Status and click Submit.
Change to “Inactive”
21
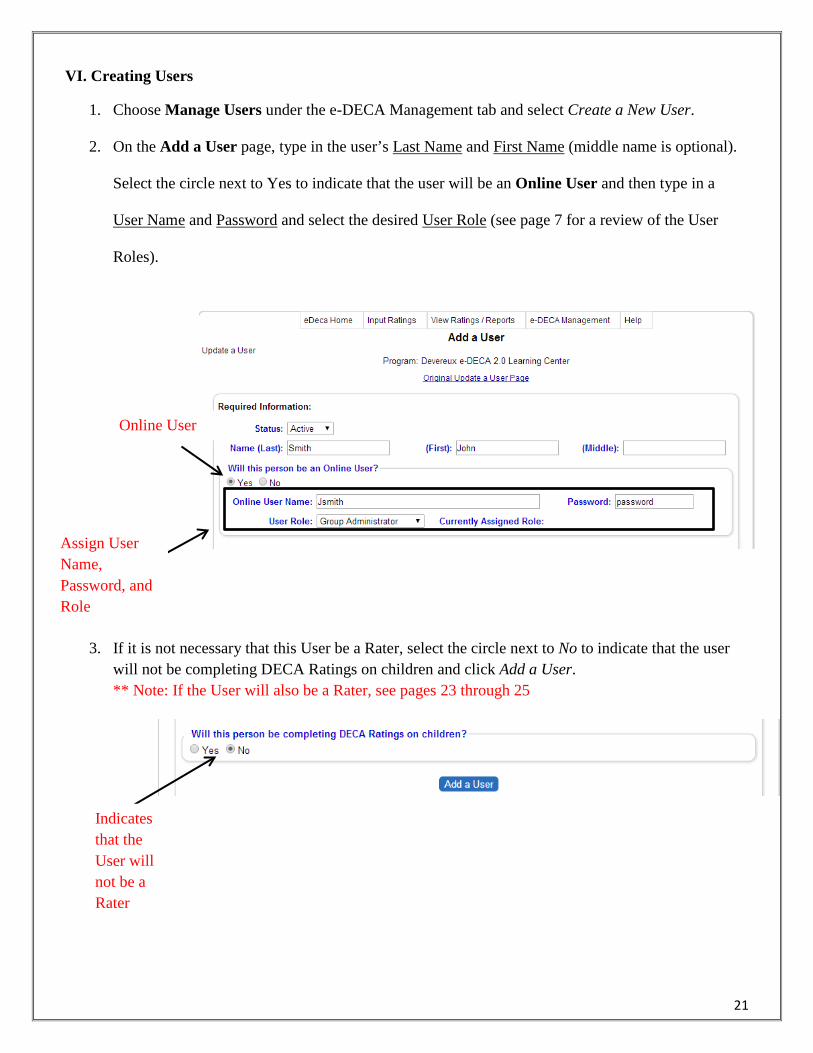
VI. Creating Users
1. Choose Manage Users under the e-DECA Management tab and select Create a New User.
2. On the Add a User page, type in the user’s Last Name and First Name (middle name is optional).
Select the circle next to Yes to indicate that the user will be an Online User and then type in a
User Name and Password and select the desired User Role (see page 7 for a review of the User
Roles).
3. If it is not necessary that this User be a Rater, select the circle next to No to indicate that the user
will not be completing DECA Ratings on children and click Add a User. ** Note: If the User will also be a Rater, see pages 23 through 25
Online User
Assign User Name, Password, and Role
Indicates that the User will not be a Rater
22
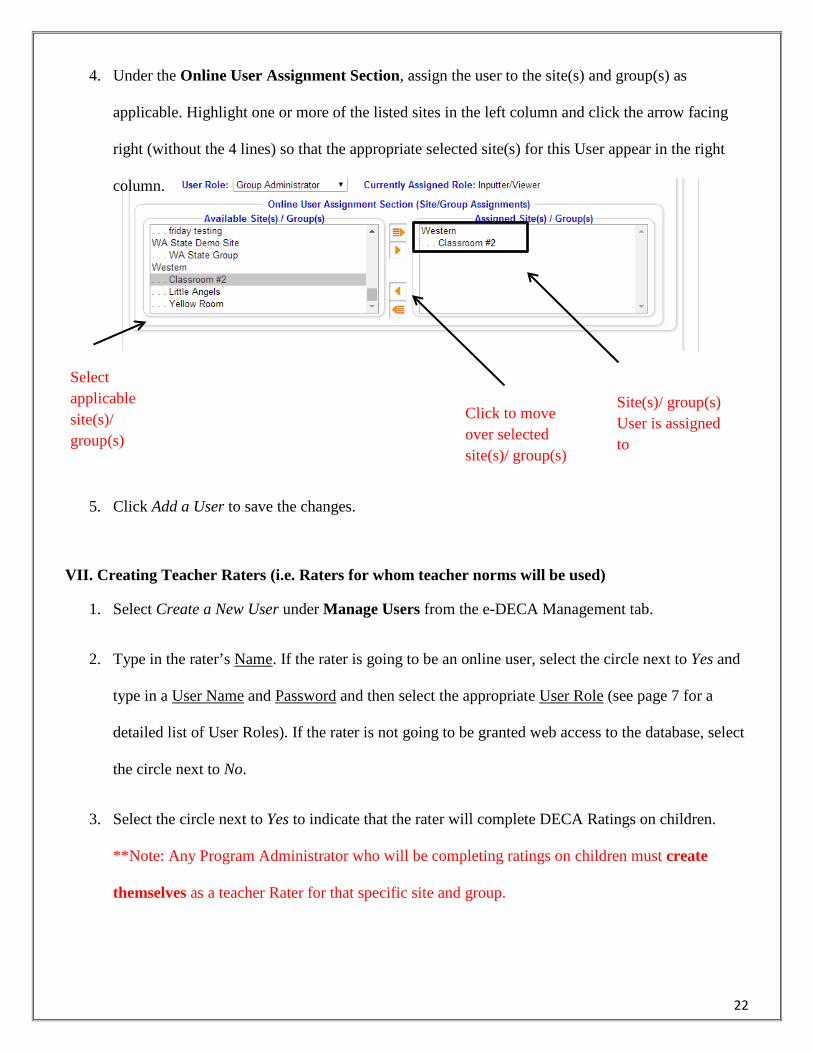
4. Under the Online User Assignment Section, assign the user to the site(s) and group(s) as
applicable. Highlight one or more of the listed sites in the left column and click the arrow facing
right (without the 4 lines) so that the appropriate selected site(s) for this User appear in the right
column.
5. Click Add a User to save the changes.
VII. Creating Teacher Raters (i.e. Raters for whom teacher norms will be used)
1. Select Create a New User under Manage Users from the e-DECA Management tab.
2. Type in the rater’s Name. If the rater is going to be an online user, select the circle next to Yes and
type in a User Name and Password and then select the appropriate User Role (see page 7 for a
detailed list of User Roles). If the rater is not going to be granted web access to the database, select
the circle next to No.
3. Select the circle next to Yes to indicate that the rater will complete DECA Ratings on children.
**Note: Any Program Administrator who will be completing ratings on children must create
themselves as a teacher Rater for that specific site and group.
Select applicable site(s)/ group(s)
Click to move over selected site(s)/ group(s)
Site(s)/ group(s) User is assigned to
23
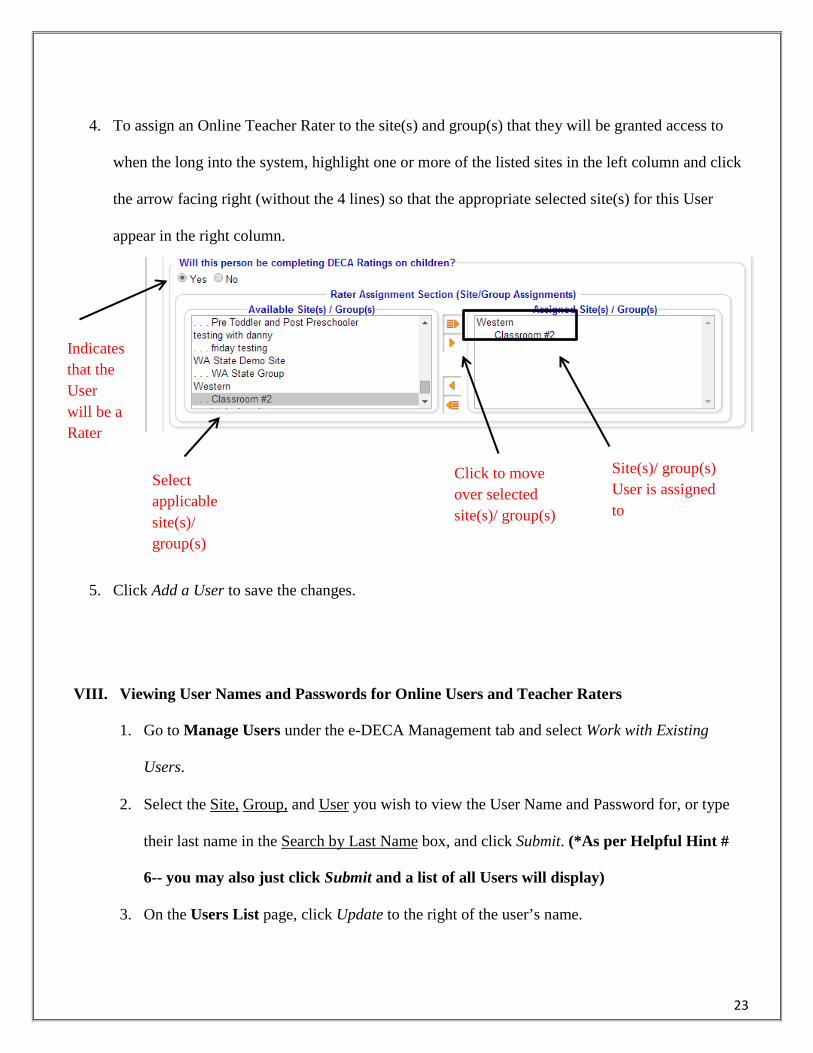
4. To assign an Online Teacher Rater to the site(s) and group(s) that they will be granted access to
when the long into the system, highlight one or more of the listed sites in the left column and click
the arrow facing right (without the 4 lines) so that the appropriate selected site(s) for this User
appear in the right column.
5. Click Add a User to save the changes.
VIII. Viewing User Names and Passwords for Online Users and Teacher Raters
1. Go to Manage Users under the e-DECA Management tab and select Work with Existing
Users.
2. Select the Site, Group, and User you wish to view the User Name and Password for, or type
their last name in the Search by Last Name box, and click Submit. (*As per Helpful Hint #
6-- you may also just click Submit and a list of all Users will display)
3. On the Users List page, click Update to the right of the user’s name.
Indicates that the User will be a Rater
Select applicable site(s)/ group(s)
Click to move over selected site(s)/ group(s)
Site(s)/ group(s) User is assigned to
24
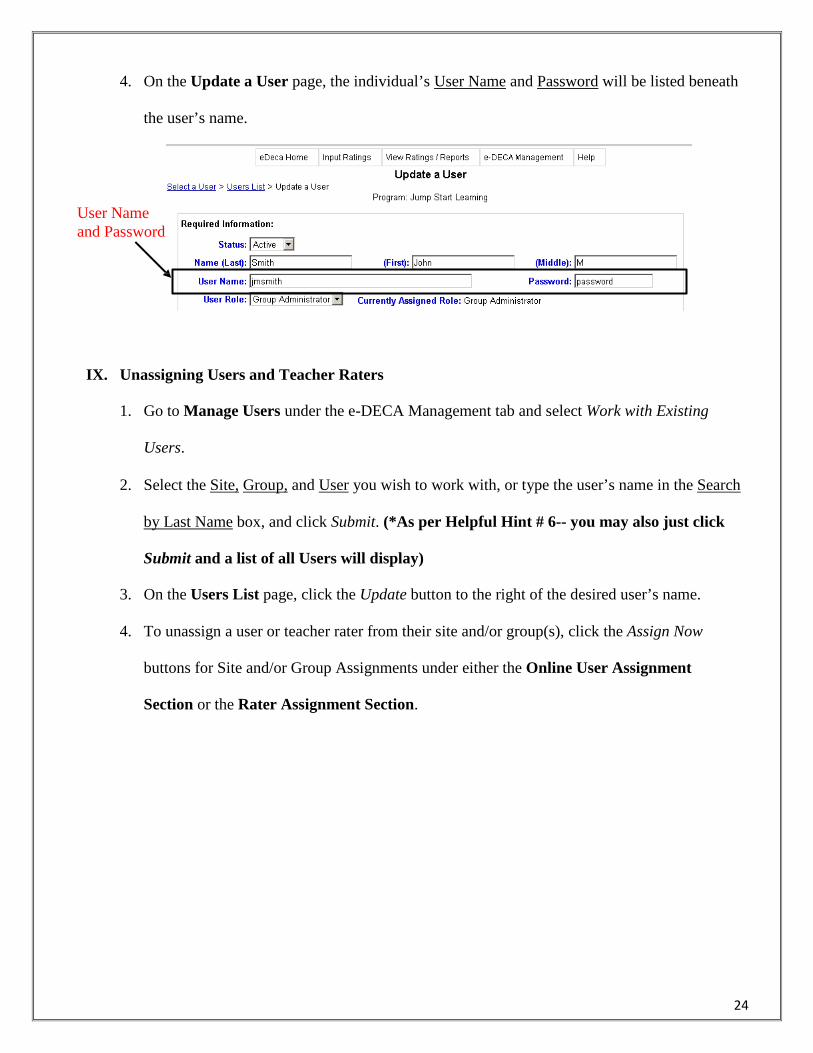
4. On the Update a User page, the individual’s User Name and Password will be listed beneath
the user’s name.
User Name and Password
IX. Unassigning Users and Teacher Raters
1. Go to Manage Users under the e-DECA Management tab and select Work with Existing
Users.
2. Select the Site, Group, and User you wish to work with, or type the user’s name in the Search
by Last Name box, and click Submit. (*As per Helpful Hint # 6-- you may also just click
Submit and a list of all Users will display)
3. On the Users List page, click the Update button to the right of the desired user’s name.
4. To unassign a user or teacher rater from their site and/or group(s), click the Assign Now
buttons for Site and/or Group Assignments under either the Online User Assignment
Section or the Rater Assignment Section.
25
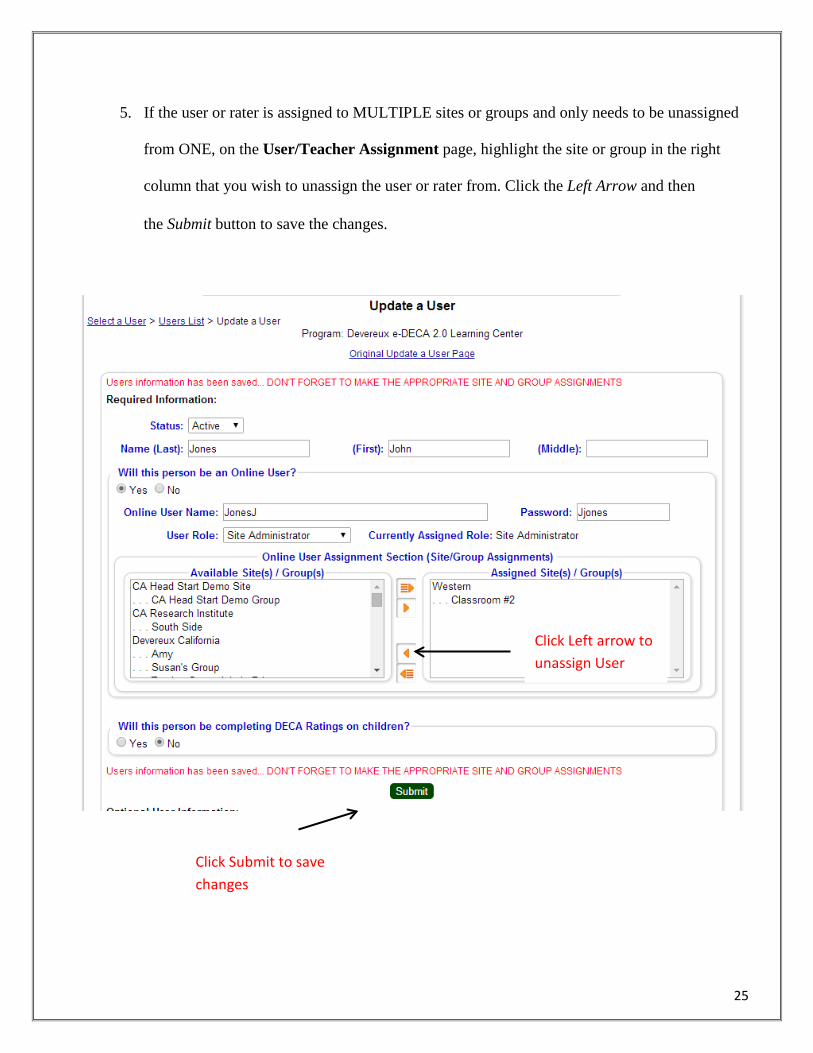
5. If the user or rater is assigned to MULTIPLE sites or groups and only needs to be unassigned
from ONE, on the User/Teacher Assignment page, highlight the site or group in the right
column that you wish to unassign the user or rater from. Click the Left Arrow and then
the Submit button to save the changes.
Click Left arrow to unassign User
Click Submit to save changes
26
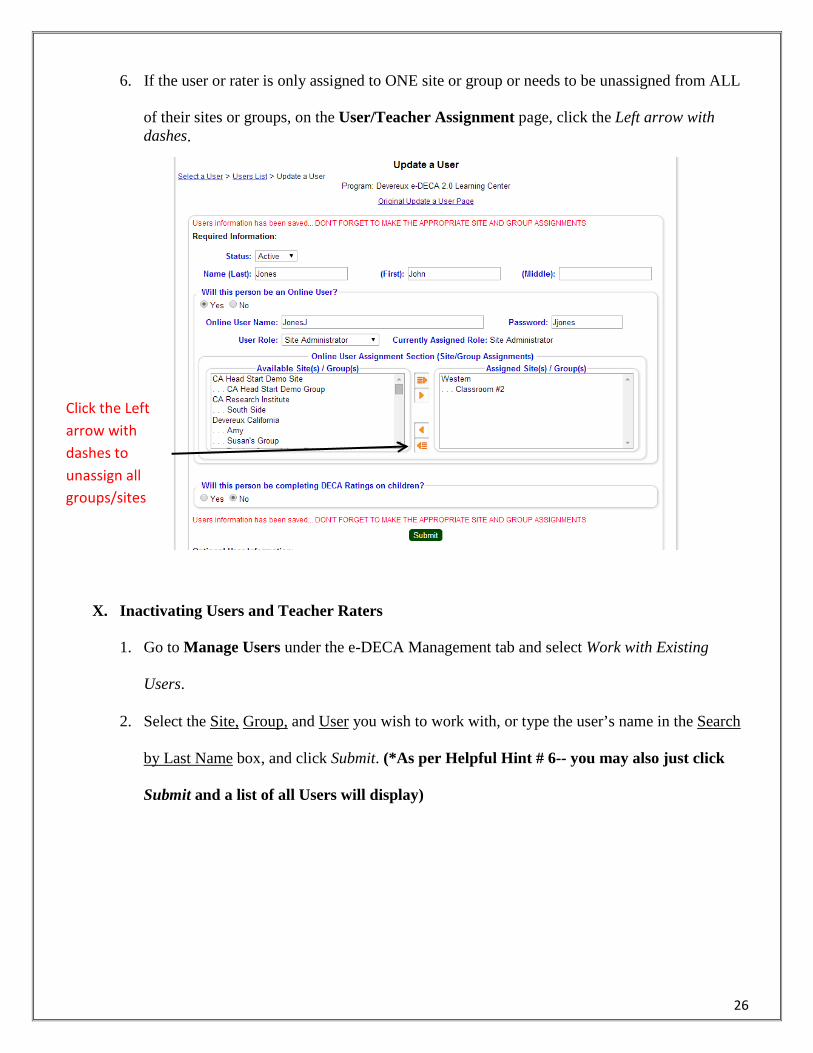
6. If the user or rater is only assigned to ONE site or group or needs to be unassigned from ALL
of their sites or groups, on the User/Teacher Assignment page, click the Left arrow with dashes.
X. Inactivating Users and Teacher Raters
1. Go to Manage Users under the e-DECA Management tab and select Work with Existing
Users.
2. Select the Site, Group, and User you wish to work with, or type the user’s name in the Search
by Last Name box, and click Submit. (*As per Helpful Hint # 6-- you may also just click
Submit and a list of all Users will display)
Click the Left arrow with dashes to unassign all groups/sites

27
3. On the Users List page, click the Update button to the right of the desired user’s name.
4. On the Update a User page, select Inactive as the status and click Submit.
XI. Creating Children
1. Go to Manage Children under the e-DECA Management tab and select Create a New Child Record.
2. On the Update a Child page, fill in the child’s First Name, Last Name, Date of Birth, and choose the
correct Gender. **Note: A child’s first name and last name must be at least two characters.
All red asterisks indicate the required information
The system defaults to “Active” for a new child
Select “Inactive”
28
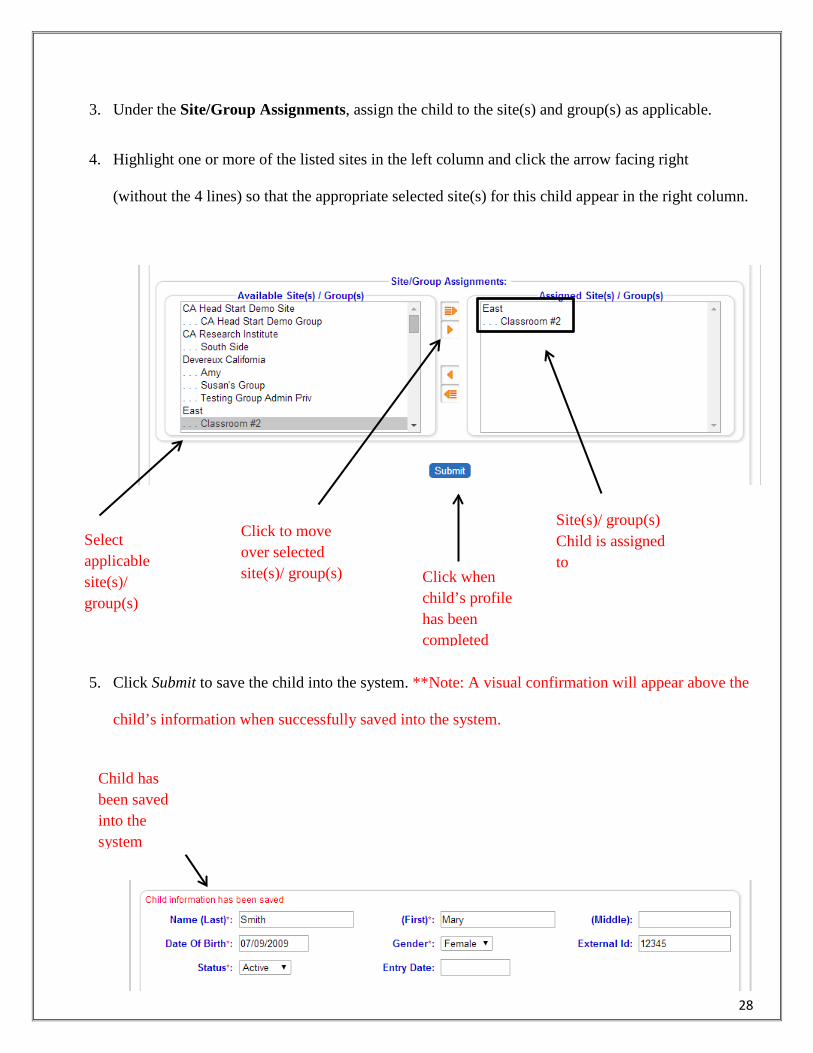
3. Under the Site/Group Assignments, assign the child to the site(s) and group(s) as applicable.
4. Highlight one or more of the listed sites in the left column and click the arrow facing right
(without the 4 lines) so that the appropriate selected site(s) for this child appear in the right column.
5. Click Submit to save the child into the system. **Note: A visual confirmation will appear above the
child’s information when successfully saved into the system.
Select applicable site(s)/ group(s)
Click to move over selected site(s)/ group(s)
Site(s)/ group(s) Child is assigned to
Click when child’s profile has been completed
Child has been saved into the system
29
XII. Unassigning Children
1. Go to Manage Children under the e-DECA Management tab and select Work with Existing
Children.
2. Choose a Site, Group, and Child you wish to inactivate, or type the child’s name in the
Search by Last Name box, and click Submit. (*As per Helpful Hint # 6-- you may also just
click Submit and a list of all Children will display)
3. On the Child List page, click the Update button located to the right of the child’s name.
4. On the Update a Child page, click the Assign Now buttons for the Site and Group
Assignments.
30
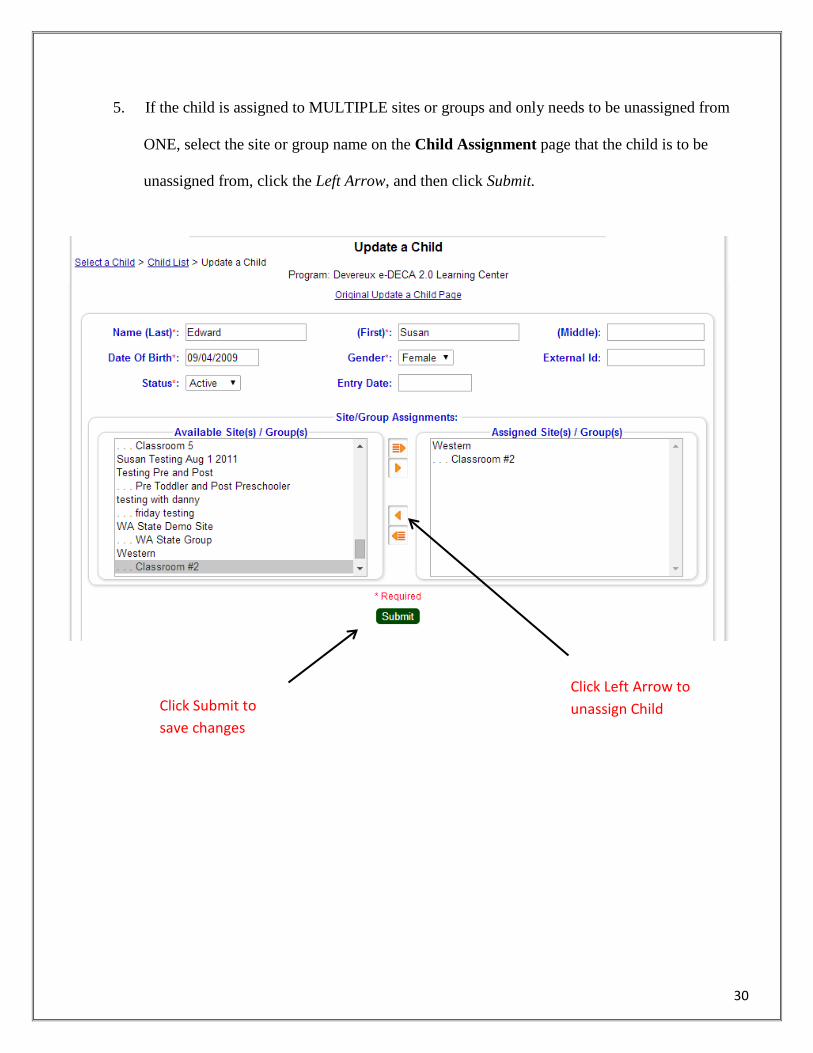
5. If the child is assigned to MULTIPLE sites or groups and only needs to be unassigned from
ONE, select the site or group name on the Child Assignment page that the child is to be
unassigned from, click the Left Arrow, and then click Submit.
Click Left Arrow to unassign Child Click Submit to
save changes
31
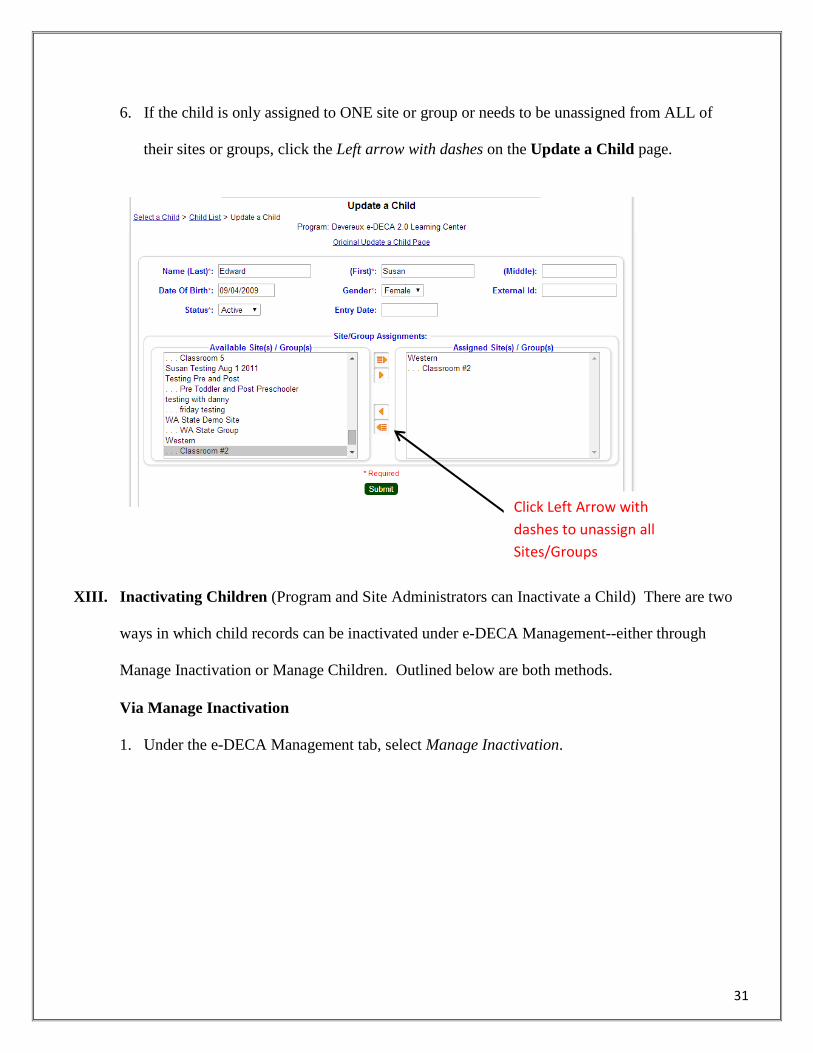
6. If the child is only assigned to ONE site or group or needs to be unassigned from ALL of
their sites or groups, click the Left arrow with dashes on the Update a Child page.
XIII. Inactivating Children (Program and Site Administrators can Inactivate a Child) There are two
ways in which child records can be inactivated under e-DECA Management--either through
Manage Inactivation or Manage Children. Outlined below are both methods.
Via Manage Inactivation
1. Under the e-DECA Management tab, select Manage Inactivation.
Click Left Arrow with dashes to unassign all Sites/Groups
32
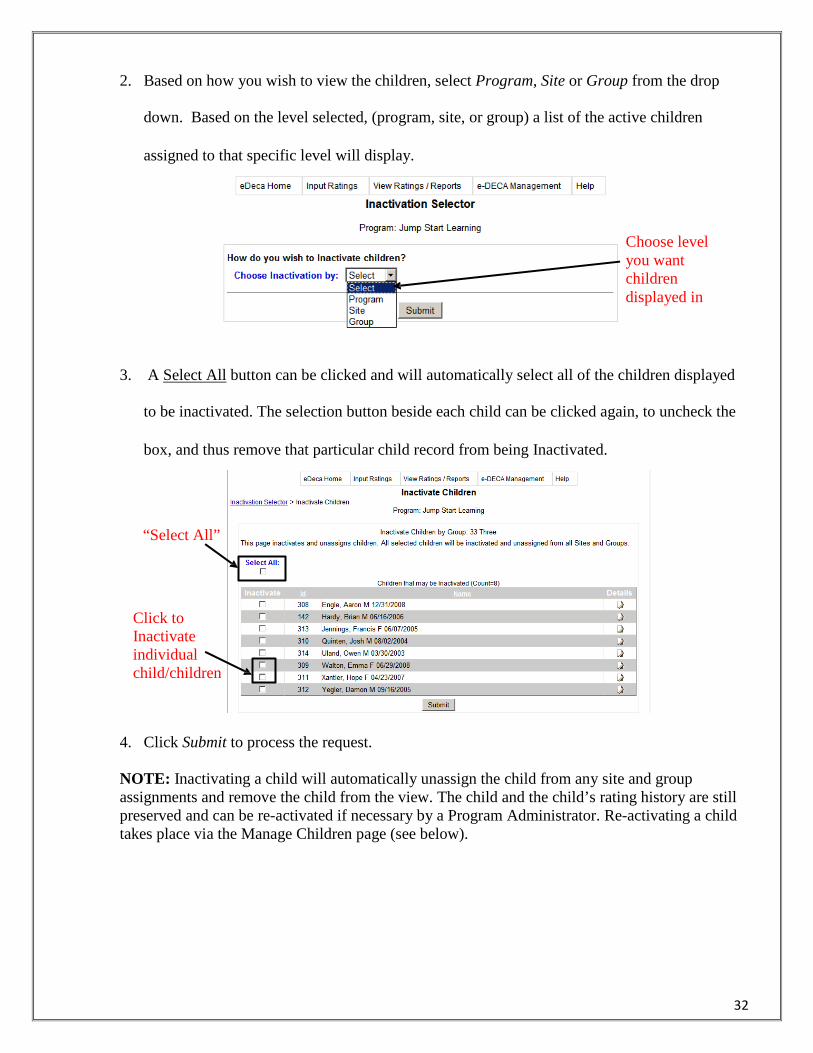
2. Based on how you wish to view the children, select Program, Site or Group from the drop
down. Based on the level selected, (program, site, or group) a list of the active children
assigned to that specific level will display.
Choose level you want children displayed in
3. A Select All button can be clicked and will automatically select all of the children displayed
to be inactivated. The selection button beside each child can be clicked again, to uncheck the
box, and thus remove that particular child record from being Inactivated.
“Select All”
Click to Inactivate individual child/children
4. Click Submit to process the request.
NOTE: Inactivating a child will automatically unassign the child from any site and group assignments and remove the child from the view. The child and the child’s rating history are still preserved and can be re-activated if necessary by a Program Administrator. Re-activating a child takes place via the Manage Children page (see below).
33
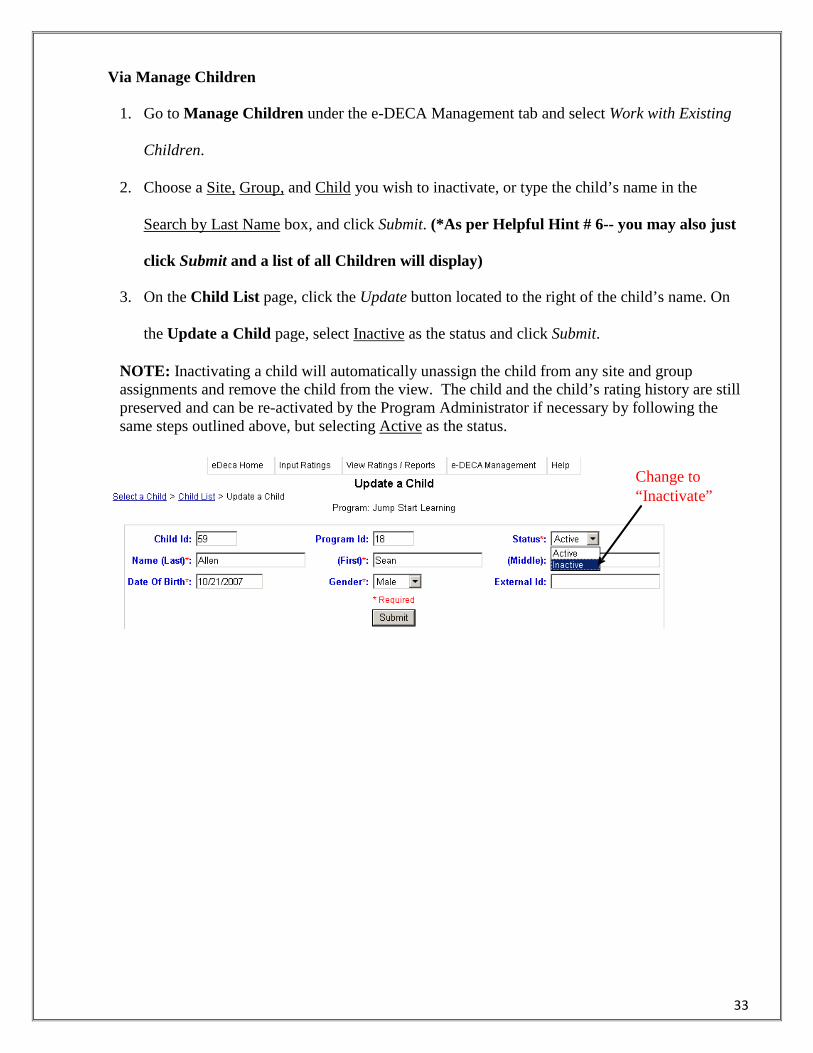
Via Manage Children
1. Go to Manage Children under the e-DECA Management tab and select Work with Existing
Children.
2. Choose a Site, Group, and Child you wish to inactivate, or type the child’s name in the
Search by Last Name box, and click Submit. (*As per Helpful Hint # 6-- you may also just
click Submit and a list of all Children will display)
3. On the Child List page, click the Update button located to the right of the child’s name. On
the Update a Child page, select Inactive as the status and click Submit.
NOTE: Inactivating a child will automatically unassign the child from any site and group assignments and remove the child from the view. The child and the child’s rating history are still preserved and can be re-activated by the Program Administrator if necessary by following the same steps outlined above, but selecting Active as the status.
Change to “Inactivate”
34
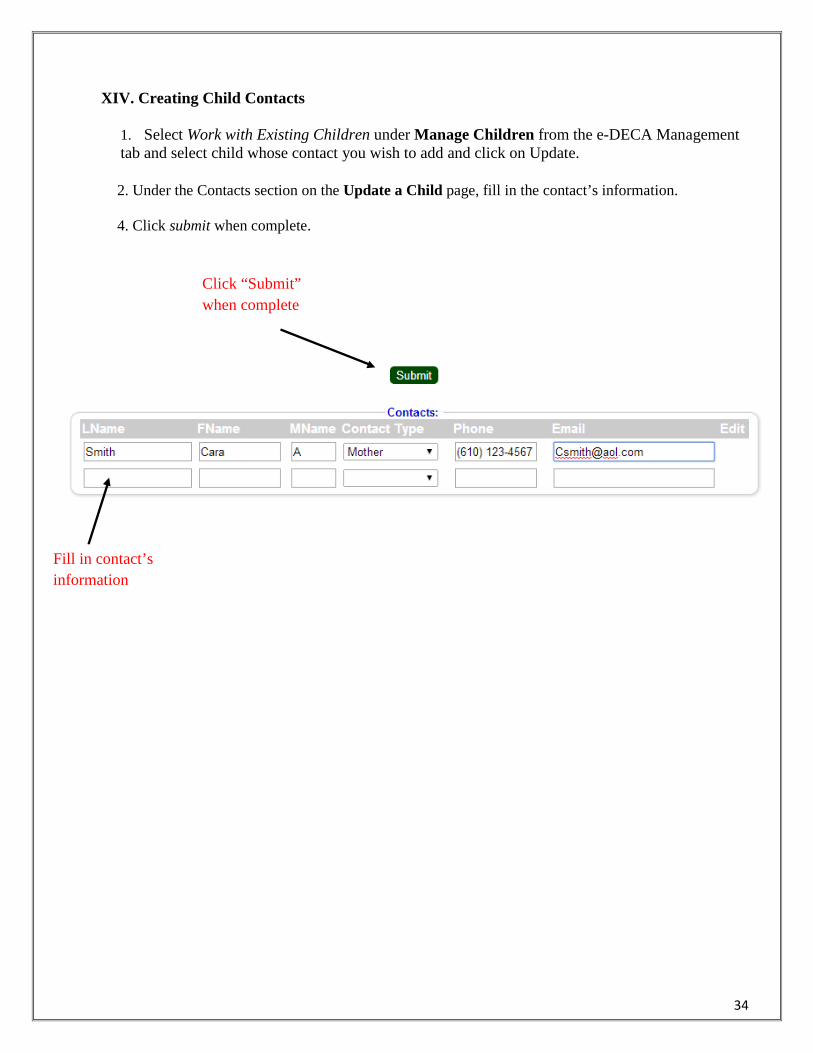
XIV. Creating Child Contacts
1. Select Work with Existing Children under Manage Children from the e-DECA Management tab and select child whose contact you wish to add and click on Update.
2. Under the Contacts section on the Update a Child page, fill in the contact’s information. 4. Click submit when complete.
Click “Submit” when complete
Fill in contact’s information
35
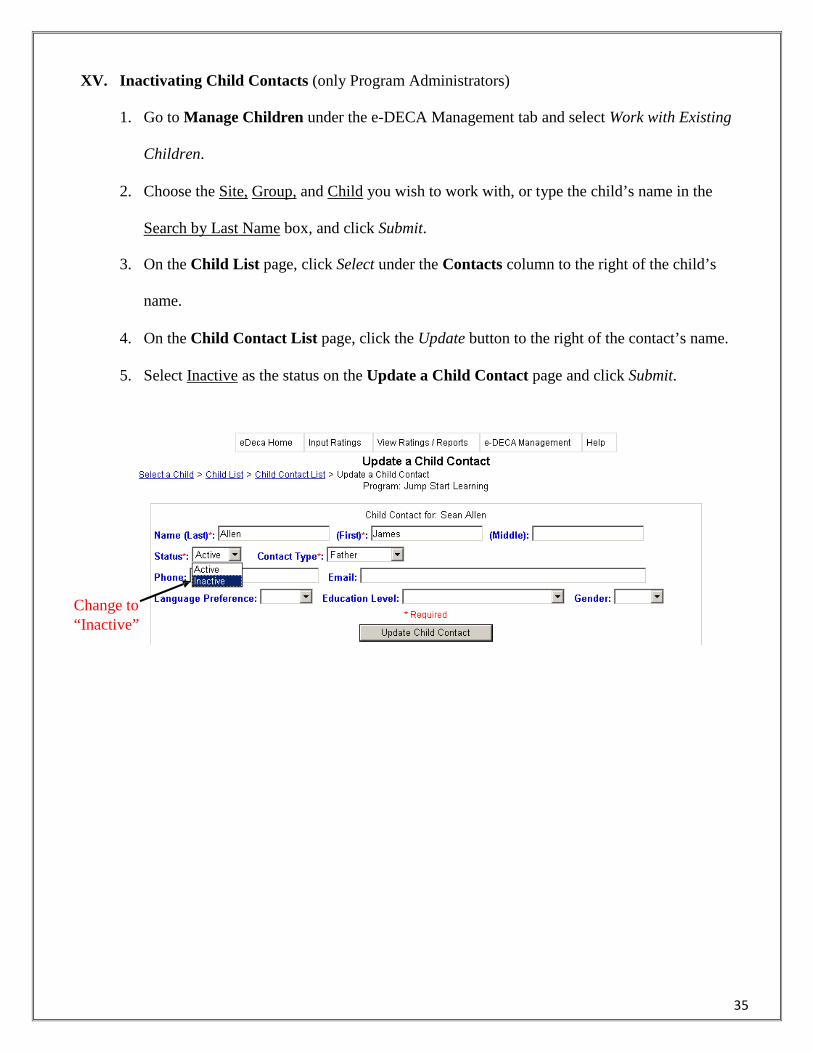
XV. Inactivating Child Contacts (only Program Administrators)
1. Go to Manage Children under the e-DECA Management tab and select Work with Existing
Children.
2. Choose the Site, Group, and Child you wish to work with, or type the child’s name in the
Search by Last Name box, and click Submit.
3. On the Child List page, click Select under the Contacts column to the right of the child’s
name.
4. On the Child Contact List page, click the Update button to the right of the contact’s name.
5. Select Inactive as the status on the Update a Child Contact page and click Submit.
Change to “Inactive”

36
XVI. Activation
1. Select Manage Activation from the e-DECA Management tab. Choose the object that you
wish to activate. In addition, choose the correct information from the subsequent boxes that
appear. Finally, click Submit.
NOTE: All objects, except children, can be activated via Activation. Inactive child records can be reactivated via the Manage Children function.
Objects that may be Activated
2. On the Activator page, click the box under the Activate column, to the right of the object
you wish to activate, and then click Submit.
Click to Submit and Activate selected object(s)
Click to indicate which object(s) you want Activated
37
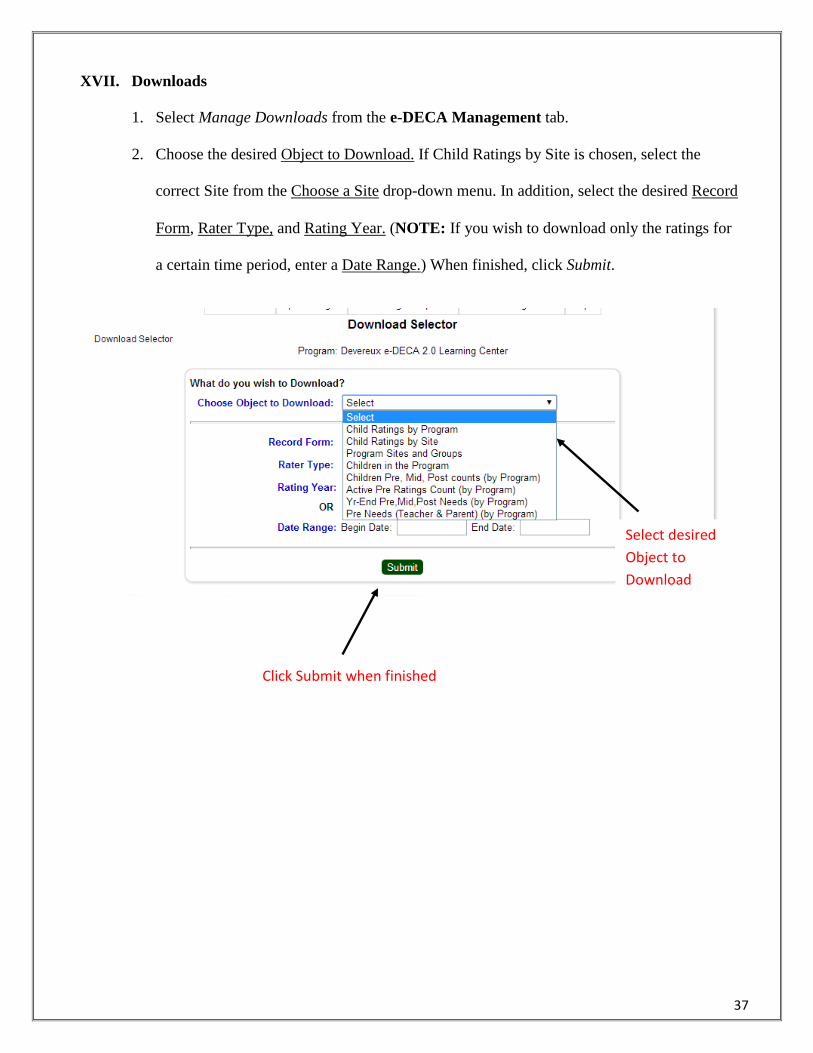
XVII. Downloads
1. Select Manage Downloads from the e-DECA Management tab.
2. Choose the desired Object to Download. If Child Ratings by Site is chosen, select the
correct Site from the Choose a Site drop-down menu. In addition, select the desired Record
Form, Rater Type, and Rating Year. (NOTE: If you wish to download only the ratings for
a certain time period, enter a Date Range.) When finished, click Submit.
Select desired Object to Download
Click Submit when finished
38
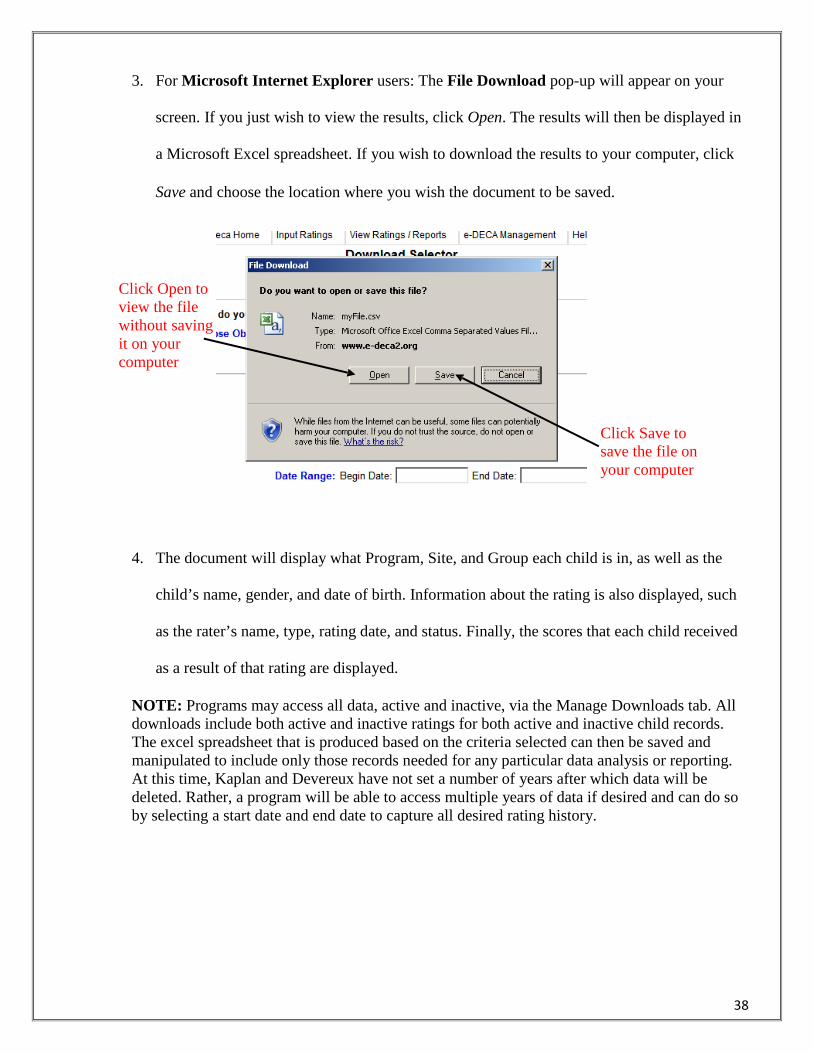
3. For Microsoft Internet Explorer users: The File Download pop-up will appear on your
screen. If you just wish to view the results, click Open. The results will then be displayed in
a Microsoft Excel spreadsheet. If you wish to download the results to your computer, click
Save and choose the location where you wish the document to be saved.
Click Open to view the file without saving it on your computer
Click Save to save the file on your computer
4. The document will display what Program, Site, and Group each child is in, as well as the
child’s name, gender, and date of birth. Information about the rating is also displayed, such
as the rater’s name, type, rating date, and status. Finally, the scores that each child received
as a result of that rating are displayed.
NOTE: Programs may access all data, active and inactive, via the Manage Downloads tab. All downloads include both active and inactive ratings for both active and inactive child records. The excel spreadsheet that is produced based on the criteria selected can then be saved and manipulated to include only those records needed for any particular data analysis or reporting. At this time, Kaplan and Devereux have not set a number of years after which data will be deleted. Rather, a program will be able to access multiple years of data if desired and can do so by selecting a start date and end date to capture all desired rating history.

39
XVIII. Viewing Strategy Reports
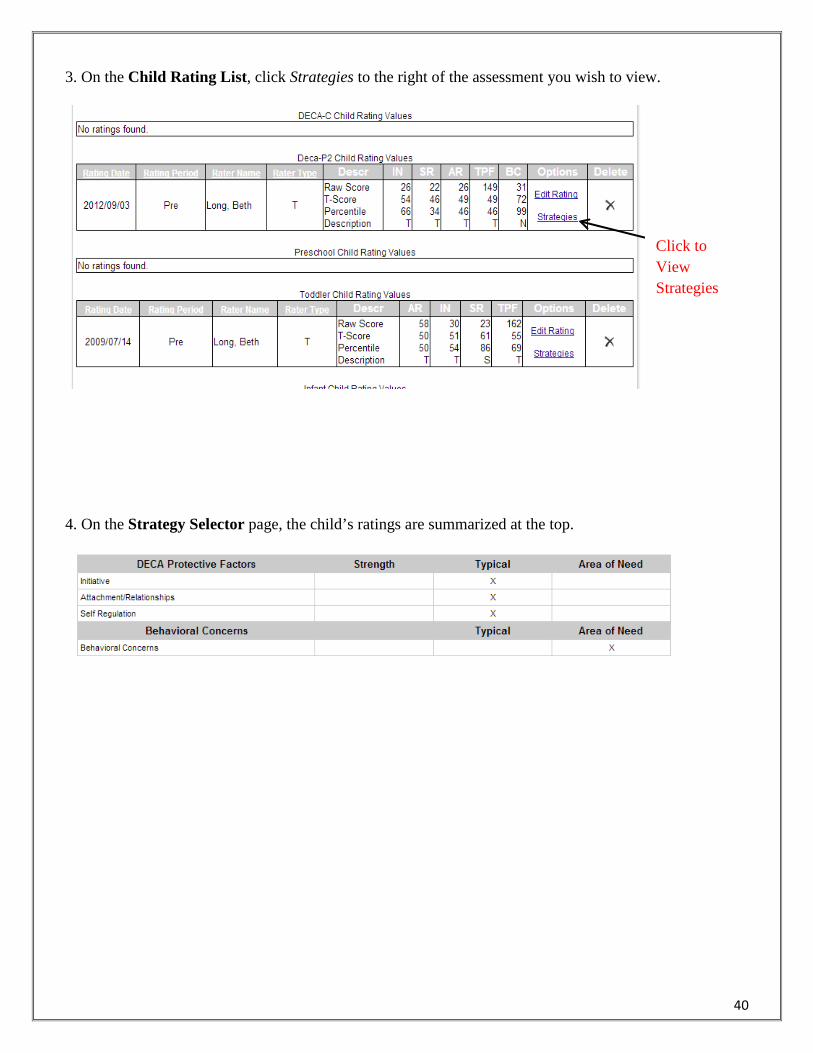
1. Select By Child from the View Ratings/Reports tab. 2. Choose the Site, Group, and Child for which you wish to view a rating, type the child’s last name into the Search by Last Name box. Select the circle next to View All Ratings for this Child and then click Submit.
40
3. On the Child Rating List, click Strategies to the right of the assessment you wish to view.
4. On the Strategy Selector page, the child’s ratings are summarized at the top.
Click to View Strategies
41
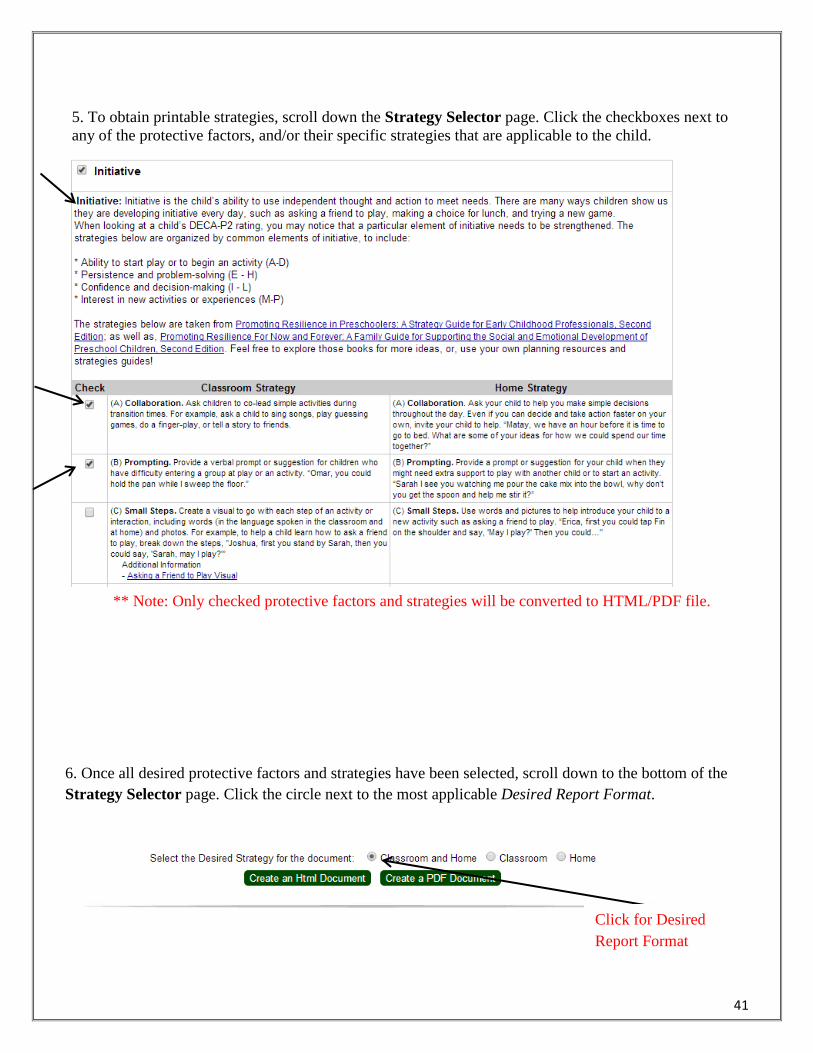
5. To obtain printable strategies, scroll down the Strategy Selector page. Click the checkboxes next to any of the protective factors, and/or their specific strategies that are applicable to the child.
** Note: Only checked protective factors and strategies will be converted to HTML/PDF file.
6. Once all desired protective factors and strategies have been selected, scroll down to the bottom of the Strategy Selector page. Click the circle next to the most applicable Desired Report Format.
Click for Desired Report Format
42
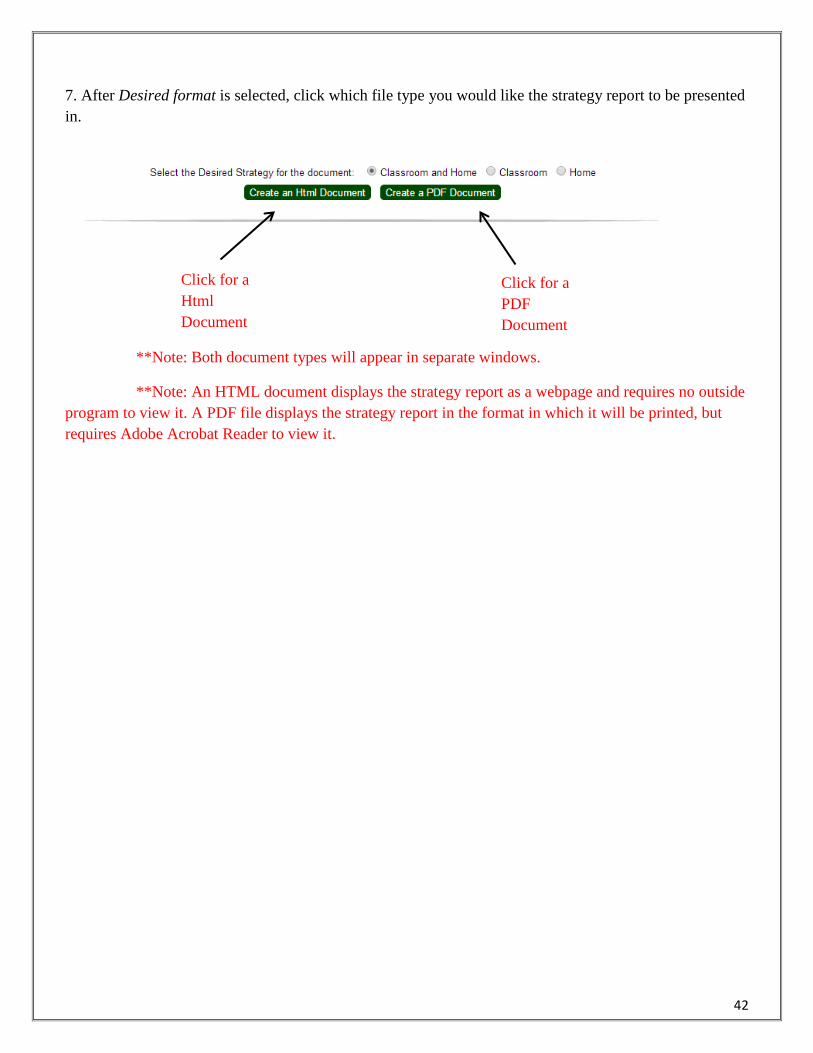
7. After Desired format is selected, click which file type you would like the strategy report to be presented in.
**Note: Both document types will appear in separate windows.
**Note: An HTML document displays the strategy report as a webpage and requires no outside program to view it. A PDF file displays the strategy report in the format in which it will be printed, but requires Adobe Acrobat Reader to view it.
Click for a PDF Document
Click for a Html Document
43
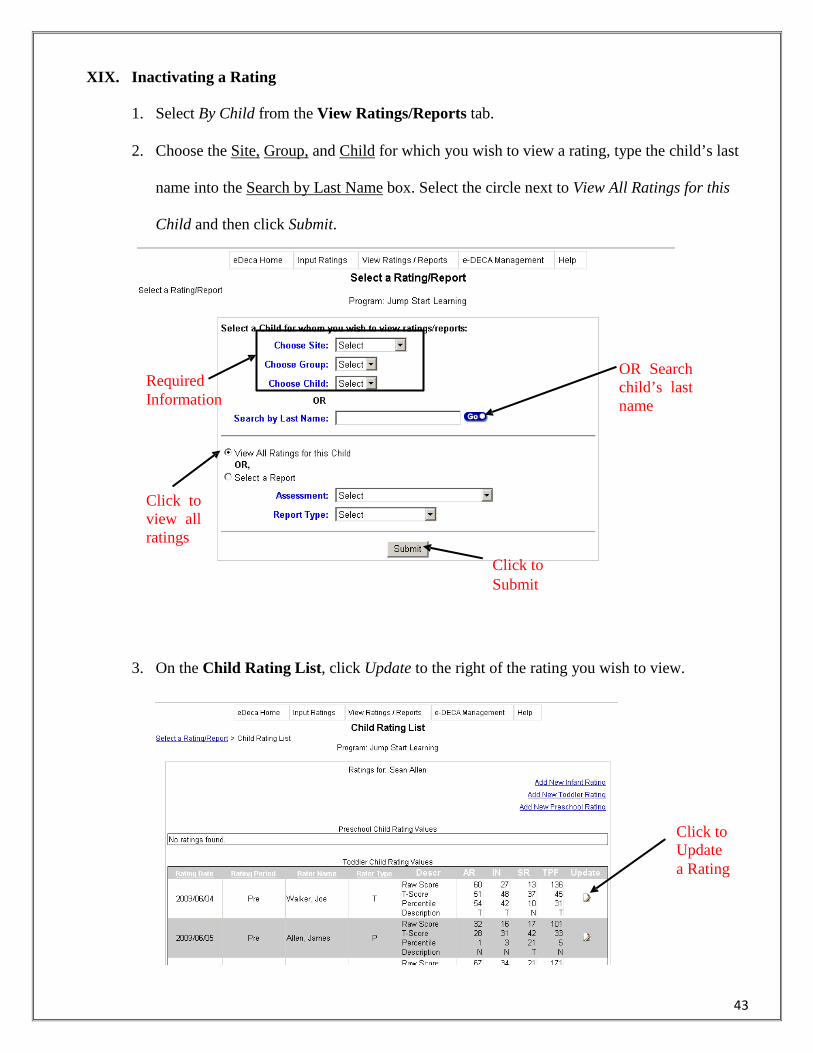
XIX. Inactivating a Rating
1. Select By Child from the View Ratings/Reports tab.
2. Choose the Site, Group, and Child for which you wish to view a rating, type the child’s last
name into the Search by Last Name box. Select the circle next to View All Ratings for this
Child and then click Submit.
Required Information
OR Search child’s last name
Click to view all ratings
Click to Submit
3. On the Child Rating List, click Update to the right of the rating you wish to view.
Click to Update a Rating
44
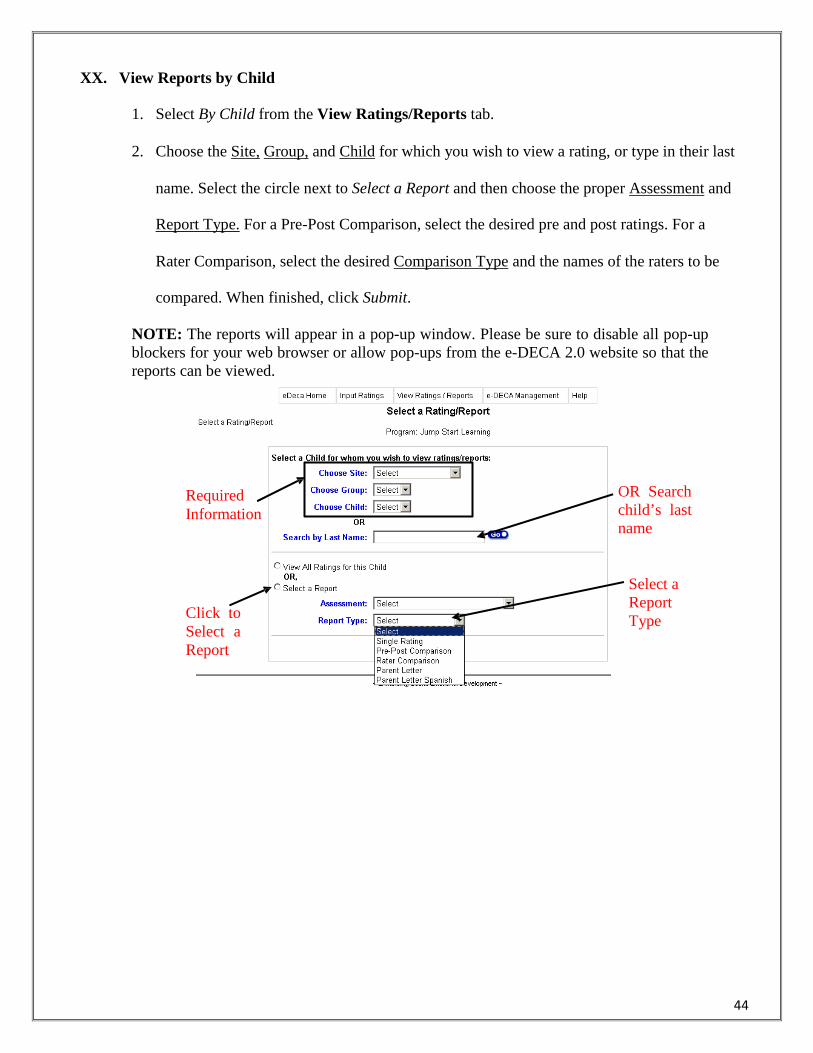
XX. View Reports by Child
1. Select By Child from the View Ratings/Reports tab.
2. Choose the Site, Group, and Child for which you wish to view a rating, or type in their last
name. Select the circle next to Select a Report and then choose the proper Assessment and
Report Type. For a Pre-Post Comparison, select the desired pre and post ratings. For a
Rater Comparison, select the desired Comparison Type and the names of the raters to be
compared. When finished, click Submit.
NOTE: The reports will appear in a pop-up window. Please be sure to disable all pop-up blockers for your web browser or allow pop-ups from the e-DECA 2.0 website so that the reports can be viewed.
Required Information
OR Search child’s last name
Click to Select a Report
Select a Report Type
45
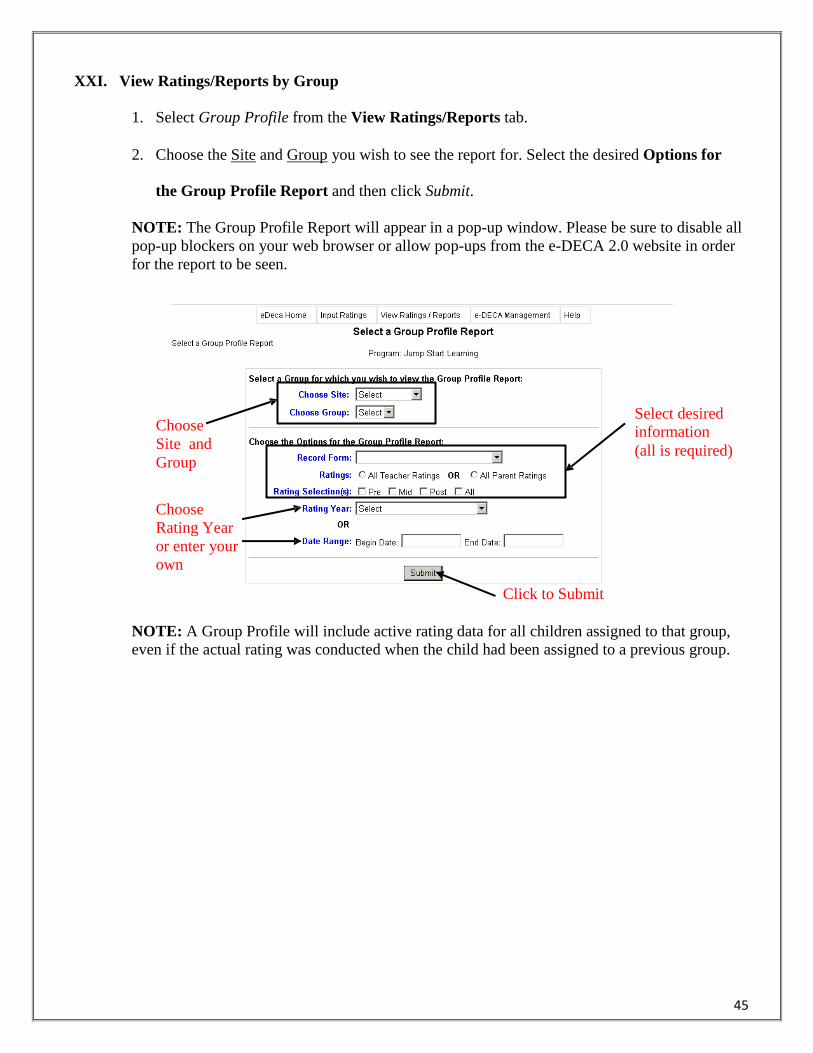
XXI. View Ratings/Reports by Group
1. Select Group Profile from the View Ratings/Reports tab.
2. Choose the Site and Group you wish to see the report for. Select the desired Options for
the Group Profile Report and then click Submit.
NOTE: The Group Profile Report will appear in a pop-up window. Please be sure to disable all pop-up blockers on your web browser or allow pop-ups from the e-DECA 2.0 website in order for the report to be seen.
Choose Site and Group
Select desired information (all is required)
Choose Rating Year or enter your own
Click to Submit
NOTE: A Group Profile will include active rating data for all children assigned to that group, even if the actual rating was conducted when the child had been assigned to a previous group.
46
Sample Group Profile Report (Preschool):
Sample Group Profile Report (Toddlers):
47
XXII. View Group Ratings List
1. Select Group Ratings List from the View Ratings/Reports tab.
2. Choose the Site and Group for which you wish to see the ratings list. Select the desired
options under the heading, Choose the Options for the Group Ratings List, or leave the
default settings as they are, and then click Submit.
3. Click on the child’s name to be re-directed to the Update a Child page for that child. Click
on the rating date to be re-directed to the Record Form for that rating.
See next page for a sample Group Ratings List
48
Sample Group Ratings List:
Only Active children in the Group
Children with no ratings or whose ratings are inactive
49
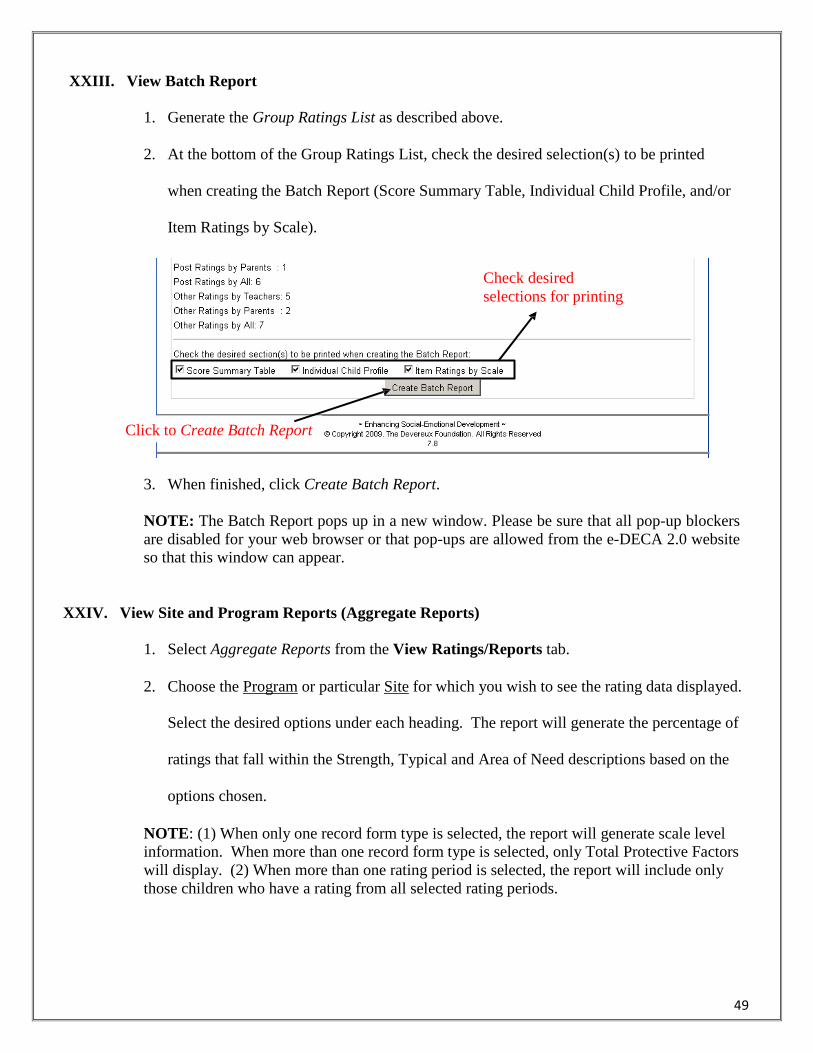
XXIII. View Batch Report
1. Generate the Group Ratings List as described above.
2. At the bottom of the Group Ratings List, check the desired selection(s) to be printed
when creating the Batch Report (Score Summary Table, Individual Child Profile, and/or
Item Ratings by Scale).
Check desired selections for printing
Click to Create Batch Report
3. When finished, click Create Batch Report.
NOTE: The Batch Report pops up in a new window. Please be sure that all pop-up blockers are disabled for your web browser or that pop-ups are allowed from the e-DECA 2.0 website so that this window can appear.
XXIV. View Site and Program Reports (Aggregate Reports)
1. Select Aggregate Reports from the View Ratings/Reports tab.
2. Choose the Program or particular Site for which you wish to see the rating data displayed.
Select the desired options under each heading. The report will generate the percentage of
ratings that fall within the Strength, Typical and Area of Need descriptions based on the
options chosen.
NOTE: (1) When only one record form type is selected, the report will generate scale level information. When more than one record form type is selected, only Total Protective Factors will display. (2) When more than one rating period is selected, the report will include only those children who have a rating from all selected rating periods.
50
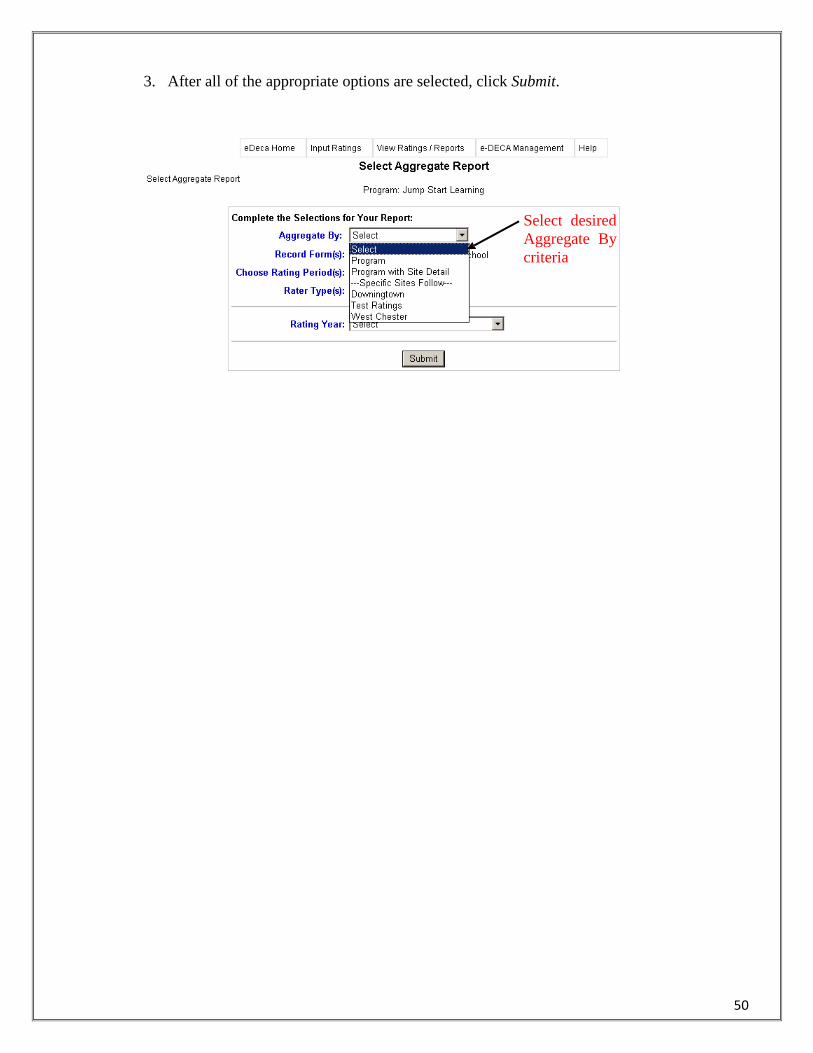
3. After all of the appropriate options are selected, click Submit.
Select desired Aggregate By criteria
51
Sample Aggregate Report (Preschoolers):
Sample Aggregate Report (Toddlers):
52
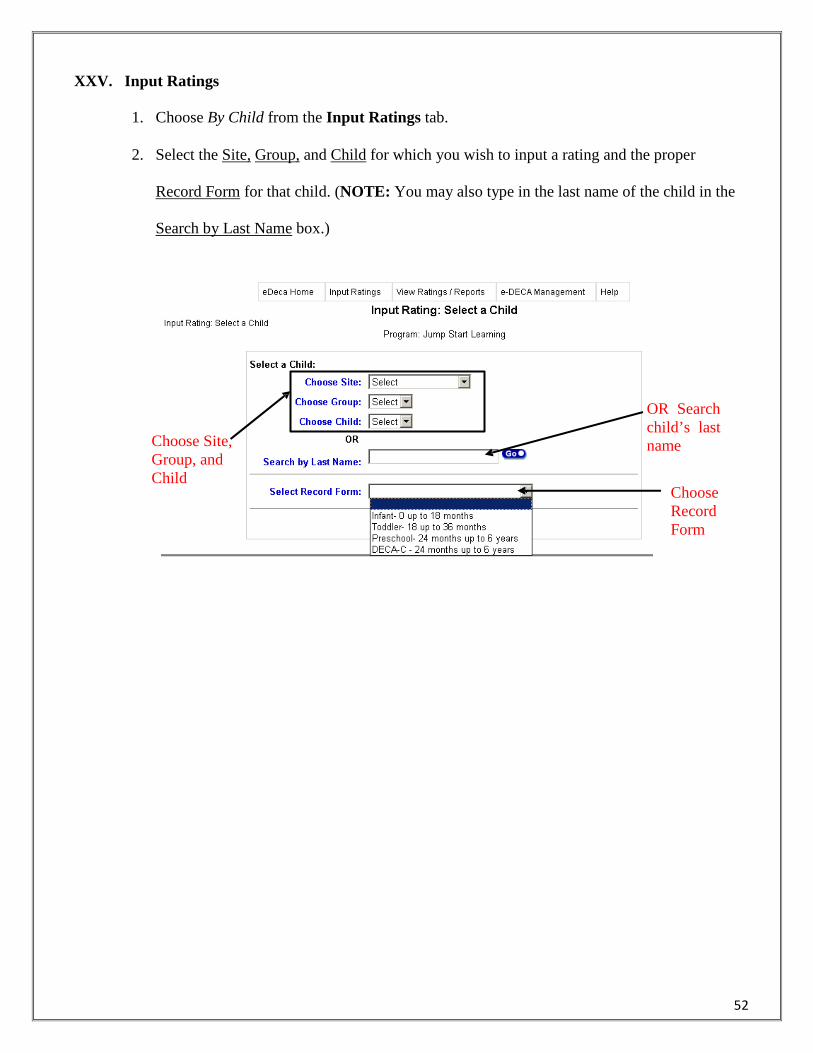
XXV. Input Ratings
1. Choose By Child from the Input Ratings tab.
2. Select the Site, Group, and Child for which you wish to input a rating and the proper
Record Form for that child. (NOTE: You may also type in the last name of the child in the
Search by Last Name box.)
Choose Site, Group, and Child
OR Search child’s last name
Choose Record Form
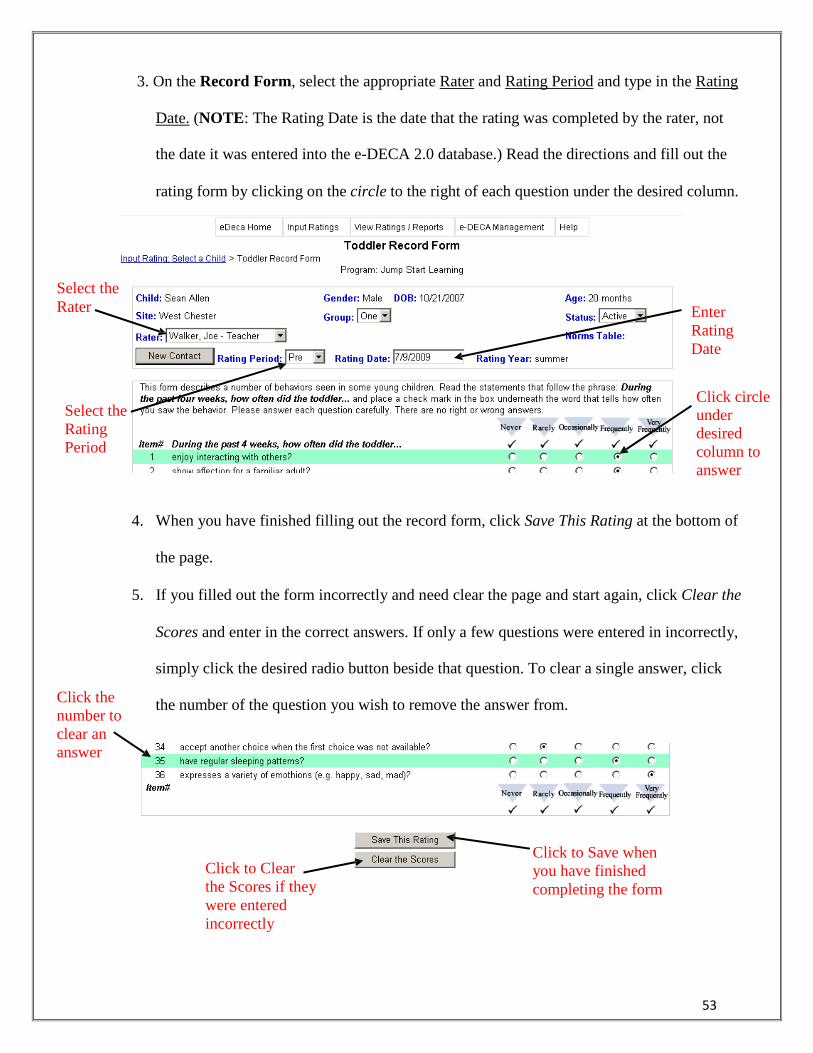
53
3. On the Record Form, select the appropriate Rater and Rating Period and type in the Rating
Date. (NOTE: The Rating Date is the date that the rating was completed by the rater, not
the date it was entered into the e-DECA 2.0 database.) Read the directions and fill out the
rating form by clicking on the circle to the right of each question under the desired column. Select the Rater
Enter Rating Date
Select the Rating Period
Click circle under desired column to answer
4. When you have finished filling out the record form, click Save This Rating at the bottom of
the page.
5. If you filled out the form incorrectly and need clear the page and start again, click Clear the
Scores and enter in the correct answers. If only a few questions were entered in incorrectly, Click the number to clear an answer
simply click the desired radio button beside that question. To clear a single answer, click
the number of the question you wish to remove the answer from.
Click to Clear the Scores if they were entered incorrectly
Click to Save when you have finished completing the form
54
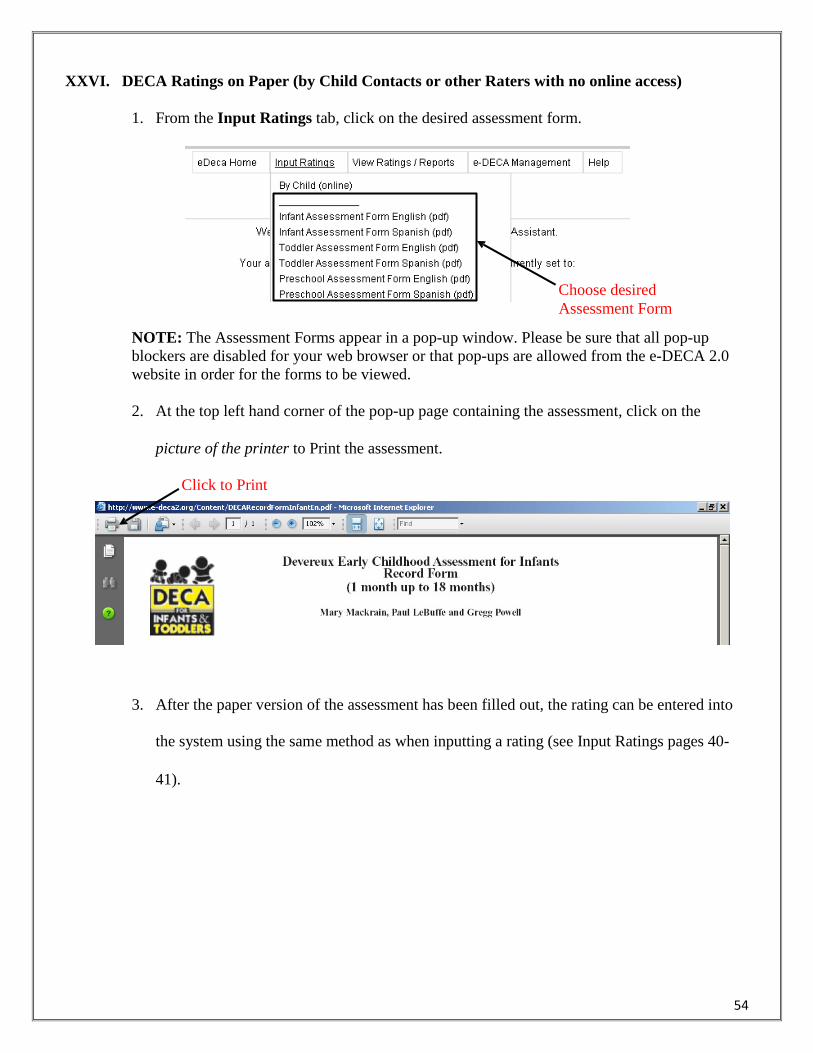
XXVI. DECA Ratings on Paper (by Child Contacts or other Raters with no online access)
1. From the Input Ratings tab, click on the desired assessment form.
Choose desired Assessment Form
NOTE: The Assessment Forms appear in a pop-up window. Please be sure that all pop-up blockers are disabled for your web browser or that pop-ups are allowed from the e-DECA 2.0 website in order for the forms to be viewed.
2. At the top left hand corner of the pop-up page containing the assessment, click on the
picture of the printer to Print the assessment.
Click to Print
3. After the paper version of the assessment has been filled out, the rating can be entered into
the system using the same method as when inputting a rating (see Input Ratings pages 40-
41).
55
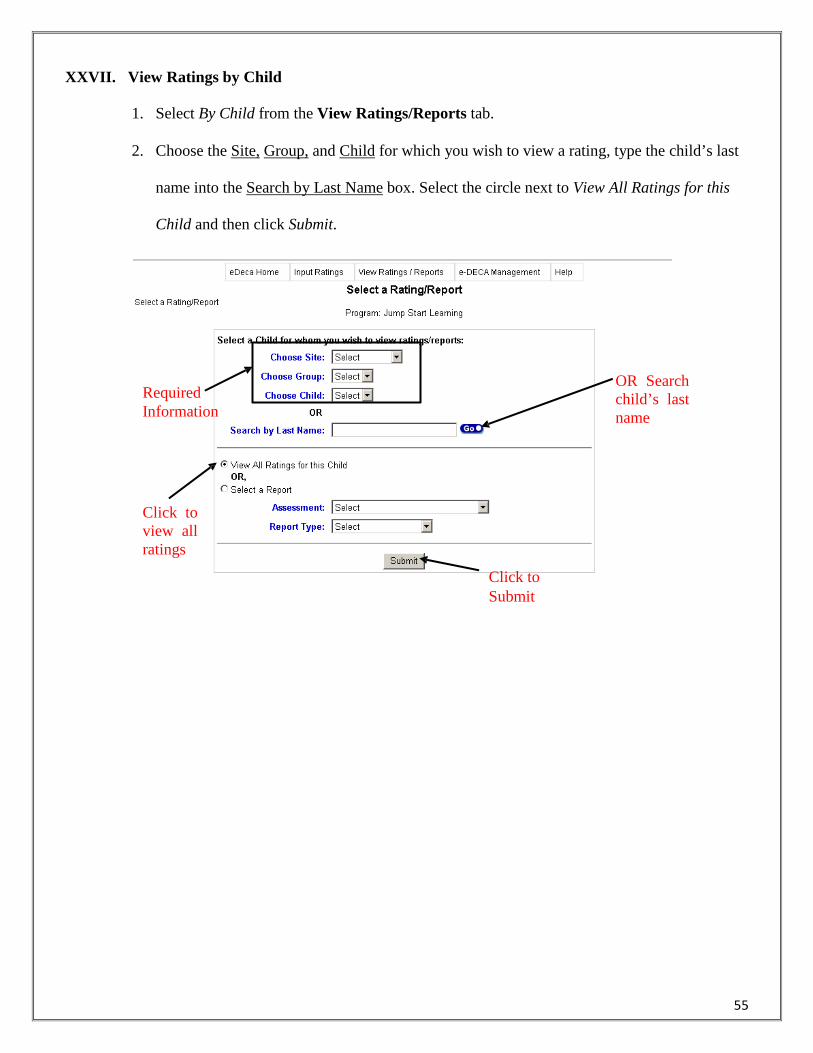
XXVII. View Ratings by Child
1. Select By Child from the View Ratings/Reports tab.
2. Choose the Site, Group, and Child for which you wish to view a rating, type the child’s last
name into the Search by Last Name box. Select the circle next to View All Ratings for this
Child and then click Submit.
Required Information
OR Search child’s last name
Click to view all ratings
Click to Submit
56
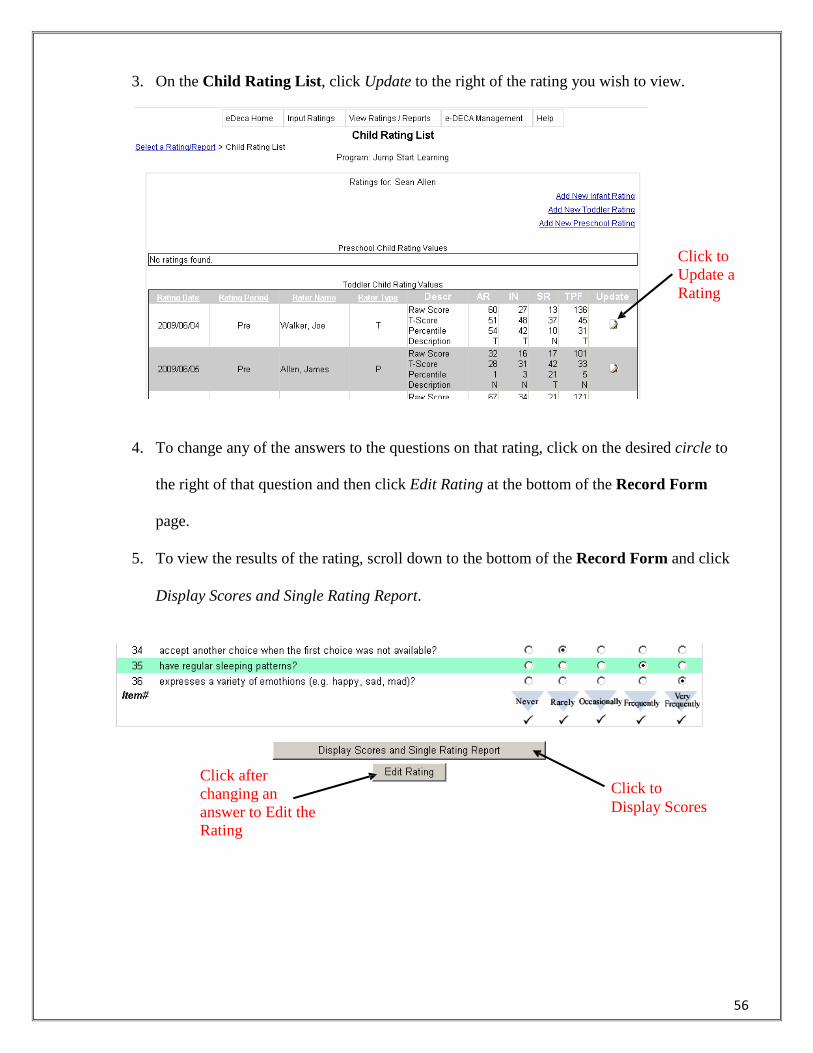
3. On the Child Rating List, click Update to the right of the rating you wish to view.
Click to Update a Rating
4. To change any of the answers to the questions on that rating, click on the desired circle to
the right of that question and then click Edit Rating at the bottom of the Record Form
page.
5. To view the results of the rating, scroll down to the bottom of the Record Form and click
Display Scores and Single Rating Report.
Click after changing an answer to Edit the Rating
Click to Display Scores
57
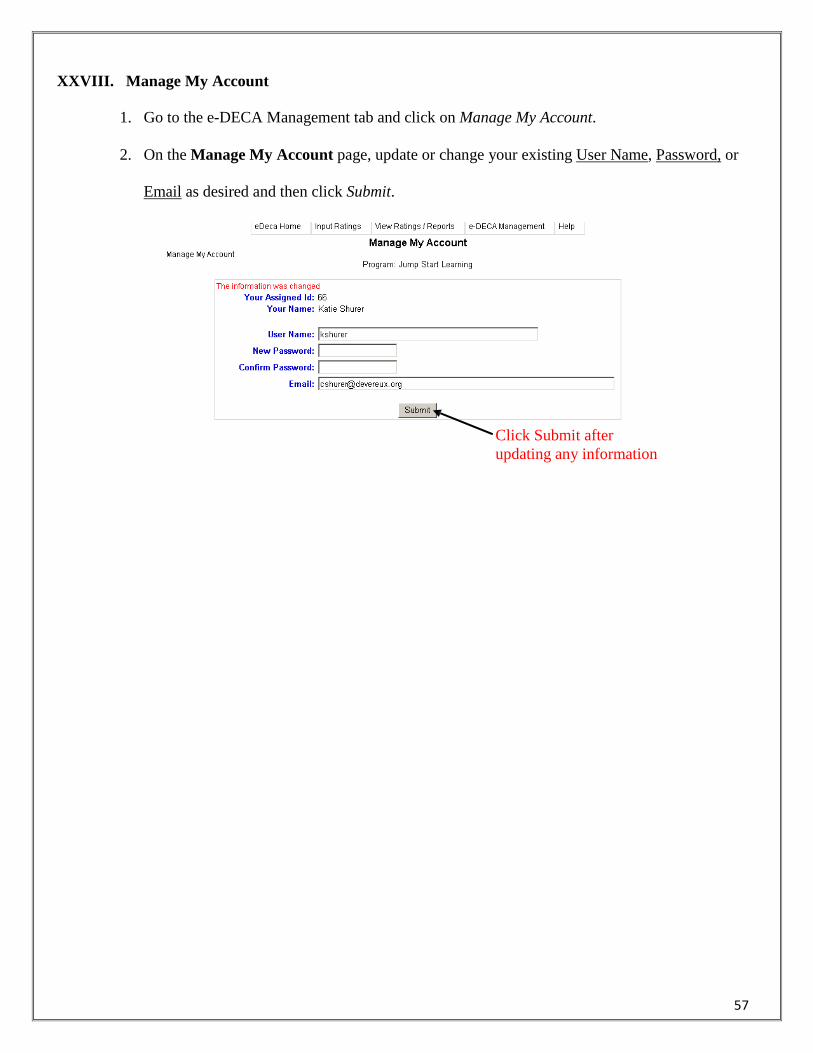
XXVIII. Manage My Account
1. Go to the e-DECA Management tab and click on Manage My Account.
2. On the Manage My Account page, update or change your existing User Name, Password, or
Email as desired and then click Submit.
Click Submit after updating any information
58
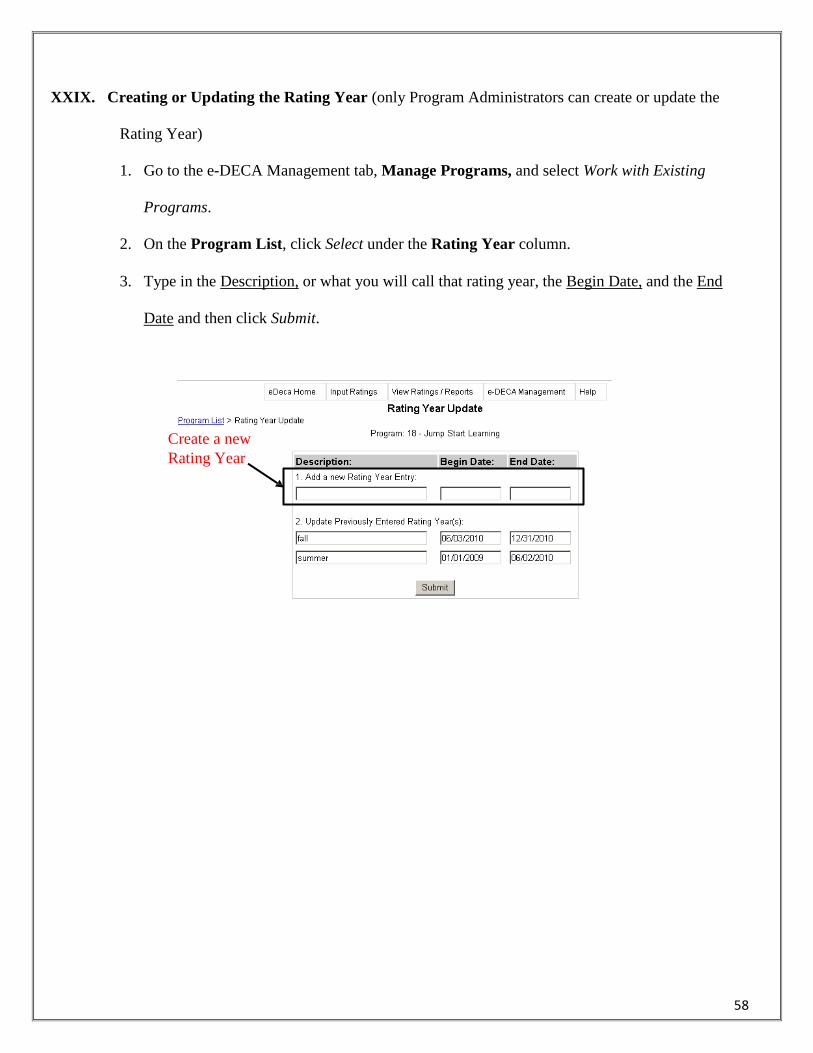
XXIX. Creating or Updating the Rating Year (only Program Administrators can create or update the
Rating Year)
1. Go to the e-DECA Management tab, Manage Programs, and select Work with Existing
Programs.
2. On the Program List, click Select under the Rating Year column.
3. Type in the Description, or what you will call that rating year, the Begin Date, and the End
Date and then click Submit.
Create a new Rating Year
59
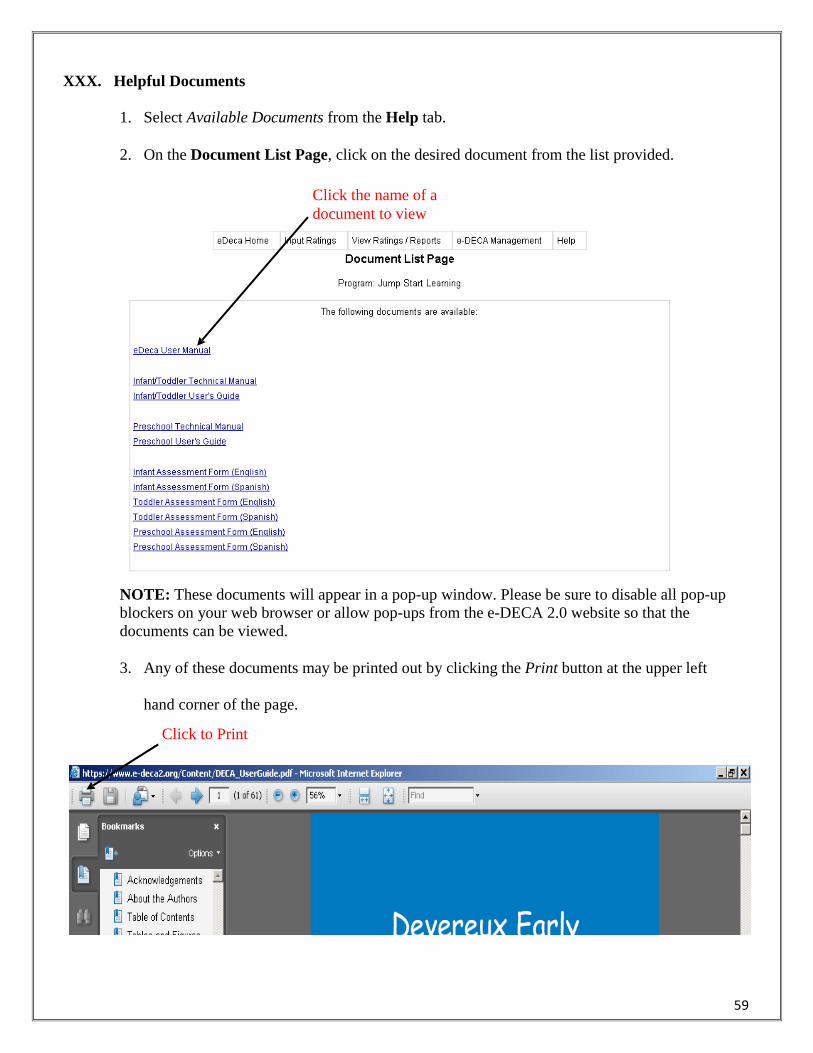
XXX. Helpful Documents
1. Select Available Documents from the Help tab.
2. On the Document List Page, click on the desired document from the list provided.
Click the name of a document to view
NOTE: These documents will appear in a pop-up window. Please be sure to disable all pop-up blockers on your web browser or allow pop-ups from the e-DECA 2.0 website so that the documents can be viewed.
3. Any of these documents may be printed out by clicking the Print button at the upper left
hand corner of the page.
Click to Print
60
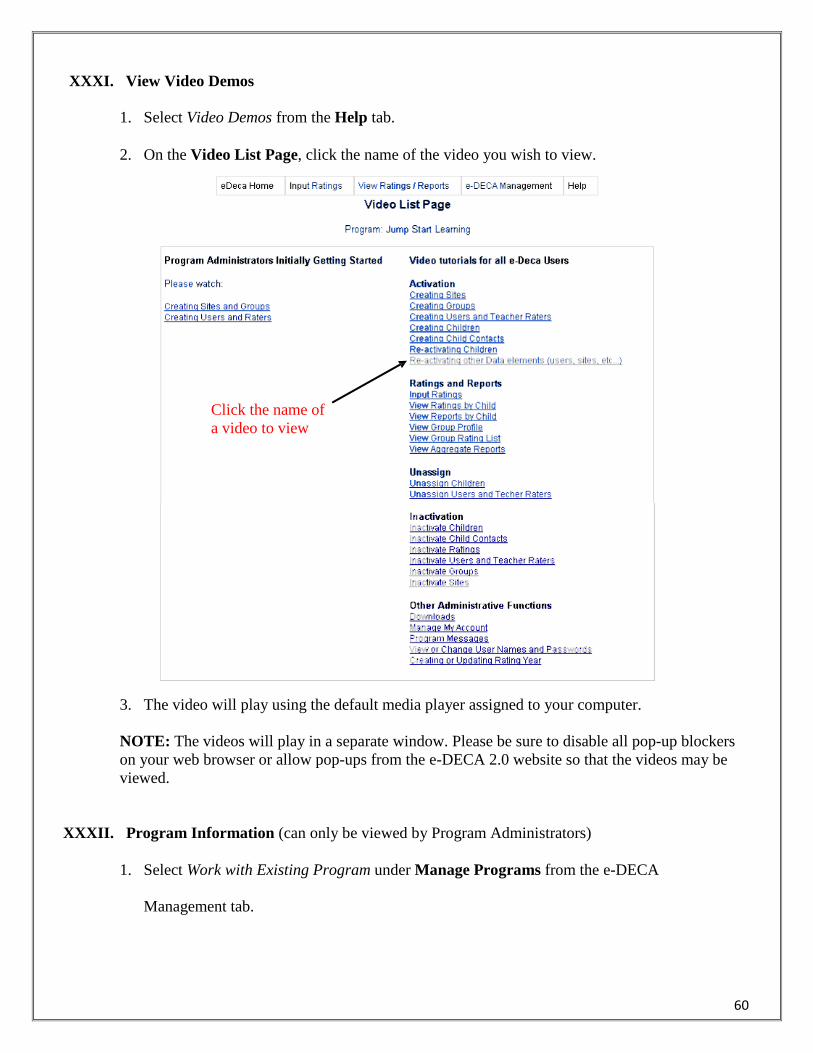
XXXI. View Video Demos
1. Select Video Demos from the Help tab.
2. On the Video List Page, click the name of the video you wish to view.
Click the name of a video to view
3. The video will play using the default media player assigned to your computer.
NOTE: The videos will play in a separate window. Please be sure to disable all pop-up blockers on your web browser or allow pop-ups from the e-DECA 2.0 website so that the videos may be viewed.
XXXII. Program Information (can only be viewed by Program Administrators)
1. Select Work with Existing Program under Manage Programs from the e-DECA
Management tab.
61
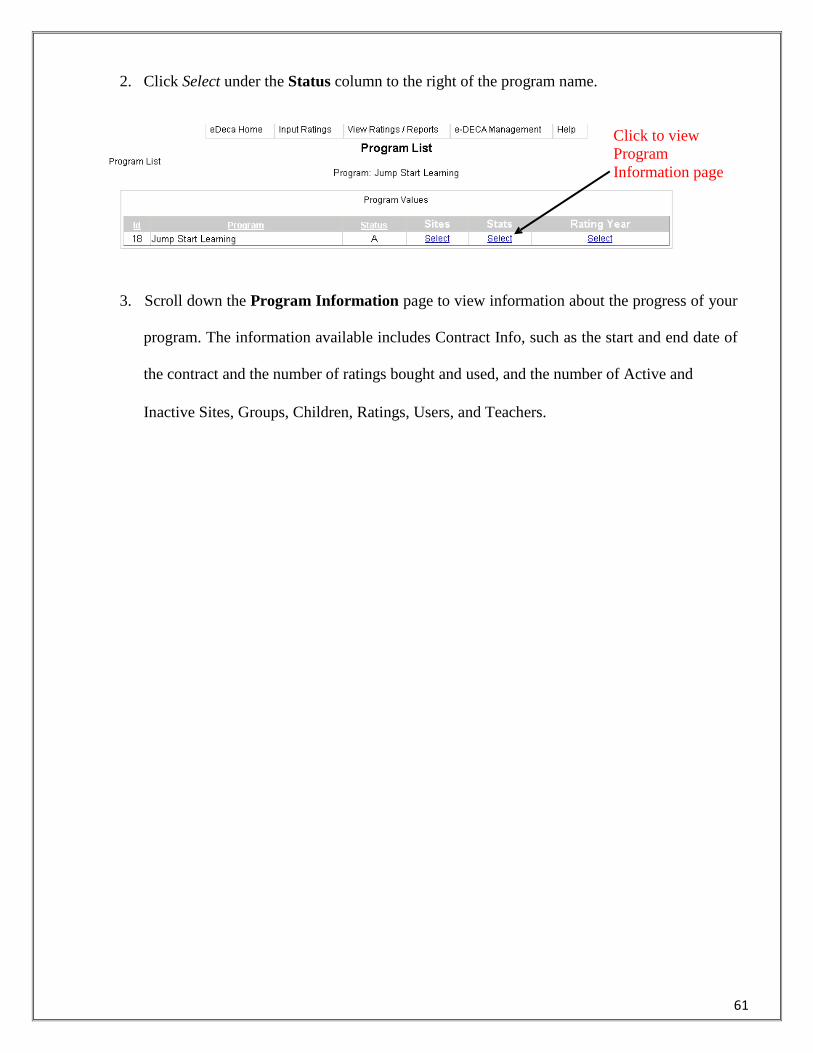
2. Click Select under the Status column to the right of the program name.
Click to view Program Information page
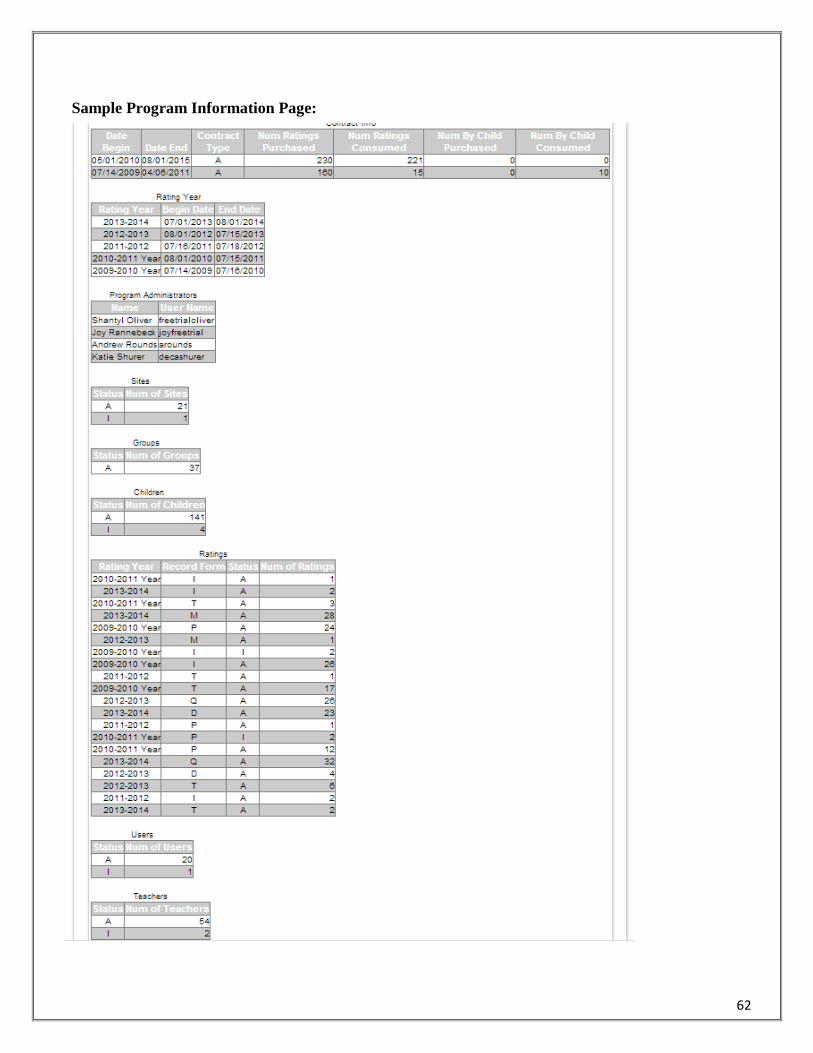
3. Scroll down the Program Information page to view information about the progress of your
program. The information available includes Contract Info, such as the start and end date of
the contract and the number of ratings bought and used, and the number of Active and
Inactive Sites, Groups, Children, Ratings, Users, and Teachers.
62
Sample Program Information Page:
63
XXXIII. Purchase Confirmation
When a renewal order is placed with Kaplan for additional rating options or to renew the annual
license, an email notification will be sent to the email address associated with the Program
Administrator. If your program needs to place an order for additional ratings or to renew the
annual license, please call Kaplan Early Learning Company at (800) 334-2014.
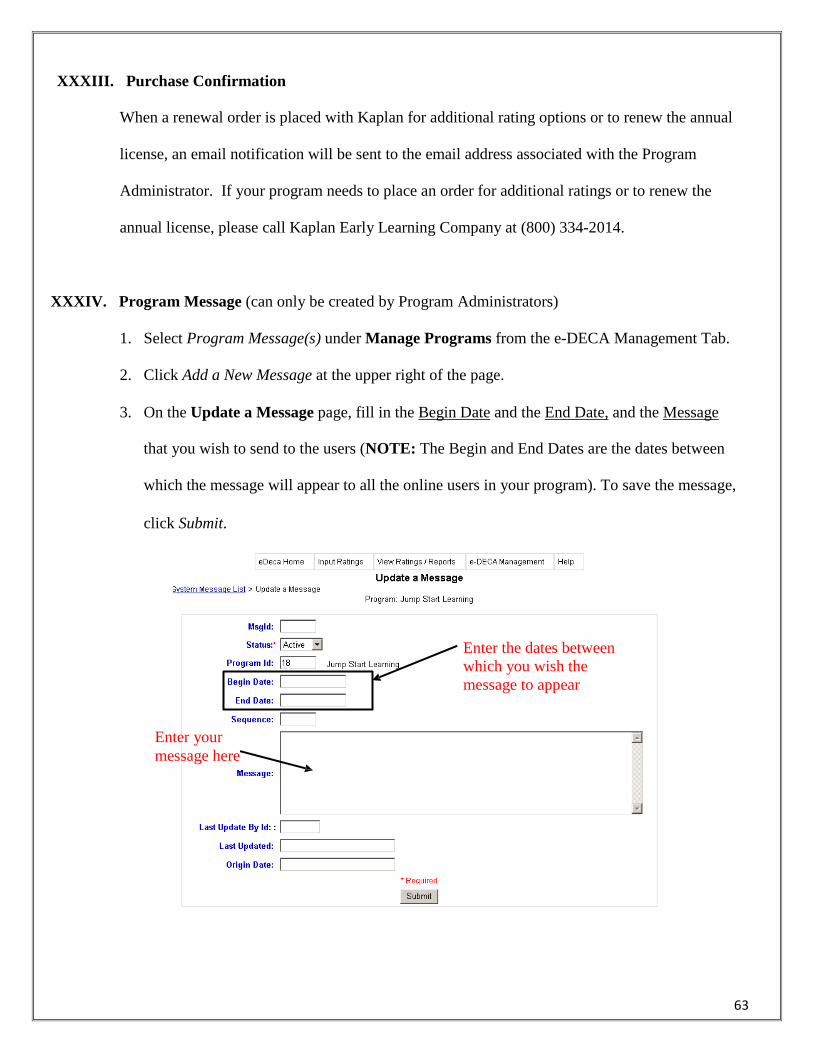
XXXIV. Program Message (can only be created by Program Administrators)
1. Select Program Message(s) under Manage Programs from the e-DECA Management Tab.
2. Click Add a New Message at the upper right of the page.
3. On the Update a Message page, fill in the Begin Date and the End Date, and the Message
that you wish to send to the users (NOTE: The Begin and End Dates are the dates between
which the message will appear to all the online users in your program). To save the message,
click Submit.
Enter the dates between which you wish the message to appear
Enter your message here
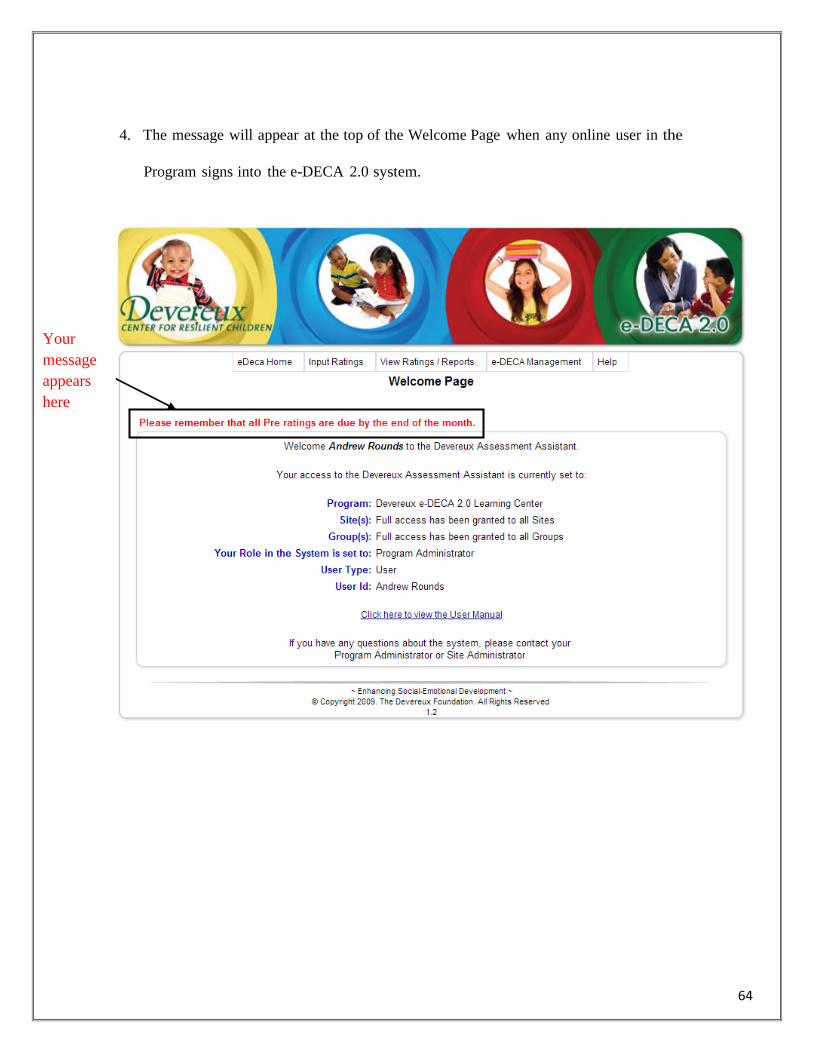
64
4. The message will appear at the top of the Welcome Page when any online user in the
Program signs into the e-DECA 2.0 system.
Your message appears here