Embed Size (px)
Citation preview

© 2016 e-Builder, Inc.
e-Builder User Guide
Planning Module

e-Builder 8.12 Help
by e-Builder, Inc.

All rights reserved. No parts of this work may be reproduced in any form or by any means - graphic, electronic, ormechanical, including photocopying, recording, taping, or information storage and retrieval systems - without thewritten permission of e-Builder.
Products that are referred to in this document may be either trademarks and/or registered trademarks of therespective owners. The publisher and the author make no claim to these trademarks.
While every precaution has been taken in the preparation of this document, the publisher and the author assume noresponsibility for errors or omissions, or for damages resulting from the use of information contained in this documentor from the use of programs and source code that may accompany it. In no event shall the publisher and the author beliable for any loss of profit or any other commercial damage caused or alleged to have been caused directly orindirectly by this document.
Printed: March 2016
e-Builder User Guide
© 2016 e-Builder, Inc.

e-Builder User Guide4
Table of Contents
Part I e-Builder Online User Assistance 6
................................................................................................................................... 61 Planning
......................................................................................................................................................... 6About the Planning Module
......................................................................................................................................................... 7Access the Planning Module
......................................................................................................................................................... 7Project Scenarios
.................................................................................................................................................. 8Access Project Scenarios
.................................................................................................................................................. 8Project Scenario Page Overview
.................................................................................................................................................. 11Create Scenarios
........................................................................................................................................... 12Add New Scenarios
........................................................................................................................................... 12Create Categories
........................................................................................................................................... 13Add Cost Estimates
........................................................................................................................................... 14Adjust Schedules
........................................................................................................................................... 15Add Cash Flow to Categories
........................................................................................................................................... 16Publish Scenarios
.................................................................................................................................................. 16Compare Scenarios
......................................................................................................................................................... 17Capital Plans
.................................................................................................................................................. 17Capital Plan Page Overview
.................................................................................................................................................. 20Create a Capital Plan
.................................................................................................................................................. 20Open an Existing Capital Plan
.................................................................................................................................................. 20Add Active Projects to the Capital Plan
.................................................................................................................................................. 21Add Scenarios to the Capital Plan
.................................................................................................................................................. 22Add Funding to the Capital Plan
.................................................................................................................................................. 22View Cash Flow Curves
.................................................................................................................................................. 22View Changes to the Capital Plan
.................................................................................................................................................. 25Modify Capital Plan Custom Fields
......................................................................................................................................................... 26Planning Reports

Part
I

6 e-Builder User Guide
1 e-Builder Online User Assistance
1.1 Planning
1.1.1 About the Planning Module
The Planning module allows you to represent current and future plans in terms ofbudget, scheduling, and resources. The e-Builder Planning module is used to helpyou determine the feasibility of planned and potential projects and how they mightfit into the scope of the capital plan. Stakeholders have real time visibility into thestatus of capital plans. Using this module reduces the costs and risks associatedwith capital planning for facility owners and companies that act on their behalf. Itdoes this by enabling a standard process to quantify and prioritize planned projectsfor inclusion in the capital plan. The Planning module is fully integrated with activeproject data so that the information you base decisions on is 100% complete andtruly up to date.
Here are a few key advantages to using the planning module:
· Better Alignment of Projects and Strategic Goals – Rank and prioritize projects
based on your organization’s strategic goals. Use consistent and objective criteria
to prioritize the projects and achieve better alignment between your chosen
projects and your strategic objectives.
· Ability to Enforce a Standard Process – Maintain compliance with regulatory
requirements and company policy. Ensure that only projects with complete
information are considered and that all projects in the plan have the correct
approvals and back-up documentation.
· Total Visibility in Project Planning – Automate the process of keeping all stake
holders (including project requesters) in the loop regarding planned and approved
project status. Eliminate the time lag in communication and provide real time
status as decisions are made.
· Easy Access to Planning Data – Centrally maintain all current and historical
planning data including potential project data and supporting information so that
it can be accessed easily, searched, and used for analysis.
· Scenario Based Planning Capability – Greatly simplify and speed up the process of

7e-Builder Online User Assistance
developing what-if scenarios for planning. Eliminate all of the time and the
manual effort that goes into creating scenarios so that you can analyze many
more combinations and pick the best one.
· Integration with Active Project Data – Obtain real time planning data including
cash flow projections using up to the minute active project cost and schedule
information improving visibility and decision making. Also eliminate the time and
effort required to manually consolidate multiple data sources.
1.1.2 Access the Planning Module
There are two methods of accessing the Planning module. The first method is fromthe Top Navigation Tabs, which should be used if you are not already in a project.However, if you are in another module within the same project, the best way toaccess the Planning module is from the project menu - this will help you avoid havingto reselect your project.
For a Specific Project
1. Click the Planning tab located on the Top Navigation Tabs.
2. Click the Please select a project... drop-down list and select your project. The
Project Scenarios page displays.
For the Current Project
If you are already within a project, you can access the Planning module via theProject Menu located in the left navigation bar.
1. Click Planning. The Project Scenarios page displays.
1.1.3 Project Scenarios
Project scenarios allow you to define multiple estimates for a potential or plannedproject. Planned projects are those that your organization may not have committedto just yet, and scenarios allow you to establish rough estimates in order todetermine whether or not a project will be feasible. A scenario includes a budget,schedule, and cash flow. A number of scenarios can be created for comparing andultimately determining the best possible option. For example, one scenario mightbe fast tracked, another might include a new technology or implementationapproach, and a different scenario might include an alternate, such as an extended

8 e-Builder User Guide
parking garage. Once a scenario is published, it is available to be added to a capitalplan.
There are six tasks required to create a scenario and need to be followed in thisorder:
1. Add new scenarios2. Create categories3. Add cost estimates4. Adjust schedules5. Add cash flow to categories6. Publish scenarios
1.1.3.1 Access Project Scenarios
To access the Project Scenarios page:
1. Click the Planning tab located on the Top Navigation Tabs.
2. Click the Please select a project... drop-down list and select your project. The
Project Scenarios page displays.
3. Click View Published or Edit Working under the title of the project scenario
you want to open.
1.1.3.2 Project Scenario Page Overview
Cost Measurements

9e-Builder Online User Assistance
LS = Lump SumEnter the lump sum of the item in the Estimate field.
UC = Unitized CostEnter the quantity of the item then click thedrop-own list to select a unit of measure. In the lastfield, enter the cost per unit.
SF = Square FeetThe square footage must first be defined in theproject scenario details in order to enter items bysquare feet. If the square feet are not already addedto the scenario details, click Edit to include it.
F = Formula
This cost measurement allows you to enter costbased on a percentage of another category item.Thus, the category you want to base your formula onmust first be created before using this costmeasurement.
Tabs
Details TabWhen you access the project scenario page, theDetails tab displays by default. This tab allows you tosee and edit all the details of the project scenario.
Notes TabClick to view or add notes to the scenario.
Documents TabClick to view or add documents to the scenario. Anexample is a written estimate from one or morevendors to help drive the final budget, schedule, andcash flow components.
Forms Tab
Click to attach forms or view forms that have beenattached to the scenario. If enabled, you can also fillout forms directly from this tab. For instance, acapital authorization request can be attached, whichis a record of the approved funds for the scenario.The planner might ask a contractor early on to give apreliminary estimate and that estimate can beattached as a reference.

10 e-Builder User Guide
Processes Tab Click to attach processes or view processes that havebeen attached to the scenario.
Snapshots Tab
Click to view snapshots of the scenario. A snapshot isautomatically taken when a published scenario isedited. This creates a version history for every editthat is made.
Buttons/Icons
Click to leave the Project Scenario page and return tothe list of project scenarios.
Click to add a new category. Categories are phases ofthe project for which you need to plan for.
Click to edit the name and/or description of thescenario. You can also alter the square footage of theproperty.
Click to create another scenario using the currentscenario as a template.
Click to delete the scenario.
Click to apply a preexisting scenario template. Tocreate scenario templates, please see your e-BuilderAdministrator.
Note: You can apply more than one templatefreely at any time. Keep in mind that if the samecategories exist in the plan and in the template, butline items are different, only the different line itemswill be added.

11e-Builder Online User Assistance
Click to publish the scenario. Publishing scenariosmakes them available for inclusion into the capitalplan. If you edit a published scenario, a snapshot willautomatically be created on the previously publishedversion and can be referenced later on.
Click to export the scenario to a Microsoft Excel®spreadsheet.
Click to adjust the zoom.
Zooming-in allows you to see a monthly view of thecalendar. Zooming midway provides a quarterly viewand when fully expanded, you can see a yearly viewof the calendar.
Click to adjust the zoom.
Zooming- in allows you to see a monthly view of thecalendar. Zooming midway provides a quarterly viewand when fully expanded, you can see a yearly viewof the calendar.
Related Topics:
· Create Scenarios
1.1.3.3 Create Scenarios
There are six tasks that are required to create a scenario and need to be followed in thisorder:
Note: At least one scenario view is required for adding project scenarios. Scenarioviews are created by your e-Builder Administrator. For more information, see CreateScenario Views.
Note: Various units of measure can be used when creating project scenarios andcategory assumptions. Your e-Builder Administrator defines these metrics. If you needadditional units of measure added, the account administrator may refer to Units of

12 e-Builder User Guide
Measure.
1. Add New Scenarios2. Create Categories3. Add Cost Estimates4. Adjust Schedules5. Add Cash Flow to Categories6. Publish Scenarios
1.1.3.3.1 Add New Scenarios
Tip: If you know ahead of time that you will be comparing scenarios, it is a goodidea to give the categories and assumptions in your different scenarios the samename, so that they are aligned during the comparison.
1. Go to the Planning module. For more information, see Access the Planning
Module.
2. Click Add Scenario. The Add Scenario dialog box displays.
3. Enter the name of the scenario in the Name field.
4. Optionally, you can also enter the square footage in the Sq. Ft. field.
Note: This field must be completed if you intend to enter category
assumption prices per square feet. You can add this information later on, by
clicking Edit on the Project Scenario page.
5. Click Save. The Project Scenario page displays.
*There are six tasks for creating scenarios that need to be following in sequence.This is task 1 of 6. The next task is Create Categories.
Related Topics
· Create Scenarios
· Units of Measure
1.1.3.3.2 Create Categories
Categories are phases of the project for which you need to plan for. Examplecategories are land acquisition, design, construction, etc. The sum of all thesecategories (which is automatically calculated) will show when added to a capitalplan.

13e-Builder Online User Assistance
To create categories:
1. Go to the desired scenario . For more information, see Access Project
Scenarios.
2. Click the Category icon. The Add Category dialog box displays.
3. Enter the name of the category in the Name field.
4. Click the Start Date and Finish Date drop-down arrows and select the
projected start and end month/year for this category.
Note: When doing this, the system will automatically create the schedule Ganttbar for you. These are optional fields and the start/finish dates can be adjustedlater on. For more information, see Adjust Schedules
5. Click Save.
*There are six tasks for creating scenarios that need to be following in sequence.This is task 2 of 6. The next task is Add Cost Estimates.
Related Topics
· Create Scenarios
1.1.3.3.3 Add Cost Estimates
As many assumptions as necessary can be added to each category. These segmentsmake up the sum of the category.
To create category assumptions:
1. Go to the desired scenario . For more information, see Access ProjectScenarios.
2. In each respective category, click the next available line and enter a category
assumption.
3. In the Estimate column, enter the estimated cost for this item.
Note: Costs can be entered with any of the different units of measurelisted below. Toggle between the options by clicking the unit of measure.
· LS = Lump Sum
· UC = Unitized Cost

14 e-Builder User Guide
· SF = Square Feet
· F = Formula
*There are six tasks for creating scenarios that need to be following in sequence.This is task 3 of 6. The next task is Adjust Schedules.
Related Topics:
· Project Scenario Page Overview
· Create Scenarios
1.1.3.3.4 Adjust Schedules
1. Go to the desired scenario . For more information, see Access Project Scenarios.
2. Select and drag the schedule bar to the desired position on the calendar. (You can
drag the schedule bar off to the edge of the plan to have the bar move out in
time, past the screen.) Click and drag the ends of the schedule bar to adjust the
duration. When you hover over the schedule bar, a pop-up window displays the
start date, end date and duration of the category.
Tip: If the category will last longer than a few months, click Zoom-out to expand the plan and see a yearly view. Setting schedules that span across multipleyears is easier to do in this calendar view.
*There are six tasks for creating scenarios that need to be following in sequence.This is task 4 of 6. The next task is Add Cash Flow to Categories.
15e-Builder Online User Assistance
Related Topics:
· Create Scenarios
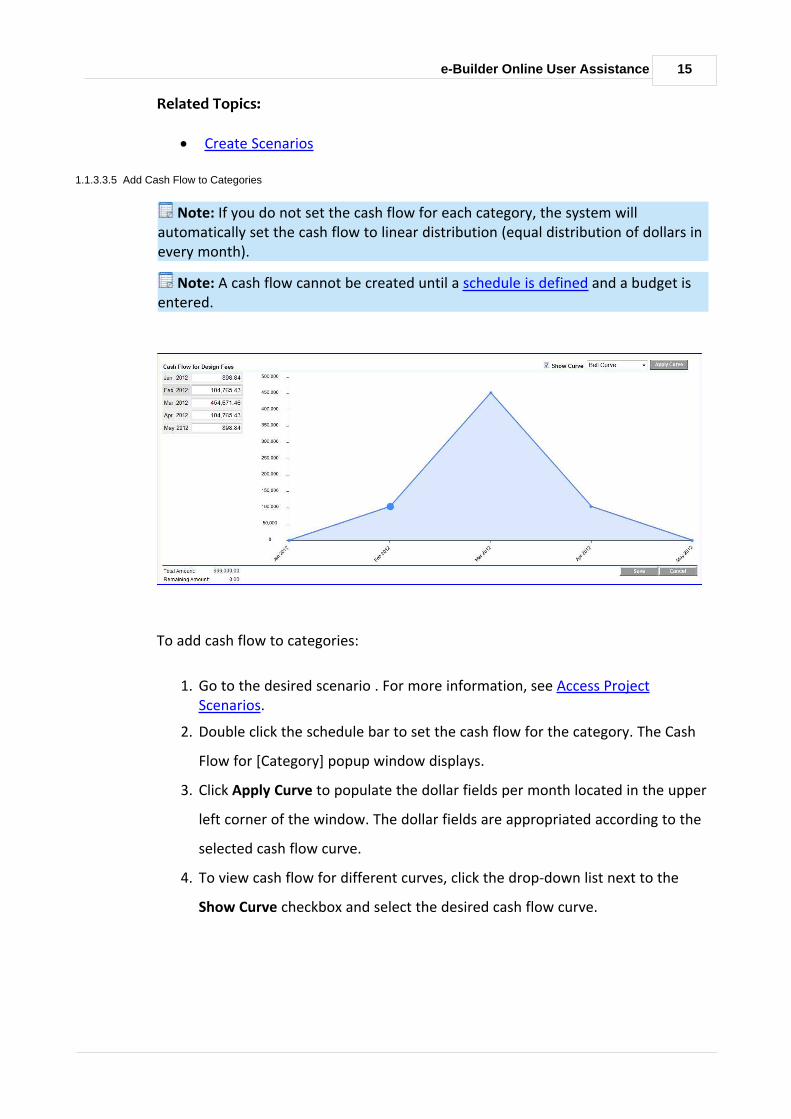
1.1.3.3.5 Add Cash Flow to Categories
Note: If you do not set the cash flow for each category, the system willautomatically set the cash flow to linear distribution (equal distribution of dollars inevery month).
Note: A cash flow cannot be created until a schedule is defined and a budget isentered.
To add cash flow to categories:
1. Go to the desired scenario . For more information, see Access ProjectScenarios.
2. Double click the schedule bar to set the cash flow for the category. The Cash
Flow for [Category] popup window displays.
3. Click Apply Curve to populate the dollar fields per month located in the upper
left corner of the window. The dollar fields are appropriated according to the
selected cash flow curve.
4. To view cash flow for different curves, click the drop-down list next to the
Show Curve checkbox and select the desired cash flow curve.

16 e-Builder User Guide
5. Click Apply Curve.
6. Click Save.
*There are six tasks for creating scenarios that need to be following in sequence.This is task 5 of 6. The next task is Publish Scenarios.
Related Topics:
· Create Scenarios
1.1.3.3.6 Publish Scenarios
Publishing scenarios makes them available for use in the capital plan. Oncepublished, you can edit a scenario if necessary and a snapshot of the previousversion will be taken for your reference.
1. Go to the desired scenario . For more information, see Access ProjectScenarios.
2. Click the Publish icon. You are prompted for confirmation.
3. Click OK.
*There are six tasks for creating scenarios that need to be following in sequence.This is task 6 of 6. For more information on creating scenarios, see Create Scenarios.
Related Topics:
· Project Scenarios
1.1.3.4 Compare Scenarios
The compare scenarios feature is a collaborative tool. Comparing scenarios is agreat way to determine the most feasible scenario among your options to add tothe capital plan.
Tip: If you know ahead of time that you will be comparing scenarios, it is a goodidea to give the categories and assumptions the same name, so that they are alignedduring the comparison. Otherwise they will show up on different rows which mightmake it difficult to compare.

17e-Builder Online User Assistance
1. Go to the Planning module. For more information, see Access the Planning
Module.
2. Select the check boxes next to the project scenarios you want to compare.
3. Click Compare. The Scenario Comparison page displays.
Note: Values that are different between compared scenarios will automaticallyshow in red.
1.1.4 Capital Plans
1.1.4.1 Capital Plan Page Overview
Tabs
DetailsWhen you access the capital plan page, the Details tab displays bydefault. This tab allows you to see and edit all the details of thecapital plan.
NotesClick this tab to view or add notes to the capital plan.
Documents
Click this tab to view or add documents to the capital plan. Sampledocuments can be any number of things: an approved letterreceived from the board on the approval of the plan, documentsthat instruct the planner to modify the plan based on some newfindings, etc.
Forms
Click this tab to attach forms or view forms that have beenattached to the capital plan. If enabled, you can also fill out formsdirectly from this tab. Sample items might include information thatinstructs team members on what to include in the plan. Officialapproval from the board or public.
Processes Click this tab to attach processes or view processes that have beenattached to the capital plan.
Buttons

18 e-Builder User Guide
Click this button to leave the Project Scenario page and return to alist of all project scenarios.
Click this icon to add active projects to the capital plan. Activeprojects must meet the following minimum requirements to beeligible for capital plan inclusion:
· Project target date is in the future
· Project has an active cash flow
· There must be at least one project view created for theaccount.
See, Add Active Projects to the Capital Plan for more information.
Click this icon to add scenarios to the capital plan. Scenarios arecreated for potential/planned projects.
See, Add Scenarios to the Capital Plan for more information.
Click this icon to add funding sources and their funds to the capitalplan.
See, Add Funding to the Capital Plan for more information.
Click this icon to edit the following items:
· Name
· Description
· Square footage
· Add/Modify custom fields
Click this icon to create another capital plan using the current planas a template.
Click this icon to delete the capital plan.

19e-Builder Online User Assistance
This icon is enabled when there are changes made to either
scenarios or active projects. A warning icon shows up next toeach project when there is a cash flow change. This icon allows youto accept and apply ALL changes to the plan at once.
Click this icon to add escalation percentages per fiscal year. If youre-Builder Administrator has already added escalation rates to theaccount, the changes you make here, will take precedence. Clickhere for an explanation of how escalation rates work.
Click this icon to finalize the capital plan.
Click this icon to export the capital plan to a Microsoft Excel®spreadsheet. On finalized plans the export shows what wasfinalized and what is currently in progress. We show two tabs – onefor each. The purpose here is that the planner can view the originalplan and see how it’s deviated from its course. Then he/she canmake any necessary course adjustments.
Click this icon to adjust the zoom.
Zooming allows you to see a monthly view of the calendar.Zooming midway provides a quarterly view and when fullyexpanded, you can see a yearly view of the calendar.
Click this icon to adjust the zoom.
Zooming allows you to see a monthly view of the calendar.Zooming midway provides a quarterly view and when fullyexpanded, you can see a yearly view of the calendar.
Related Topics:
· Create a Capital Plan
· View Changes to the Capital Plan

20 e-Builder User Guide
1.1.4.2 Create a Capital Plan
To create a capital plan:
1. Click the Planning tab located on the Top Navigation Tabs. A list of capital
plans display.
2. Click Add Capital Plan. The Add Capital Plan dialog box displays.
3. Enter the name of the capital plan in the Name field.
4. Click Save.
Related Topics:
· Add Scenarios to the Capital Plan
· Add Funding to the Capital Plan
· View Changes to the Capital Plan
1.1.4.3 Open an Existing Capital Plan
Note: The capital plan page can only be accessed if a capital plan has alreadybeen created.
1. Click the Planning tab located on the Top Navigation Tabs. A list of capital
plans display.
2. For drafts plans, click the Draft Plans tab.
Or
For finalized plans, click the Finalized Plans tab.
3. Click the title of the capital plan you want to open. The capital plan page
displays.
Related Topics:
· Create a Capital Plan
1.1.4.4 Add Active Projects to the Capital Plan
Note: If you add the same project to multiple capital plans and modify theproject's cash flow, these details will automatically update across all capital plans.
1. Go to the capital plan. For more information, see Open an Existing Capital

21e-Builder Online User Assistance
Plan.
2. Click the Project icon. A list of available projects display. Eligible projects have
an Add link to left of the project name.
3. Click the Add link next to all the projects you want to add.
4. Click Close. The project(s) are added to the Active Projects section of the
table.
If you're having trouble adding active projects, ask your e-Builder Administrator toensure that the following requirements are met:
· The project's target end date is in the future
· The project has an updated cash flow
· There is at least one project view created for the account
1.1.4.5 Add Scenarios to the Capital Plan
To add scenarios to the capital plan:
1. Open the capital plan. For more information, see Open an Existing Capital
Plan.
2. Click the Scenario icon. A list of published scenarios display.
3. Click the Add link next to all the scenarios you want to add.
4. Click Close. The scenarios are added to the Planned Projects section of the
table.
If you're having trouble adding active projects, ask your e-Builder Administrator toensure that the following requirements are met:
· At least one scenario has been created
· At least one scenario view has been created
Also, please see your e-Builder Administrator if you’re not able to pick from a list ofscenarios.

22 e-Builder User Guide
1.1.4.6 Add Funding to the Capital Plan
To add funding to the capital plan:
1. Open the capital plan. For more information, see Open an Existing Capital
Plan.
2. Click the Funding icon ( ). The Funding dialog box displays.
3. Enter all required information:
· Funding source(s)
· Funding amount for each calendar or fiscal year
4. Click Save.
1.1.4.7 View Cash Flow Curves
1. Open the capital plan. For more information, see Open an Existing Capital Plan.
2. Double click the schedule bar. The cash flow for that project or scenario will
popup in a separate window and you are able to see the cash flow curve.
Note: Cash flow curves are set in the cost module for active projects. For moreinformation, see Setting up Cash Flow. For scenarios, the cash flow is created whenbuilding out a scenario – see Add Cash Flow to Categories.
Related Topics:
· View Changes to the Capital Plan
1.1.4.8 View Changes to the Capital Plan
When the cash flow has been changed in an active or planned project, anexclamation icon displays next to the project’s name, indicating a change. Theplanning manager can click this icon to view details of the change, accept or rejectchanges.

23e-Builder Online User Assistance
Changes show for a number of reasons. For planned projects (scenarios), the icondisplays when a change is made to the cash flow. As a best practice and a practicecommon in most organizations, the cash flow is updated every time a change ismade to the budget, schedule, commitments or invoices. This cash flow change isreflected in the capital plan. It is important to note changes to budget, schedule,commitments or invoices will not be reflected in the capital plan unless the cashflow is updated.
Active Projects
Click the change icon next to the active project to view changes. A popup windowsimilar to the one below displays. All changes appear in red. In the table on the leftof this screen, the In The Plan column shows figures that are in the current capitalplan, and the Current column displays the changes. Totals for each column arelocated toward the bottom of the screen, allowing you to see what significantbudget changes there are, if any. In the graph, the red line shows the cash flowcurve of the recently changed figures. The blue line represents cash flow in thecurrent plan, before any changes.
To accept these changes, click Save Current as Plan otherwise, click Cancel.

24 e-Builder User Guide
Planned Projects (Scenarios)
Click the change icon next to the planned project to view changes. A popupwindow similar to the one below displays. This particular example shows an increasein the cash flow. The Active Scenario and Revised Scenario fields show you thedifference in total amounts. Below this, the dollar amount by which the budget wasincreased displays.
To accept these changes, click Apply Changes, otherwise, click Close.
See Full Comparison
Click See Full Comparison to see a side by side view of the details of each scenariofor better comparisons.
Note: You can also click the Apply All icon located on the capital plan pageto view and apply ALL changes at once.

25e-Builder Online User Assistance
1.1.4.9 Modify Capital Plan Custom Fields
If custom fields are set on your account, you can choose up to three custom fieldsby which to sort data in the capital plan. Custom fields support the need to sortprojects by different criteria such as resource, campus, building, project number, orany data that is pertinent to make smart planning decisions. You can modify thesecustom fields by choosing different/additional fields or changing the order in whichthey are sorted.
To modify capital plan custom fields:
1. Open the capital plan. For more information, see Open an Existing Capital
Plan.
2. Click the Edit icon . The Edit Capital Plan dialog box displays.
3. Click the drop-down arrows in the Configure Columns section and select

26 e-Builder User Guide
the desired custom fields.
4. In either the Ascending or Descending columns, select the option by
which you want to sort the custom fields.
5. Click Save.
1.1.5 Planning Reports
The Planning Reports option enables you to report upon Capital Plan and Scenarioinformation created in the Planning module. Planning reports provide visibility intoCapital Plans and Scenarios, across multiple projects, as well as Capital Plan Details,Capital Plan Cash Flows, Scenario Details and Scenario Cash Flows. These PlanningReports enable deeper analysis on all planned projects in order to reach resourceallocation decisions more quickly, and make more informed choices.
For more information on how to customize and run a report in e-Builder, see Reports Module Overview.
The types of planning reports that can be run are as follows:
Field Description
Capital PlanReport on multiple Capital Plans across projects. Forexample, a higher education program with 50 campuses mayhave a capital plan for each campus.

27e-Builder Online User Assistance
Capital PlanDetails
Report on all the Capital Plan Details that are entered foreach capital plan in the Planning module. For example, viewall the Funding, Active Projects and Planned Projects thatare configured under each Capital Plan for a higher levelview.
Capital PlanCash Flow
Report on the Cash Flow amounts configured for each savedCapital Plan including the Cash Flows for Active and PlannedProjects.
Scenario
Report on multiple scenarios across all planned projects. Forexample, present scenario data within a single report togive the bigger picture of all Planning Scenarios, in order tofacilitate effective decision making.
Scenario DetailsReport on all the details entered for each scenario within aproject.
Scenario CashFlow
Report on the cash flows entered for each project scenariowithin a single planned project.