Embed Size (px)
Citation preview

8/10/2019 Dynamics GP MFG Core Functions
http://slidepdf.com/reader/full/dynamics-gp-mfg-core-functions 1/256
Microsoft Dynamics ® GPManufacturing Core Functions

8/10/2019 Dynamics GP MFG Core Functions
http://slidepdf.com/reader/full/dynamics-gp-mfg-core-functions 2/256
Copyright Copyright © 2010 Microsoft. All rights reserved.
Limitation of liability This document is provided “as-is”. Information and views expressed in this document, includingURL and other Internet Web site references, may change without notice. You bear the risk of usingit.
Some examples depicted herein are provided for illustration only and are fictitious. No realassociation or connection is intended or should be inferred.
Intellectual property This document does not provide you with any legal rights to any intellectual property in anyMicrosoft product.
You may copy and use this document for your internal, reference purposes.
Trademarks Microsoft and Microsoft Dynamics are trademarks of the Microsoft group of companies. FairComand c-tree Plus are trademarks of FairCom Corporation and are registered in the United Statesand other countries.
All other trademarks are property of their respective owners.
Warranty disclaimer Microsoft Corporation disclaims any warranty regarding the sample code contained in thisdocumentation, including the warranties of merchantability and fitness for a particular purpose.
License agreement Use of this product is covered by a license agreement provided with the software product. If youhave any questions, please call the Microsoft Dynamics GP Customer Assistance Department at800-456-0025 (in the U.S. or Canada) or +1-701-281-6500.
Publication date May 2010

8/10/2019 Dynamics GP MFG Core Functions
http://slidepdf.com/reader/full/dynamics-gp-mfg-core-functions 3/256

8/10/2019 Dynamics GP MFG Core Functions
http://slidepdf.com/reader/full/dynamics-gp-mfg-core-functions 4/256
ii M A N U F A C T U R I N G C O R E F U N C T I O N S
C O N T E N T S
Skill sets and work centers ........................................................................................................................34
Assigning skill requirements to work centers ........................................................................................34
Next steps .....................................................................................................................................................35
Chapter 3: Operations ................................................................................................................... 37Operations terms .........................................................................................................................................37
Creating an operation .................................................................................................................................38
Modifying operation definitions ..............................................................................................................39
Attaching drawings to operation codes. ..................................................................................................39
Deleting operation codes ...........................................................................................................................40
Chapter 4: Drawings .......................................................................................................................41Drawings terms ...........................................................................................................................................41
Drawings and drawing groups .................................................................................................................41
Adding a drawing to a drawing group ...................................................................................................41
Attaching a drawing to a record ...............................................................................................................43
Deleting a drawing .....................................................................................................................................43
Removing a drawing from a drawing group. .........................................................................................43Viewing a drawing directly .......................................................................................................................43
Viewing a drawing attached to a record. .................................................................................................44
Part 2: Item extensions ............................................................................................................48
Chapter 5: Item extensions overview ............................................................................. 49Inventory and Manufacturing documentation .......................................................................................49
Item terms ....................................................................................................................................................50
Item statuses ................................................................................................................................................50
Replenishment methods ............................................................................................................................51
Fulfillment methods ...................................................................................................................................52Standard costing ..........................................................................................................................................52
Chapter 6: Item classes ................................................................................................................ 55Specifying accounts for an item class. ......................................................................................................55
Specifying a fulfillment method for an item class. .................................................................................58
Setting up shipping history for an item class .........................................................................................58
Defining overhead for a standard cost item class ..................................................................................59
Chapter 7: Manufacturing accounts ................................................................................61Overview of accounts .................................................................................................................................61
Actual and standard cost items .................................................................................................................62
Specifying Manufacturing accounts .........................................................................................................62
Chapter 8: Item engineering data ....................................................................................... 65About item classes and Manufacturing ...................................................................................................65
Entering item engineering data ................................................................................................................66
Assigning an effective date to an item .....................................................................................................68
Setting the unit of measure for shipping weight ....................................................................................68
Specifying item status ................................................................................................................................68
Identifying an item requiring incoming inspection ...............................................................................69

8/10/2019 Dynamics GP MFG Core Functions
http://slidepdf.com/reader/full/dynamics-gp-mfg-core-functions 5/256
M A N U F A C T U R I N G C O R E F U N C T I O N S iii
C O N T E N T S
About items and MRP ................................................................................................................................70
Attaching a drawing to an item ................................................................................................................71
Calculating lead time for an item unit .....................................................................................................71
Calculating lead time for quantities .........................................................................................................72
How available to promise dates are calculated for Manufacturing ....................................................73
Limitations of available to promise dates for Manufacturing ..............................................................74
Starting to track shipping history for an item ........................................................................................75Manufacturing alternates. ..........................................................................................................................76
Specifying alternates for an item ..............................................................................................................77
Removing an alternate from an item .......................................................................................................77
Removing items ..........................................................................................................................................78
How Manufacturing affects reconciling inventory ................................................................................78
Part 3: Bill of Materials ............................................................................................................ 80
Chapter 9: Bill of Materials overview ............................................................................. 81Bill of materials terms .................................................................................................................................81
Differences between types and categories ..............................................................................................83
Bill of materials types .................................................................................................................................84
Bill of materials categories .........................................................................................................................85
Issue-from and issue-to sites .....................................................................................................................85
Rules for backflushed components ..........................................................................................................87
Chapter 10: Position numbers ...............................................................................................89Position number incremental spacing .....................................................................................................89
Position numbers in Manufacturing windows .......................................................................................90
Position number guidelines. ......................................................................................................................91
Assigning existing position numbers to components ...........................................................................92Position number examples ........................................................................................................................93
Position number limits ...............................................................................................................................94
Changing position numbers of components ...........................................................................................95
Changing a bill of materials to a phantom bill of materials .................................................................96
Chapter 11: Bill of Materials entry ..................................................................................... 97Understanding the Bill of Materials Entry window ..............................................................................97
Creating a bill of materials .........................................................................................................................98
Adding a component to a bill of materials. ...........................................................................................101
Changing component details ..................................................................................................................102
Deleting a component from a bill of materials .....................................................................................102Modifying a component bill of materials ..............................................................................................103
Removing a bill of materials. ...................................................................................................................103
Requirements for bill of materials components ...................................................................................104
Backflushing bill of materials components ...........................................................................................104
Shrinkage for bill of materials components ..........................................................................................105
How floor stock costs are applied ..........................................................................................................105
Component fixed quantity ......................................................................................................................106
Specifying an alternate component in a bill ..........................................................................................106

8/10/2019 Dynamics GP MFG Core Functions
http://slidepdf.com/reader/full/dynamics-gp-mfg-core-functions 6/256
iv M A N U F A C T U R I N G C O R E F U N C T I O N S
C O N T E N T S
Verifying alternate assignments ..............................................................................................................107
Bills of materials and component effective dates .................................................................................107
Effects of engineering changes on bills ..................................................................................................108
Adding user-defined information to bills .............................................................................................109
Accounting for by-products in a bill of materials ................................................................................109
Component quantities and rounding ....................................................................................................110
Chapter 12: Links to routings ..............................................................................................111Linking component usage to a routing sequence. ................................................................................ 111
Modifying bill of materials and routing links ...................................................................................... 113
Unlinking components and routing sequences .................................................................................... 114
Viewing link information. ........................................................................................................................115
Chapter 13: Bill of Materials copies ...............................................................................117Copying a bill of materials ...................................................................................................................... 117
Removing copied component requirements ......................................................................................... 119
Chapter 14: Standard costing revaluations ............................................................121
Standard costing windows ......................................................................................................................121Comparison of rolling up and revaluing ...............................................................................................122
Entering pending changes for material costs. .......................................................................................123
Overriding a pending standard cost change .........................................................................................124
Rolling up material and overhead cost changes ..................................................................................125
Verifying rollup results ............................................................................................................................126
Using scenarios to make standard cost changes ..................................................................................127
Proposing changes to material fixed overhead ....................................................................................129
Proposing changes to material variable overhead ...............................................................................130
Interpreting the tree view ........................................................................................................................130
Revaluing affected inventory items .......................................................................................................131Revaluing all inventory items .................................................................................................................131
Specifying the standard quantity for a finished item ..........................................................................131
Chapter 15: Bill of Materials inquiries ........................................................................133Types of bill of materials queries ............................................................................................................133
Viewing components in bills of materials .............................................................................................134
Scanning bills of materials for specific items ........................................................................................135
Calculating component requirements. ...................................................................................................135
Viewing cost information. ........................................................................................................................136
Chapter 16: Reference designators ...............................................................................137Entering a reference designator ..............................................................................................................137
Modifying or deleting a reference designator ......................................................................................138
Viewing a reference designator ...............................................................................................................139
Chapter 17: Revisions and archived bills ..................................................................141Revision levels and Archived bills of materials ...................................................................................141
Creating a new revision level for a bill ..................................................................................................142
Viewing past revisions of a bill of materials .........................................................................................143
Removing Archived bills of materials ...................................................................................................144

8/10/2019 Dynamics GP MFG Core Functions
http://slidepdf.com/reader/full/dynamics-gp-mfg-core-functions 7/256
M A N U F A C T U R I N G C O R E F U N C T I O N S v
C O N T E N T S
Chapter 18: Mass updates ...................................................................................................... 145Overview of mass updates for bills of materials ..................................................................................145
Terminology for mass updates to bills of materials .............................................................................146
Adding an item to multiple bills of materials. ......................................................................................146
Removing an item from multiple bills of materials .............................................................................149
Updating an item in multiple bills of materials ...................................................................................150
Replacing an item in multiple bills of materials ...................................................................................151Default values for replacement items ....................................................................................................153
Changing default values for mass updates ...........................................................................................153
Part 4: Sales extensions ...................................................................................................... 158
Chapter 19: Sales extensions overview ..................................................................... 159Sales and Manufacturing documentation .............................................................................................159
Sales terms .................................................................................................................................................160
Chapter 20: Sales order entry .............................................................................................161
Tasks using the Manufacturing Series Sales Item Detail window .....................................................161Manufacturing orders generated from sales .........................................................................................162
Implications of generated manufacturing orders ................................................................................163
Creating a manufacturing order for a sales line ...................................................................................164
Modifying default manufacturing order details ..................................................................................166
Generating a quote-status manufacturing order ..................................................................................167
Adjusting dates for sales items ...............................................................................................................167
Adding customer part number information .........................................................................................168
Calculating the shipping weight of an order ........................................................................................169
Effects of sales orders on MRP ................................................................................................................169
Limiting effects of sales allocations on MRP. ........................................................................................170Chapter 21: Order fulfillment ..............................................................................................171
Requirements for order fulfillment history. ..........................................................................................171
Setting up document types for order fulfillment .................................................................................172
Entering order fulfillment history details .............................................................................................173
Viewing order fulfillment history ...........................................................................................................175
Modifying entire order fulfillment information ...................................................................................176
Deleting an order fulfillment entry ........................................................................................................177
Changing freight or miscellaneous charges ..........................................................................................177
Generating a history report for a document range ..............................................................................178
Generating a history report for a single order ......................................................................................178Assigning serial numbers for a sales order ...........................................................................................179
Assigning lot numbers for a sales order ................................................................................................180
Viewing bin information for an order. ...................................................................................................181
Viewing serial number assignments for an order ................................................................................182
Viewing lot number assignments for an order .....................................................................................182

8/10/2019 Dynamics GP MFG Core Functions
http://slidepdf.com/reader/full/dynamics-gp-mfg-core-functions 8/256
vi M A N U F A C T U R I N G C O R E F U N C T I O N S
C O N T E N T S
Part 5: Sales Configurator ............................................................................................... 186
Chapter 22: Sales Configurator overview ...............................................................187Sales Configurator terms .........................................................................................................................187
Requirements for using the Sales Configurator ...................................................................................188
Chapter 23: Options and promotions .......................................................................... 189Creating an option category ....................................................................................................................189Creating an option exclusion or inclusion. ............................................................................................191
Modifying an option category ................................................................................................................192
Removing an item from an option category .........................................................................................192
Deleting an option category ....................................................................................................................192
Generating a basic option category report ............................................................................................193
Sales Configurator option category assignments .................................................................................193
Assigning an option category to an item ...............................................................................................194
Changing the order of option assignments ...........................................................................................194
Unassigning option categories ................................................................................................................195
Generating an item option assignment report ......................................................................................195Creating an option promotion ................................................................................................................196
Modifying a promotion ............................................................................................................................197
Deleting a promotion ...............................................................................................................................197
Deleting all promotions for an option ...................................................................................................198
Chapter 24: Bills and routings ............................................................................................199Creating a super bill of materials. ...........................................................................................................199
Fulfillment methods for configured items ............................................................................................201
Modifying a super bill of materials ........................................................................................................202
Routings for configured items ................................................................................................................202
How super bills and routings work together .......................................................................................203
Chapter 25: Pricing and sales transactions ...........................................................205Sales Configurator pricing calculations .................................................................................................205
Effects of Multicurrency Management on pricing ...............................................................................206
Effects of promotions on pricing. ............................................................................................................206
How option items affect material costs .................................................................................................207
Configuring an item .................................................................................................................................207
Blank Sales Configurator fields ...............................................................................................................209
Adding a newly configured item to a sales order ................................................................................209
Adding a previously configured item to a sales order ........................................................................ 211
Deleting a configured bill of materials ..................................................................................................212
Viewing options for a sales line i tem .....................................................................................................212
Modifying a configured bill of materials ...............................................................................................213
Adjusting markdown amounts ...............................................................................................................214
Viewing a configured-item drawing ......................................................................................................215

8/10/2019 Dynamics GP MFG Core Functions
http://slidepdf.com/reader/full/dynamics-gp-mfg-core-functions 9/256
M A N U F A C T U R I N G C O R E F U N C T I O N S vii
C O N T E N T S
Chapter 26: Configurator manufacturing orders .............................................. 217Material costs for configured manufacturing orders ...........................................................................217
Verifying dates for configured items ......................................................................................................218
Tracking a configured-item manufacturing order ...............................................................................218
Unlinking manufacturing and sales orders ..........................................................................................219
Part 6: Manufacturing reports .................................................................................... 222Chapter 27: Reports overview ............................................................................................223
Manufacturing report options. ................................................................................................................223
Manufacturing report terms ....................................................................................................................223
Chapter 28: Manufacturing reports ...............................................................................225Creating a report option ...........................................................................................................................225
Adding a range restriction to a report option .......................................................................................226
Deleting a range restriction from a report option ................................................................................227
Generating a Manufacturing report .......................................................................................................227
Viewing manufacturing reports in the report list ................................................................................228Adding a report option to the report list ...............................................................................................228
Removing a report option from the report list .....................................................................................228
Changing report page orientation ..........................................................................................................229
Deleting a report option ...........................................................................................................................229
Glossary .....................................................................................................................................................231
Index ...............................................................................................................................................................239

8/10/2019 Dynamics GP MFG Core Functions
http://slidepdf.com/reader/full/dynamics-gp-mfg-core-functions 10/256
viii M A N U F A C T U R I N G C O R E F U N C T I O N S

8/10/2019 Dynamics GP MFG Core Functions
http://slidepdf.com/reader/full/dynamics-gp-mfg-core-functions 11/256

8/10/2019 Dynamics GP MFG Core Functions
http://slidepdf.com/reader/full/dynamics-gp-mfg-core-functions 12/256
2 M A N U F A C T U R I N G C O R E F U N C T I O N S
IntroductionYou can use Manufacturing to organize and track the daily workings of themanufacturing process, such as taking orders, purchasing raw materials, buildingfinished goods, fulfilling orders, and selling the finished goods.
This introduction is divided into the following sections:
• Manufacturing documentation• What’s in this manual• Symbols and conventions• Resources available from the Help menu• Send us your documentation comments
Manufacturing documentation
Manufacturing documentation is divided into five manuals. Refer to the followingtable for an overview of what is included in each of the manuals.
The online help file includes all of the information in the manuals, exceptinstallation information. The online help also includes field-by-field descriptions ofthe windows. You can access online help by pressing F1 whenever a Manufacturingwindow is active, or by choosing Help >> About this window.
If a Microsoft Dynamics® GP window—such as the Sales Transaction Entry window—isthe active window when you access help, online help for Microsoft Dynamics GP will bedisplayed. You can close that help, open any Manufacturing window, and try again to access Manufacturing-specific help.
What’s in this manual
This manual is designed to give you an understanding of how to use the features ofManufacturing, and how it integrates with the Microsoft Dynamics GP system.
Manual Modules or other major piecesManufacturing Setup manual System setup
User setup
Manufacturing CoreFunctions manual
Manufacturing CardsExtensions to Inventory ControlBills of MaterialsExtensions to Sales Order ProcessingSales ConfiguratorManufacturing Reports
Manufacturing ProductionFunctions manual
RoutingsManufacturing OrdersOutsourcingWork in Process
Manufacturing ManagementFunctions manual Quality AssuranceEngineering Change ManagementJob Costing
Manufacturing PlanningFunctions manual
Sales ForecastingMaster Production SchedulingCapacity Requirements Planning (CRP)Material Requirements Planning (MRP)

8/10/2019 Dynamics GP MFG Core Functions
http://slidepdf.com/reader/full/dynamics-gp-mfg-core-functions 13/256
M A N U F A C T U R I N G C O R E F U N C T I O N S 3
I N T R O D U C T I O N
To make best use of Manufacturing, you should be familiar with systemwidefeatures described in the System User’s Guide, the System Setup Guide, and theSystem Administrator’s Guide.
Some features described in the documentation are optional and can be purchasedthrough your Microsoft Dynamics GP partner.
To view information about the release of Microsoft Dynamics GP that you’re usingand which modules or features you are registered to use, choose Help >> AboutMicrosoft Dynamics GP.
The manual is divided into the following parts:
• Part 1, Manufacturing cards , includes information about defining basicManufacturing cards: machine definitions, labor codes, work centers, andoperations. Information about attaching drawings or electronic files toManufacturing records also is included.
• Part 2, Item extensions , includes information about additional windows andfields you can use to enter item information. It also includes information aboutusing standard costing with Manufacturing.
• Part 3, Bill of Materials , describes how you can create and use bills of materialsto organize your components into lists of items you use to build products.
• Part 4, Sales extensions , contains information about the windowsManufacturing adds so you can enter more information about your sales. Theextensions to Sales Order Processing also include features that help yougenerate manufacturing orders automatically from sales orders.
• Part 5, Sales Configurator , includes information about setting up and using theSales Configurator to enter customers’ selections from lists of options youcreate. Pricing is calculated based on those options, and can be used to generateand schedule manufacturing orders automatically.
• Part 6, Manufacturing reports , describes how you can use Manufacturing’sUniversal Report Filter to print Manufacturing reports.
Symbols and conventions
For definitions of unfamiliar terms, see the glossary in the manual or refer to theglossary in Help.
Symbol Description
The light bulb symbol indicates helpful tips, shortcuts and
suggestions.
The warning symbol indicates situations you should be especiallyaware of when completing tasks.
The multicurrency symbol points out features or procedures thatapply if you’re using Multicurrency Management.

8/10/2019 Dynamics GP MFG Core Functions
http://slidepdf.com/reader/full/dynamics-gp-mfg-core-functions 14/256
I N T R O D U C T I O N
4 M A N U F A C T U R I N G C O R E F U N C T I O N S
This manual uses the following conventions to refer to sections, navigation andother information.
Resources available from the Help menu
The Microsoft Dynamics GP Help menu gives you access to user assistanceresources on your computer, as well as on the Web.
ContentsOpens the Help file for the active Microsoft Dynamics GP component, and displaysthe main “contents” topic. To browse a more detailed table of contents, click the
Contents tab above the Help navigation pane. Items in the contents topic and tabare arranged by module. If the contents for the active component includes an“Additional Help files” topic, click the links to view separate Help files thatdescribe additional components.
To find information in Help by using the index or full-text search, click theappropriate tab above the navigation pane, and type the keyword to find.
To save the link to a topic in the Help, select a topic and then select the Favorites tab.Click Add.
IndexOpens the Help file for the active Microsoft Dynamics GP component, with theIndex tab active. To find information about a window that’s not currently displayed,type the name of the window, and click Display.
About this windowDisplays overview information about the current window. To view related topicsand descriptions of the fields, buttons, and menus for the window, choose theappropriate link in the topic. You also can press F1 to display Help about the currentwindow.
LookupOpens a lookup window, if a window that you are viewing has a lookup window.For example, if the Checkbook Maintenance window is open, you can choose thisitem to open the Checkbooks lookup window.
Show Required FieldsHighlights fields that are required to have entries. Required fields must containinformation before you can save the record and close the window. To change theway required fields are highlighted, choose Microsoft Dynamics GP menu >>Tools >> Setup >> User Preferences >> Display, and specify a different color andtype style.
Convention Description
Creating a batch Italicized type indicates the name of a section or procedure.
File >> Print or File >Print
The (>>) or ( > ) symbol indicates a sequence of actions, such asselecting items from a menu or toolbar, or pressing buttons in a
window. This example directs you to go to the File menu and choosePrint.
TAB or ENTER All capital letters indicate a key or a key sequence.

8/10/2019 Dynamics GP MFG Core Functions
http://slidepdf.com/reader/full/dynamics-gp-mfg-core-functions 15/256
M A N U F A C T U R I N G C O R E F U N C T I O N S 5
I N T R O D U C T I O N
Printable ManualsDisplays a list of manuals in Adobe Acrobat .pdf format, which you can print orview.
What’s NewProvides information about enhancements that were added to Microsoft DynamicsGP since the last major release.
Microsoft Dynamics GP OnlineOpens a Web page that provides links to a variety of Web-based user assistanceresources. Access to some items requires registration for a paid support plan.
Customer Feedback OptionsProvides information about how you can join the Customer ExperienceImprovement Program to improve the quality, reliability, and performance ofMicrosoft ® software and services.
Send us your documentation comments
We welcome comments regarding the usefulness of the Microsoft Dynamics GPdocumentation. If you have specific suggestions or find any errors in this manual,send your comments by e-mail to the following address: [email protected] .
To send comments about specific topics from within Help, click the DocumentationFeedback link, which is located at the bottom of each Help topic.
Note: By offering any suggestions to Microsoft, you give Microsoft full permission to usethem freely.

8/10/2019 Dynamics GP MFG Core Functions
http://slidepdf.com/reader/full/dynamics-gp-mfg-core-functions 16/256
6 M A N U F A C T U R I N G C O R E F U N C T I O N S

8/10/2019 Dynamics GP MFG Core Functions
http://slidepdf.com/reader/full/dynamics-gp-mfg-core-functions 17/256

8/10/2019 Dynamics GP MFG Core Functions
http://slidepdf.com/reader/full/dynamics-gp-mfg-core-functions 18/256
8 M A N U F A C T U R I N G C O R E F U N C T I O N S
Part 1: Manufacturing cardsThis part of the documentation describes how to set up basic Manufacturing cards.Most of the cards described here will need to be defined only once, but you can referto this information at other times for instructions on modifying or viewing existingentries.
The following information is discussed:
• Chapter 1, “ Machines and labor codes ,” describes how to define machines usedin your production processes and how to set up labor codes for productionemployees.
• Chapter 2, “Work centers ,” contains information about setting up work centersand work center calendars. Information about specifying alternate work centersand adjusting work center capacity also is included.
• Chapter 3, “Operations,” describes how to define operations for work centers.
• Chapter 4, “Drawings ,” includes information about setting up yourManufacturing system so users can view electronic files while working withManufacturing.

8/10/2019 Dynamics GP MFG Core Functions
http://slidepdf.com/reader/full/dynamics-gp-mfg-core-functions 19/256
M A N U F A C T U R I N G C O R E F U N C T I O N S 9
Chapter 1: Machines and labor codesBefore using Manufacturing, you must enter information about the differentcomponents of your operation. First you’ll need to define machines and labor codes.These basic definitions will be used throughout the system as you create routingsand work centers, and as you track your manufacturing costs.
You must enter machine definition records for any device, implement or tool usedin your manufacturing process that requires scheduling or that adds to the cost ofyour manufacturing process. If all products must be processed through a certainmachine—maybe a shrink-wrapping machine for packaging—you should enter adefinition record for the shrink-wrapping machine. If a machine or tool doesn’tsignificantly affect your schedule or your costs, however, you don’t need to create adefinition for it.
You also must define labor codes. If you have Microsoft Dynamics GP HumanResources with Payroll registered, you can link labor codes to positions. If you haveMicrosoft Dynamics GP Payroll registered, you also can link labor codes to paycodes. You can assign costs for each labor code so those costs can be included in
standard costing formulas.This information is divided into the following sections:
• Machine and labor code terms• Entering a machine record• Changing a machine definition record• Changing machine operating costs• Changing a machine ID• Deleting a machine record• Entering a labor code• Changing a labor record• Changing labor code costs
• Updating all machines or labor codes• Adding pay codes to labor codes• Removing a pay code from a labor code• Deleting a labor code
Machine and labor code terms
Refer here for information about some of the terms related to machine and laborcodes.
If you’re using outsourcing, you must set up a machine ID or a labor code for outsourcing.Refer toChapter 15, “Outsourcing overview,” and Chapter 16, “Outsourcing setup,” in the Manufacturing Production Functions documentation.
Machine A machine can be any tool, device or implement that you use in yourmanufacturing process.
Labor code A labor code is used to associate a job function with a specific paycode. For instance, jobs requiring fewer skills often have lower labor code numbersor identifiers—PROD1, PROD2, PROD3, for example—and are compensated atlower rates. Jobs requiring more skills or education have higher labor code numbersand higher pay rates.

8/10/2019 Dynamics GP MFG Core Functions
http://slidepdf.com/reader/full/dynamics-gp-mfg-core-functions 20/256
P A R T 1 M A N U F A C T U R I N G C A R D S
10 M A N U F A C T U R I N G C O R E F U N C T I O N S
Often, within a labor code, there are several pay levels. For example, an entry-levelLabor Code 3 worker usually is paid less than an experienced Labor Code 3 worker.
Shop rate The shop rate is a standard pay rate for each labor code. It is theamount used to estimate labor costs for a manufacturing order and to calculatestandard costing information.
Entering a machine recordUse the Machine Definition window to enter basic cost and overhead information,as well as warranty information, and the location and ID number for the machine.
To enter a machine record:1. Open the Machine Definition window.
(Cards >> Manufacturing >> Machines)
2. Enter or select a machine ID. The ID can be up to ten characters.
3. To enter information about the purchase of the machine, enter or select thevendor ID.
If you’ve specified the vendor for the machine but the vendor record wasn’t alreadydefined in the system, a message appears and you’ll have the option to define the newvendor. If you choose Cancel to return to the Machine Definition window, you’ll need todefine the vendor record later. If you choose Define, the Vendor Maintenance windowwill open so you can define the vendor record.
4. In the Machine Applied field, enter or select the account to which appliedmachine costs will be posted.
5. Enter or select the accounts to which fixed and variable overhead amounts will be posted.
6. You can enter the current operating costs of the machine. Enter the cost ofoperating the machine and the cost of operation per piece the machineproduces.
8/10/2019 Dynamics GP MFG Core Functions
http://slidepdf.com/reader/full/dynamics-gp-mfg-core-functions 21/256
M A N U F A C T U R I N G C O R E F U N C T I O N S 11
C H A P T E R 1 M A C H I N E S A N D L A B O R C O D E S
You must enter an operating cost for the machine if you’re defining fixed orvariable overhead for the machine as a percentage of operating costs.
The amounts you enter here should be calculated and made with the assistance of a cosor managerial accountant.
7. Enter information about the fixed overhead costs of the machine.
Mark Amount or Percent to indicate whether the fixed overhead cost will bedetermined by a percentage of costs or a specified amount.
Enter the percentage or amount, and select Hour or Piece to indicate if the costsare to be calculated on a per-hour or per-piece basis.
8. Enter information about the variable overhead costs of the machine.
Mark Amount or Percent to indicate whether the variable overhead cost will bedetermined by a percentage of costs or a specified amount.
Enter the percentage or amount, and select Hour or Piece to indicate if the costsare to be calculated on a per-hour or per-piece basis.
9. Choose Save.
Changing a machine definition record
Use these steps to change machine definition records. Some changes, however,require special consideration. Refer to Changing machine operating costs and Changinga machine ID for more details about those procedures.
To change a machine definition record:1. Open the Machine Definition window.
(Cards >> Manufacturing >> Machines)
2. Enter or select a machine ID.
3. Make changes, as needed.
4. Choose Save and close the window.
Changing machine operating costs
Changing the operating costs of a machine will affect how manufacturing costs—including standard manufacturing costs—will be calculated.
To change machine operating costs:1. Open the Machine Definition window.
(Cards >> Manufacturing >> Machines)
2. Enter or select a machine ID.
3. Enter the new cost information for the machine.

8/10/2019 Dynamics GP MFG Core Functions
http://slidepdf.com/reader/full/dynamics-gp-mfg-core-functions 22/256
P A R T 1 M A N U F A C T U R I N G C A R D S
12 M A N U F A C T U R I N G C O R E F U N C T I O N S
4. Enter information in the Pending section if you know the operating costs of amachine will change on a specific date—for instance, due to a change in theelectrical rate.
You can enter a new operating cost for the machine and the date the newoperating cost will be in effect. You also can enter the new cost per piece and thedate the new cost per piece will increase.
5. Choose Save and close the window.
6. To complete the revaluation, use the Standard Cost Rollup window.
Refer to Chapter 14, “Standard costing revaluations,” for more information.
If the machine operating costs change while a manufacturing order using that machinehas an Open status, the cost change won’t be applied to the Work in Process Machineaccount. However, the cost change will be reflected in the value of Work in ProcessFinished Goods posted to inventory. The price difference will be accounted for in thevariances that will be calculated and reported.
Changing a machine IDYou might need to assign a new machine ID to a previously defined machine. Tochange the machine ID, you must delete the existing machine record and then entera new record and assign a new machine ID to it.
To change a machine ID:1. Open the Machine Definition window.
(Cards >> Manufacturing >> Machines)
2. Enter or select the ID for the machine you need to change.
It’s a good idea to print the Machine Detail report for this machine before you delete it.The report summarizes the information that you’ve entered in the Machine Definitionwindow for this machine, and will be a handy reference when you recreate the machinerecord.
3. Choose Delete.
If the machine has been assigned to a work center, a message will indicate thatthe machine has been assigned to work centers and you’ll have the option to seea list of those work centers. You can’t delete a machine that’s assigned to a workcenter, so choose Yes to see a list of the work centers the machine has beenassigned to. Use the Work Center Setup window to remove this machine fromthose work centers, if needed.
Refer toUnassigning an employee or a machine on page 25.
4. Enter a new machine record. Refer to Entering a machine record on page 10 and tothe Machine Detail report for this machine.
Deleting a machine record
You might need to delete a machine record if you quit using it in production. Besure the machine you want to delete isn’t assigned to any work centers.

8/10/2019 Dynamics GP MFG Core Functions
http://slidepdf.com/reader/full/dynamics-gp-mfg-core-functions 23/256
M A N U F A C T U R I N G C O R E F U N C T I O N S 13
C H A P T E R 1 M A C H I N E S A N D L A B O R C O D E S
To delete a machine record:1. Open the Machine Definition window.
(Cards >> Manufacturing >> Machines)
2. Enter or select the ID of the machine to delete.
3. Choose Delete and close the window.
If the machine has been assigned to a work center, a message will indicate thatthe machine has been assigned to work centers and you’ll have the option to seea list of those work centers. You can’t delete a machine that’s assigned to a workcenter, so choose Yes to see a list of the work centers the machine has beenassigned to. Use the Work Center Setup window to remove this machine fromthose work centers, if needed.
Refer toUnassigning an employee or a machine on page 25.
Entering a labor code
Labor codes are identifiers you can use for groups of employees. Manymanufacturing companies use labor codes to distinguish between groups ofemployees who have different sets of skills or tenure. Labor codes often areassociated with different pay rates. If you’re using Microsoft Dynamics GP Payroll,you can use the pay codes defined in Payroll and associate them with labor codes.
You also can set up labor codes to be used to calculate the costs associated withoutsourced services.
Use the Labor Codes Definition window to enter labor code information.
To enter a labor code:1. Open the Labor Code Definition window.
(Cards >> Manufacturing >> Labor Codes)
2. Enter or select a labor code and enter a brief description of the labor code.

8/10/2019 Dynamics GP MFG Core Functions
http://slidepdf.com/reader/full/dynamics-gp-mfg-core-functions 24/256
P A R T 1 M A N U F A C T U R I N G C A R D S
14 M A N U F A C T U R I N G C O R E F U N C T I O N S
3. If the labor code will be used to track the costs associated with outsourcing,mark Use Labor Code for Outsourcing.
This option is available only if you’re using a labor cost bucket to trackoutsourcing costs, and if you marked the Allow Outsourced Labor Code optionin the WIP Preference Defaults window. Refer to Setting up data collection options in Chapter 4, “Manufacturing production functions setup ,” in the
Manufacturing Setup documentation.
4. Enter pay codes.
Refer to your Payroll documentation for more information about creating pay codes.Refer to Adding pay codes to labor codes on page 17 for more information aboutassigning pay codes to labor codes.
5. Enter a shop rate, and select whether it should be applied per-hour or per-piece.
6. Enter fixed overhead amounts.
Mark Amount or Percent to indicate if fixed labor overhead costs aredetermined by a percentage of labor costs or a specified amount.
Enter the percentage or amount.
7. Enter variable overhead amounts.
Mark Amount or Percent to indicate if variable labor overhead costs aredetermined by a percentage of labor costs or a specified amount.
Enter the percentage or amount.
8. Enter or select the labor costing accounts to which these overhead amounts will be posted.
9. Choose Save and close the window.
Changing a labor record
Changes to labor code records might include changes to the basic criteria for thelabor code, such as the shop rate and the comments about the code.
Changing the costs associated with a labor code will affect costing calculations.Refer to Changing labor code costs.
To change a labor code:1. Open the Labor Code Definition window.
(Cards >> Manufacturing >> Labor Codes)
2. Enter or select the labor code to change.
3. Make changes, as needed.

8/10/2019 Dynamics GP MFG Core Functions
http://slidepdf.com/reader/full/dynamics-gp-mfg-core-functions 25/256
M A N U F A C T U R I N G C O R E F U N C T I O N S 15
C H A P T E R 1 M A C H I N E S A N D L A B O R C O D E S
You cannot remove the designation for outsourcing if the labor code is included in anyoperation, or planning or active routing—that is, the labor code can’t be included onany routing for any item and can’t be part of any open manufacturing order. Also, youcan’t mark the Use Labor Code for Outsourcing option if the labor code already is thesetup labor code for any planning or working routing.
4. Choose Save and close the window.
Changing labor code costs
You can use fields in the Pending section of the Labor Code Definition window toenter information about changes to the labor code rate and overhead that you knowwill take effect on a specific date. A scheduled change—such as a change in the shopfloor rate—can be entered ahead of time using these fields.
To change labor code costs:1. Open the Labor Code Definition window.
(Cards >> Manufacturing >> Labor Codes)
2. Enter or select a labor code.3. In the Pending Shop Rate field, enter the shop rate.
4. Select Hour or Piece from the list to identify how the rate will be calculated.
5. Enter the date the new rate will take effect.
6. To change the fixed overhead rate information, mark the Fixed Overhead optionto reflect how the fixed overhead will be calculated—as an amount or as apercentage.
Enter an amount or percentage and the date the change to the fixed overhead
rate will be effective.
7. To change the variable overhead rate information, mark the Variable Overheadoption to reflect how the variable overhead will be calculated—as an amount oras a percentage.
Enter an amount or percentage and the date the change to the variable overheadrate will be effective.
8. Choose Save.
9. To complete the revaluation, you must use the Standard Cost Rollup window,available through the Go To button of the Item Maintenance window.
Refer to Chapter 14, “Standard costing revaluations ,” for more information.
Updating all machines or labor codes
You can use the Labor Code/Machine Overhead Defaults window to enter defaultsettings for overhead amounts and accounts, and then roll them down to existinglabor codes or machine IDs. This can make updating machine and labor codeinformation faster and easier.

8/10/2019 Dynamics GP MFG Core Functions
http://slidepdf.com/reader/full/dynamics-gp-mfg-core-functions 26/256
P A R T 1 M A N U F A C T U R I N G C A R D S
16 M A N U F A C T U R I N G C O R E F U N C T I O N S
To update all machines or labor codes:1. Open the Labor Code/Machine Overhead Defaults window.
(Cards >> Manufacturing >> Labor/Machine OH)
2. Enter fixed labor overhead amounts.
Mark Amount or Percent to indicate if fixed labor overhead costs aredetermined by a percentage of labor costs or a specified amount.
Enter the percentage or amount, and select Hour or Piece to indicate if the costsare to be calculated on a per-hour or per-piece basis.
3. Enter variable labor overhead amounts.
Mark Amount or Percent to indicate if variable labor overhead costs aredetermined by a percentage of labor costs or a specified amount.
Enter the percentage or amount, and select Hour or Piece to indicate if the costsare to be calculated on a per-hour or per-piece basis.
4. Enter or select the labor costing accounts to which labor overhead amounts will be posted. As you select each posting account, the description of the accountwill be displayed in the window.
5. Enter fixed machine overhead amounts.
Mark Amount or Percent to indicate if fixed machine overhead costs aredetermined by a percentage of machine costs or a specified amount.
Enter the percentage or amount, and select Hour or Piece to indicate if the costs
are to be calculated on a per-hour or per-piece basis.
6. Enter variable machine overhead amounts.
Mark Amount or Percent to indicate if variable machine overhead costs aredetermined by a percentage of machine costs or a specified amount.
Enter the percentage or amount, and select Hour or Piece to indicate if the costsare to be calculated on a per-hour or per-piece basis.

8/10/2019 Dynamics GP MFG Core Functions
http://slidepdf.com/reader/full/dynamics-gp-mfg-core-functions 27/256
M A N U F A C T U R I N G C O R E F U N C T I O N S 17
C H A P T E R 1 M A C H I N E S A N D L A B O R C O D E S
7. Enter or select the machine costing accounts to which machine overheadamounts will be posted. As you select each posting account, the description forthe account will be displayed in the window.
8. Choose Save.
A message will appear and you’ll have the option to apply changes to existing
records. If you choose No, your entries in this window will be saved but won’t be reflected in existing machine and labor code definitions. If you choose Yes,the settings for calculating overhead and the posting accounts will be updatedfor all machine records and all labor codes.
If you have machines or labor codes that require settings other than the default settingsand you roll down changes to existing records, you’ll need to review those machine anlabor code records and adjust them, as needed.
Adding pay codes to labor codes
Use the Labor Code Definition window to link pay codes to labor code definitions.
Refer to your Payroll documentation for more information about creating pay codes.
To add pay codes to labor codes:1. Open the Labor Code Definition window.
(Cards >> Manufacturing >> Labor Codes)
2. Enter or select a labor code.
3. Select a primary pay code. You also can select one or two alternate pay codes.
4. Choose Save.
Removing a pay code from a labor codeUse the Labor Code Definition window to remove pay codes from labor codes.
To remove a pay code from a labor code:1. Open the Labor Code Definition window.
(Cards >> Manufacturing >> Labor Codes)
2. Enter or select a labor code.
3. In the field that has the pay code information to remove, select the text andpress DELETE on your keyboard, or backspace over the code.
4. Choose Save.

8/10/2019 Dynamics GP MFG Core Functions
http://slidepdf.com/reader/full/dynamics-gp-mfg-core-functions 28/256
P A R T 1 M A N U F A C T U R I N G C A R D S
18 M A N U F A C T U R I N G C O R E F U N C T I O N S
Deleting a labor code
Use the Labor Code Definition window to remove a labor code.
To delete a labor code:1. Open the Labor Code Definition window.
(Cards >> Manufacturing >> Labor Codes)
2. Enter or select a labor code.
3. Choose Delete.
You can’t delete a labor code if is part of any planning or active routing, or if the laborcode is included in any routing for a manufacturing order that is not closed.

8/10/2019 Dynamics GP MFG Core Functions
http://slidepdf.com/reader/full/dynamics-gp-mfg-core-functions 29/256
8/10/2019 Dynamics GP MFG Core Functions
http://slidepdf.com/reader/full/dynamics-gp-mfg-core-functions 30/256
P A R T 1 M A N U F A C T U R I N G C A R D S
20 M A N U F A C T U R I N G C O R E F U N C T I O N S
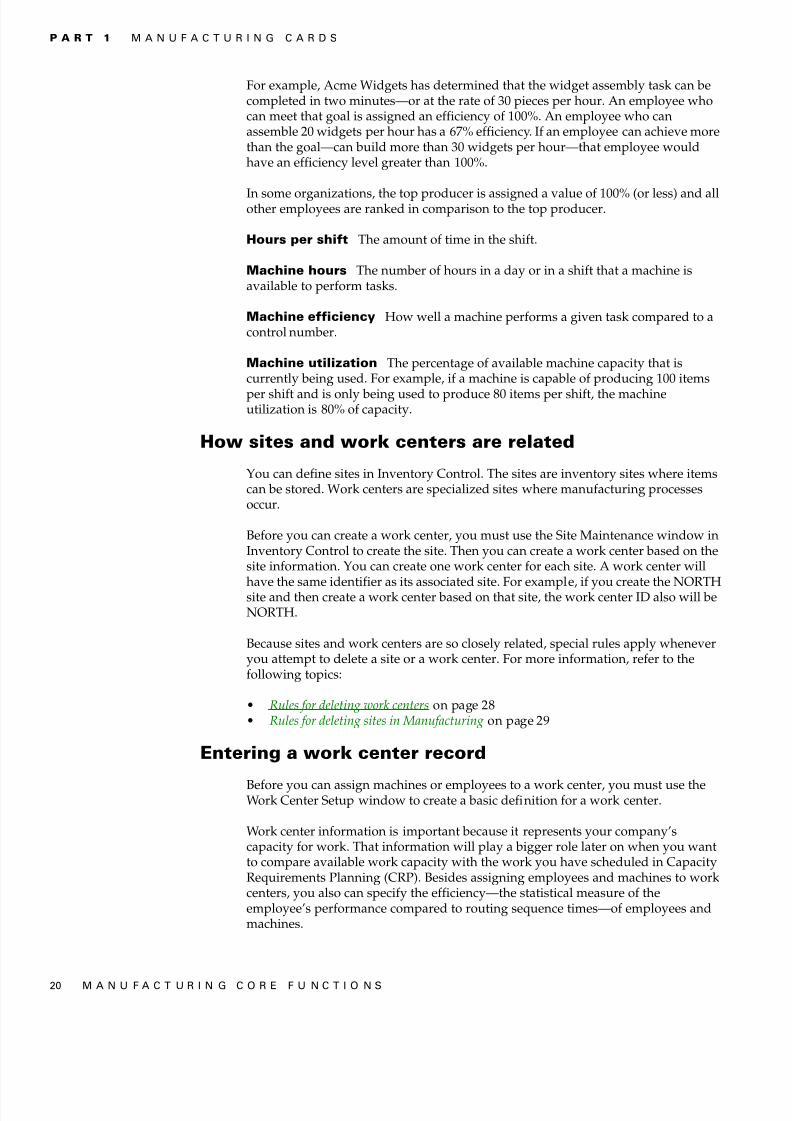
For example, Acme Widgets has determined that the widget assembly task can becompleted in two minutes—or at the rate of 30 pieces per hour. An employee whocan meet that goal is assigned an efficiency of 100%. An employee who canassemble 20 widgets per hour has a 67% efficiency. If an employee can achieve morethan the goal—can build more than 30 widgets per hour—that employee wouldhave an efficiency level greater than 100%.
In some organizations, the top producer is assigned a value of 100% (or less) and allother employees are ranked in comparison to the top producer.
Hours per shift The amount of time in the shift.
Machine hours The number of hours in a day or in a shift that a machine isavailable to perform tasks.
Machine efficiency How well a machine performs a given task compared to acontrol number.
Machine utilization The percentage of available machine capacity that iscurrently being used. For example, if a machine is capable of producing 100 itemsper shift and is only being used to produce 80 items per shift, the machineutilization is 80% of capacity.
How sites and work centers are related
You can define sites in Inventory Control. The sites are inventory sites where itemscan be stored. Work centers are specialized sites where manufacturing processesoccur.
Before you can create a work center, you must use the Site Maintenance window inInventory Control to create the site. Then you can create a work center based on thesite information. You can create one work center for each site. A work center will
have the same identifier as its associated site. For example, if you create the NORTHsite and then create a work center based on that site, the work center ID also will beNORTH.
Because sites and work centers are so closely related, special rules apply wheneveryou attempt to delete a site or a work center. For more information, refer to thefollowing topics:
• Rules for deleting work centers on page 28• Rules for deleting sites in Manufacturing on page 29
Entering a work center record
Before you can assign machines or employees to a work center, you must use theWork Center Setup window to create a basic definition for a work center.
Work center information is important because it represents your company’scapacity for work. That information will play a bigger role later on when you wantto compare available work capacity with the work you have scheduled in CapacityRequirements Planning (CRP). Besides assigning employees and machines to workcenters, you also can specify the efficiency—the statistical measure of theemployee’s performance compared to routing sequence times—of employees andmachines.

8/10/2019 Dynamics GP MFG Core Functions
http://slidepdf.com/reader/full/dynamics-gp-mfg-core-functions 31/256
M A N U F A C T U R I N G C O R E F U N C T I O N S 21
C H A P T E R 2 W O R K C E N T E R S
The Display Date field in the Work Center Setup window is important because itdetermines when the work center definition you’re creating will be effective. Somecompanies want the work center records to reflect every change to the work centerdefinition; for instance, if an employee is on vacation or if a machine is offline forrepairs. Other companies don’t want that level of detail. Refer to Timing for workcenter changes on page 24 for more information.
A work center is a specialized site. Before you begin this procedure, you must use the Site Maintenance window to set up the site that will be a work center. Refer to Inventory Controdocumentation for more information.
If you like, you can associate the work center with a department. For moreinformation about setting up departments, refer to your Payroll documentation.
To enter a work center record:1. Open the Work Center Setup window.
(Cards >> Manufacturing >> Work Centers >> Setup)
2. Enter a work center ID. The identifier for the work center must match theidentifier for the associated site.
If you enter a work center ID and there is no corresponding site ID, a messageappears and you’ll have the option to create the site ID.
3. Enter a brief description of the work center. Often, the work center descriptionis a word or phrase that describes the work that will be completed in that workcenter. The description field is required.
If the work center tasks are completed by an outside supplier, this is an outsourced worcenter. Complete this procedure and then refer toDefining or modifying an outsourcedwork center on page 25.
4. To associate a work center with a department, enter or select a departmentname.

8/10/2019 Dynamics GP MFG Core Functions
http://slidepdf.com/reader/full/dynamics-gp-mfg-core-functions 32/256
P A R T 1 M A N U F A C T U R I N G C A R D S
22 M A N U F A C T U R I N G C O R E F U N C T I O N S
5. Enter the start time, hours per shift and number of shifts. The hours per shiftmultiplied by the number of shifts can’t be greater than 24.
If you’re using Capacity Requirements Planning, (CRP), be sure the hours pershift you enter is the number of actual working hours per shift. For example, ifemployees have two 15-minute breaks in an eight-hour shift, the working hoursper shift is 7.5 hours.
6. Enter the date this work center definition should become effective in theDisplay Date field. Refer to Timing for work center changes on page 24 for moreinformation.
7. Choose Save and close the window.
Assigning an employee to a work center
Use the Work Center Setup window to assign employees to work centers.
To assign an employee to a work center:
1. Open the Work Center Setup window.(Cards >> Manufacturing >> Work Centers >> Setup)
2. Enter or select the work center to add employees to.
It’s possible to have several records for a single work center, each with a differenteffective date. Be sure the work center record you select has the appropriate DisplayDate.
3. In the first blank line of the employee scrolling window, enter or select anemployee ID.
4. Enter the number of hours the employee will work in each shift, and the
employee’s efficiency percentage. Entries in the scrolling window will be savedas they are entered.
As you add employees to the work center, the effective capacity of theemployees in the work center will be calculated.
5. Repeat steps 3 and 4 to add additional employees to the work center. If the workcenter has more than one shift, enter employees from all shifts who are part ofthe work center to the work center record.
The amount in the Effective Capacity field is calculated automatically bymultiplying each employee’s hours by his or her efficiency percentage. CRPuses this information to determine the workload that can be handled by thework center, but you can edit the amount.
6. In the Overloaded % field, enter the maximum percentage of the effectivecapacity to schedule into this work center.

8/10/2019 Dynamics GP MFG Core Functions
http://slidepdf.com/reader/full/dynamics-gp-mfg-core-functions 33/256
M A N U F A C T U R I N G C O R E F U N C T I O N S 23
C H A P T E R 2 W O R K C E N T E R S
For example, a work center might have an effective employee capacity of 100hours, but you’ve found that the work center employees respond well toslightly larger workloads, so you schedule an overload of 105%. When the workthat can be assigned to the work center is calculated in CRP, 105 hours of workper day will be assigned to the work center.
A work center will be flagged when the work center’s load exceeds the overloaded
percentage.
7. You can enter the percentage of overtime that is acceptable for the employees inthis work center. This field is for reference only, and the amount you enter herewon’t be taken into consideration when CRP information is calculated.
8. Choose Save and close the window.
Assigning a machine to a work center
Use the Work Center Setup window to assign machines to a work center.
To assign a machine to a work center:1. Open the Work Center Setup window.
(Cards >> Manufacturing >> Work Centers >> Setup)
2. Enter or select the work center to add machines to.
It’s possible to have several records for a single work center, each with a differenteffective date. Be sure the work center record you select has the appropriate DisplayDate.
3. In the first blank line of the machines scrolling window, enter or select amachine ID.
4. Enter the number of hours the machine will run in each shift, and the utilizationpercentage of the machine. Entries in the scrolling window will be saved as theyare entered.
As you add machines to the work center, the effective capacity of the machinesin the work center will be calculated.
5. Repeat steps 3 and 4 to add additional machines to the work center.
The amount in the Effective Capacity field is calculated automatically bymultiplying each machine’s hours by its efficiency percentage. CRP uses thisinformation to determine the workload that can be handled by the work center, but you can edit the amount.
6. In the Overloaded % field, enter the maximum percentage of the effectivecapacity that you want to schedule into this work center.

8/10/2019 Dynamics GP MFG Core Functions
http://slidepdf.com/reader/full/dynamics-gp-mfg-core-functions 34/256
P A R T 1 M A N U F A C T U R I N G C A R D S
24 M A N U F A C T U R I N G C O R E F U N C T I O N S
For example, a work center’s machines might have an effective machinecapacity of 10 hours, but during hot summer months you’ve found that themachine often overheats. You might schedule an overload of 90%, to keep theload a little lighter during those months. When work that can be assigned to thework center is calculated, it will assign 9 hours of work per day.
A work center will be flagged when the work center’s load exceeds the overloaded
percentage.
7. You can enter the percentage of overtime that is acceptable for the machine inthis work center. This field is for reference only, and the amount you enter herewon’t be taken into consideration when CRP information is calculated.
8. Choose Save and close the window.
Timing for work center changes
There are several ways you can change your work center records: you can adjust anemployee’s efficiency percentage to reflect the employee’s additional experience,you can add or remove machines or employees, and you can change the number ofshifts that are run in a work center.
Sometimes, changes should be reflected immediately. If you find that an employee’sefficiency rating has increased from 70% to 90%, for example, you’d want to havethat change in the work center’s capacity reflected immediately.
On the other hand, you might want to delay the effective date for some work centerchanges. For example, if you plan to take a machine offline for a week of repairs andmaintenance on the 10th of the month, you should enter the information as apending change. That way, CRP can “see” that the machine capacity of the workcenter has changed when it tries to schedule work for that period. Likewise, youcould make another pending work center change for when the machine is
scheduled to be back in service.The information you enter in the Display Date field of the Work Center Setupwindow will determine if changes will be reflected immediately or in the future.
• If a change should be reflected immediately, select the work center record youwant to change in the Work Center Setup window and make your changeswithout changing the Display Date field.
• To enter pending changes—changes that will take effect on a certain date—select the work center record you want to change in the Work Center Setupwindow, change the display date to the date the changes should take effect, andthen make your changes in the window.
Use care when entering pending changes for work center records because thechanges you enter on a day-to-day basis won’t be applied to scheduled changes. Forexample, if you have several pending work center changes scheduled and you thenchange an employee’s efficiency percentage effective immediately, you must changethe employee’s efficiency percentage in each of the pending changes.
Not all changes can be scheduled using the Display Date field. For example, a work center’sstatus as a “regular” work center or as an “outsourced” work center is effective immediately.

8/10/2019 Dynamics GP MFG Core Functions
http://slidepdf.com/reader/full/dynamics-gp-mfg-core-functions 35/256
M A N U F A C T U R I N G C O R E F U N C T I O N S 25
C H A P T E R 2 W O R K C E N T E R S
Unassigning an employee or a machine
Before you can delete a machine record, you must unassign it from its work centers.The same steps can be used for removing employee records from work centers.
Use the Work Center Setup window to remove employees from a work center.
To unassign an employee or a machine:1. Open the Work Center Setup window.
(Cards >> Manufacturing >> Work Centers >> Setup)
2. Select a work center.
3. Determine when the change should be effective.
• If the change should be effective immediately, accept the date in the DisplayDate field.
• If the change should be effective on a date you specify, enter that date in the
Display Date field. If the display date you enter hasn’t already been used toenter pending updates to this work center, a message will appear and you’llhave the option to create a new record. Choose Yes.
Refer toTiming for work center changes on page 24.
4. Mark the employee record or machine record to remove from the work center.
5. From the Edit menu, choose Delete Row. Your changes automatically will besaved.
Don’t choose the Delete button. Use the Delete button only to delete the entire workcenter record.
6. Continue removing employee records or machine records from the work center.
7. Close the window.
Defining or modifying an outsourced work center
If some of the work for your company is outsourced—that is, if its capacity comesfrom an outside supplier or contractor—you can define it as an outsourced workcenter. Use the Work Center Setup window to first define a basic work centerrecord, and then refer to this topic for entering information specific to outsourcedwork centers.
To define or modify an outsourced work center:1. Open the Work Center Setup window.
(Cards >> Manufacturing >> Work Centers >> Setup)
2. Enter or select a work center ID.

8/10/2019 Dynamics GP MFG Core Functions
http://slidepdf.com/reader/full/dynamics-gp-mfg-core-functions 36/256
P A R T 1 M A N U F A C T U R I N G C A R D S
26 M A N U F A C T U R I N G C O R E F U N C T I O N S
3. Be sure the Outsourced list is set to Yes. If you’re defining a new work center,the Outsourced Work Center Setup window opens. If you’re modifying workcenter information, choose the expansion button on the Outsourced field toopen the window.
Refer toRules for changing the outsourcing status of a work center on page 27 forinformation about the requirements and effects of changing this setting for an existing
work center.
Information will be displayed in the Work Center ID and Description fields.
4. Enter or select the vendor who is supplying the outsourced services.
5. You can enter or select the item number of the service you purchase from thevendor.
For example, if the vendor provides special testing services, you might create anitem with Service type in the Item Maintenance window, and enter “Testing” forthe item.
The item you select must have a Service type, and must be assigned to thevendor. Refer to Inventory Control documentation for more information aboutcreating item records and assigning them to vendors.
Selecting a service item number isn’t required, but it is required for tracking history.That is, if you will order the same service several times and want to be able to review theamount and costs for the service each time it is ordered, you must set up a Service ItemNumber.
6. In the PO Release Offset Days field, enter the number of days that should elapse between when the purchase order for the service is released and when theservice should begin.
For example, if the vendor needs to know 10 days in advance that the
outsourced services will be required, you would enter 10 for the PO ReleaseOffset Days.
The number you enter here will be the default value when a routing is createdusing the outsourced work center. You’ll have the option to accept the defaultvalue, or change it.
7. Choose OK and close the window.

8/10/2019 Dynamics GP MFG Core Functions
http://slidepdf.com/reader/full/dynamics-gp-mfg-core-functions 37/256
M A N U F A C T U R I N G C O R E F U N C T I O N S 27
C H A P T E R 2 W O R K C E N T E R S
Rules for changing the outsourcing status of a workcenter
You can use the Work Center Setup window to change the outsourcing status of awork center. For example, suppose you have an existing, non-outsourcing workcenter that you want to use for outsourcing, or that you have an outsourcing workcenter that you want to use for in-house activities.
You can change the outsourcing status of a work center by changing the selection inthe Outsourced field in the Work Center Setup window. To do this, however, thework center can’t be part of any planning or working routings.
If you change the status of a work center so that it is no longer an outsourcing workcenter, all outsourcing-specific information about the work center—the vendor ID,the service item number, and the offset days—will be removed from the work centerrecord.
Adjusting work center capacity
Sometimes you’ll need to adjust the numbers used to calculate the capacity of thework center as a result of changes to an employee record or a machine. For example,if an employee has completed training, you might want to increase his or herefficiency percentage. On the other hand, if a machine has become worn, you mightwant to decrease its efficiency percentage.
Other changes also impact productivity. If a work center redesign reduces the delay between operations, the work center might be able to add more work. You canreflect an increase in work center efficiency by increasing the total hours available toschedule.
The available work time of a work center also has an impact on the amount of workthat can be scheduled. If production of a certain work center will stop for a day of
training, for example, you’ll have fewer real “working” hours that can bescheduled.
To adjust work center capacity:1. Open the Work Center Setup window.
(Cards >> Manufacturing >> Work Centers >> Setup)
2. Enter or select a work center.
3. Determine when the capacity adjustments should be effective.
• To have the change effective immediately, accept the date in the DisplayDate field.
• To have the change effective on a date you specify, enter that date in theDisplay Date field. If the display date you enter hasn’t already been used toenter pending updates to this work center, a message will appear and you’llhave the option to create a new record.
Refer toTiming for work center changes on page 24 for more information.
4. In the scrolling windows, select an employee ID or machine ID.

8/10/2019 Dynamics GP MFG Core Functions
http://slidepdf.com/reader/full/dynamics-gp-mfg-core-functions 38/256
P A R T 1 M A N U F A C T U R I N G C A R D S
28 M A N U F A C T U R I N G C O R E F U N C T I O N S
5. Enter the available hours or efficiency for the employee or machine. Yourchanges automatically will be saved.
6. If needed, update other fields in the window. You can change the effectivecapacity of the employees or machines in the work center and the overloadpercentage.
7. Choose Save and close the window.
Rules for deleting work centers
Because work centers and sites are closely related, you might want to delete theassociated site when you delete a work center. Refer to the following illustration forinformation about rules that determine whether you can delete the work center, thesite, both, or neither.
Is the site:- the default draw-from site for salesorders?- part of any manufacturing orderscheduling preference?- the issue-to or issue-from site for anybilll of materials?- the issue-to or issue-from site for anypicklist or pick document for amanufacturing order with a status otherthan closed, hold, or canceled?- the issue-to or issue-from site for anymanufacturing order with a status otherthan closed, hold, or canceled?- the QA site?- the default issue-to or issue-from sitefor any master production schedule?
Is the work centerused in any activerouting, planning
routing, oroperation?
Work center can't bedeleted.
Are items assignedto the site?
Yes No
Yes No
Work center deleted,site is left intact.
Do you want todelete the site?
YesNo
The site and the workcenter are deleted.
One or more are true None are true

8/10/2019 Dynamics GP MFG Core Functions
http://slidepdf.com/reader/full/dynamics-gp-mfg-core-functions 39/256
M A N U F A C T U R I N G C O R E F U N C T I O N S 29
C H A P T E R 2 W O R K C E N T E R S
For more information about deleting site records—including the rules that apply andchanges you can make so the site can be deleted—refer toRules for deleting sites in Manufacturing on page 29.
Deleting a work center record
You can’t delete a work center record if it’s part of a current active or planning
routing. You must remove all references to the work center from active andplanning routings before deleting it.
You also can’t delete a work center record if its associated site has one or more itemsassigned to it. Refer to Inventory Control documentation for information aboutunassigning items from a site.
To delete a work center record:1. Open the Work Center Setup window.
(Cards >> Manufacturing >> Work Centers >> Setup)
2. Enter or select a work center.
3. Choose Delete.
4. A message will appear to ensure you want to delete the work center. ChooseDelete.
5. Another message will appear to ensure you want to remove the work centerfrom the site file.
• If you choose Yes, the Item Site Maintenance window will open, displayingthe work center record. Choose Delete in the Item Site Maintenancewindow. The record will be deleted from the site file. Close the Item SiteMaintenance window.
• If you choose No, the work center definition will continue to be part of thesite file.
6. Close the Work Center Setup window.
Rules for deleting sites in Manufacturing
If Manufacturing is not installed and you attempt to delete a site, several rulesapply. For example, the site can have no inventory quantities, and the site can’t bepart of an unposted transaction.
When Manufacturing is installed, additional conditions must be met before a sitecan be deleted. For example, if you delete a site and a work center has been set upfor that site, the work center must also be eligible to be deleted.

8/10/2019 Dynamics GP MFG Core Functions
http://slidepdf.com/reader/full/dynamics-gp-mfg-core-functions 40/256

8/10/2019 Dynamics GP MFG Core Functions
http://slidepdf.com/reader/full/dynamics-gp-mfg-core-functions 41/256
M A N U F A C T U R I N G C O R E F U N C T I O N S 31
C H A P T E R 2 W O R K C E N T E R S
Refer to the following topics for more information:
• Defining a work center calendar on page 31• Adjusting a work center calendar on page 32
Defining a work center calendar
Before you define work center calendars, you should have defined a calendar forthe organization using the Shop Calendar window. Use the Work Center Calendarwindow to define work center calendars.
For information about shop calendars, refer toShop calendars and Defining the shopcalendar, both in Chapter 1, “Manufacturing basic setup,” in the Manufacturing Setupdocumentation.
Information from the shop calendar will be displayed in the work center calendar because the shop calendar settings are the default settings for the work centercalendar. Down days are displayed with black backgrounds and white numbers; updays—that is, days when production will occur—are displayed with white backgrounds and black numbers.
To define a work center calendar:1. Open the Work Center Calendar window.
(Cards >> Manufacturing >> Work Centers >> Calendar)
2. Enter or select a work center.
3. Select a month and year.
4. Make your calendar adjustments. Select a day in the calendar to change it froma production day to a down day, or from a down day to a production day.
Each time you change the status of a date, a message will appear to indicate thatchanging the work center calendar might affect work center scheduling.
If you make changes to the work center calendar that will affect the number of hoursavailable for scheduling work, be sure to regenerate your schedules so the changes areappropriately reflected.
5. Choose OK and close the window.
8/10/2019 Dynamics GP MFG Core Functions
http://slidepdf.com/reader/full/dynamics-gp-mfg-core-functions 42/256

8/10/2019 Dynamics GP MFG Core Functions
http://slidepdf.com/reader/full/dynamics-gp-mfg-core-functions 43/256
M A N U F A C T U R I N G C O R E F U N C T I O N S 33
C H A P T E R 2 W O R K C E N T E R S
To designate alternate work centers:1. Open the Alternate Work Centers window.
(Cards >> Manufacturing >> Work Centers >> Alternates)
2. Enter or select the work center to specify alternates for.
3. To assign more than one alternate work center to the work center displayed atthe top of the window, enter a number in the Preference Order field in the firstempty line in the scrolling window.
You can assign a preference order to determine how overflow work will bescheduled among the alternate work centers. An alternate work center with apreference order of “1” will be considered first, “2” would be consideredsecond, and so on. Refer to Specifying preferred alternate work center order onpage 33 for more information.
4. Use the Work Center lookup button in the scrolling window to select an
alternate work center.5. Repeat steps 3 and 4 to designate other alternate work centers. Entries in the
scrolling window will be saved.
6. Close the window.
Specifying preferred alternate work center order
If you’ve defined several alternate work centers, you must designate the preferenceorder for the alternates. The preference order determines the order in which thealternates will be considered—the first alternate work center will be used first. Ifthere is additional work to assign to another work center the second alternate will be used, then the third and so on.
Use the Alternate Work Centers window to specify or adjust the preference orderfor alternate work centers.
To specify preferred alternate work center order:1. Open the Alternate Work Centers window.
(Cards >> Manufacturing >> Work Centers >> Alternates)
2. Enter or select the work center that has the alternate work centers assigned to it.

8/10/2019 Dynamics GP MFG Core Functions
http://slidepdf.com/reader/full/dynamics-gp-mfg-core-functions 44/256
P A R T 1 M A N U F A C T U R I N G C A R D S
34 M A N U F A C T U R I N G C O R E F U N C T I O N S
3. In the scrolling window, mark an alternate work center and enter the newpreference order for this alternate. You can’t use a preference order numberalready assigned to another work center. To update several preference orders,you can assign temporary values to each alternate site until you reestablish thecorrect preference order.
4. Continue updating alternate work center preference order numbers, as needed.
Your changes in the scrolling window will be saved.
5. Close the window.
Deleting alternate work centers
Use the Alternate Work Centers window to remove alternates from work centers.
To delete alternate work centers:1. Open the Alternate Work Centers window.
(Cards >> Manufacturing >> Work Centers >> Alternates)
2. In the scrolling window, mark the alternate work center to delete.3. From the Edit menu choose Delete Row. Your changes automatically will be
saved.
4. Close the window.
Skill sets and work centers
If you’re using Microsoft Dynamics GP Human Resources, you can define the skillsthat your company is seeking in its employees. Microsoft Dynamics GP HumanResources includes windows for defining skills—individual tasks or areas ofexpertise that might be required in several areas of the organization—and fordefining skill sets. Skill sets are groups of related skills. Your company might defineone skill set for office support personnel focusing on computer skills or familiaritywith office protocol. Other skill sets might be defined for your productionemployees. For example, employees in a quality assurance work center might needto know how to calibrate test equipment, to sample lots correctly, and to completespecial tests.
If you have both Manufacturing and Human Resources installed, you can applyskill sets to work center definitions. You can use the Work Center Skill Assignmentwindow to assign skill sets defined in Human Resources to employee records inwork centers.
Assigning skill requirements to work centers
Use the Work Center Skill Assignment window to assign skill sets to therequirements for employees in work centers.
You must be using Human Resources to apply skill sets to your work centers.

8/10/2019 Dynamics GP MFG Core Functions
http://slidepdf.com/reader/full/dynamics-gp-mfg-core-functions 45/256
M A N U F A C T U R I N G C O R E F U N C T I O N S 35
C H A P T E R 2 W O R K C E N T E R S
To assign skill requirements to work centers:1. Open the Work Center Skill Assignment window.
(Cards >> Manufacturing >> Work Centers >> Skills)
2. Enter or select the work center to add skill requirements to. All the skill sets thathave been defined for your organization will be displayed in the scrollingwindow.
3. Mark the Assigned option for each skill set that’s required for this work center.Your entries automatically will be saved.
4. Close the window.
You also can query employee skill records in your organization to find which employehave the skills necessary for working in a particular work center. Refer to your HumanResources documentation for more information.
Next steps
After you’ve defined work centers, you can define the operations that can beperformed in each work center. Operations—also called operation codes and opcodes—are the most basic components of routings. The operations you define foreach work center can be a type of template as you begin to create routings thatdescribe your manufacturing processes. For more information, refer to Chapter 3,“Operations.”
If you have work centers that complete basically the same task for most of theroutings in your organization, you might want to define pointer routings. Forexample, if you have a work center that handles all packaging and shipping tasks,you can create a pointer routing for those tasks. For more information, refer toPointer routings in Chapter 5, “Pointer routings,” in the Manufacturing ProductionFunctions documentation.

8/10/2019 Dynamics GP MFG Core Functions
http://slidepdf.com/reader/full/dynamics-gp-mfg-core-functions 46/256
36 M A N U F A C T U R I N G C O R E F U N C T I O N S

8/10/2019 Dynamics GP MFG Core Functions
http://slidepdf.com/reader/full/dynamics-gp-mfg-core-functions 47/256
M A N U F A C T U R I N G C O R E F U N C T I O N S 37
Chapter 3: OperationsAfter you’ve created work centers and have assigned machine and employeerecords to them, you can define operations—or “op codes”—for each work center.An operation can be anything that changes the product or even measures theproduct, such as an electrical test. An operation might be a setup routine,preparation of items for the next sequence, or any other task element required forthe completion of a task within a work center.
Operation codes are optional. They are routing sequence templates, however, andcan make entering routing sequence information quicker and more accurate if youhave many similar routing sequences.
For example, a painting work center might have a setup operation. That setupoperation definition would include information such as setup time, labor time,machine time, and the required labor codes for setup and labor. That operation codewould be linked to the work center definition. When you need to define a routingsequence for setup in that work center, you can select this operation code. You canuse the default information that is part of the operation code, or you can adjust it for
each routing sequence.Use the Operations Setup window to define operations linked to specific workcenters.
This information is divided into the following sections:
• Operations terms• Creating an operation• Modifying operation definitions• Attaching drawings to operation codes• Deleting operation codes
Operations termsRefer here for information about some of the terms related to operation codes.
Operation A specific task within the manufacturing plant. Examples ofoperations are assembly, painting, shipping and receiving.
Setup labor code Identifies the skill requirements for the person preparing thework area prior to starting production in the work center.
Run labor code Identifies the skill requirements to perform the operation asdefined.
Setup time The number of hours needed to prepare the work area.
Labor time The number of employee hours required to complete the operation.
Machine time The number of machine hours needed to complete the operation.
Queue time The time spent waiting for the operation to begin.

8/10/2019 Dynamics GP MFG Core Functions
http://slidepdf.com/reader/full/dynamics-gp-mfg-core-functions 48/256
P A R T 1 M A N U F A C T U R I N G C A R D S
38 M A N U F A C T U R I N G C O R E F U N C T I O N S
Move time The time needed to physically move an item to the next operation.
Cycle time The time required to complete one item in a manufacturing order.
Creating an operation
Use the Operations Setup window to create operations applied to specific work
centers.
To create an operation:1. Open the Operations Setup window.
(Cards >> Manufacturing >> Routings >> Operations)
2. Enter or select a work center.
3. Enter an operation code—sometimes labeled “op code” in Manufacturing—to be a unique identifier for this operation.
4. Enter a brief description of the operation code.
5. Enter the amount of time needed for setup, labor, machine, queue, move, andcycle times.
6. Enter or select labor codes for setup and run labor.
If you’re using one of the labor cost buckets for outsourcing and you selected anoutsourcing work center, you must select an outsourcing labor code.
7. If labor or machine costs for this operation should be auto-backflushed—automatically added to the costs of the project without requiring datacollection—mark the auto-backflush options.
8. If a machine is needed for the operation, enter or select the machine.
If the machine hasn’t been assigned to the work center, a message will appear,and you’ll have the option to use it, anyway. Choose Yes to add the machine tothe operation. Choose No to cancel your selection.

8/10/2019 Dynamics GP MFG Core Functions
http://slidepdf.com/reader/full/dynamics-gp-mfg-core-functions 49/256
M A N U F A C T U R I N G C O R E F U N C T I O N S 39
C H A P T E R 3 O P E R A T I O N S
If you’re using one of the machine cost buckets for outsourcing and youselected an outsourcing work center, you must enter a machine ID.
For information about attaching drawing or other electronic media files to operationcodes, refer to Attaching drawings to operation codes on page 39.
9. If you’ve set up user-defined fields for work centers, you can enter values in
those fields.
Refer to Setting up work center options in Chapter 1, “Manufacturing basic setup,”in the Manufacturing Setup documentation for more information about creatinguser-defined fields for work centers
10. Choose Insert to link the operation to the work center record. Your entriesautomatically will be saved when added to the scrolling window.
11. Close the window.
Modifying operation definitions
Use the Operations Setup window to change your operation definitions.
To modify operation definitions:1. Open the Operations Setup window.
(Cards >> Manufacturing >> Routings >> Operations)
2. Enter or select a work center.
3. In the scrolling window, mark the operation code you want to change andchoose Select.
4. Make your changes, as needed.
5. Choose Insert to add the updated record to the scrolling window. Your changesautomatically will be saved when they’re added to the scrolling window.
6. Close the window.
Attaching drawings to operation codes
If you have drawings, schematics, multimedia files, or other graphic files that willhelp employees do their tasks, you can attach the files to the operation definition.Use the Operations Setup window to do this.
Before you can attach files to operation codes, you must define drawings and drawing groups. Refer toChapter 4, “Drawings.”
If you’re attaching graphic or other media files to your operations, be sure thecomputers that will be used to view these files have the appropriate viewingsoftware installed. Paths to the viewing applications must be established for eachcomputer that will be used to view the files. Refer to Setting up INI user settings inChapter 7, “Manufacturing basic user setup,” in the Manufacturing Setupdocumentation for more information.

8/10/2019 Dynamics GP MFG Core Functions
http://slidepdf.com/reader/full/dynamics-gp-mfg-core-functions 50/256
P A R T 1 M A N U F A C T U R I N G C A R D S
40 M A N U F A C T U R I N G C O R E F U N C T I O N S
To attach drawings to operation codes:1. Open the Operations Setup window.
(Cards >> Manufacturing >> Routings >> Operations)
2. Enter or select a work center.
3. In the scrolling window, mark the operation code to which you want to attach adrawing and choose Select.
4. Select a drawing group to attach to the operation.
5. Choose Insert to move the record to the scrolling window. Your changesautomatically will be saved as they are added to the scrolling window.
6. Close the window.
Deleting operation codes
If you find that you have no use for an operation code in a specific work center, you
can delete it.You can’t delete an operation code if it is part of an active or planning routing.
To delete operation codes:1. Open the Operations Setup window.
(Cards >> Manufacturing >> Routings >> Operations)
2. Enter or select a work center.
3. In the scrolling window, mark the operation code to delete and choose Remove.Your changes automatically will be saved.
4. Close the window.

8/10/2019 Dynamics GP MFG Core Functions
http://slidepdf.com/reader/full/dynamics-gp-mfg-core-functions 51/256
M A N U F A C T U R I N G C O R E F U N C T I O N S 41
Chapter 4: DrawingsPictures—including computer-aided graphics, diagrams and multimedia files—can be invaluable in communicating the specifications of your component or finished-good items, or in explaining how to perform specific procedures withinmanufacturing operations. You can link drawings and other files to items, routingsequences and operations to be viewed by users throughout your organization astheir work is affected by a particular item or procedure.
This information is divided into the following sections:
• Drawings terms• Drawings and drawing groups• Adding a drawing to a drawing group• Attaching a drawing to a record• Deleting a drawing• Removing a drawing from a drawing group• Viewing a drawing directly• Viewing a drawing attached to a record
Drawings terms
Refer here for information about some of the terms related to drawings.
Drawings Drawings in Manufacturing can be almost any electronic file you canlink to an item record, operation, or routing sequence.
Drawing groups Drawing groups are categories of drawings. Each drawing can be linked to multiple drawing groups.
Drawings and drawing groups
You’ll need to define drawing groups—categories of drawings—and then adddrawings to those groups. Each drawing can be part of more than one drawinggroup. For example, a computer manufacturer might want to store electronic filesthat show the specifications of a 128MB RAM module. The module might be part ofa drawing group called “RAM” that includes all the different modules used by themanufacturer, and it also might be part of a group of drawings that are all part of aspecific computer model.
To view the drawing or other media files you attach to your items, routingsequences and operations, the appropriate viewing software must be installed onthe computer you’ll use to view the files. You also need to be sure that the INIsettings for each computer where files will be viewed have been properly set. Referto Setting up INI user settings in Chapter 7, “Manufacturing basic user setup,” in theManufacturing Setup documentation for more information.
Adding a drawing to a drawing group
Use the Drawings window to create drawing groups. The procedure for doing thisincludes assigning drawing names to the drawing files and recording basicinformation about the drawing.

8/10/2019 Dynamics GP MFG Core Functions
http://slidepdf.com/reader/full/dynamics-gp-mfg-core-functions 52/256
P A R T 1 M A N U F A C T U R I N G C A R D S
42 M A N U F A C T U R I N G C O R E F U N C T I O N S
To add a drawing to a drawing group:1. Open the Drawings window.
(Cards >> Manufacturing >> Drawings)
2. Enter a name for the drawing. You also can enter a brief description for thedrawing, note the designer, and enter the creation date. To enter moreinformation about the drawing, use the notes button.
3. Select the drawing type. The drawing type determines which of the viewingapplications you’ve defined for each computer will be used to view thisparticular file. For example, if you have several kinds of electronic files to attachto items or operations, you can attach CAD schematics to item files andmultimedia .AVI files to operations to illustrate how a specific task is to bedone.
4. Choose the folder button and browse to find the location of the specific drawingfile.
5. You can enter a short code to enter the drawing size or type in the DrawingType field. If you need special-sized paper to print the drawing, for example,you could note the required paper size.
6. Determine which drawing group to add this drawing to.
• If the drawing group already exists, use the lookup button on the DrawingGroups field and then select it.
• If the drawing group doesn’t exist, enter the name for the new drawinggroup in the Drawing Groups field.
7. Choose Insert to add the drawing to the drawing group displayed in theDrawing Groups field. Your entries automatically will be saved as they areadded to the scrolling window.
8. Close the window.

8/10/2019 Dynamics GP MFG Core Functions
http://slidepdf.com/reader/full/dynamics-gp-mfg-core-functions 53/256
M A N U F A C T U R I N G C O R E F U N C T I O N S 43
C H A P T E R 4 D R A W I N G S
Attaching a drawing to a record
Refer to these topics for information about linking drawing groups to recordsthroughout Manufacturing.
• Attaching a drawing to an item on page 71• Attaching drawings to operation codes on page 39
• Attaching a drawing to a sequence in Chapter 2, “Routing entry ,” in theManufacturing Production Functions documentation
• Attaching a drawing to an inspection procedure in Chapter 4, “Inspectionprocedures,” in the Manufacturing Management Functions documentation
Deleting a drawing
If a drawing becomes obsolete you can remove it from your Manufacturing records.
This procedure doesn’t remove the drawing from your computer system, but deletes theinformation about the drawing in the Manufacturing records. The actual electronic drawing file will remain in your system.
To delete a drawing:1. Open the Drawings window.
(Cards >> Manufacturing >> Drawings)
2. Enter or select a drawing.
3. Choose Delete and close the window.
Removing a drawing from a drawing group
Occasionally you might need to remove a drawing from a drawing group. Use theDrawings window to remove drawings from groups.
To remove a drawing from a drawing group:1. Open the Drawings window.
(Cards >> Manufacturing >> Drawings)
2. Enter or select a drawing.
3. In the Drawing Groups scrolling window, mark the drawing group from whichyou want to remove this drawing.
4. Choose Remove.
5. Choose Save and close the window.
Viewing a drawing directly
After you’ve specified the storage location and drawing type for a drawing, you canview the drawing. You can use this procedure to view drawings if you don’t knowwhat Manufacturing record the drawing is attached to.
This procedure assumes that INI settings have been set for the computer on whichyou’re viewing the drawings, and that the appropriate viewing software is properlyinstalled.

8/10/2019 Dynamics GP MFG Core Functions
http://slidepdf.com/reader/full/dynamics-gp-mfg-core-functions 54/256
P A R T 1 M A N U F A C T U R I N G C A R D S
44 M A N U F A C T U R I N G C O R E F U N C T I O N S
Refer to Setting up INI user settings in Chapter 7, “Manufacturing basic user setup ,” in the Manufacturing Setup documentation for more information.
To view a drawing directly:1. Open the Drawings window.
(Cards >> Manufacturing >> Drawings)
2. Enter or select a drawing to view.
3. Choose the small blue and gray image icon button on the Drawing Name field.The software for the type of drawing you’re viewing opens and displays thedrawing you’ve specified.
Viewing a drawing attached to a record
Use this procedure to view drawings attached to Manufacturing records, such asitem records, manufacturing orders, and routing sequences.
This procedure assumes that INI settings have been set for the computer on which
you’re viewing the drawings, and that the appropriate viewing software is properlyinstalled. Refer to Setting up INI user settings in Chapter 7, “Manufacturing basicuser setup,” in the Manufacturing Setup documentation for more information.
To view a drawing attached to a record:1. Choose the image icon button or an expansion icon for a Drawing Group in any
of the windows listed in the table to open the View Drawings window.
Refer to the table for more information.
If no drawing has been attached to the record, the View Drawings window won’t displayany information.
Window Path
Sales Configurator Transactions >> Manufacturing >> Sales Configurator
Routing Sequence Entry Cards >> Manufacturing >> Routings >> Routing EntryRouting View Closeup Inquiry >> Manufacturing >> Routings >> View >> mark a
sequence >> Zoom button

8/10/2019 Dynamics GP MFG Core Functions
http://slidepdf.com/reader/full/dynamics-gp-mfg-core-functions 55/256
M A N U F A C T U R I N G C O R E F U N C T I O N S 45
C H A P T E R 4 D R A W I N G S
2. Determine the kind of drawing information to view.
To view the drawing Highlight the drawing name in the scrolling windowand choose the image icon button. The viewing software will open and displaythe attached file.
To view information about the drawing Highlight the drawing name in
the scrolling window and choose the zoom icon button. The Drawings windowwill open and display more information about the drawing file.
3. When you’ve finished viewing information, close the windows.

8/10/2019 Dynamics GP MFG Core Functions
http://slidepdf.com/reader/full/dynamics-gp-mfg-core-functions 56/256

8/10/2019 Dynamics GP MFG Core Functions
http://slidepdf.com/reader/full/dynamics-gp-mfg-core-functions 57/256

8/10/2019 Dynamics GP MFG Core Functions
http://slidepdf.com/reader/full/dynamics-gp-mfg-core-functions 58/256
48 M A N U F A C T U R I N G C O R E F U N C T I O N S
Part 2: Item extensionsThis part of the documentation includes information that will help you set up andmaintain the extensions Manufacturing adds to Inventory Control. The setupprocedures generally need to be completed once, but you can refer to thisinformation at other times for instructions on modifying or viewing existing entries.
When you install Manufacturing, new windows will be added to your system, andsome existing Inventory Control windows might be modified. This part of thedocumentation describes the special considerations you’ll need to make as youwork with inventory issues and Manufacturing. You also should refer to yourInventory Control documentation.
The following information is discussed:
• Chapter 5, “Item extensions overview,” describes how Manufacturing extendsInventory Control. Definitions of basic terms and concepts are also included.
• Chapter 6, “Item classes,” contains information about how you can use itemclasses to make entering information in Manufacturing easier.
• Chapter 7, “Manufacturing accounts,” includes information about specifyingadditional, manufacturing-specific accounts for items.
• Chapter 8, “Item engineering data,” describes the tasks that can be completedusing the Item Engineering Data window.
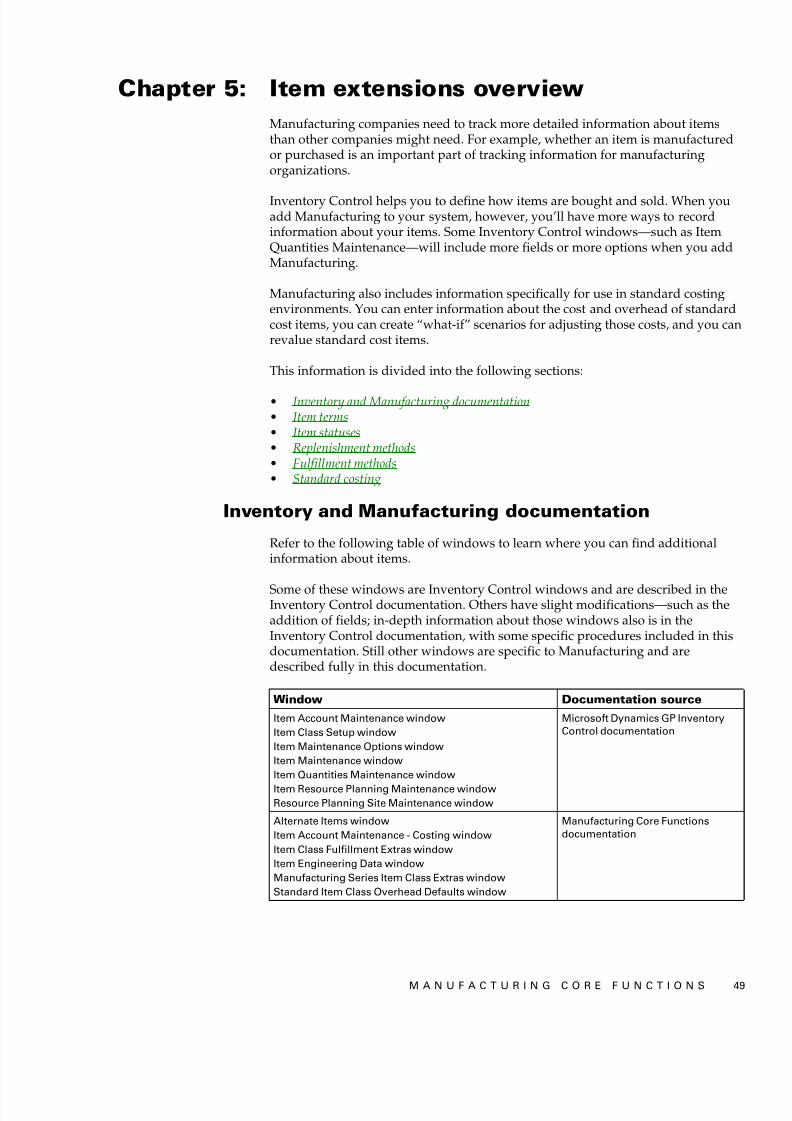
8/10/2019 Dynamics GP MFG Core Functions
http://slidepdf.com/reader/full/dynamics-gp-mfg-core-functions 59/256
M A N U F A C T U R I N G C O R E F U N C T I O N S 49
Chapter 5: Item extensions overviewManufacturing companies need to track more detailed information about itemsthan other companies might need. For example, whether an item is manufacturedor purchased is an important part of tracking information for manufacturingorganizations.
Inventory Control helps you to define how items are bought and sold. When youadd Manufacturing to your system, however, you’ll have more ways to recordinformation about your items. Some Inventory Control windows—such as ItemQuantities Maintenance—will include more fields or more options when you addManufacturing.
Manufacturing also includes information specifically for use in standard costingenvironments. You can enter information about the cost and overhead of standardcost items, you can create “what-if” scenarios for adjusting those costs, and you canrevalue standard cost items.
This information is divided into the following sections:
• Inventory and Manufacturing documentation• Item terms• Item statuses• Replenishment methods• Fulfillment methods• Standard costing
Inventory and Manufacturing documentation
Refer to the following table of windows to learn where you can find additionalinformation about items.
Some of these windows are Inventory Control windows and are described in theInventory Control documentation. Others have slight modifications—such as theaddition of fields; in-depth information about those windows also is in theInventory Control documentation, with some specific procedures included in thisdocumentation. Still other windows are specific to Manufacturing and aredescribed fully in this documentation.
Window Documentation source
Item Account Maintenance windowItem Class Setup windowItem Maintenance Options windowItem Maintenance windowItem Quantities Maintenance windowItem Resource Planning Maintenance windowResource Planning Site Maintenance window
Microsoft Dynamics GP InventoryControl documentation
Alternate Items windowItem Account Maintenance - Costing windowItem Class Fulfillment Extras windowItem Engineering Data windowManufacturing Series Item Class Extras windowStandard Item Class Overhead Defaults window
Manufacturing Core Functionsdocumentation

8/10/2019 Dynamics GP MFG Core Functions
http://slidepdf.com/reader/full/dynamics-gp-mfg-core-functions 60/256
P A R T 2 I T E M E X T E N S I O N S
50 M A N U F A C T U R I N G C O R E F U N C T I O N S
Item terms
Several terms specific to items in a manufacturing setting are used to describe howyou’ll work with Manufacturing.
Subassembly Subassemblies are combinations of raw materials that aren’tfinished products, but that are part of a larger finished good. For a phone
manufacturer, one of the components of a finished phone might be a circuit boardwith many electrical components placed upon it.
Component Components—also called raw materials—are items that are used to build products. They can be individual items like nuts, screws and diodes, or theycan be subassemblies.
Finished goods Finished goods are the final products that a company sells.
Setup cost Setup cost is the cost of preparing a work area before production begins. For instance, the cost of calibrating machines, gathering the necessary toolsand resources, and completing any trial runs of processes might be included in thesetup cost. You can specify a setup cost only for items that are manufactured.
Lead time Lead time is the minimum amount of time required for production ofan item. You can use the Calculate Manufacturing Lead Times window or the MFG/Lead Times window to calculate lead time for an item. Refer to the following topics:
• Calculating lead time for an item unit on page 71• Calculating lead time for quantities on page 72
Primary routing The primary routing is the routing that is most commonly usedin the manufacturing of an item. Your primary routing, for example, might assumethat all processes involved in the manufacturing of an item will be automated, butyou also can create other routings that can be used if some processes must be
handled manually. The primary routing is the routing that is used to estimateproduction times for an item.
Serial- or lot-number–tracked item If an item is assigned a unique identifier(which can be letters, numbers or a combination of letters and numbers), it is aserial-number–tracked item. If an item is part of a group and the group is assigned aunique identifier, the items are lot-number–tracked items.
Item statuses
In Inventory Control, you can assign item types—such as Sales Inventory,Discontinued, and Services—to items. These item types affect what you can do withthe item records. For example, you can’t assign a price list to an item unless its item
type is Sales Inventory or Discontinued. To manufacture an item—that is, to create amanufacturing order for an item—its status must be Sales Inventory.
In Manufacturing, you also can assign statuses to items. Like item types, itemstatuses affect what you can do with an item.

8/10/2019 Dynamics GP MFG Core Functions
http://slidepdf.com/reader/full/dynamics-gp-mfg-core-functions 61/256
M A N U F A C T U R I N G C O R E F U N C T I O N S 51
C H A P T E R 5 I T E M E X T E N S I O N S O V E R V I E W
Refer to the following table for information about the item statuses that areavailable.
Replenishment methods
In Inventory Control, you can specify how each item should be replenished. Youcan use the Item Resource Planning Maintenance window to specify whether eachitem should be Make, Buy, or Make or Buy. Depending on the replenishmentmethod you’ve selected, you can enter more information about how the item should be made or purchased.
The Item Resource Planning Maintenance window allows you to choose a differentreplenishment method for each item-site combination. For example, you might purchasewidgets for the North site, but make widgets for the South site. The replenishment method you specify in Item Resource Planning is the method used by MRP.
The replenishment method specified in Item Resource Planning is the method thatMRP will look at. The replenishment method specified on Item Engineering is onlyused by the BOM module. This is needed because specifying a site on a BOM is notrequired so it is not possible to get this value from Item Resource Planning.
Manufacturing extends the available replenishment methods.
Make items Make or made items are any items that are manufactured orproduced by your organization. Made items can be finished goods or can besubassemblies you use to produce other manufactured items.
Buy items Any items—including finished goods, raw materials andsubassemblies—that are purchased for use or for sale are buy or bought items.
Status Use
Active status Select Active status for items that are part of your currentprocesses. Items must have Active status before you can createpurchase orders or manufacturing orders for them.
Inactive status Select Inactive status for items that aren’t currently part of yourprocess. Some companies use the Inactive status as a steptoward making items obsolete.
Obsolete status Select Obsolete status for items that were once part of yourprocesses, but aren’t any longer. You can’t open manufacturingorders or purchase orders for items with this status.
Prerelease status Select Prerelease status for items that you’ve entered but thatyou don’t want to be generally available yet. Some companiesmight enter item records for products under development, forexample, keeping their status at Prerelease until the product isready for production.
Released status Released status is the same as Active status. You can select thisitem status for items that are part of your current processes.
Service status When you create an item with the Service item type in the ItemMaintenance window, the corresponding record automatically iscreated for the Item Engineering Data window with Servicestatus. These items can be used to track the costs of outsourcingservices.

8/10/2019 Dynamics GP MFG Core Functions
http://slidepdf.com/reader/full/dynamics-gp-mfg-core-functions 62/256
P A R T 2 I T E M E X T E N S I O N S
52 M A N U F A C T U R I N G C O R E F U N C T I O N S
Make or Buy items Make or Buy items are those that can be bought ormanufactured by your company. For example, a furniture manufacturer might usewood pieces cut to specific sizes in its manufacturing process. If the furniturecompany can either purchase the pieces from a vendor or can buy wood stock andcut its own pieces, then those pieces could be “make or buy items.
Fulfillment methods
If an item’s replenishment method is Make or Make or Buy, you can select afulfillment method for the item. A fulfillment method determines what events willcause a manufacturing order to be started. The two usual fulfillment methods areMake to Stock and Make to Order, but Manufacturing includes two types of theMake to Order method.
Fulfillment methods are combined with manufacturing sales order processingpreferences to determine how manufacturing orders are generated. Refer to Manufacturing orders generated from sales on page 162 for more information.
Make to Stock When make-to-stock items are sold, the quantities required tofulfill the sales order are taken from inventory quantities. Manufacturing orders areused to keep inventory levels up so that sales orders can be fulfilled.
Make to Order–Manual When make-to-order items are sold, manufacturingorders to build the items required to fulfill the manufacturing orders are created.Manufacturing orders respond to specific sales orders. Select Make to Order–Manual to have sales order entry processes include options for creatingmanufacturing orders. Sales order line requirements for items of this type should bemet with specific manufacturing orders.
Make to Order–Manual is the recommended fulfillment method for finished goods that aresold or configured using the Sales Configurator.
Make to Order–SilentWhen make-to-order items are sold, manufacturingorders to build the items required to fulfill the manufacturing orders are created.
Manufacturing orders respond to specific sales orders. Select Make to Order–Silentif manufacturing orders should be started automatically in response to sales orders.Sales order line requirements for items of this type should be met with specificmanufacturing orders.
Standard costing
Standard costing is an accounting method used by some businesses. Standardcosting values inventory at a cost based on the standard cost assigned to an item,plus eight other factors:
• Fixed material overhead• Variable material overhead• Labor costs• Fixed labor overhead• Variable labor overhead• Machine costs• Fixed machine overhead• Variable machine overhead
Items that have standard costs use a periodic valuation method. That is, the minorday-to-day changes in the costs of materials aren’t reflected in the cost of inventory.

8/10/2019 Dynamics GP MFG Core Functions
http://slidepdf.com/reader/full/dynamics-gp-mfg-core-functions 63/256
M A N U F A C T U R I N G C O R E F U N C T I O N S 53
C H A P T E R 5 I T E M E X T E N S I O N S O V E R V I E W
Instead, costs are assigned to inventory items that are adjusted or revaluedperiodically—usually semiannually or annually.
You can use utilities in Inventory Control to update cost information for boughtitems. You must use Manufacturing windows to update cost information formanufactured items, so that the changes to the cost of the components is “rolled up”appropriately to the cost of the finished item.
For more information about revaluing standard cost items, refer to Chapter 14, “Standardcosting revaluations.”
When you install Manufacturing, several windows related to entering andmaintaining information for a standard cost environment are included. Windowsfor “rolling up” standard costs and “revaluing” inventory—two importantprocesses in maintaining a standard cost system—are also included.
Rolling up Rolling up is the process of applying calculations based on changes tostandard cost information to items. If you change the cost of a raw material that ispart of several subassemblies and finished goods, “rolling up” that change willresult in calculations that will determine the new standard costs of thesubassemblies and finished goods. Rolling up helps you to view the effects ofstandard cost changes before actually applying the costs to items.
Revaluing Revaluing is the process of finalizing rolled-up standard cost changes.Revaluing replaces existing standard cost information with new standard costinformation. The new information will be used in your accounting processes.
As you change your standard cost information, you might roll up costs severaltimes, but probably will revalue items only at certain points.

8/10/2019 Dynamics GP MFG Core Functions
http://slidepdf.com/reader/full/dynamics-gp-mfg-core-functions 64/256
54 M A N U F A C T U R I N G C O R E F U N C T I O N S

8/10/2019 Dynamics GP MFG Core Functions
http://slidepdf.com/reader/full/dynamics-gp-mfg-core-functions 65/256
M A N U F A C T U R I N G C O R E F U N C T I O N S 55
Chapter 6: Item classesItem classes are groups of item records that you set up in Inventory Control. Youcan specify default settings for each class, such as methods for calculating labor andmaterial overhead and order policies. You then can “roll down” those entries sothey’re reflected in existing item records in each class. The default setting entrieswill be applied to new items added to each class. You can also enter default settingsfor item class characteristics, such as item types and valuation methods. If you havea large number of items to enter, you can create item classes with default entries tospeed up the entry process.
Refer to your Inventory Control documentation for more information about creating itemclasses.
Manufacturing extends the use of the item classes. This information is divided intothe following sections:
• Specifying accounts for an item class• Specifying a fulfillment method for an item class
• Setting up shipping history for an item class• Defining overhead for a standard cost item class
Specifying accounts for an item class
Items involved in manufacturing processes—whether they are components orfinished goods—require additional accounts. Manufacturing includes windows youcan use to specify these additional accounts for item classes involved in yourmanufacturing processes.
You can use the Item Class Accounts Setup - Costing window to specify accountsfor an item class. The accounts you specify in this window will be the defaultmanufacturing accounts for new items that you enter that are assigned to the class.You can change the default manufacturing accounts for each item, if needed. Referto Chapter 7, “Manufacturing accounts,” for more information.
This procedure assumes that you’ve already created the item class. For more informationabout creating an item class, refer to Inventory Control documentation.
To specify accounts for an item class:1. Open the Item Class Setup window.
(Microsoft Dynamics GP menu >> Tools >> Setup >> Inventory >> Item Class)
2. Enter or select the item class to assign manufacturing accounts to. Be sure tonote the valuation method for the item class.
3. Choose Accounts.

8/10/2019 Dynamics GP MFG Core Functions
http://slidepdf.com/reader/full/dynamics-gp-mfg-core-functions 66/256

8/10/2019 Dynamics GP MFG Core Functions
http://slidepdf.com/reader/full/dynamics-gp-mfg-core-functions 67/256
M A N U F A C T U R I N G C O R E F U N C T I O N S 57
C H A P T E R 6 I T E M C L A S S E S
Refer to the table for more information about accounts and how they’re used.
Each account selection is saved as it’s added to the scrolling window.
You can use the Clear Account button to clear an account selection that isn’t needed, o you can use the Undo Changes button to undo all changes you’ve made in the window
5. When you’ve finished, close the window.
If you’re setting up default accounts for an item class for standard cost items,you also can use the Standard Item Class Overhead Defaults window to specifythe default method for calculating overhead for items in the class. For moreinformation, refer to Defining overhead for a standard cost item class on page 59 .
Accounts Description Cost type
Standard Cost Revaluation Used for standardcost items—thosewith a periodicvaluation method.
Applied - Material Fixed OHApplied - Material Var. OH
Overhead costs for standard costcomponents are applied to theapplied accounts.
Variance - LaborVariance - Labor Fixed OHVariance - Labor Var. OHVariance - MachineVariance - Mach. Fixed OHVariance - Mach. Var. OHVariance - MaterialVariance - Mat. Fixed OHVariance - Mat. Var. OH
Differences between actual costsand standard costs for each costbucket are applied to the varianceaccounts.
Used for bothactual andstandard costitems. Actual costitems are thosewith a perpetualvaluation method.
WIP - MaterialWIP - Material Fixed OHWIP - Material Var. OHWIP - LaborWIP - Labor Fixed OHWIP - Labor Var. OHWIP - MachineWIP - Machine Fixed OHWIP - Machine Var. OH
Costs for materials and labor andmachine time, plus their associatedoverhead amounts, are applied towork in process (WIP) accountswhen they are designated for aspecific manufacturing order.
CoGS - MaterialCoGS - Material Fixed OHCoGS - Material Var. OHCoGS - LaborCoGS - Labor Fixed OHCoGS - Labor Var. OHCoGS - MachineCoGS - Machine Fixed OHCoGS - Machine Var. OH
Inventory - Material Fixed OHInventory - Material Var. OHInventory - LaborInventory - Labor Fixed OHInventory - Labor Var. OHInventory - MachineInventory - Machine Fixed OHInventory - Machine Var. OH

8/10/2019 Dynamics GP MFG Core Functions
http://slidepdf.com/reader/full/dynamics-gp-mfg-core-functions 68/256
P A R T 2 I T E M E X T E N S I O N S
58 M A N U F A C T U R I N G C O R E F U N C T I O N S
Specifying a fulfillment method for an item class
Use the Manufacturing Series Item Class Extras window to choose a defaultfulfillment method for item classes.
Only made items—items you manufacture or produce in your business—will beaffected by the fulfillment method selection.
This procedure assumes that you’ve already created the item class. For more informationabout creating an item class, refer to your Inventory Control documentation.
To specify a fulfillment option for an item class:1. Open the Item Class Setup window.
(Microsoft Dynamics GP menu >> Tools >> Setup >> Inventory >> Item Class)
2. Enter or select an item class.
3. From the Additional menu, choose Manufacturing Item Class Extras to openthe Manufacturing Series Item Class Extras window.
4. Select a fulfillment method for items in the class. For more information aboutfulfillment methods, refer to Fulfillment methods on page 52 .
5. Choose OK. A message will be displayed and you’ll have the option to rolldown changes to all items in this class.
• Choose Yes if the existing fulfillment method information for all items inthis class should be changed to the fulfillment method you’ve selected here.
• Choose No if the item records that are included in this class shouldn’t beupdated. Only subsequently entered records will be affected.
Setting up shipping history for an item class
Use the Item Class Fulfillment Extras window to indicate if shipping history should be maintained for the items in a specific class. You must set up options to trackshipping history if you plan to use Manufacturing’s order fulfillment features toreview how sales order line-item requirements have been fulfilled.
This procedure assumes that you’ve already created the item class. For more informationabout creating an item class, refer to your Inventory Control documentation.
To set up shipping history for an item class:1. Open the Item Class Setup window.
(Microsoft Dynamics GP menu >> Tools >> Setup >> Inventory >> Item Class)
2. Enter or select an item class.
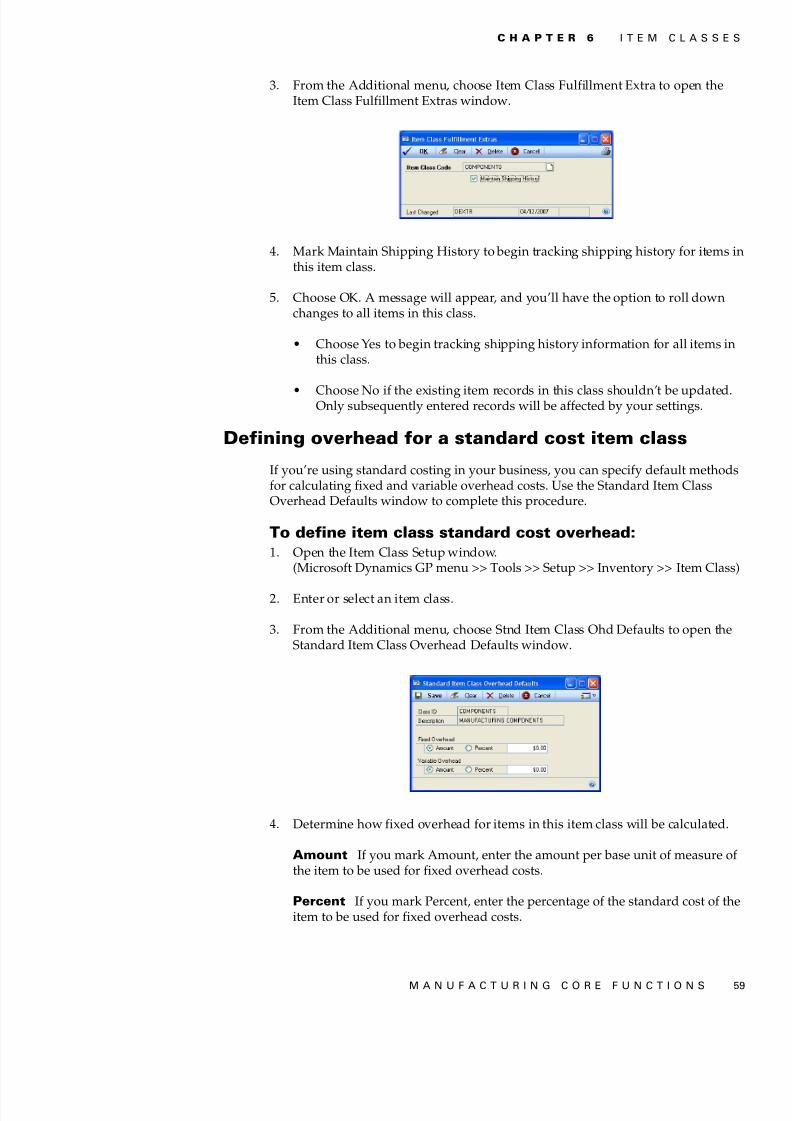
8/10/2019 Dynamics GP MFG Core Functions
http://slidepdf.com/reader/full/dynamics-gp-mfg-core-functions 69/256
M A N U F A C T U R I N G C O R E F U N C T I O N S 59
C H A P T E R 6 I T E M C L A S S E S
3. From the Additional menu, choose Item Class Fulfillment Extra to open theItem Class Fulfillment Extras window.
4. Mark Maintain Shipping History to begin tracking shipping history for items inthis item class.
5. Choose OK. A message will appear, and you’ll have the option to roll downchanges to all items in this class.
• Choose Yes to begin tracking shipping history information for all items inthis class.
• Choose No if the existing item records in this class shouldn’t be updated.Only subsequently entered records will be affected by your settings.
Defining overhead for a standard cost item class
If you’re using standard costing in your business, you can specify default methodsfor calculating fixed and variable overhead costs. Use the Standard Item ClassOverhead Defaults window to complete this procedure.
To define item class standard cost overhead:1. Open the Item Class Setup window.
(Microsoft Dynamics GP menu >> Tools >> Setup >> Inventory >> Item Class)
2. Enter or select an item class.
3. From the Additional menu, choose Stnd Item Class Ohd Defaults to open theStandard Item Class Overhead Defaults window.
4. Determine how fixed overhead for items in this item class will be calculated.
Amount If you mark Amount, enter the amount per base unit of measure ofthe item to be used for fixed overhead costs.
Percent If you mark Percent, enter the percentage of the standard cost of theitem to be used for fixed overhead costs.

8/10/2019 Dynamics GP MFG Core Functions
http://slidepdf.com/reader/full/dynamics-gp-mfg-core-functions 70/256
P A R T 2 I T E M E X T E N S I O N S
60 M A N U F A C T U R I N G C O R E F U N C T I O N S
5. Determine how variable overhead for this item class will be calculated.
Amount If you mark Amount, enter the amount per base unit of measure ofthe item to be used for variable overhead costs.
Percent If you mark Percent, enter the percentage of the standard cost of theitem to be used for variable overhead costs.
6. Choose Save. A message will be displayed and you’ll have the option to rolldown the changes to items in this class.
• Choose Yes to update existing overhead information for all items in thisclass to the overhead information you’ve entered.
• Choose No if the existing item records in this class shouldn’t be updated.Only subsequently entered records will be affected by your settings.

8/10/2019 Dynamics GP MFG Core Functions
http://slidepdf.com/reader/full/dynamics-gp-mfg-core-functions 71/256

8/10/2019 Dynamics GP MFG Core Functions
http://slidepdf.com/reader/full/dynamics-gp-mfg-core-functions 72/256
P A R T 2 I T E M E X T E N S I O N S
62 M A N U F A C T U R I N G C O R E F U N C T I O N S
Actual and standard cost items
Before you enter accounts, you should be aware of the following terms.
Actual cost items Actual cost items are those that have a perpetual valuationmethod. The cost of these items comes from the Current Cost field in the ItemMaintenance window. Current Cost is the cost that is used for the general ledger
transactions of actual cost items.
Standard cost items Standard cost items have a periodic valuation method.The “total” cost for these items comes from the Standard Cost field in the ItemMaintenance window. You also can view the breakdown of the cost—the amountsof the item cost that come from material, labor and machine costs and overhead—inthe Standard Cost Maintenance window. When you’re working with standard costitems, the broken-out costs are the costs used for general ledger transactions.Broken-out costs can include:
• Material• Material Fixed Overhead• Material Variable Overhead• Labor• Labor Fixed Overhead• Labor Variable Overhead• Machine• Machine Fixed Overhead• Machine Variable Overhead
Specifying Manufacturing accounts
Most items involved in manufacturing processes require more accounts than otherinventoried items. For example, you need work in process (WIP) accounts for itemsyou use in manufacturing processes, but you don’t need WIP accounts for other
items.You can use the Item Account Maintenance - Costing window to specify theadditional accounts needed for manufacturing items. The accounts that are neededwill depend on whether the item is a raw material component, a subassembly, or afinished good, and the valuation method of the item.
Be sure to consult your accountant for information about the accounts that will be needed.

8/10/2019 Dynamics GP MFG Core Functions
http://slidepdf.com/reader/full/dynamics-gp-mfg-core-functions 73/256
M A N U F A C T U R I N G C O R E F U N C T I O N S 63
C H A P T E R 7 M A N U F A C T U R I N G A C C O U N T S
Refer to the table for more information.
If you’re using item classes, you can specify default accounts for the items in the class. Refto Specifying accounts for an item class on page 55 for more information.
To specify Manufacturing accounts:1. Open the Item Maintenance window.
(Cards >> Inventory >> Item)
2. Enter or select the item to specify accounts for.
Accounts Description Cost type
Standard Cost Revaluation Used for standard costitems—those with aperiodic valuation method.
Applied - Material Fixed OHApplied - Material Var. OH
Overhead costs forstandard cost componentsare applied to the applied
accounts.Variance - LaborVariance - Labor Fixed OHVariance - Labor Var. OHVariance - MachineVariance - Mach. Fixed OHVariance - Mach. Var. OHVariance - MaterialVariance - Mat. Fixed OHVariance - Mat. Var. OH
Differences between actualcosts and standard costsfor each cost bucket areapplied to the varianceaccounts.
Used for both actual andstandard cost items. Actualcost items are those with aperpetual valuationmethod.
WIP - MaterialWIP - Material Fixed OHWIP - Material Var. OHWIP - LaborWIP - Labor Fixed OHWIP - Labor Var. OHWIP - MachineWIP - Machine Fixed OHWIP - Machine Var. OH
Costs for materials andlabor and machine time,plus their associatedoverhead amounts, areapplied to work in process(WIP) accounts when theyare earmarked for aspecific manufacturingorder.
Used for both actual andstandard cost items. Actualcost items are those with aperpetual valuationmethod.
CoGS - MaterialCoGS - Material Fixed OHCoGS - Material Var. OHCoGS - LaborCoGS - Labor Fixed OHCoGS - Labor Var. OHCoGS - MachineCoGS - Machine Fixed OH
CoGS - Machine Var. OHInventory - Material Fixed OHInventory - Material Var. OHInventory - LaborInventory - Labor Fixed OHInventory - Labor Var. OHInventory - MachineInventory - Machine Fixed OHInventory - Machine Var. OH
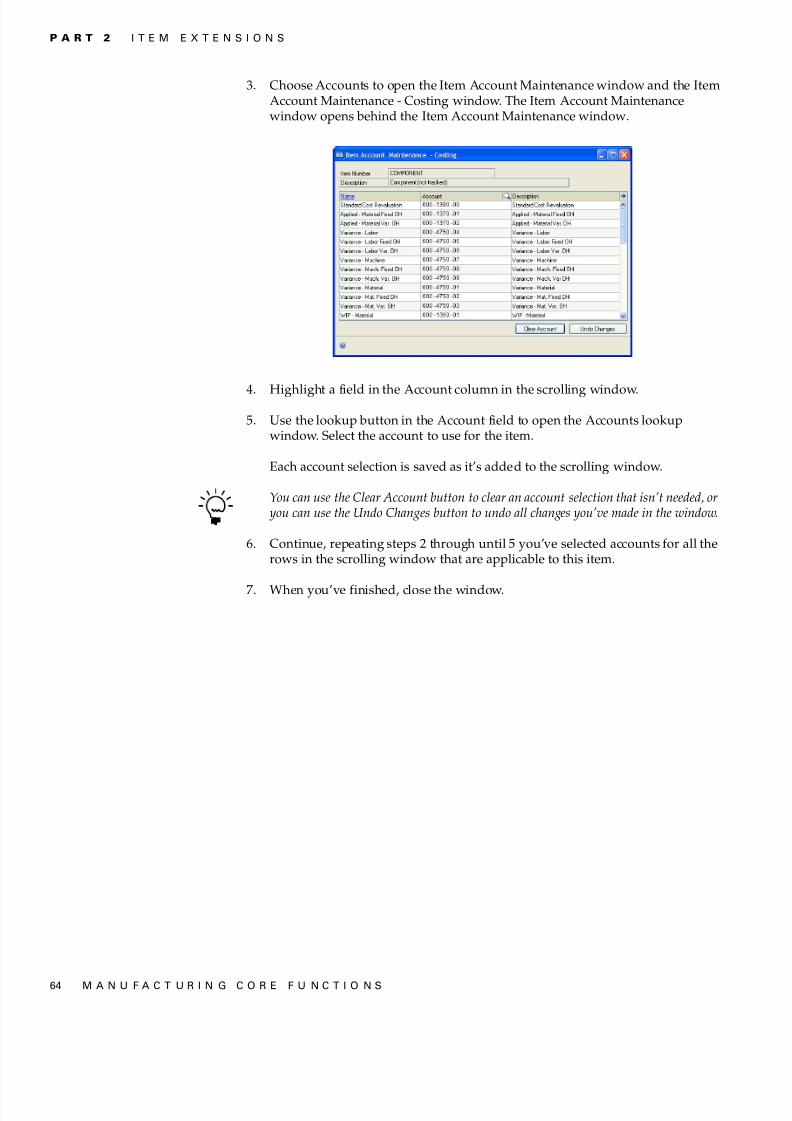
8/10/2019 Dynamics GP MFG Core Functions
http://slidepdf.com/reader/full/dynamics-gp-mfg-core-functions 74/256
P A R T 2 I T E M E X T E N S I O N S
64 M A N U F A C T U R I N G C O R E F U N C T I O N S
3. Choose Accounts to open the Item Account Maintenance window and the ItemAccount Maintenance - Costing window. The Item Account Maintenancewindow opens behind the Item Account Maintenance window.
4. Highlight a field in the Account column in the scrolling window.
5. Use the lookup button in the Account field to open the Accounts lookupwindow. Select the account to use for the item.
Each account selection is saved as it’s added to the scrolling window.
You can use the Clear Account button to clear an account selection that isn’t needed, or you can use the Undo Changes button to undo all changes you’ve made in the window.
6. Continue, repeating steps 2 through until 5 you’ve selected accounts for all therows in the scrolling window that are applicable to this item.
7. When you’ve finished, close the window.
8/10/2019 Dynamics GP MFG Core Functions
http://slidepdf.com/reader/full/dynamics-gp-mfg-core-functions 75/256
M A N U F A C T U R I N G C O R E F U N C T I O N S 65
Chapter 8: Item engineering dataMost of the Manufacturing-specific information for items can be entered in the ItemEngineering Data window. Use the Item Engineering Data window to establishguidelines for each item defined in the Item Maintenance window, such asminimum issue quantity, the status of items, and item revisions. You also can attachgraphics to items. Other functions of the Item Engineering Data window includeestablishing setup costs, scrap percentages, and average make quantities.
This information is divided into the following sections:
• About item classes and Manufacturing• Entering item engineering data• Assigning an effective date to an item• Setting the unit of measure for shipping weight• Specifying item status• Identifying an item requiring incoming inspection• About items and MRP• Attaching a drawing to an item
• Calculating lead time for an item unit• Calculating lead time for quantities• How available to promise dates are calculated for Manufacturing• Limitations of available to promise dates for Manufacturing• Starting to track shipping history for an item• Manufacturing alternates• Specifying alternates for an item• Removing an alternate from an item• Removing items• How Manufacturing affects reconciling inventory
About item classes and Manufacturing
Item classes are groups of item records that you set up in Inventory Control. Youcan use the item classes you create in Inventory Control to specify the item type,unit of measure schedule, and tax details for a group of items.
In Manufacturing, the use of item classes is extended. You can specify defaultsettings for each class, such as methods for calculating labor and material overhead.You then can roll down those entries so they’re reflected in existing item records ineach class. The default settings entries also will be applied to new items added toeach class. You also can enter default settings for item class characteristics, such asitem types and valuation methods.
Refer to Inventory Control documentation for more information about creating item classes
Using item classes isn’t required, but if you have a large number of items to enter,using item classes can speed up the data entry process. With Manufacturing, youcan use item classes to set the following options:
• Specifying a fulfillment method for an item class on page 58• Setting up shipping history for an item class on page 58• Defining overhead for a standard cost item class on page 59

8/10/2019 Dynamics GP MFG Core Functions
http://slidepdf.com/reader/full/dynamics-gp-mfg-core-functions 76/256
P A R T 2 I T E M E X T E N S I O N S
66 M A N U F A C T U R I N G C O R E F U N C T I O N S
Entering item engineering data
You can enter engineering information for each item that’s used in yourmanufacturing process. Items that are purchased for use in your company but thataren’t part of the manufacturing process—such as office supplies, for example—don’t need item engineering data.
The Item Engineering Data window builds on the item information entered in theItem Maintenance window and the Item Resource Planning Maintenance window,which are both part of Inventory Control. It’s best to enter the item information inthose windows first, and then use the Item Engineering Data window to addmanufacturing-specific information.
To enter item engineering data:1. Open the Item Engineering Data window.
(Cards >> Manufacturing >> Inventory >> Engineering Data)
You also can open this window by opening the Item Maintenance window, selecting arecord, then choosing Item Engineering Data from the Go To button.
2. Enter or select an item. Information displayed in the window varies, dependingon whether the item has already been created.
• If you opened the window using the Go To button, information about theitem will be displayed. The specific information will depend on whether adefault site has been specified for the item.
• If you enter an item number that hasn’t already been created in the ItemMaintenance window, a message will appear, asking if you want to createthe item. You can’t enter engineering information for an item without firstcreating the item in the Item Maintenance window, so choose Yes. The ItemMaintenance window opens, and you can enter the item information. Formore information about entering an item record, refer to Inventory Controldocumentation.

8/10/2019 Dynamics GP MFG Core Functions
http://slidepdf.com/reader/full/dynamics-gp-mfg-core-functions 77/256
M A N U F A C T U R I N G C O R E F U N C T I O N S 67
C H A P T E R 8 I T E M E N G I N E E R I N G D A T A
3. Select how a BOM should treat an item: as a bought item, a made item, or amake or buy item.
Manufacturing includes a setting that lets you specify if make or buy items should beconsidered made items or bought items when MRP information is calculated. Refer toSetting up general MRP options on page 50 for more information.
4. Enter additional information about the item. The information you enterdepends on the Manufacturing modules you’re using, and the replenishmentmethod for the item.
Refer to the table for more information.
5. Choose Save and close the window.
Field Additional information
Fulfillment Method Required for Make items. Refer to Fulfillment methods on page 52for general information. Refer to Manufacturing orders generatedfrom sales on page 162 for information about how fulfillmentmethods affect generated manufacturing orders.
Effective Date Refer to Assigning an effective date to an item on page 68 .
Shipping Weight Required only if shipping weight information should beautomatically calculated. Refer to Setting the unit of measure forshipping weight on page 68.
Lot Expiration Days If the item is tracked by lot numbers and has a limited shelf life,enter the maximum number of days that can be between the dateof manufacture and the date of use.
Item Status Refer to Specifying item status on page 68.
Average Quantity Optional. The Average Quantity is the default manufacturing orderquantity, and is used in calculations if setup costs of standard costitems are prorated by the average quantity.
Receive PurchaseOrders to QA Site
Mark Receive Purchase Orders to QA Site only if the items need tobe inspected when they are received. Refer to Identifying an itemrequiring incoming inspection on page 69 .
Floor Stock Mark Floor Stock if the cost of the items should be applied to an
expense account. Refer to How floor stock costs are applied onpage 105.
Destructive TestingRequired
Mark only if some items are destroyed when they are inspected.
Use Up Part? Used when making a Buy item obsolete. Refer to Assigning aneffective date to an item on page 68.
Calculate MRP Mark if item should be included in MRP calculations. Refer to Aboutitems and MRP on page 70 .
Design Authority You can enter or select a design authority—an employee or anyother entity.
Drawing Group Refer to Attaching a drawing to an item on page 71.
Minimum Issue If you enter a Minimum Issue quantity, a message appears if youattempt to create a manufacturing order or purchase order, or enter
an Issue component transaction for a quantity less than theminimum issue quantity. If you leave the field blank, no warningwill appear.
Revision Level This field is informational only, and isn’t tracked or updated bysystem processes.
Setup Cost These amounts aren’t calculated and aren’t included in anyManufacturing calculations.Carrying Cost
Drawing Size Enter the size of schematics or other drawings, if needed.
8/10/2019 Dynamics GP MFG Core Functions
http://slidepdf.com/reader/full/dynamics-gp-mfg-core-functions 78/256
P A R T 2 I T E M E X T E N S I O N S
68 M A N U F A C T U R I N G C O R E F U N C T I O N S
Assigning an effective date to an item
You’ll have only limited use of your item records if they have no effective date or ifthe effective date for the item is in the future. For example, if the effective date for anitem with the Make replenishment method is a week away, you can’t schedule anymanufacturing orders for producing that item.
You can use effective dates to modify item records before the change is to take effect.For example, to make a certain product obsolete at the end of the year, you canchange the status of the item to Obsolete and make its effective date December 31 ofthe current year. If you’ve marked Use Up Part? in the Item Engineering Datawindow for the item, however, the change to the item record won’t be effective untilall inventory quantities of the item have been depleted.
To assign an effective date to an item:1. Open the Item Engineering Data window.
(Cards >> Manufacturing >> Inventory >> Engineering Data)
2. Select an item and enter an effective date.
3. Make other changes—if any—that should be effective on the date you’vespecified.
4. Choose Save and close the window.
Setting the unit of measure for shipping weight
Use the Item Engineering Data window to specify the unit of measure for shippingweight for an item. This information will be used in Sales Order Processing and inManufacturing extensions to Sales Order Processing.
To set the unit of measure for shipping weight:1. Open the Item Engineering Data window.
(Cards >> Manufacturing >> Inventory >> Engineering Data)
2. Enter or select an item.
3. Select the unit of measure for the shipping weight.
To change the number of units for the shipping weight, use the Item Maintenancewindow (Cards >> Inventory >> Item). Refer to Inventory Control documentation formore information.
4. Choose Save and close the window.
Specifying item status
Most Manufacturing procedures require that the items you choose—to build, to sell,to purchase—must have an Active or Released status. However, other statuses areavailable so you can enter information about items and begin working with the itemrecords before the items themselves are available for use. Use the Item EngineeringData window to set the status for each item.

8/10/2019 Dynamics GP MFG Core Functions
http://slidepdf.com/reader/full/dynamics-gp-mfg-core-functions 79/256
M A N U F A C T U R I N G C O R E F U N C T I O N S 69
C H A P T E R 8 I T E M E N G I N E E R I N G D A T A
To specify item status:1. Open the Item Engineering Data window.
(Cards >> Manufacturing >> Inventory >> Engineering Data)
2. Enter or select an item.
3. Choose a status for the item. To use an item in Manufacturing—that is, to beable to create a manufacturing order for it or to use it as a component in amanufacturing order—the status of the item must be Active or Released. Youcan use other status choices to describe the status of an item within your business.
For more information, refer toItem statuses on page 50.
4. Choose Save and close the window.
Identifying an item requiring incoming inspection
If you’re using Quality Assurance, you must identify which bought items will
require inspection when they’re received. Use the Item Engineering Data window todo this.
To identify an item requiring incoming inspection:1. Open the Item Engineering Data window.
(Cards >> Manufacturing >> Inventory >> Engineering Data)
2. Select the item that will require incoming inspection.
3. Mark Receive Purchase Orders to QA Site. If you mark this option, quantities ofthis item will be posted to the inspection site rather than to inventory whenthey’re received. After they’re inspected, you must complete an inventoryadjustment transaction to move the quantities to inventory.
If no quality assurance site has been defined for your organization, a message appears.You’ll have the option to specify a quality assurance site or to cancel the procedure. If you choose Cancel, the Receive Purchase Orders to QA Site option will be cleared. Reto Setting up Quality Assurance in Chapter 5, “Manufacturing managementfunctions setup,” in the Manufacturing Setup documentation for more information.
4. To restrict the receipt records that are displayed in the QA Incoming window,use the Include Purchase Receipts From and To fields to specify a range ofdates.
When you use the QA Incoming window, you can restrict the purchase receiptsthat you view in the lookup windows based on the dates you enter. If you setthe dropdown list at the bottom of the QA Incoming window to QA Required -Restrict By Date, only those purchase receipts that include one or more itemsthat require inspection and that have a date that is within the range you specifywill be displayed when you use the lookup button on the Receipt Number field.
5. If the testing is destructive—that is, if the testing process will require that aportion of the amount received will be destroyed and won’t be suitable for usein manufacturing—mark Destructive Testing Required.
6. Choose Save and close the window.

8/10/2019 Dynamics GP MFG Core Functions
http://slidepdf.com/reader/full/dynamics-gp-mfg-core-functions 80/256

8/10/2019 Dynamics GP MFG Core Functions
http://slidepdf.com/reader/full/dynamics-gp-mfg-core-functions 81/256
M A N U F A C T U R I N G C O R E F U N C T I O N S 71
C H A P T E R 8 I T E M E N G I N E E R I N G D A T A
Attaching a drawing to an item
You can use the Item Engineering Data window to attach electronic files—CADfiles, multimedia clips, drawings, or other electronic files—to item records.
To attach a drawing to an item:1. Open the Item Engineering Data window.
(Cards >> Manufacturing >> Inventory >> Engineering Data)
2. Enter or select an item.
3. Select the drawing group that includes the drawing or other electronic files toattach to the item.
If you have the associated viewing software installed on your system, after you’veattached a drawing to an item you can choose the image icon button to view the attache file.
4. Choose Save and close the window.
Calculating lead time for an item unit
Use the MFG/Lead Times window to check the amount of lead time required forone unit of an item. You can choose to view the lead time based on the time neededto obtain purchased components for the item, or to build the item.
To calculate lead time for an item unit:1. Open the MFG/Lead Times window.
(Inquiry >> Manufacturing >> Routings >> MFG/Lead Times)
2. Specify the type of lead time information to view.
To ensure that the information is accurate, it’s especially important that you enterinformation and select options in the order described here.
Manufacturing lead time To view the labor time, machine time, cycletime, setup time, move time, and queue time for a manufactured item, enter orselect a manufactured item and then a routing for that item.

8/10/2019 Dynamics GP MFG Core Functions
http://slidepdf.com/reader/full/dynamics-gp-mfg-core-functions 82/256
P A R T 2 I T E M E X T E N S I O N S
72 M A N U F A C T U R I N G C O R E F U N C T I O N S
Component lead time To view the lead time requirements for thecomponents of a manufactured item, enter or select a manufactured item, markLead Times and then select a bill of materials for the manufactured item.
Lead time calculations for bought items will work only if you’ve identified vendors forall the items in the bill of materials and have specified the vendors’ planning lead times for the components.
Parent part lead time To view the lead time requirement for a singlepurchased item, enter or select a bought or make or buy item, mark Lead Timesand then mark the Parent option.
3. When you’ve finished viewing the information, close the window.
Calculating lead time for quantities
Use the Calculate Manufacturing Lead Times window to update the manufacturingfixed lead time and variable lead time information. You can update lead timeinformation for one Make item, or Make or Buy item, or for all items that haveroutings.
The manufacturing fixed lead time and variable lead time are based automaticallyon the item's primary routing and values set up for the routing's work centers. (Anexample for a work center is the number of hours a day a particular work center isrunning.) The manufacturing fixed lead time and variable lead time are used todetermine the lead time for any given MRP requirement. For example, assume thatthe manufacturing fixed lead time is .20 days, the manufacturing variable lead timeis .0070, and the requirement is 300. The lead time is calculated as follows.
.20 + (.0070 * 3000) = 2.300
Using the example, the lead time is 2.300 days. The value used in MRP is 3 days
since the value is rounded up to the next whole day.The information that is calculated is displayed in the Mfg Fixed Lead Time field andthe Mfg Variable Lead Time field in the Item Resource Planning Maintenancewindow (Cards >> Inventory >> Item Resource Planning) for the item-sitecombination.
You can enter manufacturing lead time information directly in the Item Resource Planning Maintenance window. If you use the Calculate Manufacturing Lead Times window toupdate lead time information for all items, however, any values you’ve entered for the item-site combination will be overwritten.
To calculate lead time for a quantity:1. Open the Calculate Manufacturing Lead Times window.
(Microsoft Dynamics GP menu >> Tools >> Utilities >> Manufacturing >> CalcMFG Lead Times)

8/10/2019 Dynamics GP MFG Core Functions
http://slidepdf.com/reader/full/dynamics-gp-mfg-core-functions 83/256
M A N U F A C T U R I N G C O R E F U N C T I O N S 73
C H A P T E R 8 I T E M E N G I N E E R I N G D A T A
2. You can update the lead time information for one item or for all items.
• To update the lead time information for all items, choose Calculate All. Amessage appears, indicating that the lead times of all made items will beupdated. Choose Yes to proceed.
• To update the lead time information for the average make quantity for a
single item, enter or select the item number and choose Calculate One. Thelead time required to build the average quantity of the item is displayed inthe Lead Time field.
3. When you’ve finished calculating lead times, close the window.
If needed, use the Item Resource Planning Maintenance window (Cards >>Inventory >> Item Resource Planning) to view the manufacturing lead time thathas been calculated.
How available to promise dates are calculated forManufacturing
You can use the Inventory Available to Promise Inquiry window to view the datewhen a specific quantity of a finished good is scheduled to be complete.
The available to promise date is calculated with one of the following equations.Down days are not considered when available to promise dates are calculated.
If all components are available User Date + Manufacturing fixed lead time(from the Item Resource Planning Maintenance window for the site).
If some components are unavailable If some components are unavailable,more calculations are done to determine the available to promise date of thefinished goods, based on whether each component is a made, bought, or make or
buy item. Once the available to promise lead times for each component aredetermined, the calculation for the finished good is User Date + Latest componentavailability date + Manufacturing fixed lead time (from the Item Resource PlanningMaintenance window for the site).
• If an unavailable component is a purchased item, the same processes that areused for purchased items in the Inventory Available to Promise window areused to find each component’s available date.
• If the unavailable component is a made item, the available promise datecalculations are run for each of its components. The available to promise datefor the subassembly item is calculated as if the subassembly were a finishedgood.
• If the unavailable component is a make or buy item and has a manufacturing bill of materials, it is treated as a made item. If the make or buy item has nomanufacturing bill of materials, it is treated as a purchased item.
You must use the Item Resource Planning Maintenance window to enter manufacturing fixed lead time information for each site where you will want to check the quantities that aravailable to promise.

8/10/2019 Dynamics GP MFG Core Functions
http://slidepdf.com/reader/full/dynamics-gp-mfg-core-functions 84/256
P A R T 2 I T E M E X T E N S I O N S
74 M A N U F A C T U R I N G C O R E F U N C T I O N S
For example, suppose that you’re building widgets, which have a manufacturinglead time of four days. To build one widget, you need two units of Component Aand three units of Component B, and you issue both of these components from theWarehouse site. There is no fixed quantity of either component on themanufacturing bill of materials. Then suppose that you want to calculate the datefor 200 widgets. On the day when you calculate the information, your inventorylevels are like those shown in the following table.
Required quantities of each component are available from their issue-from sites, sothe calculated manufacturing time would be four days from the user date. If thecurrent date is June 5, the calculated manufacturing date would be June 9.
If the inventory levels of the components are different, however, a different date
might be calculated, as illustrated in the following table.
In this case, the calculated date would be 18 days: four days of manufacturing leadtime plus 14 days for the longest component lead time. If the current date is June 5,then the calculated manufacturing date would be June 23.
Limitations of available to promise dates forManufacturing
The following limitations exist when you’re working with available to promisedates in the Inventory Available to Promise Inventory window.
• Component information is calculated based on the issue-from site only. If theitems are available at another site, you can transfer inventory items fromanother site to cover a shortage. However, the inventory levels could changefrom the time that you calculate the date and when the items are actuallyallocated for the manufacturing order. There might not be a shortage now, butthere might be one later.
Refer toIssue-from and issue-to sites on page 85 for more information about how theissue-from site for a component is determined.
• Manufacturing lead times are based on the average make quantity for the item.If the quantity of items is different than the average quantity, the real date whenyou might expect the items could be different.
• Manufacturing lead times do not reflect work center capacity. If your plant isrunning at or close to full capacity, items might not be available on thecalculated date.
Component Lead time Required quantity Warehouse site
Component A 14 days (2 x 200) + 0 = 400 500
Component B 7 days (3 x 200) + 0 = 600 600
Required quantity for a component is (BOM quantity x finished good quantity) + BOM fixedquantity.
Component Lead time Required quantity Warehouse site
Component A 14 days (2 x 200) + 0 = 400 100
Component B 7 days (3 x 200) + 0 = 600 500
Required quantity for a component is (BOM quantity x finished good quantity) + BOM fixedquantity.

8/10/2019 Dynamics GP MFG Core Functions
http://slidepdf.com/reader/full/dynamics-gp-mfg-core-functions 85/256

8/10/2019 Dynamics GP MFG Core Functions
http://slidepdf.com/reader/full/dynamics-gp-mfg-core-functions 86/256
P A R T 2 I T E M E X T E N S I O N S
76 M A N U F A C T U R I N G C O R E F U N C T I O N S
Manufacturing alternates
You can specify an unlimited number of alternates for an item. The alternates canthen be used if you have a shortage of a certain item. Obviously, you won’t be ableto specify alternates for all items in your business, but alternates can be used forsome items, such as nuts, bolts, screws, and epoxies.
There are some limitations for using alternate items. Consider these issues as youidentify alternates for use on your production floor.
• Specify alternates in the order of preference. The Item Maintenance Optionswindow in Inventory Control has two fields for substitutes. The first twoalternates you define in the Alternate Items window in Manufacturing will bedisplayed there. If you change information in the Alternate Items window, itwill be reflected in the Item Maintenance Options window.
Changes to substitute items in the Item Maintenance Options window won’t bereflected in the Alternate Items window.
• Specifying alternates doesn’t remove responsibility from production personnel.The Alternate Items window helps you record information about possiblesubstitutions, but if inventory quantities of an item are depleted, the systemwon’t automatically make the substitution for you.
• Include alternate components in bills of materials where the alternates will beused. Refer to Specifying an alternate component in a bill on page 106 and Verifyingalternate assignments on page 107 for more information.

8/10/2019 Dynamics GP MFG Core Functions
http://slidepdf.com/reader/full/dynamics-gp-mfg-core-functions 87/256
M A N U F A C T U R I N G C O R E F U N C T I O N S 77
C H A P T E R 8 I T E M E N G I N E E R I N G D A T A
Specifying alternates for an item
Use the Alternate Items window to define alternates for items.
To specify alternates for an item:1. Open the Alternate Items window.
(Cards >> Manufacturing >> Inventory >> Engineering Data >> select anitem >> Go To button >> Alternate Items)
2. Use the lookup button in the first row of the scrolling window to select the itemyou would choose first to be substituted for the item displayed at the top of thewindow. Your changes will be saved.
3. Continue using the lookup button on other scrolling window rows to chooseother alternate items. You can specify an unlimited number of alternates.
4. Choose OK and close the window.
Removing an alternate from an item
If you find that an alternate item won’t be a good substitute for another item, youcan remove the alternate from the item record. Use the Alternate Items window tocomplete this procedure.
To remove an alternate from an item:1. Open the Alternate Items window.
(Cards >> Manufacturing >> Inventory >> Engineering Data >> select anitem >> Go To button >> Alternate Items)
2. In the scrolling window, select the alternate to remove.
3. Choose the delete icon button in the scrolling window. Your changes will besaved. Close the window.

8/10/2019 Dynamics GP MFG Core Functions
http://slidepdf.com/reader/full/dynamics-gp-mfg-core-functions 88/256
P A R T 2 I T E M E X T E N S I O N S
78 M A N U F A C T U R I N G C O R E F U N C T I O N S
Removing items
Inventory Control includes two methods for removing items. You can remove itemsusing the Item Maintenance window or you can remove items with theDiscontinued type using the Inventory Year-End Closing window.
If an item that you attempt to remove is a component in a bill of materials, a
message is displayed and the item isn’t removed. Before you can remove an item,you must find all instances where it is used as a component in a bill of materials,remove the item from the bill of materials, and then use the Item Maintenancewindow or the Inventory Year-End Closing window to remove the item.
Refer toRemoving an item from multiple bills of materials on page 149 for informationabout how you can use the BOM Mass Updates window to remove an item from all bills ofmaterials.
If you use the Inventory Year-End Closing window to remove items with theDiscontinued type, no items that are components of any bill of materials will beremoved. If there were discontinued items that weren’t removed, they will be listedon the Manufacturing Components Not Removed report, which is generated whenprocessing ends in the Inventory Year-End Closing window.
How Manufacturing affects reconciling inventory
When you reconcile items in Inventory Control, you’ll also reconcile the iteminformation that is added to the system for Manufacturing.
The additional procedure adjusts the allocated quantity of an item so that it reflectsthe quantities of components allocated for manufacturing orders.
For more information about reconciling inventory, refer to Inventory Controldocumentation.
After the reconcile process is finished, an extra report destination window appearsso that you can choose where the Picklist Reconcile Report should be printed. Thepicklist reconcile process occurs before the inventory reconcile process begins.
If any manufacturing orders are locked—for example, if another user is editing amanufacturing order—both reconcile processes will be ended without updatingitem information.

8/10/2019 Dynamics GP MFG Core Functions
http://slidepdf.com/reader/full/dynamics-gp-mfg-core-functions 89/256

8/10/2019 Dynamics GP MFG Core Functions
http://slidepdf.com/reader/full/dynamics-gp-mfg-core-functions 90/256

8/10/2019 Dynamics GP MFG Core Functions
http://slidepdf.com/reader/full/dynamics-gp-mfg-core-functions 91/256
M A N U F A C T U R I N G C O R E F U N C T I O N S 81
Chapter 9: Bill of Materials overviewBills of materials (BOMs) are the lists of items needed to produce products; theydescribe the items needed to build a product unit. The information in bills ofmaterials also is critical in other areas of plant operation, such as materialpurchasing, product costing, and MRP.
You can build and store the bills of materials that your business uses to create itsproducts. You can create single- and multi-level bills of materials, copy existing billsof materials to use as the basis of new bills, and make global changes to the bills ofmaterials you’ve defined. Manufacturing Bill of Materials also includes a window—the BOM Routing Link window—that helps you link bills of materials and routings.
Refer to the table for topics related to bills of materials.
This information is divided into the following sections:
• Bill of materials terms• Differences between types and categories• Bill of materials types• Bill of materials categories• Issue-from and issue-to sites• Rules for backflushed components• Lead time calculations
Bill of materials terms
Refer here for information about some of the terms related to Manufacturing Bill ofMaterials.
Bill of materials A bill of materials is a list of the components needed to buildone unit of a product. It also shows quantities for each component.
Parent parts and components In a manufacturing environment, the terms
“parent parts” and “components” describe the relationship between an item and itscomponents. Parent parts are higher-order assemblies, such as computers or lamps.A parent part can be a subassembly or a final product. Components—also known aschild parts—can be raw materials or subassemblies that are used to build a parentpart.
Topic Refer here:
System setup tasks Chapter 3, “Manufacturing core functions setup,” in theManufacturing Setup documentation
User setup tasks Chapter 8, “Manufacturing core functions user setup,” in
the Manufacturing Setup documentationSecurity Chapter 2, “Security,” in the Manufacturing Setup
documentation
Item Engineering Data window Chapter 8, “Item engineering data,” in this manual
Reports Chapter 28, “Manufacturing reports,” in this manual

8/10/2019 Dynamics GP MFG Core Functions
http://slidepdf.com/reader/full/dynamics-gp-mfg-core-functions 92/256
P A R T 3 B I L L O F M A T E R I A L S
82 M A N U F A C T U R I N G C O R E F U N C T I O N S
Single- and multi-level bills of materials Bills of materials can havemultiple levels. The simplest bills of materials are single-level bills of materials.Those bills list the components and the amount of each component required toproduce one unit of the parent part. For example, the single-level bill of materialsfor a dining room set built by a furniture manufacturer look like this:
A multi-level bill of materials, however, lists all the components directly orindirectly involved in building the parent part, together with the required quantityfor each item. For example, if a subassembly is used in the parent part, the multi-level bill of materials will show all the components needed to build thesubassembly, including purchased parts and materials.
The multi-level bill of materials for the same dining room set—a table and sixchairs—might look like this:
Backflushing Backflushing deducts item quantities from inventory accounts tocover the quantities consumed in the manufacturing process. Backflushedquantities are accounted for when the parent parts are received—that is,transactions to account for the use of backflushed materials are created when amanufacturing order receipt is posted. Materials that are backflushed are includedin the final costs, but aren’t formally issued to a work center or work in process.
You can backflush entire bills of materials or just certain elements. When an item ismarked as backflushed in the Bill of Materials Entry window, the Backflush optionin the Picklist window automatically will be marked.
Refer to Rules for backflushed components on page 87 and Backflushing bill of materials
components on page 104 for more information.Incremental spacing Incremental spacing is a setting in the BOM PreferenceDefaults window that is used to assign position numbers to new componentsautomatically. The value selected in the New Component Position NumberIncremental Spacing field will be used to determine the position number for newcomponents. Refer to Position number incremental spacing on page 89 for moreinformation.
Single-level bill of materials for (1) Dining Room Set
Item QuantityTable 1
Chair 6
Multi-level bill of materials for (1) Dining Room Set
Item Quantity
TableTable topTable legTable leaf
1141
ChairsChair backChair seatChair legChair arm
6662412

8/10/2019 Dynamics GP MFG Core Functions
http://slidepdf.com/reader/full/dynamics-gp-mfg-core-functions 93/256
M A N U F A C T U R I N G C O R E F U N C T I O N S 83
C H A P T E R 9 B I L L O F M A T E R I A L S O V E R V I E W
Issue-from site The issue-from site—also known as the draw-from site—is thesite from which the component or subassembly quantities are taken. If you haveseveral inventory sites for an item, you can specify the site from which thecomponents should be taken for a manufacturing order. Refer to Issue-from andissue-to sites on page 85 .
Issue-to site The issue-to site—also known as the post-to site—is the site to
which components or subassemblies will be delivered when they’re needed inproduction. If your production process includes several work centers, you might setup the bill of materials so that components and subassemblies are delivered to theappropriate work centers. Refer to Issue-from and issue-to sites on page 85 .
Lead time offset Lead time offset is the number of days difference between thestart date or end date of a manufacturing order and the date that a component will be needed. For example, suppose the final step in your manufacturing process is toglue two components together, and after the gluing process, the epoxy must cure fortwo days. Then the lead time offset for the epoxy would be two days from themanufacturing order end date.
Refer to Lead time calculations on page 87 for more information.
Fixed quantity You can specify a fixed quantity of each component in a bill ofmaterials. The fixed quantity is the amount of a component that is consumed foreach manufacturing order, regardless of the manufacturing order size. For example,suppose that your manufacturing processes require you to use a sheet of metal tocreate a template to use for the rest of the manufacturing order. You could enter afixed quantity of 1 for the sheet of metal, so that it would be issued for that purpose.
Position number Each component on a bill of materials and each componentitem on a picklist has a position number. A position number is a number thatindicates the order in which components are used to build a product. All newcomponents and new picklist items will be assigned a position number. Becauseyou assign a position number to each component on a bill a materials and eachcomponent item on a picklist, a component can be used more than once in theprocess. For example, if a component is used at the beginning and at the end of theprocess, you can add the component to the bill of materials twice, using a differentposition number for each instance. The position number will be displayed inwindows where you can enter or view bill of materials and picklist information.
Reference designators Some manufacturers—especially electronicsmanufacturers—use reference designators to specify where components are to beused in an assembly. For example, if four resistors are used in an assembly, themanufacturer might include reference designators to tell the assemblers where thefour resistors should be placed on a circuit board.
Differences between types and categoriesEach bill of materials that you define in Manufacturing Bill of Materials will have atype and a category.
Types Types help describe the status of each bill of materials. For example, amanufacturing bill of materials is typically used in current manufacturing processesand an archived bill of materials is an obsolete bill of materials. Refer to Bill ofmaterials types on page 84 for more information.

8/10/2019 Dynamics GP MFG Core Functions
http://slidepdf.com/reader/full/dynamics-gp-mfg-core-functions 94/256
P A R T 3 B I L L O F M A T E R I A L S
84 M A N U F A C T U R I N G C O R E F U N C T I O N S
Categories Categories help describe the visibility of the components in a bill ofmaterials. A regular bill of materials is a straightforward bill of materials. Aphantom category must be assigned to a subassembly item if components for thesubassembly must be included in the picklist. Refer to Bill of materials categories onpage 85 for more information.
Bill of materials types
Refer to the following definitions for more information about various types of billsof materials.
Manufacturing bill of materials A manufacturing bill of materials is used to build a parent part and is the “real” production bill of materials used to calculatematerial requirements. You can create only one manufacturing bill of materials foreach item.
Engineering bill of materials An engineering bill of materials is defined for aproduct by your engineering department. An engineering bill of materials couldinclude the most recent changes proposed by an engineering department, andmight or might not match the manufacturing bill of materials.
Designs in the prototype stage of development, for example, might haveengineering bills of materials. This allows you to study the costs of producing adesign without affecting the material requirements that the system generates. Youcan create only one engineering bill of materials for each item.
Archived bill of materials An archived bill of materials is one that has beenstored for reference but isn’t used in production. Refer to Revision levels and Archivedbills of materials on page 141 to compare archived bills of materials with revisionlevels.
Configured bill of materials A configured bill of materials is created when a
customer selects options from a super bill of materials. For example, a configured bill of materials for a computer would include the basic components and optionitems that the customer had specified from a list of options that you provide. Theoption items might be for RAM, hard disks or processors. You can generate manyconfigured bills of materials for each item, so you must assign a name to eachconfigured bill of materials.
You can choose to automatically delete or archive configured bills of materials when themanufacturing orders they’re used for are closed. Refer toSetting up manufacturing order processing in Chapter 4, “Manufacturing production functions setup,” in the Manufacturing Setup documentation for more information about those options.
Super bill of materials A super bill of materials includes all of the possible
parts in a configured bill of materials for a finished item. For example, a computermanufacturer might have a super bill of materials that lists all the various computercomponent types for its customers, such as several types of processors, hard drives,monitors and RAM modules. Then, when the company needs to build a computer,someone will specify which of the component types will be included in the specificcomputer.

8/10/2019 Dynamics GP MFG Core Functions
http://slidepdf.com/reader/full/dynamics-gp-mfg-core-functions 95/256
M A N U F A C T U R I N G C O R E F U N C T I O N S 85
C H A P T E R 9 B I L L O F M A T E R I A L S O V E R V I E W
Bill of materials categories
Refer to the following definitions for more information about various categories of bills of materials.
Regular bill of materials A regular bill of materials is a basic, single-level billof materials.
Phantom bill of materials A phantom bill of materials is assigned to a bill ofmaterials for a subassembly that isn’t usually stocked as an inventory item. Forexample, a furniture manufacturer might set up a bill of materials for a table so thatthe table leaf is a subassembly. The manufacturer doesn’t want to build any extratable leaves—he wants to manufacture leaves only as tables are being made, butwill never stock the table leaves as separate inventory items. If you create phantom bills of materials, you won’t need to create separate manufacturing orders for theproduction of the subassembly items needed for parent parts.
Option bill of materials This setting is not currently used.
Modular bill of materials This setting is not currently used.
Issue-from and issue-to sites
When you create a bill of materials, you have the option to specify an issue-fromand an issue-to site for each component.
For definitions of issue-from and issue-to sites, refer toBill of materials terms on page 81.
If you specify issue-from and issue-to sites in a bill of materials, those sites will bethe issue-from and issue-to sites in the picklist. If you’re using site-specific segmentsin your chart of accounts, the accounts for the specific sites will be used as youmove materials from one site to another.
If no issue-from or issue-to site is specified for a component, however, default siteswill be used.

8/10/2019 Dynamics GP MFG Core Functions
http://slidepdf.com/reader/full/dynamics-gp-mfg-core-functions 96/256

8/10/2019 Dynamics GP MFG Core Functions
http://slidepdf.com/reader/full/dynamics-gp-mfg-core-functions 97/256
M A N U F A C T U R I N G C O R E F U N C T I O N S 87
C H A P T E R 9 B I L L O F M A T E R I A L S O V E R V I E W
Rules for backflushed components
When you create a bill of materials, you can choose to backflush all components or just specific ones. However, there are rules regarding which components can—orcannot—be backflushed. Refer to the table for more information.
Lead time calculationsYou can specify a lead time for any or all components in a bill of materials. Howlead times are calculated depends on your system setting—to have lead times offsetfrom the manufacturing order start date or the manufacturing order due date—anda number you enter for a component in a bill of materials. You can choose tocalculate component lead times based on the manufacturing order start date or duedate.
• If you use the start date, you can enter positive or negative values for thecomponent lead time. This allows you to specify that a component is needed acertain number of days before or after the start of the manufacturing order.
• If you use the manufacturing order due date, you can enter only positive valuesfor the component lead time. You can’t enter negative numbers because allcomponents must be due before the manufacturing order is due.
Refer to the illustration for an example of how lead time is calculated.
Component description Backflush?
Phantom items Not allowed.
By-product items
Item Type is Services, Flat Fee, or Miscellaneous You must backflush.
All other components. You can choose to backflush or not.
Manufacturing OrderStart Date
Manufacturing OrderDue Date
Component due two daysbefore start:Lead Time Offset = -2Offset from Start Date
Component due two daysafter start:Lead Time Offset = +2Offset from Start Date
Component due two daysbefore due date:Lead Time Offset = +2Offset from Due Date

8/10/2019 Dynamics GP MFG Core Functions
http://slidepdf.com/reader/full/dynamics-gp-mfg-core-functions 98/256
88 M A N U F A C T U R I N G C O R E F U N C T I O N S

8/10/2019 Dynamics GP MFG Core Functions
http://slidepdf.com/reader/full/dynamics-gp-mfg-core-functions 99/256
M A N U F A C T U R I N G C O R E F U N C T I O N S 89
Chapter 10: Position numbersEach component on a bill of materials and each component item on a picklist has aposition number. A position number is a number that indicates the order in whichcomponents are used to build a product. All new components and new picklistitems will be assigned a position number. Because you assign a position number toeach component on a bill a materials and each component item on a picklist, acomponent can be used more than once in the process. For example, if a componentis used at the beginning and at the end of the process, you can add the componentto the bill of materials twice, using a different position number for each instance.The position number will be displayed in windows where you can enter or view billof materials and picklist information.
When you create a new bill of materials or add a new item to a bill of materials, aposition number will be assigned to each component. The position number will bedetermined by the next available position number and the default incrementalspacing specified in the BOM Preference Defaults window. You can change thedefault position number at any time to control the position number of thecomponent on the bill of materials.
For more information about the BOM Preference Defaults window, refer toSetting up billsof materials system settings in Chapter 3, “Manufacturing core functions setup,” of the Manufacturing Setup manual.
This information is divided into the following sections:
• Position number incremental spacing• Position numbers in Manufacturing windows• Position number guidelines• Assigning existing position numbers to components• Position number examples• Position number limits
• Changing position numbers of components• Changing a bill of materials to a phantom bill of materials
Position number incremental spacing
Incremental spacing is a setting in the BOM Preference Defaults window that isused to assign position numbers to new components automatically. The valueentered in the New Component Position Number Incremental Spacing field will beused to determine the position numbers for new components.
Default incremental spacing valuesThe default incremental spacing value will be used to assign position numbers to
new bill of material components and picklist items.Refer to the following information about how the default values for positionnumbers are determined.
• The default incremental spacing from the New Component Position NumberIncremental Spacing field in the BOM Preference Defaults window is used.
• If a default spacing hasn’t been specified in the BOM Preference Defaultswindow, the default spacing for position numbers will be 1.

8/10/2019 Dynamics GP MFG Core Functions
http://slidepdf.com/reader/full/dynamics-gp-mfg-core-functions 100/256
P A R T 3 B I L L O F M A T E R I A L S
90 M A N U F A C T U R I N G C O R E F U N C T I O N S
For more information about the BOM Preference Defaults window, refer toSetting upbills of materials system settings in Chapter 3, “Manufacturing core functions setup,” of the Manufacturing Setup manual
Specified incremental spacing valuesYou can use the BOM Preference Defaults window to specify the spacing to use between position numbers. Before you set it up, you should decide how much spaceyou will need to be available between the assigned position numbers. Leavingspaces will allow you to manually add new position numbers between existingposition numbers later.
For example, you can decide to assign position numbers in multiples of 2—2, 4, 6,and 8—or in multiples of 10—10, 20, 30, 40. This will be helpful if you need to addcomponents later. You can place new components between the existing componentslater without renumbering the existing components.
Refer to Setting up bills of materials system settings in Chapter 3, “Manufacturing corefunctions setup ,” in the Manufacturing Setup manual for more information.
Position numbers in Manufacturing windowsWhen position numbers are assigned to new items automatically, you can changethem manually. You also can change a position number when you open a picklist or bill of materials to edit. There are some rules related to when you can change theposition number. There are also specific windows where you can change theposition number of a component, and then there are windows where you can’tchange the position number of a component.
Position numbers can be changed from these windows:
• Bill of Materials Entry window• Picklist window
• Add Picklist Entry window• Quick MO Add Component Entry window• Manufacturing Order Add Component Entry window• Manufacturing Order Receipt Component Entry window• Quick MO Add Component Entry window
Position numbers can’t be changed from these windows:
• BOM/Routing Link window• Bill of Materials View window• BOM Copy window• BOM Mass Updates window• Manufacturing Component Transaction Entry window• Manufacturing Component Transaction Inquiry window• Manufacturing Order Receipt Entry window• Quick MOs window

8/10/2019 Dynamics GP MFG Core Functions
http://slidepdf.com/reader/full/dynamics-gp-mfg-core-functions 101/256
M A N U F A C T U R I N G C O R E F U N C T I O N S 91
C H A P T E R 1 0 P O S I T I O N N U M B E R S
Special circumstances in windowsRefer to the following information about exceptions to the general position numberrules.
Add Picklist Entry window If you add a phantom item to the picklist, thecomponents of the phantom item will retain the position numbers from thephantom bill of materials.
BOM Routing Link window If you use the BOM Routing Link window to linkan instance of a bill of materials component to multiple routing sequences, the itemwill appear once on a picklist for each sequence that it is linked to. A component ona bill of materials can be linked to more than one routing and each bill of materials/routing combination can have different position numbers assigned to thecomponents.
For instance, the first bill of materials/routing combination that you create for anitem will retain the position number from the bill of materials. You can't change theposition number after the link has been created. If a bill of materials/routingcombination already exists for a bill of materials component—if the amount in theQuantity Linked field is greater than zero but less than the amount in the Quantityto Link field—and you choose to create an additional link, the position number will be assigned. You can't change the position number. If you need to specify theposition number of a component that is linked to more than one sequence, youshould add that item multiple times to the bill of materials and then link eachinstance to a sequence.
Sales Configurator window When you create a bill of materials, thecomponents you select to add to the bill of materials will retain the positionnumbers from the super bill of materials. You can't change these position numbers.
BOM Entry window If the item that you enter in the Alternate For field existsmore than once on the first level of the bill of materials, a message will be displayed.
When you choose OK, the Alternate Parts lookup window will open and displayonly instances of that item number on the first level of the bill of materials.
Position number guidelines
Refer to the following guidelines and requirements for using position numbers.Sometimes a message will be displayed and you’ll need to make the necessarychange before you can continue.
Position number value The position number value must be 1 or higher. It can’t be zero or a negative number.
Position number limit The position number can’t exceed the 9999 limit. Referto Position number limits on page 94 for more information.
Duplicate components A component can be on a bill of materials more thanonce, but the position number must be different for each instance.
Duplicate position numbers A position number only can exist one time oneach level of a bill of materials.

8/10/2019 Dynamics GP MFG Core Functions
http://slidepdf.com/reader/full/dynamics-gp-mfg-core-functions 102/256

8/10/2019 Dynamics GP MFG Core Functions
http://slidepdf.com/reader/full/dynamics-gp-mfg-core-functions 103/256
M A N U F A C T U R I N G C O R E F U N C T I O N S 93
C H A P T E R 1 0 P O S I T I O N N U M B E R S
Position number examples
The following information explains how position numbers work in varioussituations.
These examples make the following assumptions:
• Item A is a first-level component on a bill of materials and it has been assigneda position number of 5.
• Item X is a first-level component and has a position number of 6.
• No first-level components have the position number of 7 or 8.
• Item Z has a position number of 9.
Add a new component Item B to the bill of materials with a positionnumber of 5 You enter a position number of 5. A message is displayed becauseItem A already has been assigned a position number of 5. If you choose OK, theposition number of 5 will be assigned to Item B, and the position number for Item Awill change to 6. Because Item X was previously assigned a position number of 6, itwill be renumbered to 7. Item Z will retain its position number of 9.
Change the position number for Item Z from 9 to 4 A message will not be displayed and no renumbering will occur because there are no other items thatalready have the position number 4.
Change the position number for Item Z from 9 to 6 Since Item X alreadyhas a position number of 6, a message will be displayed. If you choose OK, Item Zwill be assigned a position number of 6, and the position number for Item X will berenumbered to be 7.
Remove Item A from the bill of materialsA message will not be displayedand no renumbering will occur because removing an item from a bill of materials
will not affect the position numbers of any other items.
You change the position number for Item A from 5 to 10 A messagewill not be displayed and no renumbering will occur because there are no otheritems that already have the position number 10.

8/10/2019 Dynamics GP MFG Core Functions
http://slidepdf.com/reader/full/dynamics-gp-mfg-core-functions 104/256
P A R T 3 B I L L O F M A T E R I A L S
94 M A N U F A C T U R I N G C O R E F U N C T I O N S
Position number limits
Sometimes the position number that is assigned— automatically or manually—exceeds the limit allowed in Microsoft Dynamics GP. When this happens, a messageis displayed and you’ll have to enter a different position number or make moreposition numbers available before you can proceed. You can make more positionnumbers available by changing—or renumbering—the position numbers of existing
components or by using phantom bills of materials to manage components.
Refer to the following topics for more information:
• Changing position numbers of components• Changing a bill of materials to a phantom bill of materials• Position number guidelines
Examples of when position numbers exceed the allowedlimitRefer to the table for examples of situations that occur when position numbersexceed the limit allowed in Microsoft Dynamics GP.
Situation Result
A position number isautomatically assigned to anew component and thenumber is higher than 9999.
The position number won’t be assigned. You can enter adifferent position number.
You assign or change theposition number to a numberthat is higher than 9999.
The position number won’t be assigned. You can enter adifferent position number.
You add a component to a billof materials and the positionnumber is higher than 9999.
You can’t add the item. You can change the position number oryou can make more position numbers available before you canadd a component to this bill of materials.
You add an item to a picklist
and the position number ishigher than 9999.
You can’t add the item. You can change the position number or
you can make more position numbers available before you canadd a component to this bill of materials.
You add an item to a picklistand the position numberalready exists. You choose tohave the previous itemrenumbered and numberingcauses the item to have aposition number higher than9999.
You can’t insert the item. You can change the position number oryou can make more position numbers available before you canadd a component to this bill of materials.
You add a component to a billof materials and the positionnumber already exists. Youchoose to have the previouscomponent renumbered andnumbering causes the item tohave a position numberhigher than 9999.
You can’t insert the item. You can change the position number oryou can make more position numbers available before you canadd a component to this bill of materials.
You select Mark All on aselected bill of materials inthe BOM Mass Updateswindow and any positionnumber would be higher than9999.
Those items won’t be selected.

8/10/2019 Dynamics GP MFG Core Functions
http://slidepdf.com/reader/full/dynamics-gp-mfg-core-functions 105/256
M A N U F A C T U R I N G C O R E F U N C T I O N S 95
C H A P T E R 1 0 P O S I T I O N N U M B E R S
Changing position numbers of components
Use the Bill of Materials Entry window to change the position numbers of existingcomponents. Sometimes it is necessary to renumber the position numbers ofexisting components to make more position numbers available for newcomponents. When a position number exceeds the limit allowed, you can renumberexisting components to make more position numbers available for new
components. Refer to Position number limits on page 94 for more information aboutposition number limits.
Refer to the following for more information:
• Position number guidelines• Position number limits• Changing a bill of materials to a phantom bill of materials
To change the position numbers of componentsUse the Bill of Materials Entry window to change the position numbers of existingcomponents.
1. Open the Bill of Materials Entry window.(Cards >> Manufacturing >> Bill of Materials)
2. Enter or select the finished good or subassembly with the bill of materials thatincludes items that you want to work with. The manufacturing bill of materialswill be displayed by default, but you can select any other bill of materials thatincludes the item.
3. If you selected an archived or configured bill of materials, enter or select theappropriate BOM name.
4. In the tree view, select a component. Information about the component will be
displayed in the right pane of the window.
5. Change the position number. Refer to Position number guidelines on page 91 formore information.
6. Change any other information in the window, as needed.
7. Choose Save. Continue to change position numbers, as needed.
8. When you’ve finished entering information, close the window.

8/10/2019 Dynamics GP MFG Core Functions
http://slidepdf.com/reader/full/dynamics-gp-mfg-core-functions 106/256
P A R T 3 B I L L O F M A T E R I A L S
96 M A N U F A C T U R I N G C O R E F U N C T I O N S
Changing a bill of materials to a phantom bill ofmaterials
Use the Bill of Materials Entry window to change a bill of materials to a phantom bill of materials.
You can use a phantom bill of materials to manage components when you need tomake more position numbers available. For instance, you can use a phantom bill ofmaterials when a position number exceeds the limit allowed. Refer to Positionnumber guidelines on page 91 for more information about position number limits.
Refer to the following for more information:
• Position number limits• Changing position numbers of components• Position number guidelines
To change a bill of materials to a phantom bill ofmaterials:
1. Open the Bill of Materials Entry window.(Cards >> Manufacturing >> Bill of Materials)
2. Enter or select the finished good or subassembly with the bill of materials thatincludes items that you want to work with. The manufacturing bill of materialswill be displayed by default, but you can select any other bill of materials thatincludes the item.
3. If you selected an archived or configured bill of materials, enter or select theappropriate BOM name.
4. Change the bill of materials category to phantom.
5. Choose Save and close the window.

8/10/2019 Dynamics GP MFG Core Functions
http://slidepdf.com/reader/full/dynamics-gp-mfg-core-functions 107/256
M A N U F A C T U R I N G C O R E F U N C T I O N S 97
Chapter 11: Bill of Materials entryUse the Bill of Materials Entry window to complete basic tasks, including creating,modifying, and deleting bills of materials.
Besides listing the components and their quantities in bills of materials, you also canadd information that will make the bills of materials more useful in your productionprocess. You can indicate if component quantities can be backflushed, you canchoose default sites for component and parent parts, and you can enter informationabout item substitutions.
This information is divided into the following sections:
• Understanding the Bill of Materials Entry window• Creating a bill of materials• Adding a component to a bill of materials• Changing component details• Deleting a component from a bill of materials• Modifying a component bill of materials
• Removing a bill of materials• Requirements for bill of materials components• Backflushing bill of materials components• Shrinkage for bill of materials components• How floor stock costs are applied• Component fixed quantity• Specifying an alternate component in a bill• Verifying alternate assignments• Bills of materials and component effective dates• Effects of engineering changes on bills• Adding user-defined information to bills• Accounting for by-products in a bill of materials• Component quantities and rounding
Understanding the Bill of Materials Entry window
The Bill of Materials Entry window is the main window for Manufacturing Bill ofMaterial. You can use the window to create, modify, and delete bills of materials.

8/10/2019 Dynamics GP MFG Core Functions
http://slidepdf.com/reader/full/dynamics-gp-mfg-core-functions 108/256
P A R T 3 B I L L O F M A T E R I A L S
98 M A N U F A C T U R I N G C O R E F U N C T I O N S
The window has two major parts: the left pane, where you enter information aboutthe bill of materials as a whole; and the right pane, where you can enter informationabout the components that make up the bill of materials. The left pane also includesa tree view where you can view the overall structure of a bill of materials.
Creating a bill of materials
Use the Bill of Materials Entry window to create or to modify a basic bill ofmaterials.
As you add items to a bill of materials, the items will be displayed in the tree view.This window will list the components that are needed to build one unit of the finalproduct.
Several options are available for the components that you add to a bill of materials.The information that you enter will depend on the component (whether it is madeor bought, for example) and on your business practices. Refer to the followingtopics for more information:
• Requirements for bill of materials components on page 104• Backflushing bill of materials components on page 104• Shrinkage for bill of materials components on page 105• How floor stock costs are applied on page 105• Component fixed quantity on page 106• Specifying an alternate component in a bill on page 106• Bills of materials and component effective dates on page 107• Adding user-defined information to bills on page 109• Accounting for by-products in a bill of materials on page 109• Component quantities and rounding on page 110
The left pane displays bill of
materials information.
The tree view displays the
structure of the bill of materials.
The right pane displays
component information.
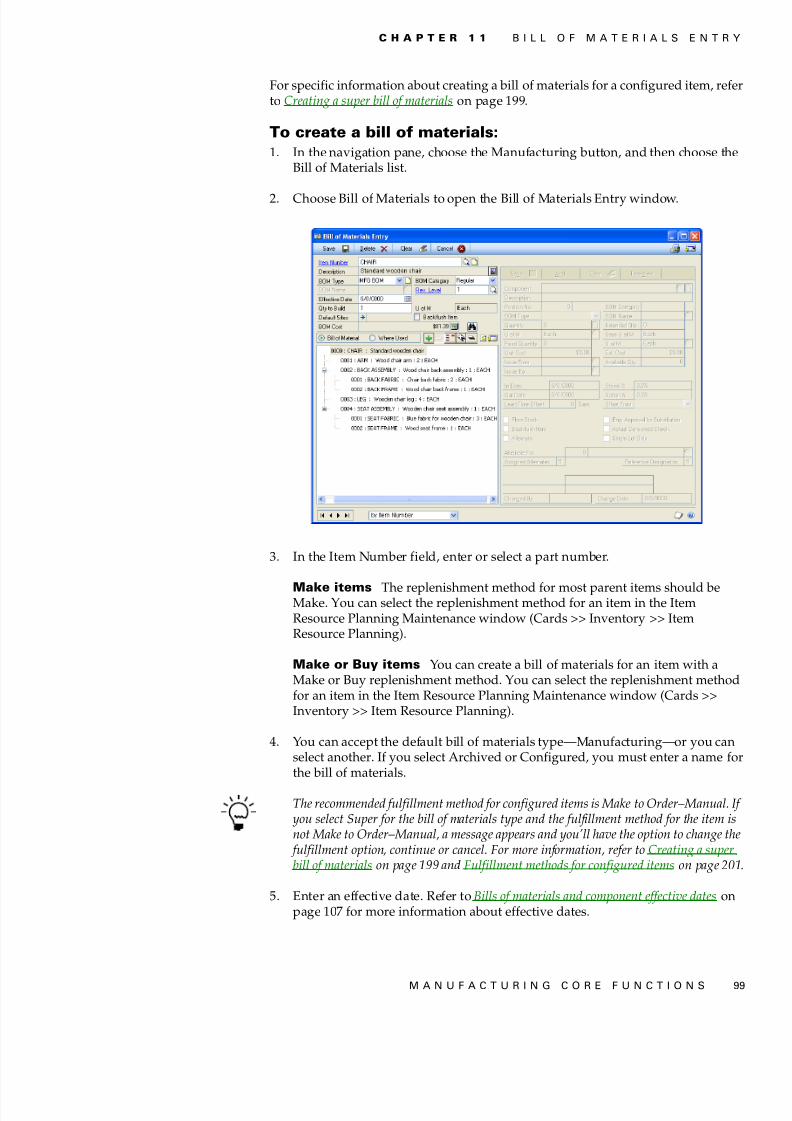
8/10/2019 Dynamics GP MFG Core Functions
http://slidepdf.com/reader/full/dynamics-gp-mfg-core-functions 109/256
M A N U F A C T U R I N G C O R E F U N C T I O N S 99
C H A P T E R 1 1 B I L L O F M A T E R I A L S E N T R Y
For specific information about creating a bill of materials for a configured item, referto Creating a super bill of materials on page 199 .
To create a bill of materials:1. In the navigation pane, choose the Manufacturing button, and then choose the
Bill of Materials list.
2. Choose Bill of Materials to open the Bill of Materials Entry window.
3. In the Item Number field, enter or select a part number.
Make items The replenishment method for most parent items should beMake. You can select the replenishment method for an item in the ItemResource Planning Maintenance window (Cards >> Inventory >> ItemResource Planning).
Make or Buy items You can create a bill of materials for an item with aMake or Buy replenishment method. You can select the replenishment methodfor an item in the Item Resource Planning Maintenance window (Cards >>Inventory >> Item Resource Planning).
4. You can accept the default bill of materials type—Manufacturing—or you canselect another. If you select Archived or Configured, you must enter a name forthe bill of materials.
The recommended fulfillment method for configured items is Make to Order–Manual. I you select Super for the bill of materials type and the fulfillment method for the item inot Make to Order–Manual, a message appears and you’ll have the option to change th fulfillment option, continue or cancel. For more information, refer toCreating a superbill of materials on page 199 and Fulfillment methods for configured items on page 201
5. Enter an effective date. Refer to Bills of materials and component effective dates onpage 107 for more information about effective dates.

8/10/2019 Dynamics GP MFG Core Functions
http://slidepdf.com/reader/full/dynamics-gp-mfg-core-functions 110/256
P A R T 3 B I L L O F M A T E R I A L S
100 M A N U F A C T U R I N G C O R E F U N C T I O N S
6. Accept the default bill of materials category—Regular—or select another.
If you’re creating a bill of materials for a subassembly and you don’t want to have tocreate separate manufacturing orders for the item when it’s needed for higher-orderassemblies, be sure the category is Phantom. Although the purpose of creating a phantom bill of materials is to create a subassembly that doesn’t need to be built with aseparate manufacturing order, you also can create manufacturing orders for phantom
items, if needed.
7. Accept the default revision level—1—or enter another. Refer to Chapter 17,“Revisions and archived bills,” for more information about revision levels.
8. Decide whether to backflush all components in this bill of materials.Backflushing means that the component quantities aren’t issued to workcenters, but that they are accounted for when a manufacturing order associatedwith this bill of materials is closed.
Refer toBackflushing bill of materials components on page 104 for more informationabout backflushing options.
• Mark Backflush Item in the left pane to have component quantities for allitems in this bill of materials backflushed. You can change this setting forspecific components later in the right pane of the window.
• Unmark Backflush if materials should not be backflushed.
9. You can enter the default issue-to and issue-from locations for the componentsin the bill of materials. Click the expansion button on the Default Sites field toopen the Bill of Materials Defaults window, where you can enter the sites.
The issue-from site is the inventory site components are taken from. The issue-to site is the work center components are delivered to. You can override thedefault sites on a component-by-component basis, if needed.
10. To add an item to the bill of materials, click the button with the green plus sign just above the tree view. Fields in the right pane of the window will becomeavailable.
11. A message appears. Choose Yes to save your changes and to continue.
12. Enter or select a component to add to the bill of materials.
Refer to Requirements for bill of materials components on page 104 for moreinformation about which items can be added to a bill of materials.
13. Accept the position number assigned to the component or change it. Refer toPosition numbers on page 89 for more information.
14. Enter information about the component in fields in the right pane.
15. Click Add to add the component information to the tree view in the left pane.
If you manually assigned a position number that is already assigned to a component onthis bill of materials, you’ll be able to choose a different position number for thiscomponent or have the existing number reassigned. Refer toPosition numbers on page 89 for more information.
8/10/2019 Dynamics GP MFG Core Functions
http://slidepdf.com/reader/full/dynamics-gp-mfg-core-functions 111/256
M A N U F A C T U R I N G C O R E F U N C T I O N S 101
C H A P T E R 1 1 B I L L O F M A T E R I A L S E N T R Y
16. Repeat steps 12 through 15 to continue adding items to the bill of materials.
17. Choose Tree view.
18. Choose Save to save the bill of materials.
Adding a component to a bill of materials
Use the Bill of Materials Entry window to add components to an existing bill ofmaterials. Refer to Requirements for bill of materials components on page 104 forinformation about what items can be bill of materials components.
To add a component to a bill of materials:1. Open the Bill of Materials Entry window.
(Cards >> Manufacturing >> Bill of Materials)
2. Enter or select the item with the bill of materials to add components to. Themanufacturing bill of materials will be displayed, but you can select any other bill of materials for the selected item.
3. If you select Archived or Configured, enter or select the appropriate BOMName.
4. Be sure the highlight in the tree view is on the parent item, and click the greenplus sign button above the tree view.
5. Enter or select the new component in the right pane.
6. Accept the position number assigned to the component or change it. Refer toPosition numbers on page 89 for more information.
7. Enter other information about the component in the fields in the right pane. You
can override the default settings for the issue-to and issue-from sites, enter thequantity of the component needed for the bill of materials, and make otherchanges, as needed.
8. Click Add.
If you manually assigned a position number that is already assigned to a component onthis bill of materials, you’ll be able to choose a different position number for thiscomponent or have the existing number reassigned. Refer toPosition numbers on page 89 for more information.
9. Continue with steps 5 through 8 for each component to add to the bill.
10. Click Tree view, and then click Save.

8/10/2019 Dynamics GP MFG Core Functions
http://slidepdf.com/reader/full/dynamics-gp-mfg-core-functions 112/256
P A R T 3 B I L L O F M A T E R I A L S
102 M A N U F A C T U R I N G C O R E F U N C T I O N S
Changing component details
Use the Bill of Materials Entry window to change component information, such aswhether all of the component requirements for a manufacturing order must betaken from a single lot or if the item requirements should be backflushed.
To change component details:1. Open the Bill of Materials Entry window.
(Cards >> Manufacturing >> Bill of Materials)
2. Enter or select the finished good or subassembly with the bill of materials thatincludes items you want to work with. The manufacturing bill of materials will be displayed by default, but you can select any other bill of materials thatincludes the item.
3. If you selected an archived or configured bill of materials, enter or select theappropriate BOM Name.
4. In the tree view, select a component.
5. Click the select item expansion button. Information about the component will be displayed in the right pane of the window.
6. Change information in the window, as needed.
7. Choose Save and close the window.
Deleting a component from a bill of materials
Use the Bill of Materials Entry window to delete a component from an existing billof materials.
To delete a component from a bill of materials:1. Open the Bill of Materials Entry window.
(Cards >> Manufacturing >> Bill of Materials)
2. Enter or select the item with the bill of materials to remove components from.The manufacturing bill of materials will be displayed by default, but you canselect any other bill of materials for the selected item.
3. Select the BOM Type—Engineering, Archived, Configured, or Super. If youselect Archived or Configured, enter or select the appropriate BOM Name.
4. In the tree view, mark the component to delete.
5. Click the remove item from BOM button. The button has a red minus sign on it.
6. Repeat steps 4 and 5 to delete all unneeded components.
7. Choose Save and close the window.

8/10/2019 Dynamics GP MFG Core Functions
http://slidepdf.com/reader/full/dynamics-gp-mfg-core-functions 113/256
M A N U F A C T U R I N G C O R E F U N C T I O N S 103
C H A P T E R 1 1 B I L L O F M A T E R I A L S E N T R Y
Modifying a component bill of materials
If you’re working with a multi-level bill of materials, your final product will includecomponents that have their own bills of materials. You also can use the Bill ofMaterials Entry window to modify the bills of materials of the components.
To modify a component bill of materials:1. In the navigation pane, choose the Manufacturing button, and then choose the
Bill of Materials list.
2. Mark an item.
3. Choose Edit to open the Bill of Materials Entry window.
4. Enter or select an item that includes a subassembly. The manufacturing bill ofmaterials will be displayed, but you can select any other bill of materials for theselected item.
5. Select the BOM Type—Engineering, Archived, Configured, or Super. If you
select Archived or Configured, enter or select the appropriate BOM Name.6. In the scrolling window, click the subassembly component item.
Information about the subassembly bill of materials will be displayed in the leftpane, and information about its components will be displayed in the right pane.
7. Modify the subassembly bill of materials using any of the following procedures.
• Adding a component to a bill of materials on page 101• Deleting a component from a bill of materials on page 102• Changing component details on page 102
8. Choose Save and close the window.
Removing a bill of materials
Use the Bill of Materials Entry window to remove a bill of materials.
To remove a bill of materials:1. Open the Bill of Materials Entry window.
(Cards >> Manufacturing >> Bill of Materials)
2. Enter or select the item with the bill of materials to remove. The manufacturing bill of materials will be displayed by default, but you can select any other bill of
materials for the selected item.3. Select the BOM Type—Engineering, Archived, Configured, or Super. If you
select Archived or Configured, enter or select the appropriate BOM Name.
4. Choose Delete and close the window.

8/10/2019 Dynamics GP MFG Core Functions
http://slidepdf.com/reader/full/dynamics-gp-mfg-core-functions 114/256
P A R T 3 B I L L O F M A T E R I A L S
104 M A N U F A C T U R I N G C O R E F U N C T I O N S
Requirements for bill of materials components
Not all items can be components of all bills of materials. Refer to the followingguidelines.
• You can add a standard cost component to the bill of materials for an actual costfinished good.
• You can’t add an actual cost component to a bill of materials for a standard costfinished good.
• You can’t add an item with the Kit type to a bill of materials.
• If you add an item with the Services, Miscellaneous, or Flat Fee type to a bill ofmaterials, those items must be backflushed.
• Average cost valuation methods can be used for finished goods or components.If you’re working in an average cost environment, however, you should be surethat system settings prevent you from allowing your inventory to be negative.Refer to Setting up manufacturing order processing in Chapter 4, “Manufacturingproduction functions setup ,” in the Manufacturing Setup documentation formore information.
• The same item number can be listed multiple times as a component on a bill ofmaterials, but it must have a different position number for each time it is listed.
• An item only can exist once on a super bill of materials, regardless of theposition number.
Backflushing bill of materials components
Backflushing is a method of accounting for the use of resources—labor, machine
time, and items—based on standards you’ve defined. Transactions to account forthe use of backflushed resources are created when finished goods are received.
For example, your business might include a procedure for painting part numbers onitems. The paint used for the procedure is minimal, so you estimate that 0.01 gramsof paint are used per finished item. When you create the bill of materials for thefinished item, you include the paint as a component of the finished item and youmark the item to be backflushed. Later, when you receive finished goods for amanufacturing order based on the bill of materials, inventory transactions will becreated to account for the use of paint, according to the bill of materials and themanufacturing order quantity.
Backflushing is typically used when a component is used in very small quantities—
such as in the paint example—or when the cost of the component isn’t significantenough to warrant the expense of issuing and tracking components.
You can backflush entire bills of materials or specific components. You must backflush items whose Item Type (from the Item Maintenance window) is Services,Flat Fee, or Miscellaneous, or if the item is floor stock. You also can backflushphantom parent items or components of phantom parent items.
To backflush all components Mark Backflush Components in the Bill ofMaterials Entry window (Cards >> Manufacturing >> Bill of Materials).

8/10/2019 Dynamics GP MFG Core Functions
http://slidepdf.com/reader/full/dynamics-gp-mfg-core-functions 115/256
M A N U F A C T U R I N G C O R E F U N C T I O N S 105
C H A P T E R 1 1 B I L L O F M A T E R I A L S E N T R Y
To backflush only specif ic components Mark the Backflush option in theBill of Materials Entry window for all the components that should be backflushed.
When an item is marked as backflushed in the Bill of Materials Entry window, theBackflush option in the Picklist window automatically will be marked.
Shrinkage for bill of materials components
When you enter or select an item to add to a bill of materials, the default shrinkagepercentage for the item typically comes from the Item Resource PlanningMaintenance window.
However, different rules apply if the replenishment method for the item is Make orif the item is a phantom item. Refer to the following table for more information.
Regardless of the default shrinkage percentages, you can change them in the Shrink% field for each component, if needed.
How floor stock costs are applied
Floor stock is a designation for items that don’t need to be issued for amanufacturing order. Usually, the cost of floor stock items is not applied to themanufacturing order, but to an expense account you specify.
To apply costs to an expense account When you use the Floor Stockoptions in Manufacturing—either in the Item Engineering Data window when youenter item information or in the Bill of Materials Entry window when you create a bill of materials—the costs of the floor stock items are applied to an expense accountyou specify in the Manufacturing Order Preference Defaults window.
To apply costs to a manufacturing order Some companies prefer to havethe costs of floor stock applied to the manufacturing order, but still don’t want tohave to issue the floor stock items. To use this kind of floor stock, be sure all floorstock options are cleared. You might need to check both the Item Engineering Datawindow for the item and the Bill of Materials Entry window for the bill of materials.Then specify the same site for the issue-from and issue-to sites for the componentitem in the bill of materials.
If you mark the floor stock option, the item won’t be included in standard cost rollupcalculations.
ReplenishmentMethod Default shrinkage percentage
Buy Comes from the Item Resource Planning Maintenance window.
Make No default shrinkage percentage is supplied.
Make or Buy A message appears when you add a make or buy item to a bill ofmaterials, and you’ll have the option to select the bill of materials typefor the item.If you choose Yes—if quantities of this item should be made—you’llneed to select a bill of materials type. If you choose Phantom, the defaultshrinkage percentages for the components of the phantom item willcome from the Item Resource Planning Maintenance window.If you choose No—if quantities of the item should be purchased—nodefault shrinkage percentage is supplied.

8/10/2019 Dynamics GP MFG Core Functions
http://slidepdf.com/reader/full/dynamics-gp-mfg-core-functions 116/256

8/10/2019 Dynamics GP MFG Core Functions
http://slidepdf.com/reader/full/dynamics-gp-mfg-core-functions 117/256
M A N U F A C T U R I N G C O R E F U N C T I O N S 107
C H A P T E R 1 1 B I L L O F M A T E R I A L S E N T R Y
Verifying alternate assignments
Use the BOM Component Assigned Alternates window to see which secondaryitems have been assigned to be alternates for a primary item in a bill of materials.
To verify alternate assignments:1. Open the Bill of Materials Entry window.
(Cards >> Manufacturing >> Bill of Materials)
2. Enter or select the finished good item number.
3. Select the BOM type and, if needed, the BOM name for the bill you’re addingalternate information to.
4. In the tree view, click the component item that has one or more substitutes.
5. Choose the Assigned Alternates expansion button to open the BOMComponent Assigned Alternates window.
Refer toSpecifying an alternate component in a bill on page 106 for more informationabout assigning alternates.
6. View the information.
7. When you’ve finished, close the window.
Bills of materials and component effective dates
Manufacturing Bill of Materials includes two types of effective dates. You can enteran effective date for the bill of materials record, and you can enter separate effectivein and out dates for each component in the bill of materials.
Bill of materials effective dates
The effective date for a bill of materials is the date when the bill of materials isavailable for use in production. No manufacturing orders can be based on a bill ofmaterials before the effective date for the bill of materials, which you can enter inthe Effective Date field in the left pane of the Bill of Materials Entry window.
For example, suppose a manufacturing company has designed a new radio. Thecompany has submitted the plans for the radio to an agency, such as the FederalCommunications Commission or Underwriters Laboratories. The company mightwant to prepare for production even though no manufacturing orders can be startedfor the radios until the approvals are received. The company could enter a bill ofmaterials effective date that is far in the future, and then change the effective date

8/10/2019 Dynamics GP MFG Core Functions
http://slidepdf.com/reader/full/dynamics-gp-mfg-core-functions 118/256
P A R T 3 B I L L O F M A T E R I A L S
108 M A N U F A C T U R I N G C O R E F U N C T I O N S
when the approvals are received. This allows the company to set up the bill ofmaterials and other Manufacturing documents beforehand, so production can beginquickly when the approvals are received.
Component effective datesYou might need to add or remove components from a bill of materials on a specificdate. For example, a toy manufacturer might have to add a safety warning label to atoy to meet new safety regulations on a certain date.
You can enter an In Date and an Out Date for each component in the Bill ofMaterials Entry window.
To add a component on a certain date Enter or select the date thecomponent should be added to the bill of materials in the In Dt. (In Date) field in theBill of Materials Entry window.
To remove a component on a certain date Enter or select the date thecomponent should be removed from the bill of materials in the Out Dt. (Out Date)field in the Bill of Materials Entry window.
If the Out Date for a component is after the required date for a picklist, then the componentwon’t be included in the picklist. Refer to How required dates are calculated in Chapter 6,“Manufacturing order overview,” in the Manufacturing Production Functionsdocumentation for more information.
Effects of engineering changes on bills
If your company is using Engineering Change Management, you can setpreferences so messages will appear if you modify the bill of materials for an itemthat is being changed.
To view the Engineering Change Request, use the Engineering Change Request -
View Only window. Refer to Handling ECM notifications in other modules in Chapter10, “Engineering change inquiries ,” in the Manufacturing Management Functionsdocumentation for more information.

8/10/2019 Dynamics GP MFG Core Functions
http://slidepdf.com/reader/full/dynamics-gp-mfg-core-functions 119/256
M A N U F A C T U R I N G C O R E F U N C T I O N S 109
C H A P T E R 1 1 B I L L O F M A T E R I A L S E N T R Y
Adding user-defined information to bills
You can add up to two fields of information for each component in each bill ofmaterials. Refer to Setting up bills of materials system settings in Chapter 3,“Manufacturing core functions setup ,” in the Manufacturing Setup documentationfor information about creating the labels that will appear on the user-defined fields.
Use the Bill of Materials Entry window to add user-defined information to bills ofmaterials.
To add user-defined information to bills:1. Open the Bill of Materials Entry window.
(Cards >> Manufacturing >> Bill of Materials)
2. Enter or select the item with the bill of materials to add component details to.The manufacturing bill of materials will be displayed, but you can select anyother bill of materials for the selected item.
3. Select the BOM type—Engineering, Archived, Configured, or Super. If you
selected Archived or Configured, enter or select the appropriate BOM Name.4. In the tree view, highlight the component item to add details to.
5. Enter information in the fields for user-defined fields.
6. Choose Save and close the window.
Accounting for by-products in a bill of materials
Some manufacturing processes result in by-products—secondary products that areproduced when a primary product is produced, usually at a predictable rate. Forexample, a lumber-milling business that cuts trees to specific sizes would haveleftover pieces. Those leftover pieces could be scrapped, or they could be ground tosawdust for use in making pressed-wood products, such as plywood.
You can use the Bill of Materials Entry window to account for the by-productsproduced by your processes. To do this, add the by-product to the bill of materialsas if the by-product item were a component of the bill of materials— expressing theamount of by-product produced as a negative number. Refer to Adding a component to a billof materials on page 101 .
For example, suppose a metal fabrication business produces one of its items bycutting shapes from sheets of metal. The metal that is left over from the process— between the cutout shapes—is a by-product that the business sells to a recyclingcenter. Past experience shows that for every assembly cut from the metal,approximately one pound of scrap metal is produced as a by-product. To reflect the by-product amounts produced, the bill of materials for a single assembly wouldinclude an entry for -1 pounds of by-product. When finished goods are received fora manufacturing order based on that bill of materials, material transactions arecreated to add one pound of by-product to inventory for each assembly.
For more information about accounting for by-product quantities produced withmanufacturing orders, refer to Manufacturing order receipts with by-products in Chapter13, “Receipts and closing,” in the Manufacturing Production Functions documentation.

8/10/2019 Dynamics GP MFG Core Functions
http://slidepdf.com/reader/full/dynamics-gp-mfg-core-functions 120/256

8/10/2019 Dynamics GP MFG Core Functions
http://slidepdf.com/reader/full/dynamics-gp-mfg-core-functions 121/256
M A N U F A C T U R I N G C O R E F U N C T I O N S 111
Chapter 12: Links to routingsThe component requirements in bills of materials are like the list of ingredients in arecipe, and routings are the instructions that explain how to use the components.Components and the routing information is all you need to produce a finished itemin a manufacturing facility.
To produce a finished item, you can specify when certain components are needed inthe process. You can use the BOM Routing Link window to create links to bills ofmaterials and routings. You also can create links to bills of materials and routingsfor each position number on the bill of materials, even if the same component islisted multiple times with different position numbers.
Linking bills of materials and routings can help you manage the delivery of yourcomponent items. If you’re building a house, for example, you won’t want all thenails delivered to the site the first day—you’ll want them delivered as they areneeded. If you link your bills of materials and routings, you can more closely matchthe delivery of components to the work center when they are needed and wherethey are needed.
MRP Linking bills of materials and routing sequences helps MaterialRequirements Planning (MRP) and picklist operations indicate material use at theexact step in the process where those materials are required. This facilitates Just-In-Time (JIT) material planning.
Sales Configurator Links between bills of materials and routings are requiredfor using the Manufacturing Sales Configurator. Refer to Chapter 24, “Bills androutings ,” for more information about using links with the Sales Configurator.
Outsourcing If you’re using outsourcing, we recommend that you use links between bills of materials and routing sequences. This ensures that purchase ordersare released and shipments are suggested at the appropriate time.
To use the BOM Routing Link window, you also must be using Manufacturing OrderProcessing, which includes routings windows.
This information is divided into the following sections:
• Linking component usage to a routing sequence• Modifying bill of materials and routing links• Unlinking components and routing sequences• Viewing link information
Linking component usage to a routing sequence
A routing sequence is the smallest part of a routing. It includes information abouthow and where a task should be done to build an item. Routing sequences alsousually include information about the required labor codes and machines needed tocomplete the task, as well as information about the time needed to complete thetask.

8/10/2019 Dynamics GP MFG Core Functions
http://slidepdf.com/reader/full/dynamics-gp-mfg-core-functions 122/256
P A R T 3 B I L L O F M A T E R I A L S
112 M A N U F A C T U R I N G C O R E F U N C T I O N S
When a manufacturing order is created, raw material shrinkage is reflected in thepicklist quantities if the manufacturing order uses a scheduling preference thatapplies raw material shrinkage. Therefore, if you’re linking component quantitiesthat have raw material shrinkage, link only the component quantity that would beneeded if there were no shrinkage. Otherwise, your picklist quantities could begreater than what is actually needed.
Use the BOM Routing Link window to complete this procedure.
To link component usage to a routing sequence:1. Open the BOM Routing Link window.
(Transactions >> Manufacturing >> Bill of Materials >> BOM/Rtg Link)
2. Enter or select the parent part item with the bill of materials and routing to link.If the parent part has more than one bill of materials, use the BOM Type andName fields to choose the appropriate bill of materials.
3. Enter or select the routing that includes the routing sequence to link to the billof materials.
4. In the Routing Sequence scrolling window, mark the sequence to link to thecomponent information. A black dot appears when you’ve marked a sequence.
5. In the Component Item Number scrolling window, mark the componentnumber to link to the marked sequence. A black dot appears when you’vemarked a component.
6. Mark the option that determines what portion of the component quantity tolink to the routing sequence.
All Mark All to link the entire component quantity to the sequence.
Percent of Total Mark Percent of Total to specify the component quantity to be linked as a percentage.
Number of Total Mark Number of Total to specify the component quantityto be linked as a number of units.

8/10/2019 Dynamics GP MFG Core Functions
http://slidepdf.com/reader/full/dynamics-gp-mfg-core-functions 123/256

8/10/2019 Dynamics GP MFG Core Functions
http://slidepdf.com/reader/full/dynamics-gp-mfg-core-functions 124/256
P A R T 3 B I L L O F M A T E R I A L S
114 M A N U F A C T U R I N G C O R E F U N C T I O N S
4. Enter or select the routing that includes the routing sequence to link to this billof materials.
5. In the lower scrolling window, locate the combination of component androuting sequence to change. Choose the expansion button for the line to openthe Set Amount window.
6. Determine what portion of the component quantity to link to the routingsequence.
All Mark All to link the entire component quantity to the sequence.
Percent of Total Mark Percent of Total to specify the component quantity to be linked as a percentage.
Number of Total Mark Number of Total to specify the component quantityto be linked as a number of units.
7. If you marked Percent of Total or Number of Total, enter the percentage ornumber of units.
8. Choose OK. The routing and component information and the amount of thecomponent linked to the sequence will be added to the lower scrolling windowin the BOM Routing Link window. Your changes will be saved when they’redisplayed in the lower scrolling window.
9. Close the window.
Unlinking components and routing sequences
Use the BOM Routing Link window to unlink components and routing sequences.
To unlink components and routing sequences:1. Open the BOM Routing Link window.
(Transactions >> Manufacturing >> Bill of Materials >> BOM/Rtg Link)
2. Enter or select the item with the bill of materials and routing link to remove. Ifthe item has more than one bill of materials, use the BOM Type and Name fieldsto choose the appropriate bill of materials.
3. Enter or select the routing that includes the routing sequence to unlink from this bill of materials.
4. In the lower scrolling window, highlight the link to delete. Choose the deleteicon button. Your changes automatically will be saved.
5. Close the window.

8/10/2019 Dynamics GP MFG Core Functions
http://slidepdf.com/reader/full/dynamics-gp-mfg-core-functions 125/256
M A N U F A C T U R I N G C O R E F U N C T I O N S 115
C H A P T E R 1 2 L I N K S T O R O U T I N G S
Viewing link information
You can use the drop-down list at the bottom of the BOM Routing Link window toview more information about the links that have been created for a specific bill ofmaterials and routing. Refer to the following tables for more information about howyou can use the drop-down list to learn more about the links.
Information in the following tables assumes that an item number is displayed in theBOM Routing Link window.
List selection is Item NumberRefer to the table for more information.
List selection is Item & RoutingRefer to the table for more information.
List selection is Item & Component PartRefer to the table for more information.
List selection is Item, Routing & Component PartRefer to the table for more information.
Routing Sequences Components Bottom scrolling windowwill display:
None selected None selected None selected All linked sequences
Routing Sequences Components Bottom scrolling windowwill display:
None selected None selected None selected Nothing
Selected None selected None selected Only linked sequences from theselected routing
Routing Sequences Components Bottom scrolling windowwill display:
None selected None selected None selected Nothing
None selected None selected One or more ismarked
Only linked sequences for themarked item
Routing Sequences Components Bottom scrolling windowwill display:
None selected None selected None selected Nothing
Selected None selected One or more ismarked
Only linked sequences in theselected routing for the markeditem

8/10/2019 Dynamics GP MFG Core Functions
http://slidepdf.com/reader/full/dynamics-gp-mfg-core-functions 126/256
P A R T 3 B I L L O F M A T E R I A L S
116 M A N U F A C T U R I N G C O R E F U N C T I O N S
List selection is Item, Routing & SequenceRefer to the table for more information.
Routing Sequences Components Bottom scrolling window willdisplay:
None selected None selected None selected Nothing
Selected One or more ismarked
None selected Only linked sequences in the selectedrouting for the marked sequence(s)

8/10/2019 Dynamics GP MFG Core Functions
http://slidepdf.com/reader/full/dynamics-gp-mfg-core-functions 127/256
M A N U F A C T U R I N G C O R E F U N C T I O N S 117
Chapter 13: Bill of Materials copiesYou can create a new bill of materials by using the Bill of Materials Entry window.To create several similar bills of materials, you can copy and modify the original billof materials.
This information is divided into the following sections:
• Copying a bill of materials• Removing copied component requirements
Copying a bill of materials
You can use the BOM Copy window to create multiple bills of materials for thesame item. For example, you might have an engineering bill of materials for aproduct that has been in development but that is ready for production. You cancreate the manufacturing bill of materials—which is the bill of materials forproduction use—by copying the engineering bill of materials. This is useful becauseengineers can continue to use the engineering bill of materials while maintaining a
separate bill of materials for use in production.
You also can use a copy of an existing bill of materials to be the basis of a bill ofmaterials for a new item. For example, suppose a jewelry manufacturer has a bill ofmaterials for a diamond necklace, but wants to use the same setting for an emeraldnecklace. The manufacturer could create a copy of the bill of materials for thediamond necklace, remove the requirements for diamonds and add newrequirements for emeralds.
Links between bill of materials components and routing sequences are not copied when yocopy a bill of materials.
Use the BOM Copy window to create new bills of materials based on existing billsof materials.
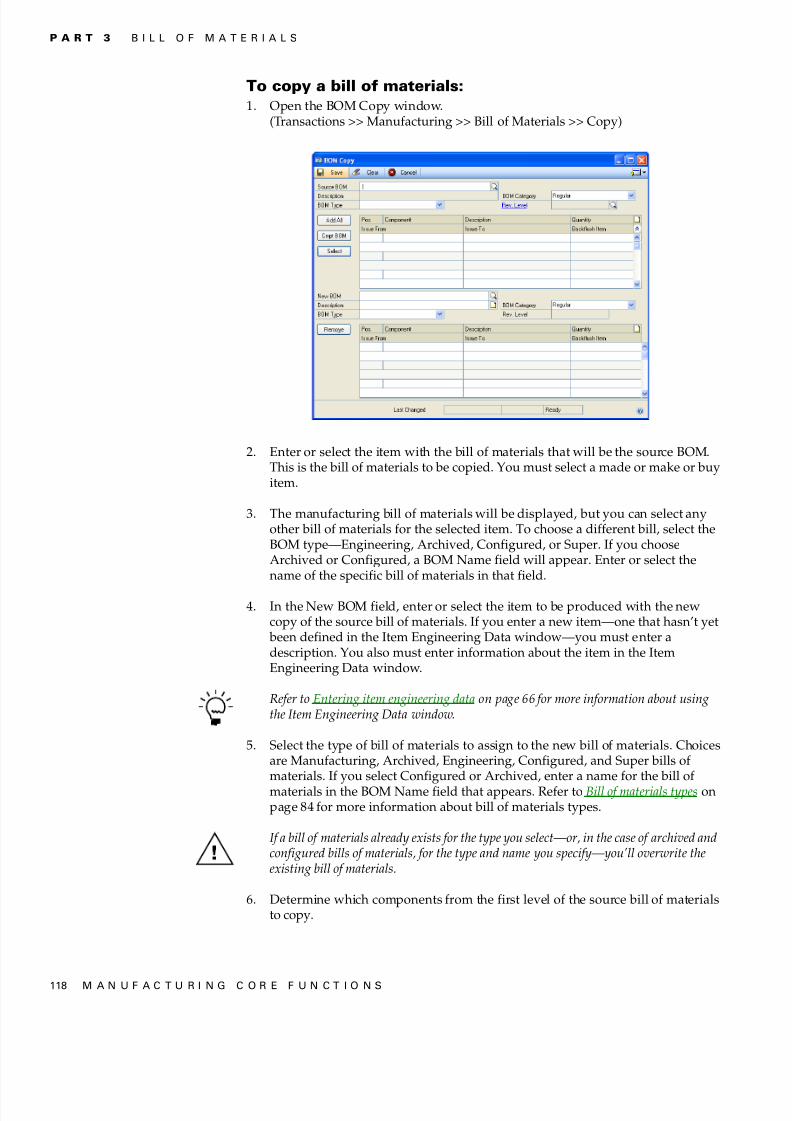
8/10/2019 Dynamics GP MFG Core Functions
http://slidepdf.com/reader/full/dynamics-gp-mfg-core-functions 128/256
P A R T 3 B I L L O F M A T E R I A L S
118 M A N U F A C T U R I N G C O R E F U N C T I O N S
To copy a bill of materials:1. Open the BOM Copy window.
(Transactions >> Manufacturing >> Bill of Materials >> Copy)
2. Enter or select the item with the bill of materials that will be the source BOM.This is the bill of materials to be copied. You must select a made or make or buyitem.
3. The manufacturing bill of materials will be displayed, but you can select anyother bill of materials for the selected item. To choose a different bill, select theBOM type—Engineering, Archived, Configured, or Super. If you chooseArchived or Configured, a BOM Name field will appear. Enter or select thename of the specific bill of materials in that field.
4. In the New BOM field, enter or select the item to be produced with the newcopy of the source bill of materials. If you enter a new item—one that hasn’t yet been defined in the Item Engineering Data window—you must enter adescription. You also must enter information about the item in the ItemEngineering Data window.
Refer toEntering item engineering data on page 66 for more information about usingthe Item Engineering Data window.
5. Select the type of bill of materials to assign to the new bill of materials. Choicesare Manufacturing, Archived, Engineering, Configured, and Super bills ofmaterials. If you select Configured or Archived, enter a name for the bill ofmaterials in the BOM Name field that appears. Refer to Bill of materials types onpage 84 for more information about bill of materials types.
If a bill of materials already exists for the type you select—or, in the case of archived andconfigured bills of materials, for the type and name you specify—you’ll overwrite theexisting bill of materials.
6. Determine which components from the first level of the source bill of materialsto copy.

8/10/2019 Dynamics GP MFG Core Functions
http://slidepdf.com/reader/full/dynamics-gp-mfg-core-functions 129/256
M A N U F A C T U R I N G C O R E F U N C T I O N S 119
C H A P T E R 1 3 B I L L O F M A T E R I A L S C O P I E S
• To copy all component requirements, choose Add All.
• To copy only a specific component and its quantity information, mark thecomponent record in the upper scrolling window and choose Select. Addadditional components, as needed.
7. To copy component requirements from any subassemblies in the source bill of
materials, mark the subassembly in the upper scrolling window and chooseCmpt BOM. The component requirements for the subassembly will bedisplayed in the upper scrolling window.
Each instance of the component position number for the component from theexisting bill of materials will be copied to the new bill of materials. You can'tchange these position numbers.
8. Repeat steps 6 and 7 to add additional subassembly components to your new bill of materials.
9. Review the component requirements in the lower scrolling window.
• To remove any of the component requirements, refer to Removing copiedcomponent requirements on page 119.
• To add component requirements from another bill of materials, select a newsource bill of materials and repeat this procedure.
10. Choose Save.
After you’ve defined the new bill of materials, you can modify it using the Bill of Materials Entry window.
Removing copied component requirements
Before you save a new bill of materials you’ve created in the BOM Copy window,you can remove any components that aren’t needed. Use the BOM Copy window tocomplete this procedure
The following procedure assumes that you’ve copied component requirements intoa new bill of materials using the BOM Copy window, but that you haven’t saved thenew bill of materials yet. If you have saved the new bill of materials, you must usethe Bill of Materials Entry window to remove components. Refer to Deleting acomponent from a bill of materials on page 102 for more information about thatprocedure.
To remove copied component requirements:1. In the lower scrolling window of the BOM Copy window, mark the component
requirement to remove from the new bill of materials.
2. Choose Remove.
3. Mark and remove any additional components.
4. Choose Save and close the window.

8/10/2019 Dynamics GP MFG Core Functions
http://slidepdf.com/reader/full/dynamics-gp-mfg-core-functions 130/256
120 M A N U F A C T U R I N G C O R E F U N C T I O N S

8/10/2019 Dynamics GP MFG Core Functions
http://slidepdf.com/reader/full/dynamics-gp-mfg-core-functions 131/256
M A N U F A C T U R I N G C O R E F U N C T I O N S 121
Chapter 14: Standard costing revaluationsStandard costing is an accounting method used by some businesses to value theirinventories. A company that uses standard costing—also known as periodiccosting—revalues its inventory periodically to reflect significant changes in the costof its items.
Manufacturing includes windows and features you can use to enter and adjuststandard costing information. You can define the standard costs of raw materials,subassemblies, and finished goods. You can change standard cost information andthen “roll up” those new costs so they’re reflected throughout your system.
Most of the information in this document explains how to change material costs. Forinformation about changing labor or machine costs or the overhead amounts associated witthem, refer to Chapter 1, “Machines and labor codes.”
This information is divided into the following sections:
• Standard costing windows
• Comparison of rolling up and revaluing• Entering pending changes for material costs• Overriding a pending standard cost change• Rolling up material and overhead cost changes• Verifying rollup results• Using scenarios to make standard cost changes• Proposing changes to material fixed overhead• Proposing changes to material variable overhead• Interpreting the tree view• Revaluing affected inventory items• Revaluing all inventory items• Specifying the standard quantity for a finished item
Standard costing windowsManufacturing includes several windows you can use to enter and update standardcosting information for items. Basically, you can choose from two methods forupdating standard costs: using the Standard Item Material Costs window, theStandard Cost Maintenance window, and the Roll Up and Revalue window, orusing the Standard Cost Changes window. You can use either method or bothmethods, but you need to be aware of the limitations of each to get the expectedresults.
Method OneThe first of the available methods for rolling up and revaluing standard costs
involves three windows. This method has two advantages:• You can enter an effective date for the pending cost information you enter.
When you roll up and revalue the changes, only the pending changes that havean effective date that is the same as or earlier than the effective date for the rollup or revalue process will be reflected in the standard cost changes.
• You can override the cost and overhead amounts for any item before thepending amounts are reflected in new material costs.

8/10/2019 Dynamics GP MFG Core Functions
http://slidepdf.com/reader/full/dynamics-gp-mfg-core-functions 132/256
P A R T 3 B I L L O F M A T E R I A L S
122 M A N U F A C T U R I N G C O R E F U N C T I O N S
Refer to the following information for an overview of the steps involved in thismethod.
Standard Item Material Costs window You can use this window to enterpending changes for costs, fixed overhead, and variable overhead for a bought item.You also can enter a date when the changes should become effective. Refer toEntering pending changes for material costs on page 123 .
Standard Cost Maintenance window As an optional step, you can viewinformation about how the proposed changes would affect the cost of a make or buyitem. For bought items, the pending material cost is displayed, as well as thepending variable and fixed overhead. Information for these categories is displayedfor make items, along with information about labor and machine costs, and theassociated fixed overhead and variable overhead costs. In the Standard CostMaintenance window, you can override the amount in any category, entering adifferent amount to be used when the standard cost items are revalued. Refer toOverriding a pending standard cost change on page 124.
Roll Up and Revalue window If you’ve entered standard cost changes in theStandard Item Material Costs window, you can roll up and revalue those entrieswith the Roll Up and Revalue window. Refer to Rolling up material and overhead costchanges on page 125 and Revaluing all inventory items on page 131 .
Method TwoThe second method involves using the Standard Cost Changes window, where youcan enter changes for the standard costs of materials, and you can edit the formulasfor calculating fixed and variable overheads.
If you use this method, you can experiment with different values for standard costchanges, viewing their effect on the cost of different components. You also can rollup and revalue items in this window to complete the process.
For more information about using the Standard Cost Changes window, refer to thefollowing topics:
• Using scenarios to make standard cost changes on page 127• Specifying the standard quantity for a finished item on page 131• Proposing changes to material fixed overhead on page 129• Proposing changes to material variable overhead on page 130• Interpreting the tree view on page 130• Revaluing affected inventory items on page 131
Comparison of rolling up and revaluing
Two of the main processes of standard costing are rolling up and revaluing. It’simportant to understand the difference between these two operations and how theyare completed in Manufacturing.
Rolling up Rolling up is the process of applying calculations based on changes tostandard cost information to items. If you change the cost of a raw material that ispart of several subassemblies and finished goods, “rolling up” that change willresult in calculations that will determine the new standard costs of thesubassemblies and finished goods. Rolling up helps you to view the effects ofstandard cost changes before applying the costs to items.

8/10/2019 Dynamics GP MFG Core Functions
http://slidepdf.com/reader/full/dynamics-gp-mfg-core-functions 133/256
M A N U F A C T U R I N G C O R E F U N C T I O N S 123
C H A P T E R 1 4 S T A N D A R D C O S T I N G R E V A L U A T I O N S
Be sure that your bills of materials are accurate when working with rolling up standard costchanges. Fixed quantities for components are included in rollup calculations, but floor stockitems are not.
Revaluing Revaluing is the process of finalizing rolled-up standard cost changes.Revaluing replaces existing standard cost information with new standard costinformation. The new information will be used in your accounting processes.
As you change your standard cost information, you might roll up costs severaltimes, but probably will revalue items only at certain points.
Revaluing inventory is an important process that might have significant impact on yourbusiness’s accounting records. We recommend using process security to restrict authority for revaluing. Refer toCreating and modifying process security sets on page 18 in Chapter2, “Security,” of the Manufacturing Setup documentation.
Labor and machine costs are calculated from a manufacturing bill of materials andprimary routing for an item, and are rolled up into the final cost of the item.Subassembly costs are directly rolled up into the accounts that incurred the cost, inwhat is called a “columnar rollup.”
Entering pending changes for material costs
Use the Standard Item Material Costs window to enter the standard material costsof new raw materials.
If the item has been assigned to a class, the overhead calculation methods for theitem class will be the default method for the item. Refer to Defining overhead for astandard cost item class on page 59 for information about setting default methods forcalculating fixed and variable overhead for an item class.
To enter pending changes for material costs:
1. Open the Standard Item Material Costs window.(Cards >> Manufacturing >> Inventory >> Std Item Mat Costs)
2. Enter or select an item.
Information about the current standard cost of the item will be displayed in thefields on the left side of the window.
3. Enter the pending material cost for the item.

8/10/2019 Dynamics GP MFG Core Functions
http://slidepdf.com/reader/full/dynamics-gp-mfg-core-functions 134/256
P A R T 3 B I L L O F M A T E R I A L S
124 M A N U F A C T U R I N G C O R E F U N C T I O N S
4. Enter the effective date for the changes.
5. Determine how fixed overhead for the item should be calculated.
Amount Mark Amount to calculate fixed overhead as a specific amount foreach unit of the item. Enter the amount in the associated field.
Percent Mark Percent to calculate fixed overhead as a percentage of thematerial cost of the item. Enter the percentage in the associated field.
6. Determine how variable overhead for the item should be calculated.
Amount Mark Amount to calculate variable overhead as a specific amountfor each unit of the item. Enter the amount in the associated field.
Percent Mark Percent to calculate variable overhead as a percentage of thematerial cost of the item. Enter the percentage in the associated field.
7. Choose Save and close the window.
After you’ve entered and saved pending changes, you must roll up and revalue thosechanges so they’re reflected in the costs of other items, if needed. Use the Roll Up andRevalue Inventory window to complete that procedure. Refer toRolling up material andoverhead cost changes on page 125 and Revaluing all inventory items on page 131.
Overriding a pending standard cost change
Use the Standard Cost Maintenance window to override any pending changes toinformation for your standard cost items. If the item is a bought item, you also canoverride the amounts for the fixed and variable overhead for labor and machinecosts.
To override a pending standard cost change:1. Open the Standard Cost Maintenance window.(Cards >> Manufacturing >> Inventory >> Std Cost Maintenance)

8/10/2019 Dynamics GP MFG Core Functions
http://slidepdf.com/reader/full/dynamics-gp-mfg-core-functions 135/256
M A N U F A C T U R I N G C O R E F U N C T I O N S 125
C H A P T E R 1 4 S T A N D A R D C O S T I N G R E V A L U A T I O N S
2. Enter or select an item. The current and pending/revalue standard costinformation for the item—including overhead calculations for fixed andvariable overhead for machine, labor and material costs—will be displayed inthe window.
• Pending/revalue material costs come from the Standard Item MaterialCosts window.
• Pending/revalue labor costs come from the Labor Code Definition windowand the primary routing for the item.
• Pending/revalue machine costs come from the Machine Definition windowand the primary routing for the item.
3. To override any amount, mark the check box in the Override column for theamount to be changed. For example, to override the fixed overhead amountassociated with labor for this item, mark the Labor Fixed Overhead option inthe Override column.
4. Enter the new amount.
5. Enter an effective date for the change.
6. Repeat steps 3 through 5 to override other values.
7. Choose Save and close the window.
After you’ve entered and saved pending changes, you must roll up and revalue thosechanges so they’re reflected in the costs of other items, if needed. Use the Roll Up andRevalue Inventory window to complete that procedure. Refer toRolling up material andoverhead cost changes on page 125 and Revaluing all inventory items on page 131.
Rolling up material and overhead cost changesUse the Roll Up and Revalue Inventory window to roll up labor, machine, materialand overhead costs for all inventoried items. When the standard cost of a laborcode, machine code, made item or bought item changes, you must update thoserecords to maintain accurate cost information.
You can change material costs in standard costing windows, but to change labor or machincosts you must use the Labor Code Definition window or Machine Definition window.
The effective date you enter for the rollup process is the cutoff date for pendingstandard cost changes in the rollup process. For example, suppose the effectiverollup date is June 30 and you have two sets of pending standard cost changes—the
effective date for one set of changes is June 15, and the effective date for the other setof changes is July 1.
When you start the rollup process, only items with pending changes with effectivedates that match or precede the effective date for the rollup will be included in therollup calculations. The cost changes with June 15 effective dates will be included inthe rollup. The cost changes with July 1 effective dates won’t be included in therollup.

8/10/2019 Dynamics GP MFG Core Functions
http://slidepdf.com/reader/full/dynamics-gp-mfg-core-functions 136/256
P A R T 3 B I L L O F M A T E R I A L S
126 M A N U F A C T U R I N G C O R E F U N C T I O N S
If the rollup process includes raw materials or subassemblies, it will change thestandard cost of the subassemblies and finished goods—including raw material orsubassembly—unless one of these instances occur:
• The raw material or subassembly isn’t part of the manufacturing bill ofmaterials. However, items that aren’t included in any bill of materials will berolled up.
• The raw material or subassembly has an In Date or Out Date in themanufacturing bill of materials that excludes it from the manufacturing bill ofmaterials on the rollup date.
• The raw material or subassembly is only an alternate for another item in themanufacturing bill of materials.
• The raw material is a floor stock item—that is, the Floor Stock option has beenmarked for the item in the Bill of Materials Entry window. (The cost of floorstock items is applied to an expense account.)
To roll up material and overhead cost changes:1. Open the Roll Up and Revalue Inventory window.
(Microsoft Dynamics GP menu >> Tools >> Routines >> Manufacturing >> RollUp and Revalue)
2. Mark the Roll Up option.
3. Enter the effective date for the rollup process.
4. Choose Process. A message will indicate when processing is complete.
5. When you roll up standard cost changes, the amounts in the pending columnswill be displayed in the current standard cost columns in the Standard CostMaintenance window. You can open that window and review the information.
6. Close the Roll Up and Revalue Inventory window.
Verifying rollup results
Before finalizing the changed standard costs, you can view the results of the rollupprocess in the Item Cost Revaluation report. Print the Item Cost Revaluation reportfrom the Standard Cost Maintenance window.

8/10/2019 Dynamics GP MFG Core Functions
http://slidepdf.com/reader/full/dynamics-gp-mfg-core-functions 137/256
M A N U F A C T U R I N G C O R E F U N C T I O N S 127
C H A P T E R 1 4 S T A N D A R D C O S T I N G R E V A L U A T I O N S
To verify rollup results:1. Open the Standard Cost Maintenance window.
(Cards >> Inventory >> Item >> select a standard cost item >> Go To button >>Standard Cost Maintenance)
2. Choose the print icon button. The Item Pending Cost Revaluation report willlist all items with standard cost information changed in the rollup process.
3. Close the Standard Cost Maintenance window.
After you’ve verified the rollup results, use the Roll Up and Revalue window torevalue standard cost items. Refer to Revaluing all inventory items on page 131 .
Using scenarios to make standard cost changes
To experiment with how changes to the standard costs of certain items would affect bills of materials, you can use the Standard Cost Changes window to enter changesto your standard cost items.
To use scenarios to make standard cost changes:1. Open the Standard Cost Changes window.(Cards >> Manufacturing >> Inventory >> Standard Cost Changes)
2. If you’ve entered other standard cost changes, you can keep those proposedchanges or you can clear all proposed changes. To clear proposed changes,choose Delete All.
3. Enter or select an item. Information about the standard costs of the item and itsassociated items will be displayed in the tree view.

8/10/2019 Dynamics GP MFG Core Functions
http://slidepdf.com/reader/full/dynamics-gp-mfg-core-functions 138/256
P A R T 3 B I L L O F M A T E R I A L S
128 M A N U F A C T U R I N G C O R E F U N C T I O N S
Information displayed in the tree view is determined by the item type—rawmaterial, subassembly or finished good—and whether you marked the Bill ofMaterial or Where Used option.
Refer to Interpreting the tree view on page 130 for more information.
The tree view will include costing information about all the subassemblies andfinished goods that meet the following criteria:
• The raw material is part of the manufacturing bill of materials for thesubassembly or finished good.
• The raw material must be a direct component of the manufacturing bill ofmaterials—it can’t be an alternate for another component.
If you decide you’d rather adjust the standard cost information for one of the other itemsin the tree view, mark the item that has the standard cost information you want tochange.
4. Determine if the change in the cost should be applied to the relatedsubassemblies and finished goods.
• To apply the changes throughout the system, be sure the Do not Roll upthrough Where Used option is not marked.
• To limit the changes to just the component item, mark Do not Roll upthrough Where Used. You can mark the option for the component or forany of its parents.
5. Enter new proposed costs for materials in the Proposed Standard Cost -Material field.
You can set the material costs or fixed or variable material overhead costs tozero. Mark the appropriate options in the Set to Zero column.
6. To change the fixed or variable material overhead information, refer toProposing changes to material fixed overhead on page 129 or Proposing changes tomaterial variable overhead on page 130.
7. Choose Save to save your proposed changes.
Type of item Bill of Material option Where Used option
Raw material(component)
Not applicable All subassemblies andfinished goods that meet
criteria.Subassembly All items in the multi-level
manufacturing bill ofmaterials for this item.Substitute items are notincluded.
All subassemblies andfinished goods that meetcriteria.
Finished good All items in the multi-levelmanufacturing bill ofmaterials for this item.Substitute items are notincluded.
Not applicable

8/10/2019 Dynamics GP MFG Core Functions
http://slidepdf.com/reader/full/dynamics-gp-mfg-core-functions 139/256
M A N U F A C T U R I N G C O R E F U N C T I O N S 129
C H A P T E R 1 4 S T A N D A R D C O S T I N G R E V A L U A T I O N S
8. Continue entering proposed changes for other items. You can choose to startagain with step 2 of this procedure, or you can go to related item records. Besure to choose Save each time you change a value.
9. When you’ve finished entering proposed standard cost changes, choose Roll Upto clear the fields in the window. Items with standard cost changes due to directentries or due to rolled-up changes through bills of materials will be displayed.
You can use the tree view to move to other items.
Choose View Items to see the effect of the rollup calculations in the tree view.
10. Determine how to proceed. You can enter more standard cost changes, delete allyour proposed changes and start over, or finalize the changes you’ve entered sofar.
• To enter additional standard cost changes, choose Save and then select anitem.
• To delete the proposed changes, choose Delete All.
• To finalize your changes and have them reflected in your accounts,complete a revaluation. Use the Standard Cost Changes window to revalueonly those inventory items that are affected by your changes, or use the RollUp and Revalue Inventory window to revalue all inventory items.
Refer toRevaluing affected inventory items on page 131 and Revaluing all inventoryitems on page 131.
Proposing changes to material fixed overhead
If you’re using the Standard Cost Changes window to change standard costinformation, use the Proposed Material Fixed Overhead Entry window to suggest
changes for calculating material fixed overhead.To propose changes to material fixed overhead:1. Open the Standard Cost Changes window.
(Cards >> Manufacturing >> Inventory >> Standard Cost Changes)
2. Enter or select an item.
3. Choose the expansion button on the Proposed Standard Cost - Fixed Ohd field.The Proposed Material Fixed Overhead Entry window will open.
4. Determine whether to base the overhead on an amount per unit of the item, oron a percentage of item cost.
Amount Mark Amount to propose calculating fixed overhead as a specificamount for each unit of the item, and enter the amount.

8/10/2019 Dynamics GP MFG Core Functions
http://slidepdf.com/reader/full/dynamics-gp-mfg-core-functions 140/256
P A R T 3 B I L L O F M A T E R I A L S
130 M A N U F A C T U R I N G C O R E F U N C T I O N S
Percent Mark Percent to propose calculating fixed overhead as a percentageof the material cost of the item, and enter the percentage.
5. Choose OK and close the window. Your proposed entry will be reflected in theStandard Cost Changes window.
Proposing changes to material variable overhead
If you’re using the Standard Cost Changes window to change standard costinformation, use the Proposed Material Variable Overhead Entry window tosuggest changes for calculating material variable overhead.
To propose changes to material variable overhead:1. Open the Standard Cost Changes window.
(Cards >> Manufacturing >> Inventory >> Standard Cost Changes)
2. Enter or select an item.
3. Choose the expansion button on the Proposed Standard Cost - Variable Ohd
field. The Proposed Material Variable Overhead Entry window will open.
4. Determine whether to base the overhead on an amount per unit of the item, oron a percentage of item cost.
Amount Mark Amount to propose calculating variable overhead as a specificamount for each unit of the item, and enter the amount.
Percent Mark Percent to propose calculating variable overhead as apercentage of the material cost of the item, and enter the percentage.
5. Choose OK and close the window. Your proposed entry will be reflected in theStandard Cost Changes window.
Interpreting the tree view
Symbols are used in the tree view to denote the various standard cost statuses thatitems can have. Refer to the table for information you can use to interpret those
symbols.Symbol Meaning
Black circle This item has a current standard cost but does not have aproposed standard cost.
Blue circle This item has a proposed standard cost.
Red circle with slash This item doesn’t have a current standard cost and doesn’t havea proposed standard cost.
Any circle with a questionmark
This item has an item in its multi-level bill of materials thatdoesn’t have a current standard cost and that doesn’t have aproposed standard cost.

8/10/2019 Dynamics GP MFG Core Functions
http://slidepdf.com/reader/full/dynamics-gp-mfg-core-functions 141/256
M A N U F A C T U R I N G C O R E F U N C T I O N S 131
C H A P T E R 1 4 S T A N D A R D C O S T I N G R E V A L U A T I O N S
Revaluing affected inventory items
If you used the Standard Cost Changes window to enter and roll up changes tostandard cost information, you can replace the current standard cost informationwith the new information. This revaluing process will affect only the inventoryitems that have standard cost changes.
Use the Standard Cost Changes window to complete this procedure.
Before beginning this procedure, be sure you’ve already entered and rolled up standard coschanges you want to make.
To revalue affected inventory items:1. Open the Standard Cost Changes window.
(Cards >> Manufacturing >> Inventory >> Standard Cost Changes)
2. Choose Replace Current Standards Costs.
If a process security set has been assigned to the inventory revaluation process, enter th
appropriate password. Refer toProcess security and Creating and modifying processsecurity sets —both in Chapter 2, “Security,” in the Manufacturing Setupdocumentation—for more information.
3. Close the window.
Revaluing all inventory items
To finalize the standard cost changes you’ve made using the Standard CostMaintenance window or the Standard Item Material Cost window, you mustrevalue inventory. This process updates the cost information for each standard costitem affected by the rollup process and revalues your inventory. Use the Roll Upand Revalue Inventory window to complete this procedure:
To revalue all inventory items:1. Open the Roll Up and Revalue Inventory window.
(Microsoft Dynamics GP menu >> Tools >> Routines >> Manufacturing >> RollUp and Revalue)
2. Mark the Revalue option.
3. Choose Process.
If a process security set has been assigned to the inventory revaluation process, enter thappropriate password. Refer toProcess security and Creating and modifying process
security sets —both in Chapter 2, “Security,” in the Manufacturing Setupdocumentation—for more information.
Specifying the standard quantity for a finished item
When you set up options for standard costing, you have the option to prorate setuptime based on either the standard quantity for the item or the average quantity forthe item. You can use the Standard Cost Changes window to specify the standardquantity for a finished good that uses standard costing (that has a periodicvaluation method). Use this procedure only if you’re prorating setup time by thestandard quantity.

8/10/2019 Dynamics GP MFG Core Functions
http://slidepdf.com/reader/full/dynamics-gp-mfg-core-functions 142/256
P A R T 3 B I L L O F M A T E R I A L S
132 M A N U F A C T U R I N G C O R E F U N C T I O N S
The average quantity information comes from the Item Engineering Data window. Refer toEntering item engineering data in Chapter 8, “Item engineering data,” in the Manufacturing Core Functions documentation for more information.
To specify the standard quantity for a finished item:1. Open the Standard Cost Changes window.
(Cards >> Manufacturing >> Inventory >> Standard Cost Changes)
2. Enter or select a parent item that has a periodic valuation method.
3. Enter the standard quantity for the item.
4. Choose Save, and close the window.

8/10/2019 Dynamics GP MFG Core Functions
http://slidepdf.com/reader/full/dynamics-gp-mfg-core-functions 143/256
M A N U F A C T U R I N G C O R E F U N C T I O N S 133
Chapter 15: Bill of Materials inquiriesBecause bills of materials are critical to production processes, several users in yourorganization might want to view bills of materials at the same time. Usersthroughout your business can use the Bill of Materials View window to view bills ofmaterials and to calculate component requirements simultaneously withoutaffecting the bills of materials.
You also can use the Bill of Materials View window to view other information aboutyour bills of materials. For example, you can enter the quantity of the finished goodto build, and the extended quantity for the individual components will becalculated. The cost of the bill of materials also is displayed.
This information is divided into the following sections:
• Types of bill of materials queries• Viewing components in bills of materials• Scanning bills of materials for specific items• Calculating component requirements
• Viewing cost information
Types of bill of materials queries
You can use the Bill of Materials View window to get information from your bill ofmaterials records in two different ways. You can start with a parent part and viewinformation about the components included in the bill of materials for that item, oryou can start with a component item and view information about all bills ofmaterials that include that component.
Refer to the table for more information about the information you can view usingthe Bill of Materials View window. Refer to Viewing components in bills of materials onpage 134 for more information about Bill of Materials queries, and to Scanning billsof materials for specific items on page 135 for more information about Where Usedqueries.
Item type Bill of Material query Where Used query
Component item Not applicable Lists bills of materials thatinclude the selected item
Subassembly Lists components included inthe bill of materials for the item
Lists bills of materials thatinclude the selected item
Final assembly Lists components included inthe bill of materials for the item
Not applicable

8/10/2019 Dynamics GP MFG Core Functions
http://slidepdf.com/reader/full/dynamics-gp-mfg-core-functions 144/256
P A R T 3 B I L L O F M A T E R I A L S
134 M A N U F A C T U R I N G C O R E F U N C T I O N S
Viewing components in bills of materials
You can use the Bill of Materials View window to see basic information about billsof materials.
To view components in bills of materials:1. Open the Bill of Materials View window.
(Inquiry >> Manufacturing >> BOM View)
2. Mark Bill of Material to display components listed in the bill of materials for anitem.
Only make and make or buy items will be available in the Items lookup window if theBill of Material option is marked.
3. Enter or select the item with the bill of materials to view.
4. The manufacturing bill of materials will be displayed, but you can choose adifferent bill. To choose a different bill, select the BOM type—Engineering,Archived, Configured, or Super. If you select Archived or Configured, a BOMName field will appear. Enter or select the name of the specific bill of materialsin that field.
5. View the information, as needed.
6. Close the window.

8/10/2019 Dynamics GP MFG Core Functions
http://slidepdf.com/reader/full/dynamics-gp-mfg-core-functions 145/256
8/10/2019 Dynamics GP MFG Core Functions
http://slidepdf.com/reader/full/dynamics-gp-mfg-core-functions 146/256
P A R T 3 B I L L O F M A T E R I A L S
136 M A N U F A C T U R I N G C O R E F U N C T I O N S
Viewing cost information
You can use the Bill of Materials View window to quickly see costing informationabout items.
To view cost information:1. Open the Bill of Materials View window.
(Inquiry >> Manufacturing >> BOM View)
2. Enter or select the item with the bill of materials to view.
3. The manufacturing bill of materials will be displayed, but you can choose adifferent bill. To choose a different bill, select the BOM type—Engineering,Archived, Configured, or Super. If you select Archived or Configured, a BOMName field will appear. Enter or select the name of the specific bill of materialsin that field.
4. Select the revision level to view.
5. View the cost information in the BOM Cost field.6. If the item uses the periodic valuation method, you can click the calculator
button to open the Standard Cost Maintenance window, which displaysinformation about the standard cost of the item.
7. When you’ve finished viewing the cost information, close the window.

8/10/2019 Dynamics GP MFG Core Functions
http://slidepdf.com/reader/full/dynamics-gp-mfg-core-functions 147/256
M A N U F A C T U R I N G C O R E F U N C T I O N S 137
Chapter 16: Reference designatorsSome manufacturers use reference designators to specify the location of acomponent in an assembly. For example, a circuit board manufacturer might have a board assembly that uses three resistors. Reference designators are used to specifywhere on the circuit board those resistors should be placed.
You can use the Reference Designator Assignment window to enter referencedesignator information. You can use the Reference Designator Inquiry window toview the information.
This information is divided into the following sections:
• Entering a reference designator• Modifying or deleting a reference designator• Viewing a reference designator
Entering a reference designator
Use the Reference Designator Assignment window to enter reference designatorsfor a component in a bill of materials. A reference designator is information thatspecifies where components should be used in an assembly, such as the placementof four resistors on a printed circuit board.
You can use the BOM Mass Updates window to add the same reference designators for acomponent that is part of several bills of materials. Refer toChapter 18, “Mass updates,” formore information.
To enter a reference designator:1. Open the Bill of Materials Entry window.
(Cards >> Manufacturing >> Bill of Materials)
2. Enter or select the bill of materials that includes the components to enterreference designators for.
3. Highlight the component in the tree view.

8/10/2019 Dynamics GP MFG Core Functions
http://slidepdf.com/reader/full/dynamics-gp-mfg-core-functions 148/256
P A R T 3 B I L L O F M A T E R I A L S
138 M A N U F A C T U R I N G C O R E F U N C T I O N S
4. In the right pane, click the Reference Designators expansion button to open theReference Designator Assignment window.
5. In the first blank line of the scrolling window, enter the first referencedesignator.
6. Continue, repeating step 5 until you’ve entered as many reference designatorsas you like.
The quantity of the component is displayed in the window, as well as thenumber of reference designators that have been entered. The componentquantity doesn’t have to be equal to the number of reference designators.
7. When you’ve finished, click OK to save your changes and close the window.
Modifying or deleting a reference designatorYou can use the Reference Designator Assignment window to modify or deletereference designation information.
To modify or delete a reference designator:1. Open the Bill of Materials Entry window.
(Cards >> Manufacturing >> Bill of Materials)
2. Enter or select the bill of materials that includes the components to enterreference designators for.
3. Highlight the component in the tree view.
4. In the right pane, click the Reference Designators expansion button to open theReference Designator Assignment window.
5. Modify information, as needed.
To modify a reference designator Type over the incorrect informationdirectly in the scrolling window.

8/10/2019 Dynamics GP MFG Core Functions
http://slidepdf.com/reader/full/dynamics-gp-mfg-core-functions 149/256
M A N U F A C T U R I N G C O R E F U N C T I O N S 139
C H A P T E R 1 6 R E F E R E N C E D E S I G N A T O R S
To delete a reference designator Select the line to delete, and choose thedelete row icon button in the upper right corner of the scrolling window.
6. When you’ve finished, click OK to save your changes and close the window.
Viewing a reference designator
You can use the Reference Designator Inquiry window to view the referencedesignation information that has been added to a component in a bill of materials. Areference designator is information that specifies where components should be usedin an assembly, such as the placement of four resistors on a printed circuit board.
To view a reference designator:1. Open the Bill of Materials View window.
(Inquiry >> Manufacturing >> BOM View)
2. Enter or select the bill of materials that includes the components to viewreference designators for.
3. Highlight the component in the tree view.4. In the right pane, click the Reference Designators expansion button to open the
Reference Designator Inquiry window.
5. When you’ve finished viewing the information, close the window.

8/10/2019 Dynamics GP MFG Core Functions
http://slidepdf.com/reader/full/dynamics-gp-mfg-core-functions 150/256

8/10/2019 Dynamics GP MFG Core Functions
http://slidepdf.com/reader/full/dynamics-gp-mfg-core-functions 151/256
M A N U F A C T U R I N G C O R E F U N C T I O N S 141
Chapter 17: Revisions and archived billsManufacturing includes two methods you can use to store historical informationabout your bills of materials. You can use revision history, archives for bills ofmaterials, or both.
This information is divided into the following sections:
• Revision levels and Archived bills of materials• Creating a new revision level for a bill• Viewing past revisions of a bill of materials• Removing Archived bills of materials
Revision levels and Archived bills of materials
It’s helpful to understand revision levels and Archived bills of materials so that youcan decide which method will work best for your business. The most significantdifference is that you can create a manufacturing order based on an Archived bill ofmaterials, but you can’t create a manufacturing order based on any revision level
for a bill of materials, except the most current revision level.
Revision levelsWhen you enter a bill of materials, you can enter a revision level for the bill ofmaterials. Each combination of finished good item, bill of materials type, and (if the bill of materials type is Archived or Configured) bill of materials name can havemultiple revision levels.
When you modify any bill of materials, you can specify a new revision level for themodified bill. When you enter a new revision level for the bill of materials, amessage appears. You’ll have the option to create a new revision level for the bill ofmaterials. At the same time, a copy of the existing bill of materials (with its previousrevision level) is stored.
When you select a bill of materials in the Bill of Materials Entry window, the newestrevision level of the bill of materials is displayed. You can’t edit the old revisionlevels of the bill of materials, but you can view them with the Bill of Materials Viewwindow. Revision level history can’t be removed unless you remove the entire billof materials.
Archived bills of materialsAnother method for storing old bills of materials is to use the Archived bill ofmaterials type. Bills of materials can become archived (that is, get the Archived billof materials type) in any of these ways:
Manually If you want to archive a current bill of materials, use the BOM Copywindow to create a copy of the current bill of materials, and then assign theArchived bill of materials type to it. (You’ll also need to assign a BOM Name to thecopy.)
Automatically for configured items Each time you use the SalesConfigurator to configure an item and then build a manufacturing order for thatitem, a bill of materials with the Configured type is created. If you marked theoption in the Manufacturing Order Preference Defaults window so that configured bills of materials automatically are archived when the manufacturing order iscompleted, Archived bills of materials will be created.

8/10/2019 Dynamics GP MFG Core Functions
http://slidepdf.com/reader/full/dynamics-gp-mfg-core-functions 152/256
P A R T 3 B I L L O F M A T E R I A L S
142 M A N U F A C T U R I N G C O R E F U N C T I O N S
Automatically for mass-changed bills of materials If you marked theoption in the BOM Preference Defaults window to automatically archive mass-changed bills of materials, bills of materials with the Archived type automaticallywill be created when you use the BOM Mass Updates window to modify multiple bills of materials at one time.
Bills of materials with the Archived type can be modified. You can purge old
Archived bills of materials. Refer to Removing Archived bills of materials on page 144 .
Creating a new revision level for a bill
You can use the Bill of Materials Entry window to create a new revision level for a bill of materials.
To create a new revision level for a bill:1. Open the Bill of Materials Entry window.
(Cards >> Manufacturing >> Bill of Materials)
2. Enter or select the finished good item number and the BOM Type for the bill of
materials you want to change.3. If the BOM Type is Archived or Configured, you must enter or select a name for
the bill of materials.
4. Select the text in the Rev. Level field, and enter the new revision level. Amessage will appear.
• If the revision level already has been used for this combination of finishedgood and bill of materials type, you’ll have the option to view the oldversion of the bill of materials.
• If the revision level hasn’t been used for this combination of finished good
and bill of materials type, the message will state that the revision level doesnot exist. You’ll have the option to move the current bill of materials torevision history (with its old revision number) and to create a copy of the bill of materials with the new revision level.
5. Change other information for the bill of materials, as needed.
6. Click Save to save your changes and close the window.

8/10/2019 Dynamics GP MFG Core Functions
http://slidepdf.com/reader/full/dynamics-gp-mfg-core-functions 153/256
M A N U F A C T U R I N G C O R E F U N C T I O N S 143
C H A P T E R 1 7 R E V I S I O N S A N D A R C H I V E D B I L L S
Viewing past revisions of a bill of materials
You can use the BOM Revision History window to view the different revision levelsfor a combination of finished good and bill of materials type. You also can use thewindow to view which revision levels for which bills of materials include aparticular component.
To view past revisions of a bill of materials:1. Open the BOM Revision History window.
(Inquiry >> Manufacturing >> BOM View >> click the Rev Level link)
2. Decide what kind of revision history you want to view.
• To view revision history for a combination of finished good and bill ofmaterials type, enter or select the combination of finished good and bill ofmaterials type. If the bill of materials type is Configured or Archived, youalso can enter or select a BOM Name.
• To view all the bill of materials revision levels that include a specificcomponent, enter or select the component.
3. Click Refresh.
4. View the information in the scrolling window.
5. To view more information about a specific revision level, double-click therecord in the scrolling window. Information about the bill of materials at thespecific revision level will be displayed in the Bill of Materials View window.
6. When you’ve finished viewing information, close the windows.

8/10/2019 Dynamics GP MFG Core Functions
http://slidepdf.com/reader/full/dynamics-gp-mfg-core-functions 154/256
P A R T 3 B I L L O F M A T E R I A L S
144 M A N U F A C T U R I N G C O R E F U N C T I O N S
Removing Archived bills of materials
If you don’t need to keep Archived bills of materials indefinitely, you might want topurge them occasionally using the Remove Archived BOMs window. There are norestrictions for purging Archived bills of materials.
You can use the Bill of Materials Entry window to delete an archived bill of
materials.
To remove Archived bills of materials:1. Open the Remove Archived BOMs window.
(Microsoft Dynamics GP menu >> Tools >> Utilities >> Manufacturing >>Remove Archived BOMs)
2. Decide what Archived bills of materials to remove.
You can remove all bills of materials with the Archived type, or you can removea range of bills of materials.
3. You can mark the Print Report option to have a list of the removed bills ofmaterials printed.
4. Click Process.
5. When processing is finished, close the window.

8/10/2019 Dynamics GP MFG Core Functions
http://slidepdf.com/reader/full/dynamics-gp-mfg-core-functions 155/256
M A N U F A C T U R I N G C O R E F U N C T I O N S 145
Chapter 18: Mass updatesSometimes a company needs to make changes to a large number of its bills ofmaterials. For instance, the company might need to replace all instances of onecomponent with another, add or remove a component from a bill of materials, orchange information about a component, such as whether it is backflushed or usedas floor stock. You can use the BOM Mass Updates window to complete thesechanges.
This information is divided into the following sections:
• Overview of mass updates for bills of materials• Terminology for mass updates to bills of materials• Adding an item to multiple bills of materials• Removing an item from multiple bills of materials• Updating an item in multiple bills of materials• Replacing an item in multiple bills of materials• Default values for replacement items• Changing default values for mass updates
Overview of mass updates for bills of materials
You can use the BOM Mass Updates window to change information about onecomponent in multiple bills of materials. There are several types of changes you canmake.
• You can replace one component with another component on several bills ofmaterials.
• You can add a component to several bills of materials.
• You can remove a component from several bills of materials.
• You can update information about a component that already exists on several bills of materials.
When you make these changes, you can choose to make an identical change to all bills of materials (adding one unit of a widget to all bills of materials, for example)or you can make slightly different changes (adding one widget to some bills ofmaterials, and two or more to other bills of materials). You also can use the BOMMass Update Defaults window to choose the information that’s the same for all ofthe changed bills of materials. For example, you might want to specify the issue-from site for all widgets, even though you’re adding different quantities of widgetsto different bills of materials. Regardless of whether you specify default values, youcan adjust each bill of materials, as needed. When processing is complete, a report isgenerated that displays information about the bills of materials that were changed.
You can use settings in the BOM Preference Defaults window to choose how themass updates will work in your company. You can choose to archive the originalversions of the bills of materials that are updated, so that you have a record of thechanges that are made. You can choose to exclude certain bill of materials typesfrom updates. You also can set up process security, so that users must be part of aprocess security group or supply a password before the bills of materials can beupdated.

8/10/2019 Dynamics GP MFG Core Functions
http://slidepdf.com/reader/full/dynamics-gp-mfg-core-functions 156/256
P A R T 3 B I L L O F M A T E R I A L S
146 M A N U F A C T U R I N G C O R E F U N C T I O N S
For more information about the setup options, refer toSetting up bills of materials systemsettings in Chapter 3, “Manufacturing core functions setup ,” in the Manufacturing Setupdocumentation.
Terminology for mass updates to bills of materials
It’s helpful to understand these terms when you’re making mass updates to bills of
materials.
Replaced item The item that will be removed from marked bills of materialswhen you process the mass update.
Replacement item The item that will be added or updated on marked bills ofmaterials when you process the mass update.
Defaults values Values used in bills of materials that might apply to thereplacement item in several bills of materials. For example, to change the issue-tosite for a component from the North site to the South site, you could enter the nameof the South site as a default value.
Adding an item to multiple bills of materials
You can use the BOM Mass Updates window to add a component to multiple billsof materials. You also can indicate which bill of materials types to include orexclude from the mass update.
This procedure assumes that you’ll enter information about the component separately foreach bill of materials. For information about how to set up default information for thecomponent, refer toChanging default values for mass updates on page 153.

8/10/2019 Dynamics GP MFG Core Functions
http://slidepdf.com/reader/full/dynamics-gp-mfg-core-functions 157/256
M A N U F A C T U R I N G C O R E F U N C T I O N S 147
C H A P T E R 1 8 M A S S U P D A T E S
To add an item to multiple bills of materials:1. Open the BOM Mass Updates window.
(Microsoft Dynamics GP menu >> Tools >> Utilities >> Manufacturing >> BOMMass Updates)
2. Mark the bill of materials types to exclude from this mass change.
Manufacturing Mark this option to exclude manufacturing bills ofmaterials.
Engineering Mark this option to exclude engineering bills of materials.
Configured Mark this option to exclude configured bills of materials.
Super Mark this option to exclude super bills of materials.
3. Enter or select the Replacement Item.
4. Select a BOM Type. If you select Archived or Configured for the BOM Type,enter or select a BOM Name.
If you’re adding a Buy item, or if you’re adding a Make or Buy item to betreated as a Buy item in the bills of materials, skip this step.
5. Mark or unmark the option to exclude bill of materials that already have thisitem as a component.
6. To restrict the bills of materials that will be displayed in the scrolling window,you can mark Item Number or Item Description and choose a range of bills ofmaterials to display.
7. Choose Refresh. All the bills of materials where the item that you’ve selectedcould be added are displayed in the scrolling window.
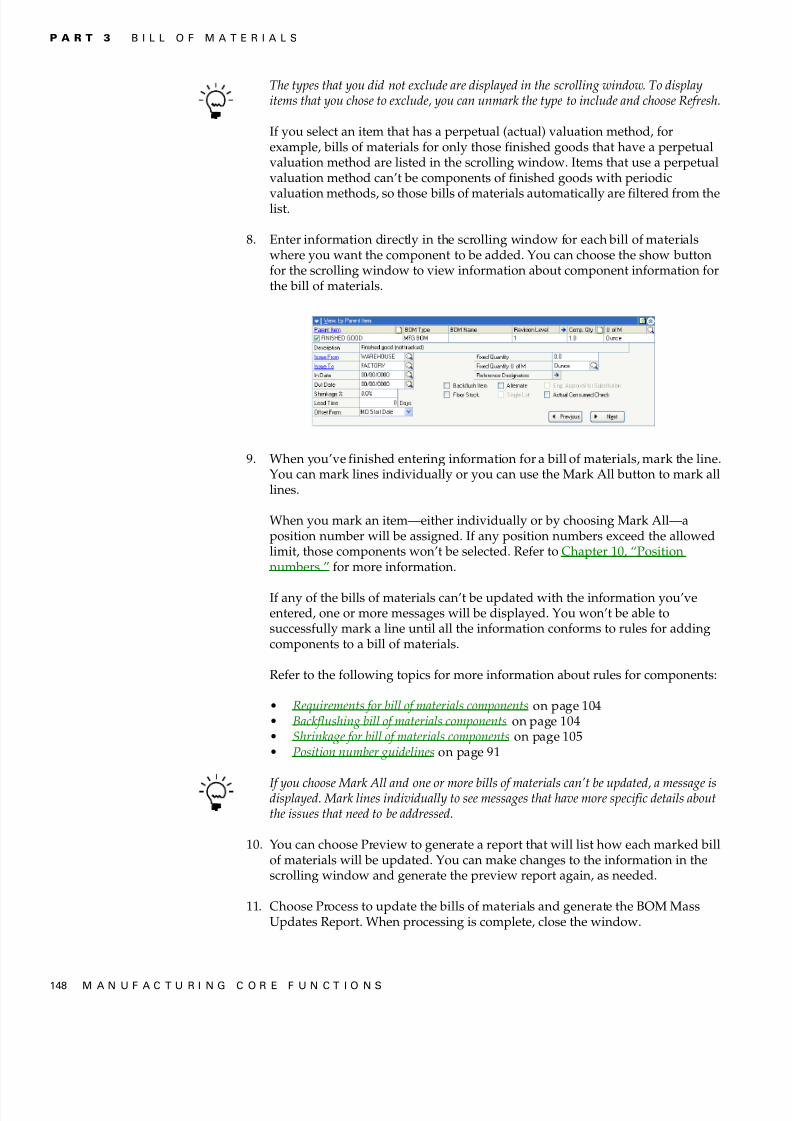
8/10/2019 Dynamics GP MFG Core Functions
http://slidepdf.com/reader/full/dynamics-gp-mfg-core-functions 158/256
P A R T 3 B I L L O F M A T E R I A L S
148 M A N U F A C T U R I N G C O R E F U N C T I O N S
The types that you did not exclude are displayed in the scrolling window. To displayitems that you chose to exclude, you can unmark the type to include and choose Refresh.
If you select an item that has a perpetual (actual) valuation method, forexample, bills of materials for only those finished goods that have a perpetualvaluation method are listed in the scrolling window. Items that use a perpetualvaluation method can’t be components of finished goods with periodic
valuation methods, so those bills of materials automatically are filtered from thelist.
8. Enter information directly in the scrolling window for each bill of materialswhere you want the component to be added. You can choose the show buttonfor the scrolling window to view information about component information forthe bill of materials.
9. When you’ve finished entering information for a bill of materials, mark the line.You can mark lines individually or you can use the Mark All button to mark alllines.
When you mark an item—either individually or by choosing Mark All—aposition number will be assigned. If any position numbers exceed the allowedlimit, those components won’t be selected. Refer to Chapter 10, “Positionnumbers.” for more information.
If any of the bills of materials can’t be updated with the information you’veentered, one or more messages will be displayed. You won’t be able tosuccessfully mark a line until all the information conforms to rules for addingcomponents to a bill of materials.
Refer to the following topics for more information about rules for components:
• Requirements for bill of materials components on page 104• Backflushing bill of materials components on page 104• Shrinkage for bill of materials components on page 105• Position number guidelines on page 91
If you choose Mark All and one or more bills of materials can’t be updated, a message isdisplayed. Mark lines individually to see messages that have more specific details aboutthe issues that need to be addressed.
10. You can choose Preview to generate a report that will list how each marked billof materials will be updated. You can make changes to the information in thescrolling window and generate the preview report again, as needed.
11. Choose Process to update the bills of materials and generate the BOM MassUpdates Report. When processing is complete, close the window.
8/10/2019 Dynamics GP MFG Core Functions
http://slidepdf.com/reader/full/dynamics-gp-mfg-core-functions 159/256
M A N U F A C T U R I N G C O R E F U N C T I O N S 149
C H A P T E R 1 8 M A S S U P D A T E S
Removing an item from multiple bills of materials
You can use the BOM Mass Updates window to remove a component from multiple bills of materials.
To remove an item from multiple bills of materials:1. Open the BOM Mass Updates window.
(Microsoft Dynamics GP menu >> Tools >> Utilities >> Manufacturing >> BOMMass Updates)
2. Mark Remove Item for the Mass Updates Function.
3. Mark the bill of materials types to exclude from this mass change.
Manufacturing Mark this option to exclude manufacturing bills ofmaterials.
Engineering Mark this option to exclude engineering bills of materials.
ConfiguredMark this option to exclude configured bills of materials.
Super Mark this option to exclude super bills of materials.
4. Enter or select the Updated/Replaced Item.
If you’re removing a Buy item, or if you’re adding a Make or Buy item that istreated as a Buy item, skip to step 5.
5. Select a BOM Type. If you select Archived or Configured for the BOM Type,enter or select a BOM Name.
6. Mark or unmark the option to exclude bill of materials that already have this
item as a component.
7. To restrict the bills of materials that will be displayed in the scrolling window,you can mark Item Number or Item Description and choose a range of bills ofmaterials to display.
8. Choose Refresh. All the bills of materials where the item that you’ve selected isa first-level component are displayed in the scrolling window.
The types that you did not exclude are displayed in the scrolling window. To displayitems that you chose to exclude, you can unmark the type to include and choose Refres
9. Mark lines for bills of materials where the component should be removed. Youcan mark lines individually, or you can choose the Mark All button to mark alllines.
10. You can choose Preview to generate a report that will list how each marked billof materials will be updated. You can make changes to the information in thescrolling window and generate the preview report again, as needed.
11. Choose Process to update the bills of materials and generate the BOM MassUpdates Report. When processing is complete, close the window.

8/10/2019 Dynamics GP MFG Core Functions
http://slidepdf.com/reader/full/dynamics-gp-mfg-core-functions 160/256
P A R T 3 B I L L O F M A T E R I A L S
150 M A N U F A C T U R I N G C O R E F U N C T I O N S
Updating an item in multiple bills of materials
You can use the BOM Mass Updates window to update the information for acomponent. For example, you can use the window so that a certain washer isalways backflushed in all bills of materials.
This procedure assumes that you’ll enter information about the component separately for
each bill of materials. For information about how to set up default information for thecomponent, refer toChanging default values for mass updates on page 153.
To update an item in multiple bills of materials:1. Open the BOM Mass Updates window.
(Microsoft Dynamics GP menu >> Tools >> Utilities >> Manufacturing >> BOMMass Updates)
2. Mark Update or Replace Item for the Mass Updates Function.
3. Mark the bill of materials types to exclude from this mass change.
ManufacturingMark this option to exclude manufacturing bills ofmaterials.
Engineering Mark this option to exclude engineering bills of materials.
Configured Mark this option to exclude configured bills of materials.
Super Mark this option to exclude super bills of materials.
4. Enter or select the Updated/Replaced Item.
If the item you’re updating is a Buy item or a Make or Buy item treated as a Buyitem, skip to step 5.
5. Select a BOM Type for the updated or replaced item. If you select Archived orConfigured for the BOM Type, enter or select a BOM Name.
6. Mark or unmark the option to exclude bills of materials that already have thisitem as a component.
7. To restrict the bills of materials that will be displayed in the scrolling window,you can mark Item Number or Item Description and choose a range of bills ofmaterials to display.
8. Choose Refresh. All the bills of materials that include the item in the first levelare displayed in the scrolling window.
The types that you did not exclude are displayed in the scrolling window. To displayitems that you chose to exclude, you can unmark the type to include and choose Refresh.
9. Enter information directly in the scrolling window for each bill of materials.You can choose the show button for the scrolling window to view informationabout component information for the bill of materials.
8/10/2019 Dynamics GP MFG Core Functions
http://slidepdf.com/reader/full/dynamics-gp-mfg-core-functions 161/256
M A N U F A C T U R I N G C O R E F U N C T I O N S 151
C H A P T E R 1 8 M A S S U P D A T E S
10. When you’ve finished entering information for a bill of materials, mark the line.You can mark lines individually or you can use the Mark All button to mark alllines.
When you mark an item—either individually or by choosing Mark All—aposition number will be assigned. If any position numbers exceed the allowedlimit, those components won't be selected. Refer to Chapter 10, “Position
numbers.” for more information.
If any of the bills of materials can’t be updated with the information you’veentered, one or more messages will be displayed. You won’t be able tosuccessfully mark a line until all the information conforms to rules for addingcomponents to a bill of materials.
Refer to the following topics for more information about rules for components:
• Requirements for bill of materials components on page 104• Backflushing bill of materials components on page 104• Shrinkage for bill of materials components on page 105• Position number guidelines on page 91
If you choose Mark All and one or more bills of materials can’t be updated, a messagedisplayed. Mark lines individually to see messages that have more specific details abouthe issues that need to be addressed.
11. You can choose Preview to generate a report that will list how each marked billof materials will be updated. You can make changes to the information in thescrolling window and generate the preview report again, as needed.
12. Choose Process to update the bills of materials and generate the BOM MassUpdates Report. When processing is complete, close the window.
Replacing an item in multiple bills of materialsYou can use the BOM Mass Updates window to replace one item with another—replacing Component A with Component B, for example.
This procedure assumes that you’ll enter information about the component separately foreach bill of materials. For information about how to set up default information for thecomponent, refer toChanging default values for mass updates on page 153.
To replace an item in multiple bills of materials:1. Open the BOM Mass Updates window.
(Microsoft Dynamics GP menu >> Tools >> Utilities >> Manufacturing >> BOMMass Updates)
2. Mark Update or Replace Item for the Mass Updates Function.
3. Mark the bill of materials types to exclude from this mass change.
Manufacturing Mark this option to exclude manufacturing bills ofmaterials.
Engineering Mark this option to exclude engineering bills of materials.

8/10/2019 Dynamics GP MFG Core Functions
http://slidepdf.com/reader/full/dynamics-gp-mfg-core-functions 162/256
P A R T 3 B I L L O F M A T E R I A L S
152 M A N U F A C T U R I N G C O R E F U N C T I O N S
Configured Mark this option to exclude configured bills of materials.
Super Mark this option to exclude super bills of materials.
4. Enter or select the Updated/Replaced Item.
If the item you’re replacing is a Buy item or a Make or Buy item treated as a Buy
item, skip to step 5.
5. Select a BOM Type for the updated or replaced item. If you select Archived orConfigured for the BOM Type, enter or select a BOM Name.
6. Enter or select the Replacement Item. To update item information, thereplacement item should be the same as the replaced item.
If the replacement is a Buy item or a Make or Buy item that should be treated asa Buy item, skip to step 7.
7. Select a BOM Type for the replacement item. If you select Archived orConfigured for the BOM Type, enter or select a BOM Name.
8. Mark or unmark the option to exclude bills of materials that already have thisitem as a component.
9. To restrict the bills of materials that will be displayed in the scrolling window,you can mark Item Number or Item Description and choose a range of bills ofmaterials to display.
10. Choose Refresh. All the bills of materials that include the replaced item in thefirst level are displayed in the scrolling window. The new item will have thesame position number as the item it replaced.
The types that you did not exclude are displayed in the scrolling window. To displayitems that you chose to exclude, you can unmark the type to include and choose Refresh.
11. Enter information directly in the scrolling window for each bill of materials.You can choose the show button for the scrolling window to view informationabout component information for the bill of materials.
12. When you’ve finished entering information for a bill of materials, mark the line.You can mark lines individually or you can use the Mark All button to mark alllines.
When you mark an item—either individually or by choosing Mark All—aposition number will be assigned. If any position numbers exceed the allowed
limit, those components won’t be selected. Refer to Chapter 10, “Positionnumbers.” for more information.
If any of the bills of materials can’t be updated with the information you’veentered, one or more messages will be displayed. You won’t be able tosuccessfully mark a line until all the information conforms to rules for addingcomponents to a bill of materials.

8/10/2019 Dynamics GP MFG Core Functions
http://slidepdf.com/reader/full/dynamics-gp-mfg-core-functions 163/256

8/10/2019 Dynamics GP MFG Core Functions
http://slidepdf.com/reader/full/dynamics-gp-mfg-core-functions 164/256
P A R T 3 B I L L O F M A T E R I A L S
154 M A N U F A C T U R I N G C O R E F U N C T I O N S
The following procedure assumes that you want to add a component to bills of materials. Touse default values for updating or replacing an item, open the BOM Mass Update Defaultswindow before marking any lines in the scrolling window, and continue as usual.
To use default values for mass updates:1. Open the BOM Mass Updates window.
(Microsoft Dynamics GP menu >> Tools >> Utilities >> Manufacturing >> BOMMass Updates)
2. Select the mass update function. Default values for mass updates are availableonly if you’re adding or updating or replacing an item.
3. Enter or select the items involved.
• If you’re adding an item, select the Replacement Item.
• If you’re replacing or updating an item, select the Replaced Item and theReplacement Item.
Refer to Adding an item to multiple bills of materials on page 146or Replacing an itemin multiple bills of materials on page 151 for more specific information.
4. Choose Refresh to update the contents of the scrolling window.
5. Choose Default to open the BOM Mass Update Defaults window.
6. Mark New Value for each component value that you want to enter defaultinformation for.
For example, if you’re updating the issue-from site for a component, you’dmark the New Value radio button for Issue From.
7. Enter the default information for the component value. You might need to enteror select a site, for example, or mark or clear a check box.
8. Choose OK.

8/10/2019 Dynamics GP MFG Core Functions
http://slidepdf.com/reader/full/dynamics-gp-mfg-core-functions 165/256
M A N U F A C T U R I N G C O R E F U N C T I O N S 155
C H A P T E R 1 8 M A S S U P D A T E S
9. Continue working in the BOM Mass Updates window, entering additionalinformation for the lines as needed and marking lines that you want to beupdated.
If you choose Mark All and one or more bills of materials can’t be updated, a messagedisplayed. Mark lines individually to see messages that have more specific details abouthe issues that need to be addressed.
10. You can choose Preview to generate a report that will list how each marked billof materials will be updated. You can make changes to the information in thescrolling window and generate the preview report again, as needed.
11. Choose Process to update the bills of materials and generate the BOM MassUpdates Report. When processing is complete, close the window.
After processing is complete, any default bill of material information you entered in thBOM Mass Update Defaults window is cleared. Default values must be reentered eachtime you start to use the BOM Mass Updates window to update a group of bills ofmaterials.

8/10/2019 Dynamics GP MFG Core Functions
http://slidepdf.com/reader/full/dynamics-gp-mfg-core-functions 166/256
156 M A N U F A C T U R I N G C O R E F U N C T I O N S

8/10/2019 Dynamics GP MFG Core Functions
http://slidepdf.com/reader/full/dynamics-gp-mfg-core-functions 167/256

8/10/2019 Dynamics GP MFG Core Functions
http://slidepdf.com/reader/full/dynamics-gp-mfg-core-functions 168/256
158 M A N U F A C T U R I N G C O R E F U N C T I O N S
Part 4: Sales extensionsThis part of the documentation describes how to set up and use Manufacturingextensions to Sales Order Processing. It includes information you’ll need when youenter sales orders in a manufacturing environment and tasks related to orderfulfillment.
When you install Manufacturing, windows are added to your Sales OrderProcessing system. This part of the documentation describes the specialconsiderations you’ll need to make as you work with sales order issues andManufacturing. It is a supplement to your Sales Order Processing documentation,so you’ll need to refer to that documentation, as well.
The following information is discussed:
• Chapter 19, “Sales extensions overview ,” describes the tasks that can becompleted with the extensions Manufacturing adds to the Sales OrderProcessing module.
• Chapter 20, “Sales order entry,” contains information about the additionalinformation that can be tracked with the extensions.
• Chapter 21, “Order fulfillment,” describes how you can use Manufacturingwindows to set up options for fulfilling your customers’ orders.

8/10/2019 Dynamics GP MFG Core Functions
http://slidepdf.com/reader/full/dynamics-gp-mfg-core-functions 169/256
M A N U F A C T U R I N G C O R E F U N C T I O N S 159
Chapter 19: Sales extensions overviewThe ability to track sales orders, shipping requirements and customer informationaccurately is vital to your company. An efficient sales order processing departmentcan be your greatest marketing asset.
Microsoft Dynamics GP Sales Order Processing is a versatile tool for managing salestransactions, but in a manufacturing environment you might need moreinformation; for instance, you might need to know if an order should be fulfilledwith inventory quantities, or if a manufacturing order should be generatedspecifically for a sales order.
When you add Manufacturing to your Microsoft Dynamics GP system, additionalwindows are added to your Sales Order Processing module to help you manage thisinformation. As you work with sales orders, the Sales Order Processingdocumentation will be your primary resource, but you also should refer to yourManufacturing documentation to find information specific to sales orders in amanufacturing environment.
This information is divided into the following sections:• Sales and Manufacturing documentation• Sales terms
Sales and Manufacturing documentation
Refer to the following table to learn where you can find additional informationabout the windows you’ll use for Manufacturing and Sales Order Processing.
Window Manual
Sales Order Fulfillment window Microsoft Dynamics GP Sales Order ProcessingdocumentationSales Order Processing Setup
window
Sales Order Setup window
Sales Transaction Entry window
Manufacturing Series Sales OrderPreferences window
Manufacturing Setup documentation
Order Fulfillment Setup window
Entire Order History window Manufacturing Core Functions documentation
Freight and Misc Adjustmentswindow
Fulfillment History Entry window
Manufacturing Series Item ClassExtras window
Manufacturing Series Sales ItemDetail window
Order Fulfillment–Lot Inquirywindow
Order Fulfillment–Serial Inquirywindow
Total Estimated Weight window

8/10/2019 Dynamics GP MFG Core Functions
http://slidepdf.com/reader/full/dynamics-gp-mfg-core-functions 170/256
P A R T 4 S A L E S E X T E N S I O N S
160 M A N U F A C T U R I N G C O R E F U N C T I O N S
Some of these windows are Microsoft Dynamics GP Sales Order Processingwindows and are described in the Sales Order Processing documentation. Othershave slight modifications—such as the addition of a field or two; in-depthinformation about those windows also is in the Sales Order Processingdocumentation, with some specific procedures included in this documentation. Stillother windows are specific to Manufacturing and are described in thisdocumentation.
Sales terms
Refer here for information about some of the terms related to the extensionsManufacturing adds to Sales Order Processing.
Quote A company’s offered price for an item that a customer or a potentialcustomer has requested. Quotes can be transferred to another document type,deleted or voided.
Sales order A request for goods or services. Sales orders can be transferred toinvoices or back orders. The Manufacturing enhancements provide thefunctionality to generate manufacturing orders automatically from sales orders.
Invoice An itemized bill of goods stating quantities, prices, shipping charges, andother fees.
Back order An order to be fulfilled when stock for items in shortage isreplenished.
Return Merchandise returned by a customer to your company. Returns decreasethe customer’s balance on account and, if you choose, increase inventory quantities.
Promise date The date the customer has been told to expect receipt of the order.
Due dateThe date the item should be ready to ship to the customer.

8/10/2019 Dynamics GP MFG Core Functions
http://slidepdf.com/reader/full/dynamics-gp-mfg-core-functions 171/256
M A N U F A C T U R I N G C O R E F U N C T I O N S 161
Chapter 20: Sales order entryAdding Manufacturing to your system requires you to consider how you want salesorders in your business to affect other modules. Manufacturing adds specialfeatures—such as item-specific due dates—to give you greater control over salesorder processing. You also can specify a bill of materials and routing and thengenerate a manufacturing order directly from a sales order.
Procedures for entering quotes, sales orders, back orders, invoices and returns are explainein the Sales Order Processing documentation.The following information explains featuresspecifically related to Manufacturing.
This information is divided into the following sections:
• Tasks using the Manufacturing Series Sales Item Detail window• Manufacturing orders generated from sales• Implications of generated manufacturing orders• Creating a manufacturing order for a sales line• Modifying default manufacturing order details
• Generating a quote-status manufacturing order• Adjusting dates for sales items• Adding customer part number information• Calculating the shipping weight of an order• Effects of sales orders on MRP• Limiting effects of sales allocations on MRP
Tasks using the Manufacturing Series Sales ItemDetail window
Tasks associated with the Manufacturing Series Sales Item Detail window can begrouped into two categories:
Generating manufacturing orders based on sales order documents Ifyou’re entering information for a quote sales order document, you can generatemanufacturing orders with Quote/Estimate status from the Manufacturing SeriesSales Item Detail window. If you enter a sales order for a back-order quantity, youcan generate manufacturing orders with Open or Released status automatically, oryou can require users to complete certain steps to generate manufacturing orders.
For more information about these tasks, refer to the following topics:
• Manufacturing orders generated from sales on page 162• Implications of generated manufacturing orders on page 163• Creating a manufacturing order for a sales line on page 164• Modifying default manufacturing order details on page 166• Generating a quote-status manufacturing order on page 167
Adding and adjusting details in sales order documents You can add in-house and promise dates to each sales order line item. The customer’s part numberfor each line item also can be added.

8/10/2019 Dynamics GP MFG Core Functions
http://slidepdf.com/reader/full/dynamics-gp-mfg-core-functions 172/256
P A R T 4 S A L E S E X T E N S I O N S
162 M A N U F A C T U R I N G C O R E F U N C T I O N S
For more information about these tasks, refer to the following topics:
• Adjusting dates for sales items on page 167• Adding customer part number information on page 168• Calculating the shipping weight of an order on page 169
Manufacturing orders generated from sales
Some companies want manufacturing orders to be created immediately to reflectthe demand generated from sales. You can set up Manufacturing to automaticallycreate manufacturing orders for the back-ordered quantity of an item, or you canindicate that a user must create each manufacturing order.
For information about applying priorities to generated manufacturing orders based on thecustomer priority, refer to Setting up manufacturing orders for sales orders in Chapter 3,“Manufacturing core functions setup,” in the Manufacturing Setup documentation.
Two factors determine how Manufacturing handles back-order quantities for eachline item:
Fulfillment method For each item with a Make replenishment method or Makeor Buy replenishment method, you should specify a fulfillment method in the ItemEngineering Data window. The options are Make to Order–Manual, Make to Order–Silent, and Make to Stock. Refer to Fulfillment methods on page 52.
Manufacturing sales order preference In the Manufacturing Series SalesOrder Preferences window, you can mark options that allow users to generatemanufacturing orders during the sales order entry process. Refer to Setting upmanufacturing orders for sales orders in Chapter 3, “Manufacturing core functionssetup,” in the Manufacturing Setup documentation.
Refer to the table for more information about how back-order quantities of items are
handled based on these settings.
Fulfillmentmethod Options marked † Effects
Make toStock
Enable Silent MOGeneration
You can’t generate a manufacturing order from sales. The Generate Quote and Generate MObuttons in the Manufacturing Series Sales Item Detail window are not available. Also, theManufacturing Series Sales Item Detail window won’t open if the fulfillment method for theitem is Make to Stock.
Enable Manual MOGeneration
Both
Neither
† If the item is a configurable item—if it has a super bill of materials—you’ll have the option to open the SalesConfigurator window, no matter what sales order options are marked.

8/10/2019 Dynamics GP MFG Core Functions
http://slidepdf.com/reader/full/dynamics-gp-mfg-core-functions 173/256
M A N U F A C T U R I N G C O R E F U N C T I O N S 163
C H A P T E R 2 0 S A L E S O R D E R E N T R Y
Implications of generated manufacturing orders
Either of the two methods for generating manufacturing orders based on sales—automatically creating the manufacturing orders or requiring some user action tocreate a suggested order—will affect sales order processing. You should be aware ofthese issues:
• You can’t delete a sales order or a line item that has an attached manufacturingorder.
• You can’t void a sales order that has an attached manufacturing order.
• If you’re using auto-allocation for one or more sales documents, any sales orderlines that are linked to manufacturing orders will be ignored. This is true even ifonly a part of the back order quantity or order quantity is linked to amanufacturing order.
• You can change the order quantity of a sales order line item with an attachedmanufacturing order only if a process security set has been specified for theprocess. Refer to Setting up manufacturing orders for sales orders in Chapter 3,“Manufacturing core functions setup,” in the Manufacturing Setupdocumentation.
Make toOrder - Silent
Enable Silent MOGeneration
Item has super bill of materials The Manufacturing Series Sales Item Detail windowopens when you move off the sales order line. You can choose to generate a manufacturingorder or quote, or you can open the Sales Configurator window.Item doesn’t have a super bill of materials A manufacturing order is generated whenyou leave the sales order line. You can limit access with a password.
Enable Manual MOGeneration
Item has super bill of materials The Manufacturing Series Sales Item Detail windowwon’t open when you move off the sales order line, but you can open the window to generatea manufacturing order.Item doesn’t have a super bill of materials You’ll have the option to open the SalesConfigurator window.
Both Item has super bill of materials The Manufacturing Series Sales Item Detail windowopens when you move off the line. You can choose to generate a manufacturing order orquote, or you can open the Sales Configurator.Item doesn’t have a super bill of materials A manufacturing order is generated whenyou move off the sales order line. You can limit access with a password.
Neither You can’t generate a manufacturing order from sales. The Generate Quote and Generate MObuttons in the Manufacturing Series Sales Item Detail window are not available. TheManufacturing Series Sales Item Detail window won’t open automatically.
Make to
Order–Manual
Enable Silent MO
Generation
The Manufacturing Series Sales Item Detail window won’t open when you move off the sales
order line, but you can open the window to generate a manufacturing order or quote. If theitem is a configured item, you’ll have the option to open the Sales Configurator window.
Enable Manual MOGeneration
The Manufacturing Series Sales Item Detail window will open when you move off the salesorder line. You can open the window to generate a manufacturing order. If the item is aconfigured item, you’ll have the option to open the Sales Configurator window.Both
Neither You can’t generate a manufacturing order from sales. The Generate Quote and Generate MObuttons in the Manufacturing Series Sales Item Detail window are not available. TheManufacturing Series Sales Item Detail window won’t open automatically.
No fulfillmentmethodselected
Any combination ofoptions
You can’t generate a manufacturing order from sales. The Generate Quote and Generate MObuttons in the Manufacturing Series Sales Item Detail window are not available. Also, theManufacturing Series Sales Item Detail window won’t open automatically.
Fulfillmentmethod Options marked † Effects
† If the item is a configurable item—if it has a super bill of materials—you’ll have the option to open the SalesConfigurator window, no matter what sales order options are marked.
8/10/2019 Dynamics GP MFG Core Functions
http://slidepdf.com/reader/full/dynamics-gp-mfg-core-functions 174/256
P A R T 4 S A L E S E X T E N S I O N S
164 M A N U F A C T U R I N G C O R E F U N C T I O N S
Creating a manufacturing order for a sales line
If you enter a sales order but don’t have enough items in inventory to fulfill theorder, a manufacturing order with Open or Released status can be createdautomatically to replenish your supply. This procedure assumes that you’vemarked Enable Silent MO Generation, Enable Manual MO Generation, or both inthe Manufacturing Series Sales Order Preferences window, and that the fulfillment
method for the item is Make to Order–Silent or Make to Order–Manual.
The status and priority of the generated manufacturing order depends on the option you’vemarked in the Manufacturing Series Sales Order Preferences window. Refer toSetting upmanufacturing orders for sales orders in Chapter 3, “Manufacturing core functions setup ,” in the Manufacturing Setup documentation for more information.
To create a manufacturing order for a sales line:1. Open the Sales Transaction Entry window.
(Transactions >> Sales >> Sales Transaction Entry)
Refer to your Sales Order Processing documentation for more information about
entering sales orders.2. Enter a sales order line item quantity greater than the inventory quantity. The
Sales Quantity Shortage Options window will open.
You also can enter a quantity in the Quantity to Back Order field. The manufacturingorder will be generated for that amount.
3. Mark either Back Order Balance or Back Order All from the Quantity ShortageOptions list.
Back Order Balance Mark this option to generate a manufacturing orderquantity based on the difference between inventory and order quantities.
Back Order All Mark this option to generate a manufacturing order quantity based on the entire order quantity.
Refer to Sales Order Processing documentation for more information about the SalesQuantity Shortage Options window.
4. Choose OK to close the window and return to the Sales Transaction Entrywindow.

8/10/2019 Dynamics GP MFG Core Functions
http://slidepdf.com/reader/full/dynamics-gp-mfg-core-functions 175/256
M A N U F A C T U R I N G C O R E F U N C T I O N S 165
C H A P T E R 2 0 S A L E S O R D E R E N T R Y
5. Move off the line. Depending on the options and the item fulfillment method,the Manufacturing Series Sales Item Detail window might open. Otherwise,you must select Manufacturing Sales Item Detail from the Additional menu.Refer to Manufacturing orders generated from sales on page 162 for moreinformation.
If the item uses the Make to Order–Silent fulfillment method, a manufacturing order is
created when you move off the line.
6. Enter or adjust date information, as needed.
7. Enter any other related information in the Manufacturing Series Sales ItemDetail window. Refer to Adjusting dates for sales items on page 167, Addingcustomer part number information on page 168 or Modifying default manufacturingorder details on page 166 for more information.
8. Generate the manufacturing order. If you close the Manufacturing Series Sales
Item Detail window without generating a manufacturing order, none of theauto-generation information—changes to the bill of materials, routing, orscheduling preference—will be saved.
Refer to the table for more information about how you can generate amanufacturing order, based on the fulfillment method for the item and yoursystem setup.
Enable Silent MOGeneration option
Enable Manual MOGeneration option
Make to stock No manufacturing orders aregenerated for Make to Stockitems.
No manufacturing ordersare generated for Make toStock items.
Make to order–Silent If the item doesn’t have asuper bill of materials, amanufacturing order isgenerated in the backgroundwhen you move off the salesorder line. Otherwise, theManufacturing Series SalesItem Detail window opens andyou can generate themanufacturing order there.
You can open theManufacturing SeriesSales Item Detail windowand generate themanufacturing order.

8/10/2019 Dynamics GP MFG Core Functions
http://slidepdf.com/reader/full/dynamics-gp-mfg-core-functions 176/256

8/10/2019 Dynamics GP MFG Core Functions
http://slidepdf.com/reader/full/dynamics-gp-mfg-core-functions 177/256
M A N U F A C T U R I N G C O R E F U N C T I O N S 167
C H A P T E R 2 0 S A L E S O R D E R E N T R Y
Generating a quote-status manufacturing order
If you’re using the Manufacturing Series Sales Item Detail window to enterinformation for a quote document, choose Generate Quote to generate a quote/estimate manufacturing order.
If you transfer the sales order document to an order, the status of the manufacturing order
automatically will be changed to Released if you marked the setup option in the Manufacturing Series Sales Order Preferences window to Change MO Status on OrderTransfer.
To generate a quote-status manufacturing order:1. Open the Sales Transaction Entry window.
(Transactions >> Sales >> Sales Transaction Entry)
2. Open a sales order quote document and select a line item.
3. From the Additional menu, choose Manufacturing Sales Item Detail.
4. Choose Generate Quote to create a manufacturing order with Quote/Estimatestatus.
To find the identifier of the manufacturing order created for each line of the quote saledocument, open the quote in the Sales Transaction Entry window, highlight theappropriate line in the scrolling window, and choose Manufacturing Sales Item Detail from the Additional menu. The manufacturing order number will be displayed in the Manufacturing Series Sales Item Detail window.
Adjusting dates for sales items
You can use the Sales Transaction Entry window or the Sales Item Detail Entrywindow—both part of the core Sales Order Processing system—to enter differentdelivery dates for sales order line items. You can use the Manufacturing Series SalesItem Detail window to adjust the in-house dates for the items.
If you’ve set a Due Date Offset in the Manufacturing Series Sales Order Preferenceswindow, use this procedure to override the default in-house due date. Refer toSetting up manufacturing sales order due dates in Chapter 3, “Manufacturing corefunctions setup,” in the Manufacturing Setup documentation for more informationabout setting the due date offset.
To adjust due dates for sales items:1. Open the Sales Transaction Entry window.
(Transactions >> Sales >> Sales Transaction Entry)
2. Open a sales order document and select a line item.

8/10/2019 Dynamics GP MFG Core Functions
http://slidepdf.com/reader/full/dynamics-gp-mfg-core-functions 178/256
P A R T 4 S A L E S E X T E N S I O N S
168 M A N U F A C T U R I N G C O R E F U N C T I O N S
3. Decide what window you want to use to change the date.
• To use the Sales Transaction Entry window, use the show icon button at thetop right corner of the scrolling window to see card view information.
• To use the Sales Item Detail Entry window, choose the Item Numberexpansion icon button.
• To use the Manufacturing Sales Item Detail window, click the Additionalmenu and choose Manufacturing Sales Item Detail.
4. Enter the Requested Ship Date if none has been entered. You also can changethe Requested Ship Date. Your changes will be reflected in other requested shipdate fields for this line item.
A message will appear, asking if you also want to update the in-house duedates. If you choose to update the in-house due date, that information isupdated for the sales order but not for any manufacturing orders that have beengenerated for the manufacturing order.
The in-house due date will precede the requested ship date by the number ofdays you’ve specified in the due date offset, unless the calculated in-house duedate occurs on a down day. Then the in-house due date might be adjusted—depending on your system settings—to occur on the closest preceding orfollowing production date.
The in-house due date is used to calculate due dates for the manufacturingorder. You might need to reschedule the manufacturing order to meet the newdue date. Refer to Rescheduling an entire manufacturing order in Chapter 9,“Routings and rescheduling ,” in the Manufacturing Production Functionsdocumentation for more information.
5. If you’re using the Manufacturing Series Sales Item Detail window, you canenter the Customer Promise Date, which is the date the item must arrive at thecustomer location. If you enter a due date that is beyond the lead time neededto produce the item, a message will appear and you’ll have the option to backorder the item rather than fulfilling the quantity from on-hand inventory.
6. Repeat steps 2 through 5, as needed, for other sales order line items.
7. Choose OK and close the window.
Adding customer part number information
Depending on your organization and the organizations of your customers, you
might need to track the customer’s part number for each sales order line item. Forexample, some customers might require you to provide invoices and otherdocuments reflecting their part-numbering scheme—not yours. Use theManufacturing Series Sales Item Detail window to enter that information.
To add customer part number information:1. Open the Sales Transaction Entry window.
(Transactions >> Sales >> Sales Transaction Entry)
2. Open a sales order document and select a line item.

8/10/2019 Dynamics GP MFG Core Functions
http://slidepdf.com/reader/full/dynamics-gp-mfg-core-functions 179/256
M A N U F A C T U R I N G C O R E F U N C T I O N S 169
C H A P T E R 2 0 S A L E S O R D E R E N T R Y
3. From the Additional menu, choose Manufacturing Sales Item Detail.
4. Enter the customer’s part number.
5. Repeat steps 2 through 4 for each line item.
6. Choose OK and close the window.
Calculating the shipping weight of an order
Use the Total Estimated Weight window to see a calculated total weightestimation—and to calculate the equivalent weight in a different unit of measure.Information in the Total Estimated Weight window is based on the weightinformation in the Item Engineering Data window.
Refer toSetting the unit of measure for shipping weight on page 68 for more information.
To calculate the shipping weight of an order:
1. Open the Sales Transaction Entry window.(Transactions >> Sales >> Sales Transaction Entry)
2. Enter or select a sales order.
3. From the Additional menu, choose Total Estimated Weight to open the TotalEstimated Weight window.
4. Review the information in the window. To calculate the equivalent weight in adifferent weight unit of measure, select the other unit of measure from the list.Close the window when you’ve finished reviewing information.
Effects of sales orders on MRP
Selling items means your stock of the items will be depleted. Manufacturing helpsyou track items by linking the Sales Order Processing and Material RequirementPlanning (MRP) modules. When you enter sales orders, the system will plan theproduction of the items by generating new items on the Material RequirementsPlanning lists.

8/10/2019 Dynamics GP MFG Core Functions
http://slidepdf.com/reader/full/dynamics-gp-mfg-core-functions 180/256
P A R T 4 S A L E S E X T E N S I O N S
170 M A N U F A C T U R I N G C O R E F U N C T I O N S
How sales order requirements are reflected in MRP quantities depends on settingsin the MRP Preference Defaults window.
• If Put SO Back Orders in Firm Buckets is marked, shortage quantities will betreated as firm requirements. A manufacturing order or an MRP-plannedmanufacturing order might be created, depending on your setup options. (Youalso can set up Manufacturing so that no manufacturing orders are created or
suggested.)
If your company uses MRP, we recommend that you mark Put SO Back Orders in FirmBuckets.
• If Put SO Back Orders in Firm Buckets isn’t marked, shortage quantities will bereflected in the Required Planned requirement and won’t appear in thePurchase Request Resolution window.
You can use the MRP Item Inquiry window—which you can open through the Additionalmenu when the Sales Transaction Entry window is open—to review the effect of sales on MRP. Refer to Viewing MRP information for a specific item in Chapter 13, “MRPinquiries,” in the Manufacturing Planning Functions documentation for more information.
Limiting effects of sales allocations on MRP
To ensure accurate MRP information, we recommend that you choose not to allocatematerials for sales orders until you’re ready to fulfill the order. By waiting toallocate materials until order fulfillment, the quantity actually on hand can becalculated and a time-phased allocation can occur.
You can prevent allocation for an individual sales order by using the Sales OrderProcessing Setup window to create a new order ID that uses Document/Batch orNone for the allocation method. If you choose to do this, however, no checking will be done when you enter sales order line item quantities. This means that when you
enter a sales order line item, you should check inventory quantities in the ItemQuantities Maintenance window or the MRP Item Inquiry window to be sureinventory quantities of the item are sufficient.
Because you can’t fulfill an order without allocating materials to it, you must allocate thematerials before fulfilling the order.
To limit effects of sales allocations on MRP:1. Open the Sales Order Processing Setup window.
(Microsoft Dynamics GP menu >> Tools >> Setup >> Sales >> Sales OrderProcessing)
2. Choose Order to open the Sales Order Setup window.
3. In the Order ID field, enter or select an Order ID. You also must enter the OrderID Next Number.
4. From the Allocate by list, select Document/Batch or None.
5. Choose Save and close the Sales Order Setup window.
6. Choose OK to close the Sales Order Processing Setup window.

8/10/2019 Dynamics GP MFG Core Functions
http://slidepdf.com/reader/full/dynamics-gp-mfg-core-functions 181/256
M A N U F A C T U R I N G C O R E F U N C T I O N S 171
Chapter 21: Order fulfillmentSales Order Processing includes a complete order fulfillment system.Manufacturing includes additional features that you can use to track the orderfulfillment and shipping history for each sales order line item. This is helpful if yourcompany ships various line items at different times and in various ways. You canuse these features to determine exactly what has been fulfilled—and what is yet to be fulfilled—on each order. Manufacturing helps you to maintain tight control oversuch information.
Sales Order Processing documentation describes in greater detail how to fulfill orders using Microsoft Dynamics GP features. Refer to that documentation for more information aboutsales order fulfillment.
This information is divided into the following sections:
• Requirements for order fulfillment history• Setting up document types for order fulfillment• Entering order fulfillment history details
• Viewing order fulfillment history• Modifying entire order fulfillment information• Deleting an order fulfillment entry• Changing freight or miscellaneous charges• Generating a history report for a document range• Generating a history report for a single order• Assigning serial numbers for a sales order• Assigning lot numbers for a sales order• Viewing bin information for an order• Viewing serial number assignments for an order• Viewing lot number assignments for an order
Requirements for order fulfillment history
Manufacturing doesn’t maintain order fulfillment history automatically—you mustset up your Microsoft Dynamics GP sales order processing system so information isgathered as you fulfill sales orders. You also must determine which items to trackshipping history for, and then use document setup windows to set up your systemto reflect your choices.
Microsoft Dynamics GP order fulfillment settingsTo track Microsoft Dynamics GP fulfillment history, order fulfillment must occur inthe Sales Order Fulfillment window and document types must be set up in thedocument setup windows to use a separate fulfillment process. Refer to Setting updocument types for order fulfillment on page 172 for more information.
Shipping historyYou can determine if shipping history will be maintained for each inventory item.You can make this selection by item or by item class. Refer to Setting up shippinghistory for an item class on page 58 and Starting to track shipping history for an item onpage 75 for more information about setting options to maintain shipping history foritem classes and items.

8/10/2019 Dynamics GP MFG Core Functions
http://slidepdf.com/reader/full/dynamics-gp-mfg-core-functions 182/256
P A R T 4 S A L E S E X T E N S I O N S
172 M A N U F A C T U R I N G C O R E F U N C T I O N S
Fulfill All buttonIf you decide to fulfill the entire quantity for a line item by using the Fulfill All button in the Sales Order Fulfillment window, you can’t use the Fulfillment HistoryEntry window. If you choose Fulfill All, a message appears to indicate that the orderwill be filled using the order fulfillment default values. Serial or lot numbers for thefulfilled items must be allocated manually. You’ll have the option to continue.
• Choose Yes to continue fulfilling the order using the order fulfillment defaultselections. The amount in the Quantity Ready to Fulfill field also will bedisplayed in the Quantity Fulfilled field.
• Choose No if you don’t want to use the order fulfillment default selections. Youmust enter the quantity to be fulfilled in the Quantity Fulfilled field; when youmove off the line, the Order Fulfillment History window will open.
Quantity fulfilledIf you’re using Manufacturing, the order fulfillment process will be slightlydifferent than it is for non-Manufacturing users. Specifically, the value for thequantity fulfilled in the Sales Transaction Entry window will not be updated
automatically if all of the following are true:
• The fulfillment order or invoice type is set to use a separate fulfillment method.
• The sales item is marked to maintain shipping history in the Fulfillment Detailwindow.
• You are not using the separate Order Fulfillment window.
This rule applies regardless of whether the sales order line is linked to amanufacturing order.
Setting up document types for order fulfillment
You’ll use the Sales Order Setup window to set up Manufacturing order fulfillmentto use with your system.
To set up document types for order fulfillment:1. Open the Sales Order Setup window.
(Microsoft Dynamics GP menu >> Tools >> Setup >> Sales >> Sales OrderProcessing >> Order button)
2. Select the order ID that will require order fulfillment history.
3. Mark Use Separate Fulfillment Process.
4. Choose Save.
5. Repeat steps 2 through 4 for other order IDs, as needed.
6. Close the window.
If you’ve created an order document type that fulfills against invoices, you should alsocreate an invoice document type that requires a separate fulfillment process.

8/10/2019 Dynamics GP MFG Core Functions
http://slidepdf.com/reader/full/dynamics-gp-mfg-core-functions 183/256
M A N U F A C T U R I N G C O R E F U N C T I O N S 173
C H A P T E R 2 1 O R D E R F U L F I L L M E N T
Entering order fulfillment history details
Use the Fulfillment History Entry window to change order fulfillment historydetails. You can enter details about the fulfillment of a line item only when you’refulfilling the line item requirement using the Sales Order Fulfillment window.
The Fulfillment History Entry window will open only if you have set up your
system properly. Refer to Setting up order fulfillment options in Chapter 3,“Manufacturing core functions setup ,” in the Manufacturing Setup documentationfor more information about system settings required for using Manufacturing orderfulfillment.
Before beginning this procedure, be sure you’ve set up sales order document types to use aseparate order fulfillment process. Refer toSetting up document types for order fulfillment on page 172 for more information.
To enter order fulfillment history details:1. Open the Sales Transaction Entry window.
(Transactions >> Sales >> Sales Transaction Entry)
2. Enter or select a sales order document. The sales document must be a documenttype that has been set up to use a separate fulfillment process.
Refer to Sales Order Processing documentation for more information about creatingsales document types.
3. Choose Options >> Allocate or Fulfill to open the Sales Allocation-FulfillmentOptions window.
4. Mark Allocate and choose OK. Items will be allocated to the sales order line-item requirement, and the window will close.
It’s important that you don’t mark the Fulfill option in this window because quantitiesmust be fulfilled through the Sales Order Fulfillment window for Manufacturing totrack order fulfillment information.
5. Choose Save in the Sales Transaction Entry window. Note the documentnumber as you save the information.
6. Open the Sales Order Fulfillment window.(Transactions >> Sales >> Order Fulfillment)
7. Select the sales document you just allocated.
8. If the item to be fulfilled is tracked by serial or lot numbers, the Serial/Lot button will be available when you select the item in the scrolling window.
• If you’ve set up Sales Order Processing to select serial and lot numbersautomatically, you don’t need to specify serial or lot numbers.
• If you haven’t set up Sales Order Processing to select serial and lot numbersautomatically, you must specify which items—with which serial numbersor from which lot—will be used to fulfill the order quantity. Refer to Assigning serial numbers for a sales order on page 179 or Assigning lot numbers for a sales order on page 180 for more information.

8/10/2019 Dynamics GP MFG Core Functions
http://slidepdf.com/reader/full/dynamics-gp-mfg-core-functions 184/256
P A R T 4 S A L E S E X T E N S I O N S
174 M A N U F A C T U R I N G C O R E F U N C T I O N S
9. The quantity ready to be fulfilled must be greater than the quantity fulfilled. Inthe Qty Fulfilled field, enter the total amount to be fulfilled, then move off theline.
The Fulfillment History Entry window opens, displaying information based onthe line item and on default entries from the Order Fulfillment Setup window.
Refer toSetting up order fulfillment options in Chapter 3, “Manufacturing core functions setup,” in the Manufacturing Setup documentation for more informationabout the Order Fulfillment Setup window.
10. You can accept the default information—shipping method, FOB point and UPSzone—or you can change it.
The shipping method will be the one specified in the Customer Maintenancewindow, or if no shipping method is specified there, the shipping methodspecified in the Order Fulfillment Setup window will be used.
11. Enter the shipping document number in the Ship BOL (Bill of Lading) field.
12. Enter the weight of the shipment in the Weight field. Select a unit of measurefrom the list.
Refer toCalculating the shipping weight of an order on page 169 for more informationabout using the Total Weight window to convert from one unit of weight measure toanother.
13. Enter the number of packages shipped.
14. Your user ID will be displayed as the person who has fulfilled this order. Acceptthat information, or enter or select another user ID.
15. Enter or select an alternate unit of measure for the variable unit of measure. Ifyou fulfill a line item in a different unit of measure than was entered on theorder, the order prices will be updated based on the new unit of measure andthe pricing schedule for that item.
For example, suppose your business sells hams. You might enter orders in theEach unit of measure, but then adjust prices for the sales order line based on theweight of each ham as you fulfill the order.
16. Enter an alternate quantity used to measure the shipment in the QTY field.

8/10/2019 Dynamics GP MFG Core Functions
http://slidepdf.com/reader/full/dynamics-gp-mfg-core-functions 185/256
M A N U F A C T U R I N G C O R E F U N C T I O N S 175
C H A P T E R 2 1 O R D E R F U L F I L L M E N T
17. Choose OK and close the Fulfillment History Entry window. Choose Save in theSales Order Fulfillment window.
If you’ve marked the preference to Run Reconcile from Sales in the MRP PreferenceDefaults window, an MRP reconciliation will start after you save information in theSales Order Fulfillment window and the order fulfillment is processed.
Viewing order fulfillment historyUse the Order Fulfillment History window to check the fulfillment progress of anorder that has not yet had a corresponding invoice posted. You also can use thiswindow to view weights and other shipping information.
If you can’t view order fulfillment information, be sure you’ve set up options for the itemand for order fulfillment properly. Refer toRequirements for order fulfillment history on page 171 for more information.
To view order fulfillment history:1. Open the Order Fulfillment History window.
(Transactions >> Sales >> Order Fulfillment >> select an order >> select theQuantity Fulfilled for a line item >> Additional >> Fulfillment History)
You can open the Order Fulfillment History window another way. If the SalesTransaction Entry window is open, choose Additional >> Order FulfillmentHistory.
2. View information in the window, as needed.
3. To view serial- or lot-number information about the items, choose theexpansion button in any line of the scrolling window. The Order Fulfillment -Lot Inquiry or the Order Fulfillment - Serial Inquiry window will open if theitem is tracked by lot or serial numbers, respectively.
Refer toViewing serial number assignments for an order on page 182or Viewing lotnumber assignments for an order on page 182 for more information.
4. When you’ve finished viewing information, close the windows.

8/10/2019 Dynamics GP MFG Core Functions
http://slidepdf.com/reader/full/dynamics-gp-mfg-core-functions 186/256
P A R T 4 S A L E S E X T E N S I O N S
176 M A N U F A C T U R I N G C O R E F U N C T I O N S
Modifying entire order fulfillment information
The Entire Order Fulfillment History window helps you to check the entirefulfillment history of an order or an invoice. You can also modify or deletefulfillment history records.
If you’re unable to view order fulfillment information, be sure you’ve set up options for the
item and for order fulfillment properly. Refer toRequirements for order fulfillment history on page 171 for more information.
To modify entire order fulfillment information:1. Open the Entire Order Fulfillment History window.
(Transactions >> Sales >> Sales Transaction Entry >> Additional >> EntireOrder History)
If the Sales Order Fulfillment window is open, choose Additional >> EntireOrder Fulfillment History.
2. Enter or select a sales order document.
3. Choose the left corner of the line item in the top scrolling window. A black dotwill appear next to the line item and the corresponding information will bedisplayed in the bottom scrolling window.
4. Review the information and make changes, as needed. Changes you enter in the bottom scrolling window will be saved as you make them.
5. For additional information about specific serial- or lot-number–tracked items,
choose the expansion button at the bottom of the line item to open either theOrder Fulfillment-Serial Inquiry or Order Fulfillment-Lot Inquiry window.
Refer toViewing serial number assignments for an order on page 182or Viewing lotnumber assignments for an order on page 182 for more information.
6. When you’ve finished reviewing the information and making changes, close thewindow.

8/10/2019 Dynamics GP MFG Core Functions
http://slidepdf.com/reader/full/dynamics-gp-mfg-core-functions 187/256
M A N U F A C T U R I N G C O R E F U N C T I O N S 177
C H A P T E R 2 1 O R D E R F U L F I L L M E N T
Deleting an order fulfillment entry
Use the Entire Order Fulfillment History window to delete order fulfillmentrecords. For example, if you created a record that shows you shipped something to acustomer that wasn’t shipped, you can delete that order fulfillment record.
You must have specified a process security set for the History Edit Security Set field in the
Order Fulfillment Setup window to use this procedure. Refer toSetting up order fulfillmentoptions in Chapter 3, “Manufacturing core functions setup ,” in the Manufacturing Setupdocumentation.
To delete an order fulfillment entry:1. Open the Entire Order Fulfillment History window.
(Transactions >> Sales >> Sales Transaction Entry >> Additional >> EntireOrder History)
2. Enter or select a sales order.
3. Choose the left corner of the line item in the top scrolling window. A black dot
will appear next to the line item and the corresponding information will bedisplayed in the bottom scrolling window.
4. In the lower scrolling window, select the order fulfillment entry to delete.Choose the delete icon button in that row of the scrolling window. Changes inthe lower scrolling window will be saved as you make them.
If you delete a transaction, that order will be available again to fulfill. If a transactionwas for a serial- or lot-number–tracked item, the items that were assigned to be used to fulfill that sales order line item will be available again.
5. Close the window.
Changing freight or miscellaneous chargesUse the Freight and Misc Adjustments window to change freight and miscellaneouscharges attached to a sales order or invoice. Freight and miscellaneous chargesentered in this window will appear on the sales document.
You must mark options in the Order Fulfillment Setup window that will allow you tooverride freight and miscellaneous charges to complete this procedure. Refer toSetting uporder fulfillment options in Chapter 3, “Manufacturing core functions setup,” in the Manufacturing Setup documentation for more information.
To change freight or miscellaneous charges:
1. Open the Sales Order Fulfillment window.(Transactions >> Sales >> Order Fulfillment)
2. Enter or select a sales order or invoice.

8/10/2019 Dynamics GP MFG Core Functions
http://slidepdf.com/reader/full/dynamics-gp-mfg-core-functions 188/256
P A R T 4 S A L E S E X T E N S I O N S
178 M A N U F A C T U R I N G C O R E F U N C T I O N S
3. Choose Additional >> Freight and Misc Adjustments to open the Freight andMisc Adjustments window.
4. Change the freight and miscellaneous charges amounts, as needed.
5. Choose OK and close the window.
Generating a history report for a document range
You can print fulfillment history report that can be helpful in tracking historicalinformation for your shipping department. Use the Sales Document Range Inquirywindow to generate this report for a range of order fulfillment records.
Order fulfillment history is tracked only for those items you specify. Refer toSetting upshipping history for an item class on page 58and Starting to track shipping history for anitem on page 75 for more information.
To generate a history report for a document range:1. Open the Sales Document Range Inquiry window.
(Inquiry >> Sales >> Sales Range Inquiry)
2. Enter or select an inquiry ID. If you’re entering a new inquiry ID, the SalesInquiry Restrictions window will open. Use that window to define the range ofsales documents to include in the range of documents for your report. Refer toyour Microsoft Dynamics GP Sales Order Processing documentation for moreinformation about creating sales inquiry ranges.
3. Determine which documents should be included in the report.
Unposted Mark to include sales documents that haven’t been invoiced andposted.
History Mark to include sales documents that have been invoiced and posted.
4. Choose Additional >> Fulfillment History Report. The Fulfillment Historyreport summarizes order fulfillment information about the order, includingshipping method, weight and number of parcels.
Generating a history report for a single order
You can generate a history report for a single sales order using either the SalesTransaction Entry window or the Sales Order Fulfillment window.
Order fulfillment history is tracked only for those items you specify. Refer toSetting upshipping history for an item class on page 58and Starting to track shipping history for anitem on page 75 for more information.

8/10/2019 Dynamics GP MFG Core Functions
http://slidepdf.com/reader/full/dynamics-gp-mfg-core-functions 189/256
M A N U F A C T U R I N G C O R E F U N C T I O N S 179
C H A P T E R 2 1 O R D E R F U L F I L L M E N T
To generate a history report for a single order:1. Open the Sales Transaction Entry window or the Sales Order Fulfillment
window.(Transactions >> Sales >> Sales Transaction Entry or Transactions >> Sales >>Order Fulfillment)
2. Enter or select a sales order document.
3. Choose Additional >> Fulfillment History Report. The Fulfillment Historyreport summarizes order fulfillment information about the order, includingshipping method, weight and number of parcels.
Assigning serial numbers for a sales order
If an item you’re fulfilling is tracked by serial numbers, you must specify whichitems—with which serial numbers—are being used to fulfill a sales orderrequirement. Use the Sales Serial Number Entry window to choose items to fulfill asales order.
Assigning serial numbers for a sales order must be completed as you’re enteringorder fulfillment details. The Sales Serial Number Entry window automatically willopen if you’re fulfilling one of those items, and if the Auto-Assign Serial Numbersoption isn’t marked in the Sales Order Processing Setup Options window. Refer toyour Sales Order Processing documentation for more information about the SalesOrder Processing Setup Options window.
The window will open only if you’re fulfilling a sales order quantity in the SalesOrder Fulfillment window and you choose Serial/Lot.
To assign serial numbers for a sales order:1. Open the Sales Serial Number Entry window.
(Transactions >> Sales >> Sales Transaction Entry >> Item Number expansion button >> Serial/Lot button)
2. To use an item with a serial number that has already been defined, mark theappropriate serial number in the Available scrolling window and choose Insert.

8/10/2019 Dynamics GP MFG Core Functions
http://slidepdf.com/reader/full/dynamics-gp-mfg-core-functions 190/256
P A R T 4 S A L E S E X T E N S I O N S
180 M A N U F A C T U R I N G C O R E F U N C T I O N S
3. To use an item with a serial number that hasn’t been defined, enter the serialnumber in the Serial Number field and choose Insert.
4. Repeat steps 2 and 3, as needed, until you’ve assigned serial numbers to the lineitem requirement to fulfill.
5. Choose OK. The Sales Order Fulfillment window will open. When you move
the highlight from the field, the Fulfillment History Entry window will open,and you can resume entering order fulfillment details. Refer to Entering order fulfillment history details on page 173 for more information.
Assigning lot numbers for a sales order
If an item you’re fulfilling is tracked by lot numbers, you must specify whichitems—from which lot—are used to fulfill a sales order requirement. Use the SalesLot Number Entry window to choose which items will be used to fulfill a salesorder.
Assigning lot numbers must be completed as you’re entering order fulfillmentdetails. The Sales Lot Number Entry window automatically will open if you’refulfilling one of those items, and if the Auto-Assign Lot Numbers option isn’tmarked in the Sales Order Processing Setup Options window. Refer to your SalesOrder Processing documentation for more information about the Sales OrderProcessing Setup Options window.
This window opens only if you’re fulfilling a sales order quantity in the Sales OrderFulfillment window and you choose Serial/Lot.
To assign lot numbers for a sales order:1. Open the Sales Lot Number Entry window.
(Transactions >> Sales >> Sales Transaction Entry >> Item Number expansion button >> Serial/Lot button)
2. In the upper scrolling window, select the lot to take items from to fulfill the salesorder. In the Quantity Selected column in the appropriate row of the scrollingwindow, enter the number of units to be used from that lot.
3. Choose Insert.

8/10/2019 Dynamics GP MFG Core Functions
http://slidepdf.com/reader/full/dynamics-gp-mfg-core-functions 191/256

8/10/2019 Dynamics GP MFG Core Functions
http://slidepdf.com/reader/full/dynamics-gp-mfg-core-functions 192/256

8/10/2019 Dynamics GP MFG Core Functions
http://slidepdf.com/reader/full/dynamics-gp-mfg-core-functions 193/256
M A N U F A C T U R I N G C O R E F U N C T I O N S 183
C H A P T E R 2 1 O R D E R F U L F I L L M E N T
4. Review the information in the lower scrolling window. Choose the expansion button for any line to open the Order Fulfillment - Lot Inquiry window.
5. When you’ve finished reviewing the information, close the window.

8/10/2019 Dynamics GP MFG Core Functions
http://slidepdf.com/reader/full/dynamics-gp-mfg-core-functions 194/256
184 M A N U F A C T U R I N G C O R E F U N C T I O N S

8/10/2019 Dynamics GP MFG Core Functions
http://slidepdf.com/reader/full/dynamics-gp-mfg-core-functions 195/256

8/10/2019 Dynamics GP MFG Core Functions
http://slidepdf.com/reader/full/dynamics-gp-mfg-core-functions 196/256
186 M A N U F A C T U R I N G C O R E F U N C T I O N S
Part 5: Sales ConfiguratorThis part of the documentation includes information that will help you set up anduse the Manufacturing Sales Configurator and describes extra steps you’ll need todefine “configured” items—complex products with many optional components oraccessories—and to enter sales orders for those items.
After you’ve set up the configured items, salespersons in your organization can usethe Sales Configurator to help customers specify the options and accessories theywant for their purchases.
The following information is discussed:
• Chapter 22, “Sales Configurator overview,” contains information about theterms and concepts you should know before using the Sales Configuratormodule.
• Chapter 23, “Options and promotions,” describes options—groups of featuresor accessories customers can choose from when they order a configured item—and explains how to set them up. The section also contains information aboutsetting up promotions for special pricing you might offer for a specific option.
• Chapter 24, “Bills and routings,” explains how to set up the bills of materialsand routings for the configurable items.
• Chapter 25, “Pricing and sales transactions,” explains how pricing is calculatedfor configured items. The section also describes how to use the SalesConfigurator window for entering information about customer orders andinquiries.
• Chapter 26, “Configurator manufacturing orders,” describes how to work withthe manufacturing orders for configured items. Special rules for calculating thematerial cost for standard cost configured finished goods also is included.
8/10/2019 Dynamics GP MFG Core Functions
http://slidepdf.com/reader/full/dynamics-gp-mfg-core-functions 197/256
M A N U F A C T U R I N G C O R E F U N C T I O N S 187
Chapter 22: Sales Configurator overviewMany companies today have designed products that are built only in response tospecific customer specifications. For example, a computer manufacturer mightmarket a basic computer that customers can configure—or customize—for the tasksthey’ll use that computer for. A graphic artist might want a larger monitor, while asoftware developer might be more interested in getting a lot of RAM.
Sales Configurator helps you define items manufactured by your business. You canincorporate information from several modules—Inventory Control, Bill ofMaterials, Routings, and Sales Order Processing—and generate manufacturingorders for the configured items as you enter information about the items. You alsocan include or exclude certain options based on customer specifications; forexample, you can require a customer who wants to use a large monitor to specifymore video RAM.
Sales Configurator can be used to enhance your sales process, too. For example, youcan set up promotions to remind your sales personnel of special offers.
This information is divided into the following sections:• Sales Configurator terms• Requirements for using the Sales Configurator
Sales Configurator terms
Refer here for information about some of the terms related to the Sales Configuratormodule:
Super bill of materials or “super BOM” Lists all the component items thatcan possibly be included in the bill of materials for a finished item. For example, ifyour company builds office chairs with either plastic or wooden arms, both types ofarms would be listed in the super bill of materials, but you would select only onearm type for a specific, configured bill of materials.
Configured bill of materials The customized bill of materials created whenyou select components from a super bill of materials. When you use the SalesConfigurator to specify options, a configured bill of materials is created and isassigned a unique identifier.
Configured cost and configured price The configured cost of the item ishow much it will cost you to build the item with a particular set of options. Theconfigured cost is the total of the cost of the components and the labor involved.The configured price is the suggested price you’ll charge the customer. Theconfigured price is based on your finished goods price schedule and the specificoptions you select.
Configured working routing A routing based on the options you choose asyou create a configured bill of materials. For example, if you created a configured bill of materials for office chairs and chose plastic components rather than woodenones, the routing would be modified to exclude the sequences for staining andvarnishing the wooden components.

8/10/2019 Dynamics GP MFG Core Functions
http://slidepdf.com/reader/full/dynamics-gp-mfg-core-functions 198/256
P A R T 5 S A L E S C O N F I G U R A T O R
188 M A N U F A C T U R I N G C O R E F U N C T I O N S
Options and option categories A choice you must make about whichcomponent item to use when building a finished good. An option category is agroup of related options. For example, a furniture manufacturer might have severalupholstery fabrics—solid, flecked or plaid—that customers can specify. Each of thefabric patterns is an option; together they are an option category called “Fabrics.”
Exclusions (of options) Options that are disallowed because of another option
selection you’ve made. For example, a furniture manufacturer might offer certainitems in a selection of wood types—oak, pine and cherry. If you chose an oak diningtable, you might create an exclusion to limit the customer’s selections for diningchairs to oak.
Inclusions (of options) Options that are automatically added to the configured bill of materials because of another option selection. For example, a computermanufacturer might include different manuals with a computer, depending on theoptions selected by the customer.
Promotions Special pricing you offer on a particular option during a certainperiod. For example, a computer manufacturer might offer special pricing on RAMmodules.
Requirements for using the Sales Configurator
Before using the Sales Configurator you must complete the following tasks. Someare described here; others are described in other Manufacturing documentation.
• Be sure all components included in a super bill of materials have been definedin Inventory Control. Refer to Inventory Control documentation and to Chapter8, “Item engineering data.”
• Specify Sales Configurator system preferences. Refer to Setting up SalesConfigurator options in Chapter 3, “Manufacturing core functions setup,” in the
Manufacturing Setup documentation.• Create option categories and indicate option item inclusions and exclusions.
Refer to Creating an option category on page 189 and Creating an option exclusion orinclusion on page 191.
• Create a super bill of materials for the configurable item. Refer to Creating asuper bill of materials on page 199 .
• Assign option categories to the finished good. Refer to Assigning an optioncategory to an item on page 194 .
• Create a routing for the configurable finished good. Refer to Routings for
configured items on page 202 .
• Use the BOM Routing Link window to link options in the super bill of materialsto specific routing sequences. If the item linked to a sequence isn’t added to theconfigured bill of materials, the linked sequence won’t be included in therouting. Refer to Linking component usage to a routing sequence on page 111 .

8/10/2019 Dynamics GP MFG Core Functions
http://slidepdf.com/reader/full/dynamics-gp-mfg-core-functions 199/256
M A N U F A C T U R I N G C O R E F U N C T I O N S 189
Chapter 23: Options and promotionsOne of the greatest benefits of using Sales Configurator is being able to definegroups of options that customers can choose from. You can use Sales Configuratorto specify how certain selections will limit or expand the other selections thatcustomers will have.
This information is divided into the following sections:
• Creating an option category• Creating an option exclusion or inclusion• Modifying an option category• Removing an item from an option category• Deleting an option category• Generating a basic option category report• Sales Configurator option category assignments• Assigning an option category to an item• Changing the order of option assignments• Unassigning option categories
• Generating an item option assignment report• Creating an option promotion• Modifying a promotion• Deleting a promotion• Deleting all promotions for an option
Creating an option category
Use the Option Category Maintenance window to create option categories—groupsof options that customers can choose from.
To create an option category:1. Open the Option Category Maintenance window.
(Cards >> Manufacturing >> Sales Configurator >> Options)

8/10/2019 Dynamics GP MFG Core Functions
http://slidepdf.com/reader/full/dynamics-gp-mfg-core-functions 200/256
P A R T 5 S A L E S C O N F I G U R A T O R
190 M A N U F A C T U R I N G C O R E F U N C T I O N S
2. Enter the name of the option category. For example, if you produce chairs andhave an option category for various types of upholstery fabrics, you mightcreate a “fabrics” option category.
3. Enter a brief description for the option category.
4. Determine how many selections customers can make from this group.
• Mark Single Selection Required if customers must choose one option fromthis category. For example, a furniture manufacturer would requirecustomers to choose one fabric to be used for the pieces they order.
• Mark Multiple Selections if customers can choose multiple options—or nooptions. For example, a computer manufacturer might have an optioncalled “Peripherals” that could include removable storage, scanners andprinters. Customers can choose as many of these options as they like.
5. In the upper scrolling window, select a blank line and then select an item toinclude in the option category. The description of the item and its minimum andmaximum allowable quantities will be displayed.
6. If the selected item has a Make replenishment method (or if the item has a Makeor Buy replenishment method and you want to use it as a made item in theconfigured bill of materials) choose its BOM Type; if the type is Archived orConfigured, enter or select the BOM Name.
7. To specify an option within the category as the default selection, mark Default.You can override the default selection when configuring an actual item.
Be sure that no default option items are exclusions for other items.
8. Enter quantity information.
Refer to the table for more information.
For example, a furniture manufacturer might build desks with two, three or
four drawers. To allow for the different numbers of drawers, the manufacturercan create a Drawers option that has a minimum quantity of 2 and a maximumquantity of 4. Later, when the Sales Configurator is used to record customerchoices, the user can specify if the customer wants two, three or four drawersfor the desk.
9. Enter or select the base unit of measure for the item.
Quantity Rules How it’s used
Minimum -- Is the smallest quantity of the itemthat’s allowed for a configured item
Average Can’t be less than the minimumquantity or greater than themaximum quantity
Is the default quantity of the item for aconfigured item.
Maximum -- Is the greatest quantity of the item that’sallowed for a configured item

8/10/2019 Dynamics GP MFG Core Functions
http://slidepdf.com/reader/full/dynamics-gp-mfg-core-functions 201/256

8/10/2019 Dynamics GP MFG Core Functions
http://slidepdf.com/reader/full/dynamics-gp-mfg-core-functions 202/256
P A R T 5 S A L E S C O N F I G U R A T O R
192 M A N U F A C T U R I N G C O R E F U N C T I O N S
Modifying an option category
You can modify an option category, if needed. You can change the designation of thecategory as a single-selection or multiple-selection category, or you can add orremove options. Use the Option Category Maintenance window to complete thisprocedure.
To modify an option category:1. Open the Option Category Maintenance window.
(Cards >> Manufacturing >> Sales Configurator >> Options)
2. Enter or select an option category.
3. To change the category description or its designation as a single-selection ormultiple-selection category, make your change and then choose Save.
4. To change an option in the upper scrolling window, make your change in thatscrolling window. Your changes automatically will be saved.
5. When you’ve finished, close the window.
Removing an item from an option category
Use the Option Category Maintenance window to remove items (options) from acategory.
To remove an item from an option category:1. Open the Option Category Maintenance window.
(Cards >> Manufacturing >> Sales Configurator >> Options)
2. Enter or select an option category.
3. In the upper scrolling window, mark the line item to be removed.
4. From the Edit menu, choose Delete Row. A message will appear.
• Choose Delete to remove the item. Your changes automatically will besaved.
• Choose Cancel to return to the Option Category Maintenance windowwithout deleting the item.
5. Close the window.
Deleting an option categoryUse the Option Category Maintenance window to delete option categories.
Before you can delete an option category, you must be sure it isn’t assigned to anyconfigurable items. Refer toUnassigning option categories on page 195 for moreinformation about using the Item Option Assignment window to see which items an optioncategory is assigned to and to remove the option category from them.

8/10/2019 Dynamics GP MFG Core Functions
http://slidepdf.com/reader/full/dynamics-gp-mfg-core-functions 203/256
M A N U F A C T U R I N G C O R E F U N C T I O N S 193
C H A P T E R 2 3 O P T I O N S A N D P R O M O T I O N S
To delete an option category:1. Open the Option Category Maintenance window.
(Cards >> Manufacturing >> Sales Configurator >> Options)
2. Enter or select an option category.
3. Choose Delete and close the window.
Generating a basic option category report
Use the Option Category Maintenance window to generate a basic report about thedisplayed option category. An Item Option Assignment report lists the optioncategories that have been assigned to a finished item.
To generate a basic option category report:1. Open the Option Category Maintenance window.
(Cards >> Manufacturing >> Sales Configurator >> Options)
2. Enter or select an option category.
3. From the File menu, select Print.
4. In the Report Destination window, mark the option to indicate where you wantto see the final report.
5. Choose OK and close the window.
Sales Configurator option category assignments
After you’ve created option categories, you can assign them to finished goods. Byassigning the option categories to finished goods, you can select items in thosecategories when you configure a bill of materials for a finished good.
Only finished goods that have a super bill of materials can have option categories assigned tthem. If you select an item that doesn’t have a super bill of materials, a message will appeaindicating that you must create a super bill of materials for the item before proceeding.
The order in which option categories appear in the scrolling window is important because it affects how item exclusions and inclusions are applied. You should assignoption categories to an item in the order you want your customer to consider thechoices.
For example, a computer manufacturer should assign option categories for memoryand processors before option categories for monitors and other peripherals. That’s
because the selections the customer makes about the computer’s speed and powerwill affect which monitors and peripherals will work best with the system.

8/10/2019 Dynamics GP MFG Core Functions
http://slidepdf.com/reader/full/dynamics-gp-mfg-core-functions 204/256
P A R T 5 S A L E S C O N F I G U R A T O R
194 M A N U F A C T U R I N G C O R E F U N C T I O N S
Assigning an option category to an item
Use the Option Assignment window to assign an option category to an item.
To assign an option category to an item:1. Open the Item Option Assignment window.
(Cards >> Manufacturing >> Sales Configurator >> Option Assignment)
2. Enter or select the configurable item that option categories should be assignedto.
3. Enter or select an option category to assign to this item. If you enter an optioncategory that doesn’t exist, a message will appear when you move off the fieldand you’ll have the option to define the option category in the Option CategoryMaintenance window. If you choose Yes, the Option Category Maintenance
window will open.4. Continue, repeating steps 2 and 3 to add as many option categories as you like.
Your changes automatically will be saved in the scrolling window.
5. Close the window.
Changing the order of option assignments
The order in which you assign option categories to an item is important. To insert anoption category between two already-assigned categories in the Item OptionAssignment window, you can change the order of your existing assignments.
To change the order of option assignments:1. Open the Item Option Assignment window.
(Cards >> Manufacturing >> Sales Configurator >> Option Assignment)
2. Enter or select the item that includes the option categories you want to changethe order of.
3. In the scrolling window, mark the option category to be moved lower in theassignment order.

8/10/2019 Dynamics GP MFG Core Functions
http://slidepdf.com/reader/full/dynamics-gp-mfg-core-functions 205/256
M A N U F A C T U R I N G C O R E F U N C T I O N S 195
C H A P T E R 2 3 O P T I O N S A N D P R O M O T I O N S
4. From the Edit menu, select Insert Row. A new row will be inserted above themarked option category.
5. Enter or select an option category for the new line in the scrolling window. Yourchanges automatically will be saved.
6. Close the window.
Unassigning option categories
Use the Item Option Assignment window to remove an option category from anitem. You can remove a single option category or all option categories.
To unassign option categories:1. Open the Item Option Assignment window.
(Cards >> Manufacturing >> Sales Configurator >> Option Assignment)
2. Enter or select the item from which option categories are to be removed.
3. Determine whether to remove a single option category or all option categories.To remove a single category Mark the option category, then select DeleteRow from the Edit menu. A message will appear.
• Choose Delete to remove the option category.
• Choose Cancel to end the procedure without deleting an option category.
To remove all assigned option categories Choose Delete. A messagewill appear.
• Choose Delete to remove all of the assigned categories from the record.
• Choose Cancel to end the procedure without deleting option categories.
4. Your changes automatically will be saved. Close the window.
Generating an item option assignment report
An Item Option Assignment report lists the options that have been assigned to aspecific option category. You can print item option assignment reports from the ItemOption Assignment window or through the Item Engineering Report Optionswindow. Refer to Chapter 28, “Manufacturing reports,” for more information aboutusing the Item Engineering Report Options window to generate this report.
To generate an item option assignment report:1. Open the Item Option Assignment window.
(Cards >> Manufacturing >> Sales Configurator >> Option Assignment)
2. Enter or select an option category.
3. From the File menu, choose Print. The report will be generated and displayedon your screen. You can send the report to a printer, view it on your screen orprint it to a file.

8/10/2019 Dynamics GP MFG Core Functions
http://slidepdf.com/reader/full/dynamics-gp-mfg-core-functions 206/256
P A R T 5 S A L E S C O N F I G U R A T O R
196 M A N U F A C T U R I N G C O R E F U N C T I O N S
Creating an option promotion
If you’re offering special pricing or discounts on certain items, you can create optionpromotions. Use the Option Promotion Maintenance window to define promotionsyou’ll offer customers who choose a specific option item.
Option promotions can be used only when the finished good has a pricing method of
Currency or Percent of List. Refer toSales Configurator pricing calculations on page 205 formore information.
Use the Option Promotion Maintenance window to create promotions.
To create an option promotion:1. Open the Option Promotion Maintenance window.
(Cards >> Manufacturing >> Sales Configurator >> Promotions)
2. Enter or select an option category and an item to promote.
3. If the item is a made item, select its BOM Type from the list. If you selectArchived or Configured, enter or select a BOM Name.
4. Enter a promotion ID, a unique identifier for the promotion.
5. Use the list at the top of the scrolling window to determine if the records in thewindow will be displayed by start date or by promotion ID.
6. Enter the effective dates—the start and end dates—for the promotion in theappropriate line in the scrolling window.

8/10/2019 Dynamics GP MFG Core Functions
http://slidepdf.com/reader/full/dynamics-gp-mfg-core-functions 207/256

8/10/2019 Dynamics GP MFG Core Functions
http://slidepdf.com/reader/full/dynamics-gp-mfg-core-functions 208/256
P A R T 5 S A L E S C O N F I G U R A T O R
198 M A N U F A C T U R I N G C O R E F U N C T I O N S
Deleting all promotions for an option
Use the Option Promotion Maintenance window to delete all the promotionsassociated with a particular option.
To delete all promotions for an option:1. Open the Option Promotion Maintenance window.
(Cards >> Manufacturing >> Sales Configurator >> Promotions)
2. Enter or select an option category and an item number.
3. Choose Delete. A message will be displayed, and you’ll have the option todelete the record, which includes all the promotions that have been assigned tothe option category-item number combination.
• Choose Delete to remove all the promotion IDs.
• Choose Cancel to leave the record unchanged.
4. When you’ve finished, close the window.

8/10/2019 Dynamics GP MFG Core Functions
http://slidepdf.com/reader/full/dynamics-gp-mfg-core-functions 209/256
M A N U F A C T U R I N G C O R E F U N C T I O N S 199
Chapter 24: Bills and routingsTo use the Sales Configurator, you must create special bills of materials and routingsthat include all options for a particular product. Setting up the bills of materials androutings properly will ensure that the manufacturing records generated from theSales Configurator are accurate, usable documents that can be easily used toproduce finished items.
Because creating a bill of materials for use with the Sales Configurator requires youto consider a different set of issues and requirements than other bills of materials,these procedures are described in this section. You also can refer to documentationabout bills of materials for more information.
Bill of Materials windows and features specific to the Sales Configurator aredescribed in this documentation. For general information about the Bill of Materialsmodule, refer to these chapters:
• Chapter 9, “Bill of Materials overview”• Chapter 11, “Bill of Materials entry”
• Chapter 12, “Links to routings”• Chapter 15, “Bill of Materials inquiries”
This information is divided into the following sections:
• Creating a super bill of materials• Fulfillment methods for configured items• Modifying a super bill of materials• Routings for configured items• How super bills and routings work together
Creating a super bill of materials
Use the Bill of Materials Entry window to create a super bill of materials. When youadd components to the super bill of materials—by using the tree view on the rightside of the window—you must enter every possible component item that you canuse for a configured item. For example, a computer manufacturer would need toinclude all the processors, all the RAM amounts, and all the hard disks to create asuper bill of materials for configuring computers.
A super bill of materials also must include all items that are required in all versionsof the configured item. For example, a computer manufacturer would need toinclude a power cord in the bill of materials for all systems.
To create a super bill of materials:
1. Open the Bill of Materials Entry window.(Cards >> Manufacturing >> Bill of Materials)
2. Enter or select the item number of the finished item to be built using the super bill of materials.

8/10/2019 Dynamics GP MFG Core Functions
http://slidepdf.com/reader/full/dynamics-gp-mfg-core-functions 210/256
P A R T 5 S A L E S C O N F I G U R A T O R
200 M A N U F A C T U R I N G C O R E F U N C T I O N S
3. Select Super BOM from the BOM Type list. Select Regular from the BOMCategory list. Other options—Modular, Phantom and Option—can’t be usedwith a super bill of materials.
If the fulfillment method for the configurable item is Make to Stock, a message appearsand you’ll have the option to change the fulfillment method, continue, or cancel. Refer toFulfillment methods for configured items on page 201 for more information.
4. Enter the date that the super bill of materials is to be available for configuringitems.
5. Accept the default quantity to build—1—or enter another.
6. Accept the default BOM category. The BOM Category for a super bill ofmaterials must be Regular.
7. Accept the default revision level—1—or enter another. Refer to Chapter 17,“Revisions and archived bills,” for more information about revision levels.
8. Decide whether to backflush all components in this bill of materials.Backflushing means that the component quantities aren’t issued to workcenters, but that they are accounted for when a manufacturing order associatedwith this bill of materials is closed.
Refer toBackflushing bill of materials components on page 104 for more informationabout backflushing options.
• Mark Backflush Item in the left pane to have component quantities for allitems in this bill of materials backflushed. You can change this setting forspecific components later in the right pane of the window.
• If materials should not be backflushed, be sure the option is unmarked.
9. You can enter the default issue-to and issue-from locations for the componentsin the bill of materials. Click the expansion button on the Defaults field to openthe Bill of Materials Defaults window, where you can enter the sites.
The issue-from site is the inventory site that components are taken from. Theissue-to site is the work center that components are delivered to. You canoverride the default sites on a component-by-component basis, if needed.
10. To add an item to the bill of materials, click the button with the green plus sign just above the tree view.
11. A message appears. To save your changes, choose Yes to continue.
12. Decide whether to add a regular component—one that is included in allconfigurations of the item—or an option category—a group of components thatcustomers will choose from, such as different fabrics for an upholstered chair.
• To add a regular component, go to step 13.
• To add an option category, go to step 16.

8/10/2019 Dynamics GP MFG Core Functions
http://slidepdf.com/reader/full/dynamics-gp-mfg-core-functions 211/256
M A N U F A C T U R I N G C O R E F U N C T I O N S 201
C H A P T E R 2 4 B I L L S A N D R O U T I N G S
13. To add a regular component, enter or select a component to add to the bill ofmaterials.
Refer to Requirements for bill of materials components on page 104 for moreinformation about which items can be added to a bill of materials.
14. Enter information about the component in fields in the right pane.
The information that you enter will depend on the component (whether it ismade or bought, for example) and on your business practices. Refer to thefollowing topics for more information:
• Requirements for bill of materials components on page 104• Backflushing bill of materials components on page 104• Shrinkage for bill of materials components on page 105• How floor stock costs are applied on page 105• Component fixed quantity on page 106• Specifying an alternate component in a bill on page 106• Bills of materials and component effective dates on page 107• Adding user-defined information to bills on page 109• Accounting for by-products in a bill of materials on page 109• Component quantities and rounding on page 110
15. Click Add to add the component information to the tree view in the left pane,then skip to step 18.
16. To add the components in an option category, choose Add Option >> Add Itemsfrom Option Category.
17. In the Option Category Lookup window, select an option category. Double-clickthe option category to add all its options to the super bill of materials.
When you add an option category to a bill of materials, the focus of the window switchto the left pane. To add more components or other option categories, choose the green plus sign button above the tree view, so that the right pane of the window is active.
18. Continue, starting at step 12 until you’ve finished adding components andoption categories to the super bill of materials.
19. If the right pane is active, choose Tree View so that the left pane of the windowis active.
20. Choose Save to save the bill of materials.
Fulfillment methods for configured items
When you create a super bill of materials for an item, you’re signalling that you’ll beusing the Sales Configurator to choose from among the item options. You mustenter the customer’s selections for a configured item, so it’s unlikely that an itemwith a super bill of materials would have a Make to Stock or Make to Order–Silentfulfillment method. Creating a configurable item with a Make to Stock or Make toOrder–Silent fulfillment method will affect Manufacturing.

8/10/2019 Dynamics GP MFG Core Functions
http://slidepdf.com/reader/full/dynamics-gp-mfg-core-functions 212/256
P A R T 5 S A L E S C O N F I G U R A T O R
202 M A N U F A C T U R I N G C O R E F U N C T I O N S
Refer to the table for more information.
Modifying a super bill of materials
The Bill of Materials Entry window includes many fields you can use to create asuper bill of materials, but Manufacturing also includes other windows and optionsyou can use to add to the basic bill of materials information. Refer to the followingtopics for more information about modifying your bill of materials information:
Adding items to a bill of materials Refer to Adding a component to a bill of
materials on page 101 for more information about adding components to a bill ofmaterials.
Removing items from a bill of materials Refer to Deleting a component from abill of materials on page 102 for more information about removing components froma bill of materials.
Changing component information Refer to Changing component details onpage 102 for more information about changing component details that will affect a bill of materials.
Deleting a bill of materials Refer to Removing a bill of materials on page 103 formore information about deleting an obsolete bill of materials.
If you need to make the same change to a group of bills of materials, you also can use theBOM Mass Updates window. Refer to Chapter 18, “Mass updates,” for more information.
Routings for configured items
If your configured items require assembly or other manufacturing processes, youmust create a routing to use in conjunction with the super bill of materials. If yourconfigured items don’t require assembly—for example, a configured item for a kitthat customers assemble themselves—no routing is required.
Creating a routing for a configured item requires two steps—creating a routing andlinking sequences and option items.
Create a routingYou must create a routing that includes separate routing sequences for adding eachoption item and each standard item to the configured item. For example, acomputer manufacturer’s routing for a configurable computer system mightinclude routing sequences for installing option items—several differentprocessors—even though only one processor can be installed in each unit. Therouting also must include the sequences for adding the standard items—such as apower cord—to the configured item.
Fulfillment method Effect for configurable items
Make to Stock You can’t select an existing bill of materials to generate amanufacturing order from the Manufacturing Series Sales ItemDetail window.
Make to Order–Silent The system won’t automatically create a manufacturing order for
the configured item, but the Manufacturing Series Sales ItemDetail window will open when you move off the sales order line.Choose Configurator in that window to use the SalesConfigurator window.
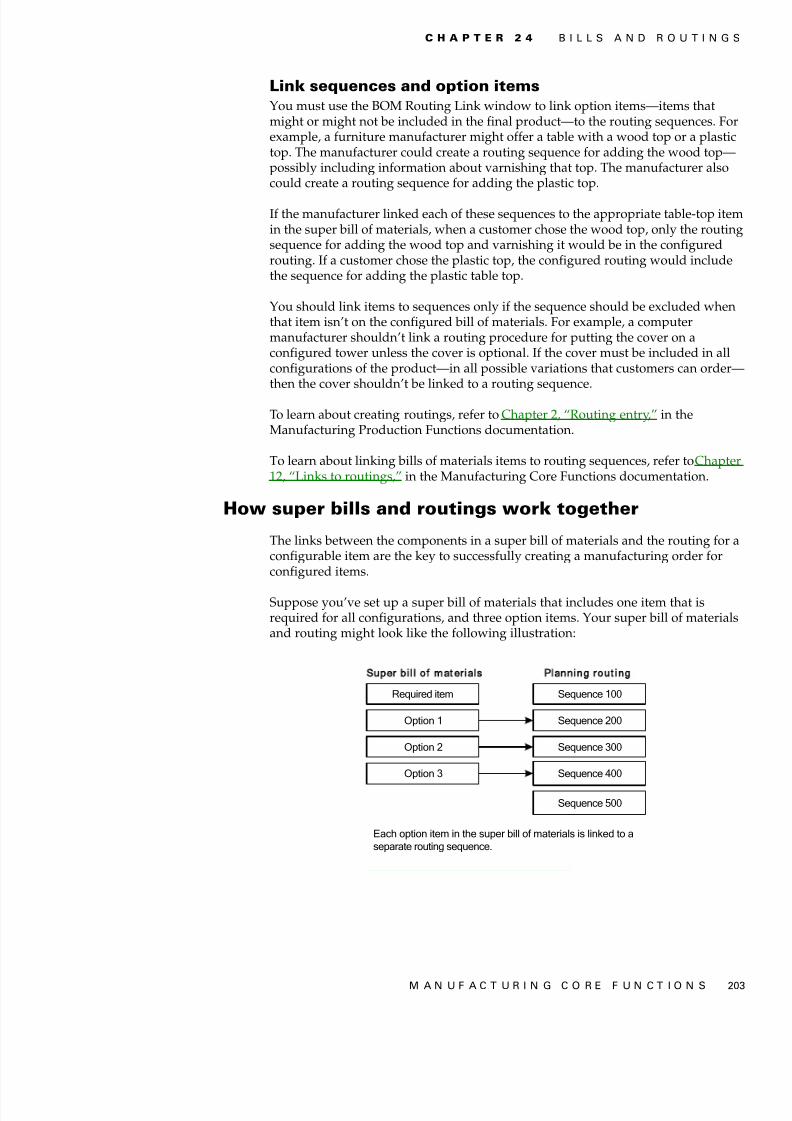
8/10/2019 Dynamics GP MFG Core Functions
http://slidepdf.com/reader/full/dynamics-gp-mfg-core-functions 213/256
M A N U F A C T U R I N G C O R E F U N C T I O N S 203
C H A P T E R 2 4 B I L L S A N D R O U T I N G S
Link sequences and option itemsYou must use the BOM Routing Link window to link option items—items thatmight or might not be included in the final product—to the routing sequences. Forexample, a furniture manufacturer might offer a table with a wood top or a plastictop. The manufacturer could create a routing sequence for adding the wood top—possibly including information about varnishing that top. The manufacturer alsocould create a routing sequence for adding the plastic top.
If the manufacturer linked each of these sequences to the appropriate table-top itemin the super bill of materials, when a customer chose the wood top, only the routingsequence for adding the wood top and varnishing it would be in the configuredrouting. If a customer chose the plastic top, the configured routing would includethe sequence for adding the plastic table top.
You should link items to sequences only if the sequence should be excluded whenthat item isn’t on the configured bill of materials. For example, a computermanufacturer shouldn’t link a routing procedure for putting the cover on aconfigured tower unless the cover is optional. If the cover must be included in allconfigurations of the product—in all possible variations that customers can order—then the cover shouldn’t be linked to a routing sequence.
To learn about creating routings, refer to Chapter 2, “ Routing entry ,” in theManufacturing Production Functions documentation.
To learn about linking bills of materials items to routing sequences, refer to Chapter12, “Links to routings ,” in the Manufacturing Core Functions documentation.
How super bills and routings work together
The links between the components in a super bill of materials and the routing for aconfigurable item are the key to successfully creating a manufacturing order forconfigured items.
Suppose you’ve set up a super bill of materials that includes one item that isrequired for all configurations, and three option items. Your super bill of materialsand routing might look like the following illustration:
Supe r b i l l o f m a te r i al s
Required item
Option 1
Option 2
Option 3
l ann ing rou t ing
Sequence 100
Sequence 200
Sequence 300
Sequence 500
Sequence 400
Each option item in the super bill of materials is linked to aseparate routing sequence.

8/10/2019 Dynamics GP MFG Core Functions
http://slidepdf.com/reader/full/dynamics-gp-mfg-core-functions 214/256
P A R T 5 S A L E S C O N F I G U R A T O R
204 M A N U F A C T U R I N G C O R E F U N C T I O N S
Suppose then that a customer places an order for the configured item. The customerwants the finished good to include options 1 and 3. The picklist and the workingrouting for the configured item might look like the following illustration:
Note that only the routing sequences that were linked to options that were notselected are excluded in the working routing. That is, if a routing sequence is notlinked at all, then that sequence will always be part of the working routing.
Picklist
Required item
Option 1
Option 3
Working routing
Sequence 100
Sequence 200
Sequence 500
Sequence 400

8/10/2019 Dynamics GP MFG Core Functions
http://slidepdf.com/reader/full/dynamics-gp-mfg-core-functions 215/256
M A N U F A C T U R I N G C O R E F U N C T I O N S 205
Chapter 25: Pricing and sales transactionsAfter you’ve completed the setup tasks for using the Sales Configurator—creatingoption categories, options and promotions, creating a super bill of materials and arouting with sequences linked to optional items—you can start using the SalesConfigurator.
However, using the Sales Configurator requires some understanding of how pricingcalculations are made for configured items. The price method assigned to thefinished item, the use of Multicurrency Management, and option promotions can allaffect how prices for items are calculated with the Sales Configurator.
This information is divided into the following sections:
• Sales Configurator pricing calculations• Effects of Multicurrency Management on pricing• Effects of promotions on pricing• How option items affect material costs• Configuring an item
• Blank Sales Configurator fields• Adding a newly configured item to a sales order• Adding a previously configured item to a sales order• Deleting a configured bill of materials• Viewing options for a sales line item• Modifying a configured bill of materials• Adjusting markdown amounts• Viewing a configured-item drawing
Sales Configurator pricing calculations
When you open the Sales Configurator window from the Manufacturing SeriesSales Item Detail window, the finished goods price method affects how the SalesConfigurator calculates prices. If you open the Sales Configurator window throughthe menu (Transactions >> Manufacturing >> Sales Configurator), pricing isn’tcalculated.
The Sales Configurator doesn’t support items with Markup-Standard Cost or Margin-Standard Cost price methods.
Pricing for currency and percent of list itemsIf a finished good has a price method of Currency or Percent of List, the SalesConfigurator window will display the item price for each available option item inthe lower scrolling window. The total price of the finished good—displayed nearthe bottom of the window—will be the value from the Item Pricing Maintenance
window. The price that’s calculated includes the prices for all the default itemoptions specified in the Option Category Maintenance window.
As you add and remove option items from the item, the total price will berecalculated by adding and subtracting the item prices of the options that are addedor removed from the original total price. Unit price information in the SalesTransaction Entry window will be updated to reflect the new total cost. Anymarkdown amounts will be included and the extended price will be recalculated.The unit cost will reflect the total cost value.

8/10/2019 Dynamics GP MFG Core Functions
http://slidepdf.com/reader/full/dynamics-gp-mfg-core-functions 216/256
P A R T 5 S A L E S C O N F I G U R A T O R
206 M A N U F A C T U R I N G C O R E F U N C T I O N S
For example, a furniture manufacturer might have chairs that have a selling price—in the Item Pricing Maintenance window—of $250. The default base for the chairs isa plastic base with a selling price of $40. One customer prefers a chair with awooden base with a selling price of $75. To calculate the selling price for the chairs ifthe wooden base is used, the system would start with the chair’s total price ($250,including the default plastic base), remove the selling price of the plastic base ($40)and then add the selling price of the wooden base ($75). The total price of the chair
will increase by $35, the difference between the prices of the two types of bases. Thechair’s new price is $285.
Percent markup-current cost or percent margin-currentcostIf the finished good has a Percent Markup-Current Cost or Percent Margin-CurrentCost price method, the Sales Configurator window displays the item price for eachavailable option item in the lower scrolling window. In this case, the prices forcomponent items aren’t used when calculating the selling price of the finishedgood. Instead, the Sales Configurator adds up all the component items costs andmachine and labor costs for the sequences required by the configured bill ofmaterials to determine the total cost of the finished good item.
After the costs are added, the price method of the finished good is used to calculatethe selling price for the item. The unit price lines in the Sales Transaction Entrywindow are updated with the new selling price information. The unit cost isupdated with the total cost value.
For example, a furniture manufacturer might have an item that includes severaldefault options. The total cost of the item—with all the default options—is $150, andincludes the machine and labor costs from the routing. If the price method for thefinished item is Percent Markup-Current Cost, and the markup is 50 % , the sellingprice of the finished good would be $225. In this case, if a customer wanted a $30wood base instead of the $12 plastic base, the total cost of the finished item would be increased by $18, the difference between the costs of the two types of bases. Theselling price for the chair would then be recalculated based on the new total cost—$168—and the 50% markup. The new selling price would be $252.
Effects of Multicurrency Management on pricing
Using Multicurrency Management can affect pricing calculations. If you’ve set upmulticurrency price lists—including one for the specific item, currency and unit ofmeasure—pricing calculations will be based on those currency amounts rather thanon multicurrency calculation scripts. That is, the pricing will be based on theamounts entered in your price lists rather than on mathematical formulas forconverting from one currency to another.
Effects of promotions on pricingOption promotions can be used only when the finished good has a price method ofCurrency or Percent of List. If an item in an option category has a valid promotion but the option category is assigned to a finished good that doesn’t have a Currencyor Percent of List price method, the promotion won’t be displayed when youconfigure the item.

8/10/2019 Dynamics GP MFG Core Functions
http://slidepdf.com/reader/full/dynamics-gp-mfg-core-functions 217/256
M A N U F A C T U R I N G C O R E F U N C T I O N S 207
C H A P T E R 2 5 P R I C I N G A N D S A L E S T R A N S A C T I O N S
As you add and remove option items from the configured item, the individual itemprices are added and subtracted to calculate the total price of the finished good. Ifan option item in the configured bill of materials has a valid promotion, thepromotion option (Pro.) will be marked in the Sales Configurator window, and themarkdown amount will be added to the total in the Markdowns-Promotions field.The total markdowns will be subtracted from the total price of the finished good todetermine the selling price.
For example, a furniture manufacturer might have an office chair with a sellingprice—from the Item Pricing Maintenance window—of $200. When you configureoptions for the office chair, suppose you choose a more expensive upholstery fabric.The new fabric has a price of $60, but also has a valid $15-off promotion—that is, thedate you’re entering the configured sales transaction falls between the promotion’sstart and end dates. When you remove the default fabric from the configured item,the cost of the default fabric—$35—will be subtracted from the total price. Whenyou add the new fabric to the item, the difference between the cost of the fabric andthe promotion—$45—will be added. The new total price for the chair will be $210.
How option items affect material costs
If you open the Sales Configurator window through the Manufacturing Series SalesItem Detail window, a bill of materials information about the basic (not optional)components of the configured item is copied. Information about the cost of thecomponent items also is included.
When you select an option for the configured item, the cost of the option itemcomponents is added to the overall material costs for the configured item. Theincrease in material costs is immediately reflected in the cost information in theSales Configurator window.
If you later have to remove an option from the bill of materials, the component costthat’s removed from the bill of materials will match the component cost that was
added to the bill of materials most recently—regardless of whether the cost of theitem has changed since the component was added to the bill of materials.
Configuring an item
Use the Sales Configurator window to select options to build a configured item.
This procedure pertains to sales situations in which you want to quickly configure a bill of materials without calculating costs and pricing.
For other sales situations—such as phone orders placed by customers who knowwhich options they want and are ready to have sales orders generated—refer to Adding a newly configured item to a sales order on page 209 or Adding a previously
configured item to a sales order on page 211 .

8/10/2019 Dynamics GP MFG Core Functions
http://slidepdf.com/reader/full/dynamics-gp-mfg-core-functions 218/256
P A R T 5 S A L E S C O N F I G U R A T O R
208 M A N U F A C T U R I N G C O R E F U N C T I O N S
To configure an item:1. Open the Sales Configurator window.
(Transactions >> Manufacturing >> Sales Configurator)
2. Enter or select an item number.
3. Enter a name for the configured bill of materials you’ll create. Option categoriesassigned to the finished good will be displayed in the top scrolling window.
If you open the Sales Configurator window through the menu, information inthe window will be displayed in functional currency only, and themulticurrency icon button will not be displayed. Refer to Blank SalesConfigurator fields on page 209 for more information.
4. Mark an option category. You should make selections from option categories inthe order they appear in the scrolling window. The options included in theoption category will be displayed in the lower scrolling window.
5. The default option selection will be marked in the lower scrolling window. Youcan accept that selection or change it. If the option category is a multiple-selection option category, you can choose as many options as you like. If theoption category is a single-selection option category, you can choose only oneoption.
• To add an option item, mark the item. A black dot will appear in the leftcolumn of selected items.
• To remove an option item, unmark the item. The black dot will disappearfrom the left column.
If you select an item option that is excluded by an earlier option selection—for example,if you select a 21-inch monitor for a system that supports only monitors through 17inches, a message will be displayed to indicate that the item selections are incompatible.You can continue adding other options.

8/10/2019 Dynamics GP MFG Core Functions
http://slidepdf.com/reader/full/dynamics-gp-mfg-core-functions 219/256
M A N U F A C T U R I N G C O R E F U N C T I O N S 209
C H A P T E R 2 5 P R I C I N G A N D S A L E S T R A N S A C T I O N S
6. You can change the amount in the Quantity field. The default value will be theminimum quantity for the option that you specified in the Option CategoryMaintenance window.
7. Repeat steps 4 through 6, adding options from each option category.
8. Choose the print icon button to generate a report that lists the options you’ve
selected for the configured item.
9. Determine if a bill of materials based on the selections should be created.
• To generate a configured bill of materials—one that includes only thecomponents that are required for the item you’ve configured—choose Save.You can modify the configured bill of materials in any of the Bill ofMaterials module windows and can generate manufacturing orders basedon it.
• If you don’t want to create a configured bill of materials, choose Clear.Information about your configured item won’t be saved.
Blank Sales Configurator fieldsSeveral fields in the lower scrolling window in the Sales Configurator window will be blank if you open the Sales Configurator through the menu. If you open the SalesConfigurator window through the Manufacturing Series Sales Item Detail window,information will be displayed in the following fields:
• Item Price will be displayed only if the finished item has a Currency or Percentof List price method.
• Due Date.
• Currency fields will be displayed only if the Sales Configurator calculates costsand prices—which it does only when you open it from the ManufacturingSeries Sales Item Detail window.
Adding a newly configured item to a sales order
This information pertains to sales situations when customers want to generate salesorders and they know which options they want, and you need to create a newconfigured bill of materials for them.
For sales situations when the customer wants to consider other options, but mightnot make a decision about purchasing the item until a later date, refer to Configuringan item on page 207 . For sales situations when the customer wants to generate a
sales order for an existing configuration, refer to Adding a previously configured itemto a sales order on page 211 .
The following procedure assumes that you’ve already completed the initial steps ofentering a sales order in the Sales Transaction Entry window, such as selecting adocument type and entering customer information. Refer to the Sales OrderProcessing documentation for more information.
Before you can open the Sales Configurator window from the Sales Transaction Entrywindow, a default price level must be entered on the price list of each option assigned to thconfigured item.

8/10/2019 Dynamics GP MFG Core Functions
http://slidepdf.com/reader/full/dynamics-gp-mfg-core-functions 220/256

8/10/2019 Dynamics GP MFG Core Functions
http://slidepdf.com/reader/full/dynamics-gp-mfg-core-functions 221/256
M A N U F A C T U R I N G C O R E F U N C T I O N S 211
C H A P T E R 2 5 P R I C I N G A N D S A L E S T R A N S A C T I O N S
9. You can change the amount in the Quantity field. The default value will be theminimum quantity for the option that you specified in the Option CategoryMaintenance window.
10. Repeat steps 7 through 9, adding options from each option category.
11. Choose the print icon button to generate a report that lists the options you’ve
selected for the configured item.
12. To update the due date for the manufacturing order, choose Schedule.
13. Choose Save. The bill of materials and routing for the manufacturing order will be created based on the options selected, and the Sales Configurator windowand the Manufacturing Series Sales Item Detail window will close. You’ll bereturned to the Sales Transaction Entry window, where you can continue toenter sales order information.
Adding a previously configured item to a sales order
This information pertains to sales situations when customers want to generate salesorders and they know which options they want, and you want to use an existingconfigured bill of materials.
For sales situations when the customer wants to consider other options, but mightnot make a decision about purchasing the item until a later date, refer to Configuringan item on page 207 . For sales situations when the customer wants to generate asales order for a new configuration, refer to Adding a newly configured item to a salesorder on page 209 .
The following procedure assumes that you’ve already completed the initial steps ofentering a sales order in the Sales Transaction Entry window, such as selecting adocument type and entering customer information. Refer to the Sales Order
Processing documentation for more information.Before you can open the Sales Configurator window from the Sales Transaction Entrywindow, a default price level must be entered on the price list of each option assigned to thconfigured item.
To add a previously configured item to a sales order:1. Open the Sales Transaction Entry window.
(Transactions >> Sales >> Sales Transaction Entry)
2. Enter or select a sales document.
3. Enter or select a new sales order line item, or mark an existing sales order lineitem.
• If you’re entering a new sales order line item, the Manufacturing Sales ItemDetail window automatically opens when you move off the line.
• If you’re configuring a sales order line item that already has been entered,choose Additional >> Manufacturing Sales Item Detail to open theManufacturing Series Sales Item Detail window.
4. Change the BOM Type to Configured BOM, and select the BOM Name.

8/10/2019 Dynamics GP MFG Core Functions
http://slidepdf.com/reader/full/dynamics-gp-mfg-core-functions 222/256
P A R T 5 S A L E S C O N F I G U R A T O R
212 M A N U F A C T U R I N G C O R E F U N C T I O N S
5. Determine if the manufacturing order should be created now or later.
• Choose Save to save your bill of materials selection without generating amanufacturing order.
• Choose Generate MO to generate a manufacturing order for the sales orderline. If process security has been set up for creating manufacturing orders,
you might need to supply a password.
6. If you chose Generate MO but there were problems with the manufacturingorder, a message will be displayed and you’ll have the option to view moreinformation.
Refer toViewing warnings for generated manufacturing orders on page 31 in Chapter5, “MPS manufacturing orders ,” in the Manufacturing Planning Functionsdocumentation for more information.
7. After you’ve saved the information or finished viewing manufacturing orderinformation, the Sales Configurator window and the Manufacturing SeriesSales Item Detail window will close. You’ll be returned to the Sales TransactionEntry window, where you can continue to enter sales order information.
Deleting a configured bill of materials
Use the Bill of Materials Entry window to delete a configured bill of materials.
To have configured bills of materials removed, archived or both when the correspondingmanufacturing order is closed, refer to Setting up manufacturing order processing inChapter 4, “Manufacturing production functions setup,” in the Manufacturing Setupdocumentation.
To delete a configured bill of materials:
1. Open the Bill of Materials Entry window.(Cards >> Manufacturing >> Bill of Materials)
2. Enter or select an item number.
3. Select Configured BOM from the BOM Type list.
4. Enter or select the name of the configured bill of materials.
5. Choose Delete and close the window.
Viewing options for a sales line item
Use the Option Inquiry window to view the options that have been selected for aparticular configured item.
To view options for a sales line item:1. Open the Sales Transaction Entry window.
(Transactions >> Sales >> Sales Transaction Entry)
2. Enter or select a sales order that includes at least one configured item.
3. Mark the line item.

8/10/2019 Dynamics GP MFG Core Functions
http://slidepdf.com/reader/full/dynamics-gp-mfg-core-functions 223/256
M A N U F A C T U R I N G C O R E F U N C T I O N S 213
C H A P T E R 2 5 P R I C I N G A N D S A L E S T R A N S A C T I O N S
4. Choose Additional >> Option Inquiry to open the Option Inquiry window.
• Mark Show Options Only to see which options were selected for thespecific sales order line item.
• Mark Show All Items to see all items in the configured bill of materials,including ones for the basic product that aren’t included in optioncategories.
5. Close the window.
Modifying a configured bill of materials
If you open the Sales Configurator window through the Manufacturing Series SalesItem Detail window, you can modify a configured bill of materials.
You can modify a configured bill of materials only if the status of manufacturing ordersbased on the bill is Quote/Estimate or Open.
To modify a configured bill of materials:1. Open the Sales Transaction Entry window.
(Transactions >> Sales >> Sales Transaction Entry)
2. Enter or select a sales document.
3. Mark the sales order line item that has the configured bill of materials tomodify.
4. Choose Additional >> Manufacturing Sales Item Detail.

8/10/2019 Dynamics GP MFG Core Functions
http://slidepdf.com/reader/full/dynamics-gp-mfg-core-functions 224/256
P A R T 5 S A L E S C O N F I G U R A T O R
214 M A N U F A C T U R I N G C O R E F U N C T I O N S
5. In the Manufacturing Series Sales Item Detail window, choose Configurator.The item number and bill of materials name will be displayed in the SalesConfigurator window that opens.
If your company is using Multicurrency Management, information in the SalesConfigurator window will be displayed in the currency selected in the SalesTransaction Entry window. Choose the multicurrency icon button to switch
between originating and functional currency views, or choose the appropriatecurrency from the View menu.
6. If sales promotions were changed or deleted since the configured bill ofmaterials was saved, a message will be displayed and you’ll have the option tokeep or discard the promotion information you’re using.
7. To check for new promotions that have been added since the configured bill ofmaterials was saved, choose Configuration >> Apply New Promotions.
As you add and remove items from the configured bill of materials, cost and priceamounts will be recalculated in the fields at the bottom of the window.
8. When you’ve finished making changes, determine if the changes should besaved.
• To save changes, choose Save. The configured bill of materials will besaved, the manufacturing order and picklist will be updated, and the salesorders fields will be adjusted.
• To close without saving your changes, close the window without choosingSave. A message will be displayed and you’ll have the option to save ordiscard your changes. Choose Discard if you don’t want to update therecords.
Adjusting markdown amountsUse the Sales Configurator window to adjust the markdown amount for aconfigured item.
You can adjust the markdown amounts for a configured bill of materials only if the status ofmanufacturing orders based on the bill is Quote/Estimate or Open.
To adjust markdown amounts:1. Open the Sales Transaction Entry window.
(Transactions >> Sales >> Sales Transaction Entry)
2. Enter or select a sales document.
3. Mark a sales order line item for a configured item.
4. Choose Additional >> Manufacturing Sales Item Detail.
5. Choose Configure to open the Sales Configurator window.
6. The total markdowns for the configured item will be displayed in theMarkdown field. You can accept the calculated markdown total or change it.Enter the markdown amount in the Unit Markdown field.

8/10/2019 Dynamics GP MFG Core Functions
http://slidepdf.com/reader/full/dynamics-gp-mfg-core-functions 225/256
M A N U F A C T U R I N G C O R E F U N C T I O N S 215
C H A P T E R 2 5 P R I C I N G A N D S A L E S T R A N S A C T I O N S
• To increase the markdown amount, enter a positive number.
• To decrease the markdown amount, enter a negative number.
When you move off the field, the unit markdown amount will be reflected inthe Line Totals region.
7. Choose Save and close the window.
Viewing a configured-item drawing
If you’ve attached electronic files to the finished item record, you can view themthrough the Sales Configurator window. Refer to Viewing a drawing attached to arecord on page 44 .

8/10/2019 Dynamics GP MFG Core Functions
http://slidepdf.com/reader/full/dynamics-gp-mfg-core-functions 226/256
216 M A N U F A C T U R I N G C O R E F U N C T I O N S

8/10/2019 Dynamics GP MFG Core Functions
http://slidepdf.com/reader/full/dynamics-gp-mfg-core-functions 227/256
M A N U F A C T U R I N G C O R E F U N C T I O N S 217
Chapter 26: Configurator manufacturing ordersThe costs for manufacturing orders for configured items are calculated differentlythan costs for other manufacturing orders.
This information is divided into the following sections:
• Material costs for configured manufacturing orders• Verifying dates for configured items• Tracking a configured-item manufacturing order• Unlinking manufacturing and sales orders
Material costs for configured manufacturing orders
You can use Sales Configurator to specify options for either actual or standard costfinished goods. Material costs for configured items are calculated differently,depending on the valuation method.
Actual cost configured items
If the configured good has a perpetual valuation method, material costs come fromthe actual costs for the items used in the manufacturing order. For example,suppose a manufacturing order for a configured item required two widgets. Thecost of the first widget was $10 and the cost of the second widget was $12. In thiscase, the cost of widgets for the manufacturing order would be $22.
However, the sales invoice cost of an item that has a perpetual valuation methodwill be based on the valuation method. That is, if you’ve built several configureditems for inventory and then sold one of those items, the cost for that item on thesales invoice will follow the LIFO/FIFO rules of the item’s valuation method. If youneed to ensure that the cost of the item made for a sales order by the linkedmanufacturing order is the cost that’s reflected on the sales invoice, you’ll need totrack the configured item by serial number and then be sure to select the specificserial number when you fulfill the sales order line.
Standard cost configured itemsIf the configured good has a periodic valuation method, standard cost informationis captured when the configured bill of materials and its associated manufacturingorder are created. A one-level standard cost rollup for the routing and the items inthe configured bill of materials is calculated. That total is the “configured standardcost” for the manufacturing order. Later, when the manufacturing order is closed,the configured standard cost is compared to the actual costs to calculate themanufacturing order variances.
For example, suppose a manufacturing order for a configured item required two
widgets. The standard cost of widgets when the configured bill of materials andmanufacturing order were created was $10—and so the total cost of widgets for themanufacturing order would be $20.
It’s important to note that the standard cost rollup is a single-level rollup. Only the standardcosts of the components that are in the top level of the bill of materials are included in therollup.
When you use the Sales Configurator to create configured bills of materials, youhave the option to save the configured bills of materials for future use. (Configured bills of materials also can be created directly in the Bill of Materials Entry window.)

8/10/2019 Dynamics GP MFG Core Functions
http://slidepdf.com/reader/full/dynamics-gp-mfg-core-functions 228/256
P A R T 5 S A L E S C O N F I G U R A T O R
218 M A N U F A C T U R I N G C O R E F U N C T I O N S
You can use configured bills in the Manufacturing Order Entry window, the QuickMOs window, or even with automatic manufacturing order generation in theManufacturing Series Sales Item Detail window to create new manufacturingorders.
However, the single-level standard cost rollup is calculated only if a super bill ofmaterials exists for the finished item and the manufacturing order is linked to a
sales order. If no super bill of materials exists or if the manufacturing order isn’tlinked to a sales order, the standard inventory cost for the finished good is used tocalculate manufacturing order variances.
Verifying dates for configured items
When you save a configured bill of materials and the associated manufacturingorder, the manufacturing order automatically is scheduled. You can use thisprocedure to check the due date for the manufacturing order.
To schedule a manufacturing order for a configured item, you must open the SalesConfigurator window by choosing Configurator in the Manufacturing Series SalesItem Detail window.
To verify dates for configured items:1. Open the Sales Transaction Entry window.
(Transactions >> Sales >> Sales Transaction Entry)
2. Enter or select a sales document.
3. Mark a sales order line item for a configured item.
4. Choose Additional >> Manufacturing Sales Item Detail.
5. Choose Configure to open the Sales Configurator window.
6. Choose Schedule.
7. When you’ve finished reviewing the manufacturing order due dateinformation, close the window.
Tracking a configured-item manufacturing order
Use the Manufacturing Order Entry window to determine which manufacturingorders are for configured items.
To track a configured-item manufacturing order:
1. Open the Manufacturing Order Entry window.(Transactions >> Manufacturing >> Manufacturing Orders >> Entry)
2. Use the browse buttons to move among the manufacturing order records. If themanufacturing order you’re interested in was created recently, you might wantto use the rightmost browse button to move to the last manufacturing orderrecord. Use the second browse button to move back through manufacturingorder records. The description of the manufacturing order for the configureditem will be “FROM SO” and then the sales document number.
3. Close the window when you’ve finished.

8/10/2019 Dynamics GP MFG Core Functions
http://slidepdf.com/reader/full/dynamics-gp-mfg-core-functions 229/256
M A N U F A C T U R I N G C O R E F U N C T I O N S 219
C H A P T E R 2 6 C O N F I G U R A T O R M A N U F A C T U R I N G O R D E R S
Unlinking manufacturing and sales orders
If you generate a manufacturing order when you configure a bill of materials andlater want to delete the manufacturing order, you must unlink the manufacturingorder from the sales order. Refer to Removing sales order-manufacturing order links inChapter 11, “Manufacturing/sales order link ,” in the Manufacturing ProductionFunctions documentation for more information about using the Manufacturing/
Sales Order Cross-reference window to complete this procedure.

8/10/2019 Dynamics GP MFG Core Functions
http://slidepdf.com/reader/full/dynamics-gp-mfg-core-functions 230/256
220 M A N U F A C T U R I N G C O R E F U N C T I O N S

8/10/2019 Dynamics GP MFG Core Functions
http://slidepdf.com/reader/full/dynamics-gp-mfg-core-functions 231/256
8/10/2019 Dynamics GP MFG Core Functions
http://slidepdf.com/reader/full/dynamics-gp-mfg-core-functions 232/256
222 M A N U F A C T U R I N G C O R E F U N C T I O N S
Part 6: Manufacturing reportsThis part of the documentation includes information that will help you set up anduse the Manufacturing reports. You can create report options and printManufacturing reports from various Manufacturing windows. You need to create areport option only once; you can print it again at any time without having to
redefine the option. This information describes how to create options and how youcan save them to use in the future.
After you’ve defined report options, others in your organization can use them toquickly generate reports. The reports can be printed to the screen, to a printer or to afile.
The following information is discussed:
• Chapter 27, “Reports overview,” provides basic information about the reportoptions windows and the terms used to describe report options.
• Chapter 28, “Manufacturing reports,” contains information that can be appliedto all report options windows, such as how to create a report option and how togenerate a report.

8/10/2019 Dynamics GP MFG Core Functions
http://slidepdf.com/reader/full/dynamics-gp-mfg-core-functions 233/256
M A N U F A C T U R I N G C O R E F U N C T I O N S 223
Chapter 27: Reports overviewManufacturing includes several report windows you can use to customizeManufacturing reports. Use the windows to create report options, which are groupsof range restrictions and sorting methods that you can use to specify howinformation should appear on reports. Reports can be produced in hard copyformat, stored in a designated file on your computer, or viewed on your computerscreen.
This information is divided into the following sections:
• Manufacturing report options• Manufacturing report terms
Manufacturing report options
Use any of the following windows to define report options for Manufacturingmodules. For more information about any of the windows, refer to online help.
• BOM Report Options window• CRP Report Options window• Drawings Report Options window• ECM Report Options window• Item Engineering Report Options window• Job Costing Report Options window• Machine Reports Options window• Manufacturing Order Routing Reports window• MOP Report Options window• MPS Report Options window• MRP Report Options window• Planning Routing Reports window• QA Report Options window• Option Group Report Selector window• Sales Forecasting Report Options window• WIP Report Options window• Work Center Report Options window
Manufacturing report terms
Several terms can be used to describe how you can print Manufacturing reports.
Report option You must create and save a report option before you can generatea Manufacturing report, if you’ve opened the report window from the Reportsmenu rather than by choosing the print icon button or Go To button. A reportoption is a collection of entries that specify the amount of information or the type ofinformation that will appear on a report. A report option includes one or morerange restrictions that you specify and can include a sorting order. Multiple reportoptions can be created.
Range restriction A range restriction limits the records included in a report. Forexample, you can limit inventory records to only those items that have itemnumbers that are within a certain range of item numbers. Depending on the recordsthat can be included in a report, you can limit information based on other criteria,such as dates, statuses, or types.

8/10/2019 Dynamics GP MFG Core Functions
http://slidepdf.com/reader/full/dynamics-gp-mfg-core-functions 234/256
P A R T 6 M A N U F A C T U R I N G R E P O R T S
224 M A N U F A C T U R I N G C O R E F U N C T I O N S
Each report option can include multiple range restrictions. The restrictions arecumulative—each range restriction will limit your report further. For example,suppose that you want to generate a report about inventory items. If the reportoption includes one restriction that limits the report to Made items, and anotherrestriction that limits the report to a certain range of item numbers, only those itemsthat meet both criteria will be included in the report.
Sorting method A sorting method determines the order that report items arelisted in. For example, a report based on employee records might be sorted byemployees’ last names or employees’ first names.
Where used “Where used” describes a group of reports and functions that letyou scan records to find parent parts—including subassemblies—that include acertain component. For example, if your company manufactures electronics, youcould run a “where used” report to see all instances where a certain resistor is used.
Organizations frequently use reports like this to be sure that changes in componentschematics or requirements do not inadvertently affect other parent parts.
Report types Some Manufacturing reports are available in two formats: text andgraphic. Both report types include the same information. Text reports are plain, textreports. Graphic reports include special formatting such as shading, borders, andfonts.
The default selection for printing text or graphic reports is a user preference. Refer toGeneral user preferences for Manufacturing in Chapter 7, “Manufacturing basic usersetup,” in the Manufacturing Setup documentation for more information.

8/10/2019 Dynamics GP MFG Core Functions
http://slidepdf.com/reader/full/dynamics-gp-mfg-core-functions 235/256
M A N U F A C T U R I N G C O R E F U N C T I O N S 225
Chapter 28: Manufacturing reportsAlthough Manufacturing has several report option windows, all the windows workin basically the same way—you must create and save a report option before you cangenerate a report, if you’re generating the report from windows opened from themenus. You can generate reports from other Manufacturing windows withoutcreating report options.
This information is divided into these sections:
• Creating a report option• Adding a range restriction to a report option• Deleting a range restriction from a report option• Generating a Manufacturing report• Viewing manufacturing reports in the report list• Adding a report option to the report list• Removing a report option from the report list• Changing report page orientation• Deleting a report option
Creating a report option
You can use any of the windows to create a report option—the procedure is basically the same in any of the windows.
The BOM Report Options window—the window displayed in the followingprocedure—is just one of the several Manufacturing report options windows youcan use.
You can open report option windows from other Manufacturing windows. Often, ifno record is displayed in a Manufacturing window when you choose the print icon button, the associated report option window will open.
To create a report option:1. Open a report options window.
(Reports >> Manufacturing >> module of your choice >> Report Options)
2. Enter a report option name.

8/10/2019 Dynamics GP MFG Core Functions
http://slidepdf.com/reader/full/dynamics-gp-mfg-core-functions 236/256
P A R T 6 M A N U F A C T U R I N G R E P O R T S
226 M A N U F A C T U R I N G C O R E F U N C T I O N S
3. Mark the Include in Report List option to include this report option in the reportlist.
Only one of the reports for each report option can be included in the report list.
4. Select a report.
5. Select a sorting method for the report information.
6. Select a report type. Text- and graphic-type reports include the sameinformation, but graphic reports add special shading and borders.
The default selection for printing text or graphic reports is a user preference. Refer toGeneral user preferences for Manufacturing in Chapter 7, “Manufacturing basic usersetup,” in the Manufacturing Setup documentation for more information.
7. Set up other report features, as needed. For example, some reports allow you toadd your own report title.
8. Create a range restriction. To include all information in the report—if the reportshould include all items or all bills of materials, for example—leave the Rangesfield blank to include all records.
Be sure to check online help for specific field information for report option windows.
• Select an attribute—a piece of information about the records—to limit thereport information. For example, if you create a report about machines inyour organization, you could include only those machines that are inspecific work centers. In that case, “Machine Location” is the attribute youwould use to restrict the report.
• Specify the information to be included in the report. If you select someattributes—such as item numbers or dates—you must enter From and Toinformation. These entries will be the first and last records in your report.
When you select other attributes—such as Status or Type—you must markthe statuses or types to be included in the report. For example, you couldgenerate a bill of materials report based only on configured bills ofmaterials.
9. Choose Insert to add the range information to the scrolling window.
10. Continue, repeating steps 8 and 9, to add more range restrictions to the report.
11. Choose Save to save the report option, and close the window.
Adding a range restriction to a report option
Use a report options window to add a restriction to an existing report option.
To add a range restriction to a report option:1. Open a report options window.
(Reports >> Manufacturing >> module of your choice >> Report Options)
2. Select a report option.

8/10/2019 Dynamics GP MFG Core Functions
http://slidepdf.com/reader/full/dynamics-gp-mfg-core-functions 237/256
M A N U F A C T U R I N G C O R E F U N C T I O N S 227
C H A P T E R 2 8 M A N U F A C T U R I N G R E P O R T S
3. Create a range restriction. To include all information in the report—if the reportshould include all items or all bills of materials, for example—leave the Rangesfield blank to include all records.
• Select an attribute—a piece of information about the records to limit thereport information.
• Specify the information to be included in the report. If you select someattributes—such as item numbers or dates—you must enter From and Toinformation. These entries will be the first and last records in your report.
When you select other attributes—such as Status or Type—you must mark thestatuses or types to be included in the report. For example, you could generate a bill of materials report based only on configured bills of materials.
4. Choose Insert to add the range information to the scrolling window.
5. Choose Save and close the window.
Deleting a range restriction from a report option
Use a report options window to remove a restriction from an existing report option.
To delete a range restriction from a report option:1. Open a report options window.
(Reports >> Manufacturing >> module of your choice >> Report Options)
2. Select a report option.
3. In the Range restriction window, highlight the restriction to remove from thereport option.
4. Choose Remove.
5. Choose Save and close the window.
Generating a Manufacturing report
Use Manufacturing report windows to choose reports and report options.
To generate a Manufacturing report:1. Open a report option window.
(Reports >> Manufacturing >> module of your choice >> Report Options)
You also can open report option windows from other Manufacturing windows.Often, if no record is displayed in a Manufacturing window when you choosethe print icon button, the associated report option window will open.
2. Enter or select a report option.
3. Select a report.
4. Choose Destination to open the Report Destination window. You can choose tosend the report to a printer, to your screen or to a file. The default selection forthe report destination comes from your user preference settings.

8/10/2019 Dynamics GP MFG Core Functions
http://slidepdf.com/reader/full/dynamics-gp-mfg-core-functions 238/256
P A R T 6 M A N U F A C T U R I N G R E P O R T S
228 M A N U F A C T U R I N G C O R E F U N C T I O N S
5. Choose OK in the Report Destination window.
6. Choose the print icon button.
In some report option windows, the report is printed and the report option issaved when you choose the print icon button. In other windows, a message will be displayed and you’ll have the option to save the report option you’ve
created.
• Choose Yes to save the report option and print the report.
• Choose No to return to the report options window. The option won’t besaved, and no report will be printed.
Viewing manufacturing reports in the report list
Use a report list window to view manufacturing reports in the report list.
To view manufacturing reports in the report list:
1. Open a report list window.(Reports >> Manufacturing >> module of your choice >> Report List).
The report list window displays the report options for the module that youselected.
2. When you have finished viewing reports, close the window.
Adding a report option to the report list
Use a report options window to add an existing report option to the report list.
To add a report option to the report list:1. Open a report options window.
(Reports >> Manufacturing >> module of your choice >> Report Options)
2. Select a report option.
3. Mark the Include in Report List option to include the report option in the reportlist.
Only one of the reports for each report option can be included in the report list.
4. Choose Save and close the window.
Removing a report option from the report list
Use a report options window to remove a report option from the report list.
To remove a report option from the report list:1. Open a report options window.
(Reports >> Manufacturing >> module of your choice >> Report Options)
2. Select the report option to remove from the report list.

8/10/2019 Dynamics GP MFG Core Functions
http://slidepdf.com/reader/full/dynamics-gp-mfg-core-functions 239/256
M A N U F A C T U R I N G C O R E F U N C T I O N S 229
C H A P T E R 2 8 M A N U F A C T U R I N G R E P O R T S
3. Unmark the Include in Report List option to remove the report option from thereport list.
4. Choose Save and close the window.
Changing report page orientation
Use the Print Setup window to change between portrait and landscape versions ofyour reports.
To change report page orientation:1. Open the Print Setup window.
(Microsoft Dynamics GP >> Print Setup)
2. Mark Portrait if reports should be printed in a vertical format; mark Landscapeif reports should be printed in a horizontal format.
3. Choose OK and close the window.
Deleting a report optionUse a report options window to delete report options.
To delete a report option:1. Open a report options window.
(Reports >> Manufacturing >> module of your choice >> Report Options)
2. Select a report option.
3. Choose Delete. A message will be displayed and you’ll have the option tocancel the removal of the report option.
• Choose Yes to delete the report option.
• Choose No to keep the report option unchanged.

8/10/2019 Dynamics GP MFG Core Functions
http://slidepdf.com/reader/full/dynamics-gp-mfg-core-functions 240/256
230 M A N U F A C T U R I N G C O R E F U N C T I O N S

8/10/2019 Dynamics GP MFG Core Functions
http://slidepdf.com/reader/full/dynamics-gp-mfg-core-functions 241/256
M A N U F A C T U R I N G C O R E F U N C T I O N S 231
GlossaryAcceptable Quality Level table
A representation of testing standards andsample sizes. AQL tables includeinformation about appropriate sample sizesand the maximum number of pieces that canfail inspection in an acceptable lot. You’llprobably set up several AQL tables to reflectdifferent inspection standards for differentitems.
Active routingSeeManufacturing order routing .
Actual costingAn inventory tracking method that involvesconstantly updating inventory each time anitem is added or removed.
Actual demandThe total quantity of an item requested on allfirm manufacturing orders.
Actual expenses (Job Costing)The total of all applied expense transactionslinked to a job.
Actual margin (Job Costing)A measure of the overall profitability of aspecific job. The actual margin for a job iscalculated by dividing the actual profit bythe actual revenue, and then multiplying theresult by 100.
Actual profit (Job Costing)The difference between actual expenses andactual revenues for a job.
Actual revenues
The total of all applied revenue transactionslinked to a job.
AllocateTo reserve materials needed for amanufacturing order.
Alternate routingAny planning routing for an item other thanthe primary routing.
Alternate work centerA work center to which work can be shiftedif the customary work center for a specifictask is not available. If the primary workcenter is temporarily shut down, or if
demand exceeds the capacity of the primarywork center, the work load can be shifted tothe alternate work center.
ApplyTo add the amount of a revenue or expenselinked to a job to the financial informationabout the job. If a transaction isn't applied toa job, its amount won't be reflected in theoverall financial information about the job.Applying transactions in Job Costing canhappen manually or automatically.
AQL tableSeeAcceptable Quality Level table .
ARCH BOMSeeArchived bill of materials .
Archived bill of materialsA bill of materials stored in a separate area ofyour computer system. Bills of material
might be archived as they become obsolete.Assemble to order
A type of manufacturing facility that puts agroup of components together according tocustomer specifications.
Back orderAn order to be fulfilled when stock for itemsin shortage is replenished.
BackflushingA method of accounting for the use ofresources—labor and machine time, anditems—based on standards you’ve defined.Transactions to account for the use of
backflushed resources are created when amanufacturing order is closed.
Backward finite schedulingA scheduling method that starts from a duedate and works out a plan for the flow ofwork through the plant with the assumptionthat there are only a limited number ofresources (machines and workers) availableto complete the task.
Backward infinite schedulingA scheduling method that starts from a duedate and works out a plan for the flow ofwork through the plant with the assumptionthat the plant has unlimited machine and
worker capacity.Batch cards
SeeManufacturing order .
Bill of materialsA list of the components and subassembliesneeded to build one unit of a product. The bill of materials also shows quantities foreach component.
Bill of operationsSeeRouting .
BinA storage device to hold discrete items.
Blanket purchase orderA purchase order that is delivered graduallyto the buyer.
BucketA time period used for calculating MRPrequirements. Manufacturing supports daily,weekly, and monthly bucketing options.
Buy itemsItems that are supplied to your plant by asupplier.
Buyer IDCode that identifies the person whopurchases the item from a supplier.
By-productA finished good that is created incidentallyto another finished good.
Child part
SeeComponent .Class
A method for grouping similar parts orproducts.
Co-productSeeBy-product .
Company dataCompany data is the information you enterabout your organization, such as itsapplicants, employees, benefits systems,training programs, and organizationalstructure.
ComponentItems used to build a product. Componentparts can be items (nuts, screws, diodes) orsubassemblies (axles, circuit boards).
Component transactionA line on a pick document to allocate,reverse allocate, issue, reverse issue, scrap,or reverse scrap components for amanufacturing order.
CONFIG BOMSeeConfigured bill of materials .
Configuration dataIn Bill of Materials, information about theproduct’s overall design. It includes thedesign authority for the product, the unit ofmeasure, and the revision level.
Configured bill of materialsA bill of materials that is built by selectingoptions from a super bill of materials.
Configured costThe calculated cost of building a specificconfigured item, depending on the options acustomer selects. The configured cost reflectsthe cost of the component items and thelabor required to manufacture the item.
Configured priceThe suggested price to charge the customer
for a configured item, based on your finishedgoods price schedule and the selectedoptions.
Configured routingA routing based on the selected options. Forexample, if you created a configured bill ofmaterials for office chairs and chose plasticcomponents rather than wooden ones, therouting would be modified to exclude thesequences for staining and varnishing thewooden components. Also known as a“configured working routing.”

8/10/2019 Dynamics GP MFG Core Functions
http://slidepdf.com/reader/full/dynamics-gp-mfg-core-functions 242/256
G L O S S A R Y
232 M A N U F A C T U R I N G C O R E F U N C T I O N S
Configured Working RoutingSeeConfigured routing .
ConsumeTo use up the quantity that has been issuedto WIP—for materials, labor time, ormachine time—for a manufacturing order.
Cost variance
The difference between the actual costs—formaterials, machine time and labor—and theestimated costs for a manufacturing order.Cost variances can be positive or negative.
Customer recordA record that shows all the information youneed to conduct sales transactions, such asaddress information, billing and shippinginstructions, credit history and other data forthat customer.
Cycle timeThe total amount of time it takes to make onepart, such as setup time, labor time, machinetime, queue time and move time.
Default inventory siteThe location commonly used to store rawmaterials or finished goods.
Defect codeAn identifier for a particular type of itemfailure. For example, if an item is too longand fails a specification for length, you mightcreate a defect code called LENGTH. Defectcodes are used in Manufacturing reports tohelp summarize information.
Denial codeAn identifier for the reason why anengineering change request wasn’t
approved.Destination routing
A routing that you copy from anotherrouting. You can add sequences to thedestination routing.
Direct laborThe time spent by one or more productionworkers on filling a specific manufacturingorder.
Discrete itemAn item that is manufactured as a distinctunit. Examples of discrete items includecomputers, automobiles, and radios.
Disposition codeAn identifier for a method for handlingdefective items. For example, you mightdecide to scrap certain defective items, andmight assign a SCRAP disposition code tothose items.
Double-bookingA situation where a job might inadvertently be charged twice for the same expense.
Down dayA day when the facility—the entire shopfloor or a specific work center—is not inproduction.
DrawingA schematic or other illustration. You can“attach” electronic drawing files—such asCAD illustrations, bitmaps and even .AVImovies—to records.
Drawing groupA set of related drawing files. For example, adrawing group might include several viewsof the same item.
Due dateThe date when the items on a sales ordershould be ready to ship.
ECMSeeEngineering change management (ECM) .
ECOSeeEngineering change order (ECO) .
ECRSeeEngineering change request (ECR) .
ElementAn order or transaction that can be linked toa job, such as a manufacturing order, a salesorder, a purchase order line, a receiving line,or inventory transaction.
Employee allocationThe assignment of workers to work areas.Each employee can be assigned an efficiencyrating for a particular task. The number ofhours per shift spent on a task can also bespecified. Total scheduled employee hoursfor the work center are also displayed.
Employee efficiency percentageA ranking of how an employee performs agiven task. You can use this field differentways, depending on how your organizationhandles its employee efficiencies. Someorganizations complete time studies ofvarious tasks, and set task goals for workers based on those figures. Employees earnefficiency ratings based on their ability tomeet those criteria. In other organizations,the top producer is assigned a value of 100%(or less) and all other employees would beranked in comparison to the top producer.
ENG BOMSeeEngineering bill of materials .
Engineering bill of materialsA proposed bill of materials. Designs that areonly in the prototype stage of development,for example, may have engineering bills ofmaterials. In this way, the costs of producinga design can be studied without impactingthe material requirements that the systemgenerates.
Engineering changemanagement (ECM)
The systems that a company has in place toensure that changes to its productspecifications are properly monitored.
Engineering change order (ECO)The second stage of the engineering changemanagement process. An engineeringchange order is a change that has beenapproved for incorporation.
Engineering change request (ECR)The proposal stage of the engineeringchange management process. Anengineering change request is a proposedchange.
Estimated expenseA projection of the expenses for a job,entered in the Job Maintenance window.
Estimated marginA job costing calculation based on estimatedrevenues and estimated expenses for a
specific job. The estimated margin iscalculated by dividing the estimated profit by the estimated revenues, and themultiplying the result by 100.
Estimated profitThe difference between the estimatedexpenses and the estimated revenues for aspecific job.
Estimated revenueA projection of the revenues for a job,entered in the Job Maintenance window.
Exclusions (MRP)A method of marking an item, site or item-
site combination so it isn’t included in MRPcalculations.
Exclusions (Sales Configurator)Options that are disallowed because ofanother option selection.
Expensed floor stockA bill of materials component that has beendesignated—regardless of its issue-to andissue-from sites—as a floor stock item. Thecost of expensed floor stock is applied to anexpense account, rather than to the cost ofthe finished item. See alsoFloor stock .
Explode
To determine the total quantities ofcomponents needed for a manufactureditem. To explode a bill of materials, thequantity ordered is multiplied by thequantity used for each of its components.Exploding continues throughout the bill ofmaterials, so component requirements forsubassemblies are also calculated.
Filled orderAn order that has had all its requirementsmet and can be closed.
8/10/2019 Dynamics GP MFG Core Functions
http://slidepdf.com/reader/full/dynamics-gp-mfg-core-functions 243/256
M A N U F A C T U R I N G C O R E F U N C T I O N S 233
G L O S S A R Y
Finished goodsAn item that is manufactured for sale. Also,the final products that a company sells.
Finite schedulingA scheduling method that assumes thatlimited capacity for labor and machines isavailable.
Fixed order quantityAn order policy type that calculates ordersize for a day’s requirements based on one ormore of these variables: standard orderquantity, order increment size, minimumorder size, and maximum order size.
Fixed quantityThe quantity of a component that is requiredfor each manufacturing order, regardless ofhow many finished goods are produced withthe order. For example, if you use twowidgets to calibrate equipment each timeyou begin a new manufacturing order, thefixed quantity for widgets would be 2 for thefinished good bill of materials.
Floor stockA bill of materials component that uses thesame site for its issue-from and issue-to sites.The cost of this type of floor stock is appliedto the cost of the finished item. See alsoExpensed floor stock .
Forecasted demandAn estimate of how much of an item should be produced over a specific period of time.
Forward infinite schedulingA scheduling type based on a starting datefor an order, with the assumption that theplant has unlimited machine and workercapacity for the work order.
Full regenerationAn MRP process that recalculates your MRPdata, including all sales orders, purchaseorders, sales forecasts, and manufacturingorders. SeeNet change regeneration .
Functional currencyThe currency type (such as dollars orpounds) used by your organization for itsaccounting. See alsoOriginating currency .
General ledger varianceThe difference between costs that have beenadded to WIP and the costs that have been
removed from WIP for a specificmanufacturing order.
Header recordThe information that ties the pieces of alarger record together. For example, theheader record of a routing includesinformation about the type of routing, therouting name, the date the routing wascreated and so on. This information tiessequence records together to create onerouting record.
Hours per shiftThe amount of time per shift actually spentworking on the assigned tasks. To determinehours available per shift, subtract any non-task related activities from the total numberof available hours. For example, if anemployee is scheduled for an eight-hourshift but has a one-hour meeting and twoquarter-hour breaks that day, the totalavailable time would be 6.5 hours.
InclusionsOption items automatically added to aconfigured bill of materials when a customerselects a certain option. For example, acomputer manufacturer might offer acomputer system in tan and black. If thecustomer selects the option for a tancomputer, the computer manufacturer mightset up the super bill of materials so that thetan keyboard automatically is included aspart of the purchase.
Indirect laborThe time spent on tasks that are not directlyrelated to filling a specific manufacturingorder. Examples of indirect labor includemeetings and training.
Instruction sheetSeeRouting .
Infinite schedulingA scheduling method that assumes that allrequired capacity for labor and machines isalways available.
Invoice historyThe information tracked about past invoices.Invoice history allows you to determinewhat historical information you will need fortracking sales activity. History informationcan include transaction detail and/oraccount distributions.
IssueA type of component transaction. Whencomponents are issued for a manufacturingorder, they are removed from inventory andadded to WIP.
Issue-from locationThe site where the components used in themanufacturing process are stored prior to beginning the manufacturing order, such aswith a vendor, or in a department, awarehouse, or another plant.
Issue-to locationThe site where the finished product will bestored prior to delivery to the customer, suchas in a department, a warehouse, or anotherplant.
Item typeA code to designate the accounting class forthe item, such as inventory, discontinued,and misc. charge.
Item-specific inventoryvaluation
An accounting method that places a value oneach item that you produce, based uponeither standard cost or current cost.
JobA series of business activities that, whencompleted, will fulfill a high-level objective.
Job categoryGroupings that you can create to organizethe titles and descriptions of jobs withinyour company. Each job category mustinclude a set of values that can be used tosort all jobs. For example, you might create a job category called REGION so you couldtrack jobs from specific geographical areas.Values for that job category might be East,West, North and South-or might be states,provinces, countries/regions or other areas.
Job costing elementA type of element that can be linked to a job.
Job costing transactionAn instance of a job element that is linked toa specific job, capturing information about aspecific revenue or expense associated withthe job. Job costing transactions aren’taccounting transactions: they won’t affectthe General Ledger or any subsidiaryledgers.
Job orderSeeManufacturing order .
Job transaction listA selection of transactions to be applied to aspecific job. You can use transaction lists tospecify the kinds of transactions that should be applied to jobs, and to specify thetransactions to be applied automatically to jobs.
KitA group of finished items that compose a set.
Labor codeA code that is used to tie a job function to aspecific pay grade. Usually, jobs requiringfewer skills have lower pay grades and arecompensated at lower rates. Jobs requiringmore skills or education have higher paygrades and higher pay rates.
Labor time
The number of employee hours required tocomplete the operation.
Lead timeThe minimum amount of time required forproduction of an item.
LocationA work site. Some businesses are organizedas a single company or division, but mayhave multiple sites.

8/10/2019 Dynamics GP MFG Core Functions
http://slidepdf.com/reader/full/dynamics-gp-mfg-core-functions 244/256
G L O S S A R Y
234 M A N U F A C T U R I N G C O R E F U N C T I O N S
Lot-for-lotAn order policy for ordering the exactquantity needed, provided that the orderquantity is between the minimum andmaximum order quantities.
Lot-numbered itemAny inventoried item that is part of a groupthat is assigned a unique identifier, whichcan be letters, numbers or a combination ofletters and numbers.
Lot-number–tracked itemSeeLot-numbered item .
Lot-sample sizeThe number of item units that should beinspected to determine if a group of itemsmeets specifications.
Lot-tracked itemSeeLot-number–tracked item .
Low-level codeA code that identifies the deepest level an
item has in any bill of materials in yourmanufacturing records.
MachineAny tool, device or implement that you usein your manufacturing process.
Machine allocationThe assignment of a machine to a work area.Each allocation record displays availablemachine hours, the efficiency rating, andutilization rate for that machine. Totalscheduled machine hours for the workcenter are also displayed.
Machine definitionThe record of a machine in your plant thatallows you to track statistics for eachmachine, including vendor information,warranty period, and operating costs.
Machine efficiencyA measure of how a machine is suited for aspecific task. The higher the efficiency rating,the more effectively the machine works.
Machine timeThe number of machine hours needed tocomplete the operation.
Machine utilizationA measure of how much of the availablemachine capacity is actually being used. Forexample, if a machine is capable ofproducing 100 items per eight-hour day andyou are only producing 80 items, themachine utilization rate is 80 percent.
Make itemAn item that is produced by your plant.
Make or Buy itemAn item that can be bought or manufactured by your company.
Make to orderAn order fulfillment method for made items.When make-to-order items are sold,manufacturing orders to build the itemsrequired to fulfill the manufacturing ordersare created. Manufacturing orders are usedto respond to specific sales orders
Make to stockAn order fulfillment method for made items.When make-to-stock items are sold, thequantities required to fulfill the sales orderare taken from inventory quantities.Manufacturing orders are used to keepinventory levels up so that sales orders can be fulfilled.
Manufacturing bill of materialsThe bill of materials used to build a parentpart in your organization. A manufacturing bill of materials is the “real” bill of materials,and is used to figure material requirementsfor your organization.
Manufacturing data sheetsSeeRouting .
Manufacturing orderA set of documents conveying the authorityto manufacture parts or products in specifiedquantities. Manufacturing orders are alsocalled batch cards, job orders, productionorders, run orders, shop orders, or workorders.
Manufacturing order receiptA document where material, labor, andmachine costs in WIP are applied to finishedgoods that are received in inventory. Costsfor backflushed materials, labor, andmachine time also are applied to the finishedgoods cost.
Manufacturing order routingA routing used to complete a specificmanufacturing order, which includes all thenecessary requirements to fill the order, suchas workers, machine time, and rawmaterials. Also known as “manufacturingrouting.”
Manufacturing picklistA list of the items and quantities of itemsthat are required to fill a manufacturingorder.
Material Requirements PlanningA series of data collection and interpretationprocedures that allow you to forecastresource requirements over a specified timeperiod (days, weeks or months).
Maximum order sizeOne of the variables that can be used tocalculate order quantities for fixed or periodorder quantity order policies. Maximumorder size puts a limit on the size ofautomatically generated purchase andmanufacturing orders. If demand is greaterthan the maximum order size, an additionalorder will be created.
MFG BOMSeeManufacturing bill of materials .
Minimum order sizeOne of the variables that can be used tocalculate order quantities for fixed or periodorder quantity order policies. It is similar tostandard order quantity, and is used in itsplace if the standard order quantity is zero. Ifthe standard order quantity is greater thanzero, the standard order quantity supersedesthe minimum order size.
Module securityA way to see if other users are working withrecords that prevent you from completingcertain processes. Module security alsoallows you to unlock records and removeusers from MRP.
Move inTo adjust the due dates of existingmanufacturing orders and purchase ordersto meet potential shortages identified byMRP calculations. If MRP calculationsuncover a shortage of an item and if there’san existing order for the item in the future,the order will be flagged to be “moved in” toprevent the shortage.
Move outTo reschedule certain manufacturing ordersor purchase orders to prevent stock overageson the current due date. An appropriatefuture date to move the order to cover afuture net requirement is proposed
Move timeThe number of hours needed to physicallymove an item to the next operation.
MRPSeeMaterial Requirements Planning .
MRP shortageA lack of resources to produce the requiredamount of an item to fill outstanding orders.Manufacturing orders can be enteredregardless of current stock of availablematerials.

8/10/2019 Dynamics GP MFG Core Functions
http://slidepdf.com/reader/full/dynamics-gp-mfg-core-functions 245/256
M A N U F A C T U R I N G C O R E F U N C T I O N S 235
G L O S S A R Y
Multi-level bill of materialsA bill of materials that lists all thecomponents directly or indirectly involvedin building the parent part, together with therequired quantity for each item. Forexample, if a subassembly is used in theparent part, the multi-level bill of materialswill show all the components needed to build the subassembly, including purchasedparts and materials. See alsoSingle-level billof materials .
Negative WIPThe situation that occurs if you enter andpost a manufacturing order receipt wheremore is consumed from WIP than was inWIP for the manufacturing order. Whenfinished goods are received into inventory before materials have been issued to theorder or before labor or machine time datacollection transactions have been completed,this can occur. You must set upManufacturing Order Processing to be ableto enter receipts that would cause negative
WIP.Net change regeneration
An MRP process that updates MRPinformation based on changes tomanufacturing orders, sales orders, purchaseorders, and inventory quantities. See alsoFullregeneration .
Nettable itemAn item, site or item-site combination that isincluded in MRP calculations.
Non-nettable itemAny item, site, or item-site combination thatis not included in MRP calculations.
Non-Standard ReportA report for internal use that summarizesinformation about defects identified in agroup of items. An NSR might also includeinformation about the disposition of thedefective items.
NSRSeeNon-Standard Report .
Op codeSeeOperation code .
OperationA specific task within the manufacturingprocess. You can use operations as templatesfor routing sequences.
Operation chartSeeRouting .
Operation codeA code assigned to a particular task withinthe manufacturing process. For example, in acompany that makes electrical components,the operation code for testing the validity ofa certain characteristic might be “110.” Also,op code.
Operation listSeeRouting .
Operations sheetsSeeRouting .
OptionIn sales configurator, an option is one of theavailable choices for some aspect of a
configured item. For example, a computermanufacturer might offer 15-, 17- and 21-inch monitors as options for a computer.
Option bill of materialsA bill of materials for a componentsignifying that the component won’t beidentical in all finished products.
Option categoryA group of related items that customers canchoose from, such as various sizes ofcomputer monitors.
Option settingA setting that controls the information that
appears on a report, such as sorting method,detail level, and range restriction.
Order incrementA variable that can be used to calculate orderquantities for fixed or period order quantityorder policies. The order increment is thenumber of item units that can be added tothe standard order quantity to increase theorder size to meet demand.
Order policyA method for calculating the order sizes ofautomatically generated purchase andmanufacturing orders. Manufacturingincludes three order policies: lot-for-lot,
fixed order quantity and period orderquantity.
Originating currencyThe alternate currency that a multicurrencytransaction was conducted in. See alsoFunctional currency .
Outsourced itemA finished good that requires one or moreoutsourced services.
Outsourced serviceA service that is part of manufacturingprocesses that is purchased from a vendor.
OutsourcingThe practice of using outside vendors toperform certain manufacturing tasks.
Outsourcing routingA routing that includes one or moresequences that are completed by anoutsourcing vendor.
Outsourcing vendorA vendor that you purchase outsourcedservices from.
Outsourcing work centerA work center where outsourced services areperformed. An outsourcing work center can be on-site or can be at the vendor site.
OverheadCosts incurred that cannot be directly relatedto the products or serviced produced. Thesecosts, such as light, heat, supervision, andmaintenance can be grouped and distributedto units of products or services by somestandard allocation method.
Parallel routingA routing that includes some routingsequences that run concurrently.
Parent partAn item built from the component parts. Aparent part can be a subassembly or a finalproduct.
PeggingTo trace an item requirement through theMRP system to find the source of the
requirement quantity. Pegging will revealwhether a requirement is driven by amanufacturing order, sales order, purchaseorder or picklist.
Period order quantityAn order policy type that calculates ordersize for requirements for a period youspecify, based on one or more of thesevariables: standard order quantity, orderincrement size, minimum order size andmaximum order size.
Periodic costingSeeStandard costing .
Periodic inventoryAn inventory tracking method that involvestaking inventory on a recurring basis, suchas monthly, quarterly or yearly. This is thesame as “standard” costing.
Perpetual inventoryAn inventory tracking method that involvesconstantly updating inventory each time anitem is added or removed.
Phantom bill of materialsA bill of materials used to describe thecomponents of a parent part that will be builtas part of a higher-level parent part. Theterm “phantom” is used to indicate that the
part never really exists as a stocked item, butis built along with the production of thehigher-level part that is driving an overallproduction order. Creating bills of materialsas phantoms allows the manufacturing orderpicklist and the Material RequirementsPlanning (MRP) features to explode throughthe phantom item down to the lower-levelparts.

8/10/2019 Dynamics GP MFG Core Functions
http://slidepdf.com/reader/full/dynamics-gp-mfg-core-functions 246/256
G L O S S A R Y
236 M A N U F A C T U R I N G C O R E F U N C T I O N S
Pick documentA group of component transactions thatshare a type such as Allocate, Issue, ReverseIssue, and that are posted together. A pickdocument can include componenttransactions for multiple manufacturingorders, items, or sites.
PicklistA list of the items and quantities of itemsthat are required to fill a manufacturingorder.
Planner IDA code that identifies the individualresponsible for the production of the item.
Planning routingA routing used to determine resourcerequirements for a potential manufacturingorder. If negotiations with the customer aresuccessful, the planning routing can beconverted into an active routing and used tofill a manufacturing order.
Pointer routingA pointer routing is used to outline a seriesof steps that are common to all itemsproduced by your plant. For example, if eachitem needs to be tested by quality assurance,packaged and shipped, a routing can bedefined to cover these steps for all items thatyou manufacture.
Post-to siteThe site where the finished product will bestored prior to delivery to the customer. Thislocation can be a department, a warehouse,or another plant.
Primary routingA routing that provides the instructions for building an item. It is a basis for schedulingand resource estimates. The primary routinginformation is used to determine therequired lead time for manufacturing theproduct. Each item can have only one activeprimary routing.
Process securityA type of security that allows you to restrictaccess to certain procedures or processeswithin Manufacturing.
Process security setA password or list of user IDs you define torestrict authority for completing aManufacturing process. You can use oneprocess security set for all restrictedprocedures, or you can create differentprocess security sets for different procedures.
Production varianceThe difference between the actual andestimated costs for a manufacturing order, based on the working routing, the picklist,and labor and machine codes.
Promise dateThe date that the customer has been told toexpect receipt of the order.
PromotionSpecial pricing offered on a particular optionfor a configured item.
A special pricing offered on a particular
option for a configured item.Purchase order
A formal request for goods or services. Thepurchase order shows the quantity of goodsordered, expected receipt date, and suppliername. The purchase order may also includeother information pertaining to the deliveryof the item, such as Free On Board (F.O.B.)points.
QA RequiredA designation for purchased items that mustpass a quality inspection before being addedto your inventory.
Quantity damagedThe total items, if any, damaged duringshipping.
Quantity orderedThe amount of the item requested on a singlepurchase order.
Quantity receivedThe amount of the item received from thesupplier.
Quantity to fillAn amount of a product that was ordered but has not been received.
QueryA search through a specific set of records forcertain information.
Queue timeThe number of hours spent waiting for theoperation to begin.
The number of hours spent waiting for anoperation to begin.
Quick manufacturing orderA manufacturing order that doesn’t requireyou to collect information about labor andmachine time and material costs when theorder is closed.
QuoteA company’s offered price for an item that acustomer or a potential customer hasrequested. Quotes can be transferred toanother document type, deleted or voided.
Raw materialsItems used to build products. They can beindividual items like nuts, screws anddiodes, or they can be subassemblies.
RecordA group of computer data tied together by acommon key. (All of one item'sinformation—from quantity and siteinformation to engineering data to bill ofmaterials data—is the item's record.)
Reference designatorInformation that specifies wherecomponents should be used in an assembly,such as the placement of four resistors on aprinted circuit board.
Regular bill of materialsA simple, single-level bill of materials.
Replaced itemAn item in a mass update to bills of materialsthat is removed from bills of materials. Areplacement item might or might not besubstituted for the replaced item.
Replacement itemAn item in a mass update to bills of materialsthat is added to bills of materials. A
replacement item might be an addition to a bill of materials, or might be a substitutionfor a replaced item.
ReturnAn item or merchandise returned by acustomer to your company. A returndecreases the customer's balance on accountand, if you choose, increases inventoryquantities.
RevalueTo finalize rolled-up standard cost changes.Revaluing replaces existing standard costinformation with new standard costinformation, which is used in youraccounting processes. As you change yourstandard cost information, you might roll upcosts several times, but probably will revalueitems only at certain points.
Revenue/expense codeA short identifier used to categorizeexpenses and revenues linked to a job.
Reverse allocateA component transaction type where itemsthat have been allocated to a manufacturingorder are unallocated. See alsoAllocate .
Reverse IssueA component transaction type where
components that were issued to amanufacturing order (which removes themfrom inventory and adds them to WIP) areremoved from WIP and put again ininventory. See alsoIssue .
Reverse ScrapA component transaction type wherecomponents that were scrapped for amanufacturing order are restored to theissued (and not scrapped) quantity for theorder. See alsoScrap .
8/10/2019 Dynamics GP MFG Core Functions
http://slidepdf.com/reader/full/dynamics-gp-mfg-core-functions 247/256
M A N U F A C T U R I N G C O R E F U N C T I O N S 237
G L O S S A R Y
Roll upTo apply calculations based on changes tostandard cost information to items. If youchange the cost of a raw material that is partof several subassemblies and finished goods,”rolling up” that change will result incalculations that will determine the newstandard costs of the subassemblies andfinished goods.
As you change your standard costinformation, you might roll up costs severaltimes, but probably will revalue items onlyat certain points.
RoutingA detailed set of instructions that describeshow to create a particular item. Routingsinclude operations to be performed, thescheduling sequence, machines and workcenters involved, and hours required forsetup and run times. Routings also caninclude information about tooling, operatorskill levels, inspection needs, testingrequirements, and so on.
In engineering change management, arouting is a list of users who must review anengineering change request before it becomes a change order, and who mustreview a change order before it's finalized.
Routing preferenceAn individual user choice on howinformation is displayed or processed forupdate in the routings subsystem.Preferences can control such actions assubstituting one description for another orappending work center operations notes onto routing notes.
Routing sequenceA single step in the manufacturing process.Some routings will contain multiple stepswhile others will have only a single step.Examples of a sequence include assembly,painting, drying, etc.
Routing sheetsSeeRouting .
Run labor codeA labor code that identifies the skillrequirements to perform the operation asdefined.
Run orders
SeeManufacturing order .Sales order
A request for goods or services. Sales orderscan be Open (ready to be filled) or Planned(hold pending credit check or other criteria).
SamplingA statistical process of selecting a portion ofa large group of items to be inspected. Fromthe sample you select—and your inspectionresults for the sample—you can drawinferences about the overall quality of theentire item quantity.
SCARSeeSupplier Corrective Action Request .
Scheduling dataThe lead time needed to manufacture anitem on a bill of materials and the amount ofscrap materials produced by themanufacturing process.
Scheduling preferenceA user preference that controls the allocationof resources to a particular manufacturingorder. Scheduling preferences identifyadditional resources that may be availableand define waiting periods for a sequence.
Scrap
A component transaction type wherecomponents that are issued to amanufacturing order are flagged to bescrapped. Scrapped component costs areapplied to the manufacturing order costs, but the quantities aren’t.
Sequence numberA number assigned to a particular step in arouting. Each step (or sequence) representsan operation in the manufacturing process.The sequence number controls the order inwhich steps are executed.
Serial-numbered itemAn inventoried item that is assigned aunique identifier, which can be letters,numbers, or a combination of letters andnumbers.
Serial-number–tracked itemSeeSerial-numbered item .
Serial-trackedSeeSerial-numbered item .
Setup costThe cost of preparing a work area forproduction. Setup costs might include thecost of calibrating machines or gathering thenecessary tools and resources.
Setup labor codeA labor code that identifies the skillrequirements for the person preparing thework area prior to performing themanufacturing task.
Setup timeThe number of hours needed to prepare thework area prior to the operation.
Ship dateThe date when a sales order leaves yourwarehouse or office.
Shipping methodThe manner in which the items aretransported from the supplier to themanufacturer. Examples of shippingmethods include FedEx, rail, air freight, etc.
Shop calendarA calendar of up and down days—dayswhen the plant is in production and when itisn’t—for an entire manufacturing facility.
Shop orderSeeManufacturing order .
Shop rateThe average pay rate for the pay grade. It isthe figure that is used when labor costs areestimated for a manufacturing order.
ShrinkageThe loss of materials. You might have rawmaterial shrinkage—such as when somecomponent items are defective and can't beused in manufacturing—or you might haveparent part shrinkage—such as when not all
manufactured items meet your productstandards.
Single-level bill of materialsA bill of materials that lists components andsubassemblies, including the quantities ofeach, that make up the parent part. See alsoMulti-level bill of materials .
SiteA location that you have defined for storingitems. A site could be a department, a plant,or a warehouse. The number of sitesdepends on your organizational structure.
Source routing
A previously defined routing that containsone or more steps that you want to use in anew routing.
Standard cost varianceThe difference between the actual costs for amanufacturing order for a standard costitem, and the standard cost of the item.
Standard costingAn accounting method used by some businesses to value their inventories. Acompany that uses standard costing—alsoknown as “periodic costing”—revalues itsinventory periodically to reflect significantchanges in the cost of its items.
Standard order quantityA variable that can be used to calculate orderquantities for fixed or period order quantityorder policies. It is similar to a minimumorder quantity, requiring no less than a setamount for an order, but it can be increased,either by increments or multiples of thestandard order quantity.

8/10/2019 Dynamics GP MFG Core Functions
http://slidepdf.com/reader/full/dynamics-gp-mfg-core-functions 248/256
G L O S S A R Y
238 M A N U F A C T U R I N G C O R E F U N C T I O N S
SubassemblyA part that is both a component and a parentpart. An assembly that is used in themanufacture of a higher-order assembly.
Super bill of materialsA list of all the component items that canpossibly be included the bill of materials fora finished item. For example, a computermanufacturer might develop a super bill ofmaterials that includes several options forhard disks, RAM, monitors, keyboards, miceand other peripherals. No computer caninclude all the options, but all the optionsmust be included in the super bill ofmaterials.
SUPER BOMSeeSuper bill of materials .
SupplierA person or company that supplies goods orservices to a manufacturer.
Supplier Corrective Action
RequestA formal report to be sent to a supplier toinvolve the supplier in resolving problemswith defective parts. SCARs describe theproblems you’ve found—including itemnumbers, lot numbers, dates and testresults—and might outline possible areas forthe supplier to research to prevent the defectfrom recurring. Suppliers usually arerequired to respond to the SCAR reportswith information about the cause of thedefect and the steps to be taken to prevent itsrecurrence.
TemplateA routing outline that you can use to quicklyand efficiently build new routings. Each timeyou need to create a new routing, you cancustomize the template and give it a uniquerouting name.
Time fenceThe minimum amount of time required forproduction of an item. When MRP is used tocreate planned manufacturing orders orpurchase orders, the orders automatically arescheduled outside the time fence.
Total costsThe cumulative total of all expensesassociated with a manufacturing order, plus
any overhead that might not be directlyconnected to the order.
Trade discountA price reduction, usually granted to acertain customer because of the customer’sspecial status. Customers with an excellentcredit history might be offered a tradediscount.
Unit costsThe value of time and resources consumed tocreate one unit of product for this order.
Unmet forecasted demandThe difference between forecasted demand(the anticipated amount of an item that will be required to meet projected orders) andactual production.
Up dayA day when the facility—the entire shopfloor or a specific work center—is inproduction.
User-defined fieldA field that can be used to track informationspecific to your company.
Valuation methodThe process used to track inventory value(FIFO Perpetual, FIFO Periodic, LIFOPerpetual, LIFO Periodic, AveragePerpetual).
VarianceThe difference between two values, such asthe difference between estimated and actualexpenses.
Where usedA Manufacturing query that scans your billsof materials and routings to find whereitems, machines and other things you’vedefined are used. If you performed a “whereused” search for all items in your plant thatuse a certain machine, for instance, thesystem would generate a list of all items thathave a step involving that machine.
Window securityA system that allows you to specify whichwindows each user in your organization will be able to use.
WIPSeeWork In Process (WIP) .
Work centerA self-contained unit of the manufacturingprocess, or an entire plant. A work centermight be an assembly area, a shipping andreceiving area or a painting area. Machinesand employees are the main components ofwork centers.
Work center calendarA calendar of up and down days—dayswhen the plant is in production and when itisn’t—for a specific work center.
Working routingSeeManufacturing order routing .
Work In Process (WIP)A system that helps you to track and analyzethe costs associated with a particularmanufacturing order and view the progressof the manufacturing order.
Work orderSeeManufacturing order .

8/10/2019 Dynamics GP MFG Core Functions
http://slidepdf.com/reader/full/dynamics-gp-mfg-core-functions 249/256
M A N U F A C T U R I N G C O R E F U N C T I O N S 239
IndexAaccounts
applied labor costs 14applied machine costs 10item classes 55overview 61specifying for an item 62
actual cost itemsdescribed 62in bills of materials 104
allocatingeffect on MRP 170effect on reconciling 78
alternate itemsdescribed 76removing 77specifying for an item 77specifying for bills of materials 106verifying 107
Alternate Items windowdisplaying 77removing alternates 77specifying alternates 77
alternate work centersdescribed 19preferred order 33removing 34specifying 32
Alternate Work Centers windowdesignating alternates 33displaying 33order for alternates 33removing alternates 34
archived bills of materialscompared to revision levels 141described 84removing 144
available to promisecalculations 73limitations 74
average costing, use in Manufacturing 104average quantities
lead times 72specifying 67
B back orders
and manufacturing ordersgenerating from sales order entry
164overview of generating 162
described 160 backflushing
machine costs, through operationcodes 38
materialsdescribed 82rules 87
backflushing ( continued)materials
setup in bills of materials 104 base units of measure, in bills of materials
110Bill of Materials Defaults window
displaying 100entering default sites 100
Bill of Materials Entry window backflushing 104changing bill of materials to phantom
96changing position numbers 95creating
bills 99super bills 199
deletingconfigured bills 212entire bills 103
displaying 95entering component details 102entering reference designators 137entering revision levels 142layout 97modifying component bills of
materials 103modifying super bills of materials 202removing a component from a bill 102specifying alternates in bill of
materials 106user-defined fields 109verifying alternates 107
Bill of Materials View windowcalculating component requirements
135displaying 134searching bills for an item 135viewing bills 134viewing costs 136viewing reference designators 139
bills of lading, entering 174 bills of materials
alternate itemsentering 106verifying 107
archiveddescribed 141removing 144
backflushing rules 87 by-products 109categories
and types 83overview 85specifying 100
componentsadding to multiple bills 146adding to one bill 101calculating requirements 135changing bill of materials to
phantom 96
bills of materials ( continued)components
changing details for multiple bills 150
changing details for one bill 102lead times 87removing copied 119removing from multiple bills 149removing from one bill 102requirements 104shrinkage 105
configureddeleting manually 212described 187
copying 117costs 136creating 98deleting
entire bill 103individual components 102
effective datesdescribed 107entering 99
engineering changes, effects 108fixed quantities, example 106item types 104lead times, example 87levels 82links to routings
creating 111in copied bills of materials 117overview 111unlinking 114uses 111
mass updatesadding an item 146changing default values 153default values 153overview 145removing an item 149replacing an item 151terms 146updating an item in bills 150
negative component quantities 109position numbers, described 83query types 133reference designators
deleting 138entering 137modifying 138viewing 139
revision levelsdescribed 141viewing 143
rounding issues 110shrinkage 105subassemblies 103super
creating 199described 187effect of fulfillment methods 201

8/10/2019 Dynamics GP MFG Core Functions
http://slidepdf.com/reader/full/dynamics-gp-mfg-core-functions 250/256
I N D E X
240 M A N U F A C T U R I N G C O R E F U N C T I O N S
bills of materials ( continued)super
routings 203terms 81types
and categories 83overview 84specifying 99
user-defined fields, enteringinformation 109
viewingcomponent information 134links 115where components are used 135
bins, viewing for order fulfillment 181BOM, see bills of materialsBOM Component Assigned Alternates
windowdisplaying 107verifying alternates 107
BOM Copy windowcopying a bill of materials 118displaying 118removing copied components 119
BOM Mass Update Defaults windowchanging default values for mass
updates 154displaying 154
BOM Mass Updates windowadding an item 147displaying 147removing an item 149replacing an item 151updating an item 150
BOM Revision History windowdisplaying 143viewing revision level history 143
BOM Routing Link windowdisplaying 112linking 112linking for configured items 203modifying links 113unlinking 114viewing link information 115
buy items, described 51 by-products
backflushing 87 bills of materials 109
CCalculate Manufacturing Lead Times
windowdisplaying 72viewing lead time 72
capacity, adjusting for a work center 27changes since last release, information
about 5classes , see item classesCOGS accounts, described 61components
components ( continued)alternate items
in bills of materials 106verifying 107
backflushing, rules 87 bills of materials
adding to 101changing bill of materials to
phantom 96changing information 102copying 117lead times 87requirements 104shrinkage 105
calculating requirements 135described 50effective dates 107fixed quantities, example 106negative quantities in bills of
materials 109reference designators
deleting 138entering 137modifying 138viewing 139
viewing, in bills of materials 134configured bills of materials
deleting 212described 84, 187modifying 213
configured costs, described 187configured prices
described 187multicurrency 206overview 205promotions 206
configured routings, described 187configuring items
with no pricing 207with pricing
existing configurations 211new configurations 209
Cost of Goods Sold accounts, described 61costs
floor stock 105labor, changing for codes 15viewing, for bills of materials 136
customer part numbers 168cycle times, in operations 38
Ddates
due datesconfigured items 218described 160manufacturing orders from sales
ordersentering 165modifying 167
effective dates bills of materials 99
dates ( continued)effective dates
described 68overview 107promotions 196standard costing changes 126work centers 22
in dates for components 108in-house dates, entering 165inventory available to promise
calculations 73limitations 74
out dates for components 108promise dates 160using to control work center changes
24document types
order fulfillment 172order fulfillment history 171
documentation, symbols and conventions3
down days, setup for work centers 31drawing groups
adding drawings 41described 41relationship to drawings 41removing drawing 43
drawingsattaching to
item records 71operations 39records 43
deleting 43described 41drawing groups
adding to 41relationship to 41removing from 43
terms 41viewing
configured items 215directly 43information about 45when attached to records 44
Drawings windowadding drawings to group 42creating drawing groups 42deleting drawings 43displaying 42removing drawings from drawing
groups 43viewing drawings 44
duplicate position numbers 92
Eeffective capacity of work centers
employees 22machines 23
employee efficiency percentagedescribed 19specifying 22

8/10/2019 Dynamics GP MFG Core Functions
http://slidepdf.com/reader/full/dynamics-gp-mfg-core-functions 251/256
M A N U F A C T U R I N G C O R E F U N C T I O N S 241
I N D E X
employeesassigning to work centers 22removing from work centers 25
Enable Manual MO Generation option,described 165
Enable Silent MO Generation option,described 165
engineering change requests (ECRs),effects on bills of materials 108
Engineering Change Request–View Onlywindow, viewing changes for bills 108
Entire Order Fulfillment History windowdeleting order fulfillment information
177displaying 176editing fulfillment history 176viewing bin information 181viewing lot numbers 182viewing serial numbers 182
Entire Order History window, where tofind documentation 159
exclusions in Sales Configuratorcreating 191described 188
Ffinished goods, described 50finished parts and components, described
81fixed overhead
for labor codes 14for machines 11for materials
changing 129entering 123entering scenarios 127overriding 124
rolling up 125updating
for labor codes 15for machines 15
fixed quantities, bills of materials 106Flat Fee items
backflushing 87 bills of materials 104
floor stockapply costs
to expense account 105to manufacturing order 105
how costs are applied 105Freight and Misc Adjustments window
displaying 178editing freight costs 178where to find documentation 159
freight charges, modifying 177Fulfillment Detail window
displaying 75starting shipping history 75
Fulfillment History Entry windowdisplaying 174entering fulfillment information 174
Fulfillment History Entry window(continued)
where to find documentation 159Fulfillment History Report, generating for
a range 178fulfillment methods
configured items 201described 52effects 162entering for an item 67item classes 58make to order 52make to stock 52
Hhelp, displaying 4Help menu, described 4history
order fulfillment reports 178starting to track for shipping 75
hours per shift, described 20
Iicons, used in manual 3inclusions in Sales Configurator
creating 191described 188
incoming inspectiondestructive testing 69earmarking items 69
incremental spacingdefault values 89for position numbers 82position numbers 89specified values 90
inventory
reconciling, effect of Manufacturing78
inventory accounts, described 61Inventory Available to Promise Inquiry
window, calculating manufacturingdate 73
Inventory Year-End Closing window,rules for removing items 78
invoices, described 160issue-from sites
described 83rules for default values 85
issue-to sitesdescribed 83rules for default values 85
Item Account Maintenance - Costingwindow
displaying 64entering accounts for an item 64
Item Class Accounts Setup - Costingwindow
displaying 56specifying accounts for a class 56
Item Class Fulfillment Extras windowdisplaying 59
Item Class Fulfillment Extras window(continued)
starting shipping history for a class 59item classes
accounts 55described 55fulfillment methods 58shipping history 58standard cost overhead 59uses in Manufacturing 65
Item Cost Revaluation report, generatingto verify results 126
Item Engineering Data windowattaching drawings to items 71designating items for inspection 69displaying 66entering effective dates 68entering item information 66excluding items from MRP 70specifying item statuses 69specifying shipping weight units of
measure 68Item Maintenance window, rules for
removing items 78Item Option Assignment window
assigning option categories to items194
changing order of assignments 194displaying 194generating reports 195removing options 195
Item Resource Planning Maintenancewindow, manufacturing fixed lead time73
item statusesdescribed 50specifying 68
item types bills of materials 104effect on backflushing 87
itemssee also alternate items, buy items,
make or buy items, item classes, lotnumbers, serial numbers, standardcosting
accounts 62Active status 51alternates
described 76removing 77specifying 77
and Sales Configurator optioncategories
assigning 194overview 193removing 195
attaching files 71average quantities 67
backflushing 104 back-order quantities 162customer part numbers 168

8/10/2019 Dynamics GP MFG Core Functions
http://slidepdf.com/reader/full/dynamics-gp-mfg-core-functions 252/256
I N D E X
242 M A N U F A C T U R I N G C O R E F U N C T I O N S
items ( continued)designating for inspection 69drawing size 67effective dates 68engineering information 66fulfillment methods 67Inactive status 51including in MRP calculations 70Obsolete status 51Prerelease status 51reconciling 78Released status 51rules for removing 78rules to backflush 87Service status 51setup
accounts 62alternates 77fulfillment method 67requires inspection 69shipping history 75shipping unit of measure 68status 68
shipping historyprocedure 171setup 75
shipping weightcalculating 169unit of measure 68
standard costs for materialsentering 123overriding 124
standard quantities 131statuses 68terms 50viewing lead time
average quantities 72one unit 71
item-site combinations, excluding fromMRP 70
LLabor Code Definition window
displaying 13labor codes
adding pay codes to 17changing 14changing costs 15deleting 18entering 13removing pay codes from 17
Labor Code/Machine Overhead Defaultswindow
displaying 16entering default overhead
calculations 16labor codes
adding pay codes 17changing 14changing costs 15deleting 18
labor codes ( continued)described 9entering 13fixed overhead 14posting accounts
entering 14updating 15
relationship to pay codes 9removing pay codes 17shop rate 14terms 9variable overhead 14
labor times 37lead time
calculations 87described 50for components 72for manufacturing time 71for parent items 72offset 83viewing for average quantities 72viewing for one item 71
lead time offsetdescribed 83used in calculations 87
legend, standard costing tree view 130linking
components and routing sequences111
for Sales Configurator 203lookup window, displaying 4lot numbers
items 50sales orders 182specifying for sales orders 180
MMachine Definition windowchanging IDs 12changing machine records 11changing operating costs 11displaying 10entering machine records 10removing records 13
machine efficiency, described 20machine hours 20machine times, described 37machine utilization
described 20work centers 23
machineschanging IDs 12creating IDs 10described 9modifying 11operating costs 11operations 38posting accounts
entering 10updating 15
removing records 12
machines ( continued)terms 9work centers
assigning to 23removing from 25
make itemsdescribed 51fulfillment methods 52
make or buy items, described 52Make to Order - Manual
described 52effects 163
Make to Order - Silentconfigured items 201described 52effects 163
Make to Stockconfigured items 201described 52effects 162
Manufacturing Order Entry window,tracking orders for configured items 218
manufacturing ordersconfigured
deleting 219effect of options on material costs
207material costs 217scheduling 218tracking progress 218
from sales ordersadjusting due dates 167
back order options 164entering due dates 165from quotes 167generating 162implications of generating 163modifying 166
Manufacturing Sales Item Detail window,modifying manufacturing order details166
Manufacturing Series Item Class Extraswindow
displaying 58setting fulfillment options for a class
58where to find documentation 159
Manufacturing Series Sales Item Detailwindow
adding customer numbers 169adjusting due dates 168displaying 165generating orders
for back orders 165for quotes 167
where to find documentation 159Manufacturing Series Sales Order
Preferences window, where to finddocumentation 159
manufacturing windows, changingposition numbers 90

8/10/2019 Dynamics GP MFG Core Functions
http://slidepdf.com/reader/full/dynamics-gp-mfg-core-functions 253/256
M A N U F A C T U R I N G C O R E F U N C T I O N S 243
I N D E X
markdowns, Sales Configurator 214mass updates
adding an item 146changing default values 153default values for items 153overview 145removing an item from bills 149replacing an item 151terms 146updating an item in bills 150
Material Overhead Applied accounts,described 61
Material Requirements Planning (MRP)and sales orders
effects of orders 169limiting effect of allocations 170
bill of materials and routing links 111including items 70
materialsfixed overhead
entering 123entering scenarios 127overriding 124
variable overheadentering 123entering scenarios 127overriding 124
MFG/Lead Times windowdisplaying 71viewing lead time 71
miscellaneous charges, modifying 177Miscellaneous items
backflushing 87 bills of materials 104
move times, described 38MRP Exclusion List window, excluding
items from MRP 70multicurrency, in Sales Configurator 206multi-level bills of materials, described 82
Nnavigation, symbols used for 3new component position number
incremental spacing 82, 89new features, information about 5
Ooperating costs, machines 11operations
attaching drawings 39changing 39creating 38deleting 40described 37relationship to routing sequences 37terms 37
Operations Setup windowattaching drawings 40deleting 40displaying 38entering 38
Operations Setup window ( continued)modifying operations 39
option categoriesassigning to items
overview 193procedure 194
creating 189deleting 192described 188modifying 192preference order 194removing from items 195removing items 192reports
basic option information 193option assignments 195
Option Category Maintenance windowcreating an exclusion 191creating an inclusion 191creating option categories 189deleting an option category 193displaying 189generating reports 193modifying an option category 192removing an item from an option
category 192Option Inquiry window
displaying 213viewing options for a sales line 213
Option Promotion Maintenance window197
creating promotions 196deleting promotions 198displaying 196modifying promotions 197
options in Sales Configuratordeleting all promotions 198described 188effect on material costs 207viewing selections 212
order fulfillmentsee also fulfillment methodsdeleting 177document types setup 172entry 173for make items 52freight charges 177history requirements 171miscellaneous charges 177modifying 176reports
for a range 178for a single order 178
shipping history 171viewing history 175
Order Fulfillment History windowdisplaying 175viewing order fulfillment information
175Order Fulfillment Setup window, where
to find documentation 159
Order Fulfillment–Bin Inquiry windowdisplaying 181viewing bins for sales 181
Order Fulfillment–Lot Inquiry windowdisplaying 183viewing lot numbers for sold items
183where to find documentation 159
Order Fulfillment–Serial Inquiry windowdisplaying 182viewing serial numbers for sales 182where to find documentation 159
Outsourced Work Center Setup windowcreating an outsourced work center
26displaying 26
outsourced work centerssee also work centerschanging outsourcing status 27defining 25described 19vendors 26
outsourcingchanging status of work centers 27labor codes 14
overheaddefault values for standard cost item
classes 59labor code 14machine 11
overtimeemployees 23machines 24
Ppage orientation 229parent parts 81pay codes
adding to labor codes 17relationship to labor codes 9removing from labor codes 17
periodic valuation , see standard costingphantom bills of materials
backflushing 104described 85entering 100
phantom items backflushing 104 backflushing components 87
position number incremental spacing 89,described 82
position numberschanging 95configured bill of materials 91displaying 90duplicate 91duplicates assigned to components 92examples 93examples of exceeding allowed limits
94

8/10/2019 Dynamics GP MFG Core Functions
http://slidepdf.com/reader/full/dynamics-gp-mfg-core-functions 254/256
I N D E X
244 M A N U F A C T U R I N G C O R E F U N C T I O N S
position numbers ( continued)for bills of materials components,
described 83guidelines 91limits 94phantom bill of materials 91requirements 91rules for changing 90special circumstances in windows 91super bill of materials 91values 91
posting accountsfor labor codes
entering 14updating 15
for machinesentering 10updating 15
item classes 55pricing
promotions 206Sales Configurator
calculations 205effects of Multicurrency
Management 206primary routings, described 50printing reports 227promotions
calculations 197creating 196deleting all for an option 198deleting one 197described 188effect on pricing 206effective dates 196modifying 197
Proposed Material Fixed Overhead Entrywindow
changing fixed overhead calculations129
displaying 129Proposed Material Variable Overhead
Entry windowchanging variable overhead
calculations 130displaying 130
purchase lead time , see lead time
Qquality assurance, earmarking items for
inspection 69queries
bills of materialscomponents 133types 133where used 133
queue times, described 37quotes
described 160generating manufacturing orders 167
Rraw materials , see componentsreconciling inventory, effect of
Manufacturing 78Reference Designator Assignment
windowdisplaying 138entering reference designators 138modifying or deleting reference
designators 138Reference Designator Inquiry window
displaying 139viewing reference designators 139
reference designatorsdeleting 138described 83entering 137modifying 138viewing 139
Remove Archived BOMs windowdisplaying 144removing archived bills 144
replenishment methods, described 51report options
creating 225deleting 229described 223ranges
adding 226deleting 227
using 227reports
generating 227graphic 224Item Cost Revaluation 126
option categories 193optionscreating 225deleting 229described 223
order fulfillmentrange of documents 178single order 178
page orientation 229printing 227ranges
adding 226deleting 227described 224
Sales Configurator basic option category report 193item option assignment report
195samples of customized reports 224samples of reports 224samples with technical names 224sorting methods 224terms 223text 224types 224where used 224
required fields, described 4resources, documentation 4returns, described 160revaluing
all inventory 131described 53, 123some inventory 131
revision levelsdescribed 141entering 142viewing 143
Roll Up and Revalue Inventory windowdisplaying 126revaluing 131rolling up changes 126
rollupsdescribed 53, 122effective dates 126standard costing 125verifying 126
rounding, issues in bills of materials 110Routing Sequence Entry window, viewing
drawings 44routing sequences, relationship to
operations 37Routing View Closeup window, viewing
drawings 44routings
configured 187described 202primary 50super bills of materials 203unlinking from bills of materials 114viewing, links 115
run labor codes, described 37
SSales Configurator bills of materials
described 187modifying 213
blank fields 209configured routings
described 187overview 202
costs 187exclusions
creating 191described 188
fulfillment methods 201inclusions
creating 191described 188
manufacturing ordersdeleting 219tracking progress 218
markdowns 214material costs
actual versus standard 217effect of options 207
multicurrency 206

8/10/2019 Dynamics GP MFG Core Functions
http://slidepdf.com/reader/full/dynamics-gp-mfg-core-functions 255/256
M A N U F A C T U R I N G C O R E F U N C T I O N S 245
I N D E X
Sales Configurator ( continued)option categories
assigning to items 194creating 189deleting 192modifying 192overview 193preference order 194unassigning 195
options 188price methods 205prices for configured items 187pricing calculations 205promotions
creating 196deleting all 198deleting single 197described 188effect on pricing 206modifying 197
reports basic option category report 193option assignment report 195
requirements 188scheduling 218super bills of materials
creating 199modifying 202
terms 187using
sales of existing configurations211
sales of new configurations 209to configure an item 207
viewingdrawings 215options 212
Sales Configurator windowadjusting markdowns 214configuring an item 208displaying 208verifying dates for configured items
218viewing drawings 44
Sales Lot Number Entry windowdisplaying 180entering lot numbers for sold items
180Sales Order Fulfillment window
Fulfill All button 172where to find documentation 159
Sales Order Processing Setup window,where to find documentation 159
Sales Order Setup window, where to finddocumentation 159
sales ordersand manufacturing orders
generating 164generating with quote status 167implications of generating 163overview of generating 162
sales orders ( continued) back-order quantities 162 bills of lading 174customer part numbers 168described 160documentation 159due dates
adjusting 167entering 165
effectsof allocations on MRP 170of orders on MRP 169
freight charges 177lot-numbered items
assigning 180viewing 182
miscellaneous charges 177modifying 166process security 163quantities 163serial-numbered items 179shipping weight 174terms 160viewing
bins 181lot-numbered items 182serial numbers 182
Sales Serial Number Entry windowdisplaying 179entering serial numbers for sold items
179Sales Transaction Entry window
order fulfillment differences 172where to find documentation 159
scheduling, manufacturing orders forconfigured items 218
Separate Fulfillment Process option 171serial numbers
for sales ordersspecifying 179viewing 182
items 50Services items
backflushing 87 bills of materials 104
Set Amount windowchanging link amounts 114displaying 114
setupdocument types 172item accounts 62item classes
accounts 55default standard cost overhead
values 59fulfillment methods 58shipping history 58
Sales Configuratorexclusions 191inclusions 191option categories 189
setup ( continued)work centers 20
setup costs, described 50setup labor codes, described 37setup times, described 37shift information, work centers 22shipping history
see also order fulfillmentsetup for item classes 58setup for items 75
shipping weightcalculating 169specifying
for sales orders 174unit of measure for an item 68
shop calendarswork center calendars, relationship to
30shop rates
described 10entering 14
shrinkage, bills of materials components105
single-level bills of materials, described 82Site Maintenance window, excluding a
site from MRP 70sites
excluding from MRP 70issue-from
described 83rules 85
issue-todescribed 83rules 85
relationship to work centers 20rules for deleting 29
skill setsassigning to work centers 34described 34
Standard Cost Changes windowdisplaying 127entering scenarios for standard costs
127revaluing 131specifying standard quantity 132
standard cost items, described 62Standard Cost Maintenance window
displaying 124overriding pending changes 124verifying rollup results 127viewing costs for standard cost made
items 136standard costing
bills of materials 104described 52effective dates 126item class overhead 59material costs
entering 123entering scenarios 127overriding 124

8/10/2019 Dynamics GP MFG Core Functions
http://slidepdf.com/reader/full/dynamics-gp-mfg-core-functions 256/256
I N D E X
standard costing ( continued)overview 52revaluing
all items 131described 123some items 131
rollupdescribed 122procedure 125
f l
Vvaluation methods
overview 62rules for bills of materials 104
variable overheadlabor codes
entering 14updating 15
machines
work centers ( continued)alternates
removing 34calendars
adjusting 32described 30entering 31relationship to shop calendar 30
creating 20d l