Embed Size (px)
Citation preview

Original Instruction Manual
Version 2.1May 2011
Woodworking Machines & Accessories
Telephone: 01246 561 520Fax: 01246 561 537
Record Power LtdUnit B, Adelphi WayStaveley S43 3LS
Email: [email protected]
DX1000 High Filtration Dust ExtractorIMPORTANTFor your safety read instructions carefully before assembling or using this product. Save this manual for future reference.
HEALTH AND SAFETY GUIDELINESAlways follow the instructions provided with the manual. Always wear safety glasses when using woodworking equipment. Always disconnect the power before adjusting any equipment. Failure to observe proper safety procedures and guidelines can result in serious injury.WARNING: Do not allow familiarity (gained from frequent use of your machine and accessories) to become commonplace. Always remember that a careless fraction of a second is sufficient to inflict severe injury. Always wear safety glasses when
using woodworking equipment.Always read the instructions provided before using woodworking equipment.

ContentsPage3 1. Introduction
3 2. Health & Safety Guidance
4 3. Health & Safety Guidance for Dust Extractors
5 3. Record Power Gurantee
6 4. Specification
6 5. Parts Identification
7 6. Assembly & Operation
8 7. Wiring Diagram
9-10 8. Maintenance
11-12 9. Exploded Diagram & Parts List
13 Certificate of Conformity

1. IntroductionDear Customer,
Thank you for investing in a RECORD POWER® DUST EXTRACTOR, which has been designed to give you years of satisfying service.
Please do not forget to fill in and return your guarantee card. (This does not affect your statutory rights).
PURPOSE OF THIS MANUALThis manual serves to give details of Specification, Health & Safety, Installation & Assembly.
Please ensure you have sufficient basic skill before using this machine.
RECORD POWER AND THE ENVIRONMENTConsiderations of environmental issues are an integral part of the design, production and other associated aspects of this product, and
all reasonable environmentally friendly options have been adopted throughout.
Users are advised to consider environmental issues associated with the use of this product, particularly when considering workpiece
material. Confirmation of sourcing from well-managed forests is advisable whenever practically possible.
WASTE ELECTRICAL AND ELECTRONIC EQUIPMENT (WEEE) REGULATIONSThe WEEE regulations aim to encourage reuse, recycling and recovery of electrical and electronic waste. The document outlining the
WEEE guidelines is available at http://www.dti.gov.uk/sustainability/weee.
2 3

READ ALL THE INSTRUCTIONS IN THIS MANUAL CAREFULLY BEFORE ASSEMBLY, INSTALLATION AND USE OF THIS PRODUCT. KEEP THESE INSTRUCTIONS IN A SAFE PLACE FOR FUTURE REFERENCE. WARNING: When using electric tools, basic safety precautions should always be followed to reduce the risk of fire, electric shock and personal injury.
SAFE OPERATION
1. Eye Protection The operation of any power tool can result inforeign objects being thrown into your eyes, which can result in severe eye damage. Always wear safety glasses or other suitable eye protection. Wear safety glasses at all times. Everyday glasses only have impact resistant lenses. They are not safety glasses which give additional lateral protection. It is also important to wear ear protectors when operating the table saw.
2. Keep work area clear.Cluttered areas and benches invite accidents and injuries.
3. Consider work area environment.Do not expose the machine to rain or damp conditions.• Keep the work area well lit.• Do not use the machine in the presence of flammable liquids or gases.
4. Guard against electric shock.Avoid body contact with earthed or grounded surfaces.
5. Keep other persons away (and pets).Do not let persons, especially children, not involved in the work, touch the machine, or extension cord (if used) and keep visitors away from the work area.
6. Store idle tools.When not in use, tools should be stored in a dry, locked- up place, out of reach of children.
7. Do not force the machine.It will do the job better and work more safely if operated at the speed at which it was intended.
8. Use the right tool.• Do not force small tools to do the job of a heavy-duty tool.• Do not use tools for purposes other than those for which they were intended.
9. Dress properly.• Non-slip footwear is recommended.• Do not wear loose clothing, neckties or jewellery; they can be caught in moving parts.• Roll up long sleeves above the elbow.• Wear protective hair covering to contain long hair.
10. Use protective equipment• Use safety glasses. (See note 1. above)• Use face or dust shield if cutting operation creates dust.• Use ear plugs or ear defenders when the machine is in use
11. Connect dust extraction equipment.
12. Do not abuse the cord.Never yank the cord to disconnect it from the socket. Keep the cord away from heat, oil and sharp edges.13. Do not overreach.Keep proper footing and balance at all times.14. Secure work.Ensure that your work piece is properly held beforestarting to cut.
15. Maintain tools with care.• Follow instructions for lubrication and changing accessories.• Inspect electric cords periodically and, if damaged, have them repaired by an authorized service facility or qualified electrician.• Inspect extension cords (if used) periodically and replace if damaged. Always use properly rated extension cord.
16. Disconnect Machine.When not in use, before servicing, changing blades etc. disconnect the machine from the power supply.
17. Never leave machine running unattended.Turn power off, do not leave machine until it comes to a complete stop.
18. Remove adjusting keys and wrenches.ENSURE that all adjusting wrenches and keys are removed before switching the machine ‘ON’.
19. Avoid unintentional starting.Ensure the switch is in the “STOP” position before turning on the power from the main electricity supply. Your Record Table saw already incorporates low voltage protection. This means the machine will not automatically start up after say a power cut, unless you first reset the start switch.
20. Out-door Extension Leads.Your machine should not be used outdoors.
21. Stay alert.Watch what you are doing, use common sense and do not use the machine when you are tired.
22. Check for damaged parts.• Before use of the machine, it should be carefully checked to determine that it will operate properly and perform its intended function.• Check for alignment of moving parts, binding of moving parts, breakage of parts, mounting and any other conditions that may affect its operation.• A guard or other part that is damaged should be properly repaired or replaced by a qualified person unless otherwise indicated in this instruction manual. Have defective switches replaced by a qualified person.• Do not use the machine if the switch does not turn on and off.
23. Warning!• The use of any accessory or attachment, other than those recommended in this instruction manual, or recommended by our Company may present a risk of personal injury.
24. Have your machine repaired by a qualified person.• This electric machine complies with the relevant safety rules. Only qualified persons using original spare parts should carry out repairs. Failure to do this may result in considerable danger to the user.
25. This machine is designed for cutting wood.• Do not use for cutting any material other than wood.
Maintenance and ServicingThis machine requires very little maintenance. This handbook gives clear instructions on installation, set up and operation.Read these instructions carefully. Remember always to switch off and unplug from the main electricity supply before carrying out any setting up or maintenance operations.
Should you need advice on the repair or maintenance of this product, our Customer Service Department can be contacted on 01246 561 520 and will be happy to assist you.
2. Health & Safety Guidance

4 5
3. Health & Safety Guidance for Dust Extractors• Remove the transit strap, which is used to secure the hood assembly to the
drum body, before use. Never use the machine with this strap fitted!
• All Record Power dust extractors are designed solely for use with wood dust and chippings. Do not use the machine to remove vapours, fumes, gases or other materials such as plaster dust, incase of combustion. Doing so will invalidate the warranty and may also lead to damage to the machine or user.
• If the machine becomes hot during use this means the filters are blocked and must be cleaned. Any damage resulting from blocked filters is not covered under the warranty.
• Do not completely cover the end of the flexible hose as the machine may pull towards the end of the hose.
• To ensure filtration of particles as small as 0.5 microns, always use the paper filter.
• Always unplug the machine before any routine maintenance such as emptying and filter replacement.
Health & Safety• This product is for dry use only and should not be used or stored outdoors in wet conditions.
• DANGER: This product should be disconnected from the power supply before emptying, when replacing filters or removing the hood for access to the motor. Failure to do so may lead to accidental starting of the motor resulting in personal injury.
• When replacing filter, NEVER touch the fan blade and ALWAYS unplug.• A paper filter MUST always be fitted as this provides protection from the fine dust most hazardous to health.• Ensure that the switch is in the OFF position (‘0’) before connecting to the power supply.• Suitable only for solid particles. Not to used for the extraction of vapors, fumes or gases.• If the hose becomes blocked, switch off immediately to prevent any damage to the machine and disconnect from the power supply before removing the blockage.• Ensure that the machine is used in a well ventilated area.
• DANGER: Before any type of maintenance is carried out, it is important that the machine is switched off and disconnected from the power supply.
• DANGER: Always ensure the cartridge and paper filter are securely and properly positioned before using the dust extractor. Failure to do so will result in dust being sucked into the motor. Always ensure a good seal between the filter and motor enclosure.
• The power supply must be equipped with a circuit breaker that provides short circuit, undervoltage and overvoltage protection.• Never cover the inlet and outlet during operation.
• DANGER: NEVER use the product to pick up any combustible substance.
• DANGER: NEVER use the product in explosive environments (dust, vapour or gas)• DO NOT pick up liquids and metal scrap such as nails and filings.• SUSPENDED DUST PARTICLES AND IGNITION SOURCES. DO NOT operate the dust collector in areas of explosive risk such as near pilot lights, open flames or
dusty atmospheres.• AVOIDING FIRES. Sparks can smolder in dust for a long time before fire or flame is detected. If metal contacts metal during operation, immediately turn off the
product, unplug the power cord from the outlet, or flip the main switch and wait for all moving parts to stop. Empty the dust into an approved air tight metal container in case of spark. Remedy the metal to metal contact problem before resuming operation.
• This appliance is not intended for use by persons (including children) with reduced physical, sensory or mental capabilities, or lack of experience and knowledge, unless they have been given supervision or instruction concerning use of the appliance by a person responsible for their safety.
• Children should be supervised to ensure that they do not play with the appliance.• WARNING: Operators shall be adequately instructed on the use of these machines.• WARNING: This machine is not suitable for picking up hazardous dust.• WARNING: This machine is for dry use only.• CAUTION: This machine is for indoor use only.• CAUTION: This machine shall be stored indoors only.• DO NOT plug or unplug under load.• After the power supply interruption or the protection device (e.g. breaker) operation occurred, ALWAYS ENSURE the switch is in the OFF position (‘0’).
4. Record Power Guarantee1. INTRODUCTION1.1 We supply machinery through a network of dealers and authorised distributors and you should be aware that your contract of sale is with the retailer from whom you purchased this product. 1.2 If you are not satisfied with this product you should in the first instance approach the retailer from whom you purchased it.1.3 Customers have statutory rights to protect them and information on this can be found at the Citizens Advice Bureau or on such web-sites as that operated by the DTI (http://www.dti.gov.uk)1.4 Returning your guarantee card will speed up the claims procedure and can be very helpful as a proof of purchase should the initial receipt be mislaid or damaged. We recommend that this is returned as close to your original purchase date as possible.1.5 Correct installation, set-up, adjustment and routine maintenance of the machine are the responsibility of the end-user and problems arising from incorrect set-up, adjustment or maintenance are not covered by the terms of this guarantee. However support is available in the first instance from the retailer who supplied you and free technical support is available from Record Power on 01246 561 520 during office hours and from an extensive knowledge base on our website www.recordpower.co.uk. We also recommend that those users who have not had suitable training in the safe use of machinery should seek such training locally before using or attempting to set up and adjust any machinery (please contact your retailer for recommendations in your local area).
2. GUARANTEE2.1 In addition to the above Record Power guarantees that for a period of 5 years from the date of purchase the components of this product will be free from defects caused by faulty construction or manufacture. 2.2 During this period Record Power will repair or replace free of charge any parts which are proved to be faulty in accordance with paragraph 2.1 above provided that:2.2.1 You follow the claims procedure set out below;2.2.2 We are given a reasonable opportunity after receiving notice of the claim to examine the product. 2.2.3 If asked to do so by us, you return the product to Record Power's premises or other approved premises such as those of the supplying dealer, for the examination to take place. 2.2.4 The fault in question is not caused by continuous industrial use, accidental damage, fair wear and tear, wilful damage, negligence on your part, incorrect electrical connection, unapproved modification, abnormal working conditions, failure to follow our instructions, misuse, or alteration or repair of the product without our approval.2.2.5 This product has been purchased by you and not used for hire purposes;2.2.6 This Guarantee extends to the cost of carriage incurred by you returning the product to Record Power as long as it is demonstrated that the defect falls within the terms of this Guarantee and you follow the claims procedure as outlined below;
3. CLAIMS PROCEDURE 3.1 In the first instance please contact the retailer who supplied the product to you. In our experience many initial problems with machines that are thought to be due to faulty parts are actually solved by correct setting up or adjustment of the machines. A good dealer should be able to resolve the majority of these issues much more quickly than processing a claim under the guarantee. 3.2 If the dealer who supplied the product to you has been unable to satisfy your query, any claim made under this Guarantee should be made directly to Record Power at the address set out at the foot of this Guarantee. The claim itself should be made in a letter setting out the date and place of purchase, and giving a brief explanation of the problem which has led to the claim. This letter should then be sent with proof of the purchase date (preferably a receipt) to Record Power. If you include a phone number or email address this will help to speed up your claim.3.3 PLEASE NOTE that it is essential that the letter of claim reaches the address below on the last day of this Guarantee at the latest. Late claims will not be considered. 3.4 We will contact you once we have received your initial written claim. If
it is necessary to return the item, in most cases but subject always to clause 2.2.5, we will arrange for collection or will provide freepost information to enable return depending on the weight and size of the product concerned. If the product is to be returned to us, we will agree with you in advance a Returns Number, to speed tracking of the claim and ensure the most appropriate method of return to you is used.
4. NOTICEThis Guarantee applies to all goods purchased from an authorised retailer of Record Power within the United Kingdom of Great Britain and Northern Ireland. This Guarantee does not confer any rights other than those expressly set out above and does not cover any claims for consequential loss or damage. This Guarantee is offered as an extra benefit and does not affect your statutory rights as a consumer. Additional written copies of this Guarantee can be obtained by writing to the address below. Please include a stamped and self addressed envelope for each copy of the Guarantee requested.
Record Power Ltd.Unit B, Adelphi WayIreland Industrial EstateStaveley, ChesterfieldS43 3LS

5. SpecificationCapacity: 45 litres Motor: 1kwSize: H640 x W375 x L415mm Weight: 11kg Filtration: 0.5 micron Air Flow: 53 litres per second Sound Pressure: LPA< 75dB (A)Sound Power: LWA< 85dB (A)
6. Parts Identification
Body
Motor Cover
Motor Switch
100mm Dia. Hose(Included)
Hose Connector
6 7
Transit Strap
Note: DX1000 shown with Easy Fit Machine Cuff, not supplied as standard.
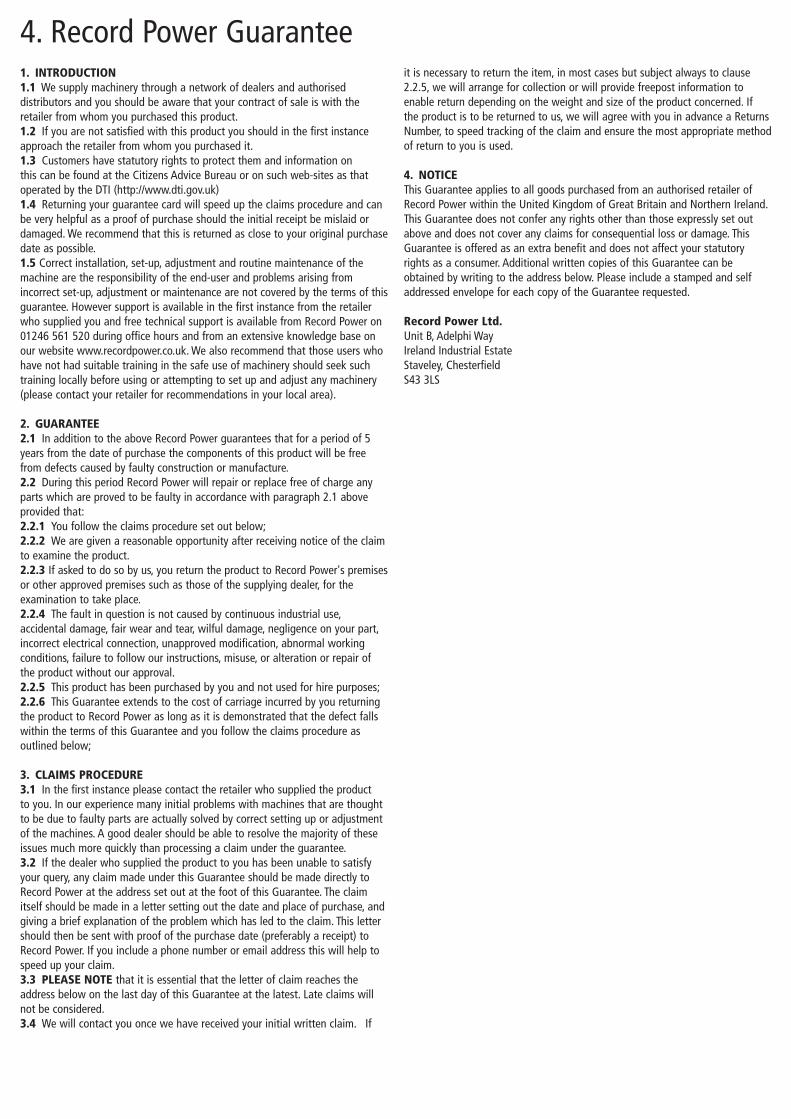
7. Assembly & Operation1. Attach one end of the flexible hose to the machine inlet and secure with the jubilee clip supplied (Fig 7.1)
2. Place the cartridge filter with open end uppermost inside a paper filter-bag and fold the top edges of the paper bag down inside the cartridge (Fig 7.2).
3. Push this on to the motor body; making sure that it is securely positioned (Fig 7.3).
3. Position the hood unit on the machine body.
4. After carefully positioning the end of the flexible hose for maximum effect, connect to power outlet.
Your dust extractor is now ready for use.
Fig. 7.1
Fig. 7.2
Hose
Body
Jubilee Clip
Filter Bag Cartridge Filter
Filter Bag
Cartridge Filter
Fold Excess Filter Bag
Inside Cartridge
Fig. 7.3
Motor
Cartridge Filter
Lid
Cartridge Filter
Lid
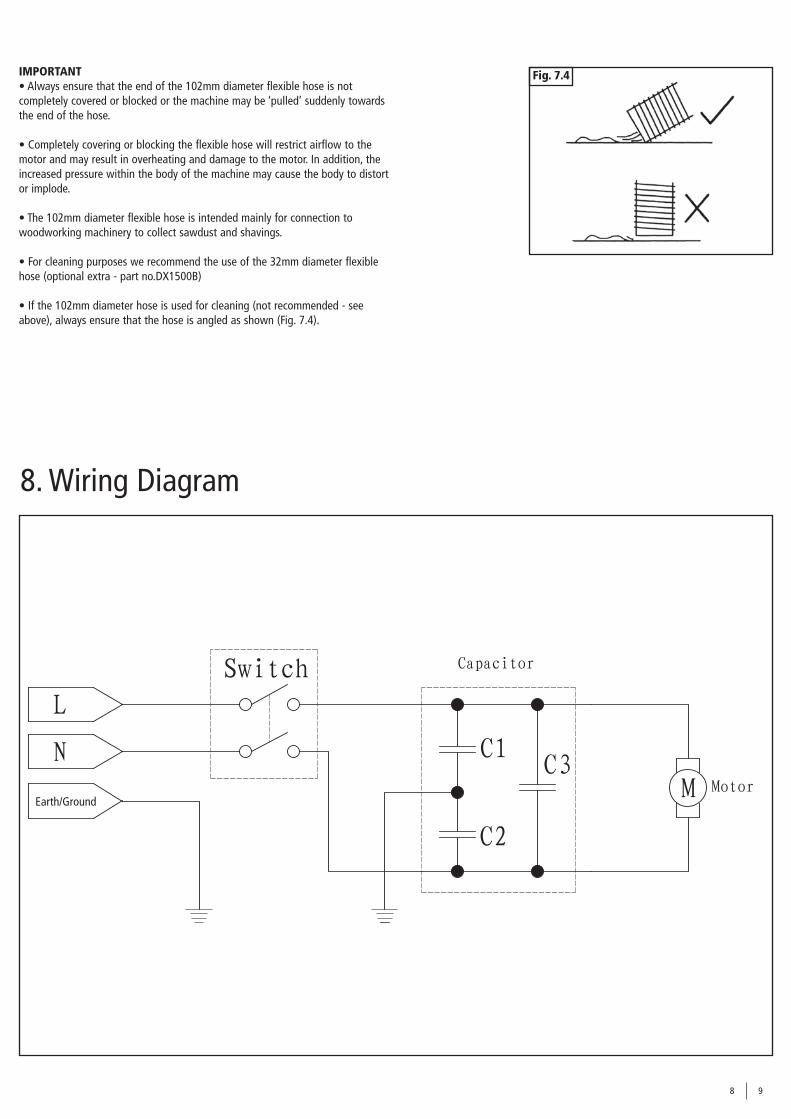
Fig. 7.4
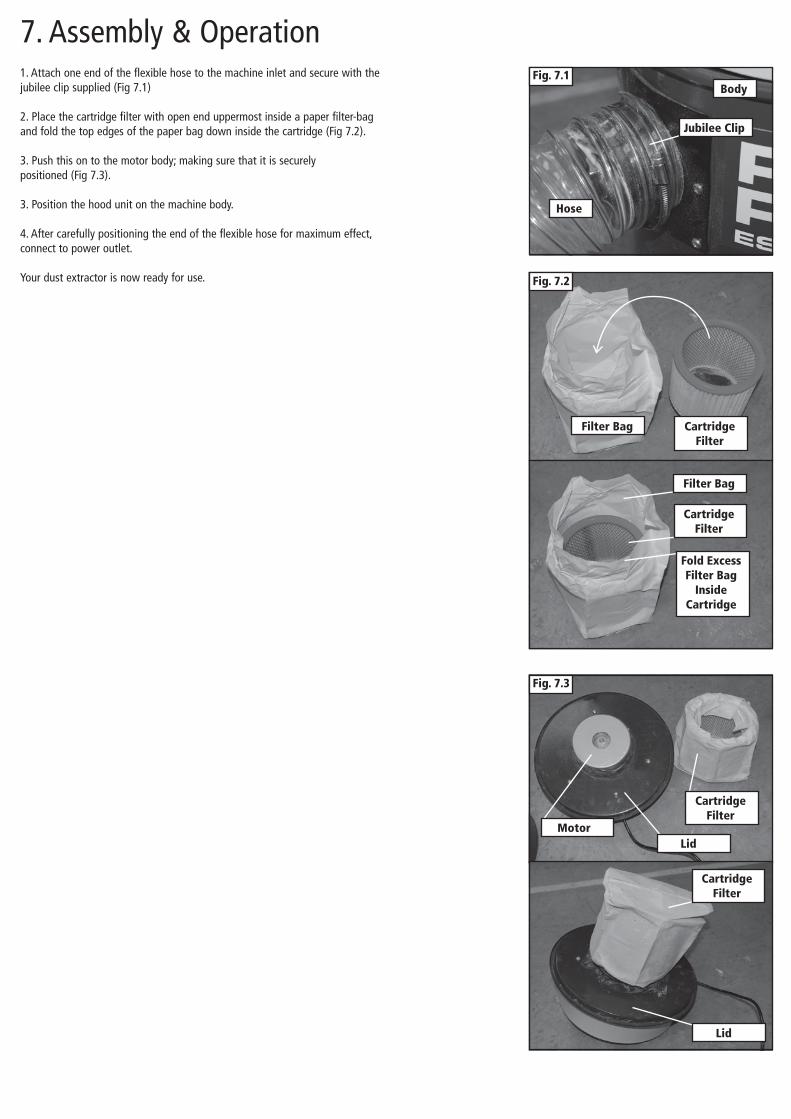
8. Wiring Diagram
M
CapacitorSwitch
L
N
GNI
C1
C2
C3Motor
IMPORTANT• Always ensure that the end of the 102mm diameter flexible hose is not completely covered or blocked or the machine may be ‘pulled’ suddenly towards the end of the hose.
• Completely covering or blocking the flexible hose will restrict airflow to the motor and may result in overheating and damage to the motor. In addition, the increased pressure within the body of the machine may cause the body to distort or implode.
• The 102mm diameter flexible hose is intended mainly for connection to woodworking machinery to collect sawdust and shavings.
• For cleaning purposes we recommend the use of the 32mm diameter flexible hose (optional extra - part no.DX1500B)
• If the 102mm diameter hose is used for cleaning (not recommended - see above), always ensure that the hose is angled as shown (Fig. 7.4).
8 9
Earth/Ground
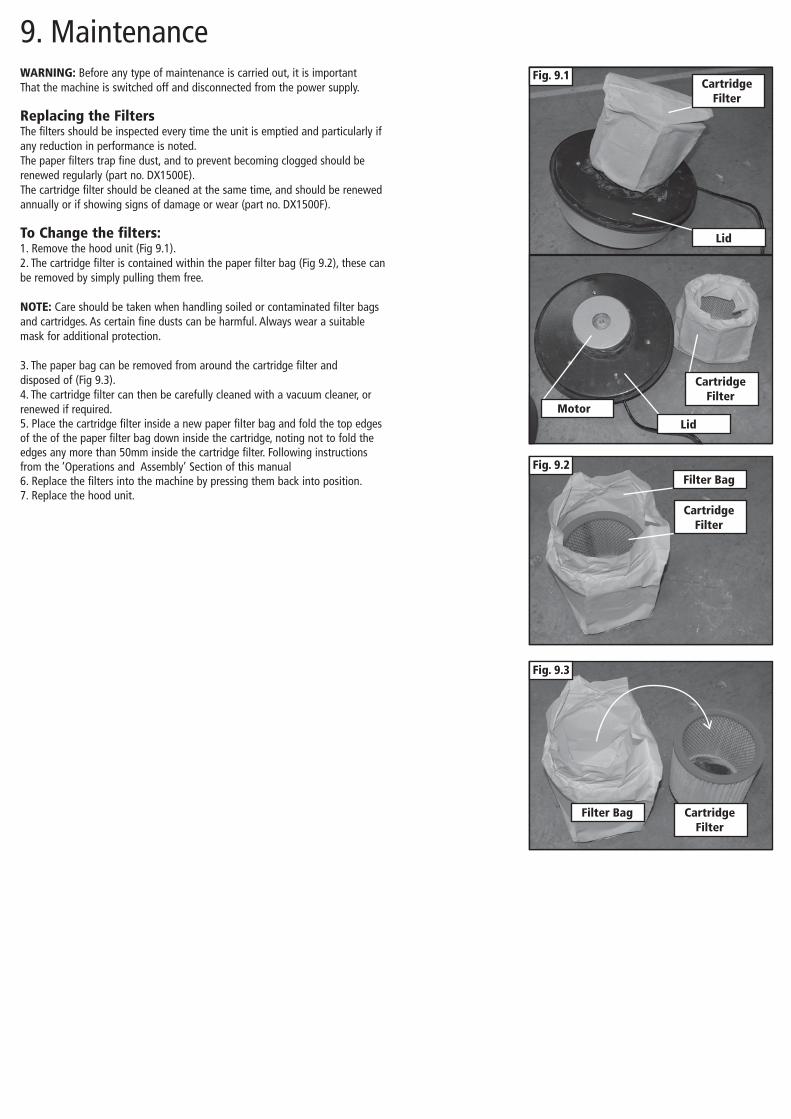
9. MaintenanceWARNING: Before any type of maintenance is carried out, it is importantThat the machine is switched off and disconnected from the power supply.
Replacing the FiltersThe filters should be inspected every time the unit is emptied and particularly if any reduction in performance is noted.The paper filters trap fine dust, and to prevent becoming clogged should be renewed regularly (part no. DX1500E).The cartridge filter should be cleaned at the same time, and should be renewed annually or if showing signs of damage or wear (part no. DX1500F).
To Change the filters:1. Remove the hood unit (Fig 9.1).2. The cartridge filter is contained within the paper filter bag (Fig 9.2), these can be removed by simply pulling them free.
NOTE: Care should be taken when handling soiled or contaminated filter bags and cartridges. As certain fine dusts can be harmful. Always wear a suitable mask for additional protection.
3. The paper bag can be removed from around the cartridge filter and disposed of (Fig 9.3).4. The cartridge filter can then be carefully cleaned with a vacuum cleaner, or renewed if required.5. Place the cartridge filter inside a new paper filter bag and fold the top edges of the of the paper filter bag down inside the cartridge, noting not to fold the edges any more than 50mm inside the cartridge filter. Following instructions from the ‘Operations and Assembly’ Section of this manual6. Replace the filters into the machine by pressing them back into position.7. Replace the hood unit.
Lid
Cartridge Filter
Motor
Cartridge Filter
Lid
Filter Bag
Cartridge Filter
Fig. 9.3
Filter Bag Cartridge Filter
Fig. 9.1
Fig. 9.2
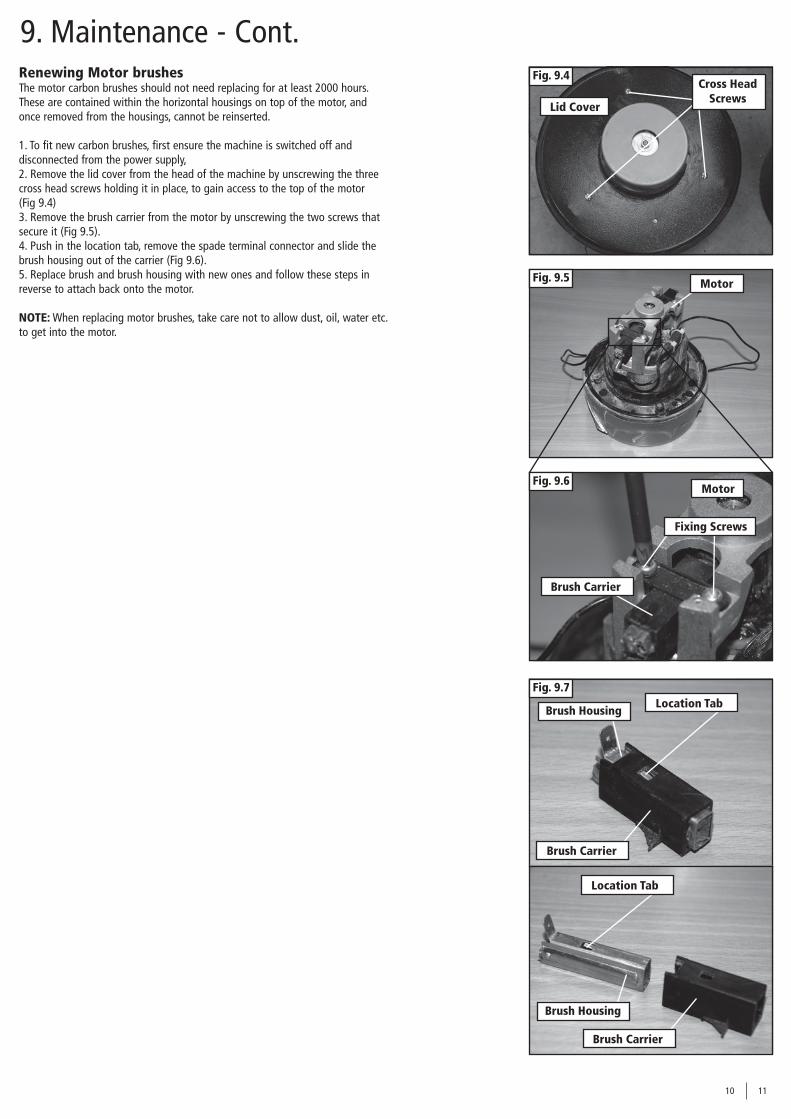
Fig. 9.5
10 11
Renewing Motor brushesThe motor carbon brushes should not need replacing for at least 2000 hours. These are contained within the horizontal housings on top of the motor, and once removed from the housings, cannot be reinserted.
1. To fit new carbon brushes, first ensure the machine is switched off and disconnected from the power supply,2. Remove the lid cover from the head of the machine by unscrewing the three cross head screws holding it in place, to gain access to the top of the motor (Fig 9.4) 3. Remove the brush carrier from the motor by unscrewing the two screws that secure it (Fig 9.5).4. Push in the location tab, remove the spade terminal connector and slide the brush housing out of the carrier (Fig 9.6).5. Replace brush and brush housing with new ones and follow these steps in reverse to attach back onto the motor.
NOTE: When replacing motor brushes, take care not to allow dust, oil, water etc. to get into the motor.
9. Maintenance - Cont.
Fig. 9.6
Fig. 9.7
Motor
Motor
Fixing Screws
Brush Carrier
Location Tab
Brush Carrier
Brush Housing
Brush Carrier
Location Tab
Brush Housing
Fig. 9.4
Lid Cover
Cross Head Screws
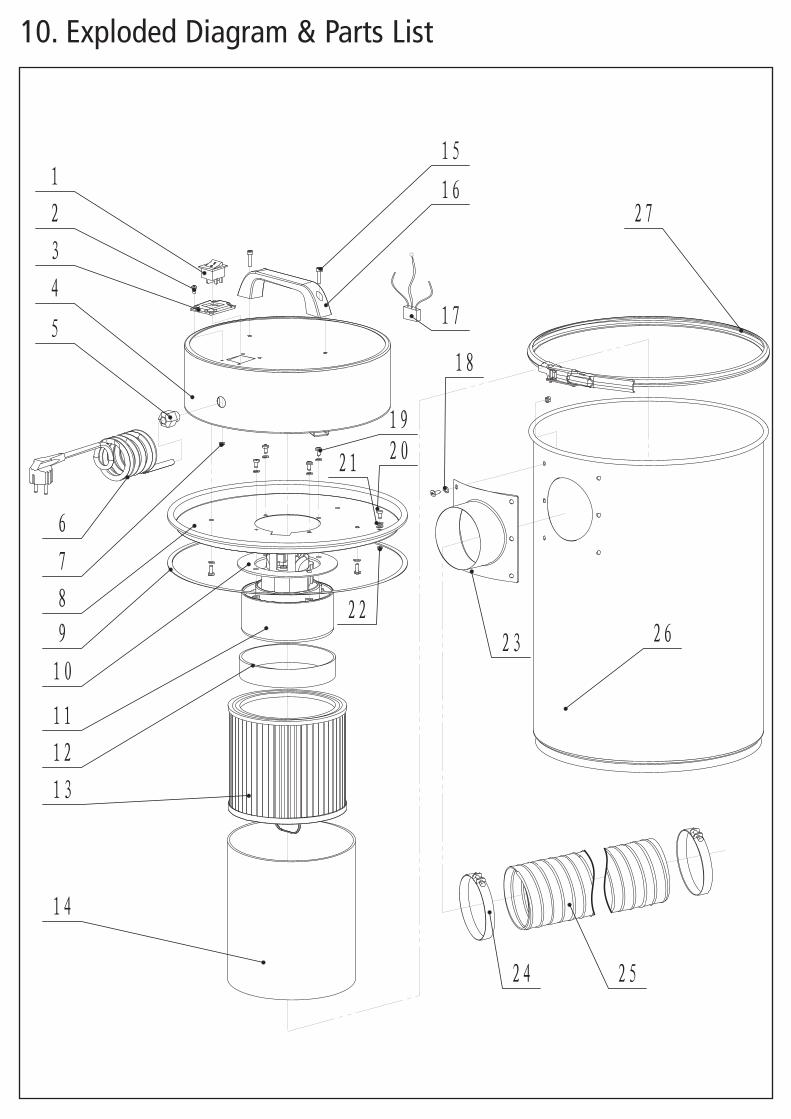
10. Exploded Diagram & Parts List
1
2
3
4
5
6
7
8
9
10
11
12
13
14
15
16
17
18
192021
22
23 26
24 25
27
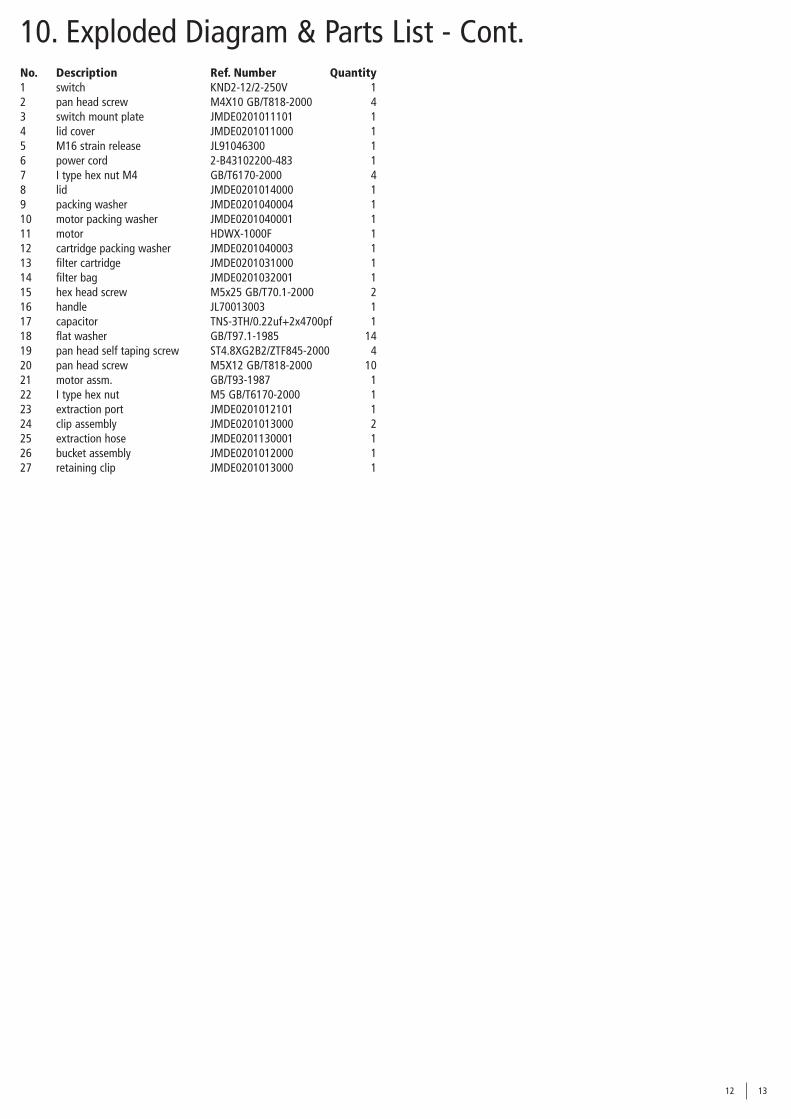
10. Exploded Diagram & Parts List - Cont.No. Description Ref. Number Quantity1 switch KND2-12/2-250V 12 pan head screw M4X10 GB/T818-2000 43 switch mount plate JMDE0201011101 14 lid cover JMDE0201011000 15 M16 strain release JL91046300 16 power cord 2-B43102200-483 17 I type hex nut M4 GB/T6170-2000 48 lid JMDE0201014000 19 packing washer JMDE0201040004 110 motor packing washer JMDE0201040001 111 motor HDWX-1000F 112 cartridge packing washer JMDE0201040003 113 filter cartridge JMDE0201031000 114 filter bag JMDE0201032001 115 hex head screw M5x25 GB/T70.1-2000 216 handle JL70013003 117 capacitor TNS-3TH/0.22uf+2x4700pf 118 flat washer GB/T97.1-1985 1419 pan head self taping screw ST4.8XG2B2/ZTF845-2000 420 pan head screw M5X12 GB/T818-2000 1021 motor assm. GB/T93-1987 122 I type hex nut M5 GB/T6170-2000 123 extraction port JMDE0201012101 124 clip assembly JMDE0201013000 225 extraction hose JMDE0201130001 126 bucket assembly JMDE0201012000 127 retaining clip JMDE0201013000 1
12 13
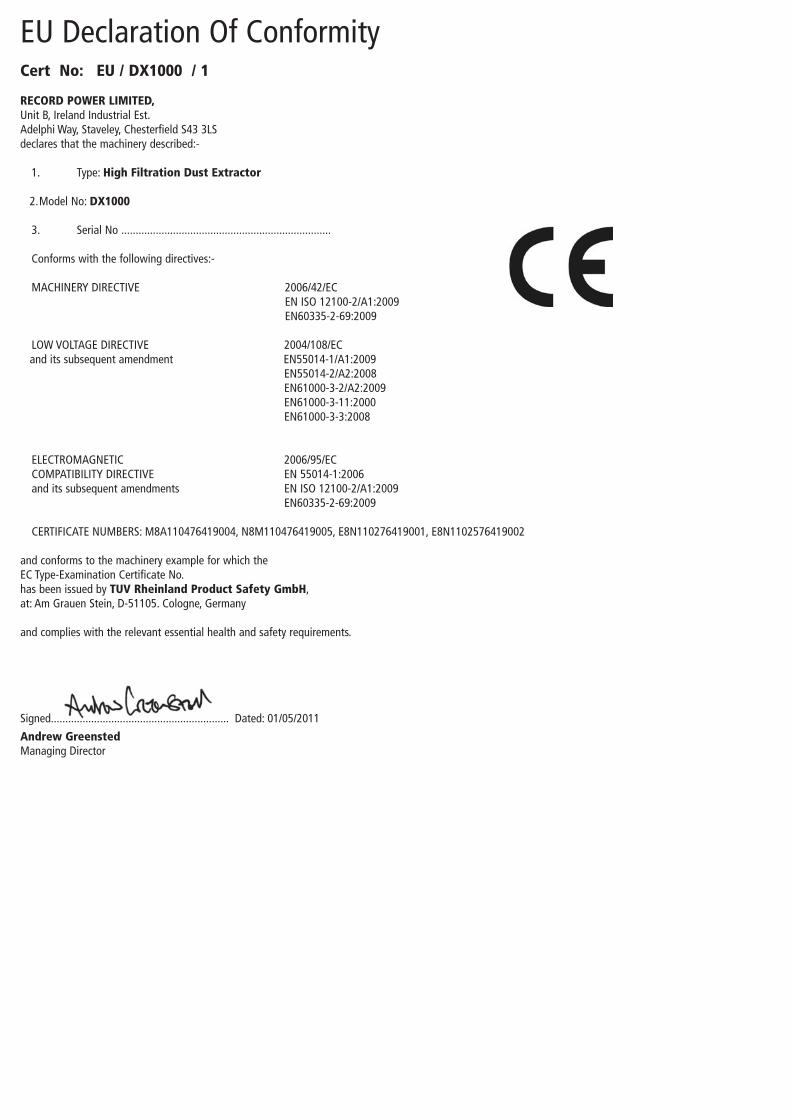
EU Declaration Of Conformity
Cert No: EU / DX1000 / 1
RECORD POWER LIMITED, Unit B, Ireland Industrial Est. Adelphi Way, Staveley, Chesterfield S43 3LSdeclares that the machinery described:-
1. Type: High Filtration Dust Extractor
2. Model No: DX1000
3. Serial No .........................................................................
Conforms with the following directives:- MACHINERY DIRECTIVE 2006/42/EC EN ISO 12100-2/A1:2009 EN60335-2-69:2009
LOW VOLTAGE DIRECTIVE 2004/108/EC and its subsequent amendment EN55014-1/A1:2009 EN55014-2/A2:2008 EN61000-3-2/A2:2009 EN61000-3-11:2000 EN61000-3-3:2008
ELECTROMAGNETIC 2006/95/EC COMPATIBILITY DIRECTIVE EN 55014-1:2006 and its subsequent amendments EN ISO 12100-2/A1:2009 EN60335-2-69:2009
CERTIFICATE NUMBERS: M8A110476419004, N8M110476419005, E8N110276419001, E8N1102576419002 and conforms to the machinery example for which theEC Type-Examination Certificate No. has been issued by TUV Rheinland Product Safety GmbH,at: Am Grauen Stein, D-51105. Cologne, Germany
and complies with the relevant essential health and safety requirements.
Signed.............................................................. Dated: 01/05/2011
Andrew GreenstedManaging Director


Record Power LimitedUnit B, Adelphi WayIreland Industrial Est.Staveley S43 3LS
Woodworking Machines & Accessories
Telephone: 01246 561 520Facsimile: 01246 561 537
Email: [email protected]
Visit www.recordpower.co.uk for the full range of Record Power products.
Woodworking Machinery
Craft Accessories
DVDs Accessories
Finishes and Waxes
Blades
In association with
Woodturning
Projects
Mantle Clock
by
Alan Holtham
In association with
Woodturning
Techniques
An Introduction to Spindle Turning
by
Alan Holtham
In association with
Step by Step Guide
Finishing on the Latheby
Alan Holtham
Buyer’s Guide Series
The essential guides to the most popular ranges of woodworking machinery