Embed Size (px)
Citation preview
YAMAHA ELECTRONICS CORPORATION, USA 6660 ORANGETHORPE AVE., BUENA PARK, CALIF. 90620, U.S.A.YAMAHA CANADA MUSIC LTD. 135 MILNER AVE., SCARBOROUGH, ONTARIO M1S 3R1, CANADAYAMAHA ELECTRONIK EUROPA G.m.b.H. SIEMENSSTR. 22-34, 25462 RELLINGEN BEI HAMBURG, F.R. OF GERMANYYAMAHA ELECTRONIQUE FRANCE S.A. RUE AMBROISE CROIZAT BP70 CROISSY-BEAUBOURG 77312 MARNE-LA-VALLEE CEDEX02, FRANCEYAMAHA ELECTRONICS (UK) LTD. YAMAHA HOUSE, 200 RICKMANSWORTH ROAD WATFORD, HERTS WD18 7GQ, ENGLANDYAMAHA SCANDINAVIA A.B. J A WETTERGRENS GATA 1, BOX 30053, 400 43 VÄSTRA FRÖLUNDA, SWEDENYAMAHA MUSIC AUSTRALIA PTY, LTD. 17-33 MARKET ST., SOUTH MELBOURNE, 3205 VIC., AUSTRALIA
DVD HOME THEATER SOUND SYSTEM
DVX-S120(DVR-S120+NX-S120+NX-C120+NX-SW120)
OWNER’S MANUAL
U B
DVD RECEIVER
DVR-S120
Printed in Malaysia WB85310-1
cv_DVX-S120_UB.p65 03.8.19, 7:44 PM1
• Explanation of Graphical Symbols
The lightning flash with arrowheadsymbol, within an equilateral triangle, isintended to alert you to the presence ofuninsulated “dangerous voltage” withinthe product’s enclosure that may be ofsufficient magnitude to constitute a risk ofelectric shock to persons.
The exclamation point within anequilateral triangle is intended to alert youto the presence of important operating andmaintenance (servicing) instructions inthe literature accompanying the appliance.
IMPORTANT SAFETY INSTRUCTIONS1 Read these instructions.
2 Keep these instructions.
3 Heed all warnings.
4 Follow all instructions.
5 Do not use this apparatus near water.
6 Clean only with dry cloth.
7 Do not block any ventilation openings. Install in accordancewith the manufacturer’s instructions.
8 Do not install near any heat sources such as radiators, heatregisters, stoves, or other apparatus (including amplifiers) thatproduce heat.
9 Do not defeat the safety purpose of the polarized orgrounding-type plug. A polarized plug has two blades withone wider than the other. A grounding type plug has twoblades and a third grounding prong. The wideblade or the third prong are provided for your safety. If theprovided plug does not fit into your outlet, consult anelectrician for replacement of the obsolete outlet.
10 Protect the power cord from being walked on or pinchedparticularly at plugs, convenience receptacles, and the pointwhere they exit from the apparatus.
11 Only use attachments/accessories specified by the manufacturer.
12 Use only with the cart, stand, tripod, bracket,or table specified by the manufacturer, orsold with the apparatus. When a cart is used,use caution when moving the cart/apparatuscombination to avoid injury from tip-over.
13 Unplug this apparatus during lightning storms or whenunused for long periods of time.
14 Refer all servicing to qualified service personnel. Servicing isrequired when the apparatus has been damaged in any way,such as power-supply cord or plug is damaged, liquid hasbeen spilled or objects have fallen into the apparatus, theapparatus has been exposed to rain or moisture, does notoperate normally, or has been dropped.
15 Be sure to allow spaces of at least 20 cm above, 10 cm behindand on both sides the unit.
16 Do not place the following objects on this unit:A vessel with water in it.If the vessel falls by vibrations and water spills, it may causedamage to the unit, and/or you may get an electric shock.
CAUTION: TO REDUCE THE RISK OF ELECTRIC SHOCK, DO NOT REMOVECOVER (OR BACK). NO USER-SERVICEABLE PARTS INSIDE. REFER SERVICING TO QUALIFIED SERVICE PERSONNEL.
RISK OF ELECTRIC SHOCKDO NOT OPEN
CAUTION
IMPORTANTPlease record the serial number of this unit in the spacebelow.
MODEL:
Serial No.:
The serial number is located on the rear or the bottom ofthis unit.Retain this Owner’s Manual in a safe place for futurereference.
I CAUTION
DVX-S120_UB.p65 03.8.5, 1:29 PM2
We Want You Listening For A LifetimeYAMAHA and the Electronic Industries Association’s ConsumerElectronics Group want you to get the most out of your equipmentby playing it at a safe level. One that lets the sound come throughloud and clear without annoying blaring or distortion – and, mostimportantly, without affecting your sensitive hearing.
Since hearing damage from loud sounds is oftenundetectable until it is too late, YAMAHA and theElectronic Industries Association’s ConsumerElectronics Group recommend you to avoid prolongedexposure from excessive volume levels.
1. IMPORTANT NOTICE : DO NOT MODIFY THISUNIT!This product, when installed as indicated in the instructionscontained in this manual, meets FCC requirements.Modifications not expressly approved by Yamaha may voidyour authority, granted by the FCC, to use the product.
2. IMPORTANT :When connecting this product to accessories and/or anotherproduct use only high quality shielded cables. Cable/ssupplied with this product MUST be used. Follow allinstallation instructions. Failure to follow instructions couldvoid your FCC authorization to use this product in the USA.
3. NOTE :This product has been tested and found to comply with therequirements listed in FCC Regulations, Part 15 for Class“B” digital devices. Compliance with these requirementsprovides a reasonable level of assurance that your use of thisproduct in a residential environment will not result in harmfulinterference with other electronic devices.
This equipment generates/uses radio frequencies and, if notinstalled and used according to the instructions found in theusers manual, may cause interference harmful to theoperation of other electronic devices.
Compliance with FCC regulations does not guarantee thatinterference will not occur in all installations. If this product isfound to be the source of interference, which can be determinedby turning the unit “OFF” and “ON”, please try to eliminate theproblem by using one of the following measures:
Relocate either this product or the device that is being affectedby the interference.
Utilize power outlets that are on different branch (circuit breakeror fuse) circuits or install AC line filter/s.
In the case of radio or TV interference, relocate/reorient theantenna. If the antenna lead-in is 300 ohm ribbon lead, changethe lead-in to coaxial type cable.
If these corrective measures do not produce satisfactory results,please contact the local retailer authorized to distribute this typeof product. If you can not locate the appropriate retailer, pleasecontact Yamaha Electronics Corp., U.S.A. 6660 OrangethorpeAve, Buena Park, CA 90620.
The above statements apply ONLY to those products distributedby Yamaha Corporation of America or its subsidiaries.
FCC INFORMATION (for US customers)E
ng
lish
CAUTION II
DVX-S120_UB.p65 03.8.5, 1:29 PM3
CAUTION: READ THIS BEFORE OPERATING YOUR UNIT.
DVR-S120This unit is not disconnected from the AC power source as longas it is connected to the wall outlet, even if this unit itself isturned off. This state is called the standby mode. In this state,this unit is designed to consume a very small quantity of power.
FOR CANADIAN CUSTOMERSTo prevent electric shock, match wide blade of plug to wide slotand fully insert.This Class B digital apparatus complies with Canadian ICES-003.
DANGER
When this unit is plugged to the wall outlet, do not place your eyesclose to the opening of the disc tray and other openings to look intoinside.
The laser component in this product is capable of emittingradiation exceeding the limit for Class 1.
DVR-S120The name plate is located on the bottom of the unit.
WARNINGTO REDUCE THE RISK OF FIRE OR ELECTRIC SHOCK,DO NOT EXPOSE THIS APPLIANCE TO RAIN ORMOISTURE.
For U.K. customersIf the socket outlets in the home are not suitable for the plug suppliedwith this appliance, it should be cut off and an appropriate 3 pin plugfitted. For details, refer to the instructions described below.
Note• The plug severed from the mains lead must be destroyed, as a plug
with bared flexible cord is hazardous if engaged in a live socketoutlet.
Special Instructions for U.K. Model
IMPORTANTTHE WIRES IN MAINS LEAD ARE COLOURED INACCORDANCE WITH THE FOLLOWING CODE:
Blue: NEUTRALBrown: LIVE
As the colours of the wires in the mains lead of this apparatusmay not correspond with the coloured markings identifying theterminals in your plug, proceed as follows:The wire which is coloured BLUE must be connected to theterminal which is marked with the letter N or coloured BLACK.The wire which is coloured BROWN must be connected to theterminal which is marked with the letter L or coloured RED.Making sure that neither core is connected to the earth terminalof the three pin plug.
1 To assure the finest performance, please read this manualcarefully. Keep it in a safe place for future reference.
2 Install this sound system in a well ventilated, cool, dry, cleanplace with at least 10 cm on the top, 10 cm on the left and right,and 10 cm at the back of DVR-S120, and 20 cm on the top, 20cm on the left and right, and 20 cm at the back of NX-SW120— away from direct sunlight, heat sources, vibration, dust,moisture, and/or cold.
3 Locate this unit away from other electrical appliances, motors,or transformers to avoid humming sounds.
4 Do not expose this unit to sudden temperature changes fromcold to hot, and do not locate this unit in a environment withhigh humidity (i.e. a room with a humidifier) to preventcondensation inside this unit, which may cause an electricalshock, fire, damage to this unit, and/or personal injury.
5 Avoid installing this unit where foreign object may fall ontothis unit and/or this unit may be exposed to liquid dripping orsplashing. On the top of this unit, do not place:– Other components, as they may cause damage and/or
discoloration on the surface of this unit.– Burning objects (i.e. candles), as they may cause fire,
damage to this unit, and/or personal injury.– Containers with liquid in them, as they may fall and liquid
may cause electrical shock to the user and/or damage tothis unit.
6 Do not cover this unit with a newspaper, tablecloth, curtain, etc.in order not to obstruct heat radiation. If the temperature insidethis unit rises, it may cause fire, damage to this unit, and/orpersonal injury.
7 Do not plug in this unit to a wall outlet until all connections arecomplete.
8 Do not operate this unit upside-down. It may overheat, possiblycausing damage.
9 Do not use force on switches, knobs and/or cords.10 When disconnecting the power cord from the wall outlet, grasp
the plug; do not pull the cord.11 Do not clean this unit with chemical solvents; this might
damage the finish. Use a clean, dry cloth.12 Only voltage specified on this unit must be used. Using this
unit with a higher voltage than specified is dangerous and maycause fire, damage to this unit, and/or personal injury.YAMAHA will not be held responsible for any damageresulting from use of this unit with a voltage other thanspecified.
13 To prevent damage by lightning, disconnect the power cordfrom the wall outlet during an electrical storm.
14 Do not attempt to modify or fix this unit. Contact qualifiedYAMAHA service personnel when any service is needed. Thecabinet should never be opened for any reasons.
15 When not planning to use this unit for long periods of time (i.e.vacation), disconnect the AC power plug from the wall outlet.
16 Be sure to read the “Solutions to Common Problems” sectionon common operating errors before concluding that this unit isfaulty.
17 Before moving this unit, press STANDBY/ON to set this unitin standby mode, and disconnect the AC power plug from thewall outlet.
18 Do not place much pressure against the Subwoofer net. It maybreak the net or the unit may fall, resulting in injury.
19 Do not place anything fragile beside the Subwoofer, as airpressure is produced that may break it, result in malfunction orcause injury.
20 Condensation will form when the surrounding temperaturechanges suddenly. Disconnect the power cord from the outlet,then leave the unit alone.
21 When using the unit for a long time, the unit may becomewarm. Turn the power off, then leave the unit alone for cooling.
III CAUTION
DVX-S120_UB.p65 03.8.5, 1:29 PM4
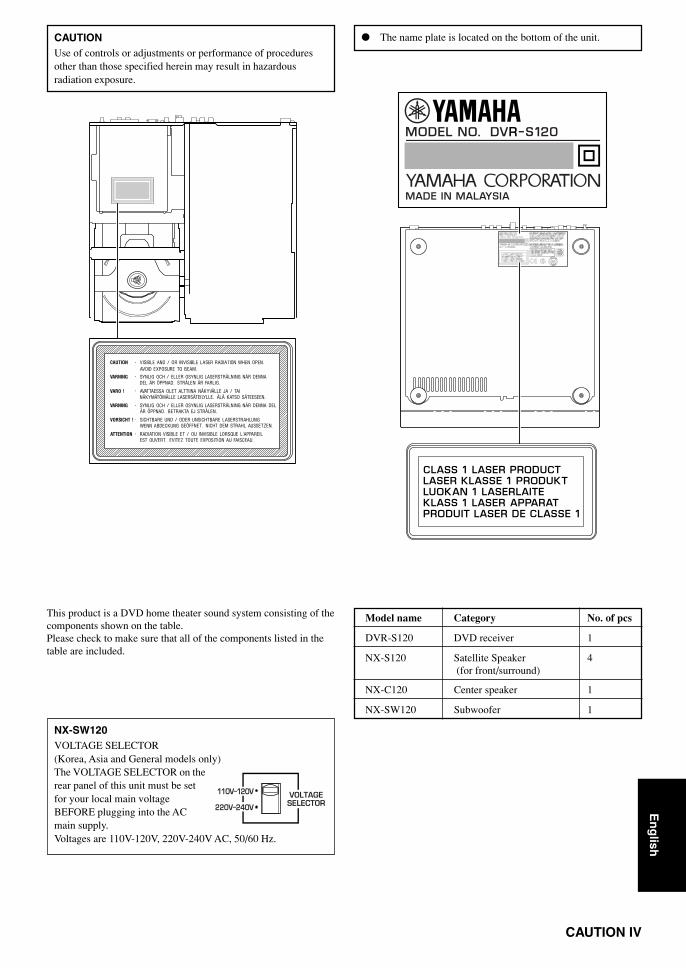
CAUTIONUse of controls or adjustments or performance of proceduresother than those specified herein may result in hazardousradiation exposure.
The name plate is located on the bottom of the unit.
This product is a DVD home theater sound system consisting of thecomponents shown on the table.Please check to make sure that all of the components listed in thetable are included.
NX-SW120VOLTAGE SELECTOR(Korea, Asia and General models only)The VOLTAGE SELECTOR on therear panel of this unit must be setfor your local main voltageBEFORE plugging into the ACmain supply.Voltages are 110V-120V, 220V-240V AC, 50/60 Hz.
110V–120V
220V–240V
VOLTAGESELECTOR
Model name Category No. of pcs
DVR-S120 DVD receiver 1
NX-S120 Satellite Speaker 4 (for front/surround)
NX-C120 Center speaker 1
NX-SW120 Subwoofer 1
En
glish
CAUTION IV
DVX-S120_UB.p65 03.8.5, 1:29 PM5
2
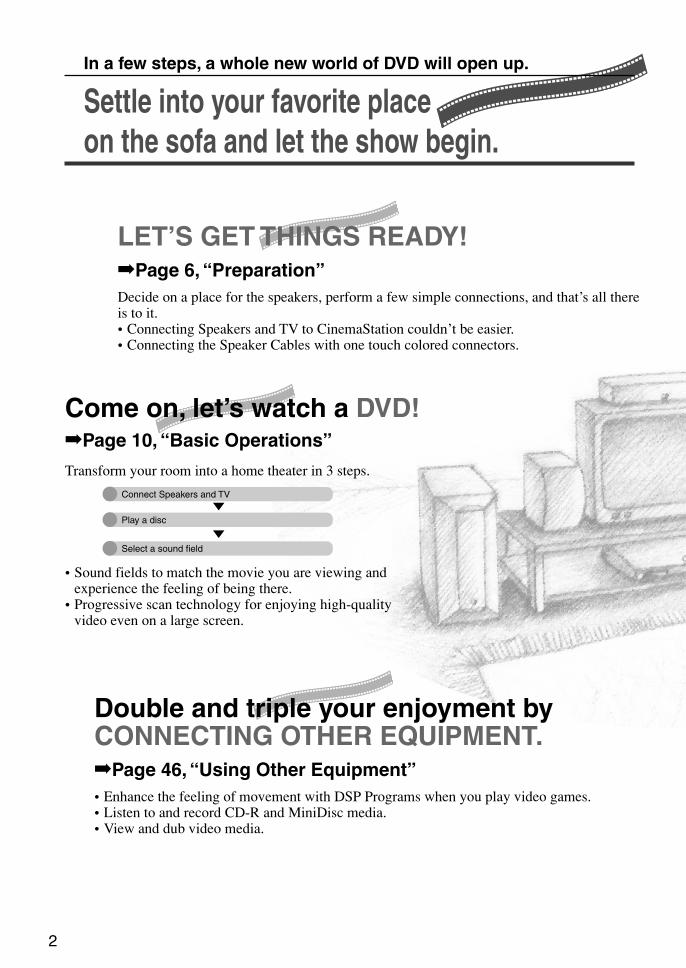
In a few steps, a whole new world of DVD will open up.
Settle into your favorite placeon the sofa and let the show begin.
LET’S GET THINGS READY!Page 6, “Preparation”Decide on a place for the speakers, perform a few simple connections, and that’s all thereis to it.• Connecting Speakers and TV to CinemaStation couldn’t be easier.• Connecting the Speaker Cables with one touch colored connectors.
Come on, let’s watch a DVD!Page 10, “Basic Operations”
Transform your room into a home theater in 3 steps.
Double and triple your enjoyment byCONNECTING OTHER EQUIPMENT.Page 46, “Using Other Equipment”• Enhance the feeling of movement with DSP Programs when you play video games.• Listen to and record CD-R and MiniDisc media.• View and dub video media.
Connect Speakers and TV
Play a disc
Select a sound field
• Sound fields to match the movie you are viewing andexperience the feeling of being there.
• Progressive scan technology for enjoying high-qualityvideo even on a large screen.
001DVX-S120-en 03.8.5, 1:39 PM2
3
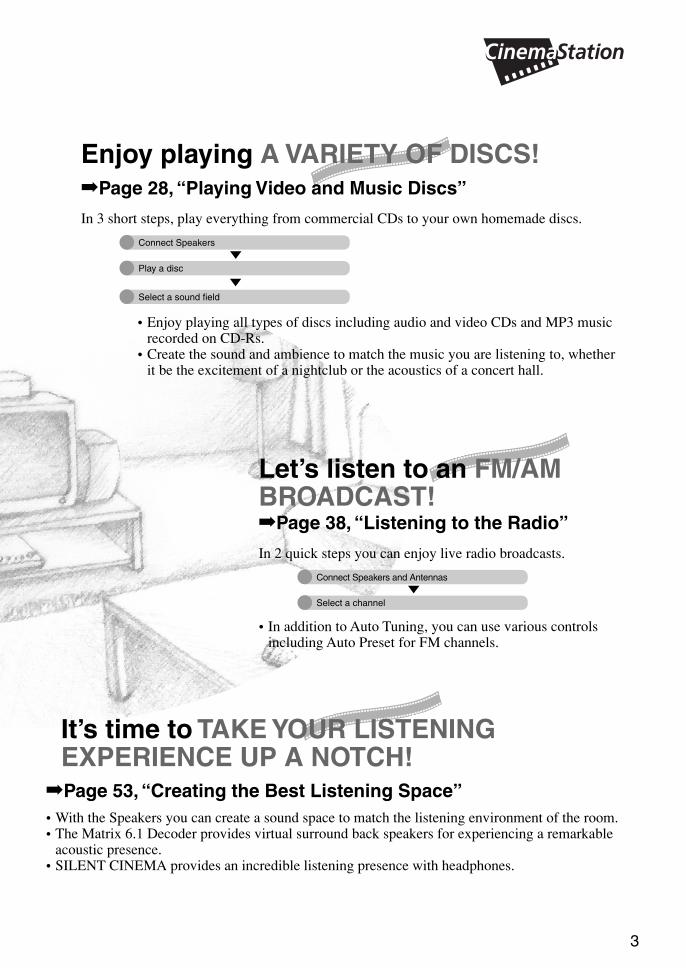
Enjoy playing A VARIETY OF DISCS!Page 28, “Playing Video and Music Discs”
In 3 short steps, play everything from commercial CDs to your own homemade discs.
It’s time to TAKE YOUR LISTENINGEXPERIENCE UP A NOTCH!
Page 53, “Creating the Best Listening Space”• With the Speakers you can create a sound space to match the listening environment of the room.• The Matrix 6.1 Decoder provides virtual surround back speakers for experiencing a remarkable
acoustic presence.• SILENT CINEMA provides an incredible listening presence with headphones.
Let’s listen to an FM/AMBROADCAST!Page 38, “Listening to the Radio”
In 2 quick steps you can enjoy live radio broadcasts.
• Enjoy playing all types of discs including audio and video CDs and MP3 musicrecorded on CD-Rs.
• Create the sound and ambience to match the music you are listening to, whetherit be the excitement of a nightclub or the acoustics of a concert hall.
• In addition to Auto Tuning, you can use various controlsincluding Auto Preset for FM channels.
Connect Speakers
Play a disc
Select a sound field
Connect Speakers and Antennas
Select a channel
001DVX-S120-en 03.8.5, 1:39 PM3
4
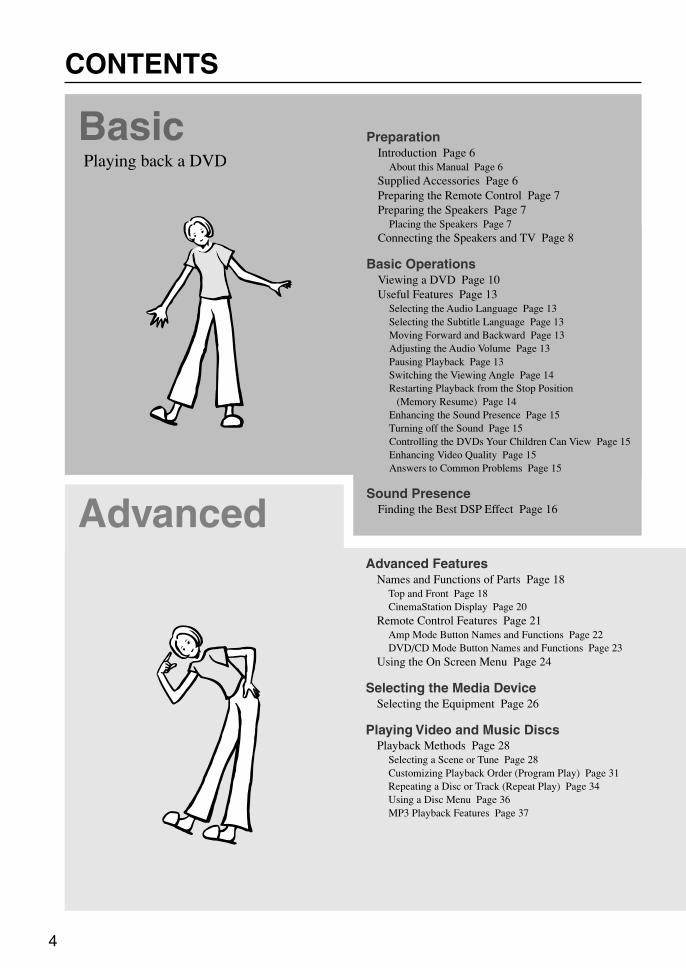
CONTENTS
Basic
Advanced
Playing back a DVD
Advanced FeaturesNames and Functions of Parts Page 18
Top and Front Page 18CinemaStation Display Page 20
Remote Control Features Page 21Amp Mode Button Names and Functions Page 22DVD/CD Mode Button Names and Functions Page 23
Using the On Screen Menu Page 24
Selecting the Media DeviceSelecting the Equipment Page 26
Playing Video and Music DiscsPlayback Methods Page 28
Selecting a Scene or Tune Page 28Customizing Playback Order (Program Play) Page 31Repeating a Disc or Track (Repeat Play) Page 34Using a Disc Menu Page 36MP3 Playback Features Page 37
PreparationIntroduction Page 6
About this Manual Page 6Supplied Accessories Page 6Preparing the Remote Control Page 7Preparing the Speakers Page 7
Placing the Speakers Page 7Connecting the Speakers and TV Page 8
Basic OperationsViewing a DVD Page 10Useful Features Page 13
Selecting the Audio Language Page 13Selecting the Subtitle Language Page 13Moving Forward and Backward Page 13Adjusting the Audio Volume Page 13Pausing Playback Page 13Switching the Viewing Angle Page 14Restarting Playback from the Stop Position
(Memory Resume) Page 14Enhancing the Sound Presence Page 15Turning off the Sound Page 15Controlling the DVDs Your Children Can View Page 15Enhancing Video Quality Page 15Answers to Common Problems Page 15
Sound PresenceFinding the Best DSP Effect Page 16
001DVX-S120-en 03.8.5, 1:39 PM4
5
Listening to the RadioConnecting the Antennas Page 38
Connecting the FM Antenna Page 38Connecting the AM Loop Antenna Page 38
Listening to the Radio Page 39Selecting the Radio Tuner Page 39Selecting Radio Stations Page 39Setting Channels in Advance (Preset) Page 41Selecting a Preset Station (Preset Tuning) Page 43Changing the Order of Preset Stations Page 43Receiving RDS Stations
(U.K. and Europe models only) Page 44
Using Other EquipmentConnecting Video Equipment Page 46
Connecting a Game Console or VCR Page 46Operating a VCR Page 48Playing a Video Game or Operating
a Video Camera Page 48Dubbing from a Video Camera to a VCR Page 49
Connecting Audio Equipment Page 50Connecting a CD or MD Recorder Page 50Recording Audio from CinemaStation Page 52
Creating the Best Listening SpacePlacing the Speakers (NX-P120) Page 53
Placing the Center Speaker Page 53Placing the Subwoofer Page 53Placing the Front and Surround Speakers Page 54Using Commercially Available Speakers
or Cables Page 56Adjusting the Speaker Volume Level Page 58
Adjusting the Speaker Balance with a Test Tone Page 58Adjusting the Speaker Volume Level
During Playback Page 60Setting the Speaker Size Page 62
Setting the Speaker Mode Page 62
More Information about DSP (Surround)Effects
Selecting DSP Program Effects Page 64Using Matrix 6.1 Page 64Using All Speakers for CD or Video playback Page 66Using Front Speakers Only for DSP Program
(Virtual Cinema DSP) Page 68Using a DSP Program with Headphones
(SILENT CINEMA) Page 69Using a DSP Program with Low Volume
(Night Listening) Page 70Changing the Delay Time of a DSP Program Page 71Reproducing the Original Dolby and DTS Sound Page 73Reproducing Stereo Sound Page 74
Types of Input SignalsTypes of Input Signals Page 75
Checking Sound Information(Input Signal Information Display) Page 75
Switching Input Modes Page 77
Additional FeaturesUsing the Sleep Timer Page 78Enjoying High-Quality Video Page 79Protecting Your Children
from Undesirable Scene Page 80Setting the Password and Parental
Control Level Page 80Locking a Disc Page 82
Operating Other Equipment with theCinemaStation Remote Control
Storing Manufacturer Codesin the Remote Control Page 83Setting the Manufacturer Code Page 83Available Operations Page 84Manufacturer Code List Page 86
Using the SET MENUUsing the SET MENU Page 88
SET MENU List Page 88Navigating the SET MENU Page 89
Using the On Screen MenuUsing the On Screen Menu Page 92
Navigating the On Screen Menu Page 92On Screen Menu Guide Page 94
AppendixSolutions to Common Problems Page 96
General Problems Page 96Disc Playback Page 99Radio Reception Page 100Remote Control Page 101
Information Page 102Glossary Page 105Index Page 107Specifications Page 109
CO
NT
EN
TS
En
glish
001DVX-S120-en 03.8.5, 1:39 PM5

6
Preparation
Supplied Accessories
Remote Control
Make sure all of the following accessories are in the box.
System Control Cable(5 m (1))
Batteries (2)(AA, R06, UM-3)
AM Loop Antenna
Indoor FM Antenna
Speaker Cables (Surround: 15 m (2),Front, Center: 5 m (3))
DVR-S120 NX-P120: NX-S120, NX-C120, NX-SW120
Video Pin Cable
Subwoofer Cable(1 pin, 5 m, (1))
Screws (M4 10) (Front,Surround Speakers (4))
Mounting Brackets (Front,Surround Speakers (4))
Non-Skid Pads(Subwoofer, 1 Set (4))
Fasteners (Center (2))
Non-Skid Pads (Front, SurroundSpeakers, 2 Sets (16))
About this Manual
explains additional operating tips that youmay find useful.
indicates an operation that you shoulddefinitely perform.
In this manual, operations that can be performed oneither the DVD Receiver or Remote Control areexplained using the Remote Control.
In this manual, Remote Control descriptions andillustrations are based on models other than those inthe U.K. or Europe. Any exceptions are clearly stated.
IntroductionYour DVD Home Theater Sound System DVX-S120 consists of the following components.
DVD Receiver (DVR-S120) 1 unit
Speaker Set (NX-P120) Satellite Speakers (Front, Surround) (NX-S120) 4 unitsCenter Speaker (NX-C120) 1 unitSubwoofer (NX-SW120) 1 unit
This Owner’s Manual was printed before final productdevelopment. After printing, some productspecifications may change due to operational upgradesand other reasons. In this case, the specifications of theproduct itself will take precedence over thespecifications in this manual.
In some cases, graphics or terms used may differslightly from the actual product or packaging tofacilitate explanation.
Explanations in this Owner’s Manual are based on DVX-S120 (DVD Receiver (DVR-S120) and Speaker Set (NX-P120)). If you use speakers other than NX-P120, make sure to set the speaker size and volume level in advance.→Page 62, “Setting the Speaker Size”→Page 58, “Adjusting the Speaker Volume Level”
Advice
Please...
TV
CH
CINEMA
CH
POWER POWER
AUDIO
/DTS SELECT
NIGHT SW
TV CH
TV INPUT
SLEEP
PRESET PRESET
A B C D E
CENTER SURR
SHIFT
STEREOMATRIX 6.1A-BREPEAT
ANGLE SUBTITLE
DVR-S120 WB56650
ON SCREEN MENU
TEST
RETURNSTATUS
TV VOL VOLUME
MUTE
AMP
DVD/CD VCR VIDEO
TUNER
MOVIE MUSIC SPORTS GAME
SET MENU
ENTER
002DVX-S120-en 03.8.5, 1:39 PM6
B asic
7
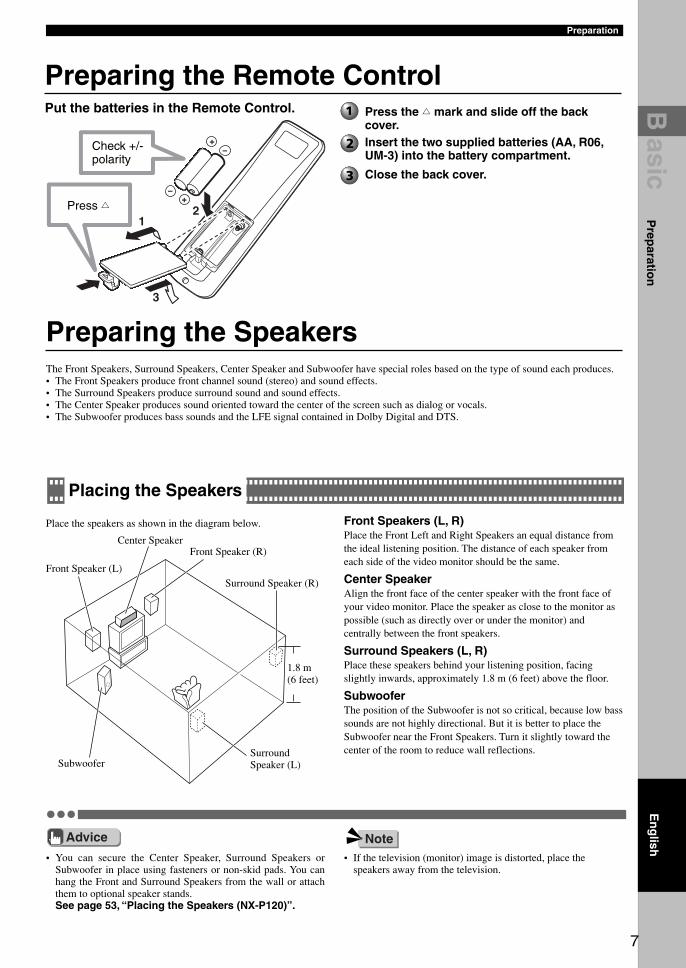
Preparation
Preparing the Remote ControlPut the batteries in the Remote Control.
Preparing the SpeakersThe Front Speakers, Surround Speakers, Center Speaker and Subwoofer have special roles based on the type of sound each produces.• The Front Speakers produce front channel sound (stereo) and sound effects.• The Surround Speakers produce surround sound and sound effects.• The Center Speaker produces sound oriented toward the center of the screen such as dialog or vocals.• The Subwoofer produces bass sounds and the LFE signal contained in Dolby Digital and DTS.
• You can secure the Center Speaker, Surround Speakers orSubwoofer in place using fasteners or non-skid pads. You canhang the Front and Surround Speakers from the wall or attachthem to optional speaker stands.See page 53, “Placing the Speakers (NX-P120)”.
Placing the Speakers
Place the speakers as shown in the diagram below.
• If the television (monitor) image is distorted, place thespeakers away from the television.
Front Speakers (L, R)Place the Front Left and Right Speakers an equal distance fromthe ideal listening position. The distance of each speaker fromeach side of the video monitor should be the same.
Center SpeakerAlign the front face of the center speaker with the front face ofyour video monitor. Place the speaker as close to the monitor aspossible (such as directly over or under the monitor) andcentrally between the front speakers.
Surround Speakers (L, R)Place these speakers behind your listening position, facingslightly inwards, approximately 1.8 m (6 feet) above the floor.
SubwooferThe position of the Subwoofer is not so critical, because low basssounds are not highly directional. But it is better to place theSubwoofer near the Front Speakers. Turn it slightly toward thecenter of the room to reduce wall reflections.
Press the h mark and slide off the backcover.Insert the two supplied batteries (AA, R06,UM-3) into the battery compartment.
Close the back cover.
Center Speaker
Front Speaker (L)
Front Speaker (R)
Surround Speaker (R)
1.8 m(6 feet)
SurroundSpeaker (L)Subwoofer
Advice Note
Check +/-polarity
Press h
En
glish
Prep
aration
002DVX-S120-en 03.8.5, 1:39 PM7
88
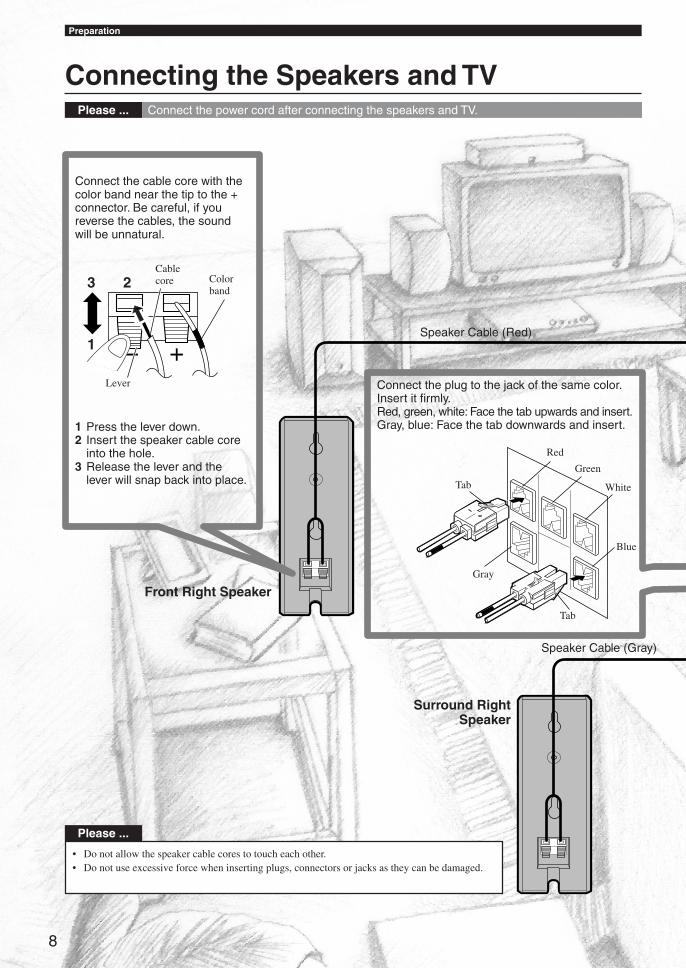
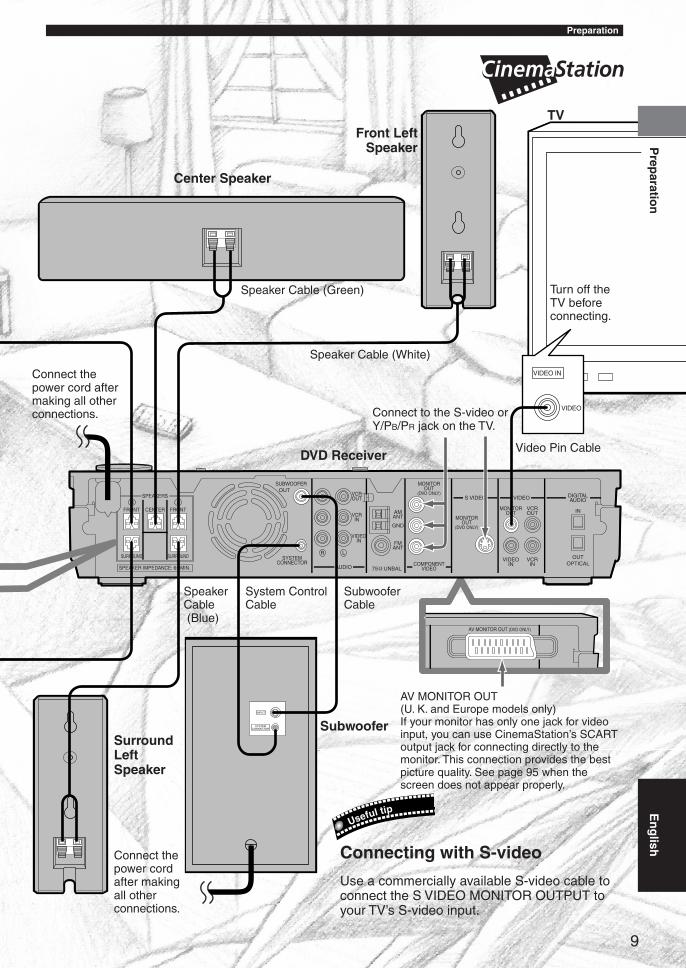
Connecting the Speakers and TVConnect the power cord after connecting the speakers and TV.Please ...
Connect the cable core with thecolor band near the tip to the +connector. Be careful, if youreverse the cables, the soundwill be unnatural.
3 2Cablecore Color
band
Lever
1 Press the lever down.2 Insert the speaker cable core
into the hole.3 Release the lever and the
lever will snap back into place.
1Speaker Cable (Red)
Connect the plug to the jack of the same color.Insert it firmly.Red, green, white: Face the tab upwards and insert.Gray, blue: Face the tab downwards and insert.
Tab
Red
Green
White
Blue
Tab
Gray
Speaker Cable (Gray)
Surround RightSpeaker
Front Right Speaker
Please
• Do not allow the speaker cable cores to touch each other.• Do not use excessive force when inserting plugs, connectors or jacks as they can be damaged.
Preparation
Please ...
003DVX-S120-en 03.8.19, 7:03 PM8
9
DIGITALAUDIOVIDEOS VIDEO
INVCROUTAM
ANT
VCROUT
VCRIN
VIDEOIN
Y
PB
PRFMANT
GND
MONITOROUT
MONITOROUT
(DVD ONLY)
MONITOROUT
(DVD ONLY)
SUBWOOFER
SPEAKERS
CENTER FRONT
SURROUND
FRONT
SURROUND
OUT
VCRIN
VIDEOINCOMPONENT
VIDEOAUDIO
R
LR
LSYSTEM
CONNECTOR75 UNBAL
OUTOPTICAL
SPEAKER IMPEDANCE: 6 MIN.
AV MONITOR OUT (DVD ONLY)
INPUT
SYSTEMCONNECTOR
VIDEO IN
VIDEO
9
SurroundLeftSpeaker
Front LeftSpeaker
Center Speaker
Speaker Cable (Green)
Speaker Cable (White)
TV
Connect thepower cord aftermaking all otherconnections.
Turn off theTV beforeconnecting.
Video Pin CableDVD Receiver
SpeakerCable (Blue)
System ControlCable
SubwooferCable
Connect to the S-video orY/PB/PR jack on the TV.
Connect thepower cordafter makingall otherconnections.
Use a commercially available S-video cable toconnect the S VIDEO MONITOR OUTPUT toyour TV’s S-video input.
Useful tip
PreparationP
reparatio
n
AV MONITOR OUT(U. K. and Europe models only)If your monitor has only one jack for videoinput, you can use CinemaStation’s SCARToutput jack for connecting directly to themonitor. This connection provides the bestpicture quality. See page 95 when thescreen does not appear properly.
Subwoofer
Connecting with S-video
En
glish
003DVX-S120-en 03.8.19, 8:46 PM9
10
POWER
TV
POWER POWER
AUDIO
/DTS SELECT
NIGHT SW
TV CH
TV INPUT
A B C D E
CENTER SURR
SHIFT
STEREOMATRIX 6.1A-BREPEAT
ANGLE SUBTITLE
DVR-S120 WB56650
Basic Operations
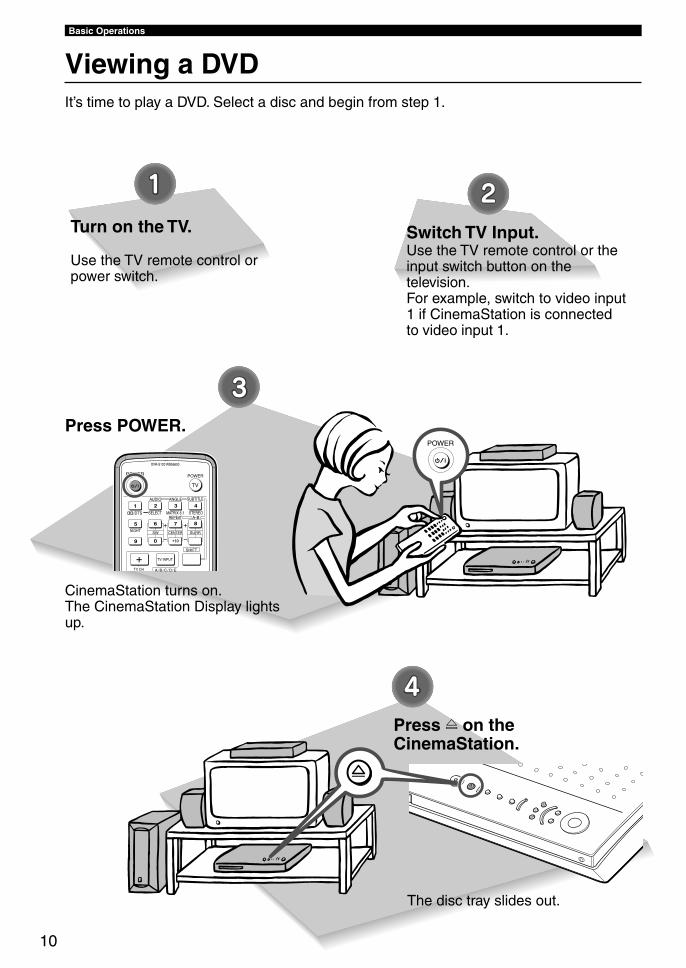
Viewing a DVDIt’s time to play a DVD. Select a disc and begin from step 1.
Turn on the TV.
Use the TV remote control orpower switch.
Switch TV Input.Use the TV remote control or theinput switch button on thetelevision.For example, switch to video input1 if CinemaStation is connectedto video input 1.
Press POWER.
CinemaStation turns on.The CinemaStation Display lightsup.
Press f on theCinemaStation.
The disc tray slides out.
004DVX-S120-en 03.8.5, 1:41 PM10
11
Basic O
peratio
ns
DVD/CD
CINEMA
AMP
DVD/CD VCR VIDEO
TUNER
MOVIE MUSIC SPORTS GAME
En
glish
Basic Operations
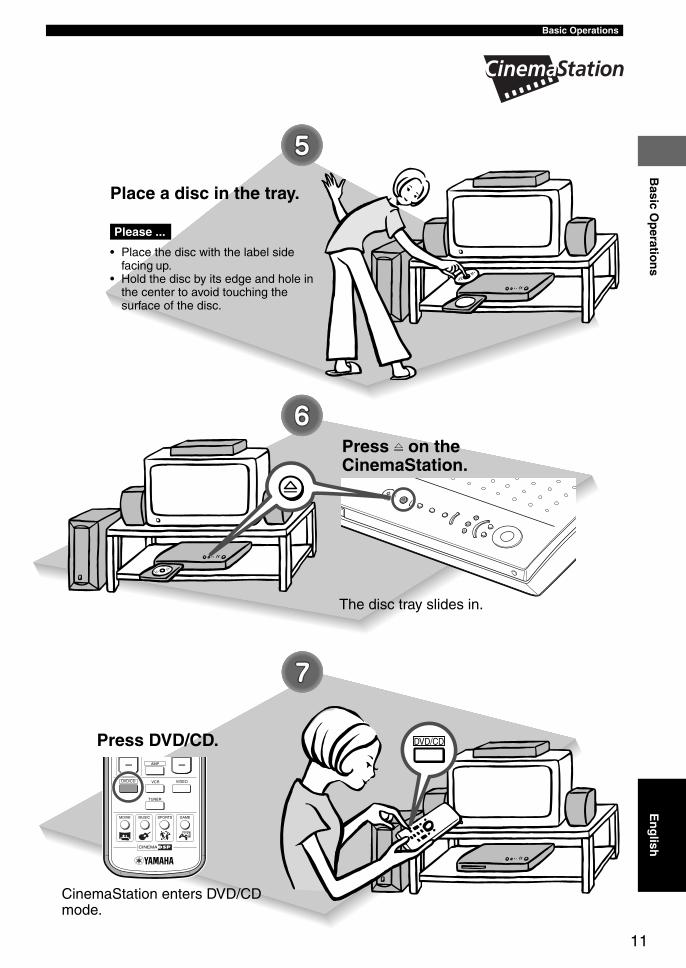
Place a disc in the tray.
• Place the disc with the label sidefacing up.
• Hold the disc by its edge and hole inthe center to avoid touching thesurface of the disc.
Please ...
Press f on theCinemaStation.
The disc tray slides in.
Press DVD/CD.
CinemaStation enters DVD/CDmode.
004DVX-S120-en 03.8.5, 1:41 PM11
12
Basic Operations
POWER
A B C D E
CHCH
TV CH
SLEEP
PRESET PRESET
A B C D E
ON SCREEN MENU
TEST
RETURNSTATUS
TV VOL VOLUME
SET MENU
ENTER
NIGHT SW
TV CH
TV INPUT
SLEEP
PRESET PRESET
A B C D E
CENTER SURR
SHIFT
ON SCREEN MENU
SET MENU
TV
POWER POWER
AUDIO
/DTS SELECT
NIGHT SW
TV CH
TV INPUT
A B C D E
CENTER SURR
SHIFT
STEREOMATRIX 6.1A-BREPEAT
ANGLE SUBTITLE
DVR-S120 WB56650
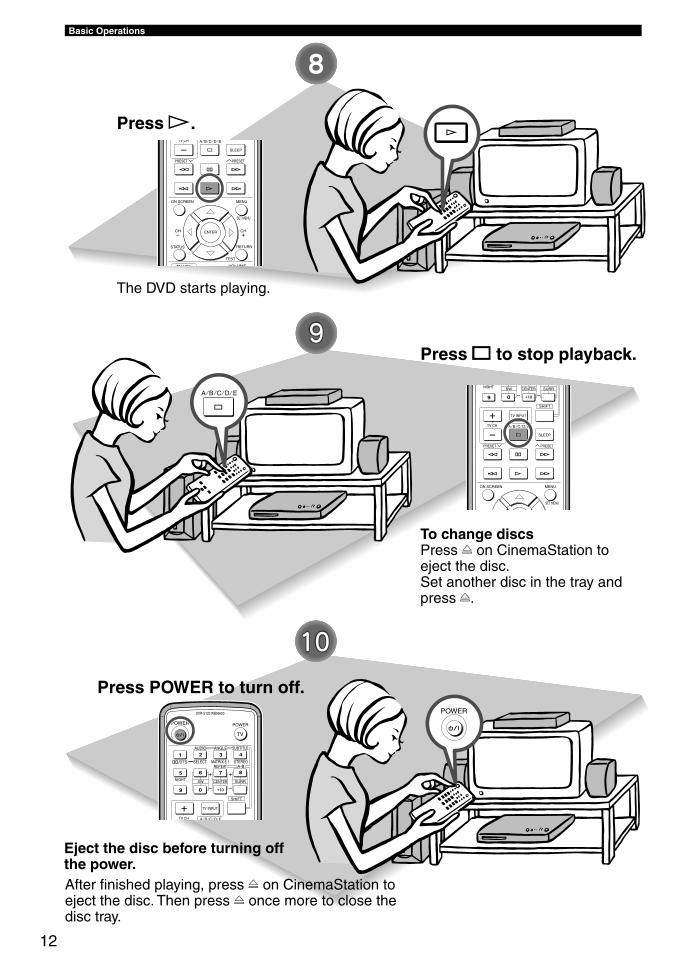
Press p.
The DVD starts playing.
Press s to stop playback.
To change discsPress f on CinemaStation toeject the disc.Set another disc in the tray andpress f.
Press POWER to turn off.
Eject the disc before turning offthe power.After finished playing, press f on CinemaStation toeject the disc. Then press f once more to close thedisc tray.
004DVX-S120-en 03.8.5, 1:41 PM12
13
Basic O
peratio
ns
13
Basic O
peratio
ns
Basic Operations
Handy Features
TV
CHCH
POWER POWER
AUDIO
/DTS SELECT
NIGHT SW
TV CH
TV INPUT
SLEEP
PRESET PRESET
A B C D E
CENTER SURR
SHIFT
STEREOMATRIX 6.1A-BREPEAT
ANGLE SUBTITLE
DVR-S120 WB56650
ON SCREEN MENU
TEST
RETURNSTATUS
TV VOL VOLUME
SET MENU
ENTER
TV
CHCH
POWER POWER
AUDIO
/DTS SELECT
NIGHT SW
TV CH
TV INPUT
SLEEP
PRESET PRESET
A B C D E
CENTER SURR
SHIFT
STEREOMATRIX 6.1A-BREPEAT
ANGLE SUBTITLE
DVR-S120 WB56650
ON SCREEN MENU
TEST
RETURNSTATUS
TV VOL VOLUME
SET MENU
ENTER
CHCH
NIGHT SW
TV CH
TV INPUT
SLEEP
PRESET PRESET
A B C D E
CENTER SURR
SHIFT
A-BREPEAT
ON SCREEN MENU
RETURNSTATUS
SET MENU
ENTER
CH
CINEMA
CH
TEST
RETURNSTATUS
TV VOL VOLUME
MUTE
AMP
DVD/CD VCR VIDEO
TUNER
MOVIE MUSIC SPORTS GAME
SET MENU
ENTER
CHCH
NIGHT SW
TV CH
TV INPUT
SLEEP
PRESET PRESET
A B C D E
CENTER SURR
SHIFT
A-BREPEAT
ON SCREEN MENU
RETURNSTATUS
SET MENU
ENTER
En
glish
Useful Features
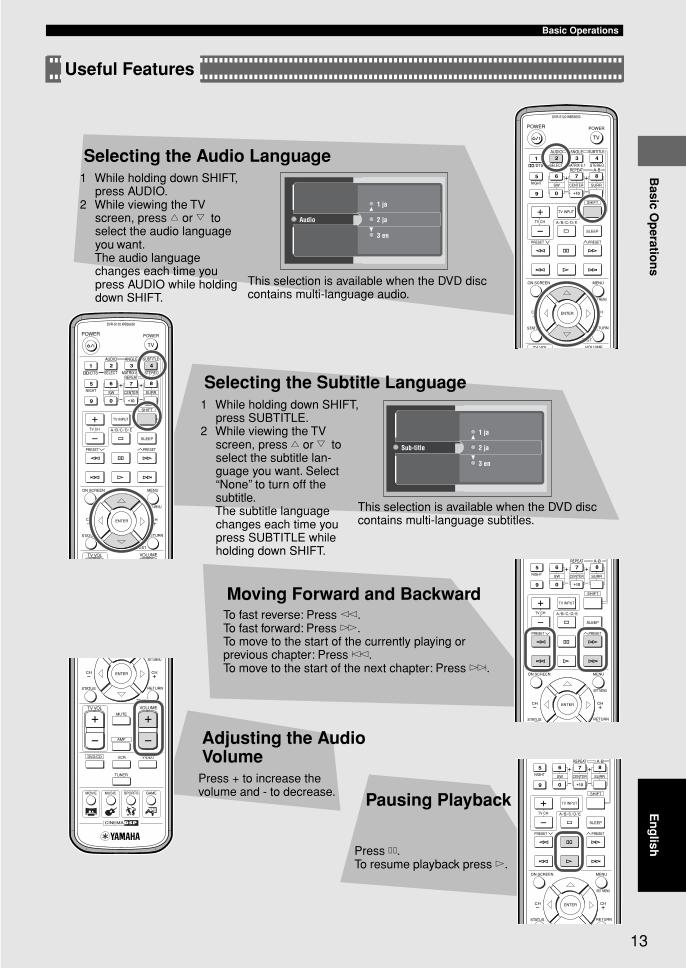
Selecting the Audio Language1 While holding down SHIFT,
press AUDIO.2 While viewing the TV
screen, press h or g toselect the audio languageyou want.The audio languagechanges each time youpress AUDIO while holdingdown SHIFT.
This selection is available when the DVD disccontains multi-language audio.
Selecting the Subtitle Language1 While holding down SHIFT,
press SUBTITLE.2 While viewing the TV
screen, press h or g toselect the subtitle lan-guage you want. Select“None” to turn off thesubtitle.The subtitle languagechanges each time youpress SUBTITLE whileholding down SHIFT.
This selection is available when the DVD disccontains multi-language subtitles.
Moving Forward and BackwardTo fast reverse: Press e.To fast forward: Press r.To move to the start of the currently playing orprevious chapter: Press t.To move to the start of the next chapter: Press y.
Adjusting the AudioVolume
Press + to increase thevolume and - to decrease. Pausing Playback
Press d.To resume playback press w.
1 ja
2 ja
3 en
Audio
2 jaSub-title
1 ja
3 en
004DVX-S120-en 03.8.6, 2:25 PM13

1414
Basic Operations
Handy FeaturesHandy Features
TV
POWER POWER
AUDIO
/DTS SELECT
NIGHT SW
TV CH
TV INPUT
SLEEP
PRESET PRESET
A B C D E
CENTER SURR
SHIFT
STEREOMATRIX 6.1A-BREPEAT
ANGLE SUBTITLE
DVR-S120 WB56650
TV
CHCH
POWER POWER
AUDIO
/DTS SELECT
NIGHT SW
TV CH
TV INPUT
SLEEP
PRESET PRESET
A B C D E
CENTER SURR
SHIFT
STEREOMATRIX 6.1A-BREPEAT
ANGLE SUBTITLE
DVR-S120 WB56650
ON SCREEN MENU
TEST
RETURNSTATUS
TV VOL VOLUME
SET MENU
ENTER
Useful Features
Switching the Viewing AngleWhile holding down SHIFT, pressANGLE.The video angle changes eachtime you press ANGLE whileholding down SHIFT.
Restarting Playback from the Stop Position(Memory Resume)
Pressing a during playback enables Memory Resume. CinemaStationmemorizes the stop position.Pressing w starts playing back the disc from the stop position.
• You can change the angle withh, g, or Number buttons,instead of ANGLE.
Advice
2
4Angle
3
5
This selection is availablewhen the DVD disc containsmulti-angle content.
004DVX-S120-en 03.8.6, 2:25 PM14
15
Basic O
peratio
ns
15
Basic OperationsB
asic Op
eration
s
Try It Out!
CH
CINEMA
CH
TEST
RETURNSTATUS
TV VOL VOLUME
MUTE
AMP
DVD/CD VCR VIDEO
TUNER
MOVIE MUSIC SPORTS GAME
SET MENU
ENTER
En
glish
Useful Features
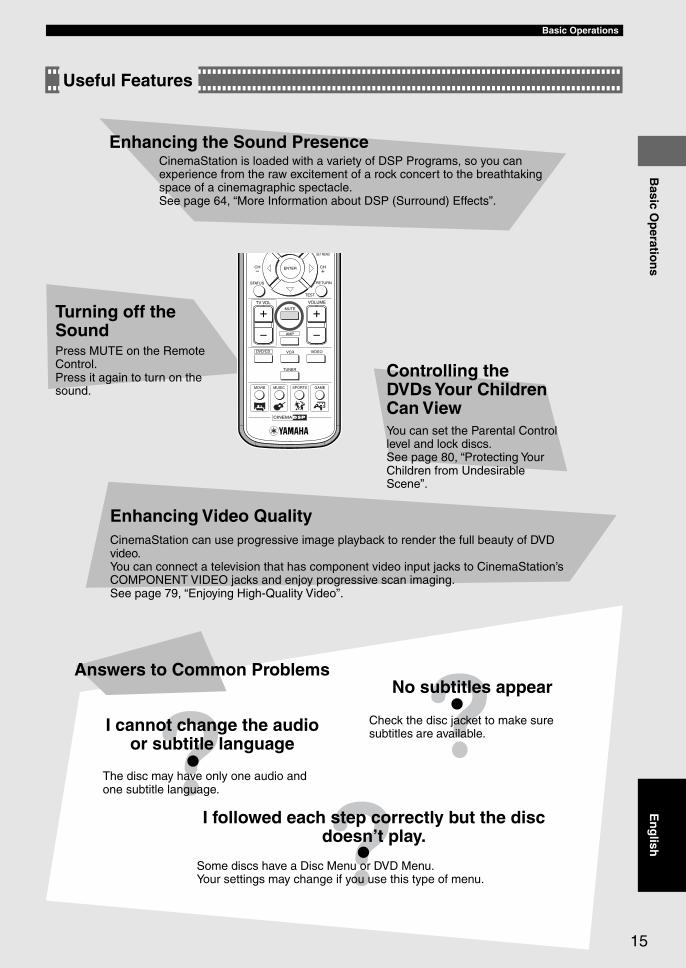
Enhancing the Sound PresenceCinemaStation is loaded with a variety of DSP Programs, so you canexperience from the raw excitement of a rock concert to the breathtakingspace of a cinemagraphic spectacle.See page 64, “More Information about DSP (Surround) Effects”.
Turning off theSoundPress MUTE on the RemoteControl.Press it again to turn on thesound.
Controlling theDVDs Your ChildrenCan ViewYou can set the Parental Controllevel and lock discs.See page 80, “Protecting YourChildren from UndesirableScene”.
Enhancing Video QualityCinemaStation can use progressive image playback to render the full beauty of DVDvideo.You can connect a television that has component video input jacks to CinemaStation’sCOMPONENT VIDEO jacks and enjoy progressive scan imaging.See page 79, “Enjoying High-Quality Video”.
Answers to Common Problems
I cannot change the audioor subtitle language
The disc may have only one audio andone subtitle language.
I followed each step correctly but the discdoesn’t play.
Some discs have a Disc Menu or DVD Menu.Your settings may change if you use this type of menu.
No subtitles appear
Check the disc jacket to make suresubtitles are available.
004DVX-S120-en 03.8.5, 1:41 PM15
16
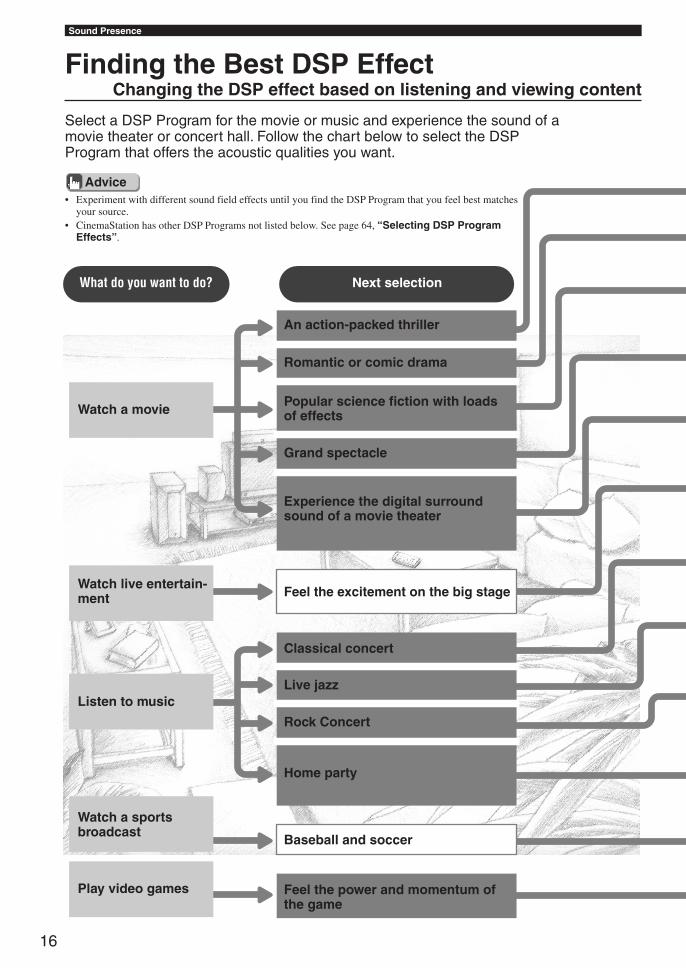
• Experiment with different sound field effects until you find the DSP Program that you feel best matchesyour source.
• CinemaStation has other DSP Programs not listed below. See page 64, “Selecting DSP ProgramEffects”.
Sound Presence
Finding the Best DSP EffectChanging the DSP effect based on listening and viewing content
Select a DSP Program for the movie or music and experience the sound of amovie theater or concert hall. Follow the chart below to select the DSPProgram that offers the acoustic qualities you want.
Advice
What do you want to do? Next selection
Watch a movie
Watch live entertain-ment
Listen to music
Watch a sportsbroadcast
Play video games
An action-packed thriller
Romantic or comic drama
Popular science fiction with loadsof effects
Grand spectacle
Experience the digital surroundsound of a movie theater
Feel the excitement on the big stage
Classical concert
Live jazz
Rock Concert
Home party
Baseball and soccer
Feel the power and momentum ofthe game
005DVX-S120-en 03.8.19, 7:04 PM16
17
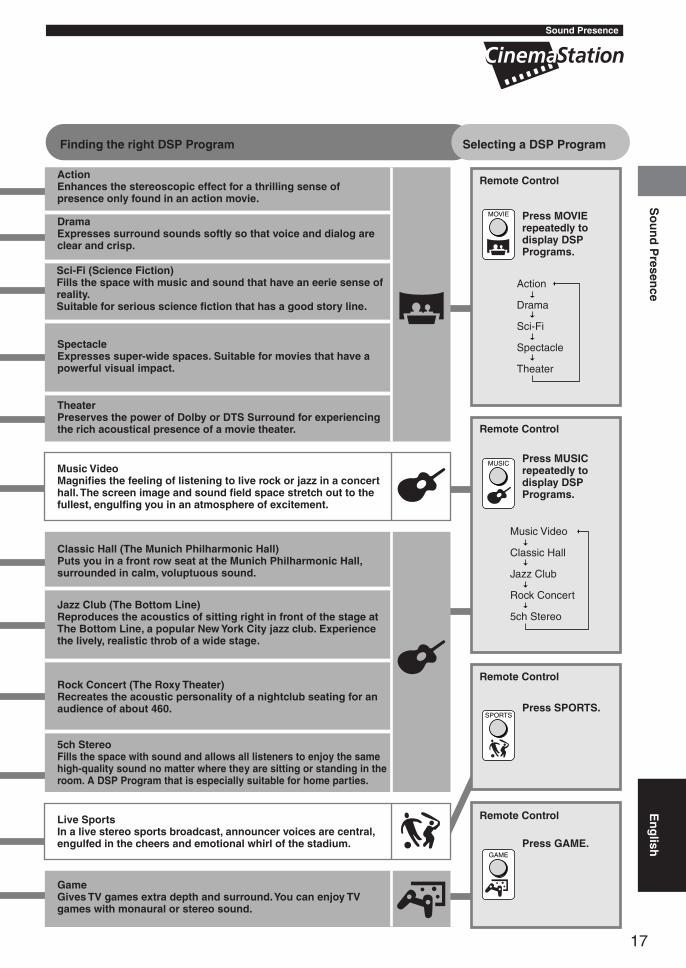
So
un
d P
resence
Action
Drama
Sci-Fi
Spectacle
Theater
Music Video
Classic Hall
Jazz Club
Rock Concert
5ch Stereo
MUSIC
SPORTS
GAME
MOVIE
Finding the right DSP Program
ActionEnhances the stereoscopic effect for a thrilling sense ofpresence only found in an action movie.
DramaExpresses surround sounds softly so that voice and dialog areclear and crisp.
Sci-Fi (Science Fiction)Fills the space with music and sound that have an eerie sense ofreality.Suitable for serious science fiction that has a good story line.
SpectacleExpresses super-wide spaces. Suitable for movies that have apowerful visual impact.
TheaterPreserves the power of Dolby or DTS Surround for experiencingthe rich acoustical presence of a movie theater.
Music VideoMagnifies the feeling of listening to live rock or jazz in a concerthall. The screen image and sound field space stretch out to thefullest, engulfing you in an atmosphere of excitement.
Classic Hall (The Munich Philharmonic Hall)Puts you in a front row seat at the Munich Philharmonic Hall,surrounded in calm, voluptuous sound.
Jazz Club (The Bottom Line)Reproduces the acoustics of sitting right in front of the stage atThe Bottom Line, a popular New York City jazz club. Experiencethe lively, realistic throb of a wide stage.
Rock Concert (The Roxy Theater)Recreates the acoustic personality of a nightclub seating for anaudience of about 460.
5ch StereoFills the space with sound and allows all listeners to enjoy the samehigh-quality sound no matter where they are sitting or standing in theroom. A DSP Program that is especially suitable for home parties.
Live SportsIn a live stereo sports broadcast, announcer voices are central,engulfed in the cheers and emotional whirl of the stadium.
GameGives TV games extra depth and surround. You can enjoy TVgames with monaural or stereo sound.
Selecting a DSP Program
Remote Control
Press MOVIErepeatedly todisplay DSPPrograms.
Remote Control
Press MUSICrepeatedly todisplay DSPPrograms.
Remote Control
Press SPORTS.
Remote Control
Press GAME.
En
glish
Sound Presence
005DVX-S120-en 03.8.19, 7:04 PM17
18
Advanced Features
Names and Functions of Parts
Top and Front
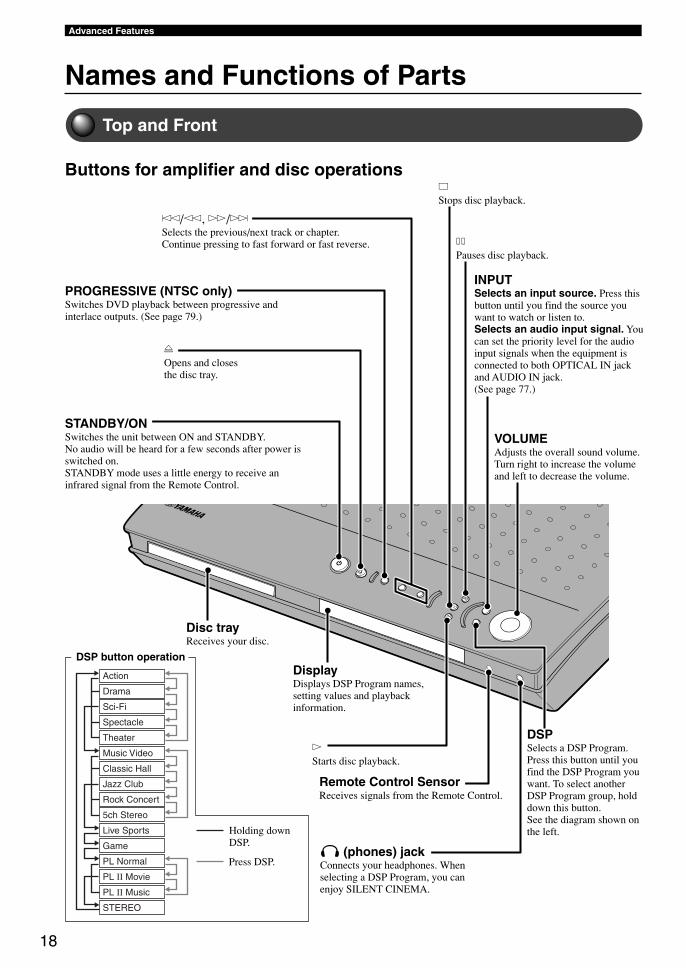
Buttons for amplifier and disc operationsaStops disc playback.
dPauses disc playback.
INPUTSelects an input source. Press thisbutton until you find the source youwant to watch or listen to.Selects an audio input signal. Youcan set the priority level for the audioinput signals when the equipment isconnected to both OPTICAL IN jackand AUDIO IN jack.(See page 77.)
VOLUMEAdjusts the overall sound volume.Turn right to increase the volumeand left to decrease the volume.
Disc trayReceives your disc.
DisplayDisplays DSP Program names,setting values and playbackinformation.
wStarts disc playback.
DSPSelects a DSP Program.Press this button until youfind the DSP Program youwant. To select anotherDSP Program group, holddown this button.See the diagram shown onthe left.
t/e, r/ySelects the previous/next track or chapter.Continue pressing to fast forward or fast reverse.
fOpens and closesthe disc tray.
STANDBY/ONSwitches the unit between ON and STANDBY.No audio will be heard for a few seconds after power isswitched on.STANDBY mode uses a little energy to receive aninfrared signal from the Remote Control.
Remote Control SensorReceives signals from the Remote Control.
Action
Drama
Sci-Fi
Spectacle
Theater
Music Video
Classic Hall
Jazz Club
Rock Concert
5ch Stereo
Live Sports
Game
PL Normal
PL II Movie
PL II Music
STEREO
Holding downDSP.
Press DSP.
DSP button operation
(phones) jackConnects your headphones. Whenselecting a DSP Program, you canenjoy SILENT CINEMA.
PROGRESSIVE (NTSC only)Switches DVD playback between progressive andinterlace outputs. (See page 79.)
006DVX-S120-en 03.8.5, 1:42 PM18
19
Advanced FeaturesA
dvan
ced F
eatures
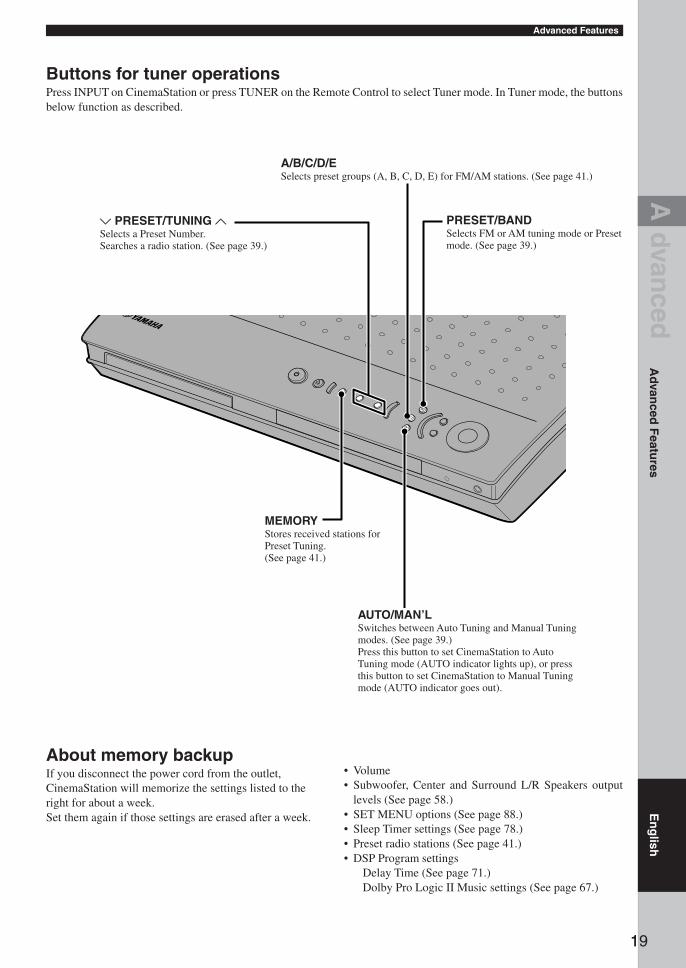
Buttons for tuner operationsPress INPUT on CinemaStation or press TUNER on the Remote Control to select Tuner mode. In Tuner mode, the buttonsbelow function as described.
About memory backupIf you disconnect the power cord from the outlet,CinemaStation will memorize the settings listed to theright for about a week.Set them again if those settings are erased after a week.
• Volume• Subwoofer, Center and Surround L/R Speakers output
levels (See page 58.)• SET MENU options (See page 88.)• Sleep Timer settings (See page 78.)• Preset radio stations (See page 41.)• DSP Program settings
Delay Time (See page 71.)Dolby Pro Logic II Music settings (See page 67.)
A d
vanced
Ad
vanced
Featu
res
19
A/B/C/D/ESelects preset groups (A, B, C, D, E) for FM/AM stations. (See page 41.)
d PRESET/TUNING uSelects a Preset Number.Searches a radio station. (See page 39.)
PRESET/BANDSelects FM or AM tuning mode or Presetmode. (See page 39.)
MEMORYStores received stations forPreset Tuning.(See page 41.)
AUTO/MAN’LSwitches between Auto Tuning and Manual Tuningmodes. (See page 39.)Press this button to set CinemaStation to AutoTuning mode (AUTO indicator lights up), or pressthis button to set CinemaStation to Manual Tuningmode (AUTO indicator goes out).
En
glish
006DVX-S120-en 03.8.19, 7:04 PM19

20
Advanced Features
CinemaStation Display
MATRIX PCM TITLE TRACK CHAP VIRTUAL SILENT REP A-B ALL AUTO STMEMORY
TUNEDPSPTY RTPTY
CTHOLD
PROGRESSIVE
DIGITAL
DVD VCDCD 888888888888
PL DSP PROG SLEEP
MATRIX PCM TITLE TRACK CHAP VIRTUAL SILENT REP A-B ALL AUTO STMEMORY
TUNEDPROGRESSIVE
DIGITAL
DVD VCDCD 888888888888
PL DSP PROG SLEEP
PSPTY RTPTY
CTHOLD
PROGRESSIVELights up whenPROGRESSIVE is activated.
Decoder indicatorLights up when an internaldecoder is working.
DSPLights up when a DSP sound fieldprogram is selected.
DSP ProgramindicatorLights up when a DSPProgram is selected.
VIRTUALLights up when VirtualCinema DSP is enabled.
SILENT CINEMA indicatorLights up when using a DSPProgram with headphones forSILENT CINEMA.
SLEEPLights up when usingthe Sleep Timer.
PCMLights up when playingPCM signal such as CDs.
Program, Repeat indicatorPROG: Lights up during Program Play.REP: Lights up during Repeat Play for whole disc,
chapter and track.REP ALL: Lights up during Repeat Play for whole
disc.REP A-B: Lights up during A-B Repeat.
STLights up when receiving a strongFM radio signal in Auto Tuning orAuto Preset mode.
Disc indicatorDVD: Lights up while a DVD disc is set in the disc tray.VCD: Lights up while a VCD disc is set in the disc tray.CD: Lights up while a music CD disc is set in the disc tray.
AUTOLights up when using AutoTuning or Auto Preset inTuning mode.
Stop (Pause)indicatorLights up when stopping orpausing disc playback.
Title, Track, Chapter indicatorTITLE: Lights up when showing the title.TRACK: Lights up when showing the track.CHAP: Lights up when showing the chapter.
MEMORYBlinks whenmemorizing(presetting) an FM/AM radio station.
Playback indicatorLights up during disc playback.
RDS indicator (U. K. andEurope models only)Lights up when receiving an RDSsignal. In PTY SEEK mode thePTY HOLD indicator lights up.
TUNEDLights up when receiving anFM/AM broadcast.
Main DisplayShows Input Source and DSPProgram names, Radio StationFrequency, Preset Numbers andother info. Shows chapter ortrack number, elapsed time andother info during disc playback.
006DVX-S120-en 03.8.5, 1:42 PM20
21
Advanced FeaturesA
dvan
ced F
eatures
30° 30°
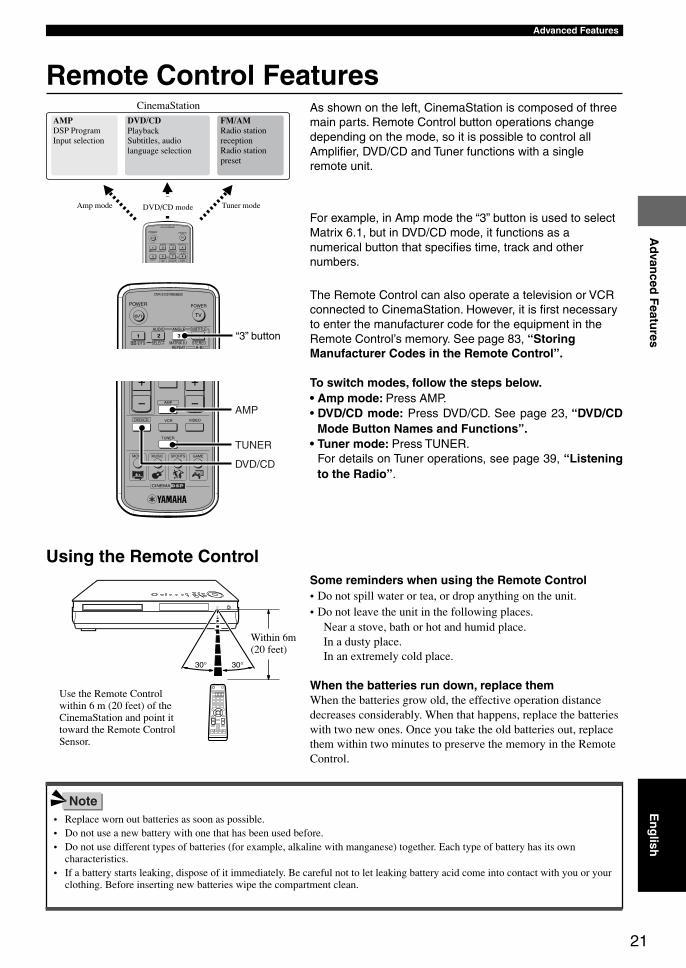
Remote Control FeaturesAs shown on the left, CinemaStation is composed of threemain parts. Remote Control button operations changedepending on the mode, so it is possible to control allAmplifier, DVD/CD and Tuner functions with a singleremote unit.
For example, in Amp mode the “3” button is used to selectMatrix 6.1, but in DVD/CD mode, it functions as anumerical button that specifies time, track and othernumbers.
The Remote Control can also operate a television or VCRconnected to CinemaStation. However, it is first necessaryto enter the manufacturer code for the equipment in theRemote Control’s memory. See page 83, “StoringManufacturer Codes in the Remote Control”.
To switch modes, follow the steps below.• Amp mode: Press AMP.• DVD/CD mode: Press DVD/CD. See page 23, “DVD/CD
Mode Button Names and Functions”.• Tuner mode: Press TUNER.
For details on Tuner operations, see page 39, “Listeningto the Radio”.
Some reminders when using the Remote Control• Do not spill water or tea, or drop anything on the unit.• Do not leave the unit in the following places.
Near a stove, bath or hot and humid place. In a dusty place. In an extremely cold place.
When the batteries run down, replace themWhen the batteries grow old, the effective operation distancedecreases considerably. When that happens, replace the batterieswith two new ones. Once you take the old batteries out, replacethem within two minutes to preserve the memory in the RemoteControl.
Use the Remote Controlwithin 6 m (20 feet) of theCinemaStation and point ittoward the Remote ControlSensor.
Using the Remote Control
• Replace worn out batteries as soon as possible.• Do not use a new battery with one that has been used before.• Do not use different types of batteries (for example, alkaline with manganese) together. Each type of battery has its own
characteristics.• If a battery starts leaking, dispose of it immediately. Be careful not to let leaking battery acid come into contact with you or your
clothing. Before inserting new batteries wipe the compartment clean.
TV
POWER POWER
AUDIO
/DTS SELECT STEREOMATRIX 6.1A-BREPEAT
ANGLE SUBTITLE
DVR-S120 WB56650
CINEMA
AMP
DVD/CD VCR VIDEO
TUNER
MOVIE MUSIC SPORTS GAME
TUNER
AMP
DVD/CD
TV
POWER POWER
AUDIO
/DTS SELECT
NIGHT SW CENTER SURR
STEREOMATRIX 6.1A-BREPEAT
ANGLE SUBTITLE
DVR-S120 WB56650
Note
CinemaStationAMPDSP ProgramInput selection
DVD/CDPlaybackSubtitles, audiolanguage selection
FM/AMRadio stationreceptionRadio stationpreset
Amp mode Tuner mode
“3” button
Within 6m(20 feet)
En
glish
DVD/CD mode
006DVX-S120-en 03.8.5, 1:42 PM21
22
Advanced Features
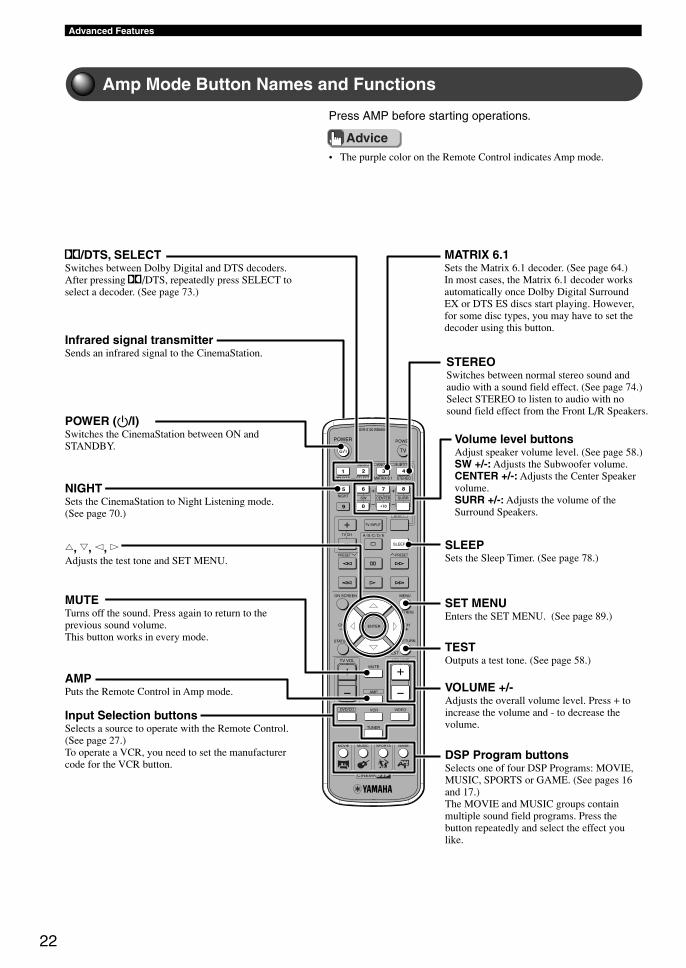
Amp Mode Button Names and Functions
Press AMP before starting operations.
• The purple color on the Remote Control indicates Amp mode.
Advice
TV
CH
CINEMA
CH
POWER POWER
AUDIO
/DTS SELECT
NIGHT SW
TV CH
TV INPUT
SLEEP
PRESET PRESET
A B C D E
CENTER SURR
SHIFT
STEREOMATRIX 6.1A-BREPEAT
ANGLE SUBTITLE
DVR-S120 WB56650
ON SCREEN MENU
TEST
RETURNSTATUS
TV VOL VOLUME
MUTE
AMP
DVD/CD VCR VIDEO
TUNER
MOVIE MUSIC SPORTS GAME
SET MENU
ENTER
DSP Program buttonsSelects one of four DSP Programs: MOVIE,MUSIC, SPORTS or GAME. (See pages 16and 17.)The MOVIE and MUSIC groups containmultiple sound field programs. Press thebutton repeatedly and select the effect youlike.
VOLUME +/-Adjusts the overall volume level. Press + toincrease the volume and - to decrease thevolume.
TESTOutputs a test tone. (See page 58.)
SET MENUEnters the SET MENU. (See page 89.)
SLEEPSets the Sleep Timer. (See page 78.)
Volume level buttonsAdjust speaker volume level. (See page 58.)SW +/-: Adjusts the Subwoofer volume.CENTER +/-: Adjusts the Center Speakervolume.SURR +/-: Adjusts the volume of theSurround Speakers.
STEREOSwitches between normal stereo sound andaudio with a sound field effect. (See page 74.)Select STEREO to listen to audio with nosound field effect from the Front L/R Speakers.
MATRIX 6.1Sets the Matrix 6.1 decoder. (See page 64.)In most cases, the Matrix 6.1 decoder worksautomatically once Dolby Digital SurroundEX or DTS ES discs start playing. However,for some disc types, you may have to set thedecoder using this button.
AMPPuts the Remote Control in Amp mode.
q/DTS, SELECTSwitches between Dolby Digital and DTS decoders.After pressing q/DTS, repeatedly press SELECT toselect a decoder. (See page 73.)
POWER (a/I)Switches the CinemaStation between ON andSTANDBY.
NIGHTSets the CinemaStation to Night Listening mode.(See page 70.)
h, g, q, wAdjusts the test tone and SET MENU.
MUTETurns off the sound. Press again to return to theprevious sound volume.This button works in every mode.
Input Selection buttonsSelects a source to operate with the Remote Control.(See page 27.)To operate a VCR, you need to set the manufacturercode for the VCR button.
Infrared signal transmitterSends an infrared signal to the CinemaStation.
006DVX-S120-en 03.8.5, 1:42 PM22
23
Advanced FeaturesA
dvan
ced F
eatures
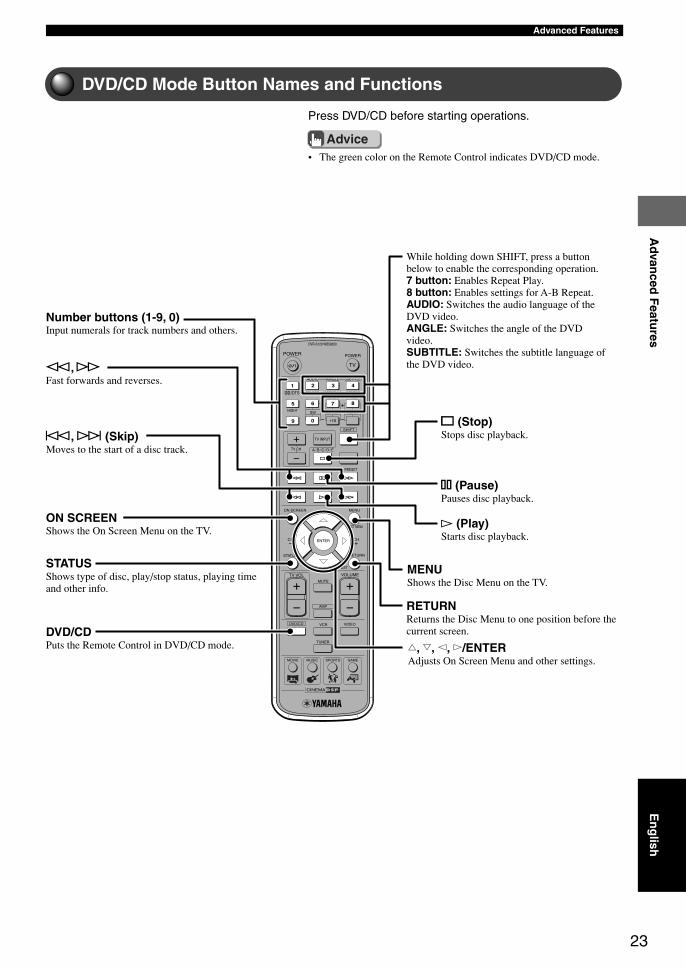
DVD/CD Mode Button Names and Functions
Press DVD/CD before starting operations.
• The green color on the Remote Control indicates DVD/CD mode.
Advice
TV
CH
CINEMA
CH
POWER POWER
AUDIO
/DTS SELECT
NIGHT SW
TV CH
TV INPUT
SLEEP
PRESET PRESET
A B C D E
CENTER SURR
SHIFT
STEREOMATRIX 6.1A-BREPEAT
ANGLE SUBTITLE
DVR-S120 WB56650
ON SCREEN MENU
TEST
RETURNSTATUS
TV VOL VOLUME
MUTE
AMP
DVD/CD VCR VIDEO
TUNER
MOVIE MUSIC SPORTS GAME
SET MENU
ENTER
STATUSShows type of disc, play/stop status, playing timeand other info.
DVD/CDPuts the Remote Control in DVD/CD mode.
While holding down SHIFT, press a buttonbelow to enable the corresponding operation.7 button: Enables Repeat Play.8 button: Enables settings for A-B Repeat.AUDIO: Switches the audio language of theDVD video.ANGLE: Switches the angle of the DVDvideo.SUBTITLE: Switches the subtitle language ofthe DVD video.
s (Stop)Stops disc playback.
e (Pause)Pauses disc playback.
h (Play)Starts disc playback.
MENUShows the Disc Menu on the TV.
RETURNReturns the Disc Menu to one position before thecurrent screen.
h, g, q, w/ENTERAdjusts On Screen Menu and other settings.
Number buttons (1-9, 0)Input numerals for track numbers and others.
w, fFast forwards and reverses.
b, a (Skip)Moves to the start of a disc track.
ON SCREENShows the On Screen Menu on the TV.
En
glish
006DVX-S120-en 03.8.5, 1:42 PM23
24
Advanced Features
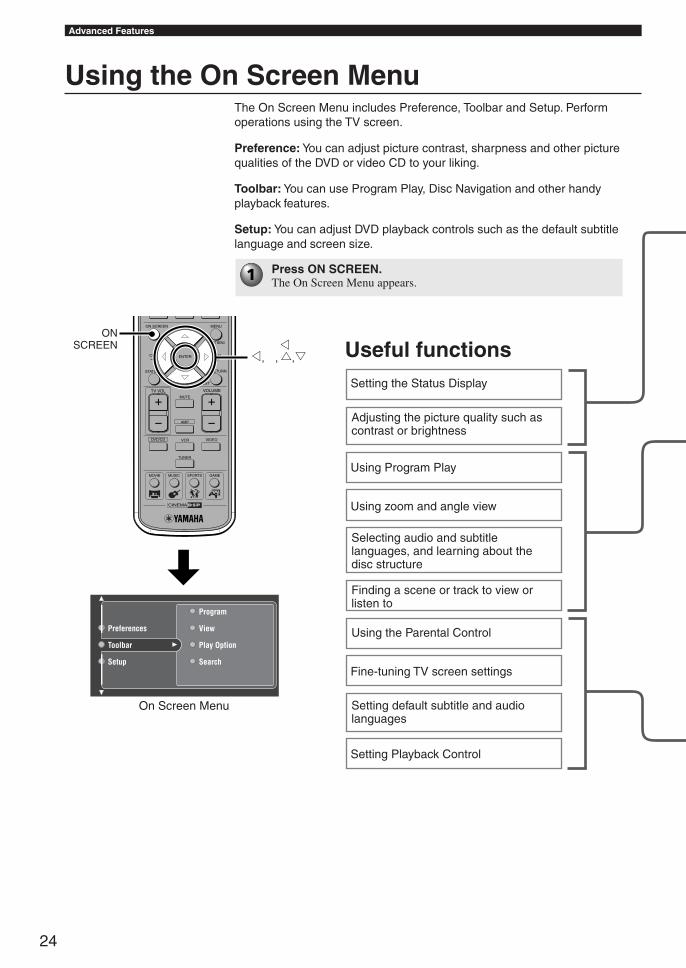
Using the On Screen MenuThe On Screen Menu includes Preference, Toolbar and Setup. Performoperations using the TV screen.
Preference: You can adjust picture contrast, sharpness and other picturequalities of the DVD or video CD to your liking.
Toolbar: You can use Program Play, Disc Navigation and other handyplayback features.
Setup: You can adjust DVD playback controls such as the default subtitlelanguage and screen size.
Useful functions
Press ON SCREEN.The On Screen Menu appears.
CH
CINEMA
CH
ON SCREEN MENU
TEST
RETURNSTATUS
TV VOL VOLUME
MUTE
AMP
DVD/CD VCR VIDEO
TUNER
MOVIE MUSIC SPORTS GAME
SET MENU
ENTER
g g, , ,hg
ONSCREEN
Setting default subtitle and audiolanguages
Program
View
Play Option
Search
Toolbar
Preferences
Setup
Adjusting the picture quality such ascontrast or brightness
Setting the Status Display
Using Program Play
Using zoom and angle view
Selecting audio and subtitlelanguages, and learning about thedisc structure
Finding a scene or track to view orlisten to
Using the Parental Control
Fine-tuning TV screen settings
Setting Playback Control
On Screen Menu
007DVX-S120-en 03.8.19, 7:05 PM24
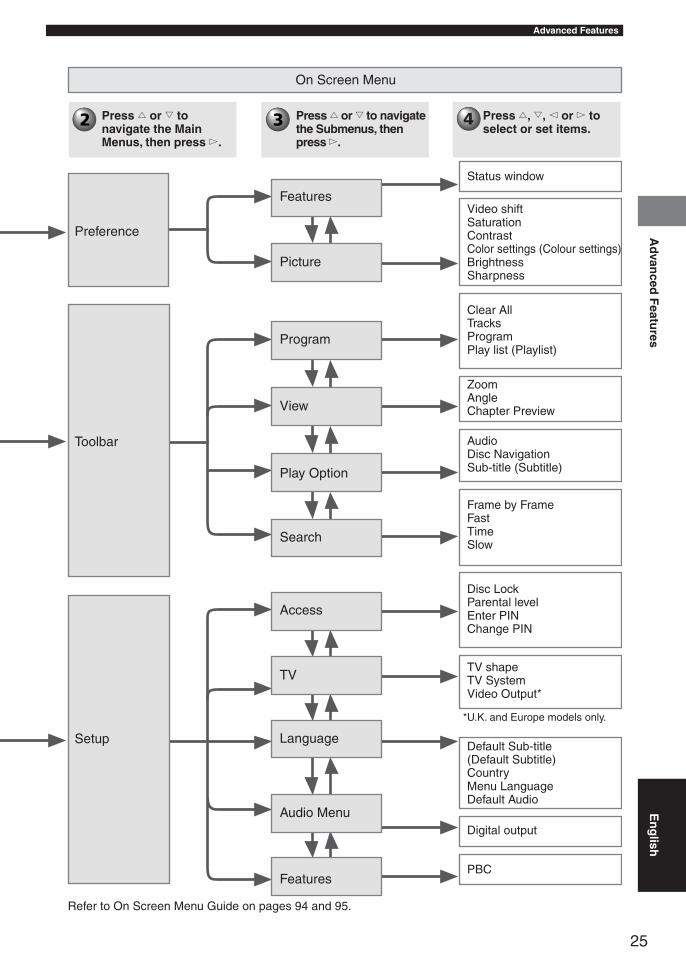
25
Ad
vanced
Featu
resAdvanced Features
Press h or g tonavigate the MainMenus, then press w.
On Screen Menu
Press h or g to navigatethe Submenus, thenpress w.
Press h, g, q or w toselect or set items.
Preference
Toolbar
Setup
Features
Picture
Program
View
Play Option
Search
Access
TV
Language
Features
Video shiftSaturationContrastColor settings (Colour settings)BrightnessSharpness
Status window
Clear AllTracksProgramPlay list (Playlist)
ZoomAngleChapter Preview
AudioDisc NavigationSub-title (Subtitle)
Frame by FrameFastTimeSlow
Disc LockParental levelEnter PINChange PIN
TV shapeTV SystemVideo Output*
Default Sub-title(Default Subtitle)CountryMenu LanguageDefault Audio
PBC
En
glish
*U.K. and Europe models only.
Digital outputAudio Menu
Refer to On Screen Menu Guide on pages 94 and 95.
007DVX-S120-en 03.8.19, 7:05 PM25
26
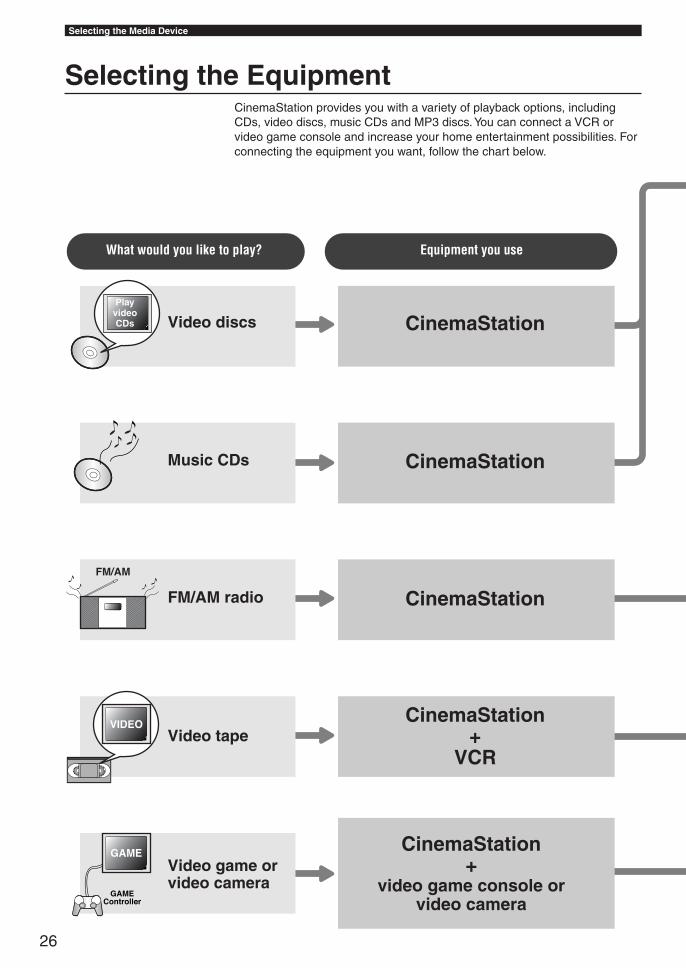
Selecting the Media Device
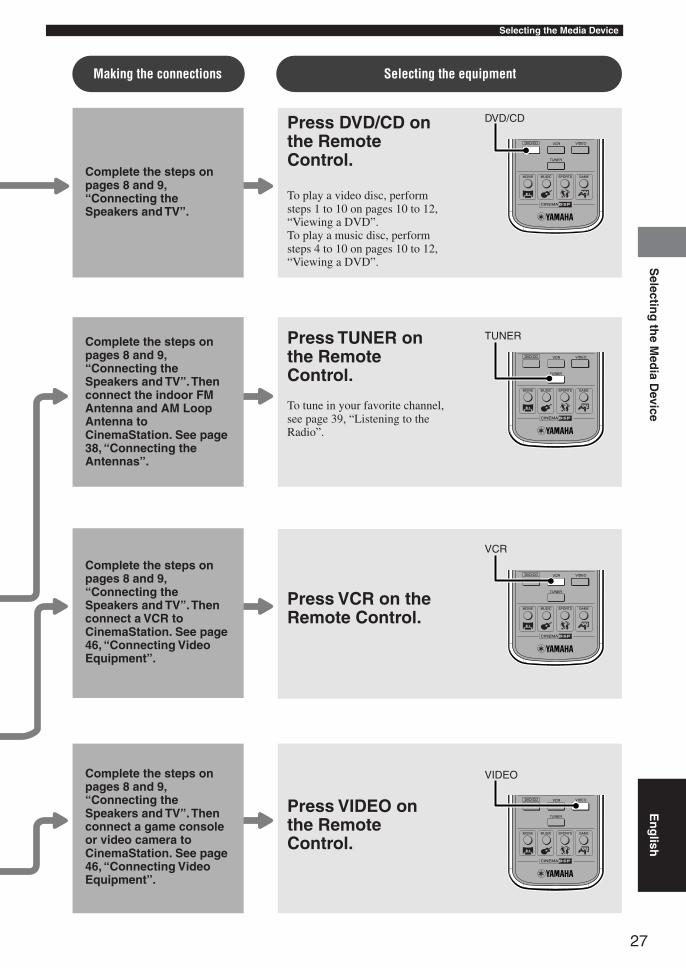
Selecting the EquipmentCinemaStation provides you with a variety of playback options, includingCDs, video discs, music CDs and MP3 discs. You can connect a VCR orvideo game console and increase your home entertainment possibilities. Forconnecting the equipment you want, follow the chart below.
What would you like to play? Equipment you use
Video discs
Music CDs
FM/AM radio
Video tape
Video game orvideo camera
CinemaStation
CinemaStation
CinemaStation
CinemaStation+
VCR
CinemaStation+
video game console orvideo camera
PlayvideoCDs
007DVX-S120-en 03.8.19, 7:05 PM26
Selectin
g th
e Med
ia De vice
27
CINEMA
DVD/CD VCR VIDEO
TUNER
MOVIE MUSIC SPORTS GAME
CINEMA
DVD/CD VCR VIDEO
TUNER
MOVIE MUSIC SPORTS GAME
CINEMA
DVD/CD VCR VIDEO
TUNER
MOVIE MUSIC SPORTS GAME
CINEMA
DVD/CD VCR VIDEO
TUNER
MOVIE MUSIC SPORTS GAME
DVD/CD
TUNER
VCR
VIDEO
Selecting the Media Device
Press DVD/CD onthe RemoteControl.
To play a video disc, performsteps 1 to 10 on pages 10 to 12,“Viewing a DVD”.To play a music disc, performsteps 4 to 10 on pages 10 to 12,“Viewing a DVD”.
Complete the steps onpages 8 and 9,“Connecting theSpeakers and TV”.
Complete the steps onpages 8 and 9,“Connecting theSpeakers and TV”. Thenconnect the indoor FMAntenna and AM LoopAntenna toCinemaStation. See page38, “Connecting theAntennas”.
Complete the steps onpages 8 and 9,“Connecting theSpeakers and TV”. Thenconnect a VCR toCinemaStation. See page46, “Connecting VideoEquipment”.
Complete the steps onpages 8 and 9,“Connecting theSpeakers and TV”. Thenconnect a game consoleor video camera toCinemaStation. See page46, “Connecting VideoEquipment”.
Press TUNER onthe RemoteControl.
To tune in your favorite channel,see page 39, “Listening to theRadio”.
Press VCR on theRemote Control.
Press VIDEO onthe RemoteControl.
Making the connections Selecting the equipment
En
glish
007DVX-S120-en 03.8.19, 7:05 PM27
28
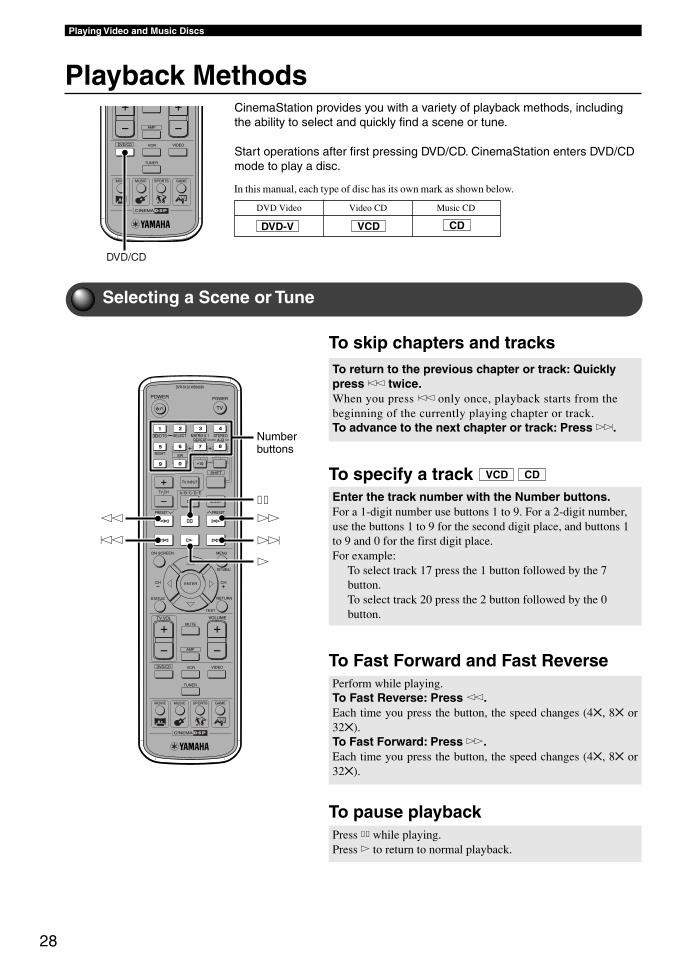
Playing Video and Music Discs
Playback MethodsCinemaStation provides you with a variety of playback methods, includingthe ability to select and quickly find a scene or tune.
Start operations after first pressing DVD/CD. CinemaStation enters DVD/CDmode to play a disc.
To skip chapters and tracksTo return to the previous chapter or track: Quicklypress t twice.When you press t only once, playback starts from thebeginning of the currently playing chapter or track.To advance to the next chapter or track: Press y.
To specify a trackEnter the track number with the Number buttons.For a 1-digit number use buttons 1 to 9. For a 2-digit number,use the buttons 1 to 9 for the second digit place, and buttons 1to 9 and 0 for the first digit place.For example:
To select track 17 press the 1 button followed by the 7button.To select track 20 press the 2 button followed by the 0button.
To Fast Forward and Fast ReversePerform while playing.To Fast Reverse: Press e.Each time you press the button, the speed changes (4, 8 or32).To Fast Forward: Press r.Each time you press the button, the speed changes (4, 8 or32).
To pause playbackPress d while playing.Press w to return to normal playback.
Selecting a Scene or Tune
Numberbuttons
TV
CH
CINEMA
CH
POWER POWER
AUDIO
/DTS SELECT
NIGHT SW
TV CH
TV INPUT
SLEEP
PRESET PRESET
A B C D E
CENTER SURR
SHIFT
STEREOMATRIX 6.1A-BREPEAT
ANGLE SUBTITLE
DVR-S120 WB56650
ON SCREEN MENU
TEST
RETURNSTATUS
TV VOL VOLUME
MUTE
AMP
DVD/CD VCR VIDEO
TUNER
MOVIE MUSIC SPORTS GAME
SET MENU
ENTER
d
w
re
t y
CDVCD
Music CDDVD Video Video CD
In this manual, each type of disc has its own mark as shown below.
DVD-V VCD CD
CINEMA
AMP
DVD/CD VCR VIDEO
TUNER
MOVIE MUSIC SPORTS GAME
DVD/CD
008DVX-S120-en 03.8.5, 1:43 PM28
29
Playing Video and Music DiscsP
laying
Vid
eo an
d M
usic D
iscs
• You can also use the On Screen Menu to operate Frame Advance, Fast Forward/Reverse and Slow Advance/Reverse. In additionto those, you can use Frame Reverse from the On Screen Menu.See pages 94 and 95, “On Screen Menu Guide”.
• The Skip feature may not work properly when using Playback Control to play a video CD.• If you use Fast Forward/Reverse while playing a Dolby Digital or DTS disc, the Speakers do not output any sound.• Slow Reverse is not available for a video CD.
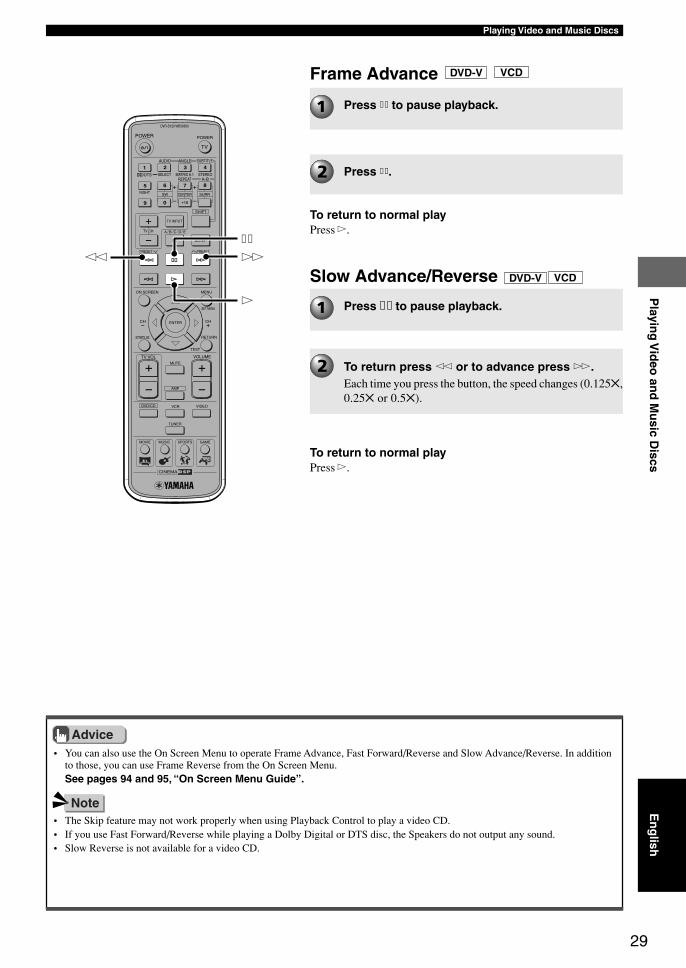
Frame Advance
Press d to pause playback.
Press d.
To return to normal playPress w.
Slow Advance/Reverse
Press d to pause playback.
To return press e or to advance press r.Each time you press the button, the speed changes (0.125,0.25 or 0.5).
TV
CH
CINEMA
CH
POWER POWER
AUDIO
/DTS SELECT
NIGHT SW
TV CH
TV INPUT
SLEEP
PRESET PRESET
A B C D E
CENTER SURR
SHIFT
STEREOMATRIX 6.1A-BREPEAT
ANGLE SUBTITLE
DVR-S120 WB56650
ON SCREEN MENU
TEST
RETURNSTATUS
TV VOL VOLUME
MUTE
AMP
DVD/CD VCR VIDEO
TUNER
MOVIE MUSIC SPORTS GAME
SET MENU
ENTER
d
w
re
Advice
Note En
glish
VCDDVD-V
DVD-V VCD
To return to normal playPress w.
008DVX-S120-en 03.8.5, 1:43 PM29
30
Playing Video and Music Discs
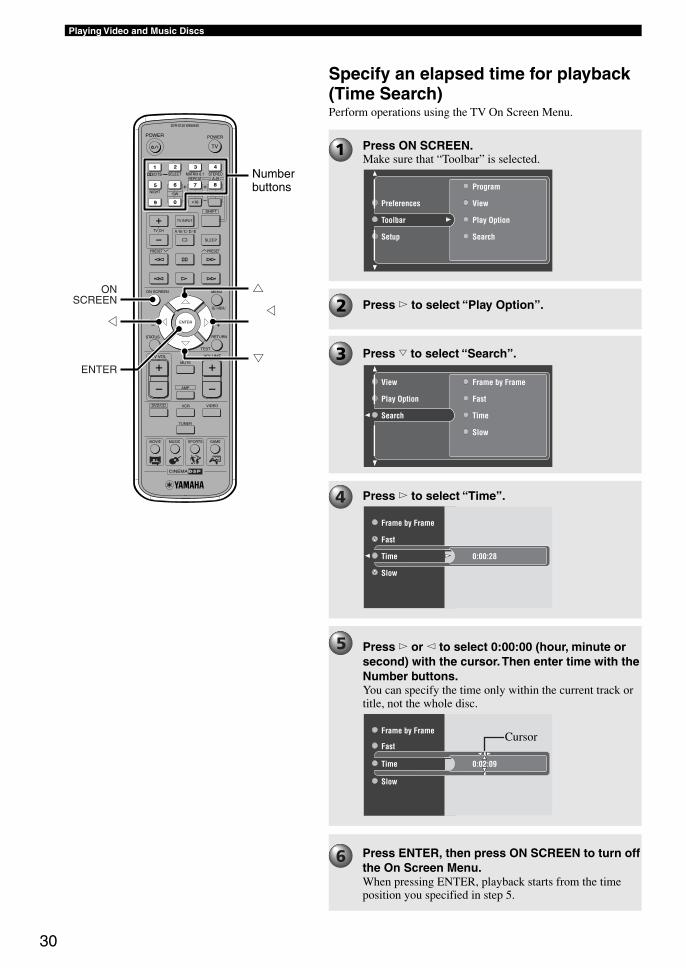
Specify an elapsed time for playback(Time Search)Perform operations using the TV On Screen Menu.
TV
CH
CINEMA
CH
POWER POWER
AUDIO
/DTS SELECT
NIGHT SW
TV CH
TV INPUT
SLEEP
PRESET PRESET
A B C D E
CENTER SURR
SHIFT
STEREOMATRIX 6.1A-BREPEAT
ANGLE SUBTITLE
DVR-S120 WB56650
ON SCREEN MENU
TEST
RETURNSTATUS
TV VOL VOLUME
MUTE
AMP
DVD/CD VCR VIDEO
TUNER
MOVIE MUSIC SPORTS GAME
SET MENU
ENTER
g
hONSCREEN
ENTER
g g
Press ON SCREEN.Make sure that “Toolbar” is selected.
Press w to select “Play Option”.
Press g to select “Search”.
Press w to select “Time”.
Press w or q to select 0:00:00 (hour, minute orsecond) with the cursor. Then enter time with theNumber buttons.You can specify the time only within the current track ortitle, not the whole disc.
Press ENTER, then press ON SCREEN to turn offthe On Screen Menu.When pressing ENTER, playback starts from the timeposition you specified in step 5.
Numberbuttons Program
View
Play Option
Search
Toolbar
Preferences
Setup
Frame by Frame
Fast
Time
Slow
Search
View
Play Option
0:00:28
Time
Frame by Frame
Fast
Slow
0:02:09Time
Frame by Frame
Fast
Slow
Cursor
008DVX-S120-en 03.8.5, 1:44 PM30
31
Playing Video and Music DiscsP
laying
Vid
eo an
d M
usic D
iscs
TV
CH
CINEMA
CH
POWER POWER
AUDIO
/DTS SELECT
NIGHT SW
TV CH
TV INPUT
SLEEP
PRESET PRESET
A B C D E
CENTER SURR
SHIFT
STEREOMATRIX 6.1A-BREPEAT
ANGLE SUBTITLE
DVR-S120 WB56650
ON SCREEN MENU
TEST
RETURNSTATUS
TV VOL VOLUME
MUTE
AMP
DVD/CD VCR VIDEO
TUNER
MOVIE MUSIC SPORTS GAME
SET MENU
ENTER
g
hONSCREEN
ENTER
g g
Customizing Playback Order (Program Play)
Playback your favorite chapters and tracks in the order youwant.
Perform operations using the TV On Screen Menu.
Program
View
Play Option
Search
Toolbar
Preferences
Setup
Clear all
Tracks
Program
Play list
Program
View
Play Option
T1 C1
Program
Tracks
Clear all
Play list
En
glish
VCD CD
Press ON SCREEN.Make sure that “Toolbar” is selected.
Press w, then repeatedly press h to select“Program”.
Press w, then press h to select “Tracks”. Thenpress w.
Ex. DVD video
Ex. CD
T1Tracks
Clear all
Program
Play list
DVD-V
008DVX-S120-en 03.8.5, 1:44 PM31
32
Playing Video and Music Discs
TV
CH
CINEMA
CH
POWER POWER
AUDIO
/DTS SELECT
NIGHT SW
TV CH
TV INPUT
SLEEP
PRESET PRESET
A B C D E
CENTER SURR
SHIFT
STEREOMATRIX 6.1A-BREPEAT
ANGLE SUBTITLE
DVR-S120 WB56650
ON SCREEN MENU
TEST
RETURNSTATUS
TV VOL VOLUME
MUTE
AMP
DVD/CD VCR VIDEO
TUNER
MOVIE MUSIC SPORTS GAME
SET MENU
ENTER
g
hONSCREEN
ENTER
g g
• Playback Control is not available during Program Play of a video CD.
Press ON SCREEN to turn off the On ScreenMenu.Program Play starts. Press w to start Program Play whenProgram Play does not start.
Advice
Note
• Once Program Play is set, the PROG indicator lights up in theCinemaStation Display.
Chapter 1Title 1
Title 9
Title 10
Title 2
Title 3
Select the chapter or track to add to ProgramPlay.
Ex. DVD videoPress h or g to select the title number to add,then press ENTER.
Perform step 4 until you add all desired chaptersor tracks.
Press h or g to select the chapter number toadd, then press ENTER.
Chapter 1Title 1
Title 9
Title 10
Title 2
Title 3
Ex. CDPress h or g to select the track number to add,then press ENTER.
Track 2
Track 14
Track 1
Track 3
Track 4
008DVX-S120-en 03.8.5, 1:44 PM32
33
Playing Video and Music DiscsP
laying
Vid
eo an
d M
usic D
iscs
CHCH
ON SCREEN MENU
TEST
RETURNSTATUS
SET MENU
ENTER
g
hONSCREEN
g g
CHCH
ON SCREEN MENU
TEST
RETURNSTATUS
SET MENU
ENTER
g
hONSCREEN
g g
Check Program Play content
Delete Program Play
Perform steps 1 to 2 in “Customizing PlaybackOrder (Program Play)” on page 31.
Press w, then press g to select “Play list”(“Playlist”). Then press w.The list appears in the specified order.
Press h or g to scroll through the list.
Perform steps 1 to 2 in “Customizing PlaybackOrder (Program Play)” on page 31.
Press w, then press h to select “Clear All”. Thenpress w.“Clear” changes to “Cleared”, and all Program Playcontent is deleted.
En
glish
CHCH
ON SCREEN MENU
TEST
RETURNSTATUS
SET MENU
ENTER
g
hONSCREEN
g g
Turn on/off Program Play
Perform steps 1 to 2 in “Customizing PlaybackOrder (Program Play)” on page 31.
Press w to select “Program”. Then press w.
Press h or g to select “On” or “Off”.
CinemaStation automatically sets Program menu item to“On” after Program Play starts. The setting does notchange even if Program Play finishes, so you can restartProgram Play by pressing w.To return to normal playback, select “Off” for Programmenu item in the On Screen Menu. Even if you set it to“Off”, the playlist remains in the memory, so you can usethe previous play list by setting it to “On”.
008DVX-S120-en 03.8.5, 1:44 PM33
34
Playing Video and Music Discs
You can repeat a favorite track, chapter or entire disc. Youcan also repeat Program Play and certain parts youspecified as many times as you like.
TV
CH
CINEMA
CH
POWER POWER
AUDIO
/DTS SELECT
NIGHT SW
TV CH
TV INPUT
SLEEP
PRESET PRESET
A B C D E
CENTER SURR
SHIFT
STEREOMATRIX 6.1A-BREPEAT
ANGLE SUBTITLE
DVR-S120 WB56650
ON SCREEN MENU
TEST
RETURNSTATUS
TV VOL VOLUME
MUTE
AMP
DVD/CD VCR VIDEO
TUNER
MOVIE MUSIC SPORTS GAME
SET MENU
ENTER
SHIFT
• Once Repeat Play is selected, the Repeat mode indicator lights up in the CinemaStation Display.— REP indicates title, chapter and track repeat— REP ALL indicates entire disc repeat
• Repeat Play may not work properly with some DVD video discs.• Repeat Play will not work during Menu Play of a video CD that is using Playback Control.
Repeating a Disc or Track (Repeat Play) DVD-V VCD CD
Play back a disc.To repeat a chapter or track first start playing it. See page28, “Selecting a Scene or Tune”.
While holding down SHIFT, press the “7” buttonto select Repeat mode.Every time you press the button, the display on the TVscreen changes as shown below.
Advice
Note
“7” button
Off (Normal playback)
Repeat (Repeat Play for currently playing chapter)
Disc (Repeat Play for currently playing disc)
Title (Repeat Play for currently playing title)
Off (Normal playback)
Repeat (Repeat Play for currently playing track)
Disc (Repeat Play for currently playing disc)
DVD video
Video CD/CD
009DVX-S120-en 03.8.5, 1:44 PM34
35
Playing Video and Music DiscsP
laying
Vid
eo an
d M
usic D
iscsE
ng
lish
• A-B Repeat may not work properly with some DVD video discs.• You can use A-B Repeat only within one track or title.
TV
CH
CINEMA
CH
POWER POWER
AUDIO
/DTS SELECT
NIGHT SW
TV CH
TV INPUT
SLEEP
PRESET PRESET
A B C D E
CENTER SURR
SHIFT
STEREOMATRIX 6.1A-BREPEAT
ANGLE SUBTITLE
DVR-S120 WB56650
ON SCREEN MENU
TEST
RETURNSTATUS
TV VOL VOLUME
MUTE
AMP
DVD/CD VCR VIDEO
TUNER
MOVIE MUSIC SPORTS GAME
SET MENU
ENTER
SHIFT
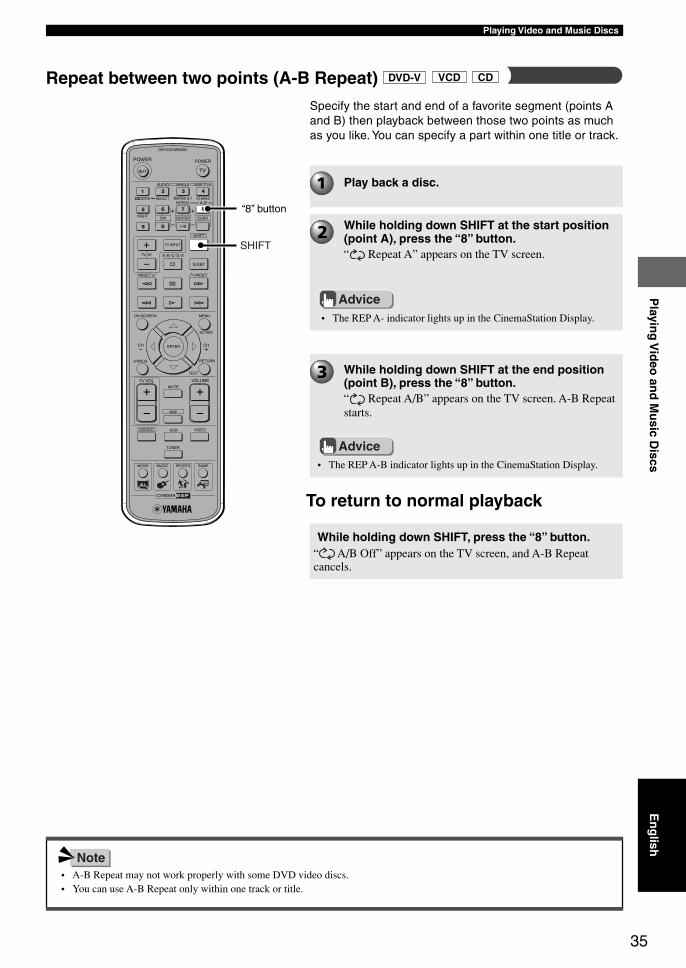
Repeat between two points (A-B Repeat) DVD-V VCD CD
Specify the start and end of a favorite segment (points Aand B) then playback between those two points as muchas you like. You can specify a part within one title or track.
Play back a disc.
While holding down SHIFT at the start position(point A), press the “8” button.“ Repeat A” appears on the TV screen.
• The REP A- indicator lights up in the CinemaStation Display.
While holding down SHIFT at the end position(point B), press the “8” button.“ Repeat A/B” appears on the TV screen. A-B Repeatstarts.
Advice
Advice
Note
“8” button
• The REP A-B indicator lights up in the CinemaStation Display.
To return to normal playback
While holding down SHIFT, press the “8” button.“ A/B Off” appears on the TV screen, and A-B Repeatcancels.
009DVX-S120-en 03.8.5, 1:44 PM35
36
Playing Video and Music Discs
Many DVDs or video CDs that have Playback Controlinclude an original menu. You can use the menu forskipping to a favorite title or chapter and switching audio orsubtitle language.
CH
CINEMA
CH
ON SCREEN MENU
TEST
RETURNSTATUS
TV VOL VOLUME
MUTE
AMP
DVD/CD VCR VIDEO
TUNER
MOVIE MUSIC SPORTS GAME
SET MENU
ENTER
g
h
ENTER
MENU
g g
TV
CHCH
POWER POWER
AUDIO
/DTS SELECT
NIGHT SW
TV CH
TV INPUT
SLEEP
PRESET PRESET
A B C D E
CENTER SURR
SHIFT
STEREOMATRIX 6.1A-BREPEAT
ANGLE SUBTITLE
DVR-S120 WB56650
ON SCREEN MENU
TEST
RETURNSTATUS
TV VOL VOLUME
SET MENU
ENTER
wt
RETURN
y
• Playback Control is not available during Program Play.
Using a Disc Menu
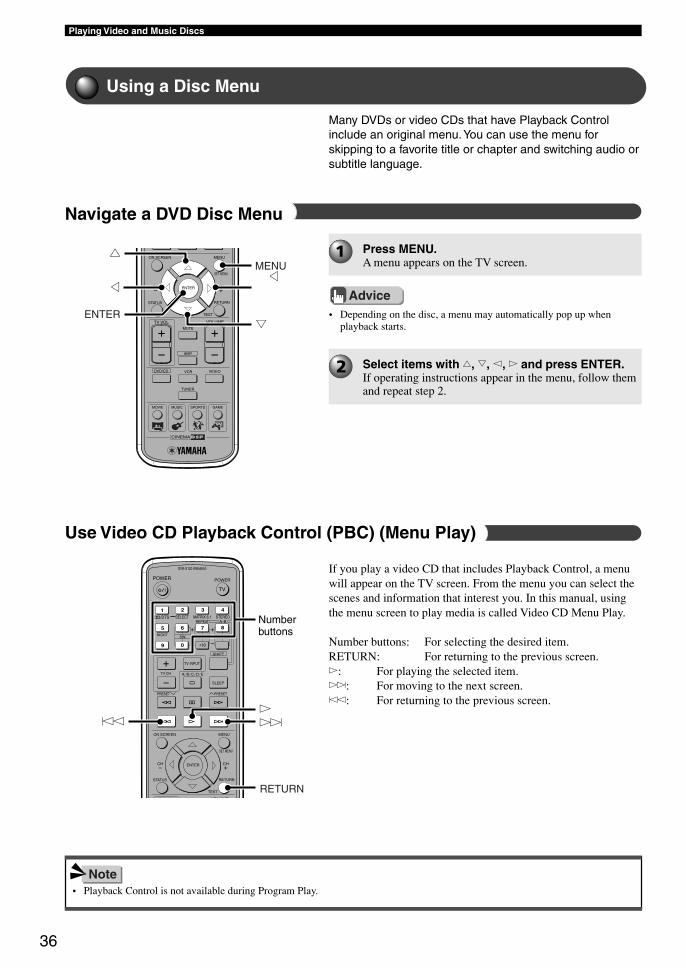
Navigate a DVD Disc Menu
Use Video CD Playback Control (PBC) (Menu Play)
Press MENU.A menu appears on the TV screen.
• Depending on the disc, a menu may automatically pop up whenplayback starts.
Advice
Select items with h, g, q, w and press ENTER.If operating instructions appear in the menu, follow themand repeat step 2.
If you play a video CD that includes Playback Control, a menuwill appear on the TV screen. From the menu you can select thescenes and information that interest you. In this manual, usingthe menu screen to play media is called Video CD Menu Play.
Number buttons: For selecting the desired item.RETURN: For returning to the previous screen.w: For playing the selected item.y: For moving to the next screen.t: For returning to the previous screen.
Note
Numberbuttons
Using a Disc Menu
009DVX-S120-en 03.8.5, 1:44 PM36
37
Playing Video and Music DiscsP
laying
Vid
eo an
d M
usic D
iscsE
ng
lish
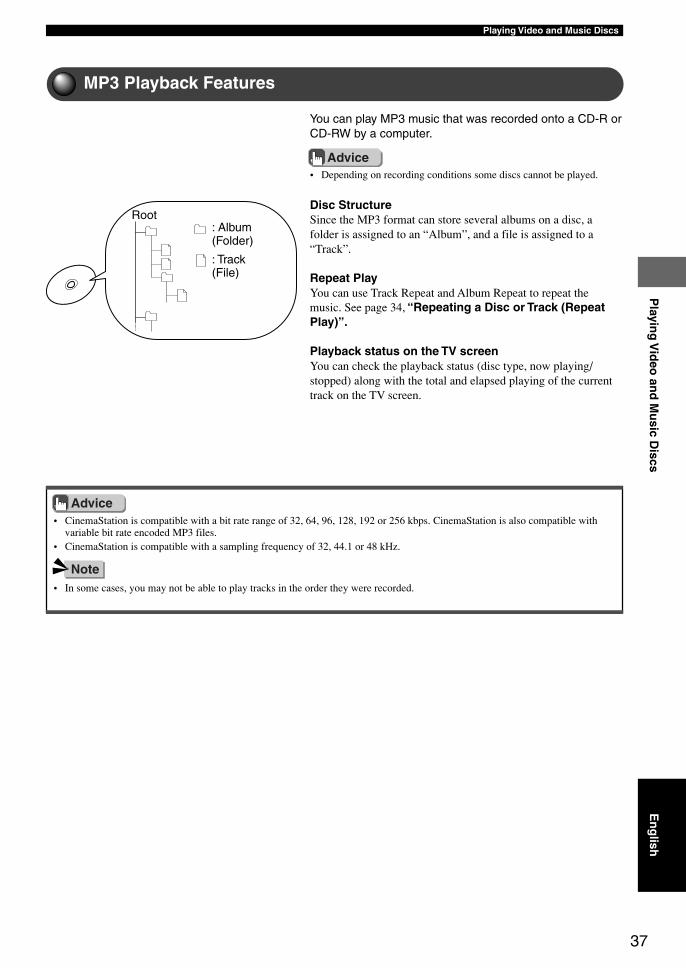
You can play MP3 music that was recorded onto a CD-R orCD-RW by a computer.
• Depending on recording conditions some discs cannot be played.
Disc StructureSince the MP3 format can store several albums on a disc, afolder is assigned to an “Album”, and a file is assigned to a“Track”.
Repeat PlayYou can use Track Repeat and Album Repeat to repeat themusic. See page 34, “Repeating a Disc or Track (RepeatPlay)”.
Playback status on the TV screenYou can check the playback status (disc type, now playing/stopped) along with the total and elapsed playing of the currenttrack on the TV screen.
• CinemaStation is compatible with a bit rate range of 32, 64, 96, 128, 192 or 256 kbps. CinemaStation is also compatible withvariable bit rate encoded MP3 files.
• CinemaStation is compatible with a sampling frequency of 32, 44.1 or 48 kHz.
• In some cases, you may not be able to play tracks in the order they were recorded.
Advice
Advice
Note
Root: Album(Folder)
: Track(File)
MP3 Playback Features
009DVX-S120-en 03.8.5, 1:44 PM37
38
Listening to the Radio
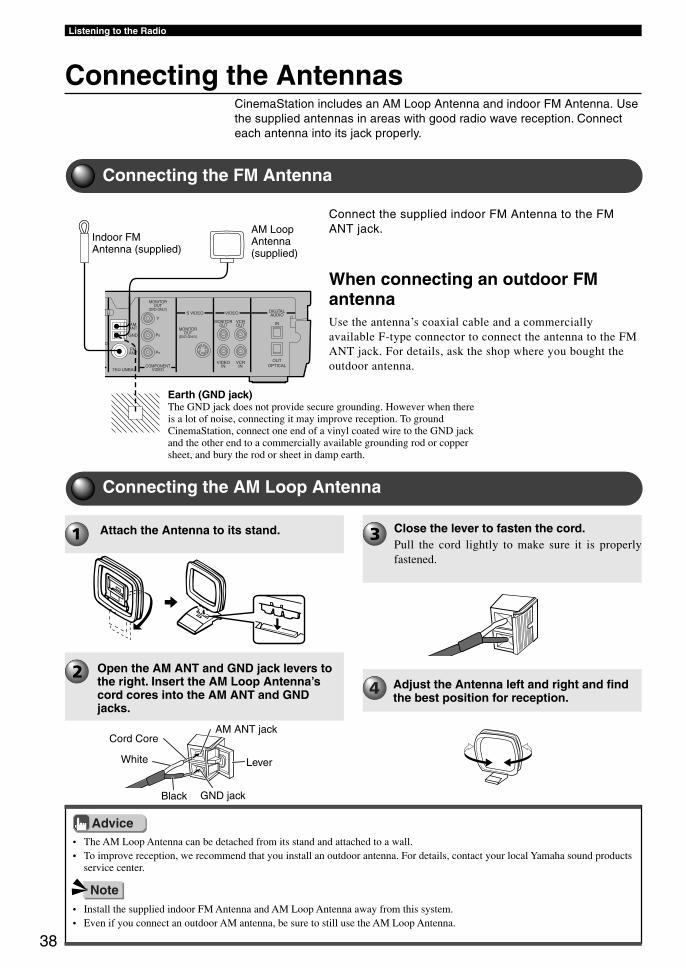
Connecting the AntennasCinemaStation includes an AM Loop Antenna and indoor FM Antenna. Usethe supplied antennas in areas with good radio wave reception. Connecteach antenna into its jack properly.
DIGITALAUDIOVIDEOS VIDEO
INVCROUTAM
ANT
O
Y
PB
PRFM
ANT
GND
MONITOROUT
MONITOROUT
(DVD ONLY)
MONITOROUT
(DVD ONLY)
VCRIN
VIDEOINCOMPONENT
VIDEO75 UNBAL
OUTOPTICAL
• The AM Loop Antenna can be detached from its stand and attached to a wall.• To improve reception, we recommend that you install an outdoor antenna. For details, contact your local Yamaha sound products
service center.
• Install the supplied indoor FM Antenna and AM Loop Antenna away from this system.• Even if you connect an outdoor AM antenna, be sure to still use the AM Loop Antenna.
Attach the Antenna to its stand.
Open the AM ANT and GND jack levers tothe right. Insert the AM Loop Antenna’scord cores into the AM ANT and GNDjacks.
Close the lever to fasten the cord.Pull the cord lightly to make sure it is properlyfastened.
Adjust the Antenna left and right and findthe best position for reception.
Cord Core
Lever
Connecting the FM Antenna
Connect the supplied indoor FM Antenna to the FMANT jack.
When connecting an outdoor FMantennaUse the antenna’s coaxial cable and a commerciallyavailable F-type connector to connect the antenna to the FMANT jack. For details, ask the shop where you bought theoutdoor antenna.
Earth (GND jack)The GND jack does not provide secure grounding. However when thereis a lot of noise, connecting it may improve reception. To groundCinemaStation, connect one end of a vinyl coated wire to the GND jackand the other end to a commercially available grounding rod or coppersheet, and bury the rod or sheet in damp earth.
Connecting the AM Loop Antenna
Advice
Note
Indoor FMAntenna (supplied)
AM LoopAntenna(supplied)
White
Black
AM ANT jack
GND jack
010DVX-S120-en 03.8.5, 1:45 PM38
39
Listening to the RadioL
istenin
g to
the R
adio
En
glish
Listening to the RadioCinemaStation provides several methods for tuning radio stations to help youfind channels as easy as you can.
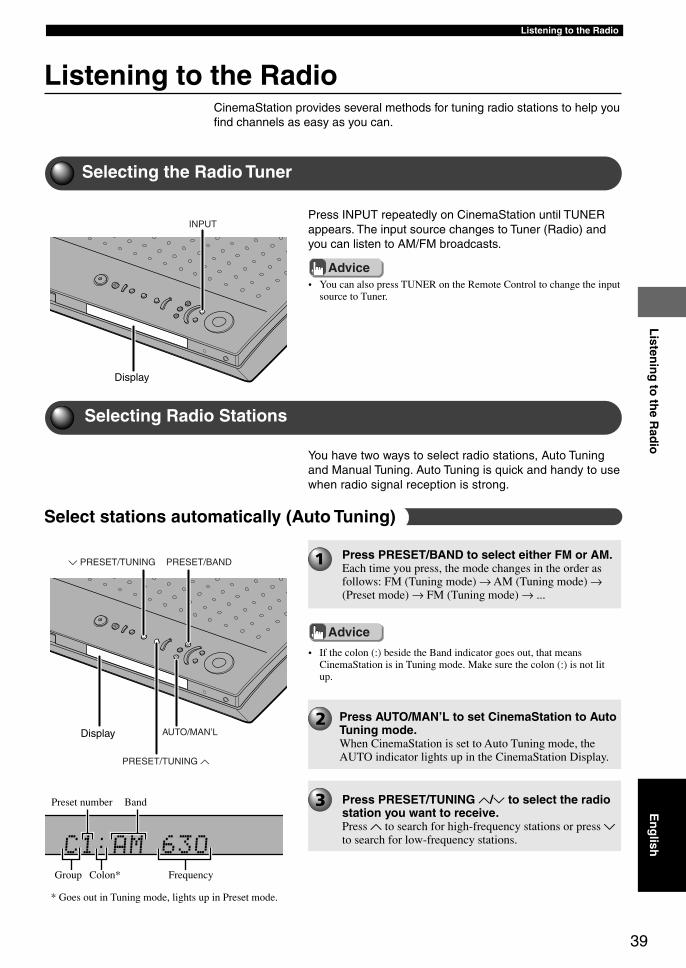
INPUT
Press PRESET/BAND to select either FM or AM.Each time you press, the mode changes in the order asfollows: FM (Tuning mode) → AM (Tuning mode) →(Preset mode) → FM (Tuning mode) → ...
PRESET/BAND
AUTO/MAN’L
d PRESET/TUNING
PRESET/TUNING u
Selecting the Radio Tuner
Press INPUT repeatedly on CinemaStation until TUNERappears. The input source changes to Tuner (Radio) andyou can listen to AM/FM broadcasts.
• You can also press TUNER on the Remote Control to change the inputsource to Tuner.
Advice
Display
Selecting Radio Stations
You have two ways to select radio stations, Auto Tuningand Manual Tuning. Auto Tuning is quick and handy to usewhen radio signal reception is strong.
Select stations automatically (Auto Tuning)
• If the colon (:) beside the Band indicator goes out, that meansCinemaStation is in Tuning mode. Make sure the colon (:) is not litup.
Advice
Press AUTO/MAN’L to set CinemaStation to AutoTuning mode.When CinemaStation is set to Auto Tuning mode, theAUTO indicator lights up in the CinemaStation Display.
Press PRESET/TUNING u/d to select the radiostation you want to receive.Press u to search for high-frequency stations or press dto search for low-frequency stations.
Display
Preset number Band
Group Colon* Frequency
* Goes out in Tuning mode, lights up in Preset mode.
010DVX-S120-en 03.8.5, 1:45 PM39
40
Listening to the Radio
PRESET/BAND
AUTO/MAN’L
d PRESET/TUNING
PRESET/TUNING u
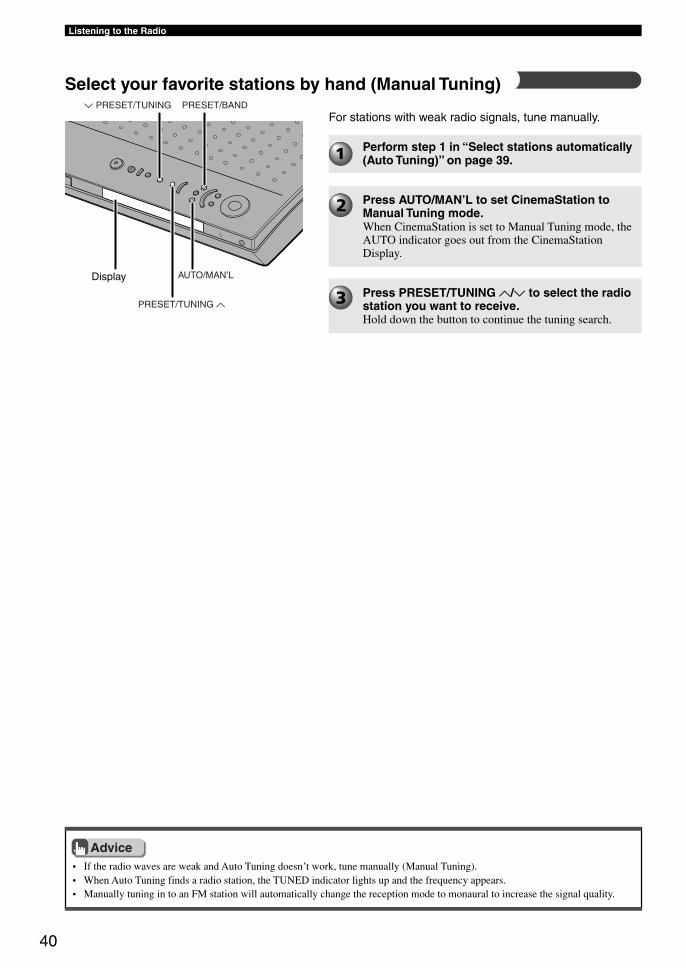
For stations with weak radio signals, tune manually.
• If the radio waves are weak and Auto Tuning doesn’t work, tune manually (Manual Tuning).• When Auto Tuning finds a radio station, the TUNED indicator lights up and the frequency appears.• Manually tuning in to an FM station will automatically change the reception mode to monaural to increase the signal quality.
Select your favorite stations by hand (Manual Tuning)
Perform step 1 in “Select stations automatically(Auto Tuning)” on page 39.
Press AUTO/MAN’L to set CinemaStation toManual Tuning mode.When CinemaStation is set to Manual Tuning mode, theAUTO indicator goes out from the CinemaStationDisplay.
Press PRESET/TUNING u/d to select the radiostation you want to receive.Hold down the button to continue the tuning search.
Advice
Display
010DVX-S120-en 03.8.5, 1:45 PM40
41
Listening to the RadioL
istenin
g to
the R
adio
En
glish
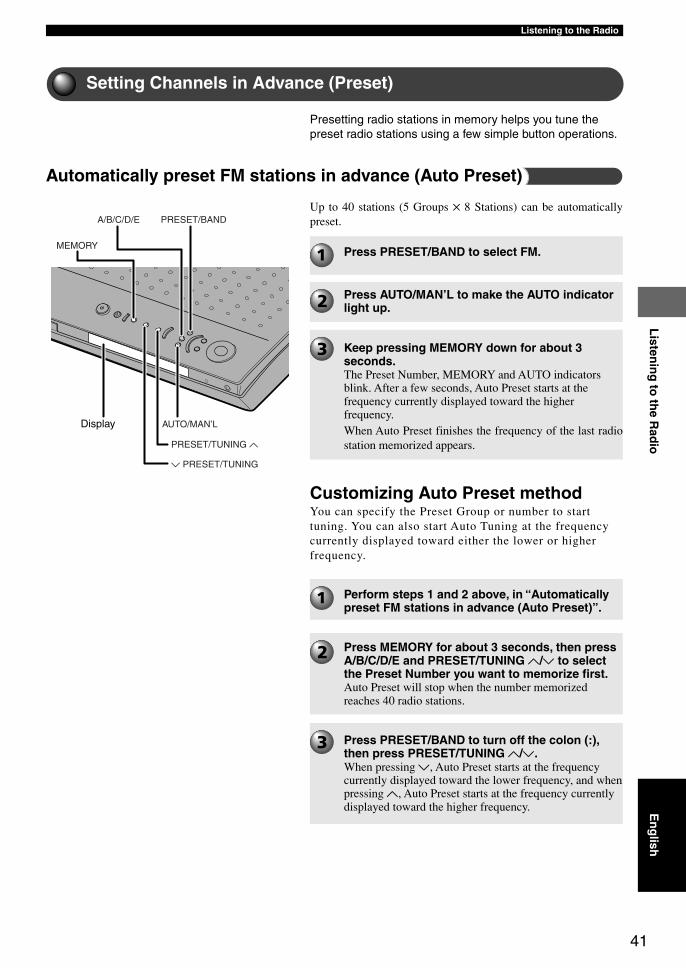
Up to 40 stations (5 Groups 8 Stations) can be automaticallypreset.PRESET/BANDA/B/C/D/E
MEMORY
AUTO/MAN’L
PRESET/TUNING u
d PRESET/TUNING
Setting Channels in Advance (Preset)
Presetting radio stations in memory helps you tune thepreset radio stations using a few simple button operations.
Automatically preset FM stations in advance (Auto Preset)
Press PRESET/BAND to select FM.
Press AUTO/MAN’L to make the AUTO indicatorlight up.
Keep pressing MEMORY down for about 3seconds.The Preset Number, MEMORY and AUTO indicatorsblink. After a few seconds, Auto Preset starts at thefrequency currently displayed toward the higherfrequency.When Auto Preset finishes the frequency of the last radiostation memorized appears.
Customizing Auto Preset methodYou can specify the Preset Group or number to starttuning. You can also start Auto Tuning at the frequencycurrently displayed toward either the lower or higherfrequency.
Perform steps 1 and 2 above, in “Automaticallypreset FM stations in advance (Auto Preset)”.
Press MEMORY for about 3 seconds, then pressA/B/C/D/E and PRESET/TUNING u/d to selectthe Preset Number you want to memorize first.Auto Preset will stop when the number memorizedreaches 40 radio stations.
Press PRESET/BAND to turn off the colon (:),then press PRESET/TUNING u/d.When pressing d, Auto Preset starts at the frequencycurrently displayed toward the lower frequency, and whenpressing u, Auto Preset starts at the frequency currentlydisplayed toward the higher frequency.
Display
010DVX-S120-en 03.8.5, 1:45 PM41
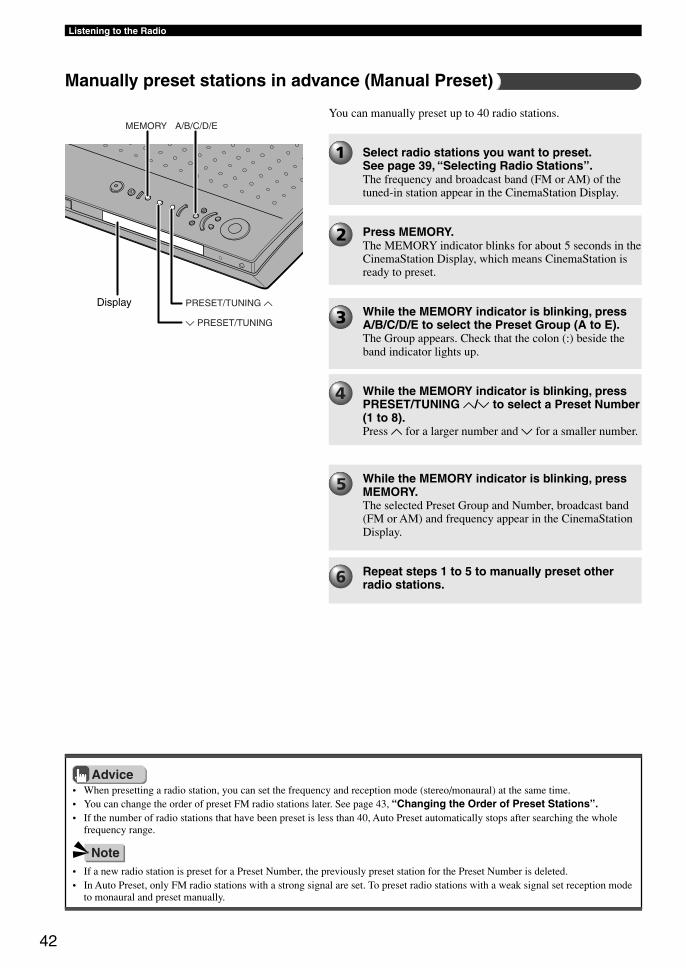
42
Listening to the Radio
You can manually preset up to 40 radio stations.A/B/C/D/EMEMORY
PRESET/TUNING u
d PRESET/TUNING
• When presetting a radio station, you can set the frequency and reception mode (stereo/monaural) at the same time.• You can change the order of preset FM radio stations later. See page 43, “Changing the Order of Preset Stations”.• If the number of radio stations that have been preset is less than 40, Auto Preset automatically stops after searching the whole
frequency range.
• If a new radio station is preset for a Preset Number, the previously preset station for the Preset Number is deleted.• In Auto Preset, only FM radio stations with a strong signal are set. To preset radio stations with a weak signal set reception mode
to monaural and preset manually.
Manually preset stations in advance (Manual Preset)
Select radio stations you want to preset.See page 39, “Selecting Radio Stations”.The frequency and broadcast band (FM or AM) of thetuned-in station appear in the CinemaStation Display.
Press MEMORY.The MEMORY indicator blinks for about 5 seconds in theCinemaStation Display, which means CinemaStation isready to preset.
While the MEMORY indicator is blinking, pressA/B/C/D/E to select the Preset Group (A to E).The Group appears. Check that the colon (:) beside theband indicator lights up.
While the MEMORY indicator is blinking, pressPRESET/TUNING u/d to select a Preset Number(1 to 8).Press u for a larger number and d for a smaller number.
While the MEMORY indicator is blinking, pressMEMORY.The selected Preset Group and Number, broadcast band(FM or AM) and frequency appear in the CinemaStationDisplay.
Repeat steps 1 to 5 to manually preset otherradio stations.
Advice
Note
Display
010DVX-S120-en 03.8.5, 1:45 PM42
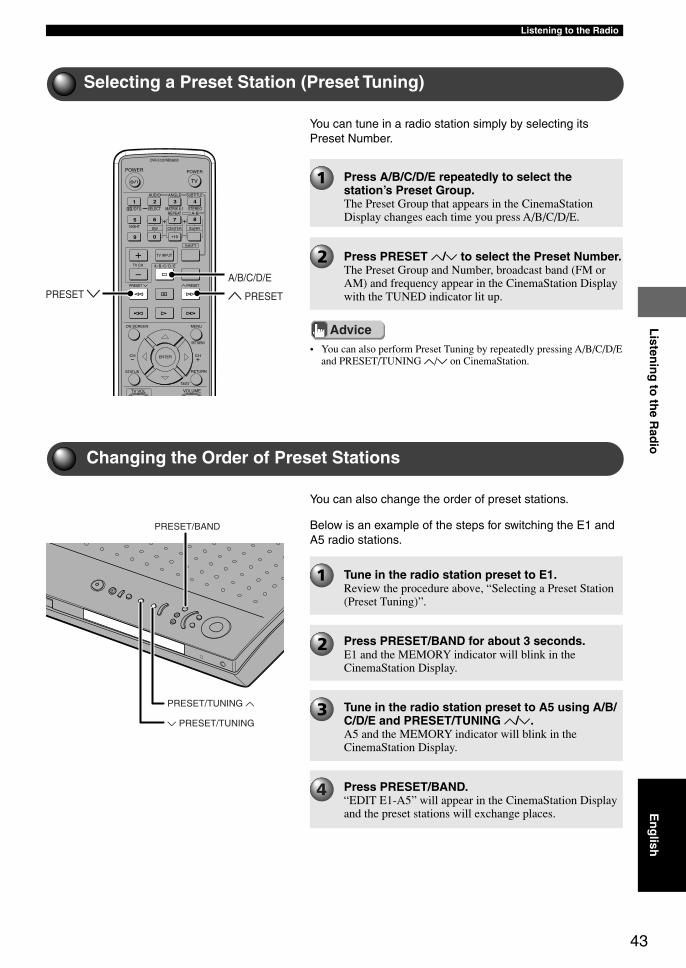
43
Listening to the RadioL
istenin
g to
the R
adio
En
glish
You can tune in a radio station simply by selecting itsPreset Number.
TV
CHCH
POWER POWER
AUDIO
/DTS SELECT
NIGHT SW
TV CH
TV INPUT
SLEEP
PRESET PRESET
A B C D E
CENTER SURR
SHIFT
STEREOMATRIX 6.1A-BREPEAT
ANGLE SUBTITLE
DVR-S120 WB56650
ON SCREEN MENU
TEST
RETURNSTATUS
TV VOL VOLUME
MUTE
SET MENU
ENTER
A/B/C/D/E
u PRESETPRESET d
PRESET/TUNING u
PRESET/BAND
d PRESET/TUNING
Selecting a Preset Station (Preset Tuning)
Changing the Order of Preset Stations
Press A/B/C/D/E repeatedly to select thestation’s Preset Group.The Preset Group that appears in the CinemaStationDisplay changes each time you press A/B/C/D/E.
Press PRESET u/d to select the Preset Number.The Preset Group and Number, broadcast band (FM orAM) and frequency appear in the CinemaStation Displaywith the TUNED indicator lit up.
• You can also perform Preset Tuning by repeatedly pressing A/B/C/D/Eand PRESET/TUNING u/d on CinemaStation.
Advice
You can also change the order of preset stations.
Below is an example of the steps for switching the E1 andA5 radio stations.
Tune in the radio station preset to E1.Review the procedure above, “Selecting a Preset Station(Preset Tuning)”.
Press PRESET/BAND for about 3 seconds.E1 and the MEMORY indicator will blink in theCinemaStation Display.
Tune in the radio station preset to A5 using A/B/C/D/E and PRESET/TUNING u/d.A5 and the MEMORY indicator will blink in theCinemaStation Display.
Press PRESET/BAND.“EDIT E1-A5” will appear in the CinemaStation Displayand the preset stations will exchange places.
010DVX-S120-en 03.8.5, 1:45 PM43
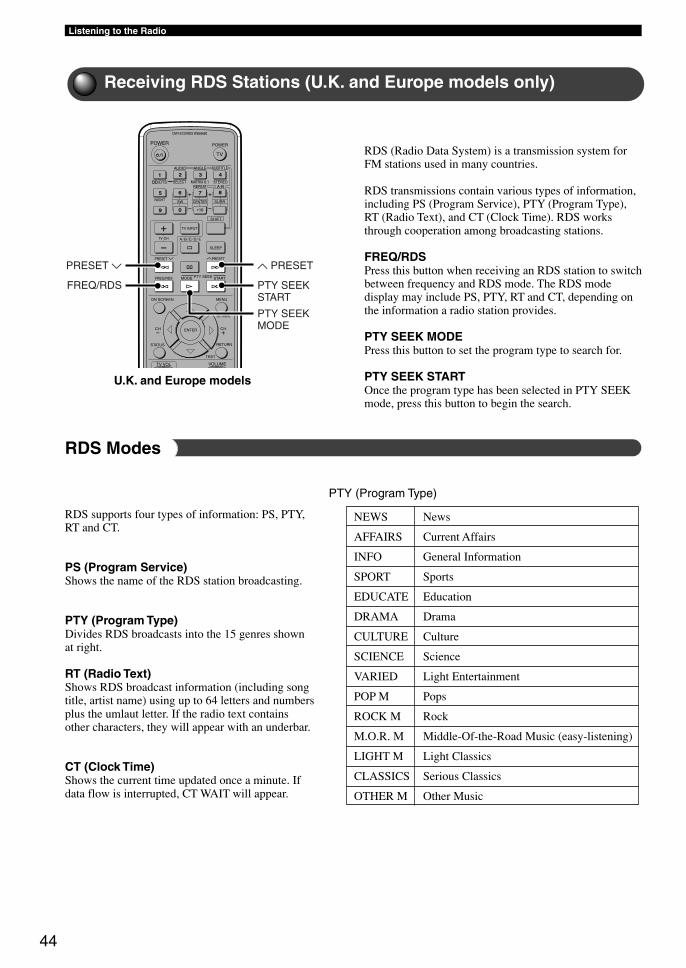
44
Listening to the Radio
TV
CHCH
POWER POWER
AUDIO
/DTS SELECT
NIGHT SW
TV CH
TV INPUT
SLEEP
PRESET PRESET
A B C D E
MODE STARTPTY SEEKFREQ/RDS
CENTER SURR
SHIFT
STEREOMATRIX 6.1A-BREPEAT
ANGLE SUBTITLE
DVR-S120RDS WB56660
ON SCREEN MENU
TEST
RETURNSTATUS
TV VOL VOLUME
SET MENU
ENTER
u PRESET
PTY SEEKSTART
PRESET d
FREQ/RDS
PTY SEEKMODE
Receiving RDS Stations (U.K. and Europe models only)
RDS (Radio Data System) is a transmission system forFM stations used in many countries.
RDS transmissions contain various types of information,including PS (Program Service), PTY (Program Type),RT (Radio Text), and CT (Clock Time). RDS worksthrough cooperation among broadcasting stations.
FREQ/RDSPress this button when receiving an RDS station to switchbetween frequency and RDS mode. The RDS modedisplay may include PS, PTY, RT and CT, depending onthe information a radio station provides.
PTY SEEK MODEPress this button to set the program type to search for.
PTY SEEK STARTOnce the program type has been selected in PTY SEEKmode, press this button to begin the search.
PTY (Program Type)
RDS Modes
RDS supports four types of information: PS, PTY,RT and CT.
PS (Program Service)Shows the name of the RDS station broadcasting.
PTY (Program Type)Divides RDS broadcasts into the 15 genres shownat right.
RT (Radio Text)Shows RDS broadcast information (including songtitle, artist name) using up to 64 letters and numbersplus the umlaut letter. If the radio text containsother characters, they will appear with an underbar.
CT (Clock Time)Shows the current time updated once a minute. Ifdata flow is interrupted, CT WAIT will appear.
NEWS
AFFAIRS
INFO
SPORT
EDUCATE
DRAMA
CULTURE
SCIENCE
VARIED
POP M
ROCK M
M.O.R. M
LIGHT M
CLASSICS
OTHER M
News
Current Affairs
General Information
Sports
Education
Drama
Culture
Science
Light Entertainment
Pops
Rock
Middle-Of-the-Road Music (easy-listening)
Light Classics
Serious Classics
Other Music
U.K. and Europe models
011DVX-S120-en 03.8.5, 1:46 PM44
45
Listening to the RadioL
istenin
g to
the R
adio
En
glish
Change RDS Mode
There are four RDS display modes. When an RDSstation is broadcasting, PS, PTY, RT or CT modeindicators corresponding to the services providedlight up in the CinemaStation Display. PressFREQ/RDS repeatedly to change among themodes supported by the currently tuned RDSstation.
Note• When an RDS station is broadcasting, do not press FREQ/RDS until
one or more mode indicators light up in the CinemaStation Display. Ifyou press FREQ/RDS before the mode indicators light up,CinemaStation may not be able to change modes.
• RDS information not provided by a station cannot be selected.• If the RDS station’s signal transmission is too weak, CinemaStation
may not be able to use the service fully. In particular, radio text uses alot of bandwidth, so it may not be available even when other modesare selectable.
• RDS information may not transmit under poor conditions. In thiscase, press AUTO/MAN’L to set CinemaStation to Manual Tuningmode. This changes reception to monaural and may help RDSinformation reappear when you switch to RDS display mode.
• If outside interference disrupts an RDS station broadcast, RDSinformation may suddenly disappear and “...WAIT ” appears in theCinemaStation Display.
About PTY SEEK
Press PTY SEEK MODE to set CinemaStation toPTY SEEK mode.The program type of the tuned in station or NEWS blinksin the CinemaStation Display.
Press PTY SEEK START to start searching allpreset RDS stations.The selected program type flashes and the PTY HOLDindicator lights up while the search is in progress.If the search finds a station that matches the program typeyou selected, CinemaStation will tune it in.If the station tuned in is not the one you want press PTYSEEK START again to continue the search for otherstations broadcasting the program type you selected.
Press PRESET u/d to select the program typeyou want.Your program type selection appears in theCinemaStation Display.
When you select the program type, CinemaStation automaticallysearches through all preset stations currently broadcasting forthat type.
To cancel steps 1 or 2Press PTY SEEK MODE twice.
PS
PTY
RT
CT
RDS mode OFF
011DVX-S120-en 03.8.5, 1:46 PM45

46
Using Other Equipment
Connecting Video EquipmentConnect a VCR to CinemaStation to play or dub videos. You can alsoconnect a game console or video camera.
Connecting a Game Console or VCR
• Always read the owner’s manual of any equipment you want to connect.
DIGITALAUDIOVIDEOS VIDEO
INVCROUTAM
ANT
VCROUT
VCRIN
VIDEOIN
Y
PB
PRFM
ANT
GND
MONITOROUT
MONITOROUT
(DVD ONLY)
MONITOROUT
(DVD ONLY)
VCRIN
VIDEOINCOMPONENT
VIDEOAUDIO
R L
75 UNBAL
OUTOPTICAL
VIDEO
DIGITAL
OPTICAL
OUTPUT
OUTPUT
L
R
L
R
AUDIO
VIDEO
L
R
L
R
AUDIO
VIDEO
AUDIO
VIDEO
L
R
AUDIO
VIDEO
INPUT OUTPUT1 OUTPUT2 INPUT1 INPUT2
Please...
TV
Connection Cables
VCR
Game console orvideo camera
Or
CinemaStation
Use a commercially available Audio/Video cable.Use the supplied Video Pin Cable.
Audio/Video cable(commercially available)
Video Pin Cable (supplied)
When directlyconnecting the TV
with the VCR, you canplay video tape on theVCR even if you turn
off CinemaStation.
Use a commercially available optical cable
Optical cable (commercially available)
011DVX-S120-en 03.8.5, 1:46 PM46
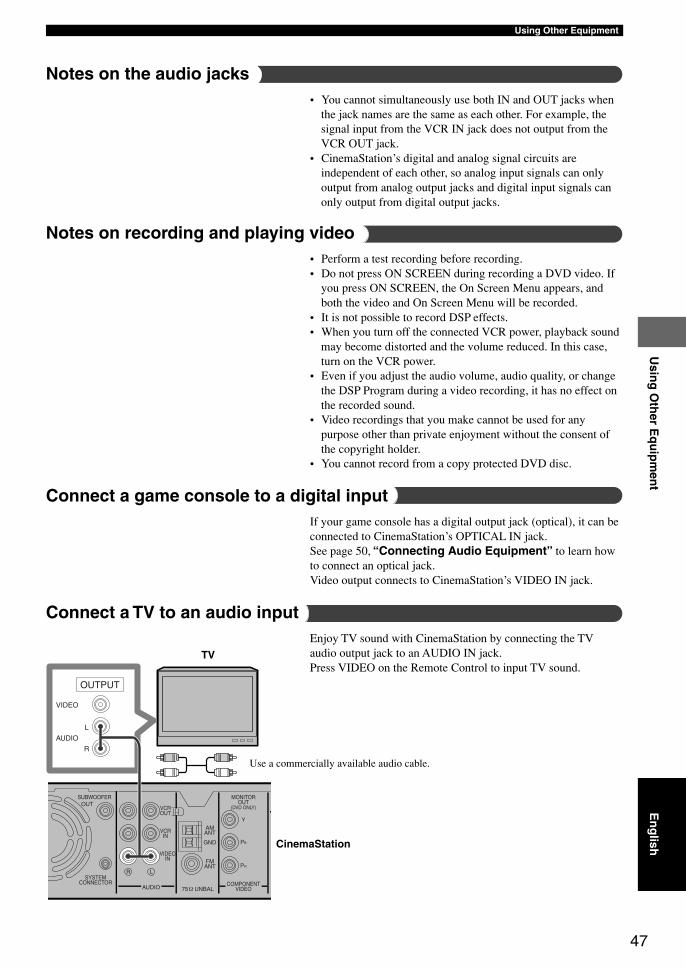
47
Using Other EquipmentU
sing
Oth
er Eq
uip
men
tE
ng
lish
TV
Use a commercially available audio cable.
CinemaStation
AMANT
VCROUT
VCRIN
VIDEOIN
Y
PB
PRFM
ANT
GND
MONITOROUT
(DVD ONLY)
SUBWOOFEROUT
COMPONENTVIDEOAUDIO
R LSYSTEM
CONNECTOR75 UNBAL
L
R
OUTPUT
AUDIO
VIDEO
Notes on the audio jacks• You cannot simultaneously use both IN and OUT jacks when
the jack names are the same as each other. For example, thesignal input from the VCR IN jack does not output from theVCR OUT jack.
• CinemaStation’s digital and analog signal circuits areindependent of each other, so analog input signals can onlyoutput from analog output jacks and digital input signals canonly output from digital output jacks.
Notes on recording and playing video• Perform a test recording before recording.• Do not press ON SCREEN during recording a DVD video. If
you press ON SCREEN, the On Screen Menu appears, andboth the video and On Screen Menu will be recorded.
• It is not possible to record DSP effects.• When you turn off the connected VCR power, playback sound
may become distorted and the volume reduced. In this case,turn on the VCR power.
• Even if you adjust the audio volume, audio quality, or changethe DSP Program during a video recording, it has no effect onthe recorded sound.
• Video recordings that you make cannot be used for anypurpose other than private enjoyment without the consent ofthe copyright holder.
• You cannot record from a copy protected DVD disc.
Connect a game console to a digital inputIf your game console has a digital output jack (optical), it can beconnected to CinemaStation’s OPTICAL IN jack.See page 50, “Connecting Audio Equipment” to learn howto connect an optical jack.Video output connects to CinemaStation’s VIDEO IN jack.
Connect a TV to an audio inputEnjoy TV sound with CinemaStation by connecting the TVaudio output jack to an AUDIO IN jack.Press VIDEO on the Remote Control to input TV sound.
011DVX-S120-en 03.8.5, 1:46 PM47
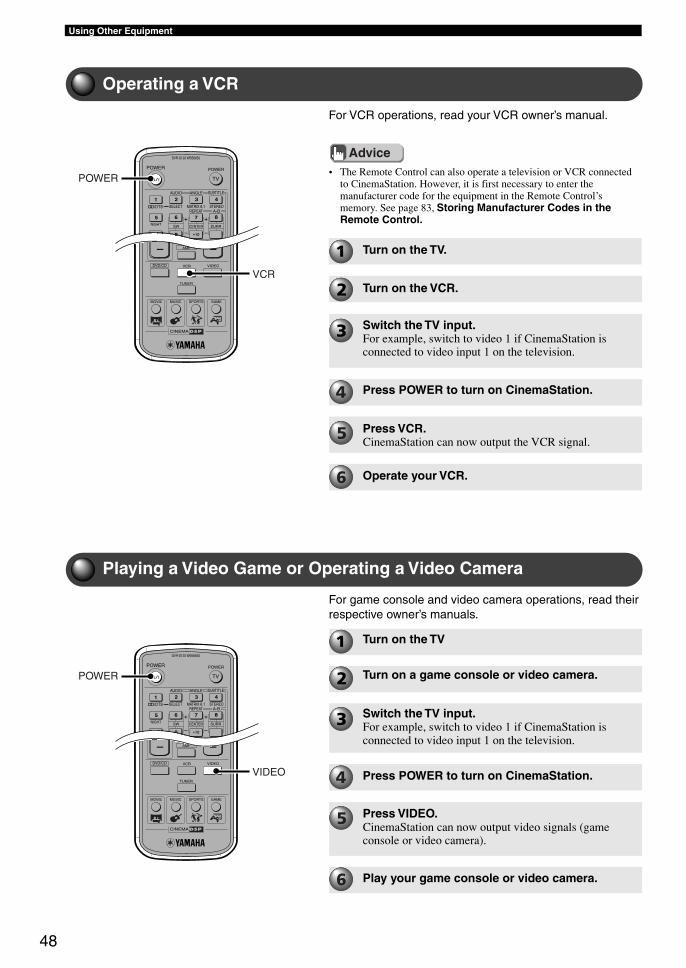
48
Using Other Equipment
Operating a VCR
For VCR operations, read your VCR owner’s manual.
TV
POWER POWER
AUDIO
/DTS SELECT
NIGHT SW CENTER SURR
SHIFT
STEREOMATRIX 6.1A-BREPEAT
ANGLE SUBTITLE
DVR-S120 WB56650
CINEMA
AMP
DVD/CD VCR VIDEO
TUNER
MOVIE MUSIC SPORTS GAME
POWER
VCR
TV
POWER POWER
AUDIO
/DTS SELECT
NIGHT SW CENTER SURR
SHIFT
STEREOMATRIX 6.1A-BREPEAT
ANGLE SUBTITLE
DVR-S120 WB56650
CINEMA
AMP
DVD/CD VCR VIDEO
TUNER
MOVIE MUSIC SPORTS GAME
POWER
VIDEO
Advice• The Remote Control can also operate a television or VCR connected
to CinemaStation. However, it is first necessary to enter themanufacturer code for the equipment in the Remote Control’smemory. See page 83, Storing Manufacturer Codes in theRemote Control.
Operate your VCR.
Turn on the TV.
Turn on the VCR.
Switch the TV input.For example, switch to video 1 if CinemaStation isconnected to video input 1 on the television.
Press POWER to turn on CinemaStation.
Press VCR.CinemaStation can now output the VCR signal.
Playing a Video Game or Operating a Video Camera
For game console and video camera operations, read theirrespective owner’s manuals.
Play your game console or video camera.
Press VIDEO.CinemaStation can now output video signals (gameconsole or video camera).
Press POWER to turn on CinemaStation.
Switch the TV input.For example, switch to video 1 if CinemaStation isconnected to video input 1 on the television.
Turn on a game console or video camera.
Turn on the TV
011DVX-S120-en 03.8.5, 1:46 PM48
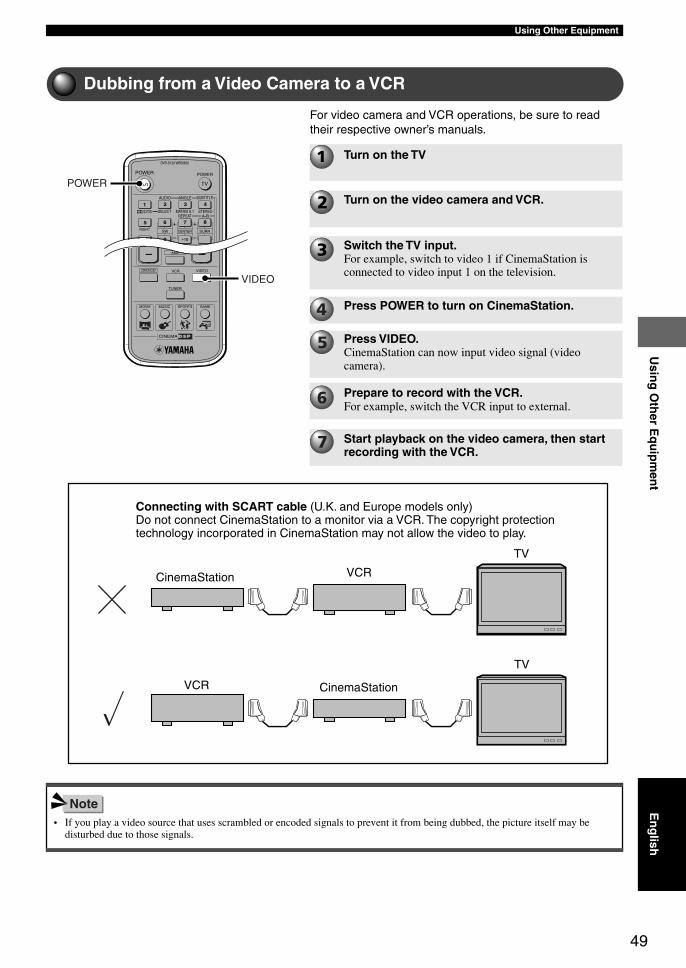
49
Using Other EquipmentU
sing
Oth
er Eq
uip
men
tE
ng
lish
Dubbing from a Video Camera to a VCR
For video camera and VCR operations, be sure to readtheir respective owner’s manuals.
TV
POWER POWER
AUDIO
/DTS SELECT
NIGHT SW CENTER SURR
SHIFT
STEREOMATRIX 6.1A-BREPEAT
ANGLE SUBTITLE
DVR-S120 WB56650
CINEMA
AMP
DVD/CD VCR VIDEO
TUNER
MOVIE MUSIC SPORTS GAME
POWER
VIDEO
Turn on the TV
Start playback on the video camera, then startrecording with the VCR.
Prepare to record with the VCR.For example, switch the VCR input to external.
Press VIDEO.CinemaStation can now input video signal (videocamera).
Press POWER to turn on CinemaStation.
Switch the TV input.For example, switch to video 1 if CinemaStation isconnected to video input 1 on the television.
Turn on the video camera and VCR.
CinemaStation VCR
TV
VCR CinemaStation
TV
Note• If you play a video source that uses scrambled or encoded signals to prevent it from being dubbed, the picture itself may be
disturbed due to those signals.
Connecting with SCART cable (U.K. and Europe models only)Do not connect CinemaStation to a monitor via a VCR. The copyright protectiontechnology incorporated in CinemaStation may not allow the video to play.
011DVX-S120-en 03.8.5, 1:46 PM49
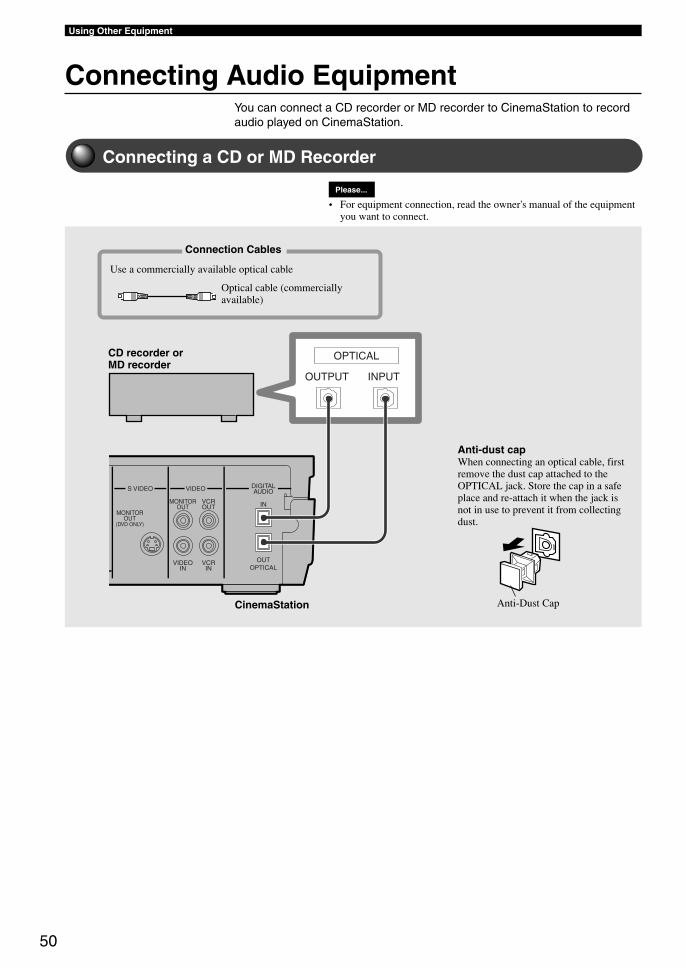
50
Using Other Equipment
Connecting Audio EquipmentYou can connect a CD recorder or MD recorder to CinemaStation to recordaudio played on CinemaStation.
Connecting a CD or MD Recorder
DIGITALAUDIOVIDEOS VIDEO
INVCROUT
MONITOROUT
MONITOROUT
(DVD ONLY)
VCRIN
VIDEOIN
OUTOPTICAL
OUTPUT
OPTICAL
INPUT
Please...
• For equipment connection, read the owner's manual of the equipmentyou want to connect.
Anti-dust capWhen connecting an optical cable, firstremove the dust cap attached to theOPTICAL jack. Store the cap in a safeplace and re-attach it when the jack isnot in use to prevent it from collectingdust.
Connection Cables
CD recorder orMD recorder
CinemaStation
Use a commercially available optical cable
Optical cable (commerciallyavailable)
Anti-Dust Cap
011DVX-S120-en 03.8.5, 1:46 PM50
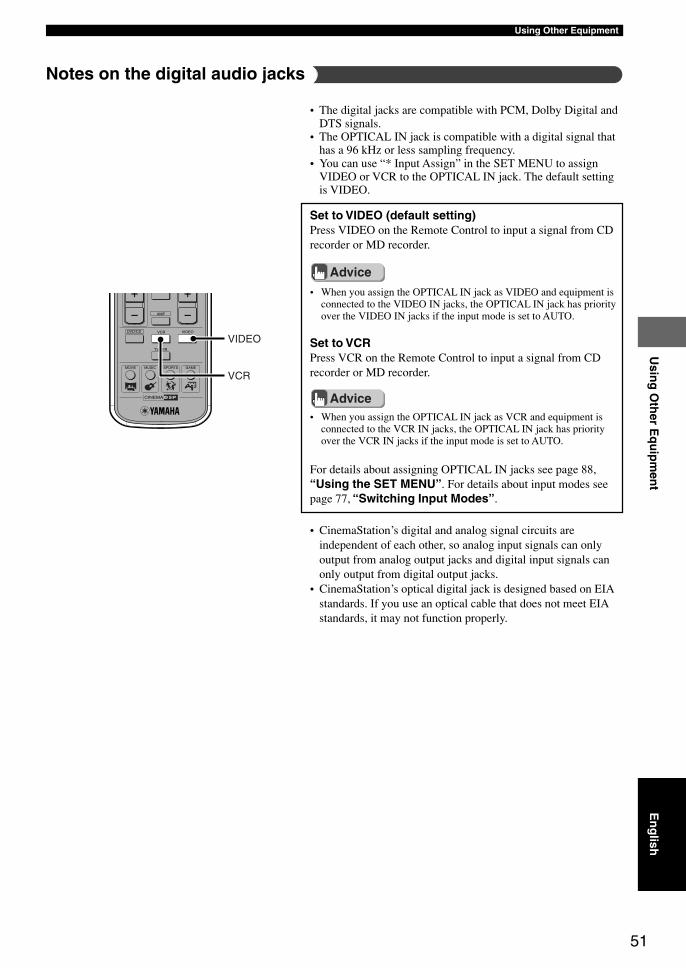
51
Using Other EquipmentU
sing
Oth
er Eq
uip
men
tE
ng
lish
Advice
Advice
• When you assign the OPTICAL IN jack as VIDEO and equipment isconnected to the VIDEO IN jacks, the OPTICAL IN jack has priorityover the VIDEO IN jacks if the input mode is set to AUTO.
• CinemaStation’s digital and analog signal circuits areindependent of each other, so analog input signals can onlyoutput from analog output jacks and digital input signals canonly output from digital output jacks.
• CinemaStation’s optical digital jack is designed based on EIAstandards. If you use an optical cable that does not meet EIAstandards, it may not function properly.
• The digital jacks are compatible with PCM, Dolby Digital andDTS signals.
• The OPTICAL IN jack is compatible with a digital signal thathas a 96 kHz or less sampling frequency.
• You can use “* Input Assign” in the SET MENU to assignVIDEO or VCR to the OPTICAL IN jack. The default settingis VIDEO.
Set to VIDEO (default setting)Press VIDEO on the Remote Control to input a signal from CDrecorder or MD recorder.
Set to VCRPress VCR on the Remote Control to input a signal from CDrecorder or MD recorder.
• When you assign the OPTICAL IN jack as VCR and equipment isconnected to the VCR IN jacks, the OPTICAL IN jack has priorityover the VCR IN jacks if the input mode is set to AUTO.
Notes on the digital audio jacks
For details about assigning OPTICAL IN jacks see page 88,“Using the SET MENU”. For details about input modes seepage 77, “Switching Input Modes”.
CINEMA
AMP
DVD/CD VCR VIDEO
TUNER
MOVIE MUSIC SPORTS GAME
VIDEO
VCR
011DVX-S120-en 03.8.5, 1:46 PM51
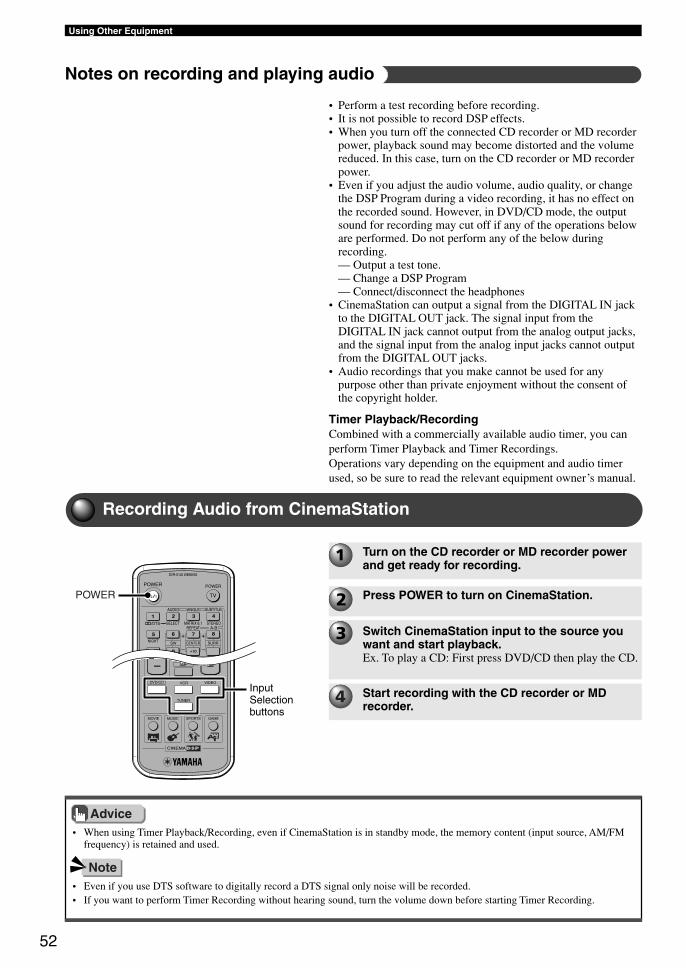
52
Using Other Equipment
• When using Timer Playback/Recording, even if CinemaStation is in standby mode, the memory content (input source, AM/FMfrequency) is retained and used.
TV
POWER POWER
AUDIO
/DTS SELECT
NIGHT SW CENTER SURR
SHIFT
STEREOMATRIX 6.1A-BREPEAT
ANGLE SUBTITLE
DVR-S120 WB56650
CINEMA
AMP
DVD/CD VCR VIDEO
TUNER
MOVIE MUSIC SPORTS GAME
POWER
Turn on the CD recorder or MD recorder powerand get ready for recording.
• Perform a test recording before recording.• It is not possible to record DSP effects.• When you turn off the connected CD recorder or MD recorder
power, playback sound may become distorted and the volumereduced. In this case, turn on the CD recorder or MD recorderpower.
• Even if you adjust the audio volume, audio quality, or changethe DSP Program during a video recording, it has no effect onthe recorded sound. However, in DVD/CD mode, the outputsound for recording may cut off if any of the operations beloware performed. Do not perform any of the below duringrecording.— Output a test tone.— Change a DSP Program— Connect/disconnect the headphones
• CinemaStation can output a signal from the DIGITAL IN jackto the DIGITAL OUT jack. The signal input from theDIGITAL IN jack cannot output from the analog output jacks,and the signal input from the analog input jacks cannot outputfrom the DIGITAL OUT jacks.
• Audio recordings that you make cannot be used for anypurpose other than private enjoyment without the consent ofthe copyright holder.
Timer Playback/RecordingCombined with a commercially available audio timer, you canperform Timer Playback and Timer Recordings.Operations vary depending on the equipment and audio timerused, so be sure to read the relevant equipment owner’s manual.
Recording Audio from CinemaStation
Notes on recording and playing audio
Start recording with the CD recorder or MDrecorder.
Switch CinemaStation input to the source youwant and start playback.Ex. To play a CD: First press DVD/CD then play the CD.
Press POWER to turn on CinemaStation.
InputSelectionbuttons
Note• Even if you use DTS software to digitally record a DTS signal only noise will be recorded.• If you want to perform Timer Recording without hearing sound, turn the volume down before starting Timer Recording.
Advice
011DVX-S120-en 03.8.5, 1:46 PM52
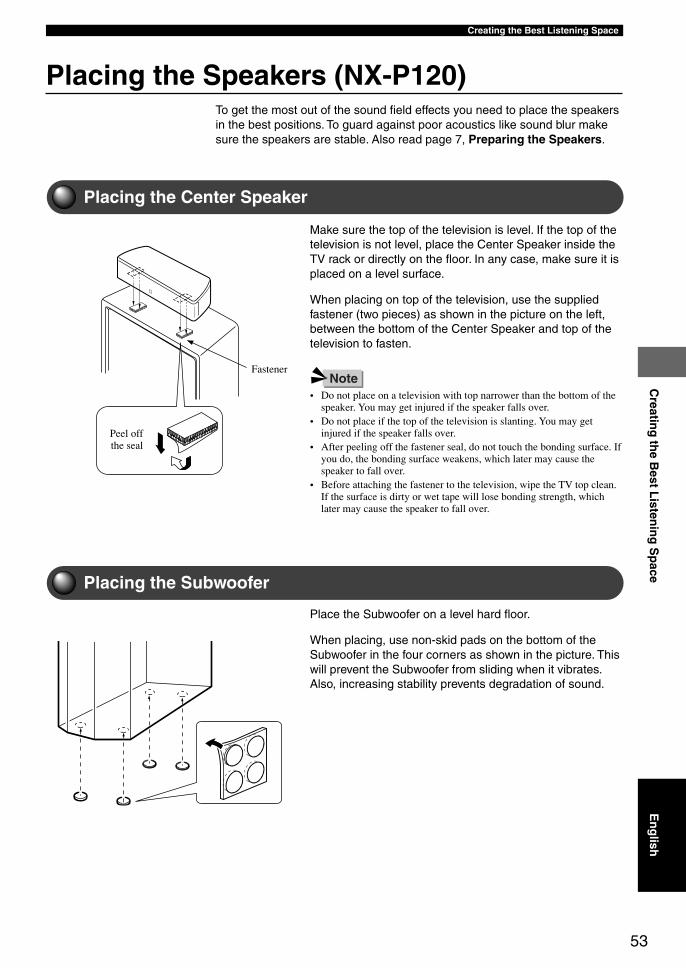
53
Creatin
g th
e Best L
istenin
g S
pace
Creating the Best Listening Space
Placing the Speakers (NX-P120)
Make sure the top of the television is level. If the top of thetelevision is not level, place the Center Speaker inside theTV rack or directly on the floor. In any case, make sure it isplaced on a level surface.
When placing on top of the television, use the suppliedfastener (two pieces) as shown in the picture on the left,between the bottom of the Center Speaker and top of thetelevision to fasten.
• Do not place on a television with top narrower than the bottom of thespeaker. You may get injured if the speaker falls over.
• Do not place if the top of the television is slanting. You may getinjured if the speaker falls over.
• After peeling off the fastener seal, do not touch the bonding surface. Ifyou do, the bonding surface weakens, which later may cause thespeaker to fall over.
• Before attaching the fastener to the television, wipe the TV top clean.If the surface is dirty or wet tape will lose bonding strength, whichlater may cause the speaker to fall over.
Placing the Center Speaker
Placing the Subwoofer
Place the Subwoofer on a level hard floor.
When placing, use non-skid pads on the bottom of theSubwoofer in the four corners as shown in the picture. Thiswill prevent the Subwoofer from sliding when it vibrates.Also, increasing stability prevents degradation of sound.
To get the most out of the sound field effects you need to place the speakersin the best positions. To guard against poor acoustics like sound blur makesure the speakers are stable. Also read page 7, Preparing the Speakers.
NoteFastener
Peel offthe seal
En
glish
012DVX-S120-en 03.8.5, 1:47 PM53
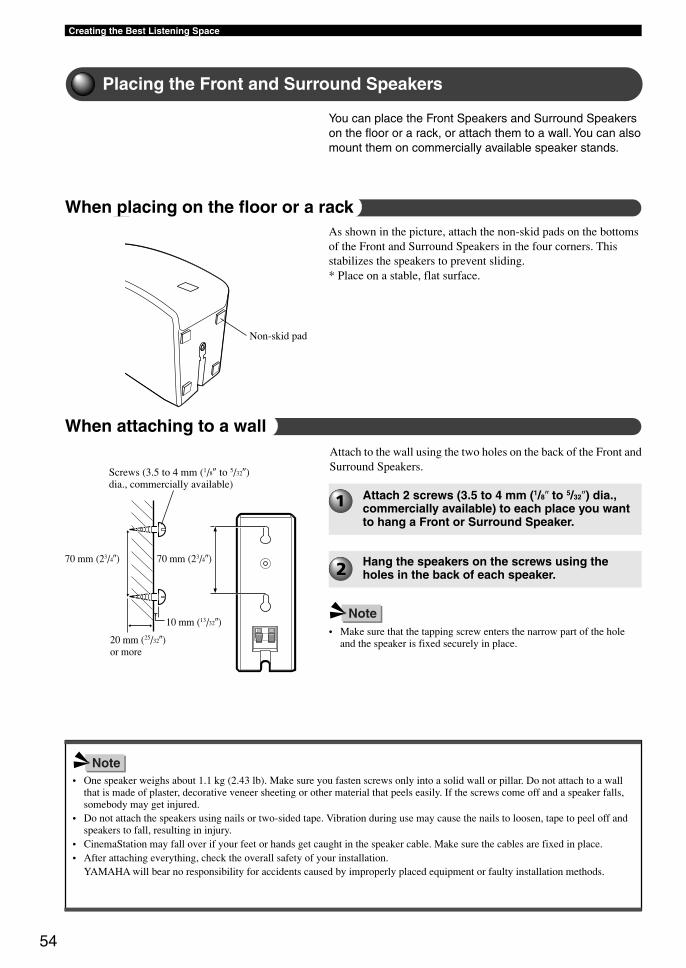
54
Creating the Best Listening Space
• One speaker weighs about 1.1 kg (2.43 lb). Make sure you fasten screws only into a solid wall or pillar. Do not attach to a wallthat is made of plaster, decorative veneer sheeting or other material that peels easily. If the screws come off and a speaker falls,somebody may get injured.
• Do not attach the speakers using nails or two-sided tape. Vibration during use may cause the nails to loosen, tape to peel off andspeakers to fall, resulting in injury.
• CinemaStation may fall over if your feet or hands get caught in the speaker cable. Make sure the cables are fixed in place.• After attaching everything, check the overall safety of your installation.
YAMAHA will bear no responsibility for accidents caused by improperly placed equipment or faulty installation methods.
Placing the Front and Surround Speakers
Attach to the wall using the two holes on the back of the Front andSurround Speakers.
Attach 2 screws (3.5 to 4 mm (1/8 to 5/32) dia.,commercially available) to each place you wantto hang a Front or Surround Speaker.
Hang the speakers on the screws using theholes in the back of each speaker.
• Make sure that the tapping screw enters the narrow part of the holeand the speaker is fixed securely in place.
As shown in the picture, attach the non-skid pads on the bottomsof the Front and Surround Speakers in the four corners. Thisstabilizes the speakers to prevent sliding.* Place on a stable, flat surface.
You can place the Front Speakers and Surround Speakerson the floor or a rack, or attach them to a wall. You can alsomount them on commercially available speaker stands.
Note
Note
Non-skid pad
Screws (3.5 to 4 mm (1/8 to 5/32)dia., commercially available)
70 mm (23/4)
10 mm (13/32)
20 mm (25/32)or more
When placing on the floor or a rack
When attaching to a wall
70 mm (23/4)
012DVX-S120-en 03.8.5, 1:47 PM54
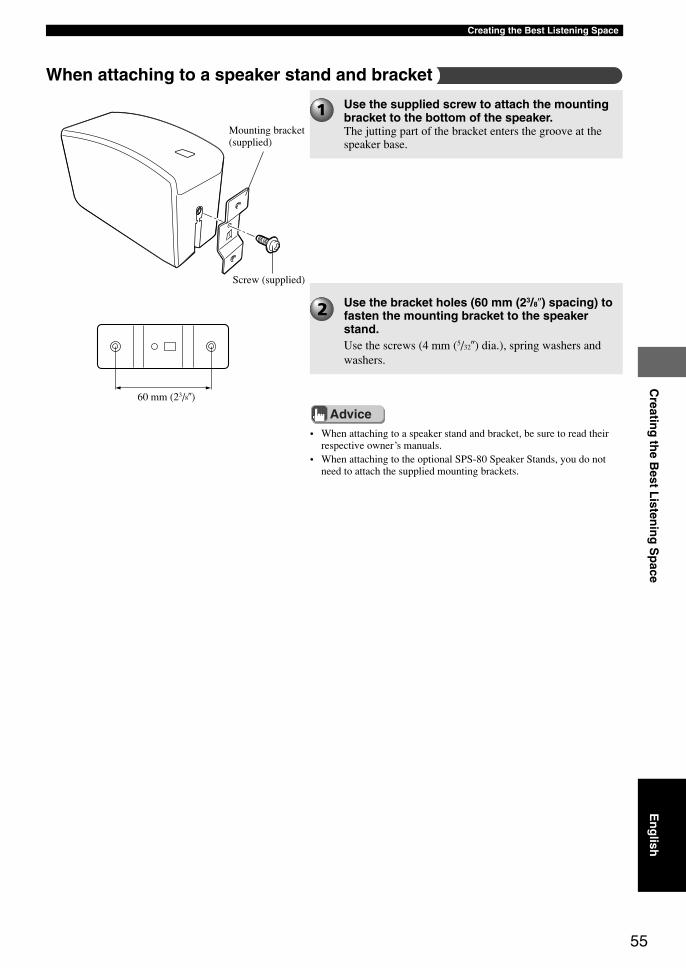
55
Creatin
g th
e Best L
istenin
g S
pace
Creating the Best Listening Space
Use the supplied screw to attach the mountingbracket to the bottom of the speaker.The jutting part of the bracket enters the groove at thespeaker base.
Use the bracket holes (60 mm (23/8) spacing) tofasten the mounting bracket to the speakerstand.Use the screws (4 mm (5/32) dia.), spring washers andwashers.
Mounting bracket(supplied)
Screw (supplied)
60 mm (23/8)
When attaching to a speaker stand and bracket
En
glish
• When attaching to a speaker stand and bracket, be sure to read theirrespective owner’s manuals.
• When attaching to the optional SPS-80 Speaker Stands, you do notneed to attach the supplied mounting brackets.
Advice
012DVX-S120-en 03.8.5, 1:47 PM55
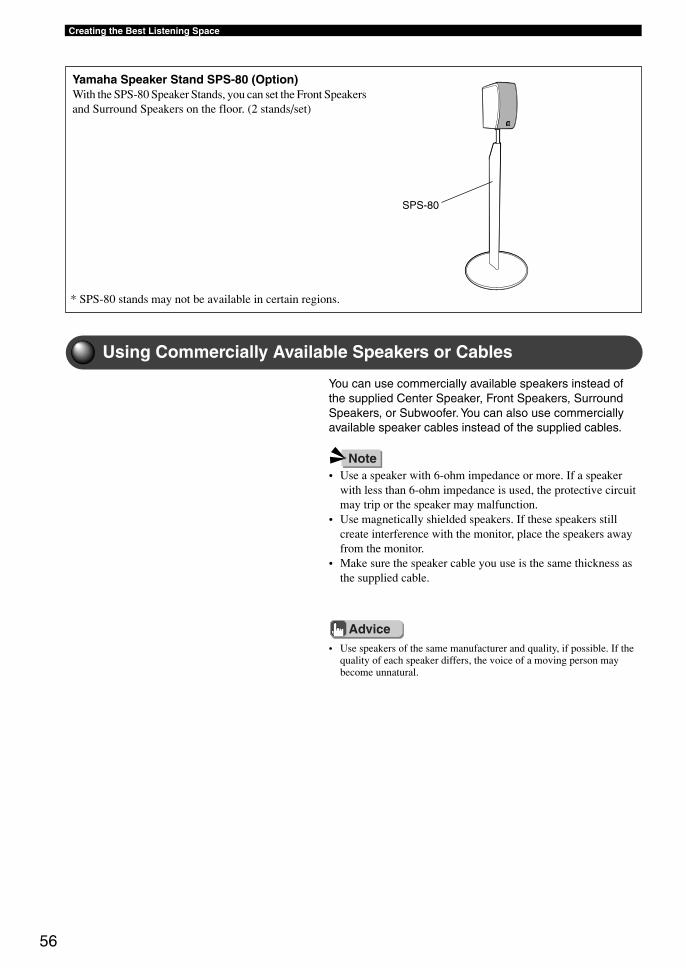
56
Creating the Best Listening Space
Yamaha Speaker Stand SPS-80 (Option)With the SPS-80 Speaker Stands, you can set the Front Speakersand Surround Speakers on the floor. (2 stands/set)
SPS-80
Using Commercially Available Speakers or Cables
• Use speakers of the same manufacturer and quality, if possible. If thequality of each speaker differs, the voice of a moving person maybecome unnatural.
Advice
You can use commercially available speakers instead ofthe supplied Center Speaker, Front Speakers, SurroundSpeakers, or Subwoofer. You can also use commerciallyavailable speaker cables instead of the supplied cables.
• Use a speaker with 6-ohm impedance or more. If a speakerwith less than 6-ohm impedance is used, the protective circuitmay trip or the speaker may malfunction.
• Use magnetically shielded speakers. If these speakers stillcreate interference with the monitor, place the speakers awayfrom the monitor.
• Make sure the speaker cable you use is the same thickness asthe supplied cable.
* SPS-80 stands may not be available in certain regions.
Note
012DVX-S120-en 03.8.5, 1:47 PM56
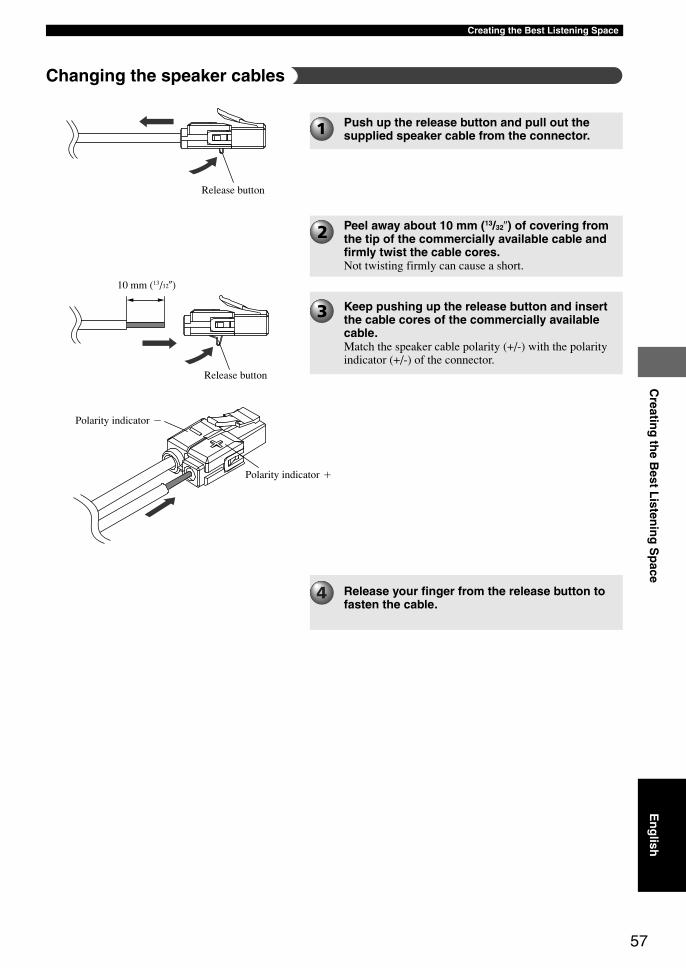
57
Creatin
g th
e Best L
istenin
g S
pace
Creating the Best Listening Space
Push up the release button and pull out thesupplied speaker cable from the connector.
Peel away about 10 mm (13/32) of covering fromthe tip of the commercially available cable andfirmly twist the cable cores.Not twisting firmly can cause a short.
Keep pushing up the release button and insertthe cable cores of the commercially availablecable.Match the speaker cable polarity (+/-) with the polarityindicator (+/-) of the connector.
Release your finger from the release button tofasten the cable.
Release button
10 mm (13/32)
Polarity indicator
Polarity indicator
Changing the speaker cables
Release button
En
glish
012DVX-S120-en 03.8.5, 1:47 PM57
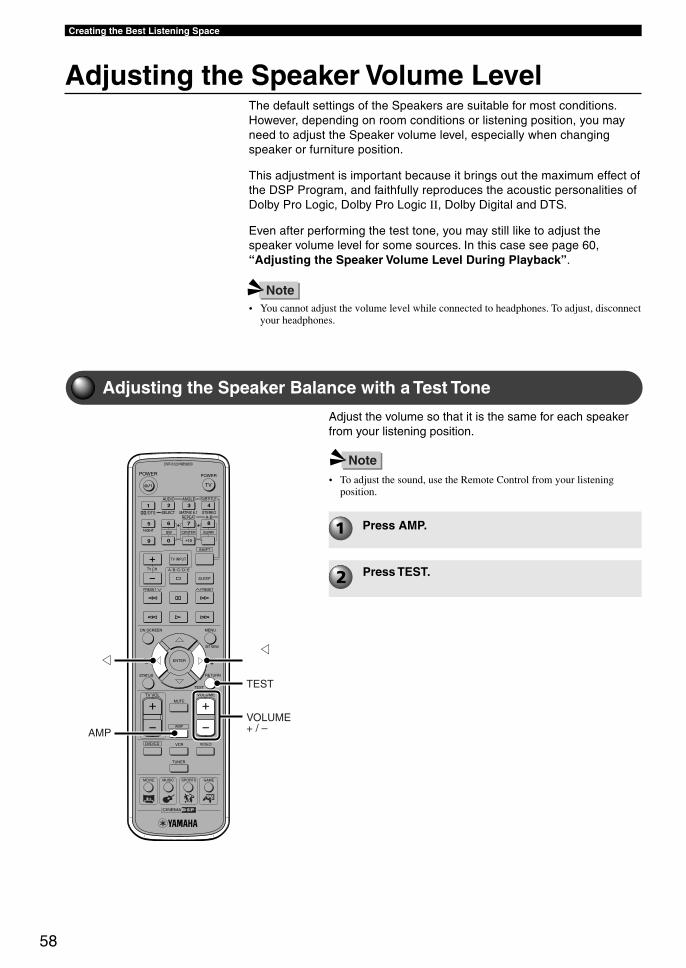
58
Creating the Best Listening Space
Adjusting the Speaker Balance with a Test Tone
TV
CH
CINEMA
CH
POWER POWER
AUDIO
/DTS SELECT
NIGHT SW
TV CH
TV INPUT
SLEEP
PRESET PRESET
A B C D E
CENTER SURR
SHIFT
STEREOMATRIX 6.1A-BREPEAT
ANGLE SUBTITLE
DVR-S120 WB56650
ON SCREEN MENU
TEST
RETURNSTATUS
TV VOL VOLUME
MUTE
AMP
DVD/CD VCR VIDEO
TUNER
MOVIE MUSIC SPORTS GAME
SET MENU
ENTER
AMPVOLUME+ / –
TEST
g g
Adjusting the Speaker Volume LevelThe default settings of the Speakers are suitable for most conditions.However, depending on room conditions or listening position, you mayneed to adjust the Speaker volume level, especially when changingspeaker or furniture position.
This adjustment is important because it brings out the maximum effect ofthe DSP Program, and faithfully reproduces the acoustic personalities ofDolby Pro Logic, Dolby Pro Logic II, Dolby Digital and DTS.
Even after performing the test tone, you may still like to adjust thespeaker volume level for some sources. In this case see page 60,“Adjusting the Speaker Volume Level During Playback”.
• You cannot adjust the volume level while connected to headphones. To adjust, disconnectyour headphones.
Adjust the volume so that it is the same for each speakerfrom your listening position.
• To adjust the sound, use the Remote Control from your listeningposition.
Press AMP.
Press TEST.
Note
Note
012DVX-S120-en 03.8.5, 1:47 PM58
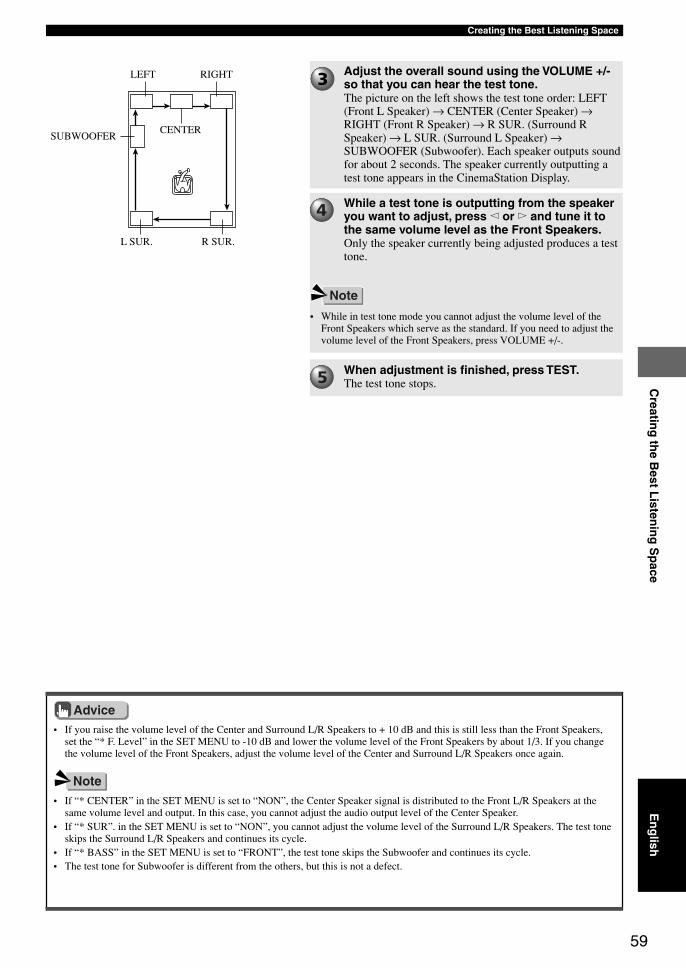
59
Creatin
g th
e Best L
istenin
g S
pace
Creating the Best Listening Space
• If you raise the volume level of the Center and Surround L/R Speakers to + 10 dB and this is still less than the Front Speakers,set the “* F. Level” in the SET MENU to -10 dB and lower the volume level of the Front Speakers by about 1/3. If you changethe volume level of the Front Speakers, adjust the volume level of the Center and Surround L/R Speakers once again.
Adjust the overall sound using the VOLUME +/-so that you can hear the test tone.The picture on the left shows the test tone order: LEFT(Front L Speaker) → CENTER (Center Speaker) →RIGHT (Front R Speaker) → R SUR. (Surround RSpeaker) → L SUR. (Surround L Speaker) →SUBWOOFER (Subwoofer). Each speaker outputs soundfor about 2 seconds. The speaker currently outputting atest tone appears in the CinemaStation Display.
While a test tone is outputting from the speakeryou want to adjust, press q or w and tune it tothe same volume level as the Front Speakers.Only the speaker currently being adjusted produces a testtone.
• While in test tone mode you cannot adjust the volume level of theFront Speakers which serve as the standard. If you need to adjust thevolume level of the Front Speakers, press VOLUME +/-.
When adjustment is finished, press TEST.The test tone stops.
Note
• If “* CENTER” in the SET MENU is set to “NON”, the Center Speaker signal is distributed to the Front L/R Speakers at thesame volume level and output. In this case, you cannot adjust the audio output level of the Center Speaker.
• If “* SUR”. in the SET MENU is set to “NON”, you cannot adjust the volume level of the Surround L/R Speakers. The test toneskips the Surround L/R Speakers and continues its cycle.
• If “* BASS” in the SET MENU is set to “FRONT”, the test tone skips the Subwoofer and continues its cycle.• The test tone for Subwoofer is different from the others, but this is not a defect.
Note
Advice
RIGHTLEFT
SUBWOOFERCENTER
L SUR. R SUR.
En
glish
012DVX-S120-en 03.8.5, 1:47 PM59
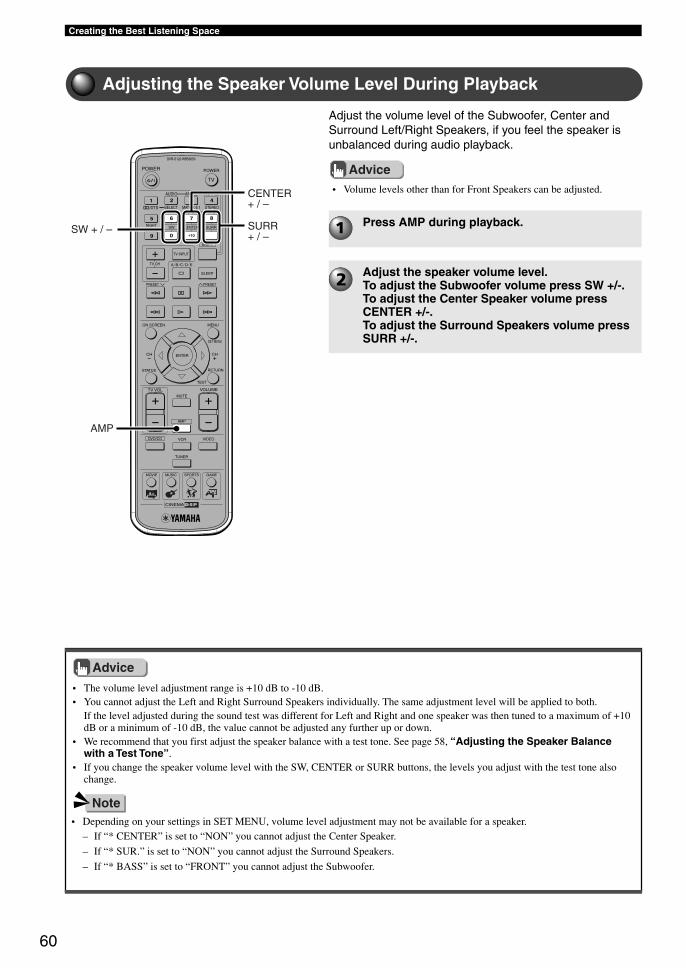
60
Creating the Best Listening Space
Adjusting the Speaker Volume Level During Playback
• The volume level adjustment range is +10 dB to -10 dB.• You cannot adjust the Left and Right Surround Speakers individually. The same adjustment level will be applied to both.
If the level adjusted during the sound test was different for Left and Right and one speaker was then tuned to a maximum of +10dB or a minimum of -10 dB, the value cannot be adjusted any further up or down.
• We recommend that you first adjust the speaker balance with a test tone. See page 58, “Adjusting the Speaker Balancewith a Test Tone”.
• If you change the speaker volume level with the SW, CENTER or SURR buttons, the levels you adjust with the test tone alsochange.
TV
CH
CINEMA
CH
POWER POWER
AUDIO
/DTS SELECT
NIGHT SW
TV CH
TV INPUT
SLEEP
PRESET PRESET
A B C D E
CENTER SURR
SHIFT
STEREOMATRIX 6.1A-BREPEAT
ANGLE SUBTITLE
DVR-S120 WB56650
ON SCREEN MENU
TEST
RETURNSTATUS
TV VOL VOLUME
MUTE
AMP
DVD/CD VCR VIDEO
TUNER
MOVIE MUSIC SPORTS GAME
SET MENU
ENTER
AMP
SURR+ / –
SW + / –
CENTER+ / –
Adjust the volume level of the Subwoofer, Center andSurround Left/Right Speakers, if you feel the speaker isunbalanced during audio playback.
• Volume levels other than for Front Speakers can be adjusted.
Advice
Press AMP during playback.
Adjust the speaker volume level.To adjust the Subwoofer volume press SW +/-.To adjust the Center Speaker volume pressCENTER +/-.To adjust the Surround Speakers volume pressSURR +/-.
• Depending on your settings in SET MENU, volume level adjustment may not be available for a speaker.– If “* CENTER” is set to “NON” you cannot adjust the Center Speaker.
– If “* SUR.” is set to “NON” you cannot adjust the Surround Speakers.
– If “* BASS” is set to “FRONT” you cannot adjust the Subwoofer.
Note
Advice
012DVX-S120-en 03.8.5, 1:47 PM60
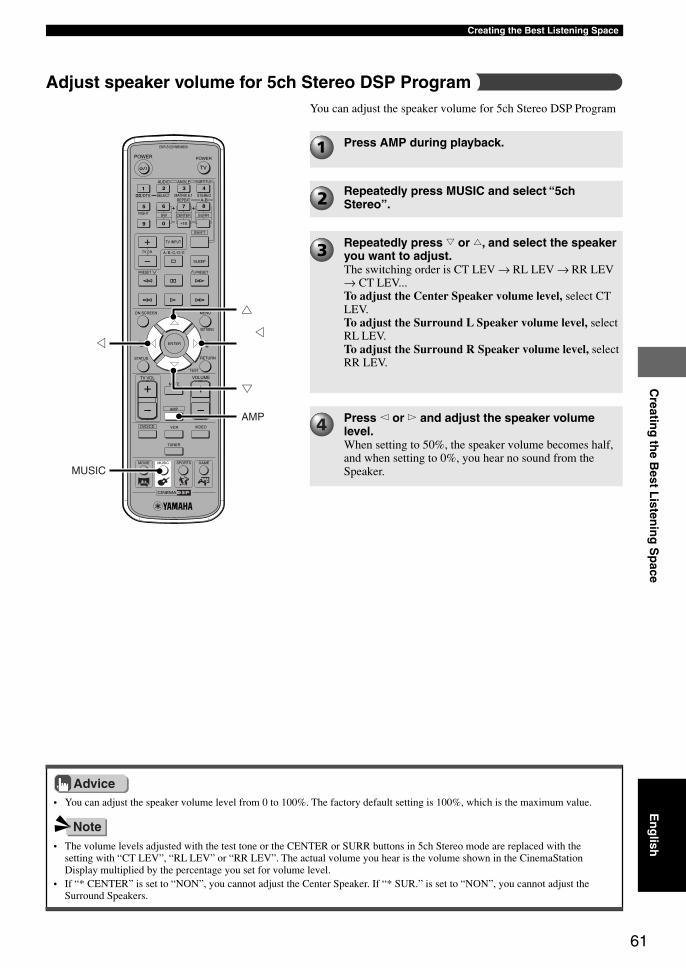
61
Creatin
g th
e Best L
istenin
g S
pace
Creating the Best Listening Space
• You can adjust the speaker volume level from 0 to 100%. The factory default setting is 100%, which is the maximum value.
You can adjust the speaker volume for 5ch Stereo DSP Program
Press AMP during playback.
Repeatedly press MUSIC and select “5chStereo”.
Repeatedly press g or h, and select the speakeryou want to adjust.The switching order is CT LEV → RL LEV → RR LEV→ CT LEV...To adjust the Center Speaker volume level, select CTLEV.To adjust the Surround L Speaker volume level, selectRL LEV.To adjust the Surround R Speaker volume level, selectRR LEV.
Press q or w and adjust the speaker volumelevel.When setting to 50%, the speaker volume becomes half,and when setting to 0%, you hear no sound from theSpeaker.
• The volume levels adjusted with the test tone or the CENTER or SURR buttons in 5ch Stereo mode are replaced with thesetting with “CT LEV”, “RL LEV” or “RR LEV”. The actual volume you hear is the volume shown in the CinemaStationDisplay multiplied by the percentage you set for volume level.
• If “* CENTER” is set to “NON”, you cannot adjust the Center Speaker. If “* SUR.” is set to “NON”, you cannot adjust theSurround Speakers.
TV
CH
CINEMA
CH
POWER POWER
AUDIO
/DTS SELECT
NIGHT SW
TV CH
TV INPUT
SLEEP
PRESET PRESET
A B C D E
CENTER SURR
SHIFT
STEREOMATRIX 6.1A-BREPEAT
ANGLE SUBTITLE
DVR-S120 WB56650
ON SCREEN MENU
TEST
RETURNSTATUS
TV VOL VOLUME
MUTE
AMP
DVD/CD VCR VIDEO
TUNER
MOVIE MUSIC SPORTS GAME
SET MENU
ENTER
g
AMP
h
MUSIC
g g
Note
Advice
Adjust speaker volume for 5ch Stereo DSP Program
En
glish
012DVX-S120-en 03.8.5, 1:47 PM61
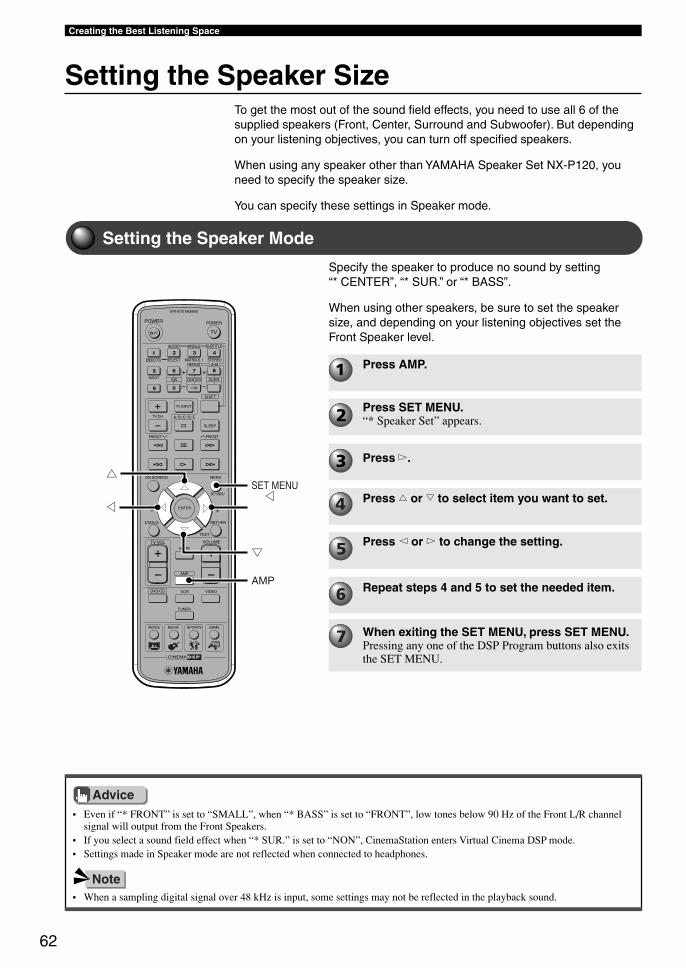
62
Creating the Best Listening Space
Setting the Speaker Size
TV
CH
CINEMA
CH
POWER POWER
AUDIO
/DTS SELECT
NIGHT SW
TV CH
TV INPUT
SLEEP
PRESET PRESET
A B C D E
CENTER SURR
SHIFT
STEREOMATRIX 6.1A-BREPEAT
ANGLE SUBTITLE
DVR-S120 WB56650
ON SCREEN MENU
TEST
RETURNSTATUS
TV VOL VOLUME
MUTE
AMP
DVD/CD VCR VIDEO
TUNER
MOVIE MUSIC SPORTS GAME
SET MENU
ENTER
g
AMP
h
g gSET MENU
• Even if “* FRONT” is set to “SMALL”, when “* BASS” is set to “FRONT”, low tones below 90 Hz of the Front L/R channelsignal will output from the Front Speakers.
• If you select a sound field effect when “* SUR.” is set to “NON”, CinemaStation enters Virtual Cinema DSP mode.• Settings made in Speaker mode are not reflected when connected to headphones.
To get the most out of the sound field effects, you need to use all 6 of thesupplied speakers (Front, Center, Surround and Subwoofer). But dependingon your listening objectives, you can turn off specified speakers.
When using any speaker other than YAMAHA Speaker Set NX-P120, youneed to specify the speaker size.
You can specify these settings in Speaker mode.
Setting the Speaker Mode
Specify the speaker to produce no sound by setting“* CENTER”, “* SUR.” or “* BASS”.
When using other speakers, be sure to set the speakersize, and depending on your listening objectives set theFront Speaker level.
Press AMP.
Press SET MENU.“* Speaker Set” appears.
Press w.
Press h or g to select item you want to set.
Press q or w to change the setting.
Repeat steps 4 and 5 to set the needed item.
When exiting the SET MENU, press SET MENU.Pressing any one of the DSP Program buttons also exitsthe SET MENU.
Note
Advice
• When a sampling digital signal over 48 kHz is input, some settings may not be reflected in the playback sound.
012DVX-S120-en 03.8.5, 1:47 PM62
63
Creatin
g th
e Best L
istenin
g S
pace
Creating the Best Listening Space
* CENTER
Sets whether the Center Speaker is present or not, andsets the size of the Center Speaker.
Selection items: LRG (Large), SML (Small), NON(None)
Default setting: SML
LRG: Select this setting when using a big CenterSpeaker. The entire frequency band of the center channelsignal is output as it is from the Center Speaker.SML: Select this setting when using a small CenterSpeaker. A center channel signal with a low tone of 90Hz or below is output from the speaker set to * BASS.NON: Select this setting when not using a CenterSpeaker. The center channel signal distributes the samevolume level to the Front L/R Speakers.
* FRONT
Sets the size of the Front Speakers.
Selection items: LARGE, SMALLDefault setting: SMALL
LARGE: Select this setting when using big FrontSpeakers. The entire frequency band of the front L/Rchannel signal is output as it is from the Front Left andRight Speakers.SMALL: Select this setting when using small FrontSpeakers. A front L/R channel signal with a low tone of90 Hz or below is output from the speaker set to *BASS.
* SUR.
Sets whether the Surround L/R Speakers are present ornot, and sets the size of the Surround L/R Speakers.
Selection items: LRG (Large), SML (Small), NON(None)Default setting: SML
LRG: Select this setting when using big Surround L/RSpeakers or when using Surround L/R Speakers withsurround subwoofers connected by speaker cables.The entire frequency band of the surround L/R channelsignal is output as it is from the Surround Speakers.SML: Select this setting when using small Surround L/RSpeakers. A surround L/R channel signal with a low toneof 90 Hz or below is output from the speaker set to *BASS.NON: Select this setting when not using Surround L/RSpeakers. The surround L/R channel signal distributesthe same volume level to the Front L/R Speakers.
* BASS
Selects the speaker to output a LFE/BASS (low tone)signal. LFE stands for Low Frequency Effect and it isused to output bands of 90 Hz and below when DolbyDigital or DTS is active.
Selection item: SWFR (Subwoofer), FRONT, BOTHDefault setting: SWFR
SWFR: Select this setting when using a Subwoofer.The LFE and low tone (90 Hz and below) sound fromother channels, depending on * CENTER, * FRONT and* SUR. settings, are output from the Subwoofer.FRONT: Select this setting when not using aSubwoofer. The LFE and low tone (90 Hz and below)sound from other channels, depending on * CENTER, *FRONT and * SUR. settings, are output from the FrontL/R Speakers.BOTH: Select this item to mix a low tone of 90 Hz andbelow with a LFE channel when using a Subwoofer andindependent of the Front Speaker Sound mode setting.The entire frequency band of the front L/R channel isoutput from both the Front L/R Speakers and Subwoofer.Sound can output from the Subwoofer during 2-channelor Dolby Surround playback.
* F. Level
Selects the Front Speaker level.When the Front Speaker volume level is extremely highand out of alignment with that of other speakers, you canlower the volume level and regain a balance.
Selection items: Nrm (Normal), -10 dBDefault setting: Nrm
Nrm: Usually this setting is selected.-10 dB: Use this setting if the output level of the Centeror Surround Speakers is out of alignment with the FrontSpeakers. The volume level of the Front Speakersdecreases 10 dB (about 1/3).
En
glish
012DVX-S120-en 03.8.5, 1:47 PM63
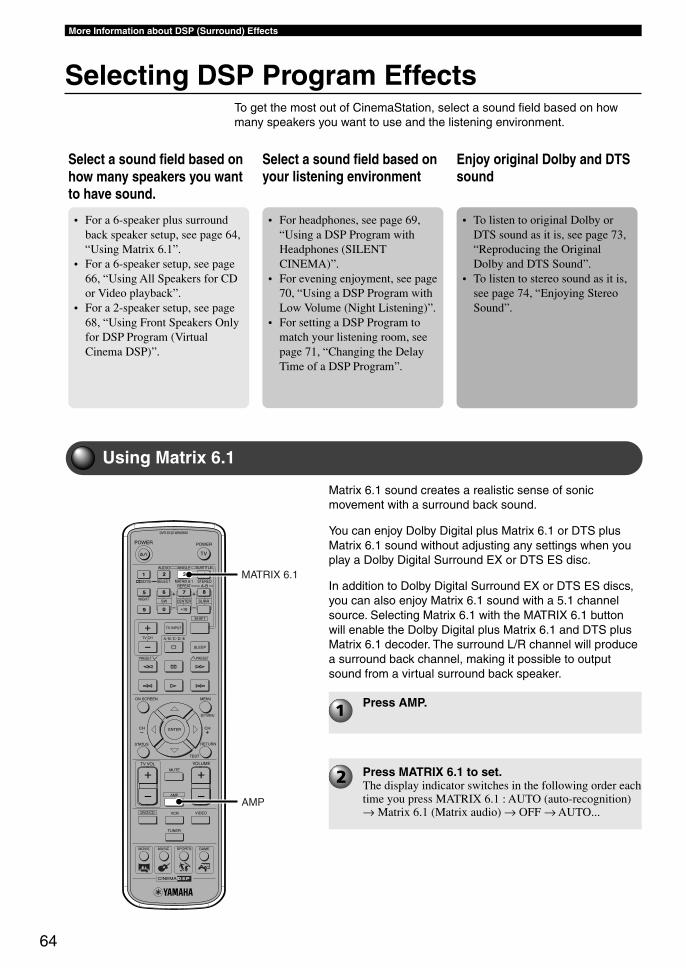
64
More Information about DSP (Surround) Effects
Selecting DSP Program EffectsTo get the most out of CinemaStation, select a sound field based on howmany speakers you want to use and the listening environment.
Select a sound field based onhow many speakers you wantto have sound.
• For a 6-speaker plus surroundback speaker setup, see page 64,“Using Matrix 6.1”.
• For a 6-speaker setup, see page66, “Using All Speakers for CDor Video playback”.
• For a 2-speaker setup, see page68, “Using Front Speakers Onlyfor DSP Program (VirtualCinema DSP)”.
Select a sound field based onyour listening environment
• For headphones, see page 69,“Using a DSP Program withHeadphones (SILENTCINEMA)”.
• For evening enjoyment, see page70, “Using a DSP Program withLow Volume (Night Listening)”.
• For setting a DSP Program tomatch your listening room, seepage 71, “Changing the DelayTime of a DSP Program”.
Enjoy original Dolby and DTSsound
• To listen to original Dolby orDTS sound as it is, see page 73,“Reproducing the OriginalDolby and DTS Sound”.
• To listen to stereo sound as it is,see page 74, “Enjoying StereoSound”.
Using Matrix 6.1
TV
CH
CINEMA
CH
POWER POWER
AUDIO
/DTS SELECT
NIGHT SW
TV CH
TV INPUT
SLEEP
PRESET PRESET
A B C D E
CENTER SURR
SHIFT
STEREOMATRIX 6.1A-BREPEAT
ANGLE SUBTITLE
DVR-S120 WB56650
ON SCREEN MENU
TEST
RETURNSTATUS
TV VOL VOLUME
MUTE
AMP
DVD/CD VCR VIDEO
TUNER
MOVIE MUSIC SPORTS GAME
SET MENU
ENTER
AMP
MATRIX 6.1
Matrix 6.1 sound creates a realistic sense of sonicmovement with a surround back sound.
You can enjoy Dolby Digital plus Matrix 6.1 or DTS plusMatrix 6.1 sound without adjusting any settings when youplay a Dolby Digital Surround EX or DTS ES disc.
In addition to Dolby Digital Surround EX or DTS ES discs,you can also enjoy Matrix 6.1 sound with a 5.1 channelsource. Selecting Matrix 6.1 with the MATRIX 6.1 buttonwill enable the Dolby Digital plus Matrix 6.1 and DTS plusMatrix 6.1 decoder. The surround L/R channel will producea surround back channel, making it possible to outputsound from a virtual surround back speaker.
Press AMP.
Press MATRIX 6.1 to set.The display indicator switches in the following order eachtime you press MATRIX 6.1 : AUTO (auto-recognition)→ Matrix 6.1 (Matrix audio) → OFF → AUTO...
013DVX-S120-en 03.8.5, 1:47 PM64
65
More Information about DSP (Surround) EffectsM
ore In
form
ation
abo
ut D
SP
(Su
rrou
nd
) Effects
• When the Matrix 6.1 decoder is working, the MATRIX indicator lights up in the CinemaStation Display. 6.1 appears beside theDSP Program name (For example: Action 6.1). Matrix 6.1 appears with Dolby Digital and DTS sound fields.
• Some Dolby Digital Surround EX or DTS ES discs do not contain a signal (flag) that CinemaStation can use for autorecognition. To play this type of disc with 6.1-channel sound, press MATRIX 6.1 to select Matrix 6.1.
• In the cases below, 6.1-channel sound cannot play even if you press MATRIX 6.1.–If “* SUR.” is set to “NON” in the SET MENU.–If sound effect is set to off (Stereo Playback).–If headphones are connected.–If a Dolby Digital KARAOKE source is playing.–If you select 5ch Stereo DSP Program.
• If you turn on the power once more after CinemaStation goes into standby, Matrix 6.1 returns to AUTO.
AUTO: Depending on whether the source is Dolbyor DTS, automatically switches betweenDolby Digital plus Matrix 6.1 and DTS plusMatrix 6.1 audio. Even if you play a 5.1channel source with this setting, no virtualsurround back speaker is created.
MATRIX 6.1: Select this item to play a 5.1 channel sourcewith Matrix 6.1. Sound outputs from thevirtual surround back speaker.
OFF: The Matrix 6.1 decoder is not enabled. Evenif you play a Dolby Digital Surround EX orDTS ES disc, no sound outputs from thevirtual surround back speaker.
Advice
Note
En
glish
013DVX-S120-en 03.8.5, 1:47 PM65
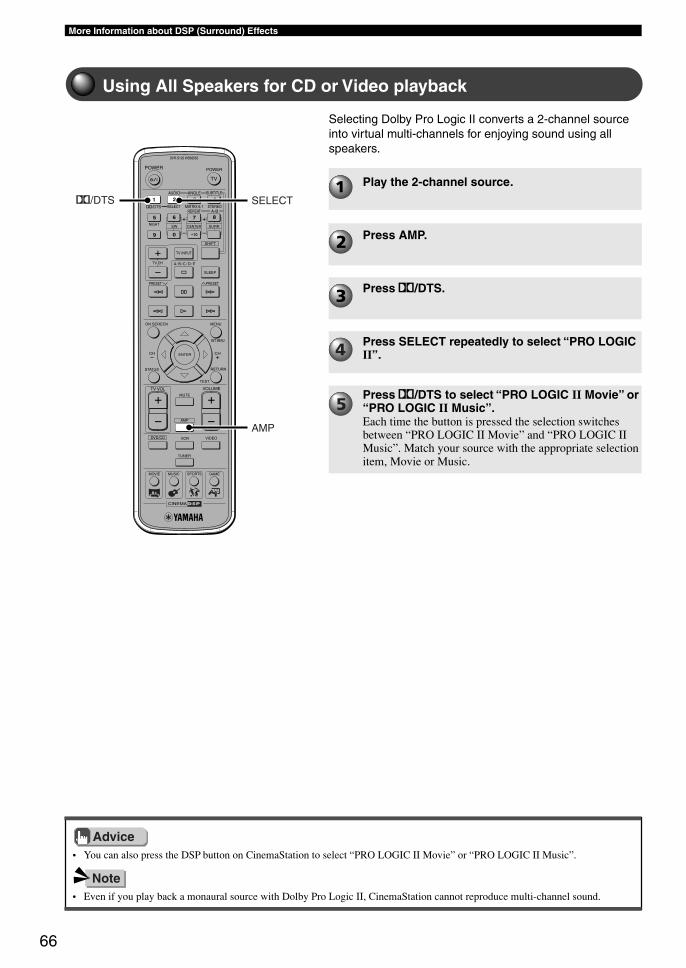
66
More Information about DSP (Surround) Effects
Using All Speakers for CD or Video playback
TV
CH
CINEMA
CH
POWER POWER
AUDIO
/DTS SELECT
NIGHT SW
TV CH
TV INPUT
SLEEP
PRESET PRESET
A B C D E
CENTER SURR
SHIFT
STEREOMATRIX 6.1A-BREPEAT
ANGLE SUBTITLE
DVR-S120 WB56650
ON SCREEN MENU
TEST
RETURNSTATUS
TV VOL VOLUME
MUTE
AMP
DVD/CD VCR VIDEO
TUNER
MOVIE MUSIC SPORTS GAME
SET MENU
ENTER
AMP
SELECTq/DTS
• You can also press the DSP button on CinemaStation to select “PRO LOGIC II Movie” or “PRO LOGIC II Music”.
• Even if you play back a monaural source with Dolby Pro Logic II, CinemaStation cannot reproduce multi-channel sound.
Selecting Dolby Pro Logic II converts a 2-channel sourceinto virtual multi-channels for enjoying sound using allspeakers.
Play the 2-channel source.
Press AMP.
Press q/DTS.
Press SELECT repeatedly to select “PRO LOGICII”.
Press q/DTS to select “PRO LOGIC II Movie” or“PRO LOGIC II Music”.Each time the button is pressed the selection switchesbetween “PRO LOGIC II Movie” and “PRO LOGIC IIMusic”. Match your source with the appropriate selectionitem, Movie or Music.
Advice
Note
013DVX-S120-en 03.8.5, 1:47 PM66
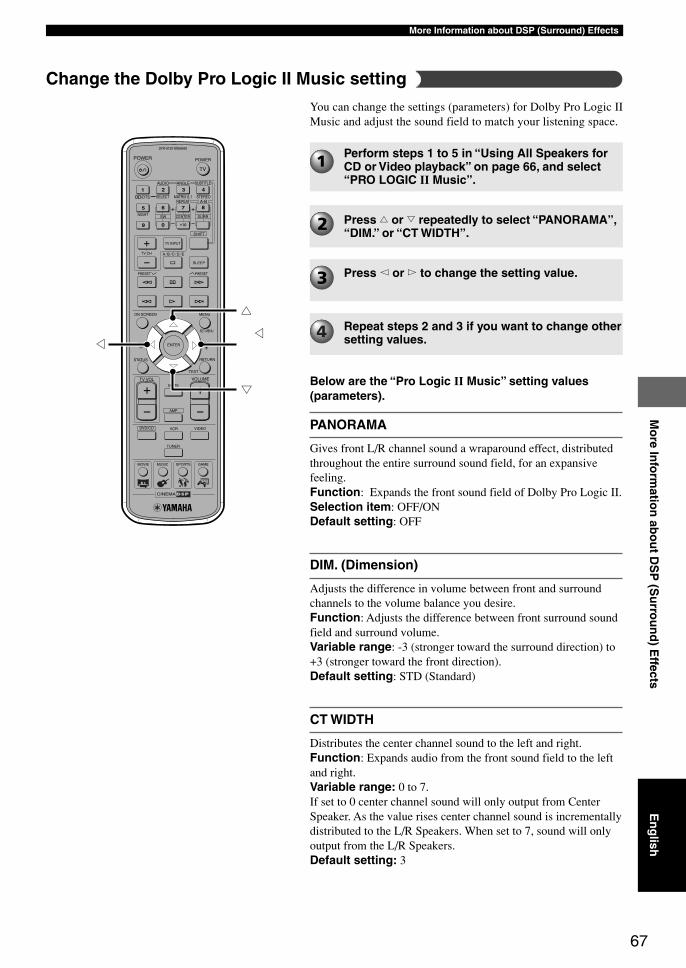
67
More Information about DSP (Surround) EffectsM
ore In
form
ation
abo
ut D
SP
(Su
rrou
nd
) Effects
TV
CH
CINEMA
CH
POWER POWER
AUDIO
/DTS SELECT
NIGHT SW
TV CH
TV INPUT
SLEEP
PRESET PRESET
A B C D E
CENTER SURR
SHIFT
STEREOMATRIX 6.1A-BREPEAT
ANGLE SUBTITLE
DVR-S120 WB56650
ON SCREEN MENU
TEST
RETURNSTATUS
TV VOL VOLUME
MUTE
AMP
DVD/CD VCR VIDEO
TUNER
MOVIE MUSIC SPORTS GAME
SET MENU
ENTER
g
h
g g
Below are the “Pro Logic II Music” setting values(parameters).
PANORAMA
Gives front L/R channel sound a wraparound effect, distributedthroughout the entire surround sound field, for an expansivefeeling.Function: Expands the front sound field of Dolby Pro Logic II.Selection item: OFF/ONDefault setting: OFF
DIM. (Dimension)
Adjusts the difference in volume between front and surroundchannels to the volume balance you desire.Function: Adjusts the difference between front surround soundfield and surround volume.Variable range: -3 (stronger toward the surround direction) to+3 (stronger toward the front direction).Default setting: STD (Standard)
CT WIDTH
Distributes the center channel sound to the left and right.Function: Expands audio from the front sound field to the leftand right.Variable range: 0 to 7.If set to 0 center channel sound will only output from CenterSpeaker. As the value rises center channel sound is incrementallydistributed to the L/R Speakers. When set to 7, sound will onlyoutput from the L/R Speakers.Default setting: 3
You can change the settings (parameters) for Dolby Pro Logic IIMusic and adjust the sound field to match your listening space.
Perform steps 1 to 5 in “Using All Speakers forCD or Video playback” on page 66, and select“PRO LOGIC II Music”.
Press h or g repeatedly to select “PANORAMA”,“DIM.” or “CT WIDTH”.
Press q or w to change the setting value.
Repeat steps 2 and 3 if you want to change othersetting values.
Change the Dolby Pro Logic II Music setting
En
glish
013DVX-S120-en 03.8.5, 1:48 PM67
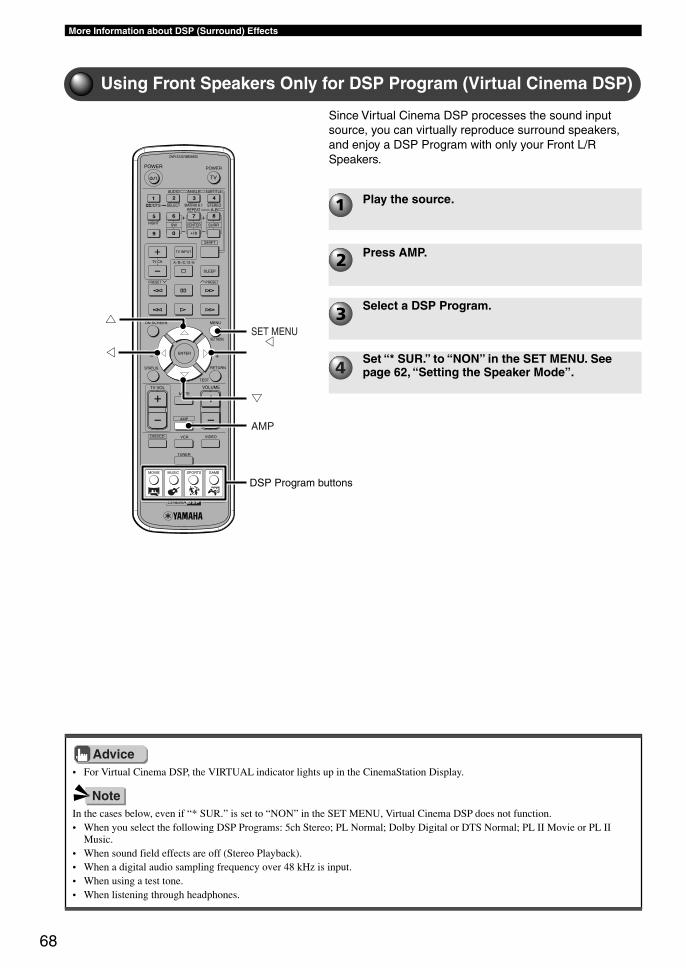
68
More Information about DSP (Surround) Effects
Using Front Speakers Only for DSP Program (Virtual Cinema DSP)
TV
CH
CINEMA
CH
POWER POWER
AUDIO
/DTS SELECT
NIGHT SW
TV CH
TV INPUT
SLEEP
PRESET PRESET
A B C D E
CENTER SURR
SHIFT
STEREOMATRIX 6.1A-BREPEAT
ANGLE SUBTITLE
DVR-S120 WB56650
ON SCREEN MENU
TEST
RETURNSTATUS
TV VOL VOLUME
MUTE
AMP
DVD/CD VCR VIDEO
TUNER
MOVIE MUSIC SPORTS GAME
SET MENU
ENTER
AMP
SET MENU
g
h
g g
• For Virtual Cinema DSP, the VIRTUAL indicator lights up in the CinemaStation Display.
In the cases below, even if “* SUR.” is set to “NON” in the SET MENU, Virtual Cinema DSP does not function.• When you select the following DSP Programs: 5ch Stereo; PL Normal; Dolby Digital or DTS Normal; PL II Movie or PL II
Music.• When sound field effects are off (Stereo Playback).• When a digital audio sampling frequency over 48 kHz is input.• When using a test tone.• When listening through headphones.
Since Virtual Cinema DSP processes the sound inputsource, you can virtually reproduce surround speakers,and enjoy a DSP Program with only your Front L/RSpeakers.
Play the source.
Press AMP.
Select a DSP Program.
Set “* SUR.” to “NON” in the SET MENU. Seepage 62, “Setting the Speaker Mode”.
Advice
Note
DSP Program buttons
013DVX-S120-en 03.8.5, 1:48 PM68
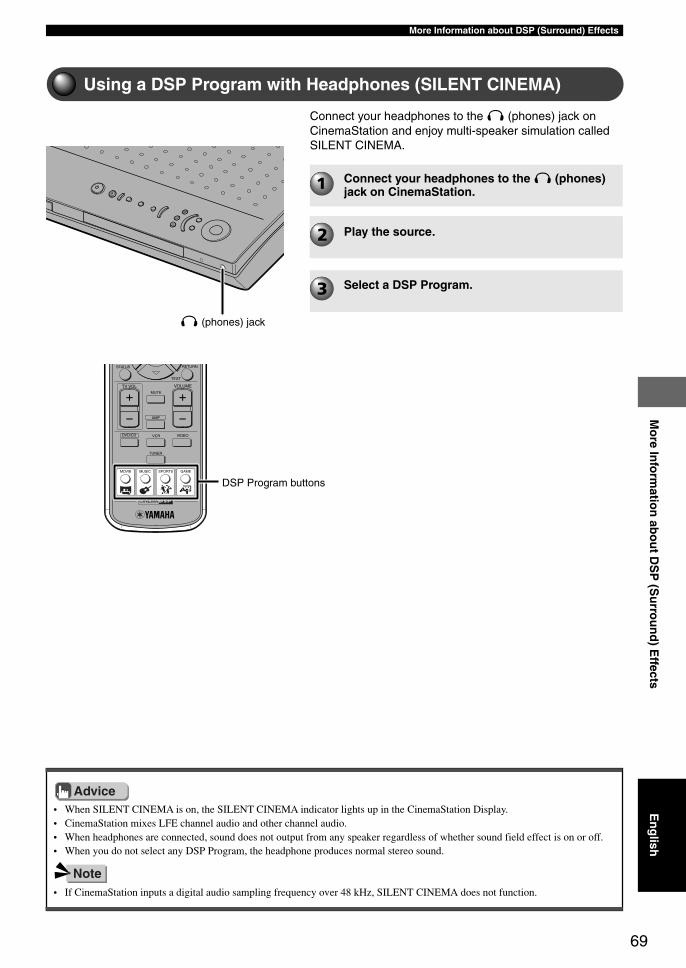
69
More Information about DSP (Surround) EffectsM
ore In
form
ation
abo
ut D
SP
(Su
rrou
nd
) Effects
CINEMA
TEST
RETURNSTATUS
TV VOL VOLUME
MUTE
AMP
DVD/CD VCR VIDEO
TUNER
MOVIE MUSIC SPORTS GAME
• When SILENT CINEMA is on, the SILENT CINEMA indicator lights up in the CinemaStation Display.• CinemaStation mixes LFE channel audio and other channel audio.• When headphones are connected, sound does not output from any speaker regardless of whether sound field effect is on or off.• When you do not select any DSP Program, the headphone produces normal stereo sound.
• If CinemaStation inputs a digital audio sampling frequency over 48 kHz, SILENT CINEMA does not function.
Connect your headphones to the (phones) jack onCinemaStation and enjoy multi-speaker simulation calledSILENT CINEMA.
Using a DSP Program with Headphones (SILENT CINEMA)
Connect your headphones to the (phones)jack on CinemaStation.
Play the source.
Select a DSP Program.
Advice
Note
DSP Program buttons
En
glish
(phones) jack
013DVX-S120-en 03.8.5, 1:48 PM69
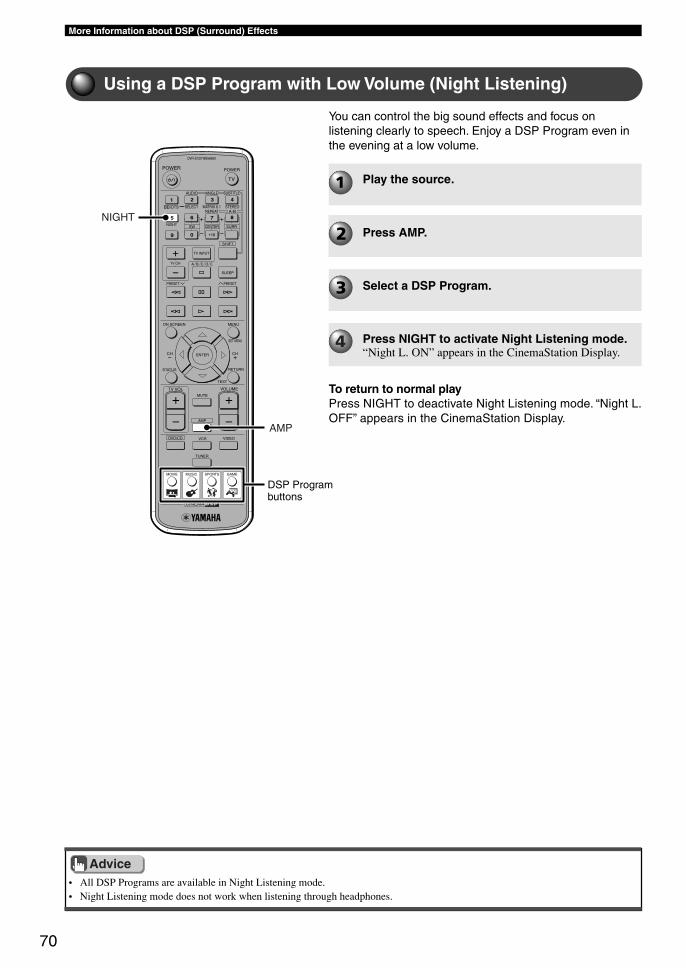
70
More Information about DSP (Surround) Effects
TV
CH
CINEMA
CH
POWER POWER
AUDIO
/DTS SELECT
NIGHT SW
TV CH
TV INPUT
SLEEP
PRESET PRESET
A B C D E
CENTER SURR
SHIFT
STEREOMATRIX 6.1A-BREPEAT
ANGLE SUBTITLE
DVR-S120 WB56650
ON SCREEN MENU
TEST
RETURNSTATUS
TV VOL VOLUME
MUTE
AMP
DVD/CD VCR VIDEO
TUNER
MOVIE MUSIC SPORTS GAME
SET MENU
ENTER
AMP
NIGHT
• All DSP Programs are available in Night Listening mode.• Night Listening mode does not work when listening through headphones.
You can control the big sound effects and focus onlistening clearly to speech. Enjoy a DSP Program even inthe evening at a low volume.
Using a DSP Program with Low Volume (Night Listening)
Play the source.
Press AMP.
Select a DSP Program.
Press NIGHT to activate Night Listening mode.“Night L. ON” appears in the CinemaStation Display.
To return to normal playPress NIGHT to deactivate Night Listening mode. “Night L.OFF” appears in the CinemaStation Display.
Advice
DSP Programbuttons
013DVX-S120-en 03.8.5, 1:48 PM70
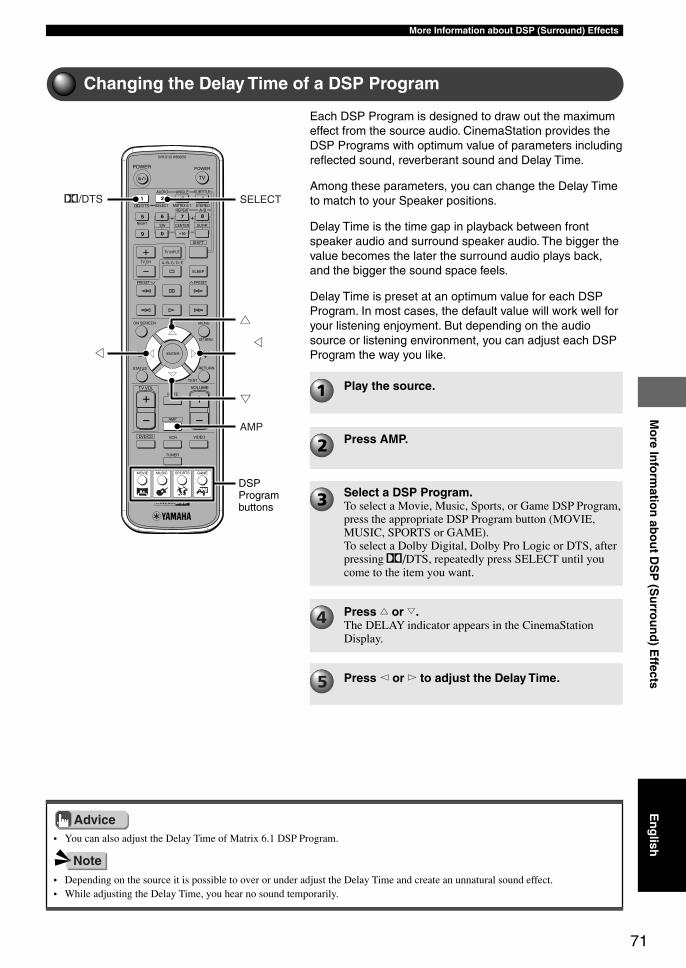
71
More Information about DSP (Surround) EffectsM
ore In
form
ation
abo
ut D
SP
(Su
rrou
nd
) Effects
Changing the Delay Time of a DSP Program
TV
CH
CINEMA
CH
POWER POWER
AUDIO
/DTS SELECT
NIGHT SW
TV CH
TV INPUT
SLEEP
PRESET PRESET
A B C D E
CENTER SURR
SHIFT
STEREOMATRIX 6.1A-BREPEAT
ANGLE SUBTITLE
DVR-S120 WB56650
ON SCREEN MENU
TEST
RETURNSTATUS
TV VOL VOLUME
MUTE
AMP
DVD/CD VCR VIDEO
TUNER
MOVIE MUSIC SPORTS GAME
SET MENU
ENTER
AMP
SELECTq/DTS
g
h
g g
• You can also adjust the Delay Time of Matrix 6.1 DSP Program.
• Depending on the source it is possible to over or under adjust the Delay Time and create an unnatural sound effect.• While adjusting the Delay Time, you hear no sound temporarily.
Each DSP Program is designed to draw out the maximumeffect from the source audio. CinemaStation provides theDSP Programs with optimum value of parameters includingreflected sound, reverberant sound and Delay Time.
Among these parameters, you can change the Delay Timeto match to your Speaker positions.
Delay Time is the time gap in playback between frontspeaker audio and surround speaker audio. The bigger thevalue becomes the later the surround audio plays back,and the bigger the sound space feels.
Delay Time is preset at an optimum value for each DSPProgram. In most cases, the default value will work well foryour listening enjoyment. But depending on the audiosource or listening environment, you can adjust each DSPProgram the way you like.
Play the source.
Press AMP.
Select a DSP Program.To select a Movie, Music, Sports, or Game DSP Program,press the appropriate DSP Program button (MOVIE,MUSIC, SPORTS or GAME).To select a Dolby Digital, Dolby Pro Logic or DTS, afterpressing q/DTS, repeatedly press SELECT until youcome to the item you want.
Press h or g.The DELAY indicator appears in the CinemaStationDisplay.
Press q or w to adjust the Delay Time.
Advice
Note
DSPProgrambuttons
En
glish
013DVX-S120-en 03.8.5, 1:48 PM71
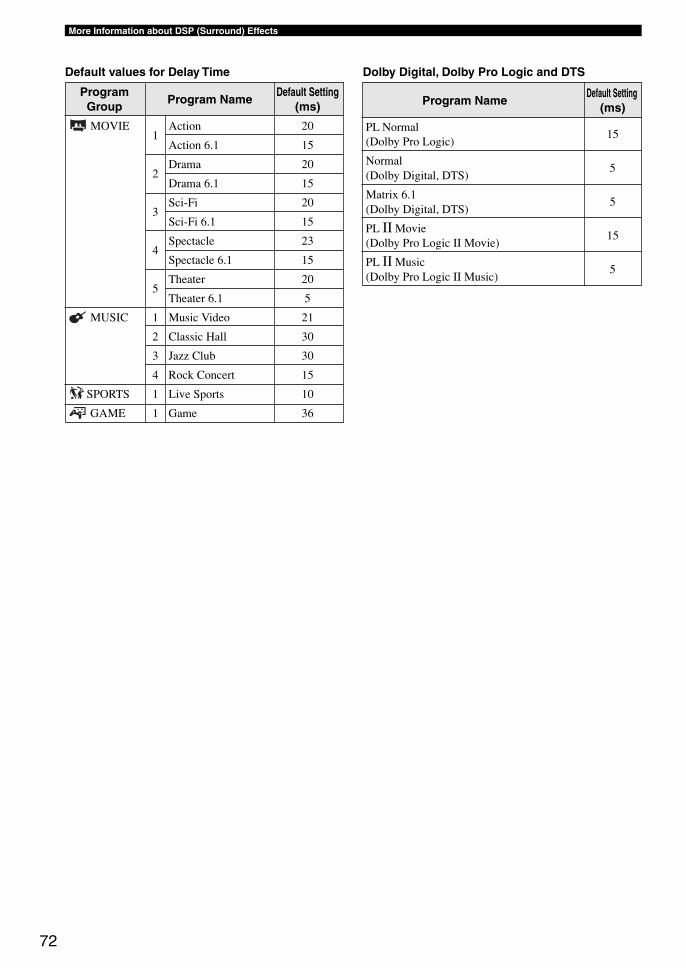
72
More Information about DSP (Surround) Effects
ProgramProgram Name
Default SettingGroup (ms)
MOVIE1
Action 20
Action 6.1 15
2Drama 20
Drama 6.1 15
3Sci-Fi 20
Sci-Fi 6.1 15
4Spectacle 23
Spectacle 6.1 15
5Theater 20
Theater 6.1 5
MUSIC 1 Music Video 21
2 Classic Hall 30
3 Jazz Club 30
4 Rock Concert 15
SPORTS 1 Live Sports 10
GAME 1 Game 36
Program Name
Default Setting(ms)
PL Normal(Dolby Pro Logic)
15
Normal(Dolby Digital, DTS)
5
Matrix 6.1(Dolby Digital, DTS)
5
PL II Movie(Dolby Pro Logic II Movie)
15
PL II Music(Dolby Pro Logic II Music)
5
Default values for Delay Time Dolby Digital, Dolby Pro Logic and DTS
013DVX-S120-en 03.8.5, 1:48 PM72
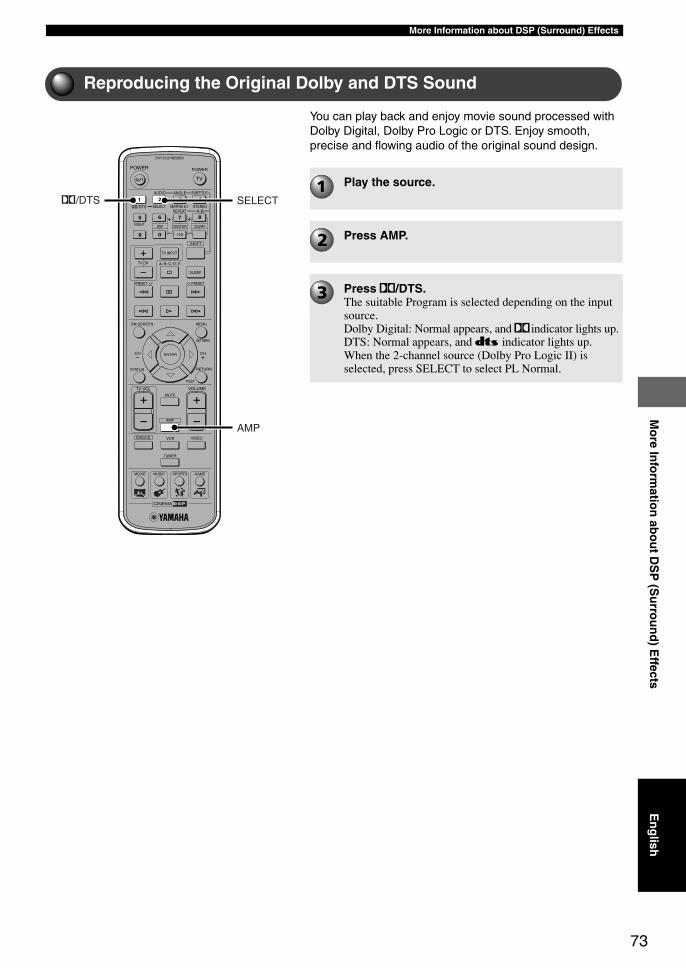
73
More Information about DSP (Surround) EffectsM
ore In
form
ation
abo
ut D
SP
(Su
rrou
nd
) Effects
Reproducing the Original Dolby and DTS Sound
TV
CH
CINEMA
CH
POWER POWER
AUDIO
/DTS SELECT
NIGHT SW
TV CH
TV INPUT
SLEEP
PRESET PRESET
A B C D E
CENTER SURR
SHIFT
STEREOMATRIX 6.1A-BREPEAT
ANGLE SUBTITLE
DVR-S120 WB56650
ON SCREEN MENU
TEST
RETURNSTATUS
TV VOL VOLUME
MUTE
AMP
DVD/CD VCR VIDEO
TUNER
MOVIE MUSIC SPORTS GAME
SET MENU
ENTER
AMP
SELECTq/DTS
You can play back and enjoy movie sound processed withDolby Digital, Dolby Pro Logic or DTS. Enjoy smooth,precise and flowing audio of the original sound design.
En
glish
Play the source.
Press AMP.
Press q/DTS.The suitable Program is selected depending on the inputsource.Dolby Digital: Normal appears, and qindicator lights up.DTS: Normal appears, and t indicator lights up.When the 2-channel source (Dolby Pro Logic II) isselected, press SELECT to select PL Normal.
013DVX-S120-en 03.8.5, 1:48 PM73
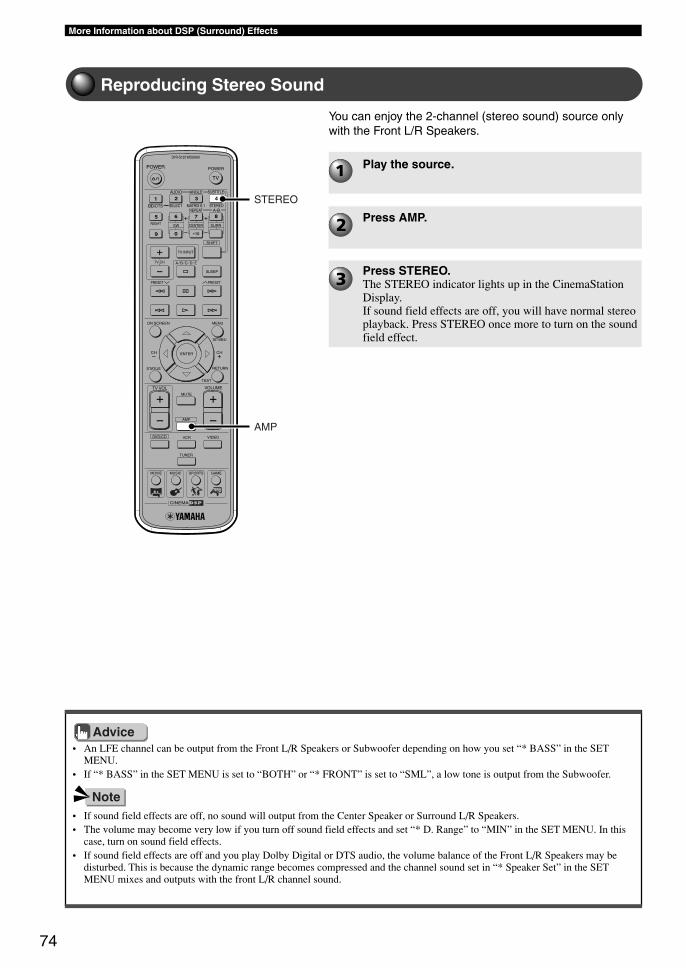
74
More Information about DSP (Surround) Effects
Reproducing Stereo Sound
TV
CH
CINEMA
CH
POWER POWER
AUDIO
/DTS SELECT
NIGHT SW
TV CH
TV INPUT
SLEEP
PRESET PRESET
A B C D E
CENTER SURR
SHIFT
STEREOMATRIX 6.1A-BREPEAT
ANGLE SUBTITLE
DVR-S120 WB56650
ON SCREEN MENU
TEST
RETURNSTATUS
TV VOL VOLUME
MUTE
AMP
DVD/CD VCR VIDEO
TUNER
MOVIE MUSIC SPORTS GAME
SET MENU
ENTER
AMP
STEREO
• An LFE channel can be output from the Front L/R Speakers or Subwoofer depending on how you set “* BASS” in the SETMENU.
• If “* BASS” in the SET MENU is set to “BOTH” or “* FRONT” is set to “SML”, a low tone is output from the Subwoofer.
• If sound field effects are off, no sound will output from the Center Speaker or Surround L/R Speakers.• The volume may become very low if you turn off sound field effects and set “* D. Range” to “MIN” in the SET MENU. In this
case, turn on sound field effects.• If sound field effects are off and you play Dolby Digital or DTS audio, the volume balance of the Front L/R Speakers may be
disturbed. This is because the dynamic range becomes compressed and the channel sound set in “* Speaker Set” in the SETMENU mixes and outputs with the front L/R channel sound.
Play the source.
Press AMP.
Press STEREO.The STEREO indicator lights up in the CinemaStationDisplay.If sound field effects are off, you will have normal stereoplayback. Press STEREO once more to turn on the soundfield effect.
Advice
Note
You can enjoy the 2-channel (stereo sound) source onlywith the Front L/R Speakers.
013DVX-S120-en 03.8.5, 1:48 PM74
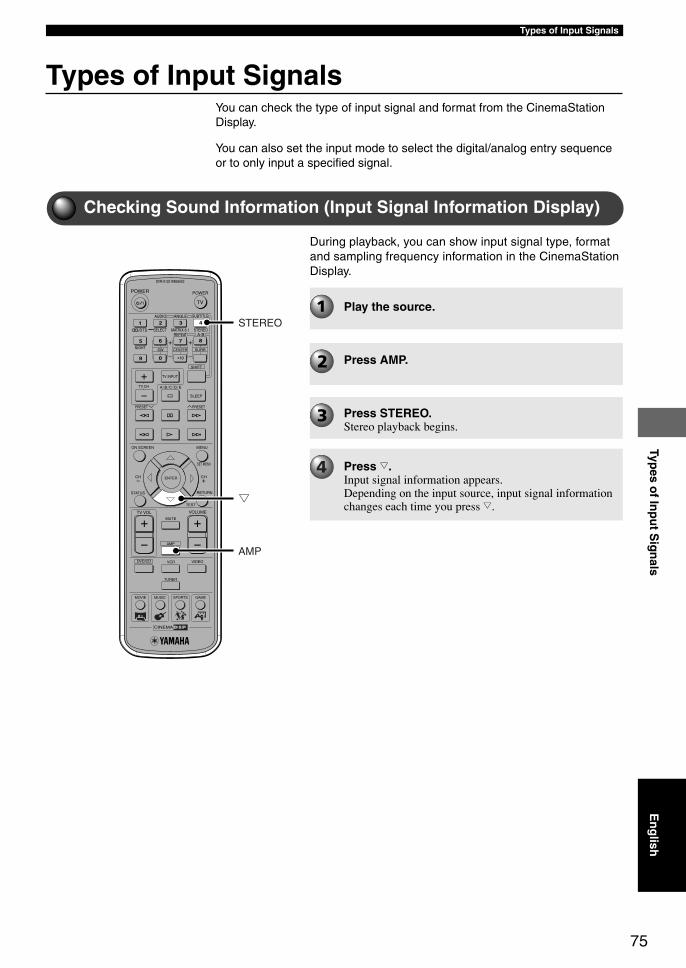
Types of Input Signals
75
Types o
f Inp
ut S
ign
als
Types of Input SignalsYou can check the type of input signal and format from the CinemaStationDisplay.
You can also set the input mode to select the digital/analog entry sequenceor to only input a specified signal.
TV
CH
CINEMA
CH
POWER POWER
AUDIO
/DTS SELECT
NIGHT SW
TV CH
TV INPUT
SLEEP
PRESET PRESET
A B C D E
CENTER SURR
SHIFT
STEREOMATRIX 6.1A-BREPEAT
ANGLE SUBTITLE
DVR-S120 WB56650
ON SCREEN MENU
TEST
RETURNSTATUS
TV VOL VOLUME
MUTE
AMP
DVD/CD VCR VIDEO
TUNER
MOVIE MUSIC SPORTS GAME
SET MENU
ENTER
AMP
STEREO
g
Checking Sound Information (Input Signal Information Display)
During playback, you can show input signal type, formatand sampling frequency information in the CinemaStationDisplay.
Play the source.
Press AMP.
Press STEREO.Stereo playback begins.
Press g.Input signal information appears.Depending on the input source, input signal informationchanges each time you press g.
En
glish
014DVX-S120-en 03.8.5, 1:48 PM75
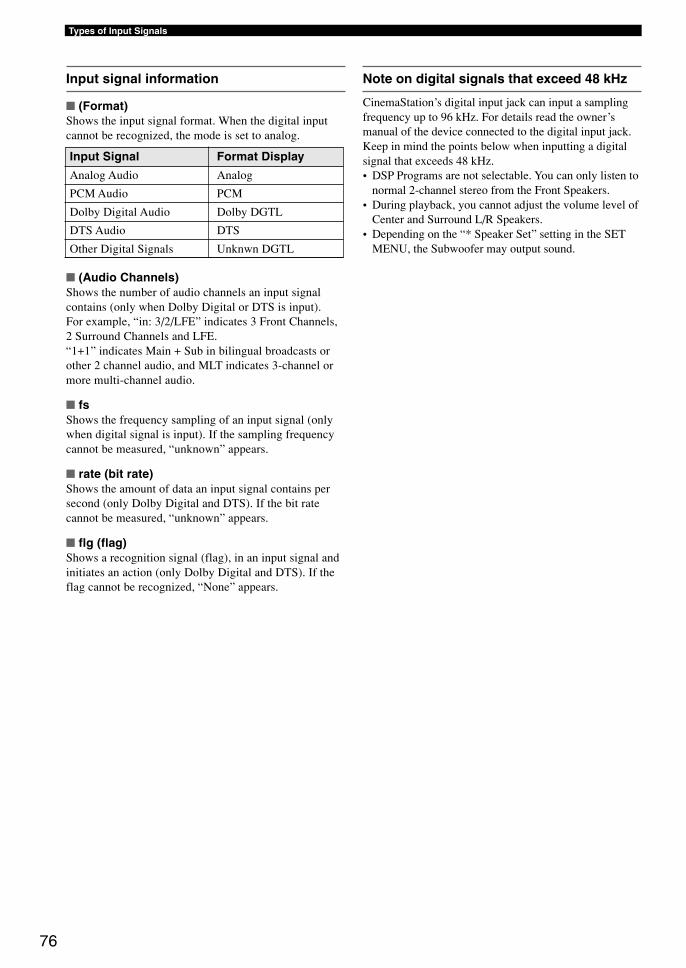
Types of Input Signals
76
Note on digital signals that exceed 48 kHz
CinemaStation’s digital input jack can input a samplingfrequency up to 96 kHz. For details read the owner’smanual of the device connected to the digital input jack.Keep in mind the points below when inputting a digitalsignal that exceeds 48 kHz.• DSP Programs are not selectable. You can only listen to
normal 2-channel stereo from the Front Speakers.• During playback, you cannot adjust the volume level of
Center and Surround L/R Speakers.• Depending on the “* Speaker Set” setting in the SET
MENU, the Subwoofer may output sound.
Input signal information
(Format)Shows the input signal format. When the digital inputcannot be recognized, the mode is set to analog.
Input Signal Format Display
Analog Audio Analog
PCM Audio PCM
Dolby Digital Audio Dolby DGTL
DTS Audio DTS
Other Digital Signals Unknwn DGTL
(Audio Channels)Shows the number of audio channels an input signalcontains (only when Dolby Digital or DTS is input).For example, “in: 3/2/LFE” indicates 3 Front Channels,2 Surround Channels and LFE.“1+1” indicates Main + Sub in bilingual broadcasts orother 2 channel audio, and MLT indicates 3-channel ormore multi-channel audio.
fsShows the frequency sampling of an input signal (onlywhen digital signal is input). If the sampling frequencycannot be measured, “unknown” appears.
rate (bit rate)Shows the amount of data an input signal contains persecond (only Dolby Digital and DTS). If the bit ratecannot be measured, “unknown” appears.
flg (flag)Shows a recognition signal (flag), in an input signal andinitiates an action (only Dolby Digital and DTS). If theflag cannot be recognized, “None” appears.
014DVX-S120-en 03.8.5, 1:48 PM76
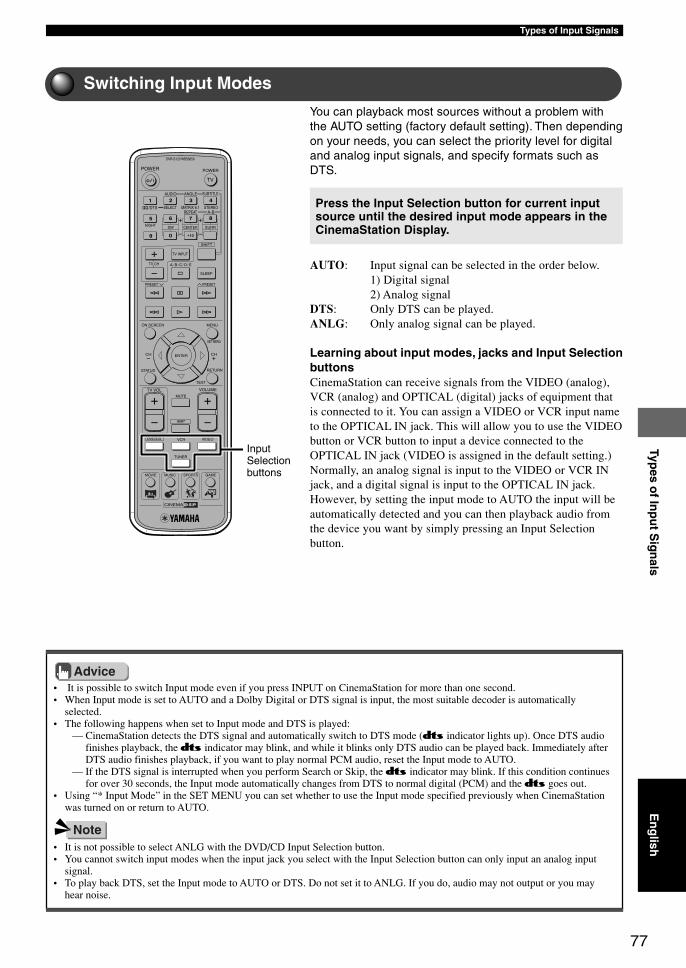
Types of Input Signals
77
Types o
f Inp
ut S
ign
als
Switching Input Modes
TV
CH
CINEMA
CH
POWER POWER
AUDIO
/DTS SELECT
NIGHT SW
TV CH
TV INPUT
SLEEP
PRESET PRESET
A B C D E
CENTER SURR
SHIFT
STEREOMATRIX 6.1A-BREPEAT
ANGLE SUBTITLE
DVR-S120 WB56650
ON SCREEN MENU
TEST
RETURNSTATUS
TV VOL VOLUME
MUTE
AMP
DVD/CD VCR VIDEO
TUNER
MOVIE MUSIC SPORTS GAME
SET MENU
ENTER
• It is possible to switch Input mode even if you press INPUT on CinemaStation for more than one second.• When Input mode is set to AUTO and a Dolby Digital or DTS signal is input, the most suitable decoder is automatically
selected.• The following happens when set to Input mode and DTS is played:
— CinemaStation detects the DTS signal and automatically switch to DTS mode (t indicator lights up). Once DTS audiofinishes playback, the t indicator may blink, and while it blinks only DTS audio can be played back. Immediately afterDTS audio finishes playback, if you want to play normal PCM audio, reset the Input mode to AUTO.
— If the DTS signal is interrupted when you perform Search or Skip, the t indicator may blink. If this condition continuesfor over 30 seconds, the Input mode automatically changes from DTS to normal digital (PCM) and the t goes out.
• Using “* Input Mode” in the SET MENU you can set whether to use the Input mode specified previously when CinemaStationwas turned on or return to AUTO.
• It is not possible to select ANLG with the DVD/CD Input Selection button.• You cannot switch input modes when the input jack you select with the Input Selection button can only input an analog input
signal.• To play back DTS, set the Input mode to AUTO or DTS. Do not set it to ANLG. If you do, audio may not output or you may
hear noise.
You can playback most sources without a problem withthe AUTO setting (factory default setting). Then dependingon your needs, you can select the priority level for digitaland analog input signals, and specify formats such asDTS.
Press the Input Selection button for current inputsource until the desired input mode appears in theCinemaStation Display.
AUTO: Input signal can be selected in the order below.1) Digital signal2) Analog signal
DTS: Only DTS can be played.ANLG: Only analog signal can be played.
Learning about input modes, jacks and Input SelectionbuttonsCinemaStation can receive signals from the VIDEO (analog),VCR (analog) and OPTICAL (digital) jacks of equipment thatis connected to it. You can assign a VIDEO or VCR input nameto the OPTICAL IN jack. This will allow you to use the VIDEObutton or VCR button to input a device connected to theOPTICAL IN jack (VIDEO is assigned in the default setting.)Normally, an analog signal is input to the VIDEO or VCR INjack, and a digital signal is input to the OPTICAL IN jack.However, by setting the input mode to AUTO the input will beautomatically detected and you can then playback audio fromthe device you want by simply pressing an Input Selectionbutton.
Advice
Note
InputSelectionbuttons
En
glish
014DVX-S120-en 03.8.5, 1:48 PM77
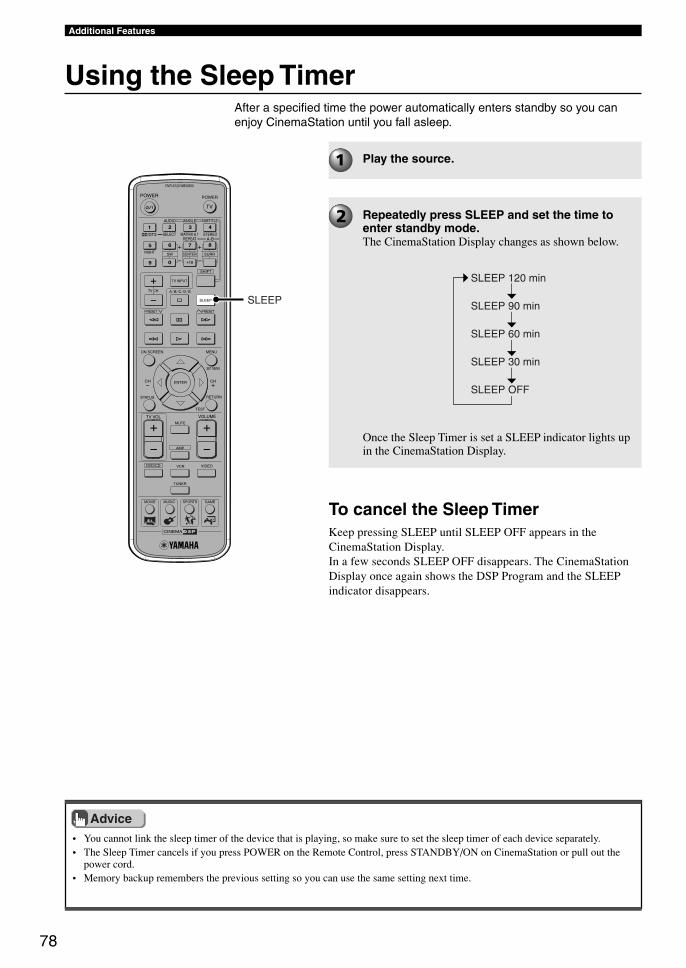
78
Additional Features
Using the Sleep TimerAfter a specified time the power automatically enters standby so you canenjoy CinemaStation until you fall asleep.
TV
CH
CINEMA
CH
POWER POWER
AUDIO
/DTS SELECT
NIGHT SW
TV CH
TV INPUT
SLEEP
PRESET PRESET
A B C D E
CENTER SURR
SHIFT
STEREOMATRIX 6.1A-BREPEAT
ANGLE SUBTITLE
DVR-S120 WB56650
ON SCREEN MENU
TEST
RETURNSTATUS
TV VOL VOLUME
MUTE
AMP
DVD/CD VCR VIDEO
TUNER
MOVIE MUSIC SPORTS GAME
SET MENU
ENTER
SLEEP
• You cannot link the sleep timer of the device that is playing, so make sure to set the sleep timer of each device separately.• The Sleep Timer cancels if you press POWER on the Remote Control, press STANDBY/ON on CinemaStation or pull out the
power cord.• Memory backup remembers the previous setting so you can use the same setting next time.
Play the source.
Repeatedly press SLEEP and set the time toenter standby mode.The CinemaStation Display changes as shown below.
Once the Sleep Timer is set a SLEEP indicator lights upin the CinemaStation Display.
SLEEP 120 min
SLEEP 90 min
SLEEP 60 min
SLEEP 30 min
SLEEP OFF
To cancel the Sleep TimerKeep pressing SLEEP until SLEEP OFF appears in theCinemaStation Display.In a few seconds SLEEP OFF disappears. The CinemaStationDisplay once again shows the DSP Program and the SLEEPindicator disappears.
Advice
015DVX-S120-en 03.8.5, 1:49 PM78
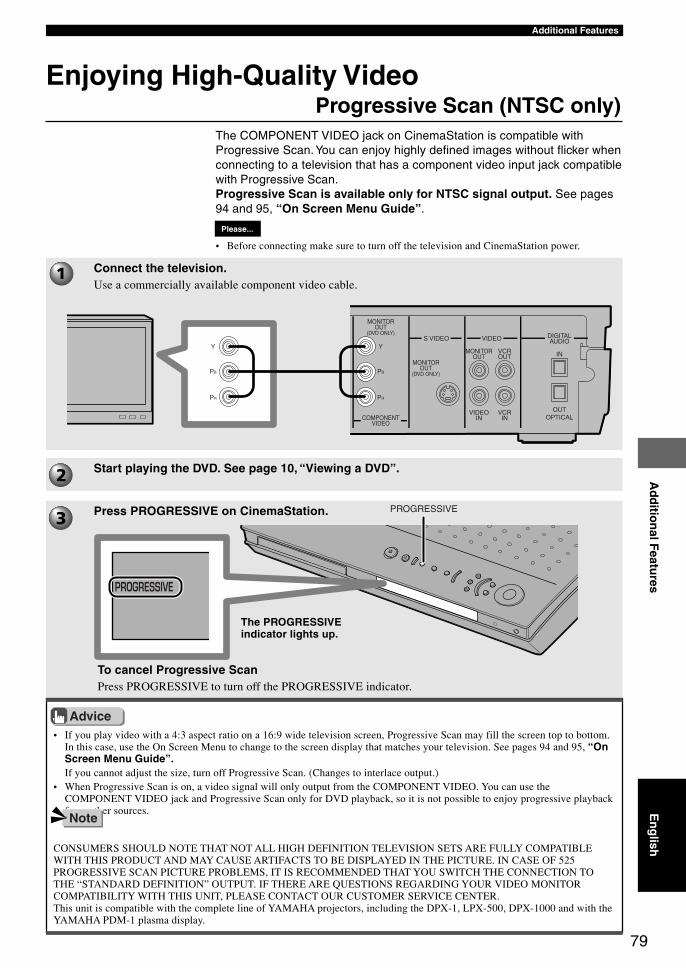
79
Additional FeaturesA
dd
ition
al Featu
res
Enjoying High-Quality VideoProgressive Scan (NTSC only)
The COMPONENT VIDEO jack on CinemaStation is compatible withProgressive Scan. You can enjoy highly defined images without flicker whenconnecting to a television that has a component video input jack compatiblewith Progressive Scan.Progressive Scan is available only for NTSC signal output. See pages94 and 95, “On Screen Menu Guide”.
• Before connecting make sure to turn off the television and CinemaStation power.
Connect the television.Use a commercially available component video cable.
Start playing the DVD. See page 10, “Viewing a DVD”.
Press PROGRESSIVE on CinemaStation.
DIGITALAUDIOVIDEOS VIDEO
INVCROUT
Y
PB
PR
MONITOROUT
MONITOROUT
(DVD ONLY)
MONITOROUT
(DVD ONLY)
VCRIN
VIDEOINCOMPONENT
VIDEO
OUTOPTICAL
Y
PB
PR
PROGRESSIVE
• If you play video with a 4:3 aspect ratio on a 16:9 wide television screen, Progressive Scan may fill the screen top to bottom.In this case, use the On Screen Menu to change to the screen display that matches your television. See pages 94 and 95, “OnScreen Menu Guide”.If you cannot adjust the size, turn off Progressive Scan. (Changes to interlace output.)
• When Progressive Scan is on, a video signal will only output from the COMPONENT VIDEO. You can use theCOMPONENT VIDEO jack and Progressive Scan only for DVD playback, so it is not possible to enjoy progressive playbackfrom other sources.
CONSUMERS SHOULD NOTE THAT NOT ALL HIGH DEFINITION TELEVISION SETS ARE FULLY COMPATIBLEWITH THIS PRODUCT AND MAY CAUSE ARTIFACTS TO BE DISPLAYED IN THE PICTURE. IN CASE OF 525PROGRESSIVE SCAN PICTURE PROBLEMS, IT IS RECOMMENDED THAT YOU SWITCH THE CONNECTION TOTHE “STANDARD DEFINITION” OUTPUT. IF THERE ARE QUESTIONS REGARDING YOUR VIDEO MONITORCOMPATIBILITY WITH THIS UNIT, PLEASE CONTACT OUR CUSTOMER SERVICE CENTER.This unit is compatible with the complete line of YAMAHA projectors, including the DPX-1, LPX-500, DPX-1000 and with theYAMAHA PDM-1 plasma display.
Please...
Advice
Note
The PROGRESSIVEindicator lights up.
To cancel Progressive ScanPress PROGRESSIVE to turn off the PROGRESSIVE indicator.
En
glish
015DVX-S120-en 03.8.5, 1:49 PM79
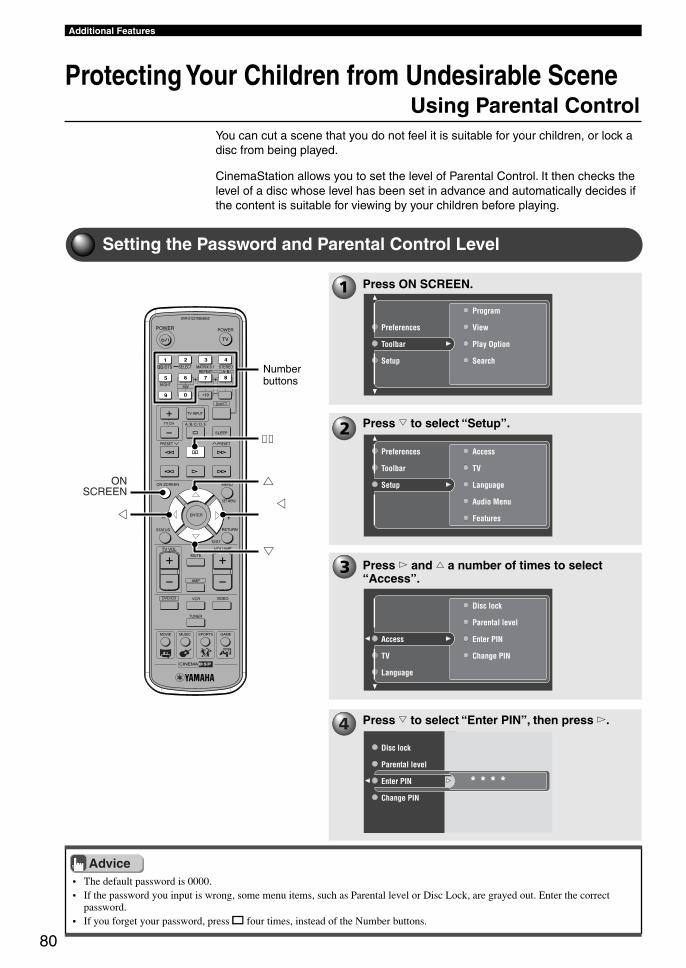
80
Additional Features
Protecting Your Children from Undesirable SceneUsing Parental Control
You can cut a scene that you do not feel it is suitable for your children, or lock adisc from being played.
CinemaStation allows you to set the level of Parental Control. It then checks thelevel of a disc whose level has been set in advance and automatically decides ifthe content is suitable for viewing by your children before playing.
Setting the Password and Parental Control Level
TV
CH
CINEMA
CH
POWER POWER
AUDIO
/DTS SELECT
NIGHT SW
TV CH
TV INPUT
SLEEP
PRESET PRESET
A B C D E
CENTER SURR
SHIFT
STEREOMATRIX 6.1A-BREPEAT
ANGLE SUBTITLE
DVR-S120 WB56650
ON SCREEN MENU
TEST
RETURNSTATUS
TV VOL VOLUME
MUTE
AMP
DVD/CD VCR VIDEO
TUNER
MOVIE MUSIC SPORTS GAME
SET MENU
ENTER
g
h
d
g g
ONSCREEN
• The default password is 0000.• If the password you input is wrong, some menu items, such as Parental level or Disc Lock, are grayed out. Enter the correct
password.• If you forget your password, press s four times, instead of the Number buttons.
Advice
Press g to select “Enter PIN”, then press w.
Press w and h a number of times to select“Access”.
Press g to select “Setup”.
Press ON SCREEN.
Number
Numberbuttons
Program
View
Play Option
Search
Toolbar
Preferences
Setup
Access
TV
Language
Audio Menu
Features
Setup
Preferences
Toolbar
Disc lock
Parental level
Enter PIN
Change PIN
Access
TV
Language
* * * *
Disc lock
Parental level
Change PIN
Enter PIN
015DVX-S120-en 03.8.5, 1:49 PM80
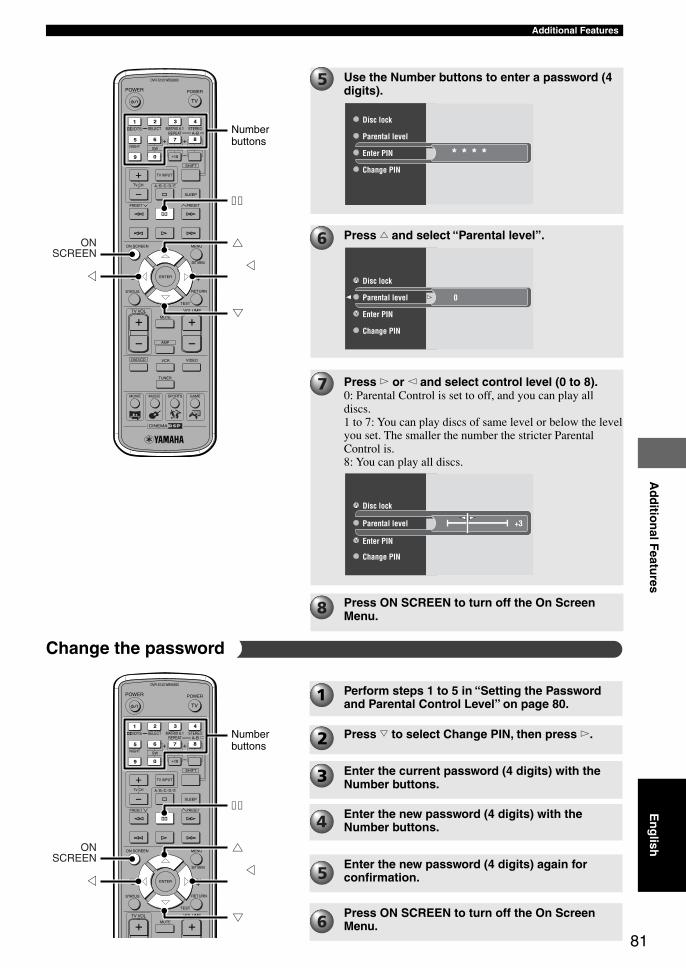
81
Additional FeaturesA
dd
ition
al Featu
res
TV
CHCH
POWER POWER
AUDIO
/DTS SELECT
NIGHT SW
TV CH
TV INPUT
SLEEP
PRESET PRESET
A B C D E
CENTER SURR
SHIFT
STEREOMATRIX 6.1A-BREPEAT
ANGLE SUBTITLE
DVR-S120 WB56650
ON SCREEN MENU
TEST
RETURNSTATUS
TV VOL VOLUME
MUTE
SET MENU
ENTER
g
h
d
g g
ONSCREEN
TV
CH
CINEMA
CH
POWER POWER
AUDIO
/DTS SELECT
NIGHT SW
TV CH
TV INPUT
SLEEP
PRESET PRESET
A B C D E
CENTER SURR
SHIFT
STEREOMATRIX 6.1A-BREPEAT
ANGLE SUBTITLE
DVR-S120 WB56650
ON SCREEN MENU
TEST
RETURNSTATUS
TV VOL VOLUME
MUTE
AMP
DVD/CD VCR VIDEO
TUNER
MOVIE MUSIC SPORTS GAME
SET MENU
ENTER
g
h
d
g g
ONSCREEN
Perform steps 1 to 5 in “Setting the Passwordand Parental Control Level” on page 80.
Enter the new password (4 digits) again forconfirmation.
Enter the new password (4 digits) with theNumber buttons.
Enter the current password (4 digits) with theNumber buttons.
Press g to select Change PIN, then press w.Numberbuttons
Change the password
Press ON SCREEN to turn off the On ScreenMenu.
Press w or q and select control level (0 to 8).0: Parental Control is set to off, and you can play alldiscs.1 to 7: You can play discs of same level or below the levelyou set. The smaller the number the stricter ParentalControl is.8: You can play all discs.
Press h and select “Parental level”.
Use the Number buttons to enter a password (4digits).
Numberbuttons
* * * *Enter PIN
Disc lock
Parental level
Change PIN
0
Enter PIN
Parental level
Disc lock
Change PIN
+3
Enter PIN
Parental level
Disc lock
Change PIN
Press ON SCREEN to turn off the On ScreenMenu.
En
glish
015DVX-S120-en 03.8.5, 1:49 PM81
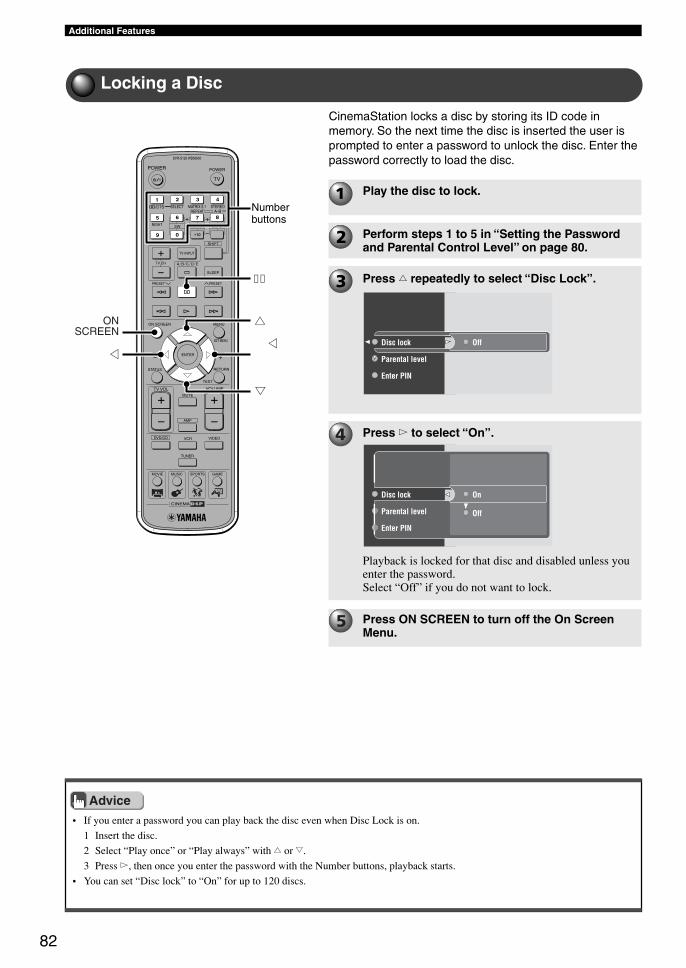
82
Additional Features
• If you enter a password you can play back the disc even when Disc Lock is on.
1 Insert the disc.
2 Select “Play once” or “Play always” with h or g.
3 Press w, then once you enter the password with the Number buttons, playback starts.
• You can set “Disc lock” to “On” for up to 120 discs.
Locking a Disc
TV
CH
CINEMA
CH
POWER POWER
AUDIO
/DTS SELECT
NIGHT SW
TV CH
TV INPUT
SLEEP
PRESET PRESET
A B C D E
CENTER SURR
SHIFT
STEREOMATRIX 6.1A-BREPEAT
ANGLE SUBTITLE
DVR-S120 WB56650
ON SCREEN MENU
TEST
RETURNSTATUS
TV VOL VOLUME
MUTE
AMP
DVD/CD VCR VIDEO
TUNER
MOVIE MUSIC SPORTS GAME
SET MENU
ENTER
g
h
d
g g
ONSCREEN
Press ON SCREEN to turn off the On ScreenMenu.
Playback is locked for that disc and disabled unless youenter the password.Select “Off” if you do not want to lock.
Press w to select “On”.
Press h repeatedly to select “Disc Lock”.
Perform steps 1 to 5 in “Setting the Passwordand Parental Control Level” on page 80.
CinemaStation locks a disc by storing its ID code inmemory. So the next time the disc is inserted the user isprompted to enter a password to unlock the disc. Enter thepassword correctly to load the disc.
Numberbuttons
Off
Parental level
Disc lock
Enter PIN
OnDisc lock
Parental level
Enter PIN
Off
Advice
Play the disc to lock.
015DVX-S120-en 03.8.5, 1:49 PM82
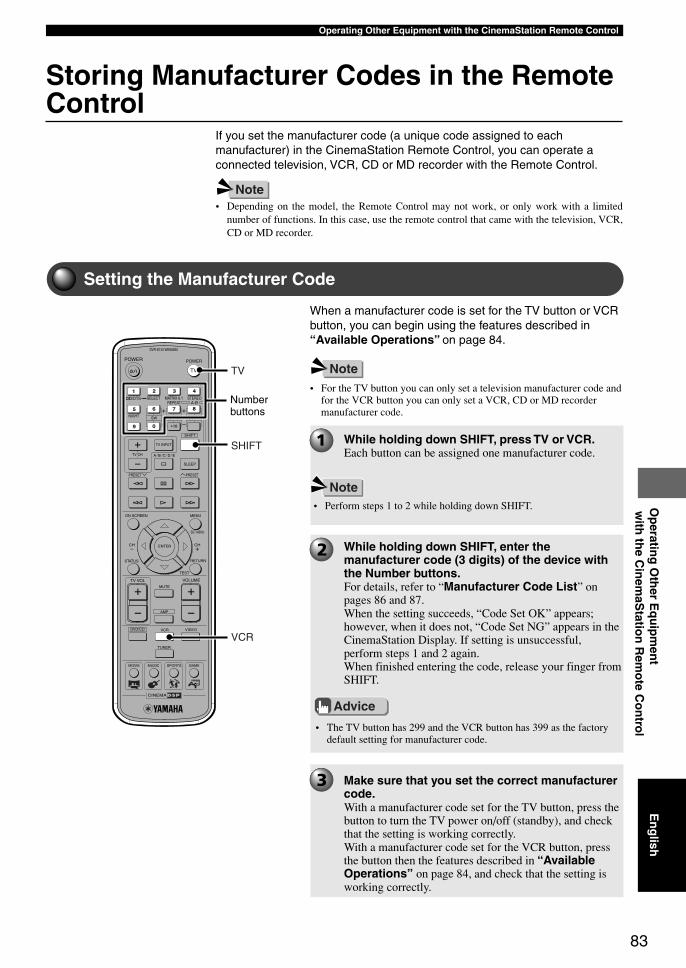
83
Operating Other Equipment with the CinemaStation Remote ControlO
peratin
g O
ther E
qu
ipm
ent
with
the C
inem
aStatio
n R
emo
te Co
ntr o
l
Storing Manufacturer Codes in the RemoteControl
If you set the manufacturer code (a unique code assigned to eachmanufacturer) in the CinemaStation Remote Control, you can operate aconnected television, VCR, CD or MD recorder with the Remote Control.
• Depending on the model, the Remote Control may not work, or only work with a limitednumber of functions. In this case, use the remote control that came with the television, VCR,CD or MD recorder.
Setting the Manufacturer Code
When a manufacturer code is set for the TV button or VCRbutton, you can begin using the features described in“Available Operations” on page 84.
TV
CH
CINEMA
CH
POWER POWER
AUDIO
/DTS SELECT
NIGHT SW
TV CH
TV INPUT
SLEEP
PRESET PRESET
A B C D E
CENTER SURR
SHIFT
STEREOMATRIX 6.1A-BREPEAT
ANGLE SUBTITLE
DVR-S120 WB56650
ON SCREEN MENU
TEST
RETURNSTATUS
TV VOL VOLUME
MUTE
AMP
DVD/CD VCR VIDEO
TUNER
MOVIE MUSIC SPORTS GAME
SET MENU
ENTER
TV
SHIFT
VCR
Note
Note
Note
Make sure that you set the correct manufacturercode.With a manufacturer code set for the TV button, press thebutton to turn the TV power on/off (standby), and checkthat the setting is working correctly.With a manufacturer code set for the VCR button, pressthe button then the features described in “AvailableOperations” on page 84, and check that the setting isworking correctly.
• The TV button has 299 and the VCR button has 399 as the factorydefault setting for manufacturer code.
Advice
While holding down SHIFT, enter themanufacturer code (3 digits) of the device withthe Number buttons.For details, refer to “Manufacturer Code List” onpages 86 and 87.When the setting succeeds, “Code Set OK” appears;however, when it does not, “Code Set NG” appears in theCinemaStation Display. If setting is unsuccessful,perform steps 1 and 2 again.When finished entering the code, release your finger fromSHIFT.
• Perform steps 1 to 2 while holding down SHIFT.
While holding down SHIFT, press TV or VCR.Each button can be assigned one manufacturer code.
• For the TV button you can only set a television manufacturer code andfor the VCR button you can only set a VCR, CD or MD recordermanufacturer code.
Numberbuttons
En
glish
016DVX-S120-en 03.8.5, 1:50 PM83
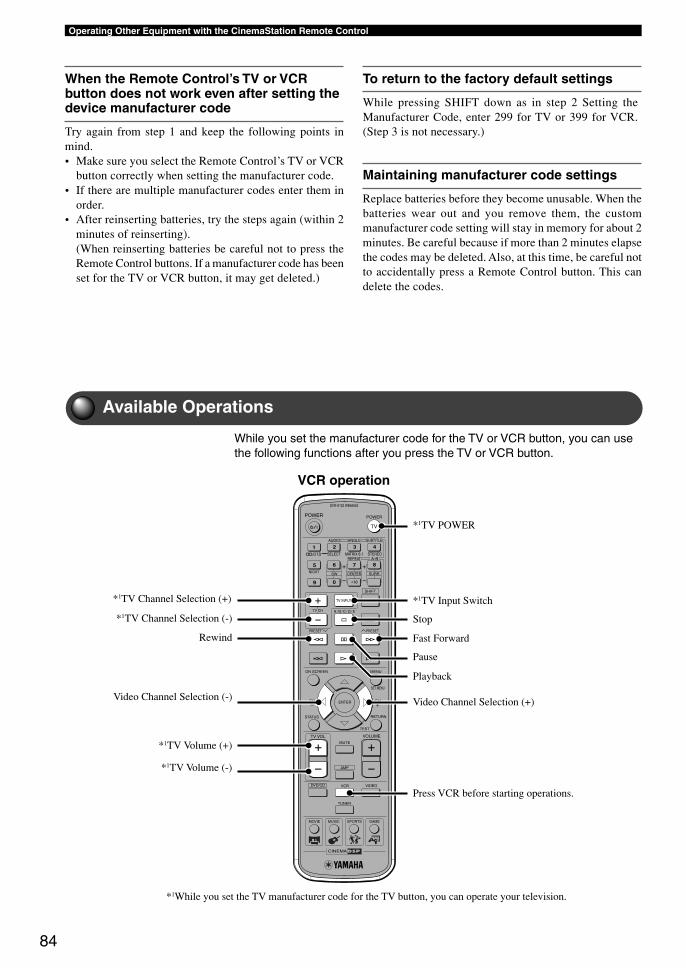
84
Operating Other Equipment with the CinemaStation Remote Control
Available Operations
While you set the manufacturer code for the TV or VCR button, you can usethe following functions after you press the TV or VCR button.
TV
CH
CINEMA
CH
POWER POWER
AUDIO
/DTS SELECT
NIGHT SW
TV CH
TV INPUT
SLEEP
PRESET PRESET
A B C D E
CENTER SURR
SHIFT
STEREOMATRIX 6.1A-BREPEAT
ANGLE SUBTITLE
DVR-S120 WB56650
ON SCREEN MENU
TEST
RETURNSTATUS
TV VOL VOLUME
MUTE
AMP
DVD/CD VCR VIDEO
TUNER
MOVIE MUSIC SPORTS GAME
SET MENU
ENTER
When the Remote Control’s TV or VCRbutton does not work even after setting thedevice manufacturer code
Try again from step 1 and keep the following points inmind.• Make sure you select the Remote Control’s TV or VCR
button correctly when setting the manufacturer code.• If there are multiple manufacturer codes enter them in
order.• After reinserting batteries, try the steps again (within 2
minutes of reinserting).(When reinserting batteries be careful not to press theRemote Control buttons. If a manufacturer code has beenset for the TV or VCR button, it may get deleted.)
To return to the factory default settings
While pressing SHIFT down as in step 2 Setting theManufacturer Code, enter 299 for TV or 399 for VCR.(Step 3 is not necessary.)
Maintaining manufacturer code settings
Replace batteries before they become unusable. When thebatteries wear out and you remove them, the custommanufacturer code setting will stay in memory for about 2minutes. Be careful because if more than 2 minutes elapsethe codes may be deleted. Also, at this time, be careful notto accidentally press a Remote Control button. This candelete the codes.
*1TV POWER
*1TV Input Switch
Stop
Fast Forward
Pause
Playback
Video Channel Selection (+)
Press VCR before starting operations.
*1TV Channel Selection (+)
*1TV Channel Selection (-)
Rewind
Video Channel Selection (-)
*1TV Volume (+)
*1TV Volume (-)
VCR operation
*1While you set the TV manufacturer code for the TV button, you can operate your television.
016DVX-S120-en 03.8.5, 1:50 PM84
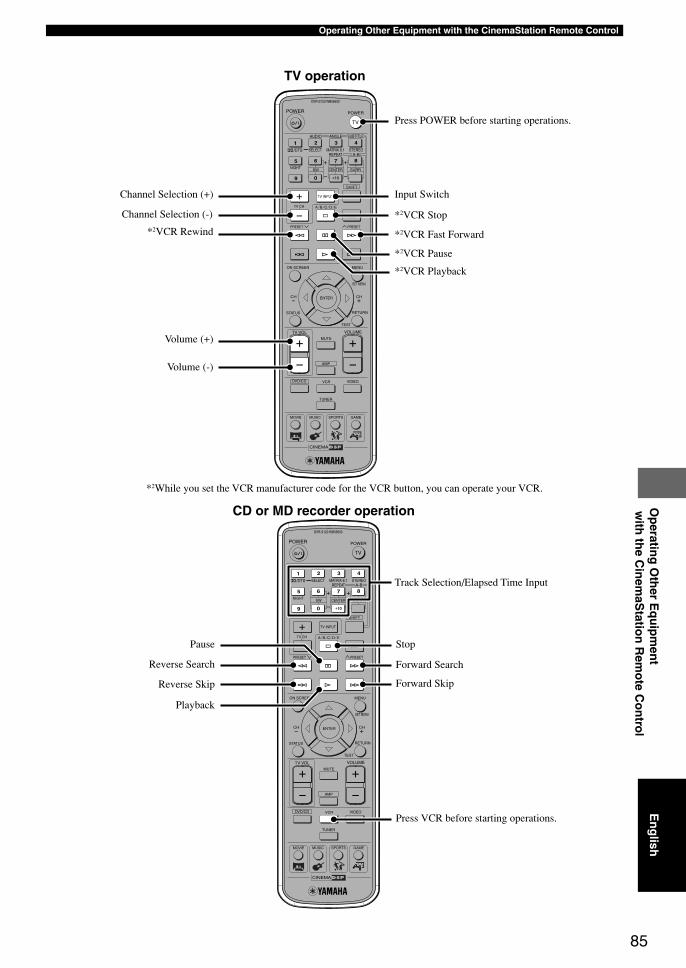
85
Operating Other Equipment with the CinemaStation Remote ControlO
peratin
g O
ther E
qu
ipm
ent
with
the C
inem
aStatio
n R
emo
te Co
ntr o
l
TV
CH
CINEMA
CH
POWER POWER
AUDIO
/DTS SELECT
NIGHT SW
TV CH
TV INPUT
SLEEP
PRESET PRESET
A B C D E
CENTER SURR
SHIFT
STEREOMATRIX 6.1A-BREPEAT
ANGLE SUBTITLE
DVR-S120 WB56650
ON SCREEN MENU
TEST
RETURNSTATUS
TV VOL VOLUME
MUTE
AMP
DVD/CD VCR VIDEO
TUNER
MOVIE MUSIC SPORTS GAME
SET MENU
ENTER
TV
CH
CINEMA
CH
POWER POWER
AUDIO
/DTS SELECT
NIGHT SW
TV CH
TV INPUT
SLEEP
PRESET PRESET
A B C D E
CENTER SURR
SHIFT
STEREOMATRIX 6.1A-BREPEAT
ANGLE SUBTITLE
DVR-S120 WB56650
ON SCREEN MENU
TEST
RETURNSTATUS
TV VOL VOLUME
MUTE
AMP
DVD/CD VCR VIDEO
TUNER
MOVIE MUSIC SPORTS GAME
SET MENU
ENTER
TV operation
CD or MD recorder operation
Press POWER before starting operations.
Channel Selection (+)
Channel Selection (-)
*2VCR Rewind
Input Switch
Volume (+)
Volume (-)
*2VCR Stop
*2VCR Fast Forward
*2VCR Pause
*2VCR Playback
Track Selection/Elapsed Time Input
StopPause
Playback
Reverse Search
Reverse Skip
Forward Search
Forward Skip
Press VCR before starting operations.
*2While you set the VCR manufacturer code for the VCR button, you can operate your VCR.
En
glish
016DVX-S120-en 03.8.5, 1:50 PM85
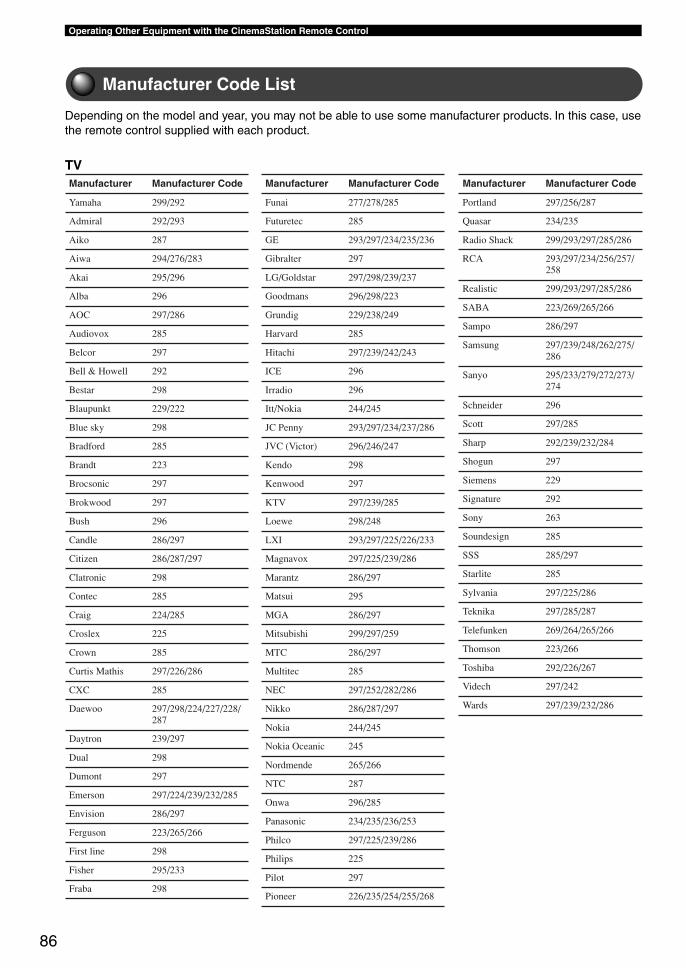
86
Operating Other Equipment with the CinemaStation Remote Control
Manufacturer Code List
Depending on the model and year, you may not be able to use some manufacturer products. In this case, usethe remote control supplied with each product.
Manufacturer Manufacturer Code
Yamaha 299/292
Admiral 292/293
Aiko 287
Aiwa 294/276/283
Akai 295/296
Alba 296
AOC 297/286
Audiovox 285
Belcor 297
Bell & Howell 292
Bestar 298
Blaupunkt 229/222
Blue sky 298
Bradford 285
Brandt 223
Brocsonic 297
Brokwood 297
Bush 296
Candle 286/297
Citizen 286/287/297
Clatronic 298
Contec 285
Craig 224/285
Croslex 225
Crown 285
Curtis Mathis 297/226/286
CXC 285
Daewoo 297/298/224/227/228/287
Daytron 239/297
Dual 298
Dumont 297
Emerson 297/224/239/232/285
Envision 286/297
Ferguson 223/265/266
First line 298
Fisher 295/233
Fraba 298
Manufacturer Manufacturer Code
Funai 277/278/285
Futuretec 285
GE 293/297/234/235/236
Gibralter 297
LG/Goldstar 297/298/239/237
Goodmans 296/298/223
Grundig 229/238/249
Harvard 285
Hitachi 297/239/242/243
ICE 296
Irradio 296
Itt/Nokia 244/245
JC Penny 293/297/234/237/286
JVC (Victor) 296/246/247
Kendo 298
Kenwood 297
KTV 297/239/285
Loewe 298/248
LXI 293/297/225/226/233
Magnavox 297/225/239/286
Marantz 286/297
Matsui 295
MGA 286/297
Mitsubishi 299/297/259
MTC 286/297
Multitec 285
NEC 297/252/282/286
Nikko 286/287/297
Nokia 244/245
Nokia Oceanic 245
Nordmende 265/266
NTC 287
Onwa 296/285
Panasonic 234/235/236/253
Philco 297/225/239/286
Philips 225
Pilot 297
Pioneer 226/235/254/255/268
Manufacturer Manufacturer Code
Portland 297/256/287
Quasar 234/235
Radio Shack 299/293/297/285/286
RCA 293/297/234/256/257/258
Realistic 299/293/297/285/286
SABA 223/269/265/266
Sampo 286/297
Samsung 297/239/248/262/275/286
Sanyo 295/233/279/272/273/274
Schneider 296
Scott 297/285
Sharp 292/239/232/284
Shogun 297
Siemens 229
Signature 292
Sony 263
Soundesign 285
SSS 285/297
Starlite 285
Sylvania 297/225/286
Teknika 297/285/287
Telefunken 269/264/265/266
Thomson 223/266
Toshiba 292/226/267
Videch 297/242
Wards 297/239/232/286
TV
016DVX-S120-en 03.8.5, 1:50 PM86
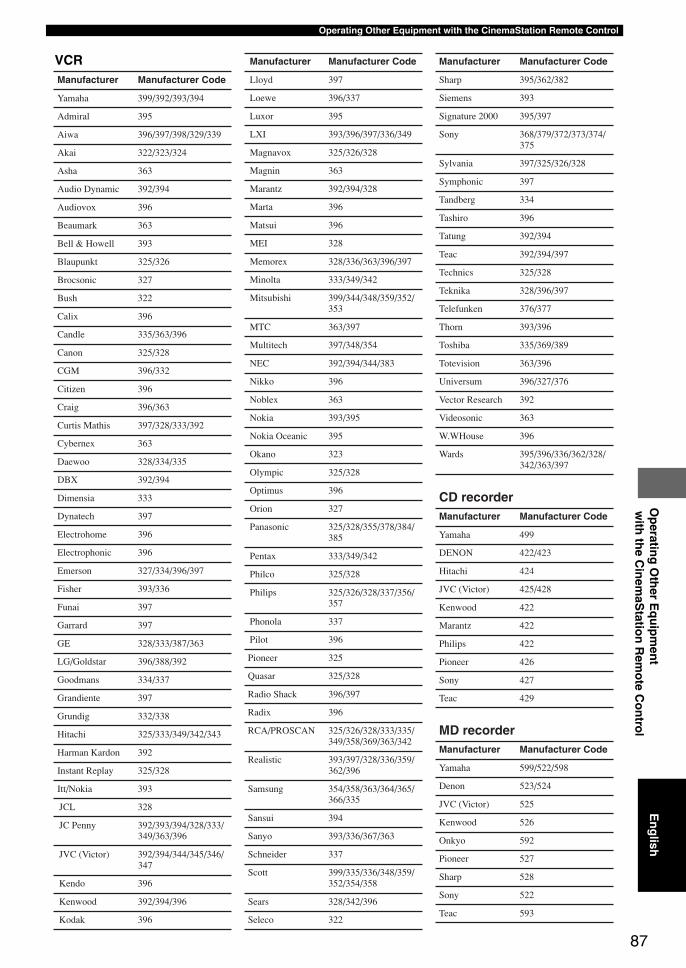
87
Operating Other Equipment with the CinemaStation Remote ControlO
peratin
g O
ther E
qu
ipm
ent
with
the C
inem
aStatio
n R
emo
te Co
ntr o
l
Manufacturer Manufacturer Code
Yamaha 399/392/393/394
Admiral 395
Aiwa 396/397/398/329/339
Akai 322/323/324
Asha 363
Audio Dynamic 392/394
Audiovox 396
Beaumark 363
Bell & Howell 393
Blaupunkt 325/326
Brocsonic 327
Bush 322
Calix 396
Candle 335/363/396
Canon 325/328
CGM 396/332
Citizen 396
Craig 396/363
Curtis Mathis 397/328/333/392
Cybernex 363
Daewoo 328/334/335
DBX 392/394
Dimensia 333
Dynatech 397
Electrohome 396
Electrophonic 396
Emerson 327/334/396/397
Fisher 393/336
Funai 397
Garrard 397
GE 328/333/387/363
LG/Goldstar 396/388/392
Goodmans 334/337
Grandiente 397
Grundig 332/338
Hitachi 325/333/349/342/343
Harman Kardon 392
Instant Replay 325/328
Itt/Nokia 393
JCL 328
JC Penny 392/393/394/328/333/349/363/396
JVC (Victor) 392/394/344/345/346/347
Kendo 396
Kenwood 392/394/396
Kodak 396
Manufacturer Manufacturer Code
Lloyd 397
Loewe 396/337
Luxor 395
LXI 393/396/397/336/349
Magnavox 325/326/328
Magnin 363
Marantz 392/394/328
Marta 396
Matsui 396
MEI 328
Memorex 328/336/363/396/397
Minolta 333/349/342
Mitsubishi 399/344/348/359/352/353
MTC 363/397
Multitech 397/348/354
NEC 392/394/344/383
Nikko 396
Noblex 363
Nokia 393/395
Nokia Oceanic 395
Okano 323
Olympic 325/328
Optimus 396
Orion 327
Panasonic 325/328/355/378/384/385
Pentax 333/349/342
Philco 325/328
Philips 325/326/328/337/356/357
Phonola 337
Pilot 396
Pioneer 325
Quasar 325/328
Radio Shack 396/397
Radix 396
RCA/PROSCAN 325/326/328/333/335/349/358/369/363/342
Realistic 393/397/328/336/359/362/396
Samsung 354/358/363/364/365/366/335
Sansui 394
Sanyo 393/336/367/363
Schneider 337
Scott 399/335/336/348/359/352/354/358
Sears 328/342/396
Seleco 322
Manufacturer Manufacturer Code
Sharp 395/362/382
Siemens 393
Signature 2000 395/397
Sony 368/379/372/373/374/375
Sylvania 397/325/326/328
Symphonic 397
Tandberg 334
Tashiro 396
Tatung 392/394
Teac 392/394/397
Technics 325/328
Teknika 328/396/397
Telefunken 376/377
Thorn 393/396
Toshiba 335/369/389
Totevision 363/396
Universum 396/327/376
Vector Research 392
Videosonic 363
W.WHouse 396
Wards 395/396/336/362/328/342/363/397
CD recorderManufacturer Manufacturer Code
Yamaha 499
DENON 422/423
Hitachi 424
JVC (Victor) 425/428
Kenwood 422
Marantz 422
Philips 422
Pioneer 426
Sony 427
Teac 429
MD recorderManufacturer Manufacturer Code
Yamaha 599/522/598
Denon 523/524
JVC (Victor) 525
Kenwood 526
Onkyo 592
Pioneer 527
Sharp 528
Sony 522
Teac 593
VCR
En
glish
016DVX-S120-en 03.8.5, 1:50 PM87
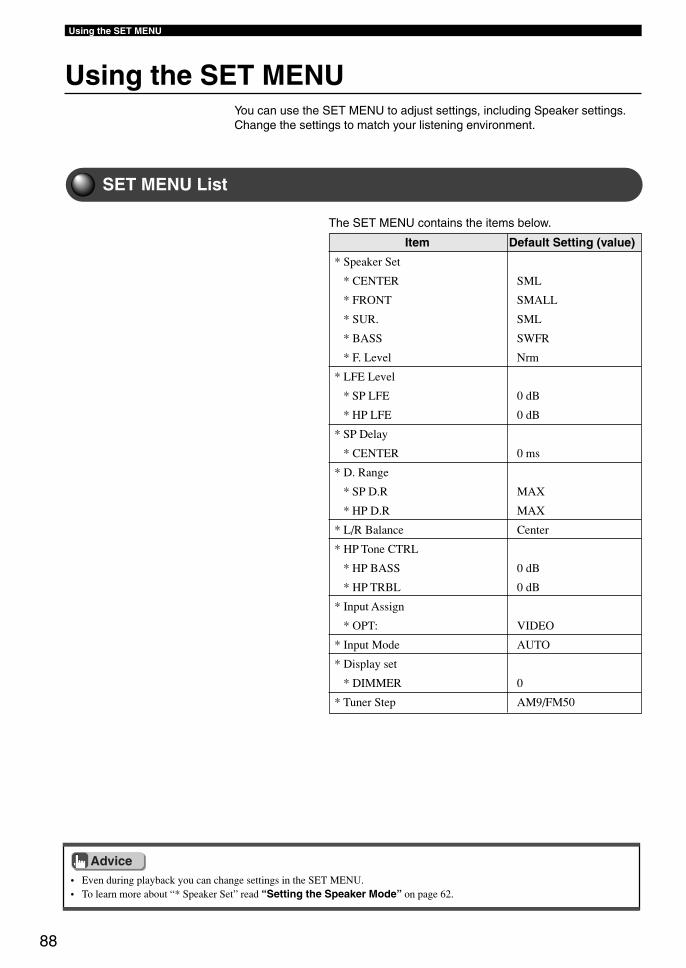
88
Using the SET MENU
Using the SET MENU
• Even during playback you can change settings in the SET MENU.• To learn more about “* Speaker Set” read “Setting the Speaker Mode” on page 62.
You can use the SET MENU to adjust settings, including Speaker settings.Change the settings to match your listening environment.
SET MENU List
The SET MENU contains the items below.
Item Default Setting (value)
* Speaker Set
* CENTER SML
* FRONT SMALL
* SUR. SML
* BASS SWFR
* F. Level Nrm
* LFE Level
* SP LFE 0 dB
* HP LFE 0 dB
* SP Delay
* CENTER 0 ms
* D. Range
* SP D.R MAX
* HP D.R MAX
* L/R Balance Center
* HP Tone CTRL
* HP BASS 0 dB
* HP TRBL 0 dB
* Input Assign
* OPT: VIDEO
* Input Mode AUTO
* Display set
* DIMMER 0
* Tuner Step AM9/FM50
Advice
017DVX-S120-en 03.8.5, 1:50 PM88
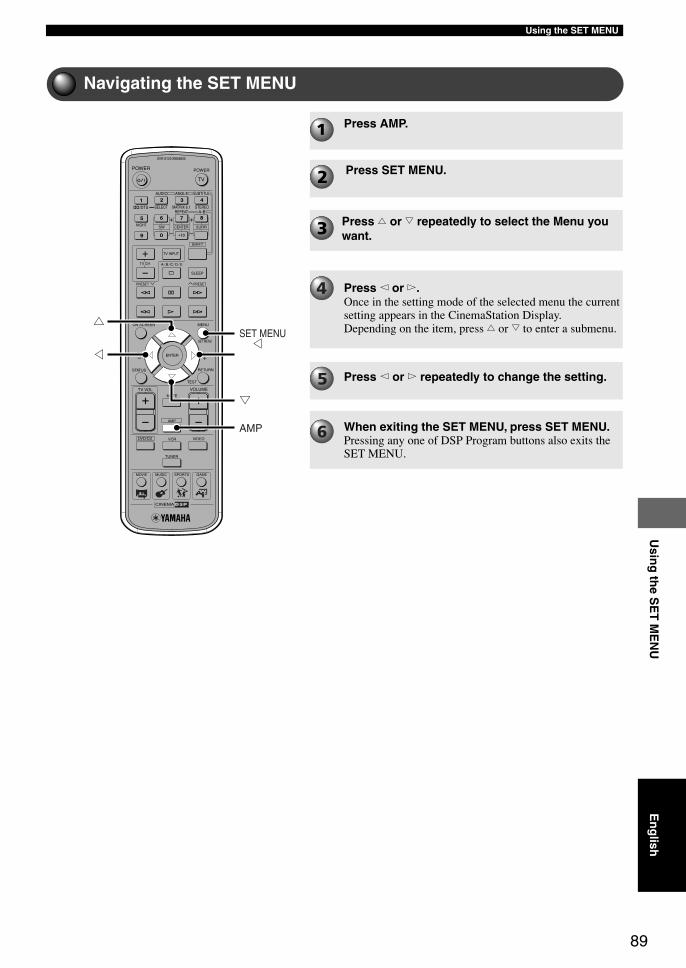
89
Using the SET MENUU
sing
the S
ET
ME
NU
Navigating the SET MENU
TV
CH
CINEMA
CH
POWER POWER
AUDIO
/DTS SELECT
NIGHT SW
TV CH
TV INPUT
SLEEP
PRESET PRESET
A B C D E
CENTER SURR
SHIFT
STEREOMATRIX 6.1A-BREPEAT
ANGLE SUBTITLE
DVR-S120 WB56650
ON SCREEN MENU
TEST
RETURNSTATUS
TV VOL VOLUME
MUTE
AMP
DVD/CD VCR VIDEO
TUNER
MOVIE MUSIC SPORTS GAME
SET MENU
ENTER
AMP
SET MENU
g
h
g g
Press AMP.
Press SET MENU.
Press h or g repeatedly to select the Menu youwant.
Press q or w.Once in the setting mode of the selected menu the currentsetting appears in the CinemaStation Display.Depending on the item, press h or g to enter a submenu.
Press q or w repeatedly to change the setting.
When exiting the SET MENU, press SET MENU.Pressing any one of DSP Program buttons also exits theSET MENU.
En
glish
017DVX-S120-en 03.8.5, 1:50 PM89
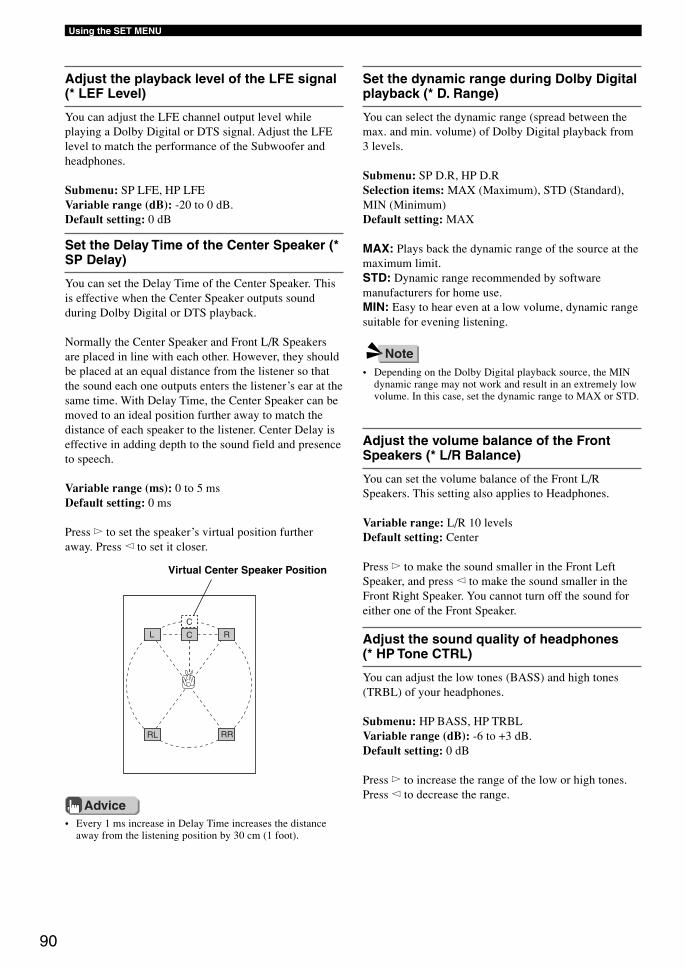
90
Using the SET MENU
Adjust the playback level of the LFE signal(* LEF Level)
You can adjust the LFE channel output level whileplaying a Dolby Digital or DTS signal. Adjust the LFElevel to match the performance of the Subwoofer andheadphones.
Submenu: SP LFE, HP LFEVariable range (dB): -20 to 0 dB.Default setting: 0 dB
L C
C
R
RL RR
Virtual Center Speaker Position
Set the dynamic range during Dolby Digitalplayback (* D. Range)
You can select the dynamic range (spread between themax. and min. volume) of Dolby Digital playback from3 levels.
Submenu: SP D.R, HP D.RSelection items: MAX (Maximum), STD (Standard),MIN (Minimum)Default setting: MAX
MAX: Plays back the dynamic range of the source at themaximum limit.STD: Dynamic range recommended by softwaremanufacturers for home use.MIN: Easy to hear even at a low volume, dynamic rangesuitable for evening listening.
Set the Delay Time of the Center Speaker (*SP Delay)
You can set the Delay Time of the Center Speaker. Thisis effective when the Center Speaker outputs soundduring Dolby Digital or DTS playback.
Normally the Center Speaker and Front L/R Speakersare placed in line with each other. However, they shouldbe placed at an equal distance from the listener so thatthe sound each one outputs enters the listener’s ear at thesame time. With Delay Time, the Center Speaker can bemoved to an ideal position further away to match thedistance of each speaker to the listener. Center Delay iseffective in adding depth to the sound field and presenceto speech.
Variable range (ms): 0 to 5 msDefault setting: 0 ms
Press w to set the speaker’s virtual position furtheraway. Press q to set it closer.
• Every 1 ms increase in Delay Time increases the distanceaway from the listening position by 30 cm (1 foot).
Advice
• Depending on the Dolby Digital playback source, the MINdynamic range may not work and result in an extremely lowvolume. In this case, set the dynamic range to MAX or STD.
Adjust the volume balance of the FrontSpeakers (* L/R Balance)
You can set the volume balance of the Front L/RSpeakers. This setting also applies to Headphones.
Variable range: L/R 10 levelsDefault setting: Center
Press w to make the sound smaller in the Front LeftSpeaker, and press q to make the sound smaller in theFront Right Speaker. You cannot turn off the sound foreither one of the Front Speaker.
Adjust the sound quality of headphones(* HP Tone CTRL)
You can adjust the low tones (BASS) and high tones(TRBL) of your headphones.
Submenu: HP BASS, HP TRBLVariable range (dB): -6 to +3 dB.Default setting: 0 dB
Press w to increase the range of the low or high tones.Press q to decrease the range.
Note
017DVX-S120-en 03.8.5, 1:50 PM90
91
Using the SET MENUU
sing
the S
ET
ME
NU
Reassign input jacks (* Input Assign)
You can assign CinemaStation’s OPTICAL IN jack toVIDEO or VCR. When set to VIDEO, press the VIDEObutton to operate the device connected to the OPTICALIN jack and the input source name will appear as VIDEO.When set to VCR, press the VCR button to operate thedevice connected to the OPTICAL IN jack and the inputsource name will appear as VCR.
Selection items: VIDEO, VCRDefault setting: VIDEO
Set the input mode when powering on (*Input Mode)
Set the input mode for powering on when playback devicesare connected to both digital and analog jacks.
Selection items: AUTO, LASTDefault setting: AUTO
AUTO: When CinemaStation power is turned on the inputmode automatically sets to AUTO.LAST: The last selected input mode is applied as is.
Adjust the CinemaStation Displaybrightness (* Display set)
DimmerYou can adjust the CinemaStation Display brightness.
Variable range: -4 to 0Default setting: 0
Press w to increase the brightness. Press q to decrease thebrightness.
Set frequency step (* Tuner Step) (Asia andGeneral models only)
The inter-station frequency spacing differs depending onthe areas. Set the frequency step according to the frequencyspacing in your area.
Selection items: AM9/FM50, AM10/FM100Default setting: AM9/FM50
Press w or q to select the desired setting.
• Turn off CinemaStation after you change the setting. Thenew setting becomes effective after you turn onCinemaStation again.
• Refer to the list below for the frequency spacing.— North, Central and South America: AM10/FM100— Other areas: AM9/FM50
Note
En
glish
017DVX-S120-en 03.8.5, 1:50 PM91
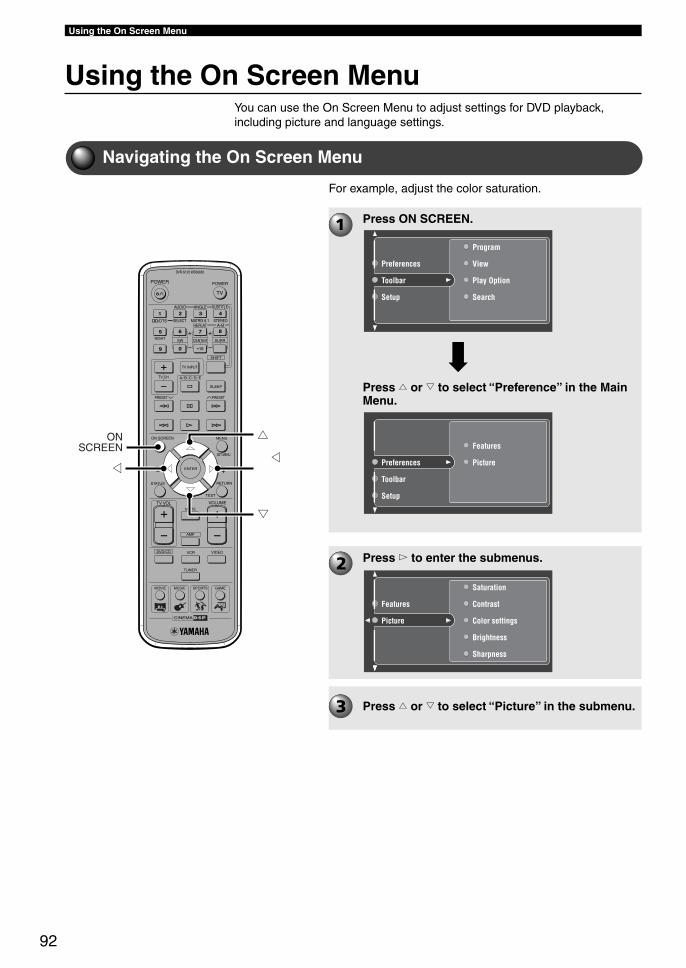
92
Using the On Screen Menu
Using the On Screen MenuYou can use the On Screen Menu to adjust settings for DVD playback,including picture and language settings.
Navigating the On Screen Menu
For example, adjust the color saturation.
TV
CH
CINEMA
CH
POWER POWER
AUDIO
/DTS SELECT
NIGHT SW
TV CH
TV INPUT
SLEEP
PRESET PRESET
A B C D E
CENTER SURR
SHIFT
STEREOMATRIX 6.1A-BREPEAT
ANGLE SUBTITLE
DVR-S120 WB56650
ON SCREEN MENU
TEST
RETURNSTATUS
TV VOL VOLUME
MUTE
AMP
DVD/CD VCR VIDEO
TUNER
MOVIE MUSIC SPORTS GAME
SET MENU
ENTER
ONSCREEN
g
h
g g
Press h or g to select “Picture” in the submenu.
Press w to enter the submenus.
Press h or g to select “Preference” in the MainMenu.
Press ON SCREEN.
Program
View
Play Option
Search
Toolbar
Preferences
Setup
Features
PicturePreferences
Toolbar
Setup
Saturation
Contrast
Color settings
Brightness
Sharpness
Picture
Features
018DVX-S120-en 03.8.5, 1:51 PM92
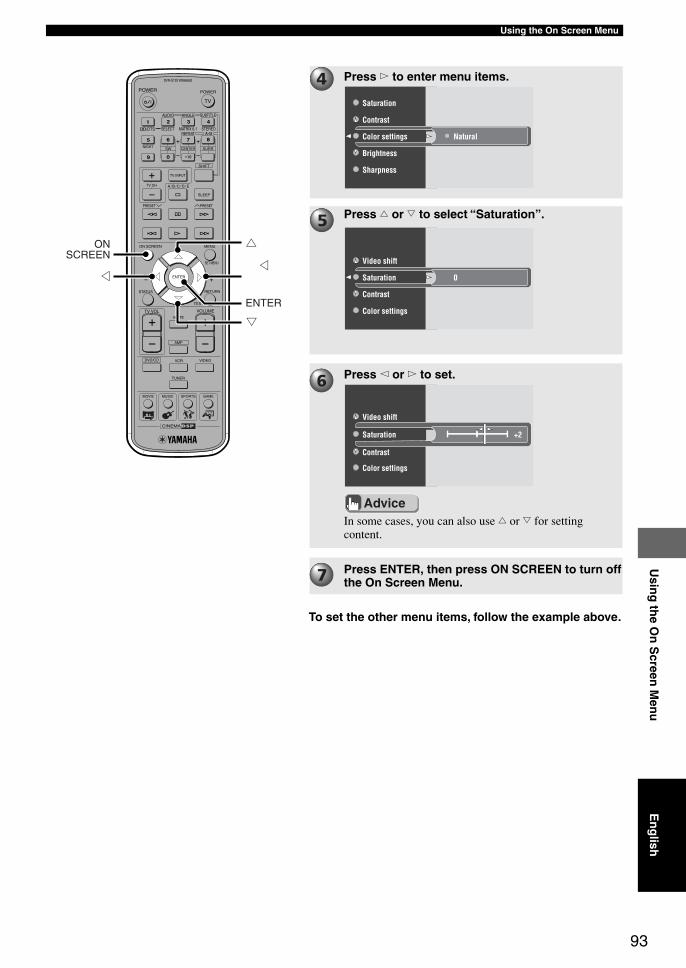
93
Using the On Screen MenuU
sing
the O
n S
creen M
enu
TV
CH
CINEMA
CH
POWER POWER
AUDIO
/DTS SELECT
NIGHT SW
TV CH
TV INPUT
SLEEP
PRESET PRESET
A B C D E
CENTER SURR
SHIFT
STEREOMATRIX 6.1A-BREPEAT
ANGLE SUBTITLE
DVR-S120 WB56650
ON SCREEN MENU
TEST
RETURNSTATUS
TV VOL VOLUME
MUTE
AMP
DVD/CD VCR VIDEO
TUNER
MOVIE MUSIC SPORTS GAME
SET MENU
ENTER
g
hONSCREEN
ENTER
g g
Press ENTER, then press ON SCREEN to turn offthe On Screen Menu.
In some cases, you can also use h or g for settingcontent.
Press q or w to set.
Press h or g to select “Saturation”.
Press w to enter menu items.
Natural
Brightness
Color settings
Saturation
Contrast
Sharpness
0
Contrast
Saturation
Video shift
Color settings
+2
Contrast
Saturation
Video shift
Color settings
En
glish
Advice
To set the other menu items, follow the example above.
018DVX-S120-en 03.8.5, 1:51 PM93
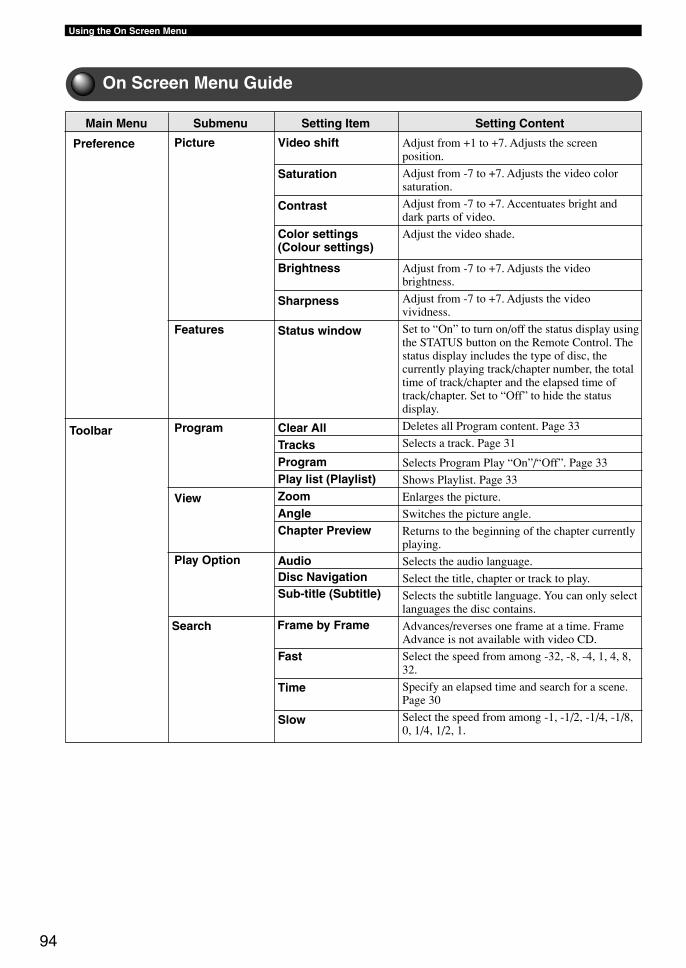
94
Using the On Screen Menu
On Screen Menu guideOn Screen Menu Guide
Adjust from +1 to +7. Adjusts the screenposition.
Adjust from -7 to +7. Adjusts the video colorsaturation.
Adjust from -7 to +7. Accentuates bright anddark parts of video.
Adjust the video shade.
Adjust from -7 to +7. Adjusts the videobrightness.
Adjust from -7 to +7. Adjusts the videovividness.
Set to “On” to turn on/off the status display usingthe STATUS button on the Remote Control. Thestatus display includes the type of disc, thecurrently playing track/chapter number, the totaltime of track/chapter and the elapsed time oftrack/chapter. Set to “Off” to hide the statusdisplay.
Deletes all Program content. Page 33
Selects a track. Page 31
Saturation
PicturePreference
Toolbar
Features
Program
View
Contrast
Brightness
Sharpness
Status window
Clear AllTracksProgramPlay list (Playlist)ZoomAngleChapter Preview
AudioDisc Navigation
Play Option
Setting ContentSetting ItemSubmenuMain Menu
Selects Program Play “On”/“Off”. Page 33
Shows Playlist. Page 33
Enlarges the picture.
Switches the picture angle.
Returns to the beginning of the chapter currentlyplaying.
Selects the audio language.
Select the title, chapter or track to play.
Selects the subtitle language. You can only selectlanguages the disc contains.
Advances/reverses one frame at a time. FrameAdvance is not available with video CD.
Select the speed from among -32, -8, -4, 1, 4, 8,32.
Specify an elapsed time and search for a scene.Page 30
Select the speed from among -1, -1/2, -1/4, -1/8,0, 1/4, 1/2, 1.
Fast
Search
Time
Sub-title (Subtitle)
Frame by Frame
Video shift
Color settings(Colour settings)
Slow
018DVX-S120-en 03.8.5, 1:51 PM94
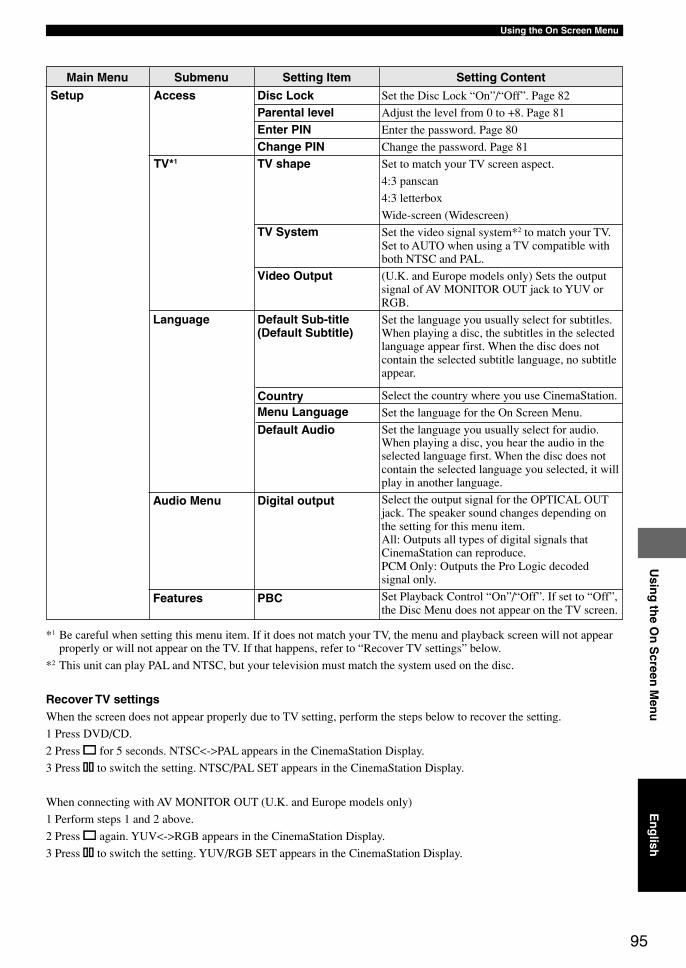
95
Using the On Screen MenuU
sing
the O
n S
creen M
enu
Set the Disc Lock “On”/“Off”. Page 82
Adjust the level from 0 to +8. Page 81
Enter the password. Page 80
Change the password. Page 81
Set to match your TV screen aspect.
4:3 panscan
4:3 letterbox
Wide-screen (Widescreen)
Set the video signal system*2 to match your TV.Set to AUTO when using a TV compatible withboth NTSC and PAL.
(U.K. and Europe models only) Sets the outputsignal of AV MONITOR OUT jack to YUV orRGB.
Set the language you usually select for subtitles.When playing a disc, the subtitles in the selectedlanguage appear first. When the disc does notcontain the selected subtitle language, no subtitleappear.
Disc LockParental levelEnter PINChange PINTV shape
Access
TV*1
Setup
TV System
Video Output
Language
Setting ContentSetting ItemSubmenuMain Menu
Default Sub-title(Default Subtitle)
Select the country where you use CinemaStation.
Set the language for the On Screen Menu.
Set the language you usually select for audio.
CountryMenu Language
When playing a disc, you hear the audio in theselected language first. When the disc does notcontain the selected language you selected, it willplay in another language.
Select the output signal for the OPTICAL OUTjack. The speaker sound changes depending onthe setting for this menu item.All: Outputs all types of digital signals thatCinemaStation can reproduce.PCM Only: Outputs the Pro Logic decodedsignal only.
Set Playback Control “On”/“Off”. If set to “Off”,the Disc Menu does not appear on the TV screen.
Default Audio
Features PBC
*1 Be careful when setting this menu item. If it does not match your TV, the menu and playback screen will not appearproperly or will not appear on the TV. If that happens, refer to “Recover TV settings” below.
*2 This unit can play PAL and NTSC, but your television must match the system used on the disc.
Recover TV settingsWhen the screen does not appear properly due to TV setting, perform the steps below to recover the setting.
1 Press DVD/CD.
2 Press s for 5 seconds. NTSC<->PAL appears in the CinemaStation Display.
3 Press e to switch the setting. NTSC/PAL SET appears in the CinemaStation Display.
When connecting with AV MONITOR OUT (U.K. and Europe models only)
1 Perform steps 1 and 2 above.
2 Press s again. YUV<->RGB appears in the CinemaStation Display.
3 Press e to switch the setting. YUV/RGB SET appears in the CinemaStation Display.
En
glish
Audio Menu Digital output
018DVX-S120-en 03.8.5, 1:51 PM95

96
Appendix
Solutions to Common ProblemsBe sure to check the points below if CinemaStation doesn’t seem to beworking normally for you. If you notice something wrong that is not listedbelow and you have already tried some solutions with no success, turn offthe CinemaStation power, remove the power plug from the outlet and contactthe store where you purchased the product or your nearest YAMAHA soundproducts service center and ask for assistance.
General Problems
Power turns on but immediately shuts off.
1 The power plug is not completely pluggedin.
Insert the plug into the outlet firmly.
2 Speaker cable is shorted. When power isturned on, the protective circuit engages andshuts the system down.
Make sure that all speaker cables arecorrectly connected.
3 CinemaStation received a strong, externalelectric shock such as from a lightening boltor excessive static electricity.
Put CinemaStation in standby, pull out theelectric cord then wait for about 30 secondsbefore reinserting the cord and turning onthe power again.
No sound.
1 You did not connect the cable properly.
Check your connections.
2 The source you selected is not suitable forplayback.
Choose the correct source using the InputSelection buttons.
3 You did not connect the Speaker cableproperly.
Check your speaker connections.
4 You turned the sound volume down.
Turn the sound volume up.
5 Sound is muted.
Press MUTE or VOLUME +/- to regain thesound and adjust the volume to your liking.
6 You inserted a CD-ROM that CinemaStationcannot play.
Play a source signal that CinemaStation canplay.
No picture.
You did not connect the cable properly.
Check your connections.
The audio suddenly decreased.
The Sleep Time function started working.
Turn the power back on and try playing thesource again.
Sound is too low on one side.
You did not connect the cable properly.
Check your connections.
Cause
Solution
Cause
Solution
Cause
Solution
CauseSolution
Cause
Solution
Cause
Solution
Cause
Solution
Cause
Solution
Cause
Solution
Cause
Solution
Cause
Solution
Cause
Solution
019DVX-S120-en 03.8.5, 1:51 PM96
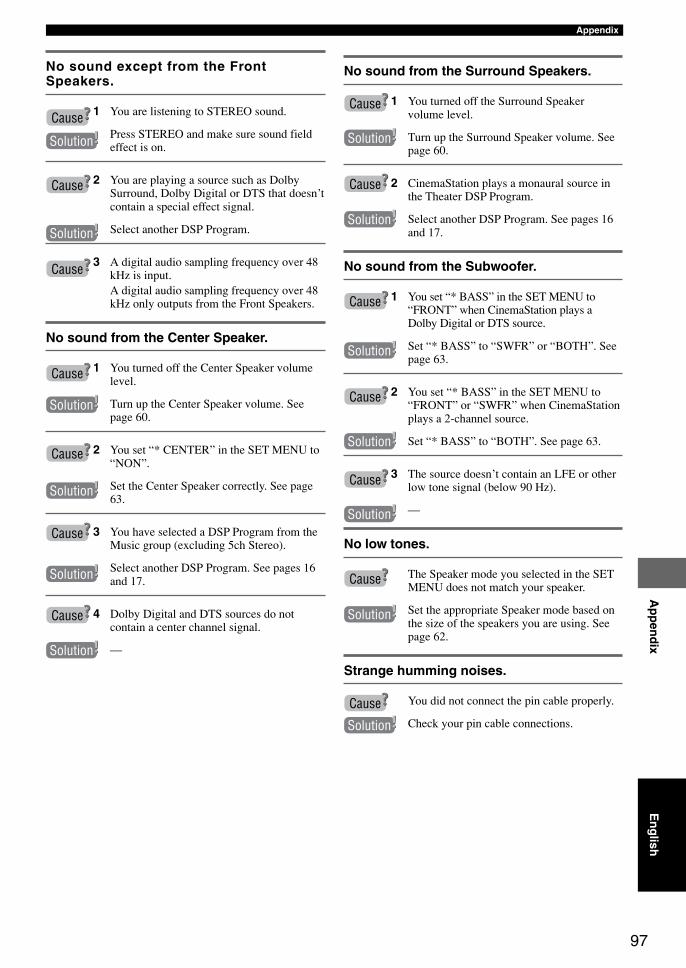
97
AppendixA
pp
end
ix
No sound except from the FrontSpeakers.
1 You are listening to STEREO sound.
Press STEREO and make sure sound fieldeffect is on.
2 You are playing a source such as DolbySurround, Dolby Digital or DTS that doesn’tcontain a special effect signal.
Select another DSP Program.
3 A digital audio sampling frequency over 48kHz is input.A digital audio sampling frequency over 48kHz only outputs from the Front Speakers.
No sound from the Center Speaker.
1 You turned off the Center Speaker volumelevel.
Turn up the Center Speaker volume. Seepage 60.
2 You set “* CENTER” in the SET MENU to“NON”.
Set the Center Speaker correctly. See page63.
3 You have selected a DSP Program from theMusic group (excluding 5ch Stereo).
Select another DSP Program. See pages 16and 17.
4 Dolby Digital and DTS sources do notcontain a center channel signal.
—
No sound from the Surround Speakers.
1 You turned off the Surround Speakervolume level.
Turn up the Surround Speaker volume. Seepage 60.
2 CinemaStation plays a monaural source inthe Theater DSP Program.
Select another DSP Program. See pages 16and 17.
No sound from the Subwoofer.
1 You set “* BASS” in the SET MENU to“FRONT” when CinemaStation plays aDolby Digital or DTS source.
Set “* BASS” to “SWFR” or “BOTH”. Seepage 63.
2 You set “* BASS” in the SET MENU to“FRONT” or “SWFR” when CinemaStationplays a 2-channel source.
Set “* BASS” to “BOTH”. See page 63.
3 The source doesn’t contain an LFE or otherlow tone signal (below 90 Hz).
—
No low tones.
The Speaker mode you selected in the SETMENU does not match your speaker.
Set the appropriate Speaker mode based onthe size of the speakers you are using. Seepage 62.
Strange humming noises.
You did not connect the pin cable properly.
Check your pin cable connections.
Cause
Solution
Cause
Solution
Cause
Cause
Solution
Cause
Solution
Cause
Solution
Cause
Solution
Cause
Solution
Cause
Solution
Cause
Solution
Cause
Solution
Cause
Solution
Cause
Solution
Cause
Solution
En
glish
019DVX-S120-en 03.8.5, 1:52 PM97
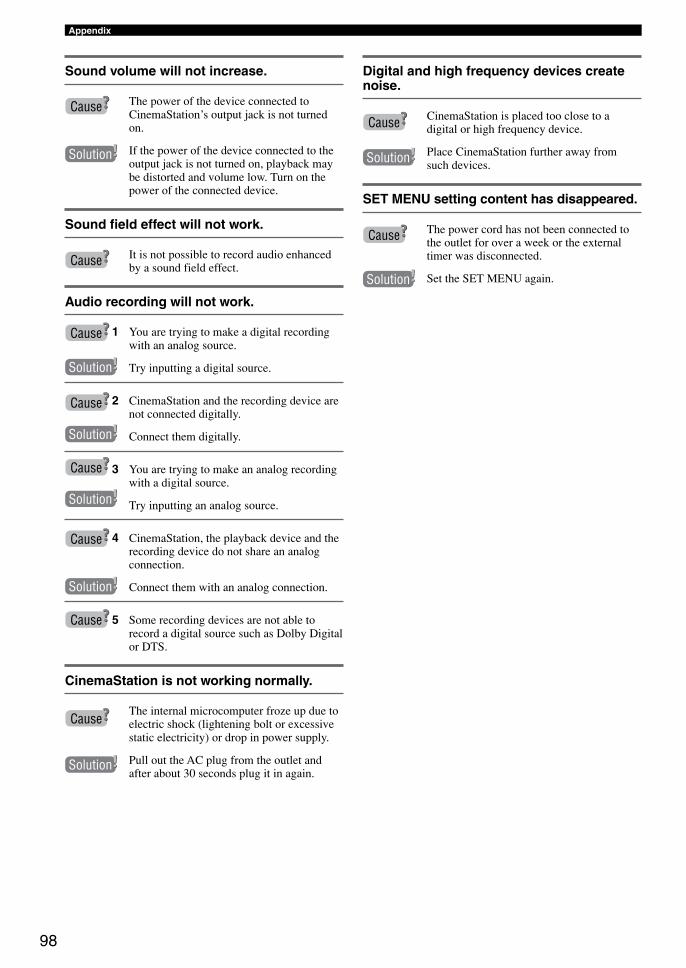
98
Appendix
Sound volume will not increase.
The power of the device connected toCinemaStation’s output jack is not turnedon.
If the power of the device connected to theoutput jack is not turned on, playback maybe distorted and volume low. Turn on thepower of the connected device.
Sound field effect will not work.
It is not possible to record audio enhancedby a sound field effect.
Audio recording will not work.
1 You are trying to make a digital recordingwith an analog source.
Try inputting a digital source.
2 CinemaStation and the recording device arenot connected digitally.
Connect them digitally.
3 You are trying to make an analog recordingwith a digital source.
Try inputting an analog source.
4 CinemaStation, the playback device and therecording device do not share an analogconnection.
Connect them with an analog connection.
5 Some recording devices are not able torecord a digital source such as Dolby Digitalor DTS.
CinemaStation is not working normally.
The internal microcomputer froze up due toelectric shock (lightening bolt or excessivestatic electricity) or drop in power supply.
Pull out the AC plug from the outlet andafter about 30 seconds plug it in again.
Digital and high frequency devices createnoise.
CinemaStation is placed too close to adigital or high frequency device.
Place CinemaStation further away fromsuch devices.
SET MENU setting content has disappeared.
The power cord has not been connected tothe outlet for over a week or the externaltimer was disconnected.
Set the SET MENU again.
Cause
Solution
Cause
Cause
Solution
Cause
Solution
Cause
Solution
Cause
Solution
Cause
Cause
Solution
Cause
Solution
Cause
Solution
019DVX-S120-en 03.8.5, 1:52 PM98
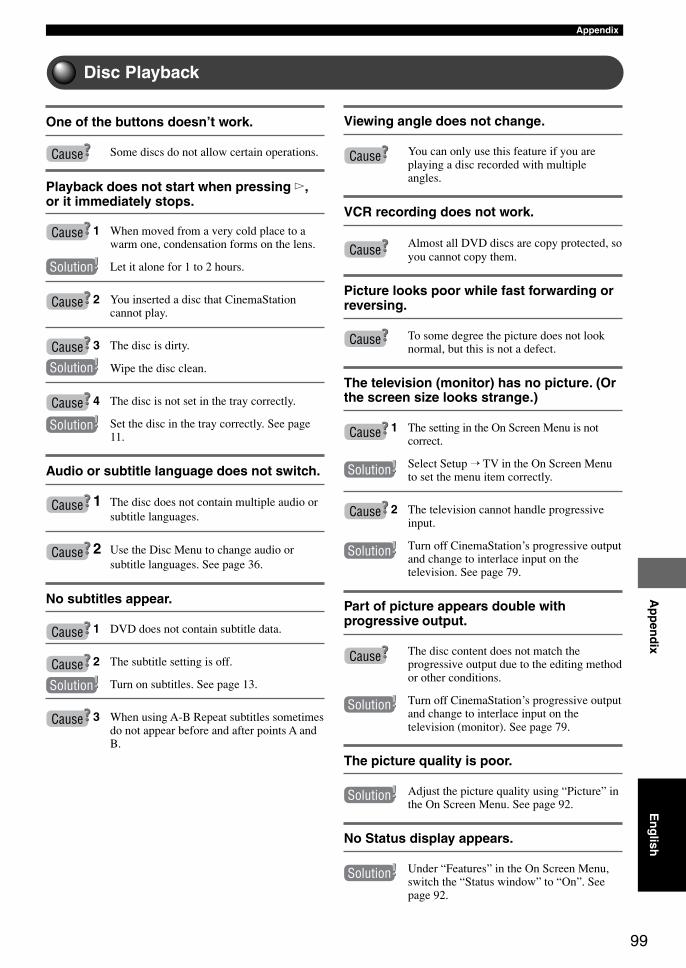
99
AppendixA
pp
end
ix
Disc Playback
One of the buttons doesn’t work.
Some discs do not allow certain operations.
Playback does not start when pressing w,or it immediately stops.
1 When moved from a very cold place to awarm one, condensation forms on the lens.
Let it alone for 1 to 2 hours.
2 You inserted a disc that CinemaStationcannot play.
3 The disc is dirty.
Wipe the disc clean.
4 The disc is not set in the tray correctly.
Set the disc in the tray correctly. See page11.
Audio or subtitle language does not switch.
1 The disc does not contain multiple audio orsubtitle languages.
2 Use the Disc Menu to change audio orsubtitle languages. See page 36.
No subtitles appear.
1 DVD does not contain subtitle data.
2 The subtitle setting is off.
Turn on subtitles. See page 13.
3 When using A-B Repeat subtitles sometimesdo not appear before and after points A andB.
Viewing angle does not change.
You can only use this feature if you areplaying a disc recorded with multipleangles.
VCR recording does not work.
Almost all DVD discs are copy protected, soyou cannot copy them.
Picture looks poor while fast forwarding orreversing.
To some degree the picture does not looknormal, but this is not a defect.
The television (monitor) has no picture. (Orthe screen size looks strange.)
1 The setting in the On Screen Menu is notcorrect.
Select Setup TV in the On Screen Menuto set the menu item correctly.
2 The television cannot handle progressiveinput.
Turn off CinemaStation’s progressive outputand change to interlace input on thetelevision. See page 79.
Part of picture appears double withprogressive output.
The disc content does not match theprogressive output due to the editing methodor other conditions.
Turn off CinemaStation’s progressive outputand change to interlace input on thetelevision (monitor). See page 79.
The picture quality is poor.
Adjust the picture quality using “Picture” inthe On Screen Menu. See page 92.
No Status display appears.
Under “Features” in the On Screen Menu,switch the “Status window” to “On”. Seepage 92.
Cause
Cause
Solution
Cause
CauseSolution
Cause
Solution
Cause
Cause
Cause
Cause
Cause
Cause
Cause
Cause
Cause
Solution
Cause
Solution
Cause
Solution
Solution
Solution
Solution
En
glish
019DVX-S120-en 03.8.5, 1:52 PM99
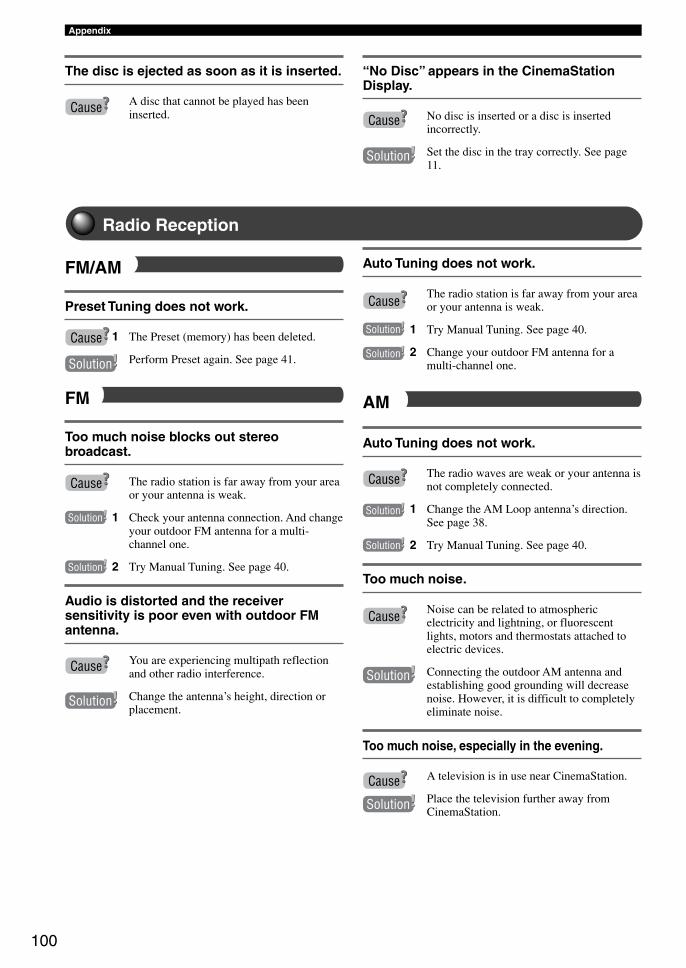
100
Appendix
The disc is ejected as soon as it is inserted.
A disc that cannot be played has beeninserted.
Radio Reception
Preset Tuning does not work.
1 The Preset (memory) has been deleted.
Perform Preset again. See page 41.
Too much noise blocks out stereobroadcast.
The radio station is far away from your areaor your antenna is weak.
1 Check your antenna connection. And changeyour outdoor FM antenna for a multi-channel one.
2 Try Manual Tuning. See page 40.
Audio is distorted and the receiversensitivity is poor even with outdoor FMantenna.
You are experiencing multipath reflectionand other radio interference.
Change the antenna’s height, direction orplacement.
Auto Tuning does not work.
The radio station is far away from your areaor your antenna is weak.
1 Try Manual Tuning. See page 40.
2 Change your outdoor FM antenna for amulti-channel one.
Auto Tuning does not work.
The radio waves are weak or your antenna isnot completely connected.
1 Change the AM Loop antenna’s direction.See page 38.
2 Try Manual Tuning. See page 40.
Too much noise.
Noise can be related to atmosphericelectricity and lightning, or fluorescentlights, motors and thermostats attached toelectric devices.
Connecting the outdoor AM antenna andestablishing good grounding will decreasenoise. However, it is difficult to completelyeliminate noise.
Too much noise, especially in the evening.
A television is in use near CinemaStation.
Place the television further away fromCinemaStation.
CauseCause
Solution
FM/AM
Cause
Solution
FM
Cause
Solution
Solution
Cause
Solution
Cause
Solution
Solution
AM
Cause
Solution
Solution
Cause
Solution
Cause
Solution
“No Disc” appears in the CinemaStationDisplay.
No disc is inserted or a disc is insertedincorrectly.
Set the disc in the tray correctly. See page11.
019DVX-S120-en 03.8.5, 1:52 PM100

101
AppendixA
pp
end
ix
The Remote Control does not work.
1 You are outside the Remote Controloperating range.
Operate the Remote Control within 6 m (20feet) and a 30° angle of the Remote ControlSensor.
2 The Remote Control Sensor is exposed todirect sunlight or lighting (invertedfluorescent lamps).
Change the lighting or CinemaStation’sorientation.
3 The batteries are worn out.
Replace the batteries with new ones.
4 You did not select the device to operate.
Press the Input Selection buttons to selectthe device you want to operate.
Remote Control does not work withCinemaStation.
You did not select the mode to operateCinemaStation.
Press DVD/CD, AMP or TUNER on theRemote Control before starting operation.
Remote Control
A peripheral device does not work with theRemote Control.
1 You cannot operate a system component.
Use the remote control that came with thedevice to operate it.
2 You did not correctly set the manufacturercode.
• Set the manufacturer code once again.See page 83.
• Set a different code from the list of codesfor the same manufacturer. See page 83.
3 The Remote Control is not compatible withyour equipment.
Use the remote control that came with thedevice to operate it.
Cause
Solution
Cause
Solution
Cause
Solution
Cause
Solution
Cause
Solution
Cause
Solution
Cause
Solution
Cause
Solution
En
glish
019DVX-S120-en 03.8.5, 1:52 PM101
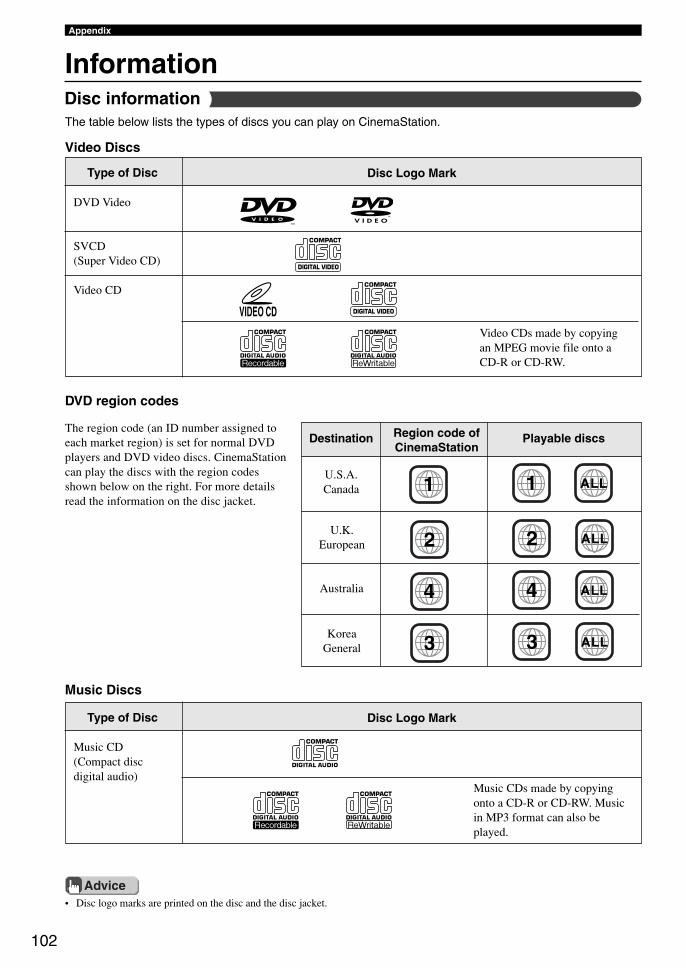
102
Appendix
Information
The table below lists the types of discs you can play on CinemaStation.
Video Discs
Type of Disc
DVD Video
SVCD(Super Video CD)
Video CD
Disc Logo Mark
DIGITAL VIDEO
DIGITAL VIDEO
Playable discsDestination Region code ofCinemaStation
1 ALL1
The region code (an ID number assigned toeach market region) is set for normal DVDplayers and DVD video discs. CinemaStationcan play the discs with the region codesshown below on the right. For more detailsread the information on the disc jacket.
Advice
DVD region codes
U.S.A.Canada
2 ALL2U.K.European
4 ALL4Australia
3 ALL3KoreaGeneral
• Disc logo marks are printed on the disc and the disc jacket.
Disc information
Video CDs made by copyingan MPEG movie file onto aCD-R or CD-RW.
Type of Disc
Music CD(Compact discdigital audio)
Disc Logo Mark
Music CDs made by copyingonto a CD-R or CD-RW. Musicin MP3 format can also beplayed.
Music Discs
019DVX-S120-en 03.8.5, 1:52 PM102
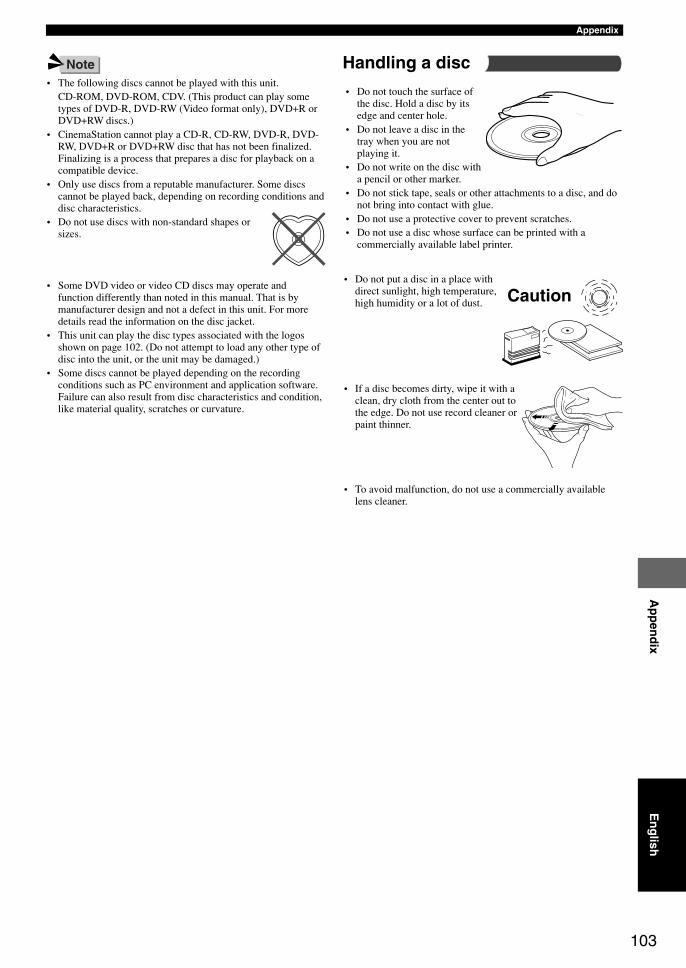
103
AppendixA
pp
end
ix
• The following discs cannot be played with this unit.CD-ROM, DVD-ROM, CDV. (This product can play sometypes of DVD-R, DVD-RW (Video format only), DVD+R orDVD+RW discs.)
• CinemaStation cannot play a CD-R, CD-RW, DVD-R, DVD-RW, DVD+R or DVD+RW disc that has not been finalized.Finalizing is a process that prepares a disc for playback on acompatible device.
• Only use discs from a reputable manufacturer. Some discscannot be played back, depending on recording conditions anddisc characteristics.
• Do not use discs with non-standard shapes orsizes.
• Some DVD video or video CD discs may operate andfunction differently than noted in this manual. That is bymanufacturer design and not a defect in this unit. For moredetails read the information on the disc jacket.
• This unit can play the disc types associated with the logosshown on page 102. (Do not attempt to load any other type ofdisc into the unit, or the unit may be damaged.)
• Some discs cannot be played depending on the recordingconditions such as PC environment and application software.Failure can also result from disc characteristics and condition,like material quality, scratches or curvature.
Note
Caution
Handling a disc
• Do not touch the surface ofthe disc. Hold a disc by itsedge and center hole.
• Do not leave a disc in thetray when you are notplaying it.
• Do not write on the disc witha pencil or other marker.
• Do not stick tape, seals or other attachments to a disc, and donot bring into contact with glue.
• Do not use a protective cover to prevent scratches.• Do not use a disc whose surface can be printed with a
commercially available label printer.
• Do not put a disc in a place withdirect sunlight, high temperature,high humidity or a lot of dust.
• If a disc becomes dirty, wipe it with aclean, dry cloth from the center out tothe edge. Do not use record cleaner orpaint thinner.
• To avoid malfunction, do not use a commercially availablelens cleaner.
En
glish
019DVX-S120-en 03.8.5, 1:52 PM103
104
Appendix
“DTS” and “DTS Digital Surround” are registered trademarks ofDigital Theater Systems, Inc.
MPEG Layer-3 audio decoding technology licensed fromFraunhofer IIS and Thomson multimedia.
Manufactured under license from Dolby Laboratories. “Dolby”,“Pro Logic”, and the double-D symbol are trademarks of DolbyLaboratories.
Copyright and logo marksThis product incorporates copyright protection technology that isprotected by method claims of certain U.S. patents and otherintellectual property rights owned by Macrovision Corporation andother rights owners. Use of this copyright protection technologymust be authorized by Macrovision Corporation, and is intended forhome and other limited viewing uses only unless otherwiseauthorized by Macrovision Corporation. Reverse engineering ordisassembly is prohibited.
SILENT CINEMA is a trademark of YAMAHACORPORATION.
Active Servo Processing Subwoofer System with a built-inpower amplifierThis subwoofer system (NX-SW120) employs AdvancedYamaha Active Servo Technology which YAMAHA hasdeveloped for reproducing higher quality super-bass sound. Thissuper-bass sound adds a more realistic, theater-in-the-homeeffect to your stereo system.
019DVX-S120-en 03.8.5, 1:52 PM104
105
AppendixA
pp
end
ix
Glossary
Bit StreamA signal that is compressed and changed into digitalformat. Then depending on the decoder it can beprocessed as 5.1 multi-channel audio.
Channel (ch)A channel is an audio type that has been divided basedon range and other characteristics.Ex. 5.1 channel• Front Speakers, Left (1ch), Right (1ch)• Center Speaker (1 ch)• Surround Speakers, Left (1ch), Right (1ch)• Subwoofer (1 ch x 0.1* = 0.1 ch)
* In contrast to a full 1-channel band, a component designedto enhance low frequency sound for added effect.
Cinema DSP (Digital Sound FieldProcessor)Dolby Surround and DTS were originally designed forthe movie theater, so playing the same program at homewould produce disparate listening experiencesdepending on variables like the room size, walling andnumber of speakers.Yamaha Cinema DSP applies original sound fieldtechnology based on a wealth of real-world datameasurements to reproduce Dolby Pro Logic, DolbyDigital and DTS sound, combining them with acousticscale, depth and tone so that you can experience thepresence of a movie theater at home.
Component Video SignalA component video signal is separated into oneluminance Y-signal and two chrominance PB/CB and PR/CR signals. Since each signal is sent independently, colorcan be reproduced more faithfully. The componentsignal is also called a color-difference signal by the wayit subtracts the luminance signal from the color signals.
DecoderA device that converts encoded data on DVD and othermedia back to its original audio or video signal.
Dolby DigitalDolby Digital is a digital surround sound system thatgives you completely independent multi-channel audio.With 3 front channels (left, center, and right), and 2surround stereo channels, Dolby Digital provides 5 full-range audio channels. With an additional channelespecially for bass effects, called LFE (low frequencyeffect), the system has a total of 5.1 channels.
By using 2-channel stereo for the surround speakers,more accurate moving sound effects and surround soundenvironment can be reproduced, like the rustling of treesor sound of waves.
Dolby Pro LogicA surround system that takes a 4-channel signal andrecords it as a 2-channel signal, then by way of somearithmetic processing converts back to an independent 4-channel signal for playback.
Dolby Pro Logic IITakes any 2-channel source and reproduces dynamic5.1-channel surround with excellent separation usingspecial signal processing. You can experience Dolby ProLogic II in MOVIE mode and MUSIC mode for stereo.You can even enjoy old movies that were only recordedin 2-channel audio (excluding monaural) in powerful5.1-channel surround.
DTS (Digital Theater Systems)The 5.1-channel surround system adopted by mostmovie theaters. With an abundance of audio data, it isable to provide authentic sounding effects.
Dynamic RangeThe difference between the smallest sound that can beheard above the equipment noise and the biggest soundthat can be heard without distortion is the dynamicrange.
Film and Video DataIn general, DVD media can be classified into the 2 typesbelow.• Film Data
Video recorded at 24 frames/second. (The film usedfor shooting movies is recorded at 24 frames/second.)Recently 30 frames/second progressive video hasmade its debut.
• Video DataVideo recorded at 30 frames/second.
CinemaStation will automatically recognize whether thesource recorded on DVD is film or video, then select thebest method to convert it into progressive output.
Interlace and Progressive OutputsUp to now the standard video signal has been NTSCwith 525i (i: interlaced) scan lines. In contrast, 525p (p:progressive) is a high-density signal with double thenumber of scan lines.
En
glish
019DVX-S120-en 03.8.5, 1:52 PM105
106
Appendix
LFE (Low Frequency Effect) 0.1ChannelThis channel is for the reproduction of low bass signals.The frequency range for this channel is 20 Hz to 120 Hz.It is added to the full-range 5 channels in Dolby Digitaland DTS to enhance low frequency sound for addedeffect. This channel is counted as 0.1 because it onlyenforces a low frequency range.
Linear PCM (LPCM)A signal that is changed to digital format withoutcompression. A CD is recorded with 16-bit sound at44.1kHz, while DVD recording is anywhere between 16bits at 48 kHz to 24 bits at 192 kHz, which makes it ahigher quality sound than CD. This signal also has a typecalled Packed PCM (P.PCM) that can be compressedwithout any loss of data.
Matrix 6.1CinemaStation incorporates a Matrix 6.1 decoder forDolby Digital and DTS multi-channel software thatenables 6.1-channel reproduction by adding the surroundback channel to existing 5.1-channel format. (Thesurround back channel is created from surround left andright channels, and output from a virtual surround backspeaker.) With this additional channel, you canexperience more dynamic and realistic moving soundespecially scenes with "fly-over" and "fly-around"effects.
NTSCNTSC is a video signal system (525 lines, 30 frames persecond) used in North America, Central America, anumber of South American countries, and some Asiancountries, including Japan.
Pan & Scan and Letter BoxIn general, DVD Video is produced for viewing on awide television screen with an aspect ratio of 16:9. Thismeans you can now view most material with theintended aspect ratio on a wide-screen television.This ratio will not fit on a standard television that has anaspect ratio of 4:3. Two picture styles, Pan & Scan andLetterbox, deal with this problem.• Pan & Scan cuts off the left and right portions of the
picture to fill the screen.• Letterbox inserts black bands at the top and bottom of
the picture to reproduce an aspect ratio of 16:9.
PALPAL is a video signal system (625 lines, 25 frames persecond) used in the United Kingdom, much of the rest ofwestern Europe, several South American countries, someMiddle East and Asian countries, several Africancountries, Australia, New Zealand, and other Pacificisland countries.
Sampling Frequency and QuantizedBit RateWhen converting an analog signal to digital, the numberof times the signal is sampled per second is called thesampling frequency while the degree of fineness whenconverting the sound level into a numeric value is calledthe quantized bit rate.The frequency band that can be played back isdetermined by the sampling rate while the dynamicrange expressing the difference in sound level isdetermined by the quantized bit rate. In principle, thehigher the sampling rate, the wider the frequency rangethat can be played back. And the higher the quantized bitrate the finer the sound that can be reproduced.
SILENT CINEMASILENT CINEMA is an original Yamaha system thatreproduces in a pair of headphones the acousticpersonality of sound field programs based on multi-speakers. Headphone parameters have been set for eachsound field so that natural stereoscopic sound can beexpressed and enjoyed through headphones.
S-Video SignalWith S-video the video signal that was normallytransmitted using a pin cable is separated andtransmitted as a luminance Y-signal and chrominance C-signal through an S video cable. Connecting with an SVIDEO jack you can enjoy recording and playback withmore beautiful images.
Title, Chapter (DVD Video)DVD video lets you divide a disc in a big way by titlesor a small way by chapters. Each division is either calleda title number or a chapter number.
Track (CD/Video CD)A CD or Video CD can be divided into a number ofsegments (tracks). Each division is called a title number.
Virtual Cinema DSP (Digital SoundField Processor)Reproduces a surround speaker sound field to let youenjoy virtual Center and Surround L/R Speakers withonly two Front L/R Speakers.
019DVX-S120-en 03.8.5, 1:52 PM106
107
AppendixA
pp
end
ix
Index5ch Stereo ...................................................................... 17
AA-B Repeat .................................................................... 35Action ............................................................................ 17
CChanging the Order of Preset Stations .......................... 43CinemaStation Display brightness ................................ 91Classic Hall .................................................................... 17Connecting a CD or MD recorder ................................. 50Connecting a Game Console ......................................... 46Connecting a VCR ......................................................... 46Connecting the Antennas ............................................... 38Connecting the Speakers ................................................. 8Connecting the TV .......................................................... 8
Connect a TV to an audio input ................................. 47Connecting with S-video ................................................. 9
DD. Range ........................................................................ 90Delay Time .................................................................... 71Digital audio jacks ......................................................... 51Disc information .......................................................... 102
Discs this unit cannot play back .............................. 103Handling a disc ........................................................ 103Music Discs ............................................................. 102Video Discs .............................................................. 102
Disc Lock ...................................................................... 82Disc Menu ..................................................................... 36Display Set .................................................................... 91Dolby Digital Surround EX disc ................................... 64Drama ............................................................................ 17DSP Program ................................................................. 17DTS ES disc .................................................................. 64DVD region codes ....................................................... 102
FFastener ......................................................................... 53Finding the Best DSP Effect .......................................... 16Frame Advance .............................................................. 29
G, HGame ............................................................................. 17HP Tone CTRL .............................................................. 90
I, JInput Assign ................................................................... 91Input Mode .................................................................... 91Input Modes ................................................................... 77Jazz Club ....................................................................... 17
LL/R Balance ................................................................... 90LEF Level ...................................................................... 90Live Sports .................................................................... 17
M, NMatrix 6.1 ...................................................................... 64MP3 ............................................................................... 37Music Video ................................................................... 17Night Listening .............................................................. 70No Disc ........................................................................ 100Non-skid pad ........................................................... 53, 54
O, POn Screen Menu ............................................................ 24
On Screen Menu Guide ............................................. 94Using the On Screen Menu ........................................ 92
Original Dolby and DTS Sound .................................... 73Parental Control ............................................................. 80Placing the Speakers ........................................................ 7Playback Control (PBC) ................................................ 36PRO LOGIC II Movie ................................................... 66PRO LOGIC II Music ................................................... 66
Pro Logic II Music setting ......................................... 67Program Play ................................................................. 31Progressive Scan ............................................................ 79
RReassign input jacks ...................................................... 91Recording Audio from CinemaStation .......................... 52Remote Control ............................................................. 21
Amp Mode ................................................................. 22DVD/CD Mode .......................................................... 23Tuner Mode ................................................................ 21Using the Remote Control ......................................... 21
Repeat Play .................................................................... 34Rock Concert ................................................................. 17
En
glish
019DVX-S120-en 03.8.5, 1:52 PM107
108
Appendix
SSci-Fi (Science Fiction) ................................................. 17Selecting Radio Stations ................................................ 39
Auto Tuning ............................................................... 39Manual Tuning ........................................................... 40Preset Tuning ............................................................. 43
SET MENU ................................................................... 90Setting Channels in Advance (Preset) ........................... 41
Auto Preset ................................................................ 41Manual Preset ............................................................ 42
Setting the Manufacturer Code ...................................... 83SILENT CINEMA ......................................................... 69Sleep Timer .................................................................... 78Slow Advance/Reverse .................................................. 29SP Delay ........................................................................ 90Speaker Mode ................................................................ 62Speaker Size .................................................................. 62Speaker Volume Level ............................................. 58, 60
5ch Stereo DSP Program ........................................... 61Spectacle ........................................................................ 17Stereo playback ............................................................. 17
TTest Tone ........................................................................ 58Theater ........................................................................... 17Time Search ................................................................... 30To change discs .............................................................. 12Tuner Step ...................................................................... 91Types of Input Signals ................................................... 75
VVirtual Cinema DSP ...................................................... 68
019DVX-S120-en 03.8.5, 1:52 PM108
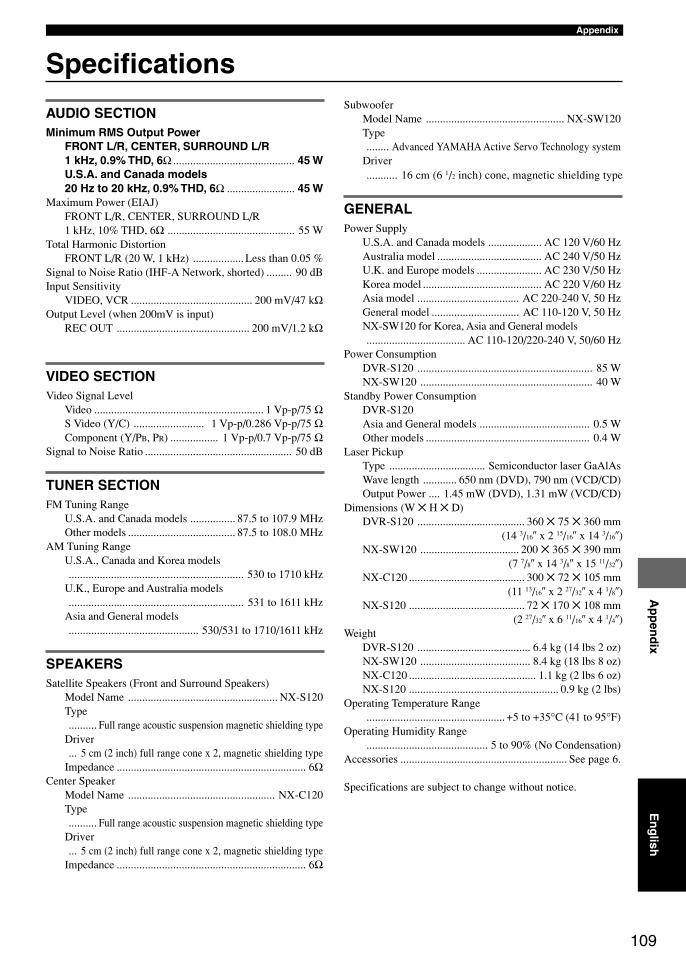
109
AppendixA
pp
end
ix
Specifications
AUDIO SECTIONMinimum RMS Output Power
FRONT L/R, CENTER, SURROUND L/R1 kHz, 0.9% THD, 6Ω ........................................... 45 WU.S.A. and Canada models20 Hz to 20 kHz, 0.9% THD, 6Ω ........................ 45 W
Maximum Power (EIAJ)FRONT L/R, CENTER, SURROUND L/R1 kHz, 10% THD, 6Ω ............................................. 55 W
Total Harmonic DistortionFRONT L/R (20 W, 1 kHz) .................. Less than 0.05 %
Signal to Noise Ratio (IHF-A Network, shorted) ......... 90 dBInput Sensitivity
VIDEO, VCR ........................................... 200 mV/47 kΩOutput Level (when 200mV is input)
REC OUT ............................................... 200 mV/1.2 kΩ
VIDEO SECTIONVideo Signal Level
Video ............................................................ 1 Vp-p/75 ΩS Video (Y/C) ......................... 1 Vp-p/0.286 Vp-p/75 ΩComponent (Y/PB, PR) ................. 1 Vp-p/0.7 Vp-p/75 Ω
Signal to Noise Ratio .................................................... 50 dB
TUNER SECTIONFM Tuning Range
U.S.A. and Canada models ................ 87.5 to 107.9 MHzOther models ...................................... 87.5 to 108.0 MHz
AM Tuning RangeU.S.A., Canada and Korea models.............................................................. 530 to 1710 kHz
U.K., Europe and Australia models.............................................................. 531 to 1611 kHz
Asia and General models.............................................. 530/531 to 1710/1611 kHz
SPEAKERSSatellite Speakers (Front and Surround Speakers)
Model Name ..................................................... NX-S120Type.......... Full range acoustic suspension magnetic shielding type
Driver... 5 cm (2 inch) full range cone x 2, magnetic shielding type
Impedance ................................................................... 6ΩCenter Speaker
Model Name .................................................... NX-C120Type.......... Full range acoustic suspension magnetic shielding type
Driver... 5 cm (2 inch) full range cone x 2, magnetic shielding type
Impedance ................................................................... 6Ω
SubwooferModel Name ................................................. NX-SW120Type........ Advanced YAMAHA Active Servo Technology system
Driver........... 16 cm (6 1/2 inch) cone, magnetic shielding type
GENERALPower Supply
U.S.A. and Canada models ................... AC 120 V/60 HzAustralia model ..................................... AC 240 V/50 HzU.K. and Europe models ....................... AC 230 V/50 HzKorea model .......................................... AC 220 V/60 HzAsia model .................................... AC 220-240 V, 50 HzGeneral model ............................... AC 110-120 V, 50 HzNX-SW120 for Korea, Asia and General models................................... AC 110-120/220-240 V, 50/60 Hz
Power ConsumptionDVR-S120 .............................................................. 85 WNX-SW120 ............................................................. 40 W
Standby Power ConsumptionDVR-S120Asia and General models ....................................... 0.5 WOther models .......................................................... 0.4 W
Laser PickupType .................................. Semiconductor laser GaAlAsWave length ............ 650 nm (DVD), 790 nm (VCD/CD)Output Power .... 1.45 mW (DVD), 1.31 mW (VCD/CD)
Dimensions (W H D)DVR-S120 ...................................... 360 75 360 mm
(14 3/16 x 2 15/16 x 14 3/16)NX-SW120 ................................... 200 365 390 mm
(7 7/8 x 14 3/8 x 15 11/32)NX-C120 ......................................... 300 72 105 mm
(11 13/16 x 2 27/32 x 4 1/8)NX-S120 ......................................... 72 170 108 mm
(2 27/32 x 6 11/16 x 4 1/4)Weight
DVR-S120 ........................................ 6.4 kg (14 lbs 2 oz)NX-SW120 ....................................... 8.4 kg (18 lbs 8 oz)NX-C120 ............................................. 1.1 kg (2 lbs 6 oz)NX-S120 ..................................................... 0.9 kg (2 lbs)
Operating Temperature Range................................................. +5 to +35°C (41 to 95°F)
Operating Humidity Range........................................... 5 to 90% (No Condensation)
Accessories ........................................................... See page 6.
Specifications are subject to change without notice.
En
glish
019DVX-S120-en 03.8.5, 1:52 PM109
YAMAHA ELECTRONICS CORPORATION, USA 6660 ORANGETHORPE AVE., BUENA PARK, CALIF. 90620, U.S.A.YAMAHA CANADA MUSIC LTD. 135 MILNER AVE., SCARBOROUGH, ONTARIO M1S 3R1, CANADAYAMAHA ELECTRONIK EUROPA G.m.b.H. SIEMENSSTR. 22-34, 25462 RELLINGEN BEI HAMBURG, F.R. OF GERMANYYAMAHA ELECTRONIQUE FRANCE S.A. RUE AMBROISE CROIZAT BP70 CROISSY-BEAUBOURG 77312 MARNE-LA-VALLEE CEDEX02, FRANCEYAMAHA ELECTRONICS (UK) LTD. YAMAHA HOUSE, 200 RICKMANSWORTH ROAD WATFORD, HERTS WD18 7GQ, ENGLANDYAMAHA SCANDINAVIA A.B. J A WETTERGRENS GATA 1, BOX 30053, 400 43 VÄSTRA FRÖLUNDA, SWEDENYAMAHA MUSIC AUSTRALIA PTY, LTD. 17-33 MARKET ST., SOUTH MELBOURNE, 3205 VIC., AUSTRALIA
DVD HOME THEATER SOUND SYSTEM
DVX-S120(DVR-S120+NX-S120+NX-C120+NX-SW120)
OWNER’S MANUAL
U B
DVD RECEIVER
DVR-S120
Printed in Malaysia WB85310-1
cv_DVX-S120_UB.p65 03.8.19, 7:44 PM1