Embed Size (px)
Citation preview
_____________________________________________________________________________________________ ©2005 Kingdom, Inc. All rights reserved Ver: 1.0
DVD Duplicator
User’s Guide
DVD Duplicator Series
©2005 Kingdom, Inc. All rights reserved
Ver: 1.0 Page - 1 of 34 User’s Guide
This optical duplication device is to be used exclusively for the purpose of copying personal
audio and data. This optical duplication device is sold and intended strictly for the purposes of
legal copying. It is a violation of International Copyright Laws to use for any other purpose and
subject to criminal charges. Kingdom is not responsible for any illegal use or any damages
resulting from the sale, use, or performance of this device.
Safety Precautions
Duplicator products are high-precision electronic devices. Do not use them in any manner
other than as specified in this manual. Please read this manual in its entirety before using the
system.
To prevent fire or shock, do not expose the unit to moisture or rain.
To prevent electronic shock, do not attempt to disassemble the duplicator or any of its internal
components. Refer servicing to authorized personnel.
The internal drives utilize a laser beam that can be harmful to the eyes. Do not disassemble
the unit. Do not attempt to look through the front panel or into the unit while the power is turned
on.
A user who changes or modifies the unit or operation procedures specification herein without
express written approval by the manufacturer will void manufacturer’s warranty.
Specifications and features are subject to change without notice or obligation.
Attention:
You should wait 10 seconds to power on after shutdown to prevent the abnormal
operation of system.
DVD Duplicator Series
©2005 Kingdom, Inc. All rights reserved
Ver: 1.0 Page - 2 of 34 User’s Guide
TABLE OF CONTENTS
SAFETY PRECAUTIONS ......................................................................................................... 1
CHAPTER 1 INTRODUCTION................................................................................................. 4
INTRODUCING THE DVD DUPLICATOR SYSTEMS......................................................................... 4
FEATURES ............................................................................................................................... 4
SYSTEM SPECIFICATION ........................................................................................................... 4
UNPACKING YOUR NEW DUPLICATOR ........................................................................................ 5
CLEANING AND MAINTENANCE .................................................................................................. 6
FOR BEST PERFORMANCE ........................................................................................................ 6
WARRANTY INFORMATION ......................................................................................................... 6
TECHNICAL SUPPORT ............................................................................................................... 7
CHAPTER 2 GETTING STARTED .......................................................................................... 8
TURNING ON THE SYSTEM......................................................................................................... 8
ABOUT THE LCD PANEL DISPLAY .............................................................................................. 8
CHAPTER 3 SIMPLE BASICS ................................................................................................ 9
OVERVIEW ............................................................................................................................... 9
COPYING A MASTER DVD......................................................................................................... 9
LOADING A DVD ONTO THE HARD DRIVE ................................................................................. 10
COPYING FROM A PARTITION ON THE HARD DRIVE.................................................................... 12
SELECTING THE SOURCE TO COPY FROM (DVD-RW OR HARD DRIVE) ..................................... 14
SELECTING A SPECIFIC HARD DRIVE PARTITION AS THE SOURCE .............................................. 16
CHAPTER 4 ADVANCED FUNCTIONS ................................................................................ 18
TESTING (SIMULATING) THE COPY PROCESS ........................................................................... 18
TESTING AND COPYING DVDS ................................................................................................ 18
VERIFYING THE TARGET (DUPLICATE) DVDS............................................................................ 18
COMPARING THE SOURCE AND TARGET AFTER COPYING .......................................................... 19
PRESCANNING THE MASTER (SOURCE) DVD........................................................................... 19
VIEWING THE DISC INFO OF THE MASTER (SOURCE) DVD........................................................ 20
SELECT SOURCE.................................................................................................................... 20
CHAPTER 5 USING THE HARD DRIVE PARTITION AS THE SOURCE ............................ 21
OVERVIEW ............................................................................................................................. 21
LOADING A DVD (IMAGE) INTO A PARTITION OF THE HARD DRIVE .............................................. 22
DELETE THE CONTENTS OF A HARD DRIVE PARTITION .............................................................. 22
REVIEW THE CONTENTS OF A PARTITION.................................................................................. 22
COMPARE THE PARTITION TO THE DVD.................................................................................... 23
DVD Duplicator Series
©2005 Kingdom, Inc. All rights reserved
Ver: 1.0 Page - 3 of 34 User’s Guide
SELECTING A HARD DRIVE PARTITION...................................................................................... 23
SELECTING THE IMAGE SOURCE DRIVE ................................................................................... 23
CHAPTER 6 EDITING TRACKS WHEN USING CDS (FOR CD ONLY) .............................. 24
OVERVIEW ............................................................................................................................. 24
COPYING TRACKS, MASTER CD TO TARGET CD ...................................................................... 24
PLAYING AN AUDIO TRACK ...................................................................................................... 24
CLOSING A SESSION ............................................................................................................... 25
CHAPTER 7 ABOUT THE SETUP OPTIONS ....................................................................... 26
OVERVIEW ............................................................................................................................. 26
LANGUAGE............................................................................................................................. 26
CD BURN SPEED ................................................................................................................... 26
DVD BURN SPEED................................................................................................................. 26
READ SPEED ......................................................................................................................... 26
AUTO START DRIVE ................................................................................................................ 26
STARTUP MENU ..................................................................................................................... 26
AUTO VERIFY......................................................................................................................... 26
AUTO COMPARE..................................................................................................................... 26
AUTO PRESCAN ..................................................................................................................... 26
EJECT DISC ........................................................................................................................... 26
BURN ON THE FLY.................................................................................................................. 27
BURN MODE .......................................................................................................................... 27
DISPLAY TIME ........................................................................................................................ 27
BUTTON SOUND ..................................................................................................................... 27
DEVICE INFO.......................................................................................................................... 27
SYSTEM INFO......................................................................................................................... 27
QUICK ERASE ........................................................................................................................ 27
FULL ERASE........................................................................................................................... 27
AUTO CLOSE TRAY................................................................................................................. 27
QUICK COMPARE.................................................................................................................... 27
AUDIO BURN SPEED............................................................................................................... 27
CHAPTER 8 TROUBLESHOOTING...................................................................................... 28
APPENDIX 1: OVERVIEW OF THE FUNCTIONS ................................................................ 29
APPENDIX 2: LCD MESSAGES ........................................................................................... 31
GENERAL MESSAGES: ............................................................................................................ 31
HARD DISK DRIVE WITH IMAGE LOADING MESSAGES:............................................................... 31
FIRMWARE UPDATE MESSAGES: ............................................................................................. 32
APPENDIX 3 TECHNICAL SUPPORT INFORMATION........................................................ 34
DVD Duplicator Series
©2005 Kingdom, Inc. All rights reserved
Ver: 1.0 Page - 4 of 34 User’s Guide
Chapter 1 Introduction
Introducing the DVD Duplicator Systems
This Kingdom One touch™ is a high speed, multi copy DVD Recordable duplication
system, enabling you to copy DVDs up to 16X speed. It provides efficient duplication of
compact disk with excellent accuracy. With its professional design and multi-function
LCD panel, the unit is particularly easy to operate.
If your system includes a hard drive, you can load an original DVD onto the hard drive
and use all of the available DVD-RW drives to duplicate multiple DVDs all at once. The
hard drive has partitions of five gigabytes each. You can load up to 1 DVD in each
partition on the hard drive and duplicate from one partition at a time. You can also use
each partition in the hard drive to load selected tracks from any number of DVDs and
then duplicate the loaded tracks to multiple DVDs.
If your system does not include a hard drive, you can use the first DVD drive as the
reader, and the remaining drives for duplication.
Features
• Stand alone IDE to IDE DVD controller
• Self system diagnostics when power is turned on
• Easy to use, informative LCD command display
• Auto format detection
• Supports high speed 16X DVD recording speed
• Supports Hard Drive images
• Industrial cooling fans and Heavy Duty power supply
• Firmware upgrade via DVD-RW
System Specification
Power: 115/230 VAC 0.5 Amp 400W 50/60 Hz
Write Speeds: CD Write Speeds: 48x,40x (CAV/Z-CLV), 32x,24x
(P-CAV/Z-CLV), 16x,8x (CLV), CD Rewrite Speeds 24x (Z-CLV),
16x,10x,4x (CLV), DVD+R Write Speeds 16x,13x (CAV),
12x,8x,6x (Z-CLV), 4x,2.4x (CLV), DVD+RW Write Speeds 8x
(Z-CLV), 6x 4x,2.4x (CLV), DVD-R Write Speeds 16x,13x (CAV),
12x,8x,6x (Z-CLV), 4x,2x (CLV), DVD-RW Write Speeds 6x
(Z-CLV), 4x,2x,1x (CLV), DVD+R DL Write Speeds 4x,2.4x
DVD Duplicator Series
©2005 Kingdom, Inc. All rights reserved
Ver: 1.0 Page - 5 of 34 User’s Guide
(CLV), DVD-R DL Write Speeds 4x, 2x (CLV).
Read Speeds: CD Read Speeds 48x Max (CD-ROM/CD-R), 32x Max (CD-RW),
DAE Speeds 32x Max DVD Read Speeds 16x Max (DVD-ROM
Single Layer), 7 Max (DVD-ROM Dual Layer), 16x Max (DVD±R),
8x Max (DVD±RW), 5x Max (DVD+R DL), 5x Max (DVD-Video).
Formats: Support for multiple formats Including CD Formats: CD-ROM,
CD-ROM/XA, CD-R, CD-RW, Photo CD, Video CD, CD-Extra,
CD-I, CD-Bridge, Hybrid-CD, CD-Text.
DVD Formats: DVD-ROM, DVD-R/RW, DVD+R/RW, DVD+R DL,
DVD-R DL.
Unpacking Your New Duplicator
Unpack the system in a clean working area with a moderate temperature control.
Confirm that the following items have been shipped with the system: power cable, user
manual.
Confirm that the voltage setting (AC 115/230V) is correct.
Confirm that the power input is stable and consistent. Install an uninterruptible power
supply (UPS) if necessary.
Make sure that the system is on a level and stable surface away from direct sunlight and
free from any vibration.
Make sure that the environment for the system is properly ventilated and free of dust,
excessive heat and humidity and electronic interference.
Make sure the system is properly grounded. Do not attempt to defeat the third ground
prong on the power cable.
The system is shipped in professionally designed, form-based packaging. If your
system is damaged during shipment, please contact the freight carrier first, and then
contact your Kingdom dealer.
IMPORTANT: Please keep and store this packaging for future transport or
storage of the system. If your system ever needs to be sent in for service, it must
be returned in the original packing or the warranty will be voided.
DVD Duplicator Series
©2005 Kingdom, Inc. All rights reserved
Ver: 1.0 Page - 6 of 34 User’s Guide
Cleaning and Maintenance
The best maintenance for your system is preventive maintenance. Using a system in an
area with excessive dust, smoke or other contaminants is not recommended because it
will increase error rates and reduce hardware life expectancy. Some light exterior
cleaning can be performed, but there is no substitute for a clean environment.
For Best Performance
For best results always use high quality media. Kingdom One touch™ duplicators
have been thoroughly tested with most major optical media makers for
maximum compatibility. Kingdom Platinum media is our first recommendation
for excellent results. Please visit us at www.kingdom.com.
Warranty Information
Kingdom, Inc. warrants to the original purchaser that this product is free from defects in
material and workmanship. Kingdom, Inc. will for one year, at its option, repair or
replace at no charge for parts and labor from the date you purchase the product from
Kingdom, Inc. Kingdom, Inc. reserves the right to determine the validity of all warranty
claims. Warranty is void if the product serial number has been altered or removed.
Warranty is void if the product has been misused or damaged or if evidence is present
that the product was altered, modified or serviced by unauthorized service people.
THE ABOVE STATED WARRANTY IS EXCLUSIVE AND REPLACES ALL OTHER
WARRANTIES EXPRESSED OR IMPLIED INCLUDING THOSE OF
MERCHANTABILITY AND FITNESS FOR A PARTICULAR PURPOSE. KINGDOM INC.
WILL NOT BE HELD LIABLE FOR ANY OTHER DAMAGES OR LOSS INCLUDING
INCIDENTIAL OR CONSEQUENTIAL DAMAGES AND LOSS OF PROFITS OR
REVENUES FROM WHATEVER CAUSE, INCLUDING BREACH OF WARRANTY OR
NEGLIGENCE.
KINGDOM INC. RESERVES THE RIGHT TO MODIFY OR UPDATE ITS PRODUCT
OBLIGATION TO REPLACE ANY EQUIPMENT DELIVERED PRIOR TO ANY SUCH
CHANGE.

DVD Duplicator Series
©2005 Kingdom, Inc. All rights reserved
Ver: 1.0 Page - 7 of 34 User’s Guide
Technical Support
For detailed technical support or questions regarding the DVD Duplicator, contact Kingdom
Technical Support at 1-800-296-2312.
Note: This duplicator has a serial number located on the rear panel. Please record the Model
Number and Serial Number and retain them for your records. It will be necessary to provide
this information to Technical Support personnel in order for them to provide you with the best
technical support possible.
Model Number: _____________________________________
Serial Number: _____________________________________
DVD Duplicator Series
©2005 Kingdom, Inc. All rights reserved
Ver: 1.0 Page - 8 of 34 User’s Guide
Chapter 2 Getting Started
Turning on the System
Plug the AC cord into the system and then into a wall outlet. NOTE: Make sure that the
voltage setting is correct (115v or 230v). Switch the ON/OFF rocker-switch located on the
back of the system (below the power outlet). The LCD display will light up, indicator lights
on each of the DVD disc drives will flash momentarily and the system will go through a
short self test routine.
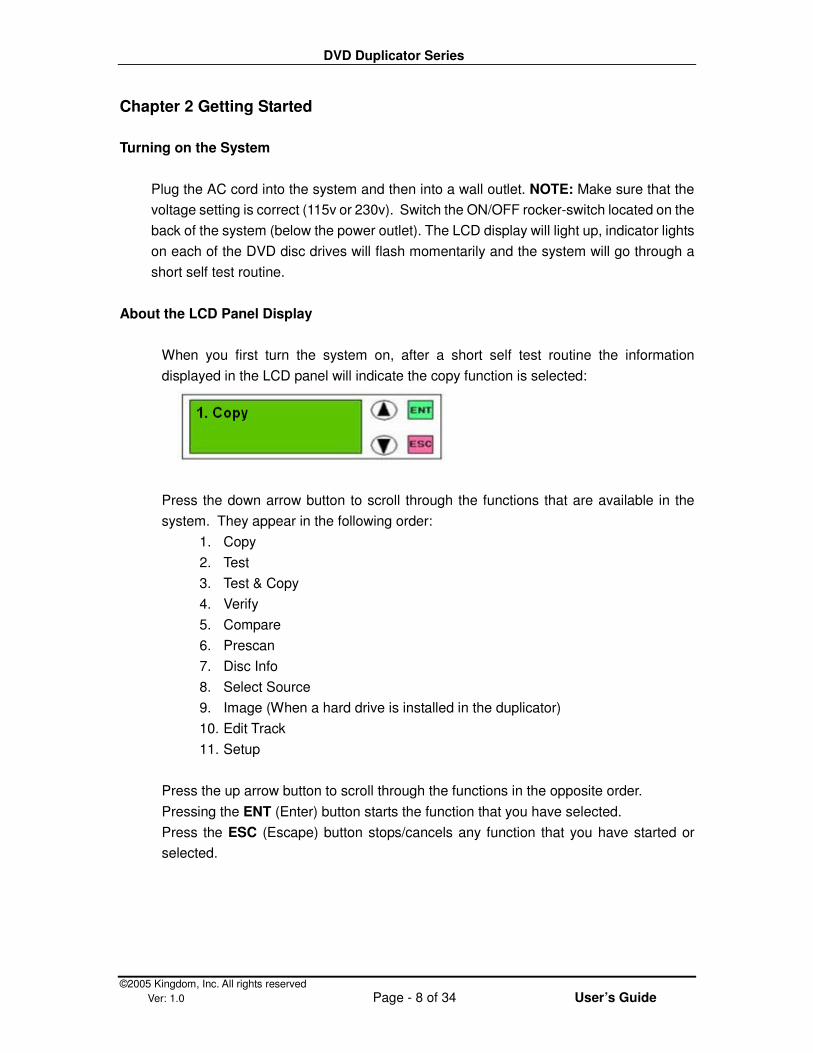
About the LCD Panel Display
When you first turn the system on, after a short self test routine the information
displayed in the LCD panel will indicate the copy function is selected:
Press the down arrow button to scroll through the functions that are available in the
system. They appear in the following order:
1. Copy
2. Test
3. Test & Copy
4. Verify
5. Compare
6. Prescan
7. Disc Info
8. Select Source
9. Image (When a hard drive is installed in the duplicator)
10. Edit Track
11. Setup
Press the up arrow button to scroll through the functions in the opposite order.
Pressing the ENT (Enter) button starts the function that you have selected.
Press the ESC (Escape) button stops/cancels any function that you have started or
selected.
DVD Duplicator Series
©2005 Kingdom, Inc. All rights reserved
Ver: 1.0 Page - 9 of 34 User’s Guide
Chapter 3 Simple Basics
Overview
This chapter covers procedures for the most frequently used functions of the DVD
Duplicator, which are as follows:
• Duplicating (Copying) a DVD
• Copying a DVD to the Hard Drive
• Duplicating from the Hard Drive
• Copying Selected Tracks to the Hard Drive
• Burning Composite DVDs from a Hard Drive Partition
• Selecting or Changing the Source (Master DVD or Hard Drive)
• Selecting a Specific Hard Drive Partition as the Source
Copying a Master DVD
Duplicating (Copying) from DVD to DVD is the most frequently used function of the system.
This procedure provides step-by-step instructions for making duplicates from a Master DVD.
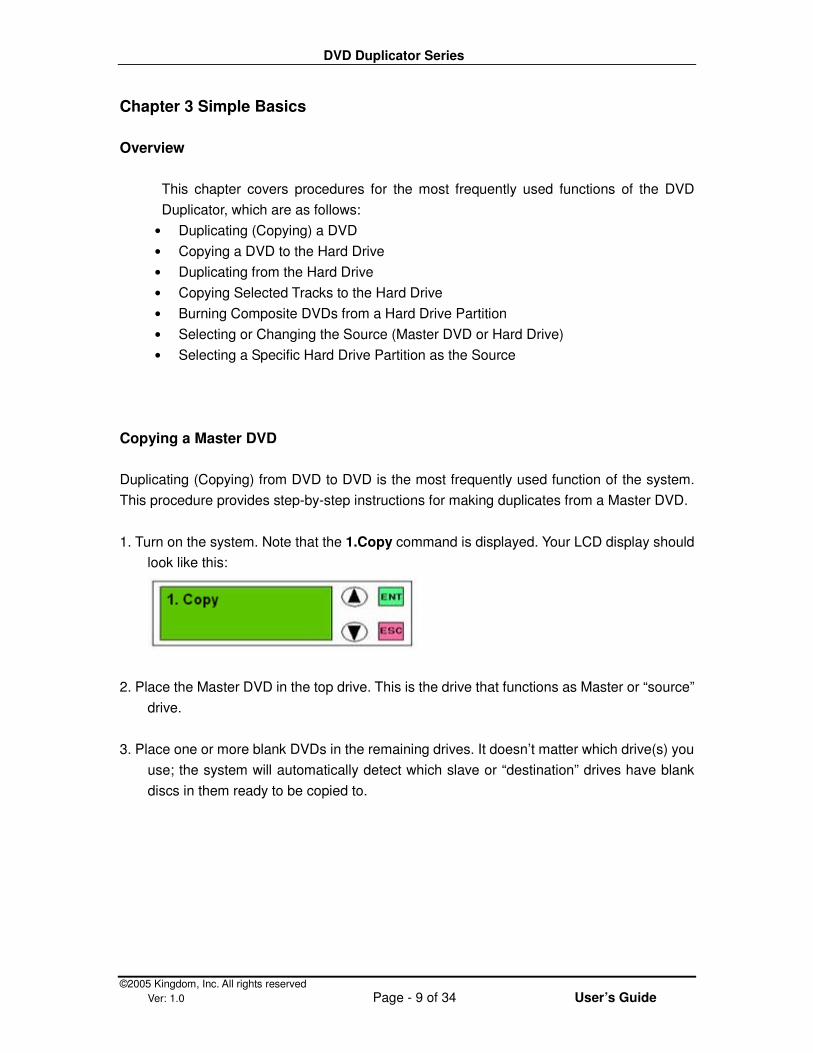
1. Turn on the system. Note that the 1.Copy command is displayed. Your LCD display should
look like this:
2. Place the Master DVD in the top drive. This is the drive that functions as Master or “source”
drive.
3. Place one or more blank DVDs in the remaining drives. It doesn’t matter which drive(s) you
use; the system will automatically detect which slave or “destination” drives have blank
discs in them ready to be copied to.
DVD Duplicator Series
©2005 Kingdom, Inc. All rights reserved
Ver: 1.0 Page - 10 of 34 User’s Guide
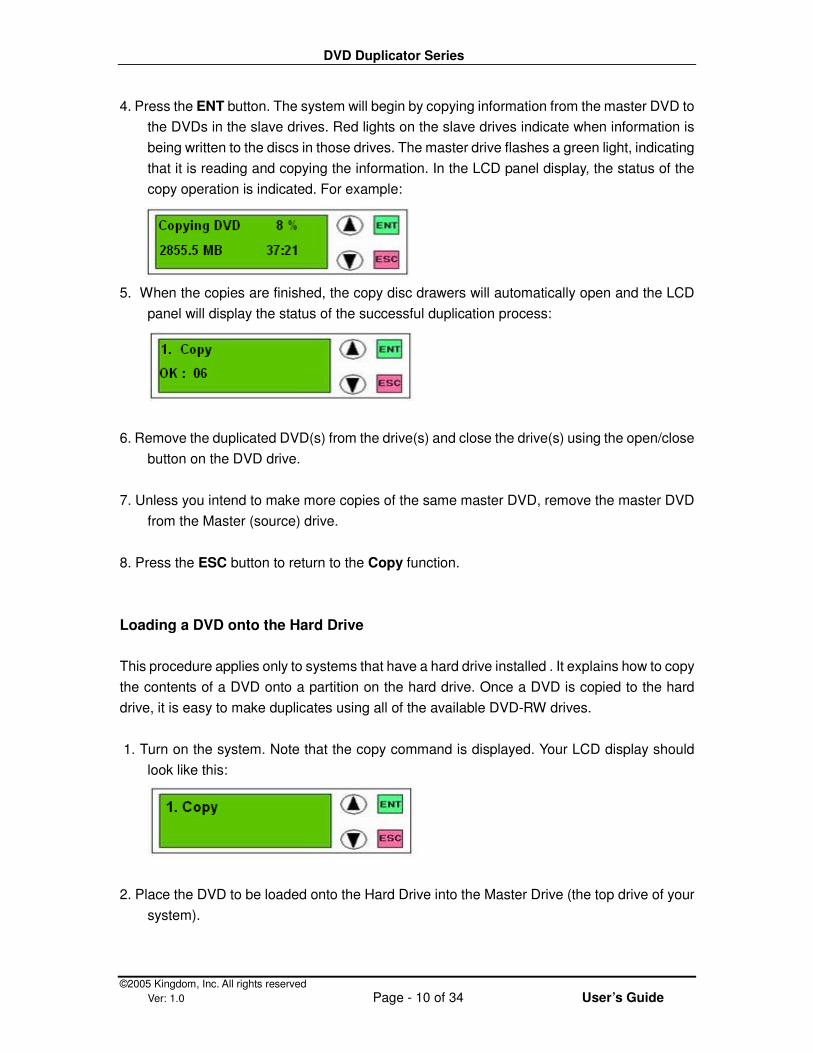
4. Press the ENT button. The system will begin by copying information from the master DVD to
the DVDs in the slave drives. Red lights on the slave drives indicate when information is
being written to the discs in those drives. The master drive flashes a green light, indicating
that it is reading and copying the information. In the LCD panel display, the status of the
copy operation is indicated. For example:
5. When the copies are finished, the copy disc drawers will automatically open and the LCD
panel will display the status of the successful duplication process:
6. Remove the duplicated DVD(s) from the drive(s) and close the drive(s) using the open/close
button on the DVD drive.
7. Unless you intend to make more copies of the same master DVD, remove the master DVD
from the Master (source) drive.
8. Press the ESC button to return to the Copy function.
Loading a DVD onto the Hard Drive
This procedure applies only to systems that have a hard drive installed . It explains how to copy
the contents of a DVD onto a partition on the hard drive. Once a DVD is copied to the hard
drive, it is easy to make duplicates using all of the available DVD-RW drives.
1. Turn on the system. Note that the copy command is displayed. Your LCD display should
look like this:
2. Place the DVD to be loaded onto the Hard Drive into the Master Drive (the top drive of your
system).
DVD Duplicator Series
©2005 Kingdom, Inc. All rights reserved
Ver: 1.0 Page - 11 of 34 User’s Guide
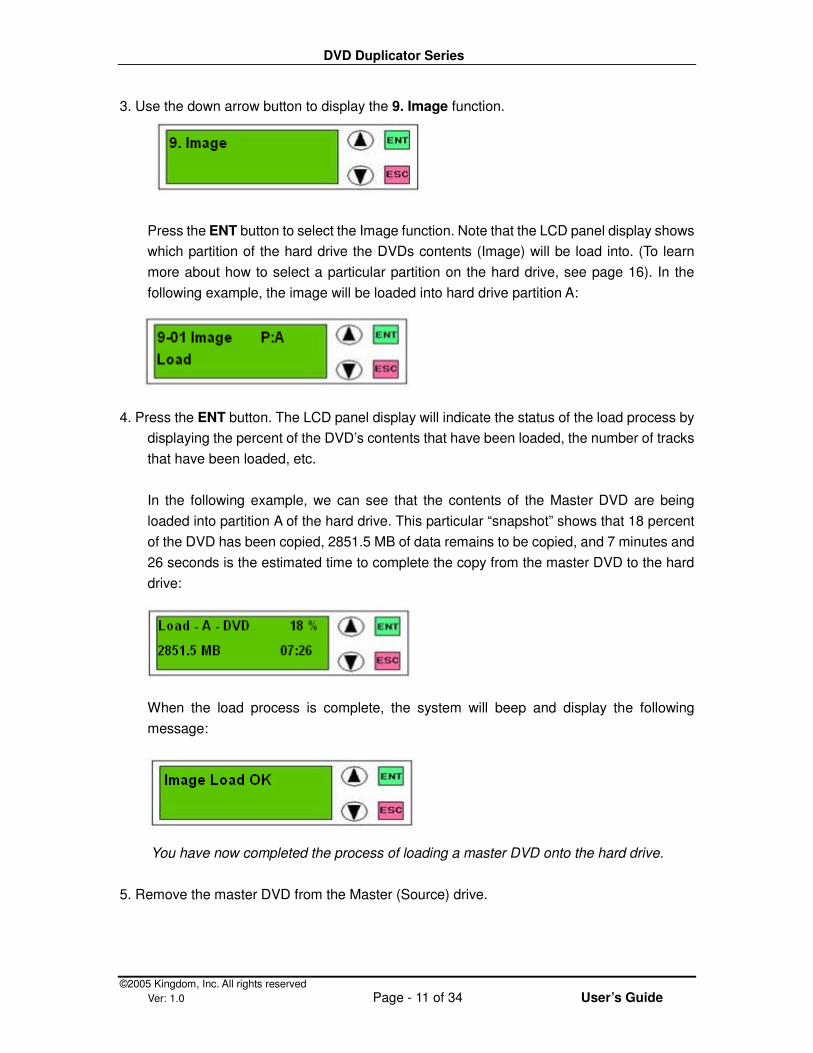
3. Use the down arrow button to display the 9. Image function.
Press the ENT button to select the Image function. Note that the LCD panel display shows
which partition of the hard drive the DVDs contents (Image) will be load into. (To learn
more about how to select a particular partition on the hard drive, see page 16). In the
following example, the image will be loaded into hard drive partition A:
4. Press the ENT button. The LCD panel display will indicate the status of the load process by
displaying the percent of the DVD’s contents that have been loaded, the number of tracks
that have been loaded, etc.
In the following example, we can see that the contents of the Master DVD are being
loaded into partition A of the hard drive. This particular “snapshot” shows that 18 percent
of the DVD has been copied, 2851.5 MB of data remains to be copied, and 7 minutes and
26 seconds is the estimated time to complete the copy from the master DVD to the hard
drive:
When the load process is complete, the system will beep and display the following
message:
You have now completed the process of loading a master DVD onto the hard drive.
5. Remove the master DVD from the Master (Source) drive.
DVD Duplicator Series
©2005 Kingdom, Inc. All rights reserved
Ver: 1.0 Page - 12 of 34 User’s Guide
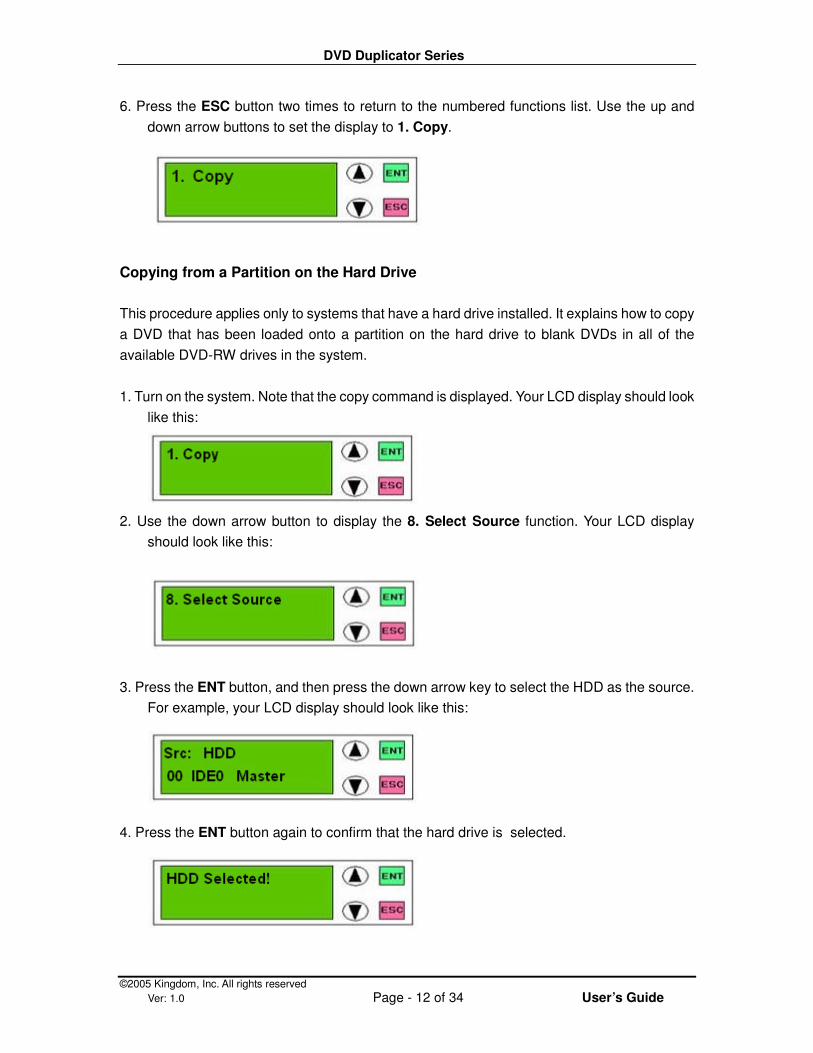
6. Press the ESC button two times to return to the numbered functions list. Use the up and
down arrow buttons to set the display to 1. Copy.
Copying from a Partition on the Hard Drive
This procedure applies only to systems that have a hard drive installed. It explains how to copy
a DVD that has been loaded onto a partition on the hard drive to blank DVDs in all of the
available DVD-RW drives in the system.
1. Turn on the system. Note that the copy command is displayed. Your LCD display should look
like this:
2. Use the down arrow button to display the 8. Select Source function. Your LCD display
should look like this:
3. Press the ENT button, and then press the down arrow key to select the HDD as the source.
For example, your LCD display should look like this:
4. Press the ENT button again to confirm that the hard drive is selected.

DVD Duplicator Series
©2005 Kingdom, Inc. All rights reserved
Ver: 1.0 Page - 13 of 34 User’s Guide
5. Then press the ESC button to return to the list of functions and use the up and down arrow
keys to redisplay the 1. Copy function. Note that the Copy function now indicates the hard
disc is the source of data. In the following example, the hard disk partition that is the
“source” is partition A:
The copy function is indicating that it will be copying from partition A of the hard drive. To
learn how to select a different partition, refer to page 16.
6. With the copy function displayed in the LCD panel, place blank DVDs in the available disc
drives and press ENT button. The system will scan for blank DVDs and then write to those
DVDs, copying the data from the displayed partition letter of the hard drive. Note that the
DVD drives that are being written to from the hard drive have a blinking light, indicating
that the copy session is in progress. The status of the copy operation is indicated in the
LCD panel display. In the following example, the “snapshot” shows that 1256.7 MBs of the
data remain to be copied from partition A, and that 44% of the data has already been
copied, and that the remaining time for the copy process is 22 minutes and 34 seconds.
7. When the copy process completes, the disc drawers will automatically open and the LCD
panel display will indicate the status. In the following example, 7 DVDs were successfully
written to from partition A of the hard drive:
You have now completed the process for using the hard drive to make DVD duplicates.
8. Press the ESC button and note that the system is still set to copy from partition A unless you
select a different source (using the 8.Select Source function)
DVD Duplicator Series
©2005 Kingdom, Inc. All rights reserved
Ver: 1.0 Page - 14 of 34 User’s Guide
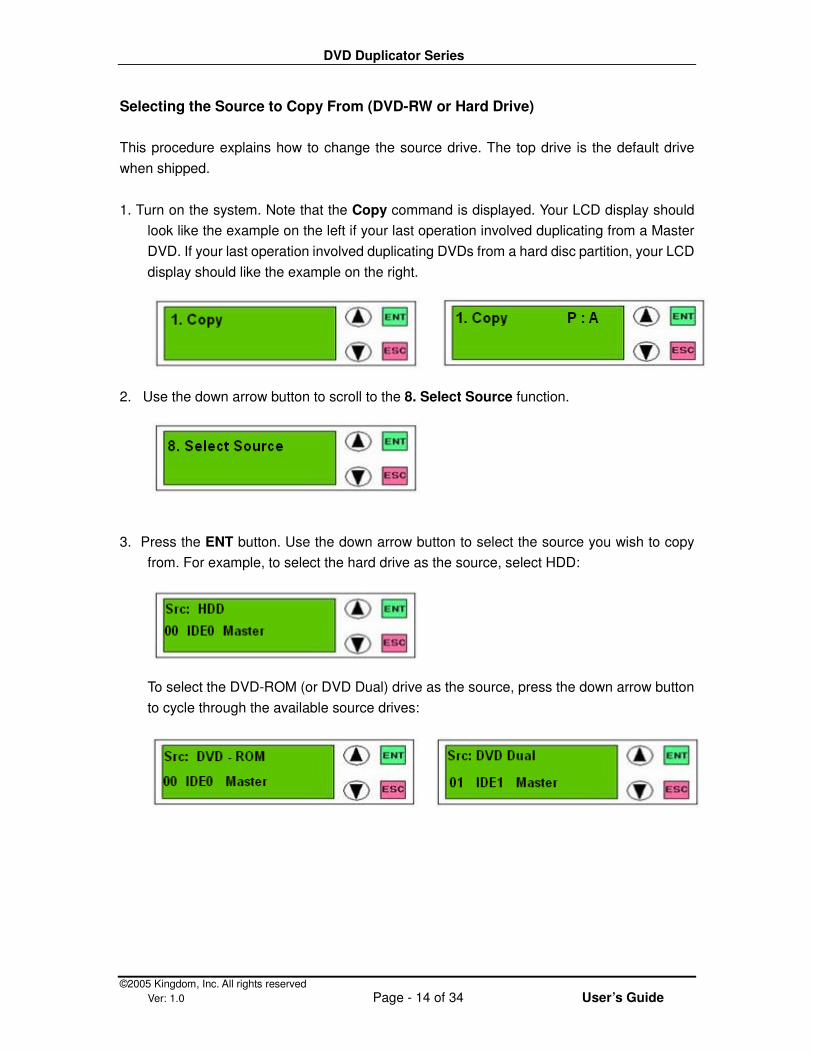
Selecting the Source to Copy From (DVD-RW or Hard Drive)
This procedure explains how to change the source drive. The top drive is the default drive
when shipped.
1. Turn on the system. Note that the Copy command is displayed. Your LCD display should
look like the example on the left if your last operation involved duplicating from a Master
DVD. If your last operation involved duplicating DVDs from a hard disc partition, your LCD
display should like the example on the right.
2. Use the down arrow button to scroll to the 8. Select Source function.
3. Press the ENT button. Use the down arrow button to select the source you wish to copy
from. For example, to select the hard drive as the source, select HDD:
To select the DVD-ROM (or DVD Dual) drive as the source, press the down arrow button
to cycle through the available source drives:

DVD Duplicator Series
©2005 Kingdom, Inc. All rights reserved
Ver: 1.0 Page - 15 of 34 User’s Guide
To select one of the DVD-RW drives as the source, press the down arrow button to cycle
through the available source drives:
4. Press the ENT button to make your selection. The LCD panel displays a confirmation of
your selection. Depending on your selection one of the next three messages may be
displayed:
5. Press the ENT button or the ESC button to return to redisplay the Select Source function.
The Copy function will reflect the source as explained in step 1.
6. If you have selected the hard drive as your source, you must make sure to specify which
partition in the hard drive you intend to use as your source, using the Image function.
This procedure is explained in the next section.
DVD Duplicator Series
©2005 Kingdom, Inc. All rights reserved
Ver: 1.0 Page - 16 of 34 User’s Guide
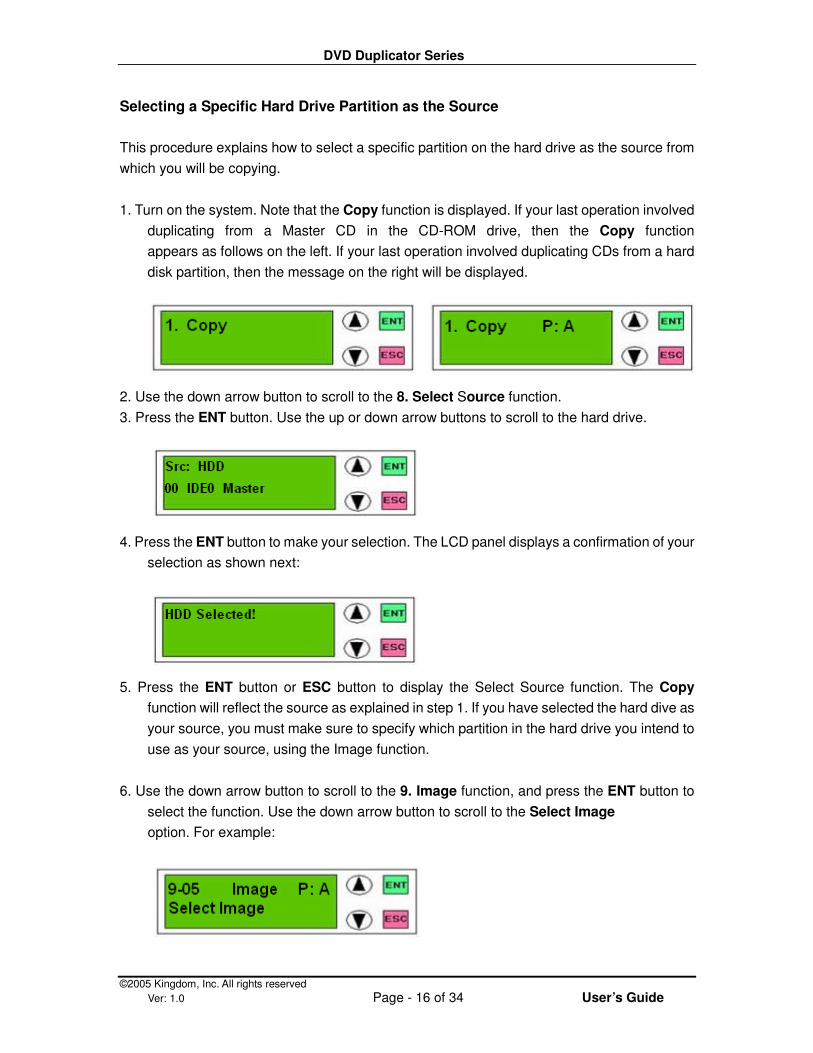
Selecting a Specific Hard Drive Partition as the Source
This procedure explains how to select a specific partition on the hard drive as the source from
which you will be copying.
1. Turn on the system. Note that the Copy function is displayed. If your last operation involved
duplicating from a Master CD in the CD-ROM drive, then the Copy function
appears as follows on the left. If your last operation involved duplicating CDs from a hard
disk partition, then the message on the right will be displayed.
2. Use the down arrow button to scroll to the 8. Select Source function.
3. Press the ENT button. Use the up or down arrow buttons to scroll to the hard drive.
4. Press the ENT button to make your selection. The LCD panel displays a confirmation of your
selection as shown next:
5. Press the ENT button or ESC button to display the Select Source function. The Copy
function will reflect the source as explained in step 1. If you have selected the hard dive as
your source, you must make sure to specify which partition in the hard drive you intend to
use as your source, using the Image function.
6. Use the down arrow button to scroll to the 9. Image function, and press the ENT button to
select the function. Use the down arrow button to scroll to the Select Image
option. For example:
DVD Duplicator Series
©2005 Kingdom, Inc. All rights reserved
Ver: 1.0 Page - 17 of 34 User’s Guide
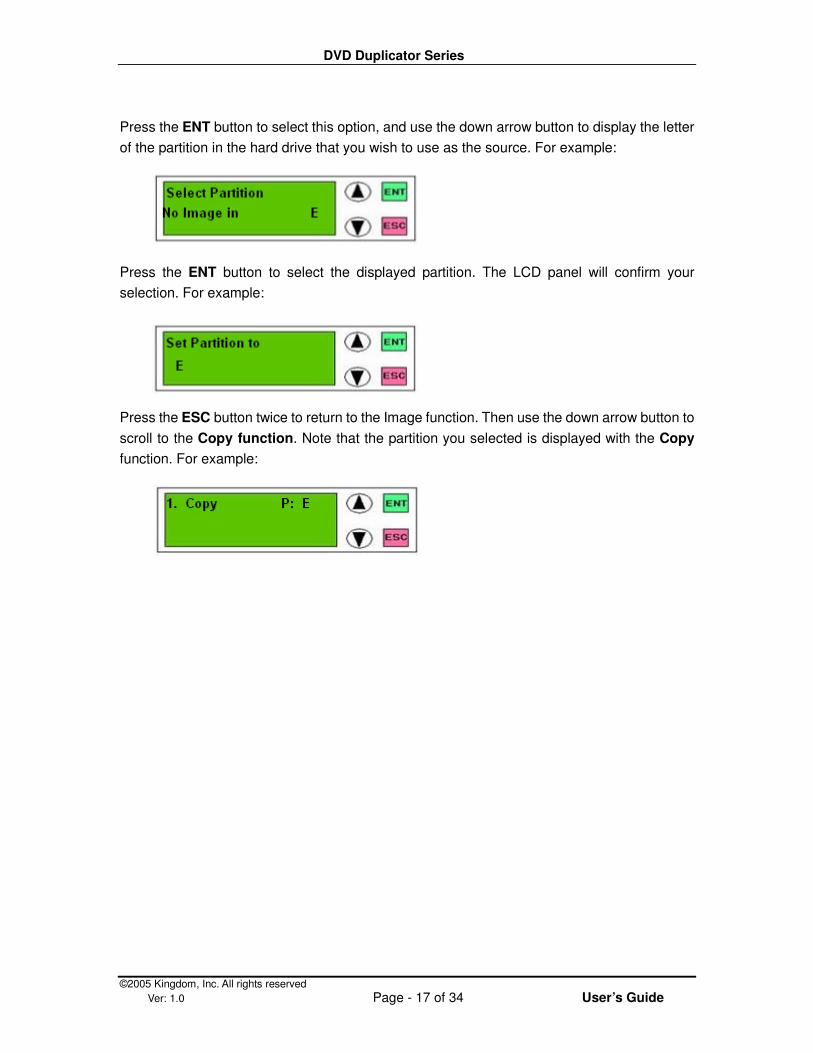
Press the ENT button to select this option, and use the down arrow button to display the letter
of the partition in the hard drive that you wish to use as the source. For example:
Press the ENT button to select the displayed partition. The LCD panel will confirm your
selection. For example:
Press the ESC button twice to return to the Image function. Then use the down arrow button to
scroll to the Copy function. Note that the partition you selected is displayed with the Copy
function. For example:
DVD Duplicator Series
©2005 Kingdom, Inc. All rights reserved
Ver: 1.0 Page - 18 of 34 User’s Guide
Chapter 4 Advanced Functions
Testing (Simulating) the Copy Process
The 2.Test function is used to simulate the copying process. When the simulation (test)
finishes, no data will be written to the DVD.
How to use the 2.Test function:
1. Use the down arrow button to scroll down to the 2.Test option.
2. The system will test the source and the target destination. If using the DVD-RW as the
source, put a source DVD into the DVD-RW (top disc drawer) blank DVDs into the
writers. If using a partition on the hard drive, ensure the correct hard disk partition is
displayed. If you use rewritable discs that contain data, the old data will be quickly
erased before simulation.
3. Press ENT to start the simulation (test). The LCD panel will display the testing
information and when the test ends, the LCD will show the results.
Testing and Copying DVDs
The 3.Test & Copy function is used to test the copying process and then actually copy the
source to the destination discs.
How to use the 3.Test & Copy function:
1. Use the down arrow button to scroll down to the 3.Test & Copy function.
2. The system will test the source and the target destination and then automatically start
the copy process. If using the DVD-RW as the source, put a source DVD into the
DVD-RW (top disc drawer), and blank DVDs into the writers. If using a partition on the
hard disk, ensure the correct hard disk partition is displayed in the LCD panel along
with the Test and Copy function. If you use rewritable discs that contain data, the old
data will be quickly erased before simulation.
3. Press ENT to start the test and copy process. The LCD panel will display the testing
information, the copy information, and the results. It will automatically eject the
duplicated DVDs when the process is finished.
Verifying the Target (Duplicate) DVDs
The 4.Verify function is used to examine if the target DVDs can be read correctly after
copying.
How to use the 4.Verify function:
1. Begin by copying a Master DVD or data from a partition in the hard drive to a target
DVD Duplicator Series
©2005 Kingdom, Inc. All rights reserved
Ver: 1.0 Page - 19 of 34 User’s Guide
(slave, destination) DVD. You can use the 1.Copy function or the 3.Test and Copy
function to do this. When the copy process is done, the system will automatically eject
the duplicated disc(s). Press the ESC button to redisplay the function and re-insert the
disc(s)
2. Use the down arrow button to display the 4.Verify function and press ENT button to
start the verify process. The system will start to verify the DVDs in the target drives.
The LCD panel will display the verify process information and the results. It will
automatically open all disc drives of the verified discs when the process is complete.
Comparing the Source and Target after Copying
The 5.Compare function compares the source DVD and the target DVD after copying.
How to use the 5.Compare function:
1. Begin by copying a master DVD to a target (slave, destination) DVD. You can use the
1.Copy function or the 3.Test and Copy function to do this. Press the ESC button to
redisplay the function.
2. Ensure that the source and the copied target DVDs are in their respective drives.
3. Use the down arrow button to scroll down to the 5.Compare function, and press the
ENT button to start the Compare process. The LCD panel will display the compare
information and the results. When the process completes, the target DVDs will be
automatically ejected.
4. Press the ENT button to view the detail of the Compare information. If the compare
result is identical, then the LCD panel will display the message “Identical”. If the result
of the compare process is “Fail” then the message will show the number of discs that
failed and succeeded. Press ENT button to view the detail of the Compare information.
If the compare failed, the LCD panel will display the reason of the failure such as “TOC
not match”.
5. Press the ESC button to redisplay the 5.Compare function.
Prescanning the Master (Source) DVD
The 6.Prescan function is used to scan the master (source) DVD to determine if it can be
read correctly and to test the read speed.
How to use the 6.Prescan function:
1. Place the Master DVD in the DVD-RW drive (source).
2. Use the down arrow button to display the 6.Prescan function.
3. Press the ENT button to start the prescan process. The system will scan the Master
DVD and the LCD panel will display the scanning information and the results. If the
master DVD can be read correctly, then the message “Prescan OK!” appears in the
DVD Duplicator Series
©2005 Kingdom, Inc. All rights reserved
Ver: 1.0 Page - 20 of 34 User’s Guide
LCD panel. If the Master DVD can not be read correctly, then the message “Prescan
Fail!” will appear in the LCD panel.
4. Press the ESC button to redisplay the function.
Viewing the Disc Info of the Master (Source) DVD
The 7.Disc Info function shows the following information about the Master DVD:
• Disc Type (e.g., DVD-R)
• Capacity (2903 MB)
How to use the 7.Disc Info function:
1. Place the Master DVD in the DVD-RW drive (source).
2. Use the down arrow to display the 7. Disc Info function.
3. Press ENT button to view the Disc Type and Capacity on the master DVD.
4. Press the ESC button to redisplay the 7. Disc Info function.
Select Source
The 8.Select Source function lets you select the data on DVD-ROM, DVD writers or
HDD as the source from which copying will be done. The following information will be
shown:
• Src: (e.g., DVD-ROM)
• 01 IDE1 Master
DVD Duplicator Series
©2005 Kingdom, Inc. All rights reserved
Ver: 1.0 Page - 21 of 34 User’s Guide
Chapter 5 Using the Hard Drive Partition as the Source
Overview
This chapter pertains to systems that contain a hard drive.
For systems that have a hard drive, the user can do the following:
• Load a DVD into a specific partition of the hard drive (9-01.Image Load)
• Delete the contents of a partition on the hard drive (9-02.Delete Image, page 22)
• Review the contents of a partition on the hard drive, such as Image Type: DVD, and
Capacity: 2903 MB (9-03.Image Info, page 22)
• Compare the contents of the working partition with the contents of the target DVD
(9-04.Compare Image, page 22)
• Select a Hard Drive Partition (Image) (9-05.Select Image, Page 22)
• Select the Image Source Drive (9-06. Image Src Drive, page 23)
The hard drive in the DVD Duplicator system contains partitions. Each partition can store
five gigabyte of data. Therefore, with an 80GB hard drive you can load as many as 12
DVDs into the hard drive. And you can duplicate the information that is in a particular
partition onto all available DVD drives at once. Each partition in the hard drive is labeled
as shown below:
80 GB Example
Hard Drive
Partition Label
Hard Drive
Partition Label
Hard Drive
Partition Label
Hard Drive
Partition Label
1 A 4 D 7 G 10 J
2 B 5 E 8 H 11 K
3 C 6 F 9 I 12 L

DVD Duplicator Series
©2005 Kingdom, Inc. All rights reserved
Ver: 1.0 Page - 22 of 34 User’s Guide
Loading a DVD (Image) into a Partition of the Hard Drive
The 9-01 Image Load option is used to load the data from a Master DVD to a partition on
the hard drive. This function is valid when a hard drive is installed in the duplicator.
Otherwise, this function will show “No HDD” on the LCD panel.
How to use the 9-01 Image Load option:
1. Use the down arrow button to scroll down to the 9. Image function. Then press ENT
button to select it. The option, 9-01 Image Load is the first option presented within
the Image function.
2. Place a Master DVD in the DVD-RW drive (top disc drawer).
3. Press ENT to start the load process. If the selected partition is already written to, then
select another working partition and press the ENT button to select it. Press the ENT
button again to confirm selection. Press the ENT button again to start the load of the
Master DVDs contents to the partition displayed in the LCD panel.
4. The LCD panel displays the status of the load process and when the load is finished,
the LCD will show the results.
Delete the Contents of a Hard Drive Partition
The 9-02 Image, Delete Image option is used to delete the data (Image) stored in the
currently displayed partition of the hard drive.
How to use the 9-02 Image, Delete Image option:
1. Use the down arrow button to scroll to the 9. Image function. Then press the ENT
button to select it. Use the down arrow button to display the option, 9-02 Image,
Delete Image. Press ENT button.
2. At the system prompt, “Delete Image in Partition? Yes” use the down arrow button
to display No and then press the ENT button to cancel the option, or, if Yes, then
press the ENT button and the data in the displayed partition is immediately deleted.
Review the Contents of a Partition
The 9-03 Image, Image Info option is used to examine the contents of the currently
displayed hard drive partition.
How to use the 9-03 Image, Image Info option:
1. Use the down arrow button to scroll to the 9.Image function. Then press the ENT
button to select it. Use the down arrow to display the option, 9-03 Image, Image Info.
Press the ENT button. The LCD panel displays the Disc Type and Capacity of the
image.
DVD Duplicator Series
©2005 Kingdom, Inc. All rights reserved
Ver: 1.0 Page - 23 of 34 User’s Guide
2. Press the ENT or the ESC button to exit this option.
Compare the partition to the DVD
The 9-04 Image, Compare Image option is used to compare this image (data) of the
target and the current working partition on the hard drive.
How to use the 9-04 Image, Compare Image option:
1. Use the down arrow button to scroll to the 9. Image function. Then press the ENT
button to select it. Use the down arrow to display the option, 9-04 Image, Compare
Image. Press the ENT button.
Selecting a Hard Drive Partition
The 9-05 Image, Select Image option is used to select the current working partition of
the hard drive.
How to use the 9-05 Image, Select Image option:
1. Use the down arrow button to scroll to the 9. Image function. Then press the ENT
button to select it. Use the down arrow to display the option, 9-05 Image, Select
Image. Press the ENT button. The LCD panel displays the prompt, “Select working
Partition-A”.
2. Use the down arrow button to display the desired working partition. Then press the
ENT button to select it.
3. Press the ENT button again to confirm your choice of the current working partition.
Selecting the Image Source Drive
The 9-06 Image, Image Src Drive option is used to select the particular drive to be the
master source from which the data will be coming from.
How to use the 9-06 Image, Image Src Drive option:
1. Use the down arrow button to scroll to the 9. Image function. Then press the ENT
button to select it. Use the down arrow to display the option, 9-06 Image, Image Src
Drive. Press the ENT button. The LCD panel displays the prompt, “ Select Image
Src:”
2. Use the down arrow button to display the desired image source. Then press the ENT
button to select it.
3. Press the ENT button again to confirm your choice of the current partition.
DVD Duplicator Series
©2005 Kingdom, Inc. All rights reserved
Ver: 1.0 Page - 24 of 34 User’s Guide
Chapter 6 Editing Tracks When Using CDs (for CD only)
Overview
In chapter 3 you learned how to copy a master DVD to a particular partition on the hard
drive. In this chapter you will learn how to use the following additional Edit Track
options:
• Copy a track from a Master CD to a target CD (10-01.Edit Track, CD to CD Edit,
• Play an Audio Track (10-03.Edit Track, play Audio Track)
• Close a session (10-04.Edit Track, Close Session, page 25)
Copying Tracks, Master CD to Target CD
The 10-01 Edit Track, CD to CD Edit option is used to combine tracks on different CDs
onto a single CD. For example, you can make a collection of favorite songs from different
music CDs and store them onto one CD.
How to use the 10-01 Edit Track, CD to CD Edit option:
1. Place the Master CD in the CD-ROM drive and a blank CD in a target CD drive.
2. Use the down arrow button to scroll to the 10. Edit Track function. Then press the
ENT button to select it. The LCD panel displays the first Edit Track option: 10-01 Edit
Track, CD to CD Edit. Press the ENT button, the LCD panel displays the contents of
the Master CD and prompts you to select a track.
3. Use the down arrow button to select the track number, and then press the ENT
button to select it. Do this for each track you wish to select.
4. Use the down arrow to scroll to the end of the list of tracks. When End appears in the
LCD panel, press the ENT button.
5. The system prompts you with the message, “End Edit disc and burn? Yes”.
6. Press the ENT button to start the “burn”. When the selected track has been copied
from the Master CD to the target CD, the LCD panel displays the message, “Burn
Complete! OK”.
7. Press the ESC button and view the system prompt, “Continue edit next disc? No”.
Use the down arrow button to display Yes and press the ENT button, or, if No, then
press the ENT button to end the Edit Track option.
Playing an Audio Track
The 10-03 Edit Track, Play Audio Track option is used to listen to any track on the master
CD. You will need headphones, which plug into the front of the disc drawer. The volume
control is next to the headphone jack. (THIS FEATURE IS NOT AVAILABLE ON ALL
MODELS)
DVD Duplicator Series
©2005 Kingdom, Inc. All rights reserved
Ver: 1.0 Page - 25 of 34 User’s Guide
How to use the 10-03 Edit Track, Play Audio Track option:
1. Place the Master DVD in the DVD-ROM drive.
2. Use the down arrow button to scroll to the 10.Edit Track function. Then press the
ENT button to select it. Use the down arrow to display the option: 10-03 Edit Track,
Play Audio Track. Press the ENT button. The LCD panel displays the contents of
the Master CD and prompts you to select a track.
3. Use the down arrow button to select the track number, and then press the ENT
button to select it.
4. Attach headphones to the disc drive to listen to the track.
5. Press the ESC button three times to stop the Play Audio Track option.
Closing a Session
The 10-04 Edit Track, Close Session option is used to finalize the target CD so that no
more data can be written to it. This option makes the CD ready to be read on a normal
player.
How to use the 10-04 Edit Track, Close Session option:
Use the down arrow button to scroll to the 10. Edit Track function. Then press the
ENT button to select it. Use the down arrow to display the option: 10-04 Edit Track,
Close Session. Press the ENT button. The LCD panel displays the prompt, “Close
all discs’ session? Yes”. If you select Yes, then the target CDs in the system can
not be written to anymore. Selecting No cancels the option and ejects the disc(s).
DVD Duplicator Series
©2005 Kingdom, Inc. All rights reserved
Ver: 1.0 Page - 26 of 34 User’s Guide
Chapter 7 Setup Options
Overview
The 11.Setup function contains options that allow the user to change the original
default settings. As there are various settings that control the duplicator’s operation, we
suggest using the preset default settings for optimal operation. The options are
described in this chapter for your reference.
Language
This option allows you to select the language that appears in the LCD Panel. The
options are: English, Spanish.
CD Burn Speed
This option allows you to change the burn speed (depending on the CD-RW maximum
speed support).
DVD Burn Speed
This option allows you to change the burn speed (depending on the DVD-RW maximum
speed support).
Read Speed
The option allows you to control the read speed of the DVD-RW (depending on the
CD-ROM maximum speed support).
Auto Start Drive
This option controls whether or not the DVD writers will auto start to copy or if the DVD
writers will test for the blank discs. The default setting is OFF.
Startup Menu
This option allows you to select which function will appear at system startup. The default
is the Copy function.
Auto Verify
This option controls the auto verify of the target DVDs, which verifies if they can be read
correctly in the DVD-RW drive after copying. The default setting is OFF
Auto Compare
This option controls the auto compare of the data between the Master DVD and the
target DVDs after a copy operation. The default setting is OFF.
Auto Prescan
This option controls the auto prescan of the master disc to see if it can be read correctly
and it tests the reading speed. The default setting is OFF.
Eject Disc
This option controls the ejection of the discs by the DVD writer. Three settings are
available: the default setting is the “Eject Good Only” setting, which will only eject the
passed discs automatically and leave the failed ones in the DVD writers; the “Eject All
Disc” setting will eject all discs, whether or not they passed or failed; the “Do Not Eject”
setting causes all the discs to remain in the DVD writers when the job is done and the
user will have to eject the discs manually.
DVD Duplicator Series
©2005 Kingdom, Inc. All rights reserved
Ver: 1.0 Page - 27 of 34 User’s Guide
Burn On the Fly
This option controls the writing methods to the DVD. When this setting is ON, the data
will direct copy from the source drive to the target drives. When the setting is OFF, the
data will load into a particular temporary partition in the hard drive and then the copied
data will come from the source partition.
Burn Mode
This option controls the writing methods to the DVD including the “Disc At Once” (DAO)
or “Track at once” (TAO). The default setting is Disc At Once. Some DVD writers may
support different writing methods. If the method selected is not supported, the
duplicator will automatically switch to the other one.
Display Time
This option is to show the copying time.
Button Sound
This option controls whether the button sound is ON or OFF. The default setting is ON.
Device Info
This option shows what drives are installed.
System Info
This option shows the system information of the LCD such as the internal firmware
revisions.
Quick Erase
This option initiates a quick erase of the data on the DVD-RW disc.
Full Erase
This option will do a complete erase of the data on the DVD-RW disc. This will take a
minute to complete.
Auto Close Tray
Auto Close Tray is to close the writer’s tray automatically. If you haven’t set any writer’s
to copy in Function 11.5 Auto Start Drive this function will be invalid.
Quick Compare
This option is related to Function 5 Compare. It lets you set a certain byte. When the
error of a target DVD is beyond the set byte, the comparison between the source DVD
and the target DVD will stop. Yet the comparison of the other target DVDs will continue.
Audio Burn Speed
Audio Burn Speed lets you control the burning speed of audio CDs. The default is auto.
DVD Duplicator Series
©2005 Kingdom, Inc. All rights reserved
Ver: 1.0 Page - 28 of 34 User’s Guide
Chapter 8 Troubleshooting
1. No display on LCD or the unit does not operate when power is on.
• Please check the power cable and the power supply.
2. LCD shows the Error message.
• During the operation like Copy, Test, Compare and Verity, you may press the ESC
button to abort the operation. An error message will be shown on the LCD. Some
DVD writers will cause the duplication to hang up and you have to power off/on to
return to normal operation.
• Failed reading may cause the error message shown on the LCD display. Change the
master DVD and try again.
• During operation, if read error, buffer under run or writing error occurs, the LCD will
show error message like: Pass XX, failed XX.
• If there is no device connected or detected by duplicator during power-on, the
duplicator will show error message on LCD before entering the main menu.
3. DVD-RW can not read disc and shows error message.
• Check the format of master DVD or master DVD itself for damage.
• Use any of the DVD-Writers to read the master; if it works, the DVD-RW may be
defective or not compatible with DVD-RW.
4. Buttons do not function.
• May be still busy on task.
• Button malfunction.
• Faulty board.
5. Copy complete but DVD-R disc is not readable/executable.
• Use compare to check.
• Change another DVD-RW drive to test.
6. The copy failure rate is high.
• Lower the speed of DVD-Writer and try again.
• Quality of disc is poor.
• Check for latest firmware version.
• Check the DVD-Writer maximum writing speed. With writing processes exceeding
24X please copy to hard drive first then to DVD.
7. Can not boot-up or fail to update firmware.
• Contact your dealer to solve the problem.
• Check to verify that correct program is downloaded and unzipped before writing the
file onto DVD.
• Failed update might cause failed boot. This can only be corrected by returning the
unit to Kingdom.
8. To cancel the duplicator working process.
• Press the ESC button for 2 seconds to cancel any “Copy”, “Test”, or “Verify” etc.
function while the job is in working process.
DVD Duplicator Series
©2005 Kingdom, Inc. All rights reserved
Ver: 1.0 Page - 29 of 34 User’s Guide
Appendix 1: Overview of the functions
Upon starting the system, you can press the down arrow button to scroll through the
available options. The last three options, Image, Edit Track, and Setup have sub-options
as listed in the outline below:
1. Copy
2. Test
3. Test and Copy
4. Verify
5. Compare
6. Prescan
7. Disc Info
8. Select Source
9. Image
9-01. Load
9-02. Delete Image
9-03. Image Info
9-04. Compare Image
9-05. Select Partition
9-06. Select Src Drive
9-07. Image Format Info
10- Edit Track
10-01. CD to CD Edit
10-02. CD to HD
10-03. Play Audio Track
10-04. Close Session
11- Setup
11-01. Language (LCD Type 1: English)
11-02. CD Burn Speed This function lets you control the burning speed of CD
writers. (default is Auto)
11-03. DVD Burn Speed This function lets you control the burning speed of DVD
writers. (default is Maximum)
11-04. Read Speed This function lets you control the reading speed of target CD’s
(The default is Maximum)
11-05. Auto Start Drive (On / Off)
11-06. Startup Menu (Copy)
11-07. Auto Verify (On / Off)
11-08. Auto Compare (On / Off)
11-09. Auto Prescan (On / Off)
11-10. Eject Disc (1 Eject Good Only 2 Eject All Disk 3 Do Not Eject)
11-11. Burn On the Fly (On / Off)

DVD Duplicator Series
©2005 Kingdom, Inc. All rights reserved
Ver: 1.0 Page - 30 of 34 User’s Guide
11-12. Burn Mode (1 DAO 2 TAO)
11-13. Display Time (On / Off)
11-14. Button Sound (On / Off)
11-15. Device Info
11-16. System Info
11-17. Quick Erase
11-18. Full Erase
11-19. Auto Close Tray
11-20. Quick Compare (On / Off)
11-21. Auto Burn Speed (Auto)
DVD Duplicator Series
©2005 Kingdom, Inc. All rights reserved
Ver: 1.0 Page - 31 of 34 User’s Guide
Appendix 2: LCD Messages
General Messages:
Message Description Initialize SDRAM Initialize the memory on the system Detect Drives Detect what drives are installed in the system Use Abort! While the function is working, cancel the job Analyzing Analyzing the source disc Source Drive Not Ready Source drive is not ready to read Target Drive Not Ready Target drive is not ready to write Source Disc Not Ready Source disc is not ready for reading Target Disc Not Ready Target disc is not ready for writing Erasing Disc System is erasing the data on the CD-RW disc Fail to get Drive Info The drive information not recognized Fail to get Src Disc Info! Can not read the information from the CD disc Save new config Fail The new setting of configuration can not be saved Load Default Config Loading the factory default setting Src & Tgt can’t in the same channel When doing the comparing, the source and target can
not be in the same drive Preparing System is preparing the data and devices installed for
CD recording Check Target Please Wait System is checking the target device, wait for a while Audio Disc!!! Can’t compare Audio disc can not be compared Identical After comparing, the contents of CD is the same Read disc error During the comparing, the disc has read errors Can’t read TOC CD’s TOC data can not read TOC not match After comparing, the source and target device’s TOC
are not identical Source Disc Empty The source CD is blank without data Target Overflow The target CDs do not have enough space to record
the source Target Disc Not Empty The target disc is not empty to record Press a key to eject good disc Press any key to eject the good disc after the recording
process Press a key to eject fail disc Press any key to eject the failed disc after the
recording process CD-RW does not support the funct CD-RW device can not support this function Hold ESC to exit Press “ESC” for three seconds to terminate the testing All data will be lost, erase? All data on the CD disc will be lost. Confirmation to
erase the CD-RW disc Erase finished CD-RW disc have been erased No erase disc in CD-RW The CD discs in the CD-RW drives are not erasable
Hard Disk Drive with Image Loading Messages:
Message Description HDD not Formatted! The hard drive is not formatted yet Format HDD? The message of formatting hard drive All data will be lost, format? All data on the hard drive will be lost. Confirm the
DVD Duplicator Series
©2005 Kingdom, Inc. All rights reserved
Ver: 1.0 Page - 32 of 34 User’s Guide
formatting of hard drive Format HDD OK! Formatting hard drive is complete Image Load OK! The image has been loaded from CD to hard drive Image Load Fail The image failed to load from CD to hard drive HDD too small to handle image The hard drive does not have enough space to store the
data image (at least 1 Gbytes) No Valid HDD! The system can not find a valid hard drive HDD too small The space of hard drive is too small No Image in Partition xx Partition xx does not have a data image Image Exists Overwrite? Current partition contains data image. Confirmation will
allow the overwriting of the existing data image Delete Image in Partition xx? Deleting the data image in partition xx Partition Damage The image partition has been damaged Verify Disk or Partition? Verify the entire hard drive or just particular partition Verify Hard Disk OK! Hard drive successfully verified Verify Hard Disk Fail! Hard drive failed to verify Verify Partition Header! Verify the partition header Select HD first! This function must select a formatted hard drive
Message Description Lost selected Tracks? Abort the tracks selected and delete it End edit disc and burn? Finishing the music disc edit and start to record the CD Continue edit next Disc? Asking to continue editing next music disc or not Target Overflow Re-Select The CD disc space is not enough to record the selected
track. Close all disc’s session? Closes the disc’s session and inhibits further data
recording Can’t edit HDD The hard drive can not be used as a source for editing
audio CD No AUDIO track in this disc The source CD does not contain an audio track Insert next disc Asking to insert the next audio disc Session were closed already! The disc sessions have been closed already Burn or Move to partition? Confirmation of direct burning to CD disc or move the
data to the partition Tgt overflow, del last trk? The CD disc space is not enough to record the selected
tracks, asking to delete the last track. Ins empty disc Asking to insert a empty disc and continue the process
Firmware Update Messages:
Message Description Invalid firmware Disc The disc does not contain valid firmware Updating F/W Firmware is updating Update F/W xxxx to yyyy? Confirmed of updating firmware version from xxxx to yyyy Searching F/W… Searching for valid firmware Check Sum Error! The updated firmware has errors Source can’t be hard drive! During the firmware compare, the source can not be hard
drive Last update F/W OK! The last firmware update was successful Last update F/W Fail! The last firmware update failed

DVD Duplicator Series
©2005 Kingdom, Inc. All rights reserved
Ver: 1.0 Page - 33 of 34 User’s Guide
Flash ROM fail! The flash ROM failed to write
DVD Duplicator Series
©2005 Kingdom, Inc. All rights reserved
Ver: 1.0 Page - 34 of 34 User’s Guide
Appendix 3: Technical Support Information
Email: [email protected]
Address: Kingdom Inc
P.O. Box 506
719 Lambs Creek Road
Mansfield, PA 16933
Telephone: 570-662-7515
Fax: 570-662-3875
Website: www.kingdom.com
Note: Before contacting Technical Support please have your Model Number and the
Serial Number of your duplicator available for reference. These numbers are located on
the rear panel of your duplicator.
For Best Performance
For best results always use high quality media. For recommendations please visit us at
www.kingdom.com.


![INDEX [datamedya.com]datamedya.com/firmware/88x-e.pdf · The COPYSTAR DVD/CDR controller, is the ideal controller for your CD/DVD Duplicator system. The controller is always upgrading](https://img.pdfslide.us/doc/110x75/5f0e724d7e708231d43f497e/index-the-copystar-dvdcdr-controller-is-the-ideal-controller-for-your-cddvd.jpg)