Embed Size (px)
Citation preview
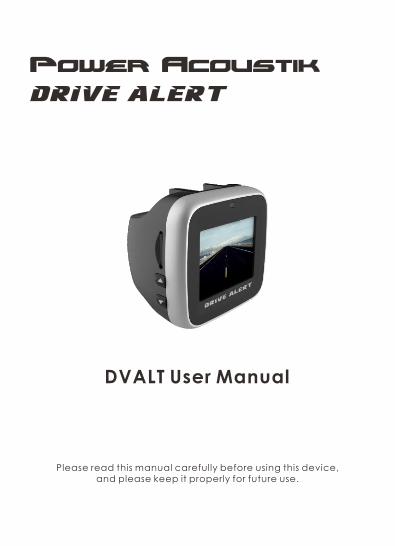
DVALT User Manual
Please read this manual carefully before using this device,and please keep it properly for future use.

WARNING: This device is a driver assistant (or driver aid). The
driver ultimately is responsible for ensuring the safe operation of
the vehicle. This device does not communicate with the vehicle
and is only a supplemental warning measure. Road conditions,
installation, weather conditions, visibility, and other factors may
affect the accuracy of this device. You should keep your eyes
on the road at all times, be alert and look to your left and right
before changing lanes. Look ahead to make sure you have
enough distance between your car and car ahead and make
sure you don't depart your lane inadvertently. Use of this
product does not relieve the driver from making sure that the
vehicle is being driven in a safe and legal manner, and the
manufacturer does not accept any liability for its use.
Please do calibration when you rst time using this camcorder.For your safety,please park the car at a safe place to do the calibration.

DVALT User Manual
Catalogue
I. Introduction-----Page 5II. Notes on Installation-----Page 5III. Battery warning-----Page 6IV. Caution-----Page 6V. Product Overview----Page 7VI. Package Contents -----Page 8VII. Installation-----Page 8VIII. Buttons Function-----Page 10IX. Power ON/OFF-----Page 10X. Using the Camcorder-----Page 11XI. LDWS Calibration-----Page 14 Long Press Menu/Mode button to Settings-----Page 17XII. Main specications and parameters-----Page 19
I.IntroductionThank you for purchasing this advanced camcorder. This camcorder is specically designed for real time video and audio recording when driving.
II.Notes on Installation1. Do NOT setup the camcorder while driving or while the vehicle is in motion.Please stop at a safe place before adjusting or installing.
2. This camcorder should be installed in a proper manner, without interfering with the driver's eyesight or Driver's eyesight,airbags or any other safety restraint system.Install the camcorder above the rear-view mirror to obtain the best open-eld view. Do NOT install the camcorder in a location that will obstruct your required driving view.
3. Make sure that the lens is within the wiping range of the windscreen wiper to ensure a clear view even when it rains.
4. Do not touch the lens with your ngers. Finger grease may be left on the lens and will result in unclear videos or snapshots. Clean the lens on a regular basis.
5. Keep the product away from strong magnetic elds, which may cause damage to this product.
6. During formatting and use, do not disconnect the power supply, or insert/remove the TF card, otherwise it is likely to damage the TF card or cause program error.
7. TF card in this product is not intended to store any other les. Before it is used, format the TF card, and promptly back up important videos and images.
8. To prevent electric shock, do not insert or remove the power plug with wet hands.
5

9. Do not use this product in places with high humidity or
temperature above 70 ℃ or below -20 ℃.10. Only use the dedicated charger and related accessories compatible with this product. 11. Use TF memory card of Class10 and 8G, or above.
III.Battery warning■ Never dismantle, crush, or pierce the battery, or allow the battery to short-circuit. Do not expose battery being placed in high temperature environment, if battery leaks or bulges, stop continue to use.
■ Always charge using the system. Risk of explosion if battery is replaced by an incorrect type.
■ Keep the battery out of reach of children.
■ Batteries may explode if exposed to naked re. Never dispose of batteries in a re.
■ Never replace the battery on your own; have the dealer do it for you.
■ Disposed of used batteries observing local regulations.
IV.Caution■ Never disassemble or attempt repair of this product. Doing so may damage the camcorder, cause electric shock and void your product warranty.
■ Set up time and date accurately before you use this camcorder.
■ Exposing the camcorder to open ames can cause explosion.
■ Due to local laws and vehicles safety considerations, do not manually operate the camcorder while driving.
■ The values displayed in this system, such as speed, position, and the distance warning to the speed camera set points, may be Inaccurate due to the inuence of surrounding environment. They are for your reference only.
6
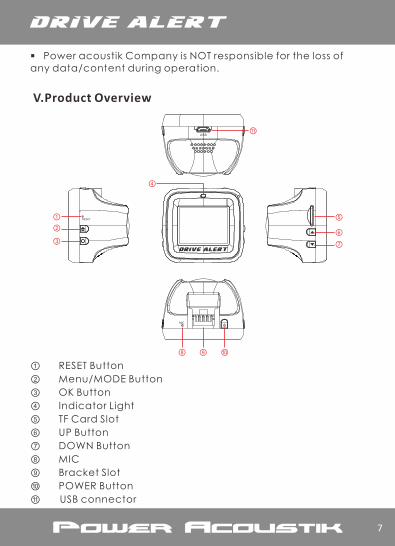
V.Product Overview
①
②
③
⑤
⑥
⑦
④
⑧ ⑨ ⑩
⑪
① RESET Button
② Menu/MODE Button
③ OK Button
④ Indicator Light
⑤ TF Card Slot
⑥ UP Button
⑦ DOWN Button
⑧ MIC
⑨ Bracket Slot
⑩ POWER Button
⑪ USB connector
■ Power acoustik Company is NOT responsible for the loss of any data/content during operation.
7

VI. Package ContentsThe package contains the following items. If there are any missing ordamaged items, contact your dealer immediately.
Car Camcorder Bracket Car Charger
USB Cable Warranty Card User Manua
VII.Installation
8
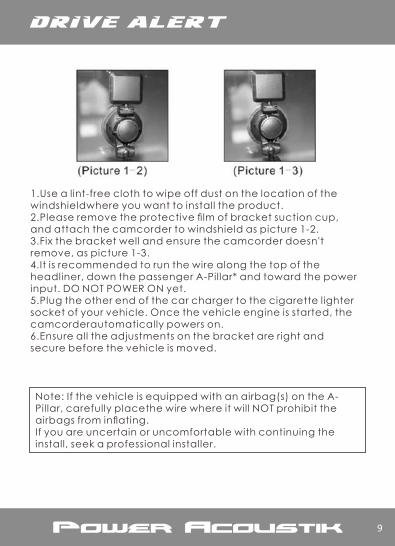
1.Use a lint-free cloth to wipe off dust on the location of thewindshieldwhere you want to install the product.2.Please remove the protective lm of bracket suction cup,and attach the camcorder to windshield as picture 1-2.3.Fix the bracket well and ensure the camcorder doesn'tremove, as picture 1-3.4.It is recommended to run the wire along the top of theheadliner, down the passenger A-Pillar* and toward the powerinput. DO NOT POWER ON yet.5.Plug the other end of the car charger to the cigarette lightersocket of your vehicle. Once the vehicle engine is started, thecamcorderautomatically powers on.6.Ensure all the adjustments on the bracket are right andsecure before the vehicle is moved.
Note: If the vehicle is equipped with an airbag(s) on the A-Pillar, carefully placethe wire where it will NOT prohibit the airbags from inating. If you are uncertain or uncomfortable with continuing the install, seek a professional installer.
9
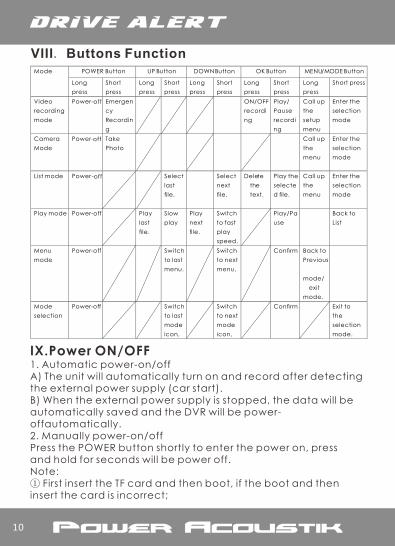
VIII.Buttons Function
IX.Power ON/OFF1. Automatic power-on/offA) The unit will automatically turn on and record after detectingthe external power supply (car start).B) When the external power supply is stopped, the data will beautomatically saved and the DVR will be power-offautomatically.2. Manually power-on/offPress the POWER button shortly to enter the power on, pressand hold for seconds will be power off.Note:① First insert the TF card and then boot, if the boot and theninsert the card is incorrect;
Mode POWER Button UP Button DOWNButton OK Button MENU/MODE Button
Long
press
Short
press
Long
press
Short
press
Long
press
Short
press
Long
press
Short
press
Long
press
Short press
Video
recording
mode
Power-off Emergen
cy
Recordin
g
ON/OFF
recordi
ng
Play/
Pause
recordi
ng
Call up
the
setup
menu
Enter the
selection
mode
Camera
Mode
Power-off Take
Photo
Call up
the
menu
Enter the
selection
mode
List mode Power -off
Select
last
le,
Select
next
le,
Delete
the
text.
Play the
selecte
d le.
Call up
the
menu
Enter the
selection
mode
Play mode Power-off Play
last
le.
Slow
play
Play
next
le.
Switch
to fast
play
speed.
Play/Pa
use
Back to
List
Menu
mode
Power-off
Switch
to last
menu.
Switch
to next
menu,
Conrm Back to
Previous
mode/
exit
mode.
Mode
selection
Power-off Switch
to last
mode
icon,
Switch
to next
mode
icon,
Conrm Exit to
the
selection
mode.
10
② Please conrm the DVR has power supply by car charger,and the DVR are used in conventional vehicle environment.
3. Indicator lightA) Power on: the machine boot indicator light.B) Video: The machine video indicator is ashing continuously.
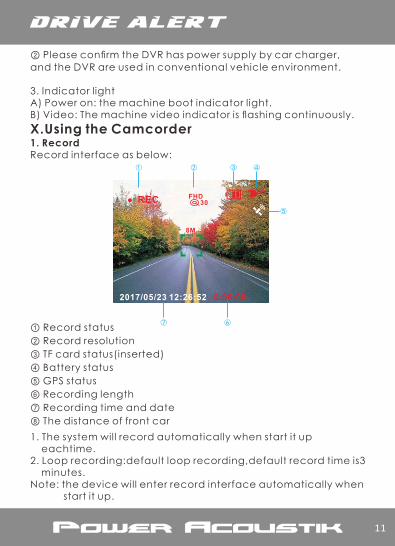
X.Using the Camcorder1. RecordRecord interface as below:
REC FHD30
2017/05/23 12:26:52 0:00:00
① ② ③ ④
⑤
⑦ ⑥① Record status
② Record resolution
③ TF card status(inserted)
④ Battery status
⑤ GPS status
⑥ Recording length
⑦ Recording time and date
⑧ The distance of front car
1. The system will record automatically when start it up eachtime.2. Loop recording:default loop recording,default record time is3 minutes.Note: the device will enter record interface automatically when start it up.
8M
11
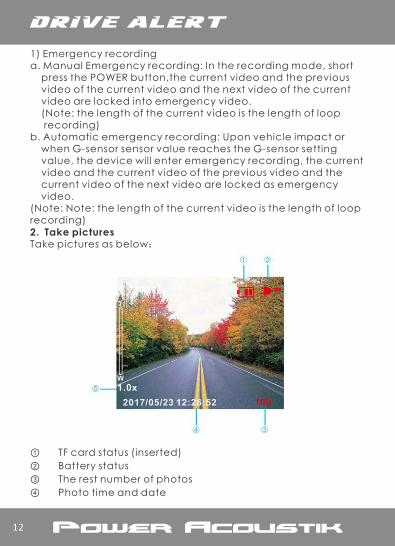
① TF card status (inserted)
② Battery status
③ The rest number of photos
④ Photo time and date
1) Emergency recordinga. Manual Emergency recording: In the recording mode, short press the POWER button,the current video and the previous video of the current video and the next video of the current video are locked into emergency video. (Note: the length of the current video is the length of loop recording)b. Automatic emergency recording: Upon vehicle impact or when G-sensor sensor value reaches the G-sensor setting value, the device will enter emergency recording, the current video and the current video of the previous video and the current video of the next video are locked as emergency video.(Note: Note: the length of the current video is the length of loop recording)2. Take picturesTake pictures as below:
12
The list interface:OK button: Play/Pause;UP button:Last le;DOWN button:Next le;
Video playback interface:OK button: Play/Pause;MENU button: Quit playing;
Photo list interface:OK button: PlayUP button: Last le;Down button:Next le;MENU/MODE button: Quit playing
1) Press the MODE key to switch mode in the recording mode interface or the playback mode interface. Press OK to enter the camera interface, press the POWER button briey to take pictures.2) Adjust the focal length of the camera by pressing the UP / DOWN button.
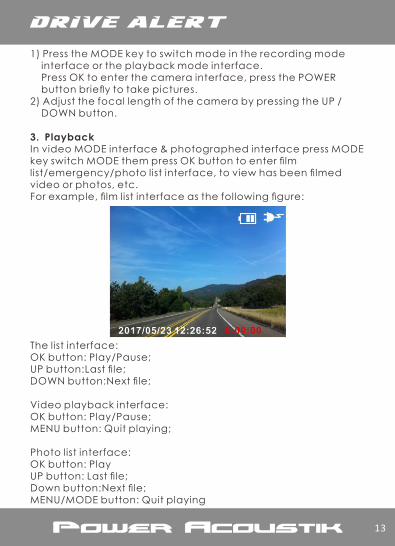
3. PlaybackIn video MODE interface & photographed interface press MODE key switch MODE them press OK button to enter lm list/emergency/photo list interface, to view has been lmed video or photos, etc.For example, lm list interface as the following gure:
13
XI:LDWS CalibrationLong Press Menu/Mode button to Settings.
1. Movie Clip TimeThe time of loop video recording: Click the UP or DOWN button to move up or down to set the recording time: 5min ,3min or 1min for choosing.And then short press OK button to conrm.
2. Sound RecordSound recording, click the UP/DOWN button to move up or down to set either ON or OFF.And then short press OK button to conrm.
3. ADAS including auxiliary driving lane deviation warning and collision warning before the car,open the corresponding function,the system starts monitoring,such as:If the detected lane drifting too close to or away from the car,the voice will be sent a Di-Di-Di reminder.
1) LDWS (Lane Departure Warning System):Warning prompts assist the driver by way or reducing vehicle trafc accidents due to lane off set.When the system detects the vehicle lane deviation, will issue a “shiftlane”the voice prompts.
2)FCWS (Forward Collision Warning System): The distance between vehicles detected. Distance 15 meters ahead of the vehicle automatically detects and issued with the vehicle in front of less than 15 meters away from the “Di-Di-Di”from voice prompt,safe driving;when the vehicle distance greater than 15 meters,the warning is automatically released.Note:Lane Departure Warning System minimum trigger speed of 30km/h,such as trigger not meet the minimum speed,will not start lane drifting warning.
4.VolumeClick the UP/DOWN button to move up or down to adjust volume.
14
Optional volume is from 1 to 10 and then short press OK button to conrm.
5. DeleteClick the UP/DOWN button to move up or down to delete single le or all les, and then short press OK button to conrm.
1. ProtectClick the UP/DOWN button to move up or down to protect/release les, and then short press OK button to conrm.
2. BeepPress UP/DOWN button to select click status: open / close, shortly press OK button to nish selecting.
3. Clock SettingPress UP/DOWN button to select time and shortly press OK button to nish time setting ,shortly press OK button to exit setting .
4. Date Format Press Menu/Mode button to select date format: Year/month/date, month/date/year or date/month/year; Shortly press Ok button to nish setting.
5. Language SelectionPress UP/DOWN button to select Language: English /Spanish, shortly press OK button to nish selecting.
6. FlickerPress UP/DOWN button to select frequency:50Hz/60Hz;Shortly press OK button to nish selecting.
7. LCD Power Save Press UP/DOWN button to select when the screen goes to sleeping mode:1 min/3 min; Shortly press OK button to nish setting.
15

8. BeepPress UP/DOWN button to select click status: open / close, shortly press OK button to nish selecting.
9. Clock SettingPress UP/DOWN button to select time and shortly press OK button to nish time setting ,shortly press OK button to exit setting.
10. Date FormatPress Menu/Mode button to select date format: Year/month/date, month/date/year or date/month/year; Shortly press Ok button to nish setting.
11. Language SelectionPress UP/DOWN button to select Language: English /Spanish, shortly press OK button to nish selecting.
12. FlickerPress UP/DOWN button to select frequency:50Hz/60Hz;Shortly press OK button to nish selecting.
13. G-sensorPress UP/DOWN button to select protect level (G-sensor sensitivity level): OFF/ High/ Middle/Low. Shortly press OK button to nish selecting.
14. Parking MonitoringPress UP/DOWN button to set Parking Monitoring ON & OFF.Shortly press OK button to nish selecting.
15. GPS Status: Display GPS signal status
16. Time Zone SelectPress UP/DOWN button to set time zone; Shortly press OK button to nished selecting.
16
17. Reset SetupReturn the unit back to factory default setting. Press UP/DOWN button to select reset status: Yes / No; Shortly press OK button to nished selecting.
18. Format SD Card.Press UP/DOWN button set format SD card status: Yes / No, Shortly press OK button to nished selecting.
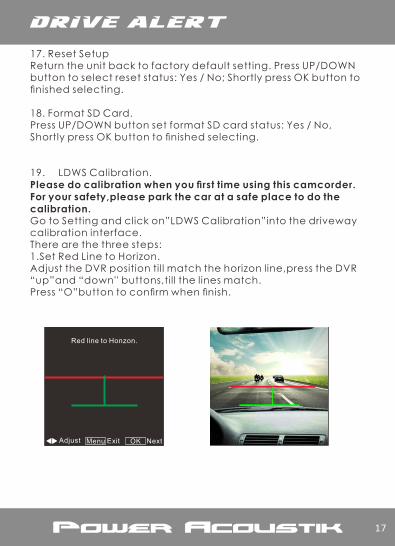
19. LDWS Calibration.Please do calibration when you rst time using this camcorder.For your safety,please park the car at a safe place to do the calibration.Go to Setting and click on”LDWS Calibration”into the drivewaycalibration interface.There are the three steps:1.Set Red Line to Horizon.Adjust the DVR position till match the horizon line,press the DVR “up”and “down'' buttons,till the lines match.Press “O”button to conrm when nish.
Red line to Honzon.
Adjust Menu Exit OK Next
17
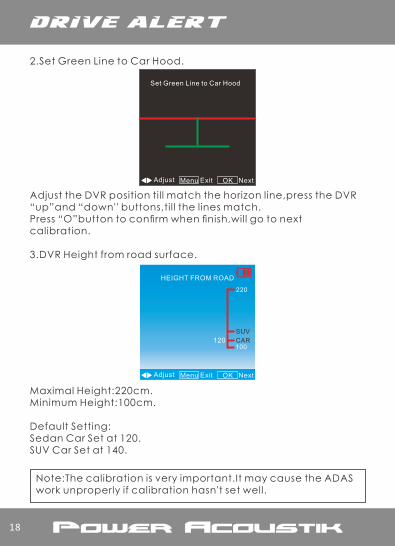
Set Green Line to Car Hood
Adjust Menu Exit OK Next
2.Set Green Line to Car Hood.
Adjust the DVR position till match the horizon line,press the DVR “up”and “down'' buttons,till the lines match.Press “O”button to conrm when nish,will go to next calibration.
3.DVR Height from road surface.
Maximal Height:220cm.Minimum Height:100cm.
Default Setting:Sedan Car Set at 120.SUV Car Set at 140.
Note:The calibration is very important.It may cause the ADAS work unproperly if calibration hasn't set well.
18
HEIGHT FROM ROAD
Adjust Menu Exit OK Next
120100
220
CAR
SUV
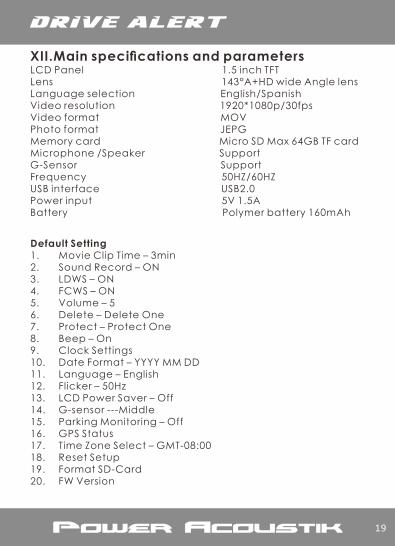
XII.Main specications and parametersLCD Panel 1.5 inch TFTLens 143°A+HD wide Angle lensLanguage selection English/SpanishVideo resolution 1920*1080p/30fps Video format MOVPhoto format JEPGMemory card Micro SD Max 64GB TF cardMicrophone /Speaker SupportG-Sensor Support Frequency 50HZ/60HZUSB interface USB2.0Power input 5V 1.5A Battery Polymer battery 160mAh
Default Setting1. Movie Clip Time – 3min2. Sound Record – ON3. LDWS – ON4. FCWS – ON5. Volume – 56. Delete – Delete One7. Protect – Protect One8. Beep – On9. Clock Settings10. Date Format – YYYY MM DD11. Language – English12. Flicker – 50Hz13. LCD Power Saver – Off14. G-sensor ---Middle 15. Parking Monitoring – Off16. GPS Status17. Time Zone Select – GMT-08:0018. Reset Setup19. Format SD-Card20. FW Version
19