Embed Size (px)
Citation preview

Version 2 EDV Network SoftwareInstruction Manual
This software is for use with Windows® XP only.
DV NETWORKV2FENG P.book Page 1 Friday, May 6, 2005 9:32 AM

2
DV NETWORKV2FENG P.book Page 2 Friday, May 6, 2005 9:32 AM
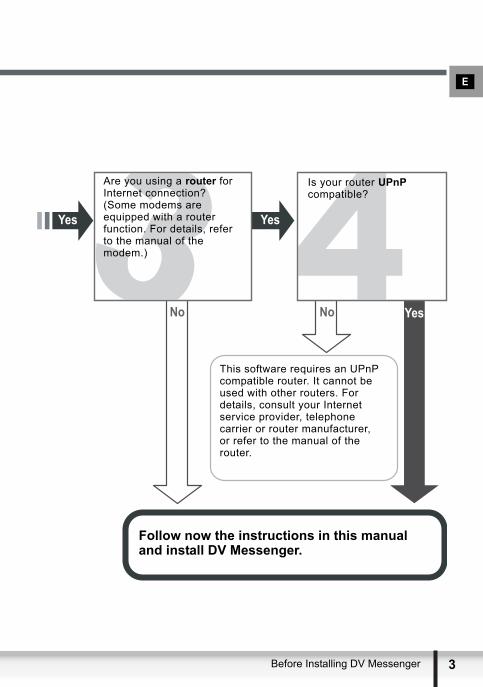
Before Installing DV MessengerTo use DV Messenger, it is required that Windows XP is installed in your computer and Windows Messenger 4.5, 4.6 or 4.7 operates correctly.Make sure to confirm the following before installing DV Messenger.
Is Windows XP and Windows Messenger 4.5, 4.6 or 4.7 installed?
Does Windows Messenger operate and can its voice or video conversation function be used?(Please consult Microsoft for details on Windows Messenger.)
This software is compatible with Windows XP only. It cannot be used with other Operating Systems. Furthermore, Windows Messenger 4.5, 4.6 or 4.7 is required. Establish an environment that allows the use of this software. Please consult Microsoft for details.
This software requires that Windows Messenger operates correctly. Please establish an environment where Windows Messenger operates. Please consult Microsoft for details.
Yes Yes
No No
Before Installing DV Messenger
E
DV NETWORKV2FENG P.book Page 3 Friday, May 6, 2005 9:32 AM
Are you using a router for Internet connection?(Some modems are equipped with a router function. For details, refer to the manual of the modem.)
Is your router UPnP compatible?
This software requires an UPnP compatible router. It cannot be used with other routers. For details, consult your Internet service provider, telephone carrier or router manufacturer, or refer to the manual of the router.
Follow now the instructions in this manual and install DV Messenger.
Yes
YesNoNo
Yes
3Before Installing DV Messenger

4
DV NETWORKV2FENG P.book Page 4 Friday, May 6, 2005 9:32 AM
Read Carefully Before Using
CANON SOFTWARE LICENCE AGREEMENTIMPORTANT: READ CAREFULLY AND UNDERSTAND ALL OF THE RIGHTS AND RESTRICTIONS DESCRIBED IN THIS CANON SOFTWARE LICENCE AGREEMENT (the “Agreement“). This Agreement is a legal agreement between you, either an individual or entity, and Canon Inc. (“Canon“) governing your use of this software program including related “online” or electronic documentation, if any (the “Software“). BY CLICKING THE “YES” BUTTON BELOW, YOU AGREE TO BE BOUND BY THE TERMS OF THIS AGREEMENT. IF YOU DO NOT AGREE TO THE TERMS OF THIS AGREEMENT, YOU MAY NOT INSTALL OR USE THE SOFTWARE. IN SUCH CASE, CLICK THE “NO“ BUTTON BELOW AND CLOSE THIS SET UP PROGRAM.
1. GRANT OF LICENSECanon grants you a non-exclusive, non-transferable licence to use (“use“ shall mean storing, loading, installing, executing or displaying) the Software on your computer (provided the Software is not Used on more than one computer at the same time) solely for use with Canons digital video camcorder products.
You may make one copy of the Software solely for backup purposes, provided that the back up copy shall contain the same copyright notice and other ownership legends exactly as and where they appear on the Software as delivered.
2. RESTRICTIONSYou shall not use or copy the Software except as expressly granted or permitted herein, and shall not assign, sublicence, sell, rent, lease, loan, convey or transfer to any third party the Software. You shall not alter, translate, modify, create derivative works, convert to another programming language, disassemble, decompile or otherwise reverse engineer the Software or allow any third party to do so except as expressly permitted by the terms of this Agreement or by law. You shall not remove, obliterate or cancel any copyright or other proprietary notice appearing on the Software or on any medium on which the Software is delivered.
3. OWNERSHIPCanon or its supplier retains in all respects the title, ownership and intellectual property rights in and to the software. Except as expressly provided herein, no license or right, express or implied, is hereby conveyed or granted by Canon to you for any intellectual property of Canon or its supplier.
4. EXPORT RESTRICTIONS AND OTHER LAWSYou agree to use the Software in a manner that complies with all applicable laws in the jurisdiction in which you use the Software.
You agree to comply with all export laws and restrictions and regulations of the country involved, and not to export or re-export, directly or indirectly, the Software in violation of any such laws and restrictions and regulations, or without all necessary approvals.
Read Carefully Before Using

E
DV NETWORKV2FENG P.book Page 5 Friday, May 6, 2005 9:32 AM
5. SUPPORT AND UPDATECanon, Canon's subsidiaries and affiliates, their distributors and dealers are not responsible for maintaining the Software or helping you to use the Software. No updates, bug-fixes or support will be made available for the Software hereunder.
6. LIMITED WARRANTY DISCLAIMERSCanon warrants that for a period of 90 days from the date the Software was supplied to you, (the “Warranty Period”) the Software, if operated as directed, will substantially achieve the functionality described in any related documentation and that any media on which the Software is supplied will be free from defects in materials and workmanship. If during the Warranty Period the Software fails to operate in accordance with this warranty or you discover physical defects in any media on which it was delivered, you may, as your sole and exclusive remedy, return the Software to the authorised dealer from whom you acquired it together with proof of purchase and the dealer will replace the Software at no charge to you. If the defective Software was downloaded from a web site, you may download a further copy. The above is your sole and exclusive remedy. Canon, Canon's subsidiaries and affiliates, their distributors and dealers do not warrant that the functions contained in the Software will meet your requirements or that the Software will be free from defects or viruses or that the operation of the Software will be uninterrupted or error free.Canon does not warrant that any data transfer through the internet using the Software will be complete or accurate.
EXCEPT FOR THE LIMITED WARRANTY DESCRIBED ABOVE, THE SOFTWARE IS SOLD “AS IS” AND CANON AND ITS SUPPLIER MAKE NO OTHER EXPRESS OR IMPLIED WARRANTY AND, TO THE EXTENT PERMITTED BY APPLICABLE LAW, EXPRESSLY DISCLAIM ALL WARRANTIES AS TO MERCHANTABILITY AND FITNESS FOR ANY PARTICULAR PURPOSE.
7. LIMITATION OF LIABILITYYour sole and exclusive remedy for any damage or loss in any way connected with the Software, whether by Canon's breach of any express or implied warranty, negligence or any breach of any other duty shall be, at Canon's your option, repair or replacement of the Software or a refund of the cost of the Software.
OTHER THAN AS STATED ABOVE AND TO THE MAXIMUM EXTENT PERMITTED BY APPLICABLE LAW, CANON, CANON'S SUBSIDIARIES AND AFFILIATES, THEIR DISTRIBUTORS AND DEALERS SHALL NOT BE LIABLE FOR ANY LOSS OR DAMAGES WHATSOEVER (WHETHER KNOWN, FORESEEABLE OR OTHERWISE) INCLUDING, WITHOUT LIMITATION, ANY CONSEQUENTIAL, INCIDENTAL, DIRECT, INDIRECT, SPECIAL, PUNITIVE, OR OTHER DAMAGES WHATSOEVER (INCLUDING, DAMAGES FOR LOSS OF PROFITS, BUSINESS INTERRUPTION, LOSS OF CONFIDENTIAL OR OTHER BUSINESS INFORMATION, LOSS OF DATA, LOSS OF PRIVACY, AND FOR ANY PECUNIARY OR OTHER LOSS WHATSOEVER) ARISING OUT OF OR IN ANY WAY RELATED TO THE USE OF OR INABILITY TO USE THE SOFTWARE WHETHER ARISING OUT OF TORT (INCLUDING NEGLIGENCE), BREACH OF CONTRACT OR OTHERWISE EVEN IF CANON, CANON'S SUBSIDIARIES OR AFFILIATES, THEIR DISTRIBUTORS OR DEALERS HAVE BEEN ADVISED OF THE POSSIBILITY OF SUCH DAMAGES.
Nothing in this Agreement shall be taken as limiting or excluding Canon's liability to you for death or personal injury caused by Canon's negligence or for fraudulent misrepresentation arising as a result of Part I of the Consumer Protection Act 1987.
NOTHING IN THIS AGREEMENT SHALL AFFECT YOUR STATUTORY RIGHTS AS A CONSUMER.
5Read Carefully Before Using

6
DV NETWORKV2FENG P.book Page 6 Friday, May 6, 2005 9:32 AM
8. TERM AND TERMINATION This Agreement is effective upon your acceptance hereof by clicking the “YES” button below and remains in effect until terminated in accordance with this clause 8. You may terminate this Agreement at any time by destroying the Software including any and all copies thereof. This Agreement shall also terminate automatically if you fail to comply with any terms of this Agreement. In the event that this Agreement terminates as a result of your failure to comply with this Agreement and without prejudice to Canon's legal rights, you must promptly destroy the Software including any and all copies thereof. Notwithstanding the foregoing, Sections 3, 5 through to 8 shall survive any termination hereof.
9. SEVERABILITYIn the event that any provision of this Agreement is declared or found to be illegal by any court or tribunal of competent jurisdiction, such provision shall be null and void with respect to the jurisdiction of that court or tribunal and all the remaining provisions of this Agreement shall remain in full force and effect.
10. ACKNOWLEDGEMENTYOU AGREE THAT THIS AGREEMENT IS THE COMPLETE AND EXCLUSIVE STATEMENT OF AGREEMENT BETWEEN YOU AND CANON CONCERNING THE SUBJECT MATTER HEREOF AND SUPERSEDES ALL PROPOSALS OR PRIOR AGREEMENTS, ORAL OR WRITTEN, AND ANY OTHER COMMUNICATIONS BETWEEN YOU AND CANON RELATING TO THE SUBJECT MATTER HEREOF.
NEITHER PARTY SHALL HAVE ANY REMEDY IN RESPECT OF ANY STATEMENT MADE TO IT UPON WHICH IT RELIED IN ENTERING INTO THIS AGREEMENT (UNLESS SUCH STATEMENT WAS MADE FRAUDULENTLY) AND THAT PARTY'S ONLY REMEDY SHALL BE FOR BRACH OF CONTRACT AS PROVIDED FOR IN THIS AGREEMENT.
11. ACKNOWLEDGMENTThis Agreement shall be governed by, and interpreted in accordance with, the laws of England and Wales. The courts within England and Wales shall have exclusive/non-exclusive jurisdiction to adjudicate any disputes arising out of or in connection with this Agreement. Both parties specifically consent to the exercise of personal jurisdiction by such courts.
Read Carefully Before Using

E
DV NETWORKV2FENG P.book Page 7 Friday, May 6, 2005 9:32 AM
ContentsBefore Installing DV Messenger .............................................................................. 2Read Carefully Before Using .................................................................................... 4Read This First .......................................................................................................... 9
About This Manual .............................................................................................. 10System Requirements .............................................................................................11What Can Be Accomplished with the Software .................................................... 12
Available Functions by Camcorder Models ........................................................ 12Required Accessories ............................................................................................ 14Read Carefully ......................................................................................................... 15Requirements for Using DV Messenger ................................................................ 16Installing the Software ............................................................................................ 17
Installing the DV Network Software .................................................................... 17Installing the Canon USB Video Driver .............................................................. 19Installing the AV/C Camera Storage Subunit-WIA Driver ................................... 20
Connecting the Camcorder to a Computer ........................................................... 23Connecting the Camcorder Using a USB Cable ................................................. 23Connecting the Camcorder Using a DV Cable .................................................. 23
DV MessengerPreparations for DV Messenger ............................................................................. 24
Checking the Camcorder Connection ................................................................. 24Setting the UPnP Router .................................................................................... 26
Videoconferencing .................................................................................................. 32Starting DV Messenger ....................................................................................... 32Preparing the Camcorder for Communication .................................................... 34Starting a Videoconference ................................................................................. 37
Ending DV Messenger ........................................................................................... 40Disconnecting DV Messenger ............................................................................ 40Ending DV Messenger ........................................................................................ 40
Screen Displays ...................................................................................................... 41DVM Panel .......................................................................................................... 41Taskbar ............................................................................................................... 44DV Messenger Icon Menu .................................................................................. 45
Changing the Mode of the Camcorder .................................................................. 46Camcorder with NETWORK Mode ..................................................................... 46Camcorder without NETWORK Mode ................................................................ 46
Operating Camcorders with DV Messenger ......................................................... 48Operating the Camera Functions ........................................................................ 49Operating the Tape Playback Functions ............................................................. 51
Sharing Images (File Transfer) ............................................................................... 53Selecting Images for Sharing .............................................................................. 53Transferring Images ............................................................................................ 55
Using the Image Capture Function ........................................................................ 57Setting of Image Capture .................................................................................... 57Changing the Capture Mode ............................................................................... 59Capturing with Your Camcorder .......................................................................... 60Capturing with Your Contact’s Camcorder .......................................................... 61
Using the View & Record Function ....................................................................... 62Setting of View & Record .................................................................................... 62
7Contents
8
DV NETWORKV2FENG P.book Page 8 Friday, May 6, 2005 9:32 AM
Starting View & Record ....................................................................................... 63Connecting with View & Record ......................................................................... 64
Additional Functions .............................................................................................. 66Changing the Background of Windows Messenger ............................................ 66Option Settings ................................................................................................... 67
Uninstalling DV Messenger .................................................................................... 68Canon USB Video DriverCapturing/Recording Movies ................................................................................. 69
Capturing movies from the tape to the computer ................................................ 69Recording movies to the tape ............................................................................. 70
Uninstalling the Canon USB Video Driver ............................................................ 71AV/C Camera Storage Subunit-WIA DriverUninstalling the AV/C Camera Storage Subunit-WIA Driver ............................... 73Troubleshooting
DV Messenger .................................................................................................... 75Canon USB Video Driver .................................................................................... 86AV/C Camera Storage Subunit-WIA Driver ......................................................... 87Uninstallation of the Canon USB Video Driver and AV/C Camera Storage Subunit-WIA Driver ............................................................................................. 87
Contents

E
DV NETWORKV2FENG P.book Page 9 Friday, May 6, 2005 9:32 AM
Read This FirstDisclaimer
• While every effort has been made to ensure that the information contained in this guide is accurate and complete, no liability can be accepted for any errors or omissions. Canon reserves the right to change the specifications of the hardware and software described herein at any time without prior notice.
• No part of this guide may be reproduced, transmitted, transcribed, stored in a retrieval system, or translated into any other language in any form, by any means, without the prior written permission of Canon.
• Canon makes no warranties for damages resulting from corrupted or lost data due to mistaken operation or malfunction of the camcorder, the software, memory cards (MultiMediaCards or SD Memory Cards), personal computers, or peripheral devices, or due to use of a memory card not formatted by a Canon camcorder.
• Microsoft® and Windows® are either registered trademarks or trademarks of Microsoft Corporation in the United Stated and/or other countries.
• Adobe, Acrobat and Reader are trademarks of Adobe Systems Incorporated.• Other names and products not mentioned above may be registered trademarks
or trademarks of their respective companies.• AV/C Camera Storage Subunit is a standard for downloading and uploading
files using an AV device equipped with the IEEE1394. The driver complies with the “AV/C Camera Storage Subunit Version 1.0” by the IEEE1394 Trade Association.
• WIA stands for Windows Image Acquisition. WIA is a driver software for downloading images from digital devices onto a computer. WIA is preinstalled on Windows XP.
© Canon Inc. 2005 All rights reserved.
Safety PrecautionsDo not play the supplied CD-ROM(s) in any CD player that does not support data CD-ROM(s). Playing the CD-ROM(s) in an audio CD player (music player) could damage the speakers. It is also possible to suffer from hearing loss from listening with headphones to the loud sound of a CD-ROM played on a music CD player.
9Read This First

1
DV NETWORKV2FENG P.book Page 10 Friday, May 6, 2005 9:32 AM
About This Manual• In this manual, DV Messenger Version 2 is abbreviated as “DV Messenger”.• In this manual, the operating modes of camcorders are described as following:
- CAMERA mode: Mode for recording video and sound to tape.- PLAY (VCR) mode: Mode for playing back video and sound recorded on a
tape.- CARD PLAY mode: Mode for playing back images recorded on a memory
card.- NETWORK mode: Mode for connecting to the computer for using DV
Messenger.• The explanations in this manual refer to camcorders equipped with the
NETWORK mode on the POWER switch of the camcorder. If your camcorder is not equipped with the NETWORK mode, refer to the instructions in parenthesis (Camcorder without NETWORK mode:).
Camcorder with NETWORK mode Camcorder without NETWORK mode
• Please note that the screens used in this manual may change.
0 Read This First

E
DV NETWORKV2FENG P.book Page 11 Friday, May 6, 2005 9:32 AM
System Requirements
System Requirements for Capturing/Recording Movies Using an Editing Software:
Proper operation is not guaranteed on a dual CPU PC or on a user-built PC.Proper operation is not guaranteed on any particular system, even if it meets the requirements outlined above.Do not connect two or more camcorders to the computer at the same time. The connection may not work correctly.A CD-ROM drive is required to install the software.
USB connection:Connect the USB cable directly to one of the computer’s main USB ports. The interface may not function correctly if the camcorder is connected via a USB hub. The connection may not operate correctly if you are using other USB devices, excluding USB mice or keyboards, at the same time. If this occurs, disconnect the other devices from the computer and try reconnecting the camcorder.Not all operations performed with a connection to a USB 2.0 compatible board can be guaranteed.
DV (IEEE1394) connection:Connect the camcorder directly to the computer using a DV (IEEE1394) cable. The connection may not operate correctly if the camcorder is connected via a repeater or other IEEE1394 devices, or if more than one IEEE1394 device is connected to the computer.Do not connect another IEEE1394 device while the AV/C Camera Storage Subunit-WIA Driver is operating. The connection may not operate correctly.
OS: Microsoft Windows XP Home Edition or Professional (Installation of Service Pack 1 recommended)Proper operation is not guaranteed on Windows XP that has been upgraded from a previous version.
CPU: Pentium 500 MHz or better (800 MHz or better recommended)RAM: 128 MB or more (256 MB or more recommended)Interface: USB (1.1/2.0) or IEEE1394 (OHCI compliant)Free Hard Disk Space: • DV Messenger: 100 MB or more
• Canon USB Video Driver: 1 MB or more• AV/C Camera Storage Subunit-WIA Driver: 1 MB or more
Display: 800 × 600 pixels/High Color (16 bit) or betterOthers: Windows Messenger Version 4.5, 4.6 or 4.7, sound function,
Internet connection** Using a standard dial-up connection is possible, but we
recommend using a broadband connection to the Internet.
OS: Microsoft Windows XP Home Edition or Professional (Installation of Service Pack 1 or 2 required)Proper operation is not guaranteed on Windows XP that has been upgraded from a previous version.
CPU: Pentium4 1.3 GHz or better, or Pentium M 1.0 GHz or better, or Celeron 2.0 GHz or better
Interface: Preinstalled Hi-Speed USB 2.0USB Cable: Supplied USB Cable
11System Requirements

1
DV NETWORKV2FENG P.book Page 12 Friday, May 6, 2005 9:32 AM
What Can Be Accomplished with the SoftwareThis topic introduces the main feature of the DV Network Software. Please note that available functions depend on the camcorder model. For details, see Available Functions by Camcorder Models.
DV Messenger Version 2 ( 24)- Real-time video communication (Videoconference).- Sharing recorded video.- Operating the camcorder form the computer.- Sharing images.- Capturing still images (Image Capture).- Remotely accessing the computer (View & Record).
Canon USB Video Driver ( 19)Installing the Canon USB Video Driver allows you to use DV Messenger by connecting the camcorder to the computer using a USB cable. If your camcorder is listed under category A in Camcorder Categories ( 13), you can also perform the followings by connecting the camcorder to a computer with preinstalled Hi-Speed USB 2.0 using a USB cable.- Capturing movies from the tape to the computer.- Recording movies that have been edited on a computer to the tape.- Converting analog signals from a connected VCR or 8mm camcorder to digital
signals and transferring them to the computer. For details, refer to the camcorder instruction manual.
AV/C Camera Storage Subunit-WIA Driver ( 20)Installing the AV/C Camera Storage Subunit-WIA Driver allows you to use DV Messenger by connecting a camcorder to a computer, both equipped with a DV (IEEE1394) terminal, with a DV (IEEE1394) cable.
Available Functions by Camcorder ModelsAvailable functions depend on the camcorder model. Refer to the following tables and identify to which category your camcorder belongs and which functions and drivers can be used with your camcorder.
2 What Can Be Accomplished with the Software
E
DV NETWORKV2FENG P.book Page 13 Friday, May 6, 2005 9:32 AM
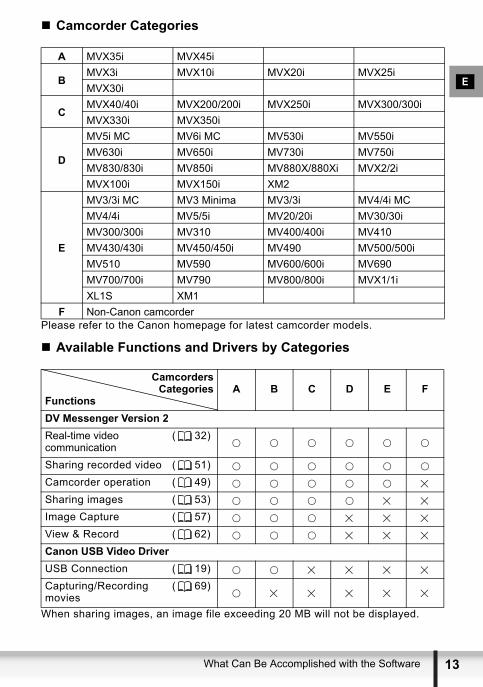
Camcorder Categories
Please refer to the Canon homepage for latest camcorder models.
Available Functions and Drivers by Categories
When sharing images, an image file exceeding 20 MB will not be displayed.
A MVX35i MVX45i
BMVX3i MVX10i MVX20i MVX25iMVX30i
CMVX40/40i MVX200/200i MVX250i MVX300/300iMVX330i MVX350i
D
MV5i MC MV6i MC MV530i MV550iMV630i MV650i MV730i MV750iMV830/830i MV850i MV880X/880Xi MVX2/2iMVX100i MVX150i XM2
E
MV3/3i MC MV3 Minima MV3/3i MV4/4i MCMV4/4i MV5/5i MV20/20i MV30/30iMV300/300i MV310 MV400/400i MV410MV430/430i MV450/450i MV490 MV500/500iMV510 MV590 MV600/600i MV690MV700/700i MV790 MV800/800i MVX1/1iXL1S XM1
F Non-Canon camcorder
CamcordersCategories
FunctionsA B C D E F
DV Messenger Version 2Real-time video ( 32) communicationSharing recorded video ( 51) Camcorder operation ( 49) Sharing images ( 53) Image Capture ( 57) View & Record ( 62)Canon USB Video DriverUSB Connection ( 19) Capturing/Recording ( 69) movies
13What Can Be Accomplished with the Software

1
DV NETWORKV2FENG P.book Page 14 Friday, May 6, 2005 9:32 AM
Required AccessoriesYou need following items for using the Software:• Digital Camcorder• The Internet connection and a software that allows you to browse the Net• USB Cable or DV (IEEE1394) Cable
If your camcorder is not listed under category A or B in Camcorder Categories ( 13), use a DV cable. Check the manual of your computer for which type of DV cable to use.
• Speaker or Headphones (when using DV Messenger)
4-pin:
6-pin:
4 Required Accessories

E
DV NETWORKV2FENG P.book Page 15 Friday, May 6, 2005 9:32 AM
Read CarefullyIf you leave the camcorder turned on for a long time, heat generation may cause damage to the camcorder. Turn off the camcorder after use.Tapes may be damaged if left in the camcorder for a long time. Do not leave tapes in the camcorder to prevent damage.If you leave the camcorder turned on for a long time (e.g. when using the View & Record or Image Capture (interval mode) function), observe the following fire precautions.- Do not use the camcorder in hot or humid places.- Do not leave the camcorder exposed to direct sunlight.- Do not cover the camcorder with blankets or clothes.- Do not leave the camcorder in a box or tight spaces.- Do not leave the camcorder outdoors.
15Read Carefully

1
DV NETWORKV2FENG P.book Page 16 Friday, May 6, 2005 9:32 AM
Requirements for Using DV MessengerTo use DV Messenger, it is required that Windows XP is installed and Windows Messenger 4.5, 4.6 or 4.7 operates correctly.Make sure to confirm the following before installing DV Messenger.1. Windows XP and Windows Messenger 4.5, 4.6 or 4.7 are installed*.2. Windows Messenger operates and its voice or video conversation can be
used*.3. If you are using a router for Internet connection: your router is UPnP
compatible.** (Some modems are equipped with a router function. For details, refer to the manual of the modem.)
* This software is compatible with Windows XP only. It cannot be used with other Operating Systems. Furthermore, Windows Messenger 4.5, 4.6 or 4.7 is required. Establish an environment that allows the use of this software. Please consult Microsoft for details.
** If you use a router to connect to the Internet, the router must be UPnP compatible and it must be recognized as “Internet Gateway Device” ( 26). For details, consult your Internet service provider, telephone carrier or router manufacturer, or refer to the manual of the router.
Be aware that yoour contact can access the contents of te tape or memory card in your camcorder when using DV messenger.
6 Requirements for Using DV Messenger

E
DV NETWORKV2FENG P.book Page 17 Friday, May 6, 2005 9:32 AM
Installing the Software
Installing the DV Network SoftwareWith this procedure, the DV Messenger will be installed and the driver files for the AV/C Camera Storage Subunit-WIA Driver and Canon USB Video Driver will be copied to your computer. The drivers will be installed when you connect the camcorder to the computer. For the installation procedure of the Canon USB Video Driver, see Installing the Canon USB Video Driver ( 19). For the installation procedure of the AV/C Camera Storage Subunit-WIA Driver, see Installing the AV/C Camera Storage Subunit-WIA Driver ( 20).
Do not connect the camcorder to the computer when installing the DV Network Software.DV Messenger can only be installed with Windows Messenger 4.5, 4.6 or 4.7. Download Windows Messenger 4.7 from the Microsoft homepage and update your Windows Messenger if necessary. Please consult Microsoft for details.Users of Windows XP Professional must first log in as an Administrator to install programs.
1 Close any programs that are running.
2 Download the DV Network Software installer from Canon’s web site and double-click the downloaded installer.
3 Select your language and click [OK].
• If Windows Messenger 4.5, 4.6 or 4.7 is not installed on your computer, a dialog appears indicating that DV Messenger cannot be installed.
• If you wish to install only the AV/C Camera Storage Subunit-WIA Driver, close the dialog and proceed with the installation.
• If you wish to install DV Messenger, close the window and cancel the installation process by clicking [Cancel] on the Install Shield Wizard. Upgrade Windows Messenger and restart installation.
17Installing the Software
1
DV NETWORKV2FENG P.book Page 18 Friday, May 6, 2005 9:32 AM
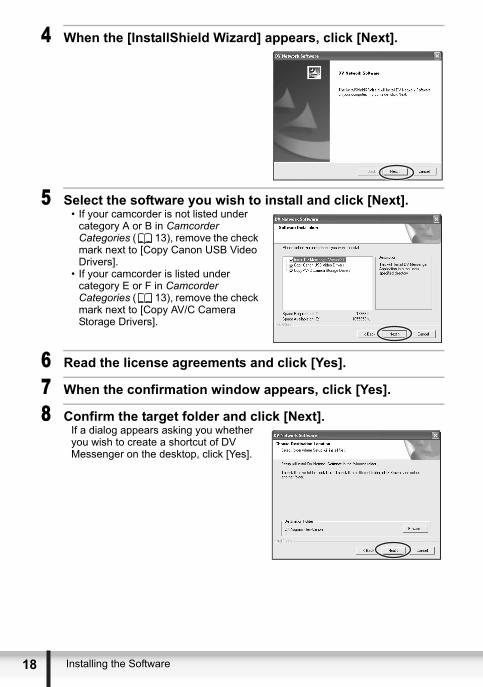
4 When the [InstallShield Wizard] appears, click [Next].
5 Select the software you wish to install and click [Next].• If your camcorder is not listed under
category A or B in Camcorder Categories ( 13), remove the check mark next to [Copy Canon USB Video Drivers].
• If your camcorder is listed under category E or F in Camcorder Categories ( 13), remove the check mark next to [Copy AV/C Camera Storage Drivers].
6 Read the license agreements and click [Yes].
7 When the confirmation window appears, click [Yes].
8 Confirm the target folder and click [Next].If a dialog appears asking you whether you wish to create a shortcut of DV Messenger on the desktop, click [Yes].
8 Installing the Software

E
DV NETWORKV2FENG P.book Page 19 Friday, May 6, 2005 9:32 AM
9 Click [Finish].• The computer restarts and installation
is complete.
Installing the Canon USB Video Driver Installing the Canon USB Video Driver allows you to use DV Messenger by connecting the camcorder to a computer using a USB cable.
To use the Canon USB Video Driver for using DV Messenger, your camcorder has to be listed under category A or B in Camcorder Categories ( 13).To use the Canon USB Video Driver for capturing/recording movies, your camcorder has to be listed under category A in Camcorder Categories ( 13), and the camcorder has to be connected to a computer with Hi-Speed USB 2.0.Before installing the driver following the procedure below, install the DV Network Software first to copy the driver files to the computer.Close any programs that are running before installing the driver.Do not turn off the camcorder until the driver installation is complete. And do not interrupt the installation.Users of Windows XP Professional must first log in as an Administrator to install programs.
1 Connect the power adapter to the camcorder.
2 If your camcorder is listed under category A in Camcorder Categories ( 13):Set the camcorder to PLAY (VCR) mode.If your camcorder is listed under category B in Camcorder Categories ( 13):Set the camcorder to NETWORK mode.
3 Connect the camcorder to the computer using the USB cable ( 23).
• The driver installation starts automatically.• A window appears allowing you to select an application program to start. Click
[Cancel] to close the window.
19Installing the Software
2
DV NETWORKV2FENG P.book Page 20 Friday, May 6, 2005 9:32 AM
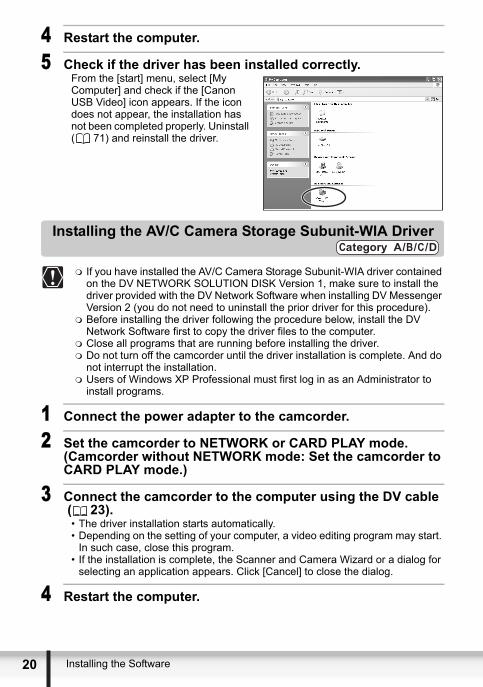
4 Restart the computer.
5 Check if the driver has been installed correctly.From the [start] menu, select [My Computer] and check if the [Canon USB Video] icon appears. If the icon does not appear, the installation has not been completed properly. Uninstall ( 71) and reinstall the driver.
Installing the AV/C Camera Storage Subunit-WIA Driver
If you have installed the AV/C Camera Storage Subunit-WIA driver contained on the DV NETWORK SOLUTION DISK Version 1, make sure to install the driver provided with the DV Network Software when installing DV Messenger Version 2 (you do not need to uninstall the prior driver for this procedure).Before installing the driver following the procedure below, install the DV Network Software first to copy the driver files to the computer.Close all programs that are running before installing the driver.Do not turn off the camcorder until the driver installation is complete. And do not interrupt the installation.Users of Windows XP Professional must first log in as an Administrator to install programs.
1 Connect the power adapter to the camcorder.
2 Set the camcorder to NETWORK or CARD PLAY mode. (Camcorder without NETWORK mode: Set the camcorder to CARD PLAY mode.)
3 Connect the camcorder to the computer using the DV cable ( 23).
• The driver installation starts automatically.• Depending on the setting of your computer, a video editing program may start.
In such case, close this program.• If the installation is complete, the Scanner and Camera Wizard or a dialog for
selecting an application appears. Click [Cancel] to close the dialog.
4 Restart the computer.
0 Installing the Software

E
DV NETWORKV2FENG P.book Page 21 Friday, May 6, 2005 9:32 AM
5 Check if the driver has been installed correctly.From the [start] menu, select [My Computer] and check if the [Canon Camera Storage Device] icon appears. If the icon does not appear, the installation has not been completed properly. Uninstall ( 73) and reinstall the driver.
Changing the Automatic Start SettingWhen you install the driver, a window appears allowing you to select an application program to start each time you connect the camcorder to the computer. When using DV Messenger, we recommend setting the computer not to start any application.
1 Connect the power adapter to the camcorder.
2 Set the camcorder to NETWORK or CARD PLAY mode.
3 Connect the camcorder to the computer using the DV cable ( 23).
4 From the [start] menu, select [My Computer].
5 Right-click the mouse button on the [Canon Camera Storage Device] icon and select [Properties].
6 Click the [Events] tab.
21Installing the Software
2
DV NETWORKV2FENG P.book Page 22 Friday, May 6, 2005 9:32 AM
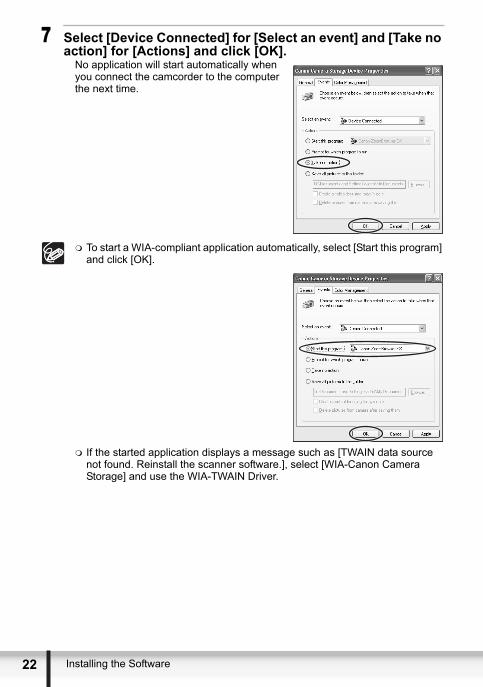
7 Select [Device Connected] for [Select an event] and [Take no action] for [Actions] and click [OK].
No application will start automatically when you connect the camcorder to the computer the next time.
To start a WIA-compliant application automatically, select [Start this program] and click [OK].
If the started application displays a message such as [TWAIN data source not found. Reinstall the scanner software.], select [WIA-Canon Camera Storage] and use the WIA-TWAIN Driver.
2 Installing the Software

E
DV NETWORKV2FENG P.book Page 23 Friday, May 6, 2005 9:32 AM
Connecting the Camcorder to a ComputerIf your camcorder is listed under category A or B in Camcorder Categories ( 13), you can use a DV cable or a USB cable to connect your camcorder to the computer. With other camcorders, use a DV cable.
Connecting the Camcorder Using a USB CableMake sure to install the DV Network Software before connecting the camcorder to the computer.Make sure the camcorder is being powered by the compact power adapter before connecting it to a computer.Do not connect any devices to the camcorder’s DV terminal when connecting the camcorder to the computer using the USB terminal.
1 Attach the supplied USB cable to the computer’s USB port and the camcorder’s USB Terminal.
• Refer to your computer manual for the location of the computer’s USB ports. • See your camcorder instruction manual for connecting instructions.
Connecting the Camcorder Using a DV Cable Make sure to install the DV Network Software before connecting the camcorder to the computer.Make sure the camcorder is being powered by the compact power adapter before connecting it to a computer.Do not connect any devices to the camcorder’s USB terminal when connecting the camcorder to the computer using the DV terminal.
1 Attach the DV cable to the computer’s IEEE1394 terminal and the camcorder’s DV terminal.
• Refer to your computer manual for the location of the computer’s IEEE1394 terminal.
• See your camcorder’s instruction manual for connecting instructions.
23Connecting the Camcorder to a Computer
2
DV NETWORKV2FENG P.book Page 24 Friday, May 6, 2005 9:32 AM
DV Messenger
Preparations for DV MessengerBefore you use DV Messenger, check whether the camcorder is correctly connected to the computer.
Users of Windows XP Professional must first log in as an Administrator to use DV Messenger.
Checking the Camcorder Connection
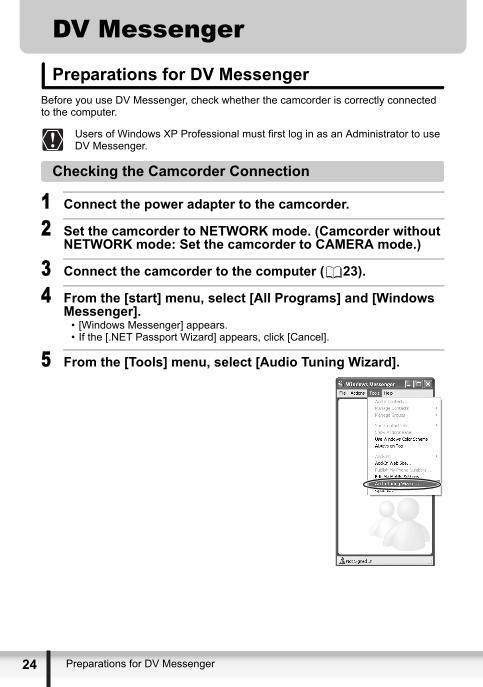
1 Connect the power adapter to the camcorder.
2 Set the camcorder to NETWORK mode. (Camcorder without NETWORK mode: Set the camcorder to CAMERA mode.)
3 Connect the camcorder to the computer ( 23).
4 From the [start] menu, select [All Programs] and [Windows Messenger].
• [Windows Messenger] appears.• If the [.NET Passport Wizard] appears, click [Cancel].
5 From the [Tools] menu, select [Audio Tuning Wizard].
4 Preparations for DV Messenger
DV
Mes
seng
er
E
DV NETWORKV2FENG P.book Page 25 Friday, May 6, 2005 9:32 AM
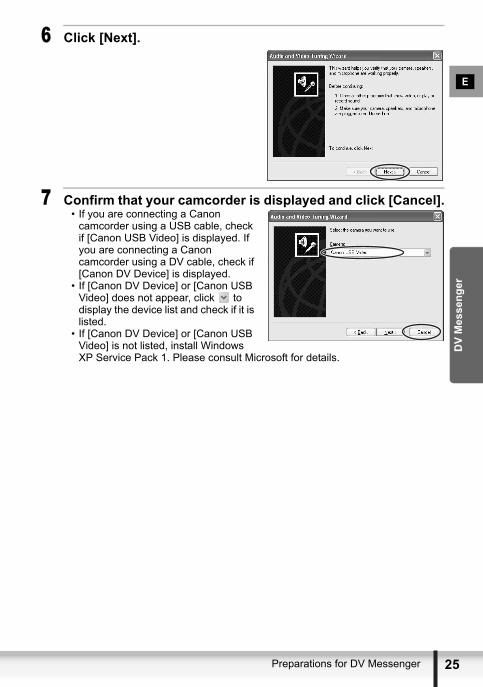
6 Click [Next].
7 Confirm that your camcorder is displayed and click [Cancel].• If you are connecting a Canon
camcorder using a USB cable, check if [Canon USB Video] is displayed. If you are connecting a Canon camcorder using a DV cable, check if [Canon DV Device] is displayed.
• If [Canon DV Device] or [Canon USB Video] does not appear, click to display the device list and check if it is listed.
• If [Canon DV Device] or [Canon USB Video] is not listed, install Windows XP Service Pack 1. Please consult Microsoft for details.
25Preparations for DV Messenger

2
DV NETWORKV2FENG P.book Page 26 Friday, May 6, 2005 9:32 AM
Setting the UPnP RouterIf you are using an UPnP-compliant router to connect to the Internet, you need to install UPnP and disable the firewall of Windows XP to use DV Messenger.
Installing UPnP
1 From the [start] menu, select [Control Panel].
2 Click [Network and Internet Connections].
6 Preparations for DV Messenger

DV
Mes
seng
er
E
DV NETWORKV2FENG P.book Page 27 Friday, May 6, 2005 9:32 AM
3 Click [Network Connections].
4 From the [Advanced] menu, select [Optional Networking Components] from the displayed menu.
5 Select [Networking Services] and click [Details].
27Preparations for DV Messenger

2
DV NETWORKV2FENG P.book Page 28 Friday, May 6, 2005 9:32 AM
6 Place a check mark next to [Universal Plug and Play] and click [OK].
• If you have installed Windows XP Service Pack 1, place a check mark next to [Internet Gateway Device Discovery and Control Client] and [Universal Plug and Play].
• If you have installed Windows XP Service Pack 2, place a check mark next to [Internet Gateway Device Discovery and Control Client] and [UPnP User Interface].
7 Click [Next].Installation starts.
8 When installation is complete, restart your computer.After restart, repeat steps 1 to 3 and check if an icon appears under [Internet Gateway Device]. If not, your router is not correctly recognized by the computer and DV Messenger cannot be used. In such case, you need to deactivate its firewall function. For details, consult your software or computer manufacturer.
8 Preparations for DV Messenger
DV
Mes
seng
er
E
DV NETWORKV2FENG P.book Page 29 Friday, May 6, 2005 9:32 AM
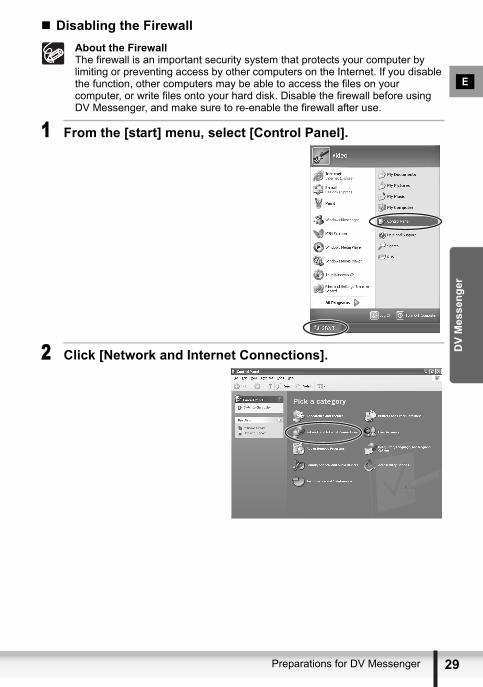
Disabling the FirewallAbout the FirewallThe firewall is an important security system that protects your computer by limiting or preventing access by other computers on the Internet. If you disable the function, other computers may be able to access the files on your computer, or write files onto your hard disk. Disable the firewall before using DV Messenger, and make sure to re-enable the firewall after use.
1 From the [start] menu, select [Control Panel].
2 Click [Network and Internet Connections].
29Preparations for DV Messenger

3
DV NETWORKV2FENG P.book Page 30 Friday, May 6, 2005 9:32 AM
3 Click [Network Connections].
4 Select [Local Area Connection], right-click the mouse button and select [Properties].
0 Preparations for DV Messenger

DV
Mes
seng
er
E
DV NETWORKV2FENG P.book Page 31 Friday, May 6, 2005 9:32 AM
5 Click the [Advanced] tab, remove the checkmark from the [Internet Connection Firewall] section and click [OK].
6 Restart the computer.After restart, repeat steps 1 to 3 and check if an icon appears under [Internet Gateway]. If not, your router is not correctly recognized by the computer and DV Messenger cannot be used. In such case, the firewall function of an Internet security software or anti-virus software may be active. For instructions on how to disable the firewall function, consult the software or computer manufacturer.
To enable the firewall after using DV Messenger, repeat steps 1 to 4 and place the checkmark back to the checkbox.
31Preparations for DV Messenger

3
DV NETWORKV2FENG P.book Page 32 Friday, May 6, 2005 9:32 AM
Videoconferencing
Starting DV MessengerDV Messenger will not start when you have signed in to Windows Messenger. In such case, sign out of Windows Messenger first and start DV Messenger.Close all programs that are running before starting DV Messenger.Do not access the memory card using programs such as Windows Explorer while DV Messenger is started.Do not update Windows Messenger while DV Messenger is started.Do not connect two or more digital camcorders to the computer.Do not disconnect the interface cable while DV Messenger is started.If an anti-virus software is installed on your computer, the firewall of the software may be active. In such case, you need to deactivate its firewall function. For further details, consult your software or computer manufacturer. If you are using an UPnP-compliant router, you need to install UPnP ( 26) and disable Windows XP’s firewall ( 29).
1 Set the camcorder to NETWORK mode.(Camcorder without NETWORK mode: Set the camcorder to CAMERA mode.)
2 Connect the camcorder to the computer ( 23).
3 Connect to the Internet.
4 Double-click the [DV Messenger] icon on the desktop, or select [DV Messenger] from the [start] menu.
• The first time you start DV Messenger, it may take time until DV Messenger starts depending on the computer environment.
• If the [Internet Sharing Configuration] window appears, click [Yes].
• DV Messenger starts. The DVM panel (DV Messenger panel) and Windows Messenger’s sign-in window appears.
• With Windows XP Service Pack 2: When the [Windows Security Alert] window appears, confirm that [DV Messenger] appears under [Name], and [Canon Inc.] under [Publisher] and click [Unblock].
2 Videoconferencing

DV
Mes
seng
er
E
DV NETWORKV2FENG P.book Page 33 Friday, May 6, 2005 9:32 AM
5 In the Windows Messenger window, click [Click here to sign in].
To use DV Messenger, both you and your contact need to be online.- If your contact is already online when you sign in:
A message will be sent automatically to your contact notifying that you have signed in.
- If your contact signs in when you are already online:A message appears automatically notifying you that your contact has signed in.
DVM Panel Windows Messenger
Message on the Computer Screen of Your Contact
Message on Your Computer Screen
33Videoconferencing
3
DV NETWORKV2FENG P.book Page 34 Friday, May 6, 2005 9:32 AM
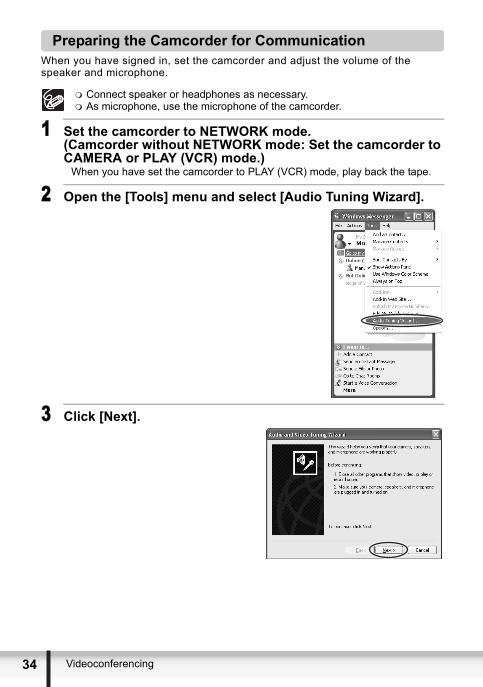
Preparing the Camcorder for CommunicationWhen you have signed in, set the camcorder and adjust the volume of the speaker and microphone.
Connect speaker or headphones as necessary.As microphone, use the microphone of the camcorder.
1 Set the camcorder to NETWORK mode.(Camcorder without NETWORK mode: Set the camcorder to CAMERA or PLAY (VCR) mode.)
When you have set the camcorder to PLAY (VCR) mode, play back the tape.
2 Open the [Tools] menu and select [Audio Tuning Wizard].
3 Click [Next].
4 Videoconferencing

DV
Mes
seng
er
E
DV NETWORKV2FENG P.book Page 35 Friday, May 6, 2005 9:32 AM
4 Select your camcorder and click [Next].If you are connecting a Canon camcorder using a USB cable, select [Canon USB Video]. If you are connecting a Canon camcorder using a DV cable, select [Canon DV Device].
5 When the video picture appears, click [Next].In NETWORK or CAMERA mode, the live video appears. In PLAY (VCR) mode, the recorded video appears.
6 Read the explanation for speaker and microphone settings and click [Next].
35Videoconferencing

3
DV NETWORKV2FENG P.book Page 36 Friday, May 6, 2005 9:32 AM
7 Set [Microphone] and click [Next].• If you are connecting a Canon
camcorder using a USB cable, select [Canon USB Video]. If you are connecting a Canon camcorder using a DV cable, select [Canon DV Device].
• The installed sound device appears for [Speaker]. Proceed with the setting unchanged.
8 Click [Click to Test Speakers], adjust the volume and click [Next].
• Clicking [Click to Test Speakers] plays back a test sound.
• Move the volume lever with the mouse to adjust the speaker volume.
9 Check if the microphone volume is correctly indicated and click [Next].
• In NETWORK or CAMERA mode: Speak into the microphone of your camcorder and check if the volume indicator operates correctly.
• In PLAY (VCR) mode: Play back the tape and check if the volume indicator operates correctly.
• Sound input with the camcorder via IEEE1394 or USB connection cannot be adjusted with the volume lever.
• The volume indicator will not operate when the camcorder is in CARD CAMERA mode.
6 Videoconferencing
DV
Mes
seng
er
E
DV NETWORKV2FENG P.book Page 37 Friday, May 6, 2005 9:32 AM
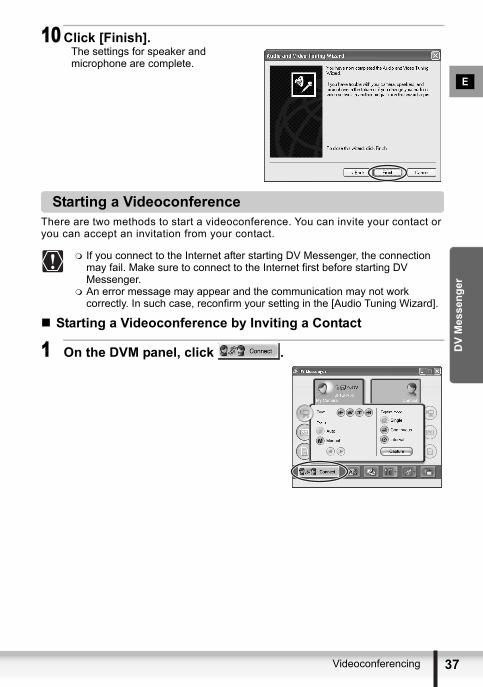
10 Click [Finish].The settings for speaker and microphone are complete.
Starting a VideoconferenceThere are two methods to start a videoconference. You can invite your contact or you can accept an invitation from your contact.
If you connect to the Internet after starting DV Messenger, the connection may fail. Make sure to connect to the Internet first before starting DV Messenger.An error message may appear and the communication may not work correctly. In such case, reconfirm your setting in the [Audio Tuning Wizard].
Starting a Videoconference by Inviting a Contact
1 On the DVM panel, click .
37Videoconferencing

3
DV NETWORKV2FENG P.book Page 38 Friday, May 6, 2005 9:32 AM
2 Select your contact and click [Select].• Only online registered members will be
listed. You can only perform a videoconference with members who have a camcorder connected and are using DV Messenger Version 2.
• Windows Messenger’s [Conversation] window appears.
• A connecting request is send to your contact and a dialog appears on your computer screen that DV Messenger is waiting for response. If you click [Cancel], the request will be cancelled.
• If your contact accepts the request, the above dialog disappears. The communication between your and your contact's DV Messenger starts and you can now operate the camcorder of your contact from the DVM panel.
• If your contact does not respond within 30 seconds after you press [Select], the connection will be canceled, and a message is automatically sent to your contact asking to download DV Messenger Version 2.
Video picture of your contact's camcorder
Video picture of your camcorder
8 Videoconferencing
DV
Mes
seng
er
E
DV NETWORKV2FENG P.book Page 39 Friday, May 6, 2005 9:32 AM
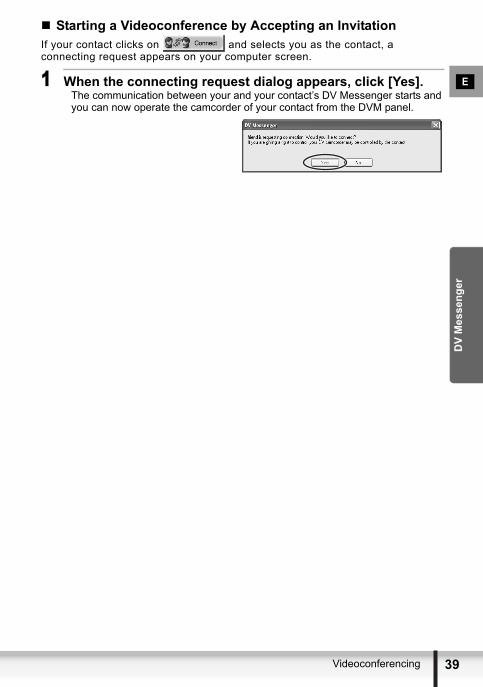
Starting a Videoconference by Accepting an InvitationIf your contact clicks on and selects you as the contact, a connecting request appears on your computer screen.
1 When the connecting request dialog appears, click [Yes].The communication between your and your contact’s DV Messenger starts and you can now operate the camcorder of your contact from the DVM panel.
39Videoconferencing

4
DV NETWORKV2FENG P.book Page 40 Friday, May 6, 2005 9:32 AM
Ending DV Messenger
Disconnecting DV Messenger
1 Click .
2 When the confirmation window appears, click [YES].The communication with your contact ends. If you wish to communicate with another contact, click and select a contact from the list.
Ending DV Messenger
1 Click the DV Messenger icon on the taskbar and select [Exit] from the displayed menu.
DV Messenger closes.
0 Ending DV Messenger
DV
Mes
seng
er
E
DV NETWORKV2FENG P.book Page 41 Friday, May 6, 2005 9:32 AM
Screen Displays
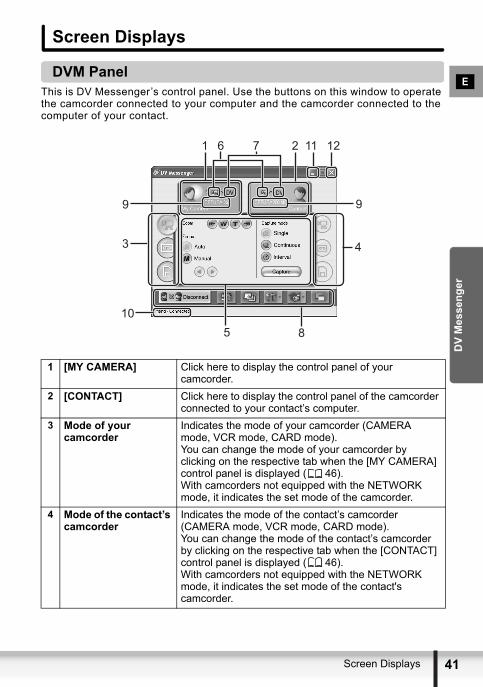
DVM PanelThis is DV Messenger’s control panel. Use the buttons on this window to operate the camcorder connected to your computer and the camcorder connected to the computer of your contact.
1 [MY CAMERA] Click here to display the control panel of your camcorder.
2 [CONTACT] Click here to display the control panel of the camcorder connected to your contact’s computer.
3 Mode of your camcorder
Indicates the mode of your camcorder (CAMERA mode, VCR mode, CARD mode).You can change the mode of your camcorder by clicking on the respective tab when the [MY CAMERA] control panel is displayed ( 46).With camcorders not equipped with the NETWORK mode, it indicates the set mode of the camcorder.
4 Mode of the contact’s camcorder
Indicates the mode of the contact’s camcorder (CAMERA mode, VCR mode, CARD mode). You can change the mode of the contact’s camcorder by clicking on the respective tab when the [CONTACT] control panel is displayed ( 46).With camcorders not equipped with the NETWORK mode, it indicates the set mode of the contact's camcorder.
1 7 2
8
4
6
5
3
9
10
11 12
9
41Screen Displays
4
DV NETWORKV2FENG P.book Page 42 Friday, May 6, 2005 9:32 AM
5 Control panel Here you find the buttons for operating the camcorder.6 Camcorder status Displays the type of the camcorders and if they are set
to allow/prohibit remote control.Camcorder with NETWORK mode, remote control allowed.Camcorder with NETWORK mode, remote control prohibited.Camcorder without NETWORK mode, remote control allowed.Camcorder without NETWORK mode, remote control prohibited.
7 Type of interface used for connection
appears when the camcorder is connected using a DV (IEEE1394) cable, and when using a USB cable.
8 Function buttons Here you find the buttons for various settings ( 43).9 Camcorder model
nameDisplays the camcorder model names ([Canon MiniDV] appears with camcorder models released before 2001).
10 Contact’s name Displays the name of your contact.11 Minimize Click here to minimize the size of the DVM panel. To
display the DVM panel again, double-click the DV Messenger icon on the taskbar, or click the DV Messenger icon and select [Open DVM Panel] from the displayed menu.
12 Close Click here to close the DVM panel. To display it again, double-click the DV Messenger icon on the taskbar, or click the DV Messenger icon and select [Open DVM Panel] from the displayed menu. This does not end DV Messenger ( 40).
2 Screen Displays

DV
Mes
seng
er
E
DV NETWORKV2FENG P.book Page 43 Friday, May 6, 2005 9:32 AM
Function Buttons (8 above)
1 Connect/Disconnect Click here to connect or disconnect the communication to your contact. When you are disconnected,
appears. Clicking the button displays the [Select a contact] window ( 37). When you are connected, appears. Clicking the button displays a window asking you to confirm disconnection ( 40).
2 Allow Remote Control
Click here to select whether you allow your contact to operate your camcorder. You can check the current status by the status icons ( 42).Click to allow remote control, and to prohibit remote control. The camcorder is set to allow remote control as the default setting.
3 Change background image of Windows Messenger
Click here to change the background image of Windows Messenger ( 66).
4 Option Click here to select the option setting for DV Messenger ( 67).
5 View & Record Click here to display the View & Record menu. You can start, end or set View & Record ( 62).
6 DVM panel always on top
This selects whether to display the DVM panel always in front of other windows. Click to display the DVM panel always on top, and
to cancel the setting.
1 2 3 4 5 6
43Screen Displays

4
DV NETWORKV2FENG P.book Page 44 Friday, May 6, 2005 9:32 AM
TaskbarWhen DV Messenger is started, the [DV Messenger] task and [DV Messenger] icon appear on the taskbar.
1 DV Messenger task Appears when the DVM panel is displayed or minimized. If the DVM panel is minimized, click here to display it.
2 DV Messenger icon A list of menus appears when you click this icon ( 45). If the DVM panel is minimized, double-click this icon to display it.
1 2
4 Screen Displays

DV
Mes
seng
er
E
DV NETWORKV2FENG P.book Page 45 Friday, May 6, 2005 9:32 AM
DV Messenger Icon MenuWhen you click the DV Messenger icon in the taskbar, a list of menus appears.
1 About DV Messenger Displays the version of DV Messenger.2 Help Topics Displays DV Messenger’s help topics.3 Start View & Record Starts the View & Record function ( 62).4 Stop View & Record Ends the View & Record function ( 62).5 Connect Displays the [Select a contact] window and starts the
communication of DV Messenger ( 37).6 Disconnect Disconnects the communication between you and your
contact. 7 Open DVM panel Displays the DV Messenger panel on the screen.8 Exit Exits DV Messenger ( 40).
12
3
6
8
4
7
5
45Screen Displays
4
DV NETWORKV2FENG P.book Page 46 Friday, May 6, 2005 9:32 AM
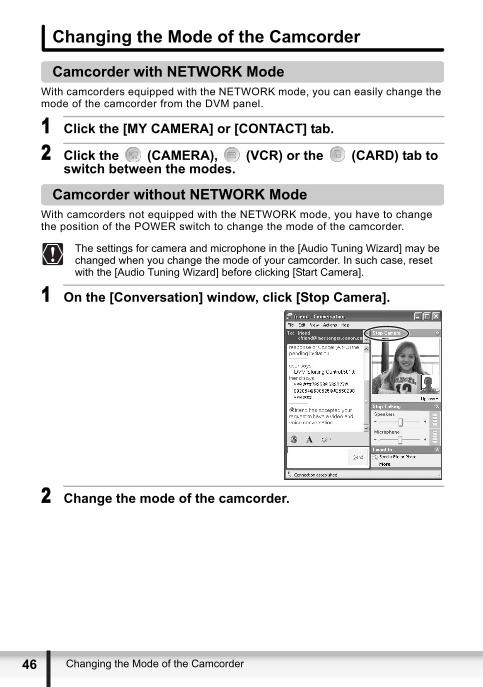
Changing the Mode of the Camcorder
Camcorder with NETWORK ModeWith camcorders equipped with the NETWORK mode, you can easily change the mode of the camcorder from the DVM panel.
1 Click the [MY CAMERA] or [CONTACT] tab.
2 Click the (CAMERA), (VCR) or the (CARD) tab to switch between the modes.
Camcorder without NETWORK ModeWith camcorders not equipped with the NETWORK mode, you have to change the position of the POWER switch to change the mode of the camcorder.
The settings for camera and microphone in the [Audio Tuning Wizard] may be changed when you change the mode of your camcorder. In such case, reset with the [Audio Tuning Wizard] before clicking [Start Camera].
1 On the [Conversation] window, click [Stop Camera].
2 Change the mode of the camcorder.
6 Changing the Mode of the Camcorder

DV
Mes
seng
er
E
DV NETWORKV2FENG P.book Page 47 Friday, May 6, 2005 9:32 AM
3 Wait until the video picture and camcorder information such as the tape counter appear on the camcorder screen and click [Start Camera].
A message with the options [Accept] and [Decline] appears in the [Conversation] window of your contact. If your contact clicks [Accept], the videoconference restarts.
47Changing the Mode of the Camcorder

4
DV NETWORKV2FENG P.book Page 48 Friday, May 6, 2005 9:32 AM
Operating Camcorders with DV MessengerYou can operate the camcorder connected to your computer and the camcorder connected to your contact’s computer with DV Messenger.If you wish to operate the camcorder of your contact, ask your contact to set the camcorder to allow remote control ( 43).
Camcorders that can be operated with DV Messenger:
Depending on the condition of the communication line during videoconference, video picture may appear interrupted or sound may be delayed.If you have started an application program which is accessing the memory card such as the Scanner and Camera Wizard, you may not be able to operate the camcorder. In such case, close the application program.
If the [VCR] control panel is displayed with camcorders with NETWORK mode, or if a camcorder without NETWORK mode is set to a mode other than the CAMERA mode, you cannot transfer live video or sound to your contact. In such case, use instant messaging on the lower part of the [Conversation] window to communicate with your contact.
Your Camcorder Your Contact’s CamcorderCanon Digital Camcorder
Canon Digital Camcorder You can operate your and your contact’s camcorder.
Non-Canon Digital Camcorder
You can only operate your camcorder.
Non-Canon Digital Camcorder
Canon Digital Camcorder You can only operate the camcorder of your contact.
Non-Canon Digital Camcorder
You cannot operate either camcorder.
The instant messagingconversation is displayed here
Enter your instantmessage here
Live or recorded video of your contact
8 Operating Camcorders with DV Messenger

DV
Mes
seng
er
E
DV NETWORKV2FENG P.book Page 49 Friday, May 6, 2005 9:32 AM
Operating the Camera Functions You can adjust the camcorder’s zoom and focus from the DVM panel.
1 Set your camcorder to NETWORK mode.(Camcorder without NETWORK mode: Set the camcorder to CAMERA mode.)
2 To operate your camcorder: Click the [MY CAMERA] tab followed by the (CAMERA) tab.(Camcorder without NETWORK mode: Click the [MY CAMERA] tab.)To operate your contact’s camcorder: Click the [CONTACT] tab followed by the (CAMERA) tab.(If your contact has a camcorder without NETWORK mode, click the [CONTACT] tab. The camcorder of your contact must be set to CAMERA mode for you to control the camera functions.)
49Operating Camcorders with DV Messenger

5
DV NETWORKV2FENG P.book Page 50 Friday, May 6, 2005 9:32 AM
The [CAMERA] Operating Buttons
1 Zoom to wide-angle Click here to zoom out (the subject becomes smaller).2 Zoom to telephoto Click here to zoom in (the subject becomes bigger).3 Wide End Click here to zoom out to maximum wide angle.4 Tele End Click here to zoom in to maximum telephoto.5 Focus Switches between auto focus and manual focus.
(Manual focus cannot be selected when a camcorder without NETWORK mode is set to .)
6 Focus closer Moves the focus point closer. (Cannot be used with autofocus).
7 Focus farther Moves the focus point farther. (Cannot be used with autofocus.)
8 OneShot AF When you click this button while the camcorder is set to manual focus in View & Record mode, the camcorder switches to autofocus for about 10 seconds. This button appears only on the [Contact] control panel in View & Record mode.
9 Capture Click here to record the live video picture as a still image on the memory card. (Only camcorders with NETWORK mode.)
10 Capture mode Select the capture mode of still images (single, continuous, interval recording).
0 Operating Camcorders with DV Messenger

DV
Mes
seng
er
E
DV NETWORKV2FENG P.book Page 51 Friday, May 6, 2005 9:32 AM
Operating the Tape Playback FunctionsWhen you play back a tape on your camcorder, you can send recorded video and sound to your contact. You can also control the playback functions from the DVM panel while monitoring the picture in the [Conversation] window.
You cannot send video or sound recorded in extended recording modes ( SP/ LP). If you play back a tape recorded in extended recording modes, the picture in the [Conversation] window may be distorted.If your contact fast forwards, rewinds or stops the tape during playback, Windows Messenger will continue to show the last picture. If the tape is played back again, the playback picture appears.Depending on the camcorder, Windows Messenger may produce noises such as buzzing sound when you pause playback or use the playback control lever. This is not a malfunction.Camcorder without NETWORK mode: If you operate the tape using the camcorder buttons or the wireless controller, the display on the DVM panel may not reflect the actual operation for a short time.
1 Set the camcorder to NETWORK mode.(Camcorder without NETWORK mode: Set the camcorder to PLAY (VCR) mode.)
2 To operate your camcorder: Click the [MY CAMERA] tab followed by the (VCR) tab.(Camcorder without NETWORK mode: Click the [MY CAMERA] tab.)To operate your contact’s camcorder (when set to PLAY (VCR) mode):Click the [CONTACT] tab followed by the (VCR) tab.(If your contact has a camcorder without NETWORK mode, click the [CONTACT] tab. The camcorder of your contact must be set to PLAY (VCR) mode for you to control the playback functions.)
51Operating Camcorders with DV Messenger
5
DV NETWORKV2FENG P.book Page 52 Friday, May 6, 2005 9:32 AM
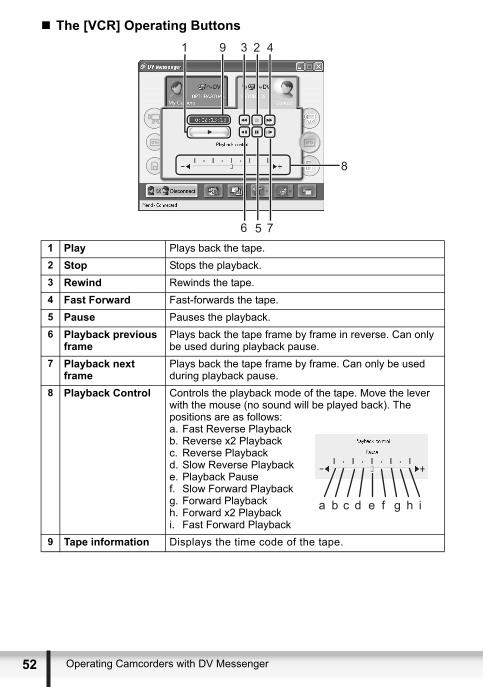
The [VCR] Operating Buttons
1 Play Plays back the tape.2 Stop Stops the playback.3 Rewind Rewinds the tape.4 Fast Forward Fast-forwards the tape.5 Pause Pauses the playback.6 Playback previous
framePlays back the tape frame by frame in reverse. Can only be used during playback pause.
7 Playback next frame
Plays back the tape frame by frame. Can only be used during playback pause.
8 Playback Control Controls the playback mode of the tape. Move the lever with the mouse (no sound will be played back). The positions are as follows: a. Fast Reverse Playbackb. Reverse x2 Playbackc. Reverse Playbackd. Slow Reverse Playbacke. Playback Pausef. Slow Forward Playbackg. Forward Playbackh. Forward x2 Playbacki. Fast Forward Playback
9 Tape information Displays the time code of the tape.
a b c d e f g h i
2 Operating Camcorders with DV Messenger
DV
Mes
seng
er
E
DV NETWORKV2FENG P.book Page 53 Friday, May 6, 2005 9:32 AM
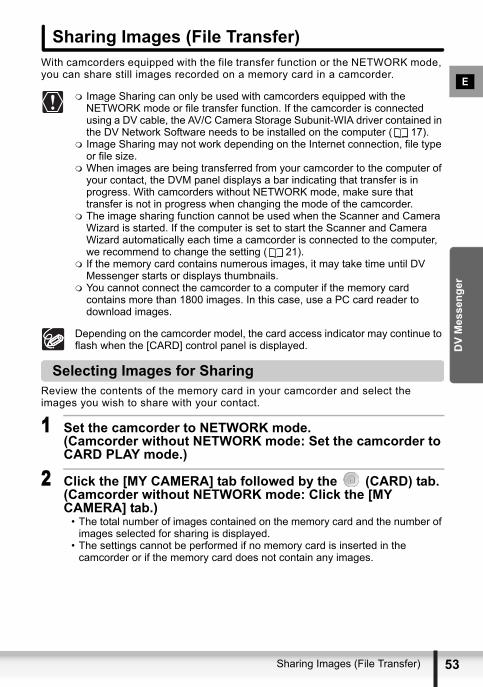
Sharing Images (File Transfer)With camcorders equipped with the file transfer function or the NETWORK mode, you can share still images recorded on a memory card in a camcorder.
Image Sharing can only be used with camcorders equipped with the NETWORK mode or file transfer function. If the camcorder is connected using a DV cable, the AV/C Camera Storage Subunit-WIA driver contained in the DV Network Software needs to be installed on the computer ( 17). Image Sharing may not work depending on the Internet connection, file type or file size.When images are being transferred from your camcorder to the computer of your contact, the DVM panel displays a bar indicating that transfer is in progress. With camcorders without NETWORK mode, make sure that transfer is not in progress when changing the mode of the camcorder.The image sharing function cannot be used when the Scanner and Camera Wizard is started. If the computer is set to start the Scanner and Camera Wizard automatically each time a camcorder is connected to the computer, we recommend to change the setting ( 21).If the memory card contains numerous images, it may take time until DV Messenger starts or displays thumbnails.You cannot connect the camcorder to a computer if the memory card contains more than 1800 images. In this case, use a PC card reader to download images.
Depending on the camcorder model, the card access indicator may continue to flash when the [CARD] control panel is displayed.
Selecting Images for SharingReview the contents of the memory card in your camcorder and select the images you wish to share with your contact.
1 Set the camcorder to NETWORK mode.(Camcorder without NETWORK mode: Set the camcorder to CARD PLAY mode.)
2 Click the [MY CAMERA] tab followed by the (CARD) tab.(Camcorder without NETWORK mode: Click the [MY CAMERA] tab.)
• The total number of images contained on the memory card and the number of images selected for sharing is displayed.
• The settings cannot be performed if no memory card is inserted in the camcorder or if the memory card does not contain any images.
53Sharing Images (File Transfer)

5
DV NETWORKV2FENG P.book Page 54 Friday, May 6, 2005 9:32 AM
3 Click [Set Sharing].Thumbnails (small versions) of the images contained on the memory card appear.
4 Select the image you wish to share by placing a checkmark to the next to the thumbnail.
• Click [Select all] to place a checkmark next to all images.
• Click [Clear all] to remove all checkmarks.
• indicates a still image, a movie.• Click [Refresh] to update the thumbnail
list.• Files exceeding 20 MB will not be
displayed.• If you move the mouse pointer on the
thumbnail, the file information appears.• Thumbnails may not appear with images not recorded with your camcorder.
5 If you have selected the images you wish to share, click [OK].
The number of shared images appears on the DVM panel.
4 Sharing Images (File Transfer)

DV
Mes
seng
er
E
DV NETWORKV2FENG P.book Page 55 Friday, May 6, 2005 9:32 AM
Transferring ImagesYou can select images from the memory card in the camcorder of your contact and transfer them to your computer.
You cannot transfer files from your contact in the following cases:- If no memory card is inserted into the camcorder of your contact.- If the memory card in the camcorder of your contact does not contain any
images.- If your contact has not set any image files for sharing.- If your contact is in the course of selecting image files for sharing.
1 Ask your contact to set his/her camcorder to NETWORK mode. (If the camcorder of your contact is not equipped with the NETWORK mode, ask him/her to set the camcorder to CARD PLAY mode.)
2 Click the [CONTACT] tab followed by the (CARD) tab.(If the camcorder of your contact is not equipped with the NETWORK mode, click the [CARD] tab.)
The total number of images contained on the memory card of your contact and the number of shared images is displayed.
3 Click [Select image].Thumbnails (small versions) of images set for sharing appear.
55Sharing Images (File Transfer)

5
DV NETWORKV2FENG P.book Page 56 Friday, May 6, 2005 9:32 AM
4 Select the image you wish to transfer by placing a checkmark to the next to the thumbnail.
• Click [Select all] to place a checkmark next to all images.
• Click [Clear all] to remove all checkmarks.
• If you move the mouse pointer on the thumbnail, the file information appears.
• Thumbnails may not appear with images not recorded with the camcorder of your contact.
5 When you have selected the images you wish to transfer, click [Fetch].
6 Select the destination folder, enter the file name and click [Save].
• The selected image(s) will be transferred to your computer.
• The transferred image will be saved to the selected folder. Numbers will be assigned to the entered file name (e.g. [image0001.jpg]).
• The transfer status will be displayed on the DVM panel. If you wish to cancel the transfer, click [Cancel].
• When the file transfer is complete, the DVM panel returns to the first status.
6 Sharing Images (File Transfer)

DV
Mes
seng
er
E
DV NETWORKV2FENG P.book Page 57 Friday, May 6, 2005 9:32 AM
Using the Image Capture FunctionWith camcorders equipped with the NETWORK mode, you can capture still images and save them to the computer.
The Image Capture function can only be used with camcorders equipped with the NETWORK mode.During Image Capture, the panel display does not change even when you click the or tab. The camcorder cannot be operated either. Wait until recording is complete or press the [Cancel] button and cancel recording. When you click [Cancel], the images will not be transferred to the computer.If you are connecting the camcorder using a USB cable, video and sound will not be transferred to the computer while the camcorder is recording a still image. It returns to normal when recording is complete.
In interval mode, the camcorder shuts off automatically when the combination of the number of images and interval exceeds 24 hours.
Setting of Image Capture
1 Click and select [Setting of image capture] from the displayed menu.
The [Setting of image capture] window appears.
57Using the Image Capture Function
5
DV NETWORKV2FENG P.book Page 58 Friday, May 6, 2005 9:32 AM
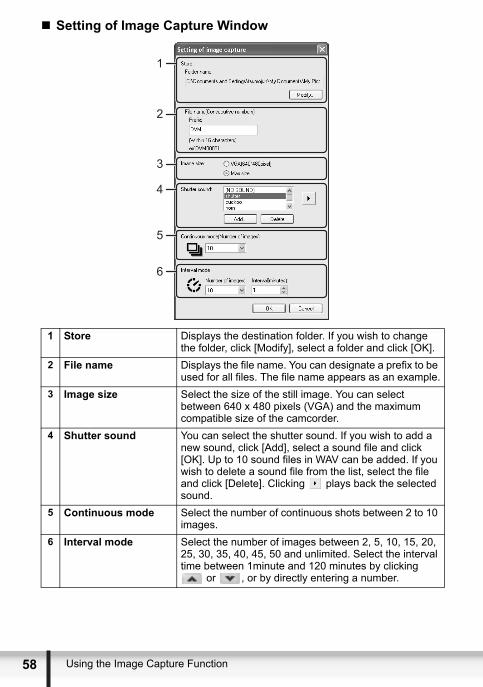
Setting of Image Capture Window
1 Store Displays the destination folder. If you wish to change the folder, click [Modify], select a folder and click [OK].
2 File name Displays the file name. You can designate a prefix to be used for all files. The file name appears as an example.
3 Image size Select the size of the still image. You can select between 640 x 480 pixels (VGA) and the maximum compatible size of the camcorder.
4 Shutter sound You can select the shutter sound. If you wish to add a new sound, click [Add], select a sound file and click [OK]. Up to 10 sound files in WAV can be added. If you wish to delete a sound file from the list, select the file and click [Delete]. Clicking plays back the selected sound.
5 Continuous mode Select the number of continuous shots between 2 to 10 images.
6 Interval mode Select the number of images between 2, 5, 10, 15, 20, 25, 30, 35, 40, 45, 50 and unlimited. Select the interval time between 1minute and 120 minutes by clicking
or , or by directly entering a number.
1
2
3
4
5
6
8 Using the Image Capture Function

DV
Mes
seng
er
E
DV NETWORKV2FENG P.book Page 59 Friday, May 6, 2005 9:32 AM
Changing the Capture ModeClick the respective capture mode button to change the capture mode.
You can select between the following 3 capture modes.
Single Clicking [Capture] records one single still image on the computer.
ContinuousClicking [Capture] records a continuous series of still images. The number of still images can be selected in the [Setting of image capture] window ( 57).
IntervalClicking [Capture] records single still images at intervals. The number of still images and the interval can be selected in the [Setting of image capture] window ( 57).
59Using the Image Capture Function
6
DV NETWORKV2FENG P.book Page 60 Friday, May 6, 2005 9:32 AM
Capturing with Your Camcorder
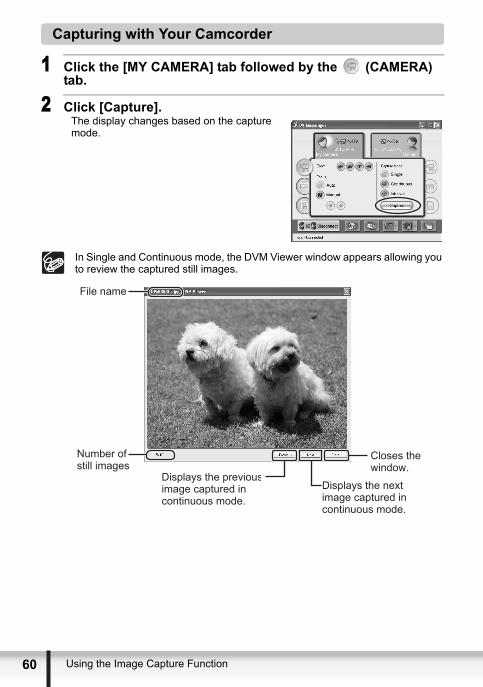
1 Click the [MY CAMERA] tab followed by the (CAMERA) tab.
2 Click [Capture].The display changes based on the capture mode.
In Single and Continuous mode, the DVM Viewer window appears allowing you to review the captured still images.
File name
Number ofstill images
Displays the nextimage captured incontinuous mode.
Closes thewindow.
Displays the previousimage captured incontinuous mode.
0 Using the Image Capture Function

DV
Mes
seng
er
E
DV NETWORKV2FENG P.book Page 61 Friday, May 6, 2005 9:32 AM
Capturing with Your Contact’s Camcorder
1 Click the [CONTACT] tab followed by the (CAMERA) tab.
2 Click [Capture].
The display changes based on the capture mode and the status will be displayed. The same information is displayed on your contact’s screen.
In Single and Continuous mode, the DVM Viewer window appears allowing you to review the captured still images.
61Using the Image Capture Function
6
DV NETWORKV2FENG P.book Page 62 Friday, May 6, 2005 9:32 AM
Using the View & Record FunctionYou can remotely access the camcorder using DV Messenger.
The View & Record function can only be used with camcorders equipped with the NETWORK mode.You need two Windows Messenger accounts (e-mail addresses); one home account and one remote account.You have to add the remote account to the contact list of the home account and the home account to the contact list of the remote account.You have to keep camcorder and computer turned on.
Setting of View & RecordBefore you can remotely access the camcorder, you have to select the remote account that can access the camcorder.
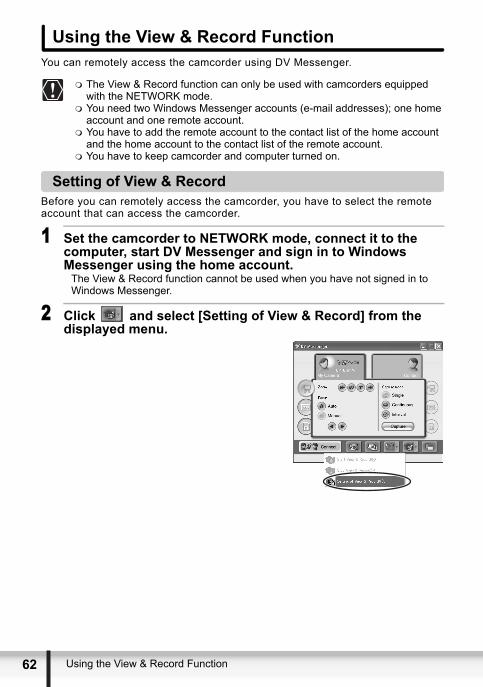
1 Set the camcorder to NETWORK mode, connect it to the computer, start DV Messenger and sign in to Windows Messenger using the home account.
The View & Record function cannot be used when you have not signed in to Windows Messenger.
2 Click and select [Setting of View & Record] from the displayed menu.
2 Using the View & Record Function
DV
Mes
seng
er
E
DV NETWORKV2FENG P.book Page 63 Friday, May 6, 2005 9:32 AM
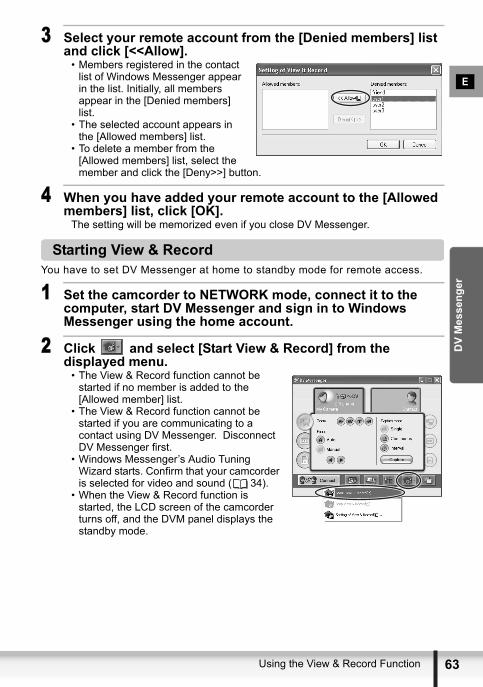
3 Select your remote account from the [Denied members] list and click [<<Allow].
• Members registered in the contact list of Windows Messenger appear in the list. Initially, all members appear in the [Denied members] list.
• The selected account appears in the [Allowed members] list.
• To delete a member from the [Allowed members] list, select the member and click the [Deny>>] button.
4 When you have added your remote account to the [Allowed members] list, click [OK].
The setting will be memorized even if you close DV Messenger.
Starting View & RecordYou have to set DV Messenger at home to standby mode for remote access.
1 Set the camcorder to NETWORK mode, connect it to the computer, start DV Messenger and sign in to Windows Messenger using the home account.
2 Click and select [Start View & Record] from the displayed menu.
• The View & Record function cannot be started if no member is added to the [Allowed member] list.
• The View & Record function cannot be started if you are communicating to a contact using DV Messenger. Disconnect DV Messenger first.
• Windows Messenger’s Audio Tuning Wizard starts. Confirm that your camcorder is selected for video and sound ( 34).
• When the View & Record function is started, the LCD screen of the camcorder turns off, and the DVM panel displays the standby mode.
63Using the View & Record Function

6
DV NETWORKV2FENG P.book Page 64 Friday, May 6, 2005 9:32 AM
Do not close DV Messenger or Windows Messenger while View & Record is started, and keep camcorder and computer turned on. If [System standby] or [System hibernates] is activated in [Power Options] on your computer, deactivate it. For details on changing the setting, consult the computer manufacturer or Microsoft.If you are using a laptop computer, make sure to power the computer from a household power source.
You cannot operate your camcorder from the DVM panel while View & Record is started. To operate your camcorder, click and select [Stop View & Record] from the displayed menu.If the camcorder is left in View & Record standby, the camcorder shuts off automatically after 24 hours.
Connecting with View & RecordYou can remotely access the camcorder by connecting to the DV Messenger in the View & Record standby mode at home.
1 At the remote access point, start DV Messenger and sign in to Windows Messenger using the remote account.
You do not need to connect a camcorder to the remote access point.
2 Click .
4 Using the View & Record Function

DV
Mes
seng
er
E
DV NETWORKV2FENG P.book Page 65 Friday, May 6, 2005 9:32 AM
3 Place a checkmark next to [Connect with View & Record], select the home account and click [Select].
• DV Messenger will be connected and Windows Messenger’s [Conversation] window appears.
• The home account will not appear if it is not registered in the contact list. In such case, add the home account to the contact list.
During View & Record, the camcorder is set to manual focus (autofocus cannot be used). Use the focus buttons or the [OneShot AF] button to focus. With the [OneShot AF] button, the camcorder focuses automatically for about 10 seconds.You cannot capture still images while the camcorder focuses after you press the [OneShot AF] button.To disconnect from the camcorder, click .
65Using the View & Record Function
6
DV NETWORKV2FENG P.book Page 66 Friday, May 6, 2005 9:32 AM
Additional Functions
Changing the Background of Windows MessengerYou can change the background image of the Windows Messenger window.
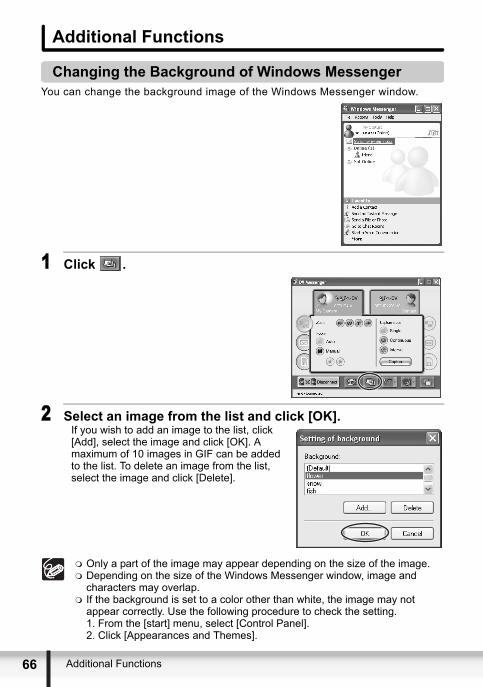
1 Click .
2 Select an image from the list and click [OK].If you wish to add an image to the list, click [Add], select the image and click [OK]. A maximum of 10 images in GIF can be added to the list. To delete an image from the list, select the image and click [Delete].
Only a part of the image may appear depending on the size of the image.Depending on the size of the Windows Messenger window, image and characters may overlap.If the background is set to a color other than white, the image may not appear correctly. Use the following procedure to check the setting.1. From the [start] menu, select [Control Panel].2. Click [Appearances and Themes].
6 Additional Functions

DV
Mes
seng
er
E
DV NETWORKV2FENG P.book Page 67 Friday, May 6, 2005 9:32 AM
3. Click [Display].4. On the [Display Properties] window, click the [Appearance] tab followed by
the [Advanced] button.5. On the [Advanced Appearances] window, select [Window] for [Item], and
check if [Color 1] is set to white.
Option SettingsSetting of Image Capture
Specify the destination folder and file names for recorded images ( 57).
DVM Panel ControlSpecify if you wish to display the DVM panel automatically each time your contact starts the Image Transfer or Image Capture function. This setting will be memorized even when you close DV Messenger.
1 Click and select [DVM panel control] from the displayed menu.
2 Place a checkmark next to the option you wish to set.
67Additional Functions

6
DV NETWORKV2FENG P.book Page 68 Friday, May 6, 2005 9:32 AM
Uninstalling DV MessengerUninstall DV Messenger if it has not been installed correctly or if it is not required anymore.
Close all programs that are running before uninstalling the software.
1 From the [start] menu, select [All Programs], [Canon Utilities], [DV Messenger] and [DV Messenger Uninstall] in succession.
2 On the confirmation dialog, click [Yes].The uninstall utility starts.
3 On the confirmation dialog, click [OK].Uninstallation is complete.
8 Uninstalling DV Messenger

Can
on U
SB V
ideo
Driv
er
E
DV NETWORKV2FENG P.book Page 69 Friday, May 6, 2005 9:32 AM
Canon USB Video Driver
Capturing/Recording MoviesIf your camcorder is listed under category A in Camcorder Categories ( 13), you can perform the followings by connecting the camcorder to a computer with Hi-Speed USB 2.0 using a USB cable.Set the camcorder to PLAY (VCR) mode.
- Capturing movies from the tape to the computer.- Recording movies that have been edited on a computer to the tape.- Converting analog signals from a connected VCR or 8mm camcorder to digital
signals and transferring them to the computer. For details, refer to the camcorder instruction manual.
Above three operations can be performed with Windows Movie Maker 2 (version 2.1.4026.0).
Make sure to connect the camcorder to a computer with Hi-Speed USB 2.0. Capturing movies from tape to the computer and recording edited movies to the tape using the Canon USB Video Driver will not work when connecting to a computer with USB 1.1 port.Do not change the position of the POWER switch or TAPE/CARD switch while capturing movies to the computer or recording movies to the tape.Proper operation is not guaranteed on all editing softwares (including Windows Movie Maker 2).
Capturing movies from the tape to the computer
1 Set the camcorder to PLAY (VCR) mode.
2 Load a recorded cassette.Make sure that “AV DV” is not displayed.
3 Connect the camcorder to the computer using the USB cable ( 23).
Start DV Messenger and capture movies to the computer. For details, refer to the Windows Movie Maker 2 Help menu.
Capturing/Recording Movies 69
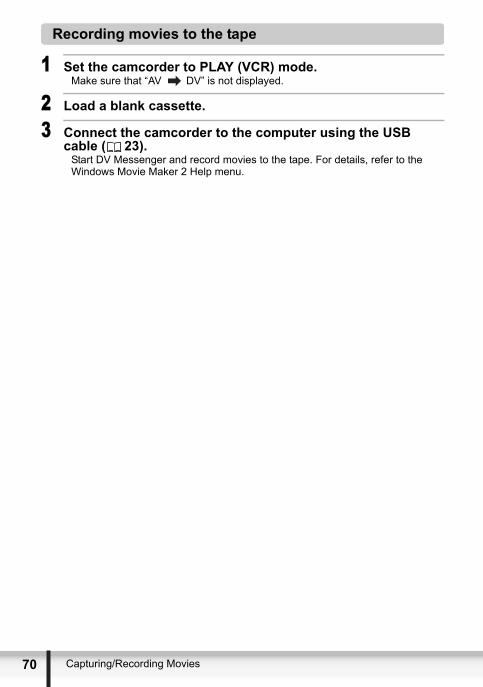
7
DV NETWORKV2FENG P.book Page 70 Friday, May 6, 2005 9:32 AM
Recording movies to the tape
1 Set the camcorder to PLAY (VCR) mode.Make sure that “AV DV” is not displayed.
2 Load a blank cassette.
3 Connect the camcorder to the computer using the USB cable ( 23).
Start DV Messenger and record movies to the tape. For details, refer to the Windows Movie Maker 2 Help menu.
0 Capturing/Recording Movies
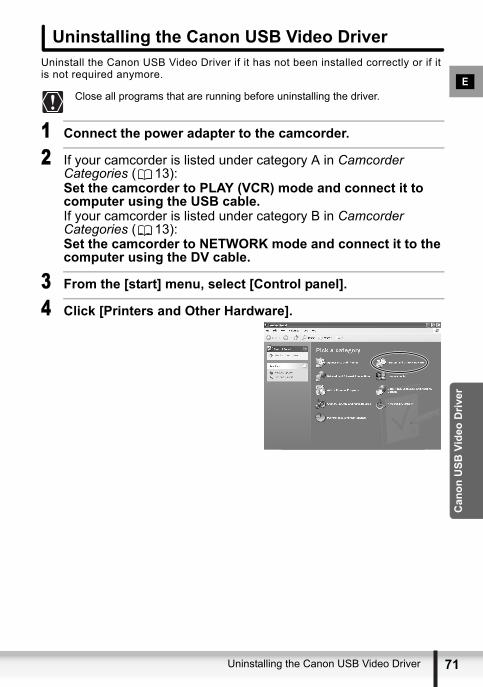
Can
on U
SB V
ideo
Driv
er
E
DV NETWORKV2FENG P.book Page 71 Friday, May 6, 2005 9:32 AM
Uninstalling the Canon USB Video DriverUninstall the Canon USB Video Driver if it has not been installed correctly or if it is not required anymore.
Close all programs that are running before uninstalling the driver.
1 Connect the power adapter to the camcorder.
2 If your camcorder is listed under category A in Camcorder Categories ( 13):Set the camcorder to PLAY (VCR) mode and connect it to computer using the USB cable.If your camcorder is listed under category B in Camcorder Categories ( 13):Set the camcorder to NETWORK mode and connect it to the computer using the DV cable.
3 From the [start] menu, select [Control panel].
4 Click [Printers and Other Hardware].
71Uninstalling the Canon USB Video Driver
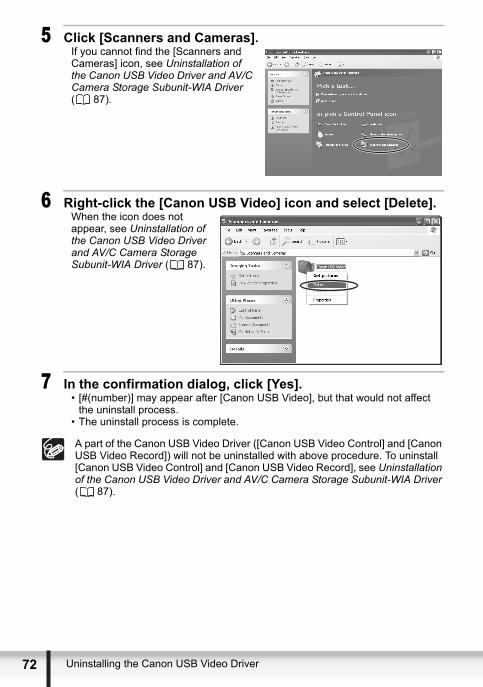
7
DV NETWORKV2FENG P.book Page 72 Friday, May 6, 2005 9:32 AM
5 Click [Scanners and Cameras].If you cannot find the [Scanners and Cameras] icon, see Uninstallation of the Canon USB Video Driver and AV/C Camera Storage Subunit-WIA Driver ( 87).
6 Right-click the [Canon USB Video] icon and select [Delete].When the icon does not appear, see Uninstallation of the Canon USB Video Driver and AV/C Camera Storage Subunit-WIA Driver ( 87).
7 In the confirmation dialog, click [Yes].• [#(number)] may appear after [Canon USB Video], but that would not affect
the uninstall process.• The uninstall process is complete.
A part of the Canon USB Video Driver ([Canon USB Video Control] and [Canon USB Video Record]) will not be uninstalled with above procedure. To uninstall [Canon USB Video Control] and [Canon USB Video Record], see Uninstallation of the Canon USB Video Driver and AV/C Camera Storage Subunit-WIA Driver ( 87).
2 Uninstalling the Canon USB Video Driver
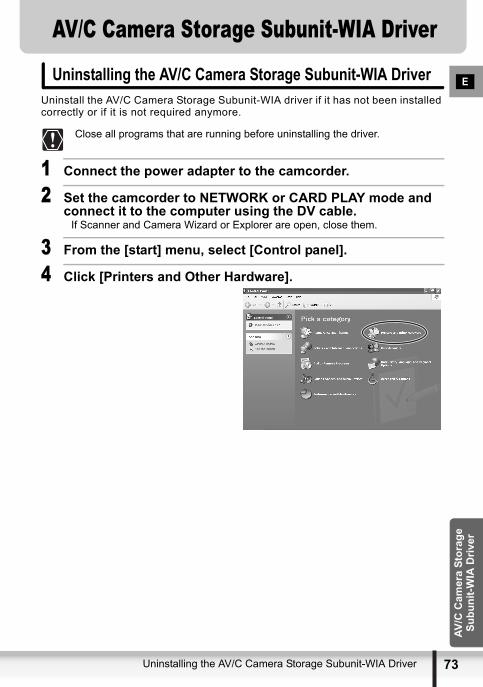
DV NETWORKV2FENG P.book Page 73 Friday, May 6, 2005 9:32 AM
AV/C Camera Storage Subunit-WIA Driver
AV/C
Cam
era
Stor
age
Subu
nit-W
IA D
river
E
Uninstalling the AV/C Camera Storage Subunit-WIA DriverUninstall the AV/C Camera Storage Subunit-WIA driver if it has not been installed correctly or if it is not required anymore.Close all programs that are running before uninstalling the driver.
1 Connect the power adapter to the camcorder.
2 Set the camcorder to NETWORK or CARD PLAY mode and connect it to the computer using the DV cable.
If Scanner and Camera Wizard or Explorer are open, close them.
3 From the [start] menu, select [Control panel].
4 Click [Printers and Other Hardware].
Uninstalling the AV/C Camera Storage Subunit-WIA Driver 73

7
DV NETWORKV2FENG P.book Page 74 Friday, May 6, 2005 9:32 AM
5 Click [Scanners and Cameras].If you cannot find the [Scanners and Cameras] icon, see Uninstallation of the Canon USB Video Driver and AV/C Camera Storage Subunit-WIA Driver ( 87).
6 Right-click the [Canon Camera Storage Device] icon and select [Delete].
When the icon does not appear, see Uninstallation of the Canon USB Video Driver and AV/C Camera Storage Subunit-WIA Driver ( 87).
7 In the confirmation dialog, click [Yes].• [#(number)] may appear after [Canon Camera Storage Device], but that would
not affect the uninstall process.• The uninstall process is complete.
4 Uninstalling the AV/C Camera Storage Subunit-WIA Driver
DV NETWORKV2FENG P.book Page 75 Friday, May 6, 2005 9:32 AM
Troubleshooting
E
For troubleshooting the following procedure, refer to the respective pages.- Installation of the Canon USB Video Driver ( 86)- Installation of the AV/C Camera Storage Subunit-WIA Driver ( 87)- Uninstallation of the Canon USB Video Driver and AV/C Camera Storage
Subunit-WIA Driver ( 87)
DV MessengerConnection
Canon camcorder: [Canon USB Video] or [Canon DV Device] does not appear in the [Audio Tuning Wizard] dialog.
Check if the camcorder is correctly connected to the computer using the USB cable or DV cable.If you have a camcorder with NETWORK mode, check if the POWER switch is set to NETWORK. If you have a camcorder without NETWORK mode, check if the POWER switch is set to position other than OFF.You have not performed the [Windows Messenger Audio Update]. Please consult Microsoft for details.
Cannot connect DVMessenger.DV Messenger does not connect if your contact has not started DV Messenger. Retry after your contact has started DV Messenger. If your contact does not have DV Messenger, ask him to download the latest version of DV Messenger from the Canon homepage.DV Messenger does not connect if your contact is using DV Messenger Version 1. Ask your contact to download the latest version of DV Messenger from the Canon homepage.If you are using a router, the router must be UPnP compatible. Please consult the router manufacturer for details. In addition, the router needs to be recognized as “Internet Gateway Device” ( 26). You also need to disable Windows XP’s firewall ( 29). Please note that proper operation cannot be guaranteed for any particular router, even if it meets all requirements.If an anti-virus software is installed on your computer, the firewall of the software may be active. In such case, you need to deactivate its firewall function. For further details, consult your software or computer manufacturer.
When connecting DV Messenger, a character string starting with “#” appears.
This is an encrypted text data required for connection. DV Messenger sends this data as an instant message to your contact.
Troubleshooting 75

7
DV NETWORKV2FENG P.book Page 76 Friday, May 6, 2005 9:32 AM
An instant message appears when DV Messenger could not connect within 30 seconds.
When your contact does not respond within 30 seconds after you tried to connect DV Messenger, a message asking him to download DV Messenger Version 2 is sent to your contact.When your contact tried to connect using DV Messenger Version 1, a message will be sent automatically asking him to download DV Messenger Version 2.
Camcorder without NETWORK mode: The DVM panel does not change to [CARD] mode even if the camcorder is set to CARD PLAY mode.
Check if the AV/C Camera Storage Subunit-WIA Driver is correctly installed.1. Set your camcorder to CARD PLAY mode.2. Connect the camcorder to the computer using a DV cable.3. From the [Start] menu, click [My Computer].4. Check if [Canon Camera Storage Device] appears under [Scanners and
Cameras].If [Canon Camera Storage Device] does not appear, install the AV/C Camera Storage Subunit-WIA Driver.
Canon camcorder: “Your DV camcorder is not connected correctly” appears on the DVM panel when I connect the camcorder to the computer.
If you have a camcorder with NETWORK mode, check if the POWER switch is set to NETWORK.If you have a camcorder without NETWORK mode, make sure the camcorder is connected to the computer using a DV cable.
VideoconferencingThe video picture does not appear in the [Conversation] window of Windows Messenger even though the video picture is shown on the camcorder's LCD screen.
Check if your camcorder is correctly connected to the computer with the USB cable or DV cable.Windows Messenger may not be able to receive video and sound if you have changed the operating mode of the camcorder during videoconference. Click [Stop Camera] and then [Start Camera] to restart the videoconference.Some Canon camcorders are equipped with an extended recording function ( SP/ LP). The extended recording modes are not supported by Windows Messenger. If you are using the camcorder in CAMERA mode, make sure that the recording mode is not set to SP or LP in the menu. If you are using the camcorder in PLAY (VCR) mode, make sure that the playback tape has been recorded in SP or LP mode.
6 Troubleshooting

E
DV NETWORKV2FENG P.book Page 77 Friday, May 6, 2005 9:32 AM
Check if [Camera] is correctly set in the [Audio Tuning Wizard]. Click [Stop Camera] in the [Conversation] window of Windows Messenger. Reset the setting in the [Audio Tuning Wizard]. Click [Start Camera] to restart the videoconference.
I receive the video picture of my contact in the [Conversation] window of Windows Messenger, but not the sound.
If your contact is using a camcorder without NETWORK mode supporting the memory card function, ask if the camcorder is set for recording to a tape (e.g. the TAPE/CARD switch is set to TAPE).Check the position of the speaker volume lever in the [Conversation] window of Windows Messenger. Move the lever to the right until the volume indicator on the right operates.
Check if the sound device is set to [Mute] in the [Control Panel].1. From the [Start] menu, select [Control Panel].2. Select [Sounds, Speech, and Audio Devices].
77Troubleshooting
7
DV NETWORKV2FENG P.book Page 78 Friday, May 6, 2005 9:32 AM
3. Click [Sound and Audio Devices].
4. Check if [Device Volume] is set to [Mute]. Remove the checkmark if necessary.
Click [Stop Camera] and interrupt the videoconference. Ask your contact to check his/her microphone settings in the [Audio Tuning Wizard].
My contact is receiving the video picture, but not the sound. Canon camcorder without NETWORK mode supporting the memory card function: Check if the camcorder is set for recording to a tape (e.g. the TAPE/CARD switch is set to TAPE).Check the position of the microphone volume lever. Move the lever to the right until the volume indicator on the right operates.If you are using a Canon camcorder, click [Stop Camera] and check whether [Canon USB Video] or [Canon DV Device] is selected in the [Audio Tuning Wizard]. Click [Start Camera] to restart the videoconference.Ask your contact to check the settings of the speakers. See “I receive the video picture of my contact in the [Conversation] window of Windows Messenger, but not the sound.” for what your contact should do.
8 Troubleshooting

E
DV NETWORKV2FENG P.book Page 79 Friday, May 6, 2005 9:32 AM
The video picture of Windows Messenger’s [Conversation] window does not appear smooth.
If Windows XP Service Pack 2 and [QoS Packet Scheduler] are installed, the video picture send by your contact may not appear smooth (e.g. the video picture stops and then appears to be fast-forwarded). In such case, uninstall the [QoS Packet Scheduler].1. From the [Start] menu, select [Control Panel].2. Click [Network and Internet Connections].
3. Click [Network Connections].
79Troubleshooting
8
DV NETWORKV2FENG P.book Page 80 Friday, May 6, 2005 9:32 AM
4. Open the network properties.
• When you are connecting to the Internet via LAN cable, right-click the [Local Area Connection] icon under [LAN or High-Speed Internet] and select [Properties] from the displayed menu. However, when you are connecting your computer directly to an ADSL modem, right-click the icon under [Broadband] and select [Properties] from the displayed menu.
• When you are connecting via wireless LAN, right-click the [Wireless Network Connection] icon under [LAN or High-Speed Internet] and select [Properties] from the displayed menu.
• When you are connecting via dial-up analog modem, right-click the icon under [Dial-up] and select [Properties] from the displayed menu.
5. Select [QoS Packet Scheduler] and click [Uninstall].• With [Local Area Connection] or [Wireless Network Connection], click the
[General] tab for uninstallation.
0 Troubleshooting
E
DV NETWORKV2FENG P.book Page 81 Friday, May 6, 2005 9:32 AM
• With [Broadband] or [Dial-up], click the [Networking] tab for uninstallation.
6. When uninstallation is complete, click [OK] and restart the computer.
There is an echo on the sound. If you are using speakers, depending on the volume and microphone sensitivity, the sound from the speakers may be picked up by the microphone, producing an echo. Change the direction or volume of the microphone, or move the camcorder away from the speakers. We recommend using headphones instead of speakers.
Cannot set the sound to mute.Sound may still be send to your contact even if the microphone volume lever is moved completely to the left and the volume lever indicates that it is set to mute. Move the lever to the right and back to the left; no sound should be sent to your contact now.
There are anomalous noises when the tape is set to playback pause or played back using playback control.
Depending on the camcorder, Windows Messenger may produce anomalous noises such as buzzing sound when you pause playback or use playback control.
81Troubleshooting

8
DV NETWORKV2FENG P.book Page 82 Friday, May 6, 2005 9:32 AM
Cannot operate the camcorder.If you cannot operate the camcorder of your contact, your contact may not allow remote control.Check if the camcorder is correctly connected to the computer.Camcorder without NETWORK mode: If the Canon camcorder is set to CAMERA mode, some camcorders will enter the demonstration mode after a certain time. During demonstration, you may not be able to operate the camcorder from the DVM panel. Operate the zoom lever on the camcorder to cancel the demonstration.When your contact has installed Windows XP Service Pack 2 and the [QoS Packet Scheduler], the connection to your contact may fail, or DV Messenger may fail when you try to operate your contact’s camcorder. In such case, refer to The video picture of Windows Messenger’s [Conversation] window does not appear smooth. ( 79), and ask your contact to uninstall the [QoS Packet Scheduler].
The DVM panel does not display the operation correctly during frame advance.
During frame advance, the camcorder performs the slow playback operation briefly. The DVM panel may therefore display [Slow].
The focus buttons on the DVM panel cannot be operated in CAMERA mode.
Camcorder without NETWORK mode: If the Canon camcorder is set to (Easy Recording) mode, focus cannot be adjusted manually. Set the camcorder to a mode other than the (Easy Recording) mode. If you are using the XL1S, you cannot switch to manual focus on the DVM panel. Set the camcorder to manual focus before using the focus buttons on the DVM panel.
The camcorder turns off during use in CAMERA mode.Camcorder without NETWORK mode: If the Canon camcorder set to CAMERA mode and a recordable tape is inserted, the camcorder automatically turns off after a certain time to protect the tape and video heads. When using the camcorder in CAMERA mode, unload or write-protect the tape.With View & Record, the camcorder shuts off automatically after 24 hours. In interval mode of Image Capture, the camcorder shuts off automatically after 24 hours.
2 Troubleshooting

E
DV NETWORKV2FENG P.book Page 83 Friday, May 6, 2005 9:32 AM
Image SharingCannot set image sharing.
There is not memory card in the camcorder.The memory card does not contain images that can be shared. Images that can be shared are still images in JPEG and movies in Motion JPEG (AVI). Thumbnails may not appear with images not recorded with a Canon camcorder.Check if the memory card cover is open.If you are connecting via a DV cable, check if an application software using the image transfer function (such as the Scanner and Camera Wizard) is started on the computer. If started, close such application.If you are connecting via a DV cable, check if the window allowing you to select an application program to start is displayed. If displayed, close the window. We recommend setting your computer to not display such window when the camcorder is connected ( 21).
During image transfer, the window indicating the progress does not change.
If the size of the image files is big, transferring an image from a memory card to the computer may take time. In such case, the window does not change. The window will change after a while when the transfer starts.If you or your contact is connecting to the Internet using a low speed line such as an analog modem, it may take time until the display changes.
Cannot transfer an image.There is no memory card inserted into your contact’s camcorder.There are no images recorded on the memory card in your contact’s camcorder that can be transferred.Your contact has not set any images for sharing.Your contact is setting images for sharing. Wait until your contact has finished.If the memory card cover is open, image transfer may not work. Ask your contact to close the memory card cover.If an application software using the image transfer function (such as Scanner and Camera Wizard) is started on the computer of your contact, you cannot use the image transfer function. Ask your contact to close such application.If a window for selecting an application to start when connecting the camcorder is displayed on the computer screen of your contact, you cannot use the image transfer function. Ask your contact to close the window.
Images are not correctly displayed in the selection window for image sharing.
Images not recorded with your camcorder may not be displayed correctly.An image file exceeding 20 MB will not be displayed.
The sharing settings reset.The setting resets when you change the position of the camcorder's POWER switch or remove the memory card.
83Troubleshooting
8
DV NETWORKV2FENG P.book Page 84 Friday, May 6, 2005 9:32 AM
View & RecordCannot start the View & Record function.
The View & Record function can only be used with Canon camcorders equipped with the NETWORK mode.You cannot start the View & Record function if you have not set the members that you allow connection to View and Record ( 62).You cannot start the View & Record function if you have not signed in to Windows Messenger.
Cannot connect with View & Record.You cannot start the View & Record function if you have not set the remote account to allow connection to View and Record are not set ( 62).24 hours have passed since you started the View & Record function. It shuts off automatically after 24 hours.If the computer to which the remote camcorder is connected is in standby mode, you cannot connect to the remote camcorder. For details on how to change the setting of the computer, please consult the computer manufacturer or Microsoft.Your Internet provider may change the allocated IP addresses on a regular basis. You cannot connect to the remote camcorder if the IP address changed after you started DV Messenger. Please consult your Internet provider for details.
4 Troubleshooting

E
DV NETWORKV2FENG P.book Page 85 Friday, May 6, 2005 9:32 AM
Windows MessengerI changed the background image of Windows Messenger, but it does not appear correctly.
The image file may be corrupted.With transparent GIF files, the transparent part may not appear correctly.Animated GIF files appear with the first scene as a still image.
Cannot end Windows Messenger.Windows Messenger cannot be ended while DV Messenger is started. End DV Messenger first.
DV Messenger UninstallationI have uninstalled DV Messenger, but [DV Network Software] is still listed in the [Add or Remove Programs] window.
In the [Add or Remove Programs] window, select [DV Network Software] and click [Change/Remove].
85Troubleshooting

8
DV NETWORKV2FENG P.book Page 86 Friday, May 6, 2005 9:32 AM
Canon USB Video DriverThe Canon camcorder is connected to the computer via USB cable, but is not recognized by the computer.
Check if the camcorder is set to NETWORK mode.Check if the USB cable is correctly connected.The driver is not correctly installed. Uninstall ( 71) and reinstall ( 19) the driver.
Cannot find the driver files.The driver files were not correctly installed to the computer. Insert the CD-ROM and reinstall the files to the computer.
Cannot capture movies from the tape to the computer.Your camcorder does not support the movie capture/record function using a USB cable. Refer to Camcorder Categories ( 13) and Available Functions and Drivers by Categories ( 13).Check if the camcorder is correctly connected to the computer using a USB cable.The camcorder is connected to a USB 1.1 port. Connect the camcorder to a computer with Hi-Speed USB 2.0.Check if the camcorder is set to PLAY (VCR) mode.No movies are recorded on the tape. Load a recorded cassette.
Cannot record the first part of the movie.Depending on the editing software, the first part of the movie may not be recorded. For details, refer to the manual of your software.
The quality of movies captured from the tape is low.The quality of a movie captured with a camcorder set to NETWORK mode is low. Set the camcorder to PLAY (VCR) mode to capture movies.
Cannot record movies to the tape.Your camcorder does not support the movie capture/record function using a USB cable. Refer to Camcorder Categories ( 13) and Available Functions and Drivers by Categories ( 13).Check if the camcorder is correctly connected to the computer using a USB cable.The camcorder is connected to a USB 1.1 port. Connect the camcorder to a computer with Hi-Speed USB 2.0.Check if the camcorder is set to PLAY (VCR) mode.Check if a recordable cassette is loaded.
6 Troubleshooting
E
DV NETWORKV2FENG P.book Page 87 Friday, May 6, 2005 9:32 AM
AV/C Camera Storage Subunit-WIA DriverInstallation
The Canon camcorder is connected to the computer via a DV cable, but is not recognized by the computer.
Check if the camcorder is set to NETWORK or CARD PLAY mode.If the IEEE1394 port did not come preinstalled, check if the IEEE1394 adapter is correctly installed.Check if the DV (IEEE1394) cable is correctly connected.The driver is not correctly installed. Uninstall ( 73) and reinstall the driver ( 20).
Cannot find the driver files.The driver files were not correctly installed to the computer. Insert the CD-ROM and reinstall the files to the computer.
Downloading Canon Camera Storage Device is not recognized.
The memory card cover is open. Disconnect the DV cable from the camcorder, close the memory card cover, and reconnect the camcorder to the computer.
UploadingCannot upload the file to the memory card.
There is not enough memory space available on the memory card.You are using a SD Memory Card and the protect switch is set to write-protection. Change the position of the protect switch.
Uninstallation of the Canon USB Video Driver and AV/C Camera Storage Subunit-WIA Driver
If you had problems uninstalling the driver, use the following procedures to remove it.
Use the procedures below for the following circumstances too.- If you do not find the [Scanners and Cameras] icon in the [Printers and
Other Hardware].- If the Camera icon does not appear in the [Scanners and Cameras] folder.
1 From the [start] menu, select [Control panel].
87Troubleshooting

8
DV NETWORKV2FENG P.book Page 88 Friday, May 6, 2005 9:32 AM
2 Click [Performance and Maintenance].
3 Click [System].
4 Click the [Hardware] tab on the [System Properties].
5 Click the [Device Manager] button.
8 Troubleshooting
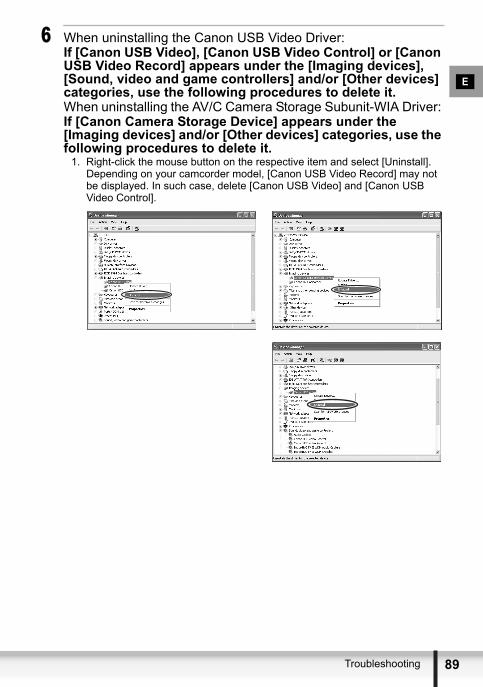
E
DV NETWORKV2FENG P.book Page 89 Friday, May 6, 2005 9:32 AM
6 When uninstalling the Canon USB Video Driver: If [Canon USB Video], [Canon USB Video Control] or [Canon USB Video Record] appears under the [Imaging devices], [Sound, video and game controllers] and/or [Other devices] categories, use the following procedures to delete it. When uninstalling the AV/C Camera Storage Subunit-WIA Driver: If [Canon Camera Storage Device] appears under the [Imaging devices] and/or [Other devices] categories, use the following procedures to delete it.
1. Right-click the mouse button on the respective item and select [Uninstall].Depending on your camcorder model, [Canon USB Video Record] may not be displayed. In such case, delete [Canon USB Video] and [Canon USB Video Control].
89Troubleshooting

9
DV NETWORKV2FENG P.book Page 90 Friday, May 6, 2005 9:32 AM
2. In the confirmation dialog, click [OK] and close [System Properties] and [Device Manager]. Remove all copies of the [Canon Camera Storage Device] icon that appear in the [Other devices] or [Imaging devices] categories, or that appear more than once in one category.
7 From the [start] menu, select [My Computer] and double-click the [C:], [WINDOWS] and [INF] folders in succession.
If the [INF] Folder Is Not Visible in the [WINDOWS] FolderUse the following procedures to show all files and folders.1. Click the [Tools] menu and select [Folder Options].2. Click the [View] tab.3. In the [Advanced setting] section, set the [Hidden files and folders] category
to the [Show hidden files and folders] option.
If [Hide extensions for known file types] is selected, remove its check mark.
0 Troubleshooting
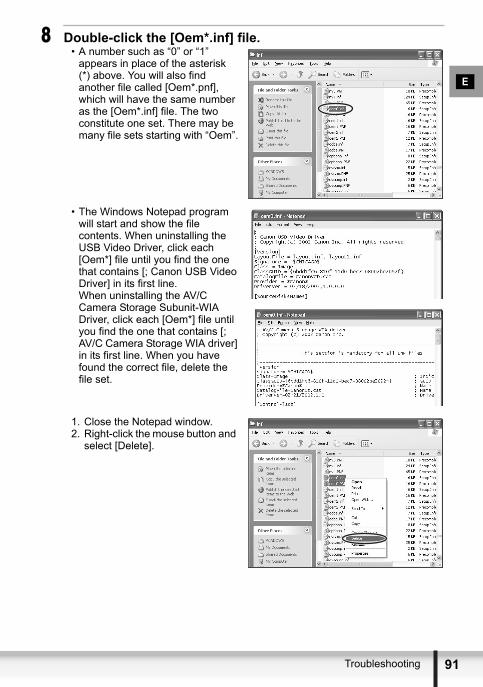
E
DV NETWORKV2FENG P.book Page 91 Friday, May 6, 2005 9:32 AM
8 Double-click the [Oem*.inf] file.• A number such as “0” or “1”
appears in place of the asterisk (*) above. You will also find another file called [Oem*.pnf], which will have the same number as the [Oem*.inf] file. The two constitute one set. There may be many file sets starting with “Oem”.
• The Windows Notepad program will start and show the file contents. When uninstalling the USB Video Driver, click each [Oem*] file until you find the one that contains [; Canon USB Video Driver] in its first line.When uninstalling the AV/C Camera Storage Subunit-WIA Driver, click each [Oem*] file until you find the one that contains [; AV/C Camera Storage WIA driver] in its first line. When you have found the correct file, delete the file set.
1. Close the Notepad window.2. Right-click the mouse button and
select [Delete].
91Troubleshooting

9
DV NETWORKV2FENG P.book Page 92 Friday, May 6, 2005 9:32 AM
9 Close all windows and restart the computer.The uninstall process is complete.
The [Inf] folder contains numerous files that are critical to the computer's operation. Be extremely careful not to delete the wrong files. If you delete the wrong file, you may be unable to restart Windows.
2 Troubleshooting

CANON INC.
Canon Europa N.V.P.O. Box 2262, 1180 EG Amstelveen, the Netherlands
Canon UK Ltd.HelpdeskTel No.: 08705 143 723 (Calls may be recorded)Fax No.: 08705 143 340
Canon Australia Pty Ltd1 Thomas Holt Drive, North Ryde, Sydney, New South Wales, AustraliaSales :Telephone 1800 816 001Service :Telephone 1800 809 714Infoline (software support) :Telephone (02) 9805 2864www.canon.com.au
Canon New Zealand LtdAkoranga Business Park, Akoranga Drive, Northcote, Auckland, New ZealandSales :Telephone 64 9 489 0317Service :Telephone 64 9 489 0362Software Support :Telephone 64 9 489 0470www.canon.co.nz
Canon Singapore Pte. Ltd1 HarbourFront Avenue, #04-01 Keppel Bay Tower, Singapore 098632Telephone (65)-6799-8888, Fax (65)-6799-8882
Canon Hongkong Company Ltd19/F, The Metropolis Tower, 10 Metropolis Drive, Hunghom, Kowloon, Hong KongPhone: 852-2170-2828Fax: 852-2723-9684
PUB DIE-226A © CANON INC. 2005 1/5/2005
DV NETWORKV2FENG P.book Page 93 Friday, May 6, 2005 9:32 AM


![Z-CT Instruction Manual [Detailed version]](https://img.pdfslide.us/doc/110x75/61d43ae1dd49d970aa4d0411/z-ct-instruction-manual-detailed-version.jpg)