Embed Size (px)
Citation preview

Dunkirk May-June, 1940
Campaign for the Khamsin WW2
Campaign Rules Version 2.12 – April, 2015
Offered by GAJO Games
http://www.gajominis.com
9420 S. Union Square
Sandy, UT 84070
801-563-5956

3/27/2015 Khamsin Dunkirk 1940, GAJO Games 2
1.0 Order of Battle Each historical force is made up of a group
of representative FOW companies. Actions
generated through campaign maneuvers
will be fought out on the tabletop using
these types of companies, and the strength
of a formation in the campaign is shown as
the number of companies fielded.
Axis Forces:
Introduction Khamsin is intended to provide a simple campaign system to generate interesting Flames
of War battles. This module is intended to be used with the basic rules to recreate a
campaign set during The Dunkirk Campaign during May-June, 1940.
AXIS FORCES – at start
FORMATION AFFILIATION MOBILITY ACTIVATION UNIT
STRENGTH TABLETOP UNIT OPTIONS
ARMEEGROUP A – KLEIST GROUP (Hesdin)
Guderian Motor +1 - Leader, XIX Corps
1st Panzer Division XIX Corps Motor 4 2 Leichte or Mittlere Panzerkompanie, or
Panzerschutzenkompanie
2nd Panzer Division XIX Corps Motor 4 2 Leichte or Mittlere Panzerkompanie, or Schutzenkompanie
10th Panzer Division XIX Corps Motor 4 2 Leichte or Mittlere Panzerkompanie, or Schutzenkompanie
SS Liebstandarte IR XIX Corps Motor 3 1 SS Schutzen or Kradschutzen company
Grossdeutschland IR XIX Corps Motor 3 1 Heer Schutzen company [*elite]
6th Panzer Division XXXXI Corps Motor 4 2 Czech Panzer company (Pz 35)
8th Panzer Division XXXXI Corps Motor 4 2 Czech Panzer company (Pz 38)
SS Verfugungs Divn XXXXI Corps Motor 3 2 SS Schutzen company
ARMEEGROUP A – HOTH GROUP (Arras)
3rd Panzer Division XVI Corps Motor 4 2 Leichte or Mittlere Panzerkompanie, or Schutzenkompanie
4th Panzer Division XVI Corps Motor 4 2 Leichte or Mittlere Panzerkompanie, or Schutzenkompanie
SS Totenkopf Divn XVI Corps Motor 3 2 SS Schutzen or Kradschutzen company
5th Panzer Division XXXIX Corps Motor 4 2 Leichte or Mittlere Panzerkompanie, or Schutzenkompanie
7th Panzer Division XXXIX Corps Motor 4 2 Czech Panzer company (Pz 38)
20th Motorized Divn XXXIX Corps Motor 4 2 Motorized Schutzen company

3/27/2015 Khamsin Dunkirk 1940, GAJO Games 3
Axis Reinforcements:
The following units become available during the course of the campaign:
Reinforcement Arrival:
German reinforcement units may be committed from May 29th (turn 8). Army Group A reserve units arrive in
Arras, those from Army Group B arrive in Ghent.
AXIS FORCES – reinforcements
FORMATION AFFILIATION MOBILITY ACTIVATION UNIT
STRENGTH TABLETOP UNIT OPTIONS
ARMEEGROUP A
9th Panzer Division Reserve Motor 4 2 Leichte Panzerkompanie, or Schutzenkompanie
29th Motorized Division Reserve Motor 4 2 Motorized Schutzen Company
ARMEEGROUP B
254th Infantry Division Reserve Leg 4 2 Heer Infantry company
AXIS FORCES – at start
FORMATION AFFILIATION MOBILITY ACTIVATION UNIT
STRENGTH TABLETOP UNIT OPTIONS
ARMEEGROUP B – 6th ARMY (*)
188th Infantry Division IV Corps Leg 4 2 Heer Infantry company
31st Infantry Division IV Corps Leg 4 2 Heer Infantry company
61st Infantry Division IV Corps Leg 4 2 Heer Infantry company
30th Infantry Division XI Corps Leg 4 2 Heer Infantry company
19th Infantry Division XI Corps Leg 4 2 Heer Infantry company
14th Infantry Division XI Corps Leg 4 2 Heer Infantry company
269th Infantry Division XXVII Corps Leg 4 2 Heer Infantry company
253rd Infantry Division XXVII Corps Leg 4 2 Heer Infantry company
217th Infantry Division XXVII Corps Leg 4 2 Heer Infantry company
7th Infantry Division X Corps Leg 4 2 Heer Infantry company
35th Infantry Division X Corps Leg 4 2 Heer Infantry company
ARMEEGROUP B – 18th ARMY (*)
56th Infantry Division IX Corps Leg 4 2 Heer Infantry company
216th Infantry Division IX Corps Leg 4 2 Heer Infantry company
256th Infantry Division XXVI Corps Leg 4 2 Heer Infantry company
208th Infantry Division XXVI Corps Leg 4 2 Heer Infantry company
3/27/2015 Khamsin Dunkirk 1940, GAJO Games 4
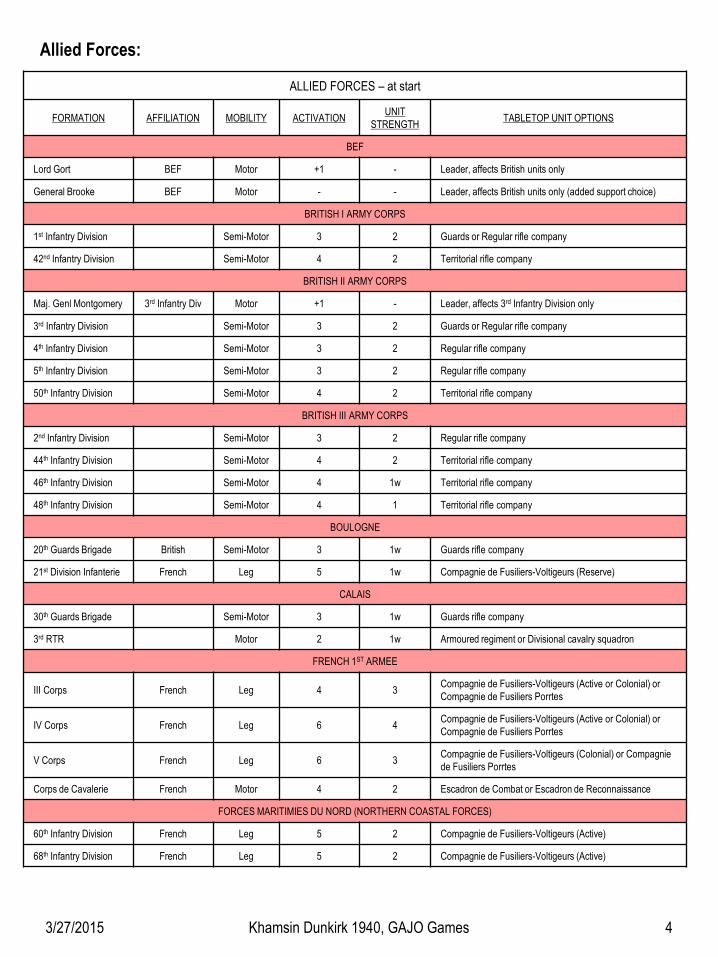
Allied Forces:
ALLIED FORCES – at start
FORMATION AFFILIATION MOBILITY ACTIVATION UNIT
STRENGTH TABLETOP UNIT OPTIONS
BEF
Lord Gort BEF Motor +1 - Leader, affects British units only
General Brooke BEF Motor - - Leader, affects British units only (added support choice)
BRITISH I ARMY CORPS
1st Infantry Division Semi-Motor 3 2 Guards or Regular rifle company
42nd Infantry Division Semi-Motor 4 2 Territorial rifle company
BRITISH II ARMY CORPS
Maj. Genl Montgomery 3rd Infantry Div Motor +1 - Leader, affects 3rd Infantry Division only
3rd Infantry Division Semi-Motor 3 2 Guards or Regular rifle company
4th Infantry Division Semi-Motor 3 2 Regular rifle company
5th Infantry Division Semi-Motor 3 2 Regular rifle company
50th Infantry Division Semi-Motor 4 2 Territorial rifle company
BRITISH III ARMY CORPS
2nd Infantry Division Semi-Motor 3 2 Regular rifle company
44th Infantry Division Semi-Motor 4 2 Territorial rifle company
46th Infantry Division Semi-Motor 4 1w Territorial rifle company
48th Infantry Division Semi-Motor 4 1 Territorial rifle company
BOULOGNE
20th Guards Brigade British Semi-Motor 3 1w Guards rifle company
21st Division Infanterie French Leg 5 1w Compagnie de Fusiliers-Voltigeurs (Reserve)
CALAIS
30th Guards Brigade Semi-Motor 3 1w Guards rifle company
3rd RTR Motor 2 1w Armoured regiment or Divisional cavalry squadron
FRENCH 1ST ARMEE
III Corps French Leg 4 3 Compagnie de Fusiliers-Voltigeurs (Active or Colonial) or
Compagnie de Fusiliers Porrtes
IV Corps French Leg 6 4 Compagnie de Fusiliers-Voltigeurs (Active or Colonial) or
Compagnie de Fusiliers Porrtes
V Corps French Leg 6 3 Compagnie de Fusiliers-Voltigeurs (Colonial) or Compagnie
de Fusiliers Porrtes
Corps de Cavalerie French Motor 4 2 Escadron de Combat or Escadron de Reconnaissance
FORCES MARITIMIES DU NORD (NORTHERN COASTAL FORCES)
60th Infantry Division French Leg 5 2 Compagnie de Fusiliers-Voltigeurs (Active)
68th Infantry Division French Leg 5 2 Compagnie de Fusiliers-Voltigeurs (Active)

3/27/2015 Khamsin Dunkirk 1940, GAJO Games 5
Allied Initial Deployment –
• Allied formations may not be deployed in
an area under German or Belgian control
at start, otherwise they may deploy as
follows:
•French 1st Army – within 1 area of Lille
•Boulogne and Calais garrisons – in that area
•BEF – any area east of the Fuhrer Halt Line
•Forces Maritime du Nord – Dunkirk
Force Changes / Restrictions –
Flames of War forces are selected from the
appropriate list as set forth in the Army List
Section. Each entry will note the base list
to be used, plus any added or deleted
options to accurately represent that
formation.
Replacements –
• The Axis CiC receives 15 armor & 20
general replacement points each
replacement turn
• The Allied CiC receives 0 armor & 5
general replacement points each
replacement turn
• Replacement Integration - both sides in
this campaign use dedicated replacements
Axis Initial Deployment –
• Axis formations may be deployed in any
areas noted on the map as starting under
German control. Only units of the same
army or group may deploy together in the
same area initially.
• The starting deployment area is shown in
parentheses after the name of the group / army on
the Order of Battle
• (*) - Forces from Armeegroup B may deploy in
either Ghent, Oudenaarde, Tournai or Douai

3/27/2015 Khamsin Dunkirk 1940, GAJO Games 6
2.0 Campaign Timeline
The campaign commences on May 22nd
and ends by June 5th (a total of 15 days).
3.0 Weather
Determining Weather –
The weather during this campaign started
out mild and sunny, but several fronts
brought overcast and storms at points
during the action.
To reflect this, each turn commencing with
the May 28th turn, the Allied CiC rolls for
weather at the start of each turn. On a roll
of 5+ the weather becomes overcast and
stormy for the day.
Below is the turn record chart, showing
events and actions for the campaign:
Weather Effects –
Weather other than clear affects operations
as follows:
Overcast/Stormy –
• No airpower will be present
• Double the movement costs for each
type of connector
• Add an extra 2 to terrain rolls for
waterway areas and areas adjacent
to waterway areas for the rest of the
campaign
Dunkirk 1940 - Turn Record Chart
1) Wed
May 22
4) Sat
May 25 [h]
7) Tue
May 28 [w]
10) Fri
May 31
13) Mon
Jun 3
2) Thu
May 23
5) Sun
May 26 [1]
8) Wed
May 29
[ar, pw]
11) Sat
Jun 1
14) Tue
Jun 4
3) Fri
May 24 [h]
6) Mon
May 27
9) Thu
May 30
12) Sun
Jun 2 [1]
15) Wed
Jun 5
Milestones indicated on the turn chart above are:
[1] – replacements available [w] – begin rolling for weather
[ar] - Axis reinforcements arrive [cr] - Allied reinforcements arrive
[h] – check for halt order [pw] – Panzer withdrawal begins

3/27/2015 Khamsin Dunkirk 1940, GAJO Games 7
4.0 Coordination and Supply
Allied Coordination –
The campaign covered a wide area, and
small forces were forced to hold off much
larger forces quite frequently.
To reflect this, the following rules apply to
units occupying the same area:
• French Corps formations may not occupy
any area with any other formation except a
leader.
• French and British forces may never occupy
the same area together, unless they are
occupying a coastal area
If a unit is ordered to move in such a way
as to violate the coordination rules the
referee will adjust that unit’s movement to
comply with these rules.
Optional Rule:
If willing players are available, the French
and British armies can be represented by
two different overall commanders, each of
whom turns in their moves separately.
While this nicely reflects the actual
coordination problems the Allies faced, it
significantly handicaps them in the
campaign, so if this rule is used the Allied
forces are awarded an extra 15 victory
points.
Axis Coordination –
German forces had a significant material
superiority in this area during the campaign
timeframe. They were inhibited in bringing
their full force to bear by the lack of
multiple approach routes for many of the
Allied defensive positions.
To reflect this, the following rules apply to
units occupying the same area:
• German units from different corps, groups
or armies may not occupy the same area
• German reserve formations may share an
area with other units from their army group
(they are not assigned to any specific corps)
If a unit is ordered to move in such a way
as to violate the coordination rules the
referee will adjust that unit’s movement to
comply with these rules.
Supply Areas –
Supply areas for Axis formations are Ghent,
Oudenaarde, Tournai and Arras. Supply
areas for the Allied formations are
Boulogne, Calais and Dunkirk.
Lille is a special case for the Allied side
only. As long as Lille is under Allied control,
any Allied force within 1 area of Lille may
ignore the firepower penalty for being out
of supply for up to 3 platoons in each
tabletop action. The three platoons must
be secretly designated after deployment.

3/27/2015 Khamsin Dunkirk 1940, GAJO Games 8
5.0 Aerial Operations
Tactical Air Support –
During this period in the war the Luftwaffe
maintained almost total air superiority over
Northern France, Belgium and Holland. To
reflect this, tactical air support is not
purchased but rolled for once an
engagement commences. To determine
the level of Axis Air Support in an
engagement roll one d6 and consult the
table below:
No air support is available if the weather is
overcast / stormy.
Luftwaffe Priority –
Even though they dominated the skies for
most of the campaign, the Luftwaffe could
not be everywhere. The commanders on
the ground could not dictate where the air
priority would lie each day, but they could
influence decisions by escalating support
requests through the command structure.
To reflect this, the German CiC for the
campaign has a pool of 6 Luftwaffe priority
points. These represent urgent requests for
priority supported by the higher command
levels.
Each time a point is used, all engagements
for that turn gain a +2 die roll modifier on
the Air Support Table. Once all 6 Luftwaffe
priority points have been expended no
more are available for the duration of the
campaign.
Overwhelming Air Superiority –
When rolling for the number of aircraft in a
flight, the Axis player automatically
receives the benefit of the Stuka
Schwerpunkt rule – he rolls 2 aircraft dice
and takes the highest result each time he
receives a support flight.
Air Support Table
Die Roll Axis Air Support Level
1-2 Sporadic
3-4 Limited
5-6 Priority
No air support is available if the weather is overcast / stormy.
Subtract 1 from the roll for every 3 areas away from an Axis
supply source
Add 2 if the Axis CiC expands a Luftwaffe priority point

3/27/2015 Khamsin Dunkirk 1940, GAJO Games 9
5.0 Aerial Operations (cont)
Port Attacks –
Once the Luftwaffe was in range, it
wrecked havoc with the port facilities in
Dunkirk and other coastal port areas.
Once a German unit is within 3 areas of
any Allied Supply Source area, the German
CiC may expend a Luftwaffe priority point
to mount an all out aerial blitz on the port.
The player rolls 1d6 and succeeds in
destroying the port facilities on a roll of 3+.
A destroyed port counts as a beach area
for evacuation purposes, with the
exception of Dunkirk, where the mole can
be used once the port is destroyed. The
mole cannot be used for evacuation while
the port is still intact.
Allied Fighter Support –
By this stage of the campaign the Allied Air
Forces were very disrupted, many of their
bases had been overwhelmed, and aircraft
losses had been very high. The remaining
French Air Forces were now heavily
concentrated on supporting their thin line
along the Somme River.
The British Royal Air Force (RAF) was the
only hope for the remaining Allied troops in
the north. The RAF provided fighter
support where it could from bases in
England.
To reflect this, any engagement within 3
areas of an Allied supply area
automatically receives sporadic air support,
which may only be used for interception.

3/27/2015 Khamsin Dunkirk 1940, GAJO Games 10
6.0 Movement
The movement point (MP) cost to use each
connector type is as follows:
Effect of Weather on Movement –
During an overcast / stormy turn the MP
cost for each connector type is doubled.
Refugees and Movement –
The German advance forced many
civilians from their homes, and they and
their belongings choked the roads leading
away from German occupied areas.
To reflect this, the following special
movement rules are in effect for this
campaign: • German units must expend one additional
movement point for each connector they use
which is attached to an Allied controlled area
• Allied units must expend one additional
movement point for every connector used that
is within 2 areas of a German controlled area
Movement Events –
Several events can affect / limit movement
options for each side, reflecting outside
interference with the conduct of operations:
• Halt by order of the Fuhrer! – on certain
turns it is possible that the German High
Command will order a halt to offensive
operations.
To reflect this, on each turn with a halt
number, the Axis CiC rolls 1d6. if the result
is equal to or less than the halt number a
halt has been imposed.
During a halt no Axis unit may activate to
enter an enemy controlled area west of the
Fuhrer Halt Line.
A halt remains in effect until rescinded.
Each turn after the halt is imposed the Axis
CiC rolls 1d6, the halt is lifted on a roll of
5+. Add one for each turn that the halt has
been in effect to date.
Once a halt has been in effect no further
halts will be ordered.
• French Counterattack – during the first
campaign turn, units of the French 1st
Armee may not be given any movement
orders. The army is focused on a local
counterattack near Cambrai.
Dunkirk Movement Table
Connector
Type
MP
Cost Special Rules
Road 1 -
Trail 2 -
Leaving
waterway
area
+1 Cost is added to normal connector
cost
Refugee
connector +1 See refugee rule

3/27/2015 Khamsin Dunkirk 1940, GAJO Games 11
6.0 Movement (continued)
British Night Withdrawals –
The BEF, with its core of regular soldiers,
was able to accomplish prodigious feats
during the Dunkirk campaign. On multiple
occasions, BEF units were heavily
engaged throughout an entire day, and still
managed to withdraw in decent order
during the night to take up new positions
for the following day. This was done at the
cost of tremendous fatigue, and heavy
losses in vehicles and material, but it was a
major factor in preserving the BEF for
evacuation.
To reflect this, a BEF unit may be ordered
to hold its area during the day, and to then
execute a night withdrawal.
The unit is treated as stationary for that
day for the purposes of any engagements,
etc. After all engagements for that
campaign turn have been resolved, any
unit with a night withdrawal order is moved
back up to 2 areas, regardless of the
results of any engagement it fought that
turn.
The destination area for the night
withdrawal is chosen by the British CiC
after all of the engagements for that turn
have been resolved. If desired at that point,
the unit may cancel its withdrawal and
remain in place, but it still incurs the
attrition penalty below, and is required to
regroup during the following campaign turn.
Units that executed a night withdrawal
must regroup in their new location, and
take an automatic 10 armor and 5 general
attrition points, in addition to any others
they may have incurred that turn.
A night withdrawal may cross, but not end
in, an area under enemy control. If it does
so, the attrition penalty for the withdrawal is
doubled.
If there is no legal area for the force to
complete its night withdrawal to the force is
considered dispersed and captured and it
is removed for the duration of the
campaign.
Allied Movement Restrictions –
The areas initially under Axis control were
already strongly held by units not involved
in the offensive. No Allied unit may enter
any of these areas at any time.

3/27/2015 Khamsin Dunkirk 1940, GAJO Games 12
7.0 Engagement Special Rules
Setting up the table –
This campaign uses the following terrain
placement tables:
Basic Low Countries table:
Roll for one random feature for every 2’ by
2’ section of table (6 rolls for a 4’ by 6’ table)
If a terrain feature is indicated, one should
be placed by the defender anywhere within
that section of the table. Terrain features
should be at least 8” and no more than 16”
in length and width, and may cover no
more than ¼ of the surface area of that
section of the table.
Modify the results from the basic table
based on the area terrain as follows:
• Open areas – subtract 1 from die rolls
• Village areas – defender may place 1
village in addition to other terrain
• Ridge terrain –defender may place 1
additional ridge
• Waterway terrain – add 1 to die rolls, the
defender may place a 4” wide waterway,
representing a canal, from one table edge
directly to the opposite table edge (the
canal must be placed at a 90 degree angle
from the table edge). The canal must be
placed prior to placing any other terrain. If
a canal is present, the attacking force may
recycle their first platoon that is lost – it
enters the table as a reinforcement the turn
following the original platoon’s elimination
and its loss counts for attrition, but not for
calculating victory points for that mission.
• Wooded terrain area – the defender may
place 2 large (roughly 16” by 16”) woods in
addition to any other terrain rolled for. Do
not subtract from any terrain rolls for an
area with wooded terrain
• Coastal area – the defender may place 2
large (roughly 16” by 16”) areas of dunes in
addition to any other terrain rolled for.
Dune areas may not be placed more than
12” from any table edge.
In addition, any orchards rolled in a coastal
area are instead areas of scrub.
• Old Fortified Areas – any forces in an
area noted as being and old fortified area
may field the following in any tabletop
actions – 36” of trench line, two AT
obstacles and 4 elements of barbed wire.
Low Countries Terrain Table 1
Terrain Die Roll
None 1-2
Crop Fields 3-4
Orchard 5
Small wood 6
Ditch or Boggy Ground 7+

3/27/2015 Khamsin Dunkirk 1940, GAJO Games 13
7.0 Engagement Special Rules (Continued)
Terrain Specifics –
Village –
Each village should consist of 3+d3
buildings, and also include a small walled
orchard of at least 6” by 6”.
Villages in this area were mostly sturdy
stone walled buildings. Any infantry stand
touching or within a building or orchard wall
is considered in bulletproof cover and
concealed.
Spring Fields –
During the operation the area was covered
with newly planted crops. Crop fields
provide no cover and do not block line of
sight, but they are difficult going for
vehicles.
Ridges –
The ridge areas were of huge tactical
importance due to the generally flat terrain
in this area. Any unit or vehicle on a ridge
or hill can see over standing crop fields,
but not woods. Ridges are treated as
difficult ground and provide concealment to
any team or vehicle on them.
Ditches –
Ditches are linear features that are
represented by a number of 8” sections.
If ditch terrain is selected the defender rolls
1d6 and places that number of 8” ditch
sections in the designated area of the table.
Each ditch section must connect to either a
canal or another ditch section.
Dunes –
Areas of dunes were prevalent near the
coast. Dunes are treated as very difficult
going for vehicles and provide cover for
infantry and man-packed gun teams only.
Scrub Areas –
Scrub areas are covered with low lying
bushes and stunted trees. They are treated
as difficult going, and provide concealment
for any team touching them.

3/27/2015 Khamsin Dunkirk 1940, GAJO Games 14
7.0 Engagement Special Rules (Continued)
Urban Areas –
Engagements in an urban area are fought
out on a cityfight table. A cityfight table is 4’
by 4’ and all terrain must be either building
or street, with a maximum of one open
space (park or equivalent) of up to 12”
square.
The defender lays out the board, using as
many ruined and intact buildings as
possible. The attacker then may move up
to d6 buildings by no more than 6” from
their original location, leaving any open
space or street terrain clear.
All engagements in an urban area are
fought out as Not One Step Back missions
unless they are played using the Total War
rules.
Weather and Terrain –
Once the weather has been overcast and
stormy the low lying terrain close to the
coast changed drastically as boggy areas
sprang up.
Commencing with the first campaign turn
that there is stormy & overcast weather,
the defender adds an additional +2 to all
terrain rolls in any waterway area, or any
area directly connected to a waterway area.
German Heavy Armor –
German forces during Dunkirk 1940 had
access to a variety of medium panzers, but
they needed to be careful with them as
replacements for any lost in action were
few and far between.
To reflect this, German forces receive extra
armor attrition when they lose any of their
medium tank models in action. Instead of 1
armor attrition point for each AFV lost, the
Germans receive the following attrition if
they lose any Czech panzer, PzKw III or
PzKw IV models in action:
Light AFVs –
During the Early War period most armored
vehicles were technically light AFVs. To
accurately reflect the effect of attrition of
these critical assets, ignore the light AFV
rule for attrition – any vehicle with an armor
rating counts as a full AFV for attrition
purposes.
Situation Armor Attrition Points
Each PzKw 35 or 38 lost +1
Each PzKw III lost +2
Each PzKw IV lost +3

3/27/2015 Khamsin Dunkirk 1940, GAJO Games 15
8.0 Allied Special Rules
The Belgian Army –
The Belgian army had lost most of its
country and taken terrible losses by the
time of the Dunkirk campaign, but it still
fought on for quite some time and tied
down significant German forces while
doing so.
Several areas on the campaign map start
under Belgian control. Allied forces may
move through but not end their movement
in a Belgian controlled area. German units
may not enter a Belgian controlled area
except via assault.
Belgian forces do not fight tabletop actions,
but German forces may attempt to seize
control of it by activating an assault against
it by one or more units.
A Belgian-controlled area is considered to
have an intrinsic SP level of 2 for defensive
purposes. If the German player activates
an assault, it succeeds on a d6 roll of 5+.
Add 1 to this roll if the German force SPs
are at least double the the defenders, and
add 2 to the roll if they are 3-1 or greater.
Once a Belgian controlled area has been
taken it may not return to Belgian control,
even if an Allied force regains control of it.
Belgian Surrender –
Once 2 or more Belgian-controlled areas
have fallen to German forces, there is a
chance that the Belgian king will accept an
armistice and surrender to the Germans.
The Belgian army starts with a resistance
level of 8. For each area that the Germans
have taken from the Belgians their
resistance level is reduced by 1.
Once the Belgian resistance level is 6 or
less, commencing on the turn following the
Allied CiC rolls 1d6 at the beginning of
each turn. If the die roll is equal to or
greater than the Belgian resistance level
the Belgian army is exhausted and the
King offers an armistice to the Germans.
If an armistice is arranged, no German
force may enter or assault a Belgian-
controlled area that turn, as the troops are
tied up managing the surrender of
individual Belgian units.
Commencing the following campaign turn,
all areas formerly Belgian controlled are
now open and uncontrolled. Either side’s
forces may enter such areas, requiring
activation to do so as normal. Such areas
become controlled in the normal way.

3/27/2015 Khamsin Dunkirk 1940, GAJO Games 16
8.0 Allied Special Rules (Cont)
Naval Bombardment –
The Allies maintained a strong naval
presence off the Channel coast, and those
areas close to the coast bombardment
support was available from the fleet.
To reflect this, the Allied player may gain
naval support for any engagement fought
within 1 area of an Allied Supply Area. The
support is considered to be the largest
Allied artillery size offered in your tactical
rules set. The Flames of War stats are
shown below.
The Allied commander must designate a
single command or FO stand to call down
the Naval fire, which will only range in on a
roll of 6 for each attempt. The stand used
to call down the naval fire may not move,
shoot or observe for another battery during
the turn it spots for the fleet.
Backs to the Sea –
The German command was very nervous
about casualties and believed that the
Luftwaffe would finish off any Allied forces
attempting evacuation. At the same time,
the Allied forces fought fanatically in
coastal areas knowing that their backs
were to the sea.
To reflect this, any time a Allied force loses
a tabletop engagement in a coastal area by
more than a 1:6 ratio, the Allied player rolls
1d6 and on a 4-6 the Allied forces rally
area and are able to barely hang on to their
positions, at the cost of heavy casualties.
The Allied player retains control of that
area, although their force incurs an
additional 10 general attrition points (in
addition to any they already received for
the action).
On any other result, the normal
engagement result rules apply.
Lord Gort –
The commander of the BEF had access to
the force’s extensive motor pool. Up to two
British units that are within 1 area of Lord
Gort may move as if they were Motor
mobility each turn.
Brooke –
Destined to play a very important role in
the overall direction of the British war
effort, General Alan Brooke did a superb
job coordinating forces from different BEF
units during the withdrawal. Any force that
includes Brooke may take an extra support
choice from their allowable choices when
selecting its forces for a tabletop
engagement.
Range ROF AT FP Special Rules
Naval
Bombardment - - 5 1+
smoke
bombardment

3/27/2015 Khamsin Dunkirk 1940, GAJO Games 17
8.0 Allied Special Rules (Cont)
Evacuation –
The Allied forces in this area were cut off
from their main forces in the south, and
Britain in particular could ill afford to lose
her only significant pool of trained soldiers.
Once it was clear that a counterattack
could not reopen communication with the
south, the preparations for an evacuation
by sea began.
The “Miracle of Dunkirk” was in reality a
very well planned and coordinated sea
evacuation, which leveraged Allied naval
power to allow redeployment from the
northern pocket.
To reflect this, the Allied player has the
capacity to evacuate up to 4 SPs of Allied
units each turn from any coastal area(s).
The number of SPs that can be evacuated
from a specific area is limited by its
evacuation capacity:
• Up to 4 SP per turn may be
evacuated for any Allied
controlled Supply Source area
if the port facilities are intact
• Up to 2 SP per turn may be
evacuated from the Dunkirk
mole if the port has been
destroyed
• Up to 1 SP per turn may be
evacuated by beach from any
other coastal area
A unit may be evacuated over several turns
if required based on available capacity.
Once a unit has begun embarking it may
not participate in combat in any way, and is
destroyed if the Allied player loses an
engagement in the embarkation area
before the entire unit has embarked.
Each unit which has been completely
evacuated provides victory points for the
Allied CiC (see Winning the Campaign).
Evacuated forces are considered to have
been re-deployed to another area, and
such forces may not re-enter the campaign
in any manner once evacuated.

3/27/2015 Khamsin Dunkirk 1940, GAJO Games 18
9.0 Axis Special Rules
Panzer Withdrawal –
The German High Command wanted to
withdraw and regroup their panzer units
once victory in the north was assured,
knowing that they would be needed to
deliver the knockout blow to the ragged
Allied line in the south.
On each turn indicated as a panzer
withdrawal turn, the Axis CiC must
withdraw 1 panzer unit (it is removed from
the campaign into strategic reserve), or
lose 10 victory points.
The Axis CiC may choose which panzer
formation is withdrawn each time a
withdrawal is required.
10.0 Winning the Campaign
Victory –
Both sides’ goals for the campaign were
quite different. The Axis forces wanted to
destroy the northern Allied armies, and
then quickly release and regroup their
mobile formations to strike south into the
heart of France.
The Allied forces wanted to delay the Axis
as long as practical, to allow time to
construct a more solid defense along the
Somme River, while saving as much
valuable equipment and even more
valuable trained personnel through
evacuation.
To reflect his, each side receives Victory
points as follows:
At the end of the campaign, the side with
the highest VP total is declared the winner.
If the winner manages to accumulate a 3:2
or higher ratio of VPs they have won an
overwhelming victory.
Dunkirk Victory Point Table
Action
Allied
VPs
Axis
VPs
Each British SP evacuated 2 -
Each French SP evacuated 1 -
Each turn the Axis holds an Allied
supply area 5
Each turn in control of an objective area 2 1
Every 5 armor or 10 general attrition
points received by German forces 1 -

3/27/2015 Khamsin Dunkirk 1940, GAJO Games 19
11.0 Strategies:
Map Movement and Area Control –
The Allies have to walk a careful line,
defending tenaciously to slow the Axis
drive down and hold the key coastal ports
as long as possible, without sacrificing the
bulk of the forces which will be desperately
needed later. The Axis forces need to
balance the need to drive hard for the
coast with managing their casualty levels,
and being ready to withdraw their key
panzer units when they are needed to the
south.
Tactical / Tabletop –
Remember that you know the mission prior
to planning your army list for a given
engagement. Think through your plan for
the action, remember the restrictions on
deployment, etc. when setting up your
force. This is a key element for achieving
victory on the tabletop.
German - The German forces fall roughly
in two groups, fast and hard hitting (but
prone to attrition) Panzer forces, and the
solid but slow moving core of infantry units
pressing steadily against the Allied line.
Your core units have lots of different
options to bring to the tabletop, allowing
lots of customization by mission and
opponent if the Axis has good intelligence.
This brings a tactical flexibility, which
combined with an overall training and
some weapons advantages (the 88mm gun,
PzKw III and IV tanks, etc.) makes the
German units very tough through the
campaign.
Allied – on the other hand, playing the
Allied forces is really an exercise in getting
deployment right and making your
firepower advantages tell before you are
inevitably outmaneuvered.
British forces, particularly regulars and
guards, can be very tenacious on defense.
British armor, with no hope for replacement,
is a precious but powerful asset that should
be used carefully and for maximum effect.
The French forces are more varied – the
infantry can be tough on defense but brittle,
while the armor, while very good, is also a
wasting asset that must be used very
carefully.
Allied strategy needs to inflict maximum
casualties and maximum delay on the
seemingly inexorable advance of the
German forces, while husbanding their
own resources to ensure continued ability
to resist long enough to cover the
evacuation.

3/27/2015 Khamsin Dunkirk 1940, GAJO Games 20
Move and Attrition Sheet – Axis Armeegroup A
Formation Current Attrition Points
Attrition Status Start
Area
Destination
Area Via*
Armor General Total
Armeegroup A – Kleist Group
General Guderian
1st Panzer Division
2nd Panzer Division
10th Panzer Division
SS Liebstandarte IR
Grossdeutschland IR
6th Panzer Division
8th Panzer Division
SS Verfugungs Division
Armeegroup A – Hoth Group
3rd Panzer Division
4th Panzer Division
SS Totenkopf Division
5th Panzer Division
7th Panzer Division
20th Motorized Division
Armeegroup A – Reserves
9th Panzer Division
29th Motorized Division
* indicate the area to be moved through to get to the destination if the formation is moving through multiple areas

3/27/2015 Khamsin Dunkirk 1940, GAJO Games 21
Move and Attrition Sheet – Axis Armeegroup B
Formation Current Attrition Points
Attrition Status Start
Area
Destination
Area Via*
Armor General Total
Armeegroup B – 6th Army
188th Infantry Division
31st Infantry Division
61st Infantry Division
30th Infantry Division
19th Infantry Division
14th Infantry Division
269th Infantry Division
253rd Infantry Division
217th Infantry Division
7th Infantry Division
35th Infantry Division
Armeegroup B – 18th Army
56th Infantry Division
216th Infantry Division
256th Infantry Division
208th Infantry Division
Armeegroup B – Reserves
254th Infantry Division
* indicate the area to be moved through to get to the destination if the formation is moving through multiple areas

3/27/2015 Khamsin Dunkirk 1940, GAJO Games 22
Move and Attrition Sheet – Allied
Formation Current Attrition Points
Attrition Status
Start
Area
Destination
Area Via* Armor General Total
Lord Gort
General Brooke
British 1st Infantry Division
British 42nd Infantry Division
General Montgomery
British 3rd Infantry Division
British 4th Infantry Division
British 5th Infantry Division
British 50th Infantry Division
British 2nd Infantry Division
British 44th Infantry Division
British 46th Infantry Division
British 48th Infantry Division
British 20th Guards Brigade
French 21st Infantry Division
British 30th Guards Brigade
British 3rd Royal Tank Regiment
French III Corps
French IV Corps
French V Corps
French Corps de Cavalerie
French 60th Infantry Division
French 68th Infantry Division
* indicate the area to be moved through to get to the destination if the formation is moving through multiple areas

3/27/2015 Khamsin Dunkirk 1940, GAJO Games 23
Battle Outcome Sheet
Axis Losses
Losses: Attrition Points:
AFV
Platoons
Lost
Total
AFVs
Lost
Other
Platoons
Lost
Other
Platoons
Below ½
Strength Armor General Total
Parent Formation:
Allied
Losses
Losses: Attrition Points:
AFV
Platoons
Lost
Total
AFVs
Lost
Other
Platoons
Lost
Other
Platoons
Below ½
Strength Armor General Total
Parent Formation:
Outcome –
Winning Side: _____________________
Winner’s Victory Points: ________
Loser’s Victory Points: ________
Overview –
Location of Battle: _____________________

3/27/2015 Khamsin Dunkirk 1940, GAJO Games 24
Khamsin Dunkirk – Key Charts
Dunkirk Air Support Table
Die Roll Axis Air Support Level
1-2 Sporadic
3-4 Limited
5-6 Priority
No air support is available if the weather is overcast / stormy.
Subtract 1 from the roll for every 3 areas away from an Axis
supply source
Add 2 if the Axis CiC expands a Luftwaffe priority point
Low Countries Terrain Table 1
Terrain Die Roll
None 1-2
Crop Fields 3-4
Orchard 5
Small wood 6
Ditch or Boggy Ground 7+
Terrain Types:
• Open areas – subtract 1 from die rolls
• Village areas – defender may place 1 village in addition
to other terrain
• Wooded terrain – defender may place 2 large (roughly
16” by 16”) woods in addition to any other terrain rolled
for. Do not subtract from any terrain rolls for an area with
wooded terrain
• Ridge terrain – defender may place 1 additional ridge
• Waterway terrain – add 1 to die rolls, the defender may
place a 4” wide waterway, representing a canal, from one
table edge directly to the opposite table edge (the canal
must be placed at a 90 degree angle from the table edge).
The canal must be placed prior to placing any other
terrain. If a canal is present, the attacking force may
recycle their first platoon that is lost – it enters the table
as a reinforcement the turn following the original
platoon’s elimination and its loss counts for attrition, but
not for calculating victory points for that mission.
• Coastal area – the defender may place 2 large (roughly
16” by 16”) areas of dunes in addition to any other terrain
rolled for. Dune areas may not be placed more than 12”
from any table edge. In addition, any orchards rolled in a
coastal area are instead areas of scrub.
• Old Fortified Areas – any forces in an area noted as
being and old fortified area may field the following in any
tabletop actions – 36” of trench line, two AT obstacles
and 4 elements of barbed wire.
Attrition Table
Situation
Armor
Attrition
Points
General
Attrition
Points
Each AFV lost (except *) +1 -
Each AFV platoon counting
as lost +2 -
Every 3 light AFVs lost +1 -
Each non-AFV platoon
reduced below ½ strength - +1
Each non-AFV platoon
counting as lost (including
light AFV platoons)
- +3
Each independent team
counting as lost - +1
Each PzKw 35(t) or 38(t)*
lost +1 -
Each PzKw III* lost +2 -
Each PzKw IV* lost +3 -

3/27/2015 Khamsin Dunkirk 1940, GAJO Games 25
Khamsin Dunkirk – Key Charts
Cumulative
Unit Effect
Armor Attrition
Points
Total Attrition
Points
15 - Reduce the maximum vehicles for any AFV platoon fielded from this
unit by 1
30 - Reduce the maximum vehicles for any AFV platoon fielded from this
unit by 2
- 40 -1 to all activation rolls
- 60 Unit deploys 1 less stand (of majority type) in each platoon fielded in
any tabletop action; -2 to activation rolls
- 120 Unit is combat ineffective
Reduce maximums – simply reduce the maximum number of AFVs allowed in any given platoon on the list by
1. For example, an Italian Medium tank platoon is allowed a maximum of 5 M14 tanks. At 15AP it may only
field 4, and at 30 AP it may only be fielded with 3 tanks. For reduced maximums note that the cost of the unit is
adjusted (only pay for 4 tanks in the example above)
Deploy 1 less stand – units at this level of attrition pay normal points for all of their platoons, but when fielding
them 1 stand of the majority type is removed at deployment. For example, a German panzergrenadier platoon
is bought at full strength with 1 command MG team and 6 MG teams. It deploys only 1 command MG and 5
MG teams on the table, the other team already counting as lost. If in effect, this replaces any maximum AFV
restriction.
ATTRITION EFFECTS
Dunkirk 1940 - Turn Record Chart
1) Wed
May 22
4) Sat
May 25 [h]
7) Tue
May 28 [w]
10) Fri
May 31
13) Mon
Jun 3
2) Thu
May 23
5) Sun
May 26 [1]
8) Wed
May 29
[ar, pw]
11) Sat
Jun 1
14) Tue
Jun 4
3) Fri
May 24 [h]
6) Mon
May 27
9) Thu
May 30
12) Sun
Jun 2 [1]
15) Wed
Jun 5
Milestones indicated on the turn chart above are:
[1] – replacements available [w] – begin rolling for weather
[ar] - Axis reinforcements arrive [cr] - Allied reinforcements arrive
[h] – check for halt order [pw] – Panzer withdrawal begins

3/27/2015 Khamsin Dunkirk 1940, GAJO Games 26
Khamsin Dunkirk – Key Charts
Both forces moving Defender stationary
Defender stationary in
fortifications
Die
Roll Encounter Type
Die
Roll Encounter Type
Die
Roll Encounter Type
1 Free for all 1 Hold the Line 1 Trench Fight
2 Free for all 2 Hold the line 2 Trench Fight
3 Encounter 3 No retreat 3 The Big Push
4 Encounter 4 No retreat 4 The Big Push
5 Encounter 5 Breakthrough 5 The Big Push
6 The Cauldron 6 Hasty Assault 6 Breakout
Movement Allowance
Mobility Movement Points per Turn
Recon 6
Motor 4
Semi-Motor 2
Leg 1
Dunkirk Movement Table
Connector
Type
MP
Cost Special Rules
Road 1 -
Trail 2 -
Leaving
waterway
area
+1 Cost is added to normal connector
cost
Refugee
connector +1 See refugee rule
Dunkirk Victory Point Table
Action
Allied
VPs
Axis
VPs
Each British SP evacuated 2 -
Each French SP evacuated 1 -
Each turn the Axis holds an Allied
supply area 5
Each turn in control of an objective area 2 1
Every 5 armor or 10 general attrition
points received by German forces 1 -
Naval Bombardment Table
Range ROF AT FP Special Rules
Naval
Bombardment - - 5 1+ smoke bombardment