Embed Size (px)
Citation preview

Download resources from http://android.suven.net
Android OS programming Training + Certification by Rocky Sir Page 1
Dummy App to Emulate DTH App functionality
Objective: Imagine that you have downloaded Tata Sky (DTH operator) App on your
android phone to select channels and pay for it. Once the channels are selected for a particular
month, it’s quite likely that you would repeat the same set for next month and more-ever even if
you plan to change the set of channels, you would be interested to know “What was selected in
the previous month?”.
In the actual App the set of channels selected would be stored locally for a given user and send to
Server also. We would like to create Dummy app to emulate DTH app functionality on the
phone only, leaving the connectivity to the server.
To make it simpler, we would like to accept the client’s choice of channels and his / her profile
name. The profile information can be stored in shared preferences and the set of channels would
be stored in SQLite Database.
Note: Before we enter into the specifications of the project, there is a short explanation to Shared
preferences.

Download resources from http://android.suven.net
Android OS programming Training + Certification by Rocky Sir Page 2
Brief Note on Shared Preferences:
What are SharedPreferences? SharedPreferences are key-value pairs of primitive data types that are saved in a file within an
apps file structure. You can then access this file from anywhere within the app to either put data
into the file or take data out of the file. You can’t access the file from another app so it’s pretty
secure from that point of view.
Where would you use SharedPreferences? You would for example use SharedPreferences in a game where you would save the user’s name,
high score, and state of the game when they logged off. Then the next time they log in, their
score and game level would be retrieved from the preference file and they would continue the
game from where they ended it when they logged off.
Save your data in a single or multiple SharedPreferences: You can save your preferences data for a single file or for multiple files, depending on your
needs. The process is the same except for the SharedPreferences object that you get.
In the case of a single file, call getPreferences(), to get a SharedPreferences object for multiple
files, call getSharedPreferences() and pass it a name for the file as a parameter.
getPreferences() - for Activity level preferences. Each Activity will have its own
preference file
getSharedPreferences() - for application-level preferences. You can access the preference
file from anywhere in the application
Retrieving the data
Once you have the SharedPreferences object, you can use a number of get<type> methods to
retrieve the values.
Saving your data
Saving the data is pretty straight forward too. Simply use the SharedPreferences.Editor class to
get an Editor object by calling edit() on the relevant SharedPreferences object. Then use the
Download resources from http://android.suven.net
Android OS programming Training + Certification by Rocky Sir Page 3
put<type> methods to save the data, finalizing the process by calling apply() or commit() on the
Editor object.
The difference between apply() and commit()
apply()
This saves your data into memory immediately and saves the data to disk on a separate thread.
So there is no chance of blocking the main thread (your app won’t hang).It is the preferred
technique but has only been available since Gingerbread (API 9, Android 2.3).
commit()
Calling this will save the data to the file however, the process is carried out in the thread that
called it, stopping everything else until the save is complete. It returns true on successful
completion, false on failure.Use commit() if you need confirmation of the success of saving your
data or if you are developing for pre-Gingerbread devices. commit() has been available since
API 1.
Type of data that you can save Use SharedPreferences to save and retrieve primitive data types in key-value pairs (boolean,
float, int, long, strings). As of Honeycomb (API 11, Android 3.0) you can also save Set<String>
sets of String values.
Using SharedPreferences to save data in a unique file
If you want to save the data in a file of your choice, for that you need to pass a file name when
instantiating the SharedPreferences object.
Create the SharedPreferences and Editor objects:
public static final String PREFS_NAME = "SUVEN_PREFS"; public static final String PREFS_KEY = "SUVEN_PREFS_String";
SharedPreferences settings; Editor editor;

Download resources from http://android.suven.net
Android OS programming Training + Certification by Rocky Sir Page 4
Instantiate the SharedPreferences and Editor objects
Instantiate a SharedPreferences object, passing your file name and file creation mode constants as
parameters. Then instantiate an Editor for this SharedPreferences object:
Now you are ready to put your data into the file using the SharedPreferences put<type>methods.
Here’s what it looks like:
commit() returns true or false, depending on the success of saving the file. Here we assign this
value to the Boolean variable successfully Saved which you can use elsewhere if a further action
depended on whether or not the file was successfully saved.
Getting the data out of your unique file
Make sure that you have an instance of the SharedPreferences object:
Then use the SharedPreferences get<type> methods to retrieve the data:
Simply pass the relevant key and default value for the data that you want. The default value is used
in case there is no matching value to the supplied key.
settings = context.getSharedPreferences(PREFS_NAME, Context.MODE_PRIVATE); editor = settings.edit();
editor.putString(PREFS_KEY, text); editor.commit():
settings = context.getSharedPreferences(PREFS_KEY, Context.MODE_PRIVATE);
text = settings.getString(PREFS_KEY, null);
return text;

Download resources from http://android.suven.net
Android OS programming Training + Certification by Rocky Sir Page 5
Technical Specification: In this Application we have 5 Activities and
corresponding xml layout files.
1. First Activity will be the splash screen which gets
launched after the application gets launched.
This screen will be in display for 5 sec. and then the
controls go to the next activity
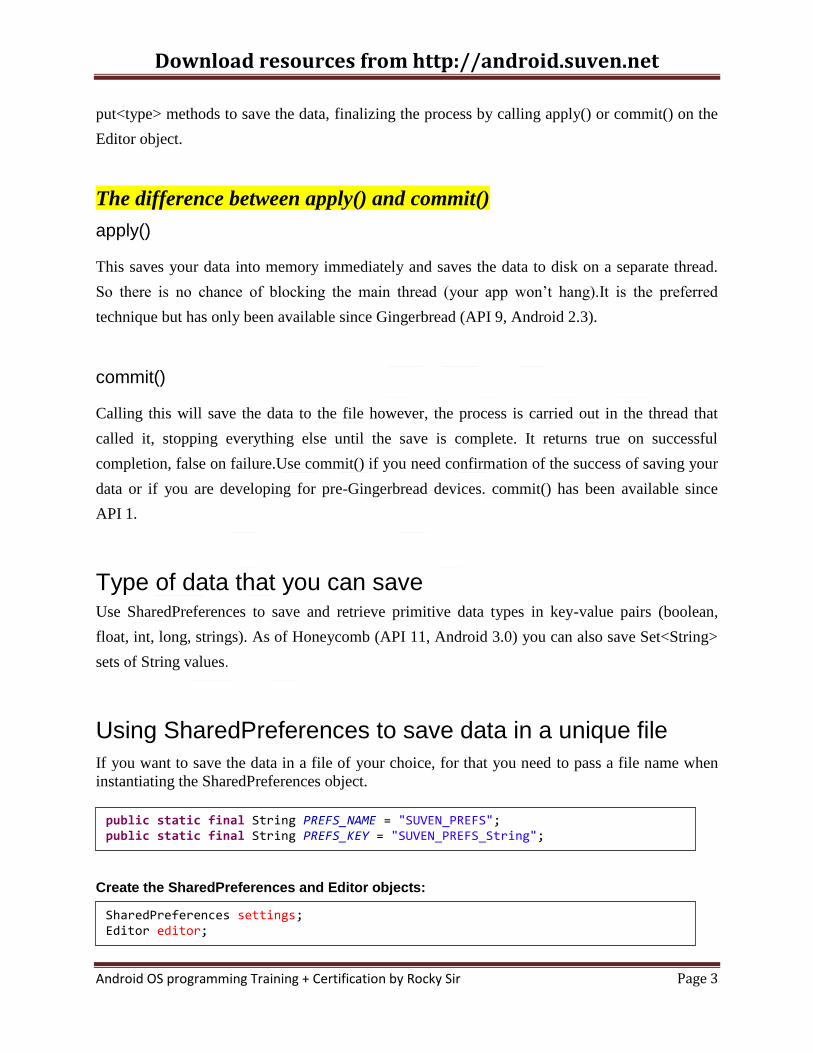
2. In the second activity user can save his profile and can see his
previous history. When this activity loads , it checks for user
profile in the SharedPreferences and set of channels are checked by
querying the sqlite database.
[ You would wonder , Why 2 sources for storing data ?
SharedPreferences are ideally used to store short data pieces. List of
channels could be large, hence they should be justifiably stored in files
or databases. Also we would like a participant learning Android OS
programming , should accept this project as a challenge where in he/she
gets a chance to use both SharedPreferences and SQLite databases. ]
Download resources from http://android.suven.net
Android OS programming Training + Certification by Rocky Sir Page 6
3. In the 3rd
activity user can select the multiple channels
If no profile found then user can
set profile
User can see the previous history
of selected channels. If he is
launching the app for first time
then ”No History Found “
message will come up.
Here user profile should be fetched from
SharedPreferencs.
And Channels history should be fetched from sqlite
database.
User can select multiple channels here and can go
forward after selecting the channels only.
And the selected channels data should go in the
next activity with their total cost using Bundle.
Note : provide at least a list of 10 channels

Download resources from http://android.suven.net
Android OS programming Training + Certification by Rocky Sir Page 7
4. In the 4th
activity show the total details
Note: Fetch the profile Information from SharedPreferences and set of channels from the
database. Recall the query() and Cursor usage.
The saved user profile should be display
in Upper TextView.
And the total cost of channels should
display in TexView after the ListView.
On pressing the button “Confirm Your Deal” the
above details should save in database.

Download resources from http://android.suven.net
Android OS programming Training + Certification by Rocky Sir Page 8
5. Last fifth activity will show the final details :
Show all the details (fetched from database) in
TableLayout.
Download resources from http://android.suven.net
Android OS programming Training + Certification by Rocky Sir Page 9
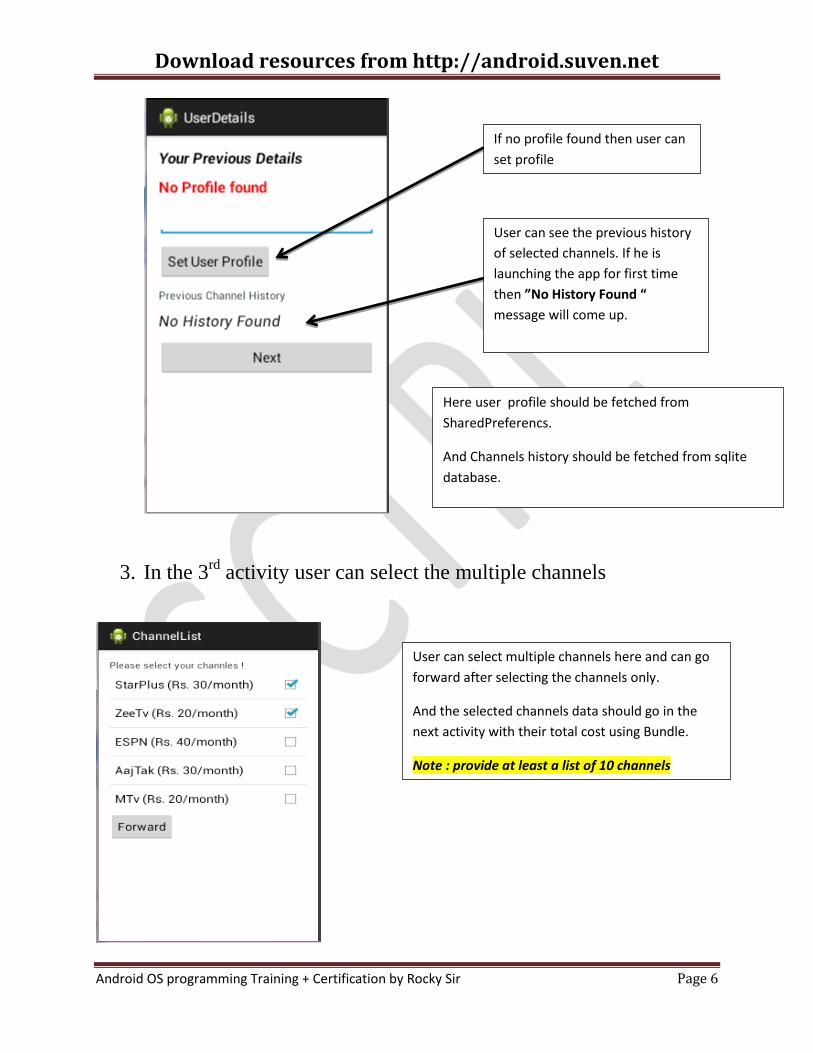
Code Snippet for Sqlite Database programming:
A java file which extends SqliteOpenHelper class which is responsible for doing all the
database operation and we will make an object of this class and use it other class for inserting
and fetching the records.
Some code snippet of this class:
publicclass DBAdapter { publicstaticfinal String KEY_ROWID = "_id"; publicstaticfinal String KEY_NAME = "name"; publicstaticfinal String KEY_CHANNEL = "channel"; publicstaticfinal String KEY_PRICE = "price"; privatestaticfinal String TAG = "DBAdapter"; privatestaticfinal String DATABASE_NAME = "MyDB"; privatestaticfinal String DATABASE_TABLE = "recharge"; privatestaticfinalintDATABASE_VERSION = 2;
privatestaticfinal String DATABASE_CREATE = "create table recharge (_id integer primary key autoincrement, " + "name text not null, channel text not null, price int not null);"; privatefinal Context context; private DatabaseHelper DBHelper; private SQLiteDatabase db; public DBAdapter(Context ctx) { this.context = ctx; DBHelper = new DatabaseHelper(context); } privatestaticclass DatabaseHelper extends SQLiteOpenHelper { DatabaseHelper(Context context) { super(context, DATABASE_NAME, null, DATABASE_VERSION);//SQLiteOpenHelper (Context context, String name, SQLiteDatabase.CursorFactory factory, int version) } // SQLiteDatabase.CursorFactory is null by default @Override publicvoid onCreate(SQLiteDatabase db) { try { db.execSQL(DATABASE_CREATE); } catch (SQLException e) { e.printStackTrace();

Download resources from http://android.suven.net
Android OS programming Training + Certification by Rocky Sir Page 10
} } @Override publicvoid onUpgrade(SQLiteDatabase db, int oldVersion, int newVersion) { Log.w(TAG, "Upgrading database from version " + oldVersion + " to " + newVersion + ", which will destroy all old data"); db.execSQL("DROP TABLE IF EXISTS contacts"); onCreate(db); } } //---opens the database--- public DBAdapter open() throws SQLException { db = DBHelper.getWritableDatabase(); returnthis; } //---closes the database--- publicvoid close() { DBHelper.close(); } //---insert a record into the database--- publiclong insertRecord(String name, String channel, int price) { ContentValues initialValues = new ContentValues(); initialValues.put(KEY_NAME, name); initialValues.put(KEY_CHANNEL, channel); initialValues.put(KEY_PRICE, price); returndb.insert(DATABASE_TABLE, null, initialValues); // 2nd parameter - null indicates all column values. } //---retrieves all the records--- public Cursor getAllRecords() { returndb.query(DATABASE_TABLE, new String[] {KEY_ROWID, KEY_NAME,KEY_CHANNEL,KEY_PRICE}, null, null, null, null, null); } }
Download the .apk from https://drive.google.com/file/d/0B4rCFkKCsCeKcmtHQlBQM1
VhUUU/view?usp=sharing