Embed Size (px)
Citation preview

DUBLIN CORE & OMEKA
Metadata & CMS
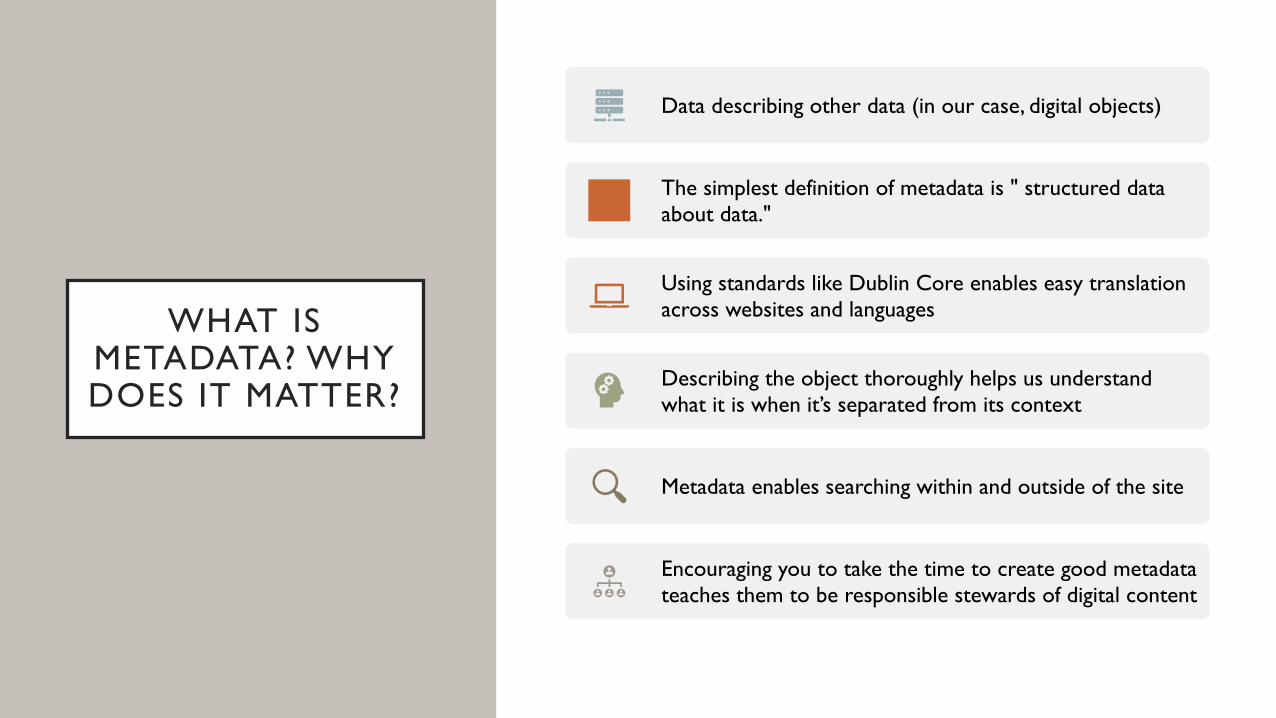
WHAT IS METADATA? WHY DOES IT MATTER?
Data describing other data (in our case, digital objects)
The simplest definition of metadata is " structured data about data."
Using standards like Dublin Core enables easy translation across websites and languages
Describing the object thoroughly helps us understand what it is when it’s separated from its context
Metadata enables searching within and outside of the site
Encouraging you to take the time to create good metadata teaches them to be responsible stewards of digital content
WHAT IS DUBLIN CORE?
Dublin Core metadata is used to supplement existing methods for searching and indexing Web-based metadata, regardless of whether the corresponding resource is an electronic document or a "real" physical object.The Dublin Core Metadata Element Set (DCMES) was the first metadata standard deliverable out of the DCMI was an IETF RFC 2413. DCMES provides a semantic vocabulary for describing the "core" information properties, such as "Description" and "Creator" and "Date".Dublin Core metadata provides card catalog-like definitions for defining the properties of objects for Web-based resource discovery systems.
WHAT IS THE DUBLIN CORE METADATA ELEMENT SET?
The Dublin Core Metadata Element Set is a set of 15 descriptive semantic definitions. It represents a core set of elements likely to be useful across a broad range of vertical industries and disciplines of study.
The Dublin Core Metadata Element Set was created to provide a core set of elements that could be shared across disciplines or within any type of organization needing to organize and classify information.
DUBLIN CORE –
THE BASICS
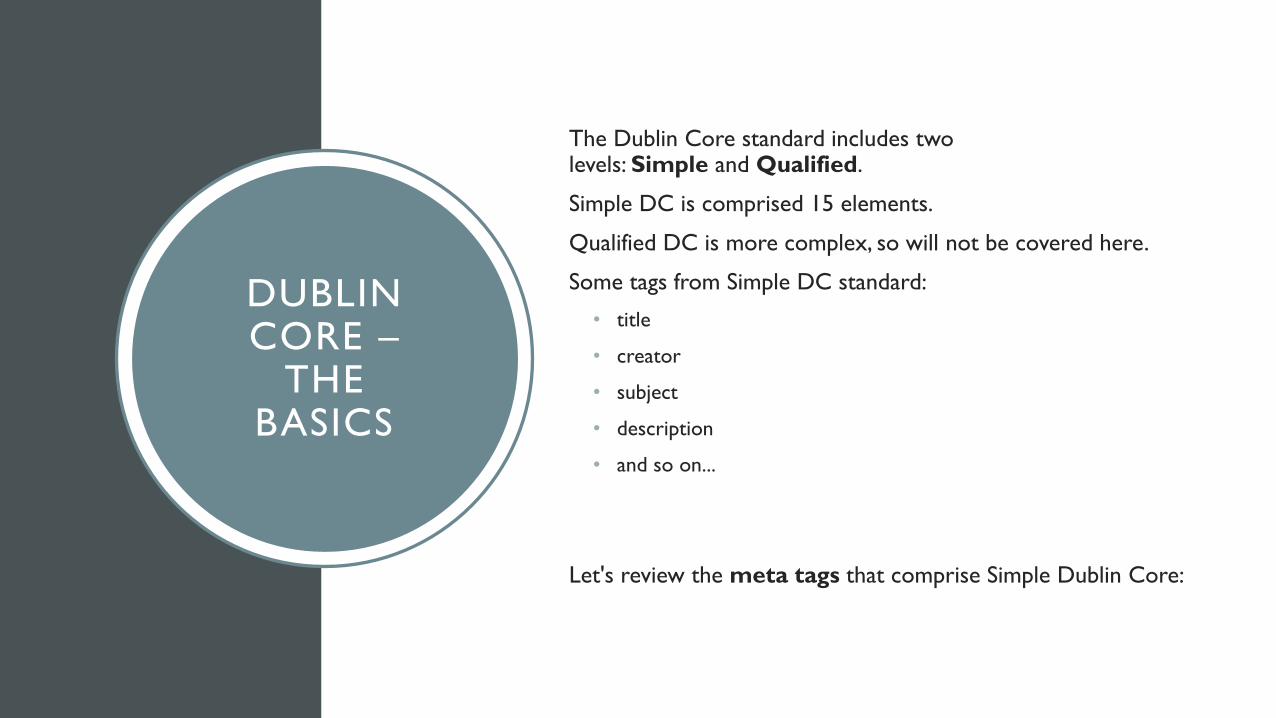
The Dublin Core standard includes two levels: Simple and Qualified.
Simple DC is comprised 15 elements.
Qualified DC is more complex, so will not be covered here.
Some tags from Simple DC standard:
• title
• creator
• subject
• description
• and so on...
Let's review the meta tags that comprise Simple Dublin Core:
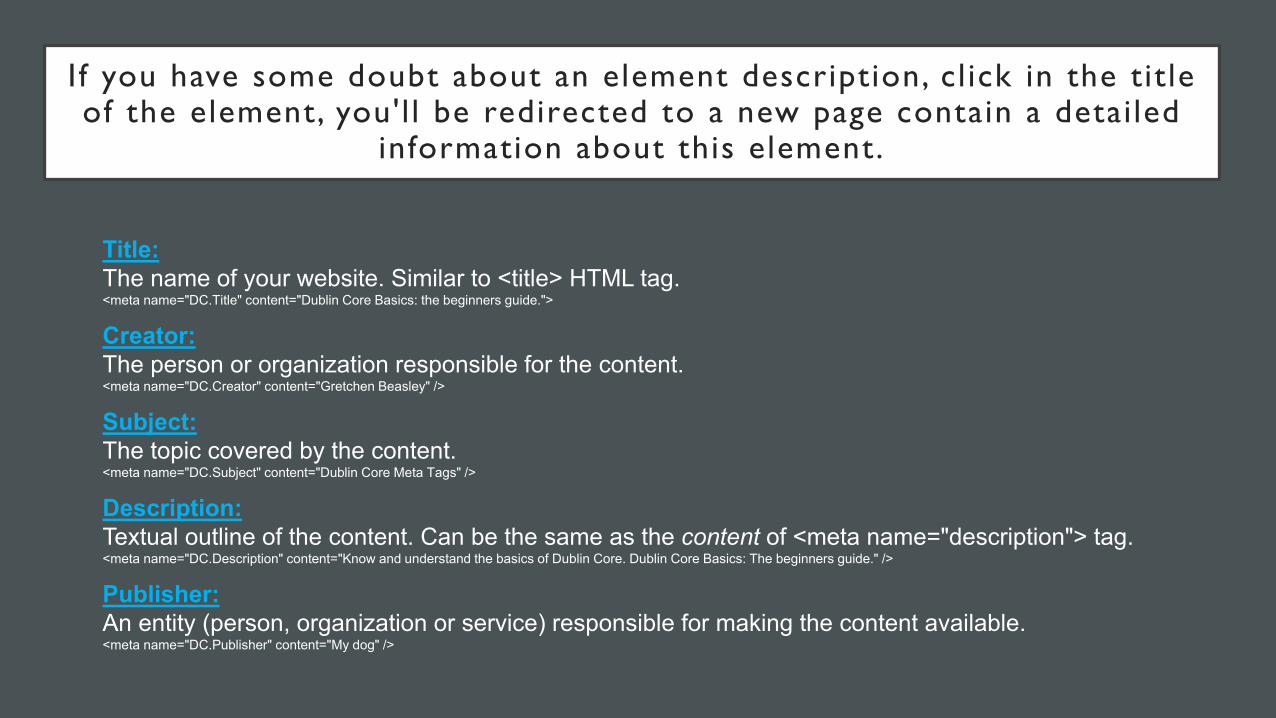
I f you have some doubt about an element description, cl ick in the tit le of the element, you'l l be redirected to a new page contain a detailed
information about this element.
Title:The name of your website. Similar to <title> HTML tag.<meta name="DC.Title" content="Dublin Core Basics: the beginners guide.">
Creator:The person or organization responsible for the content.<meta name="DC.Creator" content="Gretchen Beasley" />
Subject:The topic covered by the content.<meta name="DC.Subject" content="Dublin Core Meta Tags" />
Description:Textual outline of the content. Can be the same as the content of <meta name="description"> tag.<meta name="DC.Description" content="Know and understand the basics of Dublin Core. Dublin Core Basics: The beginners guide." />
Publisher:An entity (person, organization or service) responsible for making the content available.<meta name="DC.Publisher" content="My dog" />
I f you have some doubt about an element description, cl ick in the tit le of the element, you'l l be redirected to a new page contain a detailed
information about this element.
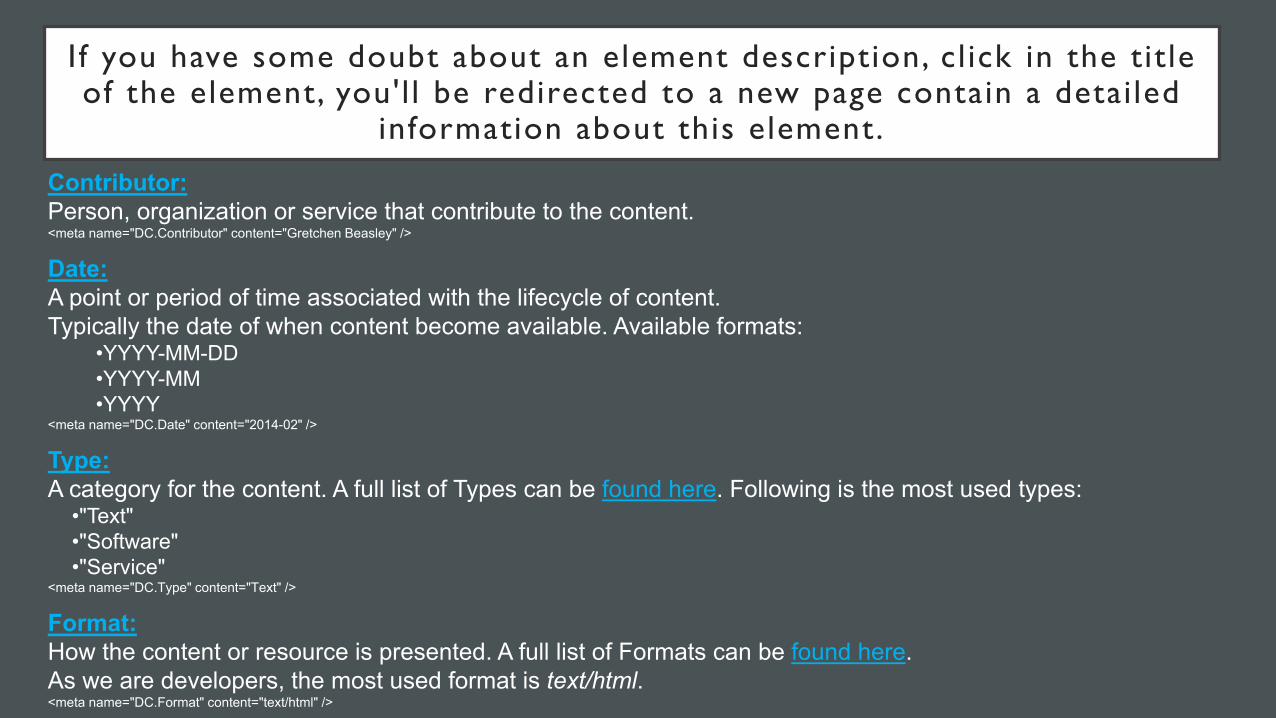
Contributor:Person, organization or service that contribute to the content.<meta name="DC.Contributor" content="Gretchen Beasley" />
Date:A point or period of time associated with the lifecycle of content. Typically the date of when content become available. Available formats:
•YYYY-MM-DD•YYYY-MM•YYYY
<meta name="DC.Date" content="2014-02" />
Type:A category for the content. A full list of Types can be found here. Following is the most used types:
•"Text"•"Software"•"Service"
<meta name="DC.Type" content="Text" />
Format:How the content or resource is presented. A full list of Formats can be found here. As we are developers, the most used format is text/html.<meta name="DC.Format" content="text/html" />
I f you have some doubt about an element description, cl ick in the tit le of the element, you'l l be redirected to a new page contain a detailed
information about this element.
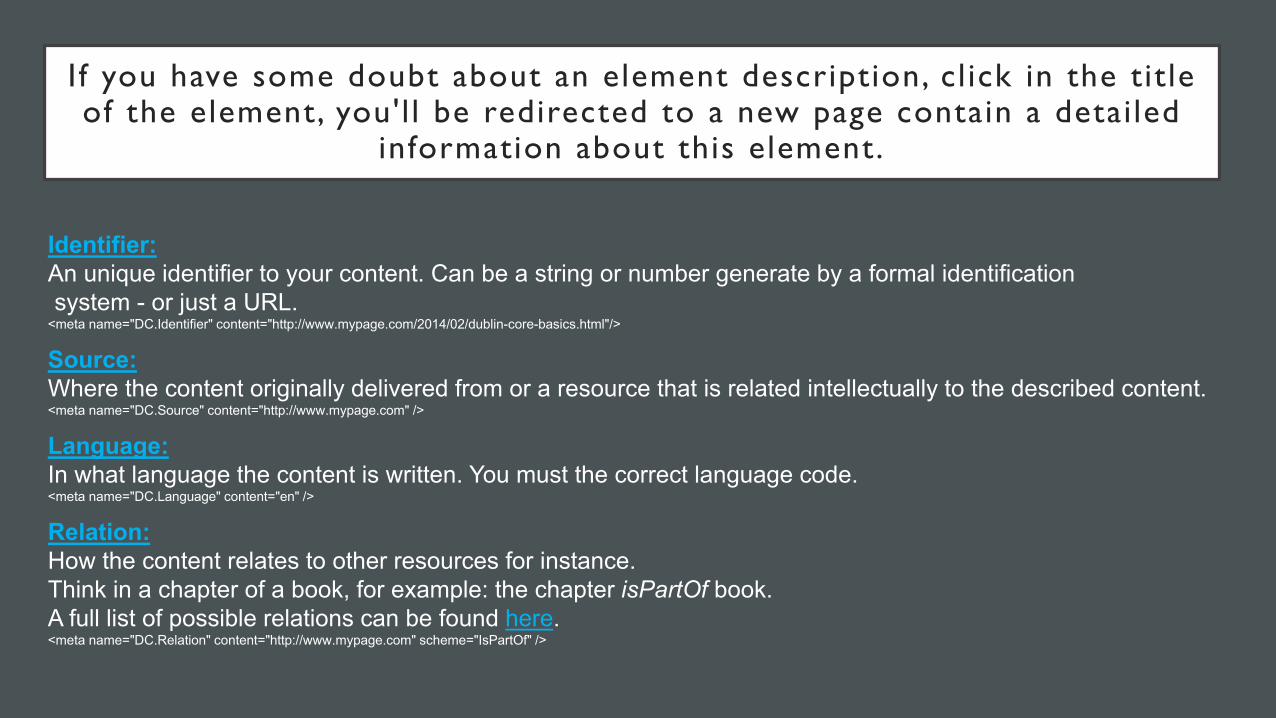
Identifier:An unique identifier to your content. Can be a string or number generate by a formal identificationsystem - or just a URL.
<meta name="DC.Identifier" content="http://www.mypage.com/2014/02/dublin-core-basics.html"/>
Source:Where the content originally delivered from or a resource that is related intellectually to the described content.<meta name="DC.Source" content="http://www.mypage.com" />
Language:In what language the content is written. You must the correct language code.<meta name="DC.Language" content="en" />
Relation:How the content relates to other resources for instance. Think in a chapter of a book, for example: the chapter isPartOf book. A full list of possible relations can be found here.<meta name="DC.Relation" content="http://www.mypage.com" scheme="IsPartOf" />
I f you have some doubt about an element description, cl ick in the tit le of the element, you'l l be redirected to a new page contain a detailed
information about this element.
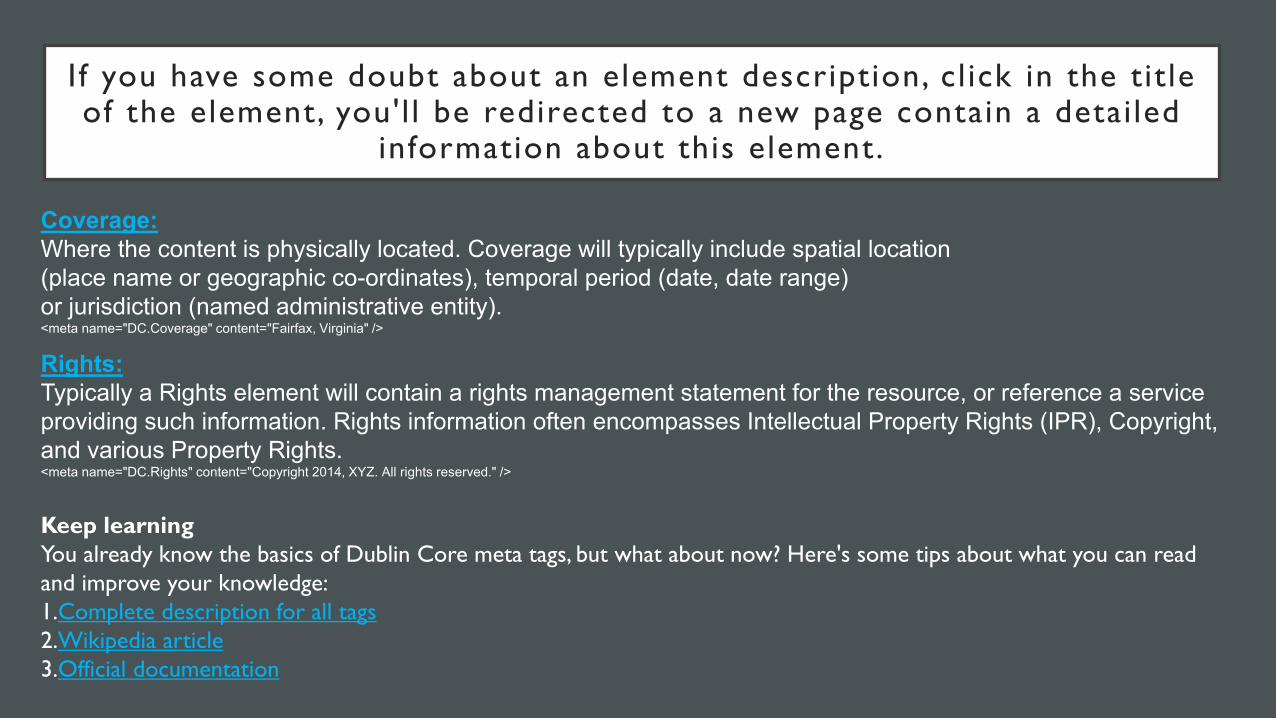
Coverage:Where the content is physically located. Coverage will typically include spatial location (place name or geographic co-ordinates), temporal period (date, date range) or jurisdiction (named administrative entity).<meta name="DC.Coverage" content="Fairfax, Virginia" />
Rights:Typically a Rights element will contain a rights management statement for the resource, or reference a service providing such information. Rights information often encompasses Intellectual Property Rights (IPR), Copyright, and various Property Rights.<meta name="DC.Rights" content="Copyright 2014, XYZ. All rights reserved." />
Keep learningYou already know the basics of Dublin Core meta tags, but what about now? Here's some tips about what you can read and improve your knowledge:1.Complete description for all tags2.Wikipedia article3.Official documentation
WHAT IS OMEKA?
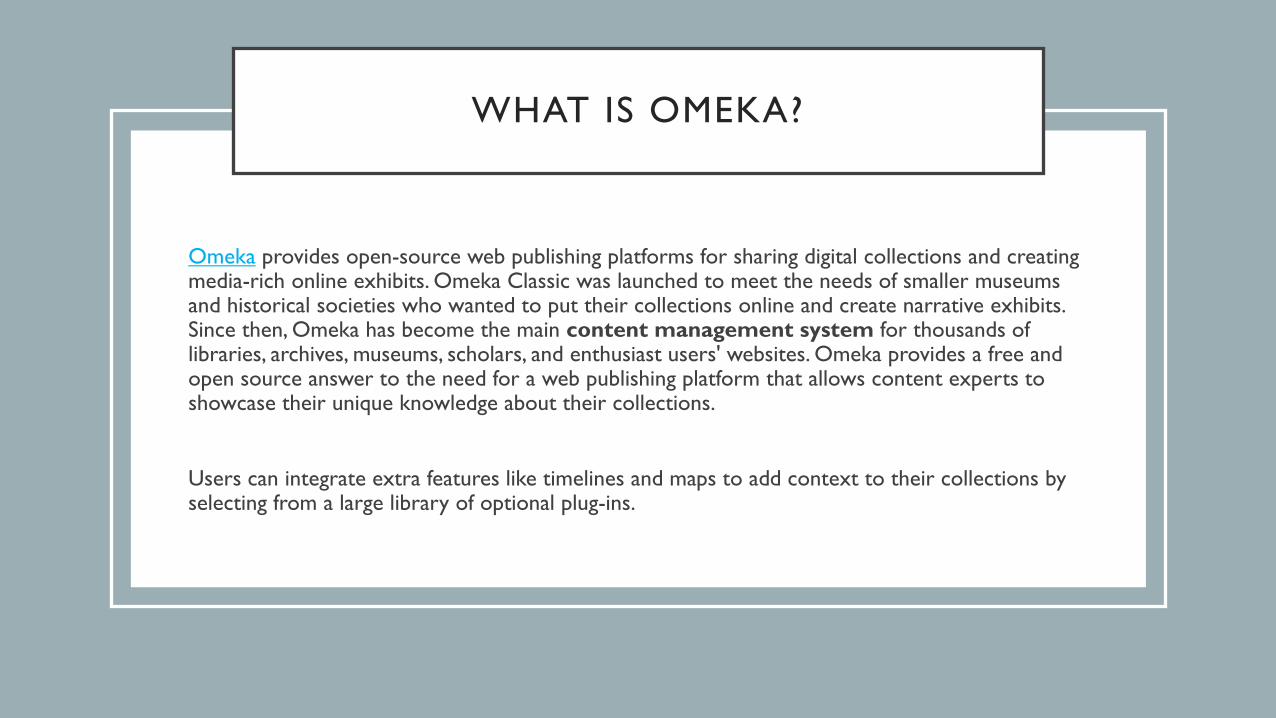
Omeka provides open-source web publishing platforms for sharing digital collections and creating media-rich online exhibits. Omeka Classic was launched to meet the needs of smaller museums and historical societies who wanted to put their collections online and create narrative exhibits. Since then, Omeka has become the main content management system for thousands of libraries, archives, museums, scholars, and enthusiast users' websites. Omeka provides a free and open source answer to the need for a web publishing platform that allows content experts to showcase their unique knowledge about their collections.
Users can integrate extra features like timelines and maps to add context to their collections by selecting from a large library of optional plug-ins.
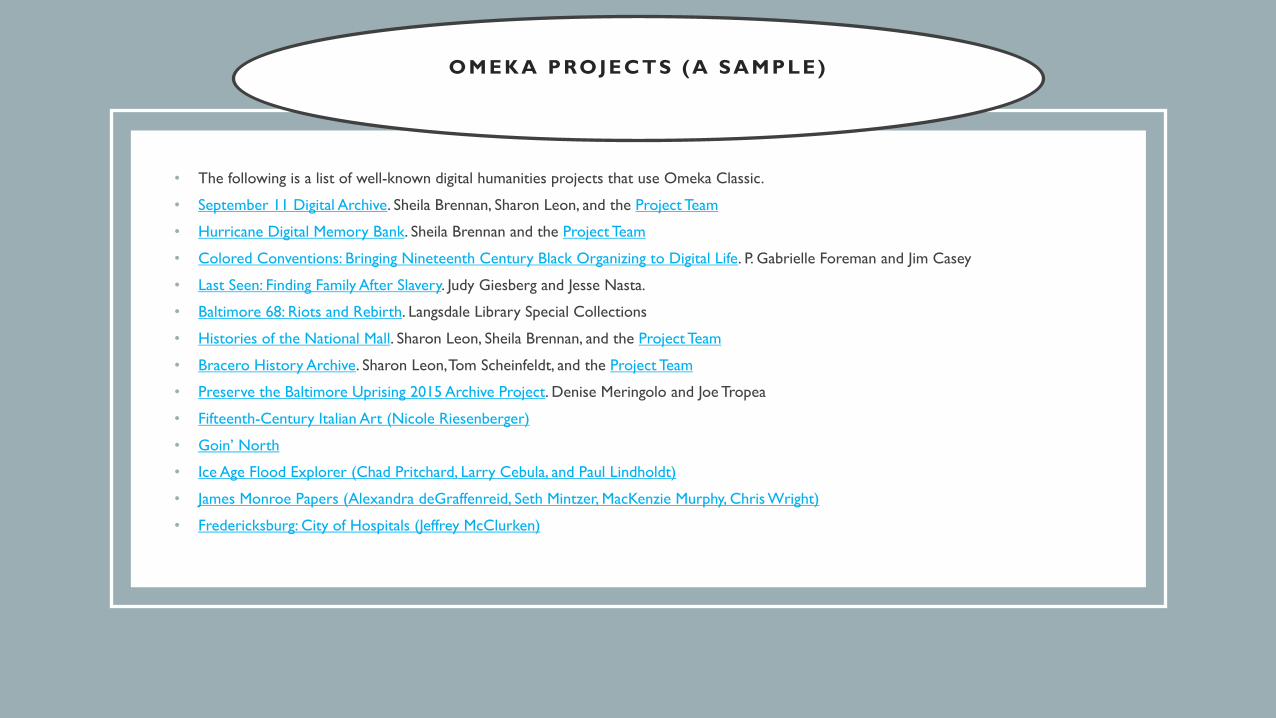
OMEKA PROJECTS (A SAMPLE)
• The following is a list of well-known digital humanities projects that use Omeka Classic.
• September 11 Digital Archive. Sheila Brennan, Sharon Leon, and the Project Team
• Hurricane Digital Memory Bank. Sheila Brennan and the Project Team
• Colored Conventions: Bringing Nineteenth Century Black Organizing to Digital Life. P. Gabrielle Foreman and Jim Casey
• Last Seen: Finding Family After Slavery. Judy Giesberg and Jesse Nasta.
• Baltimore 68: Riots and Rebirth. Langsdale Library Special Collections
• Histories of the National Mall. Sharon Leon, Sheila Brennan, and the Project Team
• Bracero History Archive. Sharon Leon, Tom Scheinfeldt, and the Project Team
• Preserve the Baltimore Uprising 2015 Archive Project. Denise Meringolo and Joe Tropea
• Fifteenth-Century Italian Art (Nicole Riesenberger)
• Goin’ North
• Ice Age Flood Explorer (Chad Pritchard, Larry Cebula, and Paul Lindholdt)
• James Monroe Papers (Alexandra deGraffenreid, Seth Mintzer, MacKenzie Murphy, Chris Wright)
• Fredericksburg: City of Hospitals (Jeffrey McClurken)
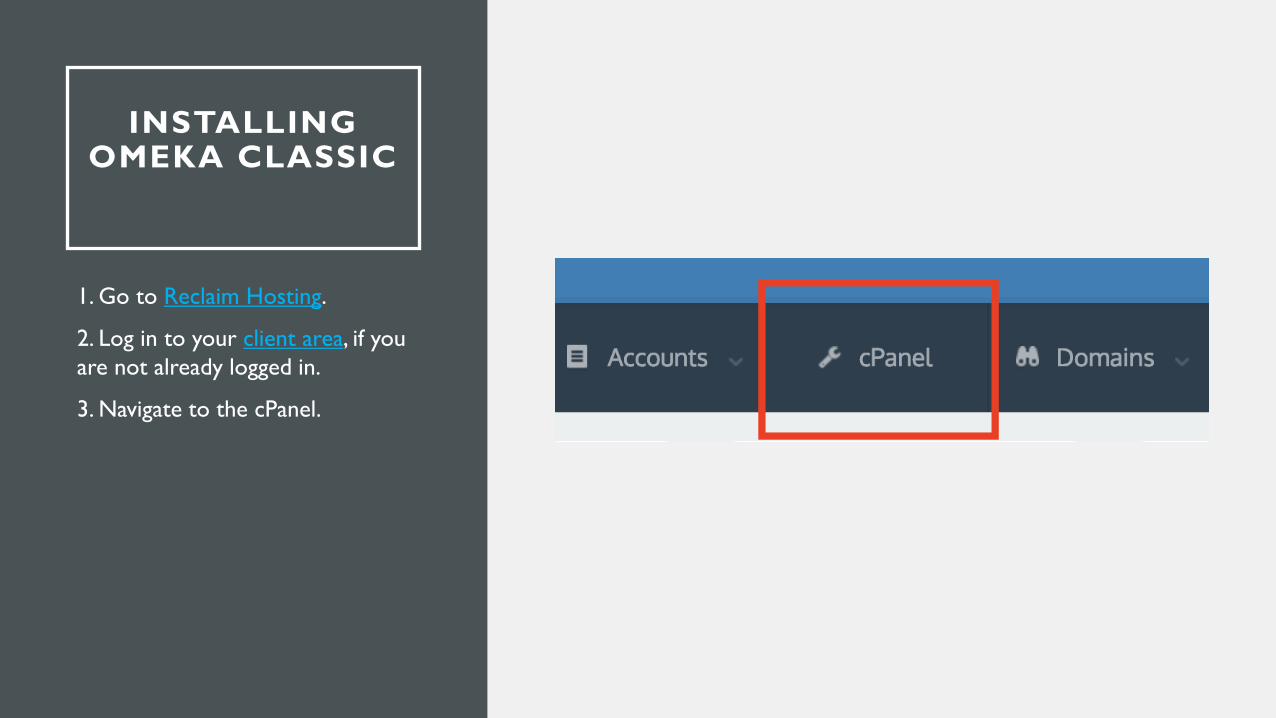
INSTALLING OMEKA CLASSIC
1. Go to Reclaim Hosting.
2. Log in to your client area, if you are not already logged in.
3. Navigate to the cPanel.
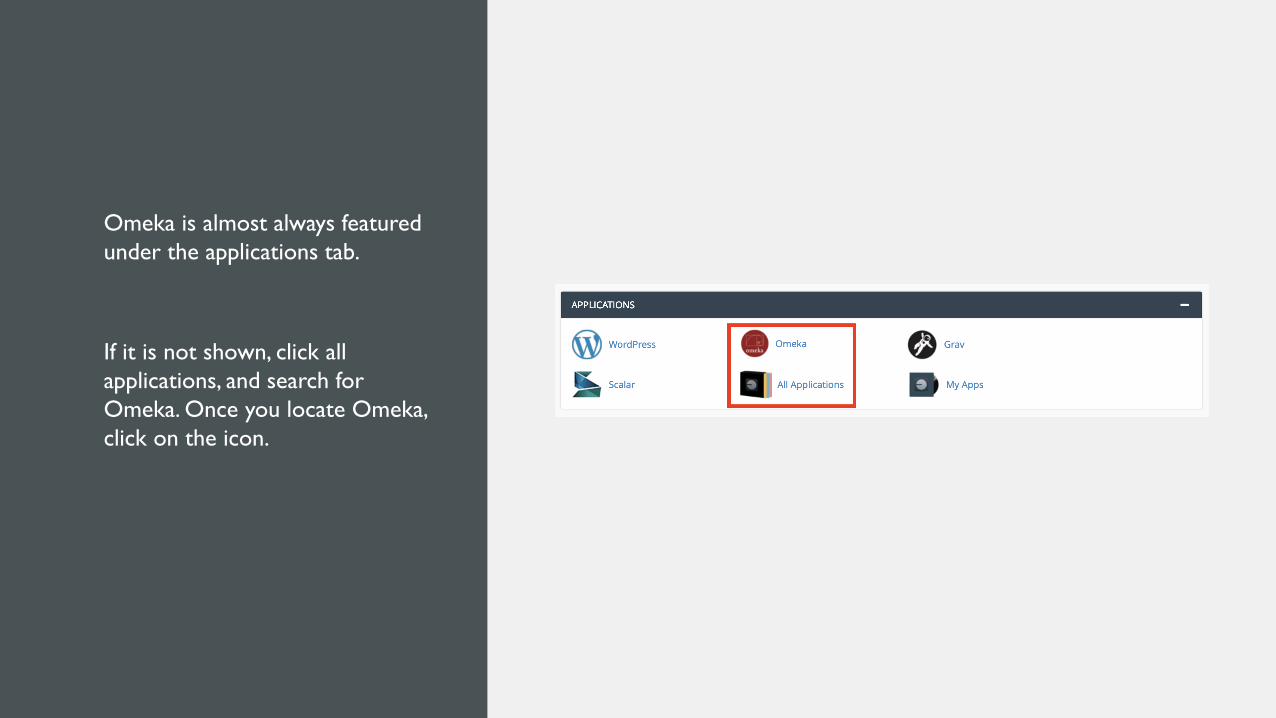
Omeka is almost always featured under the applications tab.
If it is not shown, click all applications, and search for Omeka. Once you locate Omeka, click on the icon.
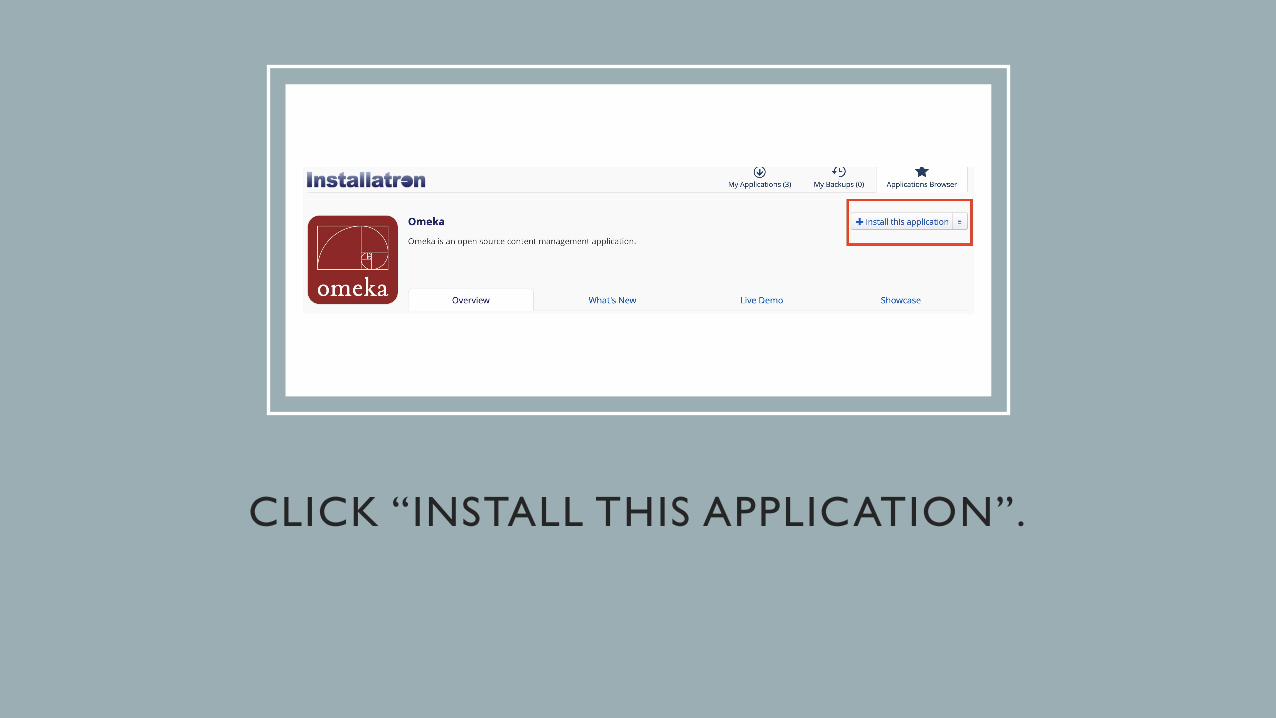
CLICK “INSTALL THIS APPLICATION”.
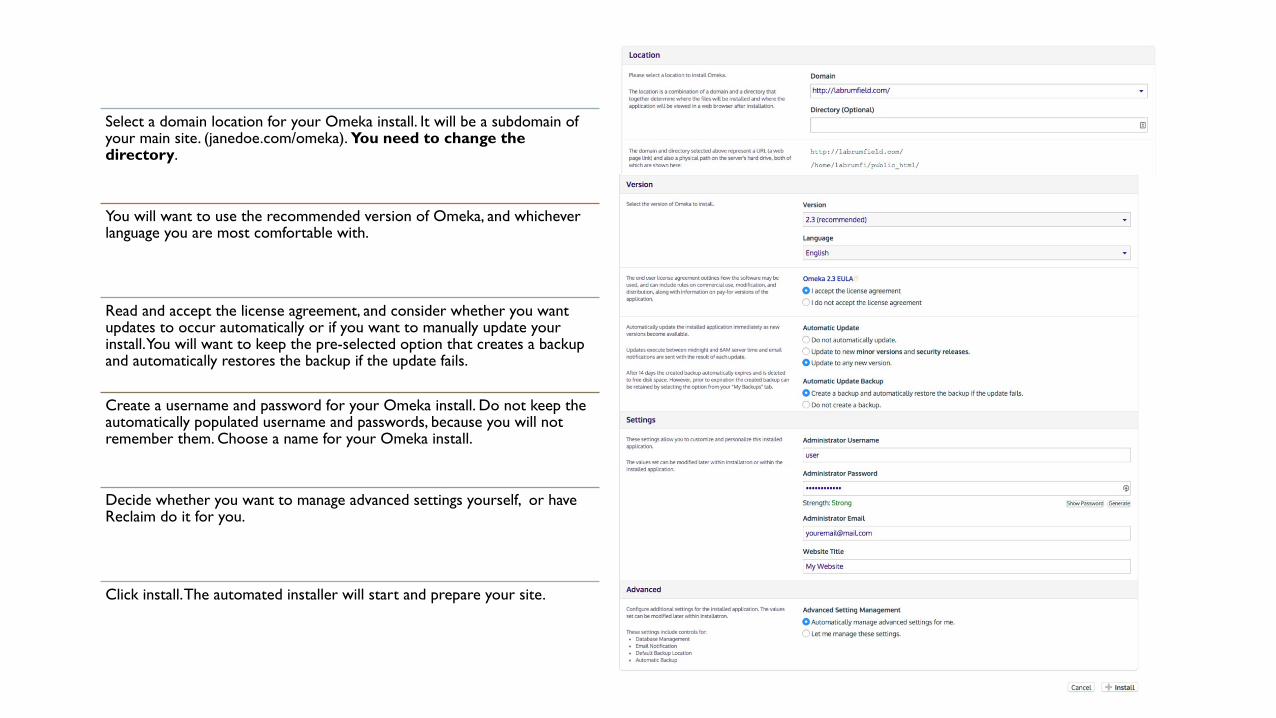
Select a domain location for your Omeka install. It will be a subdomain of your main site. (janedoe.com/omeka). You need to change the directory.
You will want to use the recommended version of Omeka, and whichever language you are most comfortable with.
Read and accept the license agreement, and consider whether you want updates to occur automatically or if you want to manually update your install. You will want to keep the pre-selected option that creates a backup and automatically restores the backup if the update fails.
Create a username and password for your Omeka install. Do not keep the automatically populated username and passwords, because you will not remember them. Choose a name for your Omeka install.
Decide whether you want to manage advanced settings yourself, or have Reclaim do it for you.
Click install. The automated installer will start and prepare your site.
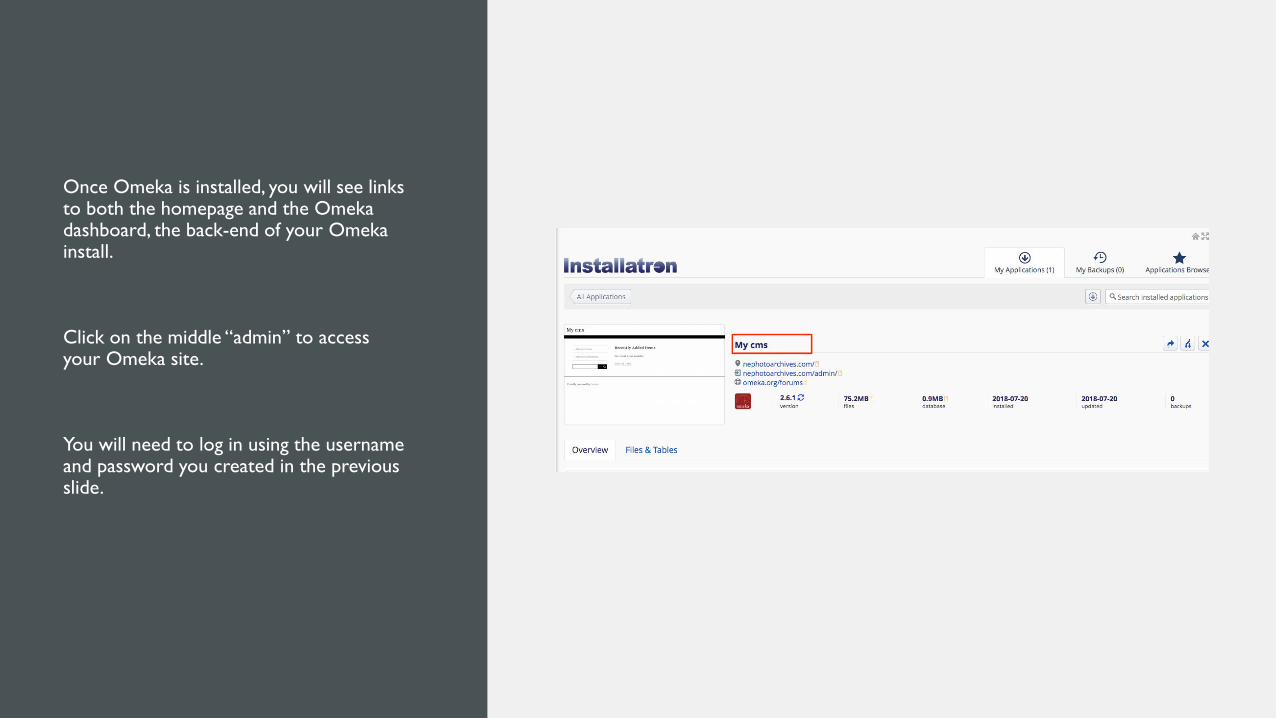
Once Omeka is installed, you will see links to both the homepage and the Omekadashboard, the back-end of your Omekainstall.
Click on the middle “admin” to access your Omeka site.
You will need to log in using the username and password you created in the previous slide.
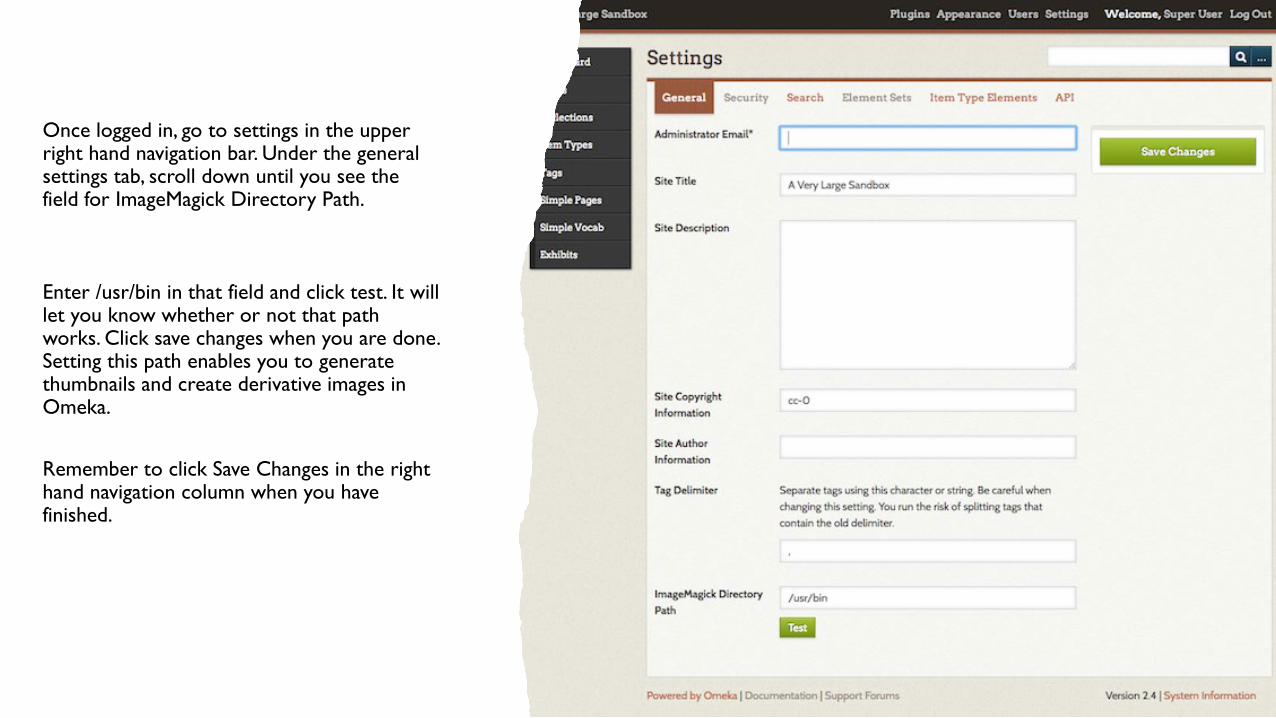
Once logged in, go to settings in the upper right hand navigation bar. Under the general settings tab, scroll down until you see the field for ImageMagick Directory Path.
Enter /usr/bin in that field and click test. It will let you know whether or not that path works. Click save changes when you are done. Setting this path enables you to generate thumbnails and create derivative images in Omeka.
Remember to click Save Changes in the right hand navigation column when you have finished.
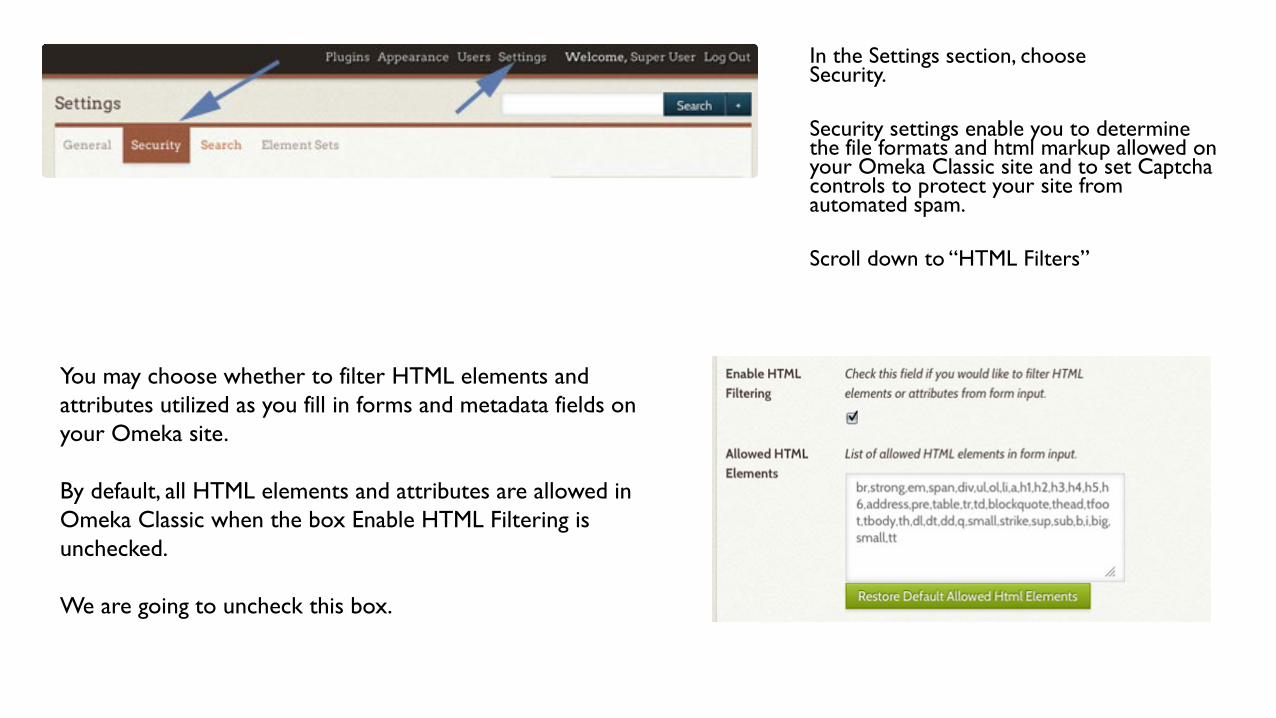
In the Settings section, choose Security.
Security settings enable you to determine the file formats and html markup allowed on your Omeka Classic site and to set Captcha controls to protect your site from automated spam.
Scroll down to “HTML Filters”
You may choose whether to filter HTML elements and attributes utilized as you fill in forms and metadata fields on your Omeka site.
By default, all HTML elements and attributes are allowed in Omeka Classic when the box Enable HTML Filtering is unchecked.
We are going to uncheck this box.
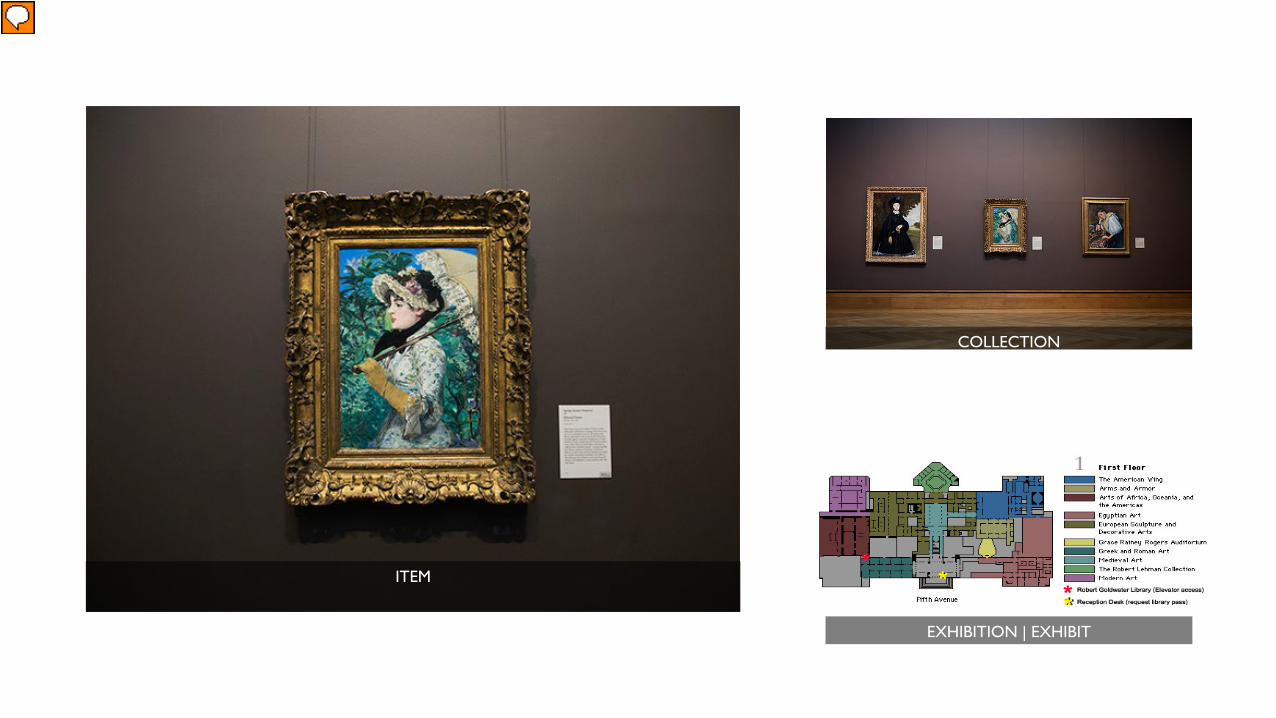
ITEM
COLLECTION
EXHIBITION | EXHIBIT
OMEKA’S INTERNAL LOGIC
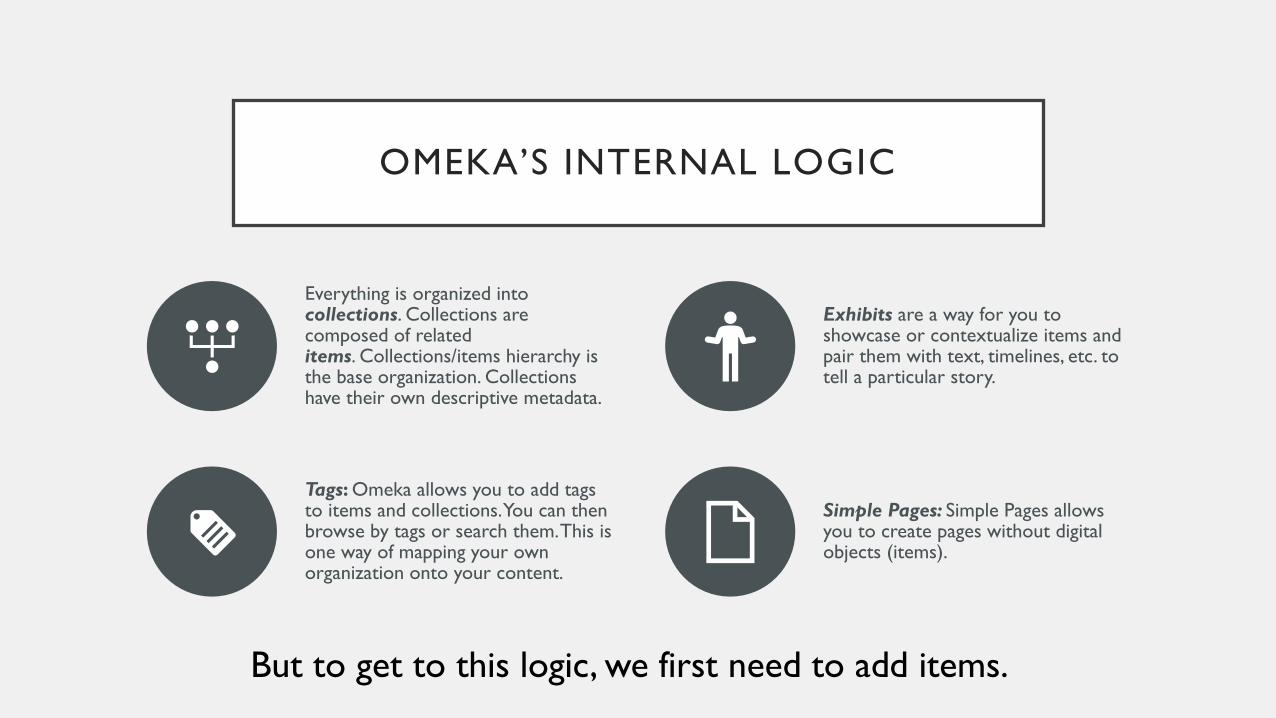
Everything is organized into collections. Collections are composed of related items. Collections/items hierarchy is the base organization. Collections have their own descriptive metadata.
Exhibits are a way for you to showcase or contextualize items and pair them with text, timelines, etc. to tell a particular story.
Tags: Omeka allows you to add tags to items and collections. You can then browse by tags or search them. This is one way of mapping your own organization onto your content.
Simple Pages: Simple Pages allows you to create pages without digital objects (items).
But to get to this logic, we first need to add items.
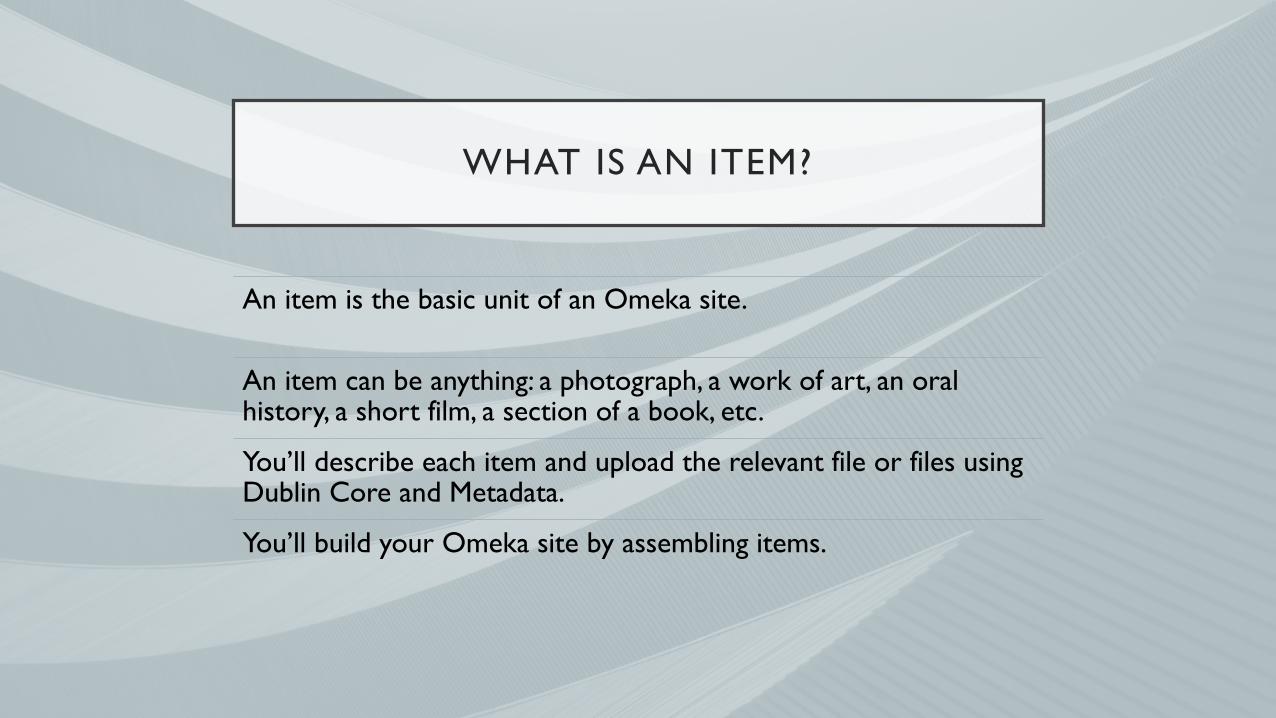
WHAT IS AN ITEM?
An item is the basic unit of an Omeka site.
An item can be anything: a photograph, a work of art, an oral history, a short film, a section of a book, etc.
You’ll describe each item and upload the relevant file or files using Dublin Core and Metadata.
You’ll build your Omeka site by assembling items.
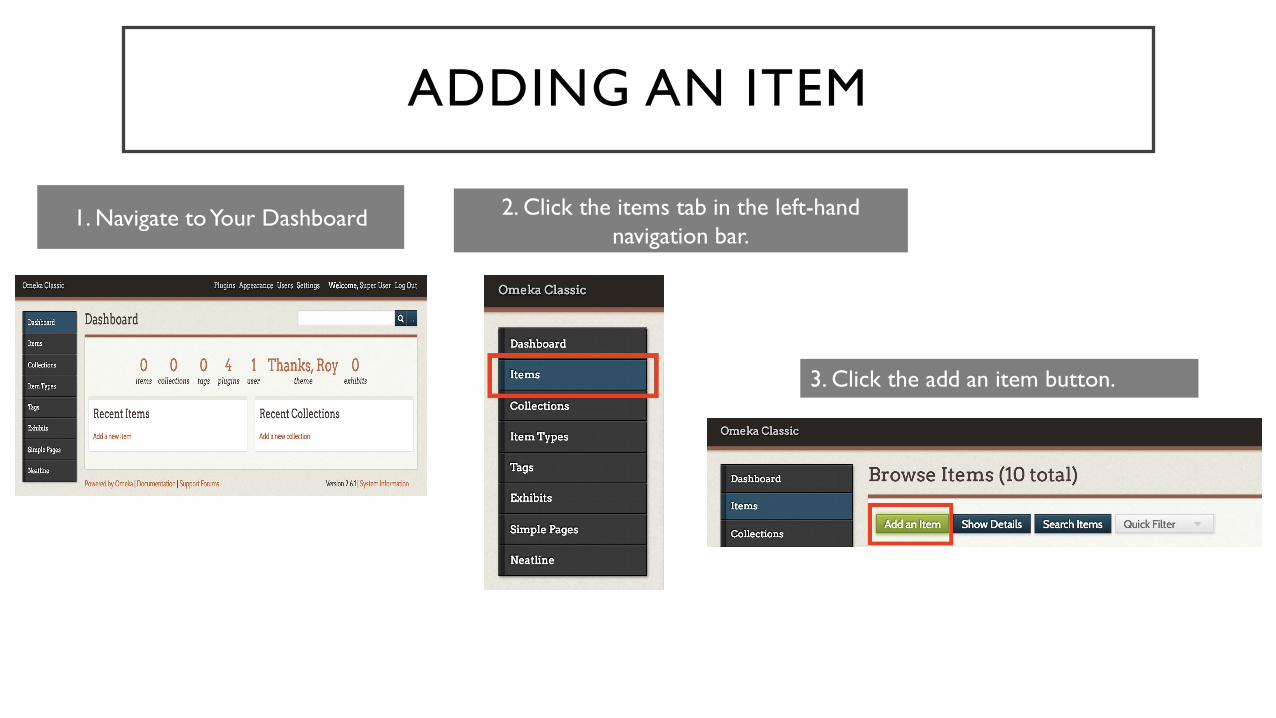
ADDING AN ITEM
1. Navigate to Your Dashboard 2. Click the items tab in the left-hand navigation bar.
3. Click the add an item button.
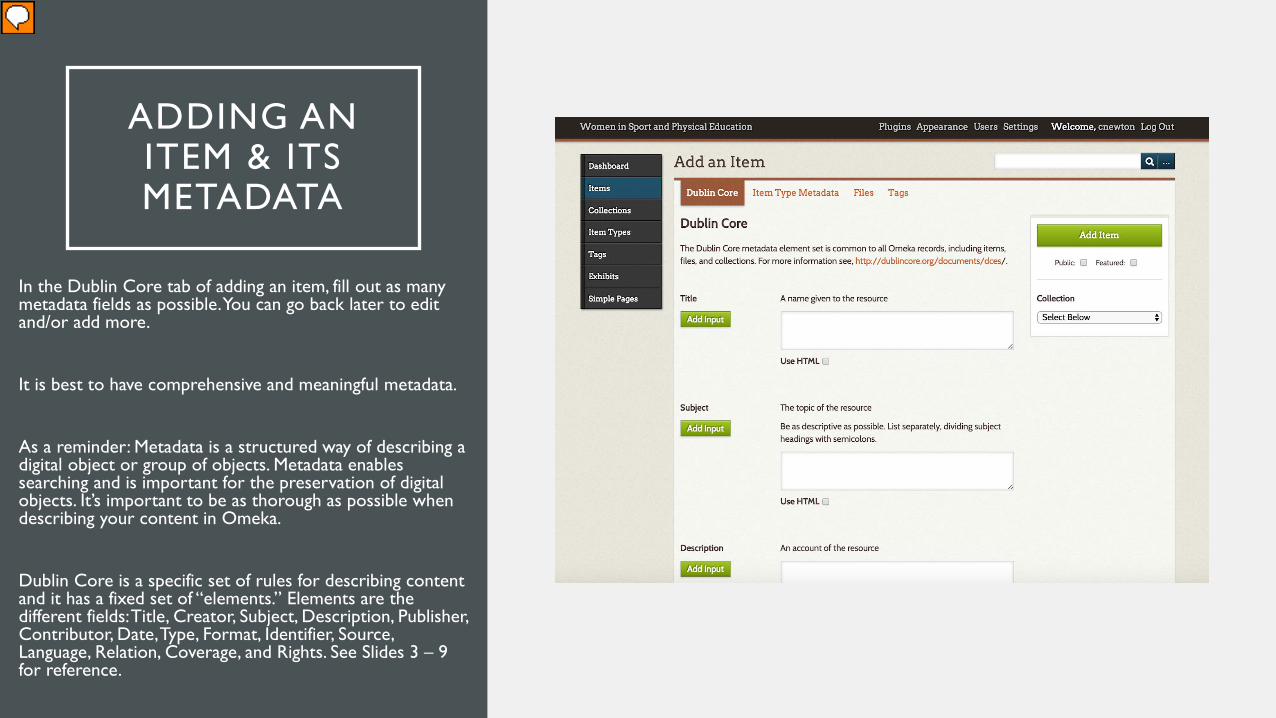
ADDING AN ITEM & ITS METADATA
In the Dublin Core tab of adding an item, fill out as many metadata fields as possible. You can go back later to edit and/or add more.
It is best to have comprehensive and meaningful metadata.
As a reminder: Metadata is a structured way of describing a digital object or group of objects. Metadata enables searching and is important for the preservation of digital objects. It’s important to be as thorough as possible when describing your content in Omeka.
Dublin Core is a specific set of rules for describing content and it has a fixed set of “elements.” Elements are the different fields: Title, Creator, Subject, Description, Publisher, Contributor, Date, Type, Format, Identifier, Source, Language, Relation, Coverage, and Rights. See Slides 3 – 9 for reference.
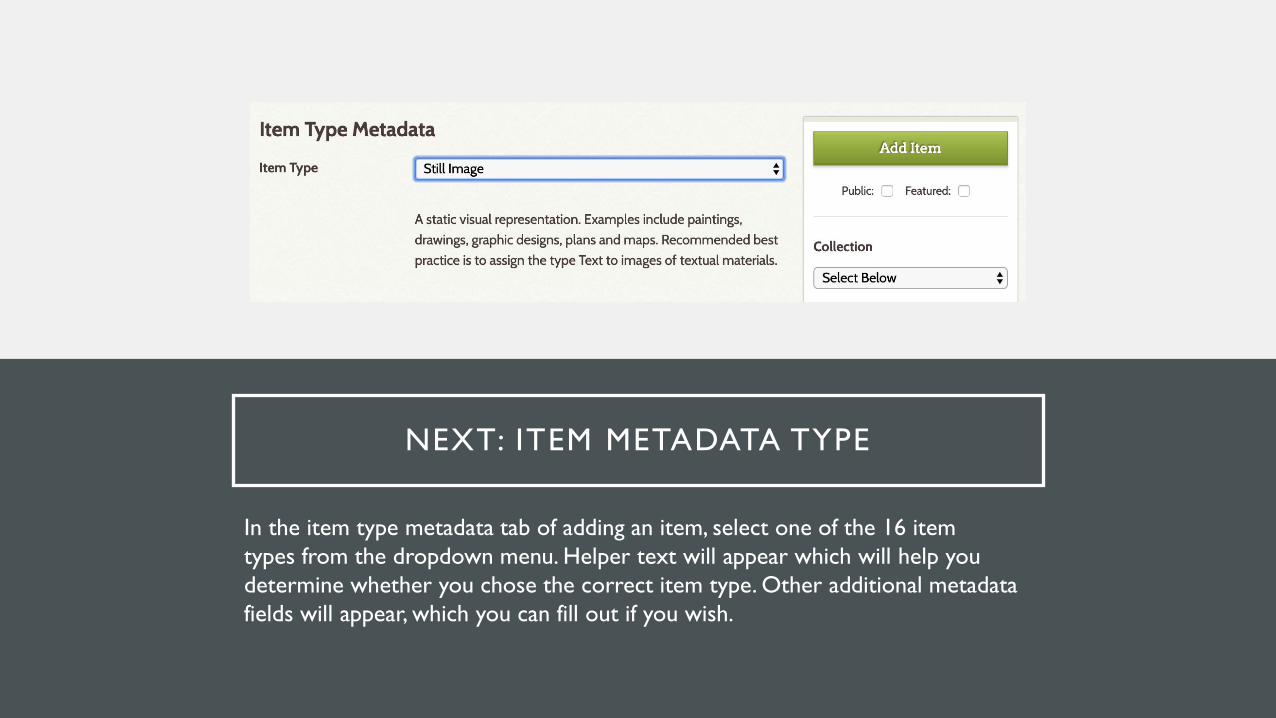
NEXT: ITEM METADATA TYPE
In the item type metadata tab of adding an item, select one of the 16 item types from the dropdown menu. Helper text will appear which will help you determine whether you chose the correct item type. Other additional metadata fields will appear, which you can fill out if you wish.
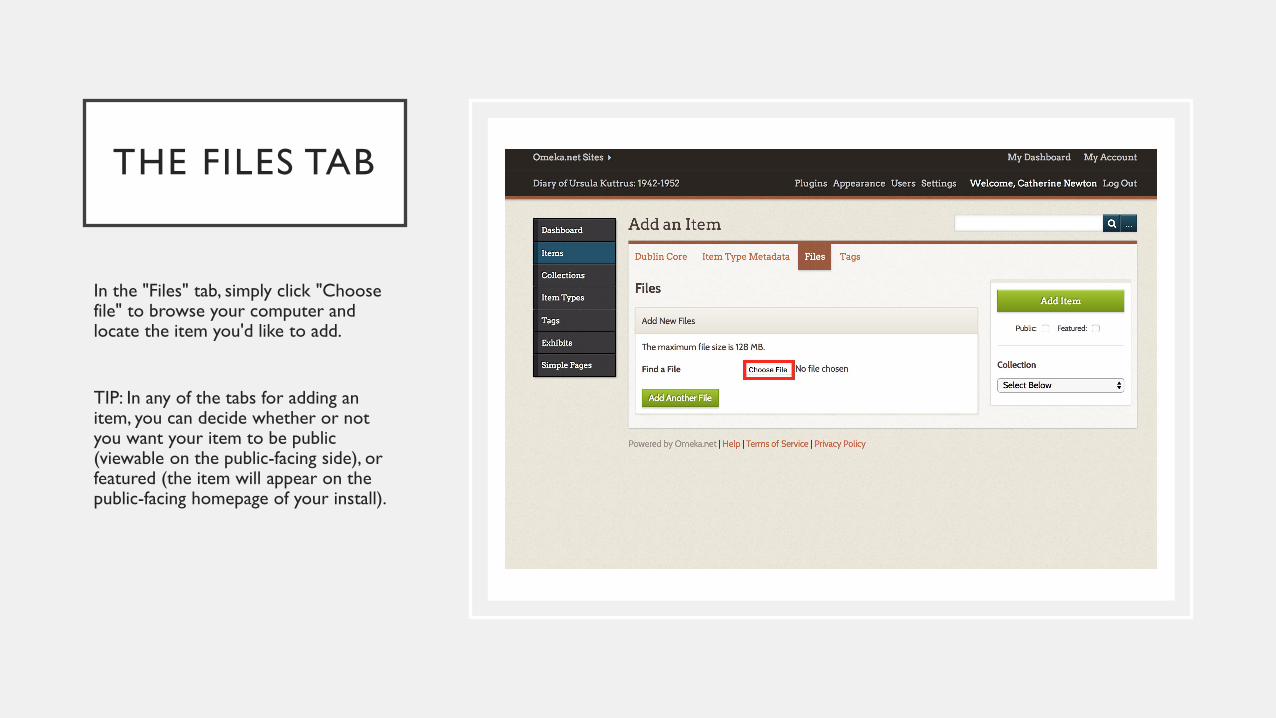
THE FILES TAB
In the "Files" tab, simply click "Choose file" to browse your computer and locate the item you'd like to add.
TIP: In any of the tabs for adding an item, you can decide whether or notyou want your item to be public (viewable on the public-facing side), orfeatured (the item will appear on the public-facing homepage of your install).
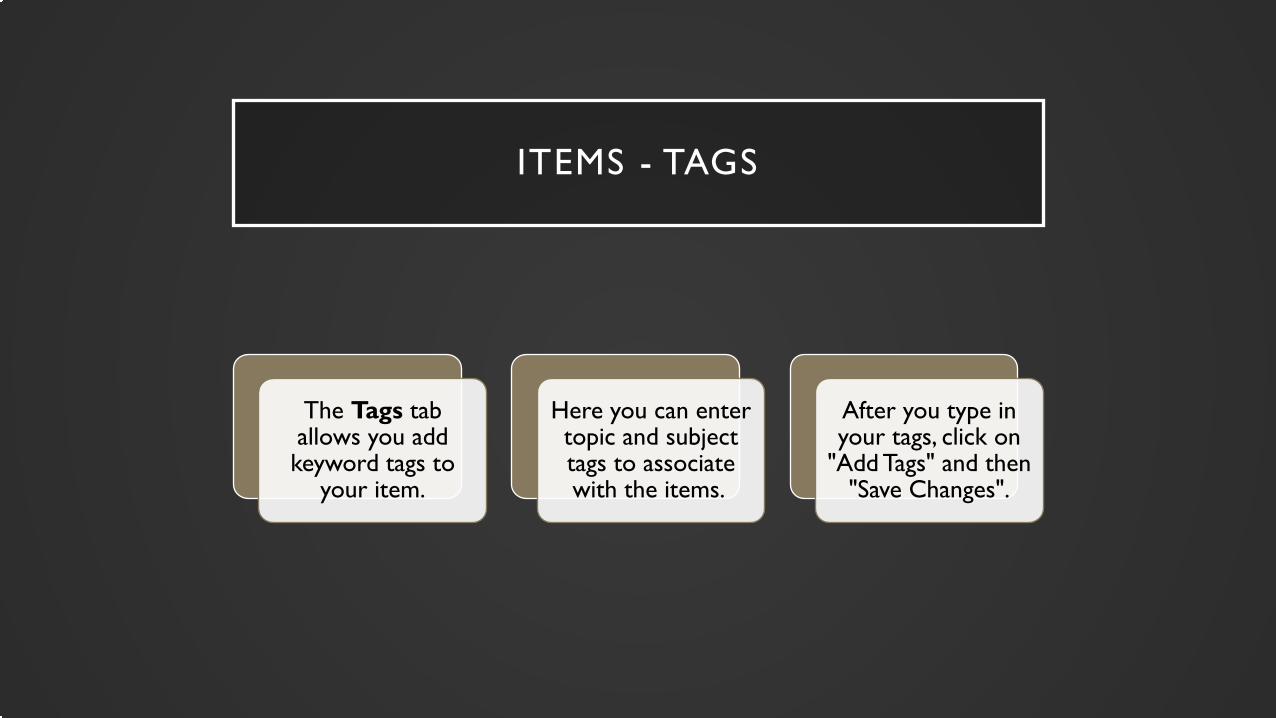
ITEMS - TAGS
The Tags tab allows you add keyword tags to
your item.
Here you can enter topic and subject tags to associate with the items.
After you type in your tags, click on
"Add Tags" and then "Save Changes".
ADDING ITEM
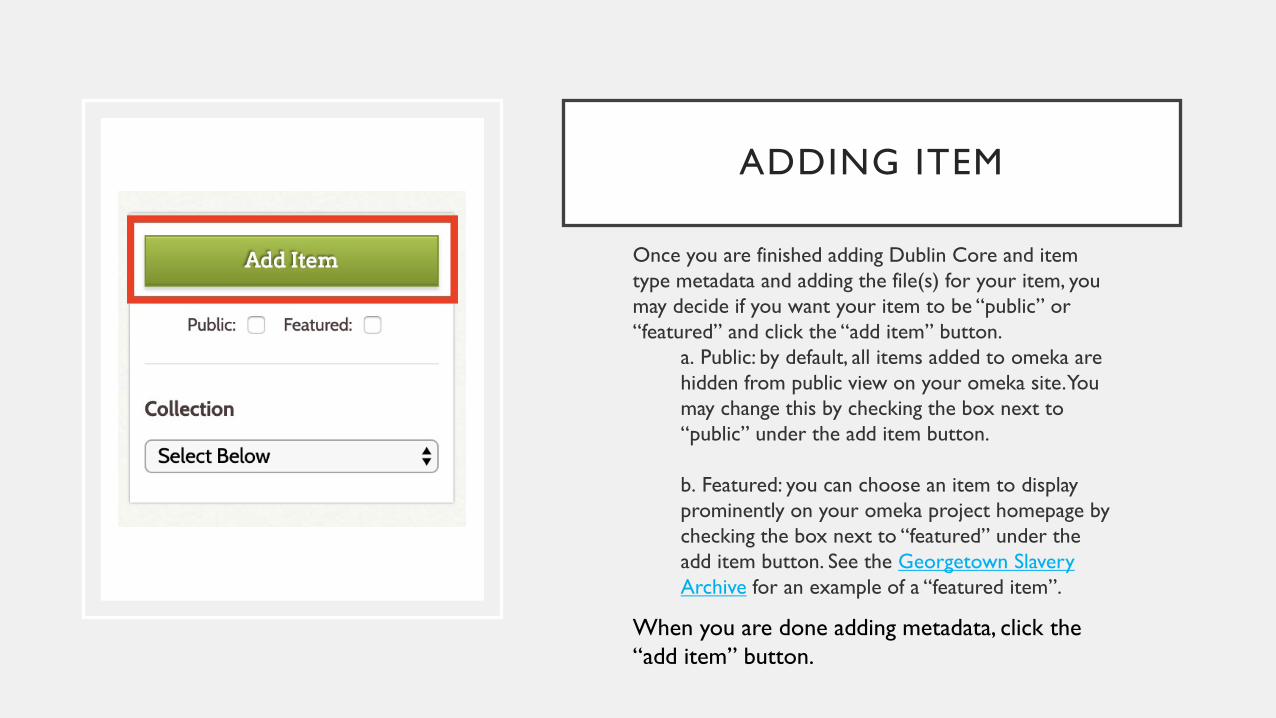
Once you are finished adding Dublin Core and item type metadata and adding the file(s) for your item, you may decide if you want your item to be “public” or “featured” and click the “add item” button.
a. Public: by default, all items added to omeka are hidden from public view on your omeka site. You may change this by checking the box next to “public” under the add item button.
b. Featured: you can choose an item to display prominently on your omeka project homepage by checking the box next to “featured” under the add item button. See the Georgetown Slavery Archive for an example of a “featured item”.
When you are done adding metadata, click the “add item” button.

• You will be redirected to the items page, and a box will appear to let you know that your item was successfully added.
•
• You can view the details, edit, or delete the item from the items page, which you can reach by clicking on the items tab on your left-hand navigation bar.
• Go ahead and continue to add more items for your final project.
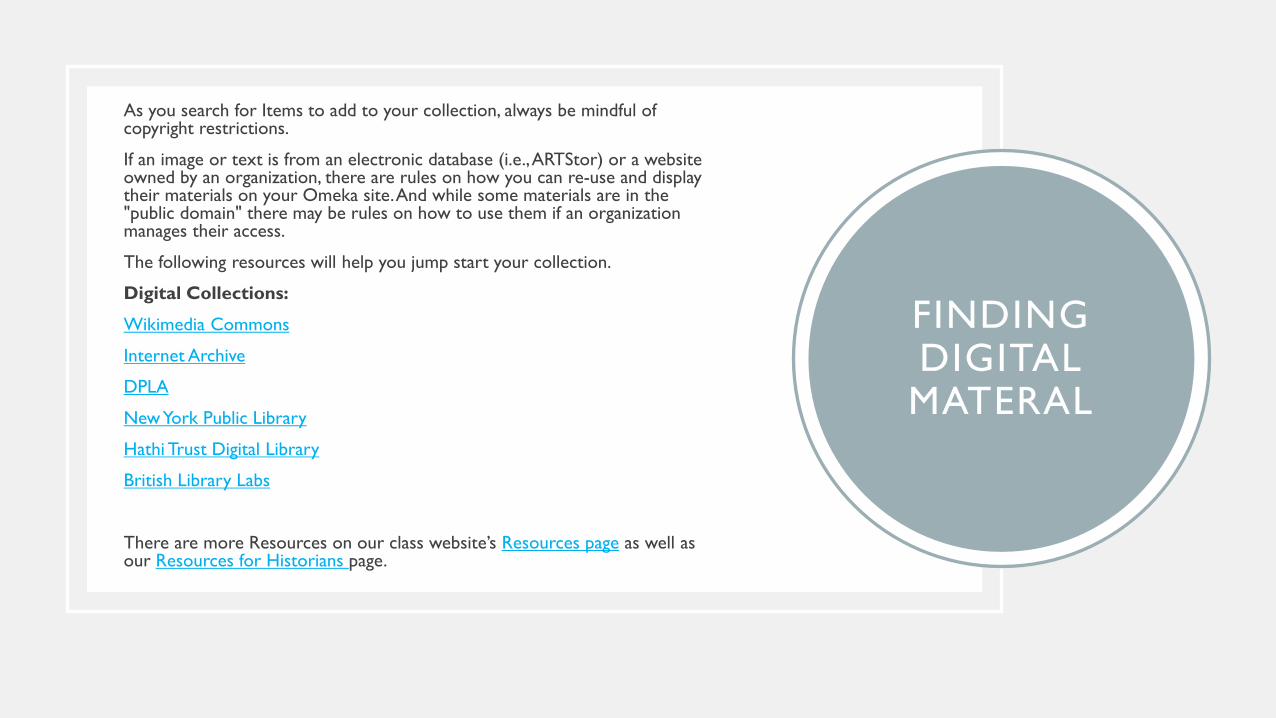
As you search for Items to add to your collection, always be mindful of copyright restrictions.
If an image or text is from an electronic database (i.e., ARTStor) or a website owned by an organization, there are rules on how you can re-use and display their materials on your Omeka site. And while some materials are in the "public domain" there may be rules on how to use them if an organization manages their access.
The following resources will help you jump start your collection.
Digital Collections:
Wikimedia Commons
Internet Archive
DPLA
New York Public Library
Hathi Trust Digital Library
British Library Labs
There are more Resources on our class website’s Resources page as well as our Resources for Historians page.
FINDING DIGITAL
MATERAL
START TO THINK ABOUT ORGANIZING YOUR OWN CONTENT
Omeka's internal organization maps closely to a physical museum’s organization. Think of an item as a painting on the wall of a museum. Note that the item has accompanying metadata (information about its provenance and descriptive details). The museum may organize items into permanent collections based on shared characteristics or donors.Items from multiple collections may be combined and contextualized in an exhibit. Often, text accompanies the items and tells a story. Just as exhibits are temporary in museums, exhibits are unique to Omeka. You can export items and collections from Omeka, but you cannot export exhibits.