Embed Size (px)
DESCRIPTION
DT250 - Raptor Drum Truck
Citation preview

- 0 -
Instruction Manual
Hydraulic Drum Truck
Note: The Owner/Operator must read carefully and understand
all the information presented here before operation.
DT250 DTR250 DTW250

- 1 -
Content
1. Figure and Dimension………………………………. 2
1.1 Figure……………………………………….… 2
1.1.1 DT250……………………………….. 2
1.1.2 DTR250……………………………… 3
1.1.3 DTW250…………………………….. 3
1.2 Technical Specification…………………….. 4
2. Part Name…….……………………………………… 4
3. Warning………………………………………………. 4
4. Installation and Operation………………………….. 5
4.1 Installation…………….…………………….. 5
4.2 Operation……………………………………. 5
4.2.1 Lift drum……………………………. 5
4.2.2 Transport drum……………………. 5
4.2.3 Put down drum…………………….. 6
5 Maintenance…………………………………………. 6
6 Hydraulic Circuit Diagram…………………………... 7
7 Exploded View & Part List….………………………. 8
7.1 DT250 Exploded View & Part List………….. 8
7.2 DTR250 Exploded View & Part List………... 11
7.2 DTW250 Exploded View & Part List……….. 14

- 2 -
THANK YOU FOR USING THIS HYDRAULIC DRUM TRUCK. FOR
YOUR SAFETY AND CORRECT OPERATION, PLEASE CAREFULLY
READ THIS INSTRUCTION BEFORE USING IT.
NOTE: All of the information reported herein is based on data available
at the moment of printing. The factory reserves the right to modify its
own products at any moment without notice and incurring in any
sanction. So it is suggested to always verify possible updates.
This hydraulic drum truck is used to clamp the drum on the ground
or stock for load and unload, transit, stack the drum. It is used widely to
factory, depot and etc.
1. FIGURE AND PARAMETER1.1 Figure
1.1.1 DT250 (It is used to load and unload, transit the drum on the ground)

- 3 -
1.1.2 DTR250 (It is used to load and unload by stock or transit the drum)
1.1.3 DTW250 (It is used to load and unload by stock or transit the drum)

- 4 -
1.2 Technical Parameter
Model DT250 DTR250 DTW250
Capacity (kg) 250 250 250
Suitable for Drum Diameter (mm) 572 572 572
Pump Stroke (mm) 345 300 345
Overall Size (L×W×H) (mm) 820×800×1050 812×980×1100820×1015×
1050
Net Weight (kg) 45 50 45
2. PART NAME(1) Swivel Wheel (Versatile Wheel)
(2) Fork Assy.
(3) Cylinder Assy.
(4) Screw
(5) Handle
(6) Discharge Joystick
(7) Lever
(8) Clamp
(9) Leg
(10) Front Wheel
(11) Bolt
(12) Chassis
3. WARNING3.1 Never use the drum truck when it has failure.
3.2 Never overload this truck beyond its rated capacity.
3.3 Place the drum on the low position when do not lift.
3.4 Raise slightly the drum on the ground when transit drum, do not

- 5 -
need lift it higher.
4. INSTALLATION AND OPERATION4.1 INSTALLATION
(1) Open the packing, take out the fork assembly (2), cylinder assembly
(3), screw (4), handle (5), bolt (11) and chassis (12) and ensure the
parts are full.
(2) Fix the fork assembly (2) and chassis (12) with bolt (11).
(3) Place the cylinder assembly (3) on the chassis (12) and fix it with
screw (4).
(4) Insert the handle (5) in the pump seat on the cylinder assembly (3)
and clamp it with the screw.
4.2 OPERATION INSTRUCTION
4.2.1 Lift drum
Screw handle (5) clockwise, and then move the transporter so as to
make the lifting frame contact with drum.
Repeatedly press the handle (5) to pump up the lifting frame so that the
upper edge of drum is between the clamp’s teeth and the teeth on the
upper end of lifting frame.
Then push the bulbous knob connected to clamp (8) to allow the clamp
to grab the drum firmly and for the bulbous knob to lock the clamp (8).
Continue to pump up the lifting frame by handle (5) and the drum will be
lifted.
4.2.2. Transport drum
Push / pull the handle (5) to move the transporter to the destination. (Of
course, if necessary, operator can turn the handle to change the
transporter’s moving direction.)
For the sake of safety it is recommended to move the loaded transporter

- 6 -
while the drum’s position is as low as possible.
4.2.3 Put down drum
Slowly screw handle (6) counterclockwise and lower the drum till it
stands on the floor.
Pull the bulbous knob back to unlock position so as to release the clamp.
Warning: It is forbidden to screw handle (6) anticlockwise rapidly in case
of damage of the drum or the transporter.
5. MAINTENANCE1. Do routine check of chassis (Part No. 12) and front rear wheels.
Especially make sure that rear caster is firm.
2. Do routine check of packing.
3. It is feasible and recommended to change hydraulic oil while
changing packing. It is suggested to use equivalent performance
hydraulic oil.
Use different hydraulic oil according to temperature scale below.
Temperature Hydraulic Oil
-5℃ ~ +45℃ L-HM68 Hydraulic oil (equivalent to ISO VG68)
-15℃ ~ -5℃ L-HM46 Hydraulic oil (equivalent to ISO VG46)
4. Do routine check of the clamp’s tooth. Replace it if tooth wears out
seriously.
5. Do routine check of all the connecting parts such as pins and
fasteners.

- 7 -
6. HYDRAULIC CIRCUIT DIAGRAM
No. Description
1 Hydraulic Cylinder
2 Swivel Discharge Valve
3 Relief valve
4 Work valve
5 Work Cylinder

- 8 -
7. EXPLODED VIEW & PART LIST7.1 DT250 EXPLODED View & Part List

- 9 -
No. Description Qty No. Description Qty
1 Nut 1 39 Ring 1
2 Locking Washer 1 40 Bearing 1
3 Swivel Wheel 1 41 Ball 1
4 Chassis 1 42 Lever 1
5 Pin 2 43 Plunger Lever 1
6 Retaining Ring 4 44 Dustproof Ring 1
7 Locking Ring 4 45 O-ring 2
8 Front Wheel 2 46 Washer 1
9 Bearing 4 47 Plunger Casing 1
10 Hexagon Socket Screw 2 48 Cylindroids Tube 1
11 Washer 2 49 Sealing Board 1
12 Spring 2 50 Supported Board 4
13 Steel Ball 2 51 Plunger Casing 1
14 Connected Board 1 52 Pin 1
15 Fixed Board 1 53 Split Pin 1
16 Torsional Spring 1 54 O-ring 2
17 Screw 2 55 Steal Ball 1
18 Nut 2 56 Bushing 1
19 Located Ring 2 57 Plunger Board 1
20 Discharge Lever 1 58 Plunger Casing 1
21 O-ring 1 59 Washer 1
22 Screw 1 60 O-ring 2
23 Roller 2 61 Dustproof Ring 1
24 Bearing 2 62 Spring 1
25 Pin 2 63 Spring Cover 1

- 10 -
26 Nut 1 64 Rod 1
No. Description Qty No. Description Qty
27 Handle 1 65 Nut 1
28 Bearing 2 66 Plunger Seat 1
29 Roller 2 67 Plunger Pin 1
30 Pin 2 68 Oil Cup 1
31 Retaining Ring 4 69 Bolt 1
32 Supporting Rack 1 70 Nut 1
33 Pin 1 71 Retaining Ring 2
34 Retaining Ring 2 72 Bearing 1
35 Locking Block 1 73 Plunger Ring 1
36 Spring 2 74 Pin 1
37 Retaining Ring 2 75 Operation Handle 1
38 Pin 1

- 11 -
7.2 DTR250 EXPLODED View & Part List

- 12 -
No. Description Qty No. Description Qty
1 Locking Ring 4 34 Retaining Ring 2
2 Bearing 4 35 Spring 2
3 Front Wheel 2 36 Retaining Ring 2
4 Retaining Ring 4 37 Pin 1
5 Axle 2 38 Locking Block 1
6 Swivel Wheel 2 39 Ball 1
7 Fork 2 40 Ring 1
8 Nut 6 41 Lever 1
9 Bolt 6 42 Bush 1
10 Chassis 1 43 Plunger Lever 1
11 HexagonSocketScrew 2 44 Dustproof Ring 1
12 Washer 2 45 O-ring 1
13 Spring 2 46 Washer 1
14 Steel Ball 3 47 Pin 1
15 Screw 2 48 Split Pin 1
16 Nut 2 49 O-ring 2
17 Torsional Spring 2 50 Screw 2
18 Located Ring 2 51 Washer 1
19 Outer Cylinder 1 52 O-ring 2
20 Screw 1 53 Dustproof Ring 1
21 O-ring 1 54 Spring 1
22 Bush 2 55 Spring Cover 1
23 Roller 2 56 Rod 1
24 Pin 2 57 Oil Cup 1
25 Discharge Joystick 1 58 Pin 1
26 Nut 1 59 Plunger Seat 1
27 Handle 1 60 Screw 1
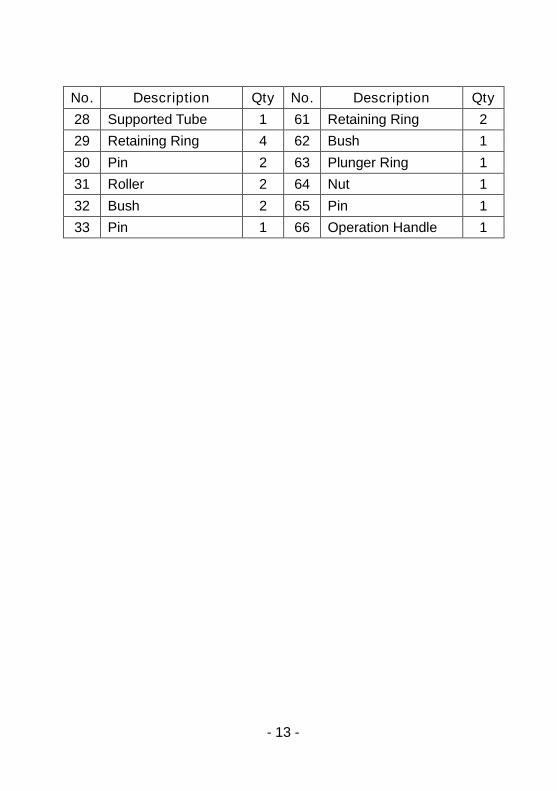
- 13 -
No. Description Qty No. Description Qty
28 Supported Tube 1 61 Retaining Ring 2
29 Retaining Ring 4 62 Bush 1
30 Pin 2 63 Plunger Ring 1
31 Roller 2 64 Nut 1
32 Bush 2 65 Pin 1
33 Pin 1 66 Operation Handle 1

- 14 -
7.3 DTW250 EXPLODED View & Part List

- 15 -
No. Description Qty No. Description Qty
1 Nut 1 40 Bearing 1
2 Locking Washer 1 41 Ball 1
3 Swivel Wheel 1 42 Lever 1
4 Left Fork 1 43 Plunger Lever 1
5 Pin 2 44 Dustproof Ring 1
6 Retaining Ring 4 45 O-ring 2
7 Locking Ring 4 46 Washer 1
8 Front Wheel 2 47 Plunger Casing 1
9 Bearing 4 48 Cylindroids Tube 1
10 Hexagon Socket Screw 2 49 Sealing Board 1
11 Washer 2 50 Supported Board 4
12 Spring 2 51 Plunger Casing 1
13 Steel Ball 2 52 Pin 1
14 Connected Board 1 53 Split Pin 1
15 Fixed Board 1 54 O-ring 2
16 Torsional Spring 1 55 Steal Ball 1
17 Screw 2 56 Bushing 1
18 Nut 2 57 Plunger Board 1
19 Located Ring 2 58 Plunger Casing 1
20 Discharge Lever 1 59 Washer 1
21 O-ring 1 60 O-ring 2
22 Screw 1 61 Dustproof Ring 1
23 Roller 2 62 Spring 1
24 Bearing 2 63 Spring Cover 1
25 Pin 2 64 Plunger Lever 1
26 Nut 1 65 Nut 1

- 16 -
No. Description Qty No. Description Qty
27 Handle 1 66 Plunger Seat 1
28 Bearing 2 67 Pin 1
29 Roller 2 68 Oil Cup 1
30 Pin 2 69 Bolt 1
31 Retaining Ring 4 70 Nut 1
32 Supported Board 1 71 Retaining Ring 2
33 Pin 1 72 Bearing 1
34 Retaining Ring 2 73 Plunger Ring 1
35 Locking Block 1 74 Pin 1
36 Spring 2 75 Operation Handle 1
37 Retaining Ring 2 76 Right Fork 1
38 Pin 1 77 Cylinder Chassis 1
39 Ring 1 78 Screw 8