Embed Size (px)
Citation preview

Drop screen awningVertikalmarkis / Vindusmarkise / Roll-markise
Manual/Bruksanvisning/Gebrauchsanweisung
SEENG NO DE
Item no. 626701450101

SAFETY INSTRUCTIONS
• The product is mounted on the wall or ceiling. The products canopy provides protection from the sun, wind and gives privacy.
• The product is intended for private use.
• Check regularly to make sure that the product is balanced. Do not use the product if damaged.
• Due to the risk of personal injury, do not make any modifications of the products design and construction.
• Technical skills are required for installation of the product. Do not install the product yourself if you are uncertain as to how the product can be installed in the place where you intend to install it, if you do not understand the user’s manual or parts thereof, if you do not have the necessary tools or if you do not have the necessary skills. Contact a qualified installer for assistance.
• The product is large and heavy. Therefore, at least two adults are re-quired to move and to install the product. Do not attempt to install the product on your own.
• Keep children and pets at a safe distance when you install and adjust the product.
• Make sure that your hands are clean when you install the product otherwise the canopy and the frame can become dirty.
• Using the product when there is frost can damage the awning.
WARNING!If these instructions are not followed, an accident may lead to serious personal injury or property damage.
2
Thank you for choosing topurchase a product from Rusta!
Read through the entire manual before installation and use!
ENG
Drop screen awningRead the user manual carefully to make sure that the product is assembled, used and maintained correctly, as described in the instructions in this user manual. Keep the user manual for future reference.

• Retract the product when there is rain or heavy wind.
• Climbing on the product and hanging objects from the product are prohibited.
• Do not place any kind of fire or other heat source close to the product.
3
USE• This product can be stopped at any position you want.
• When rolling up the drop screen awning, first pull canopy slightly downwards and then follow the canopy with your hand while canopy rolls up. By doing so you will ensure that the canopy rolls up straight.
• if you first pull the canopy downwards slightly and then release it, you risk having the canopy roll up obliquely.
MAINTENANCEAfter some time of use, it can lead to a weakening of the spring tension of the drop screen awning. In this case the drop screen awning can not roll in and out properly. To increase the spring tension again please remove the plastic cap and rotate the hexagonal pin with part 10mm wrench. During this operation please check by pulling the drop screen awning in and out if the spring is increasing. In addition, rotate carefully and do not over tighten the spring tension. If spring tension is over tighten the product will get defective and no longer usable. After getting the desired spring tension please re-plug the plastic cap.
CLEANING
• Dust and dirt accumulate on the frame over time. Therefore, it is important to clean the awning regularly to maintain an attractive appearance.
• A gentle spray cleaner or a mixture of water and cleanser can be used on the frame and then wiped clean.
• Carefully clean the canopy with a mild cleanser diluted with cold or lukewarm water. Do not use any alkaline or acidic cleansers. Only use natural soap. Let the canopy hang outdoors to dry completely. Do not use a hair dryer or another type of heated device for drying.
• Do not use high pressure washer for cleaning as this will damage the canopy.
STORAGE• Make sure that the canopy is dry before the drop screen awning is put in storage.
• If the drop screen awning will not be used for an extended time, we recommend re-moving it from the brackets and store it in a suitable location.
• Roll the drop screen awning in completely.
• Store the drop screen awning in a dry and safe place where it is not accessible to children.

PACKAGE CONTENTS
Check that all part are included in the package and not damaged. Do not mount the product if any part is missing or damaged.
The following tools are required for installation (not included):
A Awning x 1
B Bracket x 3
C ST4.8x50 Cross tapping screw
x 10
D 8x40 Plastic expansion tube
x 10
E Washer x 10
F Hook x 2
G Velcro x 2
The following tools are required for installation (not included): Drill
Measuring tape
Phillips Screwdriver
Level
Measuring tape Screwdriver Level Drill
The following tools are required for installation (not included): Drill
Measuring tape
Phillips Screwdriver
Level
The following tools are required for installation (not included): Drill
Measuring tape
Phillips Screwdriver
Level
The following tools are required for installation (not included): Drill
Measuring tape
Phillips Screwdriver
Level
ENG
4

ASSEMBLY
INSTALL BRACKETS
Determine your type of installation. Your Drop screen awning can be hung from a wall or a ceiling. Fig.1.1 illustrates a ceiling installation. Fig. 1.2 illustrates a wall installation.
1
2Make where you need to drill holes for brackets with a chalk line to ensure the drop screen awning is straight. Your drop screen awning will not install cor-rectly unless your brackets are perfectly aligned with each other. We recom-mend using a level to align the screw holes.
5
Fig 1.1 Fig 1.2
A A
B
B
B B BA

3
4
Drill three 5cm deep holes in the size as the following picture shows.
Installation Step 1: Install Brackets. Determine your type of installation. Your Drop screen awning can be hung from a wall or a ceiling. Fig.1.1 illustrates a ceiling installation. Fig. 1.2 illustrates a wall installation.
Fig 1.1 Fig1.2 Step 2: Make where you need to drill holes for brackets with a chalk line to ensure the drop screen awning is straight. Your drop screen awning will not install correctly unless your brackets are perfectly aligned with each other. We recommend using a level to align the screw holes. Ref. Fig. 2.
Fig 2 Step 3: Drill three 5cm deep holes in the size as the following picture shows. Ref. Fig. 3.
Fig. 3 8mm masonry drill / Cross section of wall/ceiling Step 4: Insert one 8x45mm plastic expansion tube in each of holes. Ref. Fig. 4.
Fig. 4
5 Fix the bracket with ST4.8x50 cross tapping screws and washers.
6Insert drop screen awning into bracket. Make sure the awning is locked into bracket.
ENG
Installation Step 1: Install Brackets. Determine your type of installation. Your Drop screen awning can be hung from a wall or a ceiling. Fig.1.1 illustrates a ceiling installation. Fig. 1.2 illustrates a wall installation.
Fig 1.1 Fig1.2 Step 2: Make where you need to drill holes for brackets with a chalk line to ensure the drop screen awning is straight. Your drop screen awning will not install correctly unless your brackets are perfectly aligned with each other. We recommend using a level to align the screw holes. Ref. Fig. 2.
Fig 2 Step 3: Drill three 5cm deep holes in the size as the following picture shows. Ref. Fig. 3.
Fig. 3 8mm masonry drill / Cross section of wall/ceiling Step 4: Insert one 8x45mm plastic expansion tube in each of holes. Ref. Fig. 4.
Fig. 4
8mm masonry drill.
5 cm
Cross section of wall/ceiling
A
B
B
D
C E
6
Insert one 8x45mm plastic expansion tube in each of holes.

Choose fixing method:
Fixing with hooksIf you choose hooks, see following steps 7–9.
7
Fixing with VelcroIf you choose Velcro, then finish installation.
F

ENG
8
9Fix the hook with ST4.8x50 cross tapping screws and washers.
7
8
Step 7: Determine the place of hook, drill the hole of 8x50, ref. Fig. 8.
Fig. 8 Step 8: Insert one 8x45mm plastic expansion tube in each of holes. Ref. Fig. 9
Fig. 9 Step 9: Fix the hook with ST4.8x50 cross tapping screws. Ref. Fig 10.
Fig. 10
5 c
m C
ross
sec
tion
of g
roun
d
8 mm masonry drill
Determine the place of hook, drill the hole of 8x50.
Insert one 8x45mm plastic expansion tube in each of holes.
Step 7: Determine the place of hook, drill the hole of 8x50, ref. Fig. 8.
Fig. 8 Step 8: Insert one 8x45mm plastic expansion tube in each of holes. Ref. Fig. 9
Fig. 9 Step 9: Fix the hook with ST4.8x50 cross tapping screws. Ref. Fig 10.
Fig. 10

RIGHT OF COMPLAINT
By law the product must be returned to the place of purchase along with the original receipt in the event of a complaint. The user is liable for any damage to the product that is caused by not using the product for its intended purpose or by not following this user manual correctly. The right of complaint will not apply in these instances.
INFORMATION ABOUT HAZARDOUS WASTEUsed products should be handled separately from household waste. They should be taken for recycling in accordance with local rules for waste management.
9

SE
VARNING! Om föreskriften inte efterföljs kan en olycka leda till allvarlig person- eller egendomsskada.
10
Tack för att du valt att köpa en produkt från Rusta!
Läs igenom hela bruksanvisningen innan montering och användning!
SE
VertikalmarkisLäs bruksanvisningen noggrant och se till att produkten installeras, används och under-hålls på rätt sätt enligt instruktionerna. Spara bruksanvisningen för senare bruk.
SÄKERHETSFÖRESKRIFTER
• Följ noga säkerhetsföreskrifterna och monteringsanvisningarna och spara bruksanvisningen för framtida bruk.
• Produkten monteras på väggen eller i taket. Markisväven ger avskild-het och skydd från sol och vind.
• Produkten är avsedd för privat bruk.
• Kontrollera regelbundet att produkten sitter korrekt. Använd inte pro-dukten om den är skadad.
• På grund av risken för personskador får inga ändringar i produktens design eller konstruktion göras.
• Det krävs tekniska kunskaper för att montera produkten. Montera inte produkten själv om du är osäker på hur den ska monteras på platsen där du vill ha den, om du inte förstår bruksanvisningen eller delar av den, om du inte har de nödvändiga verktygen eller om du inte har den kompetens som krävs. Kontakta en fackman för att få hjälp.
• Produkten är stor och tung. Det krävs därför minst två vuxna för att flytta och installera produkten. Försök inte att installera produkten på egen hand.
• Håll barn och husdjur på säkert avstånd när du installerar och justerar produkten.
• Se till att dina händer är rena när du installerar produkten, annars kan markisväven och ramen bli smutsiga.

11
• Produkten kan ta skada om den används vid frost.
• Dra upp produkten när det regnar eller blåser kraftigt.
• Det är inte tillåtet att klättra på produkten eller hänga föremål från den.
• Placera inte något som brinner eller annan värmekälla nära produkten.
ANVÄNDNING• Markisen kan stoppas vid vilken position som helst.
• När den ska rullas upp drar du först markisen en aning nedåt och följer sedan efter med handen när den rullar upp. Det säkerställer att markisen rullar upp rakt.
• Om du först drar markisen nedåt och sedan släpper den, riskerar du att den rullar upp snett.
UNDERHÅLLEfter en tids användning kan markisens fjäderspänning försvagas. Det gör att markisen inte rullar upp och ner korrekt. Öka fjäderspänningen genom att ta bort plastlocket och vrida den sexkantiga tappen med en 10 mm nyckel. Kontrollera under tiden att fjäderspän-ningen ökar genom att dra markisen upp och ner. Vrid tappen försiktigt och dra inte åt för hårt. Om tappen överspänns går funktionen sönder och markisen kan inte längre rullas upp eller ned. När önskad fjäderspänning har uppnåtts, sätt tillbaka plastlocket.
RENGÖRING• Med tiden ansamlas damm och smuts på markisen. Därför är det viktigt att rengöra
markisen regelbundet för att hålla den snygg och fräsch.
• Spreja ramen med ett milt rengöringsmedel eller en blandning av vatten och rengöringsmedel och torka av.
• Rengör markisväven försiktigt med ett milt rengöringsmedel utspätt med kallt eller ljummet vatten. Använd inte alkaliska eller sura rengöringsmedel. Använd endast såpa. Låt markisen hänga utomhus och torka helt. Använd inte hårtork eller någon annan typ av värmeanordning för att torka den.
• Använd inte högtryckstvätt vid rengöring eftersom det skadar markisväven.
FÖRVARING• Se till att markisväven är torr innan markisen tas ned för förvaring.
• Om markisen inte ska användas under en längre tid rekommenderar vi att den lossas från fästena och förvaras på lämplig plats.
• Rulla in markisen helt.
• Förvara markisen på en torr och säker plats, utom räckhåll för barn.

SE
FÖRPACKNINGENS INNEHÅLL
Kontrollera att alla delar finns med i paketet och inte är skadade. Montera inte produkten om någon del saknas eller är skadad.
Följande verktyg behövs för installation (ingår ej):
A Markis x 1
B Fäste x 3
C ST4.8x50 Krysskruv
x 10
D 8x40 Platsplugg
x 10
E Bricka x 10
F Krok x 2
G Kardborreband x 2
The following tools are required for installation (not included): Drill
Measuring tape
Phillips Screwdriver
Level
Måttband Kryssmejsel Vattenpass Borrmaskin
The following tools are required for installation (not included): Drill
Measuring tape
Phillips Screwdriver
Level
The following tools are required for installation (not included): Drill
Measuring tape
Phillips Screwdriver
Level
The following tools are required for installation (not included): Drill
Measuring tape
Phillips Screwdriver
Level
12
MONTERING
MONTERA FÄSTEN
Bestäm var produkten ska sitta. Vertikalmarkisen kan hängas på en vägg eller i ett tak. Bild 1.1 visar montering i tak. Bild 1.2 visar montering på vägg.
1
2Märk ut var du behöver borra hål för att markisen ska hänga rakt. Markisen går inte att montera korrekt om inte fästena sitter helt i linje med varandra. Vi rekommenderar att du använder ett vattenpass för att rikta in skruvhålen.
Fig 1.1 Fig 1.2
13
A A
B
B
B B BA
SE
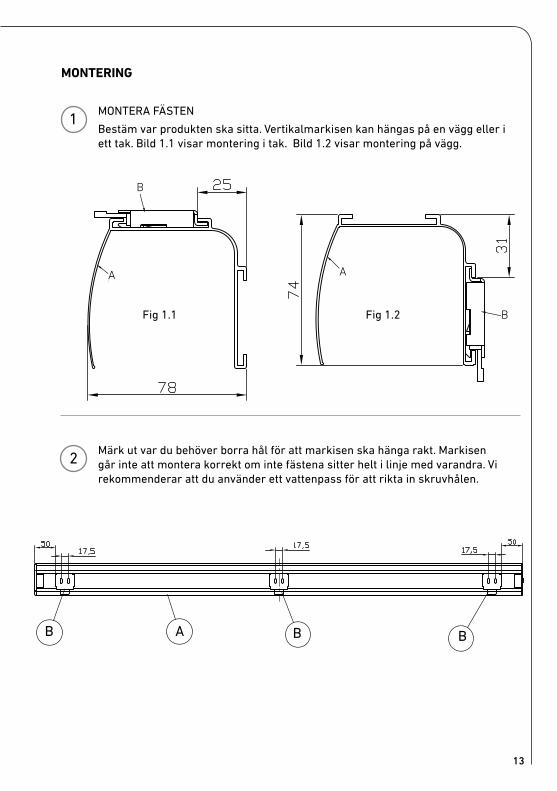
3
4
Borra tre 5 cm djupa hål i den storlek som följande bild visar.
Installation Step 1: Install Brackets. Determine your type of installation. Your Drop screen awning can be hung from a wall or a ceiling. Fig.1.1 illustrates a ceiling installation. Fig. 1.2 illustrates a wall installation.
Fig 1.1 Fig1.2 Step 2: Make where you need to drill holes for brackets with a chalk line to ensure the drop screen awning is straight. Your drop screen awning will not install correctly unless your brackets are perfectly aligned with each other. We recommend using a level to align the screw holes. Ref. Fig. 2.
Fig 2 Step 3: Drill three 5cm deep holes in the size as the following picture shows. Ref. Fig. 3.
Fig. 3 8mm masonry drill / Cross section of wall/ceiling Step 4: Insert one 8x45mm plastic expansion tube in each of holes. Ref. Fig. 4.
Fig. 4
8mm betongborr.
5 cm
Installation Step 1: Install Brackets. Determine your type of installation. Your Drop screen awning can be hung from a wall or a ceiling. Fig.1.1 illustrates a ceiling installation. Fig. 1.2 illustrates a wall installation.
Fig 1.1 Fig1.2 Step 2: Make where you need to drill holes for brackets with a chalk line to ensure the drop screen awning is straight. Your drop screen awning will not install correctly unless your brackets are perfectly aligned with each other. We recommend using a level to align the screw holes. Ref. Fig. 2.
Fig 2 Step 3: Drill three 5cm deep holes in the size as the following picture shows. Ref. Fig. 3.
Fig. 3 8mm masonry drill / Cross section of wall/ceiling Step 4: Insert one 8x45mm plastic expansion tube in each of holes. Ref. Fig. 4.
Fig. 4
5 Montera fästet med ST4.8x50 krysskruvar och brickor.
6Sätt i markisen i fästet. Se till att markisen är fixerad i fästet.
Sätt en 8x45 mm plastplugg i varje hål
Tvärsnitt av vägg/tak
A
B
B
D
C E
14

Välj fästmetod:
Fästa med krokar
Om du väljer krokar, följ steg 7–9
Fästa med kardborreband
Om du väljer kardborreband, avsluta installationen.
15
F

9 Montera kroken med ST4.8x50 krysskruvar och brickor.
7
8
Step 7: Determine the place of hook, drill the hole of 8x50, ref. Fig. 8.
Fig. 8 Step 8: Insert one 8x45mm plastic expansion tube in each of holes. Ref. Fig. 9
Fig. 9 Step 9: Fix the hook with ST4.8x50 cross tapping screws. Ref. Fig 10.
Fig. 10
5 c
m C
ross
sec
tion
of g
roun
d8 mm masonry drill
Bestäm var kroken ska sitta och borra ett hål 8x50.
Sätt en 8x45 mm plastplugg i hålet.
Step 7: Determine the place of hook, drill the hole of 8x50, ref. Fig. 8.
Fig. 8 Step 8: Insert one 8x45mm plastic expansion tube in each of holes. Ref. Fig. 9
Fig. 9 Step 9: Fix the hook with ST4.8x50 cross tapping screws. Ref. Fig 10.
Fig. 10
SE
16

INFORMATION OM MILJÖFARLIGT AVFALLUttjänt produkt ska hanteras separat från hushållsavfall och lämnas in för återvinning enligt lokala regler för avfallshantering
REKLAMATIONSRÄTT
Enligt gällande lag ska produkten vid reklamation lämnas in på inköpsstället och originalkvitto bifogas. Användaren är ansvarig för eventuella skador på produkten om produkten använts till ändamål den inte är avsedd för eller om bruksanvisningen inte följts. Reklamationsrätten gäller i sådant fall inte.
17
ADVARSEL! Dersom instruksjonene ikke følges kan det føre alvorlig skade på person eller eiendom.
18
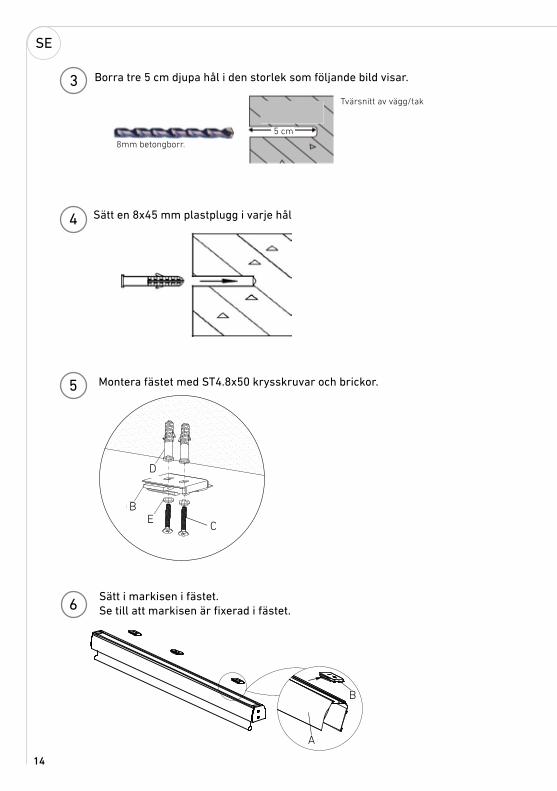
NO
Takk for at du valgte å kjøpe et produkt fra Rusta!
Les gjennom hele bruksanvisningen før installasjon og bruk!
VindusmarkiseLes bruksanvisningen nøye og sørg for at produkten monteres, brukes og vedlikeholdes riktig i henhold til instruksjonene. Ta vare på bruksanvisningen for fremtidig bruk.
SIKKERHETSANVISNINGER
• Følg sikkerhets- og monteringsanvisningene nøye, og spar bruksan-visningen til fremtidig bruk.
• Produktet monteres på vegg eller i tak. Markiseduken gir beskyttelse for sol, vind og den gir privatliv.
• Produktet er beregnet for privat bruk.
• Kontroller produktet jevnlig for å sikre at det sitter korrekt. Ikke bruk produktet hvis det er skadet.
• På grunn av fare for personskade må det ikke gjøres noen endringer på produktets design eller konstruksjon.
• Montering av produktet krever tekniske ferdigheter. Ikke installer produktet selv hvis du er usikker på hvordan produktet kan monteres der du vil ha det, hvis du ikke forstår bruksanvisningen eller deler av den, hvis du ikke har det nødvendige verktøyet, eller hvis du ikke har de nødvendige ferdighetene. Kontakt en fagmann for å få hjelp.
• Produktet er stort og tungt. Derfor er det nødvendig med minst to voksne for å flytte og installere produktet. Ikke forsøk å installere pro-duktet på egenhånd.
• Hold barn og dyr på trygg avstand når du monterer og justerer pro-duktet.
• Sørg for at hendene dine er rene når du monterer produktet ellers kan markiseduken og rammen bli skitne.

19
• Bruk av produktet når det er frost kan skade markisen.
• Rull opp produktet når det er regn eller sterk vind.
• Det er forbudt å klatre på produktet eller henge opp ting på det.
• Ikke plasser noen form for ild eller annen varmekilde i nærheten av produktet.
BRUK• Markisen kan stoppes i hvilken som helst posisjon.
• Når den skal rulles opp, drar du først markiseduken litt nedover og så følger du duken med hånden mens den rulles opp. På denne måten sikrer du at markiseduken rulles opp rett.
• Hvis du først trekker markiseduken litt ned og så slipper den, risikerer du at den rul-les opp skjevt.
VEDLIKEHOLDEtter en tids bruk, kan fjærspenningen til vertikalmarkisen svekkes. Da vil ikke vertikal-markisen rulles opp og ned ordentlig. For å øke fjærspenningen igjen, fjerner du plasthet-ten og vrir den sekskantede låsepinnen med en 10 mm skiftenøkkel. Når du gjør dette kon-trollerer du om fjæringen øker ved å dra vertikalmarkisen inn og ut. Vri forsiktig og pass på at du ikke strammer fjærspenningen for mye. Hvis fjærspenningen blir strammet for mye blir produktet ødelagt og kan ikke lenger brukes. Når du har fått den ønskede fjærspennin-gen setter du tilbake plasthetten.
RENGJØRING
• Over tid kan støv og smuss samle seg på rammen. Derfor er det viktig å rengjøre markisen med jevne mellomrom for å holde den fin.
• Bruk et mildt sprayrengjøringsmiddel eller såpevann til å rengjøre rammen, og tørk av.
• Rengjør markiseduken forsiktig med et mildt rengjøringsmiddel som er blandet med kaldt eller lunkent vann. Ikke bruk alkaliske eller sure rengjøringsmidler. Bruk kun naturlig såpe. La markiseduken henge utendørs til den er helt tørr. Ikke bruk hårtørk-er eller annen type oppvarming for tørking.
• Ikke bruk høytrykksspyler til rengjøring, da dette vil skade markiseduken.
OPPBEVARING• Kontroller at markiseduken er tørr før vertikalmarkisen tas ned for lagring.
• Hvis vertikalmarkisen ikke skal brukes i lang tid, anbefaler vi at den fjernes fra bra-kettene og lagres på egnet sted.
• Rull vertikalmarkisen helt inn.
• Oppbevar vertikalmarkisen på et tørt og trygt sted som ikke er tilgjengelig for barn.

NO
PAKENS INHOLD
Sjekk at alle deler er med i pakken og at de ikke er skadet. Ikke monter produktet hvis noen av delene mangler eller er skadet.
Følgende verktøy er nødvendig for montering (ikke inkludert):
A Markise x 1
B Braketter x 3
C ST4.8x50 Krysskrue
x 10
D 8x40 Plastplugg
x 10
E Underlagsskive x 10
F Krok x 2
G Borrelåsbånd x 2
The following tools are required for installation (not included): Drill
Measuring tape
Phillips Screwdriver
Level
Målebånd Skrutrekker Vater Drill
The following tools are required for installation (not included): Drill
Measuring tape
Phillips Screwdriver
Level
The following tools are required for installation (not included): Drill
Measuring tape
Phillips Screwdriver
Level
The following tools are required for installation (not included): Drill
Measuring tape
Phillips Screwdriver
Level
20

MONTERING
MONTER BRAKETTER
Bestem hvor produktet skal monteres. Vertikalmarkisen kan henges på vegg eller i tak. Figur 1.1 illustrerer montering i tak. Figur 1.2 illustrerer montering på vegg.
1
2Marker hvor du trenger å drille hull for braketter med en krittstrek for å sikre at vertikalmarkisen henger rett. Vertikalmarkisen kan ikke monteres korrekt hvis ikke brakettene sitter helt på linje med hverandre. Vi anbefaler at du bru-ker et vater for å sikre at skruehullene er på linje.
Fig 1.1 Fig 1.2
A A
B
B
21
B B BA

NO
3
4
Drill tre stk. 5 cm dype hull av den størrelsen som det følgende bildet viser.
Installation Step 1: Install Brackets. Determine your type of installation. Your Drop screen awning can be hung from a wall or a ceiling. Fig.1.1 illustrates a ceiling installation. Fig. 1.2 illustrates a wall installation.
Fig 1.1 Fig1.2 Step 2: Make where you need to drill holes for brackets with a chalk line to ensure the drop screen awning is straight. Your drop screen awning will not install correctly unless your brackets are perfectly aligned with each other. We recommend using a level to align the screw holes. Ref. Fig. 2.
Fig 2 Step 3: Drill three 5cm deep holes in the size as the following picture shows. Ref. Fig. 3.
Fig. 3 8mm masonry drill / Cross section of wall/ceiling Step 4: Insert one 8x45mm plastic expansion tube in each of holes. Ref. Fig. 4.
Fig. 4
5 Fest braketten med ST4.8x50 krysskruer og underlagsskiver.
6Sett vertikalmarkisen på braketten. Sørg for at markisen låses inn i braketten.
Sett inn et 8x45 mm plastplugg i hvert hull.
Installation Step 1: Install Brackets. Determine your type of installation. Your Drop screen awning can be hung from a wall or a ceiling. Fig.1.1 illustrates a ceiling installation. Fig. 1.2 illustrates a wall installation.
Fig 1.1 Fig1.2 Step 2: Make where you need to drill holes for brackets with a chalk line to ensure the drop screen awning is straight. Your drop screen awning will not install correctly unless your brackets are perfectly aligned with each other. We recommend using a level to align the screw holes. Ref. Fig. 2.
Fig 2 Step 3: Drill three 5cm deep holes in the size as the following picture shows. Ref. Fig. 3.
Fig. 3 8mm masonry drill / Cross section of wall/ceiling Step 4: Insert one 8x45mm plastic expansion tube in each of holes. Ref. Fig. 4.
Fig. 4
8mm slagbor.
5 cm
Cross section of ground
Tverrsnitt av vegg / tak
A
B
B
D
C E
22

Velg den festemetoden du ønsker:
Festing med kroker
Hvis du velger kroker, se trinn 7–9.
Festing med borrelåsbånd
Hvis du velger borrelåbånd, fullfører du installasjonen.
F
23

7
9
8
Step 7: Determine the place of hook, drill the hole of 8x50, ref. Fig. 8.
Fig. 8 Step 8: Insert one 8x45mm plastic expansion tube in each of holes. Ref. Fig. 9
Fig. 9 Step 9: Fix the hook with ST4.8x50 cross tapping screws. Ref. Fig 10.
Fig. 10
5 c
m C
ross
sec
tion
of g
roun
d8 mm masonry drill
Bestem plassering av krok, drill hullet på 8x50.
Fest kroken med ST4.8x50 krysskruer og underlagsskiver.
Sett inn et 8x45 mm plastplugg i hvert hull.
Step 7: Determine the place of hook, drill the hole of 8x50, ref. Fig. 8.
Fig. 8 Step 8: Insert one 8x45mm plastic expansion tube in each of holes. Ref. Fig. 9
Fig. 9 Step 9: Fix the hook with ST4.8x50 cross tapping screws. Ref. Fig 10.
Fig. 10
NO
24
25
REKLAMASJONSRETT
I henhold til gjeldende lov skal produktet ved reklamasjon leveres inn på kjøpsstedet med maskinstemplet kvittering vedlagt. Brukeren er ansvarlig for eventuelle skader på produktet dersom produktet brukes til noe annet enn det som er tiltenkt, eller dersom bruksanvisningen ikke følges. I slike tilfeller bortfaller reklamasjonsretten.
INFORMASJON OM FARLIG AVFALLUtslitt produkt skal ikke kastes i husholdningsavfall, men leveres til gjenvinning i henhold til lokale regler for avfallshåndtering

WARNHINWEIS! Wenn die Vorschriften nicht befolgt werden, kann ein Unfall zu gravierenden Verletzungen oder Sachschäden führen.
26
Danke, dass Sie sich für den Kauf eines Produktes von Rusta entschieden haben!
Vor der Montage und Benutzung die gesamte Gebrauchsanleitung durchlesen!
DE
Roll-markiseLesen Sie die Gebrauchsanleitung sorgfältig durch. Achten Sie darauf, dass das Produkt gemäß der Gebrauchsanleitung installiert, verwendet und gewartet wird. Bewahren Sie die Gebrauchsanweisung für eine evtl. spätere Verwendung auf.
SICHERHEITSANWEISUNGEN
• Befolgen Sie die Sicherheits- und Montagehinweise genau und bewah-ren Sie die Gebrauchsanleitung für den späteren Gebrauch auf.
• Das Produkt wird an der Wand oder der Decke montiert. Die Überda-chung des Produkts bietet Schutz vor Sonne und Wind und sorgt für Privatsphäre.
• Das Produkt ist für den privaten Gebrauch vorgesehen.
• Überprüfen Sie regelmäßig, ob das Produkt gut ausbalanciert ist. Ver-wenden Sie das Produkt nicht, wenn es beschädigt ist.
• Aufgrund der Gefahr von Verletzungen dürfen keine Änderungen an Design und Konstruktion des Produkts vorgenommen werden.
• Für die Installation des Produkts ist technisches Können erforderlich. Installieren Sie das Produkt nicht selbst, wenn Sie unsicher sind, wie das Produkt an der von Ihnen vorgesehenen Stelle installiert werden kann, wenn Sie die Gebrauchsanleitung oder Teile davon nicht verste-hen, oder wenn Sie nicht die notwendigen Werkzeuge oder die erfor-derlichen Fähigkeiten besitzen. Kontaktieren Sie in diesen Fällen einen qualifizierten Installateur, der Ihnen weiterhilft.
• Das Produkt ist groß und schwer. Aus diesem Grund sind mindestens zwei Erwachsene erforderlich, um das Produkt zu bewegen und zu installieren. Versuchen Sie nicht, das Produkt alleine zu installieren.
• Halten Sie Kinder und Haustiere in sicherem Abstand, wenn Sie das Produkt installieren und ausrichten.

27
• Stellen Sie sicher, dass Ihre Hände sauber sind, wenn Sie das Produkt installieren, da sonst das Tuch und der Rahmen verschmutzt werden können.
• Wird das Produkt bei frostigem Wetter verwendet, kann das Tuch be-schädigt werden.
• Ziehen Sie das Produkt bei Regen oder starkem Wind ein.
• Es ist verboten, auf das Produkt zu klettern und Gegenstände daran aufzuhängen.
• Positionieren Sie keine Feuer oder anderen Wärmequellen in der Nähe des Produkts.
INFORMATIONEN ÜBER UMWELTGEFÄHRLICHEN ABFALL Dieses Produkt darf am Ende seiner Lebensdauer nicht über den normalen Haushaltsabfall entsorgt werden, sondern muss je nach den kommunalen Bestimmungen für Abfallbeseitigung einem Sammelpunkt für das Recycling von elektrischen und elektronischen Geräten übergeben werden.
REKLAMATIONSRECHT
Nach geltendem Recht wird das Gerät bei Reklamation in die Verkaufsstelle zurückge-bracht. Der Originalbeleg muss beigefügt werden. Für Schäden, die durch nicht bestim-mungs- und unsachgemäßen Gebrauch entstanden sind, ist der Käufer verantwortlich. In diesen Fällen verliert das Reklamationsrecht seine Gültigkeit.

28
WERVENDUNG• Das Produkt kann in jeder beliebigen Position angehalten werden.
• Wenn Sie das Tuch aufrollen, müssen Sie es zunächst leicht nach unten ziehen und dann mit der Hand führen, während es sich aufrollt. Dadurch stellen sie sicher, dass sich das Tuch gerade aufrollt.
• Wenn Sie es leicht nach unten ziehen und dann loslassen, riskieren Sie, dass es sich schief aufwickelt.
WARTUNGMit der Zeit kann die Spannung der Feder der Markise nachlassen. In diesem Fall kann das Tuch nicht mehr korrekt ein- und ausgerollt werden. Um die Federspannung zu erhöhen, entfernen Sie die Kunststoffkappe und drehen Sie den Sechskantbolzen mit einem 10 mm-Schraubenschlüssel. Prüfen Sie, während Sie dies tun, ob sich die Federspannung erhöht, indem Sie das Tuch ein- und herausziehen. Drehen Sie zudem vorsichtig und ziehen Sie die Federspannung nicht zu stark an. Wird die Federspannung zu fest angezogen, bes-chädigt dies das Produkt, so dass es nicht mehr verwendet werden kann. Bringen Sie die Plastikkappe wieder an, sobald die gewünschte Federspannung erreicht ist.
REINIGUNG• Auf dem Rahmen sammeln sich im Lauf der Zeit Staub und Schmutz an. Daher ist
es wichtig, das Produkt regelmäßig zu reinigen, um ein ansprechendes Aussehen zu erhalten.
• Der Rahmen kann mit einem milden Reinigungsspray oder einem Gemisch aus Wass-er und Reinigungsmittel gereinigt und anschließend abgewischt werden.
• Reinigen Sie das Tuch mit einem milden Reinigungsmittel, das mit kaltem oder lau-warmem Wasser verdünnt wurde. Verwenden Sie keine alkalischen oder sauren Reinigungsmittel. Verwenden Sie nur natürliche Seife. Hängen Sie das Tuch im Freien auf, bis es vollständig getrocknet ist. Verwenden Sie keinen Fön oder andere Arten von Heizgeräten zum Trocknen.
• Verwenden Sie für die Reinigung keine Hochdruckreiniger, da dies das Tuch beschädi-gen würde.
AUFBEWARUNG• Stellen Sie sicher, dass das Tuch trocken ist, bevor die Markise verstaut wird.
• Wenn die Markise längere Zeit nicht verwendet werden soll, empfehlen wir, sie aus den Halterungen zu nehmen und an einem geeigneten Ort zu lagern.
• Rollen Sie dazu das Tuch vollständig ein.
• Bewahren Sie die Markise an einer trockenen und sicheren Stelle unzugänglich für Kinder auf.
DE

29
PACKAGE CONTENTS
Überprüfen Sie, ob alle Teile in der Packung enthalten sind und unbeschädigt sind. Montieren Sie das Produkt nicht, wenn ein Teil fehlt oder beschädigt ist.
Folgende Werkzeuge werden für die Installation benötigt (nicht im Lieferumfang enthalten):
A Sonnenschutz x 1
B Halterung x 3
C ST4.8x50 Kreuzschlitz-Blechschraube
x 10
D 8x40 Kunststoff-Anker
x 10
E Unterlegscheibe x 10
F Hake x 2
G Klettverschluss x 3
The following tools are required for installation (not included): Drill
Measuring tape
Phillips Screwdriver
Level
Maßband Schraubendreher Wasserwaage Bohrmaschine
The following tools are required for installation (not included): Drill
Measuring tape
Phillips Screwdriver
Level
The following tools are required for installation (not included): Drill
Measuring tape
Phillips Screwdriver
Level
The following tools are required for installation (not included): Drill
Measuring tape
Phillips Screwdriver
Level

INSTALLATION
INSTALLIEREN SIE DIE HALTERUNGENLegen Sie die Art der Installation fest. Die Markise kann an einer Wand oder an einer Decke montiert werden. Abb.1.1 zeigt eine Installation an der Decke. Abb. 1.2 zeigt eine Installation an der Wand.
1
2Markieren Sie die Punkte, an denen Sie die Löcher für die Halterungen bohren möchten. Zeichnen Sie mit Kreide eine Linie zwischen den Punkten, um zu gewährleisten, dass die Markise gerade hängt. Die Montage der Markise ist nicht korrekt, wenn die Halterungen nicht perfekt ausgerichtet sind. Wir empfehlen, zur Ausrichtung der Löcher für die Schrauben eine Wasserwaage zu verwenden.
Fig 1.1 Fig 1.2
DE
A A
B
B
30
B B BA
31
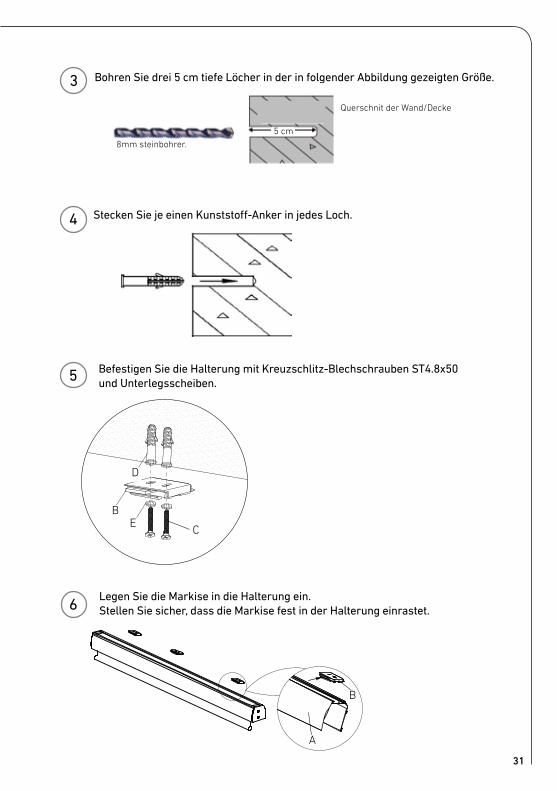
3
4
Bohren Sie drei 5 cm tiefe Löcher in der in folgender Abbildung gezeigten Größe.
Installation Step 1: Install Brackets. Determine your type of installation. Your Drop screen awning can be hung from a wall or a ceiling. Fig.1.1 illustrates a ceiling installation. Fig. 1.2 illustrates a wall installation.
Fig 1.1 Fig1.2 Step 2: Make where you need to drill holes for brackets with a chalk line to ensure the drop screen awning is straight. Your drop screen awning will not install correctly unless your brackets are perfectly aligned with each other. We recommend using a level to align the screw holes. Ref. Fig. 2.
Fig 2 Step 3: Drill three 5cm deep holes in the size as the following picture shows. Ref. Fig. 3.
Fig. 3 8mm masonry drill / Cross section of wall/ceiling Step 4: Insert one 8x45mm plastic expansion tube in each of holes. Ref. Fig. 4.
Fig. 4
5 Befestigen Sie die Halterung mit Kreuzschlitz-Blechschrauben ST4.8x50 und Unterlegsscheiben.
6Legen Sie die Markise in die Halterung ein. Stellen Sie sicher, dass die Markise fest in der Halterung einrastet.
Stecken Sie je einen Kunststoff-Anker in jedes Loch.
A
B
Installation Step 1: Install Brackets. Determine your type of installation. Your Drop screen awning can be hung from a wall or a ceiling. Fig.1.1 illustrates a ceiling installation. Fig. 1.2 illustrates a wall installation.
Fig 1.1 Fig1.2 Step 2: Make where you need to drill holes for brackets with a chalk line to ensure the drop screen awning is straight. Your drop screen awning will not install correctly unless your brackets are perfectly aligned with each other. We recommend using a level to align the screw holes. Ref. Fig. 2.
Fig 2 Step 3: Drill three 5cm deep holes in the size as the following picture shows. Ref. Fig. 3.
Fig. 3 8mm masonry drill / Cross section of wall/ceiling Step 4: Insert one 8x45mm plastic expansion tube in each of holes. Ref. Fig. 4.
Fig. 4
8mm steinbohrer.
5 cm
Querschnit der Wand/Decke
B
D
C E

DE
32
Wählen Sie die gewünschte Befestigungsmethode:
Befestigung mit HakenWenn Haken gewählt haben, führen Sie Schritt 7–9 aus.
Befestigung mit KlettverschlussWenn Sie Klettverschluss gewählt haben, schließen Sie die Installation ab.
F

7
9
8
Step 7: Determine the place of hook, drill the hole of 8x50, ref. Fig. 8.
Fig. 8 Step 8: Insert one 8x45mm plastic expansion tube in each of holes. Ref. Fig. 9
Fig. 9 Step 9: Fix the hook with ST4.8x50 cross tapping screws. Ref. Fig 10.
Fig. 10
5 c
m 5
cm
Cro
ss s
ectio
n o
f gro
und
8 mm masonry drill
Legen Sie die Stellen für die Haken fest und bohren Sie jeweils ein Loch mit 8x50 mm.
Befestigen Sie den Haken mit Kreuzschlitz-Blechschrauben ST4.8x50 und Unterlegscheiben.
Stecken Sie je einen Kunststoff-Anker in jedes Loch.
Step 7: Determine the place of hook, drill the hole of 8x50, ref. Fig. 8.
Fig. 8 Step 8: Insert one 8x45mm plastic expansion tube in each of holes. Ref. Fig. 9
Fig. 9 Step 9: Fix the hook with ST4.8x50 cross tapping screws. Ref. Fig 10.
Fig. 10

........................................................................................................................................................................................................
........................................................................................................................................................................................................
........................................................................................................................................................................................................
........................................................................................................................................................................................................
........................................................................................................................................................................................................
........................................................................................................................................................................................................
........................................................................................................................................................................................................
........................................................................................................................................................................................................
........................................................................................................................................................................................................
........................................................................................................................................................................................................
........................................................................................................................................................................................................
........................................................................................................................................................................................................
........................................................................................................................................................................................................
........................................................................................................................................................................................................
........................................................................................................................................................................................................
........................................................................................................................................................................................................
........................................................................................................................................................................................................
........................................................................................................................................................................................................
........................................................................................................................................................................................................
........................................................................................................................................................................................................
........................................................................................................................................................................................................
........................................................................................................................................................................................................
........................................................................................................................................................................................................
........................................................................................................................................................................................................
........................................................................................................................................................................................................
........................................................................................................................................................................................................
........................................................................................................................................................................................................
........................................................................................................................................................................................................
........................................................................................................................................................................................................
........................................................................................................................................................................................................
........................................................................................................................................................................................................
........................................................................................................................................................................................................
........................................................................................................................................................................................................
........................................................................................................................................................................................................
NOTES

........................................................................................................................................................................................................
........................................................................................................................................................................................................
........................................................................................................................................................................................................
........................................................................................................................................................................................................
........................................................................................................................................................................................................
........................................................................................................................................................................................................
........................................................................................................................................................................................................
........................................................................................................................................................................................................
........................................................................................................................................................................................................
........................................................................................................................................................................................................
........................................................................................................................................................................................................
........................................................................................................................................................................................................
........................................................................................................................................................................................................
........................................................................................................................................................................................................
........................................................................................................................................................................................................
........................................................................................................................................................................................................
........................................................................................................................................................................................................
........................................................................................................................................................................................................
........................................................................................................................................................................................................
........................................................................................................................................................................................................
........................................................................................................................................................................................................
........................................................................................................................................................................................................
........................................................................................................................................................................................................
........................................................................................................................................................................................................
........................................................................................................................................................................................................
........................................................................................................................................................................................................
........................................................................................................................................................................................................
........................................................................................................................................................................................................
........................................................................................................................................................................................................
........................................................................................................................................................................................................
........................................................................................................................................................................................................
........................................................................................................................................................................................................
........................................................................................................................................................................................................
........................................................................................................................................................................................................

Rustas kundtjänst: Tel. 0771 28 10 10Konsumentkontakt: Rusta Kundtjänst, Box 5064, 194 05 Upplands Väsby, SVERIGEHemsida: www.rusta.comE-post: [email protected]
SE
Customer Service Rusta: Tel. +46 (0)771 28 10 10Consumer contact: Rusta Customer Service, Box 5064, 194 05 Upplands Väsby, SWEDENWebsite: www.rusta.comE-mail: [email protected]
ENG
Rustas kundetjeneste: Tlf. +46 (0)771 28 10 10Forbrukerkontakt: Rusta Kundetjeneste, Box 5064, 194 05 Upplands Väsby, SVERIGEHjemmesida: www.rusta.comE-post: [email protected]
NO
Kundenservice Rusta: Tel. +46 (0)771 28 10 10Kundenkontakt: Rusta Kundtjänst, Box 5064, 194 05 Upplands Väsby, SCHWEDENWebsite: www.rusta.comE-mail: [email protected]
DE
Manual/Bruksanvisning/Gebrauchsanweisung
11 2016Item no. 626701450101