Embed Size (px)
Citation preview

XBee® Drop-in Networking AccessoriesUser’s Guide
XBee RS-232 AdapterXBee RS-485 Adapter
XBee Analog I/O AdapterXBee Digital I/O Adapter
XBee USB Adapter XStick
XBee Wall Router Smart Energy Range Extender
XBee Smart PlugXBee Sensors
www.digi.com 90000891_G

©2013 Digi International Inc. All Rights Reserved.Digi, Digi International, the Digi logo, the Digi website, Etherios, Device Cloud by Etherios, the Etherios logo, the Etherios website, ConnectPort, Watchport, XBee, and XBee-PRO are trademarks or registered trademarks of Digi International, Inc. in the United States and other countries worldwide.
All other trademarks are the property of their respective owners.
Information in this document is subject to change without notice and does not represent a commitment on the part of Digi International.
Digi provides this document “as is,” without warranty of any kind, either expressed or implied, including, but not limited to, the implied warranties of fitness or merchantability for a particular purpose. Digi may make improvements and/or changes in this manual or in the product(s) and/or the program(s) described in this manual at any time.
This product could include technical inaccuracies or typographical errors. Changes are periodically made to the information herein; these changes may be incorporated in new editions of the publication.
Chapter 1 General information .............................................................5About this guide............................................................................................... 5Additional product information and resources ................................................. 6Hardware changes between 9-30V and 3.7-6V adapter models..................... 7Powering options for adapters......................................................................... 7Antenna considerations ................................................................................... 8Product compatibility and differences among XBee RF protocols................... 9
Compatibility .............................................................................................. 9Product support and availability by XBee RF protocol............................... 9Network association ................................................................................ 11Commissioning and identity behaviors .................................................... 13Power levels of XBee radios.................................................................... 17Duty cycle for XBee 868 module ............................................................. 20
Chapter 2 XBee RS-232 Adapter.........................................................21
Chapter 3 XBee RS-485 Adapter.........................................................24
Chapter 4 XBee Analog Adapter.........................................................28
Chapter 5 XBee Digital I/O Adapter ....................................................36
Chapter 6 XBee USB Adapter .............................................................44
Chapter 7 XBee Sensor Adapter.........................................................46
Chapter 8 XStick ..................................................................................50
Chapter 9 XBee Wall Router/Smart Energy Range Extender52
Chapter 10 XBee Smart Plug ................................................................56
Chapter 11 XBee Sensors .....................................................................61
Chapter 12 Configure XBee RF module settings ................................64Configuration with a ConnectPort X gateway ................................................ 64Configuration without a gateway ................................................................... 69
Chapter 13 Hardware specifications ....................................................70XBee Adapters .............................................................................................. 70XStick ............................................................................................................ 72XBee Wall Router / Smart Energy Range Extender ...................................... 74
Integrated sensors for XBee Wall Router ................................................ 75XBee Smart Plug ........................................................................................... 76
Integrated sensors for XBee Smart Plug ................................................. 77XBee Sensors................................................................................................ 78
Integrated sensors for XBee Sensors...................................................... 78
C o n t e n t s
Contents 3

Sleep Current .......................................................................................... 79
Chapter 14 Safety statements...............................................................80
Contents 4

General information
This section includes information that applies to all XBee® Drop-in Networking Accessories.
About this guideThis guide describes the features and functions of all XBee Drop-in Networking Accessories for all XBee module protocols, including adapters, routers, sensors, and associated products.
It includes connection and setup information, pinouts, configuration, data retrieval, and LEDs and buttons.
Software programming for XBee Drop-in Networking Accessories is covered on product pages within the Digi Developer Community Wiki; see next page for more information and location of these pages.
Questions and technical supportFor technical assistance with your product, contact Digi Technical Support at: 877-912-3444 or make an online support request at:
http://www.digi.com/support/index.jsp
Chapter 1 G e n e r a l i n f o r m a t i o n
5
General information
Additional product information and resources
Product data sheets, user’s guides, and product manualsLocate more information, including datasheets, XBee product manuals, ConnectPort X gateway product information, etc. on these pages:
http://www.digi.com/products/wirelessdropinnetworking/
www.digi.com/din/docs
Software development resourcesDigi provides several resources to help you get started developing software solutions in Python:
Digi Developer Community Wiki
The Digi Developer Community Wiki is a place to learn about developing solutions using Digi's communications portfolio, software and services, including Python, Device Cloud by Etherios™, Etherios DIA, and more.
http://www.digi.com/wiki/developer/index.php/Main_Page
Each product’s chapter shows the link to the Wiki page for programming the product. For an index page for all XBee Drop-in Networking Accessories, go to:
http://www.digi.com/wiki/developer/index.php/Category:Drop-in_Networking_Products
Digi Python Custom Development Environment page
Python is a dynamic, object-oriented language for developing software applications, from simple programs to complex embedded applications. Python functions can be used to obtain data from attached and integrated sensors on XBee Drop-in Networking Accessories. Find this page at:
http://www.digi.com/technology/drop-in-networking/python.jsp
Digi Python Programming Guide
This guide introduces the Python programming language by showing how to create and run a simple Python program. It reviews Python modules, particularly modules with Digi-specific behavior. It describes how to load and run Python programs onto Digi devices, either through the command-line or web user interfaces, and how to run several sample Python programs. Find this guide at the Digi Python Wiki page--in the Start Here section, click the link titled Digi Python Programmer's Guide
http://www.digi.com/wiki/developer/index.php/Python_Wiki
Python Support Forum on digi.com
Find answers to common questions and exchange ideas and examples with other members of the Digi Python development community at:
http://www.digi.com/support/forum/forum.jspa?forumID=104
6

General information
Hardware changes between 9-30V and 3.7-6V adapter modelsXBee Adapters have undergone some hardware changes since first being launched. Most of the these changes are minor and will have no impact on your application. However, one important difference relates to supply voltage.
Originally, XBee Adapters were designed to accept 9-30VDC. In an effort to improve battery performance, this voltage range has been changed to 3.7-6 VDC.
Power supplies used on 9-30VDC XBee Adapters will not work with 3.7-6VDC XBee Adapters, and vice versa. Your XBee Adapter’s proper voltage is printed next to its power port.
Plugging in a power supply with the incorrect voltage will damage your device and void your warranty.
Several other changes have been implemented in the 3.7-6VDC XBee Adapter models, including an improved screw-lock connector for XBee RS-485, XBee Digital I/O, and XBee Analog I/O Adapters, and external antennas for XBee-PRO Adapters. Contact Technical Support for more details.
Powering options for adaptersSome Drop-in Networking Accessories; including the XBee Sensor, XBee Smart Plug and XBee Wall Router all have necessary powering options included.
XBee Adapter products can be powered by an external power supply or batteries, purchased separately. To determine how to power your XBee Adapter, please refer to the specification printed on the side of the enclosure, close to the power port:
For additional information, see "Power requirements" on page 70.
Specification Power Options
3.7 to 6 VDC Power supply: must be rated 3.7 to 6 VDC. Digi part number for 5V power supply: XA-ACC-PS5-NR
Battery: uses custom lithium battery pack; Digi part number: XA-ACC-CS-LBattery amp hours: 1650 mAH. Replacement batteries available for purchase; contact Digi at 952-912-3444.
9 to 30 VDC Power supply: must be rated 9 to 30 VDC.; Digi part number for 9V power supply: XA-ACC-PS
Battery: uses quantity 3 of 1.5V “N-Cell” alkaline batteries (input power is automatically down-converted). Can use standard, off-the-shelf, batteries, or Digi part number: XA-ACC-BATT
To install batteries, insert a screwdriver in the slots in the side of the adapter case and twist to snap off the cover. Insert the batteries following the polarity diagram on the board.
7
General information
Warranty exception for batteriesSome XBee Drop-in Networking Accessories ship with alkaline batteries that must be replaced by the user when discharged.
Lithium batteries must be installed or replaced by qualified service personnel.
Alkaline and lithium batteries are not covered under the terms and conditions of the Digi warranty.
Antenna considerationsProducts with external antennas should be mounted with the antenna oriented vertically to maximize the range.
Products with external antennas use RPSMA antenna connectors.
Products without external antennas can be mounted in any orientation.
8

General information
Product compatibility and differences among XBee RF protocolsXBee Drop-in Networking Accessories contain an XBee or XBee-PRO module, an RF module that performs the wireless communications for your product. Certain RF module behaviors vary by XBee RF protocol. This section describes those differences and how they affect product operation.
CompatibilityDrop-in Networking Accessories that use a particular XBee RF protocol are compatible with other products of the same XBee RF protocol only. XBee ZB products will only work with other XBee ZB products, XBee 802.15.4 products with other XBee 802.15.4 products, and so on. This applies to gateways as well: ConnectPort X gateway products with an XBee ZB module are compatible with other such gateways, 802.15.4 gateways with other such gateways, and so on. Users must standardize on one XBee RF protocol series for operability.
Product support and availability by XBee RF protocolProduct availability varies by XBee RF protocol. The table shows the XBee Drop-in Networking Accessories available for each XBee platform.
XBee-PRO 868 availability
XBee-PRO 868 adapters are available for use in Europe only. Please see the XBee-PRO 868 OEM RF Modules Product Manual from more information.
Product / ProtocolXBee
ZBXBee
ZNet2.5aXBee
802.15.4
XBee Smart Energy
XBee 868
XBee DigiMesh
900
XBee DigiMesh
2.4
XBee RS-232 Adapter
XBee RS-485 Adapter
XBee Analog Adapter
XBee Digital I/O Adapter
XBee USB Adapter
XStick
XBee Wall Router
XBee Smart Energy Range Extender
XBee Smart Plug
XBee Sensors
a. New customer deployments should not use the ZNet 2.5 protocol. Instead, use the ZigBee-certified ZB protocol. ZNet, an older protocol based on a “Designed for ZigBee” stack, should only be used where required for compatibility with previously deployed ZNet 2.5 products.
9

General information
Firmware Updates
The following table illustrates firmware update options by adapter type.
ZB Adapters allow OTA (Over The Air) firmware updates. The firmware for other adapter types must be updated locally.
Idle Current and Sleep Current - XBee and XBee-PRO
The following tables list the average expected idle and sleep currents for XBee adapters, based on type and network protocol. The first table shows XBee current values, the second table shows XBee-PRO current values.
Adapter Firmware Update?
USB Adapter Allowed
XStick Allowed
RS-232 Adapter Allowed
RS-485 Adapter Not Allowed
Analog Adapter Not Allowed
Digital I/O Adapter Not Allowed
XBee Wall Router Allowed with programming cable
XBee Smart Energy Range Extender
Allowed with programming cable
XBee Smart Plug Allowed with programming cable
Product / ProtocolXBee
ZBXBee
802.15.4
XBee Smart Energy
XBee 868
XBee DigiMesh
900
XBee DigiMesh
2.4
XBee RS-232 Adapter 72mA idle230μA sleep
XBee RS-485 Adapter 56mA idle76μA sleep
XBee Analog Adapter
XBee Digital I/O Adapter 61mA idle81μA sleep
XBee USB Adapter
XStick
XBee Wall Router
XBee Smart Energy Range Extender
XBee Smart Plug
XBee Sensors
10

General information
Network associationThe Assc LED indicates the network association status for an XBee Drop-in Networking Accessory in an XBee network.
XBee ZB / XBee ZNet 2.5
Products used in networks that use a coordinator for network association, the Assoc LED indicates network association status as follows:
XBee SE
Products used in Smart Energy networks, the Assoc LED indicates network association status as follows:
Smart Energy Range Extender
The Smart Energy Range Extender’s Assoc LED indicates its join status; once joined, it also indicates the status of its connection to the network’s Coordinator.
Product / ProtocolXBee-PRO
ZBXBee-PRO
802.15.4
XBee-PRO Smart Energy
XBee-PRO 868
XBee-PRO DigiMesh
900
XBee-PRO DigiMesh
2.4
XBee-PRO RS-232 Adapter 74mA idle68μA sleep
75mA idle287μA sleep
XBee-PRO RS-485 Adapter 69mA idle78μA sleep
58mA idle140μA sleep
XBee-PRO Analog Adapter
XBee-PRO Digital I/O Adapter
57mA idle108μA sleep
57mA idle108μA sleep
XBee-PRO USB Adapter
XStick
XBee-PRO Wall Router
XBee-PRO Smart Energy Range Extender
XBee-PRO Smart Plug
XBee-PRO Sensors
LED status Network association
On, solid green Not associated
On, blinking green Successfully joined
LED status Network association
On, solid green Successfully joined
On, blinking green Not joined, joining, or joined but connection invalid
11

General information
XBee 802.15.4 / XBee 868
Products used in networks that do not use a coordinator for network association are not set up to associate, but are configured with a default PAN ID and destination address. To maintain LED consistency, on power-up, these products immediately indicate association by blinking.
For more information regarding association options, see the product manual for the XBee module in your product.
XBee DigiMesh 900 / XBee DigiMesh2.4
Products that have been configured in a synchronous sleep-compatible mode use the Assc LED to indicate the status of the nodes synchronization with the sleeping network. Products that are not configured for sleep use the Assc LED to indicate that they are operating properly.
LED status Network association
On, solid green Joined, connection to Coordinator is working
On, 3 sec blink Not joined, AI register indicates why
On, 1 sec blink Trying to join
On, 1/4 sec blink Joined, but connection to Coordinator is not working
Synchronous Sleep
compatible?LED Status Meaning
No On, blinking green Product is powered and operating properly.
Yes On, solid green Product has not synchronized with the network or has lost synchronization with the network.
Yes On, slow blinking green (500 mSec blink time)
Product is acting as the network sleep coordinator and is operating properly.
Yes On, fast blinking green(250 mSec blink time)
Product is properly synchronized with the network.
12

General information
Commissioning and identity behaviorsThe Ident button, or, on some products, a combined Reset/Ident button, performs multiple functions to identify and configure the product in an XBee network. The location of this button is shown in each product’s chapter. Button presses and actions for each XBee RF protocol vary as shown in the following tables. These descriptions introduce XBee module concepts and commands. For additional information on these concepts and commands, see the product manual for your XBee module.Consecutive button presses must occur within 800 milliseconds of each other to perform the desired action.
Note: For more detailed descriptions and configuration information, see theCB section in the relevant XBee/XBee-PRO OEM Product manual.
XBee SE
Button press
Network association
Action
1 Associated If XBee module is asleep, wakes unit for 30 seconds.
Unassociated Start join process. Module will attempt to join a network three times before giving up. AI reading will indicate either joining success (0x00) or reason for failure (nonzero value). See AI command description for more detail.
2 Associated Broadcast a permit join message to the coordinator and all routers in the network. Permit join persists on a module for NJ time. See NJ command description for more detail.
Unassociated No action.
4 Associated Broadcasts a Leave notification to the network, then leaves the network. Restores module to EEPROM configuration values, except for the XBee Smart Energy Wall Router, which does not restore values.
Unassociated Restores module to EEPROM configuration values, except for the XBee Smart Energy Wall Router, which does not restore values.
13

General information
XBee ZB / XBee ZNet 2.5
Button press
Network association
Action
1 Associated If XBee module is asleep, wakes unit for 30 seconds. Sends a Node Identification broadcast transmission. All devices that receive this transmission will blink their Associate LED rapidly for 1 second. All API devices that receive this transmission will send a Node Identification frame out their UART (universal asynchronous receiver/transmitter) (API ID 0x95).
Unassociated If XBee module is asleep, wakes unit for 30 seconds, then blinks the AI code, a numeric error code on the Assc LED indicating the cause of join failure.
1 blink: Scan found no networks (PANs) to join.
2 blinks: Scan found no valid PANs based on current settings for SC (Scan Channel) and ID (PAN ID).
3 blinks: Valid coordinator or routers were found, but they are not allowing joining, because the permit join or NJ command expired.
7 blinks: Network joining attempt failed.
10 blinks: Coordinator Start attempt failed.
2 Associated Depends on the setting for the permit join (NJ) command for the XBee module.
If the XBee module’s NJ command setting is less than 255, two button presses temporarily enable joining on the XBee module and on the entire XBee network for 1 minute.
If joining is permanently enabled on a module (NJ = 255), joining remains permanently enabled, and two button presses have no effect.
4 Associated/Unassociated
XBee module leaves PAN, if associated, and issues a factory reset to restore default parameters in the XBee module.
For XBee ZNet 2.5, the default PAN ID is 0x234.
For XBee ZB, the default PAN ID is 0 (join any network).
4, followed by reset
Associated/ Unassociated
XBee module restores to EEPROM values
14

General information
XBee 802.15.4
Button press
Network association
Action
1 Associated Cannot wake module, but causes module to remain awake for 30 seconds if pressed when the module is awake.
Sends a Node Identification broadcast transmission. All devices that receive this transmission will blink their Associate LED rapidly for 1 second.
Unassociated Blinks a numeric error code returned by the ATAI (Association Indication) command on the Assc LED. The AI code indicates the cause of the join failure. See the 802.15.4 XBee module’s Product Manual for descriptions of these codes.
1 blink: Active scan timeout.
2 blinks: Active scan found no PANs.
3 blinks: Active scan found PAN, but the Coordinator Allow Association bit is not set.
4 blinks: Active scan found a PAN, but Coordinator and End Device are not configured to support beacons.
5 blinks: Active scan found a PAN, but Coordinator ID (PAN ID) value does not match the ID of the End Device.
6 blinks: Active Scan found a PAN, but Coordinator CH (Channel) value does not match the CH of the End Device.
7 blinks: Energy scan timeout.
8 blinks: Coordinator start request failed.
9 blinks: Coordinator could not start due to invalid parameters.
10 blinks: Coordinator Realignment is in progress.
11 blinks: Association request not sent.
12 blinks: Association request timed out - no reply was received.
13 blinks: Association request had an invalid parameter.
14 blinks: Association request channel access failure - Request was not transmitted - CCA failure.
15 blinks: Remote Coordinator did not send an ACK after Association Request was sent.
16 blinks: Remote Coordinator did not reply to the Association Request, but an ACK was received after sending the request.
17 blinks: [reserved].
18 blinks: Sync-Loss - Lost synchronization with a beaconing coordinator.
19 blinks: Disassociated - No longer associated to coordinator.
2 Associated Not supported.
4 Associated/Unassociated
Performs an ATRE command to reset the parameters in the XBee module.
4, followed by reset
Associated/ Unassociated
XBee module restores to EEPROM values
15

General information
XBee DigiMesh 900 / XBee DigiMesh2.4
Waking DigiMesh 2.4 XBee modules
When attempting to wake an XBee DigiMesh2.4 module from sleep, it is necessary to hold down the commissioning button for up to 2 seconds before the module will wake up.
XBee 868
Button press
Sleep Configuration
and Synch Status
Action
1 Not configured for sleep
Immediately sends a Node Identification broadcast transmission. All devices that receive this transmission will blink their Associate LED rapidly for 1 second. All API devices that receive this transmission will send a Node Identification frame out their UART (API ID 0x95)
1 Configured for sleep Wakes the module for 30 seconds, or until the entire network goes to sleep. Queues a Node Identification broadcast transmission to be sent at the beginning of the next network wake cycle. All devices that receive this transmission will blink their Associate LED rapidly for 1 second. All API devices that receive this transmission will send a Node Identification frame out their UART (API ID 0x95).
2 Not configured for sleep
Not supported.
2 Configured for sleep Causes a node which is configured with sleeping router nomination enabled to immediately nominate itself as the network sleep coordinator. For more information on this action, see the description of the ATSO sleep options command in the XBee module’s Product Manual.
4 Either Issues an ATRE command to restore module parameters to default values.
4, followed by reset
Either XBee module restores to EEPROM values
Button Press
Action
1 Immediately sends a Node Identification broadcast transmission. All devices that receive this transmission will blink their Associate LED rapidly for 1 second. All API devices that receive this transmission will send a Node Identification frame out their UART (API ID 0x95).
2 Not supported.
4 Issues an ATRE command to restore module parameters to default values.
4, followed by reset
XBee module restores to EEPROM values.
16
General information
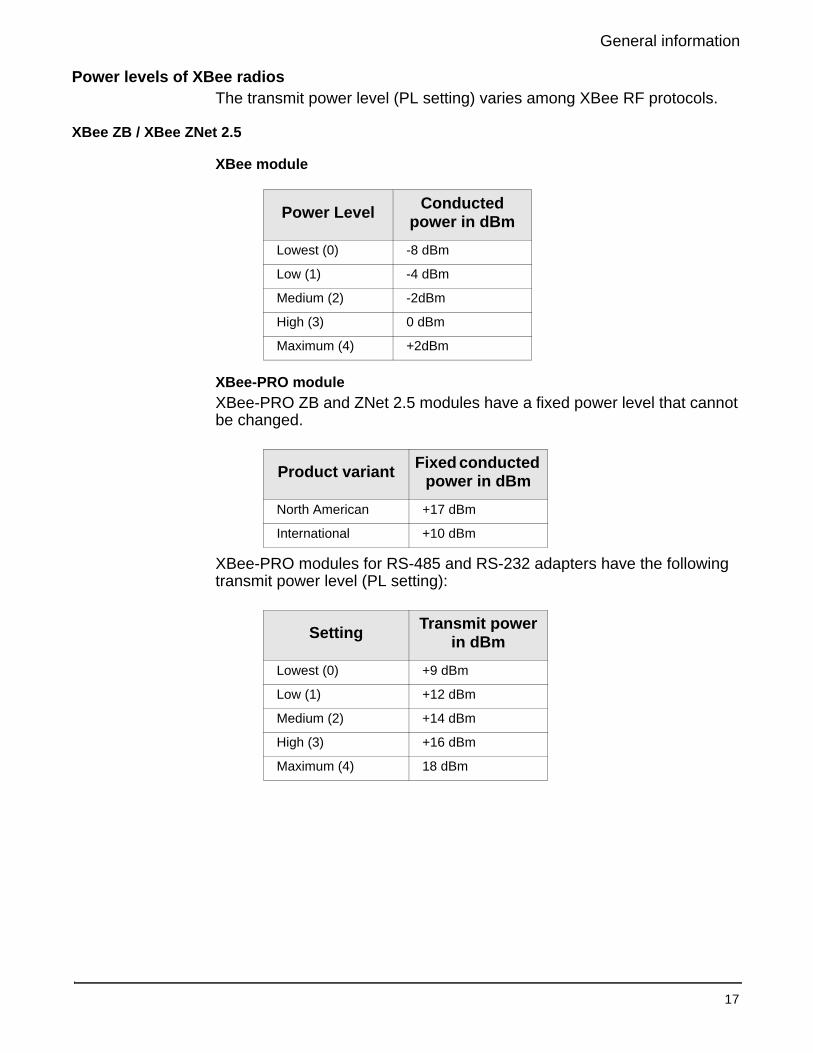
Power levels of XBee radiosThe transmit power level (PL setting) varies among XBee RF protocols.
XBee ZB / XBee ZNet 2.5
XBee module
XBee-PRO module
XBee-PRO ZB and ZNet 2.5 modules have a fixed power level that cannot be changed.
XBee-PRO modules for RS-485 and RS-232 adapters have the following transmit power level (PL setting):
Power LevelConducted
power in dBm
Lowest (0) -8 dBm
Low (1) -4 dBm
Medium (2) -2dBm
High (3) 0 dBm
Maximum (4) +2dBm
Product variantFixed conducted
power in dBm
North American +17 dBm
International +10 dBm
SettingTransmit power
in dBm
Lowest (0) +9 dBm
Low (1) +12 dBm
Medium (2) +14 dBm
High (3) +16 dBm
Maximum (4) 18 dBm
17

General information
XBee 802.15.4
XBee module
XBee-PRO module
XBee DigiMesh 900
Output power is always: 17 dBm.
XBee 868
Power LevelConducted
Power in dBm
Lowest (0) -10 dBm
Low (1) -6 dBm
Medium (2) -4 dBm
High (3) -2 dBm
Maximum (4) 0 dBm
Power LevelNorth American
variantInternational variant
Lowest (0) +10 dBm -3 dBm
Low (1) +12 dBm -3 dBm
Medium (2) +14 dBm +2 dBm
High (3) +16 dBm +8 dBm
Maximum (4) +18 dBm +10 dBm
Power LevelConducted
Power in dBm
Lowest (0) 0 dBm
Low (1) +13.7 dBm
Medium (2) +20 dBma
a. These products are currently set to not exceed this power setting:XBee RS-232 Adapter, XBee RS-485 Adapter, XBee Analog I/O Adapter,XBee Digital I/O Adapter.
High (3) +22 dBmb
b. XBee USB Adapter is currently set to not exceed this power setting.
Maximum (4) +25 dBm
18

General information
XBee DigiMesh 2.4
XBee module
XBee-PRO module
Power LevelConducted
Power in dBm
Lowest (0) -7 dBm
Low (1) -1.7 dBm
Medium (2) -0.77 dBm
High (3) +0.62 dBm
Maximum (4) +1.42 dBm
Power LevelNorth American
variantInternational
variant
Lowest (0) +10 dBm -3 dBm
Low (1) +12 dBm -3 dBm
Medium (2) +14 dBm +2 dBm
High (3) +16 dBm +8 dBm
Maximum (4) +18 dBm +10 dBm
19

General information
Duty cycle for XBee 868 moduleThe XBee 868 module has constraints regarding the amount of data it can transmit during a given time period. The duty cycle of this module is 10% averaged over the period of 1 hour. This means that if the next transmission will push the running average duty cycle over the 10% limit, the module will not transmit until enough time has elapsed to stay under the duty cycle. Because of heat restraints of the module, a 10% duty cycle over the period of 1 second will be enforced after the measured temperature of the module rises above 60°C.
20

XBee RS-232 Adapter
Overview
The XBee RS-232 Adapter provides short-range wireless connectivity to any RS-232 serial device. Unlike an embedded wireless module, which requires design integration and development time, these off-the-shelf adapters provide instant wireless connectivity to existing RS-232 serial devices. All XBee adapters can be used with Digi's ConnectPort X gateways for data aggregation and IP connectivity.
Connection and power-on1. Connect the desired device to the RS-232 port of the adapter.
2. Connect the power supply to the adapter or insert batteries.
Chapter 2 XBee RS-232 Adapter
21

XBee RS-232 Adapter
PinoutsThe RS-232 connector is an industry-standard DB9 male connector with a DTE configuration, similar to a PC serial port.
To connect the XBee RS232 Adapter to another DTE device, use a standard DB9 crossover serial cable similar to Digi part number 76000642.
To connect the XBee RS232 Adapter to a DCE device, use a straight-through null modem cable similar to Digi part number 63000066-01.
Pin 1 is in the leftmost pin on the upper row of pins; pin numbers increment from left to right, continuing left to right on the second row.
Pinouts for the connector are:
Pin Function Data direction
1 CD Input
2 RXD Input
3 TXD Output
4 DTR Output
5 GND
6 DSR Input
7 RTS Output
8 CTS Input
9 +12VDC switched power out Output
22

XBee RS-232 Adapter
Software programming and data retrievalThere are several avenues for programming the adapter.
To get started on developing solutions with the XBee RS-232 Adapter using Device Cloud, see the Device Cloud website:
http://www.etherios.com/devicecloud/
For details on programming the adapter and retrieving data from it, see the XBee RS-232 Adapter product page on the Digi Developer Community Wiki:
http://www.digi.com/wiki/developer/index.php/Category:Drop-in_Networking_Products
LEDs and buttons
Reset button
Assc Ident Power
blinking green solid green
LED/Button Function
Power LED Indicates that power is on. Illuminated only when adapter is connected to external power only, not when powered by batteries. Not available in lithium-battery models.
Assc LED Indicates the adapters’s network association status. This LED functions differently depending on the XBee RF protocol for the product. See "Network association" on page 11 for more information.
Reset button Recessed button on underside of the adapter. Performs equivalent of a power-cycle. Use a small non-conductive tool with a blunt end to press gently and hold down button.
Ident button Recessed button on power end of the adapter between Assc and Power LEDs.
Performs multiple functions for identifying and configuring the adapter in a wireless network. Button presses and actions vary by XBee RF protocol; see "Commissioning and identity behaviors" on page 13.
Consecutive button presses must occur within 800 milliseconds of each other to perform the desired action.
23
XBee RS-485 Adapter
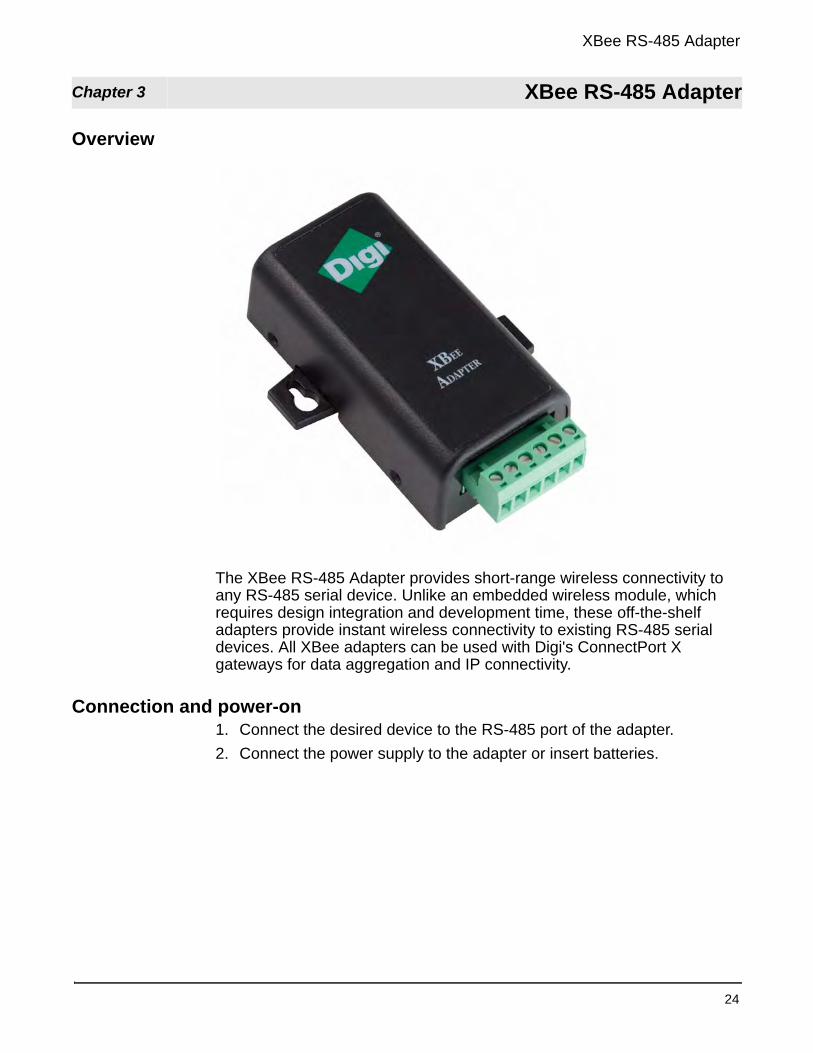
Overview
The XBee RS-485 Adapter provides short-range wireless connectivity to any RS-485 serial device. Unlike an embedded wireless module, which requires design integration and development time, these off-the-shelf adapters provide instant wireless connectivity to existing RS-485 serial devices. All XBee adapters can be used with Digi's ConnectPort X gateways for data aggregation and IP connectivity.
Connection and power-on1. Connect the desired device to the RS-485 port of the adapter.
2. Connect the power supply to the adapter or insert batteries.
Chapter 3 XBee RS-485 Adapter
24

XBee RS-485 Adapter
PinoutsThe connector for the adapter is a 6-position wire terminal block. The figure shows Pin 1 of the connector when the adapter is oriented with the mounting tabs, facing upwards (the underside of the adapter).
The adapter is switch-selectable between RS-422 half duplex/full duplex, and RS-485 modes (see "DIP switches" on page 26). The function for several pins varies between RS-422 and RS-485 modes.
Using the orientation in the above figure, pin 1 is the right-most pin and pin numbers increment from right to left. Pinouts for the connector are:
The connector accommodates wire gauges from 16AWG to 30AWG.
To insert wires, insert the wires into the removable screw-lock connector and tighten the screws associated with the wire slots.
To remove wires, loosen the screws associated with the wire slots and remove the wires.
PinFunction in
RS-422 modeFunction in
RS-485 mode
1 TxD+ (RS422) TxD+ and RxD+ (RS485)
2 TxD- (RS422) TxD- and RxD- (RS485)
3 RxD+ (RS422) Not used.
4 RxD- (RS422) Not used.
5 Ground Ground
6 +12VDC 50mA max switched power out
+12VDC 50mA max switched power out
Reset button
DIP switches
Screw-lock connector
Pin 1
25

XBee RS-485 Adapter
DIP switchesThe XBee RS-485 Adapter has several DIP switches on the underside of the unit. DIP switch 1 is the leftmost switch. When the adapter is oriented with the mounting tabs facing upwards, the DIP switches are in the ON position when the switches are positioned away from the screw-lock connector. Switch settings are:
Software programming and data retrievalThere are several avenues for programming the XBee RS-485 Adapter.
To get started on developing solutions with the XBee RS-485 Adapter using Device Cloud, see the Device Cloud website:
http://www.etherios.com/devicecloud
For details on programming the XBee RS-485 Adapter and retrieving data from it, see the XBee RS-485 Adapter product page on the Digi Developer Community Wiki:
http://www.digi.com/wiki/developer/index.php/Category:Drop-in_Networking_Products
DIP Switch Switch settings
1 Not used. It is covered up by the case and is not accessible.
2, 3, 4 together ON = RS485
OFF = RS422
5, 6 together ON = RS485 bias and line termination on.
OFF = RS485 bias and line termination off.
Note: Bias and line termination feature can be used only when powering from the external power supply.
26

XBee RS-485 Adapter
LEDs and buttons
Reset button
DIP switches
Assc Ident Power
blinking green solid green
LED/Button Function
Power LED Indicates that power is on. Illuminated only when adapter is connected to external power only, not when powered by batteries. Not available in lithium-battery models.
Assc LED Indicates the adapters’s network association status. This LED functions differently depending on the XBee RF protocol for the product. See "Network association" on page 11 for more information.
Reset button Recessed button on underside of the adapter. Performs equivalent of a power-cycle. Use a small non-conductive tool with a blunt end to press gently and hold down button.
Ident button Recessed button on power end of the adapter between Assc and Power LEDs. Performs multiple functions for identifying and configuring the adapter in a wireless network. Button presses and actions vary by XBee RF protocol; see "Commissioning and identity behaviors" on page 13.
Consecutive button presses must occur within 800 milliseconds of each other to perform the desired action.
27

XBee Analog Adapter
Overview
The XBee Analog Adapter provides short-range wireless connectivity to any analog device. Unlike an embedded wireless module, which requires design integration and development time, this off-the-shelf adapter provides instant wireless connectivity to existing analog devices. All XBee adapters can be used with Digi's ConnectPort X gateways for data aggregation and IP connectivity.
The XBee Analog adapter allows for several interfaces to analog devices. It provides greater flexibility and uses than XBee Sensors, in that it can be used with a variety of off-the-shelf sensor products and in situations when the item being measured or analyzed must be separated from the sensor/measuring device itself.
Chapter 4 X B e e A n a l o g A d a p t e r
28

XBee Analog Adapter
Deployment decisionsDeploying the XBee Analog Adapter in a solution involves answering several questions:
• What is the analog mode of the sensor you plan to attach to the adapter?
• How do you want to retrieve measurement data from the adapter?
• How will the adapter be powered? Mains or battery?
Analog modesThe XBee Analog Adapter has three modes in which it can measure input on its four terminal lines:
• 0-10 volt mode: measures voltage on a scale of 0 to 10 volts, and translates it into a 10-bit scale from 0 to 1023 as possible values.
• Current Loop (4 mA to 20 mA) mode: measures amperage on a scale of 4 to 20 mA, and translates it into a 10-bit scale from 0 to 1023 as possible values.
• Differential input mode: measures paired terminals (1 and 2 paired, 3 and 4 paired) and translates the difference in voltage between the two lines to into a 10-bit scale from 0 to 1023 as possible values.
Measurement retrieval optionsThere are several ways to retrieve data collected by the XBee module in the adapter.
• Using the DIA (Device Integration Application) framework. DIA is software that simplifies connecting devices (sensors, PLCs, etc.) to communication gateways. DIA includes a comprehensive library of plug-ins that work out-of-the-box with common device types and can also be extended to include new devices.
• By using existing Python modules provided by Digi
• By using your own custom Python programs
• By issuing remote AT commands from another XBee device
29

XBee Analog Adapter
Connection and power-on1. Connect the wires for the desired analog device to the connector for the
adapter. The connector accommodates wire gauges from 16AWG to 30AWG.
To insert wires, insert the wires into the removable screw-lock connector and tighten the screws associated with the wire slots.
To remove wires, loosen the screws associated with the wire slots and remove the wires.
The connector for the adapter is a 6-position wire terminal block. The figure shows Pin 1 of the connector when the adapter is oriented with the mounting tabs, facing upwards (the underside of the adapter).
2. Connect the power supply to the adapter or insert batteries.
Reset button
DIP switches
Screw-lock connector
Pin 1
30

XBee Analog Adapter
PinoutsUsing the orientation in the figure on the previous page, pin 1 is the right-most pin and pin numbers increment from right to left. Pinouts for the connector are:
DIP switchesThe adapter has several DIP switches on the underside of the unit. DIP switch 1 is the leftmost switch. When the adapter is oriented with the mounting tabs facing upwards, the DIP switches are in the ON position when the switches are positioned away from the screw-lock connector. Switch settings are:
Note: Switches 1 and 2 should not be on at the same time as increased parasitic battery drain will result.
PinAnalog Mode
Ten Volt Current Loop Differential
1 0-10 Volt 4-20 mA Terminal Pair 1 positive
2 0-10 Volt 4-20 mA Terminal Pair 1 negative
3 0-10 Volt 4-20 mA Terminal Pair 2 positive
4 0-10 Volt 4-20 mA Terminal Pair 2 negative
5 Ground Ground Ground
6 +12VDC 50mA max switched power out
+12VDC 50mA max switched power out
+12VDC 50mA max switched power out
DIP Switch Switch settings
1 Enables and disables direct battery pack voltage output.
ON=battery power out
OFF=no battery power out
2 Enables and disables +12V power out.
ON=+12V power out
OFF=no +12V power out
3 Not used
4 Not used
31

XBee Analog Adapter
Configuration, software programming, and data retrievalThere are several avenues for programming the adapter.
To get started on developing solutions with the adapter using Device Cloud, see the Device Cloud website:
http://www.etherios.com/devicecloud
For details on programming the adapter and retrieving data from it, see the XBee Analog Adapter product page on the Digi Developer Community Wiki:
http://www.digi.com/wiki/developer/index.php/Category:Drop-in_Networking_Products
Important: Serial communications disabled on XBee Analog and Digital I/O AdaptersFor the XBee Analog and Digital Adapters, the XBee firmware disables the XBee module’s serial communications functionality, so that the pins normally used for serial communications can instead be used for additional I/O functionality. As a result, once an XBee module has been loaded with the firmware image specific to the XBee Analog or Digital Adapters, the XBee module can no longer be configured using X-CTU, the XBee serial API, or local AT commands.
The only way to configure these adapters is by using the Ident or Ident/Reset commissioning and identification button (see "Commissioning and identity behaviors" on page 13 for description) and OTA commands—either by using a ConnectPort gateway, X-CTU, or by using the remote command API of another serial-enabled module associated to the same network.
32

XBee Analog Adapter
Input specifications and characteristics
Exceeding the maximum or minimum safe input values will result in damage to the unit.
Analog mode Specification Value
0-10 volt mode Full-scale input 10.25 VDC
Minimum input 0 VDC
Maximum safe input 11VDC
Minimum safe input -.5VDC
Input impedance 28200 ohms
Current Loop (4 mA to 20 mA) mode
Full-scale input 23.5mA
Minimum input 0mA
Maximum safe input 40mA
Minimum safe input -.5VDC
Input impedance 51.1 ohms
+/- 2 VDC differential mode
Full-scale input +2.4 VDC differential
0V differential Half-scale reading
-2V differential Minimum-scale reading
Maximum safe input (each pin) 11VDC
Minimum safe input (each pin) -.5VDC
Input impedance ~1 Megaohm
All modes Resolution 10 bits
Accuracy Differs by XBee RF protocol:
XBee ZB, ZNet 2.5, 802.15.4: 0.2%
XBee 868, DigiMesh 900: 0.4%
33

XBee Analog Adapter
Power output specificationsExternal terminal 6 is a power-out pin. It can be set to either battery pack voltage out or +12VDC at 50mA out via DIP switches 1 and 2.
External terminal 5 is a system ground pin. This ground pin should be used for all external ground connections for both power and input connections.
DIP switch 1 enables battery pack voltage minus .5VDC to terminal 6, resulting in 4VDC out with new alkaline batteries, or 3.1VDC with new lithium battery.
DIP switch 2 enables +12VDC to terminal 6. Only one switch should be on at a time. No damage will happen if both are set to on, but the output will default to the +12VDC output and increased parasitic battery drain will result.
The battery pack voltage is on terminal 6 all the time, and is not gated with the sleep of the module when DIP switch 2 is on. Any current draw from terminal 6 will result in reduced battery life.
When DIP switch 2 is on, the +12VDC at 50mA max is provided at terminal 6. This power is gated by both the sleep of the module and AT command P3. For this power setting to be on, the XBee module needs to be awake and AT command P3 set to a high level.
34

XBee Analog Adapter
LEDs and buttons
Reset button
DIP switches
Assc Ident Power
blinking green solid green
LED/Button Function
Power LED Indicates that power is on. Illuminated only when adapter is connected to external power only, not when powered by batteries. Not available in lithium-battery models.
Assc LED Indicates the adapters’s network association status. This LED functions differently depending on the XBee RF protocol for the product. See "Network association" on page 11 for more information.
Reset button Recessed button on underside of the adapter. Performs equivalent of a power-cycle. Use a small non-conductive tool with a blunt end to press gently and hold down button.
Ident button Recessed button on power end of the adapter between Assc and Power LEDs. Performs multiple functions for identifying and configuring the adapter in a wireless network. Button presses and actions vary by XBee RF protocol; see "Commissioning and identity behaviors" on page 13.
Consecutive button presses must occur within 800 milliseconds of each other to perform the desired action.
35

XBee Digital I/O Adapter
Overview
The XBee Digital I/O Adapter provides short-range wireless connectivity to any digital device, as well as an interface to logic-level inputs and sinking driver output. Unlike an embedded wireless module, which requires design integration and development time, these off-the-shelf adapters provide instant wireless connectivity to existing digital devices. All XBee adapters can be used with Digi's ConnectPort X gateways for data aggregation and IP connectivity.
Chapter 5 X B e e D i g i t a l I / O A d a p t e r
36
XBee Digital I/O Adapter
Deployment decisionsDeploying the XBee Digital I/O Adapter in a solution involves answering several questions:
• What types of conditions do you want to detect with the adapter and its attached sensor?
• Do you need the adapter to detect conditions from multiple sensors?
• Is there a need to have output from the adapter, and if so, what do you want it to do?
• How do you want to retrieve measurement data from the adapter?
• How do you want to power the adapter? Mains or battery?
Data retrieval optionsThere are several ways to retrieve data collected by the XBee module in the adapter:
• Using the DIA (Device Integration Application) framework. DIA is software that simplifies connecting devices (sensors, PLCs, etc.) to communication gateways. DIA includes a comprehensive library of plug-ins that work out-of-the-box with common device types and can also be extended to include new devices.
• By using existing Python modules provided by Digi
• By using your own custom Python programs
• By issuing remote AT commands from another XBee device
37

XBee Digital I/O Adapter
Connection and power-on1. Connect the wires for the desired analog device to the connector for the
adapter. The connector accommodates wire gauges from 16AWG to 30AWG.
To insert wires, insert the wires into the removable screw-lock connector and tighten the screws associated with the wire slots.
To remove wires, loosen the screws associated with the wire slots and remove the wires.
The connector for the adapter is a 6-position wire terminal block. The figure shows Pin 1 of the connector when the adapter is oriented with the mounting tabs, facing upwards (the underside of the adapter).
2. Connect the power supply to the adapter or insert batteries.
Reset button
DIP switches
Screw-lock connector
Pin 1
38

XBee Digital I/O Adapter
PinoutsUsing the orientation in the figure on the previous page, pin 1 is the right-most pin on the screw-lock connector, and pin numbers increment from right to left. Pinouts for the connector are:
DIP switchesThe adapter has several DIP switches on the underside of the unit. DIP switch 1 is the leftmost switch. When the adapter is oriented with the mounting tabs facing upwards, the DIP switches are in the ON position when the switches are positioned away from the screw-lock connector. Switch settings are:
Note:
• Switches 1 and 2 should not be on at the same time, as increased parasitic battery drain will result.
• Pullup use is not recommended when running from battery power, owing to the constant drain on the batteries.
Pin Function
1
These pins are configurable as digital input or sinking driver output.
2
3
4
5 GND
6 +12VDC 50mA max switched power out
DIP Switch Switch settings
1 Enables and disables direct battery pack voltage output.
ON=battery power out
OFF=no battery power out
2 Enables and disables +12V power out.
ON=+12V power out
OFF=no +12V power out
3 Turns on 10K pullup on terminal 1 to 3VDC.
4 Turns on 10K pullup on terminal 2 to 3VDC.
39

XBee Digital I/O Adapter
Configuring inputs and outputsAs shown in the pinouts table, the adapter has four external terminals that can be set as either a digital input or a sinking driver output.
The XBee module controls the sinking drivers on pins 11, 16, 12, 4 for terminals 1, 2, 3, 4 respectively.
The AT commands to the XBee module for the output function are D4, D6, D7, P2 for terminals 1, 2, 3, 4 respectively.
Outputs are activated (that is, the sinking function is turned on) by setting high the corresponding XBee pin for the output that is desired.
• To set a terminal high, set the corresponding AT command to value 5.
• To set a terminal low, set the corresponding AT command to value 4.
For example, calling the AT command D4 and setting it to 5 would cause terminal 1 to be set high.
Since the input and output functions overlap, the input function is always active and when the input function is desired, the output control pin for the matching output must be set low (turns off the sinking function). This feature can allow the inputs to monitor the output sinking operation if desired.
There are several resources to help you configure these inputs and outputs:
• DIA contains a device driver to handle this configuration automatically
• There are sample Python programs for configuring inputs and outputs available on the Digi Developer Community Wiki. See the Wiki for this sample code and different options for issuing the AT commands over the air.
40

XBee Digital I/O Adapter
Input/output specifications and characteristics
Exceeding the maximum or minimum safe input values will result in damage to the unit.
Power output specificationsExternal terminal 6 is a power-out pin. It can be set to either battery pack voltage out or +12VDC at 50mA out via DIP switches 1 and 2.
External terminal 5 is a system ground pin. This ground pin should be used for all external ground connections for both power and input connections.
DIP switch 1 enables battery pack voltage minus .5VDC to terminal 6, resulting in 4VDC out with new alkaline batteries, or 3.1VDC with new lithium battery. DIP switch 2 enables +12VDC to terminal 6. Only one switch should be on at a time. No damage will happen if both are set to on, but the output will default to the +12VDC output and increased parasitic battery drain will result.
The battery pack voltage is on terminal 6 all the time and not gated with the sleep of the module when DIP switch 2 is on. Any current draw from terminal 6 will result in reduced battery life. This mode is primarily intended with switch closure applications with the adapter, with the external switch in the customer equipment in the normally open position, so that no battery current results until the activating event occurs.
When DIP switch 2 is on, the +12VDC at 50mA max is provided at terminal 6. This power is gated by both the sleep of the module and AT command P3. For this power setting to be on, the XBee module needs to be awake and AT command P3 set to a high level.
Digital mode Specification Value
Digital Input Input type Non-inverting Schmitt trigger gate
Positive-going switching threshold ~1.6 VDC
Negative-going switching threshold ~1.0 VDC
Maximum safe input +30VDC
Minimum safe input -.5VDC
Input impedance ~1.5 MΩ
Default level when no input applied Low
Digital Output Output type Open collector sinking driver
Maximum sink current 1.8ADC
Maximum off voltage +30VDC
Minimum safe input -.5VDC
Resistor pullups 10K Ω pulled up to 3VDC; switch-selectable
41

XBee Digital I/O Adapter
Software programming and data retrievalThere are several avenues for programming the adapter.
To get started on developing solutions with the adapter using Device Cloud, see the Device Cloud website:
http://www.etherios.com/devicecloud
For details on programming the adapter and retrieving data from it, see the XBee Digital I/O Adapter product page on the Digi Developer Community Wiki:
http://www.digi.com/wiki/developer/index.php/Category:Drop-in_Networking_Products
Important: Serial communications disabled on XBee Analog and Digital I/O AdaptersFor the XBee Analog and Digital I/O Adapters, the XBee firmware disables the XBee module’s serial communications functionality, so that the pins normally used for serial communications can instead be used for additional I/O functionality. As a result, once an XBee module has been loaded with the firmware image specific to the XBee Analog or Digital I/O Adapters, the XBee module can no longer be configured using X-CTU, the XBee serial API, or local AT commands.
The only way to configure these adapters is by using the Ident or Ident/Reset commissioning and identification button (see "Commissioning and identity behaviors" on page 13 for description) and OTA commands—either by using a ConnectPort gateway, X-CTU, or by using the remote command API of another serial-enabled module associated to the same network.
42

XBee Digital I/O Adapter
LEDs and buttons
Reset button
DIP switches
Assc Ident Power
blinking green solid green
LED/Button Function
Power LED Indicates that power is on. Illuminated only when adapter is connected to external power only, not when powered by batteries. Not available in lithium-battery models.
Assc LED Indicates the adapters’s network association status. This LED functions differently depending on the XBee RF protocol for the product. See "Network association" on page 11 for more information.
Reset button Recessed button on underside of the adapter. Performs equivalent of a power-cycle. Use a small non-conductive tool with a blunt end to press gently and hold down button.
Ident button Recessed button on power end of the adapter between Assc and Power LEDs. Performs multiple functions for identifying and configuring the adapter in a wireless network. Button presses and actions vary by XBee RF protocol; see "Commissioning and identity behaviors" on page 13.
Consecutive button presses must occur within 800 milliseconds of each other to perform the desired action.
43

XBee USB Adapter
Overview
The XBee USB Adapter provides short-range wireless connectivity to any USB device. Unlike an embedded wireless module, which requires design integration and development time, these off-the-shelf adapters provide instant wireless connectivity to existing USB devices. All XBee adapters can be used with Digi's ConnectPort X gateways for data aggregation and IP connectivity
Power requirementsThe XBee USB Adapter is a bus-powered device.
Download and install device driverThe XBee USB Adapter requires a device driver, FT232R. This device driver causes adapter device to appear as an additional COM port available to the PC. Application software can access the adapter in the same way as it would access a standard COM port.
To download this device driver, go to this web page and select the download appropriate for your operating system:
http://www.ftdichip.com/Drivers/VCP.htm
http://www.ftdichip.com/Drivers/VCP/Linux/ftdi_sio.tar.gz
Chapter 6 XBee USB Adapter
44

XBee USB Adapter
Software programming and data retrievalThere are several avenues for programming the adapter.
To get started on developing solutions with the adapter using Device Cloud, see the Device Cloud website:
http://www.etherios.com/devicecloud
For details on programming the adapter and retrieving data from it, see the XBee USB Adapter product page on the Digi Developer Community Wiki:
http://www.digi.com/wiki/developer/index.php/Category:Drop-in_Networking_Products
LEDs and buttonsThere is one LED and one button on the end of the adapter opposite the USB connector:
Associate/Power LED; blinking green=associated
Assoc Reset
Reset button
LED/Button Function
Associate/Power LED
Indicates the adapters’s network association status. This LED functions differently depending on the XBee RF protocol for the product. See "Network association" on page 11 for more information.
Reset button Performs a reset. Use a small non-conductive tool with a blunt end to press gently and hold down button.
45

XBee Sensor Adapter
Overview
The XBee Sensor Adapter provides short-range wireless connectivity to Digi Watchport® Sensors. Unlike an embedded wireless module, which requires design integration and development time, these off-the-shelf adapters provide instant wireless connectivity to existing Watchport Sensors. All XBee adapters can be used with Digi's ConnectPort X gateways for data aggregation and IP connectivity
Available sensor productsThe XBee Sensor Adapter can be used with a variety of Watchport
sensors. For a description and list of supported sensors, go to Digi’s Drop-in Networking page at www.digi.com/din, navigate to Products, and click on Sensors.
Chapter 7 XBee Sensor Adapter
46
XBee Sensor Adapter
Power options Depending on adapter model, there are several powering options.
Lithium battery modelThis model can be powered by a 3-6VDC external power supply or by 2/3 AA 3.6V lithium batteries and a 1/2 AA boost capacitor. Replacement batteries available for purchase; contact Digi at 952-912-3444 or 877-912-3444.
Alkaline battery modelThis product can be powered by a 9-30VDC external power supply (see "Power requirements" on page 70) or by batteries. Use 3x1.5V “N” alkaline battery cells. To install batteries, insert a screwdriver in the slots in the side of the adapter case and twist to snap off the cover. Insert the batteries following the polarity diagram on the board.
Siting recommendationsIsolate the XBee Sensor Adapter from temperature sources other than the one you are measuring. For example, when using it to monitor indoor room temperature, do not place it in direct or indirect sunlight.
For the light sensor, low-Hertz light bulbs, such as fluorescent lamps, can produce inconsistent measuring results. Multiple light samples should be taken to achieve reliable results.
47

XBee Sensor Adapter
Connection and power-on1. Connect the sensor to the SENSOR port of the adapter.
2. Connect the power supply to the adapter or insert batteries.
PinoutsThe XBee Sensor Adapter uses an industry-standard RJ45 10 pin modular jack. Pin 1 is the leftmost pin and pin numbers increment from left to right.
Pinouts for the connector are:
Pin Function
1 Not used.
2 Not used.
3 Not used.
4 GND
5 1-wire (sensor) data
6 +5VDC switched power out.
7 GND
8 +5VDC switched power out.
9 General-purpose logic input for moisture sensor.
10 Not used.
48

XBee Sensor Adapter
Software programming and data retrievalThere are several avenues for programming the XBee Sensor Adapter.
To get started on developing solutions with the XBee Sensor Adapter using Device Cloud, see the Device Cloud website:
http://www.etherios.com/devicecloud
For details on programming the XBee Sensor Adapter and retrieving data from it using available Python modules, see the topic on the Digi Python Wiki titled Programming XBee Drop-in Networking Accessories (Adapters, Routers, Sensors)
http://www.digi.com/wiki/developer/index.php/Category:Drop-in_Networking_Products
LEDs and buttons
Reset button
Assc Ident Power
blinking green solid green
LED/Button Function
Power LED Indicates that power is on. Illuminated only when adapter is connected to external power only, not when powered by batteries. Not available in lithium-battery models.
Assc LED Indicates the adapters’s network association status. This LED may function differently depending on the XBee protocol running on your product. See "Network association" on page 11 for more information.
Reset button Recessed button on underside of the adapter. Performs equivalent of a power-cycle. Use a small non-conductive tool with a blunt end to press gently and hold down button.
Ident button Recessed button on power end of the adapter between Assc and Power LEDs. Performs multiple functions for identifying and configuring the adapter in a wireless network. Button presses and actions vary by XBee protocol; see "Commissioning and identity behaviors" on page 13. Consecutive button presses must occur within 800 milliseconds of each other to perform the desired action.
49

XStick
Overview
The XStick is a USB peripheral module adapter that provides short-range wireless connectivity to an XBee network.
Power requirementsThe XStick is a USB bus-powered device.
Connection and startupPlug the XStick into the USB connector of a PC, or use a USB extension cable.
The extension cable must be no more than 3 meters long.
Download and install device driverThe XStick requires a device driver, FT232R. To download this device driver, go to this web page and select the download appropriate for your operating system:
http://www.ftdichip.com/Drivers/VCP.htm
http://www.ftdichip.com/Drivers/VCP/Linux/ftdi_sio.tar.gz
Chapter 8 X S t i c k
50

XStick
Software programming and data retrievalThere are several avenues for programming the XStick.
To get started on developing solutions with the XStick using Device Cloud, see the Device Cloud website:
http://www.etherios.com/devicecloud
For details on programming the XStick and retrieving data from it, see the XStick product page on the Digi Developer Community Wiki:
http://www.digi.com/wiki/developer/index.php/Category:Drop-in_Networking_Products
Unsupported XBee AT commandsThe XStick does not support these XBee AT commands:
XStick ZB / ZNet 2.5:
D0, D1, D2, D3, D4, D6, IS, PR, P0, P1, P2, RP, %V, V
XStick 802.15.4:
AV, D0, D1, D2, D3, D4, D5, D6, D7, D8, IA, IC, IO, IR, IS, IT, IU, M0, M1, PR, PT, P0, P1, P2, RP, T0, T1, T2, T3, T4, T5, T6, T7
LEDs and buttons
Associate/Power LED;blinking yellow=associated
LED/Button Function
Associate/Power LED
Located inside the unit. Indicates whether the XStick is powered and its network association status. This LED functions differently depending on the XBee RF protocol for the product. See "Network association" on page 11 for more information.
51

XBee Wall Router /Smart Energy Range Extender
Overview
XBee technology enables low-cost, low-power networking of sensors, controllers and other such devices in self-configuring, self-healing wireless networks. Digi's XBee Wall Router is a small network extender that can be used to create the backbone of a wireless network or to expand the range of a wireless network so that other network devices can seamlessly communicate with one another. The XBee Wall Router can be used in conjunction with any Drop-in Networking Accessory, gateway, or XBee module with a compatible XBee RF protocol, for data aggregation and IP connectivity. The Smart Energy Range Extender is intended for use as a Range Extender device in a Smart Energy network.
Part of Digi's Drop-in Networking solutions, the XBee Wall Router helps to create and/or fortify the infrastructure of a wireless network by simply plugging into standard wall power sockets around a customer facility, creating a multi-path self-healing network. Installation is easy and completely unobtrusive.
The U.S. version of the XBee Wall Router includes a built-in mounting tab, which allows it to be securely screwed into standard wall sockets using the existing mounting screw hole. This prevents accidental unplugging of the repeater and reduces risk of theft or vandalism. The XBee Wall Router is designed primarily to “patch” areas within a wireless network where signal erosion or loss occurs due to distance limitations or air interference. It also serves to create multiple pathways, increasing the redundancy of the mesh communications to ensure maximum network reliability.
In addition to wireless network extension, the XBee Wall Router also includes integrated temperature and light sensors. Customers using ConnectPort X gateways have the ability to retrieve data from these sensors. At this time, the Smart Energy Range Extender does not support data retrieval from its sensors.
Chapter 9 X B e e W a l l R o u t e r/ S m a r t E n e r g y R a n g e E x t e n d e r
52

XBee Wall Router /Smart Energy Range Extender
Siting recommendationsIsolate the XBee Wall Router from temperature sources other than the one you are measuring. For example, when using it to monitor indoor room temperature, do not place it in direct or indirect sunlight.
For the light sensor, low-Hertz light bulbs, such as fluorescent lamps, can produce inconsistent measuring results. Multiple light samples should be taken to achieve reliable results.
Light and temperature sensorsThe XBee Wall Router’s light sensor is designed to be used in environments of less than or equal to 1200 lux. If the light sensor is exposed to light greater than 1200 lux it causes temperature readings to be inaccurate until the bright light is removed.
Connection and startup for the XBee Wall Router1. Plug the XBee Wall Router into an outlet.
2. To make sure your XBee Wall Router is properly connected to the XBee network, check the Associate/Power LED, as described on page 55.
3. Discover the XBee Wall Router in the XBee network and change configuration settings as needed, as described in "Configuration with a ConnectPort X gateway" on page 64.
Connection and startup for the Smart Energy Range Extender1. Plug the Smart Energy Range Extender into an outlet. Verify that it has
power by a flashing Associate/Power LED.
2. Register the MAC address and link key (or install code) of the Smart Energy Range Extender with the Coordinator of the Smart Energy network.
3. Set your Smart Energy network to permit joining.
4. Start the Smart Energy Range Extender’s join process by pressing the ident button once. Joining may require up to 30 seconds to complete. The Associate/Power LED will continue to flash while the device attempts to join the network. NOTE: Do not press the ident button within two minutes of the initial join attempt.
5. When the Smart Energy Range Extender has joined the network successfully, the Associate/Power LED will be lit and steady.
Operating the Smart Energy Range Extender1. To allow other devices to join your Smart Energy network via the Smart
Energy Range Extender, press the ident button twice.
2. To make a joined Smart Energy Range Extender leave the network, press the ident button four times. The Smart Energy Range Extender will leave the network, attempt to rejoin, then attempt to join a new network. If joining is enabled on a compatible neighboring Smart
53
XBee Wall Router /Smart Energy Range Extender
Energy network when this happens, the Smart Energy Range Extender will join that network.
3. A joined Smart Energy Range Extender checks its connection to the network’s Coordinator every 30 seconds. If the connection is lost, the Associate/Power LED will flash.
Software programming and data retrieval
XBee Wall RouterThere are several avenues for programming the XBee Wall Router.
To get started on developing solutions with the XBee Wall Router using Device Cloud, see the Device Cloud website:
http://www.etherios.com/devicecloud
For details on programming the XBee Wall Router and retrieving data from it, see the XBee Wall Router product page on the Digi Developer Community Wiki:
http://www.digi.com/wiki/developer/index.php/Category:Drop-in_Networking_Products
Smart Energy Range ExtenderFor details on using the Smart Energy Range Extender, refer to the XBee / XBee PRO SE (Smart Energy) RF Modules User’s Guide, available on the Digi website:
http://www.digi.com/
54

XBee Wall Router /Smart Energy Range Extender
LEDs, buttons, and integrated sensors
Temperature sensor (internal)
Associate/Power LED
Light sensor
Reset/Ident button
LED/Button Function
Associate/Power LED
Indicates the XBee Wall Router’s network association status. This LED functions differently depending on the XBee RF protocol for the product. See "Network association" on page 11 for more information.
Reset/Ident button
Performs a reset and multiple functions for identifying and configuring the XBee Wall Router in a wireless network.
Use a small non-conductive tool with a blunt end to press gently and hold down button. Button presses and actions vary by XBee RF protocol; see "Commissioning and identity behaviors" on page 13.
Consecutive button presses must occur within 800 milliseconds of each other to perform the desired action.
55

XBee Smart Plug
Overview
IMPORTANT
Read all safety information in this chapter before installing or using the XBee Smart Plug.
XBee technology enables low-cost, low-power networking of sensors, controllers and other devices in self-configuring, self-healing wireless networks. The XBee Smart Plug is an intelligent electrical outlet that can measure and control appliances plugged in via a standard electrical outlet. Part of Digi's Drop-in Networking family, XBee Smart Plug integrates with ConnectPort X gateways to centralize input from multiple XBee Smart Plugs into an energy management solution.
The XBee Smart Plug is intended for use with common household appliances (computer, television, lighting, fan, refrigerator, etc.) that meet the load ratings on the following page. It is not intended for use with products outside the operational specifications in this document or on the product label.
The XBee Smart Plug can measure current consumption from an attached appliance. This information can be communicated to monitor or control the appliance. An application can use this information to determine such things as on/off status, operating range, appliance state (low power mode, idle, etc.), or erratic behavior, to initiate subsequent actions, such as powering off the appliance.
Chapter 10 X B e e S m a r t P l u g
56
XBee Smart Plug
In addition to network extension, the XBee Smart Plug includes an integrated light sensor. Sensor data can be received by using a ConnectPort X gateway with the XBee Smart Plug.
There are two versions of the XBee Smart Plug: one for use in the USA and the other for use in Canada. The U.S. version of the XBee Smart Plug includes a built-in mounting tab, which allows it to be securely screwed into standard wall sockets using the existing mounting screw hole.
Safety informationWARNING!
XBee Smart Plug is rated for the following loads. All ratings are at 120VAC/60Hz at a maximum ambient temperature of 104° F (40° C). Do not plug in devices that exceed these ratings, either alone or in combination.
• Resistive: 120VAC, 8A
• Inductive: (0.75 pf): 120VAC, 960VA
• Motor: 1/3 HP (7.2 FLA)
XBee Smart Plug has an internal fuse that can blow if operating outside the ratings listed above. The fuse is not replaceable and blowing the fuse will void the warranty. A new unit must be purchased.
Improper use or installation can cause SERIOUS INJURY, DEATH, or LOSS/DAMAGE OF PROPERTY.
To reduce the risk of electric shock, this equipment has a grounding-type plug with a third (grounding) pin. This plug will fit into a grounding-type outlet only. If the plug does not fit into the outlet, contact a qualified electrician to install the proper outlet. Do not change the plug in any way.
Install this product in accordance with all national, state, and local electrical codes.
This product is for indoor use in dry locations only.
This product generates heat. The room in which it is installed must have adequate ventilation or the ability to dissipate heat effectively.
This product is not fault tolerant and is not designed, manufactured or intended for any use requiring fail-safe performance in which failure could lead to death, serious personal injury, or severe physical or environmental damage. This includes, but is not limited to, the operation of aircraft or nuclear facilities or for the control of devices that preserve, maintain, or contribute to human or animal safety or life support.
IMPORTANT!
Using this product in a manner outside of normal conditions and other than that described here, opening this product, or modifying it in any way voids your warranty. Digi International, Inc. is not liable for any damage incurred because of the misuse or modification of this product.
57

XBee Smart Plug
Connection and startup1. Plug the XBee Smart Plug into an outlet.
2. To make sure the XBee Smart Plug is properly connected to the XBee network, check the Associate/Power LED, as described on page 59.
3. Discover the XBee Smart Plug in the XBee network and change configuration settings as needed, as described in "Configuration with a ConnectPort X gateway" on page 64.
4. Plug the appliance you want to control into the user outlet of the XBee Smart Plug.
Note: By default, power to the user outlet is disabled. In order to power the attached appliance, the user outlet must be enabled in the device configuration settings, as described in "Configuration with a ConnectPort X gateway" on page 64.
58

XBee Smart Plug
Device operation
LEDs, buttons, and integrated sensors
Light sensor
Associate LEDOutlet LED
User outlet
Reset button on side panel
Current sensor inside case
59

XBee Smart Plug
Software programming and data retrievalThere are several avenues for programming the XBee Smart Plug.
To get started on developing solutions with the XBee Smart Plug using Device Cloud, see the Device Cloud website:
http://www.etherios.com/devicecloud
For details on programming the XBee Smart Plug and retrieving data from it, see the XBee Smart Plug product page on the Digi Developer Community Wiki:
http://www.digi.com/wiki/developer/index.php/Category:Drop-in_Networking_Products
LED/Button/Sensor
Function
User outlet Standard AC 110V, 3-prong socket used to power external appliance.
Important: Adhere to the product’s load ratings.
Power control to the user outlet is configured by the XBee module’s digital I/O channel D4. This channel must be configured as a digital output. By default, power is disabled to the user outlet (indicated by off-state of the outlet LED). To enable power to the outlet, D4 must be set high which in turn will be indicated by the outlet LED glowing.
Current sensor Detects current draw from user AC socket.
The XBee Smart Plug uses a hall-effect current sensor IC to detect RMS current draw from the user controlled outlet. As there is no power factor correction for inductive loads, sensor accuracy is only specified for resistive loads. Current measurements can still be made on inductive loads that fall within the product load rating, but accuracy is not guaranteed.
Light sensor Ambient light sensor capable of measuring indoor lighting levels.
Low-Hertz light bulbs, such as fluorescent lamps, can produce inconsistent measuring results. Multiple light samples should be taken to achieve reliable results.
Associate LED (green)
Indicates the XBee Smart Plug’s network association status. This LED functions differently depending on the XBee RF protocol for the product. See "Network association" on page 11 for more information.
Outlet LED (yellow)
Indicates when the user AC socket is powered.
Reset/Ident button
Performs a reset and multiple functions for identifying and configuring the XBee Smart Plug in a wireless network.
Use a small non-conductive tool with a blunt end to press gently and hold down button. Button presses and actions vary by XBee RF protocol; see "Commissioning and identity behaviors" on page 13. Consecutive button presses must occur within 800 milliseconds of each other to perform the desired action.
Consecutive button presses must occur within 800 milliseconds of each other to perform the desired action.
60

XBee Sensors
Overview
The XBee Sensor family is a group of XBee-enabled, battery-powered sensors incorporating an XBee module. Part of Digi's Drop-in Networking solutions, XBee Sensors read real-time data from sensors such as temperature, humidity, and light. This data can be retrieved and transmitted through wireless communications in an XBee network infrastructure. Compact size and battery power enable XBee Sensors to be dropped into facilities easily and unobtrusively while providing reliable communications. Applications include building automation, environmental monitoring, security, asset monitoring, and more.
Installation is easy: simply insert batteries, add the XBee Sensor to the XBee network, and configure inputs and outputs, using programming information available on the Digi Developer Community Wiki. Next, mount the device in a desired out-of-the-way location and begin collecting data. XBee Sensors can be used with ConnectPort X gateways, XBee embedded modules, and other XBee Drop-in Networking Accessories to "drop-in" end-to-end device networks, without the need for a wired network infrastructure.
Sensor optionsThere are currently two XBee Sensor product options available:
• XBee Sensor /L/T: Integrated ambient light and temperature sensors
• XBee Sensor /L/T/H: Integrated ambient light, temperature, and humidity sensors
Chapter 11 X B e e S e n s o r s
61
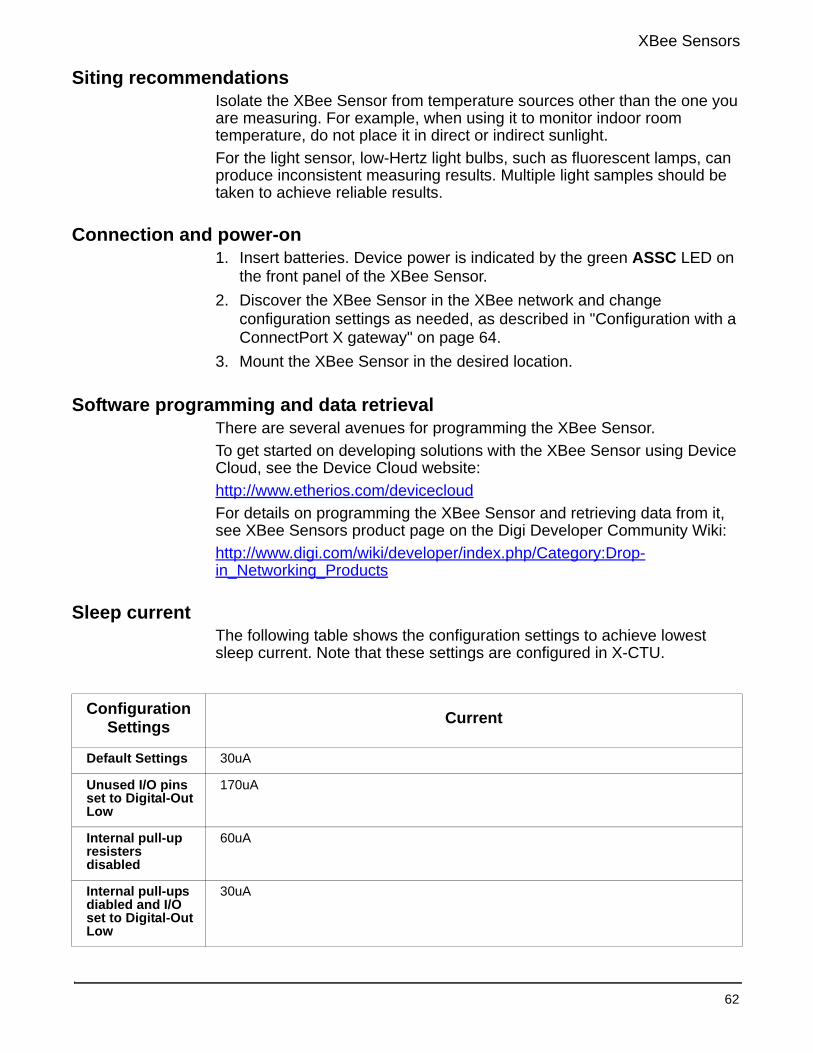
XBee Sensors
Siting recommendationsIsolate the XBee Sensor from temperature sources other than the one you are measuring. For example, when using it to monitor indoor room temperature, do not place it in direct or indirect sunlight.
For the light sensor, low-Hertz light bulbs, such as fluorescent lamps, can produce inconsistent measuring results. Multiple light samples should be taken to achieve reliable results.
Connection and power-on1. Insert batteries. Device power is indicated by the green ASSC LED on
the front panel of the XBee Sensor.
2. Discover the XBee Sensor in the XBee network and change configuration settings as needed, as described in "Configuration with a ConnectPort X gateway" on page 64.
3. Mount the XBee Sensor in the desired location.
Software programming and data retrievalThere are several avenues for programming the XBee Sensor.
To get started on developing solutions with the XBee Sensor using Device Cloud, see the Device Cloud website:
http://www.etherios.com/devicecloud
For details on programming the XBee Sensor and retrieving data from it, see XBee Sensors product page on the Digi Developer Community Wiki:
http://www.digi.com/wiki/developer/index.php/Category:Drop-in_Networking_Products
Sleep currentThe following table shows the configuration settings to achieve lowest sleep current. Note that these settings are configured in X-CTU.
Configuration Settings
Current
Default Settings 30uA
Unused I/O pins set to Digital-Out Low
170uA
Internal pull-up resisters disabled
60uA
Internal pull-ups diabled and I/O set to Digital-Out Low
30uA
62

XBee Sensors
LEDs, buttons, and integrated sensorsXBee Sensors have one button and one LED.
XBee Sensor /L/T models have integrated light and temperature sensors.
XBee Sensor /L/T/H models have integrated light, temperature, and humidity sensors.
Reset/Ident button
Integrated light sensor
Associate/Power LED
Integrated temperature and humidity sensors inside case
LED/Button Function
Associate/Power LED
Indicates power and the XBee Sensor’s network association status. This LED functions differently depending on the XBee RF protocol for the product. See "Network association" on page 11 for more information.
Reset/Ident button
Performs a reset and multiple functions for identifying and configuring the XBee Sensor in a wireless network. Use a small non-conductive tool with a blunt end to press gently and hold down button. Button presses and actions vary by XBee RF protocol; see "Commissioning and identity behaviors" on page 13.
Consecutive button presses must occur within 800 milliseconds of each other to perform the desired action.
63
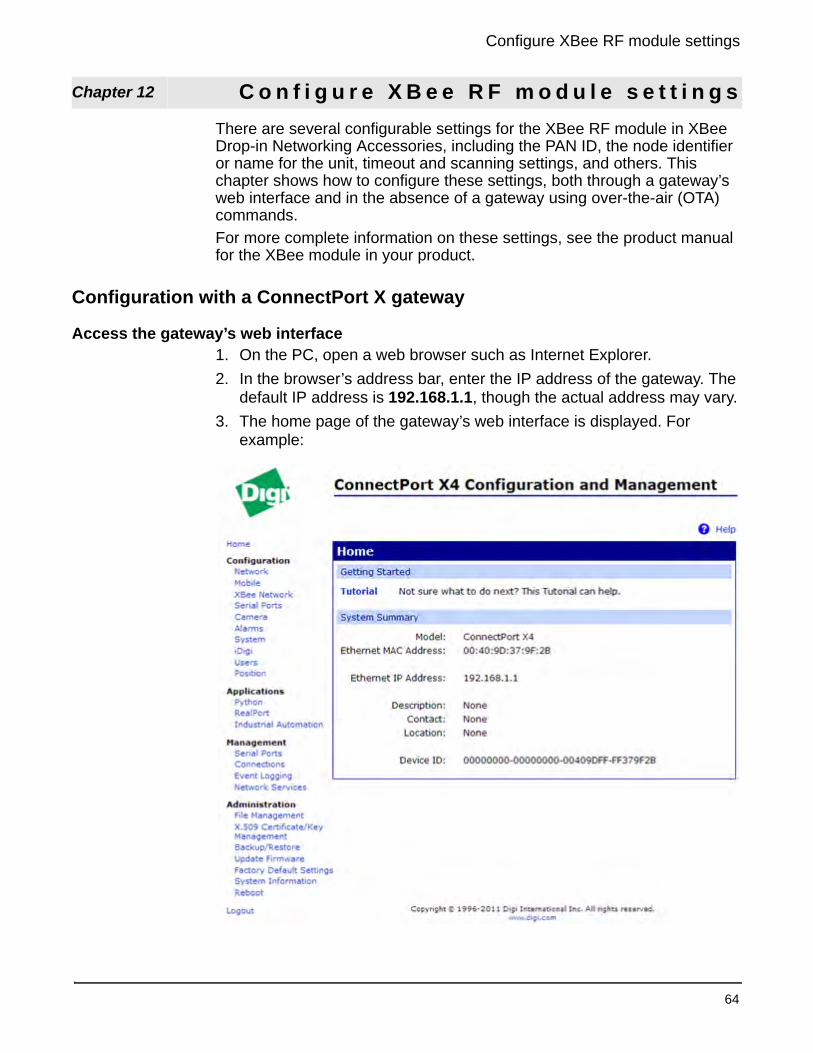
Configure XBee RF module settings
There are several configurable settings for the XBee RF module in XBee Drop-in Networking Accessories, including the PAN ID, the node identifier or name for the unit, timeout and scanning settings, and others. This chapter shows how to configure these settings, both through a gateway’s web interface and in the absence of a gateway using over-the-air (OTA) commands.
For more complete information on these settings, see the product manual for the XBee module in your product.
Configuration with a ConnectPort X gateway
Access the gateway’s web interface1. On the PC, open a web browser such as Internet Explorer.
2. In the browser’s address bar, enter the IP address of the gateway. The default IP address is 192.168.1.1, though the actual address may vary.
3. The home page of the gateway’s web interface is displayed. For example:
Chapter 12 C o n f i g u r e X B e e R F m o d u l e s e t t i n g s
64

Configure XBee RF module settings
View the gateway and nodes in their XBee network1. In the gateway’s web interface, select
Administration > System Information from the menu.
The System Information page is displayed.
2. From the list of System Information links, click XBee Network.
65

Configure XBee RF module settings
The XBee Network page is displayed. It shows several settings for the gateway, followed by the Network View of the XBee Devices.
In the Node Type column, the descriptors for the nodes can vary by XBee RF protocol. For example, XBee ZB / ZNet 2.5 series products show the XBee module in the gateway as the coordinator, and any XBee Drop-in Networking Accessories are as routers.
XBee 802.15.4 series products show the XBee module in the gateway as the coordinator, and any XBee Drop-in Networking Accessories as end nodes.
66

Configure XBee RF module settings
View and change XBee radio settings as needed1. In the web interface, go to Configuration > XBee Network.
The XBee Network Configuration page is displayed. It shows several settings for the gateway, followed by the Network View of the XBee Devices. Again, the descriptors for the nodes in the Node Type column can vary by XBee RF protocol. This example is for XBee ZB / ZNet 2.5 series products:
2. In the list under Network View of the XBee Devices, locate your product by its physical address. This address is printed on a label on the bottom of the unit. Click on the Network Address or Extended Address to open the product’s settings page.
67

Configure XBee RF module settings
3. The XBee Network Configuration page is displayed.
Settings can vary among XBee RF protocols. The settings shown here are for an XBee ZB module.
View and change configuration settings as needed. To apply configuration changes, click Apply.
The Basic radio settings control basic operation of the XBee module in an XBee network. Advanced radio settings control behavior of the XBee module at a more detailed level. Generally, these settings can be left at their defaults.
For complete settings and descriptions, refer to the Product Manual for the XBee or XBee-PRO module in your product.
To apply configuration changes, click Apply.
Notes:
• Changing the PAN ID may make your XBee product inaccessible.
• If you assign a Node Identifier, to view it, go to Configuration > XBee Network and click Refresh. The new name is displayed in the Node Identifier field.
68

Configure XBee RF module settings
Configuration without a gatewayIf you are not configuring your Drop-in Networking Accessory with a ConnectPort X gateway, the XBee module in the accessory must be configured using over-the-air (OTA) commands. There are two methods of initiating OTA commands to a target XBee module:
• Using the OTA graphical user interface of X-CTU, a software tool for configuring XBee modules. In X-CTU, this interface is referred to as Remote Configuration.
• Using the Remote Command API frame suited to your XBee RF protocol
Important: Serial communications disabled on XBee Analog and Digital I/O AdaptersFor the XBee Analog and Digital I/O Adapters, the XBee firmware disables the XBee module’s serial communications functionality, so that the pins normally used for serial communications can instead be used for additional I/O functionality. As a result, once an XBee module has been loaded with the firmware image specific to the XBee Analog or Digital I/O Adapters, the XBee module can no longer be configured using X-CTU, the XBee serial API, or local AT commands.
The only way to configure these adapters is by using the Ident or Ident/Reset commissioning and identification button (see "Commissioning and identity behaviors" on page 13 for description) and OTA commands—either by using a ConnectPort gateway, X-CTU, or the remote command API of another serial-enabled module associated to the same network.
Using X-CTU’s OTA user interfaceXBee modules can also be configured "over-the-air" using the X-CTU tool and its Remote Configuration function. In this process, an XBee module on a base device, such as a USB interface board, is connected to a PC running X-CTU software. The XBee module on the base device communicates with the XBee module on a remote device, allowing you to read, write, and restore configuration settings in the remote XBee module.
Configuring XBee modules remotely through X-CTU requires additional hardware and software. Contact Digi Technical Support for details.
Using the Remote Command API frameFor information on using the API mode directly to initiate remote commands, see the Product Manual for the XBee or XBee-PRO module in your product.
Locating OTA configuration commands for your product
To determine which OTA commands are necessary for configuring your XBee device, refer to the product page for your device on the Digi Developer Community Wiki.
http://www.digi.com/wiki/developer/index.php/Main_Page
69

Hardware specifications
XBee Adapters
Chapter 13 H a r d w a r e s p e c i f i c a t i o n s
Hardware specifications for XBee Adapters (Sheet 1 of 2)
Specification Value
Environmental Operating temperature
XBee RS-232 Adapter, XBee RS-485 Adapter, XBee Analog Adapter, XBee Digital I/O Adapter, XBee USB Adapter:
Lithium battery models:
-40° to 158° F (-40° C to 70° C)
Alkaline battery models:
0.4° to 131° F (-18° C to 55° C)
External power supply:
The temperature range of the UL/C-UL Listed power supply must be at a minimum of 40° to 158° F (-40° C to 70° C) to meet the allowed ambient temperature range for XBee Adapters. If a power supply with an ambient rating of less than 158° F (70° C) is used, then the allowed ambient temperature range of the XBee Adapter is reduced to the rating of the power supply chosen.
Relative humidity
5% to 95% (non-condensing)
Power requirements
DC power input
XBee RS-232 Adapter, XBee RS-485 Adapter, XBee Analog Adapter, XBee Digital I/O Adapter:
External power supply varies by model:
Lithium battery model:
3.7-6VDC external power supply with locking-barrel connector.
Alkaline battery model:
UL /c-UL Listed ITE or Class II external power supply, with output rated between 9 to 30VDC, with a current rating of 300mA or greater; locking-barrel connector of 2.1mm x 5.5mm, center is positive.
N-cell batteries XBee RS-232 Adapter, XBee RS-485 Adapter, XBee Analog Adapter, XBee Digital I/O Adapter:
3x1.5V “N” alkaline battery cells
Lithium batteries
XBee RS-232 Adapter, XBee RS-485 Adapter,XBee Analog Adapter, XBee Digital I/O Adapter:
2/3 AA 3.6V lithium battery and a 1/2 AA boost capacitor pack.
Bus-powered XBee USB Adapter:
• Bus powered: +5V from USB bus
• Power consumption during normal operation:
- XBee: 70 mA
- XBee-PRO: 70 mA (Rx) and 250 mA (Tx)
• Power consumption during suspend mode:
XBee and XBee-PRO: 200 uA
70

Hardware specifications
Dimensions XBee RS-232 Adapter, XBee RS-485 Adapter, XBee Analog Adapter, XBee Digital I/O Adapter:
Length 3.6 in (9.14cm)
Width 1.9 in (4.82 cm)
Height 1.2 in (3.04 cm)
Weight 2.29 oz (65.0 g)
XBee USB Adapter:
Length 2.87 in (7.29 cm)
Width 1.80 in (4.57 cm)
Height 0.83 in (2.10 cm)
Weight 1.60 oz (45.36 g)
Hardware specifications for XBee Adapters (Sheet 2 of 2) (Continued)
Specification Value
71

Hardware specifications
XStick
Specification Value
Environmental Operating temperature -40° to 185° F (-40ºC to 85ºC)
Relative humidity 5% to 95% (non-condensing)
Power Requirements Supply voltage 5V from USB port of PC
Operating current (transmit) XBee ZB / ZNet 2.5: 51mA
XBee 802.15.4: 64mA
Operating current (receive) XBee ZB / ZNet 2.5: 47mA
XBee 802.15.4: 64mA
Power-down current Do not put the XStick in sleep mode.
Dimensions Width 0.7 in (1.78 cm)
Height 0.4 in (1.02 cm)
Length 1.8 in (4.57 cm)
Weight 0.265 oz (7.5 g)
RF Operation Operating frequency band 2.4GHz ISM
Antenna options Internal antenna only
RF Performance Indoor/urban range XBee ZB / ZNet 2.5:20m
XBee 802.15.4: 15m
Outdoor RF line-of-sight Range XBee ZB / ZNet 2.5: 50m
XBee 802.15.4: 40m
Transmit power output(nominal 25ºC)
XBee ZB / ZNet 2.5: 2.8 mW (4.5 dBm) Peak Conducted (FCC & Industry Canada)
XBee 802.15.4: 1mW (0dBm) Peak Conducted (FCC & Industry Canada)
RF data rate 250kbps
Serial interface data rate (software selectable)
1200 bps-1M bps
Receiver sensitivity -90dBm
Networking and Security
Supported network topologies Point-to-point
Point-to-multipoint
Peer-to-peer
ZigBee/Mesh
Number of channels (software selectable)
16
Addressing options PAN, Channel, and address
72

Hardware specifications
Certifications The XStick is a radio transceiver, and has received these agency approvals:
United States (FCC Part 15.247)
FCC ID:
XBee ZB / ZNet 2.5 series: MCQ-XSTICK2
XBee 802.15.4 series: MCQ-XSTICK1
Industry Canada (IC) IC:
XBee ZB / ZNet 2.5 series: 1846A-XSTICK1
XBee 802.15.4 series: 1846A-XSTICK2
Europe (CE) ETSI
Japan (TELEC) Yes
Specification Value
73

Hardware specifications
XBee Wall Router / Smart Energy Range Extender
Specification Value
Environmental Operating temperature -4° F to 167° F (-20° C to 75° C)
Relative humidity 5% to 95% (non-condensing)
Power requirements AC power input Universal AC input (85VAC to 265VAC)
Locking mechanism Secure unit to electrical outlet using center outlet screw (U.S. only)
Dimensions Length 2.87 in (7.30 cm)
Width 2.87 in (5.0 cm)
Height 1.37 in (3.50 cm)
Weight 2.50 oz (70.87 g)
RF operation Operating frequency band 2.4GHz ISM
Antenna options Internal antenna
RF performance Indoor/Urban range Up to 300 ft (90 m)
Outdoor RF line-of-sight range Up to 2 miles (3200 m)
Transmit power output 63 mW (18 dBm)
RF data rate 250,000 bps
Receiver sensitivity -102 dBm (1% PER)
Networking and security
Supported network topologies XBee Wall Router
Point-to-point
Point-to-multipoint
Peer-to-peer
ZigBee
XBee Smart Energy Range Extender
ZigBee Smart Energy Application Profile
Number of channels Up to 16 - 5 MHz channels (Direct Sequence Spread Spectrum) depending on the type of XBee RF Modem
Addressing options PAN ID, Channel, 2^64 (64-bit) addresses
Certifications UL/cUL (60950-1 / CSA-22.2 No. 60950-1-03)
CE (EN 60950-1)
CB Scheme (IEC 60950-1)
FCC Part 15, Class B
EN55022 Class B, EN 55024
VCCI
C-Tick (pending)
RoHS Compliant
ZigBee Smart Energy Range Extender Device (Smart Energy Wall Router)
74

Hardware specifications
Integrated sensors for XBee Wall Router
Sensor Specification Value
Temperature sensor Range -4° F to 158° F (-20° C to 70° C)
Accuracy +/- 2° C
Ambient light sensor Range of spectral bandwidth 360 to 970 nm (similar to human eye)
Wavelength of peak sensitivity 570 nm
Environment conditions Not to exceed 1200 lux or will cause inaccurate temperature readings
75

Hardware specifications
XBee Smart Plug
Specification Value
Environmental Operating temperature -4° F to 104° F (-20° C to 40° C)
Relative humidity 5% to 95% (non-condensing)
Power requirements AC power input 120VAC, 50/60 Hz
Load rating Resistive: 120VAC, 8A
Inductive: (0.75 pf): 120VAC, 960VA
Motor: 1/3 HP (7.2 FLA)
Dimensions Length 3.07 in (9.40 cm)
Width 2.42 in (6.14 cm)
Height 1.47 in (3.73 cm)
Weight 0.26 lb (.12 kg)
RF operation Operating frequency band 2.4GHz ISM
Antenna options Internal antenna
RF performance Indoor/urban range Up to 100 ft (30 m)
RF line-of-sight range Up to 100 ft (30 m)
Transmit power output 50 mW (+17 dBm)
RF data rate 250kbp
Serial interface data rate (software selectable)
1200 bps-1M bps
Receiver sensitivity -102dBm (1% PER)
Networking and security
Supported network topologies Point-to-point
Point-to-multipoint
Peer-to-peer
ZigBee
Number of channels (software selectable)
16 - 5 MHz channels (Direct Sequence Spread Spectrum)
Addressing options PAN, Channel, and address
Certifications The XBee Smart Plug is a radio transceiver, and has received these agency approvals:
• UL/cUL 244A, Third Edition, “Standard for Solid State Controls for Appliances” (PENDING)
• FCC Part 15, Class B (PENDING)
• EN55022 Class B, EN 55024 (PENDING)
• RoHS Compliant to RoHS I and II.
United States (FCC Part 15.247) FCC ID: MCQ-XBEEPRO2
Industry Canada (IC) IC: 1846A-XBEEPRO2
76
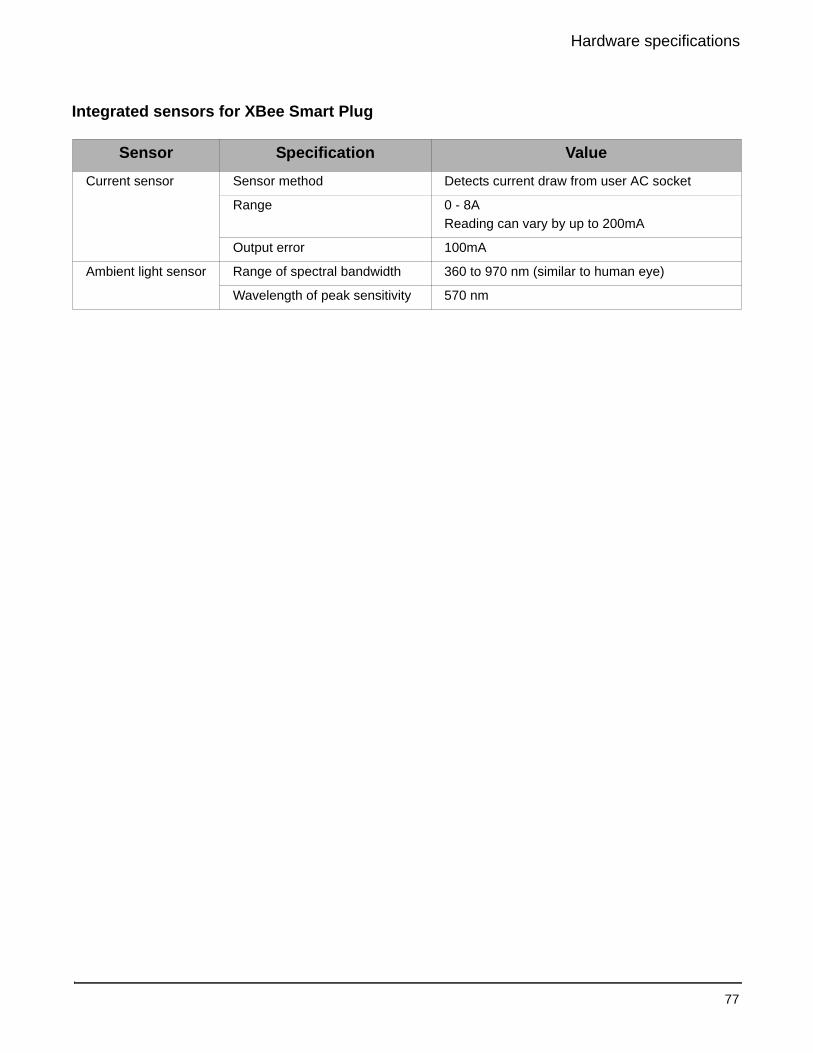
Hardware specifications
Integrated sensors for XBee Smart Plug
Sensor Specification Value
Current sensor Sensor method Detects current draw from user AC socket
Range 0 - 8A
Reading can vary by up to 200mA
Output error 100mA
Ambient light sensor Range of spectral bandwidth 360 to 970 nm (similar to human eye)
Wavelength of peak sensitivity 570 nm
77

Hardware specifications
XBee Sensors
Integrated sensors for XBee Sensors
Note: The ambient light sensor is a simple “light intensity” sensor. It is not intended to be used for applications requiring luminous intensity measurements.
Specification Value
Environmental Operating temperature -64.4° F to 131° F (-18° C to +55° C)
Relative humidity 5% to 95% (non-condensing)
Power requirements AC power input Alkaline Batteries
3 x 1.5V Alkaline battery cells
Dimensions Length 2.70 in (6.85 cm)
Width 2.50 in (6.35 cm)
Height 1.30 in (3.30 cm)
Weight 0.35 lb (0.158 kg) with batteries installed, 0.20 lb (0.091 kg) without batteries installed
RF operation Operating frequency band 2.4GHz ISM
Antenna options Internal antenna
RF performance Indoor/urban range Up to 133 ft (40 m)
Outdoor RF line-of-sight range Up to 400 ft (120 m)
Transmit power output 1.25 mW (+1 dBm) / 2 mW (+3 dBm) boost mode
RF data rate 250kbp
Receive sensitivity (1% PER) -97 dBm (-98 dBm boost mode)
Sensor Specification Value
Temperature sensor Range -64.4° F to 131° F (-18° C to +55° C)
Accuracy +/- 2° C
Ambient light sensor Range of spectral bandwidth 360 to 970 nm (similar to human eye)
Wavelength of peak sensitivity 570 nm
Luminance range 10 to 1000 lux
+/- 20%
Humidity sensor Range 5 to 95% RH
Interchangeability +/- 5% RH (0% RH to 59% RH)+/- 8%RH (60% RH to 95% RH)
Accuracy +/- 3.5% RH
78

Hardware specifications
Sleep Current
Sensor Sleep Current X-CTU Settings
Light,
Temperature,
Humidity
190uA Pull-up resistors enabled
30uA Pull-up resistors disabled
Any unused I/O pins set to digital low
79

Safety statements
80
Class I Division 2, Groups A, B, C, D Hazardous locationXBee Drop-in Networking Accessories are intended for use in ordinary locations only.
The device and any leads for the device may not be extended into a Hazardous Location.
This device has not been evaluated for use in wet locations or near combustible liquids, fumes, or vapors.
Lithium battery safety precautionXBee adapter and sensor products have no user-serviceable parts and are intended to be opened by qualified service personnel only.
Danger of explosion exists if lithium batteries are replaced incorrectly. Replacement must be done by qualified service personnel, and only with the same or equivalent battery type recommended by the manufacturer. Dispose of unused batteries according to the manufacturer's instructions.
XBee Smart Plug installation safety
IMPORTANT
Read all safety information in XBee Smart Plug chapter before installing or using the XBee Smart Plug.
Chapter 14 S a f e t y s t a t e m e n t s