Embed Size (px)
Citation preview
Drill Press Storage Cart
Drill Press
Storage Cart
Richard Hicks on July 22, 2013
Drill Press Storage Cart Richard Hicks on July 22, 2013
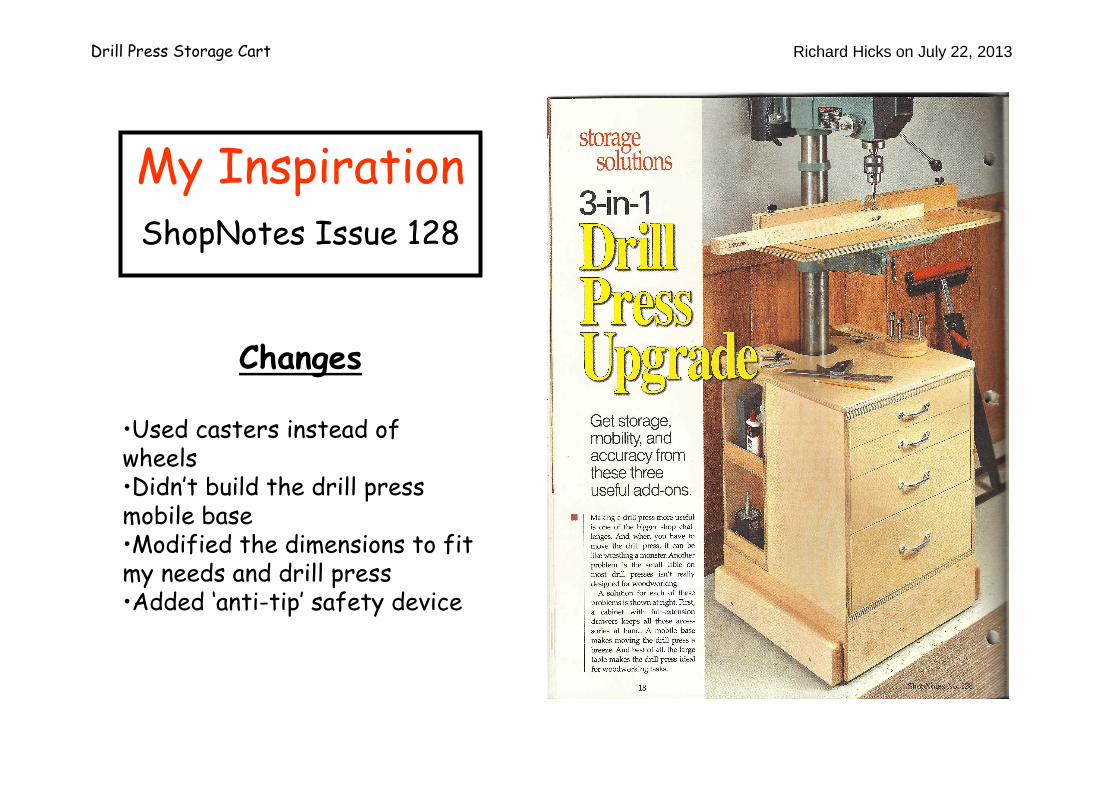
My InspirationShopNotes Issue 128
Changes
•Used casters instead of wheels•Didn’t build the drill press mobile base•Modified the dimensions to fit my needs and drill press•Added ‘anti-tip’ safety device
Drill Press Storage Cart Richard Hicks on July 22, 2013
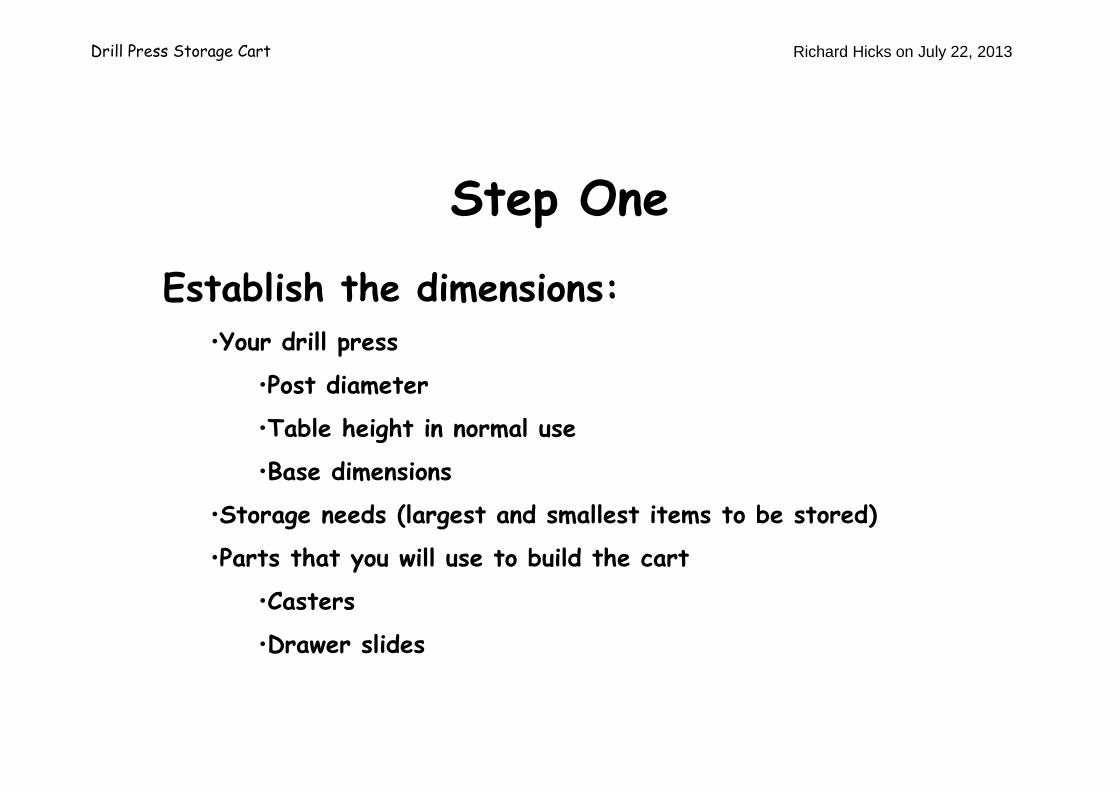
Step One
Establish the dimensions:•Your drill press
•Post diameter
•Table height in normal use
•Base dimensions
•Storage needs (largest and smallest items to be stored)
•Parts that you will use to build the cart
•Casters
•Drawer slides
Drill Press Storage Cart Richard Hicks on July 22, 2013
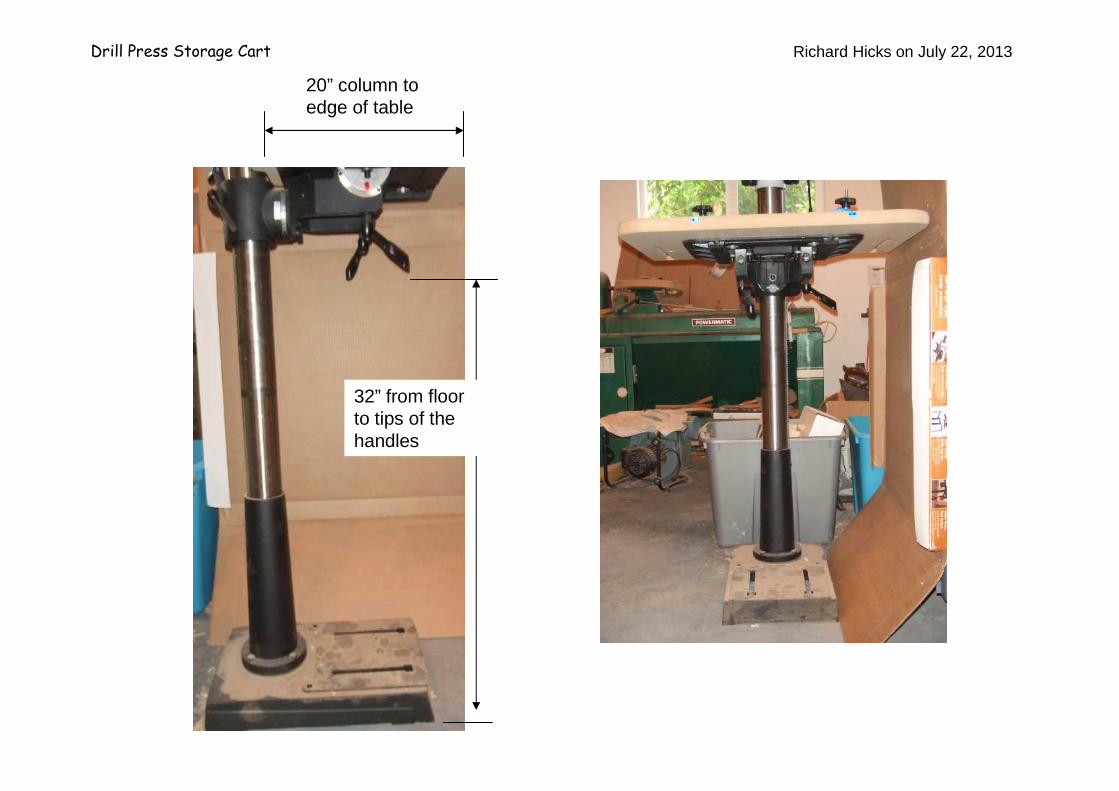
20” column to edge of table
32” from floor to tips of the handles
Drill Press Storage Cart Richard Hicks on July 22, 2013
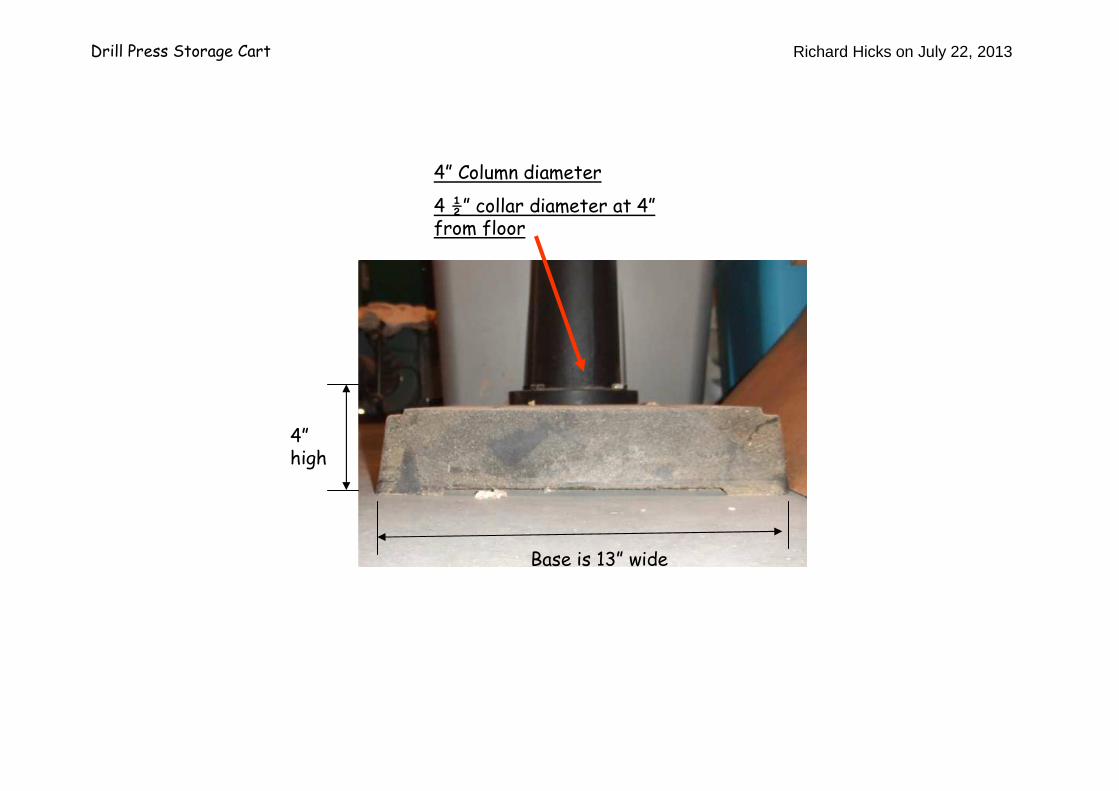
Base is 13” wide
4”high
4” Column diameter
4 ½” collar diameter at 4”from floor
Drill Press Storage Cart Richard Hicks on July 22, 2013
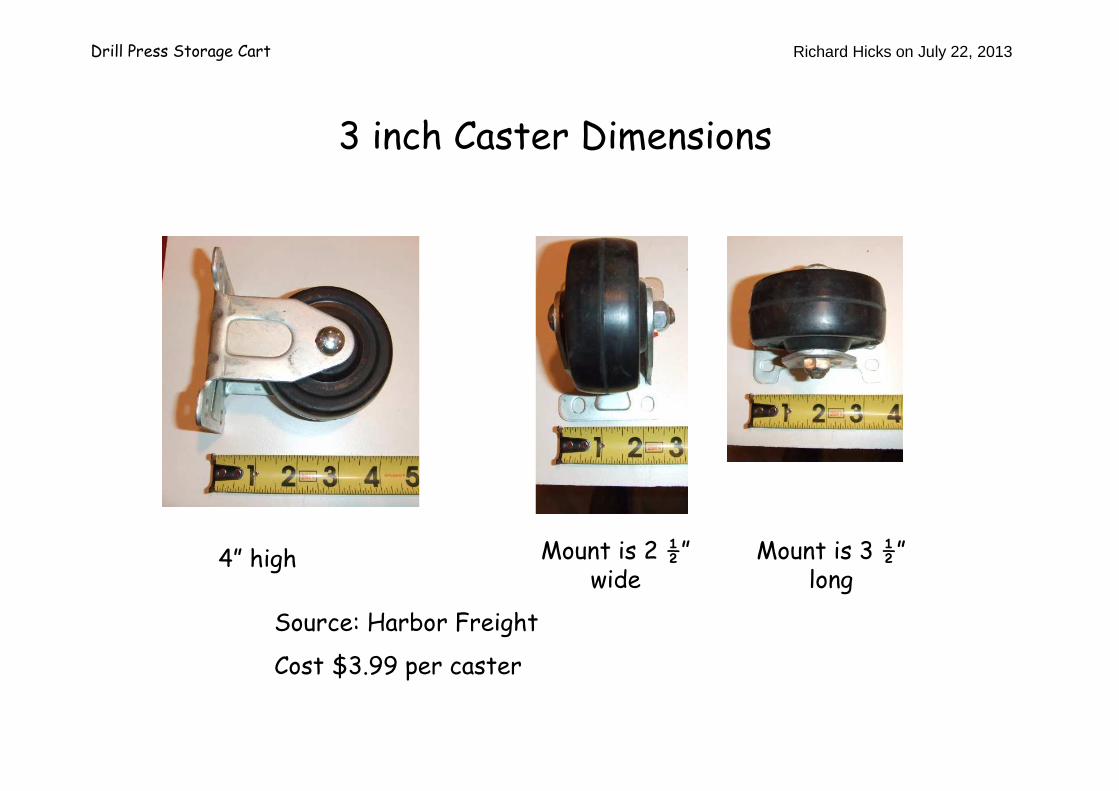
3 inch Caster Dimensions
4” high Mount is 2 ½”wide
Mount is 3 ½”long
Source: Harbor Freight
Cost $3.99 per caster
Drill Press Storage Cart Richard Hicks on July 22, 2013
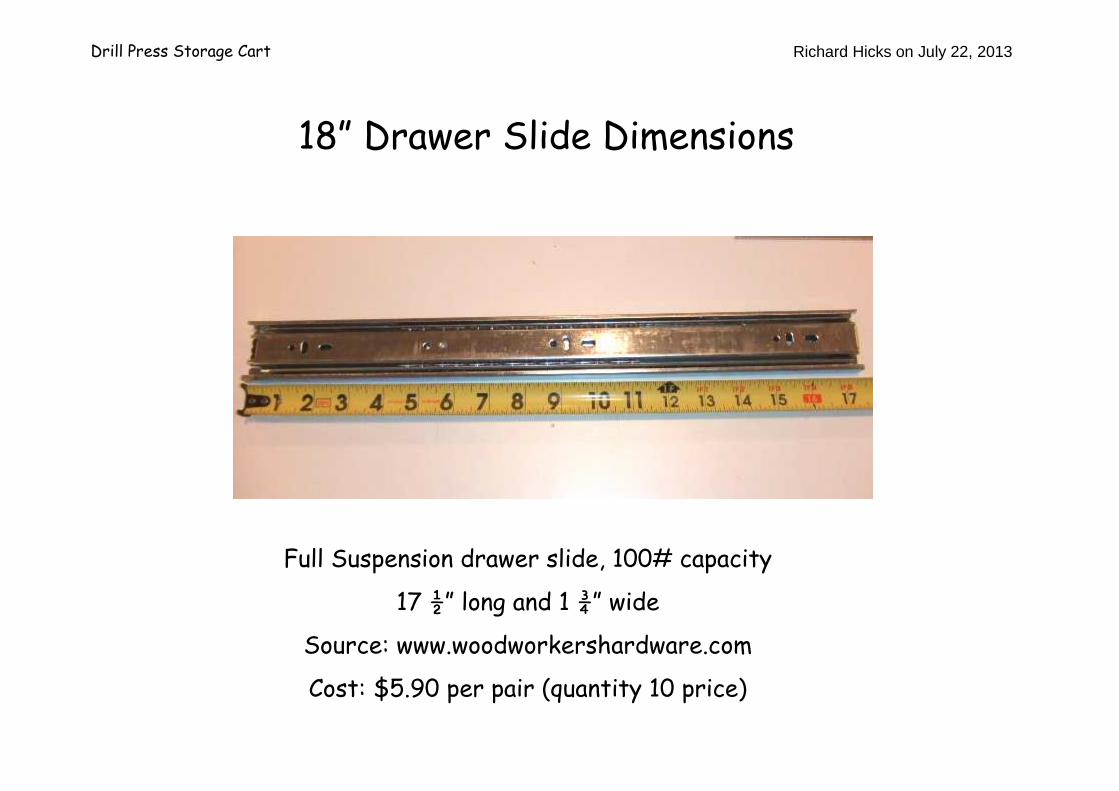
18” Drawer Slide Dimensions
Full Suspension drawer slide, 100# capacity
17 ½” long and 1 ¾” wide
Source: www.woodworkershardware.com
Cost: $5.90 per pair (quantity 10 price)
Richard Hicks on July 22, 2013
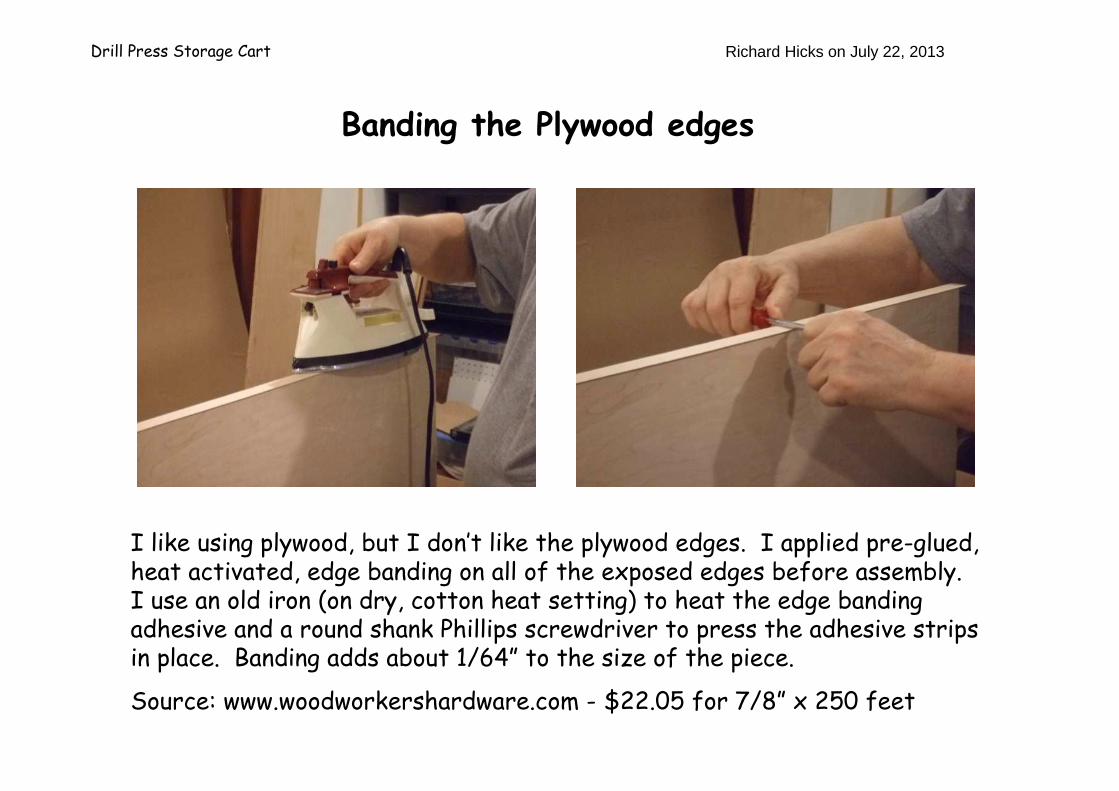
Banding the Plywood edges
I like using plywood, but I don’t like the plywood edges. I applied pre-glued, heat activated, edge banding on all of the exposed edges before assembly. I use an old iron (on dry, cotton heat setting) to heat the edge banding adhesive and a round shank Phillips screwdriver to press the adhesive strips in place. Banding adds about 1/64” to the size of the piece.
Source: www.woodworkershardware.com - $22.05 for 7/8” x 250 feet
Drill Press Storage Cart
Richard Hicks on July 22, 2013
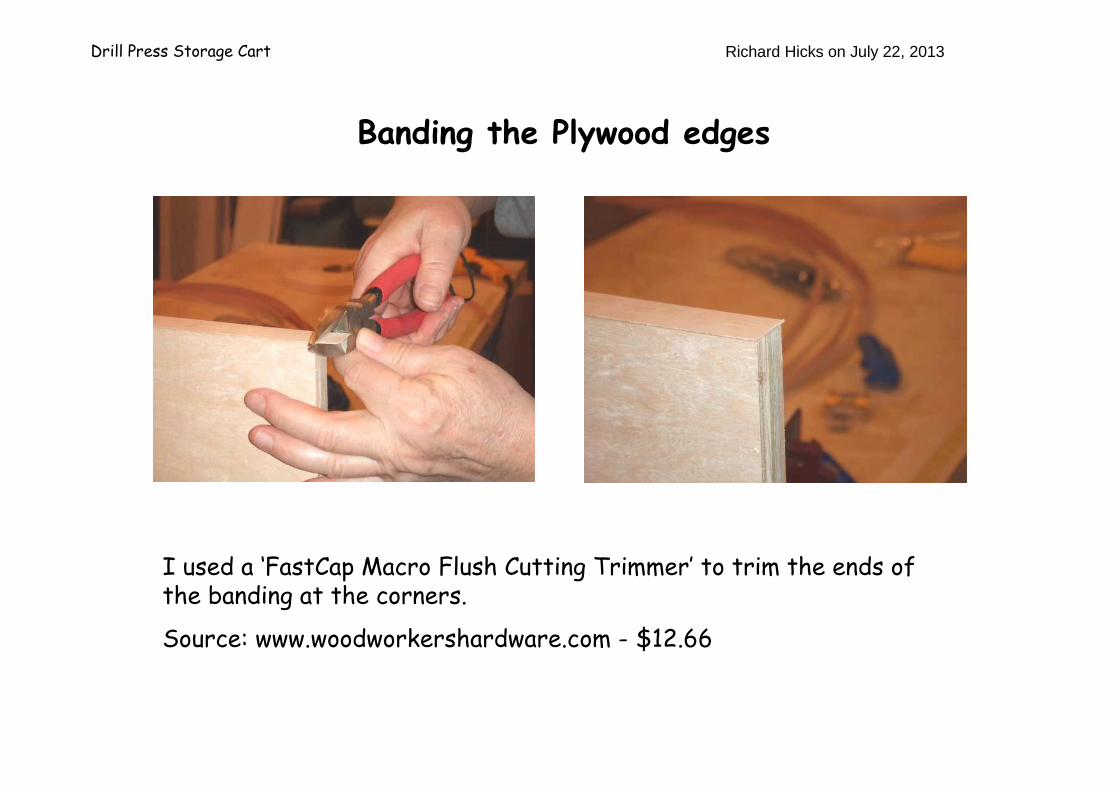
I used a ‘FastCap Macro Flush Cutting Trimmer’ to trim the ends of the banding at the corners.
Source: www.woodworkershardware.com - $12.66
Drill Press Storage Cart
Banding the Plywood edges
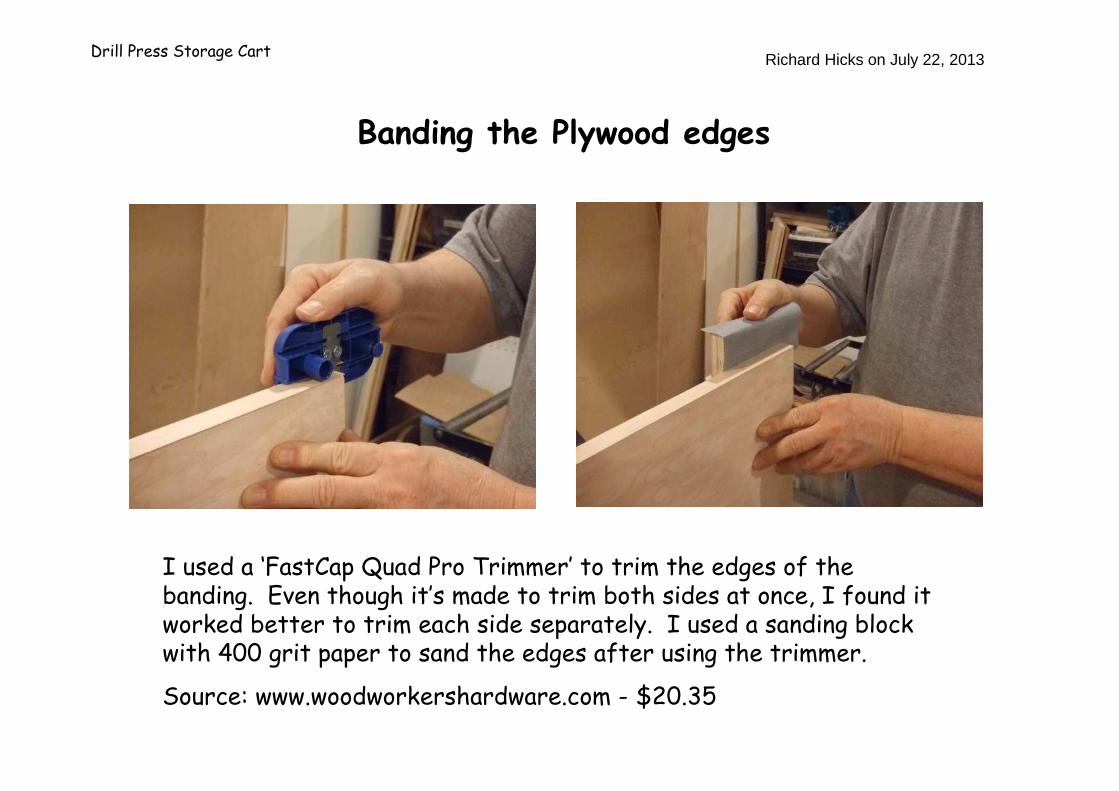
I used a ‘FastCap Quad Pro Trimmer’ to trim the edges of the banding. Even though it’s made to trim both sides at once, I found it worked better to trim each side separately. I used a sanding block with 400 grit paper to sand the edges after using the trimmer.
Source: www.woodworkershardware.com - $20.35
Banding the Plywood edges
Drill Press Storage Cart Richard Hicks on July 22, 2013
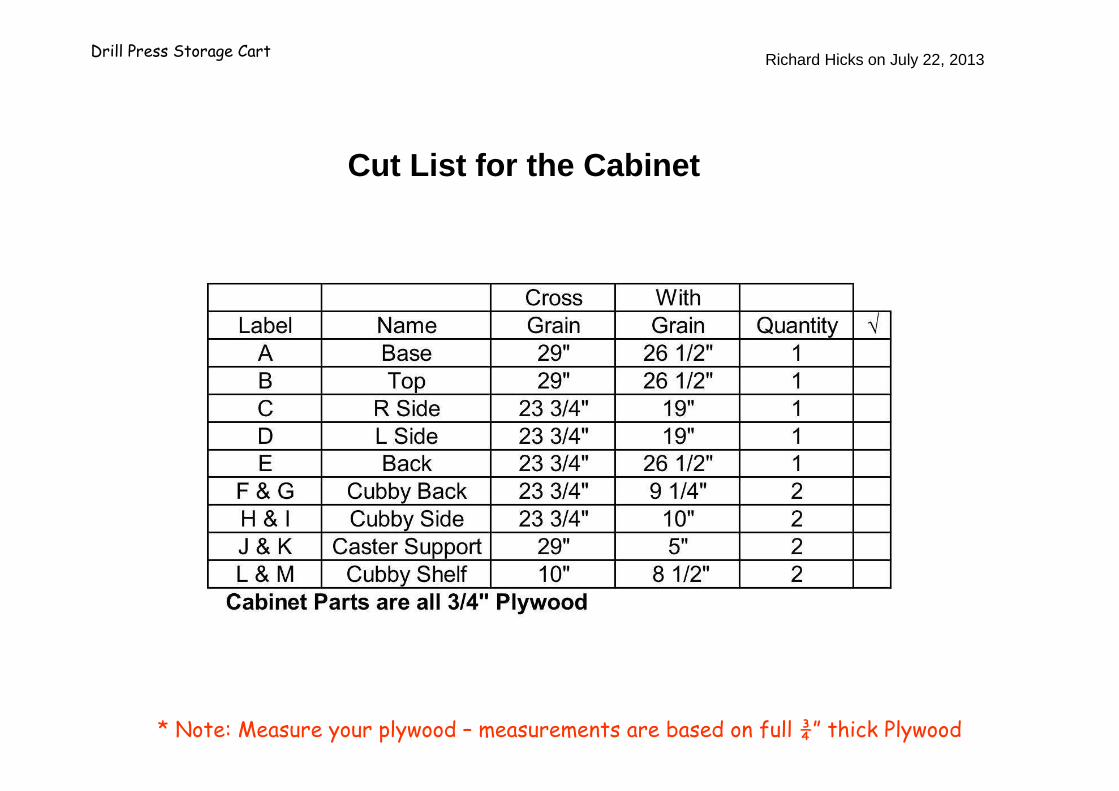
Cut List for the Cabinet
Drill Press Storage Cart Richard Hicks on July 22, 2013
* Note: Measure your plywood – measurements are based on full ¾” thick Plywood
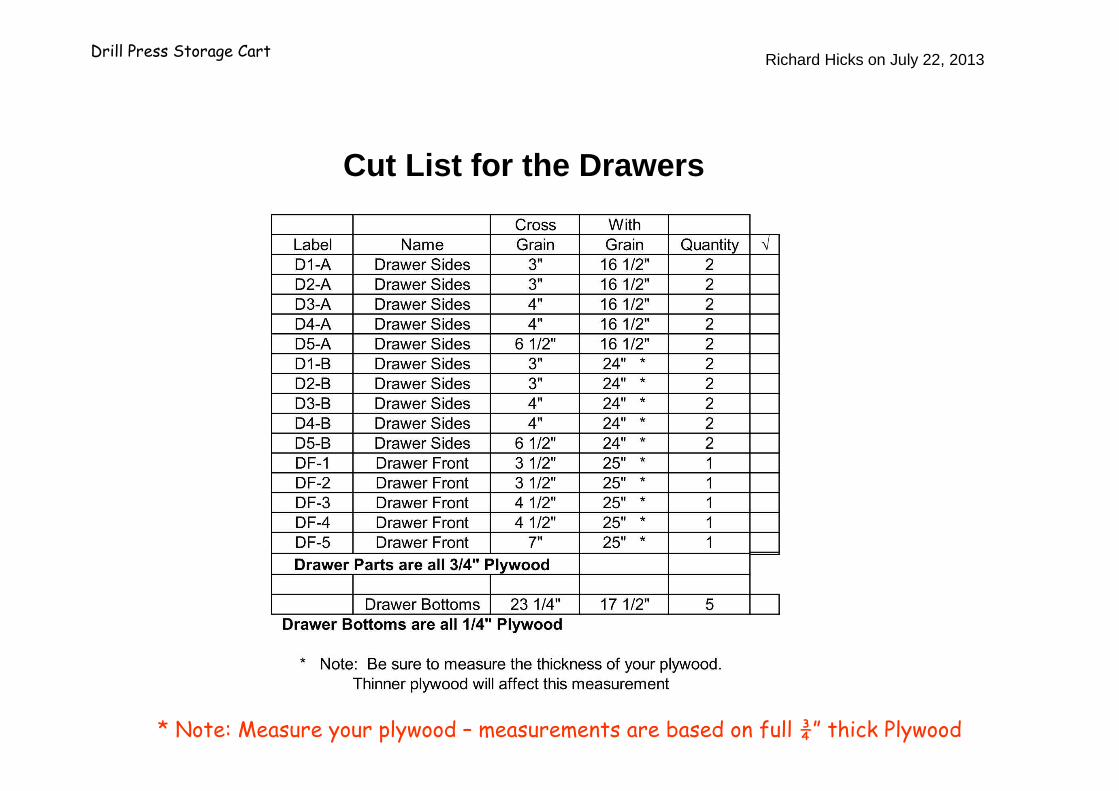
Cut List for the Drawers
Drill Press Storage Cart Richard Hicks on July 22, 2013
* Note: Measure your plywood – measurements are based on full ¾” thick Plywood
Drill Press Storage Cart Richard Hicks on July 22, 2013
Plywood Layout Sheet
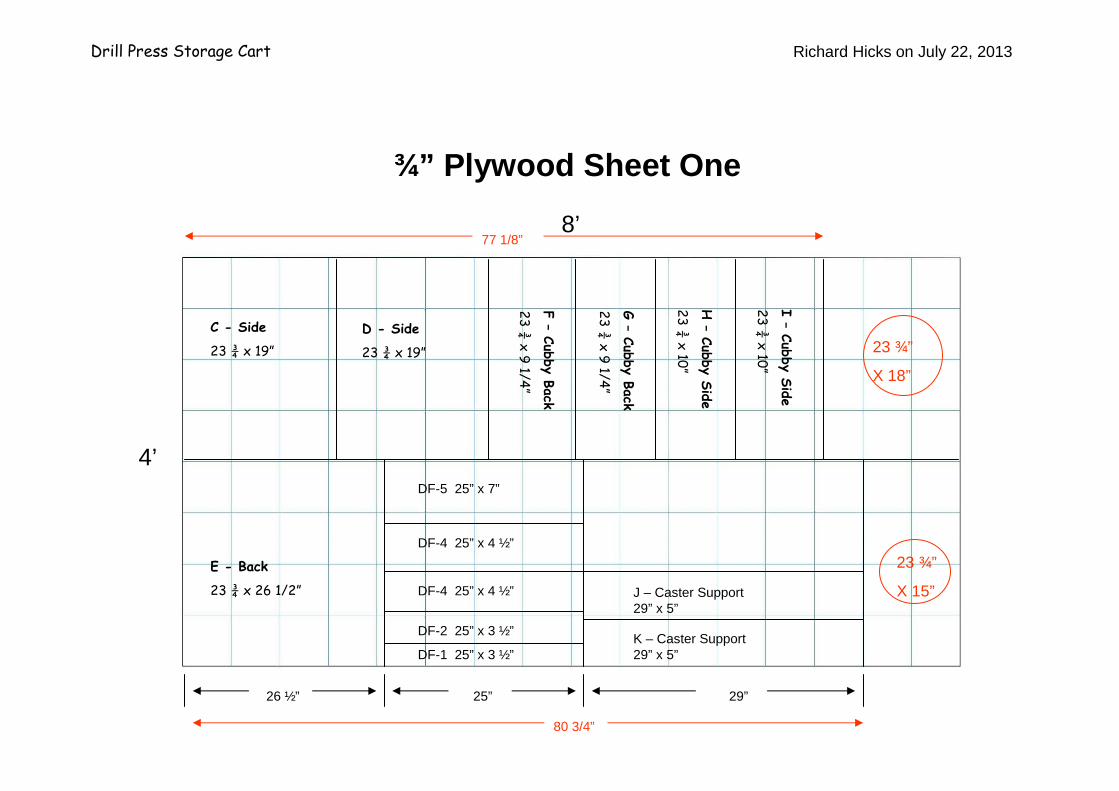
¾” Plywood Sheet One
4’
8’
C - Side
23 ¾ x 19”
D - Side
23 ¾ x 19”
F –
Cub
by B
ack
23
¾x
9 1/4
”
G –
Cub
by B
ack
23
¾x
9 1/4
”
H –
Cub
by S
ide
23
¾x
10”
I –
Cub
by S
ide
23
¾x
10”
E - Back
23 ¾ x 26 1/2”
DF-5 25” x 7”
DF-4 25” x 4 ½”
DF-2 25” x 3 ½”
DF-1 25” x 3 ½”
J – Caster Support 29” x 5”
80 3/4”
77 1/8”
23 ¾”
X 18”
DF-4 25” x 4 ½”
K – Caster Support 29” x 5”
26 ½” 25” 29”
23 ¾”
X 15”
Drill Press Storage Cart Richard Hicks on July 22, 2013
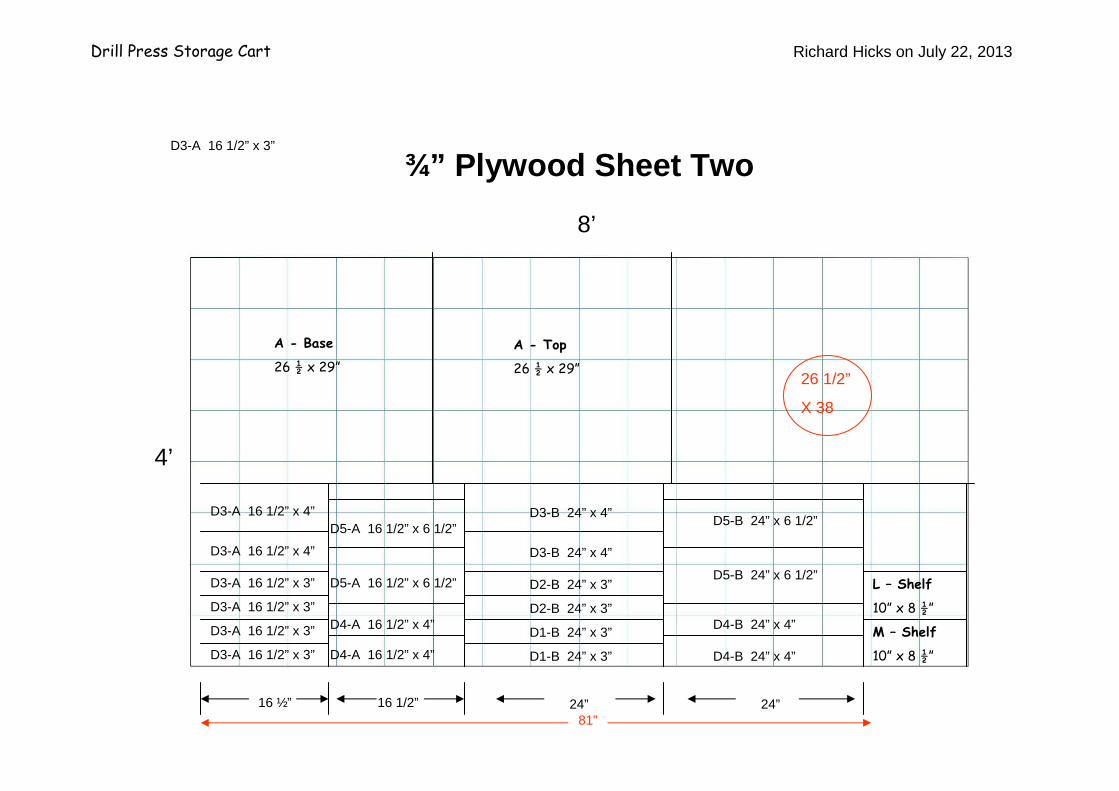
¾” Plywood Sheet Two
4’
8’
A - Base
26 ½ x 29”
A - Top
26 ½ x 29”26 1/2”
X 38
D4-A 16 1/2” x 4”
D5-A 16 1/2” x 6 1/2”
D1-B 24” x 3”
D1-B 24” x 3”
D2-B 24” x 3”
D2-B 24” x 3”
D3-B 24” x 4”
D3-B 24” x 4”
D4-B 24” x 4”
D4-B 24” x 4”
D5-B 24” x 6 1/2”
D5-B 24” x 6 1/2”
16 ½” 16 1/2” 24” 24”81”
M – Shelf
10” x 8 ½”
L – Shelf
10” x 8 ½”
Drill Press Storage Cart Richard Hicks on July 22, 2013
D3-A 16 1/2” x 3”
D3-A 16 1/2” x 4”
D3-A 16 1/2” x 4”
D3-A 16 1/2” x 3”
D3-A 16 1/2” x 3”
D3-A 16 1/2” x 3”
D3-A 16 1/2” x 3”
D5-A 16 1/2” x 6 1/2”
D4-A 16 1/2” x 4”

¼” Plywood Sheet One
Drawer Bottom 5
23 ¼” x 17 ½”
Drawer Bottom 1
23 ¼” x 17 ½”
Drawer Bottom 2
23 ¼” x 17 ½”
Drawer Bottom 3
23 ¼” x 17 ½”
Drawer Bottom 4
23 ¼” x 17 ½”
24 ½” x 96”
23 ¼” x 7””
83”
Drill Press Storage Cart Richard Hicks on July 22, 2013
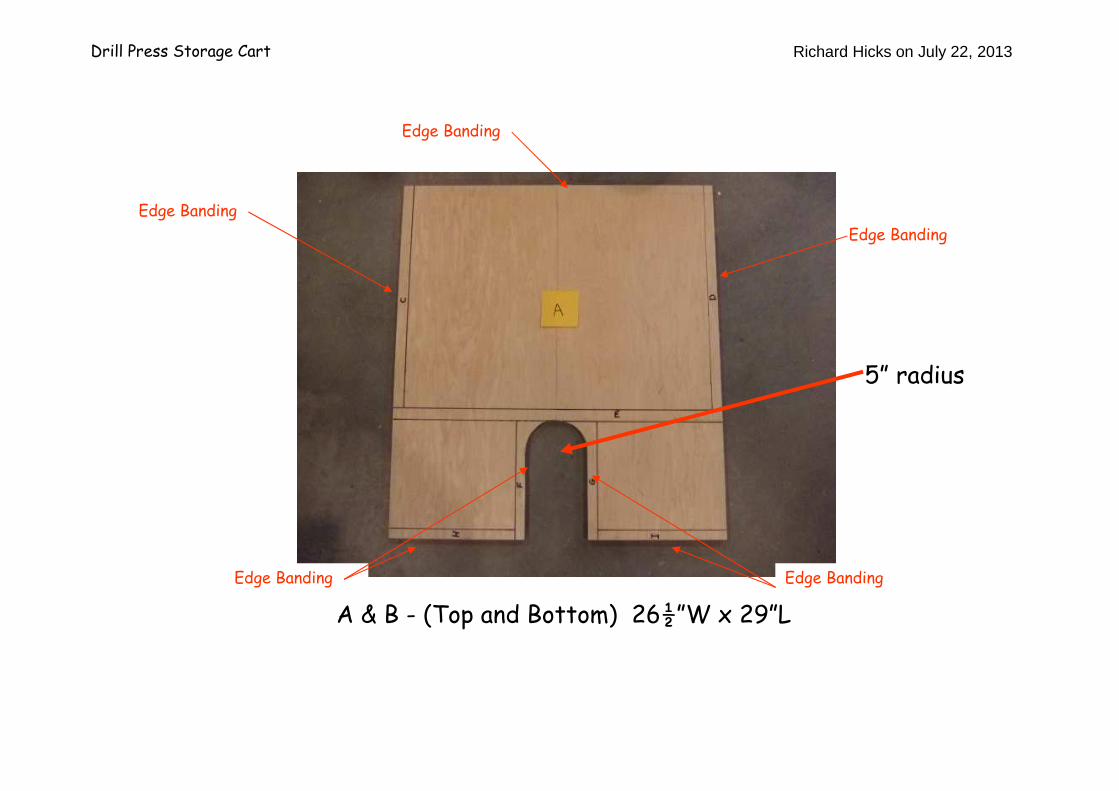
Drill Press Storage Cart Richard Hicks on July 22, 2013
A & B - (Top and Bottom) 26½”W x 29”L
5” radius
Edge Banding
Edge Banding
Edge Banding
Edge Banding Edge Banding
Drill Press Storage Cart Richard Hicks on July 22, 2013
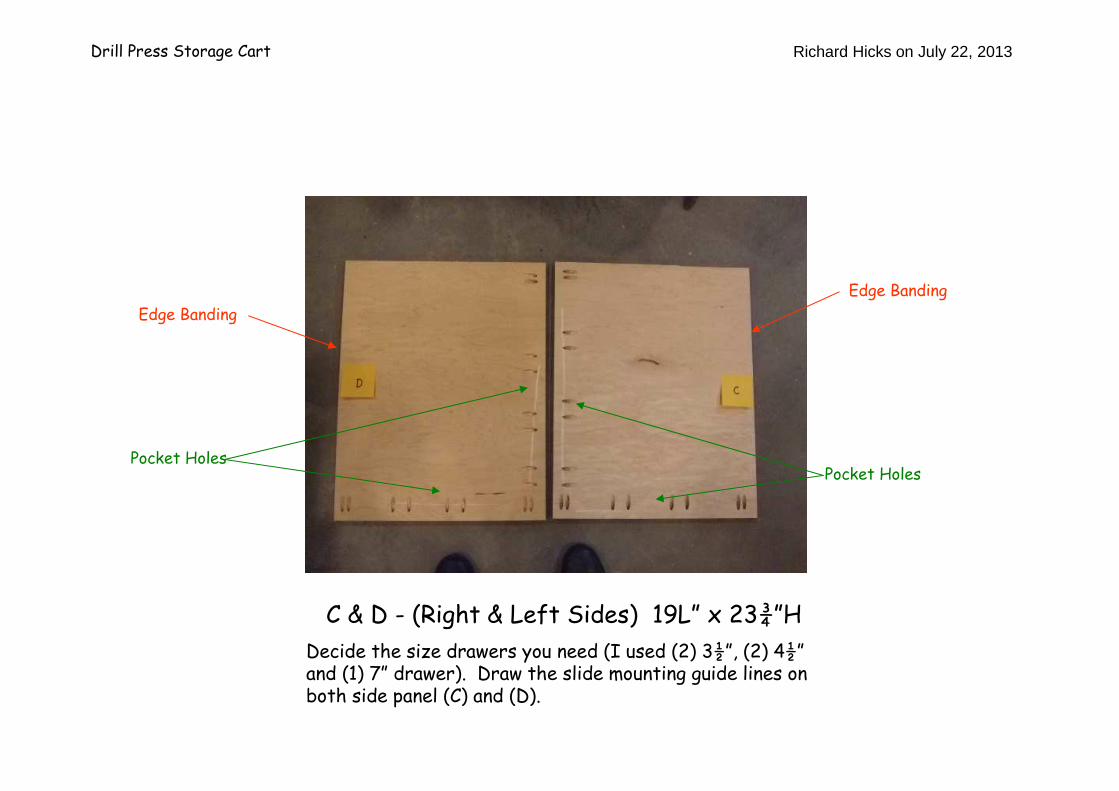
C & D - (Right & Left Sides) 19L” x 23¾”H
Decide the size drawers you need (I used (2) 3½”, (2) 4½”and (1) 7” drawer). Draw the slide mounting guide lines on both side panel (C) and (D).
Edge Banding
Edge Banding
Pocket HolesPocket Holes

Drill Press Storage Cart Richard Hicks on July 22, 2013
E - (Back) 26½”L x 23¾”H
Edge BandingEdge Banding
Pocket Holes
Drill Press Storage Cart Richard Hicks on July 22, 2013
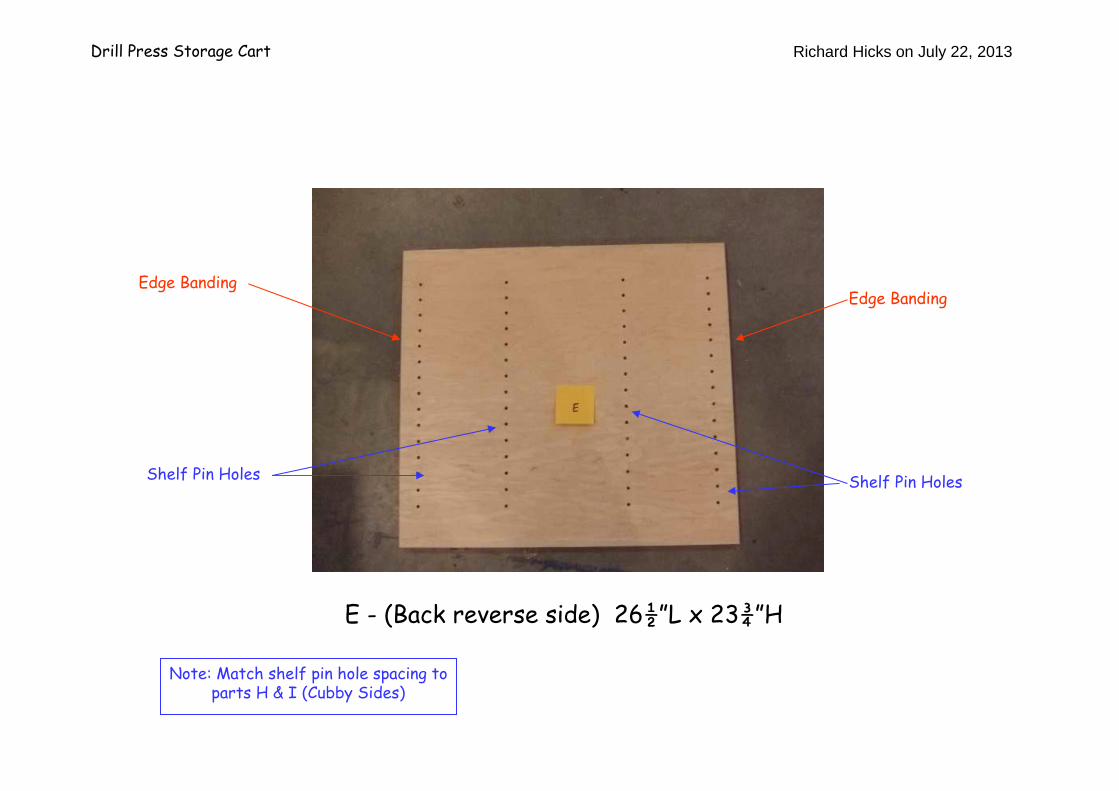
E - (Back reverse side) 26½”L x 23¾”H
Edge Banding
Shelf Pin Holes Shelf Pin Holes
Edge Banding
Note: Match shelf pin hole spacing to parts H & I (Cubby Sides)
Drill Press Storage Cart Richard Hicks on July 22, 2013
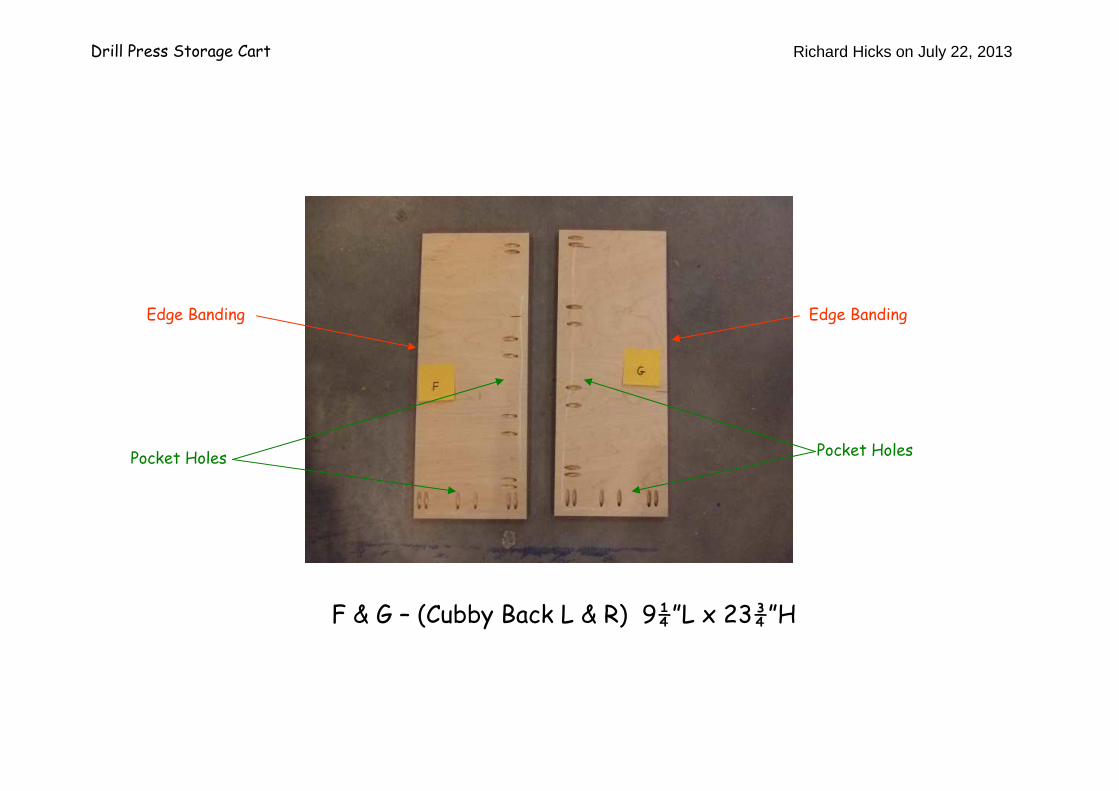
F & G – (Cubby Back L & R) 9¼”L x 23¾”H
Edge BandingEdge Banding
Pocket HolesPocket Holes
Drill Press Storage Cart Richard Hicks on July 22, 2013
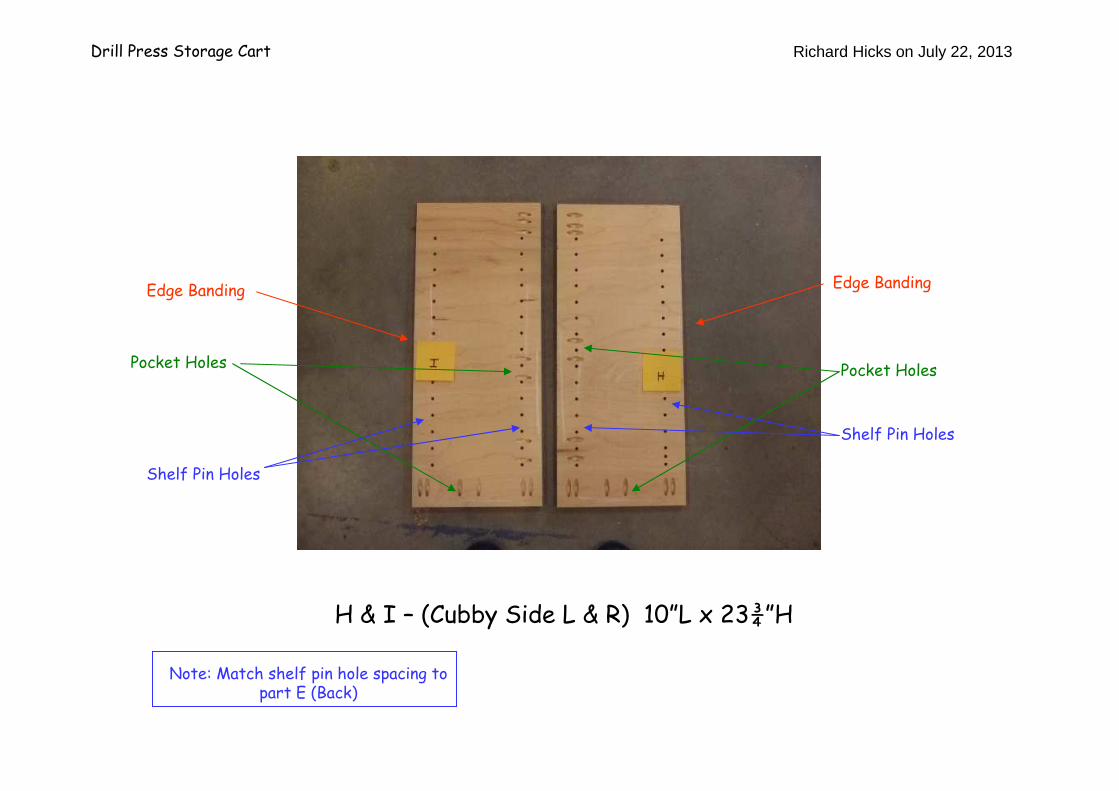
H & I – (Cubby Side L & R) 10”L x 23¾”H
Edge BandingEdge Banding
Pocket HolesPocket Holes
Shelf Pin Holes
Shelf Pin Holes
Note: Match shelf pin hole spacing to part E (Back)

Drill Press Storage Cart Richard Hicks on July 22, 2013
J & K – Caster Support (L & R) 5”W x 29”L
Edge BandingEdge Banding
Drill Press Storage Cart Richard Hicks on July 22, 2013
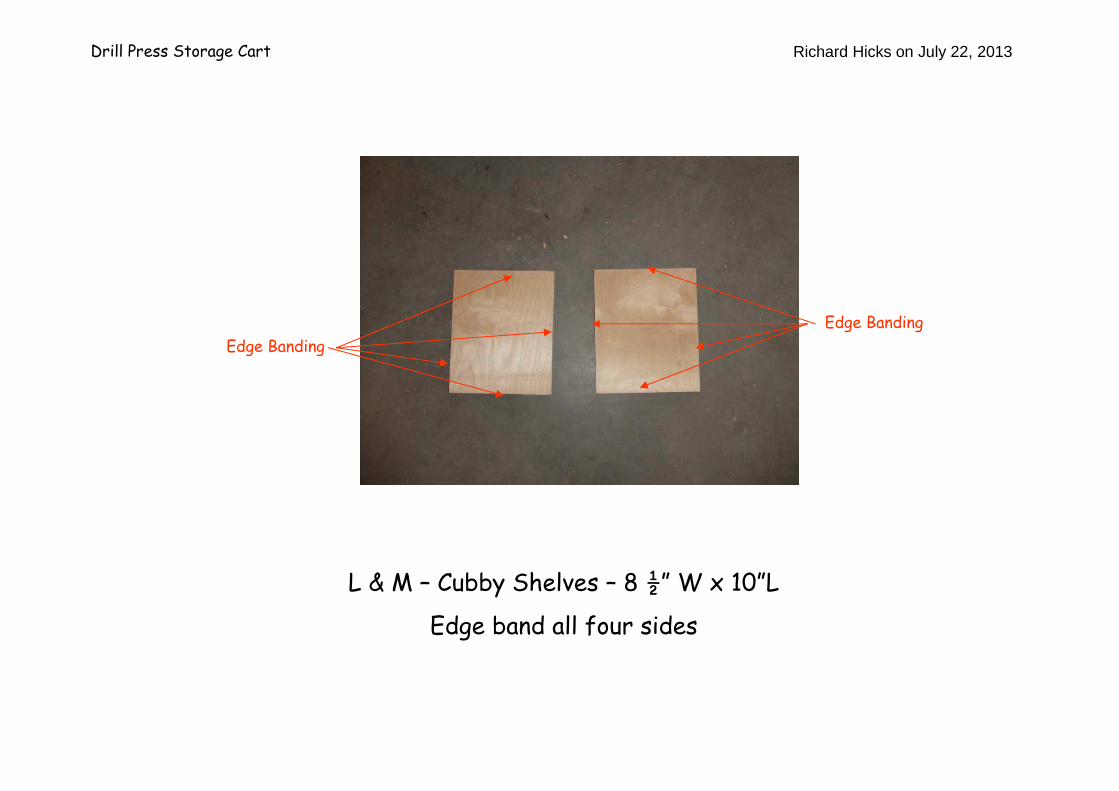
L & M – Cubby Shelves – 8 ½” W x 10”L
Edge band all four sides
Edge Banding
Edge Banding
Drill Press Storage Cart Richard Hicks on July 22, 2013
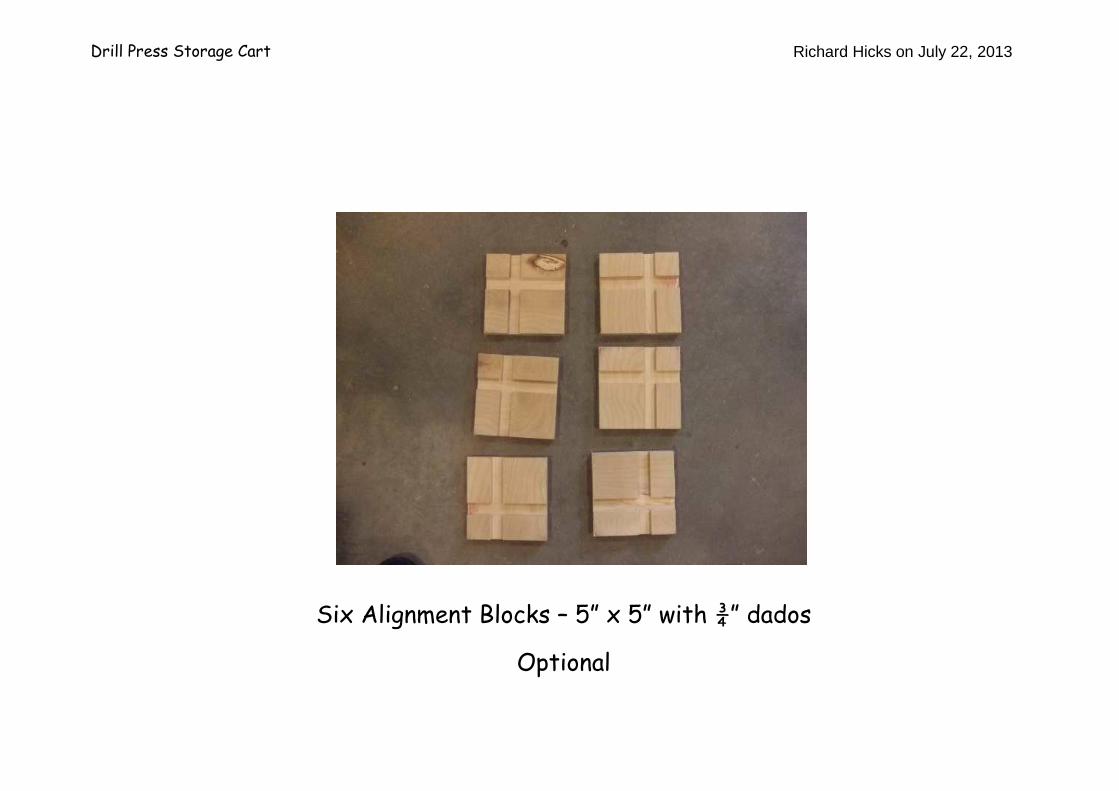
Six Alignment Blocks – 5” x 5” with ¾” dados
Optional
Drill Press Storage Cart Richard Hicks on July 22, 2013
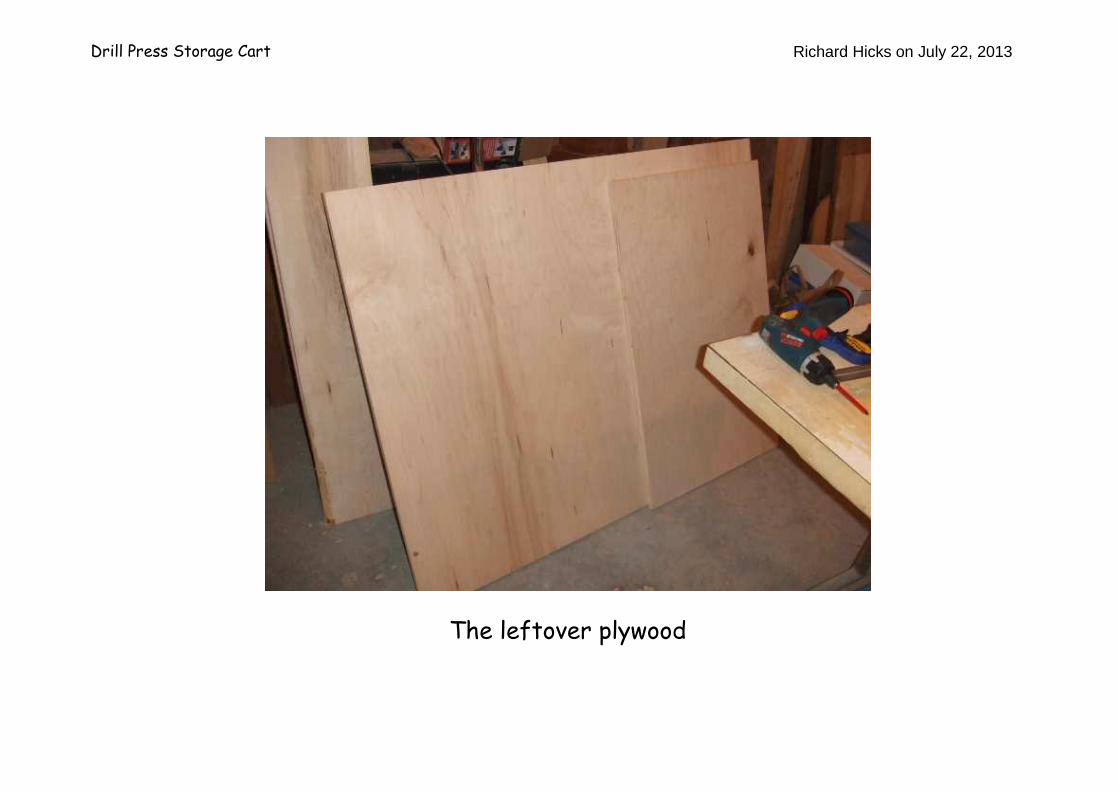
The leftover plywood
Drill Press Storage Cart Richard Hicks on July 22, 2013
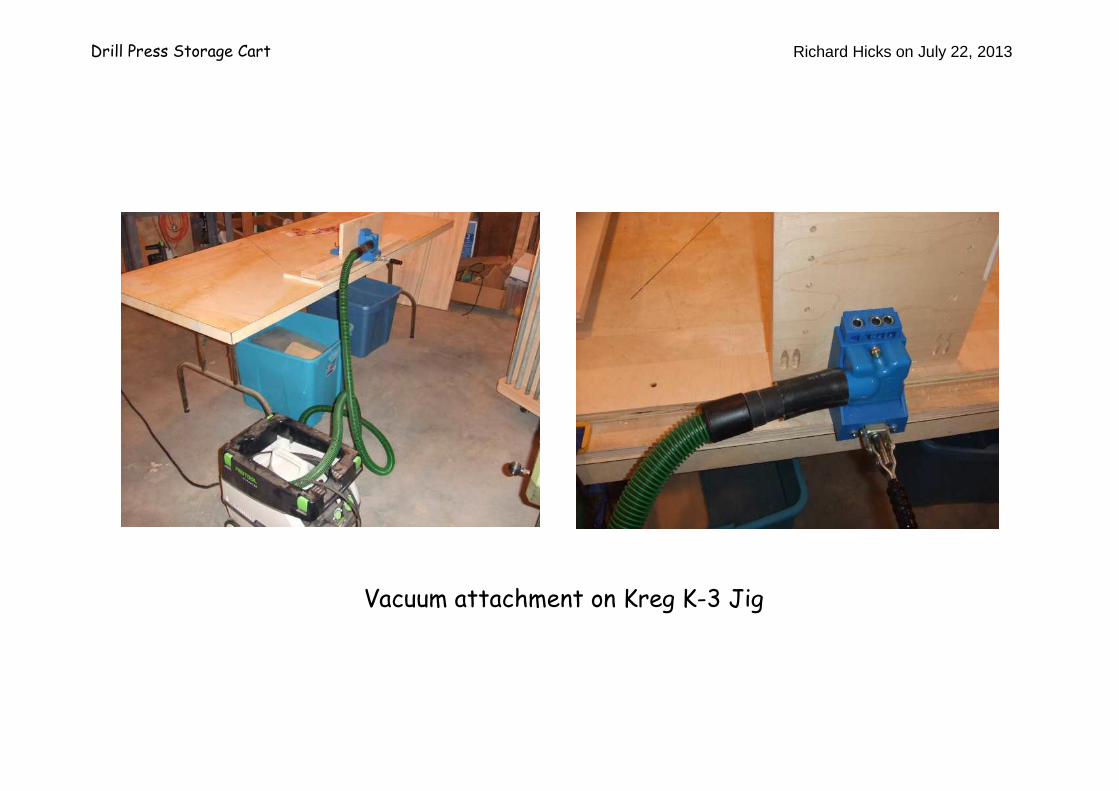
Vacuum attachment on Kreg K-3 Jig
Drill Press Storage Cart Richard Hicks on July 22, 2013
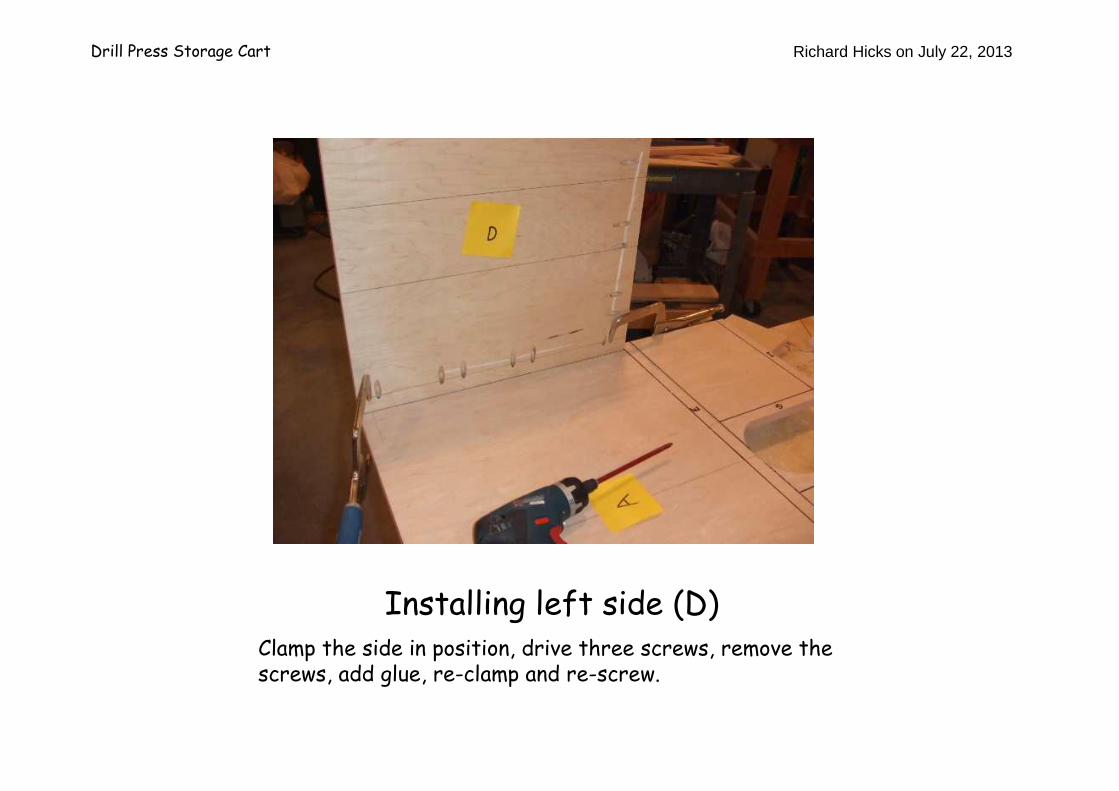
Installing left side (D)Clamp the side in position, drive three screws, remove the screws, add glue, re-clamp and re-screw.
Drill Press Storage Cart Richard Hicks on July 22, 2013
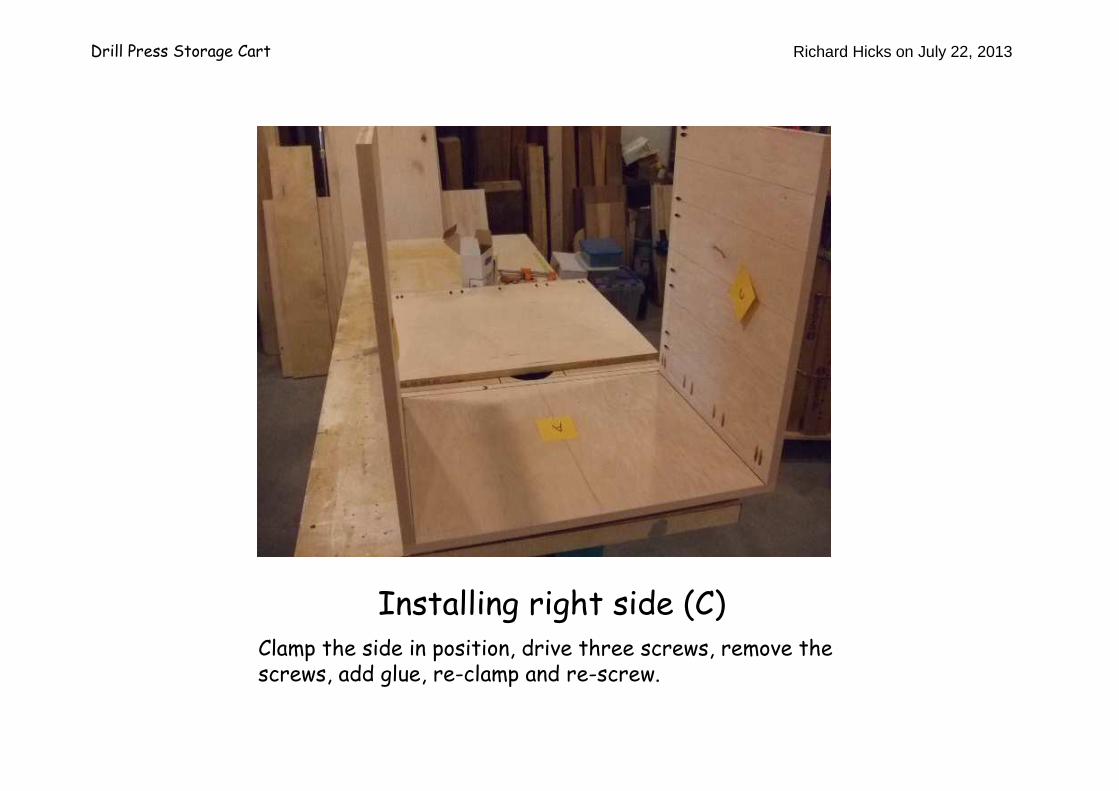
Installing right side (C)Clamp the side in position, drive three screws, remove the screws, add glue, re-clamp and re-screw.
Drill Press Storage Cart Richard Hicks on July 22, 2013
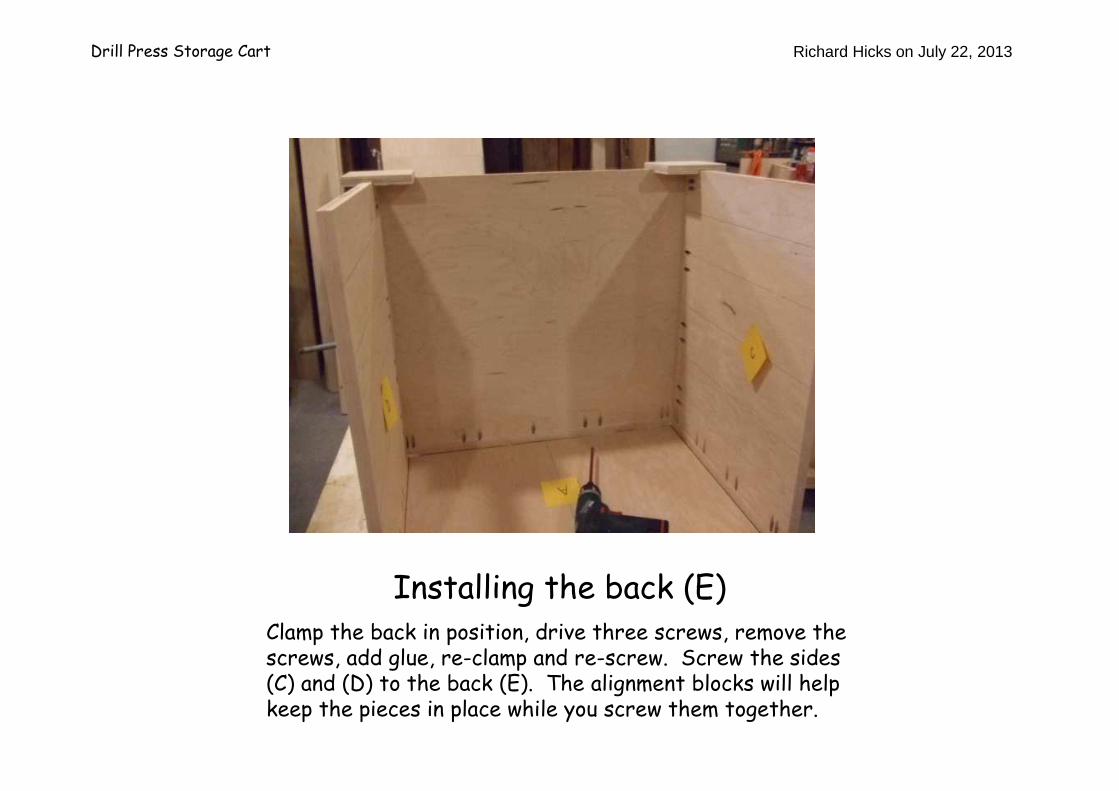
Installing the back (E)Clamp the back in position, drive three screws, remove the screws, add glue, re-clamp and re-screw. Screw the sides (C) and (D) to the back (E). The alignment blocks will help keep the pieces in place while you screw them together.
Drill Press Storage Cart Richard Hicks on July 22, 2013
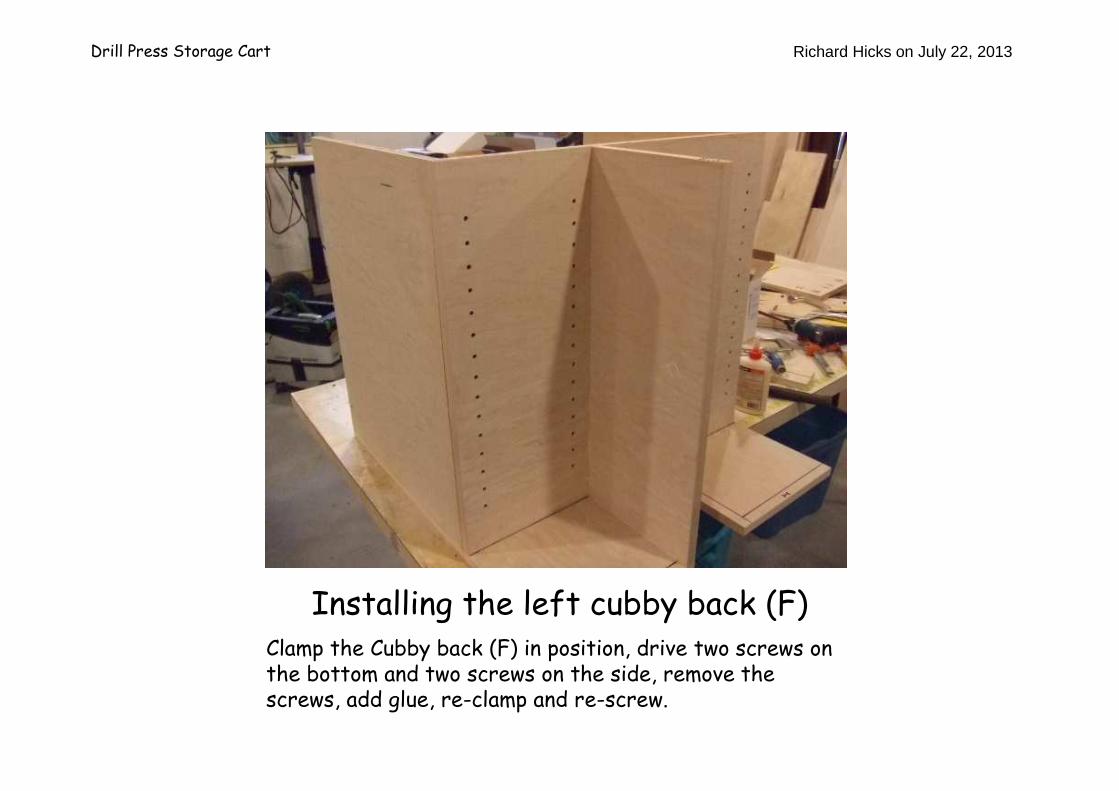
Installing the left cubby back (F)Clamp the Cubby back (F) in position, drive two screws on the bottom and two screws on the side, remove the screws, add glue, re-clamp and re-screw.
Drill Press Storage Cart Richard Hicks on July 22, 2013
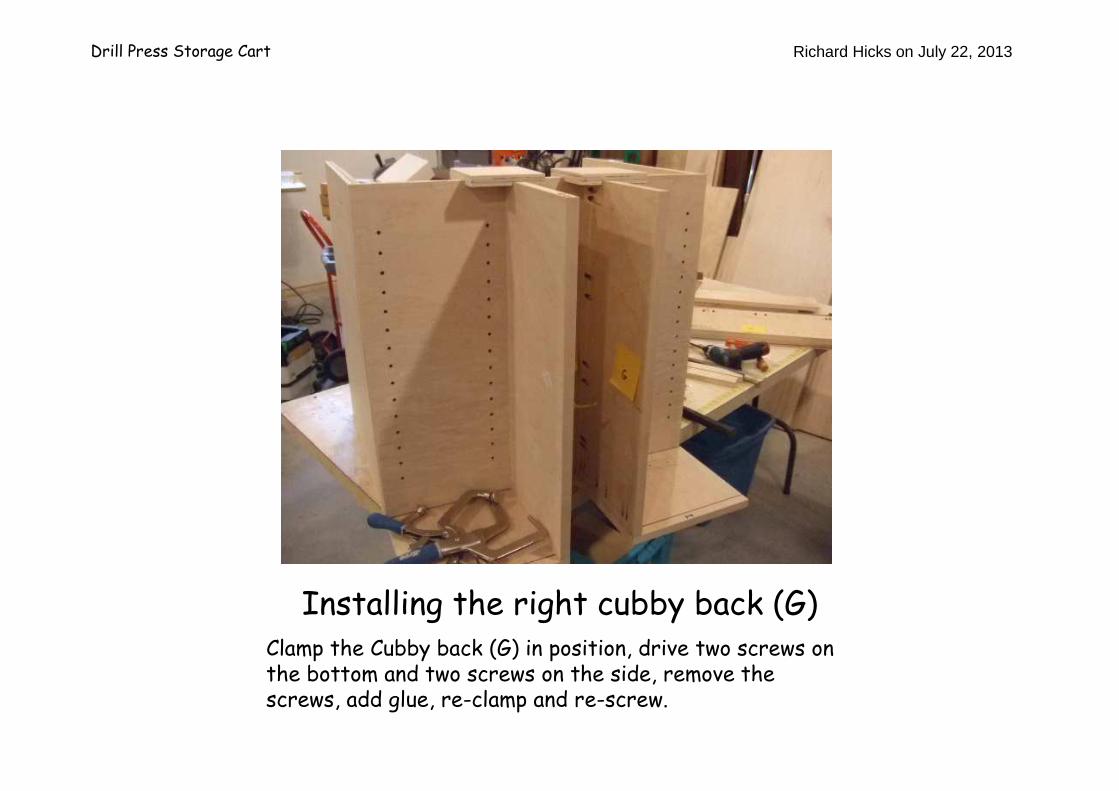
Installing the right cubby back (G)Clamp the Cubby back (G) in position, drive two screws on the bottom and two screws on the side, remove the screws, add glue, re-clamp and re-screw.
Drill Press Storage Cart Richard Hicks on July 22, 2013
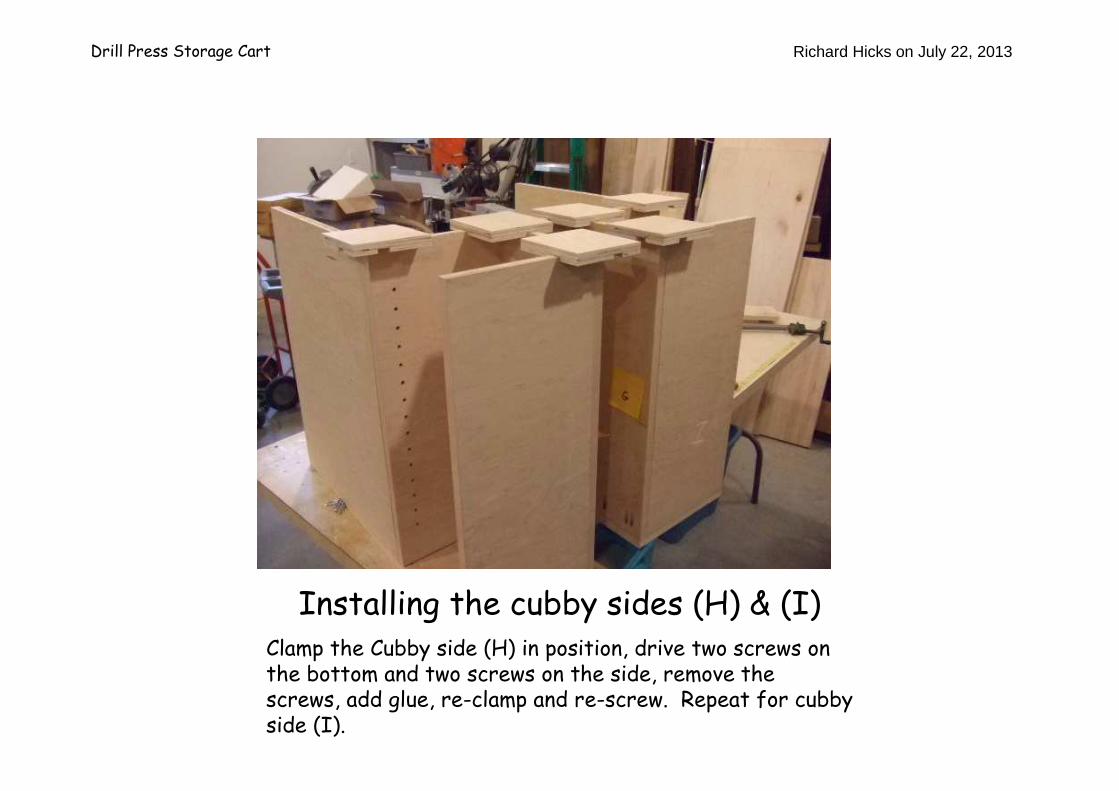
Installing the cubby sides (H) & (I)Clamp the Cubby side (H) in position, drive two screws on the bottom and two screws on the side, remove the screws, add glue, re-clamp and re-screw. Repeat for cubby side (I).
Drill Press Storage Cart Richard Hicks on July 22, 2013
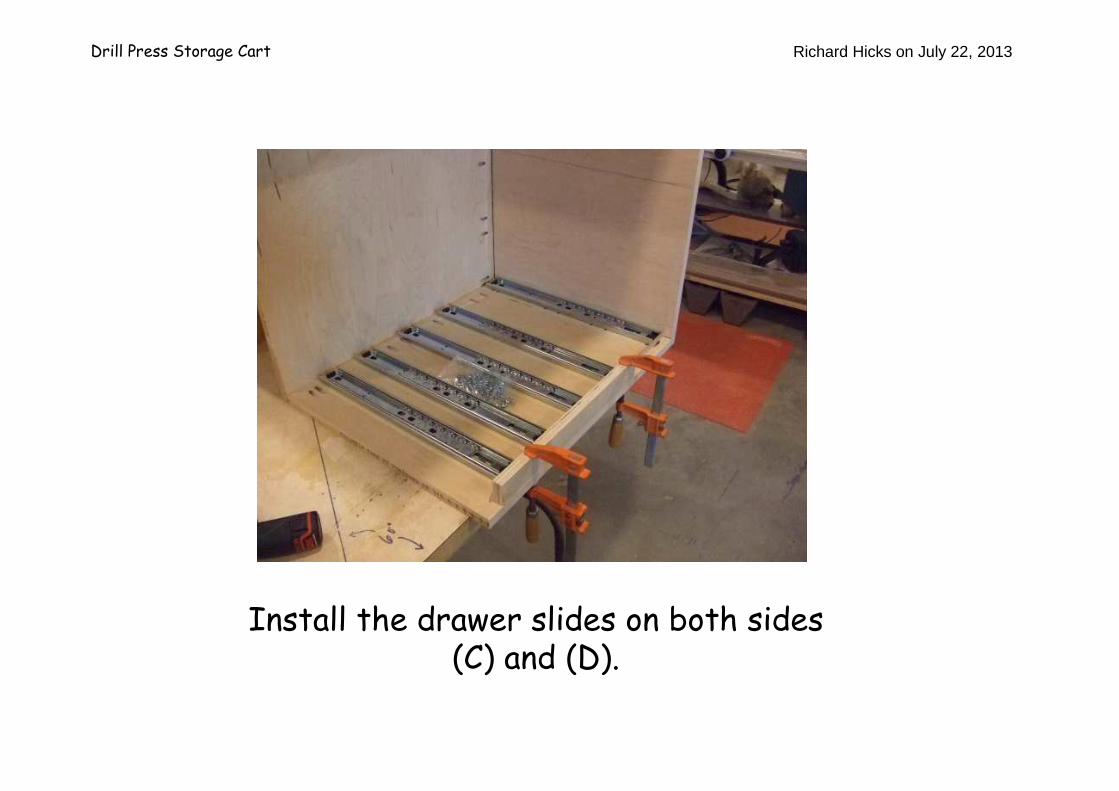
Install the drawer slides on both sides (C) and (D).
Drill Press Storage Cart Richard Hicks on July 22, 2013
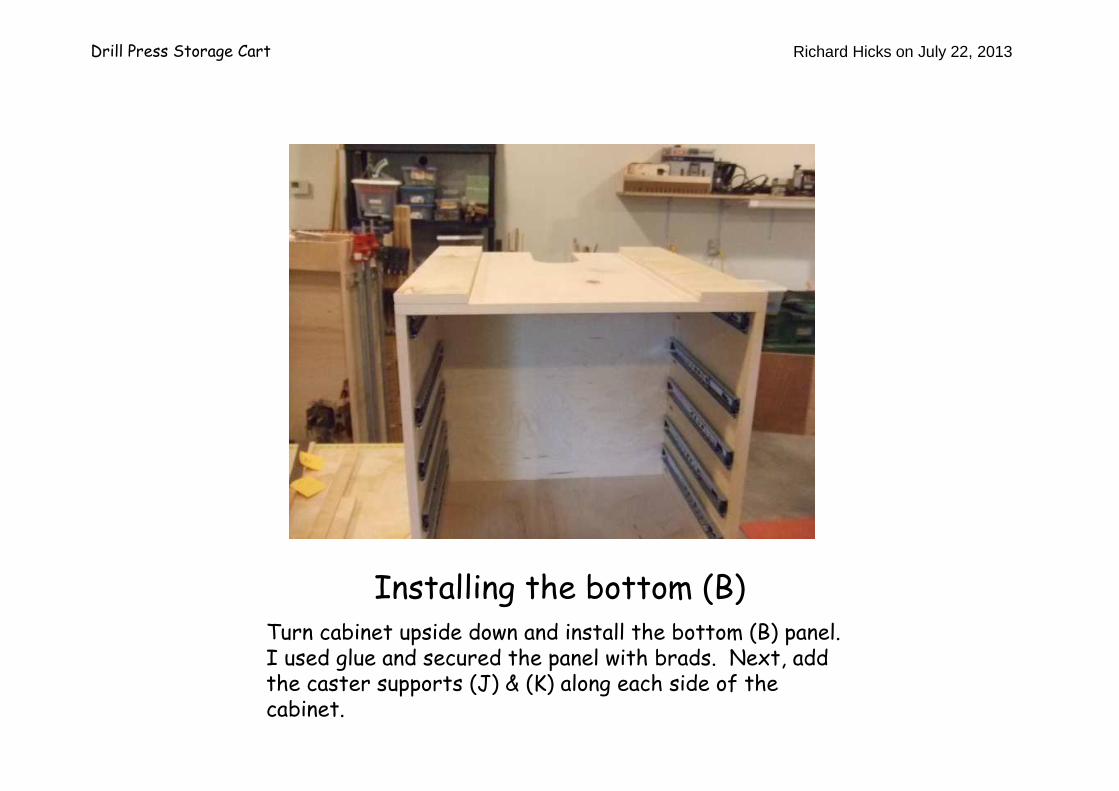
Installing the bottom (B)Turn cabinet upside down and install the bottom (B) panel. I used glue and secured the panel with brads. Next, add the caster supports (J) & (K) along each side of the cabinet.

Drill Press Storage Cart Richard Hicks on July 22, 2013
Building the DrawersMy drawer sizes are:
(2) 24” x 18” x 3”, (2) 24” x 18” x 4” and (1) 24” x 18” x 6 ½”
The drawer fronts are: (2) 3½” x 25. (2) 4½” x 25 and 7” x 25”
I used simple braded and glued butt joints, but reinforced the joints with dowels.
* Note: Measure your plywood – measurements are based on full ¾” thick Plywood
Drill Press Storage Cart Richard Hicks on July 22, 2013
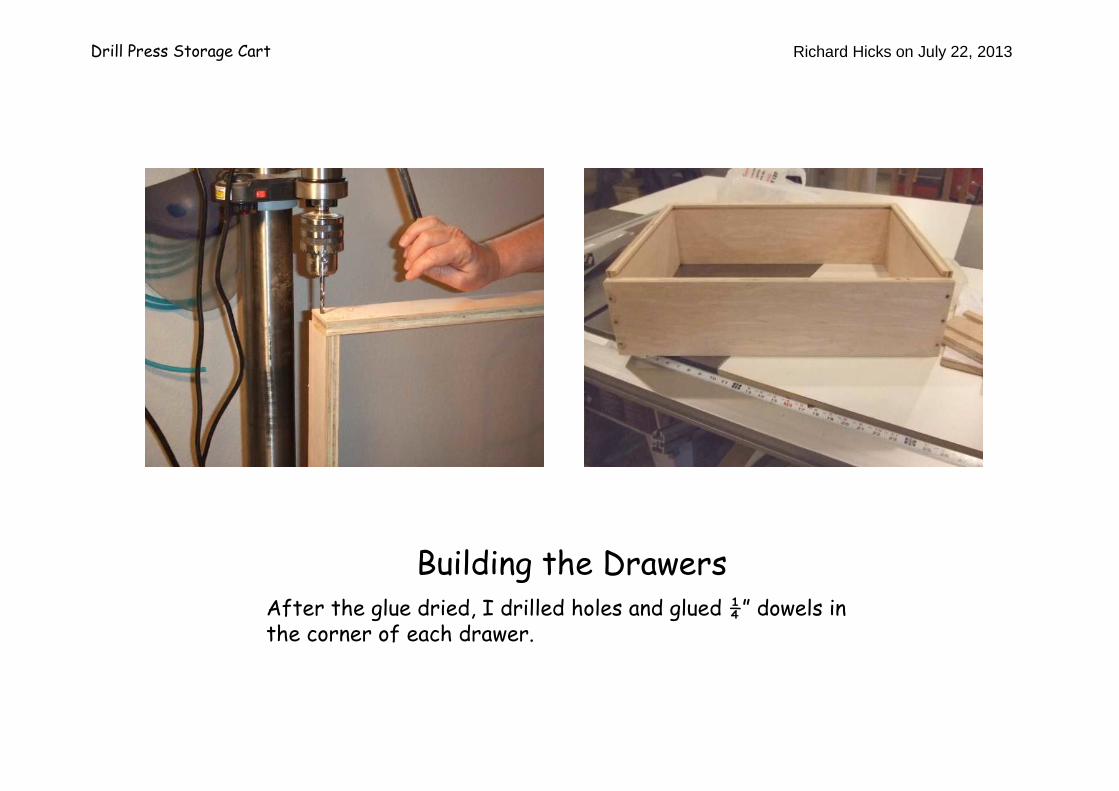
Building the DrawersAfter the glue dried, I drilled holes and glued ¼” dowels in the corner of each drawer.
Drill Press Storage Cart Richard Hicks on July 22, 2013
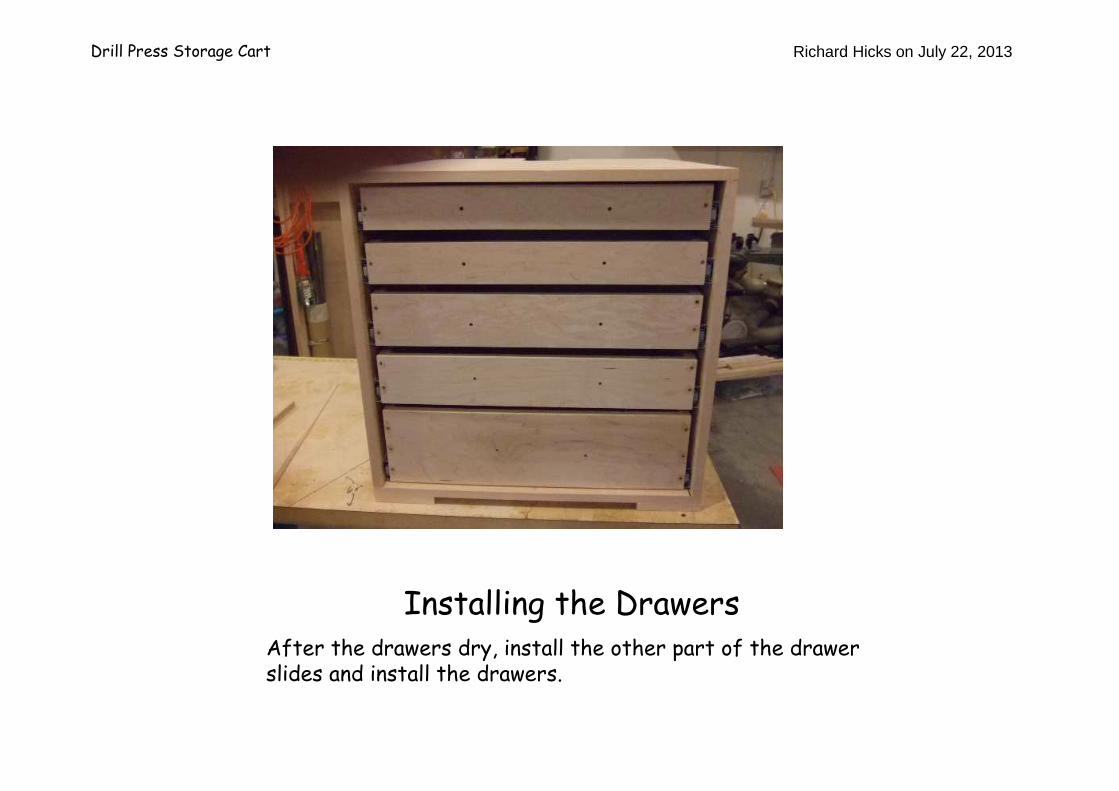
Installing the DrawersAfter the drawers dry, install the other part of the drawer slides and install the drawers.

Drill Press Storage Cart Richard Hicks on July 22, 2013
Installing the DrawersInstall the drawer handles on the drawer fronts and then attach the fronts to the drawers. I used ‘quarter’ spacing between the drawers (used a quarter as a measuring spacer between the drawer fronts).
Drill Press Storage Cart Richard Hicks on July 22, 2013
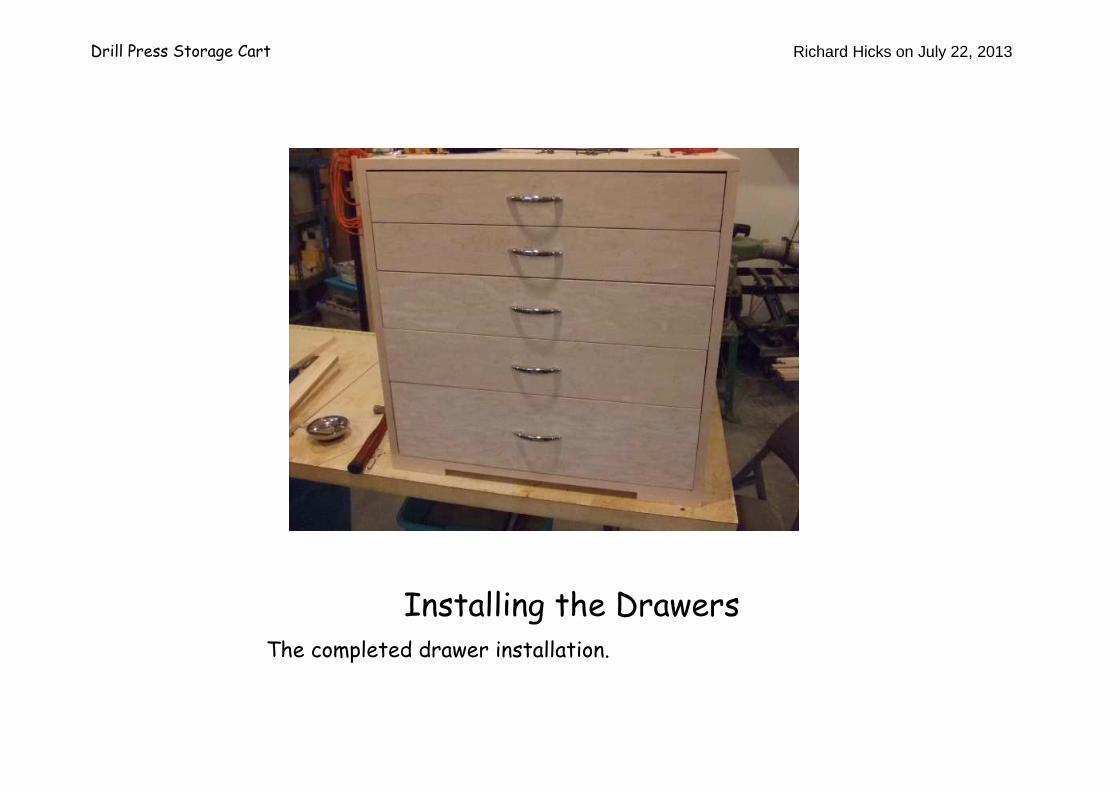
Installing the DrawersThe completed drawer installation.
Drill Press Storage Cart Richard Hicks on July 22, 2013
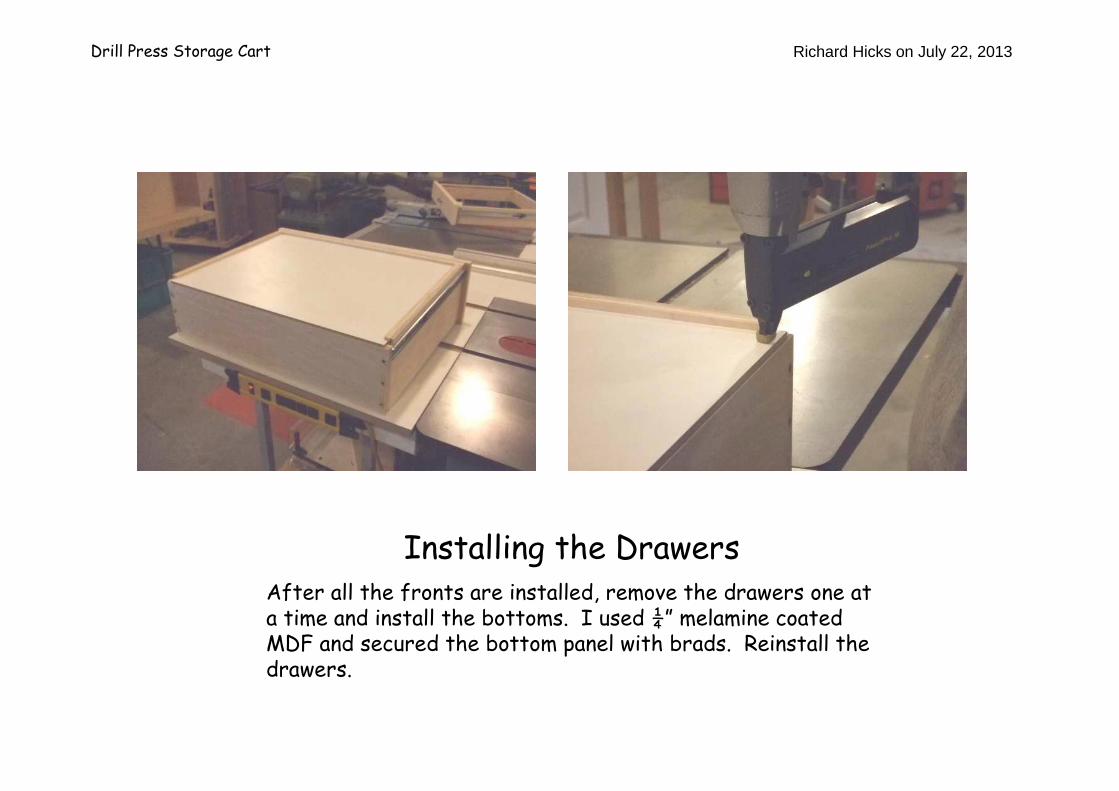
Installing the DrawersAfter all the fronts are installed, remove the drawers one at a time and install the bottoms. I used ¼” melamine coated MDF and secured the bottom panel with brads. Reinstall the drawers.
Drill Press Storage Cart Richard Hicks on July 22, 2013
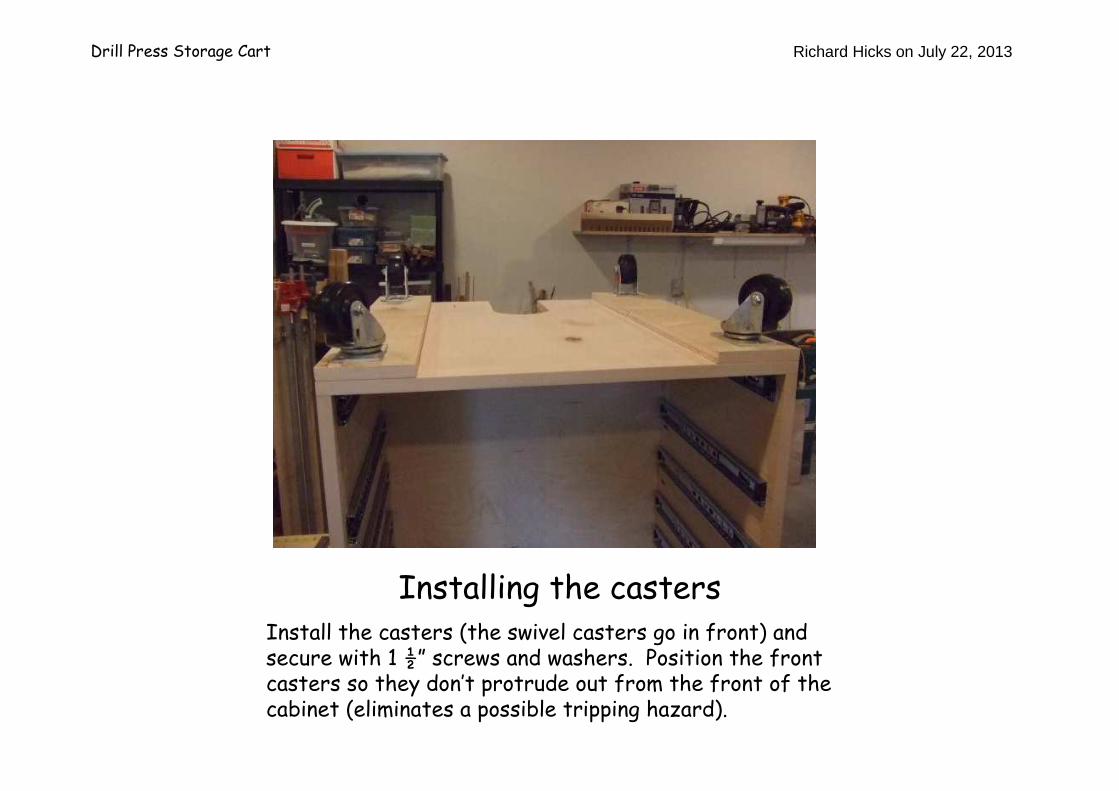
Installing the castersInstall the casters (the swivel casters go in front) and secure with 1 ½” screws and washers. Position the front casters so they don’t protrude out from the front of the cabinet (eliminates a possible tripping hazard).
Drill Press Storage Cart Richard Hicks on July 22, 2013
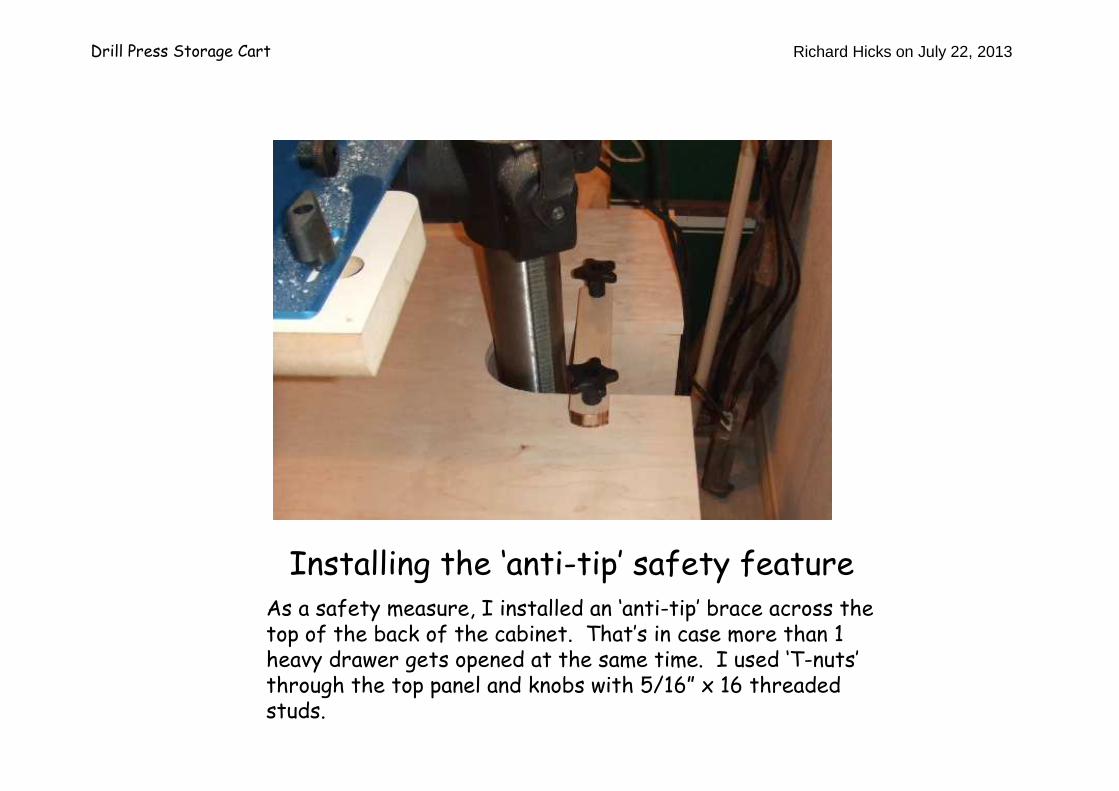
Installing the ‘anti-tip’ safety featureAs a safety measure, I installed an ‘anti-tip’ brace across the top of the back of the cabinet. That’s in case more than 1 heavy drawer gets opened at the same time. I used ‘T-nuts’through the top panel and knobs with 5/16” x 16 threaded studs.
Drill Press Storage Cart Richard Hicks on July 22, 2013
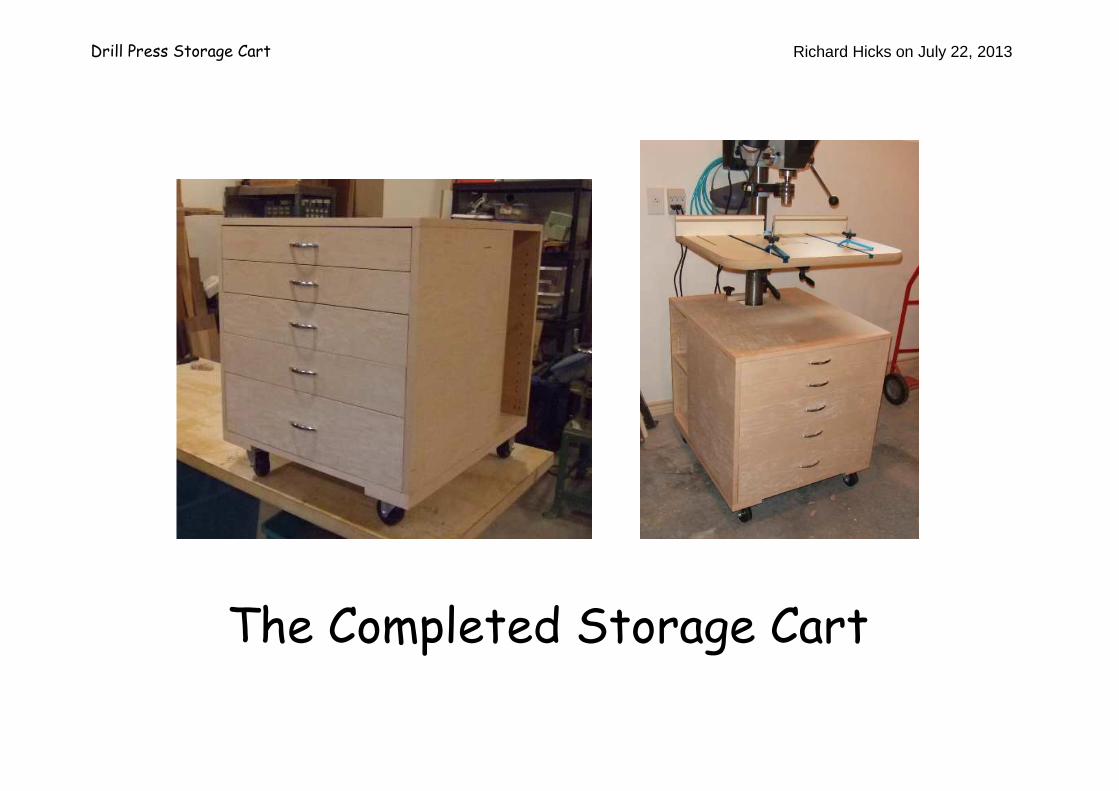
The Completed Storage Cart