Embed Size (px)
Citation preview

Dreamweaver CS4Concepts and Techniques
Chapter 9
Using Spry to Create Interactive Web Pages

Chapter 9: Using Spry to Create Interactive Web Pages 2
Chapter Objectives
• Describe the Spry framework• Describe Spry widgets• Add the Spry Collapsible Panel widget to a Web
page• Add headings to a Collapsible Panel widget

Chapter 9: Using Spry to Create Interactive Web Pages 3
Chapter Objectives
• Copy and paste text to a Collapsible Panel widget• Add and customize a Spry Menu Bar widget on a
Web page• Format a Spry widget• Describe Spry effects

Chapter 9: Using Spry to Create Interactive Web Pages 4
Starting Dreamweaver and Opening the Alaska Parks Web Site
• Click the Start button on the Windows taskbar• Click Adobe Dreamweaver CS4 on the Start
menu or point to All Programs on the Start menu, and then click Adobe Dreamweaver CS4 on the All Programs list
• If necessary, display the panel groups• If the Alaska Parks Web site hierarchy is not
displayed, click the Files panel button and then click Alaska Parks on the Files pop-up menu to display the Alaska Parks Web site hierarchy in the Files panel

Chapter 9: Using Spry to Create Interactive Web Pages 5
Copying Data Files to the Alaska Parks Web Site• Click the Files panel button, and then click the name of the
drive containing your data files, such as Removable Disk (M:)• If necessary, click the plus sign (+) next to the folder containing
your data files to expand that folder, and then click the plus sign (+) next to the Chapter09 folder to expand it
• Expand the parks folder to display the data files• Click the bear_watching.htm file to select it, and then press
CTRL+C to copy the file• Click the Files panel button, and then click Alaska Parks to
display the files for the Alaska Parks Web site• Click the main Site – Alaska Parks folder, and then press
CTRL+V to paste the file in the folder

Chapter 9: Using Spry to Create Interactive Web Pages
Copying Data Files to the Alaska Parks Web Site• Navigate back to the Chapter09\parks folder provided with
your data files• In the Chapter09\parks folder, double-click the images
folder to open it• Click the bear_map.jpg file to select it, and then press
CTRL+C to copy the file• Click the Files panel button, and then click Alaska Parks
to display the files for the Alaska Parks Web site• Click the images folder to select it, and then press
CTRL+V to paste the bear_map.jpg image file into the images folder
6

Chapter 9: Using Spry to Create Interactive Web Pages
Copying Data Files to the Alaska Parks Web Site
7

Chapter 9: Using Spry to Create Interactive Web Pages 8
Adding the Spry Collapsible Panel Widget
• Open the bear_watching file• Apply the parks_bkg.jpg image to the background
of the page• If necessary, click at the end of the last sentence
and then press the ENTER key• Collapse the panel groups• Click the Spry tab on the Insert bar to display the
Spry widgets

Chapter 9: Using Spry to Create Interactive Web Pages 9
Adding the Spry Collapsible Panel Widget
• Point to the Spry Collapsible Panel button• Click the Spry Collapsible Panel button to insert
the first collapsible panel• If necessary, click the widget name tab to select
the Collapsible Panel widget• Double-click the Collapsible panel text box in the
Property inspector and then type black_bear to name the widget
• Press the TAB key

Chapter 9: Using Spry to Create Interactive Web Pages 10
Adding the Spry Collapsible Panel Widget• In the Collapsible Panel widget, move the mouse pointer
to the end of the Tab box to display the closed-eye icon• Click the eye icon to close the panel so you can focus on
changing the properties of the tab, not the contents of the panel
• Drag to select the Tab text in the Collapsible Panel widget• In the tag inspector, click <div.CollapsiblePanelTab> to
select the tab only and to display the Div ID Property inspector
• Type bear01 in the Div ID box and then press the tab key

Chapter 9: Using Spry to Create Interactive Web Pages 11
Adding the Spry Collapsible Panel Widget• Move the mouse pointer to the end of the Tab box to
display the open-eye icon• Click the eye icon to display the Content box• Select the Content box and then click the red line
surrounding The black_bear collapsible panel to select the entire panel
• Click the Spry Collapsible Panel button on the Spry toolbar to add a second panel directly below the first panel
• Verify that the second collapsible panel is selected

Chapter 9: Using Spry to Create Interactive Web Pages 12
Adding the Spry Collapsible Panel Widget• Type brown_bear in the Collapsible panel text box in the
Property inspector and then press the TAB key to name the second panel
• Verify that the second collapsible panel still is selected• Click the Spry Collapsible Panel button on the Spry
toolbar to add a third panel directly below the second panel
• Type polar_bear in the Collapsible panel text box in the Property inspector and then press the TAB key to name the third panel

Chapter 9: Using Spry to Create Interactive Web Pages 13
Adding the Spry Collapsible Panel Widget

Chapter 9: Using Spry to Create Interactive Web Pages 14
Adding the Panel Headings
• Double-click the Tab text in the black_bear panel to select the text
• Type Black Bear to provide a descriptive heading for the first panel
• Double-click the Tab text in the second panel and then type Brown/Grizzly Bear as the heading text
• Double-click the Tab text in the third panel and then type Polar Bear to add the third panel heading

Chapter 9: Using Spry to Create Interactive Web Pages 15
Adding the Panel Headings

Chapter 9: Using Spry to Create Interactive Web Pages 16
Copying and Pasting Formatted Text with Paste Special• Use your word processing program or text-editing program to
open one of the following three documents in the Chapter09\parks folder provided with your data files: bears_Office2007.docx, bears_Office2003.doc, or bears_text.rtf
• Select the first paragraph in the data file• Press the CTRL+C keys to copy the selected paragraph• Point to the Adobe Dreamweaver program button on the
taskbar• Click the Adobe Dreamweaver program button to return to the
bear_watching page in Dreamweaver• In the black_bear Collapsible Panel widget, select the Content
text

Chapter 9: Using Spry to Create Interactive Web Pages 17
Copying and Pasting Formatted Text with Paste Special• Click Edit on the Application bar and then point to Paste
Special• Click Paste Special to display the Paste Special dialog box• If you selected text from a Word document, click the Text
with structure plus full formatting (bold, italic, styles) option button. Otherwise, click the Text with structure plus basic formatting (bold, italic) option button
• Click the OK button to paste the text• Repeat the previous steps to copy the Brown/Grizzly Bear
and Polar Bear text to the appropriate Content boxes• Click below the Polar Bear panel to view the three panels

Chapter 9: Using Spry to Create Interactive Web Pages 18
Copying and Pasting Formatted Text with Paste Special

Chapter 9: Using Spry to Create Interactive Web Pages 19
Adding an Image and Descriptive Text to the Web Page
• The insertion point should be below the third collapsible panel. Type the following text: The following image displays the areas inhabited by the three types of bears
• Apply Heading 3 to the text, and then press ENTER
• Display the panel groups and then open the images folder in the Files panel
• Drag the bear_map.jpg file to the insertion point

Chapter 9: Using Spry to Create Interactive Web Pages 20
Adding an Image and Descriptive Text to the Web Page
• Title the Web page Alaska Bears• Click the Save button on the Standard toolbar to
save the document and display the Copy Dependent Files dialog box, which appears the first time you save a Web page containing a Spry widget
• Read the information contained in the dialog box and then click the OK button to save the file
• Close the bears word processing document containing the text you copied and pasted to the bear_watching page

Chapter 9: Using Spry to Create Interactive Web Pages 21
Adding an Image and Descriptive Text to the Web Page

Chapter 9: Using Spry to Create Interactive Web Pages 22
Viewing the Web Page in Your Browser
• Press F12 to view the Web page in your browser, and allow blocked content, if necessary
• Click the Black Bear tab to collapse the panel• Click the Brown/Grizzly Bear tab to collapse the
second panel• Click the Polar Bear tab to collapse the third
panel

Chapter 9: Using Spry to Create Interactive Web Pages 23
Viewing the Web Page in Your Browser
• Click the Black Bear tab again to expand the first panel
• Click the other two panels to verify that they expand
• Collapse all three panels and then close the browser
• Close the bear_watching document

Chapter 9: Using Spry to Create Interactive Web Pages 24
Viewing the Web Page in Your Browser

Chapter 9: Using Spry to Create Interactive Web Pages 25
Creating the Alaska Topics Page
• Create a blank HTML page in the Alaska Parks Web site. Save the page as alaska_topics
• Apply the parks_bkg image to the background of the new page
• Type Alaska Parks at the top of the page and then press Enter to insert the first heading on the page
• Type Topics of Interest to insert the second heading on the page
• Center and then apply Heading 1 to both lines

Chapter 9: Using Spry to Create Interactive Web Pages 26
Creating the Alaska Topics Page
• Collapse the panel groups• In the Title text box, type Alaska Parks Topics of Interest as the title
• Open the nps_Office2007, nps_Office2003, or nps_text document provided with your data files, depending on what word processing program you have installed on your computer
• Select and then copy the text• Close the data file text document

Chapter 9: Using Spry to Create Interactive Web Pages 27
Creating the Alaska Topics Page
• Press Enter after the Topics of Interest heading in the alaska_topics page
• Click Edit on the Application bar, click Paste Special, and then select the Text with Structure plus full formatting (bold, italic, styles) option button, if possible. Otherwise, select one of the other option buttons. Click OK to paste the text
• Apply Heading 3 to the text you pasted• Click at the end of the new text and then press
ENTER• Save the page

Chapter 9: Using Spry to Create Interactive Web Pages 28
Creating the Alaska Topics Page

Chapter 9: Using Spry to Create Interactive Web Pages 29
Inserting the Spry Menu Bar
• If necessary, click the Spry tab on the Insert bar to display the Spry toolbar
• Click the Spry Menu Bar button to display the Spry Menu Bar dialog box
• If necessary, select the Horizontal option button to specify a horizontal layout, and then click the OK button to insert a horizontal menu bar

Chapter 9: Using Spry to Create Interactive Web Pages 30
Inserting the Spry Menu Bar

Chapter 9: Using Spry to Create Interactive Web Pages 31
Adding Text and Links to the Menu Bar• If necessary, select the Menu Bar widget by clicking the
Spry Menu Bar tab above Item 1• Select the Menu Bar default name (such as MenuBar1) in
the Property inspector, type alaska_nav, and then press the tab key to name the Menu Bar widget
• Verify that Item 1 in the first box is selected in the Property inspector
• In the Text box, select the Item 1 text, type Mountains, and then press ENTER to provide a name for the first menu item
• In the Property inspector, click Item 1.1 to select it

Chapter 9: Using Spry to Create Interactive Web Pages 32
Adding Text and Links to the Menu Bar
• In the Text box, select the Item 1.1 text and then type St. Elias NP and Preserve as the name of the first option on the Mountains menu
• Select the entry in the Link box, and then type http://www.nps.gov/wrst/index.htm to specify the link for the first menu option on the Mountains menu
• Click the Target text box and then type Blank to specify that the linked page opens in a new browser window
• In the Property inspector, click Item 1.2 to select it

Chapter 9: Using Spry to Create Interactive Web Pages 33
Adding Text and Links to the Menu Bar
• In the Text box, select the Item 1.2 text, and then type Glacier Bay NP as the name of the second option on the Mountains menu
• Select the entry in the Link text box, and then type http://www.nps.gov/glba/index.htm
• Click the Target text box and then type Blank to specify that the linked page opens in a new browser window
• In the Property inspector, click Item 1.3 to select it

Chapter 9: Using Spry to Create Interactive Web Pages 34
Adding Text and Links to the Menu Bar
• In the Text box, select the Item 1.3 text, and then type Kenai Fjords National Park as the name of the third option on the Mountains menu
• Select the entry in the Link text box, and then type http://www.nps.gov/kefj/index.htm
• Click the Target text box and then type Blank to specify that the linked page opens in a new browser window
• Click the Save button

Chapter 9: Using Spry to Create Interactive Web Pages 35
Adding Text and Links to the Menu Bar

Chapter 9: Using Spry to Create Interactive Web Pages 36
Adding Texts and Links to Items 2 Through 4• If necessary, select the Spry Menu Bar widget and then click Item 2 in
the Property inspector• In the Text box, select the Item 2 text, type Glaciers as the name of
the second menu in the Menu Bar widget, and then press the tab key• Point to the Plus sign (the Add menu item button) above the second
box to prepare for adding menu options to the Glaciers menu• In the Property inspector, click the Plus sign above the second box to
display Untitled Item, which is the placeholder text for the first option on the Glaciers menu
• In the Text box, select the Untitled Item text, and then type Denali National Park as the name of the first option on the Glaciers menu
• Select the entry in the Link text box, and then type http://www.nps.gov/dena

Chapter 9: Using Spry to Create Interactive Web Pages 37
Adding Texts and Links to Items 2 Through 4• Click the Target text box and then type Blank to specify that
the linked page opens in a new browser window• In the Property inspector, click the Plus sign above the
second box to add the second option to the Glaciers menu• In the Text box, select the Untitled Item text, and then type Kenai Fjords as the name of the second option on the Glaciers menu
• Select the entry in the Link text box, and then type http://www.nps.gov/kefj
• Press the TAB key two times and then type Glaciers in the Title text box to provide ToolTip text for the menu option

Chapter 9: Using Spry to Create Interactive Web Pages
Adding Texts and Links to Items 2 Through 4• Click the Target text box and then type Blank to specify
that the linked page opens in a new browser window• In the Property inspector, click the Plus sign above the
second box to add the third option to the Glaciers menu• In the Text box, select the Untitled Item text, and then type Katmai National Park as the name of the third option on the Glaciers menu
• Select the entry in the Link text box, and then type http://www.nps.gov/katm
• Press the tab key two times and then type Glaciers in the Title text box to provide ToolTip text for this menu option
38

Chapter 9: Using Spry to Create Interactive Web Pages
Adding Texts and Links to Items 2 Through 4• Click the Target text box and then type Blank to specify that
the linked page opens in a new browser window• Save the file• Click Item 3 in the Property inspector to enter properties for
the third menu item• In the Text box, select the Item 3 text, type Dinosaurs as
the name of the third menu in the Menu Bar widget, and then press the tab key
• Click Item 3.1 in the second box. In the Text box, select the Item 3.1 text, and then type Bering Land Bridge as the name of the first option on the Dinosaurs menu
• Select the entry in the Link text box, and then type http://www.nps.gov/bela
39

Chapter 9: Using Spry to Create Interactive Web Pages
Adding Texts and Links to Items 2 Through 4
• Click the Target text box and then type Blank• In the third box in the Property inspector, select the
Item 3.1.1 and Item 3.2.1 text, and then click the minus sign to delete the submenu placeholders
• Click Item 3.2 in the second box. In the Text box, select the Item 3.2 text, and then type Yukon – Charley Rivers as the name of the second option on the Dinosaurs menu
• Select the entry in the Link text box, and then type http://www.nps.gov/yuch
• Click the Target text box and then type Blank
40

Chapter 9: Using Spry to Create Interactive Web Pages
Adding Texts and Links to Items 2 Through 4
• Click Item 3.3 in the second box. In the Text box, select the Item 3.3 text, and then type Aniakchak National Monument as the name of the third option on the Dinosaurs menu
• Select the entry in the Link text box, and then type http://www.nps.gov/ania
• Click the Target text box and then type Blank• Save the file• If necessary, select the Spry Menu Bar widget
and then click Item 4 in the Property inspector
41

Chapter 9: Using Spry to Create Interactive Web Pages
Adding Texts and Links to Items 2 Through 4• In the Text box, select the Item 4 text, type Auto Touring as the name of the fourth menu in the Menu Bar widget, and then press the tab key
• In the Property inspector, click the Plus sign above the second box to add the first option to the Auto Touring menu
• In the Text box, select the Untitled Item text, and then type Denali National Park as the name of the first option on the Auto Touring menu
• Select the entry in the Link text box, and then type http://www.nps.gov/dena
• Click the Target text box and then type Blank
42

Chapter 9: Using Spry to Create Interactive Web Pages
Adding Texts and Links to Items 2 Through 4• Click the Plus sign above the second box to add the
second option to the Auto Touring menu• In the Text box, select the Untitled Item text, and then
type St. Elias National Park as the name of the second option on the Auto Touring menu
• Select the entry in the Link text box, and then type http://www.nps.gov/wrst/index.htm
• Click the Target text box and then type Blank• Click the Plus sign above the third box in the Property
inspector to display Untitled Item, which is the placeholder text for the St. Elias National Park submenu
43

Chapter 9: Using Spry to Create Interactive Web Pages
Adding Texts and Links to Items 2 Through 4
• In the Text box, select the Untitled Item text, and then type Guided Tours as the name of the submenu
• Select the entry in the Link text box, and then type http://www.nps.gov/wrst/planyourvisit/guidedtours.htm
• Click the Target text box and then type Blank• Save your document• Collapse the Property inspector
44

Chapter 9: Using Spry to Create Interactive Web Pages
Adding Texts and Links to Items 2 Through 4
• Click the Live View button on the Document toolbar to view the document as it would be displayed in your browser
• Move the mouse pointer over each menu item in the Menu Bar widget. Point to the St. Elias National Park menu item to display the submenu, and then point to the Guided Tours link
• Press the F12 key to view the page in a browser, and then allow blocked content, if necessary
• Check each of the links to verify that they work, and then close the browser
45
Chapter 9: Using Spry to Create Interactive Web Pages
Adding Texts and Links to Items 2 Through 4
46

Chapter 9: Using Spry to Create Interactive Web Pages
Customizing the Font Style and Size of the Menu Bar Widget • Open the panel groups• Double-click the CSS Styles tab in the panel groups and
then click the All button if necessary.• Click the plus sign next to SpryMenuBarHorizontal.css to
expand the styles for the Menu Bar widget• Double-click the Files tab to collapse the panel group• In the CSS Styles panel, locate and then click the
ul.MenuBarHorizontal li rule to display the properties for the top-level menu bar items
• Click to the right of the font-size property to display two drop-down menus
47

Chapter 9: Using Spry to Create Interactive Web Pages
Customizing the Font Style and Size of the Menu Bar Widget • Click the arrow on the right and then point to pt• Click pt• Click the arrow on the left to display the font size, and
then point to 14• Click 14 to change the font size of the top-level menu
items• In the CSS Styles panel, click the ul.MenuBarHorizontal ul
rule to display the properties for the menu options• Repeat the previous steps to change the font size of the
menu options to 14pt, and then click the Save button on the Standard toolbar to save the file
48
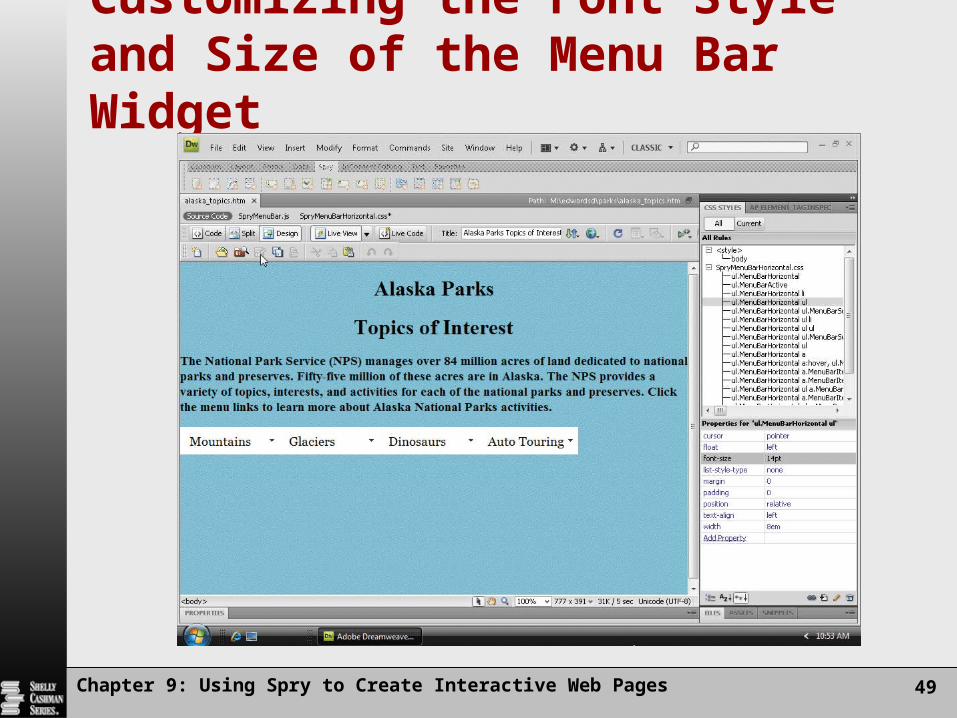
Chapter 9: Using Spry to Create Interactive Web Pages
Customizing the Font Style and Size of the Menu Bar Widget
49

Chapter 9: Using Spry to Create Interactive Web Pages
Changing the Menu Background Color
• Click the ul.MenuBarHorizontal a rule to display its properties
• Click the background-color box to display the color box
• Move the pointer to #69F• Click the pointer to apply the color to the menu
items• Move the mouse pointer over the menu and note
that the background color is bright blue when selected, which is the default background color for highlighted menu items
50

Chapter 9: Using Spry to Create Interactive Web Pages
Changing the Menu Background Color• In the CSS Styles panel, move the mouse pointer to the
ul.MenuBarHorizontal a.MenuBarItemHover, ul.MenuBarHorizontal a.MenuBarSubmenuVisible rule
• Click the rule to display its properties• Click the background-color box and then point to #69F• Click the #69F color square to select that color as the
background color to display when you point to a menu item
• Click the color property, type #000 to specify black as the text color, and then press the ENTER key
51

Chapter 9: Using Spry to Create Interactive Web Pages
Changing the Menu Background Color
• In the document window, click the menu to verify that the background color is medium blue and the text is black when you point to a menu option
• Click the Save All button on the Standard toolbar and then view the Web page in your browser
• Allow blocked content, if necessary, and then point to each menu item
• Close the browser
52

Chapter 9: Using Spry to Create Interactive Web Pages
Changing the Menu Background Color
53

Chapter 9: Using Spry to Create Interactive Web Pages 54
Closing the Web Site and Quitting Dreamweaver
• Click the Close button in the upper-right corner of the Dreamweaver title bar to close the Dreamweaver window, the document window, and the Alaska Parks Web site

Chapter 9: Using Spry to Create Interactive Web Pages 55
Chapter Summary
• Describe the Spry framework• Describe Spry widgets• Add the Spry Collapsible Panel widget to a Web
page• Add headings to a Collapsible Panel widget

Chapter 9: Using Spry to Create Interactive Web Pages 56
Chapter Summary
• Copy and paste text to a Collapsible Panel widget• Add and customize a Spry Menu Bar widget on a
Web page• Format a Spry widget• Describe Spry effects

Dreamweaver CS4Concepts and Techniques
Chapter 9 Complete
Using Spry to Create Interactive Web Pages