Embed Size (px)
Citation preview

DreamWeaver CS3Tutorial 1
Table of Contents
Define a local site ..................................................... 1Creating a Web Page ................................................. 2Code / Design View .................................................. 2Page Properties ......................................................... 3Text ........................................................................... 4Property Inspector ..................................................... 4Insert Panel ............................................................... 4Tables ........................................................................ 5Graphics .................................................................... 6Links ......................................................................... 7Flash .......................................................................... 7Status Bar .................................................................. 7Meta tags, Keywords, Search engines ...................... 8Rollovers ................................................................... 9Preferences .............................................................. 10
Wayne DeblyMay 24, 2009

Dreamweaver CS3 Tutorial Page 1
DreamWeaver CS3Tutorial 1
Getting StartedFor this tutorial,
1. Create a folder on c:\ with your_name as the folder name.
2. Copy all the files from the zip to that folder. Be sure you copy the folders.
Now open Dreamweaver CS3
Define a Local SiteTo get started working with Dreamweaver, you need to create a local site. A local site is a storage location for all thedocuments and files belonging to a web site. A local site requires a name and a local root folder, which tellsDreamweaver where you plan to store all of the site's files. You should create a local site for each web site you work on.
To create a local site:
1. From the menu bar choose Site > Manage SitesThe Manage Site window, to the right, opens.
2. Click New > SiteThe Site Definition window, to the right, opens. Click Advanced
3. Under Category choose Local Info
4. Beside Site Name type:Tutorial 1. The nameof your local site is essentially a nickname thatleads directly to the folder that you've definedas your local site.
5. Click the file folder to the right of the LocalRoot Folder field and navigate to theyour_name folder, then click Select
6. Click OK and Done
7. The Site window now displays a list of all thefolders and files that the local site “your_name”contains. The list also acts as a file manager,allowing you to copy, paste, delete, move, andopen files just as you would in WindowsExplorer on your own computer.

Dreamweaver CS3 Tutorial Page 2
Creating a Web PageWe will create a web page from an existing wordprocessed document.
From the Main Menus
From the editor, you choose File > New.
The following screen appears:
From the Menu choose Blank Page, HTML from Page Types:, and <None> from Layout:. Click Create.
Save this immediately: File > Save Save it in the directory, “your_name - Learning_Materials_Storage -Week01”, andcall it “lesson6.htm.”.
NOTE: File name: Caps? No spaces. No special characters e.g. -, /, \, * .
Code ViewDreamweaver generates code in real time as you add, move, and change the properties of elements in the Design window.This allows you to learn the tags, attributes, and attribute values for the elements in a web page as well as copy code intoAssignments and Discussion.
You can use the icons at the top of the page to:
1. View HTML code. Code view
2. Split the screen into HTML Code Veiw and Design view.
3. Return to Design view.
Choose option 2 so both the design and code windows are open. Review the design as you work in the Code window.
Or you can work primarily in the Design window. When you get the effect you want, view the HTML code with option 1to see the code that produced it. To find the exact code for an element, select it in the Design window. The correspondingcode is highlighted in the Code view.
Note, that while in Code view (#1), you cannot see your Web page.

Dreamweaver CS3 Tutorial Page 3
Page PropertiesIf you use both an image and a background color, the color appears while the image downloads, creating a more attrac-tive background for users as they wait for the image to download. If the background image has transparent pixels, thebackground color will show through.
Appearance:To define a background color for the page:
1 Choose Modify > Page Properties to open the Page Properties dialogue box.
2 Change the default background color by choosing a color in the Background field. You can enter the value if youknow the exact background color, or you can choose a color from the panel, or you can use the eye dropper to choosea color from an object on the page.
3 Click Apply to apply the background color. As soon as you click Apply in the Page Properties dialogue box, thepage updates in the Document window.
To define a background image for the page:
1 Click Browse next to the Background Image: field.
2 Select the graphic and folder that contains the graphic you want tilled as a background.
Caution: Be aware that a strong graphic may fight your text and make it unreadable.
Title/EncodingTo define the title of the page:
The title of an HTML page helps users keep track of what they're viewing as they browse; it also identifies the page inhistory and bookmark lists. If you don't title a page, it will appear in the browser window and bookmark and history listsas Untitled Document.
1 Click Title/Encoding in the Category panel. In the Title: field of the Page Properties dialogue box, type “Lesson Six- Indirect Refusal” to name the home page, then click OK. The title bar updates to reflect the name you give the file.Note the title can also be entered from the Document panel if it is showing.
Choose File > Save to save the changes you've made.

Dreamweaver CS3 Tutorial Page 4
TextOpen the Word file “lesson6.doc” . Copy all the text. Close.
In Dreamweaver:
Edit > Paste
The Property Inspector
If the property inspector is not visible, from the menu bar choose Window > Properties. Maximize it.
The Property inspector displays all the settings for a particular HTML element. It is context sensitive. These settings arebased on the HTML tag for the element and its various attributes. For example, when text is selected, the Propertyinspector displays the font, size, alignment, and other information about the text. However if you select a graphic it willshow you information about the graphic. This inspector also contains information on a Style sheet.
One attribute in the text Property inspector is worth mentioning: Size pop-up lists values like 1, 2, 3, +1, +2, +3, -1, -2,and -3 instead of point sizes. This is because font sizing in HTML is based on a relative scale of 1 to 7, where 3 is thedefault size. Until the 4.0 browsers arrived (3.0 for Microsoft Internet Explorer), it was impossible to set the point size offonts in the browser.
Highlight the title of the page and change its size, color, font, and alignment.
Highlight all the text and make it Arial. View it - F12
Note: All panels can be hidden with F4 and shown again, usually, with F4. Panels can only be moved using the gripper.
The Insert Panel
If the Insert Panel is not visible, from the menu bar choose Window > Insert.
The Insert panel duplicates the functionality of the Insert menu, letting you insert page elements with a click of themouse. Click any button or drag the object into the Document window to create the specified object. The insert panelcan be docked with the Property panel using the gripper. The panel can be collapsed with the panels tab.
If you don't recognize the icons in the panel, pass your mouse over each one to see a tool tip.
The elements in the panel are grouped into groups: Common, Layout, Forms, Text, HTML, Application, Flash Ele-ments... Select the different tabs to switch between groups.
When you click an element in the Insert panel, a dialogue box may appear to request additional information.
We will add a table to help us format the text. We will place the first four paragraphs into a centered table that is 80% thewidth of the screen. Clicking the table icon will allow you to enter a table.
We will add a Flash object with the Media icon. Clicking the down arrow will allow you to select a Flash icon.

Dreamweaver CS3 Tutorial Page 5
We will add 2 more tables for the next two blocks of data. Thesewill have a border and some background Click on table andspecify:
Row = 1 Cell Padding =12
Column = 1 Cell Spacing = 0
Width = 400 pixels
Border = 5
Select the table. Duplicate by copying and pasting. In the property box for each table choose align=center. Put a colorinto the background of the first table. For the second table put the graphic “paper.gif” as the background.
Drag each block of data into a separate table. Select the text in the first block “The Indirect Approach”, number thepoints and change the color of the centered heading.
View it - F12
Check the code with Code view. Note the format:
<table> <tr> <td> </td>
<td> </td> </tr></table>
WARNING: A word of caution with Blackboard. Under its present configuration tables do not come off well in Black-board. Blackboard’s style sheet resets column widths.
0
0
TablesClick the table icon on the Insert panel . Fill in the dialogue box asindicated. Be sure to place 0’s in empty boxes otherwise the Webpage will insert defaults (1) and they are not necessarily 0.
Select the table and in the Property Inspector box for a tablechoose align=center.
Highlight the first four paragraphs and drag them into the table.
Tip: Be sure your pointer is in the box.
View it - F12

Dreamweaver CS3 Tutorial Page 6
Graphics
Only .gif, .png, and .jpg graphic files can be used on the Web.
We are going to wrap the text around the graphic which will be on the righthand side of the page. Click at the beginning of the first line of the firstparagraph. Click on Insert Image from the Insert Panel. Choose“madanim.gif”.
Notice the property panel reflects the new object:
The Property inspector displays the width (W), height (H), source (Src), alternate text (Alt), and other information aboutthe image. In the Property inspector, type in new values for Width and Height. Notice that the W and H numbers havebecome bold. This indicates that the Width and Height you entered are not the actual width and height of the image.Because bitmap images become pixelated when you scale them, it's best to resize the image in an image editor (such asMacromedia Fireworks), rather than the HTML file. However, you might want to temporarily resize the image in theProperty inspector to see how a differently sized image would affect your layout. Then you would click the Edit Icon,beside the word Edit on the Property inspector panel, to change it’s size in a graphics program. To return the values totheir original settings, click the W and H text labels or the circular arrow beside the numbers.
Enter “Mad person” into the ALT text box for text only browsers and for roll over text. Select Align = Right to wrap thetext around the left side of the graphic.
We could have created a different effect by creating a two column table and placing the graphic in the right hand column.Add a column (width of 30) to the table and drag the graphic into it.
Add the pen icon to the top of the page beside the heading text. To do this, create a table:
Row = 1 Cell Padding = 0
Column = 2 Cell Spacing = 0
Width = 400 pixels
Border = 0
Alternatively you can use the Assets pallette (Window > Assets or F11) and drag the graphic from the panel to the page.
Insert graphic “pen.jpg” in the left hand cell. Drag the “pen.jpg” file into the left hand cell. Drag the title into the righthand cell. Readjust cells and text alignment.
View it - F12
The various panels can be toggled off and on with the F4 key.

Dreamweaver CS3 Tutorial Page 7
Creating LinksWe want to link the text, “Positive and Negative Language”, to a file in the current directory called “lesson6b.htm”. Thiscan be done in one of three ways. First highlight the text.
1. Type the filename into the Link box.
2. Click on the folder icon beside the Link box and select the “lesson6b.htm” file
3. Drag the circular icon (point-to-file icon) between the Link box and folder icon over to the “lesson6b.htm” file.
All three methods will link the text to the file.
The Link options provides 4 target options: _blank, _parent, _self, _top. The first options allows the page to be opened ina new window or tab depending on how the user’s browser is configured. The remaining 3 will open the link in the samewindow. The difference between the remaining 3 has to do with how they handle frames in a frameset.
Flash ObjectsFlash objects can be added to your pages. From the Insert panel click the down arrow beside the Media icon. Select theFlash icon. Choose man_at_desk.swf file. View the Code view. Note that in the header a new .js (javascript) file hasbeen added to your page. This is used to compensate for some IE issues that prevent the object from being immediatelyavailable when first viewed. If you have to click to make a flash object work, then this file is missing. View your filemanager and you will note a new folder has been added to your file manager, Scripts. In this folder a file,AC_RunActiveContent.js, has been added. This file and folder must be added to your Web site. It must also be addedusing the same structure as is on your hard drive, usually off the root folder.
The Status BarThe Document window displays the current document approximately as it will appear in a web browser. To start creatinga web page in the Document window, start typing or inserting objects.
The following picture shows some of the items at the bottom of the Document window. You can modify the downloadspeed with Edit > Preferences > Status Bar.
Dreamweaver CS3 Tutorial Page 8
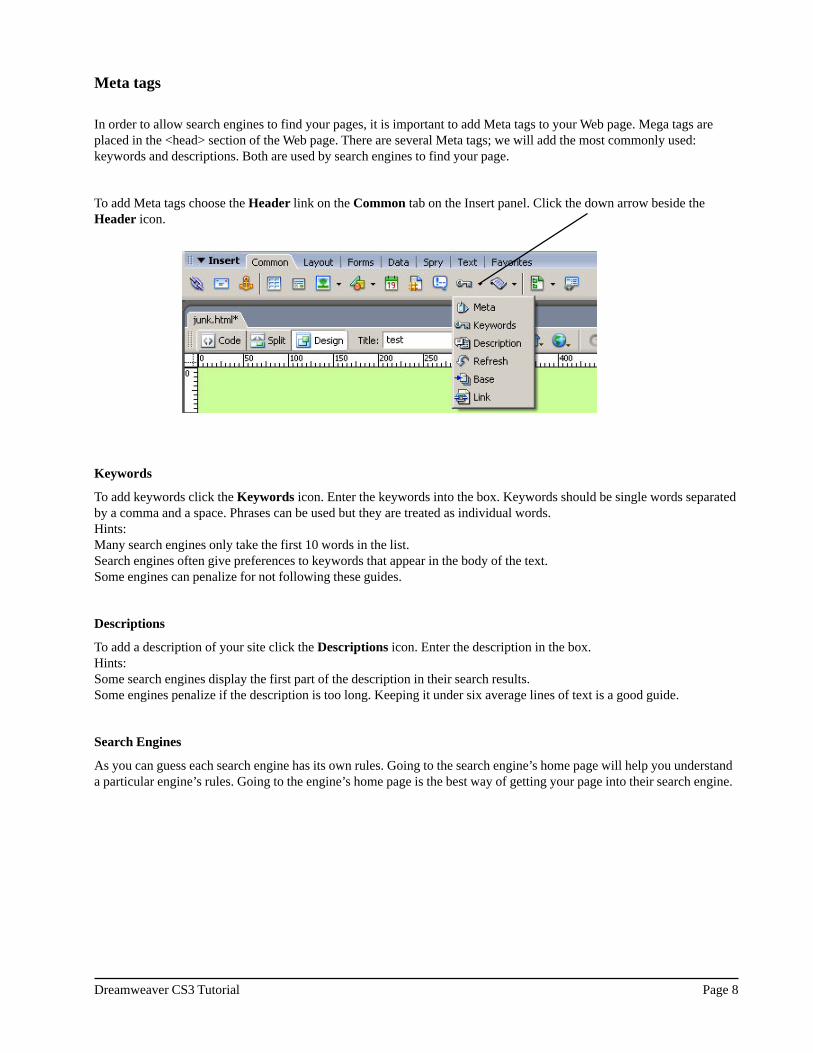
Meta tags
In order to allow search engines to find your pages, it is important to add Meta tags to your Web page. Mega tags areplaced in the <head> section of the Web page. There are several Meta tags; we will add the most commonly used:keywords and descriptions. Both are used by search engines to find your page.
To add Meta tags choose the Header link on the Common tab on the Insert panel. Click the down arrow beside theHeader icon.
Keywords
To add keywords click the Keywords icon. Enter the keywords into the box. Keywords should be single words separatedby a comma and a space. Phrases can be used but they are treated as individual words.Hints:Many search engines only take the first 10 words in the list.Search engines often give preferences to keywords that appear in the body of the text.Some engines can penalize for not following these guides.
Descriptions
To add a description of your site click the Descriptions icon. Enter the description in the box.Hints:Some search engines display the first part of the description in their search results.Some engines penalize if the description is too long. Keeping it under six average lines of text is a good guide.
Search Engines
As you can guess each search engine has its own rules. Going to the search engine’s home page will help you understanda particular engine’s rules. Going to the engine’s home page is the best way of getting your page into their search engine.

Dreamweaver CS3 Tutorial Page 9
Creating a rolloverClick the cursor in the document window where you want the image to appear. In the Inserts Panel, click the Commontab. Click the down arrow beside the Images icon. Click Rollover Image or choose from the menu
Insert > Image Objects > Rollover Image.
1. In the Insert Rollover Image window, click theBrowse button located to the right of the OriginalImage field . Navigate to the graphic image thatyou want to appear when the page loads,“button_up.jpg”. Click the file name of the graphicto highlight it, then click the select button to closethe Original Image selection box.
2. Next click the Browse button to the right of theRollover Image field and repeat the process, thistime selecting the image that you want to appearwhen the mouse rolls over the original image,“button_down.jpg”.
3. A link can also be established to a URL or file.
Note for popup file window: In both the Select Original Image and the SelectRollover Image Windows, make sure that the Relative To: pop-up menu is set toDocument. The relative pop-up menu is located in the lower left of the window.Dreamweaver will default to this setting as long as the new page is saved before theimages are inserted. This will enable you to preview the rollover images locally in abrowser before uploading them to the server.
4. The Image Name field in the Insert Rollover Image dialogue box is reserved forthe name of this rollover. Dreamweaver automatically assigns a name to theoriginal image because the behaviour uses this name as a reference in theJavaScript it generates. The Dreamweaver default image name may be changed to different name. If you do decideto specify a custom image name in this field, the name must start with a letter and should not contain any spaces orspecial characters. The first character must be a letter, but numbers can appear in the name.
5. To link the rollover to another HTML page, either click the Browse button next to the When Clicked, Go To URLfield and select the desired HTML page or type the URL in the field.
Note: If you want the rollover image to open an HTML page outside of your site, type the absolute address. Absoluteaddress example http://www.macromedia.com
Select the original image in the main window. To verify that the rolloveris applied to the image, choose Window > Behavior. Do not chooseServer Behaviour. The onMouseOver and onMouseOut event and swapimage action for the image have been added to the Behaviour window.
Choose File > Save and Press F12 to view the results in a browser.
The browser will launch, and you can test your behaviour by moving themouse over the graphic.
Note: It is recommended that you choose a rollover image that is thesame size as the original image.
As an altermative to creating your own buttons for rollovers, Dreamweaver has two icons in the Insert panel on theCommon tab under drop down menu on the Media icon. They let you create Flash buttons and text:
Flash Button places a Flash button object at the insertion point. Try it. <a href=”javascript:window.close()”>
Flash Text places a Flash text object at the insertion point. Try it.

Dreamweaver CS3 Tutorial Page 10
PreferencesI would suggest making the following changes to your preferences setting:To change your setting, from the menu bar choose: Edit > Preference.The following screen will appear:
Choose the following categories and make the following changes.
GeneralCheck - Allow Multiple Consecutive Spaces.Uncheck - Use CSS instead of HTML tags.
AccessibilityCheck off all items under Show Attributes when Inserting.
Code RewritingUncheck – Encode <,>,&, and “ in Attribute Values using &Check - Fix invalidly nested and unclosed tags.
FileTypes/Editors choose Fireworks as the Primary editor for .gif files.
Preview in BrowserClick Firefox. Check off Secondary Browser.
Click OK