Embed Size (px)
Citation preview
California State University, Northridge Information Technology Training Guide
Prepared By Steve Dan and Sandra Caesar, User Support Service April 18, 2007 ITR’s Technology training guides are the property of California State University, Northridge. They are intended for non-profit educational use only. Please do not use this material without citing the source.
Dreamweaver 8 Basics and Beyond The instructions in this document assume the reader has already created web pages using some other web page creation software (e.g., Netscape Composer or Microsoft FrontPage). Some knowledge of HTML coding is also recommended.
Table Of Contents
1. Before you Begin
2. Getting Started with Dreamweaver • Defining a New Website • The Dreamweaver Work Area
3. Creating a Basic Web Page
• Page Properties • Text • Links • Inserting Common Objects • Inserting “Head” Objects
4. Preparation for Publishing
• Previewing a Page • Good Site Organization Practices • Code Cleanup • Check Page • Publishing Pages
5. Working with Files in The Files Panel
• To open a File • To Create a New File or Folder • To Delete a File or Folder • To Rename a File or Folder • To Move a File or Folder • To Refresh the Files Panel
6. How To Learn More
• Dreamweaver Help • References
California State University, Northridge Information Technology Training Guide
Prepared By Steve Dan and Sandra Caesar, User Support Service April 18, 2007 ITR’s Technology training guides are the property of California State University, Northridge. They are intended for non-profit educational use only. Please do not use this material without citing the source.
Before You Begin
Before you begin creating the web pages within a website, it's a good idea to plan your design and organization first. Following are references you may want to read for help in that regard.
• The Non-Designer's Web Book, 3rd Edition, by Robin Williams and John Tollett (2005)
• Designing an Effective Web Page (an ITR technology training guide
which can be found at <http://www.csun.edu/itr/guides/index.html> under Web Design and Publishing )
Site accessibility — providing the ability for anyone to read every web page — is a priority for campus web pages. Refer to campus policy for additional information.
See also Some Accessibility Suggestions (an ITR technology training guide which can also be found at <http://www.csun.edu/itr/guides/index.html> under Web Design and Publishing).
Getting Started With Dreamweaver
Defining a New Website Dreamweaver includes a site maintenance and file transfer capability. To use this feature to organize your site, create a local folder (e.g., on your desktop computer) to hold the site's files and then define your site. Make sure all files for a site are saved to the Local Root Folder or a subfolder thereof. That way you can easily create relative links in your documents and, when you're ready, publish the entire site to the equivalent location on the remote server.
The Dreamweaver Work Area
The Dreamweaver work area contains the document window and (if displayed) a number of panel groups. You can choose which panel groups to display from the Window menu. The panels shown and described below will be displayed the first time you open Dreamweaver.
California State University, Northridge Information Technology Training Guide
Prepared By Steve Dan and Sandra Caesar, User Support Service April 18, 2007 ITR’s Technology training guides are the property of California State University, Northridge. They are intended for non-profit educational use only. Please do not use this material without citing the source.
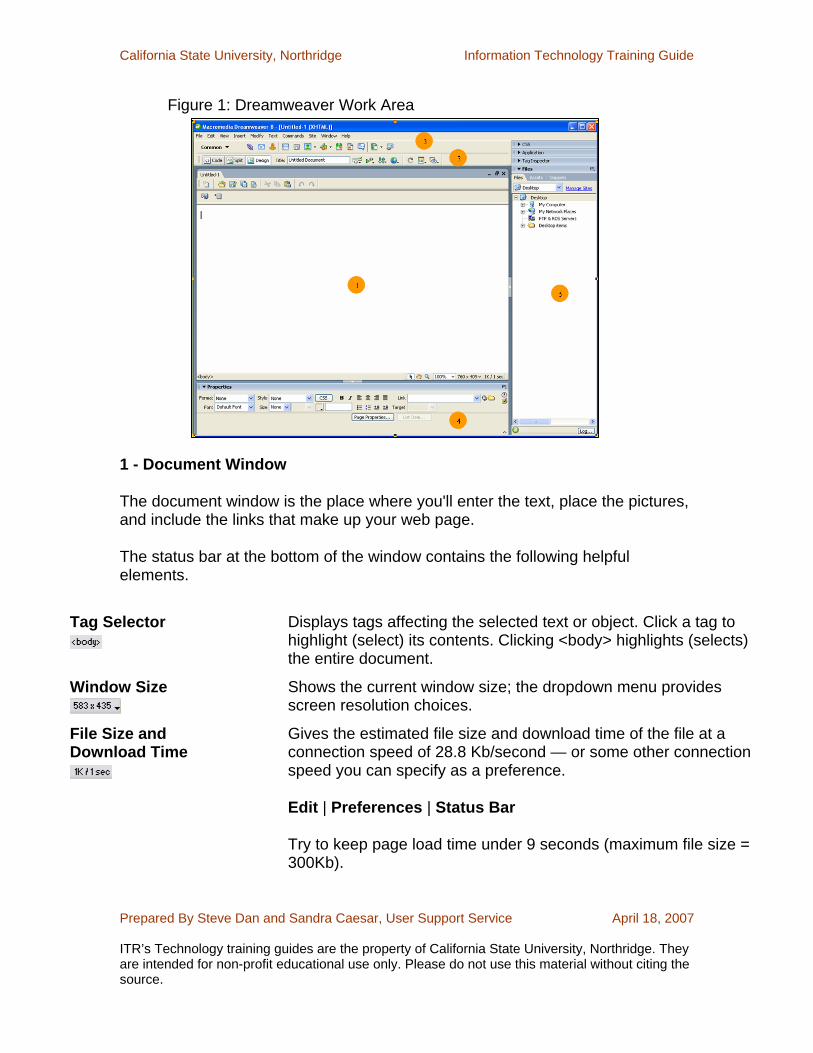
Figure 1: Dreamweaver Work Area
1 - Document Window
The document window is the place where you'll enter the text, place the pictures, and include the links that make up your web page.
The status bar at the bottom of the window contains the following helpful elements.
Tag Selector
Displays tags affecting the selected text or object. Click a tag to highlight (select) its contents. Clicking <body> highlights (selects) the entire document.
Window Size
Shows the current window size; the dropdown menu provides screen resolution choices.
File Size and Download Time
Gives the estimated file size and download time of the file at a connection speed of 28.8 Kb/second — or some other connection speed you can specify as a preference.
Edit | Preferences | Status Bar
Try to keep page load time under 9 seconds (maximum file size = 300Kb).
California State University, Northridge Information Technology Training Guide
Prepared By Steve Dan and Sandra Caesar, User Support Service April 18, 2007 ITR’s Technology training guides are the property of California State University, Northridge. They are intended for non-profit educational use only. Please do not use this material without citing the source.
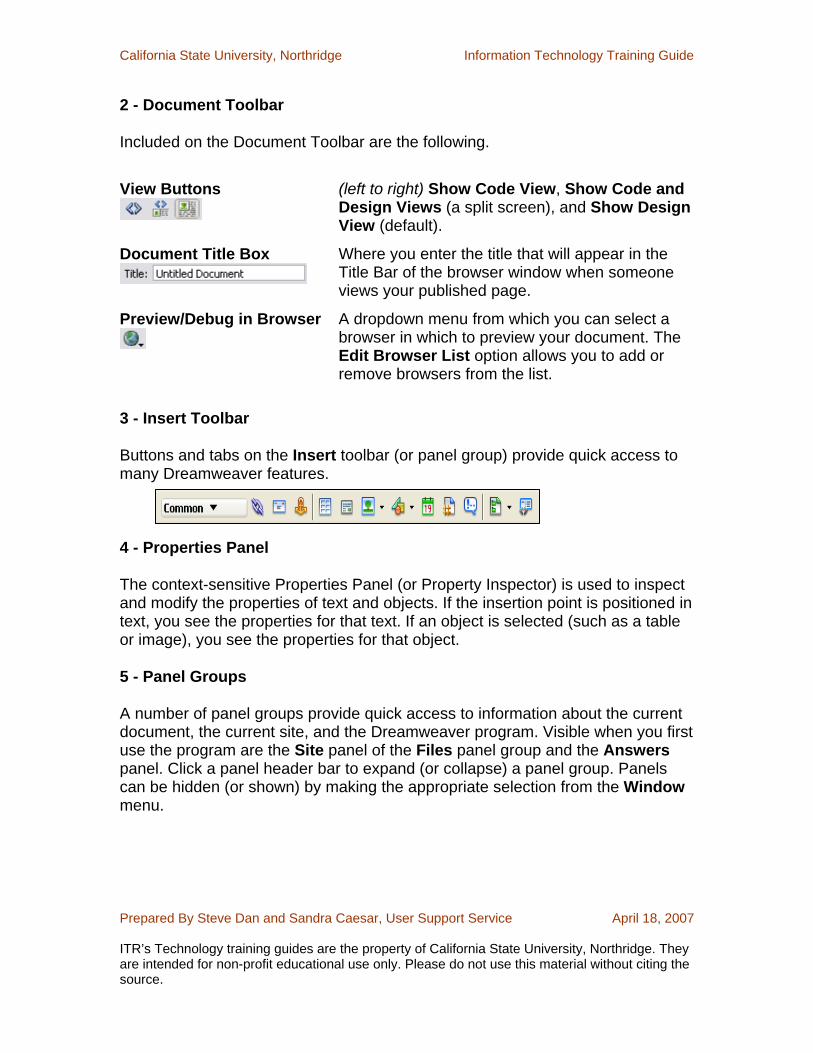
2 - Document Toolbar
Included on the Document Toolbar are the following.
View Buttons
(left to right) Show Code View, Show Code and Design Views (a split screen), and Show Design View (default).
Document Title Box
Where you enter the title that will appear in the Title Bar of the browser window when someone views your published page.
Preview/Debug in Browser
A dropdown menu from which you can select a browser in which to preview your document. The Edit Browser List option allows you to add or remove browsers from the list.
3 - Insert Toolbar
Buttons and tabs on the Insert toolbar (or panel group) provide quick access to many Dreamweaver features.
4 - Properties Panel
The context-sensitive Properties Panel (or Property Inspector) is used to inspect and modify the properties of text and objects. If the insertion point is positioned in text, you see the properties for that text. If an object is selected (such as a table or image), you see the properties for that object.
5 - Panel Groups
A number of panel groups provide quick access to information about the current document, the current site, and the Dreamweaver program. Visible when you first use the program are the Site panel of the Files panel group and the Answers panel. Click a panel header bar to expand (or collapse) a panel group. Panels can be hidden (or shown) by making the appropriate selection from the Window menu.
California State University, Northridge Information Technology Training Guide
Prepared By Steve Dan and Sandra Caesar, User Support Service April 18, 2007 ITR’s Technology training guides are the property of California State University, Northridge. They are intended for non-profit educational use only. Please do not use this material without citing the source.
Creating a Basic Web Page
1 Enter a descriptive title in the "Title:" textbox at the top of the document window. This is the title that will appear in the title bar of the browser window when people view your page; it is also the text that will be used when someone creates a bookmark to your page.
2 Save the document. Make sure the main page (in the root folder and any subfolders) is named index
Note: The extension .htm (Windows) or .html (Macintosh) will be added automatically. Windows users who would like files to use the extension .html should type the full file name in the "File name:" text box (e.g., index.html).
3 Design your page. Basic design elements are described below.
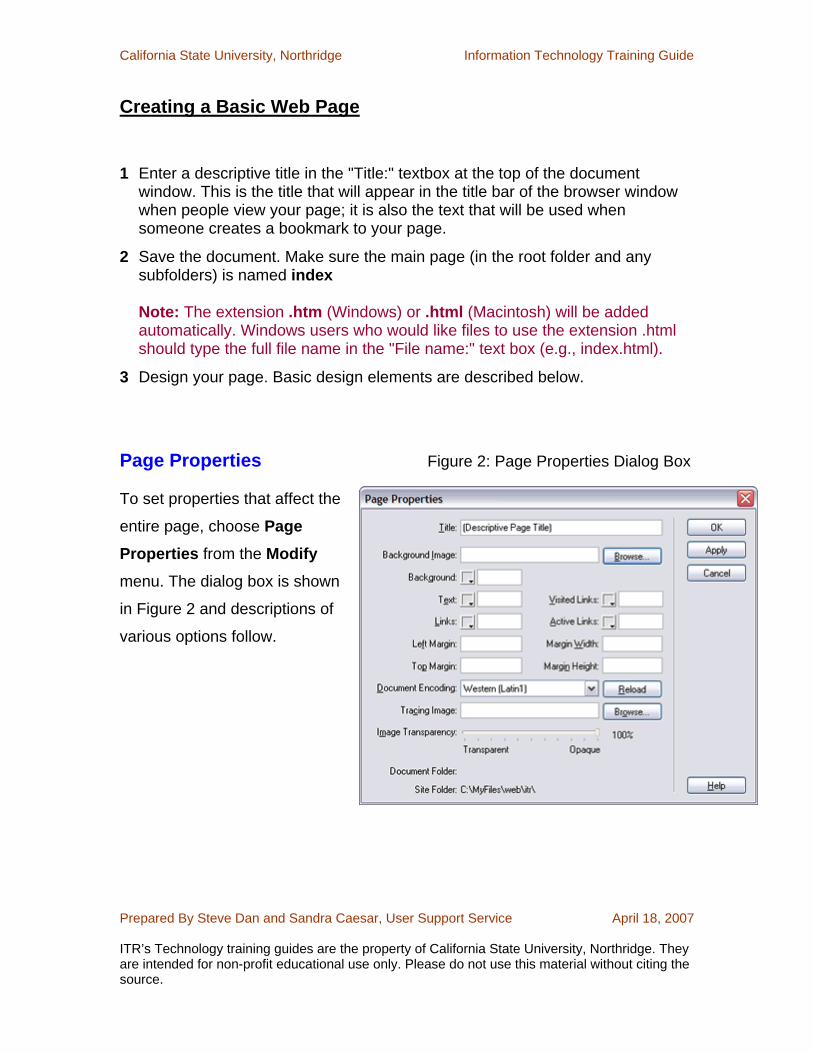
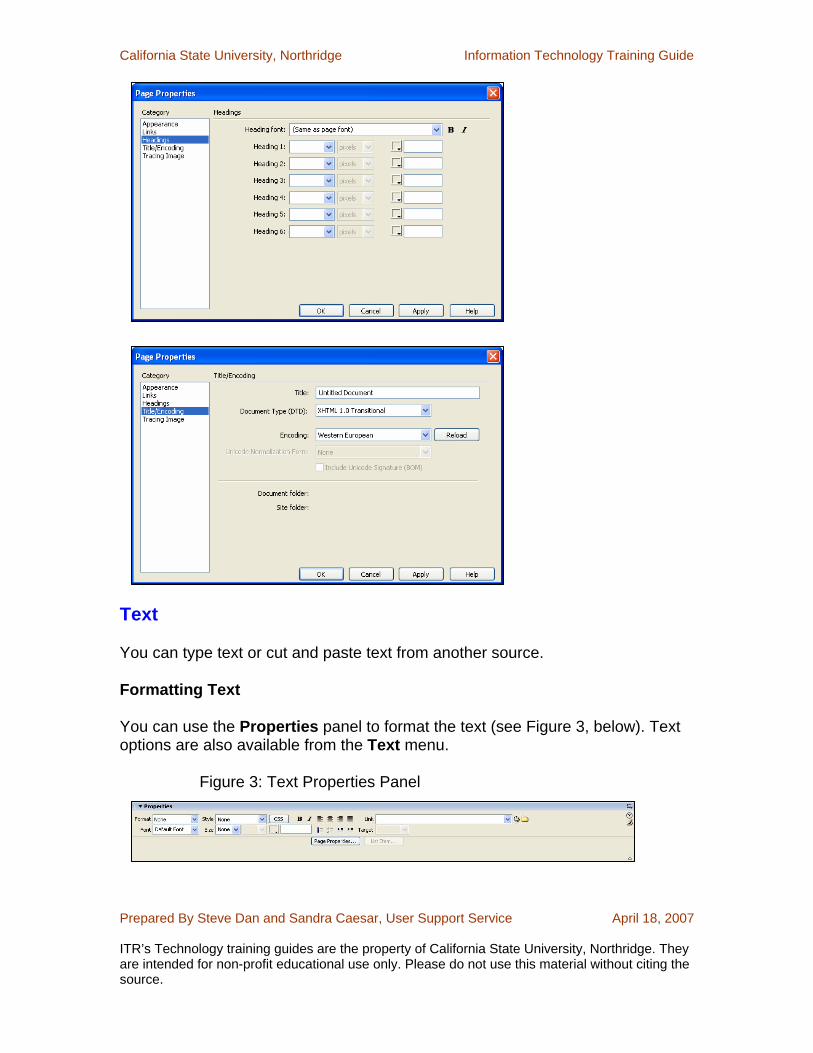
Page Properties Figure 2: Page Properties Dialog Box
To set properties that affect the
entire page, choose Page Properties from the Modify
menu. The dialog box is shown
in Figure 2 and descriptions of
various options follow.
California State University, Northridge Information Technology Training Guide
Prepared By Steve Dan and Sandra Caesar, User Support Service April 18, 2007 ITR’s Technology training guides are the property of California State University, Northridge. They are intended for non-profit educational use only. Please do not use this material without citing the source.
• Document Title: Make sure it's there; if it isn't, you can enter the page
title in the text box provided.
• Background Image: o A good source: http://www.sd81.k12.wa.us/images/pixelfoundry/
(be sure to download and save a background image to your local
site before using it).
o If you use a background image
make sure the text can still be read easily.
do not use the University word mark on a background image.
See http://www.csun.edu/images for usage instructions and
examples.
choose contrasting text and link colors.
choose a matching background color so that if someone
turns off images or your background image doesn't load for
some reason, your text will still be readable.
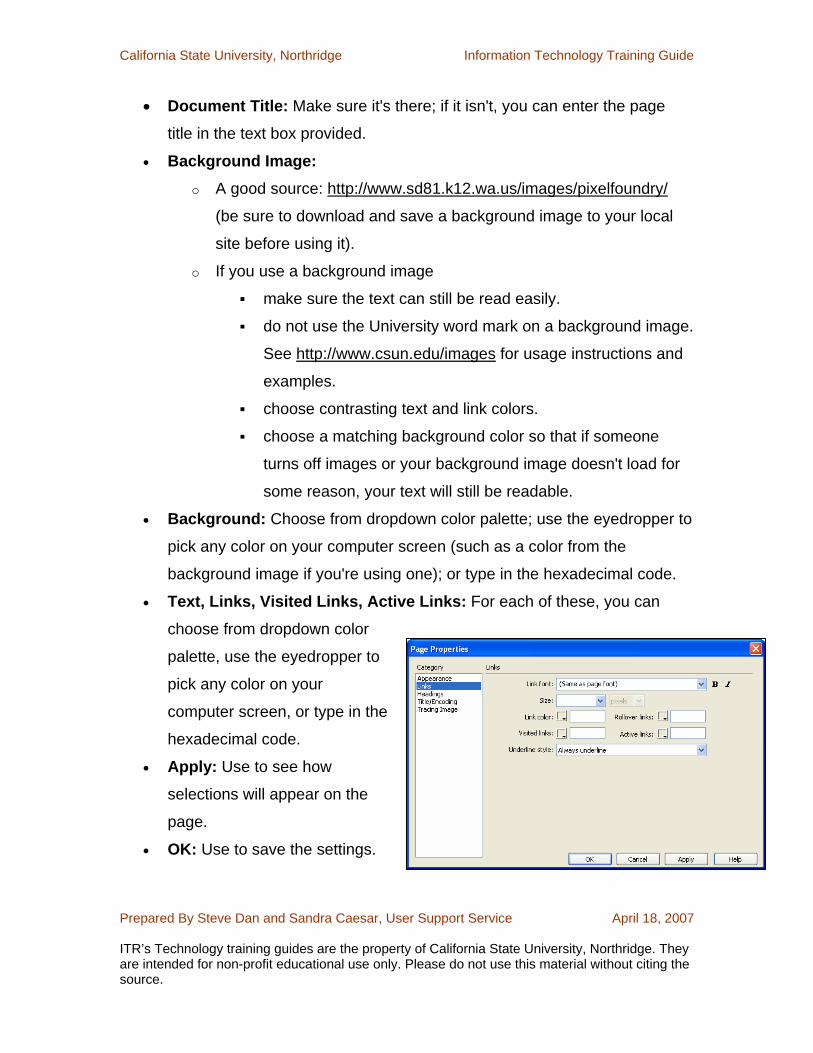
• Background: Choose from dropdown color palette; use the eyedropper to
pick any color on your computer screen (such as a color from the
background image if you're using one); or type in the hexadecimal code.
• Text, Links, Visited Links, Active Links: For each of these, you can
choose from dropdown color
palette, use the eyedropper to
pick any color on your
computer screen, or type in the
hexadecimal code.
• Apply: Use to see how
selections will appear on the
page.
• OK: Use to save the settings.
California State University, Northridge Information Technology Training Guide
Prepared By Steve Dan and Sandra Caesar, User Support Service April 18, 2007 ITR’s Technology training guides are the property of California State University, Northridge. They are intended for non-profit educational use only. Please do not use this material without citing the source.
Text
You can type text or cut and paste text from another source.
Formatting Text
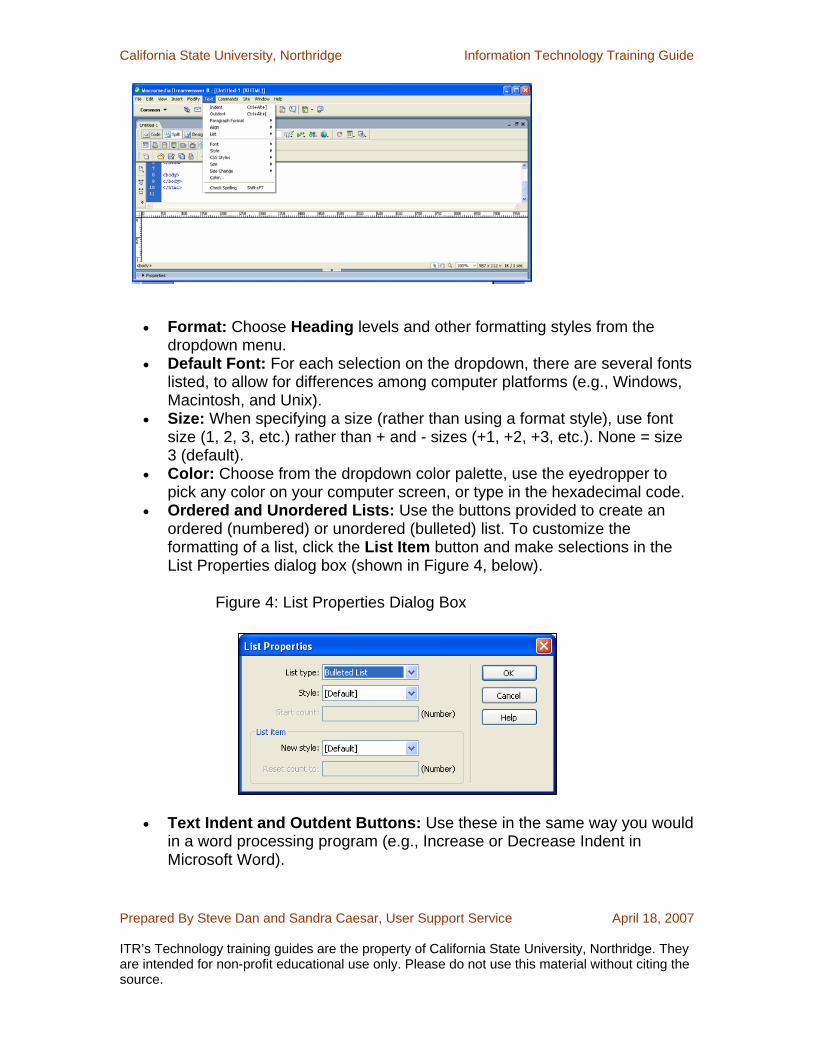
You can use the Properties panel to format the text (see Figure 3, below). Text options are also available from the Text menu.
Figure 3: Text Properties Panel
California State University, Northridge Information Technology Training Guide
Prepared By Steve Dan and Sandra Caesar, User Support Service April 18, 2007 ITR’s Technology training guides are the property of California State University, Northridge. They are intended for non-profit educational use only. Please do not use this material without citing the source.
• Format: Choose Heading levels and other formatting styles from the dropdown menu.
• Default Font: For each selection on the dropdown, there are several fonts listed, to allow for differences among computer platforms (e.g., Windows, Macintosh, and Unix).
• Size: When specifying a size (rather than using a format style), use font size (1, 2, 3, etc.) rather than + and - sizes (+1, +2, +3, etc.). None = size 3 (default).
• Color: Choose from the dropdown color palette, use the eyedropper to pick any color on your computer screen, or type in the hexadecimal code.
• Ordered and Unordered Lists: Use the buttons provided to create an ordered (numbered) or unordered (bulleted) list. To customize the formatting of a list, click the List Item button and make selections in the List Properties dialog box (shown in Figure 4, below).
Figure 4: List Properties Dialog Box
• Text Indent and Outdent Buttons: Use these in the same way you would in a word processing program (e.g., Increase or Decrease Indent in Microsoft Word).
California State University, Northridge Information Technology Training Guide
Prepared By Steve Dan and Sandra Caesar, User Support Service April 18, 2007 ITR’s Technology training guides are the property of California State University, Northridge. They are intended for non-profit educational use only. Please do not use this material without citing the source.
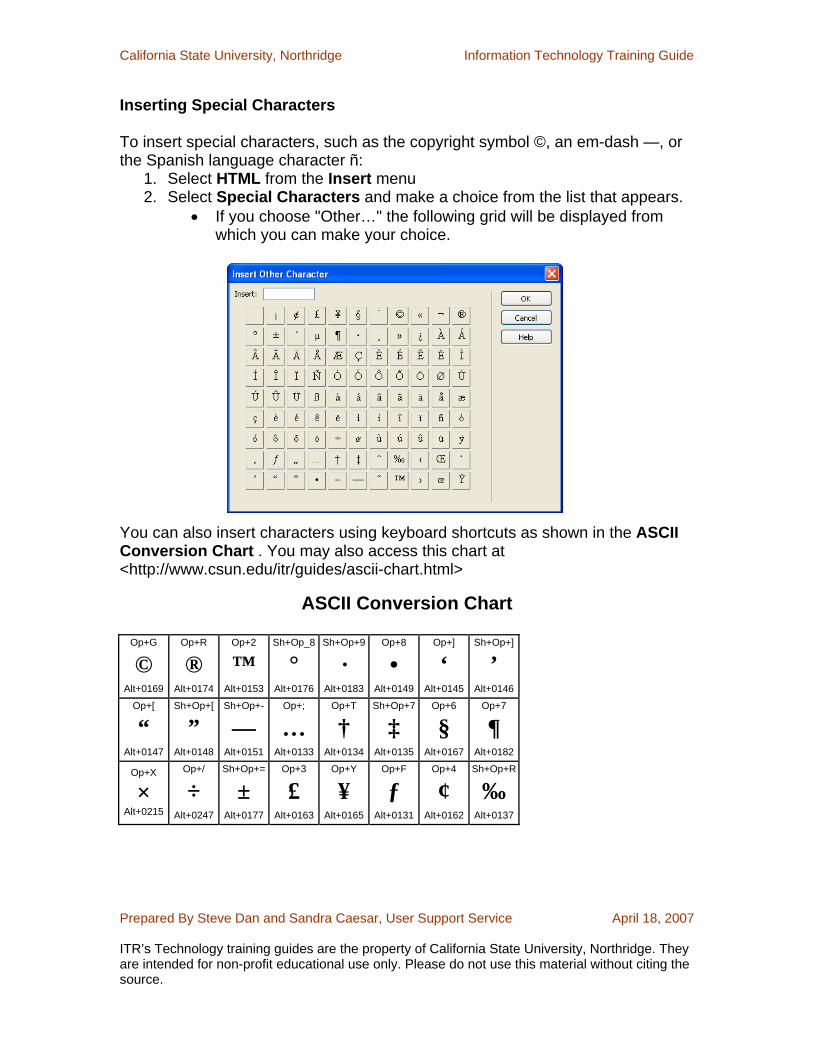
Inserting Special Characters
To insert special characters, such as the copyright symbol ©, an em-dash —, or the Spanish language character ñ:
1. Select HTML from the Insert menu 2. Select Special Characters and make a choice from the list that appears.
• If you choose "Other…" the following grid will be displayed from which you can make your choice.
You can also insert characters using keyboard shortcuts as shown in the ASCII Conversion Chart . You may also access this chart at <http://www.csun.edu/itr/guides/ascii-chart.html>
ASCII Conversion Chart
Op+G
© Alt+0169
Op+R
® Alt+0174
Op+2
™ Alt+0153
Sh+Op_8
° Alt+0176
Sh+Op+9
· Alt+0183
Op+8
• Alt+0149
Op+]
‘ Alt+0145
Sh+Op+]
’ Alt+0146
Op+[
“ Alt+0147
Sh+Op+[
” Alt+0148
Sh+Op+-
— Alt+0151
Op+;
… Alt+0133
Op+T
† Alt+0134
Sh+Op+7
‡ Alt+0135
Op+6
§ Alt+0167
Op+7
¶ Alt+0182
Op+X ×
Alt+0215
Op+/
÷ Alt+0247
Sh+Op+=
± Alt+0177
Op+3
£ Alt+0163
Op+Y
¥ Alt+0165
Op+F
ƒ Alt+0131
Op+4
¢ Alt+0162
Sh+Op+R
‰ Alt+0137
California State University, Northridge Information Technology Training Guide
Prepared By Steve Dan and Sandra Caesar, User Support Service April 18, 2007 ITR’s Technology training guides are the property of California State University, Northridge. They are intended for non-profit educational use only. Please do not use this material without citing the source.
Sh+Op+2
€ Alt+0128
Op+M
µ Alt+0181
Sh+Op+U
¨ Alt+0168
Sh+Op+I
ˆ Alt+0136
Sh+Op+E
´ Alt+0180
Sh+Op+N
˜ Alt+0152
Sh+Op+,
¯ Alt+0175
Sh+Op+Z
¸ Alt+0184
Sh+Op+3
‹ Alt+0139
Sh+Op+4
› Alt+0155
Op+\
« Alt+0171
Sh+Op+\
» Alt+0187
Sh+Op+0
‚ Alt+0130
Sh+Op+W
„ Alt+0132
Op+1 ¡
Alt+0161
Sh+Op+/
¿ Alt+0191
Op+U A
ä Alt+0228
Op+U Sh+A
Ä Alt+0196
Op+I A
â Alt+0226
Op+I Sh+A
 Alt+0194
Op+E A
á Alt+0225
Op+E Sh+A
Á Alt+0193
Op+` A
à Alt+0224
Op+` Sh+A
À Alt+0192
Op+N A
ã Alt+0227
Op+N Sh+A
à Alt+0195
Op+A
å Alt+0229
Sh+Op+A
Å Alt+0197
Op+C
ç Alt+0231
Sh+Op+C
Ç Alt+0199
Op+U E
ë Alt+0235
Op+U Sh+E
Ë Alt+0203
Op+I E
ê Alt+0234
Op+I Sh+E
Ê Alt+0202
Op+E E
é Alt+0233
Op+E Sh+E
É Alt+0201
Op+` E
è Alt+0232
Op+` Sh+E
È Alt+0200
Op+U I
ï Alt+0239
Sh+Op+F
Ï Alt+0207
Op+I I
î Alt+0238
Sh+Op+D
Î Alt+0206
Op+E I
í Alt+0237
Sh+Op+S
Í Alt+0205
Op+`I
ì Alt+0236
Op+` Sh+I
Ì Alt+0204
Op+N N
ñ Alt+0241
Op+N Sh N
Ñ Alt+0209
Op+U O
ö Alt+0246
Op+U Sh+U
Ö Alt+0214
Op+I O
ô Alt+0244
Op+I Sh+O
Ô Alt+0212
Op+E O
ó Alt+0243
Op+E Sh+O
Ó Alt+0211
Op+`O
ò Alt+0242
Op+` Sh+O
Ò Alt+0210
Op+N O
õ Alt+0245
Op+N Sh+O
Õ Alt+0213
Op+O
ø Alt+0248
Sh+Op+O
Ø Alt+0216
Op+U U
ü Alt+0252
Op+U Sh+U
Ü Alt+0220
Op+I U
û Alt+0251
Op+I Sh+U
Û Alt+0219
Op+E U
ú Alt+0250
Op+E Sh+U
Ú Alt+0218
Op+` U
ù Alt+0249
Op+` Sh+U
Ù Alt+0217
Op+U Y
ÿ Alt+0255
Op+U Sh+Y
Ÿ Alt+0159
Op+'
æ Alt+0230
Sh+Op+'
Æ Alt+0198
Op+Q
œ Alt+0156
Sh+OP+Q
ΠAlt+0140
Op+S
ß Alt+0223
California State University, Northridge Information Technology Training Guide
Prepared By Steve Dan and Sandra Caesar, User Support Service April 18, 2007 ITR’s Technology training guides are the property of California State University, Northridge. They are intended for non-profit educational use only. Please do not use this material without citing the source.
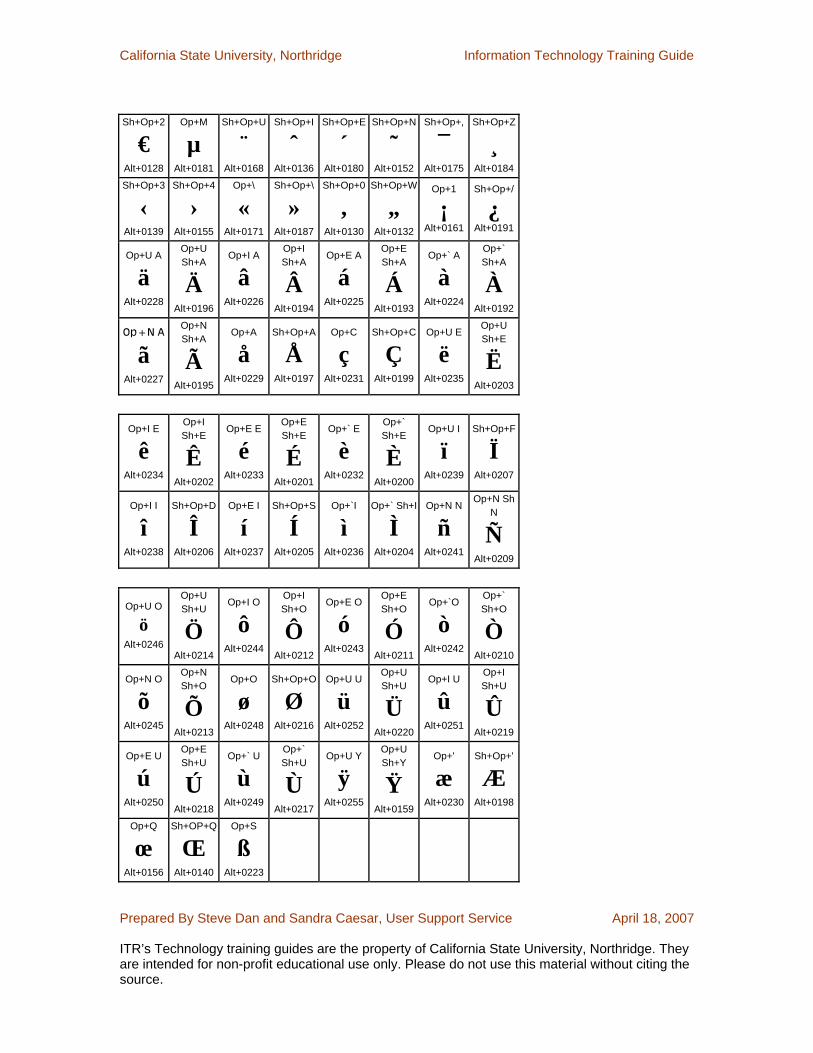
Many programs provided ways for you to include characters that aren't on your keyboard (Insert Symbol in Microsoft Word, for example), but others do not. In programs that don't have an insert character or insert symbol feature, you can paste text from a program that allows you to include such characters or you can enter individual ASCII characters by using the key combinations shown in the table above.
• The characters are shown in large boldface type. • The key combinations are shown above the character (Macintosh) and
below the character (Windows). MACINTOSH: Use the OPTION (Op) and/or SHIFT (Sh) keys in combination with keyboard characters. For example, to get the character ñ, hold down the OPTION key and tap the N key, release both keys and tap the N key again.
WINDOWS: While holding down the ALT key, type the appropriate number on the numeric keypad on the right-hand side of your keyboard. To get the character ñ, for example, hold down ALT and tap 0241.
Links Absolute and Relative Links. Highlight the text or object that you want to make into a link. Then use Properties Panel to enter the appropriate link information. To include a relative link (i.e., a link to another file in your website), do one of the following:
1. Click the Browse for File icon (a yellow folder) to browse and select a file from within your own site.
2. Then click OK:
Note: The "Select File" dialog box contains a "Relative to:" dropdown menu. Make sure "Document" is selected. 3. Click the Files panel header in the Panels Groups to expand it so that the
file you want to link to be displayed. 4. Click the Point to File icon. 5. Drag and point to the linked file in the Files panel.
California State University, Northridge Information Technology Training Guide
Prepared By Steve Dan and Sandra Caesar, User Support Service April 18, 2007 ITR’s Technology training guides are the property of California State University, Northridge. They are intended for non-profit educational use only. Please do not use this material without citing the source.
6. For an absolute link (i.e., a link to a location outside your website), type the full web address (URL) in the Link text box of the Properties panel.
• To include a link to the campus's main web page, for example, type http://www.csun.edu
Internal Links (or "Jump Links"). To insert an internal link do the following:
1. Within the open document, go to (click at) the location to be linked. 2. Click the Named Anchor button on the Common panel of the Insert panel
group (or choose Named Anchor from the Insert menu). 3. In the dialog box that appears, type a name to represent this location on
the page and then click OK. An anchor icon will appear in the document. Note: If the anchor isn't displayed, modify the Invisible Elements dialog box in Edit | Preferences.
4. Go to and select (highlight) the link text. 5. In the Link text box on the Properties panel type #anchor (where anchor
is the named anchor you created in Step 2). Alternatively, you can use the Point to File icon to drag and point to the appropriate anchor icon.
Email Links. You can insert an email link by:
• Choosing Email Link from the Insert menu or • By clicking the Email Link icon on the Common panel (tab) of the
Insert panel group (see next section, "Inserting Common Objects").
Inserting Common Objects
From the Common panel of the Insert panel group, you can easily insert a number of commonly used objects — a horizontal rule, an image, an email link, or the date, for example. These can also be selected from the Insert menu.

California State University, Northridge Information Technology Training Guide
Prepared By Steve Dan and Sandra Caesar, User Support Service April 18, 2007 ITR’s Technology training guides are the property of California State University, Northridge. They are intended for non-profit educational use only. Please do not use this material without citing the source.
Horizontal Rule.
1. Select HTML from the Insert menu 2. Then select Horizontal Rule to insert a horizontal line at insertion point. 3. With the line selected, you can change its properties (e.g., width, height,
and alignment) using the context-appropriate Properties panel (as shown in Figure 5, below).
Figure 5: Horizontal Rule Properties
Image. Clicking the Image button displays the "Select Image Source" dialog box (as shown in Figure 6, below). Locate and select an image within your site (File name:) or type the URL for a non local image (URL:).
Figure 6: Select Image Source Dialog Box
To get information about appropriate usage of the University word mark and CSUN mark and to insert the University word mark, see http://www.csun.edu/images.
California State University, Northridge Information Technology Training Guide
Prepared By Steve Dan and Sandra Caesar, User Support Service April 18, 2007 ITR’s Technology training guides are the property of California State University, Northridge. They are intended for non-profit educational use only. Please do not use this material without citing the source.
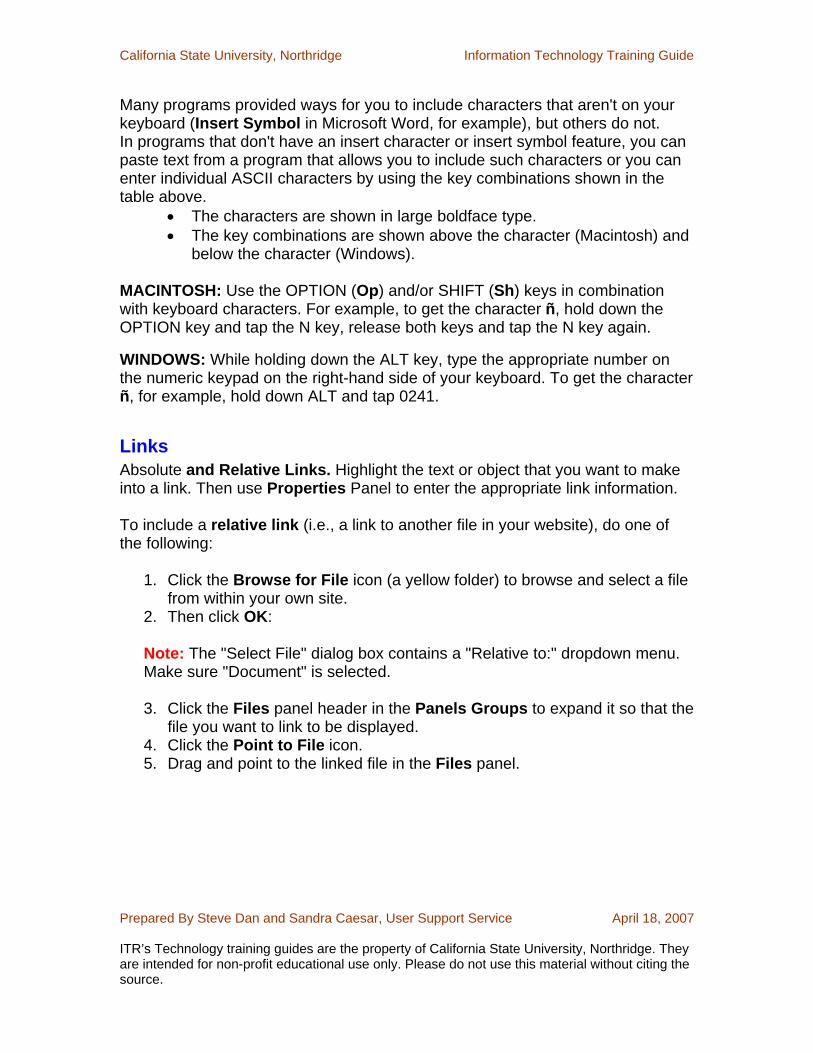
Note: For local image files, you can also drag and drop an image from the Site window into your document. Be sure to use the Properties panel (see Figure 7, below) to add alternate text that describes the image (Alt). You can also change image alignment (Align) in relation to the text or make the image a Link. You can also vertical and horizontal space (V Space or H Space) or add a border (Brdr) around the image.
Figure 7: Image Properties
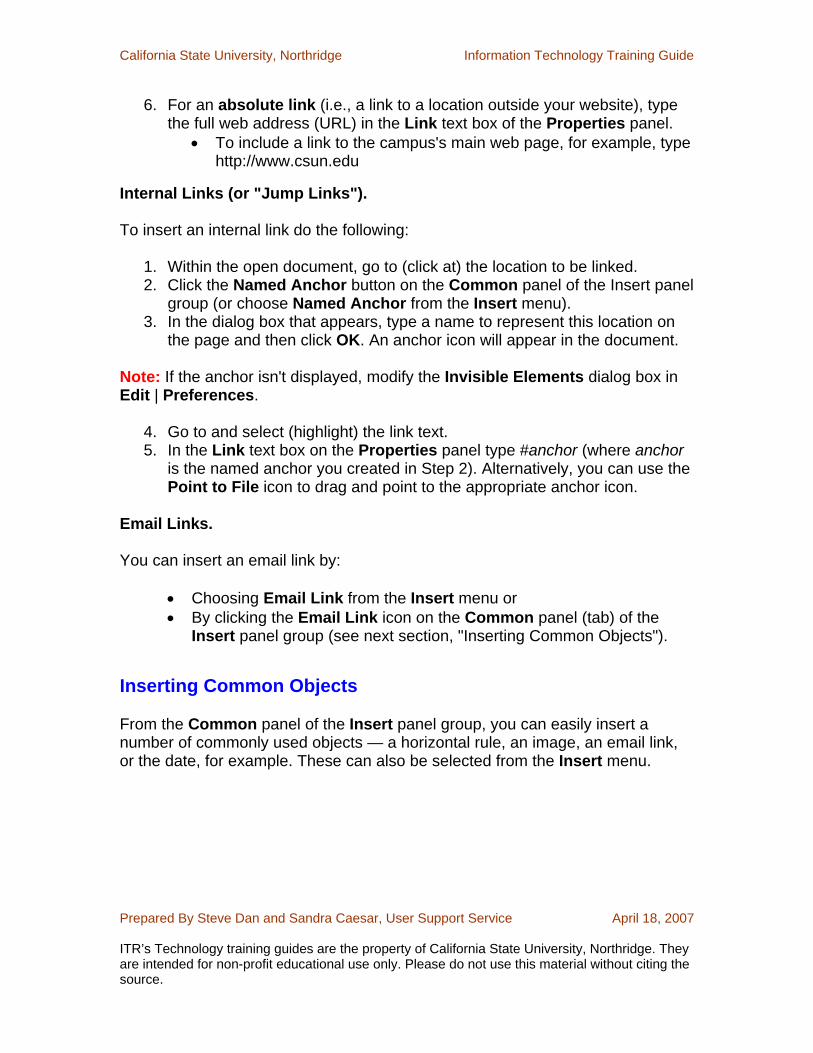
Email Link. Clicking the Email Link button displays the "Email Link" dialog box (as shown in Figure 8, below). Enter the link text and email address in the text boxes provided.
Figure 8: Email Link Dialog Box
Note: When you've entered an email address, that address will appear in the dialog box the next time you insert an email link.
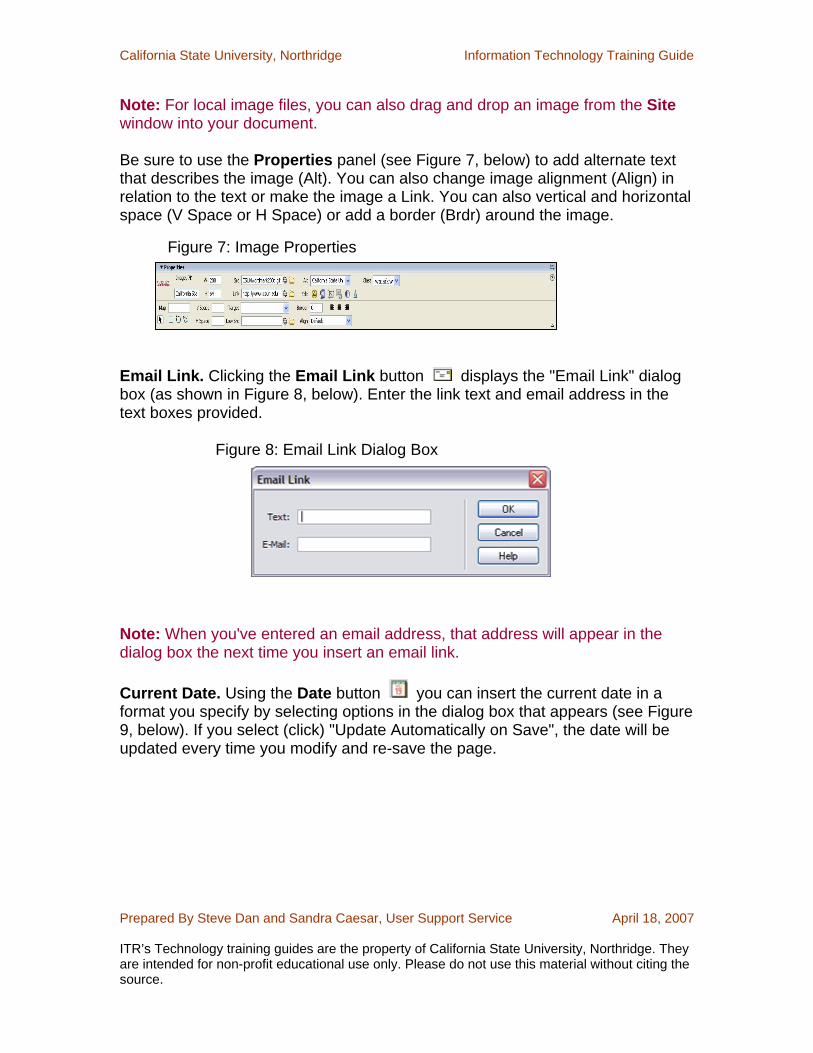
Current Date. Using the Date button you can insert the current date in a format you specify by selecting options in the dialog box that appears (see Figure 9, below). If you select (click) "Update Automatically on Save", the date will be updated every time you modify and re-save the page.
California State University, Northridge Information Technology Training Guide
Prepared By Steve Dan and Sandra Caesar, User Support Service April 18, 2007 ITR’s Technology training guides are the property of California State University, Northridge. They are intended for non-profit educational use only. Please do not use this material without citing the source.
Figure 9: Insert Date Dialog Box
Inserting Head Objects
You can insert header information using buttons on the Head panel of the Insert panel group. The tags can also be selected from the Insert | Head Tags cascading menu.
Keywords. Include keywords to help search engines find the page. Bear in mind that some engines will search on a limited number of keywords, so keep the number of keywords to a minimum.
Description. Use this tag to provide a description of the web page. If present, this summary will be used in search results.
Refresh. Use this feature when you want to inform a visitor that a page has been moved and automatically switch to the new page within a specified number of seconds.
Preparation for Publishing
Previewing a Page
Though Dreamweaver is a WISIWIG program, you don't always see exactly what you'll get when a page is published on the web.
It's a good idea to preview your pages in both Netscape and Internet Explorer, as there may be display differences.
California State University, Northridge Information Technology Training Guide
Prepared By Steve Dan and Sandra Caesar, User Support Service April 18, 2007 ITR’s Technology training guides are the property of California State University, Northridge. They are intended for non-profit educational use only. Please do not use this material without citing the source.
• Click the Preview/Debug in Browser button on the Document toolbar and select a browser.
• To add a browser to the list, you can use Edit Browser List option on the dropdown menu.
Good Site Organization Practices Get organized before you publish for the first time! If you publish first and reorganize later, you may be changing URLs that visitors to your site have bookmarked.
Rather than save every file in your website in the same folder, it's a good idea to structure the site by organizing files in separate folders according to category. This will make it easier to locate and add files as you develop the site.
• For example, the site for an academic department might include separate folders for information about faculty, degree programs, and special programs. Maintaining separate folders for images (and other assets) is another good practice.
The site maintenance feature in Dreamweaver allows you to reorganize your files without breaking any links. When you move a file within your site, Dreamweaver checks to see if the move will cause any links to be broken and, if so, asks if you want to update the links.
Code Cleanup Dreamweaver does a pretty good job of writing clean code; however, it's a good idea to use the "cleanup" feature just to make sure there aren't any extraneous codes in a document. From the Commands menu choose Clean Up XHTML.
If you use Dreamweaver to modify a web document that was created in Word, it's especially important to use the cleanup feature because Microsoft includes an abundance of unnecessary codes. From the Commands menu choose Clean Up Word HTML.
Check Page The Check Page feature — accessible from the File menu — provides ability to Check Accessibility (i.e., ADA/508 compliance), Check Links, and Check Target Browsers (including older browsers).

California State University, Northridge Information Technology Training Guide
Prepared By Steve Dan and Sandra Caesar, User Support Service April 18, 2007 ITR’s Technology training guides are the property of California State University, Northridge. They are intended for non-profit educational use only. Please do not use this material without citing the source.
Publishing Pages You can publish a single page, the contents of one folder, or an entire site using the Site panel in the Files panel group. Simply click the item(s) you want to publish and then click the Put File(s) arrow at the top of the site panel. For details, refer to the "Transferring Files" section of the appropriate Dreamweaver publishing instructions:
• Web Publishing to a Campus Account with Dreamweaver • Web Publishing to a Group Web Folder with Dreamweaver
Working with Files in the Files Panel
You can open or rename files; add, move, or delete files; or refresh the Files panel after you make changes. For Dreamweaver sites, you can also determine which files (on either the local or remote site) have been updated since the last time they were transferred.
To Open a File: 1. In the Files panel, select a site or drive from the pop-up menu (where the
current site or drive appears). 2. Navigate to the file you want to open. 3. Do one of the following:
• Double-click the file’s icon. • Right-click (Windows) or Control-click (Macintosh) the file’s icon,
then select Open.
Dreamweaver opens the file in the Document window.
To Create a New File or Folder: 1. In the Files panel, select a file or folder.
Dreamweaver will create the new file or folder inside the currently selected folder, or in the same folder as the currently selected file.
2. Right-click (Windows) or Control-click (Macintosh), then select New File or New Folder.
3. Enter a name for the new file or folder. 4. Press Enter (Windows) or Return (Macintosh).
California State University, Northridge Information Technology Training Guide
Prepared By Steve Dan and Sandra Caesar, User Support Service April 18, 2007 ITR’s Technology training guides are the property of California State University, Northridge. They are intended for non-profit educational use only. Please do not use this material without citing the source.
To Delete a File or Folder: 1. In the Files panel, select the file or folder you want to delete. 2. Right-click (Windows) or Control-click (Macintosh), then select Edit, and
then delete.
To Rename a File or Folder: 1. In the Files panel, select the file or folder you want to rename. 2. Right-click (Windows) or Control-click (Macintosh) the file’s icon, then select
Edit, and then Rename. 3. Type the new name over the existing name. 4. Press Enter (Windows) or Return (Macintosh).
To Move a File or Folder: 1. In the Files panel, select the file or folder you want to move. 2. Do one of the following:
• Right-click the file or folder, then select Edit, then Copy. Paste it in
a new location. • Drag the file or folder to a new location.
3. Refresh the Files panel to see the file or folder in its new location.
To Refresh the Files Panel,
Do One of the Following: • Right-click (Windows) or Control-click (Macintosh) any file or folder,
then select Refresh. • (Dreamweaver sites only) Click the Refresh button in the Files panel
toolbar (this option refreshes both panes).
How to Learn More
Dreamweaver Help Among the items on Dreamweaver's Help menu are:
• Getting Started with Dreamweaver — step-by-step lessons in the fundamentals of Dreamweaver MX.
• Using Dreamweaver — provides several ways to locate information: Contents, Index, and Search. To save a displayed topic, click the Favorites tab and click the Add button.
• What's New in Dreamweaver 8 — information for users who are upgrading from previous versions of Dreamweaver.
California State University, Northridge Information Technology Training Guide
Prepared By Steve Dan and Sandra Caesar, User Support Service April 18, 2007 ITR’s Technology training guides are the property of California State University, Northridge. They are intended for non-profit educational use only. Please do not use this material without citing the source.
Books
• Macromedia Dreamweaver 8 by Daniel Short and Garo Green (Peachpit Press, 2006)
• Macromedia Dreamweaver 8 for Windows and Macintosh: Visual QuickStart Guide by Tom Negrino and Dori Smith (Paperback - October 2005)
• Macromedia Dreamweaver 8: Training from the Source by Khristine Annwn Page (Paperback - March 2006)
• Teach Yourself VISUALLY Macromedia Dreamweaver 8 by Janine Warner, (Wiley Publishing Inc., 2006)