Embed Size (px)
Citation preview

Go get a 2b to 6b pencil, 9x12 construction or poster paper, a ruler and an eraser for this lesson. Often you can advance to the next picture and it will answer questions about the previous one.
You will have to read the text when the step includes measurements. For the first few steps of this lesson you will
want to read the instructions very carefully, but soon you will be able to look at the pictures for most of your instructions.
Make a 1/2 inch border by measuring and drawing a mark 1/2 in
from each corner.

Draw the 1/2 marks from each corner.
Keep turning your paper and marking ½ inch from the corner.
Then do the same thing all the way around on the top right corners.
Keep turning the pages and making marks ½ inch from the right
corners.
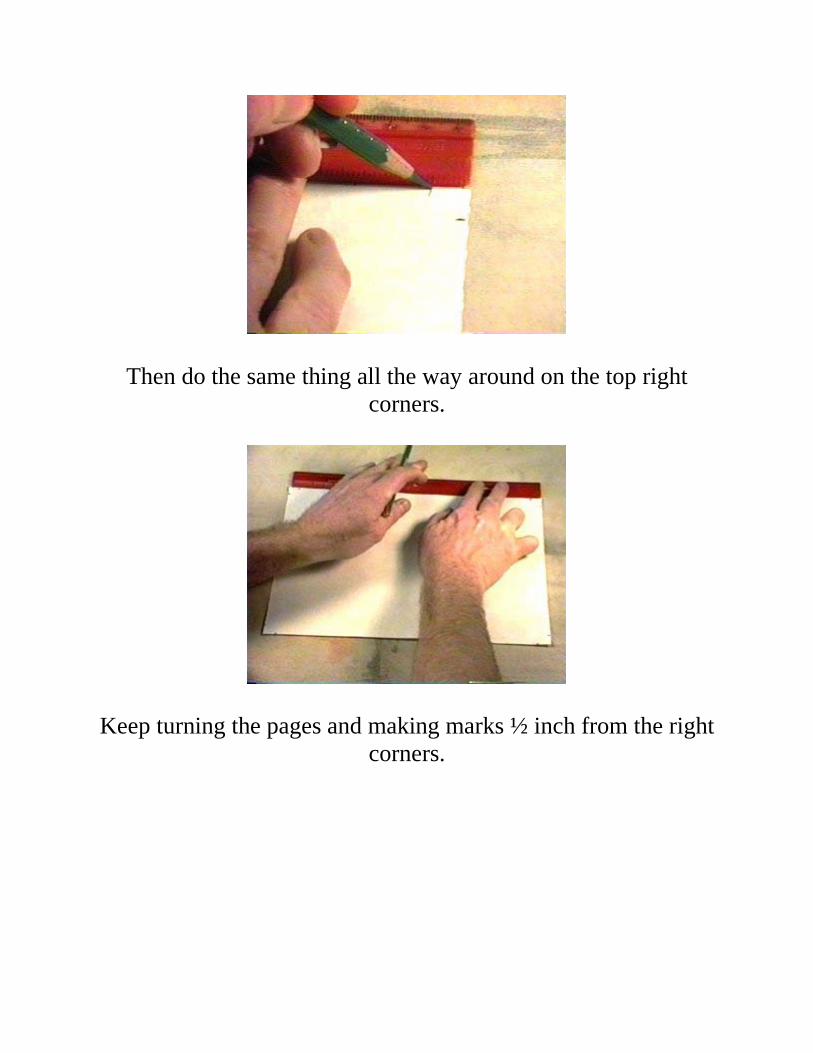
Connect the marks you made to create a simple border.
Now put the zero end of the ruler on the lower left corner of the
page.
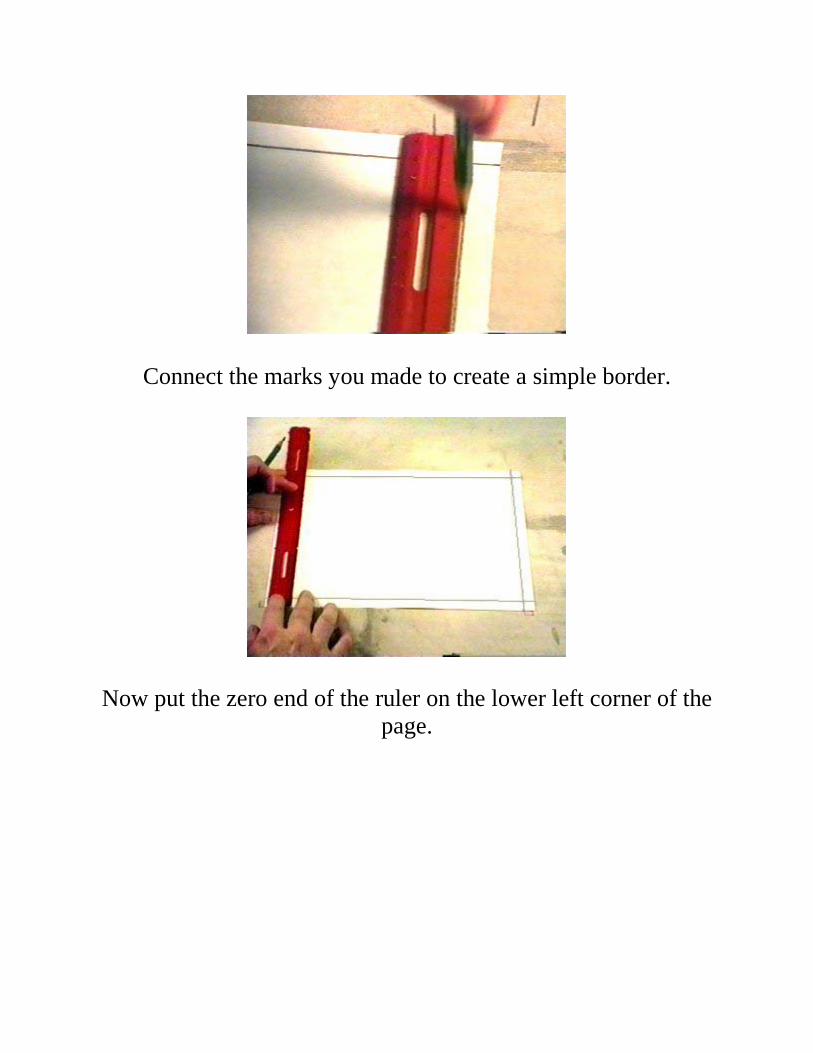
Put a mark 4-inches from the bottom of the page. This is one of
the two points you will use throughout the drawing. After all this is a two POINT perspective drawing and this is one of the
points.
Put a mark 4-inches from the bottom of the right side of the page. Now you have your TWO POINTS.
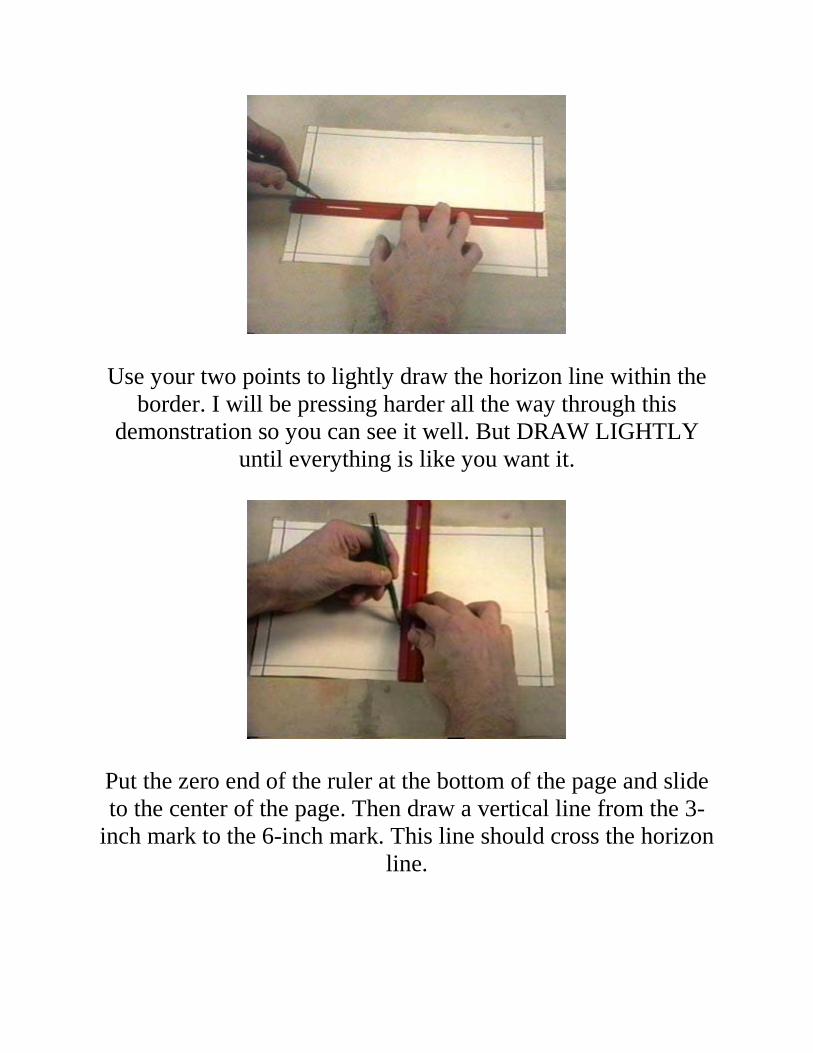
Use your two points to lightly draw the horizon line within the
border. I will be pressing harder all the way through this demonstration so you can see it well. But DRAW LIGHTLY
until everything is like you want it.
Put the zero end of the ruler at the bottom of the page and slide to the center of the page. Then draw a vertical line from the 3-
inch mark to the 6-inch mark. This line should cross the horizon line.
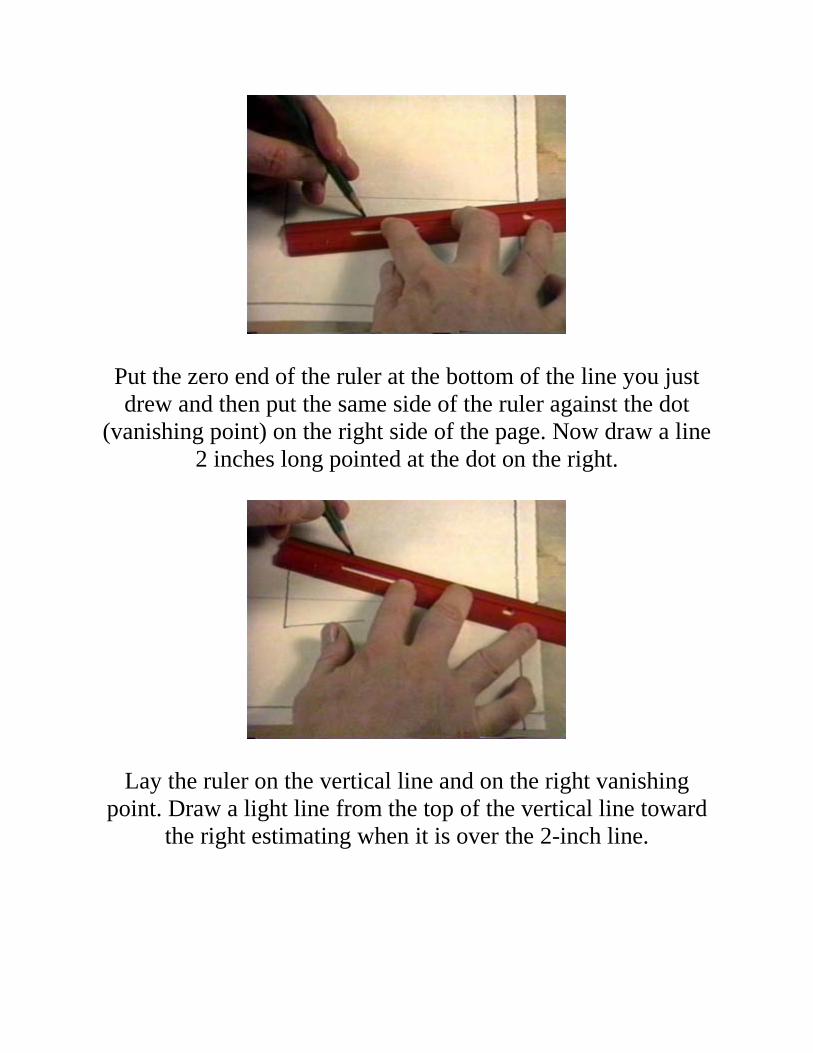
Put the zero end of the ruler at the bottom of the line you just drew and then put the same side of the ruler against the dot
(vanishing point) on the right side of the page. Now draw a line 2 inches long pointed at the dot on the right.
Lay the ruler on the vertical line and on the right vanishing point. Draw a light line from the top of the vertical line toward
the right estimating when it is over the 2-inch line.
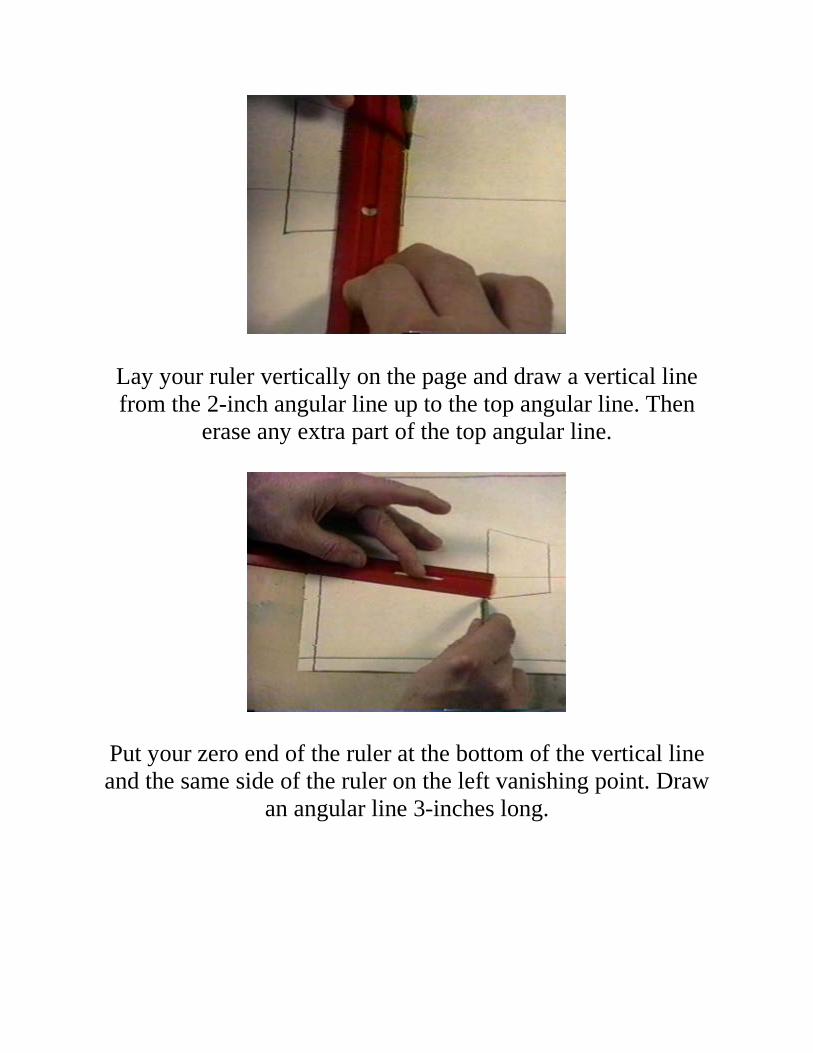
Lay your ruler vertically on the page and draw a vertical line from the 2-inch angular line up to the top angular line. Then
erase any extra part of the top angular line.
Put your zero end of the ruler at the bottom of the vertical line and the same side of the ruler on the left vanishing point. Draw
an angular line 3-inches long.

Lay the ruler on the vertical line and the left vanishing point and draw a line until it is approximately as long as the 3-inch angular
line.
Draw a vertical line from the bottom angular line to the top angular line and erase any extra length off the top line.
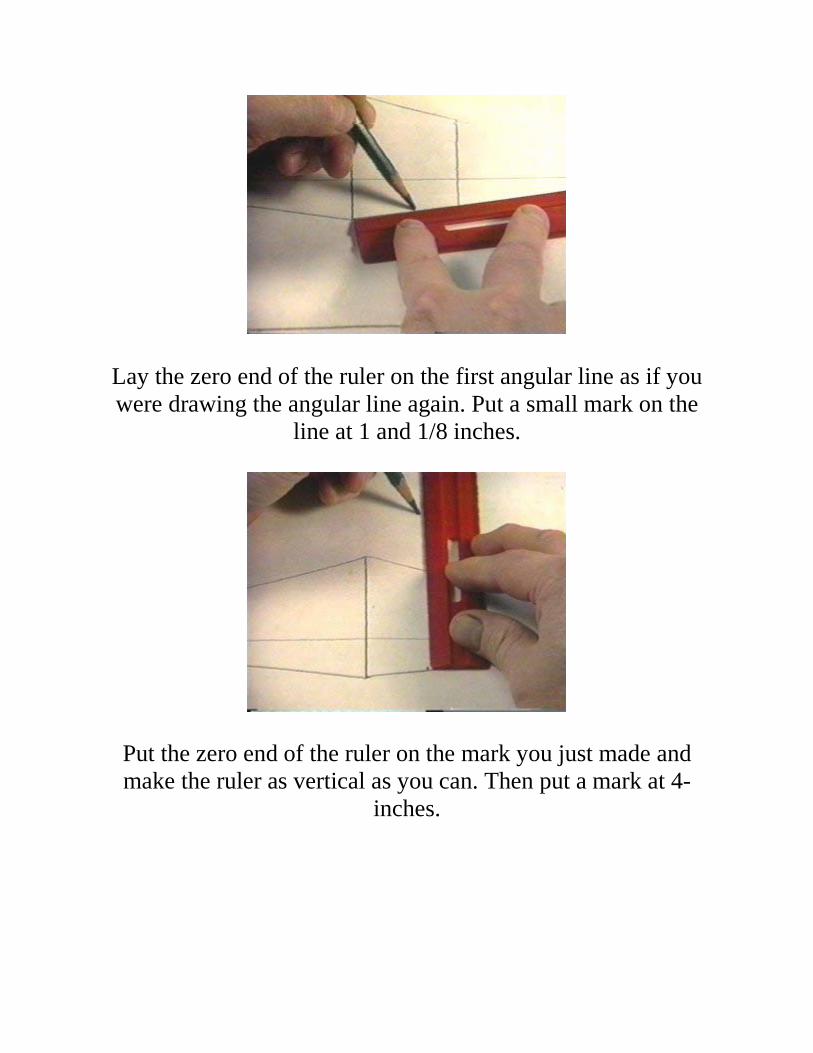
Lay the zero end of the ruler on the first angular line as if you were drawing the angular line again. Put a small mark on the
line at 1 and 1/8 inches.
Put the zero end of the ruler on the mark you just made and make the ruler as vertical as you can. Then put a mark at 4-
inches.

Erase any extra lines off the edges.
Use the 4-inch dot and the ruler to draw an angular line to the top right side of the barn.

Draw a line from the 4-inch dot to the top of the first vertical line.
Erase the horizon line from inside the shapes you have made.

Lay your ruler across the 4-inch dot and the left vanishing point.
Draw a light line approximately as long as the barn.
Use an architect's trick laying the ruler on the left angle of the roof and slide...

Slide to the left side of the barn while keeping the same angle. Draw a line from the left side of the barn to the top line and
erase the extra part of the top line if any.
Lay the zero end of the ruler on the first angular line again. Put a
small mark on the line at ¾ of an inch.

Then put a mark on 1 and ½ inches.
Draw light vertical lines from the 3/4s and the 1 and ½ inch marks.
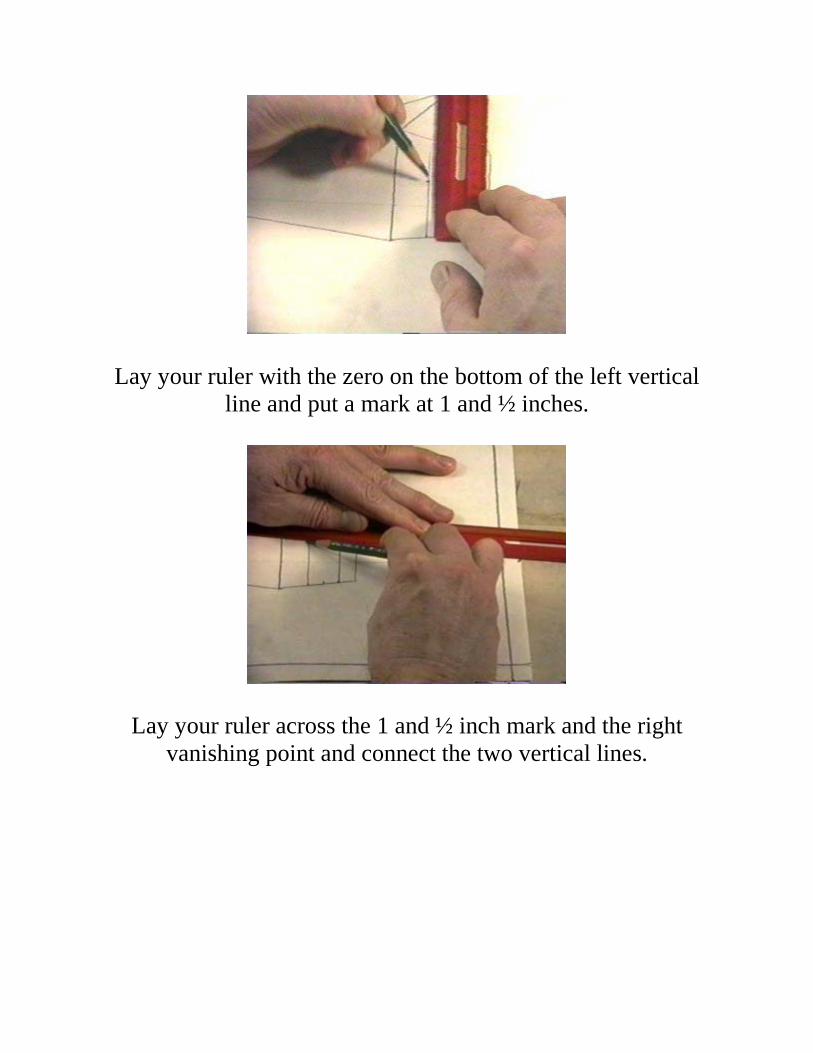
Lay your ruler with the zero on the bottom of the left vertical line and put a mark at 1 and ½ inches.
Lay your ruler across the 1 and ½ inch mark and the right vanishing point and connect the two vertical lines.
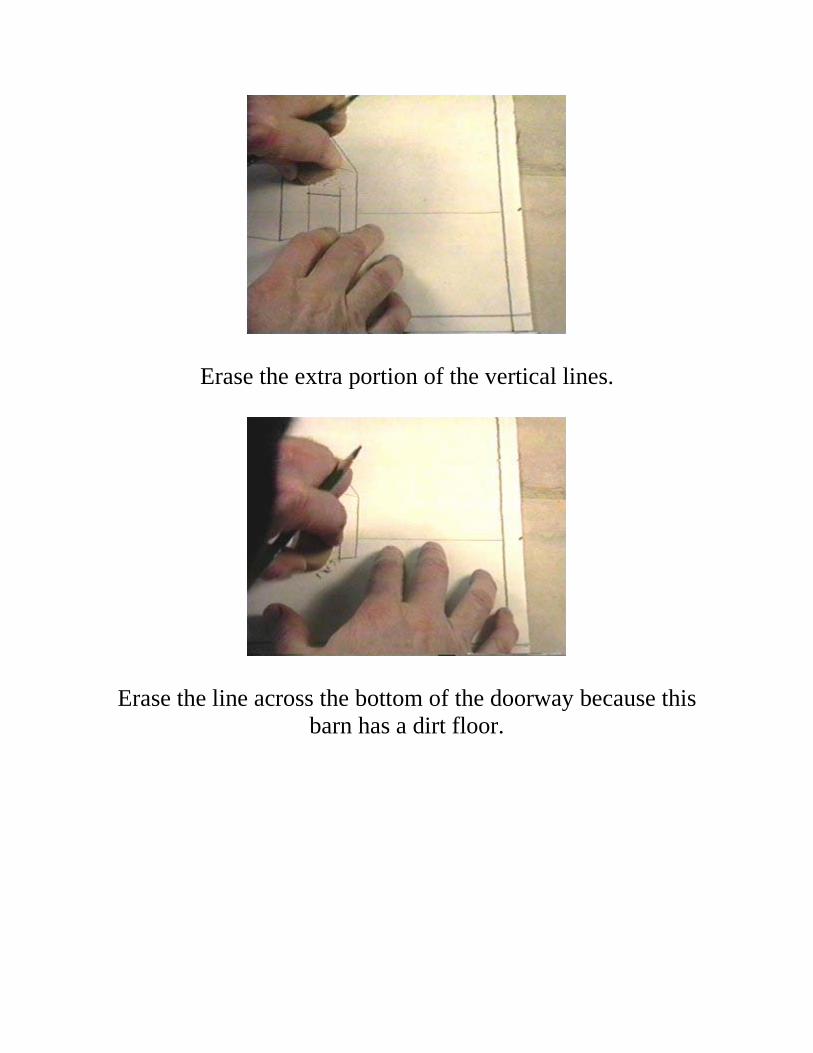
Erase the extra portion of the vertical lines.
Erase the line across the bottom of the doorway because this barn has a dirt floor.
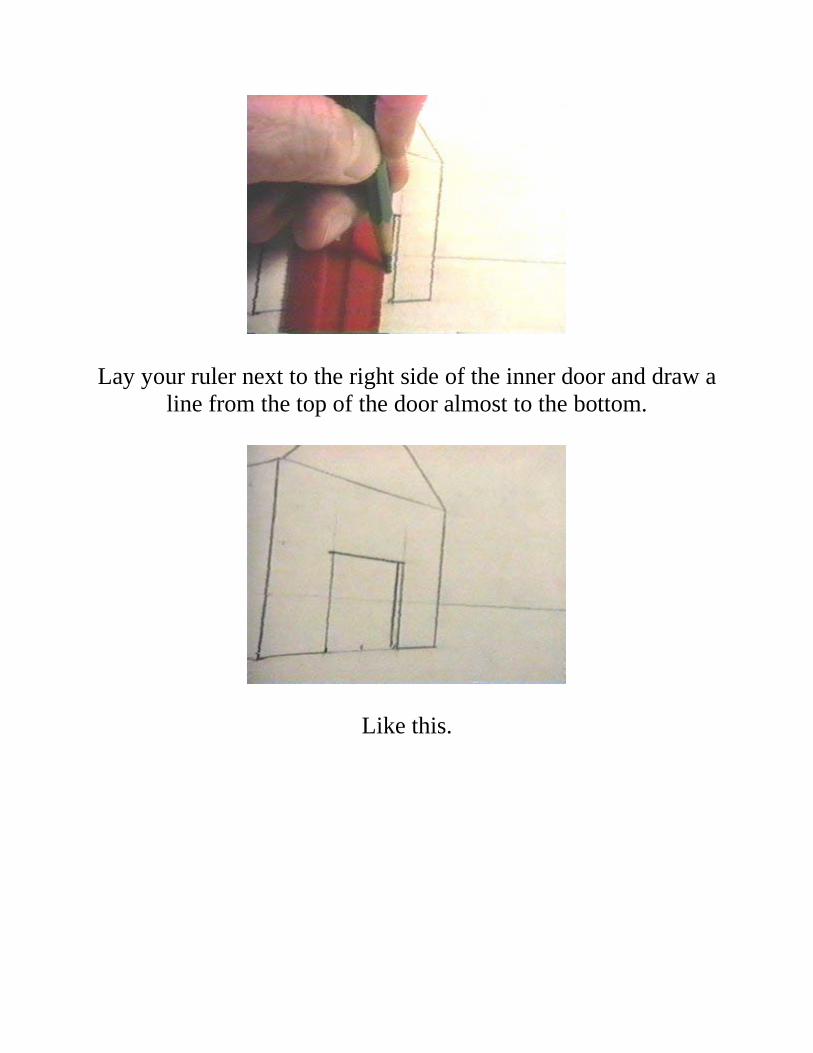
Lay your ruler next to the right side of the inner door and draw a
line from the top of the door almost to the bottom.
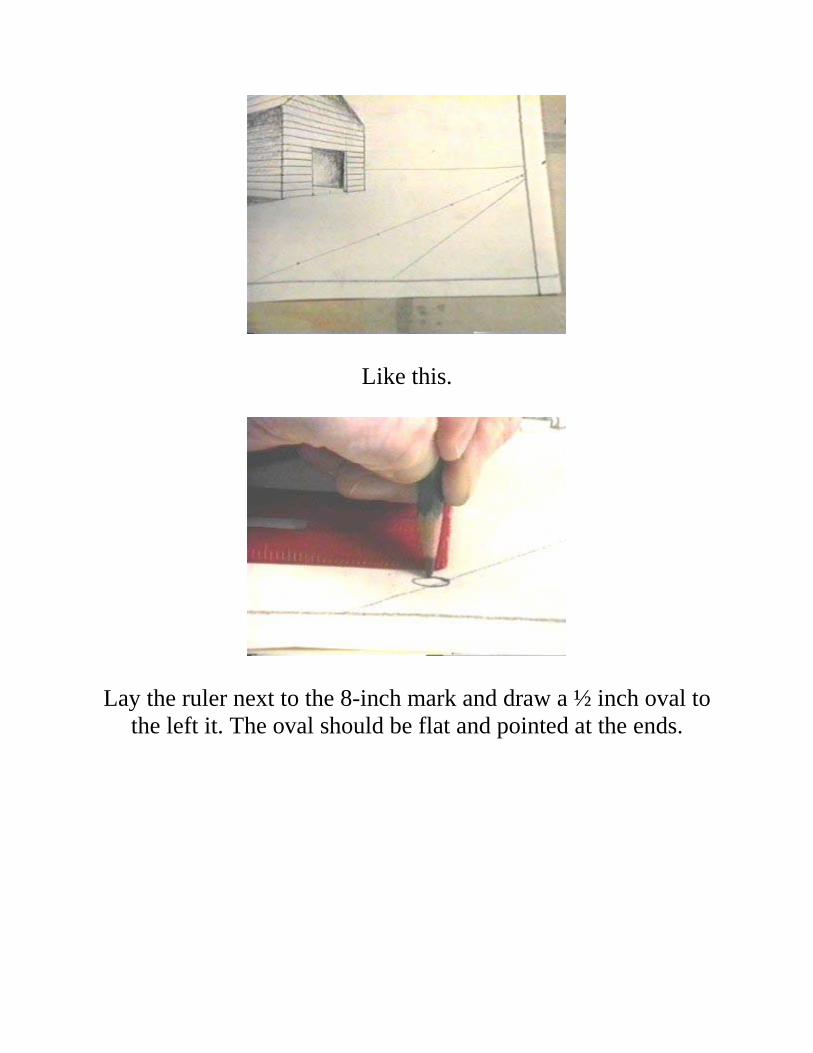
Like this.
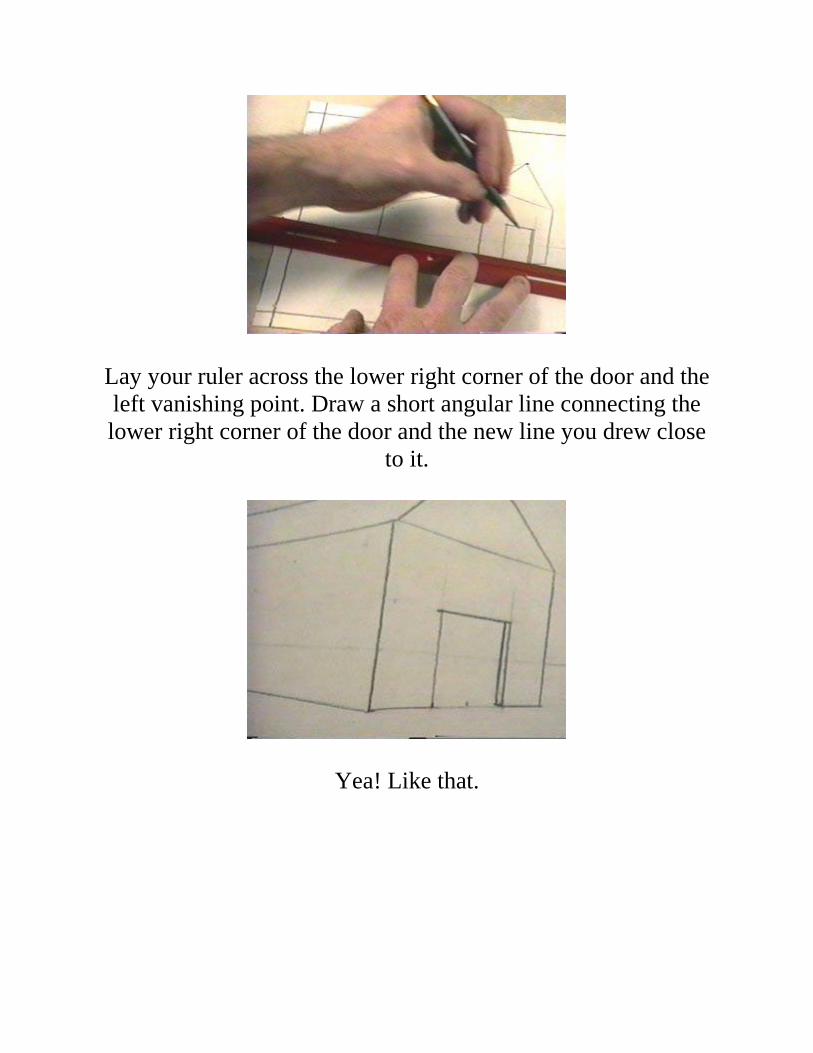
Lay your ruler across the lower right corner of the door and the left vanishing point. Draw a short angular line connecting the lower right corner of the door and the new line you drew close
to it.
Yea! Like that.
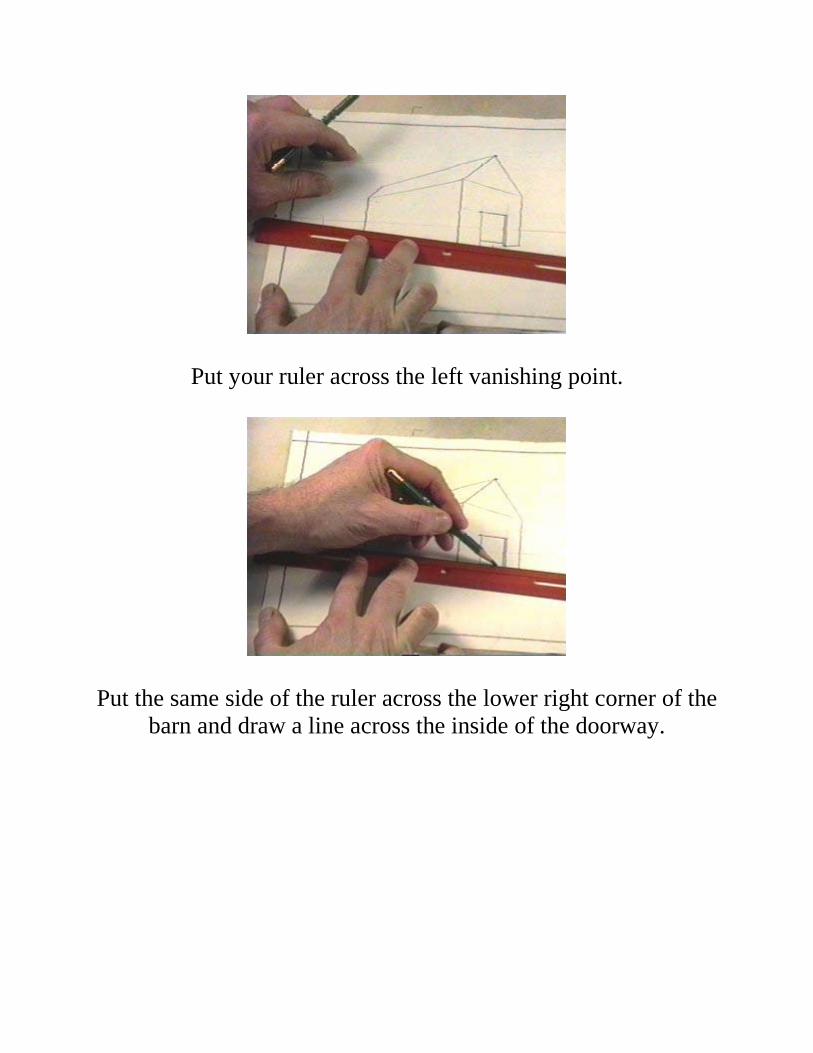
Put your ruler across the left vanishing point.
Put the same side of the ruler across the lower right corner of the
barn and draw a line across the inside of the doorway.
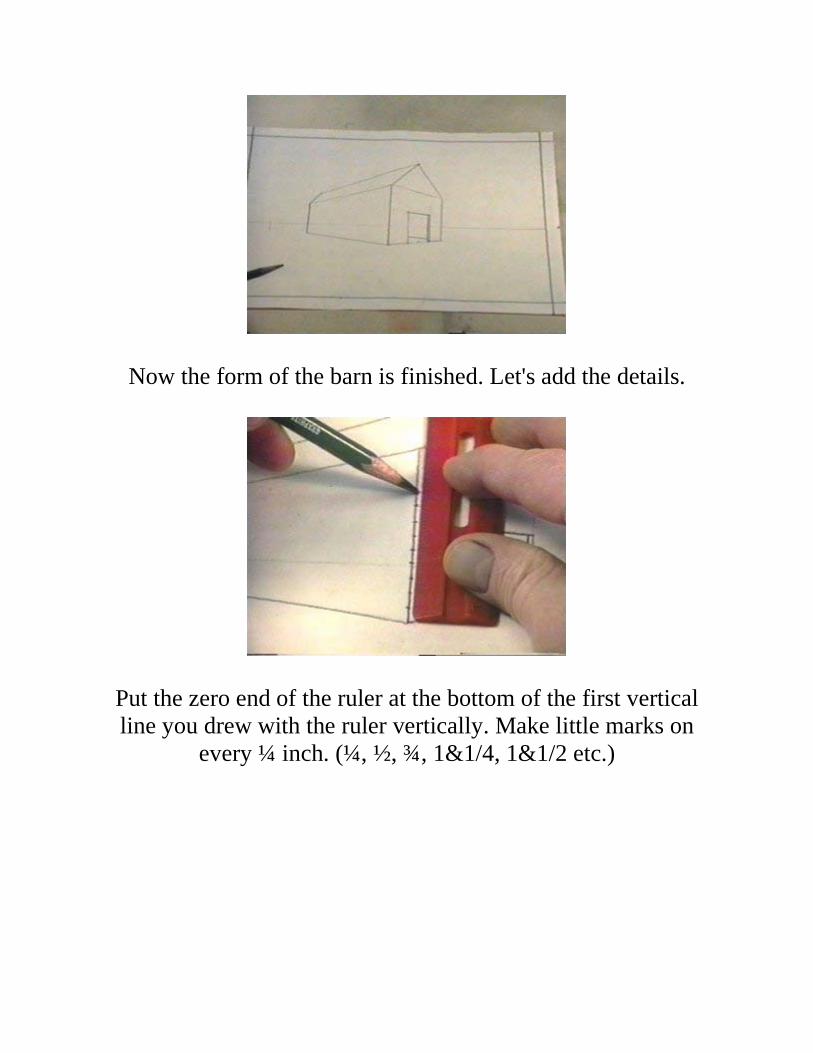
Now the form of the barn is finished. Let's add the details.
Put the zero end of the ruler at the bottom of the first vertical line you drew with the ruler vertically. Make little marks on
every ¼ inch. (¼, ½, ¾, 1&1/4, 1&1/2 etc.)
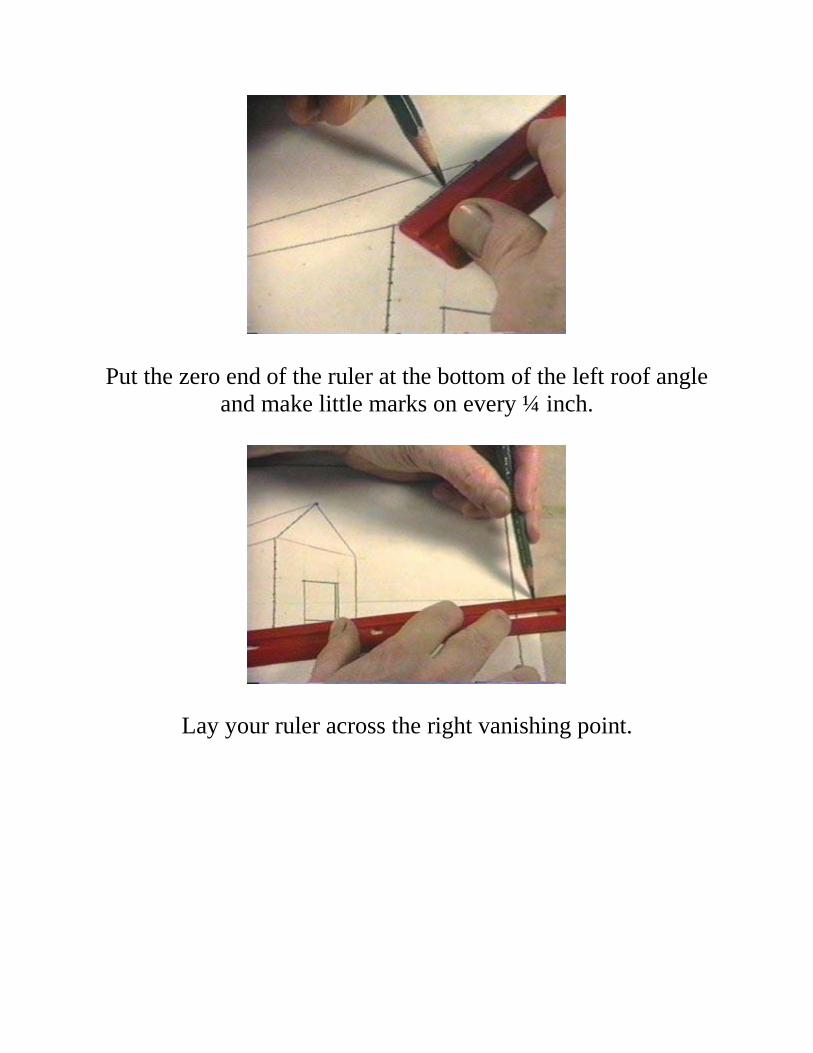
Put the zero end of the ruler at the bottom of the left roof angle
and make little marks on every ¼ inch.
Lay your ruler across the right vanishing point.
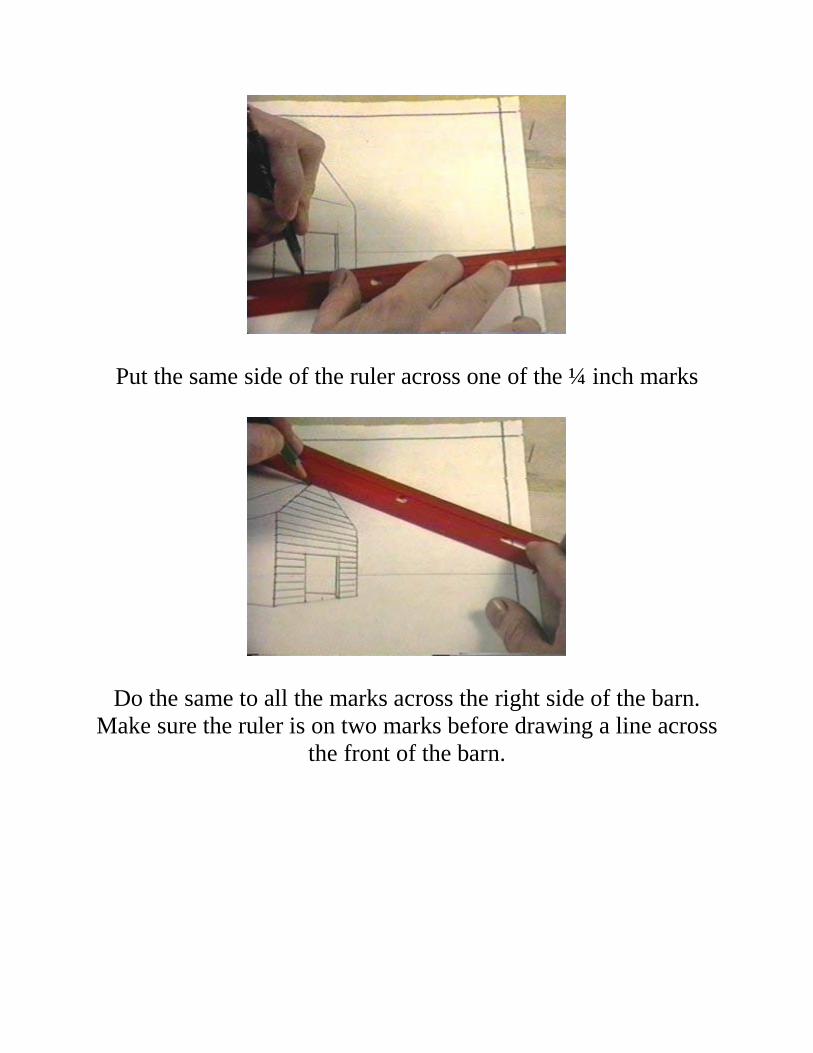
Put the same side of the ruler across one of the ¼ inch marks
Do the same to all the marks across the right side of the barn. Make sure the ruler is on two marks before drawing a line across
the front of the barn.

Lay the ruler across the left vanishing point and each of the ¼ inch marks, drawing a line on the side of the barn. Make sure the
ruler is on two marks before drawing each line.
Lay the ruler across the left vanishing point and each of every other 1/4-inch mark on the roof, drawing a line on every ½ inch
of the side of the roof. Make sure the ruler is on two marks before drawing each line.

Use the side of your pencil to make broad lines shading the boards on the wall under the roof. Don't put any dark values on
the roof.
Continue shading with lighter and lighter values down the side
of the barn.

Starting along the right angle of the roof, shade with dark values
under the edge and press softer as you move to the left and down.
Inside the doorway, on the inside wall of the barn, use the side of your pencil to make dark values that get lighter as you go to
the left.
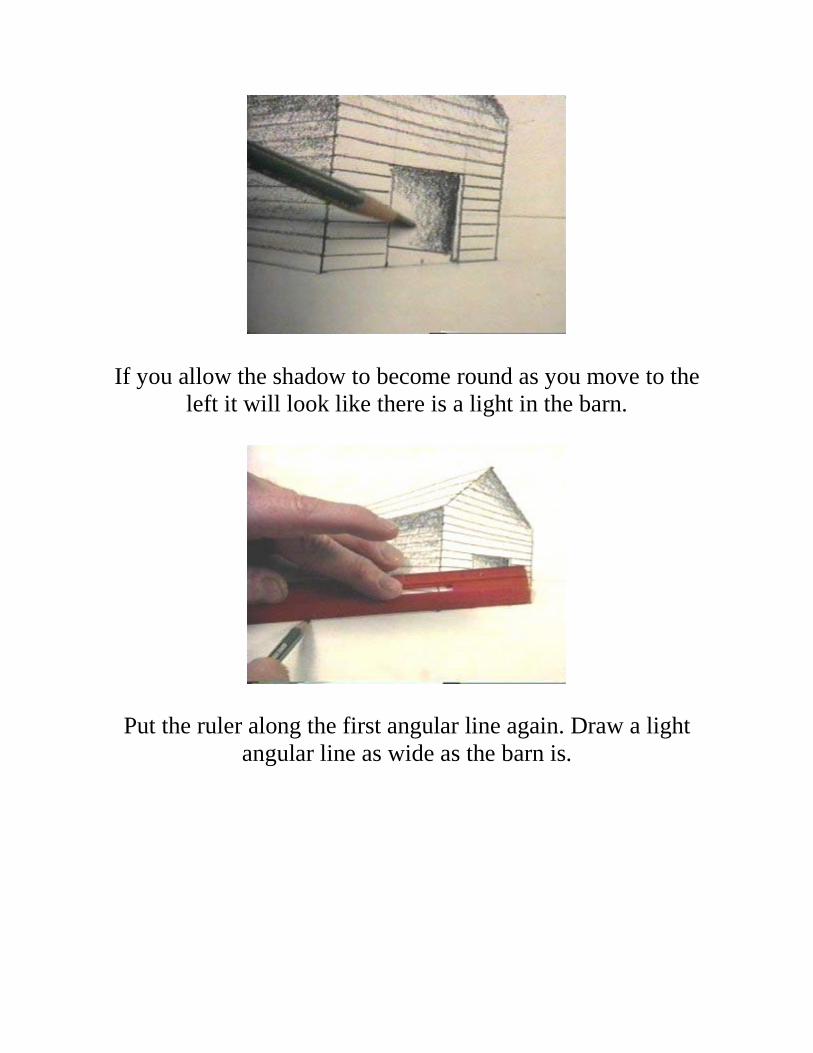
If you allow the shadow to become round as you move to the left it will look like there is a light in the barn.
Put the ruler along the first angular line again. Draw a light angular line as wide as the barn is.
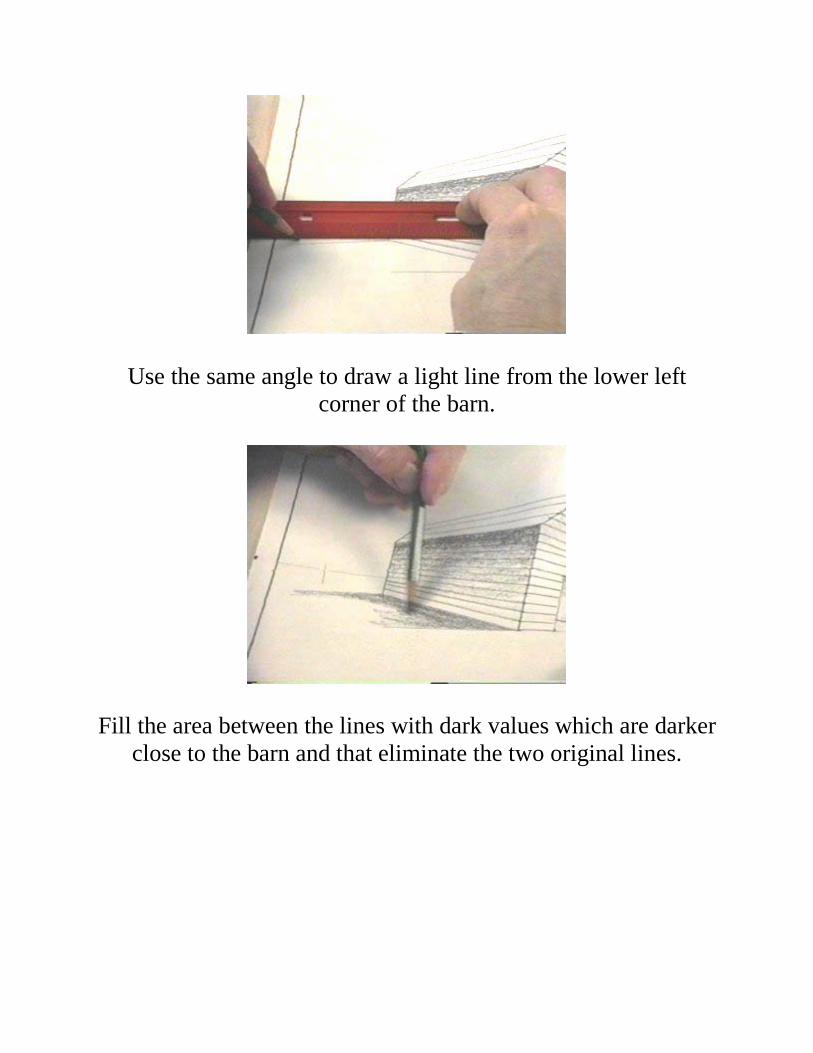
Use the same angle to draw a light line from the lower left corner of the barn.
Fill the area between the lines with dark values which are darker
close to the barn and that eliminate the two original lines.
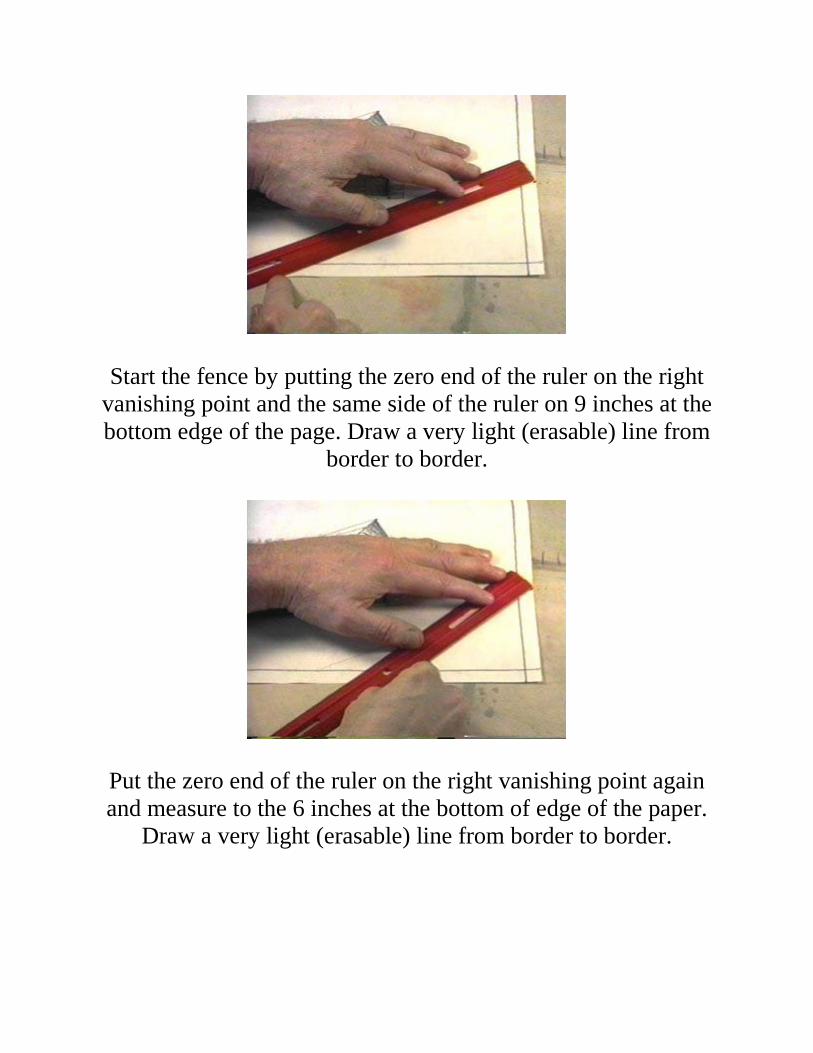
Start the fence by putting the zero end of the ruler on the right vanishing point and the same side of the ruler on 9 inches at the bottom edge of the page. Draw a very light (erasable) line from
border to border.
Put the zero end of the ruler on the right vanishing point again and measure to the 6 inches at the bottom of edge of the paper.
Draw a very light (erasable) line from border to border.

Lay the ruler with the zero end of the ruler at the top of the top
line…
Put tiny marks at 1/8, ¼, ½, 1, 2, 4, 8 inches.
Like this.
Lay the ruler next to the 8-inch mark and draw a ½ inch oval to
the left it. The oval should be flat and pointed at the ends.

Use the ruler to make the next oval on the 4-inch mark ¾s of an
inch to the left of the mark.
Each should get smaller till the last two are just the size of the original marks.
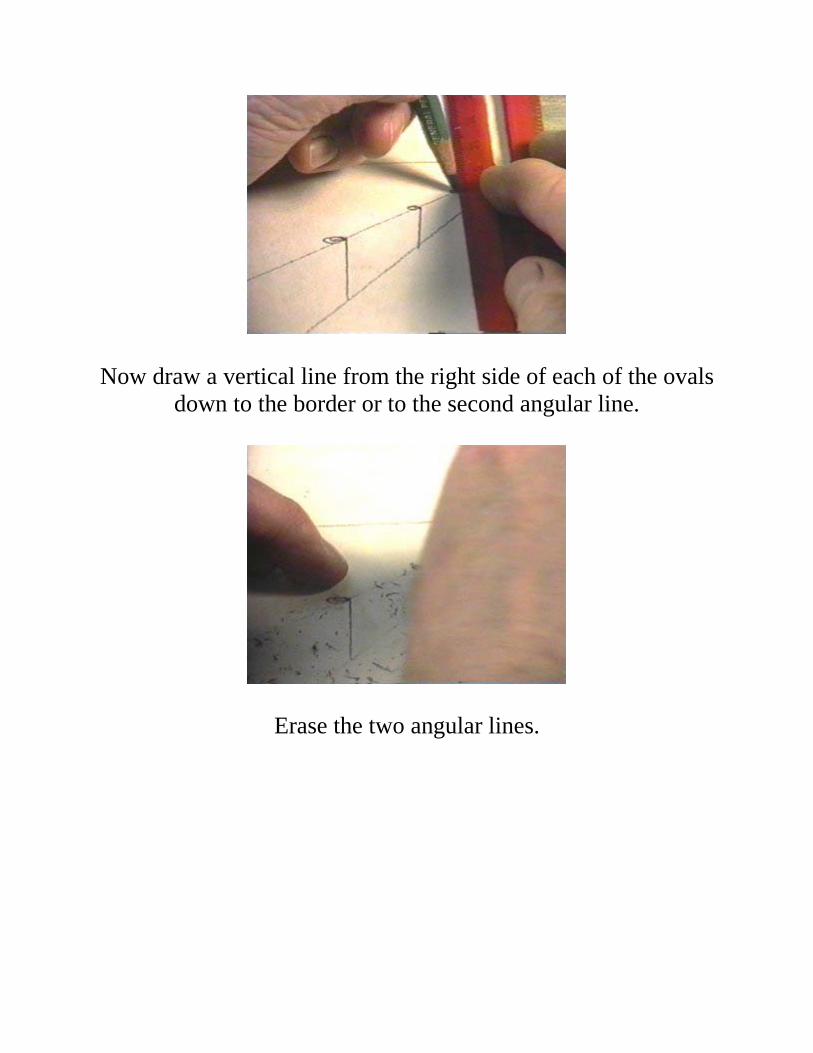
Now draw a vertical line from the right side of each of the ovals
down to the border or to the second angular line.
Erase the two angular lines.

Then lay your ruler across the right vanishing point and the top
greater-than sign. Draw a light line from border to border.
Then lay your ruler across the right vanishing point and the bottom greater-than sign. Draw a light line from border to
border.

Draw greater-than signs in the middle of each fence post where
the lines cross them.
The greater-than signs must get small as they go toward the vanishing point.

Draw the fence boards by making lines from the top of the greater-than sign along the light line…
Then make a line from the bottom of the greater-than sign to the
border.

Then erase the little bit of the light line between the greater-than
sign and the right side of the fence post.
Make the rest of the fence posts the same way until they are too
small the draw with two lines.
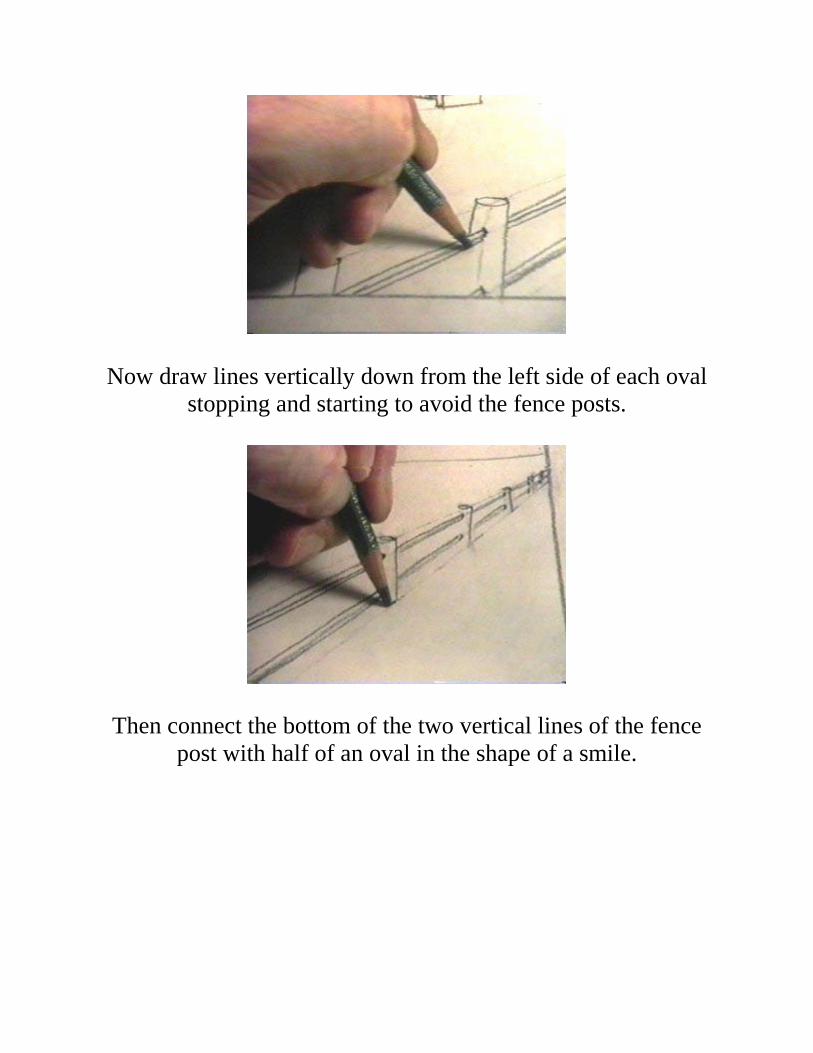
Now draw lines vertically down from the left side of each oval
stopping and starting to avoid the fence posts.
Then connect the bottom of the two vertical lines of the fence post with half of an oval in the shape of a smile.

Finish all the fence posts.
Use the side of your pencil to shade the left side of each fence post with a dark value that gets lighter as it crosses to the right.
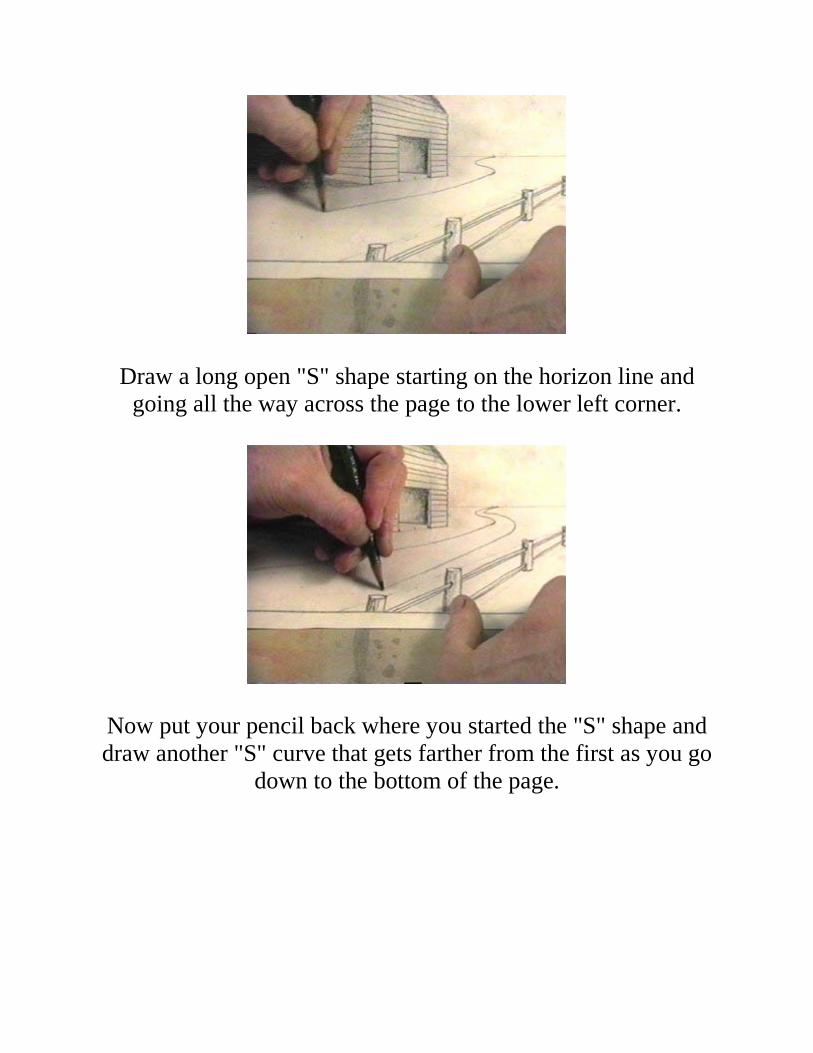
Draw a long open "S" shape starting on the horizon line and going all the way across the page to the lower left corner.
Now put your pencil back where you started the "S" shape and draw another "S" curve that gets farther from the first as you go
down to the bottom of the page.

Use the side of your pencil to make a dark value at the bottom of the page that gets lighter as you move toward the horizon line.
Be careful to fill in between the fence boards carefully.
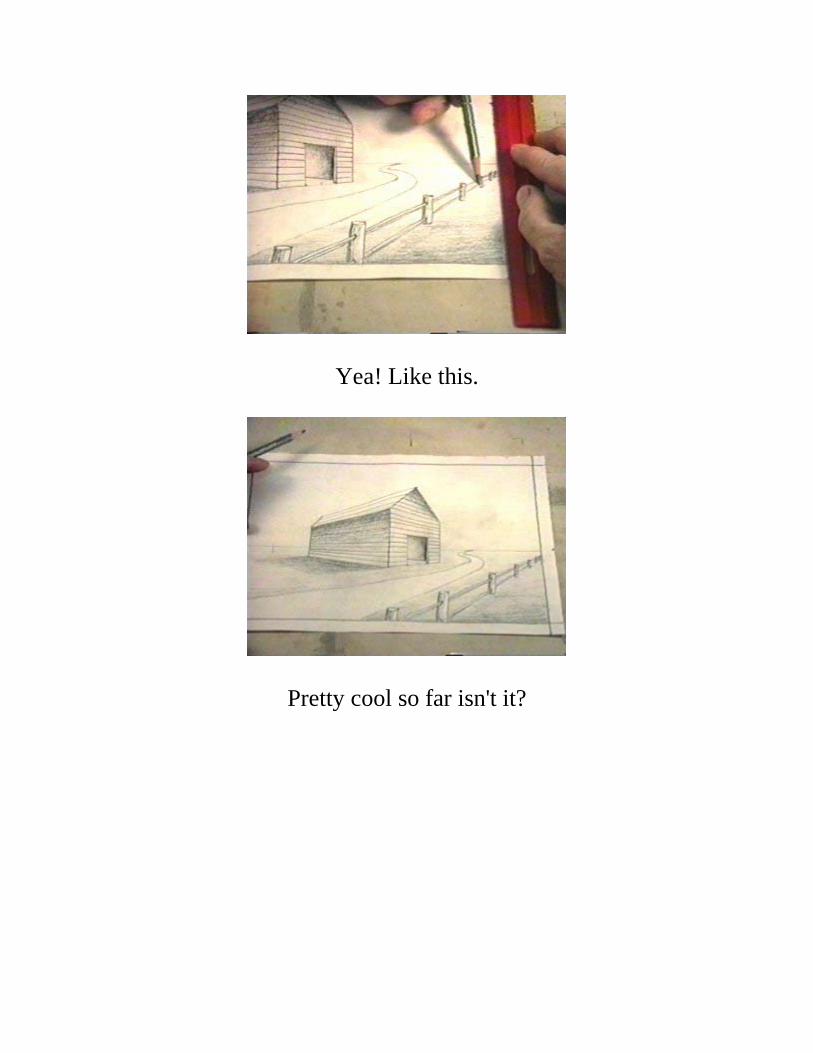
Yea! Like this.
Pretty cool so far isn't it?
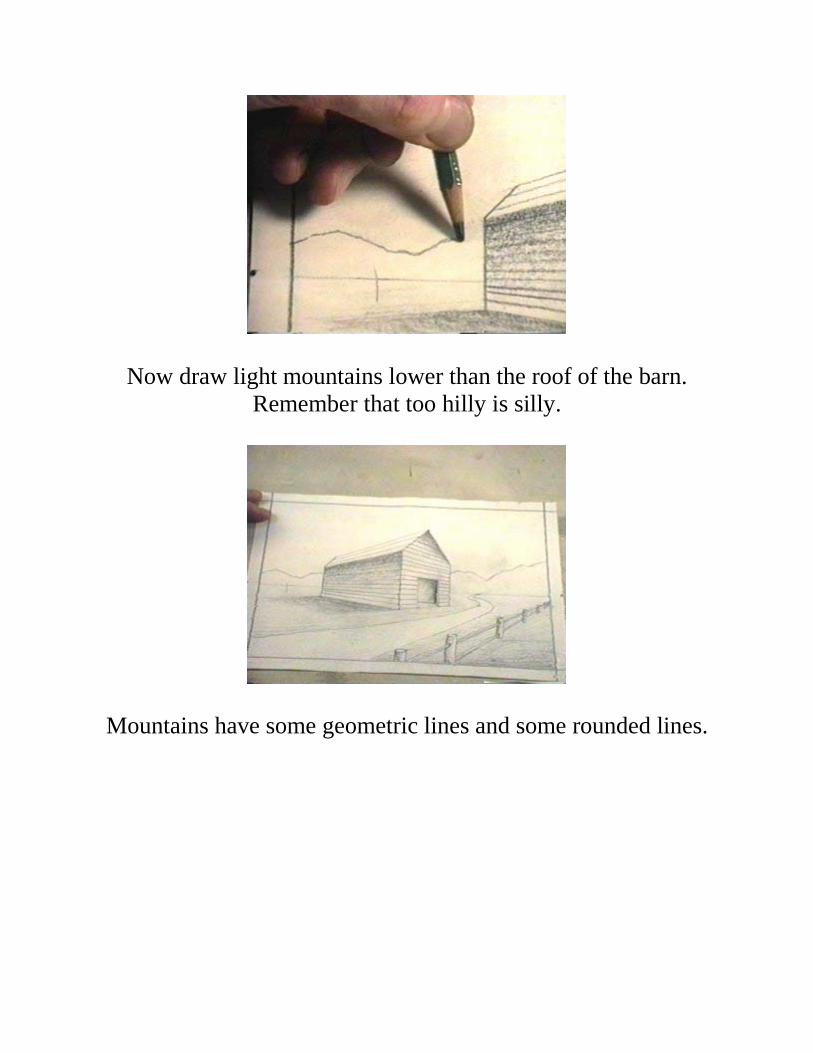
Now draw light mountains lower than the roof of the barn. Remember that too hilly is silly.
Mountains have some geometric lines and some rounded lines.

Use the side of your pencil to make a random pattern of medium
value that crawls down the left side of each mountain peak, getting wider as you move to the horizon line.
Yea Buddy!

To make clouds you draw a random pattern of three sized "C" shapes. The "C" shapes are laying on their backs in a random
pattern. (Small, medium, small, small, large etc.)
Make another random pattern of "C" shapes part of the way under the first. Don't make the same pattern."

Now make a random pattern of "C" shapes facing down and starting close to the top of the barn.
Make a little "C" shape on the end and turn around back to the roof.
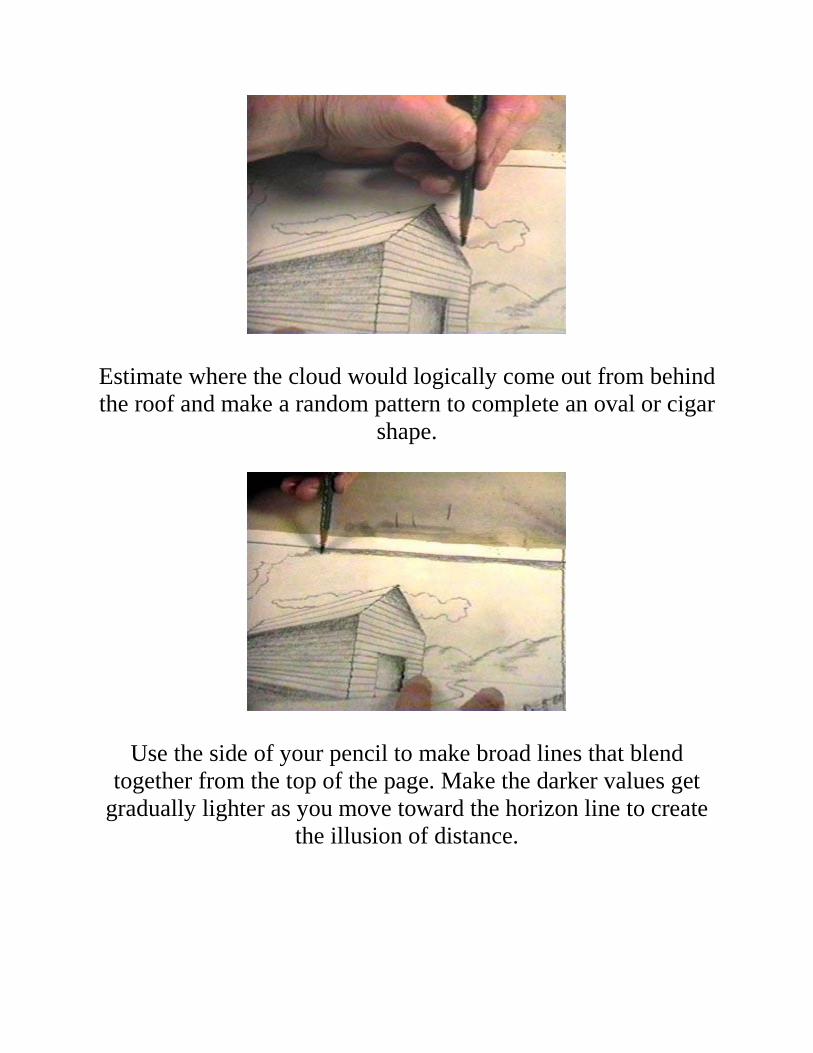
Estimate where the cloud would logically come out from behind the roof and make a random pattern to complete an oval or cigar
shape.
Use the side of your pencil to make broad lines that blend together from the top of the page. Make the darker values get
gradually lighter as you move toward the horizon line to create the illusion of distance.
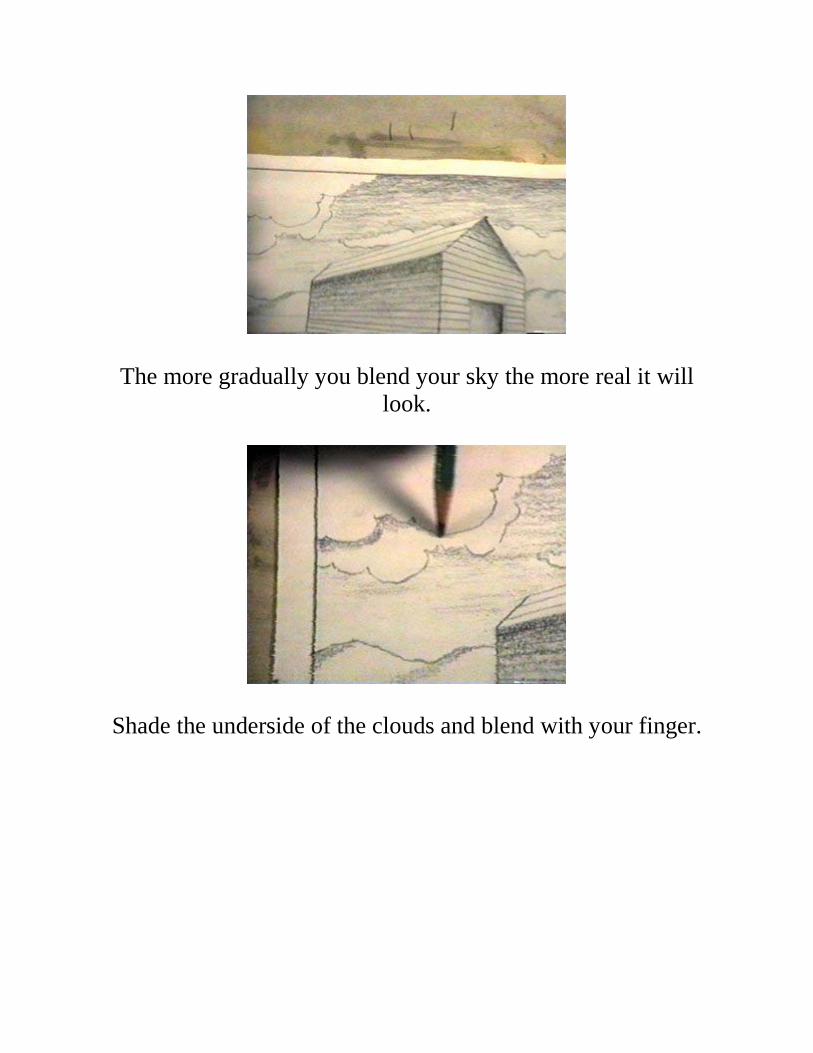
The more gradually you blend your sky the more real it will look.
Shade the underside of the clouds and blend with your finger.

Smear the bottom of the clouds, the mountains, and the closest
part of the roof lightly with your finger.
Now you can add details like "Z" shaped irregularities on the edge of the road. They should get smaller as they go up toward
the horizon line.
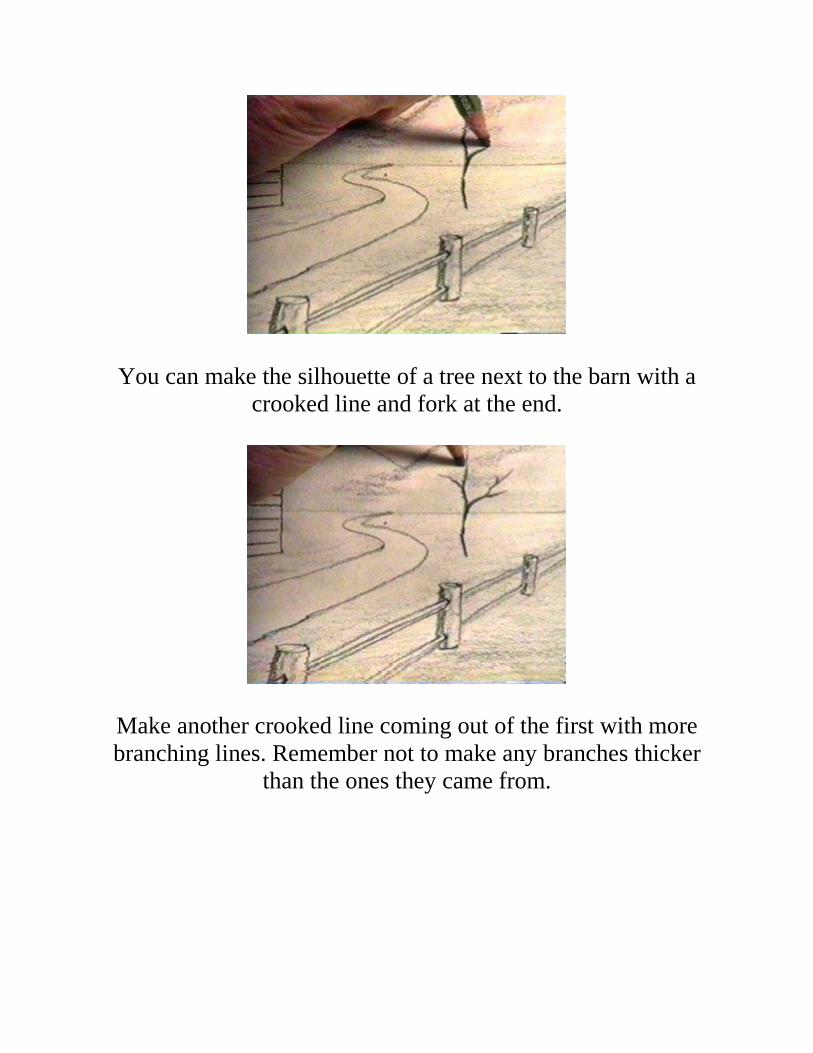
You can make the silhouette of a tree next to the barn with a crooked line and fork at the end.
Make another crooked line coming out of the first with more branching lines. Remember not to make any branches thicker
than the ones they came from.
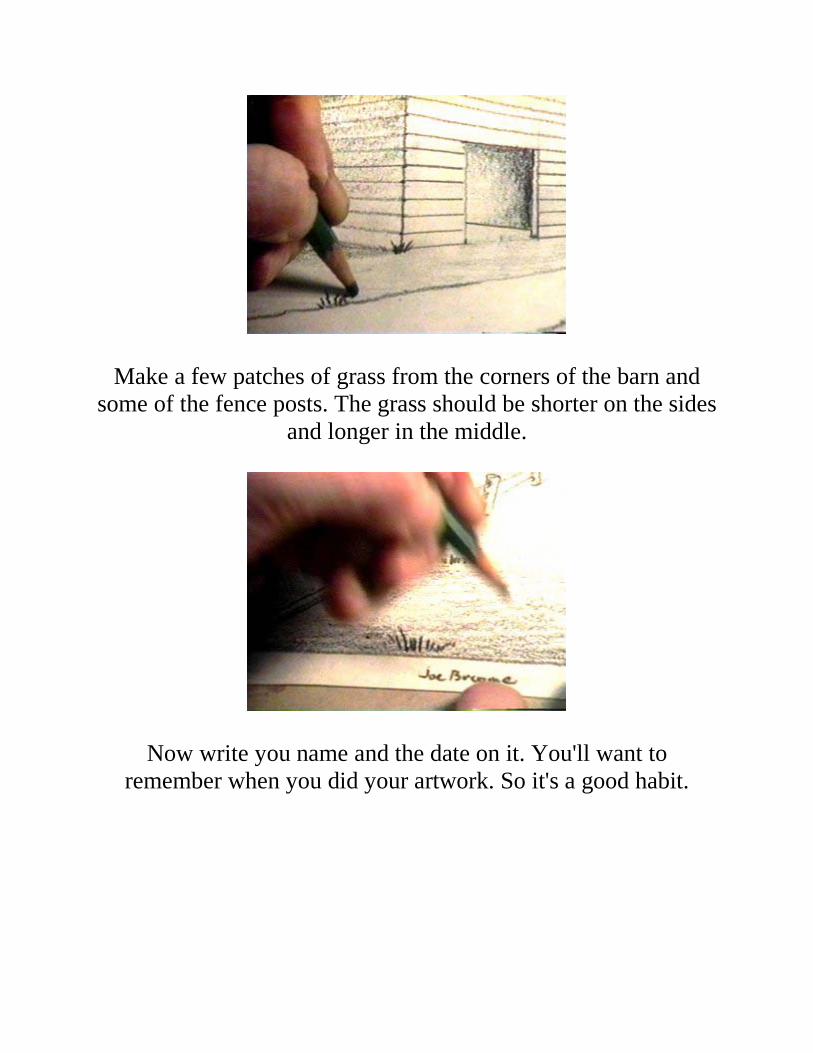
Make a few patches of grass from the corners of the barn and some of the fence posts. The grass should be shorter on the sides
and longer in the middle.
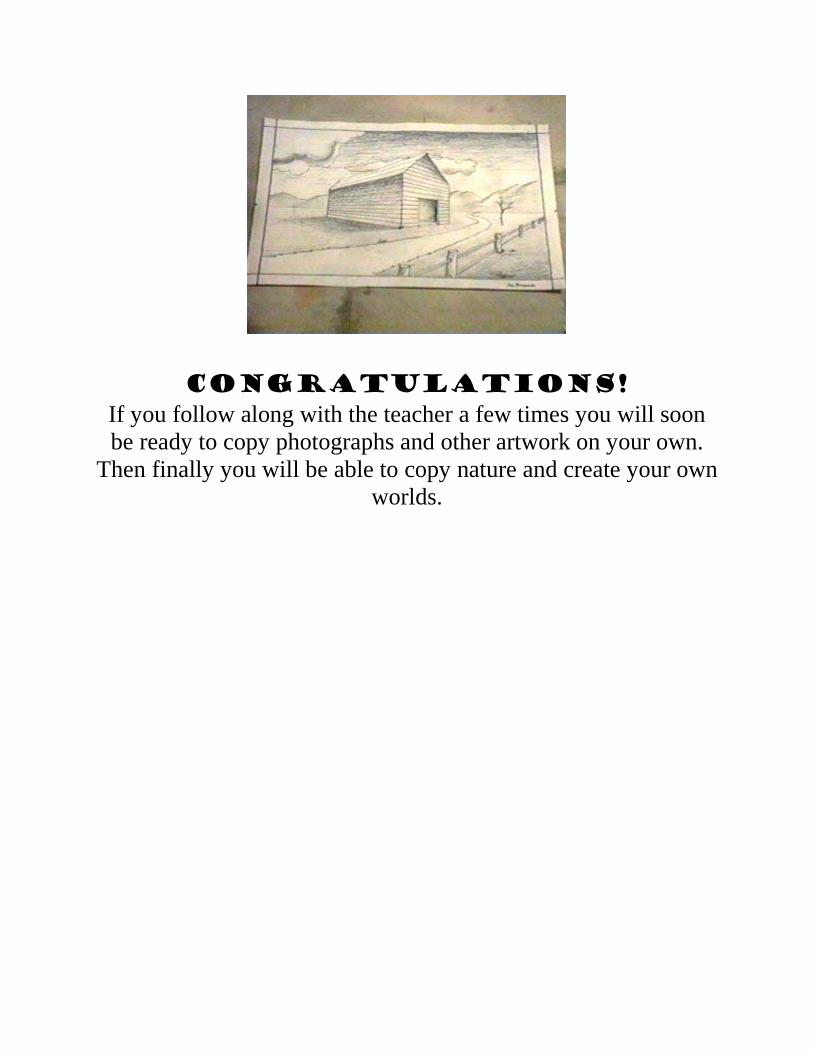
Now write you name and the date on it. You'll want to remember when you did your artwork. So it's a good habit.
Congratulations! If you follow along with the teacher a few times you will soon be ready to copy photographs and other artwork on your own.
Then finally you will be able to copy nature and create your own worlds.


![· Kekerapan [f] 10 Table 3(b) Jadual 3. (b) [6 marks] [6 markah] [8 marks] Calculate the mean. Kirakan min. Draw a "less than" ogive to represent the data. Lukiskan grafogive "kurang](https://img.pdfslide.us/doc/110x75/5e234778ebc3255bce3e5c38/kekerapan-f-10-table-3b-jadual-3-b-6-marks-6-markah-8-marks-calculate.jpg)