Embed Size (px)
Citation preview
Contents1. Introduction . . . . . . . . . . . . . . . . . . . . . . . . . . . . . . . . . . . . . . . . . . . . . . . . . . . . . . .1
2. Quick Start . . . . . . . . . . . . . . . . . . . . . . . . . . . . . . . . . . . . . . . . . . . . . . . . . . . . . . . .32.1. Starting a Game . . . . . . . . . . . . . . . . . . . . . . . . . . . . . . . . . . . . . . . . . . . . . . . . . . . . . . .4
2.2. Menus, Windows and Buttons . . . . . . . . . . . . . . . . . . . . . . . . . . . . . . . . . . . . . . . . . .6
2.3. Playing the Game . . . . . . . . . . . . . . . . . . . . . . . . . . . . . . . . . . . . . . . . . . . . . . . . . . . . . .8
2.4. History Mode . . . . . . . . . . . . . . . . . . . . . . . . . . . . . . . . . . . . . . . . . . . . . . . . . . . . . . . . 12
3. Game Rules. . . . . . . . . . . . . . . . . . . . . . . . . . . . . . . . . . . . . . . . . . . . . . . . . . . . . . 133.1. Units . . . . . . . . . . . . . . . . . . . . . . . . . . . . . . . . . . . . . . . . . . . . . . . . . . . . . . . . . . . . . . . . 13
3.2. Movement. . . . . . . . . . . . . . . . . . . . . . . . . . . . . . . . . . . . . . . . . . . . . . . . . . . . . . . . . . . 16
3.3. Combat . . . . . . . . . . . . . . . . . . . . . . . . . . . . . . . . . . . . . . . . . . . . . . . . . . . . . . . . . . . . . 20
3.4. Supply . . . . . . . . . . . . . . . . . . . . . . . . . . . . . . . . . . . . . . . . . . . . . . . . . . . . . . . . . . . . . . 26
3.5. Reinforcements . . . . . . . . . . . . . . . . . . . . . . . . . . . . . . . . . . . . . . . . . . . . . . . . . . . . . . 27
3.6. Specialist Steps . . . . . . . . . . . . . . . . . . . . . . . . . . . . . . . . . . . . . . . . . . . . . . . . . . . . . . 31
3.7. Theater Assets . . . . . . . . . . . . . . . . . . . . . . . . . . . . . . . . . . . . . . . . . . . . . . . . . . . . . . . 34
3.8. Objectives . . . . . . . . . . . . . . . . . . . . . . . . . . . . . . . . . . . . . . . . . . . . . . . . . . . . . . . . . . . 37
4. Campaign Rules . . . . . . . . . . . . . . . . . . . . . . . . . . . . . . . . . . . . . . . . . . . . . . . . . 38
5. Editor . . . . . . . . . . . . . . . . . . . . . . . . . . . . . . . . . . . . . . . . . . . . . . . . . . . . . . . . . . . 41
© 2011 Dvaput Dva d.o.o. / 2x2 Games
Page 1OF COMMANDUNITY
DRAFT
DRAFTPage 2
OF COMMANDUNITY
DRAFT
DRAFTIntroduction1.
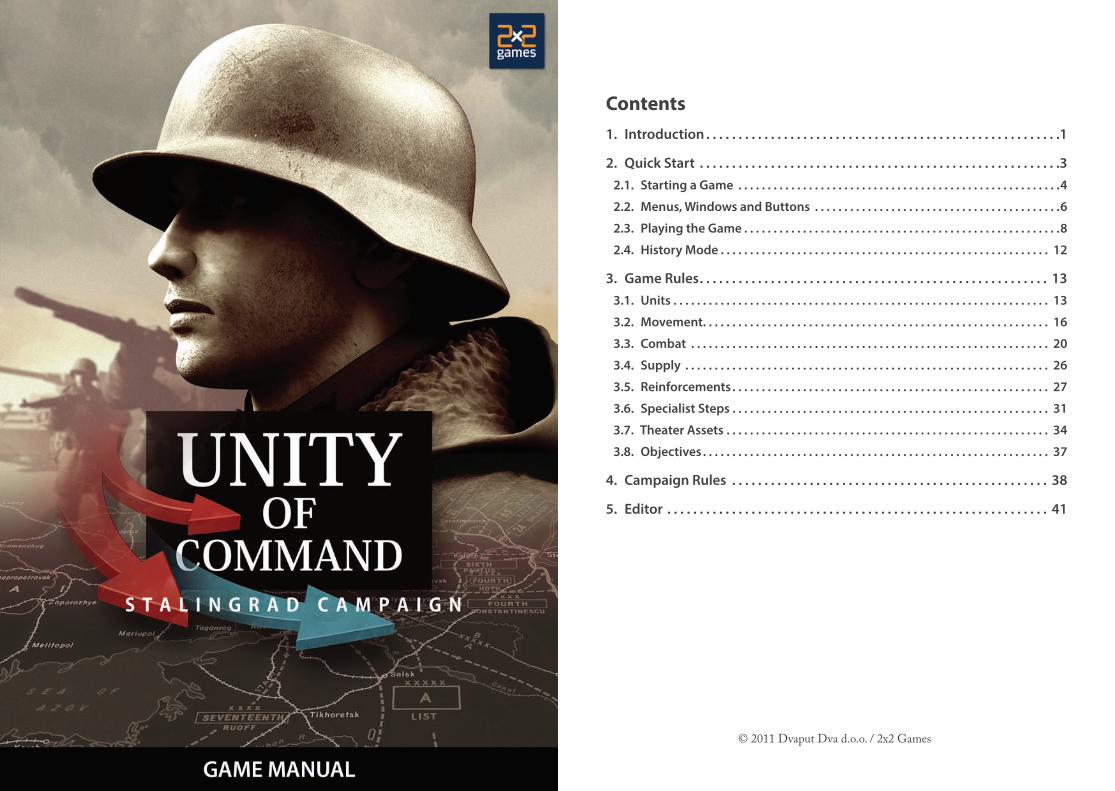
Unity of Command is a strategy game that lets you command the Red Army or Wehrmacht forces and their allies during the crucial Eastern Front campaign of 1942/43. This is the campaign that culminated in the famous Battle of Stalingrad, an event that marked a turning point in the entire war.
German plans for this campaign centered on capturing the oil-rich region of the Caucasus. Stalingrad, the city that would eventually become its main focus, was rarely even mentioned in the original plans prepaired by the OKH (German High Command of the Army).
Soviets were on the defense strategically at the time, but the Stavka (Soviet High Command) misjudged enemy intentions and placed the bulk of its strength around Moscow. This helped the Germans as relatively thin forces remained to contend with the upcoming German offensive in the south.
The initial blow delivered by German armored spearheads thus proved devastating. The summer campaign began with a seemingly unstoppable string of German victories. But even in the heat of that victorious summer, cracks were beginning to show.
As they advanced eastward, the Germans carved an enormous bulge they could never hope to hold with German forces alone. To fill the gaps, they enlisted help from the armies of their Axis allies: Italy, Romania and Hungary.
The fast moving nature of the campaign also made it difficult to provide units with fuel, ammunition and other vital supplies. Time and again, German columns had to stop short of their assigned objectives and wait for logistics to catch up.
It is in these circumstances during the fall of 1942 that the Geman offensive bogged down in the face of stiffening Soviet resistance. Their pace of advance slowed to a crawl. And the attention of the entire world became fixated on the desperate battle raging in the burning city of Stalingrad.
When Soviets finally counterattacked in November of 1942, the force of their attack changed the strategic situation overnight. The besiegers became the beseiged. The German 6th Army in Stalingrad was encircled and destroyed, and the entire southern wing of the German Eastern Front threatened with collapse.
Soviets then mounted a series of strategic offensives that completely shattered the weaker Axis armies along the Don river. This advance threatened the Germans with an even wider encirclement and for a while an entire group of German Armies fought for its very survival in this sudden and dramatic reversal of fortunes.
Then, in one final devastating stroke, Germans under von Manstein counter-attacked at Kharkov and restored the situation. Ironically, the armies finally came to rest on almost identical lines where the campaign started almost a year earlier.
Nov 1942 - Feb 1943
Feb - Mar 1943
INTRODUCTION INTRODUCTION
Jun - Nov 1942
Page 3OF COMMANDUNITY
DRAFT
DRAFTPage 4
OF COMMANDUNITY
DRAFT
DRAFTQuick Start2.
After reading the following section you should play through the tutorial which is accessible from the main game menu. The tutorial will give you a hands-on experience of basic gameplay in Unity of Command.
ScenariosScenarios represents individual battles fought during the 1942/43 campaign. Command level is operational: units represent German divisions and Soviet corps. The battlefield is divided into hexes at a scale of 20km per hex.
The game is divided into turns, which correspond to four days of real time. Each turn is comprised of two phases: in each phase one of the players acts, while the other player observes.
During your phase, you are given a chance to move your units, attack enemy units etc. When you’re done, click on the “End Turn” button. Afterwards, the opponent moves.
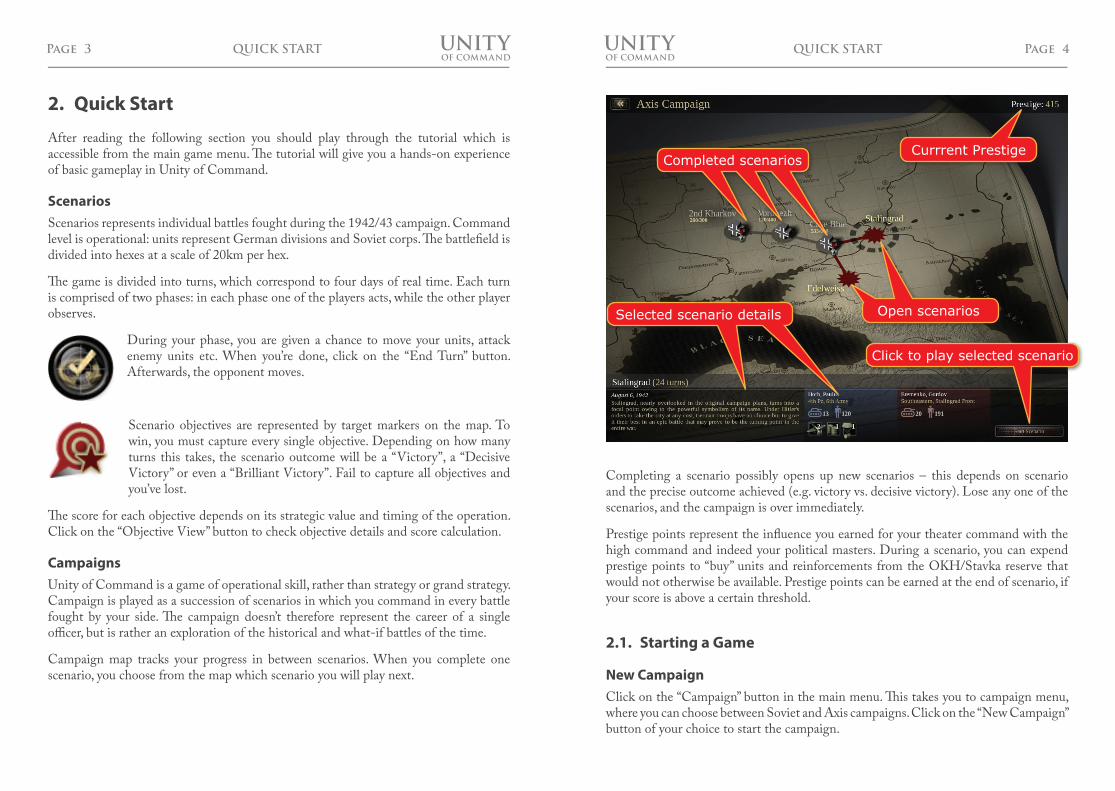
Scenario objectives are represented by target markers on the map. To win, you must capture every single objective. Depending on how many turns this takes, the scenario outcome will be a “Victory”, a “Decisive Victory” or even a “Brilliant Victory”. Fail to capture all objectives and you’ve lost.
The score for each objective depends on its strategic value and timing of the operation. Click on the “Objective View” button to check objective details and score calculation.
CampaignsUnity of Command is a game of operational skill, rather than strategy or grand strategy. Campaign is played as a succession of scenarios in which you command in every battle fought by your side. The campaign doesn’t therefore represent the career of a single officer, but is rather an exploration of the historical and what-if battles of the time.
Campaign map tracks your progress in between scenarios. When you complete one scenario, you choose from the map which scenario you will play next.
QUICK START
Completing a scenario possibly opens up new scenarios – this depends on scenario and the precise outcome achieved (e.g. victory vs. decisive victory). Lose any one of the scenarios, and the campaign is over immediately.
Prestige points represent the influence you earned for your theater command with the high command and indeed your political masters. During a scenario, you can expend prestige points to “buy” units and reinforcements from the OKH/Stavka reserve that would not otherwise be available. Prestige points can be earned at the end of scenario, if your score is above a certain threshold.
Starting a Game2.1.
New CampaignClick on the “Campaign” button in the main menu. This takes you to campaign menu, where you can choose between Soviet and Axis campaigns. Click on the “New Campaign” button of your choice to start the campaign.
Selected scenario details
Completed scenarios
QUICK START
Currrent Prestige
Click to play selected scenario
Open scenarios
Page 5OF COMMANDUNITY
DRAFT
DRAFTPage 6
OF COMMANDUNITY
DRAFT
DRAFTCampaigns are autosaved, so if you played a campaign before, there will be a button to “Continue Current”. You will also be asked to confirm when starting a new campaign, because this erases the current one. If you don’t want to continue the current campaign and simply want to start over, click “OK”.
A new campaign starts with a single unlocked scenario. Click on the “Start Scenario” button to start playing.
New Single ScenarioClick on the “Scenario” button in the main menu. This takes you to a list of scenarios to choose from. To play a single player game against the computer (“AI opponent”), simply select one of the scenarios and click on the “Start Scenario” button.
When playing a single scenario game, you will be given a certain amount of prestige points. These can be used to requisition reserve units. Any prestige points not used however, will be added to the final score. This is done to reward competent commanders who can get the job done without asking the high command for help.
Player vs. Player GamesIndividual scenarios can be played against human opponents, either in hotseat mode or over the Internet. To start a PvP game, select a scenario as described previously, then select either the “Internet” or “Hotseat” option before clicking on the “Start Scenario” button.
For Internet games, you will receive the game code as soon as the scenario starts. Send this code to your opponent (via IM, email, etc.) who should connect by clicking on “Connect to Game” from the main menu and entering the game code.
Playing a single scenario against a human opponent works in exactly the same way as playing against the computer. This means that realistically, only the first player (P1) is out there to win, while P2 is trying to make this as difficult as possible.
For a more balanced experience, UoC offers a number of dedicated PvP scenarios. These scenarios have slightly different scoring rules that allow both players a chance of victory. Find out more about these scenarios in the PvP Games section of this manual.
Internet game code
QUICK START
Menus, Windows and Buttons2.2.
BriefingWhen you start a scenario, you will be given a short briefing on the situation, your orders and victory conditions. Pay special attention to the number of turns required for victory. If you do not capture all objectives before the end of that turn, it is game over and you lose.
Axis operations are directed by the Oberkommando des Heeres (OKH) headquarters in Zossen, near Berlin. Soviet front commanders receive their orders directly from Moscow, from the Stavka of the High Command. In either case, make sure you pay close attention to dispatches you receive from higher up.
Click on the “Continue” button to begin the game. You can access the briefing at a later time either via the game menu or Ctrl-B hotkey.
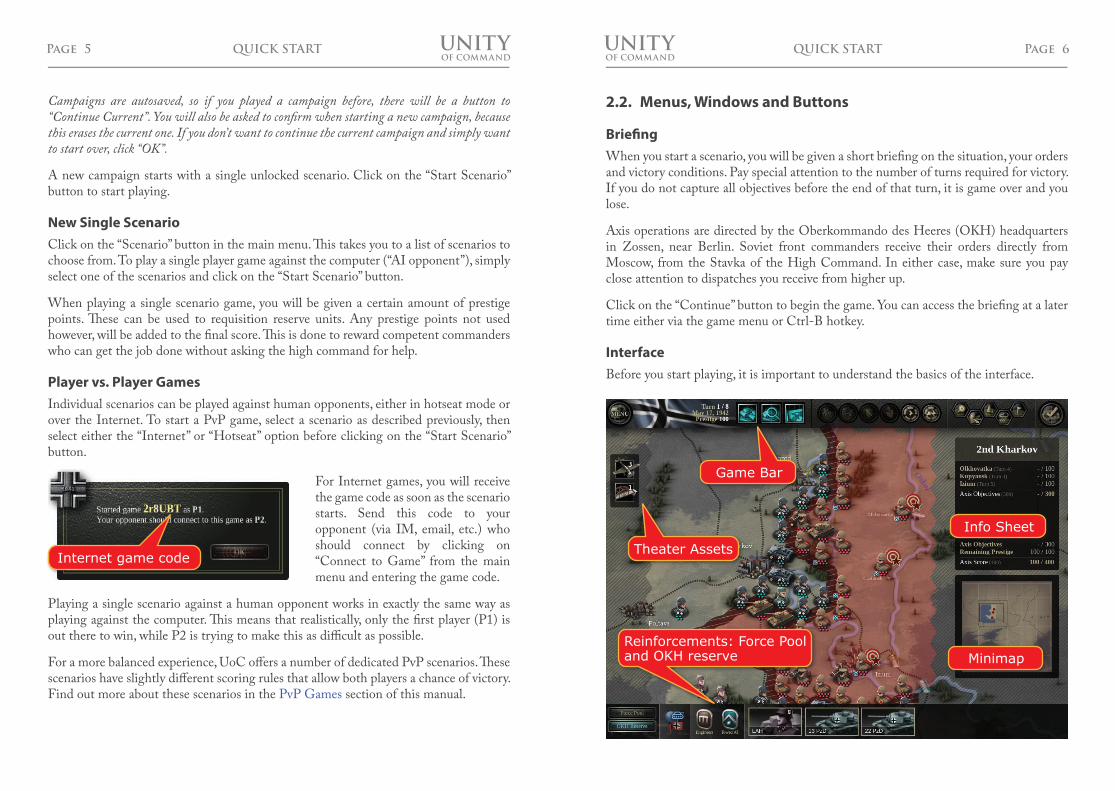
InterfaceBefore you start playing, it is important to understand the basics of the interface.
Reinforcements: Force Pooland OKH reserve
Theater Assets
Game Bar
Info Sheet
Minimap
QUICK START
Page 7OF COMMANDUNITY
DRAFT
DRAFTPage 8
OF COMMANDUNITY
DRAFT
DRAFTGame Bar – this bar cannot be hidden or minimized. The display area holds vital information such as current turn, date and prestige. The main game menu is on the far left of the bar.
Info Sheet – this sheet keeps track of the current and maximum possible score. It is multipurpose, so it also switches to displaying unit stats when a unit is selected or a combat is taking place.
Force Pool – displays reinforcements that are available either from within your own command (“Force Pool”) or by using prestige to requisition from the OKH/Stavka reserve.
Theater Assets – displays assets that are available to be used in any location on the map. These cannot be hidden or minimized, however they will dissapear after the assets have been used.
Info Sheet, Minimap and Force Pool areas can be hidden using game bar buttons. In this way, you can free up space for viewing the map.
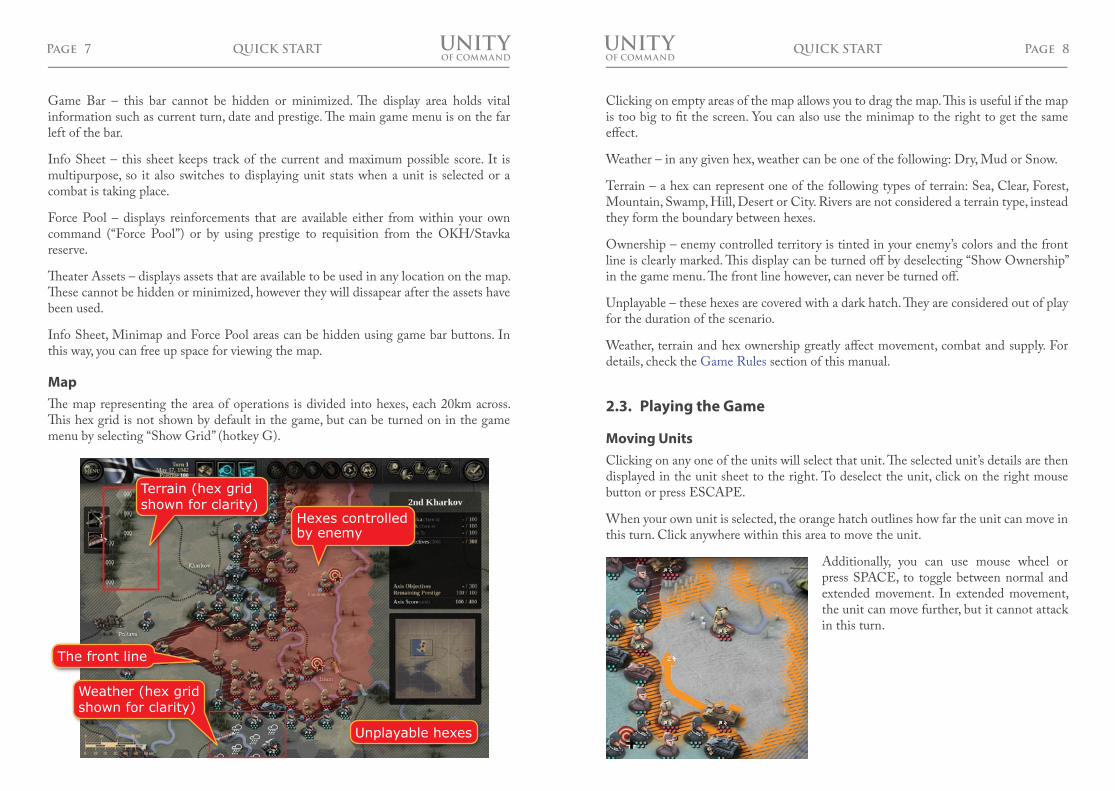
MapThe map representing the area of operations is divided into hexes, each 20km across. This hex grid is not shown by default in the game, but can be turned on in the game menu by selecting “Show Grid” (hotkey G).
Terrain (hex gridshown for clarity)
Weather (hex gridshown for clarity)
The front line
Unplayable hexes
Hexes controlledby enemy
QUICK START
Clicking on empty areas of the map allows you to drag the map. This is useful if the map is too big to fit the screen. You can also use the minimap to the right to get the same effect.
Weather – in any given hex, weather can be one of the following: Dry, Mud or Snow.
Terrain – a hex can represent one of the following types of terrain: Sea, Clear, Forest, Mountain, Swamp, Hill, Desert or City. Rivers are not considered a terrain type, instead they form the boundary between hexes.
Ownership – enemy controlled territory is tinted in your enemy’s colors and the front line is clearly marked. This display can be turned off by deselecting “Show Ownership” in the game menu. The front line however, can never be turned off.
Unplayable – these hexes are covered with a dark hatch. They are considered out of play for the duration of the scenario.
Weather, terrain and hex ownership greatly affect movement, combat and supply. For details, check the Game Rules section of this manual.
Playing the Game2.3.
Moving UnitsClicking on any one of the units will select that unit. The selected unit’s details are then displayed in the unit sheet to the right. To deselect the unit, click on the right mouse button or press ESCAPE.
When your own unit is selected, the orange hatch outlines how far the unit can move in this turn. Click anywhere within this area to move the unit.
Additionally, you can use mouse wheel or press SPACE, to toggle between normal and extended movement. In extended movement, the unit can move further, but it cannot attack in this turn.
QUICK START
Page 9OF COMMANDUNITY
DRAFT
DRAFTPage 10
OF COMMANDUNITY
DRAFT
DRAFTCombatUnits represent actual military formations, German divisions and Soviet corps. Each unit’s manpower and equipment is considered to be equally divided into a number of steps. These steps are then displayed as dots underneath the unit icon.
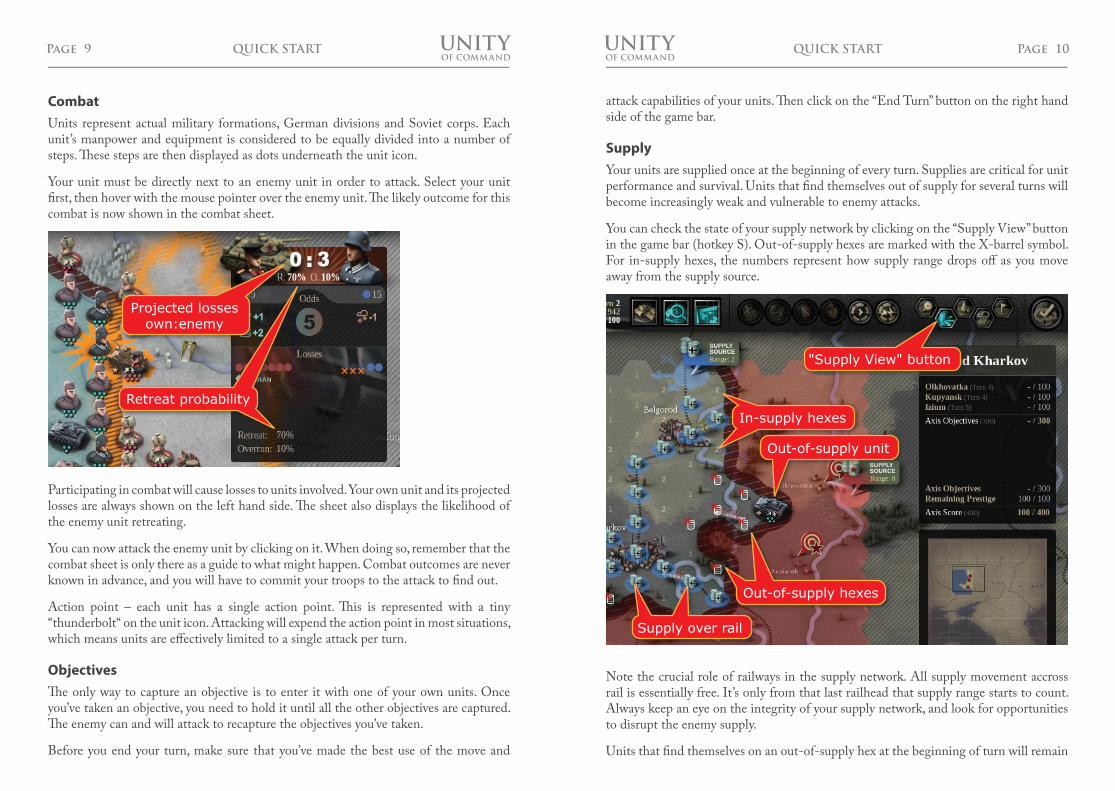
Your unit must be directly next to an enemy unit in order to attack. Select your unit first, then hover with the mouse pointer over the enemy unit. The likely outcome for this combat is now shown in the combat sheet.
Participating in combat will cause losses to units involved. Your own unit and its projected losses are always shown on the left hand side. The sheet also displays the likelihood of the enemy unit retreating.
You can now attack the enemy unit by clicking on it. When doing so, remember that the combat sheet is only there as a guide to what might happen. Combat outcomes are never known in advance, and you will have to commit your troops to the attack to find out.
Action point – each unit has a single action point. This is represented with a tiny “thunderbolt“ on the unit icon. Attacking will expend the action point in most situations, which means units are effectively limited to a single attack per turn.
ObjectivesThe only way to capture an objective is to enter it with one of your own units. Once you’ve taken an objective, you need to hold it until all the other objectives are captured. The enemy can and will attack to recapture the objectives you’ve taken.
Before you end your turn, make sure that you’ve made the best use of the move and
Retreat probability
Projected lossesown:enemy
QUICK START
attack capabilities of your units. Then click on the “End Turn” button on the right hand side of the game bar.
SupplyYour units are supplied once at the beginning of every turn. Supplies are critical for unit performance and survival. Units that find themselves out of supply for several turns will become increasingly weak and vulnerable to enemy attacks.
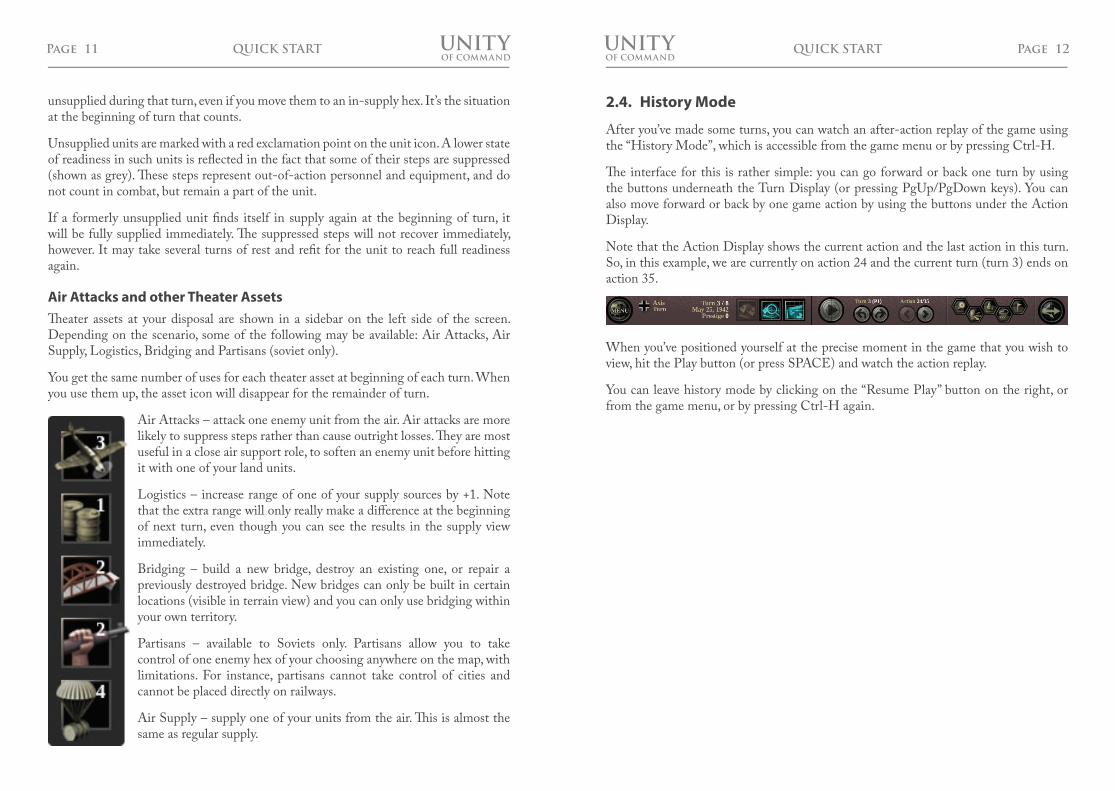
You can check the state of your supply network by clicking on the “Supply View” button in the game bar (hotkey S). Out-of-supply hexes are marked with the X-barrel symbol. For in-supply hexes, the numbers represent how supply range drops off as you move away from the supply source.
Note the crucial role of railways in the supply network. All supply movement accross rail is essentially free. It’s only from that last railhead that supply range starts to count. Always keep an eye on the integrity of your supply network, and look for opportunities to disrupt the enemy supply.
Units that find themselves on an out-of-supply hex at the beginning of turn will remain
Out-of-supply hexes
Out-of-supply unit
In-supply hexes
"Supply View" button
Supply over rail
QUICK START
Page 11OF COMMANDUNITY
DRAFT
DRAFTPage 12
OF COMMANDUNITY
DRAFT
DRAFTunsupplied during that turn, even if you move them to an in-supply hex. It’s the situation at the beginning of turn that counts.
Unsupplied units are marked with a red exclamation point on the unit icon. A lower state of readiness in such units is reflected in the fact that some of their steps are suppressed (shown as grey). These steps represent out-of-action personnel and equipment, and do not count in combat, but remain a part of the unit.
If a formerly unsupplied unit finds itself in supply again at the beginning of turn, it will be fully supplied immediately. The suppressed steps will not recover immediately, however. It may take several turns of rest and refit for the unit to reach full readiness again.
Air Attacks and other Theater AssetsTheater assets at your disposal are shown in a sidebar on the left side of the screen. Depending on the scenario, some of the following may be available: Air Attacks, Air Supply, Logistics, Bridging and Partisans (soviet only).
You get the same number of uses for each theater asset at beginning of each turn. When you use them up, the asset icon will disappear for the remainder of turn.
Air Attacks – attack one enemy unit from the air. Air attacks are more likely to suppress steps rather than cause outright losses. They are most useful in a close air support role, to soften an enemy unit before hitting it with one of your land units.
Logistics – increase range of one of your supply sources by +1. Note that the extra range will only really make a difference at the beginning of next turn, even though you can see the results in the supply view immediately.
Bridging – build a new bridge, destroy an existing one, or repair a previously destroyed bridge. New bridges can only be built in certain locations (visible in terrain view) and you can only use bridging within your own territory.
Partisans – available to Soviets only. Partisans allow you to take control of one enemy hex of your choosing anywhere on the map, with limitations. For instance, partisans cannot take control of cities and cannot be placed directly on railways.
Air Supply – supply one of your units from the air. This is almost the same as regular supply.
QUICK START
History Mode2.4.
After you’ve made some turns, you can watch an after-action replay of the game using the “History Mode”, which is accessible from the game menu or by pressing Ctrl-H.
The interface for this is rather simple: you can go forward or back one turn by using the buttons underneath the Turn Display (or pressing PgUp/PgDown keys). You can also move forward or back by one game action by using the buttons under the Action Display.
Note that the Action Display shows the current action and the last action in this turn. So, in this example, we are currently on action 24 and the current turn (turn 3) ends on action 35.
When you’ve positioned yourself at the precise moment in the game that you wish to view, hit the Play button (or press SPACE) and watch the action replay.
You can leave history mode by clicking on the “Resume Play” button on the right, or from the game menu, or by pressing Ctrl-H again.
QUICK START
Page 13OF COMMANDUNITY
DRAFT
DRAFTPage 14
OF COMMANDUNITY
DRAFT
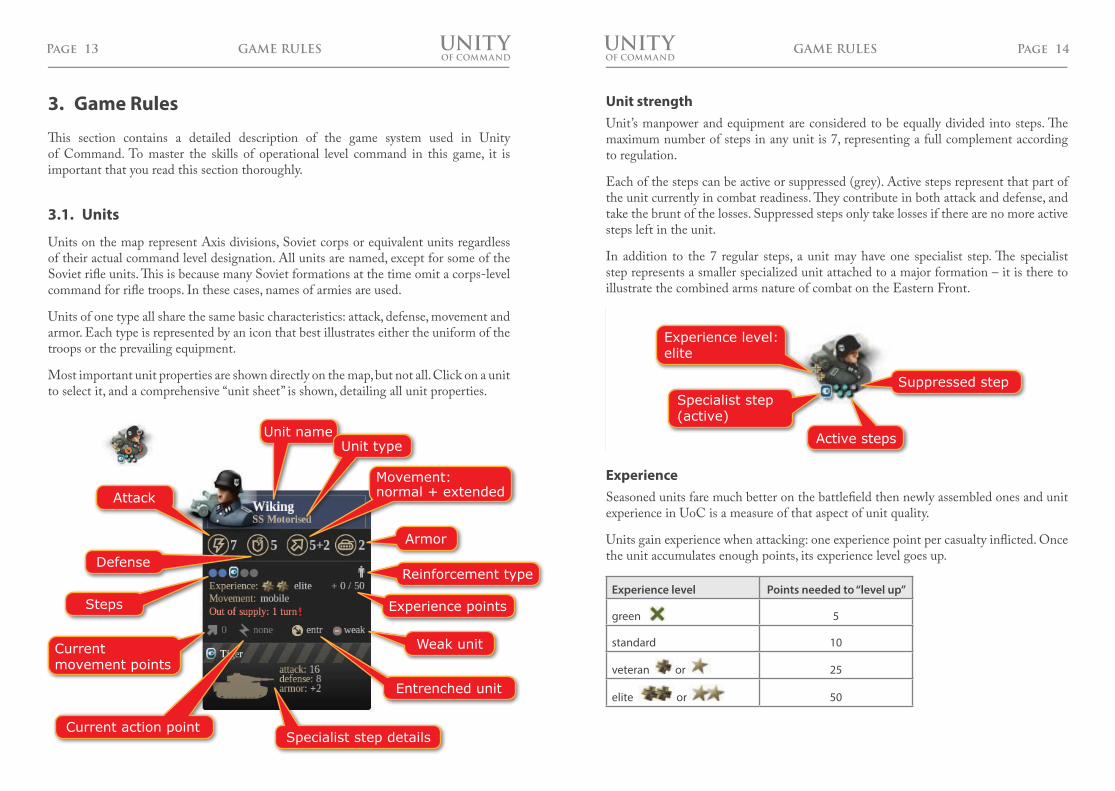
DRAFTUnit strengthUnit’s manpower and equipment are considered to be equally divided into steps. The maximum number of steps in any unit is 7, representing a full complement according to regulation.
Each of the steps can be active or suppressed (grey). Active steps represent that part of the unit currently in combat readiness. They contribute in both attack and defense, and take the brunt of the losses. Suppressed steps only take losses if there are no more active steps left in the unit.
In addition to the 7 regular steps, a unit may have one specialist step. The specialist step represents a smaller specialized unit attached to a major formation – it is there to illustrate the combined arms nature of combat on the Eastern Front.
ExperienceSeasoned units fare much better on the battlefield then newly assembled ones and unit experience in UoC is a measure of that aspect of unit quality.
Units gain experience when attacking: one experience point per casualty inflicted. Once the unit accumulates enough points, its experience level goes up.
Experience level Points needed to “level up”
green 5
standard 10
veteran or 25
elite or 50
Game Rules3.
This section contains a detailed description of the game system used in Unity of Command. To master the skills of operational level command in this game, it is important that you read this section thoroughly.
Units3.1.
Units on the map represent Axis divisions, Soviet corps or equivalent units regardless of their actual command level designation. All units are named, except for some of the Soviet rifle units. This is because many Soviet formations at the time omit a corps-level command for rifle troops. In these cases, names of armies are used.
Units of one type all share the same basic characteristics: attack, defense, movement and armor. Each type is represented by an icon that best illustrates either the uniform of the troops or the prevailing equipment.
Most important unit properties are shown directly on the map, but not all. Click on a unit to select it, and a comprehensive “unit sheet” is shown, detailing all unit properties.
Experience level:elite
Specialist step(active)
Suppressed step
Active steps
GAME RULESGAME RULES
Unit nameUnit type
Movement:normal + extended
Armor
Reinforcement type
Experience points
Weak unit
Entrenched unit
Specialist step detailsCurrent action point
Currentmovement points
Attack
Defense
Steps
Page 15OF COMMANDUNITY
DRAFT
DRAFTPage 16
OF COMMANDUNITY
DRAFT
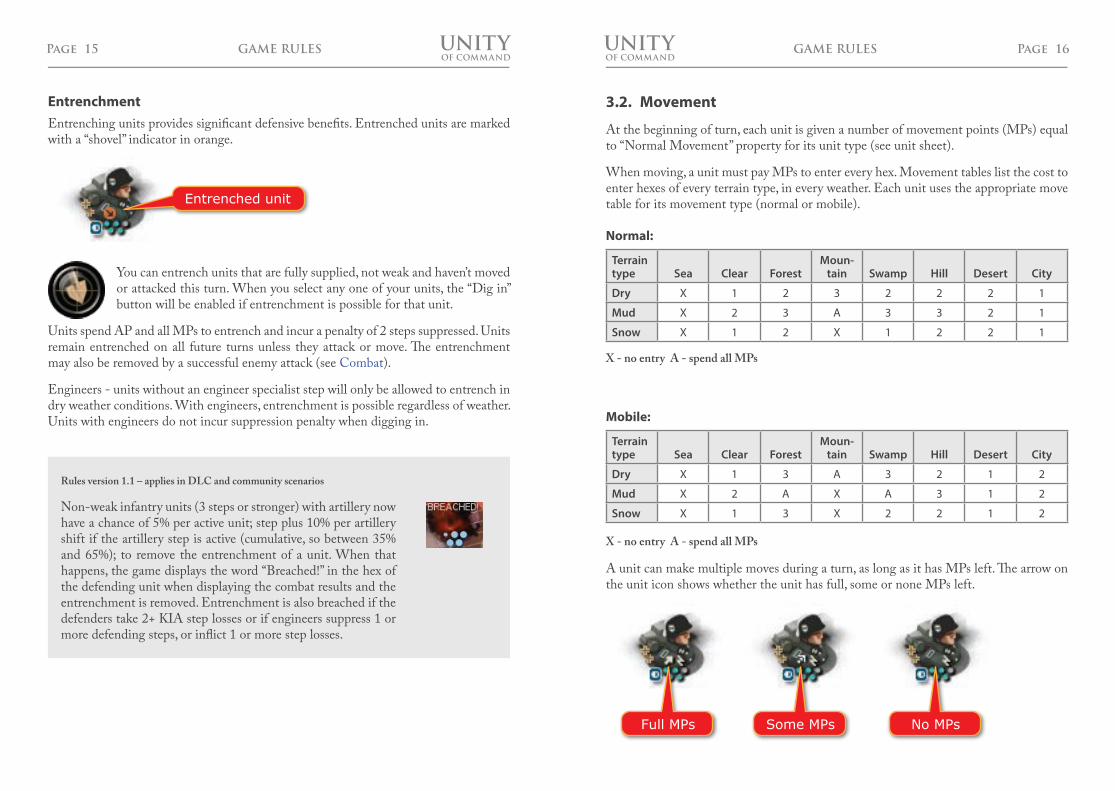
DRAFTMovement3.2.
At the beginning of turn, each unit is given a number of movement points (MPs) equal to “Normal Movement” property for its unit type (see unit sheet).
When moving, a unit must pay MPs to enter every hex. Movement tables list the cost to enter hexes of every terrain type, in every weather. Each unit uses the appropriate move table for its movement type (normal or mobile).
Normal:
Terrain type Sea Clear Forest
Moun-tain Swamp Hill Desert City
Dry X 1 2 3 2 2 2 1
Mud X 2 3 A 3 3 2 1
Snow X 1 2 X 1 2 2 1
X - no entry A - spend all MPs
Mobile:
Terrain type Sea Clear Forest
Moun-tain Swamp Hill Desert City
Dry X 1 3 A 3 2 1 2
Mud X 2 A X A 3 1 2
Snow X 1 3 X 2 2 1 2
X - no entry A - spend all MPs
A unit can make multiple moves during a turn, as long as it has MPs left. The arrow on the unit icon shows whether the unit has full, some or none MPs left.
EntrenchmentEntrenching units provides significant defensive benefits. Entrenched units are marked with a “shovel” indicator in orange.
You can entrench units that are fully supplied, not weak and haven’t moved or attacked this turn. When you select any one of your units, the “Dig in” button will be enabled if entrenchment is possible for that unit.
Units spend AP and all MPs to entrench and incur a penalty of 2 steps suppressed. Units remain entrenched on all future turns unless they attack or move. The entrenchment may also be removed by a successful enemy attack (see Combat).
Engineers - units without an engineer specialist step will only be allowed to entrench in dry weather conditions. With engineers, entrenchment is possible regardless of weather. Units with engineers do not incur suppression penalty when digging in.
GAME RULESGAME RULES
Entrenched unit
Rules version 1.1 – applies in DLC and community scenarios
Non-weak infantry units (3 steps or stronger) with artillery now have a chance of 5% per active unit; step plus 10% per artillery shift if the artillery step is active (cumulative, so between 35% and 65%); to remove the entrenchment of a unit. When that happens, the game displays the word “Breached!” in the hex of the defending unit when displaying the combat results and the entrenchment is removed. Entrenchment is also breached if the defenders take 2+ KIA step losses or if engineers suppress 1 or more defending steps, or inflict 1 or more step losses.
Full MPs Some MPs No MPs
Page 17OF COMMANDUNITY
DRAFT
DRAFTPage 18
OF COMMANDUNITY
DRAFT
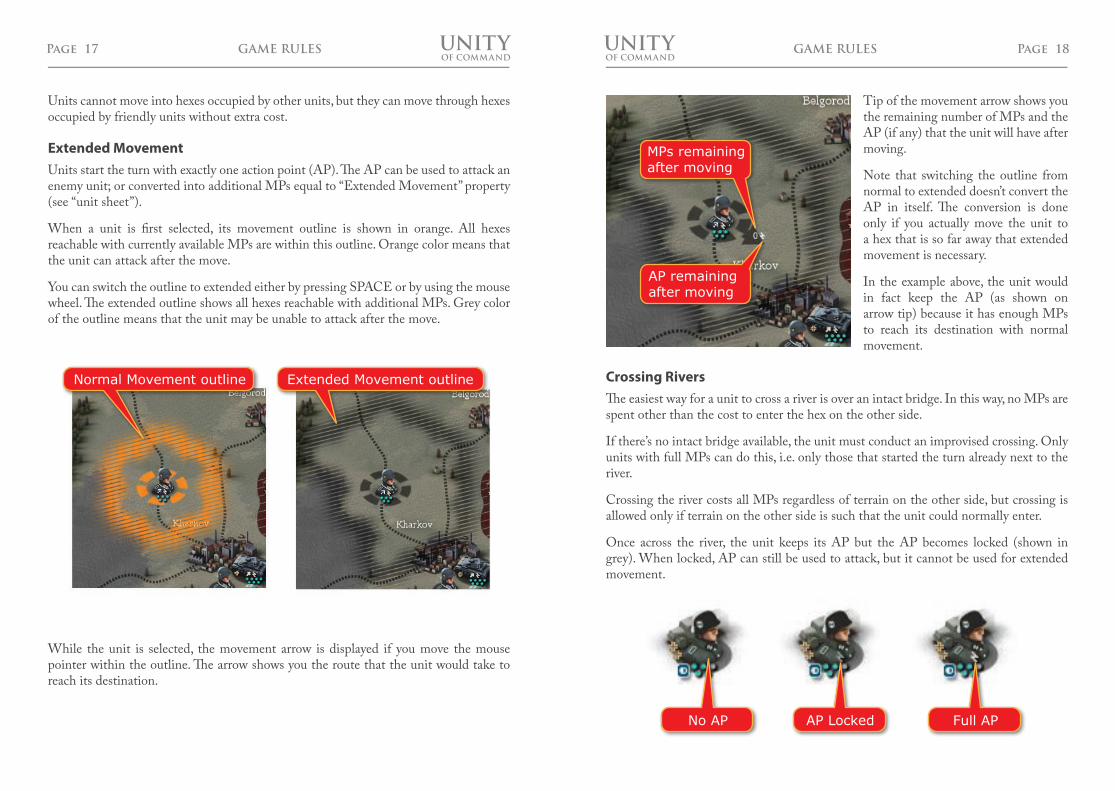
DRAFTTip of the movement arrow shows you the remaining number of MPs and the AP (if any) that the unit will have after moving.
Note that switching the outline from normal to extended doesn’t convert the AP in itself. The conversion is done only if you actually move the unit to a hex that is so far away that extended movement is necessary.
In the example above, the unit would in fact keep the AP (as shown on arrow tip) because it has enough MPs to reach its destination with normal movement.
Crossing RiversThe easiest way for a unit to cross a river is over an intact bridge. In this way, no MPs are spent other than the cost to enter the hex on the other side.
If there’s no intact bridge available, the unit must conduct an improvised crossing. Only units with full MPs can do this, i.e. only those that started the turn already next to the river.
Crossing the river costs all MPs regardless of terrain on the other side, but crossing is allowed only if terrain on the other side is such that the unit could normally enter.
Once across the river, the unit keeps its AP but the AP becomes locked (shown in grey). When locked, AP can still be used to attack, but it cannot be used for extended movement.
Units cannot move into hexes occupied by other units, but they can move through hexes occupied by friendly units without extra cost.
Extended MovementUnits start the turn with exactly one action point (AP). The AP can be used to attack an enemy unit; or converted into additional MPs equal to “Extended Movement” property (see “unit sheet”).
When a unit is first selected, its movement outline is shown in orange. All hexes reachable with currently available MPs are within this outline. Orange color means that the unit can attack after the move.
You can switch the outline to extended either by pressing SPACE or by using the mouse wheel. The extended outline shows all hexes reachable with additional MPs. Grey color of the outline means that the unit may be unable to attack after the move.
While the unit is selected, the movement arrow is displayed if you move the mouse pointer within the outline. The arrow shows you the route that the unit would take to reach its destination.
GAME RULESGAME RULES
AP remaining after moving
MPs remaining after moving
Normal Movement outline Extended Movement outline
No AP AP Locked Full AP
Page 19OF COMMANDUNITY
DRAFT
DRAFTPage 20
OF COMMANDUNITY
DRAFT
DRAFT2. If the considered hex neighbors more of your own hexes than the enemy’s it is swept along with the following exceptions:
hex contains an enemy ZOC•hex is a city•hex is an objective•
3. For all hexes that are swept along, the process is repeated from step 1.
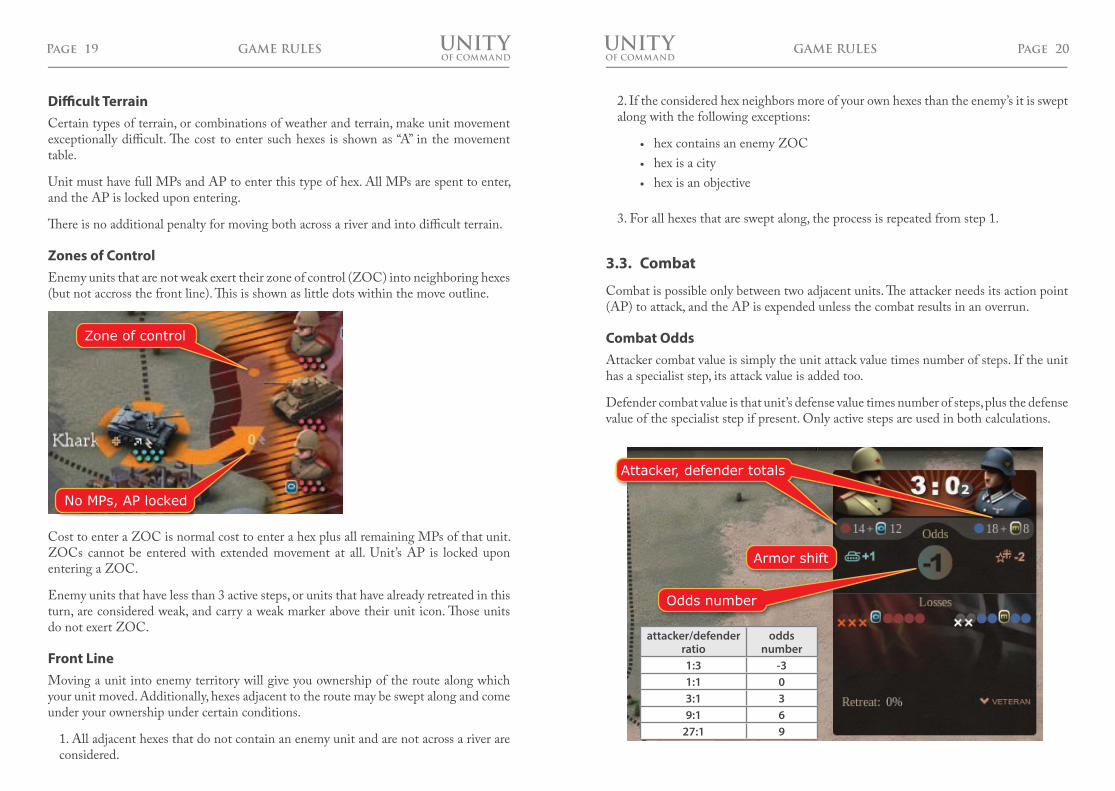
3.3. Combat
Combat is possible only between two adjacent units. The attacker needs its action point (AP) to attack, and the AP is expended unless the combat results in an overrun.
Combat OddsAttacker combat value is simply the unit attack value times number of steps. If the unit has a specialist step, its attack value is added too.
Defender combat value is that unit’s defense value times number of steps, plus the defense value of the specialist step if present. Only active steps are used in both calculations.
Difficult TerrainCertain types of terrain, or combinations of weather and terrain, make unit movement exceptionally difficult. The cost to enter such hexes is shown as “A” in the movement table.
Unit must have full MPs and AP to enter this type of hex. All MPs are spent to enter, and the AP is locked upon entering.
There is no additional penalty for moving both across a river and into difficult terrain.
Zones of ControlEnemy units that are not weak exert their zone of control (ZOC) into neighboring hexes (but not accross the front line). This is shown as little dots within the move outline.
Cost to enter a ZOC is normal cost to enter a hex plus all remaining MPs of that unit. ZOCs cannot be entered with extended movement at all. Unit’s AP is locked upon entering a ZOC.
Enemy units that have less than 3 active steps, or units that have already retreated in this turn, are considered weak, and carry a weak marker above their unit icon. Those units do not exert ZOC.
Front LineMoving a unit into enemy territory will give you ownership of the route along which your unit moved. Additionally, hexes adjacent to the route may be swept along and come under your ownership under certain conditions.
1. All adjacent hexes that do not contain an enemy unit and are not across a river are considered.
GAME RULESGAME RULES
Zone of control
No MPs, AP locked
Odds number
Attacker, defender totals
Armor shift
attacker/defender ratio
odds number
1:3 -31:1 03:1 39:1 6
27:1 9
Page 21OF COMMANDUNITY
DRAFT
DRAFTPage 22
OF COMMANDUNITY
DRAFT
DRAFTArtillery ShiftArtillery shift simulates extensive artillery preparation prior to attack. Units themselves cannot contribute bombardment shifts – this is reserved for specialist steps that provide an artillery shift.
Artillery shift is always zero when attacking into mountains or ruins. There’s also no shift if the defender is entrenched in a city, forest or swamp (excluding frozen swamps).
Other Combat ShiftsTerrain and weather provide benefits to defender (negative shifts) as shown in the table.
Terrain Terrain shift
Clear -
Forest -1
Mountain -2
Swamp* -1
Hills -1
Desert -
City** -2
Frozen Swamp -
Ruins -3
Entrenchment – provides -1 shift to defender, unless the attacker has an active engineer step.
Experience – this shift favors more experienced units. It is calculated as the difference between attacker and defender experience (green is 0, standard 1 etc.) and it can go either way.
Combat LossesAttacker and defender losses are looked up in the combat results table using the final odds number as displayed on the combat sheet. Note that, in actual combat, this number is slightly randomized on each lookup to simulate the inherent uncertainty of real life combat.
If defender had no losses, and hasn’t retreated, it may incur suppressed steps, which are also looked up in the combat results table.
The ratio of attacker and defender combat values is fed into a formula (see table) to produce an “odds number”. These odds are then further modified by “shifts” that account for influences of terrain, weather, experience etc.
Positive shifts favor the attacker (left side of the combat sheet, in green) while negative (right side, red) favor the defender. The final odds number, with all shifts included, is shown in the center of the combat sheet.
Armor ShiftArmored units can produce a significant shock effect when attacking in suitable terrain. Armor shift amounts to the difference between attacker and defender armor totals (armor value times number of steps), divided by 10.
Armor shift is attack-only. If defender has stronger armor, the armor shift is zero. There is no armor shift when attacking across rivers or into cities, mountains, forests or swamps (excluding frozen swamps). There’s also no shift if the defender is entrenched in hills or frozen swamps.
Specialist steps may provide additional armor shifts. Note that this is contributed directly, rather than by adding to respective armor totals.
AT limitations – towed AT steps contribute armor shift only in defense. Other AT steps can contribute in attack, but only to offset defender armor if present.
GAME RULES GAME RULES
Weather Weather shift
Dry -
Mud -2
Snow -1
* Swamp hexes are considered frozen during snowy weather, in which case Frozen Swamp shift applies** for City hexes that have been ruined by bombardment, Ruins shift applies
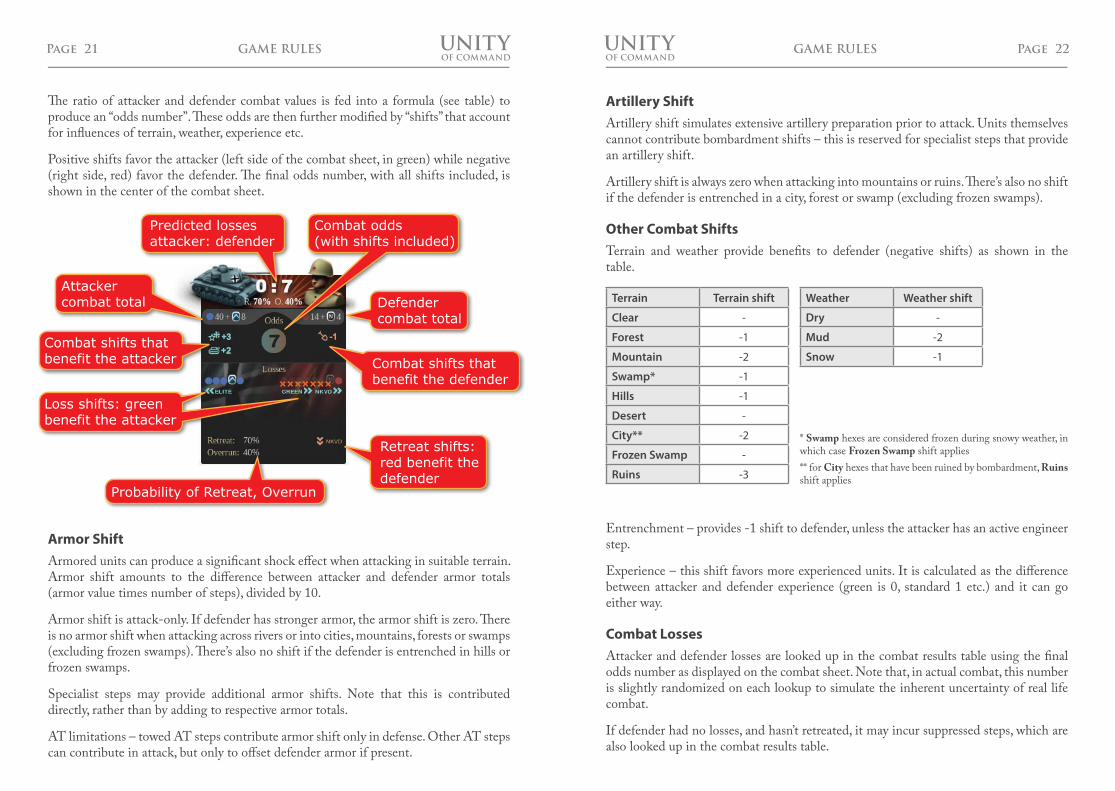
Predicted lossesattacker: defender
Combat shifts thatbenefit the attacker
Loss shifts: greenbenefit the attacker
Attackercombat total
Combat odds(with shifts included)
Defendercombat total
Retreat shifts:red benefit the defender
Combat shifts thatbenefit the defender
Probability of Retreat, Overrun
Page 23OF COMMANDUNITY
DRAFT
DRAFTPage 24
OF COMMANDUNITY
DRAFT
DRAFTCombat Side EffectsCity turned to ruins – if attacking a city with artillery, each artillery shift adds a 2% probability (cumulative) that a city will be turned to ruins. Note that if the defender is entrenched, the artillery shift will be zero, but this still applies – you can turn a city into ruins with ineffective bombardment too.
Defender entrenchment undone – this happens if defender loses 2 or more steps; or for any loss (incl. suppressed steps) if attacker has engineers.
Attacker gains experience – one experience point is gained for each enemy step lost or suppressed.
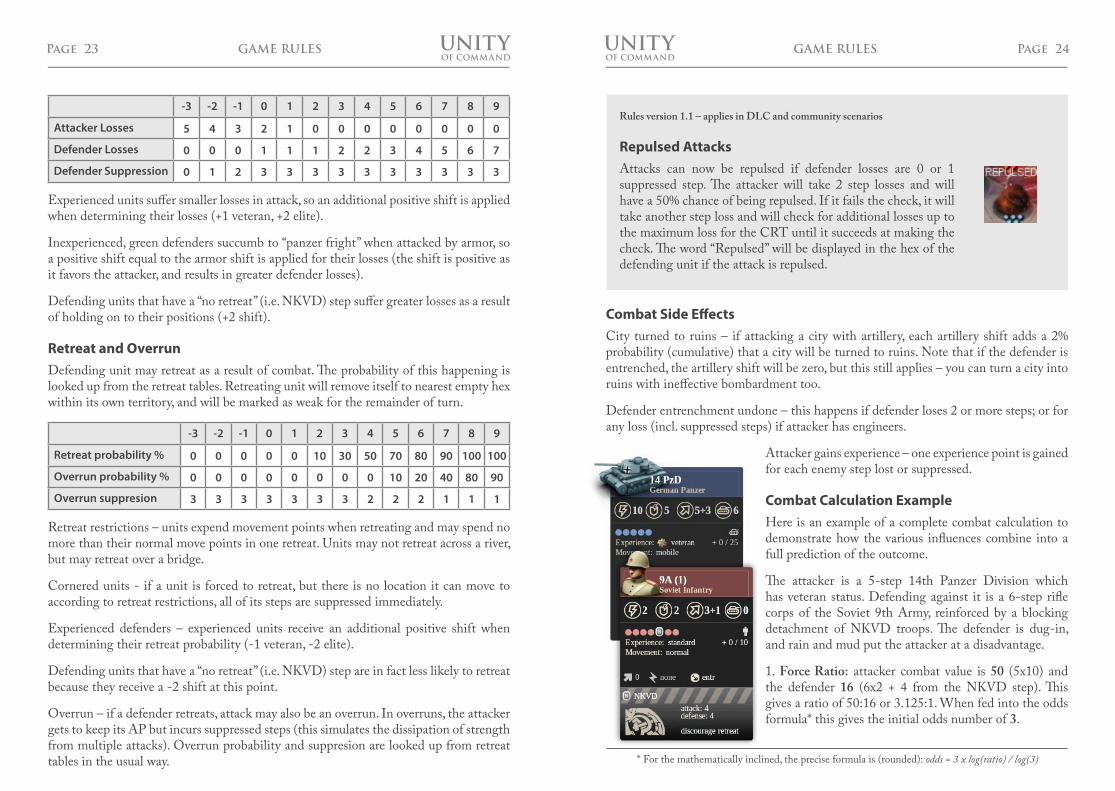
Combat Calculation ExampleHere is an example of a complete combat calculation to demonstrate how the various influences combine into a full prediction of the outcome.
The attacker is a 5-step 14th Panzer Division which has veteran status. Defending against it is a 6-step rifle corps of the Soviet 9th Army, reinforced by a blocking detachment of NKVD troops. The defender is dug-in, and rain and mud put the attacker at a disadvantage.
1. Force Ratio: attacker combat value is 50 (5x10) and the defender 16 (6x2 + 4 from the NKVD step). This gives a ratio of 50:16 or 3.125:1. When fed into the odds formula* this gives the initial odds number of 3.
-3 -2 -1 0 1 2 3 4 5 6 7 8 9
Attacker Losses 5 4 3 2 1 0 0 0 0 0 0 0 0
Defender Losses 0 0 0 1 1 1 2 2 3 4 5 6 7
Defender Suppression 0 1 2 3 3 3 3 3 3 3 3 3 3
Experienced units suffer smaller losses in attack, so an additional positive shift is applied when determining their losses (+1 veteran, +2 elite).
Inexperienced, green defenders succumb to “panzer fright” when attacked by armor, so a positive shift equal to the armor shift is applied for their losses (the shift is positive as it favors the attacker, and results in greater defender losses).
Defending units that have a “no retreat” (i.e. NKVD) step suffer greater losses as a result of holding on to their positions (+2 shift).
Retreat and OverrunDefending unit may retreat as a result of combat. The probability of this happening is looked up from the retreat tables. Retreating unit will remove itself to nearest empty hex within its own territory, and will be marked as weak for the remainder of turn.
-3 -2 -1 0 1 2 3 4 5 6 7 8 9
Retreat probability % 0 0 0 0 0 10 30 50 70 80 90 100 100
Overrun probability % 0 0 0 0 0 0 0 0 10 20 40 80 90
Overrun suppresion 3 3 3 3 3 3 3 2 2 2 1 1 1
Retreat restrictions – units expend movement points when retreating and may spend no more than their normal move points in one retreat. Units may not retreat across a river, but may retreat over a bridge.
Cornered units - if a unit is forced to retreat, but there is no location it can move to according to retreat restrictions, all of its steps are suppressed immediately.
Experienced defenders – experienced units receive an additional positive shift when determining their retreat probability (-1 veteran, -2 elite).
Defending units that have a “no retreat” (i.e. NKVD) step are in fact less likely to retreat because they receive a -2 shift at this point.
Overrun – if a defender retreats, attack may also be an overrun. In overruns, the attacker gets to keep its AP but incurs suppressed steps (this simulates the dissipation of strength from multiple attacks). Overrun probability and suppresion are looked up from retreat tables in the usual way.
GAME RULESGAME RULES
* For the mathematically inclined, the precise formula is (rounded): odds = 3 x log(ratio) / log(3)
Rules version 1.1 – applies in DLC and community scenarios
Repulsed AttacksAttacks can now be repulsed if defender losses are 0 or 1 suppressed step. The attacker will take 2 step losses and will have a 50% chance of being repulsed. If it fails the check, it will take another step loss and will check for additional losses up to the maximum loss for the CRT until it succeeds at making the check. The word “Repulsed” will be displayed in the hex of the defending unit if the attack is repulsed.
Page 25OF COMMANDUNITY
DRAFT
DRAFTPage 26
OF COMMANDUNITY
DRAFT
DRAFTSupply3.4.
Units resupply at the start of each turn. Units can only resupply if they are within range of supply sources, i.e. if they are located in an in-supply hex at the beginning of turn.
Supply TracingSupply is traced from supply sources by expending points in almost the same way as moving. Tracing starts from each supply source with points equal to its range. It then works its way into the field while expending points according to suppply table.
Clear Forest Mountain Swamp Hills Desert City
Dry 1 2 A 3 2 2 1
Mud 2 3 X A 3 2 1
Snow 1 2 X 2 2 2 1
Railway – tracing supplies is unlimited along rail lines as long as they’re uninterrupted from supply source.
Front lines – supply cannot be traced across the front line.
Rivers and difficult terrrain – “A” is interpreted differently in the supply table. Supply can be traced into an “A” hex as long as there are at least three points left, but it costs all remaining points to enter.
Supply EffectsEffects of being unsupplied mostly depend on how long the unit has been out of supply already. The effects are somewhat weaker for experienced units who are better adept at fighting while being cut off.
1 turn no recovery of previously suppressed steps
2 turns no AP, some steps suppressed (green 3, standard 2, veteran 1)
3+ turns no AP, one MP less than the normal value, all steps suppressed
Note that, when a unit has been out of supply for 3 or more turns, the reduced number of MPs means that the unit cannot cross rivers or enter terrain with “A” movement cost any more.
RecoveryOnce back in supply, units are able to recover some steps according to schedule in the following table.
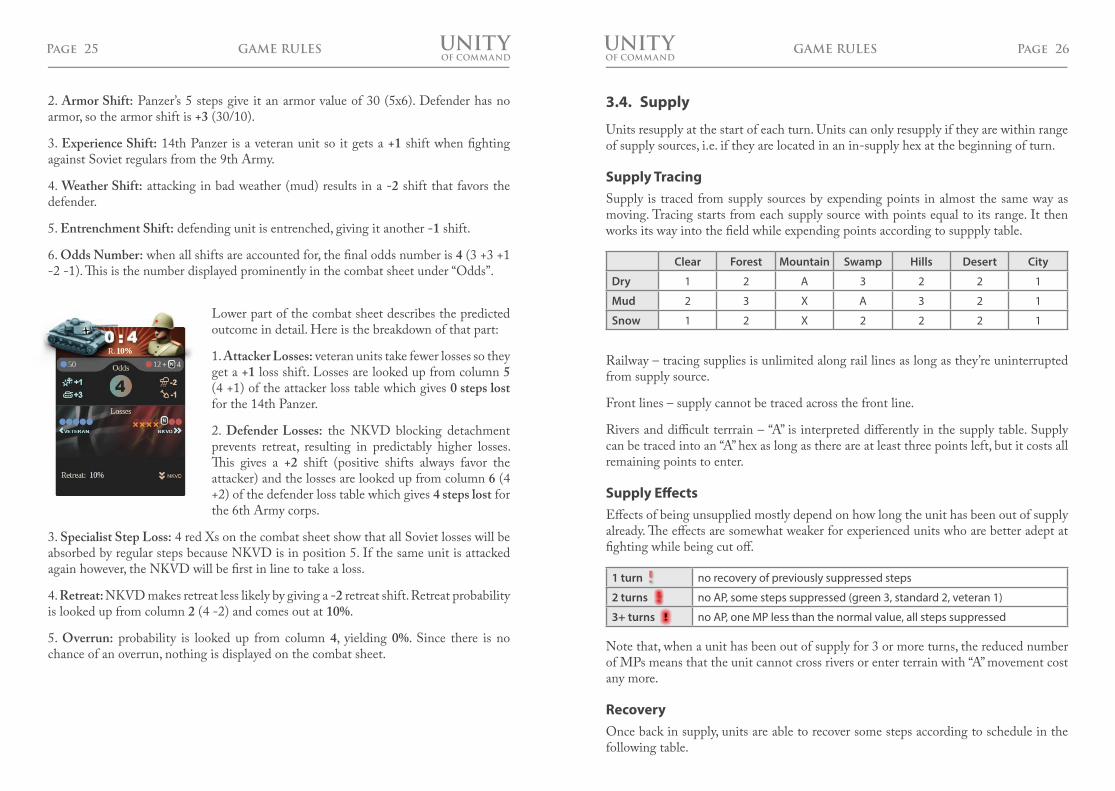
2. Armor Shift: Panzer’s 5 steps give it an armor value of 30 (5x6). Defender has no armor, so the armor shift is +3 (30/10).
3. Experience Shift: 14th Panzer is a veteran unit so it gets a +1 shift when fighting against Soviet regulars from the 9th Army.
4. Weather Shift: attacking in bad weather (mud) results in a -2 shift that favors the defender.
5. Entrenchment Shift: defending unit is entre nched, giving it another -1 shift.
6. Odds Number: when all shifts are accounted for, the final odds number is 4 (3 +3 +1 -2 -1). This is the number displayed prominently in the combat sheet under “Odds”.
Lower part of the combat sheet describes the predicted outcome in detail. Here is the breakdown of that part:
1. Attacker Losses: veteran units take fewer losses so they get a +1 loss shift. Losses are looked up from column 5 (4 +1) of the attacker loss table which gives 0 steps lost for the 14th Panzer.
2. Defender Losses: the NKVD blocking detachment prevents retreat, resulting in predictably higher losses. This gives a +2 shift (positive shifts always favor the attacker) and the losses are looked up from column 6 (4 +2) of the defender loss table which gives 4 steps lost for the 6th Army corps.
3. Specialist Step Loss: 4 red Xs on the combat sheet show that all Soviet losses will be absorbed by regular steps because NKVD is in position 5. If the same unit is attacked again however, the NKVD will be first in line to take a loss.
4. Retreat: NKVD makes retreat less likely by giving a -2 retreat shift. Retreat probability is looked up from column 2 (4 -2) and comes out at 10%.
5. Overrun: probability is looked up from column 4, yielding 0%. Since there is no chance of an overrun, nothing is displayed on the combat sheet.
GAME RULESGAME RULES
Page 27OF COMMANDUNITY
DRAFT
DRAFTPage 28
OF COMMANDUNITY
DRAFT
DRAFTNot all units can be reinforced: out-of-supply units, units supplied by air and units deployed as reinforcements in this turn are excluded.
Adding Regular StepsUnits may add up to 3 regular steps on each turn, but may never exceed a total strength of 7 regular steps. Units may only add steps of the same nationality and type. For instance, a Hungarian infantry unit may only be reinforced with Hungarian infantry steps.
Clicking on a step icon in the Force Pool bar shows its popup with “Add” buttons. It lists the number of steps available as reinforcements. If the step is from OKH/Stavka reserve, it also shows the prestige cost per step.
If the “Add” buttons are enabled, you can use them to reinforce the selected unit. Note that “Add” buttons may be disabled for the following reasons:
no unit selected: you must select a unit first•step type is wrong: check both nationality and reinforcement type•unit cannot be reinforced (out of supply etc.)•over the strength limit (7 steps)•not enough prestige•
Newly added steps are suppressed initially, and will be able to recover at the start of next turn subject to usual recovery rules.
Adding regular steps lowers the overall experience level of the unit (except for green units). For each new step, the unit will lose 1/5 of experience points needed to level up (-2 standard, -5 veteran, -10 elite). If enough experience points are lost, the unit will levels down in experience, e.g. from veteran to standard.
Unit experience Steps recovered per turn
green 1
standard 2
veteran or 3
elite or 4
Taking Supply SourcesIf you take control of an enemy supply source hex, the enemy is denied supplies from it, but you do not gain those supplies.
You cannot destroy the supply source either: if the supply source is recaptured by the enemy, it starts providing its forces with supplies again on the following turn.
Reinforcements3.5.
Units on the map may be reinforced with either regular or specialist steps – to the extent that such reinforcements are available to the player. The player may also have complete units available as reinforcements.
Reinfocements can come from player’s own Force Pool; or from the OKH/Stavka Reserve. The difference is that asking the high command to tap into its reserves means losing prestige. In other words, these reinfocements are paid for in prestige points.
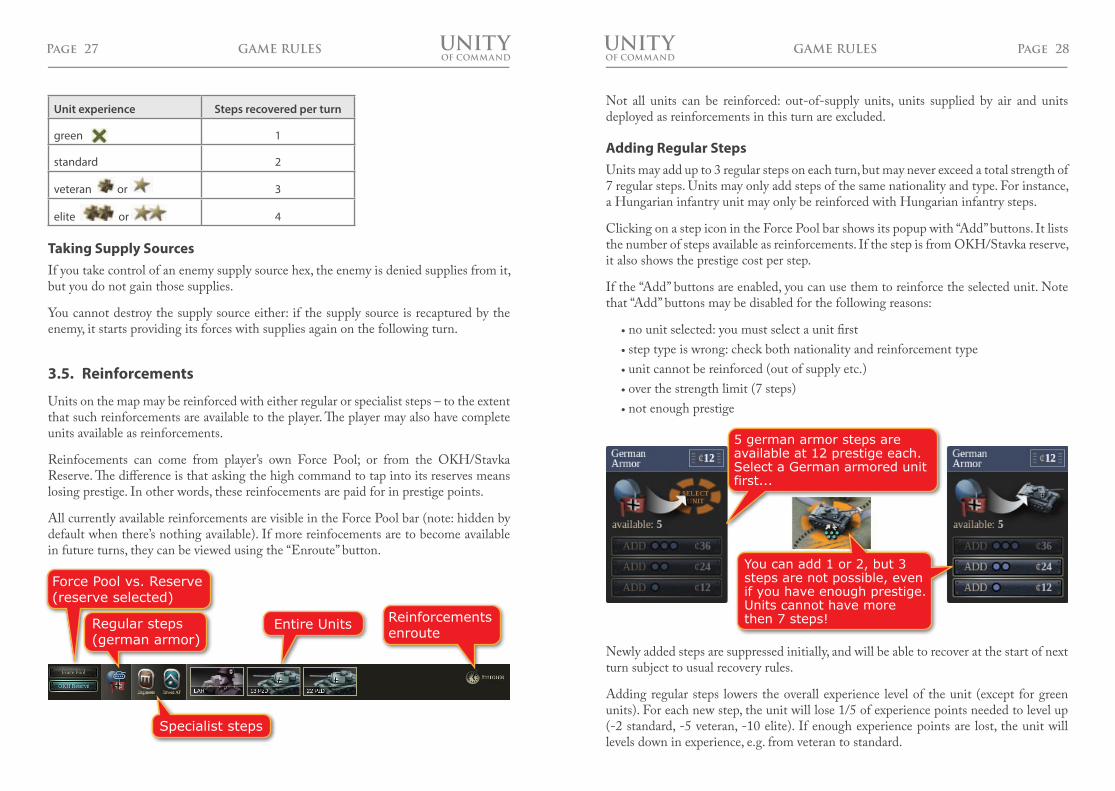
All currently available reinforcements are visible in the Force Pool bar (note: hidden by default when there’s nothing available). If more reinfocements are to become available in future turns, they can be viewed using the “Enroute” button.
GAME RULESGAME RULES
Force Pool vs. Reserve(reserve selected)
Regular steps(german armor)
Reinforcementsenroute
Specialist steps
Entire Units
5 german armor steps are available at 12 prestige each. Select a German armored unit first...
You can add 1 or 2, but 3 steps are not possible, even if you have enough prestige. Units cannot have more then 7 steps!
Page 29OF COMMANDUNITY
DRAFT
DRAFTPage 30
OF COMMANDUNITY
DRAFT
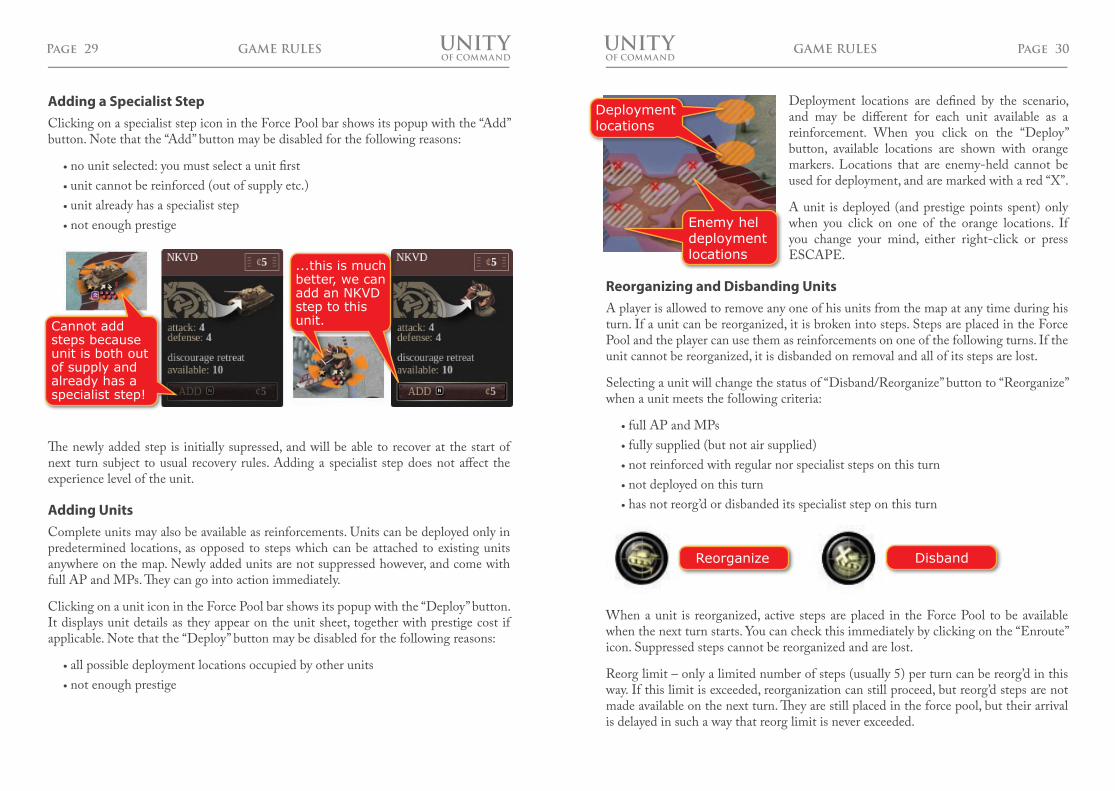
DRAFTDeployment locations are defined by the scenario, and may be different for each unit available as a reinforcement. When you click on the “Deploy” button, available locations are shown with orange markers. Locations that are enemy-held cannot be used for deployment, and are marked with a red “X”.
A unit is deployed (and prestige points spent) only when you click on one of the orange locations. If you change your mind, either right-click or press ESCAPE.
Reorganizing and Disbanding UnitsA player is allowed to remove any one of his units from the map at any time during his turn. If a unit can be reorganized, it is broken into steps. Steps are placed in the Force Pool and the player can use them as reinforcements on one of the following turns. If the unit cannot be reorganized, it is disbanded on removal and all of its steps are lost.
Selecting a unit will change the status of “Disband/Reorganize” button to “Reorganize” when a unit meets the following criteria:
full AP and MPs•fully supplied (but not air supplied)•not reinforced with regular nor specialist steps on this turn•not deployed on this turn•has not reorg’d or disbanded its specialist step on this turn•
When a unit is reorganized, active steps are placed in the Force Pool to be available when the next turn starts. You can check this immediately by clicking on the “Enroute” icon. Suppressed steps cannot be reorganized and are lost.
Reorg limit – only a limited number of steps (usually 5) per turn can be reorg’d in this way. If this limit is exceeded, reorganization can still proceed, but reorg’d steps are not made available on the next turn. They are still placed in the force pool, but their arrival is delayed in such a way that reorg limit is never exceeded.
Adding a Specialist StepClicking on a specialist step icon in the Force Pool bar shows its popup with the “Add” button. Note that the “Add” button may be disabled for the following reasons:
no unit selected: you must select a unit first•unit cannot be reinforced (out of supply etc.)•unit already has a specialist step•not enough prestige•
The newly added step is initially supressed, and will be able to recover at the start of next turn subject to usual recovery rules. Adding a specialist step does not affect the experience level of the unit.
Adding UnitsComplete units may also be available as reinforcements. Units can be deployed only in predetermined locations, as opposed to steps which can be attached to existing units anywhere on the map. Newly added units are not suppressed however, and come with full AP and MPs. They can go into action immediately.
Clicking on a unit icon in the Force Pool bar shows its popup with the “Deploy” button. It displays unit details as they appear on the unit sheet, together with prestige cost if applicable. Note that the “Deploy” button may be disabled for the following reasons:
all possible deployment locations occupied by other units•not enough prestige•
GAME RULESGAME RULES
Cannot add steps because unit is both out of supply and already has a specialist step!
...this is much better, we can add an NKVD step to this unit.
Deploymentlocations
dEnemy heldeploymentlocations
Reorganize Disband
Page 31OF COMMANDUNITY
DRAFT
DRAFTPage 32
OF COMMANDUNITY
DRAFT
DRAFTArmor and ArtilleryA specialist step may contribute armor or artillery shift (not both) in combat. This shift is displayed on the specialist step sheet (lower part of parent unit sheet). If the step represents an anti-tank unit, it is subject to limitations on AT guns, and there’s an asterisk next to the shift value.
Note that the armor shift is applied directly (as explained in Combat) and is therefore not directly comparable with the unit armor value.
Engineer CapabilityEngineers negate entrenchment shift when attacking. Also, inflicting even a single combat loss (either active or suppressed) means that enemy entrenchment is undone.
Engineers also help with forced crossings, negating the river shift in combat.
Units with engineers can entrench in any weather, and do not incur the 2 suppressed steps penalty like other units do when digging in.
Recon CapabilityRecon units capture hexes adjacent to movement route when the unit is moving, except for those hexes occupied by enemy units or ZOCs.
This does not work for mountain and city hexes and also across rivers, except when there’s a bridge.
Units with a recon step do not have their Action Point locked upon entering an enemy ZOC.
Discourage RetreatSoviet NKVD steps represent blocking detachments made up of secret police personnel. These were at times placed behind regular troops to prevent panic, unauthorized withdrawal or retreat.
In combat, units with NKVD steps are less likely to retreat (-2 shift) but suffer greater losses (+2 shift).
Anti-Air (AA)Anti-air steps prevent enemy air attacks against their parent unit and all adjacent friendly units.
Anti-tank (AT)Anti-tank units contribute armor shift in combat, but only if enemy armor is present.
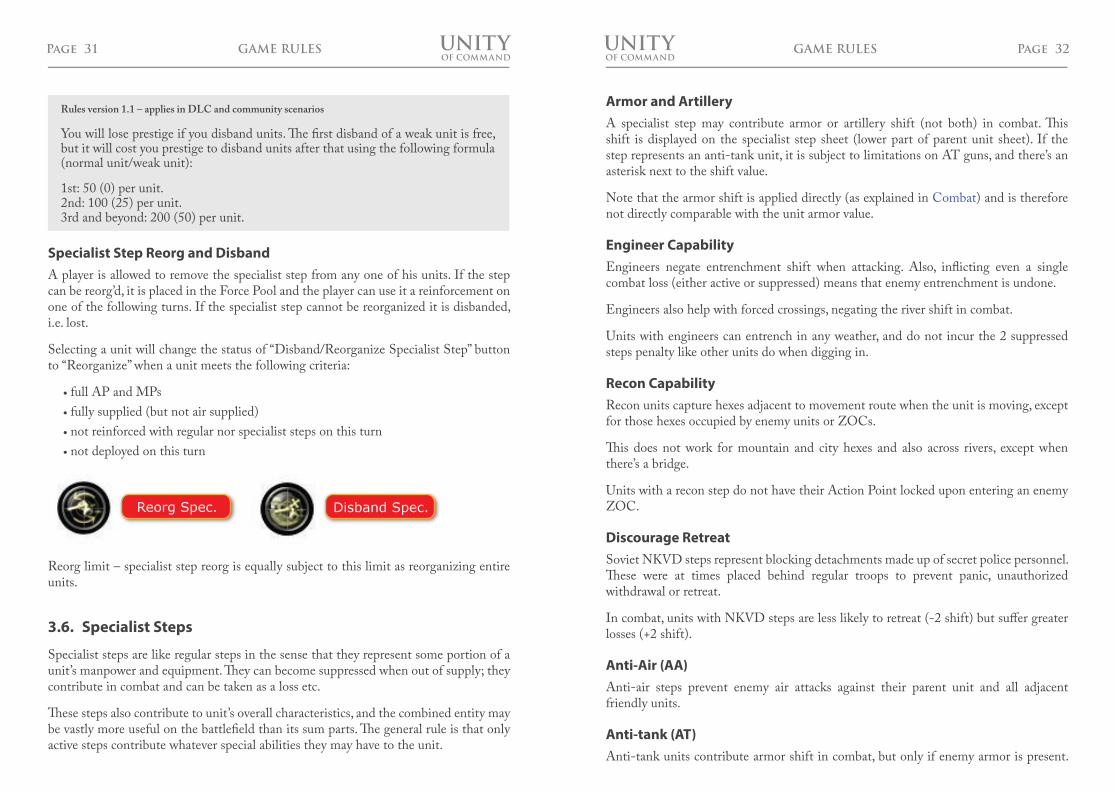
Specialist Step Reorg and DisbandA player is allowed to remove the specialist step from any one of his units. If the step can be reorg’d, it is placed in the Force Pool and the player can use it a reinforcement on one of the following turns. If the specialist step cannot be reorganized it is disbanded, i.e. lost.
Selecting a unit will change the status of “Disband/Reorganize Specialist Step” button to “Reorganize” when a unit meets the following criteria:
full AP and MPs•fully supplied (but not air supplied)•not reinforced with regular nor specialist steps on this turn•not deployed on this turn•
Reorg limit – specialist step reorg is equally subject to this limit as reorganizing entire units.
Specialist Steps3.6.
Specialist steps are like regular steps in the sense that they represent some portion of a unit’s manpower and equipment. They can become suppressed when out of supply; they contribute in combat and can be taken as a loss etc.
These steps also contribute to unit’s overall characteristics, and the combined entity may be vastly more useful on the battlefield than its sum parts. The general rule is that only active steps contribute whatever special abilities they may have to the unit.
GAME RULESGAME RULES
Reorg Spec. Disband Spec.
Rules version 1.1 – applies in DLC and community scenarios
You will lose prestige if you disband units. The first disband of a weak unit is free, but it will cost you prestige to disband units after that using the following formula (normal unit/weak unit):
1st: 50 (0) per unit. 2nd: 100 (25) per unit. 3rd and beyond: 200 (50) per unit.
Page 33OF COMMANDUNITY
DRAFT
DRAFTPage 34
OF COMMANDUNITY
DRAFT
DRAFTTheir shift counts only to negate enemy armor, and does not create an armor shift in itself.
Towed EquipmentTowed equipment steps become suppressed if the parent unit moves. This represents the longer time needed to set up towed equipment after it’s been moved.
Steps suppressed for this reason will be reactivated as soon as the player ends turn. This means they will be active in defense immediately.
Towed steps that become suppressed for other reasons (out of supply etc.) will not be reactivated in this way. They may only recover at the beginning of next turn, subject to usual recovery rules.
Towed equipment steps are also suppressed immediately when a unit retreats.
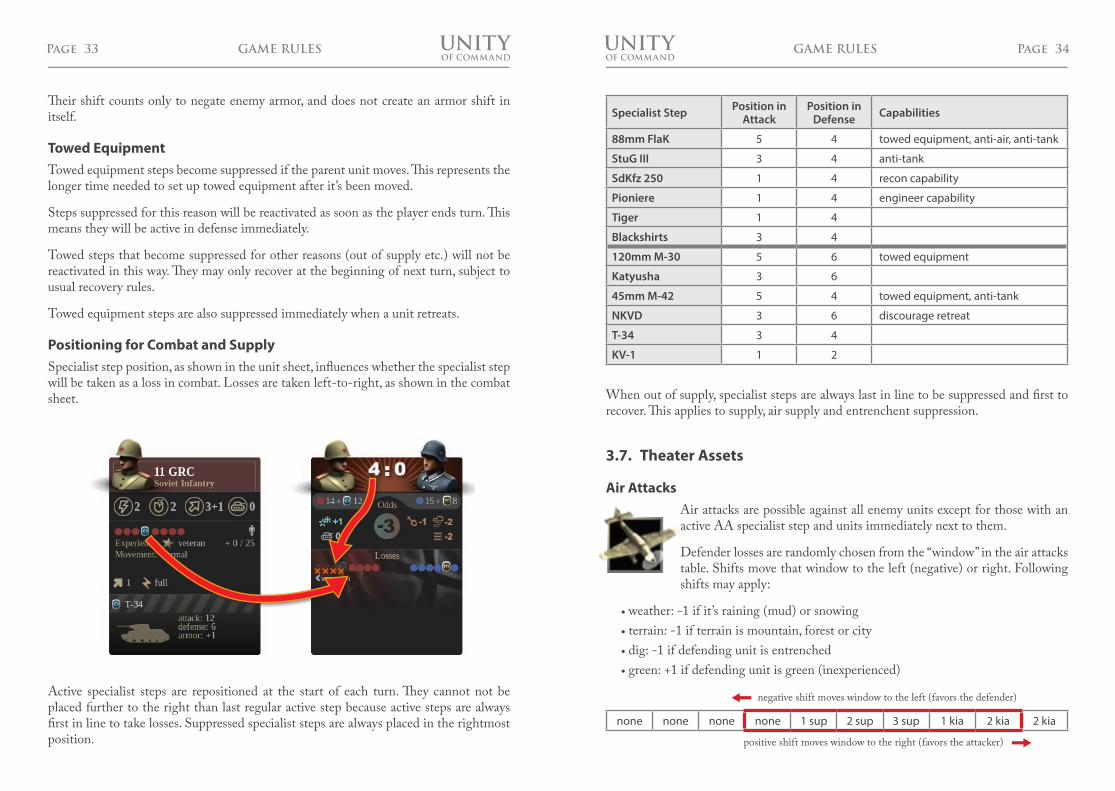
Positioning for Combat and SupplySpecialist step position, as shown in the unit sheet, influences whether the specialist step will be taken as a loss in combat. Losses are taken left-to-right, as shown in the combat sheet.
Active specialist steps are repositioned at the start of each turn. They cannot not be placed further to the right than last regular active step because active steps are always first in line to take losses. Suppressed specialist steps are always placed in the rightmost position.
GAME RULES
Specialist Step Position in Attack
Position in Defense Capabilities
88mm FlaK 5 4 towed equipment, anti-air, anti-tank
StuG III 3 4 anti-tank
SdKfz 250 1 4 recon capability
Pioniere 1 4 engineer capability
Tiger 1 4
Blackshirts 3 4
120mm M-30 5 6 towed equipment
Katyusha 3 6
45mm M-42 5 4 towed equipment, anti-tank
NKVD 3 6 discourage retreat
T-34 3 4
KV-1 1 2
When out of supply, specialist steps are always last in line to be suppressed and first to recover. This applies to supply, air supply and entrenchent suppression.
Theater Assets3.7.
Air AttacksAir attacks are possible against all enemy units except for those with an active AA specialist step and units immediately next to them.
Defender losses are randomly chosen from the “window” in the air attacks table. Shifts move that window to the left (negative) or right. Following shifts may apply:
weather: -1 if it’s raining (mud) or snowing•terrain: -1 if terrain is mountain, forest or city•dig: -1 if defending unit is entrenched•green: +1 if defending unit is green (inexperienced)•
none none none none 1 sup 2 sup 3 sup 1 kia 2 kia 2 kia
positive shift moves window to the right (favors the attacker)
negative shift moves window to the left (favors the defender)
GAME RULES
Page 35OF COMMANDUNITY
DRAFT
DRAFTPage 36
OF COMMANDUNITY
DRAFT
DRAFTIf the targeted unit is in a city, there is a 10% chance that the city is turned to ruins on each air attack.
LogisticsCommiting logistics assets to a supply source will increase its range by +1.
The resulting range increase and its effect on the supply network are visible immediately in the supply view. Note that supply view cannot be completely relied upon when considering whether a unit will be supplied on the next turn.
The weather changes from one turn to the next, and the current supply view may not be valid on the next turn. Use your knowledge of the date and geographic location to plan for the weather change ist the effects on supply.
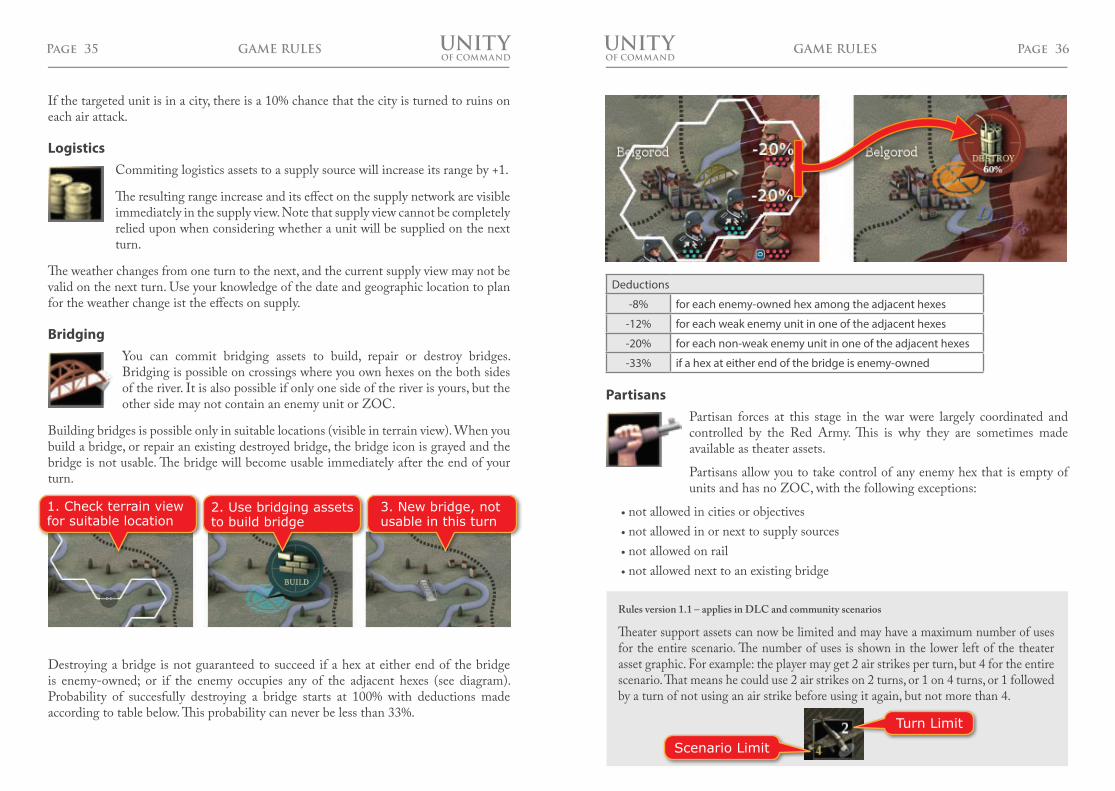
BridgingYou can commit bridging assets to build, repair or destroy bridges. Bridging is possible on crossings where you own hexes on the both sides of the river. It is also possible if only one side of the river is yours, but the other side may not contain an enemy unit or ZOC.
Building bridges is possible only in suitable locations (visible in terrain view). When you build a bridge, or repair an existing destroyed bridge, the bridge icon is grayed and the bridge is not usable. The bridge will become usable immediately after the end of your turn.
Destroying a bridge is not guaranteed to succeed if a hex at either end of the bridge is enemy-owned; or if the enemy occupies any of the adjacent hexes (see diagram). Probability of succesfully destroying a bridge starts at 100% with deductions made according to table below. This probability can never be less than 33%.
Deductions
-8% for each enemy-owned hex among the adjacent hexes
-12% for each weak enemy unit in one of the adjacent hexes
-20% for each non-weak enemy unit in one of the adjacent hexes
-33% if a hex at either end of the bridge is enemy-owned
PartisansPartisan forces at this stage in the war were largely coordinated and controlled by the Red Army. This is why they are sometimes made available as theater assets.
Partisans allow you to take control of any enemy hex that is empty of units and has no ZOC, with the following exceptions:
not allowed in cities or objectives •not allowed in or next to supply sources•not allowed on rail •not allowed next to an existing bridge•
Reinforcements: Force Pooland OKH reserve1. Check terrain view
for suitable location2. Use bridging assets to build bridge
3. New bridge, not usable in this turn
GAME RULES GAME RULES
Rules version 1.1 – applies in DLC and community scenarios
Theater support assets can now be limited and may have a maximum number of uses for the entire scenario. The number of uses is shown in the lower left of the theater asset graphic. For example: the player may get 2 air strikes per turn, but 4 for the entire scenario. That means he could use 2 air strikes on 2 turns, or 1 on 4 turns, or 1 followed by a turn of not using an air strike before using it again, but not more than 4.
Scenario Limit
Turn Limit
Page 37OF COMMANDUNITY
DRAFT
DRAFTPage 38
OF COMMANDUNITY
DRAFT
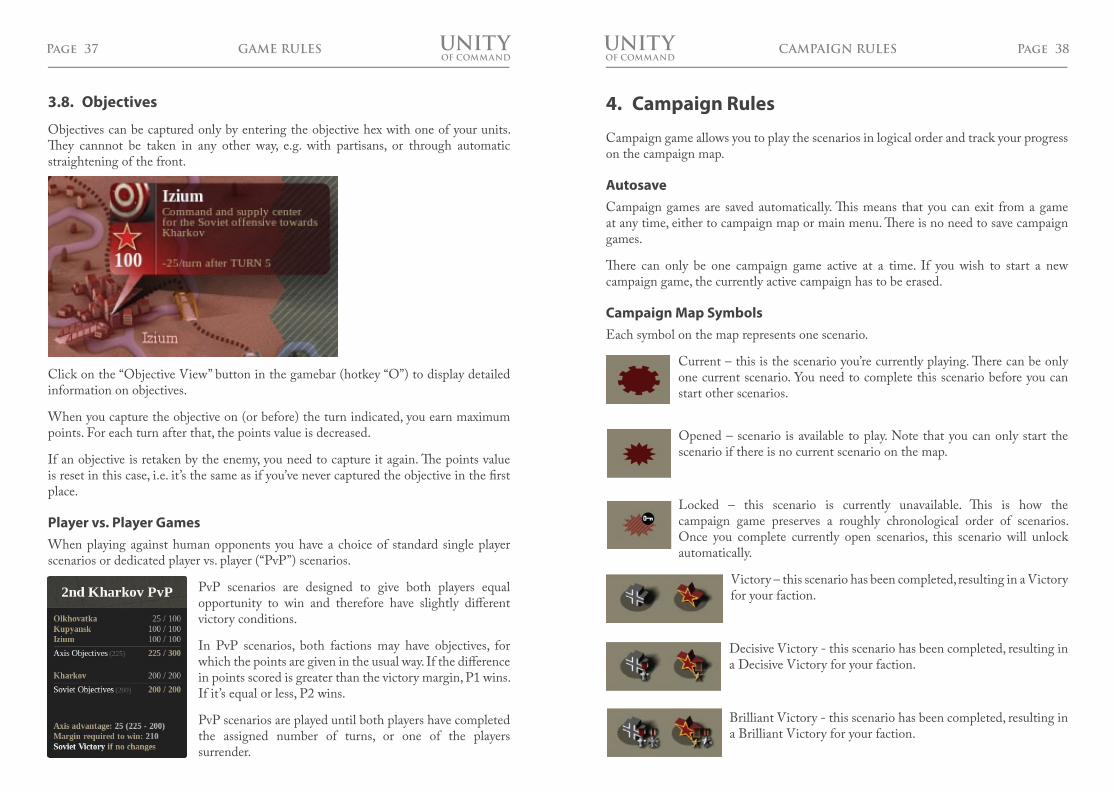
DRAFTObjectives3.8.
Objectives can be captured only by entering the objective hex with one of your units. They cannnot be taken in any other way, e.g. with partisans, or through automatic straightening of the front.
Click on the “Objective View” button in the gamebar (hotkey “O”) to display detailed information on objectives.
When you capture the objective on (or before) the turn indicated, you earn maximum points. For each turn after that, the points value is decreased.
If an objective is retaken by the enemy, you need to capture it again. The points value is reset in this case, i.e. it’s the same as if you’ve never captured the objective in the first place.
Player vs. Player GamesWhen playing against human opponents you have a choice of standard single player scenarios or dedicated player vs. player (“PvP”) scenarios.
PvP scenarios are designed to give both players equal opportunity to win and therefore have slightly different victory conditions.
In PvP scenarios, both factions may have objectives, for which the points are given in the usual way. If the difference in points scored is greater than the victory margin, P1 wins. If it’s equal or less, P2 wins.
PvP scenarios are played until both players have completed the assigned number of turns, or one of the players surrender.
Campaign Rules4.
Campaign game allows you to play the scenarios in logical order and track your progress on the campaign map.
AutosaveCampaign games are saved automatically. This means that you can exit from a game at any time, either to campaign map or main menu. There is no need to save campaign games.
There can only be one campaign game active at a time. If you wish to start a new campaign game, the currently active campaign has to be erased.
Campaign Map SymbolsEach symbol on the map represents one scenario.
Current – this is the scenario you’re currently playing. There can be only one current scenario. You need to complete this scenario before you can start other scenarios.
Opened – scenario is available to play. Note that you can only start the scenario if there is no current scenario on the map.
Locked – this scenario is currently unavailable. This is how the campaign game preserves a roughly chronological order of scenarios. Once you complete currently open scenarios, this scenario will unlock automatically.
Victory – this scenario has been completed, resulting in a Victory for your faction.
Decisive Victory - this scenario has been completed, resulting in a Decisive Victory for your faction.
Brilliant Victory - this scenario has been completed, resulting in a Brilliant Victory for your faction.
CAMPAIGN RULESGAME RULES
Page 39OF COMMANDUNITY
DRAFT
DRAFTPage 40
OF COMMANDUNITY
DRAFT
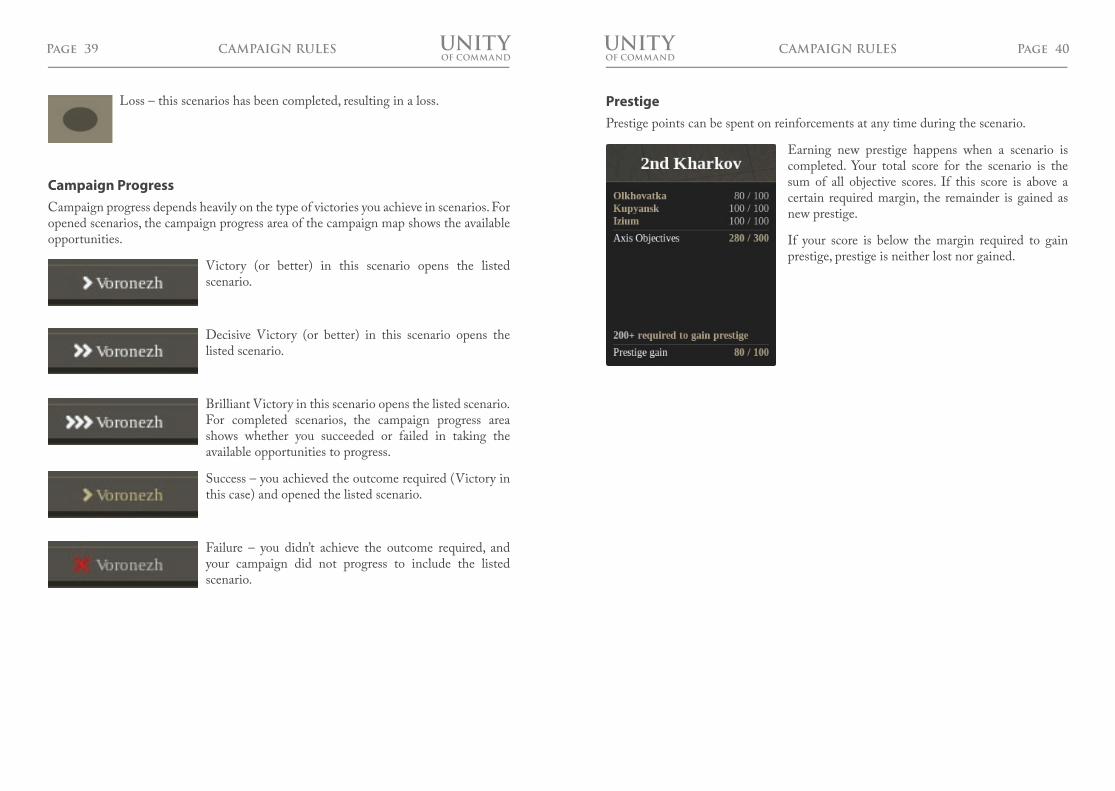
DRAFTLoss – this scenarios has been completed, resulting in a loss.
Campaign ProgressCampaign progress depends heavily on the type of victories you achieve in scenarios. For opened scenarios, the campaign progress area of the campaign map shows the available opportunities.
Victory (or better) in this scenario opens the listed scenario.
Decisive Victory (or better) in this scenario opens the listed scenario.
Brilliant Victory in this scenario opens the listed scenario.For completed scenarios, the campaign progress area shows whether you succeeded or failed in taking the available opportunities to progress.
Success – you achieved the outcome required (Victory in this case) and opened the listed scenario.
Failure – you didn’t achieve the outcome required, and your campaign did not progress to include the listed scenario.
PrestigePrestige points can be spent on reinforcements at any time during the scenario.
Earning new prestige happens when a scenario is completed. Your total score for the scenario is the sum of all objective scores. If this score is above a certain required margin, the remainder is gained as new prestige.
If your score is below the margin required to gain prestige, prestige is neither lost nor gained.
CAMPAIGN RULES CAMPAIGN RULES
Page 41OF COMMANDUNITY
DRAFT
DRAFTPage 42
OF COMMANDUNITY
DRAFT
DRAFTEditor5.
Keyboard Shortcuts
G to show the hex grid.
I to show the terrain icons (they’re displayed on the hexes, a forest is displayed by 3 trees for example). The terrain icon overlay also shows the state (no bridge present but bridging location, normal or blown) of the on-map bridges/bridge locations.
P to display the unit properties.
M to display the minimap.
T for the toolbox.
F to display the force pool.
A to display the AI hints screen.
1 for the German unit list.
2 for SS unit list.
3 for Axis Allied unit list.
4 Soviet unit list.
5 Soviet Allied unit list.
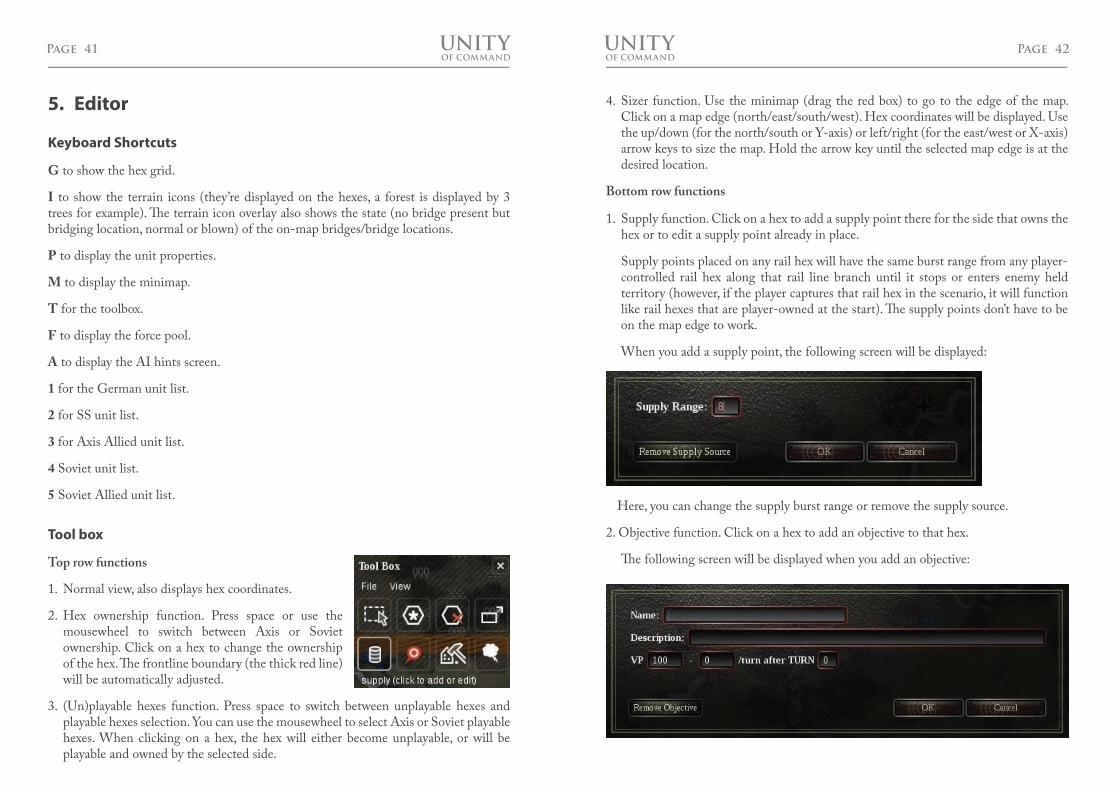
Tool box
Top row functions
1. Normal view, also displays hex coordinates.
2. Hex ownership function. Press space or use the mousewheel to switch between Axis or Soviet ownership. Click on a hex to change the ownership of the hex. The frontline boundary (the thick red line) will be automatically adjusted.
3. (Un)playable hexes function. Press space to switch between unplayable hexes and playable hexes selection. You can use the mousewheel to select Axis or Soviet playable hexes. When clicking on a hex, the hex will either become unplayable, or will be playable and owned by the selected side.
4. Sizer function. Use the minimap (drag the red box) to go to the edge of the map. Click on a map edge (north/east/south/west). Hex coordinates will be displayed. Use the up/down (for the north/south or Y-axis) or left/right (for the east/west or X-axis) arrow keys to size the map. Hold the arrow key until the selected map edge is at the desired location.
Bottom row functions
1. Supply function. Click on a hex to add a supply point there for the side that owns the hex or to edit a supply point already in place.
Supply points placed on any rail hex will have the same burst range from any player-controlled rail hex along that rail line branch until it stops or enters enemy held territory (however, if the player captures that rail hex in the scenario, it will function like rail hexes that are player-owned at the start). The supply points don’t have to be on the map edge to work.
When you add a supply point, the following screen will be displayed:
Here, you can change the supply burst range or remove the supply source.
2. Objective function. Click on a hex to add an objective to that hex.
The following screen will be displayed when you add an objective:
Page 43OF COMMANDUNITY
DRAFT
DRAFTPage 44
OF COMMANDUNITY
DRAFT
DRAFTHere, you can enter the name, description, point value, points drop per turn and the turn after the points start to drop. Example: an objective is worth 100 points. The points drop is -25 per turn after turn 5. On turn 6 the player will get 75 points for the objective.
For a brilliant victory in a scenario, all objectives need to be captured on or before the specified turn.
3. Destroy function. Click on a city to turn it into ruins or to turn ruins into a city. Click on a bridge to create it (if it’s currently a bridging location), destroy it (if it’s currently on the map as a normal bridge) or to remove an existing bridge entirely and make it a bridging location. Players can place bridges on bridging location in a scenario by using the bridging theater asset on any hexside bordering a friendly hex that isn’t occupied by an enemy unit or in enemy ZOC.
4. Weather function. This will display the weather for the selected turn. Select turns by using the numbers 0 to 9 or advance the weather one turn at a time with the left-right arrow keys or the space bar. Note that some variety is possible, the weather displayed here will essentially be an average for the turn.
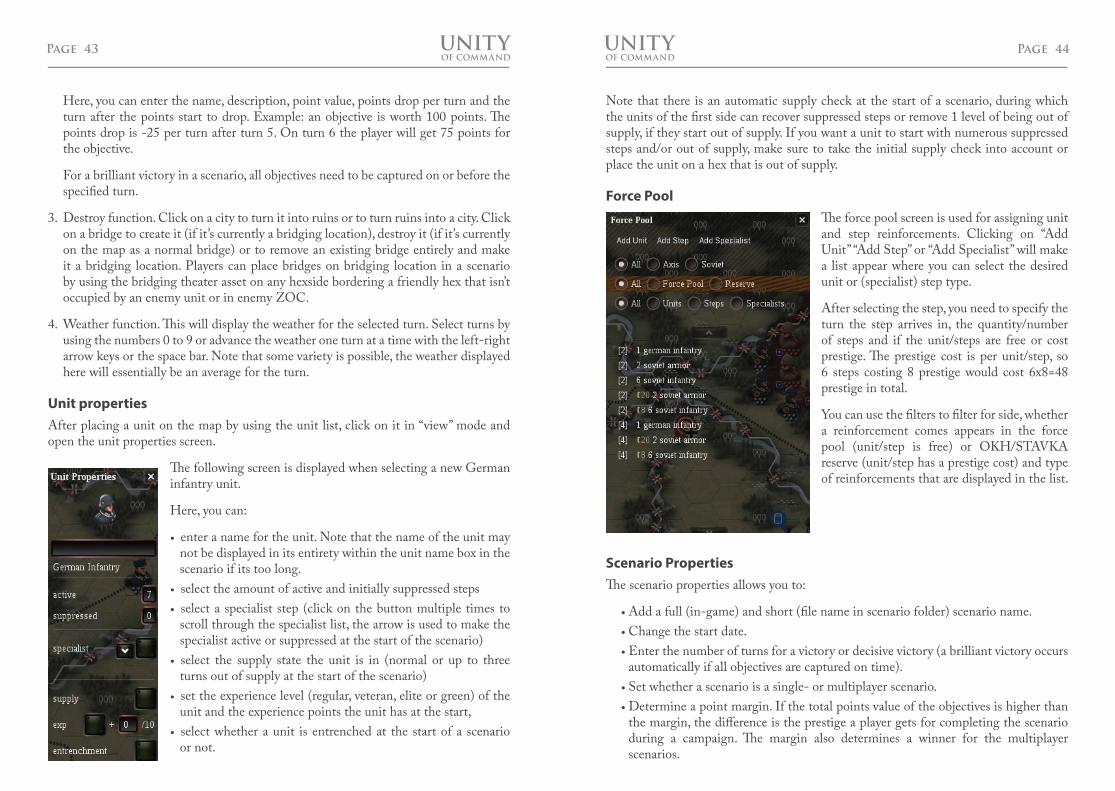
Unit propertiesAfter placing a unit on the map by using the unit list, click on it in “view” mode and open the unit properties screen.
The following screen is displayed when selecting a new German infantry unit.
Here, you can:
enter a name for the unit. Note that the name of the unit may •not be displayed in its entirety within the unit name box in the scenario if its too long.select the amount of active and initially suppressed steps•select a specialist step (click on the button multiple times to •scroll through the specialist list, the arrow is used to make the specialist active or suppressed at the start of the scenario)select the supply state the unit is in (normal or up to three •turns out of supply at the start of the scenario)set the experience level (regular, veteran, elite or green) of the •unit and the experience points the unit has at the start, select whether a unit is entrenched at the start of a scenario •or not.
Note that there is an automatic supply check at the start of a scenario, during which the units of the first side can recover suppressed steps or remove 1 level of being out of supply, if they start out of supply. If you want a unit to start with numerous suppressed steps and/or out of supply, make sure to take the initial supply check into account or place the unit on a hex that is out of supply.
Force PoolThe force pool screen is used for assigning unit and step reinforcements. Clicking on “Add Unit” “Add Step” or “Add Specialist” will make a list appear where you can select the desired unit or (specialist) step type.
After selecting the step, you need to specify the turn the step arrives in, the quantity/number of steps and if the unit/steps are free or cost prestige. The prestige cost is per unit/step, so 6 steps costing 8 prestige would cost 6x8=48 prestige in total.
You can use the filters to filter for side, whether a reinforcement comes appears in the force pool (unit/step is free) or OKH/STAVKA reserve (unit/step has a prestige cost) and type of reinforcements that are displayed in the list.
Scenario PropertiesThe scenario properties allows you to:
Add a full (in-game) and short (file name in scenario folder) scenario name.•Change the start date.•Enter the number of turns for a victory or decisive victory (a brilliant victory occurs •automatically if all objectives are captured on time).Set whether a scenario is a single- or multiplayer scenario.•Determine a point margin. If the total points value of the objectives is higher than •the margin, the difference is the prestige a player gets for completing the scenario during a campaign. The margin also determines a winner for the multiplayer scenarios.
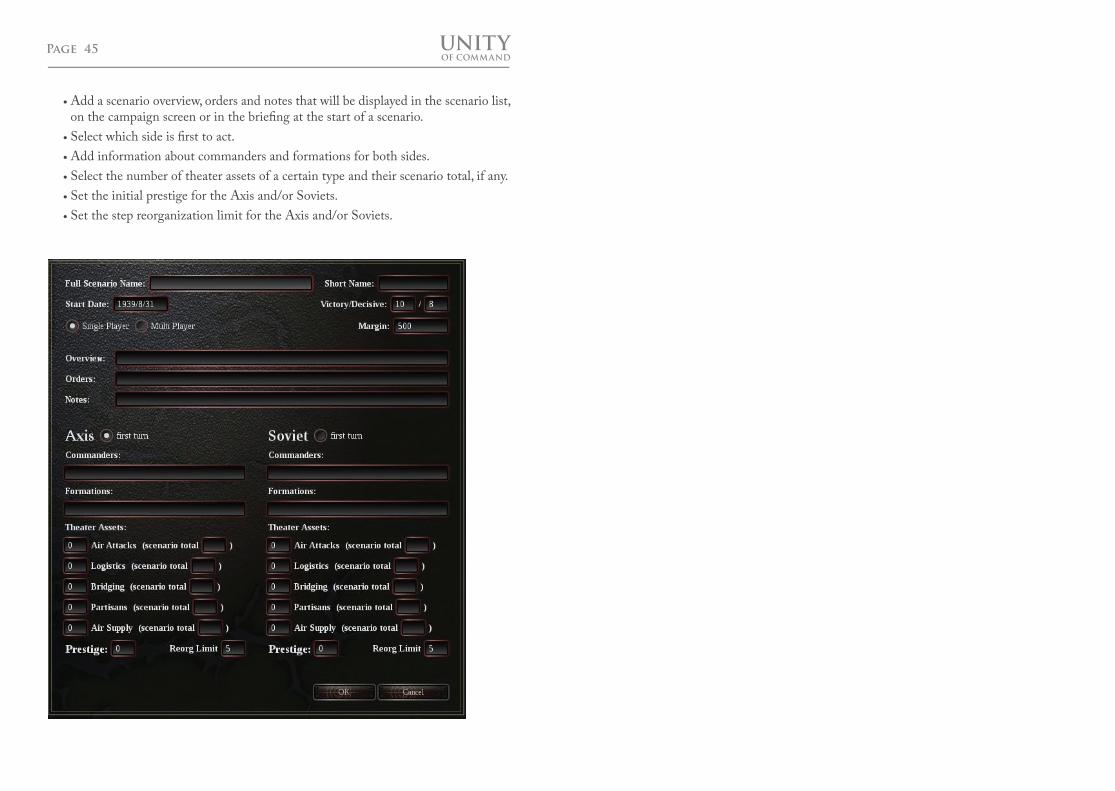
Page 45OF COMMANDUNITY
DRAFT
DRAFTAdd a scenario overview, orders and notes that will be displayed in the scenario list, •on the campaign screen or in the briefing at the start of a scenario.Select which side is first to act.•Add information about commanders and formations for both sides.•Select the number of theater assets of a certain type and their scenario total, if any.•Set the initial prestige for the Axis and/or Soviets.•Set the step reorganization limit for the Axis and/or Soviets.•


![contenthub.bvsd.org Catalog/5 6... · Web viewDRAFT. DRAFT. DRAFT. DRAFT. DRAFT. DRAFT. DRAFT. DRAFT. DRAFT. DRAFT. DRAFT. DRAFT. 6/15/2016BVSD Curriculum Essentials44 [Course Name]](https://img.pdfslide.us/doc/110x75/5d46356d88c99379458b9579/catalog5-6-web-viewdraft-draft-draft-draft-draft-draft-draft-draft.jpg)


![UvA-DARE (Digital Academic Repository) The VLT-FLAMES ... · arxiv:1704.07131v1 [astro-ph.sr] 24 apr 2017 draft -- draft -- draft -- draft -- draft -- draft -- draft -- draft -- draft](https://img.pdfslide.us/doc/110x75/60d2c5874625856f4e3584f8/uva-dare-digital-academic-repository-the-vlt-flames-arxiv170407131v1-astro-phsr.jpg)