Embed Size (px)
Citation preview
Help Guide
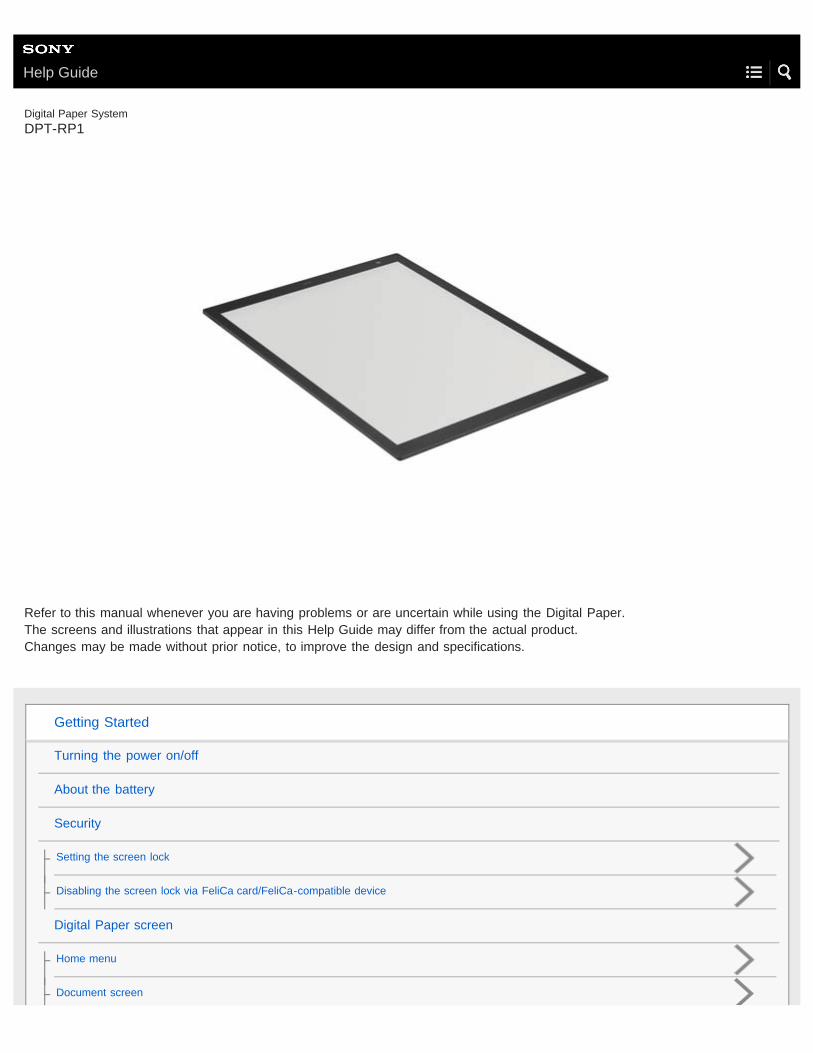
Digital Paper SystemDPT-RP1
Refer to this manual whenever you are having problems or are uncertain while using the Digital Paper.The screens and illustrations that appear in this Help Guide may differ from the actual product.Changes may be made without prior notice, to improve the design and specifications.
Getting Started
Turning the power on/off
About the battery
Security
Setting the screen lock
Disabling the screen lock via FeliCa card/FeliCa-compatible device
Digital Paper screen
Home menu
Document screen
Digital Paper App (dedicated app) screen
Transferring/managing documents
Connecting to a computer
Connecting via Wi-Fi/Connecting using a USB cable
Connecting via Bluetooth
Transferring documents to the Digital Paper
Transferring a document from a computer
Using the print operation to transfer and display data on the Digital Paper
Transferring documents from the Digital Paper
Transferring a document to a computer
Creating a back up
Syncing the Digital Paper with a computer
Searching with the Digital Paper App
Searching for a document or folder (Digital Paper App)
Searching for documents that contain a specific written mark (Digital Paper App)
Changing the organization of documents/folders on the Digital Paper
Adding/editing a note template
Reading
Opening a document
Opening a document
Selecting and opening from a folder
Opening a different document from the quick access list
Turning pages
Turning the page
Changing how to turn pages
Zooming in on a document
Display page thumbnails
Displaying left and right pages in a two-page spread

Displaying documents side-by-side
Rotating documents
Searching with the Digital Paper
Searching for a string of text within a document
Searching for a handwritten mark within a document
Searching using document information and other information
Searching for documents that contain a specific mark
Viewing a sticky note attached by a previous Digital Paper model
Displaying a document on the computer
Writing
Handwriting on a document
Adding a highlight
Using the eraser
Copying/cutting and moving handwritten items
Displaying the annotation list
Limiting edits to annotations
Calibrating the pen
Using notes
Creating a new note
Opening a note
Using side-notes on a document
Creating a side-note on an open document
Opening a side-note
Adding/deleting a page from a note
Selecting defaults for the note template
Adding/editing a note template
Various settings
Changing the settings on the Digital Paper
Changing the Digital Paper settings using the Digital Paper App
4-597-942-11(2) Copyright 2016 Sony Corporation
Updating the software
Setting up the Digital Paper App
Troubleshooting
Digital Paper issues
Cannot turn on the power
Cannot charge the Digital Paper
The battery seems to drain quickly
It takes time for a screen to be displayed
The screen is not appearing
The touch panel is reacting slowly
Pen does not work
The position of the pen tip is not aligned with the actual writing
Network issues
Cannot set up/connect to a network
The network connection suddenly stopped working
Regarding documents
Cannot display a document
Characters are not being displayed
Cannot add annotations
Cannot edit or delete annotations
Computer connection issues
The computer does not recognize the Digital Paper
Cannot transfer documents from a computer to the Digital Paper
Other
Precautions
Legal Notice
Specifications
Table Of Contents
DPT-RP1 Help Guide i......................................................................................................................
Getting Started i.................................................................................................................................
Turning the power on/off 1.................................................................................................................
About the battery 3............................................................................................................................
Security i............................................................................................................................................
Setting the screen lock 5.............................................................................................................
Disabling the screen lock via FeliCa card/FeliCa-compatible device 6.......................................
Digital Paper screen i........................................................................................................................
Home menu 8..............................................................................................................................
Document screen 9.....................................................................................................................
Digital Paper App (dedicated app) screen 11....................................................................................
Transferring/managing documents ii.................................................................................................
Connecting to a computer ii...............................................................................................................
Connecting via Wi-Fi/Connecting using a USB cable 13.............................................................
Connecting via Bluetooth 15........................................................................................................
Transferring documents to the Digital Paper ii..................................................................................
Transferring a document from a computer 17.............................................................................
Using the print operation to transfer and display data on the Digital Paper 19...........................
Transferring documents from the Digital Paper ii..............................................................................
Transferring a document to a computer 21.................................................................................
Creating a back up 22.................................................................................................................
Syncing the Digital Paper with a computer 23...................................................................................
Searching with the Digital Paper App ii.............................................................................................
Searching for a document or folder (Digital Paper App) 25.........................................................
Searching for documents that contain a specific written mark (Digital Paper
App) 26........................................................................................................................................
Changing the organization of documents/folders on the Digital Paper 28.........................................
Adding/editing a note template 30.....................................................................................................
Reading ii...........................................................................................................................................
Opening a document ii.......................................................................................................................
Opening a document 32..............................................................................................................
Selecting and opening from a folder 33.......................................................................................
Opening a different document from the quick access list 34.......................................................
Turning pages ii.................................................................................................................................
Turning the page 36....................................................................................................................
Changing how to turn pages 37...................................................................................................
Zooming in on a document 38...........................................................................................................
Display page thumbnails 39..............................................................................................................
TOC-1
Displaying left and right pages in a two-page spread 40...................................................................
Displaying documents side-by-side 41..............................................................................................
Rotating documents 43......................................................................................................................
Searching with the Digital Paper iii....................................................................................................
Searching for a string of text within a document 44.....................................................................
Searching for a handwritten mark within a document 45.............................................................
Searching using document information and other information 46...............................................
Searching for documents that contain a specific mark 47...........................................................
Viewing a sticky note attached by a previous Digital Paper model 48..............................................
Displaying a document on the computer 49......................................................................................
Writing iii............................................................................................................................................
Handwriting on a document 50..........................................................................................................
Adding a highlight 51.........................................................................................................................
Using the eraser 52...........................................................................................................................
Copying/cutting and moving handwritten items 54............................................................................
Displaying the annotation list 56........................................................................................................
Limiting edits to annotations 57.........................................................................................................
Calibrating the pen 58.......................................................................................................................
Using notes iii....................................................................................................................................
Creating a new note 60.....................................................................................................................
Opening a note 61.............................................................................................................................
Using side-notes on a document iii....................................................................................................
Creating a side-note on an open document 62...........................................................................
Opening a side-note 64...............................................................................................................
Adding/deleting a page from a note 65..............................................................................................
Selecting defaults for the note template 66.......................................................................................
Adding/editing a note template 30.....................................................................................................
Various settings iii..............................................................................................................................
Changing the settings on the Digital Paper 67..................................................................................
Changing the Digital Paper settings using the Digital Paper App 69.................................................
Updating the software 71...................................................................................................................
Setting up the Digital Paper App 72..................................................................................................
Troubleshooting iv.............................................................................................................................
Digital Paper issues iv.......................................................................................................................
Cannot turn on the power 74.......................................................................................................
Cannot charge the Digital Paper 75............................................................................................
The battery seems to drain quickly 76.........................................................................................
It takes time for a screen to be displayed 77...............................................................................
The screen is not appearing 78...................................................................................................
The touch panel is reacting slowly 79..........................................................................................
TOC-2
Pen does not work 80..................................................................................................................
The position of the pen tip is not aligned with the actual writing 81.............................................
Network issues iv...............................................................................................................................
Cannot set up/connect to a network 82.......................................................................................
The network connection suddenly stopped working 83...............................................................
Regarding documents iv....................................................................................................................
Cannot display a document 84....................................................................................................
Characters are not being displayed 85........................................................................................
Cannot add annotations 86.........................................................................................................
Cannot edit or delete annotations 87...........................................................................................
Computer connection issues iv..........................................................................................................
The computer does not recognize the Digital Paper 88..............................................................
Cannot transfer documents from a computer to the Digital Paper 89.........................................
Other iv..............................................................................................................................................
Precautions 90...................................................................................................................................
Legal Notice 94..................................................................................................................................
Specifications 95...............................................................................................................................
TOC-3
Help Guide
Digital Paper SystemDPT-RP1
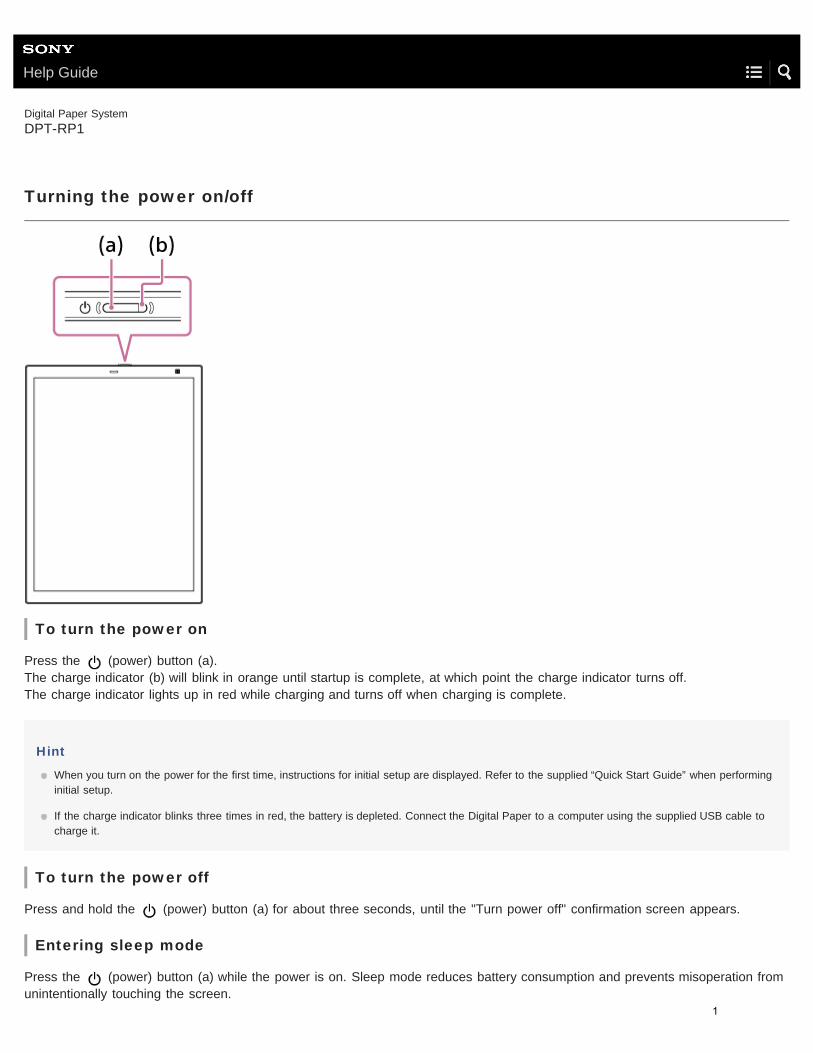
Turning the power on/off
To turn the power on
Press the (power) button (a).The charge indicator (b) will blink in orange until startup is complete, at which point the charge indicator turns off.The charge indicator lights up in red while charging and turns off when charging is complete.
Hint
When you turn on the power for the first time, instructions for initial setup are displayed. Refer to the supplied “Quick Start Guide” when performinginitial setup.
If the charge indicator blinks three times in red, the battery is depleted. Connect the Digital Paper to a computer using the supplied USB cable tocharge it.
To turn the power off
Press and hold the (power) button (a) for about three seconds, until the "Turn power off" confirmation screen appears.
Entering sleep mode
Press the (power) button (a) while the power is on. Sleep mode reduces battery consumption and prevents misoperation fromunintentionally touching the screen.
1
To cancel sleep mode, press the (power) button.
Note
[DIGITAL PAPER] is displayed in the middle of the screen during Sleep mode.
Hint
The Digital Paper is set to automatically enter sleep mode when it is not operated for 60 minutes, if it has been paired with the Digital Paper App.Launch the Digital Paper App on the computer, then click [Settings] — [General Settings] — [Edit], and select a time for [Auto sleep ].
Related TopicSetting the screen lock
4-597-942-11(2) Copyright 2016 Sony Corporation
2
Help Guide
Digital Paper SystemDPT-RP1
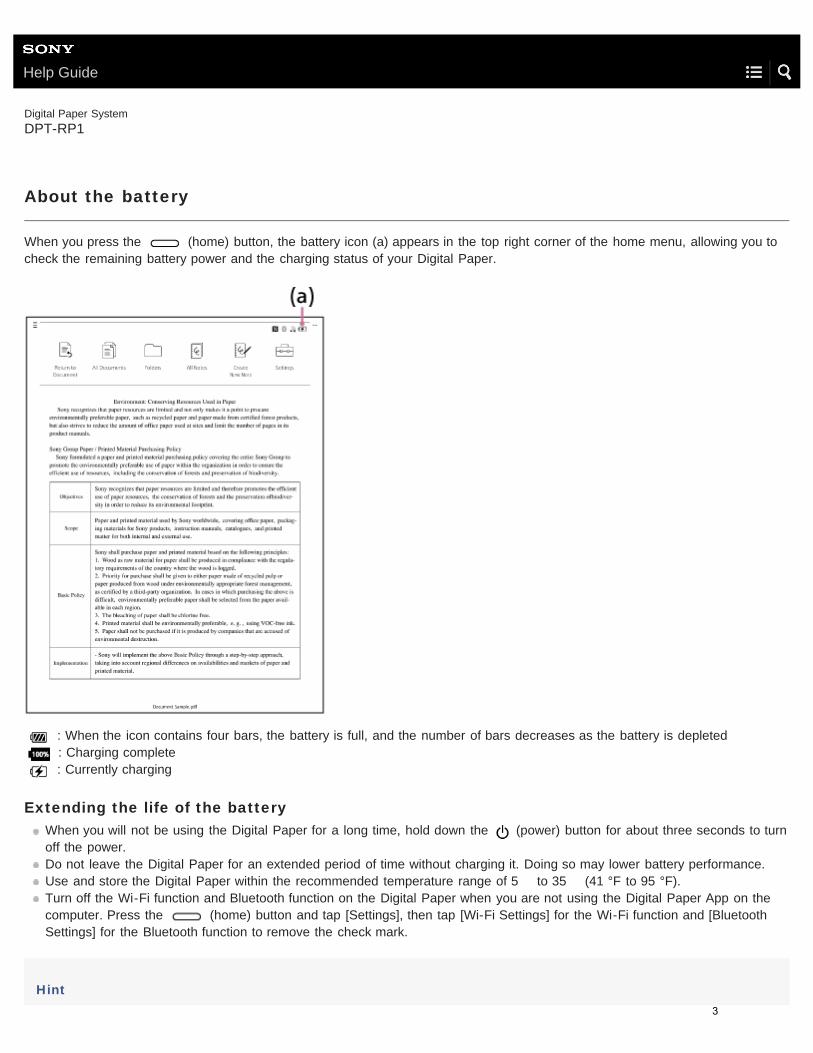
About the battery
When you press the (home) button, the battery icon (a) appears in the top right corner of the home menu, allowing you tocheck the remaining battery power and the charging status of your Digital Paper.
: When the icon contains four bars, the battery is full, and the number of bars decreases as the battery is depleted : Charging complete : Currently charging
Extending the life of the batteryWhen you will not be using the Digital Paper for a long time, hold down the (power) button for about three seconds to turnoff the power.Do not leave the Digital Paper for an extended period of time without charging it. Doing so may lower battery performance.Use and store the Digital Paper within the recommended temperature range of 5 to 35 (41 °F to 95 °F).Turn off the Wi-Fi function and Bluetooth function on the Digital Paper when you are not using the Digital Paper App on thecomputer. Press the (home) button and tap [Settings], then tap [Wi-Fi Settings] for the Wi-Fi function and [BluetoothSettings] for the Bluetooth function to remove the check mark.
Hint3

The remaining battery power and charging status of the pen cannot be viewed on the home menu. When the battery becomes low, a message willappear on the Digital Paper if you move the pen close to it. Please charge the pen before the battery is completely drained.
4-597-942-11(2) Copyright 2016 Sony Corporation
4
Help Guide
Digital Paper SystemDPT-RP1
Setting the screen lock
For security purposes, the Digital Paper can be protected by a screen lock. When the screen lock is set, a lock password must beentered after the Digital Paper is turned on or awaken from sleep mode.
Disabling the screen lock function
Press the (home) button, and tap [Settings] — [Screen Lock] — [Screen Lock]. Enter the lock password, and tap [OK].Then select [Disable] and tap [OK].
Note
Do not use a lock password that would be easy for third parties to guess. Also, change the lock password periodically.
Make sure that you do not forget the lock password that you set. If you forget the lock password, please consult your nearest Sony dealer orDigital Paper Support. The lock can be removed, but doing so will erase all of the documents on the Digital Paper.
The Tab key and Space key are inoperable when entering a lock password.
Related TopicDisabling the screen lock via FeliCa card/FeliCa-compatible device
4-597-942-11(2) Copyright 2016 Sony Corporation
Press the (home) button, and tap [Settings].1
Tap [Screen Lock] — [Screen Lock] — [Enable] — [OK].2
Enter a lock password, and tap [OK].
The lock password can be any combination of 4 to 20 alphanumeric characters and symbols.
3
5
Help Guide
Digital Paper SystemDPT-RP1
Disabling the screen lock via FeliCa card/FeliCa-compatible device
To waken the Digital Paper from sleep mode, instead of entering a lock password, a FeliCa card, FeliCa-compatible mobilephone, smartphone, or similar item can be held against the Digital Paper to disable the screen lock. After setting a lock password,follow the steps below to register a FeliCa card/FeliCa-compatible device to the Digital Paper.
Press the (home) button, and tap [Settings].1
Tap [Screen Lock] — [NFC Card Lock Release Settings].2
Enter a lock password, and tap [OK].3
Tap [Register NFC Card], and if a message asking whether you want to turn on NFC appears, tap [Yes].4
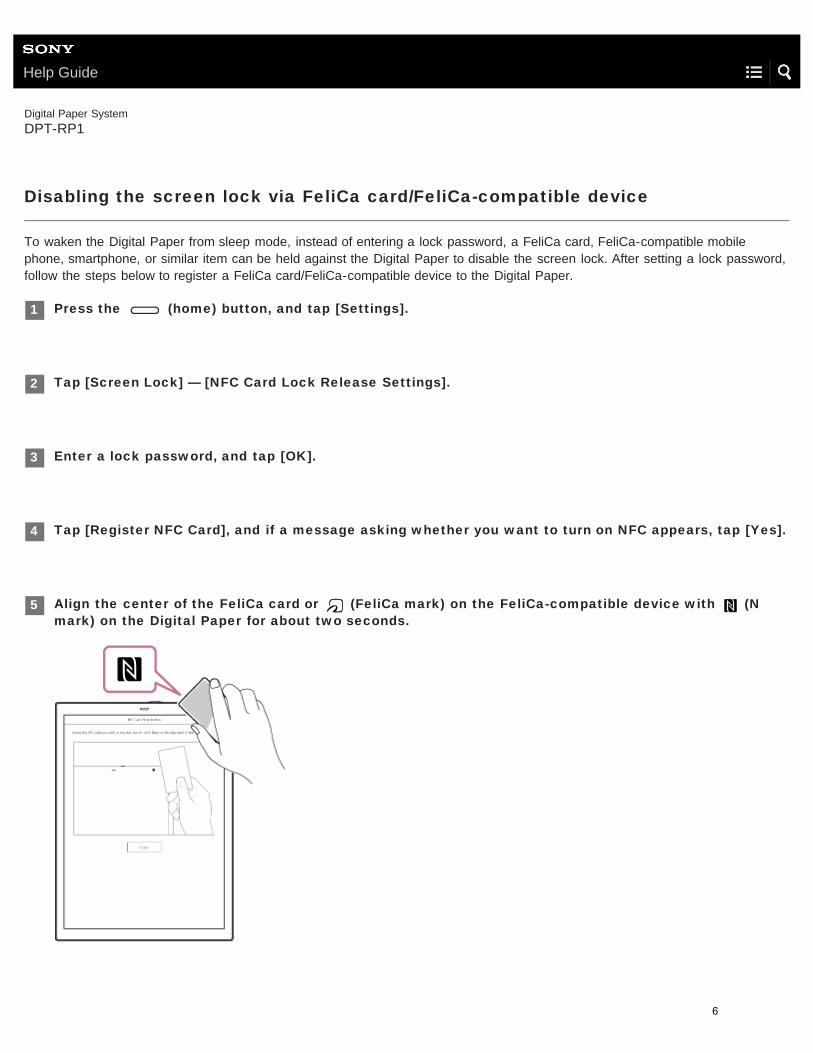
Align the center of the FeliCa card or (FeliCa mark) on the FeliCa-compatible device with (Nmark) on the Digital Paper for about two seconds.
5
6
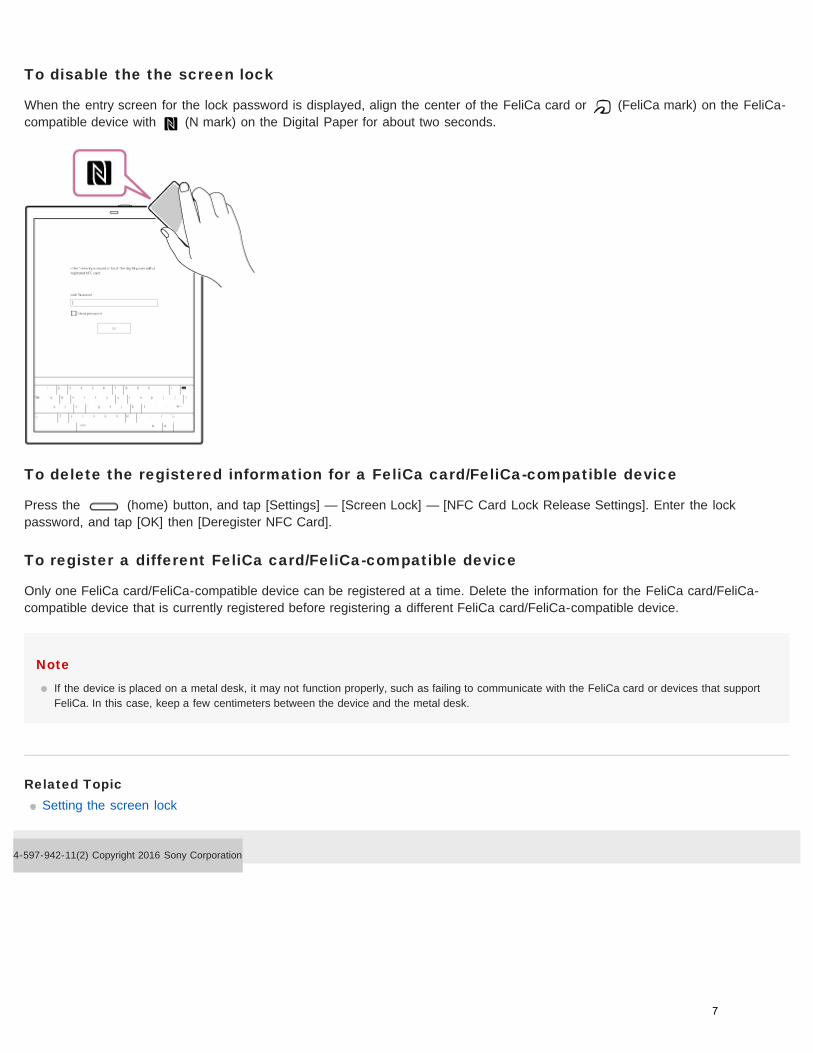
To disable the the screen lock
When the entry screen for the lock password is displayed, align the center of the FeliCa card or (FeliCa mark) on the FeliCa-compatible device with (N mark) on the Digital Paper for about two seconds.
To delete the registered information for a FeliCa card/FeliCa-compatible device
Press the (home) button, and tap [Settings] — [Screen Lock] — [NFC Card Lock Release Settings]. Enter the lockpassword, and tap [OK] then [Deregister NFC Card].
To register a different FeliCa card/FeliCa-compatible device
Only one FeliCa card/FeliCa-compatible device can be registered at a time. Delete the information for the FeliCa card/FeliCa-compatible device that is currently registered before registering a different FeliCa card/FeliCa-compatible device.
Note
If the device is placed on a metal desk, it may not function properly, such as failing to communicate with the FeliCa card or devices that supportFeliCa. In this case, keep a few centimeters between the device and the metal desk.
Related TopicSetting the screen lock
4-597-942-11(2) Copyright 2016 Sony Corporation
7
Help Guide
Digital Paper SystemDPT-RP1
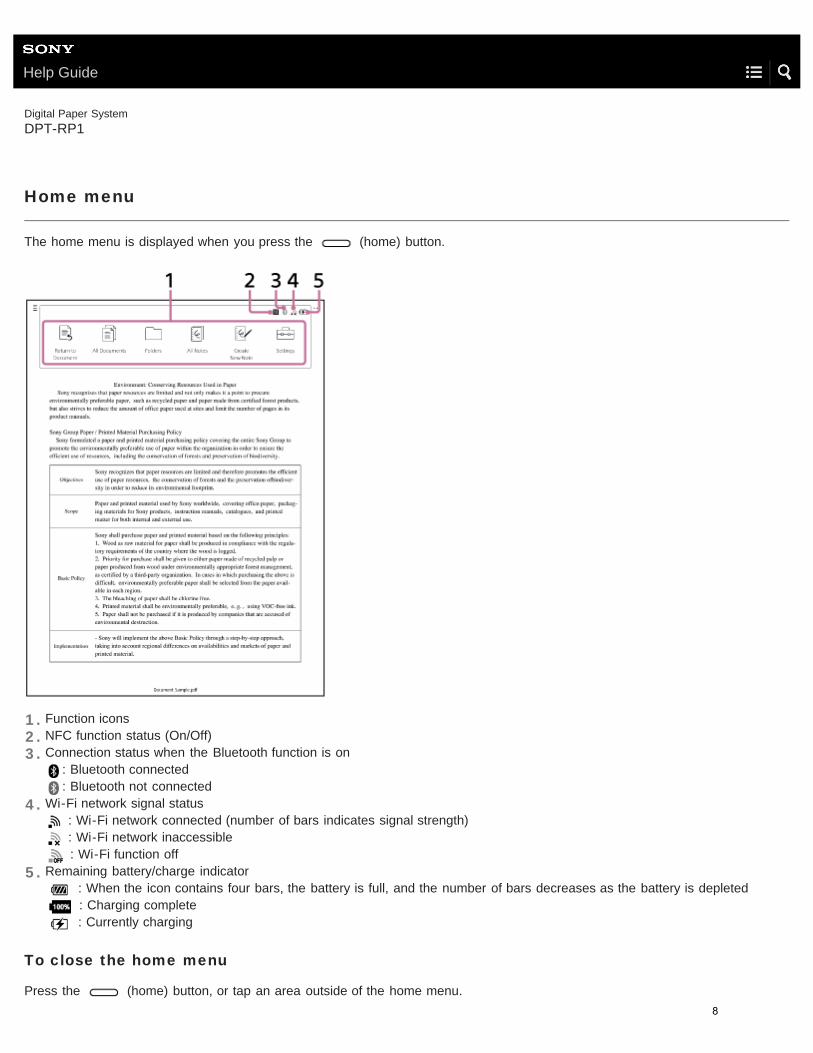
Home menu
The home menu is displayed when you press the (home) button.
To close the home menu
Press the (home) button, or tap an area outside of the home menu.
Function icons1.NFC function status (On/Off)2.Connection status when the Bluetooth function is on
: Bluetooth connected: Bluetooth not connected
3.
Wi-Fi network signal status : Wi-Fi network connected (number of bars indicates signal strength) : Wi-Fi network inaccessible : Wi-Fi function off
4.
Remaining battery/charge indicator : When the icon contains four bars, the battery is full, and the number of bars decreases as the battery is depleted : Charging complete : Currently charging
5.
8
Help Guide
Digital Paper SystemDPT-RP1
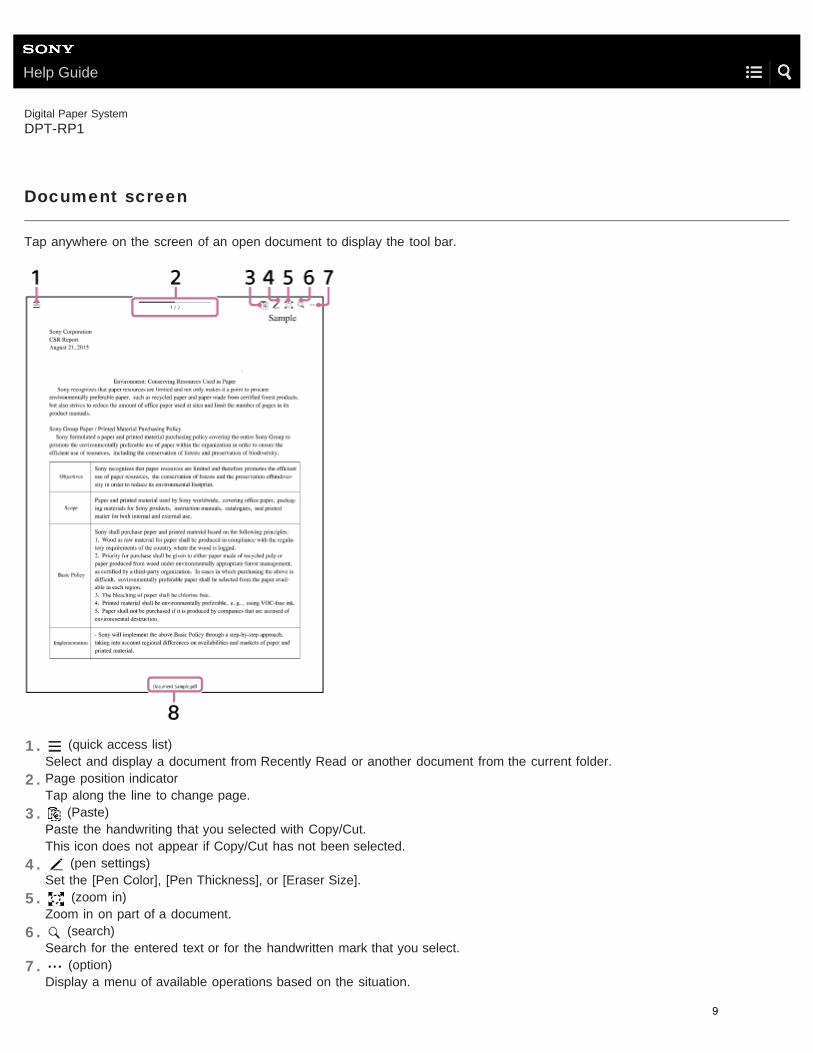
Document screen
Tap anywhere on the screen of an open document to display the tool bar.
(quick access list)Select and display a document from Recently Read or another document from the current folder.
1.
Page position indicator Tap along the line to change page.
2.
(Paste) Paste the handwriting that you selected with Copy/Cut. This icon does not appear if Copy/Cut has not been selected.
3.
(pen settings)Set the [Pen Color], [Pen Thickness], or [Eraser Size].
4.
(zoom in) Zoom in on part of a document.
5.
(search)Search for the entered text or for the handwritten mark that you select.
6.
(option)Display a menu of available operations based on the situation.
7.
9
To hide the tool bar
Tap an area outside of the tool bar.
4-597-942-11(2) Copyright 2016 Sony Corporation
Filename8.
10

Help Guide
Digital Paper SystemDPT-RP1
Digital Paper App (dedicated app) screen
The Digital Paper App must be used to operate the Digital Paper with your computer. After connecting the computer to the Digital Paper, launch the Digital Paper App on your computer.
MenuOperate the Digital Paper App from the menu.
1.
Connection status with the Digital Paper and empty space/total available space2.Execute sync. Will not operate if the sync folder is not set.3.[Transfer documents to Digital Paper]Transfer documents from the computer to the Digital Paper.
4.
[Screenshot]Take a screenshot of the Digital Paper, and save it to the computer.
5.
[Settings]Change the settings.
6.
[Help]Display this Help Guide or open the product support website.
7.
[Folders]/[All documents]Switch the screen display on the Digital Paper App.
8.
[File information]/[Mark]/[Search] Search for documents within the Digital Paper.
9.
(New folder)Create a new folder on the Digital Paper. Click [Folders] and open a folder on your Digital Paper before creation.
(Transfer documents to computer)Transfer documents from the Digital Paper to the computer.
(Delete)Delete folders and documents from the Digital Paper.
(Set sync folder)Set the sync folder.
10.
Documents/Folders* list
You can change the display order of the list by clicking on an item title.
11.
11
Related TopicConnecting via Wi-Fi/Connecting using a USB cableConnecting via BluetoothSetting up the Digital Paper App
4-597-942-11(2) Copyright 2016 Sony Corporation
You can confirm whether a file is a document, note, etc. based on the icon. : Document : Document to sync: Note : Note to sync : Unread document/note: Folder : Folder to sync
Right-click on an item to display a menu of available operations based on the situation.When you double-click on a folder name, the display switches to that folder.
Folders are only displayed when the Digital Paper App is in Folder view.*
12
Help Guide
Digital Paper SystemDPT-RP1
Connecting via Wi-Fi/Connecting using a USB cable
After the Digital Paper has been paired with the Digital Paper App, documents can be transferred and otherwise operated, byconnecting the Digital Paper to the computer. For how to pair with the Digital Paper App, see the links in “Related Topics.” Thereare three ways to connect to a computer: “connect via Wi-Fi,” “connect via the supplied USB cable,” and “connect via Bluetooth®.”This section explains how to connect via Wi-Fi and connect via the supplied USB cable. For how to connect via Bluetooth, see thelinks in “Related Topics.”
To connect via Wi-Fi
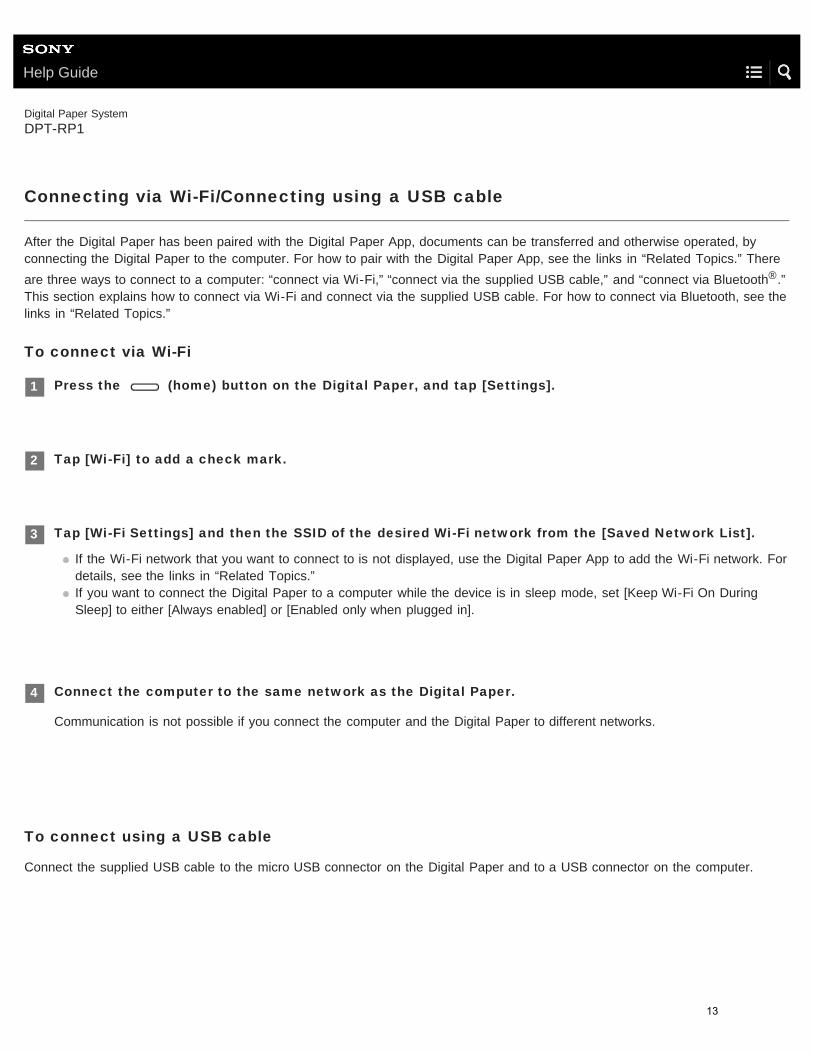
To connect using a USB cable
Connect the supplied USB cable to the micro USB connector on the Digital Paper and to a USB connector on the computer.
Press the (home) button on the Digital Paper, and tap [Settings].1
Tap [Wi-Fi] to add a check mark.2
Tap [Wi-Fi Settings] and then the SSID of the desired Wi-Fi network from the [Saved Network List].
If the Wi-Fi network that you want to connect to is not displayed, use the Digital Paper App to add the Wi-Fi network. Fordetails, see the links in “Related Topics.”If you want to connect the Digital Paper to a computer while the device is in sleep mode, set [Keep Wi-Fi On DuringSleep] to either [Always enabled] or [Enabled only when plugged in].
3
Connect the computer to the same network as the Digital Paper.
Communication is not possible if you connect the computer and the Digital Paper to different networks.
4
13
To check the connection status
Launch the Digital Paper App on the computer. If [Connected] is displayed in the upper left portion of the screen, the DigitalPaper and the computer are properly connected.
Hint
When removing the USB cable, close the Digital Paper App before doing so.
Related TopicConnecting via BluetoothSetting up the Digital Paper AppChanging the Digital Paper settings using the Digital Paper App
4-597-942-11(2) Copyright 2016 Sony Corporation
14
Help Guide
Digital Paper SystemDPT-RP1
Connecting via Bluetooth
To make a Bluetooth connection with your computer, you must first complete Bluetooth pairing (device registration). Once pairingis complete, you can operate the Digital Paper from your computer the next time you use the Digital Paper if the Bluetoothfunction of the Digital Paper is turned on. (When the Digital Paper App is launched, Windows can automatically connect to theBluetooth-paired Digital Paper.) Perform the steps below to pair.
To connect to the Digital Paper from your computerFor Windows When setting [Bluetooth automatic connection] on the Digital Paper App to on: Automatically connects to the Bluetooth-paired Digital Paper when the Digital Paper App is launched. When setting [Bluetooth automatic connection] on the Digital Paper App to off: Click [Bluetooth automatic connection] on the screen of the Digital Paper App to connect the Digital Paper.
Press the (home) button and tap [Settings].1
Tap [Bluetooth] to add a check mark.2
Tap [Bluetooth Settings] — [Bluetooth Pairing] to change the Digital Paper to pairing standby mode.3
Turn on the Bluetooth function on the computer and operate the computer to complete the deviceregistration of the Digital Paper.
For details, see the instruction manual for your computer.
4
Tap [Close] in the [Bluetooth Pairing...] dialog box on the Digital Paper to close.5
15
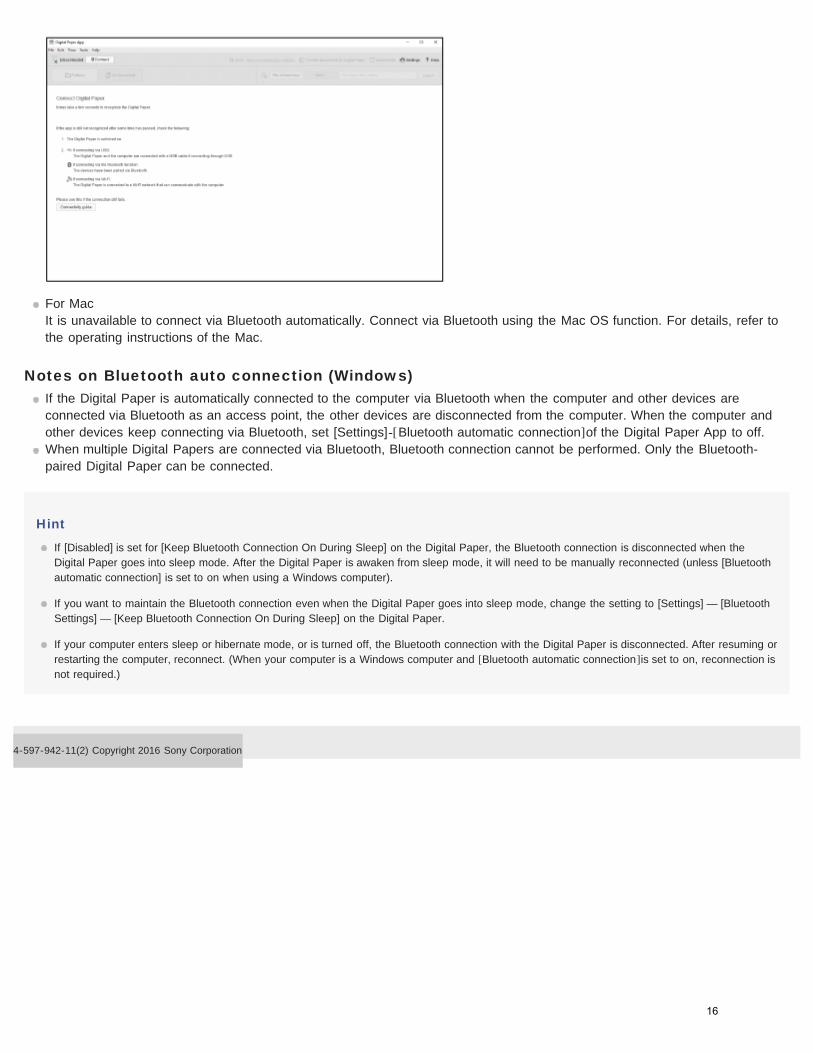
For Mac It is unavailable to connect via Bluetooth automatically. Connect via Bluetooth using the Mac OS function. For details, refer tothe operating instructions of the Mac.
Notes on Bluetooth auto connection (Windows)If the Digital Paper is automatically connected to the computer via Bluetooth when the computer and other devices areconnected via Bluetooth as an access point, the other devices are disconnected from the computer. When the computer andother devices keep connecting via Bluetooth, set [Settings]-[Bluetooth automatic connection]of the Digital Paper App to off.When multiple Digital Papers are connected via Bluetooth, Bluetooth connection cannot be performed. Only the Bluetooth-paired Digital Paper can be connected.
Hint
If [Disabled] is set for [Keep Bluetooth Connection On During Sleep] on the Digital Paper, the Bluetooth connection is disconnected when theDigital Paper goes into sleep mode. After the Digital Paper is awaken from sleep mode, it will need to be manually reconnected (unless [Bluetoothautomatic connection] is set to on when using a Windows computer).
If you want to maintain the Bluetooth connection even when the Digital Paper goes into sleep mode, change the setting to [Settings] — [BluetoothSettings] — [Keep Bluetooth Connection On During Sleep] on the Digital Paper.
If your computer enters sleep or hibernate mode, or is turned off, the Bluetooth connection with the Digital Paper is disconnected. After resuming orrestarting the computer, reconnect. (When your computer is a Windows computer and [Bluetooth automatic connection]is set to on, reconnection isnot required.)
4-597-942-11(2) Copyright 2016 Sony Corporation
16

Help Guide
Digital Paper SystemDPT-RP1
Transferring a document from a computer
Use the Digital Paper App to transfer documents. Only PDF files can be transferred to the Digital Paper.
Note
If the Wi-Fi function or Bluetooth function is turned off or the USB cable is removed during the transfer, the data may be corrupted.
The maximum file size for transfers is 1 GB per file.
Data cannot be transferred while [All documents] is selected on the Digital Paper App or while search results are being displayed. Click [Folders]and open a folder on your Digital Paper to transfer.
Hint
Files can also be transferred by clicking [Transfer documents to Digital Paper] on the Digital Paper App.
The amount of free space on the Digital Paper is displayed in the top left of the Digital Paper App screen.
Related TopicConnecting via Wi-Fi/Connecting using a USB cableConnecting via Bluetooth
Connect the computer to the Digital Paper.1
Launch the Digital Paper App on the computer.2
Click [Folders] and open a folder on your Digital Paper (transfer destination).3
Select a file/folder on your computer, then drag-and-drop it into the Digital Paper App.
Multiple files/folders can be selected and transferred together.
4
17
Transferring a document to a computerSyncing the Digital Paper with a computerChanging the organization of documents/folders on the Digital PaperUsing the print operation to transfer and display data on the Digital Paper
4-597-942-11(2) Copyright 2016 Sony Corporation
18
Help Guide
Digital Paper SystemDPT-RP1
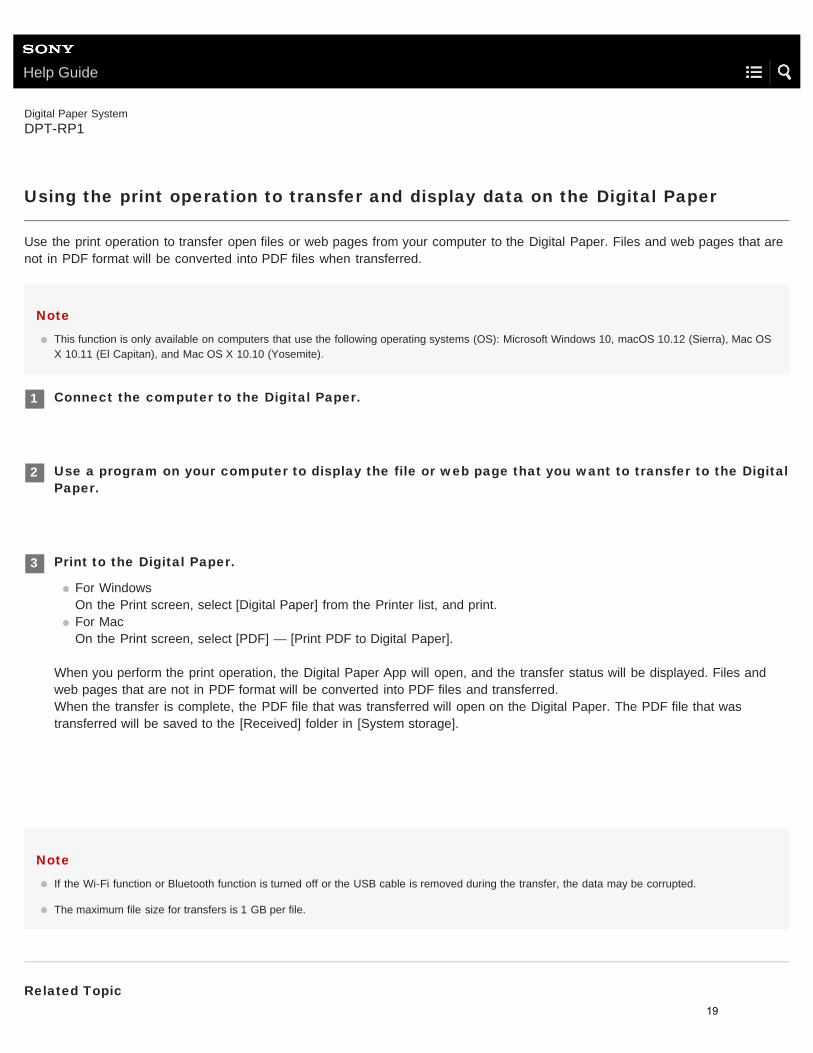
Using the print operation to transfer and display data on the Digital Paper
Use the print operation to transfer open files or web pages from your computer to the Digital Paper. Files and web pages that arenot in PDF format will be converted into PDF files when transferred.
Note
This function is only available on computers that use the following operating systems (OS): Microsoft Windows 10, macOS 10.12 (Sierra), Mac OSX 10.11 (El Capitan), and Mac OS X 10.10 (Yosemite).
Note
If the Wi-Fi function or Bluetooth function is turned off or the USB cable is removed during the transfer, the data may be corrupted.
The maximum file size for transfers is 1 GB per file.
Related Topic
Connect the computer to the Digital Paper.1
Use a program on your computer to display the file or web page that you want to transfer to the DigitalPaper.
2
Print to the Digital Paper.
For WindowsOn the Print screen, select [Digital Paper] from the Printer list, and print.For MacOn the Print screen, select [PDF] — [Print PDF to Digital Paper].
When you perform the print operation, the Digital Paper App will open, and the transfer status will be displayed. Files andweb pages that are not in PDF format will be converted into PDF files and transferred.When the transfer is complete, the PDF file that was transferred will open on the Digital Paper. The PDF file that wastransferred will be saved to the [Received] folder in [System storage].
3
19
Connecting via Wi-Fi/Connecting using a USB cableConnecting via BluetoothTransferring a document from a computerSyncing the Digital Paper with a computerChanging the organization of documents/folders on the Digital Paper
4-597-942-11(2) Copyright 2016 Sony Corporation
20
Help Guide
Digital Paper SystemDPT-RP1
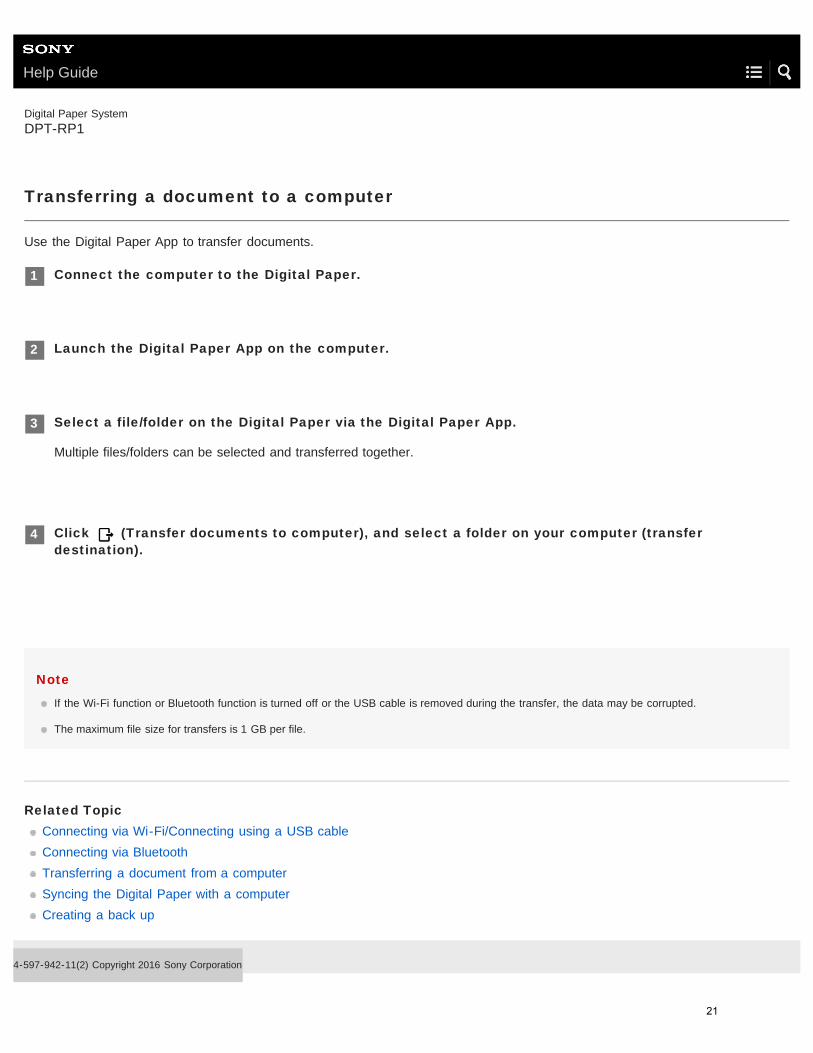
Transferring a document to a computer
Use the Digital Paper App to transfer documents.
Note
If the Wi-Fi function or Bluetooth function is turned off or the USB cable is removed during the transfer, the data may be corrupted.
The maximum file size for transfers is 1 GB per file.
Related TopicConnecting via Wi-Fi/Connecting using a USB cableConnecting via BluetoothTransferring a document from a computerSyncing the Digital Paper with a computerCreating a back up
4-597-942-11(2) Copyright 2016 Sony Corporation
Connect the computer to the Digital Paper.1
Launch the Digital Paper App on the computer.2
Select a file/folder on the Digital Paper via the Digital Paper App.
Multiple files/folders can be selected and transferred together.
3
Click (Transfer documents to computer), and select a folder on your computer (transferdestination).
4
21
Help Guide
Digital Paper SystemDPT-RP1
Creating a back up
In preparation for the unlikely event that the data on your Digital Paper is accidentally erased or that a malfunction causes thedata to be deleted or corrupted, be sure to back up all important content to your computer.
Note
If the Wi-Fi function or Bluetooth function is turned off or the USB cable is removed during the transfer, the data may be corrupted.
The maximum file size for transfers is 1 GB per file.
Related TopicConnecting via Wi-Fi/Connecting using a USB cableConnecting via BluetoothTransferring a document to a computerSyncing the Digital Paper with a computer
4-597-942-11(2) Copyright 2016 Sony Corporation
Connect the computer to the Digital Paper.1
Launch the Digital Paper App on the computer.2
Click [Folders], and open the folder labeled [System storage] at the top of the Digital Paper.3
Select all of the folders and documents within the [System storage] folder.4
Click (Transfer documents to computer), and select a folder on your computer (transferdestination).
5
22
Help Guide
Digital Paper SystemDPT-RP1
Syncing the Digital Paper with a computer
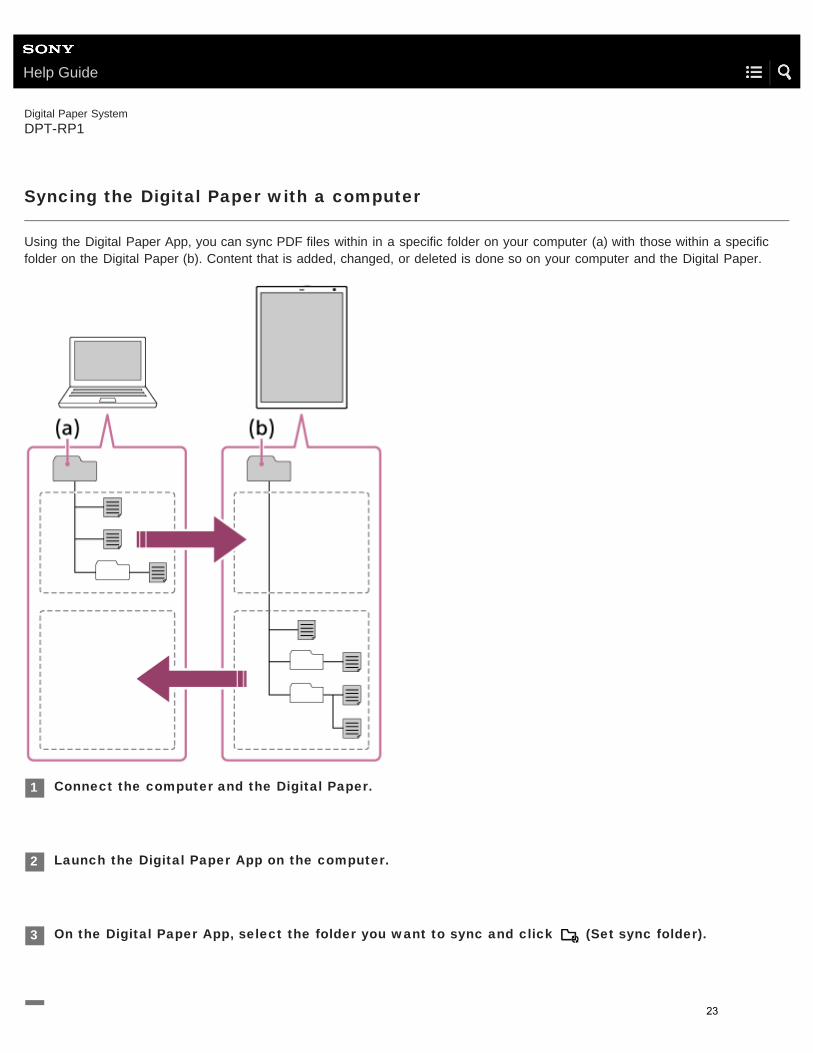
Using the Digital Paper App, you can sync PDF files within in a specific folder on your computer (a) with those within a specificfolder on the Digital Paper (b). Content that is added, changed, or deleted is done so on your computer and the Digital Paper.
Connect the computer and the Digital Paper.1
Launch the Digital Paper App on the computer.2
On the Digital Paper App, select the folder you want to sync and click (Set sync folder).3
23
To update the contents of the synced folder
Click (Sync).
To delete the sync settings
On the Digital Paper App, right-click the folder configured with the sync settings and click [Delete sync setting].
Hint
If separately editing the same PDF file on your computer and the Digital Paper, the PDF file on the Digital Paper is synced on the computer andthe PDF file on the computer is saved with a different name.
Even if you delete the sync settings, the folders and files saved on the Digital Paper and computer are not deleted.
Note
Only the designated folders — and only the PDF files in those folders — are synced. Folders with no PDF files are not synced.
You cannot configure or delete the sync settings while syncing.
Related TopicConnecting via Wi-Fi/Connecting using a USB cableConnecting via Bluetooth
4-597-942-11(2) Copyright 2016 Sony Corporation
On the folder selection screen, select the folders of the computer.
When the sync settings are successful, the corresponding folder/document/note icon changes.
4
Click (Sync).
The specified folder is synced with the Digital Paper.
5
24
Help Guide
Digital Paper SystemDPT-RP1
Searching for a document or folder (Digital Paper App)
Using the Digital Paper App, the folder names/file names within the Digital Paper can be searched, as well as the title/authorlisted in the document settings.
To close the search results list
Click [Close search results].
Related TopicConnecting via Wi-Fi/Connecting using a USB cableConnecting via BluetoothSearching for documents that contain a specific written mark (Digital Paper App)
Connect the computer to the Digital Paper.1
Launch the Digital Paper App on the computer.2
Set the search parameters.
When you want to search all of the documents, click [All documents].When you want to search within a specific folder, click [Folders] and select the folder you want to search.
3
Click [File information] — [Filename, title, author], then enter the text and click [Search].4
Double-click on one search result.
When a folder is selected, the documents within the folder are displayed in the Digital Paper App.When a document is selected, the computer will open the document using a PDF-viewer program.
5
25
Help Guide
Digital Paper SystemDPT-RP1
Searching for documents that contain a specific written mark (Digital Paper App)
Select a mark using the Digital Paper App to search for documents on the Digital Paper which contain the mark.
To close the search results list
Click [Close search results].
Note
Depending on the way written, marks may not be recognized.
Connect the computer to the Digital Paper.1
Launch the Digital Paper App on the computer.2
Set the search parameters.
When you want to search all of the documents, click [All documents].When you want to search within a specific folder, click [Folders] and select the folder you want to search.
3
Click [Mark], then select the mark you want to search and click [Search].
The documents that contain the mark will be displayed.Even when there are multiple hits within a single document, the search results are displayed as just one document.
4
Double-click on one search result.
The computer will open the document using a PDF-viewer program.
5
26
Related TopicConnecting via Wi-Fi/Connecting using a USB cableConnecting via BluetoothSearching for a document or folder (Digital Paper App)Searching for a handwritten mark within a documentSearching for a string of text within a document
4-597-942-11(2) Copyright 2016 Sony Corporation
27
Help Guide
Digital Paper SystemDPT-RP1
Changing the organization of documents/folders on the Digital Paper
Using the Digital Paper App, you can create new folders on the Digital Paper, as well as rename, move, copy, and delete theexisting folders/documents.
To create a folder
Click (New folder) at the level where you want to make a new folder. Then input the name of the folder and click [OK].
To change the folder name/file name
Right-click to select a folder/document, and then click [Rename]. Proceed to enter the folder name/file name, and then click [OK].
To move/copy
Right-click to select a folder/document, and then click [Cut (within Digital Paper)]/[Copy (within Digital Paper)]. Next, display thefolder that you want to move/copy to and right-click, then click [Paste (within Digital Paper)].
To delete
Select a folder/document, and then click (Delete).
Note
Folder names and file names that contain certain special characters may not be displayed properly.
Folders and documents cut or copied with the Digital Paper App cannot be pasted anywhere other than in the Digital Paper App. If copying afolder or document to your computer, copy using the [Transfer documents to computer] function.
Files and folders cut or copied on your computer cannot be pasted in the Digital Paper App. If copying to the Digital Paper App, copy using the
Connect the computer to the Digital Paper.1
Launch the Digital Paper App on the computer.2
Click [Folders] or [All documents] to display the folder/document you want to edit.
To move/copy/create a new folder, click [Folders] to display the folders.
3
28
[Transfer documents to Digital Paper] function.
When renaming or moving the synced folder, the sync settings are deleted. If you want to sync continuously, set [Set sync folder] again.
Related TopicConnecting via Wi-Fi/Connecting using a USB cableConnecting via Bluetooth
4-597-942-11(2) Copyright 2016 Sony Corporation
29
Help Guide
Digital Paper SystemDPT-RP1
Adding/editing a note template
Using the Digital Paper App, you can add a note template to the Digital Paper. You can also delete templates and change theirnames.
To add a note template
Click [Add] under [Note template]. Click [Select file], and then select the PDF file you want to use as a template from your computer. Enter a name for the template,then click [OK].
To delete a note template
Select a template, and click [Delete].
To change the name of a template
Select a template, and click [Rename]. Then enter a name for the template, and click [OK].
Note
PDF files that are password protected cannot be added as templates.
Hint
For PDF files that have multiple pages, only the first page will be registered as a template.
Connect the computer to the Digital Paper.1
Launch the Digital Paper App on the computer.2
Click [Settings] to display the [Settings] screen.3
30
Related TopicSelecting defaults for the note template
4-597-942-11(2) Copyright 2016 Sony Corporation
31
Help Guide
Digital Paper SystemDPT-RP1
Opening a document
You can organize the All Documents list by [Date Read] or [Date Modified] and select a document from there.
To delete a document
Tap anywhere on the screen of a document to display the tool bar, and then tap (option) in the upper right of the documentscreen — [Delete This Document].
To change the document name
Tap anywhere on the screen of a document to display the tool bar, and then tap (option) in the upper right of the documentscreen — [Change Document Name].
Related TopicSelecting and opening from a folderOpening a different document from the quick access list
4-597-942-11(2) Copyright 2016 Sony Corporation
Press the (home) button, and tap [All Documents].1
Tap [Date Read] or [Date Modified].
is displayed to the left of documents, and is displayed to the left of notes.For unread files, is displayed.
2
Tap the document you want to open.3
32
Help Guide
Digital Paper SystemDPT-RP1
Selecting and opening from a folder
Related TopicOpening a documentOpening a different document from the quick access list
4-597-942-11(2) Copyright 2016 Sony Corporation
Press the (home) button, and tap [Folders].1
Tap to open a folder, and then tap the document you want to display.
To return to a higher tier of folders, tap the name of the folder at the top of the screen. is displayed to the left of documents, and is displayed to the left of notes.
For unread files, is displayed.
2
33
Help Guide
Digital Paper SystemDPT-RP1
Opening a different document from the quick access list
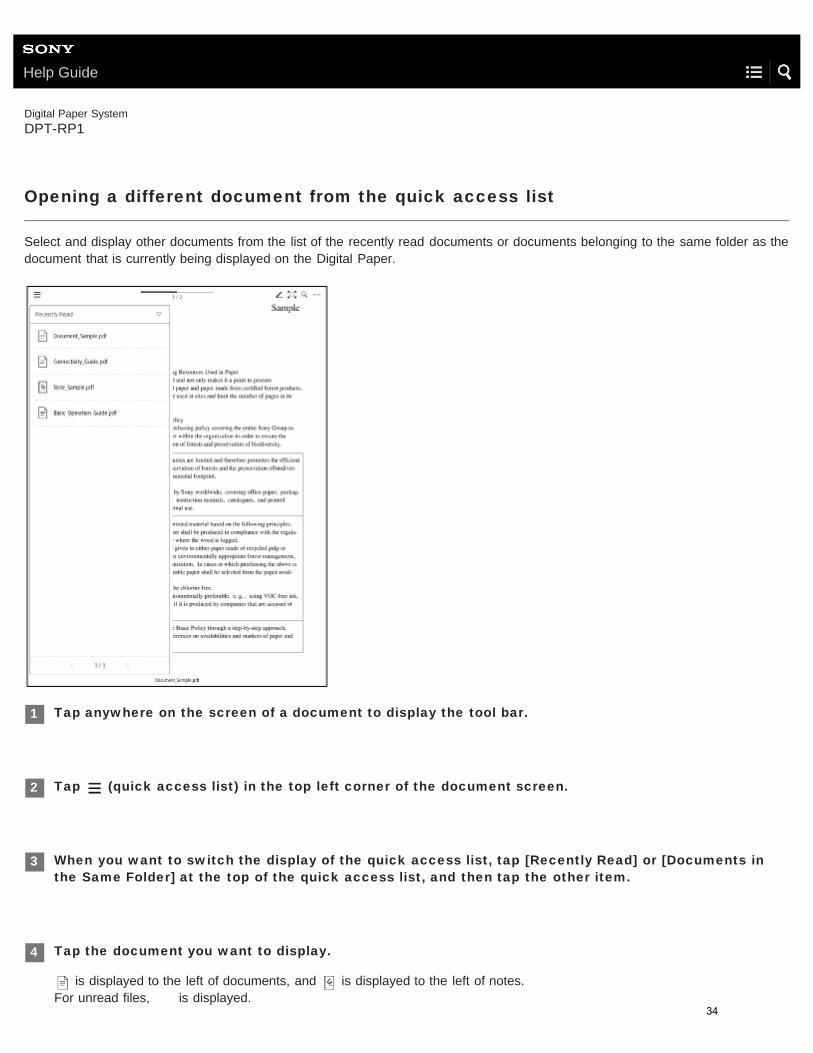
Select and display other documents from the list of the recently read documents or documents belonging to the same folder as thedocument that is currently being displayed on the Digital Paper.
Tap anywhere on the screen of a document to display the tool bar.1
Tap (quick access list) in the top left corner of the document screen.2
When you want to switch the display of the quick access list, tap [Recently Read] or [Documents inthe Same Folder] at the top of the quick access list, and then tap the other item.
3
Tap the document you want to display.
is displayed to the left of documents, and is displayed to the left of notes.For unread files, is displayed.
4
34
Related TopicOpening a documentSelecting and opening from a folder
4-597-942-11(2) Copyright 2016 Sony Corporation
35
Help Guide
Digital Paper SystemDPT-RP1
Turning the page
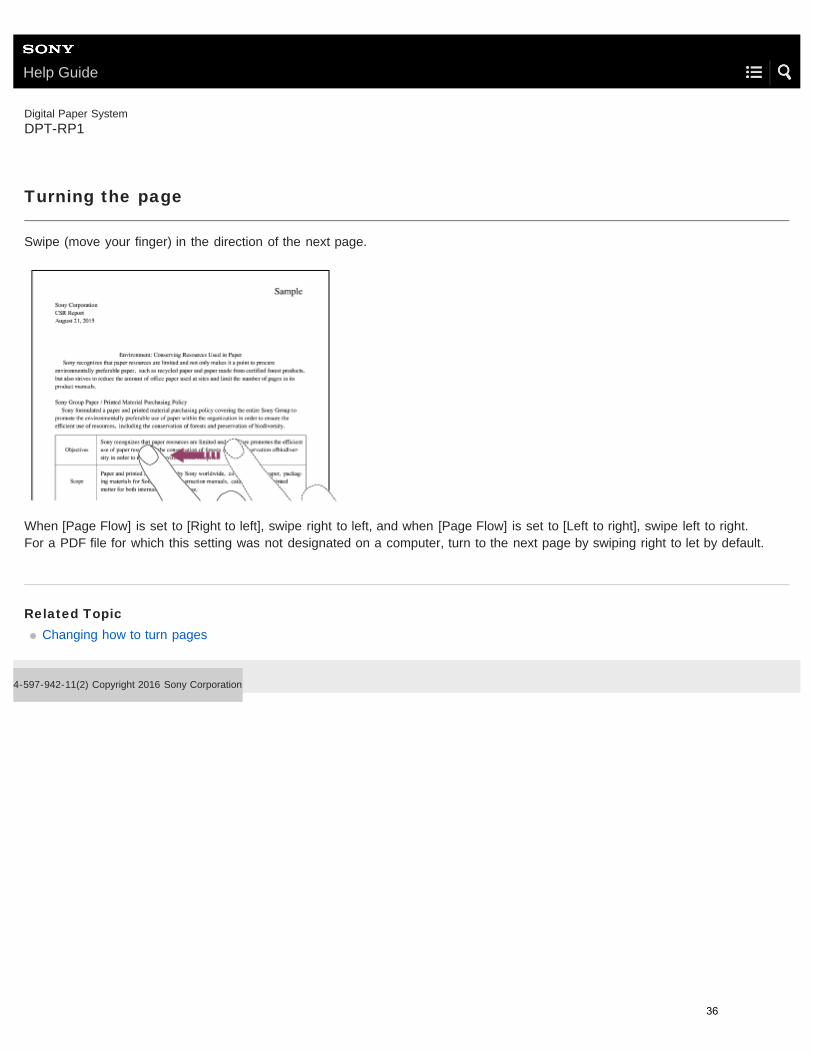
Swipe (move your finger) in the direction of the next page.
When [Page Flow] is set to [Right to left], swipe right to left, and when [Page Flow] is set to [Left to right], swipe left to right.For a PDF file for which this setting was not designated on a computer, turn to the next page by swiping right to let by default.
Related TopicChanging how to turn pages
4-597-942-11(2) Copyright 2016 Sony Corporation
36
Help Guide
Digital Paper SystemDPT-RP1
Changing how to turn pages
4-597-942-11(2) Copyright 2016 Sony Corporation
Tap anywhere on the screen of a document to display the tool bar.1
Tap (option) in the upper right of the document screen — [Page Flow].2
To turn the page by swiping from right to left, tap [Right to left], and to turn by swiping from left toright, tap [Left to right].
3
37
Help Guide
Digital Paper SystemDPT-RP1
Zooming in on a document
Zoom in on part of a document. While zoomed in, you can write using the pen, delete items written with the pen, and highlightitems.
To return to the original size
Tap [Exit] in the upper right of the document screen.
Note
You cannot turn the page while zoomed in.
4-597-942-11(2) Copyright 2016 Sony Corporation
Tap anywhere on the screen of a document to display the toolbar.1
Tap (zoom in) in the upper right of the document screen.2
Tap the location you want to zoom into, or use your finger or the pen to encircle the area you want tozoom into.
The document is zoomed in.
3
38

Help Guide
Digital Paper SystemDPT-RP1
Display page thumbnails
You can search for a page by displaying a list of 16 pages on a single screen.
To return the display to normal size
Tap any one of the pages.
Hint
When switching from documents that are being displayed side-by-side, nine pages are displayed in the list.
Tap anywhere on the screen of a document to display the tool bar.1
Tap (option) in the upper right of the document screen — [Page Thumbnails].2
39
Help Guide
Digital Paper SystemDPT-RP1
Displaying left and right pages in a two-page spread
Display the pages of a single document two at a time, as a left-right two-page spread.
To change the page settings
Depending on whether the document has a cover page, you can change whether to start the two-page spread from page one.Tap (option) — [Two-Page Spread Settings]. Select [Without cover] to display the two-page spread from page one, and select[With cover] to display the spread from page two.
To return to a single page display
Tap (option) — [Display Single Page].
Note
When displaying a document as a two-page spread, you cannot display two documents side-by-side, rotate the document, create a side-note, oradd/delete a page from a note.
You cannot draw across the span of two pages.
Related TopicDisplaying documents side-by-side
4-597-942-11(2) Copyright 2016 Sony Corporation
Tap anywhere on the screen of a document to display the tool bar.1
Tap (option) in the upper right of the document screen — [Two-Page Spread].2
40
Help Guide
Digital Paper SystemDPT-RP1
Displaying documents side-by-side
Display the same document twice in a side-by-side arrangement. You can also display two different documents or notes in a side-by-side arrangement.
To display different documents or notes in a side-by-side arrangement
Tap (quick access list) on the other document or note you want to display, and tap the document that you want to displayside-by-side. When you want to switch the display of the quick access list, tap [Recently Read] or [Documents in the SameFolder] at the top of the quick access list, and then tap the other item.
To switch which side the documents are displayed on
Tap (option) on either the left or right — [Swap Screens].
To return to a one-page display of either side
Tap (option) on the document you want to display, and then tap [Display This Document Only].
Note
When documents are displayed side-by-side, the document cannot be rotated.
The documents cannot be displayed top and bottom.
The quick access list contains documents that were recently opened, or documents in the same folder as the document currently being displayed.Documents that do not appear in the quick access list cannot be displayed in a side-by-side arrangement.
Hint
After you have displayed different documents and notes in a side-by-side arrangement, you can display the most recent arrangement ofdocuments/notes by tapping (option) — [Open Previous Side-by-Side Documents.
Tap anywhere on the screen of a document to display the tool bar.1
Tap (option) in the upper right of the document screen — [Display Documents Side-by-Side].2
41

Related TopicDisplaying left and right pages in a two-page spreadCreating a side-note on an open document
4-597-942-11(2) Copyright 2016 Sony Corporation
42
Help Guide
Digital Paper SystemDPT-RP1
Rotating documents
Rotate a document 90 degrees.
To return the document to its original orientation
Once again, tap (option) — [Rotate].
Note
When documents are displayed side-by-side or when a document is being displayed as a two-page spread, the document cannot be rotated.
4-597-942-11(2) Copyright 2016 Sony Corporation
Tap anywhere on the screen of a document to display the tool bar.1
Tap (option) in the upper right of the document screen — [Rotate].2
43
Help Guide
Digital Paper SystemDPT-RP1
Searching for a string of text within a document
Search for a string of text within the document that is currently being displayed on the Digital Paper.
To close the search results list
Tap an area outside of the search screen.
Note
There is no differentiation between upper case and lower case letters.
Handwritten text and text that is embedded in an image cannot be searched.
Related TopicSearching for a handwritten mark within a documentSearching for documents that contain a specific written mark (Digital Paper App)
4-597-942-11(2) Copyright 2016 Sony Corporation
Tap anywhere on the screen of a document to display the tool bar.1
Tap (search) in the upper right of the document screen.2
Tap the [Search Text] tab — the search term input field. Then use the keyboard to enter a string oftext, and tap [Search].
3
Tap one of the search results.
The page that you tapped will be displayed.
4
44

Help Guide
Digital Paper SystemDPT-RP1
Searching for a handwritten mark within a document
Select a specific mark, and search for the handwritten mark within the document that is currently being displayed on the DigitalPaper.
To close the search
Tap an area outside of the search screen.
Note
Depending on the way written, marks may not be recognized correctly.
Related TopicSearching for a string of text within a documentSearching for documents that contain a specific written mark (Digital Paper App)
4-597-942-11(2) Copyright 2016 Sony Corporation
Tap anywhere on the screen of a document to display the tool bar.1
Tap (search) in the upper right of the document screen.2
Tap the [Search Mark] tab, and then select the mark and tap [Search].
Even when there are multiple hits for a single page, they are complied and displayed as a single search result.
3
Tap one of the search results.
The page that you tapped will be displayed.
4
45
Help Guide
Digital Paper SystemDPT-RP1
Searching using document information and other information
You can search for file names, titles, or authors of a document on the Digital Paper.
To close the search results list
Tap [Return to All Documents].
4-597-942-11(2) Copyright 2016 Sony Corporation
Press the (home) button and tap [All Documents].1
Tap (search) in the upper right of the document screen.2
Tap the [File Information] tab, insert a string of text, and tap [Search].
The search results are displayed.
3
Tap a search result.
The document opens.
4
46

Help Guide
Digital Paper SystemDPT-RP1
Searching for documents that contain a specific mark
Search for documents on the Digital Paper that contain a handwritten mark by selecting the specific mark.
To close the search result list
Tap [Return to All Documents].
Note
Depending on the way written, marks may not be recognized correctly.
4-597-942-11(2) Copyright 2016 Sony Corporation
Press the (home) button and tap [All Documents].1
Tap (search) in the upper right of the document screen.2
Tap the [Mark] tab, select the mark you want to search, and tap [Search].
The documents containing the mark are displayed.Even if a document contains multiple instances of the mark, the document is displayed once in the search results.
3
Tap a search result.
The document opens.
4
47
Help Guide
Digital Paper SystemDPT-RP1
Viewing a sticky note attached by a previous Digital Paper model
The contents of handwritten sticky notes and text sticky notes that were added to a document using the previous Digital Papermodel, “DPT-S1,” can be viewed.
To close the handwritten sticky note/text sticky note screen
Tap an area outside of the sticky note.
Note
Handwritten sticky notes/text sticky notes cannot be edited on this device.
4-597-942-11(2) Copyright 2016 Sony Corporation
Tap (handwritten sticky note) or (text sticky note) on the document with your finger.1
48
Help Guide
Digital Paper SystemDPT-RP1
Displaying a document on the computer
Documents that are saved to the Digital Paper can be opened using a PDF-viewer program on your computer.
Related TopicConnecting via Wi-Fi/Connecting using a USB cableConnecting via Bluetooth
4-597-942-11(2) Copyright 2016 Sony Corporation
Connect the computer to the Digital Paper.1
Launch the Digital Paper App on the computer.2
Double-click on the document you want to display.
The computer will launch a PDF-viewer program and display the document as read only.Though the document is temporarily saved to the computer, it is deleted when the Digital Paper App is closed.
3
49
Help Guide
Digital Paper SystemDPT-RP1
Handwriting on a document
To change the pen type
Tap anywhere on the screen of a document to display the tool bar. Then, tap (pen settings) in the top right corner of thedocument screen and select an item for [Pen Color] or [Pen Thickness].
Hint
On the screen of the Digital Paper, the blue pen will appear black, and the red pen will appear gray. However, when transferred to a computerthey will be displayed as blue and red, respectively.
The contents of your handwriting are saved the moment you finish writing them.
Related TopicCalibrating the penUsing the eraserDisplaying the annotation list
4-597-942-11(2) Copyright 2016 Sony Corporation
Use the pen to write directly on the page.
Just like when using a normal pen and paper, you can lay the side of your palm flat against the screen as you write.
1
50
Help Guide
Digital Paper SystemDPT-RP1
Adding a highlight
Note
Highlights cannot be added to the following.A document that was scanned (page contains only image data)Text that is embedded in an imageAn area that was handwritten on the Digital PaperA note that does not contain text
Related TopicUsing the eraserDisplaying the annotation list
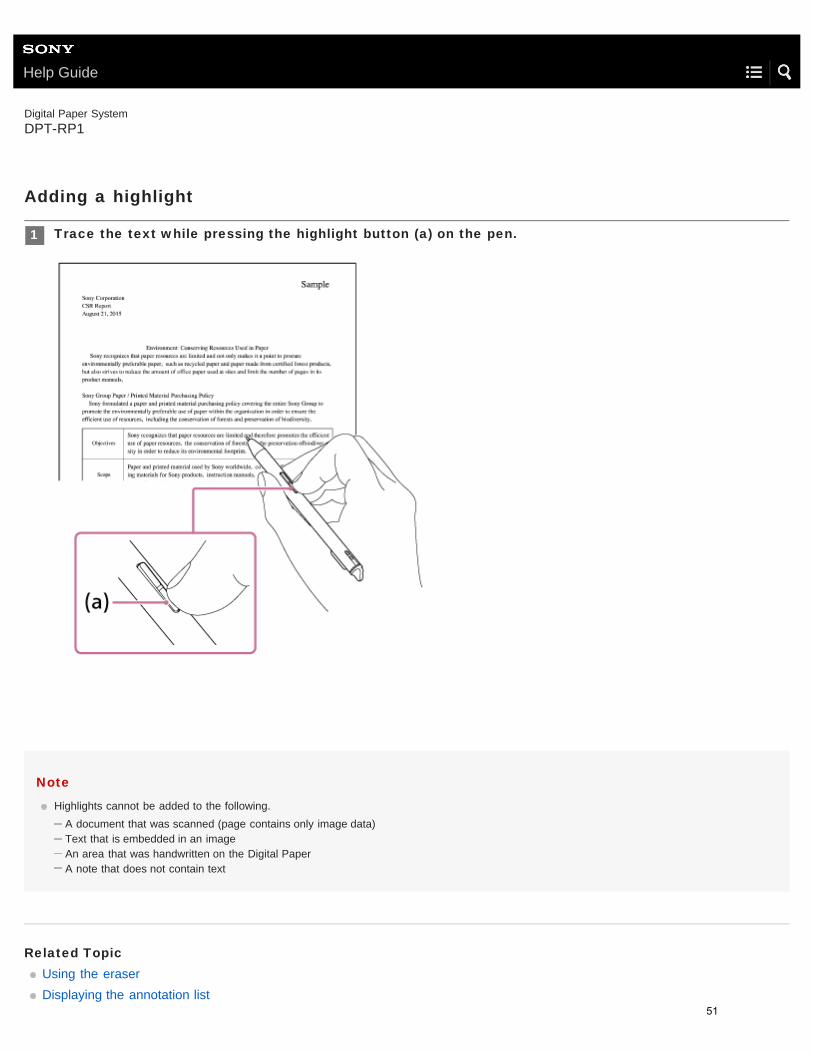
Trace the text while pressing the highlight button (a) on the pen.1
51
Help Guide
Digital Paper SystemDPT-RP1
Using the eraser
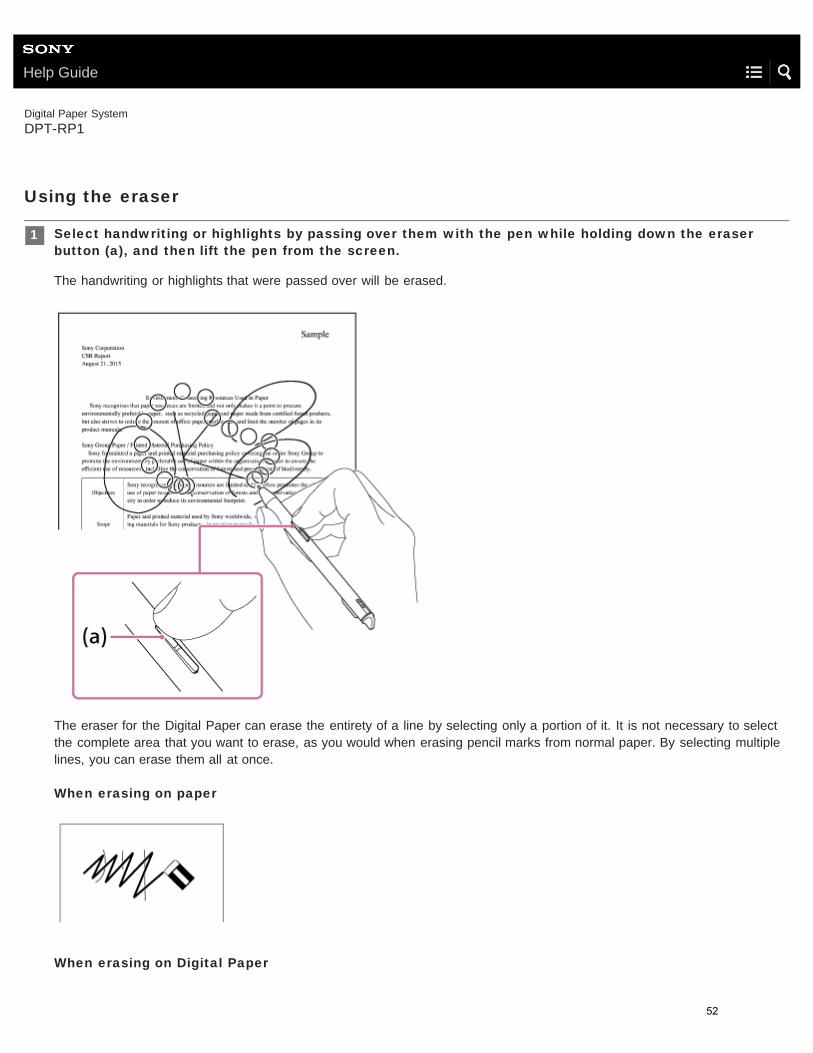
Select handwriting or highlights by passing over them with the pen while holding down the eraserbutton (a), and then lift the pen from the screen.
The handwriting or highlights that were passed over will be erased.
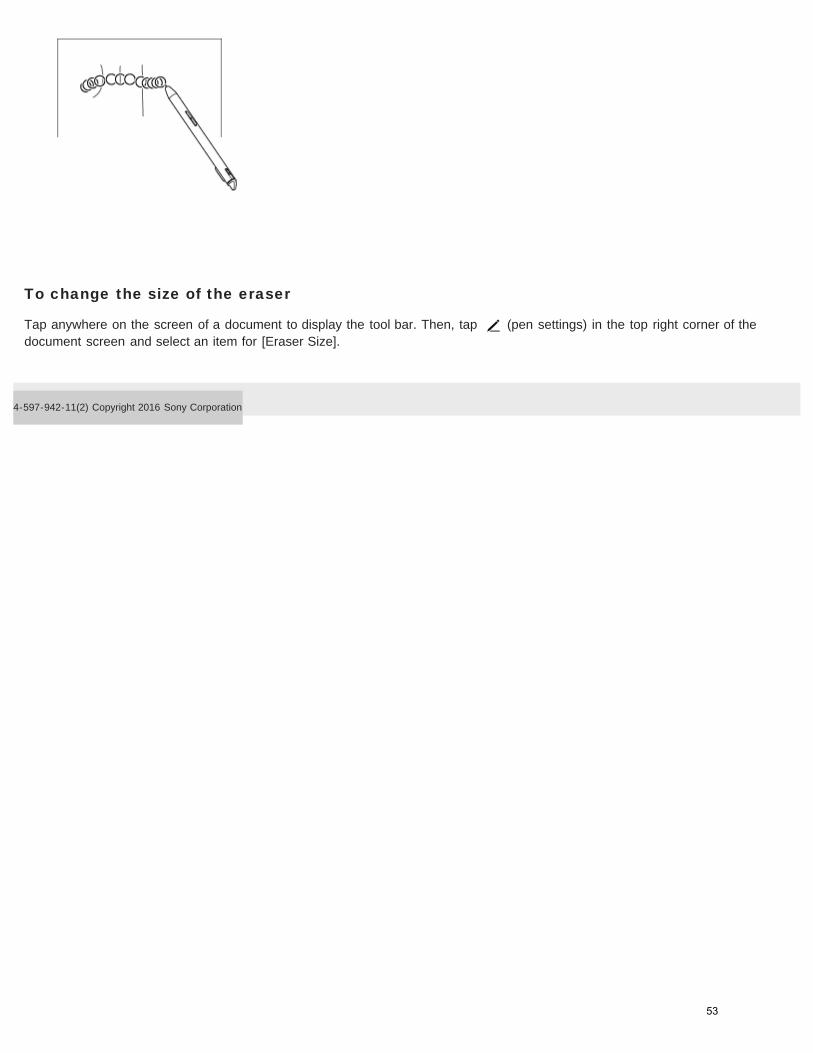
The eraser for the Digital Paper can erase the entirety of a line by selecting only a portion of it. It is not necessary to selectthe complete area that you want to erase, as you would when erasing pencil marks from normal paper. By selecting multiplelines, you can erase them all at once.
When erasing on paper
When erasing on Digital Paper
1
52
To change the size of the eraser
Tap anywhere on the screen of a document to display the tool bar. Then, tap (pen settings) in the top right corner of thedocument screen and select an item for [Eraser Size].
4-597-942-11(2) Copyright 2016 Sony Corporation
53
Help Guide
Digital Paper SystemDPT-RP1
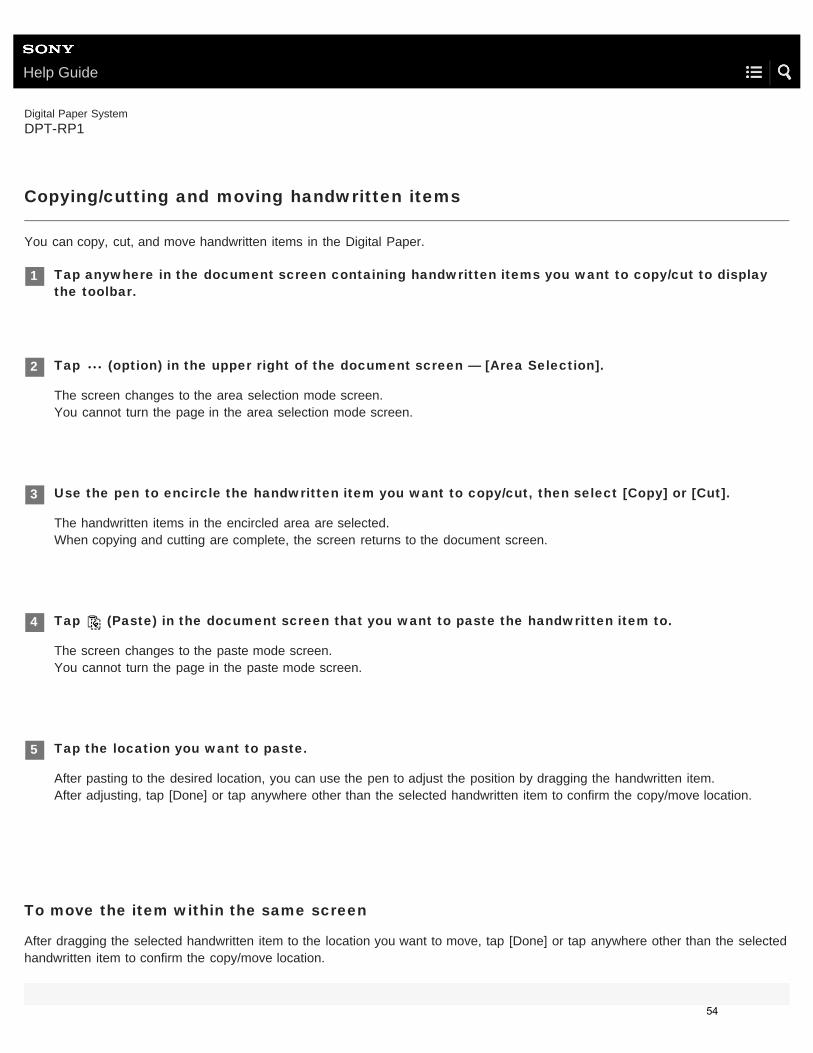
Copying/cutting and moving handwritten items
You can copy, cut, and move handwritten items in the Digital Paper.
To move the item within the same screen
After dragging the selected handwritten item to the location you want to move, tap [Done] or tap anywhere other than the selectedhandwritten item to confirm the copy/move location.
Tap anywhere in the document screen containing handwritten items you want to copy/cut to displaythe toolbar.
1
Tap (option) in the upper right of the document screen — [Area Selection].
The screen changes to the area selection mode screen.You cannot turn the page in the area selection mode screen.
2
Use the pen to encircle the handwritten item you want to copy/cut, then select [Copy] or [Cut].
The handwritten items in the encircled area are selected.When copying and cutting are complete, the screen returns to the document screen.
3
Tap (Paste) in the document screen that you want to paste the handwritten item to.
The screen changes to the paste mode screen.You cannot turn the page in the paste mode screen.
4
Tap the location you want to paste.
After pasting to the desired location, you can use the pen to adjust the position by dragging the handwritten item.After adjusting, tap [Done] or tap anywhere other than the selected handwritten item to confirm the copy/move location.
5
54

Note
The paste operation is only available once. The (Paste) icon disappears after pasting once.
If you restart the Digital Paper, the [Copy]/[Cut] content is lost.
If you [Copy]/[Cut] a new item, the previously selected content is overwritten.
4-597-942-11(2) Copyright 2016 Sony Corporation
55
Help Guide
Digital Paper SystemDPT-RP1
Displaying the annotation list
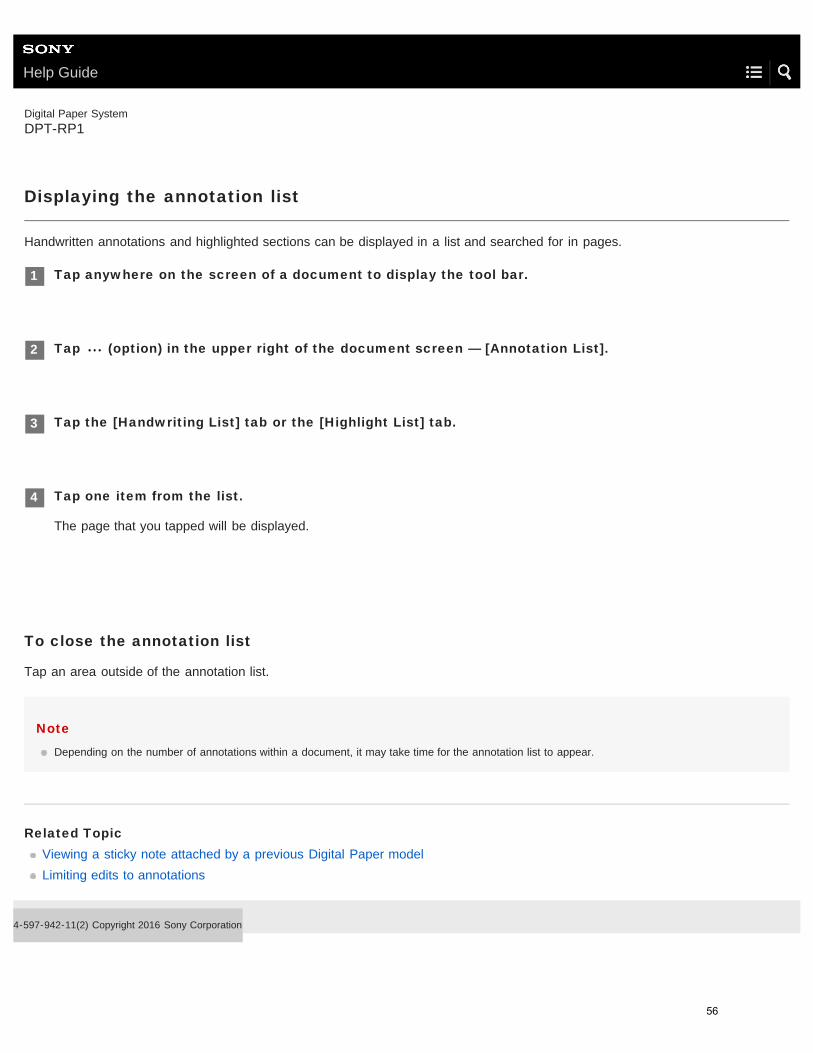
Handwritten annotations and highlighted sections can be displayed in a list and searched for in pages.
To close the annotation list
Tap an area outside of the annotation list.
Note
Depending on the number of annotations within a document, it may take time for the annotation list to appear.
Related TopicViewing a sticky note attached by a previous Digital Paper modelLimiting edits to annotations
4-597-942-11(2) Copyright 2016 Sony Corporation
Tap anywhere on the screen of a document to display the tool bar.1
Tap (option) in the upper right of the document screen — [Annotation List].2
Tap the [Handwriting List] tab or the [Highlight List] tab.3
Tap one item from the list.
The page that you tapped will be displayed.
4
56
Help Guide
Digital Paper SystemDPT-RP1
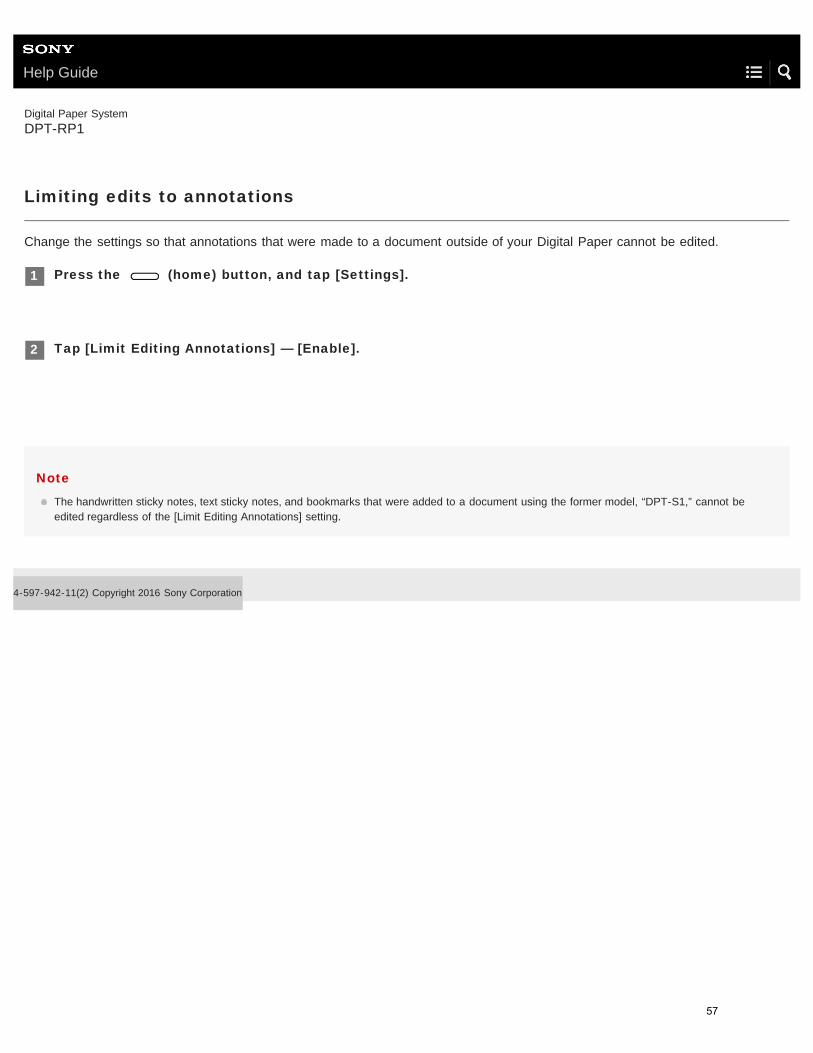
Limiting edits to annotations
Change the settings so that annotations that were made to a document outside of your Digital Paper cannot be edited.
Note
The handwritten sticky notes, text sticky notes, and bookmarks that were added to a document using the former model, “DPT-S1,” cannot beedited regardless of the [Limit Editing Annotations] setting.
4-597-942-11(2) Copyright 2016 Sony Corporation
Press the (home) button, and tap [Settings].1
Tap [Limit Editing Annotations] — [Enable].2
57
Help Guide
Digital Paper SystemDPT-RP1
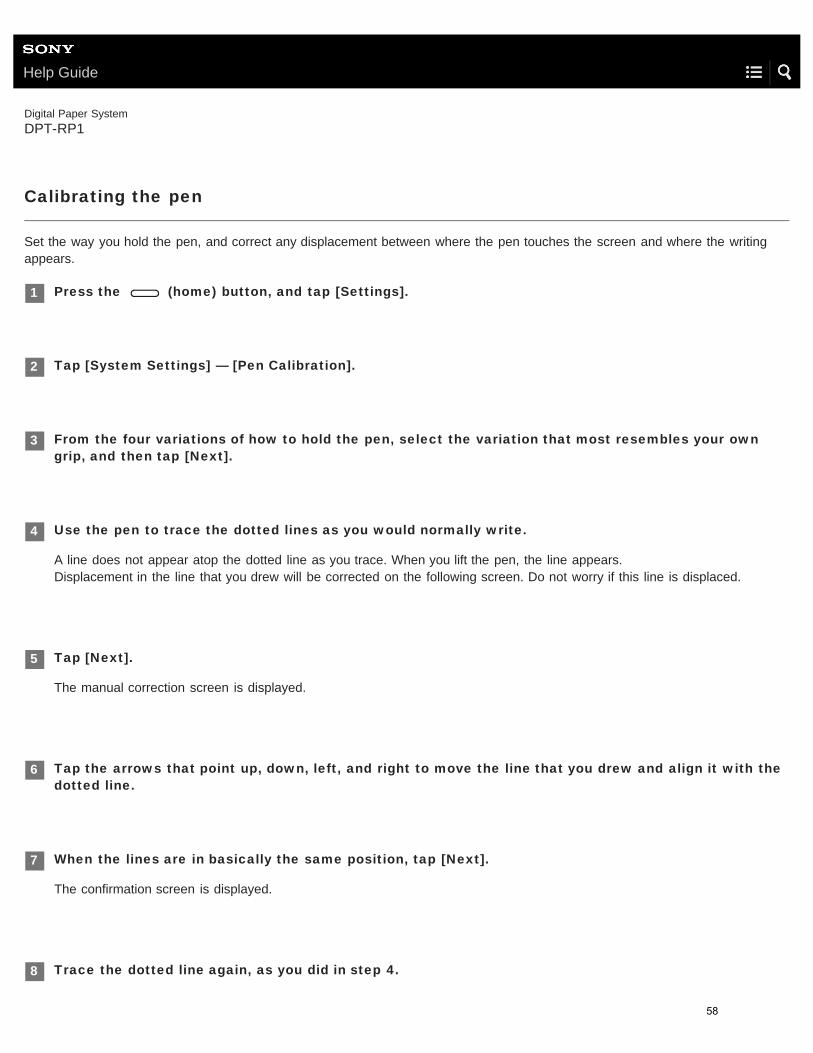
Calibrating the pen
Set the way you hold the pen, and correct any displacement between where the pen touches the screen and where the writingappears.
Press the (home) button, and tap [Settings].1
Tap [System Settings] — [Pen Calibration].2
From the four variations of how to hold the pen, select the variation that most resembles your owngrip, and then tap [Next].
3
Use the pen to trace the dotted lines as you would normally write.
A line does not appear atop the dotted line as you trace. When you lift the pen, the line appears.Displacement in the line that you drew will be corrected on the following screen. Do not worry if this line is displaced.
4
Tap [Next].
The manual correction screen is displayed.
5
Tap the arrows that point up, down, left, and right to move the line that you drew and align it with thedotted line.
6
When the lines are in basically the same position, tap [Next].
The confirmation screen is displayed.
7
Trace the dotted line again, as you did in step 4.8
58
4-597-942-11(2) Copyright 2016 Sony Corporation
If the line that you drew appears displaced, tap [Recalibrate] to return to the previous screen. The line that you drew on theconfirmation screen will be displayed, so correct the placement again, as you did in step 6. After you finish correcting theposition, tap [Next], and trace the dotted line on the confirmation screen again.
When the dotted line and the line that you drew appear to line up, tap [Save].9
59
Help Guide
Digital Paper SystemDPT-RP1
Creating a new note
There are two types of notes: “standalone notes” and “side-notes on documents.” This section explains how to create astandalone note. For how to create a side-note, see the links in “Related Topics.”
Hint
Notes are created as PDF files and can be handled the same way as documents. After creation, the Digital Paper App can be used to move thenote to a different folder or change the file name.
Note
Even when a document is open, performing the steps above will not create a side-note on the document.
Related TopicAdding/editing a note templateCreating a side-note on an open documentChanging the organization of documents/folders on the Digital PaperSelecting defaults for the note template
4-597-942-11(2) Copyright 2016 Sony Corporation
Press the (home) button, and tap [Create New Note].1
Select a template, and tap [OK].
A note is made in the Note folder under a file name that combines the name of the template with the date of creation.
2
60
Help Guide
Digital Paper SystemDPT-RP1
Opening a note
Hint
Notes are documents (PDF files) marked with special attributes. As with documents, notes can also be opened from the All Documents list or thequick access list.
Related TopicOpening a side-noteOpening a documentSelecting and opening from a folderOpening a different document from the quick access list
4-597-942-11(2) Copyright 2016 Sony Corporation
Press the (home) button, and tap [All Notes].1
Tap the note you want to display.2
61
Help Guide
Digital Paper SystemDPT-RP1
Creating a side-note on an open document
There are two types of notes: “standalone notes” and “side-notes on documents.” This section explains how to create a side-noteon a document. For how to create a standalone note, see the links in “Related Topics.”
Hint
When a one-to-one relationship is made between a side-note and a document, simply select (option) — [Open Side-Note] on the screen ofthe document to display the side-note alongside the document. This is convenient for displaying a note without have to find it in a list.
To change the side that the document and the side-note are displayed on
Tap (option) — [Swap Screens].
To display only one document
Tap (option) on either the left or right, and then tap [Display This Document Only].
Note
When the document and side-note are displayed side-by-side, the document cannot be rotated.
The document and side-note cannot be displayed top and bottom.
When you press the (home) button and tap [Create New Note], a standalone note is created, not a side-note.
A side-note cannot be created in a note.
Tap anywhere on the screen of a document to display the tool bar.1
Tap (option) in the upper right of the document screen — [Create a New Side-Note for ThisDocument].
2
Select a template, and tap [OK].
The document and side-note are displayed side-by-side.The side-note is given the same file name as the document with “_Note” attached to the end, and it is located in the samefolder as the document.
3
62
Hint
Only one side-note can be created per document. When you want to create a side-note to replace the existing side-note, after displaying theexisting side-note in side-by-side format with the document, tap (option) — [Create a New Side-Note for This Document]. The old side-notewill become a standalone note.
Side-notes are created as PDF files and can be handled the same way as documents. After creation, the relationship between the document andthe side-note will be retained, even if the Digital Paper App is used to move the document or the side-note to another folder or to change the filename of the side-note.
Related TopicAdding/editing a note templateDisplaying documents side-by-sideChanging the organization of documents/folders on the Digital PaperCreating a new noteSelecting defaults for the note template
4-597-942-11(2) Copyright 2016 Sony Corporation
63
Help Guide
Digital Paper SystemDPT-RP1
Opening a side-note
Hint
Side-notes are documents (PDF files) marked with special attributes. As with documents and standalone notes, they can be opened independently.
Related TopicOpening a noteOpening a documentSelecting and opening from a folderOpening a different document from the quick access list
4-597-942-11(2) Copyright 2016 Sony Corporation
Tap anywhere on the screen of a document to display the tool bar.1
Tap (option) in the upper right of the document screen — [Open Side-Note].2
64
Help Guide
Digital Paper SystemDPT-RP1
Adding/deleting a page from a note
To add a page after the final page
On the final page of the note, swipe (move your finger) in the direction that would take you to the next page.
Note
After a page is deleted, it cannot be returned.
Pages cannot be added/deleted when viewing the document as a two-page spread.
4-597-942-11(2) Copyright 2016 Sony Corporation
Tap anywhere on the screen of a document to display the tool bar.1
Tap (option) in the upper right of the document screen — [Insert New Page] or [Delete CurrentPage].
When you tap [Insert New Page], one page is inserted before the page that is currently being displayed.
2
65
Help Guide
Digital Paper SystemDPT-RP1
Selecting defaults for the note template
Set whether to select a template when you create a new note or to use a specific template without the option to select.
Related TopicAdding/editing a note template
4-597-942-11(2) Copyright 2016 Sony Corporation
Press the (home) button, and tap [Settings].1
Tap [Note Template], then tap either your desired template or [Select template every time note iscreated].
2
66

Help Guide
Digital Paper SystemDPT-RP1
Changing the settings on the Digital Paper
Setting items[Wi-Fi]Switch the Wi-Fi function On/Off.[Wi-Fi Settings]
[Keep Wi-Fi On During Sleep]When [Always enabled] or [Enabled only when plugged in] is selected, the Wi-Fi connection is maintained even when theDigital Paper enters sleep mode, and documents can be transferred and operated from the Digital Paper App.[Wi-Fi Frequency Bands]Select the frequency of the Wi-Fi network that you want to use with the Digital Paper.[Update Saved Network List]Update the [Saved Network List].[Saved Network List]View the list of Wi-Fi networks that have been added by the Digital Paper App. Tap the SSID that is currently connected to display the [Link Speed], [Frequency], and other connection information. If thecomputer that the Digital Paper App is installed to is connected to a different network, you can change the connection forthe Digital Paper by tapping an SSID from the [Saved Network List].
[Bluetooth] Switch the Bluetooth function On/Off.[Bluetooth Settings]
[Bluetooth Pairing] Enter standby mode for Bluetooth pairing.[Keep Bluetooth Connection On During Sleep] When [Always enabled] or [Enabled only when plugged in] is selected, the Bluetooth connection is maintained even whenthe Digital Paper enters sleep mode, and documents can be transferred and operated from the Digital Paper App.[Delete Pairing Information for All Bluetooth Devices] Delete the paring information of all paired Bluetooth devices.
[NFC]Switch the NFC function On/Off.[Limit Editing Annotations]Annotations that were made to a document outside of your Digital Paper cannot be edited.[Note Template]Set whether to select a template each time a new note is created, or to use a specific template by default--without the option
Press the (home) button, and tap [Settings].1
Set the individual items.2
67
to select--whenever a new note is created.[Screen Lock]
[Screen Lock]Set a screen lock on the Digital Paper by setting a lock password between 4 to 20 alphanumeric characters and symbolsin length.[Change Lock Password]Change the lock password for the Digital Paper.[NFC Card Lock Release Settings]Register a FeliCa card, FeliCa-compatible mobile phone, smartphone, etc., which can then be used to disable the screenlock on the Digital Paper.
[Server Settings] Settings for linking Digital Paper to a system.[System Settings]
[Pen Calibration]Set the way you hold the pen, and correct any displacement between where the pen touches the screen and where thewriting appears.[Initialize Digital Paper]Initialize the system storage, and return all settings to their factory defaults. After initialization is complete, the Digital Paperwill automatically turn off.
[System Information]
[Device Details]Display the amount of available space in system storage, the [Software Version], [Device ID], [MAC Address], and[Bluetooth Address].[Legal Information]Display information regarding trademarks and copyrights.[End User License Agreement]Display the software’s End User License Agreement. Be sure to read this before use.
[Regulatory Information]Display the VCCI mark based on the rules for voluntary control measures and the marks and registration numbers for theradio wave/radio communication industry acts.
Related TopicConnecting via Wi-Fi/Connecting using a USB cableConnecting via BluetoothSelecting defaults for the note templateSetting the screen lockAdding/editing a note templateCalibrating the pen
4-597-942-11(2) Copyright 2016 Sony Corporation
68
Help Guide
Digital Paper SystemDPT-RP1
Changing the Digital Paper settings using the Digital Paper App
Use the Digital Paper App to change the settings of the Digital Paper.
Setting items[Paired Digital Paper]Display information for the Digital Paper that has been paired. If pairing with a different Digital Paper, click [Re-pair with DigitalPaper].[Bluetooth automatic connection] When launching the Digital Paper App, set whether or not the Bluetooth-paired Digital Paper is automatically connected.[Automatic sync] When using the Digital Paper App, set whether or not the connected Digital Paper is automatically synced.
[Interval] Set the interval to sync automatically.
[Note template]Add a note template to the Digital Paper, delete a template, or change the name of a template.[Wi-Fi of the Digital Paper] Set whether or not the Digital Paper is connected via Wi-Fi.[Saved Wi-Fi networks]Add a Wi-Fi network for the Digital Paper to connect to, or edit/delete the settings for a Wi-Fi network that has already beenstored. A Wi-Fi network can be set only when Wi-Fi is turned on.[General Settings]Click [Edit] to edit each item.
[Username ]The username that is set here will be listed as the author of annotations.[Date format ]Set the display format for the date.
Connect the computer to the Digital Paper.
When changing the settings for the Wi-Fi network, please connect via the USB cable.
1
Launch the Digital Paper App on the computer.2
Click [Settings], and set the individual items.3
69

[Time format ]Set the display format for the time.[Time zone ]Set the time zone.[Auto sleep ]Set the amount of time before the Digital Paper enters sleep mode.
Hint
A maximum of 20 Wi-Fi networks can be stored to a Digital Paper device.
Digital Paper supports the security methods WPA2-PSK (AES) and 802.1x EAP (TLS/PEAP). See the instruction manual for your wireless routerto confirm whether your router supports the same security methods.
When this device is connected with the Digital Paper App, the time is automatically set.
Note
If paired with another Digital Paper, the sync settings are deleted.
Related TopicConnecting via Wi-Fi/Connecting using a USB cableConnecting via Bluetooth
4-597-942-11(2) Copyright 2016 Sony Corporation
70
Help Guide
Digital Paper SystemDPT-RP1
Updating the software
Information on software updates for the Digital Paper and the Digital Paper App is checked automatically via the Internet. Whenupdate information is found, a message appears on the screen of the Digital Paper App, and you can choose whether to update.When updating the software of the Digital Paper, use the supplied USB cable to connect the computer to the Digital Paper.If you have skipped an update or want to manually check the update information, follow the steps below.
To check the software version of the Digital Paper
Press the (home) button on the Digital Paper, and tap [Settings] — [System Information] — [Device Details].
To check the software version of the Digital Paper AppFor WindowsFrom the menu bar of the Digital Paper App, click [Help] — [About Digital Paper App].For MacFrom the menu bar of the Digital Paper App, click [Digital Paper App] — [About Digital Paper App].
4-597-942-11(2) Copyright 2016 Sony Corporation
Use the supplied USB cable to connect the computer to the Digital Paper.1
Connect the computer to the Internet, and launch the Digital Paper App.2
From the menu bar click [Help] — [Software update], and follow the screen to update.3
71
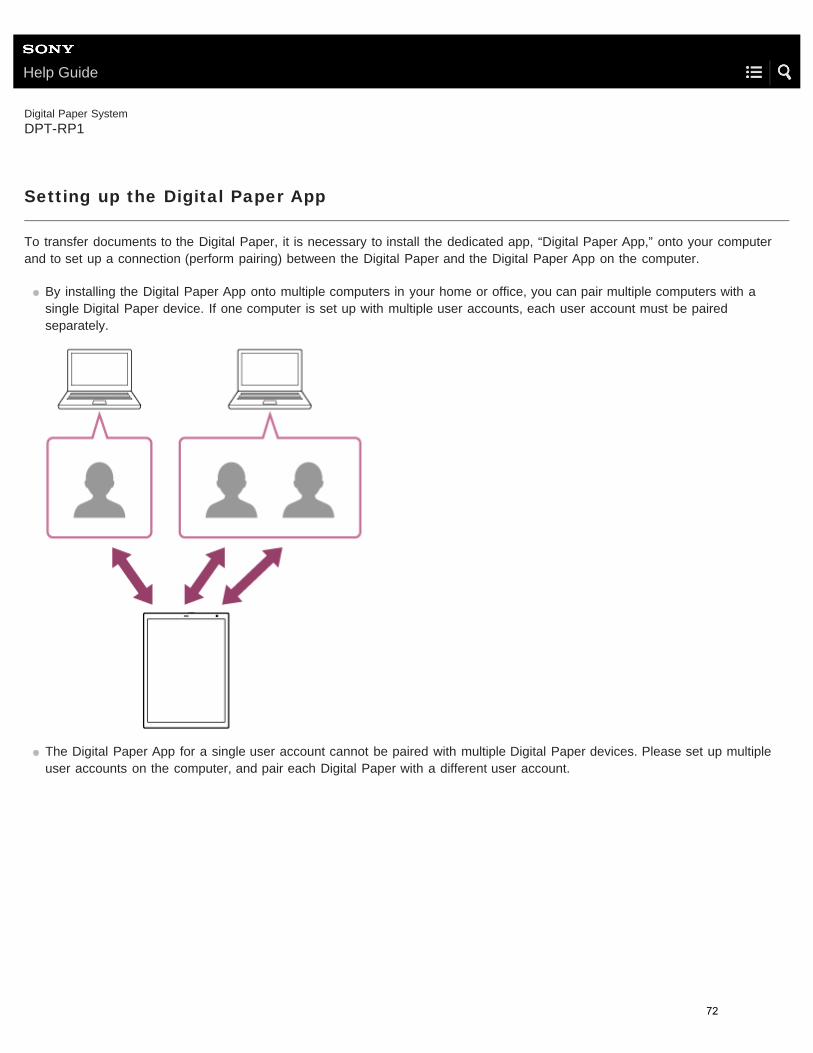
Help Guide
Digital Paper SystemDPT-RP1
Setting up the Digital Paper App
To transfer documents to the Digital Paper, it is necessary to install the dedicated app, “Digital Paper App,” onto your computerand to set up a connection (perform pairing) between the Digital Paper and the Digital Paper App on the computer.
By installing the Digital Paper App onto multiple computers in your home or office, you can pair multiple computers with asingle Digital Paper device. If one computer is set up with multiple user accounts, each user account must be pairedseparately.
The Digital Paper App for a single user account cannot be paired with multiple Digital Paper devices. Please set up multipleuser accounts on the computer, and pair each Digital Paper with a different user account.
72
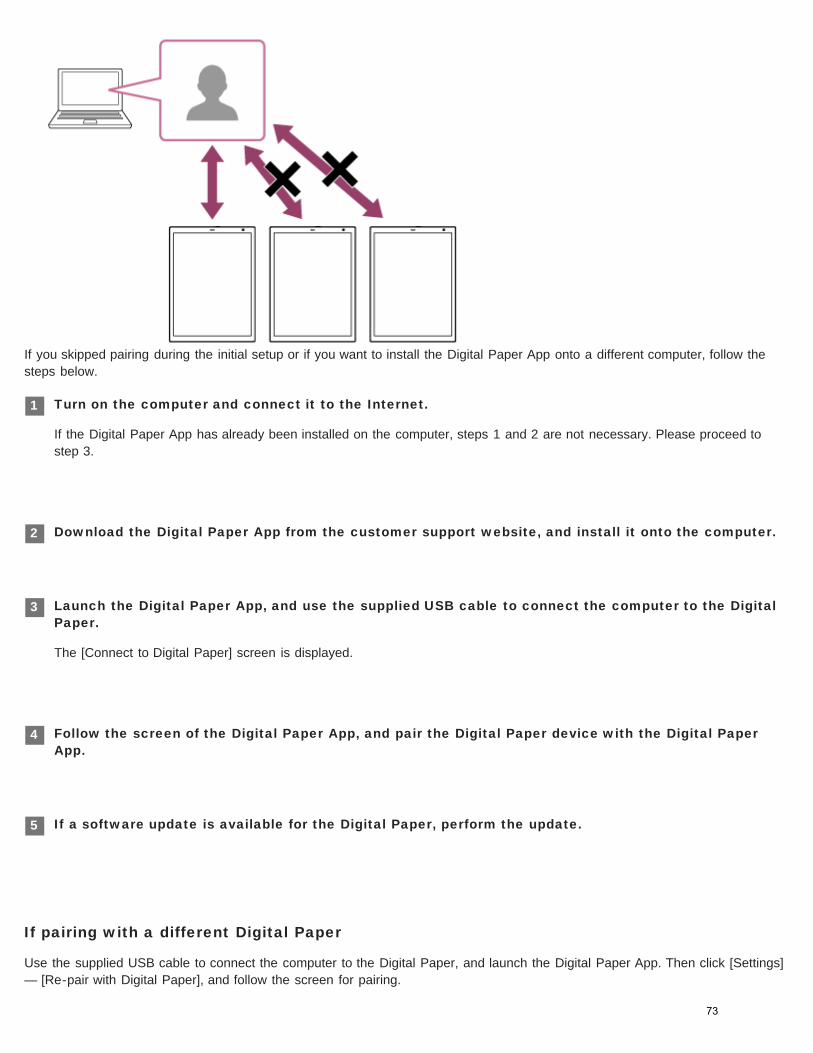
If you skipped pairing during the initial setup or if you want to install the Digital Paper App onto a different computer, follow thesteps below.
If pairing with a different Digital Paper
Use the supplied USB cable to connect the computer to the Digital Paper, and launch the Digital Paper App. Then click [Settings]— [Re-pair with Digital Paper], and follow the screen for pairing.
Turn on the computer and connect it to the Internet.
If the Digital Paper App has already been installed on the computer, steps 1 and 2 are not necessary. Please proceed tostep 3.
1
Download the Digital Paper App from the customer support website, and install it onto the computer.2
Launch the Digital Paper App, and use the supplied USB cable to connect the computer to the DigitalPaper.
The [Connect to Digital Paper] screen is displayed.
3
Follow the screen of the Digital Paper App, and pair the Digital Paper device with the Digital PaperApp.
4
If a software update is available for the Digital Paper, perform the update.5
73
Help Guide
Digital Paper SystemDPT-RP1
Cannot turn on the power
If the charge indicator blinks three times in red when the (power) button is pressed, the battery is depleted. Connect theDigital Paper to a computer using the supplied USB cable to charge it.When the battery is entirely empty, the Digital Paper cannot turn on. If you connect the Digital Paper to a computer using thesupplied USB cable and charge it, the Digital Paper will turn on.When the power does not turn on, even when the Digital Paper is connected via the supplied USB cable for charging, pressthe (power) button. When the battery is entirely empty, it may take five to ten minutes from the time that charging beginsfor the power to turn on.When the Digital Paper experiences condensation, the power may not turn on. Wait a few hours, and then turn it on.
4-597-942-11(2) Copyright 2016 Sony Corporation
74
Help Guide
Digital Paper SystemDPT-RP1
Cannot charge the Digital Paper
Please use the supplied USB cable for charging. If you use a USB cable other than the one supplied, the performance andsafety are not guaranteed.Use the supplied USB cable to connect the computer directly to the Digital Paper. If connecting to the computer through aUSB hub, functionality is not guaranteed.When connected to a computer for charging, make sure that the computer is turned on. If the computer is off, the DigitalPaper cannot be charged. If the power is on but the computer is in sleep mode, standby mode, or hibernation, the DigitalPaper cannot be charged. Make sure that the computer will not enter any sort of sleep mode while charging.When charging the Digital Paper from a laptop computer, it is necessary for the laptop to have a sufficient electrical supply.Please charge the Digital Paper while also charging the notebook computer.Charge within the recommended temperature range of 5 °C to 35 °C (41 °F to 95 °F). When the Digital Paper is outside of therecommended temperature range and cannot be charged, remove the USB cable from the Digital Paper. Wait until thetemperature is within the recommended range before reconnecting the USB cable and charging.
4-597-942-11(2) Copyright 2016 Sony Corporation
75
Help Guide
Digital Paper SystemDPT-RP1
The battery seems to drain quickly
Check whether the battery finished charging completely. Press the (home) button to display the battery icon in the topright corner of the home menu. When the icon changes from to , charging is complete.When using the Digital Paper in an ambient temperature lower than 5 °C (41°F), the battery may drain quickly, but this is nota malfunction.The battery drains even when the Digital Paper is in sleep mode. We recommend turning the power completely off when notin use.Even when the power is off, if the Digital Paper is left alone for an extended period of time, the battery will drain. Charge theDigital Paper before use.Turn off the Wi-Fi function when you are not using the network. Press the (home) button and tap [Settings], then tap[Wi-Fi] to remove the check mark.Turn off the Bluetooth function when you are not using a Bluetooth connection. Press the (home) button and tap[Settings], then tap [Bluetooth] to remove the check mark.If your Digital Paper is connected to a computer that is in sleep mode, standby mode, or hibernation, the battery will drainwithout charging. Make sure that the computer will not enter any sort of sleep mode.Battery life varies depending on frequency of use, device settings, and usage environment.Under the following conditions, the battery will drain more quickly.
Frequent handwriting.Frequent highlighting.Frequently searching for documents.Displaying documents which contain large image files.Using the Digital Paper while [Wi-Fi] is set to On. Or, setting up the Wi-Fi connection to remain connected during sleepmode.Selecting [Wi-Fi Settings] within [Settings], and then leaving the display on [Saved Network List].Using the Digital Paper while [Bluetooth] is set to On. Or, setting up the Bluetooth connection to remain during sleep mode.
4-597-942-11(2) Copyright 2016 Sony Corporation
76
Help Guide
Digital Paper SystemDPT-RP1
It takes time for a screen to be displayed
When using the Digital Paper in a cold environment, it may take time for the display to function.
4-597-942-11(2) Copyright 2016 Sony Corporation
77
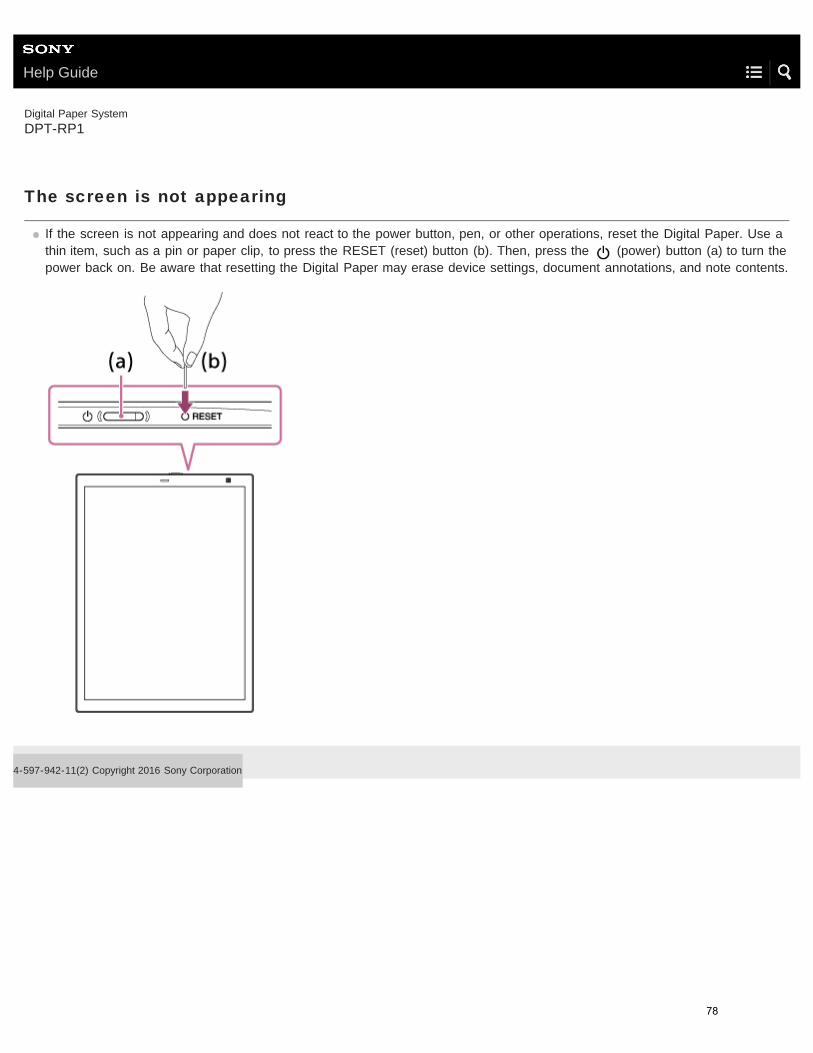
Help Guide
Digital Paper SystemDPT-RP1
The screen is not appearing
If the screen is not appearing and does not react to the power button, pen, or other operations, reset the Digital Paper. Use athin item, such as a pin or paper clip, to press the RESET (reset) button (b). Then, press the (power) button (a) to turn thepower back on. Be aware that resetting the Digital Paper may erase device settings, document annotations, and note contents.
4-597-942-11(2) Copyright 2016 Sony Corporation
78
Help Guide
Digital Paper SystemDPT-RP1
The touch panel is reacting slowly
The screen may be dirty: use a soft cloth (e.g., an eyeglass cleaning cloth) to wipe off the screen.
4-597-942-11(2) Copyright 2016 Sony Corporation
79
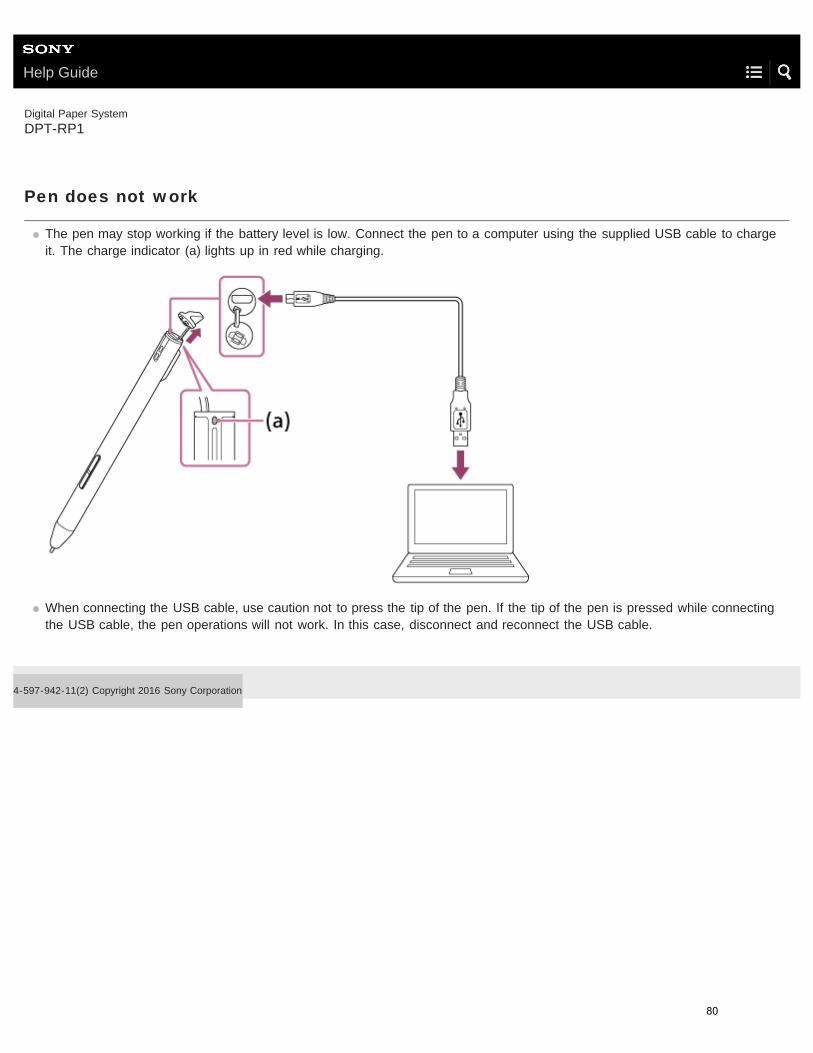
Help Guide
Digital Paper SystemDPT-RP1
Pen does not work
The pen may stop working if the battery level is low. Connect the pen to a computer using the supplied USB cable to chargeit. The charge indicator (a) lights up in red while charging.
When connecting the USB cable, use caution not to press the tip of the pen. If the tip of the pen is pressed while connectingthe USB cable, the pen operations will not work. In this case, disconnect and reconnect the USB cable.
4-597-942-11(2) Copyright 2016 Sony Corporation
80
Help Guide
Digital Paper SystemDPT-RP1
The position of the pen tip is not aligned with the actual writing
The pen may need to be calibrated if the actual writing or tapping is not aligned with the pen tip. Press the (home)button, and tap [Settings] — [System Settings] — [Pen Calibration].
4-597-942-11(2) Copyright 2016 Sony Corporation
81
Help Guide
Digital Paper SystemDPT-RP1
Cannot set up/connect to a network
The [Saved Network List] displays a list of Wi-Fi networks that have been added to the Digital Paper App. If the Wi-Fi networkthat you want to connect to is not displayed in the [Saved Network List], use the Digital Paper App to add the Wi-Fi network.
If the battery of the Digital Paper is low, it may not be able to connect to a Wi-Fi network. Charge the Digital Paper beforeconnecting it to a Wi-Fi network.Turn on the Wi-Fi function. Press the (home) button, and tap [Settings], then tap [Wi-Fi] to add a check mark.Confirm that your wireless router is within the communication range.Confirm that the security method (WPA2-PSK (AES), 802.1x EAP (TLS/PEAP)) and IP address are set correctly on the DigitalPaper.
Confirm that the security method of the Digital Paper (WPA2-PSK (AES), 802.1x EAP (TLS/PEAP)) is supported by yourwireless router. Also, check the encryption key of your wireless router.A username and password may be required for connecting to a public wireless LAN. Enter the correct username andpassword.If the wireless router filters access by MAC address, press the (home) button on the Digital Paper, and then tap[Settings] — [System Information] — [Device Details] to check the MAC address. Afterwards, register the MAC address of theDigital Paper to your wireless router.Confirm that the network settings for your wireless router are correct. For more on the settings of your wireless router, refer tothe instruction manual for your router or contact the network administrator.The Digital Paper may be separated too far from the wireless router. Move the Digital Paper closer to the wireless router.The connection may be weakened by obstacles such as walls, metal, and concrete between the Digital Paper and the wirelessrouter. Move the Digital Paper to a different location.The Digital Paper may experience signal interference from nearby wireless devices (a cordless phone, microwave, Bluetoothdevice, etc.) using the 2.4 GHz frequency band. Turn off the wireless function of those devices, or move the Digital Paper to adifferent location.If the wireless router is set to not display its SSID (stealth setting), it will not appear in the SSID list when adding the Wi-Finetwork to the Digital Paper. Manually set up the Wi-Fi network.A maximum of 20 Wi-Fi networks can be stored to a Digital Paper device. If you want to add another Wi-Fi network when 20networks are already stored, delete an unnecessary Wi-Fi network.
4-597-942-11(2) Copyright 2016 Sony Corporation
Use the supplied USB cable to connect the computer to the Digital Paper, and launch the Digital Paper App.1.Click [Settings] — [Add] under [Saved Wi-Fi networks], and follow the screen to add another Wi-Fi network.2.Press the (home) button on the Digital Paper, and tap [Settings] — [Wi-Fi Settings] — [Update Saved Network List].3.
Use the supplied USB cable to connect the computer to the Digital Paper, and launch the Digital Paper App.1.Click [Settings], then select an SSID from the [Saved Wi-Fi networks] and click [Edit].2.Follow the screen to confirm the security method and IP address.3.
82
Help Guide
Digital Paper SystemDPT-RP1
The network connection suddenly stopped working
If the battery of the Digital Paper is low, it may not be able to connect to a Wi-Fi network. Charge the Digital Paper beforeconnecting it to a Wi-Fi network.Confirm that your wireless router is within the communication range.Connect to an available network. Press the (home) button, and then tap [Settings] — [Wi-Fi Settings] — the SSID of anavailable Wi-Fi network.The Digital Paper is separated too far from the wireless router. Move the Digital Paper closer to the wireless router.The connection may be weakened by obstacles such as walls, metal, and concrete between the Digital Paper and the wirelessrouter. Move the Digital Paper to a different location.The Digital Paper may be experiencing signal interference from nearby wireless devices (a cordless phone, microwave,Bluetooth device, etc.) using the 2.4 GHz frequency band. Turn off the wireless function of those devices, or move the DigitalPaper to a different location.A problem may have occurred with the network that was connected. Check with the network administrator.When the password for the wireless router has been changed, input the new password using the Digital Paper App, andreconnect.
If a connection cannot be established via BluetoothIf the battery of the Digital Paper is low, it may not be able to connect. Charge the Digital Paper before establishing aconnection via Bluetooth.For Windows, make the Bluetooth connection using “Access Point Mode.”Delete the paring information and pair again.Up to four computers can be connected. If you want to connect to the fifth computer, disconnect an unnecessary connection.The Digital Paper is separated too far from the wireless router. Move the Digital Paper closer to the computer.The connection may be weakened by obstacles such as walls, metal, and concrete between the Digital Paper and thecomputer. Move the Digital Paper to a different location.The Digital Paper may be experiencing signal interference from nearby wireless devices (a cordless phone, microwave,Bluetooth device, wireless device etc.) using the 2.4 GHz frequency band. Turn off the wireless function of those devices, ormove the Digital Paper to a different location.When the Digital Paper is initialized, the pairing information is also deleted. After deleting the pairing information of yourcomputer, perform Bluetooth pairing again.
Related TopicChanging the Digital Paper settings using the Digital Paper App
4-597-942-11(2) Copyright 2016 Sony Corporation
Use the supplied USB cable to connect the computer to the Digital Paper, and launch the Digital Paper App.1.Click [Settings], then select an SSID from the [Saved Wi-Fi networks] and click [Edit].2.Follow the screen to input the new password.3.Press the (home) button on the Digital Paper, and tap [Settings] — [Wi-Fi Settings] — [Update Saved Network List].4.Tap the SSID of the desired Wi-Fi network from the [Saved Network List].5.
83
Help Guide
Digital Paper SystemDPT-RP1
Cannot display a document
Only PDF files that conform to the specifications of PDF 1.7 can be displayed. PDF files that contain the extended functions ofAdobe extension level 1-8 are not supported.
4-597-942-11(2) Copyright 2016 Sony Corporation
84
Help Guide
Digital Paper SystemDPT-RP1
Characters are not being displayed
User-defined text and some special symbols may not be displayed.
4-597-942-11(2) Copyright 2016 Sony Corporation
85
Help Guide
Digital Paper SystemDPT-RP1
Cannot add annotations
Annotations cannot be made if the pen battery is too low. Please charge the pen.Annotations cannot be made while a document is being saved.When there is limited free space in system storage, documents will open as “Read-Only,” and annotations cannot be made.Delete unnecessary documents to increase the amount of free space.Highlights cannot be added to a document that was scanned (pages containing only image data) or on text that is embeddedin an image.When the Digital Paper is being operated via the Digital Paper App, annotations may be temporarily unavailable. Wait untiloperations are complete.
4-597-942-11(2) Copyright 2016 Sony Corporation
86

Help Guide
Digital Paper SystemDPT-RP1
Cannot edit or delete annotations
When [Limit Editing Annotations] is set to [Enable], annotations that were made outside of your Digital Paper cannot be edited.To make these annotations editable, press the (home) button and tap [Settings], then change [Limit EditingAnnotations] to [Disable].The handwritten sticky notes, text sticky notes, and bookmarks that were added to a document using the former model, “DPT-S1,” cannot be edited.When the battery level of the pen is low, you may not be able to edit or delete annotations. Charge the pen.When the document is protected, you cannot edit or delete annotations.When there is limited free space in system storage, documents will open as “Read-Only,” and you cannot edit or deleteannotations. Delete unnecessary documents to increase the amount of free space.When operating the Digital Paper using the Digital Paper App, you temporarily may not be able to edit or delete annotations.Wait until operations are complete.
4-597-942-11(2) Copyright 2016 Sony Corporation
87
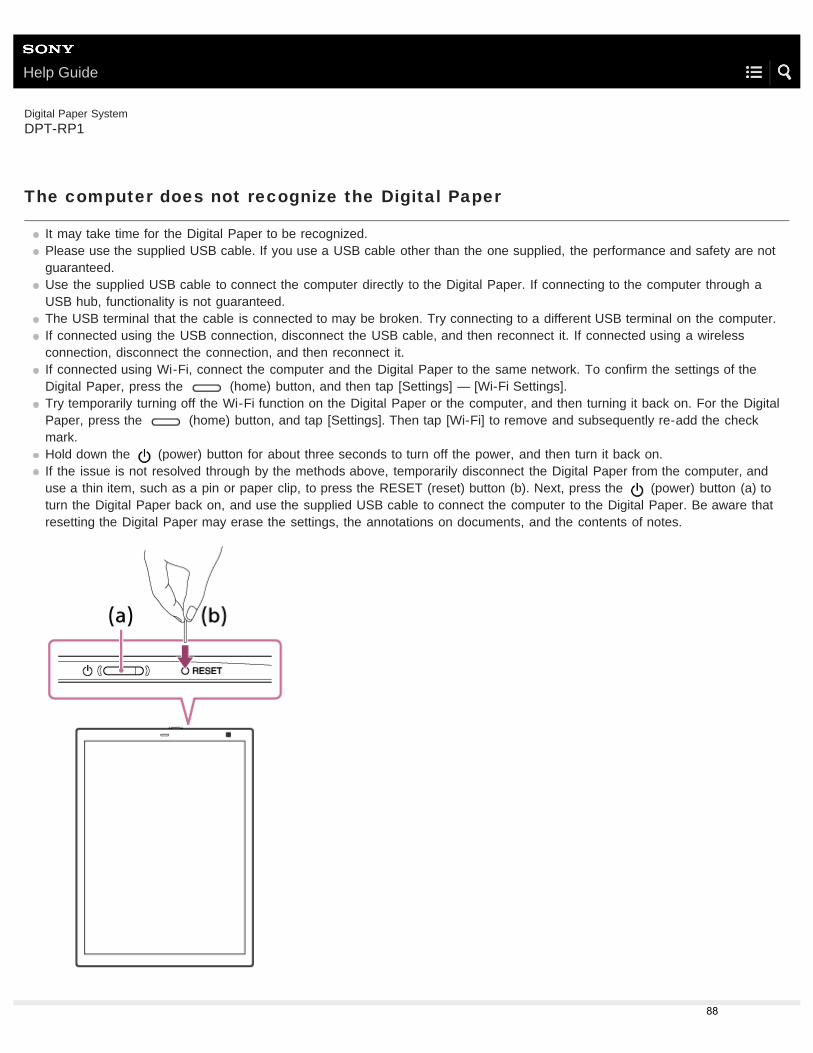
Help Guide
Digital Paper SystemDPT-RP1
The computer does not recognize the Digital Paper
It may take time for the Digital Paper to be recognized.Please use the supplied USB cable. If you use a USB cable other than the one supplied, the performance and safety are notguaranteed.Use the supplied USB cable to connect the computer directly to the Digital Paper. If connecting to the computer through aUSB hub, functionality is not guaranteed.The USB terminal that the cable is connected to may be broken. Try connecting to a different USB terminal on the computer.If connected using the USB connection, disconnect the USB cable, and then reconnect it. If connected using a wirelessconnection, disconnect the connection, and then reconnect it.If connected using Wi-Fi, connect the computer and the Digital Paper to the same network. To confirm the settings of theDigital Paper, press the (home) button, and then tap [Settings] — [Wi-Fi Settings].Try temporarily turning off the Wi-Fi function on the Digital Paper or the computer, and then turning it back on. For the DigitalPaper, press the (home) button, and tap [Settings]. Then tap [Wi-Fi] to remove and subsequently re-add the checkmark.Hold down the (power) button for about three seconds to turn off the power, and then turn it back on.If the issue is not resolved through by the methods above, temporarily disconnect the Digital Paper from the computer, anduse a thin item, such as a pin or paper clip, to press the RESET (reset) button (b). Next, press the (power) button (a) toturn the Digital Paper back on, and use the supplied USB cable to connect the computer to the Digital Paper. Be aware thatresetting the Digital Paper may erase the settings, the annotations on documents, and the contents of notes.
88
Help Guide
Digital Paper SystemDPT-RP1
Cannot transfer documents from a computer to the Digital Paper
The amount of free space in the system storage of the Digital Paper may be insufficient. Check the capacity of the DigitalPaper in the top left area of the Digital Paper App screen. When the amount of free space is insufficient, use the Digital PaperApp to delete any unnecessary data.
4-597-942-11(2) Copyright 2016 Sony Corporation
89
Help Guide
Digital Paper SystemDPT-RP1
Precautions
Safety
Handling the deviceIf the device causes interference to radio or television reception, turn the device off and move it away from the radio ortelevision.Refrain from using the device in an aircraft according to the inflight announcements during taking off or landing.When you put the device into a bag, make sure no objects with sharp or hard edges come into direct contact with the device.Do not drop, or put any heavy object on top of the device or apply a strong shock to the device. It may cause a malfunction ordamage.Never subject the device to extremes of light, temperature, moisture or vibration.If part of the device that generates heat contacts your skin for a prolonged period, you may suffer burn symptoms, such asredness, swelling, even if the temperature is moderate. Avoid prolonged contact, especially if you have sensitive skin.Do not leave the device on an unstable surface.Do not poke people with the supplied pen.Do not treat or use the supplied pen roughly, such as bending it, or scratching the touchscreen with it.Use the supplied pen only for touchscreen operations.Do not use the pen if it is damaged or deformed.Do not subject the pen to shock or vibration.Do not apply any excessive pressure to the pen tip and pen button during operation.Do not keep the pen tip pressed while the pen is not in use.Do not leave the pen on the touchscreen: doing so drains the battery.If an object is placed on the touchscreen, it may cause a malfunction. When not in use, leave the device in sleep mode orturn it off.When using the device another country/region, it is your responsibility to ensure that it is used in compliance with the followingspecifications:
AC voltageWireless products regulationsOther safety regulations or requirements
Be sure not to short-circuit the terminals of the device with metallic objects.Never leave the device exposed to high temperature, such as in a car parked in the sun or under direct sunlight.As the device uses magnets, it may affect medical equipment such as a cardiac pacemaker, defibrillator, or programmableshunt valve. Do not put the device close to medical equipment or people using medical equipment. If you use medicalequipment and feel anxious, consult your doctor before you use the device.
Avoiding water and moistureNote that condensation may form temporarily in cases such as when the device is moved quickly from a low-temperatureenvironment to a high temperature environment or used in a room that has a heater just turned on. Condensation creates aphenomenon where moisture in the air adheres to surfaces such as metal panels, etc., and then changes to liquid. Ifcondensation forms in the device, leave it turned off until the condensation disappears. If you use the device withcondensation present, a malfunction may result.The device is not waterproof. Remember to follow the precautions below.
Be careful not to drop the device into a sink or other container filled with water.90
Do not use the device in humid locations or bad weather, such as in the rain or snow.Do not get the device wet.
If you touch the device with wet hands, or put it in a damp article of clothing, the device may get wet and this may cause amalfunction.
Charging the deviceHeat may build up in the device while charging, or if it is used for an extended period of time.Use the supplied USB cable only. Do not use any other USB cable.Never wrap the device in anything when it is being charged. Heat build-up in the device may cause malfunction or damage.If the battery lasts only half the normal time even after being fully charged, it may be reaching the end of its life.
Cleaning the deviceClean the device with a soft cloth, such as a cleaning cloth for eyeglasses. Make sure that there is no dust or dirt on the softcloth, as the device may be damaged.Do not use any type of abrasive pad, scouring powder or solvent, such as alcohol or benzene, as it may mar the finish of thecase.Wipe the pen with a dry cloth when it gets dirty. Tapping or dragging on the touchscreen using a dirty pen may damage thesurface.Be sure to keep the device away from water or spills.
Regulatory information
This device displays the information below.
The Declaration of Conformity (DoC) logo and the FCC Identifier (FCC ID) based on the FCC RulesThe VCCI mark based on RULES FOR VOLUNTARY CONTROL MEASURESThe marks and registration numbers of the radio wave and radio communication actsYou can view these marks or registration numbers on the Digital Paper: press the (home) button, then tap [Settings] —[Regulatory Information].
If you cannot display the marks or registration numbers due to a malfunction, contact the Sony Support Center.
End User License AgreementYou can display the End User License Agreement from the [Settings]. Press the (home) button, then tap [Settings] — [System Information] — [End User License Agreement].
DisplayThe display is made of thin, lightweight plastic film. When the device is illuminated, distortion of the plastic film may occur. Thisis not a malfunction.Do not apply excessive pressure to the touchscreen. The color or brightness may become uneven and may cause the deviceto malfunction.When using the device in a cold environment, the screen may change at a slower speed. This is not a malfunction.
Wi-Fi connectivity
The Wireless LAN functionality has passed Wi-Fi certification and complies with the interoperability specifications established
91
by WFA (Wi-Fi Alliance).
Wireless featureTurn off the wireless feature of the device when you are in a location where radio communications are prohibited. You mustobtain permission from the appropriate authorities before enabling the wireless feature in such places.Turn off the wireless feature in health care facilities where any regulations posted in such areas instruct you to do so.Hospitals or health care facilities may be using equipment that could be affected by radio frequency (RF) energy which isgenerated by wireless communication.Do not use your device near medical equipment without first obtaining permission to do so.General notes on using the Wi-Fi (Wireless LAN) function. In some countries or regions, use of Wi-Fi products may berestricted by the local regulations (e.g. limited number of channels).
Usage environment of NFC
If the device is placed on a metal desk, it may not function properly, such as failing to communicate with the FeliCa card ordevices that support FeliCa. In this case, keep a few centimeters between the device and the metal desk.
Applications on the device
Disclaimer: In no event will SONY be liable for any financial damage, or loss of profits, including claims made by third parties,arising out of the use of the software supplied with this device.Sony is not responsible for incomplete recording/downloading or damaged data due to problems of the device or computer.
Copyright laws prohibit reproducing the software or the manual accompanying it in whole or in part, or renting the softwarewithout the permission of the copyright holder.Due to continued efforts to improve quality, software specifications may be changed without notice.Operation of this device with software other than that provided is not covered by the warranty.Depending on the types of the text and characters, the text shown on the device may not be displayed properly. This is due to:
The capacity of the device.The device is not functioning normally.Content information is written in a language or character that is not supported by the device.
We do not guarantee all languages will be able to be displayed properly on your device.User-created characters and some special characters may not be displayed.
TouchscreenDo not press the screen or screen frame strongly or rub the screen. When operating the device, touch it softly.You can use the pen while resting your hands on the touchscreen. When the pen is near the touchscreen, the finger operationis inactive.
The device Disposal Reference
The built-in rechargeable battery of the device is recyclable. Do not remove the battery yourself; consult the Sony Support Center. For customers in the USAFCC Compliance Statement NOTE:This equipment has been tested and found to comply with the limits for a Class B digital device, pursuant to Part 15 of the FCCRules. These limits are designed to provide reasonable protection against harmful interference in a residential installation. Thisequipment generates, uses and can radiate radio frequency energy and, if not installed and used in accordance with theinstructions, may cause harmful interference to radio communications.However, there is no guarantee that interference will not occur in a particular installation. If this equipment does cause harmfulinterference to radio or television reception, which can be determined by turning the equipment off and on, the user is encouragedto try to correct the interference by one or more of the following measures:
92
Reorient or relocate the receiving antenna.Increase the separation between the equipment and receiver.Connect the equipment into an outlet on a circuit different from that to which the receiver is connected.Consult the dealer or an experienced radio/TV technician for help.
This DPT-RP1 has been tested and meets the FCC RF exposure guidelines when used with the Sony Corporation accessoriessupplied or designated for this product. Use of other accessories may not ensure compliance with FCC RF exposure guidelines. If you have any questions about this product, you may call:Sony Customer Information Center1-800-222-SONY (7669) orhttp://www.sony.com/The number below is for the FCC related matters only.Regulatory Information Declaration of ConformityTrade Name: SONYModel No.: DPT-RP1Responsible Party: Sony Electronics Inc.Address: 16535 Via Esprillo, San Diego, CA92127 U.S.A.Telephone Number: 858-942-2230This device complies with Part 15 of the FCC Rules.Operation is subject to the following two conditions: (1) this device may not cause harmful interference, and (2) this device mustaccept any interference received, including interference that may cause undesired operation.
In order to comply with FCC radio-frequency radiation exposure guidelines for an uncontrolled exposure, this device and itsantenna must not be co-located or operating in conjunction with any other antenna or transmitter.
FCC Radiation Exposure Statement
This equipment complies with FCC radiation exposure limits set forth for an uncontrolled environment and meets the FCC radiofrequency (RF) Exposure Guidelines.This equipment should be installed and operated keeping the radiator at least 20 cm or more away from person’s body (excludingextremities: hands, wrists, feet and ankles). The available scientific evidence does not show that any health problems are associated with using low power wireless devices.There is no proof, however, that these low power wireless devices are absolutely safe. Low power Wireless devices emit lowlevels of radio frequency energy (RF) in the microwave range while being used. Whereas high levels of RF can produce healtheffects (by heating tissue), exposure of low-level RF that does not produce heating effects causes no known adverse healtheffects. Many studies of low-level RF exposures have not found any biological effects. Some studies have suggested that somebiological effects might occur, but such findings have not been confirmed by additional research. DPT-RP1 has been tested andfound to comply with FCC radiation exposure limits set forth for an uncontrolled environment and meets the FCC radio frequency(RF) Exposure Guidelines.
No guarantee for data
Sony is not responsible for damaged (or deleted) data due to any problem with the device or computer.
Backup
Sony recommends that you make a backup of the contents of the device in case of operation error or data corruption.
4-597-942-11(2) Copyright 2016 Sony Corporation
93
Help Guide
Digital Paper SystemDPT-RP1
Legal Notice
Copyright laws prohibit copying the data of this product or the contents of this Help Guide (illustrations, related documents, etc.) inwhole or in part without the permission of the copyright holder. Additionally, use of the data of this product or the contents of thisHelp Guide is not allowed without Sony’s permission except for personal use.
Sony, the Sony logo are either trademarks or registered trademarks of Sony Corporation.Microsoft and Windows are trademarks or registered trademarks of Microsoft Corporation in the United States and / or othercountries.Macintosh, Mac, Mac OS,and macOS are trademarks of Apple Inc., registered in the U.S. and other countries.This DPT-RP1 contains Adobe Reader Mobile software under license from Adobe Systems Incorporated, Copyright © 1995-2011 Adobe Systems Incorporated. All rights reserved. Adobe and Reader are trademarks of Adobe Systems Incorporated.This product includes software developed by the OpenSSL Project for use in the OpenSSL Toolkit.(http://www. openssl.org/) Copyright © 1998-2011The OpenSSL Project. All rights reserved.Wi-Fi, the Wi-Fi CERTIFIED logo, WPA, WPA2 and Wi-Fi Protected Setup are trademarks or registered trademarks of Wi-FiAlliance.Foxit PDF SDK Copyright (c) 2017, Foxit Corporationwww.foxitsoftware.com, All rights reservedPortions of this software are Copyright ©2005The FreeType Project (www.freetype.org). All rights reserved.This software is based in part on the work of the Independent JPEG Group.The N-Mark is a trademark or registered trademark of NFC Forum, Inc. in the United States and in other countries.The Bluetooth word mark and logos are owned by the Bluetooth SIG, Inc. and any use of such marks by Sony Corporation isunder license.FeliCa is a registered trademark of Sony Corporation.
All other system names and product names appearing in this document are the registered trademarks or trademarks of theirrespective owners.Further, the trademark™ and registered trademark® symbols are not indicated throughout this document.
4-597-942-11(2) Copyright 2016 Sony Corporation
94

Help Guide
Digital Paper SystemDPT-RP1
Specifications
Specifications
ModelDPT-RP1
Basic informationDisplay 338 mm (13.3 in) diagonal electrophoretic display 1650 × 2200 pixel resolution16-level gray scaleTouchscreenProjected capacitive touchscreen capable of pen inputInternal memory capacity/User available capacity16 GB/Approx. 11 GBNumber of PDF files that can be stored in the internal memory Approx. 10,000 files (One approx. 1 MB PDF file)InterfaceMicro USB connector
Power sourceBatteryBuilt-in rechargeable batteryUSB-based charging timeApprox. 5.5 hoursNon-included AC adapter-based charging time(Recommended AC adapter: AC-UUD12) Approx. 3.5 hoursBattery life (continuous use) Wi-Fi off: up to 3 weeks*1 Wi-Fi on: up to 1 week*2
Operating/charging temperature5 °C to 35 °C (41 °F to 95 °F)
Wi-Fi*3
Wireless standardsIEEE 802.11a/b/g/n/ac MIMOFrequency bands2.4 GHz band, 5 GHz bandSecurityWPA2-PSK (AES), 802.1x EAP (TLS/PEAP)Connection typeWPS (Wi-Fi Protected Setup)/Manual setup
95
Wi-Fi authenticationSupported
BluetoothCommunication method Bluetooth Ver4.2Frequency band 2.4 GHz band
NFC*4
Frequency bands13.56 MHz band
Dimensions/MassDimensions (w/h/d)Approx. 224 mm × 302.6 mm × 5.9 mm (8 7/8 in × 12 in × 1/4 in)Mass (including battery)Approx. 349 g (12.3 oz)
StylusBatteryBuilt-in rechargeable batteryUSB-based charging timeApprox. 3 hoursNon-included AC adapter-based charging time(Recommended AC adapter: AC-UUD12) Approx. 3 hoursBattery life (continuous use)Approx. 1 month*5
Operating/charging temperature5 °C to 35 °C (41 °F to 95 °F)
Design and specifications are subject to change without notice.
Supported File Types
The following file types can be displayed by the Digital Paper. However, depending on the file size and format, it may not bepossible to view some data. File extensions are shown in parentheses.
DocumentsPDF (.pdf)*
Operating Environment for Digital Paper App
To transfer documents between a computer and the Digital Paper (DPT-RP1), the Digital Paper App must be installed on the
Under the conditions that 30 pages of a PDF document are read for 60 minutes per day, and the pen is used for approx. 1 minute while reading. TheBluetooth function is set to Off, and the Digital Paper is in sleep mode when not in use.
*1
Under the conditions that 60 pages of a PDF document are read for 120 minutes per day, the pen is used for approx. 10 minutes while reading, and adocument is taken in and out twice via Wi-Fi. Taking a document in and out assumes that a 5 MB PDF file is taken in, and then it is taken out with 2MB of notes after reading. The Bluetooth function is set to Off, and the Digital Paper is in sleep mode when not in use.
*2
The communication speed may vary depending on the distance and presence of obstacles between communication devices, the signal strength, linecongestion, and other factors. DPT-RP1 is for domestic use.
*3
NFC is an abbreviation for Near Field Communication, one of the standards for short-distance wireless communication.*4
Under the condition that entries are made to a PDF document for 60 minutes per day. The Digital Paper is in sleep mode when not in use.*5
Compliant with PDF 1.7 specifications. PDF files that contain the extended functions of Adobe extension level 1-8 are not supported.*
96
computer.
OS*
Microsoft Windows 10 (32/64 bit)
Windows 10 HomeWindows 10 Pro
Microsoft Windows 8.1 (32/64 bit)
Windows 8.1Windows 8.1 Pro
Microsoft Windows 7 (32/64 bit)
Windows 7 Home Premium (SP1 and later)Windows 7 Professional (SP1 and later)Windows 7 Ultimate (SP1 and later)
macOS
10.12(Sierra)
Mac OS X
10.11 (El Capitan)10.10 (Yosemite)
CPUIntel Core™ 2 Duo 2.0 GHz, or a compatible CPU that is equal or greater
Memory2 GB or more
DisplayScreen resolution 1024 × 768
The following system environments are not supported.
Self-constructed computersComputers with a non-standard OSMulti boot systems
4-597-942-11(2) Copyright 2016 Sony Corporation
English OS installations only.*
97

![Help Guide DPT-RP1/DPT-CP1 · 4 Tap [Register NFC Card], and if a message asking whether you want to turn on NFC appears, tap [Yes]. Align the center of the FeliCa card or (FeliCa](https://img.pdfslide.us/doc/110x75/5e172f0cd5d2076d7005d600/help-guide-dpt-rp1dpt-cp1-4-tap-register-nfc-card-and-if-a-message-asking-whether.jpg)