Embed Size (px)
Citation preview
Maven and JBoss AS quickstart [Getting started with Maven and JBoss application server] [17/8/2013]
Francesco Marchioni
1
© www.mastertheboss.com 2013 All Rights Reserved Follow mastertheboss on Twitter for more eBooks: https://twitter.com/mastertheboss
Contents
Getting started with Maven and JBoss AS............................................................... 2
Maven basics ............................................................................................................................................................. 2
Setting up your first JBoss project with Maven .................................................................................................... 7
JBoss AS plugin in action....................................................................................................................................... 13
Advanced JBoss AS plugin use cases................................................................................................................... 16
2
© www.mastertheboss.com 2013 All Rights Reserved Follow mastertheboss on Twitter for more eBooks: https://twitter.com/mastertheboss
Getting started with Maven and JBoss AS
Welcome to the "Getting started with Maven and JBoss AS" eBook. In this mini eBook we will
cover the following topics:
Maven basics
Maven dependencies required to compile JBoss projects
Using the JBoss AS plugin for Maven
What is Apache Maven ? Apache Maven originated as an attempt to simplify the build process
for the older Apache Jakarta Alexandria project. Today Apache Maven is more than just build
automation. Although it has become popular especially among developers, it has become an
essential component of Java EE projects not just for individual developers but for Agile teams
and Managers
Maven basics
In this section we will cover at first the Maven installation and the basic commands to get started.
Installing Maven
Maven is distributed in several formats, for your convenience, and can be downloaded from
http://maven.apache.org/download.html.
Once the download is complete, unzip the distribution archive (for example, apache-maven-3.0.4-
bin.zip) to the directory in which you wish to install Maven.
Next, add the M2_HOME environment variable to your system so that it will point to the folder
where Maven has been unpacked.
Finally, update the PATH environment variable by adding the Maven binaries to your
system path. Following here are the steps you need to perform on a Linux OS :
export M2_HOME=/usr/local/maven-3.0.4
PATH=$M2_HOME/bin:$PATH
And here are the same steps for Windows:
set M2_HOME=c:\maven-3.0.4
3
© www.mastertheboss.com 2013 All Rights Reserved Follow mastertheboss on Twitter for more eBooks: https://twitter.com/mastertheboss
set PATH=%M2_HOME%\bin;%PATH%
Once you have completed your installation, run mvn --version to verify that
Maven has been correctly installed:
mvn --version
Apache Maven 3.0.4 (r1075438; 2011-02-28 18:31:09+0100)
Maven home: C:\apache-maven-3.0.4\bin\..
Java version: 1.6.0, vendor: Sun Microsystems Inc.
Java home: C:\Programmi\Java\jdk1.6.0\jre
Default locale: it_IT, platform encoding: Cp1252
OS name: "windows xp", version: "5.1",
arch: "x86", family: "windows"
Essential components of Maven
As we said, Maven moved its first steps as build process framework, therefore the first thing we
need is creating a project. A Maven project needs to conform to some rules so that every developer
that participates in the project sticks to the same structure. A new project for Apache Maven can be
either "hand-crafted" with manual folder and files creation or you can use a much simpler approach
that is creating a new project from archetypes.
An archetype is a template project for a particular type of module, which ranges from a simple
JAR or WAR module to a more complete template application for many popular frameworks.
The most important file contained in your Maven project is the Project Object Model (pom.xml)
which contains all the project definitions, the libraries used, the plugins to be included and more.
Creating your first archetype
In order to test Maven we will use a minimal archetype named maven-archetype-quickstart that
contains the standard Maven project structure and, of course, the Project Object Module file
(pom.xml). Start the command-line terminal and run the following command:
mvn archetype:generate -DarchetypeGroupId=org.apache.maven.archetypes -DarchetypeArtifactId=maven-archetype-quickstart
If it’s the first time that you are using Maven, you will see some downloads in action and after some
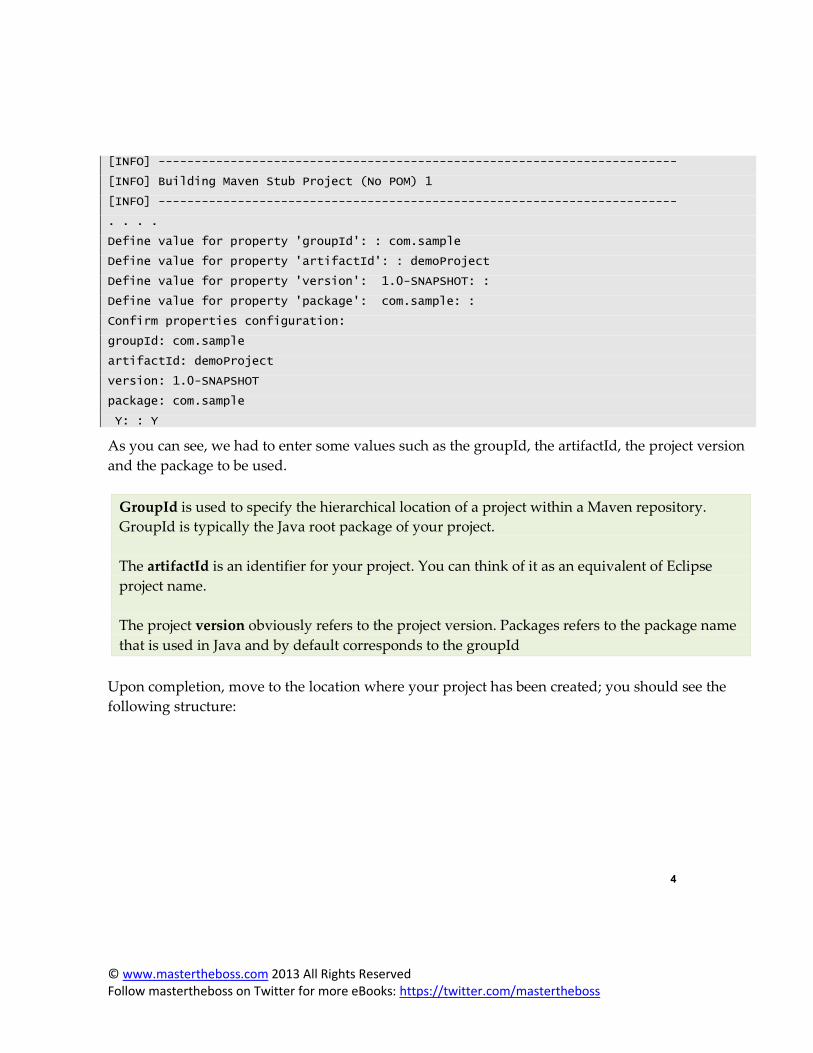
seconds you should see the following input on the console:
[INFO] Scanning for projects...
[INFO]
4
© www.mastertheboss.com 2013 All Rights Reserved Follow mastertheboss on Twitter for more eBooks: https://twitter.com/mastertheboss
[INFO] ------------------------------------------------------------------------
[INFO] Building Maven Stub Project (No POM) 1
[INFO] ------------------------------------------------------------------------
. . . .
Define value for property 'groupId': : com.sample
Define value for property 'artifactId': : demoProject
Define value for property 'version': 1.0-SNAPSHOT: :
Define value for property 'package': com.sample: :
Confirm properties configuration:
groupId: com.sample
artifactId: demoProject
version: 1.0-SNAPSHOT
package: com.sample
Y: : Y
As you can see, we had to enter some values such as the groupId, the artifactId, the project version
and the package to be used.
GroupId is used to specify the hierarchical location of a project within a Maven repository.
GroupId is typically the Java root package of your project.
The artifactId is an identifier for your project. You can think of it as an equivalent of Eclipse
project name.
The project version obviously refers to the project version. Packages refers to the package name
that is used in Java and by default corresponds to the groupId
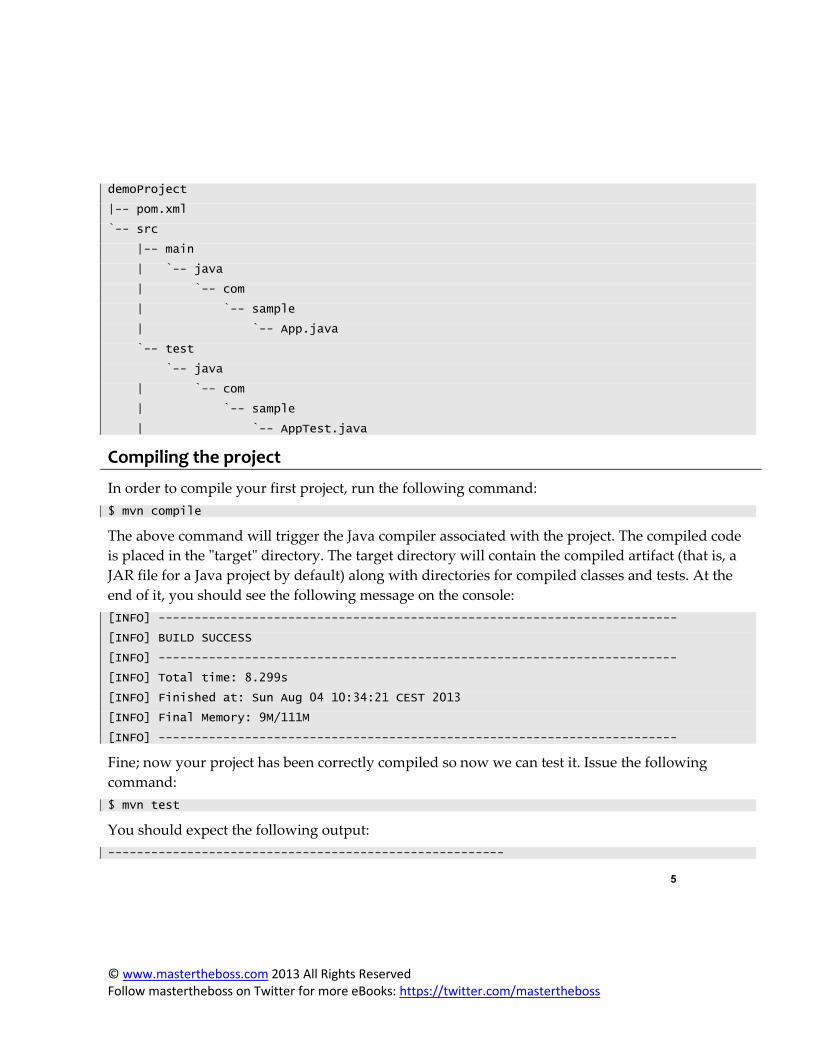
Upon completion, move to the location where your project has been created; you should see the
following structure:
5
© www.mastertheboss.com 2013 All Rights Reserved Follow mastertheboss on Twitter for more eBooks: https://twitter.com/mastertheboss
demoProject
|-- pom.xml
`-- src
|-- main
| `-- java
| `-- com
| `-- sample
| `-- App.java
`-- test
`-- java
| `-- com
| `-- sample
| `-- AppTest.java
Compiling the project
In order to compile your first project, run the following command:
$ mvn compile
The above command will trigger the Java compiler associated with the project. The compiled code
is placed in the "target" directory. The target directory will contain the compiled artifact (that is, a
JAR file for a Java project by default) along with directories for compiled classes and tests. At the
end of it, you should see the following message on the console:
[INFO] ------------------------------------------------------------------------
[INFO] BUILD SUCCESS
[INFO] ------------------------------------------------------------------------
[INFO] Total time: 8.299s
[INFO] Finished at: Sun Aug 04 10:34:21 CEST 2013
[INFO] Final Memory: 9M/111M
[INFO] ------------------------------------------------------------------------
Fine; now your project has been correctly compiled so now we can test it. Issue the following
command:
$ mvn test
You should expect the following output:
-------------------------------------------------------

6
© www.mastertheboss.com 2013 All Rights Reserved Follow mastertheboss on Twitter for more eBooks: https://twitter.com/mastertheboss
T E S T S
-------------------------------------------------------
Running com.sample.AppTest
Tests run: 1, Failures: 0, Errors: 0, Skipped: 0, Time elapsed: 0.046 sec
Results :
Tests run: 1, Failures: 0, Errors: 0, Skipped: 0
[INFO] ---------------------------------------------------------------------
[INFO] BUILD SUCCESS
[INFO] ---------------------------------------------------------------------
[INFO] Total time: 8.301s
[INFO] Finished at: Sun Aug 04 10:34:36 CEST 2013
[INFO] Final Memory: 10M/108M
[INFO] ---------------------------------------------------------------------
Nothing fancy, however you have just compiled and tested your first Maven project.
Maven Lifecycles
The build lifecycle defines the process of building, testing, distributing an artifact, and is the core
part of every Maven project. There are three inbuilt build lifecycles: default, clean, and site.
The default lifecycle handles the project compilation, test, and deployment. It contains
over 20 build phases, the following are the most important phases are listed here:
validate - validate the project is correct and all necessary information is available
compile - compile the source code of the project
test - test the compiled source code using a suitable unit testing framework. These tests
should not require the code be packaged or deployed
package - take the compiled code and package it in its distributable format, such as a JAR.
integration-test - process and deploy the package if necessary into an environment where
integration tests can be run
verify - run any checks to verify the package is valid and meets quality criteria
install - install the package into the local repository, for use as a dependency in other
projects locally
deploy - done in an integration or release environment, copies the final package to the
remote repository for sharing with other developers and projects.

7
© www.mastertheboss.com 2013 All Rights Reserved Follow mastertheboss on Twitter for more eBooks: https://twitter.com/mastertheboss
Whenever you execute a build phase, all prior build phases are executed sequentially.
Therefore, when executing mvn integration-test will execute the validate, compile, test, and
package build phases before executing the integration-test build phase.
Setting up your first JBoss project with Maven
Maven is fully integrated with most common development environment. In particular, if you have
downloaded the newest Eclipse Kepler, then you have the Maven M2E (Maven to Eclipse) plugin
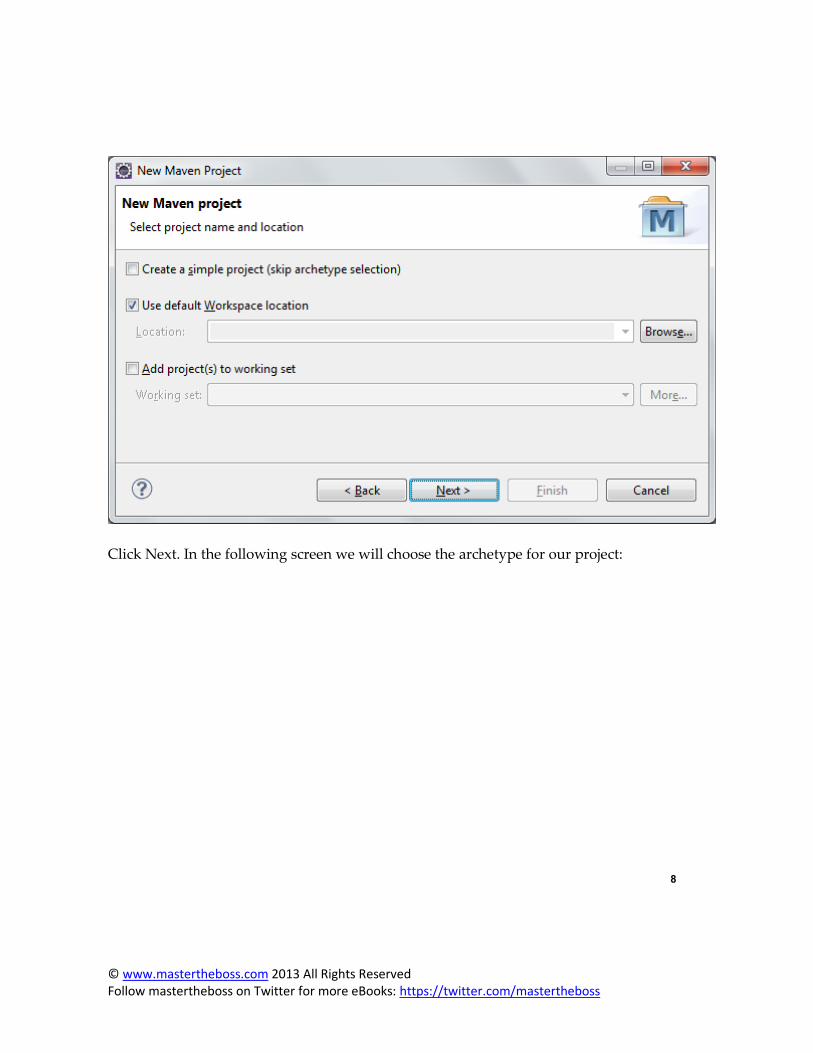
integrated out of the box. So start Eclipse Kepler and from the File menu choose: New | Maven
Project:
Click Next. That will take you to the following screen where you can choose the project location
and decide to use or not an archetype as starter:
8
© www.mastertheboss.com 2013 All Rights Reserved Follow mastertheboss on Twitter for more eBooks: https://twitter.com/mastertheboss
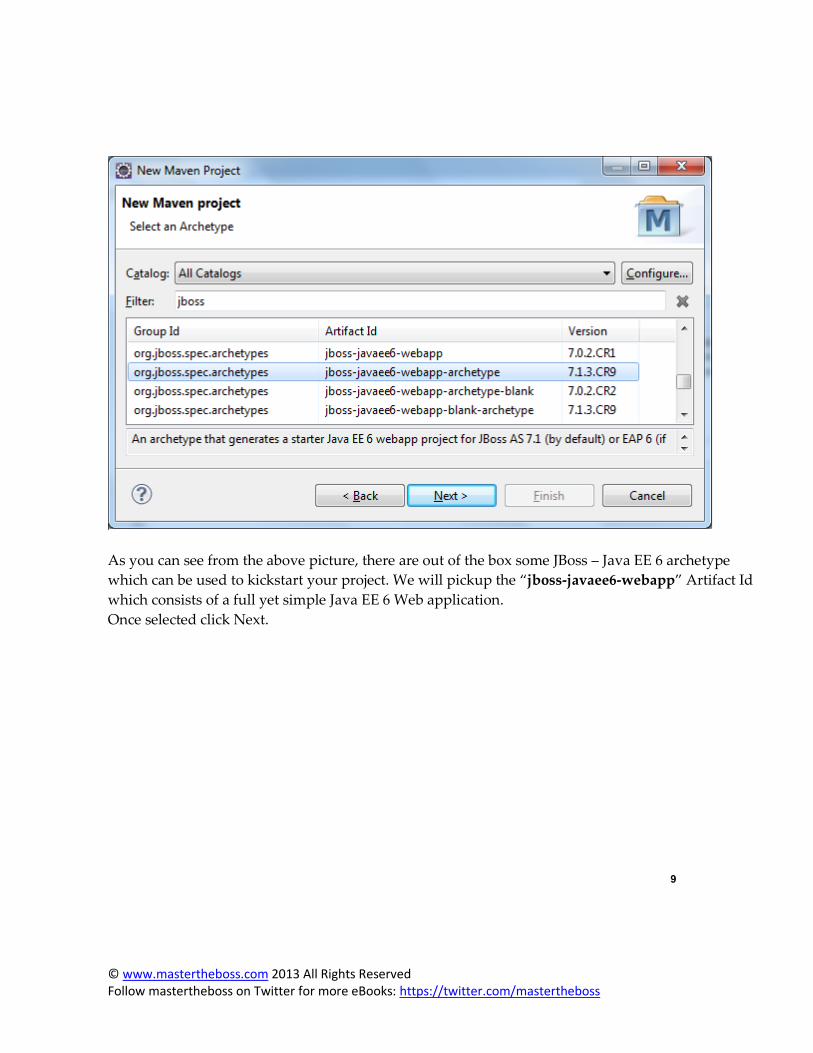
Click Next. In the following screen we will choose the archetype for our project:
9
© www.mastertheboss.com 2013 All Rights Reserved Follow mastertheboss on Twitter for more eBooks: https://twitter.com/mastertheboss
As you can see from the above picture, there are out of the box some JBoss – Java EE 6 archetype
which can be used to kickstart your project. We will pickup the “jboss-javaee6-webapp” Artifact Id
which consists of a full yet simple Java EE 6 Web application.
Once selected click Next.
10
© www.mastertheboss.com 2013 All Rights Reserved Follow mastertheboss on Twitter for more eBooks: https://twitter.com/mastertheboss
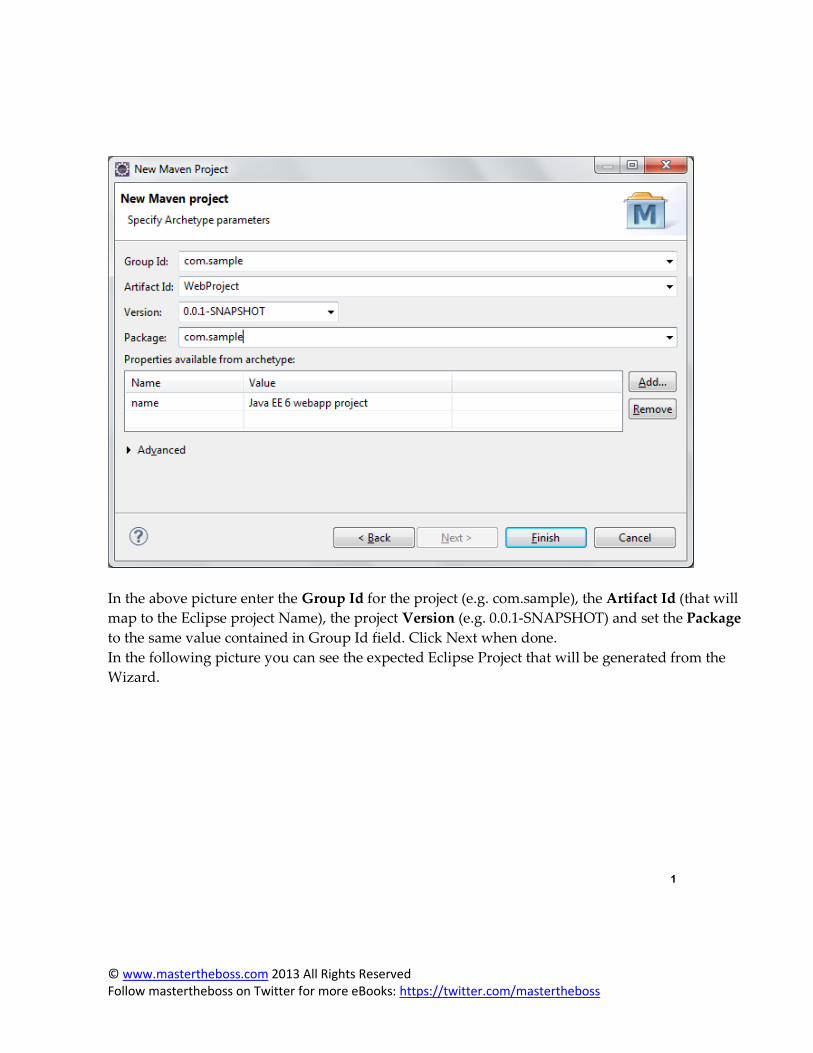
In the above picture enter the Group Id for the project (e.g. com.sample), the Artifact Id (that will
map to the Eclipse project Name), the project Version (e.g. 0.0.1-SNAPSHOT) and set the Package
to the same value contained in Group Id field. Click Next when done.
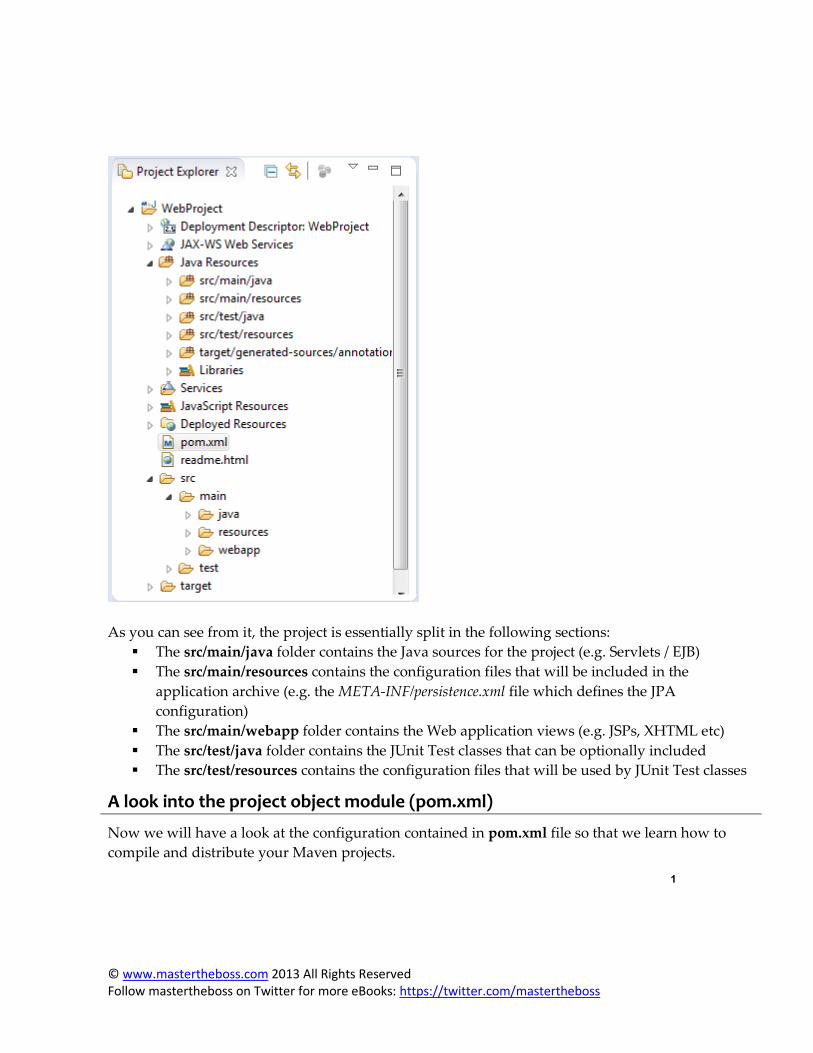
In the following picture you can see the expected Eclipse Project that will be generated from the
Wizard.
11
© www.mastertheboss.com 2013 All Rights Reserved Follow mastertheboss on Twitter for more eBooks: https://twitter.com/mastertheboss
As you can see from it, the project is essentially split in the following sections:
The src/main/java folder contains the Java sources for the project (e.g. Servlets / EJB)
The src/main/resources contains the configuration files that will be included in the
application archive (e.g. the META-INF/persistence.xml file which defines the JPA
configuration)
The src/main/webapp folder contains the Web application views (e.g. JSPs, XHTML etc)
The src/test/java folder contains the JUnit Test classes that can be optionally included
The src/test/resources contains the configuration files that will be used by JUnit Test classes
A look into the project object module (pom.xml)
Now we will have a look at the configuration contained in pom.xml file so that we learn how to
compile and distribute your Maven projects.
12
© www.mastertheboss.com 2013 All Rights Reserved Follow mastertheboss on Twitter for more eBooks: https://twitter.com/mastertheboss
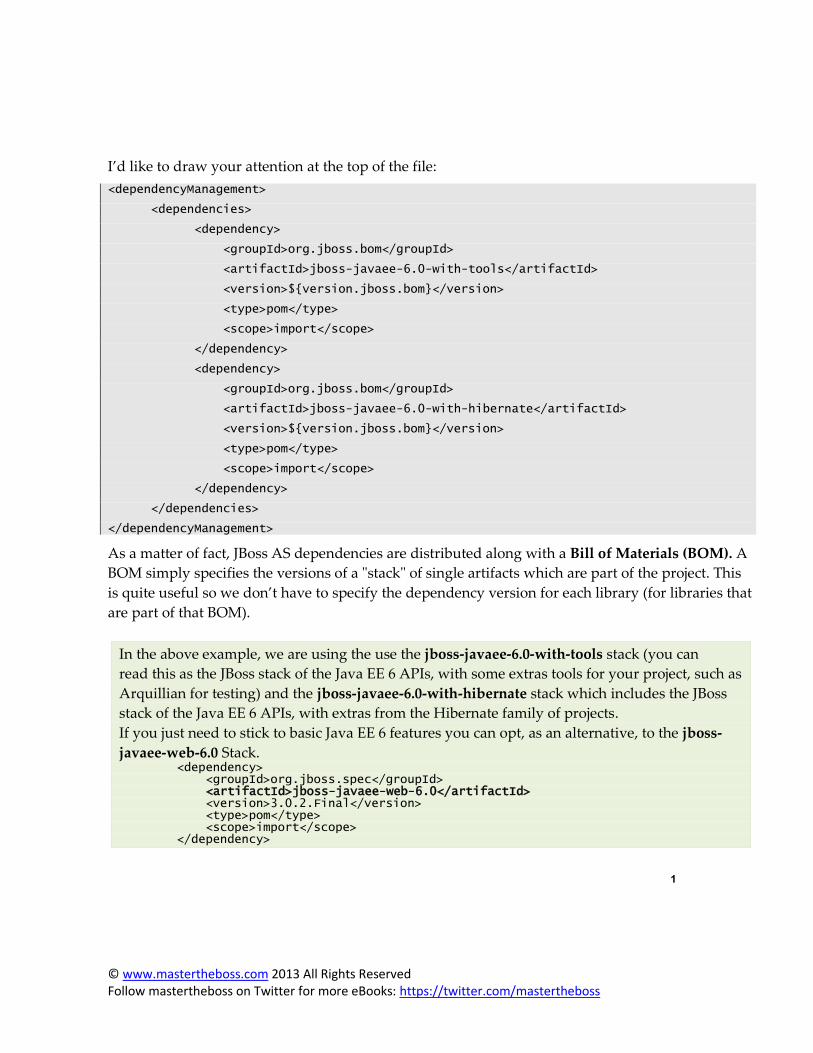
I’d like to draw your attention at the top of the file:
<dependencyManagement>
<dependencies>
<dependency>
<groupId>org.jboss.bom</groupId>
<artifactId>jboss-javaee-6.0-with-tools</artifactId>
<version>${version.jboss.bom}</version>
<type>pom</type>
<scope>import</scope>
</dependency>
<dependency>
<groupId>org.jboss.bom</groupId>
<artifactId>jboss-javaee-6.0-with-hibernate</artifactId>
<version>${version.jboss.bom}</version>
<type>pom</type>
<scope>import</scope>
</dependency>
</dependencies>
</dependencyManagement>
As a matter of fact, JBoss AS dependencies are distributed along with a Bill of Materials (BOM). A
BOM simply specifies the versions of a "stack" of single artifacts which are part of the project. This
is quite useful so we don’t have to specify the dependency version for each library (for libraries that
are part of that BOM).
In the above example, we are using the use the jboss-javaee-6.0-with-tools stack (you can
read this as the JBoss stack of the Java EE 6 APIs, with some extras tools for your project, such as
Arquillian for testing) and the jboss-javaee-6.0-with-hibernate stack which includes the JBoss
stack of the Java EE 6 APIs, with extras from the Hibernate family of projects.
If you just need to stick to basic Java EE 6 features you can opt, as an alternative, to the jboss-
javaee-web-6.0 Stack. <dependency> <groupId>org.jboss.spec</groupId> <artifactId>jboss-javaee-web-6.0</artifactId> <version>3.0.2.Final</version> <type>pom</type> <scope>import</scope> </dependency>
13
© www.mastertheboss.com 2013 All Rights Reserved Follow mastertheboss on Twitter for more eBooks: https://twitter.com/mastertheboss
Once that you have included the BOM in your project, then you can refer to your dependency just
by including its groupId, artifactId and the scope: see for example the following dependency which
is included in the project to solve CDI dependencies and does not include the dependency version:
<dependency>
<groupId>javax.enterprise</groupId>
<artifactId>cdi-api</artifactId>
<scope>provided</scope>
</dependency>
In the lower part of the pom.xml some plugins are defined, such as the Maven compiler plugin
which can be used to enforces JDK compatibility (in our case we stick to Java 1.6):
<plugin>
<artifactId>maven-compiler-plugin</artifactId>
<version>2.3.1</version>
<configuration>
<source>1.6</source>
<target>1.6</target>
</configuration>
</plugin>
Finally, if you have fetched a recent archetype version (e.g. 7.1.3 CR9) of the jboss-javaee6-webapp
archetype, you should be able to see the jboss-as-maven-plugin plugin in your pom.xml which
buys us the capability to deploy our application to JBoss AS 7 from within Maven:
<plugin>
<groupId>org.jboss.as.plugins</groupId>
<artifactId>jboss-as-maven-plugin</artifactId>
<version>7.4.Final</version>
</plugin>
JBoss AS plugin in action
With all dependencies and plugins in the right place we will now install and deploy our application
from within Eclipse. From the top menu, create a new Maven Run Configuration (Run | Run
Configurations) with the following settings:

14
© www.mastertheboss.com 2013 All Rights Reserved Follow mastertheboss on Twitter for more eBooks: https://twitter.com/mastertheboss
The first thing you have to set is the Base Directory which will be used to create the artifact:
you can hit the “Browse Workspace” button in order to select the top level folder of our
project.
Next, enter the Maven goals that will be executed: the first one (“install”) will compile,
package and install the application into our repository. The second one (“jboss-as:deploy”)
will actually deploy the application, provided that JBoss AS is running.
Finally, checkout which Maven Runtime will be used to perform this action. As I have some
specific proxy settings in an external Maven installation, I have selected to use this specific
Maven release.
Click on Run: the Maven shell will at first start downloading plugins and dependencies. Next the
compiler will kick in, compiling and packaging your project. Finally. it will attempt to deploy the
application via JMX over HTTP:
15
© www.mastertheboss.com 2013 All Rights Reserved Follow mastertheboss on Twitter for more eBooks: https://twitter.com/mastertheboss
Downloading: http://repo.maven.apache.org/maven2/org/jboss/as/plugins/jboss-as-maven-plugin/7.4.Final/jboss-as-maven-plugin-7.4.Final.pom
. . . . . . .
INFO: JBoss Remoting version 3.2.12.GA
[INFO] ------------------------------------------------------------------------
[INFO] BUILD SUCCESS
[INFO] ------------------------------------------------------------------------
[INFO] Total time: 37.221s
[INFO] Finished at: Fri Aug 16 16:13:18 CEST 2013
[INFO] Final Memory: 14M/89M
[INFO] ------------------------------------------------------------------------
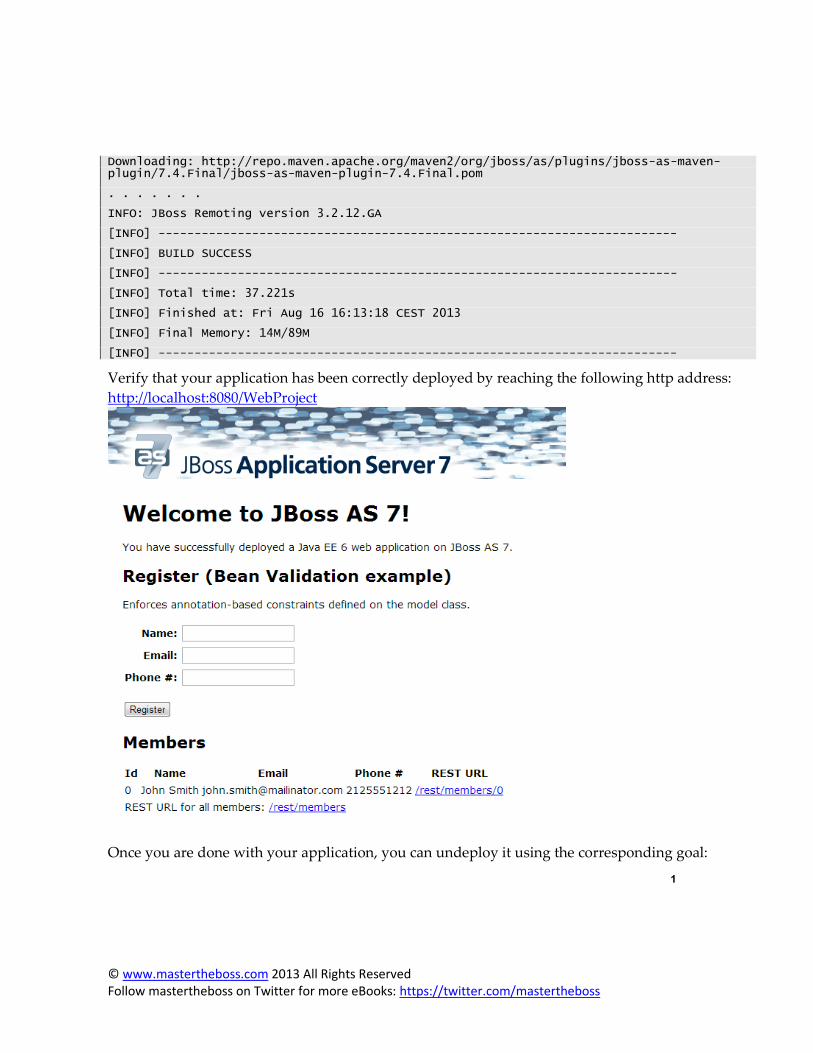
Verify that your application has been correctly deployed by reaching the following http address:
http://localhost:8080/WebProject
Once you are done with your application, you can undeploy it using the corresponding goal:
16
© www.mastertheboss.com 2013 All Rights Reserved Follow mastertheboss on Twitter for more eBooks: https://twitter.com/mastertheboss
mvn jboss-as:undeploy
In order to redeploy your application, issue the following command:
mvn jboss-as:redeploy
As we said, the jboss:deploy executes deployment via JMX over HTTP. The packaged archive is
moved into the application server’s tmp folders which sometimes might not be practical; for
example if you want to rely on the deployment scanner features (e.g. manually removing the file
from the “deployments” folder in order to undeploy). You can opt for an hard copy of the archive
into the “deployments” folder by issuing: mvn jboss:hard-deploy
Advanced JBoss AS plugin use cases
As it is, the JBoss plugin deploys the application to the default host location (localhost) using the
default management port (9999). If you are using different settings or simply you want to deploy
your project across several nodes, then you can plug-in a variable expression for the hostname and
port and pass these variables to the Maven shell as in the following example:
<plugin>
<groupId>org.jboss.as.plugins</groupId>
<artifactId>jboss-as-maven-plugin</artifactId>
<version>7.4.Final</version>
<configuration>
<hostname>${hostname}</hostname>
<port>${port}</port>
</configuration>
</plugin>
Then, if your application server is bound to the IP Address 192.168.0.1 and it’s using a management
port of 10199, here’s how to execute the deployment task:
mvn jboss-as:deploy -Dhost=192.168.0.1 -Dport=10199
Domain Deployment
The above settings can be used for deploying your applications to standalone servers. If you are
planning to deploy your application to a domain of servers, then you can specify the domain
17
© www.mastertheboss.com 2013 All Rights Reserved Follow mastertheboss on Twitter for more eBooks: https://twitter.com/mastertheboss
settings through the configuration stanza of your plugin. In this case, we are deploying our
application to the other-server-group:
<plugin>
. . . . .
<configuration>
<domain>
<server-groups>
<server-group>other-server-group</server-group>
</server-groups>
</domain>
</configuration>
</plugin>