Embed Size (px)
Citation preview

Dollar Store MakerspacesKimberly Bramfeld and Tia Felock
November 5, 2016

3D Paper Snowflake – All Steps
Supplies: scissors stapler scrap paper – 8”x11” (6 sheets for each snowflake), or two-sided/wrapping paper
3 Make each sheet of paper into a square. Fold the paper as shown below.
4
Cut off the rectangular piece of paper to get a perfect square ;)

5 Fold all squares diagonally, then in half again.
6
Cut three parallel lines toward the folded side, about 1” each.
11 2
When you’re done cutting, go back to the square and unfold your triangle twice.
13
Time for rolling! Take two innermost paper points together to form a tube. Staple together.

4 Flip the whole thing to the other side.
15
Take the next two paper points and pull them on the opposite side of the first tube. Staple together as before.
16
Repeat the procedure with flipping the paper and joining the paper points together on opposite sides until all paper points have been joined. 7 Yay! One of your six basic pieces is ready. Repeat all the steps with the other triangles.
18

Now, after you’ve prepared five other pieces, join three of them together at the top with a staple. You’ll get two, three-armed pieces.
19
It’s time to staple together previously joined two pieces.
20
You’re almost done :) Now you just need to staple together every pair of arms.
21 You’ve made it!

Easy Kids Craft: Origami Kites
Spring is here, and I’ve been getting my craft on lately. I decided I wanted to make some pretty
paper kites, ones I could use to decorate my daughter’s room, hang in front of windows, or make into
a mobile. I also didn’t want to take a lot of time to make them either. ‘Cause I’m impatient like that.
This is what I came up with – start to finish, less than 15 minutes.
Easy Kids Craft: Origami Kites
Learn More About Career LifePrep
These kites are super-easy to make, even 3 and 4 year olds can make them with a little help. And
you can probably make them with whatever you have in your house right now.
What you Need to Make These Easy Origami Kites
1 Sheet of origami paper, or 6″ x 6″ piece of wrapping paper, patterned scrapbook paper, or even
plain paper your child has colored
1 Toothpick
2 2′-3′ Pieces of raffia, embroidery floss, yarn or ribbon, plus 4 pieces about 6″ long
4 Pieces of scrap fabric, cut into 1/2″ by 3″ pieces (tissue paper could be substituted here, too)
Transparent tape
How to Make Easy Origami Kites

Easy Origami Kite Step 1
First, fold the paper as shown. Then tape one of the ends of your raffia, ribbon, or whatever you’re
using, into the crease at the bottom of the kite.
Easy Origami Kites Step 2
Next, fold the kite back up, and tape a toothpick to the back flap of the paper. Now fold it down flat
and tape the toothpick to the other flap. It will look like this when you’re done:
Easy Origami Kites Step 3
After you’ve taped both flaps to the toothpick, tie your second piece of raffia around the toothpick.
Trim off the short end so that it tucks neatly inside the kite.

Easy Origami Kites Step 4
You’re almost done! Grab your fabric scraps and your extra raffia pieces. Get ready to tie them onto
your kite tail.
Easy Origami Kites Step 5
Now all you have to do is tie them on to the tail! Raffia holds knots well, so I was able to keep these
in place with little tying. But if you’re using ribbon, tie them on a little tighter. Do this three more times
and space them out to make them relatively even on your kite tail. But don’t worry if they are uneven,
that just adds to the charm. Snip off the ends of the short pieces of raffia, and viola! You have a kite!
Easy Origami Kite
- See more at: http://www.woojr.com/easy-kids-craft-origami-kites/#sthash.NRpWkvBp.dpuf

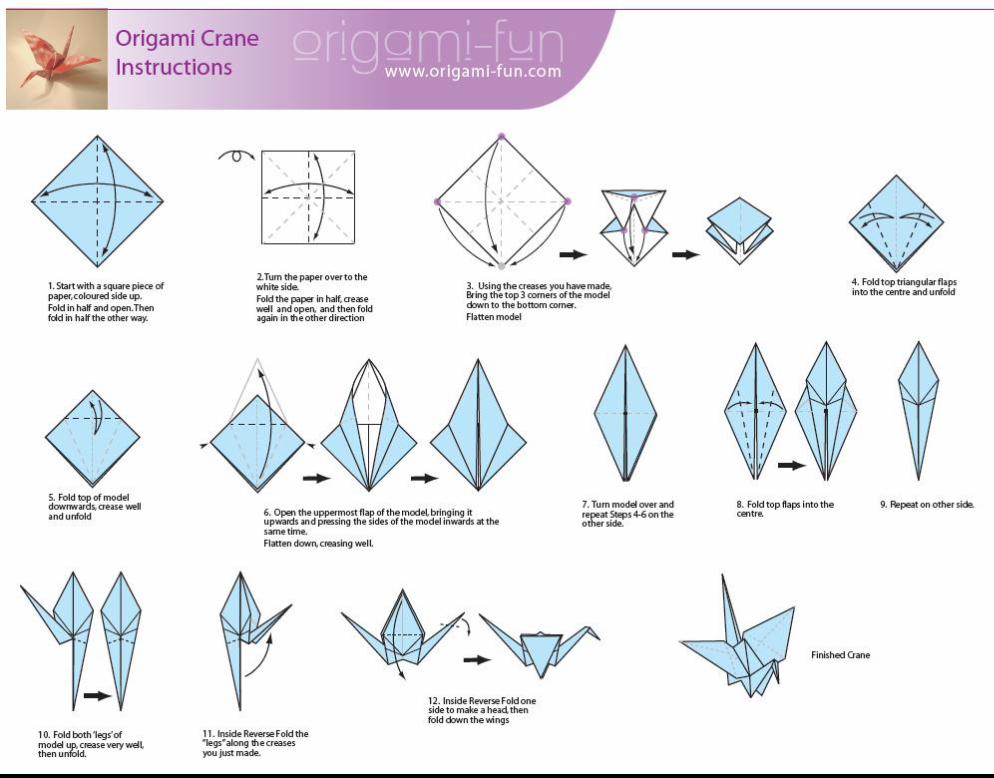
How To Fold An Origami Butterfly
Beginner’s Guide to Making a Simple Origami Butterfly
Origami doesn’t have to be difficult and with just a little bit of practice, your kids will be experts in no
time. Every piece of origami, from a simple flower to a complex dragon, is created in the same way –
with just a few folds in the right places.
Origami is a great craft for children of all ages to enjoy. There is no glue, scissors or small pieces
involved, which makes it perfect for even the littlest little ones to have a go. Because you only need
one piece of card per project, origami is also one of the cheapest craft projects out there and is great
to keep kids amused on a journey without the worry of losing pieces of leaving parts behind.
These simple origami butterflies can be used in loads of different ways – use them instead of ribbons
to decorate presents, hang them from the ceiling for a pretty summer decoration or simply hand
them out as cheap yet thoughtful homemade gifts.
What You’ll Need
1 square piece of thin colored card or paper
Origami Butterfly Directions
Origami Butterfly – Step 1

1. Cut out a square from a piece of colored card or paper – the bigger the piece, the easier the folds
are to make. 4”x4” is a good size for a small butterfly, 6”x6” for a medium butterfly and 10”x10” for a
large butterfly. These sizes are just guides – any square piece will work. Don’t go any smaller than
3”x3”, or you’ll really struggle to make the folds.
Step 2
2. Fold the square in half horizontally then unfold. Fold the square in half vertically then unfold.
Step 3
3. Turn the square over and fold along one of the diagonals then unfold. Fold along the other
diagonal then unfold.
Step 4a
Step 4b

Step 4c
4. Holding two opposite sides, push the centers together until they meet in the middle of the square.
Flatten the sides above and below so you’re left with a flat triangle with several layers.
Step 5
5. Take the bottom corners of the top layer triangle and fold them to meet at the top corner.
Step 6
6. Turn the card over and fold the top of the triangle backwards over the bottom edge, so the tip
sticks out a little bit. Make sure you don’t flatten the raised edges in the process – these will form
part of the butterfly’s wings and make it look more real.
Step 7
7. Tuck the tip that sticks out over the side and turn the card over. Fold in half and you’re done.
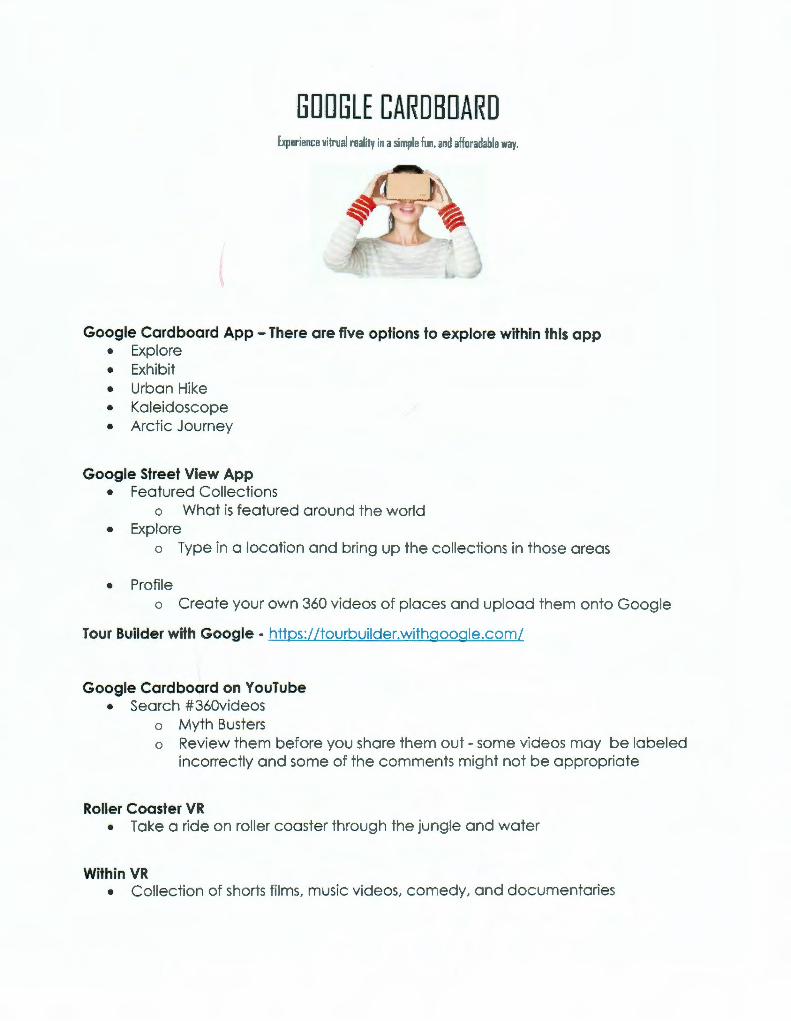
[]OOGLE CARDBOARD Experience vitrual reality in a simple fun . and afforadable way.
Google Cardboard App -There are five options to explore within this app • Explore • Exhibit • Urban Hike • Kaleidoscope • Arctic Journey
Google Street View App • Featured Collections
o What is featured around the world • Explore
o Type in a location and bring up the collections in those areas
• Profile o Create your own 360 videos of places and upload them onto Google
Tour Builder with Google- https://tourbuilder.withgoogle.com/
Google Cardboard on YouTube • Search #360videos
o Myth Busters o Review them before you share them out - some videos may be labeled
incorrectly and some of the comments might not be appropriate
Roller Coaster VR • Take a ride on roller coaster through the jungle and water
Within VR • Collection of shorts films, music videos, comedy, and documentaries

All the apps can be downloaded for free on Google Play or the App Store
App Store Links
Google Cardboard o https://itunes.apple.com/us/app/google-cardboard/id987962261 ?mt=8
Google Street View o https://itunes.apple .com/us/app/google-street-view/id904418768?mt=8
Roller Coaster VR
o https://itunes.apple.com/us/app/roller-coaster-vr/id935697 665?mt=8
Google Play Store
Google Cardboard o https://play.google.com/store/apps/details?id=com.google.samples.app
s.cardboarddemo&hl=en
Google Street View o https :1/play.google .com/store/ apps/ details ?id=com .google .android .stree
t&hl=en
Roller Coaster VR o https://play.google.com/store/apps/details?id=com.fibrum.roallercoaster
vr&hl=en
If you have any further questions from today, please contact:
Kimberly Bramfeld- [email protected]
Tia Felock- [email protected]