Embed Size (px)
Citation preview
DOLBY ATMOS – LIVE WORKFLOW AWS Elemental Live – AWS Elemental MediaPackage – Amazon CloudFront
© 2021, Amazon Web Services, Inc. or its affiliates. All rights reserved. 2
CONTENTS
INTRODUCTION .....................................................................................................................................3
REQUIREMENTS ....................................................................................................................................4
ORDER OF WORK ..............................................................................................................................4
STEP A: CREATE A CHANNEL IN AWS ELEMENTAL MEDIAPACKAGE AND DISTRIBUTE IT WITH AMAZON CLOUDFRONT .............................................................................................................5
STEP B: CREATE AN EVENT IN AWS ELEMENTAL LIVE ...................................................................8
STEP C: START THE EVENT: DOLBY ATMOS IN AWS ELEMENTAL LIVE .....................................10
STEP D: VALIDATE YOUR HLS OR DASH DOLBY ATMOS STREAM. .............................................11
STEP E: CLEAN UP ..............................................................................................................................15
© 2021, Amazon Web Services, Inc. or its affiliates. All rights reserved. 3
INTRODUCTION
This workflow example shows how to use AWS Elemental Live, AWS Elemental MediaStore and
Amazon CloudFront services to deliver HLS and DASH streams with Dolby Atmos audio.
AWS Elemental Live is an on-premises solution that processes live video for delivery to broadcast
televisions and streaming to internet-connected devices. It allows you to easily and reliably compress
live video sources into multiple versions for distribution. Deployed on-premises as appliances or as
AWS-licensed software on your infrastructure, AWS Elemental Live lets you deploy reliable, high-
quality live video processing at the source, within the studio, or inside remote facilities. For more
information see https://aws.amazon.com/elemental-live/
AWS Elemental MediaPackage is a video delivery service that allows video providers to securely and reliably distribute streaming video at scale. It makes it easy to prepare your live and on-demand video content for delivery to multiple devices, and improve the viewer experience with advanced features. With MediaPackage, customers can reduce workflow complexity, increase origin resiliency, and better protect multiscreen assets without the risk of under or over-provisioning video infrastructure. MediaPackage also works with other AWS Media Services to unlock the growing ecosystem of connected devices and the dynamic viewing experiences they enable. For more information see https://aws.amazon.com/mediapackage/
Amazon CloudFront is a fast content delivery network (CDN) service that securely delivers data,
videos, applications, and APIs to customers globally with low latency, high transfer speeds, all within
a developer-friendly environment. CloudFront is integrated with AWS – both physical locations that
are directly connected to the AWS global infrastructure, as well as other AWS services. For more
information see https://aws.amazon.com/cloudfront/
© 2021, Amazon Web Services, Inc. or its affiliates. All rights reserved. 4
REQUIREMENTS
To follow this workflow, you need:
• An AWS Elemental Live encoder (version 2.16.3 or higher) connected to the internet
• An SDI or TS source with Dolby Atmos audio Metadata
• An AWS account for AWS Elemental MediaPackage and Amazon CloudFront
• Credentials/stream keys for delivery to your MediaPackage channel
• A Dolby developer account (this is free of charge)
ORDER OF WORK
Step A: Create a channel in AWS Elemental MediaPackage and distribute it with Amazon
CloudFront
Step B: Create an event in AWS Elemental Live
Step C: Start streaming the video: Dolby Atmos in AWS Elemental Live
Step D: Validate your HLS or DASH Dolby Atmos stream
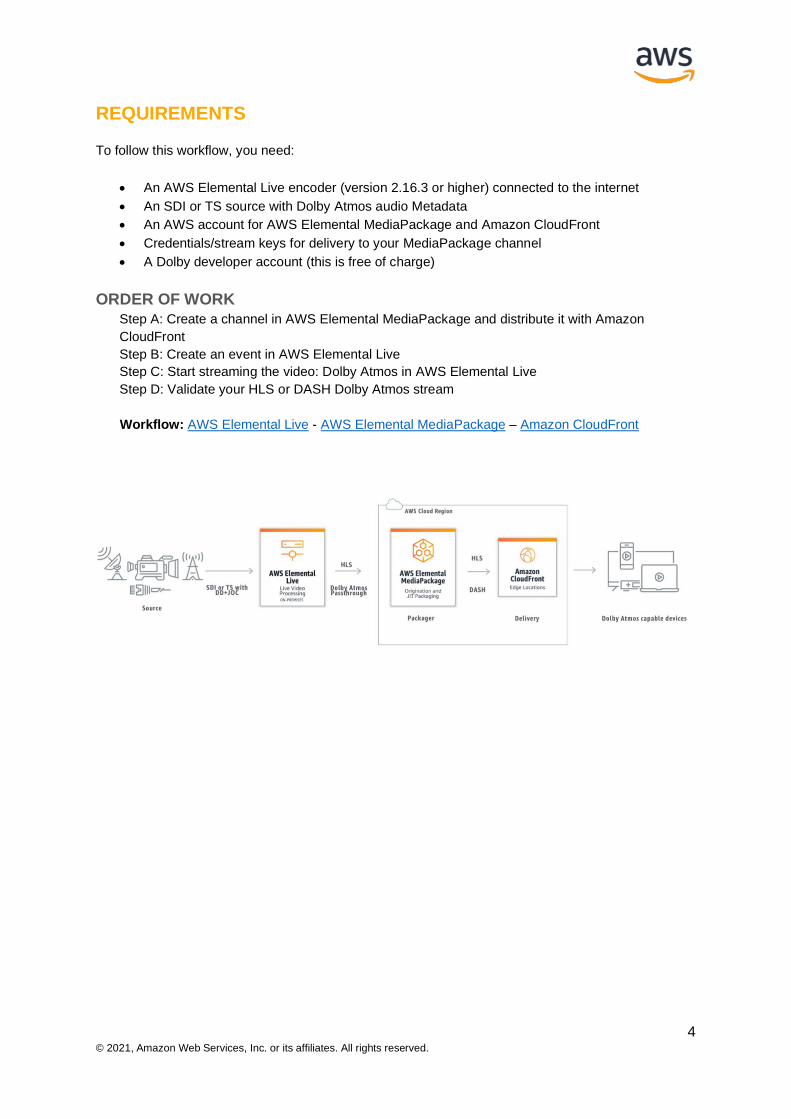
Workflow: AWS Elemental Live - AWS Elemental MediaPackage – Amazon CloudFront
© 2021, Amazon Web Services, Inc. or its affiliates. All rights reserved. 5
STEP A: Create a channel in AWS Elemental MediaPackage and distribute it with Amazon CloudFront
1. Open the MediaPackage console at https://console.aws.amazon.com/mediapackage/
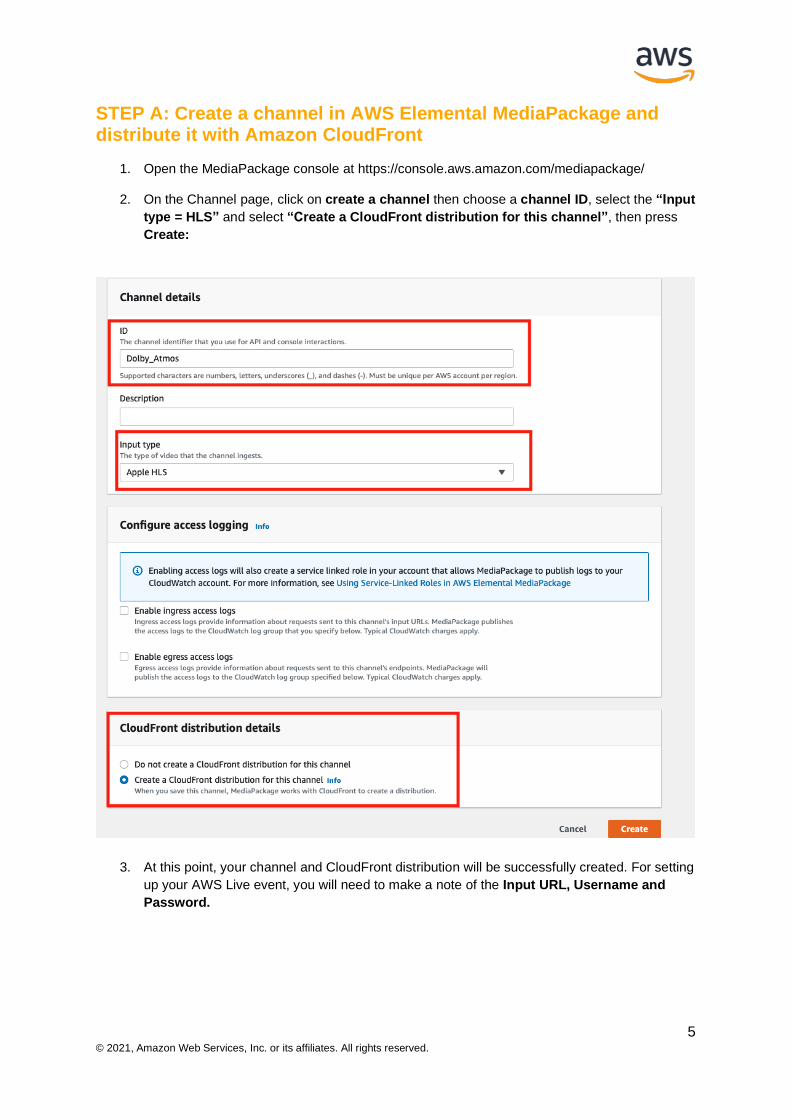
2. On the Channel page, click on create a channel then choose a channel ID, select the “Input
type = HLS” and select “Create a CloudFront distribution for this channel”, then press
Create:
3. At this point, your channel and CloudFront distribution will be successfully created. For setting
up your AWS Live event, you will need to make a note of the Input URL, Username and
Password.
© 2021, Amazon Web Services, Inc. or its affiliates. All rights reserved. 6
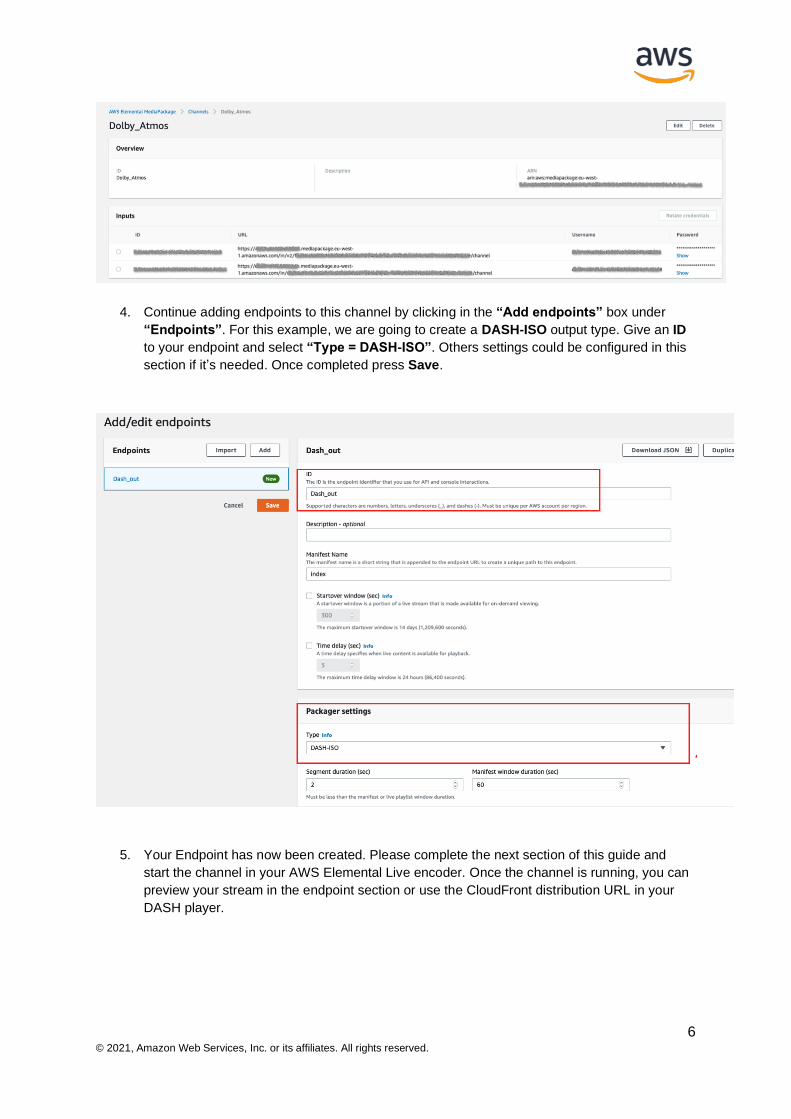
4. Continue adding endpoints to this channel by clicking in the “Add endpoints” box under
“Endpoints”. For this example, we are going to create a DASH-ISO output type. Give an ID
to your endpoint and select “Type = DASH-ISO”. Others settings could be configured in this
section if it’s needed. Once completed press Save.
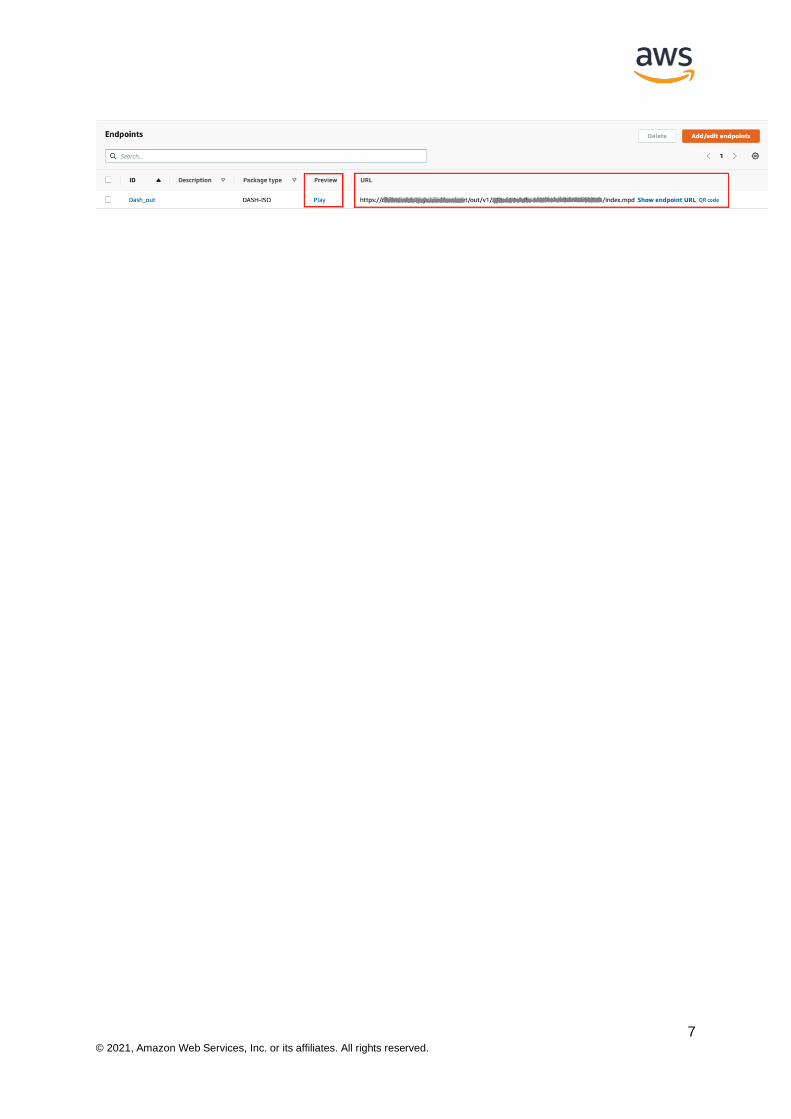
5. Your Endpoint has now been created. Please complete the next section of this guide and
start the channel in your AWS Elemental Live encoder. Once the channel is running, you can
preview your stream in the endpoint section or use the CloudFront distribution URL in your
DASH player.
© 2021, Amazon Web Services, Inc. or its affiliates. All rights reserved. 7
© 2021, Amazon Web Services, Inc. or its affiliates. All rights reserved. 8
STEP B: Create an event in AWS Elemental Live
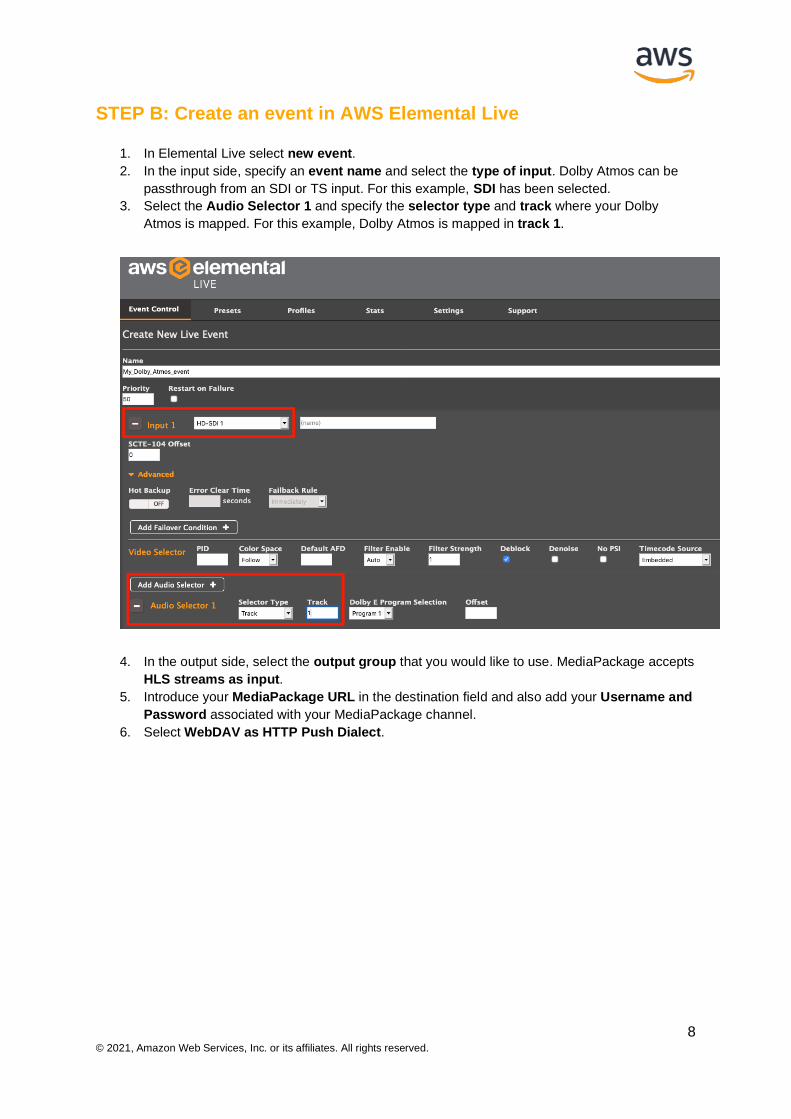
1. In Elemental Live select new event.
2. In the input side, specify an event name and select the type of input. Dolby Atmos can be
passthrough from an SDI or TS input. For this example, SDI has been selected.
3. Select the Audio Selector 1 and specify the selector type and track where your Dolby
Atmos is mapped. For this example, Dolby Atmos is mapped in track 1.
4. In the output side, select the output group that you would like to use. MediaPackage accepts
HLS streams as input.
5. Introduce your MediaPackage URL in the destination field and also add your Username and
Password associated with your MediaPackage channel.
6. Select WebDAV as HTTP Push Dialect.

© 2021, Amazon Web Services, Inc. or its affiliates. All rights reserved. 9
7. Add an output for the Video and the Audio. 8. Configure your video elementary stream as you wish.
9. Configure your audio elementary stream as Dolby Digital Passthrough and select the
Audio Source.
10. It’s highly recommended to create a redundant output by using the additional MediaPackage
Input created in the previous section of this guide. Please repeat points 4 – 9 to create an additional output.
11. Now the event configuration is completed, you can start the event.
© 2021, Amazon Web Services, Inc. or its affiliates. All rights reserved. 10
STEP C: Start the event: Dolby Atmos in AWS Elemental Live
Currently, AWS Elemental Live supports Dolby Atmos (DD+JOC) Passthrough. You can pass
through Dolby Atmos from an SDI or TS input to MP4 in Archive, DASH, HLS, and UDP/TS
output groups. The steps below help to verify that your source contains Dolby Atmos audio:
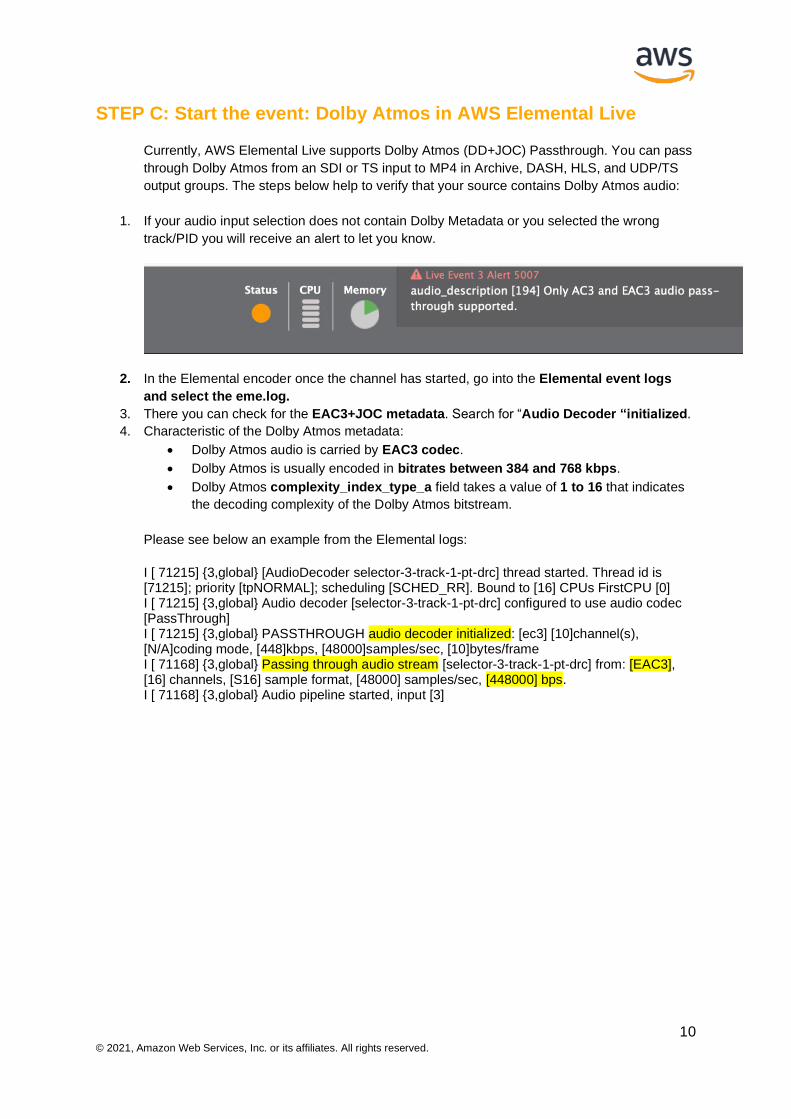
1. If your audio input selection does not contain Dolby Metadata or you selected the wrong
track/PID you will receive an alert to let you know.
2. In the Elemental encoder once the channel has started, go into the Elemental event logs
and select the eme.log.
3. There you can check for the EAC3+JOC metadata. Search for “Audio Decoder “initialized.
4. Characteristic of the Dolby Atmos metadata:
• Dolby Atmos audio is carried by EAC3 codec.
• Dolby Atmos is usually encoded in bitrates between 384 and 768 kbps.
• Dolby Atmos complexity_index_type_a field takes a value of 1 to 16 that indicates
the decoding complexity of the Dolby Atmos bitstream.
Please see below an example from the Elemental logs:
I [ 71215] {3,global} [AudioDecoder selector-3-track-1-pt-drc] thread started. Thread id is [71215]; priority [tpNORMAL]; scheduling [SCHED_RR]. Bound to [16] CPUs FirstCPU [0] I [ 71215] {3,global} Audio decoder [selector-3-track-1-pt-drc] configured to use audio codec [PassThrough] I [ 71215] {3,global} PASSTHROUGH audio decoder initialized: [ec3] [10]channel(s), [N/A]coding mode, [448]kbps, [48000]samples/sec, [10]bytes/frame I [ 71168] {3,global} Passing through audio stream [selector-3-track-1-pt-drc] from: [EAC3], [16] channels, [S16] sample format, [48000] samples/sec, [448000] bps. I [ 71168] {3,global} Audio pipeline started, input [3]
© 2021, Amazon Web Services, Inc. or its affiliates. All rights reserved. 11
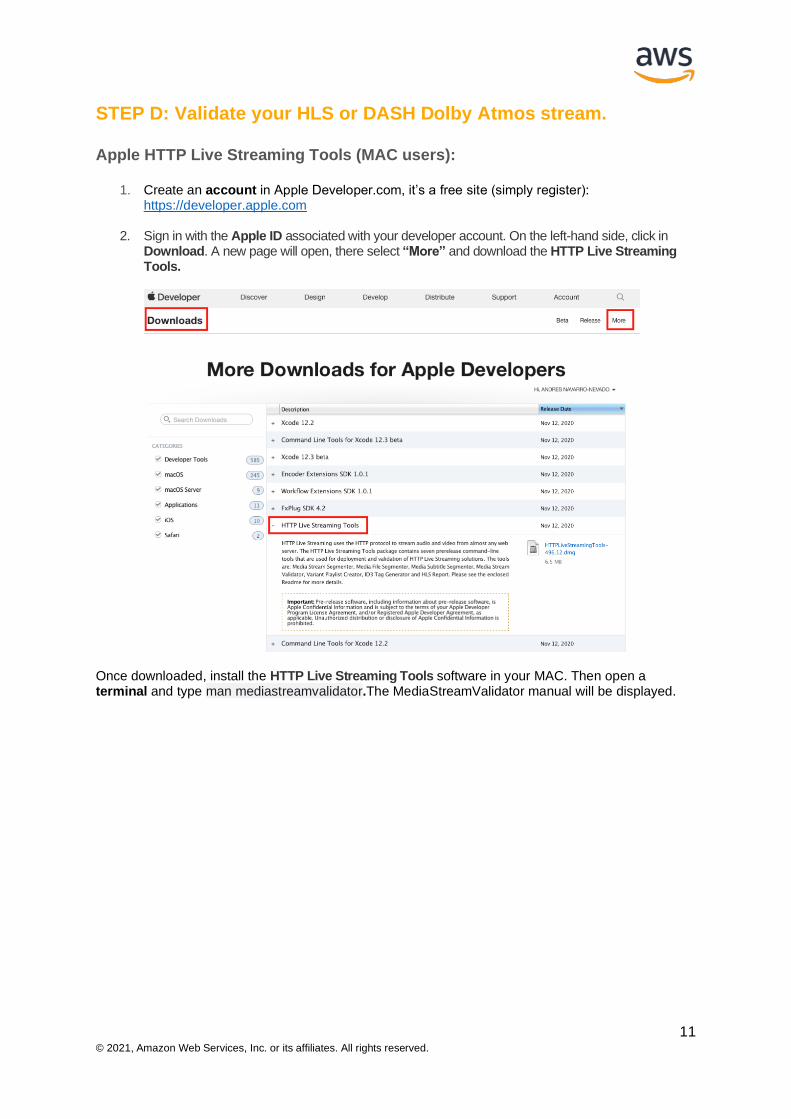
STEP D: Validate your HLS or DASH Dolby Atmos stream. Apple HTTP Live Streaming Tools (MAC users):
1. Create an account in Apple Developer.com, it’s a free site (simply register): https://developer.apple.com
2. Sign in with the Apple ID associated with your developer account. On the left-hand side, click in Download. A new page will open, there select “More” and download the HTTP Live Streaming Tools.
Once downloaded, install the HTTP Live Streaming Tools software in your MAC. Then open a terminal and type man mediastreamvalidator.The MediaStreamValidator manual will be displayed.
© 2021, Amazon Web Services, Inc. or its affiliates. All rights reserved. 12
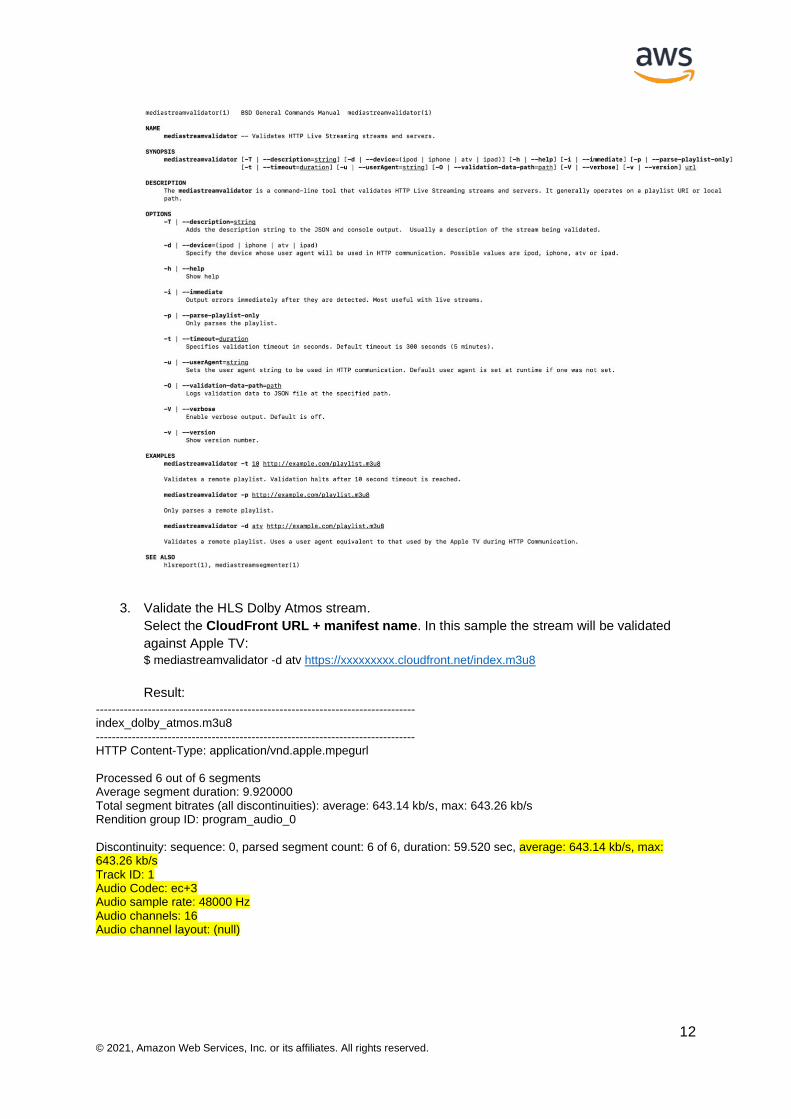
3. Validate the HLS Dolby Atmos stream.
Select the CloudFront URL + manifest name. In this sample the stream will be validated
against Apple TV:
$ mediastreamvalidator -d atv https://xxxxxxxxx.cloudfront.net/index.m3u8
Result:
-------------------------------------------------------------------------------- index_dolby_atmos.m3u8 -------------------------------------------------------------------------------- HTTP Content-Type: application/vnd.apple.mpegurl Processed 6 out of 6 segments Average segment duration: 9.920000 Total segment bitrates (all discontinuities): average: 643.14 kb/s, max: 643.26 kb/s Rendition group ID: program_audio_0 Discontinuity: sequence: 0, parsed segment count: 6 of 6, duration: 59.520 sec, average: 643.14 kb/s, max: 643.26 kb/s Track ID: 1 Audio Codec: ec+3 Audio sample rate: 48000 Hz Audio channels: 16 Audio channel layout: (null)
© 2021, Amazon Web Services, Inc. or its affiliates. All rights reserved. 13
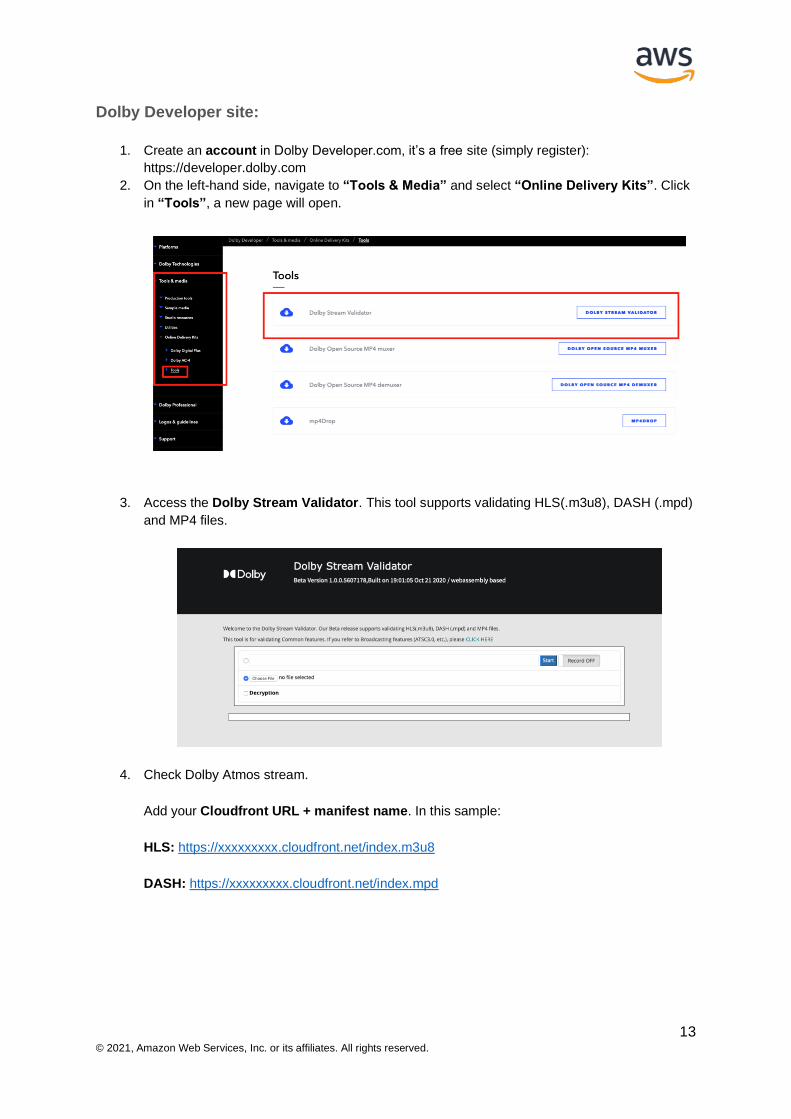
Dolby Developer site:
1. Create an account in Dolby Developer.com, it’s a free site (simply register):
https://developer.dolby.com
2. On the left-hand side, navigate to “Tools & Media” and select “Online Delivery Kits”. Click
in “Tools”, a new page will open.
3. Access the Dolby Stream Validator. This tool supports validating HLS(.m3u8), DASH (.mpd)
and MP4 files.
4. Check Dolby Atmos stream.
Add your Cloudfront URL + manifest name. In this sample:
HLS: https://xxxxxxxxx.cloudfront.net/index.m3u8
DASH: https://xxxxxxxxx.cloudfront.net/index.mpd
© 2021, Amazon Web Services, Inc. or its affiliates. All rights reserved. 14
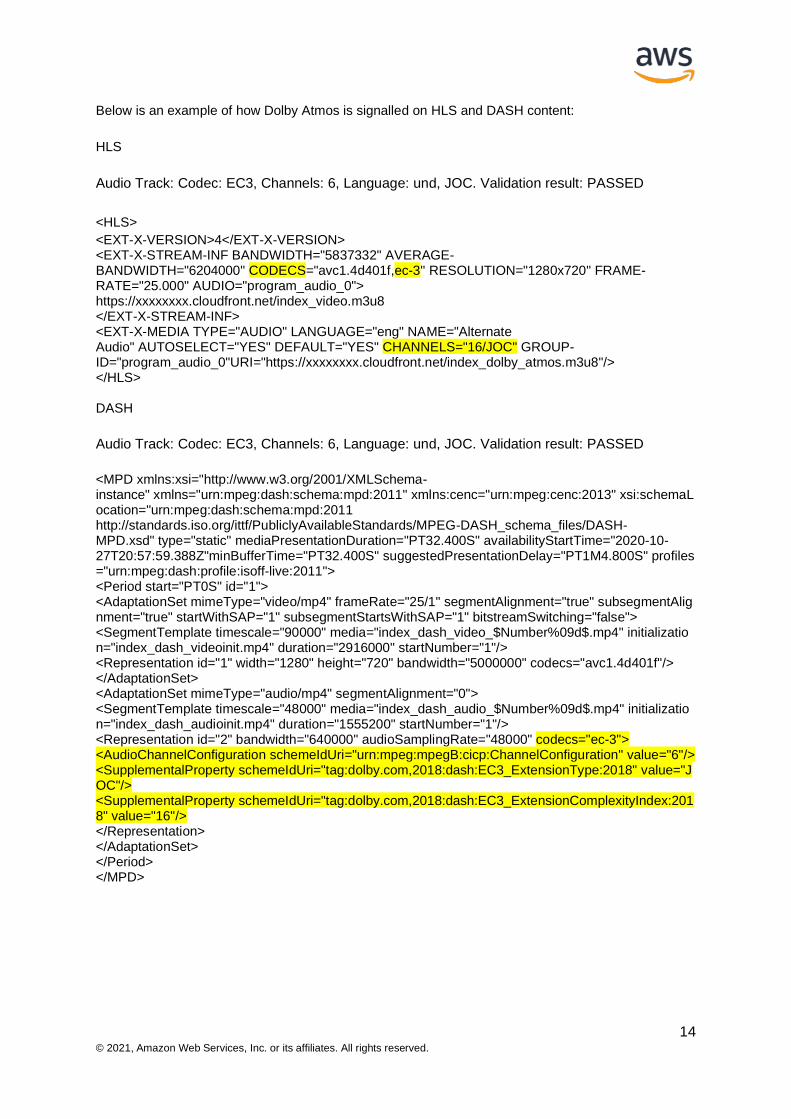
Below is an example of how Dolby Atmos is signalled on HLS and DASH content:
HLS
Audio Track: Codec: EC3, Channels: 6, Language: und, JOC. Validation result: PASSED
<HLS>
<EXT-X-VERSION>4</EXT-X-VERSION> <EXT-X-STREAM-INF BANDWIDTH="5837332" AVERAGE-BANDWIDTH="6204000" CODECS="avc1.4d401f,ec-3" RESOLUTION="1280x720" FRAME-RATE="25.000" AUDIO="program_audio_0"> https://xxxxxxxx.cloudfront.net/index_video.m3u8 </EXT-X-STREAM-INF> <EXT-X-MEDIA TYPE="AUDIO" LANGUAGE="eng" NAME="Alternate Audio" AUTOSELECT="YES" DEFAULT="YES" CHANNELS="16/JOC" GROUP-ID="program_audio_0"URI="https://xxxxxxxx.cloudfront.net/index_dolby_atmos.m3u8"/> </HLS> DASH
Audio Track: Codec: EC3, Channels: 6, Language: und, JOC. Validation result: PASSED
<MPD xmlns:xsi="http://www.w3.org/2001/XMLSchema-instance" xmlns="urn:mpeg:dash:schema:mpd:2011" xmlns:cenc="urn:mpeg:cenc:2013" xsi:schemaLocation="urn:mpeg:dash:schema:mpd:2011 http://standards.iso.org/ittf/PubliclyAvailableStandards/MPEG-DASH_schema_files/DASH-MPD.xsd" type="static" mediaPresentationDuration="PT32.400S" availabilityStartTime="2020-10-27T20:57:59.388Z"minBufferTime="PT32.400S" suggestedPresentationDelay="PT1M4.800S" profiles="urn:mpeg:dash:profile:isoff-live:2011"> <Period start="PT0S" id="1"> <AdaptationSet mimeType="video/mp4" frameRate="25/1" segmentAlignment="true" subsegmentAlignment="true" startWithSAP="1" subsegmentStartsWithSAP="1" bitstreamSwitching="false"> <SegmentTemplate timescale="90000" media="index_dash_video_$Number%09d$.mp4" initialization="index_dash_videoinit.mp4" duration="2916000" startNumber="1"/> <Representation id="1" width="1280" height="720" bandwidth="5000000" codecs="avc1.4d401f"/> </AdaptationSet> <AdaptationSet mimeType="audio/mp4" segmentAlignment="0"> <SegmentTemplate timescale="48000" media="index_dash_audio_$Number%09d$.mp4" initialization="index_dash_audioinit.mp4" duration="1555200" startNumber="1"/> <Representation id="2" bandwidth="640000" audioSamplingRate="48000" codecs="ec-3"> <AudioChannelConfiguration schemeIdUri="urn:mpeg:mpegB:cicp:ChannelConfiguration" value="6"/> <SupplementalProperty schemeIdUri="tag:dolby.com,2018:dash:EC3_ExtensionType:2018" value="JOC"/> <SupplementalProperty schemeIdUri="tag:dolby.com,2018:dash:EC3_ExtensionComplexityIndex:2018" value="16"/> </Representation> </AdaptationSet> </Period> </MPD>
© 2021, Amazon Web Services, Inc. or its affiliates. All rights reserved. 15
STEP E: CLEAN UP
Once your test has been finished, to avoid additional charges, it’s important to stop and
delete all of the AWS resources you used.
1. In the AWS CloudFront console, under CloudFront Distributions, choose the
distribution ID that you wish to end, then choose Disable (this process can take up
to 15 mins) and wait for the status to change from “In Progress” to “Disable”.
2. Select again the distribution ID and choose Delete.
3. Once the CloudFront distribution has been deleted, access the AWS MediaPackage
console, then access the channel that you wish to delete and remove any
endpoints attached. Then you will be able to delete the channel. Note: That this
action permanently deletes the channel.