Embed Size (px)
Citation preview
Dolby Atmos® Home Theater Installation Guidelines September 2014
2
Contents 1. Background on Dolby Atmos
2. General Dolby Atmos Home Setup Guidelines
Dolby Atmos Home Playback
Dolby Atmos Home Theater Speaker Options
Overhead Speakers
Alternatives to Overhead Speakers
Dolby Atmos Enabled Speakers
Use of Existing Speakers
Combination: Overhead and Dolby Atmos Enabled Speakers
Use of Existing Overhead Speakers
3. Standard Speaker Configurations
Dolby Conventions for Speaker Configurations
Standard Setup for Both Overhead Speakers and Dolby Atmos Enabled Speakers
4. Additional Speaker Placement Guidelines
Listener-Level Speaker Placement Guidelines
Overhead/Height Speaker Placement Guidelines
5. Dolby Surround Upmixer
3
1. Background on Dolby Atmos Many leading Hollywood movies, including recent Academy Award® winning films,
are presented in Dolby Atmos®, as this revolutionary sound technology allows
filmmakers unprecedented realism and creative freedom. With Dolby Atmos, content
creators can precisely place and move sounds almost anywhere, including overhead,
to create a multidimensional listening experience.
Dolby Atmos technology is now available for the home and will produce a
multidimensional listening experience never before experienced in a home theater.
And you’ll get a great immersive experience, no matter what kind of Dolby Atmos
home theater setup you have. Dolby Atmos content is mixed as audio objects instead
of traditional channels. This means the content is not tied to any specific playback
configuration. Further, the technology automatically adapts the object audio to take
full advantage of the number and placement of your speakers, from systems with
five speakers on the floor and two speakers producing overhead sound to a Dolby
Atmos system with as many as 24 speakers on the floor and 10 overhead speakers.
Figure 1: At left is a Dolby Atmos system with five speakers on the floor and two overhead speakers; at right is a Dolby Atmos system with up to 24 speakers on the floor and 10 overhead speakers.
Additionally, a new Dolby surround upmixer allows for legacy channel-based content
that has not been mixed for Dolby Atmos to be expanded to fill the flexible speaker
layouts of a Dolby Atmos system.

4
These installation guidelines are intended to be a resource for integrating Dolby
Atmos into a home theater system and unlocking the potential of this revolutionary
audio format. Details include use of conventional overhead speakers and Dolby
Atmos enabled speaker technology, which enables you to architect a system capable
of reproducing overhead sound, even if you’re not able to put speakers in or on a
client’s ceiling.
5
2. General Dolby Atmos Home Setup Guidelines
The following components are needed to set up a Dolby Atmos home theater system.
1. A source device to play Dolby Atmos content. Many existing devices will work.
2. A Dolby Atmos capable A/V receiver (AVR) or processor unit.
3. Speakers to reproduce overhead or height audio.
4. Speakers to reproduce listener-level audio. Note: In many use cases, the customer’s existing speakers may be employed in a Dolby Atmos home theater.1
Dolby Atmos Home Playback
Source device options to play or stream content
To experience this sound revolution, you’ll need a way to play or stream Dolby
Atmos content. There are two initial pathways into the home theater:
1. You can play Dolby Atmos content encoded on a Blu-ray Disc™ through an
existing Blu-ray Disc player. Be sure you have a recent player that’s fully compliant
with Blu-ray™ specifications.2
2. You can stream Dolby Atmos content from a compatible game console, Blu-ray, or
streaming media player.
In both cases, be sure to set your player to bitstream output and ensure secondary
audio functionality is disabled. Connect to your AVR using an HDMI® connection.3
Dolby Atmos capable AVR or processor
You’ll be able to assemble a system from a wide range of available A/V components,
starting with an AVR or pre-processor that supports Dolby Atmos decoding and
rendering. Leading AVR manufacturers are introducing products that support Dolby
Atmos playback for the home.
1 With the exception of the center and center surround speakers, all speakers in a Dolby Atmos playback system (listener level, overhead, Dolby Atmos enabled) must be added in pairs.
2 You will not need to replace your Blu-ray player as long as it fully conforms to the Blu-ray specification. Current-generation Blu-ray players, and most recent players, are compatible. You should check with the Blu-ray player manufacturer if you encounter problems.
3 Decoding and rendering of Dolby Atmos content is managed entirely by the AVR. To properly pass the Dolby Atmos audio to the AVR, source devices must be connected to the AVR via HDMI 1.4 or later and set to audio bitstream out. For Blu-ray players, the secondary audio mixing option must be disabled.
AVR Most
show
but t
throu
or Do
Figure
If you
add t
Most
micro
speci
this s
the a
Bass
capa
Note
Dolby
frequ
bass
Dolby The d
multi
new
You h
and y
Dolby
connection
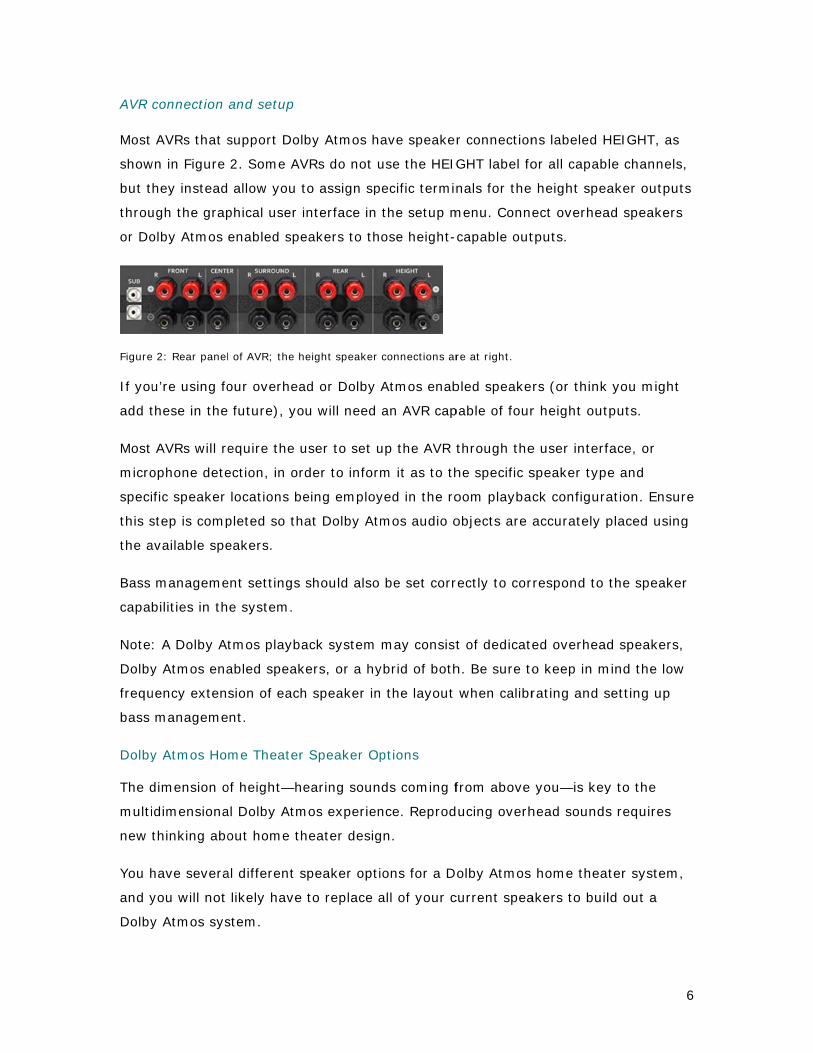
AVRs that s
wn in Figure
hey instead
ugh the grap
olby Atmos
e 2: Rear panel
u’re using fo
these in the
AVRs will re
ophone dete
ific speaker
step is comp
available spe
manageme
bilities in th
: A Dolby At
y Atmos ena
uency exten
manageme
y Atmos Ho
dimension o
idimensiona
thinking abo
have severa
you will not
y Atmos sys
and setup
support Dol
2. Some AV
allow you t
phical user i
enabled spe
l of AVR; the h
our overhea
future), yo
equire the u
ection, in or
locations be
pleted so th
eakers.
ent settings
e system.
tmos playba
abled speak
sion of each
nt.
me Theater
of height—he
al Dolby Atm
out home th
al different s
likely have
stem.
by Atmos h
VRs do not u
to assign sp
interface in
eakers to th
eight speaker
ad or Dolby
u will need
user to set u
rder to infor
eing employ
at Dolby At
should also
ack system
kers, or a hy
h speaker in
Speaker Op
earing soun
mos experien
heater desig
speaker opti
to replace a
ave speake
use the HEIG
pecific termin
the setup m
ose height-
connections ar
Atmos enab
an AVR cap
up the AVR t
m it as to th
yed in the ro
mos audio o
be set corr
may consist
ybrid of both
n the layout
ptions
ds coming f
nce. Reprod
gn.
ions for a D
all of your c
r connection
GHT label fo
nals for the
menu. Conne
capable out
re at right.
bled speake
pable of four
through the
he specific s
oom playba
objects are
rectly to cor
t of dedicate
h. Be sure to
when calibr
from above
ducing overh
olby Atmos
current spea
ns labeled H
or all capab
height spea
ect overhea
tputs.
rs (or think
r height out
e user interf
speaker type
ck configura
accurately p
rrespond to
ed overhead
o keep in m
rating and s
you—is key
head sounds
home theat
akers to buil
HEIGHT, as
le channels,
aker output
ad speakers
you might
puts.
face, or
e and
ation. Ensur
placed using
the speaker
d speakers,
mind the low
setting up
y to the
s requires
ter system,
ld out a
6
,
s
re
g
r
7
Many installations currently have systems with a subwoofer and either five or seven
speakers positioned at about ear level. These speakers are referred to as the
“listener level” in this document. Any speaker type that is capable of accurately
representing a stereo pan is suitable to reproduce objects.
As in the past, the placement of all listener-level speakers should follow these
recommendations, which are based on ITU-R BS.775-3:
The speakers located in the front of the room shall be used as a reference
point. All speakers in the listener plane should ideally be equidistant from the
listener position. If this is not possible, compensating for distance may be
used to time align the arrival of audio from each speaker to the listener.
All listener speakers should be at the same height, typically 3.9 feet (1.2
meters), which is ear level for the average seated listener (as defined in ITU-
R BS.1116-1).
If possible, the height of the rear speakers should be the same as the height of the
front speakers. If the room design makes this impractical, or impossible, the rear
speakers may be higher than the front speakers. However, it is suggested that the
height of the rear speakers should not be more than 1.25 times the height of the
front speakers.
Overhead Speakers
Overhead sound is a vital part of the Dolby Atmos experience. There are a variety of
options for adding this capability to a room.
One solution is to install speakers overhead. Most high-power, full-frequency
conventional overhead speakers with wide dispersion characteristics will work in a
Dolby Atmos home theater.
Characteristics
Dolby Atmos audio is mixed using discrete, full-range audio objects that may move
around anywhere in three-dimensional space. With this in mind, overhead speakers
should complement the frequency response, output, and power-handling capabilities
of the listener-level speakers. Choose overhead speakers that are timbre matched as
closely as possible to the primary listener-level speakers. Overhead speakers with a
wide dispersion pattern are desirable for use in a Dolby Atmos system. This will
ensure the closest replication of the cinematic environment, where overhead
speakers are placed high above the listeners.
8
Mounting considerations
If the chosen overhead speakers have a wide dispersion pattern (approximately 45
degrees from the acoustical reference axis over the audio band from 100 Hz to 10
kHz or wider), then speakers may be mounted facing directly downward. For
speakers with narrower dispersion patterns, those with aimable or angled elements
should be angled toward the primary listening position.
Room treatment considerations for use of overhead speakers
For optimal performance, the overhead speakers should be at least two times the
height of the listener’s ear level (this generally applies to on-ceiling speakers, which
may be installed lower than the actual ceiling height).
Sound-absorbing and sound-diffusing treatment for handling reflections from the
walls, floor, and ceiling are recommended to improve sound quality and reduce
unwanted audio reflection.
Alternatives to Overhead Speakers Installing overhead speakers may not be possible or desirable for your client.
Installing speakers overhead and running the necessary wiring can be expensive and
time consuming. If your client rents the home, the property owner may not allow it.
And if the ceiling is made of a material such as concrete or brick, installing speakers
overhead may not be possible. Finally, your client may not like the look of overhead
speakers.
Dolby Atmos Enabled Speakers
Through our knowledge of psychoacoustics and sound physics, we’ve developed
speakers that can create overhead sound even though they’re only a few feet off the
floor. Dolby specifies filtering characteristics for these speakers that amplify the
perception of sound originating overhead. Employing a predetermined angle of
incidence in the speaker cabinet, the speakers direct sound upward, where it reflects
off the ceiling to produce an incredibly accurate and lifelike recreation of overhead
sound. The performance of Dolby Atmos enabled speakers must be experienced to
be believed.
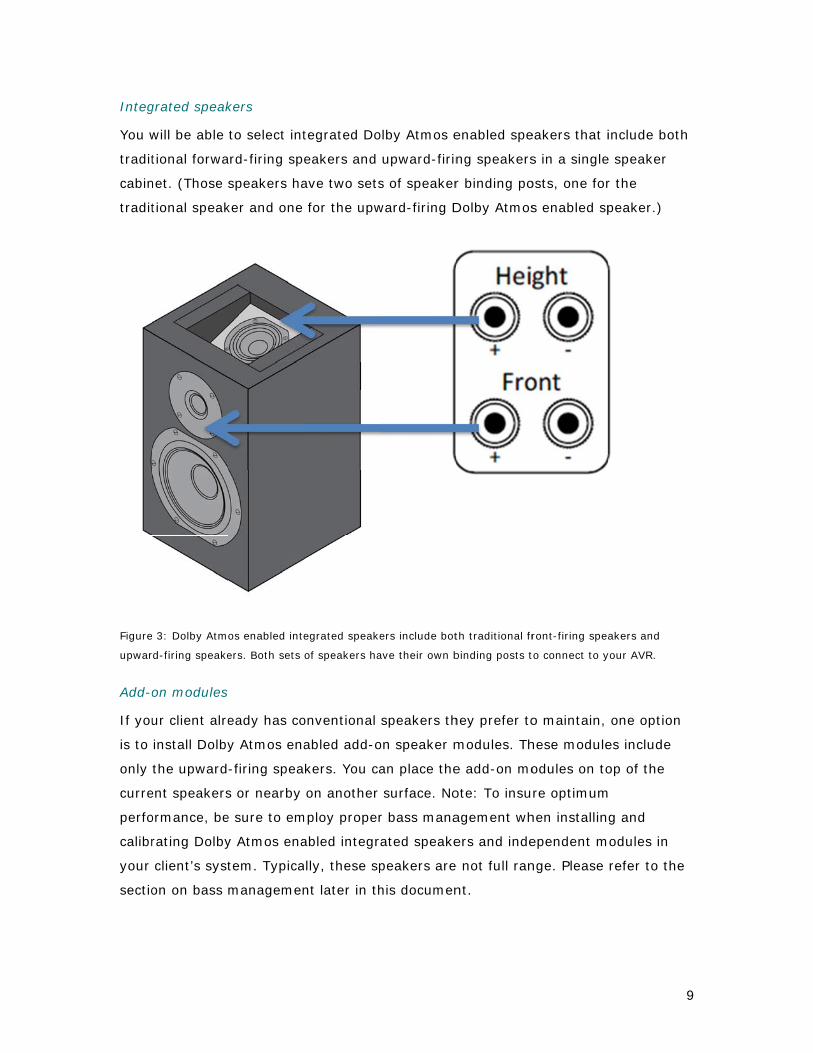
Integ
You w
tradit
cabin
tradit
Figure
upwar
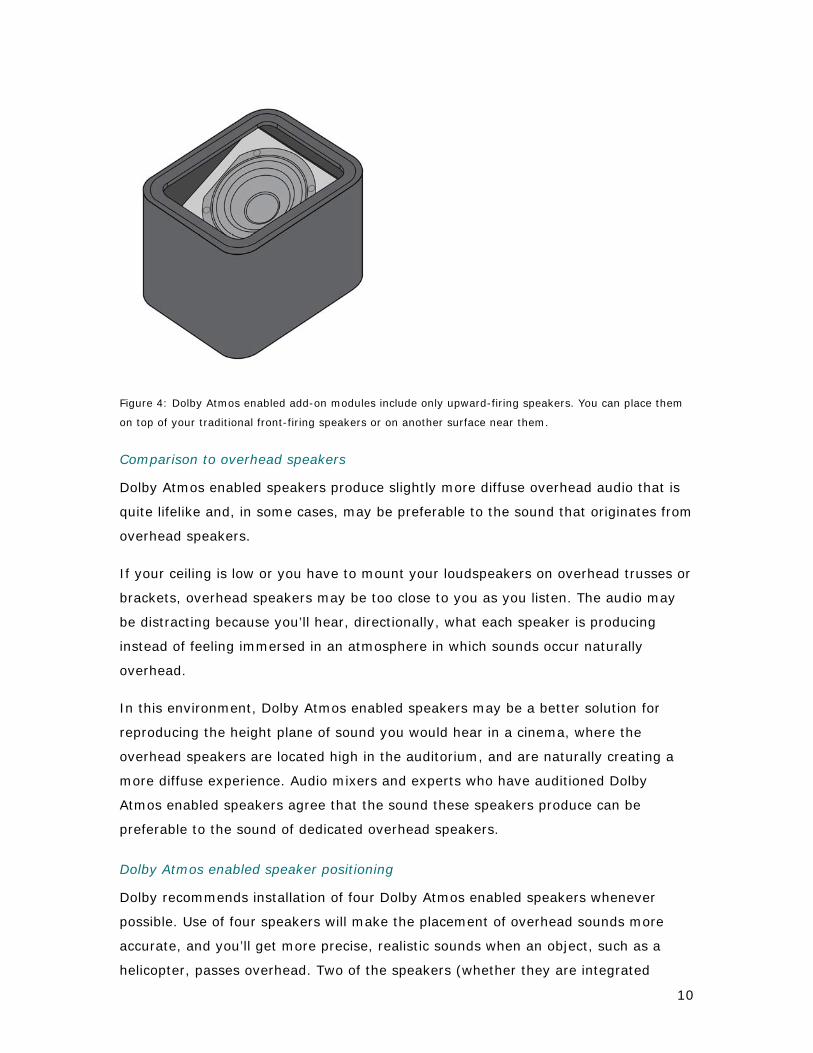
Add-o
If you
is to
only
curre
perfo
calibr
your
sectio
grated speak
will be able
tional forwa
net. (Those
tional speak
e 3: Dolby Atm
rd-firing speake
on modules
ur client alre
install Dolby
the upward
ent speakers
ormance, be
rating Dolby
client’s syst
on on bass
kers
to select int
ard-firing sp
speakers ha
ker and one
os enabled inte
ers. Both sets
eady has co
y Atmos ena
-firing spea
s or nearby
e sure to em
y Atmos ena
tem. Typica
managemen
tegrated Do
eakers and
ave two sets
for the upw
egrated speake
of speakers ha
onventional
abled add-o
kers. You ca
on another
mploy proper
abled integr
lly, these sp
nt later in th
olby Atmos e
upward-firin
s of speaker
ward-firing D
ers include bot
ave their own b
speakers th
on speaker m
an place the
surface. No
r bass mana
ated speake
peakers are
his documen
enabled spe
ng speakers
r binding po
Dolby Atmos
th traditional fr
binding posts t
hey prefer to
modules. Th
e add-on mo
ote: To insu
agement wh
ers and inde
e not full ran
nt.
eakers that i
s in a single
osts, one for
s enabled sp
ront-firing spea
to connect to y
o maintain,
hese module
odules on to
re optimum
hen installin
ependent m
nge. Please
include both
e speaker
r the
peaker.)
akers and
your AVR.
one option
es include
op of the
m
g and
odules in
refer to the
9
h
10
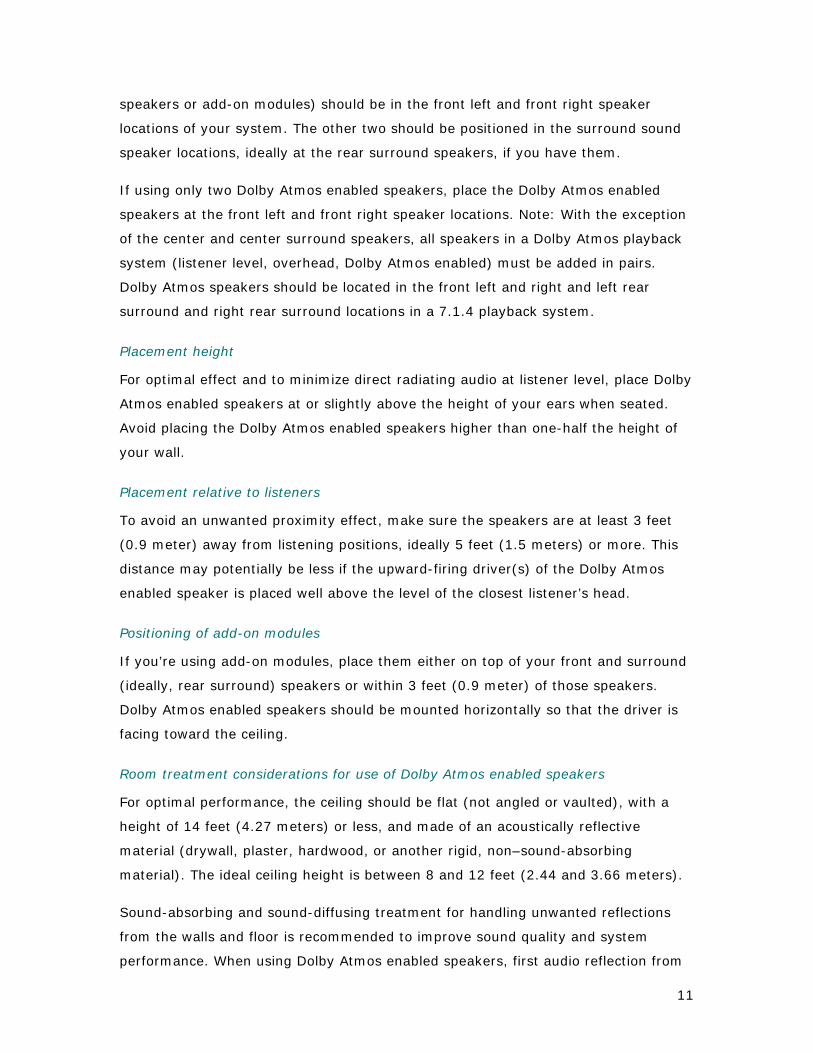
Figure 4: Dolby Atmos enabled add-on modules include only upward-firing speakers. You can place them
on top of your traditional front-firing speakers or on another surface near them.
Comparison to overhead speakers
Dolby Atmos enabled speakers produce slightly more diffuse overhead audio that is
quite lifelike and, in some cases, may be preferable to the sound that originates from
overhead speakers.
If your ceiling is low or you have to mount your loudspeakers on overhead trusses or
brackets, overhead speakers may be too close to you as you listen. The audio may
be distracting because you’ll hear, directionally, what each speaker is producing
instead of feeling immersed in an atmosphere in which sounds occur naturally
overhead.
In this environment, Dolby Atmos enabled speakers may be a better solution for
reproducing the height plane of sound you would hear in a cinema, where the
overhead speakers are located high in the auditorium, and are naturally creating a
more diffuse experience. Audio mixers and experts who have auditioned Dolby
Atmos enabled speakers agree that the sound these speakers produce can be
preferable to the sound of dedicated overhead speakers.
Dolby Atmos enabled speaker positioning
Dolby recommends installation of four Dolby Atmos enabled speakers whenever
possible. Use of four speakers will make the placement of overhead sounds more
accurate, and you’ll get more precise, realistic sounds when an object, such as a
helicopter, passes overhead. Two of the speakers (whether they are integrated
11
speakers or add-on modules) should be in the front left and front right speaker
locations of your system. The other two should be positioned in the surround sound
speaker locations, ideally at the rear surround speakers, if you have them.
If using only two Dolby Atmos enabled speakers, place the Dolby Atmos enabled
speakers at the front left and front right speaker locations. Note: With the exception
of the center and center surround speakers, all speakers in a Dolby Atmos playback
system (listener level, overhead, Dolby Atmos enabled) must be added in pairs.
Dolby Atmos speakers should be located in the front left and right and left rear
surround and right rear surround locations in a 7.1.4 playback system.
Placement height
For optimal effect and to minimize direct radiating audio at listener level, place Dolby
Atmos enabled speakers at or slightly above the height of your ears when seated.
Avoid placing the Dolby Atmos enabled speakers higher than one-half the height of
your wall.
Placement relative to listeners
To avoid an unwanted proximity effect, make sure the speakers are at least 3 feet
(0.9 meter) away from listening positions, ideally 5 feet (1.5 meters) or more. This
distance may potentially be less if the upward-firing driver(s) of the Dolby Atmos
enabled speaker is placed well above the level of the closest listener’s head.
Positioning of add-on modules
If you’re using add-on modules, place them either on top of your front and surround
(ideally, rear surround) speakers or within 3 feet (0.9 meter) of those speakers.
Dolby Atmos enabled speakers should be mounted horizontally so that the driver is
facing toward the ceiling.
Room treatment considerations for use of Dolby Atmos enabled speakers
For optimal performance, the ceiling should be flat (not angled or vaulted), with a
height of 14 feet (4.27 meters) or less, and made of an acoustically reflective
material (drywall, plaster, hardwood, or another rigid, non–sound-absorbing
material). The ideal ceiling height is between 8 and 12 feet (2.44 and 3.66 meters).
Sound-absorbing and sound-diffusing treatment for handling unwanted reflections
from the walls and floor is recommended to improve sound quality and system
performance. When using Dolby Atmos enabled speakers, first audio reflection from
12
the ceiling is desired; audio reflections from elsewhere within the room should be
avoided.
Bass management with Dolby Atmos enabled speakers
Be mindful to employ proper bass management when installing Dolby Atmos enabled
speakers in the customer’s system. Typically, these speakers are not full range, and
manufacturer documentation should be consulted for specific details on each model.
Integrated speakers may direct low frequencies intended for the elevation drivers to
the primary speakers; in other instances, including when modules are employed, you
will have to perform bass management in the AVR or pre-processor.
Use of Existing Speakers
Most existing speakers within current home theaters will work for Dolby Atmos
playback. Floor-standing, stand-mounted, on-wall, and in-wall speakers that
currently produce audio at the listener level can be complemented with overhead
speakers and/or Dolby Atmos enabled speakers to generate the height plane of
overhead sounds. If the AVR or pre-processor supports them, more speakers may
also be added at listener level to add greater precision to object audio placement and
movement. With the exception of the center and center surround speakers, all
speakers must be added in pairs in a Dolby Atmos playback system.
Front height mounted speakers
Most AVRs will support the use of front height (Dolby® Pro Logic® IIz) mounted
speakers with Dolby Atmos playback; however, Dolby recommends the use of either
overhead or Dolby Atmos enabled speakers to create the most lifelike and enveloping
audio experience. Front height speakers may be used in conjunction with overhead
speakers in larger room installations that can support a greater number of
overhead/height outputs.
Combination: Overhead and Dolby Atmos Enabled Speakers
In some instances, a home theater system may already have overhead speakers that
can be used to generate overhead audio. In this case, Dolby Atmos enabled speakers
may be used to complement existing overhead speakers to create a full, four-
speaker height experience. If existing overhead speakers are in the front of the
room, then Dolby Atmos enabled speakers may be used in the rear of the room and
vice versa.
13
Use of Existing Overhead Speakers
In some existing home theater systems, overhead speakers are employed to
generate audio that would otherwise be created by listener-level speakers (for
example, left/right surround speakers). When transitioning to Dolby Atmos, existing
overhead speakers should only be repurposed as overhead outputs if a
corresponding listener-level speaker can be added to assume the previous overhead
speaker feed.
For example, if two overhead speakers located toward the rear of the room are
currently used to reproduce left/right surround outputs, they should be used as
overhead speakers only if replacement left/right surrounds can be added at the
listener level. If this is not possible, the overhead speakers should continue to be
used for left/right surround outputs. In this case, overhead sound can be achieved
by installing additional overhead speakers, Dolby Atmos enabled speakers, or
modules in the front speaker locations.
14
3. Standard Speaker Configurations
Dolby Conventions for Speaker Configurations
With the debut of Dolby Atmos, there is a new method of referring to surround sound
speaker configurations (see the “Dolby Atmos for the Home Theater” white paper for
more details). It is based on the standard nomenclature (stereo, 5.1, and 7.1) but
adds a number at the end to specify the number of height speakers you employ in
the playback system (for example, 7.1.4).
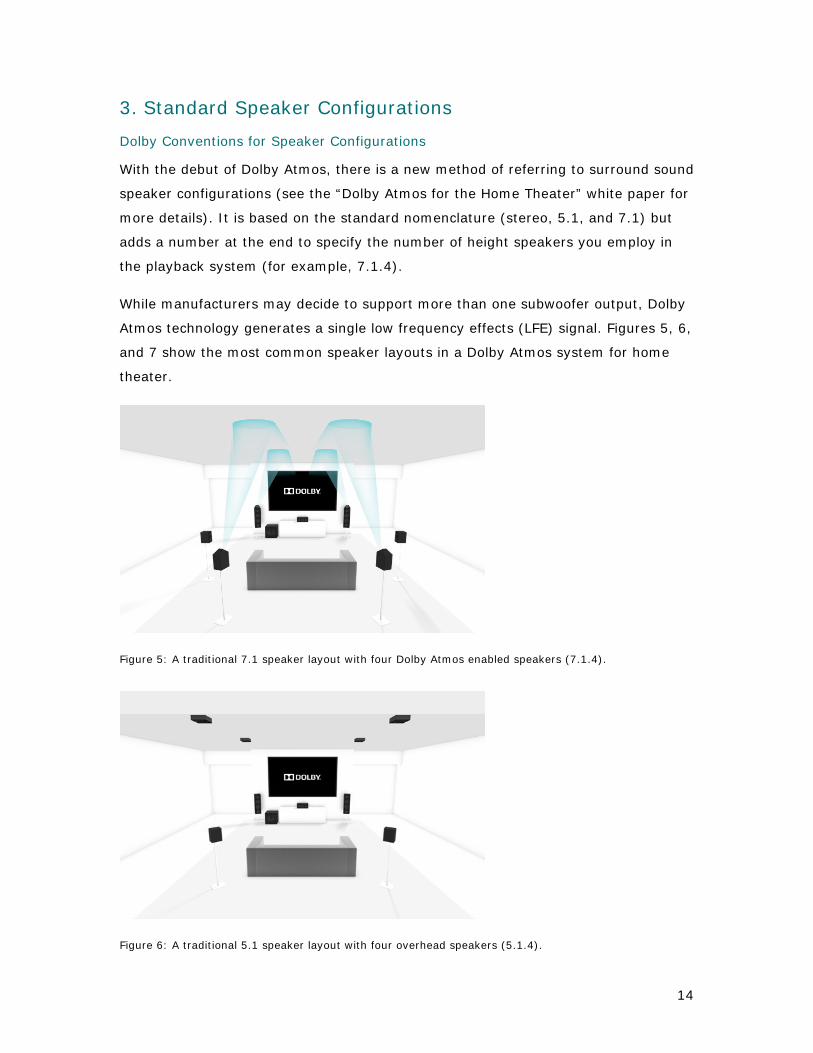
While manufacturers may decide to support more than one subwoofer output, Dolby
Atmos technology generates a single low frequency effects (LFE) signal. Figures 5, 6,
and 7 show the most common speaker layouts in a Dolby Atmos system for home
theater.
Figure 5: A traditional 7.1 speaker layout with four Dolby Atmos enabled speakers (7.1.4).
Figure 6: A traditional 5.1 speaker layout with four overhead speakers (5.1.4).
15
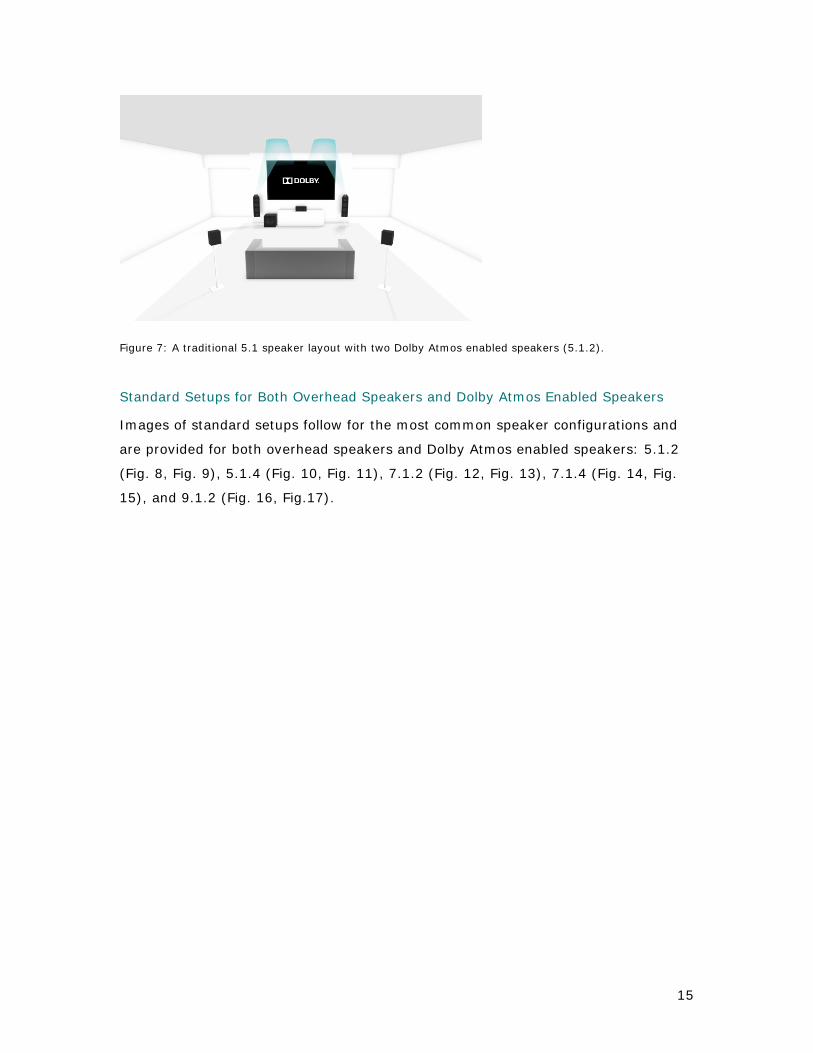
Figure 7: A traditional 5.1 speaker layout with two Dolby Atmos enabled speakers (5.1.2).
Standard Setups for Both Overhead Speakers and Dolby Atmos Enabled Speakers
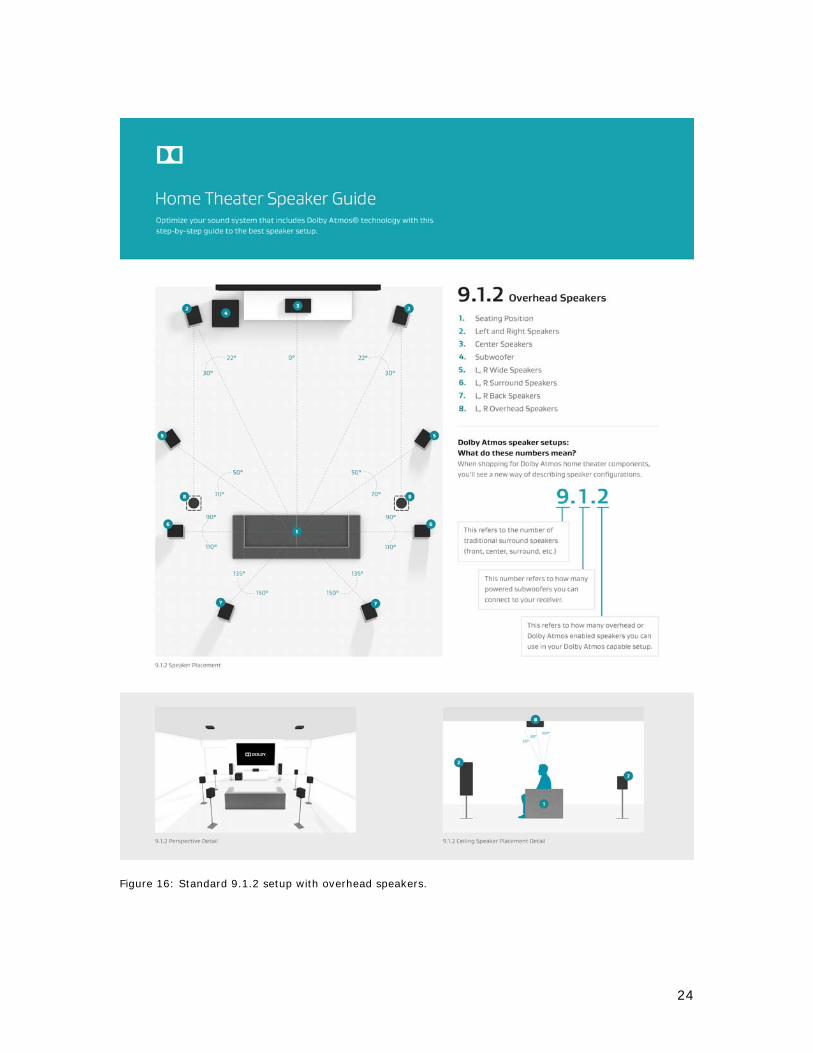
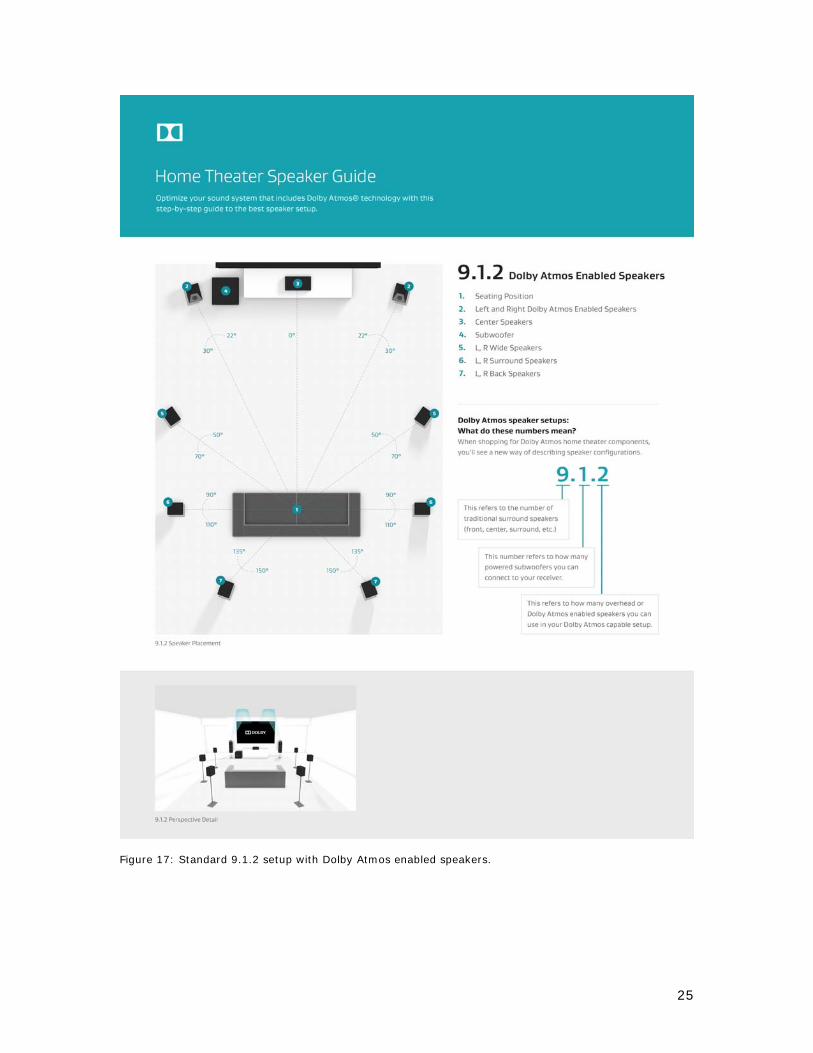
Images of standard setups follow for the most common speaker configurations and
are provided for both overhead speakers and Dolby Atmos enabled speakers: 5.1.2
(Fig. 8, Fig. 9), 5.1.4 (Fig. 10, Fig. 11), 7.1.2 (Fig. 12, Fig. 13), 7.1.4 (Fig. 14, Fig.
15), and 9.1.2 (Fig. 16, Fig.17).
16
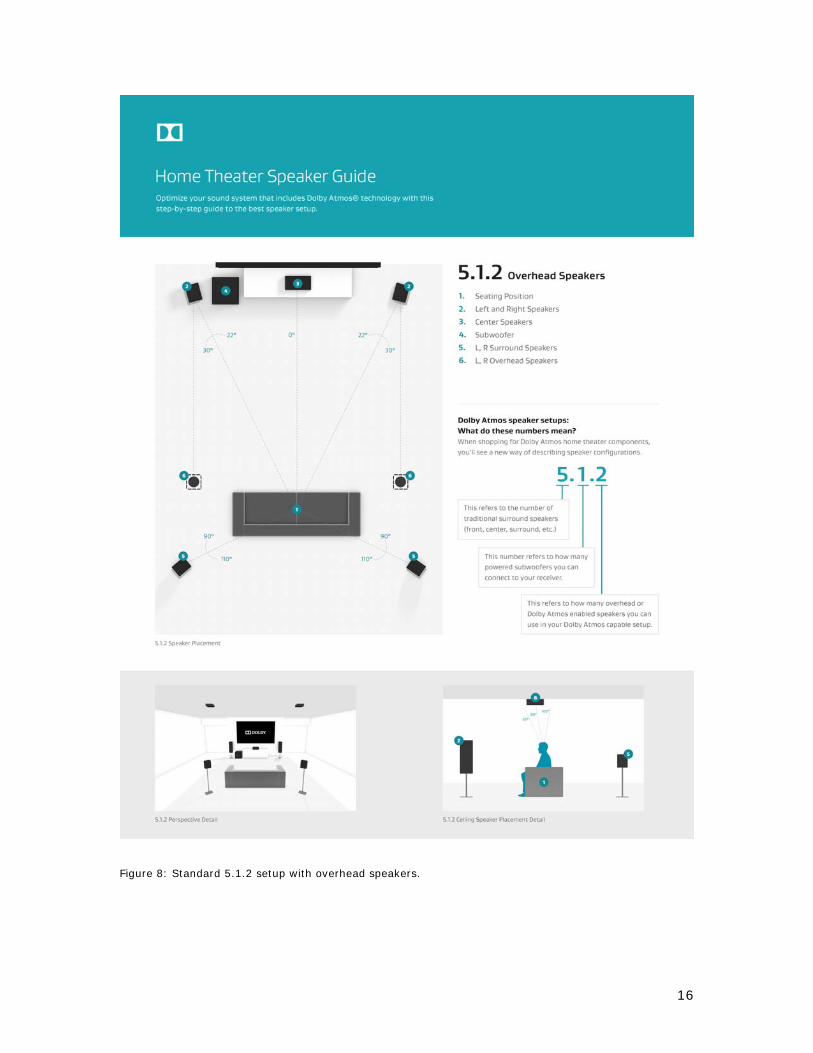
Figure 8: Standard 5.1.2 setup with overhead speakers.

17
Figure 9: Standard 5.1.2 setup with Dolby Atmos enabled speakers.
18
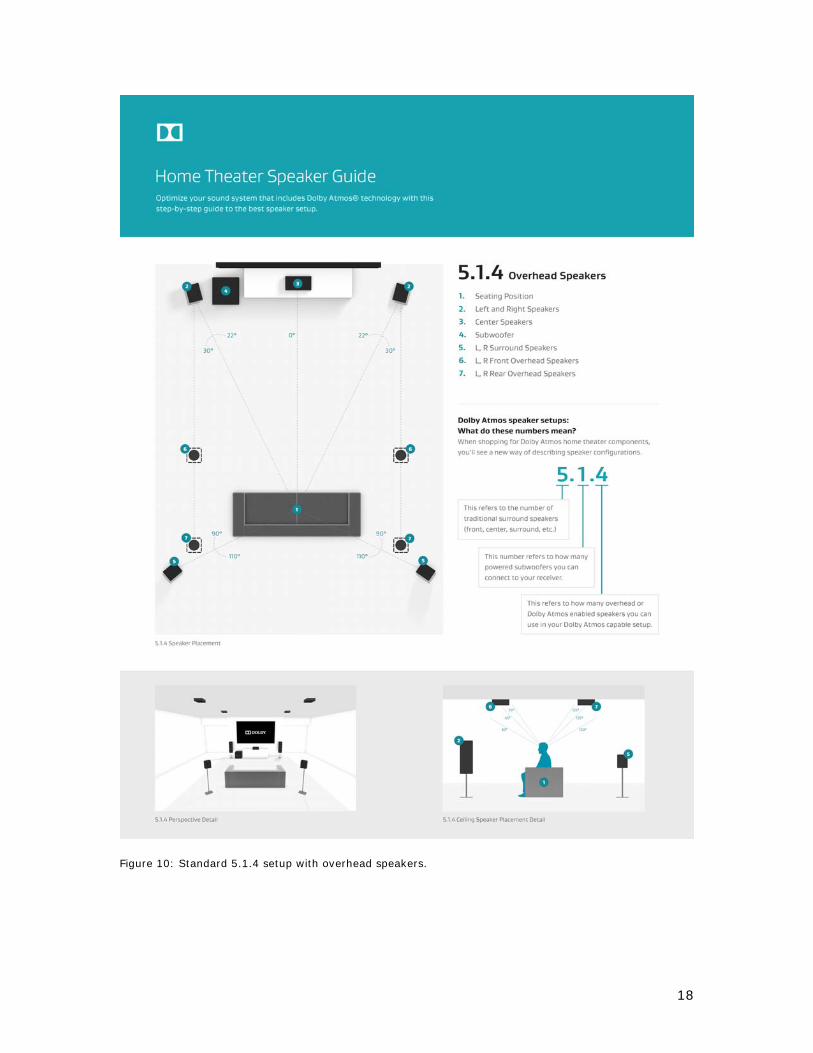
Figure 10: Standard 5.1.4 setup with overhead speakers.

19
Figure 11: Standard 5.1.4 setup with Dolby Atmos enabled speakers.
20
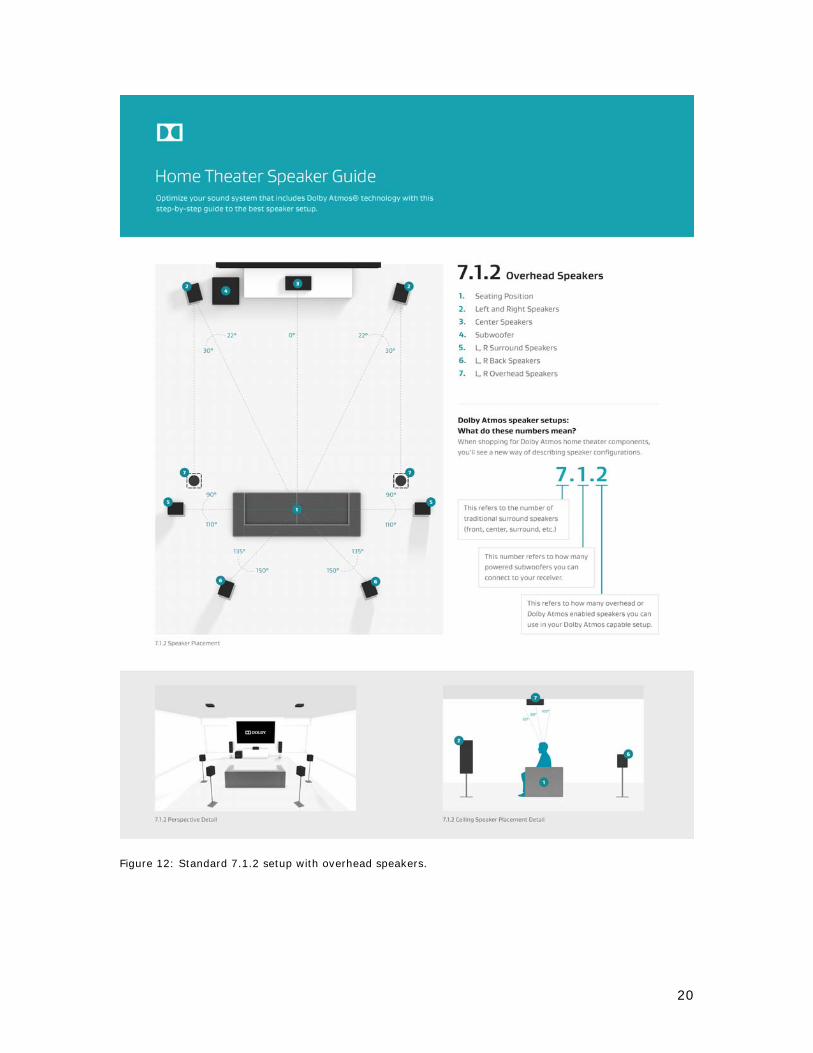
Figure 12: Standard 7.1.2 setup with overhead speakers.
21
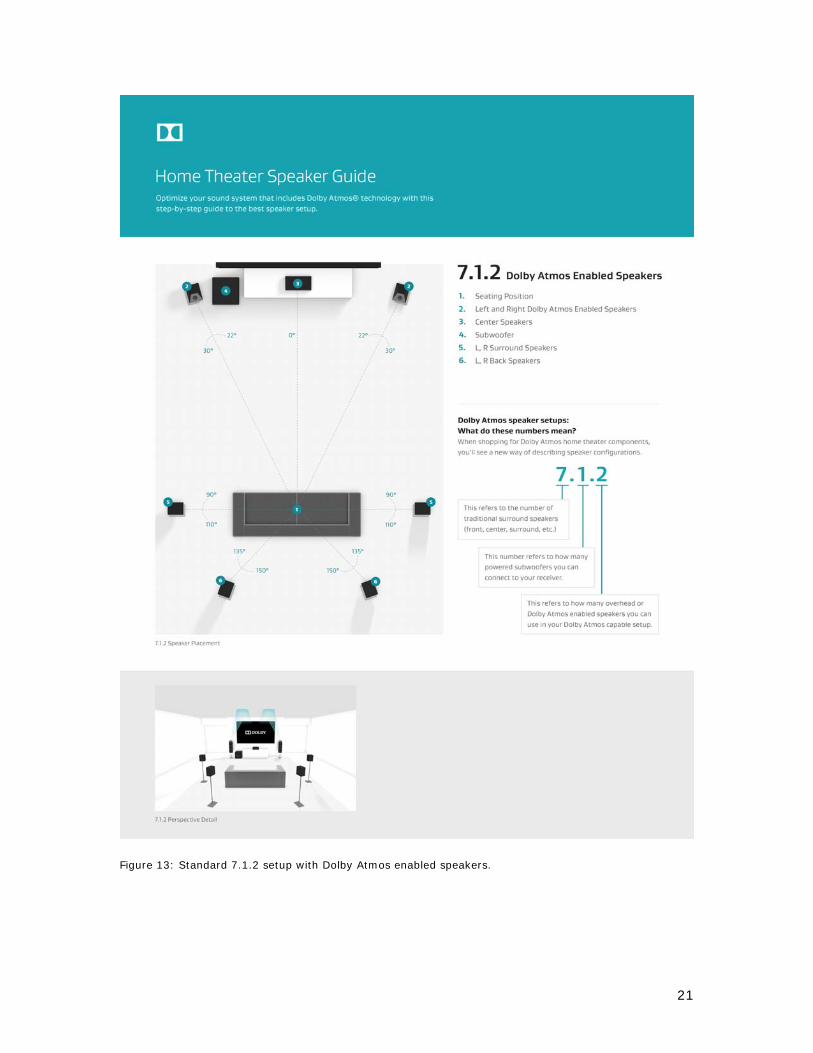
Figure 13: Standard 7.1.2 setup with Dolby Atmos enabled speakers.

22
Figure 14: Standard 7.1.4 setup with overhead speakers.
23
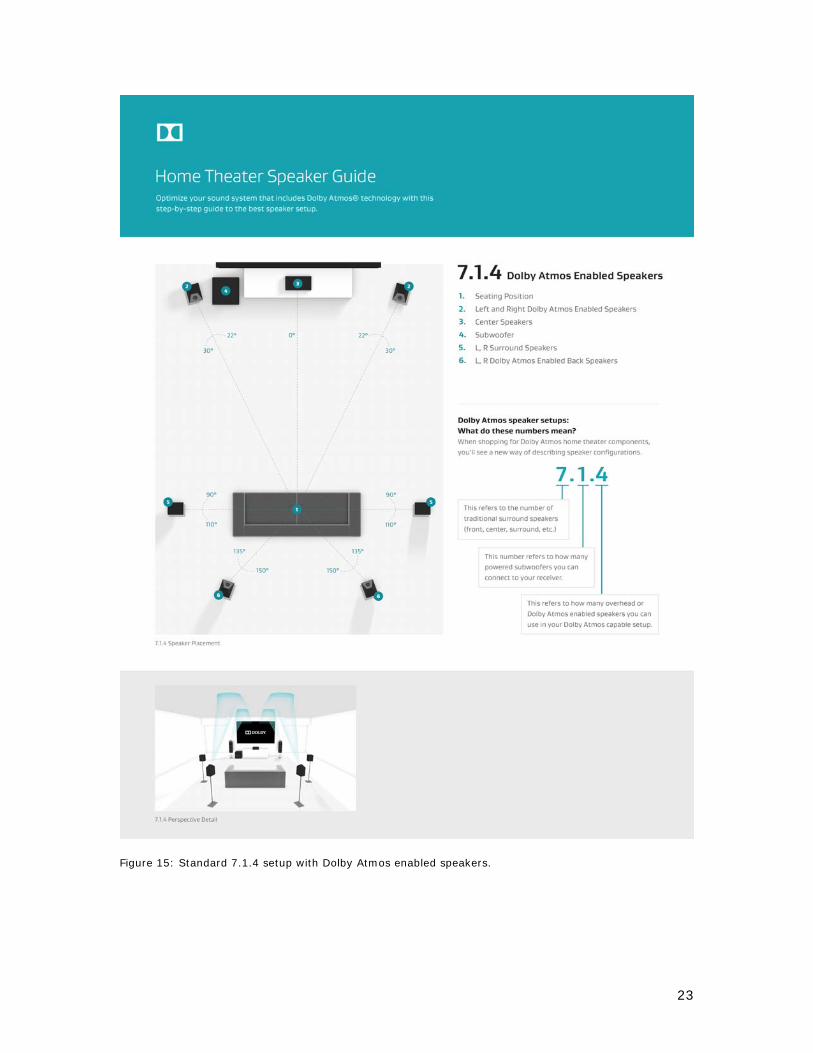
Figure 15: Standard 7.1.4 setup with Dolby Atmos enabled speakers.
24
Figure 16: Standard 9.1.2 setup with overhead speakers.
25
Figure 17: Standard 9.1.2 setup with Dolby Atmos enabled speakers.

26
4. Additional Speaker Placement Guidelines In addition to the typical configurations in the previous section, Dolby Atmos can
support a variety of additional speaker positions, up to a maximum of 34 total (for
example, 24.1.10).
This section focuses on the placement of speakers, which may be added to the
positions covered in section 3. For clarity, the positions covered in section 3 were:
Left/Right speaker pair
Left Surround/Right Surround speaker pair
Left Rear Surround/Right Rear Surround speaker pair
Left Wide/Right Wide speaker pair
Left Front Overhead/Right Front Overhead speaker pair
Left Middle Overhead/Right Middle Overhead speaker pair
Left Rear Overhead/Right Rear Overhead speaker pair
For information on how to position these standard speaker positions, please refer
back to section 3.
Listener-Level Speaker Placement Guidelines This section provides placement guidelines for the following nontraditional listener
speakers:
Left Center/Right Center speaker pair
Left Screen/Right Screen speaker pair
Left Surround 1/Right Surround 1 speaker pair
Left Surround 2/Right Surround 2 speaker pair
Left Rear Surround 1/Right Rear Surround 1 speaker pair
Left Rear Surround 2/Right Rear Surround 2 speaker pair
Left Center Surround/Right Center Surround speaker pair
Center Surround speaker
In the following descriptions and examples, the term center-front reference denotes
an imaginary line between the listener position and the middle of the screen or the
placement of the Center speaker.
Note that, in all of these examples, speakers are added in pairs. This is crucial to
ensure an optimal Dolby Atmos playback environment.
27
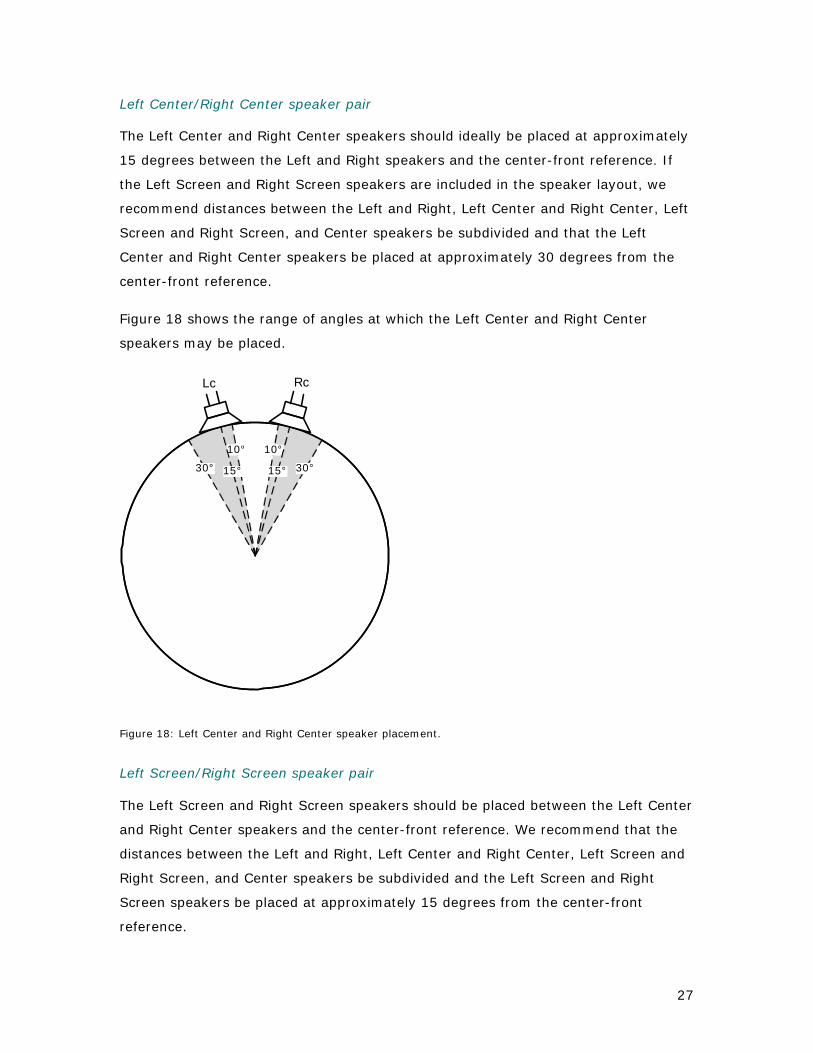
Left Center/Right Center speaker pair The Left Center and Right Center speakers should ideally be placed at approximately
15 degrees between the Left and Right speakers and the center-front reference. If
the Left Screen and Right Screen speakers are included in the speaker layout, we
recommend distances between the Left and Right, Left Center and Right Center, Left
Screen and Right Screen, and Center speakers be subdivided and that the Left
Center and Right Center speakers be placed at approximately 30 degrees from the
center-front reference.
Figure 18 shows the range of angles at which the Left Center and Right Center
speakers may be placed.
Figure 18: Left Center and Right Center speaker placement.
Left Screen/Right Screen speaker pair The Left Screen and Right Screen speakers should be placed between the Left Center
and Right Center speakers and the center-front reference. We recommend that the
distances between the Left and Right, Left Center and Right Center, Left Screen and
Right Screen, and Center speakers be subdivided and the Left Screen and Right
Screen speakers be placed at approximately 15 degrees from the center-front
reference.
30°30°
RcLc
10° 10°
15° 15°
28
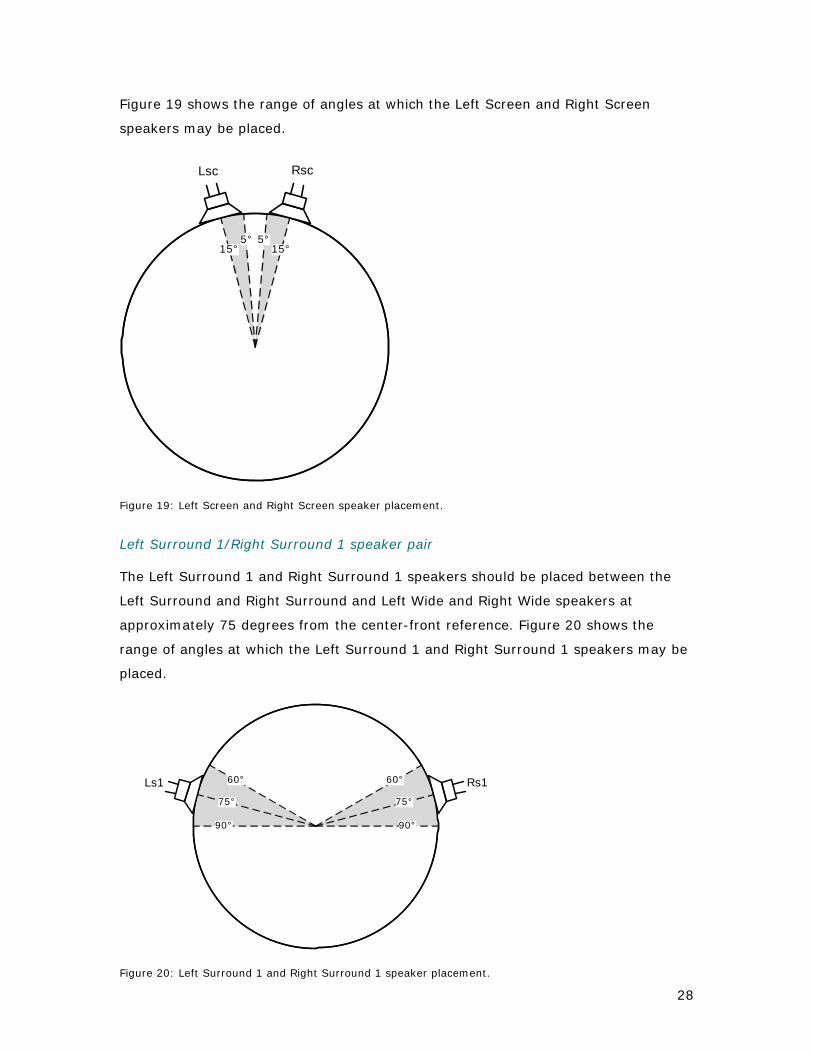
Figure 19 shows the range of angles at which the Left Screen and Right Screen
speakers may be placed.
Figure 19: Left Screen and Right Screen speaker placement.
Left Surround 1/Right Surround 1 speaker pair The Left Surround 1 and Right Surround 1 speakers should be placed between the
Left Surround and Right Surround and Left Wide and Right Wide speakers at
approximately 75 degrees from the center-front reference. Figure 20 shows the
range of angles at which the Left Surround 1 and Right Surround 1 speakers may be
placed.
Ls1/Rs1 Speaker Pair Placement Figure
Figure 20: Left Surround 1 and Right Surround 1 speaker placement.
5°15°
5°15°
Lsc Rsc
90°
60°60°
90°
75°75°
Rs1Ls1
29
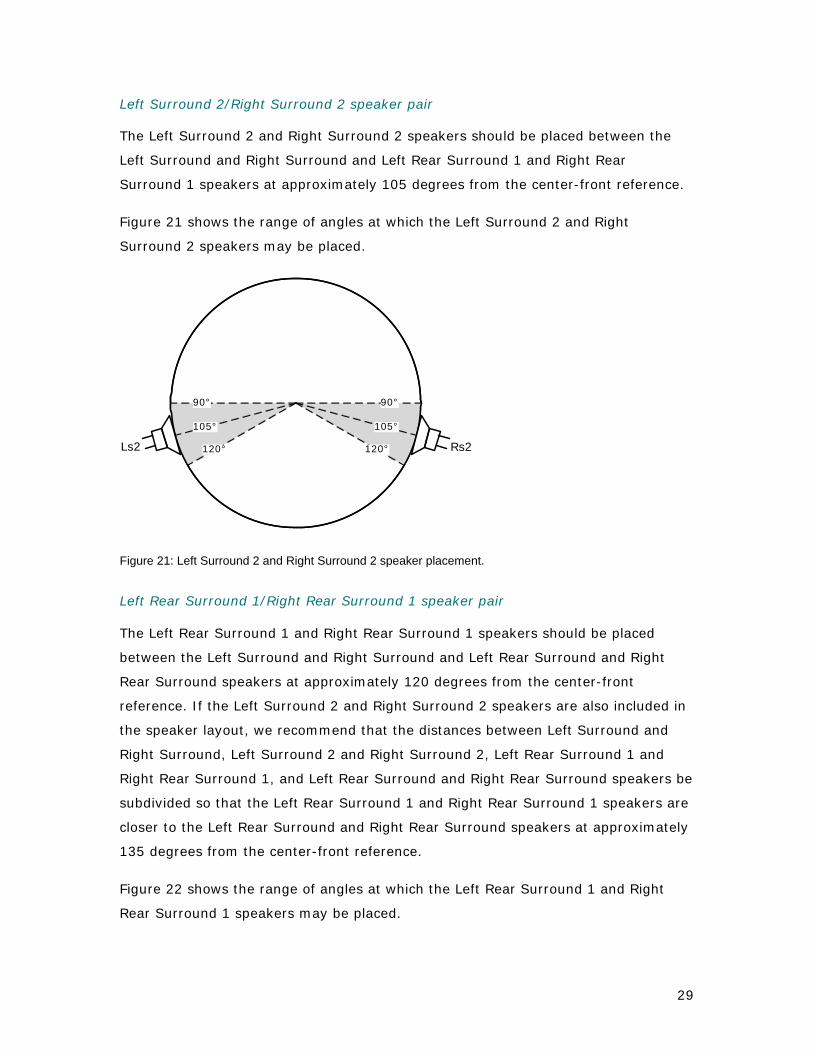
Left Surround 2/Right Surround 2 speaker pair The Left Surround 2 and Right Surround 2 speakers should be placed between the
Left Surround and Right Surround and Left Rear Surround 1 and Right Rear
Surround 1 speakers at approximately 105 degrees from the center-front reference.
Figure 21 shows the range of angles at which the Left Surround 2 and Right
Surround 2 speakers may be placed.
Ls2/Rs2 Speaker Pair Placement Figure
Figure 21: Left Surround 2 and Right Surround 2 speaker placement.
Left Rear Surround 1/Right Rear Surround 1 speaker pair The Left Rear Surround 1 and Right Rear Surround 1 speakers should be placed
between the Left Surround and Right Surround and Left Rear Surround and Right
Rear Surround speakers at approximately 120 degrees from the center-front
reference. If the Left Surround 2 and Right Surround 2 speakers are also included in
the speaker layout, we recommend that the distances between Left Surround and
Right Surround, Left Surround 2 and Right Surround 2, Left Rear Surround 1 and
Right Rear Surround 1, and Left Rear Surround and Right Rear Surround speakers be
subdivided so that the Left Rear Surround 1 and Right Rear Surround 1 speakers are
closer to the Left Rear Surround and Right Rear Surround speakers at approximately
135 degrees from the center-front reference.
Figure 22 shows the range of angles at which the Left Rear Surround 1 and Right
Rear Surround 1 speakers may be placed.
90°
105°
120°
90°
120°
105°
Rs2Ls2
30
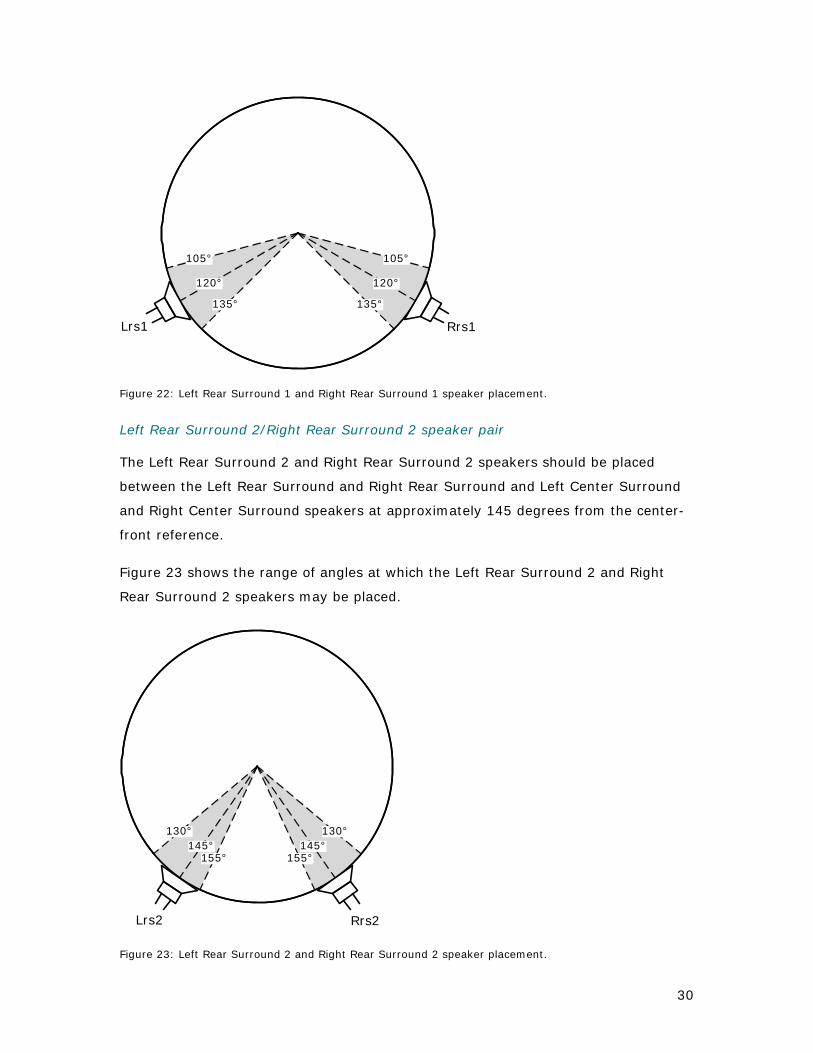
Figure 22: Left Rear Surround 1 and Right Rear Surround 1 speaker placement.
Left Rear Surround 2/Right Rear Surround 2 speaker pair The Left Rear Surround 2 and Right Rear Surround 2 speakers should be placed
between the Left Rear Surround and Right Rear Surround and Left Center Surround
and Right Center Surround speakers at approximately 145 degrees from the center-
front reference.
Figure 23 shows the range of angles at which the Left Rear Surround 2 and Right
Rear Surround 2 speakers may be placed.
Figure 23: Left Rear Surround 2 and Right Rear Surround 2 speaker placement.
105°
135°
120°
105°
120°
135°
Rrs1Lrs1
130°
155°145°
130°145°
155°
Rrs2Lrs2
31
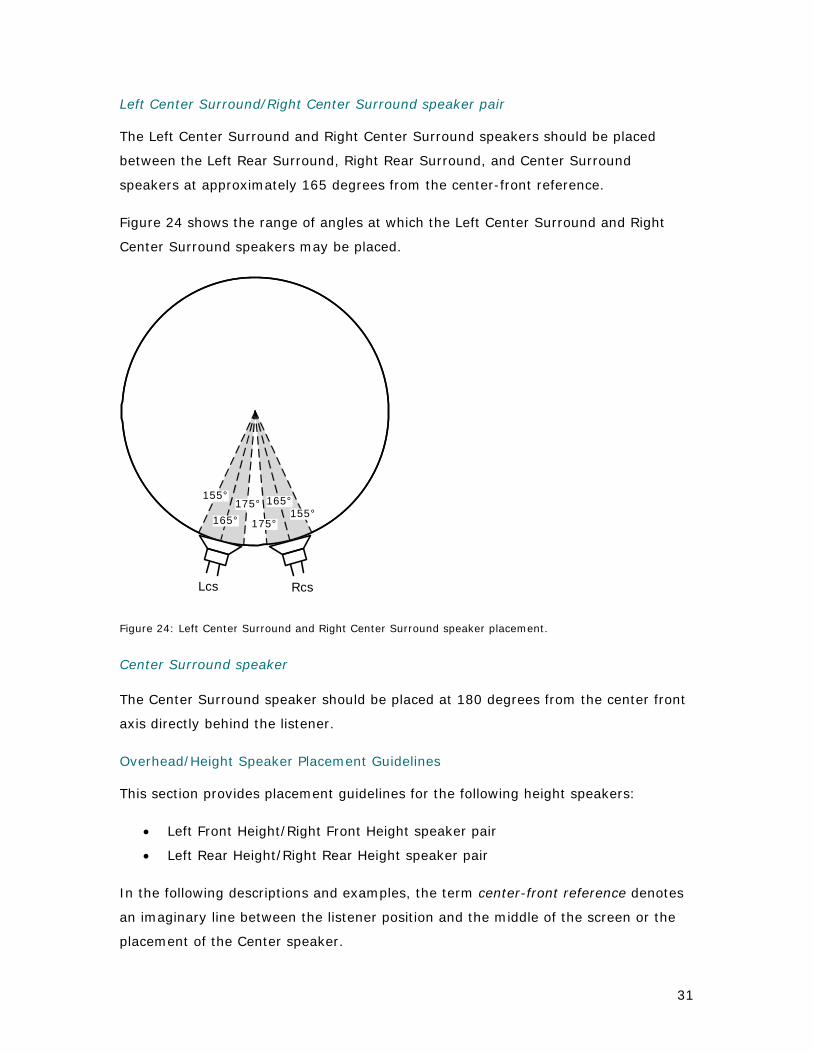
Left Center Surround/Right Center Surround speaker pair The Left Center Surround and Right Center Surround speakers should be placed
between the Left Rear Surround, Right Rear Surround, and Center Surround
speakers at approximately 165 degrees from the center-front reference.
Figure 24 shows the range of angles at which the Left Center Surround and Right
Center Surround speakers may be placed.
Figure 24: Left Center Surround and Right Center Surround speaker placement.
Center Surround speaker The Center Surround speaker should be placed at 180 degrees from the center front
axis directly behind the listener.
Overhead/Height Speaker Placement Guidelines This section provides placement guidelines for the following height speakers:
Left Front Height/Right Front Height speaker pair
Left Rear Height/Right Rear Height speaker pair
In the following descriptions and examples, the term center-front reference denotes
an imaginary line between the listener position and the middle of the screen or the
placement of the Center speaker.
175°
155° 165°175°165° 155°
RcsLcs
32
Note that, in all of these examples, overhead speakers must be added to the
playback system in pairs.
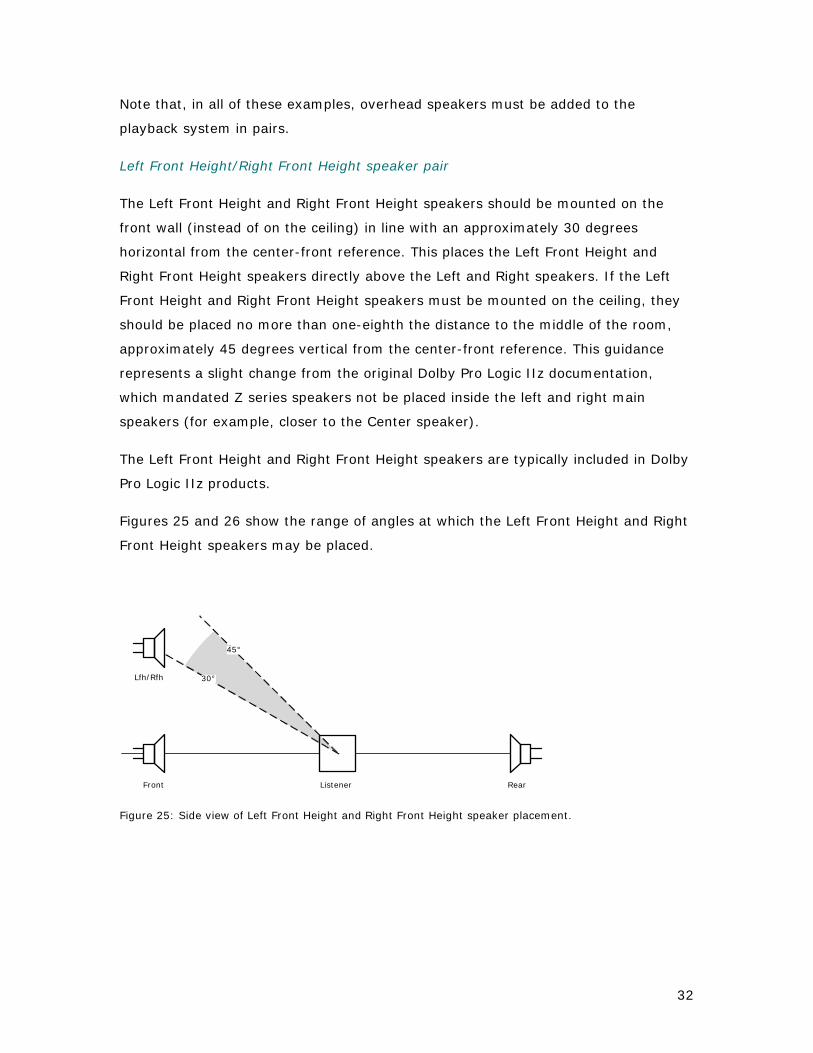
Left Front Height/Right Front Height speaker pair
The Left Front Height and Right Front Height speakers should be mounted on the
front wall (instead of on the ceiling) in line with an approximately 30 degrees
horizontal from the center-front reference. This places the Left Front Height and
Right Front Height speakers directly above the Left and Right speakers. If the Left
Front Height and Right Front Height speakers must be mounted on the ceiling, they
should be placed no more than one-eighth the distance to the middle of the room,
approximately 45 degrees vertical from the center-front reference. This guidance
represents a slight change from the original Dolby Pro Logic IIz documentation,
which mandated Z series speakers not be placed inside the left and right main
speakers (for example, closer to the Center speaker).
The Left Front Height and Right Front Height speakers are typically included in Dolby
Pro Logic IIz products.
Figures 25 and 26 show the range of angles at which the Left Front Height and Right
Front Height speakers may be placed.
Figure 25: Side view of Left Front Height and Right Front Height speaker placement.
30°
45°
Lfh/Rfh
Front Listener Rear
33
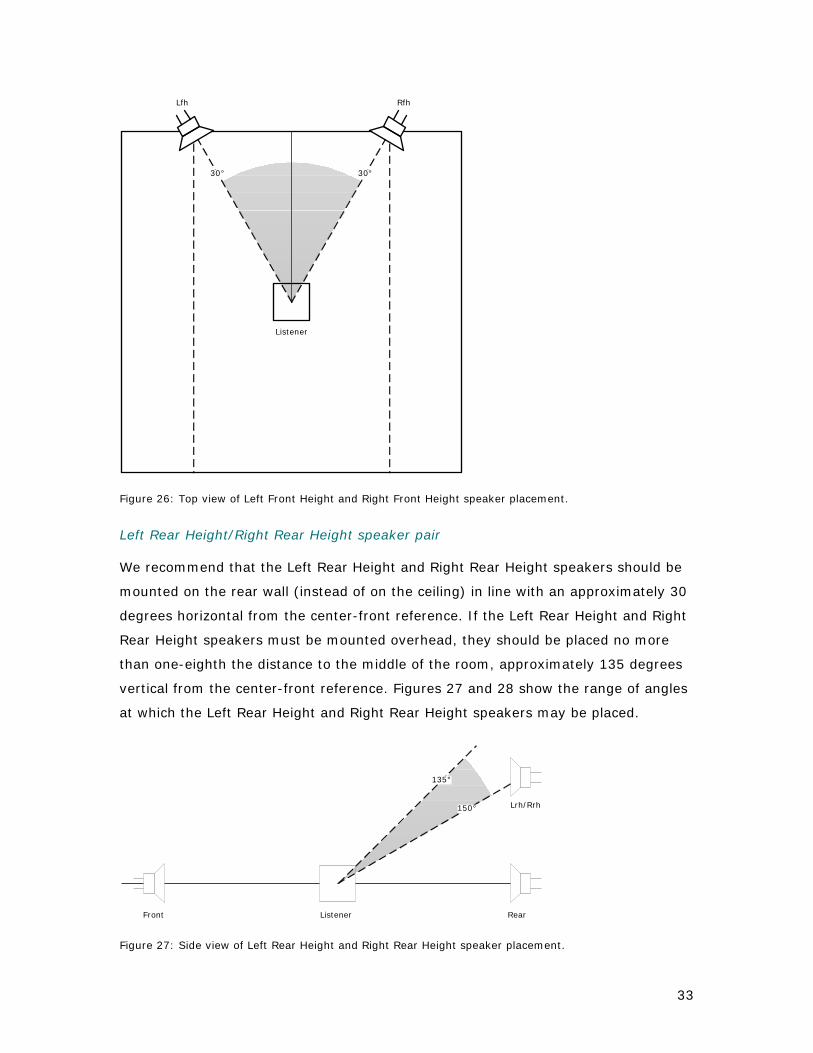
Figure 26: Top view of Left Front Height and Right Front Height speaker placement.
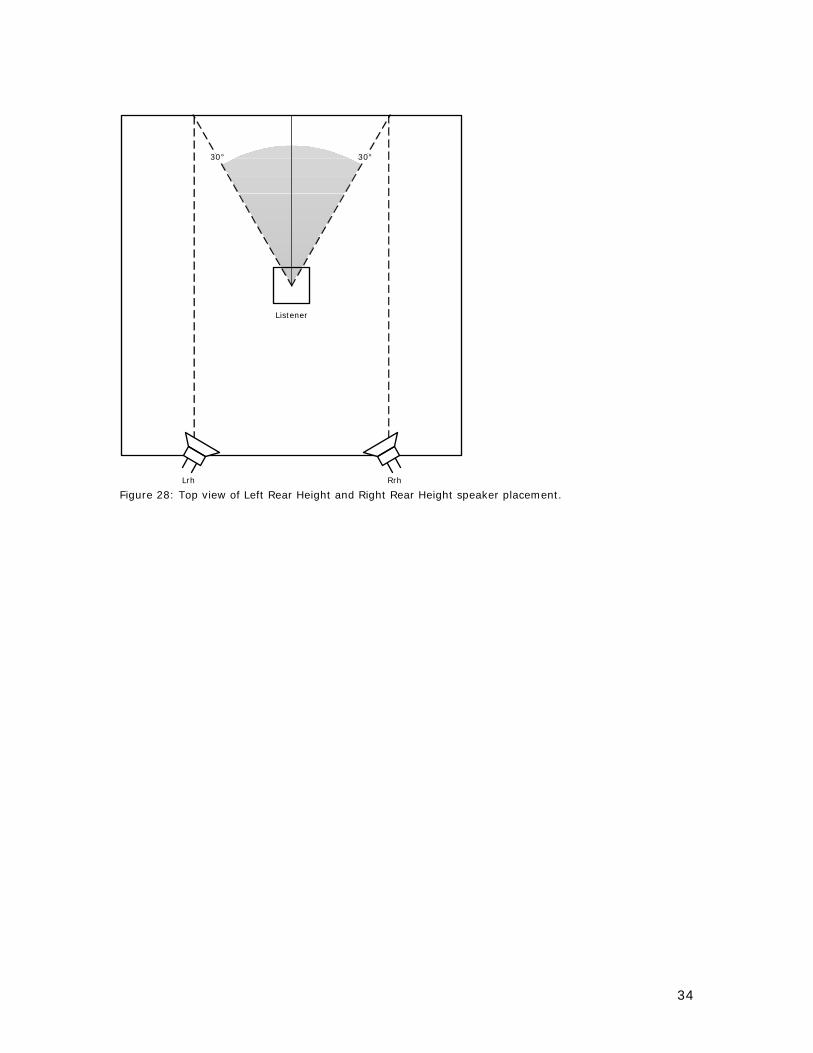
Left Rear Height/Right Rear Height speaker pair We recommend that the Left Rear Height and Right Rear Height speakers should be
mounted on the rear wall (instead of on the ceiling) in line with an approximately 30
degrees horizontal from the center-front reference. If the Left Rear Height and Right
Rear Height speakers must be mounted overhead, they should be placed no more
than one-eighth the distance to the middle of the room, approximately 135 degrees
vertical from the center-front reference. Figures 27 and 28 show the range of angles
at which the Left Rear Height and Right Rear Height speakers may be placed.
Figure 27: Side view of Left Rear Height and Right Rear Height speaker placement.
Listener
30°
Lfh Rfh
30°
Lrh/Rrh150°
135°
Front Listener Rear
34
op View of Lrh/Rrh Speaker Placement Figure
Figure 28: Top view of Left Rear Height and Right Rear Height speaker placement.
Listener
30°30°
Lrh Rrh
35
5. Dolby Surround Upmixer Clients that invest in a Dolby Atmos home theater naturally expect to get full use of
all of their components, even when the content they are playing isn’t mixed in Dolby
Atmos. This includes taking advantage of overhead and Dolby Atmos enabled
speakers to further enhance the playback experience.
Included in the Dolby Atmos technology bundle is a new, advanced upmixer designed
to be compatible with traditional channel-based as well as Dolby Atmos speaker
systems. The Dolby surround upmixer expands the audio of legacy channel-based
content, including native stereo, 5.1, and 7.1 content, for playback through a Dolby
Atmos system—regardless of speaker number or placement—while simultaneously
honoring and maintaining the artists’ intent for the mix.
The Dolby surround upmixer analyzes and processes multiple perceptually spaced
frequency bands, accurately steering each individually. The result is a surround
playback experience characterized by precisely located audio elements and a more
spacious ambience.
In a Dolby Atmos system, the channel-based mix is fully honored. Dolby Atmos
enabled speakers and overhead speakers are employed to lend a sense of
atmospherics or room effect to the listening experience. This new technology will
process and upmix channel-based content to as many as 17 speaker locations at
listener level and 10 Dolby Atmos enabled or overhead speakers. Note: To maintain
an accurate frontal audio image, the upmixer will not send upmixed audio to the
front wide speakers or any speakers that are located between the Left, Center, and
Right speakers. Audio is not upmixed to the Center Surround speaker.
A Center spread on/off control enables the user to spread the center image across a
wider front soundstage. This optional feature is ideally suited for playback of two-
channel music content or playback of channel-based content in a home theater
design that employs a wider screen configuration than typical installations.
The Dolby surround and center spread function should be selected from the AVR or
pre-processor user interface or from the system’s remote control.
Dolby, Dolby Atmos, Pro Logic, and the double-D symbol are registered trademarks of Dolby Laboratories.
Academy Award is a trademark and service mark of the Academy of Motion Picture Arts and Sciences.
HDMI is a trademark or registered trademark of HDMI Licensing, LLC in the United States and other
countries. © 2014 Dolby Laboratories, Inc. All rights reserved. S14/28264