Embed Size (px)
Citation preview

1
Dolby Atmos-enabled Speakers Setup Instructions forElite Models SC-85, SC-87, and SC-89
Use this procedure to setup Dolby Atmos-enabled Speakers and update the A/V receiver’s firmware using aUSB storage device. If you have any difficulty carrying out these instructions, please call Pioneer’s CustomerSupport Center toll free in the USA at 1-844-679-5350 for assistance.
The first step is to confirm the AVR’s firmware version is 1-290-008-518-121 or newer.The buttons and connector mentioned in the following procedures are located on the Remote Control or theAVR’s Front Panel as shown in Figure 1.
Check the Firmware Version
1. Turn on the receiver by pressing theSTANDBY/ON button.
2. If using the Remote, press the MAIN button.3. Press the HOME MENU button and using the
or button, Select “4. System Setup” andpress the ENTER button.
4. Using the or button, Select “g. Other Setup”and press the ENTER button.
Remote
AVR Front Panel
Figure 1
2
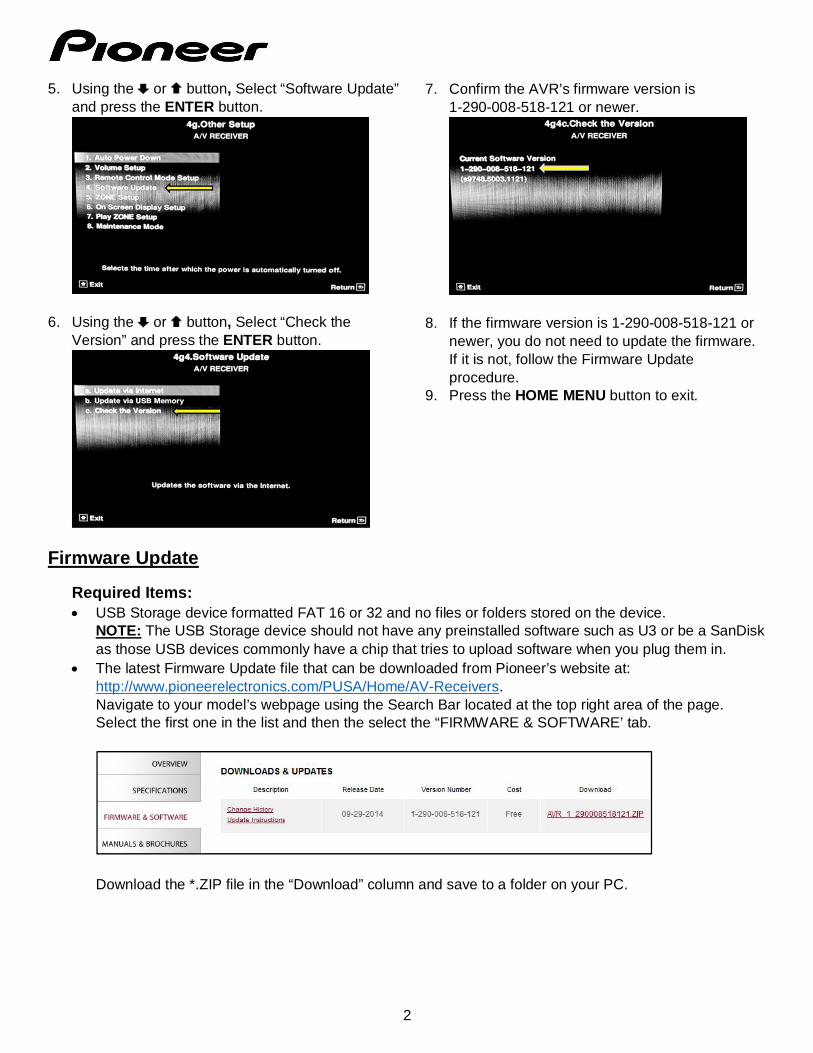
5. Using the or button, Select “Software Update”and press the ENTER button.
6. Using the or button, Select “Check theVersion” and press the ENTER button.
7. Confirm the AVR’s firmware version is1-290-008-518-121 or newer.
8. If the firmware version is 1-290-008-518-121 ornewer, you do not need to update the firmware.If it is not, follow the Firmware Updateprocedure.
9. Press the HOME MENU button to exit.
Firmware Update
Required Items:· USB Storage device formatted FAT 16 or 32 and no files or folders stored on the device.
NOTE: The USB Storage device should not have any preinstalled software such as U3 or be a SanDiskas those USB devices commonly have a chip that tries to upload software when you plug them in.
· The latest Firmware Update file that can be downloaded from Pioneer’s website at:http://www.pioneerelectronics.com/PUSA/Home/AV-Receivers.Navigate to your model’s webpage using the Search Bar located at the top right area of the page.Select the first one in the list and then the select the “FIRMWARE & SOFTWARE’ tab.
Download the *.ZIP file in the “Download” column and save to a folder on your PC.
3
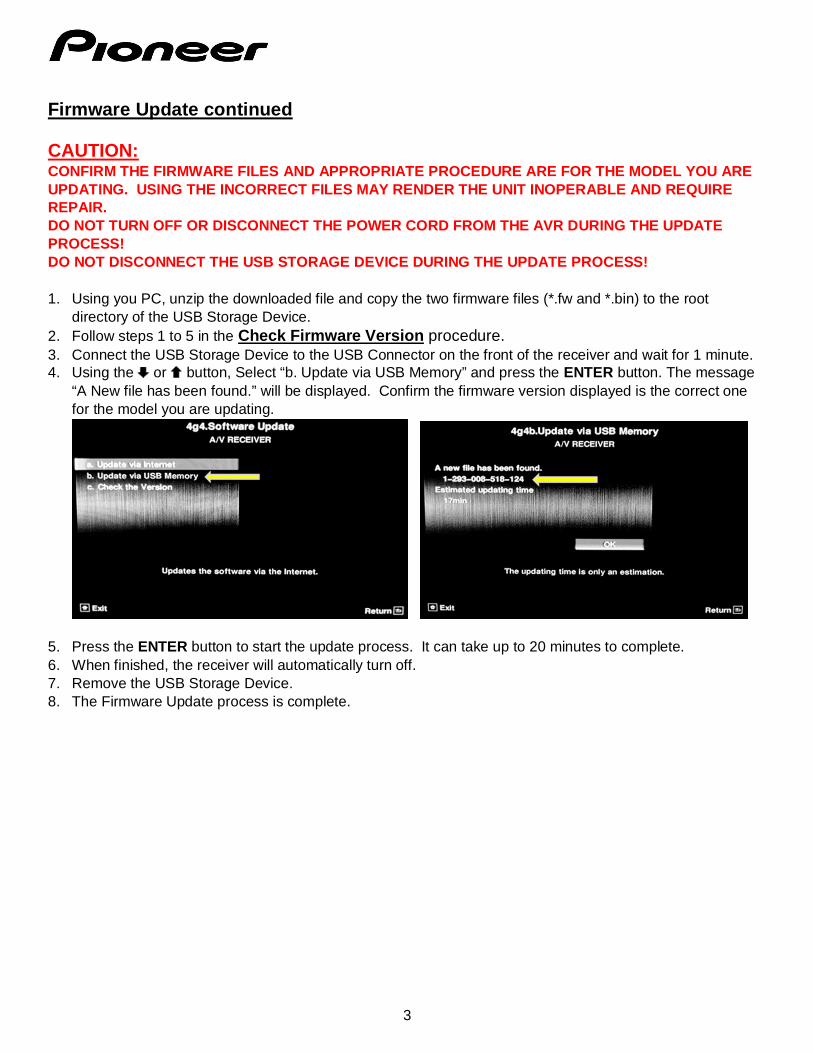
Firmware Update continued
CAUTION:CONFIRM THE FIRMWARE FILES AND APPROPRIATE PROCEDURE ARE FOR THE MODEL YOU AREUPDATING. USING THE INCORRECT FILES MAY RENDER THE UNIT INOPERABLE AND REQUIREREPAIR.DO NOT TURN OFF OR DISCONNECT THE POWER CORD FROM THE AVR DURING THE UPDATEPROCESS!DO NOT DISCONNECT THE USB STORAGE DEVICE DURING THE UPDATE PROCESS!
1. Using you PC, unzip the downloaded file and copy the two firmware files (*.fw and *.bin) to the rootdirectory of the USB Storage Device.
2. Follow steps 1 to 5 in the Check Firmware Version procedure.3. Connect the USB Storage Device to the USB Connector on the front of the receiver and wait for 1 minute.4. Using the or button, Select “b. Update via USB Memory” and press the ENTER button. The message
“A New file has been found.” will be displayed. Confirm the firmware version displayed is the correct onefor the model you are updating.
5. Press the ENTER button to start the update process. It can take up to 20 minutes to complete.6. When finished, the receiver will automatically turn off.7. Remove the USB Storage Device.8. The Firmware Update process is complete.
4
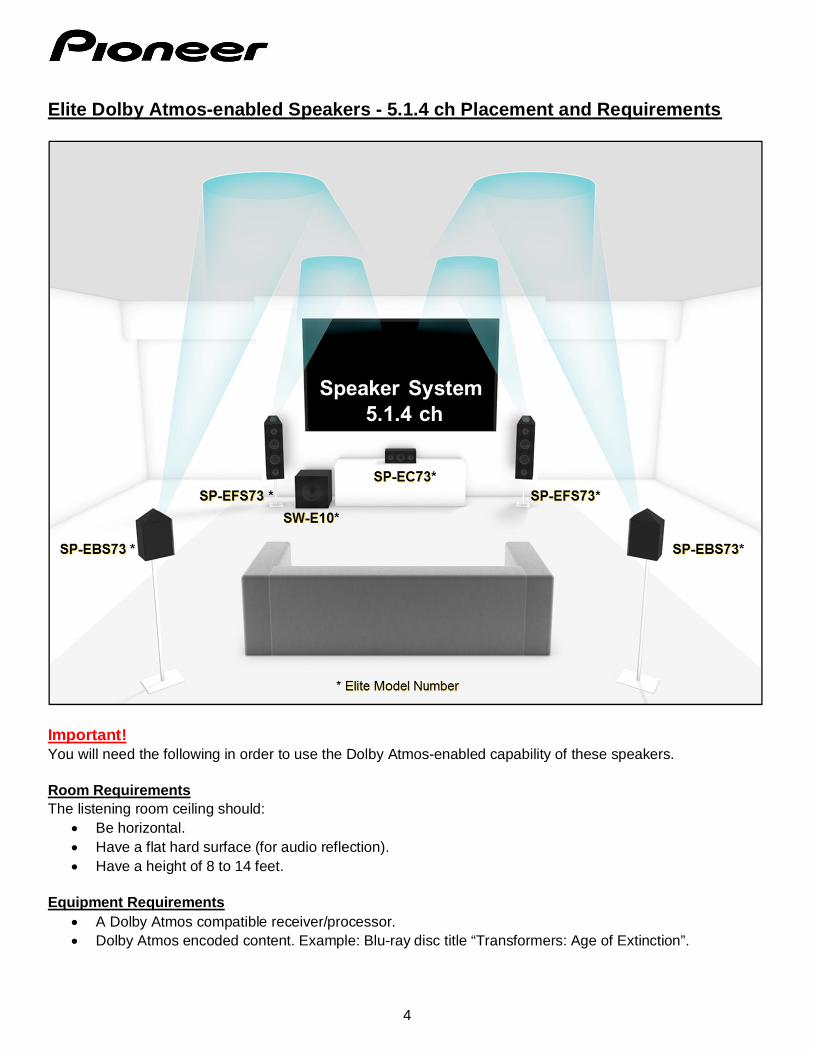
Elite Dolby Atmos-enabled Speakers - 5.1.4 ch Placement and Requirements
Important!You will need the following in order to use the Dolby Atmos-enabled capability of these speakers.
Room RequirementsThe listening room ceiling should:
· Be horizontal.· Have a flat hard surface (for audio reflection).· Have a height of 8 to 14 feet.
Equipment Requirements· A Dolby Atmos compatible receiver/processor.· Dolby Atmos encoded content. Example: Blu-ray disc title “Transformers: Age of Extinction”.
5
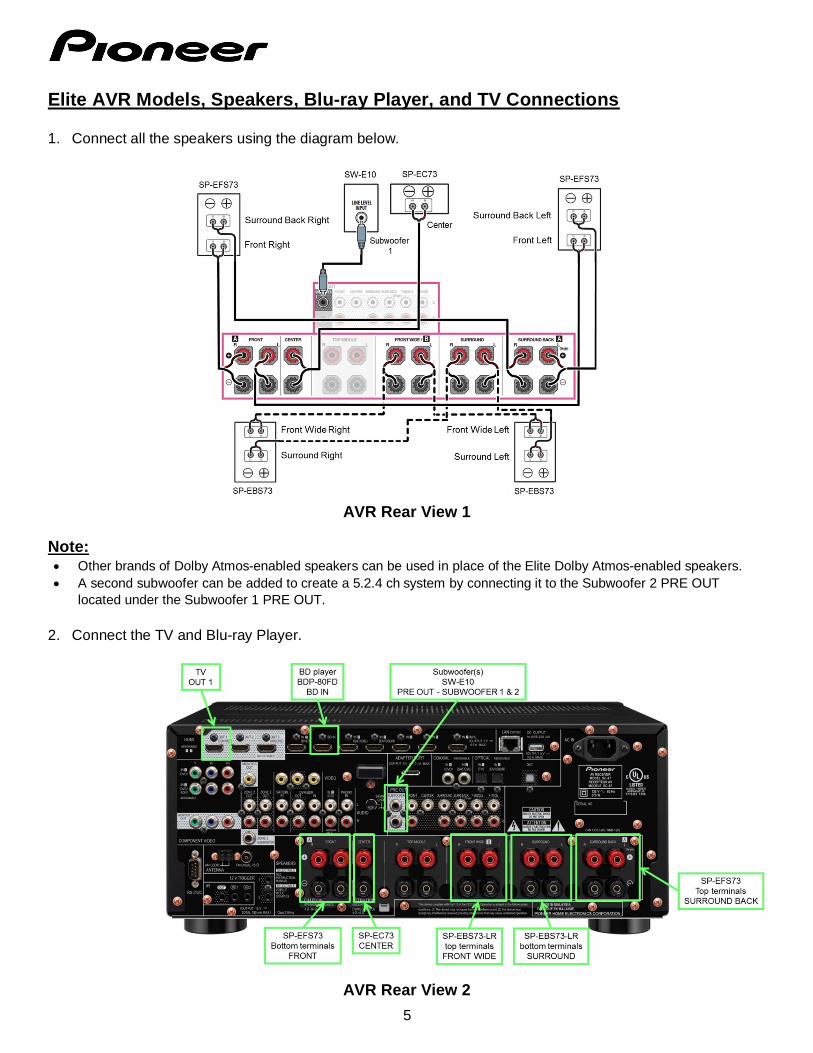
Elite AVR Models, Speakers, Blu-ray Player, and TV Connections
1. Connect all the speakers using the diagram below.
AVR Rear View 1
Note:· Other brands of Dolby Atmos-enabled speakers can be used in place of the Elite Dolby Atmos-enabled speakers.· A second subwoofer can be added to create a 5.2.4 ch system by connecting it to the Subwoofer 2 PRE OUT
located under the Subwoofer 1 PRE OUT.
2. Connect the TV and Blu-ray Player.
AVR Rear View 2
6
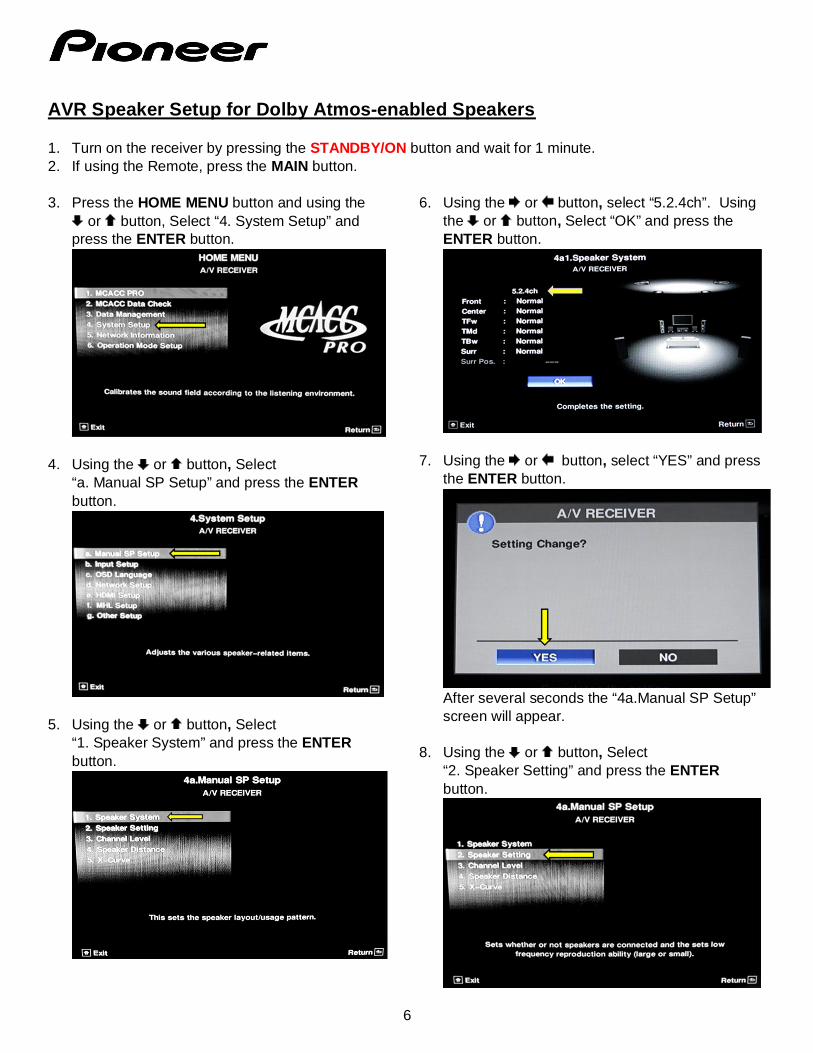
AVR Speaker Setup for Dolby Atmos-enabled Speakers
1. Turn on the receiver by pressing the STANDBY/ON button and wait for 1 minute.2. If using the Remote, press the MAIN button.
3. Press the HOME MENU button and using the or button, Select “4. System Setup” and
press the ENTER button.
4. Using the or button, Select“a. Manual SP Setup” and press the ENTERbutton.
5. Using the or button, Select“1. Speaker System” and press the ENTERbutton.
6. Using the or button, select “5.2.4ch”. Usingthe or button, Select “OK” and press theENTER button.
7. Using the or button, select “YES” and pressthe ENTER button.
After several seconds the “4a.Manual SP Setup”screen will appear.
8. Using the or button, Select“2. Speaker Setting” and press the ENTERbutton.
7
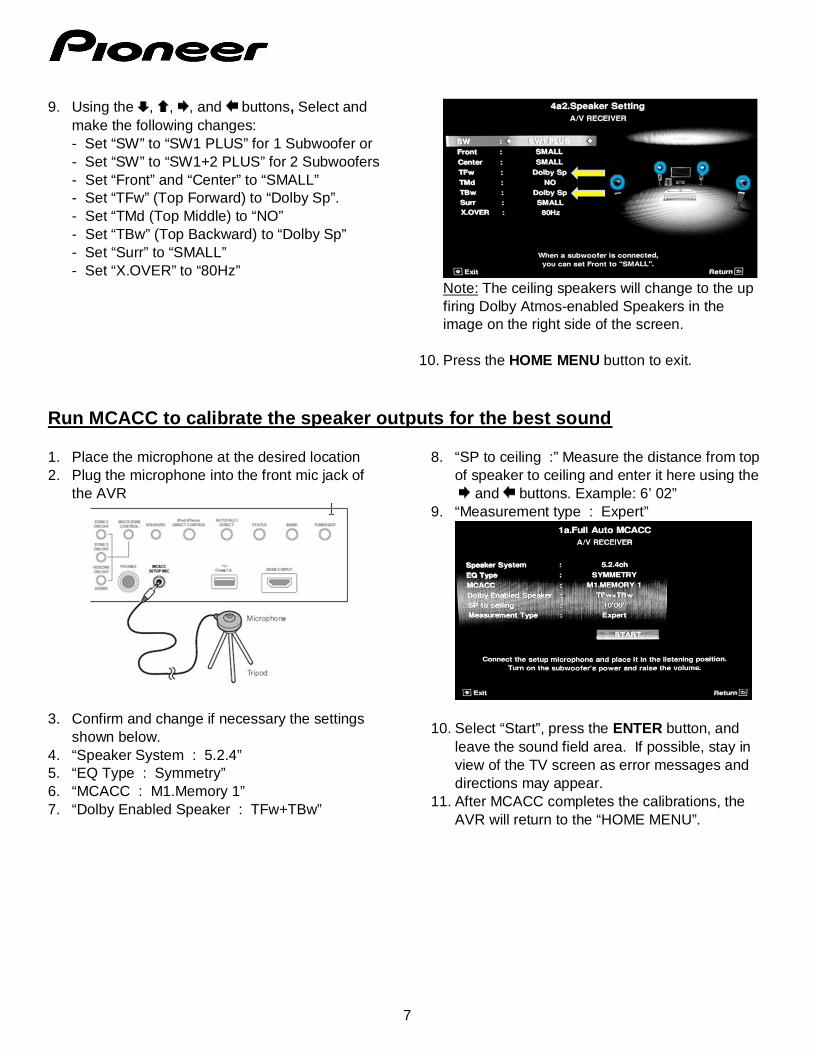
9. Using the , , , and buttons, Select andmake the following changes:- Set “SW” to “SW1 PLUS” for 1 Subwoofer or- Set “SW” to “SW1+2 PLUS” for 2 Subwoofers- Set “Front” and “Center” to “SMALL”- Set “TFw” (Top Forward) to “Dolby Sp”.- Set “TMd (Top Middle) to “NO”- Set “TBw” (Top Backward) to “Dolby Sp”- Set “Surr” to “SMALL”- Set “X.OVER” to “80Hz”
Note: The ceiling speakers will change to the upfiring Dolby Atmos-enabled Speakers in theimage on the right side of the screen.
10. Press the HOME MENU button to exit.
Run MCACC to calibrate the speaker outputs for the best sound
1. Place the microphone at the desired location2. Plug the microphone into the front mic jack of
the AVR
3. Confirm and change if necessary the settingsshown below.
4. “Speaker System : 5.2.4”5. “EQ Type : Symmetry”6. “MCACC : M1.Memory 1”7. “Dolby Enabled Speaker : TFw+TBw”
8. “SP to ceiling :” Measure the distance from topof speaker to ceiling and enter it here using the and buttons. Example: 6’ 02”
9. “Measurement type : Expert”
10. Select “Start”, press the ENTER button, andleave the sound field area. If possible, stay inview of the TV screen as error messages anddirections may appear.
11. After MCACC completes the calibrations, theAVR will return to the “HOME MENU”.
8
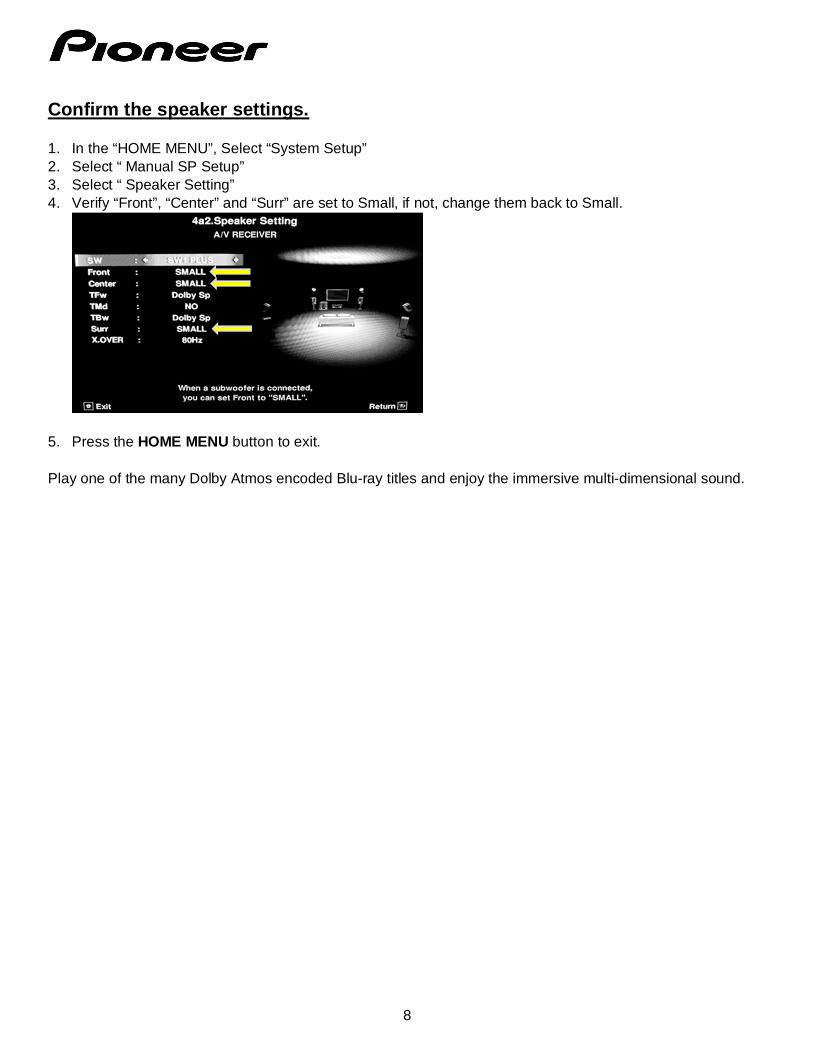
Confirm the speaker settings.
1. In the “HOME MENU”, Select “System Setup”2. Select “ Manual SP Setup”3. Select “ Speaker Setting”4. Verify “Front”, “Center” and “Surr” are set to Small, if not, change them back to Small.
5. Press the HOME MENU button to exit.
Play one of the many Dolby Atmos encoded Blu-ray titles and enjoy the immersive multi-dimensional sound.