Embed Size (px)
DESCRIPTION
admin
Citation preview

Managing
Dokeos 2.2
1
© Dokeos 2012
Administrator Manual

Table of contents
Foreword...................................................................................................................................3Part 1........................................................................................................................................7Part 2........................................................................................................................................9
Administration tools of the portal..............................................................................................9Chapter 1: General Configuration............................................................................................11Chapter 2: Create Portal Backup.............................................................................................49 .........................................................................................................................................49 .........................................................................................................................................49Chapter 3: Create an announcement (news).............................................................................50Chapter 4: Languages...........................................................................................................52Chapter 5: Edit the home page...............................................................................................53 ..................................................................................................................55Chapter 6: Customize registration...........................................................................................56Chapter 7: Consult portal reporting.........................................................................................57Chapter 8: Global calendar.....................................................................................................58Chapter 9: Create Certificate Templates...................................................................................59Chapter 10: Configure automatic e-mails..................................................................................63
Part 3......................................................................................................................................64Management tools of the users...............................................................................................64Chapter 1: Search and advanced search...................................................................................66Chapter 2: « Users list » tool..................................................................................................68Chapter 3: « Add a user » tool................................................................................................73Chapter 4: « Profiling » tool...................................................................................................74Chapter 5: « Export » tool......................................................................................................76Chapter 6: « Import » tool.....................................................................................................77Chapter 7: « HR Management » tool........................................................................................79
Part 4......................................................................................................................................79Management tools for Course.................................................................................................79Chapter 1: Search and Advanced Search..................................................................................81Chapter 2: Create a course....................................................................................................84Chapter 3: Automatic enrollment.............................................................................................90Chapter 4: Export courses......................................................................................................91Chapter 5: Register users.......................................................................................................91Chapter 6: Manage the courses categories................................................................................94 ............................................................................................95
Part 5......................................................................................................................................96Course sessions....................................................................................................................96Chapter 1: Search / Course sessions list...................................................................................98Chapter 2: Sessions categories ..............................................................................................99Chapter 3: Create a session..................................................................................................100Chapter 4: Create sessions in batches / Export sessions...........................................................103Chapter 5: Copy between sessions........................................................................................106
Part 6....................................................................................................................................107Classes..............................................................................................................................107Chapter 1: Search / Class list................................................................................................108Chapter 2: Create / fill a class...............................................................................................109Chapter 3: Add a class to a course.........................................................................................109Chapter 4: Using CSV files....................................................................................................111
2

FOREWORD
DOKEOS? YOU SAID DOKEOS? Dokeos is a platform for distance learning (or e-learning platform), intuitive and easy to use. Whether you are trainers, learners, training audience, with Dokeos you will find all the tools to organize courses. Dokeos allows trainers to focus on creating scenarios and content by freeing them of any technical aspect. Dokeos lets you express your creativity to develop attractive, interactive and multimedia courses. Dokeos is also available for users of collaborative tools: videoconferencing, forums, blogs, wiki...
In addition to this ease of use, Dokeos has the great advantage being free software of which the source code is accessible and can be modified or adapted for more specific needs.
Structure of the manual
Each part of this manual, illustrated with screenshots, will guide you to understand the various administration tools offered by Dokeos.
This manual comprises six distinct parts:
The first part (page 7 and following) presents the actions to be carried out immediately after installation of
the portal, to ensure the safety and to choose its operating mode: classes or sessions.
The second part (page 9 and following) attempts to describe the administration tools of the portal.
The third part (page 64 and following) presents the administration tools to manage users.
The fourth part (page 79 and following) presents the administration tools to manage courses.
3

The fifth part (page 96 and following) describes the functions of sessions.
The sixth part (page 107 and following) describes the functions of classes.
Certain parts, or chapters, contain a heading « tips and tricks ». These « tips and tricks » are mainly intended to reflect on how to implement the tools in the context of a course or a company.
4

Memo: users in Dokeos
Tips and tricks: roles and rights
To help you organize the profile structure, Dokeos offers several profiles: from Human Resources Manager (Supervisor) to Learner (or trainee).
Example of situation: we are a multinational.
Alice is starting a project. She has the rights of HR Manager (Supervisor) and acts as project manager, supervising the processes and the progress of the courses in the Reporting tool.
Paul is the System administrator. He imports lists of users in the system or connects them to the LDAP directory of the company.
The company has 3 centers: in London, New York and Shanghai. In the center of Shanghai, Ping is the local HR manager. He has the Administrator rights of sessions and registers the employees to the sessions.
A series of authors (located in the 3 centers) produce and import courses. They have the rights of Trainer.
Chang is Coach in Shanghai. He supervises 30 people on this site in the course session Hiver 20008, Shanghai New Recruits.
Tien-Mu is a new employee. He is registered in Dokeos with the rights of Learner and takes part in the course activities.
To modify a profile, log in as System Administrator, enter Administration and search for the name of the user. Access information attached to the user by clicking the pencil icon and change the rights by using the « Profile » drop-down list.
To approach the pedagogical administration of the portal, you must keep in mind the roles and rights associated with the users.
Definition of the rolesTo help you organize the role structure, Dokeos offers six affected roles with different responsibilities:
• Learner• Tutor (this profile appears only with the creation of sessions: he is the person in charge of a session and
ensures the reporting• Trainer• Human Resources Manager (Supervisor)• Sessions administrator• Platform administrator
5

Roles and rightsThe description of the rights of Sessions administrator and the Human Resources Manager (Supervisor) is achieved when these two roles are in their main function and they are not registered as a learner in a course. Keep in mind that to be named Tutor of the session, a user must first have a Trainer role on the platform. The « Tutor » column below describes only the rights of the Tutor in the sessions, which has in addition the rights of a Trainer in his own courses.
Learn
er
Tuto
r
Train
er
HR
Man
ag
er
Sessio
ns
ad
min
istr
ato
r
Pla
tform
ad
min
istr
ato
r
Create a course
Manage the interaction and production tools (6)
Use the interaction and production tools (6)
Create or import contents in the «Documents» tool
(1) (6)
Exploit the administration tools of a course (Settings, Reporting and Backup)
(6)
Register learners to a course (6)
Create sessions
Register learners in a session (2)
Add new courses to a session (2)
Get detailed reporting of the learners (3)(4) (3) (5)
(1) except within the framework of the « groups » tool, where the creation and/or import of documents are authorized in the groups tools(2) except for sessions created by the platform administrator(3) detailed reporting of learners registered to courses for which he is responsible (4) detailed learners reporting of sessions where he is the tutor (5) detailed learners reporting of sessions where he is the creator (6) only in courses where he is the creator
6

PART 1Important, after the installation of the
portalYour portal has just been installed, on your server or directly hosted by Dokeos.You are the administrator and for this reason, some operations are now necessary to define the security level of the platform and to carry out a pedagogical choice, especially in relation to the type of organization which you are part of.
Setup security on a portal hosted on your serverWhen you are identified as an administrator and get the administration interface, a message informs you that the rights of two files must be modified. For safety, place in « read only » (CHMOD 444) the files:• main/inc/con/configuration.php• main/install/index.php
For the portals hosted directly by Dokeos, this operation is already carried out.
Choosing a security strategyThe « Security » tool on the section Portal > Configuration settings authorizes two function modes for the security of the server, against uploading files containing dangerous codes:• Blacklist: black list is a filtering mode that makes it possible to remove (or rename) the files which
extensions appear on a list set up by the administrator.• Whitelist: white list is a filtering mode that makes it possible to remove (or rename) the files which
extensions do not appear in a list set up by the administrator. This method is generally considered as more secure but more constraining than the blacklist.
7

If the second choice is more constraining, it does not make it much less secure. You will probably be contacted by certain trainers to authorize other types of files at the beginning of portal setup, but a few weeks after its startup, you will have listed all the files used by your organization on the portal and you will not be bothered any more.
Carry out a pedagogical choice: classes or sessionsThe « Portal » tool on the section Portal > Configuration settings authorizes two exclusive function modes: Classes or Sessions.
Based on the selected educational organization and the type of organization to which you belong, you will have to choose one of the function modes.
To make your choice, keep in mind the following: • A class contains learners, registered by the administrator. The trainer can decide to register
learners and / or classes to his course. • A session is a set of courses (belonging to one or more trainers):
o grouping learners o during a defined period of time o supervised by a sessions administrator who can intervene in the session, X days before the
opening of the session and Y days after (the number of days are defined by the administrator).
The sessions administrator can be a trainer not intervening in any of the courses from the
session.
The trainers cannot directly modify the course list, the start and end dates and the list of participants in a session; it is the administrator (you!) who is in charge.
The administration of the sessions and classes is detailed in parts 5 and 6 of this document.
Strategy of safety and operation in classes or sessions are to be set on the section Portal > Configuration settings of the administration interface. It is this part where the manual begins… Follow the guide!
8

PART 2Administration tools of the portal
The « Portal » section of the administration interface is where the most parameters are. It allows:
• General configuration of the platform, including the
modification of some of the parameters preset at the time of
the initial installation of the portal.
• The configuration of E-commerce catalogue.
• The configuration of the E-commerce credentials for
payment option.
• Generating a full backup of the platform.
• The creation and the programmed display of announcements (news) intended for a target group or all the users of the platform.
• The choice of the languages shown on the login page of the platform.
• The customization of the portal home page.
• Customizing the registration page for different users.
• Tracking (reporting) of courses and users.
• Keeping a global calendar allowing sending e-mail to all users of the platform.
• Adding templates for Quiz Certificates
• Changing the content of emails sent automatically from the platform e.g. after registering a new user on the
platform or following the correction of a quiz by the trainer.
• Adding Terms & Conditions to registrations.
9

•Tips and tricks: multisite function
Dokeos manages multisite. This means that we can administer multiple Dokeos sites from one portal. A main portal, controlled by a super administrator, manages the courses and users of a series of sub- sites.
The super administrator distributes courses and users over the sub-sites using textbox fields (multiple selection). These are not copies of courses or users, but multiple accesses. I.e., if the original course is deleted, the mirror course will also disappear.
Each course and each user can be found in one or more sites that have different addresses (domain names) and possibly a distinct graphical style. The purpose of this process is variable: serve more clients with the same content, managing a university with several faculties and students who have cross-registration, management of business units within a multinational.
The multisite limits, for the sub-sites, the setting of the portal. And to function, it requires that the addresses of the sites that are added, also exist.
10

Chapter 1: General ConfigurationThe general configuration of the portal has 11 tools that give access to a certain number of parameters.
The parameters of the configuration tools are reviewed in the following pages, by specifying (in bold character) the parameters configured by default at the time of a new installation and by making some remarks as for the significance of these parameters.
Configure the portalThe « Portal » tool on the section « Configuration settings » makes it possible to intervene on the general parameter settings described hereafter, via fields to be completed or check boxes. Please take into account that modifications are accepted only after clicking on the « Submit » button.
11

Type of information Setting Remarks
12

Organization name • Text field to be completed• Organization
Information is shown in the center of the screen.
Organization URL (web address)
• Text field to be completed• http://www.dokeos.com
E-learning portal name • Text field to be completed• Academy
Portal Administrator: E-mail
• Text field to be completed• [email protected]
domain
Portal Administrator: Last Name
• Text field to be completed• Doe
Portal Administrator: First Name
• Text field to be completed• John
Platform Administrator Information in footer
• No• Yes
Session's tutor's data in the footer
• No• Yes
If « yes » is selected, information is shown on left bottom of the screen
Show teacher information in footer
• No• Yes
If « yes » is selected, information is shown on left bottom of the screen
Registration • After approval• No• Yes
If « yes » or « After approval » is selected, a «Register» link appears on the home page that leads to a self-registration form.If « After approval » is selected, the intervention of the administrator is necessary to release the user account. The release is carried out from the users list.
Registration as Trainer • No• Yes
If « yes » is selected, it requires the authorization of self-registration on the portal (see preceding line).If «yes» is selected, the choice «Follow course » or « Create course » is shown on the self-registration form.
Lost password • No• Yes
If « yes » is selected, a link « Lost password » appears on the home page. The recovery of the password is carried out thanks to the valid e-mail address used by the trainee.
Use sessions • No• Yes
Exclusive choice: all the portal functions in classes OR sessions.A class contains trainees, registered by the administrator. The trainer can decide to register trainees and/or classes with his course. See parts 1, 5 and 6.
Tabs in the header • « Home » tab The « Administration » tab is only visible to the administrator (or
13

• « Agenda » tab• « Courses » tab• « My profile » tab• « Administration» tab• « Reporting » tab• « Social network » tab
Sessions administrator (limited access to administration functions)!
Show session tutor • No• Yes
Not applicable if selected mode is Classes. Otherwise, displays the name of the session tutor in the session title, on the course list page
Allow non admin to create course
• No• Yes
If « no » is selected, only the portal administrator is authorized to create courses.
Learners access to course catalogue
• No• Yes
If « yes » is selected, it allows learner to see the list of the courses in order to subscribe to the available courses, by showing a link « Subscribe » on the home page seen by the trainees.If « no » is selected, the responsibility for the registration is referenced to each trainer, or the portal administrator.
Enable terms and conditions
• No• Yes
If « yes » is selected, a link « Terms and Conditions » is added to the portal section of the administration interface.Every new user must accept these terms and conditions to be registered.A user already registered will accept the terms and conditions at the time of his next login if those are activated subsequently to his registration on the portal.
Email notification on course creation
• No• Yes
If « yes » is checked, the administrator of the platform is informed by email of the creation of any new course. Allows the reconfiguration of the current page in the form of Widgets, if that term is checked.
Show Catalogue • No• Yes
If « yes » is selected and E-Commerce feature is activated, the product catalogue will be displayed on the portal homepage.
Select the online editor for your portal
• Ckeditor• Fckeditor
Enable chat in the whole platform
• Disabled• Enabled
If « Enabled » then chat will be activated in all pages of the portal.
Chat requests in the portal
• Text field to be completed This is the default value in seconds that the chat will use to
14

• 2 send requests to the server
15

Configure the users parametersThe « Users » tool on the « Configuration settings » section makes it possible to set relative information of the user, via fields to be completed or check boxes. Please take into account that modifications are accepted only after clicking on the « Submit » button.
Type of information
Setting Remarks
Profile • API keys• E-mail• Language• Login• Name• Code• OpenID URL• Password• Phone• Picture• Theme
(stylesheet)
Only the selected elements are accessible to the users for the update of their profile.
Registration: required fields
• E-mail• Language• Code• Phone
The selected fields are mandatory when registering a user.
Personal calendar • No• Yes
16
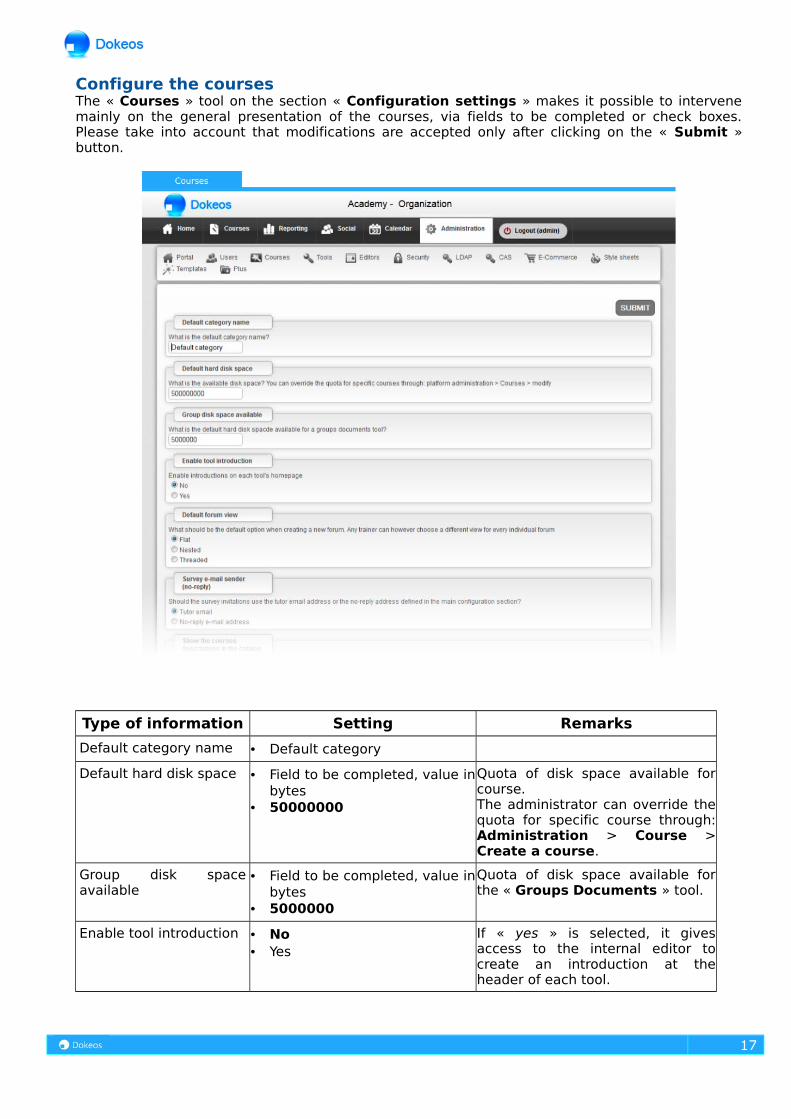
Configure the coursesThe « Courses » tool on the section « Configuration settings » makes it possible to intervene mainly on the general presentation of the courses, via fields to be completed or check boxes. Please take into account that modifications are accepted only after clicking on the « Submit » button.
Type of information Setting Remarks
Default category name • Default category
Default hard disk space • Field to be completed, value in bytes
• 50000000
Quota of disk space available for course.The administrator can override the quota for specific course through: Administration > Course > Create a course.
Group disk space available
• Field to be completed, value in bytes
• 5000000
Quota of disk space available for the « Groups Documents » tool.
Enable tool introduction • No• Yes
If « yes » is selected, it gives access to the internal editor to create an introduction at the header of each tool.
17

Default forum view • Flat• Nested• Threaded
Manage the default display of new forums.The responsible trainer can choose a different view for every individual forum.
Survey e-mail sender (no-reply)
• Tutor email• No-reply e-mail address
Choose the e-mail address used by the « Surveys » tool.
Show the courses descriptions in the catalog
• No• Yes
If « yes » is selected, it will show the courses descriptions as an integrated popup when clicking on a course info icon in the courses catalog.
Allow tutors to edit sessions
• No• Yes
If « yes » is selected, it tutors are allowed to edit session comments.
Go to the course directly after login
• No• Yes
If « yes » is selected, a user will go directly to the course after login, when the user is registered in the course.
18

Configure the toolsThe « Tools » tool on the section « Configuration settings » makes it possible to intervene mainly on the visible tools by default in the courses and the parameter setting of those, via fields to be completed or check boxes. Please take into account that modifications are accepted only after clicking on the « Submit » button.
Type of information Setting Remarks
Modules active upon course creation
• Calendar• Announcements• Chat• Course Description• Documents• Dropbox• Forums• Glossary• Groups• Modules• Links• Notebook• Online Conference• Quizzes• Assignments• Surveys• Users• Wiki
Defines the visible tools by default during the creation of all new courses.
Use a title for the document name
• No• Yes
If « no » is selected, the name of the file (without extension) will be used to name the document.
19
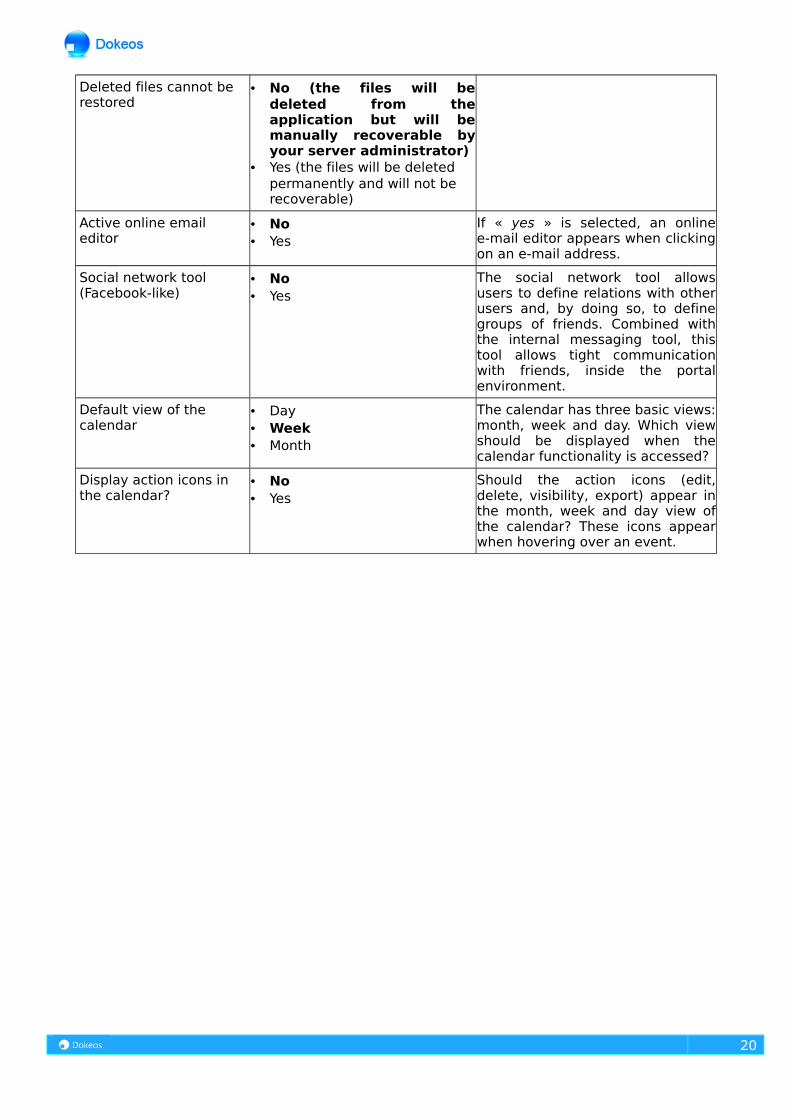
Deleted files cannot be restored
• No (the files will be deleted from the application but will be manually recoverable by your server administrator)
• Yes (the files will be deleted permanently and will not be recoverable)
Active online email editor
• No• Yes
If « yes » is selected, an online e-mail editor appears when clicking on an e-mail address.
Social network tool (Facebook-like)
• No• Yes
The social network tool allows users to define relations with other users and, by doing so, to define groups of friends. Combined with the internal messaging tool, this tool allows tight communication with friends, inside the portal environment.
Default view of the calendar
• Day• Week• Month
The calendar has three basic views: month, week and day. Which view should be displayed when the calendar functionality is accessed?
Display action icons in the calendar?
• No• Yes
Should the action icons (edit, delete, visibility, export) appear in the month, week and day view of the calendar? These icons appear when hovering over an event.
20

The « Editors » tool on the section « Configuration settings » makes it possible to set the functionalities of the internal editor via check boxes. Please take into account that modifications are accepted only after clicking on the « Submit » button.
Type of information
Setting Remarks
Public pages compliance to WAI
• No
• YesFor more information, please visit the WAI (Web Accessibility Initiative, W3C) site: http://www.w3.org/WAI/
SCIImathML mathematical editor
• No
• YesIf « yes » is selected, an additional icon is installed in the editor. The SCIImathML Mathematical editor will be displayed when clicking on this new icon.
Block students copy and paste
• No
• YesManages the possibility for students to use or not the features to copy / paste in the group documents editor (enable / disable the context menu and keyboard shortcuts).
Buttons bar extended • No
• YesIf « yes » is selected, all the toolbars of the editor is displayed when this is maximized.
21

Configure securityThe « Security » tool on the section « Configuration settings » makes it possible to intervene on the security level of the portal, via fields to be completed or check boxes. Please take into account that modifications are accepted only after clicking on the « Submit » button.
Type of information Setting Remarks
Type of filtering on document uploads
• Blacklist• Whitelist
By default, filtering is set on blacklist, which does not contain any file extension to be filtered.If you maintain this type of filtering, make sure to populate the list of extensions to be removed (or renamed) on your server.
Blacklist - setting • Field to complete• Empty by default
Separate the file extensions by semicolons.Do not put dots in front of the files extensions.All files, including those without extension are accepted on the server by default.Upper and lower cases don’t matter.
Whitelist- setting • Field to complete• htm;html;jpg;jpeg;gif;• png;swf;avi;mpg;mpeg;• mov;flv;doc;docx;xls;• xlsx;ppt;pptx;odt;odp;ods;
All files which extensions do not appear on the whitelist are removed (or renamed) systematically. Do not put dots in front of the files extensions.All files without extension are accepted on the server by default. Upper and lower cases don’t matter.
22

Filtering behaviour (skip/rename)
• Rename• Remove
If « Remove » is selected, the files which extensions appear on the blacklist OR do not appear on the whitelist will be prohibited on the server.If « Rename » is selected, the undesirable extensions will be replaced by another extension (see below), but nevertheless imported on the server.
Replacement extension • Field to complete• dangerous
Replacement extension if the selected filtering is «rename ».
Permissions for new directories
• Field to complete• 0777
The ability to define the permissions settings to assign to every newly created directory lets you improve security against attacks by hackers uploading dangerous content to your portal. The given format uses the UNIX terminology of Owner-Group-Others with Read-Write-Execute permissions.
Permissions for new files • Field to complete• 0666
The ability to define the permissions settings to assign to every newly created file lets you improve security against attacks by hackers uploading dangerous content to your portal.The given format uses the UNIX terminology of Owner-Group-Others with Read-Write-Execute permissions. Attention, If you use Oogie, make sure that the user who launch OpenOffice can write files in the course folder.
OpenID authentification • No• Yes
If « yes » is selected, an additional login form is shown on the portal homepage.
Register users by tutor • No• Yes
Enabling « yes » can be of interest when the portal functions in Sessions.
Extend rights for tutor • No• Yes
Enabling « yes » can be of interest when the portal functions in Sessions. The tutor inherits the same rights as the trainer to use the production tools.
Type of information Setting Remarks
Extend rights for tutors on surveys
• No• Yes
Enabling « yes » can be of interest for the « Surveys » tool when the portal functions in Sessions.
23
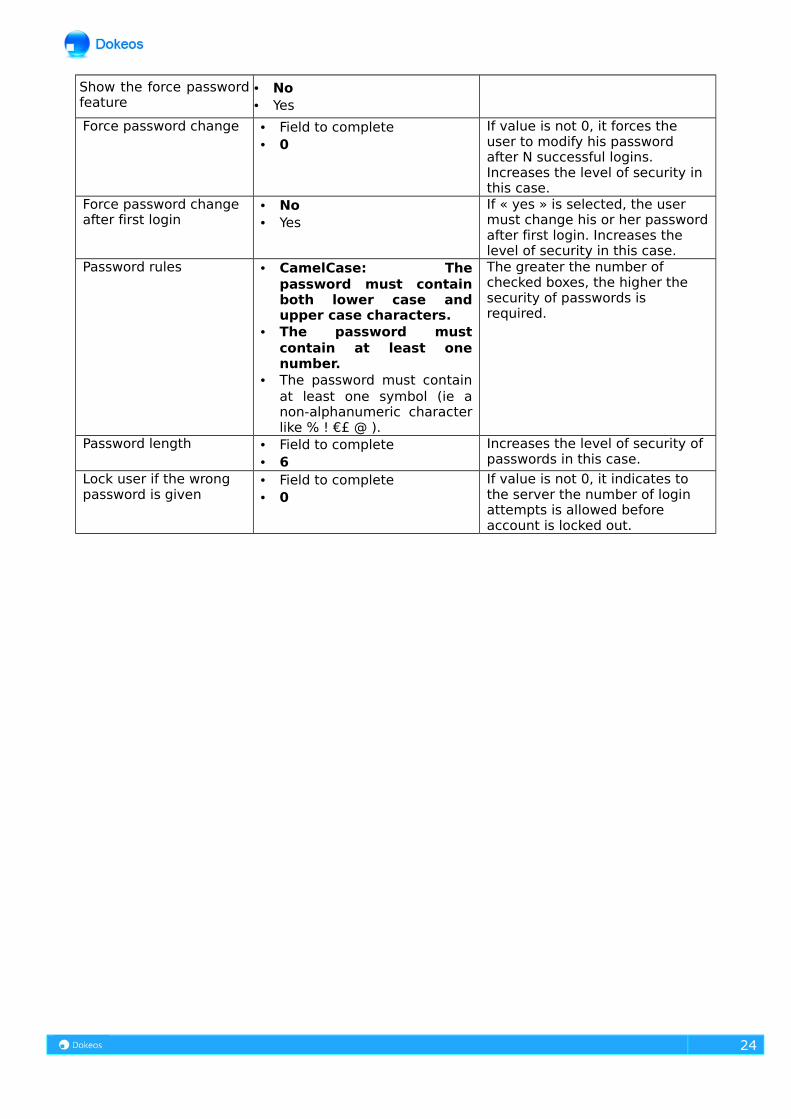
Show the force password feature
• No• Yes
Force password change • Field to complete• 0
If value is not 0, it forces the user to modify his password after N successful logins. Increases the level of security in this case.
Force password change after first login
• No• Yes
If « yes » is selected, the user must change his or her password after first login. Increases the level of security in this case.
Password rules • CamelCase: The password must contain both lower case and upper case characters.
• The password must contain at least one number.
• The password must contain at least one symbol (ie a non-alphanumeric character like % ! €£ @ ).
The greater the number of checked boxes, the higher the security of passwords is required.
Password length • Field to complete• 6
Increases the level of security of passwords in this case.
Lock user if the wrong password is given
• Field to complete• 0
If value is not 0, it indicates to the server the number of login attempts is allowed before account is locked out.
24

Configure the communication with an LDAP serverThe « LDAP » tool on the « Configuration settings » section makes it possible to set the communication with an LDAP server or a replicate server, via fields to be completed or check boxes. Please take into account that modifications are accepted only after clicking on the « Submit » button.
Type of information
Setting Remarks
Main LDAP server address
• Field to be completed• localhost
For more information about the configuration of LDAP server, please refer to the installation guide (paragraph 6: LDAP) contents in the installation file of Dokeos, while following the directory: dokeos-1.8.6.1 .zip \ dokeos-1.8.6.1\documentation \ installation_guide.html
Main LDAP server's port
• Field to be completed• 389
LDAP domain • Field to be completed• dc=nodomain
Replicate server address
• Field to be completed• localhost
Replicate server's port
• Field to be completed• 389
Search term • Field to be completed• Empty
LDAP version • LDAP 2
25

• LDAP 3
Tutor identification field
• Field to be completed• employeenumber
Authentication login • Field to be completed• Empty
Authentication password
• Field to be completed• Empty
Tutor identification value
• Field to be completed• Empty
LDAP server type • Default ldap server (used on linux servers)
• MS Active Directory
26

Configure « CAS » unique identificationThe « CAS » tool on the « Configuration settings » section allows you to use the SSO type CAS (Central Authentication Service) system, thus avoiding re-identifying at each connection to a new application. The setup is done via fields to be completed or check boxes. Please take into account that modifications are accepted only after clicking on the « Submit » button.
Type of information
Setting Remarks
CAS Activation • No• Yes
See in the various fields the necessary information to connect to the main CAS server.Main CAS server
address• Field to be completed• Empty by default
Root location of your cas installation
• Field to be completed• Empty by default
CAS Port • Field to be completed• Empty by default
CAS Protocol used • CASV1• CASV2• SAML
User add by CAS activation
• No• Yes
XML field for user login • Field to be completed• Empty by default
XML field for user email
• Field to be completed• Empty by default
XML field for user firstname
• Field to be completed
27

• Empty by defaultXML field for user firstname
• Field to be completed• Empty by default
28

Configure E-Commerce The « E-Commerce » tool on the « Configuration settings » section allows you to set up the parameters for e-commerce payment and catalogue management. The setup is done via check boxes. Please take into account that modifications are accepted only after clicking on the « Submit » button.
Type of information
Setting Remarks
E-commerce payment type
• None• Atos• Paypal
If « Atos» or « Paypal» is selected and « Show Catalogue » is enabled for the portal (if «yes» is selected in Administration > Portal > Configuration settings > Portal > Show Catalogue), then the Shopping Cart will be displayed on top right of the screen and the « Ecommerce Management » and the « E-commerce settings » tools will appear in Administration > Portal.
E-commerce catalog type
• Sessions• Courses• Modules
Dokeos has 3 types of catalogue: Courses, Modules and Sessions. Depending on what will be sold, you can choose the appropriate
29

option for your e-commerce.Catalog Currency • USD Dollar
• EuroChoose the currency that will be used for the payment and that will be displayed in the catalogue.
Ecommerce Payment Methods
• Cheque• Installment• Online
Choose the payment method that will be used for your e-commerce.
E-Commerce settingsIn the Portal part of the administration interface the « E-commerce settings » tool will appear when the E-commerce feature has been activated via Administration > Portal > Configuration settings > E-Commerce. Clicking on the link «E-commerce settings» will allow you to configure the E-commerce credentials for Atos or Paypal, depending on the chosen E-commerce type. Complete the Ecommerce payment type form and click the « Submit » button to save the settings.
E-Commerce ManagementIn the Portal part of the administration interface the « E-commerce Management » tool will appear when the E-commerce feature has been activated via Administration > Portal > Configuration settings > E-Commerce. Clicking on the link « E-commerce Management » will allow you to configure the data of the courses, modules or sessions, depending on the chosen E-commerce catalog type.
30

Configure courses for the CatalogueFirst of all, in order for a course to appear on the list of E-commerce management, you have to make sure that this is enabled when creating the course. When you create the course as a Trainer, please make sure that you allow it to be attached to catalogue of products. When you create the course as Administrator, please make sure that payment is allowed.
31

To enable a course for the Catalogue:• From the courses list of E-commerce management simply click on the pencil icon. Please
note that the initial price of the course is 0.00.• Fill in the price of the course in the « Cost field ».• Select « Active » so that the course will appear in the catalogue on the homepage of the
portal.• Select the « Start » and « End » dates to indicate the period that the course will be
available.• Click on the « Submit » button to activate the course for the Catalogue.
The enabled course will appear in the Catalogue of the portal homepage.
32

Configure modules for the CatalogueWhen you activate the E-commerce feature for the first time, there won’t be any module packs or programs available in E-commerce management. Therefore you have to create the module pack or program first. To do this:
• From the E-commerce management page, click on the « Create Programmes » link/icon.• Fill in the « Name » field of the module pack/program.• Fill in the price of the module pack/program in the « Cost field ».• Select « Active » so that the module pack/program will appear in the catalogue on the
portal homepage.• Select the « Start » and « End » dates to indicate the period that the module pack/program
will be available.• Select the Course from where you would like to select the modules. Please note that the
course have to contain modules to be able to do that. Select the module(s) you want to add in the module pack/program.
• Click on the « Submit » button to activate the module/program for the Catalogue.
The enabled module pack/program will appear in the Catalogue of the portal homepage.
33

Configure sessions for the CatalogueWhen you have chosen to use sessions for the Catalogue, all existing sessions will be displayed automatically on the Catalogue of the portal homepage after the E-commerce feature has been activated and « Show Catalogue » is enabled.
These sessions that already have been created will also appear on the E-commerce management page. So if there aren’t any sessions created yet, we suggest doing that first. For more information on creating sessions, please refer to the Sessions chapter in this manual.You can edit an existing session from the E-commerce management page by simply clicking on the
34

pencil icon.
35

Choose the themeThe « Style sheets » tool on the « Configuration settings » section makes it possible to select the main theme of the portal. Keep in mind that the theme of the portal can be replaced by the theme of the course, or the one chosen by the user. The theme by default is « Dokeos Blue ».
36

TemplatesThe « Templates » tool of the « Configuration settings » section makes it possible to modify one of the standard templates provided by Dokeos, or to add a template specific to your organization.Remember, the templates are available during the creation of a multi-media page, in the « Documents » tool.
Modify an existing templateClick on the « Edit » button represented by a pencil, located opposite the templates, to modify.The shown screen gives access to the internal editor of Dokeos, which allows the modification of the selected templates.Do not forget to add a miniature of the modified template in order to update the icon of the templates, in the list seen by the administrator as well as in the list presented to the trainer when creating a multi-media page.Click on the « Submit » button.
List of templates provided by default:
37

38

Add a new templateClick on the link « Add a template» located on top left of the screen.The shown screen gives access to the internal editor of Dokeos, which allows creation of a new template.Do not forget to add a miniature of the modified template in order to update the icon of the template, in the list seen by the administrator as well as in the list presented to the trainer when creating a multi-media page.Click on the « Submit » button.
Remove an existing template permanentlyClick on the « Delete » button represented by a cross, located opposite the templates, to modify.A request for confirmation is shown.Click on « OK » to remove the template permanently, from the list seen by the administrator as well as in the list presented to the trainer when creating a multi-media page.
39

Configure the « Plus » settingsThe « Plus » tool on the « Configuration settings » section allows you to set up the remaining parameters for the portal. The setup is done via fields to be completed or check boxes. Please take into account that modifications are accepted only after clicking on the « Submit » button.
Type of information
Setting Remarks
Course homepage design
• Two columns view• Three columns view• Activities view
Manage the display of tools on the courses home page.
Tools shortcuts • No• Yes
If « yes » is selected, the list of the visible tools is shown in the form of icons, in lower part of the navigation bars.
Group categories • No• Yes
If « yes » is selected, it authorizes the trainers to create categories in the «Groups» tool.
Server Type • Production server• Test server
Enabling the test (or development) server shows translation feature functional that indicates untranslated strings.Enable « Production server » for an active portal.
Who’s Online • Display number of users online in this course
Information is shown on bottom right of the screen.
40

• Display number of users online on all pages (visible for the persons who are logged in)
• Display number of users online on the login page (visible for the world)
Allow users profiling inside course
• No• Yes
If « yes » is selected, it allows the trainer to create new fields for the « Profile » tab.
Display Code in course name
• No• Yes
If « yes » is selected, the shown code is the one chosen by the trainer during the creation of a course. This code is used on the server to create the file in which all the elements of a course are stored.
Display trainer in course name
• No• Yes
If « yes » is selected, the name of the responsible trainer(s) appears besides the name of the course, on all screens where it is listed.
Dropbox: Can documents be overwritten
• No• Yes
If « no » is selected, the users can preserve various versions of a document (versioning mechanism).
Dropbox: Maximum file size of a document
• Field to be completed• 100000000
Maximum size (in bytes) of a document in the « Dropbox » tool.
Type of information Setting Remarks
Dropbox: Upload to own dropbox space
• No• Yes
If « yes » is selected, trainers and users can upload documents to their dropbox without sending the documents to themselves
Dropbox: Learner <-> Learner
• No• Yes
If « yes » is selected, a peer to peer connection is simulated in the «Dropbox » tool .If not, only the trainer can receive documents.
Dropbox: Allow group • No• Yes
If « yes » is selected, users can send files to groups
Dropbox: Allow mailing • No• Yes
If « yes » is selected, the trainer can send a personal document to each user.
Portal Administrator: telephone
• Optional text field to complete
• (000) 001 02 03
Extended profile • No• Yes
The extended profile offers the fields below, in addition to the usual fields.If « yes » is selected, the fields of the extended profile will be shown to the users in the «Profile » tab.
41

Enable learner view • No• Yes
If « yes » is selected, a link «Learner View» appears on top right of the screen.Clicking on this link makes it possible for the trainer to see the screens of a course as a trainee would see them, in order to validate the elements of the course (useful when the trainer has used the visibility/invisibility of certain elements).
Display course navigation menu
• No• Icons only• Icons and texts• Texts only
If « no » is not selected, it displays a navigation menu on the right side of the screen, with the icons and/or text of the available tools.
Page after login • Homepage• Courses
If « Homepage » is selected, the registered users see a page identical to the home page of the portal.If « Courses » is selected, then the shown page lists all the courses to which the trainee is registered (or all courses created by a trainer, if necessary).
Time limit on Who Is Online
• Field to be completed, value in minutes
• 30
Specify for how long after its last action a user still is regarded as connected to the portal.
Type of information Setting Remarks
Course homepage breadcrumb
• Code• Course• Course home• Session and course
name
Enables the horizontal links navigation system usually in the top left of your page, allowing to quickly reach the various sections of a course.
Example material at course creation
• No• Yes
If « yes » is selected, a series of examples (in the « Documents » or « Quizzes » tool) is created in each new course.
Account validity • Fields to be completed, in days
• 3660
Automatically deactivate a user account X days after his registration.
Show e-mail addresses • No• Yes
If « yes » is selected, the e-mail addresses are shown to everyone in the « Users » tool.
Show courses number • No• Yes
If « yes » is selected and if the courses categories are listed on the home page, the number of courses contained in each category is shown.
Show empty categories • No• Yes
If « yes » is selected and if the courses categories are listed on the home page, the categories, not containing course yet, is shown.
Show back links from • No Facilitate navigation in the categories and
42

categories/course • Yes subcategories of courses by showing an additional link to go back to the preceding screen.
Show course languages • No• Yes
If « yes » is selected and if the courses categories are listed on the home page, the language in which a course is conceived is shown (which perhaps differs from the portal language).
Split users' upload directory
• No• Yes
On high-load portals, where a lot of users are registered and send their pictures, the upload directory (main/upload/users/) might contain too many files for the filesystem to handle (it has been reported with more than 36000 files on a Debian server). Changing this option will enable a one-level splitting of the directories in the upload directory. 9 directories will be used in the base directory and all subsequent users' directories will be stored into one of these 9 directories. The change of this option will not affect the directories structure on disk, but will affect the behaviour of the Dokeos code, so if you change this option, you have to create the new directories and move the existing directories by yourself on the server. Be aware that when creating and moving those directories, you will have to move the directories of users 1 to 9 into subdirectories of the same name. If you are not sure about this option, it is best not to activate it.
Hide DLTT Markup • No• Yes
Hides the normally shown specific code when a variable of a language is not translated.
Type of information Setting Remarks
Display categories on home page
• No• Yes
Showing courses by categories, empty courses, closed courses is dependent on this parameter setting.
Character set • Drop-down list, closed choice
• iso-8859-15
To modify only in the case of certain languages (Russian, Japanese).
No-reply e-mail address • Optional field to complete• Empty by default
Email address that will be used when e-mail is sent from the platform while specifically requiring not answering it.This address should ideally be set at the server to ignore / delete any incoming mail automatically.
Gradebook activation • No• Yes
The « Gradebook » tool makes it possible to assess competences. The activation of this tool can however complex the interface. Please take
43

note of the « Trainer » documentation for more information on the « Gradebook » tool and its impact on the interface, before activating it.
Thresholds coloring • Enable thresholds
Levels labeling • Enable Ranking
Threshold • Field to be completed• 50
Display score upper limit • Enable score upper limit display
User theme selection • No• Yes
If « yes » is selected, this parameter will allow each user to choose his/her own style.By default the style of the portal will however remain unchanged.If a course or a session has a visual theme assigned, this one will take precedence over the theme selected by the user.
Allow course themes • No• Yes
If « yes » is selected, it allows to select a theme for each course and thus to modify appearance for the user.When a user enters the course, the style sheet of the course will have priority over the user's own style sheet and the platform's default style sheet.
Showing the parameter settings of the « Gradebook » tool, with Trainer View:
44
Type of information
Setting Remarks
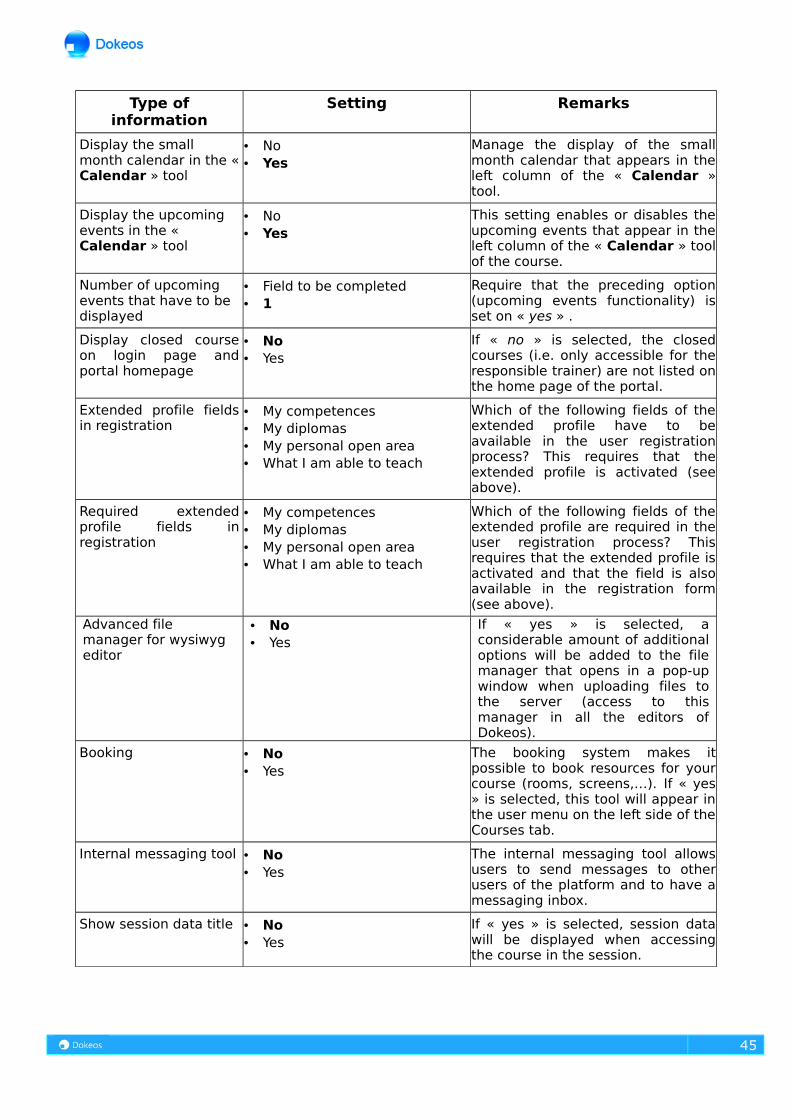
Display the small month calendar in the « Calendar » tool
• No• Yes
Manage the display of the small month calendar that appears in the left column of the « Calendar » tool.
Display the upcoming events in the « Calendar » tool
• No• Yes
This setting enables or disables the upcoming events that appear in the left column of the « Calendar » tool of the course.
Number of upcoming events that have to be displayed
• Field to be completed• 1
Require that the preceding option (upcoming events functionality) is set on « yes » .
Display closed course on login page and portal homepage
• No• Yes
If « no » is selected, the closed courses (i.e. only accessible for the responsible trainer) are not listed on the home page of the portal.
Extended profile fields in registration
• My competences• My diplomas• My personal open area• What I am able to teach
Which of the following fields of the extended profile have to be available in the user registration process? This requires that the extended profile is activated (see above).
Required extended profile fields in registration
• My competences• My diplomas• My personal open area• What I am able to teach
Which of the following fields of the extended profile are required in the user registration process? This requires that the extended profile is activated and that the field is also available in the registration form (see above).
Advanced file manager for wysiwyg editor
• No• Yes
If « yes » is selected, a considerable amount of additional options will be added to the file manager that opens in a pop-up window when uploading files to the server (access to this manager in all the editors of Dokeos).
Booking • No• Yes
The booking system makes it possible to book resources for your course (rooms, screens,…). If « yes » is selected, this tool will appear in the user menu on the left side of the Courses tab.
Internal messaging tool • No• Yes
The internal messaging tool allows users to send messages to other users of the platform and to have a messaging inbox.
Show session data title • No• Yes
If « yes » is selected, session data will be displayed when accessing the course in the session.
45

Type of information
Setting Remarks
Allow the definition and use of sub-languages
• No• Yes
If « yes » is selected, you will be able to define variations for each of the language terms used in the platform's interface, in the form of a new language based on and extending an existing language. You will find this option in the languages section of the administration panel, in the shape of a plus icon.
Show glossary terms in documents
• Automatic: adds links to all defined glossary terms found in the document
• Manual: shows a glossary icon in the online editor, so you can mark the terms that are in the glossary and that you want to link
• None: doesn't add any glossary terms to the documents
Defines how to add links to the glossary terms from the documents created in the internal editor of Dokeos.
The definition in the glossary is shown within a framework when the pointer is rolled over the word located in the document.
Show the glossary terms in extra tools
• No• Yes
If « yes » is selected, it allows to configure how to add the glossary terms in extra tools as Modules and Quizzes.
mimeTEX mathematical editor
• No• Yes
If « yes » is selected, an additional icon is installed in the editor. The mimeTEX mathematical editor will be displayed when clicking on this new icon.
Allow students to insert videos from YouTube
• No• Yes
Manage the possibility for the students to insert (or not) YouTube videos via activation/deactivation of the corresponding icon in the editor of the group documents.
Allow students to download directories
• No• Yes
Allow students to pack and download a complete directory from the documents tool.
What events have to be displayed in the calendar?
• Global calendar• Quiz events• Session events
The calendar cannot only display the events that you add to the calendar application but it can also display other time-related information like sessions, platform events, quiz date information, assignment expiry dates, ...
Mindmap converter • No• Yes
If « Yes » is selected, the Mindmaps are converted by the server. Requires in this case that DokeosMind is installed and operational on the server.
Detail view of calendar items
• Detail view of calendar items
• Edit view of calendar items
What has to be displayed when somebody clicks on an event in the calendar?
Calendar Navigation • In the actions bar
• As part of the calendar
Where does the calendar navigation have to be displayed?
46

Display feedback messages (*)
• No• Yes
Manages the activation/deactivation of certain feedback.
Can regular users manage the calendar?
• No• Yes
If « Yes » is selected, regular users can add, edit or delete events.
Can users manage the group agenda?
• No• Yes
If « Yes » is selected, it allows users to manage the group agenda and they can add, edit or delete events that are targeted at one or more of the groups the user is member of.
Enable Captcha • No• Yes
If « Yes » is selected, it secures the self-registration by adding a Captcha field that the user must manually copy. In this case, it helps to limit pollution by spammers.
Number of announcements in the list
• Field to be completed
• 8
How many announcements have to appear in the list on the left of the announcements tool?
Calendar export all events
• No• Yes
Provide a link to export all events of the calendar tool at once?
Enable Contextual help (*)
• No• Yes
If « Yes » is selected, a contextual help appears under the header of the platform, in various screens.
Display the breadcrumbs (*)
• No• Yes
If « Yes » is selected, it displays a « breadcrumbs » facilitating the navigation between screens.
Fields of group scenario
• Announcements• Calendar• Description• Documents• Forum• Max number of
users• Private or public
group• Group
registration• Group
unregistration• Wiki• Assignments
Which of the following fields have to be available when adding or modifying a group scenario?
Max upload file size in messages
• Field to be completed
• 20971520
Maximum size for file uploads in the messaging tool (in Bytes)
Show category in Quiz (*)
• No• Yes
If « Yes » is selected, it displays a tool to create categories to manage the quiz.
Automatic email templates (*)
• No• Yes
If « Yes » is selected, an « Automatic emails » link is added to the « Portal » section of the administration interface. This function is detailed in « Chapter 10: Configure automatic e-mails » of this manual.
Automatic groups filling
• No• Yes
When a user is registered to a course or session, add him/her to a group in course.
Create groups if no seats available
• No• Yes
When there are no seats available in Groups for automatic registration, add a group.
No of seats in groups • Field to be completed
Number of seats to allot in a newly created group.
47

• 20Email alerts user subscribed to the Session
• No• Yes
If « Yes » is selected, an email notification is sent when a user is registered to a session.
Installation date • Info displayed Displays the installation date of the portal.
48

Chapter 2: Create Portal BackupFor security reasons, as well as for record and reusability, it is prudent to create a backup of the entire portal. The « Portal » section of the administration interface allows this, thanks to the « Portal Backup » tool. This Portal Backup process is automated. It offers the choice between creating a complete backup of the portal, or select items if you want to export courses containing sessions. To make sure the sessions are included in the export, it is necessary to select them from the list. To start the backup:
• Click the « Portal Backup » link. • On the page that appears, choose to generate a full backup, or select items (to choose from
the next screen). • Finally, to start the backup procedure, click on the « Create a backup » button or the
« Submit » button after you have selected the items. The backup is available as a downloadable ZIP file that can be stored on your hard drive and simultaneously in the form of a compressed file stored on the server where Dokeos is installed.
49

Chapter 3: Create an announcement (news)The « Portal » section of the administration interface comprises a tool for creating and distributing announcements (news). Very easy to use, this tool makes it possible to format contents and to make it visible for a selected public (unidentified trainers and/or learners and/or users) during a certain amount of time.
Create and distribute an announcementClick on the link « Add a news » located on top left of the screen.
In the screen which is shown, you must:• Name the announcement• Select the language• Write and format the contents of the announcement in the internal editor• Define a start and completion date to display the announcement• Choose the public recipient of the announcement• If required tick off the box « Send mail »• Click on the button « Add news »
The headings of the announcements are shown on the home page of the portal, their contents being detailed while clicking on the title of each announcement:
50
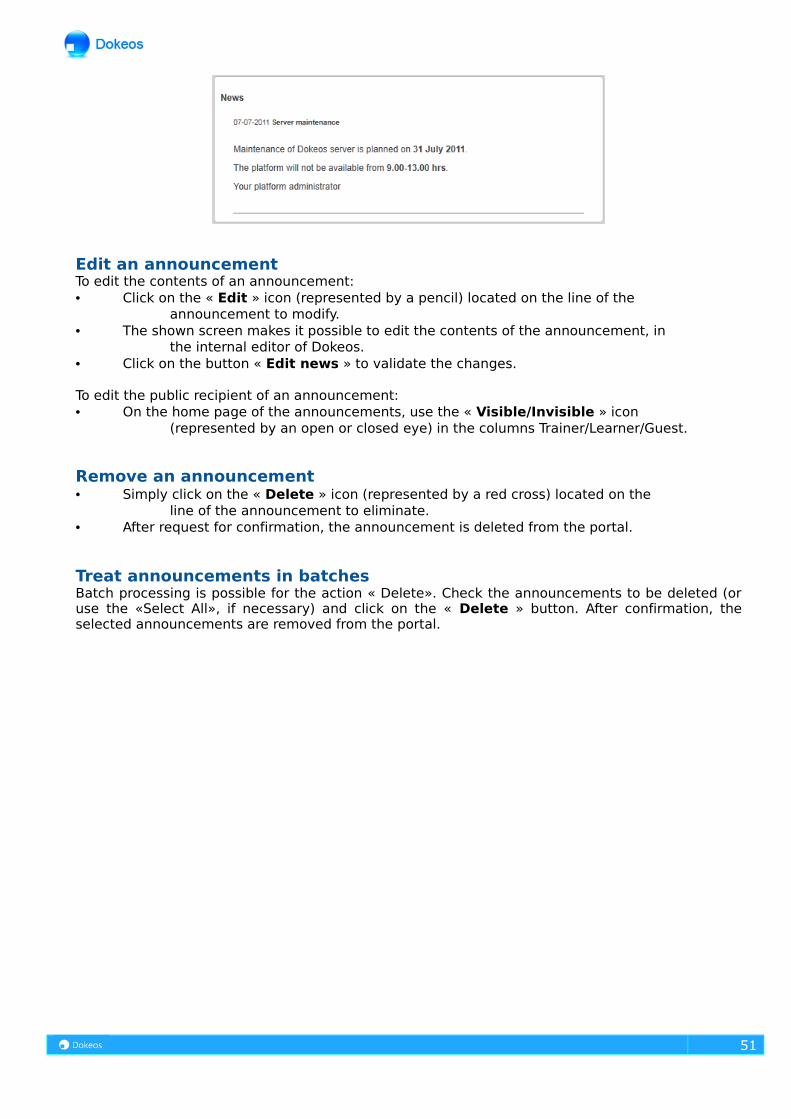
Edit an announcementTo edit the contents of an announcement:• Click on the « Edit » icon (represented by a pencil) located on the line of the
announcement to modify.• The shown screen makes it possible to edit the contents of the announcement, in
the internal editor of Dokeos.• Click on the button « Edit news » to validate the changes.
To edit the public recipient of an announcement:• On the home page of the announcements, use the « Visible/Invisible » icon
(represented by an open or closed eye) in the columns Trainer/Learner/Guest.
Remove an announcement• Simply click on the « Delete » icon (represented by a red cross) located on the
line of the announcement to eliminate.• After request for confirmation, the announcement is deleted from the portal.
Treat announcements in batchesBatch processing is possible for the action « Delete». Check the announcements to be deleted (or use the «Select All», if necessary) and click on the « Delete » button. After confirmation, the selected announcements are removed from the portal.
51

Chapter 4: Languages
The « Portal » section of the administration interface allows, thanks to the « Languages » tool, to define what languages appear in the drop-down list visible on the portal home page. These same languages will be shown to the trainer during the creation of a course, which makes it possible to dissociate, if necessary, the portal language to that of the course.
Make a language available/not availableOn the home page of the languages, use the « Visible/Invisible » icon (represented by an open or closed eye) to make a language available/not available on the portal.
Edit the name of a languageUse the « Edit » icon (represented by a pencil) to change the name of a language, or to possibly transform the selected language into portal language by default.A click on the button « Validate » is necessary to save the modifications.
Select a language by default for the portalFastest is to click on the button « Set language as default » (represented by a globe).The changes are accepted after confirmation.
52

Chapter 5: Edit the home page
53

Tricks and easy ways: Customizing your Dokeos homepage
This will implement a lightweight Content Management System (CMS) and help you articulate deep course processes with surface information (courses catalogue, commercial website, company intranet...).
Login as admin > go to Administration tab > Portal > Edit portal homepage and:Add a nice image in the Central Area. Select or build an image that helps understand
what the portal is about. Resize it (using tools like GIMP or Photoshop) to values like 720x 250 pixels. In our example, the image addresses a metro company employees: it recycles a metro lines image to present the course program as a pathway towards skills improvement.
In the right hand menu, add web pages through the "Add a page (CMS)" tool. In two steps : (A) Add a page (remove the "http://" that appears there), (B) edit (yellow pencil) the page create and type your text (basic layout = text + title + one trainer picture aligned right).
Edit the homepage notice there too (important messages to your visitors) Go back to Administration tab - top middle- and enter Portal > Portal news to add news. To have news visible only before login, check Guest target group only.
Multilingual: if you manage a multilingual portal take into account that the language selector on top of the Portal Homepage Edition page decides for which language your changes will be active. In other words, in a bilingual portal you will have to edit 2 homepages, 2 sets of links and 2 sets of news.
Below: portal homepage editing
54

The « Portal » section of the administration interface allows, thanks to the tool « Edit portal homepage », to personalize the home page of the portal.
Edit the homepage A click on the link « Edit » gives access to the internal editor and the possibility to edit the Dokeos homepage.
Edit the course categoriesClick on the link « Edit course categories » to return towards another part of the administration interface, allowing to add/modify/delete the course categories by default.This functionality is detailed further in the documentation.
Insert links on the home pageA click on the « New page » link/icon gives access to a screen making it possible to insert a link towards another part of the site or to another site.To let the user not lose the context of the portal, and open the link in a new window, click on the « Yes» box.
Place a standard announcement on the home pageA click on the link « Edit notice » gives access to a screen allowing the drafting of a simple announcement (title and contents), without any difficulty.
55

Chapter 6: Customize registrationThe « Portal » section of the administration interface allows, thanks to the tool « Registration page », to add a customized message displayed above the registration form.
Create the messageA click on the « Edit » link provides access to the internal editor and the ability to enter and format the message.
56

Chapter 7: Consult portal reporting
The « Portal » section of the administration interface allows, thanks to the « Reporting » tool, to show various indicators of portal tracking: indicators related to courses, users and system.The list below shows the indicators available. The majority of them are shown in the shape of bar graphs.
57

Chapter 8: Global calendar
The « Portal » section of the administration interface allows, thanks to the «Global calendar » tool, to inform portal users.
Add an event to the global calendar• Click on the link « Add a global event »• Complete the fields « Start Date » and « End Date »: you can help yourselves with
the calendar-support while clicking on the button « Submit »• Add the name of the event • Add a description of the event• Finally click on the button « Submit » to add the event to the list.
58

Chapter 9: Create Certificate Templates
The « Portal » section of the administration interface allows, thanks to the « Certificate Templates » tool, to modify one of the standard certificate templates provided by Dokeos, or to add a certificate template specific to your organization.Remember, the certificate templates are available in the Scenario settings of the « Quiz » tool.
Modify an existing certificate templateClick on the « Edit » icon represented by a pencil, located underneath the template, to modify.The shown screen gives access to the internal editor of Dokeos, which allows the modification of the selected template. Do not forget to add a miniature of the modified template in order to update the icon of the template, in the list seen by the administrator as well as in the list presented to the trainer when using certificates in quizzes.Click on the « Submit » button.
59

60

Add a new certificate templateClick on the link « ADD TEMPLATE » located on top left of the screen.The shown screen gives access to the internal editor of Dokeos, which allows creation of a new template.Do not forget to add a miniature of the modified template in order to update the icon of the template, in the list seen by the administrator as well as in the list presented to the trainer when using certificates in quizzes.Click on the « Submit » button.
61

Remove an existing certificate template permanentlyClick on the « Delete » button represented by a cross, located underneath the template, to modify.A request for confirmation is shown.Click on « OK » to remove the template permanently, from the list seen by the administrator as well as in the list presented to the trainer when using certificates in quizzes.
62

Chapter 10: Configure automatic e-mails
The « Portal » section of the administration interface allows, thanks to the « Automatic emails » tool, to customize the content of the emails which are automatically sent to users after registration and after correction of a quiz by the trainer.
Modify the contents of an automatic emailA click on the « Edit » icon represented by a pencil, gives access to a screen where the following can be modified:
• The title of the automatic email• The language in which it is supposed to be sent• Contents of the email
Certain elements of the contents appear between braces. These elements are automatically replaced by Dokeos before sending of the email. For proper formatting of e-mails, do not modify the elements between braces!
63

PART 3Management tools of the users
The « Users » section of the administration interface allows:
• To carry out a multi-criteria search to find a
user,
• To carry out all management tasks of the users
(courses/trainees),
• To add a user,
• To export the users list from the portal,
• To import a CSV or XML users list,
• To enrich the headings of the « Profile » tab.
64

Tips and tricks: import users
Throughout your course project you will have to register users in Dokeos. There is a tool for that in the portal administration. This operation will be able to meet several objectives: add users, but also add courses to a user (one reintroduces an existing user by assigning courses to him) or to amend in only one operation of several users.During all these steps, Dokeos will use the identifier (or username or Login) as single identifier to know if two registrations correspond to the same person.To import users in Dokeos:
To build a list of these users in Excel or Openoffice
Attention to the following points:• the first line of the file must mandatorily contain the column name required by Dokeos, with
exactly the same orthography and the same breakdown: LastName, FirstName, Email etc,• no semicolon in the fields (because the point comma will be used as separator of fields),• the fields of the columns LastName, FirstName and Email cannot be empty,• Only the columns LastName, FirstName and Email are mandatory. The others are optional. If you
do not wish to specify the other values, remove or avoid adding the corresponding columns.
To export this list in CSV format
Excel and Openoffice enable you to export the users list in CSV format.For that, choose: « Save As », unroll the list of formats types and select CSV (sometimes called « Text (CSV) »).During this export Excel and Openoffice propose to you « to publish the filter parameters » (sometimes formulated in other words according to the versions of Excel).Select this option in order to choose the semicolon as delimitor of fields (this is mandatory to import them in Dokeos).If possible, open a simple type text editor « Notepad» (Start Menu > Accessoires > Notepad) and open created CSV file there, in order to check that the separator is indeed the point comma, that the first line mentions the names required by Dokeos to be able to record the users correctly, and that none of the first three columns contains empty fields (an empty field corresponds here to a succession of two
65

semicolons).
To import CSV list in DokeosLogin to your Dokeos portal as an administrator. Enter Administration > Users > Import users list. Browse your hard drive via the Browse button and select the CSV file that you created. Select File type: CSV, Send a mail to users: yes.
Caution: Password and username values correspond in French to the password and the login (or «identifier») of the user. If these columns are filled in your CSV file, Dokeos will record the values that you propose. If these columns are empty or missing, Dokeos generates values according to a random criterion. It is then imperative that you select the box « Send a email to the user» at the time of the import, because if not nobody will know his password (it is however still possible for the user to use the function « I lost my password» presented on the home page of the portal in order to have it sent).
Chapter 1: Search and advanced search
66

The search and advanced search tools make it possible to find all the users who meet the given criteria.
You will use more easily the simple search field to find a single user. It is enough for you to seize a character string (incomplete name, portion of e-mail address, etc…) and the search tools return all the users that contain the required information.
For a search based on refined criteria, the advanced research tools propose several criteria, it is thus easy to isolate the trainers or the trainees, unless you do not wish to seek all the trainees whose e-mail address contains for example @yahoo.fr. In this case, the two search criteria return the list of the users considered.
Once the user (or users) is (are) found, several management tools is at your disposal.These tools are described in detail in the following chapter.
67

Chapter 2: « Users list » tool
The « Users list » tool provides the list of the people registered on the portal. You will use this tool to manage the list of the users, to inform you on the courses to which they are registered, to assign a role or responsibilities to them… The « Users list » tool allows also the reporting of activities of the various trainees.
Activate an accountIf the administrator has set the registrations so that self-registrations are authorized after approval, then the new registered users on the portal see their account blocked until you click on the icon represented by a prohibited direction.Consequently, the icon is transformed into a white tick off mark on green bottom, signing that the new user can freely reach the platform.
Consult the courses list of a userA click on the icon « Courses » shows a pop-up list of the courses to which the trainee is registered, or lists it courses managed by a trainer.You will use this functionality only for the consultation, the « Information » tool described below is much more powerful.
68

Consult the information attached to a userA click on the icon « Information » shows a screen where all the information attached to a user is
gathered.
Since the preceding screen, the possible functionalities are the following ones:
Functionality Description and standard screenReporting of the activity of a user:
Shows the individual report of a user and gives access the detailed reporting of activities in each course:
Relative information of
course:
Shows the details of a course:• Internet Addresses gives directly access to the home page of the course• List tools and documents of the course
• List registered users
69

Homepage of a course:
Gives access to the home page of the course, viewed as the responsible trainer, and with the same rights. The administrator can thus modify/enrich any course from the portal.
Edit information of a course:
Displays extended properties of course by completing the properties on which the responsible trainer may involve other specific administrator:
70

Login as a userA click on the icon « Login as » modifies temporarily information of identification of the administrator so that he can endorse the identity of a user, trainee or trainer.Once identified, the administrator can act as if he were the trainee or the trainer considered.
Get reporting of a user
A click on the icon «Reporting» gives access to detailed reporting of activities in each course.
You will note here that the reporting of trainer is not available, only the activities of a trainee can be followed.
Modify the relative information of a userA click on the icon « Edit » shows the individual management screen of the user.
You can modify here any type of relative information of the selected user:
71

Remove a userA click on the icon « Delete » removes the platform user permanently, after request for confirmation.
A trainer cannot be removed permanently in the condition of not being responsible for course any more, which the administrator can decide by modifying information of a course, as described in the preceding page.
72

Chapter 3: « Add a user » toolThe « Add a user » tool authorizes an individual registration on the portal.The administrator has thus the leisure to register either a trainee, or a trainer.The fields to be completed are illustrated by the screenshot below, only those marked with an asterisk are mandatory.
73

Chapter 4: « Profiling » tool
The « Profiling » tool makes it possible to create additional fields appearing in the « Profile » tab and exploitable to sort the users when the administrator registers them to the course itself.
Add a profile fieldTo complete the various fields make sure to:• Use only letters and figures for the « Label » field
• Separate the possible values by semicolons for the following types: « Select drop-down » , «Multiple selection drop-down » and « Double select » (in this case with a vertical separation | for different options of selection boxes)
74
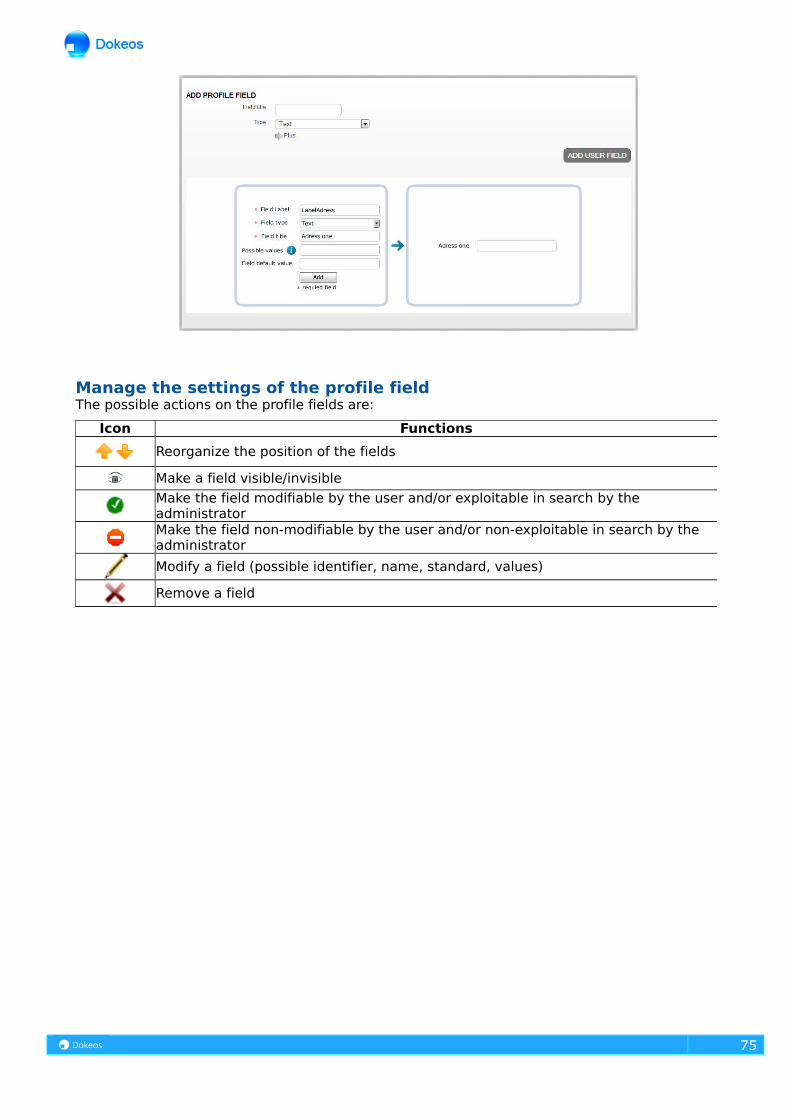
Manage the settings of the profile fieldThe possible actions on the profile fields are:
75
Icon Functions
Reorganize the position of the fields
Make a field visible/invisible
Make the field modifiable by the user and/or exploitable in search by the administratorMake the field non-modifiable by the user and/or non-exploitable in search by the administrator
Modify a field (possible identifier, name, standard, values)
Remove a field

Chapter 5: « Export » tool
The « Export » tool allows the backup of the following list of users:• Portal
or• Registered users of a particular course
If you leave the field « Learners in course » empty, all the users registered on the portal will be exported in a file. The formats of export are:• XML• CSV
76
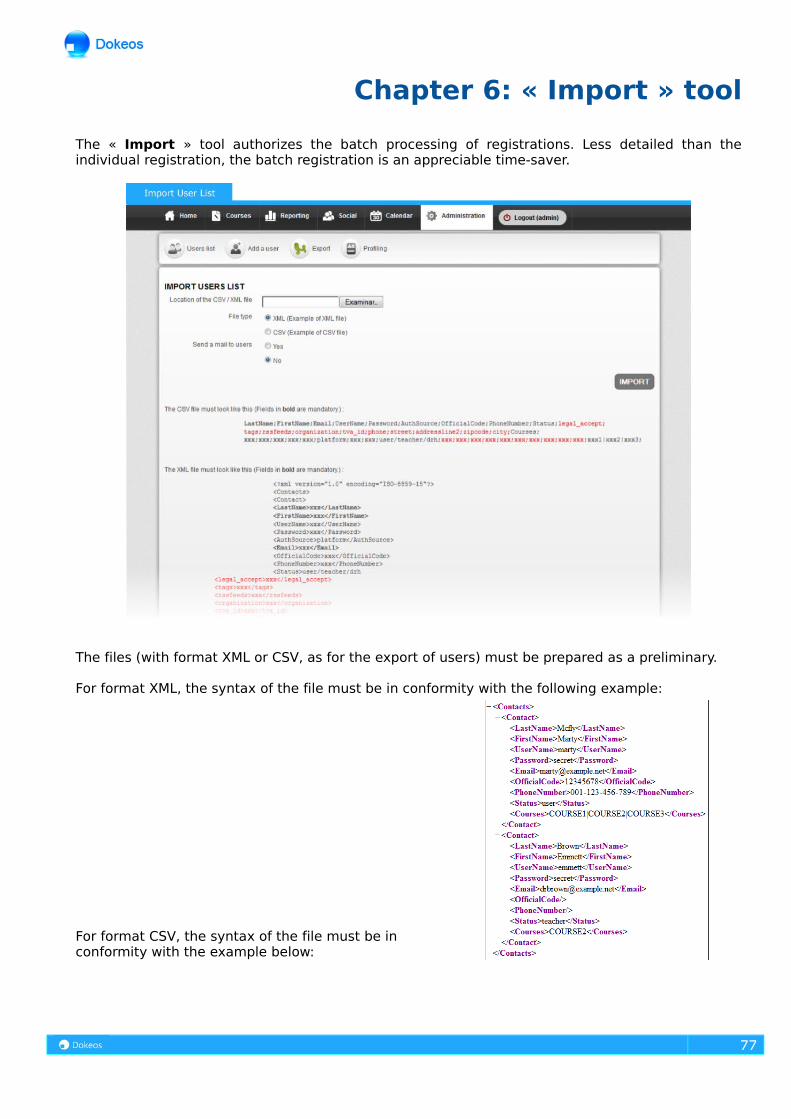
Chapter 6: « Import » tool
The « Import » tool authorizes the batch processing of registrations. Less detailed than the individual registration, the batch registration is an appreciable time-saver.
The files (with format XML or CSV, as for the export of users) must be prepared as a preliminary.
For format XML, the syntax of the file must be in conformity with the following example:
For format CSV, the syntax of the file must be in conformity with the example below:
77

78

Chapter 7: « HR Management » tool
The « HR Management » tool makes it possible to automatically assign new portal users, who register themselves via the Registration form which is accessible via the portal homepage, to a certain HR Manager. The selected HR Manager will become the main HR Manager. From the Edit User Information screen it’s also possible to assign a user to a certain HR manager.
PART 4Management tools for Course
79

The « Courses » section of the administration interface allows to:
• Undertake a multi-dimensional search to find a
course,
• Perform all management tasks around course,
• Establish a course individually or in batches,
• Manage the categories of course,
• Add users to a course, individually or in batches.
80

Chapter 1: Search and Advanced Search
The « Search and Advanced search » tools can retrieve all courses that meet a set of criteria.
The results returned by the search tools are presented in the form of a list and make it possible to carry out several operations.
In addition to the code of the course, a colored icon allows identification at first glance:
Open - access allowed for the whole world
81

Open - access allowed for users registered on the platform
Private access (course reachable only by people on the users list)
Completely closed - the course is only accessible to the trainers
The search results screen provides access to the following functions/features:
Functionality Description and standard screenInformation on
course:Displays the details of course:• Web address to directly access the homepage of the course• List of the tools and course materials (documents)• List of registered users
Homepage of the course:
Provides access to the considered home page of the course, with Trainer View, and with the same rights. The administrator can modify / add any course on the portal.
Reporting of activity in a
course:
Shows tracking of activity of users registered to the selected course and allows access to individual reporting of each course:
Also allows reporting of course in terms of tools used:
82

Functionality Description and standard screen
Modify the information of a
course:
Displays extended properties of course by completing the properties on which the responsible trainer may involve other specific administrator:
Remove a course: Delete permanently the selected course, after request for confirmation.
Gives access to the backup tools / import of a backup of a course,
The previous tools also appear when you request the display of all courses on the portal via the tool « Course List ». This tool will not be detailed in a separate chapter.
83
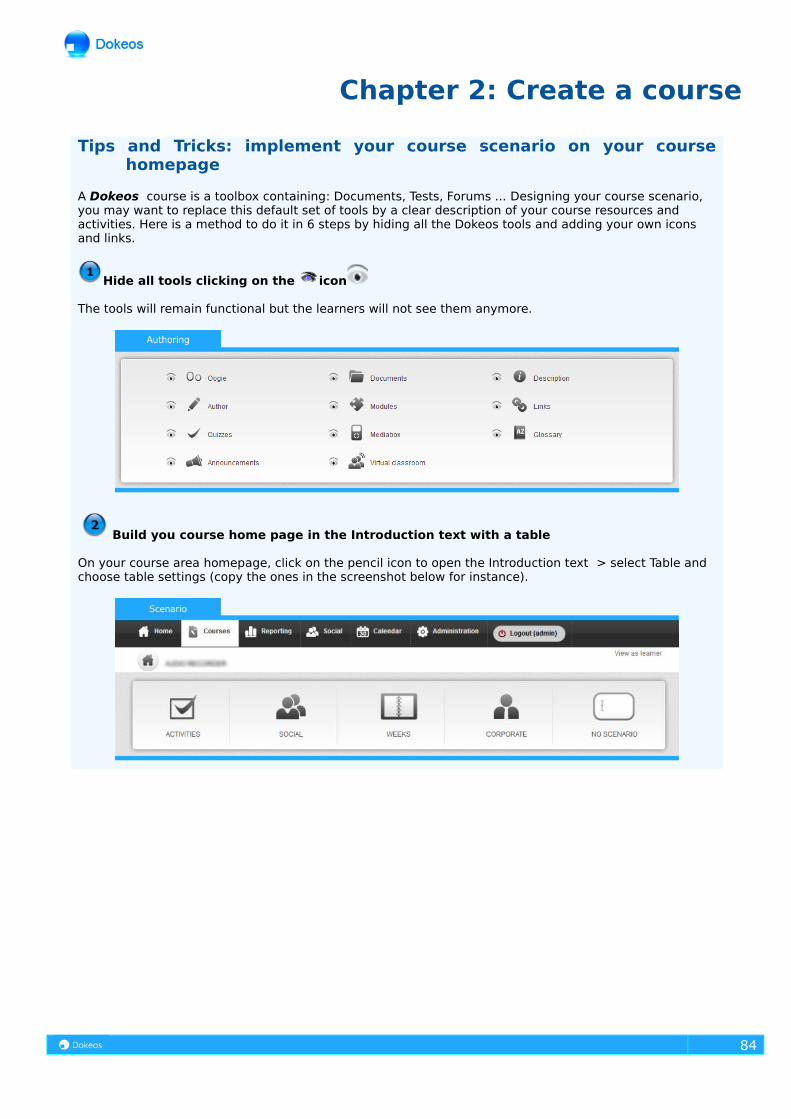
Chapter 2: Create a course
Tips and Tricks: implement your course scenario on your course homepage
A Dokeos course is a toolbox containing: Documents, Tests, Forums ... Designing your course scenario, you may want to replace this default set of tools by a clear description of your course resources and activities. Here is a method to do it in 6 steps by hiding all the Dokeos tools and adding your own icons and links.
Hide all tools clicking on the icon
The tools will remain functional but the learners will not see them anymore.
Build you course home page in the Introduction text with a table
On your course area homepage, click on the pencil icon to open the Introduction text > select Table and choose table settings (copy the ones in the screenshot below for instance).
84

Add icons to illustrate the key features of your courseYou can alternatively use the default icons from the images gallery or add your own through Browse > Send.
Go to one of the pages you want to be a target for a link and copy its address from the address bar
85

A web link is a connection between an origin page and a destination page. You need to start by copying the address ot the target and then create the link on the origin page. Select any page and Ctrl+c or right-click+copy in the address bar.
Paste the link on top of an image in Introduction textGo back to course area Introduction text > edit it > select an image > click the link button and paste the link on top of image. Repeat for all icons.
You end up with a clear course homepage that links only to the pages and activities you designedDokeos toolbox does not appear anymore. You customized your environment and adapted the software to
86

your pedagogical scenario.
Conclusion : pedagogy at stakeLinking things together your own way is powerful. Consider using the same idea in other situations :• linking the feedback of a test to a theory page (you may want to use the Popup option of the link feature)• linking the course area Introduction text to a learner production so as to point other learners to an example good practice• (...) all connections that your imagination will consider relevant
In Dokeos, every resource or learning object has an address (also called URL). It is visible in the address bar on top of your browser andcan become the target of a link.
87

Create a courseThe tool for creating course is very similar to that shown to the trainers.As an administrator, you can however:• Choose a « main » trainer in the drop-down list « Main Trainer »• Choose several trainers (which however will have the same rights
as the « main » trainer) from the « Trainers » list.
You just have to define:
• A code for your course (make sure to choose a code referring to the style of course, combined with a numerical classification: CAO001 or ANGLAIS004 for example). If defined in lowercase, then the course code will be automatically converted to uppercase by Dokeos. Similarly, the characters -, _ and space will be eliminated from the code,• A clear and detailed name,• A category from the drop-down list, and which you can manage as an administrator,• The language used to display the environment of your course (nothing prohibits you to choose English, even if the portal is installed in French). The choice of language will not influence the content of the course, just the working environment in which your content is displayed,• Access authorizations,• The possibilities for subscribe / unsubscribe,• The disk space (similar to the default parameter setting of the portal).
Memo: Controlling access to a courseDuring the construction phase, it is preferable not to allow participants to access the course: it is always disappointing for a trainee to discover unfinished or missing elements; he will hardly be motivated to return, even if in the meantime you have time to finalize your production.
88

You can modify the properties of your course, so that it is (temporarily) not available to trainees.A common use is as a first step to close all access to the course (check « Course access >> Completely closed » and « Subscription >> This function is only available to trainers », see screenshot below) during its design period: no access except for the person in charge of the course, no registration possible for other users. Then you can allow entry to the course but not access (leave the box « Course access >> Completely Closed » selected and click « Subscription >> Allowed»), and the time required so that each participant is registered.Finally, you can close the registrations and allow access to course only for registered users (click on « Course access >> Private Access» and « Subscription >> This function is only available to trainers », not without having removed the possible intruders as a preliminary by using the functionalities of the tool « Users ».
Some organizations prefer not to use this method and use a centralized administrative registration. In this case, the participants do not have the opportunity to enroll in the course; only the person in charge of the course can give access to them.
Create courses in batchesAccording to the same principle as to import users in batches, you can prepare a list of courses to be created in only one operation, in a file CSV.
The format of the file is detailed in the screenshot below:
89
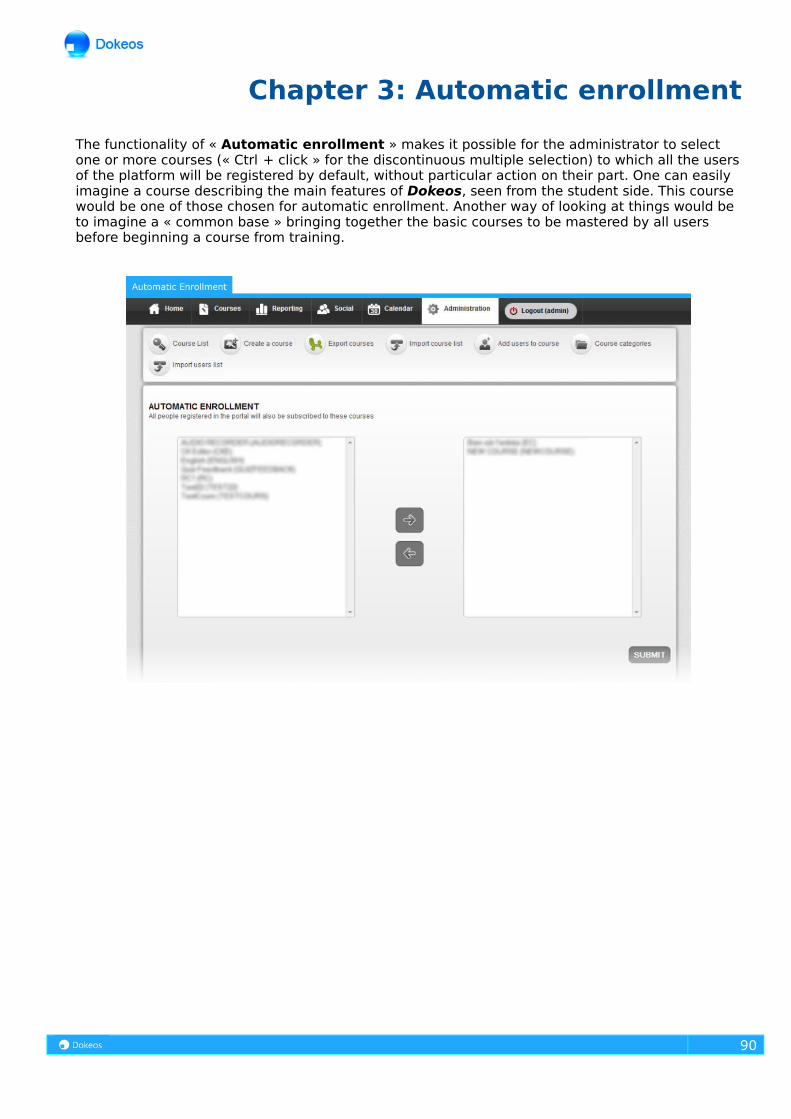
Chapter 3: Automatic enrollment
The functionality of « Automatic enrollment » makes it possible for the administrator to select one or more courses (« Ctrl + click » for the discontinuous multiple selection) to which all the users of the platform will be registered by default, without particular action on their part. One can easily imagine a course describing the main features of Dokeos, seen from the student side. This course would be one of those chosen for automatic enrollment. Another way of looking at things would be to imagine a « common base » bringing together the basic courses to be mastered by all users before beginning a course from training.
90

Chapter 4: Export courses
The « Export courses » feature (not to be confused with the backup of courses) generates a CSV file listing the following information:
• Course code • Title • Category to which the course is attached• Trainer • Language of the course
Chapter 5: Register users
Based on a very simple principle, the registration of users to courses is done by:
91

1. The discontinuous (« Ctrl » key down) or continuous (« Shift » key down) multiple selections of users in the
left box.2. The discontinuous (« Ctrl » key down) or continuous (« Shift » key down) multiple selections of course in the
right area.3. A click on the button « Add users to courses »
To facilitate the work of selection, you can use (both for the users and for the course) sorting by first letter.You can also carefully create new profile fields (see Part 3, Chapter 6) and authorize the filter of the fields: for example, create a profile field called « service » in order to be able to isolate all users from the same service on the left list and for whom a particular course is designed.
Subscribe / unsubscribe users in batchesThe handlings (subscribe / unsubscribe) of the users may also be facilitated in batches, thanks to a CSV file format which is shown in the screenshot below:
92

93

Chapter 6: Manage the courses categories
The general categories allow the trainers to group a set of consistent courses. These general categories are common to all trainers and managed only by the portal administrator.They are independent of the personal categories that each trainer can create for clearness in his own courses list.
Add a general category or a subcategoryClick on the link « Add a category » and then fill in the « Category code » and « Category name », and decide on the authorization to add course in this category. The procedure is identical for the creation of sub-categories, after opening an existing category.
Manage the categoriesThe management of categories uses the known icons:
94

Icon Functions
Open a category to add / manage subcategories
Edit a category
Delete a category
Rearrange the position of categories
Display categories and subcategories when creating courseWhen creating course, the trainer has to select a category (possibly a subcategory) to which the course belongs. If sub-categories are defined by the administrator, they will be presented to the trainer as shown below:
95

PART 5Course sessions
The « Course sessions » section of the administration interface allows:
• To search an existing session
• To list all the sessions
• To create a new session
• To export the sessions
Tips and tricks: managing course sessions
Course sessions is a Dokeos administration tool that helps organise groups of learners and associate them to a set of courses. A session can be limited in time and supervised by a coach who will get access to reporting data and interaction tools.Let me take an example. This term, my company registers its new employees in a course session called May 2008 Geneva New Hire Course. The session contains one course called New Hire Course.
At the end of the session, we have the new employees pass an English Language test that decides whether we register them to a Session 2 called September 2008 Geneva Glucose monitoring or to a Session 3 called September 2008 Geneva English as a Second Language.
Memo: Working with classes or sessionsThe platform administrator must make a pedagogical choice: working with classes or sessions. Although classes and sessions are both created by the administrator, there is a fundamental difference between the two functions:
96

• A class contains trainees, enrolled by the administrator. The trainer can decide to register trainees and / or
classes to his course.• A session is a course package (belonging to one or more persons in charge):
o gathering traineeso during a specified timeo supervised by a sessions administrator who can intervene in the session, X days before
the opening of the session and Y days after (the number of days are defined by the administrator)
o trainers cannot directly modify the list of courses, start and end dates and the list of participants in a session
97

Chapter 1: Search / Course sessions list
In addition to the sessions list, the screen showing search results allows certain actions.
Manage Sessions
98
Icon FunctionsAdd users to the session (same screen as adding users when creating the session, see Chapter 2)Add course to this session (same screen as adding course when creating the session, see Chapter 2)Edit a session (session name, name of the coach, opening/closing dates of session, access times of the coach)
Delete session

Chapter 2: Sessions categories Sessions can now be grouped into categories. This facilitates their administration.
Create a sessions category Click on the link « Add category » and enter the title of the category. Finally click on the button « Add a category ».
Add sessions to a category Once the sessions category is created, it is empty. Sessions can be associated to a category at the creation or editing of a session.
99

Chapter 3: Create a sessionTo create a session, you must define the parameters listed in the memo of Part 5.The steps are illustrated below. Some of the screens shown during the creation of a session are identical to those called during a later modification.
Define the general properties of the sessionEnter:• The name of the session,• A description of the session,• The name of the tutor,• The category/programme to which the session belongs,• Start and end dates of session (or check the « No time limit » box),• If required, associate a certificate to the session. Choose the template, tool, evaluation mode and
minimum score to be used for the certificate.
Click on the « Next » button.
Add courses to the sessionThe left area shows the list of courses available on the portal, the right area (empty when creating) shows the list of courses related to the session.Multiple selections are always possible: « Ctrl» allows a discontinuous multiple selection; « Shift » allows a continuous multiple selection. Click on the « Next » button.
100

Select the participants in the sessionOn the same principle as for the selection of the course, the left area presents all the users (trainers and learners) registered on the portal, the right side (empty when creating) shows a list of users registered for the session.If you have defined profile fields used for sorting, then you will be able to facilitate the users' search, using these fields, and sorting by first letter.Finally click on the « Subscribe users to this session » button.
101

View / edit the summary of the session createdThe final screen lets you view the parameters of the created session.
Manage settings of the sessionThe summary of the session provides access to known functions:
Icon Functions
Show detailed reporting of course or trainee
Edit the general properties of the session, add or withdraw courses or trainees in the session
Delete courses or trainees from session
102
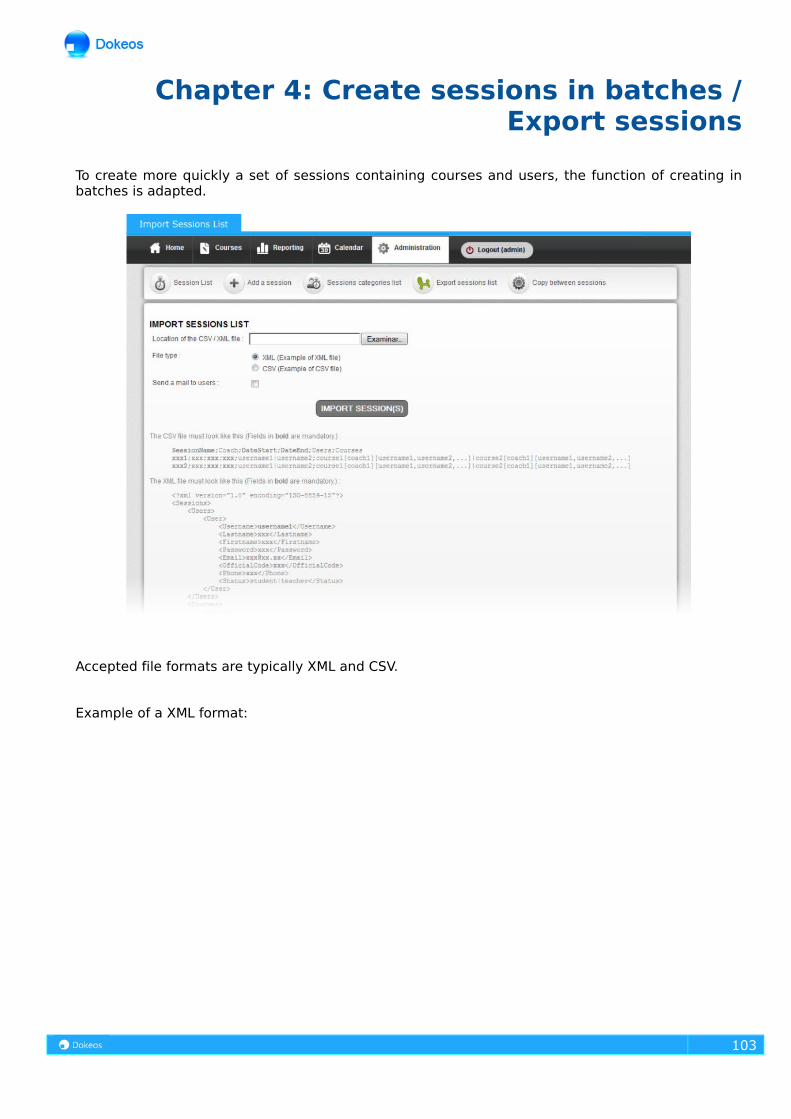
Chapter 4: Create sessions in batches / Export sessions
To create more quickly a set of sessions containing courses and users, the function of creating in batches is adapted.
Accepted file formats are typically XML and CSV.
Example of a XML format:
103
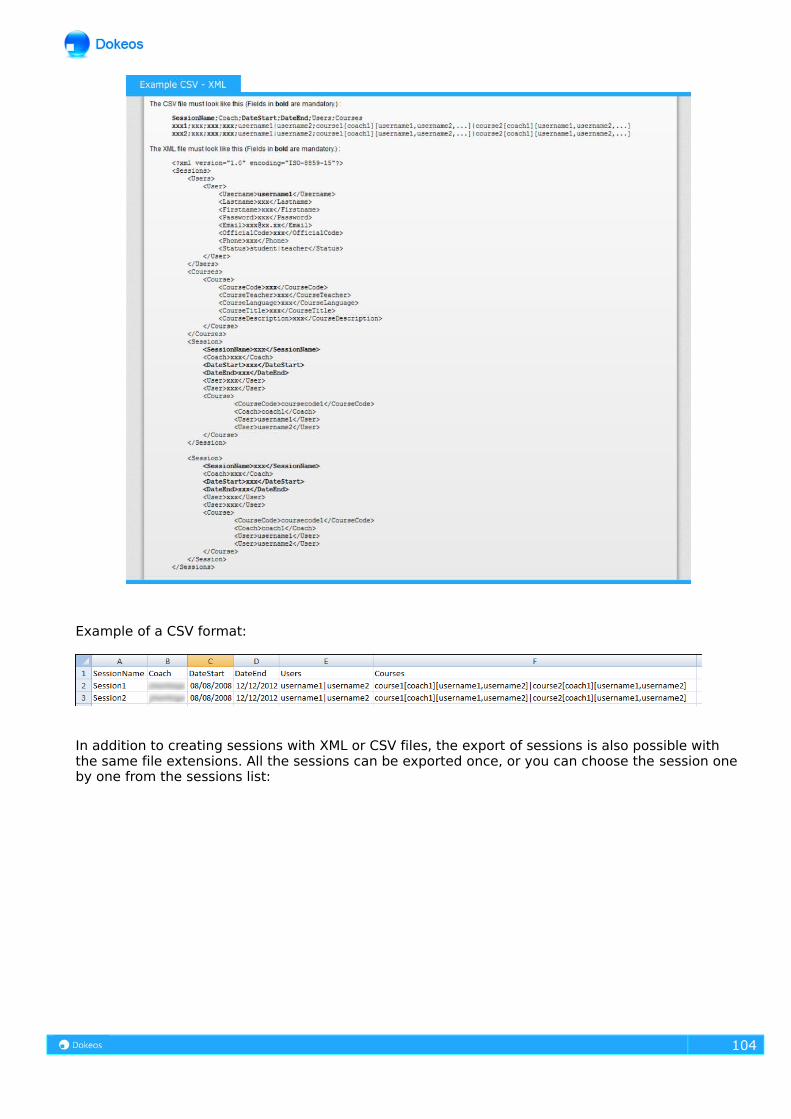
Example of a CSV format:
In addition to creating sessions with XML or CSV files, the export of sessions is also possible with the same file extensions. All the sessions can be exported once, or you can choose the session one by one from the sessions list:
104

Example of an exported XL file:
105

Chapter 5: Copy between sessionsThis feature makes it faster to add courses in a session, once the course already belongs to another session. The copy principle is based on two drop-down lists, one to choose the original session from which courses will be copied, the second to choose the destination session. In the first drop-down you click on the list to select the course(s) to be copied to the destination session. Clicking on the « Copy » button completes the copy process.
106
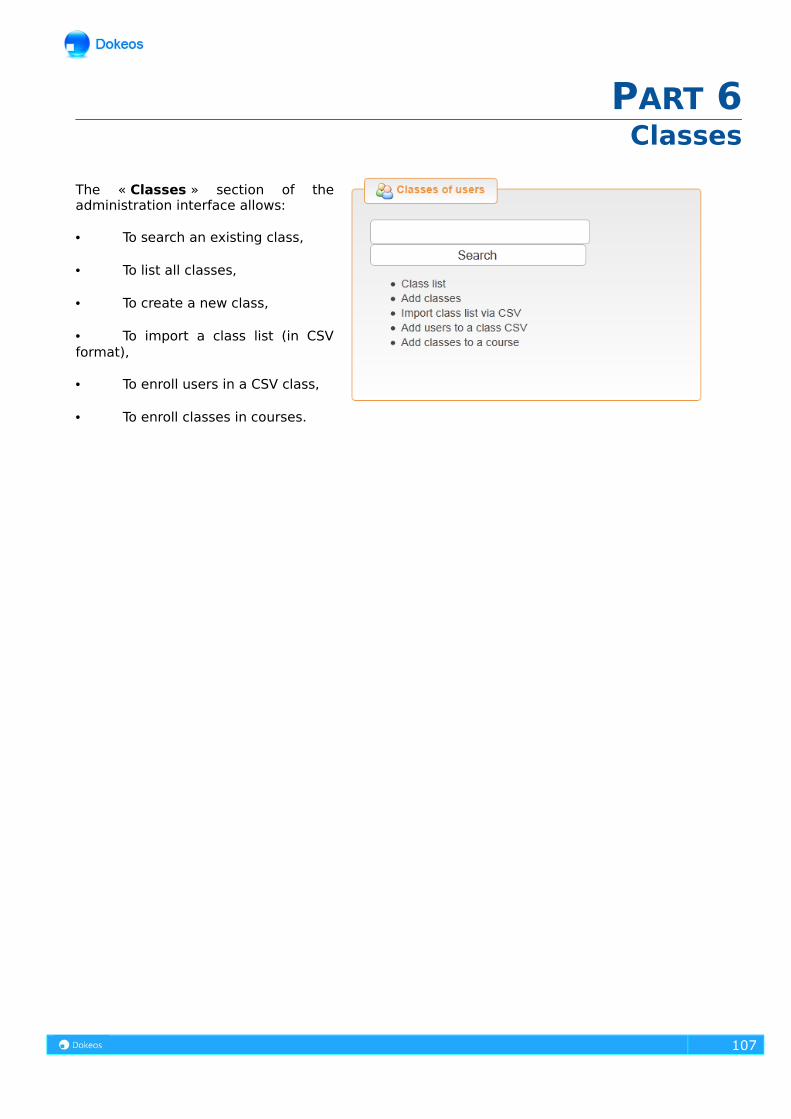
PART 6Classes
The « Classes » section of the administration interface allows:
• To search an existing class,
• To list all classes,
• To create a new class,
• To import a class list (in CSV format),
• To enroll users in a CSV class,
• To enroll classes in courses.
107

Chapter 1: Search / Class list
In addition to the list of classes, the screen showing search results allows certain actions.
Manage the classesThe administrative functions of classes are copied to the course sessions:
108
Icon FunctionsShows a list of those enrolled in the class, as well as the list of the courses to which the class is registered
Edit the name of the class
Removing a class
Add / remove users in the class
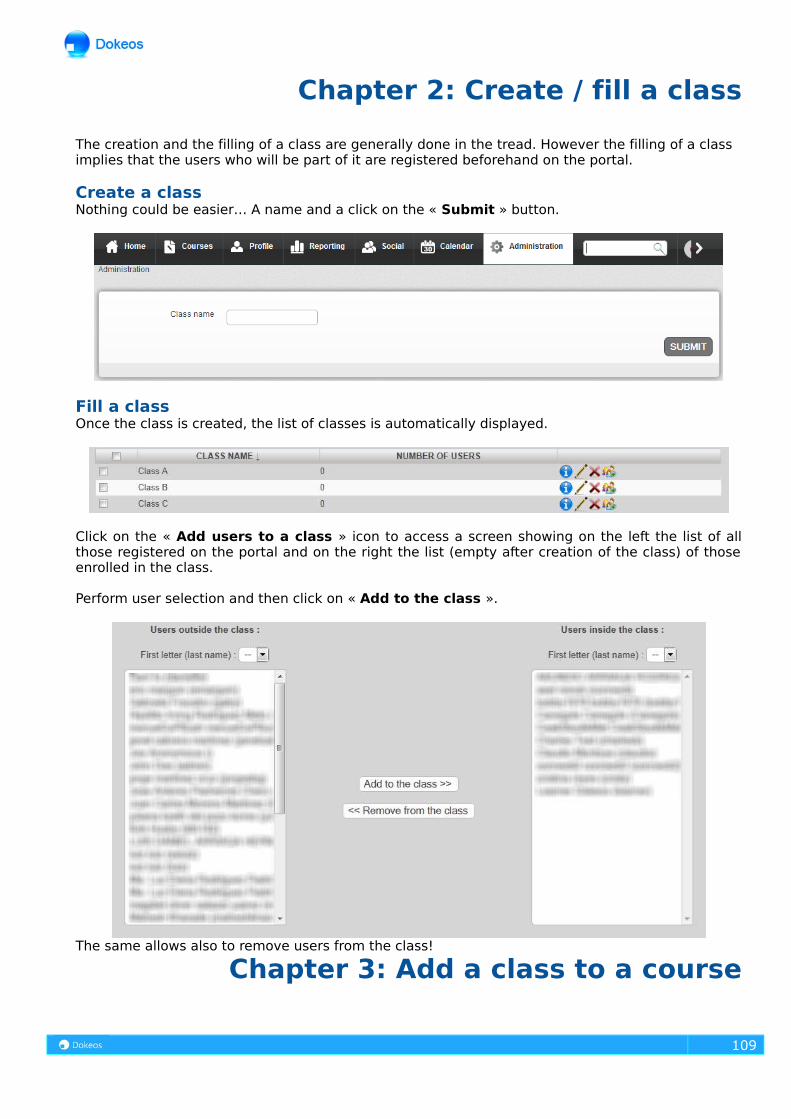
Chapter 2: Create / fill a class
The creation and the filling of a class are generally done in the tread. However the filling of a class implies that the users who will be part of it are registered beforehand on the portal.
Create a classNothing could be easier… A name and a click on the « Submit » button.
Fill a classOnce the class is created, the list of classes is automatically displayed.
Click on the « Add users to a class » icon to access a screen showing on the left the list of all those registered on the portal and on the right the list (empty after creation of the class) of those enrolled in the class.
Perform user selection and then click on « Add to the class ».
The same allows also to remove users from the class!
Chapter 3: Add a class to a course
109

The logical step following the creation of a class and its filling is its registration to one or more course.The screen for registration is structured in a known way: the list of the classes to be registered on the left, on the right that of the courses available.The buttons located at the center allow subscribing / unsubscribing of selected classes with one or more courses.
110

Chapter 4: Using CSV files
As for the course, sessions and users, CSV files can be used for:
• Importing a list of classes• Registering users to a class
Import a list of classesExample of CSV file for quick import of classes:
Register users to a classExample of CSV file for quick registration of users to a class:
Index
111