Embed Size (px)
DESCRIPTION
Sync save user manual
Citation preview
Sync & Save 1.2 © 2013 Pine Street Data www.pinestreetdata.com 1
Sync&Save
Introduction Sync & Save allows you to connect the DoForms service (www.doforms.com) with your accounting or
management software. If your system can import a comma delimited, tab delimited or fixed length file,
or if you need to populate an Access, Microsoft SQL, MySQL or Oracle table, or an Excel worksheet then
Sync & Save can produce the format you need. Sync & Save can also automatically upload Lookup Data
from Access, Microsoft SQL, MySQL, Oracle, CSV or Excel sources.
Resources
You can find more resources for Sync & Save at our support site: http://www.doforms.com/support.
System Requirements
• Operating System: Windows XP (Home or Professional), Windows Vista (All Editions), Windows 7
(All editions) , Windows 8 (All editions except RT)
• Processor: 1 GHz
• RAM: 512 MB
• Disk Space: 20 MB
• Framework: Microsoft .Net Framework 4.0

Sync & Save 1.2 © 2013 Pine Street Data www.pinestreetdata.com 2
Table of Contents Introduction .................................................................................................................................................. 1
Resources ...................................................................................................................................................... 1
System Requirements ................................................................................................................................... 1
Job List ........................................................................................................................................................... 3
Download Jobs .............................................................................................................................................. 4
New Download Job ................................................................................................................................... 4
Download Format ..................................................................................................................................... 5
Submissions ........................................................................................................................................... 5
Fields ..................................................................................................................................................... 5
Attachments .......................................................................................................................................... 6
Filter ...................................................................................................................................................... 7
Download Settings .................................................................................................................................... 8
General .................................................................................................................................................. 8
General Options .................................................................................................................................... 8
Export .................................................................................................................................................... 9
Export Options ...................................................................................................................................... 9
Submission .......................................................................................................................................... 10
Submission Options ............................................................................................................................ 10
Download Schedule ................................................................................................................................ 11
Download Errors ..................................................................................................................................... 12
Upload Jobs ................................................................................................................................................. 13
New Upload Job ...................................................................................................................................... 13
Upload Settings ....................................................................................................................................... 14
General ................................................................................................................................................ 14
General Options .................................................................................................................................. 14
Source ................................................................................................................................................. 14
Target .................................................................................................................................................. 14
Upload Schedule ..................................................................................................................................... 15
License......................................................................................................................................................... 16
Windows Task Scheduler ............................................................................................................................ 17

Sync & Save 1.2 © 2013 Pine Street Data www.pinestreetdata.com 3
Job List
View all jobs you have configured, as well as a log of major events.
• Click Refresh to refresh the list of jobs and the log.
• Click New Download Job to create a new job to download data you have submitted.
• Click New Upload Job to create a new job that will update lookup tables.
• Click Edit to edit an existing job or Delete to delete the job.
• Click Run to run a job. Each time a job is run a new range of submission is queried. For instance,
if a job was last run on Thursday at 5 pm and it is currently Friday at 5 pm, all submissions
received between Thursday at 5 pm and Friday at 5 pm will be downloaded. Jobs can also be
run from the command line or scheduled.
• Check off Tools | Run Scheduled Jobs to automatically run jobs. Sync & Save must be running
for scheduled jobs to run.
• Check off Tools | Debug Mode to capture more detailed information in the detailed logs.
• Click Tools | Unicode Mode to support Unicode characters in sql database exports.
• Click Tools | Detailed Log… to view detailed logs.
• Click Tools | Configuration Data… to view the data stored by the program.
• Click Help | License to activate your copy of Sync & Save.
Sync & Save 1.2 © 2013 Pine Street Data www.pinestreetdata.com 4
Download Jobs
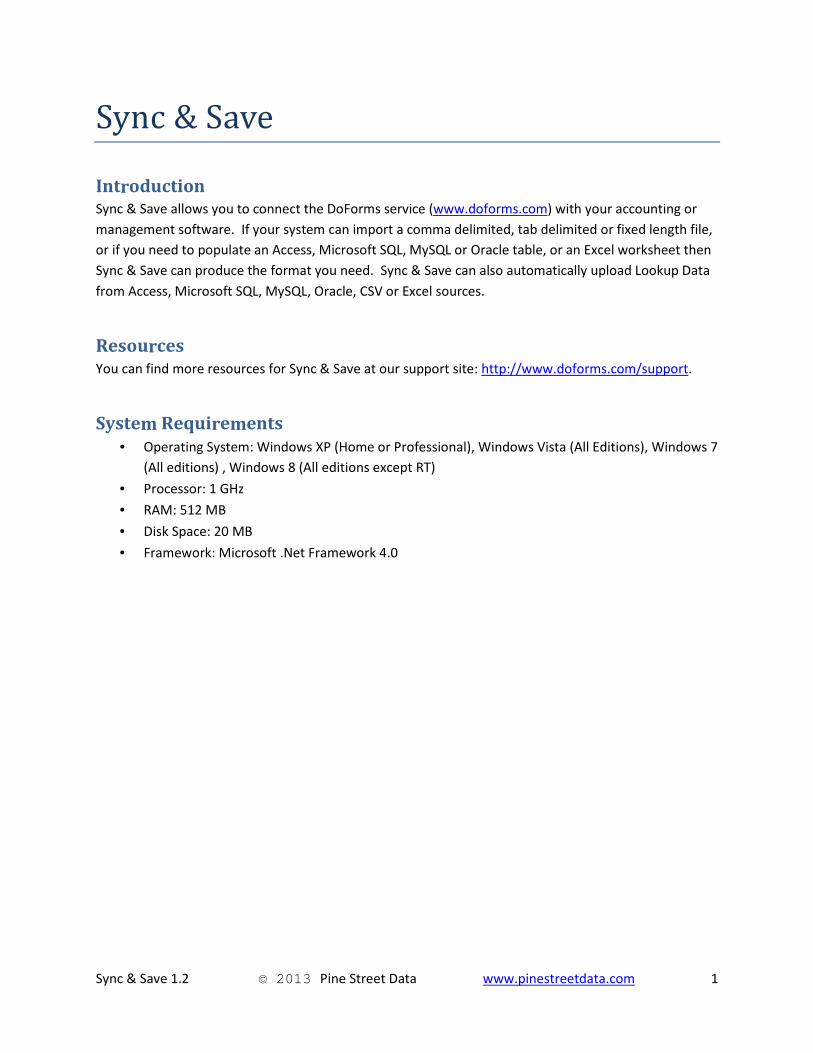
New Download Job
Enter the webservice ID and password that you have
configured on the DoForms web site:
Enter the name of the job and click Finish to add the new
download job.

Sync & Save 1.2 © 2013 Pine Street Data www.pinestreetdata.com 5
Download Format
Submissions
• Select a range that includes submissions for the form you have chosen and click Refresh. This
will populate the left half of the screen with data you have uploaded to DoForms.
• Click Export Submissions to test the job. The job will search for submissions within the range set
in the Submissions area of the screen.
• Click Add All >> to copy all the available fields to the export format.
Fields
• Drag and drop elements from the Submissions tree into the Export Format grid in order to add
new submission fields to the export format.
• The column numbers control the order that values will be added to the export file. You can drag
and drop rows to reorder, or highlight a row and hit Delete to delete.
• Values in [square brackets] will be populated from form submissions. If the label of a field on
the DoForms form is changed, the value will need to be updated here.
• You can enter static values in the list of values as well as add more than one value to a field. For
example: “[LastName], [FirstName]”
• If you are setting up a fixed width export, then configure the length of the field and whether it
should be left justified. If the data received in the submission is longer than this length, then it
will be truncated.
• If desired, enter the column name in the Name field.
• Standard arithmetic operators can be used on fields that will contain numeric values. Check the
“Calc” checkbox to evaluate the field. For example: “[Quantity]*[Cost of Part]”.
• Select the correct data type for each field.

Sync & Save 1.2 © 2013 Pine Street Data www.pinestreetdata.com 6
Attachments
• Drag an attachment field into the Attachment column to export that image. Available fields will
display (Attachment) after the field name.
• Configure the export path for the attachment. Placeholder values can be added to the path
(both file name and folder) using drag and drop.
• Make sure the Export Path will evaluate to a valid path. If more than one attachment would
evaluate to the same path, then Sync & Save will automatically make the paths unique by adding
a number to the end of the file name.

Sync & Save 1.2 © 2013 Pine Street Data www.pinestreetdata.com 7
Filter
If any filter expression is entered, it must be true for the record to be exported. If no filter expression is
entered then all records received will be exported.
All values that you expect to be text should be surrounded by single quotes:
• '[UserName]'='[email protected]'
If you expect the value to be a number, you do not need to surround it in quotes:
• [phonenumber]=5094698841
All date and time values should be surrounded with sharps:
• #[BirthDate]# > #1/1/2012#
You can combine formulas using "and" and "or" as well as parenthesis. Note: The keywords "and" and
"or" must be lowercase.
• '[UserName]'='[email protected]' and [JobNumber]=25
• '[UserName]'='[email protected]' and ([JobNumber]=25 or [JobNumber]=10)
The filter expression is evaluated for each record that would be exported. If you have a repeating
section in your submission, the filter expression will be evaluated for each detail record that would be
exported.
Note: The filter does not affect which submissions are downloaded or removed from the server, just
which records are exported.
Sync & Save 1.2 © 2013 Pine Street Data www.pinestreetdata.com 8
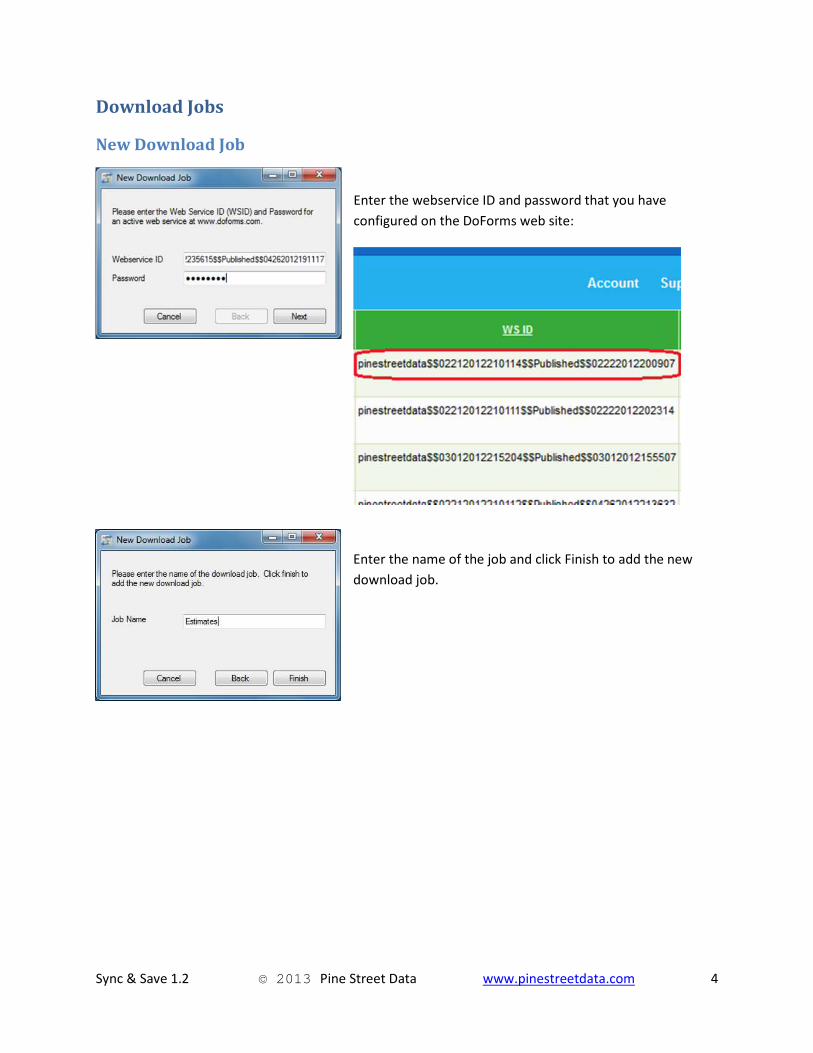
Download Settings
General
• Set the job name.
• Click Connection Settings to set the user name and password used to authenticate with the
DoForms service.
• Click Copy Command Line to copy to the clipboard the command line that will run this job.
General Options
• Select the Start At date for the next time the job is run. This date advances each time the job
runs.
• Check Send Notification Email to send an email when the job completes. Click Settings to
configure the SMTP server settings.

Sync & Save 1.2 © 2013 Pine Street Data www.pinestreetdata.com 9
Export
• Choose the export type. Changing the export type will change the other options available.
Export Options
• Check Clear Unset Placeholders to get rid of any [placeholder] values that were not replaced
with submission data.
Text File Exports
• Choose the file name and folder.
• You can choose to make the file name unique by adding the date and time to the file name.
• Check Include Column Names to populate the first row of the export file with column headers.
• Check Backup Up Previous File to make a backup of the last file exported. The backup will add
the date and time to the name of the backed up file.
• Check Delete Previous Lines to create a new file each time the job is run. Leave unchecked to
append lines to an existing file. Note that Add Date To File Name, Add Time To File Name, and
Back Up Previous File must all be unchecked to append lines to an existing file.
Microsoft Excel Export
• Set the Worksheet to populate. If the worksheet does not exist in the selected file, it will be
created.
• Leave Add Date to File Name, Add Time To File Name and Delete Previous Rows unchecked to
append rows to an existing worksheet.
Microsoft Access Exports
Sync & Save 1.2 © 2013 Pine Street Data www.pinestreetdata.com 10
• Choose the file name and folder. If the file does not already exist, a blank database will be
created.
• Set the name of the table to populate in the access database.
• Check Include Column Names to name the columns based on the export format.
• Check Backup Up Previous Table to make a backup of the last table exported. The backup will
add the date and time to the name of the backed up table.
• Check Delete Previous Table to delete and recreate the export table. This insures the table
format will match the export format. Leave unchecked to append records to an existing table.
Note that if the table format does not match the export format, the export will fail.
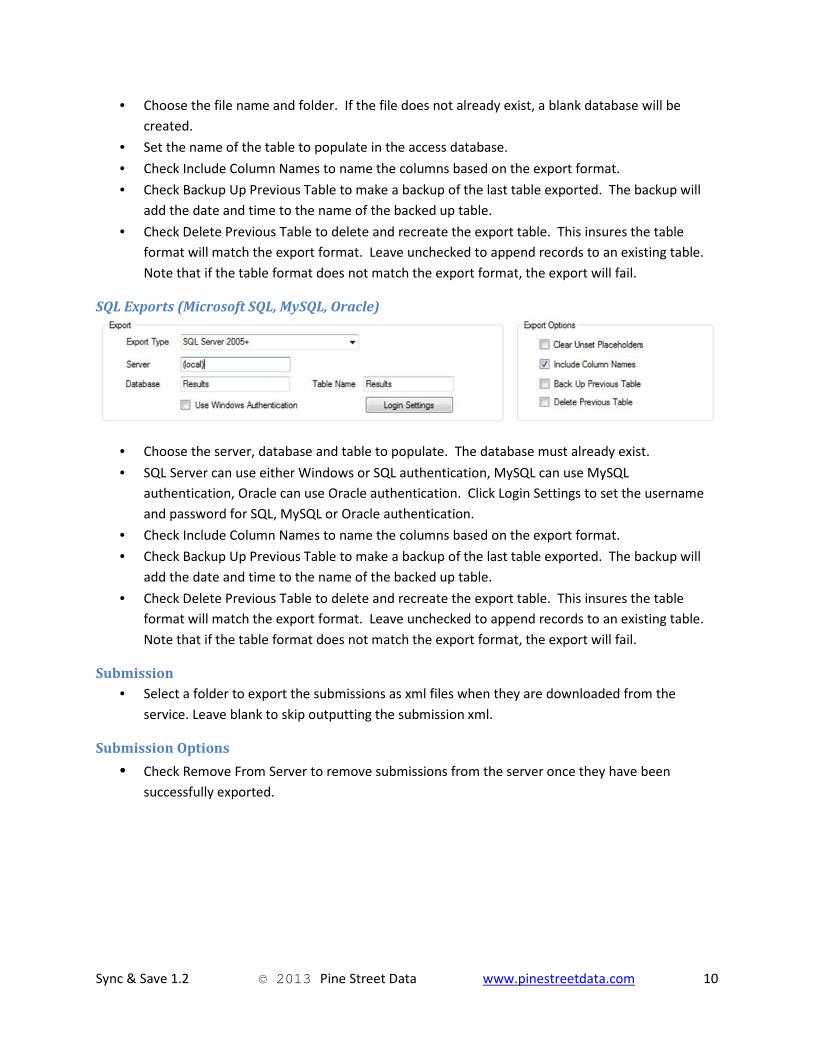
SQL Exports (Microsoft SQL, MySQL, Oracle)
• Choose the server, database and table to populate. The database must already exist.
• SQL Server can use either Windows or SQL authentication, MySQL can use MySQL
authentication, Oracle can use Oracle authentication. Click Login Settings to set the username
and password for SQL, MySQL or Oracle authentication.
• Check Include Column Names to name the columns based on the export format.
• Check Backup Up Previous Table to make a backup of the last table exported. The backup will
add the date and time to the name of the backed up table.
• Check Delete Previous Table to delete and recreate the export table. This insures the table
format will match the export format. Leave unchecked to append records to an existing table.
Note that if the table format does not match the export format, the export will fail.
Submission
• Select a folder to export the submissions as xml files when they are downloaded from the
service. Leave blank to skip outputting the submission xml.
Submission Options
• Check Remove From Server to remove submissions from the server once they have been
successfully exported.

Sync & Save 1.2 © 2013 Pine Street Data www.pinestreetdata.com 11
Download Schedule
• Set up a schedule for the job.
• Choose the days, interval and time range for the job to be run.
• Tools | Run Scheduled Jobs must be checked off on the main menu for the scheduled jobs to run
automatically.
• Sync & Save must remain open for scheduled jobs to run.
• The next date the job is scheduled to run is displayed on the main screen of Sync & Save.
• If Sync & Save has scheduled jobs to run, it can be minimized to the notification area of the taskbar.

Sync & Save 1.2 © 2013 Pine Street Data www.pinestreetdata.com 12
Download Errors
• If errors are encountered while exporting, the submission is stored.
• Click on the link in the Submission column to view the submission in xml format.
• Click on the link in the Error column to view the full error.
• Once the cause of the error has been resolved, the data can be re-exported. Select individual
rows and click Resend Selected or click Resend All to re-export all the submissions.
• If you do not want to re-export the data, you can clear the errors by using the Delete all or
Delete Selected buttons.

Sync & Save 1.2 © 2013 Pine Street Data www.pinestreetdata.com 13
Upload Jobs
New Upload Job
Enter the name of the upload job.
Enter the name of the lookup data.

Sync & Save 1.2 © 2013 Pine Street Data www.pinestreetdata.com 14
Upload Settings
General
• Set the job name. You will use this name if you use the windows task scheduler to run the job
automatically.
• Click Connection Settings to set the user name and password used to authenticate with the
DoForms service.
• Choose the source type. Changing the source type will change the options available in the
bottom half of the screen.
• Click Copy Command Line to copy to the clipboard the command line to run this job.
General Options
• Check Send Notification Email and click Settings to send an SMTP email each time the job
completes.
• Check Only Upload If Data Has Changed to keep a snapshot of the data. The data will only be
uploaded if it is different than the last snapshot taken.
Source
• Set the connection parameters for the source of the data to upload.
• A single table or query name can be entered in the Table/Query field, or a custom SQL query can
be entered in the SQL Query field.
• Click the Preview button to view the results of your query.
Target
• Set the name of the lookup data to update.
• Click Run Job to manually run the job.

Sync & Save 1.2 © 2013 Pine Street Data www.pinestreetdata.com 15
Upload Schedule
• Set up a schedule for the job.
• Choose the days, interval and time range for the job to be run.
• Tools | Run Scheduled Jobs must be checked off on the main menu for the scheduled jobs to run
automatically.
• Sync & Save must remain open for scheduled jobs to run.
• The next date the job is scheduled to run is displayed on the main screen of Sync & Save.
• If Sync & Save has scheduled jobs to run, it can be minimized to the notification area of the taskbar.

Sync & Save 1.2 © 2013 Pine Street Data www.pinestreetdata.com 16
License
Enter your serial number and click Activate to license your copy of Sync & Save. The license can be used
on one machine at a time. If you want to move the license, then click Deactivate to release the serial
number. An active internet connection is required to activate the program. While in Demo Mode, the
program will only process two submissions at a time.

Sync & Save 1.2 © 2013 Pine Street Data www.pinestreetdata.com 17
Windows Task Scheduler
You can use the Windows Task Scheduler (Control Panel | Administrative Tools | Task Scheduler) to run
your jobs on a regular schedule.
The following instructions are for Windows 7:
• In the Task Scheduler, choose Action | Create Basic Task… Give the task a name and select a
schedule.
• Under Action, choose Start a program. Browse to the install location and then add the job name
as an argument. Wrap the job name in quotes. If you want to run more than one job, just leave
a space between each job name.
• You can also copy the Command from the Job – Settings screen by clicking Copy Command Line
and paste it into the Program/script field:
• When you click Next you will get the following message. Click Yes to include the Job Name as an
argument.

Sync & Save 1.2 © 2013 Pine Street Data www.pinestreetdata.com 18


![What's New in doForms€¦ · What's New in doForms doForms v. 4.1.2 (May 9, 2016) Summary [May 9, 2016 update] Adjustable table widths and layout grid widths. Users can now format](https://img.pdfslide.us/doc/110x75/5f4f5b0b2afa395c630355b1/whats-new-in-doforms-whats-new-in-doforms-doforms-v-412-may-9-2016-summary.jpg)