Embed Size (px)
Citation preview

Copyright © 2011-2014 CosmoThemes. All rights reserved.
TRIPOD

Copyright © 2011-2014 CosmoThemes. All rights reserved.
Dear customer,
First of all, thank you for choosing CosmoThemes and purchasing one of our Premium Themes – your choice is
greatly appreciated!
Current version of Tripod has been developed for WordPress 3.5 and above and is not backwards compatible with older versions of WordPress. Tripod has been tested in all modern browsers: IE 9, Opera, Firefox, Safari and Chrome. If you happen to face some difficulties with this theme, consider to use our support which is conducted ONLY through the CosmoThemes support forums: http://cosmothemes.com/forums

Copyright © 2011-2014 CosmoThemes. All rights reserved.
TABLE OF CONTENTS
1. Installation instructions
2. Demo content import
3. Templates builder
3.1 Default templates
3.2 Creating a template
3.3 Editing template´s elements
3.4 Assigning templates to layouts
3.5 Creating galleries or blog archives pages
4. General settings
4.1 Background styling options
4.2 Custom logo
4.3 Multiple multi-level jQuery menus
5. Gallery posts
6. Revolution slider
7. Availability calendar
8. WooCommerce plugin
9. Theme settings
9.1 Custom page templates
9.2 Unlimited sidebars
9.3 Shortcodes
9.4 Show/Hide meta elements
9.5 Featured image
9.6 Posts likes
9.7 Post format
9.8 Social sharing
9.9 Related posts
9.10 Nested comments
9.11 Facebook comments
10. Widgets
10.1 Twitter widget
10.2 Quick contact form widget
10.3 Flickr widget
10.4 Tabber widget
10.5 Categories with icons
10.6 Instagram widget
10.7 Latest galleries posts
11. Languages
Copyright © 2011-2014 CosmoThemes. All rights reserved.
1. INSTALLATION INSTRUCTIONS
Please update your WordPress installation prior installing the theme. 1. Go to your WordPress Backend. 2. Open Appearance - Themes - Install Themes 3. Navigate to Upload 4. Browse for .zip file on your local computer, and Install it. 5. Then go to back to Appearance - Themes, and Activate theme
You can also upload the theme manually via FTP, into the folder /wp-content/themes/

Copyright © 2011-2014 CosmoThemes. All rights reserved.
After successful activation, go to the left side area of the backend to control Theme’s specific settings.

Copyright © 2011-2014 CosmoThemes. All rights reserved.
2. DEMO CONTENT IMPORT
First, find the /xml-import/ folder from your downloaded archive.
1. Go to Tripod – Extra – Import / Export link from the backend menu
2. Copy the content of the “01_import.txt” file into the "This is the import zone" text area. This file will import
demo settings.
3. After successful import of site structure you can upload the “02_wordpress.xml” file using the built-in
WordPress import plugin: Tools – Import. This will import demo posts and pages.
4. Choose WordPress if you already have the plugin installed, then follow the steps on the screen.

Copyright © 2011-2014 CosmoThemes. All rights reserved.
3. TEMPLATES BUILDER
3.1 DEFAULT TEMPLATES
When you initially install the theme, you will already have 3 default templates in your list:
- Mainpage that is already assigned for your Mainpage layout
- Default that is assigned for your Archives by date, Post format, Post type, Attachment, Author, Categories,
Tags, Search layouts, etc.
- Posts that is assigned for your Pages, Posts and Galleries Layouts
Each template is comprised of the following areas: Header, Content and Footer.
Each of these areas contains several so-called elements: Logo, Main menu, Widgets, etc.
You can find the full list of available elements by clicking the edit elements icon from each available area.
However, there are elements only available for specific areas, for example Logo can be found in Header only,
while Secondary menu in Footer.
Thus, the general rule for Templates is to divide content in areas and add desired elements in custom places at
user´s will.
The Content area contains the so-called Default elements row. You cannot delete this row or split it into several
columns as it is intended to display WordPress content for each page.
If the template containing this row is assigned for such pages as Author archives or Category it will represent the
author's posts or posts belonging to a given category. Feel free to edit this row and choose content layout.
However, if the template is assigned for Pages or Posts - it will represent the page content. Thus, editing this row
will have no effect.
Copyright © 2011-2014 CosmoThemes. All rights reserved.
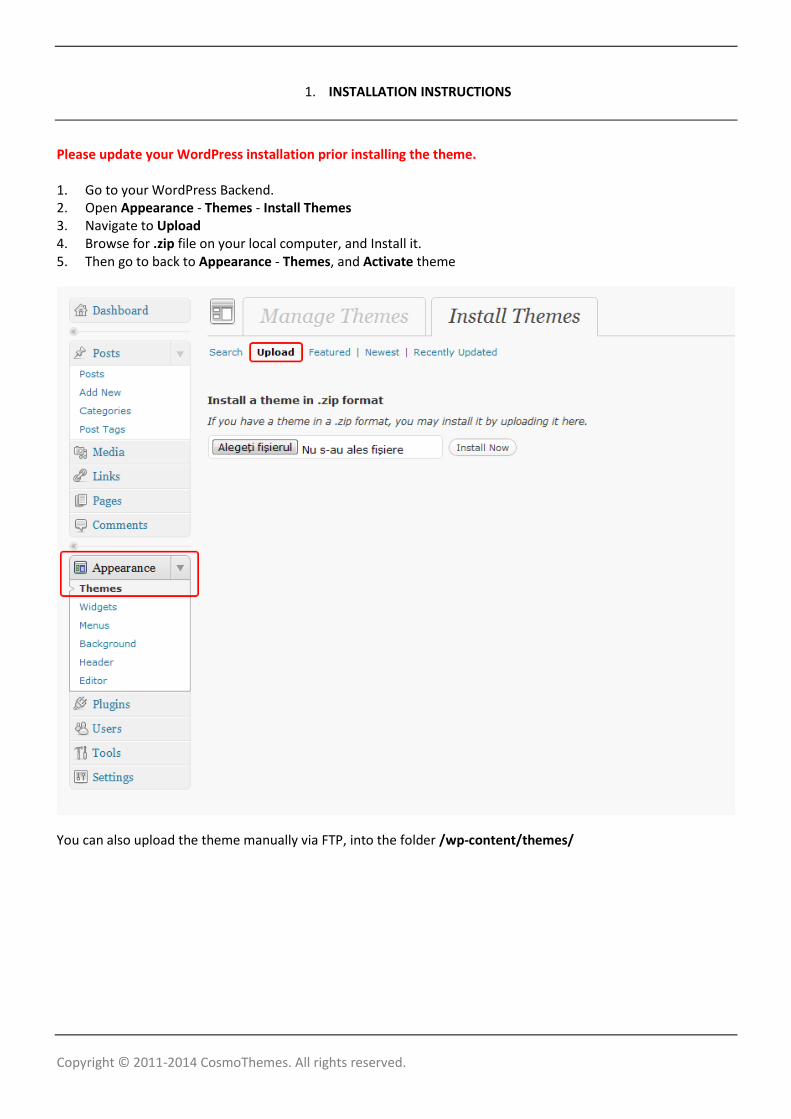
3.2 CREATING A TEMPLATE
Besides editing your existing templates you can create new ones and assign them for specific posts/pages.
To do so, follow the steps below:
1. Press Add new button from the left side area of your Templates
2. Type the name of your new template for easier identification
3. Press the Update settings button located at the bottom of your page.
Copyright © 2011-2014 CosmoThemes. All rights reserved.
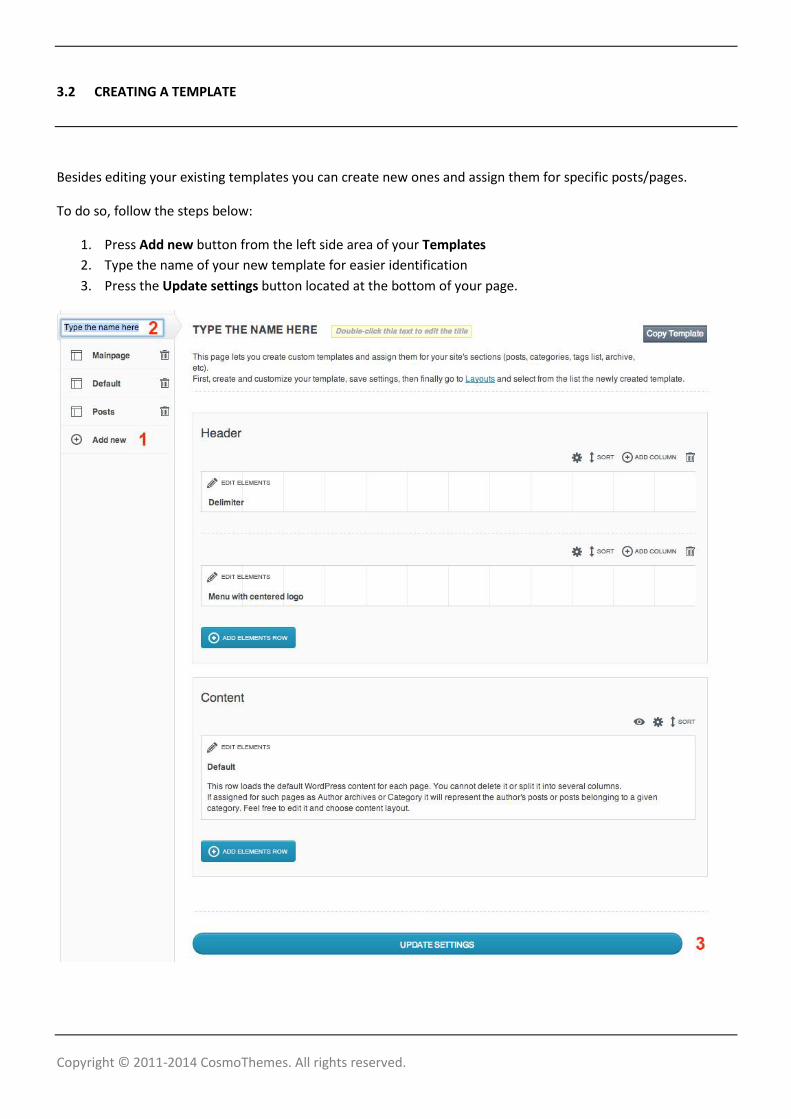
After the template has been created feel free to add Rows of elements and split them into columns.
To do so, follow the steps below:
1. Press the Add elements row button located in each of your site´s sections
2. Press Add columns button located at the top of your new row of elements if you wish
3. Drag and drop the border of your added columns to resize the content area.
4. Press the Edit elements icon of your each row to add elements such as widgets, categories, testimonials,
etc.
5. Repeat the steps above with other sections until you have your desired layout.
6. Press the Update settings button located at the bottom of your page.

Copyright © 2011-2014 CosmoThemes. All rights reserved.
3.3 EDITING TEMPLATES ELEMENTS
To add or edit an element you need to press the edit elements icon located near each column.
After that you may follow the steps below:
1. Provide a Name for the new element you are adding or editing
2. Choose if you want the label to be displayed in front end or not
3. Choose the element type you wish to add (these will be different depending the site´s area)
4. Select the view type and other related settings such as title position, thumbnail resize method, etc.
5. Press Save to finish editing the element
6. Press Update settings button located at the bottom of your page
Feel free to experiment with each option so you can choose the best layout.

Copyright © 2011-2014 CosmoThemes. All rights reserved.
3.4 ASSIGNING TEMPLATES TO LAYOUTS
After you have created or edited your templates you need to assign them to your site´s sections or a page/post
in order for them to take effect.
To do so, follow the steps below:
1. Navigate to Layouts setting from the theme main menu
2. Choose the section you wish to assign the template
3. Choose the desired layout: full width or with sidebars
4. Select your template from the dropdown list
5. Select your sidebar if you have opted for such a layout
6. Press Update Settings button
The steps above will have global impact on your archives and new posts/pages. However, you can set individual
settings for each of your pages, posts or products.
Similar to the example above you can assign an existing template for Pages or Posts. To do so, navigate to one of
your existing pages or posts and find the Page builder box below Post settings and choose your layout and
desired template as in the instruction described above.
Copyright © 2011-2014 CosmoThemes. All rights reserved.
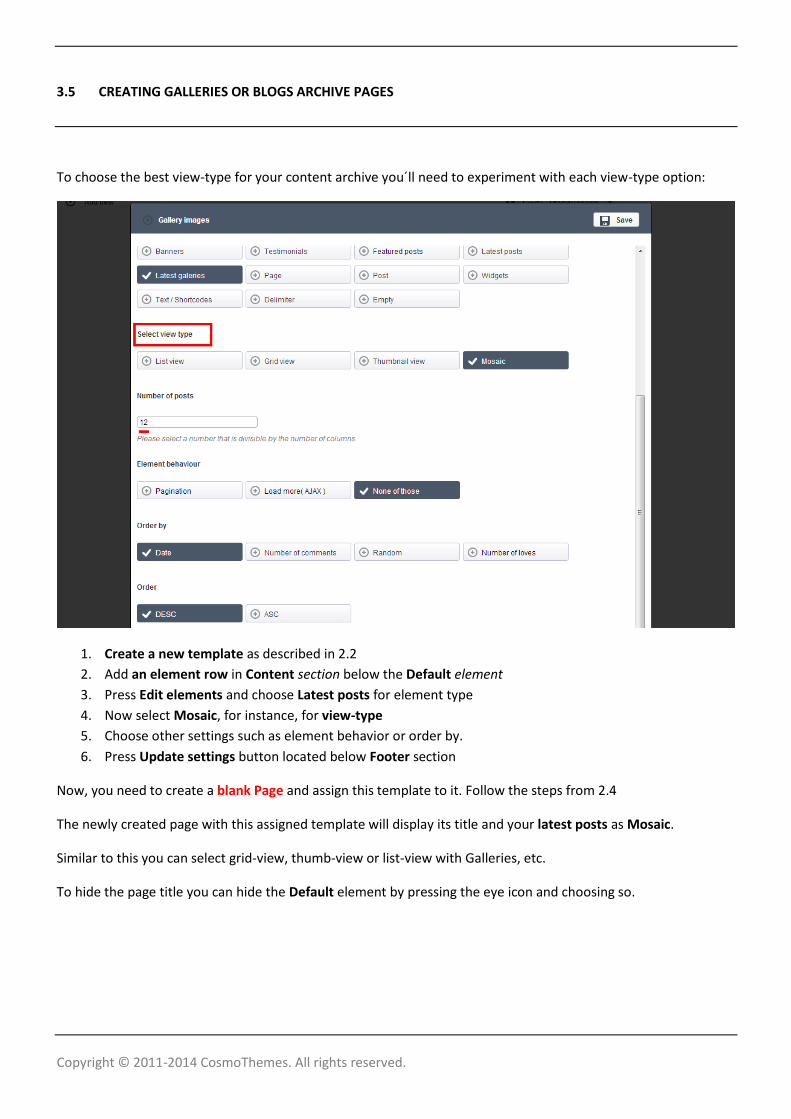
3.5 CREATING GALLERIES OR BLOGS ARCHIVE PAGES
To choose the best view-type for your content archive you´ll need to experiment with each view-type option:
1. Create a new template as described in 2.2
2. Add an element row in Content section below the Default element
3. Press Edit elements and choose Latest posts for element type
4. Now select Mosaic, for instance, for view-type
5. Choose other settings such as element behavior or order by.
6. Press Update settings button located below Footer section
Now, you need to create a blank Page and assign this template to it. Follow the steps from 2.4
The newly created page with this assigned template will display its title and your latest posts as Mosaic.
Similar to this you can select grid-view, thumb-view or list-view with Galleries, etc.
To hide the page title you can hide the Default element by pressing the eye icon and choosing so.

Copyright © 2011-2014 CosmoThemes. All rights reserved.
This means that the text content inside your page, if any, will also be hidden.
To have your latest posts on a stretched full-width background color press the gear icon and choose to Use this
row on full-width. Choose your desired color and opt to stretch the content as well.

Copyright © 2011-2014 CosmoThemes. All rights reserved.
4. GENERAL SETTINGS
4.1 BACKGROUND STYLING OPTIONS
Feel free to choose from a range of 14 different patterns for your site.
If you do not wish a background pattern simply choose the last blank one.
To set a background image different to the provided ones go to Appearance – Background and use the default
WordPress functionality.
4.2 CUSTOM LOGO
You can either upload your personalized logo or opt for a text-based logo and choose from a variety of free fonts
from Google. Set font family, font size and weight. A live preview will help you choose the best style.
To do so navigate to Tripod – Settings – Styling and scroll down, find “Logo type” setting.

Copyright © 2011-2014 CosmoThemes. All rights reserved.
4.3 MULTI-LEVEL JQUERY MENUS
We recommend you to create your own custom menu.
To do so, go to Appearance – Menus and create a new menu. E.g.: Header.
Then, from Theme Locations choose for Main menu the newly menu you have just created.
Populate the menu as desired by dragging and dropping custom links, pages or categories.
Press Save Menu.
After you have saved your menu you have to add the “Menu element” to your Templates.
To do so, navigate to Templates and edit the Menu element located in Header.
You can set the number of visible page items in the main menu. Remaining pages will be visible from the
dropdown menu item “More”.

Copyright © 2011-2014 CosmoThemes. All rights reserved.
5. GALLERY POSTS
To add a Gallery posts to your site use the built-in Galleries custom posts located in your left-side sidebar. Press
the Add new link and fill in your gallery post title and content, if any.
To add images to your gallery press the Add gallery images link from the Attached images box.
There are 2 ways to add images to your gallery: either by uploading new images or by selecting old images that
already exist on your server.
1. To upload new images to your gallery opt for Upload files link. Then click the Select Files button and browse
for your images. Simply click the Add to gallery button when you’re done.

Copyright © 2011-2014 CosmoThemes. All rights reserved.
2. To use your old images to create a new gallery post you need to opt for Media Library link.
Press the SHIFT key to select multiple images that you wish to assign for this post and click the Add to gallery
button when you’re done.
Make sure to choose your Featured image to display its’ thumbnail on archive pages.
Publish your post as you would do for a standard blog post and choose a category set for it.

Copyright © 2011-2014 CosmoThemes. All rights reserved.
6. REVOLUTION SLIDER
The theme comes with an extended license of the Revolution slider plugin. The Extended License grants you a
non-exclusive, non-transferrable right to make use of the work. Your use of the Work is limited to a single
application.
To use the Revolution slider plugin, please follow the general instruction of installing a Plugin.
http://codex.wordpress.org/Managing_Plugins#Installing_Plugins
Create a new slide following the general rules and populate it with slides.
When you’re done you can insert a slider into the theme by copying the generated shortcode and pasting it inside
a Text/Shortcode element from the Templates builder or directly into a page or post.
For any support question please contact the Revolution Slider developers directly
http://codecanyon.net/user/themepunch
Copyright © 2011-2014 CosmoThemes. All rights reserved.
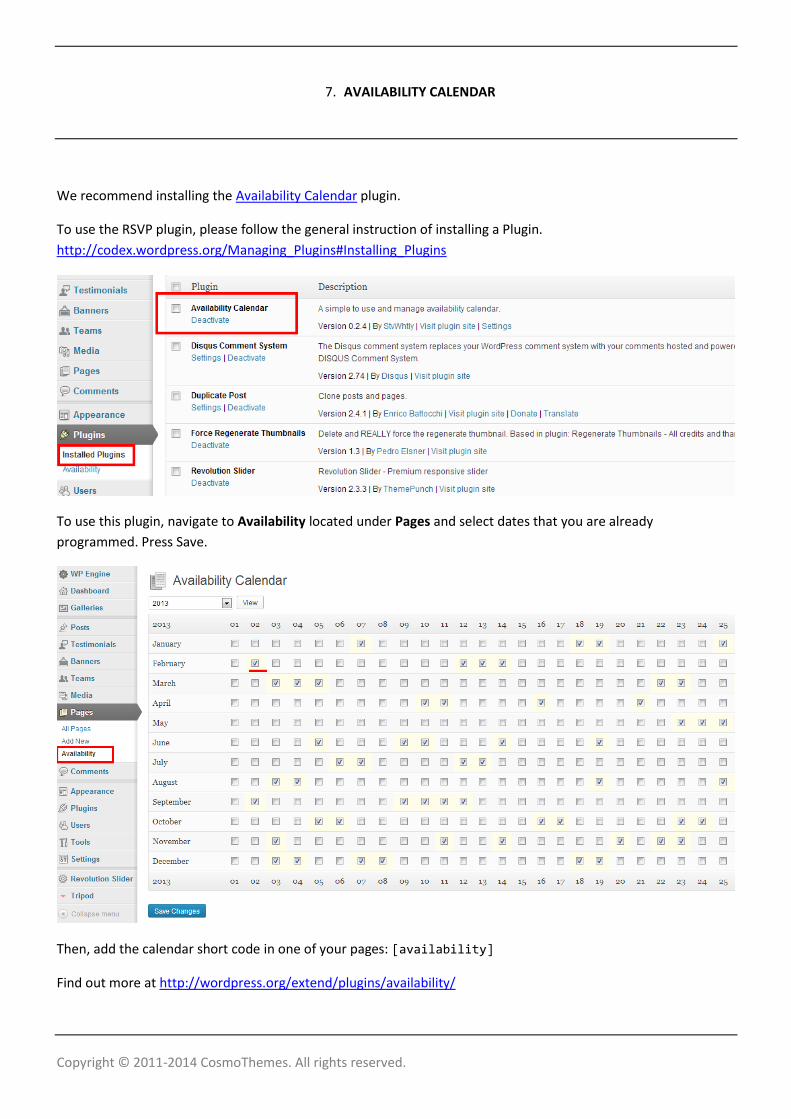
7. AVAILABILITY CALENDAR
We recommend installing the Availability Calendar plugin.
To use the RSVP plugin, please follow the general instruction of installing a Plugin.
http://codex.wordpress.org/Managing_Plugins#Installing_Plugins
To use this plugin, navigate to Availability located under Pages and select dates that you are already
programmed. Press Save.
Then, add the calendar short code in one of your pages: [availability]
Find out more at http://wordpress.org/extend/plugins/availability/
Copyright © 2011-2014 CosmoThemes. All rights reserved.
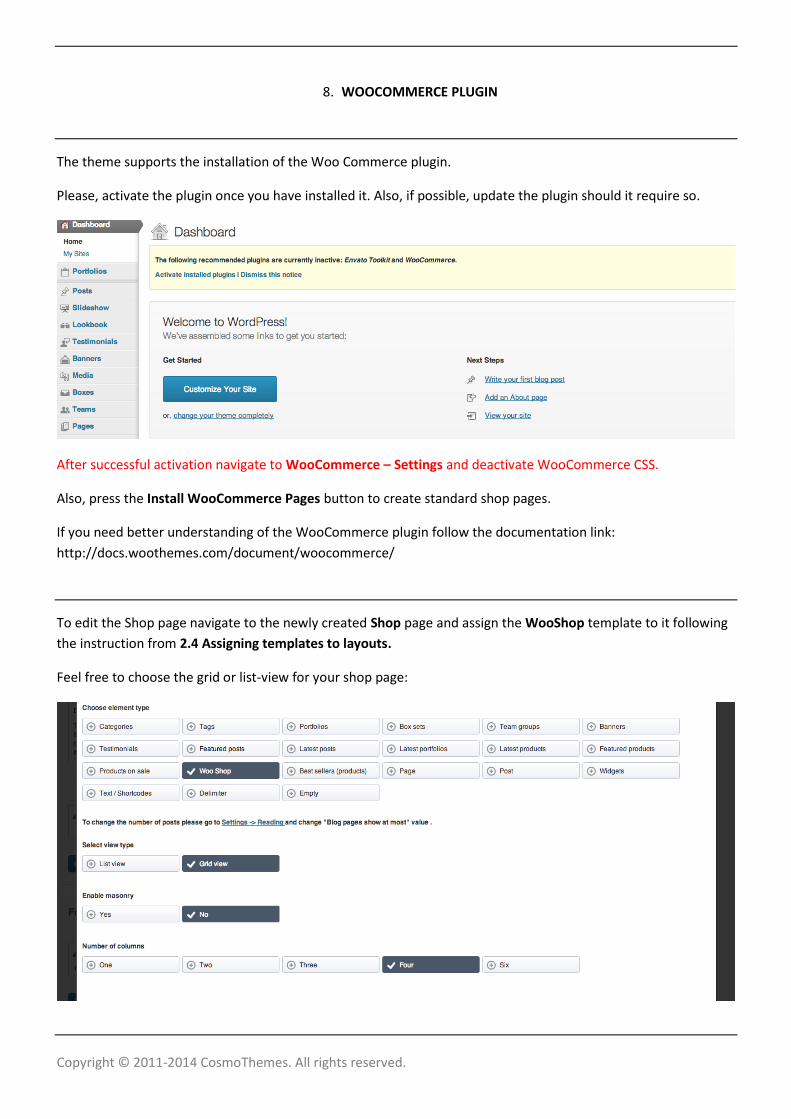
8. WOOCOMMERCE PLUGIN
The theme supports the installation of the Woo Commerce plugin.
Please, activate the plugin once you have installed it. Also, if possible, update the plugin should it require so.
After successful activation navigate to WooCommerce – Settings and deactivate WooCommerce CSS.
Also, press the Install WooCommerce Pages button to create standard shop pages.
If you need better understanding of the WooCommerce plugin follow the documentation link:
http://docs.woothemes.com/document/woocommerce/
To edit the Shop page navigate to the newly created Shop page and assign the WooShop template to it following
the instruction from 2.4 Assigning templates to layouts.
Feel free to choose the grid or list-view for your shop page:

Copyright © 2011-2014 CosmoThemes. All rights reserved.
9. THEME SETTINGS
9.1 CUSTOM PAGE TEMPLATES
By default, the layout is set in 2 columns aligned by right side. You can also choose the page template aligning the
content by left side or opting for full-width display (no sidebars).
This option is available both for posts and pages.
You can either edit global settings from Tripod – Sidebars Layout – Posts or individual settings from each post or
page.
If you choose the Sidebar Layout for your post, you can display different sidebars at your desire. Select which
Widget Area will be shown for each particular post from the select bar below the Post Layout. By default, the
Main Area will be shown.
9.2 UNLIMITED SIDEBARS
You can add individual sidebars for specific posts.
Create your New Sidebar at Tripod – Extra – Sidebars then go to Appearance – Widgets and populate your Areas
with desired Widgets.
Finally, assign your newly created sidebar to your specific post.

Copyright © 2011-2014 CosmoThemes. All rights reserved.
9.3 SHORTCODES
CosmoThemes comes with 100+ shortcodes to choose from:
Columns, Buttons, Tabs & Toggles, Info Boxes, Typography, Map/Contact, Tables.
Each section comes with various options. After customizing your shortcode press Insert. The shortcode will be
inserted in the above Post text area. Make sure not to delete or alter any inserted tags.
If you feel that the shortcode generates a defect layout make sure to eliminate any spaces and breaks between
them.

Copyright © 2011-2014 CosmoThemes. All rights reserved.
9.4 SHOW/HIDE META ELEMENTS
You can choose which meta element will be shown or hidden for each of your post/page.
Individual posts settings will have priority over General.
Edit general post settings in Tripod – Settings – Post settings or individual from the Post settings box below the
content area from each post.
9.5 FEATURED IMAGES
In order to use images for your posts please use FFEATURED IMAGES. You can show the featured Image both on the category/archive page and on single. Enable or disable it from Tripod – Post Settings. When adding/editing a post, on the right side you will see a box: Featured Image.
Click on it, upload an image and then click the “use as featured image” link.

Copyright © 2011-2014 CosmoThemes. All rights reserved.
Don’t forget to set the Image Caption to show users what the image is about.
9.6 POSTS LIKES
You can let users like your posts by enabling this feature from Tripod - Settings – Likes If enabled, set a limit of likes to turn your posts into Featured.
You can also generate a random number of likes for your posts.

Copyright © 2011-2014 CosmoThemes. All rights reserved.
9.7 POST FORMAT
Choose the corresponding format of the Post to correctly add a video, image, audio, attachment, gallery or
standard post.
Using YouTube and Vimeo URLs for video posts will automatically set a Featured image for the post and crop all
thumbnail sizes.
To set galleries on your blog post simply choose Gallery format type and upload several images. Save the post.
9.8 SOCIAL SHARING
Each post by default has the Social Sharing feature enabled. It can be disabled from Theme’s backend menu:
Tripod – Settings – Posts settings.
You can also choose to display social sharing on each particular post.
9.9 RELATED POSTS
Similar posts feature show posts with the same tags. If there are no other posts with the same tags, then similar
posts will not be shown.

Copyright © 2011-2014 CosmoThemes. All rights reserved.
Choose from backend how many similar posts to display for individual posts: Tripod – Settings - Posts setting
9.10 NESTED COMMENTS
Go to Settings – Discussion - Enable threaded (nested) comments X levels deep and select the deepness level.
If you choose to disable nested comments, all the previous nested comments will be displayed as simple ones.

Copyright © 2011-2014 CosmoThemes. All rights reserved.
9.11 FACEBOOK COMMENTS
To enable Facebook comments navigate to Tripod – Settings - Social
You can create a Facebook developers account by accessing this link https://developers.facebook.com/apps
Next, insert your application ID so you can choose settings as:
- Make every post public by default or approve each comment before it appears
- Allow users to post using other login providers, etc.

Copyright © 2011-2014 CosmoThemes. All rights reserved.
10. WIDGETS
10.1 TWITTER WIDGET
To display your Twitter posts go to Appearance – Widgets and drag and drop the Latest Tweets widget to one of
desired Sidebars. Set the Twitter username and the number of latest tweets you want to show.
You will also need to provide several other data from you registered application.
Please, follow the instruction from https://dev.twitter.com/apps
Choose between the animated version and static one. The animated version will display 1 tweet at a time.
10.2 QUICK CONTACT FORM WIDGET
To display the Contact Form Widget navigate to Appearance – Widgets and drag and drop the Quick Contact
Form widget to one of the Footer Widget Area. Next, set your desired email and press Save.

Copyright © 2011-2014 CosmoThemes. All rights reserved.
10.3 FLICKR WIDGET
To display Flickr Widget go to Appearance – Widgets and drag and drop the CosmoThemes Flickr Photos widget
to one of the Widget Areas. Set your desired ID and display preferences.
To find out your ID visit http://idgettr.com/ , insert your username and copy the generated ID:
10.4 TABBER WIDGET
To display Hot and New posts, Latest Comments and Tags drag and drop the Tabber Widget to one of your
sidebars.
Set values to display the desired number of entries.
If Facebook comments are enabled there will be only 3 tabs: hot, new and tags.
10.5 CATEGORIES WITH ICONS
To use an enhanced Category Widget go to Appearance – Widgets and drag and drop the Category Icons widget.
You can select an icon for each category from the provided drop-down list.
The icons list is automatically generated from the images names located in
/$theme_directory$/images/category_icons/
So, simply upload a new .png image sized 16x16px and it will appear in the widget’s dropdown list.

Copyright © 2011-2014 CosmoThemes. All rights reserved.
10.6 INSTAGRAM WIDGET
In order for this widget to work you need to get an User ID and an Access Token. Both will be provided by
accessing the following link:
https://api.instagram.com/oauth/authorize/?client_id=708d95d99a58482e8bd9122263f994b5&redirect_uri=http
://cosmothemes.com/instagram/&response_type=code
Insert both data in the provided inputs when adding the Instagram widget.
You can choose several settings for your widget, among them being the image size. Instagram provides the
following sizes: Thumbnail: 150x150 Low resolution: 306x306 Standard resolution: 612x612
10.7 LATEST GALLERIES WIDGET
To display Latest galleries drag and drop the Latest custom posts widget to one of your sidebars.
Then select Gallery for Post type and choose other settings like post taxonomy and number of posts, if you wish.
Press Save to make sure your settings were saved.

Copyright © 2011-2014 CosmoThemes. All rights reserved.
11. LANGUAGES
Firstly you'll need a tool allowing you to translate .po file into your language.
You can use Poedit app, or CodeStyling WordPress Plugin.
http://www.poedit.net/
http://www.code-styling.de/english/development/wordpress-plugin-codestyling-localization-en
Open .po file from /languages/ folder of the theme, and start translating each word to your language.
After you finished, click button "Save Catalog", and it will create a new .mo file in the same folder.
Then you'll need to open wp-config.php file from the root folder of your WordPress install, and replace this line:
define ('WPLANG', '');
with something like:
define ('WPLANG', 'fr_FR');
Then make sure that .mo file from /languages/ folder of our theme has the same name as your language code:
"fr_FR.mo"
You can find more information here: http://www.catswhocode.com/blog/how-to-make-a-translatable-
wordpress-theme