Embed Size (px)
Citation preview

Trend Micro Incorporated reserves the right to make changes to this document and tothe product described herein without notice. Before installing and using the product,review the readme files, release notes, and/or the latest version of the applicabledocumentation, which are available from the Trend Micro website at:
http://docs.trendmicro.com
© 2016 Trend Micro Incorporated. All Rights Reserved.Trend Micro, the Trend Microt-ball logo, and Control Manager are trademarks or registered trademarks of TrendMicro Incorporated. All other product or company names may be trademarks orregistered trademarks of their owners.
Document Part No.: APEM57301/160118
Release Date: April 2016
Protected by U.S. Patent No.: Patents pending.

This documentation introduces the main features of the product and/or providesinstallation instructions for a production environment. Read through the documentationbefore installing or using the product.
Detailed information about how to use specific features within the product may beavailable in the Trend Micro Online Help and/or the Trend Micro Knowledge Base atthe Trend Micro website.
Trend Micro always seeks to improve its documentation. If you have questions,comments, or suggestions about this or any Trend Micro document, please contact us [email protected].
Evaluate this documentation on the following site:
http://www.trendmicro.com/download/documentation/rating.asp


i
Table of ContentsPreface
Preface .................................................................................................................. v
Documentation ................................................................................................... v
Audience ............................................................................................................. vi
Document Conventions .................................................................................. vii
Terminology ..................................................................................................... viii
About Trend Micro ............................................................................................ x
Chapter 1: IntroductionAbout TippingPoint Advanced Threat Protection Analyzer ................... 1-2
What's New ..................................................................................................... 1-2
Features and Benefits ..................................................................................... 1-3Enable Sandboxing as a Centralized Service ...................................... 1-4Custom Sandboxing ............................................................................... 1-4Broad File Analysis Range ..................................................................... 1-4YARA Rules ............................................................................................ 1-4Document Exploit Detection ............................................................... 1-5Automatic URL Analysis ....................................................................... 1-5Detailed Reporting ................................................................................. 1-5Alert Notifications .................................................................................. 1-5Clustered Deployment ........................................................................... 1-5Trend Micro Integration ........................................................................ 1-5Web Services API and Manual Submission ....................................... 1-6Custom Defense Integration ................................................................ 1-6
Chapter 2: Preparing to Deploy TippingPoint AdvancedThreat Protection Analyzer
Deployment Overview ................................................................................... 2-2Product Specifications ........................................................................... 2-2

Trend Micro TippingPoint Advanced Threat Protection Analyzer 5.5 Installation and DeploymentGuide
ii
Deployment Considerations ................................................................. 2-2Recommended Network Environment .............................................. 2-6
Deployment Requirements ........................................................................... 2-8Logon Credentials ................................................................................ 2-10Ports Used by ATP Analyzer ............................................................. 2-10
Chapter 3: Installing TippingPoint Advanced ThreatProtection Analyzer
Installation Tasks ............................................................................................ 3-2Setting Up the Hardware ....................................................................... 3-2Installing TippingPoint Advanced Threat Protection Analyzer ...... 3-3
Chapter 4: Using the Preconfiguration ConsoleThe Preconfiguration Console ...................................................................... 4-2
Preconfiguration Console Basic Operations ...................................... 4-3Configuring Network Addresses on the Preconfiguration Console .................................................................................................................... 4-4Viewing High Availability Details on the Preconfiguration Console .................................................................................................................... 4-7
Chapter 5: Technical SupportTroubleshooting Resources .......................................................................... 5-2
Contacting Trend Micro TippingPoint Support ........................................ 5-3
Sending Suspicious Content to Trend Micro ............................................. 5-4
Other Resources ............................................................................................. 5-5
Appendix A: Getting StartedThe Management Console ........................................................................... A-2
Getting Started Tasks .................................................................................... A-3Accounts Tab ......................................................................................... A-4License ..................................................................................................... A-8Network Tab ........................................................................................ A-11Proxy Tab ............................................................................................. A-13

Table of Contents
iii
Time Tab .............................................................................................. A-14SMTP Tab ............................................................................................ A-17Importing an Image ............................................................................ A-18Enabling External Connections ........................................................ A-20Cluster Tab ........................................................................................... A-21
IndexIndex .............................................................................................................. IN-1


v
PrefaceWelcome to the TippingPoint Advanced Threat Protection Analyzer Installation andDeployment Guide. This guide contains information about the requirements andprocedures for deploying and installing ATP Analyzer.
DocumentationThe documentation set for TippingPoint Advanced Threat Protection Analyzer includesthe following:
TABLE 1. Product Documentation
DOCUMENT DESCRIPTION
Administrator's Guide PDF documentation provided with the product ordownloadable from the Trend Micro website.
The Administrator’s Guide contains detailed instructions onhow to configure and manage ATP Analyzer, andexplanations on ATP Analyzer concepts and features.
Installation andDeployment Guide
PDF documentation provided with the product ordownloadable from the Trend Micro website.
The Installation and Deployment Guide containsinformation about requirements and procedures forplanning deployment, installing ATP Analyzer, and usingthe Preconfiguration Console to set initial configurationsand perform system tasks.
Syslog Content MappingGuide
PDF documentation provided with the product ordownloadable from the Trend Micro website.
The Syslog Content Mapping Guide provides informationabout log management standards and syntaxes forimplementing syslog events in ATP Analyzer.
Quick Start Card The Quick Start Card provides user-friendly instructions onconnecting ATP Analyzer to your network and onperforming the initial configuration.
Trend Micro TippingPoint Advanced Threat Protection Analyzer 5.5 Installation and DeploymentGuide
vi
DOCUMENT DESCRIPTION
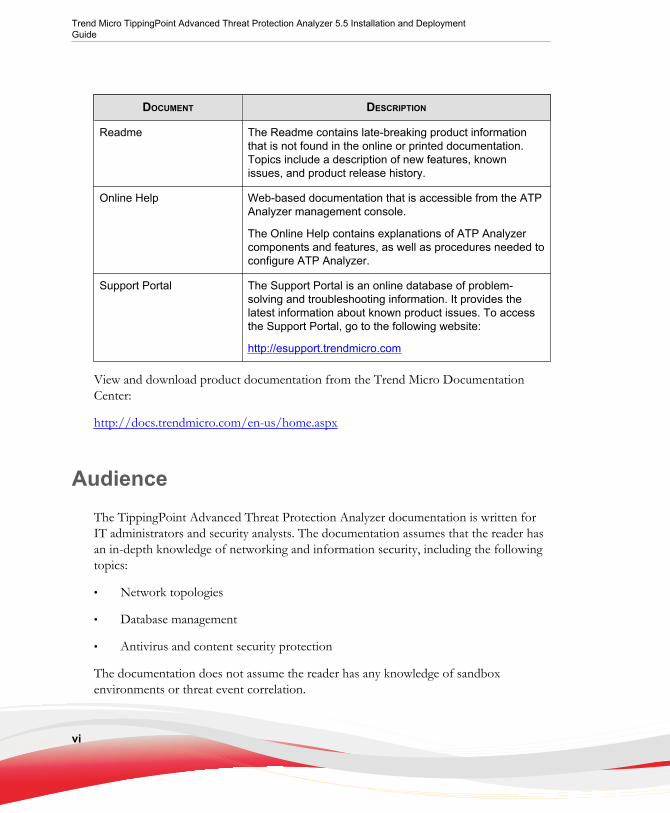
Readme The Readme contains late-breaking product informationthat is not found in the online or printed documentation.Topics include a description of new features, knownissues, and product release history.
Online Help Web-based documentation that is accessible from the ATPAnalyzer management console.
The Online Help contains explanations of ATP Analyzercomponents and features, as well as procedures needed toconfigure ATP Analyzer.
Support Portal The Support Portal is an online database of problem-solving and troubleshooting information. It provides thelatest information about known product issues. To accessthe Support Portal, go to the following website:
http://esupport.trendmicro.com
View and download product documentation from the Trend Micro DocumentationCenter:
http://docs.trendmicro.com/en-us/home.aspx
AudienceThe TippingPoint Advanced Threat Protection Analyzer documentation is written forIT administrators and security analysts. The documentation assumes that the reader hasan in-depth knowledge of networking and information security, including the followingtopics:
• Network topologies
• Database management
• Antivirus and content security protection
The documentation does not assume the reader has any knowledge of sandboxenvironments or threat event correlation.

vii
Document ConventionsThe documentation uses the following conventions:
TABLE 2. Document Conventions
CONVENTION DESCRIPTION
UPPER CASE Acronyms, abbreviations, and names of certaincommands and keys on the keyboard
Bold Menus and menu commands, command buttons, tabs,and options
Italics References to other documents
Monospace Sample command lines, program code, web URLs, filenames, and program output
Navigation > Path The navigation path to reach a particular screen
For example, File > Save means, click File and then clickSave on the interface
Note Configuration notes
Tip Recommendations or suggestions
Important Information regarding required or default configurationsettings and product limitations
WARNING! Critical actions and configuration options

Trend Micro TippingPoint Advanced Threat Protection Analyzer 5.5 Installation and DeploymentGuide
viii
Terminology
TERMINOLOGY DESCRIPTION
ActiveUpdate A component update source managed by Trend Micro.ActiveUpdate provides up-to-date downloads of viruspattern files, scan engines, program, and other TrendMicro component files through the Internet.
Active primary appliance Clustered appliance with which all management tasks areperformed. Retains all configuration settings andallocates submissions to secondary appliances forperformance improvement.
Administrator The person managing TippingPoint Advanced ThreatProtection Analyzer
Clustering A cluster consists of at least two TippingPoint AdvancedThreat Protection Analyzer appliances configured in away that provides some sort of benefit.
Multiple standalone TippingPoint Advanced ThreatProtection Analyzer appliances can be deployed andconfigured to form a cluster that provides fault tolerance,improved performance, or a combination thereof.
Custom port A hardware port that connects TippingPoint AdvancedThreat Protection Analyzer to an isolated networkdedicated to sandbox analysis
Dashboard UI screen on which widgets are displayed
High availability cluster In a high availability cluster, one appliance acts as theactive primary appliance, and one acts as the passiveprimary appliance. The passive primary applianceautomatically takes over as the new active primaryappliance if the active primary appliance encounters anerror and is unable to recover.
Load-balancing cluster In a load balancing cluster, one appliance acts as theactive primary appliance, and any additional appliancesact as secondary appliances. The secondary appliancesprocess submissions allocated by the active primaryappliance for performance improvement.

ix
TERMINOLOGY DESCRIPTION
Management console A web-based user interface for managing a product.
Management port A hardware port that connects to the managementnetwork.
Passive primary appliance Clustered appliance that is on standby until active primaryappliance encounters an error and is unable to recover.Provides high availability.
Role-based administration Role-based administration streamlines howadministrators configure user accounts and controlaccess to the management console.
Sandbox image A ready-to-use software package (operating system withapplications) that require no configuration or installation.Virtual Analyzer supports only image files in the OpenVirtual Appliance (OVA) format.
Sandbox instance A single virtual machine based on a sandbox image.
Secondary appliance Clustered appliance that processes submissionsallocated by the active primary appliance for performanceimprovement.
Standalone appliance Appliance that is not part of any cluster. Clusteredappliances can revert to being standalone appliances bydetaching the appliance from its cluster.
Threat Connect A Trend Micro service that correlates suspicious objectsdetected in your environment and threat data from theTrend Micro Smart Protection Network. By providing on-demand access to Trend Micro intelligence databases,Threat Connect enables you to identify and investigatepotential threats to your environment.
Virtual Analyzer A secure virtual environment used to manage andanalyze samples submitted by Trend Micro products.Sandbox images allow observation of file and networkbehavior in a natural setting.
Widget A customizable screen to view targeted, selected datasets.

Trend Micro TippingPoint Advanced Threat Protection Analyzer 5.5 Installation and DeploymentGuide
x
TERMINOLOGY DESCRIPTION
YARA YARA rules are malware detection patterns that are fullycustomizable to identify targeted attacks and securitythreats specific to your environment.
About Trend MicroAs a global leader in cloud security, Trend Micro develops Internet content security andthreat management solutions that make the world safe for businesses and consumers toexchange digital information. With over 20 years of experience, Trend Micro providestop-ranked client, server, and cloud-based solutions that stop threats faster and protectdata in physical, virtual, and cloud environments.
As new threats and vulnerabilities emerge, Trend Micro remains committed to helpingcustomers secure data, ensure compliance, reduce costs, and safeguard businessintegrity. For more information, visit:
http://www.trendmicro.com
Trend Micro and the Trend Micro t-ball logo are trademarks of Trend MicroIncorporated and are registered in some jurisdictions. All other marks are the trademarksor registered trademarks of their respective companies.

1-1
Chapter 1
IntroductionThis chapter introduces Trend Micro™ TippingPoint Advanced Threat ProtectionAnalyzer 5.5 and the new features in this release.

Trend Micro TippingPoint Advanced Threat Protection Analyzer 5.5 Installation and DeploymentGuide
1-2
About TippingPoint Advanced ThreatProtection Analyzer
TippingPoint™ Advanced Threat Protection Analyzer is a custom sandbox analysisserver that enhances the targeted attack protection of Trend Micro and third-partysecurity products. TippingPoint Advanced Threat Protection Analyzer supports out-of-the-box integration with Trend Micro email and web security products, and can also beused to augment or centralize the sandbox analysis of other TippingPoint AdvancedThreat Protection products. The custom sandboxing environments that can be createdwithin the TippingPoint Advanced Threat Protection Analyzer precisely match targetdesktop software configurations — resulting in more accurate detections and fewer falsepositives.
It also provides a Web Services API to allow integration with any third party product,and a manual submission feature for threat research.
What's NewTABLE 1-1. What's New in TippingPoint Advanced Threat Protection Analyzer 5.5
FEATURE/ENHANCEMENT DETAILS
High availability TippingPoint Advanced Threat Protection Analyzerprovides the option of setting up a cluster environment toavoid having a single point of failure.
High-performancehardware
The TippingPoint Advanced Threat Protection Analyzerappliance allows a maximum of 60 sandbox instances.The hardware uses two 4TB hard disk drives that areconfigured in RAID1.
Automatic URL analysis TippingPoint Advanced Threat Protection Analyzer nowperforms page scanning and sandbox analysis of URLsthat are automatically submitted by integrating products.
System and applicationevents notification
TippingPoint Advanced Threat Protection Analyzerprovides immediate intelligence about system andapplication events through email notifications.

Introduction
1-3
FEATURE/ENHANCEMENT DETAILS
Sample analysisprioritization
TippingPoint Advanced Threat Protection Analyzerprovides the option of prioritizing objects for analysis.
Improved detection TippingPoint Advanced Threat Protection Analyzerprovides increased protection by improving its detectioncapabilities. The enhancements in this release includeOffice 2013 sandbox support, YARA rules support, unifiedVA analysis reports, and increased sandbox imagesupport of up to 20GB.
Role-based administration TippingPoint Advanced Threat Protection Analyzer nowallows administrators to create and assign Investigator andOperator accounts.
Syslog server support forTrend Micro Event Format(TMEF) logs
TippingPoint Advanced Threat Protection Analyzerprovides the option of sending logs to the syslog server inTrend Micro Event Format (TMEF).
Complete IPV4 and IPV6dual-stack support
TippingPoint Advanced Threat Protection Analyzersupports IPV4 and IPV6 addresses for all settings.
Internet Explorer 11 andEdge browser support
TippingPoint Advanced Threat Protection Analyzersupports the latest versions of Internet Explorer.
Integration with TrendMicro products
TippingPoint Advanced Threat Protection Analyzer nowallows integration with TippingPoint Advanced ThreatProtection for Email and InterScan Web Security.
Features and BenefitsTippingPoint Advanced Threat Protection Analyzer includes the following features:
• Enable Sandboxing as a Centralized Service on page 1-4
• Custom Sandboxing on page 1-4
• Broad File Analysis Range on page 1-4
• YARA Rules on page 1-4
• Document Exploit Detection on page 1-5

Trend Micro TippingPoint Advanced Threat Protection Analyzer 5.5 Installation and DeploymentGuide
1-4
• Automatic URL Analysis on page 1-5
• Detailed Reporting on page 1-5
• Alert Notifications on page 1-5
• Clustered Deployment on page 1-5
• Trend Micro Integration on page 1-5
• Web Services API and Manual Submission on page 1-6
• Custom Defense Integration on page 1-6
Enable Sandboxing as a Centralized ServiceTippingPoint Advanced Threat Protection Analyzer ensures optimized performancewith a scalable solution able to keep pace with email, network, endpoint, and anyadditional source of samples.
Custom SandboxingTippingPoint Advanced Threat Protection Analyzer performs sandbox simulation andanalysis in environments that match the desktop software configurations attackersexpect in your environment and ensures optimal detection with low false-positive rates.
Broad File Analysis RangeTippingPoint Advanced Threat Protection Analyzer examines a wide range of Windowsexecutable, Microsoft Office, PDF, web content, and compressed file types usingmultiple detection engines and sandboxing.
YARA RulesTippingPoint Advanced Threat Protection Analyzer uses YARA rules to identifymalware. YARA rules are malware detection patterns that are fully customizable toidentify targeted attacks and security threats specific to your environment.

Introduction
1-5
Document Exploit Detection
Using specialized detection and sandboxing, TippingPoint Advanced Threat ProtectionAnalyzer discovers malware and exploits that are often delivered in common officedocuments and other file formats.
Automatic URL Analysis
TippingPoint Advanced Threat Protection Analyzer performs page scanning andsandbox analysis of URLs that are automatically submitted by integrating products.
Detailed Reporting
TippingPoint Advanced Threat Protection Analyzer delivers full analysis resultsincluding detailed sample activities and C&C communications via central dashboardsand reports.
Alert Notifications
Alert notifications provide immediate intelligence about the state of TippingPointAdvanced Threat Protection Analyzer.
Clustered Deployment
Multiple standalone TippingPoint Advanced Threat Protection Analyzer appliances canbe deployed and configured to form a cluster that provides fault tolerance, improvedperformance, or a combination thereof.
Trend Micro Integration
TippingPoint Advanced Threat Protection Analyzer enables out-of-the-box integrationto expand the sandboxing capacity for the TippingPoint Advanced Threat Protectionand Trend Micro email and web security products.

Trend Micro TippingPoint Advanced Threat Protection Analyzer 5.5 Installation and DeploymentGuide
1-6
Web Services API and Manual SubmissionTippingPoint Advanced Threat Protection Analyzer allows any security product orauthorized threat researcher to submit samples.
Custom Defense IntegrationTippingPoint Advanced Threat Protection Analyzer shares new IOC detectionintelligence automatically with other Trend Micro solutions and third-party securityproducts.

2-1
Chapter 2
Preparing to Deploy TippingPointAdvanced Threat Protection Analyzer
This chapter discusses the items you need to prepare to deploy TippingPoint AdvancedThreat Protection Analyzer and connect it to your network.
If TippingPoint Advanced Threat Protection Analyzer is already deployed on yournetwork and you have a patch or hot fix to apply to it, see the TippingPoint AdvancedThreat Protection Analyzer Administrator's Guide.

Trend Micro TippingPoint Advanced Threat Protection Analyzer 5.5 Installation and DeploymentGuide
2-2
Deployment Overview
Product Specifications
Standard TippingPoint Advanced Threat Protection Analyzer appliances have thefollowing specifications.
Contact Trend Micro if the appliance you are using does not meet these hardwarespecifications.
FEATURE SPECIFICATIONS
Rack size 2U 19-inch standard rack
Availability Raid 1 configuration
Storage size 4 TB free storage
Connectivity • Management port: 1 x 10Base-T/100Base-TX/1000Base-T
• Custom ports: 3 x 10Base-T/100Base-TX/1000Base-T
Dimensions (WxDxH) 48.2 cm (18.98 in) x 75.58 cm (29.75 in) x 8.73 cm (3.44 in)
Maximum weight 31.5 kg (69.45 lb)
Operating temperature 10 °C to 35 °C at 10% to 80% relative humidity (RH)
Power 750W, 120-240 VAC 50/60 Hz
Deployment Considerations
Any TippingPoint Advanced Threat Protection Analyzer appliance can be deployed andconfigured as a standalone appliance. A standalone appliance processes all submittedobjects without the assistance of other TippingPoint Advanced Threat ProtectionAnalyzer appliances. It cannot provide continued scanning and analysis services when itencounters an error and is unable to recover.

Preparing to Deploy TippingPoint Advanced Threat Protection Analyzer
2-3
Multiple standalone TippingPoint Advanced Threat Protection Analyzer appliances canbe deployed and configured to form a cluster that provides fault tolerance, improvedperformance, or a combination thereof.
Depending on your requirements and the number of TippingPoint Advanced ThreatProtection Analyzer appliances available, you may deploy the following clusterconfigurations:
TABLE 2-1. Cluster Configurations
CLUSTER CONFIGURATION DESCRIPTION
High availability cluster In a high availability cluster, one appliance acts as the activeprimary appliance, and one acts as the passive primaryappliance. The passive primary appliance automatically takesover as the new active primary appliance if the active primaryappliance encounters an error and is unable to recover.
For details, see High Availability Cluster on page 2-3.
Load-balancing cluster In a load balancing cluster, one appliance acts as the activeprimary appliance, and any additional appliances act assecondary appliances. The secondary appliances processsubmissions allocated by the active primary appliance forperformance improvement.
For details, see Load-Balancing Cluster on page 2-4.
High availability clusterwith load balancing
In a high availability cluster with load balancing, one applianceacts as the active primary appliance, one acts as the passiveprimary appliance, and any additional appliances act assecondary appliances. The passive primary appliance takesover as the active primary appliance if the active primaryappliance encounters an error and is unable to recover. Thesecondary appliances process submissions allocated by theactive primary appliance for performance improvement.
For details, see High Availability Cluster with Load Balancingon page 2-5.
High Availability ClusterIn a high availability cluster, one appliance acts as the active primary appliance, and oneacts as the passive primary appliance. The passive primary appliance automatically takes

Trend Micro TippingPoint Advanced Threat Protection Analyzer 5.5 Installation and DeploymentGuide
2-4
over as the new active primary appliance if the active primary appliance encounters anerror and is unable to recover.
Deploy this cluster configuration if you want to ensure that TippingPoint AdvancedThreat Protection Analyzer capabilities remain available even when the applianceencounters an error and is unable to recover.
The following figure shows two TippingPoint Advanced Threat Protection Analyzerappliances deployed in a high availability cluster configuration and how integratingproducts communicate with TippingPoint Advanced Threat Protection Analyzer.
Note
Trend Micro recommends using a Category 6 or higher Ethernet cable to directly connectthe active primary appliance and passive primary appliance using eth3.
FIGURE 2-1. High Availability Cluster
Load-Balancing Cluster
In a load balancing cluster, one appliance acts as the active primary appliance, and anyadditional appliances act as secondary appliances. The secondary appliances processsubmissions allocated by the active primary appliance for performance improvement.

Preparing to Deploy TippingPoint Advanced Threat Protection Analyzer
2-5
Deploy this cluster configuration if you require improved object processingperformance.
The following figure shows TippingPoint Advanced Threat Protection Analyzerappliances deployed in a load-balancing cluster configuration and how integratingproducts communicate with TippingPoint Advanced Threat Protection Analyzer.
FIGURE 2-2. Load-Balancing Cluster
High Availability Cluster with Load BalancingIn a high availability cluster with load balancing, one appliance acts as the active primaryappliance, one acts as the passive primary appliance, and any additional appliances act assecondary appliances. The passive primary appliance takes over as the active primaryappliance if the active primary appliance encounters an error and is unable to recover.The secondary appliances process submissions allocated by the active primary appliancefor performance improvement.
Deploy this cluster configuration if you want to combine the benefits of high availabilityclustering and load-balancing clustering.
The following figure shows TippingPoint Advanced Threat Protection Analyzerappliances deployed in a high availability cluster configuration and how integratingproducts communicate with TippingPoint Advanced Threat Protection Analyzer.

Trend Micro TippingPoint Advanced Threat Protection Analyzer 5.5 Installation and DeploymentGuide
2-6
Note
Trend Micro recommends using a Category 6 or higher Ethernet cable to directly connectthe active primary appliance and passive primary appliance using eth3.
FIGURE 2-3. High Availability Cluster with Load Balancing
Recommended Network EnvironmentTippingPoint Advanced Threat Protection Analyzer requires connection to amanagement network, which usually is the organization’s intranet. After deployment,administrators can perform configuration tasks from any computer on the managementnetwork.
Trend Micro recommends using a custom network for sample analysis. Customnetworks ideally are connected to the Internet but do not have proxy settings, proxyauthentication, and connection restrictions.

Preparing to Deploy TippingPoint Advanced Threat Protection Analyzer
2-7
The networks must be independent of each other so that malicious samples in thecustom network do not affect hosts in the management network.
Network Settings
Ports are found at the back of the appliance, as shown in the following image.

Trend Micro TippingPoint Advanced Threat Protection Analyzer 5.5 Installation and DeploymentGuide
2-8
Network interface ports include:
• Management port (eth0): Connects the appliance to the management network
• Custom ports (eth1, eth2, eth3): Connect the appliance to isolated networks thatare reserved for sandbox analysis
Note
When using high availability, eth3 is used to directly connect two identical appliancesand cannot be used for sandbox analysis.
TippingPoint Advanced Threat Protection Analyzer requires one available static IPaddress in the management network.
If sandbox instances require Internet connectivity during sample analysis, Trend Microrecommends allocating one extra IP address for Virtual Analyzer. The SandboxManagement > Network Connection screen allows you to specify static addresses. Formore information, see the TippingPoint Advanced Threat Protection AnalyzerAdministrator's Guide.
Deployment Requirements
REQUIREMENT DETAILS
TippingPoint AdvancedThreat Protection Analyzer
Obtain from Trend Micro
TippingPoint AdvancedThreat Protection Analyzerinstallation CD
Obtain from Trend Micro
Activation Code Obtain from Trend Micro
Monitor and VGA cable Connects to the VGA port of the appliance
USB keyboard Connects to a USB port of the appliance
USB mouse Connects to a USB port of the appliance

Preparing to Deploy TippingPoint Advanced Threat Protection Analyzer
2-9
REQUIREMENT DETAILS
Ethernet cables • One cable connects the management port of theappliance to the management network.
• One cable connects a custom port to an isolatednetwork that is reserved for sandbox analysis.
• If using high availability, one cable directly connectseth3 to eth3 on an identical appliance.
Internet-enabled computer A computer with the following software installed:
• Microsoft Internet Explorer™ 9, 10, or 11
• Microsoft Edge™
• Google Chrome™
• Mozilla Firefox™
• Adobe® Flash® 10 or later
IP addresses • One static IP address in the management network
• If sandbox instances require Internet connectivity, oneextra IP address for Virtual Analyzer
• If using high availability, one extra virtual IP address
Third party softwarelicenses
Licenses for all third party software installed on sandboximages

Trend Micro TippingPoint Advanced Threat Protection Analyzer 5.5 Installation and DeploymentGuide
2-10
Logon Credentials
CONSOLE PURPOSEDEFAULT
CREDENTIALSYOUR
INFORMATION
Preconfiguration console
Perform initial configurationtasks. See ConfiguringNetwork Addresses on thePreconfiguration Console onpage 4-4.
• ATPAnalyzerlogin (notconfigurable): admin
• Password:admin
Password:
Managementconsole
• Configure product settings
• View and downloadreports
• User name(notconfigurable): admin
• Password:Admin1234!
Password:
Other useraccounts(configured onthe managementconsole, inAdministration> Accounts /Contacts >Accounts)
User account 1:
User name:
Password:
User account 2:
User name:
Password:
Ports Used by ATP AnalyzerThe following table shows the ports that are used with TippingPoint Advanced ThreatProtection Analyzer and why they are used.

Preparing to Deploy TippingPoint Advanced Threat Protection Analyzer
2-11
TABLE 2-2. Ports used by ATP Analyzer
PORT PROTOCOL FUNCTION PURPOSE
21 TCP Outbound TippingPoint Advanced ThreatProtection Analyzer uses this port tosend backup data to FTP servers.
22 TCP Listening andoutbound
ATP Analyzer uses this port to:
• Access the preconfigurationconsole with a computer throughSSH
• Send backup data to an SFTPserver
25 TCP Outbound ATP Analyzer sends notifications andscheduled reports through SMTP.
53 TCP/UDP Outbound ATP Analyzer uses this port for DNSresolution.
67 UDP Outbound ATP Analyzer sends requests to theDHCP server if IP addresses areassigned dynamically.
68 UDP Listening ATP Analyzer receives responsesfrom the DHCP server.

Trend Micro TippingPoint Advanced Threat Protection Analyzer 5.5 Installation and DeploymentGuide
2-12
PORT PROTOCOL FUNCTION PURPOSE
80 TCP Listening andoutbound
ATP Analyzer connects to othercomputers and integrated Trend Microproducts and hosted services throughthis port.
In particular,ATP Analyzer uses thisport to:
• Verify the ATP Analyzer productlicense through CustomerLicensing Portal
• Query Web Reputation Servicesthrough the Smart ProtectionNetwork
• Connect to the Community FileReputation service for fileprevalence when analyzing filesamples
123 UDP Listening andoutbound
ATP Analyzer connects to the NTPserver to synchronize time.
137 UDP Outbound ATP Analyzer uses NetBIOS toresolve IP addresses to host names.

Preparing to Deploy TippingPoint Advanced Threat Protection Analyzer
2-13
PORT PROTOCOL FUNCTION PURPOSE
443 TCP Listening andoutbound
ATP Analyzer uses this port to:
• Access the management consolewith a computer through HTTPS
• Communicate with otherTippingPoint Advanced ThreatProtection Analyzer appliances ina cluster environment
• Connect to Trend Micro ThreatConnect
• Communicate with Trend MicroControl Manager
• Connect to Web ReputationServices to query the blockingreason
• Receive files from a computerwith Manual Submission Tool
• Receive samples from integratedproducts
• Send anonymous threatinformation from Smart Feedback
• Send Suspicious Objects list andanalysis information to integratedproducts
• Update components byconnecting to the ActiveUpdateserver
• Verify the safety of files throughthe Certified Safe SoftwareService

Trend Micro TippingPoint Advanced Threat Protection Analyzer 5.5 Installation and DeploymentGuide
2-14
PORT PROTOCOL FUNCTION PURPOSE
514 UDP Outbound ATP Analyzer sends logs to a syslogserver over UDP.
NoteThis is the default port.Configure this port through themanagement console.
601 TCP Outbound ATP Analyzer sends logs to a syslogserver over TCP.
NoteThis is the default port.Configure this port through themanagement console.
5274 TCP Outbound TippingPoint Advanced ThreatProtection Analyzer uses this port asthe default port to connect to theSmart Protection Server for webreputation services.
User-defined Outbound TippingPoint Advanced ThreatProtection Analyzer uses the specifiedport to send logs to syslog servers.

3-1
Chapter 3
Installing TippingPoint AdvancedThreat Protection Analyzer
This chapter discusses the TippingPoint Advanced Threat Protection Analyzerinstallation tasks.
TippingPoint Advanced Threat Protection Analyzer is already installed on newappliances. Perform the tasks only if you need to reinstall or upgrade the firmware.

Trend Micro TippingPoint Advanced Threat Protection Analyzer 5.5 Installation and DeploymentGuide
3-2
Installation Tasks
Procedure
1. Prepare the appliance for installation. For details, see Setting Up the Hardware onpage 3-2.
2. Install TippingPoint Advanced Threat Protection Analyzer. For details, seeInstalling TippingPoint Advanced Threat Protection Analyzer on page 3-3.
3. Configure the IP address of the appliance on the preconfiguration console. Fordetails, see Configuring Network Addresses on the Preconfiguration Console onpage 4-4.
Setting Up the Hardware
Procedure
1. Mount the appliance in a standard 19-inch 4-post rack, or on a free-standing object,such as a sturdy desktop.
Note
When mounting the appliance, leave at least two inches of clearance on all sides forproper ventilation and cooling.
2. Connect the appliance to a power source.
TippingPoint Advanced Threat Protection Analyzer includes two 750-watt hot-plug power supply units. One acts as the main power supply and the other as abackup. The corresponding AC power slots are located at the back of theappliance, as shown in the following image.

Installing TippingPoint Advanced Threat Protection Analyzer
3-3
3. Connect the monitor to the VGA port at the back of the appliance.
4. Connect the keyboard and mouse to the USB ports at the back of the appliance.
5. Connect the Ethernet cables to the management and custom ports.
• Management port: A hardware port that connects the appliance to themanagement network
• Custom port: A hardware port that connects the appliance to an isolatednetwork dedicated to sandbox analysis
Note
When using high availability, eth3 is used to directly connect two identicalappliances and cannot be used for sandbox analysis.
6. Power on the appliance.
Note
The power button is found on the front panel of the appliance, behind the bezel.
Installing TippingPoint Advanced Threat ProtectionAnalyzer
Procedure
1. Power on the appliance.
Note
The power button is found on the front panel of the appliance, behind the bezel.

Trend Micro TippingPoint Advanced Threat Protection Analyzer 5.5 Installation and DeploymentGuide
3-4
The power-on self-test (POST) screen appears.
2. Insert the CD containing the TippingPoint Advanced Threat Protection Analyzerinstallation package.
3. Restart the appliance.
The POST screen appears.
4. Press F11.

Installing TippingPoint Advanced Threat Protection Analyzer
3-5
The Boot Manager screen appears.
5. Under Boot Manager Main Menu, select BIOS Boot Menu and press Enter.
The BIOS Boot Manager screen appears.
6. Select DVD-ROM and press Enter.

Trend Micro TippingPoint Advanced Threat Protection Analyzer 5.5 Installation and DeploymentGuide
3-6
The TippingPoint Advanced Threat Protection Analyzer Appliance Installationscreen appears.
7. Select 1. Install Appliance and press Enter.
• When installing TippingPoint Advanced Threat Protection Analyzer via serialport, select 2. Install Appliance via Serial Port and press Enter.

Installing TippingPoint Advanced Threat Protection Analyzer
3-7
The Trend Micro License Agreement screen appears.
8. Click Accept.

Trend Micro TippingPoint Advanced Threat Protection Analyzer 5.5 Installation and DeploymentGuide
3-8
The Select Disk screen appears.
9. Select the disk on which to install the TippingPoint Advanced Threat ProtectionAnalyzer software.
10. Click Continue.

Installing TippingPoint Advanced Threat Protection Analyzer
3-9
The program checks if the minimum hardware requirements are met, and thendisplays the Hardware Profile screen.
Note
TippingPoint Advanced Threat Protection Analyzer requires at least:
• 8 GB RAM
• 400 GB available disk space
• Two CPUs
• One Ethernet network interface card
11. Click Continue.

Trend Micro TippingPoint Advanced Threat Protection Analyzer 5.5 Installation and DeploymentGuide
3-10
WARNING!
Installation involves repartitioning of the disks. All data on the disks are lost.
A confirmation message appears.
12. Click Continue.
The installation program repartitions the disks and prepares the environment forinstallation. Upon completion, the appliance is restarted and TippingPointAdvanced Threat Protection Analyzer software is installed.
What to do next
Configure the IP address of the appliance on the preconfiguration console to completethe deployment process. For details, see Configuring Network Addresses on thePreconfiguration Console on page 4-4.

4-1
Chapter 4
Using the Preconfiguration ConsoleThis chapter discusses how to use the TippingPoint Advanced Threat ProtectionAnalyzer preconfiguration console.

Trend Micro TippingPoint Advanced Threat Protection Analyzer 5.5 Installation and DeploymentGuide
4-2
The Preconfiguration ConsoleThe preconfiguration console is a Bash-based (Unix shell) interface used to configurenetwork settings, view high availability details, ping remote hosts, and change thepreconfiguration console password.
The following table describes the tasks performed on the preconfiguration console.
TASK PROCEDURE
Logging on Type valid logon credentials. The default credentialsare:
• User name: admin
• Password: admin
Configuring network addressesfor the appliance
Specify the appliance IP address, subnet mask,gateway, and DNS. For details, see ConfiguringNetwork Addresses on the Preconfiguration Consoleon page 4-4.

Using the Preconfiguration Console
4-3
TASK PROCEDURE
Viewing high availability details View the active and passive appliance host names, IPaddresses, and sync status.
NoteHigh availability cannot be configured on thepreconfiguration console. Use the managementconsole to configure high availability. For detailssee the High Availability Tab and Cluster Tabtopics in theTippingPoint Advanced ThreatProtection Analyzer Administrator’s Guide.
Pinging a remote host Type a valid IP address or FQDN and click Ping.
Changing the preconfigurationconsole password
Type the new password twice and click Save.
Logging off On the Main Menu, click Log off.
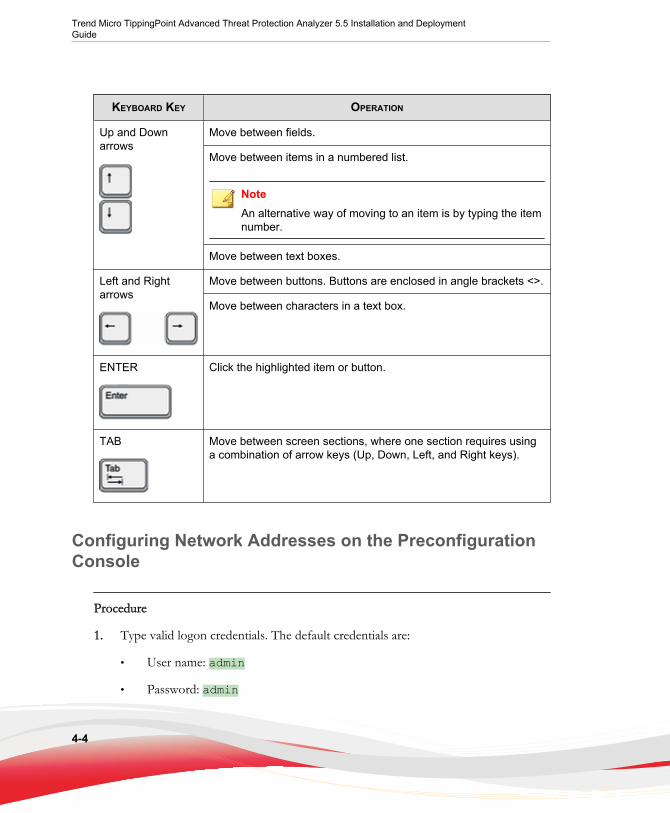
Preconfiguration Console Basic OperationsUse the following keyboard keys to perform basic operations on the preconfigurationconsole.
Important
Disable scroll lock (using the SCROLL LOCK key on the keyboard) to perform thefollowing operations.
Trend Micro TippingPoint Advanced Threat Protection Analyzer 5.5 Installation and DeploymentGuide
4-4
KEYBOARD KEY OPERATION
Up and Downarrows
Move between fields.
Move between items in a numbered list.
NoteAn alternative way of moving to an item is by typing the itemnumber.
Move between text boxes.
Left and Rightarrows
Move between buttons. Buttons are enclosed in angle brackets <>.
Move between characters in a text box.
ENTER Click the highlighted item or button.
TAB Move between screen sections, where one section requires usinga combination of arrow keys (Up, Down, Left, and Right keys).
Configuring Network Addresses on the PreconfigurationConsole
Procedure
1. Type valid logon credentials. The default credentials are:
• User name: admin
• Password: admin

Using the Preconfiguration Console
4-5
Note
None of the characters you type appear on the screen.
This password is different from the password used to log on to the web-basedmanagement console. For more information, see Logon Credentials on page 2-10.
The Main Menu screen appears.
2. Select Configure appliance IP address and press ENTER.

Trend Micro TippingPoint Advanced Threat Protection Analyzer 5.5 Installation and DeploymentGuide
4-6
The Appliance IP Settings screen appears.
3. Specify the following required settings:
ITEM GUIDELINES
IPv4 address • Must be in the same subnet as the virtual IP address.
• Must not conflict with the following addresses:
• Sandbox network: Configured in Virtual Analyzer >Sandbox Management > Network Connection
• Virtual IP address: Configured in Administration >System Settings > High Availability
• Virtual Analyzer: 1.1.0.0 - 1.1.2.255
• Broadcast: 255.255.255.255
• Multicast: 224.0.0.0 - 239.255.255.255
• Link local: 169.254.1.0 - 169.254.254.255
• Class E: 240.0.0.0 - 255.255.255.255
• Localhost: 127.0.0.1/8

Using the Preconfiguration Console
4-7
ITEM GUIDELINES
NoteChanging the IP address changes the management consoleURL.
Subnet mask Must not be any of the following numbers:
• 111.111.111.111
• 255.255.255.255
IPv4 gateway Must be in the same subnet as the IP address
IPv4 DNS server 1 Same as IP address
IPv4 DNS server 2(Optional)
Same as IP address
4. (Optional) Configure the IPv6 settings.
5. Press TAB to navigate to Save, and then press ENTER.
The Main Menu screen appears after the settings are successfully saved.
Viewing High Availability Details on the PreconfigurationConsole
Before you begin
The High Availability screen looks different depending on the appliance you log on to.
Use the High Availability screen to view details about the high availability configuration.
Note
On a passive primary appliance, this screen can be used to detach the appliance from thecluster.

Trend Micro TippingPoint Advanced Threat Protection Analyzer 5.5 Installation and DeploymentGuide
4-8
Procedure
1. Type valid logon credentials. The default credentials are:
• User name: admin
• Password: admin
Note
None of the characters you type appear on the screen.
This password is different from the password used to log on to the web-basedmanagement console. For more information, see Logon Credentials on page 2-10.
The Main Menu screen appears.
2. Select View high availability details and press ENTER.

Using the Preconfiguration Console
4-9
The High Availability screen appears.
The following table shows the on-screen labels and high availability configurationdetails.
TABLE 4-1. High Availability Screen
LABEL DETAIL
Mode Cluster mode of the appliance.
Status Sync status of the passive primary appliance.
Host name Host name of the appliance.
Management IP address Management IP address of the appliance.
IPv4 virtual address IPv4 virtual address of the active primary appliance.
IPv6 virtual address IPv6 virtual address of the active primary appliance.
3. (Optional) On the passive primary appliance, press TAB to navigate to Detach, andthen press ENTER to detach the passive primary appliance.

Trend Micro TippingPoint Advanced Threat Protection Analyzer 5.5 Installation and DeploymentGuide
4-10
Note
Detaching the passive primary appliance disables high availability.
4. Press TAB to navigate to Back, and then press ENTER.
The Main Menu screen appears.

5-1
Chapter 5
Technical SupportLearn about the following topics:
• Troubleshooting Resources on page 5-2
• Contacting Trend Micro TippingPoint Support on page 5-3
• Sending Suspicious Content to Trend Micro on page 5-4
• Other Resources on page 5-5

Trend Micro TippingPoint Advanced Threat Protection Analyzer 5.5 Installation and DeploymentGuide
5-2
Troubleshooting ResourcesBefore contacting technical support, consider visiting the following Trend Micro onlineresources.
Using the Support Portal
The Trend Micro Support Portal is a 24x7 online resource that contains the most up-to-date information about both common and unusual problems.
Procedure
1. Go to http://esupport.trendmicro.com.
2. Select a product or service from the appropriate drop-down list and specify anyother related information.
The Technical Support product page appears.
3. Use the Search Support box to search for available solutions.
4. If no solution is found, click Submit a Support Case from the left navigation andadd any relevant details, or submit a support case here:
http://esupport.trendmicro.com/srf/SRFMain.aspx
A Trend Micro support engineer investigates the case and responds in 24 hours orless.
Threat Encyclopedia
Most malware today consists of “blended threats” which combine two or moretechnologies to bypass computer security protocols. Trend Micro combats this complexmalware with products that create a custom defense strategy. The Threat Encyclopediaprovides a comprehensive list of names and symptoms for various blended threats,including known malware, spam, malicious URLs, and known vulnerabilities.

Technical Support
5-3
Go to http://www.trendmicro.com/vinfo/us/threat-encyclopedia/#malware to learnmore about:
• Malware and malicious mobile code currently active or “in the wild”
• Correlated threat information pages to form a complete web attack story
• Internet threat advisories about targeted attacks and security threats
• Web attack and online trend information
• Weekly malware reports
Contacting Trend Micro TippingPoint SupportContact the TippingPoint Technical Assistance Center (TAC) by using any of thefollowing options.
Phone • North America: +1 866 681 8324
• International: +1 512 681 8324
For online support and additional international toll-free numbers, visithttps://tmc.tippingpoint.com
Email address [email protected]
• Visit us online at:
http://www.trendmicro.com/tippingpoint
• Trend Micro product documentation:
http://docs.trendmicro.com
Speeding Up the Support CallTo improve problem resolution, have the following information available:
• Steps to reproduce the problem
• Appliance or network information
Trend Micro TippingPoint Advanced Threat Protection Analyzer 5.5 Installation and DeploymentGuide
5-4
• Computer brand, model, and any connected hardware or devices
• Amount of memory and free hard disk space
• Operating system and service pack version
• Version of the installed agent
• Serial number or activation code
• Detailed description of install environment
• Exact text of any error message received
Sending Suspicious Content to Trend MicroSeveral options are available for sending suspicious content to Trend Micro for furtheranalysis.
Email Reputation Services
Query the reputation of a specific IP address and nominate a message transfer agent forinclusion in the global approved list:
https://ers.trendmicro.com
Refer to the following Knowledge Base entry to send message samples to Trend Micro:
http://esupport.trendmicro.com/solution/en-US/1112106.aspx
File Reputation Services
Gather system information and submit suspicious file content to Trend Micro:
http://esupport.trendmicro.com/solution/en-us/1059565.aspx
Record the case number for tracking purposes.

Technical Support
5-5
Web Reputation Services
Query the safety rating and content type of a URL suspected of being a phishing site, orother so-called “disease vector” (the intentional source of Internet threats such asspyware and malware):
http://global.sitesafety.trendmicro.com
If the assigned rating is incorrect, send a re-classification request to Trend Micro.
Other ResourcesIn addition to solutions and support, there are many other helpful resources availableonline to help you stay up to date, learn about innovations, and to be aware of the latestsecurity trends.
Download Center
From time to time, Trend Micro may release a patch for a reported known issue or anupgrade that applies to a specific product or service. To find out whether any patchesare available, go to:
http://downloadcenter.trendmicro.com
If a patch has not been applied (patches are dated), open the Readme to determinewhether it is relevant to your environment. The Readme also contains installationinstructions.
Documentation Feedback
Trend Micro always seeks to improve its documentation. If you have questions,comments, or suggestions about this or any Trend Micro document, please go to thefollowing site:
http://www.trendmicro.com/download/documentation/rating.asp


A-1
Appendix A
Getting StartedThis chapter describes how to get started with TippingPoint Advanced ThreatProtection Analyzer and configure initial settings.

Trend Micro TippingPoint Advanced Threat Protection Analyzer 5.5 Installation and DeploymentGuide
A-2
The Management ConsoleTippingPoint Advanced Threat Protection Analyzer provides a built-in managementconsole for configuring and managing the product.
Open the management console from any computer on the management network withthe following resources:
• Microsoft Internet Explorer™ 9, 10, or 11
• Microsoft Edge™
• Google Chrome™
• Mozilla Firefox™
• Adobe® Flash® 10 or later
To log on, open a browser window and type the following URL:
https://<Appliance IP Address>/pages/login.php
This opens the logon screen, which shows the following options:

Getting Started
A-3
TABLE A-1. Management Console Logon Options
OPTION DETAILS
User name Type the logon credentials (user name and password) for themanagement console.
Use the default administrator logon credentials when logging onfor the first time:
• User name: admin
• Password: Admin1234!
Trend Micro recommends changing the password after logging onto the management console for the first time.
Configure user accounts to allow other users to access themanagement console without using the administrator account. Fordetails, see Accounts Tab on page A-4.
Password
Session duration Choose how long you would like to be logged on.
• Default: 10 minutes
• Extended: 1 day
To change these values, navigate to Administration > SystemSettings and click the Session Timeout tab.
Log On Click Log On to log on to the management console.
Getting Started Tasks
Procedure
1. Activate the product license using a valid Activation Code. For details, see Licenseon page A-8.
2. Specify the TippingPoint Advanced Threat Protection Analyzer host name and IPaddress. For details, see Network Tab on page A-11.

Trend Micro TippingPoint Advanced Threat Protection Analyzer 5.5 Installation and DeploymentGuide
A-4
3. Configure proxy settings if TippingPoint Advanced Threat Protection Analyzerconnects to the management network or Internet through a proxy server. Fordetails, see Proxy Tab on page A-13.
4. Configure date and time settings to ensure that TippingPoint Advanced ThreatProtection Analyzer features operate as intended. For details, see Time Tab onpage A-14.
5. Configure SMTP settings to enable sending of notifications through email. Fordetails, see SMTP Tab on page A-17.
6. Import sandbox instances to Virtual Analyzer. For details, see Importing an Imageon page A-18.
7. Configure Virtual Analyzer network settings to enable sandbox instances toconnect to external destinations. For details, see Enabling External Connections onpage A-20.
8. (Optional) Deploy and configure additional TippingPoint Advanced ThreatProtection Analyzer appliances for use in a high availability or load-balancingcluster. For details, see Cluster Tab on page A-21.
Accounts Tab
Use the Accounts tab, in Administration > Accounts / Contacts > Accounts, to createand manage user accounts. Users can use these accounts, instead of the defaultadministrator account, to access the management console.
Some settings are shared by all user accounts, while others are specific to each account.
This screen includes the following options.

Getting Started
A-5
TABLE A-2. Accounts Tasks
TASK STEPS
Add Click Add to add a new user account. This opens the AddAccount window, where you specify settings for the account. Fordetails, see Add Account Window on page A-6.
Edit Select a user account and then click Edit to edit its settings. Thisopens the Edit Account window, which contains the samesettings as the Add Account window. For details, see AddAccount Window on page A-6.
Only one user account can be edited at a time.
Delete Select a user account to delete and then click Delete. Only oneuser account can be deleted at a time.
Unlock TippingPoint Advanced Threat Protection Analyzer includes asecurity feature that locks an account in case the user typed anincorrect password five times in a row. This feature cannot bedisabled. Accounts locked this way, including administratoraccounts, unlock automatically after ten minutes. Theadministrator can manually unlock accounts that have beenlocked.
Only one user account can be unlocked at a time.
Sort Column Data Click a column title to sort the data below it.
Search If there are many entries in the table, type some characters in theSearch text box to narrow down the entries. As you type, theentries that match the characters you typed are displayed.TippingPoint Advanced Threat Protection Analyzer searches allcells in the table for matches.
Records andPagination Controls
The panel at the bottom of the screen shows the total number ofuser accounts. If all user accounts cannot be displayed at thesame time, use the pagination controls to view the accounts thatare hidden from view.

Trend Micro TippingPoint Advanced Threat Protection Analyzer 5.5 Installation and DeploymentGuide
A-6
Add Account Window
The Add Account window appears when you add a user account from the Accountsscreen.
This window includes the following options.

Getting Started
A-7
TABLE A-3. Add Account Window
FIELD DETAILS
Name Type the name of the account owner.
User name andpassword
Type an account name that does not exceed 40 characters.
Type a password with at least six characters and then confirm it.
If you want to use a stricter password, configure the globalpassword policy in Administration > System Settings >Password Policy tab. The password policy will be displayed inthe window and must be satisfied before you can add a useraccount.
When a user exceeds the number of retries allowed while enteringincorrect passwords, TippingPoint Advanced Threat ProtectionAnalyzer sets the user account to inactive (locked). You canunlock the account in the Accounts screen.
TipRecord the user name and password for future reference.
Description (Optional) Type a description that does not exceed 40 characters.
Role Select the role and associated permissions of this user account.
• Administrator: Users have full access to submitted objects,analysis results, and product settings
• Investigator: Users have read-only access to submittedobjects, analysis results, and product settings, but candownload the investigation package, including submittedobjects
• Operator: Users have read-only access to submitted objects,analysis results, and product settings
Add to contacts Select to add this user account to the Contacts list.
Email address Type the email address of the account owner.
Phone number (Optional) Type the phone number of the account owner.
Trend Micro TippingPoint Advanced Threat Protection Analyzer 5.5 Installation and DeploymentGuide
A-8
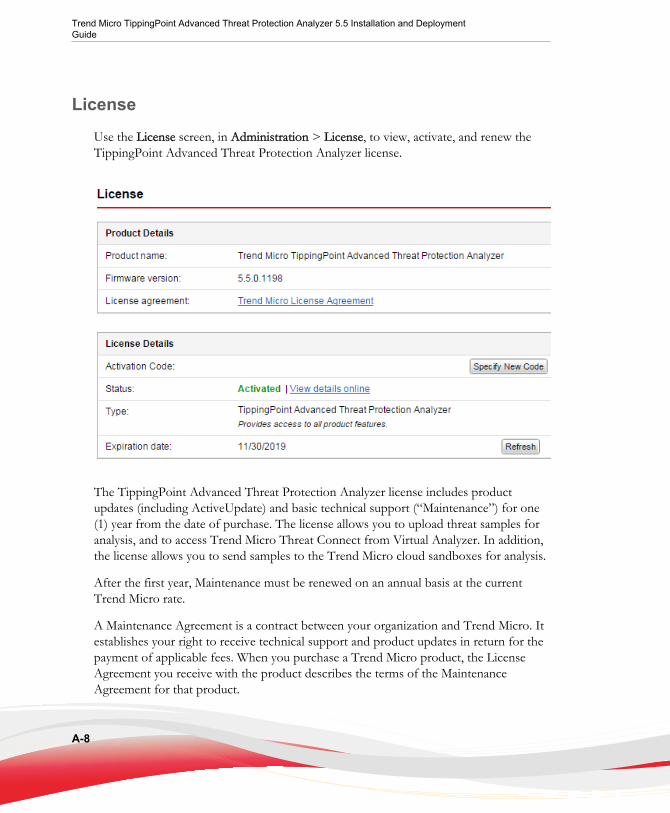
License
Use the License screen, in Administration > License, to view, activate, and renew theTippingPoint Advanced Threat Protection Analyzer license.
The TippingPoint Advanced Threat Protection Analyzer license includes productupdates (including ActiveUpdate) and basic technical support (“Maintenance”) for one(1) year from the date of purchase. The license allows you to upload threat samples foranalysis, and to access Trend Micro Threat Connect from Virtual Analyzer. In addition,the license allows you to send samples to the Trend Micro cloud sandboxes for analysis.
After the first year, Maintenance must be renewed on an annual basis at the currentTrend Micro rate.
A Maintenance Agreement is a contract between your organization and Trend Micro. Itestablishes your right to receive technical support and product updates in return for thepayment of applicable fees. When you purchase a Trend Micro product, the LicenseAgreement you receive with the product describes the terms of the MaintenanceAgreement for that product.

Getting Started
A-9
The Maintenance Agreement has an expiration date. Your License Agreement does not.If the Maintenance Agreement expires, you will no longer be entitled to receive technicalsupport from Trend Micro or access Trend Micro Threat Connect.
Typically, 90 days before the Maintenance Agreement expires, you will start to receiveemail notifications, alerting you of the pending discontinuation. You can update yourMaintenance Agreement by purchasing renewal maintenance from your Reseller, TrendMicro sales, or on the Trend Micro Customer Licensing Portal at:
https://clp.trendmicro.com/fullregistration
The License screen includes the following information and options.
TABLE A-4. Product Details
FIELD DETAILS
Product name Displays the name of the product.
Firmware version Displays the full patch and build number for the product.
License agreement Displays a link to the Trend Micro License Agreement. Click thelink to view or print the license agreement.

Trend Micro TippingPoint Advanced Threat Protection Analyzer 5.5 Installation and DeploymentGuide
A-10
TABLE A-5. License Details
FIELD DETAILS
Activation Code View the Activation Code in this section. If your license hasexpired, obtain a new Activation Code from Trend Micro. Torenew the license, click Specify New Code, and type the newActivation Code.
The License screen reappears displaying the number of days leftbefore the product expires.
Status Displays either Activated, Not Activated, Evaluation, orExpired.
Click View details online to view detailed license informationfrom the Trend Micro website. If the status changes (for example,after you renewed the license) but the correct status is notindicated in the screen, click Refresh.
Type • TippingPoint Advanced Threat Protection Analyzer: Providesaccess to all product features
• TippingPoint Advanced Threat Protection Analyzer (Trial):Provides access to all product features
Expiration date View the expiration date of the license. Renew the license beforeit expires.

Getting Started
A-11
Network TabUse this screen to configure the host name, the IPv4 and IPv6 addresses of theTippingPoint Advanced Threat Protection Analyzer appliance, and other networksettings.
An IPv4 address is required and the default is 192.168.252.2. Modify the IPv4address immediately after completing all deployment tasks.
Note
You can also use the Preconfiguration Console to modify the network settings.
For details, see the Configuring Network Addresses on the Preconfiguration Console onpage 4-4.
TippingPoint Advanced Threat Protection Analyzer uses the specified IP addresses toconnect to the Internet when accessing Trend Micro hosted services, including the

Trend Micro TippingPoint Advanced Threat Protection Analyzer 5.5 Installation and DeploymentGuide
A-12
Smart Protection Network, the ActiveUpdate server, and Threat Connect. The IPaddresses also determine the URLs used to access the management console.
The following table lists configuration limitations when using TippingPoint AdvancedThreat Protection Analyzer in a high availability cluster configuration.
TABLE A-6. Configuration Limitations when Using High Availability
FIELD LIMITATION
Host name Cannot be modified
IPv4 address • Must differ from IPv4 virtual address
• Must be in the same network segment as IPv4 virtual address
IPv6 address • Must differ from IPv6 virtual address
• Must be in the same network segment as IPv6 virtual address
• Cannot be deleted if IPv6 virtual address has been configured
• Cannot be added or deleted

Getting Started
A-13
Proxy Tab
Specify proxy settings if TippingPoint Advanced Threat Protection Analyzer connects tothe Internet or management network through a proxy server.
Configure the following settings.
TABLE A-7. Proxy Tab Tasks
TASK STEPS
Use an HTTP proxyserver
Select this option to enable proxy settings.
Server name or IPaddress
Type the proxy server host name or IPv4 address, or IPv6address.
The management console does not support host names withdouble-byte encoded characters. If the host name includes suchcharacters, type its IP address instead.

Trend Micro TippingPoint Advanced Threat Protection Analyzer 5.5 Installation and DeploymentGuide
A-14
TASK STEPS
Port Type the port number that TippingPoint Advanced ThreatProtection Analyzer uses to connect to the proxy server.
Proxy serverrequiresauthentication
Select this option if the connection to the proxy server requiresauthentication. TippingPoint Advanced Threat Protection Analyzersupports the following authentication methods:
• No authentication
• Basic authentication
• Digest authentication
NoteTippingPoint Advanced Threat Protection Analyzerproduct license cannot be validated when connectingto the Internet through proxy server with digestauthentication.
• NTMLv1 authentication
User name Type the user name used for authentication.
NoteThis option is only available if Proxy server requiresauthentication is enabled.
Password Type the password used for authentication.
NoteThis option is only available if Proxy server requiresauthentication is enabled.
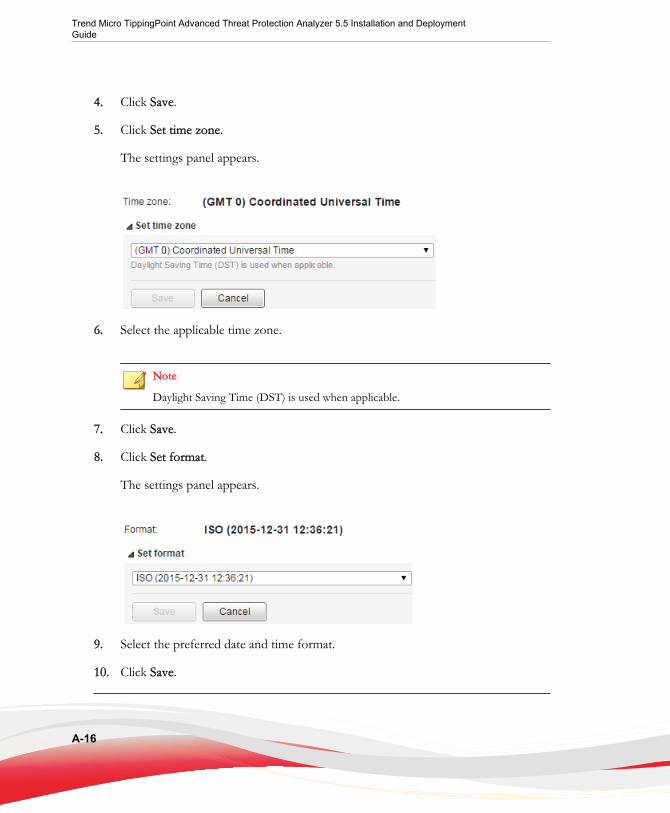
Time TabConfigure date and time settings immediately after installation.

Getting Started
A-15
Procedure
1. Go to Administration > System Settings and click the Time tab.
The Time screen appears.
2. Click Set date and time.
The settings panel appears.
3. Select one of the following methods and configure the applicable settings.
• Select Connect to an NTP server and type the host name, IPv4 address, orIPv6 address of the NTP server.
• Select Set manually and configure the time.
Trend Micro TippingPoint Advanced Threat Protection Analyzer 5.5 Installation and DeploymentGuide
A-16
4. Click Save.
5. Click Set time zone.
The settings panel appears.
6. Select the applicable time zone.
Note
Daylight Saving Time (DST) is used when applicable.
7. Click Save.
8. Click Set format.
The settings panel appears.
9. Select the preferred date and time format.
10. Click Save.

Getting Started
A-17
SMTP Tab
TippingPoint Advanced Threat Protection Analyzer uses SMTP settings when sendingnotifications through email.
Configure the following settings.
TABLE A-8. SMTP Tab Tasks
TASK STEPS
Server address Type the SMTP server host name, IPv4 address, or IPv6 address.
The management console does not support host names withdouble-byte encoded characters. If the host name includes suchcharacters, type its IP address instead.
Sender emailaddress
Type the email address of the sender.
SMTP serverrequiresauthentication
Select this option if connection to the SMTP server requiresauthentication.

Trend Micro TippingPoint Advanced Threat Protection Analyzer 5.5 Installation and DeploymentGuide
A-18
TASK STEPS
User name Type the user name used for authentication.
NoteThis option is only available if SMTP server requiresauthentication is enabled.
Password Type the password used for authentication.
NoteThis option is only available if SMTP server requiresauthentication is enabled.
Importing an Image
The hardware specifications of your product determine the number of images that youcan import and the number of instances that you can deploy per image.
Virtual Analyzer supports OVA files up to 20GB in size.
Important
Virtual Analyzer stops analysis and keeps all samples in the queue whenever an image isadded or deleted, or when instances are modified.
Procedure
1. Go to Virtual Analyzer > Sandbox Management and click the Images tab.
The Images screen appears.
2. Click Import.

Getting Started
A-19
The Import Image screen appears.
3. Select an image source and configure the applicable settings.
a. Type a permanent image name with a maximum of 50 characters.
b. Choose the number of instances to allocate for the image.
Note
Trend Micro recommends distributing the number of instances evenly across alldeployed images. Submitted objects must pass through all images beforeanalysis results are generated.
c. Type the URL or network share path of the OVA file.
d. (Optional) Select Connect through a proxy sever.
e. (Optional) Type the logon credentials if authentication is required.
4. Click Import.
Virtual Analyzer validates the OVA files before starting the import process.
Note
If you selected HTTP or FTP server, TippingPoint Advanced Threat ProtectionAnalyzer downloads the images first before importing into Virtual Analyzer. Theprocess can only be canceled before the download completes.

Trend Micro TippingPoint Advanced Threat Protection Analyzer 5.5 Installation and DeploymentGuide
A-20
Enabling External Connections
Sample analysis is paused and settings are disabled whenever Virtual Analyzer is beingconfigured.
Procedure
1. Go to Virtual Analyzer > Sandbox Management and click the NetworkConnection tab.
The Network Connection screen appears.
2. Select Enable external connections.
The settings panel appears.
3. Select the type of connection to be used by sandbox instances.
• Custom: Any user-defined network
Important
Trend Micro recommends using an environment isolated from the managementnetwork, such as a test network with Internet connection but without proxysettings, proxy authentication, and connection restrictions.
• Management network: Default organization Intranet

Getting Started
A-21
WARNING!
Enabling connections to the management network may result in malwarepropagation and other malicious activity in the network.
4. If you selected Custom, specify the following:
• Network adapter: Select an adapter with a linked state.
• IP address: Type an IPv4 address.
• Subnet mask
• Gateway
• DNS
5. Click Save.
Cluster Tab
Multiple standalone TippingPoint Advanced Threat Protection Analyzer appliances canbe deployed and configured to form a cluster that provides fault tolerance, improvedperformance, or a combination thereof.
Depending on your requirements and the number of TippingPoint Advanced ThreatProtection Analyzer appliances available, you may deploy the following clusterconfigurations:
TABLE A-9. Cluster Configurations
CLUSTER CONFIGURATION DESCRIPTION
High availability cluster In a high availability cluster, one appliance acts as the activeprimary appliance, and one acts as the passive primaryappliance. The passive primary appliance automatically takesover as the new active primary appliance if the active primaryappliance encounters an error and is unable to recover.

Trend Micro TippingPoint Advanced Threat Protection Analyzer 5.5 Installation and DeploymentGuide
A-22
CLUSTER CONFIGURATION DESCRIPTION
Load-balancing cluster In a load balancing cluster, one appliance acts as the activeprimary appliance, and any additional appliances act assecondary appliances. The secondary appliances processsubmissions allocated by the active primary appliance forperformance improvement.
High availability clusterwith load balancing
In a high availability cluster with load balancing, one applianceacts as the active primary appliance, one acts as the passiveprimary appliance, and any additional appliances act assecondary appliances. The passive primary appliance takesover as the active primary appliance if the active primaryappliance encounters an error and is unable to recover. Thesecondary appliances process submissions allocated by theactive primary appliance for performance improvement.
The following table lists the available configuration modes and associated appliancebehavior.
TABLE A-10. Cluster Configuration Modes
CONFIGURATIONMODE
DESCRIPTION
Primary (Active) • Management console is fully accessible
• Retains all configuration settings
Primary (Passive) • Management console is unavailable
• Automatically configured based on the settings of the activeprimary appliance
• On standby
• Takes over as the active primary appliance if the activeprimary appliance encounters an error and is unable torecover
• Does not process submissions

Getting Started
A-23
CONFIGURATIONMODE
DESCRIPTION
Secondary • Automatically configured based on the settings of the activeprimary appliance
• Identifies the active primary appliance using its IP address orvirtual IP address
• Processes submissions allocated by the active primaryappliance for performance improvement
• Management console only shows screens with configurablesettings:
• Virtual Analyzer > Sandbox Management > NetworkConnection
• Virtual Analyzer > Sandbox Management > CloudSandbox
• Administration > Updates > Hot Fixes / Patches
• Administration > Updates > Firmware
• Administration > System Settings > Network
• Administration > Accounts / Contacts > Accounts
• Administration > Accounts / Contacts > Contacts
• Administration > Audit Logs
• Administration > System Maintenance > Power Off /Restart
• Administration > System Maintenance > Cluster
• Administration > License
Nodes List
The Nodes list is displayed on the active primary appliance.
The Nodes list contains the following information:

Trend Micro TippingPoint Advanced Threat Protection Analyzer 5.5 Installation and DeploymentGuide
A-24
TABLE A-11. Nodes List Columns
COLUMN DESCRIPTION
Status Connection status of the appliance. Mouseover a status icon toview details.
Mode Cluster mode of the appliance.
Management IPAddress
Management IP address of the appliance.
Host Name Host name of the appliance.
Last Connected Date and time that the appliance last connected to the activeprimary appliance.
NoteNo data (indicated by a dash) if appliance is passive primaryappliance.

Getting Started
A-25
COLUMN DESCRIPTION
Details Additional details about the operational status of the appliance.
• For standalone appliance:
• Standalone appliance: The appliance is a standaloneappliance.
• For passive primary appliance:
• Fully synced: The passive primary appliance is fullysynced to the active primary appliance.
• Syncing n%: The passive primary appliance is syncingsettings from the active primary appliance.
• Sync error: The passive primary appliance is unable toconnect to the active primary appliance. Verify that theappliances are directly connected using eth3, and thateth3 is not used for sandbox analysis.
• For secondary appliances:
• Inconsistent component version: One or morecomponents have different versions on the active primaryappliance and secondary appliance. Use the samecomponent versions on all appliances.
• Not connected: The active primary appliance did notreceive a heartbeat from the secondary appliance withinthe last 10 seconds. Verify that the secondary appliance ispowered on and able to connect to the active primaryappliance through the network.
• Invalid API key: The secondary appliance is configuredwith an invalid API key. Verify the Active primary API keyon the secondary appliance.
• Incompatible software version: The firmware versionson the active primary appliance and secondary applianceare different. Use the same firmware version on allappliances.
• Unexpected error: An unexpected error has occurred. Ifthe issue persists, contact your support provider.

Trend Micro TippingPoint Advanced Threat Protection Analyzer 5.5 Installation and DeploymentGuide
A-26
COLUMN DESCRIPTION
Action Actions that can be executed depending on the appliance modeand status.
• For active primary appliance:
• Swap: Swap the roles of the primary appliances. Sets thecurrent passive primary appliance to primary mode (active)and the current active primary appliance to primary mode(passive). Appears when the passive primary appliancehas synced all settings from the active primary appliance.For details, see Swapping the Active Primary Applianceand the Passive Primary Appliance on page A-29
• For passive primary appliance:
• Detach: Detach the passive primary appliance. Disableshigh availability and allows the passive primary applianceto be used as a standalone appliance. Appears when thepassive primary appliance has synced all settings from theactive primary appliance. For details, see Detaching thePassive Primary Appliance from the Cluster on pageA-29
• Remove: Remove inaccessible passive primary appliance.Disables high availability. Appears when the active primaryappliance is unable to reach the passive primary appliancethrough eth3. For details, see Removing the PassivePrimary Appliance from the Cluster on page A-30
• For secondary appliances:
• Remove: Remove inaccessible secondary appliance.Affects object processing capacity. Secondary appliancesattempt to connect to the active primary appliance every10 seconds. Appears when the active primary appliancedoes not receive a heartbeat from the secondary appliancewithin one minute. For details, see Removing a SecondaryAppliance from the Cluster on page A-32
Click Refresh to refresh the information in the Nodes list.

Getting Started
A-27
Adding a Passive Primary Appliance to the Cluster
The following table lists requirements that need to be fulfilled by both active primaryappliance and passive primary appliance before the passive primary appliance can beadded to the cluster.
TABLE A-12. High Availability Clustering Requirements
REQUIREMENT DESCRIPTION
Hardware model Must be same hardware model
Physical connection Must be directly connected to each other using eth3
Firmware version Must have same firmware version
Host name Must be different
IP addresses Must be symmetrical:
• If only IPv4 address is configured on active primaryappliance, passive primary appliance cannot configure bothIPv4 address and IPv6 address.
• If IPv4 address and IPv6 address are configured on activeprimary appliance, passive primary appliance cannot onlyconfigure IPv4 address.
Network segment Must be in the same network segment
Virtual IP address Must be configured on the active primary appliance
In a high availability cluster, one appliance acts as the active primary appliance, and oneacts as the passive primary appliance. The passive primary appliance automatically takesover as the new active primary appliance if the active primary appliance encounters anerror and is unable to recover.
Note
If your network has Trend Micro Control Manager, only register the active primaryappliance to Control Manager.

Trend Micro TippingPoint Advanced Threat Protection Analyzer 5.5 Installation and DeploymentGuide
A-28
Procedure
1. Perform the installation and deployment tasks as described in InstallingTippingPoint Advanced Threat Protection Analyzer on page 3-1.
2. Configure the passive primary appliance.
a. On the management console of the passive primary appliance, go toAdministration > System Maintenance and click the Cluster tab.
b. Select Primary mode (passive).
c. Type the IPv4 address or IPv6 address of the active primary appliance inActive primary IP address.
d. Click Test Connection.
e. Click Save.
You will be redirected to the appliance standby screen.
• The passive primary appliance stops processing objects if it was previously doingso.
• The passive primary appliance will sync all settings from the active primaryappliance. The total time to complete syncing depends on the appliance model.
Important
While the appliance is syncing, it cannot:
• Take over as active primary appliance
• Switch to another mode
• The management console of the passive primary appliance cannot be accessed.Manage the appliance and monitor the sync status from the management consoleof the active primary appliance.

Getting Started
A-29
Swapping the Active Primary Appliance and the PassivePrimary Appliance
Swapping the primary appliances sets the current passive primary appliance to primarymode (active) and the current active primary appliance to primary mode (passive).
Procedure
1. On the management console of the active primary appliance, go to Administration> System Maintenance and click the Cluster tab.
2. Click Swap to swap the primary appliances.
Detaching the Passive Primary Appliance from the Cluster
Detaching the passive primary appliance disables high availability and allows theappliance to be used as a standalone appliance. After a passive primary appliance isdetached, it no longer appears in the nodes list.
Detach the passive primary appliance to update or upgrade the product, and to modifythe host name.
Important
Detaching the passive primary appliance does not reset the appliance settings. Trend Microrecommends reinstalling the appliance if you want to use it as a standalone appliance.
Procedure
1. On the management console of the active primary appliance, go to Administration> System Maintenance and click the Cluster tab.
2. Click Detach to detach the passive primary appliance from the cluster.

Trend Micro TippingPoint Advanced Threat Protection Analyzer 5.5 Installation and DeploymentGuide
A-30
Removing the Passive Primary Appliance from the ClusterRemoving a disconnected or abnormal passive primary appliance from the clusterreduces the clutter in the nodes list.
Procedure
1. On the management console of the active primary appliance, go to Administration> System Maintenance and click the Cluster tab.
2. Wait for Remove to appear next to the passive primary appliance in the nodes list.
3. Click Remove to remove the passive primary appliance from the cluster.
Note
The passive primary appliance automatically rejoins the cluster if it reconnects to theactive primary appliance.
Adding a Secondary Appliance to the ClusterVerify that the secondary appliance has the same firmware version as the active primaryappliance.
To view the appliance firmware version, see the TippingPoint Advanced ThreatProtection Analyzer Administrator's Guide.
Update or upgrade the appliance firmware as necessary. For details, see theTippingPoint Advanced Threat Protection Analyzer Administrator's Guide.
Note
If your network has Trend Micro Control Manager, only register the active primaryappliance to Control Manager.
Procedure
1. Perform the installation and deployment tasks as described in InstallingTippingPoint Advanced Threat Protection Analyzer on page 3-1.

Getting Started
A-31
2. Configure the secondary appliance.
a. On the management console of the secondary appliance, go to Administration> System Maintenance and click the Cluster tab.
b. Select Secondary mode.
c. Type the IPv4 address or IPv6 address of the active primary appliance inActive primary IP address.
Note
If you have a passive primary appliance, type the IPv4 virtual address or IPv6virtual address.
d. Type the Active primary API key.
e. Click Test Connection.
Tip
Secondary appliances can test their connection to the active primary applianceat any time. Click Test Connection to get detailed information about anyconnectivity problems.
f. Click Save.
3. (Optional) Configure additional settings on the secondary appliance.
a. Configure the sandbox network connection setting.
For details, see Enabling External Connections on page A-20.
Note
Trend Micro recommends using the external network connection setting of theactive primary appliance.
b. Configure the cloud sandbox setting.
For details, see the TippingPoint Advanced Threat Protection AnalyzerAdministrator's Guide.

Trend Micro TippingPoint Advanced Threat Protection Analyzer 5.5 Installation and DeploymentGuide
A-32
c. Configure the appliance network settings.
For details, see Network Tab on page A-11.
d. Add accounts.
For details, see Accounts Tab on page A-4.
Removing a Secondary Appliance from the Cluster
Removing a disconnected secondary appliance from the cluster reduces the clutter in thenodes list and widgets of the active primary appliance.
Procedure
1. On the management console of the active primary appliance, go to Administration> System Maintenance and click the Cluster tab.
2. Wait for Remove to appear next to the secondary appliance in the nodes list.
Note
Secondary appliances attempt to connect to the active primary appliance every 10seconds. If the active primary appliance does not receive a heartbeat within oneminute, Remove appears next to the secondary appliance in the Nodes list.
Secondary appliances automatically rejoin the cluster if they reconnect to the activeprimary appliance.
3. Click Remove to remove the secondary appliance from the cluster.
The secondary appliance is removed from the nodes list and widgets of the activeprimary appliance.

Getting Started
A-33
Replacing the Active Primary Appliance with a SecondaryAppliance
If the active primary appliance is unresponsive or cannot be restored, and no passiveprimary appliance is deployed, it can be replaced by a secondary appliance from thesame cluster.
Tip
Trend Micro recommends deployment of a passive primary appliance for high availability.For details, see Adding a Passive Primary Appliance to the Cluster on page A-27.
Important
Submissions do not have a result if they were being analyzed on the active primaryappliance when it becomes unresponsive.
Procedure
1. Power off the active primary appliance.
2. Select a secondary appliance from the same cluster and configure it as the newactive primary appliance.
a. On the management console of the secondary appliance, go to Administration> System Maintenance and click the Cluster tab.
b. Select Primary mode (active).
c. Click Save.
3. Configure the IP address of the new active primary appliance.
For details, see Network Tab on page A-11.
Note
Trend Micro recommends using the same IP address as the original active primaryappliance. This allows secondary appliances and integrated products to connectwithout reconfiguration.

Trend Micro TippingPoint Advanced Threat Protection Analyzer 5.5 Installation and DeploymentGuide
A-34
4. Verify the settings on the new active primary appliance.
Note
Settings take up to one day to propagate to secondary appliances.

IN-1
IndexAaccount management, A-4Activation Code, A-8
Ccontacting, 5-5
documentation feedback, 5-5custom network, 2-6custom port, 2-8
Ddeployment tasks
hardware setup, 3-2installation, 3-6
documentation feedback, 5-5
EEthernet cables, 2-9
Fform factor, 2-2
Ggetting started tasks, A-3
Iimages, A-18installation tasks, 3-2IP addresses (for product), 2-8
Llicense, A-8
Mmanagement console, A-2management console accounts, A-4management network, 2-6
management port, 2-8
Nnetwork environment, 2-6
Pport, 2-7ports, 2-10power supply, 3-2preconfiguration console, 4-2
operations, 4-3product specifications, 2-2
Ssandbox images, A-18sandbox management
imagesimporting, A-18
network connection, A-20session duration (for management console),A-3system maintenance
cluster tabprimary appliance, A-33remove, A-32secondary appliance, A-30, A-32,A-33test connection, A-30
nodes list, A-23system settings
Network Tab, A-11Proxy Tab, A-13SMTP Tab, A-17Time Tab, A-14


![Trend Micro TIPPINGPOINT SECURITY … micro tippingpoint ® security ... tippingpoint security management system advanced policy ... sms_tippingpoint_160601us] sms technical](https://img.pdfslide.us/doc/110x75/5ac3d5097f8b9aa0518cd632/trend-micro-tippingpoint-security-micro-tippingpoint-security-tippingpoint.jpg)