Embed Size (px)
Citation preview

qwertyuiopasdfghjklzxcvbnmqwertyuiopasdfghjklzxcvbnmqwertyuiopasdfghjklzxcvbnmqwertyuiopasdfghjklzxcvbnmqwertyuiopasdfghjklzxcvbnmqwertyuiopasdfghjklzxcvbnmqwertyuiopasdfghjklzxcvbnmqwertyuiopasdfghjklzxcvbnmqwertyuiopasdfghjklzxcvbnmqwertyuiopasdfghjklzxcvbnmqwertyuiopasdfghjklzxcvbnmqwertyuiopasdfghjklzxcvbnmqwertyuiopasdfghjklzxcvbnmqwertyuiopasdfghjklzxcvbnmqwertyuiopasdfghjklzxcvbnmqwertyuiopasdfghjklzxcvbnmqwertyuiopasdfghjklzxcvbnmqwertyuiopasdfghjklzxcvbnmrtyuiopasdfghjklzxcvbnmqwertyuiopasdfghjklzxcvbnmqwertyuiopasdfghjklzxcvbnmqwertyuiopasdfghjklzxcvbnmqwertyuiopasdfghjklzxcvbnmqwertyuiopasdfghjklzxcvbnmqwertyuiopasdfghjklzx
How To Do A Requisition in Peoplesoft 9.2
11/01/16

Page 1 of 19
On the navigation pane go to “Purchasing”, “Requisitions”, “Add/Update Requisitions”.

Page 2 of 19
Click “Add”
Verify that Requisition ID is “NEXT”.

Page 3 of 19
Verify that Requisition ID is “NEXT”. Requisition ID will populate on page 9 of this guide.
Click “Personalize”.

Page 4 of 19
Personalize your screen to match the below.
Click “OK” when finished.
Page 5 of 19
Click Personalize.
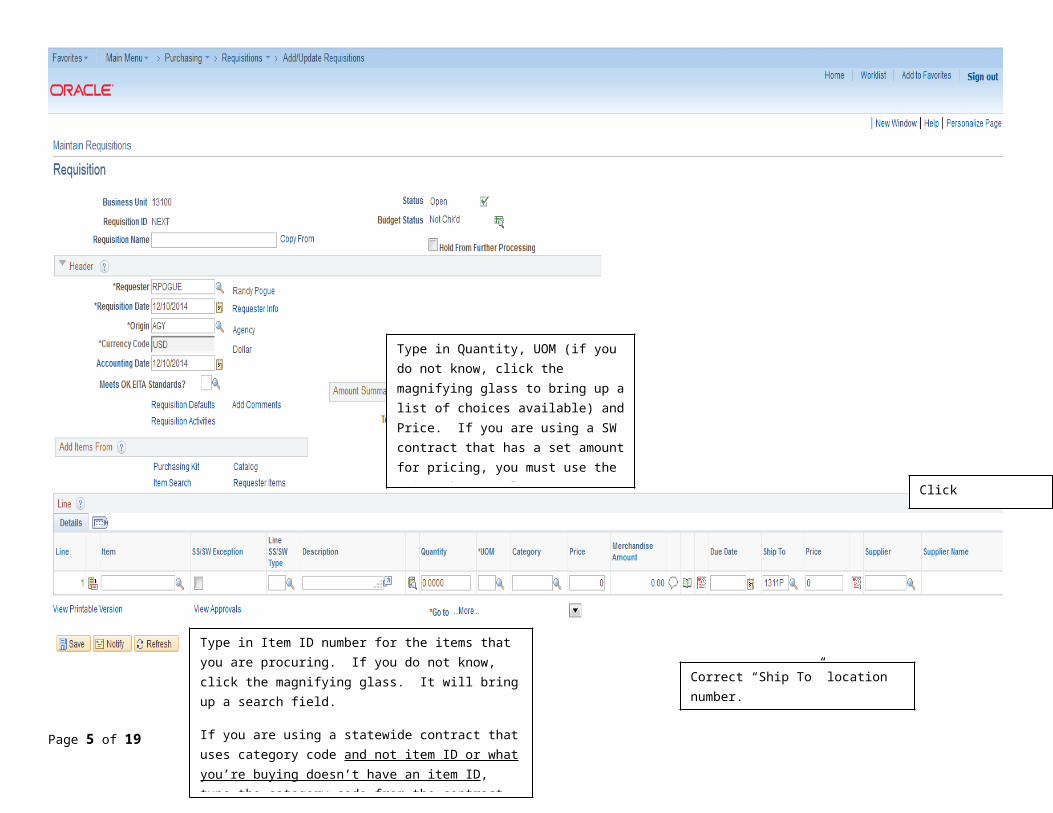
Type in Quantity, UOM (if you do not know, click the magnifying glass to bring up a list of choices available) and Price. If you are using a SW contract that has a set amount for pricing, you must use the price that populates.
Type in Item ID number for the items that you are procuring. If you do not know, click the magnifying glass. It will bring up a search field.
If you are using a statewide contract that uses category code and not item ID or what you’re buying doesn’t have an item ID, type the category code from the contract under the Category heading.
Correct “Ship To” location number.

Page 6 of 19
Click on Schedule to input Funding information.
Click on Distributions/Chartfields.Input who will receive the shipment at the facility/factory level.

Page 7 of 19
Input funding information into the Sub-Account (if applicable), Fund Type, Class-Funding, Dept and Bud Ref.
If you are using a CFDA (grant funding), you must put this funding information in both the CFDA# heading and on the line comments. Line comments are discussed on page 14 and header comments on page 17 of this guide.
Verify that Account Code is correct. If it is not, correct. If you are not sure, check with Accounts Payable.
Click OK when completed.

Page 8 of 19
Click “Details”.
Input “Billing location” number.

Page 9 of 19
Click “Budget Information”.
Click “Budget Date” to make sure it is correct. If you are doing a requisition for a future FY, make sure that the date states “07/01/xx” for whatever that FY is.
Click “OK” when finished.

Page 10 of 19
Click Return to Main Page.

Page 11 of 19Click Save. It will then input a Requisition ID. This will be the Requisition number.
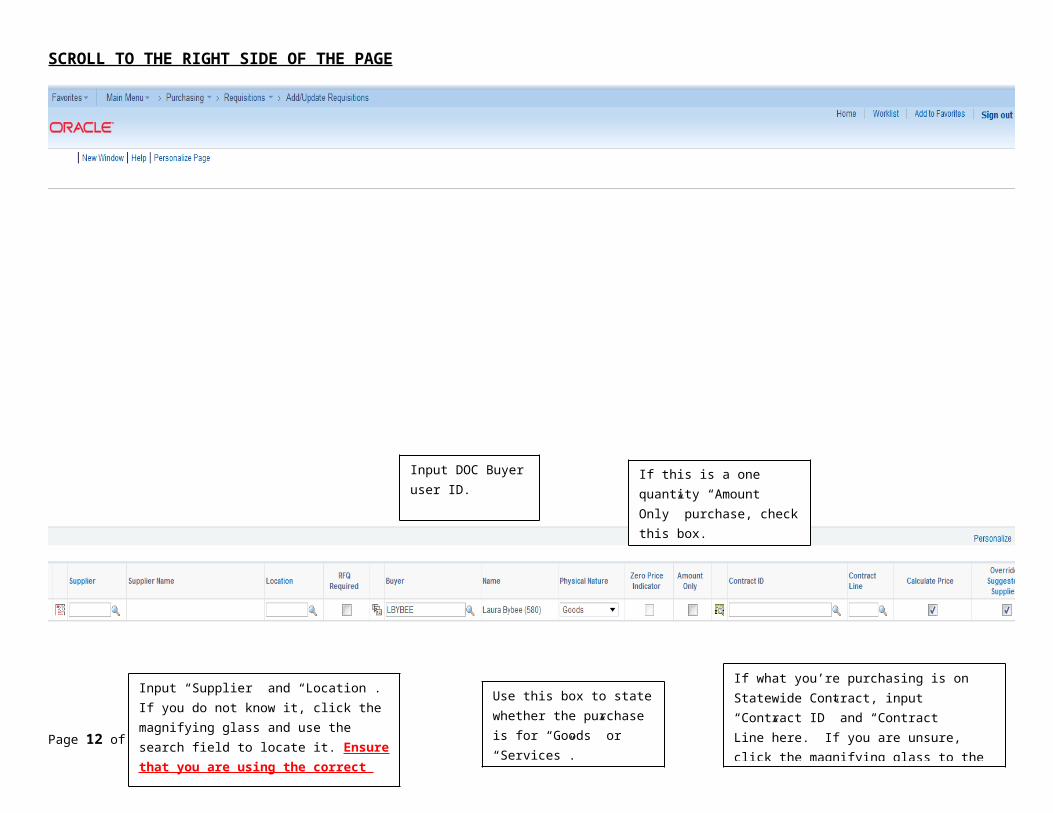
SCROLL TO THE RIGHT SIDE OF THE PAGE
Page 12 of 19
Input “Supplier” and “Location”. If you do not know it, click the magnifying glass and use the search field to locate it. Ensure that you are using the correct supplier ID.
Input DOC Buyer user ID.
Use this box to state whether the purchase is for “Goods” or “Services”.
If this is a one quantity “Amount Only” purchase, check this box.
If what you’re purchasing is on Statewide Contract, input “Contract ID” and “Contract Line”here. If you are unsure, click the magnifying glass to the right to search.

SCROLL BACK TO THE LEFT SIDE OF THE PAGE
Page 13 of 19
Click the “Comment” Box.

Page 14 of 19
Put all specifications about the line in the first comment box. Examples include: Cell phone for Warden. Number xxx-xxx-xxxx. OR if you are bidding out a washing machine, put all required specifications in this box.
To add attachments (ie signed approval route slips, quotes, invoices, etc) click on “Add attachments”. You can then browse for the document you need to attach in your files. Documents need to be pdf, Microsoft Word or Microsoft Excel files. Add all attachments to line 1.
Click "+" to enter additional comment boxes.
Ensure that “Send to Supplier” is checked.
Click “OK” when completed.
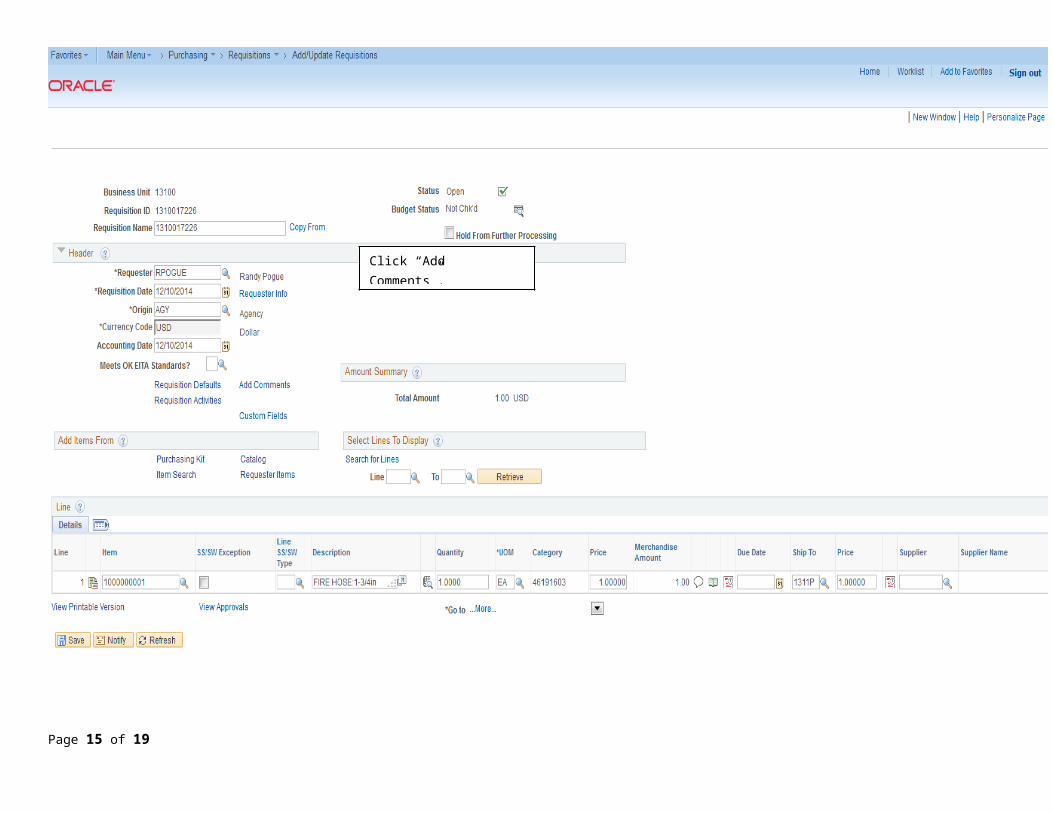
Page 15 of 19
Click “Add Comments”.

Page 16 of 19
“Requisition Comments" are required to include the text in the “Justification/Header (Edit) Comments for all requisitions/POs” guide.
Ensure that “Send to Supplier” is checked.
Click “Plus Sign” to add additional comment boxes.
To add attachments (ie signed approval route slips, quotes, invoices, etc) click on “Add attachments”. You can then browse for the document you need to attach in your files. Documents need to be pdf, Microsoft Word or Microsoft Excel files. You can only attach one document to header comments.
Click “OK” when completed”.

Page 17 of 19
If you are now ready to submit your requisition for further processing, click the green check mark next to Open and the magnifying glass next to Not Chk’d on Budget Status. This will verify that your budget was correct. If it is, it will say “Valid”. If not, it will say “Error”. If there is an error, contact DOC Accounts Control.
Click Save and then View Printable Version. This will bring up a PDF that you can sign and send on to your appropriate approvers.

Page 18 of 19


![[Microsoft Word format].doc](https://img.pdfslide.us/doc/110x75/54c6aecf4a79595e6c8b45d1/microsoft-word-formatdoc.jpg)