Embed Size (px)
Citation preview

DOC-103-D iDirect User ManualSOFTWARE VERSION 1.10

Version 1.10IDIRECT USER GUIDEIDIRECT USER GUIDE
1.1 Contact RCL P.1
1.2 iPad Resources P.1
1.3 Minimum Requirements P.1
1.4 Required Equipment P.2
1.5 Spotlight Limits P.2
6.1 Accessing the Gesture Pad P.23
6.2 Controlling Movement P.24
6.3 Individual Dimming P.29
6.4 Gesture Pad Settings P.30
2.1 Product Overview P.3
2.2 Status Bar P.4
2.3 Launching iDirect P.4
5.1 Editing Areas P.13
5.2 Area Status Icons P.15
5.3 Adding Spotlights P.15
5.4 Editing Spotlight Icons (Light Plan View Only) P.18
5.5 Editing Spotlights P.19
5.6 Deleting Spotlights P.21
5.7 Spotlight Information P.22
4.1 Controls Panel P.6
4.2 Password Lock P.6
4.3 Light Tables P.7
4.4 Light Plans P.8
4.5 Importing Light Plans P.9
4.6 Gesture Pad P.10
4.7 Dimming P.10
4.8 Scenes P.11
4.9 Backing Up Data P.11
3.1 iDirect System Overview P.5
3.2 Wifi Connection P.5
1.0 Introduction
6.0 Gesture Pad
2.0 iDirect Overview
5.0 Areas
4.0 iDirect Overview
3.0 iDirect Setup

Version 1.10IDIRECT USER GUIDEIDIRECT USER GUIDE
7.1 Using Area Dimmers P.31
7.2 All Areas Dimming P.32
9.1 Troubleshooting P.38
8.1 Creating Scenes P.33
8.2 Activating Scenes P.34
8.3 Editing Scenes P.35
8.4 Updating Scene Settings P.36
8.5 Deleting Scenes P.37
7.0 Dimming
9.0 Troubleshooting
8.0 Scenes

Version 1.10IDIRECT USER GUIDE
DOC-103-D PAGE 1
1.0 Introduction
iDirect is a lighting control system developed by RCL to manage and control their remote controlled spotlights. The app has been designed specifically for the iPad and takes full advantage of its larger screen.
Featuring a simple yet powerful interface, it is possible to adjust spotlights individually, dim Areas and recall custom Scenes. Spotlights are selected and controlled through a simple interface using intuitive gestures.
This guide explains how to set up and operate iDirect.
1.1 Contact RCL
Have a question about iDirect that is not covered in this guide? Please contact RCL at:
For up-to-date information about iDirect, including the latest version of this guide, please visit:
www.rclighting.com
For DMX and RCL product installation instructions, please visit:
www.rclighting.com/downloads
1.2 iPad Resources
Information regarding Apple’s iPad can be found at:
www.apple.com/ipad
If you experience any issues with your iPad, we recommend consulting Apple’s online support section which can be found at:
www.apple.com/support/ipad
1.3 Minimum Requirements
For iDirect to function correctly, the app requires an iPad 2 or later running at least iOS version 6.0. iDirect is not supported on the iPad 1, iPhone or iPod Touch.
IMPORTANT
• To ensure that iDirect runs correctly, RCL recommends that your iPad is always running the latest version of the app and iOS.
PAGE 2
Version 1.10IDIRECT USER GUIDE
DOC-103-D
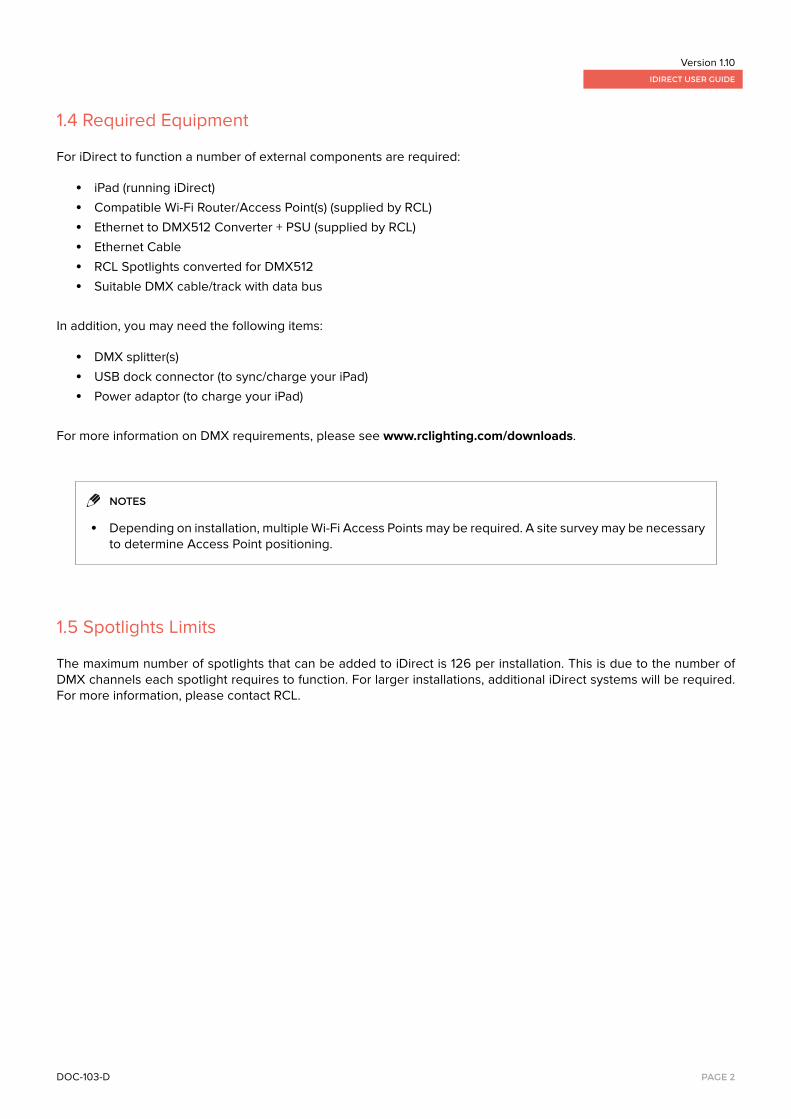
1.4 Required Equipment
For iDirect to function a number of external components are required:
• iPad (running iDirect)• Compatible Wi-Fi Router/Access Point(s) (supplied by RCL)• Ethernet to DMX512 Converter + PSU (supplied by RCL)• Ethernet Cable• RCL Spotlights converted for DMX512• Suitable DMX cable/track with data bus
In addition, you may need the following items:
• DMX splitter(s)• USB dock connector (to sync/charge your iPad)• Power adaptor (to charge your iPad)
For more information on DMX requirements, please see www.rclighting.com/downloads.
NOTES
• Depending on installation, multiple Wi-Fi Access Points may be required. A site survey may be necessary to determine Access Point positioning.
1.5 Spotlights Limits
The maximum number of spotlights that can be added to iDirect is 126 per installation. This is due to the number of DMX channels each spotlight requires to function. For larger installations, additional iDirect systems will be required. For more information, please contact RCL.

PAGE 3
Version 1.10IDIRECT USER GUIDE
DOC-103-D
2.0 iPad Overview
This chapter outlines some of the basic iPad features and controls and how they relate to iDirect. If you are familiar with the iPad and its operation, please feel free to skip this section. For full instructions on the iPad, please see Apple’s ‘iPad User Guide’.
The features and appearance of your iPad may differ slightly depending on the model.
Status Bar
iDirect App Icon
Sleep/Wake
Multi-Touch Display
Dock Connector
Home Button
Side Switch
Volume Buttons
Front View
Rear View

PAGE 4
Version 1.10IDIRECT USER GUIDE
DOC-103-D
2.1 Status Bar
Found at the top of the iPad’s screen, the Status Bar is used to provide information about the iPad.
Symbol What it means
Wi-Fi Shows that the iPad is connected to a Wi-Fi network.
Battery Shows the amount of charge left in the iPad.
Battery Charging Shows that the battery is currently charging (when connected to a power supply).
2.2 Launching iDirect
To begin using iDirect you will need to launch it from your iPad’s Home screen. Once the app has been downloaded from the App Store, tap the iDirect icon.
NOTES
• For more information on any version of Apple iPad, please refer to apple support at www.apple.com/uk/support/

PAGE 5
Version 1.10IDIRECT USER GUIDE
DOC-103-D
3.0 iDirect Setup
Before using iDirect, it is important to ensure that your DMX system and spotlights have been installed correctly. Installation instructions can be found at:
www.rclighting.com/downloads
DSL
43 LAN 21
ON/OFF
DMX512A
Art-Net10BaseT
Power In
Pin 1 = 0VPin4 = 9-24VDC
DMX A POW DMX BCOM
DMX512B
0FED
C B A9876
5432
1
SUB-NET
0FED
C B A9876
5432
1
UNIVERSESELECT
B
0FED
C B A9876
5432
1
UNIVERSESELECT
A
iDirect(iPad not included)
Wi-Fi Router Ethernet to Mediator Box
To Spotlights
3.1 iDirect System Overview
iDirect uses a DMX signal to control the lights in a system. The iPad connects to a Wi-Fi router, which in turn is connected to a device Ethernet to Mediator Box that supplies the DMX data. For more information on DMX, please see: www.rclighting.com/downloads.
3.2 Wi-Fi Connection
For iDirect to work correctly, it must be connected wirelessly to the iDirect router via Wi-Fi. When connected to the Wi-Fi network, the Wi-Fi icon in the status bar at the top of the screen shows the signal strength. The more bars you see, the stronger the signal.
To turn Wi-Fi on or off: Go to Settings > Wi-Fi > Toggle Wi-Fi On/Off
To connect to the Wi-Fi router: Go to Settings > Wi-Fi > Choose “Router Name” from the list
Once you have selected your Wi-Fi network from the list, you may be prompted to enter a password (locked networks are represented by a lock icon ). Enter your password to join the iDirect network.

PAGE 6
Version 1.10IDIRECT USER GUIDE
DOC-103-D
4.0 iDirect Overview
This chapter provides a brief overview of the different sections found in iDirect and the features they contain.
4.1 Controls Panel
The Controls panel is the main point of navigation within iDirect. From here you can choose to access the Areas, Dimming or Scenes sections which are then displayed in the Console.
Dimming
Scenes
Export
Areas
Controls Panel Console
4.2 Password Lock
On installation, the user will be provided with a password that will prevent unauthorised changes to the app. To enable editing of the iDirect installation, users will be prompted for this password.
The app will be locked as default. Tapping on Unlock, Edit or Add will all prompt for your allocated password. Only by entering a user password will all app features be made available to the user. The app will remain unlocked until either the app is exit or the lock button is pressed on screen.

PAGE 7
Version 1.10IDIRECT USER GUIDE
DOC-103-D
4.3 Light Tables
In Light Table view, spotlights in an Area are represented by tiles depicting an image of the spotlight. Each tile can be named to aid identification (if no name is given, the tiles are automatically assigned a number).
Current Area
Add Spotlight
Spotlight Tile
Page Dots
Edit Spotlights
Lock
Switch ViewsArea NameHome
Up to nine Spotlight Tiles are displayed in the Console at any one time. If an Area contains more spotlights, additional pages will be created. The number of pages, including the current page, is indicated by page ‘dots’ at the bottom of the screen.
Tapping the Home button in the Light Table view will send all spotlights in the selected area to the home position.
To view addition pages: Swipe left or right in the Console to cycle though spotlight pages.

PAGE 8
Version 1.10IDIRECT USER GUIDE
DOC-103-D
4.4 Light Plans
Light Plans are reflected ceiling plans in a PDF format that are produced by RCL and can then be imported into iDirect. They represent an alternative selection method to the Light Table view, with spotlights represented by icons on the plan.
If a Light Plan has been added to a particular Area, it can be viewed by tapping the Light Plan button that appears in the navigation bar. Areas that have a Light Plan associated with them are indicated by a icon in the Area row.
Tapping the Home button in the Light Plan view will send all spotlights in the selected area to their home position.
To zoom in or out: When viewing a Light Plan, pinch two fingers together or apart.
To move around the screen: When zoomed in, drag a finger across the screen to navigate around the Light Plan.
Add Spotlight
Spotlight Icon
Edit Spotlights
Switch ViewsArea NameHome
NavigateZoom

Version 1.10IDIRECT USER GUIDE
DOC-103-D PAGE 9
4.5 Importing Light Plans
If you would like to access Light Plans within iDirect, you will need to supply a floor plan or reflected ceiling plan to RCL. These documents must be in a digital format such as a PDF, DWG or EPS file. RCL will then convert the drawings into a format that can be imported into iDirect.
Email submissions to: [email protected]
Minimum document requirements:
• PDF, DWG, EPS, JPG or PNG file format (DWG or PDF preferred)• High Resolution Image (300+ DPI preferred)• A4 size or larger (A0 preferred)
To import a Light Plan: When you receive an email from RCL containing the Light Plan File:
1. Open the Mail app on your iPad.2. Tap on the attached file.3. Tap Open in RCL iDirect. You will automatically be redirected to iDirect where the Light Plan can be viewed.
NOTES
• To receive email, you will need to be connected to an internet enabled Wi-Fi network. Ensure you reconnect to the iDirect router before using iDirect. For more information, see Chapter 3.
• Light Plans are supplied as an A0 sized vector file which can be read by iDirect.
WARNING
• Importing a Light Plan will delete all current settings within iDirect. Any spotlights or Areas that had previously been set up will be deleted.

PAGE 10
Version 1.10IDIRECT USER GUIDE
DOC-103-D
4.6 Gesture Pad
The Gesture Pad is where you control the movement and intensity of individual spotlights. It is accessed by selecting a spotlight from either a Light Plan or Light Table. For instructions on operating the Gesture Pad, see Chapter 6.
4.7 Dimming
In iDirect, spotlights can be dimmed individually via the Gesture Pad (above), or through the Dimming section (below) where spotlights within a specific Area are dimmed simultaneously.
To view addition pages: Swipe left or right in the Console to cycle though dimmer pages.
Help* Settings
Dimmer Slider
DMX Overlay
Gesture Zone
Spotlight Name
Dimming Section
Dimmer Panel
Area NameArea Dim Level
Active SetLocked

PAGE 11
Version 1.10IDIRECT USER GUIDE
DOC-103-D
4.8 Scenes
The Scenes section is where you create and manage Scenes. Scenes store spotlight settings and allow different lighting schemes to be recorded and recalled quickly.
To view addition pages: Swipe left or right in the Console to cycle though Scene pages.
A Scenes Locking Feature enables each scene to be locked on an individual basis. Locking a scene will disable the ability to edit scene settings and prevent any unwanted setting changes.
To successfully lock a scene, tap the Padlock icon at the bottom right of a Scene Tile.
To lock a Scene:
1. Tap the Padlock icon located at the bottom right of a Scene Tile.2. Enter your unique password when prompted. 3. The Scene will now be locked. To unlock the scene, repeat instructions 1 to 2.
4.9 Backing Up Data
iDirect offer and email backup system. On installation, RCL will keep a copy of your initial installation. Users can also perform backups to their personal email address if required.
RCL strongly recommends backing up your iPad regularly. iDirect settings are stored within the app and could be lost if not backed up.
Apple provide a number of ways to back up data on your iPad. For more details on backing up, please see www.apple.com/support/ipad/basics
Add Scene
Scenes Section
Edit Scenes Active Scene
Scene Tile
Scene Description
Scene Lock

PAGE 12
Version 1.10IDIRECT USER GUIDE
DOC-103-D
To perform a backup of your iDirect data:
1. Tap the Export button on the Controls Panel.
2. Enter a name for the backup file and tap Create.
3. This will open a new e-mail message. You will require an email address to be configured in the mail application.
4. Safely store your exported backup e-mail if necessary for later use.
Backup can be restored at any time by sending a backup to an email address on your iPad.
To restore a backup of previously exported iDirect data:
5. Open the Mail app on your iPad.
6. Locate the previously exported iDirect data sent to the desired e-mail address. Tap on the attached RCLD file.
7. Tap Open in RCL iDirect to be automatically redirectedly to iDirect. The backup data will now have been restored.
IMPORTANT
• Please note that any data currently stored in the app will be lost when performing a restoration of previous backup data.
IMPORTANT
• Backing up data via iCloud requires internet access. You will need to connect to an alternative internet enabled Wi-Fi router before backing up. Once complete, you will need to reconnect with the iDirect router before using iDirect. For more information, see Chapter 3.

PAGE 13
Version 1.10IDIRECT USER GUIDE
DOC-103-D
5.0 Areas
In iDirect, when you add a spotlight, it is assigned to an Area. Areas are designed to simplify navigation and spotlight selection. An area can represent an individual room or a section of a room, depending upon your personal preference.
When iDirect launches for the first time, an Area is automatically created allowing you to begin adding spotlights straight away. Areas are accessed through the Controls panel and are viewed as a Light Table or Light Plan.
5.1 Editing Areas
In iDirect, Areas can be added, deleted, renamed or reordered depending on your requirements. Before any changes can be made, Editing needs to be enabled.
To enable editing: When any Area is selected from the Controls panel, tap Edit in the Controls panel navigation bar.
To add a new Area: Tap the Plus button in the Controls panel. A new Area will be created at the bottom of the Areas list.
NOTES
• Areas added in this manner can only be viewed as Light Tables. If you wish to add an Area with a Light Plan, please contact RCL. Adding an Area will require your unique iDirect password as detailed in section 4.2
Edit/Done
Delete Area
Reorder Area
Add New Area
Area Name

PAGE 14
Version 1.10IDIRECT USER GUIDE
DOC-103-D
To delete an Area: First tap the Minus button next to the Area you wish to remove. Then tap the Delete button that appears to confirm.
To rename an Area: Tap inside the Name field. The onscreen keyboard will appear and a new name can be added. To hide the keyboard, tap the Keyboard key .
To reorder Areas: Tap and hold the Reorder Button on the right side of the Area to be moved. Drag the Area up or down to the desired position in the list.
To disable editing: Tap Done in the Controls panel navigation bar once editing is complete.
To view an Area: Tap an Area Row in the Controls panel to view the Area. Its Light Table will be displayed in the Console.
WARNING
• Deleting an Area will cause all of it’s settings to be lost. Any spotlights associated with that Area will need to be assigned to an alternative Area and reacquired to function.
Delete Area Confirm Deletion

PAGE 15
Version 1.10IDIRECT USER GUIDE
DOC-103-D
5.2 Area Status Icons
Found in the Areas section of the Controls panel. When present these icons indicate the status of an Area.
Symbol What it means
Light PlanThe Area has a Light Plan associated with it. If no Light Plan is available, the Area will be viewed as a Light Table.
DimmingThe intensity of spotlights in this Area is being controlled by an Area Dimmer in the Dimming Section.
SceneThe Area is associated with a Scene that is currently active. The position and intensity of the spotlights in this Area are being controlled by the Scene’s settings.
5.3 Adding Spotlights
Spotlights can be added to an Area from either the Light Plan or Light Table view.
To add a spotlight: Select the Area you wish to add a spotlight to, then tap the Add button in the navigation bar. The New Spotlight popover will appear.
Status Icons
Spotlight Model
Lamp Power
Lamp Type
Beamwidth
Spotlight Colour
Colour Temperature
Acquire Spotlight (inactive)
Cancel
Name Field
Required Fields
Optional Fields

PAGE 16
Version 1.10IDIRECT USER GUIDE
DOC-103-D
iDirect automatically assigns a name to each new spotlight created for identification purposes. This name includes an automatically assigned sequential number e.g. “Spotlight 01”.
To rename the spotlight: Tap inside the Name field. The onscreen keyboard will appear and a new name can be added. To hide the keyboard, tap the Keyboard key .
For a spotlight to be added to iDirect, three Spotlight Attributes need to be defined. Up to three optional Lamp Attributes can also be included. The options available will vary according to spotlight models and lamp types.
Required Attributes What it means
Model This refers to the spotlight model. Available options are DR2, DR3, DR7, DR8, DR9.
Lamp This refers to the lamp type installed in the spotlight. Options will vary according to which spotlight model has been selected.
Colour This refers to the colour of the spotlight. Options will vary according to which spotlight model has been selected.
Optional Attributes What it means
Power This refers to the power of the lamp. If only one option is available, it will automatically be included.
Beam This refers to the beamwidth of the lamp.
Temperature (K) This refers to the colour temperature of the lamp.
To add spotlight attributes: Tap each Attribute Field in order, and choose from the available options. Selected attributes will be indicated by a .
NOTES
• The number of Name characters that can be displayed on a Spotlight Tile is limited to 13.

PAGE 17
Version 1.10IDIRECT USER GUIDE
DOC-103-D
To complete the process, the spotlight being added to iDirect needs to be Acquired to link it with the system. Once the required Spotlight Attributes have been entered, the Acquire Spotlight button becomes active.
To acquire the spotlight:
1. Tap the Acquire Spotlight button.
2. Press and hold the button on the RCL remote controller to activate the laser.
3. Aim the controller’s laser at the sensor of the spotlight to be added to iDirect.
4. When the spotlight has been selected, the indicator LED on the spotlight will turn red.
5. Aim the controller’s laser away from the spotlight’s sensor. The LED on the spotlight will switch to flashing green to show that the spotlight has been acquired.
6. The spotlight has now been added to iDirect. Tap Done in iDirect to finish.
To cancel the process: At any time, tap the Cancel button in the New Spotlight popover.
NOTES
• When a spotlight is ‘Acquired’ it is assigned a Start Address that identifies it to the DMX system. For more information on Start Addresses, please visit: www.rclighting.com/dmx/faq.
TIPS
• iDirect remembers the product attributes that were last inputted. This saves time when adding multiples of the same spotlight type (you will still need to complete the Acquire Spotlight process for each light).
Red Flashing Green
Inactive Active
PAGE 18
Version 1.10IDIRECT USER GUIDE
DOC-103-D
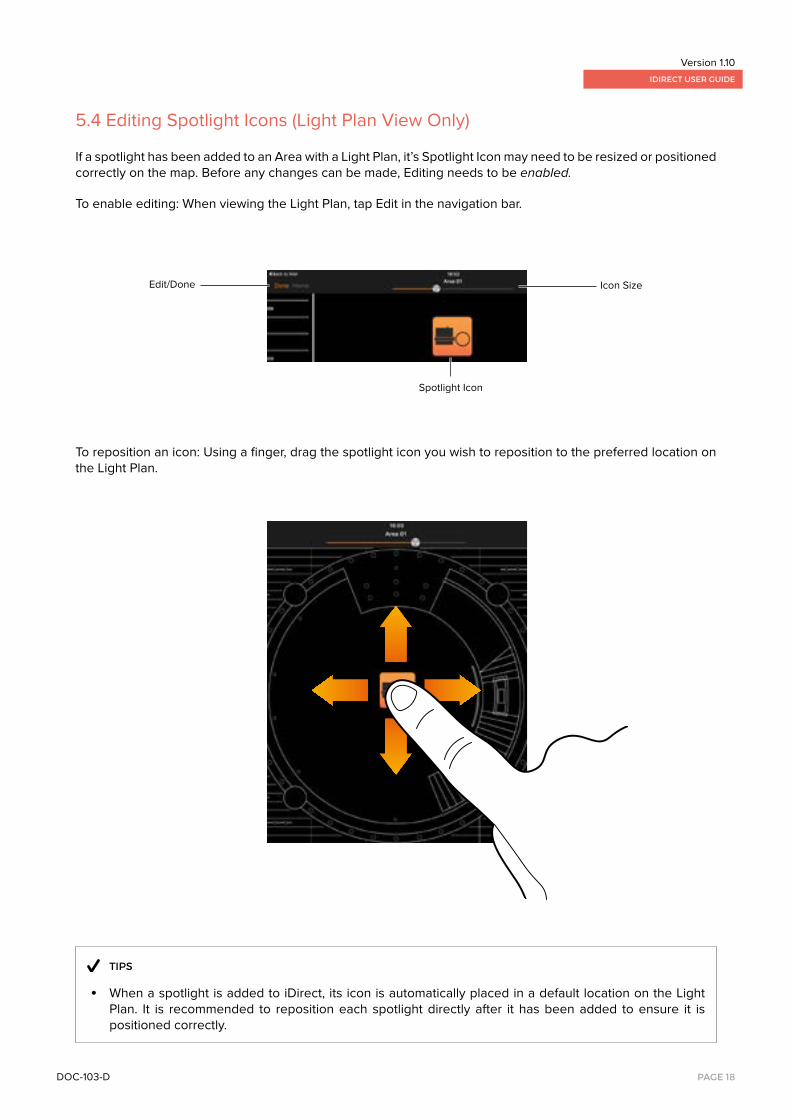
5.4 Editing Spotlight Icons (Light Plan View Only)
If a spotlight has been added to an Area with a Light Plan, it’s Spotlight Icon may need to be resized or positioned correctly on the map. Before any changes can be made, Editing needs to be enabled.
To enable editing: When viewing the Light Plan, tap Edit in the navigation bar.
To reposition an icon: Using a finger, drag the spotlight icon you wish to reposition to the preferred location on the Light Plan.
TIPS
• When a spotlight is added to iDirect, its icon is automatically placed in a default location on the Light Plan. It is recommended to reposition each spotlight directly after it has been added to ensure it is positioned correctly.
Edit/Done
Spotlight Icon
Icon Size

PAGE 19
Version 1.10IDIRECT USER GUIDE
DOC-103-D
To resize an icon: Drag the slider in the navigation bar left or right to resize the spotlight icons in a Light Plan.
To disable editing: Tap Done in the navigation bar once editing is complete.
5.5 Editing Spotlights
It is possible to edit the information for a spotlight. This is useful if you wish to rename it or if some of the spotlight information has changed. Before any changes can be made, Editing needs to be enabled.
To enable editing: When viewing a Light Plan or Light Table, tap Edit in the navigation bar.
NOTES
• When Editing is enabled, spotlights cannot be selected from the Light Plan and then controlled in the Gesture Pad.
Edit/Done
Light Plan View
Edit/Done
Light Table View

PAGE 20
Version 1.10IDIRECT USER GUIDE
DOC-103-D
To edit spotlight information: Tap on the Tile or Icon of the spotlight you wish to edit to bring up the Edit Spotlight popover.
To edit spotlight name: Tap inside the Name field. The onscreen keyboard will appear and a new name can be added. To hide the keyboard, tap the Keyboard key .
To update attributes: Tap the Attribute Field you wish to edit and choose from the available options.
To save updated settings: Once editing is complete, tap the Done button in the Edit Spotlight popover to store any changes made.
To cancel editing a spotlight: At any time, tap the Cancel button in the Edit Spotlight popover.
If a spotlight in a project is replaced for any reason, the new spotlight will need to be Acquired again to relink it to the iDirect system.
To reacquire the spotlight: Tap the Acquire Spotlight button and repeat the Acquire Spotlight process outlined earlier.
To disable editing: Tap Done in the navigation bar once editing is complete.
NOTES
• If Spotlight Attributes are changed, you may be required to reselect other attributes again.
NOTES
• For the Acquire Spotlight button to be active, all three Spotlight Attributes must be set.
Light Table View Light Plan View
Done DoneCancel Cancel
Delete Spotlight (Light Plan only)
Spotlight Attributes
Lamp Attributes
Acquire Spotlight(active)

PAGE 21
Version 1.10IDIRECT USER GUIDE
DOC-103-D
5.6 Deleting Spotlights
Spotlights can be deleted from iDirect from either the Light Table or Light Plan view. The process of deleting a spotlight is slightly different depending on which view you are in.
In Light Table view:
1. Tap Edit in the navigation bar.
2. Tap the Minus button in the top left corner of the spotlight you wish to delete.
3. Tap the Delete Spotlight button that appears to confirm deletion.
4. Once you have finished deleting spotlights, tap Done in the navigation bar.
In Light Plan view:
1. Tap Edit in the navigation bar.
2. Tap the icon of the spotlight you wish to delete.
3. Tap the Minus button in the Edit Spotlight popover.
4. Tap the Delete button that appears to confirm deletion.
5. Once you have finished deleting spotlights, tap Done in the navigation bar.
NOTES
• When deleting spotlights, they will be removed from both the Light Plan and Light Table view.

PAGE 22
Version 1.10IDIRECT USER GUIDE
DOC-103-D
5.7 Spotlight Information
It’s possible to check the information for a spotlight. This is useful if you have a variety of spotlights installed or you would like to check the Start Address of a particular fixture.
To view spotlight information: In Light Table view, tap the Information icon located in the bottom right corner of a Spotlight Tile. A popover containing the spotlight information will appear.
To dismiss spotlight information: Tap anywhere outside of the popover to dismiss it.
Spotlight Information Attributes
Start Address

PAGE 23
Version 1.10IDIRECT USER GUIDE
DOC-103-D
6.0 Gesture Pad
The Gesture Pad is where you control the movement and intensity of individual spotlights. It has been designed with the user in mind, with a simple interface that allows adjustment through intuitive gestures.
6.1 Accessing The Gesture Pad
The Gesture Pad can be accessed from either the Light Plan or Light Table views.
To access the Gesture Pad: Tap the Tile or Icon of the spotlight you wish to control.
To exit the Gesture Pad: Double Tap anywhere in the Gesture Pad with a single finger. iDirect will return to the previous view.
Light Table View Light Plan View
Gesture Pad
Exit to Light Table/Light Plan

PAGE 24
Version 1.10IDIRECT USER GUIDE
DOC-103-D
6.2 Controlling Movement
RCL spotlights are aimed using pan and tilt motions to control their direction. iDirect uses onscreen multi-directional gestures and interprets the movements to control the spotlights.
To control pan movement: Touch anywhere on the screen and drag your finger horizontally to control the spotlight in pan.
NOTES
• Axis of movement and movement limits may differ between spotlight models. Check product datasheets for individual specifications.
Pan Movement Tilt Movement

PAGE 25
Version 1.10IDIRECT USER GUIDE
DOC-103-D
To control tilt movement: Touch anywhere on the screen and drag your finger vertically to control the spotlight in tilt.
To control pan & tilt movement: Touch anywhere on the screen and drag your finger diagonally to control the spotlight in pan and tilt.
TIPS
• When controlling spotlights, try not to look at the spotlight itself. Instead look at the spotlight beam to aim the light correctly.
• Smooth, consistent movements will produce better results when aiming spotlights.• A tone will sound to indicate when a spotlight has reached its limit of movement in either the pan or tilt
direction.
PAGE 26
Version 1.10IDIRECT USER GUIDE
DOC-103-D
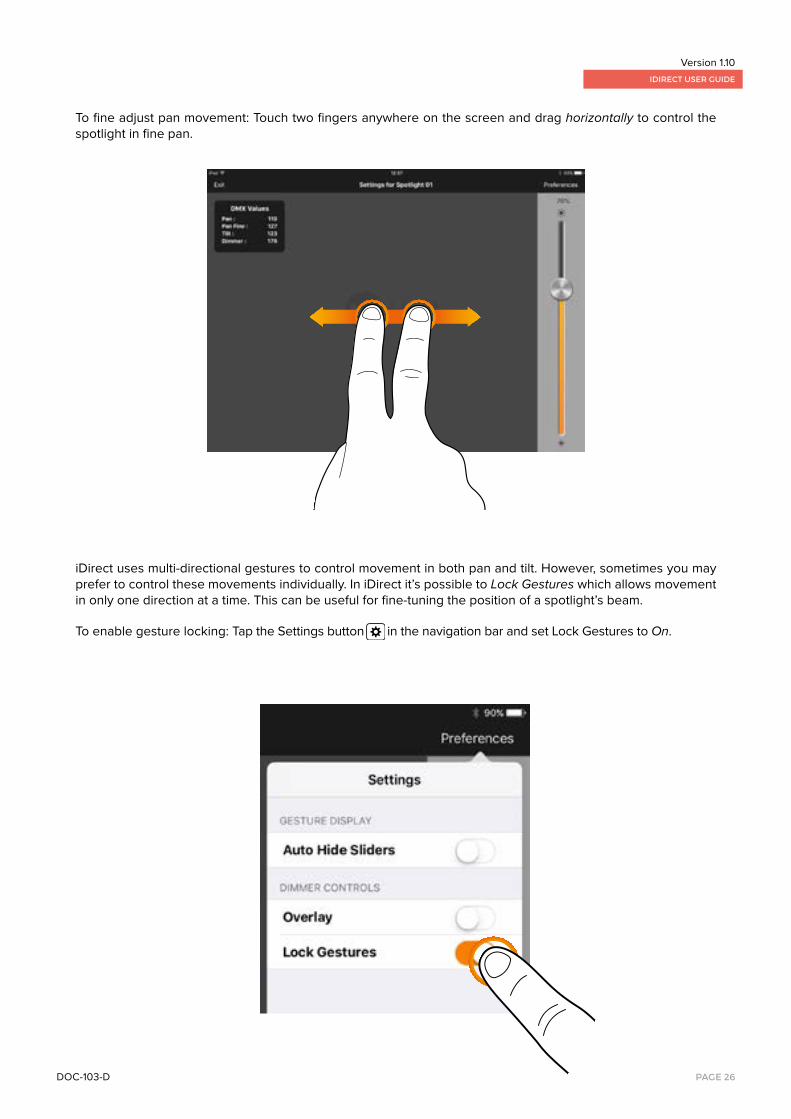
To fine adjust pan movement: Touch two fingers anywhere on the screen and drag horizontally to control the spotlight in fine pan.
iDirect uses multi-directional gestures to control movement in both pan and tilt. However, sometimes you may prefer to control these movements individually. In iDirect it’s possible to Lock Gestures which allows movement in only one direction at a time. This can be useful for fine-tuning the position of a spotlight’s beam.
To enable gesture locking: Tap the Settings button in the navigation bar and set Lock Gestures to On.
PAGE 27
Version 1.10IDIRECT USER GUIDE
DOC-103-D
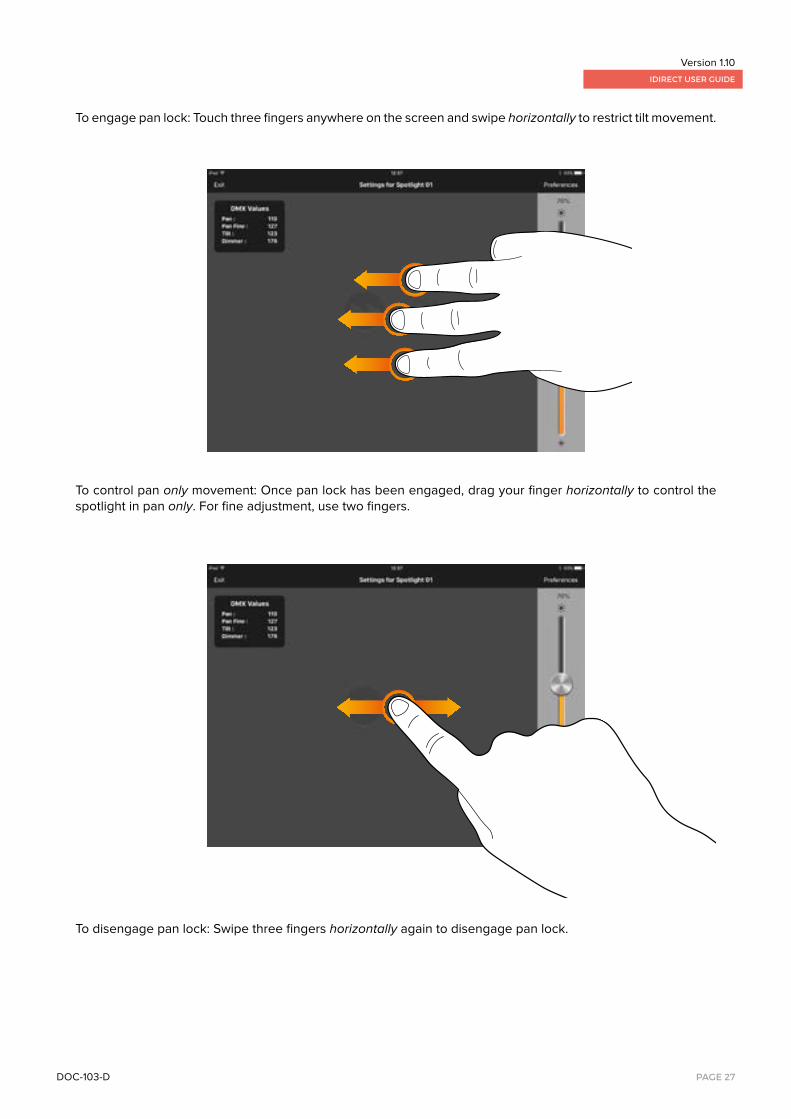
To engage pan lock: Touch three fingers anywhere on the screen and swipe horizontally to restrict tilt movement.
To control pan only movement: Once pan lock has been engaged, drag your finger horizontally to control the spotlight in pan only. For fine adjustment, use two fingers.
To disengage pan lock: Swipe three fingers horizontally again to disengage pan lock.

PAGE 28
Version 1.10IDIRECT USER GUIDE
DOC-103-D
To engage tilt lock: Touch three fingers anywhere on the screen and swipe vertically to restrict pan movement.
To control tilt only movement: Once tilt lock has been engaged, drag your finger vertically to control the spotlight in tilt only.
To disengage tilt lock: Swipe three fingers horizontally again to disengage tilt lock.

PAGE 29
Version 1.10IDIRECT USER GUIDE
DOC-103-D
6.3 Individual Dimming
Dimming of individual spotlights can be achieved using the Dimmer Slider in the Gesture Pad.
To adjust dimming: Slide the Dimmer Knob up or down to adjust the intensity of an individual spotlight.
DIMMING BEHAVIOUR
• The dimming range of LEDs is slightly reduced compared to halogen lamps. RCL’s LED head dims to approximately 5% before switching off. After an LED spotlight is dimmed down and then switched off, it may not turn back on initially and then ‘pop-on’ after a certain dim level has been reached. This behaviour is normal for LEDs.
• Metal Halide lamps (HIR111-CE-P, HIT-CE) can’t currently be dimmed, however they can be switched on or off.
Dimmer Percentage
Maximum Intensity
Dimmer Knob
Minimum Intensity
PAGE 30
Version 1.10IDIRECT USER GUIDE
DOC-103-D
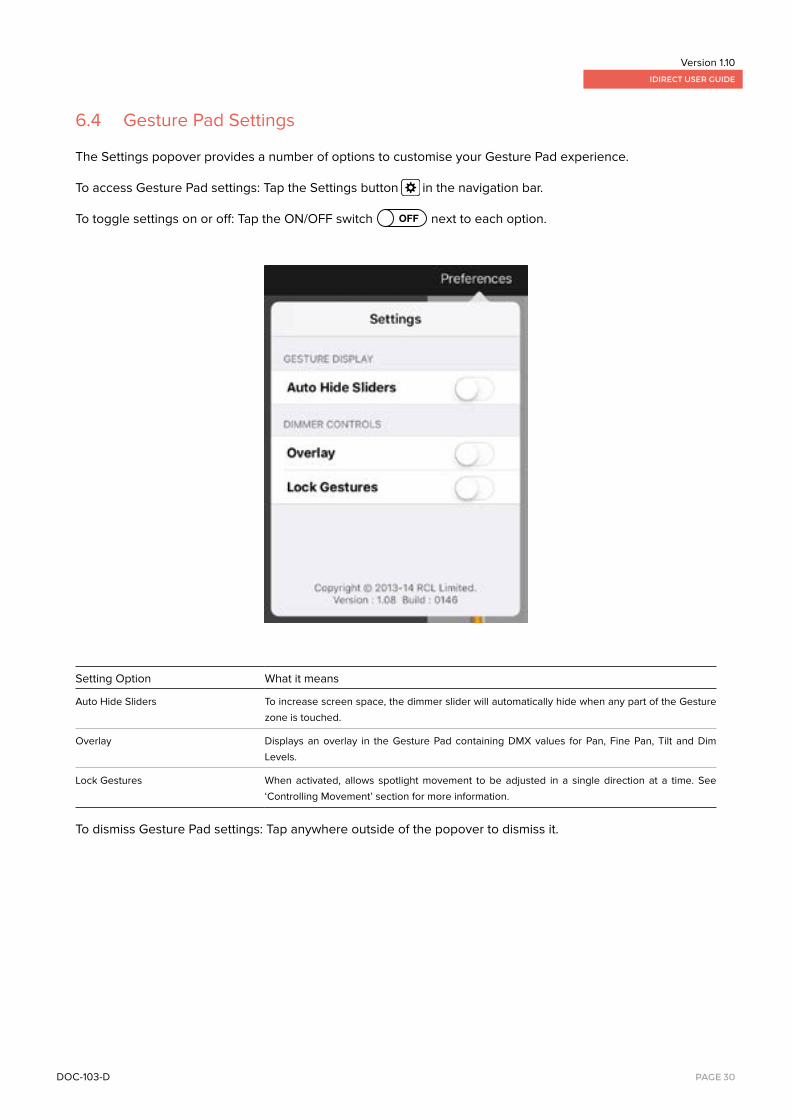
6.4 Gesture Pad Settings
The Settings popover provides a number of options to customise your Gesture Pad experience.
To access Gesture Pad settings: Tap the Settings button in the navigation bar.
To toggle settings on or off: Tap the ON/OFF switch next to each option.
Setting Option What it means
Auto Hide Sliders To increase screen space, the dimmer slider will automatically hide when any part of the Gesture zone is touched.
Overlay Displays an overlay in the Gesture Pad containing DMX values for Pan, Fine Pan, Tilt and Dim Levels.
Lock Gestures When activated, allows spotlight movement to be adjusted in a single direction at a time. See ‘Controlling Movement’ section for more information.
To dismiss Gesture Pad settings: Tap anywhere outside of the popover to dismiss it.

PAGE 31
Version 1.10IDIRECT USER GUIDE
DOC-103-D
7.0 Dimming
The Dimming section allows all spotlights within a specific Area to be dimmed simultaneously. For each Area added to iDirect, a corresponding Dimmer panel is automatically created in the Dimming section.
To access Dimming: Tap Dimming in the Controls panel. The available Area Dimmers will be displayed in the Console.
7.1 Using Area Dimmers
If spotlights within an Area have been dimmed individually via the Gesture Pad, the Dimmer panel for that Area will be inactive. Using an Area dimmer will override the individual settings and adjust the spotlights to the same dim level.
To set an Area’s dim level:
1. Tap the Unlock Dimmer button for the Area dimmer you wish to adjust. The Dimmer panel will become active.
2. Slide the Dimmer Knob up or down to the preferred intensity level. The dim level will be set after your finger is released.
To adjust an Area’s dim level: Once an Area Dimmer has been set, Slide the Dimmer Knob up or down to adjust the dim level. The intensity will change as the dimmer knob is moved.
NOTES
• Spotlights that have been switched ‘off’ (dim level of 0%) via the Gesture Pad will not be affected by an Area dimmer.
WARNING
• Using an Area dimmer will cause spotlights within that Area to lose their individual dim settings. To prevent this from happening a Scene can be created to store the individual settings. For more information on Scenes, see Chapter 8.
Dimmer Locked Dimmer Active Dimmer Set
PAGE 32
Version 1.10IDIRECT USER GUIDE
DOC-103-D
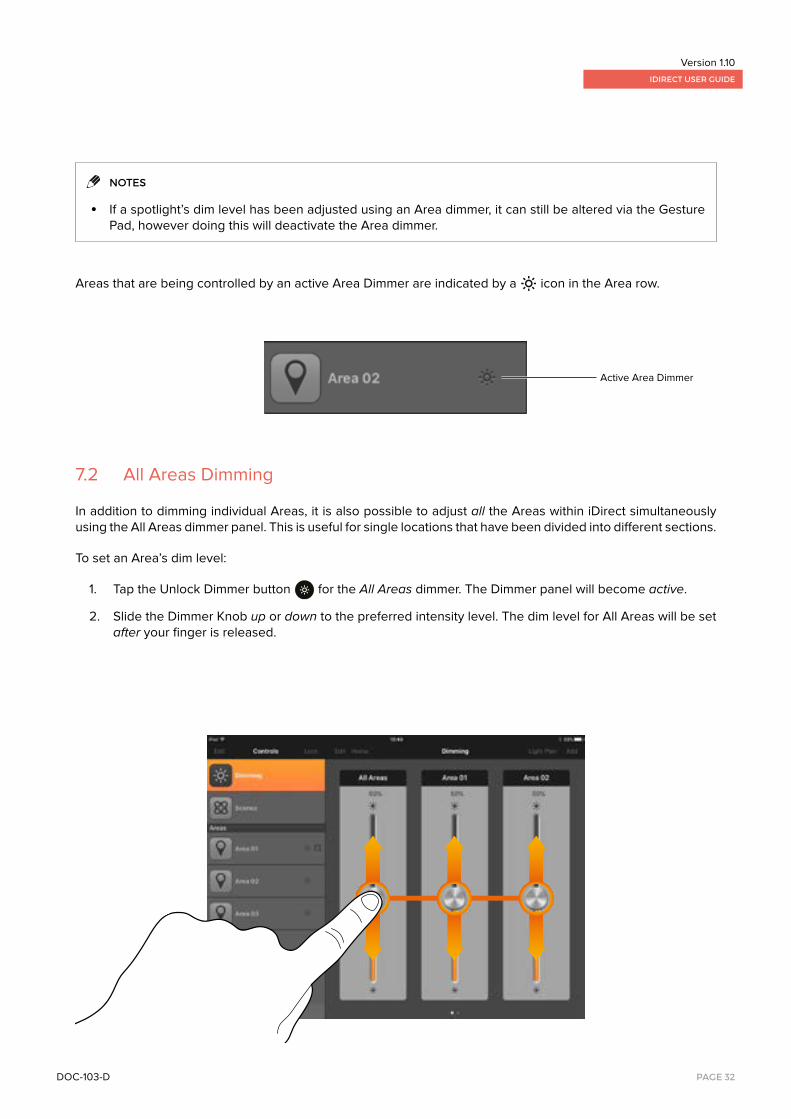
Areas that are being controlled by an active Area Dimmer are indicated by a icon in the Area row.
7.2 All Areas Dimming
In addition to dimming individual Areas, it is also possible to adjust all the Areas within iDirect simultaneously using the All Areas dimmer panel. This is useful for single locations that have been divided into different sections.
To set an Area’s dim level:
1. Tap the Unlock Dimmer button for the All Areas dimmer. The Dimmer panel will become active.
2. Slide the Dimmer Knob up or down to the preferred intensity level. The dim level for All Areas will be set after your finger is released.
NOTES
• If a spotlight’s dim level has been adjusted using an Area dimmer, it can still be altered via the Gesture Pad, however doing this will deactivate the Area dimmer.
Active Area Dimmer

PAGE 33
Version 1.10IDIRECT USER GUIDE
DOC-103-D
8.0 Scenes
A great timesaving tool, the Scenes section allows different lighting schemes to be recorded and recalled quickly. Note: to access Scenes the user will need to input their inique iDirect password as referenced in Section 4.2.
To access Scenes: Tap Scenes in the Controls panel. The Scenes section will be displayed in the Console.
8.1 Creating Scenes
Creating a Scene records the current state of spotlights within different Areas. The position and intensity of each light is stored by iDirect and then recalled when the Scene is activated.
To create a scene: Set spotlights to the desired position and dim level, then tap the Add button in the navigation bar. The New Scene popover will appear.
For a Scene to be created, it needs to be given a description to identify it. This can be modified later if required.
To add a Scene description: Tap inside the Scene Description field. The onscreen keyboard will appear and a description can be added. To hide the keyboard, tap the Keyboard key .
A Scene also requires at least one Area to be included before it can be created.
To add Areas to the Scene: Tap each Area you wish to include in the Scene. Selected Areas will be indicated by a . Tapping again will remove the Area from the Scene.
Available Areas
Cancel
Scene Description(required)
Create Scene(inactive)
PAGE 34
Version 1.10IDIRECT USER GUIDE
DOC-103-D
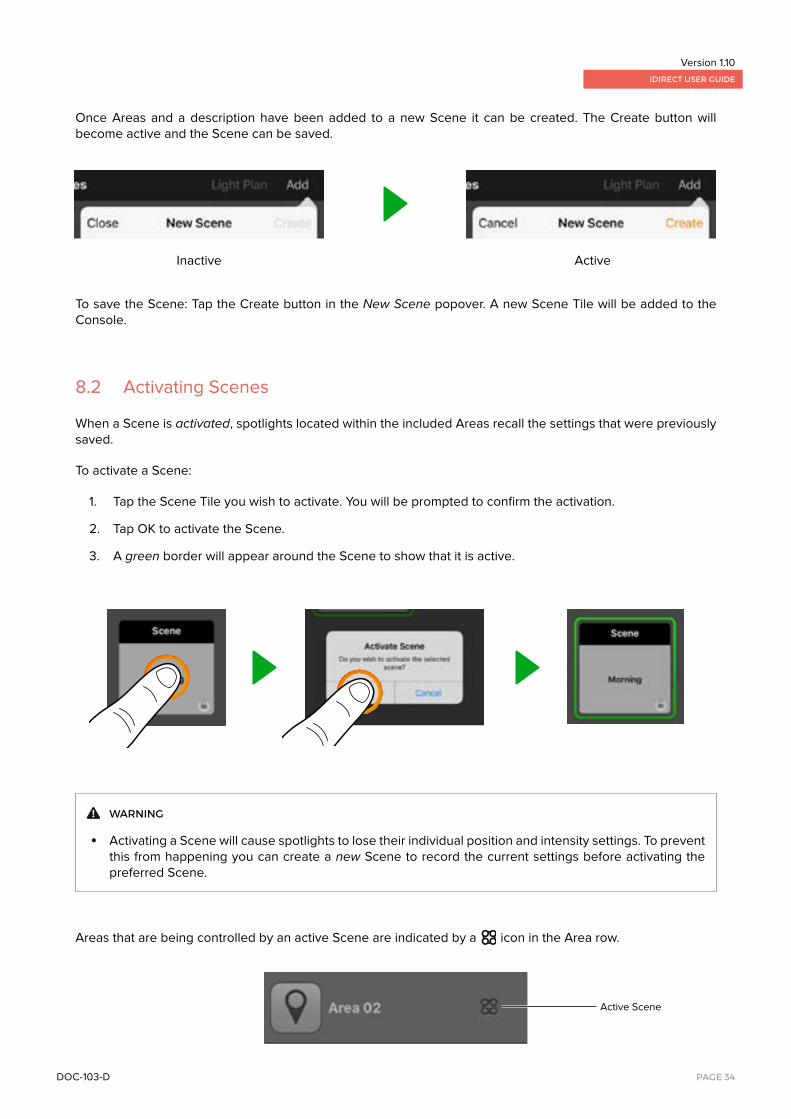
Once Areas and a description have been added to a new Scene it can be created. The Create button will become active and the Scene can be saved.
To save the Scene: Tap the Create button in the New Scene popover. A new Scene Tile will be added to the Console.
8.2 Activating Scenes
When a Scene is activated, spotlights located within the included Areas recall the settings that were previously saved.
To activate a Scene:
1. Tap the Scene Tile you wish to activate. You will be prompted to confirm the activation.
2. Tap OK to activate the Scene.
3. A green border will appear around the Scene to show that it is active.
Areas that are being controlled by an active Scene are indicated by a icon in the Area row.
WARNING
• Activating a Scene will cause spotlights to lose their individual position and intensity settings. To prevent this from happening you can create a new Scene to record the current settings before activating the preferred Scene.
Active Scene
Inactive Active

PAGE 35
Version 1.10IDIRECT USER GUIDE
DOC-103-D
8.3 Editing Scenes
It’s possible to edit information for a Scene. This is useful if you wish to rename it, add or remove Areas or update settings for an Area based on a revised scheme. Before any changes can be made, Editing needs to be enabled.
To enable editing: When viewing the Scenes section, tap Edit in the navigation bar.
To edit Scene information: Tap the tile of the Scene you wish to edit to bring up the Edit Scene popover.
To edit a Scene’s description: Tap inside the Description field. The onscreen keyboard will appear and a new description can be added. To hide the keyboard, tap the Keyboard key .
To add an Area to a Scene: Tap the Plus button next to an Area you wish to add to the Scene. The Area will be moved to the Areas in Scene category.
To remove an Area from a Scene:
Cancel Update Scene(inactive)
Areas Currently Included in Scene
Areas Currently Not Included in Scene
Edit/Done

PAGE 36
Version 1.10IDIRECT USER GUIDE
DOC-103-D
1. Tap the Minus button next to an Area you wish to remove from the Scene.
2. The Area will be moved to the Areas not in Scene category.
To save changes: Once editing is complete, tap Update in the Edit Scene popover to store the changes made.
To cancel editing a Scene: At any time, tap the Cancel button in the Edit Spotlight popover.
To disable Scene editing: Tap Done in the navigation bar once editing is complete.
8.4 Updating Scene Settings
Occasionally you might want to adjust some of the spotlights within a Scene and then save the updated settings. When editing a Scene, the status of each Area is indicated by an icon.
Symbol What it means
Settings Match The current settings for spotlights within the Area match the stored settings for the Scene.
Settings ChangedThe spotlights within an Area have been adjusted and no longer match the stored settings for the Scene.
Status Icons

PAGE 37
Version 1.10IDIRECT USER GUIDE
DOC-103-D
To update Area settings:
1. Adjust spotlights within an Area as required.
2. In the Scenes section, tap Edit in the navigation bar.
3. Tap the Scene Tile you wish to update. The Edit Scene popover will appear.
4. Tap the icon next to the Area to accept the changes.
5. Tap the Update button to store the new settings.
6. Once you have finished updating Scenes, tap Done in the navigation bar.
8.5 Deleting Scenes
Scenes can be easily deleted from iDirect if they are no longer required.
To delete a Scene:
1. Tap Edit in the navigation bar.
2. Tap the Minus button in the top left corner of the Scene you wish to delete.
3. Tap the Delete Scene button that appears to confirm deletion.
4. Once you have finished deleting Scenes, tap Done in the navigation bar.
NOTES
• Scene settings will only be stored after the tapping the Update button in the Edit Scene popover.

PAGE 38
Version 1.10IDIRECT USER GUIDE
DOC-103-D
9.0 Troubleshooting
From time to time you may experiance some issues with your iPad or iDirect itself. In this section we have listed some of the more common issues and steps to resolve them. For iPad specific issues, RCL recommends checking Apple’s support pages at: www.apple.com/support/ipad
Problem: Spotlights will not respond to Scene or Dimming commands from the Controls Panel.
Response: The connection between iDirect and the Ethernet Converter may have been broken. Try the following:
1. Tap on any Area in the Controls Panel, then tap back into either the Scenes or Dimming sections before trying to adjust the settings again.
2. Select any spotlight to enter the Gesture Pad and then return to the Controls Panel (using a double tap in the Gesture Pad). Now try adjusting the Scenes or Dimming again.
3. Minimise the app by tapping the Home button . Close the app from the Multitasking tray by double tapping the Home button , then holding down your finger on the iDirect icon until it starts to wobble and the Minus button appears. Tap the button to fully close iDirect. Now reopen iDirect by tapping on the icon on the home screen.
Problem: Spotlight stops responding whilst controlling in the Gesture Pad.
Response: The connection between iDirect and the Ethernet Converter may have been broken. Try the following:
1. Exit the Gesture Pad (using a double tap) and reselect the light you were controlling. The light may move slightly as it will be adjusting to the last DMX signal sent.
Problem: Spotlights in iDirect are not responding to any commands.
Response: Try the following:
1. Ensure that power is being supplied to the spotlights.
2. Check that the iDirect router and the Ethernet Converter devices are switched on.
3. Make sure that your iPad is connected to the iDirect router.
4. Reacquire the spotlights in iDirect.
Problem: When using the Gesture Pad to control a spotlight, more than one fixture responds to the commands.
Response: Spotlights may share the same Start Address. Try the following:
1. In Light Plan view, tap the icon on the tile of each affected spotlight to check the assigned Start Address.
2. If two or more spotlights share a Start Address, they will need to be reacquired.
PAGE 39
Version 1.10IDIRECT USER GUIDE
DOC-103-D
Problem: It’s difficult to position a spotlight beam precisely.
Response: Try the following:
1. Enable the Lock Gestures function to restrict movement to a single direction.
2. Use the Fine Adjust gesture to control the spotlight in pan more accurately.
Problem: Some spotlights won’t dim.
Response: The spotlights may be fitted with Metal Halide lamps, which can’t be dimmed:
1. Check the product label on each spotlight. The lamp type will be listed. HIR111-CE-P and HIT-CE are both Metal Halide lamps.
2. Ensure that the lamp attributes in iDirect match those of the spotlight. In Light Plan view, tap the icon on the tile of each spotlight to check the lamp type.
3. If the lamp type is incorrect, Edit the spotlight information to include the correct lamp type.