Embed Size (px)
Citation preview

Do more Apache Cassandra distributed database work with AMD EPYC 7601 processors | Commissioned by AMD December 2017
Do more Apache Cassandra distributed database work with AMD EPYC 7601 processorsVersus servers based on Intel Xeon processors E5-2699 v4Businesses that provide private cloud services with demanding NoSQL applications—from social media to ecommerce to media streaming—can run Apache Cassandra® distributed databases in their clouds to take advantage of its distributed, highly reliable architecture. Private clouds can provide this NoSQL service while also bolstering control and security, but enterprises need to know what they’re getting from their hardware before they invest.
The new AMD EPYC™ 7601 processor allows for more cores per socket and higher memory capacity per server compared to the previous generation Intel® Xeon® processors we tested,1 which could improve the performance of certain workloads in a private cloud infrastructure. In our datacenter, we compared the distributed database performance of two six-node clusters: one built on AMD EPYC 7601 processors, and another based on Intel Xeon processors E5-2699 v4.
Compared to the Intel solution, the AMD solution handled significantly more Cassandra write operations per second on the same number of servers, which could allow for faster updates and shorter data load times.
up to
50%operations per secondmore
A Principled Technologies report: Hands-on testing. Real-world results.

Do more Apache Cassandra distributed database work with AMD EPYC 7601 processors | Commissioned by AMD December 2017 | 2
AMD EPYC processors helped boost Cassandra performanceMoving your company’s data and applications to a private cloud can provide resiliency and flexibility for your most important Cassandra databases. Apache Cassandra databases are replicated across multiple servers or datacenters for fault tolerance, so no single point of failure exists. Cassandra databases are also highly scalable and elastic, so businesses that can see rapid growth often use these databases to minimize downtime for mission-critical data.2
The AMD EPYC 7601 series of processors are based on a new chip and system architecture, which offers resources such as 32 cores that could prove useful to certain distributed database workloads.
About the AMD EPYC 7601 processor
The AMD EPYC processor has up to up to 32 cores and can run with 2 TB of DDR4 memory spread across eight channels.
AMD EPYC processors provide performance and power management features that let you balance performance with power usage at boot time, depending on the needs of your workload and your datacenter.
The AMD EPYC line includes security features that we did not test in our datacenter, including AMD Secure Root-of-Trust technology, Secure Run Technology, and Secure Move Technology. AMD also states that the EPYC family supports encrypted memory features, which include three different modes: transparent mode, Secure Encrypted Memory mode, and Secure Encrypted Virtualization mode, all of which give you the opportunity to choose the security features that are right for you.
To learn more about the AMD EPYC 7601 processor and the complete AMD EPYC family, visit www.amd.com/epyc.
Do more Apache Cassandra distributed database work with AMD EPYC 7601 processors | Commissioned by AMD December 2017 | 3
Milli
ons o
f ope
ratio
ns p
er se
cond
0.5
0.0
1.0
1.5
2.01.86
1.24
Servers based on AMD
EPYC 7601 processors
Servers based on Intel Xeon processors E5-2699 v4
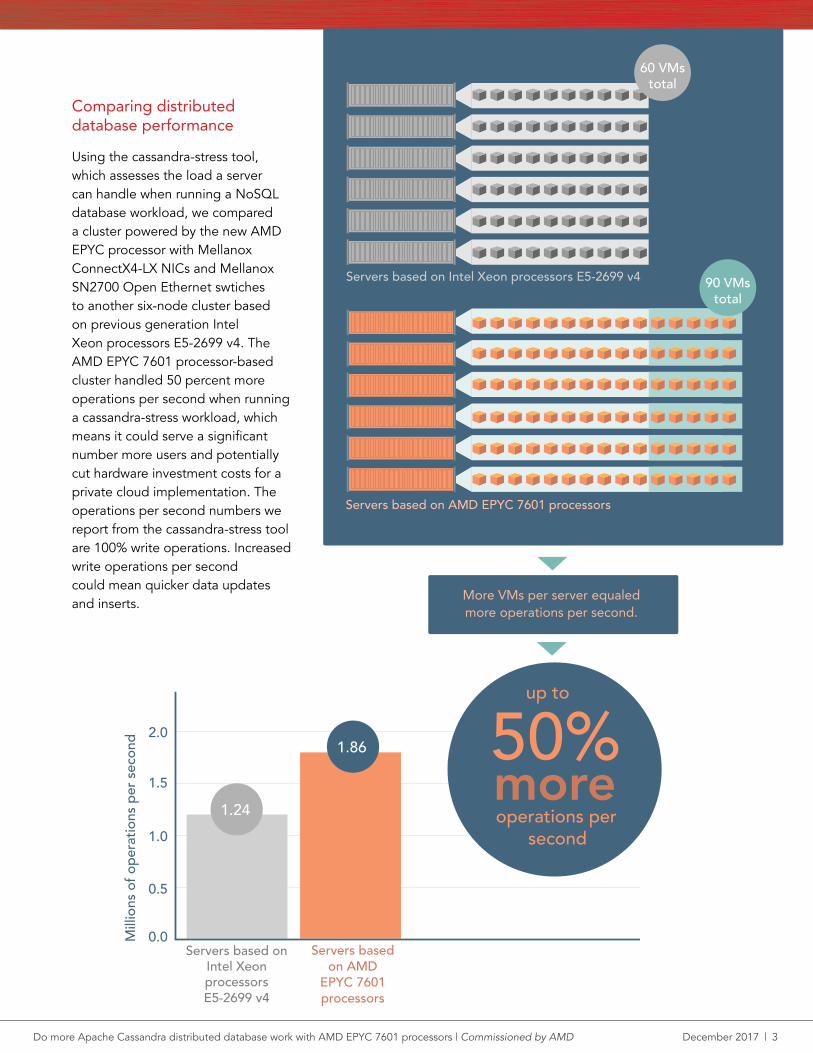
Comparing distributed database performance
Using the cassandra-stress tool, which assesses the load a server can handle when running a NoSQL database workload, we compared a cluster powered by the new AMD EPYC processor with Mellanox ConnectX4-LX NICs and Mellanox SN2700 Open Ethernet swtiches to another six-node cluster based on previous generation Intel Xeon processors E5-2699 v4. The AMD EPYC 7601 processor-based cluster handled 50 percent more operations per second when running a cassandra-stress workload, which means it could serve a significant number more users and potentially cut hardware investment costs for a private cloud implementation. The operations per second numbers we report from the cassandra-stress tool are 100% write operations. Increased write operations per second could mean quicker data updates and inserts.
up to
50%moreoperations per
second
90 VMstotal
60 VMstotal
Servers based on AMD EPYC 7601 processors
Servers based on Intel Xeon processors E5-2699 v4
More VMs per server equaled more operations per second.

Do more Apache Cassandra distributed database work with AMD EPYC 7601 processors | Commissioned by AMD December 2017 | 4
AMD EPYC 7601 processors delivered more for Apache Cassandra distributed databases in our testsPrivate clouds require an investment in hardware that can often be costly—a cost that grows along with the size of distributed database workloads a business deploys. The new AMD EPYC processor architecture can help ease that burden by increasing the available number of cores per socket, which could let businesses get more distributed database work done per server compared to a previous generation Intel Xeon E5-2699 v4 processor architecture. In our tests, we found that a cluster based on 32-core AMD EPYC 7601 processors increased the operations per second an Apache Cassandra distributed database could process by 50 percent over a same-sized cluster based on 22-core Intel Xeon processors E5-2699 v4.3 This means that businesses seeking to run these reliable, elastic databases on a private cloud setup could do so on an AMD EPYC 7601 processor-based server platform and experience faster updates and shorter data load times.
1 Processor specifications, accessed December 19, 2017, http://www.amd.com/en/products/epyc-7000-series-2-socket-models and https://ark.intel.com/products/91317/Intel-Xeon-Processor-E5-2699-v4-55M-Cache-2_20-GHz.
2 To learn more, see “What is Cassandra?,” accessed October 18, 2017, http://cassandra.apache.org.
3 Outputs will vary based on your specific application and configuration.
Do more Apache Cassandra distributed database work with AMD EPYC 7601 processors | Commissioned by AMD December 2017 | 5
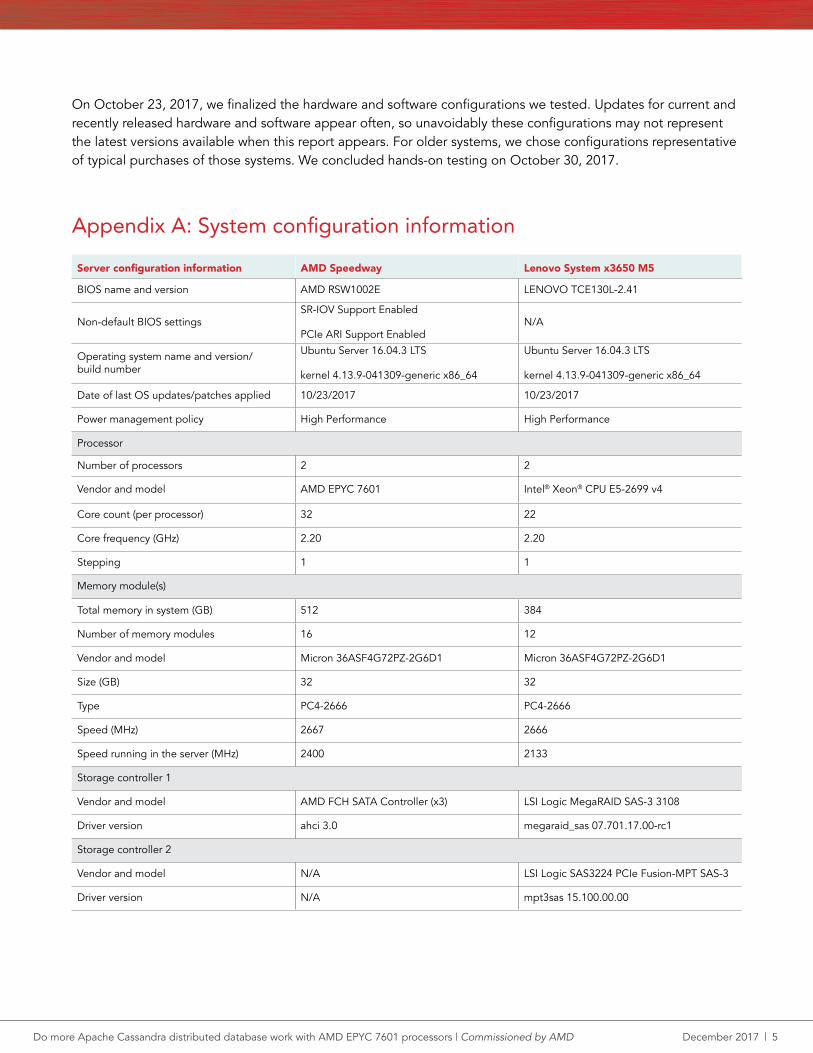
On October 23, 2017, we finalized the hardware and software configurations we tested. Updates for current and recently released hardware and software appear often, so unavoidably these configurations may not represent the latest versions available when this report appears. For older systems, we chose configurations representative of typical purchases of those systems. We concluded hands-on testing on October 30, 2017.
Appendix A: System configuration information
Server configuration information AMD Speedway Lenovo System x3650 M5
BIOS name and version AMD RSW1002E LENOVO TCE130L-2.41
Non-default BIOS settingsSR-IOV Support Enabled
PCIe ARI Support EnabledN/A
Operating system name and version/build number
Ubuntu Server 16.04.3 LTS
kernel 4.13.9-041309-generic x86_64
Ubuntu Server 16.04.3 LTS
kernel 4.13.9-041309-generic x86_64
Date of last OS updates/patches applied 10/23/2017 10/23/2017
Power management policy High Performance High Performance
Processor
Number of processors 2 2
Vendor and model AMD EPYC 7601 Intel® Xeon® CPU E5-2699 v4
Core count (per processor) 32 22
Core frequency (GHz) 2.20 2.20
Stepping 1 1
Memory module(s)
Total memory in system (GB) 512 384
Number of memory modules 16 12
Vendor and model Micron 36ASF4G72PZ-2G6D1 Micron 36ASF4G72PZ-2G6D1
Size (GB) 32 32
Type PC4-2666 PC4-2666
Speed (MHz) 2667 2666
Speed running in the server (MHz) 2400 2133
Storage controller 1
Vendor and model AMD FCH SATA Controller (x3) LSI Logic MegaRAID SAS-3 3108
Driver version ahci 3.0 megaraid_sas 07.701.17.00-rc1
Storage controller 2
Vendor and model N/A LSI Logic SAS3224 PCIe Fusion-MPT SAS-3
Driver version N/A mpt3sas 15.100.00.00
Do more Apache Cassandra distributed database work with AMD EPYC 7601 processors | Commissioned by AMD December 2017 | 6
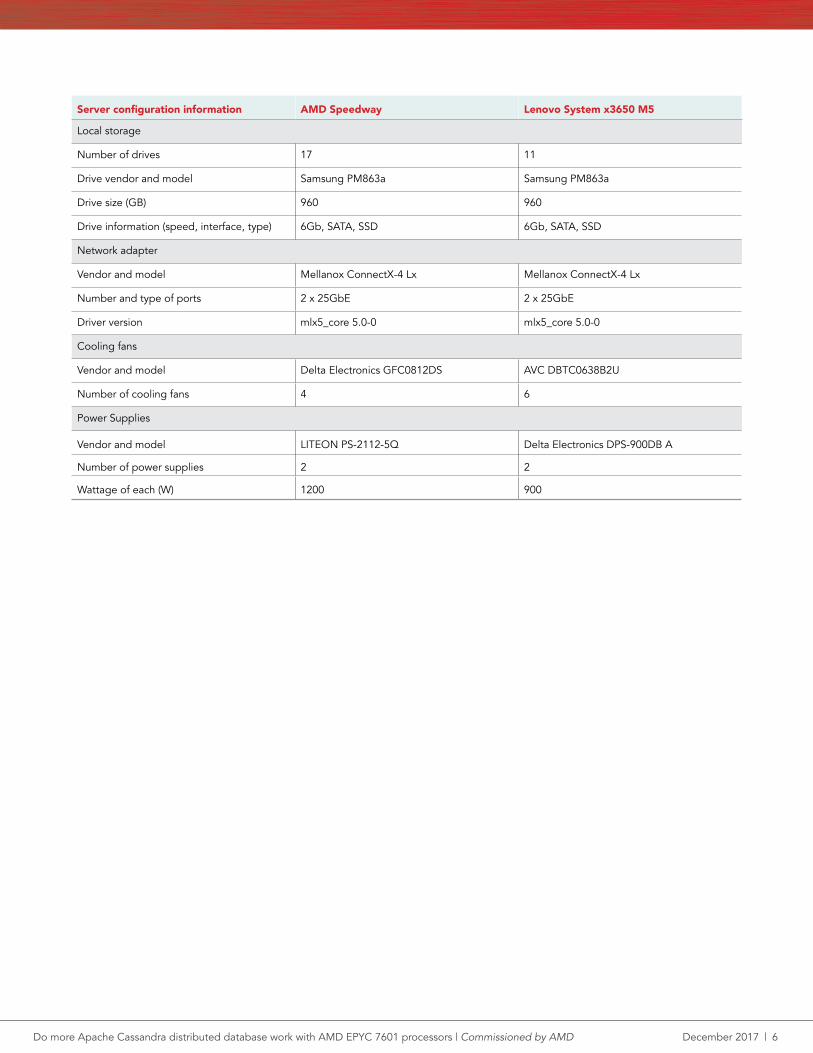
Server configuration information AMD Speedway Lenovo System x3650 M5
Local storage
Number of drives 17 11
Drive vendor and model Samsung PM863a Samsung PM863a
Drive size (GB) 960 960
Drive information (speed, interface, type) 6Gb, SATA, SSD 6Gb, SATA, SSD
Network adapter
Vendor and model Mellanox ConnectX-4 Lx Mellanox ConnectX-4 Lx
Number and type of ports 2 x 25GbE 2 x 25GbE
Driver version mlx5_core 5.0-0 mlx5_core 5.0-0
Cooling fans
Vendor and model Delta Electronics GFC0812DS AVC DBTC0638B2U
Number of cooling fans 4 6
Power Supplies
Vendor and model LITEON PS-2112-5Q Delta Electronics DPS-900DB A
Number of power supplies 2 2
Wattage of each (W) 1200 900
Do more Apache Cassandra distributed database work with AMD EPYC 7601 processors | Commissioned by AMD December 2017 | 7
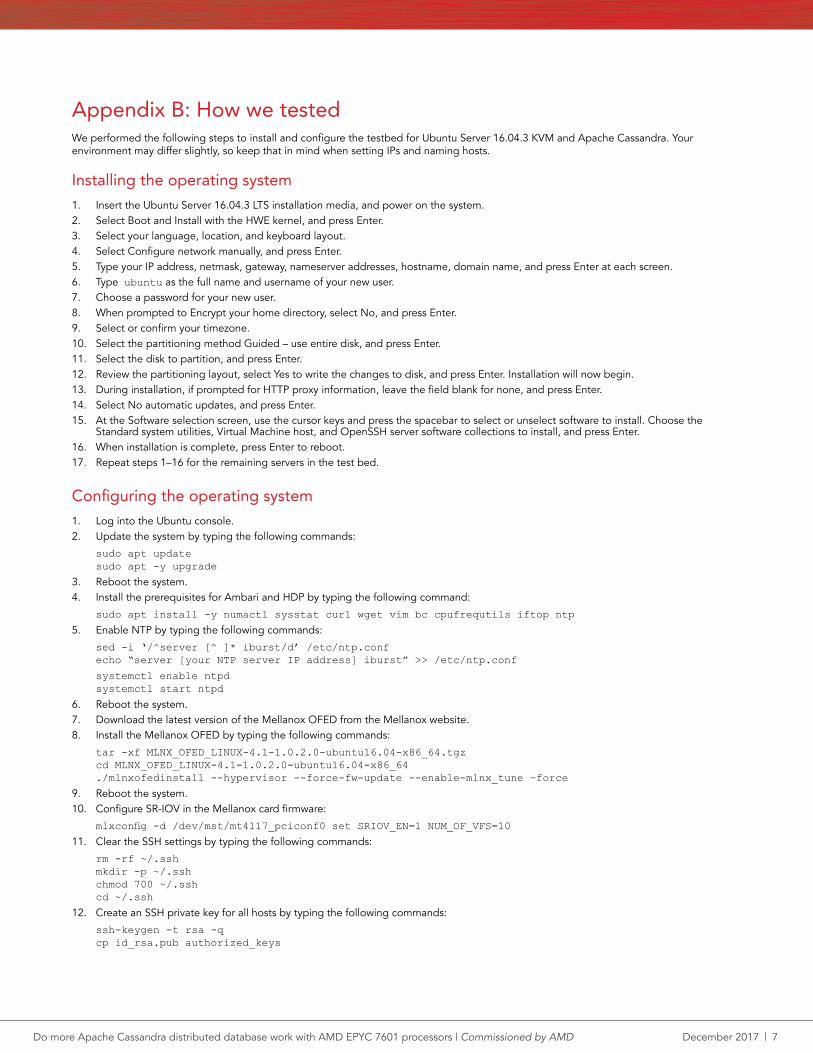
Appendix B: How we testedWe performed the following steps to install and configure the testbed for Ubuntu Server 16.04.3 KVM and Apache Cassandra. Your environment may differ slightly, so keep that in mind when setting IPs and naming hosts.
Installing the operating system 1. Insert the Ubuntu Server 16.04.3 LTS installation media, and power on the system.2. Select Boot and Install with the HWE kernel, and press Enter.3. Select your language, location, and keyboard layout.4. Select Configure network manually, and press Enter.5. Type your IP address, netmask, gateway, nameserver addresses, hostname, domain name, and press Enter at each screen.6. Type ubuntu as the full name and username of your new user.7. Choose a password for your new user.8. When prompted to Encrypt your home directory, select No, and press Enter.9. Select or confirm your timezone.10. Select the partitioning method Guided – use entire disk, and press Enter.11. Select the disk to partition, and press Enter.12. Review the partitioning layout, select Yes to write the changes to disk, and press Enter. Installation will now begin.13. During installation, if prompted for HTTP proxy information, leave the field blank for none, and press Enter.14. Select No automatic updates, and press Enter.15. At the Software selection screen, use the cursor keys and press the spacebar to select or unselect software to install. Choose the
Standard system utilities, Virtual Machine host, and OpenSSH server software collections to install, and press Enter.16. When installation is complete, press Enter to reboot.17. Repeat steps 1–16 for the remaining servers in the test bed.
Configuring the operating system1. Log into the Ubuntu console.2. Update the system by typing the following commands:
sudo apt updatesudo apt -y upgrade
3. Reboot the system.4. Install the prerequisites for Ambari and HDP by typing the following command:
sudo apt install -y numactl sysstat curl wget vim bc cpufrequtils iftop ntp
5. Enable NTP by typing the following commands:
sed -i ‘/^server [^ ]* iburst/d’ /etc/ntp.confecho “server [your NTP server IP address] iburst” >> /etc/ntp.conf
systemctl enable ntpdsystemctl start ntpd
6. Reboot the system.7. Download the latest version of the Mellanox OFED from the Mellanox website.8. Install the Mellanox OFED by typing the following commands:
tar -xf MLNX_OFED_LINUX-4.1-1.0.2.0-ubuntu16.04-x86_64.tgzcd MLNX_OFED_LINUX-4.1-1.0.2.0-ubuntu16.04-x86_64./mlnxofedinstall --hypervisor --force-fw-update --enable-mlnx_tune –force
9. Reboot the system.10. Configure SR-IOV in the Mellanox card firmware:
mlxconfig -d /dev/mst/mt4117_pciconf0 set SRIOV_EN=1 NUM_OF_VFS=10
11. Clear the SSH settings by typing the following commands:
rm -rf ~/.sshmkdir -p ~/.sshchmod 700 ~/.sshcd ~/.ssh
12. Create an SSH private key for all hosts by typing the following commands:
ssh-keygen -t rsa -qcp id_rsa.pub authorized_keys
Do more Apache Cassandra distributed database work with AMD EPYC 7601 processors | Commissioned by AMD December 2017 | 8
echo “StrictHostKeyChecking=no” > configecho > known_hostscp -rp ~/.ssh ~/clean_sshcd ~/clean_ssh
13. Copy keys to the root user by typing the following commands:
sudo su
rm -rf /root/.sshcp -rp ../clean_ssh /root/.sshchown -R root:root /root/.sshexit
14. Copy the key to the other hosts by typing the following commands (replacing ${remotehost} with the host you want to copy to):
scp -rp ~/clean_ssh ${remotehost}:~/.sshssh ${remotehost}cd ~sudo su
rm -rf /root/.sshcp -rp .ssh /root/.sshchown -R root:root /root/.sshexitexit
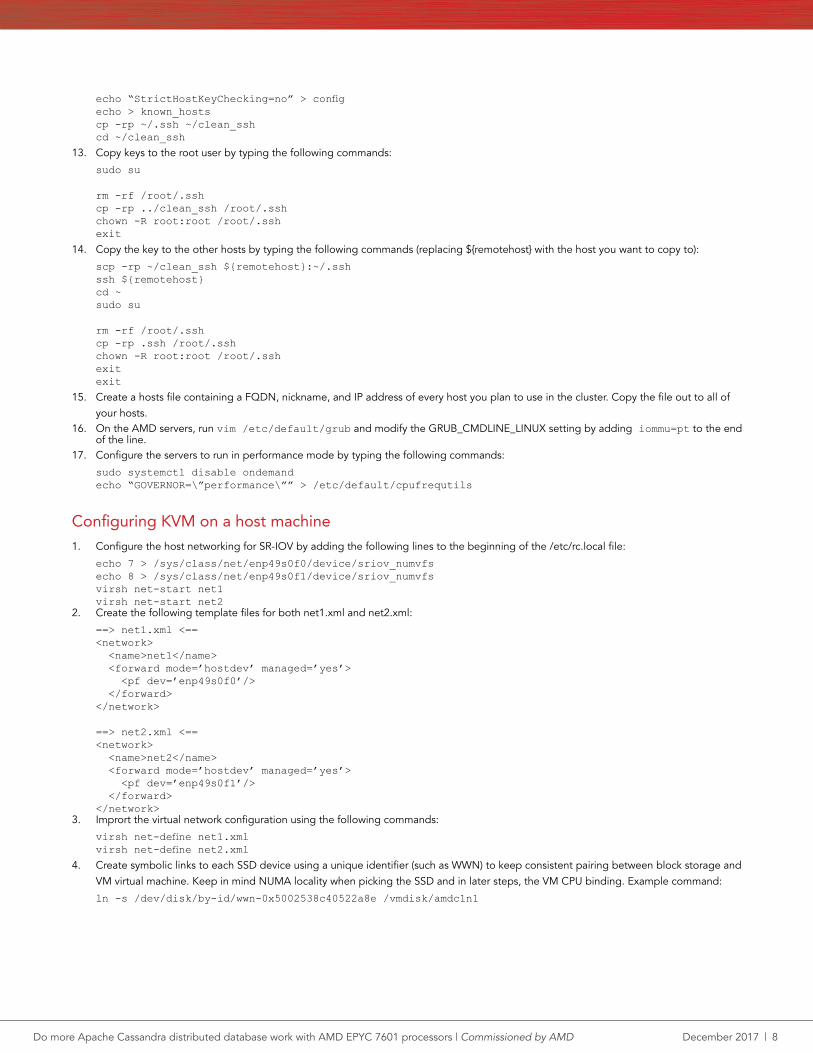
15. Create a hosts file containing a FQDN, nickname, and IP address of every host you plan to use in the cluster. Copy the file out to all of your hosts.
16. On the AMD servers, run vim /etc/default/grub and modify the GRUB_CMDLINE_LINUX setting by adding iommu=pt to the end of the line.
17. Configure the servers to run in performance mode by typing the following commands:
sudo systemctl disable ondemandecho “GOVERNOR=\”performance\”” > /etc/default/cpufrequtils
Configuring KVM on a host machine1. Configure the host networking for SR-IOV by adding the following lines to the beginning of the /etc/rc.local file:
echo 7 > /sys/class/net/enp49s0f0/device/sriov_numvfsecho 8 > /sys/class/net/enp49s0f1/device/sriov_numvfsvirsh net-start net1virsh net-start net2
2. Create the following template files for both net1.xml and net2.xml:
==> net1.xml <==<network> <name>net1</name> <forward mode=’hostdev’ managed=’yes’> <pf dev=’enp49s0f0’/> </forward></network>
==> net2.xml <==<network> <name>net2</name> <forward mode=’hostdev’ managed=’yes’> <pf dev=’enp49s0f1’/> </forward></network>
3. Imprort the virtual network configuration using the following commands:
virsh net-define net1.xmlvirsh net-define net2.xml
4. Create symbolic links to each SSD device using a unique identifier (such as WWN) to keep consistent pairing between block storage and VM virtual machine. Keep in mind NUMA locality when picking the SSD and in later steps, the VM CPU binding. Example command:
ln -s /dev/disk/by-id/wwn-0x5002538c40522a8e /vmdisk/amdc1n1
Do more Apache Cassandra distributed database work with AMD EPYC 7601 processors | Commissioned by AMD December 2017 | 9
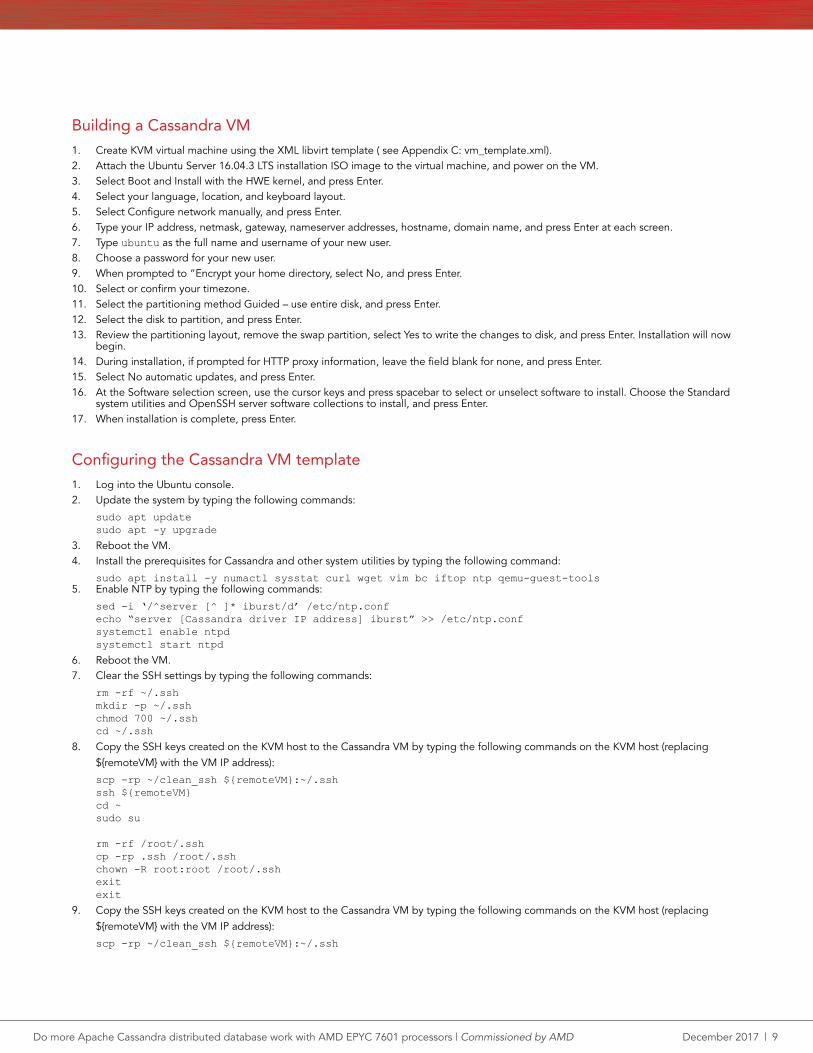
Building a Cassandra VM1. Create KVM virtual machine using the XML libvirt template ( see Appendix C: vm_template.xml).2. Attach the Ubuntu Server 16.04.3 LTS installation ISO image to the virtual machine, and power on the VM.3. Select Boot and Install with the HWE kernel, and press Enter.4. Select your language, location, and keyboard layout.5. Select Configure network manually, and press Enter.6. Type your IP address, netmask, gateway, nameserver addresses, hostname, domain name, and press Enter at each screen.7. Type ubuntu as the full name and username of your new user.8. Choose a password for your new user.9. When prompted to “Encrypt your home directory, select No, and press Enter.10. Select or confirm your timezone.11. Select the partitioning method Guided – use entire disk, and press Enter.12. Select the disk to partition, and press Enter.13. Review the partitioning layout, remove the swap partition, select Yes to write the changes to disk, and press Enter. Installation will now
begin.14. During installation, if prompted for HTTP proxy information, leave the field blank for none, and press Enter.15. Select No automatic updates, and press Enter.16. At the Software selection screen, use the cursor keys and press spacebar to select or unselect software to install. Choose the Standard
system utilities and OpenSSH server software collections to install, and press Enter.17. When installation is complete, press Enter.
Configuring the Cassandra VM template1. Log into the Ubuntu console.2. Update the system by typing the following commands:
sudo apt updatesudo apt -y upgrade
3. Reboot the VM.4. Install the prerequisites for Cassandra and other system utilities by typing the following command:
sudo apt install -y numactl sysstat curl wget vim bc iftop ntp qemu-guest-tools5. Enable NTP by typing the following commands:
sed -i ‘/^server [^ ]* iburst/d’ /etc/ntp.confecho “server [Cassandra driver IP address] iburst” >> /etc/ntp.confsystemctl enable ntpdsystemctl start ntpd
6. Reboot the VM.7. Clear the SSH settings by typing the following commands:
rm -rf ~/.sshmkdir -p ~/.sshchmod 700 ~/.sshcd ~/.ssh
8. Copy the SSH keys created on the KVM host to the Cassandra VM by typing the following commands on the KVM host (replacing ${remoteVM} with the VM IP address):
scp -rp ~/clean_ssh ${remoteVM}:~/.sshssh ${remoteVM}cd ~sudo su
rm -rf /root/.sshcp -rp .ssh /root/.sshchown -R root:root /root/.sshexitexit
9. Copy the SSH keys created on the KVM host to the Cassandra VM by typing the following commands on the KVM host (replacing ${remoteVM} with the VM IP address):
scp -rp ~/clean_ssh ${remoteVM}:~/.ssh
Do more Apache Cassandra distributed database work with AMD EPYC 7601 processors | Commissioned by AMD December 2017 | 10
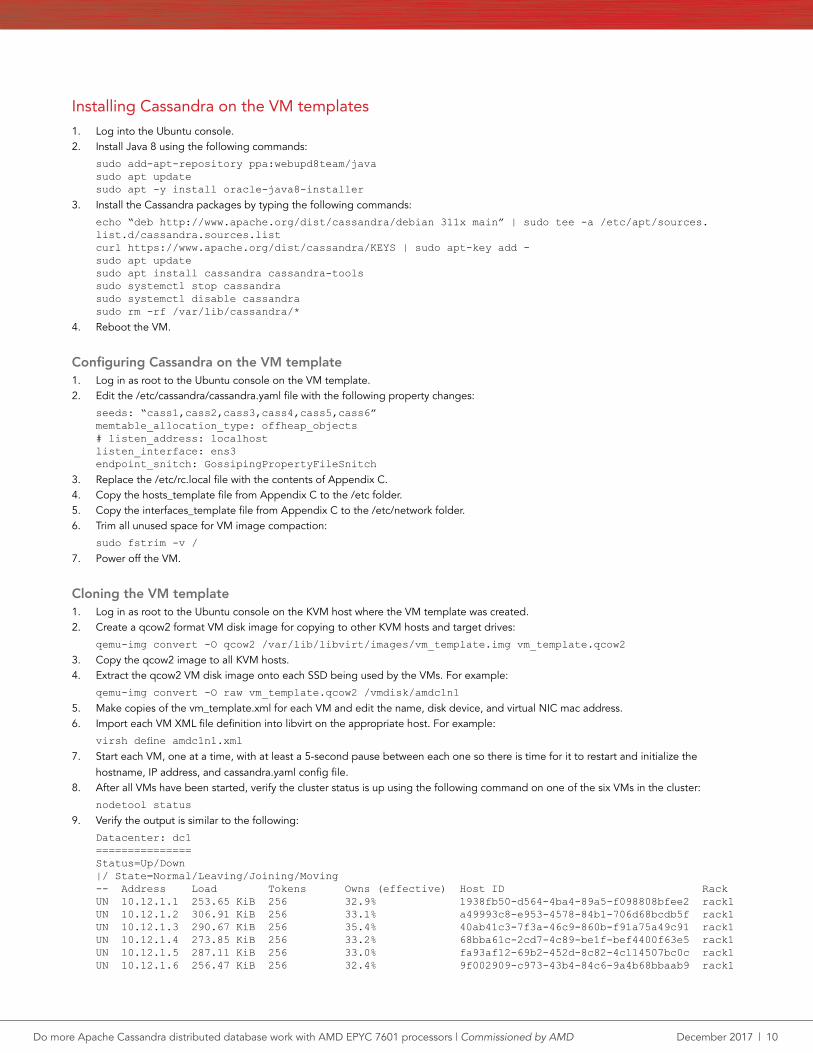
Installing Cassandra on the VM templates1. Log into the Ubuntu console.2. Install Java 8 using the following commands:
sudo add-apt-repository ppa:webupd8team/javasudo apt updatesudo apt -y install oracle-java8-installer
3. Install the Cassandra packages by typing the following commands:
echo “deb http://www.apache.org/dist/cassandra/debian 311x main” | sudo tee -a /etc/apt/sources.list.d/cassandra.sources.listcurl https://www.apache.org/dist/cassandra/KEYS | sudo apt-key add -sudo apt updatesudo apt install cassandra cassandra-toolssudo systemctl stop cassandrasudo systemctl disable cassandrasudo rm -rf /var/lib/cassandra/*
4. Reboot the VM.
Configuring Cassandra on the VM template1. Log in as root to the Ubuntu console on the VM template.2. Edit the /etc/cassandra/cassandra.yaml file with the following property changes:
seeds: “cass1,cass2,cass3,cass4,cass5,cass6” memtable_allocation_type: offheap_objects# listen_address: localhostlisten_interface: ens3endpoint_snitch: GossipingPropertyFileSnitch
3. Replace the /etc/rc.local file with the contents of Appendix C.4. Copy the hosts_template file from Appendix C to the /etc folder.5. Copy the interfaces_template file from Appendix C to the /etc/network folder.6. Trim all unused space for VM image compaction:
sudo fstrim -v /
7. Power off the VM.
Cloning the VM template1. Log in as root to the Ubuntu console on the KVM host where the VM template was created.2. Create a qcow2 format VM disk image for copying to other KVM hosts and target drives:
qemu-img convert -O qcow2 /var/lib/libvirt/images/vm_template.img vm_template.qcow2
3. Copy the qcow2 image to all KVM hosts.4. Extract the qcow2 VM disk image onto each SSD being used by the VMs. For example:
qemu-img convert -O raw vm_template.qcow2 /vmdisk/amdc1n1
5. Make copies of the vm_template.xml for each VM and edit the name, disk device, and virtual NIC mac address.6. Import each VM XML file definition into libvirt on the appropriate host. For example:
virsh define amdc1n1.xml
7. Start each VM, one at a time, with at least a 5-second pause between each one so there is time for it to restart and initialize the hostname, IP address, and cassandra.yaml config file.
8. After all VMs have been started, verify the cluster status is up using the following command on one of the six VMs in the cluster:
nodetool status
9. Verify the output is similar to the following:
Datacenter: dc1===============Status=Up/Down|/ State=Normal/Leaving/Joining/Moving-- Address Load Tokens Owns (effective) Host ID RackUN 10.12.1.1 253.65 KiB 256 32.9% 1938fb50-d564-4ba4-89a5-f098808bfee2 rack1UN 10.12.1.2 306.91 KiB 256 33.1% a49993c8-e953-4578-84b1-706d68bcdb5f rack1UN 10.12.1.3 290.67 KiB 256 35.4% 40ab41c3-7f3a-46c9-860b-f91a75a49c91 rack1UN 10.12.1.4 273.85 KiB 256 33.2% 68bba61c-2cd7-4c89-be1f-bef4400f63e5 rack1UN 10.12.1.5 287.11 KiB 256 33.0% fa93af12-69b2-452d-8c82-4c114507bc0c rack1UN 10.12.1.6 256.47 KiB 256 32.4% 9f002909-c973-43b4-84c6-9a4b68bbaab9 rack1
Do more Apache Cassandra distributed database work with AMD EPYC 7601 processors | Commissioned by AMD December 2017 | 11
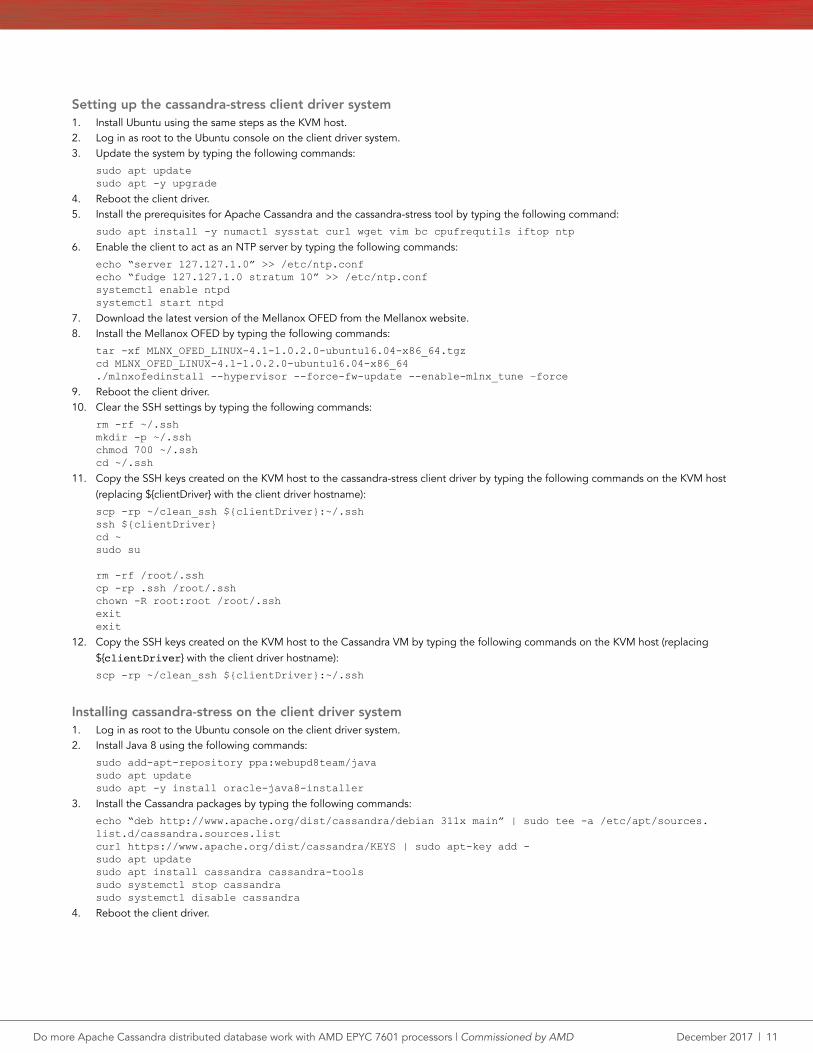
Setting up the cassandra-stress client driver system1. Install Ubuntu using the same steps as the KVM host.2. Log in as root to the Ubuntu console on the client driver system.3. Update the system by typing the following commands:
sudo apt updatesudo apt -y upgrade
4. Reboot the client driver.5. Install the prerequisites for Apache Cassandra and the cassandra-stress tool by typing the following command:
sudo apt install -y numactl sysstat curl wget vim bc cpufrequtils iftop ntp
6. Enable the client to act as an NTP server by typing the following commands:
echo “server 127.127.1.0” >> /etc/ntp.confecho “fudge 127.127.1.0 stratum 10” >> /etc/ntp.confsystemctl enable ntpdsystemctl start ntpd
7. Download the latest version of the Mellanox OFED from the Mellanox website.8. Install the Mellanox OFED by typing the following commands:
tar -xf MLNX_OFED_LINUX-4.1-1.0.2.0-ubuntu16.04-x86_64.tgzcd MLNX_OFED_LINUX-4.1-1.0.2.0-ubuntu16.04-x86_64./mlnxofedinstall --hypervisor --force-fw-update --enable-mlnx_tune –force
9. Reboot the client driver.10. Clear the SSH settings by typing the following commands:
rm -rf ~/.sshmkdir -p ~/.sshchmod 700 ~/.sshcd ~/.ssh
11. Copy the SSH keys created on the KVM host to the cassandra-stress client driver by typing the following commands on the KVM host (replacing ${clientDriver} with the client driver hostname):
scp -rp ~/clean_ssh ${clientDriver}:~/.sshssh ${clientDriver}cd ~sudo su
rm -rf /root/.sshcp -rp .ssh /root/.sshchown -R root:root /root/.sshexitexit
12. Copy the SSH keys created on the KVM host to the Cassandra VM by typing the following commands on the KVM host (replacing ${clientDriver} with the client driver hostname):
scp -rp ~/clean_ssh ${clientDriver}:~/.ssh
Installing cassandra-stress on the client driver system1. Log in as root to the Ubuntu console on the client driver system.2. Install Java 8 using the following commands:
sudo add-apt-repository ppa:webupd8team/javasudo apt updatesudo apt -y install oracle-java8-installer
3. Install the Cassandra packages by typing the following commands:
echo “deb http://www.apache.org/dist/cassandra/debian 311x main” | sudo tee -a /etc/apt/sources.list.d/cassandra.sources.listcurl https://www.apache.org/dist/cassandra/KEYS | sudo apt-key add -sudo apt updatesudo apt install cassandra cassandra-toolssudo systemctl stop cassandrasudo systemctl disable cassandra
4. Reboot the client driver.

Do more Apache Cassandra distributed database work with AMD EPYC 7601 processors | Commissioned by AMD December 2017 | 12
Running cassandra-stress1. Log in as root to the Ubuntu console on the client driver system or any linux system with SSH access to all systems and VMs in the
testbed.2. Create a folder to hold the test scripts and results, then copy to the casstest.sh (Appendix C) and run_script.sh (Appendix C) scripts to
that folder.3. Update the casstest.sh script with the appropriate test parameters. 4. Create two files, clusters-amd.txt and clusters-intel.txt, which include the host names of each cassandra client, separated by commas for
VMs of the same cluster and each cluster on a separate line. For example:
amdc1n1,amdc1n2,amdc1n3,amdc1n4,amdc1n5,amdc1n6amdc2n1,amdc2n2,amdc2n3,amdc2n4,amdc2n5,amdc2n6amdc3n1,amdc3n2,amdc3n3,amdc3n4,amdc3n5,amdc3n6
5. Run the benchmark using the following command:
./run_script.sh
Do more Apache Cassandra distributed database work with AMD EPYC 7601 processors | Commissioned by AMD December 2017 | 13
Appendix C: Scriptsvm_template.xml
<domain type=’kvm’> <name>amdc1n1</name> <memory unit=’KiB’>31457280</memory> <currentMemory unit=’KiB’>31457280</currentMemory> <memoryBacking> <hugepages/> <nosharepages/> </memoryBacking> <vcpu placement=’static’ cpuset=’0-3,64-67’>8</vcpu> <numatune> <memory mode=’strict’ nodeset=’0’/> </numatune> <os> <type arch=’x86_64’ machine=’pc-i440fx-xenial’>hvm</type> <boot dev=’hd’/> </os> <features> <acpi/> <apic/> </features> <cpu mode=’host-passthrough’> <topology sockets=’1’ cores=’8’ threads=’1’/> </cpu> <clock offset=’utc’/> <on_poweroff>destroy</on_poweroff> <on_reboot>restart</on_reboot> <on_crash>restart</on_crash> <pm> <suspend-to-mem enabled=’no’/> <suspend-to-disk enabled=’no’/> </pm> <devices> <emulator>/usr/bin/kvm</emulator> <disk type=’block’ device=’disk’> <driver name=’qemu’ type=’raw’ cache=’none’ discard=’unmap’/> <source dev=’/vmdisk/amdc1n1’/> <target dev=’sda’ bus=’scsi’/> <address type=’drive’ controller=’0’ bus=’0’ target=’0’ unit=’0’/> </disk> <controller type=’usb’ index=’0’ model=’ich9-ehci1’> <address type=’pci’ domain=’0x0000’ bus=’0x00’ slot=’0x05’ function=’0x7’/> </controller> <controller type=’usb’ index=’0’ model=’ich9-uhci1’> <master startport=’0’/> <address type=’pci’ domain=’0x0000’ bus=’0x00’ slot=’0x05’ function=’0x0’ multifunction=’on’/> </controller> <controller type=’usb’ index=’0’ model=’ich9-uhci2’> <master startport=’2’/> <address type=’pci’ domain=’0x0000’ bus=’0x00’ slot=’0x05’ function=’0x1’/> </controller> <controller type=’usb’ index=’0’ model=’ich9-uhci3’> <master startport=’4’/> <address type=’pci’ domain=’0x0000’ bus=’0x00’ slot=’0x05’ function=’0x2’/> </controller> <controller type=’scsi’ index=’0’ model=’virtio-scsi’> <address type=’pci’ domain=’0x0000’ bus=’0x00’ slot=’0x04’ function=’0x0’/> </controller> <controller type=’pci’ index=’0’ model=’pci-root’/> <controller type=’virtio-serial’ index=’0’> <address type=’pci’ domain=’0x0000’ bus=’0x00’ slot=’0x02’ function=’0x0’/> </controller> <interface type=’network’>
Do more Apache Cassandra distributed database work with AMD EPYC 7601 processors | Commissioned by AMD December 2017 | 14
<mac address=’12:01:01:61:6d:64’/> <source network=’net1’/> <model type=’virtio’/> <address type=’pci’ domain=’0x0000’ bus=’0x00’ slot=’0x03’ function=’0x0’/> </interface> <serial type=’pty’> <target port=’0’/> </serial> <console type=’pty’> <target type=’serial’ port=’0’/> </console> <channel type=’unix’> <source mode=’bind’/> <target type=’virtio’ name=’org.qemu.guest_agent.0’/> <address type=’virtio-serial’ controller=’0’ bus=’0’ port=’1’/> </channel> <memballoon model=’virtio’> <address type=’pci’ domain=’0x0000’ bus=’0x00’ slot=’0x07’ function=’0x0’/> </memballoon> </devices></domain>
rc.local#!/bin/sh -eDOMAIN=”cass.local”IFNAME=”ens3”SWAPDEV=”/dev/sda2”ROOTDEV=”/dev/sda1”ETHER=`ip addr show dev ${IFNAME} | awk ‘/ether/{print $2;exit}’`echo $ETHER > /var/run/etherSUBNETVAR=`awk -F’:’ ‘{printf(“%d”,$1)}’ /run/ether`CLUSTER=`awk -F’:’ ‘{printf(“%d”,$2)}’ /run/ether`NODE=`awk -F’:’ ‘{printf(“%d”,$3)}’ /run/ether`HOSTPREFIX=`awk -F’:’ ‘{print $4$5$6}’ /run/ether | xxd -r -p`export DOMAIN ETHER HOSTPREFIX SUBNETVAR CLUSTER NODEecho $DOMAIN > /run/domainecho $SUBNETVAR > /run/subnetvarecho $CLUSTER > /run/clusterecho $NODE > /run/nodeecho $HOSTPREFIX > /run/hostprefixHOSTNAME=”${HOSTPREFIX}c${CLUSTER}n${NODE}”export HOSTNAMEhostnamectl set-hostname $HOSTNAMEcp -pf /etc/hosts /etc/hosts_backupcp -pf /etc/network/interfaces /etc/network/interfaces_backupcp -pf /etc/blkid /etc/blkid_backupenvsubst < /etc/hosts_template > /etc/hostsenvsubst < /etc/network/interfaces_template > /etc/network/interfacesblkid > /etc/blkidREBOOT=0if [ “$(diff -q /etc/hosts /etc/hosts_backup)” != “” ]; then REBOOT=1elif [ “$(diff -q /etc/network/interfaces /etc/network/interfaces_backup)” != “” ]; then REBOOT=1elif [ “$(diff -q /etc/blkid /etc/blkid_backup)” != “” ]; then REBOOT=1fiif [ 0$REBOOT -ne 0 ]; then if [ ! -e /noreboot ]; then rm -rf /var/lib/cassandra/* rm -rf /var/log/cassandra/*# swapoff ${SWAPDEV}# mkswap -L ${HOSTNAME}-swap ${SWAPDEV} tune2fs -L ${HOSTNAME}-root ${ROOTDEV}
Do more Apache Cassandra distributed database work with AMD EPYC 7601 processors | Commissioned by AMD December 2017 | 15
blkid > /etc/blkid update-grub echo REBOOT REQUIRED! sleep 5 reboot fificp -pf /etc/cassandra/cassandra.yaml /etc/cassandra/cassandra.yaml_backupsed -i “s/cluster_name:.*/cluster_name: ‘${HOSTPREFIX}-cluster${CLUSTER}’/” /etc/cassandra/cassandra.yamlif [ “$(diff -q /etc/cassandra/cassandra.yaml /etc/cassandra/cassandra.yaml_backup)” != “” ]; then rm -rf /var/lib/cassandra/* rm -rf /var/log/cassandra/*fiexit 0
hosts_template127.0.0.1 localhost# The following lines are desirable for IPv6 capable hosts::1 localhost ip6-localhost ip6-loopbackff02::1 ip6-allnodesff02::2 ip6-allrouters10.${SUBNETVAR}.${CLUSTER}.1 ${HOSTPREFIX}c${CLUSTER}n1.${DOMAIN} ${HOSTPREFIX}c${CLUSTER}n1 cass110.${SUBNETVAR}.${CLUSTER}.2 ${HOSTPREFIX}c${CLUSTER}n2.${DOMAIN} ${HOSTPREFIX}c${CLUSTER}n2 cass210.${SUBNETVAR}.${CLUSTER}.3 ${HOSTPREFIX}c${CLUSTER}n3.${DOMAIN} ${HOSTPREFIX}c${CLUSTER}n3 cass310.${SUBNETVAR}.${CLUSTER}.4 ${HOSTPREFIX}c${CLUSTER}n4.${DOMAIN} ${HOSTPREFIX}c${CLUSTER}n4 cass410.${SUBNETVAR}.${CLUSTER}.5 ${HOSTPREFIX}c${CLUSTER}n5.${DOMAIN} ${HOSTPREFIX}c${CLUSTER}n5 cass510.${SUBNETVAR}.${CLUSTER}.6 ${HOSTPREFIX}c${CLUSTER}n6.${DOMAIN} ${HOSTPREFIX}c${CLUSTER}n6 cass610.${SUBNETVAR}.0.21 driver1-${SUBNETVAR}.${DOMAIN} driver1-${SUBNETVAR} driver1.${DOMAIN} driver110.${SUBNETVAR}.0.22 driver2-${SUBNETVAR}.${DOMAIN} driver2-${SUBNETVAR} driver2.${DOMAIN} driver210.${SUBNETVAR}.0.23 driver3-${SUBNETVAR}.${DOMAIN} driver3-${SUBNETVAR} driver3.${DOMAIN} driver310.${SUBNETVAR}.0.24 driver4-${SUBNETVAR}.${DOMAIN} driver4-${SUBNETVAR} driver4.${DOMAIN} driver410.${SUBNETVAR}.0.25 driver5-${SUBNETVAR}.${DOMAIN} driver5-${SUBNETVAR} driver5.${DOMAIN} driver510.${SUBNETVAR}.0.26 driver6-${SUBNETVAR}.${DOMAIN} driver6-${SUBNETVAR} driver6.${DOMAIN} driver610.${SUBNETVAR}.0.27 driver7-${SUBNETVAR}.${DOMAIN} driver7-${SUBNETVAR} driver7.${DOMAIN} driver710.${SUBNETVAR}.0.28 driver8-${SUBNETVAR}.${DOMAIN} driver8-${SUBNETVAR} driver8.${DOMAIN} driver810.${SUBNETVAR}.0.29 driver9-${SUBNETVAR}.${DOMAIN} driver9-${SUBNETVAR} driver9.${DOMAIN} driver9
interfaces_template# This file describes the network interfaces available on your system# and how to activate them. For more information, see interfaces(5).source /etc/network/interfaces.d/*# The loopback network interfaceauto loiface lo inet loopback# The primary network interfaceauto ens3iface ens3 inet static address 10.${SUBNETVAR}.${CLUSTER}.${NODE} netmask 255.255.0.0 gateway 10.${SUBNETVAR}.0.1 dns-search 10.${SUBNETVAR}.0.1 dns-nameservers 10.${SUBNETVAR}.0.1
casstest.sh#!/bin/bashNAME=${1-amd}#NAME=${1-intel}TIMESTAMP=”`date +%Y%m%d%H%M%S`”CLUSTER_FILE=”clusters-${NAME}.txt”
Do more Apache Cassandra distributed database work with AMD EPYC 7601 processors | Commissioned by AMD December 2017 | 16
CLUSTERS=”$(cat $CLUSTER_FILE)”CLIENT_CORES=7CLIENT_CORE_START=1CLIENT_HTSKIP=44CLIENT_COUNT=3HOST_COUNT=6HOST_LIST=”$(for i in `seq 1 $HOST_COUNT`; do echo ${NAME}00${i}; done) $(for i in `seq 1 $CLIENT_COUNT`; do echo driver${i}; done)”RESULT_DIR=”${NAME}_results_${TIMESTAMP}”RESULT_FILE=”$RESULT_DIR/${NAME}_results.txt”LOG_FILE=”$RESULT_DIR/script.log”TIMING_FILE=”$RESULT_DIR/script.log”THREADS=1000DURATION=300STAT_INTERVAL=10STAT_COUNT=$((DURATION/STAT_INTERVAL))
STRESS_CMD=”cassandra-stress write no-warmup duration=${DURATION}s cl=one -rate threads=${THREADS} -schema \”replication(factor=3)\” -pop seq=1..100000000 no-wrap”
echo “Contacting all hosts:”for HOST in ${HOST_LIST};do ssh ${HOST} ‘echo $(uname -nr)’donewaitecho “Contacting all VMs:”for CLUSTER in ${CLUSTERS}; do for NODE in $(echo $CLUSTER | sed ‘s/,/ /g’); do ssh ${NODE} ‘echo $(uname -nr) : $(java -version 2>&1 | tail -n 1) : cassandra $(dpkg -s cassandra | awk “/Version/{print \$2;exit}”)’ ssh ${NODE} “nodetool flush ; nodetool cleanup ; sync” & donedonewaitsleep 1for CLUSTER in ${CLUSTERS}; do NODE1=”$(echo ${CLUSTER} | awk -F’,’ ‘{print $1}’)” ssh ${NODE1} “nodetool status” cqlsh --request-timeout=120 -e “drop keyspace keyspace1” ${NODE1} & sleep 0.1donewaitsleep 1for CLUSTER in ${CLUSTERS}; do for NODE in $(echo $CLUSTER | sed ‘s/,/ /g’); do ssh ${NODE} “nodetool flush ; sleep 10 ; nodetool cleanup ; nodetool clearsnapshot ; nodetool flush ; nodetool cleanup ; sync” & sleep 0.01 done sleep 0.1donewaitecho “Cleanup done...sleeping 60 seconds...”sleep 60for CLUSTER in ${CLUSTERS}; do NODE1=”$(echo ${CLUSTER} | awk -F’,’ ‘{print $1}’)” ssh ${NODE1} “nodetool status” & sleep 0.1donewaitecho “Starting perf capture on hosts”for HOST in ${HOST_LIST};do SAR_FILE=”/tmp/sar_${HOST}.bin” VMSTAT_FILE=”/tmp/vmstat_${HOST}.txt” ssh ${HOST} “killall -w sar > /dev/null ; sync ; rm -f ${SAR_FILE} ; sync ; nohup sar ${STAT_
Do more Apache Cassandra distributed database work with AMD EPYC 7601 processors | Commissioned by AMD December 2017 | 17
INTERVAL} $((STAT_COUNT+10)) -o ${SAR_FILE} > /dev/null 2>&1 &” & ssh ${HOST} “pkill vmstat ; sync ; rm -f ${VMSTAT_FILE} ; sync ; nohup vmstat ${STAT_INTERVAL} $((STAT_COUNT+10)) > ${VMSTAT_FILE} 2>&1 &” &donewaitecho “Starting perf capture on VMs”for CLUSTER in ${CLUSTERS}; do for NODE in $(echo $CLUSTER | sed ‘s/,/ /g’); do VMSTAT_FILE=”/tmp/vmstat_${NODE}.txt” ssh ${NODE} “pkill vmstat ; sync ; rm -f ${VMSTAT_FILE} ; sync ; nohup vmstat ${STAT_INTERVAL} $((STAT_COUNT+10)) > ${VMSTAT_FILE} 2>&1 &” & donedonewait
sleep ${STAT_INTERVAL}
mkdir -p ${RESULT_DIR}rm -f latest_resultsln -s ${RESULT_DIR} latest_resultsCOUNT=${CLIENT_CORE_START}CLUSTER_COUNT=1for CLUSTER in ${CLUSTERS}; do CLUSTER_NAME=${NAME}_cluster${CLUSTER_COUNT} CLUSTER_NODES=$CLUSTER ssh root@driver$(((CLUSTER_COUNT%CLIENT_COUNT)+1)) “numactl --physcpubind=$((COUNT+0))-$((COUNT+CLIENT_CORES-1)),$((COUNT+CLIENT_HTSKIP))-$((COUNT+CLIENT_HTSKIP+CLIENT_CORES-1)) --localalloc ${STRESS_CMD} -node ${CLUSTER_NODES} -log interval=1” | while read -r line; do echo -e “${CLUSTER_NAME}\t$(date ‘+%Y-%m-%d %T.%3N’) $line”; done | tee ${RESULT_DIR}/${CLUSTER_NAME}_driver$(((CLUSTER_COUNT%CLIENT_COUNT)+1)).txt | grep -v “replica were required but only” & sleep 0.01 if [ $((CLUSTER_COUNT%CLIENT_COUNT)) = 0 ]; then COUNT=$((COUNT+CLIENT_CORES)) fi ((CLUSTER_COUNT++))donewaitsync
grep “Op rate” ${RESULT_DIR}/*_cluster*_driver*.txt | tee ${RESULT_FILE}sed ‘s/,//’ ${RESULT_FILE} | awk ‘{sum=sum+$7}END{print “Total op/s: “sum}’ | tee -a ${RESULT_FILE}sync
echo “Stopping perf capture on hosts”sleep ${STAT_INTERVAL}for HOST in ${HOST_LIST};do ssh ${HOST} “killall -w sar ; pkill vmstat ; sync” &donewait
echo “Stopping perf capture on VMs”for CLUSTER in ${CLUSTERS}; do for NODE in $(echo $CLUSTER | sed ‘s/,/ /g’); do ssh ${NODE} “pkill vmstat ; sync” & donedonewait
echo “Copying host perf logs”for HOST in ${HOST_LIST};do SAR_FILE=”/tmp/sar_${HOST}.bin” VMSTAT_FILE=”/tmp/vmstat_${HOST}.txt” scp ${HOST}:${SAR_FILE} ${RESULT_DIR}/ scp ${HOST}:${VMSTAT_FILE} ${RESULT_DIR}/donewait
Do more Apache Cassandra distributed database work with AMD EPYC 7601 processors | Commissioned by AMD December 2017 | 18
Principled Technologies is a registered trademark of Principled Technologies, Inc.All other product names are the trademarks of their respective owners.
DISCLAIMER OF WARRANTIES; LIMITATION OF LIABILITY:Principled Technologies, Inc. has made reasonable efforts to ensure the accuracy and validity of its testing, however, Principled Technologies, Inc. specifically disclaims any warranty, expressed or implied, relating to the test results and analysis, their accuracy, completeness or quality, including any implied warranty of fitness for any particular purpose. All persons or entities relying on the results of any testing do so at their own risk, and agree that Principled Technologies, Inc., its employees and its subcontractors shall have no liability whatsoever from any claim of loss or damage on account of any alleged error or defect in any testing procedure or result.
In no event shall Principled Technologies, Inc. be liable for indirect, special, incidental, or consequential damages in connection with its testing, even if advised of the possibility of such damages. In no event shall Principled Technologies, Inc.’s liability, including for direct damages, exceed the amounts paid in connection with Principled Technologies, Inc.’s testing. Customer’s sole and exclusive remedies are as set forth herein.
This project was commissioned by AMD.
PrincipledTechnologies®
Facts matter.®PrincipledTechnologies®
Facts matter.®
echo “Copying VM perf logs”for CLUSTER in ${CLUSTERS}; do for NODE in $(echo $CLUSTER | sed ‘s/,/ /g’); do VMSTAT_FILE=”/tmp/vmstat_${NODE}.txt” scp ${NODE}:${VMSTAT_FILE} ${RESULT_DIR}/ donedonewait
cp $0 ${RESULT_DIR}/
run_script.sh#!/bin/bashOUTPUT_FILE=”script_output.log”TIMING_FILE=”script_timing.txt”REPLAY_FILE=”script_replay.sh”rm -f ${OUTPUT_FILE}rm -f ${TIMING_FILE}syncscript --timing=${TIMING_FILE} ${OUTPUT_FILE} -c ./casstest.shecho “scriptreplay --timing=${TIMING_FILE} ${OUTPUT_FILE}” > ${REPLAY_FILE}chmod +x ${REPLAY_FILE}synccp -f ${OUTPUT_FILE} latest_results/cp -f ${TIMING_FILE} latest_results/cp -f ${REPLAY_FILE} latest_results/cp -f $0 latest_results/sync