Embed Size (px)
Citation preview

HEY! THE INFORMATION IN THIS PDF IS OUTDATED!
JOIN US AT DIYBOOKSCANNER.ORGFOR UP-TO-DATE PLANS AND INFO

http://www.instructables.com/id/DIY-High-Speed-Book-Scanner-from-Trash-and-Cheap-C/
Home Sign Up! Explore Community Submit
All Art Craft Food Games Green Home Kids Life Music Offbeat Outdoors Pets Ride Science Sports Tech
DIY High-Speed Book Scanner from Trash and Cheap Camerasby daniel_reetz on April 18, 2009
Table of Contents
intro: DIY High-Speed Book Scanner from Trash and Cheap Cameras . . . . . . . . . . . . . . . . . . . . . . . . . . . . . . . . . . . . . . . . . . . . . . . . . . . . . . . . . . . . . . . . . . . . . 4
Video . . . . . . . . . . . . . . . . . . . . . . . . . . . . . . . . . . . . . . . . . . . . . . . . . . . . . . . . . . . . . . . . . . . . . . . . . . . . . . . . . . . . . . . . . . . . . . . . . . . . . . . . . . . . . . . . . . . . 4
step 1: Material Acquisition: Dumpster Dive in the Day With Your Camera . . . . . . . . . . . . . . . . . . . . . . . . . . . . . . . . . . . . . . . . . . . . . . . . . . . . . . . . . . . . . . . . . . 5
step 2: Material Acquisition: Tools and Why You (Might) Need Them . . . . . . . . . . . . . . . . . . . . . . . . . . . . . . . . . . . . . . . . . . . . . . . . . . . . . . . . . . . . . . . . . . . . . . 6
step 3: Material Acquisition: Buying Recycled Stuff. . . . . . . . . . . . . . . . . . . . . . . . . . . . . . . . . . . . . . . . . . . . . . . . . . . . . . . . . . . . . . . . . . . . . . . . . . . . . . . . . . . . 7
step 4: Base: Materials . . . . . . . . . . . . . . . . . . . . . . . . . . . . . . . . . . . . . . . . . . . . . . . . . . . . . . . . . . . . . . . . . . . . . . . . . . . . . . . . . . . . . . . . . . . . . . . . . . . . . . . . 7
step 5: Base: Preparing and Cutting the Wood . . . . . . . . . . . . . . . . . . . . . . . . . . . . . . . . . . . . . . . . . . . . . . . . . . . . . . . . . . . . . . . . . . . . . . . . . . . . . . . . . . . . . . . 8
step 6: Base: A Drilling Template For Speed . . . . . . . . . . . . . . . . . . . . . . . . . . . . . . . . . . . . . . . . . . . . . . . . . . . . . . . . . . . . . . . . . . . . . . . . . . . . . . . . . . . . . . . . 9
step 7: Base: Screw It. . . . . . . . . . . . . . . . . . . . . . . . . . . . . . . . . . . . . . . . . . . . . . . . . . . . . . . . . . . . . . . . . . . . . . . . . . . . . . . . . . . . . . . . . . . . . . . . . . . . . . . . . . 9
step 8: Base: Cut the Column Piece. . . . . . . . . . . . . . . . . . . . . . . . . . . . . . . . . . . . . . . . . . . . . . . . . . . . . . . . . . . . . . . . . . . . . . . . . . . . . . . . . . . . . . . . . . . . . . . 10
step 9: Base: Drilling the Column . . . . . . . . . . . . . . . . . . . . . . . . . . . . . . . . . . . . . . . . . . . . . . . . . . . . . . . . . . . . . . . . . . . . . . . . . . . . . . . . . . . . . . . . . . . . . . . . . 10
step 10: Base: Bolt the Column in Place. . . . . . . . . . . . . . . . . . . . . . . . . . . . . . . . . . . . . . . . . . . . . . . . . . . . . . . . . . . . . . . . . . . . . . . . . . . . . . . . . . . . . . . . . . . . 11
step 11: Base: Attaching the Countertop Material. . . . . . . . . . . . . . . . . . . . . . . . . . . . . . . . . . . . . . . . . . . . . . . . . . . . . . . . . . . . . . . . . . . . . . . . . . . . . . . . . . . . . 11
step 12: Base: Attaching the Outlet Strip. . . . . . . . . . . . . . . . . . . . . . . . . . . . . . . . . . . . . . . . . . . . . . . . . . . . . . . . . . . . . . . . . . . . . . . . . . . . . . . . . . . . . . . . . . . . 11
step 13: Bookholder: Introduction and Design Issues . . . . . . . . . . . . . . . . . . . . . . . . . . . . . . . . . . . . . . . . . . . . . . . . . . . . . . . . . . . . . . . . . . . . . . . . . . . . . . . . . . 12
step 14: Bookholder: Introduction and Design Issues (Continued) . . . . . . . . . . . . . . . . . . . . . . . . . . . . . . . . . . . . . . . . . . . . . . . . . . . . . . . . . . . . . . . . . . . . . . . . . 13
step 15: Bookholder: Materials and Prep. . . . . . . . . . . . . . . . . . . . . . . . . . . . . . . . . . . . . . . . . . . . . . . . . . . . . . . . . . . . . . . . . . . . . . . . . . . . . . . . . . . . . . . . . . . . 13
step 16: Bookholder: First Strip. . . . . . . . . . . . . . . . . . . . . . . . . . . . . . . . . . . . . . . . . . . . . . . . . . . . . . . . . . . . . . . . . . . . . . . . . . . . . . . . . . . . . . . . . . . . . . . . . . . 13
step 17: Bookholder: Second Strip. . . . . . . . . . . . . . . . . . . . . . . . . . . . . . . . . . . . . . . . . . . . . . . . . . . . . . . . . . . . . . . . . . . . . . . . . . . . . . . . . . . . . . . . . . . . . . . . 14
step 18: Bookholder: Screw It. . . . . . . . . . . . . . . . . . . . . . . . . . . . . . . . . . . . . . . . . . . . . . . . . . . . . . . . . . . . . . . . . . . . . . . . . . . . . . . . . . . . . . . . . . . . . . . . . . . . 14
step 19: Bookholder 2: The Reckoning . . . . . . . . . . . . . . . . . . . . . . . . . . . . . . . . . . . . . . . . . . . . . . . . . . . . . . . . . . . . . . . . . . . . . . . . . . . . . . . . . . . . . . . . . . . . . 15
step 20: Bookholder 2: Cut the Coroplast . . . . . . . . . . . . . . . . . . . . . . . . . . . . . . . . . . . . . . . . . . . . . . . . . . . . . . . . . . . . . . . . . . . . . . . . . . . . . . . . . . . . . . . . . . . 15
step 21: Bookholder 2: Glue and/or Screw . . . . . . . . . . . . . . . . . . . . . . . . . . . . . . . . . . . . . . . . . . . . . . . . . . . . . . . . . . . . . . . . . . . . . . . . . . . . . . . . . . . . . . . . . . 15
step 22: Bookholder 2: Relief for Book Spines . . . . . . . . . . . . . . . . . . . . . . . . . . . . . . . . . . . . . . . . . . . . . . . . . . . . . . . . . . . . . . . . . . . . . . . . . . . . . . . . . . . . . . . 16
step 23: Bookholder 2: Sticking Books Down With Toolbox Liner . . . . . . . . . . . . . . . . . . . . . . . . . . . . . . . . . . . . . . . . . . . . . . . . . . . . . . . . . . . . . . . . . . . . . . . . . 16
step 24: Bookholder 2: Thirst. . . . . . . . . . . . . . . . . . . . . . . . . . . . . . . . . . . . . . . . . . . . . . . . . . . . . . . . . . . . . . . . . . . . . . . . . . . . . . . . . . . . . . . . . . . . . . . . . . . . . 17
step 25: Platen: Overview . . . . . . . . . . . . . . . . . . . . . . . . . . . . . . . . . . . . . . . . . . . . . . . . . . . . . . . . . . . . . . . . . . . . . . . . . . . . . . . . . . . . . . . . . . . . . . . . . . . . . . 17
step 26: Platen: More on Plastics . . . . . . . . . . . . . . . . . . . . . . . . . . . . . . . . . . . . . . . . . . . . . . . . . . . . . . . . . . . . . . . . . . . . . . . . . . . . . . . . . . . . . . . . . . . . . . . . . 18
Video . . . . . . . . . . . . . . . . . . . . . . . . . . . . . . . . . . . . . . . . . . . . . . . . . . . . . . . . . . . . . . . . . . . . . . . . . . . . . . . . . . . . . . . . . . . . . . . . . . . . . . . . . . . . . . . . . . . . 18
step 27: Platen: Assembly, Loosely Put . . . . . . . . . . . . . . . . . . . . . . . . . . . . . . . . . . . . . . . . . . . . . . . . . . . . . . . . . . . . . . . . . . . . . . . . . . . . . . . . . . . . . . . . . . . . 18
step 28: Platen: Hinge . . . . . . . . . . . . . . . . . . . . . . . . . . . . . . . . . . . . . . . . . . . . . . . . . . . . . . . . . . . . . . . . . . . . . . . . . . . . . . . . . . . . . . . . . . . . . . . . . . . . . . . . . 19
step 29: Platen: Putting the pieces together. . . . . . . . . . . . . . . . . . . . . . . . . . . . . . . . . . . . . . . . . . . . . . . . . . . . . . . . . . . . . . . . . . . . . . . . . . . . . . . . . . . . . . . . . . 20
step 30: Platen: CLAMP . . . . . . . . . . . . . . . . . . . . . . . . . . . . . . . . . . . . . . . . . . . . . . . . . . . . . . . . . . . . . . . . . . . . . . . . . . . . . . . . . . . . . . . . . . . . . . . . . . . . . . . . 20
step 31: Column Extension: All In One "Step" . . . . . . . . . . . . . . . . . . . . . . . . . . . . . . . . . . . . . . . . . . . . . . . . . . . . . . . . . . . . . . . . . . . . . . . . . . . . . . . . . . . . . . . . 21

http://www.instructables.com/id/DIY-High-Speed-Book-Scanner-from-Trash-and-Cheap-C/
step 32: Lighting: Why You Should Use Halogen Bulbs . . . . . . . . . . . . . . . . . . . . . . . . . . . . . . . . . . . . . . . . . . . . . . . . . . . . . . . . . . . . . . . . . . . . . . . . . . . . . . . . 21
step 33: Lighting: How To Light For Cheap, Crappy Cameras . . . . . . . . . . . . . . . . . . . . . . . . . . . . . . . . . . . . . . . . . . . . . . . . . . . . . . . . . . . . . . . . . . . . . . . . . . . . 22
step 34: Lighting: But Why Not The Alternatives? . . . . . . . . . . . . . . . . . . . . . . . . . . . . . . . . . . . . . . . . . . . . . . . . . . . . . . . . . . . . . . . . . . . . . . . . . . . . . . . . . . . . . 22
Video . . . . . . . . . . . . . . . . . . . . . . . . . . . . . . . . . . . . . . . . . . . . . . . . . . . . . . . . . . . . . . . . . . . . . . . . . . . . . . . . . . . . . . . . . . . . . . . . . . . . . . . . . . . . . . . . . . . . 22
step 35: Lighting: The Solution, I Said It Already . . . . . . . . . . . . . . . . . . . . . . . . . . . . . . . . . . . . . . . . . . . . . . . . . . . . . . . . . . . . . . . . . . . . . . . . . . . . . . . . . . . . . . 23
step 36: Lighting: Enough Talk, Let's Mount 'Em . . . . . . . . . . . . . . . . . . . . . . . . . . . . . . . . . . . . . . . . . . . . . . . . . . . . . . . . . . . . . . . . . . . . . . . . . . . . . . . . . . . . . . 24
step 37: Firmware/Camera Setup . . . . . . . . . . . . . . . . . . . . . . . . . . . . . . . . . . . . . . . . . . . . . . . . . . . . . . . . . . . . . . . . . . . . . . . . . . . . . . . . . . . . . . . . . . . . . . . . . 24
Video . . . . . . . . . . . . . . . . . . . . . . . . . . . . . . . . . . . . . . . . . . . . . . . . . . . . . . . . . . . . . . . . . . . . . . . . . . . . . . . . . . . . . . . . . . . . . . . . . . . . . . . . . . . . . . . . . . . . 24
step 38: Video Switch: . . . . . . . . . . . . . . . . . . . . . . . . . . . . . . . . . . . . . . . . . . . . . . . . . . . . . . . . . . . . . . . . . . . . . . . . . . . . . . . . . . . . . . . . . . . . . . . . . . . . . . . . . 25
step 39: Video Switch: Jacks . . . . . . . . . . . . . . . . . . . . . . . . . . . . . . . . . . . . . . . . . . . . . . . . . . . . . . . . . . . . . . . . . . . . . . . . . . . . . . . . . . . . . . . . . . . . . . . . . . . . 25
step 40: Video Switch: Solder all grounds together. . . . . . . . . . . . . . . . . . . . . . . . . . . . . . . . . . . . . . . . . . . . . . . . . . . . . . . . . . . . . . . . . . . . . . . . . . . . . . . . . . . . 25
step 41: Video Switch: Output . . . . . . . . . . . . . . . . . . . . . . . . . . . . . . . . . . . . . . . . . . . . . . . . . . . . . . . . . . . . . . . . . . . . . . . . . . . . . . . . . . . . . . . . . . . . . . . . . . . 26
step 42: Video Switch: Completion. . . . . . . . . . . . . . . . . . . . . . . . . . . . . . . . . . . . . . . . . . . . . . . . . . . . . . . . . . . . . . . . . . . . . . . . . . . . . . . . . . . . . . . . . . . . . . . . 26
step 43: Display Systems: Overview . . . . . . . . . . . . . . . . . . . . . . . . . . . . . . . . . . . . . . . . . . . . . . . . . . . . . . . . . . . . . . . . . . . . . . . . . . . . . . . . . . . . . . . . . . . . . . . 27
step 44: Display Systems: Locating the Video Signal Wire. . . . . . . . . . . . . . . . . . . . . . . . . . . . . . . . . . . . . . . . . . . . . . . . . . . . . . . . . . . . . . . . . . . . . . . . . . . . . . . 27
step 45: Display Systems: Solder it in. . . . . . . . . . . . . . . . . . . . . . . . . . . . . . . . . . . . . . . . . . . . . . . . . . . . . . . . . . . . . . . . . . . . . . . . . . . . . . . . . . . . . . . . . . . . . . 28
step 46: Display Systems: IT LIVES!! . . . . . . . . . . . . . . . . . . . . . . . . . . . . . . . . . . . . . . . . . . . . . . . . . . . . . . . . . . . . . . . . . . . . . . . . . . . . . . . . . . . . . . . . . . . . . . 28
step 47: Display Systems: Pesky Power Management. . . . . . . . . . . . . . . . . . . . . . . . . . . . . . . . . . . . . . . . . . . . . . . . . . . . . . . . . . . . . . . . . . . . . . . . . . . . . . . . . . 29
step 48: Display Systems: Hack Time. . . . . . . . . . . . . . . . . . . . . . . . . . . . . . . . . . . . . . . . . . . . . . . . . . . . . . . . . . . . . . . . . . . . . . . . . . . . . . . . . . . . . . . . . . . . . . 29
step 49: Display Systems: Put it Back Together. . . . . . . . . . . . . . . . . . . . . . . . . . . . . . . . . . . . . . . . . . . . . . . . . . . . . . . . . . . . . . . . . . . . . . . . . . . . . . . . . . . . . . . 29
step 50: Display Systems: Easier Options. . . . . . . . . . . . . . . . . . . . . . . . . . . . . . . . . . . . . . . . . . . . . . . . . . . . . . . . . . . . . . . . . . . . . . . . . . . . . . . . . . . . . . . . . . . 30
step 51: Camera Support: Overview. . . . . . . . . . . . . . . . . . . . . . . . . . . . . . . . . . . . . . . . . . . . . . . . . . . . . . . . . . . . . . . . . . . . . . . . . . . . . . . . . . . . . . . . . . . . . . . 30
step 52: Camera Support: The New Deal. . . . . . . . . . . . . . . . . . . . . . . . . . . . . . . . . . . . . . . . . . . . . . . . . . . . . . . . . . . . . . . . . . . . . . . . . . . . . . . . . . . . . . . . . . . 31
step 53: Camera Support: Angle Brackets . . . . . . . . . . . . . . . . . . . . . . . . . . . . . . . . . . . . . . . . . . . . . . . . . . . . . . . . . . . . . . . . . . . . . . . . . . . . . . . . . . . . . . . . . . 31
step 54: Camera Support: Screws to Hold Your Babies in Place . . . . . . . . . . . . . . . . . . . . . . . . . . . . . . . . . . . . . . . . . . . . . . . . . . . . . . . . . . . . . . . . . . . . . . . . . . 31
step 55: Camera Support: A More General Proposal . . . . . . . . . . . . . . . . . . . . . . . . . . . . . . . . . . . . . . . . . . . . . . . . . . . . . . . . . . . . . . . . . . . . . . . . . . . . . . . . . . 32
step 56: Camera Support: Final Notes. . . . . . . . . . . . . . . . . . . . . . . . . . . . . . . . . . . . . . . . . . . . . . . . . . . . . . . . . . . . . . . . . . . . . . . . . . . . . . . . . . . . . . . . . . . . . . 32
step 57: Handle/Electronics: Overview. . . . . . . . . . . . . . . . . . . . . . . . . . . . . . . . . . . . . . . . . . . . . . . . . . . . . . . . . . . . . . . . . . . . . . . . . . . . . . . . . . . . . . . . . . . . . 33
step 58: Handle/Electronics: Hub . . . . . . . . . . . . . . . . . . . . . . . . . . . . . . . . . . . . . . . . . . . . . . . . . . . . . . . . . . . . . . . . . . . . . . . . . . . . . . . . . . . . . . . . . . . . . . . . . 34
step 59: Handle/Electronics: Hub 2. . . . . . . . . . . . . . . . . . . . . . . . . . . . . . . . . . . . . . . . . . . . . . . . . . . . . . . . . . . . . . . . . . . . . . . . . . . . . . . . . . . . . . . . . . . . . . . . 34
step 60: Handle/Electronics: Trimmin' . . . . . . . . . . . . . . . . . . . . . . . . . . . . . . . . . . . . . . . . . . . . . . . . . . . . . . . . . . . . . . . . . . . . . . . . . . . . . . . . . . . . . . . . . . . . . . 34
step 61: Handle/Electronics: Battery Case . . . . . . . . . . . . . . . . . . . . . . . . . . . . . . . . . . . . . . . . . . . . . . . . . . . . . . . . . . . . . . . . . . . . . . . . . . . . . . . . . . . . . . . . . . 35
step 62: Handle/Electronics: Momentary Switch Installation 1 . . . . . . . . . . . . . . . . . . . . . . . . . . . . . . . . . . . . . . . . . . . . . . . . . . . . . . . . . . . . . . . . . . . . . . . . . . . . 35
step 63: Handle/Electronics: Momentary Switch Installation 2 . . . . . . . . . . . . . . . . . . . . . . . . . . . . . . . . . . . . . . . . . . . . . . . . . . . . . . . . . . . . . . . . . . . . . . . . . . . . 35
step 64: Handle/Electronics: Momentary Switch Wiring . . . . . . . . . . . . . . . . . . . . . . . . . . . . . . . . . . . . . . . . . . . . . . . . . . . . . . . . . . . . . . . . . . . . . . . . . . . . . . . . . 36
step 65: Handle/Electronics: Momentary Switch Wiring 2 . . . . . . . . . . . . . . . . . . . . . . . . . . . . . . . . . . . . . . . . . . . . . . . . . . . . . . . . . . . . . . . . . . . . . . . . . . . . . . . 36
step 66: Handle/Electronics: Mechanicals 1. . . . . . . . . . . . . . . . . . . . . . . . . . . . . . . . . . . . . . . . . . . . . . . . . . . . . . . . . . . . . . . . . . . . . . . . . . . . . . . . . . . . . . . . . . 37
step 67: Handle/Electronics: Mechanicals 2. . . . . . . . . . . . . . . . . . . . . . . . . . . . . . . . . . . . . . . . . . . . . . . . . . . . . . . . . . . . . . . . . . . . . . . . . . . . . . . . . . . . . . . . . . 37
step 68: Handle/Electronics: Mechanicals 3. . . . . . . . . . . . . . . . . . . . . . . . . . . . . . . . . . . . . . . . . . . . . . . . . . . . . . . . . . . . . . . . . . . . . . . . . . . . . . . . . . . . . . . . . . 38
step 69: Handle/Electronics: Soldering it All Together. . . . . . . . . . . . . . . . . . . . . . . . . . . . . . . . . . . . . . . . . . . . . . . . . . . . . . . . . . . . . . . . . . . . . . . . . . . . . . . . . . 38
step 70: Handle/Electronics: Mounting it Up. . . . . . . . . . . . . . . . . . . . . . . . . . . . . . . . . . . . . . . . . . . . . . . . . . . . . . . . . . . . . . . . . . . . . . . . . . . . . . . . . . . . . . . . . . 38
step 71: Handle/Electronics: Looking Back . . . . . . . . . . . . . . . . . . . . . . . . . . . . . . . . . . . . . . . . . . . . . . . . . . . . . . . . . . . . . . . . . . . . . . . . . . . . . . . . . . . . . . . . . . 39

http://www.instructables.com/id/DIY-High-Speed-Book-Scanner-from-Trash-and-Cheap-C/
step 72: Handle/Electronics: Posterity . . . . . . . . . . . . . . . . . . . . . . . . . . . . . . . . . . . . . . . . . . . . . . . . . . . . . . . . . . . . . . . . . . . . . . . . . . . . . . . . . . . . . . . . . . . . . 39
step 73: Final Steps: Painting it All Together. . . . . . . . . . . . . . . . . . . . . . . . . . . . . . . . . . . . . . . . . . . . . . . . . . . . . . . . . . . . . . . . . . . . . . . . . . . . . . . . . . . . . . . . . 40
step 74: Final Steps: Which Cameras?? . . . . . . . . . . . . . . . . . . . . . . . . . . . . . . . . . . . . . . . . . . . . . . . . . . . . . . . . . . . . . . . . . . . . . . . . . . . . . . . . . . . . . . . . . . . . 41
step 75: Final Steps: Plugging it All Together and Powering it UP . . . . . . . . . . . . . . . . . . . . . . . . . . . . . . . . . . . . . . . . . . . . . . . . . . . . . . . . . . . . . . . . . . . . . . . . . 41
step 76: SETUP AND OPERATION BABY . . . . . . . . . . . . . . . . . . . . . . . . . . . . . . . . . . . . . . . . . . . . . . . . . . . . . . . . . . . . . . . . . . . . . . . . . . . . . . . . . . . . . . . . . . 42
step 77: Load a Book and Capture It. . . . . . . . . . . . . . . . . . . . . . . . . . . . . . . . . . . . . . . . . . . . . . . . . . . . . . . . . . . . . . . . . . . . . . . . . . . . . . . . . . . . . . . . . . . . . . . 43
step 78: Download Page Builder . . . . . . . . . . . . . . . . . . . . . . . . . . . . . . . . . . . . . . . . . . . . . . . . . . . . . . . . . . . . . . . . . . . . . . . . . . . . . . . . . . . . . . . . . . . . . . . . . 43
step 79: Run Page Builder. . . . . . . . . . . . . . . . . . . . . . . . . . . . . . . . . . . . . . . . . . . . . . . . . . . . . . . . . . . . . . . . . . . . . . . . . . . . . . . . . . . . . . . . . . . . . . . . . . . . . . 44
Video . . . . . . . . . . . . . . . . . . . . . . . . . . . . . . . . . . . . . . . . . . . . . . . . . . . . . . . . . . . . . . . . . . . . . . . . . . . . . . . . . . . . . . . . . . . . . . . . . . . . . . . . . . . . . . . . . . . . 44
Related Instructables . . . . . . . . . . . . . . . . . . . . . . . . . . . . . . . . . . . . . . . . . . . . . . . . . . . . . . . . . . . . . . . . . . . . . . . . . . . . . . . . . . . . . . . . . . . . . . . . . . . . . . . . . . . 44
Advertisements . . . . . . . . . . . . . . . . . . . . . . . . . . . . . . . . . . . . . . . . . . . . . . . . . . . . . . . . . . . . . . . . . . . . . . . . . . . . . . . . . . . . . . . . . . . . . . . . . . . . . . . . . . . . . . . 45
Comments . . . . . . . . . . . . . . . . . . . . . . . . . . . . . . . . . . . . . . . . . . . . . . . . . . . . . . . . . . . . . . . . . . . . . . . . . . . . . . . . . . . . . . . . . . . . . . . . . . . . . . . . . . . . . . . . . . . 45

http://www.instructables.com/id/DIY-High-Speed-Book-Scanner-from-Trash-and-Cheap-C/
intro: DIY High-Speed Book Scanner from Trash and Cheap CamerasI love books. There is some truly fantastic knowledge and information hidden out there in hard to find, rare, and not commercially viable books. I find that I want my bookswith me everywhere. But that's where the problems begin. Buying, moving, storing, and preserving books means environmental costs... and when I loan a book to afriend, I no longer have access to it.
Video
Digital books change the landscape . After suffering through scanning many of my old, rare, and government issue books, I decided to create a book scanner thatanybody could make, for around $300. And that's what this instructable is all about. A greener future with more books rather than fewer books. More access toinformation, rather than less access to information. And maybe, years from now, a reformed publishing/distribution model (but I'm not holding my breath...).
UPDATE: We've outgrown the Instructables commenting system. There's a new place to discuss book scanner building -- please join us at DIYBOOKSCANNER.ORG
I've built two of these things now, and this instructable covers the best parts of both of them. You can build a book scanner using only hand tools plus a drill. I realizedthat not everyone is comfortable with using all the different hand tools you might need to make it. So I scanned a book on using hand tools that should answer all yourquestions. ;)
Download a sample here.Download the entire book (115mb) here. I may have to remove this if there are too many downloads. Please note that these were taken before the scanner and softwarewere complete. Scans from the final system are much nicer.
We have written some open-source, free software to convert the images from your scanner into PDFs. It's currently in a rough alpha stage, and needs a pretty fastcomputer to get things done. It works on Macs and PCs. Help us improve it! This software is covered on step(78-79).
EDIT: Many people have commented that an automatic page flipper would be faster. I think this system is pretty fast. I made a comparison video if you'd like to see howthis compares to an automatic scanning system. And you can watch a movie while you work on my system.
Let's get to it!UPDATE, 2009-04-28. Step 1 now contains a beta-quality printable PDF materials list.

http://www.instructables.com/id/DIY-High-Speed-Book-Scanner-from-Trash-and-Cheap-C/
Image Notes1. Built for Aaron Clarke, the writer of PageBldr, our open-source, free bookscanning software.
Image Notes1. A prototype built by me, for me, from a Polaroid MP-4 copystand and a lot ofjunk.
step 1: Material Acquisition: Dumpster Dive in the Day With Your CameraLet's start with getting the things you need.This book scanner employs recycled, found, and salvaged materials at every step. I think it's important to note that this is notonly because it is the right thing to do, environmentally speaking, when prototyping and building things, but also because the major thrust of this project is to make itaffordable for almost anyone. Affordability often means getting creative with what you have and what you can find.
UPDATE-2009-04-28 -I've made a PDF materials checklist. It's currently in beta. Please help me perfect it!UPDATE-2009-4-29: Here's the parts list by Autophile, who's almost completed his own scanner.
One of the problems of building this way is that there is a strong stigma against recovering things from the trash. I'll admit that this affects even me on occasion. With thatin mind, I want to show you a little dumpster diving trick that's socially acceptable. It's terribly simple. Take your camera, and hold it over the edge of any dumpster youfind interesting. When you get home, see if there's anything that will help you. Later, return under cover of darkness and recover whatever it is you needed.
I spent almost a month thinking about this second book scanner and where to find stuff. During this month, I was vigilant about noting the locations of various constructiondumpsters, and I also kept an eye on trashcans whenever I passed them. Whenever I saw something interesting, I made a simple decision. Should I grab it now, orsimply photograph it? If it was a dumpster, I photographed it. If it was something useful, I grabbed it right away. It's good to keep a fabric shopping bag or backpack onyou to transport all the stuff you will inevitably find.
Image Notes1. Yep, that's a camera. The same camera that will be scanning your books later.:)

http://www.instructables.com/id/DIY-High-Speed-Book-Scanner-from-Trash-and-Cheap-C/
step 2: Material Acquisition: Tools and Why You (Might) Need ThemOften construction dumpsters have objects that are awkward to grab or even too large to fit in a car. For this reason it is good practice to bring some tools. I have a drilland a "sawzall" that come with me when I'm dumpster diving. With these tools, I can remove interesting parts of things, salvage screws and hardware, etc, as well as cutboards in half if they are too big to fit in my car. You should also have a flashlight and heavy gloves to protect your hands.
In terms of this project, I would argue that using recycled materials is actually only a secondary benefit because the environmental benefits of using digital books reallyadd up over time. Using recycled junk isn't just a challenge, it makes walks and watching purposeful, lightens the load on landfills and trucks, and makes up for otherareas where you may not be as conscious as you'd like to be. It also sets the precedent that while finding everything at the Home Depot or hardware store is fine, findingthe stuff out of the ether is far better.
Image Notes1. Noah Bicknell, Editor.2. Daniel Reetz, Dumpster Diver3. so long4. farewell
Image Notes

http://www.instructables.com/id/DIY-High-Speed-Book-Scanner-from-Trash-and-Cheap-C/
1. ether
step 3: Material Acquisition: Buying Recycled Stuff.Finally, dumpsters are far from the only place to find things. This project requires some things that you will never find in dumpsters -- like working light bulbs. For this, lookto places which explicitly work in recycling. In my community, Habitat for Humanity ReStore is a fantastic resource. They had the paint I wanted, the halogen light bulbs Ineeded, and even a light fixture that worked to hold my lightbulbs, all for profoundly reduced prices. You can find the HDPE you need in the form of cutting boards at thriftstores. And you can also ask friends and family if they have extras. Chances are, they do or they know someone who does.
Another great spot are hazardous waste recycling facilities. Mine has a "materials exchange" where you can get paint and glue for free.
Image Notes1. shiny.
step 4: Base: MaterialsTo make the frame, you will need to acquire some materials. I was able to get almost everything from the trash.
*. You need an 8' 2x4 or the equivalent in smaller pieces. You need at least one piece that is about 4' long. You can make almost the entire base from this single board. Iwas able to find one 8' piece in the dumpster of a construction site near my house (See: Material Acquisition Recommendations). Later, I found a few more short scrapsof much nicer stuff.
*. You need 4 bolts (at least 4 inches long), 4 nuts and a handful of woodscrews. I was able to find bolts in the trash (during Fargo's famous Spring Cleaning Week), butall the screws I found were too short. My friend Wolfgang loaned me some deck screws because he had a lot of them left over from building his workshop.
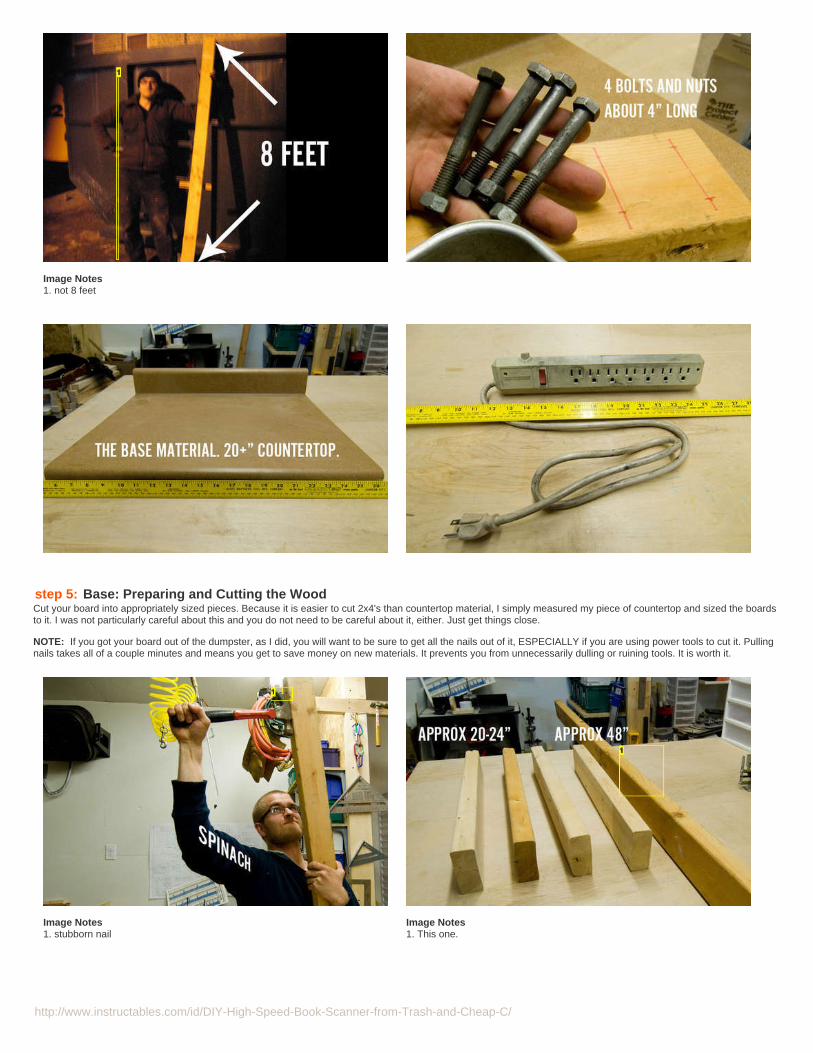
*. You need large-ish piece (20x22 or larger) of either countertop material, coated MDF, melamine, or plastic. I chose countertop material because I was able to find it in alocal dumpster. Often you can get such cutoff pieces at no cost simply by asking. Additionally, if you wait until the end of the month when people are moving fromapartment to apartment, there will be pieces of furniture like desks, coffeetables, and bookshelves that have the right finish. The important thing is that the surface be alittle slippery.
*. You need a power strip. This will be the control center for your lighting. You can get away without it if they are hard to come by or expensive. I found mine in the trashon moving day.
http://www.instructables.com/id/DIY-High-Speed-Book-Scanner-from-Trash-and-Cheap-C/
Image Notes1. not 8 feet
step 5: Base: Preparing and Cutting the WoodCut your board into appropriately sized pieces. Because it is easier to cut 2x4's than countertop material, I simply measured my piece of countertop and sized the boardsto it. I was not particularly careful about this and you do not need to be careful about it, either. Just get things close.
NOTE: If you got your board out of the dumpster, as I did, you will want to be sure to get all the nails out of it, ESPECIALLY if you are using power tools to cut it. Pullingnails takes all of a couple minutes and means you get to save money on new materials. It prevents you from unnecessarily dulling or ruining tools. It is worth it.
Image Notes1. stubborn nail
Image Notes1. This one.
http://www.instructables.com/id/DIY-High-Speed-Book-Scanner-from-Trash-and-Cheap-C/
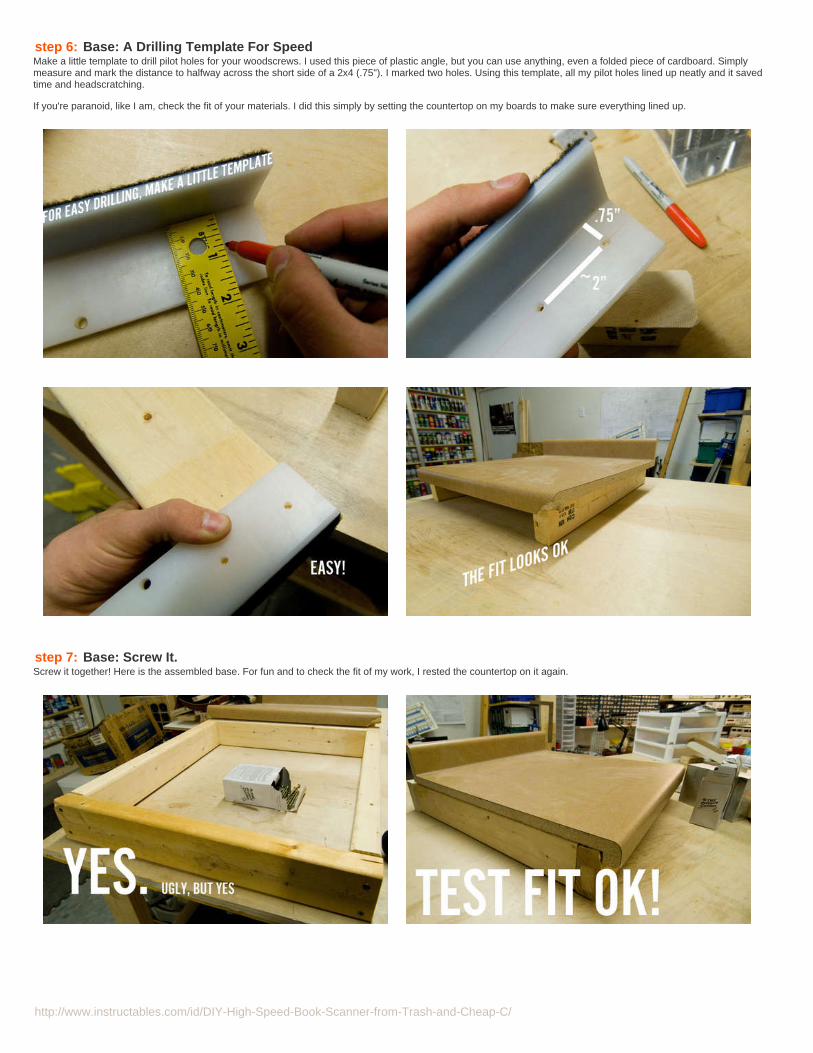
step 6: Base: A Drilling Template For SpeedMake a little template to drill pilot holes for your woodscrews. I used this piece of plastic angle, but you can use anything, even a folded piece of cardboard. Simplymeasure and mark the distance to halfway across the short side of a 2x4 (.75"). I marked two holes. Using this template, all my pilot holes lined up neatly and it savedtime and headscratching.
If you're paranoid, like I am, check the fit of your materials. I did this simply by setting the countertop on my boards to make sure everything lined up.
step 7: Base: Screw It.Screw it together! Here is the assembled base. For fun and to check the fit of my work, I rested the countertop on it again.
http://www.instructables.com/id/DIY-High-Speed-Book-Scanner-from-Trash-and-Cheap-C/
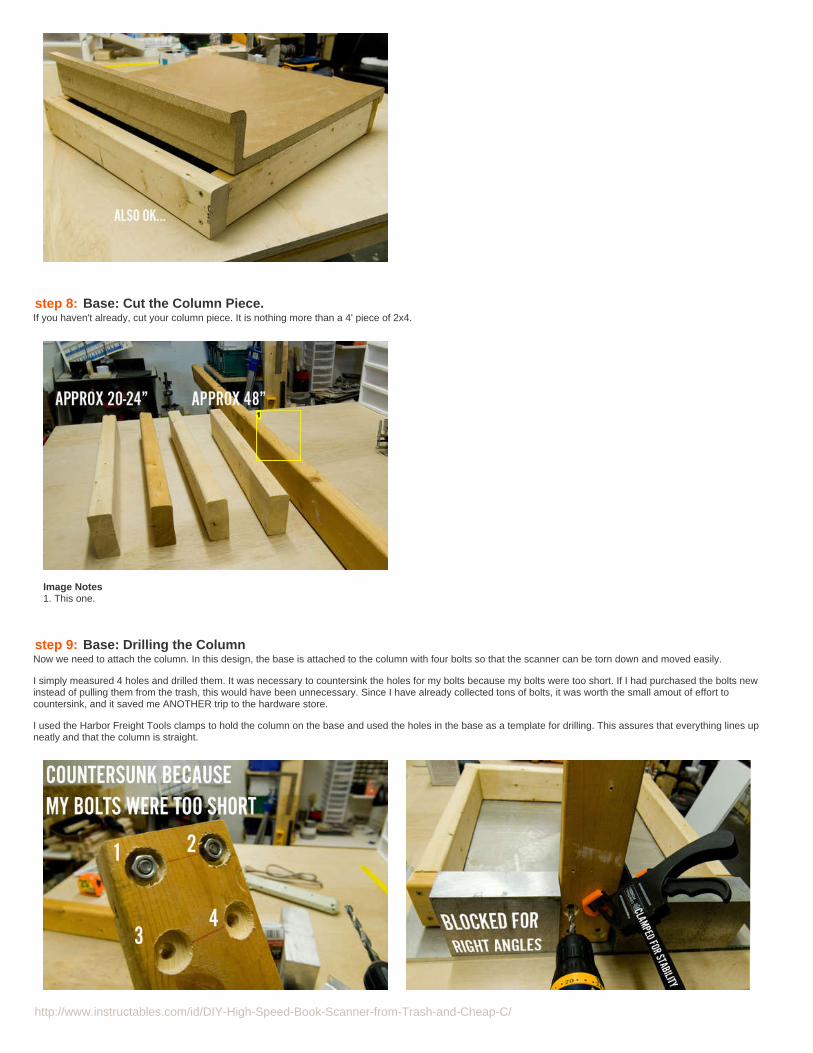
step 8: Base: Cut the Column Piece.If you haven't already, cut your column piece. It is nothing more than a 4' piece of 2x4.
Image Notes1. This one.
step 9: Base: Drilling the ColumnNow we need to attach the column. In this design, the base is attached to the column with four bolts so that the scanner can be torn down and moved easily.
I simply measured 4 holes and drilled them. It was necessary to countersink the holes for my bolts because my bolts were too short. If I had purchased the bolts newinstead of pulling them from the trash, this would have been unnecessary. Since I have already collected tons of bolts, it was worth the small amout of effort tocountersink, and it saved me ANOTHER trip to the hardware store.
I used the Harbor Freight Tools clamps to hold the column on the base and used the holes in the base as a template for drilling. This assures that everything lines upneatly and that the column is straight.
http://www.instructables.com/id/DIY-High-Speed-Book-Scanner-from-Trash-and-Cheap-C/
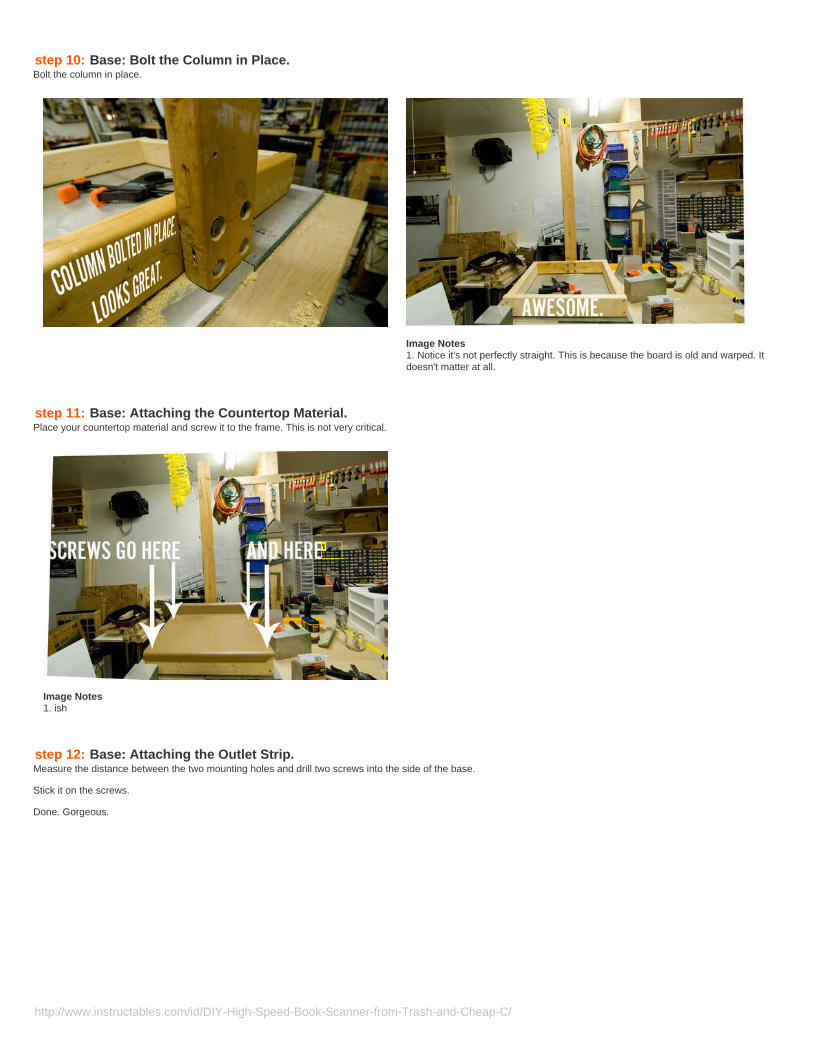
step 10: Base: Bolt the Column in Place.Bolt the column in place.
Image Notes1. Notice it's not perfectly straight. This is because the board is old and warped. Itdoesn't matter at all.
step 11: Base: Attaching the Countertop Material.Place your countertop material and screw it to the frame. This is not very critical.
Image Notes1. ish
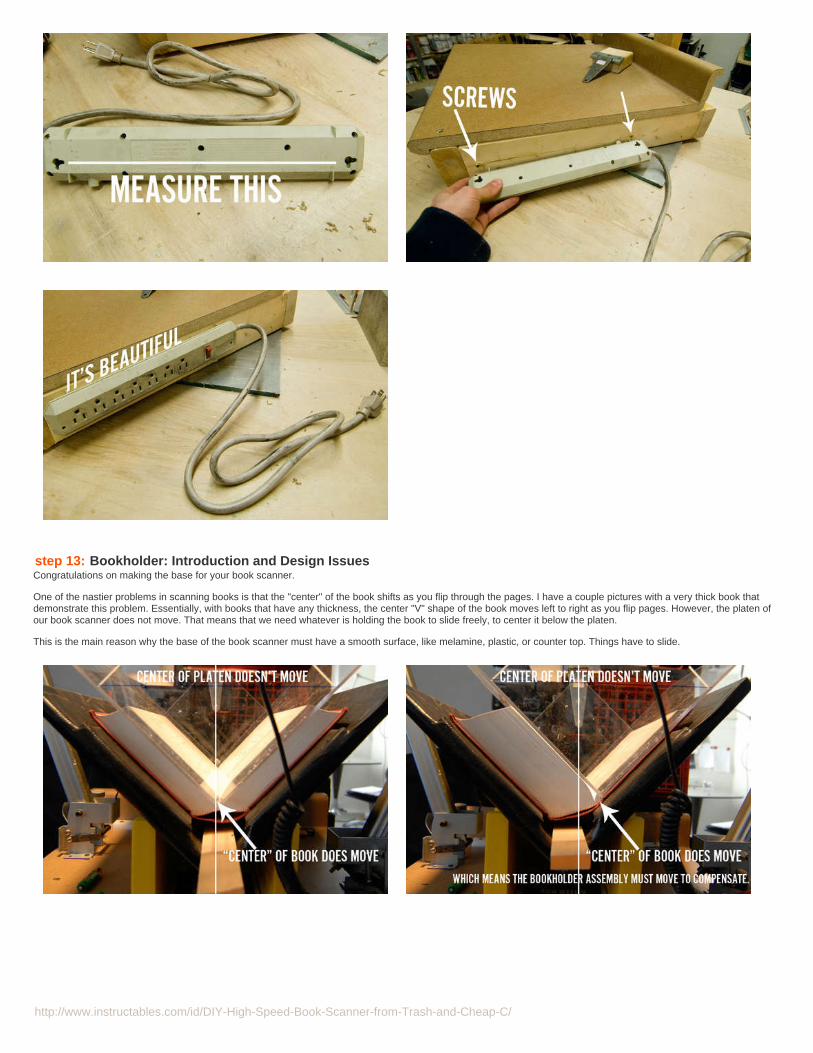
step 12: Base: Attaching the Outlet Strip.Measure the distance between the two mounting holes and drill two screws into the side of the base.
Stick it on the screws.
Done. Gorgeous.
http://www.instructables.com/id/DIY-High-Speed-Book-Scanner-from-Trash-and-Cheap-C/
step 13: Bookholder: Introduction and Design IssuesCongratulations on making the base for your book scanner.
One of the nastier problems in scanning books is that the "center" of the book shifts as you flip through the pages. I have a couple pictures with a very thick book thatdemonstrate this problem. Essentially, with books that have any thickness, the center "V" shape of the book moves left to right as you flip pages. However, the platen ofour book scanner does not move. That means that we need whatever is holding the book to slide freely, to center it below the platen.
This is the main reason why the base of the book scanner must have a smooth surface, like melamine, plastic, or counter top. Things have to slide.
http://www.instructables.com/id/DIY-High-Speed-Book-Scanner-from-Trash-and-Cheap-C/
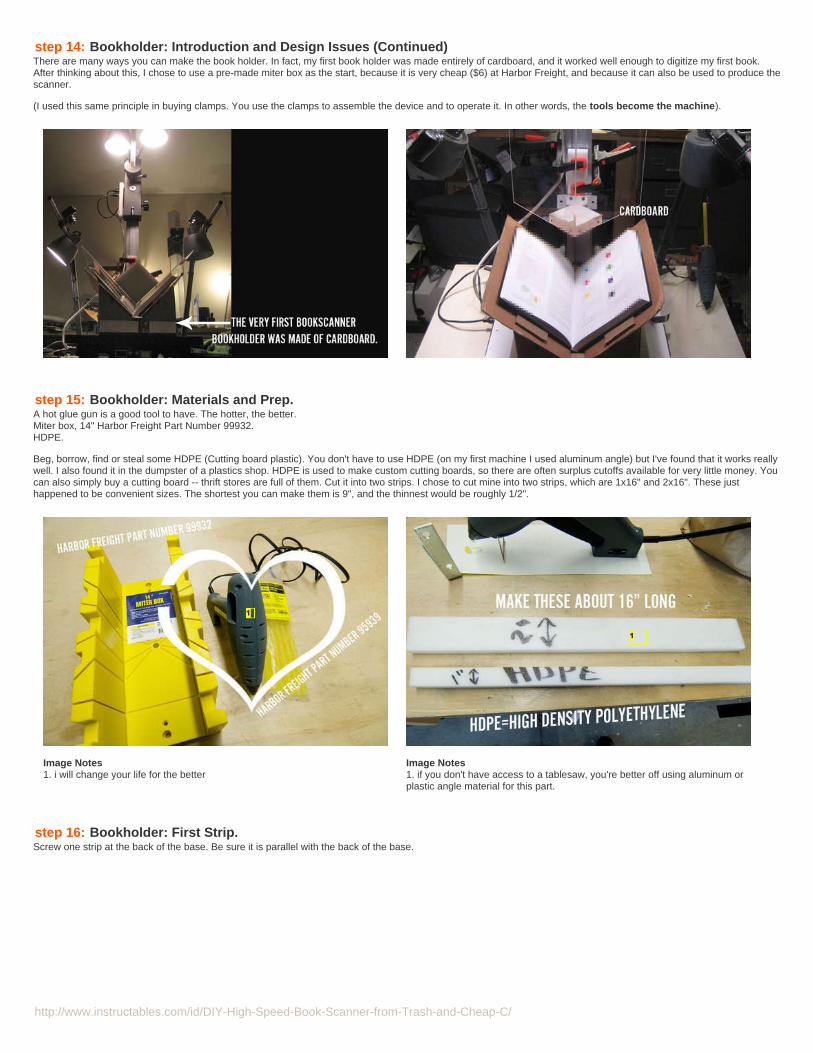
step 14: Bookholder: Introduction and Design Issues (Continued)There are many ways you can make the book holder. In fact, my first book holder was made entirely of cardboard, and it worked well enough to digitize my first book.After thinking about this, I chose to use a pre-made miter box as the start, because it is very cheap ($6) at Harbor Freight, and because it can also be used to produce thescanner.
(I used this same principle in buying clamps. You use the clamps to assemble the device and to operate it. In other words, the tools become the machine).
step 15: Bookholder: Materials and Prep.A hot glue gun is a good tool to have. The hotter, the better.Miter box, 14" Harbor Freight Part Number 99932.HDPE.
Beg, borrow, find or steal some HDPE (Cutting board plastic). You don't have to use HDPE (on my first machine I used aluminum angle) but I've found that it works reallywell. I also found it in the dumpster of a plastics shop. HDPE is used to make custom cutting boards, so there are often surplus cutoffs available for very little money. Youcan also simply buy a cutting board -- thrift stores are full of them. Cut it into two strips. I chose to cut mine into two strips, which are 1x16" and 2x16". These justhappened to be convenient sizes. The shortest you can make them is 9", and the thinnest would be roughly 1/2".
Image Notes1. i will change your life for the better
Image Notes1. if you don't have access to a tablesaw, you're better off using aluminum orplastic angle material for this part.
step 16: Bookholder: First Strip.Screw one strip at the back of the base. Be sure it is parallel with the back of the base.
http://www.instructables.com/id/DIY-High-Speed-Book-Scanner-from-Trash-and-Cheap-C/
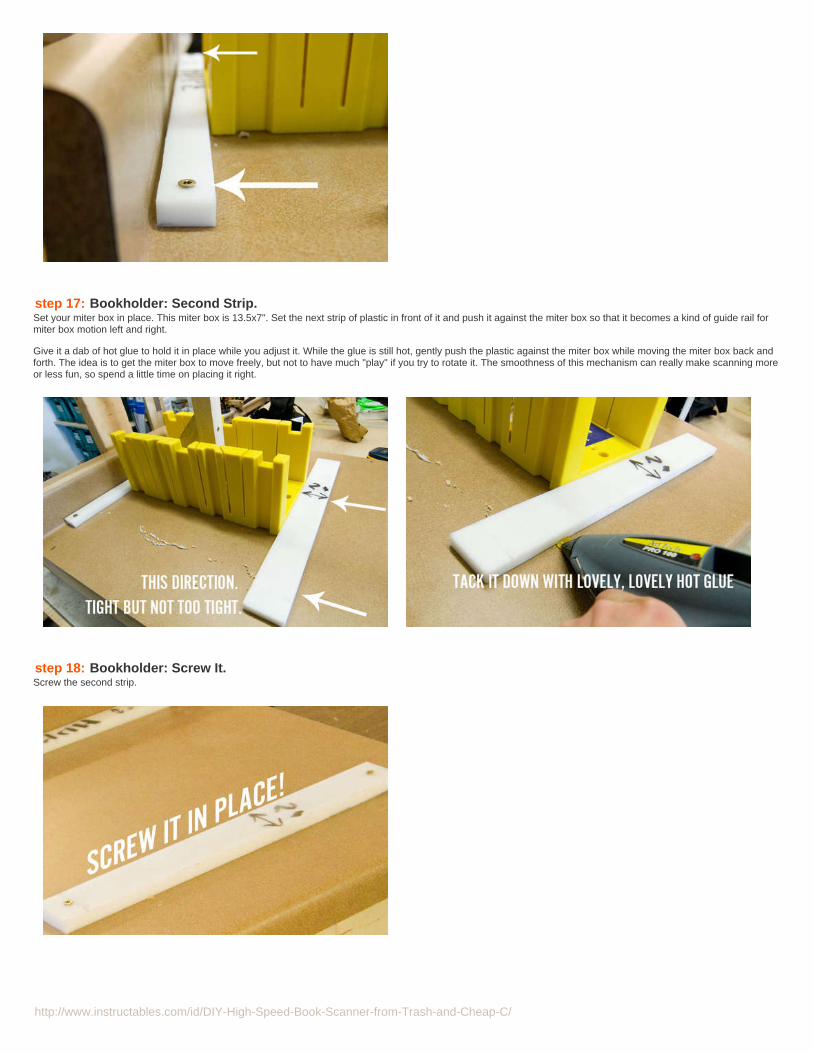
step 17: Bookholder: Second Strip.Set your miter box in place. This miter box is 13.5x7". Set the next strip of plastic in front of it and push it against the miter box so that it becomes a kind of guide rail formiter box motion left and right.
Give it a dab of hot glue to hold it in place while you adjust it. While the glue is still hot, gently push the plastic against the miter box while moving the miter box back andforth. The idea is to get the miter box to move freely, but not to have much "play" if you try to rotate it. The smoothness of this mechanism can really make scanning moreor less fun, so spend a little time on placing it right.
step 18: Bookholder: Screw It.Screw the second strip.
http://www.instructables.com/id/DIY-High-Speed-Book-Scanner-from-Trash-and-Cheap-C/
step 19: Bookholder 2: The ReckoningThe next part of the book holder assembly is where the book actually rests. As with the other parts of this instructable, you can (and should) substitute other materials. Inthis case, I used Coroplast (CORrugated PLASTic) because I was able to scrap it from an election sign last fall. You could probably make it more easily from wood, MDF,or perhaps even heavy cardboard.
Materials (pictures will be in the next steps if you need them):Coroplast, wood or MDF.Two angle brackets.Hot glue gun or other kind of glue.Tool box liner material.Spray glue or stapler.
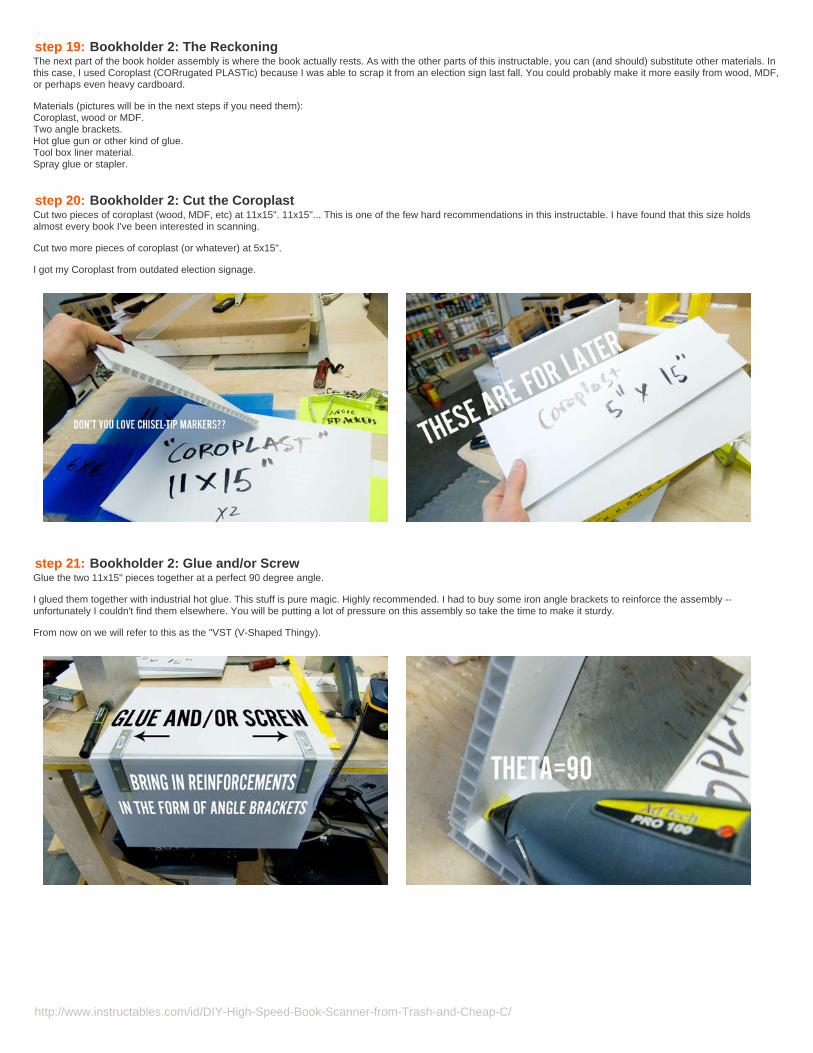
step 20: Bookholder 2: Cut the CoroplastCut two pieces of coroplast (wood, MDF, etc) at 11x15". 11x15"... This is one of the few hard recommendations in this instructable. I have found that this size holdsalmost every book I've been interested in scanning.
Cut two more pieces of coroplast (or whatever) at 5x15".
I got my Coroplast from outdated election signage.
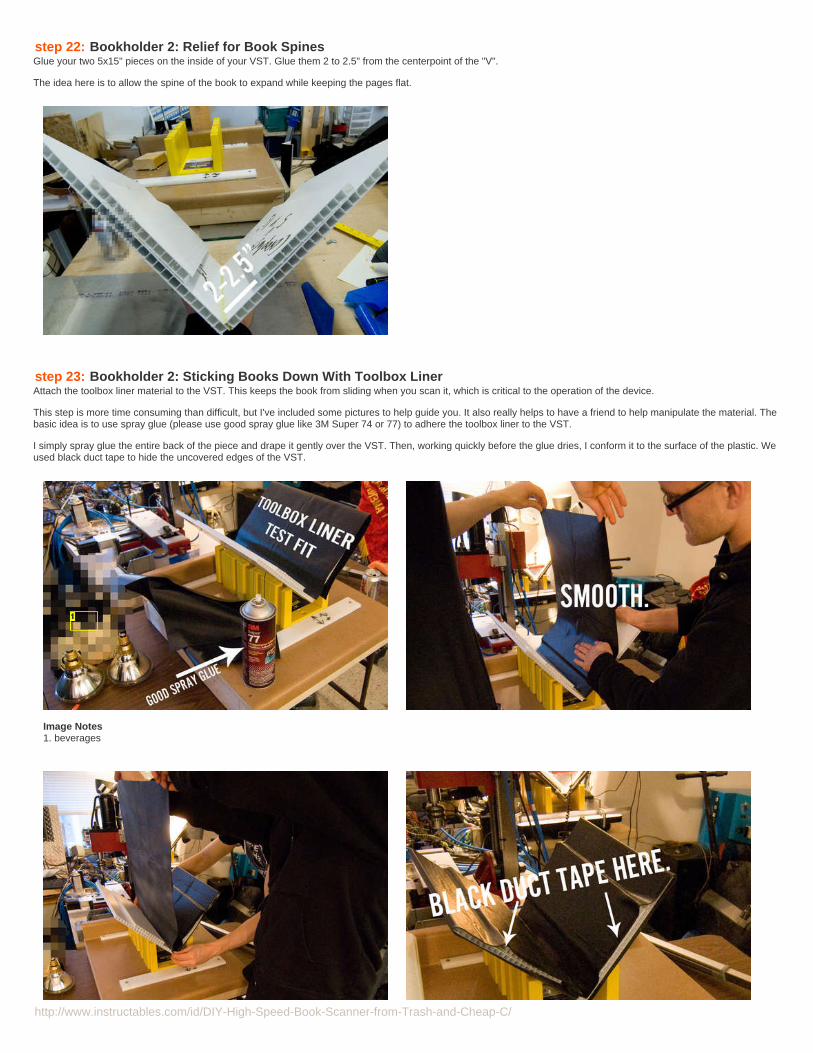
step 21: Bookholder 2: Glue and/or ScrewGlue the two 11x15" pieces together at a perfect 90 degree angle.
I glued them together with industrial hot glue. This stuff is pure magic. Highly recommended. I had to buy some iron angle brackets to reinforce the assembly --unfortunately I couldn't find them elsewhere. You will be putting a lot of pressure on this assembly so take the time to make it sturdy.
From now on we will refer to this as the "VST (V-Shaped Thingy).
http://www.instructables.com/id/DIY-High-Speed-Book-Scanner-from-Trash-and-Cheap-C/
step 22: Bookholder 2: Relief for Book SpinesGlue your two 5x15" pieces on the inside of your VST. Glue them 2 to 2.5" from the centerpoint of the "V".
The idea here is to allow the spine of the book to expand while keeping the pages flat.
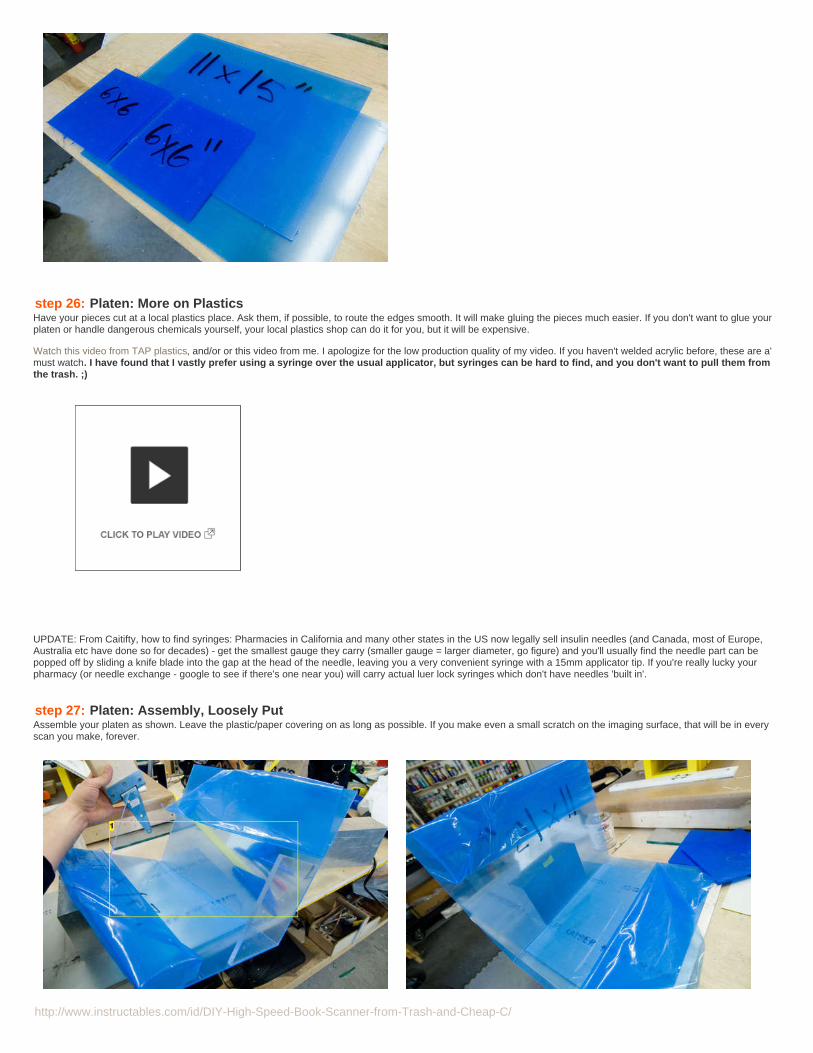
step 23: Bookholder 2: Sticking Books Down With Toolbox LinerAttach the toolbox liner material to the VST. This keeps the book from sliding when you scan it, which is critical to the operation of the device.
This step is more time consuming than difficult, but I've included some pictures to help guide you. It also really helps to have a friend to help manipulate the material. Thebasic idea is to use spray glue (please use good spray glue like 3M Super 74 or 77) to adhere the toolbox liner to the VST.
I simply spray glue the entire back of the piece and drape it gently over the VST. Then, working quickly before the glue dries, I conform it to the surface of the plastic. Weused black duct tape to hide the uncovered edges of the VST.
Image Notes1. beverages

http://www.instructables.com/id/DIY-High-Speed-Book-Scanner-from-Trash-and-Cheap-C/
step 24: Bookholder 2: Thirst.
step 25: Platen: OverviewThe plastics in this part are something you should buy new. Unfortunately, I have found no good way to make a platen from recycled materials. I have made 4 platens intotal, and the first two used recycled scrap plastics (there is a surplus shop in town that sells acrylic cutoffs and scrap). The first platen could not be glued because theplastics were slightly warped, and the second one, the paper covering that protects the acrylic had become hardened and almost impossible to remove. A tip: near-boilingwater will remove such paper, but it is not fun.
Save yourself the pain and go buy new, clean plastic. You won't regret it.
Materials:2 11x15" cuts of 1/8" clear acrylic.2 6x6" squares of 1/4" clear acrylic.Some methylene chloride.A syringe or applicator.Something square.A tongue hinge.A chunk of scrap wood (or two).
http://www.instructables.com/id/DIY-High-Speed-Book-Scanner-from-Trash-and-Cheap-C/
step 26: Platen: More on PlasticsHave your pieces cut at a local plastics place. Ask them, if possible, to route the edges smooth. It will make gluing the pieces much easier. If you don't want to glue yourplaten or handle dangerous chemicals yourself, your local plastics shop can do it for you, but it will be expensive.
Watch this video from TAP plastics, and/or or this video from me. I apologize for the low production quality of my video. If you haven't welded acrylic before, these are a'must watch. I have found that I vastly prefer using a syringe over the usual applicator, but syringes can be hard to find, and you don't want to pull them fromthe trash. ;)
Video
UPDATE: From Caitifty, how to find syringes: Pharmacies in California and many other states in the US now legally sell insulin needles (and Canada, most of Europe,Australia etc have done so for decades) - get the smallest gauge they carry (smaller gauge = larger diameter, go figure) and you'll usually find the needle part can bepopped off by sliding a knife blade into the gap at the head of the needle, leaving you a very convenient syringe with a 15mm applicator tip. If you're really lucky yourpharmacy (or needle exchange - google to see if there's one near you) will carry actual luer lock syringes which don't have needles 'built in'.
step 27: Platen: Assembly, Loosely PutAssemble your platen as shown. Leave the plastic/paper covering on as long as possible. If you make even a small scratch on the imaging surface, that will be in everyscan you make, forever.
http://www.instructables.com/id/DIY-High-Speed-Book-Scanner-from-Trash-and-Cheap-C/
Image Notes1. your desired outcome
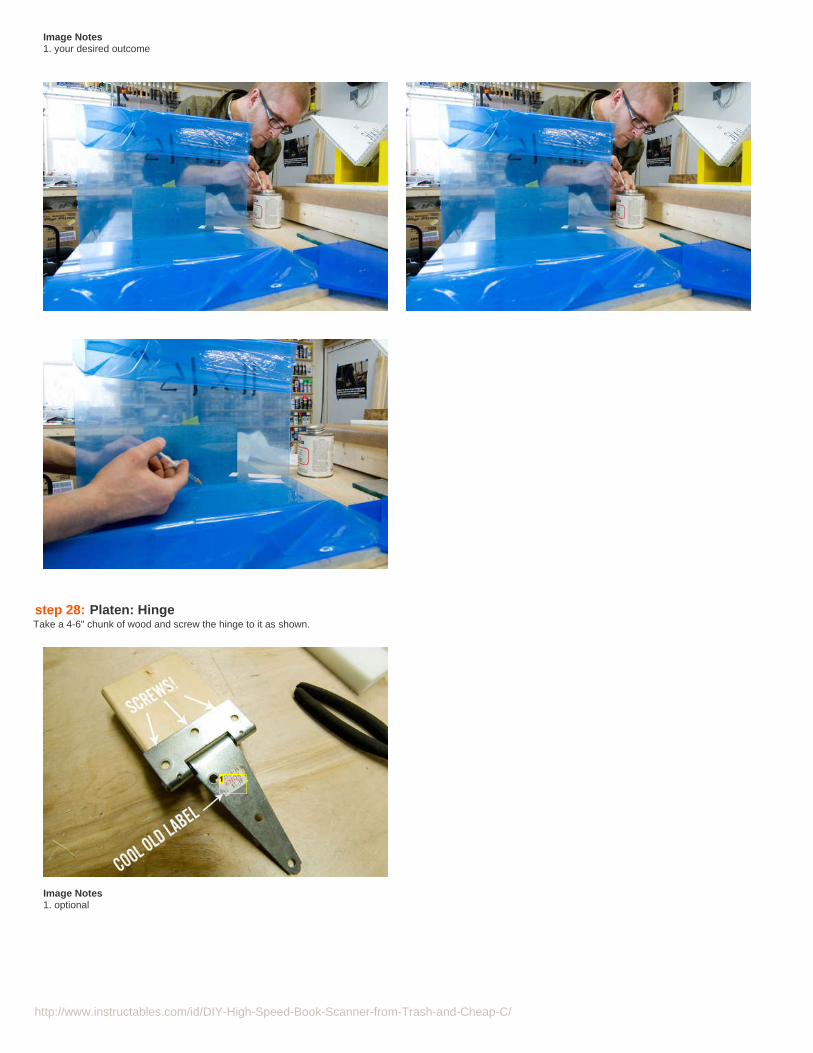
step 28: Platen: HingeTake a 4-6" chunk of wood and screw the hinge to it as shown.
Image Notes1. optional
http://www.instructables.com/id/DIY-High-Speed-Book-Scanner-from-Trash-and-Cheap-C/
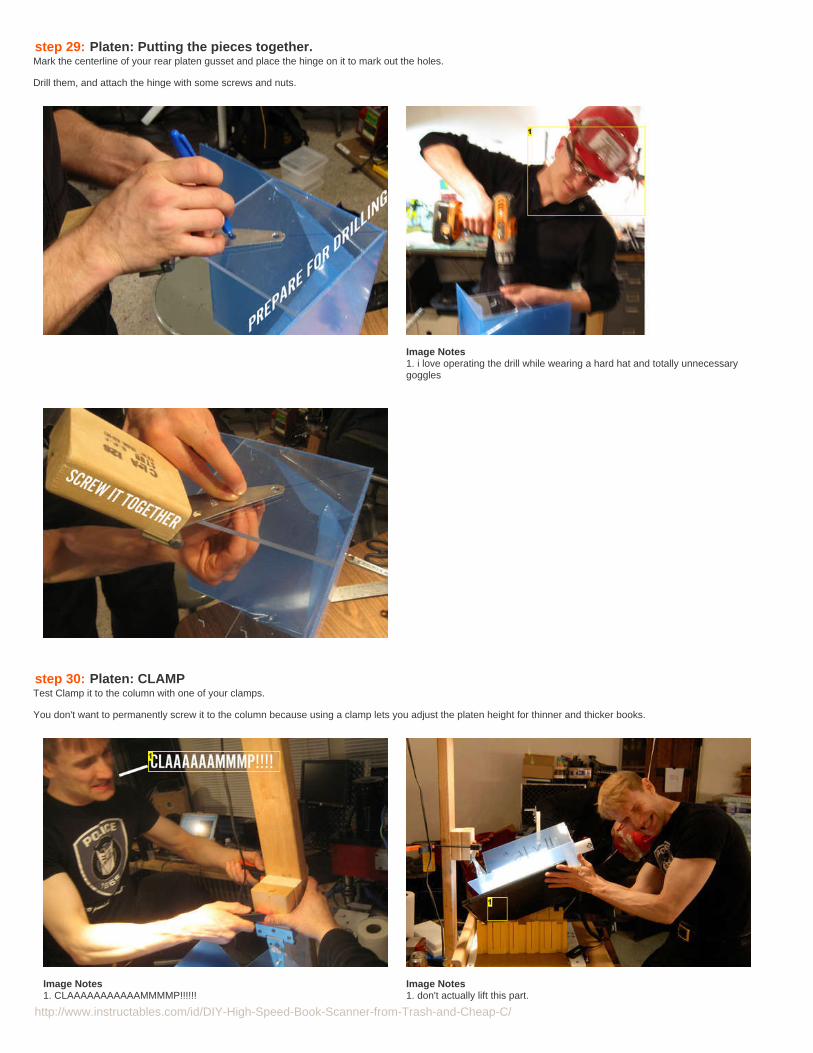
step 29: Platen: Putting the pieces together.Mark the centerline of your rear platen gusset and place the hinge on it to mark out the holes.
Drill them, and attach the hinge with some screws and nuts.
Image Notes1. i love operating the drill while wearing a hard hat and totally unnecessarygoggles
step 30: Platen: CLAMPTest Clamp it to the column with one of your clamps.
You don't want to permanently screw it to the column because using a clamp lets you adjust the platen height for thinner and thicker books.
Image Notes1. CLAAAAAAAAAAAMMMMP!!!!!!
Image Notes1. don't actually lift this part.
http://www.instructables.com/id/DIY-High-Speed-Book-Scanner-from-Trash-and-Cheap-C/
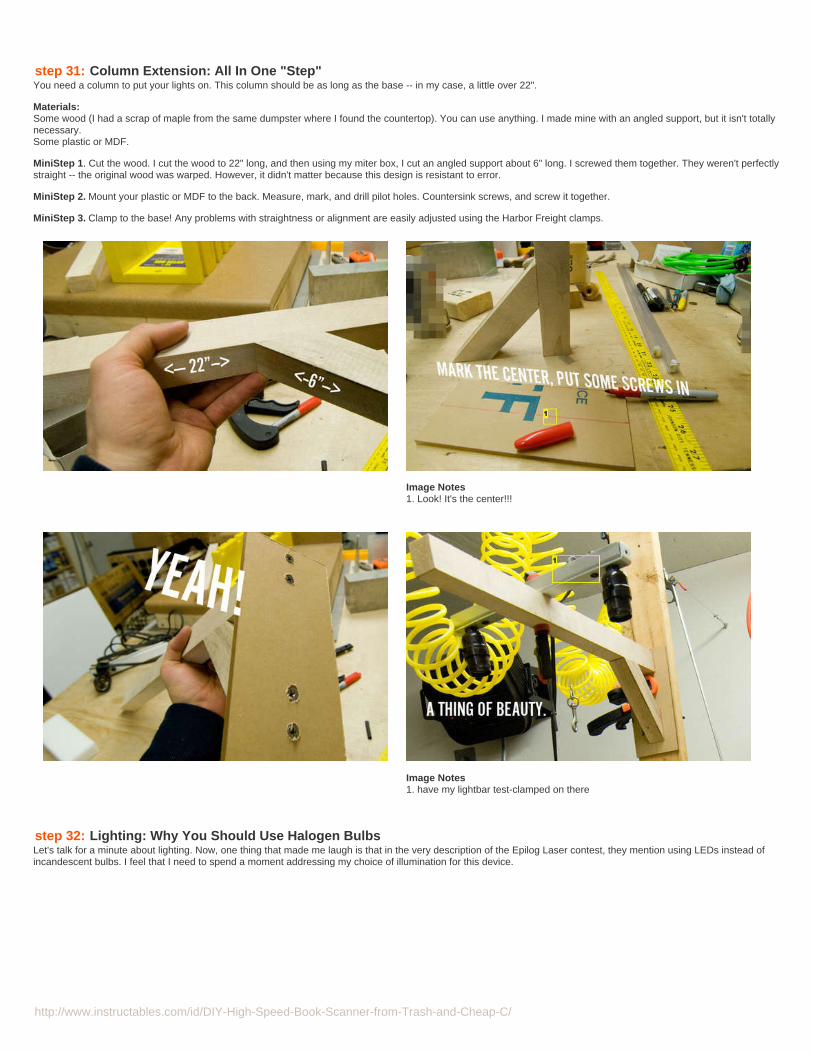
step 31: Column Extension: All In One "Step"You need a column to put your lights on. This column should be as long as the base -- in my case, a little over 22".
Materials:Some wood (I had a scrap of maple from the same dumpster where I found the countertop). You can use anything. I made mine with an angled support, but it isn't totallynecessary.Some plastic or MDF.
MiniStep 1. Cut the wood. I cut the wood to 22" long, and then using my miter box, I cut an angled support about 6" long. I screwed them together. They weren't perfectlystraight -- the original wood was warped. However, it didn't matter because this design is resistant to error.
MiniStep 2. Mount your plastic or MDF to the back. Measure, mark, and drill pilot holes. Countersink screws, and screw it together.
MiniStep 3. Clamp to the base! Any problems with straightness or alignment are easily adjusted using the Harbor Freight clamps.
Image Notes1. Look! It's the center!!!
Image Notes1. have my lightbar test-clamped on there
step 32: Lighting: Why You Should Use Halogen BulbsLet's talk for a minute about lighting. Now, one thing that made me laugh is that in the very description of the Epilog Laser contest, they mention using LEDs instead ofincandescent bulbs. I feel that I need to spend a moment addressing my choice of illumination for this device.
http://www.instructables.com/id/DIY-High-Speed-Book-Scanner-from-Trash-and-Cheap-C/
step 33: Lighting: How To Light For Cheap, Crappy CamerasLet me start by saying that this whole system is designed to work under non-ideal conditions and to be manufactured from just about anything -- this is less aninstructable, I hope, than it is a general template to build and innovate with similar devices. However, one truth, photographically speaking, is "Garbage in, Garbage out".To get the best book scans, we need to pay attention to how a camera works. This is especially important because we are using cheap cameras. While I could go onabout the cameras for weeks on end, I will keep this very simple.
In a perfect world, we would use our cameras on their lowest ISO setting to reduce noise.In a perfect world, we would use a very small aperture (from f6 to f11) to keep things very sharp.In a perfect world, we would use a very fast shutter speed (faster than 1/60th of a second) so our movement doesn't blur the images.
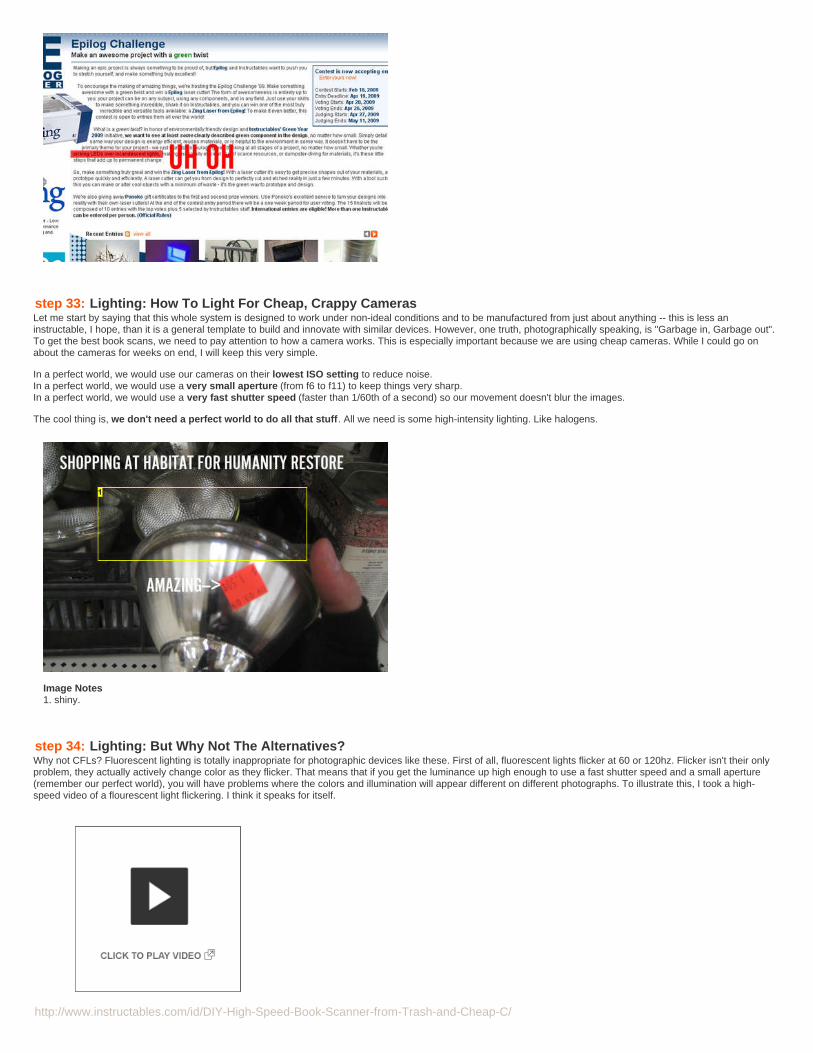
The cool thing is, we don't need a perfect world to do all that stuff. All we need is some high-intensity lighting. Like halogens.
Image Notes1. shiny.
step 34: Lighting: But Why Not The Alternatives?Why not CFLs? Fluorescent lighting is totally inappropriate for photographic devices like these. First of all, fluorescent lights flicker at 60 or 120hz. Flicker isn't their onlyproblem, they actually actively change color as they flicker. That means that if you get the luminance up high enough to use a fast shutter speed and a small aperture(remember our perfect world), you will have problems where the colors and illumination will appear different on different photographs. To illustrate this, I took a high-speed video of a flourescent light flickering. I think it speaks for itself.
Video
http://www.instructables.com/id/DIY-High-Speed-Book-Scanner-from-Trash-and-Cheap-C/
Update: I have had several comments that this video is misleading. There is a discussion about this in the comments. The primary point of argument is that most, if notall, CFL (the small, socketed fluorescents) flicker in the KHz instead of Hz. This is true. However, even if flicker is a non issue, they are not as bright as halogens, which,multiplied times the need for more bulbs (because they are not as bright) just saps the nice green construction of this project with a bunch of mercury.
There are other, more technical reasons to prefer bulbs with a more continuous spectrum, but for that, please read the comments. /Update
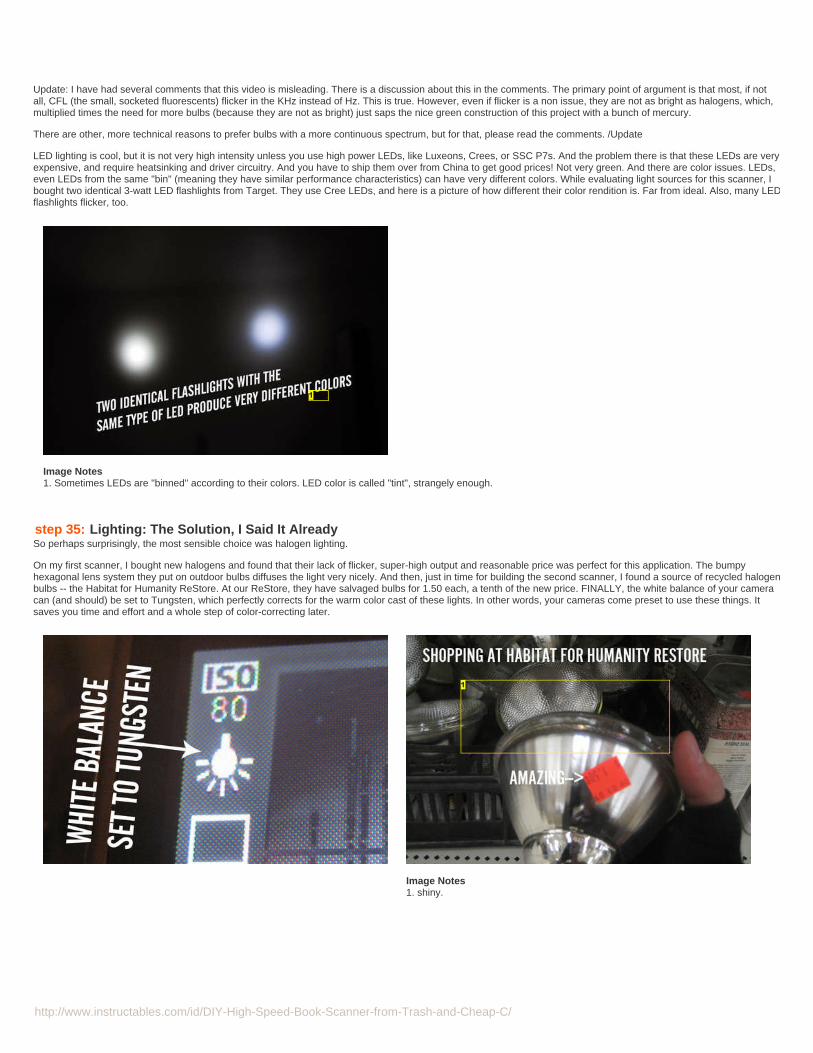
LED lighting is cool, but it is not very high intensity unless you use high power LEDs, like Luxeons, Crees, or SSC P7s. And the problem there is that these LEDs are veryexpensive, and require heatsinking and driver circuitry. And you have to ship them over from China to get good prices! Not very green. And there are color issues. LEDs,even LEDs from the same "bin" (meaning they have similar performance characteristics) can have very different colors. While evaluating light sources for this scanner, Ibought two identical 3-watt LED flashlights from Target. They use Cree LEDs, and here is a picture of how different their color rendition is. Far from ideal. Also, many LEDflashlights flicker, too.
Image Notes1. Sometimes LEDs are "binned" according to their colors. LED color is called "tint", strangely enough.
step 35: Lighting: The Solution, I Said It AlreadySo perhaps surprisingly, the most sensible choice was halogen lighting.
On my first scanner, I bought new halogens and found that their lack of flicker, super-high output and reasonable price was perfect for this application. The bumpyhexagonal lens system they put on outdoor bulbs diffuses the light very nicely. And then, just in time for building the second scanner, I found a source of recycled halogenbulbs -- the Habitat for Humanity ReStore. At our ReStore, they have salvaged bulbs for 1.50 each, a tenth of the new price. FINALLY, the white balance of your cameracan (and should) be set to Tungsten, which perfectly corrects for the warm color cast of these lights. In other words, your cameras come preset to use these things. Itsaves you time and effort and a whole step of color-correcting later.
Image Notes1. shiny.
http://www.instructables.com/id/DIY-High-Speed-Book-Scanner-from-Trash-and-Cheap-C/
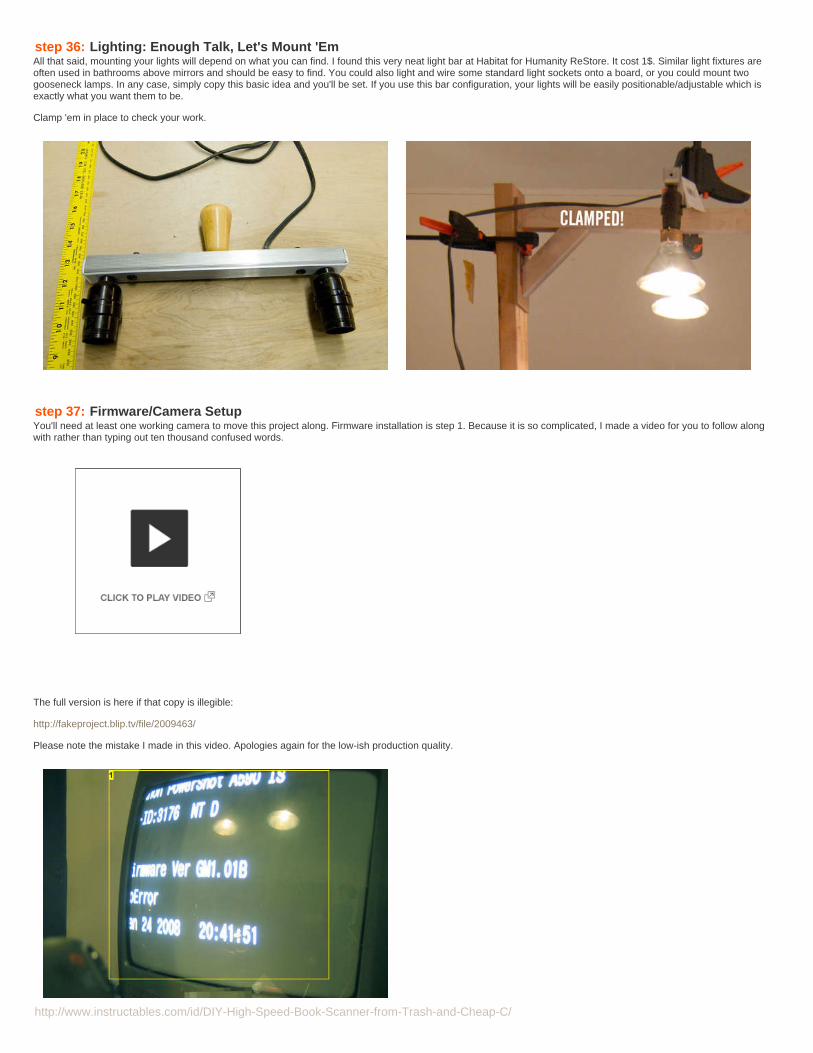
step 36: Lighting: Enough Talk, Let's Mount 'EmAll that said, mounting your lights will depend on what you can find. I found this very neat light bar at Habitat for Humanity ReStore. It cost 1$. Similar light fixtures areoften used in bathrooms above mirrors and should be easy to find. You could also light and wire some standard light sockets onto a board, or you could mount twogooseneck lamps. In any case, simply copy this basic idea and you'll be set. If you use this bar configuration, your lights will be easily positionable/adjustable which isexactly what you want them to be.
Clamp 'em in place to check your work.
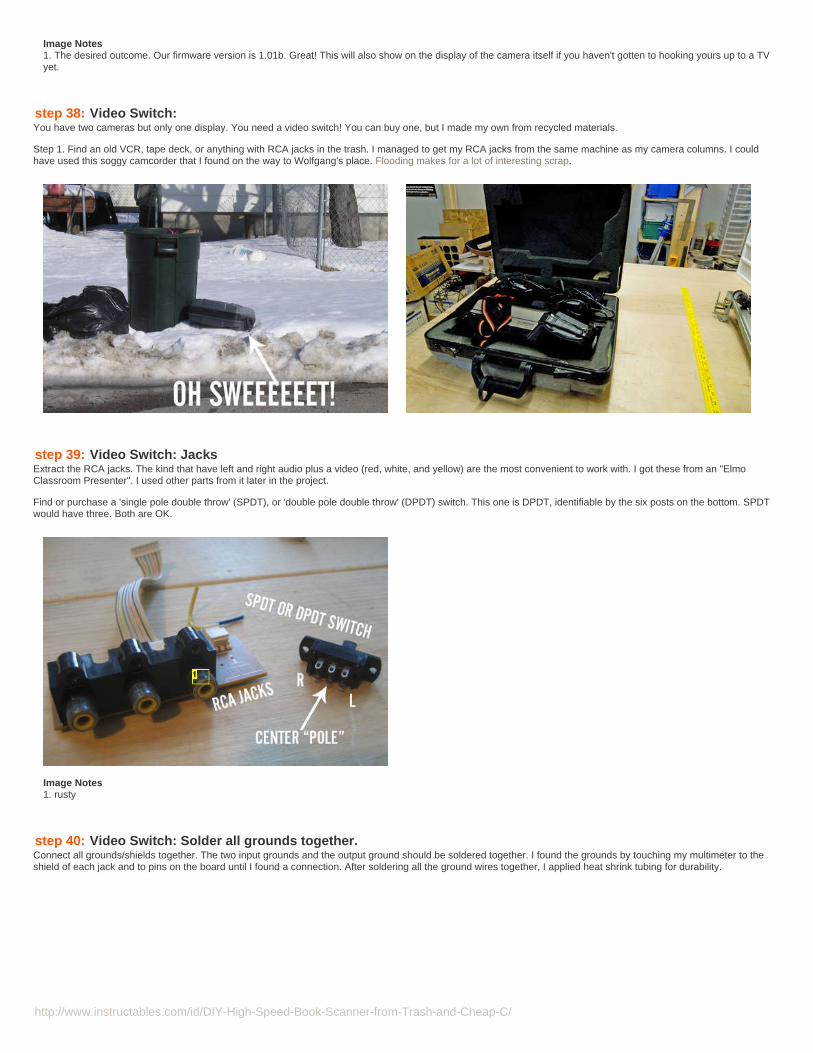
step 37: Firmware/Camera SetupYou'll need at least one working camera to move this project along. Firmware installation is step 1. Because it is so complicated, I made a video for you to follow alongwith rather than typing out ten thousand confused words.
Video
The full version is here if that copy is illegible:
http://fakeproject.blip.tv/file/2009463/
Please note the mistake I made in this video. Apologies again for the low-ish production quality.
http://www.instructables.com/id/DIY-High-Speed-Book-Scanner-from-Trash-and-Cheap-C/
Image Notes1. The desired outcome. Our firmware version is 1.01b. Great! This will also show on the display of the camera itself if you haven't gotten to hooking yours up to a TVyet.
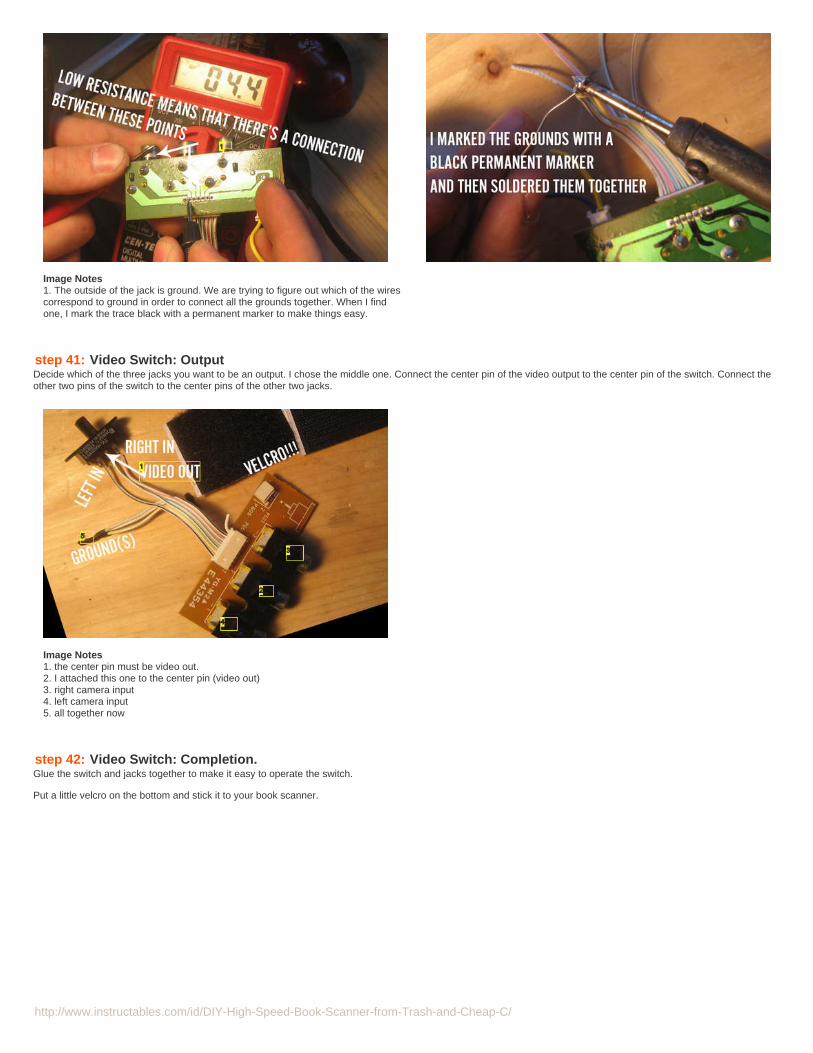
step 38: Video Switch:You have two cameras but only one display. You need a video switch! You can buy one, but I made my own from recycled materials.
Step 1. Find an old VCR, tape deck, or anything with RCA jacks in the trash. I managed to get my RCA jacks from the same machine as my camera columns. I couldhave used this soggy camcorder that I found on the way to Wolfgang's place. Flooding makes for a lot of interesting scrap.
step 39: Video Switch: JacksExtract the RCA jacks. The kind that have left and right audio plus a video (red, white, and yellow) are the most convenient to work with. I got these from an "ElmoClassroom Presenter". I used other parts from it later in the project.
Find or purchase a 'single pole double throw' (SPDT), or 'double pole double throw' (DPDT) switch. This one is DPDT, identifiable by the six posts on the bottom. SPDTwould have three. Both are OK.
Image Notes1. rusty
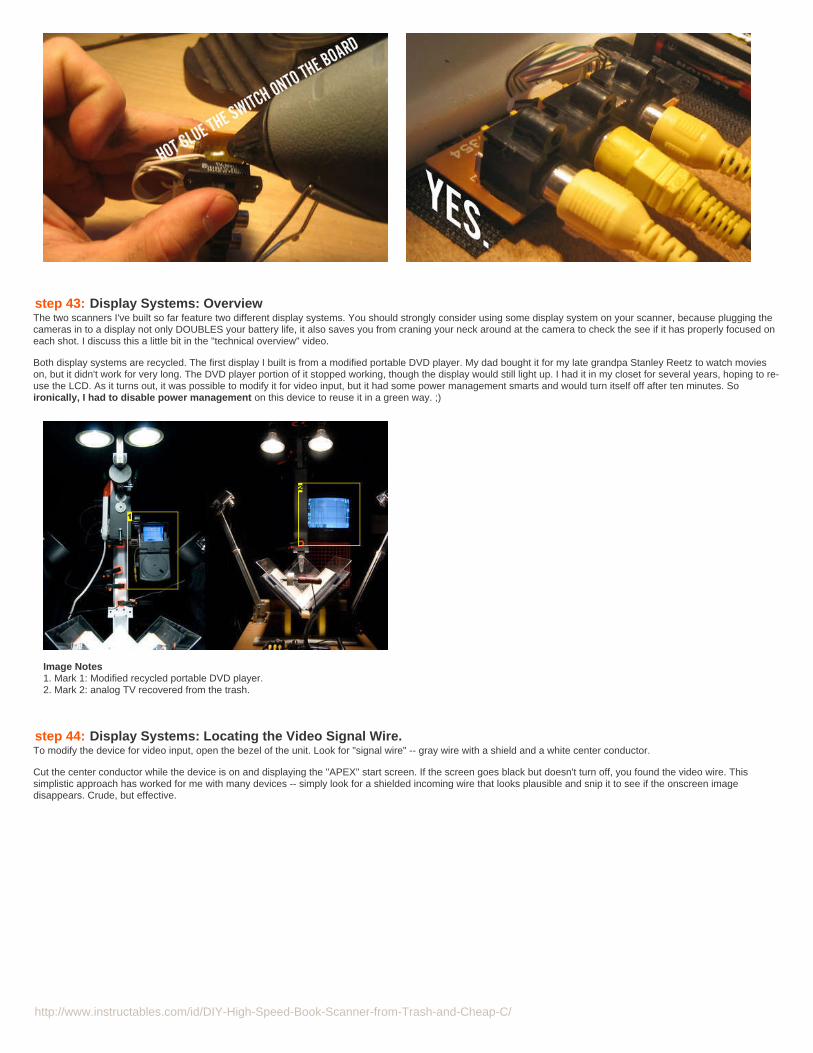
step 40: Video Switch: Solder all grounds together.Connect all grounds/shields together. The two input grounds and the output ground should be soldered together. I found the grounds by touching my multimeter to theshield of each jack and to pins on the board until I found a connection. After soldering all the ground wires together, I applied heat shrink tubing for durability.
http://www.instructables.com/id/DIY-High-Speed-Book-Scanner-from-Trash-and-Cheap-C/
Image Notes1. The outside of the jack is ground. We are trying to figure out which of the wirescorrespond to ground in order to connect all the grounds together. When I findone, I mark the trace black with a permanent marker to make things easy.
step 41: Video Switch: OutputDecide which of the three jacks you want to be an output. I chose the middle one. Connect the center pin of the video output to the center pin of the switch. Connect theother two pins of the switch to the center pins of the other two jacks.
Image Notes1. the center pin must be video out.2. I attached this one to the center pin (video out)3. right camera input4. left camera input5. all together now
step 42: Video Switch: Completion.Glue the switch and jacks together to make it easy to operate the switch.
Put a little velcro on the bottom and stick it to your book scanner.
http://www.instructables.com/id/DIY-High-Speed-Book-Scanner-from-Trash-and-Cheap-C/
step 43: Display Systems: OverviewThe two scanners I've built so far feature two different display systems. You should strongly consider using some display system on your scanner, because plugging thecameras in to a display not only DOUBLES your battery life, it also saves you from craning your neck around at the camera to check the see if it has properly focused oneach shot. I discuss this a little bit in the "technical overview" video.
Both display systems are recycled. The first display I built is from a modified portable DVD player. My dad bought it for my late grandpa Stanley Reetz to watch movieson, but it didn't work for very long. The DVD player portion of it stopped working, though the display would still light up. I had it in my closet for several years, hoping to re-use the LCD. As it turns out, it was possible to modify it for video input, but it had some power management smarts and would turn itself off after ten minutes. Soironically, I had to disable power management on this device to reuse it in a green way. ;)
Image Notes1. Mark 1: Modified recycled portable DVD player.2. Mark 2: analog TV recovered from the trash.
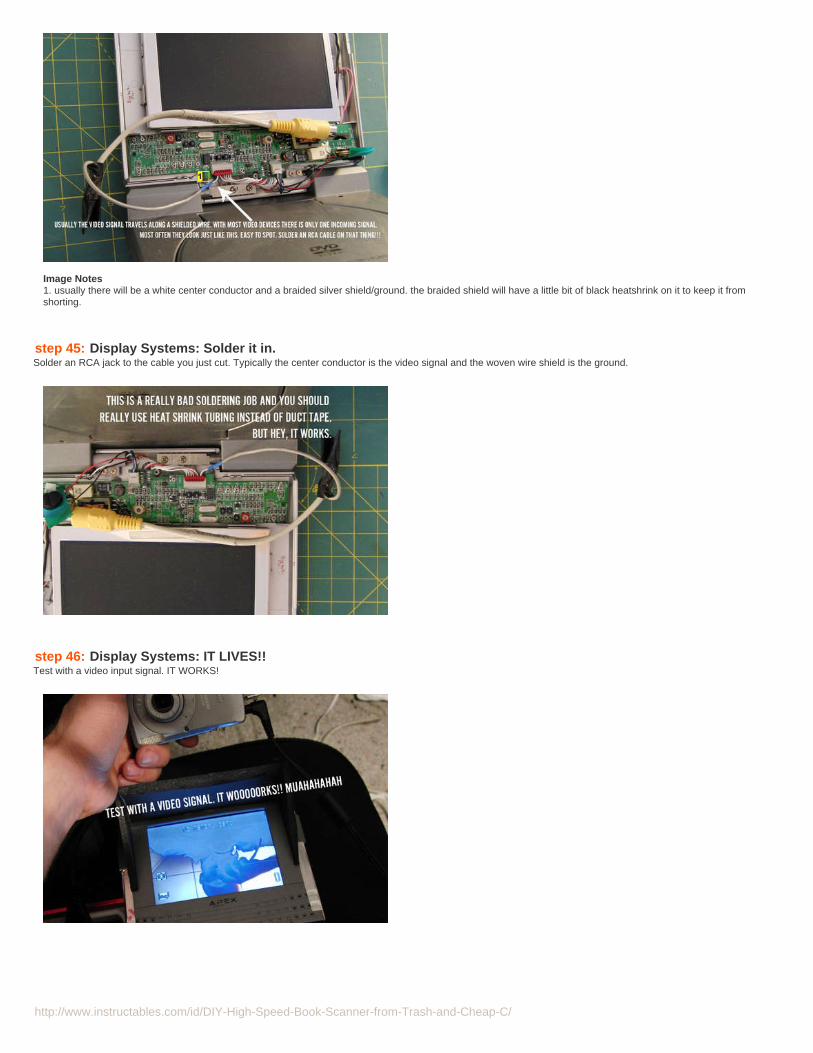
step 44: Display Systems: Locating the Video Signal Wire.To modify the device for video input, open the bezel of the unit. Look for "signal wire" -- gray wire with a shield and a white center conductor.
Cut the center conductor while the device is on and displaying the "APEX" start screen. If the screen goes black but doesn't turn off, you found the video wire. Thissimplistic approach has worked for me with many devices -- simply look for a shielded incoming wire that looks plausible and snip it to see if the onscreen imagedisappears. Crude, but effective.
http://www.instructables.com/id/DIY-High-Speed-Book-Scanner-from-Trash-and-Cheap-C/
Image Notes1. usually there will be a white center conductor and a braided silver shield/ground. the braided shield will have a little bit of black heatshrink on it to keep it fromshorting.
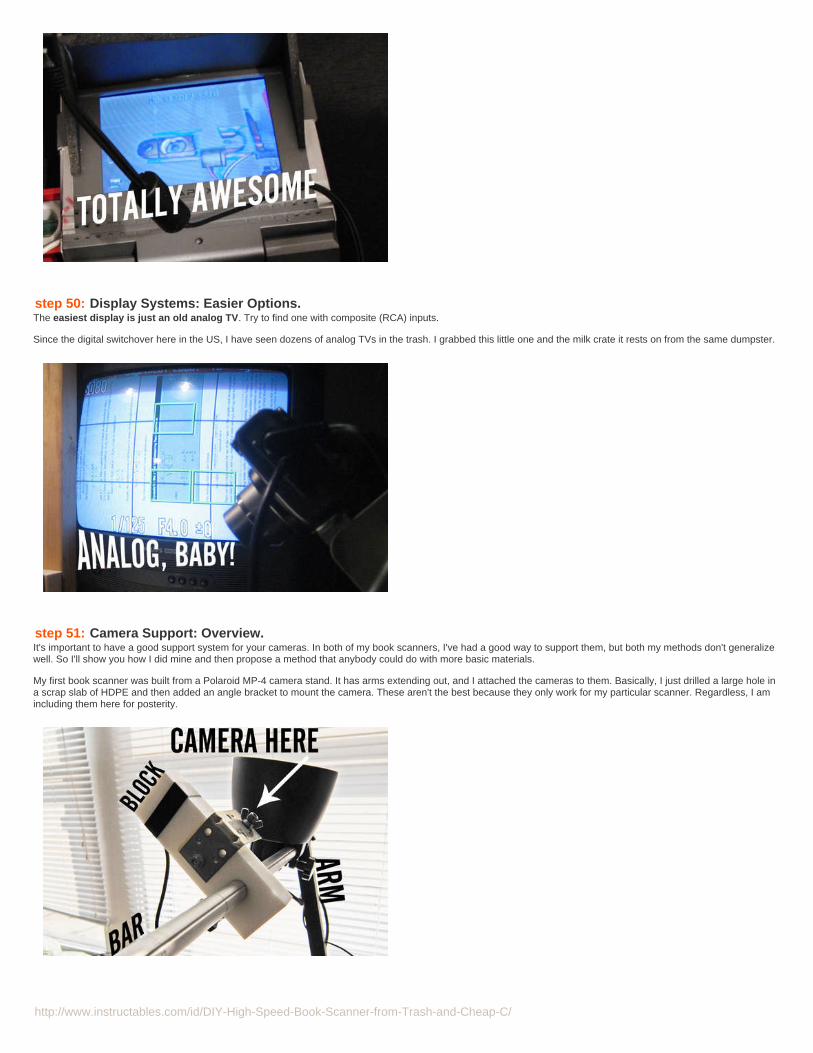
step 45: Display Systems: Solder it in.Solder an RCA jack to the cable you just cut. Typically the center conductor is the video signal and the woven wire shield is the ground.
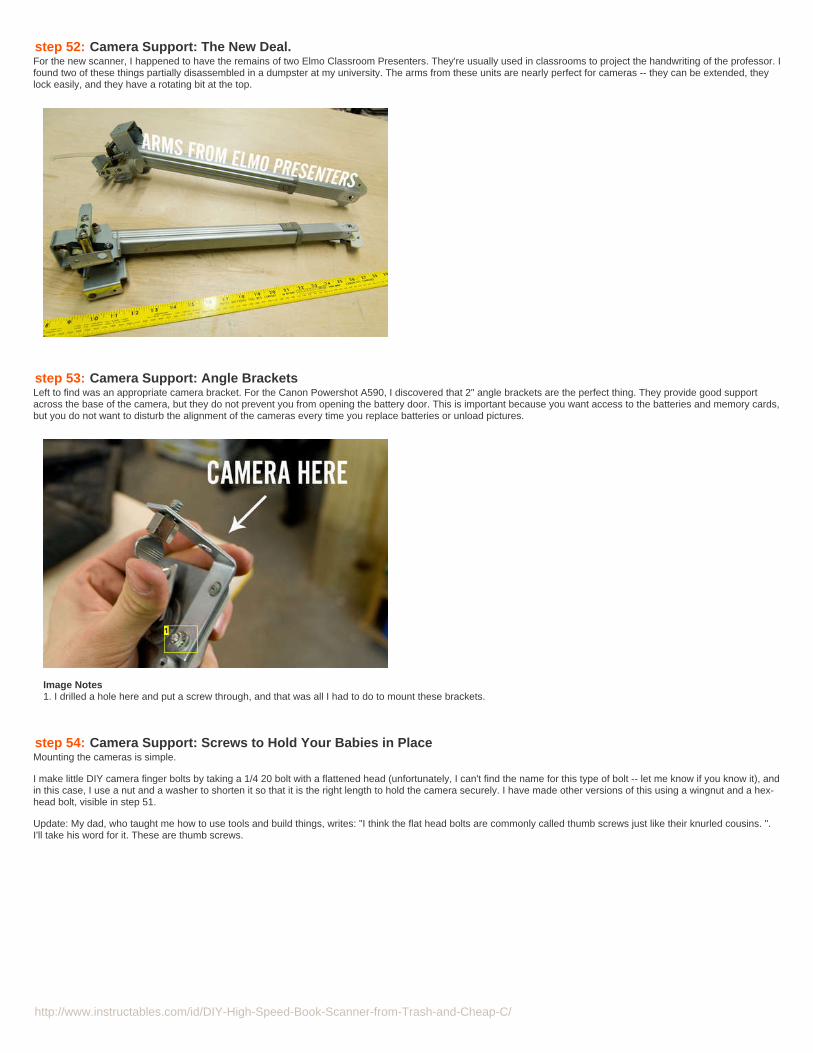
step 46: Display Systems: IT LIVES!!Test with a video input signal. IT WORKS!

http://www.instructables.com/id/DIY-High-Speed-Book-Scanner-from-Trash-and-Cheap-C/
step 47: Display Systems: Pesky Power Management.Ordinarily this DVD player would shut itself off if there was not a DVD in it for say, 10 minutes. There will never be a DVD in it again , so we need to keep the screen fromturning itself off. Open the base of the unit. Unplug the flat ribbon cable that connects the laser mechanism to the base. In my unit, I never reconnected these parts.
Look at the area where the display connects to the mainboard. In every one of these devices that I've seen, there is a section of the board that looks like a secondarypower supply. Note here the small voltage regulator, transformer, and capacitors.
step 48: Display Systems: Hack Time.Get the datasheet for the voltage regulator (and other chips if you suspect them). I used Octopart.com to look up the datasheet by entering the numbers as they appearon the chip. This particular voltage regulator is a "BA055" made by Micrel. According to the datasheet, pin 1 (the leftmost pin) is the "Enable" pin. That means that it turnsthe regulator on and off. The datasheet also says that it can be connected directly to Vin(the positive power input) to turn the device on permanently. Heat pin 1 with asoldering iron and gently lift it from the circuit board. Solder it to the voltage input.
I really wish Instructables didn't resize images. If you find this hard to read, let me know and I'll upload another, larger version.
step 49: Display Systems: Put it Back Together.Reassemble the device! You now have a free, recycled LCD screen for any project.
I also made a little visor for mine from a scrap of black foamcore material.
http://www.instructables.com/id/DIY-High-Speed-Book-Scanner-from-Trash-and-Cheap-C/
step 50: Display Systems: Easier Options.The easiest display is just an old analog TV. Try to find one with composite (RCA) inputs.
Since the digital switchover here in the US, I have seen dozens of analog TVs in the trash. I grabbed this little one and the milk crate it rests on from the same dumpster.
step 51: Camera Support: Overview.It's important to have a good support system for your cameras. In both of my book scanners, I've had a good way to support them, but both my methods don't generalizewell. So I'll show you how I did mine and then propose a method that anybody could do with more basic materials.
My first book scanner was built from a Polaroid MP-4 camera stand. It has arms extending out, and I attached the cameras to them. Basically, I just drilled a large hole ina scrap slab of HDPE and then added an angle bracket to mount the camera. These aren't the best because they only work for my particular scanner. Regardless, I amincluding them here for posterity.
http://www.instructables.com/id/DIY-High-Speed-Book-Scanner-from-Trash-and-Cheap-C/
step 52: Camera Support: The New Deal.For the new scanner, I happened to have the remains of two Elmo Classroom Presenters. They're usually used in classrooms to project the handwriting of the professor. Ifound two of these things partially disassembled in a dumpster at my university. The arms from these units are nearly perfect for cameras -- they can be extended, theylock easily, and they have a rotating bit at the top.
step 53: Camera Support: Angle BracketsLeft to find was an appropriate camera bracket. For the Canon Powershot A590, I discovered that 2" angle brackets are the perfect thing. They provide good supportacross the base of the camera, but they do not prevent you from opening the battery door. This is important because you want access to the batteries and memory cards,but you do not want to disturb the alignment of the cameras every time you replace batteries or unload pictures.
Image Notes1. I drilled a hole here and put a screw through, and that was all I had to do to mount these brackets.
step 54: Camera Support: Screws to Hold Your Babies in PlaceMounting the cameras is simple.
I make little DIY camera finger bolts by taking a 1/4 20 bolt with a flattened head (unfortunately, I can't find the name for this type of bolt -- let me know if you know it), andin this case, I use a nut and a washer to shorten it so that it is the right length to hold the camera securely. I have made other versions of this using a wingnut and a hex-head bolt, visible in step 51.
Update: My dad, who taught me how to use tools and build things, writes: "I think the flat head bolts are commonly called thumb screws just like their knurled cousins. ".I'll take his word for it. These are thumb screws.

http://www.instructables.com/id/DIY-High-Speed-Book-Scanner-from-Trash-and-Cheap-C/
Image Notes1. thumb screw!
step 55: Camera Support: A More General ProposalThe nice thing is that you can make almost anything into a camera arm. One idea I had is a very simple DIY "gorillapod" which is mounted to the top of a 2x4 cut at anangle like these arms.
You could also make a camera arm with a bracket much like these existing arms. I have made a little mockup in Maya. With nothing more than a board, some brackets,and a few wingnuts, you can have your own articulating arm. Actually, this system would work even better than the one I've made, and I will probably make somethinglike it for a future book scanner.
Image Notes1. not to scale
step 56: Camera Support: Final Notes.Mounting the camera arms is a little tricky because the lens of the camera is not in the center of the camera or perfectly on-axis with the arm. What this means is that youneed to mount the arm on the left and right side offset by a small amount. We simply eyeballed the cameras so that the extended lens assembly looked about in thecenter of the V-shaped thingy. Then we screwed them onto the countertop base.
In the future, I hope to flesh out this step of the book scanner instructable a bit more, and I'm looking forward to your input and ideas on more general camera arms, too.I'd have spent more time on them if I didn't have such great solutions at hand.
http://www.instructables.com/id/DIY-High-Speed-Book-Scanner-from-Trash-and-Cheap-C/
Image Notes1. Mounted further back to compensate for the offset of the camera. Both aremounted to center the lens on the center of the VST.2. Mounted further forward to compensate for the offset of the camera. Both aremounted to center the lens on the center of the VST.3. gawd, this material is ugly. couldn't they throw away some nice black stuff? ;)
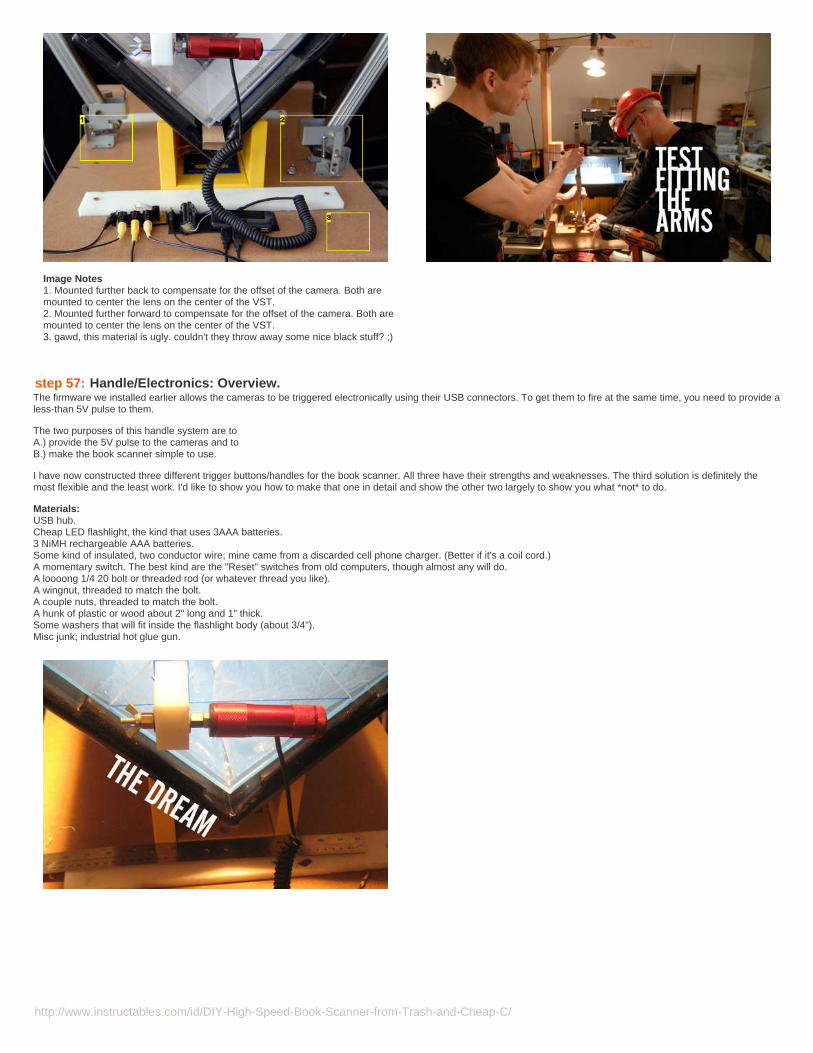
step 57: Handle/Electronics: Overview.The firmware we installed earlier allows the cameras to be triggered electronically using their USB connectors. To get them to fire at the same time, you need to provide aless-than 5V pulse to them.
The two purposes of this handle system are toA.) provide the 5V pulse to the cameras and toB.) make the book scanner simple to use.
I have now constructed three different trigger buttons/handles for the book scanner. All three have their strengths and weaknesses. The third solution is definitely themost flexible and the least work. I'd like to show you how to make that one in detail and show the other two largely to show you what *not* to do.
Materials:USB hub.Cheap LED flashlight, the kind that uses 3AAA batteries.3 NiMH rechargeable AAA batteries.Some kind of insulated, two conductor wire; mine came from a discarded cell phone charger. (Better if it's a coil cord.)A momentary switch. The best kind are the "Reset" switches from old computers, though almost any will do.A loooong 1/4 20 bolt or threaded rod (or whatever thread you like).A wingnut, threaded to match the bolt.A couple nuts, threaded to match the bolt.A hunk of plastic or wood about 2" long and 1" thick.Some washers that will fit inside the flashlight body (about 3/4").Misc junk; industrial hot glue gun.
http://www.instructables.com/id/DIY-High-Speed-Book-Scanner-from-Trash-and-Cheap-C/
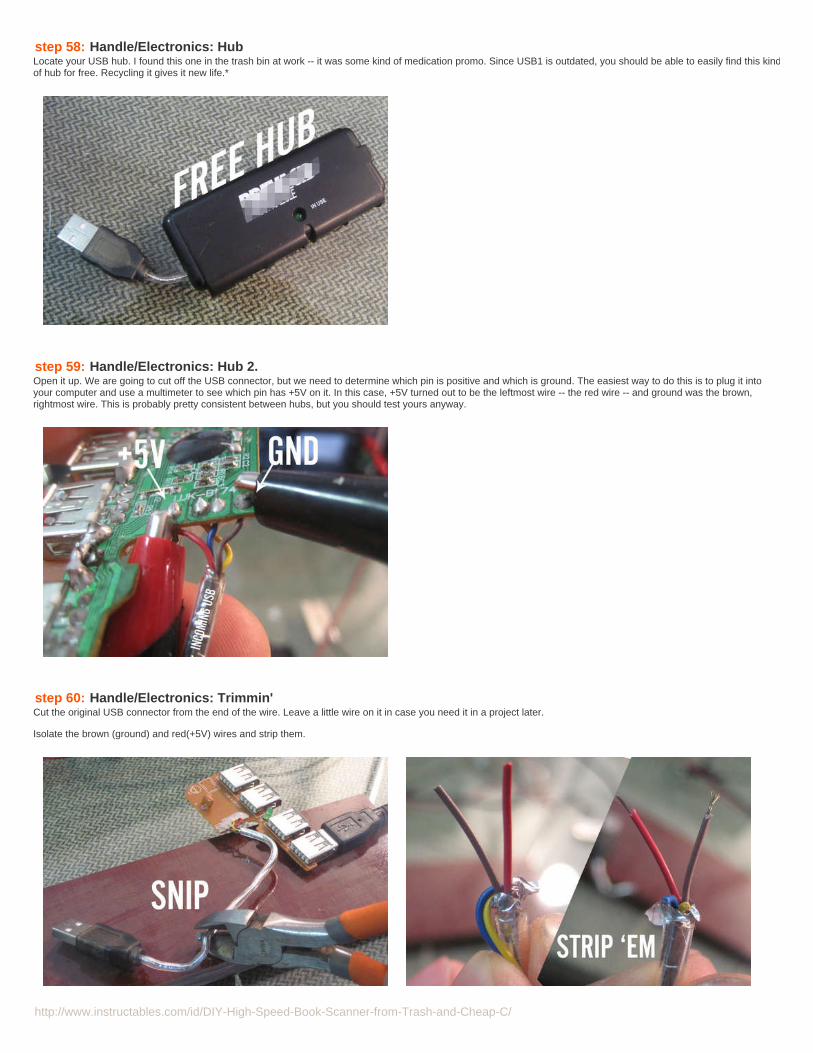
step 58: Handle/Electronics: HubLocate your USB hub. I found this one in the trash bin at work -- it was some kind of medication promo. Since USB1 is outdated, you should be able to easily find this kindof hub for free. Recycling it gives it new life.*
step 59: Handle/Electronics: Hub 2.Open it up. We are going to cut off the USB connector, but we need to determine which pin is positive and which is ground. The easiest way to do this is to plug it intoyour computer and use a multimeter to see which pin has +5V on it. In this case, +5V turned out to be the leftmost wire -- the red wire -- and ground was the brown,rightmost wire. This is probably pretty consistent between hubs, but you should test yours anyway.
step 60: Handle/Electronics: Trimmin'Cut the original USB connector from the end of the wire. Leave a little wire on it in case you need it in a project later.
Isolate the brown (ground) and red(+5V) wires and strip them.
http://www.instructables.com/id/DIY-High-Speed-Book-Scanner-from-Trash-and-Cheap-C/
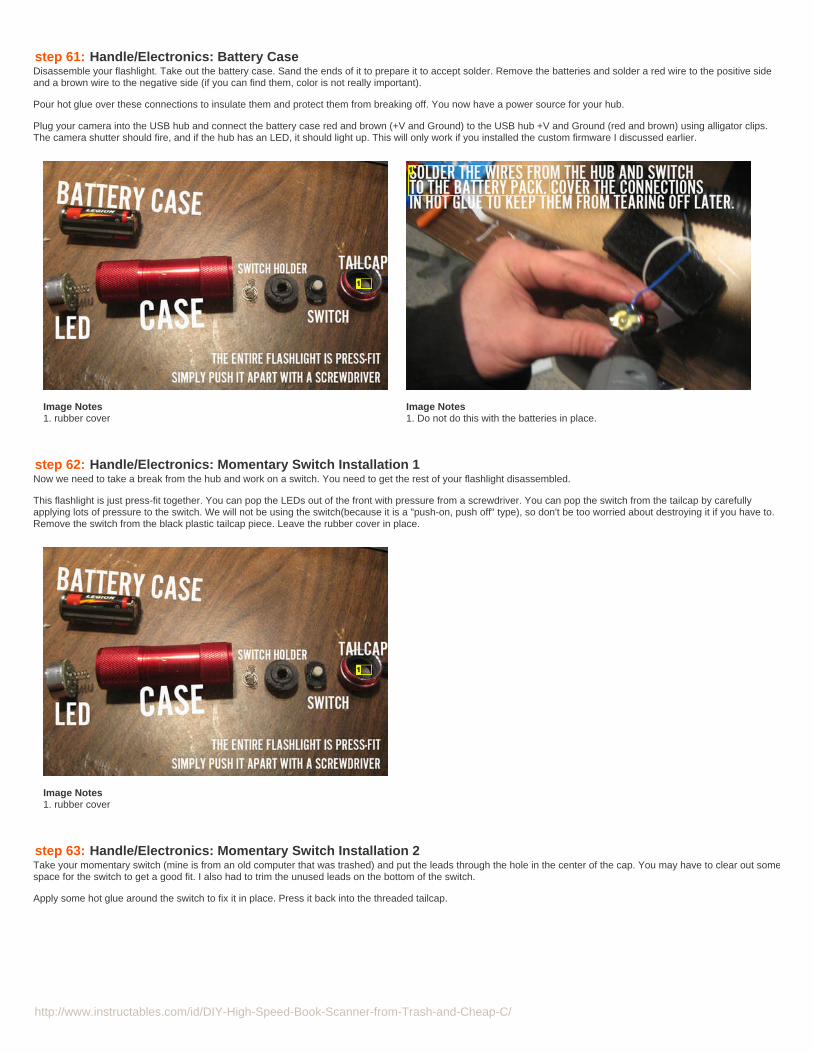
step 61: Handle/Electronics: Battery CaseDisassemble your flashlight. Take out the battery case. Sand the ends of it to prepare it to accept solder. Remove the batteries and solder a red wire to the positive sideand a brown wire to the negative side (if you can find them, color is not really important).
Pour hot glue over these connections to insulate them and protect them from breaking off. You now have a power source for your hub.
Plug your camera into the USB hub and connect the battery case red and brown (+V and Ground) to the USB hub +V and Ground (red and brown) using alligator clips.The camera shutter should fire, and if the hub has an LED, it should light up. This will only work if you installed the custom firmware I discussed earlier.
Image Notes1. rubber cover
Image Notes1. Do not do this with the batteries in place.
step 62: Handle/Electronics: Momentary Switch Installation 1Now we need to take a break from the hub and work on a switch. You need to get the rest of your flashlight disassembled.
This flashlight is just press-fit together. You can pop the LEDs out of the front with pressure from a screwdriver. You can pop the switch from the tailcap by carefullyapplying lots of pressure to the switch. We will not be using the switch(because it is a "push-on, push off" type), so don't be too worried about destroying it if you have to.Remove the switch from the black plastic tailcap piece. Leave the rubber cover in place.
Image Notes1. rubber cover
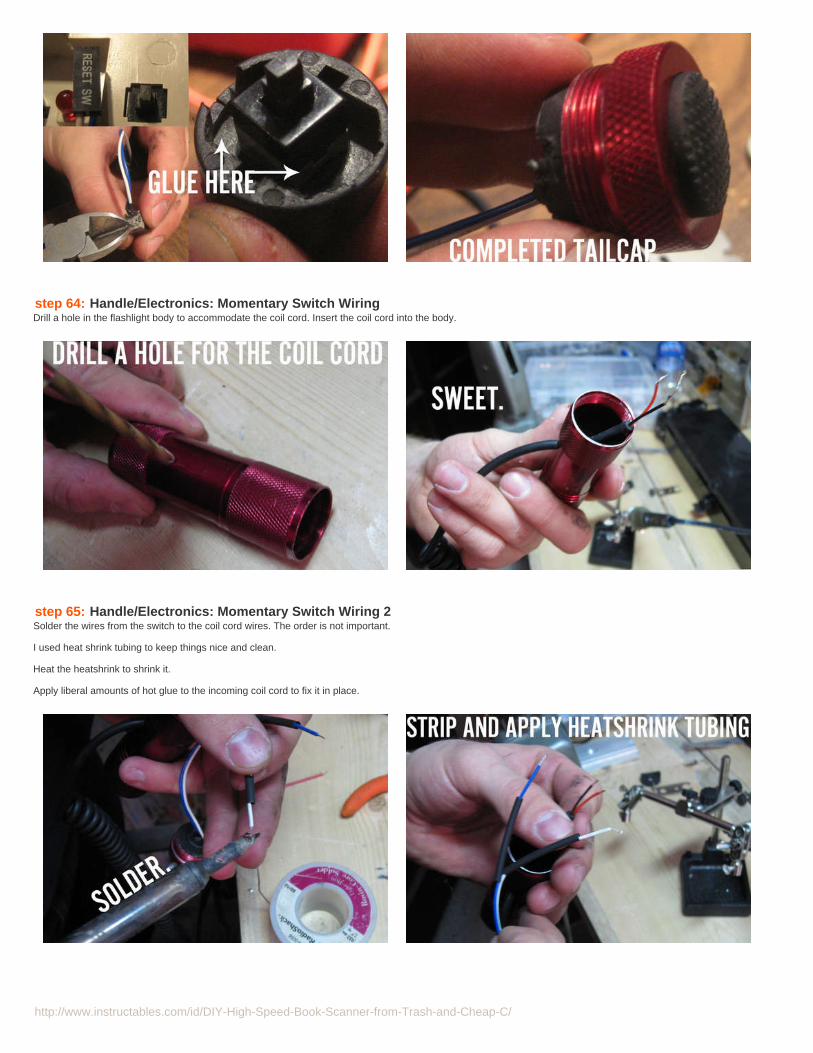
step 63: Handle/Electronics: Momentary Switch Installation 2Take your momentary switch (mine is from an old computer that was trashed) and put the leads through the hole in the center of the cap. You may have to clear out somespace for the switch to get a good fit. I also had to trim the unused leads on the bottom of the switch.
Apply some hot glue around the switch to fix it in place. Press it back into the threaded tailcap.
http://www.instructables.com/id/DIY-High-Speed-Book-Scanner-from-Trash-and-Cheap-C/
step 64: Handle/Electronics: Momentary Switch WiringDrill a hole in the flashlight body to accommodate the coil cord. Insert the coil cord into the body.
step 65: Handle/Electronics: Momentary Switch Wiring 2Solder the wires from the switch to the coil cord wires. The order is not important.
I used heat shrink tubing to keep things nice and clean.
Heat the heatshrink to shrink it.
Apply liberal amounts of hot glue to the incoming coil cord to fix it in place.
http://www.instructables.com/id/DIY-High-Speed-Book-Scanner-from-Trash-and-Cheap-C/
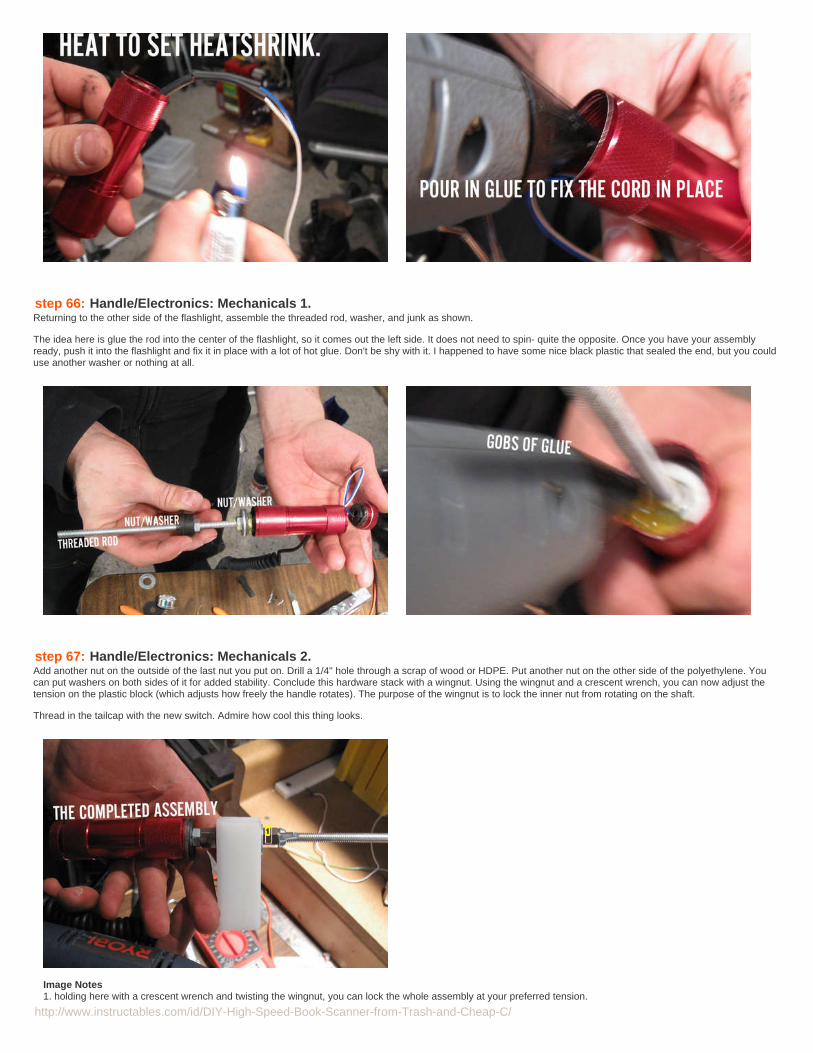
step 66: Handle/Electronics: Mechanicals 1.Returning to the other side of the flashlight, assemble the threaded rod, washer, and junk as shown.
The idea here is glue the rod into the center of the flashlight, so it comes out the left side. It does not need to spin- quite the opposite. Once you have your assemblyready, push it into the flashlight and fix it in place with a lot of hot glue. Don't be shy with it. I happened to have some nice black plastic that sealed the end, but you coulduse another washer or nothing at all.
step 67: Handle/Electronics: Mechanicals 2.Add another nut on the outside of the last nut you put on. Drill a 1/4" hole through a scrap of wood or HDPE. Put another nut on the other side of the polyethylene. Youcan put washers on both sides of it for added stability. Conclude this hardware stack with a wingnut. Using the wingnut and a crescent wrench, you can now adjust thetension on the plastic block (which adjusts how freely the handle rotates). The purpose of the wingnut is to lock the inner nut from rotating on the shaft.
Thread in the tailcap with the new switch. Admire how cool this thing looks.
Image Notes1. holding here with a crescent wrench and twisting the wingnut, you can lock the whole assembly at your preferred tension.
http://www.instructables.com/id/DIY-High-Speed-Book-Scanner-from-Trash-and-Cheap-C/
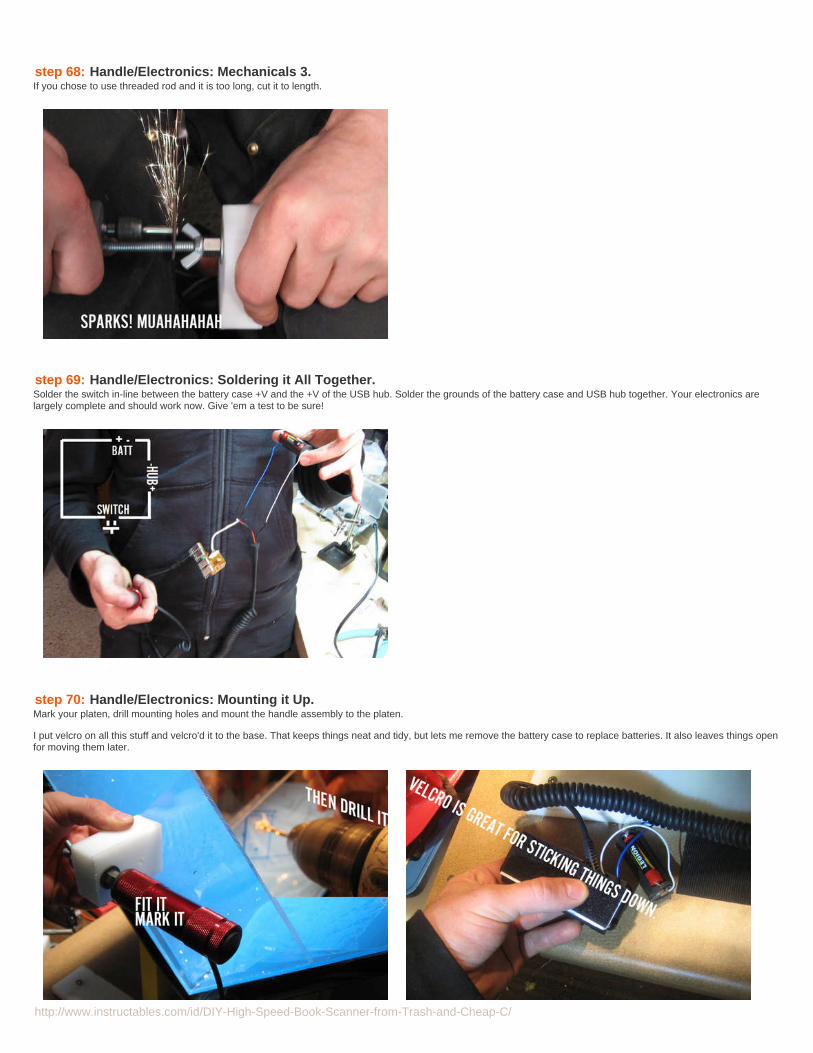
step 68: Handle/Electronics: Mechanicals 3.If you chose to use threaded rod and it is too long, cut it to length.
step 69: Handle/Electronics: Soldering it All Together.Solder the switch in-line between the battery case +V and the +V of the USB hub. Solder the grounds of the battery case and USB hub together. Your electronics arelargely complete and should work now. Give 'em a test to be sure!
step 70: Handle/Electronics: Mounting it Up.Mark your platen, drill mounting holes and mount the handle assembly to the platen.
I put velcro on all this stuff and velcro'd it to the base. That keeps things neat and tidy, but lets me remove the battery case to replace batteries. It also leaves things openfor moving them later.
http://www.instructables.com/id/DIY-High-Speed-Book-Scanner-from-Trash-and-Cheap-C/
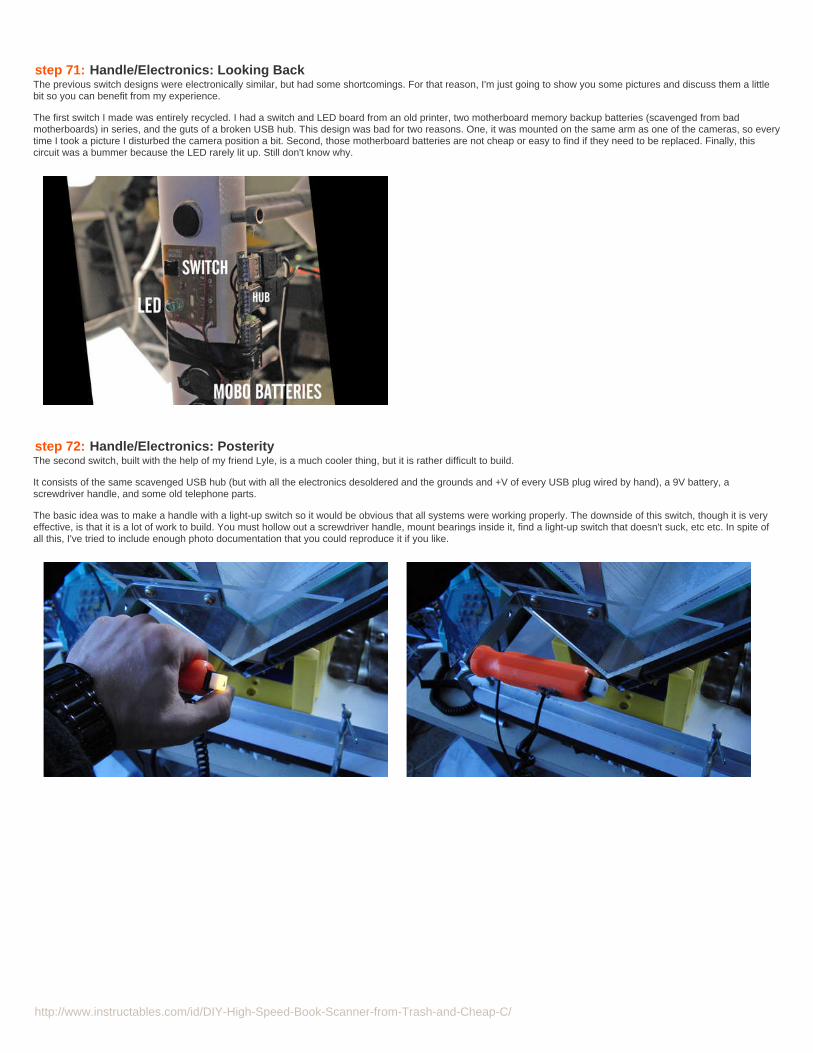
step 71: Handle/Electronics: Looking BackThe previous switch designs were electronically similar, but had some shortcomings. For that reason, I'm just going to show you some pictures and discuss them a littlebit so you can benefit from my experience.
The first switch I made was entirely recycled. I had a switch and LED board from an old printer, two motherboard memory backup batteries (scavenged from badmotherboards) in series, and the guts of a broken USB hub. This design was bad for two reasons. One, it was mounted on the same arm as one of the cameras, so everytime I took a picture I disturbed the camera position a bit. Second, those motherboard batteries are not cheap or easy to find if they need to be replaced. Finally, thiscircuit was a bummer because the LED rarely lit up. Still don't know why.
step 72: Handle/Electronics: PosterityThe second switch, built with the help of my friend Lyle, is a much cooler thing, but it is rather difficult to build.
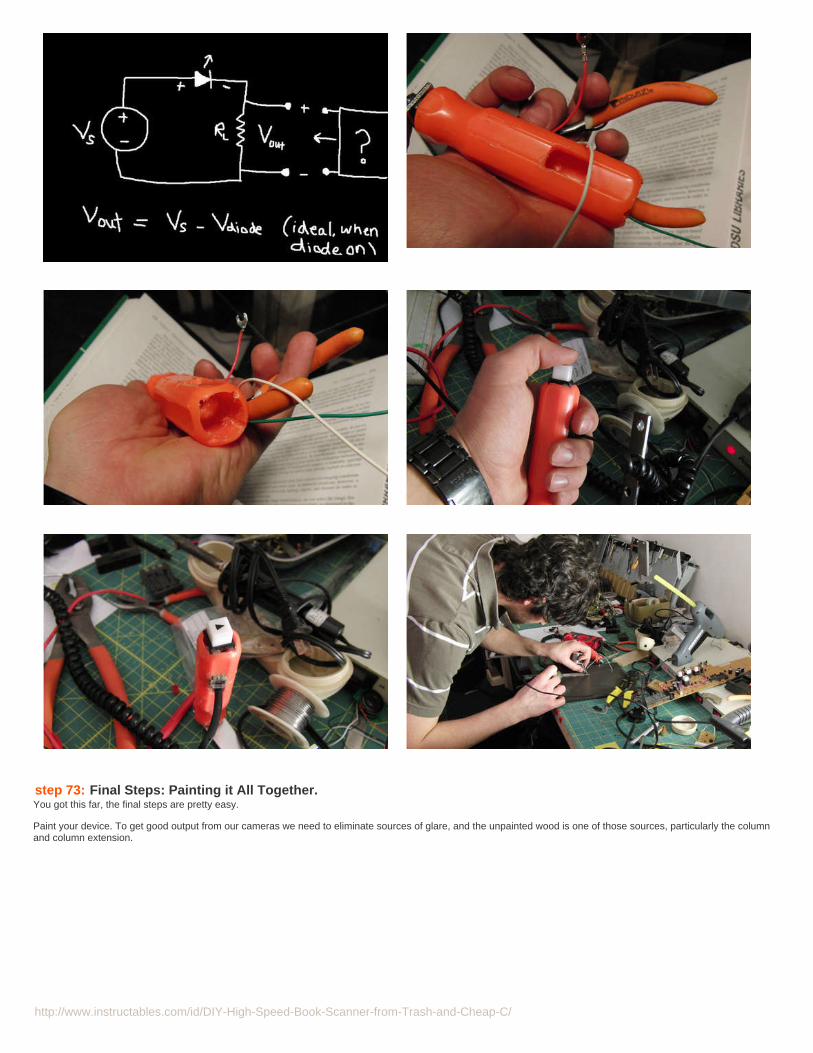
It consists of the same scavenged USB hub (but with all the electronics desoldered and the grounds and +V of every USB plug wired by hand), a 9V battery, ascrewdriver handle, and some old telephone parts.
The basic idea was to make a handle with a light-up switch so it would be obvious that all systems were working properly. The downside of this switch, though it is veryeffective, is that it is a lot of work to build. You must hollow out a screwdriver handle, mount bearings inside it, find a light-up switch that doesn't suck, etc etc. In spite ofall this, I've tried to include enough photo documentation that you could reproduce it if you like.
http://www.instructables.com/id/DIY-High-Speed-Book-Scanner-from-Trash-and-Cheap-C/
step 73: Final Steps: Painting it All Together.You got this far, the final steps are pretty easy.
Paint your device. To get good output from our cameras we need to eliminate sources of glare, and the unpainted wood is one of those sources, particularly the columnand column extension.

http://www.instructables.com/id/DIY-High-Speed-Book-Scanner-from-Trash-and-Cheap-C/
step 74: Final Steps: Which Cameras??At the time of this writing, the best camera for this task is the Canon Powershot A590 IS. It has enough resolution, enough manual control, works with CHDK/StereodataMaker, and often goes on sale online for $100. The price made this scanner possible.
You may use other cameras, but be sure they are on the supported list of StereoData Maker. Any camera that can run SDM will probably work, but again, these are thebest. Keep in mind that ONLY CANON POWERSHOT CAMERAS WORK WITH CHDK/STEREODATA MAKER.
If you need more help with StereoData Maker, please post in the comments, or better still, sign up forthe official Yahoo Group.Many knowledgeable users -- and thedevelopers of SDM -- hang out there.
Now I know many of the people reading this are probably college students. You can substantially reduce the cost of your book scanner by agreeing with your roommateor pals to buy the same cameras. You don't need a book scanner every day, so you can just borrow each other the cameras for a few days at a time.
step 75: Final Steps: Plugging it All Together and Powering it UPHopefully your cameras have arrived by now.
Plug your main outlet strip into the wall.
Plug your TV into the outlet strip.
Plug your lights into the outlet strip.
Put fresh rechargeable AAs into your cameras. I recommend Sanyo Eneloop NiMH batteries.
Put fresh rechargeable AAAs into the battery holder for the hub.
Plug the cameras into the hub using the USB cables that came with the cameras.
Plug the video cables (that come with the cameras) into your video switch.
Turn everything on.
Center your lights over the platen.
Revel in the glory that is your machine.
http://www.instructables.com/id/DIY-High-Speed-Book-Scanner-from-Trash-and-Cheap-C/
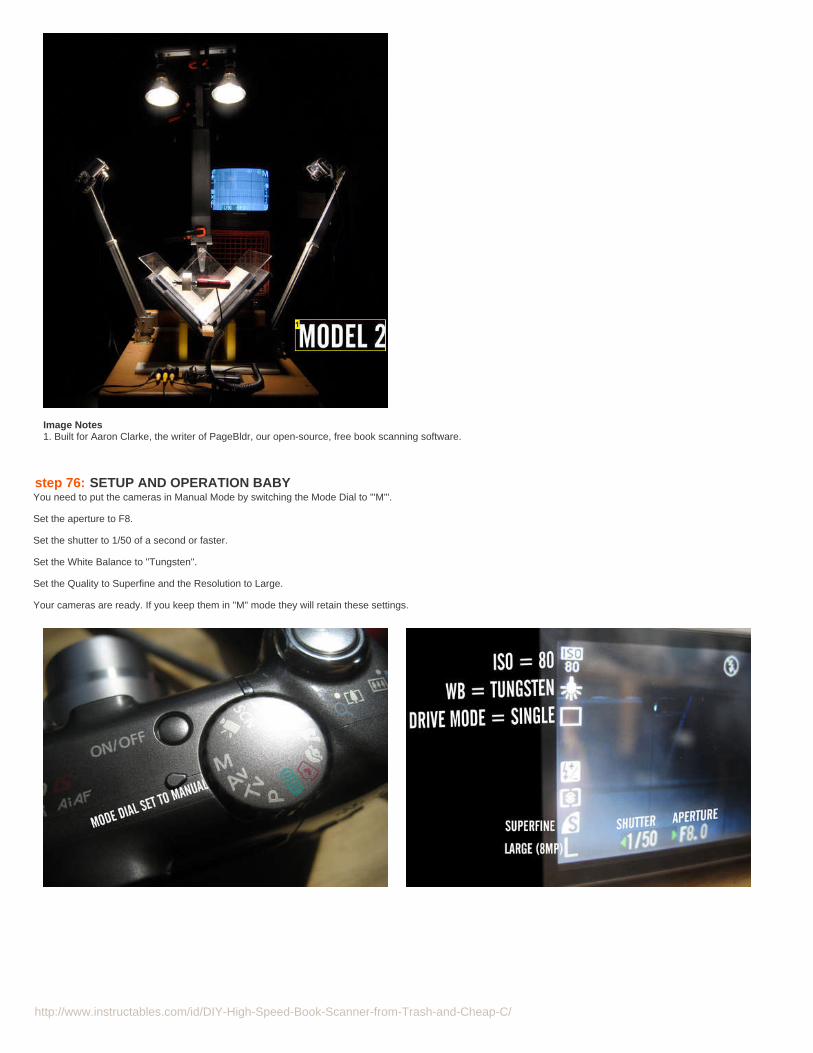
Image Notes1. Built for Aaron Clarke, the writer of PageBldr, our open-source, free book scanning software.
step 76: SETUP AND OPERATION BABYYou need to put the cameras in Manual Mode by switching the Mode Dial to "'M'".
Set the aperture to F8.
Set the shutter to 1/50 of a second or faster.
Set the White Balance to "Tungsten".
Set the Quality to Superfine and the Resolution to Large.
Your cameras are ready. If you keep them in "M" mode they will retain these settings.
http://www.instructables.com/id/DIY-High-Speed-Book-Scanner-from-Trash-and-Cheap-C/
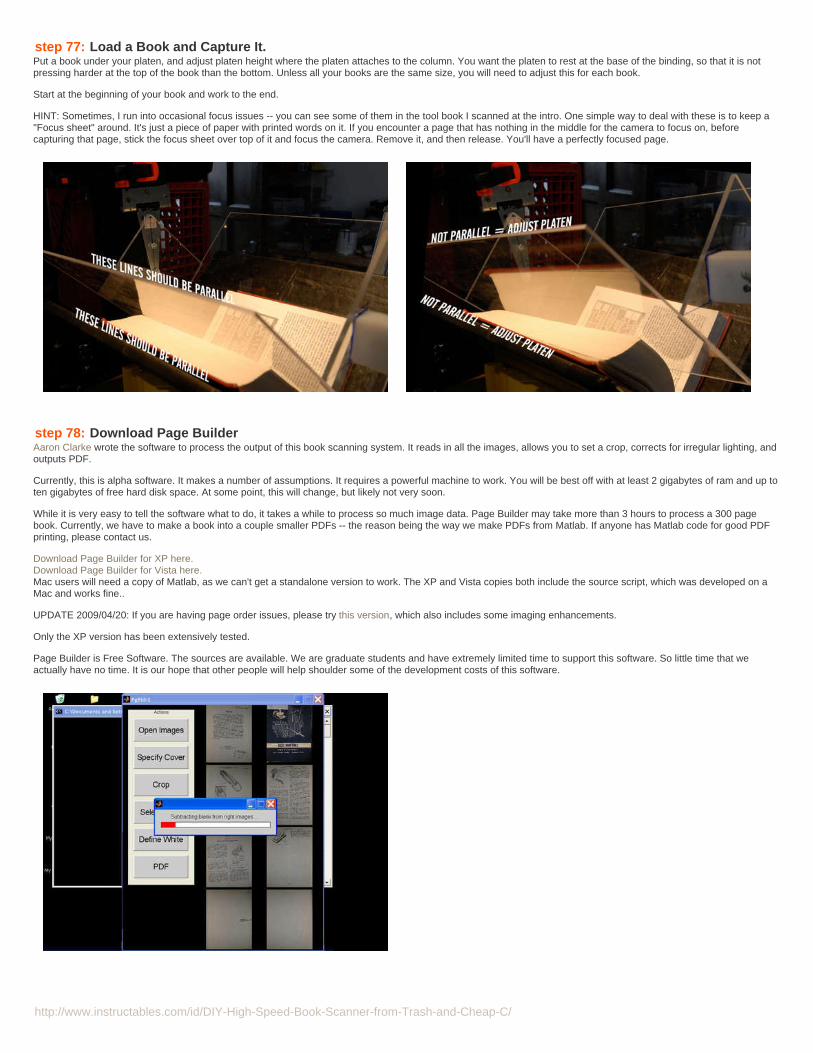
step 77: Load a Book and Capture It.Put a book under your platen, and adjust platen height where the platen attaches to the column. You want the platen to rest at the base of the binding, so that it is notpressing harder at the top of the book than the bottom. Unless all your books are the same size, you will need to adjust this for each book.
Start at the beginning of your book and work to the end.
HINT: Sometimes, I run into occasional focus issues -- you can see some of them in the tool book I scanned at the intro. One simple way to deal with these is to keep a"Focus sheet" around. It's just a piece of paper with printed words on it. If you encounter a page that has nothing in the middle for the camera to focus on, beforecapturing that page, stick the focus sheet over top of it and focus the camera. Remove it, and then release. You'll have a perfectly focused page.
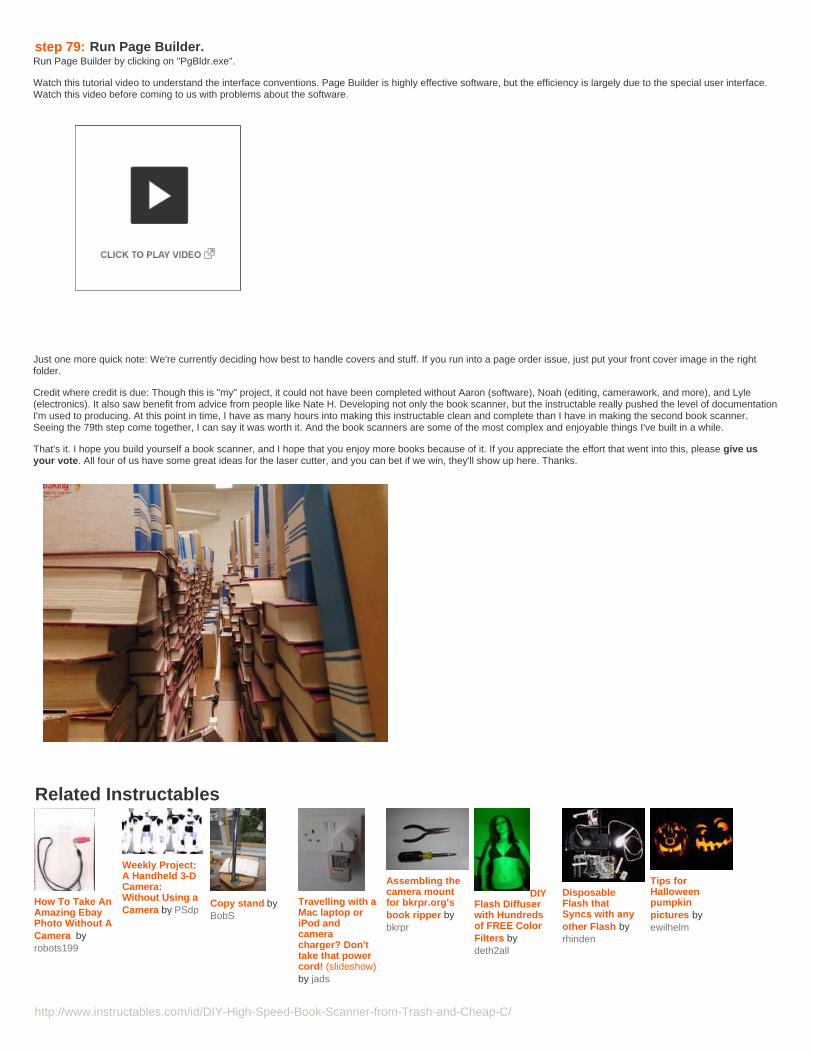
step 78: Download Page BuilderAaron Clarke wrote the software to process the output of this book scanning system. It reads in all the images, allows you to set a crop, corrects for irregular lighting, andoutputs PDF.
Currently, this is alpha software. It makes a number of assumptions. It requires a powerful machine to work. You will be best off with at least 2 gigabytes of ram and up toten gigabytes of free hard disk space. At some point, this will change, but likely not very soon.
While it is very easy to tell the software what to do, it takes a while to process so much image data. Page Builder may take more than 3 hours to process a 300 pagebook. Currently, we have to make a book into a couple smaller PDFs -- the reason being the way we make PDFs from Matlab. If anyone has Matlab code for good PDFprinting, please contact us.
Download Page Builder for XP here.Download Page Builder for Vista here.Mac users will need a copy of Matlab, as we can't get a standalone version to work. The XP and Vista copies both include the source script, which was developed on aMac and works fine..
UPDATE 2009/04/20: If you are having page order issues, please try this version, which also includes some imaging enhancements.
Only the XP version has been extensively tested.
Page Builder is Free Software. The sources are available. We are graduate students and have extremely limited time to support this software. So little time that weactually have no time. It is our hope that other people will help shoulder some of the development costs of this software.
http://www.instructables.com/id/DIY-High-Speed-Book-Scanner-from-Trash-and-Cheap-C/
step 79: Run Page Builder.Run Page Builder by clicking on "PgBldr.exe".
Watch this tutorial video to understand the interface conventions. Page Builder is highly effective software, but the efficiency is largely due to the special user interface.Watch this video before coming to us with problems about the software.
Video
Just one more quick note: We're currently deciding how best to handle covers and stuff. If you run into a page order issue, just put your front cover image in the rightfolder.
Credit where credit is due: Though this is "my" project, it could not have been completed without Aaron (software), Noah (editing, camerawork, and more), and Lyle(electronics). It also saw benefit from advice from people like Nate H. Developing not only the book scanner, but the instructable really pushed the level of documentationI'm used to producing. At this point in time, I have as many hours into making this instructable clean and complete than I have in making the second book scanner.Seeing the 79th step come together, I can say it was worth it. And the book scanners are some of the most complex and enjoyable things I've built in a while.
That's it. I hope you build yourself a book scanner, and I hope that you enjoy more books because of it. If you appreciate the effort that went into this, please give usyour vote. All four of us have some great ideas for the laser cutter, and you can bet if we win, they'll show up here. Thanks.
Related Instructables
How To Take AnAmazing EbayPhoto Without ACamera byrobots199
Weekly Project:A Handheld 3-DCamera:Without Using aCamera by PSdp
Copy stand byBobS
Travelling with aMac laptop oriPod andcameracharger? Don'ttake that powercord! (slideshow)by jads
Assembling thecamera mountfor bkrpr.org'sbook ripper bybkrpr
DIYFlash Diffuserwith Hundredsof FREE ColorFilters bydeth2all
DisposableFlash thatSyncs with anyother Flash byrhinden
Tips forHalloweenpumpkinpictures byewilhelm

http://www.instructables.com/id/DIY-High-Speed-Book-Scanner-from-Trash-and-Cheap-C/
Advertisements
Comments50 comments Add Comment view all 351 comments
you1 says: May 27, 2009. 7:53 PM REPLYI'm moving my post to the Camera page, to keep my post relavant to the webpage.
When pusing the USB connection button to the two cameras:The first push on the button causes the cameras to focuse on the pages,and a second push on the button will capture the images.
Alternatively, holding the button down for a longer duration (aboult half a second) will refocus the cameras and then capture the images.
Question: Is it possible to capture an image on every button press (quick click) without a re-focus, and capture a re-focused image by holding the buttondown a bit longer (long clicks)?
For example: click, click, click, (long click for re-focused capture), repeat.
StereoDataMaker http://stereo.jpn.org/eng/sdm/quick.htm talks about Ricoh CA-1 switch unit; however, I'm not quite sure how to utilize it with the USB hub.
This addition will make capture quicker (imagine 1000+ pages); additionally, we don't have to worry about the camera not focusing properly when half thepage does not have any content.
daniel_reetz says: May 27, 2009. 10:04 PM REPLYI have thought a lot about implementing similar behavior. But my idea was a little different. Basically, I want to have StereoDataMaker attempt focusevery time, but if for some reason it can't find focus, it should revert to the previous position.
I am confident this is possible with a script loaded into SDM. However, I haven't had the time to work on it at all.
The Ricoh switch unit has some desirable properties, but it's not so different from the hub solution I've made.
you1 says: Jun 9, 2009. 4:33 AM REPLYI created script to put the remote button on steroids :D.
Here is a link to the discussion thread: http://www.diybookscanner.org/forum/viewtopic.php?f=3&t=9&p=59#p59
Here is a link to the script:http://www.mind2b.com/component/content/article/9-info/9-multiple-camera-remote-control-button-software
Best,Edvin
daniel_reetz says: Jun 9, 2009. 6:23 AM REPLYTotally, completely, absolutely, awesome. Can't wait to try this!!
daniel_reetz says: May 27, 2009. 10:04 PM REPLYBy previous position, I mean previous focus position.
james415 says: Jun 6, 2009. 9:06 AM REPLYGLASS PLATEN *UPDATE*
OK, I am back with a new sliding mechanism for the glass platen carrier I posted a few days ago. It is again pretty self explanatory but I will give thehighlights. Note: please ignore the metal ruler that is used to pose scanner for her photos. It is not part of the design.
1. Add a second 4" column, so there is one on each side. Make sure to allow room for the book to slide left and right.
2. Attach a set of slides to each pillar for each side of the carrier to ride on. These should be of the roller variety for the sake of smooth operation. In my case,these match the slides used on the bottom.
3. Attach a set of braces to each side of the platen carrier that will connect to the slides on the pillars.
That is pretty much it. The entire thing moves vertically as high as you would like to go. There is no interference with the book in any way. The slide is lightenough to move with one finger, but you could probably add springs or weights to make is even easier.
I am working on a set of adjestable camera mounts that will attach to each side of the platen. Other than that, it is more or less complete.
I plan on scanning one book per day until my library it complete. After that, it is just a quick scan every time I buy a new book.
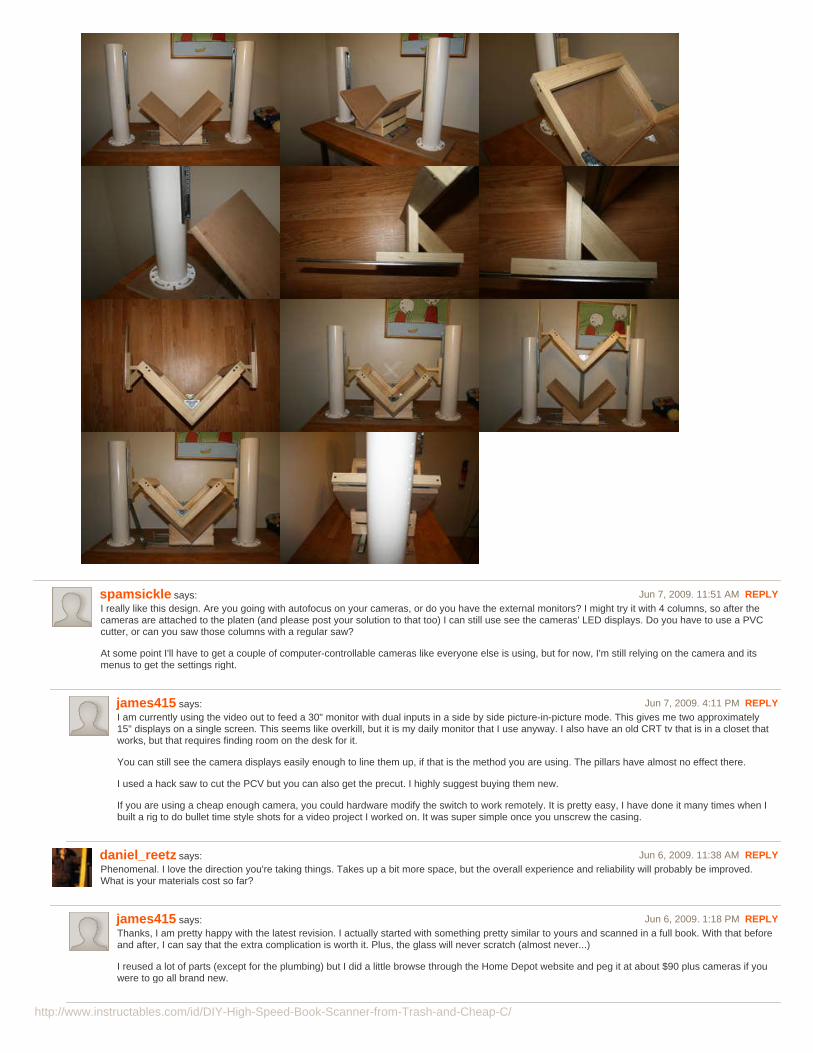
http://www.instructables.com/id/DIY-High-Speed-Book-Scanner-from-Trash-and-Cheap-C/
spamsickle says: Jun 7, 2009. 11:51 AM REPLYI really like this design. Are you going with autofocus on your cameras, or do you have the external monitors? I might try it with 4 columns, so after thecameras are attached to the platen (and please post your solution to that too) I can still use see the cameras' LED displays. Do you have to use a PVCcutter, or can you saw those columns with a regular saw?
At some point I'll have to get a couple of computer-controllable cameras like everyone else is using, but for now, I'm still relying on the camera and itsmenus to get the settings right.
james415 says: Jun 7, 2009. 4:11 PM REPLYI am currently using the video out to feed a 30" monitor with dual inputs in a side by side picture-in-picture mode. This gives me two approximately15" displays on a single screen. This seems like overkill, but it is my daily monitor that I use anyway. I also have an old CRT tv that is in a closet thatworks, but that requires finding room on the desk for it.
You can still see the camera displays easily enough to line them up, if that is the method you are using. The pillars have almost no effect there.
I used a hack saw to cut the PCV but you can also get the precut. I highly suggest buying them new.
If you are using a cheap enough camera, you could hardware modify the switch to work remotely. It is pretty easy, I have done it many times when Ibuilt a rig to do bullet time style shots for a video project I worked on. It was super simple once you unscrew the casing.
daniel_reetz says: Jun 6, 2009. 11:38 AM REPLYPhenomenal. I love the direction you're taking things. Takes up a bit more space, but the overall experience and reliability will probably be improved.What is your materials cost so far?
james415 says: Jun 6, 2009. 1:18 PM REPLYThanks, I am pretty happy with the latest revision. I actually started with something pretty similar to yours and scanned in a full book. With that beforeand after, I can say that the extra complication is worth it. Plus, the glass will never scratch (almost never...)
I reused a lot of parts (except for the plumbing) but I did a little browse through the Home Depot website and peg it at about $90 plus cameras if youwere to go all brand new.

http://www.instructables.com/id/DIY-High-Speed-Book-Scanner-from-Trash-and-Cheap-C/
jradi says: Jun 7, 2009. 3:16 AM REPLYThat's a beautiful design, I'll definitely migrate to it with V2. I thought you said the glas platen with that wooden frame was heavy? How can you liftit with just a finger?
You should also think about posting a copy to the diybookscanner site!
james415 says: Jun 7, 2009. 4:04 PM REPLYJradi, you should be able to replicate it without too much trouble. I am working on some more details to post as well.
The wood and glass is definitely "heavier" than Lexan, but still pretty light. I would say about 3 pounds. Definitely "one finger" possible(although probably not the most convenient way to operate. I am also experimenting with some old fashioned window sash stylecounterweight on pulleys and cords running into the pillars.
I am working on a post for the diybookscanner site and hope to see you there.
daniel_reetz says: Jun 6, 2009. 4:15 PM REPLYYO! Everyone!
If you're building a book scanner or even thinking about building a book scanner, please join us at DIYBOOKSCANNER.ORG. We have a forum where youcan start your own project log, and there's a lot more coming. Instructables has been absolutely great, but we're really pushing the limits of legibility with theircomment system. Hope to see you there!
AutumnJazz says: Jun 4, 2009. 6:28 PM REPLYMost, if not all cameras made in the past few years, allow you to set a custom white balance. Just point them at a white surface (or borrow an Expodisc), hitwhatever the camera calls its custom white balance function, and there you go. Perfect color.
daniel_reetz says: Jun 5, 2009. 11:44 AM REPLYYou don't need to use custom white balance if you use the bulbs I suggested and the white balance I suggested. It's simple and consistent to do it thisway.
AutumnJazz says: Jun 5, 2009. 1:55 PM REPLYWith the software, which seems to white balance anyway, I don't think camera WB matters much.
daniel_reetz says: Jun 5, 2009. 2:06 PM REPLYIt does make a pretty big difference, because if you set it incorrectly you can have bad (clipping) data in one or more color channels.
AutumnJazz says: Jun 4, 2009. 6:56 PM REPLY1/50 and f/8 won't always result in the same exposure if different lighting is used, or if the book is really glossy.
daniel_reetz says: Jun 5, 2009. 11:46 AM REPLYThat's true, but it's obvious and not a problem. I suspect people can figure out how to set different shutter speeds if they don't use the bulbs Irecommend.
Gloss has little to do with exposure. However, pages which are mostly white will indeed shift the exposure meter reading up.
dark_slasher91 says: Jun 4, 2009. 12:46 AM REPLYHi its me again.
Regarding step #15, it says the miter box has a length of 14 in but how high is it?
jradi says: Jun 5, 2009. 5:20 AM REPLYHeight isn't super critical. It has to be high enough to support a right angle (the book cradle) without the corner touching the bottom. The height isdependent on the width of the miter box. I assume you're asking because you're building one yourself. If that's the case, then keep in mind that the widerit is, the more sturdy it will hold the cradle, but the higher the sides have to be. The narrower the miter box, the shorer the sides can be, but it will be lessstable.
The other option is to cut a right triangle into the sides so the cradle can rest right in it, maybe even be screwed into the endcaps. That seems to be thedirection most people are going now, combined with the sliding keyboard glides.
jradi says: May 21, 2009. 4:15 AM REPLYJust got my two cameras, now I'm off to try and make the switch first. It's the part that I'm most nervous about and I like to start projects from the hardeststep first to figure out if it's worth it. I have the advantage of a big budget, so I've been trying to find an alternative method to soldering. Despite yourassurances, I've ruined many projects trying to solder - I just form beads of solder that won't stick to anything!
Anyway, for the arms, I was thinking of using a variation of a goosenecked lamp arm to make them totally positionable. Found an idea on Make:
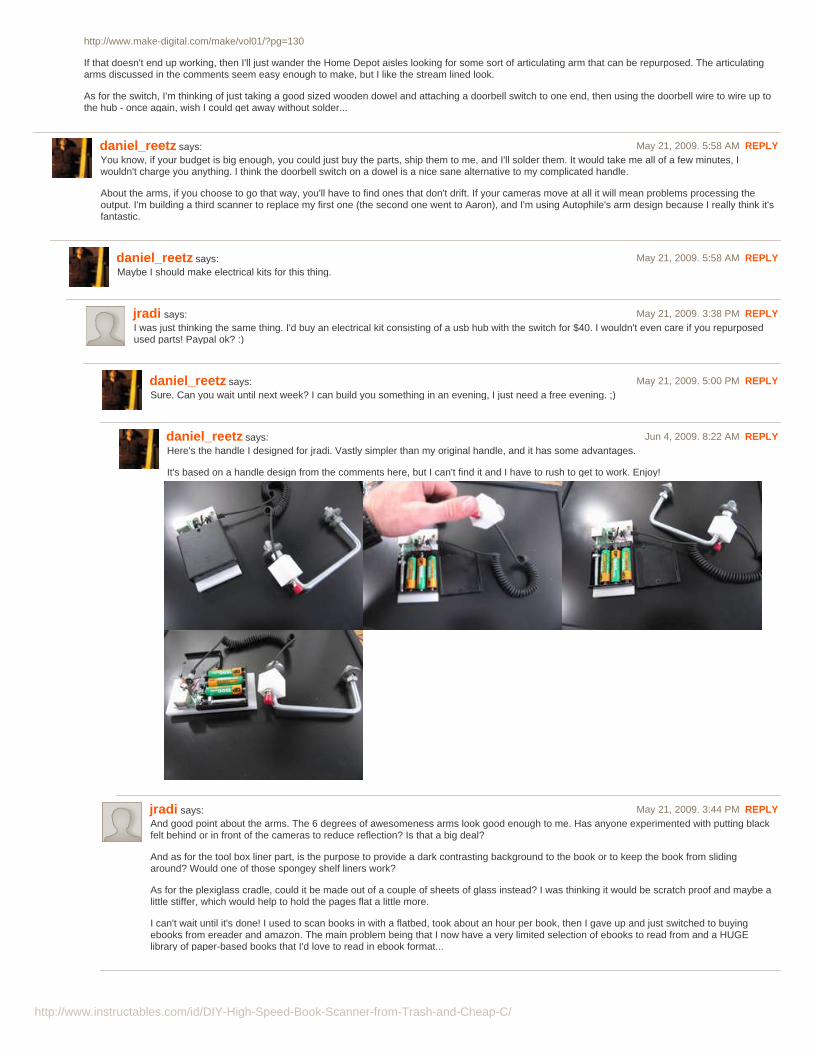
http://www.instructables.com/id/DIY-High-Speed-Book-Scanner-from-Trash-and-Cheap-C/
http://www.make-digital.com/make/vol01/?pg=130
If that doesn't end up working, then I'll just wander the Home Depot aisles looking for some sort of articulating arm that can be repurposed. The articulatingarms discussed in the comments seem easy enough to make, but I like the stream lined look.
As for the switch, I'm thinking of just taking a good sized wooden dowel and attaching a doorbell switch to one end, then using the doorbell wire to wire up tothe hub - once again, wish I could get away without solder...
daniel_reetz says: May 21, 2009. 5:58 AM REPLYYou know, if your budget is big enough, you could just buy the parts, ship them to me, and I'll solder them. It would take me all of a few minutes, Iwouldn't charge you anything. I think the doorbell switch on a dowel is a nice sane alternative to my complicated handle.
About the arms, if you choose to go that way, you'll have to find ones that don't drift. If your cameras move at all it will mean problems processing theoutput. I'm building a third scanner to replace my first one (the second one went to Aaron), and I'm using Autophile's arm design because I really think it'sfantastic.
daniel_reetz says: May 21, 2009. 5:58 AM REPLYMaybe I should make electrical kits for this thing.
jradi says: May 21, 2009. 3:38 PM REPLYI was just thinking the same thing. I'd buy an electrical kit consisting of a usb hub with the switch for $40. I wouldn't even care if you repurposedused parts! Paypal ok? :)
daniel_reetz says: May 21, 2009. 5:00 PM REPLYSure. Can you wait until next week? I can build you something in an evening, I just need a free evening. ;)
daniel_reetz says: Jun 4, 2009. 8:22 AM REPLYHere's the handle I designed for jradi. Vastly simpler than my original handle, and it has some advantages.
It's based on a handle design from the comments here, but I can't find it and I have to rush to get to work. Enjoy!
jradi says: May 21, 2009. 3:44 PM REPLYAnd good point about the arms. The 6 degrees of awesomeness arms look good enough to me. Has anyone experimented with putting blackfelt behind or in front of the cameras to reduce reflection? Is that a big deal?
And as for the tool box liner part, is the purpose to provide a dark contrasting background to the book or to keep the book from slidingaround? Would one of those spongey shelf liners work?
As for the plexiglass cradle, could it be made out of a couple of sheets of glass instead? I was thinking it would be scratch proof and maybe alittle stiffer, which would help to hold the pages flat a little more.
I can't wait until it's done! I used to scan books in with a flatbed, took about an hour per book, then I gave up and just switched to buyingebooks from ereader and amazon. The main problem being that I now have a very limited selection of ebooks to read from and a HUGElibrary of paper-based books that I'd love to read in ebook format...

http://www.instructables.com/id/DIY-High-Speed-Book-Scanner-from-Trash-and-Cheap-C/
daniel_reetz says: May 21, 2009. 5:03 PM REPLYReflection is something Autophile and I are both actively dealing with. Basically, if you're OK with a little page skew, you can easily dealwith reflection by positioning the cameras just so. Otherwise, yes, I have tried black felt and it does help, but it's not the best solution.Aaron and I are currently tinkering with PageBuilder to handle skew.
The purpose of the tool box liner is to keep the book from sliding AND to provide a black background. Black because then that light isabsorbed rather than causing even more glare off the cameras. I can send you a roll of the right stuff. It's $7 or $8 at Harbor Freight Tools.
If you figure out a good way to make a glass platen, let me know. :(
I can't wait until my whole library is digital. My plan is to make it happen by July. Well, at least to have all the scanning done, processingcan take forever if it needs to.
spamsickle says: May 25, 2009. 11:19 PM REPLYIt seems to me that black cloth WOULD be the best solution. Offsetting the camera can eliminate the camera reflection (if you can geta general deskew post-processing program working), but you'll still be dealing with all the other environmental reflections. With booksthat are mostly text, that shouldn't be a problem, because the white page should wash out the reflections and the remaining reflectionsin the black text are probably broken up enough that they won't be distracting, but with art books, the reflection of the corner of theceiling in the room you're scanning isn't something you can deskew your way out of.
I have cameras (one compact, one DSLR), wood, and spare plexiglass, so I'll be cobbling together something this week. Initially, I'mplanning to manually trigger the cameras, as in the bkrpr setup, because I want to get something built and working ASAP. I'll be goingwith black cloth both in front of the camera and behind it, to try to eliminate everything except the reflection of the lens itself. Could youexpand on some of the problems you've encountered with this type of setup?
spamsickle says: Jun 8, 2009. 5:41 PM REPLYTo answer my own question, once I got it built, I found that reflections weren't really a problem unless there was an actualillumination source in the line of sight. Ambient reflections were simply washed out on normal text pages. I may still run into aproblem scanning dark images (haven't done that yet), but for 95% of the books I'm scanning, reflection doesn't look like it will bea problem.
james415 says: Jun 1, 2009. 9:28 PM REPLYGLASS PLATEN.
Here is my contribution.
I based this on the same basic pattern outlined above so I won't reiterate those steps. There are a few design improvements that could be added to anyalready completed scanner with minimal rework. Note, the cameras are mounted on two cheap tripods to either side of the scanner. This seems to workbetter than mounting on the platen directly, as the bkrpr project does, you mileage may vary. (I tried both).
The improvements are:
1. A ball bearing desk drawer slide for the book holder. This is silk smooth and basically self working. As you move through the book, it will creep over justfrom the pressure of the platen.
2. A vertical sliding hinge with a counter balance spring to make the platen neutrally buoyant (easy to lift). This keeps the platen parallel at all times and thereis no risk of pinching the book when lowering.
3. A more stable (and easier) rear support, built from 4" PVC and a matching toilet connection (both new please).
4. The glass platen. This is the one people seem to be asking for the most so I did it. It took about 1 hour with only hand tools, so it is very doable. I think thepictures are pretty self explanatory. You could also use a table router, but the ash strips work well. Please try to use a light hardwood, as it will be morestable and cut more precisely. The only thing that may need a bit of explanation is the 1/4" hardwood dowel running between the 1/32" glass panes. Thisruns through holes on either face of the platen carrier. This keeps the bottom corner of the assemble from attempting to spread, as well as giving the panes anice joint. This joint will keep the panes from chipping each other and also makes a nice rounded front to squeeze into the book spine. The glass is easilyreplaceable by sliding it out of each end. The clarity beats the 1/32" Lexan I used to prototype and will not scratch or attract dust.
Please excuse the photos, as the uploader mangled them. I have the originals in 15MP for anyone who needs a detail or something. Email me.
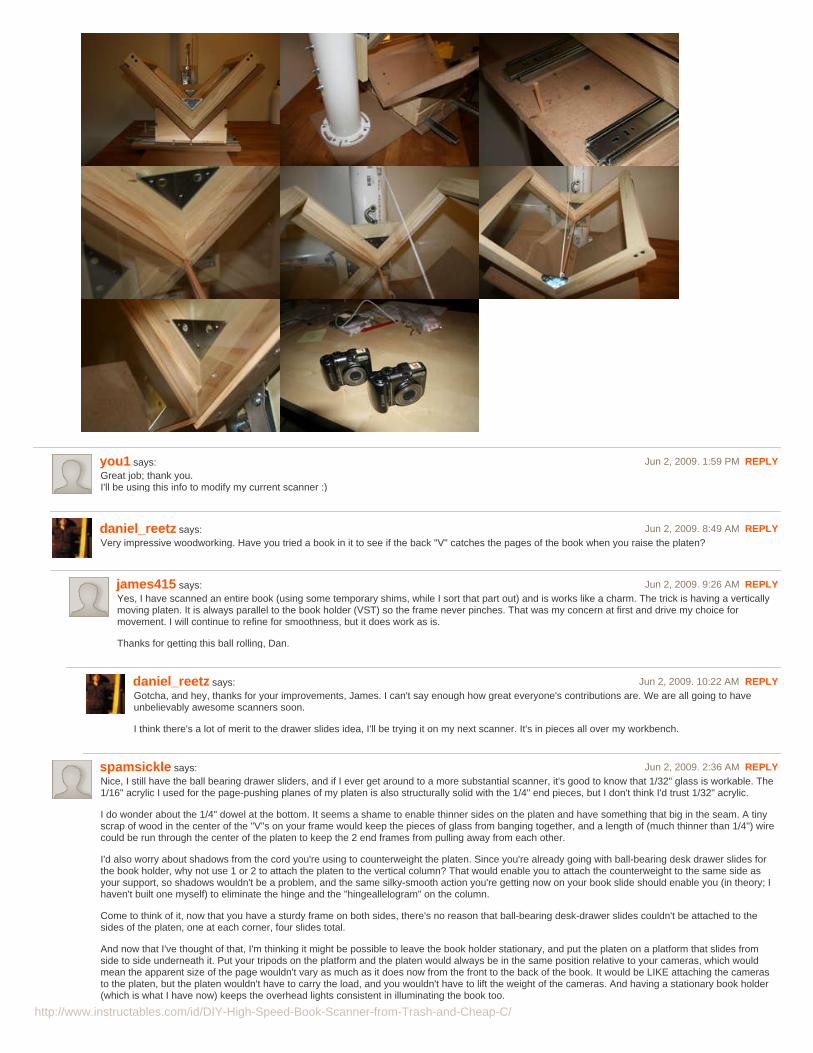
http://www.instructables.com/id/DIY-High-Speed-Book-Scanner-from-Trash-and-Cheap-C/
you1 says: Jun 2, 2009. 1:59 PM REPLYGreat job; thank you.I'll be using this info to modify my current scanner :)
daniel_reetz says: Jun 2, 2009. 8:49 AM REPLYVery impressive woodworking. Have you tried a book in it to see if the back "V" catches the pages of the book when you raise the platen?
james415 says: Jun 2, 2009. 9:26 AM REPLYYes, I have scanned an entire book (using some temporary shims, while I sort that part out) and is works like a charm. The trick is having a verticallymoving platen. It is always parallel to the book holder (VST) so the frame never pinches. That was my concern at first and drive my choice formovement. I will continue to refine for smoothness, but it does work as is.
Thanks for getting this ball rolling, Dan.
daniel_reetz says: Jun 2, 2009. 10:22 AM REPLYGotcha, and hey, thanks for your improvements, James. I can't say enough how great everyone's contributions are. We are all going to haveunbelievably awesome scanners soon.
I think there's a lot of merit to the drawer slides idea, I'll be trying it on my next scanner. It's in pieces all over my workbench.
spamsickle says: Jun 2, 2009. 2:36 AM REPLYNice, I still have the ball bearing drawer sliders, and if I ever get around to a more substantial scanner, it's good to know that 1/32" glass is workable. The1/16" acrylic I used for the page-pushing planes of my platen is also structurally solid with the 1/4" end pieces, but I don't think I'd trust 1/32" acrylic.
I do wonder about the 1/4" dowel at the bottom. It seems a shame to enable thinner sides on the platen and have something that big in the seam. A tinyscrap of wood in the center of the "V"s on your frame would keep the pieces of glass from banging together, and a length of (much thinner than 1/4") wirecould be run through the center of the platen to keep the 2 end frames from pulling away from each other.
I'd also worry about shadows from the cord you're using to counterweight the platen. Since you're already going with ball-bearing desk drawer slides forthe book holder, why not use 1 or 2 to attach the platen to the vertical column? That would enable you to attach the counterweight to the same side asyour support, so shadows wouldn't be a problem, and the same silky-smooth action you're getting now on your book slide should enable you (in theory; Ihaven't built one myself) to eliminate the hinge and the "hingeallelogram" on the column.
Come to think of it, now that you have a sturdy frame on both sides, there's no reason that ball-bearing desk-drawer slides couldn't be attached to thesides of the platen, one at each corner, four slides total.
And now that I've thought of that, I'm thinking it might be possible to leave the book holder stationary, and put the platen on a platform that slides fromside to side underneath it. Put your tripods on the platform and the platen would always be in the same position relative to your cameras, which wouldmean the apparent size of the page wouldn't vary as much as it does now from the front to the back of the book. It would be LIKE attaching the camerasto the platen, but the platen wouldn't have to carry the load, and you wouldn't have to lift the weight of the cameras. And having a stationary book holder(which is what I have now) keeps the overhead lights consistent in illuminating the book too.

http://www.instructables.com/id/DIY-High-Speed-Book-Scanner-from-Trash-and-Cheap-C/
You've inspired me again! I may get around to building a 2.0 for myself anyway now, if I get to a point where I'm not so busy scanning books...
daniel_reetz says: Jun 2, 2009. 8:48 AM REPLYSince you're already going with ball-bearing desk drawer slides for the book holder, why not use 1 or 2 to attach the platen to the vertical column?
Cool idea.
I've read your platform description a number of times, but I think a sketch would be really helpful to understand it better. Care to throw one together?
spamsickle says: Jun 2, 2009. 10:29 AM REPLYUpon reflection, I think the only way that particular innovation might be worthwhile is if the cameras are still attached to the platen rather than theplatform, and with the added weight and the potential for one of the cameras to shift as it's being moved around, it may not be worth the troubleperiod.. As james415 pointed out, whether the book slides or the platen/camera slides, the camera is still the same distance from the platenplanes being photographed. The issue of vertical creep which still remains may be better solved in software (varying the portion of the imagecropped) than by attempting to further finesse the camera positions.
you1 says: Jun 4, 2009. 7:08 AM REPLYPerhaps someone else has thought about this, or said it differently...
With a strong support, the cameras can be attached to a fixed platen, where as the book cradel can moves up and down (via ball-baringslides, or hingeallelogram), and slightly side to side.
The immediate benefit of this model is that the cameras' focus can be locked; therefore, not only the scanning will be faster because we wontbe refocusing on every capture, but also, every capture will be in focus (even with partial white pages)
edvin
james415 says: Jun 2, 2009. 8:26 AM REPLYThe hinge in the picture above has since been replaced with a vertical sliding mechanism. This is still not ideal and is where I am focusing myrevisions for now. The string was just to hold it steady for the photo, I should have been more specific. The counterweight is the spring picturedabove. It makes the platen "float" to some degree, which is important because it is a bit heavier than Lexan.
I was considering using a series of roller slides on the platen carrier as well, but I am trying to balance between stability and access to the book forpage turning.
Having the book stationary would have no effect on the apparent size of the page. No matter how you do it, the camera is stationary relative to theplaten face. The only consideration is which on allows for smoother travel.
Finally, the dowel in the center has no effect on the image quality. It is nestled into the crease of the book, where the image is not used anyway. Youcould certainly make is a bit thinner, but this works well. I originally considered using wire actually, and just letting the panes of glass touch, but then Iconsidered the benefit of preventing spread as well as compression with the thin panes and the dowel worked out perfectly.
The platen is the one part of this that really did come out ideal. The hinge is the real soft spot for improvement, in my case.
spamsickle says: Jun 2, 2009. 10:14 AM REPLY"Having the book stationary would have no effect on the apparent size of the page. No matter how you do it, the camera is stationary relative tothe platen face."
I guess you're right, except the way I'm currently doing it - no rollers anywhere, so pages do get closer or further away as you turn through thebook. Sometimes simplicity has its drawbacks.
"Finally, the dowel in the center has no effect on the image quality. It is nestled into the crease of the book, where the image is not used anyway.You could certainly make is a bit thinner, but this works well."
For most images in most books, I'm sure this is true. For some of the books I'll be scanning, with images that span the crease (maps, artwork,etc.), having a dowel in the middle will just exacerbate the break that was introduced when the book was bound. Sure, it's only a couple ofmillimeters that you're losing, but if it's easily avoided, why not?
james415 says: Jun 2, 2009. 11:18 AM REPLYYou bring up a great point. I did not even consider gutter bleeds or DPS (double page spreads). In that case, you might need something alittle more narrow in the middle. Thanks for the ideas. Lets try to roll them into a solution.
daniel_reetz says: Jun 3, 2009. 8:30 AM REPLYI have often wondered if beveled, sanded glass or acrylic could make a super-sharp V at the bottom, capable of seeing far into the crease.
james415 says: Jun 3, 2009. 9:07 AM REPLYThat would definitely work, but there is the question of flexing. A thin piece of glass will absolutely flex more than people expect (minedoes). Thicker glass would fix this, but would also result in a joint just as think as a separate piece.
The ideal solution would probably be 1/32" glass panes with a soldered joint (like stained glass). Does anyone on line have anyexperience with this?

http://www.instructables.com/id/DIY-High-Speed-Book-Scanner-from-Trash-and-Cheap-C/
daniel_reetz says: Jun 3, 2009. 4:11 PM REPLYI'm thinking they could also be glued with epoxy, or the adhesive that sticks the rearview to the inside of a windshield.
catnip4all says: Jun 5, 2009. 6:07 AM REPLYI've seen this trick on some of the atiz's higher cost products. It's additional work. Sanding glass or plastic isn't easy. If they'renot precisely sanded the glue won't stick. Most books and most people will do just fine with regular V joints.
dark_slasher91 says: Jun 1, 2009. 10:35 PM REPLYawesome job. From what I am seeing in the pictures, it is quite smaller in dimensions from the original (correct me if I'm wrong). I am personally lookingfor ways to decrease the size of the scanner so I can store it easily in a closet if necessary.
james415 says: Jun 2, 2009. 8:16 AM REPLYNo, it is actually the same size platen as the one Dan built. It looks a little smaller because of the platen carrier frame and the beefy support.
james415 says: Jun 1, 2009. 9:42 PM REPLYForgot to mention one thing. I used MDF for the book holder. I has a piece rescued from a scrap pile, but otherwise I would have used ash or some otherhard wood. MDF is often made with formaldehyde and other nasty glues. Try to avoid having too much of it in your house (Looking at you IKEA!).
Also, this entire device will be covered in black flocking to absorb light. Remember, black paint is only helping you if it is matte. Cloth or flocking is evenbetter. I took the pictures now, so the structure will be apparent.
I have been running the test pages through Adobe Acrobat Pro to automatically replace the image of the letters, with digital, searchable text. I am lookingfor a free alternative that works as well, but most of the major ones are lacking a bit.
view all 351 comments


![DIY Christmas Decorations - Sew in Love · 2020-02-05 · Cheap or Free Eco Friendly Ideas DIY CHRISTMAS DECORATIONS FORAGED LEAVES WREATH $ Ô Ô Ô B Õ \ 5 B ] 3 Õ ( Õ ( Õ (](https://img.pdfslide.us/doc/110x75/5f4c8e6d92b71437511784e5/diy-christmas-decorations-sew-in-love-2020-02-05-cheap-or-free-eco-friendly.jpg)