Embed Size (px)
Citation preview

I n s i d e W e b O b j e c t s
Discovering WebObjects for HTML
May 2001
Apple Computer, Inc.© 2001 Apple Computer, Inc.All rights reserved. No part of this publication may be re-produced, stored in a retrieval sys-tem, or transmitted, in any form or by any means, mechanical, electronic, photocopying, recording, or other-wise, without prior written permis-sion of Apple Computer, Inc., with the following exceptions: Any person is hereby authorized to store docu-mentation on a single computer for personal use only and to print copies of documentation for personal use provided that the documentation contains Apple’s copyright notice. The Apple logo is a trademark of Ap-ple Computer, Inc. Use of the “keyboard” Apple logo (Option-Shift-K) for commercial pur-poses without the prior written con-sent of Apple may constitute trademark infringement and unfair competition in violation of federal and state laws. No licenses, express or implied, are granted with respect to any of the technology described in this book. Apple retains all intellectual property rights associated with the technology described in this book. This book is intended to assist application devel-opers to develop applications only for Apple-labeled or Apple-licensed computersEvery effort has been made to ensure that the information in this document is accurate. Apple is not responsible for typographical errors.Apple Computer, Inc.1 Infinite LoopCupertino, CA 95014408-996-1010Apple, the Apple logo, Cocoa, Mac, Macintosh, and WebObjects are trademarks of Apple Computer, Inc., registered in the United States and other countries.
Enterprise Objects and Enterprise Objects Framework are trademarks of NeXT Software, Inc., registered in the United States and other countries.Java is a registered trademark of Sun Microsystems, Inc. in the United States and other countries.Simultaneously published in the United States and Canada
Even though Apple has reviewed this manual, APPLE MAKES NO WARRAN-TY OR REPRESENTATION, EITHER EX-PRESS OR IMPLIED, WITH RESPECT TO THIS MANUAL, ITS QUALITY, AC-CURACY, MERCHANTABILITY, OR FITNESS FOR A PARTICULAR PUR-POSE. AS A RESULT, THIS MANUAL IS SOLD “AS IS,” AND YOU, THE PUR-CHASER, ARE ASSUMING THE EN-TIRE RISK AS TO ITS QUALITY AND ACCURACY.
IN NO EVENT WILL APPLE BE LIABLE FOR DIRECT, INDIRECT, SPECIAL, IN-CIDENTAL, OR CONSEQUENTIAL DAMAGES RESULTING FROM ANY DEFECT OR INACCURACY IN THIS MANUAL, even if advised of the possi-bility of such damages.
THE WARRANTY AND REMEDIES SET FORTH ABOVE ARE EXCLUSIVE AND IN LIEU OF ALL OTHERS, ORAL OR WRITTEN, EXPRESS OR IMPLIED. No Apple dealer, agent, or employee is au-thorized to make any modification, exten-sion, or addition to this warranty.
Some states do not allow the exclusion or limitation of implied warranties or liabil-ity for incidental or consequential damag-es, so the above limitation or exclusion may not apply to you. This warranty gives you specific legal rights, and you may also have other rights which vary from state to state.

3
Apple Computer, Inc. May 2001
Contents
Figures, Listings, and Tables
9
Chapter 1
About This Book
13
Why Read This Book 13Assumptions 14Further Reading 16
Chapter 2
Introduction to WebObjects
17
WebObjects Features 18Database Access and Independence 18Scalability 18Object Orientation 19Dynamic Publishing 20User Input 22Client-Server Applications 23
Development Tools 23Project Builder 24WebObjects Builder 24EOModeler 24
Chapter 3
Your First Project
27
Project Builder 27Hello WebObjects 28
Launch Project Builder 28Using the New Project Assistant 28The Main Window 31Modifying the Main Component 33

4
Apple Computer, Inc. May 2001
C O N T E N T S
Building the Project 34Running the Project 34
Chapter 4
Developing Dynamic Content
37
Components and Classes 38The Main Component 39
Adding Java methods 39Adding a WOString 40
HTML and WOD Files 43Build and Run the Application 43Response Generation 44Maintaining State in the Component 46
Adding the Variable to Count Method Calls 47Displaying the Count 48Increasing the Variable’s Value 48Refreshing the Page 49The Counter in Action 50
Further Exploration 52
Chapter 5
Managing User Input
53
Request Processing 54Processing the Request 58Generating the Response 60Backtracking Cache 61
User Interface 62Tracing the Request-Response Loop 65Conditional Display With WOConditional Elements 68Derived Properties 72
Chapter 6
Component Communication
77
Custom Objects 77Duplicating the UserEntry Project 78Adding the Custom Class 78

C O N T E N T S
5
Apple Computer, Inc. May 2001
Following a Keypath 83Defining a New Component 84Modifying the Main component 91Running the Application 93
Chapter 7
Using the Session to Manage State
95
The Session 96Displaying and Editing Lists of Objects 97
The NSArray and NSMutableArray Classes 97NSArray 98NSMutableArray 98
Adding the NSMutableArray to the Session 98Adding the WORepetition to Main 101Editing the Users 103Displaying and Editing Lists of Objects 97Deleting Users 105
Running the Application 105Benefits of Encapsulation 106The NSArray and NSMutableArray Classes 97
Chapter 8
Database Basics
109
Database Structure 109Tables 109Rows 110
Uniquing 110Not Null 111
Relationship 111To-One Relationships 112To-Many Relationships 113
Chapter 9
Introduction to Enterprise Objects
115
System Architecture 115WebObjects Interaction 118

6
Apple Computer, Inc. May 2001
C O N T E N T S
Enterprise Objects 118EOControl 119
The Object Graph 119The Editing Context 120
EOAccess 120The Adaptor Level 120The Database Level 121
The Model 121
Chapter 10
Working With Editing Contexts
123
The Authors Application 123Creating the Authors Database 124Creating the Authors Model 125
Adding the Author Entity to the Model 128The EOModeler Window 133Creating the AUTHOR Table 135
Creating the Application 136Customizing the Main component 137
Customizing Main.wo 138Customizing Main.java 140
Running the Authors Application 145Browsing the Database 147
Further Exploration 148
Chapter 11
Using Custom Objects
151
Generating a Custom Class 151Generating a Java Class From a Model Entity 151Adding a Java Class to the Project 152
Modifying the Authors Project 155Adding Custom Logic 158Using Custom Logic 159Setting Default Values 163

C O N T E N T S
7
Apple Computer, Inc. May 2001
Chapter 12
Working With Relationships
165
Completing the Authors Model 165Define the Book Entity 166Create the BOOK Table 169Define the Model’s Relationships 170
What Are Delete Rules? 172Delete Rules in the Authors Model 172
Using Relationships in Your Code 173Add Java Classes for Author and Book to the Project 174
To-One Relationships in Java 177To-Many Relationships in Java 177
Create the AuthorBookEdit Component 178AuthorBookEdit.wo 178AuthorBookEdit.java 180
Modify Session.java 182Modify the Main Component 184
Main.wo 184Main.java 186
Running the Application 189Deleting Authors 189
Create the ConfirmAuthorDelete Component 190Edit ConfirmAuthorDelete.java 191Modify the Main Component 192Run the Application 192
Sorting a Fetch 193
Glossary
197
Index 203

8
Apple Computer, Inc. May 2001
C O N T E N T S

9
Apple Computer, Inc. May 2001
Figures, Listings, and Tables
Chapter 2
Introduction to WebObjects
17
Figure 2-1 Dynamic page generation in WebObjects 21
Chapter 3
Your First Project
27
Figure 3-1 The New Project Assistant 29Figure 3-2 Choosing a location for the project 30Figure 3-3 Project Builder’s main window 31Figure 3-4 The HelloWebObjects application in action 35
Chapter 4
Developing Dynamic Content
37
Figure 4-1 What time is it? 44Listing 4-1 WOString’s value binding to the currentTime method in
Main.wod 43Listing 4-2 URL that generates a new Session object 51Listing 4-3 URL with session ID 52
Chapter 5
Managing User Input
53
Figure 5-1 The request-response loop 55Figure 5-2 Structure of a component action URL 56Figure 5-3 Binding the Favorite Food text field to personName 64Figure 5-4 WOConditional elements 71Figure 5-5 Adding a derived property 74Listing 5-1 Example of a component action URL 56Listing 5-2 Overriding the awake method 59Listing 5-3 Overriding the sleep method 61Listing 5-4 Tracing the request-response loop—the awake method 65

10
Apple Computer, Inc. May 2001
F I G U R E S A N D T A B L E S
Listing 5-5 Tracing the request-response loop—the accessor and action methods 66
Listing 5-6 Implementation of entryIncomplete as a derived property 74Table 5-1 Request-response processing phases 56Table 5-2 Request-response processing time line 57
Chapter 6
Component Communication
77
Figure 6-1 UserEdit.wo 90Figure 6-2 Main.wo 93Listing 6-1 Instantiating the user instance variable in the constructor of the
Main.java class 82Listing 6-2 Main.java’s entryIncomplete method using the user instance
variable 82Listing 6-3 User.java 85Listing 6-4 EditUser.java’s submitChanges method 90Listing 6-5 The noDataEntered method of the Main.java class 91Listing 6-6 Main component’s editUser action method 92
Chapter 7
Using the Session to Manage State
95
Figure 7-1 Relationship between application and session 96Figure 7-2 Main.wo with a WORepetition 103Figure 7-3 The application in action 106Listing 7-1 Session.java 100Listing 7-2 The editUser method of the Main.java class 103Listing 7-3 The submitChanges method of the UserEdit.java class 104Listing 7-4 The addUser method of the Main.java class 104Listing 7-5 The deleteUser method of the Main.java class 105
Chapter 9
Introduction to Enterprise Objects
115
Figure 9-1 The Enterprise Objects approach 117

F I G U R E S A N D T A B L E S
11
Apple Computer, Inc. May 2001
Chapter 10
Working With Editing Contexts
123
Figure 10-1 Authors model with Authors entity 133Figure 10-2 Main.wo with elements to maintain author information 140Figure 10-3 The Authors application 146Figure 10-4 EOModeler’s Data Browser 147Figure 10-5 Data Browser using filter 148Listing 10-1 The constructor in Main.java 141Listing 10-2 The addAuthor method in Main.java 142Listing 10-3 The deleteAuthor method in Main.java 143Listing 10-4 The editAuthor method in Main.java 144Listing 10-5 The updateAuthor method in Main.java 144Listing 10-6 The saveChanges method in Main.java 144Listing 10-7 The revertChanges method in Main.java 145Listing 10-8 Fetch specification that uses sort orderings 149
Chapter 11
Using Custom Objects
151
Figure 11-1 Main.wo after adding the fullName derived property to Author.java 160
Figure 11-2 Main.wo using the fullName derived property 161Figure 11-3 The Authors application using the fullName method to display
author information 162Listing 11-1 Author.java generated by EOModeler 154Listing 11-2 Main.java modified to use Author class instead of
EOGenericRecord 156Listing 11-3 The fullName method in Author.java 159Listing 11-4 The constructor in Author.java—setting default value for
lastName 163
Chapter 12
Working With Relationships
165
Figure 12-1 Relationships in the Authors model 171Figure 12-2 FileMerge window 175Figure 12-3 FileMerge window—adding fullName method to new
Author.java 176Figure 12-4 AuthorBookEdit.wo 180
12
Apple Computer, Inc. May 2001
F I G U R E S A N D T A B L E S
Figure 12-5 Main.wo with the editBooks action and the Books WOHyperlink 186
Figure 12-6 ConfirmAuthorDelete.wo 191Figure 12-7 The ConfirmAuthorDelete component in action 193Listing 12-1 The methods that implement the author relationship in
Book.java 177Listing 12-2 The methods that implement the books relationship in
Author.java 177Listing 12-3 The deleteBook method in AuthorBooEdit.java 181Listing 12-4 The addBook method in AuthorBookEdit.java 181Listing 12-5 Method calls to add a book and set its author 182Listing 12-6 The constructor in Session.java 182Listing 12-7 The fetchAuthorList method in Session.java 183Listing 12-8 The addAuthor method in Session.java 183Listing 12-9 The deleteAuthor method in Session.java 184Listing 12-10 The constructor in Main.java 187Listing 12-11 The addAuthor method in Main.java—uses the addAuthor method
in Session.java 187Listing 12-12 The deleteAuthor method in Main.java—uses the deleteAuthor
method in Session.java 187Listing 12-13 The editBooks method in Main.java—sends Author object to
AuthorBookEdit component 188Listing 12-14 The revertChanges method in Main.java—uses default editing
context and the fetchAuthorList method in Session.java 188Listing 12-15 The deleteAuthor method in ConfirmAuthorDelete.java 191Listing 12-16 The deleteAuthor method in Main.java—returns
ConfirmAuthorDelete component 192Listing 12-17 The sortAuthorList method in Session.java 194

Why Read This Book
13
Apple Computer, Inc. May 2001
C H A P T E R 1
1 About This Book
WebObjects is an application server with tools, technologies, and capabilities to create internet and intranet applications. It has an object-oriented architecture that promotes quick development of reusable components. WebObjects is extremely scalable and supports high transaction volumes.
This book introduces the architecture, development tools, and use of the WebObjects HTML-based system.
Why Read This Book
Discovering WebObjects for HTML
is written for developers who want to start developing applications using WebObjects. There are other approaches for developing WebObjects applications. For more information on them, see
Inside WebObjects: WebObjects Overview
.
You should read this book if you wish to learn to maintain or develop WebObjects HTML applications and currently are at a beginner or intermediate level of experience with the WebObjects system.
This book will lead you on a hands-on exploration of the WebObjects programming environment. Through examples paired with explanations of the theory behind them, you’ll learn to construct dynamic applications that allow your users to view and modify data from your databases.
This book has two main parts. The first part shows you how to use the WebObjects’s tools to develop a Web application. You learn how to
14
Assumptions
Apple Computer, Inc. May 2001
C H A P T E R 1
About This Book
�
use the WebObjects development environment, including Project Builder and WebObjects Builder
�
compile and run WebObjects applications
�
manipulate user input in your programs
�
create your own components and reuse them in your applications
The second part introduces the Enterprise Object technology and the use of databases as a persistent storage mechanism. In it you learn about
�
basic database architecture
�
the object-to-database connection
�
designing your database schema
�
using editing contexts to collect changes
Assumptions
As of version 5, the WebObjects runtime is implemented entirely in Java. This document assumes you are familiar with Java and with the basic principles of object-oriented programming. While object-oriented programming experience is not necessary, WebObjects is an extensively object-based system. Familiarity with the Sun standard Java libraries beyond the basic object types like String and Integer is not necessary, because the Foundation libraries in WebObjects provide most of the functionality your WebObjects applications utilize.
Some familiarity with database architecture and OODBs (object oriented databases) is beneficial, but not necessary. The Enterprise Object technology abstracts most of the specific details of databases away from your job as a developer, but an understanding of the underlying structure is always useful. A basic explanation of database architecture and usage is given in “Database Basics” (page 109).
This book has the following chapters:
�
“Introduction to WebObjects” (page 17) introduces WebObjects’s technologies and explains how they fit together.

C H A P T E R 1
About This Book
Assumptions
15
Apple Computer, Inc. May 2001
�
“Your First Project” (page 27) guides you through the creation of a simple WebObjects application project.
�
“Developing Dynamic Content” (page 37) introduces the use of WebObjects elements to display dynamic data.
�
“Managing User Input” (page 53) shows you the steps WebObjects takes when processing a request from a web browser. It also introduces the use of conditional-display WebObjects elements and derived properties.
�
“Component Communication” (page 77) shows how to send data from one component to another to maintain state.
�
“Using the Session to Manage State” (page 95) introduces the use of the Session object to maintain state in a centralized location. It also shows the benefits of designing reusable components.
�
“Database Basics” (page 109) provides a brief introduction to essential database concepts.
�
“Introduction to Enterprise Objects” (page 115) shows the layers of an Enterprise Objects application and explains the role of the model.
�
“Working With Editing Contexts” (page 123) guides you through the creation of a database with OpenBase Manager and a model with EOModeler. It shows you how to define an entity and how to create a database table based on an entity’s definition. The chapter also shows how to perform data access using the Enterprise Object technology.
�
“Using Custom Objects” (page 151) guides you through the process of generating Java class files to add custom logic to enterprise objects.
�
“Working With Relationships” (page 165) shows you how to create relationships between entities in EOModeler and how WebObjects implements those relationships in your application. It also shows you how to define a fetch specification and how to sort fetched data.

16
Further Reading
Apple Computer, Inc. May 2001
C H A P T E R 1
About This Book
Further Reading
You can access a wealth of information at http://www.apple.com/developer. It provides links to resources that developers can use to obtain up-to-date information on WebObjects technologies, documentation, and related issues.
17
Apple Computer, Inc. May 2001
C H A P T E R 2
2 Introduction to WebObjects
The Web started out as a means of disseminating static documents interconnected via hyperlinks. With its steady commercialization have come much greater demands on website developers. Today, it’s not uncommon for a website to connect to a database, display dynamic data, take user input, and offer a reasonable facsimile of a desktop application.
Typically, each of these features is added by a developer at the behest of the customers or site owner. Dozens of incompatible mechanisms for solving the same problems exist, and any given site is a house of cards held together by expensive and frequent programmer intervention.
Another issue, all to real for many IS (Information Systems) managers, is the need to access data stored in databases from different vendors. Traditionally, developers have had to include custom code in their applications to be able to communicate efficiently with each database. Even if an organization standardizes on one database, if the need ever arises to upgrade due to performance or business reasons, then the custom code used to access the database becomes obsolete, slowing the transition process.
WebObjects solves all the common problems—dynamic page generation, user input, state management, interface with databases—that usually consume most of a developer’s time, instead freeing the developer to spend her time constructing the logic that actually makes the application different.
In this chapter, you
�
learn how WebObjects saves you from reinventing the wheel
�
discover the features of WebObjects that make it a superior application development system
�
learn about WebObjects’s development tools
18
WebObjects Features
Apple Computer, Inc. May 2001
C H A P T E R 2
Introduction to WebObjects
WebObjects Features
WebObjects solves many of the basic problems required for developing Web applications. Frequently, programmers reinvent the wheel to provide required features and capabilities to their applications, or invest a lot of work integrating partial solutions. WebObjects comes with much of the logic needed by a Web application, and provides an infrastructure that enables developers to work both effectively
and
efficiently.
Database Access and Independence
Almost any service beyond providing access to organized, static data relies on a database. Hence, it is very important to make database access powerful and efficient, both in use and implementation. WebObjects relies on the Enterprise Objects layer, which represents your database using Java objects (enterprise objects) with custom behavior and validation rules.
Other solutions for database access rely on technology such as embedding database access code, like SQL (Structured Query Language), within the Web pages themselves, which makes modifying the application much more difficult.
The Enterprise Object technology handles the dirty work of database access tasks, like caching, fetching, saving, and relationship modeling, allowing you to concentrate on the implementation of your custom business logic. It even constructs the basic Java code required for your objects—you modify this code to add specialized logic, appropriate to your application. By providing this level of object abstraction, Enterprise Objects allows you to modify your database schema or even move to a totally different storage mechanism without any code modification.
Scalability
WebObjects is scalable at several levels, from development to deployment.

C H A P T E R 2
Introduction to WebObjects
WebObjects Features
19
Apple Computer, Inc. May 2001
At the development level, individual pages and components can be developed in a modular fashion and reused, because they are each individual Java objects or WebObjects components. Further, a project can be easily broken into frameworks and products to facilitate code sharing and multiple-developer organization.
The WebObjects system itself scales over a broad range of user load, without any developer intervention. When a new request is made to your application, a new session is created, which encapsulates the activity and changes of a particular user. Caches are maintained by the application as well as by each of its sessions (a session represents the activity of one user) to speed response generation and minimize database access. In addition, WebObjects automatically caches component definitions to minimize the need to read files from disk. For more detail on session and state management see “Using the Session to Manage State” (page 95).
At deployment, WebObjects offers a linear scaling mechanism. The simplest deployment system is one computer running a Web server, WebObjects, and a database server. As your needs increase, the database server and Web server can be moved to other computers. Additional instances of your application can run in parallel and use the same database transparently. If demand increases further, additional application servers can be added using the same database and Web servers. WebObjects even automatically adds new application servers to its load balancing system to ensure the most efficient access possible. (See
Deploying WebObjects Applications
for more information on deployment.)
Object Orientation
Experience has demonstrated that object orientation is a very useful paradigm for many development projects. WebObjects is designed on an object-oriented model, with every part of the system, from components to the process of generating pages itself, organized using an object model.
As a developer, you gain many benefits from this model. You can customize the process of page generation by adding your logic to standard methods, which are invoked at determined stages. This is possible because all WebObjects components inherit from the WOComponent class. A
component
is an object that encompasses the look and behavior of a Web page, or a portion of one.
Pages or components that share behavior—for example, a component that displays search results for each of the entities you have in your database—can gain the usual benefits of inheritance, saving you from writing duplicate code and all the attendant inefficiencies.

20
WebObjects Features
Apple Computer, Inc. May 2001
C H A P T E R 2
Introduction to WebObjects
You are also freed from the need to conceive of your data as anything but first-class objects. Rather than thinking about tables, columns, and rows in a database when retrieving information or manipulating relationships, you manage data by creating objects or arrays of objects, and by invoking their methods. The Enterprise Object technology manipulates the database for you to reflect your changes.
Dynamic Publishing
The most basic websites are composed of static pages in HTML that are served to a user’s browser. These pages change infrequently, and the scope of the changes is such that it is practical to manually update the documents on the rare occasion that they change.
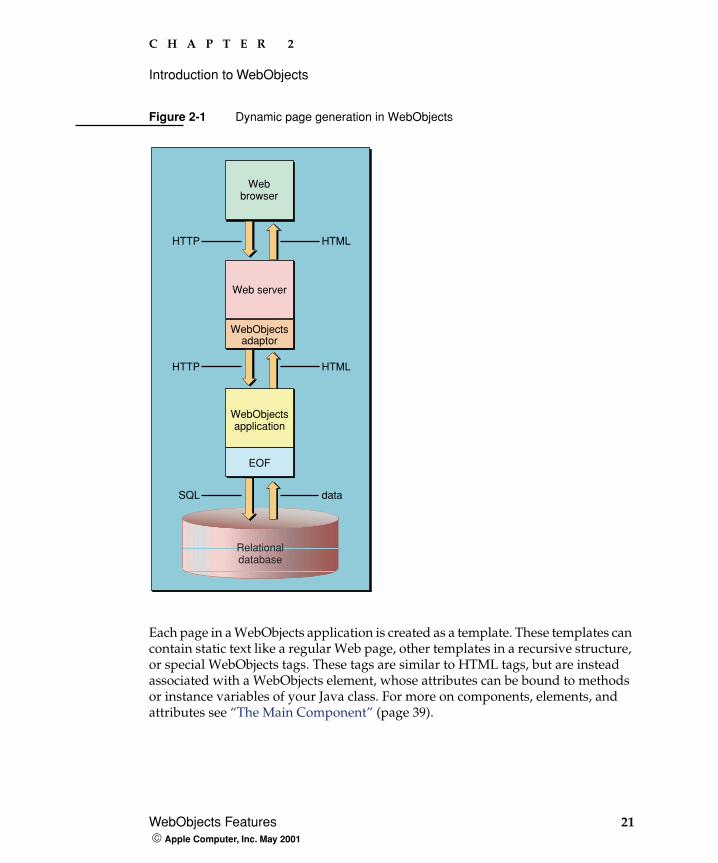
Increasingly though, users need more dynamic or frequently updated content via the Web. Weather reports, news stories, and stock quotes change frequently, and it’s impractical or impossible to alter static text documents on a Web server to reflect new information often enough to be useful. Instead, special software generates HTML (hypertext markup language) code on the fly. (The pages generated can include current information obtained from a data source, often a relational database.) This code is then sent to a user’s Web browser. Figure 2-1 illustrates how requests by a Web browser are processed to generate a response page.
C H A P T E R 2
Introduction to WebObjects
WebObjects Features
21
Apple Computer, Inc. May 2001
Figure 2-1
Dynamic page generation in WebObjects
Each page in a WebObjects application is created as a template. These templates can contain static text like a regular Web page, other templates in a recursive structure, or special WebObjects tags. These tags are similar to HTML tags, but are instead associated with a WebObjects element, whose attributes can be bound to methods or instance variables of your Java class. For more on components, elements, and attributes see “The Main Component” (page 39).
Relationaldatabase
Web server
WebObjectsadaptor
HTTP HTML
HTTP HTML
SQL data
Webbrowser
WebObjectsapplication
EOF

22
WebObjects Features
Apple Computer, Inc. May 2001
C H A P T E R 2
Introduction to WebObjects
When the template is requested, WebObjects fills in the missing data represented by the tags by calling the methods associated with the element’s attributes and inserting the result into the returned HTML code on the fly. The called methods might access a database, perform calculations, or carry out any other custom logic you have defined.
Several other common idioms exist for dynamic page generation. These range from various third-party solutions to hand-rolled Perl or Java servlet systems. Few offer the easy database access, or close association with Java logic that WebObjects provides. Another problem common to most other solutions is a lack of scalability—page-based logic rapidly becomes impossible to maintain as the size of the site increases.
User Input
There is a qualitative change in the kind of services your application can offer to its users when it no longer relies solely on navigation for control. By allowing the users of your application to input data, you increase the application’s scope dramatically beyond that of solely sharing already extant information. For example, you have to come up with logic that validates the data the user enters, so that your database does not become corrupted.
A few mechanisms for user input are in common use. Most involve encoding the data into a string that is attached to the URL (Uniform Resource Locator) of the page the user requests, and parsing it on the server end via a custom program written to use the CGI (Common Gateway Interface) protocol.
WebObjects instead follows the same paradigm used for dynamic page generation. Standard HTML form elements can be associated with variables and methods in your Java code and, when the user submits a form, the methods indicated are called with the user-entered data as an argument. Your methods can take any action you determine to record this input—and if you associate a form element with a database field via the enterprise object property representing it, user input is recorded in the database automatically. (See
WebObjects Programming Topics
in
http://
developer.apple.com/techpubs/webobjects/Topics/TopicsTOC.html
for more information on enterprise objects.)

C H A P T E R 2
Introduction to WebObjects
Development Tools
23
Apple Computer, Inc. May 2001
Client-Server Applications
One of the most pressing issues in Web application development is the need to come up with ways of maintaining state—information about the user’s session, her interaction with the application during a given period—between requests. Because HTTP (Hypertext Transfer Protocol) is a stateless protocol, there is no connection maintained between the user’s browser and the Web server. This leaves the responsibility for maintaining state up to you.
In a desktop application, the notion of state is implicit: there is only one user. In a Web application, however, there may be hundreds of simultaneous users.
There are two ways of maintaining state in a Web application: using cookies and customizing URLs.
When
cookies
are used, information is stored on a Web browser (the client) by the Web server. When the server needs to determine the current state of a client, it retrieves the cookie. The drawback of this approach is that Web browsers can be configured to refuse cookies. In such cases, the application’s functionality can be severely limited.
To ensure that state can be maintained, whether cookies are enabled or not on the client, many Web applications use customized URLs, in which they add the kind of information that would otherwise be stored on a cookie.
WebObjects can maintain state using either of these approaches. However, you don’t have to worry about which one is actually used. All you do is store the required state information in an instance of the Session class. When a request is processed, WebObjects automatically activates the Session instance associated with the user who initiated the request (the fact that such information was retrieved from a cookie or from the URL is transparent to you). See “Using the Session to Manage State” (page 95) for more information.
Development Tools
For the most part you interact with the WebObjects development environment via three tools: Project Builder, WebObjects Builder, and EOModeler.

24
Development Tools Apple Computer, Inc. May 2001
C H A P T E R 2
Introduction to WebObjects
Project Builder
Project Builder is your primary WebObjects development tool. It provides an integrated development environment that allows you to edit code, organize resources, and compile your project, as well as facilitate your work with other programs like WebObjects Builder when you edit your WebObjects components. Project Builder is described in “Project Builder” (page 27).
WebObjects Builder
WebObjects Builder is a specialized application for editing WebObjects components. It handles editing the HTML file as well as the WOD (WebObjects data) file that controls the connection between your HTML components and your Java code. WebObjects Builder is introduced in “The Main Component” (page 39).
EOModeler
EOModeler is a tool for constructing a model that relates your database structure to Java objects. As such, it’s only used in WebObjects programs that perform database access. With EOModeler you can create a model in two ways:
� Reverse-engineer an existing database schema.
EOModeler reads your database’s schema and creates a model from it.
� Create the model from scratch.

C H A P T E R 2
Introduction to WebObjects
Development Tools 25 Apple Computer, Inc. May 2001
You can create a new model from scratch by defining the entities, attributes, and relationships that represent your data model. You can then have EOModeler create the underlying tables. This is the approach used in “Creating the Authors Model” (page 125).
Constructing a good model is a very important part of developing a database-enabled WebObjects application. With a properly constructed model, an application practically writes itself. See “The Model” (page 121) for more information.

26 Development Tools Apple Computer, Inc. May 2001
C H A P T E R 2
Introduction to WebObjects

Project Builder 27 Apple Computer, Inc. May 2001
C H A P T E R 3
3 Your First Project
WebObjects is a large system, built of many complex layers. Fortunately, those layers are largely self contained, allowing you to ignore some complexity until you find you want more control over specific processes. This allows you to construct a simple WebObjects application that is fully functional, without needing to have complete knowledge of the underlying system. As you add more features to the demonstration applications you create, you will explore the WebObjects frameworks to a greater depth.
Most of your access to the WebObjects system will be through the tools you use to create applications in it—Project Builder, WebObjects Builder, and for database-enabled applications, EOModeler.
In this chapter, you
� run Project Builder and perform initial setup
� learn about the components of a project
� use the New Project Assistant
� learn about the parts of the Project Builder editing window
� build and run a simple application
Project Builder
While developing a WebObjects application, you spend most of your time working with the Project Builder application. It allows you to organize your project and all the associated files, compile and run your project, and edit your source code.

28 Hello WebObjects Apple Computer, Inc. May 2001
C H A P T E R 3
Your First Project
Project Builder is installed as part of the developer package. It is located in the /Developer/Applications directory.
Hello WebObjects
There is a place for breaking with tradition, but this is not it: your first WebObjects application will display “Hello World!” in your browser. Though this project is trivial, it does serve as an example with which to examine the interface of Project Builder. Also, a successful build and launch verifies that your development environment is correctly installed and configured.
Launch Project Builder
1. Navigate to the /Developer/Applications directory.
2. Double-click the Project Builder icon.
The first time you run Project Builder, you are greeted by a setup assistant that walks you through some of the basic configuration settings of Project Builder. At this point, you could customize the build system used to compile your projects, but for now, accept the default options on each pane.
Using the New Project AssistantWhen you first launch Project Builder, you see only its menu bar. To create a project to work in, choose New Project from the File menu. The Project Builder Assistant appears, walking you through a few steps to create a new project.

C H A P T E R 3
Your First Project
Hello WebObjects 29 Apple Computer, Inc. May 2001
Figure 3-1 The New Project Assistant
There are several project types to choose from. Each starts out with a slightly different set of files and configuration to facilitate particular types of applications, from command-line tools to desktop applications. The following are two types of WebObjects project you can develop:
� WebObjects Application. This project type is the basic starting point for WebObjects applications. It provides one Web page, a system for moving resources like images to your Web server’s document root during installation, and other basic components like the Session and Application classes.
� WebObjects Framework. A framework is a bundle of related code, resources such as sounds and graphics, and more. You can make your applications dependent on your frameworks as a means of sharing code between applications. Your WebObjects applications are based on the JavaWebObjects framework, and you can write your own as well.
Follow these steps to build your first WebObjects application project.
1. Select WebObjects Application from the list of templates and click Next.
30 Hello WebObjects Apple Computer, Inc. May 2001
C H A P T E R 3
Your First Project
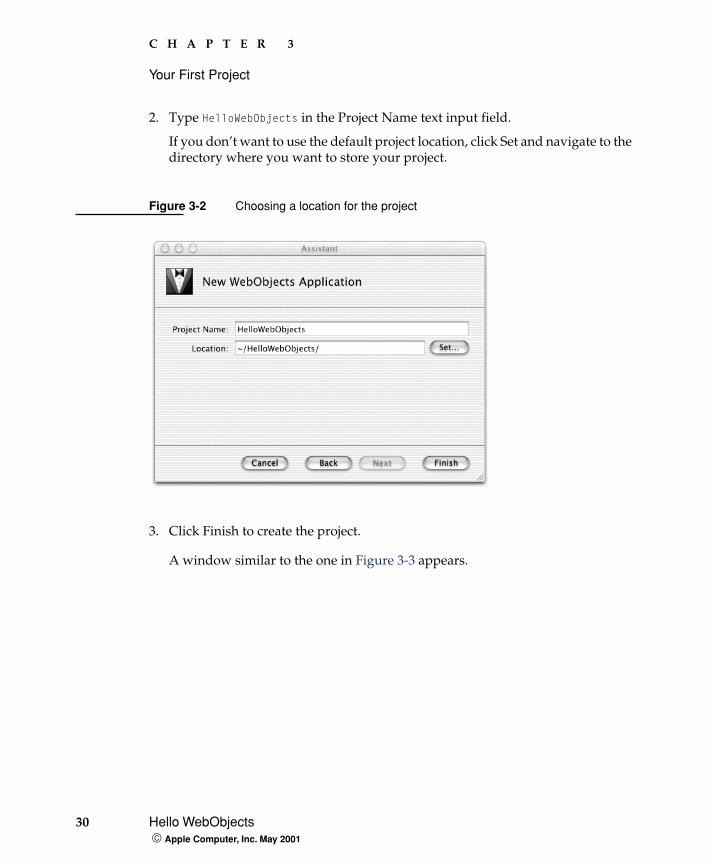
2. Type HelloWebObjects in the Project Name text input field.
If you don’t want to use the default project location, click Set and navigate to the directory where you want to store your project.
Figure 3-2 Choosing a location for the project
3. Click Finish to create the project.
A window similar to the one in Figure 3-3 appears.

C H A P T E R 3
Your First Project
Hello WebObjects 31 Apple Computer, Inc. May 2001
The Main Window
Figure 3-3 Project Builder’s main window
The Project Builder main window organizes all the files in your project and provides all the tools you need to edit, build, and debug them.
When you first create a project, Project Builder displays the release notes in the code editor, which is the pane where you usually edit files. This document contains information about the latest release of Project Builder. You should read it carefully.
Build project
Groups & Files list
Code editor
Clean up project
Run application
Target menu

32 Hello WebObjects Apple Computer, Inc. May 2001
C H A P T E R 3
Your First Project
The left pane is a tabbed pane used for organization. In the Groups & Files pane, which is initially visible, there are several groups of files, each with a disclosure triangle.
� Classes
This group initially contains the .java files for the Application, Session, and DirectAction classes that your application uses. You can customize your application by changing these files. In addition, when you add new classes to your project, they are stored here by default.
� Web Components
Each Web page or component you create is stored within its own subgroup in the Web Components group. Each subgroup contains the files that define the HTML representation and WebObjects behavior for each component. Initially, only the Main subgroup is present.
Inside the Main subgroup you find three items: Main.wo, Main.java , and Main.api. They define the look and behavior of the Main component.
� Resources
Graphics, sounds, and movies for your components are stored in this folder. In database-enabled applications, the model files (with the extension .eomodeld) are stored here.
� Web Server Resources
Some resources may be referenced not only by your WebObjects applications but also by static pages in other parts of the site. Resources in this folder are moved to a location outside of the application wrapper, where they can be accessed by other means as well.
� Frameworks
Every WebObjects project is dependent on at least the JavaWebObjects framework, which contains the code behind WebObjects. You can add additional frameworks to your project by choosing Project > Add Files.
� Documentation
Documentation for your project can be organized by Project Builder.
� Products

C H A P T E R 3
Your First Project
Hello WebObjects 33 Apple Computer, Inc. May 2001
The actual files created by compiling your application are listed under this group. It includes the executable, an organized tree of resources for components, and localized versions of the components themselves.
The other three panes, Bookmarks, Targets, and Breakpoints, are explained in greater detail later in the book.
Modifying the Main ComponentNow you’ll use WebObjects Builder to modify the Main component.
1. Open Main.wo.
Double-click the Main.wo component in the Main subgroup in the Web Components group in the Groups & Files list in Project Builder. The WebObjects Builder application opens and displays a window for Main.wo.
2. Modify Main.wo.
Enter Hello World! in the content pane.

34 Hello WebObjects Apple Computer, Inc. May 2001
C H A P T E R 3
Your First Project
3. Save Main.wo.
Choose File > Save.
Building the ProjectAll that remains is to compile the project and run it. When you start the build process, Project Builder does more than compile the Java bytecode from your files. First, only files that have changed since the last build are compiled, to save time. Project Builder also gathers all the resources required for your project, organizes them for your Web server, and compresses your Java class files into a JAR (Java Archive) file.
When you choose Build from the Build menu, the build pane appears so you can watch the progress of the build. This is also the pane that displays Java compilation errors if your project has any, but its output is frequently very useful even when it doesn’t contain error messages.
In Project Builder, choose Build > Build or click in the main window.
Because you didn’t modify any Java code, you shouldn’t encounter any compilation errors. When the compilation progress bar is complete, you’re ready to run your project.
Running the ProjectUnless you changed the default location when you first ran Project Builder, you now have a bundle called HelloWebObjects.woa in the build directory at the top level of your project’s directory.
Choose Debug > Run Executable or click in Project Builder’s main window.

C H A P T E R 3
Your First Project
Hello WebObjects 35 Apple Computer, Inc. May 2001
Since your application is already built, the Run pane appears immediately, displaying the output from your application as it runs:
Reading MacOSClassPath.txt ...
Launching HelloWebObjects.woa ...
. . .
Creating adaptor of class WODefaultAdaptor listening on port -1 with a listen
queue size of 128 and 2 WOWorkerThreads.
Creating LifebeatThread now with: HelloWebObjects -1 1085 30000
Welcome to HelloWebObjects!
Opening application's URL in browser:
http://localhost:49189/cgi-bin/WebObjects/HelloWebObjects
Waiting for requests...
After the last line appears, the URL shown opens automatically in your default browser.
Figure 3-4 The HelloWebObjects application in action

36 Hello WebObjects Apple Computer, Inc. May 2001
C H A P T E R 3
Your First Project
37 Apple Computer, Inc. May 2001
C H A P T E R 4
4 Developing Dynamic Content
Having dynamic content means only that the information your website or application displays varies based on some conditions. Examples of dynamic content include news sites, product catalogs where entries change and users can accumulate a shopping cart of items, or online polls and statistics.
With WebObjects, you can generate your dynamic content several ways. You can use all the programming logic you’re familiar with to determine which image to display or what information to present; you can define templates that are filled in from a database; you could also allow the user to enter data to be displayed.
In this chapter, you add some elements to your Web page and learn how to connect them to Java code that you write. You also learn in general how the HTML code, WebObjects components, and their Java classes relate to each other, and you are introduced to the request-response loop, the system WebObjects uses to interact with the users of your application.
In this chapter, you
� learn about the WebObjects Builder Inspector
� use WebObjects Builder to bind WOElements to your Java code
� use methods to provide dynamic data in your Web page
� learn the basics of the request-response cycle
� customize the Main component, the default entry point of your application
38 Components and Classes Apple Computer, Inc. May 2001
C H A P T E R 4
Developing Dynamic Content
Components and Classes
Each Web page displayed on a user’s Web browser is a WebObjects component. A component is made up of several parts:
� HTML file. This portion of the component is mostly standard HTML code. A component is either a complete HTML page, with <HTML> and </HTML> tags, or a shorter segment of HTML code that can be inserted inline into another component.
In addition to regular HTML tags and text, a component can contain special tags used by WebObjects, the <WEBOBJECT> and </WEBOBJECT> tags. Web browsers never see these tags because WebObjects replaces them with regular HTML code before sending them to the browser.
� WOD file. This is the glue between your HTML file and your Java code. Every WebObjects element used in a component has an entry in this file specifying its parameters, such as Java methods to call for data. WOD stands for WebObjects data.
� Java file. Every component has a Java class file associated with it. These classes inherit from the WOComponent class, which provides all the basic functionality a component needs. To customize behavior, you can add your own variables and logic to intercede in the built-in system
� API file. If you design your own components for reuse, they may rely on certain information being present in their Java code definitions. The API file lists the parameters for your custom components.
� WOO file. Contains information about display groups, special components used to display database information. WOO stands for WebObjects object.
The Web Components group—in the Groups & Files list in Project Builder’s main window—lists all the components of a project. Each item is itself a subgroup named after the component. Such groups contain the Java and API files for the component. The HTML, WOD, and WOO files are contained in a subgroup of the component subgroup, named using the component’s name with the .wo extension (Main.wo, for example). The contents of the .wo group are maintained by WebObjects Builder.

C H A P T E R 4
Developing Dynamic Content
The Main Component 39 Apple Computer, Inc. May 2001
The Main Component
By default, every WebObjects application includes a Main component. This component, initially empty, is the first page displayed to users unless you arrange otherwise. It can be used as the login page for the rest of your application.
The initial Main component is entirely empty. In this section, you add a method that calculates the date to the Java class, add a WOElement to the page, and use the WOD file to bind it all together.
Adding Java methodsFirst, you add a Java method to the Main.java file. This method simply returns the current date when it is called.
1. Create a WebObjects application project and name it DateDisplay.
For details on how to create a new project see “Hello WebObjects” (page 28).
2. Select Main.java from the Groups & Files list in Project Builder’s main window.

40 The Main Component Apple Computer, Inc. May 2001
C H A P T E R 4
Developing Dynamic Content
3. Add the following code to the Main.java file. This is a public method that returns the current date using the NSTimestamp class.
public NSTimestamp currentTime() {
// by default, a new NSTimestamp object is initialized
// to the current date and time
return new NSTimestamp();
}
Notice that the Main class inherits from WOComponent.
The WOComponent class defines dozens of methods needed by WebObjects. Many of these methods are introduced later in this book.
4. Save the Main.java file by choosing File > Save.
Adding a WOStringTo display dynamic text, you add a WebObjects element to the Main component. This element is the WOString, which is used to display dynamic string data in a page. Such strings can be the output of a Java method that returns a String object or another object that can be converted to a String object.

C H A P T E R 4
Developing Dynamic Content
The Main Component 41 Apple Computer, Inc. May 2001
1. Open the Main component with WebObjects Builder by double-clicking Main.wo in Project Builder.
2. Add text and a WOString.
Enter “The current time is “ in the content editor in WebObjects Builder’s main window.
With the cursor at the end of the new text, press the Space bar and click .
3. Open the WOString Binding Inspector.
Select the WOString element and click . The WOString Binding Inspector appears.
If the Inspector appears, but doesn’t look like the one shown, click the WOString you just inserted. The Inspector displays information about the element that is currently selected.
The Inspector displays the attributes for WOString elements. Each of them can be set, either to static values or by binding them to instance variables or methods in your code, which provide a value at runtime.
Notice that the value attribute is displayed in red. This means that this binding is required. In this case, the value attribute’s binding produces the text that the WOString displays, and the other attributes affect how the string is displayed. You use this WOString to display the current time.

42 The Main Component Apple Computer, Inc. May 2001
C H A P T E R 4
Developing Dynamic Content
4. Bind the WOString’s value attribute to the currentTime method.
Notice that the name of the currentTime method you entered in Main.java is listed in the Main list, in the bottom-left corner of the Main.wo window.
Drag a connection from the currentTime method to the WOString element in the content editor.
While WOString has several attributes, WebObjects Builder assumes you want to bind the value attribute because it’s the one most commonly used in WOStrings.
5. Save Main.wo.
The currentTime method is now bound to the WOString on the page. This connection is recorded in the WOD file. See Listing 4-1 (page 43).
C H A P T E R 4
Developing Dynamic Content
HTML and WOD Files 43 Apple Computer, Inc. May 2001
HTML and WOD Files
The connection you just made on the WOString element is implemented in the WOD file. You can examine the HTML code and WOD files in Project Builder, within the Main.wo subgroup.
In the HTML file, the <WEBOBJECT> tag after your static text represents the location where the WOString inserts the value returned from your method. This is a simple behavior, but some WebObjects elements offer much more complex logic.
<BODY BGCOLOR=#FFFFFF>
The current time is <WEBOBJECT NAME=String1></WEBOBJECT>
</BODY>
Notice that the tag reads <WEBOBJECT NAME=String1>. The only entry in the WOD file has the same name.
Listing 4-1 WOString’s value binding to the currentTime method in Main.wod
String1: WOString {
value = currentTime;
}
The entry has only one listed binding: the connection between the value attribute and the currentTime method. This method is called whenever the WOString needs to determine what value to display.
Build and Run the Application
Now that you’ve customized the Main component, you can run the application and watch your logic in action.

44 Response Generation Apple Computer, Inc. May 2001
C H A P T E R 4
Developing Dynamic Content
Choose Build > Build and Run.
A page similar to the one in Figure 4-1 appears after Project Builder builds and starts your application.
Figure 4-1 What time is it?
Response Generation
When you run the DateDisplay application, the page displayed by your browser has replaced the WOString you added to the Main component with the current date and time. If you reload the page, the date and time changes. WebObjects assembles the page dynamically during the request-response cycle.
When your browser requests the URL corresponding to your WebObjects application, your Web server hands control to the WebObjects adaptor. This program goes through several steps in generating the response it returns.

C H A P T E R 4
Developing Dynamic Content
Response Generation 45 Apple Computer, Inc. May 2001
1. Reading the HTML file
Much like a regular Web server, WebObjects first reads an HTML file. Unlike a regular Web server, though, WebObjects parses a <WEBOBJECT> tag before returning it to the Web server.
2. Merging the WOD file
When a <WEBOBJECT> tag is encountered, the WOD file for the component is consulted. All the WebObjects tags in an HTML file are named, and each one is listed by its name in the WOD file.
Each <WEBOBJECT> tag represents a WebObjects component. When a <WEBOBJECT> tag needs to be evaluated, the entire response generation process is invoked recursively on the new component, continuing as many times as necessary. The Main component was added to your project automatically by the Project Builder Assistant. You can create and use your own components (pages) as you’ll see later in “Defining a New Component” (page 84).
3. Accessing Java methods
Each type of WebObjects component has special logic for constructing the HTML code to return to the Web server. Customization of this process is done with attributes defined by the component’s developer. Each binding in a WOD file can be either static or dynamic. If a binding is static, the value supplied is used directly.
If a binding is dynamic—that is, an attribute is bound to a Java method or instance variable—then WebObjects invokes the method or accesses the instance variable to obtain the value at runtime. In the example above, when the WOString is evaluated, it calls the method named in its value binding (currentTime ) to get the value to display. The implementation of WOString turns the NSTimestamp object into a string and displays it in your Web browser.
This process takes place each time your browser requests the Main component. If you reload the page, the method is invoked again and a new date and time value is displayed.
For more information on the request-response loop, see “Request Processing” (page 54).

46 Maintaining State in the Component Apple Computer, Inc. May 2001
C H A P T E R 4
Developing Dynamic Content
Maintaining State in the Component
Understanding the connection between a component and its Java class file is an important part of WebObjects development. Not only do you associate methods with the component to create dynamic content in this fashion, but you can also use the methods provided by the WOComponent class to maintain state for a component.
When you add methods to a component in WebObjects Builder, you are actually editing the component’s Java file. When you modify how the component looks or add display elements, you are editing HTML code. A WebObjects component is a high-level view of both the HTML code and the Java class that describe a Web page, or part of one. After using WebObjects Builder to define the major parts of a component, you can add details by editing the HTML code manually and by modifying its Java file.
When your application runs, components are instantiated as needed. That is, each component is also an object in your application. For example, when the DateDisplay application launches, a Main object is created. As the component’s content is determined by WebObjects, methods in Main.java are used to provide the data for its dynamic elements, in this case the WOString that displays the current time. When it’s time for WebObjects to add the content for the WOString, it looks up the element’s value binding. In the example, value is bound to the currentTime method. WebObjects then invokes the currentTime method, which returns the current time.
An instance of a component “survives” at least for two cycles of the request-response loop: in the first cycle the page is rendered while in the second cycle the component determines which component to display next. If the component to be displayed is different from the first one, the latter is discarded while an instance of the new component is created. However, if the component to display is the same one, then the instance “lives on.” You can use instance variables in your component’s class to store information and keep track of the user’s behavior as she interacts with your application.
In this case, you’ll add a variable to the Main component and add code to increment it each time the page is displayed. You can use this variable to show the number times the page has been loaded by a specific user in the session.

C H A P T E R 4
Developing Dynamic Content
Maintaining State in the Component 47 Apple Computer, Inc. May 2001
To keep track of the number of times the currentTime method has been called, you need to add an integer instance variable to the Main.java file, increment it each time the page is loaded, and add a means of telling the page to refresh itself.
Adding the Variable to Count Method Calls
1. Open Main.wo in WebObjects Builder (if it’s not already open) by double-clicking it in Project Builder’s main window.
2. Choose Add Key from the Edit Source menu at the bottom-left corner of the Main.wo window.
3. Add a key of type int named loadCount.
4. Examine the Java file in Project Builder to confirm that the variable was added.
public class Main extends WOComponent {
protected int loadCount;

48 Maintaining State in the Component Apple Computer, Inc. May 2001
C H A P T E R 4
Developing Dynamic Content
Displaying the CountTo display the load count on the component, you need to add another WOString to the component.
1. Add a label and a WOString to the component.
a. Enter “Page load count: ” below the line that displays the current time.
b. Add a WOString to the right of the label.
2. Bind the loadCount variable to the new WOString’s value attribute.
Increasing the Variable’s ValueModify the currentTime method so it increments the loadCount variable each time it is called. Since WebObjects calls the method each time the page needs to be displayed, loadCount is increased by one each time.
public NSTimestamp currentTime() {
loadCount++;
return new NSTimestamp();

C H A P T E R 4
Developing Dynamic Content
Maintaining State in the Component 49 Apple Computer, Inc. May 2001
}
Refreshing the PageFinally, you need to add a way to reload the page. In WebObjects, regular hyperlinks (WOHyperlinks) can call Java methods on your components. Action methods are covered in greater detail in “Request Processing” (page 54). For now, you only need to add a method that simply reloads the current page.
1. Add the action method.
Open the Main component in WebObjects Builder and choose Add Action from the Edit Source menu.
a. Name the action refreshTime.
b. Select null from the “Page returned” pop-up menu.
The value returned by an action method represents the next page (component) to be displayed. When you return null, the current page is redrawn. In a later task, you learn how to return a new component.
c. Click Add.
2. Add a hyperlink.
Position the cursor below the line where the load count is displayed.
Choose WebObjects > WOHyperlink, or click .
By default, the text for a new link is “Hyperlink”. You can replace this by selecting the text and typing something more appropriate over it, such as “Refresh Time”.
3. Connect the refreshTime method to the WOHyperlink.

50 Maintaining State in the Component Apple Computer, Inc. May 2001
C H A P T E R 4
Developing Dynamic Content
Much like a WOString, a WOHyperlink has several attributes. In this case, you bind the refreshTime method to the action attribute of the WOHyperlink.
Drag from the refreshTime method in the Main list to the WOHyperlink. When you release the mouse button, you will see a pop-up list of attributes. Choose the action attribute to indicate that you want the refreshTime method called when the link is clicked.
4. Save Main.wo.
The Counter in ActionBuild and run the DateDisplay application. When your browser loads the page, you’ll see that the counter has been increased to 1. If you click Refresh Page, the time and the load count are updated.

C H A P T E R 4
Developing Dynamic Content
Maintaining State in the Component 51 Apple Computer, Inc. May 2001
This same counter instance variable is increased by one each time you use the link because WebObjects created a Main object and associated it with your browser window. Each time you interact with the application, by clicking Refresh Page, the same object is used. If you open another browser window and connect to the application again using the URL shown in Project Builder’s Run pane, a separate instance of Main is created and associated with that window. From then on you can work with both windows individually. As a matter of fact, not only is a new instance of Main created, a new Session object is created as well.
WebObjects determines that a new Session object needs to be created when the incoming URL does not contain a session ID. The first time you connect to the application using a URL like the one in Listing 4-2, WebObjects creates a Session object and assigns it a session ID and other information. That information is added to the URL returned to your browser together with the Web page to be displayed (see Listing 4-3 (page 52)). When you send another request from your browser (by clicking Refresh Page, for example) WebObjects uses the session ID encoded in the URL to locate the Session object that is to process the request. This is the default mechanism WebObjects uses to keep track of the state of each user. For more on state management see “Client-Server Applications” (page 23) and “Using the Session to Manage State” (page 95).
Listing 4-2 URL that generates a new Session object
http://foo.com:49361/cgi-bin/WebObjects/DateDisplay

52 Further Exploration Apple Computer, Inc. May 2001
C H A P T E R 4
Developing Dynamic Content
Listing 4-3 URL with session ID
http://foo.com:49361/cgi-bin/WebObjects/DateDisplay.woa/wo/
whcV5sauLNtG8Tfh6xCuvM/0.1
Further Exploration
You’ve learned how to use some of WebObjects’s tools, and how to add elements and bind them to your Java code using WebObjects Builder. You also learned how to display dynamic content based on Java code, and maintain state data from one request to the next. Feel free to explore WebObjects Builder to learn more. Here are a few suggested exercises:
� All the usual attributes of a Web page—title, background color, font size, and the like–can be maintained in WebObjects Builder. Make the DateDisplay application a bit smoother around the edges by setting the page title and customizing the text displayed. If a WOString is inside another HTML tag, the WOString is affected just like ordinary text.
� The NSTimestamp class displays as an ANSI standard date by default. If you examine the WOString element in the Inspector, you’ll see a binding called dateFormat, which you can use to control how the time and date are displayed.
� What happens if the WOString that displays the value of the loadCount instance variable is placed before the WOString that displays the time (and updates loadCount)? WebObjects parses the WOStrings in the order in which they appear, so loadCount is 0 the first time it is displayed.

53 Apple Computer, Inc. May 2001
C H A P T E R 5
5 Managing User Input
WebObjects’s ability to dynamically display information is sufficient for some Web applications, but most require more complex interaction with the user.
WebObjects provides a system for associating display and user input elements on a Web page with your Java variables and methods. You’ve seen how easy it is to display your dynamic data in Web pages. In this chapter, you learn how to take data from your application’s users.
In this chapter, you
� learn the system WebObjects uses to take in user input
� take input from the user via form elements like WOForm and WOTextField
� use WOConditionals for the conditional display of elements
� learn to construct derived properties with custom logic
User input in WebObjects is based on the basic HTML input elements—forms, text input fields, and so on. Connecting these elements to variables and methods is very similar to the process used to bind the value attribute of WOStrings.
You place components that mirror HTML form elements into your components. These components use your Java code to generate HTML code that Web browsers can interpret and display, and are programmed to translate user inputs or selections back into Java variables. The system by which values are taken from these elements and communicated to your Java code is called request processing.

54 Request Processing Apple Computer, Inc. May 2001
C H A P T E R 5
Managing User Input
Request Processing
Each action taken by a user is communicated to your application via the Web server and the WebObjects adaptor. All the pertinent details of the user’s action—the contents of text fields, the state of radio buttons and checkboxes, and the selections in pop-up menus—as well as information about the session and button or link activated is encoded in the HTTP (Hypertext Transfer Protocol) request.
The request is decoded by the action of the WebObjects adaptor and default behaviors in the application. This decoding process, which culminates in the generation of a response page to be returned to the Web browser, is called the request-response loop. See Figure 5-1.

C H A P T E R 5
Managing User Input
Request Processing 55 Apple Computer, Inc. May 2001
Figure 5-1 The request-response loop
WebObjects has two request processing models: component actions and direct actions.
� Component actions. This model enables you to maintain state in your applications; therefore, it requires and uses sessions. By default, WebObjects applications use this model and it’s the one explained in this chapter.
� Direct actions. This model is used by applications that don’t require state management (such as search engines, product catalogs, document libraries, and dynamic publishing). Applications that use this model don’t have sessions by default.
As Figure 5-2 shows, a component action request URL contains all the information necessary for WebObjects to reconstruct the state the session and components were in when a page was last generated for a given user. Listing 5-1 shows an example of a component action URL.
Web Browser HTTP Server WebObjects Adaptor WebObjects Applications
Response page
User sees thenext page
Request
2. Invoke action
Response
1. Take valuefrom request
Request
Response 3. Generate response
Requestpage
User performsan action
Requestcomponent
Returnsresponse component
Responsecomponent
Generatesresponsepage
56 Request Processing Apple Computer, Inc. May 2001
C H A P T E R 5
Managing User Input
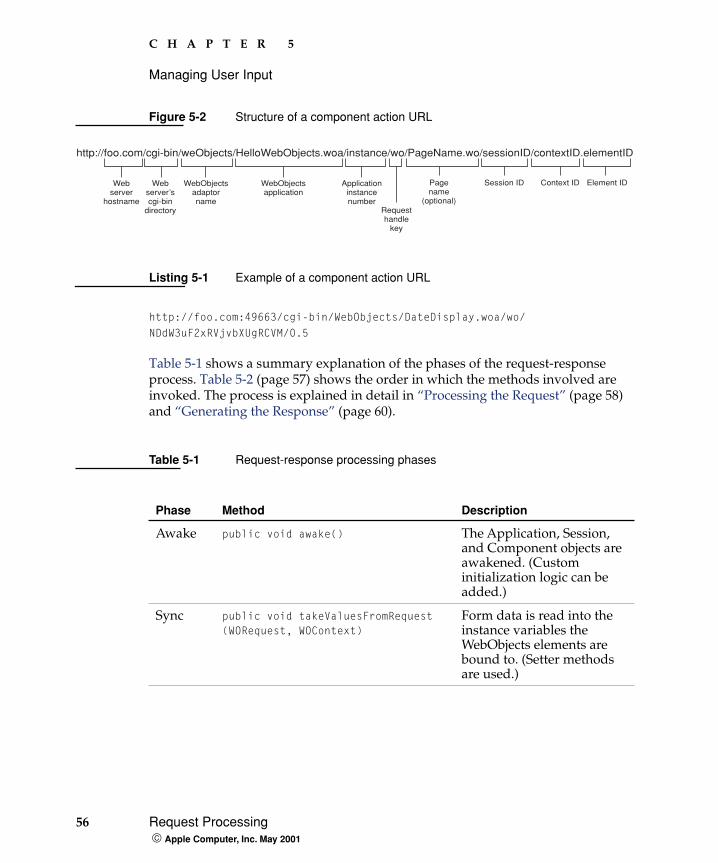
Figure 5-2 Structure of a component action URL
Listing 5-1 Example of a component action URL
http://foo.com:49663/cgi-bin/WebObjects/DateDisplay.woa/wo/
NDdW3uF2xRVjvbXUgRCVM/0.5
Table 5-1 shows a summary explanation of the phases of the request-response process. Table 5-2 (page 57) shows the order in which the methods involved are invoked. The process is explained in detail in “Processing the Request” (page 58) and “Generating the Response” (page 60).
Table 5-1 Request-response processing phases
Phase Method Description
Awake public void awake() The Application, Session, and Component objects are awakened. (Custom initialization logic can be added.)
Sync public void takeValuesFromRequest (WORequest, WOContext)
Form data is read into the instance variables the WebObjects elements are bound to. (Setter methods are used.)
http://foo.com/cgi-bin/weObjects/HelloWebObjects.woa/instance/wo/PageName.wo/sessionID/contextID.elementID
Webserver
hostname
Webserver’scgi-bin
directory
WebObjectsadaptorname
WebObjectsapplication
Applicationinstancenumber
Requesthandle
key
Pagename
(optional)
Session ID Element IDContext ID

C H A P T E R 5
Managing User Input
Request Processing 57 Apple Computer, Inc. May 2001
Action public WOActionResults invokeAction (WORequest, WOContext)
The action the user triggered (with a link or a submit button) is performed. The action could create a new page.
Response public void appendToResponse (WOResponse, WOContext)
The response page is generated. The form elements’ contents are set to the values stored in the instance variables the WebObjects elements are bound to. (Getter methods are used.)
Sleep public void sleep() The Application, Session, and Component objects are put to sleep. (Custom deactivation logic can be added.)
Table 5-2 Request-response processing time line
Application Session Component
awake
awake
awake
takeValuesFromRequest
takeValuesFromRequest
takeValuesFromRequest
setter methods invoked
invokeAction
Table 5-1 Request-response processing phases
Phase Method Description

58 Request Processing Apple Computer, Inc. May 2001
C H A P T E R 5
Managing User Input
Processing the RequestRequest processing takes place in three stages: awakening, state synchronization, and action invocation.
� Awake. This stage is carried out when WebObjects invokes the awake method.
In a multi-user system, limited resources need to be used as efficiently as possible. To this end, applications are only active while they are performing a task. A single server can be running several different applications or many instances of the same application. WebObjects keeps applications asleep while they are not participating in the request-response loop. See “Generating the Response” (page 60) for more information.
The application object’s awake method is invoked first, then the session’s, and finally the component’s. You can customize this method in each of the classes involved to provide logic you need to perform before processing the request. Although the default implementations of those methods do nothing, you should call the superclass’s method before executing custom logic, as Listing 5-2 shows.
invokeAction
invokeAction
appendToResponse
appendToResponse
appendToResponse
getter methods invokedresponse page generated
sleep
sleep
sleep
Table 5-2 Request-response processing time line
Application Session Component
C H A P T E R 5
Managing User Input
Request Processing 59 Apple Computer, Inc. May 2001
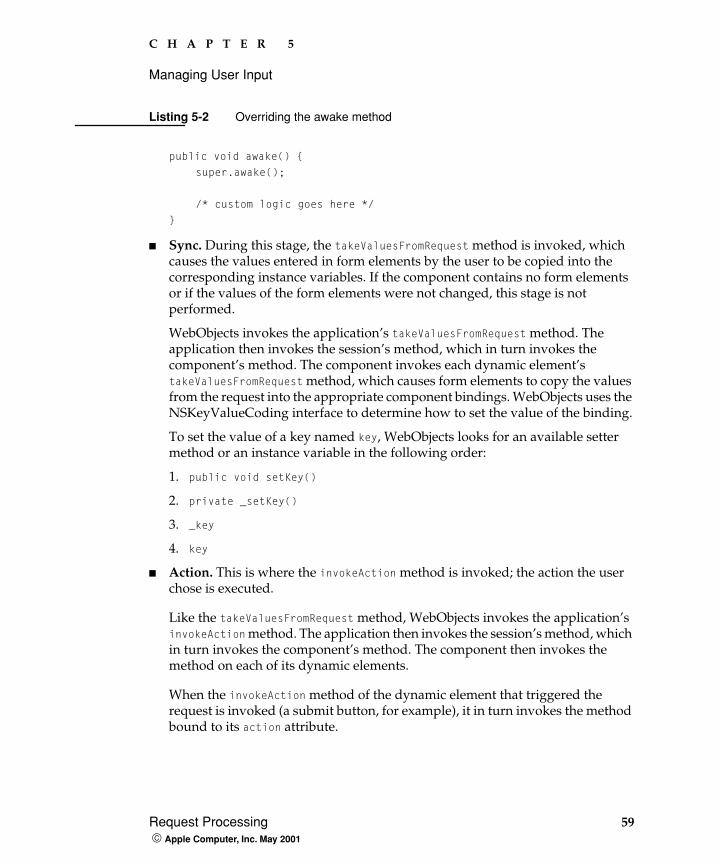
Listing 5-2 Overriding the awake method
public void awake() {
super.awake();
/* custom logic goes here */
}
� Sync. During this stage, the takeValuesFromRequest method is invoked, which causes the values entered in form elements by the user to be copied into the corresponding instance variables. If the component contains no form elements or if the values of the form elements were not changed, this stage is not performed.
WebObjects invokes the application’s takeValuesFromRequest method. The application then invokes the session’s method, which in turn invokes the component’s method. The component invokes each dynamic element’s takeValuesFromRequest method, which causes form elements to copy the values from the request into the appropriate component bindings. WebObjects uses the NSKeyValueCoding interface to determine how to set the value of the binding.
To set the value of a key named key, WebObjects looks for an available setter method or an instance variable in the following order:
1. public void setKey()
2. private _setKey()
3. _key
4. key
� Action. This is where the invokeAction method is invoked; the action the user chose is executed.
Like the takeValuesFromRequest method, WebObjects invokes the application’s invokeAction method. The application then invokes the session’s method, which in turn invokes the component’s method. The component then invokes the method on each of its dynamic elements.
When the invokeAction method of the dynamic element that triggered the request is invoked (a submit button, for example), it in turn invokes the method bound to its action attribute.
60 Request Processing Apple Computer, Inc. May 2001
C H A P T E R 5
Managing User Input
Generating the ResponseAfter the form values are gathered and the action method is invoked, the application creates a response page. This is the component returned by the action method. The response-generation process has two phases: append to response and sleep.
� Response. Here is where the response page is generated. Each WebObjects element’s appendToResponse method is invoked, so that it can add its content to the page to be displayed.
WebObjects invokes the application’s appendToResponse method. Then the application invokes the session’s method, which in turn invokes the component’s method. The component goes through its HTML code creating the page’s content. When it finds a <WEBOBJECT> tag, it invokes the corresponding element’s appendToResponse method, so that it can get the values of its binding and add the resulting content to the page. The process continues recursively until the entire response page has been created.
When a variable needs to be evaluated, WebObjects uses a system much like the one it uses when a variable needs to be set. When the value of a key named key is requested, WebObjects first looks for a getter method. If one is not found, it accesses the instance variable itself. The order in which WebObjects tries to obtain the value for key is as follows:
1. public [...] getKey()
2. public [...] key()
3. private [...] _getKey()
4. private [...] key()
5. [...] _key
6. [...] key
� Sleep. When the response process is completed, the sleep methods of the Component, Session, and Application objects are invoked. (The order in which the objects’ sleep method is called is the opposite of the order in which the awake methods are invoked in the awake phase.) When overriding the sleep method, you should follow the structure in Listing 5-3.

C H A P T E R 5
Managing User Input
Request Processing 61 Apple Computer, Inc. May 2001
Listing 5-3 Overriding the sleep method
public void sleep() {
/* custom logic goes here */
super.sleep();
}
After all the objects involved in the request-response process are put to sleep, the new page is sent to the WebObjects adaptor.
Backtracking CacheWebObjects supports the use of a Web browser’s Back button (backtracking) by keeping a cache of recently viewed pages on the server. The cache is configured to hold 30 pages per session, but you can customize it to meet your needs. To change the default size of the cache, add code to the Application class’s constructor. For example, to change the page cache size to 45 pages, you add this code:
setPageCacheSize(45);
When a response page is generated, it and its state information are added to the cache. That way, when the user clicks her browser’s Back button, WebObjects can retrieve the correct component and its state.
For backtracking to work properly with dynamic data, a Web browser’s own cache should be disabled, so that all page requests go to the Web server and, therefore, your application. You can accomplish this by adding this code to the Application class’s constructor:
setPageRefreshOnBacktrackEnabled(true);
When the cache becomes full, the oldest page in it is discarded to make room to store a new page. When the user backtracks past the oldest page in the cache, WebObjects informs her of the situation with a special page.

62 User Interface Apple Computer, Inc. May 2001
C H A P T E R 5
Managing User Input
User Interface
Input elements are bound to variables in a way very similar to the way display elements are. In fact, input elements are essentially bidirectional display elements—they get a value from the object when the response is generated and send a value back to the object when a request is received. See “Request Processing” (page 54) for more information.
For this example, you display a bit of information about the user. You’ll use text input fields to get data from the user, and once she’s entered it, you’ll use a WOConditional to hide the text fields and display the data. Then you’ll encapsulate the user data into a custom object so you can generate an array of them.
First, create a new project named UserEntry. Edit the Main component with WebObjects Builder. The first step is to add variables for the data the user enters. Then, you add WOTextFields and bind them to the variables.
1. Add two variables named personName and favoriteFood to the Main component using the Edit Source menu. These variables should be of type java.lang.String. Make sure the three options below “Generate source code for” are selected so that an instance variable and accessor methods are generated.

C H A P T E R 5
Managing User Input
User Interface 63 Apple Computer, Inc. May 2001
2. Use the Edit Source menu to add an action method named addUser. Accept the default of null for the component’s return value.
In a later step, you’ll customize this method to set some additional variables.
3. Add a WOForm, labels, WOTextFields, and a WOSubmitButton to capture data from the user.
a. Add the WOForm by choosing Forms > WOForm.
All form elements, including submit buttons, must be within a WOForm to function.
b. Add the WOForm’s elements.
Add two labels “Name: ” and “Favorite Food: ” in separate lines.
Add a WOTextField next to the Name label by choosing Forms > WOTextField.
Add a second WOTextField next to the Favorite Food label.
Place the cursor at the end of last text field and press Shift-Enter.
Note: Avoid calling a variable name. This name is used by WebObjects and using it for your own purposes will lead to unexpected results!

64 User Interface Apple Computer, Inc. May 2001
C H A P T E R 5
Managing User Input
Choose Forms > WOSubmitButton to add a button to use to submit the form.
4. Bind the variables to the value attribute of the appropriate text fields, just as with the WOString. See Figure 5-3.
Figure 5-3 Binding the Favorite Food text field to personName
5. Bind the addUser action to the action attribute of the WOSubmitButton.
6. Save Main.wo.

C H A P T E R 5
Managing User Input
Tracing the Request-Response Loop 65 Apple Computer, Inc. May 2001
All the user interface elements are connected. The WOTextFields set the properties bound to them during request processing. The Java method bound to the WOSubmitButton’s action attribute is called when the user clicks the submit button.
Tracing the Request-Response Loop
Now you’ll modify the methods in your Java files to display a message indicating when they’re called, so you can watch the phases of the request-response loop in action.
Each time the user submits a request, the contents of the text fields are sent with the request. WebObjects then determines the properties to update and the methods to invoke using the WOD file.
Selecting the options under “Generate source code for” when you added the favoriteFood and personName keys to the Main component caused WebObjects Builder to insert not just two String variables, but also two methods that are used to update those variables (the accessor methods, a getter method and a setter method). If you add Java printing statements to those methods and to the addPerson action method, you can watch them being called during the request part of the request-response loop. If you add the other methods described in “Request Processing” (page 54), you can watch them being called as you use the application, as well.
Edit the Session.java, Application.java, and Main.java files to add the awake method so you can track the processing of the request. You can use the Java System.out.println method to log text to the console of your application; it is then displayed in the Run pane of Project Builder’s main window. Add the method in Listing 5-4 to all three files.
Listing 5-4 Tracing the request-response loop—the awake method
public void awake() {
super.awake();
System.out.println(this.getClass().getName() + "‘s awake method called");

66 Tracing the Request-Response Loop Apple Computer, Inc. May 2001
C H A P T E R 5
Managing User Input
}
This method prints the name of the class followed by a notification that the awake method was called in each class that you put it in. Notice that it calls super.awake to ensure that the superclass’s awake method is called before executing its custom logic.
Edit the setPersonName, setFavoriteFood, and addUser methods in Main.java to log strings to the console when they are called. Your methods should look like the ones in Listing 5-5.
Listing 5-5 Tracing the request-response loop—the accessor and action methods
public void setPersonName(String newPersonName) {
System.out.println("Setting personName to ‘" + newPersonName + “‘”);
personName = newPersonName;
}
public void setFavoriteFood(String newFavoriteFood) {
System.out.println("Setting favoriteFood to ‘" + newFavoriteFood + “‘”);
favoriteFood = newFavoriteFood;
}
public WOComponent addUser() {
System.out.println("The submit button was clicked.");
return null;
}
Build and run the new application, correcting any errors revealed during compilation if necessary.

C H A P T E R 5
Managing User Input
Tracing the Request-Response Loop 67 Apple Computer, Inc. May 2001
Notice that when the page first loads, the awake methods are called. This is because the request-response loop is run through the first time the page is generated. Also notice that your set methods are not called. This is because at the time of the first request the user has not yet filled in any text fields, so the state synchronization phase does not take place (See “Processing the Request” (page 58)).
Fill in the data fields and click Submit.

68 Conditional Display With WOConditional Elements Apple Computer, Inc. May 2001
C H A P T E R 5
Managing User Input
When you click Submit, you’ll be able to watch the request portion of the request-response loop through Project Builder’s output window as variables are updated.
Application:awake method called
Session:awake method called
Main:awake method called
Setting personName to ‘Joshua Marker’
Setting favoriteFood to ‘Sushi’
The submit button was clicked.
Because of the printLn method calls added, you can see that WebObjects calls each awake method, does variable assignment, and then calls the action method you assigned to the submit button. This means that if code in the addUser method referred to the favoriteFood or personName variables, the values provided by the user would be available, rather than old values, if any. You can take advantage of this to set other variables in your component. For example, currently the form fields remain active even after the user has filled them in. You could make the fields disappear once the necessary data has been entered by checking in the addUser method to see if both fields are filled in and setting a Boolean property to indicate whether the entry is still incomplete. You could then use a WOConditional element to hide some elements of the component.
Conditional Display With WOConditional Elements
A WOConditional element provides a means of conditionally displaying part of a component. This part could include text, elements, and other components.
The WOConditional element has two attributes: condition and negate. The condition attribute is required. While it is syntactically correct to use the values YES or NO for this binding, the element is only useful when condition is bound to a Java method that returns true or false (you can also bind it to integer objects, in which case nonzero values are interpreted as true and zero values as false). If the method evaluates to true, the contents of the conditional are displayed; otherwise, they are not. If the negate attribute it set to true, this arrangement is reversed: the contents are displayed only if the condition attribute evaluates to false.

C H A P T E R 5
Managing User Input
Conditional Display With WOConditional Elements 69 Apple Computer, Inc. May 2001
You can use a pair of WOConditionals to ask the user for input and then display the information she entered. This is the method you’ll use to capture and display user data.
1. Add an instance variable you can use to indicate whether the user has entered the necessary information.
Add the following variable to Main.java:
protected boolean entryIncomplete;
You can use WebObjects Builder’s Edit Source menu or add the variable directly to the class file. (If you use WebObjects Builder, be sure to deselect the options under “Create source code for” in the Add Key dialog.)
This variable should be initialized to true because the variables are empty when the page is first displayed, so the entry is incomplete. Otherwise, the fields would not be displayed the first time the page is shown. Initialize the variable in the component’s constructor.
public Main(WOContext context) {
super(context);
entryIncomplete = true;
}
Also modify the addUser method to check the form properties and update the value of entryIncomplete.
public WOComponent addUser() {
System.out.println("'addUser' button was clicked.");
if (personName.equals("") || favoriteFood.equals("") {
entryIncomplete = true;
}
else {
entryIncomplete = false; // the entry is now complete
}
return null;
}
2. Save Main.java.
3. Open Main.wo in WebObjects Builder
4. Make the form element conditional by wrapping it in a WOConditional.

70 Conditional Display With WOConditional Elements Apple Computer, Inc. May 2001
C H A P T E R 5
Managing User Input
The fields and the submit button should be displayed only while entryIncomplete is true. Select the form and choose WOConditional from the WebObjects menu. (You can select the form by clicking inside it and then clicking the <WOForm> tag in the path pane, located below the content editor.)
5. Bind the condition attribute of the WOConditional to the entryIncomplete instance variable.
As long as entryIncomplete evaluates to true, WebObjects displays the WOConditional’s content.
6. Create elements to display the data once it has been entered.
a. Make a new line below the WOConditional.
b. Add two WOStrings.
c. Add the text “ prefers to eat “ between the WOStrings (note the leading and trailing spaces).
d. Bind the first WOString’s value attribute to personName, and the second’s to favoriteFood.
7. Select the new items and create a WOConditional around them.
8. Bind the new WOConditional’s condition to entryIncomplete. Click “+” on the WOConditional to invert its meaning. It changes to a “-” and the contents of the second WOConditional are displayed only when the value of the entryIncomplete variable is false.
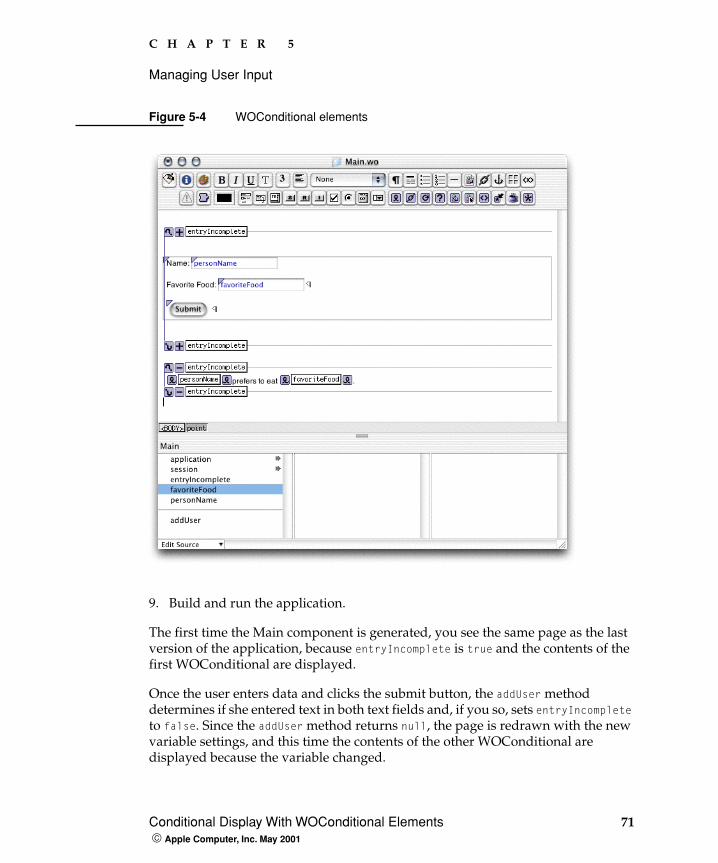
C H A P T E R 5
Managing User Input
Conditional Display With WOConditional Elements 71 Apple Computer, Inc. May 2001
Figure 5-4 WOConditional elements
9. Build and run the application.
The first time the Main component is generated, you see the same page as the last version of the application, because entryIncomplete is true and the contents of the first WOConditional are displayed.
Once the user enters data and clicks the submit button, the addUser method determines if she entered text in both text fields and, if you so, sets entryIncomplete to false. Since the addUser method returns null, the page is redrawn with the new variable settings, and this time the contents of the other WOConditional are displayed because the variable changed.
72 Derived Properties Apple Computer, Inc. May 2001
C H A P T E R 5
Managing User Input
Derived Properties
Instead of using an instance variable to determine when the entry is complete, you could provide logic in a method that evaluates the entry at the moment the method is called and decides whether it is complete. By doing this, you can completely remove the variable.
This kind of property is called a derived property, because while it is a property of the object, it is not directly stored but is instead derived via logic. You can remove the entryIncomplete variable and replace it with an entryIncomplete method without changing the WOD file or altering Main.wo.
1. Remove the entryIncomplete variable from your Main.java file.
Remove the variable declaration as well as the assignments in the constructor and in the addUser method. You can remove the variable itself using WebObjects Builder by Control-clicking the variable name and choosing “Delete entryIncomplete” . To remove the other code you must edit the Java file in Project Builder.

C H A P T E R 5
Managing User Input
Derived Properties 73 Apple Computer, Inc. May 2001
2. Add a method called entryIncomplete that provides the same information the variable did.
Add the property by choosing Add Key from the Edit Source menu in WebObjects Builder’s main window. In the Add Key dialog, deselect the option to generate an instance variable. WebObjects automatically selects the other two options. Deselect the option to generate a method for setting the value, leaving only the option to generate a method for returning the value, as shown in Figure 5-5.

74 Derived Properties Apple Computer, Inc. May 2001
C H A P T E R 5
Managing User Input
Figure 5-5 Adding a derived property
Modify the entryIncomplete method so that it looks like the one shown in Listing 5-6.
Listing 5-6 Implementation of entryIncomplete as a derived property
public boolean entryIncomplete() {
if (personName == null || favoriteFood == null ||
personName.equals("") || favoriteFood.equals("")) {
System.out.println("The entry is incomplete.");
return true;
}
else {
System.out.println("The entry is complete.");
return false;
}
}
3. Build and run the application.

C H A P T E R 5
Managing User Input
Derived Properties 75 Apple Computer, Inc. May 2001
Notice that the application runs just as before, and you can now see that WebObjects requests the entryIncomplete method twice in the course of displaying the page—once while evaluating each WOConditional.
You can use this behavior in the future to derive data when it is needed rather than storing it in a variable.

76 Derived Properties Apple Computer, Inc. May 2001
C H A P T E R 5
Managing User Input

Custom Objects 77 Apple Computer, Inc. May 2001
C H A P T E R 6
6 Component Communication
A single component does not an application make. One of the aspects of the WebObjects strategy is the ability to define new components and share data between them.
As was said before, WebObjects is a heavily object-oriented system. It provides for easy encapsulation of data into components and custom classes, and facilitates the sharing of data between components when an application is run.
In this chapter, you
� encapsulate data into a custom a class
� learn how WebObjects follows keypaths
� add a new WOComponent to your application
� programmatically create new components and return them to the user
� pass information between components
Custom Objects
Right now, you’re storing the name and food information in variables of the Main component, abandoning the benefits of an object-oriented system.
In the case that you wanted to pass the information the user enters to other components, you’d have pass both values. If you had more information about a particular person, you’d have to pass each datum separately. It would be much

78 Custom Objects Apple Computer, Inc. May 2001
C H A P T E R 6
Component Communication
more convenient to encapsulate all the information about a user into one object and pass that from component to component. Since WebObjects is fully object-oriented, you can define a custom object to contain the user-entered data.
For now, you’ll just encapsulate the same data into an object. Later, though, this kind of encapsulation is exactly what will allow you to use a database as your persistent data storage system.
Once you’ve defined the User class with the appropriate properties, you’ll add a variable of type User to the Main component and modify the WOTextFields on Main.wo to use that variable’s properties instead of the personName and favoriteFood instance variables.
Duplicating the UserEntry ProjectBefore proceeding with the custom class example, you should create a copy of the UserEntry project.
1. Duplicate the UserEntry directory and name it UserEntryCustomObject.
2. Rename the UserEntry.pbproj file inside the UserEntryCustomObject directory to UserEntryCustomObject.pbproj.
3. Open the UserEntryCustomObject project in Project Builder.
4. Rename the UserEntry target to UserEntryCustomObject.
a. Click the Targets tab.
b. Select the UserEntry target in the Targets list.
c. Choose Project > Rename.
d. Replace UserEntry with UserEntryCustomObject.
e. Click the Files tab.
5. Choose Build > Clean.
Adding the Custom ClassIn this section you’ll create the custom class User.java and add it to your project.
1. Make sure the UserEntryCustomObject project is open in Project Builder.

C H A P T E R 6
Component Communication
Custom Objects 79 Apple Computer, Inc. May 2001
2. Select the group and target for the new file.
a. Select Classes in the Groups & Files list.
b. Choose Application Server from the target menu, located on the toolbar.
3. Add the class file.
a. Choose File > New File.

80 Custom Objects Apple Computer, Inc. May 2001
C H A P T E R 6
Component Communication
b. Under WebObjects, select Java Class and click Next.
c. Enter User.java in the File Name text field and click Finish.

C H A P T E R 6
Component Communication
Custom Objects 81 Apple Computer, Inc. May 2001
4. Move the variables and methods relating to the person name and favorite food properties from Main.java to the new class.
Select the personName and favoriteFood variables, as well as their accessor methods, from Main.java and choose Cut on the Edit menu. Then paste them into the User.java file.
5. Save Main.java and User.java.
6. Add a variable of type User to the Main component.
a. Open the Main component in WebObjects Builder.
b. Choose Add Key from the Edit Source menu.
c. Name the variable user and choose User from the Type pop-up menu. Do not include accessor methods.

82 Custom Objects Apple Computer, Inc. May 2001
C H A P T E R 6
Component Communication
7. Instantiate the user variable in the Main class.
You need to create a User object in the Main component. Make the constructor method of the Main class look like Listing 6-1.
Listing 6-1 Instantiating the user instance variable in the constructor of the Main.java class
public Main(WOContext context) {
super(context);
user = new User();
}
Save Main.java.
8. Change the bindings on the dynamic elements to use the new variable.
Click user in the variable browser of WebObjects Builder’s main window. Just as with creating other bindings, drag a connection from the variable favoriteFood to the WOTextField that is currently bound to favoriteFood. When you release the mouse button, a pop-up menu lists the bindings available.
Notice that value has a checkmark next to it, indicating that it currently has a binding. Selecting value replaces favoriteFood with user.favoriteFood.
Replace the personName binding in a similar fashion. Be sure to change both the WOStrings and the WOTextFields.
9. Update the entryIncomplete method.
The entryIncomplete method in Main can no longer directly access the personName and favoriteFood instance variables because they are protected elements of the User class. It has to use the accessor methods that User provides. Make the changes necessary so that the method looks like Listing 6-2.
Listing 6-2 Main.java’s entryIncomplete method using the user instance variable
public boolean entryIncomplete() {
if (user.personName() == null || user.favoriteFood() == null ||
user.personName().equals("") || user.favoriteFood().equals("")) {
return true;
}
C H A P T E R 6
Component Communication
Custom Objects 83 Apple Computer, Inc. May 2001
else {
return false;
}
}
10. Choose UserEntryCustomObject from the target pop-up menu.
11. Build and run the application.
The behavior is the same as the one displayed by the UserEntry project, defined in “Managing User Input” (page 53), but the data is now being accessed via the new custom object.
Following a KeypathYou’ll notice that the bindings for the dynamic elements are in a slightly different format. Rather than simply naming the variable or method to call, they specify a more specific path to the property in question: in this case, the userName variable from the user object. This is called a keypath.
Encapsulating data into objects, as in this example, is a very important part of object-oriented development. Access to this data is defined by a keypath that specifies the objects, methods, or variables that can provide the data in question.
A keypath is a set of keys separated by periods. When WebObjects requires access to data specified in a keypath, it follows the keypath by evaluating the first key from the list.
This first key is evaluated within the scope of the instance representing the component—the class file in the component is examined for the method or variable. In this case, the user instance variable found in the Main.java class.
At this point, if there is another key in the keypath, it is evaluated the same way, but this time using the result of the first keypath as the source object for the method or variable. Now, the personName method is called. Since there are no more keys in the keypath, the value from the personName method is returned as the value for the binding.
In this way, you can access the data you need, as long as it can be reached by some method from the current component. In the simplest case, you store variables in the component itself. As your data becomes more complex, you may need to store it in custom objects and pass them between components.

84 Defining a New Component Apple Computer, Inc. May 2001
C H A P T E R 6
Component Communication
Defining a New Component
In this section, you’ll create a new project and add a component for displaying and editing a user’s information.
Remember that each component has its own Java class. It is convenient to think of components, as well as the objects representing them, as self-contained units with specific tasks. The task of the new component is to allow the user to edit a User object. By encapsulating behavior this way, you ensure that if you add, remove, or alter the properties of a user, you need to modify only this component to allow editing the new attributes.
You begin by creating a new project since you no longer need the code for tracking the request-response cycle. Then you add the custom User class and create a component for editing a User object. Then you will alter the Main component to maintain a list of users rather than a single user, and add methods to use the new component to edit any one of them.
1. Create a new WebObjects application project and name it ComponentCommunication.

C H A P T E R 6
Component Communication
Defining a New Component 85 Apple Computer, Inc. May 2001
2. Add a User.java class.
Follow the steps in “Adding the Custom Class” (page 78) to add the file to the project. Then edit the file so that it looks like Listing 6-3.
Listing 6-3 User.java
import com.webobjects.foundation.*;
import com.webobjects.appserver.*;
import com.webobjects.eocontrol.*;
public class User extends Object {
protected String personName;
protected String favoriteFood;
public String personName() {
return personName;
}
public void setPersonName(String newPersonName) {
personName = newPersonName;
86 Defining a New Component Apple Computer, Inc. May 2001
C H A P T E R 6
Component Communication
}
public String favoriteFood() {
return favoriteFood;
}
public void setFavoriteFood(String newFavoriteFood) {
favoriteFood = newFavoriteFood;
}
public boolean entryIncomplete() {
if (personName == null || favoriteFood == null ||
personName.equals("") || favoriteFood.equals("")) {
return true;
}
else {
return false;
}
}
}
3. Add a component to the project.
a. Select Web Components from the Groups & Files list.
b. Choose File > New File.
c. Under WebObjects, select Component in the New File pane of the assistant and click Next.
d. Enter UserEdit in the File Name text field.
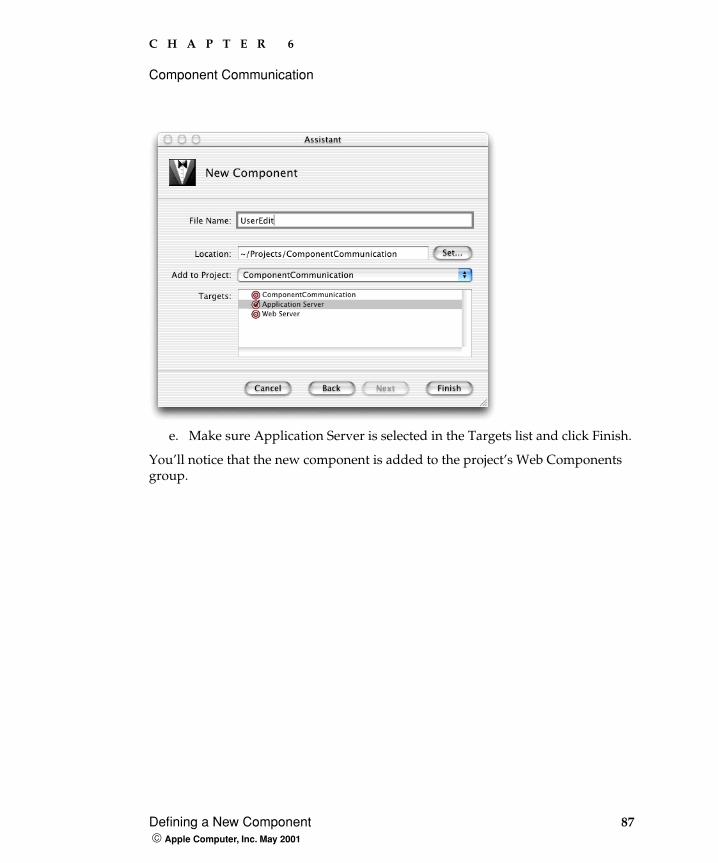
C H A P T E R 6
Component Communication
Defining a New Component 87 Apple Computer, Inc. May 2001
e. Make sure Application Server is selected in the Targets list and click Finish.
You’ll notice that the new component is added to the project’s Web Components group.

88 Defining a New Component Apple Computer, Inc. May 2001
C H A P T E R 6
Component Communication
You’re now ready to customize the component used for editing a User object, UserEdit. The user edits one User object at a time, so UserEdit.java needs to have one instance variable of type User. The UserEdit component will have fields similar to those defined in the Main component of the UserEntry project (see “User Interface” (page 62)) and buttons to submit and cancel the changes.
1. Open UserEdit.wo in WebObjects Builder.
2. Add a User instance variable named user to the component.
Select the options that create an instance variable and provide accessor methods. This variable holds the particular User object being edited.

C H A P T E R 6
Component Communication
Defining a New Component 89 Apple Computer, Inc. May 2001
3. Add a WOForm element to the UserEdit component.
4. Add and bind the WOTextFields as shown in Figure 6-1 (page 90).
5. Add an action method called submitChanges to the component. Choose Main as the page returned by the method. This means that when the user is done editing, she’s returned to the Main component rather than the UserEdit component.
6. Use the Forms menu to add a WOResetButton and a WOSubmitButton, and bind the submitChanges method to the WOSubmitButton’s action attribute.
The WOResetButton resets the form fields.
7. Save UserEdit.wo.
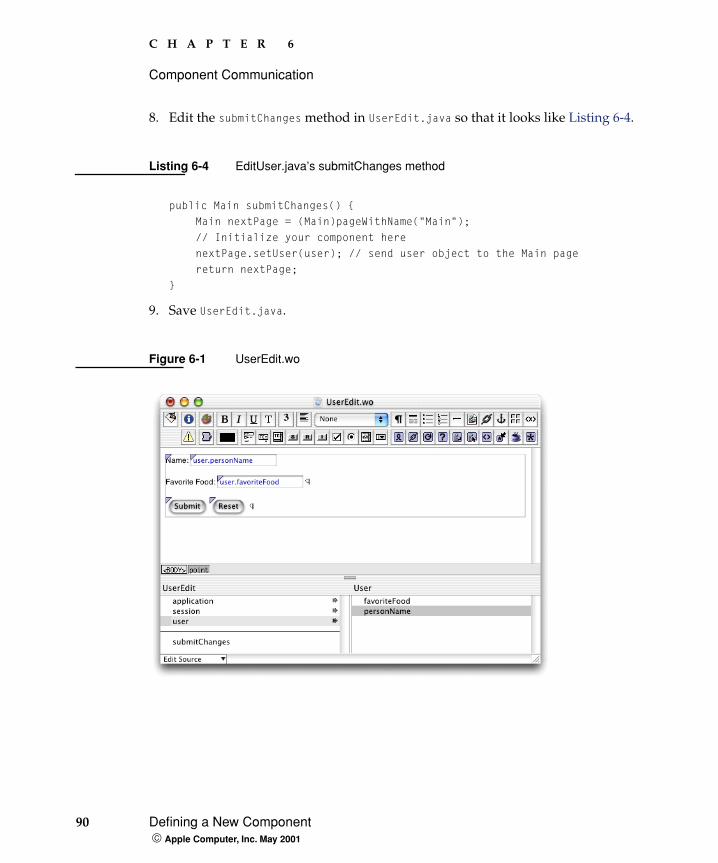
90 Defining a New Component Apple Computer, Inc. May 2001
C H A P T E R 6
Component Communication
8. Edit the submitChanges method in UserEdit.java so that it looks like Listing 6-4.
Listing 6-4 EditUser.java’s submitChanges method
public Main submitChanges() {
Main nextPage = (Main)pageWithName("Main");
// Initialize your component here
nextPage.setUser(user); // send user object to the Main page
return nextPage;
}
9. Save UserEdit.java.
Figure 6-1 UserEdit.wo

C H A P T E R 6
Component Communication
Modifying the Main component 91 Apple Computer, Inc. May 2001
Modifying the Main component
In this section you’ll add elements to the Main component so that it displays the user information after it has been edited. The component needs a WOConditional element so that user information is displayed only if the user entered data in the UserEdit page. After the modifications are made, Main.wo should look similar to Figure 6-2 (page 93).
1. Add a method called noDataEntered to Main.java, as shown in Listing 6-5.
Listing 6-5 The noDataEntered method of the Main.java class
public boolean noDataEntered() {
if (user == null || user.entryIncomplete()) {
return true;
}
else {
return false;
}
}
2. Open Main.wo in WebObjects Builder.
3. Add a user instance variable of type User, including accessor methods.
4. Add informational text displayed when no data has been entered.
a. Add a WOConditional element.
b. Enter the following text inside the WOConditional: User data has not been entered.
c. Bind the WOConditional’s condition attribute to noDataEntered.
5. Add display fields and a caption displayed when data has been entered.
a. Add another WOConditional element below the first one.
b. Inside the second WOConditional, add a WOString, enter the text “ likes to eat “ after it, and add another WOString.

92 Modifying the Main component Apple Computer, Inc. May 2001
C H A P T E R 6
Component Communication
c. Bind the first WOString’s value attribute to user.personName and the second’s to user.favoriteFood.
d. Bind the WOConditional’s condition attribute to noDataEntered.
Click “+” in the WOConditional so that it changes to “-”. This makes it so that only one of the WOConditional elements’s content is displayed at a time. See “Conditional Display With WOConditional Elements” (page 68) for more information.
6. Add an action called editUser, which returns a UserEdit component.
7. Add a link that displays the UserEdit page.
a. Add a WOHyperlink below the second WOConditional, and enter Edit as its caption.
b. Bind the WOHyperlink’s action attribute to the editUser action.
8. Save Main.wo.
9. Edit the editUser method in Main.java so that it looks like Listing 6-6.
Listing 6-6 Main component’s editUser action method
public UserEdit editUser() {
UserEdit nextPage = (UserEdit)pageWithName("UserEdit");
// Initialize your component here
if (user == null) {
user = new User();
}
nextPage.setUser(user); // send the user object to the UserEdit page
return nextPage;
}
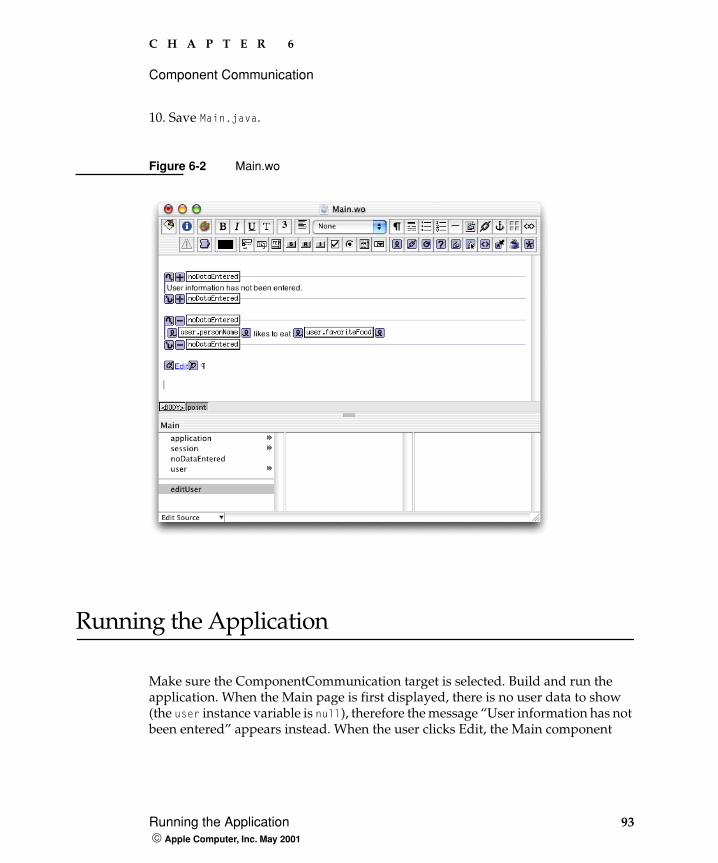
C H A P T E R 6
Component Communication
Running the Application 93 Apple Computer, Inc. May 2001
10. Save Main.java.
Figure 6-2 Main.wo
Running the Application
Make sure the ComponentCommunication target is selected. Build and run the application. When the Main page is first displayed, there is no user data to show (the user instance variable is null), therefore the message “User information has not been entered” appears instead. When the user clicks Edit, the Main component

94 Running the Application Apple Computer, Inc. May 2001
C H A P T E R 6
Component Communication
invokes its userEdit action, which returns a UserEdit page. If the user enters data into the Name and Favorite Food text fields in the UserEdit page and clicks submit, UserEdit’s submitChanges action, which returns a new Main page, is invoked.
There is only one instance of User during the application’s execution. The User object is instantiated in Main’s editUser method if it does not already exist (see Listing 6-6 (page 92). Main then sends this object to the newly created UserEdit page. Similarly, UserEdit sends the User object to a new Main instance in its submitChanges method.
95 Apple Computer, Inc. May 2001
C H A P T E R 7
7 Using the Session to Manage State
The Web is by its nature a stateless medium. A Web server receives a request, reads the document, and returns it to the requesting browser, without any knowledge of previous requests from the same user.
A Web application, however, needs to maintain state between one request from a particular user and the next. WebObjects encodes a unique identifier with each incoming request. This identifier is used to maintain state over a stateless medium. See “Request Processing” (page 54) for more information.
Part of this state is the session. While you can pass information back and forth between components, you frequently need to maintain state that is shared between components. Rather than pass this information from component to component (as described in “Component Communication” (page 77)), you can store it at a higher level—in the Session object. Each component has access to the Session object, so such data stored in it is globally available.
In this chapter, you
� store persistent information in the Session object
� access the session from multiple components
� see the benefit of making your components reusable
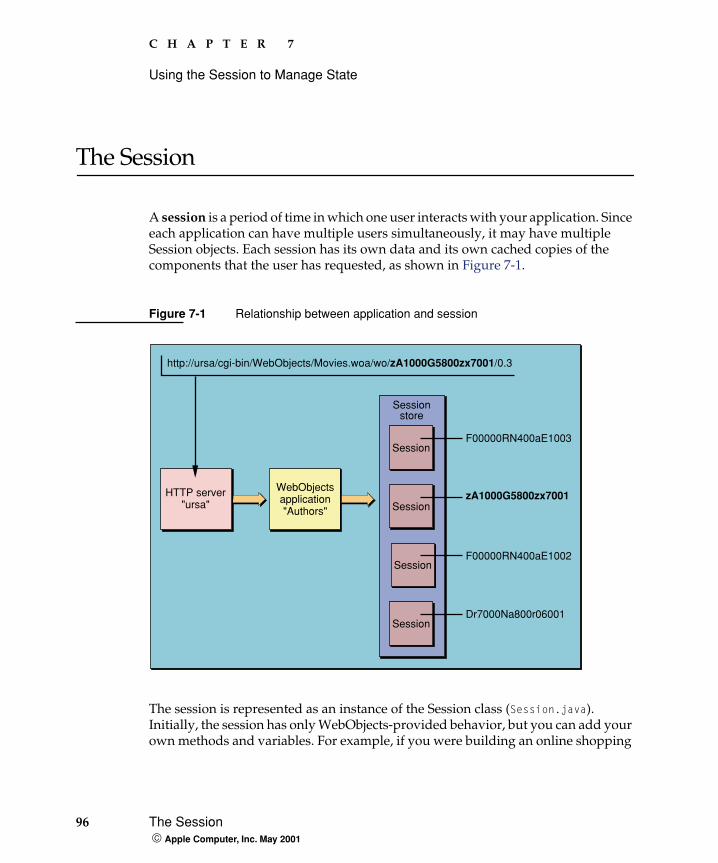
96 The Session Apple Computer, Inc. May 2001
C H A P T E R 7
Using the Session to Manage State
The Session
A session is a period of time in which one user interacts with your application. Since each application can have multiple users simultaneously, it may have multiple Session objects. Each session has its own data and its own cached copies of the components that the user has requested, as shown in Figure 7-1.
Figure 7-1 Relationship between application and session
The session is represented as an instance of the Session class (Session.java). Initially, the session has only WebObjects-provided behavior, but you can add your own methods and variables. For example, if you were building an online shopping
F00000RN400aE1003
zA1000G5800zx7001
F00000RN400aE1002
Dr7000Na800r06001
http://ursa/cgi-bin/WebObjects/Movies.woa/wo/zA1000G5800zx7001/0.3
WebObjectsapplication"Authors"
HTTP server"ursa"
Sessionstore
Session
Session
Session
Session

C H A P T E R 7
Using the Session to Manage State
Displaying and Editing Lists of Objects 97 Apple Computer, Inc. May 2001
application, the session would be an appropriate place to store a user’s shopping cart, because the session is tied to one particular user and persists as long as the user is using the application.
When an incoming request is processed, WebObjects automatically activates the Session instance associated with the user who originated the request, as described in “Request Processing” (page 54).
The WOComponent class includes a method for accessing the currently active session. Since all your components inherit from this class and WebObjects automatically activates the correct session when a request is processed, calling the session method from your component (or in a keypath) provides you with the session for the current user.
Displaying and Editing Lists of Objects
Before you begin, you should make a copy of the ComponentCommunication project and name it SessionState. See “Duplicating the UserEntry Project” (page 78).
You’ll now edit the Main component to show a list of users instead of just one. For that, you’ll need to use the NSArray and NSMutableArray classes.
The NSArray and NSMutableArray ClassesThe NSArray represents an ordered collection of objects, much like a Java array (java.lang.Array). NSArray objects are not changeable after being instantiated. (The array itself is not changeable, but the items it contains can be changed if their types are mutable.) The NSMutableArray class (a subclass of NSArray) is intended for arrays that need to grow and shrink dynamically.
The following sections list the NSArray and NSMutableArray methods that you may find useful when manipulating arrays.

98 Displaying and Editing Lists of Objects Apple Computer, Inc. May 2001
C H A P T E R 7
Using the Session to Manage State
NSArray
objectAtIndex(int index)
Returns the object at the given integer index. The first object in an NSArray is at index zero. Objects are returned as generic Java Objects. Your Java code may need to cast objects to a specific class to use them.
count
Returns an integer indicating the number of objects in the NSArray.
NSMutableArray
addObject(Object anObject)
Adds the given object to the end of the array, increasing its size by one.removeObjectAtIndex(int index)
Removes the indicated object from the array, causing it to shrink in size.In addition to these methods, the NSArray and NSMutableArray classes have other methods you may find useful. You can examine them using Java Browser.
Adding the NSMutableArray to the SessionYou can use WebObjects Builder to add an array to the Session class.
1. Open Main.wo in WebObjects Builder.
2. Add the userList instance variable to session.
a. Select session in the Main list.
b. Control-click in the Session list.
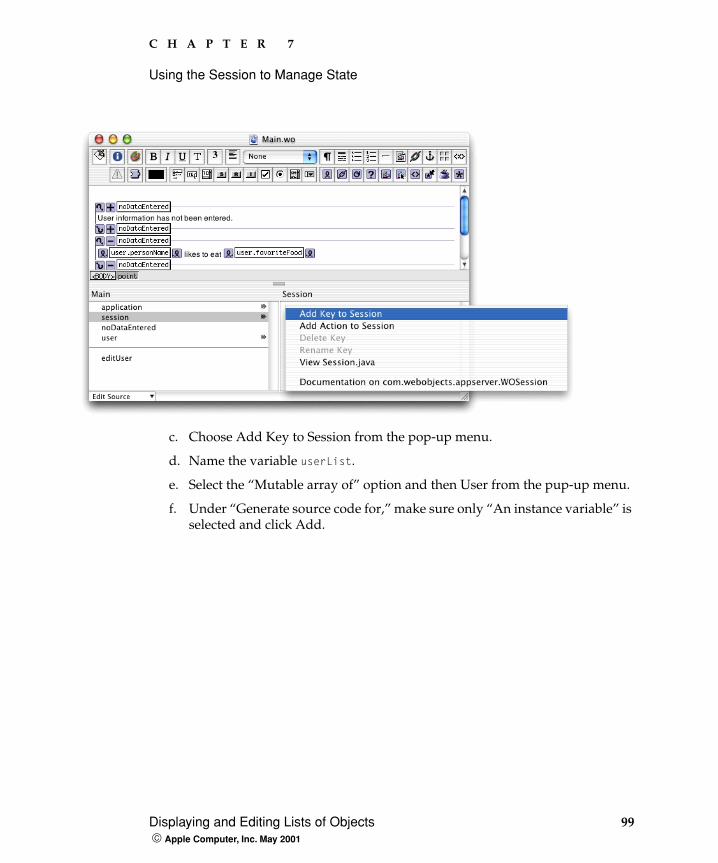
C H A P T E R 7
Using the Session to Manage State
Displaying and Editing Lists of Objects 99 Apple Computer, Inc. May 2001
c. Choose Add Key to Session from the pop-up menu.
d. Name the variable userList.
e. Select the “Mutable array of” option and then User from the pup-up menu.
f. Under “Generate source code for,” make sure only “An instance variable” is selected and click Add.
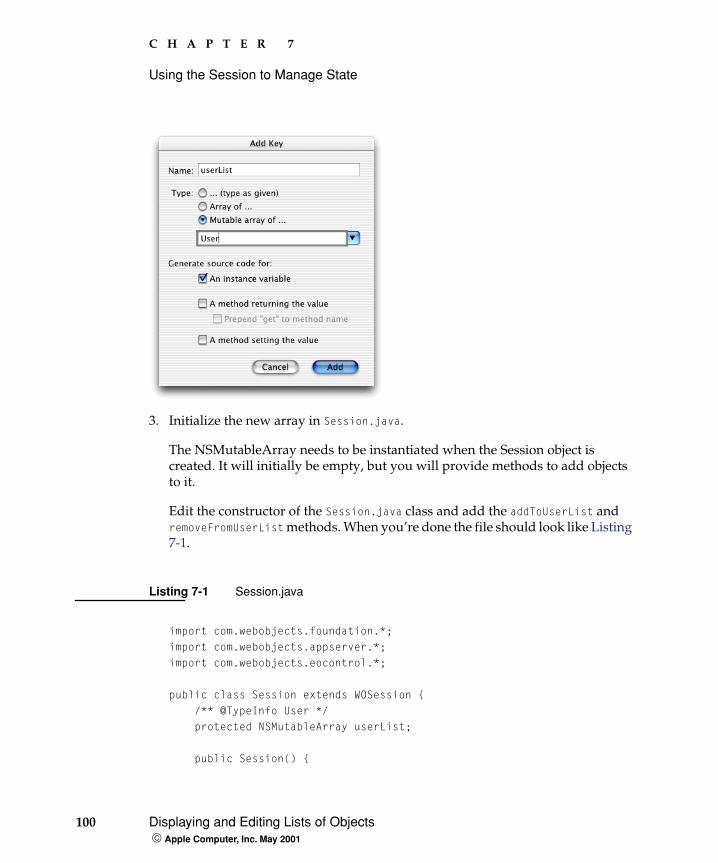
100 Displaying and Editing Lists of Objects Apple Computer, Inc. May 2001
C H A P T E R 7
Using the Session to Manage State
3. Initialize the new array in Session.java.
The NSMutableArray needs to be instantiated when the Session object is created. It will initially be empty, but you will provide methods to add objects to it.
Edit the constructor of the Session.java class and add the addToUserList and removeFromUserList methods. When you’re done the file should look like Listing 7-1.
Listing 7-1 Session.java
import com.webobjects.foundation.*;
import com.webobjects.appserver.*;
import com.webobjects.eocontrol.*;
public class Session extends WOSession {
/** @TypeInfo User */
protected NSMutableArray userList;
public Session() {

C H A P T E R 7
Using the Session to Manage State
Displaying and Editing Lists of Objects 101 Apple Computer, Inc. May 2001
super();
/* ** Put your per-session initialization code here ** */
userList = new NSMutableArray();
}
public void addToUserList(User newUser) {
userList.addObject(newUser);
}
public void removeFromUserList(User aUser) {
userList.removeObject(aUser);
}
}
Adding the WORepetition to MainA WORepetition element is an element designed to iterate over each item in an NSArray, repeating a set of HTML code (possibly including WebObjects elements) once for each item.
A WORepetition has bindings for a list to iterate over (the list attribute) and for a variable to use to hold each item temporarily as it iterates over the list (the item attribute). As the contents of a WORepetition are displayed, the current item in the list is stored in the placeholder. WebObjects elements within the WORepetition can refer to this placeholder variable, and the value of each item is substituted in turn.
You’ll wrap the dynamic elements in Main.wo in a WORepetition. You can use the user instance variable as the WORepetition’s placeholder. After performing the following steps, Main.wo should look similar to Figure 7-2 (page 103).
1. In Main.wo, delete the first WOConditional element (the one that contains the text “User information has not been entered.”
2. Cut the internal contents of the remaining WOConditional.
3. Select the WOConditional and delete it.
4. Paste the content after the Edit WOHyperlink.
5. Add a deleteUser method that returns null.
6. Add a WOHyperlink to delete users.
a. Add a WOHyperlink element after the second WOString.

102 Displaying and Editing Lists of Objects Apple Computer, Inc. May 2001
C H A P T E R 7
Using the Session to Manage State
b. Enter Delete as the WOHyperlink’s caption.
c. Add a carriage return after the WOHyperlink by pressing Shift-Enter.
d. Bind the WOHyperlink’s action attribute to the deleteUser method.
7. Wrap the dynamic elements in Main.wo with a WORepetition.
a. Select all the elements in the page.
b. Choose WebObjects > WORepetition.
The elements are enclosed in a WORepetition element.
8. Bind the WORepetition’s list attribute to session.userList.
Drag from session.userList to the first square of the WORepetition.
9. Bind the WORepetition’s item attribute to user.
Drag from user to the second square of the WORepetition.
10. Add an addUser action that returns a UserEdit page.
11. Add a WOHyperlink to add new users.
a. Add a WOHyperlink below the WORepetition.
b. Enter Add User as the WOHyperlink’s caption.
c. Bind the WOHyperlink’s action attribute to the addUser method.

C H A P T E R 7
Using the Session to Manage State
Displaying and Editing Lists of Objects 103 Apple Computer, Inc. May 2001
Figure 7-2 Main.wo with a WORepetition
Editing the UsersYou can use the UserEdit component to edit an arbitrary user. To do so, you’ll use the editUser method in Main.java. The method has additional logic that is not needed in this application. Edit the editUser method so that it looks like Listing 7-2.
Listing 7-2 The editUser method of the Main.java class
public UserEdit editUser() {
UserEdit nextPage = (UserEdit)pageWithName("UserEdit");
// Initialize your component here
nextPage.setUser(user);
return nextPage;
}

104 Displaying and Editing Lists of Objects Apple Computer, Inc. May 2001
C H A P T E R 7
Using the Session to Manage State
The editUser method creates an instance of UserEdit and calls its setUser method with user as the argument. The user variable contains the appropriate object because, when the user clicks Edit, WebObjects stores the session.userList item corresponding to the row on which the Edit link is located in the user instance variable. Remember that the WORepetition’s item attribute is bound to user.
The UserEdit component requires a minor change. The submitChanges method in UserEdit.java no longer needs to invoke the setUser method of the Main.java class (user information is stored at the session level, which Main can access through the session object). Edit the submitChanges method so that it looks like Listing 7-3.
Listing 7-3 The submitChanges method of the UserEdit.java class
public Main submitChanges() {
Main nextPage = (Main)pageWithName("Main");
// Initialize your component here
return nextPage;
}
Adding UsersThis is where it all ties together. Right now, you have a means of editing a specific user (the UserEdit component); a list of users, which starts out empty (session.userList); and a WORepetition that displays your list (in the Main component). All you need to add is a way to build the list!
You need to edit the addUser method in Main.java so that it creates a new User object, adds it to the session’s list of users, and also passes it to the UserEdit page before it is sent to the Web browser to be edited. Edit addUser so that it matches Listing 7-4. Notice in particular the code that retrieves the Session object. The addToUserList method of that object is then invoked with the newly created User object as the argument.
Listing 7-4 The addUser method of the Main.java class
public UserEdit addUser() {
UserEdit nextPage = (UserEdit)pageWithName("UserEdit");

C H A P T E R 7
Using the Session to Manage State
Running the Application 105 Apple Computer, Inc. May 2001
// Initialize your component here
Session session = (Session)session(); // get session for current user
User newUser = new User(); // create a new user object
session.addToUserList(newUser); // add new user to session's userList
nextPage.setUser(newUser); // send the new user to UserEdit
return nextPage;
}
Deleting UsersThe last step is to edit the deleteUser method in Main.java so that it removes a user from the list. The method is very similar to the addUser method described in “Displaying and Editing Lists of Objects” (page 97). The only difference is that, instead of creating a new user object and invoking the Session.addToUserList method, it only invokes the Session.removeFromUserList method with the User object in the user instance variable (updated by WebObjects when the user clicks Delete).
Edit the deleteUser method in Main.java so that it looks like Listing 7-5.
Listing 7-5 The deleteUser method of the Main.java class
public WOComponent deleteUser() {
Session session = (Session)session();// get session for current user
session.removeFromUserList(user);// remove user from session's userList
return null;
}
Running the Application
Build and run the application. Verify that new users you create are added to the list and that you can edit and delete existing users.
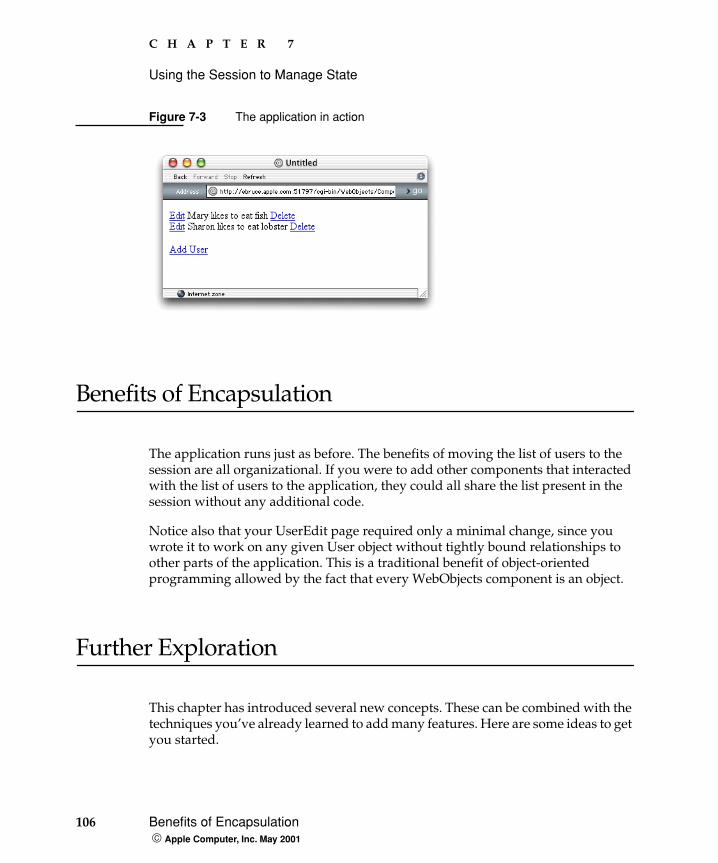
106 Benefits of Encapsulation Apple Computer, Inc. May 2001
C H A P T E R 7
Using the Session to Manage State
Figure 7-3 The application in action
Benefits of Encapsulation
The application runs just as before. The benefits of moving the list of users to the session are all organizational. If you were to add other components that interacted with the list of users to the application, they could all share the list present in the session without any additional code.
Notice also that your UserEdit page required only a minimal change, since you wrote it to work on any given User object without tightly bound relationships to other parts of the application. This is a traditional benefit of object-oriented programming allowed by the fact that every WebObjects component is an object.
Further Exploration
This chapter has introduced several new concepts. These can be combined with the techniques you’ve already learned to add many features. Here are some ideas to get you started.

C H A P T E R 7
Using the Session to Manage State
Further Exploration 107 Apple Computer, Inc. May 2001
� Improve the Edit User link. Give the user the ability to edit the users in the array by clicking their names rather than Edit. You can do this by replacing the static text within the WOHyperlink with the WOString that displays the user’s name.
� Indicate whether the entry is complete. Add a textual indication of whether the user entry is complete using a WOConditional and the entryIncomplete property of the user variable.
� Show the number of items in the list. Use a WOString and the count method of userList to display the number of entries in the list.

108 Further Exploration Apple Computer, Inc. May 2001
C H A P T E R 7
Using the Session to Manage State
Database Structure 109 Apple Computer, Inc. May 2001
C H A P T E R 8
8 Database Basics
WebObjects uses a technology called Enterprise Objects to access data from databases. While Enterprise Objects lets you treat your data as instances of Java classes rather than requiring you to concern yourself with the database level, it is useful to have some knowledge of basic database structure.
This chapter is only a basic introduction to the structure and use of a database. It is sufficient for you to begin using Enterprise Objects, but for further detail you should consult the documentation for your database or your local database administrator.
In this chapter, you learn
� how a modern database is structured
� how relationships are implemented in a database
Database Structure
A modern database closely follows the object-oriented paradigm. The basic unit of organization is the table, which defines the attributes of a data entity. A table can have zero or more rows.
TablesThe table is the equivalent of a class definition. It defines the attributes or properties that each row in it has. Each property is called a column.
110 Database Structure Apple Computer, Inc. May 2001
C H A P T E R 8
Database Basics
Much like in Java, in most databases there are certain primitive types—like string, int, or double in Java—and each column on a table is defined to be of a given one of these types. Enterprise Objects handles the conversion from database internal types to Java types. Further, for each column, you can declare whether a given row is required to provide a value or whether it is allowed to be null.
You can think of a table as a class, columns as instance variables, and rows as individual object instances. Like a class definition file in Java, a table itself does not have variables. You must add a row to it to use any of its properties.
RowsA row is the equivalent of an instance of a Java class. Where the table is like a class, a row is like an instance of a class.
Uniquing
Each row in a given table has to be different in some way from the others. This is so the database system knows which row to update or delete when you make changes to your data.
The database uses a primary key that defines a property (or set of properties) whose value uniquely identifies each row. For each table you define, you provide a key (or list of keys), which define how the database system can be sure two given rows are different. For example, if you are defining a table to contain data about people, you might decide to use a person’s last name to differentiate each row from the others.
The database system ensures that each row has a unique value in the column (or combination of values in the set of columns) you specify as the primary key. Enterprise Objects hides many of the complexities of database interaction, including the conversion from database internal types to Java types. However, if you try to override it and set a value in a row that conflicts with a value in another row, the database refuses to make the change and reports an error that your application should handle.
It’s important to choose the primary keys for your tables carefully. If you define your unique key as the column containing a person’s last name, you could run into difficulty as soon as you try to add two people with the same last name to your table. In general, it’s best to make your primary key one you don’t plan on using for anything else and let Enterprise Objects handle it for you.

C H A P T E R 8
Database Basics
Relationship 111 Apple Computer, Inc. May 2001
In the example Authors database (see “Creating the Authors Database” (page 124)), each table has a column that servers as its primary key called ENTITYNAME_ID of type integer.
Not Null
You may wish to declare that without certain data, a row isn’t valid. By declaring a given column not-null, you tell the database system to reject any new rows that don’t provide the required data.
If you’re gathering information for an email mailing list, for example, a row without a value for the EMAIL_ADDRESS column isn’t useful.
A table’s primary key column must always be declared not-null.
Relationship
Part of a database’s scheme is each table’s relationships with other tables. Each relationship has source and destination keys that define it.
Rows and tables can relate in many ways. Just as with object-oriented programming, the way you design your database tables is depends on how you intend to use them. Relationships can model ownership, where one row is a subordinate part of another row, but placed in a separate table for organization—for example, each row in a PERSON table can own a row in an ADDRESS table because every person must have a mailing address. Relationships can be optional or required. In the Authors database, every book must have an author, but it is conceivable that some authors are as yet unpublished (and hence would have no rows in the BOOK table).
Since a relationship leads from a source table to a destination table, we speak of following a relationship. While Enterprise Objects removes most database considerations from using your object’s relationships, it’s useful to understand how a relationship is maintained at the database level.

112 Relationship Apple Computer, Inc. May 2001
C H A P T E R 8
Database Basics
Relationships are followed not from table to table but from a specific row into another row. It doesn’t make any sense to ask what the author of the BOOK table is, but each row of the BOOK table has a corresponding row in the AUTHOR table.
To link table rows, foreign keys are used. Foreign keys are columns in the source table whose rows point to the primary key column in the target table. For example, the BOOK table has a foreign key column (AUTHOR_ID) that is used to find the corresponding row in the AUTHOR table (the author of the book). AUTHOR_ID in the BOOK table does not provide any information on a book. Its only purpose is to link the rows of the BOOK table with rows on the AUTHOR table.
One important attribute of a relationship is called ordinality. Ordinality is a measure of whether a relationship necessarily relates a row to only one other row, or to multiple rows in the destination table. This breaks relationships into two types: to-one or to-many.
To-One RelationshipsA to-one relationship, as the name suggests, is one where the source row is connected to only one other row by the relationship. Each row in the BOOK table has only one author in the AUTHOR table.
The destination column (or columns) of a to-one relationship must be the same as the primary key columns of the destination table. This guarantees that there is only one destination row for any given source row.
To find the row corresponding to a specific book’s author, you would perform the following steps:
1. Get the source and destination columns.
According to the definition of the relationship, the source column is AUTHOR_ID in the BOOK table, and the destination column is AUTHOR_ID in the AUTHOR table.
2. Get the value in the source row’s AUTHOR_ID column.
3. Find the target row in the AUTHOR table (the row whose AUTHOR_ID column is equal to the value of the AUTHOR_ID column in the source row).
Since AUTHOR_ID is the primary key for the AUTHOR table, there is only one matching row. This row contains data about the book’s author.
C H A P T E R 8
Database Basics
Relationship 113 Apple Computer, Inc. May 2001
To-Many RelationshipsAlternatively, a relationship can have the ability to connect the source row with multiple destination rows. For example, in the Authors database, each author can have multiple books. Remember that the AUTHOR_ID column in the BOOK table is a foreign key, not a primary key. Therefore, that column doesn’t have to have unique values throughout the rows of the BOOK table.
To find the BOOK rows corresponding to an AUTHOR row, you would perform the following steps:
1. Get the source and destination columns.
According to the definition of the relationship, the source column is AUTHOR_ID in the AUTHOR table, and the destination attribute is AUTHOR_ID in the BOOK table.
2. Get the value in the row’s AUTHOR_ID column for the source row.
3. Find the rows in the BOOK table whose AUTHOR_ID column’s value is equal to the value from the AUTHOR_ID column in the source row.
Notice that AUTHOR_ID is not the primary key for the BOOK table. This means that the relationship could lead to more than one row in the BOOK table. Each of these would have the same value in their AUTHOR_ID column, meaning that the books that they represent have all been written by the same author.
Further, there’s no guarantee that there would be any rows in the BOOK table whose AUTHOR_ID column’s value match the value of the AUTHOR_ID column in the source row at all. So the relationship could lead to no rows in the BOOK table.

114 Relationship Apple Computer, Inc. May 2001
C H A P T E R 8
Database Basics

System Architecture 115 Apple Computer, Inc. May 2001
C H A P T E R 9
9 Introduction to Enterprise Objects
Enterprise Objects is a powerful system that makes using a database as a persistent storage for your data almost transparent to you as a developer. It removes the need for you to work with SQL or other database querying languages by providing an automatic layer that translates database schemata into Java code.
This abstraction allows you to concentrate on the behavior of your enterprise objects (the Java classes that are generated from your data model) rather than spending your time implementing dozens of procedures to handle your data on the database end, and it allows you to benefit from the advantages that object orientation provides.
This chapter introduces the theory behind the Enterprise Object technology. “Working With Editing Contexts” (page 123), puts the theory to use.
This chapter explains
� the layers that make up an Enterprise Objects application
� the role the model plays in an Enterprise Objects application
System Architecture
Enterprise Objects is a suite of tools and code that allow you to create database-based applications. It is divided into several layers concerned with connecting to the database, converting result sets to enterprise objects, and ensuring that the state of the enterprise objects and the database are always synchronized. WebObjects adds another layer on top of Enterprise Objects; it is used to manipulate enterprise objects and display their data.

116 System Architecture Apple Computer, Inc. May 2001
C H A P T E R 9
Introduction to Enterprise Objects
The following components, listed from the WebObjects layer down to the database, make up the Enterprise Objects architecture.
� WebObjects components display and manipulate enterprise objects.
� Enterprise objects are the instances of Java classes you’ve created to represent your database rows.
� An editing context manages a graph of objects and keeps track of changes that need to be transmitted to the database.
� The model (maintained with EOModeler) provides a high-level view of your data model. It defines the mapping between the data entities your application requires and the tables in your database. It also defines relationships between entities, which are reflected in the database tables with primary and foreign key definitions.
� The database level translates from the dictionaries used by the adaptor level to enterprise objects, and vice versa.
� The adaptor level understands the preferred protocol of the database, and uses it to translate between simple objects called dictionaries and the raw data on the database.
� The database is external to Enterprise Objects and provided by a third party.
Figure 9-1 illustrates the approach that Enterprise Objects takes when interacting with a database.

C H A P T E R 9
Introduction to Enterprise Objects
System Architecture 117 Apple Computer, Inc. May 2001
Figure 9-1 The Enterprise Objects approach
EOAccess
EOControl
Your Code
EOAccess
EOControl
Your Code
EOAccess
EOAdaptor
Database

118 System Architecture Apple Computer, Inc. May 2001
C H A P T E R 9
Introduction to Enterprise Objects
You’re familiar with manipulating Java objects using WebObjects components. Now, we’ll start at the top with those objects and follow the interactions in the Enterprise Objects layer down to the database.
WebObjects InteractionWebObjects provides the user interface for your enterprise objects. The WebObjects dynamic elements use an interface called EOKeyValueCoding to communicate with Java objects. All enterprise objects implement this interface.
Enterprise ObjectsAn enterprise object is first and foremost a Java object like any other. It has instance variables and methods that act on them. However, it has the additional characteristic of being linked to a database structure by Enterprise Objects. Enterprise objects differ from other objects in that they are a representation of data that is stored in a database.
Each enterprise object typically represents one row from a database. When the properties (instance variables) of an enterprise object are changed and you instruct Enterprise Objects to save those changes, they are propagated through the layers down to the database.
An enterprise object can be an instance of the default EOGenericRecord class or of a custom Java class. EOGenericRecord provides all the default behavior of propagating changes to the database but does not allow the addition of custom logic. You use an EOGenericRecord when you don’t need special behavior beyond that of basic representation of database values. You define a custom class when you wish to have more control over the properties and behavior of your data. Custom classes are defined as subclasses of EOGenericRecord so they inherit the default enterprise object behavior.
Enterprise objects, whether represented by EOGenericRecord or a custom class, are defined in a model created with the EOModeler application. The model, which is explained in greater detail in “The Model” (page 121), specifies which columns in your database are associated with a particular property for each entity of your data model.

C H A P T E R 9
Introduction to Enterprise Objects
System Architecture 119 Apple Computer, Inc. May 2001
EOGenericRecords use the key-value coding mechanism defined in the EOKeyValueCoding interface to store their data. Each key is named for the database column it represents. When an enterprise object is instantiated from a row in the database, the value of its keys are obtained from their corresponding columns in the row.
EOControlThe control layer is the principal domain of enterprise objects. It provides an insulated layer dedicated to maintaining the state of enterprise objects. Data flows out and upward to WebObjects components, and can be propagated downward toward the database. The EOControl layer is responsible for
� tracking changes to enterprise objects
� updating the database when changes are saved
� managing undo operations in the object graph
� managing uniquing in the object graph
Uniquing is used by Enterprise Objects to ensure that an enterprise object is not duplicated in the control layer. This mechanism uses an entity’s primary key to determine the identity and uniqueness of each enterprise object in the object graph. It is important that enterprise objects not be duplicated in the object graph to maintain data integrity and use memory efficiently. For example, if two books have the same author, the control layer ensures that they both refer to the same Author object in memory. Uniquing is one of the responsibilities of the object graph.
The Object Graph
An object graph is a collection of all the currently active enterprise objects for a particular external store. You can think of it as a snapshot of the current state of the database reflected in Java objects.
An object graph can also represent a potential state of the database. If your components make changes to some enterprise objects, those changes are stored in an object graph until they are committed to the database. Keeping track of these changes is the responsibility of the EOEditingContext class.
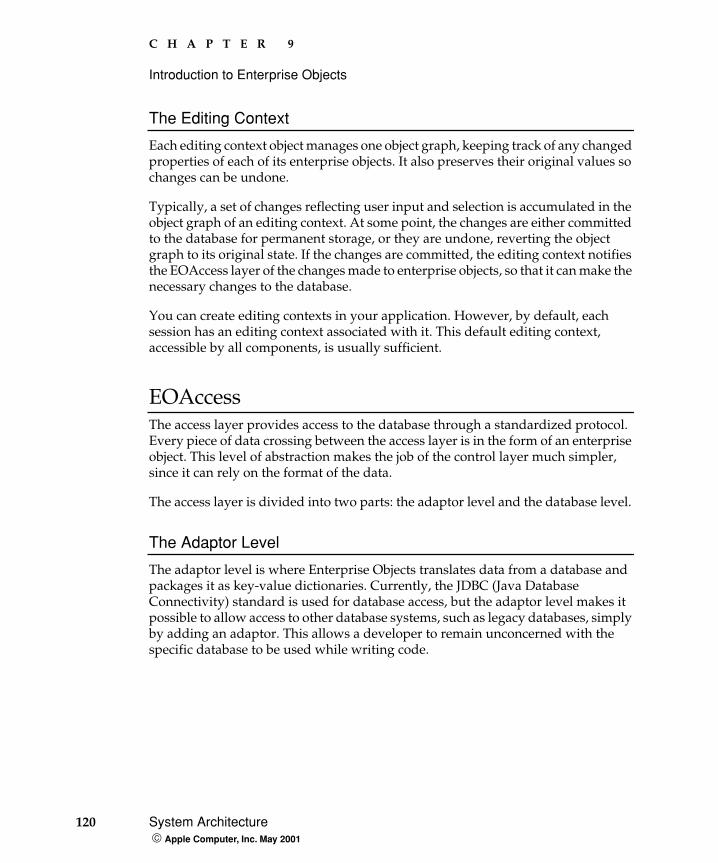
120 System Architecture Apple Computer, Inc. May 2001
C H A P T E R 9
Introduction to Enterprise Objects
The Editing Context
Each editing context object manages one object graph, keeping track of any changed properties of each of its enterprise objects. It also preserves their original values so changes can be undone.
Typically, a set of changes reflecting user input and selection is accumulated in the object graph of an editing context. At some point, the changes are either committed to the database for permanent storage, or they are undone, reverting the object graph to its original state. If the changes are committed, the editing context notifies the EOAccess layer of the changes made to enterprise objects, so that it can make the necessary changes to the database.
You can create editing contexts in your application. However, by default, each session has an editing context associated with it. This default editing context, accessible by all components, is usually sufficient.
EOAccessThe access layer provides access to the database through a standardized protocol. Every piece of data crossing between the access layer is in the form of an enterprise object. This level of abstraction makes the job of the control layer much simpler, since it can rely on the format of the data.
The access layer is divided into two parts: the adaptor level and the database level.
The Adaptor Level
The adaptor level is where Enterprise Objects translates data from a database and packages it as key-value dictionaries. Currently, the JDBC (Java Database Connectivity) standard is used for database access, but the adaptor level makes it possible to allow access to other database systems, such as legacy databases, simply by adding an adaptor. This allows a developer to remain unconcerned with the specific database to be used while writing code.
C H A P T E R 9
Introduction to Enterprise Objects
The Model 121 Apple Computer, Inc. May 2001
The Database Level
The database level is the level beyond which no details are known about the specific database underneath. Enterprise objects are created from raw data from the database, and when data is needed by the control layer, the database layer performs the needed fetches from the database. Similarly, the database layer handles the actual updates to the database when an editing context is saved.
The Model
The model is a representation of the entire database, from table structure to delete rules. It specifies to Enterprise Objects how to translate data between the enterprise objects and database rows. You use EOModeler to create models.
The model also specifies the information needed to connect to the database, including network and password information.

122 The Model Apple Computer, Inc. May 2001
C H A P T E R 9
Introduction to Enterprise Objects

The Authors Application 123 Apple Computer, Inc. May 2001
C H A P T E R 1 0
10 Working With Editing Contexts
Now that you have read the theory behind Enterprise Objects, you can put some of it into practice. You’ll use a project similar to the one you developed before and add database access to it. As you work, refer to the previous chapters as necessary to be sure you understand what is going on.
In this chapter, you
� create a database using OpenBase Manager
� define an entity in EOModeler
� create a database table using EOModeler
� perform fetch, insert, update, and delete operations on an object store
� save editing context changes to an object store
The Authors Application
In this section you’ll create an application to edit the AUTHOR table of the Books database. The table stores the first and last names of book authors. Your application provides facilities for adding, editing, and deleting authors.
The AUTHORS table contains three columns: FIRST_NAME, LAST_NAME, and, AUTHOR_ID. The AUTHOR_ID column serves as the table’s primary key, and it’s not shown in the application’s user interface. You don’t even need to worry about updating the value of that column; Enterprise Objects does it for you.

124 The Authors Application Apple Computer, Inc. May 2001
C H A P T E R 1 0
Working With Editing Contexts
Creating the Authors DatabaseThe first step is to create the Authors database. You’ll user OpenBase Manager to create it.
1. Launch OpenBase Manager.
The OpenBase Manager application is located in the /Applications/OpenBase directory.
2. Create a new database.
a. Choose Database > New.
b. Enter Authors in the Database Name text field.
c. Select the Start Database at Boot option.
d. Choose ASCII from the Internal Encoding pop-up menu.

C H A P T E R 1 0
Working With Editing Contexts
The Authors Application 125 Apple Computer, Inc. May 2001
e. Click Set.
3. Start the database.
a. Select the localhost/Authors database in the list.
b. Click Start.
4. Quit OpenBase Manager.
You now have an empty database called Authors.
Creating the Authors ModelEOModeler is the tool you use to model your data. In it you define the entities that serve as the interface between your code and the database. In this section, you’ll use EOModeler to add a table to the Authors database.
1. Launch EOModeler.
The EOModeler application is located in the /Developer/Applications directory.
2. Choose Model > New.
3. Select the adaptor to use.

126 The Authors Application Apple Computer, Inc. May 2001
C H A P T E R 1 0
Working With Editing Contexts
With the JDBC adaptor provided with your WebObjects installation, you can communicate with any database that includes a JDBC driver.
Select JDBC from the list and click Next.
4. Provide JDBC connection information.
Your model includes the information necessary to connect to your database. The JDBC Connection dialog is where you enter that information. For this exercise, you only need to specify the URL used to connect to the database.
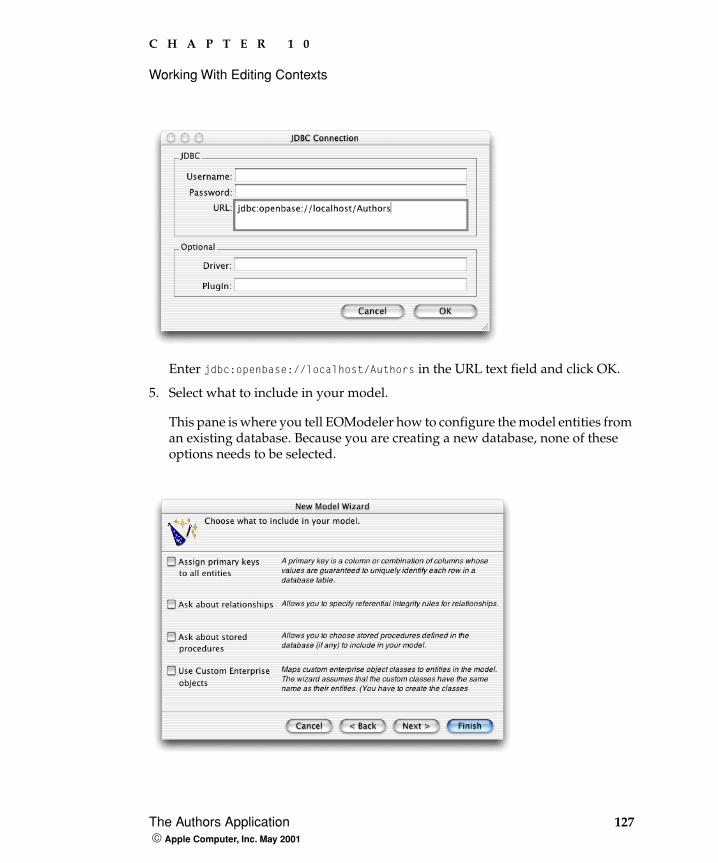
C H A P T E R 1 0
Working With Editing Contexts
The Authors Application 127 Apple Computer, Inc. May 2001
Enter jdbc:openbase://localhost/Authors in the URL text field and click OK.
5. Select what to include in your model.
This pane is where you tell EOModeler how to configure the model entities from an existing database. Because you are creating a new database, none of these options needs to be selected.

128 The Authors Application Apple Computer, Inc. May 2001
C H A P T E R 1 0
Working With Editing Contexts
Deselect all the options and click Finish.
Adding the Author Entity to the Model
In this section you’ll add an entity called Author to the new model. This entity maps to the AUTHOR table that EOModeler generates from the entity’s properties.
1. Add the entity.
Choose Property > Add Entity.
2. Configure the entity.
Choose Tools > Inspector.
The Entity Inspector appears. It allows you to enter a variety of information pertaining to the new entity.
a. Name the entity Author.
b. Enter AUTHOR in the Table Name text field.
c. Enter Author in the Class text field.

C H A P T E R 1 0
Working With Editing Contexts
The Authors Application 129 Apple Computer, Inc. May 2001
3. Add and configure Author’s attributes.
The Author entity has two significant attributes: firstName and lastName. An additional attribute, authorId, serves as the entity’s primary key.
a. Make sure the Author entity is selected in the entity list.
b. Choose Property > Add Attribute.
c. Name the attribute firstName.
d. Enter FIRST_NAME as the column name.
e. Enter char in the External Type text field.
f. Choose String as the internal data type.
g. Enter 30 in the External Width text field.

130 The Authors Application Apple Computer, Inc. May 2001
C H A P T E R 1 0
Working With Editing Contexts
h. Click to display the Advanced Attribute Inspector.
i. Select the Allow Null Value option.
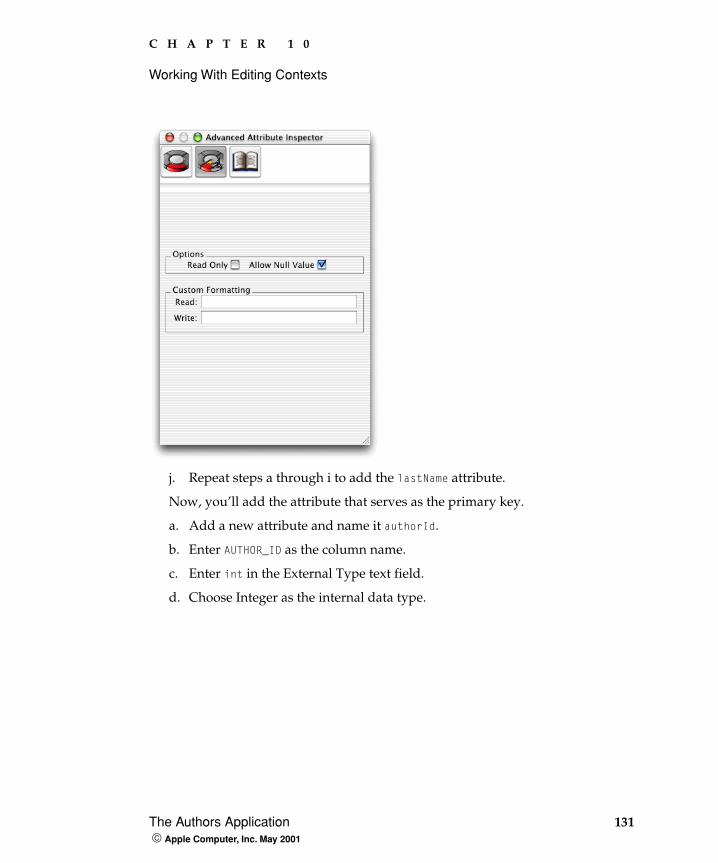
C H A P T E R 1 0
Working With Editing Contexts
The Authors Application 131 Apple Computer, Inc. May 2001
j. Repeat steps a through i to add the lastName attribute.
Now, you’ll add the attribute that serves as the primary key.
a. Add a new attribute and name it authorId.
b. Enter AUTHOR_ID as the column name.
c. Enter int in the External Type text field.
d. Choose Integer as the internal data type.

132 The Authors Application Apple Computer, Inc. May 2001
C H A P T E R 1 0
Working With Editing Contexts
4. Select a primary key for the Author entity.
a. In the authorId row of the Author Attributes list, click in the column with a key as its heading so that a key appears in the row.
b. Click in the diamond column of the authorId row so that the diamond disappears.
The authorId attribute is nothing more than a database artifact, required to make sure that rows in the AUTHOR table are unique; it has no meaning to you or the application’s users. The diamond icon indicates that an attribute is a property that is made available to an application’s custom logic and, if necessary, the application’s user. Because authorId provides no additional information about an author, it is not required for the application’s normal operation.

C H A P T E R 1 0
Working With Editing Contexts
The Authors Application 133 Apple Computer, Inc. May 2001
Figure 10-1 Authors model with Authors entity
Save the model and name it Authors.
The EOModeler Window
The left pane of EOModeler’s main window lists the entities present in the model. If you click an entity, details about its attributes are displayed in the right pane.
In Figure 10-1 (page 133), you see the Author entity and the definitions of each of its attributes. The values of the columns indicate the properties of each attribute.
By default, the most commonly used columns are enabled in this view. To enable other columns, use the Add Column menu in the bottom frame of the window. These are the available columns and their meanings:
Primary KeyThe primary key icon in the first column indicates that the attribute is used to uniquely identify a row. In the Author entity, only authorId is a primary key.

134 The Authors Application Apple Computer, Inc. May 2001
C H A P T E R 1 0
Working With Editing Contexts
Class PropertyThe presence of a diamond in the second column indicates that the attribute is a class property. A class property is one for which EOModeler generates Java access methods. Generally, any attributes that are actually a property of the entity are made class properties, and attributes that are used for database level functionality (such as the authorId attribute) are not.
LockingIndicates whether an attribute should be used for locking when an update is performed. That is, whether Enterprise Objects uses this attribute to determine whether changes have been made.
Allows NullIndicates whether the database column can have a null value.
NameThe name of the attribute, which determines the Java method names that EOModeler generates when it creates the class definition.
Value Class (Java)The class used to represent this attribute.
External TypeThe data type used by the database to represent this attribute.
WidthThe maximum width of an attribute, usually used for String attributes.
ColumnThe name of the database column that corresponds to this attribute.
DefinitionThe definition for a derived column. A derived attribute doesn’t actually exist in the database and hence an attribute can’t have both a Definition and a Column. Setting one clears the other.
PrecisionThe number of significant digits to include. Used for some numerical types.
PrototypeThe prototype from which this attribute inherits its characteristics. You can use prototypes to set up default attribute types.
Read OnlyControls whether the attribute can be modified or only read.

C H A P T E R 1 0
Working With Editing Contexts
The Authors Application 135 Apple Computer, Inc. May 2001
ScaleThe number of characters to the right of the decimal point in a number attribute.
Value TypeThis type is used in decoding values for enterprise objects represented by Objective-C classes rather than Java classes and is not used in this text.
Write FormatUsed in tandem with Read Format to write data to the database in a custom format.
The External Type attribute must be one of the types defined by the JDBC adaptor. These are the most common ones:
blob
A Binary Large Object. Used to store images and large data files. Usually represented as an NSData object.
char
Used to store character information and represented with a Java String. An attribute declared to be a char must have its width set, as well.
date, datetimeUsed to store date information and usually represented by an NSTimestamp object.
double
Used to store floating-point numbers and generically represented by a Java Number.
int
Used to store integer numbers and usually represented by a Java Number. Foreign and primary keys are usually best modeled as integers.
long
Used to store very large integers.
Creating the AUTHOR Table
Now that you have created the Author entity, it is time to create the AUTHOR table behind it.
1. Select the Author entity from the entity list.

136 The Authors Application Apple Computer, Inc. May 2001
C H A P T E R 1 0
Working With Editing Contexts
2. Choose Property > Generate SQL.
3. Make sure that only the Create Tables option is selected.
4. Click Execute SQL.
5. Quit EOModeler.
Creating the ApplicationIn this section you’ll create the Authors application. The application allows its users to add, edit, and remove authors from the Authors database.
This section introduces the use of enterprise object classes (custom Java classes derived from entities defined in a model to access database information) and the methods used to add objects into the data store (adding rows to the AUTHOR table in the Authors database). You’ll use EOModeler to create the Author.java class. After adding it to your project, you’ll be able to create Author objects in your code. You’ll then add those objects to the data store.

C H A P T E R 1 0
Working With Editing Contexts
The Authors Application 137 Apple Computer, Inc. May 2001
Follow these steps to create the Authors application:
1. Create a new WebObjects application project and name it Authors.
2. Add the Authors model to the project.
a. Select Resources from the Groups & Files list.
b. Choose Project > Add Files.
c. Choose the Authors.eomodeld file you created in “Creating the Authors Model” (page 125) and click Open.
d. Select the “Copy items into destination group’s folder (if needed)” option.
e. Select the Application Server target and click Add.
Customizing the Main componentThe entire application’s functionality is provided by the Main component. It includes an authorList array where the authors are maintained while the application runs. When the users clicks Save, the changes made to authorList are

138 The Authors Application Apple Computer, Inc. May 2001
C H A P T E R 1 0
Working With Editing Contexts
saved to the database. Main.wo includes elements to edit an author’s information and actions to add, edit, update, and delete authors. A WORepetition shows all the contents of authorList.
Customizing Main.wo
After following these steps, Main.wo should look like Figure 10-2 (page 140).
1. Open Main.wo in WebObjects Builder.
2. Add three keys.
a. Name the first key author, set its type as EOGenericRecord, and do not include accessor methods.
b. Name the second key authorItem, set its type as EOGenericRecord, and do not include accessor methods.
c. Name the third key authorList, choose “Mutable array of” and EOGenericRecord for its type, and do not include accessor methods.
3. Add six actions, all of them returning null, which tells WebObjects to return the current page, Main, instead of a new one (the same instance of Main persists throughout the application’s operation):
addAuthor
deleteAuthor
editAuthor
revertChanges
saveChanges
updateAuthor
4. Add a WOForm element to edit author information.
a. Choose Forms > WOForm.
b. In the WOForm Binding Inspector, choose true for the multipleSubmit attribute.
c. Inside the WOForm, enter the text “Last Name: “, follow it with a WOTextField, and press Shift-Enter.

C H A P T E R 1 0
Working With Editing Contexts
The Authors Application 139 Apple Computer, Inc. May 2001
d. Bind the Last Name WOTextField’s value attribute to author.lastName.
e. Enter the text “First Name: “, follow it with a WOTextField, and press Shift-Enter.
f. Bind the First Name WOTextField’s value attribute to author.firstName.
g. Add two WOSubmitButtons to the WOForm.
Enter “Update” for the first WOSubmitButton’s value attribute (include the quotation marks), and bind its action attribute to the updateAuthor action.
Enter “Add” for the second WOSubmitButton’s value attribute, and bind its action attribute to the addAuthor action.
5. Add a second WOForm below the first one for the Save and Revert WOSubmitButtons.
a. Set the WOForm’s multipleSubmit attribute to true.
b. Add a WOSubmitButton inside the WOForm, enter “Revert” for its value attribute, and bind its action attribute to revertChanges.
c. Add another WOSubmitButton to the right of the Revert WOSubmitButton, enter “Save” for its value attribute, and bind its action attribute to saveChanges.
6. Add a WORepetition to display the list of authors.
a. Add the WORepetition below the second WOForm.
b. Add two WOHyperlinks, separated by a space character, inside the WORepetition.
Enter Edit as the first WOHyperlink’s caption and bind its action attribute to editAuthor.
Enter Delete as the second WOHyperlink’s caption and bind its action attribute to deleteAuthor.
c. Add two WOStrings, separated by “, “ to the right of the Delete WOHyperlink.
Bind the first WOString to authorItem.lastName and the second to authorItem.firstName.
Note: Since author, authorItem, and authorList are EOGenericRecords, WebObjects Builder does not know what their properties are. You must type the keypaths for them manually.

140 The Authors Application Apple Computer, Inc. May 2001
C H A P T E R 1 0
Working With Editing Contexts
Put the cursor on the right of the second WOString and press Shift-Enter.
d. Bind WORepetition’s list attribute to authorList, and its item attribute to authorItem.
7. Save Main.wo.
Figure 10-2 Main.wo with elements to maintain author information
Customizing Main.java
Now you’ll edit Main.java to add the application’s custom logic.
1. Add the following instance variables:

C H A P T E R 1 0
Working With Editing Contexts
The Authors Application 141 Apple Computer, Inc. May 2001
private EOEditingContext editingContext;
private EOClassDescription authorClassDescription;
private EOFetchSpecification fetchSpec;
Several methods in the Main class require the use of the editing context, class description, and fetch specification. Having the class’s constructor store these objects in instance variables reduces the lines of code required to implement those methods.
2. Edit the constructor to perform custom initialization.
When the Main component is created, it needs to request and store the editing context and retrieve the authors stored in the database (the first time you run the application, there’s nothing to retrieve).
Edit the constructor so that it looks like Listing 10-1.
Listing 10-1 The constructor in Main.java
public Main(WOContext context) {
super(context);
// build fetch specification
fetchSpec = new EOFetchSpecification("Author", null, null);
// get editing context
editingContext = session().defaultEditingContext();
// fetch
authorList = new
NSMutableArray(editingContext.objectsWithFetchSpecification(fetchSpec));
// get Author class description
authorClassDescription =
EOClassDescription.classDescriptionForEntityName("Author");
// create a new Author object (where form data is stored)
author = new EOGenericRecord(authorClassDescription);
}
142 The Authors Application Apple Computer, Inc. May 2001
C H A P T E R 1 0
Working With Editing Contexts
There are three parts to retrieving data from a database with WebObjects: the fetch specification, the editing context, and the fetch.
� EOFetchSpecification. An EOFetchSpecification is an object representation of a request for objects from the object store (database). It describes the objects that you want to retrieve. You can create fetch specifications programmatically or define them in the EOModel file.
A fetch specification is defined in three parts—the entity to fetch, restrictions used to filter the fetched objects, and the order of the result. The last two are optional, but the first one must be provided when the fetch specification is created.
� Editing Context. Fetches are performed through an editing context, which is responsible for maintaining the object graph for the fetched objects.
� Fetch. After a fetch specification has been defined, it can be used to fetch data from the object store. WebObjects translates the fetch specification into SQL statements that your database system can understand. The database returns a list of rows that WebObjects translates into enterprise objects (instances of EOGenericRecord) before returning them in an NSArray.
3. Edit the addAuthor method to that it looks like Listing 10-2.
Listing 10-2 The addAuthor method in Main.java
public WOComponent addAuthor() {
// add only if the author is not already in the list
if (! authorList.containsObject(author)) {
// add author to list
authorList.addObject(author);
// insert author into editing context
editingContext.insertObject(author);
// create a new author
author = new EOGenericRecord(authorClassDescription);
}
return null;
}

C H A P T E R 1 0
Working With Editing Contexts
The Authors Application 143 Apple Computer, Inc. May 2001
Because of Enterprise Objects’s Java integration, inserting a new row in your database is almost as simple as adding an item to an array. Once your class is defined as a subclass of EOGenericRecord, all you need to do is insert the object into an editing context; it is then maintained in the object graph like other objects fetched from the database. When the saveChanges method is called, a new row is created in the database for each object added to the editing context.
The addAuthor method is invoked when the user clicks Add. If the user isn’t editing an existing author, it inserts the Author object that the user edited (through the first form’s text fields) into authorList, and inserts it in the object graph maintained by the editing context as well. It then creates a new Author object, where another author’s data can be stored. (Note that the new instance is added to the object graph only if the user clicks Add again.)
4. Edit the deleteAuthor method so that it looks like Listing 10-3.
Listing 10-3 The deleteAuthor method in Main.java
public WOComponent deleteAuthor() {
// remove author from authorList
authorList.removeObject(authorItem);
// get object’s editing context
EOEditingContext ec = authorItem.editingContext();
// remove author from object graph
ec.deleteObject(authorItem);
return null;
}
In multiuser applications an object can be in a different editing context than the default one. When you need to delete an enterprise object from a data store, you should ask the object itself for its editing context. Then you invoke that editing context’s deleteObject method.
5. Edit the editAuthor method so that it looks like Listing 10-4.
144 The Authors Application Apple Computer, Inc. May 2001
C H A P T E R 1 0
Working With Editing Contexts
Listing 10-4 The editAuthor method in Main.java
public WOComponent editAuthor() {
// set the author to edit to the one the user selected
author = authorItem;
return null;
}
When the user clicks Edit, authorItem contains the author object to be edited. The next time the page is drawn, the text fields are populated with the information for the selected author.
6. Edit the updateAuthor method so that it looks like Listing 10-5.
Listing 10-5 The updateAuthor method in Main.java
public WOComponent updateAuthor() {
// create a new author
author = new EOGenericRecord(authorClassDescription);
return null;
}
When the user clicks Update, the Author object she edited gets updated with the values entered in the form’s text fields (the object is already in the list). Therefore, the only thing this method needs to do is create a new Author object. The next time the page is drawn, the text fields are populated with nothing (because they get their data from the new, empty Author object), enabling the user to enter the information for a new author.
7. Edit the saveChanges method so that it looks like Listing 10-6.
Listing 10-6 The saveChanges method in Main.java
public WOComponent saveChanges() {
// save changes made in editing context to object store
editingContext.saveChanges();
C H A P T E R 1 0
Working With Editing Contexts
The Authors Application 145 Apple Computer, Inc. May 2001
return null;
}
8. Edit the revertChanges method so that it looks like Listing 10-7.
Listing 10-7 The revertChanges method in Main.java
public WOComponent revertChanges() {
// revert changes made in editing context
editingContext.revert();
// re-fetch
authorList = new
NSMutableArray(editingContext.objectsWithFetchSpecification(fetchSpec));
return null;
}
When the user clicks Revert, the revertChanges method tells the editing context to discard any changes made since the enterprise objects in it were last fetched or saved. However, the authorList array isn’t tied to the editing context in any way. Therefore, you must retrieve a new list of authors from the object store and assign it to authorList, so that the user sees up-to-date information. (The previous list is garbage-collected by the Java runtime after it is no longer referenced by variables in your application.)
9. Save Main.java.
Running the Authors ApplicationFigure 10-3 shows the Authors application after the names of some authors have been entered.

146 The Authors Application Apple Computer, Inc. May 2001
C H A P T E R 1 0
Working With Editing Contexts
Figure 10-3 The Authors application
There is only one instance of Main throughout the application’s execution (all the actions return null). When Main is created, it reads the authors from the database and stores them in the authorList instance variable. As the user makes changes, authorList (and its editing context) is updated. The WORepetition element displays the contents of authorList and links so that the user can edit or delete a particular author. Changes are saved when the user clicks Save.
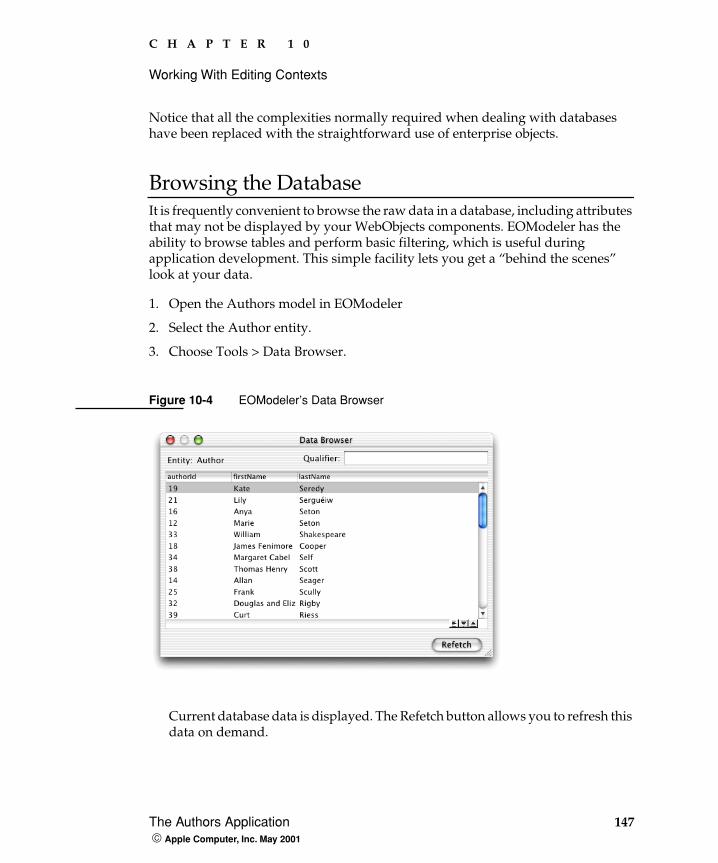
C H A P T E R 1 0
Working With Editing Contexts
The Authors Application 147 Apple Computer, Inc. May 2001
Notice that all the complexities normally required when dealing with databases have been replaced with the straightforward use of enterprise objects.
Browsing the DatabaseIt is frequently convenient to browse the raw data in a database, including attributes that may not be displayed by your WebObjects components. EOModeler has the ability to browse tables and perform basic filtering, which is useful during application development. This simple facility lets you get a “behind the scenes” look at your data.
1. Open the Authors model in EOModeler
2. Select the Author entity.
3. Choose Tools > Data Browser.
Figure 10-4 EOModeler’s Data Browser
Current database data is displayed. The Refetch button allows you to refresh this data on demand.
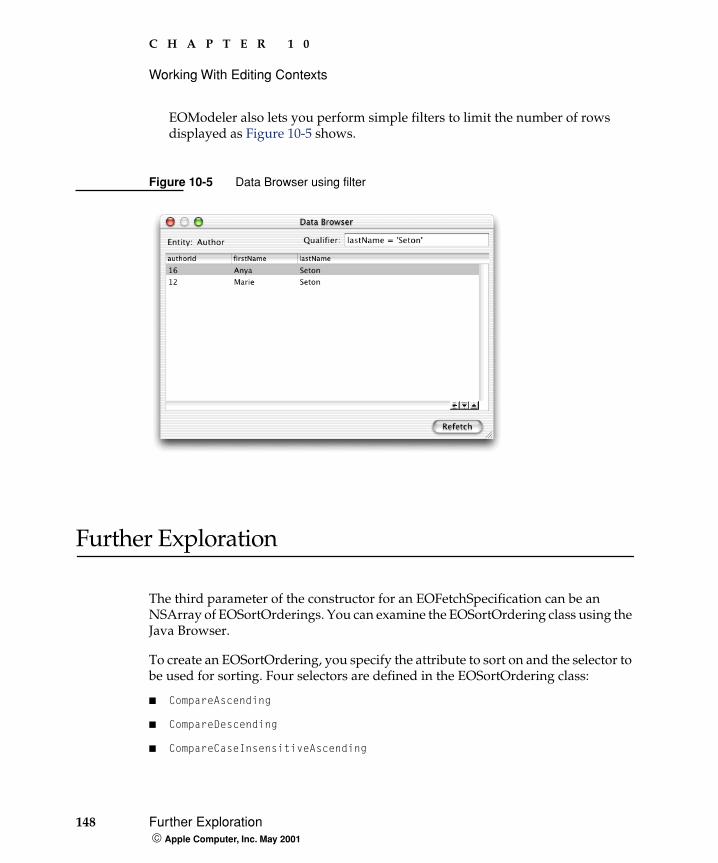
148 Further Exploration Apple Computer, Inc. May 2001
C H A P T E R 1 0
Working With Editing Contexts
EOModeler also lets you perform simple filters to limit the number of rows displayed as Figure 10-5 shows.
Figure 10-5 Data Browser using filter
Further Exploration
The third parameter of the constructor for an EOFetchSpecification can be an NSArray of EOSortOrderings. You can examine the EOSortOrdering class using the Java Browser.
To create an EOSortOrdering, you specify the attribute to sort on and the selector to be used for sorting. Four selectors are defined in the EOSortOrdering class:
� CompareAscending
� CompareDescending
� CompareCaseInsensitiveAscending

C H A P T E R 1 0
Working With Editing Contexts
Further Exploration 149 Apple Computer, Inc. May 2001
� CompareCaseInsensitiveDescending
The case insensitive versions of the ascending and descending selectors are for use with strings and ignore the case of characters when sorting.
A fetch specification created with a sort ordering in place might look like Listing 10-8.
Listing 10-8 Fetch specification that uses sort orderings
EOSortOrdering lastNameSort = new EOSortOrdering("lastName",
EOSortOrdering.CompareCaseInsensitiveAscending);
EOSortOrdering firstNameSort = new EOSortOrdering("firstName",
EOSortOrdering.CompareCaseInsensitiveAscending);
NSMutableArray sortOrderings = new NSMutableArray();
sortOrderings.addObject(lastNameSort);
sortOrderings.addObject(firstNameSort);
EOFetchSpecification authorFetch = new EOFetchSpecification("Author", null,
sortOrderings);

150 Further Exploration Apple Computer, Inc. May 2001
C H A P T E R 1 0
Working With Editing Contexts

Generating a Custom Class 151 Apple Computer, Inc. May 2001
C H A P T E R 1 1
11 Using Custom Objects
You’ve already seen how easy it is to manipulate database rows by representing them as EOGenericRecords. Now, instead of using generic enterprise objects, you’ll create an enterprise object class and customize its behavior.
In this chapter, you
� generate a custom Java class
� add custom logic to an enterprise object class
� learn how to set default values for enterprise objects’s properties
Generating a Custom Class
The first step in customizing the behavior of enterprise objects is the generation of custom classes from entity definitions in your model (enterprise objects classes). You’ll continue working on the Authors project created in “Working With Editing Contexts” (page 123), including the Authors model.
EOModeler generates a Java class based on the attributes of entities as they’re defined in the model.
Generating a Java Class From a Model EntityTo generate a Java class representing the Author entity, perform the following steps:

152 Generating a Custom Class Apple Computer, Inc. May 2001
C H A P T E R 1 1
Using Custom Objects
1. Double-click the Authors.eomodeld model file in the Resources group to open it in EOModeler.
2. In EOModeler, select the Author entity.
3. Choose Property > Generate Java Files.
4. Navigate to your project’s directory and click Save.
5. Close Authors.eomodeld.
Adding a Java Class to the ProjectTo add Author.java to the project, follow these steps:
1. Select Classes in the Groups & Files list in Project Builder’s main window,
2. Choose Project > Add Files.
3. Select Author.java in your project’s directory and click Open.

C H A P T E R 1 1
Using Custom Objects
Generating a Custom Class 153 Apple Computer, Inc. May 2001
4. Select the Application Server target and click Add.

154 Generating a Custom Class Apple Computer, Inc. May 2001
C H A P T E R 1 1
Using Custom Objects
EOModeler generates the code in Listing 11-1.
Listing 11-1 Author.java generated by EOModeler
import com.webobjects.foundation.*;
import com.webobjects.eocontrol.*;
public class Author extends EOGenericRecord {
public Author() {
super();
}
public String firstName() {
return (String)storedValueForKey("firstName");
}
public void setFirstName(String value) {
takeStoredValueForKey(value, "firstName");
}
public String lastName() {
return (String)storedValueForKey("lastName");

C H A P T E R 1 1
Using Custom Objects
Modifying the Authors Project 155 Apple Computer, Inc. May 2001
}
public void setLastName(String value) {
takeStoredValueForKey(value, "lastName");
}
}
The class file generated by EOModeler contains accessor methods for the attributes declared to be class properties.
There are a few things in particular to notice about this file.
� The Author class extends the EOGenericRecord class. This way, all the default behavior of EOGenericRecord is present in your class.
� There are no instance variables in the Author class. Instead, values are accessed via the accessor methods, which use key-value coding.
If you add code that modifies data to a custom Java class and you want the changes to be stored in the database, you should use these accessor methods to set the affected properties.
Modifying the Authors Project
Your code is written to work with EOGenericRecords. To take advantage of the Author class, you need to alter the definitions of variables and methods that interact with Author objects in your program, making them Author objects rather than EOGenericRecords.
Make the following changes to the Main.java class:
1. Change the @TypeInfo line above the authorList’s definition so that it reads
/** @TypeInfo Author */
2. Change the class of the authorItem and author instance variables from EOGenericRecord to Author.
3. Delete the authorClassDescription instance-variable definition and its assignment in the constructor.

156 Modifying the Authors Project Apple Computer, Inc. May 2001
C H A P T E R 1 1
Using Custom Objects
You only needed the class description to create new instances of EOGenericRecord with the correct type information. Now that you’ll be using the Author class, the class description is no longer needed.
4. Change the constructor, addAuthor, and updateAuthor methods to create a new Author object instead of a new EOGenericRecord object.
author = new Author();
5. Save Main.java.
After making those changes, Main.java should look similar to Listing 11-2.
Listing 11-2 Main.java modified to use Author class instead of EOGenericRecord
Main.java modified to use custom Author class instead of EOGenericRecord
import com.webobjects.foundation.*;
import com.webobjects.appserver.*;
import com.webobjects.eocontrol.*;
import com.webobjects.eoaccess.*;
public class Main extends WOComponent {
protected Author author;
protected Author authorItem;
private EOEditingContext editingContext;
private EOFetchSpecification fetchSpec;
/** @TypeInfo Author */
protected NSMutableArray authorList;
public Main(WOContext context) {
super(context);
// build fetch specification
fetchSpec = new EOFetchSpecification("Author", null, null);
// get editing context
editingContext = session().defaultEditingContext();
// fetch
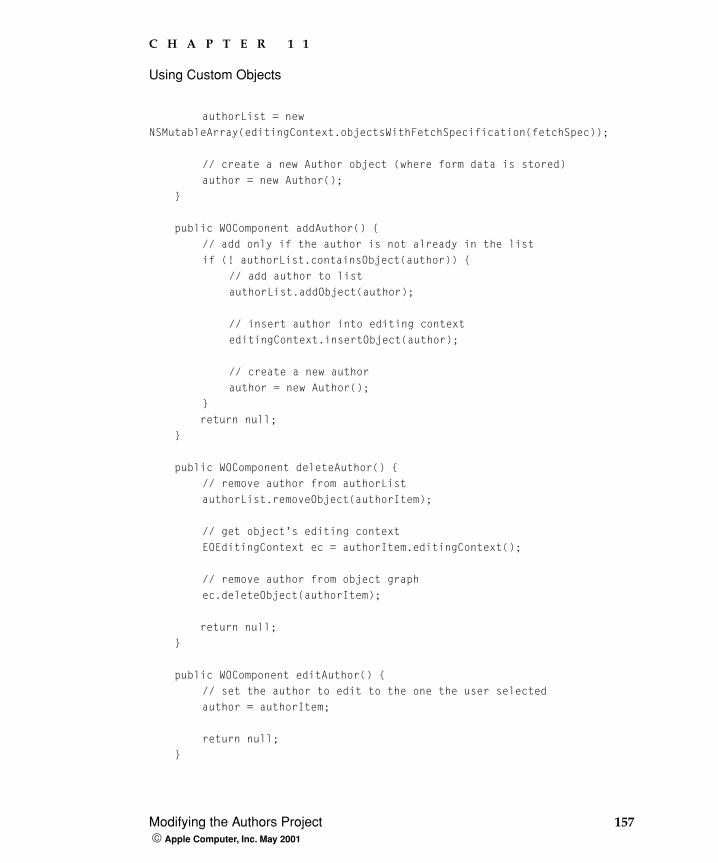
C H A P T E R 1 1
Using Custom Objects
Modifying the Authors Project 157 Apple Computer, Inc. May 2001
authorList = new
NSMutableArray(editingContext.objectsWithFetchSpecification(fetchSpec));
// create a new Author object (where form data is stored)
author = new Author();
}
public WOComponent addAuthor() {
// add only if the author is not already in the list
if (! authorList.containsObject(author)) {
// add author to list
authorList.addObject(author);
// insert author into editing context
editingContext.insertObject(author);
// create a new author
author = new Author();
}
return null;
}
public WOComponent deleteAuthor() {
// remove author from authorList
authorList.removeObject(authorItem);
// get object’s editing context
EOEditingContext ec = authorItem.editingContext();
// remove author from object graph
ec.deleteObject(authorItem);
return null;
}
public WOComponent editAuthor() {
// set the author to edit to the one the user selected
author = authorItem;
return null;
}

158 Adding Custom Logic Apple Computer, Inc. May 2001
C H A P T E R 1 1
Using Custom Objects
public WOComponent revertChanges() {
// revert changes made in editing context
editingContext.revert();
// refetch
authorList = new
NSMutableArray(editingContext.objectsWithFetchSpecification(fetchSpec));
return null;
}
public WOComponent saveChanges() {
// save changes made in editing context to object store
editingContext.saveChanges();
return null;
}
public WOComponent updateAuthor() {
// create a new author
author = new Author();
return null;
}
}
No further changes need to be made for the application to run just as before. Because Author is a subclass of EOGenericRecord, it still responds to the keypaths in the WOD file of the Main component. Build and run the application to confirm it.
Adding Custom Logic
Now that the Author entity is represented by the Author class, you can add custom methods to it.
C H A P T E R 1 1
Using Custom Objects
Using Custom Logic 159 Apple Computer, Inc. May 2001
Frequently, you’ll want to display data in a form different from that used to is record it in the database. For example, it would be convenient to have a single method in the Author class that returns an author’s full name, last name first with a comma separating the last and first names. A similar technique is used in the Authors application (two WOStrings separated by a comma), but putting the logic into a single method allows you to easily suppress the comma if the first name is not present.
Add the fullName method shown in Listing 11-3 to the Author class, and save Author.java.
Listing 11-3 The fullName method in Author.java
public String fullName() {
String first = firstName();
String last = lastName();
String full;
if ((first != null) && (! (first.equals("")))) {
full = last + ", " + first;
}
else {
full = last;
}
return full;
}
Using Custom Logic
In this section you’ll modify Main.wo to use the fullName property of Author to display an author’s full name.
1. Open the Main.wo component in WebObjects Builder.

160 Using Custom Logic Apple Computer, Inc. May 2001
C H A P T E R 1 1
Using Custom Objects
Figure 11-1 shows that WebObjects Builder recognizes the type of authorItem as Author. Also, a browser for the Author class appears next to the browser for the Main class. Notice that the new method, fullName, is represented as a property of the authorItem variable.
Figure 11-1 Main.wo after adding the fullName derived property to Author.java
2. Remove the comma and the WOString that displays authorItem.firstName.
3. Bind the remaining WOString’s value attribute to authorItem.fullName. You can now use the drag method to perform the binding because WebObjects Builder has more information about authorItem than when it was an EOGenericRecord. Your component should look like Figure 11-2.

C H A P T E R 1 1
Using Custom Objects
Using Custom Logic 161 Apple Computer, Inc. May 2001
Figure 11-2 Main.wo using the fullName derived property
4. Save Main.wo, and build and run the application.
Figure 11-3 shows that when an author’s first name is missing, the comma is not displayed, as it was before.

162 Using Custom Logic Apple Computer, Inc. May 2001
C H A P T E R 1 1
Using Custom Objects
Figure 11-3 The Authors application using the fullName method to display author information

C H A P T E R 1 1
Using Custom Objects
Setting Default Values 163 Apple Computer, Inc. May 2001
Setting Default Values
When an Author object is instantiated, its first and last name attributes have no values. Sometimes default values should be provided for properties of your enterprise objects. There are several ways to do accomplish this.
You could assign initial values in the same method that creates the new instance. You could do so by simply invoking the setLastName and setFirstName methods on the new instance with the appropriate arguments. One advantage of this approach is that it allows you to create new instances with different defaults depending on certain circumstances.
Alternatively, you can provide initial values in the Author class itself, so that no values need to be set when the instance is created. This is the strategy you will use for the Author entity.
You can also combine these methods—setting a default in the class and overriding it in the specific cases you wish to.
Modify the constructor in Author.java so that it looks like Listing 11-4.
Listing 11-4 The constructor in Author.java—setting default value for lastName
public Author() {
super();
setLastName("*required*");
}
When you build and run the application, “*required*” appears in the Last Name text field whenever a new author object is created.

164 Setting Default Values Apple Computer, Inc. May 2001
C H A P T E R 1 1
Using Custom Objects
Completing the Authors Model 165 Apple Computer, Inc. May 2001
C H A P T E R 1 2
12 Working With Relationships
Relationships between entities are an integral part of developing Enterprise Objects applications. In this chapter you’ll explore how to implement the relationships described in “Relationship” (page 111) by adding a Book entity and creating to-one and to-many relationships between Author and Book.
In this chapter, you
� use EOModeler to add the Book entity to the Authors model
� use EOModeler to add the BOOK table to the Authors database
� use EOModeler to create relationships between the Author and Book entities
� use relationships in Java code
� construct a fetch specification
� perform an in-memory sort
Completing the Authors Model
To complete the Authors model, you’ll add the Book entity to it. After defining the entity’s attributes, you’ll add the BOOK table to the Authors database. Then you’ll add the relationships between Author and Book.
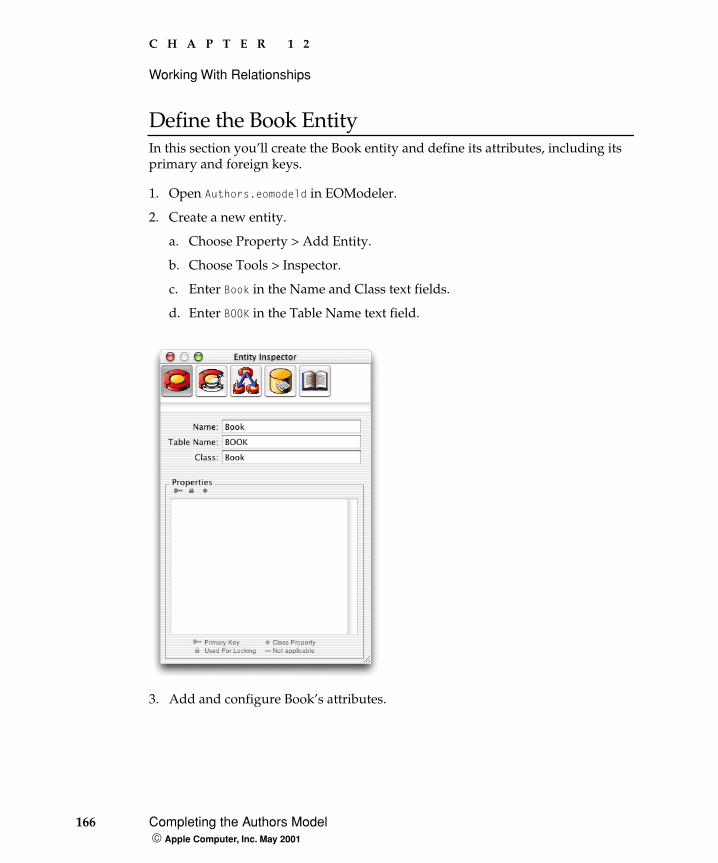
166 Completing the Authors Model Apple Computer, Inc. May 2001
C H A P T E R 1 2
Working With Relationships
Define the Book EntityIn this section you’ll create the Book entity and define its attributes, including its primary and foreign keys.
1. Open Authors.eomodeld in EOModeler.
2. Create a new entity.
a. Choose Property > Add Entity.
b. Choose Tools > Inspector.
c. Enter Book in the Name and Class text fields.
d. Enter BOOK in the Table Name text field.
3. Add and configure Book’s attributes.

C H A P T E R 1 2
Working With Relationships
Completing the Authors Model 167 Apple Computer, Inc. May 2001
The Book entity has one major attribute, title, which stores a book’s title. It also needs a primary key attribute, bookId, to ensure that all the rows in the BOOK table are unique. Finally, it requires an additional attribute, a foreign key, which is used to link a book to its author. This last attribute is named authorId.
Add the title attribute by following these steps:
a. Make sure the Book entity is selected in entity list.
b. Add a new attribute and name it title.
c. Enter TITLE as the column name.
d. Enter char as the external type.
e. Choose String as the internal data type.
f. Enter 50 in the External Width text field.
g. Select the Allow Null Value option in the Advanced Attribute Inspector.
Add the bookId attribute:
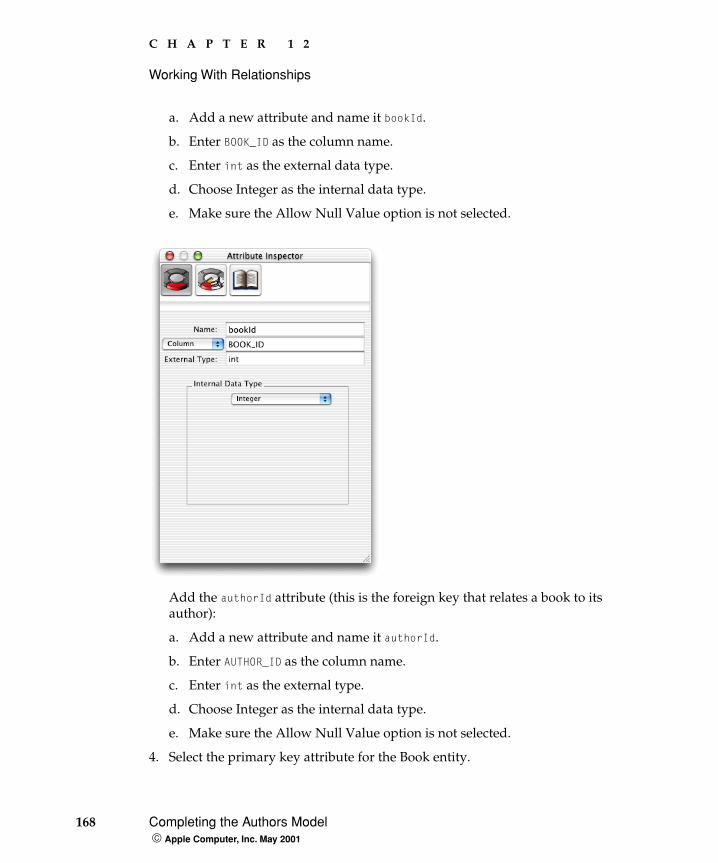
168 Completing the Authors Model Apple Computer, Inc. May 2001
C H A P T E R 1 2
Working With Relationships
a. Add a new attribute and name it bookId.
b. Enter BOOK_ID as the column name.
c. Enter int as the external data type.
d. Choose Integer as the internal data type.
e. Make sure the Allow Null Value option is not selected.
Add the authorId attribute (this is the foreign key that relates a book to its author):
a. Add a new attribute and name it authorId.
b. Enter AUTHOR_ID as the column name.
c. Enter int as the external type.
d. Choose Integer as the internal data type.
e. Make sure the Allow Null Value option is not selected.
4. Select the primary key attribute for the Book entity.

C H A P T E R 1 2
Working With Relationships
Completing the Authors Model 169 Apple Computer, Inc. May 2001
a. In the bookId row of the Book Attributes list, click in the column with a key as its heading so that a key appears in the row.
b. Click in the diamond column of the bookId row so that the diamond disappears (the value of the bookId attribute is not relevant to the application).
5. Make authorId a hidden attribute.
For the same reason that bookId is irrelevant, the value of authorId is of no interest to the application.
Click in the diamond column of the authorId row in the Book Attributes list, so that the diamond disappears.
Create the BOOK TableIn this section, you’ll create the BOOK table, just like you created the AUTHOR table in “Creating the AUTHOR Table” (page 135).
1. Select the Book entity from the entity list.
2. Choose Property > Generate SQL.
3. Make sure that only the Create Tables option is selected.
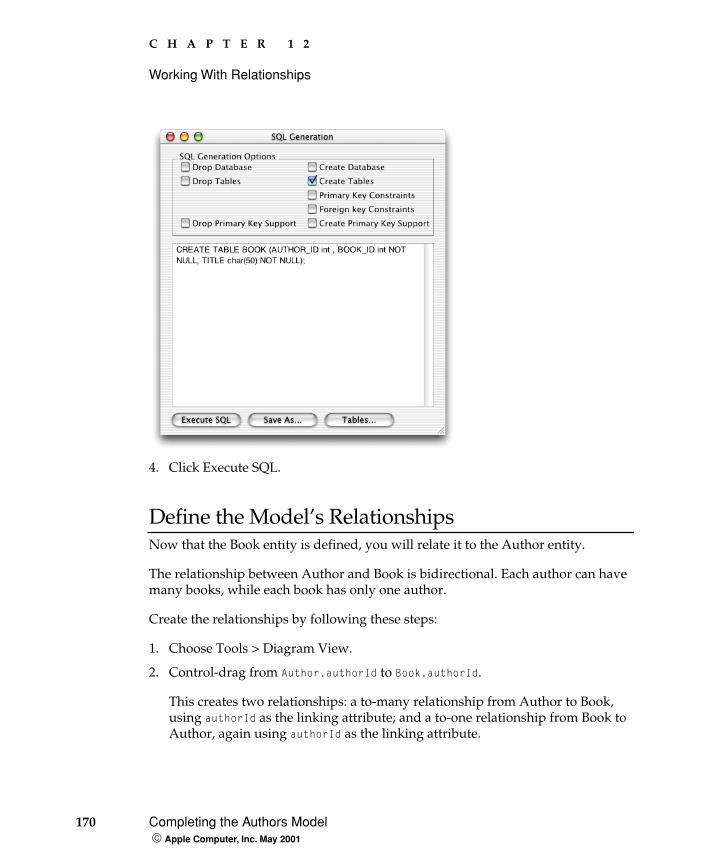
170 Completing the Authors Model Apple Computer, Inc. May 2001
C H A P T E R 1 2
Working With Relationships
4. Click Execute SQL.
Define the Model’s RelationshipsNow that the Book entity is defined, you will relate it to the Author entity.
The relationship between Author and Book is bidirectional. Each author can have many books, while each book has only one author.
Create the relationships by following these steps:
1. Choose Tools > Diagram View.
2. Control-drag from Author.authorId to Book.authorId.
This creates two relationships: a to-many relationship from Author to Book, using authorId as the linking attribute; and a to-one relationship from Book to Author, again using authorId as the linking attribute.

C H A P T E R 1 2
Working With Relationships
Completing the Authors Model 171 Apple Computer, Inc. May 2001
Figure 12-1 graphically depicts the two relationships. Book is linked to Author by a single-headed arrow, meaning that a book can have one author. Whereas Author is linked to Book by a double-headed arrow, meaning that an author can have more than one book.
Figure 12-1 Relationships in the Authors model
Deletion can become complex due to the relationships between entities. For example, if you delete an Author object, what should happen to the Book objects associated with it? You can define the behavior you desire by using delete rules in your model.
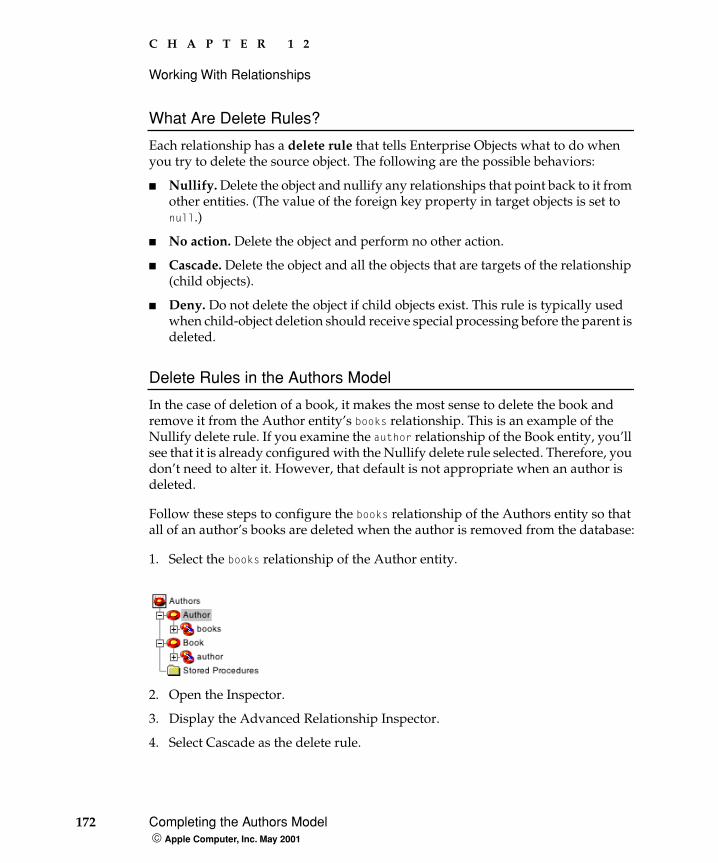
172 Completing the Authors Model Apple Computer, Inc. May 2001
C H A P T E R 1 2
Working With Relationships
What Are Delete Rules?
Each relationship has a delete rule that tells Enterprise Objects what to do when you try to delete the source object. The following are the possible behaviors:
� Nullify. Delete the object and nullify any relationships that point back to it from other entities. (The value of the foreign key property in target objects is set to null.)
� No action. Delete the object and perform no other action.
� Cascade. Delete the object and all the objects that are targets of the relationship (child objects).
� Deny. Do not delete the object if child objects exist. This rule is typically used when child-object deletion should receive special processing before the parent is deleted.
Delete Rules in the Authors Model
In the case of deletion of a book, it makes the most sense to delete the book and remove it from the Author entity’s books relationship. This is an example of the Nullify delete rule. If you examine the author relationship of the Book entity, you’ll see that it is already configured with the Nullify delete rule selected. Therefore, you don’t need to alter it. However, that default is not appropriate when an author is deleted.
Follow these steps to configure the books relationship of the Authors entity so that all of an author’s books are deleted when the author is removed from the database:
1. Select the books relationship of the Author entity.
2. Open the Inspector.
3. Display the Advanced Relationship Inspector.
4. Select Cascade as the delete rule.

C H A P T E R 1 2
Working With Relationships
Using Relationships in Your Code 173 Apple Computer, Inc. May 2001
5. Select the Owns Destination option.
6. Save Books.eomodeld.
Using Relationships in Your Code
In this section you’ll add to your application the ability to maintain an author’s books.
Before you can begin, you need to add the Java classes for Author and Book to your project. Because you’ve customized Author.java, you’ll need to merge the new code generated by EOModeler with your own.

174 Using Relationships in Your Code Apple Computer, Inc. May 2001
C H A P T E R 1 2
Working With Relationships
Add Java Classes for Author and Book to the Project
1. Open the Authors project in Project Builder.
2. Open Authors.eomodeld in EOModeler.
3. Update your project’s Author.java class.
a. Select the Author entity in the entity list.
b. Choose Property > Generate Java Files.
You are notified that Author.java already exists and asked how you wish to proceed.
Click Merge. The FileMerge application launches.
c. Merge the files.
As Figure 12-2 shows, FileMerge outlines and separates the differences between the two files. The file generated by EOModeler is on the left, and the the one that you customized is on the right.

C H A P T E R 1 2
Working With Relationships
Using Relationships in Your Code 175 Apple Computer, Inc. May 2001
Figure 12-2 FileMerge window
FileMerge highlights the differences between the files. Each highlighted area has a numbered arrow.
In this case you need to integrate the differences into the new file. The most important difference to include in the new Author.java file is the fullName method.
Click the arrow in the area that contains the fullName method and choose “Choose both (left first)” from the Actions pop-up menu, as shown in Figure 12-3.

176 Using Relationships in Your Code Apple Computer, Inc. May 2001
C H A P T E R 1 2
Working With Relationships
Figure 12-3 FileMerge window—adding fullName method to new Author.java
Repeat the process with the rest of the highlighted areas (you can ignore sections containing comments).
Choose File > Save Merge to save the new Author.java file.
4. Add Book.java to the project.
a. Select the Book entity in the entity list in EOModeler’s main window.
b. Choose Property > Generate Java Files.
c. Save Book.java in your project’s directory.
d. Add Book.java to the project.
(For details on adding a custom Java class to a project, see “Adding a Java Class to the Project” (page 152).)

C H A P T E R 1 2
Working With Relationships
Using Relationships in Your Code 177 Apple Computer, Inc. May 2001
To-One Relationships in Java
The author method in Listing 12-1 implements the author relationship, a to-one relationship from Book to Author.
Listing 12-1 The methods that implement the author relationship in Book.java
public Author author() {
return (Author)storedValueForKey("author");
}
public void setAuthor(Author value) {
takeStoredValueForKey(value, "author");
}
}
Enterprise Objects follows the procedure described in “To-One Relationships” (page 112) when you access the author property of Book objects.
To-Many Relationships in Java
The code in Listing 12-2 implements the to-many relationship between Author and Book, books.
Listing 12-2 The methods that implement the books relationship in Author.java
public NSArray books() {
return (NSArray)storedValueForKey("books");
}
public void setBooks(NSMutableArray value) {
takeStoredValueForKey(value, "books");
}
public void addToBooks(Book object) {
NSMutableArray array = (NSMutableArray)books();
willChange();
array.addObject(object);
}
public void removeFromBooks(Book object) {
NSMutableArray array = (NSMutableArray)books();

178 Using Relationships in Your Code Apple Computer, Inc. May 2001
C H A P T E R 1 2
Working With Relationships
willChange();
array.removeObject(object);
}
}
Notice that the books associated with a particular author can be retrieved as an NSArray simply by calling the books method. The NSArray returned is an array of Book objects. Changes made to them are automatically tracked by the editing context and are saved when saveChanges is called. Further, a book can be added to or removed from an author’s list using the two provided methods, addToBooks and removeFromBooks. In that case, however, the editing context has to be notified of the change.
At the database level, the AUTHOR_ID column in the BOOK table corresponds to the AUTHOR_ID of the owning AUTHOR row. Adding a book to an author’s array is actually a matter of setting AUTHOR_ID on the new BOOK row to the same value as the author’s AUTHOR_ID. When you use the addToBooks method, Enterprise Objects takes care of updating the value of the authorId property of the Book object for you.
Create the AuthorBookEdit ComponentIn this section you’ll create the component that allows your application’s user to maintain the books of a specific author.
AuthorBookEdit.wo
After performing the steps below, your AuthorBookEdit.wo component should look like Figure 12-4 (page 180).
1. Add the AuthorBookEdit component to the project.
This component allows editing the list of books an author has written.
a. Select Web Components from the Groups & Files list.
b. Choose File > New File.
c. Under WebObjects, select Component and click Next.
d. Name the component AuthorBookEdit and click Finish.
2. Design AuthorBookEdit.wo.

C H A P T E R 1 2
Working With Relationships
Using Relationships in Your Code 179 Apple Computer, Inc. May 2001
a. Open AuthorBookEdit.wo in WebObjects Builder.
b. Add the author key to the component, choose Author as its type, and include accessor methods.
c. Add the bookItem key to the component, choose Book as its type, and do not include accessor methods.
d. Add an action called deleteBook that returns null.
e. Add an action called addBook that returns null.
f. Add an action called returnToMain that returns an object of type Main.
g. Enter the label “Books by “, add a WOString after it, and press Shift-Enter.
h. Select the line containing the label and the WOString, and choose Elements > Heading > H3.
i. Bind the WOString to author.fullName.
j. Add a WORepetition element.
Bind the list attribute to author.books.
Bind the item attribute to bookItem.
k. Add the WORepetition’s content.
Add a WOHyperlink, a space character, and a WOTextField inside the WORepetition and press Shift-Enter.
Enter Delete as the WOHyperlink’s caption, and bind its action attribute to deleteBook.
Bind the WOTextField’s value attribute to bookItem.title.
l. Add two WOSubmitButtons below the WORepetition.
Enter “Done” for the value attribute of the first WOSubmitButton, and bind its action attribute to returnToMain.
Enter “Add” for the value attribute of the second WOSubmitButton, and bind its action attribute to addBook.
m. Add a WOForm element that encompasses all the elements you’ve added so far.
Select all the elements by choosing Edit > Select All.
Choose Forms > WOForm.

180 Using Relationships in Your Code Apple Computer, Inc. May 2001
C H A P T E R 1 2
Working With Relationships
Click anywhere inside a WOForm where there are no elements.
Choose Window > Inspector.
Choose true for the multipleSubmit attribute of the WOForm.
3. Save AuthorBookEdit.wo.
Figure 12-4 AuthorBookEdit.wo
AuthorBookEdit.java
The Java code of the AuthorBookEdit component needs to be edited to implement the procedures needed to add and delete books from the books relationship of Author objects. However, all you have to do is maintain an array of books, in the same way as you would manipulate an NSArray (add an object to the array to add a book, and remove objects from it to delete books). The only additional code you need to include is to notify the editing context of the changes made to the array.

C H A P T E R 1 2
Working With Relationships
Using Relationships in Your Code 181 Apple Computer, Inc. May 2001
1. Modify the deleteBook method so that it looks like Listing 12-3.
Listing 12-3 The deleteBook method in AuthorBooEdit.java
public WOComponent deleteBook() {
// get editing context from book object
EOEditingContext ec = bookItem.editingContext();
// delete book from its editing context
ec.deleteObject(bookItem);
// remove object from relationship
author.removeObjectFromBothSidesOfRelationshipWithKey(bookItem,
"books");
return null;
}
The action method first removes the book from the books array of author, and then notifies the editing context that the enterprise object in question should be deleted the next time changes are saved.
When the page refreshes, the book in question is no longer displayed in the list because it has been removed from the books array (relationship) by the removeObjectFromBothSidesOfRelationshipWithKey method.
2. Modify the addBook method so that it looks like Listing 12-4.
Listing 12-4 The addBook method in AuthorBookEdit.java
public WOComponent addBook() {
// get editing context
EOEditingContext ec = session().defaultEditingContext();
// create new book object
Book newBook = new Book();
newBook.setTitle("New Book");
// insert new book into editing context

182 Using Relationships in Your Code Apple Computer, Inc. May 2001
C H A P T E R 1 2
Working With Relationships
ec.insertObject(newBook);
// add new book to books and set author for it
author.addObjectToBothSidesOfRelationshipWithKey(newBook, "books");
return null;
}
The addObjectToBothSidesOfRelationshipWithKey method takes care of adding the new book to the books array of author, as well as setting the author property for the new book. Alternatively, you could have set each relationship individually, as shown in Listing 12-5.
Listing 12-5 Method calls to add a book and set its author
author.addToBooks(newBook);
newBook.setAuthor(author);
Modify Session.javaThe major change that needs to be made to the Session.java class is adding the authorList instance variable. Each Session object also needs to fetch the list of authors during its creation.
1. Cut the fetchSpec instance variable definition from Main.java and paste it in Session.java:
private EOFetchSpecification fetchSpec;
2. Edit the constructor so that it matches Listing 12-6.
Listing 12-6 The constructor in Session.java
public Session() {
super();
// build fetch specification
fetchSpec = new EOFetchSpecification("Author", null, null);

C H A P T E R 1 2
Working With Relationships
Using Relationships in Your Code 183 Apple Computer, Inc. May 2001
// fetch
fetchAuthorList();
}
3. Add the fetchAuthorList method in Listing 12-7.
Listing 12-7 The fetchAuthorList method in Session.java
public void fetchAuthorList() {
// get editing context
EOEditingContext ec = defaultEditingContext();
// fetch
authorList = new
NSMutableArray(ec.objectsWithFetchSpecification(fetchSpec));
}
4. Add the addAuthor method in Listing 12-8. (You can copy and paste the addAuthor method in Main.java and make the necessary modifications.)
Listing 12-8 The addAuthor method in Session.java
public boolean addAuthor(Author author) {
// add only if the author is not already in the list
if (! authorList.containsObject(author)) {
// add author to list
authorList.addObject(author);
// insert author into editing context
defaultEditingContext().insertObject(author);
return true;
}
else {
return false;
}
}
184 Using Relationships in Your Code Apple Computer, Inc. May 2001
C H A P T E R 1 2
Working With Relationships
5. Add the deleteAuthor method in Listing 12-9. (You can copy and paste the deleteAuthor method in Main.java, and make the necessary modifications.)
Listing 12-9 The deleteAuthor method in Session.java
public void deleteAuthor(Author author) {
// remove author from authorList
authorList.removeObject(author);
// get object’s editing context
EOEditingContext ec = author.editingContext();
// remove author from object graph
ec.deleteObject(author);
}
6. Save Session.java.
7. Add the authorList instance variable.
a. In WebObjects Builder, select session from the AuthorBookEdit browser.
b. Control-click in the Session browser and choose Add Key to Session.
c. Name the key authorList, set its type to a mutable array of Author, and generate accessor methods.
Modify the Main ComponentThe Main component needs to display the AuthorBookEdit component, so that the application’s user can edit an author’s books. To accomplish that, a WOHyperlink and its action need to be added to Main.wo.
Main.wo
A new action, editBooks, needs to be added to the component. It also needs a new WOHyperlink, which invokes the new action. After completing the required changes, your Main.wo should look like Figure 12-5 (page 186).
1. Open Main.wo in WebObjects Builder.

C H A P T E R 1 2
Working With Relationships
Using Relationships in Your Code 185 Apple Computer, Inc. May 2001
2. Add a new action named editBooks that returns AuthorBookEdit.
3. Add a WOHyperlink between the Delete WOHyperlink and the WOString inside the WORepetition.
Set the caption to Books and bind its action attribute to editBooks.
4. Bind the WORepetition’s list attribute to session.authorList.
5. Delete the authorList key.
a. Select authorList in Main’s browser.
b. Choose “Delete authorList“ from the Edit Source pop-up menu.
6. Save Main.wo.

186 Using Relationships in Your Code Apple Computer, Inc. May 2001
C H A P T E R 1 2
Working With Relationships
Figure 12-5 Main.wo with the editBooks action and the Books WOHyperlink
Main.java
1. Add a session instance variable.
private Session session;
2. Edit the constructor so that it looks like Listing 12-10.

C H A P T E R 1 2
Working With Relationships
Using Relationships in Your Code 187 Apple Computer, Inc. May 2001
Listing 12-10 The constructor in Main.java
public Main(WOContext context) {
super(context);
// get session
session = (Session)session();
// get editing context
editingContext = session.defaultEditingContext();
// create a new author object (where form data is stored)
author = new Author();
}
3. Edit the addAuthor method so that it looks like Listing 12-11.
Listing 12-11 The addAuthor method in Main.java—uses the addAuthor method in Session.java
public WOComponent addAuthor() {
if (session.addAuthor(author) {
// create a new author
author = new Author();
}
return null;
}
4. Edit the deleteAuthor method so that it looks like Listing 12-12.
Listing 12-12 The deleteAuthor method in Main.java—uses the deleteAuthor method in Session.java
public WOComponent deleteAuthor() {
session.deleteAuthor(authorItem);
return null;
}
5. Edit the editBooks method so that it looks like Listing 12-13.

188 Using Relationships in Your Code Apple Computer, Inc. May 2001
C H A P T E R 1 2
Working With Relationships
Listing 12-13 The editBooks method in Main.java—sends Author object to AuthorBookEdit component
public AuthorBookEdit editBooks() {
AuthorBookEdit nextPage =
(AuthorBookEdit)pageWithName("AuthorBookEdit");
// Initialize your component here
nextPage.setAuthor(authorItem);
return nextPage;
}
The editBooks method needs to send the author whose books are to be edited to the AuthorBookEdit component (the next page to be displayed).
6. Edit the revertChanges method so that it matches Listing 12-14.
Listing 12-14 The revertChanges method in Main.java—uses default editing context and the fetchAuthorList method in Session.java
public WOComponent revertChanges() {
// revert object graph
editingContext.revert();
// refetch
session.fetchAuthorList();
return null;
}
This method now uses the session’s fetchAuthorList method because the author list is stored in the session, not the Main component.
7. Save Main.java.
C H A P T E R 1 2
Working With Relationships
Running the Application 189 Apple Computer, Inc. May 2001
Running the Application
Build and run your application. When the user clicks on an author’s Book link, Main’s editBook method creates an AuthorBookEdit object and tells it which author it is to process with the setAuthor message.
The AuthorBookEdit component displays the books associated with the author by iterating through the books relationship of author (an NSMutableArray) in the WORepetition. When the user clicks Add, the addBook method creates a new Book object and adds it to the books relationship of author and the editing context. Similarly, when the user clicks Delete on a book in the list, the book is removed from the books relationship and deleted from the editing context. When the user is done editing the books of the author, she clicks Done to return to the Main page.
Deleting Authors
When the user deletes an author, she doesn’t get a warning telling her that all the books related to that author are going to be deleted as well. In this section, you’ll add a component that displays such a warning.
Though conceptually more complex, the design and implementation of the logic for deleting authors is just as simple as that for books. The only significant difference is that the application asks the user for confirmation before deleting the author, because this action has the side effect of removing additional objects from the object store that the user may not be aware of.
You’ll add a component that displays the author that the user wants to delete, along with all related books, and asks for confirmation. If the user changes her mind, she’ll be returned to the Main component. If the user clicks Delete, the author and related books are deleted from the editing context (the actual delete transaction takes place when the user clicks Save on the Main page).

190 Deleting Authors Apple Computer, Inc. May 2001
C H A P T E R 1 2
Working With Relationships
Create the ConfirmAuthorDelete Component
1. Add a new component and name it ConfirmAuthorDelete.
(See “Defining a New Component” (page 84) for details.)
2. Open ConfirmAuthorDelete.wo in WebObjects Builder.
3. Add the following instance variables:
a. author (Author), with accessor methods
b. bookItem (Book), without accessor methods
4. Add the following actions:
a. cancel (Main)
b. deleteAuthor (Main)
5. Edit the component’s content so that it looks similar to Figure 12-6 and make the necessary bindings.

C H A P T E R 1 2
Working With Relationships
Deleting Authors 191 Apple Computer, Inc. May 2001
Figure 12-6 ConfirmAuthorDelete.wo
6. Save ConfirmAuthorDelete.wo.
Edit ConfirmAuthorDelete.javaEdit the deleteAuthor method so that it looks like Listing 12-15.
Listing 12-15 The deleteAuthor method in ConfirmAuthorDelete.java
public Main deleteAuthor() {
Main nextPage = (Main)pageWithName("Main");

192 Deleting Authors Apple Computer, Inc. May 2001
C H A P T E R 1 2
Working With Relationships
// get session
Session session = (Session)session();
session.deleteAuthor(author);
return nextPage;
}
Modify the Main ComponentThe Main component needs to display the ConfirmAuthorDelete component when its deleteAuthor action is invoked. You accomplish that by modifying the deleteAuthor method in Main.java so that it looks like Listing 12-16.
Listing 12-16 The deleteAuthor method in Main.java—returns ConfirmAuthorDelete component
public ConfirmAuthorDelete deleteAuthor() {
ConfirmAuthorDelete nextPage =
(ConfirmAuthorDelete)pageWithName("ConfirmAuthorDelete");
nextPage.setAuthor(authorItem);
return nextPage;
}
Run the ApplicationBuild and run the application. Create a new author, add several books, and save your changes. (You can use EOModeler to browse the tables’s contents and confirm that the new information has been added to the database.) Click Delete on the newly added author. You should be presented with a confirmation page similar to Figure 12-7.
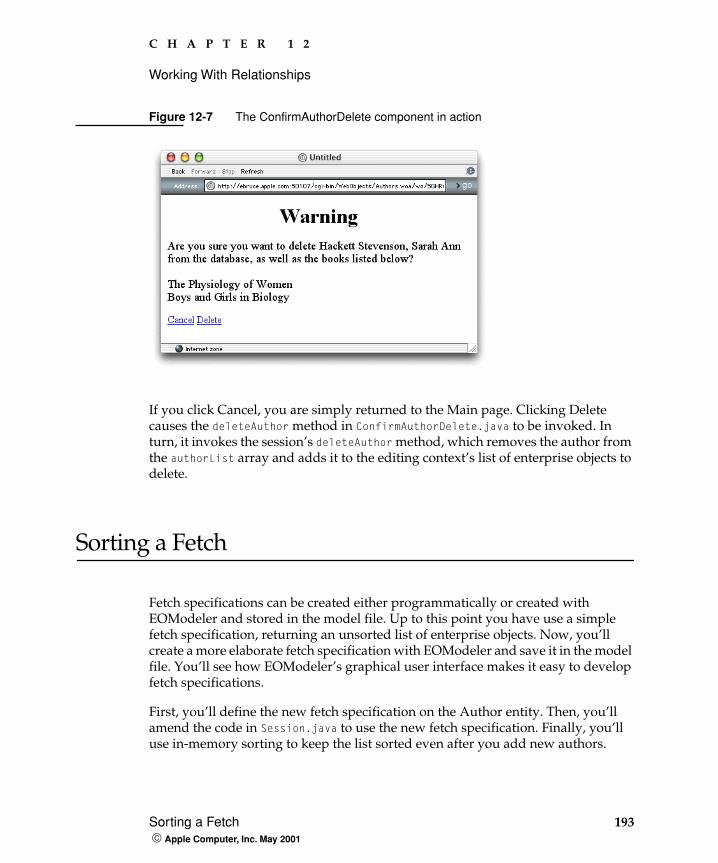
C H A P T E R 1 2
Working With Relationships
Sorting a Fetch 193 Apple Computer, Inc. May 2001
Figure 12-7 The ConfirmAuthorDelete component in action
If you click Cancel, you are simply returned to the Main page. Clicking Delete causes the deleteAuthor method in ConfirmAuthorDelete.java to be invoked. In turn, it invokes the session’s deleteAuthor method, which removes the author from the authorList array and adds it to the editing context’s list of enterprise objects to delete.
Sorting a Fetch
Fetch specifications can be created either programmatically or created with EOModeler and stored in the model file. Up to this point you have use a simple fetch specification, returning an unsorted list of enterprise objects. Now, you’ll create a more elaborate fetch specification with EOModeler and save it in the model file. You’ll see how EOModeler’s graphical user interface makes it easy to develop fetch specifications.
First, you’ll define the new fetch specification on the Author entity. Then, you’ll amend the code in Session.java to use the new fetch specification. Finally, you’ll use in-memory sorting to keep the list sorted even after you add new authors.

194 Sorting a Fetch Apple Computer, Inc. May 2001
C H A P T E R 1 2
Working With Relationships
In “Further Exploration” (page 148), you were given the opportunity to sort the list of authors during the fetch. If you did so, you probably noticed that once you added new authors to the list, the list didn’t stay sorted. You can use Enterprise Objects’s sorting mechanism on a previously fetched array of enterprise objects, as well as during a fetch.
In this section you’ll add a new method to Session.java, sortAuthorList, which sorts the authorList array. You’ll also modify the addAuthor method in Main.java to call the sortAuthorList method to re-sort the authorList array each time an author is added.
1. Add the sortAuthorList method, shown in Listing 12-17, to Session.java.
Listing 12-17 The sortAuthorList method in Session.java
public void sortAuthorList() {
// create array to store sort orderings
NSMutableArray sortOrderings = new NSMutableArray();
// create sort ordering
EOSortOrdering sortOrdering1 = new EOSortOrdering("lastName",
EOSortOrdering.CompareAscending);
// add sort ordering to orderings array
sortOrderings.addObject(sortOrdering1);
// sort authorList using orderings
EOSortOrdering.sortArrayUsingKeyOrderArray(authorList,
sortOrderings);
}
2. Edit the addAuthor method in Session.java to sort the list after adding a new author to it.
Add the following code after the line that adds a new author to the list:
// sort list
sortAuthorList();
Sorting is performed in this section of the code because if the list remains unchanged, there is no need to sort it.

C H A P T E R 1 2
Working With Relationships
Sorting a Fetch 195 Apple Computer, Inc. May 2001
Build and run the application. You’ll find that the author list is sorted after you add a new author.

196 Sorting a Fetch Apple Computer, Inc. May 2001
C H A P T E R 1 2
Working With Relationships

197 Apple Computer, Inc. May 2001
13 Glossary
adaptor, database A mechanism that connects your application to a particular database server. For each type of server you use, you need a separate adaptor. WebObjects provides an adaptor for databases conforming to JDBC.
adaptor, WebObjects A process (or a part of one) that connects WebObjects applications to an HTTP server.
application object An object (of the WOApplication class) that represents a single instance of a WebObjects application. The application object’s main role is to coordinate the handling of HTTP requests, but it can also maintain application-wide state information.
attribute In Entity-Relationship modeling, an identifiable characteristic of an entity. For example, lastName can be an attribute of an Employee entity. An attribute typically corresponds to a column in a database table. See also entity; relationship.
business logic The rules associated with the data in a database that typically encode business policies. An example is automatically adding late fees for overdue items.
CGI A standard for communication between external applications and information servers, such as HTTP or Web servers. Short for Common Gateway Interface.
class In object-oriented languages such as Java, a prototype for a particular kind of object. A class definition declares instance variables and defines methods for all members of the class. Objects that have the same types of instance variables and have access to the same methods belong to the same class.
class property An instance variable in an enterprise object that meets two criteria: it’s based on an attribute in your model, and it can be fetched from the database. A class property can be an attribute, a relationship, a method, or an instance variable.
column In a relational database, the dimension of a table that holds values for a particular attribute. For example, a table that contains employee records might have a LAST_NAME column that contains the values for each employee’s last name. See also attribute.
component An object (of the WOComponent class) that represents a Web page or a reusable portion of one.

G L O S S A R Y
198 Apple Computer, Inc. May 2001
context An object that encapsulates state information for a given transaction (one cycle of the request-response loop). Context objects are implemented with the WOContext class. They encapsulate information about the URL, context ID, application, session, component, request, and response items. WebObjects maintains a cache of WOContext objects to support the back function of Web browsers. See also request-response loop.
cookie General mechanism used by Web servers to store and retrieve persistent data on a client system (Web browser). The information stored is usually state data associated with a range of URLs.
database server A data storage and retrieval system. Database servers typically run on a dedicated computer and are accessed by client applications over a network.
delete rule A delete rule specifies the action to take when the source object of a relationship is deleted from the data store. The possible actions are nullify, cascade, deny, and none. Delete rules are defined in model files with the EOModeler application. See also relationship.
display group A display group collects an array of objects from a data source, sorts it and displays data from the objects in the user interface. See also EODisplayGroup; WODisplayGroup.
dynamic element A dynamic version of an HTML element. WebObjects includes a list of dynamic elements with which you can build your component.
enterprise object A Java object that conforms to the key-value coding protocol and whose properties (instance data) can map to stored data. An enterprise object brings together stored data with methods for operating on that data. See also key-value coding; property.
entity In Entity-Relationship modeling, a distinguishable object about which data is kept. For example, you can have an Employee entity with attributes such as lastName, firstName, address, and so on. An entity typically corresponds to a table in a relational database; an entity’s attributes, in turn, correspond to a table’s columns. See also attribute; table.
Entity-Relationship modeling A Discipline for examining and representing the components and interrelationships in a database system. Also known as E-R modeling, this discipline factors a database system into entities, attributes, and relationships.
EODisplayGroup A display group that displays data in J2SE or Cocoa interface elements using EOAssociations. See also display group.
EOModeler A tool used to create and edit models.
fetch In Enterprise Objects applications, to retrieve data from the database server into the client application, usually into enterprise objects.
foreign key An attribute in an entity that gives it access to rows in another entity. This attribute must be the primary key of the

G L O S S A R Y
199 Apple Computer, Inc. May 2001
related entity. For example, an Employee entity can contain the foreign key deptID, which matches the primary key in the entity Department. You can then use deptID as the source attribute in Employee and as the destination attribute in Department to form a relationship between the entities. See also primary key; relationship.
HTML-based application approach A WebObjects development approach that allows you to create HTML-based Web applications.
inheritance In object-oriented programming, the ability of a superclass to pass its characteristics (methods and instance variables) on to its subclasses.
instance In object-oriented languages such as Java, an object that belongs to (is a member of) a particular class. Instances are created at runtime according to the specification in the class definition.
Java Browser A tool used to peruse Java APIs and class hierarchies.
Java Foundation Classes A set of graphical user interface components and services written in Java. The component set is known as Swing.
JDBC Stands for “Java Database Connectivity.” An interface between Java platforms and databases.
key An arbitrary value (usually a string) used to locate a datum in a data structure such as a dictionary.
key-value coding The mechanism that allows the properties in enterprise objects to be accessed by name (that is, as key-value pairs) by other parts of the application.
key-value pair See key-value coding.
locking A mechanism to ensure that data isn’t modified by more than one user at a time and that data isn’t read as it is being modified.
many-to-many relationship A relationship in which each record in the source entity may correspond to more than one record in the destination entity, and each record in the destination may correspond to more than one record in the source. For example, an employee can work on many projects, and a project can be staffed by many employees. See also relationship.
method In object-oriented programming, a procedure that can be executed by an object.
model An object (of the EOModel class) that defines, in Entity-Relationship terms, the mapping between enterprise object classes and the database schema. This definition is typically stored in a file created with the EOModeler application. A model also includes the information needed to connect to a particular database server.
object A programming unit that groups together a data structure (instance variables) and the operations (methods) that can use or affect that data. Objects are the principal building blocks of object-oriented programs.

G L O S S A R Y
200 Apple Computer, Inc. May 2001
primary key An attribute in an entity that uniquely identifies rows of that entity. For example, the Employee entity can contain an EmpID attribute that uniquely identifies each employee.
Project Builder A tool used to manage the development of a WebObjects application or framework.
property In Entity-Relationship modeling, an attribute or relationship. See also attribute; relationship.
record The set of values that describes a single instance of an entity; in a relational database, a record is equivalent to a row.
relational database A database designed according to the relational model, which uses the discipline of Entity-Relationship modeling and the data design standards called normal forms.
relationship A link between two entities that’s based on attributes of the entities. For example, the Department and Employee entities can have a relationship based on the deptID attribute as a foreign key in Employee and as the primary key in Department (note that although the join attribute deptID is the same for the source and destination entities in this example, it doesn’t have to be). This relationship would make it possible to find the employees for a given department. See also foreign key: many-to-many relationship; primary key; to-many relationship; to-one relationship.
reusable component A component that can be nested within other components and acts like a dynamic element. Reusable
components allow you to extend the WebObject’s selection of dynamically generated HTML elements.
request A message conforming to the Hypertext Transfer Protocol (HTTP) sent from the user’s Web browser to a Web server that asks for a resource like a Web page. See also response.
request-response loop The main loop of a WebObjects application that receives a request, responds to it, and awaits the next request.
response A message conforming to the Hypertext Transfer Protocol (HTTP) sent from the Web server to the user’s Web browser that contains the resource specified by the corresponding request. The response is typically a Web page. See also request.
row In a relational database, the dimension of a table that groups attributes into records.
rule In the Direct to Web and Direct to Java Client approaches, a specification used to customize the user interfaces of applications developed with these approaches.
session A period during which access to a WebObjects application and its resources is granted to a particular client (typically a browser). Also an object (of the WOSession class) representing a session.
target A blueprint for building a product from specified files in your project. It consists of a list of the necessary files and specifications on how to build them. Some
G L O S S A R Y
201 Apple Computer, Inc. May 2001
common types of targets build frameworks, libraries, applications, and command-line tools
table A two-dimensional set of values corresponding to an entity. The columns of a table represent characteristics of the entity and the rows represent instances of the entity.
template In a WebObjects component, a file containing HTML that specifies the overall appearance of a Web page generated from the component.
to-many relationship A relationship in which each source record has zero to many corresponding destination records. For example, a department has many employees.
to-one relationship A relationship in which each source record has exactly one corresponding destination record. For example, each employee has one job title.
transaction A set of actions that is treated as a single operation.
uniquing A mechanism to ensure that, within a given context, only one object is associated with each row in the database.
validation A mechanism to ensure that user-entered data lies within specified limits.
Web server An application that serves Web pages to Web browsers using the HTTP protocol. In WebObjects, the Web server lies between the browser and a WebObjects application. When the Web server receives a request from a browser, it passes the request to the WebObjects adaptor, which generates
a response and returns it to the Web server. The Web server then sends the response to the browser. See also adaptor, WebOBjects; request-response loop.
WebObjects Builder A tool used to graphically edit WebObjects components.
WODisplayGroup A display group that displays data in WebObjects components. See also display group.

G L O S S A R Y
202 Apple Computer, Inc. May 2001

203 Apple Computer, Inc. May 2001
Index
A
accessor methods 65, 155action attribute 50action method, example of adding 49Actions pop-up menu (FileMerge) 175adaptor level 120adaptors 44, 54Add Column pop-up menu (EOModeler) 133addObject method 98addUser method 102, 104–105Advanced Attribute Inspector (EOModeler) 130,
167Allows Null column (EOModeler) 134API files of components 38appendToResponse method 60Application class 32applications
creating 136–137editing contexts in 120as project type 29running 105and sessions 96
arrays 97–101AuthorBookEdit component 178–182Authors application 123–148
custom objects in 151–163database editing in 123–149relationships in 165–195
awake method 58–59
B
Back button 61backtracking cache 61blob (Binary Large Object) type 135
C
cache, backtracking 61Cascade delete rule 172char type 135class properties 134Class Property column (EOModeler) 134Classes group (Project Builder) 32client-server applications 23Column column (EOModeler) 134columns in databases 109component action request processing 55components
See also Main componentcounting number of loads 48defined 19example of adding 84–90example of modifying 33, 39–43maintaining state in 46–51, 95–107parts of 38sharing data between 77–94
condition attribute 68conditional display of elements 68–71ConfirmAuthorDelete component 190cookies 23count method 98custom classes 78–83, 151–155custom logic 158–162
D
Data Browser (EOModeler) 147database level 121databases 109–113
accessing 18browsing in EOModeler 147columns in 109

I N D E X
204 Apple Computer, Inc. May 2001
databases (continued)connecting to 121creating 124foreign keys in 112legacy 120not-null columns in 111preferred protocol of 116primary keys in 110querying languages for 115relationships in 111–113rows in 110structure of 109–111tables in 109translating data 121uniquing in 110updates to 121
date type 135DateDisplay application 39datetime type 135default values of properties, setting 163Definition column (EOModeler) 134delete rules 172deleteObject method 143Deny delete rule 172derived properties 72–75, 160–161developer resources 16development tools 23–25dictionaries 116, 120direct action request processing 55DirectAction class 32display groups 38Documentation group (Project Builder) 32double type 135dynamic publishing 20–22, 37–52
E
Edit Source menu (WebObjects Builder) 47, 69editing contexts 116, 123–149encapsulation of data
benefits of 106custom objects and 77–83
Enterprise Object technology 115–121
enterprise objects 115–121entities, adding to a model 128–132Entity Inspector (EOModeler) 128EOAccess layer 120–121EOControl layer 119–120EOFetchSpecification class 142, 148–149EOGenericRecord class 118, 142, 155, 160EOKeyValueCoding interface 118–119EOModeler application
browsing tables with 147creating fetch specifications 193generated code 154introduced 24main window 133opening 125
EOSortOrdering class 148External Type column (EOModeler) 134–135
F
features of WebObjects 18–23fetch specifications 142, 148–149, 193–195FileMerge application 174–176foreign keys 112, 135frameworks 29Frameworks group (Project Builder) 32
G
Groups & Files pane (Project Builder) 32
H
HTML files of componentsdefined 38editing 46reading 45relationship to WOD files 43
HTML input elements 53, 62

I N D E X
205 Apple Computer, Inc. May 2001
I
in-memory sorting 194–195input elements 53, 62int type 135invokeAction method 59item attribute 101, 104
J
Java Browser 98, 148Java class files of components 32Java classes
accessor methods in 155adding to project 78, 152generating from model entity 151in JAR files 34
Java files of components 38, 46Java Number class 135Java String class 135JavaWebObjects framework 32JDBC (Java Database Connectivity) standard 120JDBC adaptor 126, 135JDBC driver 126
K
keypaths 83, 97, 158key-value coding 119, 155key-value dictionaries 120
L
legacy databases 120list attribute 101loadCount variable 48Locking column (EOModeler) 134long type 135
M
Main component 39–43Main subgroup (Project Builder) 32models 24, 121multiple users 96
N
Name column (EOModeler) 134negate attribute 68New Project Assistant 28–30No action delete rule 172not-null columns in databases 111NSArray class 97–98NSData object 135NSMutableArray class 97–101Nullify delete rule 172
O
object orientation 19objectAtIndex method 98OODBS (object-oriented databases) 14OpenBase Manager 124
P, Q
page cache 61Precision column (EOModeler) 134Primary Key column (EOModeler) 133primary keys 110, 135Products group (Project Builder) 32Project Builder
getting started with 27–35introduced 24location of 28main window 31–33running applications 44

I N D E X
206 Apple Computer, Inc. May 2001
Project Builder Assistant. See New Project Assistant
projectschoosing type of 29components of 32creating a simple one 27–30location for 30
properties of enterprise objects 118class properties 134default values for 163
Prototype column (EOModeler) 134
R
Read Only column (EOModeler) 134Refetch button (EOModeler) 147relationships in databases
data deletion and 171–173, 189–193and database design 111–113example of creating 165–195Java in code 173–188
release notes, displayed in Project Builder 31removeObjectAtIndex method 98request processing 54–61
backtracking cache 61generating the response 60–61models for 55request-response loop and 55stages of 58–59
request-response loopintroduced 37overview 55phases of 56response generation and 44–45tracing 65–68
Resources group (Project Builder) 32response generation 44–45response page 54, 60revertChanges method 145rows in databases 110Run pane (Project Builder) 34, 51
S
saveChanges method 144scalability in WebObjects 18Scale column (EOModeler) 135Session class
adding arrays to 98–101as default class in application 32
session method 97sessions (Session objects)
creating new instances 51overview of 96using to manage state 95–105
setUser method 104sleep method 60sorting
and fetch specifications 193–195specifying order 148
state management 46–52, 95–107static binding 45submit button 63, 67–68submitChanges method 94, 104
T
tablescreating 135in databases 109
takeValuesFromRequest method 59to-many relationships 113, 170, 177tools 23–25to-one relationships 112, 170, 177
U
uniquing 110user input
and derived properties 72–75introduced 22managing 53–75and request processing 54–61

I N D E X
207 Apple Computer, Inc. May 2001
user interface of 62–65userEdit action 94UserEdit component 84–94, 103UserEntry project 78users (User objects)
adding 102, 104deleting 101, 105editing 103multiple 96sessions for 96
V
Value Class (Java) column (EOModeler) 134Value Type column (EOModeler) 135
W, X, Y, Z
web browser cache 61Web Components group (Project Builder) 32, 38Web Server Resources group (Project Builder) 32WebObjects adaptor 44, 54WebObjects Application project type 29WebObjects Builder
adding arrays to Session class 98introduced 24introduction to using 33main window 41
WebObjects Framework project type 29Width column (EOModeler) 134WOComponent class 19, 38
See also componentsWOConditional elements 68–71, 91WOD files
introduced 38merging 45relationship to HTML files 43
WOElement class 39WOHyperlink elements 101–102, 107WOO files 38WORepetition elements 101, 146
WOString Binding Inspector 41WOString elements 40–43WOStrings 53, 159WOTextFields 82Write Format column (EOModeler) 135

I N D E X
208 Apple Computer, Inc. May 2001