Embed Size (px)
Citation preview

DIO Suppression Attack in RPL Software Recommended: NetSim Standard v12.1/v12.2 (32-bit/ 64-bit), Visual Studio 2017/2019
Follow the instructions specified in the following link to clone/download the project folder from
GitHub using Visual Studio:
https://tetcos.freshdesk.com/support/solutions/articles/14000099351-how-to-clone-
netsim-file- exchange-project-repositories-from-github-
Other tools such as GitHub Desktop, SVN Client, Sourcetree, Git from the command line, or any
client you like to clone the Git repository.
Note: It is recommended not to download the project as an archive (compressed zip) to avoid
incompatibility while importing workspaces into NetSim.
Secure URL for the GitHub repository:
v12.1: https://github.com/NetSim-TETCOS/DIO_Suppression_Attack_in_IoT_v12.1.git
v12.2: https://github.com/NetSim-TETCOS/DIO_Suppression_Attack_in_IoT_v12.2.git
Note: The cloned project directory will contain the documentation specific to the NetSim version
(v12.1/v12.2).
In DIO Suppression Attack, a malicious node broadcast DIO message to legitimate nodes. If malicious
node transmits repeatedly a DIO message that is considered consistent by the receiving nodes. If the
nodes receive enough consistent DIOs, they will suppress their own DIO transmission. Since DIO
messages are exploited to discover neighbors and the network topology, their continuous suppression
can cause some nodes to remain hidden and some routes to remain undiscovered. DIO Suppression
attacks affect the performance of IoT networks protocols such as RPL protocol.
Implementation in RPL (for 1 sink)
• In RPL the transmitter broadcasts the DIO during DODAG formation.
• The receiver on receiving the DIO from the transmitter updates its parent list, sibling list, rank
and sends a DAO message with route information.
• Malicious node upon receiving the DIO message it transmits DIO message repeatedly to
legitimate nodes.
• The legitimate nodes on listening to the malicious node DIO message they will suppress their
own DIO transmission.
• The continuous suppression can cause some nodes to remain hidden and some routes to remain
undiscovered.
The DIO.c file contains the following functions
1. fn_NetSim_RPL_MaliciousNode( )

This function is used to identify whether a current device is malicious or not in-order to establish
malicious behavior.
2. fn_NetSim_RPL_MaliciousNodeReplay()
This function is used by the malicious node to transmit DIO message repeatedly to legitimate
nodes.
You can set any device as malicious and you can have more than one malicious node in a scenario.
Device id’s of malicious nodes can be set inside the fn_NetSim_RPL_MaliciousNode() function.
Steps:
1. The downloaded folder contains the folders Documentation, MatLab code and
Workspace_DIO_Suppression
2. After you unzip the downloaded project folder, Open NetSim Home Page click on Open
Simulation option,

3. Click on Workspace options

4. Click on More Options,
5. Click on Import, browse the extracted folder path and go into the
WorkSpace_DIO_SUPPRESSION_Attack_RPL directory. Click on Select folder button and then on
OK.
6. Create a user variable with the name of MATLAB_PATH and provide the path of the installation
directory of user’s respective MATLAB version.

7. Make sure that the following directory is in the PATH(Environment variable)
<Path where MATLAB is installed>\bin\win64
Note: If the machine has more than one MATLAB installed, the directory for the target platform must be ahead of any other MATLAB directory (for instance, when compiling a 64-bit application, the directory in the MATLAB 64-bit installation must be the first one on the PATH).
8. Open Command prompt as admin and execute the command “matlab -regserver”. This will register MATLAB as a COM automation server and is required for NetSim to start MATLAB automation server during runtime.
9. Place plotDAG.m present in the MATLAB_Code folder inside the root directory of MATLAB. For
Example: “C:\Program Files\MATLAB\R2016a”.

10. Go to home page, Click on Open Simulation >Workspace options and click on the Open code
button.
11. Set malicious node id in RPL.h file
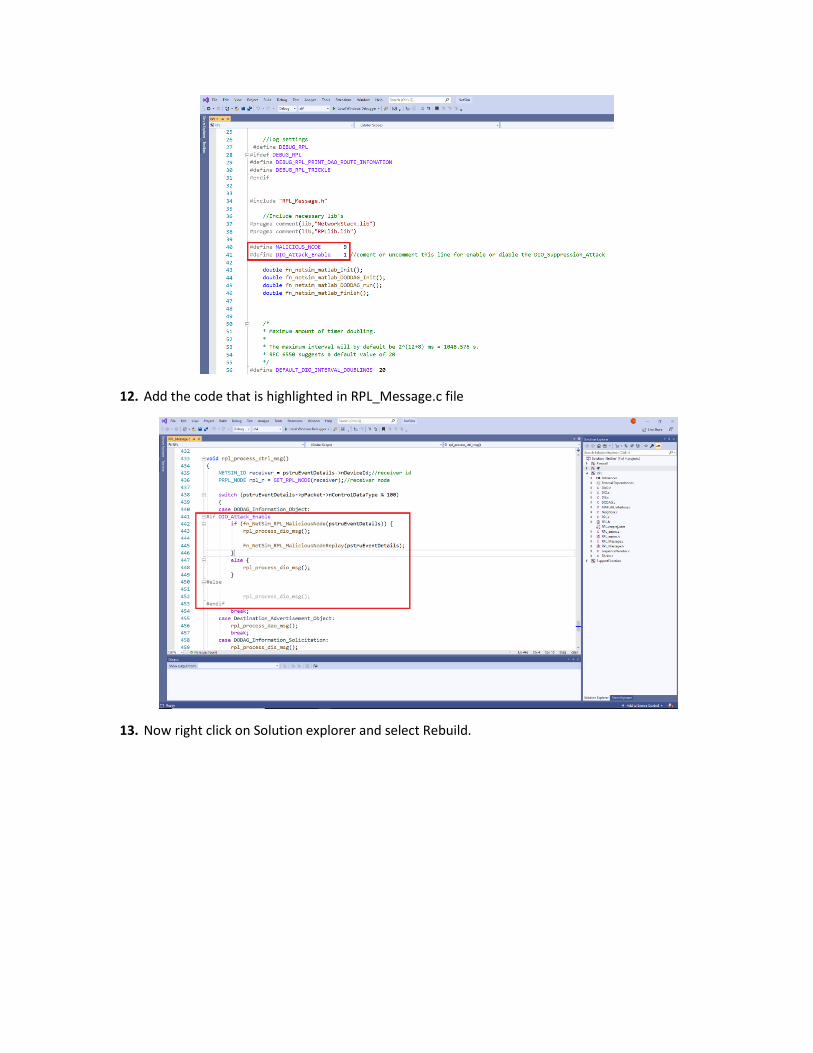
12. Add the code that is highlighted in RPL_Message.c file
13. Now right click on Solution explorer and select Rebuild.

14. Upon rebuilding, libRPL.dll will automatically get replaced in the respective bin folders of the
current workspace
Note:
1. Based on whether you are using NetSim 32 bit or 64-bit setup you can configure
Visual studio to build 32 bit or 64 bit Dll files respectively as shown below:
2. While importing the workspace, if the following warning message indicating
Software Version Mismatch is displayed, you can ignore it and proceed.

15. Go to NetSim home page, click on Open Simulation, Click on WITH_DIO_Suppression_Attack.
Settings that were done to create the network scenario for DIO Suppression Attack:
1. Create a network scenario in IoT (Internet of Things) with UDP running in the Transport Layer
and RPL in Network Layer.
2. For example, you can create a scenario as shown in the following screenshot:

Note: In above screenshot Red color Wireless_Sensor_Node_9 is a malicious node.
For Application 1:
• Source – Device id 1
• Destination – Device id 11
• Packet Size – 50Bytes
• Inter Arrival Time – 1000000microsec
For Application 2:
• Source – Device id 6
• Destination – Device id 11
• Packet Size – 50Bytes
• Inter Arrival Time – 1000000microsec
Link Properties (Adhoc Link 1)
Channel Characteristics – Path Loss only
Path Loss model – LOG DISTANCE
Path Loss Exponent- 3
Device Properties: Go to 6LoWPAN Gateway Properties->Network_Layer->
DIORedundancyConstant-> 6.
3. The DIO suppression attack requires the adversary to transmit only k (DIO Redundancy
Constant) DIO messages at each Trickle period.
4. DIO Redundancy Constant(k) is act as suppression threshold, as we set 6, the malicious node will
replay the DIO message 6 times to the neighboring nodes. After replaying the DIO message the
neighboring nodes will suppress their own DIO transmission.
5. Run the Simulation for 100sec.
6. View the packet animation. You will find that malicious node (Device id 9) even after receiving
DIO message from neighbor nodes it will start transmitting repeatedly DIO message to neighbor
nodes.

7. This will cause some nodes to remain hidden and some route to remain undiscovered or in the
worst case, a partition of the network.
Settings that were done to create the network scenario for WITHOUT_DIO Suppression Attack:
For Creating Without DIO Suppression Attack scenario you just have to set 0 to DIO_Attack_Enable
macro as shown in below screenshot. Rest all other steps are similar as mention in “Settings that
were done to create the network scenario for DIO Suppression Attack”.
Output:
Case 1: With DIO Suppression Attack
DODAG Formation Graph:

When root node(Wireless_Sensor_Node_8) broadcast the DIO message all nodes that are
present in the communication range will also broadcast their own DIO messages but when
malicious node will broadcast the DIO message, it will repeatedly transmit the DIO message
to the neighbor nodes such that it prevents the DIO messages from other neighbor nodes
reaching them.
So, it degrades the routing information and some nodes remain hidden in the network.
We can observe from the above graph that Wireless_Sensor_Node_6 is not part of DODAG
formation as it is not discovered and remain hidden in the network.
Case 2: Without DIO Suppression Attack
DODAG Formation Graph:
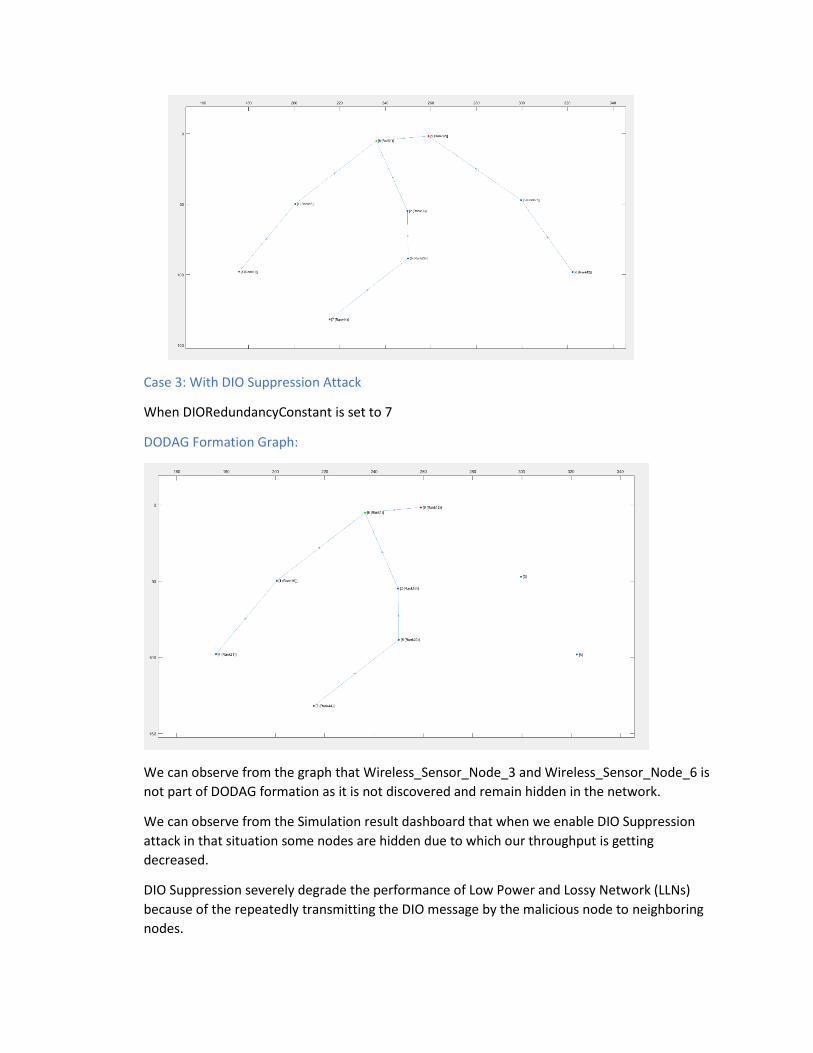
Case 3: With DIO Suppression Attack
When DIORedundancyConstant is set to 7
DODAG Formation Graph:
We can observe from the graph that Wireless_Sensor_Node_3 and Wireless_Sensor_Node_6 is
not part of DODAG formation as it is not discovered and remain hidden in the network.
We can observe from the Simulation result dashboard that when we enable DIO Suppression
attack in that situation some nodes are hidden due to which our throughput is getting
decreased.
DIO Suppression severely degrade the performance of Low Power and Lossy Network (LLNs)
because of the repeatedly transmitting the DIO message by the malicious node to neighboring
nodes.

The DIO suppression attack, an attack that induces victim nodes to suppress the transmission of
DIO messages. This causes a general degradation of the routes quality that can lead, eventually,
to network partitions.