Embed Size (px)
Citation preview

3-798-762-24 (1)
1995 by Sony Corporation
DCR-VX1000
Operation ManualBefore operating the unit, please read this manual thoroughly,and retain it for future reference.
Owner’s RecordThe model and serial numbers are located on the bottom. Record theserial number in the space provided below. Refer to these numberswhenever you call upon your Sony dealer regarding this product.Model No. DCR-VX1000 Model No. AC-V615
Serial No. Serial No.
Digital VideoCameraRecorder

2
English
Welcome to digital videoCongratulations on your purchase of this Sony Digital Handycam camcorder. With your Handycam,you can capture life’s precious moments with superior picture and sound quality. Your Handycam isloaded with advanced features, but at the same time it is very easy to use. You will soon be producinghome video that you can enjoy for years to come.
WARNING For Customers in the U.S.A.WARNINGThis equipment has been tested and found tocomply with the limits for a Class B digital device,pursuant to Part 15 of the FCC Rules. These limitsare designed to provide reasonable protectionagainst harmful interference in a residentialinstallation. This equipment generates, uses, andcan radiate radio frequency energy and, if notinstalled and used in accordance with theinstructions, may cause harmful interference toradio communications. However, there is noguarantee that interference will not occur in aparticular installation. If this equipment does causeharmful interference to radio or television reception,which can be determined by turning the equipmentoff and on, the user is encouraged to try to correctthe interference by one or more of the followingmeasures:- Reorient or relocate the receiving antenna.- Increase the separation between the equipment and
receiver.- Connect the equipment into an outlet on a circuit
different from that to which the receiver isconnected.
- Consult the dealer or an experienced radio/TVtechnician for help.
CAUTIONYou are cautioned that any changes or modificationsnot expressly approved in this manual could voidyour authority to operate this equipment.
The shielded interface cable recommended in thismanual must be used with the equipment in order tocomply with the limits for a digital device pursuantto Subpart B of Part 15 of FCC Rules.
For customers in CANADACAUTIONTO PREVENT ELECTRIC SHOCK, DO NOT USETHIS POLARIZED AC PLUG WITH ANEXTENSION CORD, RECEPTACLE OR OTHEROUTLET UNLESS THE BLADES CAN BE FULLYINSERTED TO PREVENT BLADE EXPOSURE.
To prevent fire or shock hazard, donot expose the unit to rain ormoisture.
This symbol is intended to alert theuser to the presence of uninsulated“dangerous voltage” within theproduct’s enclosure that may be ofsufficient magnitude to constitutea risk of electric shock to persons.
This symbol is intended to alert theuser to the presence of importantoperating and maintenance(servicing) instructions in theliterature accompanying theappliance.
DISPOSAL OF LITHIUM ION BATTERY.
LITHIUM ION BATTERY.DISPOSE OF PROPERLY.You can return your unwanted lithium ion batteriesto your nearest Sony Service Center or FactoryService Center.Note: In some areas the disposal of lithium ion
batteries in household or business trash maybe prohibited.
For the Sony Service Center nearest you call 1-800-222-SONY (United States only)For the Factory Service Center nearest you call 416-499-SONY (Canada only)Caution: Do not handle damaged or leaking lithiumion battery.
As you read through this manual, buttons andsettings on the camcorder are shown in capitalletters.e.g. Set the POWER switch to CAMERA.The beep sound is indicated with in theillustrations.

3
Table of Contents
Before You BeginNotes and Precautions 4Checking Supplied Accessories 5
Getting StartedCharging and Inserting the Battery Pack 6Inserting a Cassette 9
Basic OperationsCamera Recording 10Hints for Better Shooting 13Checking the Recorded Picture 14Connections for Playback 15Playing Back a Tape 16
Advanced OperationsUsing Alternate Power Sources 18Changing the Mode Settings 20< for Camera Recording >Fader and Overlap 23Re-recording a Picture in the Middle of a Recorded Tape 25Photo Recording 27Interval Recording 28Cut Recording 29Self-timer Recording 30< for Automatic/Manual Adjustment >Selecting Automatic Mode and Manual Adjustment 31Focusing Manually 32Using the PROGRAM AE Function 34Adjusting the Exposure 38Adjusting the Shutter Speed 40Using the ND Filter 41Using with the Zebra Pattern 42Adjusting the White Balance 43Adjusting the Recording Sound 46Releasing the Steady Shot Function 48Presetting the Adjustment for Picture Quality 49< for Playback/Editing >Searching the Recorded Picture 51Checking the Information for the Recorded Picture 53Editing onto Another Tape 54Replacing Recording on a Tape 56
Additional InformationUsing Your Camcorder Abroad 57Replacing the Lithium Battery in the Camcorder 58Resetting the Date and Time 60Video Cassettes 61Tips for Using the Battery Pack 63Maintenance Information and Precautions 65Trouble Check 68Specifications 71Identifying the Parts 72Warning Indicators 82Glossary 83Index (back cover)

4
Before You Begin
Notes and PrecautionsNote on TV Color SystemsTV color systems differ from country to country. To view your recordings on a TV, you need an NTSCsystem based TV. Please check the list to see the TV color system of your country (p. 57).
Precaution on CopyrightTelevision programs, films, video tapes, and other materials may be copyrighted.Unauthorized recording of such materials may be contrary to the provision of the copyright laws.
Precautions on Camcorder Care• Do not let the camcorder get wet. Keep the camcorder from rain or sea water. It may cause a
malfunction and sometimes the malfunction cannot be repaired. [a]• Do not let sand get into the camcorder. When you use the camcorder on a sandy beach or
dusty place, protect it from the sand or dust. Sand or dust may cause the unit to malfunctionand sometimes the malfunction cannot be repaired. [b]
• Never leave the camcorder under temperatures above 140 °F (60° C), such as in a car parked in thesun or under direct sunlight. [c]
[c][b][a]
Contents of the recording cannot be compensated if recording or playback is not made due to amalfunction of the camcorder, video tape, etc.
See “Precautions” as well (p. 67).
5
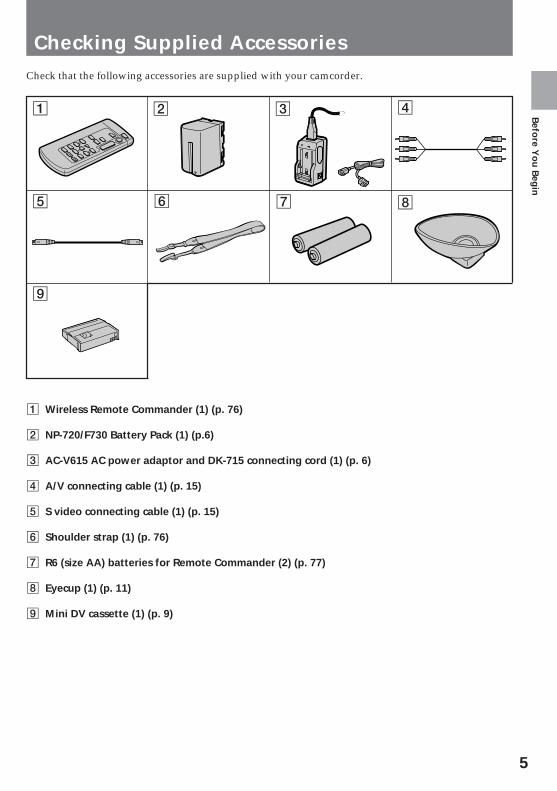
Checking Supplied AccessoriesCheck that the following accessories are supplied with your camcorder.
9
85
4321
6 7
1 Wireless Remote Commander (1) (p. 76)
2 NP-720/F730 Battery Pack (1) (p.6)
3 AC-V615 AC power adaptor and DK-715 connecting cord (1) (p. 6)
4 A/V connecting cable (1) (p. 15)
5 S video connecting cable (1) (p. 15)
6 Shoulder strap (1) (p. 76)
7 R6 (size AA) batteries for Remote Commander (2) (p. 77)
8 Eyecup (1) (p. 11)
9 Mini DV cassette (1) (p. 9)
Befo
re Yo
u B
egin

6
Getting Started
Charging and Inserting the Battery PackBefore using your camcorder, you first need to charge and install the battery pack. To charge thebattery pack, use the supplied AC power adaptor.This digital camcorder does not interface with "InfoLITHIUM" batteries. The remaining time (minutes)indication does not appear when using "InfoLITHIUM" batteries.
Charging the Battery Pack
Charge the battery pack on a flat place without vibration.(1) Connect the AC power adaptor to a wall outlet.(2) Align the surface of the battery pack indicated by the z mark with the edge of the terminal shutterof the AC power adaptor. Then fit and slide the battery pack in the direction of the arrow.The CHARGE lamp (orange) lights up. Charging begins.When charging is completed, the CHARGE lamp goes out. Unplug the unit from the wall outlet, thenremove the battery pack and install it on the camcorder.
1 2
Charging Time
* Approximate minutes to charge an empty pack using the supplied AC power adaptor (Lower temperaturesrequire a longer charging time.)
Battery Life
* Approximate minutes when recording while you repeat recording start/stop, zooming and turning thepower on/off. The actual battery life may be shorter.
** Approximate continuous recording and playing back time indoors.
Battery Pack
NP-720/F730
Charging time*
190
Battery Pack
NP-720/F730
Typical recording time*
50
Continuous using time**
105

7
Gettin
g Started
Removing the Battery PackSlide the battery pack in the direction of the arrow.
Notes on charging the battery pack• The POWER lamp will remain lit for a while even if the battery pack is removed and the power cord is
unplugged after charging the battery pack. This is normal.• If the POWER lamp does not light, disconnect the AC power cord. After about one minute, reconnect the
AC power cord again.• You cannot operate the camcorder using the AC power adaptor while charging the battery pack.• When a fully charged battery pack is installed, the CHARGE lamps will light once, then go out.
Inserting the Battery Pack
(1) Slide OPEN and open the battery cover.(2) Insert the battery pack until it is hooked by the RELEASE knob.(3) Close the cover.
1 32
OPEN

8
Charging and Inserting the Battery Pack
To Remove the Battery PackSlide the RELEASE knob leftward.
RELEASE
Note on battery packYou cannot use NP-520/500H/F750 battery pack.

9
Gettin
g Started
Inserting a Cassette
You can use mini DV cassette with logo* only.Make sure that a power source is inserted.(1) Slide EJECT. The cassette compartment automatically lifts up and opens.(2) Insert a cassette (supplied) with the window facing out.(3) Press the outside of the cassette compartment cover to close the compartment. The cassettecompartment automatically retracts.(4) After the cassette compartment cover has retracted, press the upper cassette compartment coveruntil it clicks.
* and are trademarks.
43
EJECT
To Eject the CassetteSlide EJECT. After the cassette compartment opens, take out the cassette.You cannot eject the cassette while C MEMORY appears in the viewfinder because the camcorder isstill writing information to the mini DV cassette-mounted cassette memory (p. 83). In this case, thecassette compartment automatically lifts up and opens after C MEMORY disappears.
To Prevent Accidental ErasureSlide and open the tab on the cassette to expose the red mark. If you try to record with the red markexposed, the ˇ and 6 indicators flash in the viewfinder, and you cannot record on the tape. Torerecord on this tape, slide and close the tab to cover the red mark.
1 2

10
LOCK
STANDBYPHOTO STANDBY
STBY
0 : 0 5 : 2 0 5 4
CAMERA
VTR
POWER
OFF
LOCK
STANDBYPHOTO STANDBY
STBY
REC
LOCK
STANDBYPHOTO STANDBY
When ND ON flashes in the viewfinderSet ND FILTER to ON.
To Stop Recording Momentarily [a]Press START/STOP again. The “STBY” indicator appears in the viewfinder (Standby mode).
To Finish Recording [b]Press START/STOP to stop recording. Turn the POWER switch to OFF. Then, eject the cassette andbattery (p. 8, 9).
LOCK
STANDBYPHOTO STANDBY
LOCK
STANDBYPHOTO STANDBY
Basic Operations
Camera RecordingMake sure that a power source and a cassette are inserted. You can hear the beep sound, indicatedwith in the illustrations, which confirms your operation. Before you record one-time events, youmay want to make a trial recording to make sure that you are using the camcorder correctly.(1) Remove the hood cap, and attach it to the grip strap.(2) While pressing the centre button on the POWER switch, set it to CAMERA.(3) Turn STANDBY up.(4) Press START/STOP. The camcorder starts recording. The “REC” indicator appears in theviewfinder, and the red lamps on the front and back of the camcorder and in the viewfinder light.
[a] [b]
2 4
3
1

11
Basic O
peratio
ns
Note on Standby modeIf you leave the camcorder for 5 minutes or more with a cassette inserted in Standby mode, the camcordergoes off automatically. This prevents wearing down the battery and wearing out the tape. To resumeStandby mode, turn the POWER switch to OFF once and then to CAMERA. To start recording, press START/STOP.
Notes on the time code• The time code indicates the recording or playback time, "0:00:00" (hours : minutes : seconds) in the
viewfinder and "0:00:00:00" (hours : minutes : seconds : frames) on the TV screen. This camcorder uses thedrop frame mode (p. 84).
• Be sure not make a blank portion when recording, because the time code will start from “0:00:00:00” again.You cannot rewrite the time code on the tape if there is a blank portion between pictures.
To Focus the Viewfinder Lens
If the viewfinder is not in focus at all or when you use the camcorder after someone else has used it,focus the viewfinder lens. Turn the viewfinder lens adjustment ring so that the indicators in theviewfinder come into sharp focus.
When the shooting condition is too brightUse the supplied large eyecup. Fit it onto the camcorder by stretching the corners a little. [a]
If you wear glasses or you cannot view the cornersFold back the eyecup to see better. [b]
Note on beep soundAs indicated with in the illustrations, a beep sounds when you turn the power on or when you startrecording and two beeps sound when you stop recording, confirming the operation. Several beeps also soundas a warning of any unusual condition of the camcorder (p. 82). Note that the beep sound is not recorded onthe tape. If you do not want to hear the beep sound, set the BEEP to OFF in the menu system (p. 20).
To record through an external microphoneConnect a microphone to the MIC jack. In this case, sound from the built-in microphone will not be recorded.If no cassette is inserted while using a monaural microphone, you cannot monitor the left side sound from theheadphones jack or audio output jack.
Note on color viewfinderThe color viewfinder employs an LCD screen made with high-precision technology.However, black points or bright points of light (red, blue or green) may appear constantly on the colorviewfinder screen. These points are not recorded on the tape. This is not a malfunction.(Effective dots: more than 99.99%)
STBY STBY
[b][a]

12
W
T
W
T
W T
Using the Zoom Feature
Zooming is a recording technique that lets you change the size of the subject in the scene. For moreprofessional-looking recordings, use the zoom sparingly.T side: for telephoto (subject appears closer)W side: for wide-angle (subject appears farther away)
Zooming SpeedPress the zoom button firmly for high-speed zoom. Press it softly for relatively slow zooming.
Note on the focus rangeYou can shoot a subject that is at least about 2.6 feet (80 cm) in the telephoto position, 0.5 inch (1 cm) in thewide position away from the lens surface.
Notes on Digital Zoom• More than 10x zoom is performed digitally, and the picture quality deteriorates as you go toward the T
side. If you do not want to use the digital zoom, set the D ZOOM function to OFF in the menu system (p.20).
• The horizontal bar in the power zoom indicator separates the digital zooming zone (above the bar [a]) andthe optical zooming zone (under the bar [b]). If you set the D ZOOM function to OFF, the part above thebar disappears.
W
T
W
T
[b]
[a]
Camera Recording

13
Basic O
peratio
ns
Hints for Better Shooting
For hand-held shots, you’ll get better results holding the camcorder according to the followingsuggestions:
[a] [b]
• Hold the camcorder firmly and secure it with the grip strap so that you can easily manipulate thecontrols with your thumb [a].
• Place your right elbow against your side.• Place your left hand under the camcorder to support it.• Keep your fingers away from the built-in microphone.• Place your eye firmly against the viewfinder eyecup.• Use the viewfinder frame as a guide to determine the horizontal plane.• You can record in a low position to get an interesting recording angle. Lift the viewfinder up to
record from a low position (you can turn it up to about 80 degrees.) [b]. In this case, it’s useful to useREC START/STOP located under the carrying handle.
Cautions on the viewfinder• Do not pick up the camcorder by the viewfinder. [c]• Do not place the camcorder so as to point the viewfinder toward the sun. The inside of the viewfinder may
be deformed. Be careful in placing the camcorder under sunlight or by the window. [d]• Do not point the lens toward the sun with a close -up lens attached. Doing so may damage the camcorder.
Place the camcorder on a flat surface or use a tripodTry placing the camcorder on a table top or any other flat surface of suitable height. If you have a tripod for astill camera, you can also use it with the camcorder. Make sure the tripod screw is shorter than 9/32 inch(6.5 mm).
[c] [d]
14
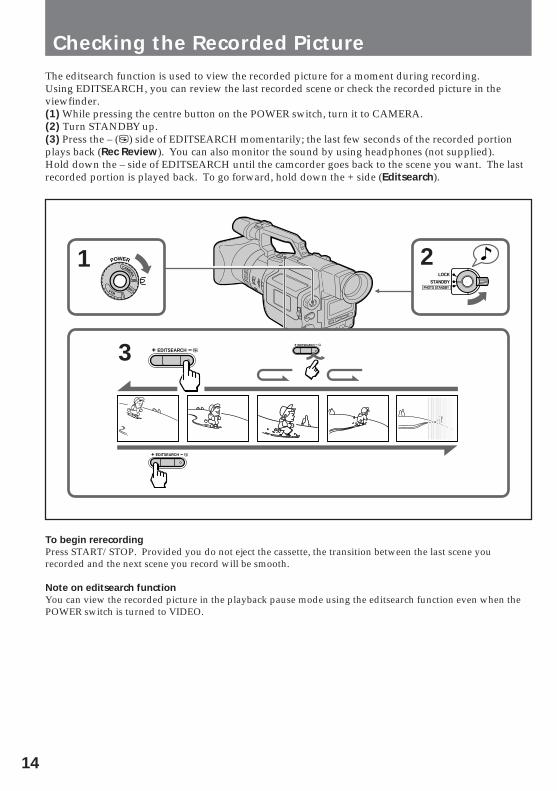
The editsearch function is used to view the recorded picture for a moment during recording.Using EDITSEARCH, you can review the last recorded scene or check the recorded picture in theviewfinder.(1) While pressing the centre button on the POWER switch, turn it to CAMERA.(2) Turn STANDBY up.(3) Press the – (Œ) side of EDITSEARCH momentarily; the last few seconds of the recorded portionplays back (Rec Review). You can also monitor the sound by using headphones (not supplied).Hold down the – side of EDITSEARCH until the camcorder goes back to the scene you want. The lastrecorded portion is played back. To go forward, hold down the + side (Editsearch).
Checking the Recorded Picture
EDITSEARCH
EDITSEARCHEDITSEARCH
CAMERA
VTR
POWER
OFF
LOCK
STANDBYPHOTO STANDBY
1 2
3
To begin rerecordingPress START/STOP. Provided you do not eject the cassette, the transition between the last scene yourecorded and the next scene you record will be smooth.
Note on editsearch functionYou can view the recorded picture in the playback pause mode using the editsearch function even when thePOWER switch is turned to VIDEO.

15
Basic O
peratio
ns
You can use this camcorder as a VCR by connecting it to your TV for playback. It is recommended touse the house current as the power source (p. 18).
Connecting Directly to a TVConnect the camcorder to your TV by using the supplied A/V connecting cable. Set the TV/VCRselector to VCR on the TV.
To get higher quality pictures in DV format, connect the camcorder to your TV using the S video cable.If you are going to connect the camcorder using the S video cable [a], you do not need to connect theyellow (video) plug of the A/V connecting cable [b].
Connections for Playback
: Signal flow
AUDIO INAUDIO OUT
S VIDEO OUT [a] S VIDEO IN
TV
VIDEO OUT [b] VIDEO IN
If a VCR is connected to the TVConnect the camcorder to LINE IN on the VCR by using the supplied connecting cable. Set the inputselector on the VCR to LINE. Set the TV/VCR selector to VCR on the TV.
: Signal flow
TV
VCR
VIDEO/AUDIO IN
S VIDEO IN
AUDIO OUT
VIDEOOUT [b]
S VIDEO OUT [a]
If your TV or VCR is monauralConnect only the white plug for audio on the TV or the VCR. With this connection, the sound ismonaural, and the sound from the headphone jack on the camcorder is also monaural.
To connect a TV or a VCR without audio/video input jacksUse an RFU adaptor (not supplied).

16
POWER
OFF
CA
MERA
VTR
REW
PLAY
You can monitor the playback picture in the viewfinder. You can also watch it on a TV screen, afterconnecting the camcorder to a TV or VCR (p. 15). You can control playback using the supplied RemoteCommander (p. 76).(1) While pressing the center button on the POWER switch, turn it to VTR.(2) Insert the recorded tape with the window facing out.(3) Press 0 to rewind the tape.(4) Press ·. Playback starts.
Playing Back a Tape
14
3
To stop playback, press π.To fast-forward the tape, press ).
To monitor the sound while viewing the playback picture in the viewfinderConnect headphones (not supplied) to the 2 jack (p. 75).
To mark the portion you want to monitor againPress ZERO SET MEMORY while playing back.After you finish playing back, press 0. The tape rewinds to the position you want (0:00:00) and stops.
Various Playback ModesTo view a still picture (playback pause)Press P during playback. To resume playback, press P or ·. When still picture mode lasts for 5minutes or more, the camcorder automatically enters stop mode. To playback again, press · again.
To locate a scene (Picture Search)Keep pressing 0 or ) during playback. To resume normal playback, release the button.
To monitor the high-speed picture while advancing the tape or rewinding (Skip scan)Keep pressing 0 while rewinding or ) while advancing the tape. To resume normal playback,press ·.
To view the picture at 1/5 speed (Slow Playback)Press < or > to select direction, then press & during playback. To resume normal playback, press·. If slow playback lasts for about 1 minute, it shifts to normal speed automatically.
To view the picture at double speedPress < or > to select direction, then press x2 on the Remote Commander during playback. Toresume normal playback, press ·.

17
Basic O
peratio
ns
To view the picture frame by framePress > during playback pause mode.Press < in reverse direction during playback pause mode.
To view the picture in reverse directionPress < during playback.
Notes on playback• The sound is muted in the various playback modes.• The previous scene may appear like mosaic noise during slow playback or playback pause. This is not a
malfunction.
To display the indicatorsPress DISPLAY (p. 76). Tape counter, remaining battery indicator and other indicators appear on theconnected TV screen. To erase the indicators, press DISPLAY again.
18
Advanced Operations
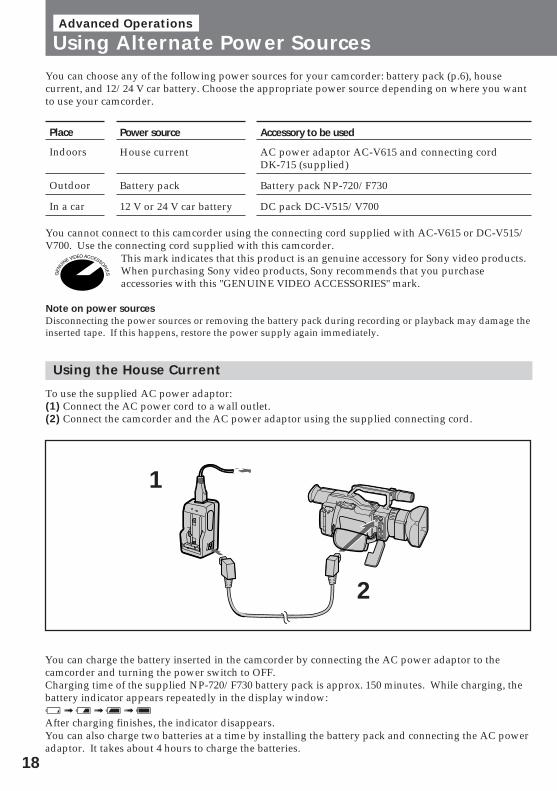
Using Alternate Power SourcesYou can choose any of the following power sources for your camcorder: battery pack (p.6), housecurrent, and 12/24 V car battery. Choose the appropriate power source depending on where you wantto use your camcorder.
You cannot connect to this camcorder using the connecting cord supplied with AC-V615 or DC-V515/V700. Use the connecting cord supplied with this camcorder.
This mark indicates that this product is an genuine accessory for Sony video products.When purchasing Sony video products, Sony recommends that you purchaseaccessories with this "GENUINE VIDEO ACCESSORIES" mark.
Note on power sourcesDisconnecting the power sources or removing the battery pack during recording or playback may damage theinserted tape. If this happens, restore the power supply again immediately.
Using the House Current
To use the supplied AC power adaptor:(1) Connect the AC power cord to a wall outlet.(2) Connect the camcorder and the AC power adaptor using the supplied connecting cord.
Place
Indoors
Outdoor
In a car
Power source
House current
Battery pack
12 V or 24 V car battery
You can charge the battery inserted in the camcorder by connecting the AC power adaptor to thecamcorder and turning the power switch to OFF.Charging time of the supplied NP-720/F730 battery pack is approx. 150 minutes. While charging, thebattery indicator appears repeatedly in the display window:b ∫ B ıAfter charging finishes, the indicator disappears.You can also charge two batteries at a time by installing the battery pack and connecting the AC poweradaptor. It takes about 4 hours to charge the batteries.
Accessory to be used
AC power adaptor AC-V615 and connecting cordDK-715 (supplied)
Battery pack NP-720/F730
DC pack DC-V515/V700
1
2

19
Ad
vanced
Op
eration
s
WARNINGAC power cord must only be changed at qualified service shop.
Precautions• The set is not disconnected from the AC power source as long as it is connected to the wall outlet,
even if the set itself has been turned off.• To prevent accident from a short circuit, do not come into contact with the terminal inside the
shutter at the rear of the camcorder.
Notes on the POWER lamp• The POWER lamp will remain lit for a while even if the unit is unplugged after use. This is normal.• If the POWER lamp does not light, disconnect the AC power cord. After about one minute, try again.
Using a Car Battery
Use the DC-V515/V700 pack (not supplied). Connect the cord of the DC pack to the cigarette lightersocket of a car (12 V or 24 V). Connect the DC pack in the same way as the AC power adaptor.Use the connecting cord supplied with this camcorder.

20
MENU EXECUTE
MENU
EXECUTE
M E N U
A S H U T T E RD Z O O MZ E B R AC O M M A N D E R
B E E PH E A D P H O N E
[ M E N U ] : E N D
O N
M E N U
A S H U T T E RD Z O O MZ E B R A
M E N U
A S H U T T E RD Z O O MZ E B R A
M E N U
A S H U T T E RD Z O O MZ E B R A
M E N U
D Z O O MO F FO N
O F F
M E N U
D Z O O M
M E N U
D Z O O M
O F FO N
O F FO N
O N
O N
M E N U
A S H U T T E RD Z O O MZ E B R A O N
E V F M O D E
You can change the mode settings in the menu system to further enjoy the features and function of thecamcorder.(1) Slide OPEN and open the battery cover.(2) Press MENU to display the menu in the viewfinder.(3) Press V or v to select the desired item, then press EXECUTE.(4) Press V or v to select the desired mode, then press EXECUTE. If you want to change the othermodes, repeat steps 3 and 4.(5) Press MENU to erase the menu display.
Changing the Mode Settings
To display the menu on the TV screenConnect the camcorder to your TV (page 15), and press MENU.
Note on the menu systemYou may need to repeat step 3 before you select the desired mode because some items have three steps.
Setting the Mode of Each Item
Select RETURN to return to main menu (item select).
Items in CAMERA and VTR ModesCOMMANDER <VTR4/OFF/ID/ID SET>• Normally select VTR4.• Select OFF when not using the Remote Commander.• Select ID when using the Remote Commander with the ID number set.• Select ID SET to register the ID number using the same number as the Remote Commander.
To set the ID, see page 78.
1
2 3
4
5

21
Ad
vanced
Op
eration
s
HEADPHONE <LOW/MID/HIGH>• Normally select LOW.• Select MID to slightly raise the volume of the headphone.• Select HIGH to raise the volume of the headphone.
BEEP <ON/OFF>• Normally select ON.• Select OFF to turn the beep sound off.
EVF MODE <COLOR/BRIGHT>• Select this item and change the level of the indicator by pressing > or . to adjust the color intensity
and brightness of the picture in the viewfinder.
CLOCK SET• Select this item to reset the date or time. See page 60.
Items in CAMERA Mode onlyA SHUTTER <ON/OFF>• Normally select ON.• Select OFF when adjusting the shutter speed.
D ZOOM <ON/OFF>• Select ON to activate digital zooming. The zooming ability becomes 20x.• Select OFF otherwise. The zooming ability becomes 10x.
ZEBRA <OFF/ON>• Normally select OFF.• Select ON to shoot with the zebra pattern displayed in the viewfinder.
FRAME REC <OFF/ON>• Normally select OFF.• Select ON for cut recording.When you remove the power source, the setting becomes OFF.
INT REC <SET> <INTERVAL/REC TIME>• Normally select OFF. Select ON to make interval recording.• Select INTERVAL to set or change the waiting time for interval recording.• Select REC TIME to set or change the recording time for interval recording.When you remove the power source, the setting becomes OFF, but the waiting time and recording timeare retained.
SELFTIMER <10SEC/2SEC>• Normally select 10SEC.• Select 2SEC to set the time for self-timer recording to 2 sec.
CUSTOM <SET> <COLOR LV/SHARPNESS/WB SHIFT/AE SHIFT/GAINSHIFT(0dB/–3dB)/RESET>• Normally select OFF. Select ON for camera recording based on the setting mode preset in the
CUSTOM menu.• Select COLOR LV/SHARPNESS/WB SHIFT/AE SHIFT and change the level of the indicator by
pressing > or . to preset the color intensity (COLOR LV), sharpness (SHARPNESS), white balance(WB SHIFT), and brightness (AE SHIFT) of the picture.
• Select GAINSHIFT to preset the gain-shift of the picture (0 dB/–3 dB).• Select RESET to reset the preset setting in the CUSTOM menu.

22
Items in VTR Mode onlyA MIX BAL• Select this item and change the level of the indicator by pressing > or . to adjust the volume balance
between audio mode ST1 and ST2.
SEARCH <C MEMORY/OFF>• Normally select C MEMORY to activate cassette memory search function.• Select OFF otherwise. In this case, the recorded picture is searched without cassette memory
function.
When DIGITAL MODE is set to OVERLAPYou cannot set D ZOOM to ON. Once you set DIGITAL MODE to OVERLAP, D ZOOM settings are changedto OFF automatically.
About FRAME REC and INT REC settingBoth settings are automatically set to off when:• Power switch is set to OFF or VTR.• Power source is disconnected.• PHOTO button is pressed.Other settings retains as long as lithium battery is installed even if power source is disconnected.
Changing the Mode Settings

23
Ad
vanced
Op
eration
s
STBY REC
STBY REC
LOCK
STANDBYPHOTO STANDBY
START/STOP
FADER
OVERLAP
You can fade in or out to give your recording a professional appearance.When fading in, the picture gradually fades in from black while the sound increases. When fading out,the picture gradually fades to black while the sound decreases.With the overlap function, the picture gradually fades in over a still picture of the last scene recorded.
Using the Fader and Overlap Function
When Fading in [a](1) While the camcorder is in Standby mode, press FADER/OVERLAP. The fade indicator startsflashing.(2) Press START/STOP to start recording. The fade indicator stops flashing, fading in and recordingstarts.
When Fading out [b](1) During recording, press FADER/OVERLAP. The fade indicator starts flashing.(2) Press START/STOP to stop recording. The fade indicator stops flashing, fading out starts, and thenrecording stops.
Fader and Overlap
Fade-out
1 2
[b]
[a]Fade-in

24
STBY REC
LOCK
STANDBYPHOTO STANDBY
START/STOP
FADER
OVERLAP
DIGITAL MODE
ZOOM
OVERLAP
Fader and Overlap
When using Overlap(1) Slide OPEN and open the battery cover.(2) Set DIGITAL MODE on the rear of battery cover to OVERLAP.(3) Press FADER/OVERLAP repeatedly until “OVERLAP” appears in the viewfinder.The stored last scene overlaps the scene being shot.(4) Press START/STOP to start recording.The scene being shot gradually fades in over the still picture of the last recorded scene.
OVERLAP
To Cancel the Fade-in/Fade-out FunctionBefore pressing START/STOP, press FADER/OVERLAP until the fade indicator disappears.
To use the fading function repeatedlyStart from step 1 each time.
Notes on the fading and overlap function• You cannot fade in, fade out, or use the overlap function while you record with interval recording, cut
recording or photo recording.• The last scene for overlap is stored only when you record and press START/STOP again (recording
standby/pause mode) before using overlap. In other cases, this camcorder starts Rec Review automaticallyto store the picture on the tape before it overlaps the scene being shot.
3
2
4
1

25
Ad
vanced
Op
eration
s
LOCK
STANDBYPHOTO STANDBY
START/STOP
EDITSEARCH EDITSEARCH
LOCK
STANDBYPHOTO STANDBY
START/STOPZERO SET
MEMORY3
2
1
4
5
[b][a]
Re-recording a Picture in the Middle of aRecorded Tape
You can re-record a scene in the middle of a recorded tape by setting the starting [a] and ending [b]points.The previously recorded portion will be erased.
(1) Press START/STOP while recording.The camcorder enters Standby mode.(2) Hold down the +(forward) or –(reverse) side of EDITSEARCH until the camcorder goes to thepoint where you want to end the insertion. [b]The camcorder enters Standby mode again.(3) Press ZERO SET MEMORY.The counter is reset to “0:00:00”.“ZERO SET MEMORY” flashes, and the ending point is stored in memory.(4) Hold down the – side of EDITSEARCH until the camcorder goes back to the point where you wantto start the insertion. [a]The camcorder enters Standby mode again.(5) Press START/STOP to start re-recording.The insert recording stops automatically at the counter zero point, and the camcorder enters Standbymode again. Zero set memory resumes automatically.
To change the end pointPress ZERO SET MEMORY so that “ZERO SET MEMORY” disappears.Repeat steps 2 to 4.

26
Notes on editsearch• The picture may be distorted at the end of the inserted portion when it is played back.• Zero set memory may not function when there is a blank portion between pictures on a tape.• You can re-record without using the zero set memory. Skip steps 2 and 3. Press START/STOP to stop
recording.
To use the insert recording repeatedlyStart from step 1 each time.
Re-recording a Picture in the Middle of a Recorded Tape

27
Ad
vanced
Op
eration
s
Photo RecordingYou can record a still picture like a photograph for about seven seconds. This mode is useful whenyou want to enjoy a picture such as a photograph or when you print a picture using a video printer.Shutter speed is automatically adjusted up to 1/1000 depending on the exposure.(1) Set the standby switch to PHOTO STANDBY.(2) Keep pressing PHOTO lightly until a still picture appears in the viewfinder.To change the still picture, release PHOTO, select still picture again, and keep pressing PHOTO lightlyagain.If you press the PHOTO button on the Remote Commander when a still picture appears in theviewfinder, the camcorder will record that still picture. However, you cannot select other still picturesby using this button.(3) Press PHOTO deeper.The still picture in the viewfinder is recorded for about seven seconds. The sound during those sevenseconds is also recorded. If you change the POWER switch or the standby selector to other positionswhile recording, this operation is performed after recording.
1 2,3
LOCK
STANDBYPHOTO STANDBY
START/STOP PHOTO
Note on using self-timer recordingWhen you use self-timer recording with photo recording, you cannot select the picture. In this case, once youpress PHOTO, self-timer recording starts, and the still picture at the point the self-timer starts is recorded.
When using the video printer• The supplied Remote Commander is useful when printing a still picture with the CVP-M1 Video printer
(not supplied). To print the still picture, first connect the LANC control jack and the video output jack onthe camcorder to the LANC jack and the video input jack on the video printer respectively. Then, pressPRINT on the Remote Commander. The CVP-M1 automatically captures and prints the picture. Refer tothe instruction manual of the video printer as well.
• The recorded date is automatically printed as well. The present date, however, may not be printed if youtry to print when the POWER switch is turned to CAMERA and the camcorder is in Standby mode.
• You can also print pictures other than still pictures after selecting the desired one with the playback pausemode.

28
LOCK
STANDBYPHOTO STANDBY
START/STOP
EXECUTE
MENU
MENU
Interval RecordingYou can make a time-lapse recording by setting the camcorder to automatically record and standbysequentially. You can achieve an excellent recording for flowering, emergence, etc., with this function.(1) Slide OPEN and open the battery cover while the camcorder is in Standby mode. Press MENU todisplay the menu in the viewfinder.(2) Press > or . to select INT REC, then press EXECUTE.(3) Press > or . to select ON, then press EXECUTE.(4) Press > or . to select INTERVAL, then press EXECUTE.(5) Press > or . to select the desired waiting time, then press EXECUTE.The time: 30SEC ↔ 1MIN ↔ 5MIN ↔ 10MIN.(6) Press > or . to select REC TIME, then press EXECUTE.(7) Press > or . to select the desired recording time, then press EXECUTE.The time: 0.2SEC ↔ 0.5SEC ↔ 1SEC ↔ 2SEC.(8) Press MENU to erase the menu display.(9) Press START/STOP to start interval recording.
1
91
2
7
~8
To stop interval recording before the tape endsPress START/STOP.
To cancel the interval recording• Set the INT REC mode to OFF in the menu system.• Turn STANDBY down to LOCK.• Turn the power switch to OFF or VTR.
Note on interval recordingYou cannot do interval recording with photo recording.

29
Ad
vanced
Op
eration
s
LOCK
STANDBYPHOTO STANDBY
START/STOP
EXECUTE
MENU
MENU
Cut RecordingYou can make a recording with a stop-motion animated effect using cut recording. To create thiseffect, alternately move the subject a little and make a cut recording. Secure the camcorder and use theRemote Commander for effective cut recording.(1) Slide OPEN and open the battery cover while the camcorder is in Standby mode. Press MENU todisplay the menu in the viewfinder.(2) Press V or v to select FRAME REC, then press EXECUTE.(3) Press V or v to select ON, then press EXECUTE.(4) Press MENU to erase the menu display.(5) Press START/STOP on the camcorder or the Remote Commander to start cut recording.The camcorder records about 6 frames, then enters in recording standby mode.(6) Move the subject, and repeat step 5.
1
1
4
2,3
5
To cancel the cut recording• Set the FRAME REC mode to OFF in the menu system.• Turn STANDBY down to LOCK.• Turn the power switch to OFF or VTR.
Notes on cut recording• The portion immediately after cut recording is completed may be longer than four frames.• You cannot do cut recording with photo recording.• Remaining tape indicator may not be accurate if you do cut recording repeatedly.

30
LOCK
STANDBYPHOTO STANDBY
START/STOP
SELFTIMER
Self-timer RecordingYou can make a recording with the self-timer when the SELFTIMER mode is set to ON (2SEC or10SEC) in the menu system. This mode is useful when you want to make a recording at yourself.(1) Press SELF TIMER to display in the viewfinder while the camcorder is in Standby mode.(2) Press START/STOP.Self-timer starts counting down with a beep sound, then recording starts automatically at the time youset.
To stop self-timer recordingPress START/STOP.Use the Remote Commander for convenience.
To cancel self-timer recordingPress SELF TIMER so that disappears from the viewfinder while the camcorder is in Standby mode.
Self-timer recording mode is canceled when• Self-timer recording is finished.• Power switch is set to OFF or VTR.• Standby selector is set to LOCK.• Interval recording starts.• Cut recording starts.
To change the time for self-timer recordingSet it at the SELFTIMER mode in the menu system (page 20).
To use photo recording with self-timer recordingSet the standby selector to PHOTO STANDBY, press SELF TIMER, and press PHOTO.Self-timer starts counting down with a beep sound, then photo recording starts automatically at the time youset (page 27).Note that self-timer recording will not function when you press SELF TIMER if you keep pressing PHOTOlightly. In this case, release PHOTO once and start from step 1 again.
1 2

31
Ad
vanced
Op
eration
s
AUTO LOCK
HOLD
Selecting Automatic Mode and ManualAdjustment
You can select three types of adjustment mode for exposure, shutter speed, white balance, focus, andrecording level.• Automatic Mode: offers you worry-free operation under most shooting conditions. Normally use
this mode. Set HOLD/AUTO LOCK selector to AUTO LOCK.• PROGRAM AE Mode: offers you three PROGRAM AE modes to fit the shooting situation. Set
HOLD/AUTO LOCK selector to center (auto lock release) position.• Manual Adjustment: offers you creative recording under various conditions. Set HOLD/AUTO
LOCK selector to center (auto lock release) position.
A:Automatic adjustmentM:Manual adjustmentS: Select*: You can select automatic or manual to adjust focusing at any mode.
Using Automatic Mode
Set HOLD/AUTO LOCK selector to AUTO LOCK. In automatic mode, the camcorder adjusts theexposure, shutter speed**, white balance, and recording level automatically. The focus can be adjustedautomatically by setting the FOCUS switch to AUTO.** When the A SHUTTER mode in the menu system (page 20) is set to
ON: 1/60 to 1/250 automatic adjustmentOFF: 1/60 fixed
PROGRAM AE Mode
You can select from three PROGRAM AE modes.In this mode, you can adjust exposure (p. 38), shutter speed (p. 40),white balance (p. 43), and recordinglevel (p. 46) manually.
Mode Exposure (iris) Shutter Speed White Balance Focus* Recording Level
Automatic A A A A/M A
PROGRAM AE Priority to Iris M A S A/M M Priority to shutter A M S A/M M Twilight A A S A/M M (No indication) A A S A/M M
Manual A M S A/M M

32
FOUCUS
AUTO
MANUAL
INFINITY
PUSH AUTO
Focusing ManuallyTo activate auto focusing, very bright condition and proper contrast are required. Use manual focusaccording to the conditions. You can focus manually even if the HOLD/AUTO LOCK selector is set toAUTO LOCK (Automatic Mode).
When to Use Manual Focus
In the following cases you should obtain better results by adjusting the focus manually.
• Insufficient light [a]• Subjects with little contrast — walls, sky, etc. [b]• Too much brightness behind the subject [c]• Horizontal stripes [d]• Bright subject or subject reflecting light• Shooting a stationary subject when using a tripod
Focusing Manually
When focusing manually, first focus in telephoto before recording, and then reset the shot length.(1) Set FOCUS to MANUAL while the camcorder is recording or in Standby mode.f appears in the viewfinder.(2) Keep pressing the “T” (telephoto) side of the zoom button until the zooming stops.(3) Turn the focus ring to achieve a sharp focus.While turning the focus ring, or appears in the viewfinder.
appears in the viewfinder in focus.(4) Set the desired shot length using the zoom button.
[a] [b] [c] [d]
1
2
43

33
Ad
vanced
Op
eration
s
PUSH AUTO
FOUCUS
AUTO
MANUAL
INFINITY
PUSH AUTO
When or appearsTurn focus ring clockwise when appears, or turn it counterclockwise when appears in theviewfinder. If you cannot get in focus, turn in the reverse direction.
When appears, focus is at infinity.
When appears, subject is too close.
Notes on indicator• It does not appear when you select a slow shutter speed (while DIGITAL MODE switch is set to ZOOM).• It disappears if you do not turn the focus ring for 1.5 seconds.
To Reactivate Auto FocusingSet FOCUS to AUTO to disappear f in the viewfinder.
Shooting in relatively dark placesShoot in wide angle after focusing in telephoto.
Shooting a scene with lots of movement in bright lightSet the zoom button fully to the wide-angle position.
Close-ups (Macro)Set the zoom button fully to the wide-angle position.
Focusing to Infinity
Focus to infinity when the camcorder focuses on a nearby subject while you want on focus to a distantsubject.Slide FOCUS in the direction of the arrow (INFINITY) to focus to infinity.When you release FOCUS, manual focus resumes.
Shooting with Auto Focusing Momentarily
Press PUSH AUTO.The auto focus functions while you are pressing PUSH AUTO.Use this switch to focus on one subject and then another with smooth focusing.When you release PUSH AUTO, manual focusing resumes.

34
CONTROL
F 1 . 6A E A
F 2A E A
A E A
A E S
AUTO LOCK
HOLD AE
PROGRAM
Using the PROGRAM AE FunctionSelect one of the three PROGRAM AE modes, then go to each step.(1) Set HOLD/AUTO LOCK selector to the center (auto lock release) position.(2) Press PROGRAM AE repeatedly to select the desired mode.The mode changes: AEA (Priority to iris) → AES (Priority to shutter speed) → Å (Twilight) → Noindication (Manual), cyclically in the viewfinder.
Giving Priority to Iris AEA, A
You can select the exposure (iris) to determine the desired depth of field. Gain and the shutter speedare automatically set in combination with the exposure (iris) value to maintain appropriate exposure.
Turn the CONTROL dial to select the desired exposure (iris) value. As you turn the dial, the F valuechanges between F1.6 and F11.For a smaller exposure (iris), select a higher value. Gain and the shutter speed change in accordancewith the selected exposure (iris) value.
To return to automatic modeSet HOLD/AUTO LOCK selector to AUTO LOCK, or press PROGRAM AE repeatedly until AEA,AES, or Å disappears from the display.
2
1

35
Ad
vanced
Op
eration
s
CONTROL
9 0A E S
10 0A E S
The depth of field
Exposure (iris)
Zoom
Shallow (lowering the F value)
Smaller iris
Telephoto (T)
Deep (raising the F value)
Larger iris
Wide (W)
When you focus in telephotoYou cannot choose F1.6.
About the depth of fieldThe depth of field is the in-focus range, measured from the distance behind a subject to the distance in front.The depth of field can vary with the exposure (iris) value and the focal length. Lowering the F value (largeiris) reduces the depth of field. Raising the F value (smaller iris) provides a larger depth of field. Zooming intelephoto position offers a smaller depth of field while the depth of field in wide-angle position is greater.
Giving Priority to Shutter Speed AES, S
You can select the shutter speed between 1/ 60 and 1/10000. When you select a faster shutter speed,movement appears clearer with less shaking when the tape is played back in still or slow mode. Thismode is most effective in the following cases:• A golf swing or a tennis match in fine weather with the ball movement captured clearly• Playing back certain scenes with high-speed movements in clear sharp pictures
Turn the CONTROL dial to select the desired shutter speed. As you turn the dial, shutter speedchanges between 1/60 and 1/10000.For a faster shutter speed, select a larger value indicator in the viewfinder. The exposure (iris) valuechanges in accordance with the selected shutter speed.
36
AE
PROGRAM
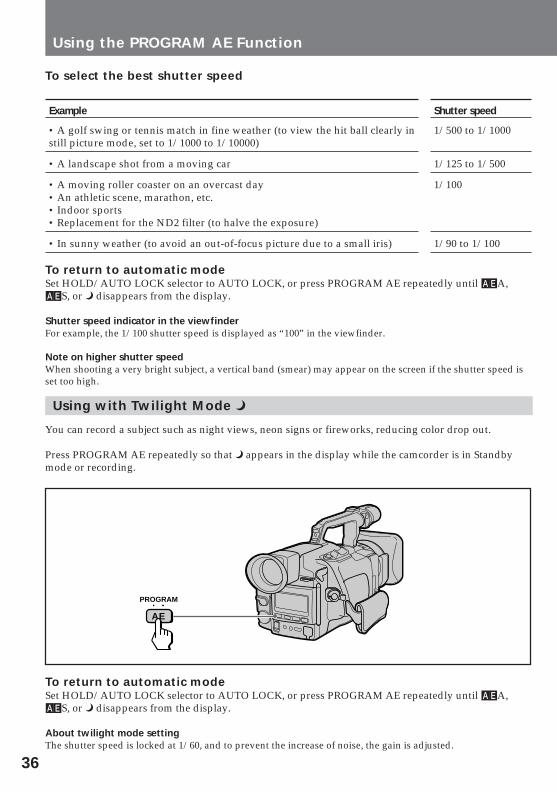
To select the best shutter speed
To return to automatic modeSet HOLD/AUTO LOCK selector to AUTO LOCK, or press PROGRAM AE repeatedly until AEA,AES, or Å disappears from the display.
Shutter speed indicator in the viewfinderFor example, the 1/100 shutter speed is displayed as “100” in the viewfinder.
Note on higher shutter speedWhen shooting a very bright subject, a vertical band (smear) may appear on the screen if the shutter speed isset too high.
Using with Twilight Mode Å
You can record a subject such as night views, neon signs or fireworks, reducing color drop out.
Press PROGRAM AE repeatedly so that Å appears in the display while the camcorder is in Standbymode or recording.
To return to automatic modeSet HOLD/AUTO LOCK selector to AUTO LOCK, or press PROGRAM AE repeatedly until AEA,AES, or Å disappears from the display.
About twilight mode settingThe shutter speed is locked at 1/60, and to prevent the increase of noise, the gain is adjusted.
Using the PROGRAM AE Function
Example
• A golf swing or tennis match in fine weather (to view the hit ball clearly instill picture mode, set to 1/1000 to 1/10000)
• A landscape shot from a moving car
• A moving roller coaster on an overcast day• An athletic scene, marathon, etc.• Indoor sports• Replacement for the ND2 filter (to halve the exposure)
• In sunny weather (to avoid an out-of-focus picture due to a small iris)
Shutter speed
1/500 to 1/1000
1/125 to 1/500
1/100
1/90 to 1/100

37
Ad
vanced
Op
eration
s
AUTO LOCK
HOLD
To lock the PROGRAM AE mode and manual settings
Set HOLD/AUTO LOCK selector to HOLD.The EXPOSURE, SHUTTER SPEED, WHT BAL, REC LEVEL, PROGRAM AE buttons, and CONTROL,EXPOSURE dials do not function.
About the previous settingsThe lithium battery must be installed to temporarily save manual settings if you detach the battery. Thesettings are saved for five minutes.

38
AUTO LOCK
HOLDEXPOSURE
Adjusting the ExposureAdjust the exposure manually under the following cases.
[a] Turn the exposure dial to + when:• The background is too bright (backlighting)• Insufficient light: most of the picture is dark[b] Turn the exposure dial to – when:• The subject is bright and the background is dark• You want to record the darkness faithfully
Adjusting the Exposure
(1) Set HOLD/AUTO LOCK selector to the center (auto lock release) position while the camcorder isin Standby mode.(2) Press EXPOSURE.The exposure is locked at the value which was selected automatically at that time.(3) Turn EXPOSURE dial to select the desired exposure value. As you turn the dial, the exposure (iris)value changes between OPEN and CLOSE and the exposure value changes between 0 (–3) dB and+18dB while the iris value is set to OPEN.To increase the exposure to brighten the picture, select a higher level.
[b][a]
1
3
2
To lock the manual settingsSet HOLD/AUTO LOCK to HOLD after making the settings. The EXPOSURE, SHUTTER SPEED,WHT BAL, PROGRAM AE and REC LEVEL buttons, the CONTROL and EXPOSURE dials do notfunction.
39
Ad
vanced
Op
eration
s
AUTO LOCK
HOLD
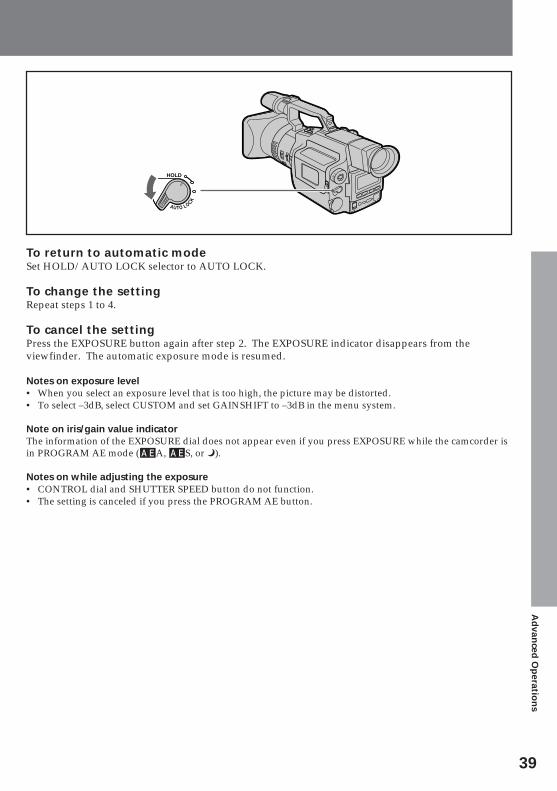
To return to automatic modeSet HOLD/AUTO LOCK selector to AUTO LOCK.
To change the settingRepeat steps 1 to 4.
To cancel the settingPress the EXPOSURE button again after step 2. The EXPOSURE indicator disappears from theviewfinder. The automatic exposure mode is resumed.
Notes on exposure level• When you select an exposure level that is too high, the picture may be distorted.• To select –3dB, select CUSTOM and set GAINSHIFT to –3dB in the menu system.
Note on iris/gain value indicatorThe information of the EXPOSURE dial does not appear even if you press EXPOSURE while the camcorder isin PROGRAM AE mode (AEA, AES, or Å).
Notes on while adjusting the exposure• CONTROL dial and SHUTTER SPEED button do not function.• The setting is canceled if you press the PROGRAM AE button.

40
AECONTROL
AUTO LOCK
HOLD
PROGRAM
SHUTTERSPEED
Adjusting the Shutter Speed(1) Set HOLD/AUTO LOCK selector to the center (auto lock release) position while the camcorder isin Standby mode.(2) Press PROGRAM AE repeatedly until AEA, AES, or Å disappears from the display.(3) Press SHUTTER SPEED.The speed is locked at the value which was selected automatically at that time.As you press SHUTTER SPEED the speed changes 1/100 and 1/1000.(4) Turn CONTROL dial to select the desired speed. As you turn the dial, speed changes:1/4 ↔ 1/8 ↔ 1/15 ↔ 1/30 ↔ ... ↔ 1/4000 ↔ 1/6000 ↔ 1/10000To increase the shutter speed, select a smaller setting (large value indicator in the viewfinder).
To lock the manual settingsSet HOLD/AUTO LOCK to HOLD after making the settings. The EXPOSURE, SHUTTER SPEED,WHT BAL, PROGRAM AE and REC LEVEL buttons, the CONTROL and EXPOSURE dials do notfunction.
To return to automatic modeSet HOLD/AUTO LOCK selector to AUTO LOCK.
To change the settingRepeat steps 1 to 4 above.
To cancel the settingPress the SHUTTER SPEED button again after step 2. The SHUTTER SPEED indicator disappears fromthe viewfinder.
Note on the shutter speedYou can set the speed to 1/4, 1/8, 1/15, and 1/30 only when you set the DIGITAL MODE switch to ZOOM.
For quick access to the desired shutter speedFirst press SHUTTER SPEED twice to set to 1/100, then press SHUTTER SPEED again to set to 1/1000. Turnthe CONTROL dial for quick access to speeds of more than 1/1000.
1
2
3
4

41
Ad
vanced
Op
eration
s
Using the ND FilterUsing the ND filter (correspond to one-tenth the quantity of light), you can record a picture clearly,preventing the picture from going out of focus under bright conditions.When ND ON flashes in the viewfinder [a]Set ND FILTER to ON.When ND OFF flashes in the viewfinder [b]Set ND FILTER to OFF.
NDFILTER
ON
OFF
NDFILTER
ON
OFF
[b][a]

42
EXECUTE
MENU
MENU
Using with the Zebra PatternYou can set the camcorder to display a zebra pattern (diagonal stripes) in the portion of the picture inthe viewfinder with a subject whose brightness exceeds a certain level. The portion of the picturewhere zebra pattern appears is an area of high brightness and overexposure. You can check the picturelevel of a subject by displaying the zebra pattern. Use the zebra pattern as a guide for adjusting theexposure (iris) and shutter speed so that you can get the desired picture.Before you start recording, set ZEBRA to ON in the menu system.(1) Slide OPEN and open the battery cover while the camcorder is in Standby mode.(2) Press MENU to display the menu in the viewfinder.(3) Press > or . to select ZEBRA, then press EXECUTE.(4) Press > or . to select ON, then press EXECUTE.(5) Press MENU to erase the menu display.
Note on shooting with the zebra patternEven though you see the zebra pattern in the viewfinder, the zebra pattern is not recorded.
3,4
5
2
1
Zebrapattern
43
Ad
vanced
Op
eration
s
AUTO LOCK
HOLD WHT BAL
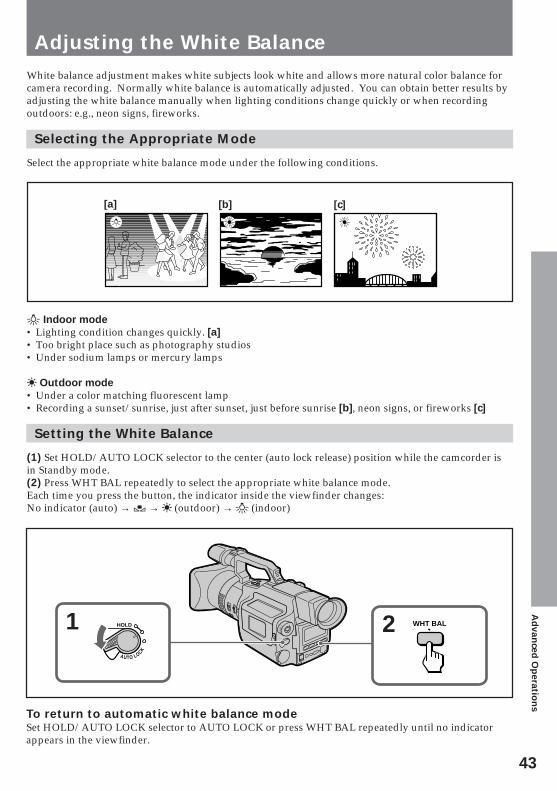
Adjusting the White BalanceWhite balance adjustment makes white subjects look white and allows more natural color balance forcamera recording. Normally white balance is automatically adjusted. You can obtain better results byadjusting the white balance manually when lighting conditions change quickly or when recordingoutdoors: e.g., neon signs, fireworks.
Selecting the Appropriate Mode
Select the appropriate white balance mode under the following conditions.
e Indoor mode• Lighting condition changes quickly. [a]• Too bright place such as photography studios• Under sodium lamps or mercury lamps
w Outdoor mode• Under a color matching fluorescent lamp• Recording a sunset/sunrise, just after sunset, just before sunrise [b], neon signs, or fireworks [c]
Setting the White Balance
(1) Set HOLD/AUTO LOCK selector to the center (auto lock release) position while the camcorder isin Standby mode.(2) Press WHT BAL repeatedly to select the appropriate white balance mode.Each time you press the button, the indicator inside the viewfinder changes:No indicator (auto) → ∑ → w (outdoor) → e (indoor)
[a] [b] [c]
21
To return to automatic white balance modeSet HOLD/AUTO LOCK selector to AUTO LOCK or press WHT BAL repeatedly until no indicatorappears in the viewfinder.

44
Adjusting the White Balance
Locking the white balance setting (One-push white balance mode)
When you set the white balance to one-push white balance mode, the setting is locked and maintainedeven if lighting conditions change, and saved for one hour after power sources such as the battery aredetached if the lithium battery is inserted. You can achieve recording with natural colors withoutbeing affected by ambient light.(1) Set HOLD/AUTO LOCK selector to the center (auto lock release) position.(2) Press WHT BAL twice to display ∑ in the viewfinder.(3) Shoot a white object such as paper fully in the viewfinder.(4) Press ∑.The ∑ indicator flashes rapidly. When the white balance has been adjusted and stored in the memory,the indicator stops flashing.
AUTO LOCK
HOLD
WHT BAL
1
2
4

45
Ad
vanced
Op
eration
s
Notes on the ∑ indicator in the viewfinder• The state of the indicator shows as follows:
Slow flashing: White balance is not adjusted.Fast flashing: White balance is being adjusted after pressing the ∑ button.Lights up: White balance has been adjusted.
• When the ∑ indicator remains flashing even if you press the ∑ button, shoot in automatic white balancemode. Press WHT BAL until no indicator appears in the viewfinder or set HOLD/AUTO LOCK selector toAUTO LOCK.
Notes on white balance• When you shoot with studio lighting or video lighting, use the e (indoor) mode.• When you shoot with fluorescent lighting, use automatic white balance mode. If you use the e mode,
white balance may not be adjusted appropriately.
Shooting when the lighting condition changes• When the lighting condition has changed, readjust the white balance with the ∑ button while the
camcorder is in Standby mode. This button does not function during recording.• When you adjust the exposure (iris) and shutter speed manually, and move from indoors to outdoors or
vice-versa, set HOLD/AUTO LOCK selector to AUTO LOCK, then set HOLD/AUTO LOCK selector to thecenter position again.
• When you move from indoors to outdoors or vice-versa, or detach the battery for replacement whileshooting in automatic white balance mode, point the camcorder at a white subject about 10 seconds beforeyou start recording.

46
AUTO LOCK
HOLD
CONTROL
RECLEVEL
AUTO LOCK
HOLD
1
2
3
Adjusting the Recording SoundYou can adjust the recording sound level. Use headphones to monitor the sound when you adjust.
To adjust the recording sound automatically
Set HOLD/AUTO LOCK selector to AUTO LOCK.
To adjust the recording sound manually
(1) Set HOLD/AUTO LOCK selector to the center position.(2) Press REC LEVEL to display ” in the viewfinder.(3) Turn CONTROL dial to adjust the sound level, so that the PEAK indicator does not light up.It is recommended to use headphones (not supplied) to monitor the sound when you adjust.As you turn the dial, the sound level changes between 0 (no sound) and 10 in 0.5 steps.
To lock the settingSet HOLD/AUTO LOCK selector to HOLD.
To return to automatic recording soundPress REC LEVEL until ” disappears from the viewfinder.

47
Ad
vanced
Op
eration
s
Notes on the adjustment• The sound level setting is retained as long as the power is on and for about five minutes after the power
turns off. After that the level is set to 7.5, the factory setting.• If you change the shutter speed or you press PROGRAM AE button, ” disappears from the viewfinder and
you cannot adjust the sound level. To adjust, press REC LEVEL again to display ” in the viewfinder.• Though the DV recording system records two stereo sounds to stereo 1 and 2, this camcorder records the
sound to stereo 1 only. You can adjust the play back sound balance between stereo 1 and 2 (p. 22).• Sound level also appears at the lower right in the display window.
For example, when 7.0 appears in the viewfinder, 7 appears in the display window, and when 7.5 appearsin the viewfinder, 7. appears in the display window (the decimal point represents 0.5).

48
STEADY SHOT
ONOFF
When you shoot, the Ó indicator appears in the viewfinder. This indicates that the Steady Shotfunction is working and the camcorder compensates for camera-shake.
(1) Slide OPEN and open the battery cover.(2) Set STEADY SHOT to OFF so that the Ó indicator disappears.
To activate the Steady Shot function againSet STEADY SHOT to ON to display the Ó indicator.
Notes on the Steady Shot function• The Steady Shot function will not correct excessive camera-shake.• The Steady Shot function becomes less effective when using a teleconversion lens (not supplied) or wide
teleconversion lens (not supplied).• The Steady Shot function detects and compensates for camera-shake. You can turn off the Steady Shot
function if you use the camcorder mounted on a tripod because you do not have to worry about camera-shake.
Releasing the Steady Shot Function

49
Ad
vanced
Op
eration
s
EXECUTE
MENU MENU
Presetting the Adjustment for Picture QualityYou can preset the camcorder to record the picture with the desired picture quality.When presetting, adjust the picture by shooting a subject and checking the picture displayed on a TVusing the menu system.(1) Slide OPEN and open the battery cover while the camcorder is in Standby mode.(2) Press MENU to display the menu in the viewfinder.(3) Press > or . to select CUSTOM, then press EXECUTE.The custom mode menu appears.(4) Press . to select SET, then press EXECUTE.(5) Press . to select ON, then press EXECUTE.(6) Press > or . to select the desired item, then press EXECUTE.(7) Press > or . to adjust the selected mode, then press EXECUTE.
(8) Press MENU to erase the menu display.
ItemCOLOR LV
SHARPNESS
WB SHIFT
AE SHIFT
GAINSHIFT
Function to adjust thecolor intensity
sharpness
white balance
brightness
gain-shift
Adjustment valueDecreases color intensity ↔ Increases color intensity
Softer ↔ Sharper
Bluish ↔ Reddish
Darker ↔ Brighter
0dB/–3dB
Note on adjustment of each itemMake sure to shoot the appropriate subject for the item you want to preset.
To record with the preset setting1 Press MENU while the camcorder is in Standby mode.2 Press > or . to select CUSTOM, then press EXECUTE.3 Press . to select SET, then press EXECUTE.4 Press . to select ON, then press EXECUTE.5 Press MENU to display [CP] in the viewfinder.
1
~ 83
7
2

50
To record without the preset setting1 Press MENU while the camcorder is in Standby mode.2 Press > or . to select CUSTOM, then press EXECUTE.3 Press . to select SET, then press EXECUTE.4 Press > to select OFF, then press EXECUTE.[CP] goes off in the viewfinder.
To return to the standard setting1 Press MENU while the camcorder is in Standby mode.2 Press > or . to select CUSTOM, then press EXECUTE.3 Press . to select SET, then press EXECUTE.4 Press . to select RESET, then press EXECUTE.[CP] goes off in the viewfinder.
Checking the Custom Preset SettingYou can display and check the custom preset setting in the viewfinder while recording.
Press CP CHECK located on the top of the camcorder while the camcorder is in Standby mode orrecording.Custom preset setting appears in the viewfinder.
About the gain-shift settingUse the gain-shift function when you shoot under bright conditions. It adjusts the gain as close as –3 dBautomatically. The gain-shift function does not work when you shoot under dark conditions.
Presetting the Adjustment for Picture Quality

51
Ad
vanced
Op
eration
s
Searching the Recorded PictureWhen you use a cassette memory-mounted mini DV cassette which can store the recorded date or time,etc., you can search the recorded picture with the date or time using the Remote Commander (Cassettememory search). You can also search the photo-recorded pictures only, or the recorded picture in thebackward and forward direction from the present position without cassette memory.
Searching the recorded picture with the date or time – Cassettememory search
(1) Turn the POWER switch to VTR.(2) Slide OPEN and open the battery cover.(3) Press MENU to display the menu in the viewfinder.(4) Set SEARCH to C MEMORY in the menu system.(5) Press MENU to erase the menu display.(6) Press SEARCH SELECT on the Remote Commander to select date search (search with the date) orphoto search (search the photo-recorded pictures only).(7) Press ± for upward or ≠ for downward on the Remote Commander to select the desiredpicture.Cassette memory search starts.
About the cassette memory searchYou can search up to 6 days for date search and 43 pictures for photo search when you use the 4K-bit cassettememory.
Note on the cassette memory searchYou cannot use cassette memory search function even if you set the SEARCH to C MEMORY in the menusystem, when you use a mini DV cassette lacking the cassette memory.
2
1 3~5 6
7
POWER
CA
MERA
VTR
OFF
SEARCHSELECT

52
Searching the Recorded Picture
Searching the recorded picture without using cassette memory
(1) Turn the POWER switch to VTR.(2) Slide OPEN and open the battery cover.(3) Press MENU to display the menu in the viewfinder.(4) Set the SEARCH to OFF in the menu system.(5) Press MENU to erase the menu display.(6) Press SEARCH SELECT on the Remote Commander to select date search (search with the date) orphoto search (search the photo-recorded pictures only).(7) Press ± for forward or ≠ for backward on the Remote Commander to select the desiredpicture.Each time you press ± or ≠, the camcorder searches for the next scene.
2
1 3~5 6
7
To stop searchingPress πSTOP.
When you use a recorded tape which has blank portions between picturesThe camcorder may not search for the recorded picture or data may not be stored.
Notes on searching• Be sure to install the lithium battery when you use the cassette with cassette memory.• The camcorder may not search if the beginning of the search portion is too close to the tape head position.• When you use date search, the camcorder plays back the search picture, and when you use photo search,
the camcorder enters playback pause at the point.
POWER
CA
MERA
VTR
OFF
SEARCHSELECT

53
Ad
vanced
Op
eration
sChecking the Information for the RecordedPicture
You can display the recorded date and time or the various settings in the viewfinder while playingback the tape.
Press DATA CODE on the Remote Commander while playing back. Each time you press the button,the indicator changes: recorded date and time → various settings → No indication, cyclically in theviewfinder.
Press DATA CODE again to erase the display.
DATA CODE
“– –:– –:– –” appears when• the camcorder cannot read the data code because of a damaged tape or noise.• the tape was recorded without setting the date and time.

54
You can create your own video program by editing with any other DV, mini DV, h 8 mm, H Hi8,j VHS, k S-VHS, VHSC, K S-VHSC, l Betamax, or ¬ ED Beta VCR that hasvideo/audio inputs.You can edit with little deterioration of picture and sound quality when using the DV connecting cable.
Before Editing
Connect the camcorder to the VCR using the supplied A/V connecting cable (page 15) or the DVconnecting cable (not supplied).Use this camcorder as a player.
Using the A/V connecting cableSet the input selector on the VCR to LINE.
Using the DV connecting cableSimply connect the DV connecting cable to DV IN/OUT and DV products to DV IN.
About DV connecting cableYou can record picture, sound and system data at the same time on the DV products by using the DVconnecting cable only.
Editing onto Another Tape
DV IN/OUT DV IN/OUT
VMC-2DVç : Signal flow
ç
55
Ad
vanced
Op
eration
s
Starting Editing
(1) Insert a blank tape (or a tape you want to record over) into the recording VCR. Then insert yourrecorded tape into the camcorder.(2) Play back the recorded tape on the camcorder until you locate the point where you want to startediting. Then set the camcorder to playback pause mode.(3) Set the recording VCR to recording pause mode.(4) Press P on the camcorder and VCR simultaneously to start editing.
To Edit More ScenesRepeat steps 2 to 4.
To Stop EditingPress STOP π on the camcorder and VCR.
Note on editing when using the A/V connecting cablePress DISPLAY on the Remote Commander while editing onto another tape to turn off the display indicators.Otherwise, the indicators will be recorded on the tape.
If your VCR is a monaural typeConnect only the white plug for audio on both the camcorder and the VCR. With this connection, the soundis monaural.
For fine synchro-editing functionYou can edit precisely by connecting a control cable to the LANC jack of this camcorder and other videoequipment having fine synchro-editing function, using this camcorder as a player.
Notes on editing when using the DV connecting cable• You can connect one VCR only.• When using the DCR-VX1000 as a recorder, press the two recording buttons at the same time to set the
recording VCR to recording pause mode.• Connect the LANC jacks when controlling this camcorder from an other VCR for editing.• If you record playback pause picture via the DV jack, the recorded picture becomes rough.• You can use this camcorder as a recorder. In this case, you do not need to change the connection since the
direction of signal flow changes automatically, but check that "DV IN" appears on the TV and/orviewfinder.
When you use this camcorder as a recorderCassette memory data is not recorded.

56
Replacing Recording on a TapeYou can insert a new picture, sound, recording date/time, camera information, etc., from a VCR ontoyour originally recorded tape by specifying and ending points.Connection is the same as in "Using the DV connecting cable" on page 54. Refer to the instructionmanual of the connected equipment also.(1) Turn the POWER switch to VTR.(2) Search for the start point to be inserted on the VCR, then set the VCR to playback pause mode.(3) Search for the point where you want to end insert editing, then set the camcorder to playback pausemode.It is convenient to use the EDITSEARCH button (p. 14).(4) Press ZERO SET MEMORY.The counter is reset to zero (0:00:00:00).(5) Search for the point where you want to start editing, then set the camcorder to recording pausemode.(6) Press P on the camcorder and the VCR simultaneously to start editing.The editing starts and new scene is inserted on the recorded tape. The editing stops automatically nearthe counter zero point (0:00:00:00).
1 4
3,5,6
To change the end pointPress ZERO SET MEMORY after step 5 to go off the ZERO SET MEMORY indicator, then repeat fromstep 2.
To stop editingPress πSTOP to go off the ZERO SET MEMORY indicator.
About editingYou can start editing without setting the end point. Instead of steps 3 and 4, press πSTOP at the desired endpoint.
Notes on editing• You cannot edit with the equipment which is not connected to DV connector.• The previous recorded scene is erased when editing starts.• The picture may be distorted at the end of the inserted portion when it is played back.
POWER
CA
MERA
VTR
OFF
PAUSE
ZERO SETMEMORY

57
Ad
ditio
nal In
form
ation
Additional Information
Using Your Camcorder Abroad
Each country has its own electricity and TV color systems. Before using your camcorder abroad, checkthe following points:
Power Sources
You can use your camcorder in any country with the supplied AC power adaptor within 100 V to 240V AC, 50/60 Hz.
Use a commercially available AC plug adaptor, if necessary, depending on the design of the walloutlet.
Difference in Color Systems
This camcorder is an NTSC system-based camcorder. If you want to view the playback picture on a TV,it must be an NTSC system based TV. Check the following alphabetical list.
NTSC system countriesBahama Islands, Bolivia, Canada, Central America, Chile, Colombia, Ecuador, Jamaica, Japan, Korea,Mexico, Peru, Surinam, Taiwan, the Philippines, the U.S.A., Venezuela, etc.
PAL system countriesAustralia, Austria, Belgium, China, Denmark, Finland, Germany, Great Britain, Holland, Hong Kong,Italy, Kuwait, Malaysia, New Zealand, Norway, Portugal, Singapore, Spain, Sweden, Switzerland,Thailand, etc.
PAL M system countryBrazil
PAL N system countriesArgentina, Paraguay, Uruguay
SECAM system countriesBulgaria, Czech Republic, France, Guyana, Hungary, Iran, Iraq, Monaco, Poland, Russia, SlovakRepublic, Ukraine, etc.
AC-V515
Wall outlet
AC plug adaptor

58
Replacing the Lithium Battery in theCamcorder
Your camcorder is supplied with the lithium battery installed. When the battery becomes weak ordead, I indicator flashes in the viewfinder for about 5 seconds when you set the POWER switch toCAMERA. In this case, replace the battery with the Sony CR2025 or Duracell DL-2025lithium battery. Use of another battery may present a risk of fire or explosion.The lithium battery installed at the factory may not last 1 year.
Notes on Lithium Battery• Note that the lithium battery has a positive (+) and a negative (–) terminals as illustrated. Be sure
to install the lithium battery so that terminals on the battery match the terminals onthe camcorder.
• To avoid a poor connection, clean the battery with a dry cloth before using it.
CR2025
CR2025
(+) (–)
WARNINGThe battery may explode if mistreated. Do not recharge, disassemble, or dispose of in fire.
CautionKeep the lithium battery out of the reach of children. Should the battery be swallowed, consult adoctor immediately.
59
Ad
ditio
nal In
form
ation
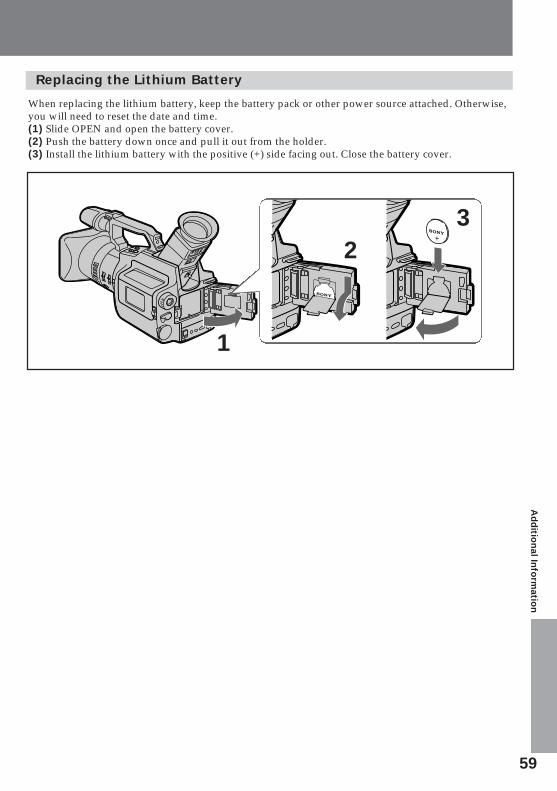
Replacing the Lithium Battery
When replacing the lithium battery, keep the battery pack or other power source attached. Otherwise,you will need to reset the date and time.(1) Slide OPEN and open the battery cover.(2) Push the battery down once and pull it out from the holder.(3) Install the lithium battery with the positive (+) side facing out. Close the battery cover.
1
23

60
M E N U
A S H U T T E RD Z O O MZ E B R AC O M M A N D E RH E A D P H O N E
[ M E N U ] : E N D
O N
M E N U
B E E PE V F M O D EF R A M E R E C
S E L F T I M E RC U S T O MC L O C K S E T
[ M E N U ] : E N D
I N T R E C
M E N U
1 9 9 5 JAN 1
C L O C K S E T1 2 0 0
M E N U
C L O C K S E T1 2 0 0
1 9 9 6 JUL 1
C L O C K S E T1 2 0 0
1 2 : 0 0 : 0 0 AM
1 9 9 6 JUL 4
C L O C K S E T1 2 0 0
1 9 9 6 JUL 4
C L O C K S E T 3 0 0
1 9 9 6 JUL 4
C L O C K S E T 3 1 6
M E N U
B E E PE V F M O D EF R A M E R E C
S E L F T I M E RC U S T O MC L O C K S E T
[ M E N U ] : E N D
I N T R E C
3 : 1 6 : 0 0 PM
EXECUTE
MENU EXECUTE
MENU
EXECUTEJAN 1 19 9 5
JUL 4 19 9 6
EXECUTE
EXECUTE
EXECUTE
B E E PE V F M O D E
AM
AM
1 9 9 6 JAN 1
AM
AM
PM
PM
You can reset the date or time in the menu system.(1) Slide OPEN and open the battery cover.(2) Press MENU to display the menu in the viewfinder.(3) Select CLOCK SET, then press EXECUTE.(4) Press V or v to adjust the year, and then press EXECUTE.(5) Using V, v and EXECUTE as step 4, adjust the month, day, hour and minutes. Note that when youhold down V or v the indications in the menu display advance faster.(6) Press MENU to erase the menu display.
Resetting the Date and Time
The year indicator changes as follows:1995 n 1996 n - - - n 2025 n 1995
Note on the time indicatorThe internal clock of the camcorder operates on a 12-hour cycle.12:00:00 AM stands for midnight.12:00:00 PM stands for noon.
2 3 4
5
61
61
Ad
ditio
nal In
form
ation
Video Cassettes
Usable Cassettes
You can use the mini DV cassette only. You cannot use any other h 8 mm, H Hi8, j VHS, k S-VHS, VHSC, K S-VHSC , l Betamax or ¬ ED Beta cassette.
Copyright Signal
When You Play BackUsing this camcorder, you cannot play back a tape that has recorded a copyright control signals forcopyright protection of software. “COPY INHIBIT” appears on the TV or in the viewfinder if you tryto play back such a tape. This camcorder does not record copyright control signals on the tape when itrecords.
When You RecordYou cannot use this camcorder and the DV connecting cable to copy a tape that has recorded thecopyright control signals for copyright protection of software. "COPY INHIBIT" appears on the TV orin the viewfinder if the play back signal of such a tape is input to this camcorder.
Audio modeThe camcorder records sound in stereo 1 only in 12-bit mode (32 kHz), but can play back soundrecorded in either stereo 1 or 2. Moreover, it can also play back sound recorded in 16-bit mode (32kHz, 44.1 kHz or 48 kHz).
We recommend to use an ME cassetteYou can get the highest quality pictures with this camcorder using an ME cassette which is the highestquality cassette.You may not get as good quality with lesser quality cassettes.
62
Video Cassettes
Notes on the mini DV cassette
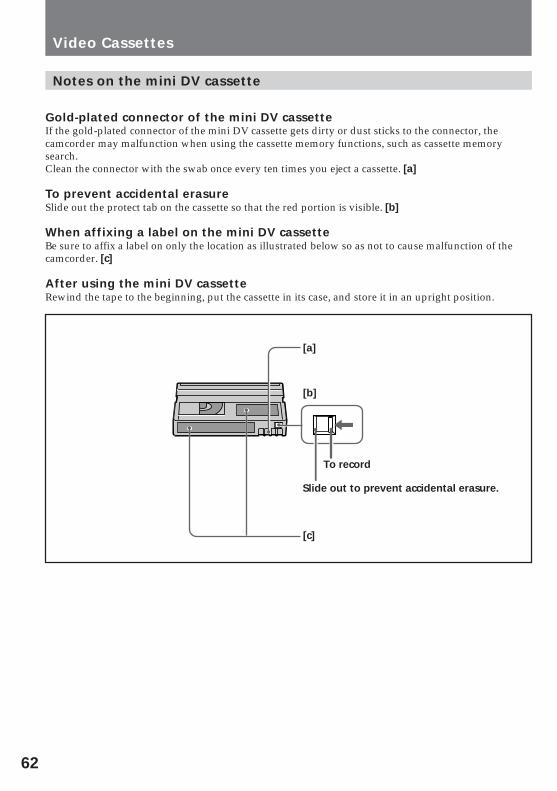
Gold-plated connector of the mini DV cassetteIf the gold-plated connector of the mini DV cassette gets dirty or dust sticks to the connector, thecamcorder may malfunction when using the cassette memory functions, such as cassette memorysearch.Clean the connector with the swab once every ten times you eject a cassette. [a]
To prevent accidental erasureSlide out the protect tab on the cassette so that the red portion is visible. [b]
When affixing a label on the mini DV cassetteBe sure to affix a label on only the location as illustrated below so as not to cause malfunction of thecamcorder. [c]
After using the mini DV cassetteRewind the tape to the beginning, put the cassette in its case, and store it in an upright position.
[a]
[c]
[b]
To record
Slide out to prevent accidental erasure.

63
Ad
ditio
nal In
form
ationLOCK
STANDBYPHOTO STANDBY
START/STOP
This section shows you how you can get the most out of your battery pack.
Preparing the Battery Pack
Always Carry Additional BatteriesHave sufficient battery pack power to do 2 to 3 times as much recording as you have planned.
Battery Life is Shorter in Cold EnvironmentBattery efficiency is decreased and the battery will be used up more quickly if you are recording in coldenvironment.
To Save Battery PowerTurn the STANDBY switch on the camcorder down when not recording to save battery power [a].A smooth transition between scenes can be made even if recording is stopped and started again. Whilepositioning the subject, selecting an angle, or looking at the viewfinder, the lens moves automaticallyand the battery is used. The battery is also used when a cassette is inserted or removed.
When to Replace the Battery Pack
While you are using your camcorder, the remaining battery indicator decreases gradually as batterypower is used up.
Tips for Using the Battery Pack
Notes on the Rechargeable Battery Pack
CautionNever leave the battery pack under temperatures above 140 ˚F (60 ˚C), such as in a car parked in thesun or under direct sunlight.
When the remaining battery indicator reaches the lowest point, the i indicator appears and startsflashing in the viewfinder. [b]When the i indicator in the viewfinder changes from slow flashing to rapid flashing while you arerecording, set the POWER switch to OFF on the camcorder and replace the battery pack. Leave thetape in the camcorder to obtain smooth transition between scenes after the battery pack is replaced.
[b][a]
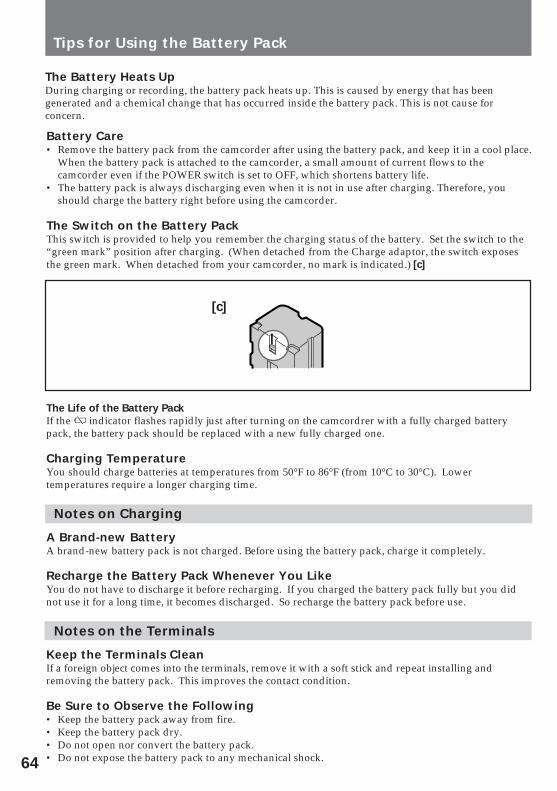
64
The Battery Heats UpDuring charging or recording, the battery pack heats up. This is caused by energy that has beengenerated and a chemical change that has occurred inside the battery pack. This is not cause forconcern.
Battery Care• Remove the battery pack from the camcorder after using the battery pack, and keep it in a cool place.
When the battery pack is attached to the camcorder, a small amount of current flows to thecamcorder even if the POWER switch is set to OFF, which shortens battery life.
• The battery pack is always discharging even when it is not in use after charging. Therefore, youshould charge the battery right before using the camcorder.
The Switch on the Battery PackThis switch is provided to help you remember the charging status of the battery. Set the switch to the“green mark” position after charging. (When detached from the Charge adaptor, the switch exposesthe green mark. When detached from your camcorder, no mark is indicated.) [c]
The Life of the Battery PackIf the i indicator flashes rapidly just after turning on the camcordrer with a fully charged batterypack, the battery pack should be replaced with a new fully charged one.
Charging TemperatureYou should charge batteries at temperatures from 50°F to 86°F (from 10°C to 30°C). Lowertemperatures require a longer charging time.
Notes on Charging
A Brand-new BatteryA brand-new battery pack is not charged. Before using the battery pack, charge it completely.
Recharge the Battery Pack Whenever You LikeYou do not have to discharge it before recharging. If you charged the battery pack fully but you didnot use it for a long time, it becomes discharged. So recharge the battery pack before use.
Notes on the Terminals
Keep the Terminals CleanIf a foreign object comes into the terminals, remove it with a soft stick and repeat installing andremoving the battery pack. This improves the contact condition.
Be Sure to Observe the Following• Keep the battery pack away from fire.• Keep the battery pack dry.• Do not open nor convert the battery pack.• Do not expose the battery pack to any mechanical shock.
[c]
Tips for Using the Battery Pack

65
Ad
ditio
nal In
form
ation
Moisture Condensation
If the camcorder is brought directly from a cold place to a warm place, moisture may condense insidethe camcorder, on the surface of the tape, or on the lens. If this happens, the tape may stick to the headdrum and be damaged or the camcorder may not operate correctly. To prevent possible damage underthese circumstances, the camcorder is furnished with moisture sensors. However, take the followingprecautions.
Inside the CamcorderWhen and 6 indicators flash in the viewfinder, moisture has condensed inside the camcorder. If thishappens, none of the functions except cassette ejection will work.Eject the cassette, turn off the camcorder, and leave it with the cassette compartment open forabout 1 hour.If the indicator does not light up when you turn on the power, you can use the camcorder again.
On the Surface of the TapeIf there is moisture on the surface of the tape, when you insert cassette and press a tape transportbutton (·PLAY, etc.), the 6 indicator flashes in the viewfinder. If this happens, none of the functionsexcept cassette ejection will work.Eject the cassette and leave it for about 1 hour.If the 6 indicator does not light up when you insert the cassette and press a tape transport button, youcan use the camcorder again.
On the LensNo indicator will appear, but the picture becomes dim. Turn off the power and do not use thecamcorder for about 1 hour.
How to Prevent Moisture CondensationWhen bringing the camcorder from a cold place to a warm place, put the camcorder in a plastic bagand allow it to adapt to room conditions over a period of time.(1) Be sure to tightly seal the plastic bag containing the camcorder.(2) Remove the bag when the air temperature inside it has reached the temperature surrounding it(after about 1 hour).
Maintenance Information and Precautions

66
Removing Dust from Inside the Viewfinder
(1) While holding down the hook, slide the eyecup in the direction of the arrow and remove it out.(2) Clean the surface with a commercially available blower.
To reattach the eyecupDo step 1 above sliding the eyecup in the reverse direction of the arrow.
1 2
Video Head Cleaning
To ensure normal recording and clear pictures, clean the video heads often. When the v indicatorflashes in the viewfinder or mosaic noise appears on the playback picture or part of the pictureremains, the video heads may be dirty.
[a] [b]
[a] Slight contamination[b] Critical contaminationIf this happens, clean the video heads with the Sony DVM12CL cleaning cassette (not supplied). Afterchecking the picture, if it is still “noisy”, repeat the cleaning. (Do not repeat cleaning more than 5times.)
CautionDo not use a commercially available wet-type cleaning cassette. It may damage the video heads.
NoteIf the DVM12CL (not supplied) cleaning cassette is not available in your area, consult your nearest Sonydealer.
Maintenance Information and Precautions

67
Ad
ditio
nal In
form
ation
Precautions
Camcorder Operation• Operate the camcorder using 7.2 V (battery pack), or 8.4 V (AC power adaptor).• For DC or AC operation, use only the accessories recommended in this manual.• Should any solid object or liquid fall into the casing, unplug the camcorder and have it checked by
your nearest Sony dealer before operating it any further.• Avoid rough handling or mechanical shock. Be particularly careful of the lens.• Keep the POWER switch set to OFF when not using the camera.• Do not wrap up the camcorder and operate it since heat may build up internally.• Keep the camcorder away from strong magnetic fields or mechanical vibration.
On Handling Tapes• Do not insert anything into the small holes on the cassette.• Do not open the tape protect cover or touch the tape.• Avoid touching or damaging the terminals. To remove dust, clean the terminals with a soft cloth.
Camcorder Care• When the camcorder is not to be used for a long time, disconnect the power source and remove the
cassette. Periodically turn on the power, operate the CAMERA and VTR sections and play back atape for about 3 minutes.
• Clean the camcorder body with a soft dry cloth, or a soft cloth lightly moistened with a milddetergent solution. Do not use any type of solvent which may damage the finish.
AC Power AdaptorCharging• Use only a lithium ion type battery.• Charge the battery on a flat place without vibration.• The battery will get hot during charging. However, this is normal.
Others• Unplug the unit from the wall outlet when not in use for a long time. To disconnect the cord, pull it
out by the plug. Never pull the cord itself.• Do not operate the unit with a damaged cord or if the unit has been dropped or damaged.• Do not bend the AC power cord forcibly, or put a heavy object on it. This will damage the cord and
may cause a fire or an electrical shock.• Be sure that nothing metallic comes into contact with the metal parts of the connecting plate. If this
happens, a short may occur and the unit may be damaged.• Always keep the metal contacts clean.• Do not disassemble the unit.• Do not apply mechanical shock or drop the unit.• While the unit is in use, particularly during charging, keep it away from AM receivers and video
equipment because it will disturb AM reception and video operation.• The unit becomes warm while in use. This is normal.• Do not place the unit in locations that are:
– Extremely hot or cold– Dusty or dirty– Very humid– Vibrating
If any difficulty should arise, unplug the unit and contact your nearest Sony dealer.

68
Cause and/or Corrective Actions
• The tape is stuck to the drum.m Eject the tape. (p. 9)
• Rewind the tape or use a new one. (p. 16)• Set the POWER switch to CAMERA. (p. 10)• The tab on the cassette is out (red).m Use a new tape or slide the tab. (p. 9)
• Set the Standby switch to STANDBY. (p. 10)
• Insert the battery pack. (p. 7)• The battery is dead.m Use a charged battery pack or the AC power adaptor. (p.
6, 18)
• Moisture condensation has occurred.m Remove the cassette and leave the camcorder for at least
an hour. (p. 65)
• Set the POWER switch to VTR. (p. 16)• Rewind the tape or use a new one. (p. 16)• The camcorder is updating the cassette memory
data (The cassette memory mounted mini-DVcassette only).m Eject the cassette after C MEMORY indicator disappears.
(p. 9)
• Set the STEADY SHOT to ON. (p. 48)
• Set the FOCUS switch to AUTO. (p. 33)• Shooting condition is not good enough to focus
automatically.m Focus manually. (p. 32)
Cause and/or Corrective Actions
• Insert the battery pack. (p. 7)• The battery is dead.m Use a charged battery pack. (p. 6)
• Connect the AC power adaptor to a wall outlet. (p. 18)
• While being operated in CAMERA mode, the camcorder hasbeen in the Standby mode for more than 5 minutes.m Turn STANDBY down once and turn it up again. (p. 11)
• The battery is dead.m Use a charged battery pack. (p. 6)
• The ambient temperature is too low. (p. 63)• Charge the battery pack again. (p. 6)• The battery pack is completely dead and cannot be
recharged.m Use another battery pack. (p. 64)
Power
Symptom
The power is not on.
The power goes off.
The battery pack is quicklydischarged.
Operation
Symptom
START/STOP does not operate.
The cassette cannot be removed from theholder.
No function except for cassette ejectionworks.
The tape does not move when a tapetransport button is pressed.
The STEADY SHOT function does notactive.
The autofocus function does not active.
If you run into any problem using the camcorder, use the following table to troubleshoot the problem.
Camcorder
Trouble Check
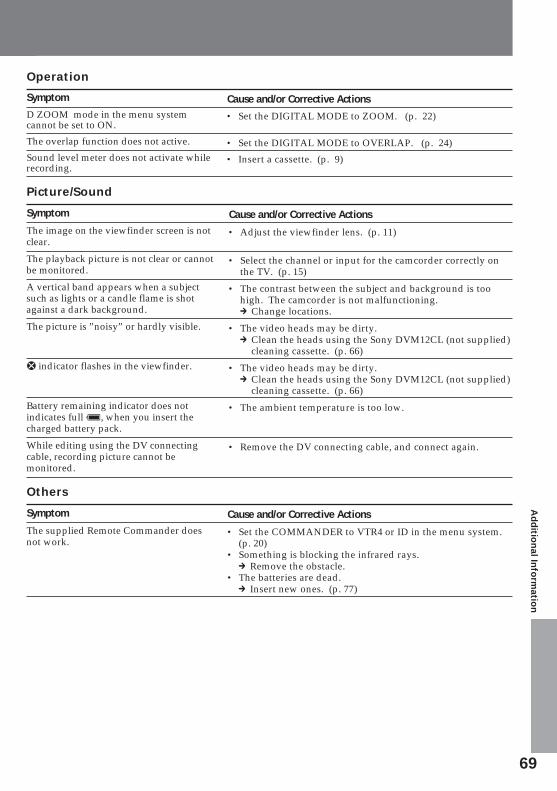
69
Ad
ditio
nal In
form
ation
Operation
Symptom
D ZOOM mode in the menu systemcannot be set to ON.
The overlap function does not active.
Sound level meter does not activate whilerecording.
Picture/Sound
Symptom
The image on the viewfinder screen is notclear.
The playback picture is not clear or cannotbe monitored.
A vertical band appears when a subjectsuch as lights or a candle flame is shotagainst a dark background.
The picture is ”noisy” or hardly visible.
v indicator flashes in the viewfinder.
Battery remaining indicator does notindicates full ı, when you insert thecharged battery pack.
While editing using the DV connectingcable, recording picture cannot bemonitored.
Others
Symptom
The supplied Remote Commander doesnot work.
Cause and/or Corrective Actions
• Adjust the viewfinder lens. (p. 11)
• Select the channel or input for the camcorder correctly onthe TV. (p. 15)
• The contrast between the subject and background is toohigh. The camcorder is not malfunctioning.m Change locations.
• The video heads may be dirty.m Clean the heads using the Sony DVM12CL (not supplied)
cleaning cassette. (p. 66)
• The video heads may be dirty.m Clean the heads using the Sony DVM12CL (not supplied)
cleaning cassette. (p. 66)
• The ambient temperature is too low.
• Remove the DV connecting cable, and connect again.
Cause and/or Corrective Actions
• Set the DIGITAL MODE to ZOOM. (p. 22)
• Set the DIGITAL MODE to OVERLAP. (p. 24)
• Insert a cassette. (p. 9)
Cause and/or Corrective Actions
• Set the COMMANDER to VTR4 or ID in the menu system.(p. 20)
• Something is blocking the infrared rays.m Remove the obstacle.
• The batteries are dead.m Insert new ones. (p. 77)

70
Cause and/or Corrective Actions
• Disconnect the AC power cord. After about one minute, tryagain. (p.18)
• See the following chart.
Symptom
The POWER lamp does not light.
The CHARGE lamp flashes.
AC Power Adaptor
Remove the battery pack from theAC power adaptor. Then attach thesame battery pack again.
When the CHARGE lamp does not flashagain:If the charging status shown by theCHARGE lamp proceeds within 1 hour,there is no problem.
When the CHARGE lamp flashesagain:The problem is with the AC poweradaptor.
Please contact your nearest Sonydealer in connection with theproduct with the problem.
4
4
4
4
4
When the CHARGE lamp does not flashagain:If the charging status shown by the CHARGElamp proceeds within 1 hour, the problem iswith the battery pack first attached.
When the CHARGE lamp flashesagain:Attach another battery pack.
When the CHARGE Lamp FlashesCheck through the following chart.
Trouble Check
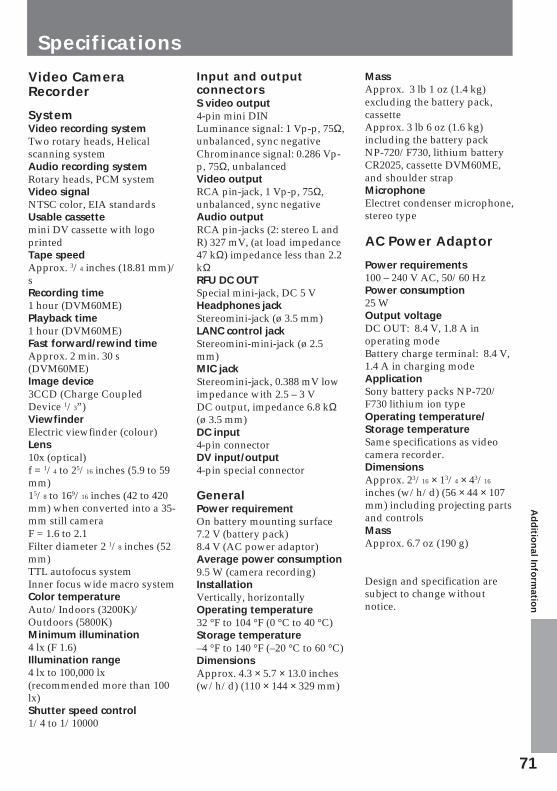
71
Ad
ditio
nal In
form
ation
Video CameraRecorder
SystemVideo recording systemTwo rotary heads, Helicalscanning systemAudio recording systemRotary heads, PCM systemVideo signalNTSC color, EIA standardsUsable cassettemini DV cassette with logoprintedTape speedApprox. 3/4 inches (18.81 mm)/sRecording time1 hour (DVM60ME)Playback time1 hour (DVM60ME)Fast forward/rewind timeApprox. 2 min. 30 s(DVM60ME)Image device3CCD (Charge CoupledDevice 1/3”)ViewfinderElectric viewfinder (colour)Lens10x (optical)f = 1/4 to 25/16 inches (5.9 to 59mm)15/8 to 169/16 inches (42 to 420mm) when converted into a 35-mm still cameraF = 1.6 to 2.1Filter diameter 2 1/8 inches (52mm)TTL autofocus systemInner focus wide macro systemColor temperatureAuto/Indoors (3200K)/Outdoors (5800K)Minimum illumination4 lx (F 1.6)Illumination range4 lx to 100,000 lx(recommended more than 100lx)Shutter speed control1/4 to 1/10000
Input and outputconnectorsS video output4-pin mini DINLuminance signal: 1 Vp-p, 75Ω,unbalanced, sync negativeChrominance signal: 0.286 Vp-p, 75Ω, unbalancedVideo outputRCA pin-jack, 1 Vp-p, 75Ω,unbalanced, sync negativeAudio outputRCA pin-jacks (2: stereo L andR) 327 mV, (at load impedance47 kΩ) impedance less than 2.2kΩRFU DC OUTSpecial mini-jack, DC 5 VHeadphones jackStereomini-jack (ø 3.5 mm)LANC control jackStereomini-mini-jack (ø 2.5mm)MIC jackStereomini-jack, 0.388 mV lowimpedance with 2.5 – 3 VDC output, impedance 6.8 kΩ(ø 3.5 mm)DC input4-pin connectorDV input/output4-pin special connector
GeneralPower requirementOn battery mounting surface7.2 V (battery pack)8.4 V (AC power adaptor)Average power consumption9.5 W (camera recording)InstallationVertically, horizontallyOperating temperature32 °F to 104 °F (0 °C to 40 °C)Storage temperature–4 °F to 140 °F (–20 °C to 60 °C)DimensionsApprox. 4.3 × 5.7 × 13.0 inches(w/h/d) (110 × 144 × 329 mm)
Specifications
MassApprox. 3 lb 1 oz (1.4 kg)excluding the battery pack,cassetteApprox. 3 lb 6 oz (1.6 kg)including the battery packNP-720/F730, lithium batteryCR2025, cassette DVM60ME,and shoulder strapMicrophoneElectret condenser microphone,stereo type
AC Power Adaptor
Power requirements100 – 240 V AC, 50/60 HzPower consumption25 WOutput voltageDC OUT: 8.4 V, 1.8 A inoperating modeBattery charge terminal: 8.4 V,1.4 A in charging modeApplicationSony battery packs NP-720/F730 lithium ion typeOperating temperature/Storage temperatureSame specifications as videocamera recorder.DimensionsApprox. 23/16 × 13/4 × 43/16
inches (w/h/d) (56 × 44 × 107mm) including projecting partsand controlsMassApprox. 6.7 oz (190 g)
Design and specification aresubject to change withoutnotice.
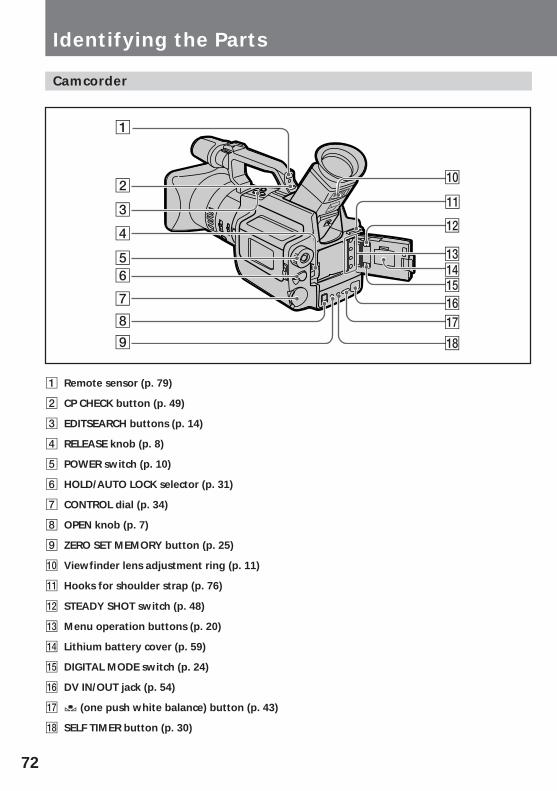
72
Identifying the Parts
Camcorder
1 Remote sensor (p. 79)
2 CP CHECK button (p. 49)
3 EDITSEARCH buttons (p. 14)
4 RELEASE knob (p. 8)
5 POWER switch (p. 10)
6 HOLD/AUTO LOCK selector (p. 31)
7 CONTROL dial (p. 34)
8 OPEN knob (p. 7)
9 ZERO SET MEMORY button (p. 25)
0 Viewfinder lens adjustment ring (p. 11)
!¡ Hooks for shoulder strap (p. 76)
!™ STEADY SHOT switch (p. 48)
!£ Menu operation buttons (p. 20)
!¢ Lithium battery cover (p. 59)
!∞ DIGITAL MODE switch (p. 24)
!§ DV IN/OUT jack (p. 54)
!¶ ∑ (one push white balance) button (p. 43)
!• SELF TIMER button (p. 30)
1
3
2
4
5
6
8
7
9
!º
!¡
!™
!£
!∞
!§
!¶
!•
!¢

73
Ad
ditio
nal In
form
ation
!ª Accessory shoe
@º Display window (p. 81)
@¡ EJECT switch (p. 9)
@™ Zoom button (p. 12)
@£ REC LEVEL (recording level) button (p. 46)
@¢ WHT BAL (white balance) button (p. 43)
@∞ SHUTTER SPEED button (p. 40)
@§ PROGRAM AE button (p. 34)
@º
@¡
@™
@£
@¢
@∞
@§
!ª
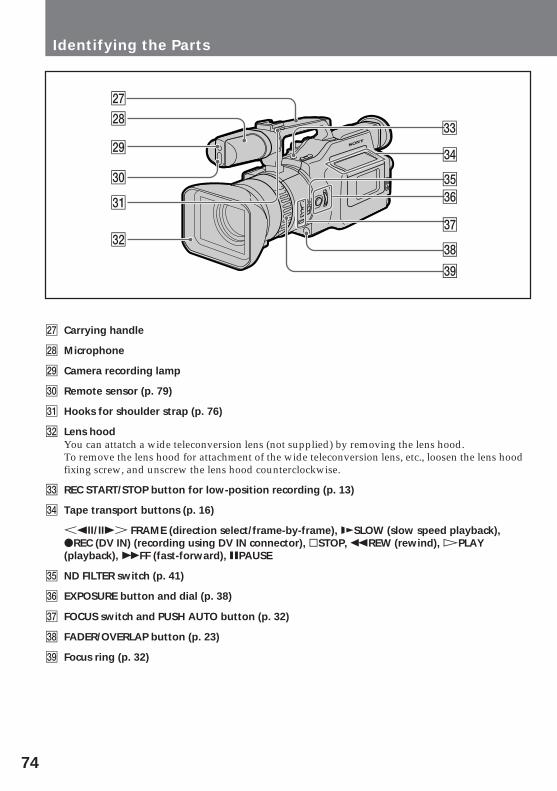
74
@¶ Carrying handle
@• Microphone
@ª Camera recording lamp
#º Remote sensor (p. 79)
#¡ Hooks for shoulder strap (p. 76)
#™ Lens hoodYou can attatch a wide teleconversion lens (not supplied) by removing the lens hood.To remove the lens hood for attachment of the wide teleconversion lens, etc., loosen the lens hoodfixing screw, and unscrew the lens hood counterclockwise.
#£ REC START/STOP button for low-position recording (p. 13)
#¢ Tape transport buttons (p. 16)
<'/7> FRAME (direction select/frame-by-frame), &SLOW (slow speed playback),rREC (DV IN) (recording using DV IN connector), πSTOP, 0REW (rewind), ·PLAY(playback), )FF (fast-forward), PPAUSE
#∞ ND FILTER switch (p. 41)
#§ EXPOSURE button and dial (p. 38)
#¶ FOCUS switch and PUSH AUTO button (p. 32)
#• FADER/OVERLAP button (p. 23)
#ª Focus ring (p. 32)
@¶
@•
@ª
#º
#¡
#™
#£
#¢
#∞#§
#¶
#•
#ª
Identifying the Parts

75
Ad
ditio
nal In
form
ation
$∞
$¶
%º
%¡
$ª
$§
$•$£
$¢
%™
$º
$¡
$™
$º Camera recording lamp
$¡ PHOTO button (p. 27)
$™ lLANC control jackl stands for Local Application Control Bus System. The l control jack is used for controlling thetape transport of video equipment and peripherals connected to it. This jack has the same functionas the jack indicated as CONTROL L or REMOTE.
$£ 2 (headphones) jack (p. 16)
$¢ PEAK lamp
$∞ MIC (PLUG IN POWER) jackConnect an external microphone (not supplied). This jack also accepts a “plug-in-power”microphone.
$§ DC IN jack (p. 18)
$¶ S VIDEO output jack (p. 15)
$• RFU DC OUT (p. 15)
$ª Audio/Video output jack (p. 15)
%º Standby selector (p. 10)
%¡ START/STOP button (p. 10)
%™ Tripod receptacle (p. 13)

76
Attaching the shoulder strapAttach the supplied shoulder strap to the hooks for the shoulder strap (!¡ and #¡ on page 72and 74).
2 31
Remote Commander
1
6
32
54
7
!¡
!º
9
8
1 TransmitterPoint toward the remote sensor to control the camcorder after turning on the POWER switch onthe camcorder.
2 PRINT button (p. 27)
3 PHOTO button (p. 27)
4 ZERO SET MEMORY button (p. 25)
5 DATA CODE button (p. 53)
6 DISPLAY button (p. 17)
7 VTR4/ID/HOLD selector (p. 78)Select VTR4 or ID, the same setting as COMMANDER in the menu system. Select HOLD toprevent the buttons from being accidentally pressed.
8 START/STOP button
9 Zoom buttonThe zooming speed is unchangeable on the Remote Commander.
Identifying the Parts

77
Ad
ditio
nal In
form
ation
!º Tape transport buttons (p. 16)0REW (rewind), ·PLAY (playback), )FF (fast-forward), πSTOP, '/7 (frame-by-frame),PPAUSE, &SLOW (slow speed playback), x2 (double speed playback)
!¡ SEARCH SELECT/≠/± buttons (p. 51)
Preparing the Remote CommanderTo use the Remote Commander, you must insert two size AA (R6) batteries. Use the supplied size AA(R6) batteries.(1) Remove the battery cover from the Remote Commander.(2) Insert both of the size AA (R6) batteries with correct polarity.(3) Put the battery cover back onto the Remote Commander.
2 31
To avoid damage from possible battery leakageRemove the batteries when you will not use the Remote Commander for a long time.
Using the Remote CommanderMake sure that the COMMANDER mode is not set to OFF in the menu system.

78
EXECUTE
MENU
MENU
ID HOLDVTR 4
STOP
About the ID of the Remote Commander
You can avoid misoperation from other remote commanders by setting the VTR4/ID/HOLD selectorto ID. Use the supplied Remote Commander when you set the selector to ID. When you use theRemote Commander for the first time, register the ID following the procedure below. Once youregister the ID, you do not need to do again.(1) Slide OPEN and open the battery cover.(2) Press MENU to display the menu in the viewfinder.(3) Press > or . to select COMMANDER, then press EXECUTE.(4) Press > or . to select ID SET.(5) Set the VTR4/ID/HOLD selector on the Remote Commander to ID.(6) Point the Remote Commander at the camcorder and press STOP on the Remote Commander.After the beep sound, the ID of the Remote Commander is registered, and the COMMANDER is set toID in the menu system.(7) Press MENU to erase the menu display.
When the BEEP is set to OFF in the menu systemThe beep does not sound at step 6.
2
3,4
71
5
6
Identifying the Parts

79
Ad
ditio
nal In
form
ation
Remote Control DirectionAim the Remote Commander to the remote sensor.The operative range of the Remote Commander is about 5 m indoors. Depending on the angle, RemoteCommander may not activate the camcorder.
Remote sensor
Notes on the Remote Commander• Keep the remote sensor away from strong light sources such as direct sunlight or illumination.
Otherwise, the remote control may not be effective.• Be sure that there is no obstacle between the remote sensor and the Remote Commander.• This camcorder works at commander mode VTR 4 or ID. The commander modes (VTR 4 or ID) are
used to distinguish this camcorder from other Sony VCRs to avoid remote control misoperation. Ifyou use another Sony VCR at commander mode ID, we recommend you change the commandermode or cover the remote sensor of the VCR with black paper.
• You do not need to register the ID again once you have done so. Set the COMMANDER to ID in themenu system, and set the VTR4/ID/HOLD selector ID on the Remote Commander to ID.
• The registered ID is not erased even if you replace the lithium battery.

80
W
ND
TSTBY
1 6 B I T
1 0 0 0ON
P H O T OC M E M O R Y
F 2 . 8
F A D E R
7 . 5
CP
0 dB
0 : 1 3 : 4 6 3 2
In the Viewfinder
1 Focus indicator (p. 32)
2 ND filter indicator (p. 41)
3 White balance indicator (p. 44)
4 Zoom indicator (p. 12)
5 PROGRAM AE mode/fading indicators (p. 23, 34)
6 Warning indicator (p. 82)
7 Audio recording level indicator (p. 46)
8 Steady shot indicator (p. 48)
9 Time code (p. 11)
!º Recording/battery indicator
!¡ Custom presetting (p. 50)
!™ Tape transport mode
!£ Self-timer indicator (p. 30)
!¢ Audio mode indicator (p. 83)
!∞ Photo recording indicators (p. 27)
!§ Cassette memory indicator (p. 9)
!¶ Remaining tape indicator
!• Remaining battery indicator (p. 63)
1
3
2
4
7
8
9
56
!º
!¡
!™
!¢!∞!§
!£
!•
!¶
Identifying the Parts

81
Ad
ditio
nal In
form
ation
In the Display Window
1 Time code (p. 11)
2 MEMORY indicator (p. 25)Same as ZERO SET MEMORY indicator in the viewfinder.
3 Warning indicators (p. 82)
4 Remaining battery indicator (p. 63)
5 Lights up while cassette is inserted
6 Remaining tape indicator
7 Audio recording level indicator (p. 46)
8 PROGRAM AE mode indicator (p. 34)
9 Lights up while displaying the date and time
!º Manual adjustment value/date and time
!¡ White balance indicators (p. 43)
!™ Self-timer indicator (p. 30)
§ v
e
† ˇ
∑
ı tAS88.88dB 88.888 18.
88
MEMORY
AMPM
min
1 43 5 6 72
8 9 !º !¡ !™

82
If indicators flash in the viewfinder, or a caution lamp on the camcorder flashes, check the following:: You can hear the beep sound when the BEEP is set to ON.
Warning Indicators
C MEMORY
4.7 1995
321
54 6
!º97 8
1 Battery RemainingSlow flashing: The battery is weak.Fast flashing: The battery is dead.
2 The tape is near the end.
3 The tape has run out.
4 No tape has been inserted.
5 The tab on the tape is out (red). (p. 9)
6 Moisture condensation has occurred. (p. 65)
7 The video heads may be contaminated. (p. 66)
8 Some other trouble has occurred.Eject the cassette. If it remains lit, disconnect the power source and contact your Sony dealer orlocal authorized facility.
9 The lithium battery is weak or the lithium battery is not installed. (p. 58)This indicator flashes five times when the power is turned on, then disappears.
!º Updating the cassette memory data. Use after C MEMORY indicator disappears.The cassette compartment automatically lifts up and opens after the indicator disappears.

83
Ad
ditio
nal In
form
ation
Glossary
Audio mode (p. 22, p. 61)There are two modes on DV format:• 12-bit mode which records two stereo sounds such as stereo 1 and stereo 2• 16-bit mode which records a stereo soundThis camcorder records sound in stereo 1 in 12-bit mode only, but can play back a tape recorded inboth modes.
Cassette memory (p. 51)Cassette memory-mounted DV format cassette can store:– Index information such as recorded date or time,– Camera information such as F value or shutter speed,– Standard tape information that can also be stored on a DV format cassette lacking cassette memory,etc.
DV format (p. 61)Newly developed consumer digital VCR format. For higher quality pictures and sound, video andaudio signals are recorded on a tape as digital signals.
Gain (p. 49)Amplification of video signal strength. Shift the gain up when the subject is too dark, but shifting thegain too much makes the noise increase.
ID-2 systemThis camcorder has the ID-2 system which communicates a control signal to provide copyrightprotection in an analog connection.
Iris (p. 35)Same as lens diaphragm. Adjustable lens-opening mechanism.
ND filter (p. 41)Optical filter for decreasing the quantity of light without adjusting iris or shutter speed. Thiscamcorder has a built-in ND filter and turns the filter on/off is switchable.
NTSC system (p. 57)TV color system standard used in USA, Canada, and other parts of the world. An NTSC-recorded tapecannot be played back on the PAL or SECAM system VCR.
PROGRAM AE (p. 34)The selectable recording mode to fit the subject or shooting situationIn this camcorder, four PROGRAM AE modes (auto mode is included) are selectable.
Remote Commander mode (p. 78)The type of Remote control signal. There are five types (VTR1, VTR2, VTR3, VTR4, and ID) to preventmisoperation between the Remote Commanders of Sony video products. Select VTR4 or ID to controlthis camcorder. Normally select VTR4, and select ID to prevent misoperation.
RFU adaptor (p. 15)Converts video and audio signals into a television wave signal to playback a picture at a TV channel.
S video output jack (p. 15)Separates the video signal into chrominance and luminance (black and white) signals to get a clearpicture.

84
Shutter speed (p. 40)The amount of time the shutter is open. The faster the shutter speed is the less blurring occurs even ifshooting a moving subject. This camcorder adjusts shutter speed automatically depending on thespeed of the subject, or it can be adjusted manually (selectable).
Standby Mode (p. 10)The camcorder is ready to start recording, recording standby mode. To set standby mode, turnSTANDBY up.
Time code (p. 11)The time code indicates the frame-by-frame position of the tape as a serial number of hour, minute,second, and frame. As the picture and counter reading are identical, you can locate a desired sceneprecisely with the counter.This camcorder uses the drop frame mode which adjusts the difference between the logical time code(running at 30 frames/s) and real NTSC system time code (running at 29.97 frames/s) so that the twoare in sync.
White balance (p. 43)Adjusts the color balance so that white subjects look white. In this camcorder, automatic adjustment,manual adjustment, w(outdoor), and e(indoor) are selectable.
Zebra pattern (p. 42)Diagonal stripes which show the signal level of a subject appear in the viewfinder. The portion of thepicture where the zebra pattern appears is an area of high brightness and overexposure.
Glossary

85
Ad
ditio
nal In
form
ation

86

87
Ad
ditio
nal In
form
ation

Sony Corporation Printed in Japan
A,B
AC power adaptor ...................... 6Adjusting the sound ................ 46Adjusting viewfinder .............. 11A/V connecting cable .............. 15Battery pack ................................. 6Beep sound ................................. 10Brightness ................................... 49
C
Camera recording ..................... 10Cassette memory ....................... 51Charging battery ......................... 6Cleaning video heads .............. 66Clock set ..................................... 60Close ups .................................... 33Color intensity ........................... 49COMMANDER ......................... 20Connection ................................. 15Custom preset ............................ 49
D
DATA CODE ............................. 53Date/time ................................... 60Depth of field ............................. 35Display window ........................ 81Double speed playback ........... 16DV connecting cable ................ 54Digital zooming ......................... 12
E,F,G
Editing ........................................ 54EDITSEARCH ........................... 14EJECT ............................................ 9Eyecup ........................................ 11Exposure ..................................... 38Fast-forward .............................. 16Focus ........................................... 32Frame-by-frame ......................... 17Gain-shift .................................... 49
H,I,J,K,L,M
Headphone ................................ 16ID number .................................. 78ID system ................................... 78Iris ............................................... 35LANC ......................................... 75Lithium battery ......................... 58Menu system ............................. 20MIC (microphone) jack ............ 11
N,O,P,Q
ND filter ..................................... 41One-push white balance .......... 44
Overlap ....................................... 24PEAK lamp ................................ 75Playback on TV ......................... 16Playback pause .......................... 16Power sources ............................ 18PROGRAM AE .......................... 34
R
Recording lamp ......................... 74Recording sound level ............. 46Rec. Review ................................ 14Remote Commander ................ 76Rewind ....................................... 16RFU adaptor .............................. 15
S
Self-timer recording ................. 30Sharpness ................................... 49Shoulder strap ........................... 76Shutter speed ............................. 40Standby mode ............................ 10Steady shot ................................. 48Supplied accessories .................. 5S video connecting cable ......... 15
T,U,V
Time code ................................... 11Tripod mounting ....................... 13Trouble check ............................ 68Twilight ...................................... 36Viewfinder ................................. 80Video printer ............................. 27Volume balance ......................... 22VTR4 ........................................... 83
W,X,Y,Z
Warning ...................................... 82White balance ............................ 43Zebra pattern ............................. 42ZERO SET MEMORY .............. 25Zoom ........................................... 12
Index