Embed Size (px)
Citation preview
IIDigital Photography
Techniques
Chapter Four: Digital Photography Foundations . . . . . . . . . . . . 157
Chapter Five: Seeing the Light . . . . . . . . . . . . . . . . . . . . . . . . . . . . . 215
Chapter Six: Multiple Exposures and Extending the Frame . . . . . . . . . . . . . . . . . . . . . . . . . . . . . . . . . . . . .287
04_RWPhoto(p3).indd 155 8/6/10 12:09:12 PM
Excerpted from Real World Digital Photography, Third Edition by Katrin Eismann, Sean Duggan and Tim Grey. Copyright © 2011. Used with permission of Pearson Education, Inc. and Peachpit Press.
4Digital Photography Foundations
With most digital cameras, it’s easy to begin taking photos as soon as you insert a battery and a memory card. But it’s important to familiarize your-self with the different settings contained in your digital camera’s menus and submenus. Human nature being what it is, of course, most of us probably take lots of pictures before delving too deeply into the instruction manual. The fully automatic mode on most cameras that handles every decision for you except where to point the camera makes this very easy to do. The Auto mode is great for those times when you need to take a picture quickly and don’t want to think about which setting to use. But to achieve the photo-graph you’re after, you’ll more often need—and want—to take the camera off autopilot. Understanding the core concepts outlined in this chapter will make the difference between using your digital camera as a nifty gadget and using it as powerful creative tool.
In the first part of this chapter, we’ll explain some important settings and menu options to help you know your camera better. In addition, we’ll take the time to review some fundamentals of photography and how they relate to digital cameras. In the second part of this chapter, we’ll look at some of the important concepts and practices that form the foundation of making good photographs.
04_RWPhoto(p3).indd 157 8/6/10 12:09:12 PM
Excerpted from Real World Digital Photography, Third Edition by Katrin Eismann, Sean Duggan and Tim Grey. Copyright © 2011. Used with permission of Pearson Education, Inc. and Peachpit Press.
ChaPTer 4: DigiTal PhoTograPhy FounDaTions158
Setting Up Your Digital Camera The path to a camera’s menu system differs from one camera to the next. With some you may be able to access it by simply pressing a Menu button on the back of the camera. With others, you might have to rotate a dial to a spe-cial position. Some cameras separate the menus into two sections: one for overall setup configuration that you access via a dial and another with spe-cific shooting mode options that you access with a button. Depending on the camera you have, the order of the settings may vary, and some of the ones mentioned here might not be available to you, but many of them are stan-dard on most digital cameras. We’ll start with the items that are the most important for image quality.
Choosing a File FormatThe first setting to consider is what file format to use when saving the images to the camera’s memory card. The two choices are JPEG and RAW. Depending on the type of camera you have, RAW may not be an option. Some cameras also offer the ability to record short video clips, but for this section we’ll focus on still images. We’ll discuss video capabilities in Chapter 6, “Multiple Exposures and Extending the Frame.”
JPEG
Most consumer-level digital cameras offer only one “choice” of file format: JPEG. If this is the case with your camera, then your choice is easy. Shooting in JPEG also offers you the ability to choose different image sizes and com-pression levels (how small the file size is when saved to the memory card). Image size and compression are important settings that affect how many images you can fit onto a memory card, as well as image quality. We’ll take a closer look at those settings shortly. As you move into the world of deluxe point-and-shoot and more advanced models, an additional format will likely be available: RAW.
Note We highly recom-mend that you either
read your camera manual from cover to cover before proceed-ing or have it within reach as you dive into this chapter .
04_RWPhoto(p3).indd 158 8/6/10 12:09:13 PM
Excerpted from Real World Digital Photography, Third Edition by Katrin Eismann, Sean Duggan and Tim Grey. Copyright © 2011. Used with permission of Pearson Education, Inc. and Peachpit Press.
seTTing uP your DigiTal Camera 159
RAW
As you saw in Chapter 2, “How a Digital Camera Works,” a RAW file isn’t really an image file format; rather, it contains the data gathered by the cam-era’s image sensor before any post-capture processing is applied to it. A RAW file is a “recipe” to make an image. And just as you can modify or improve a recipe for a food dish, with RAW processing software you can also modify the RAW recipe and change certain aspects of how the image looks.
RAW gives you the most creative control and editing flexibility. Since the RAW format is “unprocessed,” you can compensate (within reason) for exposure defi-ciencies in the capture during image processing. Although RAW offers unprec-edented control in how you can process the captured image, for some people, RAW’s primary disadvantage is that it adds additional steps to the workflow. You can’t simply open the image directly into Photoshop or another program. You must convert the RAW file to a common image file format, using either the camera manufacturer’s proprietary software or other products such as Adobe Lightroom, Apple Aperture, Adobe Camera Raw (which comes with Adobe Photoshop), or other programs. Many consumer-level photo sharing and edit-ing applications, such as Apple’s iPhoto, also offer the ability to view RAW files from some cameras as long as the software is up to date and offers support for your particular camera. We feel the extra conversion step is a small price to pay for the considerable creative choices and nondestructive workflow that RAW provides. If your camera supports a RAW format, and maximum quality and control over the image processing are important to you, we recommend choos-ing the RAW format over JPEG (see the sidebar “The Case for RAW”). For more on integrating RAW images into your imaging workflow using Lightroom, see Chapter 8, “Working in the Digital Darkroom.”
RAW + JPEG
For those times when the convenience of JPEG is still important, such as when you need to hand off files to a client right after a shooting session or for the simple reason that you’re not totally confidant with RAW process-ing yet, many cameras offer the ability to shoot in RAW + JPEG mode. This mode saves a RAW file along with a JPEG version of each shot. The downside to this approach is that it reduces the number of photos that can be saved to the memory card. But for some situations it may be the perfect compro-mise between the ease of use that JPEG offers and the full control and image quality available in a RAW file.
04_RWPhoto(p3).indd 159 8/6/10 12:09:13 PM
Excerpted from Real World Digital Photography, Third Edition by Katrin Eismann, Sean Duggan and Tim Grey. Copyright © 2011. Used with permission of Pearson Education, Inc. and Peachpit Press.
ChaPTer 4: DigiTal PhoTograPhy FounDaTions160
The Case for RAW
When faced with a choice between using JPeg and raW for our photo-graphs, we almost always choose raW. our bias here has less to do with JPeg compression issues and more to do with the “no turning back” nature of JPeg. once an image is captured and recorded in the JPeg format, all the camera settings, such as sharpening, saturation, contrast, white balance, and exposure compensation, are irrevocably applied to the photo. With raW, the image is left untouched by the camera, leaving you to apply these settings at your discretion in a raW conversion program. This means, essen-tially, that you get a second chance to evaluate the image on a large moni-tor and decide which settings suit it best. and you can do this repeatedly, since the original raW image remains untouched. additionally, shooting in raW gives you access to the higher bit depth captured by your camera’s image sensor; JPeg files are limited to 8 bits.
We really appreciate the control and flexibility available in the raW format. it’s not that we have commitment issues, but few things in life are as flexible as a raW digital capture combined with all the possibilities that programs like lightroom and Camera raw offer, and since that flexibility is there for us, we like to take advantage of it. With JPeg, you can never go home again. With raW you can go home as often as you like and are always welcomed with open arms.
Despite our bias toward raW, we do realize that this format is not ideal for everyone or every situation (for instance, fast-action photos that require shooting multiple frames per second for a sustained period or product shoots and event photography that involve hundreds of images and con-trolled lighting). But for most images, raW is our format of choice.
JPEG Settings: Image Size and CompressionIf you are shooting JPEG, of all the menu settings you can make at the cam-era level, arguably the most important in determining final image qual-ity are image size and compression. ISO and White Balance are two other important settings that can affect image quality, but they apply to both RAW and JPEG files and we’ll cover them later in this chapter.
04_RWPhoto(p3).indd 160 8/6/10 12:09:13 PM
Excerpted from Real World Digital Photography, Third Edition by Katrin Eismann, Sean Duggan and Tim Grey. Copyright © 2011. Used with permission of Pearson Education, Inc. and Peachpit Press.
seTTing uP your DigiTal Camera 161
The image size in pixel dimensions is the primary determinant of how large a print you can make, and the compression level affects the quality of the image once it’s written to the memory card in the JPEG format. Other set-tings, such as sharpening, saturation, and contrast adjustments, can also affect the quality of a JPEG image, of course, but they usually show up far-ther down in the menu system, so we’ll cover them a bit later in this section.
Image size
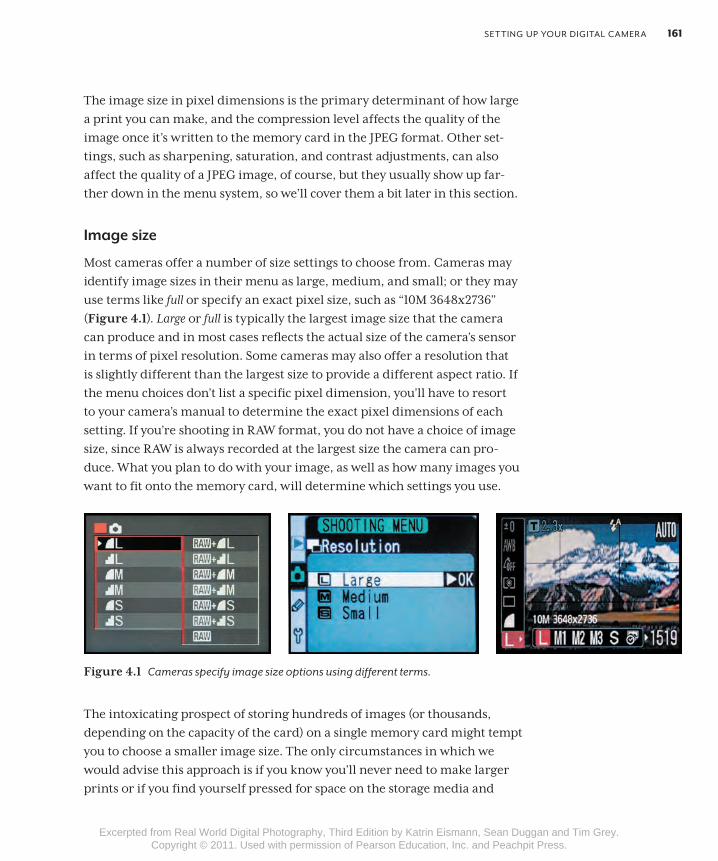
Most cameras offer a number of size settings to choose from. Cameras may identify image sizes in their menu as large, medium, and small; or they may use terms like full or specify an exact pixel size, such as “10M 3648x2736” (Figure 4.1). Large or full is typically the largest image size that the camera can produce and in most cases reflects the actual size of the camera’s sensor in terms of pixel resolution. Some cameras may also offer a resolution that is slightly different than the largest size to provide a different aspect ratio. If the menu choices don’t list a specific pixel dimension, you’ll have to resort to your camera’s manual to determine the exact pixel dimensions of each setting. If you’re shooting in RAW format, you do not have a choice of image size, since RAW is always recorded at the largest size the camera can pro-duce. What you plan to do with your image, as well as how many images you want to fit onto the memory card, will determine which settings you use.
Figure 4.1 Cameras specify image size options using different terms.
The intoxicating prospect of storing hundreds of images (or thousands, depending on the capacity of the card) on a single memory card might tempt you to choose a smaller image size. The only circumstances in which we would advise this approach is if you know you’ll never need to make larger prints or if you find yourself pressed for space on the storage media and
04_RWPhoto(p3).indd 161 8/6/10 12:09:13 PM
Excerpted from Real World Digital Photography, Third Edition by Katrin Eismann, Sean Duggan and Tim Grey. Copyright © 2011. Used with permission of Pearson Education, Inc. and Peachpit Press.
ChaPTer 4: DigiTal PhoTograPhy FounDaTions162
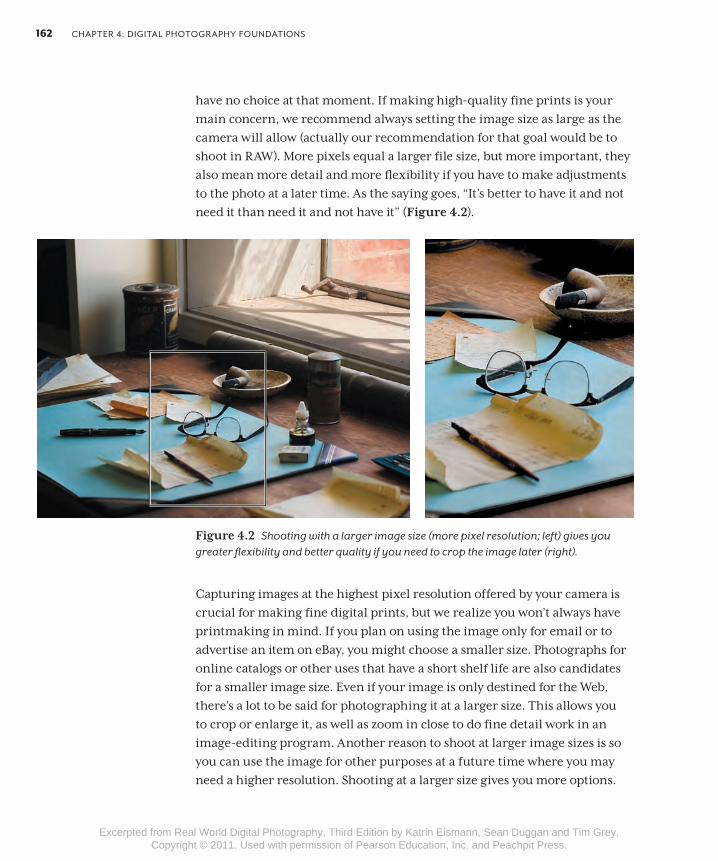
have no choice at that moment. If making high-quality fine prints is your main concern, we recommend always setting the image size as large as the camera will allow (actually our recommendation for that goal would be to shoot in RAW). More pixels equal a larger file size, but more important, they also mean more detail and more flexibility if you have to make adjustments to the photo at a later time. As the saying goes, “It’s better to have it and not need it than need it and not have it” (Figure 4.2).
Figure 4.2 Shooting with a larger image size (more pixel resolution; left) gives you greater flexibility and better quality if you need to crop the image later (right).
Capturing images at the highest pixel resolution offered by your camera is crucial for making fine digital prints, but we realize you won’t always have printmaking in mind. If you plan on using the image only for email or to advertise an item on eBay, you might choose a smaller size. Photographs for online catalogs or other uses that have a short shelf life are also candidates for a smaller image size. Even if your image is only destined for the Web, there’s a lot to be said for photographing it at a larger size. This allows you to crop or enlarge it, as well as zoom in close to do fine detail work in an image-editing program. Another reason to shoot at larger image sizes is so you can use the image for other purposes at a future time where you may need a higher resolution. Shooting at a larger size gives you more options.
04_RWPhoto(p3).indd 162 8/6/10 12:09:14 PM
Excerpted from Real World Digital Photography, Third Edition by Katrin Eismann, Sean Duggan and Tim Grey. Copyright © 2011. Used with permission of Pearson Education, Inc. and Peachpit Press.
seTTing uP your DigiTal Camera 163
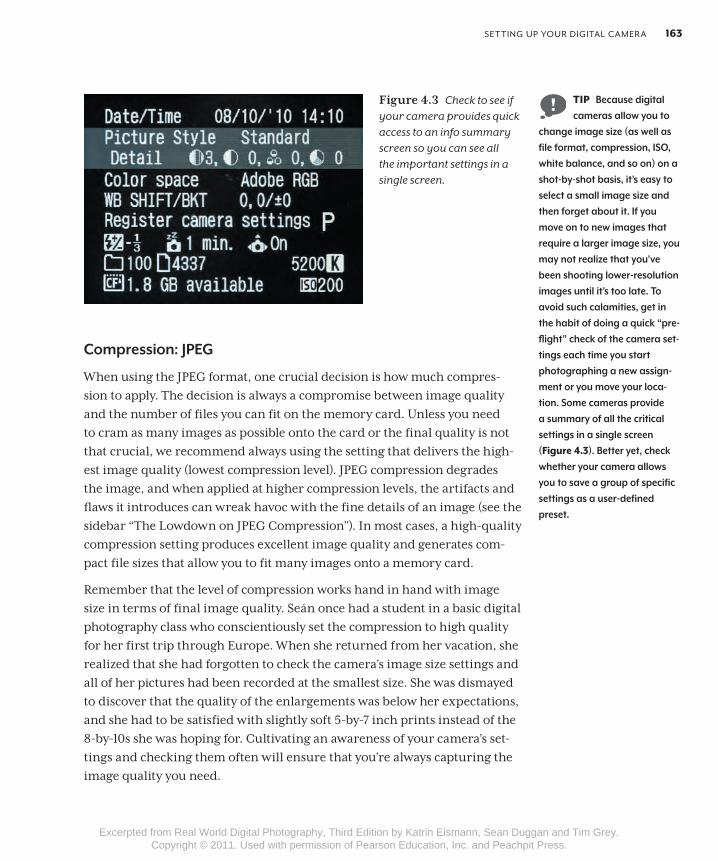
Figure 4.3 Check to see if your camera provides quick access to an info summary screen so you can see all the important settings in a single screen.
Compression: JPEG
When using the JPEG format, one crucial decision is how much compres-sion to apply. The decision is always a compromise between image quality and the number of files you can fit on the memory card. Unless you need to cram as many images as possible onto the card or the final quality is not that crucial, we recommend always using the setting that delivers the high-est image quality (lowest compression level). JPEG compression degrades the image, and when applied at higher compression levels, the artifacts and flaws it introduces can wreak havoc with the fine details of an image (see the sidebar “The Lowdown on JPEG Compression”). In most cases, a high-quality compression setting produces excellent image quality and generates com-pact file sizes that allow you to fit many images onto a memory card.
Remember that the level of compression works hand in hand with image size in terms of final image quality. Seán once had a student in a basic digital photography class who conscientiously set the compression to high quality for her first trip through Europe. When she returned from her vacation, she realized that she had forgotten to check the camera’s image size settings and all of her pictures had been recorded at the smallest size. She was dismayed to discover that the quality of the enlargements was below her expectations, and she had to be satisfied with slightly soft 5-by-7 inch prints instead of the 8-by-10s she was hoping for. Cultivating an awareness of your camera’s set-tings and checking them often will ensure that you’re always capturing the image quality you need.
tip Because digital cameras allow you to
change image size (as well as file format, compression, ISO, white balance, and so on) on a shot-by-shot basis, it’s easy to select a small image size and then forget about it . If you move on to new images that require a larger image size, you may not realize that you’ve been shooting lower-resolution images until it’s too late . To avoid such calamities, get in the habit of doing a quick “pre-flight” check of the camera set-tings each time you start photographing a new assign-ment or you move your loca-tion . Some cameras provide a summary of all the critical settings in a single screen (Figure 4.3) . Better yet, check whether your camera allows you to save a group of specific settings as a user-defined preset .
04_RWPhoto(p3).indd 163 8/6/10 12:09:14 PM
Excerpted from Real World Digital Photography, Third Edition by Katrin Eismann, Sean Duggan and Tim Grey. Copyright © 2011. Used with permission of Pearson Education, Inc. and Peachpit Press.
ChaPTer 4: DigiTal PhoTograPhy FounDaTions164
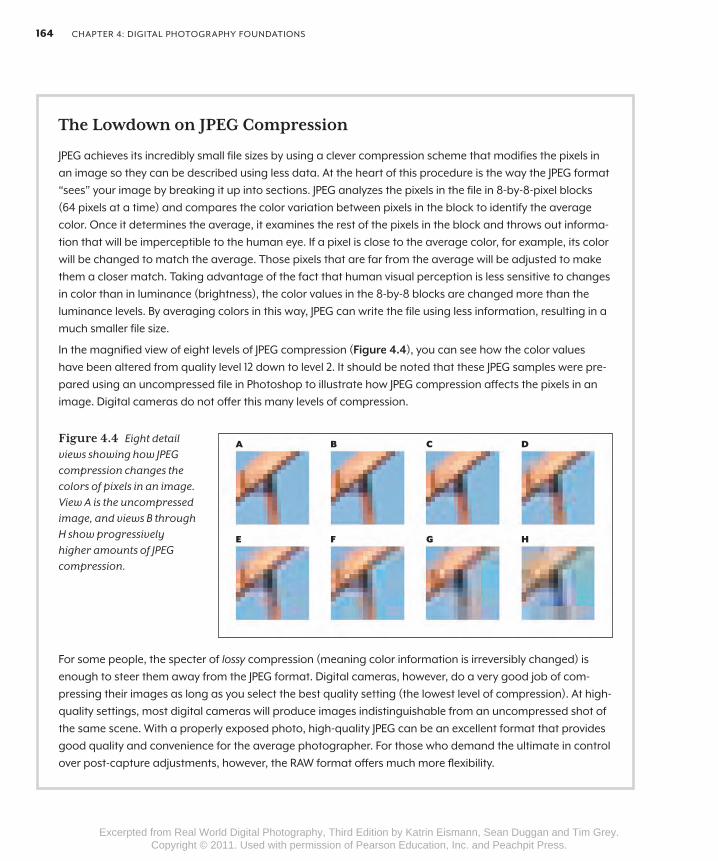
The Lowdown on JPEG Compression
JPeg achieves its incredibly small file sizes by using a clever compression scheme that modifies the pixels in an image so they can be described using less data. at the heart of this procedure is the way the JPeg format “sees” your image by breaking it up into sections. JPeg analyzes the pixels in the file in 8-by-8-pixel blocks (64 pixels at a time) and compares the color variation between pixels in the block to identify the average color. once it determines the average, it examines the rest of the pixels in the block and throws out informa-tion that will be imperceptible to the human eye. if a pixel is close to the average color, for example, its color will be changed to match the average. Those pixels that are far from the average will be adjusted to make them a closer match. Taking advantage of the fact that human visual perception is less sensitive to changes in color than in luminance (brightness), the color values in the 8-by-8 blocks are changed more than the luminance levels. By averaging colors in this way, JPeg can write the file using less information, resulting in a much smaller file size.
in the magnified view of eight levels of JPeg compression (Figure 4 .4), you can see how the color values have been altered from quality level 12 down to level 2. it should be noted that these JPeg samples were pre-pared using an uncompressed file in Photoshop to illustrate how JPeg compression affects the pixels in an image. Digital cameras do not offer this many levels of compression.
Figure 4.4 Eight detail views showing how JPEG compression changes the colors of pixels in an image. View A is the uncompressed image, and views B through H show progressively higher amounts of JPEG compression.
A
E
B
F
C
G
D
H
For some people, the specter of lossy compression (meaning color information is irreversibly changed) is enough to steer them away from the JPeg format. Digital cameras, however, do a very good job of com-pressing their images as long as you select the best quality setting (the lowest level of compression). at high-quality settings, most digital cameras will produce images indistinguishable from an uncompressed shot of the same scene. With a properly exposed photo, high-quality JPeg can be an excellent format that provides good quality and convenience for the average photographer. For those who demand the ultimate in control over post-capture adjustments, however, the raW format offers much more flexibility.
04_RWPhoto(p3).indd 164 8/6/10 12:09:15 PM
Excerpted from Real World Digital Photography, Third Edition by Katrin Eismann, Sean Duggan and Tim Grey. Copyright © 2011. Used with permission of Pearson Education, Inc. and Peachpit Press.
seTTing uP your DigiTal Camera 165
ISOThe ISO setting determines a digital camera’s sensitivity to light. As the ISO rating doubles, the light sensitivity of the image sensor also doubles—or it can be considered twice as “fast.” This is similar to how the ISO rating works for film. Unlike with film, however, where the ISO is the same for an entire roll, digital cameras let you change the setting on a shot-by-shot basis. This provides you with tremendous flexibility in your photography. You could shoot at ISO 100 in the bright sunlight for most of the day, for example, and then quickly to switch to ISO 400 or much higher if you suddenly found yourself in heavy shade or went indoors.
With film, the chemical recipe used to create the light-sensitive emulsion determined the ISO sensitivity. As you saw in Chapter 2, even though a digital camera offers different ISO settings, the image sensor has a specific sensitivity that can’t be changed. To increase the effective ISO setting, the sensor’s signals are amplified as they are handed off for internal processing by the analog-to-digital converter. In this respect, the ISO setting on a digital camera has more in common with the volume control on your stereo, since it just “turns up” the signal from the sensor, allowing the camera to be more sensitive in lower light levels.
Choosing an ISO setting
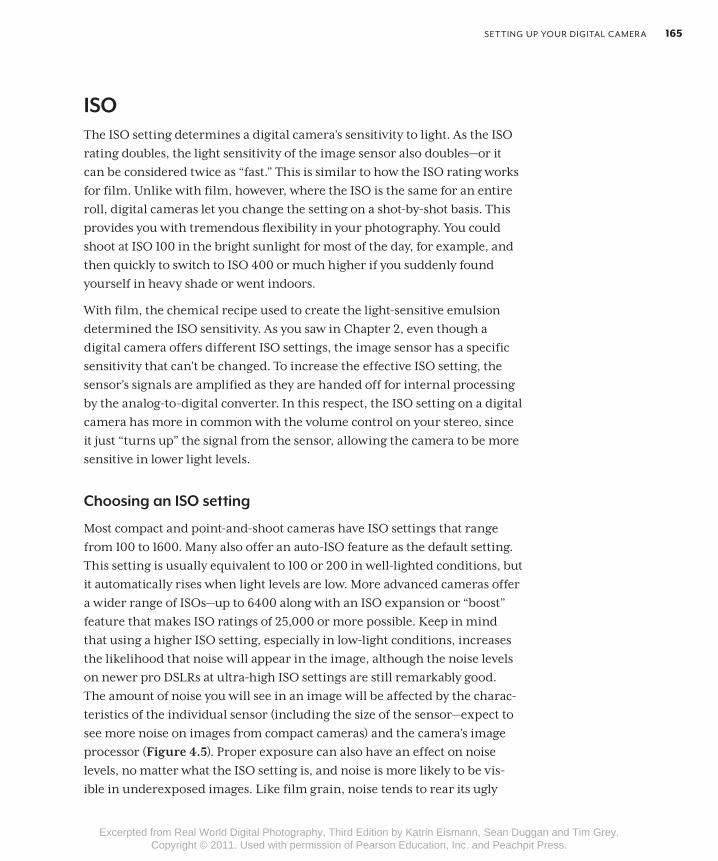
Most compact and point-and-shoot cameras have ISO settings that range from 100 to 1600. Many also offer an auto-ISO feature as the default setting. This setting is usually equivalent to 100 or 200 in well-lighted conditions, but it automatically rises when light levels are low. More advanced cameras offer a wider range of ISOs—up to 6400 along with an ISO expansion or “boost” feature that makes ISO ratings of 25,000 or more possible. Keep in mind that using a higher ISO setting, especially in low-light conditions, increases the likelihood that noise will appear in the image, although the noise levels on newer pro DSLRs at ultra-high ISO settings are still remarkably good. The amount of noise you will see in an image will be affected by the charac-teristics of the individual sensor (including the size of the sensor—expect to see more noise on images from compact cameras) and the camera’s image processor (Figure 4.5). Proper exposure can also have an effect on noise levels, no matter what the ISO setting is, and noise is more likely to be vis-ible in underexposed images. Like film grain, noise tends to rear its ugly
04_RWPhoto(p3).indd 165 8/6/10 12:09:15 PM
Excerpted from Real World Digital Photography, Third Edition by Katrin Eismann, Sean Duggan and Tim Grey. Copyright © 2011. Used with permission of Pearson Education, Inc. and Peachpit Press.
ChaPTer 4: DigiTal PhoTograPhy FounDaTions166
head more often in darker areas of the image (Figure 4.6). To see how image quality is impacted by ISO on your camera, take some test shots in a dark environment at different ISO settings and evaluate them on a computer to determine your personal tolerance for image noise. If you are shooting JPEG, be sure to use the largest image size possible and view the images at 100% to see the best display of fine details.
Since the ISO setting you choose will be influenced by the type of photo-graphs you’re taking and the lighting conditions you’re in, there’s no “right” ISO setting, but there are some general guidelines you can follow:
• Low ISO for minimal noise. If your main concern is capturing the best image quality with the least amount of noise, use low ISO settings. Every
Figure 4.5 An old radio photographed with an inex-pensive compact camera (left) and a full-frame sensor DSLR (right). Both images were shot at ISO 1600, but the smaller sensor of the compact camera yields an image with more noise.
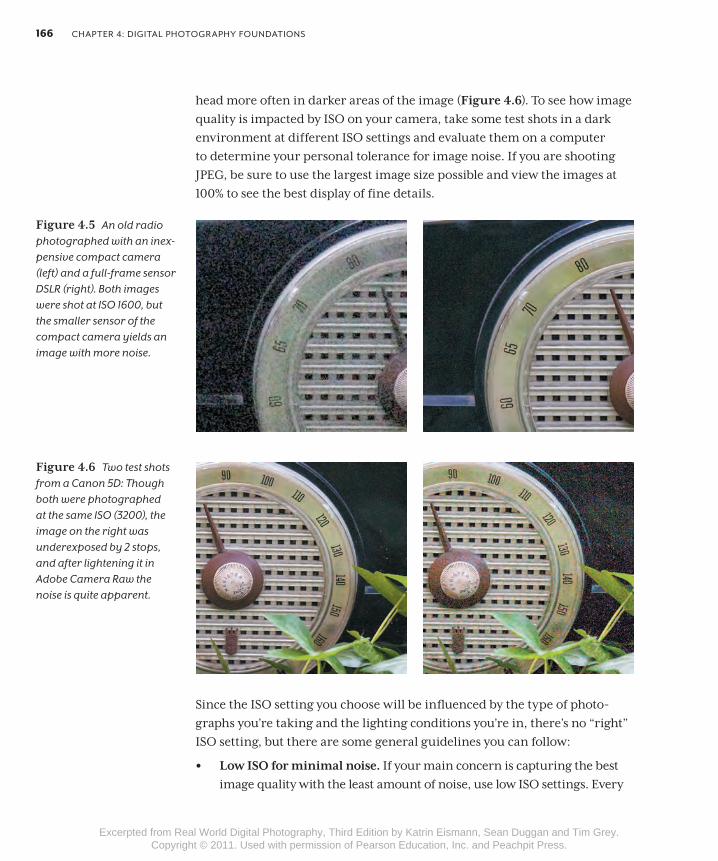
Figure 4.6 Two test shots from a Canon 5D: Though both were photographed at the same ISO (3200), the image on the right was underexposed by 2 stops, and after lightening it in Adobe Camera Raw the noise is quite apparent.
04_RWPhoto(p3).indd 166 8/6/10 12:09:16 PM
Excerpted from Real World Digital Photography, Third Edition by Katrin Eismann, Sean Duggan and Tim Grey. Copyright © 2011. Used with permission of Pearson Education, Inc. and Peachpit Press.
seTTing uP your DigiTal Camera 167
camera is different, of course, and this is where making test exposures at different ISO settings can be very valuable in helping you decide on the ideal setting for different types of images. If you find that the shutter speed at a given ISO is too slow for a handheld shot, choose a wider lens aperture or use a tripod. If you don’t have a tripod, stabilize the camera by resting it on a table, the roof of your car, a tree stump or wall, or another object. When all else fails, try bumping the ISO up to a higher number.
• Higher ISO for low light or fast capture. For low-light photography or situations where you need to react fast to changing conditions or cap-ture motion (and using a tripod is not an option), higher ISO settings will provide you with a wider range of exposure options. Most high-end and professional DSLRs produce excellent results with surprisingly low noise levels at ISO settings of 1000 to 3200. And the ISO expansion or boost feature on many cameras can produce very serviceable images even at ultra-high ISO settings of 25,000. Higher ISOs are appropriate for times when you must use a fast shutter speed that’s not available with a lower ISO or if there simply isn’t enough available light for hand-held photography.
• Auto ISO. Many cameras offer an Auto ISO setting where the camera will adjust the ISO as the lighting levels change. Most Auto ISO features base their choice of ISO on the ability to use a shutter speed that is fast enough for handheld photography. If you’d rather not worry about keep-ing track of the ISO, Auto ISO may be way to go.
Using Noise for Creative Effect
Back when film was the primary medium used for making photographs, many photographers developed an appreciation for the look of certain film grain and would use a particular film stock not only for its increased sensitivity to light, but also for the aesthetic qualities of its grain pattern. unfortunately, digital noise is not quite as attractive as film grain, and the presence of too much noise in an image may prove disappointing, especially if you’re used to the look of film grain. We find it’s better to capture images with little or no visible noise and then add a grain effect later in lightroom, Camera raw, or Photoshop where we have more con-trol. noise in a digital capture can be minimized to a certain extent by using image-editing software, but the result is never as satisfying as if the noise levels were low or nonexistent to begin with. The best noise-reduc-tion strategy we can advise is to try to avoid it in the first place. For those times when circumstances beyond your control leave you with no choice in the matter, we cover noise reduction in Chapter 8.
04_RWPhoto(p3).indd 167 8/6/10 12:09:16 PM
Excerpted from Real World Digital Photography, Third Edition by Katrin Eismann, Sean Duggan and Tim Grey. Copyright © 2011. Used with permission of Pearson Education, Inc. and Peachpit Press.
ChaPTer 4: DigiTal PhoTograPhy FounDaTions168
White Balance Photography is all about light (the Greek word photography derives from phos and graphis meaning “light writing”), but not all light is created equal. Different sources of light produce illumination with different color charac-teristics. A digital camera’s ability to record an image with an accurate color balance is largely determined by the White Balance setting. Before we delve into the nuances of white balance and digital photography, let’s take a quick look at the science behind it.
Color temperature
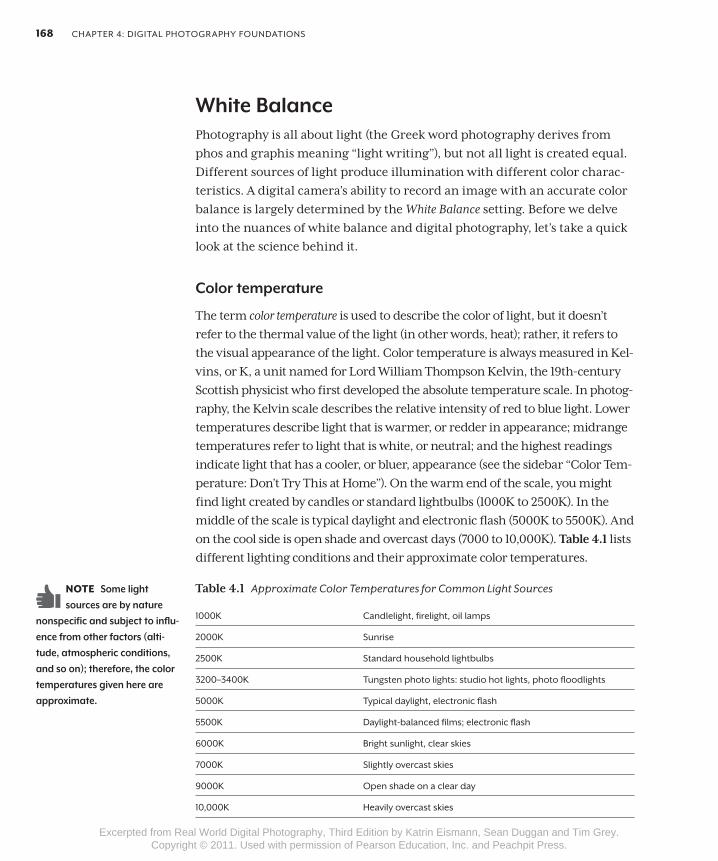
The term color temperature is used to describe the color of light, but it doesn’t refer to the thermal value of the light (in other words, heat); rather, it refers to the visual appearance of the light. Color temperature is always measured in Kel-vins, or K, a unit named for Lord William Thompson Kelvin, the 19th-century Scottish physicist who first developed the absolute temperature scale. In photog-raphy, the Kelvin scale describes the relative intensity of red to blue light. Lower temperatures describe light that is warmer, or redder in appearance; midrange temperatures refer to light that is white, or neutral; and the highest readings indicate light that has a cooler, or bluer, appearance (see the sidebar “Color Tem-perature: Don’t Try This at Home”). On the warm end of the scale, you might find light created by candles or standard lightbulbs (1000K to 2500K). In the middle of the scale is typical daylight and electronic flash (5000K to 5500K). And on the cool side is open shade and overcast days (7000 to 10,000K). Table 4.1 lists different lighting conditions and their approximate color temperatures.
Table 4.1 Approximate Color Temperatures for Common Light Sources
1000K Candlelight, firelight, oil lamps
2000K Sunrise
2500K Standard household lightbulbs
3200–3400K Tungsten photo lights: studio hot lights, photo floodlights
5000K Typical daylight, electronic flash
5500K Daylight-balanced films; electronic flash
6000K Bright sunlight, clear skies
7000K Slightly overcast skies
9000K Open shade on a clear day
10,000K Heavily overcast skies
Note Some light sources are by nature
nonspecific and subject to influ-ence from other factors (alti-tude, atmospheric conditions, and so on); therefore, the color temperatures given here are approximate .
04_RWPhoto(p3).indd 168 8/6/10 12:09:16 PM
Excerpted from Real World Digital Photography, Third Edition by Katrin Eismann, Sean Duggan and Tim Grey. Copyright © 2011. Used with permission of Pearson Education, Inc. and Peachpit Press.
seTTing uP your DigiTal Camera 169
Although different sources produce light with varying color temperatures, the amazing thing about human vision is that our eyes and our brain con-tinuously balance the colors, no matter what the lighting may be, so that we see a scene with a reasonably accurate color balance. If you leave an office building that is lit with ordinary fluorescent lights, which are closer to the green end of the spectrum, and walk out into the sunlight, you don’t notice any major changes in the color balance of the objects you’re viewing. Even with such a sophisticated visual system, however, there are still situations where we notice that some light sources produce illumination that’s notice-ably “warmer” (early morning, late afternoon, or candlelight) or “cooler” (shade or twilight).
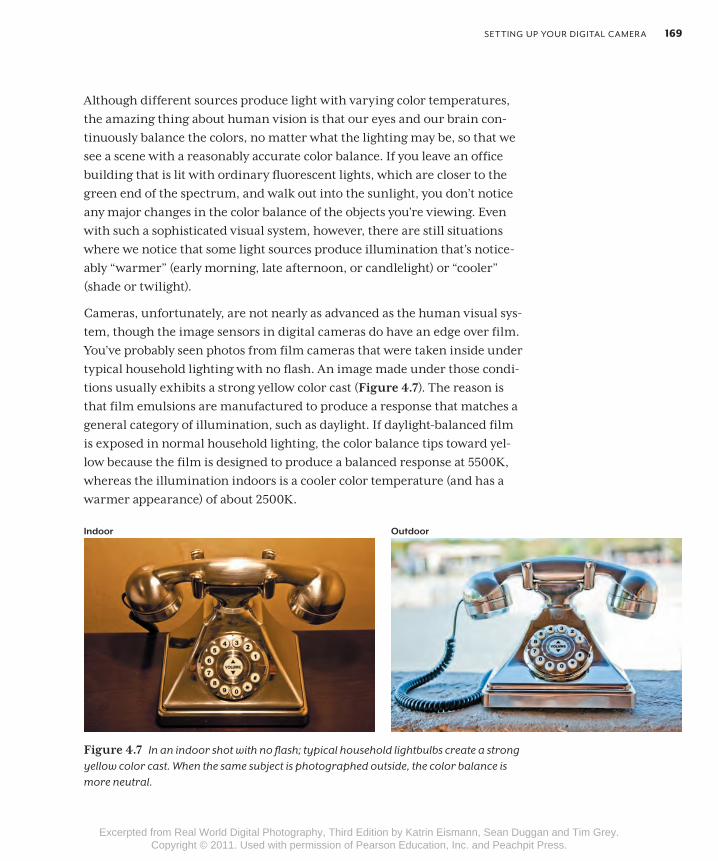
Cameras, unfortunately, are not nearly as advanced as the human visual sys-tem, though the image sensors in digital cameras do have an edge over film. You’ve probably seen photos from film cameras that were taken inside under typical household lighting with no flash. An image made under those condi-tions usually exhibits a strong yellow color cast (Figure 4.7). The reason is that film emulsions are manufactured to produce a response that matches a general category of illumination, such as daylight. If daylight-balanced film is exposed in normal household lighting, the color balance tips toward yel-low because the film is designed to produce a balanced response at 5500K, whereas the illumination indoors is a cooler color temperature (and has a warmer appearance) of about 2500K.
Indoor Outdoor
Figure 4.7 In an indoor shot with no flash; typical household lightbulbs create a strong yellow color cast. When the same subject is photographed outside, the color balance is more neutral.
04_RWPhoto(p3).indd 169 8/6/10 12:09:17 PM
Excerpted from Real World Digital Photography, Third Edition by Katrin Eismann, Sean Duggan and Tim Grey. Copyright © 2011. Used with permission of Pearson Education, Inc. and Peachpit Press.
ChaPTer 4: DigiTal PhoTograPhy FounDaTions170
With film, the choices for color balance were limited to daylight and tung-sten lamps. If you needed to make further adjustments, you had to rely on color-correction filters. Digital cameras, on the other hand, make no assumptions about the type of light you’re shooting in until the image data is processed by the camera’s software. The decision the camera makes about how the colors in an image should be rendered is determined by the White Balance setting. At the most basic level, the camera uses white balance to accurately reproduce white. If you get the white balance right, all the other colors should also be accurate.
Color Temperature: Don’t Try This at Home
one of the most confusing aspects of color temperature is that light with a warmer appearance has a lower temperature, whereas light that exhibits cooler, bluer characteristics is said to have a higher temperature. This is, of course, completely counterintuitive to our normal association of cooler with lower temperatures and warmer with higher readings, but there is a method to this madness.
The key to this seemingly backwards scale can be traced back to 1899 and the german physicist max Planck’s experiments with thermal radiation and black body radiators. in physics, a black body is a theoreti-cal object that absorbs all wavelengths of thermal radiation falling on it, reflecting no light and appearing totally black at low temperatures. When heated, however, a black body emits thermal radiation. at lower temperatures, this radiation is invisible to the human eye, but as the temperature increases, the radiation becomes visible as the black body begins to glow and give off its own light.
To bring this discussion into the realm of common experience, imagine a darkened kitchen and a black, cast iron frying pan on the stove with the burner turned up to high. once the iron pan gets hot enough, it will begin to glow a dull reddish color (1000K). as the temperature increases, the color of the glowing metal shifts to orange and then yellow (2000K–3000K). as the pan becomes hotter still, the color of the superheated metal transforms into a yellowish-white (above 3000K). By the time the color of the frying pan reaches 5000K, it will be glowing white-hot. Continued color temperature increases past 7000K shifts the color of the glowing iron pan into the blues of the higher frequency regions of the visible spectrum.
The incendiary nature of this experiment moves us to caution you against trying it out in your own kitchen. it’s much safer as an imaginary exercise to help you understand where color temperature comes from. real experiments with black body radiators are better left to trained professionals who possess the necessary equipment and stylish blast furnace fashions to protect themselves.
04_RWPhoto(p3).indd 170 8/6/10 12:09:17 PM
Excerpted from Real World Digital Photography, Third Edition by Katrin Eismann, Sean Duggan and Tim Grey. Copyright © 2011. Used with permission of Pearson Education, Inc. and Peachpit Press.
seTTing uP your DigiTal Camera 171
Choosing a White Balance setting
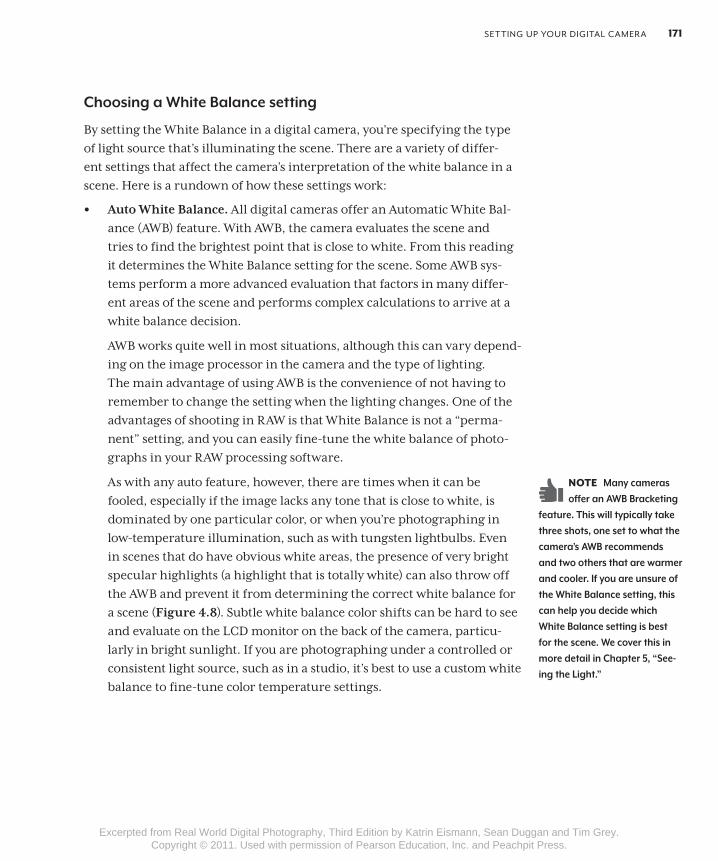
By setting the White Balance in a digital camera, you’re specifying the type of light source that’s illuminating the scene. There are a variety of differ-ent settings that affect the camera’s interpretation of the white balance in a scene. Here is a rundown of how these settings work:
• Auto White Balance. All digital cameras offer an Automatic White Bal-ance (AWB) feature. With AWB, the camera evaluates the scene and tries to find the brightest point that is close to white. From this reading it determines the White Balance setting for the scene. Some AWB sys-tems perform a more advanced evaluation that factors in many differ-ent areas of the scene and performs complex calculations to arrive at a white balance decision.
AWB works quite well in most situations, although this can vary depend-ing on the image processor in the camera and the type of lighting. The main advantage of using AWB is the convenience of not having to remember to change the setting when the lighting changes. One of the advantages of shooting in RAW is that White Balance is not a “perma-nent” setting, and you can easily fine-tune the white balance of photo-graphs in your RAW processing software.
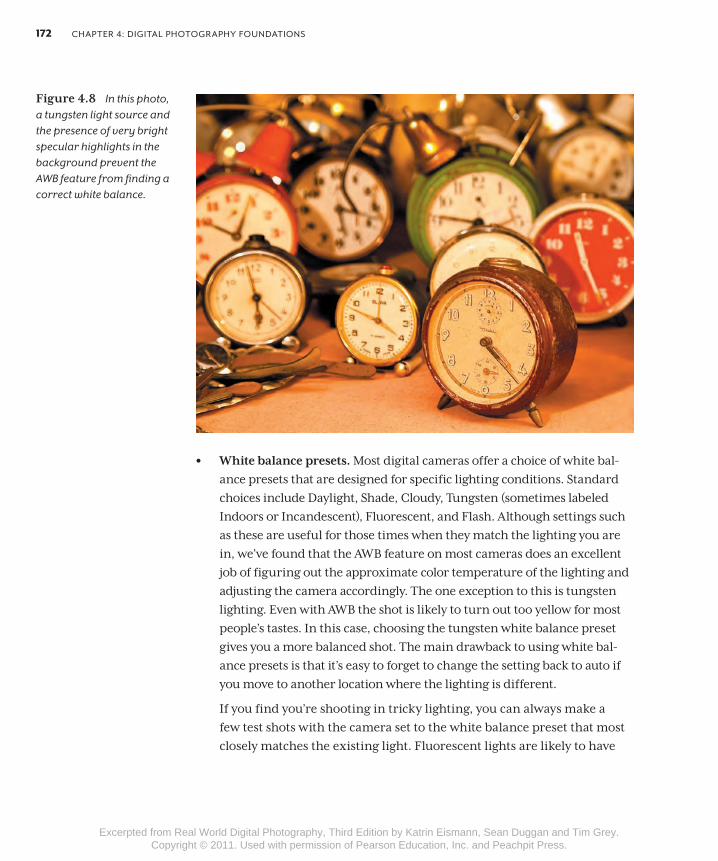
As with any auto feature, however, there are times when it can be fooled, especially if the image lacks any tone that is close to white, is dominated by one particular color, or when you’re photographing in low-temperature illumination, such as with tungsten lightbulbs. Even in scenes that do have obvious white areas, the presence of very bright specular highlights (a highlight that is totally white) can also throw off the AWB and prevent it from determining the correct white balance for a scene (Figure 4.8). Subtle white balance color shifts can be hard to see and evaluate on the LCD monitor on the back of the camera, particu-larly in bright sunlight. If you are photographing under a controlled or consistent light source, such as in a studio, it’s best to use a custom white balance to fine-tune color temperature settings.
Note Many cameras offer an AWB Bracketing
feature . This will typically take three shots, one set to what the camera’s AWB recommends and two others that are warmer and cooler . If you are unsure of the White Balance setting, this can help you decide which White Balance setting is best for the scene . We cover this in more detail in Chapter 5, “See-ing the Light .”
04_RWPhoto(p3).indd 171 8/6/10 12:09:17 PM
Excerpted from Real World Digital Photography, Third Edition by Katrin Eismann, Sean Duggan and Tim Grey. Copyright © 2011. Used with permission of Pearson Education, Inc. and Peachpit Press.
ChaPTer 4: DigiTal PhoTograPhy FounDaTions172
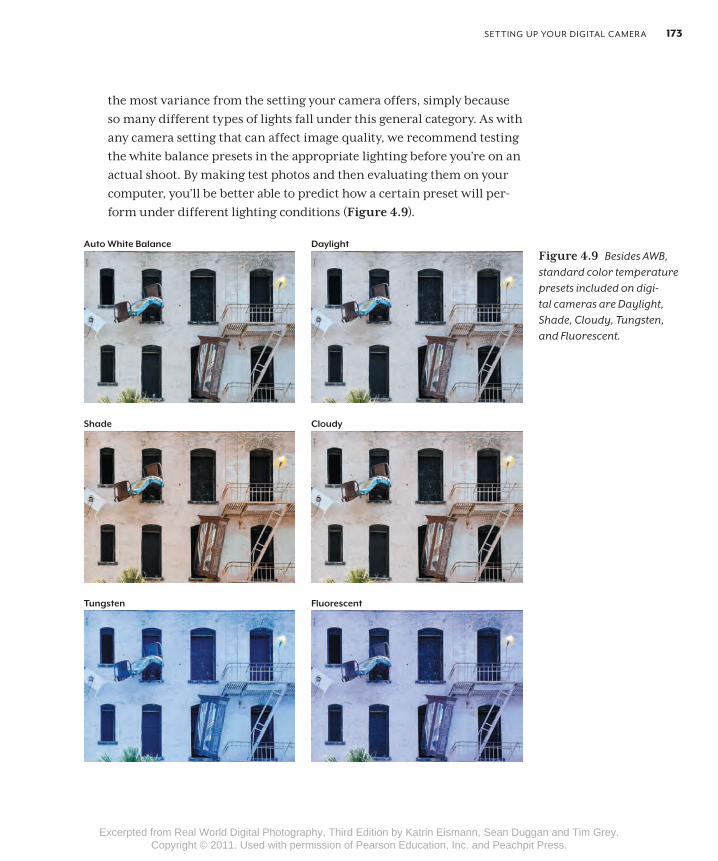
• White balance presets. Most digital cameras offer a choice of white bal-ance presets that are designed for specific lighting conditions. Standard choices include Daylight, Shade, Cloudy, Tungsten (sometimes labeled Indoors or Incandescent), Fluorescent, and Flash. Although settings such as these are useful for those times when they match the lighting you are in, we’ve found that the AWB feature on most cameras does an excellent job of figuring out the approximate color temperature of the lighting and adjusting the camera accordingly. The one exception to this is tungsten lighting. Even with AWB the shot is likely to turn out too yellow for most people’s tastes. In this case, choosing the tungsten white balance preset gives you a more balanced shot. The main drawback to using white bal-ance presets is that it’s easy to forget to change the setting back to auto if you move to another location where the lighting is different.
If you find you’re shooting in tricky lighting, you can always make a few test shots with the camera set to the white balance preset that most closely matches the existing light. Fluorescent lights are likely to have
Figure 4.8 In this photo, a tungsten light source and the presence of very bright specular highlights in the background prevent the AWB feature from finding a correct white balance.
04_RWPhoto(p3).indd 172 8/6/10 12:09:18 PM
Excerpted from Real World Digital Photography, Third Edition by Katrin Eismann, Sean Duggan and Tim Grey. Copyright © 2011. Used with permission of Pearson Education, Inc. and Peachpit Press.
seTTing uP your DigiTal Camera 173
the most variance from the setting your camera offers, simply because so many different types of lights fall under this general category. As with any camera setting that can affect image quality, we recommend testing the white balance presets in the appropriate lighting before you’re on an actual shoot. By making test photos and then evaluating them on your computer, you’ll be better able to predict how a certain preset will per-form under different lighting conditions (Figure 4.9).
FluorescentTungsten
CloudyShade
DaylightAuto White BalanceFigure 4.9 Besides AWB, standard color temperature presets included on digi-tal cameras are Daylight, Shade, Cloudy, Tungsten, and Fluorescent.
04_RWPhoto(p3).indd 173 8/6/10 12:09:19 PM
Excerpted from Real World Digital Photography, Third Edition by Katrin Eismann, Sean Duggan and Tim Grey. Copyright © 2011. Used with permission of Pearson Education, Inc. and Peachpit Press.
ChaPTer 4: DigiTal PhoTograPhy FounDaTions174
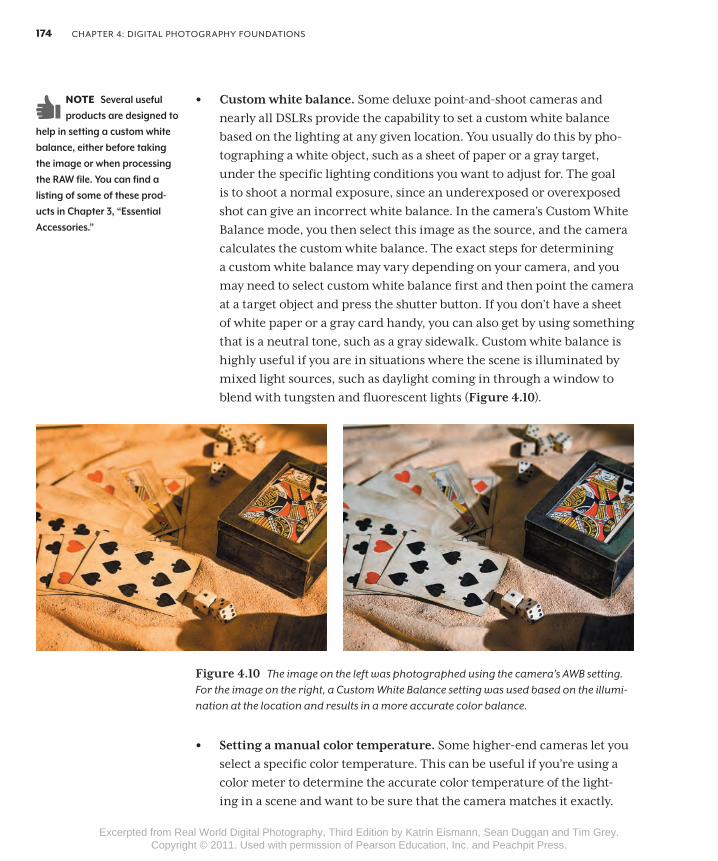
• Custom white balance. Some deluxe point-and-shoot cameras and nearly all DSLRs provide the capability to set a custom white balance based on the lighting at any given location. You usually do this by pho-tographing a white object, such as a sheet of paper or a gray target, under the specific lighting conditions you want to adjust for. The goal is to shoot a normal exposure, since an underexposed or overexposed shot can give an incorrect white balance. In the camera’s Custom White Balance mode, you then select this image as the source, and the camera calculates the custom white balance. The exact steps for determining a custom white balance may vary depending on your camera, and you may need to select custom white balance first and then point the camera at a target object and press the shutter button. If you don’t have a sheet of white paper or a gray card handy, you can also get by using something that is a neutral tone, such as a gray sidewalk. Custom white balance is highly useful if you are in situations where the scene is illuminated by mixed light sources, such as daylight coming in through a window to blend with tungsten and fluorescent lights (Figure 4.10).
Figure 4.10 The image on the left was photographed using the camera’s AWB setting. For the image on the right, a Custom White Balance setting was used based on the illumi-nation at the location and results in a more accurate color balance.
• Setting a manual color temperature. Some higher-end cameras let you select a specific color temperature. This can be useful if you’re using a color meter to determine the accurate color temperature of the light-ing in a scene and want to be sure that the camera matches it exactly.
Note Several useful products are designed to
help in setting a custom white balance, either before taking the image or when processing the RAW file . You can find a listing of some of these prod-ucts in Chapter 3, “Essential Accessories .”
04_RWPhoto(p3).indd 174 8/6/10 12:09:19 PM
Excerpted from Real World Digital Photography, Third Edition by Katrin Eismann, Sean Duggan and Tim Grey. Copyright © 2011. Used with permission of Pearson Education, Inc. and Peachpit Press.
seTTing uP your DigiTal Camera 175
At high altitudes, for example, the color temperature of the light is likely to be much higher, which produces photos with a cooler, or bluer, appearance. Although the Automatic or Custom White Balance feature may handle this condition with ease, if you’re precisely measuring the color temperature using a color meter, you may find it useful to set a specific temperature. Even if you’re not using a color meter, you can still make test shots and experiment with manual settings to determine which one gives you the color balance you need.
Understanding how your camera handles white balance and how to modify the settings is important because it can affect the appearance and color quality of your images. Shooting in RAW provides more flexibility for mak-ing changes to the white balance in the digital darkroom. We cover white balance as it pertains to crafting a well-exposed image in Chapter 5.
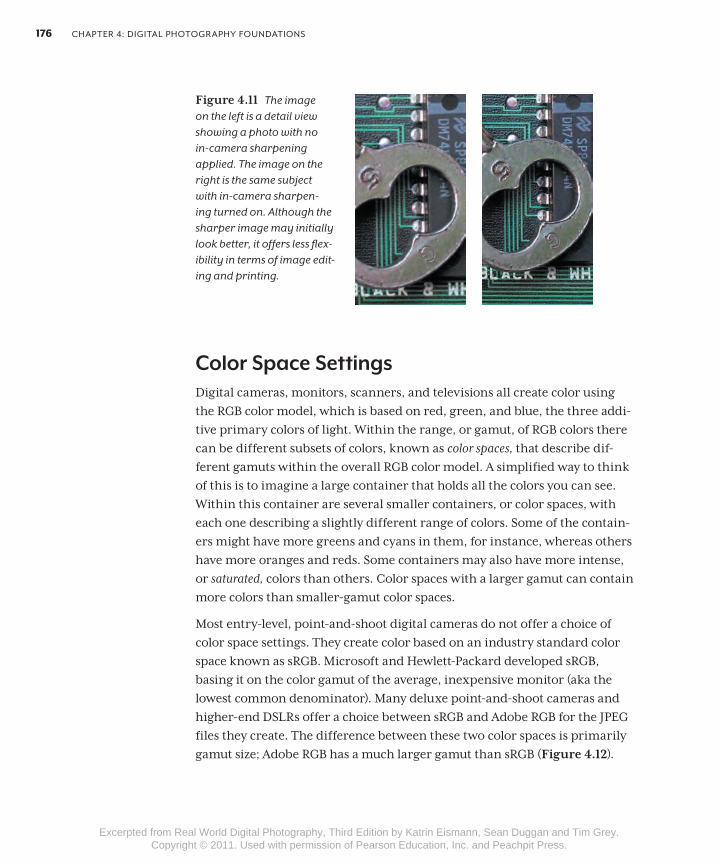
Sharpening, Saturation, and Other Enhancement OptionsSince some people may find the initial image as delivered by the camera too “soft,” cameras typically have a sharpening option to produce JPEG images that look sharper and more finished. Fortunately, many cameras allow you to choose the level of sharpening applied, or even to turn it off completely. Our view on the sharpening feature is unanimous: If your camera provides you with a way to disable it, turn it off for good.
The reason for our impassioned view is that sharpening is a destructive pro-cess that permanently alters the color and contrast of edge pixels—areas of the image where light and dark colors are adjacent to each other. The cam-era just sees a bunch of pixels and applies a sharpening amount based on canned formulas that are hard-wired into it. A camera doesn’t know what your photograph requires or how you might want to use sharpening, so the sharpening it applies may not be appropriate for the image. This is especially true if you plan to make prints, since the amount of sharpening that you apply is influenced by the subject matter and the size of the final print.
We have the same philosophy when faced with options to alter contrast, brightness, and color saturation: Turn these features off! All of these deci-sions and enhancements are best applied later in an image-editing program, where you can apply them in a way that complements the specific image and in a flexible manner that doesn’t harm the original (Figure 4.11).
Note Camera settings that apply sharpening
or modifications to image contrast, brightness, or color saturation only affect JPEG images and are not applied to RAW files .
04_RWPhoto(p3).indd 175 8/6/10 12:09:20 PM
Excerpted from Real World Digital Photography, Third Edition by Katrin Eismann, Sean Duggan and Tim Grey. Copyright © 2011. Used with permission of Pearson Education, Inc. and Peachpit Press.
ChaPTer 4: DigiTal PhoTograPhy FounDaTions176
Figure 4.11 The image on the left is a detail view showing a photo with no in-camera sharpening applied. The image on the right is the same subject with in-camera sharpen-ing turned on. Although the sharper image may initially look better, it offers less flex-ibility in terms of image edit-ing and printing.
Color Space SettingsDigital cameras, monitors, scanners, and televisions all create color using the RGB color model, which is based on red, green, and blue, the three addi-tive primary colors of light. Within the range, or gamut, of RGB colors there can be different subsets of colors, known as color spaces, that describe dif-ferent gamuts within the overall RGB color model. A simplified way to think of this is to imagine a large container that holds all the colors you can see. Within this container are several smaller containers, or color spaces, with each one describing a slightly different range of colors. Some of the contain-ers might have more greens and cyans in them, for instance, whereas others have more oranges and reds. Some containers may also have more intense, or saturated, colors than others. Color spaces with a larger gamut can contain more colors than smaller-gamut color spaces.
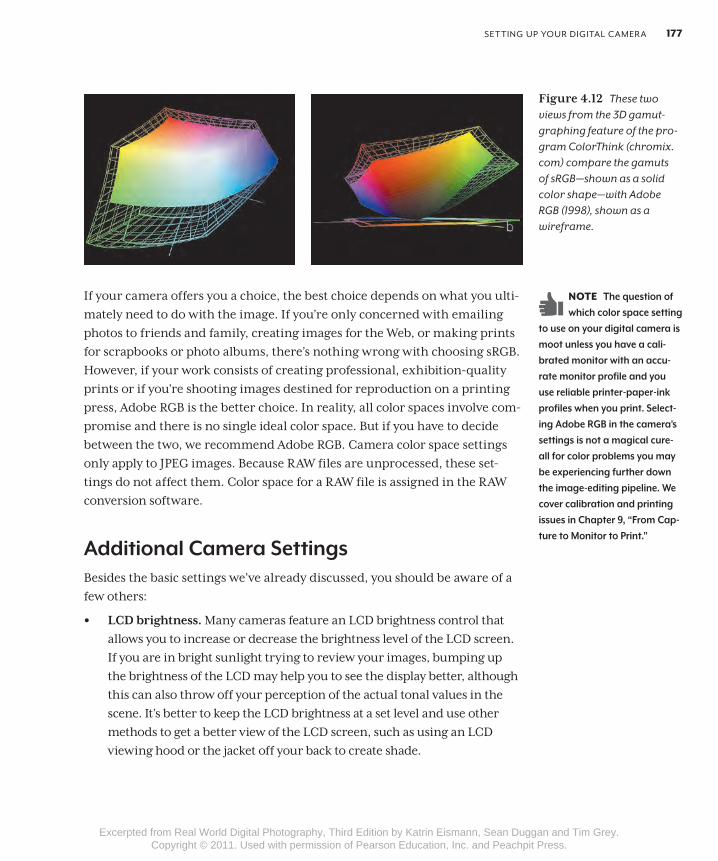
Most entry-level, point-and-shoot digital cameras do not offer a choice of color space settings. They create color based on an industry standard color space known as sRGB. Microsoft and Hewlett-Packard developed sRGB, basing it on the color gamut of the average, inexpensive monitor (aka the lowest common denominator). Many deluxe point-and-shoot cameras and higher-end DSLRs offer a choice between sRGB and Adobe RGB for the JPEG files they create. The difference between these two color spaces is primarily gamut size; Adobe RGB has a much larger gamut than sRGB (Figure 4.12).
04_RWPhoto(p3).indd 176 8/6/10 12:09:20 PM
Excerpted from Real World Digital Photography, Third Edition by Katrin Eismann, Sean Duggan and Tim Grey. Copyright © 2011. Used with permission of Pearson Education, Inc. and Peachpit Press.
seTTing uP your DigiTal Camera 177
If your camera offers you a choice, the best choice depends on what you ulti-mately need to do with the image. If you’re only concerned with emailing photos to friends and family, creating images for the Web, or making prints for scrapbooks or photo albums, there’s nothing wrong with choosing sRGB. However, if your work consists of creating professional, exhibition-quality prints or if you’re shooting images destined for reproduction on a printing press, Adobe RGB is the better choice. In reality, all color spaces involve com-promise and there is no single ideal color space. But if you have to decide between the two, we recommend Adobe RGB. Camera color space settings only apply to JPEG images. Because RAW files are unprocessed, these set-tings do not affect them. Color space for a RAW file is assigned in the RAW conversion software.
Additional Camera SettingsBesides the basic settings we’ve already discussed, you should be aware of a few others:
• LCD brightness. Many cameras feature an LCD brightness control that allows you to increase or decrease the brightness level of the LCD screen. If you are in bright sunlight trying to review your images, bumping up the brightness of the LCD may help you to see the display better, although this can also throw off your perception of the actual tonal values in the scene. It’s better to keep the LCD brightness at a set level and use other methods to get a better view of the LCD screen, such as using an LCD viewing hood or the jacket off your back to create shade.
Figure 4.12 These two views from the 3D gamut-graphing feature of the pro-gram ColorThink (chromix.com) compare the gamuts of sRGB—shown as a solid color shape—with Adobe RGB (1998), shown as a wireframe.
Note The question of which color space setting
to use on your digital camera is moot unless you have a cali-brated monitor with an accu-rate monitor profile and you use reliable printer-paper-ink profiles when you print . Select-ing Adobe RGB in the camera’s settings is not a magical cure-all for color problems you may be experiencing further down the image-editing pipeline . We cover calibration and printing issues in Chapter 9, “From Cap-ture to Monitor to Print .”
04_RWPhoto(p3).indd 177 8/6/10 12:09:20 PM
Excerpted from Real World Digital Photography, Third Edition by Katrin Eismann, Sean Duggan and Tim Grey. Copyright © 2011. Used with permission of Pearson Education, Inc. and Peachpit Press.

ChaPTer 4: DigiTal PhoTograPhy FounDaTions178
• LCD/system sleep. This determines the length of inactivity (in other words, not pressing any buttons) required before your camera enters a sleep or standby mode. If you want to conserve your battery, choose a relatively short amount of time such as 15 to 30 seconds; if you want the camera to be always at the ready, set a longer interval. If your camera has a separate setting for LCD standby, choose the shortest time available. If you don’t use the LCD for framing the image but rather rely on the optical viewfinder, see if you can turn off the display for all but reviewing pur-poses. The less the LCD is on, the longer your batteries will last.
• Setting the date and time. This is pretty straightforward, but it’s defi-nitely something you want to do before you take any photos. Digital cameras record the date and time of day you created an image, as well as other information, and include it with the image file (see the section “Metadata” later in this chapter). Computers can also use dates to sort images, so having an accurate date and time attached to your images is important. Although having the accurate time may seem like a trivial detail, it can be very useful to know the time of day a photograph was taken. For world travelers, see the sidebar “Managing Capture Times Across Different Time Zones.”
• File-numbering options. Digital cameras name files using a combina-tion of letters and sequential serial numbers (such as DSC_2051.NEF or IMG_0406.CR2). Although this filenaming scheme is hardly useful if you have to sort through countless folders of digital photos, it does provide a starting point. On many cameras you can specify how you want to handle the numbering sequence.
Continuous Numbering continues the number sequence even after you’ve changed storage media. This setting ensures that all your shots will have discrete numbers, preventing you from accidentally overwrit-ing an earlier image with the same file number. Cameras usually assign an upper limit to the numbering scheme, such as 9999, beyond which they’ll start over again at 0001.
Auto Reset, or Auto Renumber, automatically resets the file number to 0001 whenever you replace the storage media card. The main drawback to this system is that if you are not careful with how you organize your files, newer files could accidentally overwrite earlier images with the same name. If you store your images from each session in separate folders, there is less of a chance of conflicting filenames, but the possibility does exist.
04_RWPhoto(p3).indd 178 8/6/10 12:09:20 PM
Excerpted from Real World Digital Photography, Third Edition by Katrin Eismann, Sean Duggan and Tim Grey. Copyright © 2011. Used with permission of Pearson Education, Inc. and Peachpit Press.
seTTing uP your DigiTal Camera 179
We all use Continuous Numbering and batch rename the camera files when downloading or importing them into an image-management application, such as Lightroom. We’ll cover using Lightroom to batch rename files in greater detail in Chapter 8.
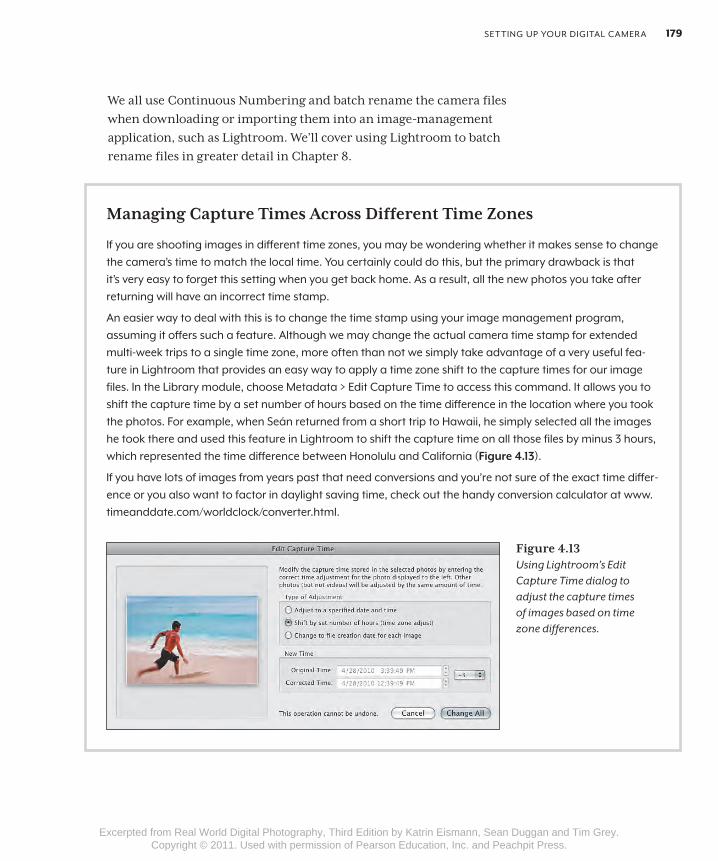
Managing Capture Times Across Different Time Zones
if you are shooting images in different time zones, you may be wondering whether it makes sense to change the camera’s time to match the local time. you certainly could do this, but the primary drawback is that it’s very easy to forget this setting when you get back home. as a result, all the new photos you take after returning will have an incorrect time stamp.
an easier way to deal with this is to change the time stamp using your image management program, assuming it offers such a feature. although we may change the actual camera time stamp for extended multi-week trips to a single time zone, more often than not we simply take advantage of a very useful fea-ture in lightroom that provides an easy way to apply a time zone shift to the capture times for our image files. in the library module, choose metadata > edit Capture Time to access this command. it allows you to shift the capture time by a set number of hours based on the time difference in the location where you took the photos. For example, when seán returned from a short trip to hawaii, he simply selected all the images he took there and used this feature in lightroom to shift the capture time on all those files by minus 3 hours, which represented the time difference between honolulu and California (Figure 4 .13).
if you have lots of images from years past that need conversions and you’re not sure of the exact time differ-ence or you also want to factor in daylight saving time, check out the handy conversion calculator at www.timeanddate.com/worldclock/converter.html.
Figure 4.13 Using Lightroom’s Edit Capture Time dialog to adjust the capture times of images based on time zone differences.
04_RWPhoto(p3).indd 179 8/6/10 12:09:21 PM
Excerpted from Real World Digital Photography, Third Edition by Katrin Eismann, Sean Duggan and Tim Grey. Copyright © 2011. Used with permission of Pearson Education, Inc. and Peachpit Press.
ChaPTer 4: DigiTal PhoTograPhy FounDaTions180
Formatting the Memory CardWhen you first use a memory card, you should format it using the camera’s formatting option to prepare the card for use with that camera. Although some cameras let you shoot with an unformatted card, certain camera-specific features may not function properly until the camera has formatted the card. You should also reformat each time you need to erase a card—for instance, when you want to reuse it and take new photos. Formatting a card erases the directory structure on the card. The images are not removed from the memory card until new images replace them, but with no direc-tory structure referencing the files, you can no longer view them. Since this action is irreversible (there’s no Undo command), be sure you’re not wip-ing out important images that have not been backed up yet. See the sidebar “Recovering Deleted Files from a Memory Card” in case you inadvertently reformat a card with important images.
When you hook up the card to your computer to download photos, either via a card reader (highly recommended) or directly from the camera, you may be tempted to delete the files you’ve already transferred by dragging the folders on the card to the computer’s trash can or recycle bin. We caution against this and recommend formatting the card in the camera to delete the files. Although there may be no harm in deleting images on the card from your computer, it’s best to format the card in your camera. Since the pri-mary purpose of the card is to be the place where the camera saves its image files, it makes sense to let the camera do it so that the card is optimized for use in that device. If you have more than one type of digital camera, we rec-ommend having dedicated media cards for each one. Not all cameras can read cards formatted in other cameras, so rather than risk losing images, we dedicate media cards to each camera to avoid the card formatting issue.
We also suggest that you reformat the card after every use instead of simply deleting the files using the camera’s erase command, because the File Allo-cation Table (FAT) is regenerated with each new format. As with any com-puter file system, data corruption can slowly build up over time; formatting the camera media card after confirming that you have safely downloaded and backed up the images before each use ensures that you’ll start with a clean slate.
To ensure that the photos you have downloaded are fine and do not suffer from any file corruption issues (rare, but it does happen from time to time),
04_RWPhoto(p3).indd 180 8/6/10 12:09:21 PM
Excerpted from Real World Digital Photography, Third Edition by Katrin Eismann, Sean Duggan and Tim Grey. Copyright © 2011. Used with permission of Pearson Education, Inc. and Peachpit Press.
exPosure moDes 181
import the images into your digital editing or file management program (e.g., Lightroom, Adobe Bridge, Aperture, BreezeBrowser, etc.) before you reformat the memory card. If the program can generate thumbnails and large previews, the files should be fine. You should also make a backup copy of the images on a separate hard drive before the card is reformatted. Hard drives do crash, so having duplicate copies of important images on a differ-ent drive is one way to guard against such hardware failures.
Recovering Deleted Files from a Memory Card
in some cases, images that have been erased from a memory card, either by deleting files on the card or by formatting the card, may be able to be recovered using special software designed for this purpose. Programs such as image rescue by lexar (lexar.com) and Card rescue by Winrecovery (cardrescue.com) take advantage of the fact that in most cases deleting files or formatting cards only removes the directory structure that indexes what files are stored on the card, not the actual files. By inventorying the card and building a new directory structure, “lost” files can sometimes be recovered and saved to a specified folder on your computer.
Keep in mind that if you have deleted files or reformatted the card and then used it to store new photos, this will limit the number of files that can poten-tially be recovered since the newer files replace the previously saved files on the card. Depending on the problems affecting the files and/or the memory card, some recovered files may still have corruption issues that can render them unusable.
Exposure ModesDigital cameras usually provide several exposure modes for your photo-graphing pleasure. Although most cameras do a pretty good job when left on autopilot, you gain more technical control and opportunity for creative image making when you explore the other exposure modes. Although the modes vary, some are common to nearly every camera. Typically, these include a semiautomatic mode where you make certain exposure choices and the camera handles the rest; a full manual mode; and possibly
04_RWPhoto(p3).indd 181 8/6/10 12:09:21 PM
Excerpted from Real World Digital Photography, Third Edition by Katrin Eismann, Sean Duggan and Tim Grey. Copyright © 2011. Used with permission of Pearson Education, Inc. and Peachpit Press.
ChaPTer 4: DigiTal PhoTograPhy FounDaTions182
a selection of scene modes that are designed for specific situations. Before considering what each exposure mode is and what it offers you, let’s look at the basics of photographic exposure.
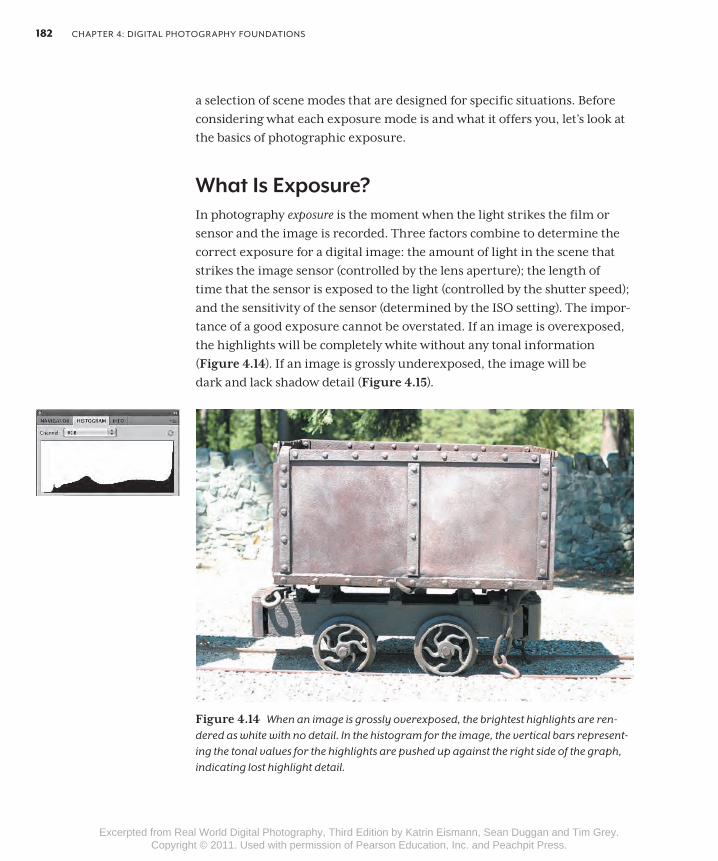
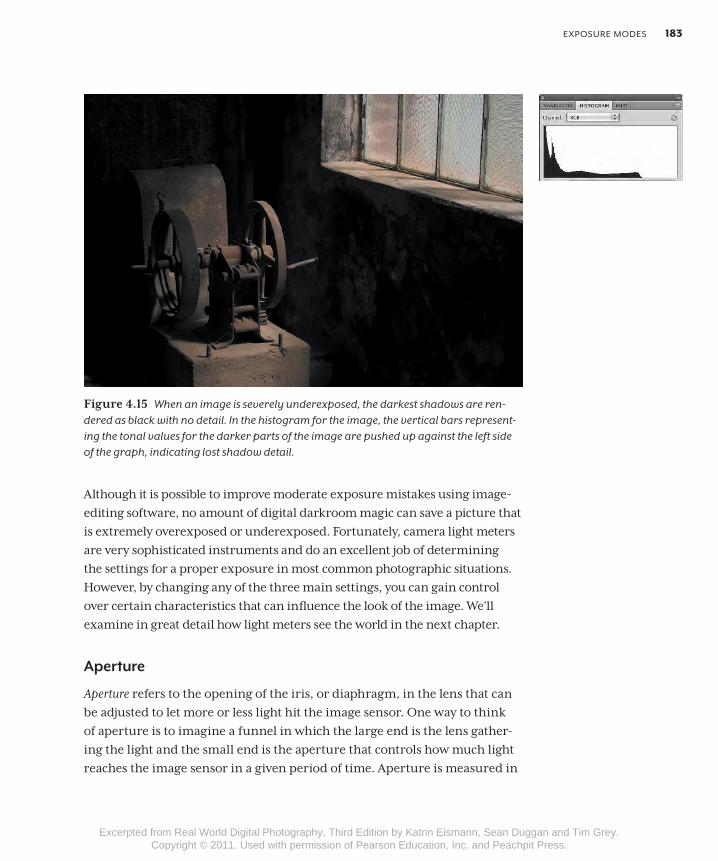
What Is Exposure?In photography exposure is the moment when the light strikes the film or sensor and the image is recorded. Three factors combine to determine the correct exposure for a digital image: the amount of light in the scene that strikes the image sensor (controlled by the lens aperture); the length of time that the sensor is exposed to the light (controlled by the shutter speed); and the sensitivity of the sensor (determined by the ISO setting). The impor-tance of a good exposure cannot be overstated. If an image is overexposed, the highlights will be completely white without any tonal information (Figure 4.14). If an image is grossly underexposed, the image will be dark and lack shadow detail (Figure 4.15).
Figure 4.14 When an image is grossly overexposed, the brightest highlights are ren-dered as white with no detail. In the histogram for the image, the vertical bars represent-ing the tonal values for the highlights are pushed up against the right side of the graph, indicating lost highlight detail.
04_RWPhoto(p3).indd 182 8/6/10 12:09:21 PM
Excerpted from Real World Digital Photography, Third Edition by Katrin Eismann, Sean Duggan and Tim Grey. Copyright © 2011. Used with permission of Pearson Education, Inc. and Peachpit Press.
exPosure moDes 183
Figure 4.15 When an image is severely underexposed, the darkest shadows are ren-dered as black with no detail. In the histogram for the image, the vertical bars represent-ing the tonal values for the darker parts of the image are pushed up against the left side of the graph, indicating lost shadow detail.
Although it is possible to improve moderate exposure mistakes using image-editing software, no amount of digital darkroom magic can save a picture that is extremely overexposed or underexposed. Fortunately, camera light meters are very sophisticated instruments and do an excellent job of determining the settings for a proper exposure in most common photographic situations. However, by changing any of the three main settings, you can gain control over certain characteristics that can influence the look of the image. We’ll examine in great detail how light meters see the world in the next chapter.
Aperture
Aperture refers to the opening of the iris, or diaphragm, in the lens that can be adjusted to let more or less light hit the image sensor. One way to think of aperture is to imagine a funnel in which the large end is the lens gather-ing the light and the small end is the aperture that controls how much light reaches the image sensor in a given period of time. Aperture is measured in
04_RWPhoto(p3).indd 183 8/6/10 12:09:22 PM
Excerpted from Real World Digital Photography, Third Edition by Katrin Eismann, Sean Duggan and Tim Grey. Copyright © 2011. Used with permission of Pearson Education, Inc. and Peachpit Press.
ChaPTer 4: DigiTal PhoTograPhy FounDaTions184
f-stops, and each full stop represents a factor of two in the amount of light admitted. Thus, “opening up” a lens from f5.6 to f4 will admit twice as much light, and “stopping down” from f11 to f16 will cut the amount of light in half (see the sidebar “What’s in an ƒ-stop?”).
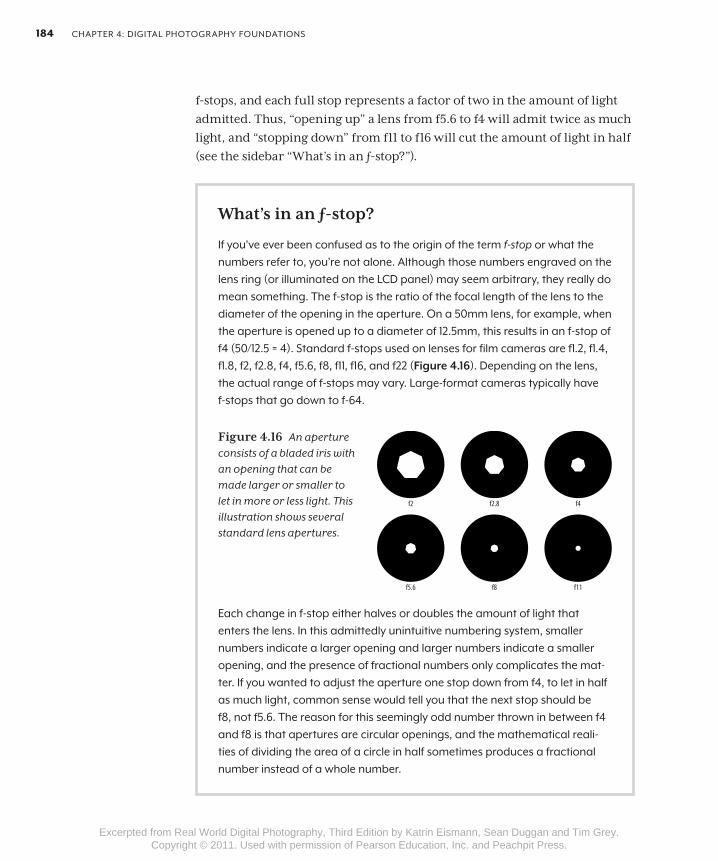
What’s in an ƒ-stop?
if you’ve ever been confused as to the origin of the term f-stop or what the numbers refer to, you’re not alone. although those numbers engraved on the lens ring (or illuminated on the lCD panel) may seem arbitrary, they really do mean something. The f-stop is the ratio of the focal length of the lens to the diameter of the opening in the aperture. on a 50mm lens, for example, when the aperture is opened up to a diameter of 12.5mm, this results in an f-stop of f4 (50/12.5 = 4). standard f-stops used on lenses for film cameras are f1.2, f1.4, f1.8, f2, f2.8, f4, f5.6, f8, f11, f16, and f22 (Figure 4 .16). Depending on the lens, the actual range of f-stops may vary. large-format cameras typically have f-stops that go down to f-64.
f2 f2.8 f4
f5.6 f8 f11
Figure 4.16 An aperture consists of a bladed iris with an opening that can be made larger or smaller to let in more or less light. This illustration shows several standard lens apertures.
each change in f-stop either halves or doubles the amount of light that enters the lens. in this admittedly unintuitive numbering system, smaller numbers indicate a larger opening and larger numbers indicate a smaller opening, and the presence of fractional numbers only complicates the mat-ter. if you wanted to adjust the aperture one stop down from f4, to let in half as much light, common sense would tell you that the next stop should be f8, not f5.6. The reason for this seemingly odd number thrown in between f4 and f8 is that apertures are circular openings, and the mathematical reali-ties of dividing the area of a circle in half sometimes produces a fractional number instead of a whole number.
04_RWPhoto(p3).indd 184 8/6/10 12:09:23 PM
Excerpted from Real World Digital Photography, Third Edition by Katrin Eismann, Sean Duggan and Tim Grey. Copyright © 2011. Used with permission of Pearson Education, Inc. and Peachpit Press.
exPosure moDes 185
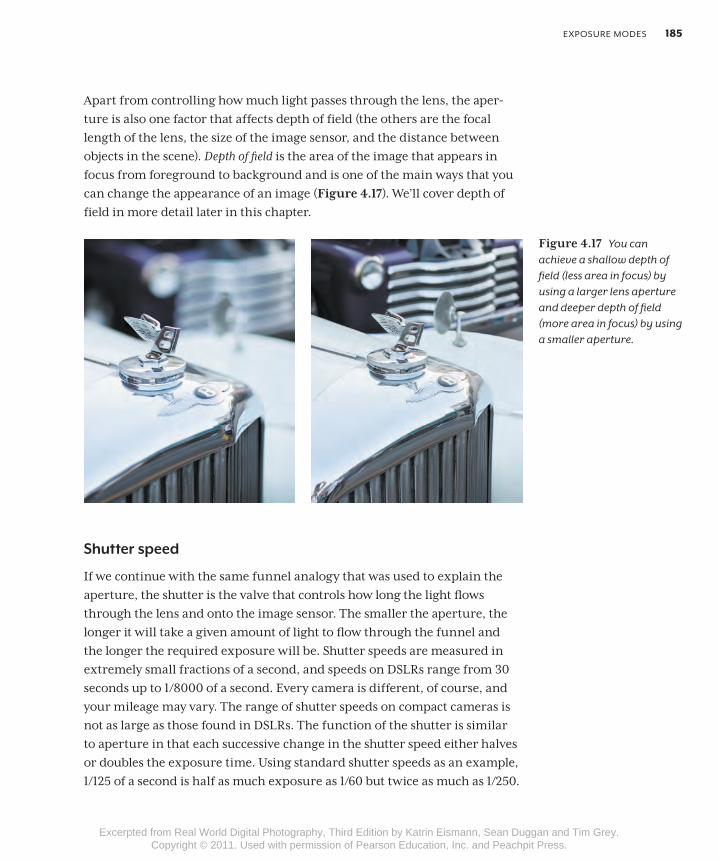
Apart from controlling how much light passes through the lens, the aper-ture is also one factor that affects depth of field (the others are the focal length of the lens, the size of the image sensor, and the distance between objects in the scene). Depth of field is the area of the image that appears in focus from foreground to background and is one of the main ways that you can change the appearance of an image (Figure 4.17). We’ll cover depth of field in more detail later in this chapter.
Shutter speed
If we continue with the same funnel analogy that was used to explain the aperture, the shutter is the valve that controls how long the light flows through the lens and onto the image sensor. The smaller the aperture, the longer it will take a given amount of light to flow through the funnel and the longer the required exposure will be. Shutter speeds are measured in extremely small fractions of a second, and speeds on DSLRs range from 30 seconds up to 1/8000 of a second. Every camera is different, of course, and your mileage may vary. The range of shutter speeds on compact cameras is not as large as those found in DSLRs. The function of the shutter is similar to aperture in that each successive change in the shutter speed either halves or doubles the exposure time. Using standard shutter speeds as an example, 1⁄125 of a second is half as much exposure as 1⁄60 but twice as much as 1⁄250.
Figure 4.17 You can achieve a shallow depth of field (less area in focus) by using a larger lens aperture and deeper depth of field (more area in focus) by using a smaller aperture.
04_RWPhoto(p3).indd 185 8/6/10 12:09:23 PM
Excerpted from Real World Digital Photography, Third Edition by Katrin Eismann, Sean Duggan and Tim Grey. Copyright © 2011. Used with permission of Pearson Education, Inc. and Peachpit Press.
ChaPTer 4: DigiTal PhoTograPhy FounDaTions186
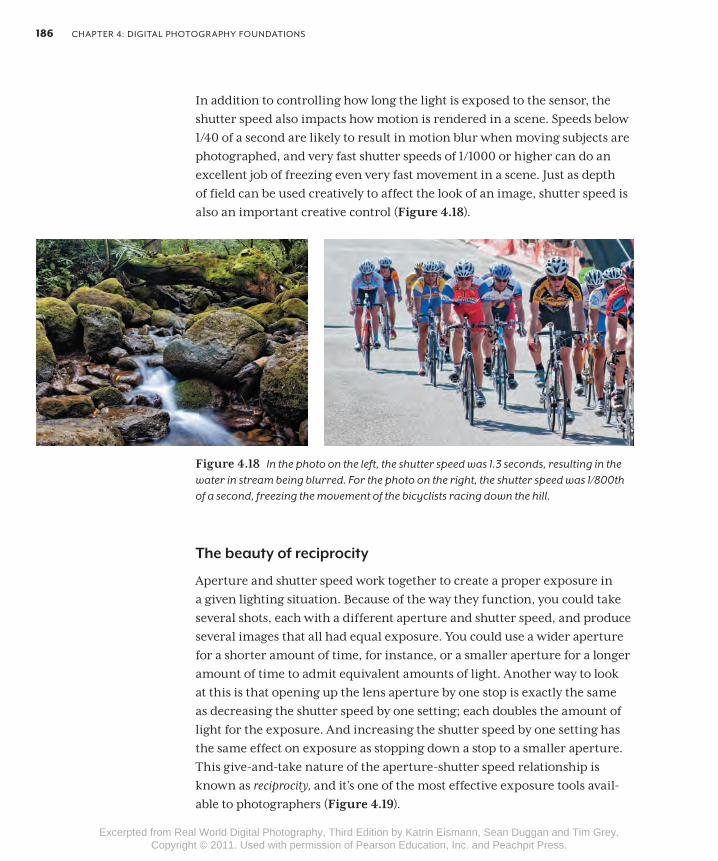
In addition to controlling how long the light is exposed to the sensor, the shutter speed also impacts how motion is rendered in a scene. Speeds below 1/40 of a second are likely to result in motion blur when moving subjects are photographed, and very fast shutter speeds of 1/1000 or higher can do an excellent job of freezing even very fast movement in a scene. Just as depth of field can be used creatively to affect the look of an image, shutter speed is also an important creative control (Figure 4.18).
Figure 4.18 In the photo on the left, the shutter speed was 1.3 seconds, resulting in the water in stream being blurred. For the photo on the right, the shutter speed was 1/800th of a second, freezing the movement of the bicyclists racing down the hill.
The beauty of reciprocity
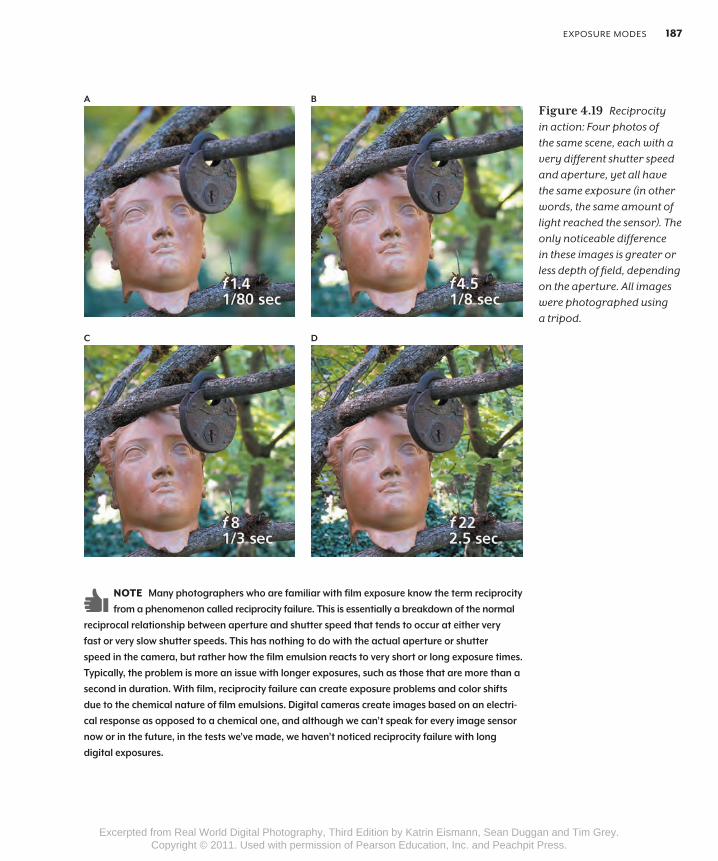
Aperture and shutter speed work together to create a proper exposure in a given lighting situation. Because of the way they function, you could take several shots, each with a different aperture and shutter speed, and produce several images that all had equal exposure. You could use a wider aperture for a shorter amount of time, for instance, or a smaller aperture for a longer amount of time to admit equivalent amounts of light. Another way to look at this is that opening up the lens aperture by one stop is exactly the same as decreasing the shutter speed by one setting; each doubles the amount of light for the exposure. And increasing the shutter speed by one setting has the same effect on exposure as stopping down a stop to a smaller aperture. This give-and-take nature of the aperture-shutter speed relationship is known as reciprocity, and it’s one of the most effective exposure tools avail-able to photographers (Figure 4.19).
04_RWPhoto(p3).indd 186 8/6/10 12:09:24 PM
Excerpted from Real World Digital Photography, Third Edition by Katrin Eismann, Sean Duggan and Tim Grey. Copyright © 2011. Used with permission of Pearson Education, Inc. and Peachpit Press.
exPosure moDes 187
A
C
B
D
Note Many photographers who are familiar with film exposure know the term reciprocity from a phenomenon called reciprocity failure . This is essentially a breakdown of the normal
reciprocal relationship between aperture and shutter speed that tends to occur at either very fast or very slow shutter speeds . This has nothing to do with the actual aperture or shutter speed in the camera, but rather how the film emulsion reacts to very short or long exposure times . Typically, the problem is more an issue with longer exposures, such as those that are more than a second in duration . With film, reciprocity failure can create exposure problems and color shifts due to the chemical nature of film emulsions . Digital cameras create images based on an electri-cal response as opposed to a chemical one, and although we can’t speak for every image sensor now or in the future, in the tests we’ve made, we haven’t noticed reciprocity failure with long digital exposures .
Figure 4.19 Reciprocity in action: Four photos of the same scene, each with a very different shutter speed and aperture, yet all have the same exposure (in other words, the same amount of light reached the sensor). The only noticeable difference in these images is greater or less depth of field, depending on the aperture. All images were photographed using a tripod.
04_RWPhoto(p3).indd 187 8/6/10 12:09:25 PM
Excerpted from Real World Digital Photography, Third Edition by Katrin Eismann, Sean Duggan and Tim Grey. Copyright © 2011. Used with permission of Pearson Education, Inc. and Peachpit Press.
ChaPTer 4: DigiTal PhoTograPhy FounDaTions188
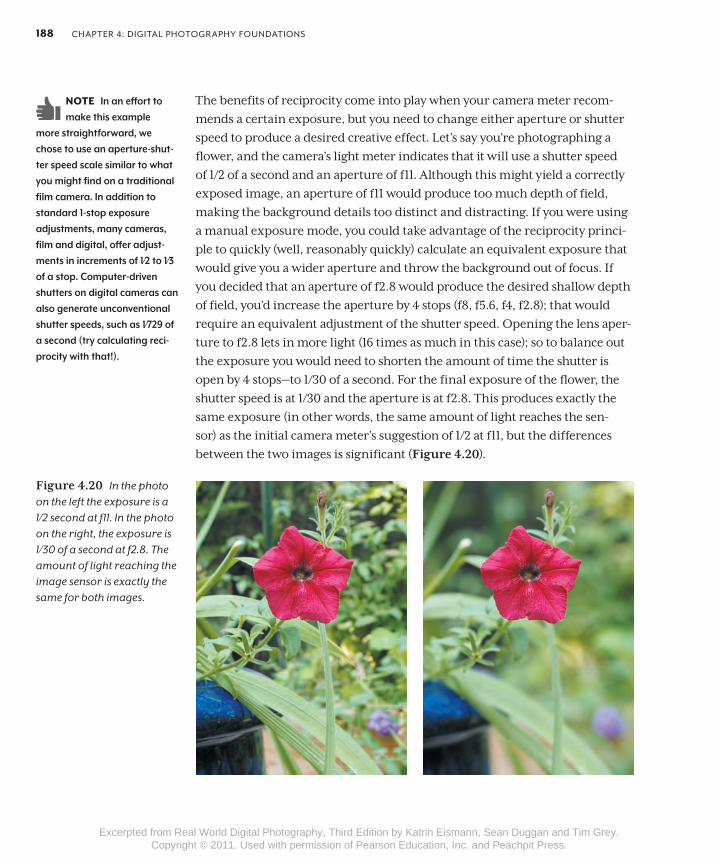
The benefits of reciprocity come into play when your camera meter recom-mends a certain exposure, but you need to change either aperture or shutter speed to produce a desired creative effect. Let’s say you’re photographing a flower, and the camera’s light meter indicates that it will use a shutter speed of 1⁄2 of a second and an aperture of f11. Although this might yield a correctly exposed image, an aperture of f11 would produce too much depth of field, making the background details too distinct and distracting. If you were using a manual exposure mode, you could take advantage of the reciprocity princi-ple to quickly (well, reasonably quickly) calculate an equivalent exposure that would give you a wider aperture and throw the background out of focus. If you decided that an aperture of f2.8 would produce the desired shallow depth of field, you’d increase the aperture by 4 stops (f8, f5.6, f4, f2.8); that would require an equivalent adjustment of the shutter speed. Opening the lens aper-ture to f2.8 lets in more light (16 times as much in this case); so to balance out the exposure you would need to shorten the amount of time the shutter is open by 4 stops—to 1⁄30 of a second. For the final exposure of the flower, the shutter speed is at 1⁄30 and the aperture is at f2.8. This produces exactly the same exposure (in other words, the same amount of light reaches the sen-sor) as the initial camera meter’s suggestion of 1⁄2 at f11, but the differences between the two images is significant (Figure 4.20).
Note In an effort to make this example
more straightforward, we chose to use an aperture-shut-ter speed scale similar to what you might find on a traditional film camera . In addition to standard 1-stop exposure adjustments, many cameras, film and digital, offer adjust-ments in increments of 1⁄2 to 1⁄3 of a stop . Computer-driven shutters on digital cameras can also generate unconventional shutter speeds, such as 1⁄729 of a second (try calculating reci-procity with that!) .
Figure 4.20 In the photo on the left the exposure is a 1⁄2 second at f11. In the photo on the right, the exposure is 1⁄30 of a second at f2.8. The amount of light reaching the image sensor is exactly the same for both images.
04_RWPhoto(p3).indd 188 8/6/10 12:09:26 PM
Excerpted from Real World Digital Photography, Third Edition by Katrin Eismann, Sean Duggan and Tim Grey. Copyright © 2011. Used with permission of Pearson Education, Inc. and Peachpit Press.
exPosure moDes 189
Fortunately, unless you’re operating on full manual mode or you just enjoy the intellectual challenge, when used in Aperture or Shutter Priority mode, cam-eras will automatically calculate the reciprocal aperture and shutter speed val-ues for you. This makes it easier to concentrate on the image and choose the settings that will give you the right creative look. We’ll cover exposure consid-erations in greater depth later in this chapter and also in Chapter 5.
Full Auto ModeNearly all modern cameras provide a fully automatic mode that does every-thing for you but compose the shot and decide when to press the shutter button. Full Auto mode evaluates the lighting; selects the ISO, white balance, aperture, and speed settings; and even decides whether the scene needs a little extra light from the built-in flash. This is a good mode to use if you’re new to digital photography and you still don’t know much about your new camera but you want to take pictures right away—or when you need to hand the camera to someone else to take a picture of you.
Keep in mind that some camera features, such as the abilities to change the ISO, adjust the exposure with exposure compensation, and shoot in RAW for-mat, may not be available in Full Auto mode. To gain an extra level of control and customization while enjoying the ease of automatic operation, you may have to use another automatic mode that is commonly called Program.
Program ModeProgram mode is similar to Full Auto mode in that the camera selects the appropriate aperture and shutter speed to deliver the correct exposure for the scene you’re photographing. You also have the ability to modify the set-tings the camera has chosen by shifting the aperture–shutter speed com-bination to select a mix that better serves your creative goals (reciprocity in action). On DSLRs you usually make this adjustment by dialing a control wheel until you arrive at a desired aperture or shutter speed, something you can do without taking your eye away from the viewfinder. On compact cameras or deluxe point-and-shoot models, the procedure may be more cumbersome: You usually have to manipulate a series of buttons, requiring you to take your eye away from the camera. Program modes also offer access to more advanced features of the cameras, such as shooting in RAW format,
04_RWPhoto(p3).indd 189 8/6/10 12:09:26 PM
Excerpted from Real World Digital Photography, Third Edition by Katrin Eismann, Sean Duggan and Tim Grey. Copyright © 2011. Used with permission of Pearson Education, Inc. and Peachpit Press.
ChaPTer 4: DigiTal PhoTograPhy FounDaTions190
exposure compensation, higher ISO settings, and choosing a custom white balance. Because it offers the convenience of being fully automatic with the flexibility of changing some of the settings, you may find that Program mode works well for many situations.
Aperture Priority ModeAperture Priority can be thought of as a semiautomatic mode because it relies on you to decide which aperture to choose while the camera supplies the appro-priate shutter speed. Once you select a given aperture, the camera constantly adjusts the shutter speed in response to changing exposure conditions, but the aperture remains the same. This mode is an excellent choice for images where depth of field issues take precedence over shutter speed. A wider aperture causes the background to be more out of focus, and a smaller aperture yields a photo with more areas of the image in focus. Aperture Priority is excellent for portraits where you want only the subject in focus (use a smaller ƒ number for a larger aperture) and for scenic shots where you want good depth of field throughout the scene (use a larger ƒ number for a smaller aperture).
Shutter Priority ModeLike Aperture Priority, Shutter Priority is a semiautomatic mode. You decide what shutter speed you want to shoot with, and the camera chooses the cor-rect aperture. Shutter Priority is ideal for situations where exposure time is more important than depth of field. If you need to freeze motion, such as with sports or birds in flight, using this mode allows you to select an appro-priately fast shutter speed. If your aim is to use motion blur creatively, such as the classic rendition of moving water in a stream, you can also use Shut-ter Priority to choose a slow shutter speed. Depending on the speed of the object you’re trying to blur, you may need to use a tripod so that stationary elements in the image remain sharp.
Manual ModeWith Manual mode you have to do all the work. Well, maybe not all the work. The camera does provide a light meter to tell you if your settings will give you a properly exposed image, but you have to turn the dials or push the buttons and make sure that aperture and shutter speed are set correctly.
04_RWPhoto(p3).indd 190 8/6/10 12:09:26 PM
Excerpted from Real World Digital Photography, Third Edition by Katrin Eismann, Sean Duggan and Tim Grey. Copyright © 2011. Used with permission of Pearson Education, Inc. and Peachpit Press.
exPosure moDes 191
Although a Manual mode is essential for photographic control geeks (like the three of us) and those who want as many creative options as possible, it’s not as spontaneous as some of the other modes, and realistically you may only need to control either aperture or shutter speed to achieve the effect you want. For some situations, however, such as night photography and in the studio, having a Manual mode is critical.
Scene ModesScene modes are preset configurations that are designed for you to use under specific shooting conditions to achieve good results without having to think about the optimal camera settings. They’re not exposure modes you would use all the time. You’ll find these modes on many digital cameras, from com-pact point-and-shoot models all the way up through advanced DSLRs. The actual names and modes vary from camera to camera (other terms we’ve heard include Best Shot and Creative Assist modes), and depending on their features, some cameras may offer more sophisticated interpretations. But here’s a rundown of some of the most common scene modes:
• Portrait. The main feature of this mode is that it will try to soften the focus of the background while keeping the main subject sharp. The degree to which the background is thrown out of focus depends on a number of factors, including the amount of light available, the distance between the subject and the background, the maximum aperture and focal length of the lens, as well as the size of the image sensor (compact cameras cannot create the same shallow depth of field that is possible from a DSLR). Some cameras may also use a Center-Weighted metering pattern to give emphasis to the center portion of the frame. Center-Weighted metering is common in portrait situations. See Chapter 5 for detailed coverage of how a camera’s light meter works.
• Night portrait. This mode is for portraits of people or any photo where the subject is relatively close to the camera, at twilight or at night. If such a scene is photographed normally, the flash will fire and the camera will expose for the immediate foreground subject, leaving the background very dark and underexposed. In Night Portrait mode, the camera uses the flash and also chooses a slower shutter speed, creating a balanced expo-sure between the main subject and the darker background. The exposure for the main subject and the background will look good. Some cameras have a mode that is similar to this called Slow-Sync Flash (Figure 4.21).
04_RWPhoto(p3).indd 191 8/6/10 12:09:26 PM
Excerpted from Real World Digital Photography, Third Edition by Katrin Eismann, Sean Duggan and Tim Grey. Copyright © 2011. Used with permission of Pearson Education, Inc. and Peachpit Press.
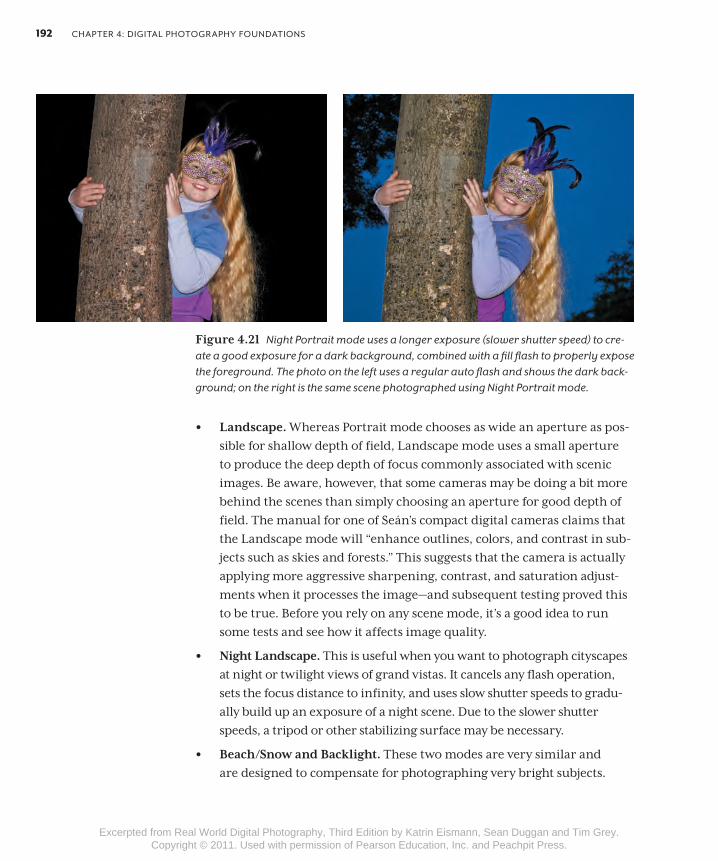
ChaPTer 4: DigiTal PhoTograPhy FounDaTions192
Figure 4.21 Night Portrait mode uses a longer exposure (slower shutter speed) to cre-ate a good exposure for a dark background, combined with a fill flash to properly expose the foreground. The photo on the left uses a regular auto flash and shows the dark back-ground; on the right is the same scene photographed using Night Portrait mode.
• Landscape. Whereas Portrait mode chooses as wide an aperture as pos-sible for shallow depth of field, Landscape mode uses a small aperture to produce the deep depth of focus commonly associated with scenic images. Be aware, however, that some cameras may be doing a bit more behind the scenes than simply choosing an aperture for good depth of field. The manual for one of Seán’s compact digital cameras claims that the Landscape mode will “enhance outlines, colors, and contrast in sub-jects such as skies and forests.” This suggests that the camera is actually applying more aggressive sharpening, contrast, and saturation adjust-ments when it processes the image—and subsequent testing proved this to be true. Before you rely on any scene mode, it’s a good idea to run some tests and see how it affects image quality.
• Night Landscape. This is useful when you want to photograph cityscapes at night or twilight views of grand vistas. It cancels any flash operation, sets the focus distance to infinity, and uses slow shutter speeds to gradu-ally build up an exposure of a night scene. Due to the slower shutter speeds, a tripod or other stabilizing surface may be necessary.
• Beach/Snow and Backlight. These two modes are very similar and are designed to compensate for photographing very bright subjects.
04_RWPhoto(p3).indd 192 8/6/10 12:09:27 PM
Excerpted from Real World Digital Photography, Third Edition by Katrin Eismann, Sean Duggan and Tim Grey. Copyright © 2011. Used with permission of Pearson Education, Inc. and Peachpit Press.
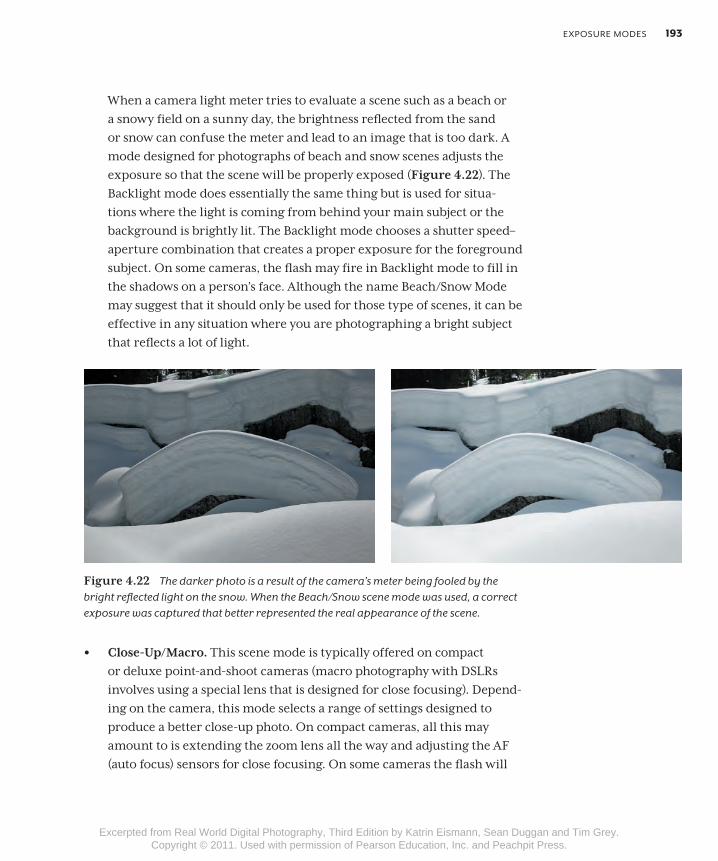
exPosure moDes 193
When a camera light meter tries to evaluate a scene such as a beach or a snowy field on a sunny day, the brightness reflected from the sand or snow can confuse the meter and lead to an image that is too dark. A mode designed for photographs of beach and snow scenes adjusts the exposure so that the scene will be properly exposed (Figure 4.22). The Backlight mode does essentially the same thing but is used for situa-tions where the light is coming from behind your main subject or the background is brightly lit. The Backlight mode chooses a shutter speed–aperture combination that creates a proper exposure for the foreground subject. On some cameras, the flash may fire in Backlight mode to fill in the shadows on a person’s face. Although the name Beach/Snow Mode may suggest that it should only be used for those type of scenes, it can be effective in any situation where you are photographing a bright subject that reflects a lot of light.
Figure 4.22 The darker photo is a result of the camera’s meter being fooled by the bright reflected light on the snow. When the Beach/Snow scene mode was used, a correct exposure was captured that better represented the real appearance of the scene.
• Close-Up/Macro. This scene mode is typically offered on compact or deluxe point-and-shoot cameras (macro photography with DSLRs involves using a special lens that is designed for close focusing). Depend-ing on the camera, this mode selects a range of settings designed to produce a better close-up photo. On compact cameras, all this may amount to is extending the zoom lens all the way and adjusting the AF (auto focus) sensors for close focusing. On some cameras the flash will
04_RWPhoto(p3).indd 193 8/6/10 12:09:28 PM
Excerpted from Real World Digital Photography, Third Edition by Katrin Eismann, Sean Duggan and Tim Grey. Copyright © 2011. Used with permission of Pearson Education, Inc. and Peachpit Press.
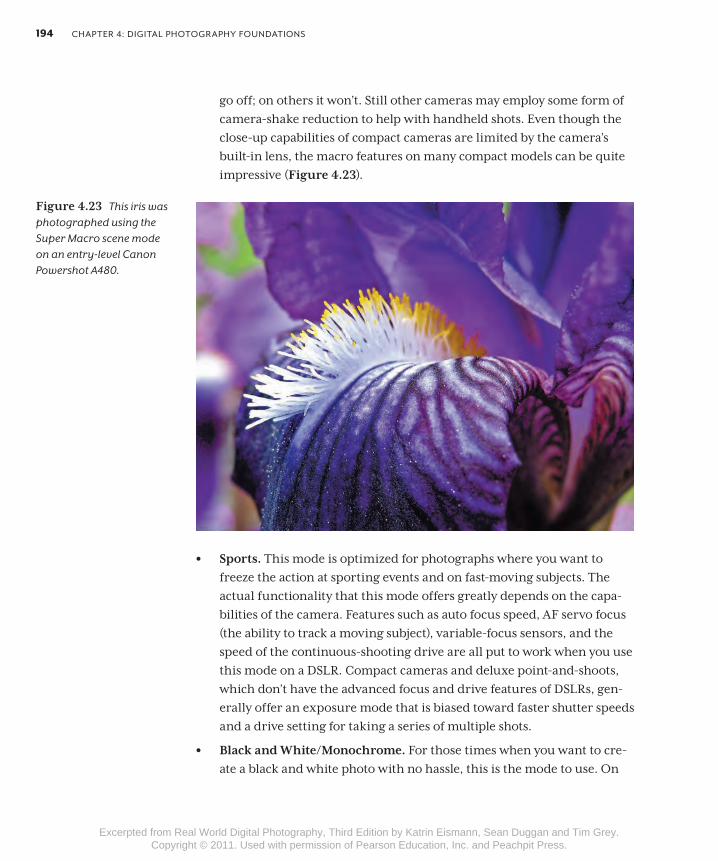
ChaPTer 4: DigiTal PhoTograPhy FounDaTions194
go off; on others it won’t. Still other cameras may employ some form of camera-shake reduction to help with handheld shots. Even though the close-up capabilities of compact cameras are limited by the camera’s built-in lens, the macro features on many compact models can be quite impressive (Figure 4.23).
• Sports. This mode is optimized for photographs where you want to freeze the action at sporting events and on fast-moving subjects. The actual functionality that this mode offers greatly depends on the capa-bilities of the camera. Features such as auto focus speed, AF servo focus (the ability to track a moving subject), variable-focus sensors, and the speed of the continuous-shooting drive are all put to work when you use this mode on a DSLR. Compact cameras and deluxe point-and-shoots, which don’t have the advanced focus and drive features of DSLRs, gen-erally offer an exposure mode that is biased toward faster shutter speeds and a drive setting for taking a series of multiple shots.
• Black and White/Monochrome. For those times when you want to cre-ate a black and white photo with no hassle, this is the mode to use. On
Figure 4.23 This iris was photographed using the Super Macro scene mode on an entry-level Canon Powershot A480.
04_RWPhoto(p3).indd 194 8/6/10 12:09:29 PM
Excerpted from Real World Digital Photography, Third Edition by Katrin Eismann, Sean Duggan and Tim Grey. Copyright © 2011. Used with permission of Pearson Education, Inc. and Peachpit Press.
meTaDaTa 195
some cameras the Black and White mode may only be available when shooting JPEG files. If you are shooting in RAW+JPEG, the JPEG file will be black and white and the RAW file will still retain all color and edit-ing properties. But we prefer to take our images in color and convert to black and white using an image-editing program, since that gives us the most flexibility to creatively interpret the file The only reasons we can think of to use a Black and White or Monochrome mode is if you don’t have the time or experience to make the conversion in another pro-gram, or if you’re new to viewing the world in gray tones and actually seeing the image in black and white on the LCD helps with the composi-tion and subject matter you’ve chosen. Otherwise, we don’t recommend shooting in Black and White mode.
• Other modes. The variety of scene modes is limited only by the imagi-nation of camera manufacturers. Some of the modes are useful in relatively limited circumstances, such as a Fireworks mode or a mode designed to copy documents (espionage mode?).
MetadataMetadata is not a setting or mode that you’ll find on your camera, but your camera is generating lots of metadata every time you take a picture. To use a simple definition, metadata is information about information. More specifi-cally, metadata is structured information about a collection of data—such as an image file—that makes accessing and using that file more efficient and productive.
Advances in the digital management of information have underscored the importance of metadata among different professional disciplines, but the concept has been around for a long time. Distance scales, notations, and legends on maps, for example, qualify as metadata since they are essentially information about the map, which in itself is just information about a spe-cific geographic area (Figure 4.24). Dictionaries also feature metadata in the form of a dictionary guide that tells you how to interpret the different infor-mation you’ll find listed in the word definitions.
04_RWPhoto(p3).indd 195 8/6/10 12:09:29 PM
Excerpted from Real World Digital Photography, Third Edition by Katrin Eismann, Sean Duggan and Tim Grey. Copyright © 2011. Used with permission of Pearson Education, Inc. and Peachpit Press.
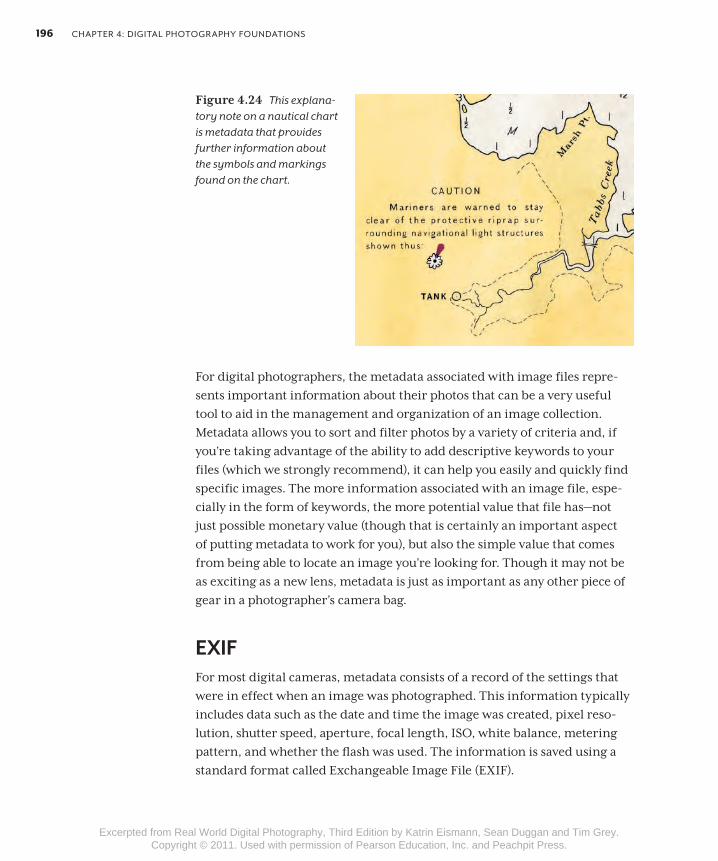
ChaPTer 4: DigiTal PhoTograPhy FounDaTions196
Figure 4.24 This explana-tory note on a nautical chart is metadata that provides further information about the symbols and markings found on the chart.
For digital photographers, the metadata associated with image files repre-sents important information about their photos that can be a very useful tool to aid in the management and organization of an image collection. Metadata allows you to sort and filter photos by a variety of criteria and, if you’re taking advantage of the ability to add descriptive keywords to your files (which we strongly recommend), it can help you easily and quickly find specific images. The more information associated with an image file, espe-cially in the form of keywords, the more potential value that file has—not just possible monetary value (though that is certainly an important aspect of putting metadata to work for you), but also the simple value that comes from being able to locate an image you’re looking for. Though it may not be as exciting as a new lens, metadata is just as important as any other piece of gear in a photographer’s camera bag.
EXIFFor most digital cameras, metadata consists of a record of the settings that were in effect when an image was photographed. This information typically includes data such as the date and time the image was created, pixel reso-lution, shutter speed, aperture, focal length, ISO, white balance, metering pattern, and whether the flash was used. The information is saved using a standard format called Exchangeable Image File (EXIF).
04_RWPhoto(p3).indd 196 8/6/10 12:09:29 PM
Excerpted from Real World Digital Photography, Third Edition by Katrin Eismann, Sean Duggan and Tim Grey. Copyright © 2011. Used with permission of Pearson Education, Inc. and Peachpit Press.
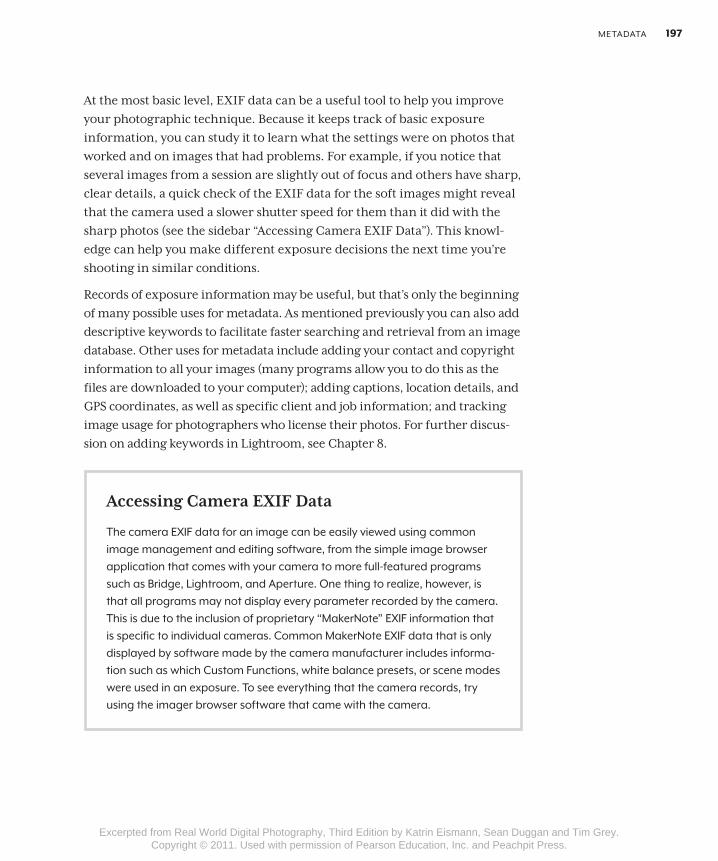
meTaDaTa 197
At the most basic level, EXIF data can be a useful tool to help you improve your photographic technique. Because it keeps track of basic exposure information, you can study it to learn what the settings were on photos that worked and on images that had problems. For example, if you notice that several images from a session are slightly out of focus and others have sharp, clear details, a quick check of the EXIF data for the soft images might reveal that the camera used a slower shutter speed for them than it did with the sharp photos (see the sidebar “Accessing Camera EXIF Data”). This knowl-edge can help you make different exposure decisions the next time you’re shooting in similar conditions.
Records of exposure information may be useful, but that’s only the beginning of many possible uses for metadata. As mentioned previously you can also add descriptive keywords to facilitate faster searching and retrieval from an image database. Other uses for metadata include adding your contact and copyright information to all your images (many programs allow you to do this as the files are downloaded to your computer); adding captions, location details, and GPS coordinates, as well as specific client and job information; and tracking image usage for photographers who license their photos. For further discus-sion on adding keywords in Lightroom, see Chapter 8.
Accessing Camera EXIF Data
The camera exiF data for an image can be easily viewed using common image management and editing software, from the simple image browser application that comes with your camera to more full-featured programs such as Bridge, lightroom, and aperture. one thing to realize, however, is that all programs may not display every parameter recorded by the camera. This is due to the inclusion of proprietary “makernote” exiF information that is specific to individual cameras. Common makernote exiF data that is only displayed by software made by the camera manufacturer includes informa-tion such as which Custom Functions, white balance presets, or scene modes were used in an exposure. To see everything that the camera records, try using the imager browser software that came with the camera.
04_RWPhoto(p3).indd 197 8/6/10 12:09:29 PM
Excerpted from Real World Digital Photography, Third Edition by Katrin Eismann, Sean Duggan and Tim Grey. Copyright © 2011. Used with permission of Pearson Education, Inc. and Peachpit Press.
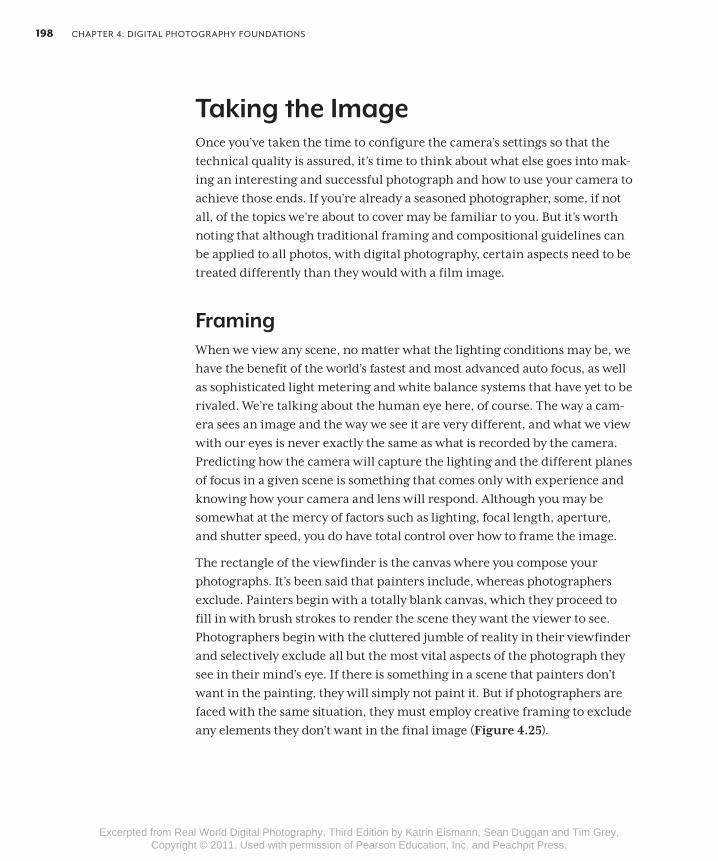
ChaPTer 4: DigiTal PhoTograPhy FounDaTions198
Taking the ImageOnce you’ve taken the time to configure the camera’s settings so that the technical quality is assured, it’s time to think about what else goes into mak-ing an interesting and successful photograph and how to use your camera to achieve those ends. If you’re already a seasoned photographer, some, if not all, of the topics we’re about to cover may be familiar to you. But it’s worth noting that although traditional framing and compositional guidelines can be applied to all photos, with digital photography, certain aspects need to be treated differently than they would with a film image.
FramingWhen we view any scene, no matter what the lighting conditions may be, we have the benefit of the world’s fastest and most advanced auto focus, as well as sophisticated light metering and white balance systems that have yet to be rivaled. We’re talking about the human eye here, of course. The way a cam-era sees an image and the way we see it are very different, and what we view with our eyes is never exactly the same as what is recorded by the camera. Predicting how the camera will capture the lighting and the different planes of focus in a given scene is something that comes only with experience and knowing how your camera and lens will respond. Although you may be somewhat at the mercy of factors such as lighting, focal length, aperture, and shutter speed, you do have total control over how to frame the image.
The rectangle of the viewfinder is the canvas where you compose your photographs. It’s been said that painters include, whereas photographers exclude. Painters begin with a totally blank canvas, which they proceed to fill in with brush strokes to render the scene they want the viewer to see. Photographers begin with the cluttered jumble of reality in their viewfinder and selectively exclude all but the most vital aspects of the photograph they see in their mind’s eye. If there is something in a scene that painters don’t want in the painting, they will simply not paint it. But if photographers are faced with the same situation, they must employ creative framing to exclude any elements they don’t want in the final image (Figure 4.25).
04_RWPhoto(p3).indd 198 8/6/10 12:09:29 PM
Excerpted from Real World Digital Photography, Third Edition by Katrin Eismann, Sean Duggan and Tim Grey. Copyright © 2011. Used with permission of Pearson Education, Inc. and Peachpit Press.
TaKing The image 199
Figure 4.25 By carefully considering how you frame an image in the viewfinder, you can eliminate distracting details, or find a better composition. In many cases, you can do this simply by moving closer to the subject (right).
Horizontal or vertical?
The rectangular or square aspect ratio of most camera viewfinders can be a blessing and a curse. In some regards, it can make composition easier since it defines the shape where you must compose the image. On the other hand, since our view of the world is not limited by rectangular constraints, we often find we must work around the narrow window on the world that the viewfinder provides.
If your image format is rectangular, the first choice you face is whether to frame the image horizontally or vertically. Many novice photographers use horizontal framing because most camera designs encourage you to hold the camera in a horizontal orientation. Until you become used to it, using ver-tical framing requires a conscious effort to rotate the camera. Depending on your photographic experience and your skill at seeing images amid the visual confusion of reality, deciding on a horizontal or vertical frame may come easily to you, or it may take some practice. Certain subjects will obvi-ously lend themselves to one or the other, of course. But others are not so easy, and some may work well with both methods. Above all, try to be con-scious of not falling into the routine of taking all your images as horizontals (Figure 4.26).
04_RWPhoto(p3).indd 199 8/6/10 12:09:30 PM
Excerpted from Real World Digital Photography, Third Edition by Katrin Eismann, Sean Duggan and Tim Grey. Copyright © 2011. Used with permission of Pearson Education, Inc. and Peachpit Press.
ChaPTer 4: DigiTal PhoTograPhy FounDaTions200
Figure 4.26 Horizontal or vertical? Both of these shots are good photos of the subject, but the vertical one is a stronger composition that fits the subject better and makes good use of the prominent diagonal element in the scene.
When you look at a scene, put away any preconceived ideas about how it should be framed and try to distill it down to just the basic shapes and col-ors. Using this approach, you should be able to see whether elements in the image suggest a horizontal or a vertical view. Some scenes, such as land-scapes and large group portraits, are obvious candidates for the horizontal frame. The vertical frame is ideal for images where there are strong verti-cal lines, such as soaring skyscrapers, towering trees, or the classic head and shoulders portrait pose. But even with images where the orientation of the frame seems clear, be open to trying a different approach, because you might find a new and better composition that didn’t occur to you at first (Figure 4.27). When in doubt deciding which frame orientation will work best, go ahead and take the image as both a vertical and a horizontal.
04_RWPhoto(p3).indd 200 8/6/10 12:09:31 PM
Excerpted from Real World Digital Photography, Third Edition by Katrin Eismann, Sean Duggan and Tim Grey. Copyright © 2011. Used with permission of Pearson Education, Inc. and Peachpit Press.
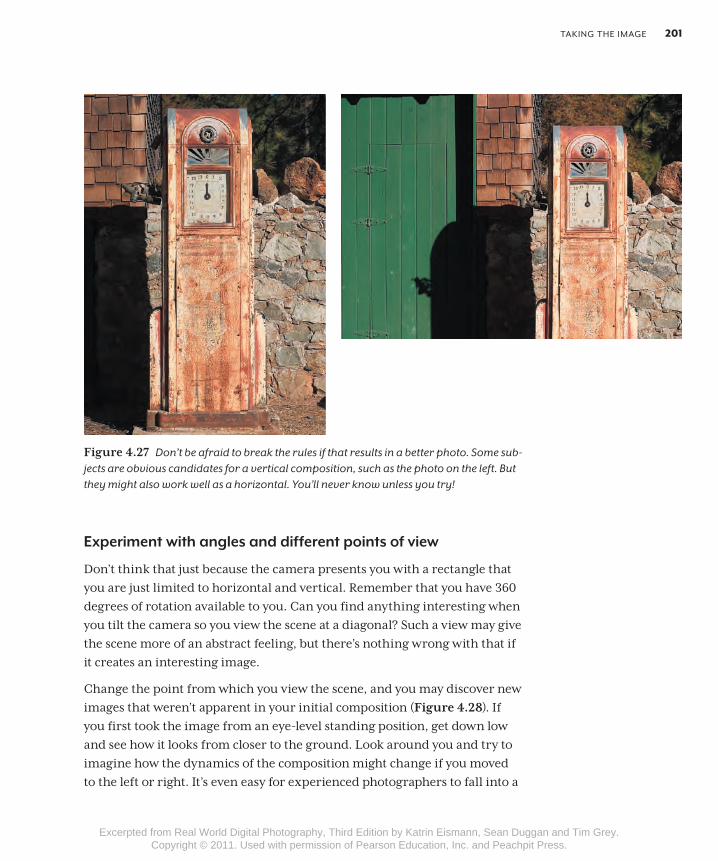
TaKing The image 201
Figure 4.27 Don’t be afraid to break the rules if that results in a better photo. Some sub-jects are obvious candidates for a vertical composition, such as the photo on the left. But they might also work well as a horizontal. You’ll never know unless you try!
Experiment with angles and different points of view
Don’t think that just because the camera presents you with a rectangle that you are just limited to horizontal and vertical. Remember that you have 360 degrees of rotation available to you. Can you find anything interesting when you tilt the camera so you view the scene at a diagonal? Such a view may give the scene more of an abstract feeling, but there’s nothing wrong with that if it creates an interesting image.
Change the point from which you view the scene, and you may discover new images that weren’t apparent in your initial composition (Figure 4.28). If you first took the image from an eye-level standing position, get down low and see how it looks from closer to the ground. Look around you and try to imagine how the dynamics of the composition might change if you moved to the left or right. It’s even easy for experienced photographers to fall into a
04_RWPhoto(p3).indd 201 8/6/10 12:09:31 PM
Excerpted from Real World Digital Photography, Third Edition by Katrin Eismann, Sean Duggan and Tim Grey. Copyright © 2011. Used with permission of Pearson Education, Inc. and Peachpit Press.
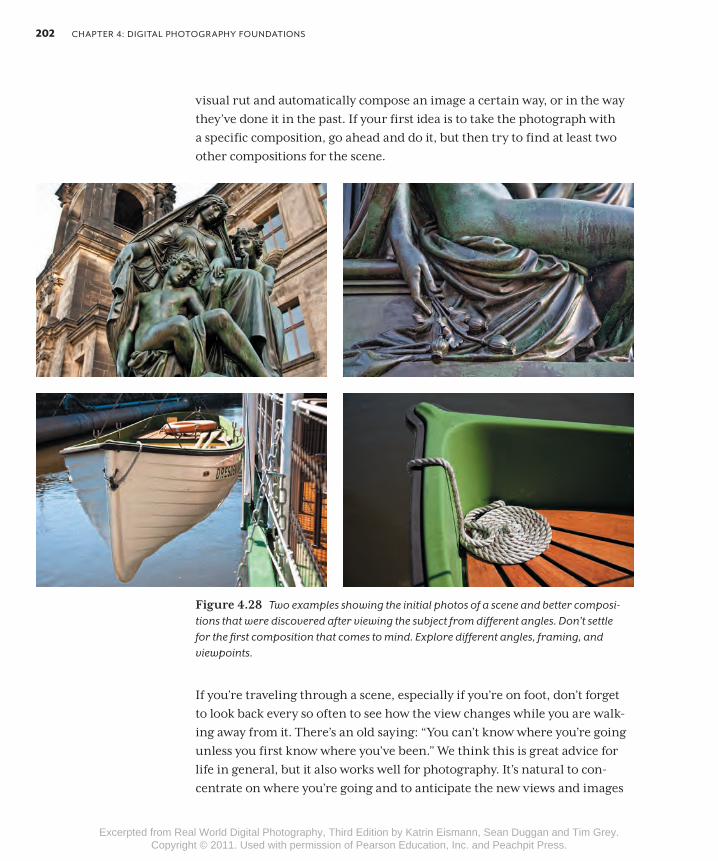
ChaPTer 4: DigiTal PhoTograPhy FounDaTions202
visual rut and automatically compose an image a certain way, or in the way they’ve done it in the past. If your first idea is to take the photograph with a specific composition, go ahead and do it, but then try to find at least two other compositions for the scene.
Figure 4.28 Two examples showing the initial photos of a scene and better composi-tions that were discovered after viewing the subject from different angles. Don’t settle for the first composition that comes to mind. Explore different angles, framing, and viewpoints.
If you’re traveling through a scene, especially if you’re on foot, don’t forget to look back every so often to see how the view changes while you are walk-ing away from it. There’s an old saying: “You can’t know where you’re going unless you first know where you’ve been.” We think this is great advice for life in general, but it also works well for photography. It’s natural to con-centrate on where you’re going and to anticipate the new views and images
04_RWPhoto(p3).indd 202 8/6/10 12:09:33 PM
Excerpted from Real World Digital Photography, Third Edition by Katrin Eismann, Sean Duggan and Tim Grey. Copyright © 2011. Used with permission of Pearson Education, Inc. and Peachpit Press.
TaKing The image 203
you may see around the next bend in the road. But we have found many great and often unexpected images simply by looking back over the path we have already walked. For one thing the lighting is likely to be different, and in many cases, that alone is enough to create a compelling new image. The dynamics of the scene will also change, and you may see new relation-ships between certain elements in the image or between the foreground and background that create an entirely different photograph than what you saw when you were only looking ahead.
The Importance of Cropping in the CameraSome photographers like to frame the image a little loose so they can have some extra room to apply a specific crop later when the image is printed. For example, when framing an architectural photo with a traditional film camera, a photographer may frame the initial composition and then step back one or two steps, or zoom the lens to a wider view, to allow for some straightening and cropping.
Making every pixel count
With digital photography, however, cropping is not a practice we recom-mend. The reason is that cropping a digital photograph means that you are throwing away pixels and effectively lowering the megapixel resolution for that particular shot. If you shoot a horizontal photo with a 12-megapixel camera, for example, and then decide later on that it works better as a verti-cal, the act of cropping it to the different orientation will turn the original 12-megapixel images into approximately a 6-megapixel image. By halving the resolution of the image, you also halve the file size and drastically affect how large that image can be printed. To avoid this, don’t waste any of the viewfinder area. Take advantage of every pixel that the image sensor has to offer and fill the entire frame with the image you want to capture.
If you’re shooting image elements that will be composited into a separate multi-image collage, consider framing your shots to take advantage of the diagonal width of the viewfinder. This will give you more usable pixels than if you had filled the frame either horizontally or vertically. The difference is a small one, admittedly, but if you’re trying to maximize pixel resolution and the image will be used in a collage where the diagonal orientation won’t be an issue, this is one way to increase the pixel count (Figure 4.29).
04_RWPhoto(p3).indd 203 8/6/10 12:09:33 PM
Excerpted from Real World Digital Photography, Third Edition by Katrin Eismann, Sean Duggan and Tim Grey. Copyright © 2011. Used with permission of Pearson Education, Inc. and Peachpit Press.
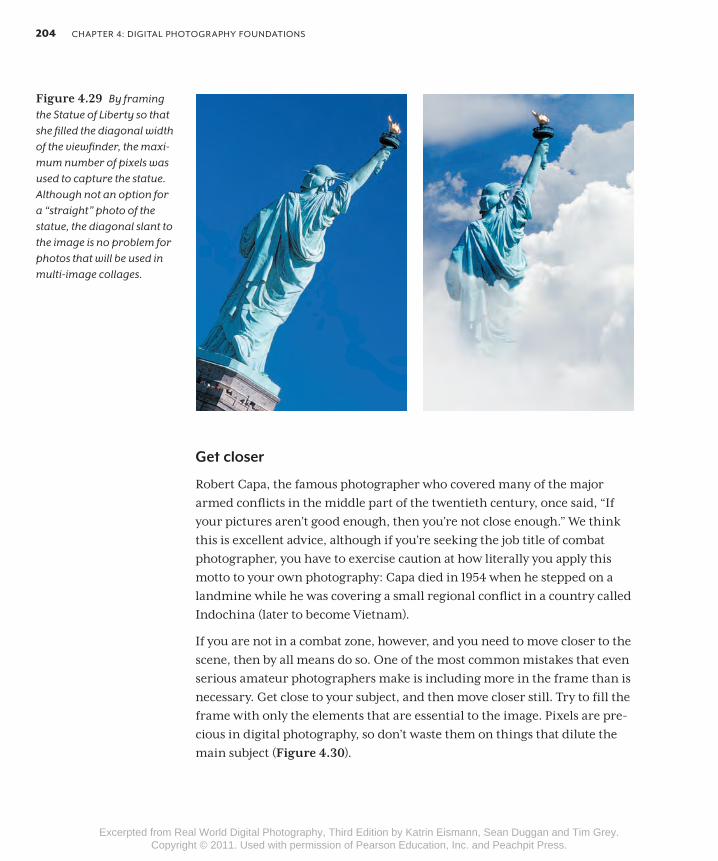
ChaPTer 4: DigiTal PhoTograPhy FounDaTions204
Get closer
Robert Capa, the famous photographer who covered many of the major armed conflicts in the middle part of the twentieth century, once said, “If your pictures aren’t good enough, then you’re not close enough.” We think this is excellent advice, although if you’re seeking the job title of combat photographer, you have to exercise caution at how literally you apply this motto to your own photography: Capa died in 1954 when he stepped on a landmine while he was covering a small regional conflict in a country called Indochina (later to become Vietnam).
If you are not in a combat zone, however, and you need to move closer to the scene, then by all means do so. One of the most common mistakes that even serious amateur photographers make is including more in the frame than is necessary. Get close to your subject, and then move closer still. Try to fill the frame with only the elements that are essential to the image. Pixels are pre-cious in digital photography, so don’t waste them on things that dilute the main subject (Figure 4.30).
Figure 4.29 By framing the Statue of Liberty so that she filled the diagonal width of the viewfinder, the maxi-mum number of pixels was used to capture the statue. Although not an option for a “straight” photo of the statue, the diagonal slant to the image is no problem for photos that will be used in multi-image collages.
04_RWPhoto(p3).indd 204 8/6/10 12:09:34 PM
Excerpted from Real World Digital Photography, Third Edition by Katrin Eismann, Sean Duggan and Tim Grey. Copyright © 2011. Used with permission of Pearson Education, Inc. and Peachpit Press.
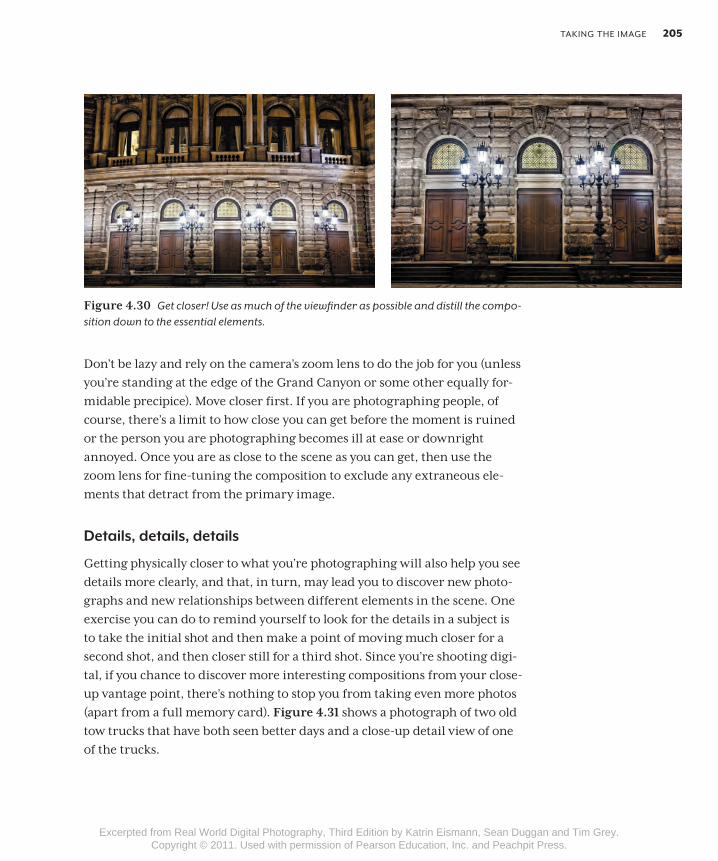
TaKing The image 205
Figure 4.30 Get closer! Use as much of the viewfinder as possible and distill the compo-sition down to the essential elements.
Don’t be lazy and rely on the camera’s zoom lens to do the job for you (unless you’re standing at the edge of the Grand Canyon or some other equally for-midable precipice). Move closer first. If you are photographing people, of course, there’s a limit to how close you can get before the moment is ruined or the person you are photographing becomes ill at ease or downright annoyed. Once you are as close to the scene as you can get, then use the zoom lens for fine-tuning the composition to exclude any extraneous ele-ments that detract from the primary image.
Details, details, details
Getting physically closer to what you’re photographing will also help you see details more clearly, and that, in turn, may lead you to discover new photo-graphs and new relationships between different elements in the scene. One exercise you can do to remind yourself to look for the details in a subject is to take the initial shot and then make a point of moving much closer for a second shot, and then closer still for a third shot. Since you’re shooting digi-tal, if you chance to discover more interesting compositions from your close-up vantage point, there’s nothing to stop you from taking even more photos (apart from a full memory card). Figure 4.31 shows a photograph of two old tow trucks that have both seen better days and a close-up detail view of one of the trucks.
04_RWPhoto(p3).indd 205 8/6/10 12:09:34 PM
Excerpted from Real World Digital Photography, Third Edition by Katrin Eismann, Sean Duggan and Tim Grey. Copyright © 2011. Used with permission of Pearson Education, Inc. and Peachpit Press.
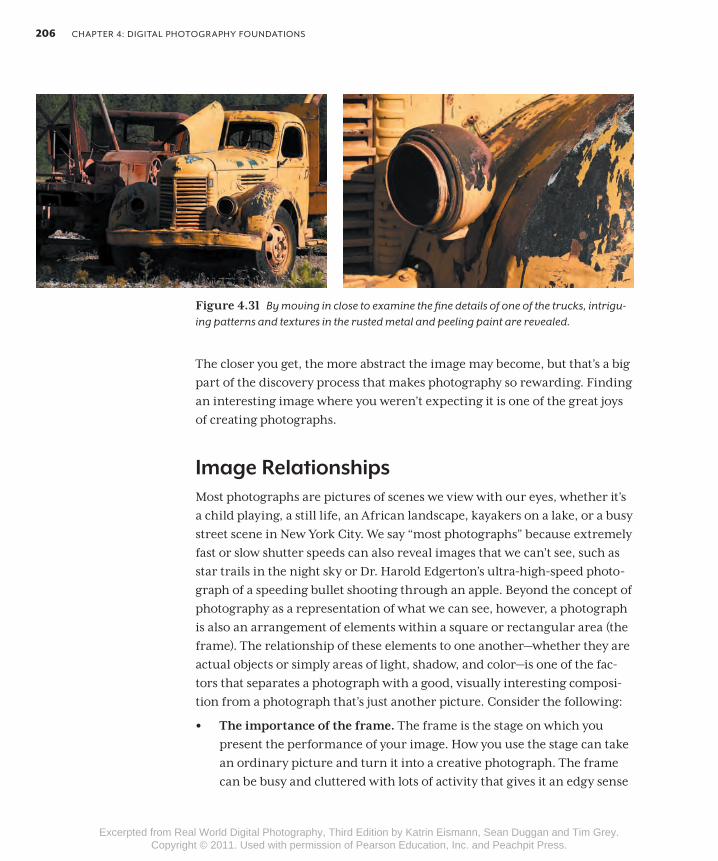
ChaPTer 4: DigiTal PhoTograPhy FounDaTions206
Figure 4.31 By moving in close to examine the fine details of one of the trucks, intrigu-ing patterns and textures in the rusted metal and peeling paint are revealed.
The closer you get, the more abstract the image may become, but that’s a big part of the discovery process that makes photography so rewarding. Finding an interesting image where you weren’t expecting it is one of the great joys of creating photographs.
Image RelationshipsMost photographs are pictures of scenes we view with our eyes, whether it’s a child playing, a still life, an African landscape, kayakers on a lake, or a busy street scene in New York City. We say “most photographs” because extremely fast or slow shutter speeds can also reveal images that we can’t see, such as star trails in the night sky or Dr. Harold Edgerton’s ultra-high-speed photo-graph of a speeding bullet shooting through an apple. Beyond the concept of photography as a representation of what we can see, however, a photograph is also an arrangement of elements within a square or rectangular area (the frame). The relationship of these elements to one another—whether they are actual objects or simply areas of light, shadow, and color—is one of the fac-tors that separates a photograph with a good, visually interesting composi-tion from a photograph that’s just another picture. Consider the following:
• The importance of the frame. The frame is the stage on which you present the performance of your image. How you use the stage can take an ordinary picture and turn it into a creative photograph. The frame can be busy and cluttered with lots of activity that gives it an edgy sense
04_RWPhoto(p3).indd 206 8/6/10 12:09:35 PM
Excerpted from Real World Digital Photography, Third Edition by Katrin Eismann, Sean Duggan and Tim Grey. Copyright © 2011. Used with permission of Pearson Education, Inc. and Peachpit Press.
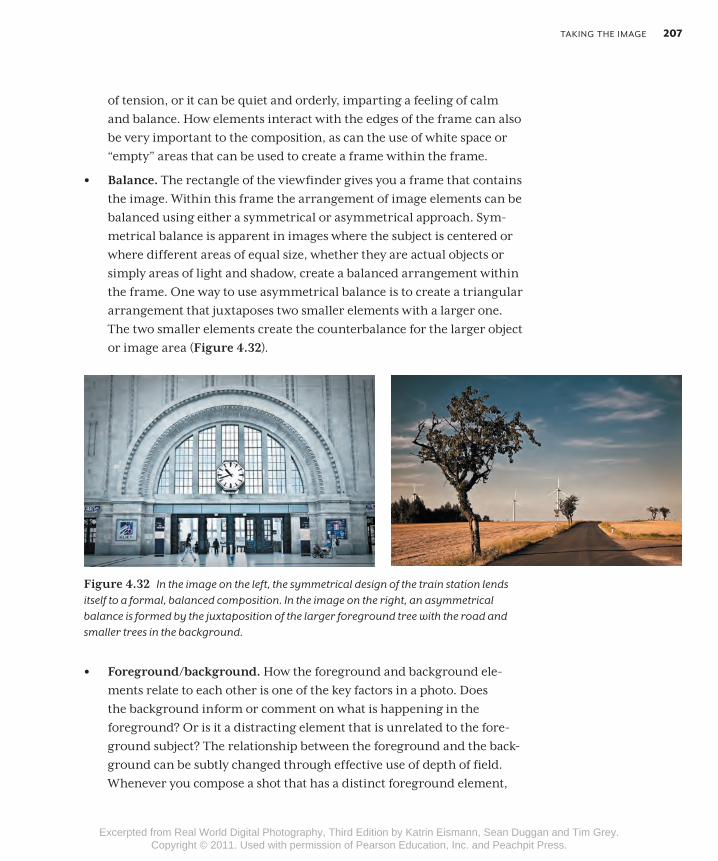
TaKing The image 207
of tension, or it can be quiet and orderly, imparting a feeling of calm and balance. How elements interact with the edges of the frame can also be very important to the composition, as can the use of white space or “empty” areas that can be used to create a frame within the frame.
• Balance. The rectangle of the viewfinder gives you a frame that contains the image. Within this frame the arrangement of image elements can be balanced using either a symmetrical or asymmetrical approach. Sym-metrical balance is apparent in images where the subject is centered or where different areas of equal size, whether they are actual objects or simply areas of light and shadow, create a balanced arrangement within the frame. One way to use asymmetrical balance is to create a triangular arrangement that juxtaposes two smaller elements with a larger one. The two smaller elements create the counterbalance for the larger object or image area (Figure 4.32).
Figure 4.32 In the image on the left, the symmetrical design of the train station lends itself to a formal, balanced composition. In the image on the right, an asymmetrical balance is formed by the juxtaposition of the larger foreground tree with the road and smaller trees in the background.
• Foreground/background. How the foreground and background ele-ments relate to each other is one of the key factors in a photo. Does the background inform or comment on what is happening in the foreground? Or is it a distracting element that is unrelated to the fore-ground subject? The relationship between the foreground and the back-ground can be subtly changed through effective use of depth of field. Whenever you compose a shot that has a distinct foreground element,
04_RWPhoto(p3).indd 207 8/6/10 12:09:36 PM
Excerpted from Real World Digital Photography, Third Edition by Katrin Eismann, Sean Duggan and Tim Grey. Copyright © 2011. Used with permission of Pearson Education, Inc. and Peachpit Press.

ChaPTer 4: DigiTal PhoTograPhy FounDaTions208
take a moment to survey what is happening in the background. This is good practice just to be sure that there is nothing in the background showing up that you don’t want in the photo, but in some cases you may see something that would work well if it was included.
• Size, position, and point of view. The size of image elements and the way they are viewed contribute to their importance in the overall image, as does how they relate to each other. By composing an image so that certain elements are larger, for instance, you focus attention on those areas and give those elements more importance in the final image. This approach can often be successful in images that focus on smaller or more mundane objects that we usually don’t pay much attention to (Figure 4.33).
Figure 4.33 The size of image elements and their relationship to each other can be used effectively in a composition to draw the viewer’s attention to a spe-cific area, to make a visual comment, or to give impor-tance to ordinary objects that we may see every day.
04_RWPhoto(p3).indd 208 8/6/10 12:09:36 PM
Excerpted from Real World Digital Photography, Third Edition by Katrin Eismann, Sean Duggan and Tim Grey. Copyright © 2011. Used with permission of Pearson Education, Inc. and Peachpit Press.
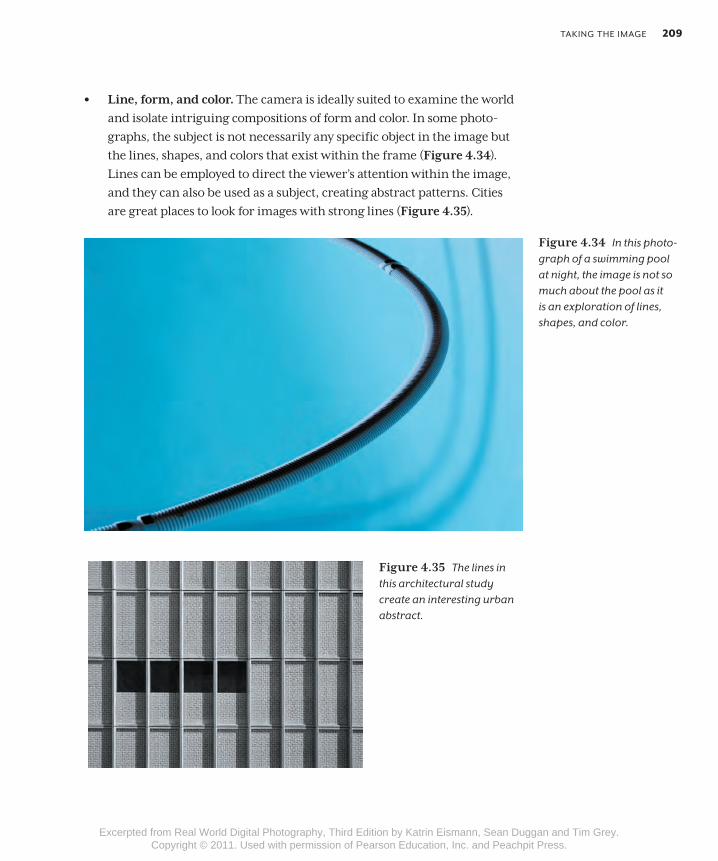
TaKing The image 209
• Line, form, and color. The camera is ideally suited to examine the world and isolate intriguing compositions of form and color. In some photo-graphs, the subject is not necessarily any specific object in the image but the lines, shapes, and colors that exist within the frame (Figure 4.34). Lines can be employed to direct the viewer’s attention within the image, and they can also be used as a subject, creating abstract patterns. Cities are great places to look for images with strong lines (Figure 4.35).
Figure 4.35 The lines in this architectural study create an interesting urban abstract.
Figure 4.34 In this photo-graph of a swimming pool at night, the image is not so much about the pool as it is an exploration of lines, shapes, and color.
04_RWPhoto(p3).indd 209 8/6/10 12:09:37 PM
Excerpted from Real World Digital Photography, Third Edition by Katrin Eismann, Sean Duggan and Tim Grey. Copyright © 2011. Used with permission of Pearson Education, Inc. and Peachpit Press.
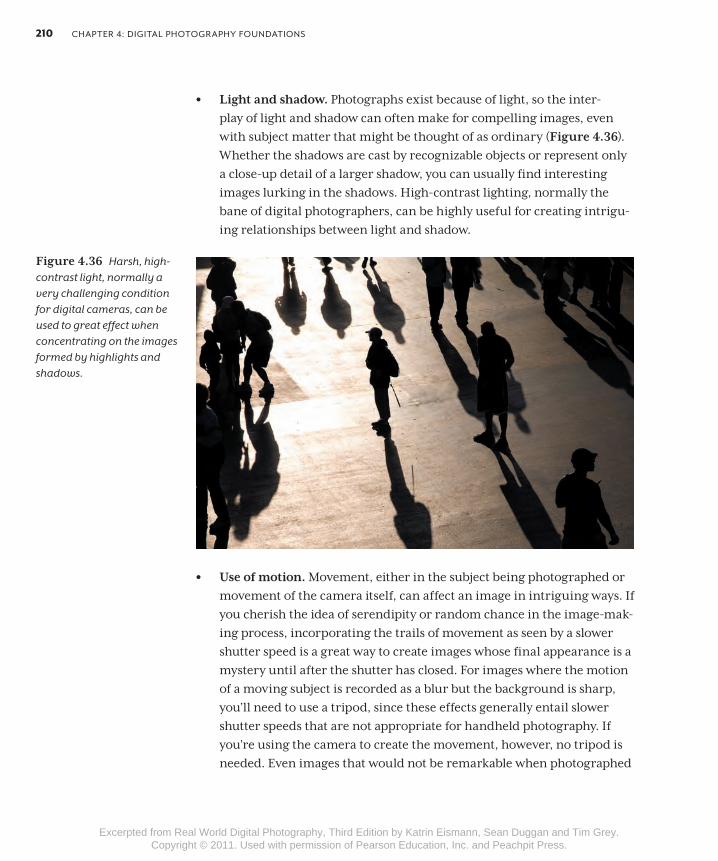
ChaPTer 4: DigiTal PhoTograPhy FounDaTions210
• Light and shadow. Photographs exist because of light, so the inter-play of light and shadow can often make for compelling images, even with subject matter that might be thought of as ordinary (Figure 4.36). Whether the shadows are cast by recognizable objects or represent only a close-up detail of a larger shadow, you can usually find interesting images lurking in the shadows. High-contrast lighting, normally the bane of digital photographers, can be highly useful for creating intrigu-ing relationships between light and shadow.
• Use of motion. Movement, either in the subject being photographed or movement of the camera itself, can affect an image in intriguing ways. If you cherish the idea of serendipity or random chance in the image-mak-ing process, incorporating the trails of movement as seen by a slower shutter speed is a great way to create images whose final appearance is a mystery until after the shutter has closed. For images where the motion of a moving subject is recorded as a blur but the background is sharp, you’ll need to use a tripod, since these effects generally entail slower shutter speeds that are not appropriate for handheld photography. If you’re using the camera to create the movement, however, no tripod is needed. Even images that would not be remarkable when photographed
Figure 4.36 Harsh, high-contrast light, normally a very challenging condition for digital cameras, can be used to great effect when concentrating on the images formed by highlights and shadows.
04_RWPhoto(p3).indd 210 8/6/10 12:09:38 PM
Excerpted from Real World Digital Photography, Third Edition by Katrin Eismann, Sean Duggan and Tim Grey. Copyright © 2011. Used with permission of Pearson Education, Inc. and Peachpit Press.
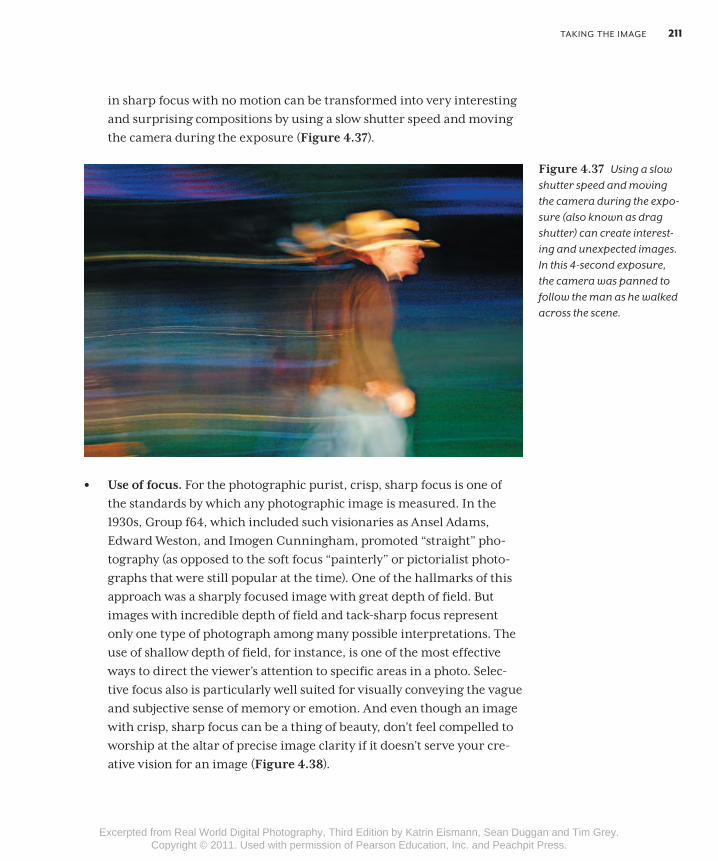
TaKing The image 211
in sharp focus with no motion can be transformed into very interesting and surprising compositions by using a slow shutter speed and moving the camera during the exposure (Figure 4.37).
• Use of focus. For the photographic purist, crisp, sharp focus is one of the standards by which any photographic image is measured. In the 1930s, Group f64, which included such visionaries as Ansel Adams, Edward Weston, and Imogen Cunningham, promoted “straight” pho-tography (as opposed to the soft focus “painterly” or pictorialist photo-graphs that were still popular at the time). One of the hallmarks of this approach was a sharply focused image with great depth of field. But images with incredible depth of field and tack-sharp focus represent only one type of photograph among many possible interpretations. The use of shallow depth of field, for instance, is one of the most effective ways to direct the viewer’s attention to specific areas in a photo. Selec-tive focus also is particularly well suited for visually conveying the vague and subjective sense of memory or emotion. And even though an image with crisp, sharp focus can be a thing of beauty, don’t feel compelled to worship at the altar of precise image clarity if it doesn’t serve your cre-ative vision for an image (Figure 4.38).
Figure 4.37 Using a slow shutter speed and moving the camera during the expo-sure (also known as drag shutter) can create interest-ing and unexpected images. In this 4-second exposure, the camera was panned to follow the man as he walked across the scene.
04_RWPhoto(p3).indd 211 8/6/10 12:09:38 PM
Excerpted from Real World Digital Photography, Third Edition by Katrin Eismann, Sean Duggan and Tim Grey. Copyright © 2011. Used with permission of Pearson Education, Inc. and Peachpit Press.
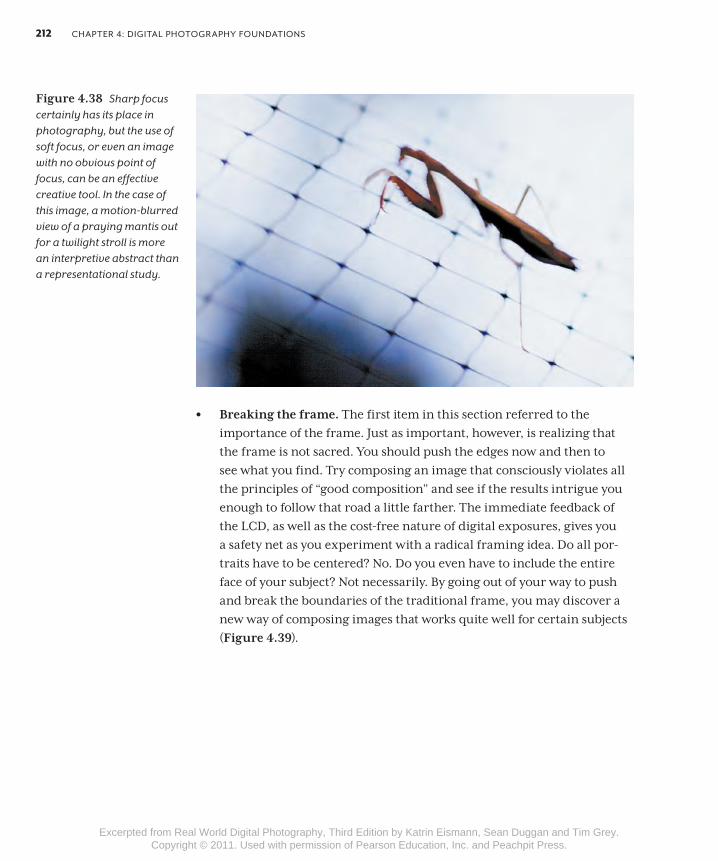
ChaPTer 4: DigiTal PhoTograPhy FounDaTions212
• Breaking the frame. The first item in this section referred to the importance of the frame. Just as important, however, is realizing that the frame is not sacred. You should push the edges now and then to see what you find. Try composing an image that consciously violates all the principles of “good composition” and see if the results intrigue you enough to follow that road a little farther. The immediate feedback of the LCD, as well as the cost-free nature of digital exposures, gives you a safety net as you experiment with a radical framing idea. Do all por-traits have to be centered? No. Do you even have to include the entire face of your subject? Not necessarily. By going out of your way to push and break the boundaries of the traditional frame, you may discover a new way of composing images that works quite well for certain subjects (Figure 4.39).
Figure 4.38 Sharp focus certainly has its place in photography, but the use of soft focus, or even an image with no obvious point of focus, can be an effective creative tool. In the case of this image, a motion-blurred view of a praying mantis out for a twilight stroll is more an interpretive abstract than a representational study.
04_RWPhoto(p3).indd 212 8/6/10 12:09:39 PM
Excerpted from Real World Digital Photography, Third Edition by Katrin Eismann, Sean Duggan and Tim Grey. Copyright © 2011. Used with permission of Pearson Education, Inc. and Peachpit Press.
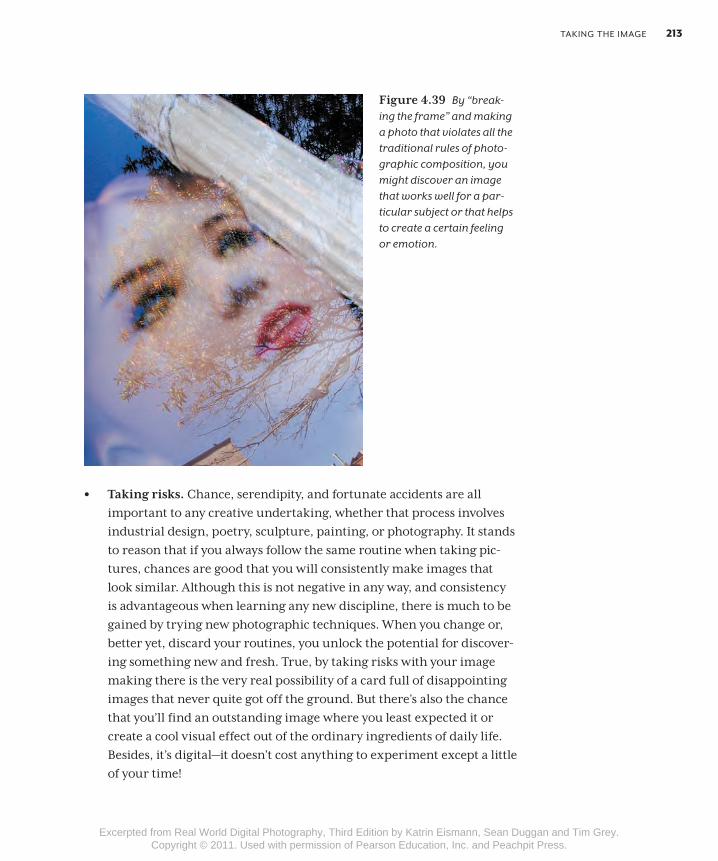
TaKing The image 213
Figure 4.39 By “break-ing the frame” and making a photo that violates all the traditional rules of photo-graphic composition, you might discover an image that works well for a par-ticular subject or that helps to create a certain feeling or emotion.
• Taking risks. Chance, serendipity, and fortunate accidents are all important to any creative undertaking, whether that process involves industrial design, poetry, sculpture, painting, or photography. It stands to reason that if you always follow the same routine when taking pic-tures, chances are good that you will consistently make images that look similar. Although this is not negative in any way, and consistency is advantageous when learning any new discipline, there is much to be gained by trying new photographic techniques. When you change or, better yet, discard your routines, you unlock the potential for discover-ing something new and fresh. True, by taking risks with your image making there is the very real possibility of a card full of disappointing images that never quite got off the ground. But there’s also the chance that you’ll find an outstanding image where you least expected it or create a cool visual effect out of the ordinary ingredients of daily life. Besides, it’s digital—it doesn’t cost anything to experiment except a little of your time!
04_RWPhoto(p3).indd 213 8/6/10 12:09:40 PM
Excerpted from Real World Digital Photography, Third Edition by Katrin Eismann, Sean Duggan and Tim Grey. Copyright © 2011. Used with permission of Pearson Education, Inc. and Peachpit Press.
ChaPTer 4: DigiTal PhoTograPhy FounDaTions214
Digital Photography Is PhotographyIn various places throughout this book, there are occasional comparisons between digital and film photography. In the end, the differences are really no more than technical and procedural details. Photography is point of view, framing, and timing. In that regard, digital photography is fundamentally no different than film photography. Only the tools have changed.
Digital tools have changed not only the technical aspects of photography, but the personal as well. For many people, digital photography has reig-nited their interest and passion for photography. With digital photography, it’s much easier to explore the world visually with a camera and share your explorations with family, friends, and the rest of the world. Instant feedback and the ability to delete bad shots translates to a perfect learning environ-ment for improving your photographic skills. Although you may not be keeping all your photos, don’t be too quick to delete the bad shots. Take time to study the failed images so you can see why they didn’t work. Everyone can recognize an image they are disappointed with, but knowing what went wrong is the key to taking better photos in the future.
Just as you can learn from the bloopers, so can you learn from the photos that do work—study your successful images as well. Remember what worked in those images as you look through the viewfinder. Make more images like them, and make better images, too. Above all, take more pictures! Photogra-phy is all about seeing, and the more you look, the more you will see. A prac-ticed eye is one of the best tools a photographer can have. If you are used to looking for good images, you’ll find them. Give your eyes plenty of practice. Digital photography makes this easier than ever.
04_RWPhoto(p3).indd 214 8/6/10 12:09:40 PM
Excerpted from Real World Digital Photography, Third Edition by Katrin Eismann, Sean Duggan and Tim Grey. Copyright © 2011. Used with permission of Pearson Education, Inc. and Peachpit Press.