Embed Size (px)
Citation preview
En
Printed in Japan S2G10000101(11)
6MAA3811--
DIGITAL CAMERA
The Guide to Digital Photographywith the
En
5.6-16.8mm1:2.7-4.8
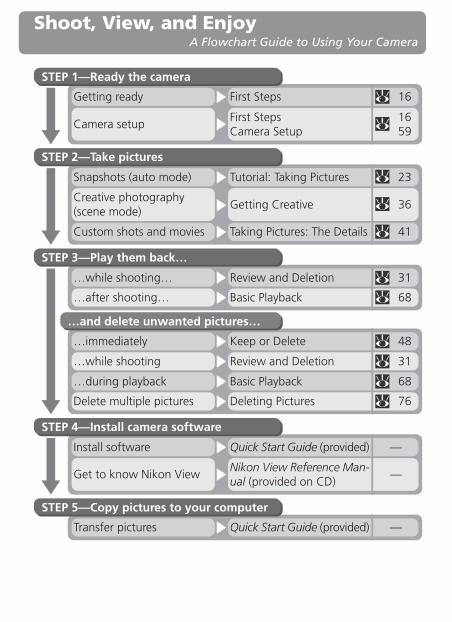
Shoot, View, and EnjoyA Flowchart Guide to Using Your Camera
STEP 1—Ready the camera
Getting ready First Steps 16
Camera setupFirst StepsCamera Setup
1659
STEP 2—Take pictures
Tutorial: Taking PicturesSnapshots (auto mode) 23
Getting CreativeCreative photography(scene mode)
36
Taking Pictures: The DetailsCustom shots and movies 41
STEP 3—Play them back…
Review and Deletion…while shooting… 31
Basic Playback…after shooting… 68
STEP 4—Install camera software
Quick Start Guide (provided)Install software
Nikon View Reference Man-ual (provided on CD)
Get to know Nikon View —
Keep or Delete…immediately 48
Review and Deletion…while shooting 31
Basic Playback…during playback 68
Deleting PicturesDelete multiple pictures 76
…and delete unwanted pictures…
—
STEP 5—Copy pictures to your computer
Quick Start Guide (provided)Transfer pictures —
i
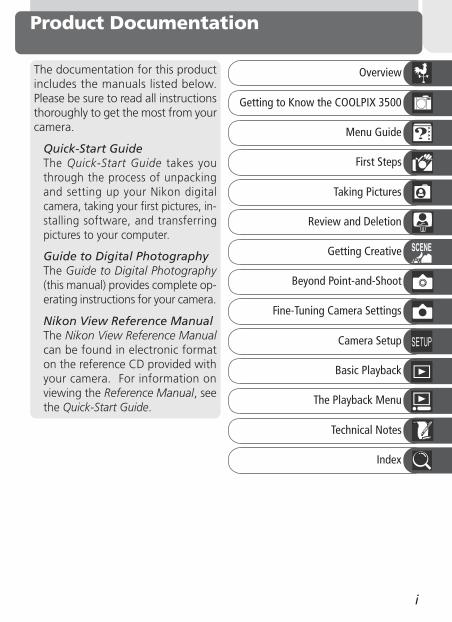
Product Documentation
The documentation for this productincludes the manuals listed below.Please be sure to read all instructionsthoroughly to get the most from yourcamera.
Quick-Start GuideThe Quick-Start Guide takes youthrough the process of unpackingand setting up your Nikon digitalcamera, taking your first pictures, in-stalling software, and transferringpictures to your computer.
Guide to Digital PhotographyThe Guide to Digital Photography(this manual) provides complete op-erating instructions for your camera.
Nikon View Reference ManualThe Nikon View Reference Manualcan be found in electronic formaton the reference CD provided withyour camera. For information onviewing the Reference Manual, seethe Quick-Start Guide.
Getting to Know the COOLPIX 3500
Overview
First Steps
Taking Pictures
Review and Deletion
Getting Creative
Beyond Point-and-Shoot
Fine-Tuning Camera Settings
Camera Setup
Basic Playback
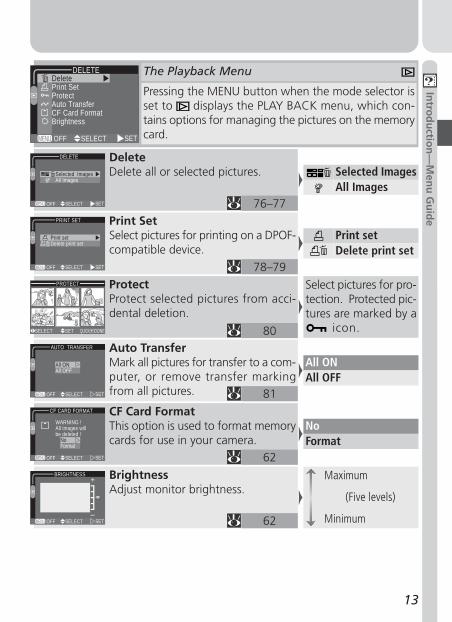
The Playback Menu
Technical Notes
Index
Menu Guide
ii
To prevent damage to your Nikon product or injury to yourself or to others,read the following safety precautions in their entirety before using this equip-ment. Keep these safety instructions where all those who use the productwill read them.
The consequences that could result from failure to observe the precautionslisted in this section are indicated by the following symbol:
WARNINGSTurn off immediately in the eventof malfunctionShould you notice smoke or an un-usual smell coming from the equip-ment or from the AC adapter (avail-able separately), unplug the ACadapter or remove the battery imme-diately, taking care to avoid burns.Continued operation could result ininjury. After removing the battery,take the equipment to a Nikon-autho-rized service center for inspection.
Do not use in the presence of flam-mable gasDo not use electronic equipment inthe presence of flammable gas, as thiscould result in explosion or fire.
Observe caution when using thecamera strapCaution should be exercised to pre-vent strangulation when wearing thecamera strap around your neck. Neverplace the strap around the neck of aninfant or child.
Do not disassembleTouching the product’s internal partscould result in injury. In the event ofa malfunction, the product should berepaired only by a qualified technician.Should the product break open as theresult of a fall or other accident, re-move the battery or AC adapter andthen take the product to a Nikon-au-thorized service center for inspection.
Observe proper precautions whenhandling batteriesBatteries may leak or explode if im-properly handled. Observe the follow-ing precautions when handling bat-teries for use in this product:
• Be sure the product is off before re-placing the battery. If you are usingan AC adapter, be sure it is un-plugged.
• Use only a rechargeable Nikon EN-EL2lithium-ion battery (supplied).
• When inserting the battery, do not at-tempt to insert it upside down orbackwards.
• Do not short or disassemble the bat-tery.
• Do not expose the battery to flameor to excessive heat.
• Do not immerse in or expose to water.• Do not transport or store with metal
objects such as necklaces or hairpins.
For Your Safety
This icon marks warnings, information that should be read beforeusing your Nikon product to prevent possible injury.
iii
• Batteries are prone to leakage whenfully discharged. To avoid damage tothe product, be sure to remove thebattery when no charge remains.
• When the battery is not in use, attachthe terminal cover and store in a coolplace.
• Immediately after use, or when theproduct is used on battery power foran extended period, the battery maybecome hot. Before removing thebattery, turn the camera off and al-low the battery to cool.
• Discontinue use immediately shouldyou notice any changes in the battery,such as discoloration or deformation.
Use appropriate cablesWhen connecting cables to the inputand output jacks, use only the cablesprovided or sold by Nikon for the pur-pose, to maintain compliance withproduct regulations.
The lens section• Do not insert your fingers in the gap
between the rotating lens section andthe camera body. Your fingers couldbe pinched between the body and thelens section, resulting in injury. Par-ticular care should be observed in thecase of small children.
• To prevent your fingers, flesh, or otherobjects from being pinched in the gapbetween the rotating lens section andthe camera body, return the lens sec-tion to its housing in the camera bodybefore transporting the camera.
Keep out of reach of childrenParticular care should be taken to pre-vent infants from putting the batteryor other small parts into their mouths.
Removing memory cardsMemory cards may become hot dur-ing use. Observe due caution whenremoving memory cards from thecamera.
CD-ROMsThe CD-ROMs on which the softwareand manuals are distributed shouldnot be played back on audio CDequipment. Playing CD-ROMs on anaudio CD player could cause hearingloss or damage the equipment.
Observe caution when operatingthe flashUsing the flash close to your subject’seyes could cause temporary visual im-pairment. Particular care should beobserved if photographing infants,when the flash should be no less thanone meter (39˝) from the subject.
Avoid contact with liquid crystalShould the monitor break, care shouldbe taken to avoid injury due to bro-ken glass and to prevent liquid crystalfrom the monitor touching the skinor entering the eyes or mouth.

iv
• No part of the manuals included with thisproduct may be reproduced, transmitted,transcribed, stored in a retrieval system,or translated into any language in anyform, by any means, without Nikon’sprior written permission.
• Nikon reserves the right to change thespecifications of the hardware and soft-ware described in these manuals at anytime and without prior notice.
Notices
E3500
FOR HOME OR OFFICE USE
Tested To ComplyWith FCC Standards
• Nikon will not be held liable for any dam-ages resulting from the use of this prod-uct.
• While every effort has been made toensure that the information in thesemanuals is accurate and complete, wewould appreciate it were you to bringany errors or omissions to the attentionof the Nikon representative in your area(address provided separately).
Notice for customers in the U.S.A.Federal Communications Commission (FCC) Radio Frequency Interference StatementThis equipment has been tested and foundto comply with the limits for a Class B digi-tal device, pursuant to Part 15 of the FCCrules. These limits are designed to pro-vide reasonable protection against harm-ful interference in a residential installation.This equipment generates, uses, and canradiate radio frequency energy and, if notinstalled and used in accordance with theinstructions, may cause harmful interfer-ence to radio communications. However,there is no guarantee that interference willnot occur in a particular installation. If thisequipment does cause harmful interfer-ence to radio or television reception, whichcan be determined by turning the equip-ment off and on, the user is encouragedto try to correct the interference by one ormore of the following measures:• Reorient or relocate the receiving an-
tenna.• Increase the separation between the
equipment and receiver.• Connect the equipment into an outlet
on a circuit different from that to whichthe receiver is connected.
• Consult the dealer or an experienced ra-dio/television technician for help.
CAUTIONSModificationsThe FCC requires the user to be notifiedthat any changes or modifications madeto this device that are not expressly ap-proved by Nikon Corporation may void theuser’s authority to operate the equipment.
Interface CablesUse the interface cables sold or providedby Nikon for your equipment. Using otherinterface cables may exceed the limits ofClass B Part 15 of the FCC rules.
Nikon Inc.,1300 Walt Whitman Road, Melville, New York11747-3064, U.S.A.Tel.: 631-547-4200
v
Notice for customers in Canada
CAUTIONThis class B digital apparatus meets all re-quirements of the Canadian InterferenceCausing Equipment Regulations.
ATTENTIONCet appareil numérique de la classe B res-pecte toutes les exigences du Règlementsur le matériel brouilleur du Canada.
Notice Concerning Prohibition of Copying or ReproductionNote that simply being in possession of material that has been digitally copied or repro-duced by means of a scanner, digital camera or other device may be punishable by law.
• Items prohibited by law from beingcopied or reproducedDo not copy or reproduce paper money,coins, securities, government bonds, orlocal government bonds, even if suchcopies or reproductions are stamped“Sample.”
The copying or reproduction of papermoney, coins, or securities which are cir-culated in a foreign country is prohib-ited.
Unless the prior permission of the gov-ernment has been obtained, the copy-ing or reproduction of unused postagestamps or post cards issued by the gov-ernment is prohibited.
The copying or reproduction of stampsissued by the government and of certi-fied documents stipulated by law is pro-hibited.
• Cautions on certain copies and repro-ductionsThe government has issued cautions oncopies or reproductions of securities is-sued by private companies (shares, bills,checks, gift certificates, etc.), commuterpasses, or coupon tickets, except whena minimum of necessary copies are tobe provided for business use by a com-pany. Also, do not copy or reproducepassports issued by the government, li-censes issued by public agencies and pri-vate groups, ID cards, and tickets, suchas passes and meal coupons.
• Comply with copyright noticesThe copying or reproduction of copy-righted creative works such as books,music, paintings, woodcut prints, maps,drawings, movies, and photographs isprohibited except when it is done for per-sonal use at home or for similar restrictedand non-commercial use.
Trademark InformationApple, the Apple logo, Macintosh, Mac OS, Power Macintosh, PowerBook, and QuickTime are registered trademarksof Apple Computer, Inc. Finder, Power Mac, iMac, and iBook are trademarks of Apple Computer, Inc. IBM is aregistered trademark of International Business Machines Corporation. Microsoft and Windows are registered trade-marks of Microsoft Corporation. Internet is a trademark of Digital Equipment Corporation. CompactFlash is atrademark of SanDisk Corporation. Lexar Media is a trademark of Lexar Media Corporation. Adobe and Acrobat areregistered trademarks of Adobe Systems Inc. Zip is a registered trademark of Iomega Corporation in the U.S. andother countries. All other trade names mentioned in this manual or the other documentation provided with yourNikon product are trademarks or registered trademarks of their respective holders.
vi
Table of Contents
Product Documentation .................................................................................. iFor Your Safety ............................................................................................... iiNotices ........................................................................................................... iv
Introduction: Before You Begin ...................................................................... 1Overview: About This Manual ....................................................................... 2Getting to Know the COOLPIX 3500: The Parts of the Camera and TheirFunctions ......................................................................................................... 4
Where to Find It—Parts of the COOLPIX 3500 ................................................ 4How to Use It—Camera Controls and Displays ................................................ 6
Menu Guide: Index to Menu Options ........................................................... 9Tutorial: Getting Started ................................................................................. 15First Steps: Getting Ready to Use Your Camera ............................................ 16
Step 1—Attach the Camera Strap ................................................................... 16Step 2—Insert the Battery and Memory Card .................................................. 16Step 3—Choose a Language .......................................................................... 19Step 4—Set the Time and Date ....................................................................... 21
Taking Pictures: The Basics ............................................................................. 23Step 1—Ready the Camera ............................................................................. 23Step 2—Choose Mode .......................................................................... 25Step 3—Adjust Camera Settings (Optional) ..................................................... 26Step 4—Frame the Picture .............................................................................. 26Step 5—Focus and Shoot ............................................................................... 28Step 6—Put the Camera Away ....................................................................... 30
Review and Deletion: Quick Review ............................................................. 31Quick Review .................................................................................................. 32Full-Screen Review .......................................................................................... 32Thumbnail Review .......................................................................................... 34
Getting Creative: Scene Selection ................................................................. 36
vii
Taking Pictures: The Details ............................................................................ 41Beyond Point-and-Shoot: Camera Controls .................................................. 42
, , or Movie: Choosing a Shooting Mode ......................................... 42Flash Photography: The Button .................................................................. 43Delaying Shutter Release: Choosing a Self-Timer Mode ................................... 45Framing Pictures: Optical and Digital Zoom ..................................................... 47Keep or Delete: Picture Review ....................................................................... 48
Fine-Tuning Camera Settings: The -Mode Menu ..................................... 49Making Effective Use of Memory: Image Quality and Size ............................... 50Adjusting Exposure: Exp. +/– ........................................................................... 53Keeping Colors True: White Balance ............................................................... 54Taking Pictures in a Sequence: Continuous ...................................................... 56Getting Sharper Pictures: BSS (Best Shot Selector) ........................................... 57Making Edges More Distinct: Image Sharpening ............................................. 58
Camera Setup: The SET-UP Menu ................................................................... 59Adjusting Monitor Brightness: Brightness ........................................................ 62Formatting Memory Cards: CF Card Format .................................................... 62Setting the Time and Date: Date ..................................................................... 63Conserving Battery Power: Auto Off ............................................................... 63Choosing a Language: Language .................................................................... 64Choosing a USB Protocol: USB ........................................................................ 64Restoring Default Settings: Reset All ( Mode Only) .................................. 66
Playing Pictures Back: Playback Mode ........................................................... 67Basic Playback: Full-Frame and Thumbnail Playback ................................... 68The Playback Menu: Managing Pictures ....................................................... 75
Deleting Pictures: Delete ................................................................................. 76Ordering Prints: Print Set ................................................................................. 78Safeguarding Valuable Pictures: Protect .......................................................... 80Marking All Pictures for Transfer: Auto Transfer ............................................... 81
Technical Notes: Camera Care, Options, and Resources ............................... 83Caring for the Camera and Battery ................................................................. 84Optional Accessories ....................................................................................... 87Web Resources ............................................................................................... 88Troubleshooting .............................................................................................. 88Specifications ................................................................................................. 95
Index ................................................................................................................. 98

viii

1
Overview
2–3
Getting to Know theCOOLPIX 3500
4–8
This chapter is divided into the following sections:
OverviewRead this section for a description of how thismanual is organized and for an explanation of thesymbols and conventions used.
Getting to Know the COOLPIX 3500Bookmark this section and refer to it as you readthrough the manual for information on the namesand functions of camera parts.
Menu GuideRefer to this section for instructions on using themenus that control some aspects of camera opera-tion. This section also contains an index of menuoptions.
IntroductionBefore You Begin
Menu Guide
9–14

2
Intro
du
ction
—O
verview
OverviewAbout This Manual
Thank you for your purchase of a COOLPIX 3500 digital camera. This manualhas been written to help you enjoy taking digital pictures with your COOLPIX3500. Read this manual thoroughly before use, and keep it handy whenusing the product.
Use Only Nikon Brand Electronic Accessories
Your Nikon COOLPIX digital camera is designed to the highest standards andincludes complex electronic circuitry. Only Nikon brand electronic accessories(including battery chargers, batteries, and AC adapters) certified by Nikonspecifically for use with your Nikon digital camera are engineered and provento operate within the operational and safety requirements of this electroniccircuitry.
THE USE OF NON-NIKON ELECTRONIC ACCESSORIES COULD DAMAGE YOUR CAMERA AND MAY VOID
YOUR NIKON WARRANTY.
For more information about Nikon brand accessories, contact your local au-thorized Nikon dealer.
3
Intro
du
ction
—O
verview
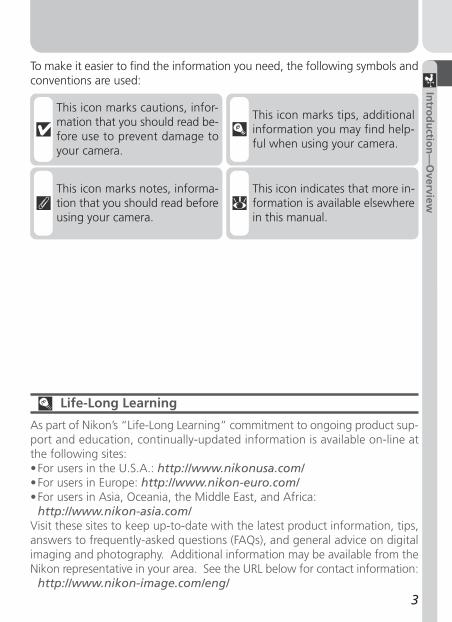
To make it easier to find the information you need, the following symbols andconventions are used:
Life-Long Learning
As part of Nikon’s “Life-Long Learning” commitment to ongoing product sup-port and education, continually-updated information is available on-line atthe following sites:•For users in the U.S.A.: http://www.nikonusa.com/•For users in Europe: http://www.nikon-euro.com/•For users in Asia, Oceania, the Middle East, and Africa:
http://www.nikon-asia.com/Visit these sites to keep up-to-date with the latest product information, tips,answers to frequently-asked questions (FAQs), and general advice on digitalimaging and photography. Additional information may be available from theNikon representative in your area. See the URL below for contact information:
http://www.nikon-image.com/eng/
This icon marks cautions, infor-mation that you should read be-fore use to prevent damage toyour camera.
This icon marks tips, additionalinformation you may find help-ful when using your camera.
This icon marks notes, informa-tion that you should read beforeusing your camera.
This icon indicates that more in-formation is available elsewherein this manual.
4
Intro
du
ction
—G
etting
to K
no
w th
e CO
OLPIX
3500
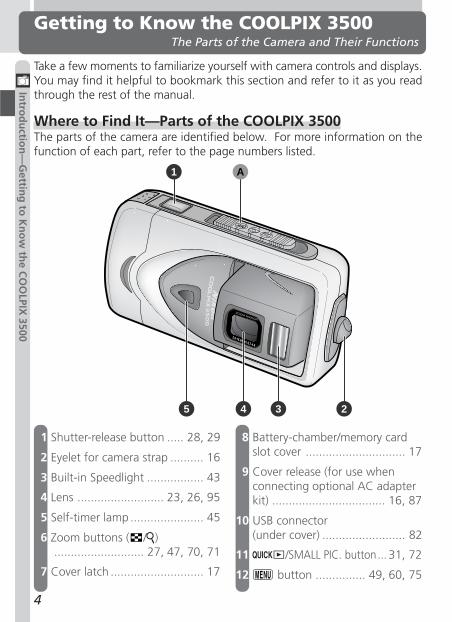
Getting to Know the COOLPIX 3500The Parts of the Camera and Their Functions
Take a few moments to familiarize yourself with camera controls and displays.You may find it helpful to bookmark this section and refer to it as you readthrough the rest of the manual.
Where to Find It—Parts of the COOLPIX 3500The parts of the camera are identified below. For more information on thefunction of each part, refer to the page numbers listed.
1 Shutter-release button ..... 28, 29
2 Eyelet for camera strap .......... 16
3 Built-in Speedlight ................. 43
4 Lens .......................... 23, 26, 95
5 Self-timer lamp ...................... 45
6 Zoom buttons ( / )........................... 27, 47, 70, 71
7 Cover latch ............................ 17
8 Battery-chamber/memory cardslot cover .............................. 17
9 Cover release (for use whenconnecting optional AC adapterkit) .................................. 16, 87
10 USB connector(under cover) ......................... 82
11 /SMALL PIC. button ... 31, 72
12 button ............... 49, 60, 75
A1
45 3 2
5
Intro
du
ction
—G
etting
to K
no
w th
e CO
OLPIX
3500
B 6 C
14 12 1115
8
9
1013
7
D
16
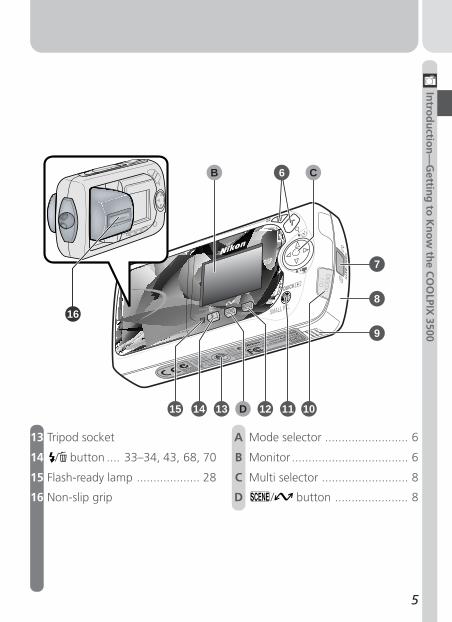
13 Tripod socket
14 / button .... 33–34, 43, 68, 70
15 Flash-ready lamp ................... 28
16 Non-slip grip
A Mode selector ......................... 6
B Monitor ................................... 6
C Multi selector .......................... 8
D / button ...................... 8
6
Intro
du
ction
—G
etting
to K
no
w th
e CO
OLPIX
3500
How to Use It—Camera Controls and Displays
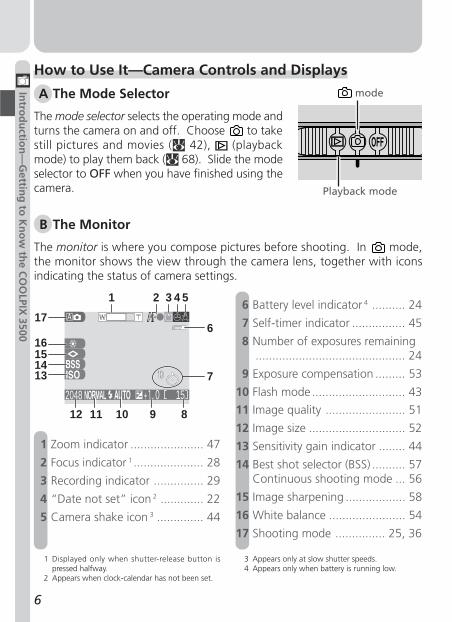
A The Mode Selector
The mode selector selects the operating mode andturns the camera on and off. Choose to takestill pictures and movies ( 42), (playbackmode) to play them back ( 68). Slide the modeselector to OFF when you have finished using thecamera.
B The Monitor
The monitor is where you compose pictures before shooting. In mode,the monitor shows the view through the camera lens, together with iconsindicating the status of camera settings.
1 Zoom indicator ...................... 47
2 Focus indicator 1 ..................... 28
3 Recording indicator ............... 29
4 “Date not set” icon 2 ............. 22
5 Camera shake icon 3 .............. 44
6 Battery level indicator 4 .......... 24
7 Self-timer indicator ................ 45
8 Number of exposures remaining............................................. 24
9 Exposure compensation ......... 53
10 Flash mode ............................ 43
11 Image quality ........................ 51
12 Image size ............................. 52
13 Sensitivity gain indicator ........ 44
14 Best shot selector (BSS) .......... 57Continuous shooting mode ... 56
15 Image sharpening .................. 58
16 White balance ....................... 54
17 Shooting mode ............... 25, 36
2048 15NORMAL
1 32 4 5
6
7
89101112
13141516
17
1 Displayed only when shutter-release button ispressed halfway.
2 Appears when clock-calendar has not been set.
3 Appears only at slow shutter speeds.4 Appears only when battery is running low.
mode
Playback mode
7
Intro
du
ction
—G
etting
to K
no
w th
e CO
OLPIX
3500
2048 15NORMAL
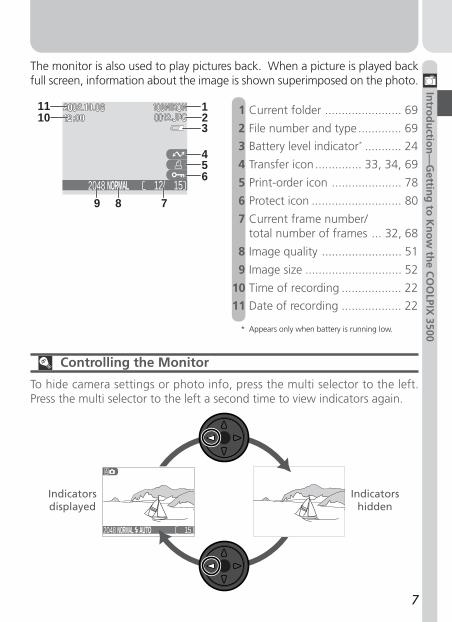
The monitor is also used to play pictures back. When a picture is played backfull screen, information about the image is shown superimposed on the photo.
Controlling the Monitor
To hide camera settings or photo info, press the multi selector to the left.Press the multi selector to the left a second time to view indicators again.
Indicatorshidden
Indicatorsdisplayed
1 Current folder ....................... 69
2 File number and type ............. 69
3 Battery level indicator* ........... 24
4 Transfer icon .............. 33, 34, 69
5 Print-order icon ..................... 78
6 Protect icon ........................... 80
7 Current frame number/total number of frames ... 32, 68
8 Image quality ........................ 51
9 Image size ............................. 52
10 Time of recording .................. 22
11 Date of recording .................. 22
0012/0015
1
3
456
789
1011
NORMAL2048
2
* Appears only when battery is running low.
8
Intro
du
ction
—G
etting
to K
no
w th
e CO
OLPIX
3500
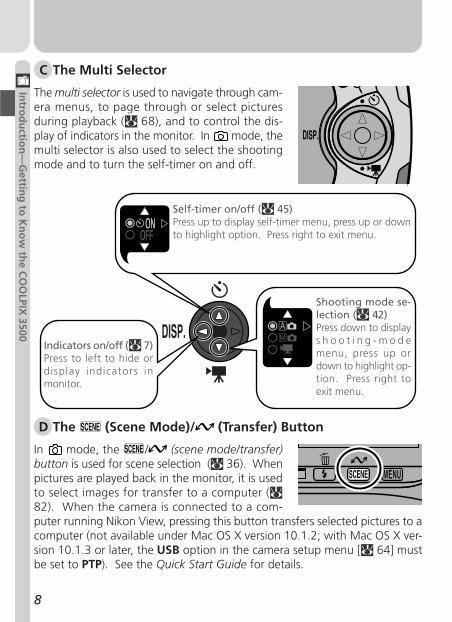
C The Multi Selector
The multi selector is used to navigate through cam-era menus, to page through or select picturesduring playback ( 68), and to control the dis-play of indicators in the monitor. In mode, themulti selector is also used to select the shootingmode and to turn the self-timer on and off.
ONONOFFOFF
Self-timer on/off ( 45)Press up to display self-timer menu, press up or downto highlight option. Press right to exit menu.
Indicators on/off ( 7)Press to left to hide ordisplay indicators inmonitor.
Shooting mode se-lection ( 42)Press down to displays h o o t i n g - m o d emenu, press up ordown to highlight op-tion. Press right toexit menu.
D The (Scene Mode)/ (Transfer) Button
In mode, the / (scene mode/transfer)button is used for scene selection ( 36). Whenpictures are played back in the monitor, it is usedto select images for transfer to a computer (82). When the camera is connected to a com-puter running Nikon View, pressing this button transfers selected pictures to acomputer (not available under Mac OS X version 10.1.2; with Mac OS X ver-sion 10.1.3 or later, the USB option in the camera setup menu [ 64] mustbe set to PTP). See the Quick Start Guide for details.
9
Intro
du
ction
—M
enu
Gu
ide
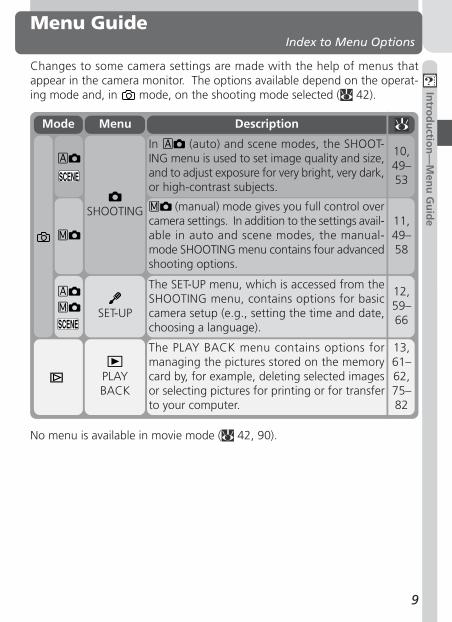
Menu GuideIndex to Menu Options
Changes to some camera settings are made with the help of menus thatappear in the camera monitor. The options available depend on the operat-ing mode and, in mode, on the shooting mode selected ( 42).
No menu is available in movie mode ( 42, 90).
13,61–62,75–82
The PLAY BACK menu contains options formanaging the pictures stored on the memorycard by, for example, deleting selected imagesor selecting pictures for printing or for transferto your computer.
In (auto) and scene modes, the SHOOT-ING menu is used to set image quality and size,and to adjust exposure for very bright, very dark,or high-contrast subjects.
10,49–53
SHOOTING (manual) mode gives you full control overcamera settings. In addition to the settings avail-able in auto and scene modes, the manual-mode SHOOTING menu contains four advancedshooting options.
11,49–58
12,59–66
The SET-UP menu, which is accessed from theSHOOTING menu, contains options for basiccamera setup (e.g., setting the time and date,choosing a language).
SET-UP
PLAYBACK
Menu DescriptionMode
10
Intro
du
ction
—M
enu
Gu
ide
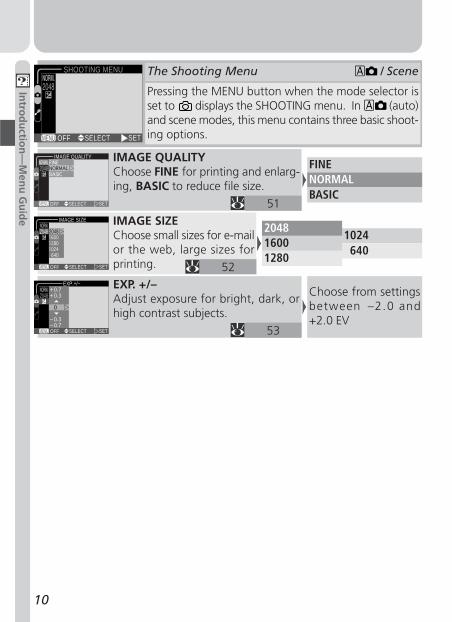
SHOOTING MENU
MENU SELECT SETOFF
IMAGE QUALITYChoose FINE for printing and enlarg-ing, BASIC to reduce file size.
EXP. +/–Adjust exposure for bright, dark, orhigh contrast subjects.
EXP.+/–
MENU SELECT SETOFF
51
53
Choose from settingsbetween –2.0 and+2.0 EV
FINENORMALBASIC
IMAGE QUALITY
MENU SELECT SETOFF
The Shooting Menu / Scene
Pressing the MENU button when the mode selector isset to displays the SHOOTING menu. In (auto)and scene modes, this menu contains three basic shoot-ing options.
IMAGE SIZEChoose small sizes for e-mailor the web, large sizes forprinting.
IMAGE SIZE
MENU SELECT SETOFF 52
1024640
204816001280
11
Intro
du
ction
—M
enu
Gu
ide
Off
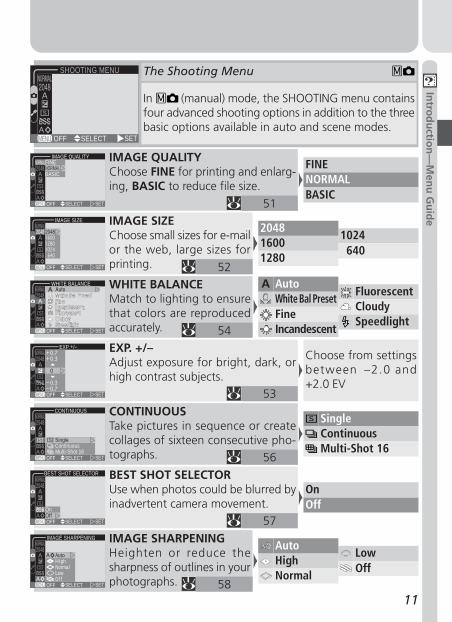
SHOOTING MENU
MENU SELECT SETOFF
IMAGE QUALITYChoose FINE for printing and enlarg-ing, BASIC to reduce file size.
WHITE BALANCEMatch to lighting to ensurethat colors are reproducedaccurately.
EXP. +/–Adjust exposure for bright, dark, orhigh contrast subjects.
CONTINUOUSTake pictures in sequence or createcollages of sixteen consecutive pho-tographs.
BEST SHOT SELECTORUse when photos could be blurred byinadvertent camera movement.
IMAGE QUALITYFINENORMALBASIC
MENU SELECT SETOFF
WHITE BALANCE
MENU SELECT SETOFF
EXP.+/–
MENU SELECT SETOFF
CONTINUOUS
ContinuousMulti-Shot 16
Single
MENU SELECT SETOFF
BEST SHOT SELECTOR
OnOff
MENU SELECT SETOFF
51
54
53
56
57
IMAGE SHARPENINGHeighten or reduce thesharpness of outlines in yourphotographs.
IMAGE SHARPENING
AutoHighNorma lLowOf f
MENU SELECT SETOFF
FINENORMALBASIC
58
Choose from settingsbetween –2.0 and+2.0 EV
SingleContinuousMulti-Shot 16
AutoWhite Bal Preset
A
FineIncandescent
FluorescentCloudySpeedlight
On
The Shooting Menu
In (manual) mode, the SHOOTING menu containsfour advanced shooting options in addition to the threebasic options available in auto and scene modes.
HighNormal
LowOff
Auto
IMAGE SIZEChoose small sizes for e-mailor the web, large sizes forprinting.
IMAGE SIZE
MENU SELECT SETOFF 52
1024640
204816001280
12
Intro
du
ction
—M
enu
Gu
ide
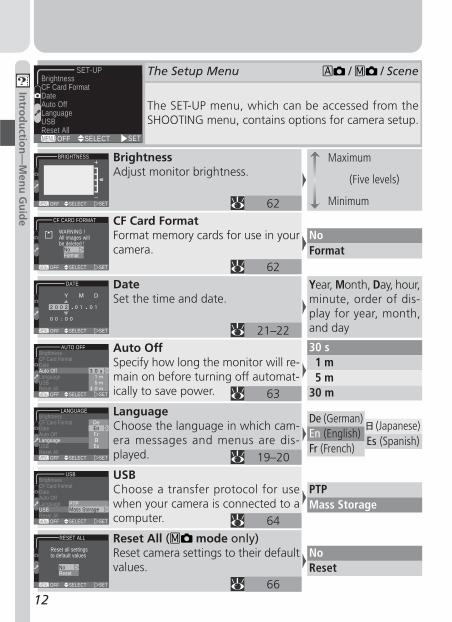
(Five levels)
Maximum
Minimum
NoFormat
30 s1 m5 m
30 m
De (German)En (English)Fr (French)
PTPMass Storage
Year, Month, Day, hour,minute, order of dis-play for year, month,and day
BrightnessCF Card FormatDateAuto OffLanguageUSBReset All
SET-UP
MENU SELECT SETOFF
BrightnessAdjust monitor brightness.
CF Card FormatFormat memory cards for use in yourcamera.
DateSet the time and date.
Auto OffSpecify how long the monitor will re-main on before turning off automat-ically to save power.
LanguageChoose the language in which cam-era messages and menus are dis-played.
USBChoose a transfer protocol for usewhen your camera is connected to acomputer.
BRIGHTNESS
MENU SELECT SETOFF
MENU SELECT SETOFF
WARNING !All images willbe deleted !
NoFormat
CF CARD FORMAT
DATE
MENU SELECT SETOFF
BrightnessCF Card FormatDateAuto OffLanguageUSBReset All
AUTO OFF
MENU SELECT SETOFF
BrightnessCF Card FormatDateAuto OffLanguageUSBReset All
LANGUAGE
MENU SELECT SETOFF
BrightnessCF Card FormatDateAuto OffLanguageUSBReset All
USB
PTPMass Storage
MENU SELECT SETOFF
62
62
21–22
63
19–20
64
(Japanese)Es (Spanish)
Reset All ( mode only)Reset camera settings to their defaultvalues.
RESET ALL
Reset all settingsto default values
NoReset
MENU SELECT SETOFF 66
NoReset
The Setup Menu / / Scene
The SET-UP menu, which can be accessed from theSHOOTING menu, contains options for camera setup.
13
Intro
du
ction
—M
enu
Gu
ide
Auto TransferMark all pictures for transfer to a com-puter, or remove transfer markingfrom all pictures.
AUTO TRANSFER
All ONAll OFF
MENU SELECT SETOFF
BrightnessAdjust monitor brightness.
BRIGHTNESS
MENU SELECT SETOFF
CF Card FormatThis option is used to format memorycards for use in your camera.
WARNING !All images willbe deleted !
CF CARD FORMAT
MENU SELECT SETOFF
NoFormat
DeletePrint SetProtectAuto TransferCF Card FormatBrightness
DELETE
MENU SELECT SETOFF
DeleteDelete all or selected pictures.
Print SetSelect pictures for printing on a DPOF-compatible device.
ProtectProtect selected pictures from acci-dental deletion.
Selected ImagesAll Images
DELETE
MENU SELECT SETOFF
PRINT SET
Print setDelete print set
MENU SELECT SETOFF
PROTECT
QUICKSELECT SET DONE
76–77
78–79
80
81
62
62
NoFormat
All ONAll OFF
Select pictures for pro-tection. Protected pic-tures are marked by a
icon.
Print setDelete print set
Selected ImagesAll Images
(Five levels)
Maximum
Minimum
The Playback Menu
Pressing the MENU button when the mode selector isset to displays the PLAY BACK menu, which con-tains options for managing the pictures on the memorycard.
14
Intro
du
ction
—M
enu
Gu
ide
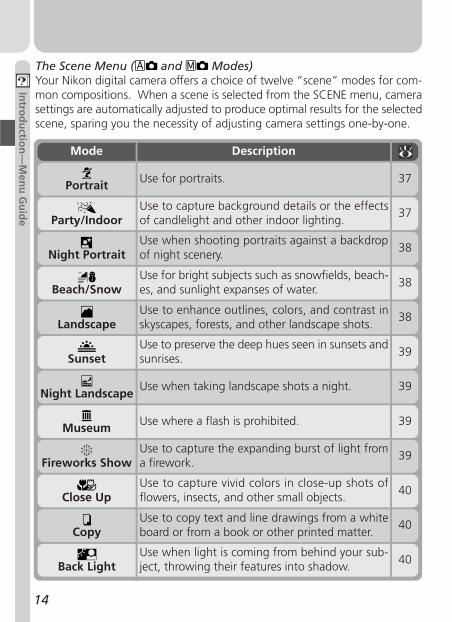
The Scene Menu ( and Modes)Your Nikon digital camera offers a choice of twelve “scene” modes for com-mon compositions. When a scene is selected from the SCENE menu, camerasettings are automatically adjusted to produce optimal results for the selectedscene, sparing you the necessity of adjusting camera settings one-by-one.
40Back LightUse when light is coming from behind your sub-ject, throwing their features into shadow.
40Copy
Use to copy text and line drawings from a whiteboard or from a book or other printed matter.
40Close UpUse to capture vivid colors in close-up shots offlowers, insects, and other small objects.
39Fireworks Show
Use to capture the expanding burst of light froma firework.
39Museum Use where a flash is prohibited.
39Night Landscape
Use when taking landscape shots a night.
39SunsetUse to preserve the deep hues seen in sunsets andsunrises.
38Landscape
Use to enhance outlines, colors, and contrast inskyscapes, forests, and other landscape shots.
38Beach/SnowUse for bright subjects such as snowfields, beach-es, and sunlight expanses of water.
38Night PortraitUse when shooting portraits against a backdropof night scenery.
37Party/Indoor
Use to capture background details or the effectsof candlelight and other indoor lighting.
37Portrait Use for portraits.
Mode Description
15
Taking Pictures
23–30
Review and Deletion
31–35
Getting Creative
36–40
First Steps
16–22
TutorialGetting Started
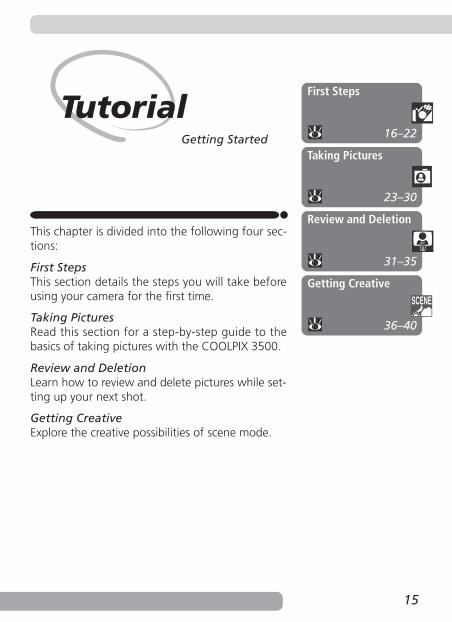
This chapter is divided into the following four sec-tions:
First StepsThis section details the steps you will take beforeusing your camera for the first time.
Taking PicturesRead this section for a step-by-step guide to thebasics of taking pictures with the COOLPIX 3500.
Review and DeletionLearn how to review and delete pictures while set-ting up your next shot.
Getting CreativeExplore the creative possibilities of scene mode.
Tuto
rial—First Step
s
16
Step 2—Insert the Battery and Memory CardYour camera is powered by a rechargeable Nikon EN-EL2 lithium-ion battery,which can be charged using the MH-60 battery charger provided with thecamera. To store pictures, your camera uses CompactFlash™ memory cards.
2.1 Charge the batteryThe EN-EL2 lithium-ion battery supplied with your camera is not fullycharged at shipment. We recommend that you charge the battery be-fore use. Instructions for charging the battery may be found in theinstruction manual included with the battery charger.
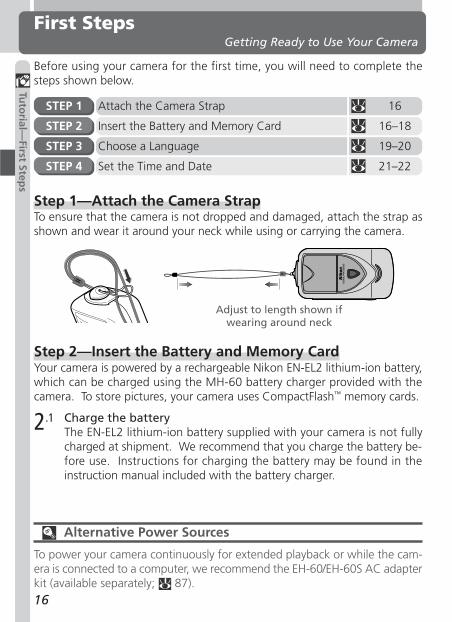
First StepsGetting Ready to Use Your Camera
Before using your camera for the first time, you will need to complete thesteps shown below.
Attach the Camera Strap 16STEP 1
Insert the Battery and Memory Card 16–18STEP 2
Choose a Language 19–20STEP 3
Set the Time and Date 21–22STEP 4
Step 1—Attach the Camera StrapTo ensure that the camera is not dropped and damaged, attach the strap asshown and wear it around your neck while using or carrying the camera.
Adjust to length shown ifwearing around neck
Alternative Power Sources
To power your camera continuously for extended playback or while the cam-era is connected to a computer, we recommend the EH-60/EH-60S AC adapterkit (available separately; 87).
Tuto
rial—First Step
s
17
Read Battery Warnings
Read and follow all warnings and instructions supplied by the batterymanufacturer.
Formatting Memory Cards
The memory card supplied with your camera is formatted at shipment. Othermemory cards, however, must be formatted before first use. For informationon formatting memory cards, see “Camera Setup: CF Card Format” ( 62).
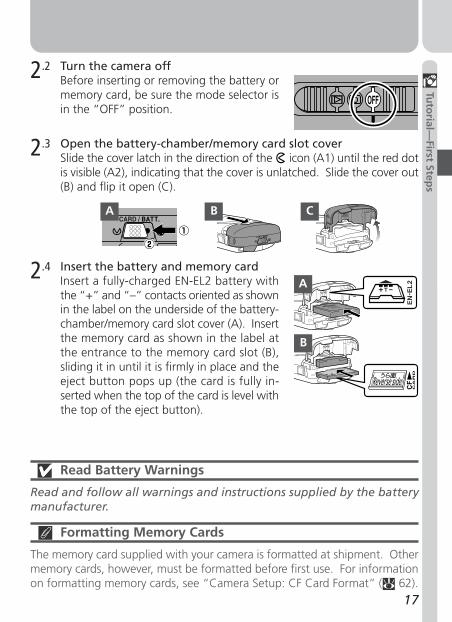
2.2 Turn the camera offBefore inserting or removing the battery ormemory card, be sure the mode selector isin the “OFF” position.
2.3 Open the battery-chamber/memory card slot coverSlide the cover latch in the direction of the icon (A1) until the red dotis visible (A2), indicating that the cover is unlatched. Slide the cover out(B) and flip it open (C).
2.4 Insert the battery and memory cardInsert a fully-charged EN-EL2 battery withthe “+” and “–” contacts oriented as shownin the label on the underside of the battery-chamber/memory card slot cover (A). Insertthe memory card as shown in the label atthe entrance to the memory card slot (B),sliding it in until it is firmly in place and theeject button pops up (the card is fully in-serted when the top of the card is level withthe top of the eject button).
A B
EN E
L 2
-C
EN E
L 2
-
EN E
L 2
-
EN E
L 2
-
A
B
Tuto
rial—First Step
s
18
A B C
Removing the Battery
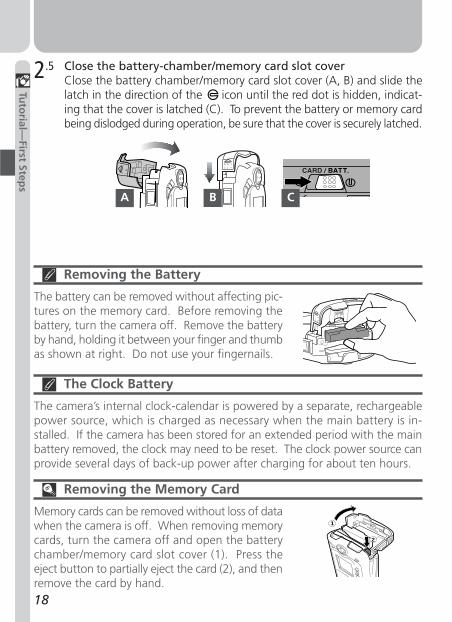
The battery can be removed without affecting pic-tures on the memory card. Before removing thebattery, turn the camera off. Remove the batteryby hand, holding it between your finger and thumbas shown at right. Do not use your fingernails.
1
2
EN E
L 2
-
The Clock Battery
The camera’s internal clock-calendar is powered by a separate, rechargeablepower source, which is charged as necessary when the main battery is in-stalled. If the camera has been stored for an extended period with the mainbattery removed, the clock may need to be reset. The clock power source canprovide several days of back-up power after charging for about ten hours.
Removing the Memory Card
Memory cards can be removed without loss of datawhen the camera is off. When removing memorycards, turn the camera off and open the batterychamber/memory card slot cover (1). Press theeject button to partially eject the card (2), and thenremove the card by hand.
2.5 Close the battery-chamber/memory card slot coverClose the battery chamber/memory card slot cover (A, B) and slide thelatch in the direction of the icon until the red dot is hidden, indicat-ing that the cover is latched (C). To prevent the battery or memory cardbeing dislodged during operation, be sure that the cover is securely latched.
Tuto
rial—First Step
s
19
Highlight SET-UP menu page tab ( )
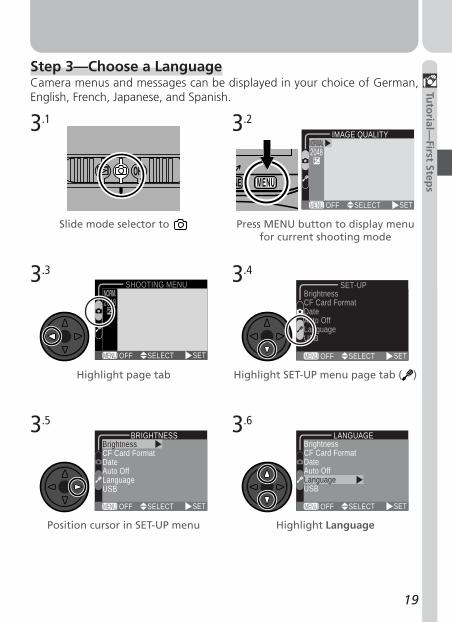
Step 3—Choose a LanguageCamera menus and messages can be displayed in your choice of German,English, French, Japanese, and Spanish.
Press MENU button to display menufor current shooting mode
IMAGE QUALITY
MENU SELECT SETOFF
Slide mode selector to
Highlight page tab
Position cursor in SET-UP menu Highlight Language
3.1 3.2
3.3 3.4
3.5 3.6
SHOOTING MENU
MENU SELECT SETOFF
BRIGHTNESSBrightnessCF Card FormatDateAuto OffLanguageUSB
MENU SELECT SETOFF
BrightnessCF Card FormatDateAuto OffLanguageUSB
SET-UP
MENU SELECT SETOFF
BrightnessCF Card FormatDateAuto OffLanguageUSB
LANGUAGE
MENU SELECT SETOFF

Tuto
rial—First Step
s
20
Choose a language from:De Deutsch (German)En EnglishFr Français (French)
JapaneseEs Español (Spanish)
Display options
LANGUAGEBrightnessCF Card FormatDateAuto OffLanguageUSB
MENU SELECT SETOFF
Return to SET-UP menu. If you haveyet to set the time and date, proceedto Step 4.6 on the following page to
set the time and date.
3.7 3.8
3.9
BrightnessCF Card FormatDateAuto OffLanguageUSB
LANGUAGE
MENU SELECT SETOFF
BrightnessCF Card FormatDateAuto OffLanguageUSB
LANGUAGE
MENU SELECT SETOFF
Tuto
rial—First Step
s
21
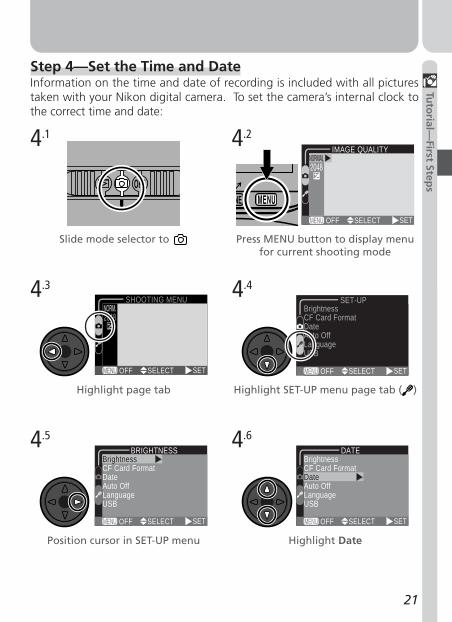
Step 4—Set the Time and DateInformation on the time and date of recording is included with all picturestaken with your Nikon digital camera. To set the camera’s internal clock tothe correct time and date:
Slide mode selector to
4.1 4.2
Highlight SET-UP menu page tab ( )Highlight page tab
4.3 4.4
Position cursor in SET-UP menu Highlight Date
4.5 4.6
Press MENU button to display menufor current shooting mode
IMAGE QUALITY
MENU SELECT SETOFF
SHOOTING MENU
MENU SELECT SETOFF
BRIGHTNESSBrightnessCF Card FormatDateAuto OffLanguageUSB
MENU SELECT SETOFF
BrightnessCF Card FormatDateAuto OffLanguageUSB
SET-UP
MENU SELECT SETOFF
BrightnessCF Card FormatDateAuto OffLanguageUSB
DATE
MENU SELECT SETOFF
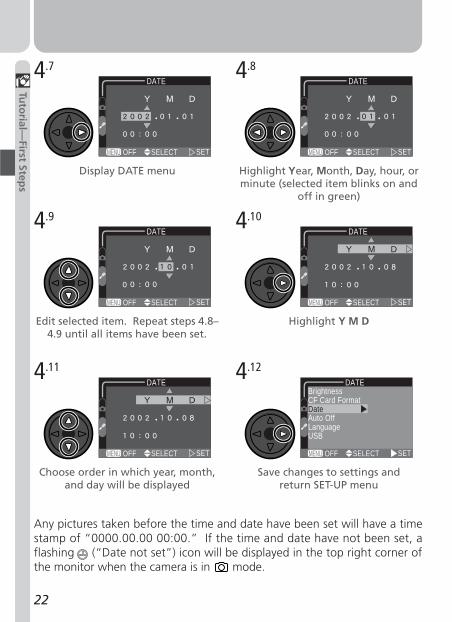
Tuto
rial—First Step
s
22
BrightnessCF Card FormatDateAuto OffLanguageUSB
DATE
MENU SELECT SETOFF
DATE
MENU SELECT SETOFF
DATE
MENU SELECT SETOFF
DATE
MENU SELECT SETOFF
Highlight Y M DEdit selected item. Repeat steps 4.8–4.9 until all items have been set.
4.9 4.10
Choose order in which year, month,and day will be displayed
Save changes to settings andreturn SET-UP menu
4.11 4.12
Any pictures taken before the time and date have been set will have a timestamp of “0000.00.00 00:00.” If the time and date have not been set, aflashing (“Date not set”) icon will be displayed in the top right corner ofthe monitor when the camera is in mode.
Highlight Year, Month, Day, hour, orminute (selected item blinks on and
off in green)
Display DATE menu
4.7 4.8DATE
MENU SELECT SETOFF
DATE
MENU SELECT SETOFF
23
Tuto
rial—Takin
g Pictu
resTaking Pictures
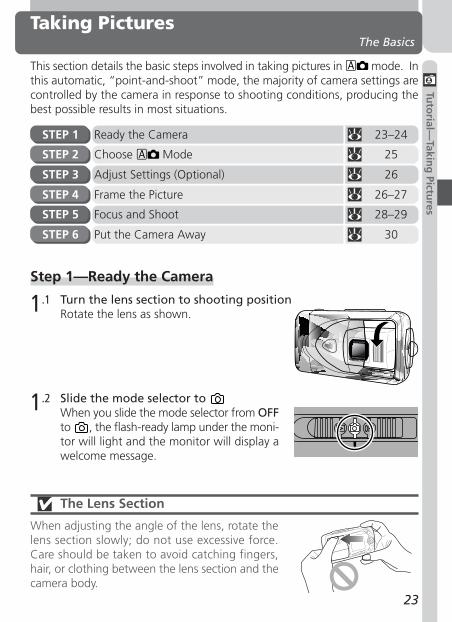
The Basics
This section details the basic steps involved in taking pictures in mode. Inthis automatic, “point-and-shoot” mode, the majority of camera settings arecontrolled by the camera in response to shooting conditions, producing thebest possible results in most situations.
Ready the Camera 23–24STEP 1
Choose Mode 25STEP 2
Frame the Picture 26–27STEP 4
Focus and Shoot 28–29STEP 5
Put the Camera Away 30STEP 6
Adjust Settings (Optional) 26STEP 3
1.2 Slide the mode selector to When you slide the mode selector from OFFto , the flash-ready lamp under the moni-tor will light and the monitor will display awelcome message.
Step 1—Ready the Camera
1.1 Turn the lens section to shooting positionRotate the lens as shown.
The Lens Section
When adjusting the angle of the lens, rotate thelens section slowly; do not use excessive force.Care should be taken to avoid catching fingers,hair, or clothing between the lens section and thecamera body.
24
Tuto
rial—Takin
g Pictu
res
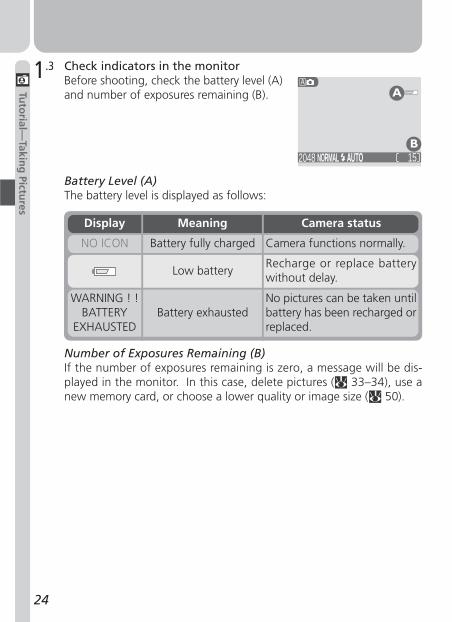
Battery Level (A)The battery level is displayed as follows:
Number of Exposures Remaining (B)If the number of exposures remaining is zero, a message will be dis-played in the monitor. In this case, delete pictures ( 33–34), use anew memory card, or choose a lower quality or image size ( 50).
NO ICON Battery fully charged Camera functions normally.
Display Meaning Camera status
Low batteryRecharge or replace batterywithout delay.
WARNING ! !BATTERY
EXHAUSTEDBattery exhausted
No pictures can be taken untilbattery has been recharged orreplaced.
1.3 Check indicators in the monitorBefore shooting, check the battery level (A)and number of exposures remaining (B).
15NORMAL2048B
A
25
Tuto
rial—Takin
g Pictu
res
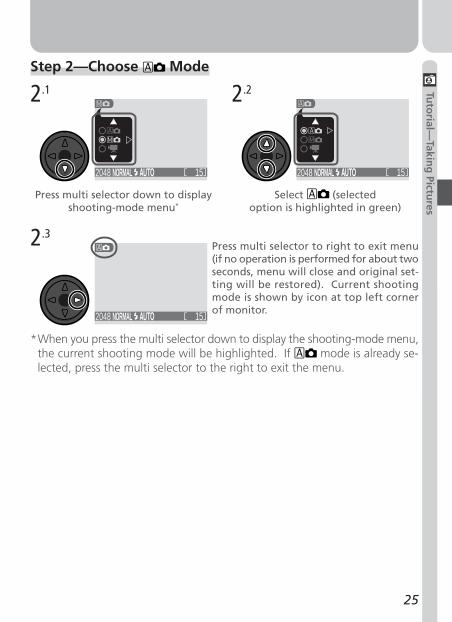
Step 2—Choose Mode
15NORMAL2048
Press multi selector down to displayshooting-mode menu*
2.1
Press multi selector to right to exit menu(if no operation is performed for about twoseconds, menu will close and original set-ting will be restored). Current shootingmode is shown by icon at top left cornerof monitor.
2.3
2048 15NORMAL
Select (selectedoption is highlighted in green)
2.2
2048 15NORMAL
*When you press the multi selector down to display the shooting-mode menu,the current shooting mode will be highlighted. If mode is already se-lected, press the multi selector to the right to exit the menu.
26
Tuto
rial—Takin
g Pictu
res
Setting Default Description
Flashmode
AutoFlash fires automatically when lighting ispoor.
43
Self timer Off Self-timer off. 45–46
Imagequality
NORMALPictures compressed for balance betweenquality and file size that is ideal for snap-shots.
51
Imagesize
2048 Pictures are 2,048 × 1,536 pixels in size. 52
Exp. +/– ±0 No exposure compensation performed. 53
Step 4—Frame the Picture
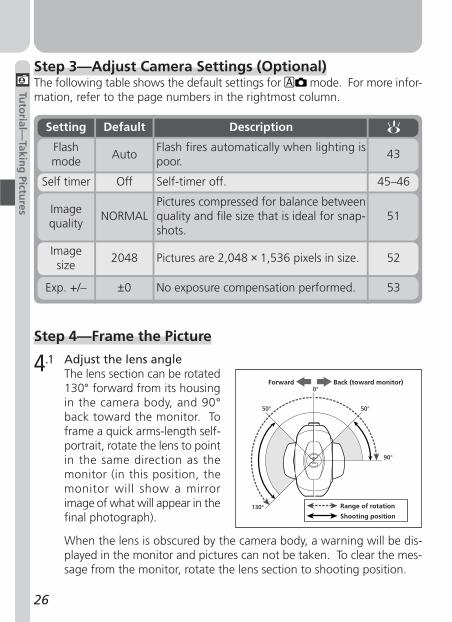
4.1 Adjust the lens angleThe lens section can be rotated130° forward from its housingin the camera body, and 90°back toward the monitor. Toframe a quick arms-length self-portrait, rotate the lens to pointin the same direction as themonitor (in this position, themonitor will show a mirrorimage of what will appear in thefinal photograph).
Step 3—Adjust Camera Settings (Optional)The following table shows the default settings for mode. For more infor-mation, refer to the page numbers in the rightmost column.
Range of rotation
Shooting position
Forward Back (toward monitor)0°
50°50°
130°
90°
When the lens is obscured by the camera body, a warning will be dis-played in the monitor and pictures can not be taken. To clear the mes-sage from the monitor, rotate the lens section to shooting position.
27
Tuto
rial—Takin
g Pictu
res
4.2 Ready the cameraHold the camera steadily in both hands.
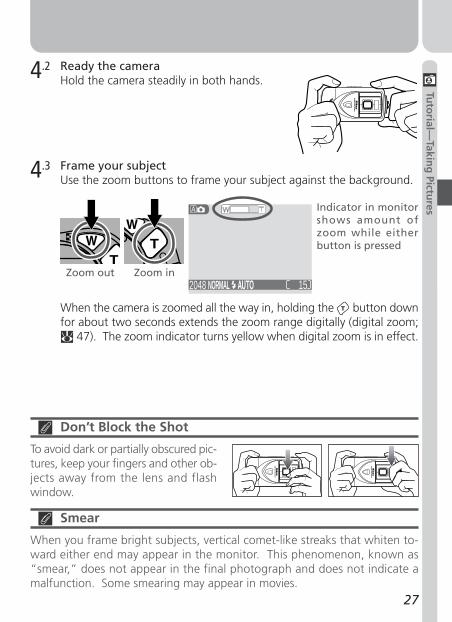
4.3 Frame your subjectUse the zoom buttons to frame your subject against the background.
Don’t Block the Shot
To avoid dark or partially obscured pic-tures, keep your fingers and other ob-jects away from the lens and flashwindow.
Smear
When you frame bright subjects, vertical comet-like streaks that whiten to-ward either end may appear in the monitor. This phenomenon, known as“smear,” does not appear in the final photograph and does not indicate amalfunction. Some smearing may appear in movies.
Indicator in monitorshows amount ofzoom while eitherbutton is pressed
2048 15NORMAL
When the camera is zoomed all the way in, holding the button downfor about two seconds extends the zoom range digitally (digital zoom;
47). The zoom indicator turns yellow when digital zoom is in effect.
Zoom out Zoom in
28
Tuto
rial—Takin
g Pictu
res
Step 5—Focus and Shoot
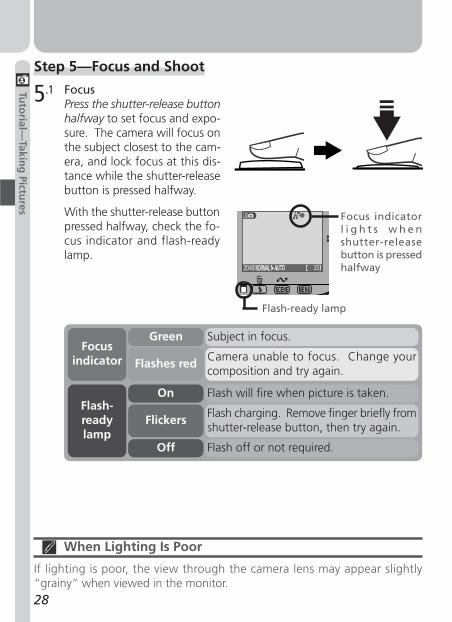
5.1 FocusPress the shutter-release buttonhalfway to set focus and expo-sure. The camera will focus onthe subject closest to the cam-era, and lock focus at this dis-tance while the shutter-releasebutton is pressed halfway.
With the shutter-release buttonpressed halfway, check the fo-cus indicator and flash-readylamp.
Focusindicator
Flash-readylamp
Camera unable to focus. Change yourcomposition and try again.
Flash charging. Remove finger briefly fromshutter-release button, then try again.
Subject in focus.
Flash will fire when picture is taken.
Flash off or not required.
Flashes red
Flickers
Green
On
Off
When Lighting Is Poor
If lighting is poor, the view through the camera lens may appear slightly“grainy” when viewed in the monitor.
2048 15NORMAL
Focus indicatorl i g h t s w h e nshutter-releasebutton is pressedhalfway
Flash-ready lamp
29
Tuto
rial—Takin
g Pictu
res
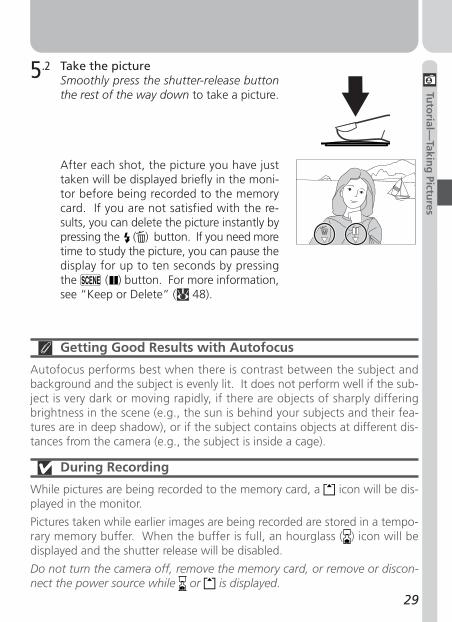
5.2 Take the pictureSmoothly press the shutter-release buttonthe rest of the way down to take a picture.
After each shot, the picture you have justtaken will be displayed briefly in the moni-tor before being recorded to the memorycard. If you are not satisfied with the re-sults, you can delete the picture instantly bypressing the ( ) button. If you need moretime to study the picture, you can pause thedisplay for up to ten seconds by pressingthe ( ) button. For more information,see “Keep or Delete” ( 48).
Getting Good Results with Autofocus
Autofocus performs best when there is contrast between the subject andbackground and the subject is evenly lit. It does not perform well if the sub-ject is very dark or moving rapidly, if there are objects of sharply differingbrightness in the scene (e.g., the sun is behind your subjects and their fea-tures are in deep shadow), or if the subject contains objects at different dis-tances from the camera (e.g., the subject is inside a cage).
During Recording
While pictures are being recorded to the memory card, a icon will be dis-played in the monitor.
Pictures taken while earlier images are being recorded are stored in a tempo-rary memory buffer. When the buffer is full, an hourglass ( ) icon will bedisplayed and the shutter release will be disabled.
Do not turn the camera off, remove the memory card, or remove or discon-nect the power source while or is displayed.
30
Tuto
rial—Takin
g Pictu
res
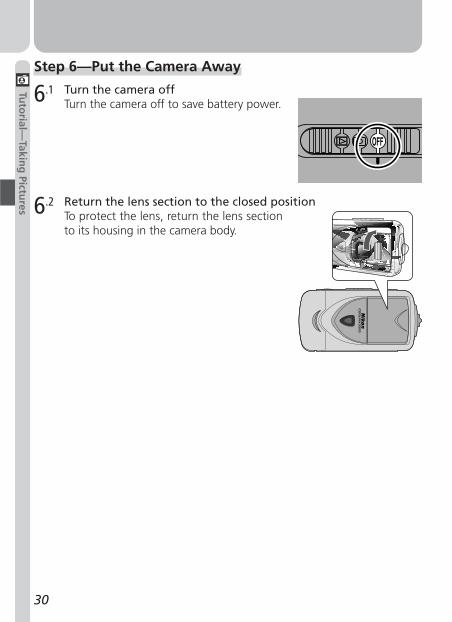
Step 6—Put the Camera Away
6.1 Turn the camera offTurn the camera off to save battery power.
6.2 Return the lens section to the closed positionTo protect the lens, return the lens sectionto its housing in the camera body.
31
Tuto
rial—R
eview an
d D
eletion
Review and DeletionQuick Review
Using the quick review function on your Nikon digital camera, you can viewthe results of earlier attempts while setting up the next shot, and use whatyou see to change camera settings or to choose a better angle. Once youhave the shot you want, you can delete your failures instantly to make roomfor more shots on the memory card.
To use quick review, the camera must be in mode. Press the but-ton once to display the most recent picture at the top left corner of the moni-tor, twice to display pictures full screen. Pressing the button a third timereturns you to mode.
Mode Quick ReviewPictures are displayedin the top left corner ofthe monitor, allowingyou to view the resultsof previous attemptswhile setting up yournext shot.
Full-Screen ReviewPictures are displayedfull screen or in menusof four or nine “thumb-nail” images. You canzoom in on and deleteindividual pictures.
2048 14
1
NORMAL2048 14NORMAL 1/00112048 NORMAL
32
Tuto
rial—R
eview an
d D
eletion
Press the multi selector up to view picturesrecorded before the current photo, down toview pictures recorded after the current pho-to. Keep multi selector pressed to scroll rap-idly to the desired frame number.
View otherpictures
1/00112048 NORMAL
Quick ReviewThe following operations can be performed inquick review:
2048 14
1
NORMAL
All other camera controls function as they do in shooting mode.
Full-Screen ReviewThe following operations can be performed in full-screen review:
Press DescriptionTo
Shutterrelease
To return to shooting mode, press the shut-ter-release button halfway.
Return toshooting mode
Enter full-screen review (see below) with thecurrent picture displayed full screen.
View currentpicture full screen
Press the multi selector up to view picturesrecorded before the current photo, down toview pictures recorded after the currentphoto.
View otherpictures
Press DescriptionTo
33
Tuto
rial—R
eview an
d D
eletion
( )
Press the ( ) button for an enlarged viewof the current photo ( 71). While the pho-to is zoomed in, use the multi selector to viewareas not visible in the monitor. To cancelzoom, press .
Zoom photo in
( )Press the ( ) button to display up tonine pictures at a time as small thumbnail pre-views (see following page).
View multiplepictures
( )
A confirmation dialog will be displayed. Pressmulti selector up or down to highlight op-tion, press to right to select.
•Select No to exitwithout deletingpicture
•Select Yes to de-lete picture
DELETE
NoYes
SELECT SET
Delete currentpicture
Press DescriptionTo
( )
Pictures selected for transfer are marked witha icon. Turn this marking on or off toselect the pictures that will be transferred toa computer at a later date ( 82).
Select currentpicture for transfer
to a computer
Press multi selector to left to hide or displayphoto info superimposed on picture in mon-itor ( 7).
Hide or displayphoto info
Shutterrelease/
To end review and return to shooting mode,press the button or press the shutter-release button halfway.
Return to mode
34
Tuto
rial—R
eview an
d D
eletion
Press DescriptionTo
Shutterrelease/
To end review and return to shooting mode,press the button or press the shutter-release button halfway.
Return to mode
Press the multi selector up, down, left, or rightto highlight thumbnails.
Highlight pictures
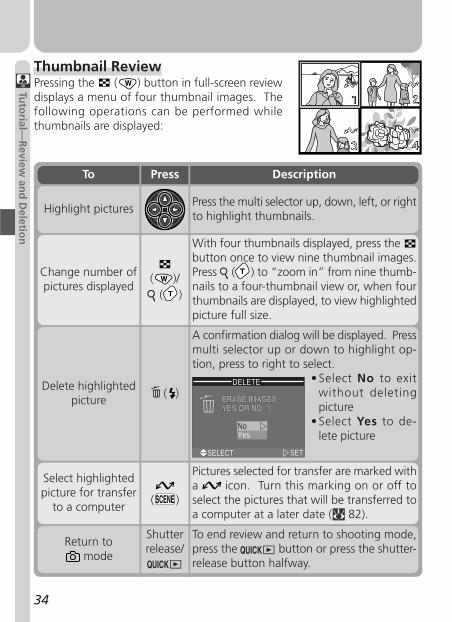
Thumbnail ReviewPressing the ( ) button in full-screen reviewdisplays a menu of four thumbnail images. Thefollowing operations can be performed whilethumbnails are displayed:
( )/ ( )
With four thumbnails displayed, press the button once to view nine thumbnail images.Press ( ) to “zoom in” from nine thumb-nails to a four-thumbnail view or, when fourthumbnails are displayed, to view highlightedpicture full size.
Change number ofpictures displayed
( )
A confirmation dialog will be displayed. Pressmulti selector up or down to highlight op-tion, press to right to select.
• Select No to exitwithout deletingpicture
• Select Yes to de-lete picture
Delete highlightedpicture
DELETE
NoYes
SELECT SET
( )
Pictures selected for transfer are marked witha icon. Turn this marking on or off toselect the pictures that will be transferred toa computer at a later date ( 82).
Select highlightedpicture for transfer
to a computer

35
Tuto
rial—R
eview an
d D
eletion
Playback Mode ( 67)
This section describes quick review, which allows you to view pictures withoutleaving mode. To learn about additional playback options available in (playback) mode, see “Playing Pictures Back” ( 67).
36
Tuto
rial—G
etting
Creative
Getting CreativeScene Selection
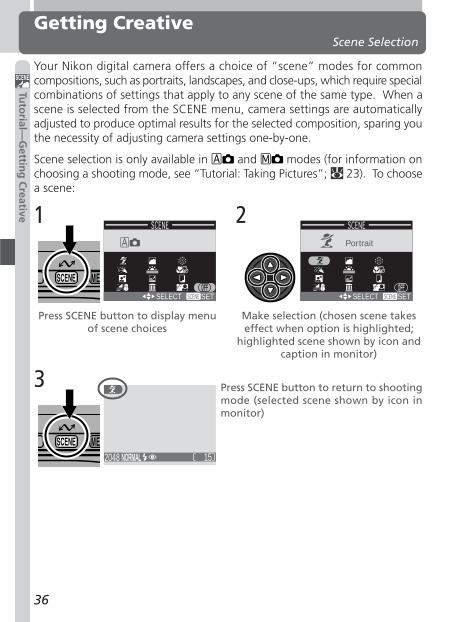
SELECT SET
2048 15NORMAL
Your Nikon digital camera offers a choice of “scene” modes for commoncompositions, such as portraits, landscapes, and close-ups, which require specialcombinations of settings that apply to any scene of the same type. When ascene is selected from the SCENE menu, camera settings are automaticallyadjusted to produce optimal results for the selected composition, sparing youthe necessity of adjusting camera settings one-by-one.
Scene selection is only available in and modes (for information onchoosing a shooting mode, see “Tutorial: Taking Pictures”; 23). To choosea scene:
Portrait
SELECT SET
Press SCENE button to display menuof scene choices
1
Make selection (chosen scene takeseffect when option is highlighted;
highlighted scene shown by icon andcaption in monitor)
2
Press SCENE button to return to shootingmode (selected scene shown by icon inmonitor)
3

37
Tuto
rial—G
etting
Creative
In scene mode, you can adjust flash ( 43) and self-timer ( 45) settings(restrictions may apply depending on the scene selected). Pressing the MENUbutton will display the SHOOTING menu ( 49). To return to or mode, select OFF in the SCENE menu.
The following pages describe when to use each scene mode.
Camera Shake
At slow shutter speeds, a icon appears in the monitor. Pictures taken atthese speeds may be blurred by inadvertent camera movement (“camerashake”). While use of a tripod is recommended when this icon is displayed,other methods that may be successful in preventing blurring at a given settingare indicated by the number of stars in the “Camera Shake” rating:
✯ Support the camera steadily in both hands with your elbows againstyour torso.
✯✯ Place the camera on a flat, level surface such as a wall or table.
Use for shots that include details of the background be-hind the main subject, or to capture the effects of candle-light and other indoor background lighting.
Party/Indoor
• Flash mode set to (auto with red-eye reduction); other modes canbe selected ( 43). Camera Shake: ✯
Use for portraits. Main subject stands out clearly while back-ground details are softened, lending the composition a senseof depth.
• Flash mode set to (auto with red-eye reduction); other modes canbe selected ( 43).
• Degree to which background details are softened depends on the amountof light available.
Portrait
38
Tuto
rial—G
etting
Creative
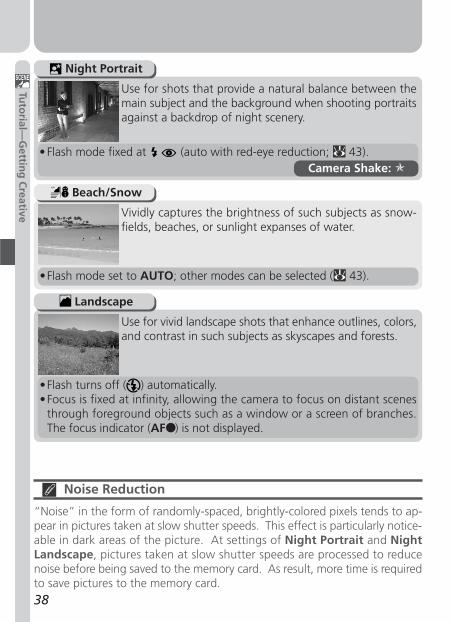
Noise Reduction
“Noise” in the form of randomly-spaced, brightly-colored pixels tends to ap-pear in pictures taken at slow shutter speeds. This effect is particularly notice-able in dark areas of the picture. At settings of Night Portrait and NightLandscape, pictures taken at slow shutter speeds are processed to reducenoise before being saved to the memory card. As result, more time is requiredto save pictures to the memory card.
Vividly captures the brightness of such subjects as snow-fields, beaches, or sunlight expanses of water.
Beach/Snow
Use for shots that provide a natural balance between themain subject and the background when shooting portraitsagainst a backdrop of night scenery.
Night Portrait
• Flash mode fixed at (auto with red-eye reduction; 43).Camera Shake: ✯
Use for vivid landscape shots that enhance outlines, colors,and contrast in such subjects as skyscapes and forests.
Landscape
•Flash turns off ( ) automatically.•Focus is fixed at infinity, allowing the camera to focus on distant scenes
through foreground objects such as a window or a screen of branches.The focus indicator (AF● ) is not displayed.
•Flash mode set to AUTO; other modes can be selected ( 43).
39
Tuto
rial—G
etting
Creative
Flash turns off ( ) automatically. Use indoors where flashphotography is prohibited (for example in museums andart galleries) or in other settings in which you do not wantto use the flash.
Museum
• The Best Shot Selector (BSS; 57) turns on automatically, reducing theeffects of inadvertent camera movement.
• Photography may be prohibited altogether in some settings. Be sure toobtain permission first. Camera Shake: ✯
Preserves the deep hues seen in sunsets and sunrises. Flashturns off ( ) automatically.
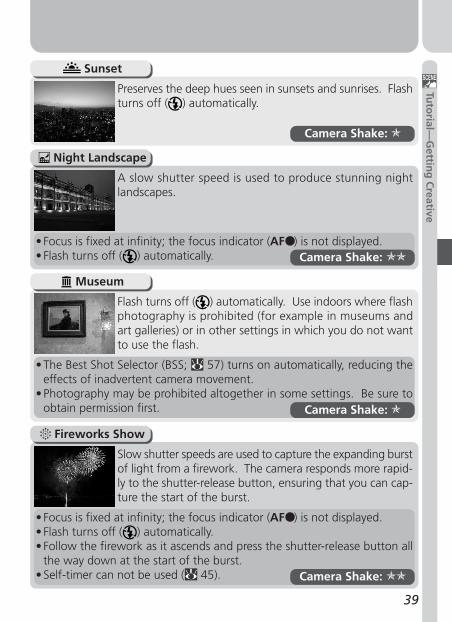
Sunset
Camera Shake: ✯
A slow shutter speed is used to produce stunning nightlandscapes.
Night Landscape
• Focus is fixed at infinity; the focus indicator (AF● ) is not displayed.• Flash turns off ( ) automatically. Camera Shake: ✯✯
Slow shutter speeds are used to capture the expanding burstof light from a firework. The camera responds more rapid-ly to the shutter-release button, ensuring that you can cap-ture the start of the burst.
Fireworks Show
• Focus is fixed at infinity; the focus indicator (AF● ) is not displayed.• Flash turns off ( ) automatically.• Follow the firework as it ascends and press the shutter-release button all
the way down at the start of the burst.• Self-timer can not be used ( 45). Camera Shake: ✯✯
40
Tuto
rial—G
etting
Creative
Copy
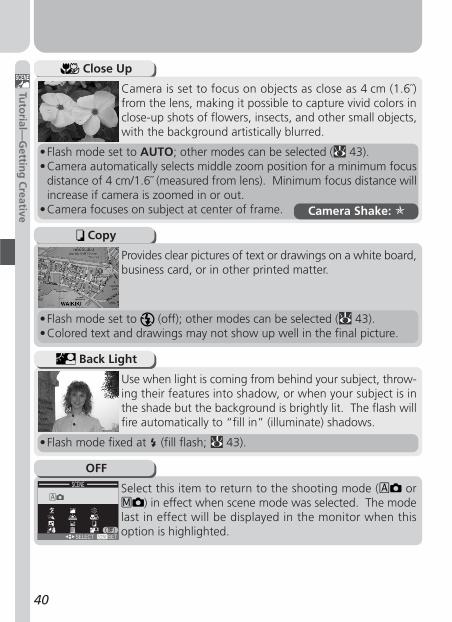
Use when light is coming from behind your subject, throw-ing their features into shadow, or when your subject is inthe shade but the background is brightly lit. The flash willfire automatically to “fill in” (illuminate) shadows.
Back Light
•Flash mode fixed at (fill flash; 43).
Select this item to return to the shooting mode ( or) in effect when scene mode was selected. The mode
last in effect will be displayed in the monitor when thisoption is highlighted.
OFF
SELECT SET
Close Up
Camera is set to focus on objects as close as 4 cm (1.6˝)from the lens, making it possible to capture vivid colors inclose-up shots of flowers, insects, and other small objects,with the background artistically blurred.
•Flash mode set to AUTO; other modes can be selected ( 43).•Camera automatically selects middle zoom position for a minimum focus
distance of 4 cm/1.6˝ (measured from lens). Minimum focus distance willincrease if camera is zoomed in or out.
•Camera focuses on subject at center of frame. Camera Shake: ✯
Provides clear pictures of text or drawings on a white board,business card, or in other printed matter.
•Flash mode set to (off); other modes can be selected ( 43).•Colored text and drawings may not show up well in the final picture.
41
Fine-Tuning CameraSettings
49–58
Beyond Point-and-Shoot
42–48
In “Tutorial: Taking Pictures,” you learned the basicorder of operations for taking pictures in mode.This chapter details the options available for takingpictures in all shooting modes. It is divided into thefollowing sections:
Beyond Point-and-ShootRead this section for advice on the most frequently-used camera controls, including shooting-mode andscene selection, flash mode, the self-timer, andzoom, as well as for information on the operationsthat can be performed while pictures are displayedin the monitor after shooting.
Fine-Tuning Camera SettingsThis section details the options available in theSHOOTING menu.
TakingPictures
The Details
42
Taking
Pictures—
Beyo
nd
Poin
t-and
-Sho
ot
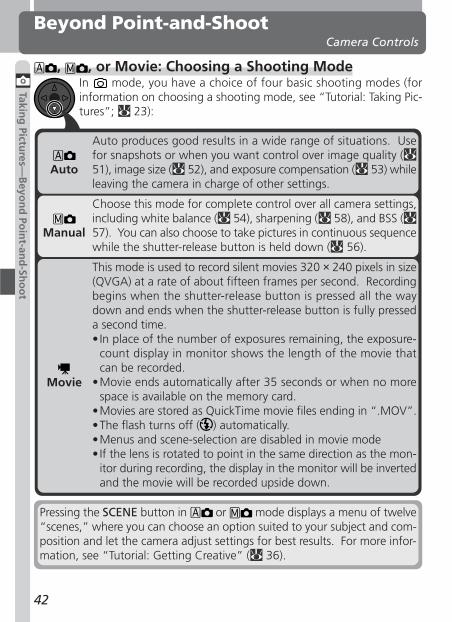
, , or Movie: Choosing a Shooting Mode
Beyond Point-and-ShootCamera Controls
In mode, you have a choice of four basic shooting modes (forinformation on choosing a shooting mode, see “Tutorial: Taking Pic-tures”; 23):
Pressing the SCENE button in or mode displays a menu of twelve“scenes,” where you can choose an option suited to your subject and com-position and let the camera adjust settings for best results. For more infor-mation, see “Tutorial: Getting Creative” ( 36).
Auto
Auto produces good results in a wide range of situations. Usefor snapshots or when you want control over image quality (51), image size ( 52), and exposure compensation ( 53) whileleaving the camera in charge of other settings.
Manual
Choose this mode for complete control over all camera settings,including white balance ( 54), sharpening ( 58), and BSS (57). You can also choose to take pictures in continuous sequencewhile the shutter-release button is held down ( 56).
Movie
This mode is used to record silent movies 320 × 240 pixels in size(QVGA) at a rate of about fifteen frames per second. Recordingbegins when the shutter-release button is pressed all the waydown and ends when the shutter-release button is fully presseda second time.• In place of the number of exposures remaining, the exposure-
count display in monitor shows the length of the movie thatcan be recorded.
•Movie ends automatically after 35 seconds or when no morespace is available on the memory card.
•Movies are stored as QuickTime movie files ending in “.MOV”.•The flash turns off ( ) automatically.•Menus and scene-selection are disabled in movie mode• If the lens is rotated to point in the same direction as the mon-
itor during recording, the display in the monitor will be invertedand the movie will be recorded upside down.
43
Taking
Pictures—
Beyo
nd
Poin
t-and
-Sho
ot
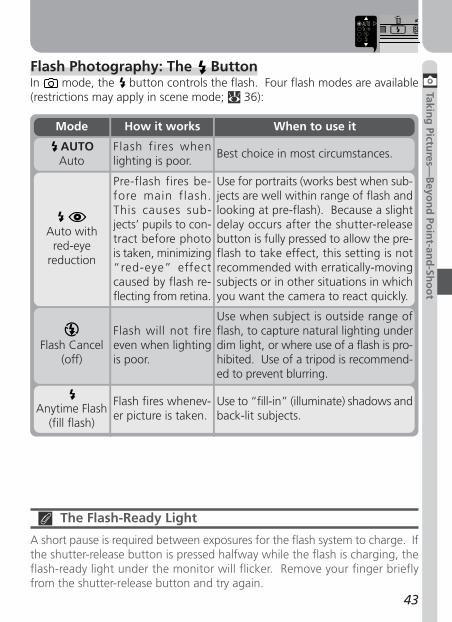
Flash Photography: The ButtonIn mode, the button controls the flash. Four flash modes are available(restrictions may apply in scene mode; 36):
AUTOAuto
Flash fires whenlighting is poor.
Best choice in most circumstances.
Auto with
red-eyereduction
Pre-flash fires be-fore main flash.This causes sub-jects’ pupils to con-tract before photois taken, minimizing“red-eye” effectcaused by flash re-flecting from retina.
Use for portraits (works best when sub-jects are well within range of flash andlooking at pre-flash). Because a slightdelay occurs after the shutter-releasebutton is fully pressed to allow the pre-flash to take effect, this setting is notrecommended with erratically-movingsubjects or in other situations in whichyou want the camera to react quickly.
Anytime Flash(fill flash)
Flash fires whenev-er picture is taken.
Use to “fill-in” (illuminate) shadows andback-lit subjects.
Flash Cancel(off)
Flash will not fireeven when lightingis poor.
Use when subject is outside range offlash, to capture natural lighting underdim light, or where use of a flash is pro-hibited. Use of a tripod is recommend-ed to prevent blurring.
Mode How it works When to use it
AUTO
The Flash-Ready Light
A short pause is required between exposures for the flash system to charge. Ifthe shutter-release button is pressed halfway while the flash is charging, theflash-ready light under the monitor will flicker. Remove your finger brieflyfrom the shutter-release button and try again.
44
Taking
Pictures—
Beyo
nd
Poin
t-and
-Sho
ot
2048 15NORMAL
The flash mode can be selected with the button:
AUTO
2048 15NORMAL
Press button to displayflash-mode menu
1
Press multi selector to right to exit menu(flash-mode menu will also close if no op-eration is performed for about two sec-onds). Current flash mode is shown by iconat bottom of monitor.
3
AUTO
2048 15NORMAL
Press multi selector up or down untildesired mode is highlighted
2
The ISO (Sensitivity Gain) and (Camera Shake) Icons
When lighting is poor and the flash is off ( ), the camera will automaticallyraise its sensitivity to light for faster exposures, minimizing blur caused bycamera shake. When sensitivity is raised above the default value, an ISO iconwill appear in the monitor to warn that “noise” may appear in the final pic-ture. If the shutter speed required for exposure is very slow, a (camerashake) icon will appear in the monitor. Use of a tripod or support is recom-mended.
45
Taking
Pictures—
Beyo
nd
Poin
t-and
-Sho
ot
2048 15NORMAL
Delaying Shutter Release: Choosing a Self-Timer ModeWhen the self-timer is on, pictures will not be taken until ten seconds afterthe shutter-release button is pressed all the way down, giving you time toposition yourself in front of the camera when taking pictures in which youwant to appear yourself. When taking low-light or close-up shots with theflash off, the self-timer can be used to prevent pictures from being blurred bycamera movement that occurs when the shutter-release button is pressed.
To use the self-timer:
1 Position the cameraMount the camera on a tripod (recommended) or rest it on a flat, stablesurface.
2 Turn the self-timer onThe self-timer setting is controlled with the multi selector.
Press multi selector up todisplay self-timer menu
ONONOFFOFF
2048 15NORMAL
Press multi selector up ordown to highlight ON
ONONOFFOFF
2048 15NORMAL
Press multi selector right to exit menu(if no operation is performed for abouttwo seconds, menu will close and origi-nal setting will be restored). When timeris on, self-timer icon is displayed in moni-tor.
2.1 2.2
2.3
ONONOFFOFF
46
Taking
Pictures—
Beyo
nd
Poin
t-and
-Sho
ot
3 Compose the pictureAdjust camera settings and frame the picture. Remember that the camerawill focus on the closest object; compose your picture with no other ob-jects between your subject and the camera.
4 Start the timerPress the shutter-release button all the way down to lock focus and acti-vate the timer.
The self-timer lamp on the front of the camerawill start to blink when the shutter-release but-ton is pressed, and continue to blink until onesecond before the photo is taken. The self-timer lamp will stay lit during the final secondto warn that the shutter is about to be released.To stop the timer before a picture is taken, pressthe shutter-release button.
Restrictions on the Self-Timer
The self-timer is not available in movie mode ( 42) or when FireworksShow ( 39) is selected in scene mode.
Digital Zoom
The Multi-shot 16 option in the Continuous menu ( 56) is not availablewhen digital zoom is in effect.
Full press
Count-down timer in monitor showsnumber of seconds remaining untilpicture is taken
2048 15NORMAL
I I IIIIIIII I
5.6-16.8mm1:2.7-4.8
47
Taking
Pictures—
Beyo
nd
Poin
t-and
-Sho
ot
Framing Pictures: Optical and Digital ZoomYour Nikon digital camera offers two kinds of zoom: optical zoom, in whichthe camera’s telescoping lens can be used to magnify the subject up to 3 ×,and digital zoom, in which digital processing is used to further magnify theimage up to 4 ×.
Optical ZoomPhotos can be framed in the monitor using the zoom buttons.
Optical zoom is not available in movie mode, although digital zoom can beused to magnify the subject up to about 3 ×.
Digital ZoomAt the maximum optical zoom position, holding the button down for twoseconds triggers digital zoom.
The camera can be zoomed in and out in the digital zoom range by pressingthe and buttons. To restore ordinary optical zoom, press until thezoom indicator turns white.
In digital zoom, data from the camera’s image sensor are processed digitally,enlarging the center portion of the picture to fill the frame. Unlike opticalzoom, digital zoom does not increase the amount of detail visible in the pic-ture. Instead, details visible at maximum optical zoom are enlarged, produc-ing a slightly “grainy” image. While digital zoom is in effect, the camerafocuses on the subject in the center of the frame, even if objects in otherareas of the frame are closer to the camera.
Zoom out Zoom in
Indicator in monitor displaysamount of zoom while eitherbutton is pressed
Maximum optical zoomposition
Zoom indicator turns yellowin digital zoom range
Hold for 2 s
48
Taking
Pictures—
Beyo
nd
Poin
t-and
-Sho
ot
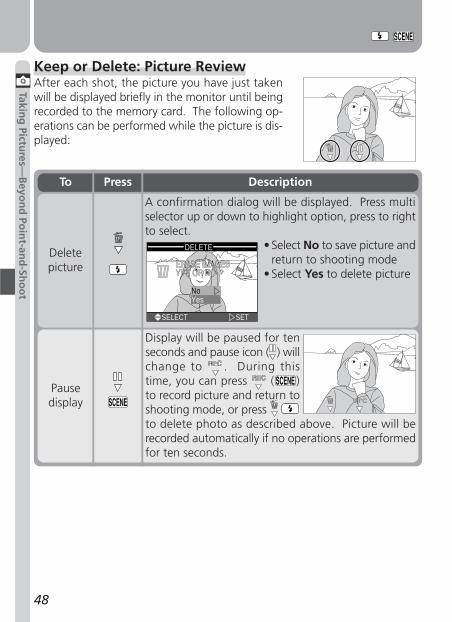
Keep or Delete: Picture ReviewAfter each shot, the picture you have just takenwill be displayed briefly in the monitor until beingrecorded to the memory card. The following op-erations can be performed while the picture is dis-played:
To Press Description
Deletepicture
A confirmation dialog will be displayed. Press multiselector up or down to highlight option, press to rightto select.
• Select No to save picture andreturn to shooting mode
• Select Yes to delete picture
DELETE
NoYes
SELECT SET
Pausedisplay
Display will be paused for tenseconds and pause icon ( ) willchange to . During thistime, you can press ( )to record picture and return toshooting mode, or press to delete photo as described above. Picture will berecorded automatically if no operations are performedfor ten seconds.
49
Taking
Pictures—
Fine-Tu
nin
g C
amera Settin
gs
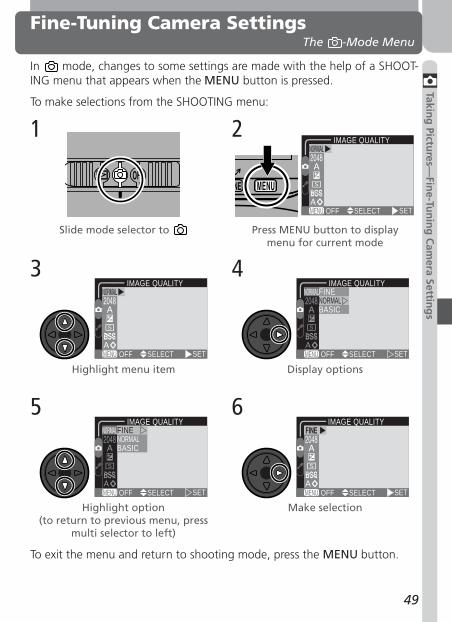
Fine-Tuning Camera SettingsThe -Mode Menu
In mode, changes to some settings are made with the help of a SHOOT-ING menu that appears when the MENU button is pressed.
To make selections from the SHOOTING menu:
Slide mode selector to
1
Press MENU button to displaymenu for current mode
2IMAGE QUALITY
MENU SELECT SETOFF
To exit the menu and return to shooting mode, press the MENU button.
Make selection
Highlight menu item
3
6
Highlight option(to return to previous menu, press
multi selector to left)
5
IMAGE QUALITY
MENU SELECT SETOFF
IMAGE QUALITY
MENU SELECT SETOFFMENU SELECT SETOFF
IMAGE QUALITYFINENORMALBASIC
Display options
4IMAGE QUALITY
FINENORMALBASIC
MENU SELECT SETOFF
50
Taking
Pictures—
Fine-Tu
nin
g C
amera Settin
gs
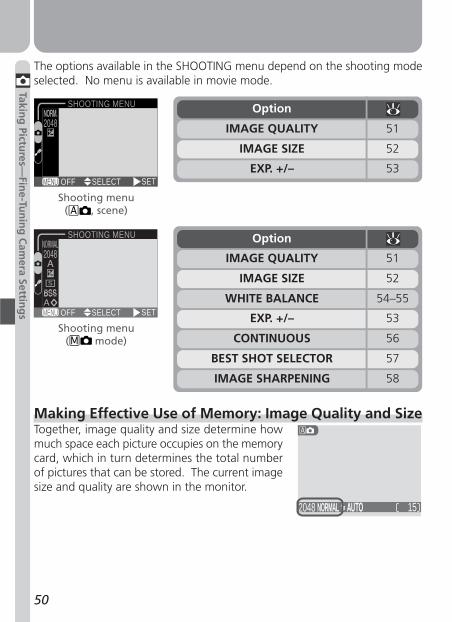
Making Effective Use of Memory: Image Quality and SizeTogether, image quality and size determine howmuch space each picture occupies on the memorycard, which in turn determines the total numberof pictures that can be stored. The current imagesize and quality are shown in the monitor.
The options available in the SHOOTING menu depend on the shooting modeselected. No menu is available in movie mode.
Shooting menu( , scene)
Shooting menu( mode)
SHOOTING MENU
MENU SELECT SETOFF
Option
IMAGE QUALITY 51
IMAGE SIZE 52
WHITE BALANCE 54–55
EXP. +/– 53
CONTINUOUS 56
BEST SHOT SELECTOR 57
IMAGE SHARPENING 58
SHOOTING MENU
MENU SELECT SETOFF
Option
IMAGE QUALITY
IMAGE SIZE
EXP. +/–
51
52
53
2048 15NORMAL
51
Taking
Pictures—
Fine-Tu
nin
g C
amera Settin
gs
IMAGE QUALITY
MENU SELECT SETOFF
Option Description
FINE Fine image quality, suitable for enlarge-ments or high-quality prints.
BASICBasic image quality, suitable for picturesthat will be distributed by e-mail or used inweb pages.
NORMALNormal image quality, suited to most ap-plications.
FINE
NORMAL
BASIC
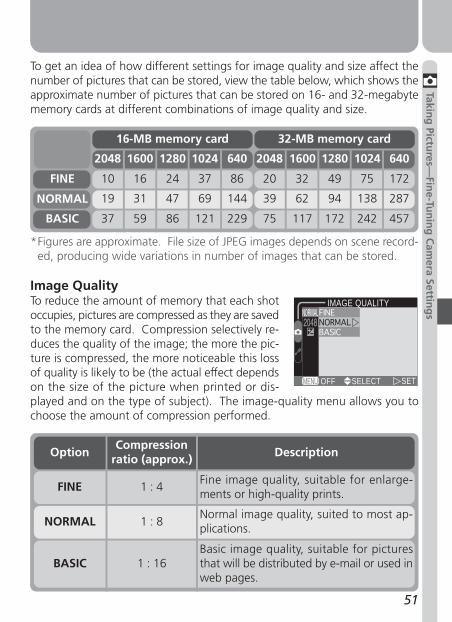
16-MB memory card 32-MB memory card
*Figures are approximate. File size of JPEG images depends on scene record-ed, producing wide variations in number of images that can be stored.
Image QualityTo reduce the amount of memory that each shotoccupies, pictures are compressed as they are savedto the memory card. Compression selectively re-duces the quality of the image; the more the pic-ture is compressed, the more noticeable this lossof quality is likely to be (the actual effect dependson the size of the picture when printed or dis-played and on the type of subject). The image-quality menu allows you tochoose the amount of compression performed.
To get an idea of how different settings for image quality and size affect thenumber of pictures that can be stored, view the table below, which shows theapproximate number of pictures that can be stored on 16- and 32-megabytememory cards at different combinations of image quality and size.
Compressionratio (approx.)
1 : 4
1 : 16
1 : 8
10
19
37
2048
16
31
59
1600
24
47
86
1280
86
144
229
640
37
69
121
1024
172
287
457
640
32
62
117
1600
49
94
172
1280
75
138
242
1024
20
39
75
2048
52
Taking
Pictures—
Fine-Tu
nin
g C
amera Settin
gs
IMAGE SIZE
MENU SELECT SETOFF
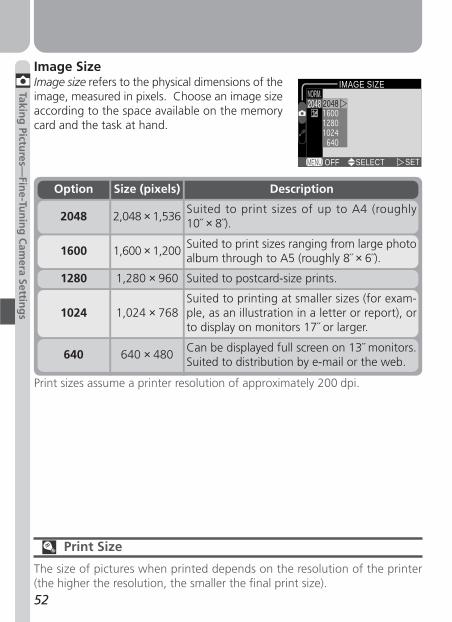
Image SizeImage size refers to the physical dimensions of theimage, measured in pixels. Choose an image sizeaccording to the space available on the memorycard and the task at hand.
Print Size
The size of pictures when printed depends on the resolution of the printer(the higher the resolution, the smaller the final print size).
Print sizes assume a printer resolution of approximately 200 dpi.
1280 Suited to postcard-size prints.1,280 × 960
Option DescriptionSize (pixels)
2048Suited to print sizes of up to A4 (roughly10˝ × 8˝).
2,048 × 1,536
1024Suited to printing at smaller sizes (for exam-ple, as an illustration in a letter or report), orto display on monitors 17˝ or larger.
1,024 × 768
640 Can be displayed full screen on 13˝ monitors.Suited to distribution by e-mail or the web.
640 × 480
1600 Suited to print sizes ranging from large photoalbum through to A5 (roughly 8˝ × 6˝).
1,600 × 1,200
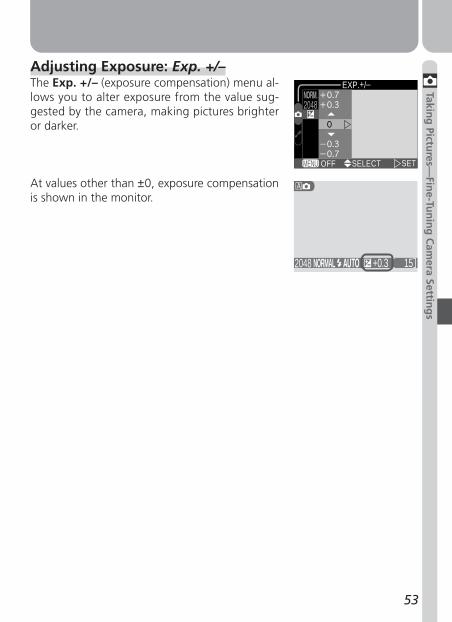
53
Taking
Pictures—
Fine-Tu
nin
g C
amera Settin
gs
Adjusting Exposure: Exp. +/–The Exp. +/– (exposure compensation) menu al-lows you to alter exposure from the value sug-gested by the camera, making pictures brighteror darker.
EXP.+/–
MENU SELECT SETOFF
2048 15NORMAL +0.3
At values other than ±0, exposure compensationis shown in the monitor.
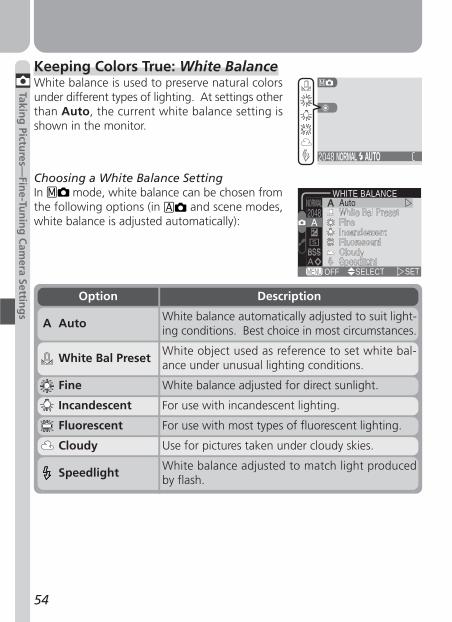
54
Taking
Pictures—
Fine-Tu
nin
g C
amera Settin
gs
2048 NORMAL
Keeping Colors True: White BalanceWhite balance is used to preserve natural colorsunder different types of lighting. At settings otherthan Auto, the current white balance setting isshown in the monitor.
WHITE BALANCE
MENU SELECT SETOFF
Option Description
AutoA White balance automatically adjusted to suit light-ing conditions. Best choice in most circumstances.
White Bal PresetWhite object used as reference to set white bal-ance under unusual lighting conditions.
Fine White balance adjusted for direct sunlight.
Incandescent For use with incandescent lighting.
Fluorescent For use with most types of fluorescent lighting.
Cloudy Use for pictures taken under cloudy skies.
Speedlight White balance adjusted to match light producedby flash.
Choosing a White Balance SettingIn mode, white balance can be chosen fromthe following options (in and scene modes,white balance is adjusted automatically):
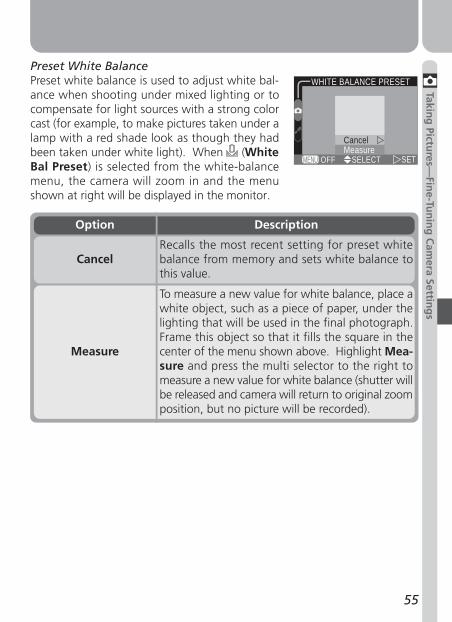
55
Taking
Pictures—
Fine-Tu
nin
g C
amera Settin
gs
Preset White BalancePreset white balance is used to adjust white bal-ance when shooting under mixed lighting or tocompensate for light sources with a strong colorcast (for example, to make pictures taken under alamp with a red shade look as though they hadbeen taken under white light). When (WhiteBal Preset) is selected from the white-balancemenu, the camera will zoom in and the menushown at right will be displayed in the monitor.
Option Description
CancelRecalls the most recent setting for preset whitebalance from memory and sets white balance tothis value.
Measure
To measure a new value for white balance, place awhite object, such as a piece of paper, under thelighting that will be used in the final photograph.Frame this object so that it fills the square in thecenter of the menu shown above. Highlight Mea-sure and press the multi selector to the right tomeasure a new value for white balance (shutter willbe released and camera will return to original zoomposition, but no picture will be recorded).
CancelMeasure
WHITE BALANCE PRESET
MENU SELECT SETOFF
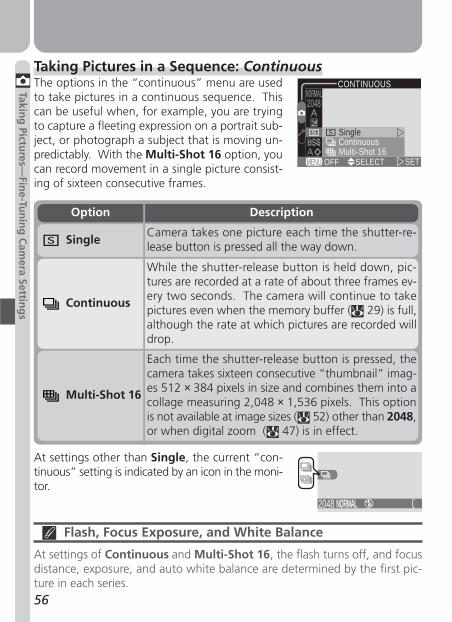
56
Taking
Pictures—
Fine-Tu
nin
g C
amera Settin
gs
Taking Pictures in a Sequence: ContinuousThe options in the “continuous” menu are usedto take pictures in a continuous sequence. Thiscan be useful when, for example, you are tryingto capture a fleeting expression on a portrait sub-ject, or photograph a subject that is moving un-predictably. With the Multi-Shot 16 option, youcan record movement in a single picture consist-ing of sixteen consecutive frames.
CONTINUOUS
ContinuousMulti-Shot 16
Single
MENU SELECT SETOFF
Flash, Focus Exposure, and White Balance
At settings of Continuous and Multi-Shot 16, the flash turns off, and focusdistance, exposure, and auto white balance are determined by the first pic-ture in each series.
Option Description
Camera takes one picture each time the shutter-re-lease button is pressed all the way down.
Single
While the shutter-release button is held down, pic-tures are recorded at a rate of about three frames ev-ery two seconds. The camera will continue to takepictures even when the memory buffer ( 29) is full,although the rate at which pictures are recorded willdrop.
Continuous
Each time the shutter-release button is pressed, thecamera takes sixteen consecutive “thumbnail” imag-es 512 × 384 pixels in size and combines them into acollage measuring 2,048 × 1,536 pixels. This optionis not available at image sizes ( 52) other than 2048,or when digital zoom ( 47) is in effect.
Multi-Shot 16
At settings other than Single, the current “con-tinuous” setting is indicated by an icon in the moni-tor.
2048 NORMAL
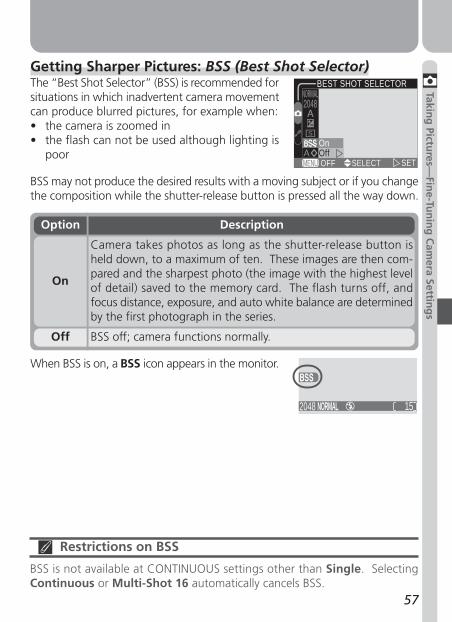
57
Taking
Pictures—
Fine-Tu
nin
g C
amera Settin
gs
Getting Sharper Pictures: BSS (Best Shot Selector)The “Best Shot Selector” (BSS) is recommended forsituations in which inadvertent camera movementcan produce blurred pictures, for example when:• the camera is zoomed in• the flash can not be used although lighting is
poor
BEST SHOT SELECTOR
OnOff
MENU SELECT SETOFF
Option Description
Off BSS off; camera functions normally.
On
Camera takes photos as long as the shutter-release button isheld down, to a maximum of ten. These images are then com-pared and the sharpest photo (the image with the highest levelof detail) saved to the memory card. The flash turns off, andfocus distance, exposure, and auto white balance are determinedby the first photograph in the series.
Restrictions on BSS
BSS is not available at CONTINUOUS settings other than Single. SelectingContinuous or Multi-Shot 16 automatically cancels BSS.
When BSS is on, a BSS icon appears in the monitor.
BSS may not produce the desired results with a moving subject or if you changethe composition while the shutter-release button is pressed all the way down.
2048 15NORMAL
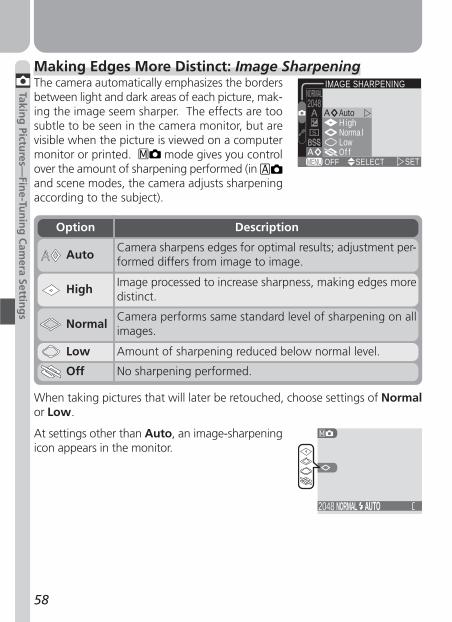
58
Taking
Pictures—
Fine-Tu
nin
g C
amera Settin
gs
Option Description
Making Edges More Distinct: Image SharpeningThe camera automatically emphasizes the bordersbetween light and dark areas of each picture, mak-ing the image seem sharper. The effects are toosubtle to be seen in the camera monitor, but arevisible when the picture is viewed on a computermonitor or printed. mode gives you controlover the amount of sharpening performed (in and scene modes, the camera adjusts sharpeningaccording to the subject).
AutoCamera sharpens edges for optimal results; adjustment per-formed differs from image to image.
High Image processed to increase sharpness, making edges moredistinct.
NormalCamera performs same standard level of sharpening on allimages.
Low Amount of sharpening reduced below normal level.
Off No sharpening performed.
IMAGE SHARPENING
AutoHighNorma lLowOf f
MENU SELECT SETOFF
2048 NORMAL
When taking pictures that will later be retouched, choose settings of Normalor Low.
At settings other than Auto, an image-sharpeningicon appears in the monitor.
59
Camera
SetupThe SET-UP Menu
This chapter details the options available in the SET-UP menu, where you can adjust basic camera set-tings and perform such tasks as formatting memorycards and restoring settings to their default values.
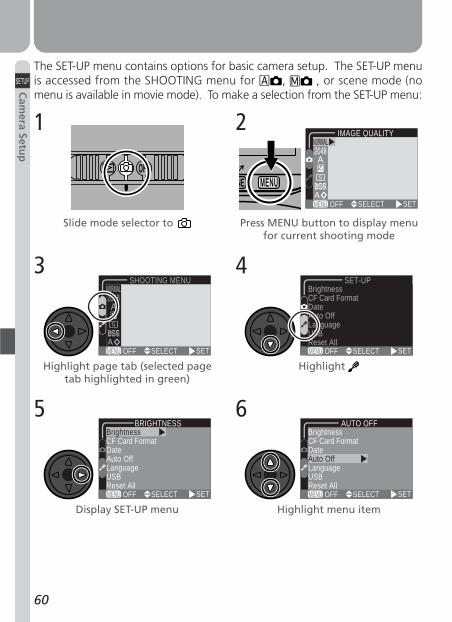
60
Cam
era Setup
IMAGE QUALITY
MENU SELECT SETOFF
Slide mode selector to
1 2
Press MENU button to display menufor current shooting mode
The SET-UP menu contains options for basic camera setup. The SET-UP menuis accessed from the SHOOTING menu for , , or scene mode (nomenu is available in movie mode). To make a selection from the SET-UP menu:
Highlight page tab (selected pagetab highlighted in green)
3
Highlight
4SHOOTING MENU
MENU SELECT SETOFF
BrightnessCF Card FormatDateAuto OffLanguageUSBReset All
SET-UP
MENU SELECT SETOFF
Display SET-UP menu
5BRIGHTNESS
BrightnessCF Card FormatDateAuto OffLanguageUSBReset AllMENU SELECT SETOFF
Highlight menu item
6BrightnessCF Card FormatDateAuto OffLanguageUSBReset All
AUTO OFF
MENU SELECT SETOFF
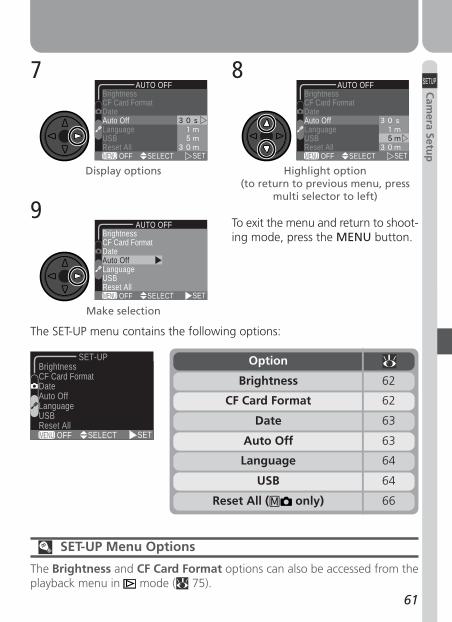
61
Cam
era Setup
Display options
7
Highlight option(to return to previous menu, press
multi selector to left)
8BrightnessCF Card FormatDateAuto OffLanguageUSBReset All
AUTO OFF
MENU SELECT SETOFF
BrightnessCF Card FormatDateAuto OffLanguageUSBReset All
AUTO OFF
MENU SELECT SETOFF
Make selection
9BrightnessCF Card FormatDateAuto OffLanguageUSBReset All
AUTO OFF
MENU SELECT SETOFF
To exit the menu and return to shoot-ing mode, press the MENU button.
The SET-UP menu contains the following options:
BrightnessCF Card FormatDateAuto OffLanguageUSBReset All
SET-UP
MENU SELECT SETOFF
Option
Brightness 62
CF Card Format 62
Date 63
Auto Off 63
Language 64
USB 64
Reset All ( only) 66
SET-UP Menu Options
The Brightness and CF Card Format options can also be accessed from theplayback menu in mode ( 75).
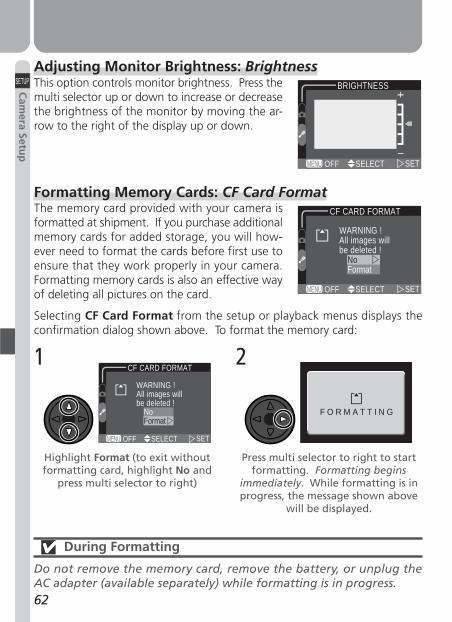
62
Cam
era Setup
Formatting Memory Cards: CF Card FormatThe memory card provided with your camera isformatted at shipment. If you purchase additionalmemory cards for added storage, you will how-ever need to format the cards before first use toensure that they work properly in your camera.Formatting memory cards is also an effective wayof deleting all pictures on the card.
Selecting CF Card Format from the setup or playback menus displays theconfirmation dialog shown above. To format the memory card:
MENU SELECT SETOFF
WARNING !All images willbe deleted !
NoFormat
CF CARD FORMAT
Highlight Format (to exit withoutformatting card, highlight No and
press multi selector to right)
WARNING !All images willbe deleted !
NoFormat
CF CARD FORMAT
MENU SELECT SETOFF
1
Press multi selector to right to startformatting. Formatting begins
immediately. While formatting is inprogress, the message shown above
will be displayed.
F O R M A T T I N G
2
Adjusting Monitor Brightness: BrightnessThis option controls monitor brightness. Press themulti selector up or down to increase or decreasethe brightness of the monitor by moving the ar-row to the right of the display up or down.
BRIGHTNESS
MENU SELECT SETOFF
During Formatting
Do not remove the memory card, remove the battery, or unplug theAC adapter (available separately) while formatting is in progress.

63
Cam
era Setup
Setting the Time and Date: DateThis option is used to set the camera to the cur-rent date and time. For more information, see“Tutorial: First Steps” ( 21).
DATE
MENU SELECT SETOFF
Conserving Battery Power: Auto OffWhen operated on battery power, the camera willenter sleep mode if no operations are performedfor thirty seconds (or three minutes when menusare displayed). The time limit for sleep mode canbe chosen from thirty seconds (30 s), one minute(1 m), five minutes (5 m), and thirty minutes (30 m)using Auto Off.
Before Formatting
Formatting memory cards permanently deletes all data they contain, includ-ing protected pictures and any other data that may be on the card. Beforeformatting, be sure to transfer to a computer any pictures you would like tokeep.
Sleep Mode (Auto Off)
In sleep mode, the camera itself is effectively off, consuming almost no power.The camera can be reactivated by pressing the shutter-release button or slid-ing the mode selector to a new position.
When powered by an AC adapter kit (available separately; 87), the camerawill remain on for thirty minutes if no operations are performed, regardless ofthe setting in the Auto Off menu.
BrightnessCF Card FormatDateAuto OffLanguageUSBReset All
AUTO OFF
MENU SELECT SETOFF
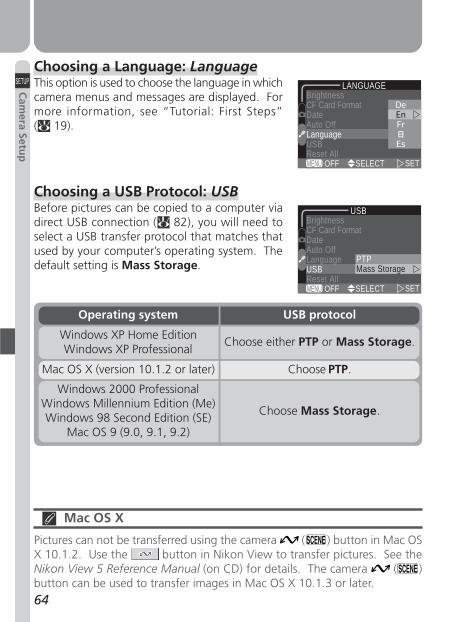
64
Cam
era Setup
BrightnessCF Card FormatDateAuto OffLanguageUSBReset All
LANGUAGE
MENU SELECT SETOFF
Choosing a Language: LanguageThis option is used to choose the language in whichcamera menus and messages are displayed. Formore information, see “Tutorial: First Steps”( 19).
BrightnessCF Card FormatDateAuto OffLanguageUSBReset All
USB
PTPMass Storage
MENU SELECT SETOFF
Choosing a USB Protocol: USBBefore pictures can be copied to a computer viadirect USB connection ( 82), you will need toselect a USB transfer protocol that matches thatused by your computer’s operating system. Thedefault setting is Mass Storage.
Mac OS X
Pictures can not be transferred using the camera ( ) button in Mac OSX 10.1.2. Use the button in Nikon View to transfer pictures. See theNikon View 5 Reference Manual (on CD) for details. The camera ( )button can be used to transfer images in Mac OS X 10.1.3 or later.
Operating system USB protocol
Windows XP Home EditionWindows XP Professional
Choose either PTP or Mass Storage.
Mac OS X (version 10.1.2 or later) Choose PTP.
Windows 2000 ProfessionalWindows Millennium Edition (Me)Windows 98 Second Edition (SE)
Mac OS 9 (9.0, 9.1, 9.2)
Choose Mass Storage.
65
Cam
era Setup
Windows 2000 Professional, Windows Millennium Edition (Me),Windows 98 Second Edition (SE), Mac OS 9 (9.0, 9.1, 9.2)
Do not select PTP when connecting the COOLPIX 3500 to a computer run-ning one of the above operating systems (there is no need to change the USBsetting when using the camera for the first time, as Mass Storage is selectedat shipment).
If you have already changed the USB setting to PTP, be sure to select MassStorage before connecting the camera to your computer.
If you have connected the camera to a computer running one of the aboveoperating systems with PTP selected in the USB menu, disconnect the cam-era as described below. Be sure to select Mass Storage in the USB menubefore reconnecting the camera.
Windows 2000 ProfessionalA dialog will be displayed welcoming you to the Found New Hardware Wiz-ard. Click Cancel to close the dialog, and then disconnect the camera.
Windows Millennium Edition (Me)After displaying a message stating that the hardware information database isbeing updated, the computer will start the Add New Hardware Wizard. ClickCancel to exit the wizard, and then disconnect the camera.
Windows 98 Second Edition (SE)The Add New Hardware Wizard will be displayed. Click Cancel to exit thewizard, and then disconnect the camera.
Mac OS 9 (9.0, 9.1, 9.2)A dialog will be displayed stating that the computer is unable to use the driverneeded for the “Nikon Digital Camera E3500_PTP” USB device. Click Cancelto close the dialog, and then disconnect the camera.
66
Cam
era Setup
Restoring Default Settings: Reset All ( Mode Only)Reset All is used to reset settings to their defaultvalues. This option is only available in the SET-UPmenu for mode, but resets settings for allmodes.
Choosing Reset restores the settings listed below to their default values.
RESET ALL
Reset all settingsto default values
NoReset
MENU SELECT SETOFF
Resetting File Numbering to 0001
To reset file numbering ( 69) to 0001, select Reset All after either deletingall pictures ( 77) or formatting the memory card ( 62).
Choosing Reset also clears the current file number ( 69) from memory.Numbering will continue from the lowest number available on the memorycard. All other settings are unaffected.
DefaultSetting DefaultSetting
±0Exposure compensation
SingleContinuous
OffBest Shot Selector
AutoImage sharpeningAutoWhite balance
3Monitor brightness
30 sAuto off
Option Description
No Exit menu, leaving settings unchanged.
Reset Restore settings to default values.
67
The Playback Menu
75–82
Basic Playback
68–74
Playing
Pictures BackPlayback Mode
This section details the operations that can be per-formed when the mode selector is set to . It isdivided into the following two sections:
Basic PlaybackThis section covers playback operations that can beperformed using the buttons on the back of thecamera and the multi selector.
The Playback MenuRead this section for a description of the operationsthat can be performed in the playback menu.
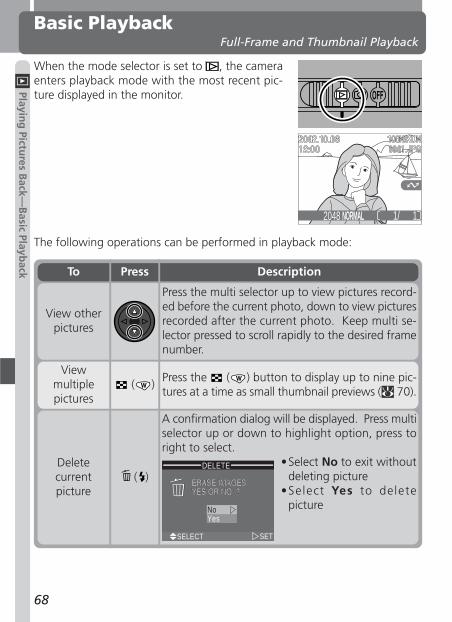
68
Playing
Pictures B
ack—B
asic Playback
When the mode selector is set to , the cameraenters playback mode with the most recent pic-ture displayed in the monitor.
Basic PlaybackFull-Frame and Thumbnail Playback
1/00112048 NORMAL
Press the multi selector up to view pictures record-ed before the current photo, down to view picturesrecorded after the current photo. Keep multi se-lector pressed to scroll rapidly to the desired framenumber.
View otherpictures
Viewmultiplepictures
( )Press the ( ) button to display up to nine pic-tures at a time as small thumbnail previews ( 70).
Press DescriptionTo
The following operations can be performed in playback mode:
( )
A confirmation dialog will be displayed. Press multiselector up or down to highlight option, press toright to select.
•Select No to exit withoutdeleting picture
•Select Yes to deletepicture
Deletecurrentpicture
DELETE
NoYes
SELECT SET
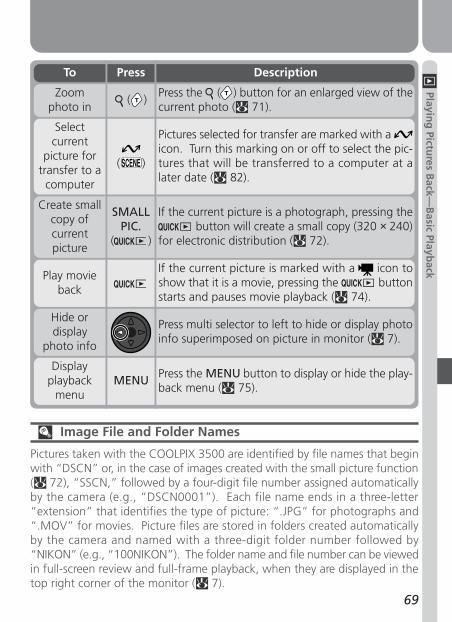
69
Playing
Pictures B
ack—B
asic Playback
Press multi selector to left to hide or display photoinfo superimposed on picture in monitor ( 7).
Hide ordisplay
photo info
MENU Press the MENU button to display or hide the play-back menu ( 75).
Displayplayback
menu
Press Description
( )Press the ( ) button for an enlarged view of thecurrent photo ( 71).
Zoomphoto in
( )
Pictures selected for transfer are marked with a icon. Turn this marking on or off to select the pic-tures that will be transferred to a computer at alater date ( 82).
Selectcurrent
picture fortransfer to a
computer
SMALLPIC.
( )
If the current picture is a photograph, pressing the button will create a small copy (320 × 240)
for electronic distribution ( 72).
Create smallcopy ofcurrentpicture
If the current picture is marked with a icon toshow that it is a movie, pressing the buttonstarts and pauses movie playback ( 74).
Play movieback
Image File and Folder Names
Pictures taken with the COOLPIX 3500 are identified by file names that beginwith “DSCN” or, in the case of images created with the small picture function( 72), “SSCN,” followed by a four-digit file number assigned automaticallyby the camera (e.g., “DSCN0001”). Each file name ends in a three-letter“extension” that identifies the type of picture: “.JPG” for photographs and“.MOV” for movies. Picture files are stored in folders created automaticallyby the camera and named with a three-digit folder number followed by“NIKON” (e.g., “100NIKON”). The folder name and file number can be viewedin full-screen review and full-frame playback, when they are displayed in thetop right corner of the monitor ( 7).
To

70
Playing
Pictures B
ack—B
asic Playback
Press the multi selector up, down, left, or right tohighlight thumbnails.
Highlightpictures
Thumbnail ReviewPressing the ( ) button in full-screen reviewdisplays a menu of four thumbnail images. Thefollowing operations can be performed whilethumbnails are displayed:
( )/ ( )
With four thumbnails displayed, press the but-ton once to view nine thumbnail images. Press ( ) to “zoom in” from nine thumbnails to a four-thumbnail view or, when four thumbnails are dis-played, to view highlighted picture full size.
Changenumber of
picturesdisplayed
Press DescriptionTo
( )
Pictures selected for transfer are marked with a icon. Turn this marking on or off to select
the pictures that will be transferred to a comput-er at a later date ( 82).
Select high-lighted picturefor transfer toa computer
( )
A confirmation dialog will be displayed. Press multiselector up or down to highlight option, press toright to select.
• Select No to exit with-out deleting picture
• Select Yes to deletepicture
Deletehighlighted
picture
DELETE
NoYes
SELECT SET
SMALLPIC.
( )
If the current picture is a photograph, pressingthe button will create a small copy for elec-tronic distribution ( 72).
Create smallcopy of high-lighted picture
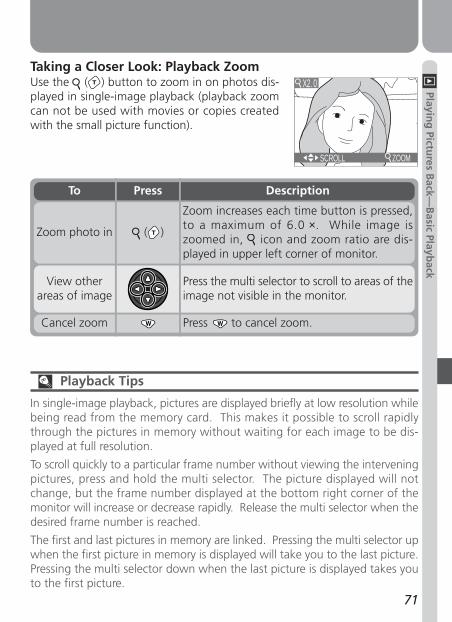
71
Playing
Pictures B
ack—B
asic Playback
Press the multi selector to scroll to areas of theimage not visible in the monitor.
View otherareas of image
Playback Tips
In single-image playback, pictures are displayed briefly at low resolution whilebeing read from the memory card. This makes it possible to scroll rapidlythrough the pictures in memory without waiting for each image to be dis-played at full resolution.
To scroll quickly to a particular frame number without viewing the interveningpictures, press and hold the multi selector. The picture displayed will notchange, but the frame number displayed at the bottom right corner of themonitor will increase or decrease rapidly. Release the multi selector when thedesired frame number is reached.
The first and last pictures in memory are linked. Pressing the multi selector upwhen the first picture in memory is displayed will take you to the last picture.Pressing the multi selector down when the last picture is displayed takes youto the first picture.
Press to cancel zoom.Cancel zoom
Taking a Closer Look: Playback ZoomUse the ( ) button to zoom in on photos dis-played in single-image playback (playback zoomcan not be used with movies or copies createdwith the small picture function).
DescriptionTo Press
Zoom increases each time button is pressed,to a maximum of 6.0 ×. While image iszoomed in, icon and zoom ratio are dis-played in upper left corner of monitor.
Zoom photo in ( )
X2.0
SCROLL ZOOM
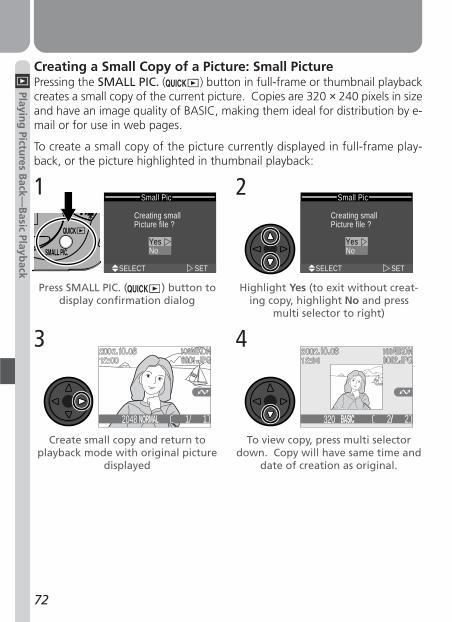
72
Playing
Pictures B
ack—B
asic Playback
Creating a Small Copy of a Picture: Small PicturePressing the SMALL PIC. ( ) button in full-frame or thumbnail playbackcreates a small copy of the current picture. Copies are 320 × 240 pixels in sizeand have an image quality of BASIC, making them ideal for distribution by e-mail or for use in web pages.
To create a small copy of the picture currently displayed in full-frame play-back, or the picture highlighted in thumbnail playback:
Small Pic
Creating smallPicture file ?
SELECT SET
YesNo
Press SMALL PIC. ( ) button todisplay confirmation dialog
Small Pic
Creating smallPicture file ?
SELECT SET
YesNo
1
Highlight Yes (to exit without creat-ing copy, highlight No and press
multi selector to right)
2
Create small copy and return toplayback mode with original picture
displayed
3
To view copy, press multi selectordown. Copy will have same time and
date of creation as original.
4
1/00112048 NORMAL 2/0012
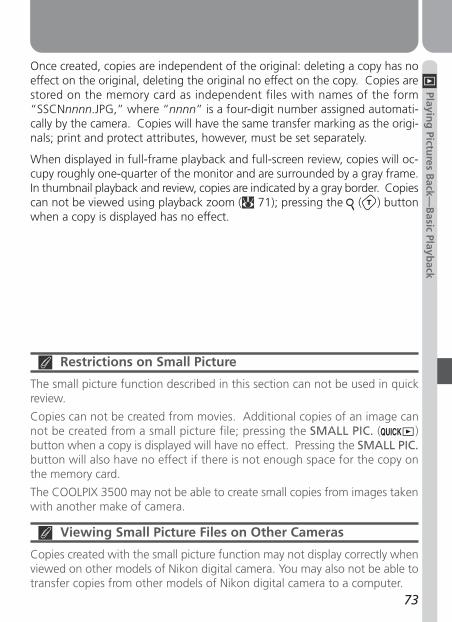
73
Playing
Pictures B
ack—B
asic Playback
Once created, copies are independent of the original: deleting a copy has noeffect on the original, deleting the original no effect on the copy. Copies arestored on the memory card as independent files with names of the form“SSCNnnnn.JPG,” where “nnnn” is a four-digit number assigned automati-cally by the camera. Copies will have the same transfer marking as the origi-nals; print and protect attributes, however, must be set separately.
When displayed in full-frame playback and full-screen review, copies will oc-cupy roughly one-quarter of the monitor and are surrounded by a gray frame.In thumbnail playback and review, copies are indicated by a gray border. Copiescan not be viewed using playback zoom ( 71); pressing the ( ) buttonwhen a copy is displayed has no effect.
Restrictions on Small Picture
The small picture function described in this section can not be used in quickreview.
Copies can not be created from movies. Additional copies of an image cannot be created from a small picture file; pressing the SMALL PIC. ( )button when a copy is displayed will have no effect. Pressing the SMALL PIC.button will also have no effect if there is not enough space for the copy onthe memory card.
The COOLPIX 3500 may not be able to create small copies from images takenwith another make of camera.
Viewing Small Picture Files on Other Cameras
Copies created with the small picture function may not display correctly whenviewed on other models of Nikon digital camera. You may also not be able totransfer copies from other models of Nikon digital camera to a computer.
74
Playing
Pictures B
ack—B
asic Playback
Movie PlaybackMovies are indicated by a icon. In full-frameplayback, movies can be viewed using the button. Movies can not be played back whenthumbnails are displayed.
DescriptionTo Press
Pressing the button while playback isin progress pauses display. To resume play-back, press the button again.
Pause/resumeplayback
When movie ends, final frame is displayed forone second, followed by a still image of thefirst frame.
Start playback
When movie is paused, pressing the multi se-lector down advances the movie one frame.If the last frame of the movie is displayed,pressing the multi selector down ends movieplayback and displays the first frame of themovie.
Advancemovie one
frame
When movie is paused, pressing the multi se-lector up rewinds the movie one frame.
Rewind movieone frame
9/0019START
Inverted Playback
Movies recorded with the lens pointing in the same direction as the monitorwill be played back upside down.
75
Playing
Pictures B
ack—Th
e Playback M
enu
The Playback MenuManaging Pictures
The playback menu contains options for deleting pictures and protecting im-ages from deletion. You can also create a digital “print order” for printingphotographs on any device compatible with the Digital Print Order Format(DPOF), and select images for transfer to a computer.
To view the playback menu:
Press MENU button to displayplayback menu
Select
DeletePrint SetProtectAuto TransferCF Card FormatBrightness
DELETE
MENU SELECT SETOFF
1 2
The playback menu contains the following options:
DeletePrint SetProtectAuto TransferCF Card FormatBrightness
DELETE
MENU SELECT SETOFF
Option
Delete 76–77
Print Set 78–79
Protect 80
Auto Transfer 81
CF Card Format 62
Brightness 62
Memory Card Format/Brightness
The CF Card Format and Brightness options can also be accessed from theSET-UP menu for mode. These options are described in “Camera Setup”( 59).
76
Playing
Pictures B
ack—Th
e Playback M
enu
Deleting Selected Photographs and MoviesTo delete selected photographs and movies:
Highlight Selected Images Display menu of thumbnail images
Highlight picture Press multi selector up or down to se-lect picture for deletion. Selected pic-tures are marked by icon. Repeatsteps 3 and 4 to select additional pic-tures for deletion. To deselect picture,highlight and press multi selector upor down. To exit without deleting pic-tures, press MENU button.
2
3 4
Deleting Pictures: DeleteThe Delete menu contains the following options:
Selected ImagesAll Images
DELETE
MENU SELECT SETOFF
ERASE SELECTED IMAGES
QUICKSELECT SET DONE
ERASE SELECTED IMAGES
QUICKSELECT SET DONE
ERASE SELECTED IMAGES
QUICKSELECT SET DONE
1
Selected ImagesAll Images
DELETE
MENU SELECT SETOFF
DescriptionOption
Delete selected photo-graphs and movies.
Selected Images
Delete all pictures.All Images
77
Playing
Pictures B
ack—Th
e Playback M
enu
Press to display a confirmation dia-log. Press multi selector up or down tohighlight option, press to right to putchoice into effect:• Select No to return to playback menu
without deleting pictures• Select Yes to delete all selected pictures
DELETE
NoYes
MENU SELECT SETOFF
5
Before Deletion
Once deleted, pictures can not be recovered. Be sure that any pictures youwould like to keep have been transferred to your computer.
Protected Pictures
Pictures marked with a icon are protected and can not be selected fordeletion.
Deleting All Photographs and MoviesTo delete all pictures on the memory card:
Highlight All Images Confirmation dialog displayed. Pressmulti selector up or down to highlightoption, press to right to put choice intoeffect:• Select No to return to playback menu
without deleting pictures• Select Yes to delete all pictures on
memory card (protected pictures willnot be deleted)
1 2Selected ImagesAll Images
DELETE
MENU SELECT SETOFF
Exclude
ERASE ALL IMAGES
Erasing All Images
YesNo
( )
MENU SELECT SETOFF
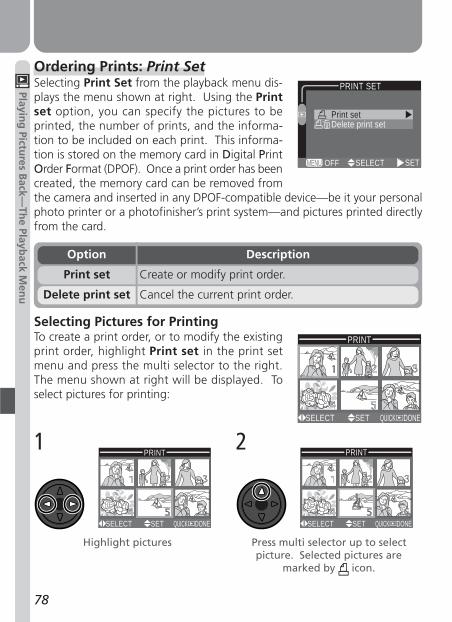
78
Playing
Pictures B
ack—Th
e Playback M
enu
Ordering Prints: Print SetSelecting Print Set from the playback menu dis-plays the menu shown at right. Using the Printset option, you can specify the pictures to beprinted, the number of prints, and the informa-tion to be included on each print. This informa-tion is stored on the memory card in Digital PrintOrder Format (DPOF). Once a print order has beencreated, the memory card can be removed fromthe camera and inserted in any DPOF-compatible device—be it your personalphoto printer or a photofinisher’s print system—and pictures printed directlyfrom the card.
Highlight pictures Press multi selector up to selectpicture. Selected pictures are
marked by icon.
1 2PRINT
QUICKSELECT SET DONE QUICK
SELECT SET DONE
PRINT SET
Print setDelete print set
MENU SELECT SETOFF
QUICKSELECT SET DONE
DescriptionOption
Create or modify print order.Print set
Cancel the current print order.Delete print set
Selecting Pictures for PrintingTo create a print order, or to modify the existingprint order, highlight Print set in the print setmenu and press the multi selector to the right.The menu shown at right will be displayed. Toselect pictures for printing:
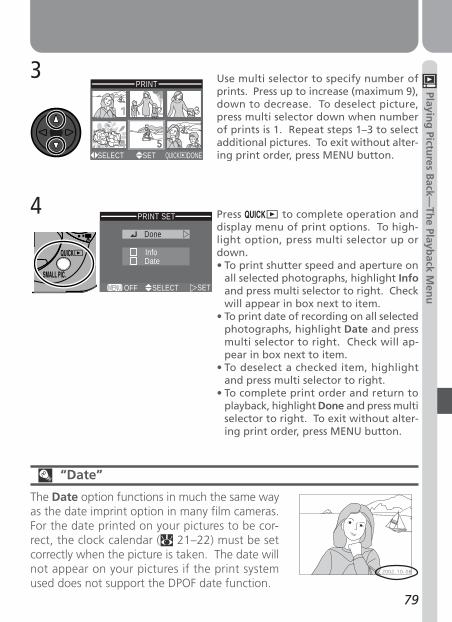
79
Playing
Pictures B
ack—Th
e Playback M
enu
Use multi selector to specify number ofprints. Press up to increase (maximum 9),down to decrease. To deselect picture,press multi selector down when numberof prints is 1. Repeat steps 1–3 to selectadditional pictures. To exit without alter-ing print order, press MENU button.
Press to complete operation anddisplay menu of print options. To high-light option, press multi selector up ordown.• To print shutter speed and aperture on
all selected photographs, highlight Infoand press multi selector to right. Checkwill appear in box next to item.
• To print date of recording on all selectedphotographs, highlight Date and pressmulti selector to right. Check will ap-pear in box next to item.
• To deselect a checked item, highlightand press multi selector to right.
• To complete print order and return toplayback, highlight Done and press multiselector to right. To exit without alter-ing print order, press MENU button.
3
4
QUICK
SELECT SET DONE
Done
InfoDate
PRINT SET
MENU SELECT SETOFF
“Date”
The Date option functions in much the same wayas the date imprint option in many film cameras.For the date printed on your pictures to be cor-rect, the clock calendar ( 21–22) must be setcorrectly when the picture is taken. The date willnot appear on your pictures if the print systemused does not support the DPOF date function.
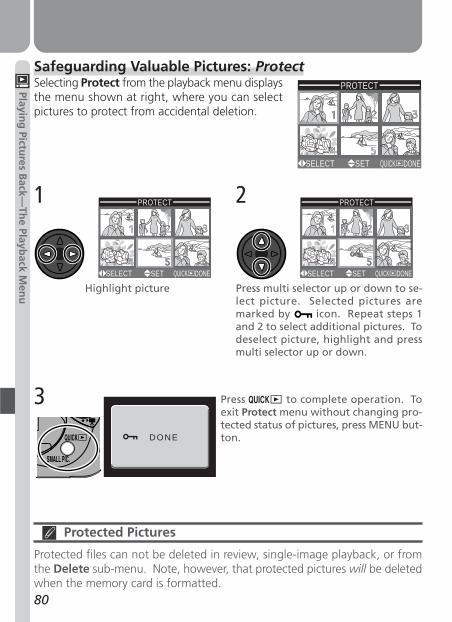
80
Playing
Pictures B
ack—Th
e Playback M
enu
DONE
Safeguarding Valuable Pictures: ProtectSelecting Protect from the playback menu displaysthe menu shown at right, where you can selectpictures to protect from accidental deletion.
Highlight picture Press multi selector up or down to se-lect picture. Selected pictures aremarked by icon. Repeat steps 1and 2 to select additional pictures. Todeselect picture, highlight and pressmulti selector up or down.
Press to complete operation. Toexit Protect menu without changing pro-tected status of pictures, press MENU but-ton.
1 2
3
PROTECT
QUICKSELECT SET DONE
PROTECT
QUICKSELECT SET DONE
PROTECT
QUICKSELECT SET DONE
Protected Pictures
Protected files can not be deleted in review, single-image playback, or fromthe Delete sub-menu. Note, however, that protected pictures will be deletedwhen the memory card is formatted.
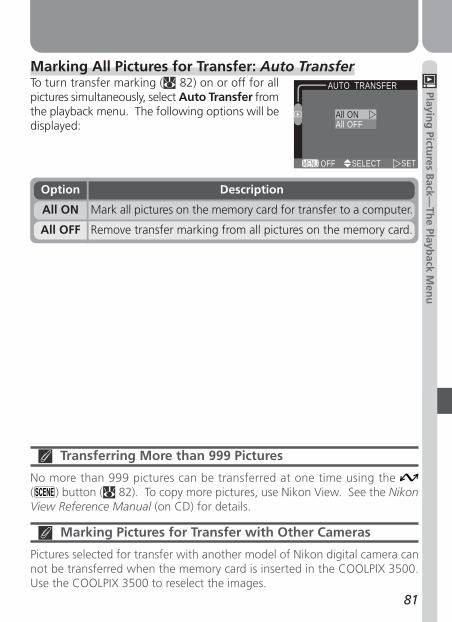
81
Playing
Pictures B
ack—Th
e Playback M
enu
AUTO TRANSFER
All ONAll OFF
MENU SELECT SETOFF
Marking All Pictures for Transfer: Auto TransferTo turn transfer marking ( 82) on or off for allpictures simultaneously, select Auto Transfer fromthe playback menu. The following options will bedisplayed:
Transferring More than 999 Pictures
No more than 999 pictures can be transferred at one time using the ( ) button ( 82). To copy more pictures, use Nikon View. See the NikonView Reference Manual (on CD) for details.
Marking Pictures for Transfer with Other Cameras
Pictures selected for transfer with another model of Nikon digital camera cannot be transferred when the memory card is inserted in the COOLPIX 3500.Use the COOLPIX 3500 to reselect the images.
DescriptionOption
Mark all pictures on the memory card for transfer to a computer.All ON
Remove transfer marking from all pictures on the memory card.All OFF
82
Playing
Pictures B
ack—Th
e Playback M
enu
Pictures can be transferred to the computer by pressing the ( ) buttonon the camera body or by clicking the button in Nikon View. For infor-mation on installing Nikon View and transferring pictures using the ( )button, see the Quick Start Guide. More information on using Nikon Viewmay be found in the Nikon View Reference Manual (on CD).
Pictures are automatically marked for transfer as they are taken. If the se-lected picture is already marked with a icon, pressing the ( ) but-ton will turn transfer marking off. If the picture is not marked with a icon, pressing the ( ) button will turn transfer marking on. If thecamera is connected to a computer as described below, pressing the ( ) button will transfer pictures marked with a icon to the computer.
Transferring Pictures to a Computer
Once you have installed the Nikon View software provided with your camera,you can connect the camera via the UC-E3 cable provided and copy (transfer)selected pictures to your computer at the touch of a button.
Selecting Pictures for Transfer
Pictures selected for transfer to a computer are marked with a icon. Youcan turn transfer marking for selected pictures on or off by pressing the ( ) button while the pictures are displayed in playback mode ( 69, 70) orin full-screen or thumbnail review ( 33, 34).
Use UC-E3 cable to connectcamera directly to computeras shown. Do not connectcamera via USB hub or key-board.
1/00112048 NORMAL
( )button
Full-screen review/single-image playback
Thumbnail review/thumbnail playback

83
Technical
NotesCamera Care, Options, and Resources
This chapter provides tips on cleaning and storingyour camera, a list of optional accessories availablefor the COOLPIX 3500, information on where toget help on line, troubleshooting advice, and cam-era specifications.

84
Techn
ical No
tes
Caring for the Camera and BatteryTo ensure continued enjoyment of your Nikon product, observe the followingprecautions when using or storing the device.
Keep dryThe device will be damaged if immersed in water or subjected to highlevels of moisture.
Handle the lens and all moving parts with careDo not apply force to the lens or to the battery, card, and connectorcovers. These parts are especially susceptible to damage.
Turn the product off before removing or disconnecting the power sourceDo not unplug the product or remove the battery while the product is on,or while images are being recorded or deleted. Forcibly cutting power tothe product in these circumstances could result in loss of data or in damageto product memory or internal circuitry. To prevent an accidentalinterruption of power, avoid carrying the product from one location toanother while the AC adapter is connected.
Do not dropThe product may malfunction if subjected to strong shocks or vibration.
Keep away from strong magnetic fieldsDo not use or store this device in the vicinity of equipment that generatesstrong electromagnetic radiation or magnetic fields. Strong static chargesor the magnetic fields produced by equipment such as radio transmitterscould interfere with the monitor, damage data stored on the memorycard, or affect the product’s internal circuitry.
Avoid sudden changes in temperatureSudden changes in temperature, such as occur when entering or leavinga heated building on a cold day, can cause condensation inside the device.To prevent condensation, place the device in a carrying case or a plasticbag before exposing it to sudden changes in temperature.
85
Techn
ic al No
tes
Cleaning
LensOne key to cleaning the lens is to not touch it with your fingers. Use a blower(typically a small device with a rubber bulb attached to one end that youpump to produce a stream of air out the other) to remove dust or lint. Toremove fingerprints or other stains that can not be removed with a blower,wipe the lens with a soft cloth, using a spiral motion that starts in the centerof the lens and works out to the edges.
MonitorRemove dust or lint with a blower. To remove fingerprints and other stains,clean the monitor with a soft, dry cloth, being careful not to apply pressure.
BodyUse a blower to remove dust and lint, then wipe gently with a soft, dry cloth.After using the camera at the beach or seaside, wipe off any sand or salt witha cloth lightly dampened with fresh water, then dry thoroughly.
Do not use alcohol, thinner, or other volatile chemicals
Avoid Contact with Liquid Crystal
Should the monitor break, care should be taken to avoid injury due to brokenglass and to prevent the liquid crystal from the monitor touching the skin orentering the eyes or mouth.
Notes on the Monitor
•The monitor may contain a few pixels that are always lit or that do not light.This is a characteristic common to all TFT LCD monitors and does not indi-cate a malfunction. Images recorded with the product will not be affected.
• Images in the monitor may be difficult to see in a bright light.•The monitor is lit by an LED backlight. Should the monitor begin to dim or
flicker, contact your Nikon service representative.
86
Techn
ical No
tes
StorageWhen the camera is not in use, turn the camera off and return the lens sec-tion to its housing in the camera body. To prevent mold or mildew, store thecamera in a dry, well-ventilated area. If you will not be using the product forlong periods, remove the battery to prevent leakage and store the camera ina plastic bag containing a desiccant. Do not, however, store the camera casein a plastic bag, as this may cause the material to deteriorate. Note thatdesiccant gradually loses its capacity to absorb moisture and should be re-placed at regular intervals. Do not store your camera with naphtha or cam-phor moth balls or in locations that:• are poorly ventilated or damp• are next to equipment that produces strong electromagnetic fields, such as
televisions or radios• are exposed to temperatures above 50 °C (122 °F) or below –10 °C (14 °F),
for example near a space heater or in a closed vehicle on a hot day• are subject to humidities of over 60%
To prevent mold or mildew, take the camera out of storage at least once amonth. Turn the camera on and release the shutter a few times before put-ting the camera away again.
Store the battery in a cool, dry place.
Batteries
• When you turn the device on, check the battery-level displayed in the moni-tor to determine whether the battery needs to be replaced. A warning willbe displayed when the battery needs to be replaced.
• Ready a spare battery and keep it fully charged when taking pictures onimportant occasions. Depending on your location, you may find it difficultto purchase replacement batteries on short notice.
• On cold days, the capacity of batteries tends to decrease. Be sure the bat-tery is fully charged before taking pictures outside in cold weather. Keep aspare battery in a warm place and exchange the two as necessary. Oncewarmed, a cold battery may recover some of its charge.
• Should the battery terminals become dirty, wipe them off with a clean, drycloth before use.
87
Techn
ic al No
tes
Optional AccessoriesAt the time of writing, the following optional accessories were available for theCOOLPIX 3500. Contact your local retailer or Nikon representative for details.
Approved Memory Cards
In addition to the card provided with your camera, the following memorycards have been tested and approved for use in the COOLPIX 3500:
Memory Cards
Turn the power off before inserting or removing memory cards. Inserting orremoving cards with the power on could render them unusable.
Insert memory cards as shown in the illustrationat right. Inserting cards upside down or backwardscould damage the camera or the card.
*EH-60S available only in USA.
LexarMedia
Nikon EC-CF series All capacities
SanDisk SDCFB series 16 MB, 32 MB, 48 MB, 64 MB, 96 MB, 128 MB4× USB series 8 MB, 16 MB, 32 MB, 48 MB, 64 MB, 80 MB8× USB series 8 MB, 16 MB, 32 MB, 48 MB, 64 MB, 80 MB10× USB series 128 MB, 160 MB
Operation is not guaranteed with other makes of memory card. For moredetails on the above cards, please contact the manufacturer.
Additional EN-EL2 Li-ion batteries are availablefrom your retailer or local Nikon representative
Rechargeable battery
CS-E2500 soft caseCarrying case
EC-AD1 PC-card adapterCompactFlash™ memory
card adapters
HL-E2500 LCD hoodMonitor (LCD) hood
EH-60/EH-60S AC adapter kit*AC adapter
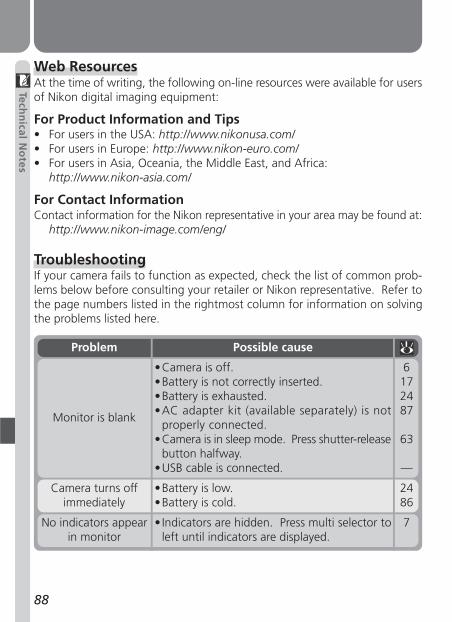
88
Techn
ical No
tes
Web ResourcesAt the time of writing, the following on-line resources were available for usersof Nikon digital imaging equipment:
For Product Information and Tips• For users in the USA: http://www.nikonusa.com/• For users in Europe: http://www.nikon-euro.com/• For users in Asia, Oceania, the Middle East, and Africa:
http://www.nikon-asia.com/
For Contact InformationContact information for the Nikon representative in your area may be found at:
http://www.nikon-image.com/eng/
TroubleshootingIf your camera fails to function as expected, check the list of common prob-lems below before consulting your retailer or Nikon representative. Refer tothe page numbers listed in the rightmost column for information on solvingthe problems listed here.
Monitor is blank
•Camera is off.•Battery is not correctly inserted.•Battery is exhausted.•AC adapter kit (available separately) is not
properly connected.•Camera is in sleep mode. Press shutter-release
button halfway.•USB cable is connected.
6172487
63
—
No indicators appearin monitor
• Indicators are hidden. Press multi selector toleft until indicators are displayed.
7
Camera turns offimmediately
•Battery is low.•Battery is cold.
2486
Problem Possible cause
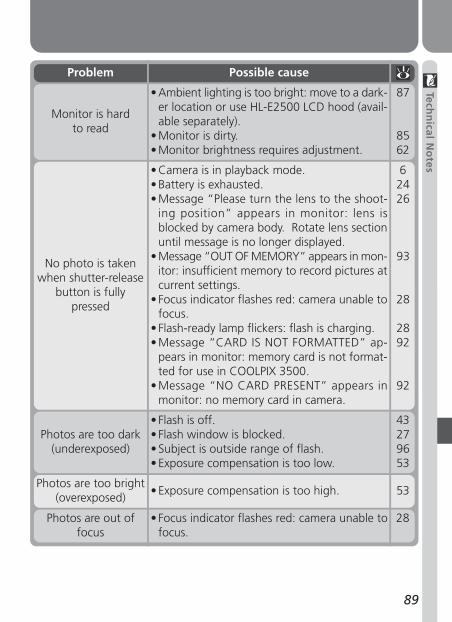
89
Techn
ic al No
tes
Monitor is hardto read
• Ambient lighting is too bright: move to a dark-er location or use HL-E2500 LCD hood (avail-able separately).
• Monitor is dirty.• Monitor brightness requires adjustment.
87
8562
Photos are too bright(overexposed)
• Exposure compensation is too high. 53
Photos are too dark(underexposed)
• Flash is off.• Flash window is blocked.• Subject is outside range of flash.• Exposure compensation is too low.
43279653
Photos are out offocus
• Focus indicator flashes red: camera unable tofocus.
28
Problem Possible cause
No photo is takenwhen shutter-release
button is fullypressed
• Camera is in playback mode.• Battery is exhausted.• Message “Please turn the lens to the shoot-
ing position” appears in monitor: lens isblocked by camera body. Rotate lens sectionuntil message is no longer displayed.
• Message “OUT OF MEMORY” appears in mon-itor: insufficient memory to record pictures atcurrent settings.
• Focus indicator flashes red: camera unable tofocus.
• Flash-ready lamp flickers: flash is charging.• Message “CARD IS NOT FORMATTED” ap-
pears in monitor: memory card is not format-ted for use in COOLPIX 3500.
• Message “NO CARD PRESENT” appears inmonitor: no memory card in camera.
62426
93
28
2892
92
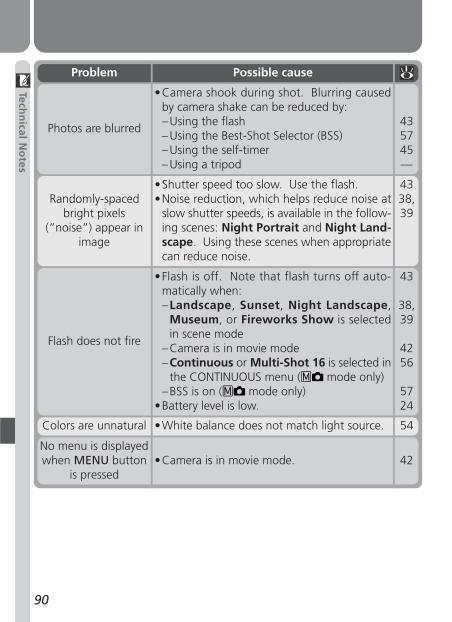
90
Techn
ical No
tesColors are unnatural •White balance does not match light source. 54
No menu is displayedwhen MENU button
is pressed•Camera is in movie mode. 42
Photos are blurred
•Camera shook during shot. Blurring causedby camera shake can be reduced by:–Using the flash– Using the Best-Shot Selector (BSS)– Using the self-timer– Using a tripod
435745—
Randomly-spacedbright pixels
(“noise”) appear inimage
•Shutter speed too slow. Use the flash.•Noise reduction, which helps reduce noise at
slow shutter speeds, is available in the follow-ing scenes: Night Portrait and Night Land-scape. Using these scenes when appropriatecan reduce noise.
4338,39
Flash does not fire
•Flash is off. Note that flash turns off auto-matically when:–Landscape, Sunset, Night Landscape,
Museum, or Fireworks Show is selectedin scene mode
–Camera is in movie mode–Continuous or Multi-Shot 16 is selected in
the CONTINUOUS menu ( mode only)–BSS is on ( mode only)
•Battery level is low.
43
38,39
4256
5724
Problem Possible cause
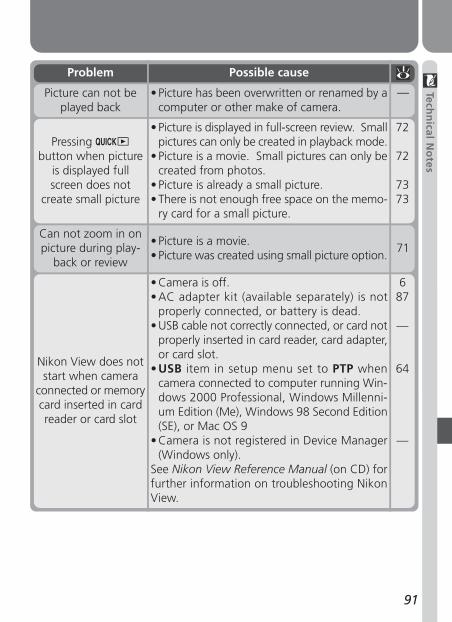
91
Techn
ic al No
tes
Can not zoom in onpicture during play-
back or review
• Picture is a movie.• Picture was created using small picture option.
71
Picture can not beplayed back
• Picture has been overwritten or renamed by acomputer or other make of camera.
—
Pressing button when picture
is displayed fullscreen does not
create small picture
• Picture is displayed in full-screen review. Smallpictures can only be created in playback mode.
• Picture is a movie. Small pictures can only becreated from photos.
• Picture is already a small picture.• There is not enough free space on the memo-
ry card for a small picture.
72
72
7373
Nikon View does notstart when camera
connected or memorycard inserted in cardreader or card slot
• Camera is off.• AC adapter kit (available separately) is not
properly connected, or battery is dead.• USB cable not correctly connected, or card not
properly inserted in card reader, card adapter,or card slot.
• USB item in setup menu set to PTP whencamera connected to computer running Win-dows 2000 Professional, Windows Millenni-um Edition (Me), Windows 98 Second Edition(SE), or Mac OS 9
• Camera is not registered in Device Manager(Windows only).
See Nikon View Reference Manual (on CD) forfurther information on troubleshooting NikonView.
687
—
64
—
Problem Possible cause
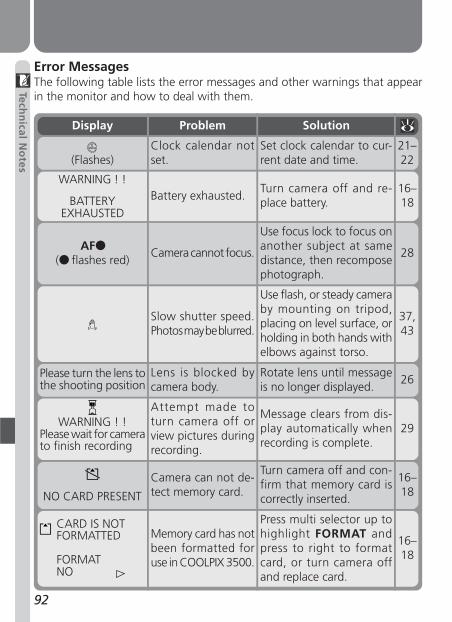
92
Techn
ical No
tes
Attempt made toturn camera off orview pictures duringrecording.
Message clears from dis-play automatically whenrecording is complete.
29WARNING ! !Please wait for camerato finish recording
Lens is blocked bycamera body.
Rotate lens until messageis no longer displayed.
26Please turn the lens tothe shooting position
Problem SolutionDisplay
Clock calendar notset.
Set clock calendar to cur-rent date and time.(Flashes)
21–22
Battery exhausted.Turn camera off and re-place battery.
WARNING ! !
BATTERYEXHAUSTED
16–18
Camera cannot focus.
Use focus lock to focus onanother subject at samedistance, then recomposephotograph.
AF●(● flashes red)
28
Slow shutter speed.Photos may be blurred.
Use flash, or steady cameraby mounting on tripod,placing on level surface, orholding in both hands withelbows against torso.
37,43
Error MessagesThe following table lists the error messages and other warnings that appearin the monitor and how to deal with them.
Camera can not de-tect memory card.
Turn camera off and con-firm that memory card iscorrectly inserted.NO CARD PRESENT
16–18
Memory card has notbeen formatted foruse in COOLPIX 3500.
Press multi selector up tohighlight FORMAT andpress to right to formatcard, or turn camera offand replace card.
CARD IS NOTFORMATTED
FORMATNO
16–18
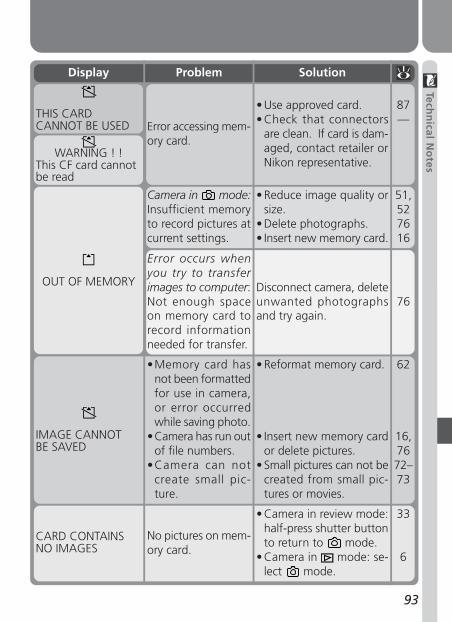
93
Techn
ic al No
tes
Problem SolutionDisplay
Camera in mode:Insufficient memoryto record pictures atcurrent settings.
Error occurs whenyou try to transferimages to computer:Not enough spaceon memory card torecord informationneeded for transfer.
• Reduce image quality orsize.
• Delete photographs.• Insert new memory card.
Disconnect camera, deleteunwanted photographsand try again.
OUT OF MEMORY
51,527616
76
•Memory card hasnot been formattedfor use in camera,or error occurredwhile saving photo.
•Camera has run outof file numbers.
•Camera can notcreate small pic-ture.
• Reformat memory card.
• Insert new memory cardor delete pictures.
• Small pictures can not becreated from small pic-tures or movies.
IMAGE CANNOTBE SAVED
62
16,7672–73
CARD CONTAINSNO IMAGES
33
6
No pictures on mem-ory card.
• Camera in review mode:half-press shutter buttonto return to mode.
• Camera in mode: se-lect mode.
WARNING ! !This CF card cannotbe read
THIS CARDCANNOT BE USED Error accessing mem-
ory card.
• Use approved card.• Check that connectors
are clean. If card is dam-aged, contact retailer orNikon representative.
87—
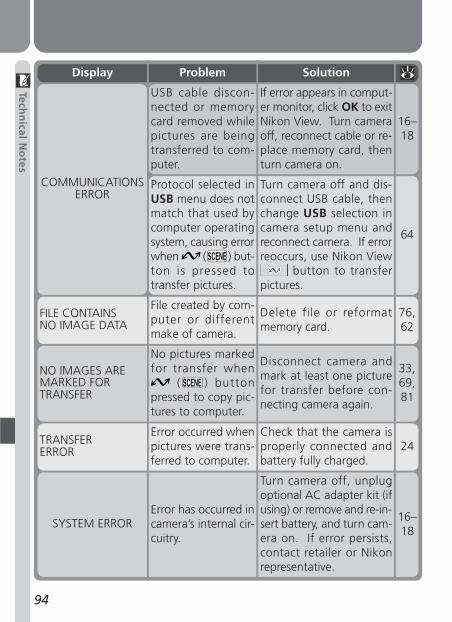
94
Techn
ical No
tes
Display SolutionProblem
COMMUNICATIONSERROR
TRANSFERERROR 24
Check that the camera isproperly connected andbattery fully charged.
Error occurred whenpictures were trans-ferred to computer.
FILE CONTAINSNO IMAGE DATA
76,62
Delete file or reformatmemory card.
File created by com-puter or differentmake of camera.
NO IMAGES AREMARKED FORTRANSFER
33,69,81
Disconnect camera andmark at least one picturefor transfer before con-necting camera again.
No pictures markedfor transfer when
( ) buttonpressed to copy pic-tures to computer.
SYSTEM ERROR 16–18
Turn camera off, unplugoptional AC adapter kit (ifusing) or remove and re-in-sert battery, and turn cam-era on. If error persists,contact retailer or Nikonrepresentative.
Error has occurred incamera’s internal cir-cuitry.
16–18
If error appears in comput-er monitor, click OK to exitNikon View. Turn cameraoff, reconnect cable or re-place memory card, thenturn camera on.
USB cable discon-nected or memorycard removed whilepictures are beingtransferred to com-puter.
64
Turn camera off and dis-connect USB cable, thenchange USB selection incamera setup menu andreconnect camera. If errorreoccurs, use Nikon View
button to transferpictures.
Protocol selected inUSB menu does notmatch that used bycomputer operatingsystem, causing errorwhen ( ) but-ton is pressed totransfer pictures.
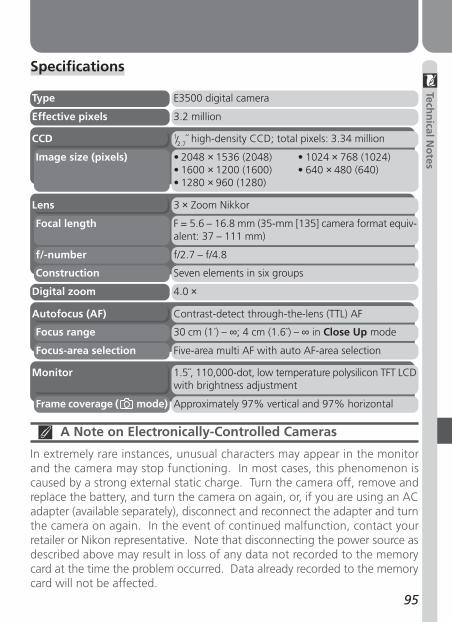
95
Techn
ical No
tes
Specifications
Type E3500 digital camera
Digital zoom 4.0 ×
Effective pixels 3.2 million
1/2.7˝ high-density CCD; total pixels: 3.34 millionCCD
Image size (pixels) • 2048 × 1536 (2048)• 1600 × 1200 (1600)• 1280 × 960 (1280)
• 1024 × 768 (1024)• 640 × 480 (640)
3 × Zoom NikkorLens
Focal length F = 5.6 – 16.8 mm (35-mm [135] camera format equiv-alent: 37 – 111 mm)
f/-number f/2.7 – f/4.8
Construction Seven elements in six groups
Contrast-detect through-the-lens (TTL) AFAutofocus (AF)
Focus range 30 cm (1´) – ∞; 4 cm (1.6˝) – ∞ in Close Up mode
Focus-area selection Five-area multi AF with auto AF-area selection
1.5˝, 110,000-dot, low temperature polysilicon TFT LCDwith brightness adjustment
Monitor
Frame coverage ( mode) Approximately 97% vertical and 97% horizontal
A Note on Electronically-Controlled Cameras
In extremely rare instances, unusual characters may appear in the monitorand the camera may stop functioning. In most cases, this phenomenon iscaused by a strong external static charge. Turn the camera off, remove andreplace the battery, and turn the camera on again, or, if you are using an ACadapter (available separately), disconnect and reconnect the adapter and turnthe camera on again. In the event of continued malfunction, contact yourretailer or Nikon representative. Note that disconnecting the power source asdescribed above may result in loss of any data not recorded to the memorycard at the time the problem occurred. Data already recorded to the memorycard will not be affected.
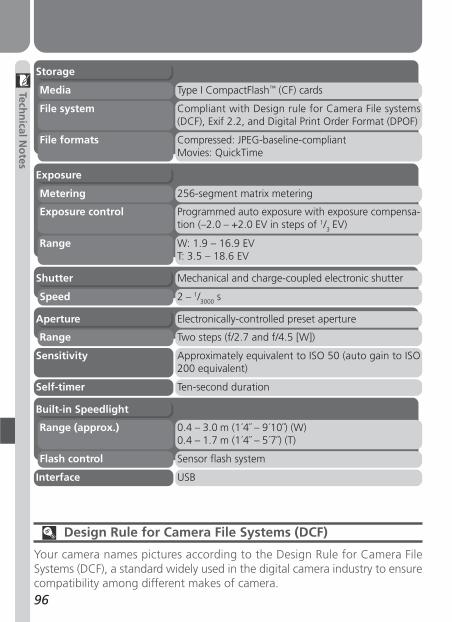
96
Techn
ical No
tes
Design Rule for Camera File Systems (DCF)
Your camera names pictures according to the Design Rule for Camera FileSystems (DCF), a standard widely used in the digital camera industry to ensurecompatibility among different makes of camera.
Sensitivity Approximately equivalent to ISO 50 (auto gain to ISO200 equivalent)
Self-timer Ten-second duration
Interface USB
Electronically-controlled preset apertureAperture
Range Two steps (f/2.7 and f/4.5 [W])
Mechanical and charge-coupled electronic shutterShutter
Speed 2 – 1/3000 s
Built-in Speedlight
Range (approx.) 0.4 – 3.0 m (1´4˝ – 9´10˝) (W)0.4 – 1.7 m (1´4˝ – 5´7˝) (T)
Flash control Sensor flash system
Exposure
Metering 256-segment matrix metering
Exposure control Programmed auto exposure with exposure compensa-tion (–2.0 – +2.0 EV in steps of 1/3 EV)
Range W: 1.9 – 16.9 EVT: 3.5 – 18.6 EV
Storage
Media Type I CompactFlash™ (CF) cards
File system Compliant with Design rule for Camera File systems(DCF), Exif 2.2, and Digital Print Order Format (DPOF)
File formats Compressed: JPEG-baseline-compliantMovies: QuickTime
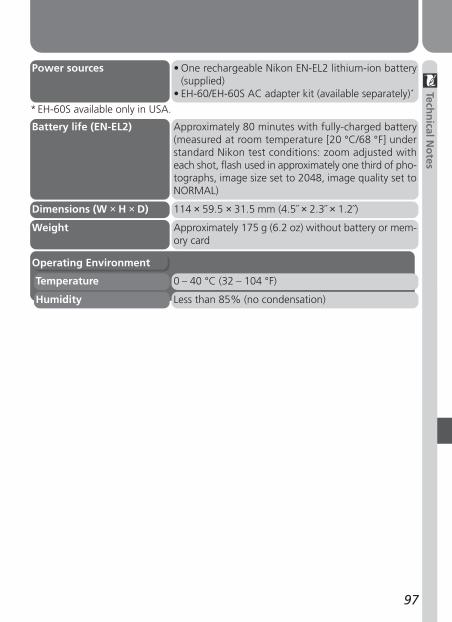
97
Techn
ical No
tes
Operating Environment
Temperature 0 – 40 °C (32 – 104 °F)
Humidity Less than 85% (no condensation)
Power sources • One rechargeable Nikon EN-EL2 lithium-ion battery(supplied)
• EH-60/EH-60S AC adapter kit (available separately)*
Battery life (EN-EL2) Approximately 80 minutes with fully-charged battery(measured at room temperature [20 °C/68 °F] understandard Nikon test conditions: zoom adjusted witheach shot, flash used in approximately one third of pho-tographs, image size set to 2048, image quality set toNORMAL)
Dimensions (W × H × D) 114 × 59.5 × 31.5 mm (4.5˝ × 2.3˝ × 1.2˝)
Weight Approximately 175 g (6.2 oz) without battery or mem-ory card
*EH-60S available only in USA.
98
Ind
ex
Index
Symbols2048, 1600, 1280, 1024, 640,
52 (shooting) mode, 6 (playback) mode, 6 button, 4, 33, 34, 68, 70
button, 4, 33, 69, 71 button, 5, 43 button, 5, 33, 34, 68, 70
button, 5, 33, 34, 69, 70,82. See shooting mode; mov-ies
, See self timer, 6, 24
, 6, 22, 6, 37, 44, , , , , , ,
, , , , , 37–40
AUTO, , , , 43, 6, 53
A, , , , , , , 54, , , 56, , , , , 58
, , , 78, 80, 81
A. See shooting mode,
autoAccessories. See optional ac-
cessoriesAF● . See focus indicatorAutofocus, 28Auto Off, 63Auto Transfer, 81
BBack Light, 40BASIC, 51Battery, 16–18, 24
life, 86, 97storing, 86
Beach/Snow, 38BEST SHOT SELECTOR, 57Brightness, 62BSS. See BEST SHOT SELECTOR
CCamera strap, 16CF card. See memory cardCF Card Format, 62Clock-calendar, 18, 21–22Close Up, 40CompactFlash™ card. See
memory cardCompression. See image qual-
ityComputer. See Nikon View;
transferCONTINUOUS, 56Copy, 40Copying images. See transfer
DDate, 21–22
imprinting, 79DCF. See Design rule for Cam-
era File systemsDelete, 76–77Deleting images
from playback menu, 76–77in full-frame playback, 68in quick review, 33in thumbnail review, 34, 70
Design rule for Camera File sys-tems, 69, 96
Digital Print Order Format, 78DISP. See monitor, indicators;
photo informationDPOF. See digital Print Order
Format
EError messages, 92–94EXP +/–, 53Exposure compensation, 6, 53
FFINE, 51Fireworks Show, 39Flash, 43Flash mode, 43Flash-ready lamp, 28, 43Focus. See autofocusFocus indicator, 6, 28Formatting. See memory card
IImage quality, 6, 51Image size, 6, 52IMAGE SHARPENING, 58ISO. See sensitivity
JJPEG. See image quality
LLandscape, 38Language, 19–20, 64
99
Ind
ex
M. See shooting mode,
manualMass storage. See USB.Memory card, 87
approved cards, 87capacity of, 51formatting, 62insertion and removal of, 16–
18MENU button, 4, 49, 60, 75Menus, 9–14Mode selector, 5, 6Monitor, 5, 6–7
brightness, 62indicators, 6–7framing photographs in, 27
MOV. See moviesMovies, 42
playing back, 74recording, 42
Multi selector, 5, 8Museum, 39
NNight Landscape, 39Night Portrait, 38Nikon View, i, 82Noise, 38, 44Noise reduction, 38NORMAL, 51Number of exposures remain-
ing, 6, 24
OOn/off. See mode selectorOptional accessories, 87
PParty/Indoor, 37Photo information, 7, 33, 69Picture Transfer Protocol. See
USB.Playback, 68. See also quick re-
viewfull frame, 68movie, 74thumbnail, 70zoom, 71
PLAY BACK menu, 75Portrait, 37Print Set, 78–79Protect, 80PTP. See USB.
QQuality. See image quality
button, 4, 31Quick review, 32
full screen, 32thumbnail, 34
QuickTime. See moviesQVGA. See movies
RRed-eye reduction. See flash
modeReset All, 66
SScene, 36
mode, 37–40selection, 36
SCENE button, 5Self-portrait. See monitor; self-
timer
Self-timer, 45Sensitivity, 6, 44SET-UP menu, 59Sharpening. See IMAGE
SHARPENINGShooting mode, 6, 42
(auto), 42 (manual), 42
movie, 42Shutter-release button, 28–29Shutter release delay. See self-
timerSize. See image sizeSMALL PIC. button, 4, 72Small picture, 72Smear, 27Specifications, 95–97Speedlight. See flashStrap. See camera strapSunset, 39
TT. See zoom, indicator
. See zoom, buttonsTelephoto. See zoomThumbnail display, 34, 70Time and date. See DateTimer. See self-timerTransfer, 8, 82
marking images for, 33, 34,69, 70, 81, 82
Troubleshooting, 88–94, 95
UUSB, 64
100
Ind
ex
WW. See zoom, indicator
. See zoom, buttonsWeb resources, 88White balance, 54
preset, 55Wide angle. See zoom
ZZoom
buttons, 4, 27, 47, 70, 71digital, 47indicator, 6, 27, 47optical, 47

En
Printed in Japan S2G10000101(11)
6MAA3811--
DIGITAL CAMERA
The Guide to Digital Photographywith the
En
5.6-16.8mm1:2.7-4.8