Embed Size (px)
Citation preview
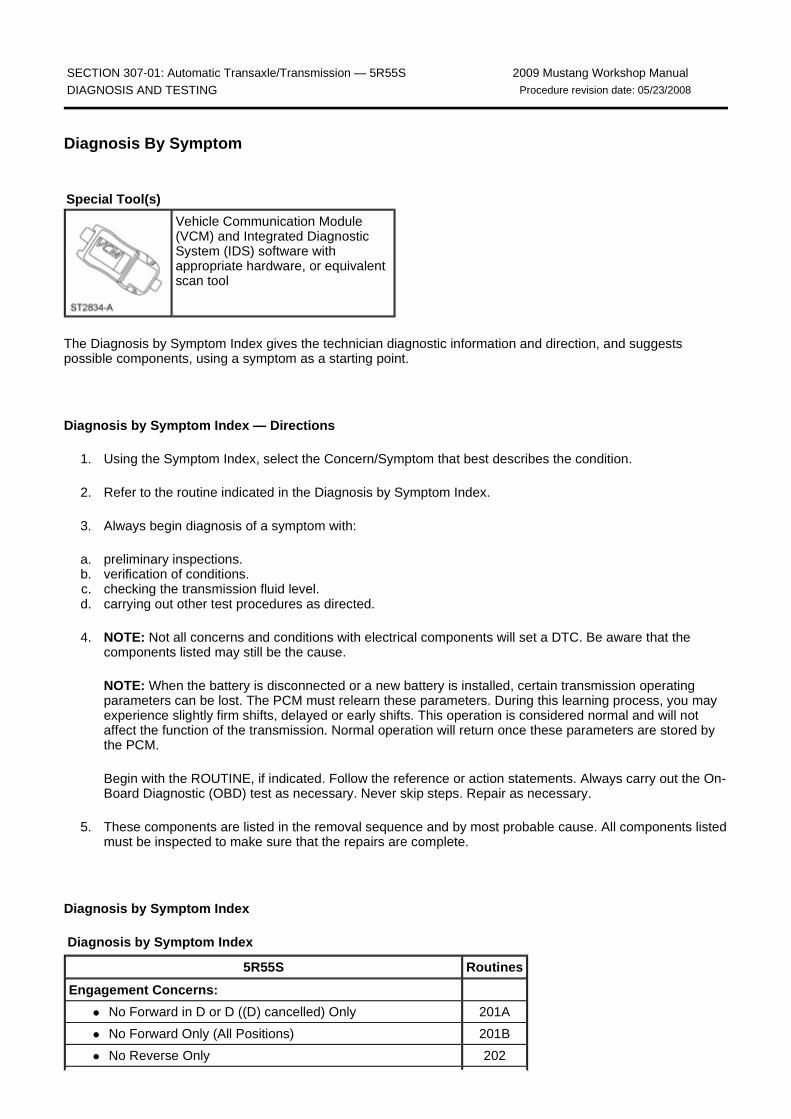
Diagnosis By Symptom
The Diagnosis by Symptom Index gives the technician diagnostic information and direction, and suggests possible components, using a symptom as a starting point.
Diagnosis by Symptom Index — Directions
1. Using the Symptom Index, select the Concern/Symptom that best describes the condition.
2. Refer to the routine indicated in the Diagnosis by Symptom Index.
3. Always begin diagnosis of a symptom with:
a. preliminary inspections. b. verification of conditions. c. checking the transmission fluid level. d. carrying out other test procedures as directed.
4. NOTE: Not all concerns and conditions with electrical components will set a DTC. Be aware that the components listed may still be the cause.
NOTE: When the battery is disconnected or a new battery is installed, certain transmission operating parameters can be lost. The PCM must relearn these parameters. During this learning process, you may experience slightly firm shifts, delayed or early shifts. This operation is considered normal and will not affect the function of the transmission. Normal operation will return once these parameters are stored by the PCM.
Begin with the ROUTINE, if indicated. Follow the reference or action statements. Always carry out the On-Board Diagnostic (OBD) test as necessary. Never skip steps. Repair as necessary.
5. These components are listed in the removal sequence and by most probable cause. All components listed must be inspected to make sure that the repairs are complete.
Diagnosis by Symptom Index
Diagnosis by Symptom Index
SECTION 307-01: Automatic Transaxle/Transmission — 5R55S 2009 Mustang Workshop Manual DIAGNOSIS AND TESTING Procedure revision date: 05/23/2008
Special Tool(s)
Vehicle Communication Module (VCM) and Integrated Diagnostic System (IDS) software with appropriate hardware, or equivalent scan tool
5R55S Routines
Engagement Concerns:
� No Forward in D or D ((D) cancelled) Only 201A
� No Forward Only (All Positions) 201B
� No Reverse Only 202

� Harsh Reverse Only 203
� Harsh Forward Only 204A
� Harsh Manual 1st Gear Only 204B
� Delayed/Soft Reverse Only 205
� Delayed/Soft Forward Only 206
� No Forward and No Reverse 207
� Harsh Forward and Harsh Reverse 208
� Delayed Forward and Delayed Reverse 209
Shift Concerns:
� Some/All Shifts Missing (Automatic Mode Only) 210
� Timing Concern
Early/Late (Some/All) 211
Erratic/Hunting (Some/All) 212
� Feel Concerns
Soft/Slipping (Some/All) 213
Harsh (Some/All) 214
� No First Gear in Drive, Engages in a Higher Gear 215
� No First Gear in Manual 1st 216
� No Manual 2nd Gear 217
� No 1-2 Shift 220
� No 2-3 Shift 221
� No 3-4 Shift 222
� No 4-3 Shift 223
� No 3-2 Shift 224
� No 2-1 Shift 225
� Soft/Slipping 1-2 Shift 226
� Soft/Slipping 2-3 Shift 227
� Soft/Slipping 3-4 Shift 228
� Soft/Slipping 4-3 Shift 229
� Soft/Slipping 3-2 Shift 230
� Soft/Slipping 2-1 Shift 231
� Harsh 1-2 Shift 232
� Harsh 2-3 Shift 233
� Harsh 3-4 Shift 234
� Harsh 4-3 Shift 235
� Harsh 3-2 Shift 236
� Harsh 2-1 Shift 237
� No 4-5 Shift 270
� No 5-4 Shift 271
� Soft/Slipping 4-5 Shift 272
� Soft/Slipping 5-4 Shift 273
� Harsh 4-5 Shift 274
� Harsh 5-4 Shift 275
Torque Converter Clutch (TCC) Operation Concerns:
� Does Not Apply 240
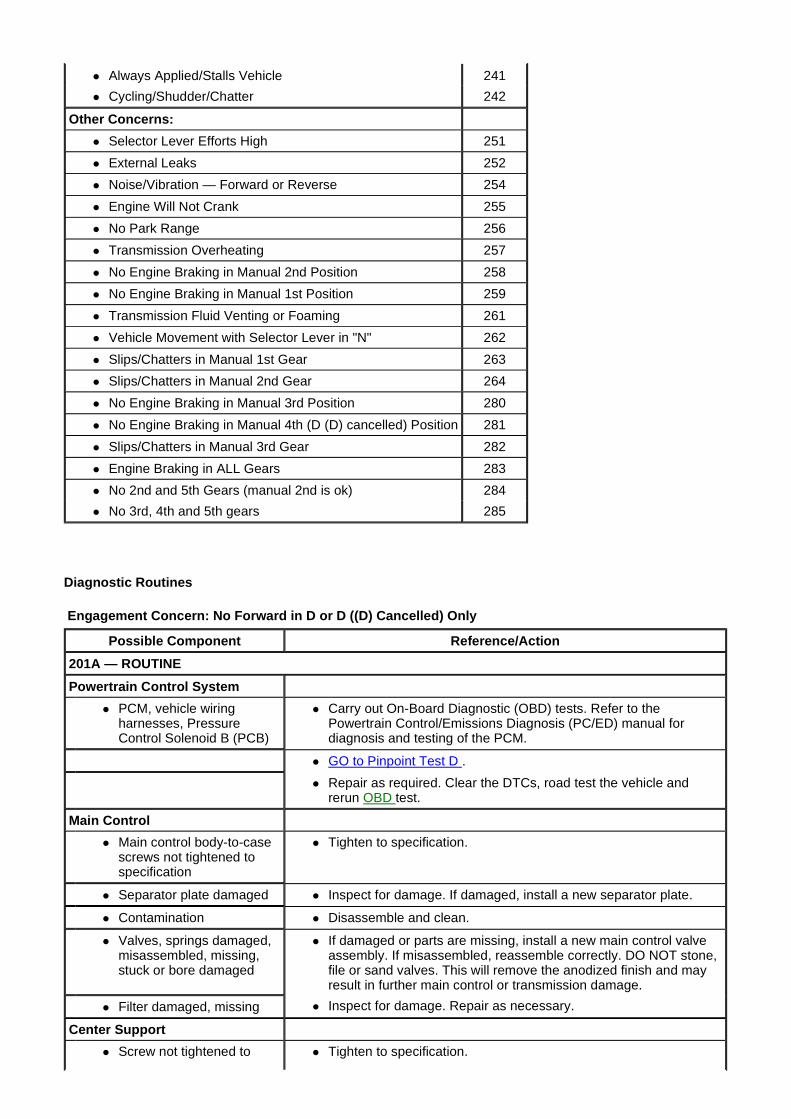
Diagnostic Routines
Engagement Concern: No Forward in D or D ((D) Canc elled) Only
� Always Applied/Stalls Vehicle 241
� Cycling/Shudder/Chatter 242
Other Concerns:
� Selector Lever Efforts High 251
� External Leaks 252
� Noise/Vibration — Forward or Reverse 254
� Engine Will Not Crank 255
� No Park Range 256
� Transmission Overheating 257
� No Engine Braking in Manual 2nd Position 258
� No Engine Braking in Manual 1st Position 259
� Transmission Fluid Venting or Foaming 261
� Vehicle Movement with Selector Lever in "N" 262
� Slips/Chatters in Manual 1st Gear 263
� Slips/Chatters in Manual 2nd Gear 264
� No Engine Braking in Manual 3rd Position 280
� No Engine Braking in Manual 4th (D (D) cancelled) Position 281
� Slips/Chatters in Manual 3rd Gear 282
� Engine Braking in ALL Gears 283
� No 2nd and 5th Gears (manual 2nd is ok) 284
� No 3rd, 4th and 5th gears 285
Possible Component Reference/Action
201A — ROUTINE
Powertrain Control System
� PCM, vehicle wiring harnesses, Pressure Control Solenoid B (PCB)
� Carry out On-Board Diagnostic (OBD) tests. Refer to the Powertrain Control/Emissions Diagnosis (PC/ED) manual for diagnosis and testing of the PCM.
� GO to Pinpoint Test D .
� Repair as required. Clear the DTCs, road test the vehicle and rerun OBD test.
Main Control
� Main control body-to-case screws not tightened to specification
� Tighten to specification.
� Separator plate damaged � Inspect for damage. If damaged, install a new separator plate.
� Contamination � Disassemble and clean.
� Valves, springs damaged, misassembled, missing, stuck or bore damaged
� If damaged or parts are missing, install a new main control valve assembly. If misassembled, reassemble correctly. DO NOT stone, file or sand valves. This will remove the anodized finish and may result in further main control or transmission damage.
� Filter damaged, missing � Inspect for damage. Repair as necessary.
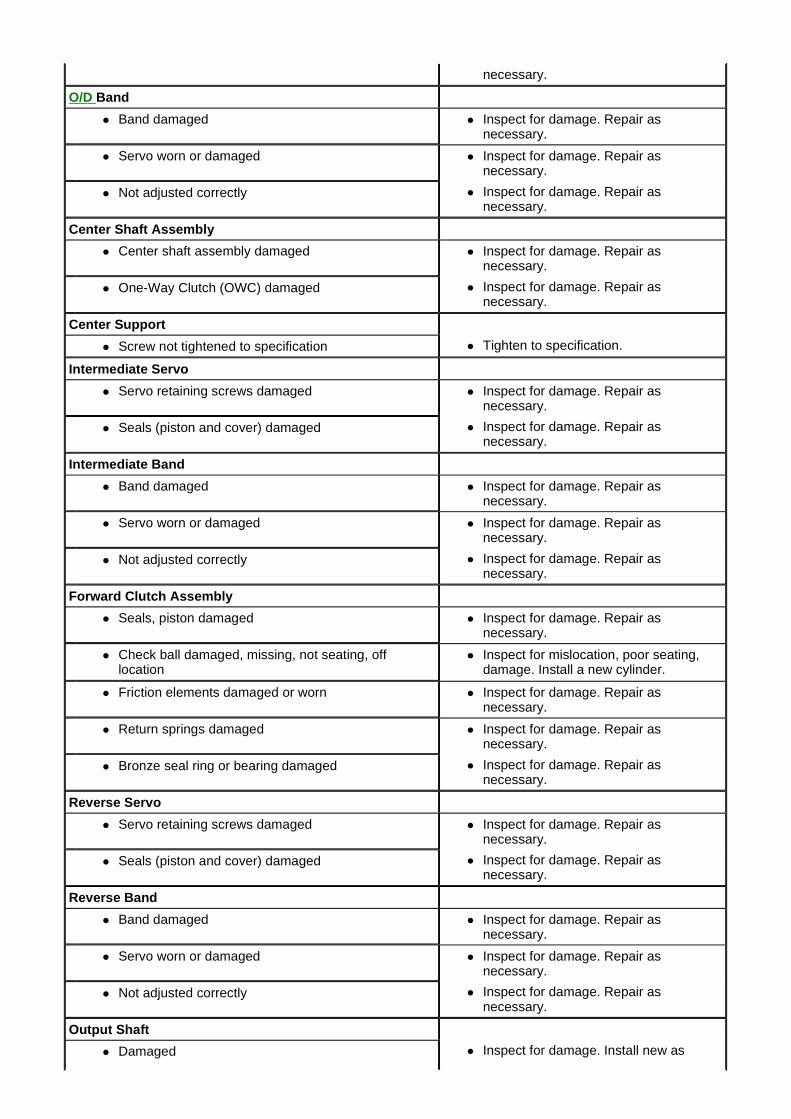
Center Support
� Screw not tightened to � Tighten to specification.
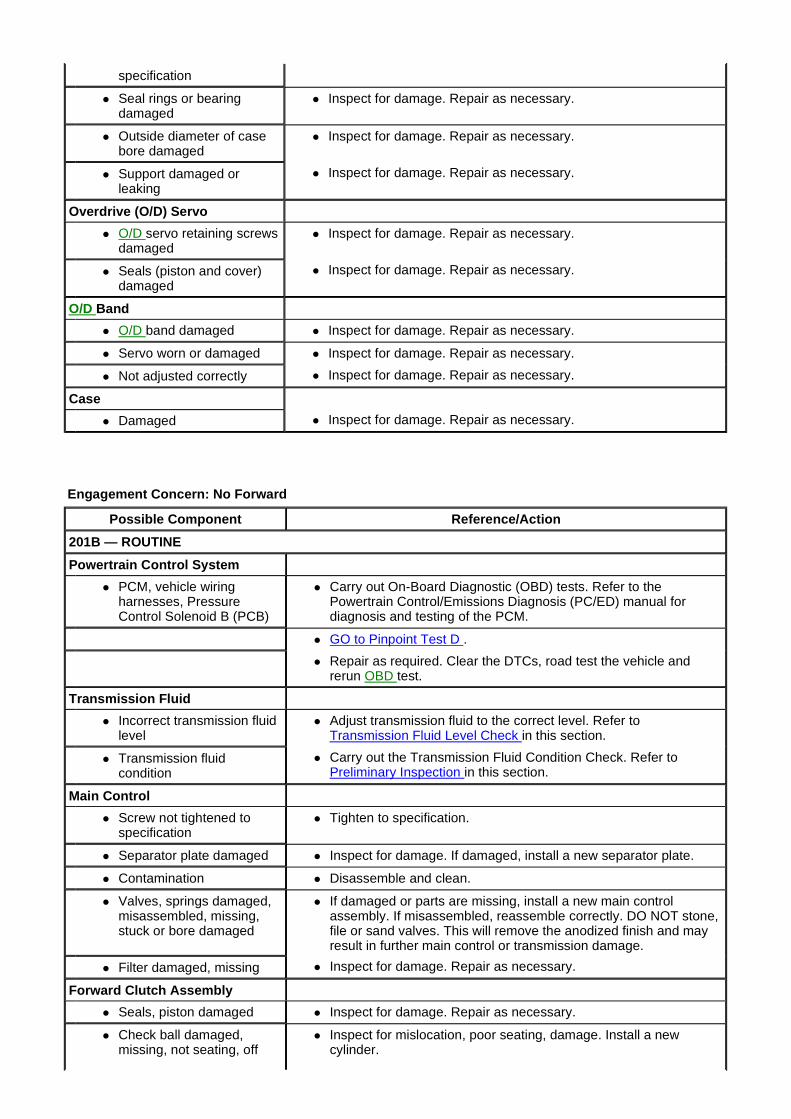
Engagement Concern: No Forward
specification
� Seal rings or bearing damaged
� Inspect for damage. Repair as necessary.
� Outside diameter of case bore damaged
� Inspect for damage. Repair as necessary.
� Support damaged or leaking
� Inspect for damage. Repair as necessary.
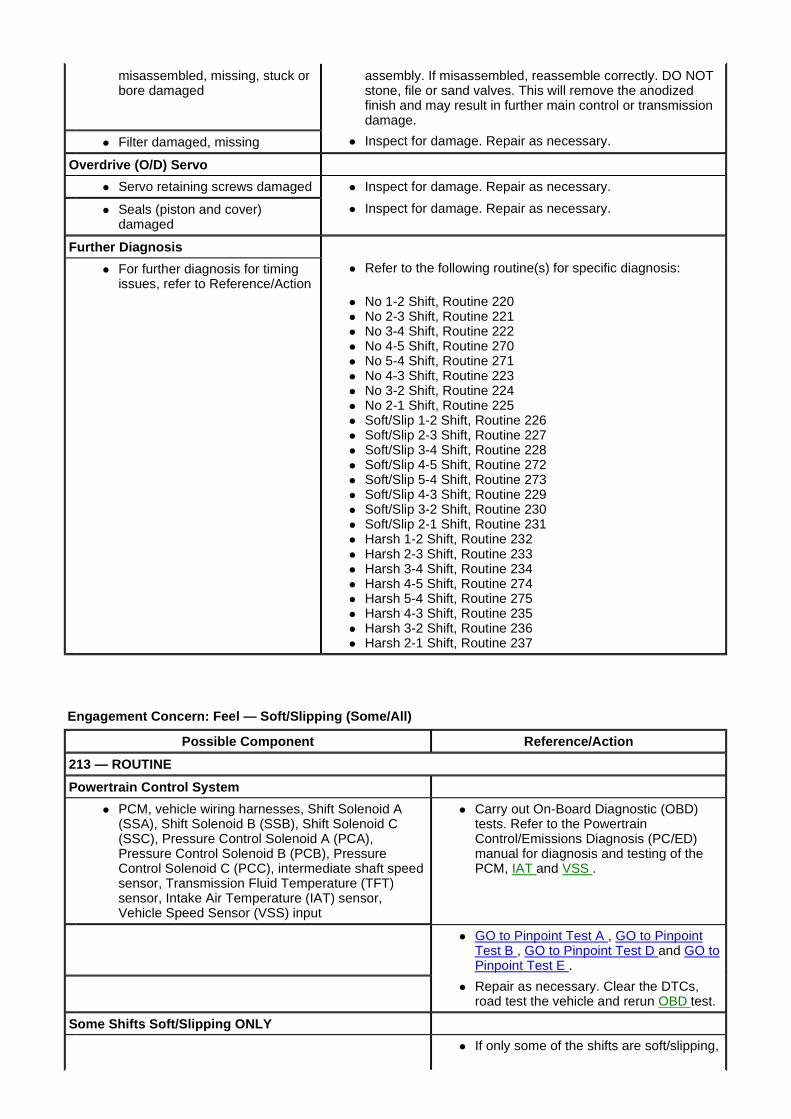
Overdrive (O/D) Servo
� O/D servo retaining screws damaged
� Inspect for damage. Repair as necessary.
� Seals (piston and cover) damaged
� Inspect for damage. Repair as necessary.
O/D Band
� O/D band damaged � Inspect for damage. Repair as necessary.
� Servo worn or damaged � Inspect for damage. Repair as necessary.
� Not adjusted correctly � Inspect for damage. Repair as necessary.
Case
� Damaged � Inspect for damage. Repair as necessary.
Possible Component Reference/Action
201B — ROUTINE
Powertrain Control System
� PCM, vehicle wiring harnesses, Pressure Control Solenoid B (PCB)
� Carry out On-Board Diagnostic (OBD) tests. Refer to the Powertrain Control/Emissions Diagnosis (PC/ED) manual for diagnosis and testing of the PCM.
� GO to Pinpoint Test D .
� Repair as required. Clear the DTCs, road test the vehicle and rerun OBD test.
Transmission Fluid
� Incorrect transmission fluid level
� Adjust transmission fluid to the correct level. Refer to Transmission Fluid Level Check in this section.
� Transmission fluid condition
� Carry out the Transmission Fluid Condition Check. Refer to Preliminary Inspection in this section.
Main Control
� Screw not tightened to specification
� Tighten to specification.
� Separator plate damaged � Inspect for damage. If damaged, install a new separator plate.
� Contamination � Disassemble and clean.
� Valves, springs damaged, misassembled, missing, stuck or bore damaged
� If damaged or parts are missing, install a new main control assembly. If misassembled, reassemble correctly. DO NOT stone, file or sand valves. This will remove the anodized finish and may result in further main control or transmission damage.
� Filter damaged, missing � Inspect for damage. Repair as necessary.
Forward Clutch Assembly
� Seals, piston damaged � Inspect for damage. Repair as necessary.
� Check ball damaged, missing, not seating, off
� Inspect for mislocation, poor seating, damage. Install a new cylinder.
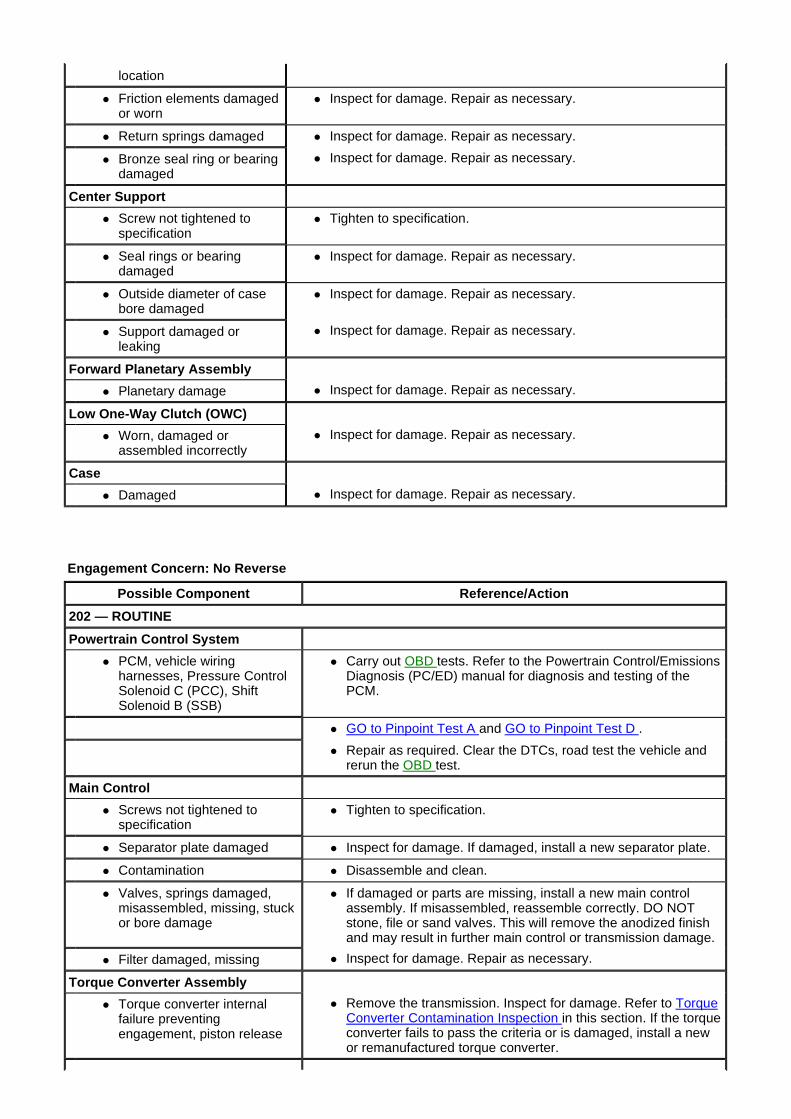
Engagement Concern: No Reverse
location
� Friction elements damaged or worn
� Inspect for damage. Repair as necessary.
� Return springs damaged � Inspect for damage. Repair as necessary.
� Bronze seal ring or bearing damaged
� Inspect for damage. Repair as necessary.
Center Support
� Screw not tightened to specification
� Tighten to specification.
� Seal rings or bearing damaged
� Inspect for damage. Repair as necessary.
� Outside diameter of case bore damaged
� Inspect for damage. Repair as necessary.
� Support damaged or leaking
� Inspect for damage. Repair as necessary.
Forward Planetary Assembly
� Planetary damage � Inspect for damage. Repair as necessary.
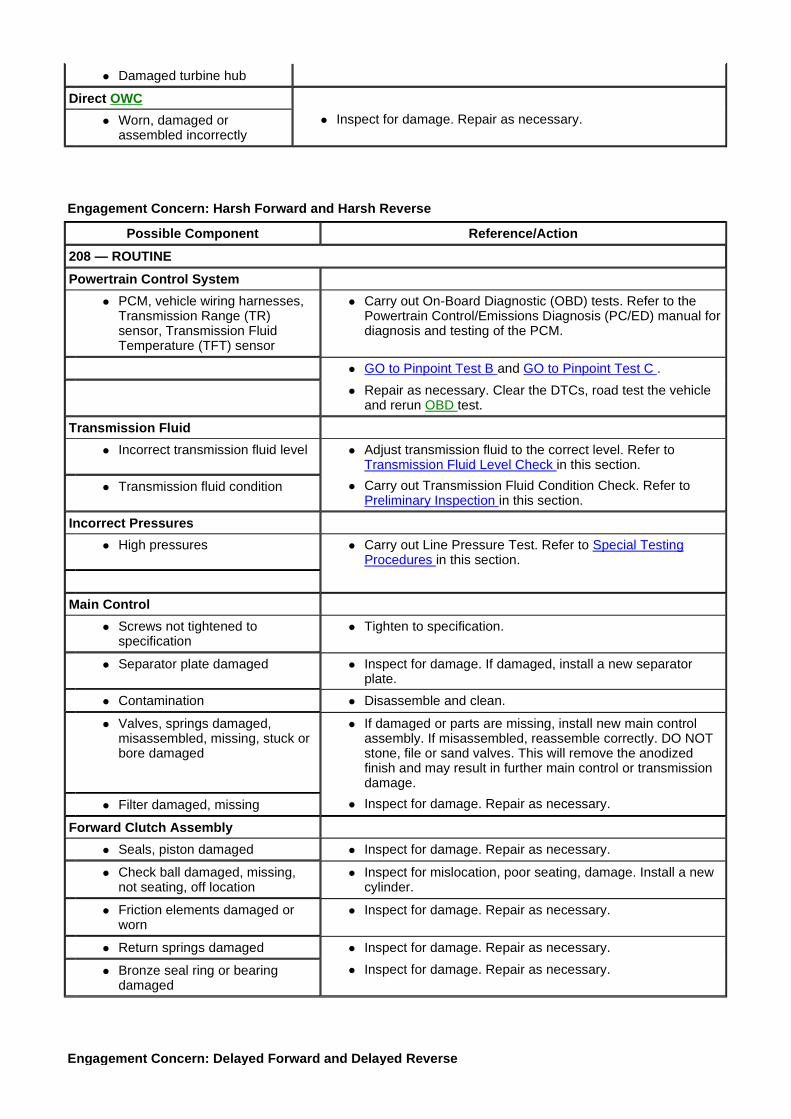
Low One-Way Clutch (OWC)
� Worn, damaged or assembled incorrectly
� Inspect for damage. Repair as necessary.
Case
� Damaged � Inspect for damage. Repair as necessary.
Possible Component Reference/Action
202 — ROUTINE
Powertrain Control System
� PCM, vehicle wiring harnesses, Pressure Control Solenoid C (PCC), Shift Solenoid B (SSB)
� Carry out OBD tests. Refer to the Powertrain Control/Emissions Diagnosis (PC/ED) manual for diagnosis and testing of the PCM.
� GO to Pinpoint Test A and GO to Pinpoint Test D .
� Repair as required. Clear the DTCs, road test the vehicle and rerun the OBD test.
Main Control
� Screws not tightened to specification
� Tighten to specification.
� Separator plate damaged � Inspect for damage. If damaged, install a new separator plate.
� Contamination � Disassemble and clean.
� Valves, springs damaged, misassembled, missing, stuck or bore damage
� If damaged or parts are missing, install a new main control assembly. If misassembled, reassemble correctly. DO NOT stone, file or sand valves. This will remove the anodized finish and may result in further main control or transmission damage.
� Filter damaged, missing � Inspect for damage. Repair as necessary.
Torque Converter Assembly
� Torque converter internal failure preventing engagement, piston release
� Remove the transmission. Inspect for damage. Refer to Torque Converter Contamination Inspection in this section. If the torque converter fails to pass the criteria or is damaged, install a new or remanufactured torque converter.
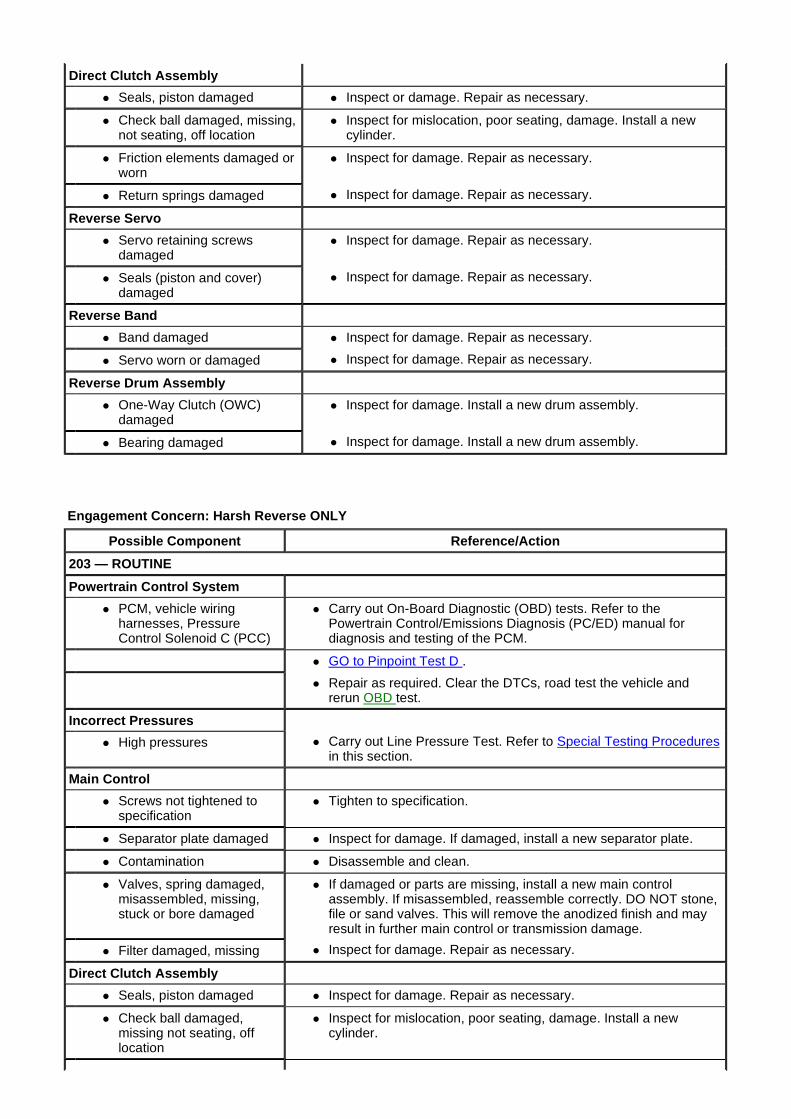
Engagement Concern: Harsh Reverse ONLY
Direct Clutch Assembly
� Seals, piston damaged � Inspect or damage. Repair as necessary.
� Check ball damaged, missing, not seating, off location
� Inspect for mislocation, poor seating, damage. Install a new cylinder.
� Friction elements damaged or worn
� Inspect for damage. Repair as necessary.
� Return springs damaged � Inspect for damage. Repair as necessary.
Reverse Servo
� Servo retaining screws damaged
� Inspect for damage. Repair as necessary.
� Seals (piston and cover) damaged
� Inspect for damage. Repair as necessary.
Reverse Band
� Band damaged � Inspect for damage. Repair as necessary.
� Servo worn or damaged � Inspect for damage. Repair as necessary.
Reverse Drum Assembly
� One-Way Clutch (OWC) damaged
� Inspect for damage. Install a new drum assembly.
� Bearing damaged � Inspect for damage. Install a new drum assembly.
Possible Component Reference/Action
203 — ROUTINE
Powertrain Control System
� PCM, vehicle wiring harnesses, Pressure Control Solenoid C (PCC)
� Carry out On-Board Diagnostic (OBD) tests. Refer to the Powertrain Control/Emissions Diagnosis (PC/ED) manual for diagnosis and testing of the PCM.
� GO to Pinpoint Test D .
� Repair as required. Clear the DTCs, road test the vehicle and rerun OBD test.
Incorrect Pressures
� High pressures � Carry out Line Pressure Test. Refer to Special Testing Procedures in this section.
Main Control
� Screws not tightened to specification
� Tighten to specification.
� Separator plate damaged � Inspect for damage. If damaged, install a new separator plate.
� Contamination � Disassemble and clean.
� Valves, spring damaged, misassembled, missing, stuck or bore damaged
� If damaged or parts are missing, install a new main control assembly. If misassembled, reassemble correctly. DO NOT stone, file or sand valves. This will remove the anodized finish and may result in further main control or transmission damage.
� Filter damaged, missing � Inspect for damage. Repair as necessary.
Direct Clutch Assembly
� Seals, piston damaged � Inspect for damage. Repair as necessary.
� Check ball damaged, missing not seating, off location
� Inspect for mislocation, poor seating, damage. Install a new cylinder.
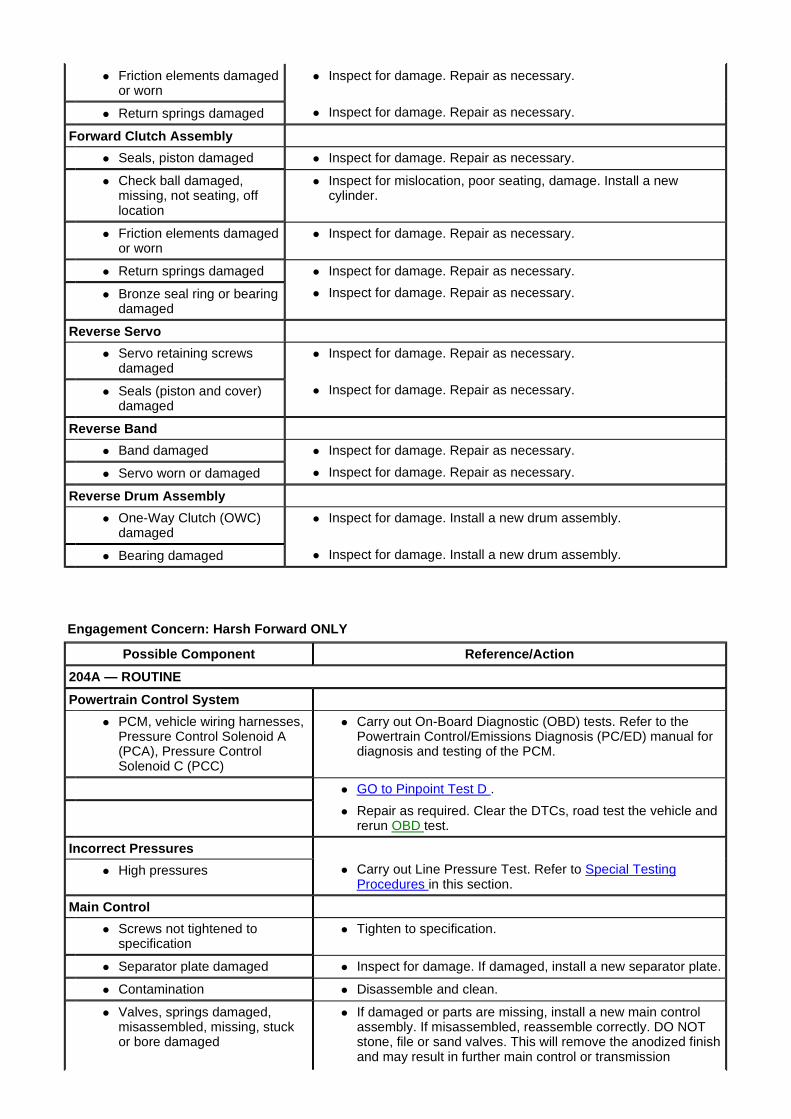
Engagement Concern: Harsh Forward ONLY
� Friction elements damaged or worn
� Inspect for damage. Repair as necessary.
� Return springs damaged � Inspect for damage. Repair as necessary.
Forward Clutch Assembly
� Seals, piston damaged � Inspect for damage. Repair as necessary.
� Check ball damaged, missing, not seating, off location
� Inspect for mislocation, poor seating, damage. Install a new cylinder.
� Friction elements damaged or worn
� Inspect for damage. Repair as necessary.
� Return springs damaged � Inspect for damage. Repair as necessary.
� Bronze seal ring or bearing damaged
� Inspect for damage. Repair as necessary.
Reverse Servo
� Servo retaining screws damaged
� Inspect for damage. Repair as necessary.
� Seals (piston and cover) damaged
� Inspect for damage. Repair as necessary.
Reverse Band
� Band damaged � Inspect for damage. Repair as necessary.
� Servo worn or damaged � Inspect for damage. Repair as necessary.
Reverse Drum Assembly
� One-Way Clutch (OWC) damaged
� Inspect for damage. Install a new drum assembly.
� Bearing damaged � Inspect for damage. Install a new drum assembly.
Possible Component Reference/Action
204A — ROUTINE
Powertrain Control System
� PCM, vehicle wiring harnesses, Pressure Control Solenoid A (PCA), Pressure Control Solenoid C (PCC)
� Carry out On-Board Diagnostic (OBD) tests. Refer to the Powertrain Control/Emissions Diagnosis (PC/ED) manual for diagnosis and testing of the PCM.
� GO to Pinpoint Test D .
� Repair as required. Clear the DTCs, road test the vehicle and rerun OBD test.
Incorrect Pressures
� High pressures � Carry out Line Pressure Test. Refer to Special Testing Procedures in this section.
Main Control
� Screws not tightened to specification
� Tighten to specification.
� Separator plate damaged � Inspect for damage. If damaged, install a new separator plate.
� Contamination � Disassemble and clean.
� Valves, springs damaged, misassembled, missing, stuck or bore damaged
� If damaged or parts are missing, install a new main control assembly. If misassembled, reassemble correctly. DO NOT stone, file or sand valves. This will remove the anodized finish and may result in further main control or transmission
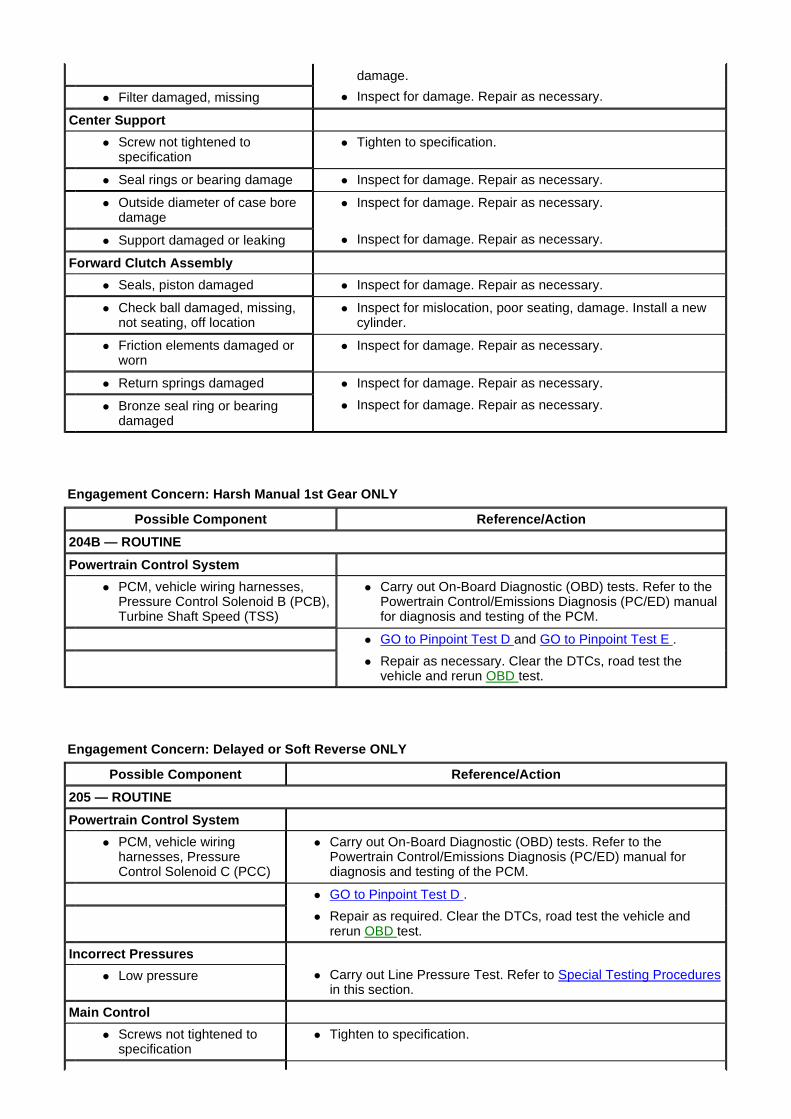
Engagement Concern: Harsh Manual 1st Gear ONLY
Engagement Concern: Delayed or Soft Reverse ONLY
damage.
� Filter damaged, missing � Inspect for damage. Repair as necessary.
Center Support
� Screw not tightened to specification
� Tighten to specification.
� Seal rings or bearing damage � Inspect for damage. Repair as necessary.
� Outside diameter of case bore damage
� Inspect for damage. Repair as necessary.
� Support damaged or leaking � Inspect for damage. Repair as necessary.
Forward Clutch Assembly
� Seals, piston damaged � Inspect for damage. Repair as necessary.
� Check ball damaged, missing, not seating, off location
� Inspect for mislocation, poor seating, damage. Install a new cylinder.
� Friction elements damaged or worn
� Inspect for damage. Repair as necessary.
� Return springs damaged � Inspect for damage. Repair as necessary.
� Bronze seal ring or bearing damaged
� Inspect for damage. Repair as necessary.
Possible Component Reference/Action
204B — ROUTINE
Powertrain Control System
� PCM, vehicle wiring harnesses, Pressure Control Solenoid B (PCB), Turbine Shaft Speed (TSS)
� Carry out On-Board Diagnostic (OBD) tests. Refer to the Powertrain Control/Emissions Diagnosis (PC/ED) manual for diagnosis and testing of the PCM.
� GO to Pinpoint Test D and GO to Pinpoint Test E .
� Repair as necessary. Clear the DTCs, road test the vehicle and rerun OBD test.
Possible Component Reference/Action
205 — ROUTINE
Powertrain Control System
� PCM, vehicle wiring harnesses, Pressure Control Solenoid C (PCC)
� Carry out On-Board Diagnostic (OBD) tests. Refer to the Powertrain Control/Emissions Diagnosis (PC/ED) manual for diagnosis and testing of the PCM.
� GO to Pinpoint Test D .
� Repair as required. Clear the DTCs, road test the vehicle and rerun OBD test.
Incorrect Pressures
� Low pressure � Carry out Line Pressure Test. Refer to Special Testing Procedures in this section.
Main Control
� Screws not tightened to specification
� Tighten to specification.
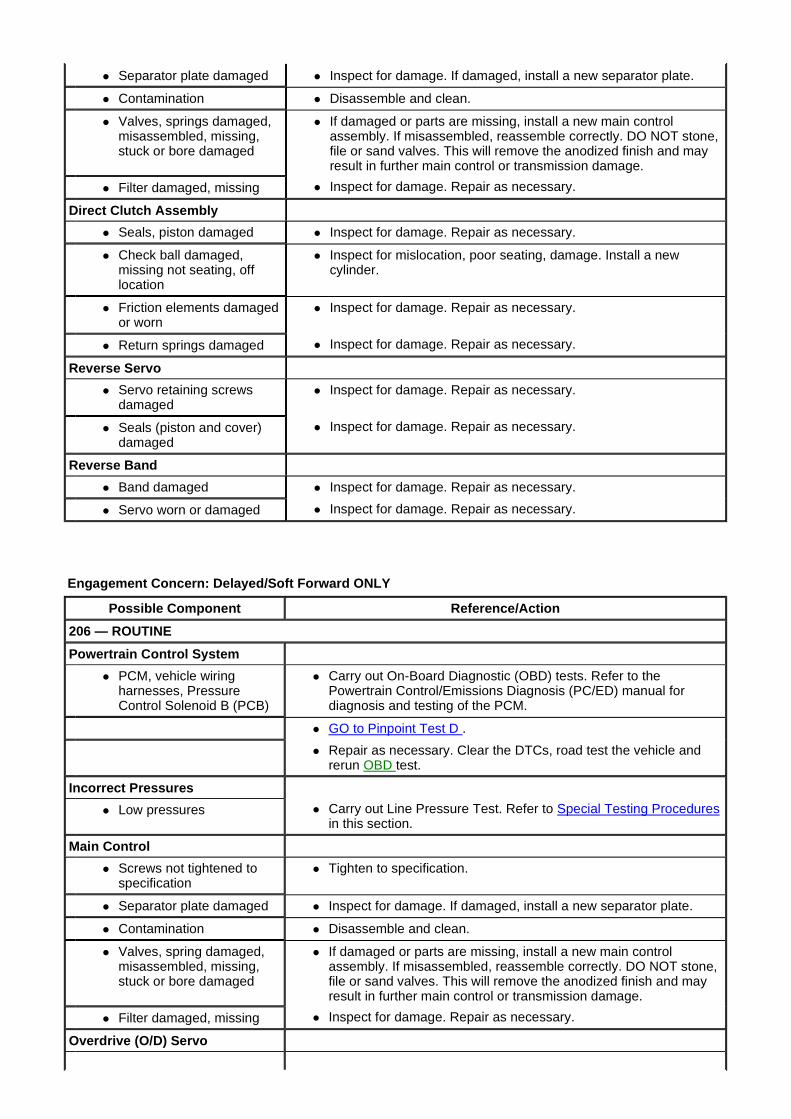
Engagement Concern: Delayed/Soft Forward ONLY
� Separator plate damaged � Inspect for damage. If damaged, install a new separator plate.
� Contamination � Disassemble and clean.
� Valves, springs damaged, misassembled, missing, stuck or bore damaged
� If damaged or parts are missing, install a new main control assembly. If misassembled, reassemble correctly. DO NOT stone, file or sand valves. This will remove the anodized finish and may result in further main control or transmission damage.
� Filter damaged, missing � Inspect for damage. Repair as necessary.
Direct Clutch Assembly
� Seals, piston damaged � Inspect for damage. Repair as necessary.
� Check ball damaged, missing not seating, off location
� Inspect for mislocation, poor seating, damage. Install a new cylinder.
� Friction elements damaged or worn
� Inspect for damage. Repair as necessary.
� Return springs damaged � Inspect for damage. Repair as necessary.
Reverse Servo
� Servo retaining screws damaged
� Inspect for damage. Repair as necessary.
� Seals (piston and cover) damaged
� Inspect for damage. Repair as necessary.
Reverse Band
� Band damaged � Inspect for damage. Repair as necessary.
� Servo worn or damaged � Inspect for damage. Repair as necessary.
Possible Component Reference/Action
206 — ROUTINE
Powertrain Control System
� PCM, vehicle wiring harnesses, Pressure Control Solenoid B (PCB)
� Carry out On-Board Diagnostic (OBD) tests. Refer to the Powertrain Control/Emissions Diagnosis (PC/ED) manual for diagnosis and testing of the PCM.
� GO to Pinpoint Test D .
� Repair as necessary. Clear the DTCs, road test the vehicle and rerun OBD test.
Incorrect Pressures
� Low pressures � Carry out Line Pressure Test. Refer to Special Testing Procedures in this section.
Main Control
� Screws not tightened to specification
� Tighten to specification.
� Separator plate damaged � Inspect for damage. If damaged, install a new separator plate.
� Contamination � Disassemble and clean.
� Valves, spring damaged, misassembled, missing, stuck or bore damaged
� If damaged or parts are missing, install a new main control assembly. If misassembled, reassemble correctly. DO NOT stone, file or sand valves. This will remove the anodized finish and may result in further main control or transmission damage.
� Filter damaged, missing � Inspect for damage. Repair as necessary.
Overdrive (O/D) Servo
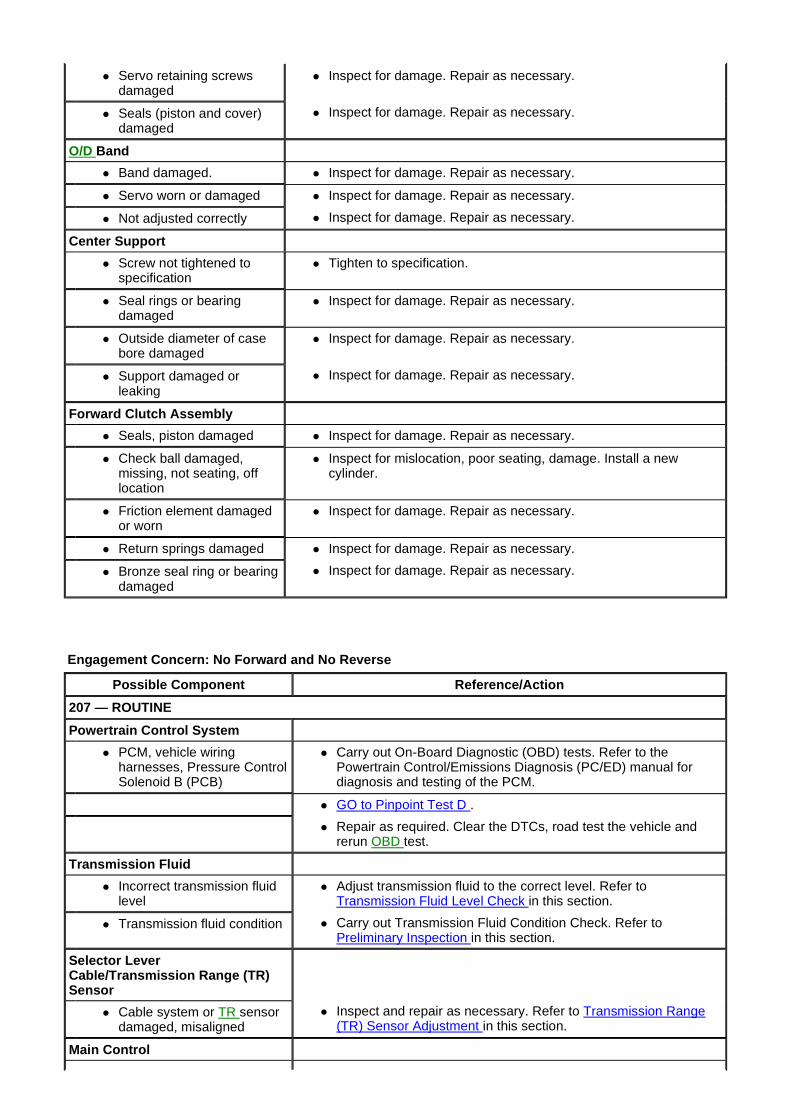
Engagement Concern: No Forward and No Reverse
� Servo retaining screws damaged
� Inspect for damage. Repair as necessary.
� Seals (piston and cover) damaged
� Inspect for damage. Repair as necessary.
O/D Band
� Band damaged. � Inspect for damage. Repair as necessary.
� Servo worn or damaged � Inspect for damage. Repair as necessary.
� Not adjusted correctly � Inspect for damage. Repair as necessary.
Center Support
� Screw not tightened to specification
� Tighten to specification.
� Seal rings or bearing damaged
� Inspect for damage. Repair as necessary.
� Outside diameter of case bore damaged
� Inspect for damage. Repair as necessary.
� Support damaged or leaking
� Inspect for damage. Repair as necessary.
Forward Clutch Assembly
� Seals, piston damaged � Inspect for damage. Repair as necessary.
� Check ball damaged, missing, not seating, off location
� Inspect for mislocation, poor seating, damage. Install a new cylinder.
� Friction element damaged or worn
� Inspect for damage. Repair as necessary.
� Return springs damaged � Inspect for damage. Repair as necessary.
� Bronze seal ring or bearing damaged
� Inspect for damage. Repair as necessary.
Possible Component Reference/Action
207 — ROUTINE
Powertrain Control System
� PCM, vehicle wiring harnesses, Pressure Control Solenoid B (PCB)
� Carry out On-Board Diagnostic (OBD) tests. Refer to the Powertrain Control/Emissions Diagnosis (PC/ED) manual for diagnosis and testing of the PCM.
� GO to Pinpoint Test D .
� Repair as required. Clear the DTCs, road test the vehicle and rerun OBD test.
Transmission Fluid
� Incorrect transmission fluid level
� Adjust transmission fluid to the correct level. Refer to Transmission Fluid Level Check in this section.
� Transmission fluid condition � Carry out Transmission Fluid Condition Check. Refer to Preliminary Inspection in this section.
Selector Lever Cable/Transmission Range (TR) Sensor
� Cable system or TR sensor damaged, misaligned
� Inspect and repair as necessary. Refer to Transmission Range (TR) Sensor Adjustment in this section.
Main Control
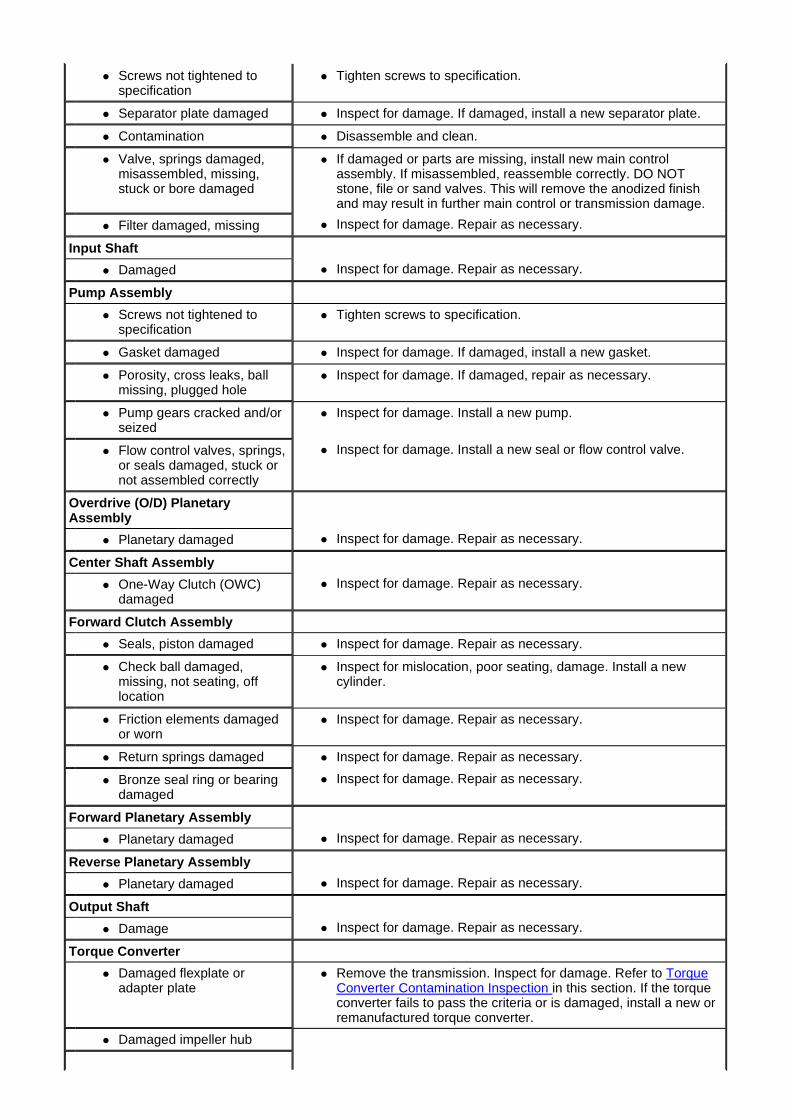
� Screws not tightened to specification
� Tighten screws to specification.
� Separator plate damaged � Inspect for damage. If damaged, install a new separator plate.
� Contamination � Disassemble and clean.
� Valve, springs damaged, misassembled, missing, stuck or bore damaged
� If damaged or parts are missing, install new main control assembly. If misassembled, reassemble correctly. DO NOT stone, file or sand valves. This will remove the anodized finish and may result in further main control or transmission damage.
� Filter damaged, missing � Inspect for damage. Repair as necessary.
Input Shaft
� Damaged � Inspect for damage. Repair as necessary.
Pump Assembly
� Screws not tightened to specification
� Tighten screws to specification.
� Gasket damaged � Inspect for damage. If damaged, install a new gasket.
� Porosity, cross leaks, ball missing, plugged hole
� Inspect for damage. If damaged, repair as necessary.
� Pump gears cracked and/or seized
� Inspect for damage. Install a new pump.
� Flow control valves, springs, or seals damaged, stuck or not assembled correctly
� Inspect for damage. Install a new seal or flow control valve.
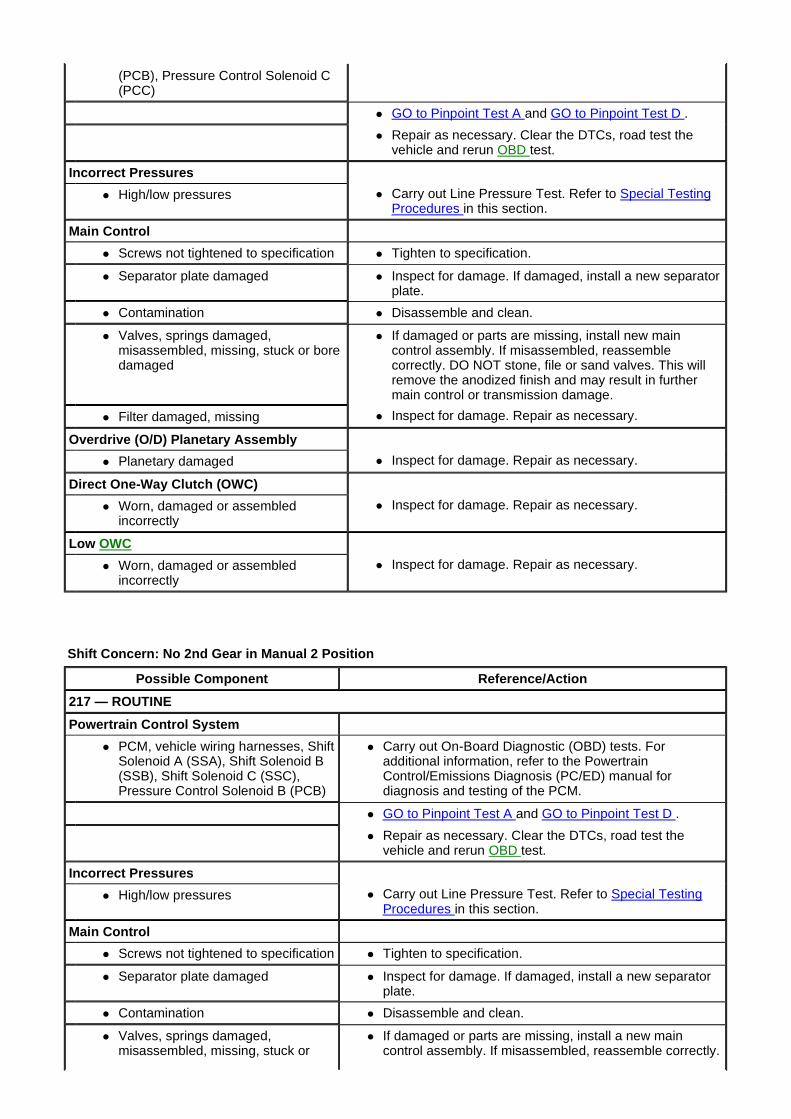
Overdrive (O/D) Planetary Assembly
� Planetary damaged � Inspect for damage. Repair as necessary.
Center Shaft Assembly
� One-Way Clutch (OWC) damaged
� Inspect for damage. Repair as necessary.
Forward Clutch Assembly
� Seals, piston damaged � Inspect for damage. Repair as necessary.
� Check ball damaged, missing, not seating, off location
� Inspect for mislocation, poor seating, damage. Install a new cylinder.
� Friction elements damaged or worn
� Inspect for damage. Repair as necessary.
� Return springs damaged � Inspect for damage. Repair as necessary.
� Bronze seal ring or bearing damaged
� Inspect for damage. Repair as necessary.
Forward Planetary Assembly
� Planetary damaged � Inspect for damage. Repair as necessary.
Reverse Planetary Assembly
� Planetary damaged � Inspect for damage. Repair as necessary.
Output Shaft
� Damage � Inspect for damage. Repair as necessary.
Torque Converter
� Damaged flexplate or adapter plate
� Remove the transmission. Inspect for damage. Refer to Torque Converter Contamination Inspection in this section. If the torque converter fails to pass the criteria or is damaged, install a new or remanufactured torque converter.
� Damaged impeller hub
Engagement Concern: Harsh Forward and Harsh Revers e
Engagement Concern: Delayed Forward and Delayed Re verse
� Damaged turbine hub
Direct OWC
� Worn, damaged or assembled incorrectly
� Inspect for damage. Repair as necessary.
Possible Component Reference/Action
208 — ROUTINE
Powertrain Control System
� PCM, vehicle wiring harnesses, Transmission Range (TR) sensor, Transmission Fluid Temperature (TFT) sensor
� Carry out On-Board Diagnostic (OBD) tests. Refer to the Powertrain Control/Emissions Diagnosis (PC/ED) manual for diagnosis and testing of the PCM.
� GO to Pinpoint Test B and GO to Pinpoint Test C .
� Repair as necessary. Clear the DTCs, road test the vehicle and rerun OBD test.
Transmission Fluid
� Incorrect transmission fluid level � Adjust transmission fluid to the correct level. Refer to Transmission Fluid Level Check in this section.
� Transmission fluid condition � Carry out Transmission Fluid Condition Check. Refer to Preliminary Inspection in this section.
Incorrect Pressures
� High pressures � Carry out Line Pressure Test. Refer to Special Testing Procedures in this section.
Main Control
� Screws not tightened to specification
� Tighten to specification.
� Separator plate damaged � Inspect for damage. If damaged, install a new separator plate.
� Contamination � Disassemble and clean.
� Valves, springs damaged, misassembled, missing, stuck or bore damaged
� If damaged or parts are missing, install new main control assembly. If misassembled, reassemble correctly. DO NOT stone, file or sand valves. This will remove the anodized finish and may result in further main control or transmission damage.
� Filter damaged, missing � Inspect for damage. Repair as necessary.
Forward Clutch Assembly
� Seals, piston damaged � Inspect for damage. Repair as necessary.
� Check ball damaged, missing, not seating, off location
� Inspect for mislocation, poor seating, damage. Install a new cylinder.
� Friction elements damaged or worn
� Inspect for damage. Repair as necessary.
� Return springs damaged � Inspect for damage. Repair as necessary.
� Bronze seal ring or bearing damaged
� Inspect for damage. Repair as necessary.
Shift Concern: Some/All Shifts Missing (Automatic Mode Only)
Possible Component Reference/Action
209 — ROUTINE
Powertrain Control System
� PCM, vehicle wiring harnesses, Transmission Fluid Temperature (TFT) sensor
� Carry out On-Board Diagnostic (OBD) tests. Refer to the Powertrain Control/Emissions Diagnosis (PC/ED) manual for diagnosis and testing of the PCM.
� GO to Pinpoint Test B .
� Repair as necessary. Clear the DTCs, road test the vehicle and rerun OBD test.
Transmission Fluid
� Incorrect transmission fluid level
� Adjust transmission fluid to the correct level. Refer to Transmission Fluid Level Check in this section.
� Transmission fluid condition � Carry out Transmission Fluid Condition Check. Refer to Preliminary Inspection in this section.
Incorrect Pressures
� High pressures � Carry out Line Pressure Test. Refer to Special Testing Procedures in this section.
Main Control
� Screws not tightened to specification
� Tighten to specification.
� Separator plate damaged � Inspect for damage. If damaged, install a new separator plate.
� Contamination � Disassemble and clean.
� Valves and springs damaged, misassembled, missing, stuck or bore damaged
� If damaged or parts are missing, install a new main control assembly. If misassembled, reassemble correctly. DO NOT stone, file or sand valves. This will remove the anodized finish and may result in further main control or transmission damage.
� Filter damaged, missing � Inspect for damage. Repair as necessary.
Pump Assembly
� Screws not tightened to specification
� Tighten screws to specification.
� Gasket damaged � Inspect for damage. If damaged, install a new gasket.
� Porosity, cross leaks, ball missing, plugged hole
� Inspect for damage. If damaged, repair as necessary.
� Pump gears cracked and/or seized
� Inspect for damage. Install a new pump.
� Flow control valves, springs, or seals damaged, stuck or not assembled correctly
� Inspect for damage. Install a new seal or flow control valve.
Possible Component Reference/Action
210 — ROUTINE
Powertrain Control System
� PCM, vehicle wiring harnesses, Shift Solenoid A (SSA), Shift Solenoid B (SSB), Shift Solenoid C (SSC), Torque Converter Clutch (TCC) solenoid, Pressure Control Solenoid A (PCA), Pressure Control Solenoid B (PCB), Pressure Control Solenoid C
� Carry out On-Board Diagnostic (OBD) tests. Refer to the Powertrain Control/Emissions Diagnosis (PC/ED) manual for diagnosis and testing of the PCM, IAT and VSS .

(PCC), Output Shaft Speed (OSS) sensor, Transmission Range (TR) sensor, Intake Air Temperature (IAT) sensor, Vehicle Speed Sensor (VSS) input
� GO to Pinpoint Test A , GO to Pinpoint Test C , GO to Pinpoint Test D and GO to Pinpoint Test E .
� Repair as necessary. Clear the DTCs, road test the vehicle and rerun OBD test.
Some Shifts Missing ONLY
� If only some shifts are missing, determine which shift(s) is missing.
� Refer to the following routine(s) for further No Shift concerns:
� No 1-2 Shift, Routine 220 � No 2-3 Shift, Routine 221 � No 3-4 Shift, Routine 222 � No 4-5 Shift, Routine 270 � No 5-4 Shift, Routine 271 � No 4-3 Shift, Routine 223 � No 3-2 Shift, Routine 224 � No 2-1 Shift, Routine 225
Transmission Fluid
� Incorrect transmission fluid level � Adjust transmission fluid to correct level. Refer to Transmission Fluid Level Check in this section.
� Transmission fluid condition � Carry out Transmission Fluid Condition Check. Refer to Preliminary Inspection in this section.
Selector Lever Cable/ TR Sensor
� Cable system or TR sensor damaged, misaligned � Inspect and repair as necessary. Refer to Transmission Range (TR) Sensor Adjustment in this section.
Incorrect Pressures
� High/low pressures � Carry out Line Pressure Test. Refer to Special Testing Procedures in this section.
Main Control
� Screws not tightened to specification � Tighten to specification.
� Separator plate damaged � Inspect for damage. If damaged, install a new separator plate.
� Contamination � Disassemble and clean.
� Valve, springs damaged, misassembled, missing, stuck or bore damaged
� If damaged or parts are missing, install new main control assembly. If misassembled, reassemble correctly. DO NOT stone, file or sand valves. This will remove the anodized finish and may result in further main control or transmission damage.
� Filter damaged, missing � Inspect for damage. Repair as necessary.
Pump Assembly
� Screws not tightened to specification � Tighten screws to specification.
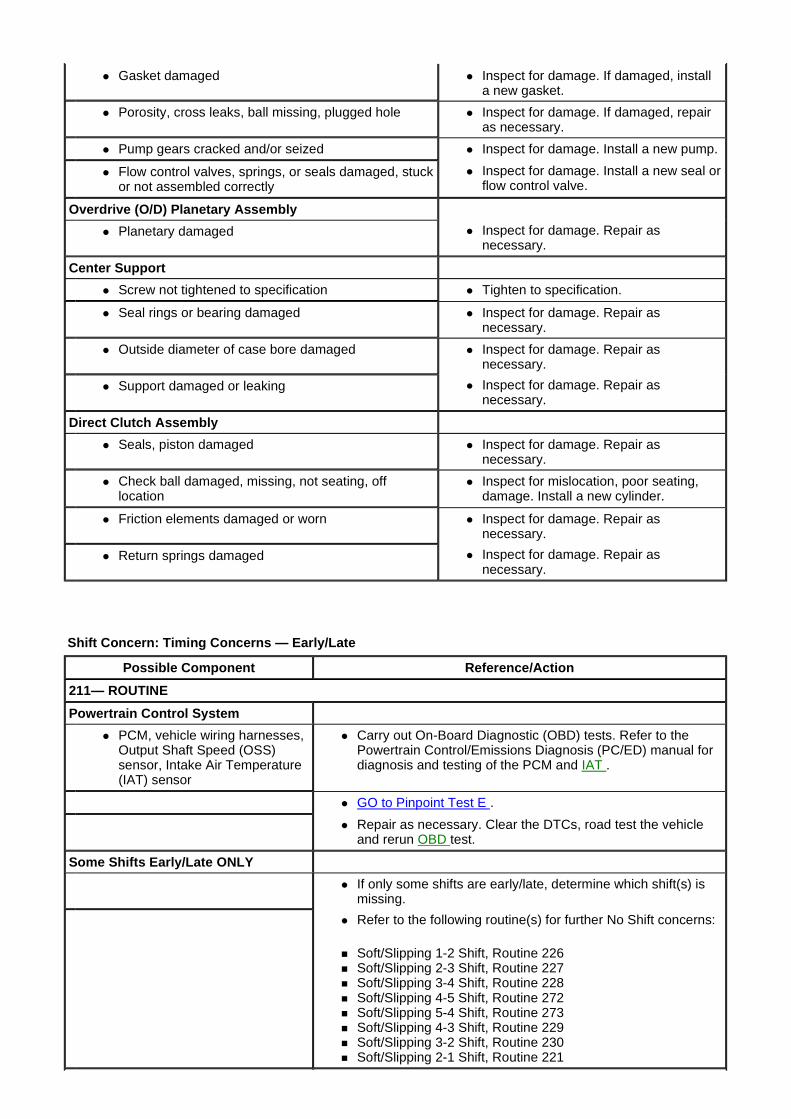
Shift Concern: Timing Concerns — Early/Late
� Gasket damaged � Inspect for damage. If damaged, install a new gasket.
� Porosity, cross leaks, ball missing, plugged hole � Inspect for damage. If damaged, repair as necessary.
� Pump gears cracked and/or seized � Inspect for damage. Install a new pump.
� Flow control valves, springs, or seals damaged, stuck or not assembled correctly
� Inspect for damage. Install a new seal or flow control valve.
Overdrive (O/D) Planetary Assembly
� Planetary damaged � Inspect for damage. Repair as necessary.
Center Support
� Screw not tightened to specification � Tighten to specification.
� Seal rings or bearing damaged � Inspect for damage. Repair as necessary.
� Outside diameter of case bore damaged � Inspect for damage. Repair as necessary.
� Support damaged or leaking � Inspect for damage. Repair as necessary.
Direct Clutch Assembly
� Seals, piston damaged � Inspect for damage. Repair as necessary.
� Check ball damaged, missing, not seating, off location
� Inspect for mislocation, poor seating, damage. Install a new cylinder.
� Friction elements damaged or worn � Inspect for damage. Repair as necessary.
� Return springs damaged � Inspect for damage. Repair as necessary.
Possible Component Reference/Action
211— ROUTINE
Powertrain Control System
� PCM, vehicle wiring harnesses, Output Shaft Speed (OSS) sensor, Intake Air Temperature (IAT) sensor
� Carry out On-Board Diagnostic (OBD) tests. Refer to the Powertrain Control/Emissions Diagnosis (PC/ED) manual for diagnosis and testing of the PCM and IAT .
� GO to Pinpoint Test E .
� Repair as necessary. Clear the DTCs, road test the vehicle and rerun OBD test.
Some Shifts Early/Late ONLY
� If only some shifts are early/late, determine which shift(s) is missing.
� Refer to the following routine(s) for further No Shift concerns:
� Soft/Slipping 1-2 Shift, Routine 226 � Soft/Slipping 2-3 Shift, Routine 227 � Soft/Slipping 3-4 Shift, Routine 228 � Soft/Slipping 4-5 Shift, Routine 272 � Soft/Slipping 5-4 Shift, Routine 273 � Soft/Slipping 4-3 Shift, Routine 229 � Soft/Slipping 3-2 Shift, Routine 230 � Soft/Slipping 2-1 Shift, Routine 221
Shift Concern: Timing Concerns — Erratic/Hunting ( Some/All)
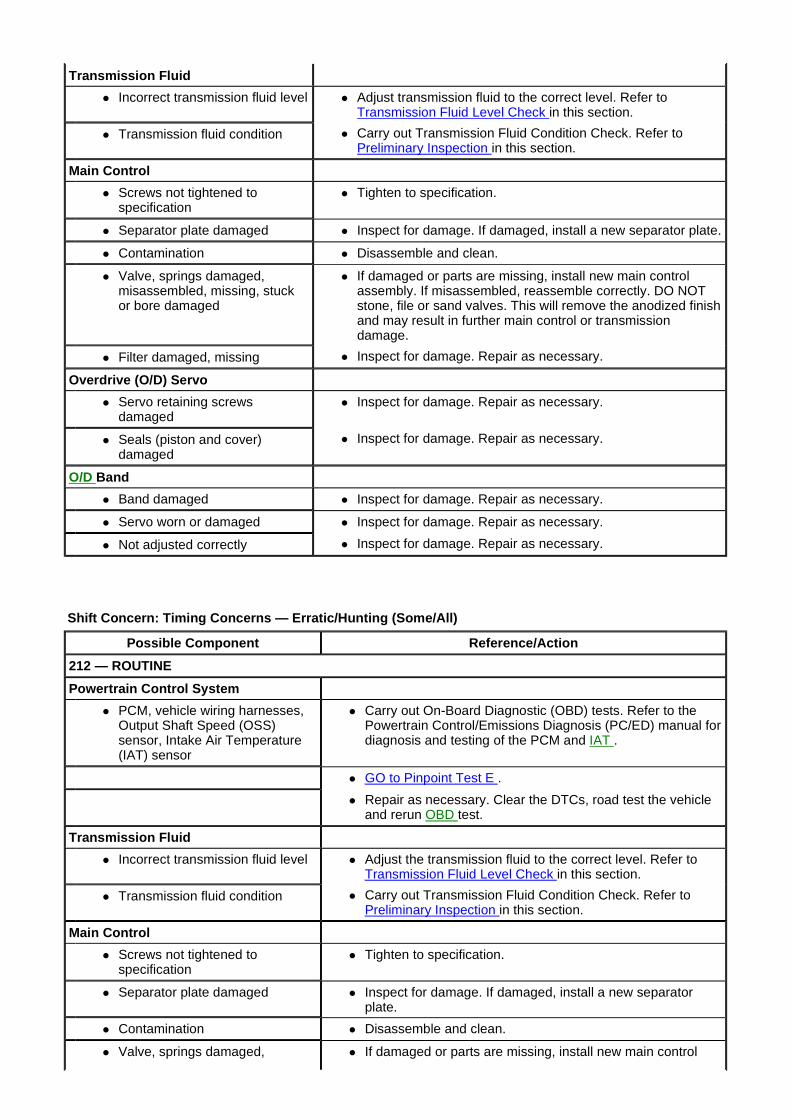
Transmission Fluid
� Incorrect transmission fluid level � Adjust transmission fluid to the correct level. Refer to Transmission Fluid Level Check in this section.
� Transmission fluid condition � Carry out Transmission Fluid Condition Check. Refer to Preliminary Inspection in this section.
Main Control
� Screws not tightened to specification
� Tighten to specification.
� Separator plate damaged � Inspect for damage. If damaged, install a new separator plate.
� Contamination � Disassemble and clean.
� Valve, springs damaged, misassembled, missing, stuck or bore damaged
� If damaged or parts are missing, install new main control assembly. If misassembled, reassemble correctly. DO NOT stone, file or sand valves. This will remove the anodized finish and may result in further main control or transmission damage.
� Filter damaged, missing � Inspect for damage. Repair as necessary.
Overdrive (O/D) Servo
� Servo retaining screws damaged
� Inspect for damage. Repair as necessary.
� Seals (piston and cover) damaged
� Inspect for damage. Repair as necessary.
O/D Band
� Band damaged � Inspect for damage. Repair as necessary.
� Servo worn or damaged � Inspect for damage. Repair as necessary.
� Not adjusted correctly � Inspect for damage. Repair as necessary.
Possible Component Reference/Action
212 — ROUTINE
Powertrain Control System
� PCM, vehicle wiring harnesses, Output Shaft Speed (OSS) sensor, Intake Air Temperature (IAT) sensor
� Carry out On-Board Diagnostic (OBD) tests. Refer to the Powertrain Control/Emissions Diagnosis (PC/ED) manual for diagnosis and testing of the PCM and IAT .
� GO to Pinpoint Test E .
� Repair as necessary. Clear the DTCs, road test the vehicle and rerun OBD test.
Transmission Fluid
� Incorrect transmission fluid level � Adjust the transmission fluid to the correct level. Refer to Transmission Fluid Level Check in this section.
� Transmission fluid condition � Carry out Transmission Fluid Condition Check. Refer to Preliminary Inspection in this section.
Main Control
� Screws not tightened to specification
� Tighten to specification.
� Separator plate damaged � Inspect for damage. If damaged, install a new separator plate.
� Contamination � Disassemble and clean.
� Valve, springs damaged, � If damaged or parts are missing, install new main control
Engagement Concern: Feel — Soft/Slipping (Some/All )
misassembled, missing, stuck or bore damaged
assembly. If misassembled, reassemble correctly. DO NOT stone, file or sand valves. This will remove the anodized finish and may result in further main control or transmission damage.
� Filter damaged, missing � Inspect for damage. Repair as necessary.
Overdrive (O/D) Servo
� Servo retaining screws damaged � Inspect for damage. Repair as necessary.
� Seals (piston and cover) damaged
� Inspect for damage. Repair as necessary.
Further Diagnosis
� For further diagnosis for timing issues, refer to Reference/Action
� Refer to the following routine(s) for specific diagnosis:
� No 1-2 Shift, Routine 220 � No 2-3 Shift, Routine 221 � No 3-4 Shift, Routine 222 � No 4-5 Shift, Routine 270 � No 5-4 Shift, Routine 271 � No 4-3 Shift, Routine 223 � No 3-2 Shift, Routine 224 � No 2-1 Shift, Routine 225 � Soft/Slip 1-2 Shift, Routine 226 � Soft/Slip 2-3 Shift, Routine 227 � Soft/Slip 3-4 Shift, Routine 228 � Soft/Slip 4-5 Shift, Routine 272 � Soft/Slip 5-4 Shift, Routine 273 � Soft/Slip 4-3 Shift, Routine 229 � Soft/Slip 3-2 Shift, Routine 230 � Soft/Slip 2-1 Shift, Routine 231 � Harsh 1-2 Shift, Routine 232 � Harsh 2-3 Shift, Routine 233 � Harsh 3-4 Shift, Routine 234 � Harsh 4-5 Shift, Routine 274 � Harsh 5-4 Shift, Routine 275 � Harsh 4-3 Shift, Routine 235 � Harsh 3-2 Shift, Routine 236 � Harsh 2-1 Shift, Routine 237
Possible Component Reference/Action
213 — ROUTINE
Powertrain Control System
� PCM, vehicle wiring harnesses, Shift Solenoid A (SSA), Shift Solenoid B (SSB), Shift Solenoid C (SSC), Pressure Control Solenoid A (PCA), Pressure Control Solenoid B (PCB), Pressure Control Solenoid C (PCC), intermediate shaft speed sensor, Transmission Fluid Temperature (TFT) sensor, Intake Air Temperature (IAT) sensor, Vehicle Speed Sensor (VSS) input
� Carry out On-Board Diagnostic (OBD) tests. Refer to the Powertrain Control/Emissions Diagnosis (PC/ED) manual for diagnosis and testing of the PCM, IAT and VSS .
� GO to Pinpoint Test A , GO to Pinpoint Test B , GO to Pinpoint Test D and GO to Pinpoint Test E .
� Repair as necessary. Clear the DTCs, road test the vehicle and rerun OBD test.
Some Shifts Soft/Slipping ONLY
� If only some of the shifts are soft/slipping,
determine which shift(s) is missing.
� Refer to the following routine(s) for further Soft/Slipping concerns:
� Soft/Slipping 1-2 Shift, Routine 226 � Soft/Slipping 2-3 Shift, Routine 227 � Soft/Slipping 3-4 Shift, Routine 228 � Soft/Slipping 4-5 Shift, Routine 272 � Soft/Slipping 5-4 Shift, Routine 273 � Soft/Slipping 4-3 Shift, Routine 229 � Soft/Slipping 3-2 Shift, Routine 230 � Soft/Slipping 2-1 Shift, Routine 231
Transmission Fluid
� Incorrect transmission fluid level � Adjust transmission fluid to the correct level. Refer to Transmission Fluid Level Check in this section.
� Transmission fluid condition � Carry out Transmission Fluid Condition Check. Refer to Preliminary Inspection in this section.
Incorrect Pressures
� High/low pressures � Carry out Line Pressure Test. Refer to Special Testing Procedures in this section.
Main Control
� Screws not tightened to specification � Tighten to specification.
� Separator plate damaged � Inspect for damage. If damaged, install a new separator plate.
� Contamination � Disassemble and clean.
� Valves, springs damaged, misassembled, missing, stuck or bore damaged
� If damaged or parts are missing, install new main control assembly. If misassembled, reassemble correctly. DO NOT stone, file or sand valves. This will remove the anodized finish and may result in further main control or transmission damage.
� Filter damaged, missing � Inspect for damage. Repair as necessary.
Torque Converter Assembly
� Torque converter internal failure preventing engagement, piston release
� Remove the transmission. Inspect for damage. Refer to Torque Converter Contamination Inspection in this section. If the torque converter fails to pass the criteria or is damaged, install a new or remanufactured torque converter.
Fluid Pump Assembly
� Screws not tightened to specification � Tighten screws to specification.
� Gasket damaged � Inspect for damage. If damaged, install a new gasket.
� Porosity, cross leaks, ball missing, plugged hole � Inspect for damage. If damaged, repair as necessary.
� Pump gears cracked and/or seized � Inspect for damage. Install a new pump.
� Flow control valves, springs, or seals damaged, stuck or not assembled correctly
� Inspect for damage. Install a new seal or flow control valve.
Coast Clutch Assembly
� Seals, piston damaged � Inspect for damage. Repair as necessary.
� Check ball damaged, missing, not seating, off � Inspect for mislocation, poor seating,
Shift Concern: Feel — Harsh (Some/All)
location damage. Install a new cylinder.
� Friction elements damaged or worn � Inspect for damage. Repair as necessary.
� Return springs damaged � Inspect for damage. Repair as necessary.
Center Support
� Screw not tightened to specification � Tighten to specification.
� Seal rings or bearings damaged � Inspect for damage. Repair as necessary.
� Outside diameter of case bore damage � Inspect for damage. Repair as necessary.
� Support damaged or leaking � Inspect for damage. Repair as necessary.
Intermediate Servo
� Servo retaining screws damaged � Inspect for damage. Repair as necessary.
� Seals (piston and cover) damaged � Inspect for damage. Repair as necessary.
Intermediate Band
� Band damaged � Inspect for damage. Repair as necessary.
� Servo worn or damaged � Inspect for damage. Repair as necessary.
� Not adjusted correctly � Inspect for damage. Repair as necessary.
Direct Clutch Assembly
� Seals, piston damaged � Inspect for damage. Repair as necessary.
� Check ball damaged, missing, not seating, off location
� Inspect for mislocation, poor seating, damage. Install a new cylinder.
� Friction elements damaged or worn � Inspect for damage. Repair as necessary.
� Return springs damaged � Inspect for damage. Repair as necessary.
Forward Clutch Assembly
� Seals, piston damaged � Inspect for damage. Repair as necessary.
� Check ball damaged, missing, not seating, off location
� Inspect for mislocation, poor seating, damage. Install a new cylinder.
� Friction elements damaged or worn � Inspect for damage. Repair as necessary.
� Return springs damaged � Inspect for damage. Repair as necessary.
� Bronze seal ring or bearing damaged � Inspect for damage. Repair as necessary.
Reverse Servo
� Servo retaining screws damaged � Inspect for damage. Repair as necessary.
� Seals (piston and cover) damaged � Inspect for damage. Repair as necessary.
Reverse Band
� Band damaged � Inspect for damage. Repair as necessary.
� Servo worn or damaged � Inspect for damage. Repair as necessary.
� Not adjusted correctly � Inspect for damage. Repair as necessary.
Case
� Damaged � Inspect for damage. Repair as necessary.
Possible Component Reference/Action
214— ROUTINE
Powertrain Control System
� PCM, vehicle wiring harnesses, Shift Solenoid A (SSA), Shift Solenoid B (SSB), Shift Solenoid C
� Carry out On-Board Diagnostic (OBD) tests. Refer to the Powertrain
(SSC), Pressure Control Solenoid A (PCA), Pressure Control Solenoid B (PCB), Pressure Control Solenoid C (PCC), intermediate shaft speed sensor, Transmission Range (TR) sensor, Transmission Fluid Temperature (TFT) sensor, Intake Air Temperature (IAT) sensor, Vehicle Speed Sensor (VSS) input
Control/Emissions Diagnosis (PC/ED) manual for diagnosis and testing of the PCM, IAT and VSS .
� GO to Pinpoint Test A , GO to Pinpoint Test B , GO to Pinpoint Test D and GO to Pinpoint Test E .
� Repair as necessary. Clear the DTCs, road test the vehicle and rerun OBD test.
Some Shifts Harsh ONLY
� If only some of the shifts are harsh, determine which shift(s) is missing.
� Refer to the following routine(s) for further No Shift concerns:
� Harsh 1-2 Shift, Routine 232 � Harsh 2-3 Shift, Routine 233 � Harsh 3-4 Shift, Routine 234 � Harsh 4-5 Shift, Routine 274 � Harsh 5-4 Shift, Routine 275 � Harsh 4-3 Shift, Routine 235 � Harsh 3-2 Shift, Routine 236 � Harsh 2-1 Shift, Routine 237
Transmission Fluid
� Incorrect transmission fluid level � Adjust transmission fluid to the correct level. Refer to Transmission Fluid Level Check in this section.
Incorrect Pressures
� High/low pressures � Carry out Line Pressure Test. Refer to Special Testing Procedures in this section.
Main Control
� Screws not tightened to specification � Tighten to specification.
� Separator plate damaged � Inspect for damage. If damaged, install a new separator plate.
� Contamination � Disassemble and clean.
� Valves, springs damaged, misassembled, missing, stuck, or bore damaged
� If damaged or parts are missing, install new main control assembly. If misassembled, reassemble correctly. DO NOT stone, file or sand valves. This will remove the anodized finish and may result in further main control or transmission damage.
� Filter damaged, missing � Inspect for damage. Repair as necessary.
Input Shaft
� Damaged � Inspect for damage. Install new as necessary.
Overdrive (O/D) Servo
� Servo retaining screws damaged � Inspect for damage. Repair as necessary.
� Seals (piston and cover) damaged � Inspect for damage. Repair as
necessary.
O/D Band
� Band damaged � Inspect for damage. Repair as necessary.
� Servo worn or damaged � Inspect for damage. Repair as necessary.
� Not adjusted correctly � Inspect for damage. Repair as necessary.
Center Shaft Assembly
� Center shaft assembly damaged � Inspect for damage. Repair as necessary.
� One-Way Clutch (OWC) damaged � Inspect for damage. Repair as necessary.
Center Support
� Screw not tightened to specification � Tighten to specification.
Intermediate Servo
� Servo retaining screws damaged � Inspect for damage. Repair as necessary.
� Seals (piston and cover) damaged � Inspect for damage. Repair as necessary.
Intermediate Band
� Band damaged � Inspect for damage. Repair as necessary.
� Servo worn or damaged � Inspect for damage. Repair as necessary.
� Not adjusted correctly � Inspect for damage. Repair as necessary.
Forward Clutch Assembly
� Seals, piston damaged � Inspect for damage. Repair as necessary.
� Check ball damaged, missing, not seating, off location
� Inspect for mislocation, poor seating, damage. Install a new cylinder.
� Friction elements damaged or worn � Inspect for damage. Repair as necessary.
� Return springs damaged � Inspect for damage. Repair as necessary.
� Bronze seal ring or bearing damaged � Inspect for damage. Repair as necessary.
Reverse Servo
� Servo retaining screws damaged � Inspect for damage. Repair as necessary.
� Seals (piston and cover) damaged � Inspect for damage. Repair as necessary.
Reverse Band
� Band damaged � Inspect for damage. Repair as necessary.
� Servo worn or damaged � Inspect for damage. Repair as necessary.
� Not adjusted correctly � Inspect for damage. Repair as necessary.
Output Shaft
� Damaged � Inspect for damage. Install new as
Shift Concern: No 1st and 2nd Gear in Drive, Engag es in a Higher Gear
Engagement Concern: No 1st Gear in Manual 1 Positi on
necessary.
Case
� Damaged � Inspect for damage. Repair as necessary.
Possible Component Reference/Action
215 — ROUTINE
Powertrain Control System
� PCM, vehicle wiring harnesses, Shift Solenoid A (SSA), Shift Solenoid B (SSB), Shift Solenoid C (SSC), Transmission Range (TR) sensor
� Carry out On-Board Diagnostic (OBD) tests. Refer to the Powertrain Control/Emissions Diagnosis (PC/ED) manual for diagnosis and testing of the PCM.
� GO to Pinpoint Test A and GO to Pinpoint Test C .
� Repair as necessary. Clear the DTCs, road test the vehicle and rerun OBD test.
Incorrect Pressures
� High/low pressures � Carry out Line Pressure Test. Refer to Special Testing Procedures in this section.
Main Control
� Screws not tightened to specification � Tighten to specification.
� Separator plate damaged � Inspect for damage. If damaged, install a new separator plate.
� Contamination � Disassemble and clean.
� Valves/springs damaged, misassembled, missing, stuck or bore damaged
� If damaged or parts are missing, install new main control assembly. If misassembled, reassemble correctly. DO NOT stone, file or sand valves. This will remove the anodized finish and may result in further main control or transmission damage.
� Filter damaged, missing � Inspect for damage. Repair as necessary.
Overdrive (O/D) Servo
� Servo retaining screws damaged � Inspect for damage. Repair as necessary.
� Seals (piston and cover) damaged � Inspect for damage. Repair as necessary.
Direct One-Way Clutch (OWC)
� Worn, damaged or assembled incorrectly
� Inspect for damage. Repair as necessary.
Low OWC
� Worn, damaged or assembled incorrectly
� Inspect for damage. Repair as necessary.
Possible Component Reference/Action
216 — ROUTINE
Powertrain Control System
� PCM, vehicle wiring harnesses, Shift Solenoid A (SSA), Shift Solenoid B (SSB), Pressure Control Solenoid B
� Carry out On-Board Diagnostic (OBD) tests. Refer to the Powertrain Control/Emissions Diagnosis (PC/ED) manual for diagnosis and testing of the PCM.
Shift Concern: No 2nd Gear in Manual 2 Position
(PCB), Pressure Control Solenoid C (PCC)
� GO to Pinpoint Test A and GO to Pinpoint Test D .
� Repair as necessary. Clear the DTCs, road test the vehicle and rerun OBD test.
Incorrect Pressures
� High/low pressures � Carry out Line Pressure Test. Refer to Special Testing Procedures in this section.
Main Control
� Screws not tightened to specification � Tighten to specification.
� Separator plate damaged � Inspect for damage. If damaged, install a new separator plate.
� Contamination � Disassemble and clean.
� Valves, springs damaged, misassembled, missing, stuck or bore damaged
� If damaged or parts are missing, install new main control assembly. If misassembled, reassemble correctly. DO NOT stone, file or sand valves. This will remove the anodized finish and may result in further main control or transmission damage.
� Filter damaged, missing � Inspect for damage. Repair as necessary.
Overdrive (O/D) Planetary Assembly
� Planetary damaged � Inspect for damage. Repair as necessary.
Direct One-Way Clutch (OWC)
� Worn, damaged or assembled incorrectly
� Inspect for damage. Repair as necessary.
Low OWC
� Worn, damaged or assembled incorrectly
� Inspect for damage. Repair as necessary.
Possible Component Reference/Action
217 — ROUTINE
Powertrain Control System
� PCM, vehicle wiring harnesses, Shift Solenoid A (SSA), Shift Solenoid B (SSB), Shift Solenoid C (SSC), Pressure Control Solenoid B (PCB)
� Carry out On-Board Diagnostic (OBD) tests. For additional information, refer to the Powertrain Control/Emissions Diagnosis (PC/ED) manual for diagnosis and testing of the PCM.
� GO to Pinpoint Test A and GO to Pinpoint Test D .
� Repair as necessary. Clear the DTCs, road test the vehicle and rerun OBD test.
Incorrect Pressures
� High/low pressures � Carry out Line Pressure Test. Refer to Special Testing Procedures in this section.
Main Control
� Screws not tightened to specification � Tighten to specification.
� Separator plate damaged � Inspect for damage. If damaged, install a new separator plate.
� Contamination � Disassemble and clean.
� Valves, springs damaged, misassembled, missing, stuck or
� If damaged or parts are missing, install a new main control assembly. If misassembled, reassemble correctly.
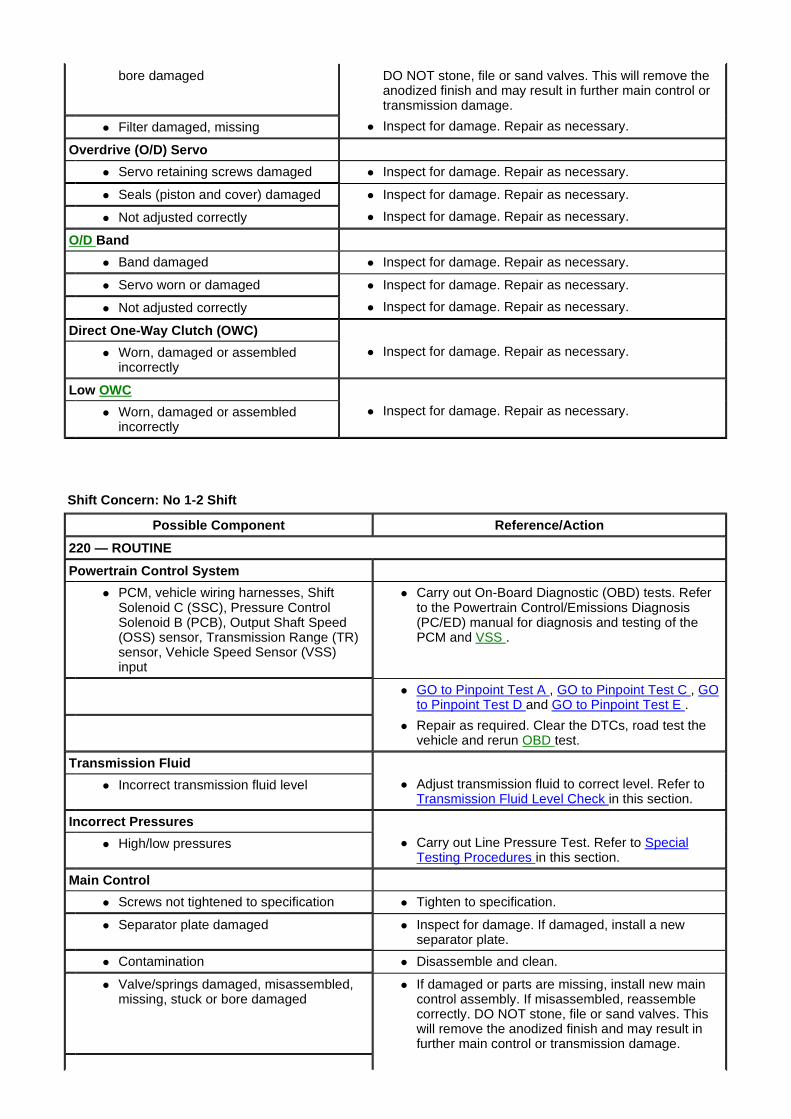
Shift Concern: No 1-2 Shift
bore damaged DO NOT stone, file or sand valves. This will remove the anodized finish and may result in further main control or transmission damage.
� Filter damaged, missing � Inspect for damage. Repair as necessary.
Overdrive (O/D) Servo
� Servo retaining screws damaged � Inspect for damage. Repair as necessary.
� Seals (piston and cover) damaged � Inspect for damage. Repair as necessary.
� Not adjusted correctly � Inspect for damage. Repair as necessary.
O/D Band
� Band damaged � Inspect for damage. Repair as necessary.
� Servo worn or damaged � Inspect for damage. Repair as necessary.
� Not adjusted correctly � Inspect for damage. Repair as necessary.
Direct One-Way Clutch (OWC)
� Worn, damaged or assembled incorrectly
� Inspect for damage. Repair as necessary.
Low OWC
� Worn, damaged or assembled incorrectly
� Inspect for damage. Repair as necessary.
Possible Component Reference/Action
220 — ROUTINE
Powertrain Control System
� PCM, vehicle wiring harnesses, Shift Solenoid C (SSC), Pressure Control Solenoid B (PCB), Output Shaft Speed (OSS) sensor, Transmission Range (TR) sensor, Vehicle Speed Sensor (VSS) input
� Carry out On-Board Diagnostic (OBD) tests. Refer to the Powertrain Control/Emissions Diagnosis (PC/ED) manual for diagnosis and testing of the PCM and VSS .
� GO to Pinpoint Test A , GO to Pinpoint Test C , GO to Pinpoint Test D and GO to Pinpoint Test E .
� Repair as required. Clear the DTCs, road test the vehicle and rerun OBD test.
Transmission Fluid
� Incorrect transmission fluid level � Adjust transmission fluid to correct level. Refer to Transmission Fluid Level Check in this section.
Incorrect Pressures
� High/low pressures � Carry out Line Pressure Test. Refer to Special Testing Procedures in this section.
Main Control
� Screws not tightened to specification � Tighten to specification.
� Separator plate damaged � Inspect for damage. If damaged, install a new separator plate.
� Contamination � Disassemble and clean.
� Valve/springs damaged, misassembled, missing, stuck or bore damaged
� If damaged or parts are missing, install new main control assembly. If misassembled, reassemble correctly. DO NOT stone, file or sand valves. This will remove the anodized finish and may result in further main control or transmission damage.
Shift Concern: No 2-3 Shift
� Filter damaged, missing � Inspect for damage. Repair as necessary.
Overdrive (O/D) Servo
� Servo retaining screws damaged � Inspect for damage. Repair as necessary.
� Seals (piston and cover) damaged � Inspect for damage. Repair as necessary.
O/D Band
� Band damaged � Inspect for damage. Repair as necessary.
� Servo worn or damaged � Inspect for damage. Repair as necessary.
� Not adjusted correctly � Inspect for damage. Repair as necessary.
O/D Planetary Assembly
� Planetary damaged � Inspect for damage. Repair as necessary.
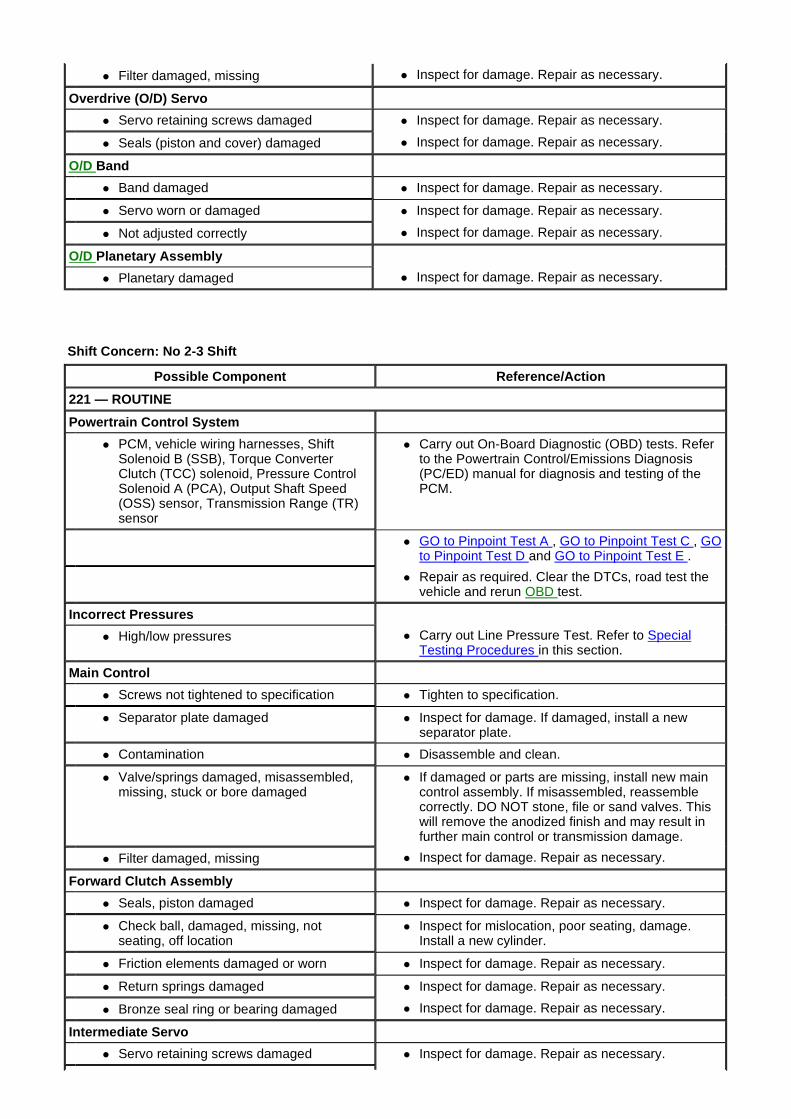
Possible Component Reference/Action
221 — ROUTINE
Powertrain Control System
� PCM, vehicle wiring harnesses, Shift Solenoid B (SSB), Torque Converter Clutch (TCC) solenoid, Pressure Control Solenoid A (PCA), Output Shaft Speed (OSS) sensor, Transmission Range (TR) sensor
� Carry out On-Board Diagnostic (OBD) tests. Refer to the Powertrain Control/Emissions Diagnosis (PC/ED) manual for diagnosis and testing of the PCM.
� GO to Pinpoint Test A , GO to Pinpoint Test C , GO to Pinpoint Test D and GO to Pinpoint Test E .
� Repair as required. Clear the DTCs, road test the vehicle and rerun OBD test.
Incorrect Pressures
� High/low pressures � Carry out Line Pressure Test. Refer to Special Testing Procedures in this section.
Main Control
� Screws not tightened to specification � Tighten to specification.
� Separator plate damaged � Inspect for damage. If damaged, install a new separator plate.
� Contamination � Disassemble and clean.
� Valve/springs damaged, misassembled, missing, stuck or bore damaged
� If damaged or parts are missing, install new main control assembly. If misassembled, reassemble correctly. DO NOT stone, file or sand valves. This will remove the anodized finish and may result in further main control or transmission damage.
� Filter damaged, missing � Inspect for damage. Repair as necessary.
Forward Clutch Assembly
� Seals, piston damaged � Inspect for damage. Repair as necessary.
� Check ball, damaged, missing, not seating, off location
� Inspect for mislocation, poor seating, damage. Install a new cylinder.
� Friction elements damaged or worn � Inspect for damage. Repair as necessary.
� Return springs damaged � Inspect for damage. Repair as necessary.
� Bronze seal ring or bearing damaged � Inspect for damage. Repair as necessary.
Intermediate Servo
� Servo retaining screws damaged � Inspect for damage. Repair as necessary.

Shift Concern: No 3-4 Shift
� Seals (piston and cover) damaged � Inspect for mislocation, poor seating, damage. Install a new cylinder.
Intermediate Band
� Band damaged � Inspect for damage. Repair as necessary.
� Servo worn or damaged � Inspect for damage. Repair as necessary.
� Not adjusted correctly � Inspect for damage. Repair as necessary.
Possible Component Reference/Action
222 — ROUTINE
Powertrain Control System
� PCM, vehicle wiring harnesses, Shift Solenoid A (SSA), Pressure Control Solenoid C (PCC), Output Shaft Speed (OSS) sensor, Transmission Range (TR) sensor
� Carry out On-Board Diagnostic (OBD) tests. Refer to the Powertrain Control/Emissions Diagnosis (PC/ED) manual for diagnosis and testing of the PCM.
� GO to Pinpoint Test A , GO to Pinpoint Test C , GO to Pinpoint Test D and GO to Pinpoint Test E .
� Repair as required. Clear the DTCs, road test the vehicle and rerun OBD test.
Incorrect Pressures
� High/low pressures � Carry out Line Pressure Test. Refer to Special Testing Procedures in this section.
Main Control
� Screws not tightened to specification � Tighten to specification.
� Separator plate damaged � Inspect for damage. If damaged, install a new separator plate.
� Contamination � Disassemble and clean.
� Valve/springs damaged, misassembled, missing, stuck or bore damaged
� If damaged or parts are missing, install new main control assembly. If misassembled, reassemble correctly. DO NOT stone, file or sand valves. This will remove the anodized finish and may result in further main control or transmission damage.
� Filter damaged, missing � Inspect for damage. Repair as necessary.
Center Support
� Screws not tightened to specification � Tighten to specification.
� Seal rings or bearing damaged � Inspect for damage. Repair as necessary.
� Outside diameter of case bore damaged
� Inspect for damage. Repair as necessary.
� Support damaged or leaking � Inspect for damage. Repair as necessary.
Direct Clutch Assembly
� Seals, piston damaged � Inspect for damage. Repair as necessary.
� Check ball damaged, missing, not seating, off location
� Inspect for mislocation, poor seating, damage. Install a new cylinder.
� Friction elements damaged or worn � Inspect for damage. Repair as necessary.
� Return springs damaged � Inspect for damage. Repair as necessary.
Forward Clutch Assembly
� Seals, piston damaged � Inspect for damage. Repair as necessary.
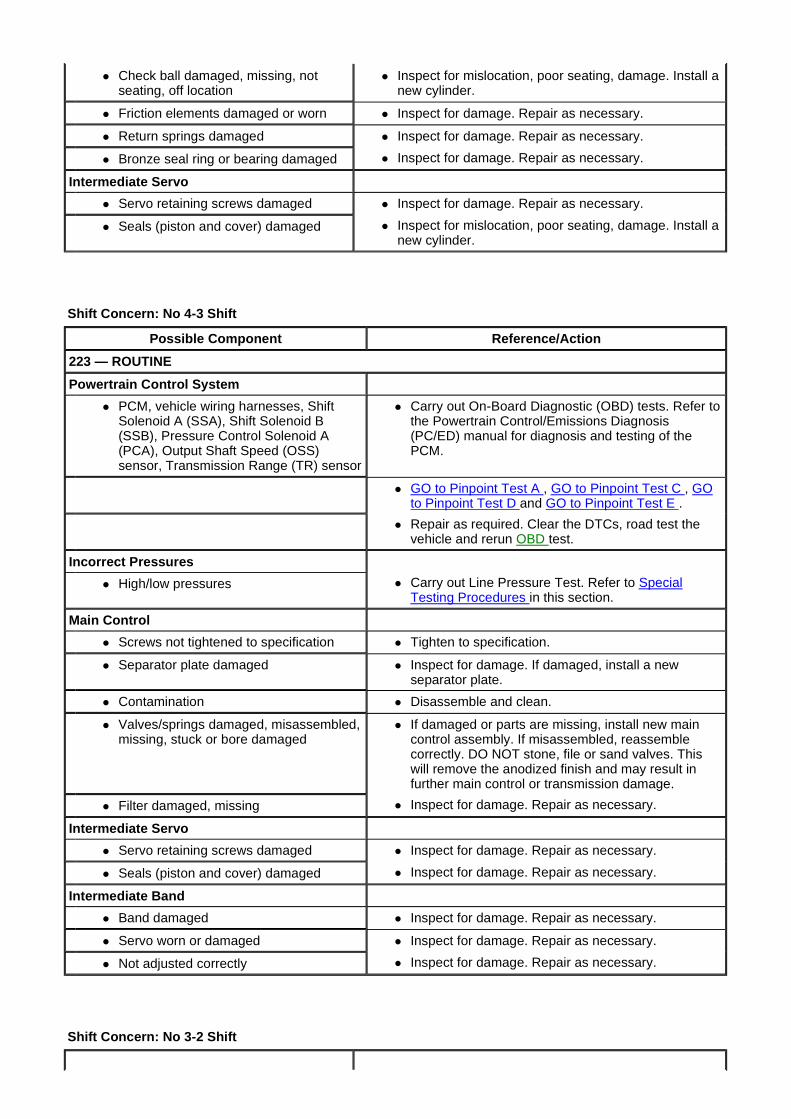
Shift Concern: No 4-3 Shift
Shift Concern: No 3-2 Shift
� Check ball damaged, missing, not seating, off location
� Inspect for mislocation, poor seating, damage. Install a new cylinder.
� Friction elements damaged or worn � Inspect for damage. Repair as necessary.
� Return springs damaged � Inspect for damage. Repair as necessary.
� Bronze seal ring or bearing damaged � Inspect for damage. Repair as necessary.
Intermediate Servo
� Servo retaining screws damaged � Inspect for damage. Repair as necessary.
� Seals (piston and cover) damaged � Inspect for mislocation, poor seating, damage. Install a new cylinder.
Possible Component Reference/Action
223 — ROUTINE
Powertrain Control System
� PCM, vehicle wiring harnesses, Shift Solenoid A (SSA), Shift Solenoid B (SSB), Pressure Control Solenoid A (PCA), Output Shaft Speed (OSS) sensor, Transmission Range (TR) sensor
� Carry out On-Board Diagnostic (OBD) tests. Refer to the Powertrain Control/Emissions Diagnosis (PC/ED) manual for diagnosis and testing of the PCM.
� GO to Pinpoint Test A , GO to Pinpoint Test C , GO to Pinpoint Test D and GO to Pinpoint Test E .
� Repair as required. Clear the DTCs, road test the vehicle and rerun OBD test.
Incorrect Pressures
� High/low pressures � Carry out Line Pressure Test. Refer to Special Testing Procedures in this section.
Main Control
� Screws not tightened to specification � Tighten to specification.
� Separator plate damaged � Inspect for damage. If damaged, install a new separator plate.
� Contamination � Disassemble and clean.
� Valves/springs damaged, misassembled, missing, stuck or bore damaged
� If damaged or parts are missing, install new main control assembly. If misassembled, reassemble correctly. DO NOT stone, file or sand valves. This will remove the anodized finish and may result in further main control or transmission damage.
� Filter damaged, missing � Inspect for damage. Repair as necessary.
Intermediate Servo
� Servo retaining screws damaged � Inspect for damage. Repair as necessary.
� Seals (piston and cover) damaged � Inspect for damage. Repair as necessary.
Intermediate Band
� Band damaged � Inspect for damage. Repair as necessary.
� Servo worn or damaged � Inspect for damage. Repair as necessary.
� Not adjusted correctly � Inspect for damage. Repair as necessary.
Shift Concern: No 2-1 Shift
Possible Component Reference/Action
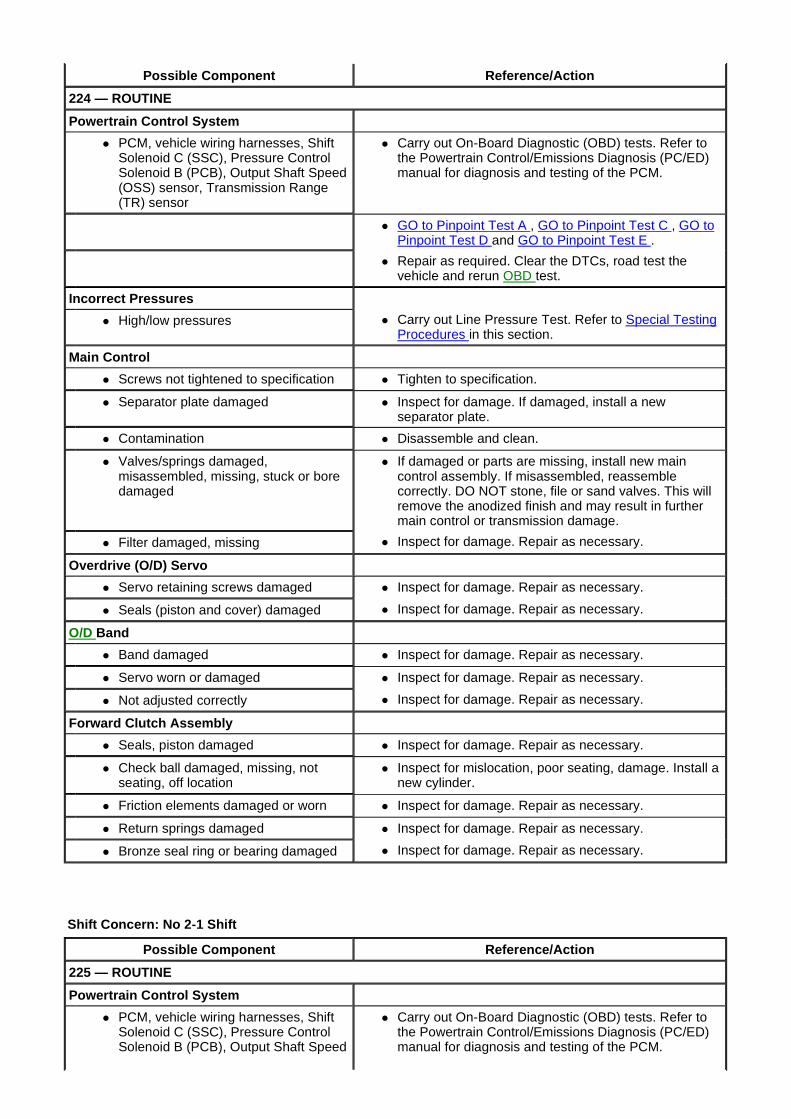
224 — ROUTINE
Powertrain Control System
� PCM, vehicle wiring harnesses, Shift Solenoid C (SSC), Pressure Control Solenoid B (PCB), Output Shaft Speed (OSS) sensor, Transmission Range (TR) sensor
� Carry out On-Board Diagnostic (OBD) tests. Refer to the Powertrain Control/Emissions Diagnosis (PC/ED) manual for diagnosis and testing of the PCM.
� GO to Pinpoint Test A , GO to Pinpoint Test C , GO to Pinpoint Test D and GO to Pinpoint Test E .
� Repair as required. Clear the DTCs, road test the vehicle and rerun OBD test.
Incorrect Pressures
� High/low pressures � Carry out Line Pressure Test. Refer to Special Testing Procedures in this section.
Main Control
� Screws not tightened to specification � Tighten to specification.
� Separator plate damaged � Inspect for damage. If damaged, install a new separator plate.
� Contamination � Disassemble and clean.
� Valves/springs damaged, misassembled, missing, stuck or bore damaged
� If damaged or parts are missing, install new main control assembly. If misassembled, reassemble correctly. DO NOT stone, file or sand valves. This will remove the anodized finish and may result in further main control or transmission damage.
� Filter damaged, missing � Inspect for damage. Repair as necessary.
Overdrive (O/D) Servo
� Servo retaining screws damaged � Inspect for damage. Repair as necessary.
� Seals (piston and cover) damaged � Inspect for damage. Repair as necessary.
O/D Band
� Band damaged � Inspect for damage. Repair as necessary.
� Servo worn or damaged � Inspect for damage. Repair as necessary.
� Not adjusted correctly � Inspect for damage. Repair as necessary.
Forward Clutch Assembly
� Seals, piston damaged � Inspect for damage. Repair as necessary.
� Check ball damaged, missing, not seating, off location
� Inspect for mislocation, poor seating, damage. Install a new cylinder.
� Friction elements damaged or worn � Inspect for damage. Repair as necessary.
� Return springs damaged � Inspect for damage. Repair as necessary.
� Bronze seal ring or bearing damaged � Inspect for damage. Repair as necessary.
Possible Component Reference/Action
225 — ROUTINE
Powertrain Control System
� PCM, vehicle wiring harnesses, Shift Solenoid C (SSC), Pressure Control Solenoid B (PCB), Output Shaft Speed
� Carry out On-Board Diagnostic (OBD) tests. Refer to the Powertrain Control/Emissions Diagnosis (PC/ED) manual for diagnosis and testing of the PCM.
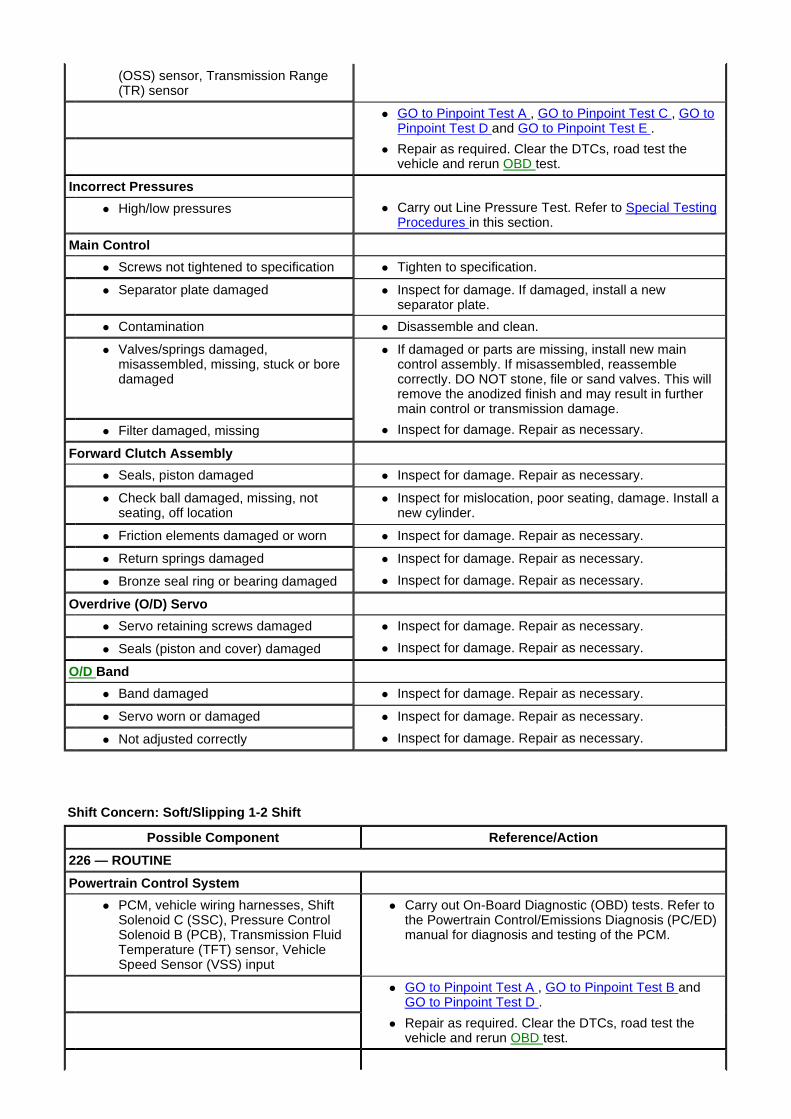
Shift Concern: Soft/Slipping 1-2 Shift
(OSS) sensor, Transmission Range (TR) sensor
� GO to Pinpoint Test A , GO to Pinpoint Test C , GO to Pinpoint Test D and GO to Pinpoint Test E .
� Repair as required. Clear the DTCs, road test the vehicle and rerun OBD test.
Incorrect Pressures
� High/low pressures � Carry out Line Pressure Test. Refer to Special Testing Procedures in this section.
Main Control
� Screws not tightened to specification � Tighten to specification.
� Separator plate damaged � Inspect for damage. If damaged, install a new separator plate.
� Contamination � Disassemble and clean.
� Valves/springs damaged, misassembled, missing, stuck or bore damaged
� If damaged or parts are missing, install new main control assembly. If misassembled, reassemble correctly. DO NOT stone, file or sand valves. This will remove the anodized finish and may result in further main control or transmission damage.
� Filter damaged, missing � Inspect for damage. Repair as necessary.
Forward Clutch Assembly
� Seals, piston damaged � Inspect for damage. Repair as necessary.
� Check ball damaged, missing, not seating, off location
� Inspect for mislocation, poor seating, damage. Install a new cylinder.
� Friction elements damaged or worn � Inspect for damage. Repair as necessary.
� Return springs damaged � Inspect for damage. Repair as necessary.
� Bronze seal ring or bearing damaged � Inspect for damage. Repair as necessary.
Overdrive (O/D) Servo
� Servo retaining screws damaged � Inspect for damage. Repair as necessary.
� Seals (piston and cover) damaged � Inspect for damage. Repair as necessary.
O/D Band
� Band damaged � Inspect for damage. Repair as necessary.
� Servo worn or damaged � Inspect for damage. Repair as necessary.
� Not adjusted correctly � Inspect for damage. Repair as necessary.
Possible Component Reference/Action
226 — ROUTINE
Powertrain Control System
� PCM, vehicle wiring harnesses, Shift Solenoid C (SSC), Pressure Control Solenoid B (PCB), Transmission Fluid Temperature (TFT) sensor, Vehicle Speed Sensor (VSS) input
� Carry out On-Board Diagnostic (OBD) tests. Refer to the Powertrain Control/Emissions Diagnosis (PC/ED) manual for diagnosis and testing of the PCM.
� GO to Pinpoint Test A , GO to Pinpoint Test B and GO to Pinpoint Test D .
� Repair as required. Clear the DTCs, road test the vehicle and rerun OBD test.
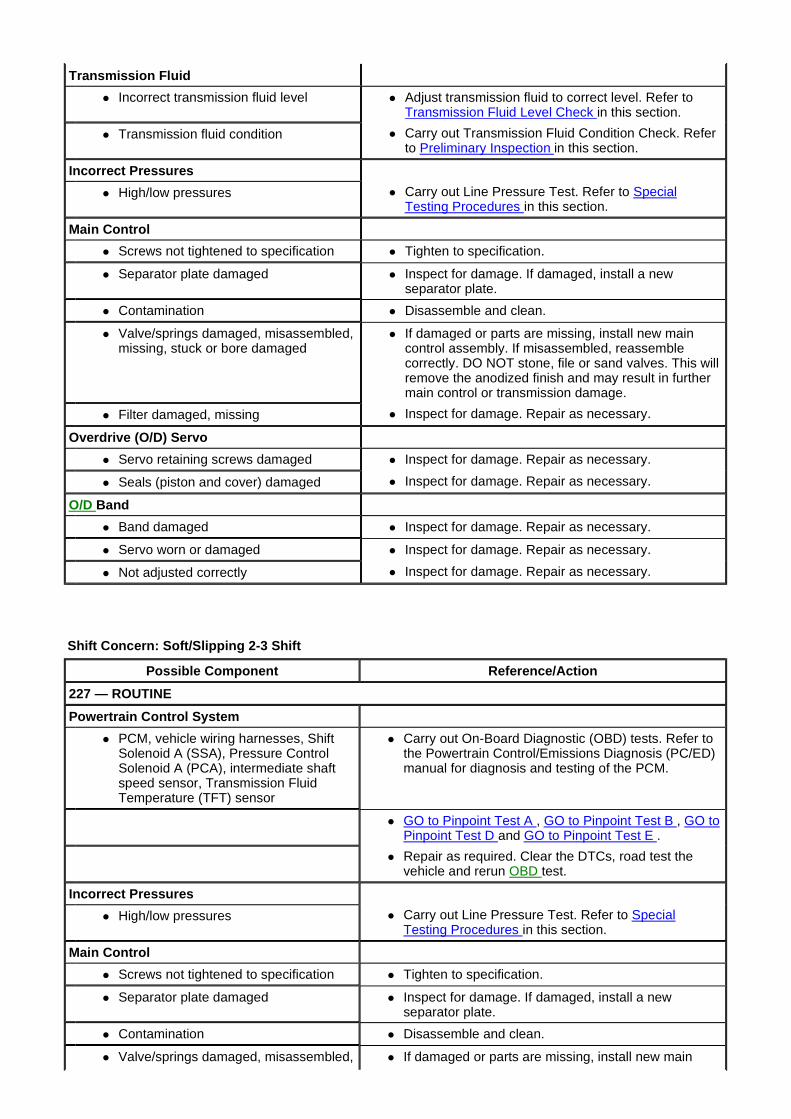
Shift Concern: Soft/Slipping 2-3 Shift
Transmission Fluid
� Incorrect transmission fluid level � Adjust transmission fluid to correct level. Refer to Transmission Fluid Level Check in this section.
� Transmission fluid condition � Carry out Transmission Fluid Condition Check. Refer to Preliminary Inspection in this section.
Incorrect Pressures
� High/low pressures � Carry out Line Pressure Test. Refer to Special Testing Procedures in this section.
Main Control
� Screws not tightened to specification � Tighten to specification.
� Separator plate damaged � Inspect for damage. If damaged, install a new separator plate.
� Contamination � Disassemble and clean.
� Valve/springs damaged, misassembled, missing, stuck or bore damaged
� If damaged or parts are missing, install new main control assembly. If misassembled, reassemble correctly. DO NOT stone, file or sand valves. This will remove the anodized finish and may result in further main control or transmission damage.
� Filter damaged, missing � Inspect for damage. Repair as necessary.
Overdrive (O/D) Servo
� Servo retaining screws damaged � Inspect for damage. Repair as necessary.
� Seals (piston and cover) damaged � Inspect for damage. Repair as necessary.
O/D Band
� Band damaged � Inspect for damage. Repair as necessary.
� Servo worn or damaged � Inspect for damage. Repair as necessary.
� Not adjusted correctly � Inspect for damage. Repair as necessary.
Possible Component Reference/Action
227 — ROUTINE
Powertrain Control System
� PCM, vehicle wiring harnesses, Shift Solenoid A (SSA), Pressure Control Solenoid A (PCA), intermediate shaft speed sensor, Transmission Fluid Temperature (TFT) sensor
� Carry out On-Board Diagnostic (OBD) tests. Refer to the Powertrain Control/Emissions Diagnosis (PC/ED) manual for diagnosis and testing of the PCM.
� GO to Pinpoint Test A , GO to Pinpoint Test B , GO to Pinpoint Test D and GO to Pinpoint Test E .
� Repair as required. Clear the DTCs, road test the vehicle and rerun OBD test.
Incorrect Pressures
� High/low pressures � Carry out Line Pressure Test. Refer to Special Testing Procedures in this section.
Main Control
� Screws not tightened to specification � Tighten to specification.
� Separator plate damaged � Inspect for damage. If damaged, install a new separator plate.
� Contamination � Disassemble and clean.
� Valve/springs damaged, misassembled, � If damaged or parts are missing, install new main
Shift Concern: Soft/Slipping 3-4 Shift
missing, stuck or bore damaged control assembly. If misassembled, reassemble correctly. DO NOT stone, file or sand valves. This will remove the anodized finish and may result in further main control or transmission damage.
� Filter damaged, missing � Inspect for damage. Repair as necessary.
Intermediate Servo
� Servo retaining screws damaged � Inspect for damage. Repair as necessary.
� Seals (piston and cover) damaged � Inspect for mislocation, poor seating, damage. Install a new cylinder.
Intermediate Band
� Band damaged � Inspect for damage. Repair as necessary.
� Servo worn or damaged � Inspect for damage. Repair as necessary.
� Not adjusted correctly � Inspect for damage. Repair as necessary.
Direct One-Way Clutch (OWC)
� Worn, damaged or assembled incorrectly
� Inspect for damage. Repair as necessary.
Possible Component Reference/Action
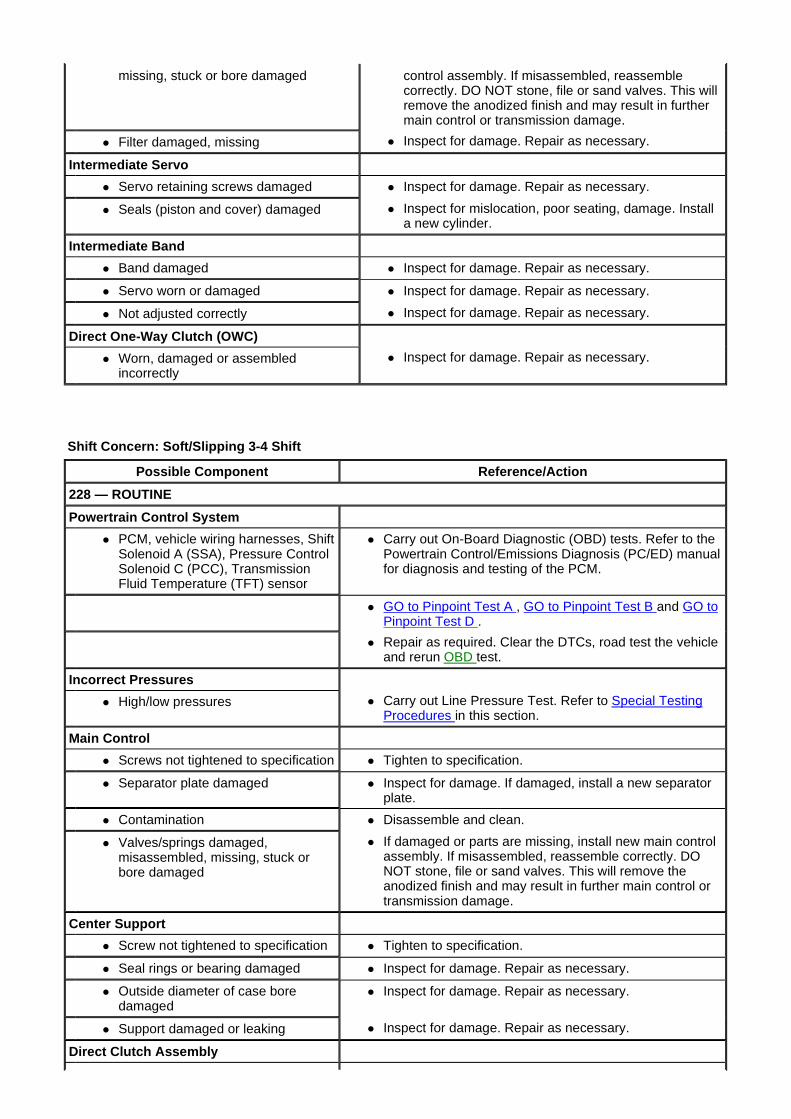
228 — ROUTINE
Powertrain Control System
� PCM, vehicle wiring harnesses, Shift Solenoid A (SSA), Pressure Control Solenoid C (PCC), Transmission Fluid Temperature (TFT) sensor
� Carry out On-Board Diagnostic (OBD) tests. Refer to the Powertrain Control/Emissions Diagnosis (PC/ED) manual for diagnosis and testing of the PCM.
� GO to Pinpoint Test A , GO to Pinpoint Test B and GO to Pinpoint Test D .
� Repair as required. Clear the DTCs, road test the vehicle and rerun OBD test.
Incorrect Pressures
� High/low pressures � Carry out Line Pressure Test. Refer to Special Testing Procedures in this section.
Main Control
� Screws not tightened to specification � Tighten to specification.
� Separator plate damaged � Inspect for damage. If damaged, install a new separator plate.
� Contamination � Disassemble and clean.
� Valves/springs damaged, misassembled, missing, stuck or bore damaged
� If damaged or parts are missing, install new main control assembly. If misassembled, reassemble correctly. DO NOT stone, file or sand valves. This will remove the anodized finish and may result in further main control or transmission damage.
Center Support
� Screw not tightened to specification � Tighten to specification.
� Seal rings or bearing damaged � Inspect for damage. Repair as necessary.
� Outside diameter of case bore damaged
� Inspect for damage. Repair as necessary.
� Support damaged or leaking � Inspect for damage. Repair as necessary.
Direct Clutch Assembly
Shift Concern: Feel — Soft/Slipping 4-3 Shift
Shift Concern: Soft/Slipping 3-2 Shift
� Seals, piston damaged � Inspect for damage. Repair as necessary.
� Check ball damaged, missing, not seating, off location
� Inspect for mislocation, poor seating, damage. Install a new cylinder.
� Friction elements damaged or worn � Inspect for damage. Repair as necessary.
� Return springs damaged � Inspect for damage. Repair as necessary.
Intermediate Servo
� Servo retaining screws damaged � Inspect for damage. Repair as necessary.
� Seals (piston and cover) damaged � Inspect for damage. Repair as necessary.
Possible Component Reference/Action
229 — ROUTINE
Powertrain Control System
� PCM, vehicle wiring harnesses, Shift Solenoid A (SSA), Pressure Control Solenoid A (PCA), Transmission Fluid Temperature (TFT) sensor
� Carry out On-Board Diagnostic (OBD) tests. Refer to the Powertrain Control/Emissions Diagnosis (PC/ED) manual for diagnosis and testing of the PCM.
� GO to Pinpoint Test A , GO to Pinpoint Test B and GO to Pinpoint Test D .
� Repair as required. Clear the DTCs, road test the vehicle and rerun OBD test.
Incorrect Pressures
� High/low pressures � Carry out Line Pressure Test. Refer to Special Testing Procedures in this section.
Main Control
� Screws not tightened to specification � Tighten to specification.
� Separator plate damaged � Inspect for damage. If damaged, install a new separator plate.
� Contamination � Disassemble and clean.
� Valves/springs damaged, misassembled, missing, stuck or bore damaged
� If damaged or parts are missing, install new main control assembly. If misassembled, reassemble correctly. DO NOT stone, file or sand valves. This will remove the anodized finish and may result in further main control or transmission damage.
� Filter damaged, missing � Inspect for damage. Repair as necessary.
Intermediate Servo
� Servo retaining screws damaged � Inspect for damage. Repair as necessary.
� Seals (piston and cover) damaged � Inspect for damage. Repair as necessary.
Intermediate Band
� Band damaged � Inspect for damage. Repair as necessary.
� Servo worn or damaged � Inspect for damage. Repair as necessary.
� Not adjusted correctly � Inspect for damage. Repair as necessary.
Possible Component Reference/Action
230 — ROUTINE
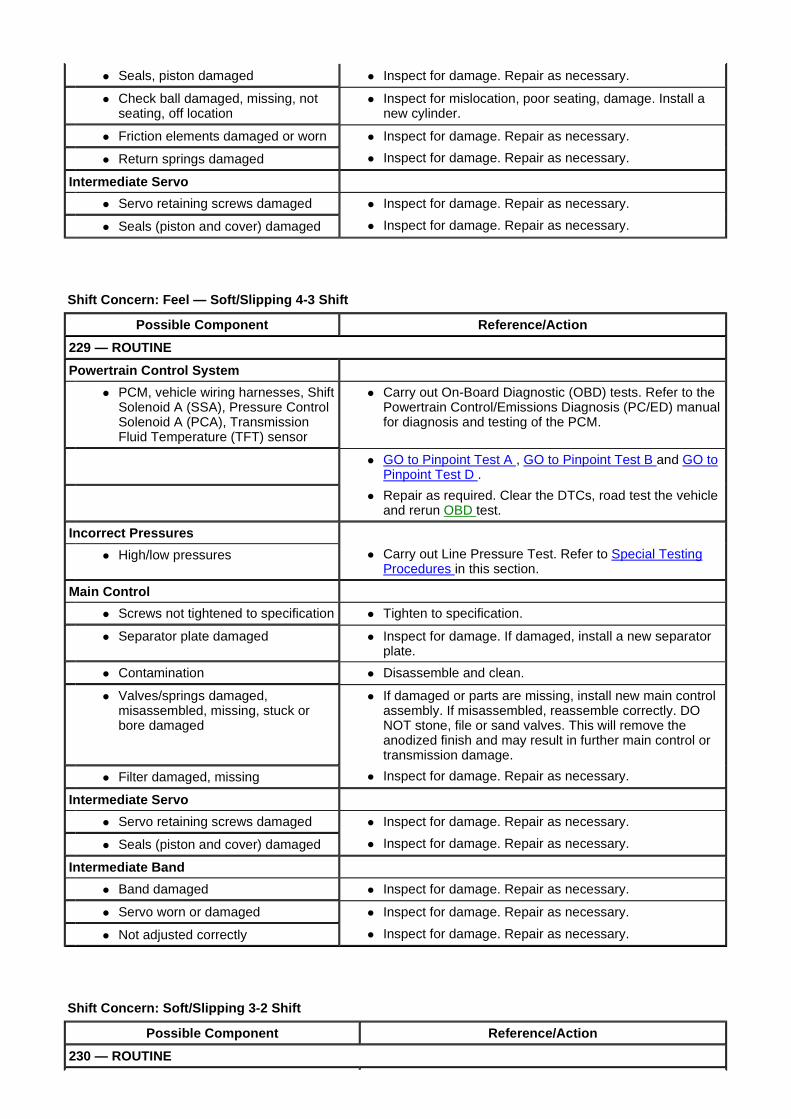
Shift Concern: Feel — Soft/Slipping 2-1 Shift
Powertrain Control System
� PCM, vehicle wiring harnesses, Shift Solenoid C (SSC), Pressure Control Solenoid B (PCB), intermediate shaft speed sensor, Transmission Fluid Temperature (TFT) sensor
� Carry out On-Board Diagnostic (OBD) tests. Refer to the Powertrain Control/Emissions Diagnosis (PC/ED) manual for diagnosis and testing of the PCM.
� GO to Pinpoint Test A , GO to Pinpoint Test B , GO to Pinpoint Test D and GO to Pinpoint Test E .
� Repair as required. Clear the DTCs, road test the vehicle and rerun OBD test.
Incorrect Pressures
� High/low pressures � Carry out Line Pressure Test. Refer to Special Testing Procedures in this section.
Main Control
� Screws not tightened to specification � Tighten to specification.
� Separator plate damaged � Inspect for damage. If damaged, install a new separator plate.
� Contamination � Disassemble and clean.
� Valves/springs damaged, misassembled, missing, stuck or bore damaged
� If damaged or parts are missing, install new main control assembly. If misassembled, reassemble correctly. DO NOT stone, file or sand valves. This will remove the anodized finish and may result in further main control or transmission damage.
� Filter damaged, missing � Inspect for damage. Repair as necessary.
Overdrive (O/D) Servo
� Servo retaining screws damaged � Inspect for damage. Repair as necessary.
� Seals (piston and cover) damaged � Inspect for damage. Repair as necessary.
O/D Band
� Band damaged � Inspect for damage. Repair as necessary.
� Servo worn or damaged � Inspect for damage. Repair as necessary.
� Not adjusted correctly � Inspect for damage. Repair as necessary.
Direct One-Way Clutch (OWC)
� Worn, damaged or assembled incorrectly
� Inspect for damage. Repair as necessary.
Possible Component Reference/Action
231 — ROUTINE
Powertrain Control System
� PCM, vehicle wiring harnesses, Shift Solenoid C (SSC), Pressure Control Solenoid B (PCB), Transmission Fluid Temperature (TFT) sensor
� Carry out On-Board Diagnostic (OBD) tests. Refer to the Powertrain Control/Emissions Diagnosis (PC/ED) manual for diagnosis and testing of the PCM.
� GO to Pinpoint Test A , GO to Pinpoint Test B and GO to Pinpoint Test D .
� Repair as required. Clear the DTCs, road test the vehicle and rerun OBD test.
Incorrect Pressures
� High/low pressures � Carry out Line Pressure Test. Refer to Special Testing Procedures in this section.
Shift Concern: Harsh 1-2 Shift
Main Control
� Screws not tightened to specification � Tighten to specification.
� Separator plate damaged � Inspect for damage. If damaged, install a new separator plate.
� Contamination � Disassemble and clean.
� Valves/springs damaged, misassembled, missing, stuck or bore damaged
� If damaged or parts are missing, install new main control assembly. If misassembled, reassemble correctly. DO NOT stone, file or sand valves. This will remove the anodized finish and may result in further main control or transmission damage.
� Filter damaged, missing � Inspect for damage. Repair as necessary.
Possible Component Reference/Action
232 — ROUTINE
Powertrain Control System
� PCM, vehicle wiring harnesses, Shift Solenoid C (SSC), Pressure Control Solenoid B (PCB), Turbine Shaft Speed (TSS) sensor, Transmission Range (TR) sensor, Transmission Fluid Temperature (TFT) sensor
� Carry out On-Board Diagnostic (OBD) tests. Refer to the Powertrain Control/Emissions Diagnosis (PC/ED) manual for diagnosis and testing of the PCM.
� GO to Pinpoint Test A , GO to Pinpoint Test B , GO to Pinpoint Test C , GO to Pinpoint Test D and GO to Pinpoint Test E .
� Repair as required. Clear the DTCs, road test the vehicle and rerun OBD test.
Incorrect Pressures
� High/low pressures � Carry out Line Pressure Test. Refer to Special Testing Procedures in this section.
Main Control
� Screws not tightened to specification � Tighten to specification.
� Separator plate damaged � Inspect for damage. If damaged, install a new separator plate.
� Contamination � Disassemble and clean.
� Valve/springs damaged, misassembled, missing, stuck or bore damaged
� If damaged or parts are missing, install new main control assembly. If misassembled, reassemble correctly. DO NOT stone, file or sand valves. This will remove the anodized finish and may result in further main control or transmission damage.
� Filter damaged, missing � Inspect for damage. Repair as necessary.
Overdrive (O/D) Servo
� Servo retaining screws damaged � Inspect for damage. Repair as necessary.
� Seals (piston and cover) damaged � Inspect for damage. Repair as necessary.
O/D Band
� Band damaged � Inspect for damage. Repair as necessary.
� Servo worn or damaged � Inspect for damage. Repair as necessary.
� Not adjusted correctly � Inspect for damage. Repair as necessary.
Shift Concern: Harsh 2-3 Shift
Possible Component Reference/Action
233 — ROUTINE
Powertrain Control System
� PCM, vehicle wiring harnesses, Shift Solenoid B (SSB), Pressure Control Solenoid A (PCA), Turbine Shaft Speed (TSS) sensor, intermediate shaft speed sensor, Transmission Range (TR) sensor, Transmission Fluid Temperature (TFT) sensor
� Carry out On-Board Diagnostic (OBD) tests. Refer to the Powertrain Control/Emissions Diagnosis (PC/ED) manual for diagnosis and testing of the PCM.
� GO to Pinpoint Test A , GO to Pinpoint Test B , GO to Pinpoint Test C , GO to Pinpoint Test D and GO to Pinpoint Test E .
� Repair as required. Clear the DTCs, road test the vehicle and rerun OBD test.
Incorrect Pressures
� High/low pressures � Carry out Line Pressure Test. Refer to Special Testing Procedures in this section.
Main Control
� Screws not tightened to specification � Tighten to specification.
� Separator plate damaged � Inspect for damage. If damaged, install a new separator plate.
� Contamination � Disassemble and clean.
� Valve/springs damaged, misassembled, missing, stuck or bore damaged
� If damaged or parts are missing, install new main control assembly. If misassembled, reassemble correctly. DO NOT stone, file or sand valves. This will remove the anodized finish and may result in further main control or transmission damage.
� Filter damaged, missing � Inspect for damage. Repair as necessary.
Overdrive (O/D) Servo
� Servo retaining screws damaged � Inspect for damage. Repair as necessary.
� Seals (piston and cover) damaged � Inspect for damage. Repair as necessary.
O/D Band
� Band damaged � Inspect for damage. Repair as necessary.
� Servo worn or damaged � Inspect for damage. Repair as necessary.
� Not adjusted correctly � Inspect for damage. Repair as necessary.
Direct Clutch Assembly
� Seals, piston damaged � Inspect for damage. Repair as necessary.
� Check ball damaged, missing, not seating, off location
� Inspect for mislocation, poor seating, damage. Install a new cylinder.
� Friction elements damaged or worn � Inspect for damage. Repair as necessary.
� Return springs damaged � Inspect for damage. Repair as necessary.
Intermediate Servo
� Servo retaining screws damaged � Inspect for damage. Repair as necessary.
� Seals (piston and cover) damaged � Inspect for damage. Repair as necessary.
Intermediate Band
� Band damaged � Inspect for damage. Repair as necessary.
Shift Concern: Harsh 3-4 Shift
� Servo worn or damaged � Inspect for damage. Repair as necessary.
� Not adjusted correctly � Inspect for damage. Repair as necessary.
Direct One-Way Clutch (OWC)
� Worn, damaged or assembled incorrectly � Inspect for damage. Repair as necessary.
Possible Component Reference/Action
234 — ROUTINE
Powertrain Control System
� PCM, vehicle wiring harnesses, Shift Solenoid A (SSA), Pressure Control Solenoid C (PCC), Transmission Range (TR) sensor, Transmission Fluid Temperature (TFT) sensor
� Carry out On-Board Diagnostic (OBD) tests. Refer to the Powertrain Control/Emissions Diagnosis (PC/ED) manual for diagnosis and testing of the PCM.
� GO to Pinpoint Test A , GO to Pinpoint Test B , GO to Pinpoint Test C and GO to Pinpoint Test D .
� Repair as required. Clear the DTCs, road test the vehicle and rerun OBD test.
Incorrect Pressures
� High/low pressures � Carry out Line Pressure Test. Refer to Special Testing Procedures in this section.
Main Control
� Screws not tightened to specification � Tighten to specification.
� Separator plate damaged � Inspect for damage. If damaged, install a new separator.
� Contamination � Disassemble and clean.
� Valve/springs damaged, misassembled, missing, stuck or bore damaged
� If damaged or parts are missing, install new main control assembly. If misassembled, reassemble correctly. DO NOT stone, file or sand valves. This will remove the anodized finish and may result in further main control or transmission damage.
� Filter damaged, missing � Inspect for damage. Repair as necessary.
Center Support
� Screws not tightened to specification � Tighten to specification.
� Seal rings or bearing damaged � Inspect for damage. Repair as necessary.
� Outside diameter of case bore damaged � Inspect for damage. Repair as necessary.
� Support damaged or leaking � Inspect for damage. Repair as necessary.
Direct Clutch Assembly
� Seals, piston damaged � Inspect for damage. Repair as necessary.
� Check ball damaged, missing, not seating, off location
� Inspect for mislocation, poor seating, damage. Install a new cylinder.
� Friction elements damaged or worn � Inspect for damage. Repair as necessary.
� Return springs damaged � Inspect for damage. Repair as necessary.
Intermediate Servo
� Seals (piston and cover) damaged � Inspect for damage. Repair as necessary.
Shift Concern: Harsh 4-3 Shift
Shift Concern: Harsh 3-2 Shift
Possible Component Reference/Action
235 — ROUTINE
Powertrain Control System
� PCM, vehicle wiring harnesses, Shift Solenoid A (SSA), Pressure Control Solenoid A (PCA), Transmission Range (TR) sensor, Transmission Fluid Temperature (TFT) sensor
� Carry out On-Board Diagnostic (OBD) tests. Refer to the Powertrain Control/Emissions Diagnosis (PC/ED) manual for diagnosis and testing of the PCM.
� GO to Pinpoint Test A , GO to Pinpoint Test B , GO to Pinpoint Test C and GO to Pinpoint Test D .
� Repair as required. Clear the DTCs, road test the vehicle and rerun OBD test.
Incorrect Pressures
� High/low pressures � Carry out Line Pressure Test. Refer to Special Testing Procedures in this section.
Main Control
� Screws not tightened to specification � Tighten to specification.
� Separator plate damaged � Inspect for damage. If damaged, install a new separator plate.
� Contamination � Disassemble and clean.
� Valves, springs damaged, misassembled, missing, stuck or bore damaged
� If damaged or parts are missing, install new main control assembly. If misassembled, reassemble correctly. DO NOT stone, file or sand valves. This will remove the anodized finish and may result in further main control or transmission damage.
� Filter damaged, missing � Inspect for damage. Repair as necessary.
Direct Clutch Assembly
� Seals, piston damaged � Inspect for damage. Repair as necessary.
� Check ball damaged, missing, not seating, off location
� Inspect for mislocation, poor seating, damage. Install a new cylinder.
� Friction elements damaged or worn � Inspect for damage. Repair as necessary.
� Return springs damaged � Inspect for damage. Repair as necessary.
Intermediate Servo
� Servo retaining screws damaged � Inspect for damage. Repair as necessary.
� Seals (piston and cover) damaged � Inspect for damage. Repair as necessary.
Intermediate Band
� Band damaged � Inspect for damage. Repair as necessary.
� Servo worn or damaged � Inspect for damage. Repair as necessary.
� Not adjusted correctly � Inspect for damage. Repair as necessary.
Possible Component Reference/Action
236 — ROUTINE
Powertrain Control System
� PCM, vehicle wiring harnesses, Shift Solenoid C (SSC), Pressure Control Solenoid B (PCB), Turbine Shaft Speed (TSS) sensor,
� Carry out On-Board Diagnostic (OBD) tests. Refer to the Powertrain Control/Emissions Diagnosis (PC/ED) manual for diagnosis and testing of the PCM.
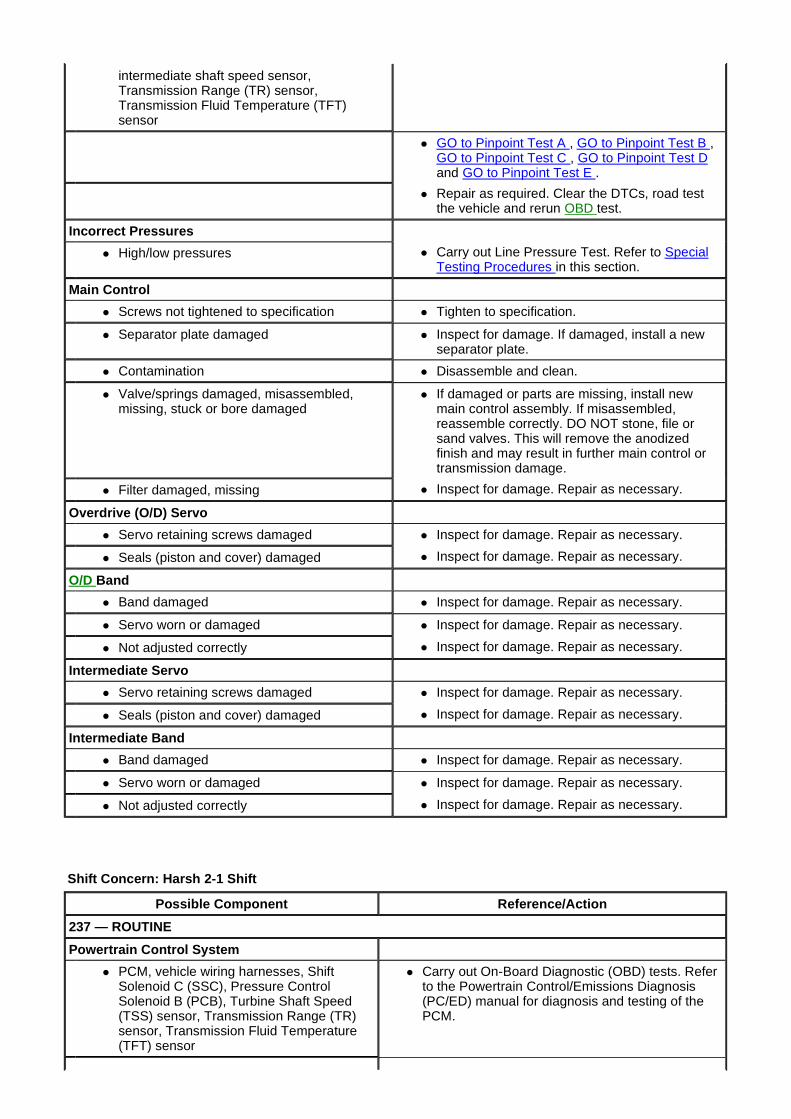
Shift Concern: Harsh 2-1 Shift
intermediate shaft speed sensor, Transmission Range (TR) sensor, Transmission Fluid Temperature (TFT) sensor
� GO to Pinpoint Test A , GO to Pinpoint Test B , GO to Pinpoint Test C , GO to Pinpoint Test D and GO to Pinpoint Test E .
� Repair as required. Clear the DTCs, road test the vehicle and rerun OBD test.
Incorrect Pressures
� High/low pressures � Carry out Line Pressure Test. Refer to Special Testing Procedures in this section.
Main Control
� Screws not tightened to specification � Tighten to specification.
� Separator plate damaged � Inspect for damage. If damaged, install a new separator plate.
� Contamination � Disassemble and clean.
� Valve/springs damaged, misassembled, missing, stuck or bore damaged
� If damaged or parts are missing, install new main control assembly. If misassembled, reassemble correctly. DO NOT stone, file or sand valves. This will remove the anodized finish and may result in further main control or transmission damage.
� Filter damaged, missing � Inspect for damage. Repair as necessary.
Overdrive (O/D) Servo
� Servo retaining screws damaged � Inspect for damage. Repair as necessary.
� Seals (piston and cover) damaged � Inspect for damage. Repair as necessary.
O/D Band
� Band damaged � Inspect for damage. Repair as necessary.
� Servo worn or damaged � Inspect for damage. Repair as necessary.
� Not adjusted correctly � Inspect for damage. Repair as necessary.
Intermediate Servo
� Servo retaining screws damaged � Inspect for damage. Repair as necessary.
� Seals (piston and cover) damaged � Inspect for damage. Repair as necessary.
Intermediate Band
� Band damaged � Inspect for damage. Repair as necessary.
� Servo worn or damaged � Inspect for damage. Repair as necessary.
� Not adjusted correctly � Inspect for damage. Repair as necessary.
Possible Component Reference/Action
237 — ROUTINE
Powertrain Control System
� PCM, vehicle wiring harnesses, Shift Solenoid C (SSC), Pressure Control Solenoid B (PCB), Turbine Shaft Speed (TSS) sensor, Transmission Range (TR) sensor, Transmission Fluid Temperature (TFT) sensor
� Carry out On-Board Diagnostic (OBD) tests. Refer to the Powertrain Control/Emissions Diagnosis (PC/ED) manual for diagnosis and testing of the PCM.
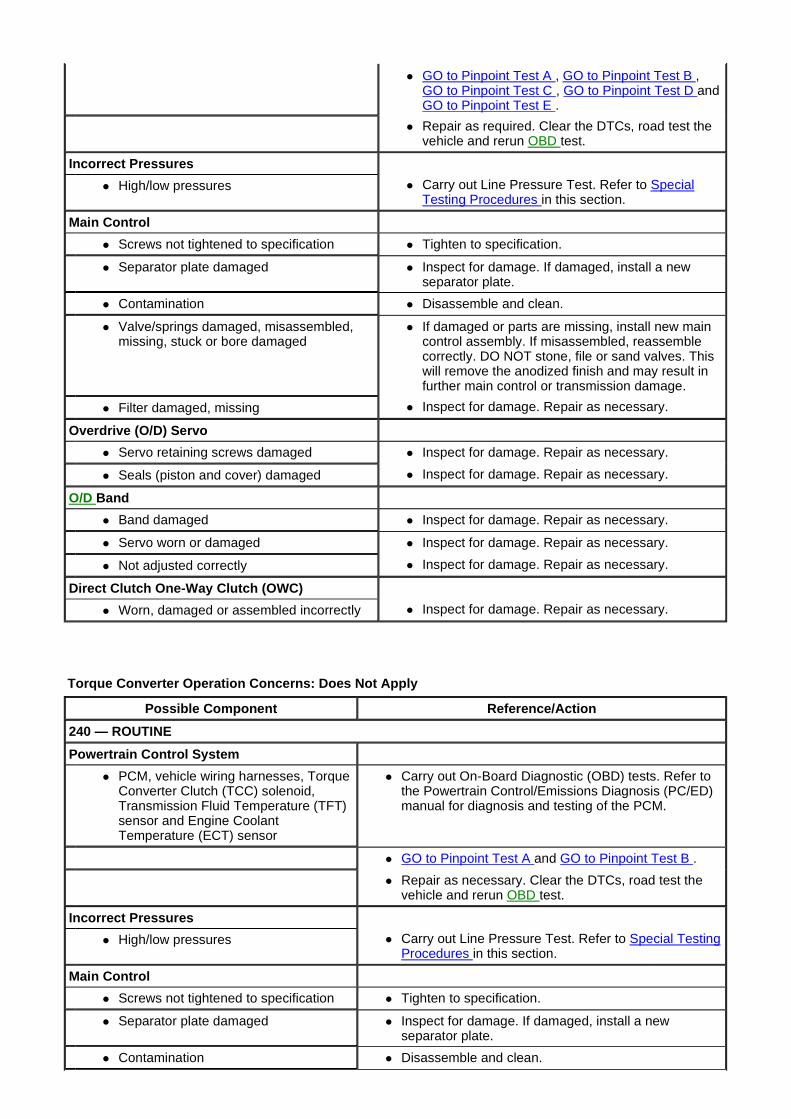
Torque Converter Operation Concerns: Does Not Appl y
� GO to Pinpoint Test A , GO to Pinpoint Test B , GO to Pinpoint Test C , GO to Pinpoint Test D and GO to Pinpoint Test E .
� Repair as required. Clear the DTCs, road test the vehicle and rerun OBD test.
Incorrect Pressures
� High/low pressures � Carry out Line Pressure Test. Refer to Special Testing Procedures in this section.
Main Control
� Screws not tightened to specification � Tighten to specification.
� Separator plate damaged � Inspect for damage. If damaged, install a new separator plate.
� Contamination � Disassemble and clean.
� Valve/springs damaged, misassembled, missing, stuck or bore damaged
� If damaged or parts are missing, install new main control assembly. If misassembled, reassemble correctly. DO NOT stone, file or sand valves. This will remove the anodized finish and may result in further main control or transmission damage.
� Filter damaged, missing � Inspect for damage. Repair as necessary.
Overdrive (O/D) Servo
� Servo retaining screws damaged � Inspect for damage. Repair as necessary.
� Seals (piston and cover) damaged � Inspect for damage. Repair as necessary.
O/D Band
� Band damaged � Inspect for damage. Repair as necessary.
� Servo worn or damaged � Inspect for damage. Repair as necessary.
� Not adjusted correctly � Inspect for damage. Repair as necessary.
Direct Clutch One-Way Clutch (OWC)
� Worn, damaged or assembled incorrectly � Inspect for damage. Repair as necessary.
Possible Component Reference/Action
240 — ROUTINE
Powertrain Control System
� PCM, vehicle wiring harnesses, Torque Converter Clutch (TCC) solenoid, Transmission Fluid Temperature (TFT) sensor and Engine Coolant Temperature (ECT) sensor
� Carry out On-Board Diagnostic (OBD) tests. Refer to the Powertrain Control/Emissions Diagnosis (PC/ED) manual for diagnosis and testing of the PCM.
� GO to Pinpoint Test A and GO to Pinpoint Test B .
� Repair as necessary. Clear the DTCs, road test the vehicle and rerun OBD test.
Incorrect Pressures
� High/low pressures � Carry out Line Pressure Test. Refer to Special Testing Procedures in this section.
Main Control
� Screws not tightened to specification � Tighten to specification.
� Separator plate damaged � Inspect for damage. If damaged, install a new separator plate.
� Contamination � Disassemble and clean.

Torque Converter Operation Concern: Always Applied /Stalls Vehicle
� Valve, springs damaged, misassembled, missing, stuck or bore damaged
� If damaged or parts are missing, install new main control assembly. If misassembled, reassemble correctly. DO NOT stone, file or sand valves. This will remove the anodized finish and may result in further main control or transmission damage.
� Filter damaged, missing � Inspect for damage. Repair as necessary.
Torque Converter Assembly
� Torque converter internal failure preventing engagement, piston application
� Remove the transmission. Inspect for damage. Refer to Torque Converter Contamination Inspection in this section. If the torque converter fails to pass the criteria or is damaged, install a new or remanufactured torque converter.
Pump Assembly
� Screws not tightened to specification � Tighten screws to specification.
� Gasket damaged � Inspect for damage. If damaged, install a new gasket.
� Porosity, cross leaks, ball missing, plugged hole
� Inspect for damage. If damaged, repair as necessary.
� Pump gears cracked and/or seized � Inspect for damage. Install a new pump.
� Flow control valves, springs or seals damaged, stuck or not assembled correctly
� Inspect for damage. Install a new seal or flow control valve.
Possible Component Reference/Action
241 — ROUTINE
Powertrain Control System
� PCM, vehicle wiring harnesses, Torque Converter Clutch (TCC) solenoid
� Carry out On-Board Diagnostic (OBD) tests. Refer to the Powertrain Control/Emissions Diagnosis (PC/ED) manual for diagnosis and testing of the PCM.
� GO to Pinpoint Test A .
� Repair as necessary. Clear the DTCs, road test the vehicle and rerun OBD test.
Main Control
� Screws not tightened to specification
� Tighten to specification.
� Separator plate damaged � Inspect for damage. If damaged, install a new separator plate.
� Contamination � Disassemble and clean.
� Valve, springs damaged, misassembled, missing, stuck or bore damaged
� If damaged or parts are missing, install new main control assembly. If misassembled, reassemble correctly. DO NOT stone, file or sand valves. This will remove the anodized finish and may result in further main control or transmission damage.
� Filter damaged, missing � Inspect for damage. Repair as necessary.
Torque Converter Assembly
� Torque converter internal failure preventing engagement, piston release
� Remove the transmission. Inspect for damage. Refer to Torque Converter Contamination Inspection in this section. If the torque converter fails to pass the criteria or is damaged, install a new or remanufactured torque converter.
Low One-Way Clutch (OWC)
� Worn, damaged or assembled incorrectly.
� Inspect for damage. Repair as necessary.
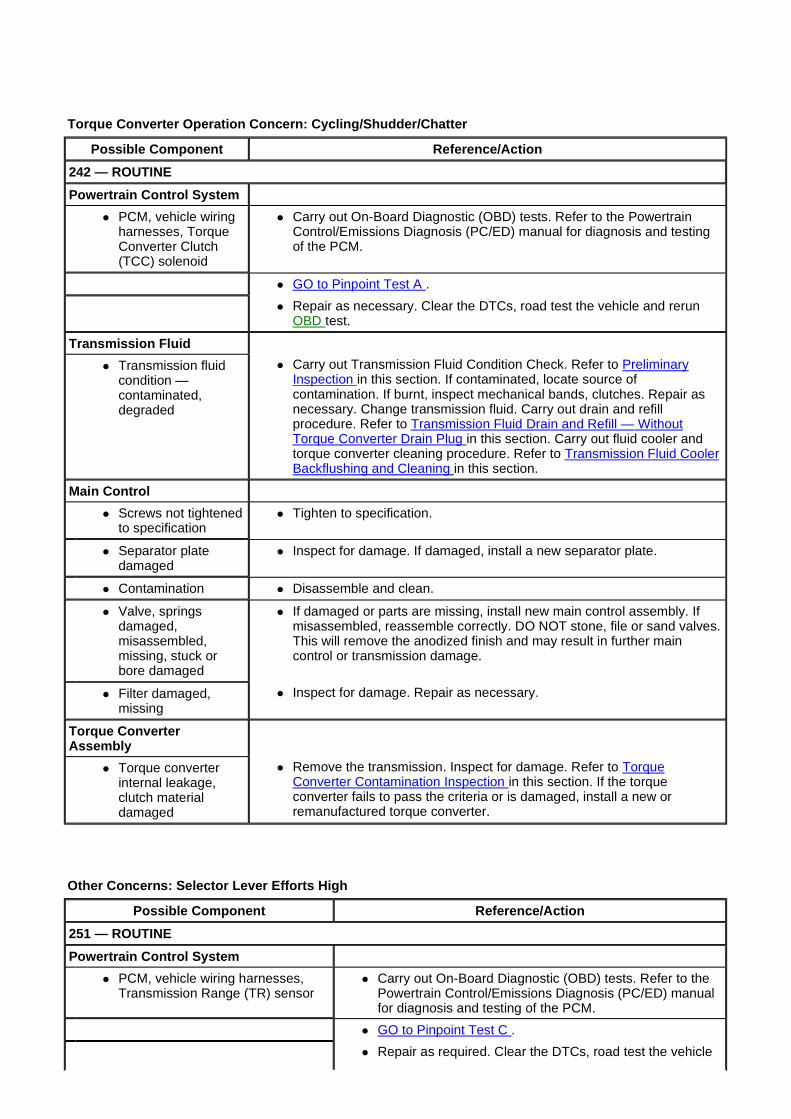
Torque Converter Operation Concern: Cycling/Shudde r/Chatter
Other Concerns: Selector Lever Efforts High
Possible Component Reference/Action
242 — ROUTINE
Powertrain Control System
� PCM, vehicle wiring harnesses, Torque Converter Clutch (TCC) solenoid
� Carry out On-Board Diagnostic (OBD) tests. Refer to the Powertrain Control/Emissions Diagnosis (PC/ED) manual for diagnosis and testing of the PCM.
� GO to Pinpoint Test A .
� Repair as necessary. Clear the DTCs, road test the vehicle and rerun OBD test.
Transmission Fluid
� Transmission fluid condition — contaminated, degraded
� Carry out Transmission Fluid Condition Check. Refer to Preliminary Inspection in this section. If contaminated, locate source of contamination. If burnt, inspect mechanical bands, clutches. Repair as necessary. Change transmission fluid. Carry out drain and refill procedure. Refer to Transmission Fluid Drain and Refill — Without Torque Converter Drain Plug in this section. Carry out fluid cooler and torque converter cleaning procedure. Refer to Transmission Fluid Cooler Backflushing and Cleaning in this section.
Main Control
� Screws not tightened to specification
� Tighten to specification.
� Separator plate damaged
� Inspect for damage. If damaged, install a new separator plate.
� Contamination � Disassemble and clean.
� Valve, springs damaged, misassembled, missing, stuck or bore damaged
� If damaged or parts are missing, install new main control assembly. If misassembled, reassemble correctly. DO NOT stone, file or sand valves. This will remove the anodized finish and may result in further main control or transmission damage.
� Filter damaged, missing
� Inspect for damage. Repair as necessary.
Torque Converter Assembly
� Torque converter internal leakage, clutch material damaged
� Remove the transmission. Inspect for damage. Refer to Torque Converter Contamination Inspection in this section. If the torque converter fails to pass the criteria or is damaged, install a new or remanufactured torque converter.
Possible Component Reference/Action
251 — ROUTINE
Powertrain Control System
� PCM, vehicle wiring harnesses, Transmission Range (TR) sensor
� Carry out On-Board Diagnostic (OBD) tests. Refer to the Powertrain Control/Emissions Diagnosis (PC/ED) manual for diagnosis and testing of the PCM.
� GO to Pinpoint Test C .
� Repair as required. Clear the DTCs, road test the vehicle
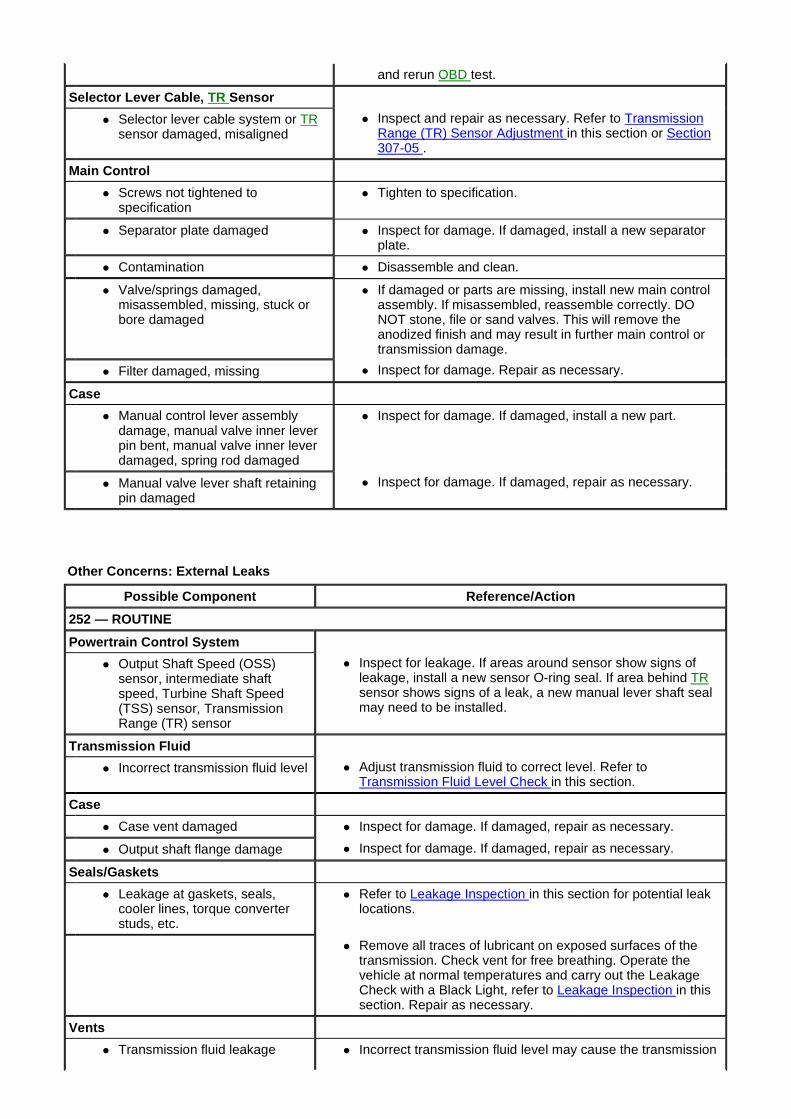
Other Concerns: External Leaks
and rerun OBD test.
Selector Lever Cable, TR Sensor
� Selector lever cable system or TR sensor damaged, misaligned
� Inspect and repair as necessary. Refer to Transmission Range (TR) Sensor Adjustment in this section or Section 307-05 .
Main Control
� Screws not tightened to specification
� Tighten to specification.
� Separator plate damaged � Inspect for damage. If damaged, install a new separator plate.
� Contamination � Disassemble and clean.
� Valve/springs damaged, misassembled, missing, stuck or bore damaged
� If damaged or parts are missing, install new main control assembly. If misassembled, reassemble correctly. DO NOT stone, file or sand valves. This will remove the anodized finish and may result in further main control or transmission damage.
� Filter damaged, missing � Inspect for damage. Repair as necessary.
Case
� Manual control lever assembly damage, manual valve inner lever pin bent, manual valve inner lever damaged, spring rod damaged
� Inspect for damage. If damaged, install a new part.
� Manual valve lever shaft retaining pin damaged
� Inspect for damage. If damaged, repair as necessary.
Possible Component Reference/Action
252 — ROUTINE
Powertrain Control System
� Output Shaft Speed (OSS) sensor, intermediate shaft speed, Turbine Shaft Speed (TSS) sensor, Transmission Range (TR) sensor
� Inspect for leakage. If areas around sensor show signs of leakage, install a new sensor O-ring seal. If area behind TR sensor shows signs of a leak, a new manual lever shaft seal may need to be installed.
Transmission Fluid
� Incorrect transmission fluid level � Adjust transmission fluid to correct level. Refer to Transmission Fluid Level Check in this section.
Case
� Case vent damaged � Inspect for damage. If damaged, repair as necessary.
� Output shaft flange damage � Inspect for damage. If damaged, repair as necessary.
Seals/Gaskets
� Leakage at gaskets, seals, cooler lines, torque converter studs, etc.
� Refer to Leakage Inspection in this section for potential leak locations.
� Remove all traces of lubricant on exposed surfaces of the transmission. Check vent for free breathing. Operate the vehicle at normal temperatures and carry out the Leakage Check with a Black Light, refer to Leakage Inspection in this section. Repair as necessary.
Vents
� Transmission fluid leakage � Incorrect transmission fluid level may cause the transmission
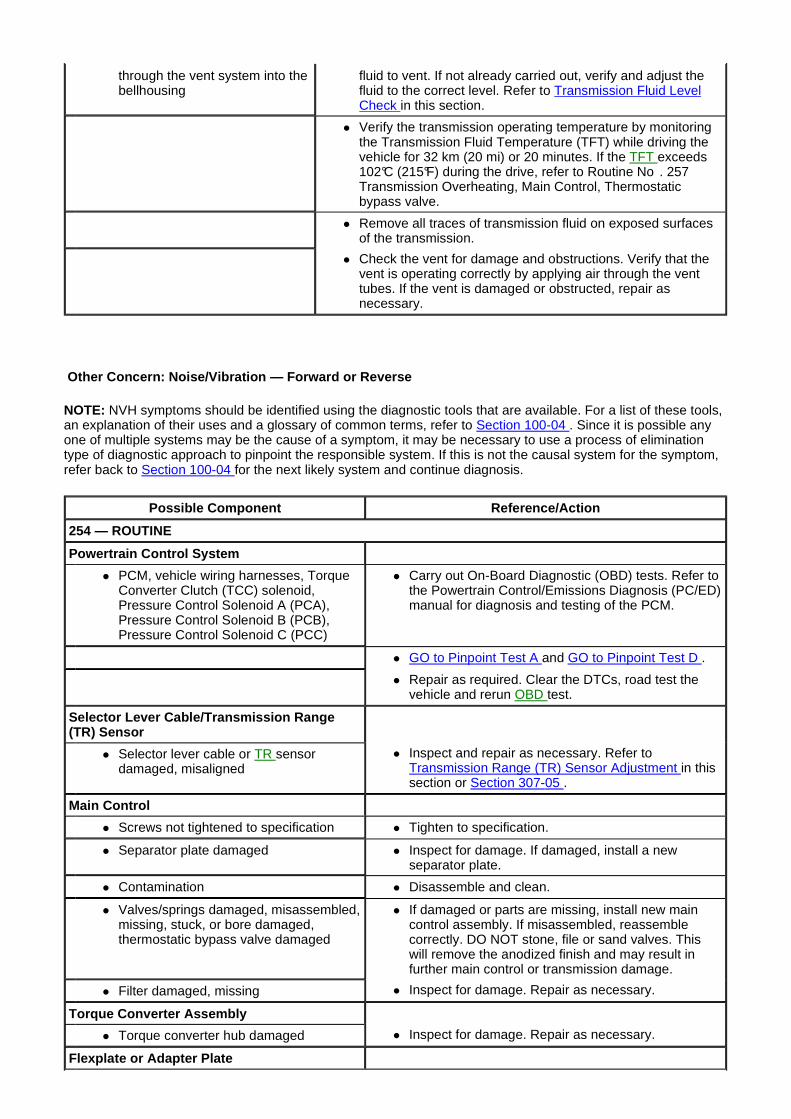
Other Concern: Noise/Vibration — Forward or Revers e
NOTE: NVH symptoms should be identified using the diagnostic tools that are available. For a list of these tools, an explanation of their uses and a glossary of common terms, refer to Section 100-04 . Since it is possible any one of multiple systems may be the cause of a symptom, it may be necessary to use a process of elimination type of diagnostic approach to pinpoint the responsible system. If this is not the causal system for the symptom, refer back to Section 100-04 for the next likely system and continue diagnosis.
through the vent system into the bellhousing
fluid to vent. If not already carried out, verify and adjust the fluid to the correct level. Refer to Transmission Fluid Level Check in this section.
� Verify the transmission operating temperature by monitoring the Transmission Fluid Temperature (TFT) while driving the vehicle for 32 km (20 mi) or 20 minutes. If the TFT exceeds 102°C (215°F) during the drive, refer to Routine No . 257 Transmission Overheating, Main Control, Thermostatic bypass valve.
� Remove all traces of transmission fluid on exposed surfaces of the transmission.
� Check the vent for damage and obstructions. Verify that the vent is operating correctly by applying air through the vent tubes. If the vent is damaged or obstructed, repair as necessary.
Possible Component Reference/Action
254 — ROUTINE
Powertrain Control System
� PCM, vehicle wiring harnesses, Torque Converter Clutch (TCC) solenoid, Pressure Control Solenoid A (PCA), Pressure Control Solenoid B (PCB), Pressure Control Solenoid C (PCC)
� Carry out On-Board Diagnostic (OBD) tests. Refer to the Powertrain Control/Emissions Diagnosis (PC/ED) manual for diagnosis and testing of the PCM.
� GO to Pinpoint Test A and GO to Pinpoint Test D .
� Repair as required. Clear the DTCs, road test the vehicle and rerun OBD test.
Selector Lever Cable/Transmission Range (TR) Sensor
� Selector lever cable or TR sensor damaged, misaligned
� Inspect and repair as necessary. Refer to Transmission Range (TR) Sensor Adjustment in this section or Section 307-05 .
Main Control
� Screws not tightened to specification � Tighten to specification.
� Separator plate damaged � Inspect for damage. If damaged, install a new separator plate.
� Contamination � Disassemble and clean.
� Valves/springs damaged, misassembled, missing, stuck, or bore damaged, thermostatic bypass valve damaged
� If damaged or parts are missing, install new main control assembly. If misassembled, reassemble correctly. DO NOT stone, file or sand valves. This will remove the anodized finish and may result in further main control or transmission damage.
� Filter damaged, missing � Inspect for damage. Repair as necessary.
Torque Converter Assembly
� Torque converter hub damaged � Inspect for damage. Repair as necessary.
Flexplate or Adapter Plate
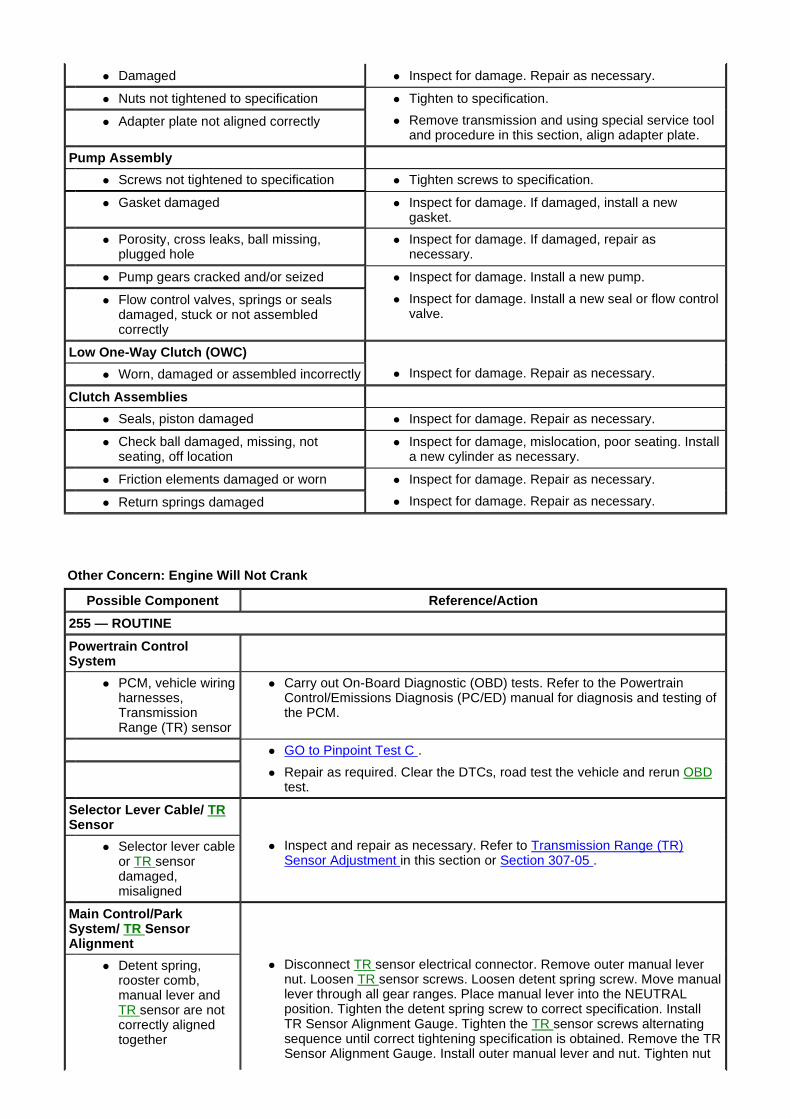
Other Concern: Engine Will Not Crank
� Damaged � Inspect for damage. Repair as necessary.
� Nuts not tightened to specification � Tighten to specification.
� Adapter plate not aligned correctly � Remove transmission and using special service tool and procedure in this section, align adapter plate.
Pump Assembly
� Screws not tightened to specification � Tighten screws to specification.
� Gasket damaged � Inspect for damage. If damaged, install a new gasket.
� Porosity, cross leaks, ball missing, plugged hole
� Inspect for damage. If damaged, repair as necessary.
� Pump gears cracked and/or seized � Inspect for damage. Install a new pump.
� Flow control valves, springs or seals damaged, stuck or not assembled correctly
� Inspect for damage. Install a new seal or flow control valve.
Low One-Way Clutch (OWC)
� Worn, damaged or assembled incorrectly � Inspect for damage. Repair as necessary.
Clutch Assemblies
� Seals, piston damaged � Inspect for damage. Repair as necessary.
� Check ball damaged, missing, not seating, off location
� Inspect for damage, mislocation, poor seating. Install a new cylinder as necessary.
� Friction elements damaged or worn � Inspect for damage. Repair as necessary.
� Return springs damaged � Inspect for damage. Repair as necessary.
Possible Component Reference/Action
255 — ROUTINE
Powertrain Control System
� PCM, vehicle wiring harnesses, Transmission Range (TR) sensor
� Carry out On-Board Diagnostic (OBD) tests. Refer to the Powertrain Control/Emissions Diagnosis (PC/ED) manual for diagnosis and testing of the PCM.
� GO to Pinpoint Test C .
� Repair as required. Clear the DTCs, road test the vehicle and rerun OBD test.
Selector Lever Cable/ TR Sensor
� Selector lever cable or TR sensor damaged, misaligned
� Inspect and repair as necessary. Refer to Transmission Range (TR) Sensor Adjustment in this section or Section 307-05 .
Main Control/Park System/ TR Sensor Alignment
� Detent spring, rooster comb, manual lever and TR sensor are not correctly aligned together
� Disconnect TR sensor electrical connector. Remove outer manual lever nut. Loosen TR sensor screws. Loosen detent spring screw. Move manual lever through all gear ranges. Place manual lever into the NEUTRAL position. Tighten the detent spring screw to correct specification. Install TR Sensor Alignment Gauge. Tighten the TR sensor screws alternating sequence until correct tightening specification is obtained. Remove the TR Sensor Alignment Gauge. Install outer manual lever and nut. Tighten nut
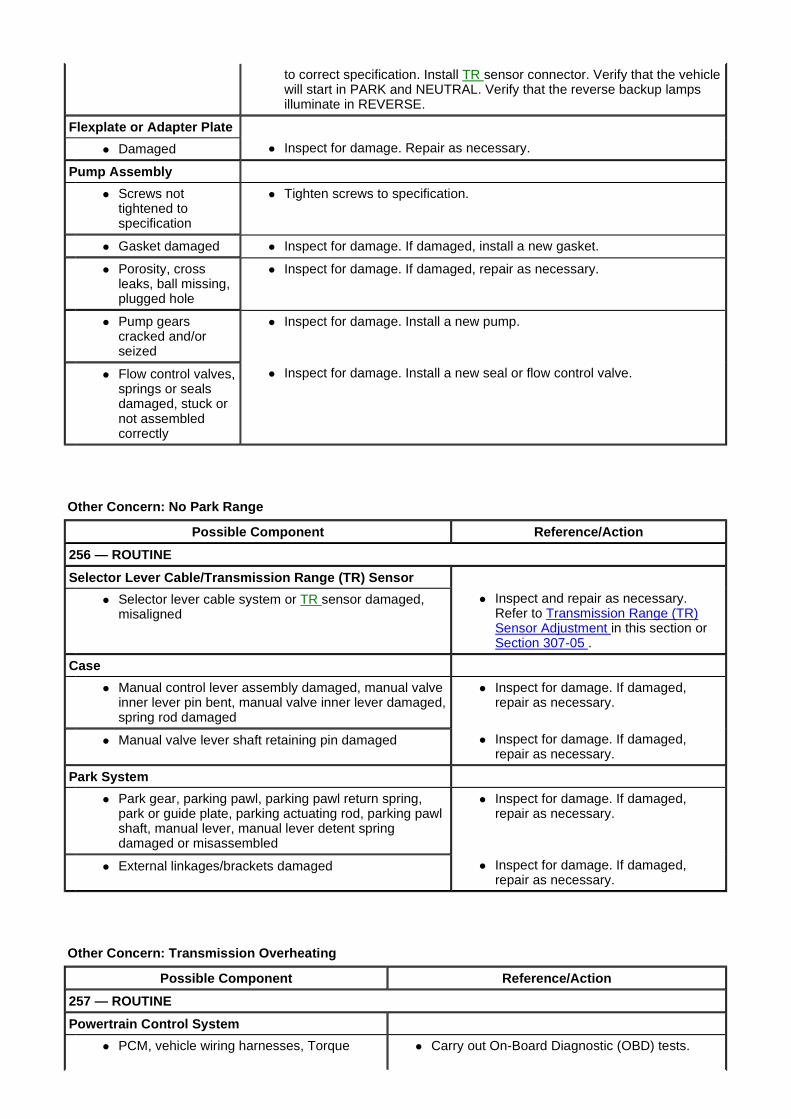
Other Concern: No Park Range
Other Concern: Transmission Overheating
to correct specification. Install TR sensor connector. Verify that the vehicle will start in PARK and NEUTRAL. Verify that the reverse backup lamps illuminate in REVERSE.
Flexplate or Adapter Plate
� Damaged � Inspect for damage. Repair as necessary.
Pump Assembly
� Screws not tightened to specification
� Tighten screws to specification.
� Gasket damaged � Inspect for damage. If damaged, install a new gasket.
� Porosity, cross leaks, ball missing, plugged hole
� Inspect for damage. If damaged, repair as necessary.
� Pump gears cracked and/or seized
� Inspect for damage. Install a new pump.
� Flow control valves, springs or seals damaged, stuck or not assembled correctly
� Inspect for damage. Install a new seal or flow control valve.
Possible Component Reference/Action
256 — ROUTINE
Selector Lever Cable/Transmission Range (TR) Sensor
� Selector lever cable system or TR sensor damaged, misaligned
� Inspect and repair as necessary. Refer to Transmission Range (TR) Sensor Adjustment in this section or Section 307-05 .
Case
� Manual control lever assembly damaged, manual valve inner lever pin bent, manual valve inner lever damaged, spring rod damaged
� Inspect for damage. If damaged, repair as necessary.
� Manual valve lever shaft retaining pin damaged � Inspect for damage. If damaged, repair as necessary.
Park System
� Park gear, parking pawl, parking pawl return spring, park or guide plate, parking actuating rod, parking pawl shaft, manual lever, manual lever detent spring damaged or misassembled
� Inspect for damage. If damaged, repair as necessary.
� External linkages/brackets damaged � Inspect for damage. If damaged, repair as necessary.
Possible Component Reference/Action
257 — ROUTINE
Powertrain Control System
� PCM, vehicle wiring harnesses, Torque � Carry out On-Board Diagnostic (OBD) tests.
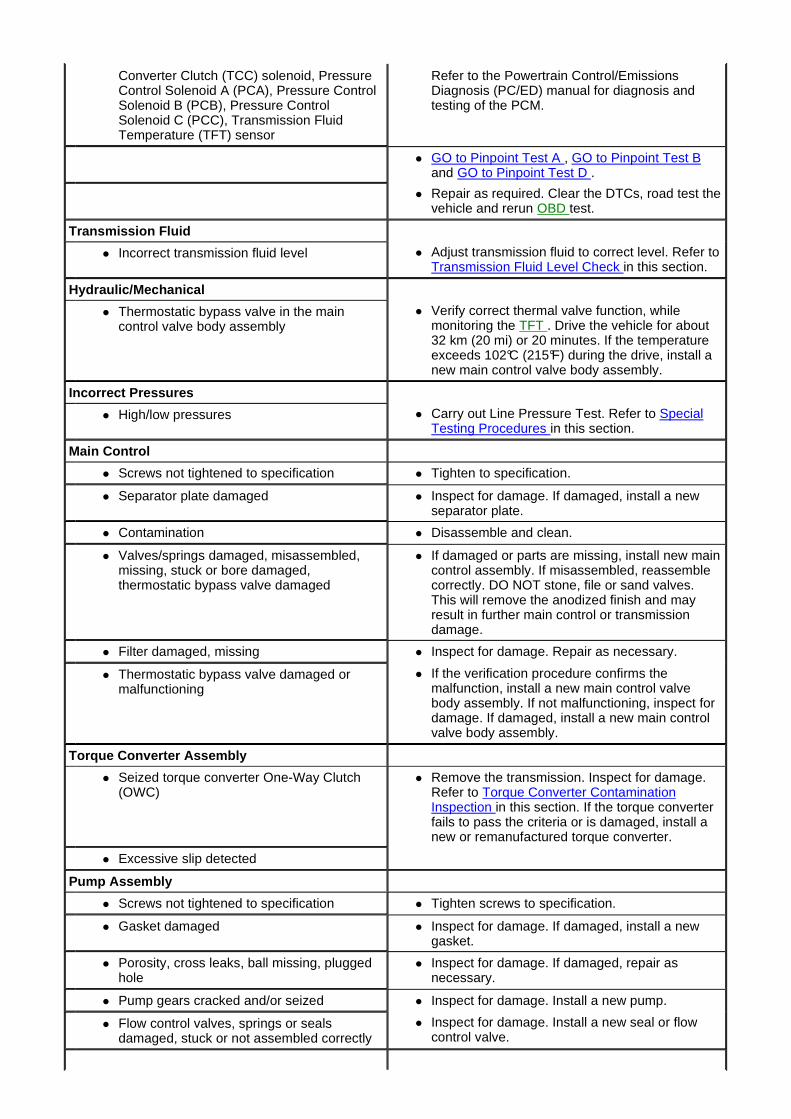
Converter Clutch (TCC) solenoid, Pressure Control Solenoid A (PCA), Pressure Control Solenoid B (PCB), Pressure Control Solenoid C (PCC), Transmission Fluid Temperature (TFT) sensor
Refer to the Powertrain Control/Emissions Diagnosis (PC/ED) manual for diagnosis and testing of the PCM.
� GO to Pinpoint Test A , GO to Pinpoint Test B and GO to Pinpoint Test D .
� Repair as required. Clear the DTCs, road test the vehicle and rerun OBD test.
Transmission Fluid
� Incorrect transmission fluid level � Adjust transmission fluid to correct level. Refer to Transmission Fluid Level Check in this section.
Hydraulic/Mechanical
� Thermostatic bypass valve in the main control valve body assembly
� Verify correct thermal valve function, while monitoring the TFT . Drive the vehicle for about 32 km (20 mi) or 20 minutes. If the temperature exceeds 102°C (215°F) during the drive, install a new main control valve body assembly.
Incorrect Pressures
� High/low pressures � Carry out Line Pressure Test. Refer to Special Testing Procedures in this section.
Main Control
� Screws not tightened to specification � Tighten to specification.
� Separator plate damaged � Inspect for damage. If damaged, install a new separator plate.
� Contamination � Disassemble and clean.
� Valves/springs damaged, misassembled, missing, stuck or bore damaged, thermostatic bypass valve damaged
� If damaged or parts are missing, install new main control assembly. If misassembled, reassemble correctly. DO NOT stone, file or sand valves. This will remove the anodized finish and may result in further main control or transmission damage.
� Filter damaged, missing � Inspect for damage. Repair as necessary.
� Thermostatic bypass valve damaged or malfunctioning
� If the verification procedure confirms the malfunction, install a new main control valve body assembly. If not malfunctioning, inspect for damage. If damaged, install a new main control valve body assembly.
Torque Converter Assembly
� Seized torque converter One-Way Clutch (OWC)
� Remove the transmission. Inspect for damage. Refer to Torque Converter Contamination Inspection in this section. If the torque converter fails to pass the criteria or is damaged, install a new or remanufactured torque converter.
� Excessive slip detected
Pump Assembly
� Screws not tightened to specification � Tighten screws to specification.
� Gasket damaged � Inspect for damage. If damaged, install a new gasket.
� Porosity, cross leaks, ball missing, plugged hole
� Inspect for damage. If damaged, repair as necessary.
� Pump gears cracked and/or seized � Inspect for damage. Install a new pump.
� Flow control valves, springs or seals damaged, stuck or not assembled correctly
� Inspect for damage. Install a new seal or flow control valve.
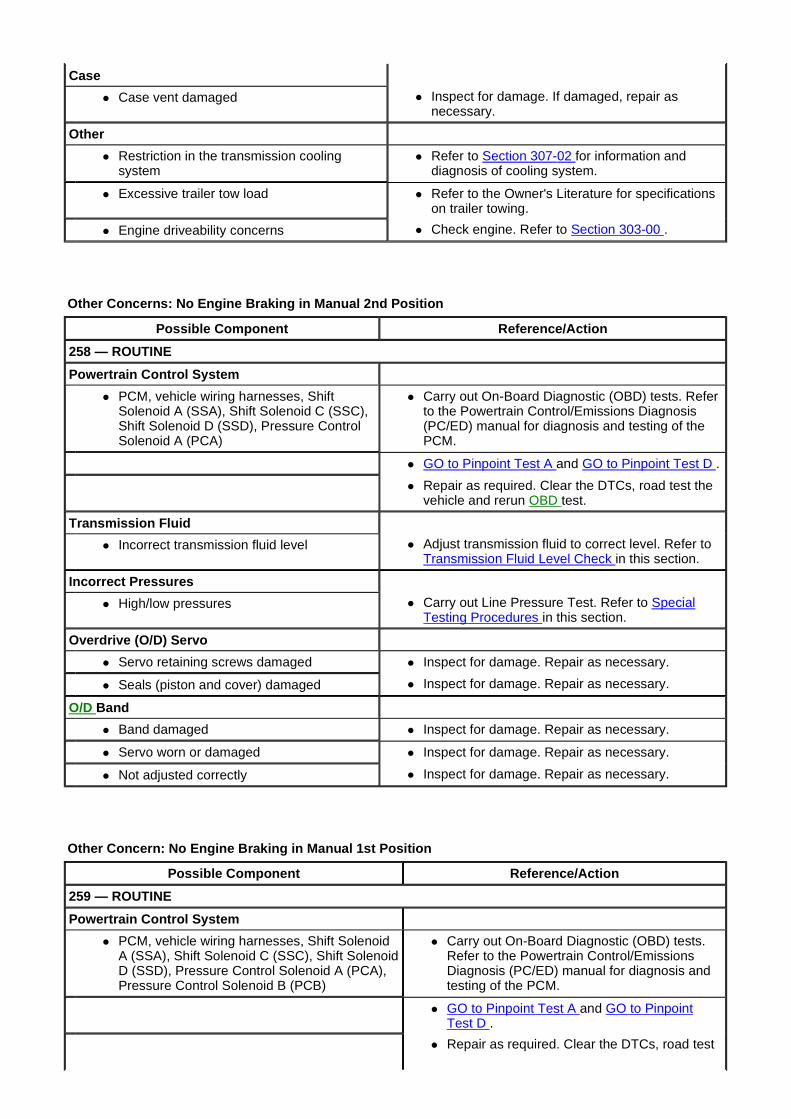
Other Concerns: No Engine Braking in Manual 2nd Po sition
Other Concern: No Engine Braking in Manual 1st Pos ition
Case
� Case vent damaged � Inspect for damage. If damaged, repair as necessary.
Other
� Restriction in the transmission cooling system
� Refer to Section 307-02 for information and diagnosis of cooling system.
� Excessive trailer tow load � Refer to the Owner's Literature for specifications on trailer towing.
� Engine driveability concerns � Check engine. Refer to Section 303-00 .
Possible Component Reference/Action
258 — ROUTINE
Powertrain Control System
� PCM, vehicle wiring harnesses, Shift Solenoid A (SSA), Shift Solenoid C (SSC), Shift Solenoid D (SSD), Pressure Control Solenoid A (PCA)
� Carry out On-Board Diagnostic (OBD) tests. Refer to the Powertrain Control/Emissions Diagnosis (PC/ED) manual for diagnosis and testing of the PCM.
� GO to Pinpoint Test A and GO to Pinpoint Test D .
� Repair as required. Clear the DTCs, road test the vehicle and rerun OBD test.
Transmission Fluid
� Incorrect transmission fluid level � Adjust transmission fluid to correct level. Refer to Transmission Fluid Level Check in this section.
Incorrect Pressures
� High/low pressures � Carry out Line Pressure Test. Refer to Special Testing Procedures in this section.
Overdrive (O/D) Servo
� Servo retaining screws damaged � Inspect for damage. Repair as necessary.
� Seals (piston and cover) damaged � Inspect for damage. Repair as necessary.
O/D Band
� Band damaged � Inspect for damage. Repair as necessary.
� Servo worn or damaged � Inspect for damage. Repair as necessary.
� Not adjusted correctly � Inspect for damage. Repair as necessary.
Possible Component Reference/Action
259 — ROUTINE
Powertrain Control System
� PCM, vehicle wiring harnesses, Shift Solenoid A (SSA), Shift Solenoid C (SSC), Shift Solenoid D (SSD), Pressure Control Solenoid A (PCA), Pressure Control Solenoid B (PCB)
� Carry out On-Board Diagnostic (OBD) tests. Refer to the Powertrain Control/Emissions Diagnosis (PC/ED) manual for diagnosis and testing of the PCM.
� GO to Pinpoint Test A and GO to Pinpoint Test D .
� Repair as required. Clear the DTCs, road test
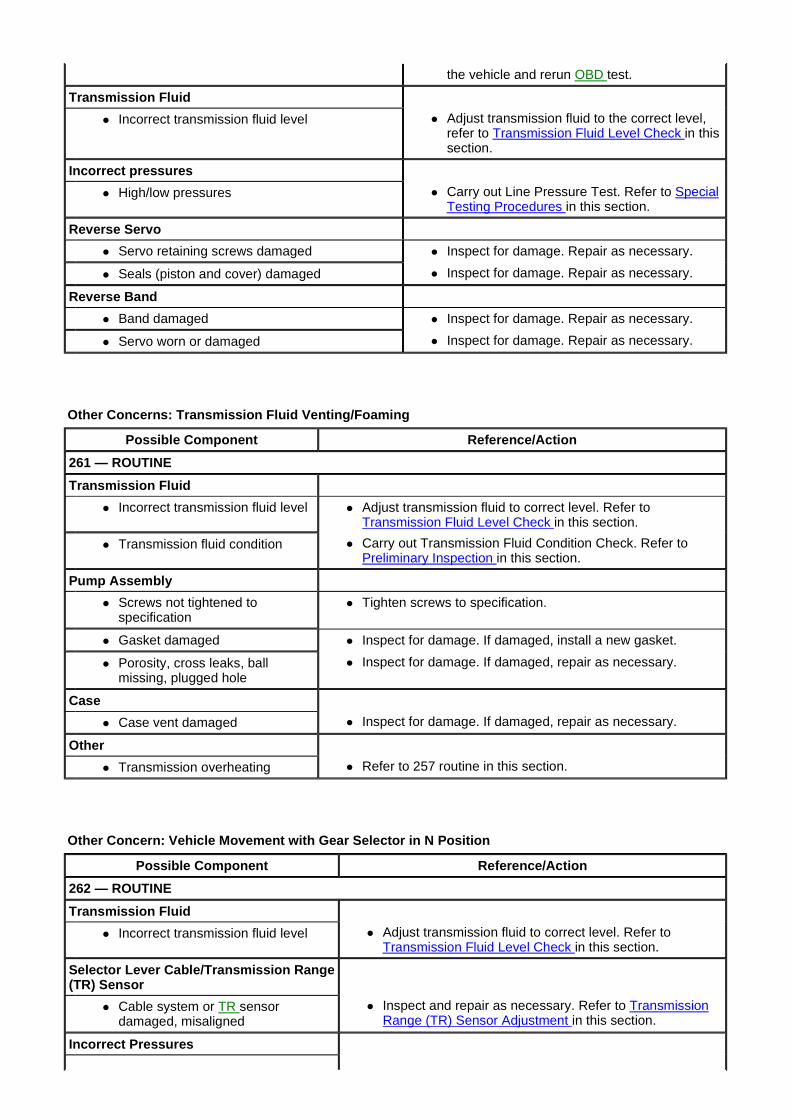
Other Concerns: Transmission Fluid Venting/Foaming
Other Concern: Vehicle Movement with Gear Selector in N Position
the vehicle and rerun OBD test.
Transmission Fluid
� Incorrect transmission fluid level � Adjust transmission fluid to the correct level, refer to Transmission Fluid Level Check in this section.
Incorrect pressures
� High/low pressures � Carry out Line Pressure Test. Refer to Special Testing Procedures in this section.
Reverse Servo
� Servo retaining screws damaged � Inspect for damage. Repair as necessary.
� Seals (piston and cover) damaged � Inspect for damage. Repair as necessary.
Reverse Band
� Band damaged � Inspect for damage. Repair as necessary.
� Servo worn or damaged � Inspect for damage. Repair as necessary.
Possible Component Reference/Action
261 — ROUTINE
Transmission Fluid
� Incorrect transmission fluid level � Adjust transmission fluid to correct level. Refer to Transmission Fluid Level Check in this section.
� Transmission fluid condition � Carry out Transmission Fluid Condition Check. Refer to Preliminary Inspection in this section.
Pump Assembly
� Screws not tightened to specification
� Tighten screws to specification.
� Gasket damaged � Inspect for damage. If damaged, install a new gasket.
� Porosity, cross leaks, ball missing, plugged hole
� Inspect for damage. If damaged, repair as necessary.
Case
� Case vent damaged � Inspect for damage. If damaged, repair as necessary.
Other
� Transmission overheating � Refer to 257 routine in this section.
Possible Component Reference/Action
262 — ROUTINE
Transmission Fluid
� Incorrect transmission fluid level � Adjust transmission fluid to correct level. Refer to Transmission Fluid Level Check in this section.
Selector Lever Cable/Transmission Range (TR) Sensor
� Cable system or TR sensor damaged, misaligned
� Inspect and repair as necessary. Refer to Transmission Range (TR) Sensor Adjustment in this section.
Incorrect Pressures
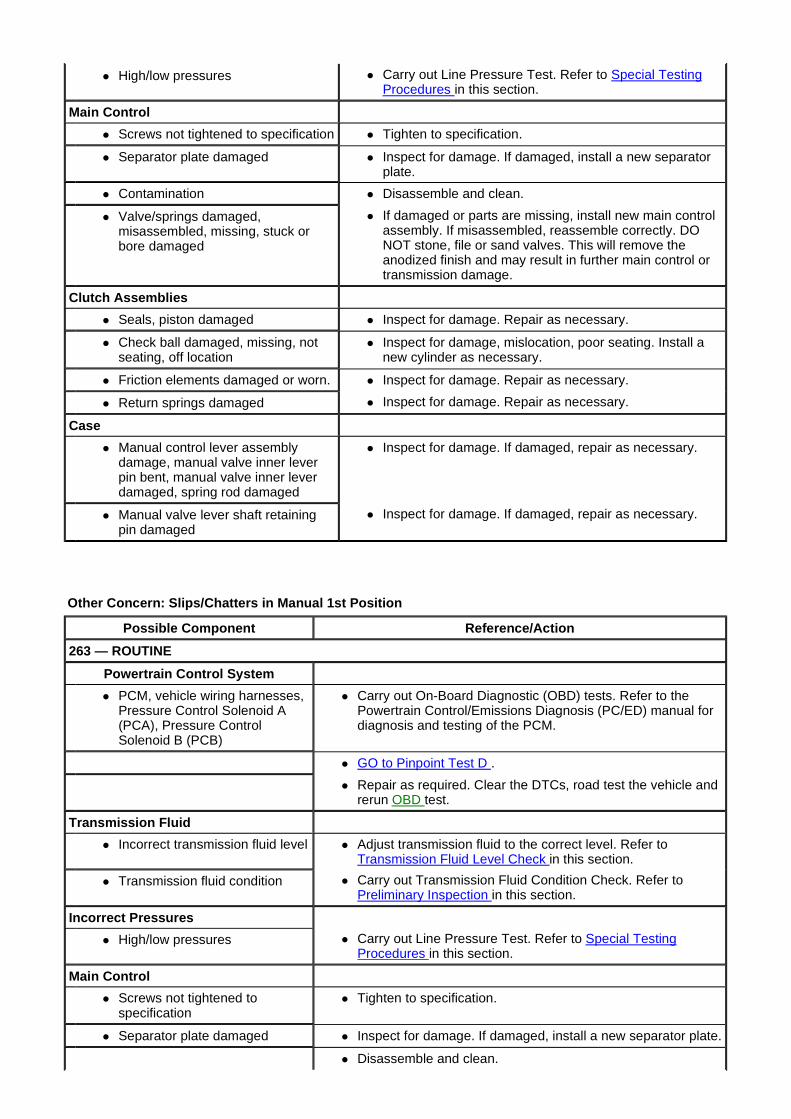
Other Concern: Slips/Chatters in Manual 1st Positi on
� High/low pressures � Carry out Line Pressure Test. Refer to Special Testing Procedures in this section.
Main Control
� Screws not tightened to specification � Tighten to specification.
� Separator plate damaged � Inspect for damage. If damaged, install a new separator plate.
� Contamination � Disassemble and clean.
� Valve/springs damaged, misassembled, missing, stuck or bore damaged
� If damaged or parts are missing, install new main control assembly. If misassembled, reassemble correctly. DO NOT stone, file or sand valves. This will remove the anodized finish and may result in further main control or transmission damage.
Clutch Assemblies
� Seals, piston damaged � Inspect for damage. Repair as necessary.
� Check ball damaged, missing, not seating, off location
� Inspect for damage, mislocation, poor seating. Install a new cylinder as necessary.
� Friction elements damaged or worn. � Inspect for damage. Repair as necessary.
� Return springs damaged � Inspect for damage. Repair as necessary.
Case
� Manual control lever assembly damage, manual valve inner lever pin bent, manual valve inner lever damaged, spring rod damaged
� Inspect for damage. If damaged, repair as necessary.
� Manual valve lever shaft retaining pin damaged
� Inspect for damage. If damaged, repair as necessary.
Possible Component Reference/Action
263 — ROUTINE
Powertrain Control System
� PCM, vehicle wiring harnesses, Pressure Control Solenoid A (PCA), Pressure Control Solenoid B (PCB)
� Carry out On-Board Diagnostic (OBD) tests. Refer to the Powertrain Control/Emissions Diagnosis (PC/ED) manual for diagnosis and testing of the PCM.
� GO to Pinpoint Test D .
� Repair as required. Clear the DTCs, road test the vehicle and rerun OBD test.
Transmission Fluid
� Incorrect transmission fluid level � Adjust transmission fluid to the correct level. Refer to Transmission Fluid Level Check in this section.
� Transmission fluid condition � Carry out Transmission Fluid Condition Check. Refer to Preliminary Inspection in this section.
Incorrect Pressures
� High/low pressures � Carry out Line Pressure Test. Refer to Special Testing Procedures in this section.
Main Control
� Screws not tightened to specification
� Tighten to specification.
� Separator plate damaged � Inspect for damage. If damaged, install a new separator plate.
� Disassemble and clean.
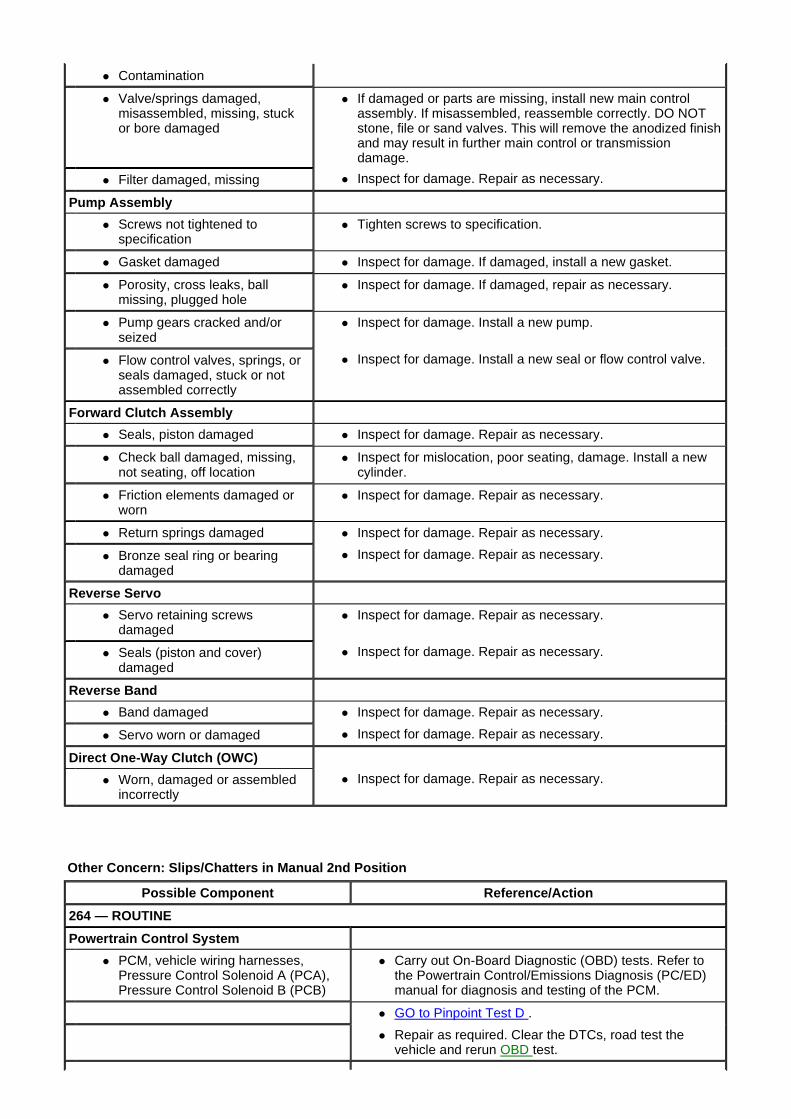
Other Concern: Slips/Chatters in Manual 2nd Positi on
� Contamination
� Valve/springs damaged, misassembled, missing, stuck or bore damaged
� If damaged or parts are missing, install new main control assembly. If misassembled, reassemble correctly. DO NOT stone, file or sand valves. This will remove the anodized finish and may result in further main control or transmission damage.
� Filter damaged, missing � Inspect for damage. Repair as necessary.
Pump Assembly
� Screws not tightened to specification
� Tighten screws to specification.
� Gasket damaged � Inspect for damage. If damaged, install a new gasket.
� Porosity, cross leaks, ball missing, plugged hole
� Inspect for damage. If damaged, repair as necessary.
� Pump gears cracked and/or seized
� Inspect for damage. Install a new pump.
� Flow control valves, springs, or seals damaged, stuck or not assembled correctly
� Inspect for damage. Install a new seal or flow control valve.
Forward Clutch Assembly
� Seals, piston damaged � Inspect for damage. Repair as necessary.
� Check ball damaged, missing, not seating, off location
� Inspect for mislocation, poor seating, damage. Install a new cylinder.
� Friction elements damaged or worn
� Inspect for damage. Repair as necessary.
� Return springs damaged � Inspect for damage. Repair as necessary.
� Bronze seal ring or bearing damaged
� Inspect for damage. Repair as necessary.
Reverse Servo
� Servo retaining screws damaged
� Inspect for damage. Repair as necessary.
� Seals (piston and cover) damaged
� Inspect for damage. Repair as necessary.
Reverse Band
� Band damaged � Inspect for damage. Repair as necessary.
� Servo worn or damaged � Inspect for damage. Repair as necessary.
Direct One-Way Clutch (OWC)
� Worn, damaged or assembled incorrectly
� Inspect for damage. Repair as necessary.
Possible Component Reference/Action
264 — ROUTINE
Powertrain Control System
� PCM, vehicle wiring harnesses, Pressure Control Solenoid A (PCA), Pressure Control Solenoid B (PCB)
� Carry out On-Board Diagnostic (OBD) tests. Refer to the Powertrain Control/Emissions Diagnosis (PC/ED) manual for diagnosis and testing of the PCM.
� GO to Pinpoint Test D .
� Repair as required. Clear the DTCs, road test the vehicle and rerun OBD test.
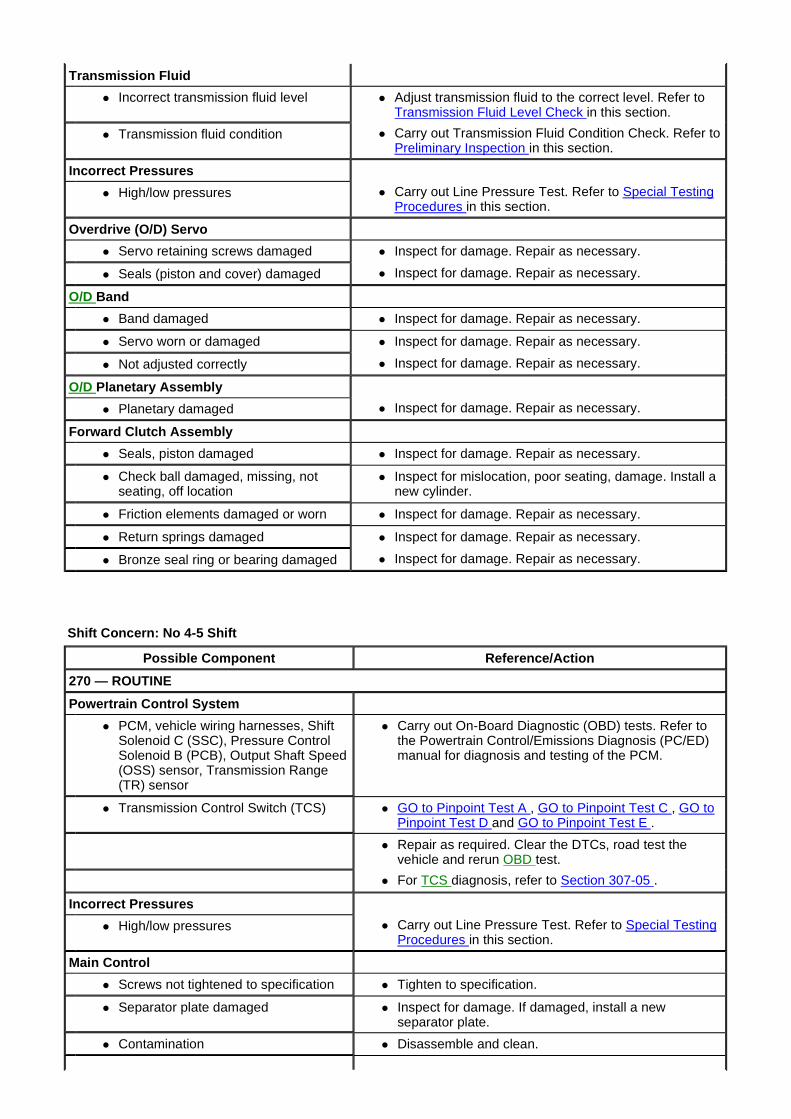
Shift Concern: No 4-5 Shift
Transmission Fluid
� Incorrect transmission fluid level � Adjust transmission fluid to the correct level. Refer to Transmission Fluid Level Check in this section.
� Transmission fluid condition � Carry out Transmission Fluid Condition Check. Refer to Preliminary Inspection in this section.
Incorrect Pressures
� High/low pressures � Carry out Line Pressure Test. Refer to Special Testing Procedures in this section.
Overdrive (O/D) Servo
� Servo retaining screws damaged � Inspect for damage. Repair as necessary.
� Seals (piston and cover) damaged � Inspect for damage. Repair as necessary.
O/D Band
� Band damaged � Inspect for damage. Repair as necessary.
� Servo worn or damaged � Inspect for damage. Repair as necessary.
� Not adjusted correctly � Inspect for damage. Repair as necessary.
O/D Planetary Assembly
� Planetary damaged � Inspect for damage. Repair as necessary.
Forward Clutch Assembly
� Seals, piston damaged � Inspect for damage. Repair as necessary.
� Check ball damaged, missing, not seating, off location
� Inspect for mislocation, poor seating, damage. Install a new cylinder.
� Friction elements damaged or worn � Inspect for damage. Repair as necessary.
� Return springs damaged � Inspect for damage. Repair as necessary.
� Bronze seal ring or bearing damaged � Inspect for damage. Repair as necessary.
Possible Component Reference/Action
270 — ROUTINE
Powertrain Control System
� PCM, vehicle wiring harnesses, Shift Solenoid C (SSC), Pressure Control Solenoid B (PCB), Output Shaft Speed (OSS) sensor, Transmission Range (TR) sensor
� Carry out On-Board Diagnostic (OBD) tests. Refer to the Powertrain Control/Emissions Diagnosis (PC/ED) manual for diagnosis and testing of the PCM.
� Transmission Control Switch (TCS) � GO to Pinpoint Test A , GO to Pinpoint Test C , GO to Pinpoint Test D and GO to Pinpoint Test E .
� Repair as required. Clear the DTCs, road test the vehicle and rerun OBD test.
� For TCS diagnosis, refer to Section 307-05 .
Incorrect Pressures
� High/low pressures � Carry out Line Pressure Test. Refer to Special Testing Procedures in this section.
Main Control
� Screws not tightened to specification � Tighten to specification.
� Separator plate damaged � Inspect for damage. If damaged, install a new separator plate.
� Contamination � Disassemble and clean.
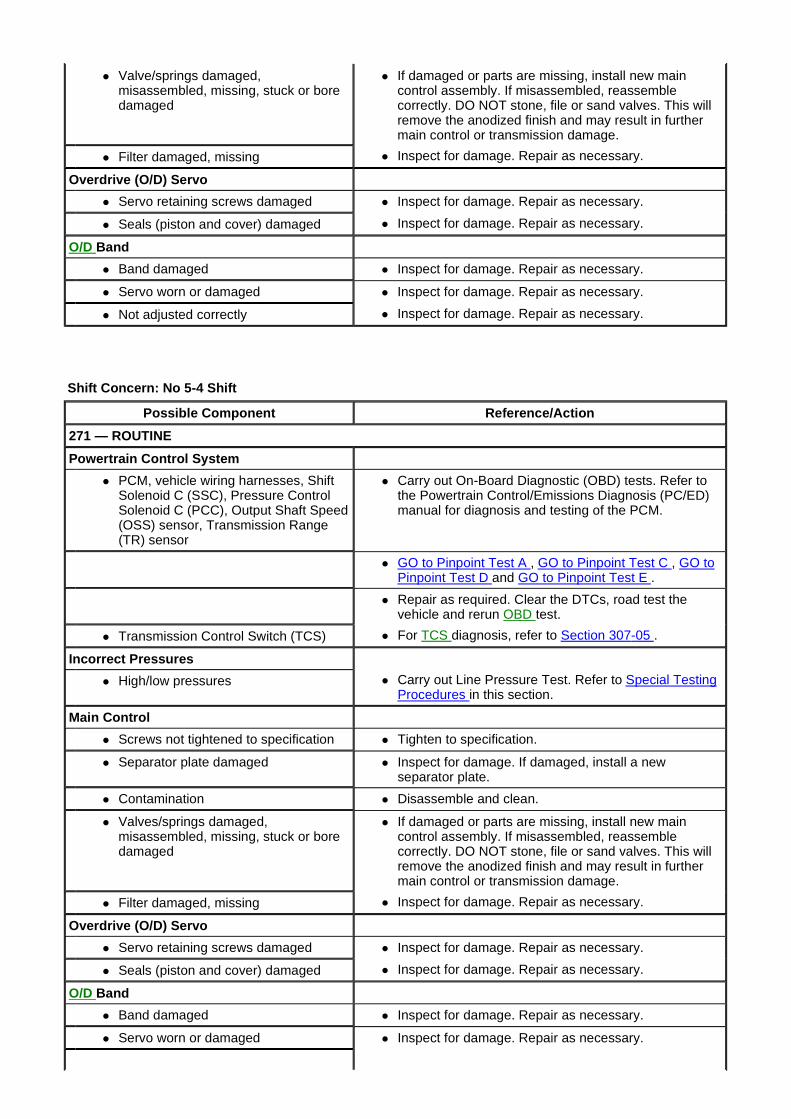
Shift Concern: No 5-4 Shift
� Valve/springs damaged, misassembled, missing, stuck or bore damaged
� If damaged or parts are missing, install new main control assembly. If misassembled, reassemble correctly. DO NOT stone, file or sand valves. This will remove the anodized finish and may result in further main control or transmission damage.
� Filter damaged, missing � Inspect for damage. Repair as necessary.
Overdrive (O/D) Servo
� Servo retaining screws damaged � Inspect for damage. Repair as necessary.
� Seals (piston and cover) damaged � Inspect for damage. Repair as necessary.
O/D Band
� Band damaged � Inspect for damage. Repair as necessary.
� Servo worn or damaged � Inspect for damage. Repair as necessary.
� Not adjusted correctly � Inspect for damage. Repair as necessary.
Possible Component Reference/Action
271 — ROUTINE
Powertrain Control System
� PCM, vehicle wiring harnesses, Shift Solenoid C (SSC), Pressure Control Solenoid C (PCC), Output Shaft Speed (OSS) sensor, Transmission Range (TR) sensor
� Carry out On-Board Diagnostic (OBD) tests. Refer to the Powertrain Control/Emissions Diagnosis (PC/ED) manual for diagnosis and testing of the PCM.
� GO to Pinpoint Test A , GO to Pinpoint Test C , GO to Pinpoint Test D and GO to Pinpoint Test E .
� Repair as required. Clear the DTCs, road test the vehicle and rerun OBD test.
� Transmission Control Switch (TCS) � For TCS diagnosis, refer to Section 307-05 .
Incorrect Pressures
� High/low pressures � Carry out Line Pressure Test. Refer to Special Testing Procedures in this section.
Main Control
� Screws not tightened to specification � Tighten to specification.
� Separator plate damaged � Inspect for damage. If damaged, install a new separator plate.
� Contamination � Disassemble and clean.
� Valves/springs damaged, misassembled, missing, stuck or bore damaged
� If damaged or parts are missing, install new main control assembly. If misassembled, reassemble correctly. DO NOT stone, file or sand valves. This will remove the anodized finish and may result in further main control or transmission damage.
� Filter damaged, missing � Inspect for damage. Repair as necessary.
Overdrive (O/D) Servo
� Servo retaining screws damaged � Inspect for damage. Repair as necessary.
� Seals (piston and cover) damaged � Inspect for damage. Repair as necessary.
O/D Band
� Band damaged � Inspect for damage. Repair as necessary.
� Servo worn or damaged � Inspect for damage. Repair as necessary.
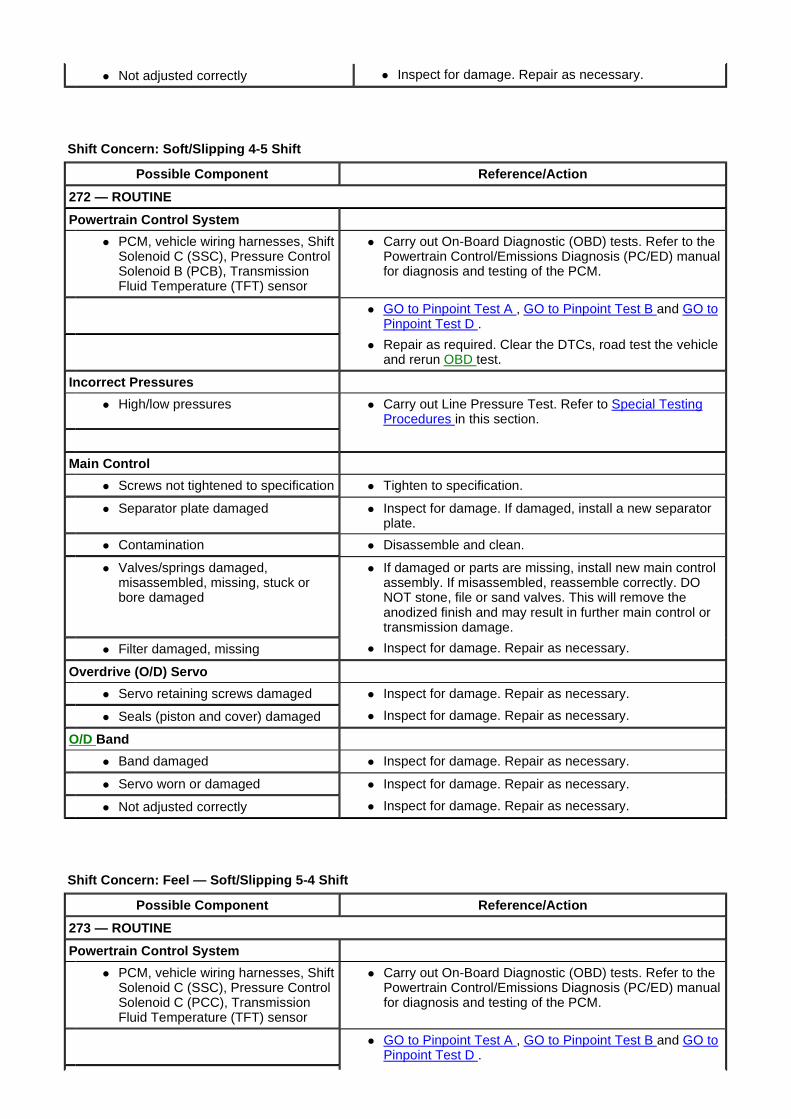
Shift Concern: Soft/Slipping 4-5 Shift
Shift Concern: Feel — Soft/Slipping 5-4 Shift
� Not adjusted correctly � Inspect for damage. Repair as necessary.
Possible Component Reference/Action
272 — ROUTINE
Powertrain Control System
� PCM, vehicle wiring harnesses, Shift Solenoid C (SSC), Pressure Control Solenoid B (PCB), Transmission Fluid Temperature (TFT) sensor
� Carry out On-Board Diagnostic (OBD) tests. Refer to the Powertrain Control/Emissions Diagnosis (PC/ED) manual for diagnosis and testing of the PCM.
� GO to Pinpoint Test A , GO to Pinpoint Test B and GO to Pinpoint Test D .
� Repair as required. Clear the DTCs, road test the vehicle and rerun OBD test.
Incorrect Pressures
� High/low pressures � Carry out Line Pressure Test. Refer to Special Testing Procedures in this section.
Main Control
� Screws not tightened to specification � Tighten to specification.
� Separator plate damaged � Inspect for damage. If damaged, install a new separator plate.
� Contamination � Disassemble and clean.
� Valves/springs damaged, misassembled, missing, stuck or bore damaged
� If damaged or parts are missing, install new main control assembly. If misassembled, reassemble correctly. DO NOT stone, file or sand valves. This will remove the anodized finish and may result in further main control or transmission damage.
� Filter damaged, missing � Inspect for damage. Repair as necessary.
Overdrive (O/D) Servo
� Servo retaining screws damaged � Inspect for damage. Repair as necessary.
� Seals (piston and cover) damaged � Inspect for damage. Repair as necessary.
O/D Band
� Band damaged � Inspect for damage. Repair as necessary.
� Servo worn or damaged � Inspect for damage. Repair as necessary.
� Not adjusted correctly � Inspect for damage. Repair as necessary.
Possible Component Reference/Action
273 — ROUTINE
Powertrain Control System
� PCM, vehicle wiring harnesses, Shift Solenoid C (SSC), Pressure Control Solenoid C (PCC), Transmission Fluid Temperature (TFT) sensor
� Carry out On-Board Diagnostic (OBD) tests. Refer to the Powertrain Control/Emissions Diagnosis (PC/ED) manual for diagnosis and testing of the PCM.
� GO to Pinpoint Test A , GO to Pinpoint Test B and GO to Pinpoint Test D .

Shift Concerns: Harsh 4-5 Shift
� Repair as required. Clear the DTCs, road test the vehicle and rerun OBD test.
Incorrect Pressures
� High/low pressures � Carry out Line Pressure Test. Refer to Special Testing Procedures in this section.
Main Control
� Screws not tightened to specification � Tighten to specification.
� Separator plate damaged � Inspect for damage. If damaged, install a new separator plate.
� Contamination � Disassemble and clean.
� Valves/springs damaged, misassembled, missing, stuck or bore damaged
� If damaged or parts are missing, install new main control assembly. If misassembled, reassemble correctly. DO NOT stone, file or sand valves. This will remove the anodized finish and may result in further main control or transmission damage.
� Filter damaged, missing � Inspect for damage. Repair as necessary.
Direct Clutch Assembly
� Seals, piston damaged � Inspect for damage. Repair as necessary.
� Check ball damaged, missing, not seating, off location
� Inspect for mislocation, poor seating, damage. Install a new cylinder.
� Friction elements damaged or worn � Inspect for damage. Repair as necessary.
� Return springs damaged � Inspect for damage. Repair as necessary.
Direct One-Way Clutch (OWC)
� Worn, damaged or assembled incorrectly
� Inspect for damage. Repair as necessary.
Possible Component Reference/Action
274 — ROUTINE
Powertrain Control System
� PCM, vehicle wiring harnesses, Shift Solenoid C (SSC), Pressure Control Solenoid B (PCB), Turbine Shaft Speed (TSS) sensor, Transmission Range (TR) sensor, Transmission Fluid Temperature (TFT) sensor
� Carry out On-Board Diagnostic (OBD) tests. Refer to the Powertrain Control/Emissions Diagnosis (PC/ED) manual for diagnosis and testing of the PCM.
� GO to Pinpoint Test A , GO to Pinpoint Test B , GO to Pinpoint Test C , GO to Pinpoint Test D and GO to Pinpoint Test E .
� Repair as required. Clear the DTCs, road test the vehicle and rerun OBD test.
Incorrect Pressures
� High/low pressures � Carry out Line Pressure Test. Refer to Special Testing Procedures in this section.
Main Control
� Screws not tightened to specification � Tighten to specification.
� Separator plate damaged � Inspect for damage. If damaged, install a new separator.
� Contamination � Disassemble and clean.
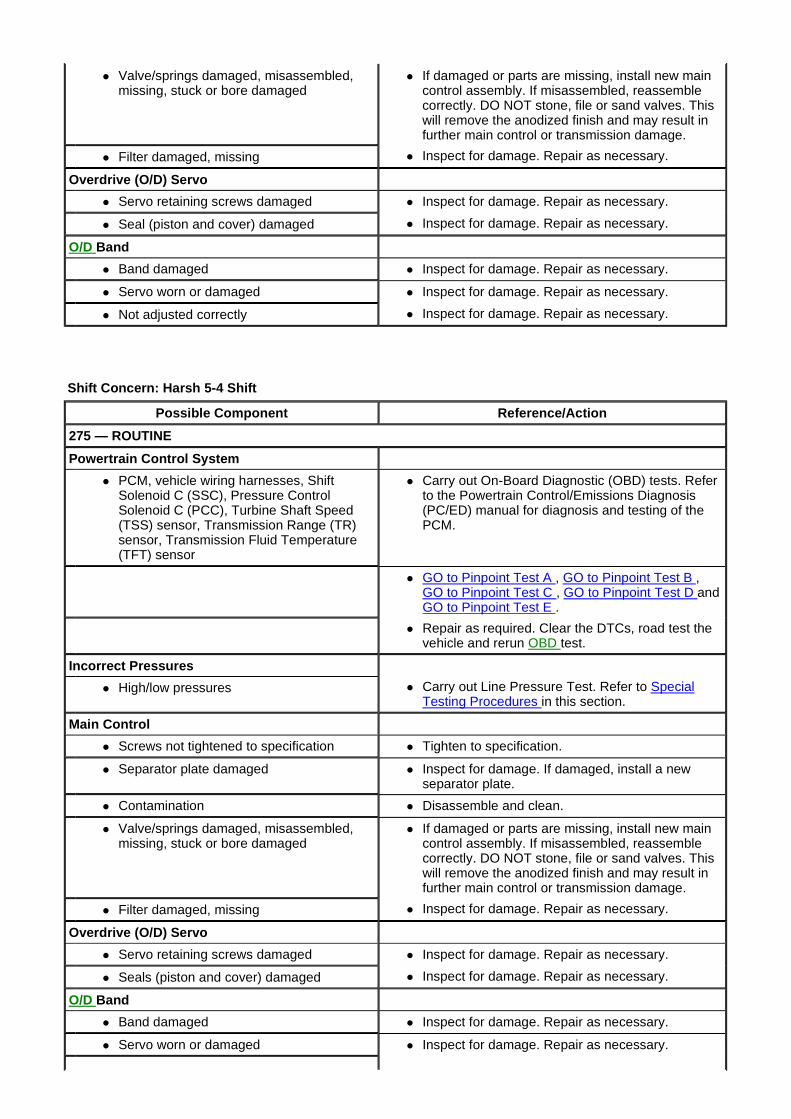
Shift Concern: Harsh 5-4 Shift
� Valve/springs damaged, misassembled, missing, stuck or bore damaged
� If damaged or parts are missing, install new main control assembly. If misassembled, reassemble correctly. DO NOT stone, file or sand valves. This will remove the anodized finish and may result in further main control or transmission damage.
� Filter damaged, missing � Inspect for damage. Repair as necessary.
Overdrive (O/D) Servo
� Servo retaining screws damaged � Inspect for damage. Repair as necessary.
� Seal (piston and cover) damaged � Inspect for damage. Repair as necessary.
O/D Band
� Band damaged � Inspect for damage. Repair as necessary.
� Servo worn or damaged � Inspect for damage. Repair as necessary.
� Not adjusted correctly � Inspect for damage. Repair as necessary.
Possible Component Reference/Action
275 — ROUTINE
Powertrain Control System
� PCM, vehicle wiring harnesses, Shift Solenoid C (SSC), Pressure Control Solenoid C (PCC), Turbine Shaft Speed (TSS) sensor, Transmission Range (TR) sensor, Transmission Fluid Temperature (TFT) sensor
� Carry out On-Board Diagnostic (OBD) tests. Refer to the Powertrain Control/Emissions Diagnosis (PC/ED) manual for diagnosis and testing of the PCM.
� GO to Pinpoint Test A , GO to Pinpoint Test B , GO to Pinpoint Test C , GO to Pinpoint Test D and GO to Pinpoint Test E .
� Repair as required. Clear the DTCs, road test the vehicle and rerun OBD test.
Incorrect Pressures
� High/low pressures � Carry out Line Pressure Test. Refer to Special Testing Procedures in this section.
Main Control
� Screws not tightened to specification � Tighten to specification.
� Separator plate damaged � Inspect for damage. If damaged, install a new separator plate.
� Contamination � Disassemble and clean.
� Valve/springs damaged, misassembled, missing, stuck or bore damaged
� If damaged or parts are missing, install new main control assembly. If misassembled, reassemble correctly. DO NOT stone, file or sand valves. This will remove the anodized finish and may result in further main control or transmission damage.
� Filter damaged, missing � Inspect for damage. Repair as necessary.
Overdrive (O/D) Servo
� Servo retaining screws damaged � Inspect for damage. Repair as necessary.
� Seals (piston and cover) damaged � Inspect for damage. Repair as necessary.
O/D Band
� Band damaged � Inspect for damage. Repair as necessary.
� Servo worn or damaged � Inspect for damage. Repair as necessary.
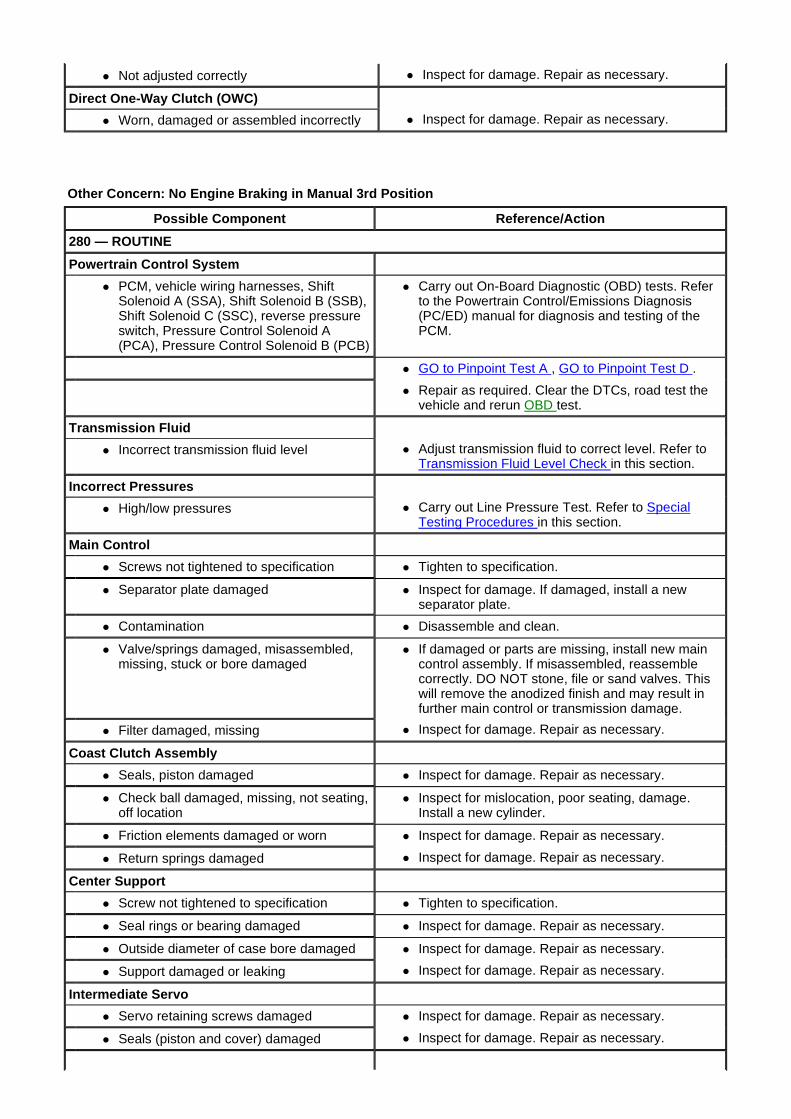
Other Concern: No Engine Braking in Manual 3rd Pos ition
� Not adjusted correctly � Inspect for damage. Repair as necessary.
Direct One-Way Clutch (OWC)
� Worn, damaged or assembled incorrectly � Inspect for damage. Repair as necessary.
Possible Component Reference/Action
280 — ROUTINE
Powertrain Control System
� PCM, vehicle wiring harnesses, Shift Solenoid A (SSA), Shift Solenoid B (SSB), Shift Solenoid C (SSC), reverse pressure switch, Pressure Control Solenoid A (PCA), Pressure Control Solenoid B (PCB)
� Carry out On-Board Diagnostic (OBD) tests. Refer to the Powertrain Control/Emissions Diagnosis (PC/ED) manual for diagnosis and testing of the PCM.
� GO to Pinpoint Test A , GO to Pinpoint Test D .
� Repair as required. Clear the DTCs, road test the vehicle and rerun OBD test.
Transmission Fluid
� Incorrect transmission fluid level � Adjust transmission fluid to correct level. Refer to Transmission Fluid Level Check in this section.
Incorrect Pressures
� High/low pressures � Carry out Line Pressure Test. Refer to Special Testing Procedures in this section.
Main Control
� Screws not tightened to specification � Tighten to specification.
� Separator plate damaged � Inspect for damage. If damaged, install a new separator plate.
� Contamination � Disassemble and clean.
� Valve/springs damaged, misassembled, missing, stuck or bore damaged
� If damaged or parts are missing, install new main control assembly. If misassembled, reassemble correctly. DO NOT stone, file or sand valves. This will remove the anodized finish and may result in further main control or transmission damage.
� Filter damaged, missing � Inspect for damage. Repair as necessary.
Coast Clutch Assembly
� Seals, piston damaged � Inspect for damage. Repair as necessary.
� Check ball damaged, missing, not seating, off location
� Inspect for mislocation, poor seating, damage. Install a new cylinder.
� Friction elements damaged or worn � Inspect for damage. Repair as necessary.
� Return springs damaged � Inspect for damage. Repair as necessary.
Center Support
� Screw not tightened to specification � Tighten to specification.
� Seal rings or bearing damaged � Inspect for damage. Repair as necessary.
� Outside diameter of case bore damaged � Inspect for damage. Repair as necessary.
� Support damaged or leaking � Inspect for damage. Repair as necessary.
Intermediate Servo
� Servo retaining screws damaged � Inspect for damage. Repair as necessary.
� Seals (piston and cover) damaged � Inspect for damage. Repair as necessary.
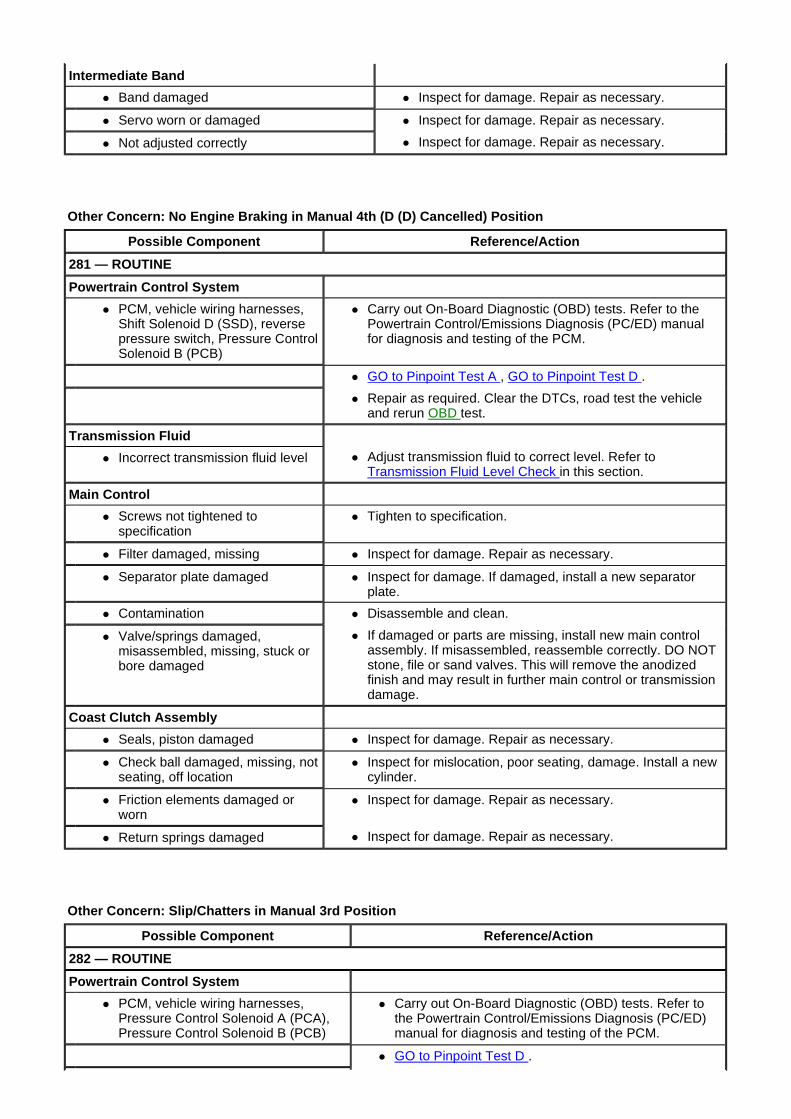
Other Concern: No Engine Braking in Manual 4th (D (D) Cancelled) Position
Other Concern: Slip/Chatters in Manual 3rd Positio n
Intermediate Band
� Band damaged � Inspect for damage. Repair as necessary.
� Servo worn or damaged � Inspect for damage. Repair as necessary.
� Not adjusted correctly � Inspect for damage. Repair as necessary.
Possible Component Reference/Action
281 — ROUTINE
Powertrain Control System
� PCM, vehicle wiring harnesses, Shift Solenoid D (SSD), reverse pressure switch, Pressure Control Solenoid B (PCB)
� Carry out On-Board Diagnostic (OBD) tests. Refer to the Powertrain Control/Emissions Diagnosis (PC/ED) manual for diagnosis and testing of the PCM.
� GO to Pinpoint Test A , GO to Pinpoint Test D .
� Repair as required. Clear the DTCs, road test the vehicle and rerun OBD test.
Transmission Fluid
� Incorrect transmission fluid level � Adjust transmission fluid to correct level. Refer to Transmission Fluid Level Check in this section.
Main Control
� Screws not tightened to specification
� Tighten to specification.
� Filter damaged, missing � Inspect for damage. Repair as necessary.
� Separator plate damaged � Inspect for damage. If damaged, install a new separator plate.
� Contamination � Disassemble and clean.
� Valve/springs damaged, misassembled, missing, stuck or bore damaged
� If damaged or parts are missing, install new main control assembly. If misassembled, reassemble correctly. DO NOT stone, file or sand valves. This will remove the anodized finish and may result in further main control or transmission damage.
Coast Clutch Assembly
� Seals, piston damaged � Inspect for damage. Repair as necessary.
� Check ball damaged, missing, not seating, off location
� Inspect for mislocation, poor seating, damage. Install a new cylinder.
� Friction elements damaged or worn
� Inspect for damage. Repair as necessary.
� Return springs damaged � Inspect for damage. Repair as necessary.
Possible Component Reference/Action
282 — ROUTINE
Powertrain Control System
� PCM, vehicle wiring harnesses, Pressure Control Solenoid A (PCA), Pressure Control Solenoid B (PCB)
� Carry out On-Board Diagnostic (OBD) tests. Refer to the Powertrain Control/Emissions Diagnosis (PC/ED) manual for diagnosis and testing of the PCM.
� GO to Pinpoint Test D .
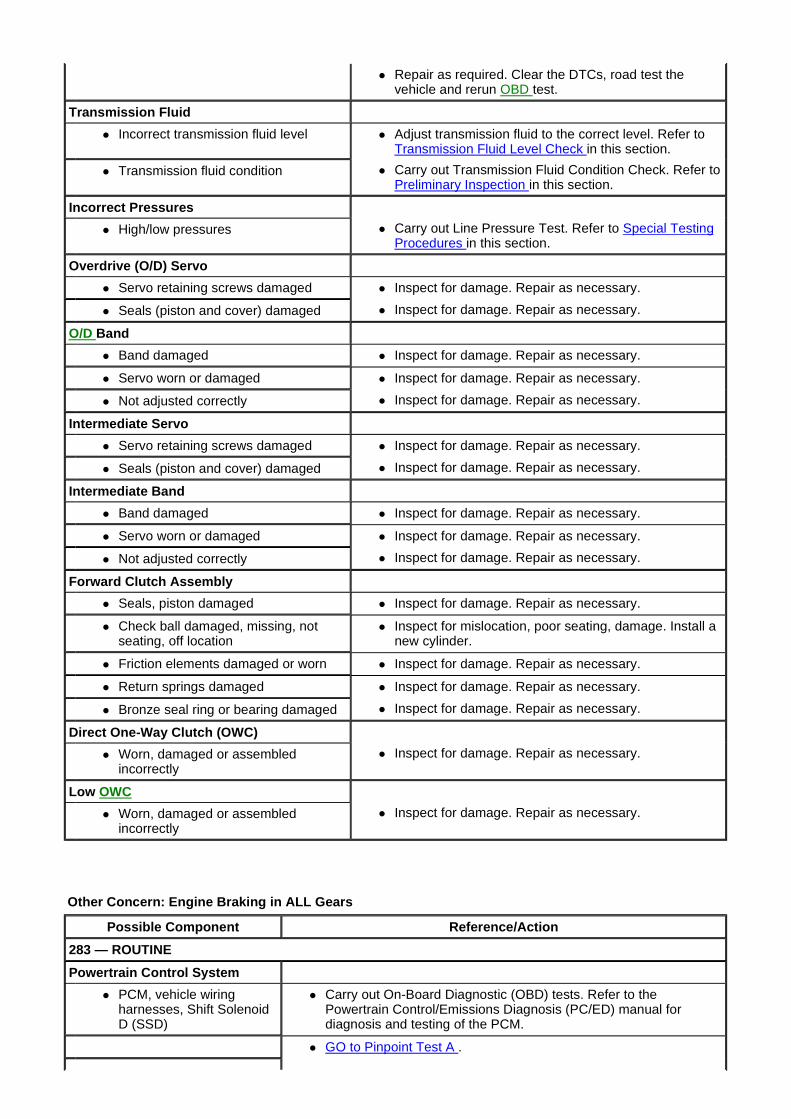
Other Concern: Engine Braking in ALL Gears
� Repair as required. Clear the DTCs, road test the vehicle and rerun OBD test.
Transmission Fluid
� Incorrect transmission fluid level � Adjust transmission fluid to the correct level. Refer to Transmission Fluid Level Check in this section.
� Transmission fluid condition � Carry out Transmission Fluid Condition Check. Refer to Preliminary Inspection in this section.
Incorrect Pressures
� High/low pressures � Carry out Line Pressure Test. Refer to Special Testing Procedures in this section.
Overdrive (O/D) Servo
� Servo retaining screws damaged � Inspect for damage. Repair as necessary.
� Seals (piston and cover) damaged � Inspect for damage. Repair as necessary.
O/D Band
� Band damaged � Inspect for damage. Repair as necessary.
� Servo worn or damaged � Inspect for damage. Repair as necessary.
� Not adjusted correctly � Inspect for damage. Repair as necessary.
Intermediate Servo
� Servo retaining screws damaged � Inspect for damage. Repair as necessary.
� Seals (piston and cover) damaged � Inspect for damage. Repair as necessary.
Intermediate Band
� Band damaged � Inspect for damage. Repair as necessary.
� Servo worn or damaged � Inspect for damage. Repair as necessary.
� Not adjusted correctly � Inspect for damage. Repair as necessary.
Forward Clutch Assembly
� Seals, piston damaged � Inspect for damage. Repair as necessary.
� Check ball damaged, missing, not seating, off location
� Inspect for mislocation, poor seating, damage. Install a new cylinder.
� Friction elements damaged or worn � Inspect for damage. Repair as necessary.
� Return springs damaged � Inspect for damage. Repair as necessary.
� Bronze seal ring or bearing damaged � Inspect for damage. Repair as necessary.
Direct One-Way Clutch (OWC)
� Worn, damaged or assembled incorrectly
� Inspect for damage. Repair as necessary.
Low OWC
� Worn, damaged or assembled incorrectly
� Inspect for damage. Repair as necessary.
Possible Component Reference/Action
283 — ROUTINE
Powertrain Control System
� PCM, vehicle wiring harnesses, Shift Solenoid D (SSD)
� Carry out On-Board Diagnostic (OBD) tests. Refer to the Powertrain Control/Emissions Diagnosis (PC/ED) manual for diagnosis and testing of the PCM.
� GO to Pinpoint Test A .
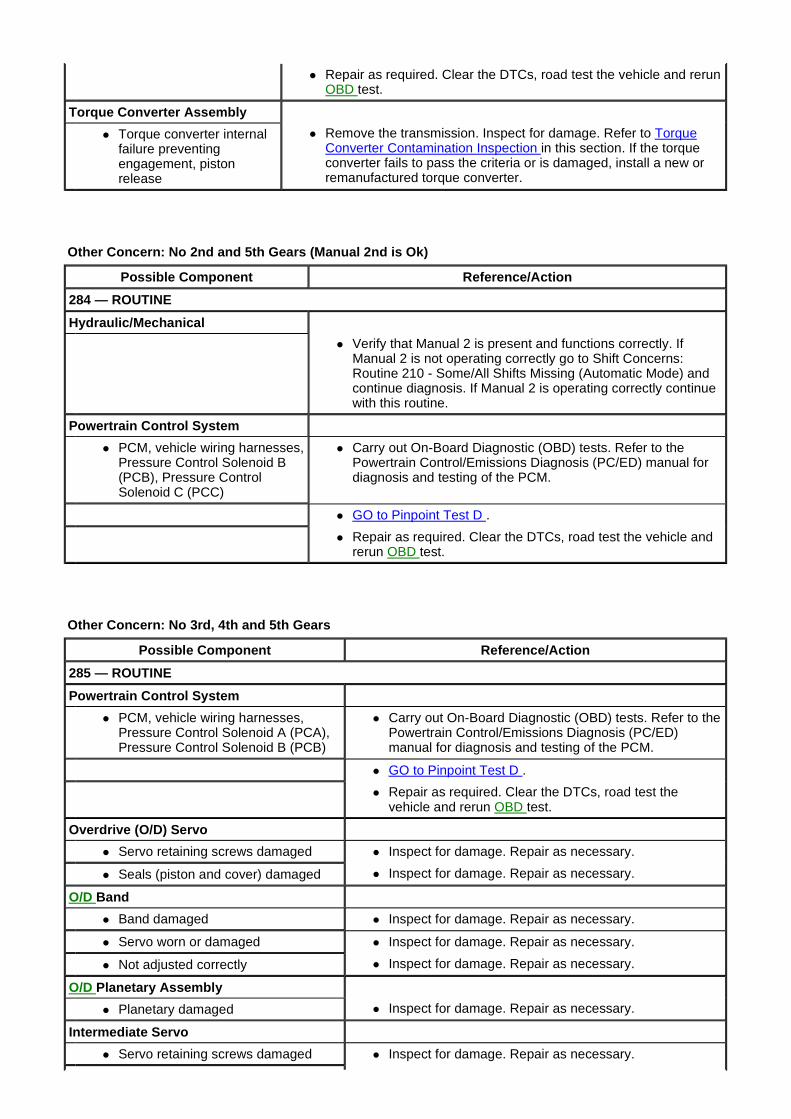
Other Concern: No 2nd and 5th Gears (Manual 2nd is Ok)
Other Concern: No 3rd, 4th and 5th Gears
� Repair as required. Clear the DTCs, road test the vehicle and rerun OBD test.
Torque Converter Assembly
� Torque converter internal failure preventing engagement, piston release
� Remove the transmission. Inspect for damage. Refer to Torque Converter Contamination Inspection in this section. If the torque converter fails to pass the criteria or is damaged, install a new or remanufactured torque converter.
Possible Component Reference/Action
284 — ROUTINE
Hydraulic/Mechanical
� Verify that Manual 2 is present and functions correctly. If Manual 2 is not operating correctly go to Shift Concerns: Routine 210 - Some/All Shifts Missing (Automatic Mode) and continue diagnosis. If Manual 2 is operating correctly continue with this routine.
Powertrain Control System
� PCM, vehicle wiring harnesses, Pressure Control Solenoid B (PCB), Pressure Control Solenoid C (PCC)
� Carry out On-Board Diagnostic (OBD) tests. Refer to the Powertrain Control/Emissions Diagnosis (PC/ED) manual for diagnosis and testing of the PCM.
� GO to Pinpoint Test D .
� Repair as required. Clear the DTCs, road test the vehicle and rerun OBD test.
Possible Component Reference/Action
285 — ROUTINE
Powertrain Control System
� PCM, vehicle wiring harnesses, Pressure Control Solenoid A (PCA), Pressure Control Solenoid B (PCB)
� Carry out On-Board Diagnostic (OBD) tests. Refer to the Powertrain Control/Emissions Diagnosis (PC/ED) manual for diagnosis and testing of the PCM.
� GO to Pinpoint Test D .
� Repair as required. Clear the DTCs, road test the vehicle and rerun OBD test.
Overdrive (O/D) Servo
� Servo retaining screws damaged � Inspect for damage. Repair as necessary.
� Seals (piston and cover) damaged � Inspect for damage. Repair as necessary.
O/D Band
� Band damaged � Inspect for damage. Repair as necessary.
� Servo worn or damaged � Inspect for damage. Repair as necessary.
� Not adjusted correctly � Inspect for damage. Repair as necessary.
O/D Planetary Assembly
� Planetary damaged � Inspect for damage. Repair as necessary.
Intermediate Servo
� Servo retaining screws damaged � Inspect for damage. Repair as necessary.
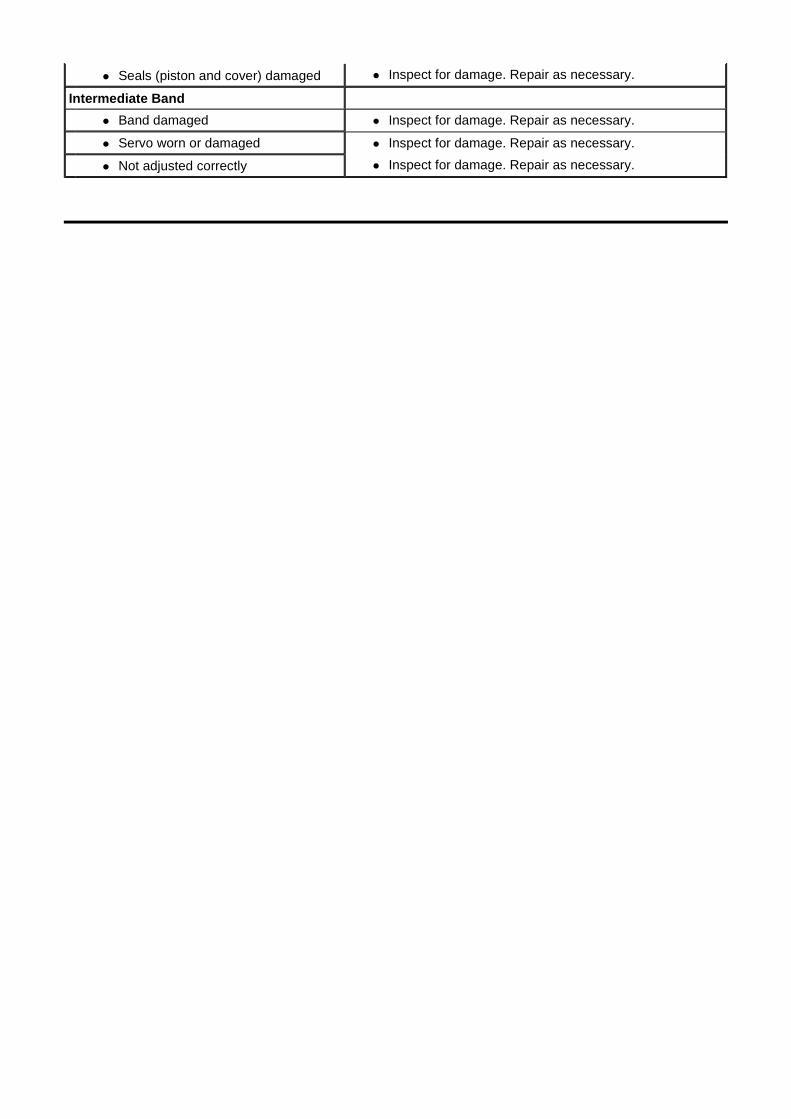
� Seals (piston and cover) damaged � Inspect for damage. Repair as necessary.
Intermediate Band
� Band damaged � Inspect for damage. Repair as necessary.
� Servo worn or damaged � Inspect for damage. Repair as necessary.
� Not adjusted correctly � Inspect for damage. Repair as necessary.