Embed Size (px)
Citation preview
DF3600U
DF3600U
SUNPAK
Universal Flash
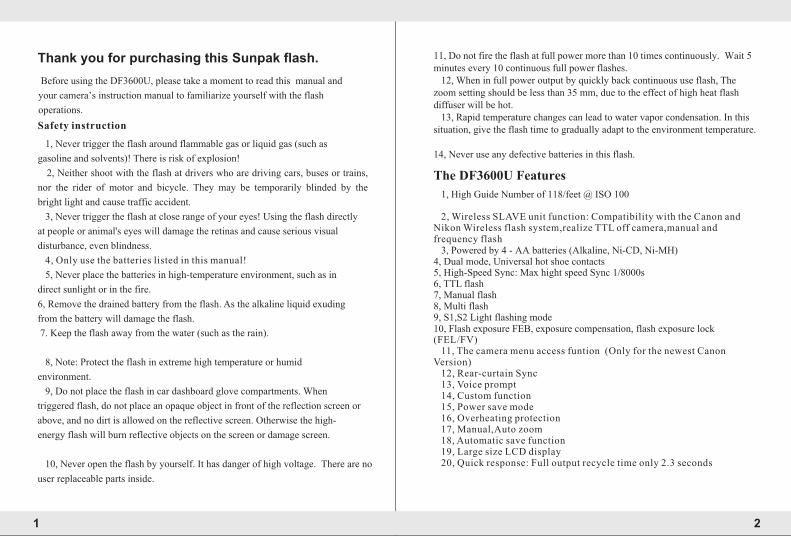
Thank you for purchasing this Sunpak flash.
Before using the DF3600U, please take a moment to read this manual and your camera’s instruction manual to familiarize yourself with the flash operations.Safety instruction
1, Never trigger the flash around flammable gas or liquid gas (such as
gasoline and solvents)! There is risk of explosion!
2, Neither shoot with the flash at drivers who are driving cars, buses or trains,
nor the rider of motor and bicycle. They may be temporarily blinded by the
bright light and cause traffic accident.
3, Never trigger the flash at close range of your eyes! Using the flash directly
at people or animal's eyes will damage the retinas and cause serious visual
disturbance, even blindness.
4, Only use the batteries listed in this manual!
5, Never place the batteries in high-temperature environment, such as in direct sunlight or in the fire.
6, Remove the drained battery from the flash. As the alkaline liquid exuding from the battery will damage the flash.
7. Keep the flash away from the water (such as the rain).
8, Note: Protect the flash in extreme high temperature or humid
environment. 9, Do not place the flash in car dashboard glove compartments. When
triggered flash, do not place an opaque object in front of the reflection screen or
above, and no dirt is allowed on the reflective screen. Otherwise the high-
energy flash will burn reflective objects on the screen or damage screen.
10, Never open the flash by yourself. It has danger of high voltage. There are no user replaceable parts inside.
11, Do not fire the flash at full power more than 10 times continuously. Wait 5 minutes every 10 continuous full power flashes. 12, When in full power output by quickly back continuous use flash, The zoom setting should be less than 35 mm, due to the effect of high heat flash diffuser will be hot. 13, Rapid temperature changes can lead to water vapor condensation. In this situation, give the flash time to gradually adapt to the environment temperature.
14, Never use any defective batteries in this flash.
1, High Guide Number of 118/feet @ ISO 100
2, Wireless SLAVE unit function: Compatibility with the Canon and Nikon Wireless flash system,realize TTL off camera,manual and frequency flash 3, Powered by 4 - AA batteries (Alkaline, Ni-CD, Ni-MH)
4, Dual mode, Universal hot shoe contacts 5, High-Speed Sync: Max hight speed Sync 1/8000s 6, TTL flash 7, Manual flash 8, Multi flash 9, S1,S2 Light flashing mode 10, Flash exposure FEB, exposure compensation, flash exposure lock
(FEL/FV) 11, The camera menu access funtion (Only for the newest Canon Version) 12, Rear-curtain Sync 13, Voice prompt 14, Custom function 15, Power save mode 16, Overheating protection 17, Manual,Auto zoom 18, Automatic save function 19, Large size LCD display 20, Quick response: Full output recycle time only 2.3 seconds
The DF3600U Features
1 2
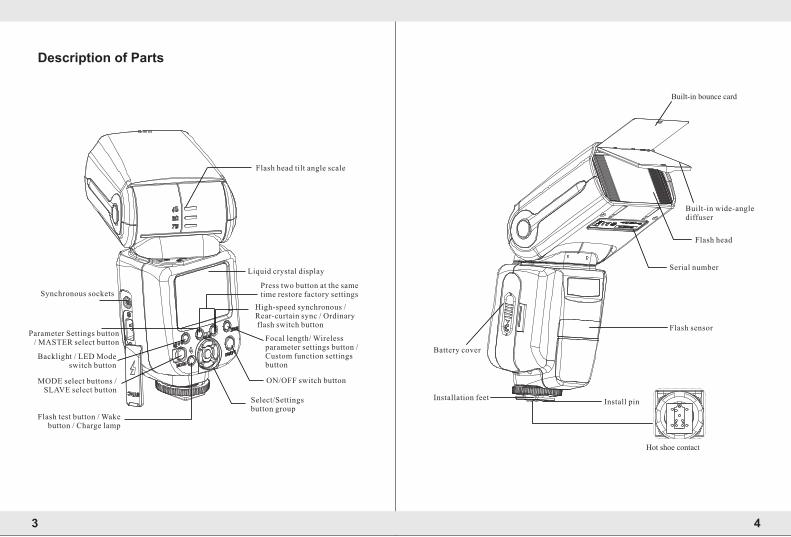
Description of Parts
Synchronous sockets
Parameter Settings button / MASTER select button
Backlight / LED Mode switch button
MODE select buttons / SLAVE select button
Flash test button / Wake button / Charge lamp
Flash head tilt angle scale
Liquid crystal display
Press two button at the same time restore factory settings
High-speed synchronous / Rear-curtain sync / Ordinary flash switch button
Focal length/ Wireless parameter settings button / Custom function settings button
ON/OFF switch button
Battery cover
Installation feet
Built-in bounce card
Built-in wide-angle diffuser
Flash head
Flash sensor
Install pin
Serial number
3 4
Hot shoe contact
Select/Settingsbutton group
<< >>
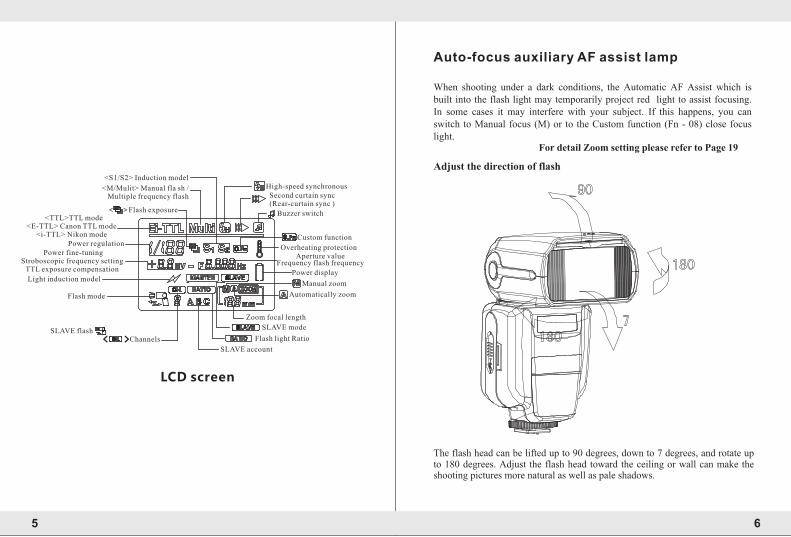
<S1/S2> Induction model
<M/Mulit> Manual fla sh / Multiple frequency flash
< >Flash exposure <TTL>TTL mode
<E-TTL> Canon TTL mode<i-TTL> Nikon mode
Power regulation Power fine-tuning
Stroboscopic frequency setting TTL exposure compensation
Light induction model
Flash mode
SLAVE flashChannels
High-speed synchronous Second curtain sync (Rear-curtain sync )
Buzzer switch
Custom function
Overheating protectionAperture value
Frequency flash frequency
Power display
Manual zoom
Automatically zoom
Zoom focal length
SLAVE mode
Flash light Ratio
SLAVE account
LCD screen
When shooting under a dark conditions, the Automatic AF Assist which is built into the flash light may temporarily project red light to assist focusing. In some cases it may interfere with your subject. If this happens, you can switch to Manual focus (M) or to the Custom function (Fn - 08) close focus light.
Auto-focus auxiliary AF assist lamp
For detail Zoom setting please refer to Page 19
Adjust the direction of flash
The flash head can be lifted up to 90 degrees, down to 7 degrees, and rotate up to 180 degrees. Adjust the flash head toward the ceiling or wall can make the shooting pictures more natural as well as pale shadows.
5 6

Applicable batteries and power supply.
The following batteries are applicable to the flash.
1, AA battery
A:4 (AA) Alkaline manganese battery (1.5V). The battery can meet demand of medium power without maintenance, but it can not be recharge.
B:4 (AA) Nickel-cadmium battery (1.2V). The battery recycles quickly and can be recharged, so it is economic and practical.
C:4 (AA) Nimh batteries (1.2V). This battery's power obviously exceed that of nickel-cadmium battery and it is less harmful to the environment (do not contain cadmium).
D:4 (AA) Lithium battery (1.5V). This battery has large capacity. Low self-discharge rate and no need of maintenance.
E:4 (AA) Hydrogen oxygen cell (1.5V). This battery is also called (Oxyride), Its capacity is larger and its service life is about 1.5 times of alkaline battery's. So it is very Suitable for use in electronic products of high power consumption.
Install the battery
Lithium battery installation
1, Open the battery cover.According to the direction of the arrow shown in slide battery hatch cover, open the battery compartment.
2, Install battery According to the battery polarity located on the indise of the battery cover, install the battery into battery compartment. Make sure the battery polarity contact is correct.
3, Close the battery cover.Closed it according to the direction of the arrow shown in slide the battery cover.
7 8
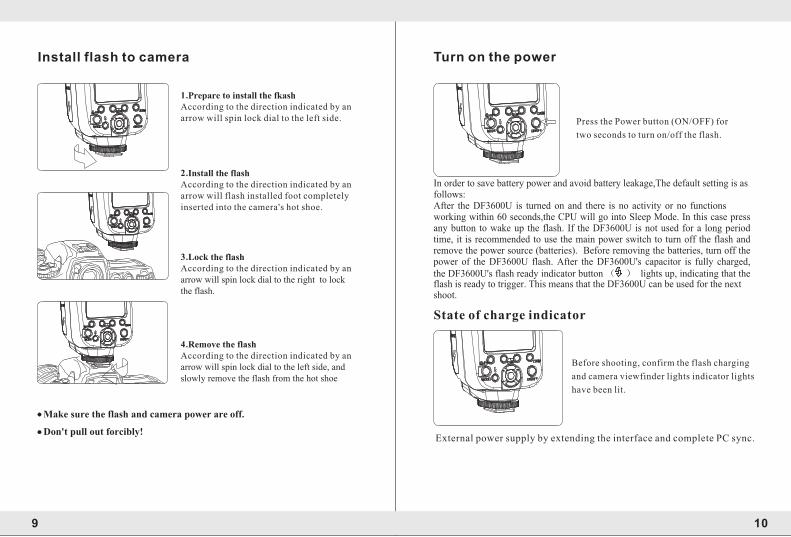
Install flash to camera
1. Prepare to install the fkashAccording to the direction indicated by an arrow will spin lock dial to the left side.
2. Install the flashAccording to the direction indicated by an arrow will flash installed foot completely inserted into the camera's hot shoe.
3. Lock the flash According to the direction indicated by an arrow will spin lock dial to the right to lock the flash.
4. Remove the flashAccording to the direction indicated by an arrow will spin lock dial to the left side, and slowly remove the flash from the hot shoe
Make sure the flash and camera power are off.
Don't pull out forcibly!
9 10
Turn on the power
Press the Power button (ON/ ) for
two seconds to turn on/off the flash.
OFF
In order to save battery power and avoid battery leakage,The default setting is as follows: After the DF3600U is turned on and there is no activity or no functions working within 60 seconds,the CPU will go into Sleep Mode. In this case press any button to wake up the flash. If the DF3600U is not used for a long period time, it is recommended to use the main power switch to turn off the flash and remove the power source (batteries). Before removing the batteries, turn off the power of the DF3600U flash. After the DF3600U's capacitor is fully charged, the DF3600U's flash ready indicator button ( ) lights up, indicating that the flash is ready to trigger. This means that the DF3600U can be used for the next shoot.
State of charge indicator
Before shooting, confirm the flash charging
and camera viewfinder lights indicator lights
have been lit.
External power supply by extending the interface and complete PC sync.
In order to save battery power and avoid battery leakage,The default settingare as following:
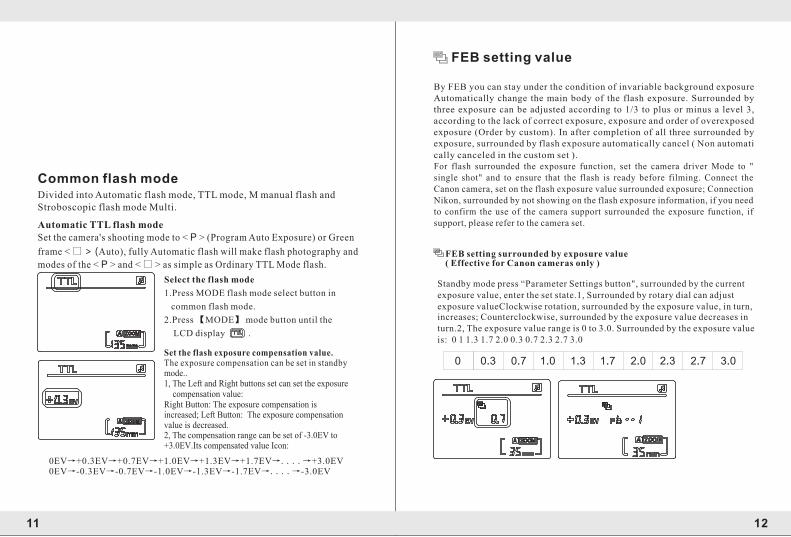
Common flash modeDivided into Automatic flash mode, TTL mode, M manual flash and Stroboscopic flash mode Multi.
Automatic TTL flash modeSet the camera's shooting mode to < P > (Program Auto Exposure) or Green
frame < □ > (Auto), fully Automatic flash will make flash photography and
modes of the < P > and < □ > as simple as Ordinary TTL Mode flash.
Select the flash mode
1.Press MODE flash mode select button in
common flash mode.
2.Press 【MODE】 mode button until the
LCD display .
Set the flash exposure compensation value. The exposure compensation can be set in standby mode..1, The Left and Right buttons set can set the exposure compensation value: Right Button: The exposure compensation is increased; Left Button: The exposure compensation value is decreased.2, The compensation range can be set of -3.0EV to +3.0EV.Its compensated value Icon:
0EV→+0.3EV→+0.7EV→+1.0EV→+1.3EV→+1.7EV→....→+3.0EV0EV→-0.3EV→-0.7EV→-1.0EV→-1.3EV→-1.7EV→....→-3.0EV
11 12
0 3.02.72.32.01.71.31.00.70.3
By FEB you can stay under the condition of invariable background exposure Automatically change the main body of the flash exposure. Surrounded by three exposure can be adjusted according to 1/3 to plus or minus a level 3, according to the lack of correct exposure, exposure and order of overexposed exposure (Order by custom). In after completion of all three surrounded by exposure, surrounded by flash exposure automatically cancel ( Non automati
FEB setting value
FEB setting surrounded by exposure value ( Effective for Canon cameras only )
Standby mode press “Parameter Settings button", surrounded by the current exposure value, enter the set state.1, Surrounded by rotary dial can adjust exposure valueClockwise rotation, surrounded by the exposure value, in turn,
For flash surrounded the exposure function, set the camera driver Mode to "single shot" and to ensure that the flash is ready before filming. Connect the Canon camera, set on the flash exposure value surrounded exposure; Connection Nikon, surrounded by not showing on the flash exposure information, if you need to confirm the use of the camera support surrounded the exposure function, if support, please refer to the camera set.
cally canceled in the custom set ).
increases; Counterclockwise, surrounded by the exposure value decreases in turn.2, The exposure value range is 0 to 3.0. Surrounded by the exposure value is: 0 1 1.3 1.7 2.0 0.3 0.7 2.3 2.7 3.0

3, Complete setup
After set up press again the【 Parameter Settings button 】to exit the set
status. If FEB value is not 0 displays, as shown by the custom function can be set FEB exposure sequence.
On-line operation
Flash TTL modeThrough the hot shoe connection Canon camera;Screen displays E-TTL to represent the current metering system; Through the hot shoe connection Nikon camera;Screen display i-TTL to represent the current metering system; Because the Nikon system does not support flash on FEB Settings, while online does not display the FEB information, to realize surrounded the exposure function on Nikon (BKT), please refer to the camera Settings.
Flash exposure lock (FEL/FV)
Use flash exposure lock, you can lock the correct
flash exposure Settings for each parts of scene.
When flash TTL mode is displayed on the LCD
screen, please connect the flash with camera
correctly. Canon camera press the
" FEL" or "*" (AEL- Auto exposure lock) button,
Nikon Camera press "FV" button, Then the flash
give off preflash, camera will calculate the
appropriate flash output data, At this point you
have a time to re composition, After it finished you
can press the shutter to shooting.(This feature
requires to camer support to use.Please refer to
your camera manual set)
13 14
P
TV
AV
M
AV/A
TV/S
M
Other Automatic flash shooting mode
As long as the camera's shooting mode to (AV) or A (Aperture priority ae),
the [TV] S (Shutter priority ae) or [M] (Manual), you can also use E-TTL
/ i-TTL flash Automatically
Select this mode to manually set the shutter speed.Value is Automatically
set to match the camera shutter speed circle for standard exposure.If the
aperture display flashing, means that the background underexposed or
overexposed, adjust the shutter speed until the aperture stop flashing.
Select this mode to manually set the aperture value.The camera is
Automatically set to match the aperture shutter speed to achieve
standard exposure.If the dark background, such as at night), will use
the slow sync in order to obtain the main your subject and the
background of the standard exposure.Using flash for MASTER of your
subject standard exposure.Use the slow shutter background exposure
standards.Because for low illumination scene will use the slow shutter,
it is recommended to use a tripod.If the shutter speed display flashing,
means that the background underexposed or overexposed.Adjust the
display stops flashing until aperture shutter speed.
To manually set the shutter speed and aperture when choosing this pattern.
Using flash for MASTER of your subject standard exposure.Using a
combination of you to set the shutter speed and aperture to obtain
background exposure.
If you use the < DEP > or < A - DEP > shooting model, The result and use
< P > (AE) model is the same.Flash Sync Speeds and Apertures Value.
Shutter Speed Setting Aperture Setting
Set Automatically(1/60 sec.~1/Xsec.)
Set manually(30 sec.~1/Xsec.)
Set Automatically(30 sec.~1/Xsec.)
Set manually(buLb,30 sec.~1/Xsec.)
Automatic
Automatic
Manual
Manual
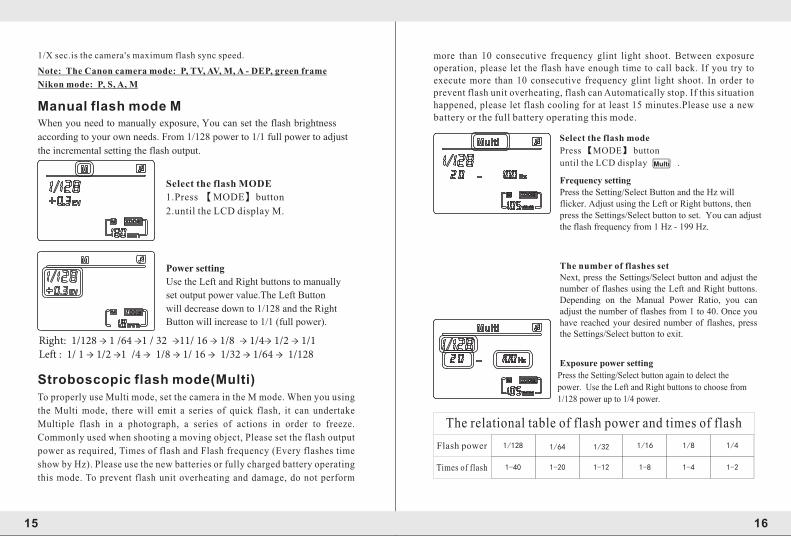
Manual flash mode MWhen you need to manually exposure, You can set the flash brightness
according to your own needs. From 1/128 power to 1/1 full power to adjust
the incremental setting the flash output.
1.Press 【MODE】button
2.until the LCD display M.
Select the flash MODE
Power setting
Use the Left and Right buttons to manually
set output power value.The Left Button will decrease down to 1/128 and the Right Button will increase to 1/1 (full power).
Stroboscopic flash mode(Multi)To properly use Multi mode, set the camera in the M mode. When you using
the Multi mode, there will emit a series of quick flash, it can undertake
Multiple flash in a photograph, a series of actions in order to freeze.
Commonly used when shooting a moving object, Please set the flash output
power as required, Times of flash and Flash frequency (Every flashes time
show by Hz). Please use the new batteries or fully charged battery operating
this mode. To prevent flash unit overheating and damage, do not perform
1/X sec.is the camera's maximum flash sync speed.
Note: The Canon camera mode: P, TV, AV, M, A - DEP, green frame
Nikon mode: P, S, A, M
Right: 1/128 → 1 /64 →1 / 32 →11/ 16 → 1/8 → 1/4→ 1/2 → 1/1Left : 1/ 1 → 1/2 →1 /4 → 1/8 → 1/ 16 → 1/32 → 1/64 → 1/128
15 16
1 2-
1 4/
1 4-
1 8/
1 8-
1 16/
1 12-
1 32/
1 20-
1 64/
1-40
1/128
Press 【MODE】 button
until the LCD display .
Frequency setting
Press the Setting/Select Button and the Hz will flicker. Adjust using the Left or Right buttons, then press the Settings/Select button to set. You can adjust the flash frequency from 1 Hz - 199 Hz.
The number of flashes setNext, press the Settings/Select button and adjust the number of flashes using the Left and Right buttons. Depending on the Manual Power Ratio, you can adjust the number of flashes from 1 to 40. Once you have reached your desired number of flashes, press the Settings/Select button to exit.
battery or the full battery operating this mode.
Exposure power setting
Press the Setting/Select button again to delect the power. Use the Left and Right buttons to choose from 1/128 power up to 1/4 power.
The relational table of flash power and times of flash
Flash power
Times of flash
more than 10 consecutive frequency glint light shoot. Between exposure operation, please let the flash have enough time to call back. If you try to execute more than 10 consecutive frequency glint light shoot. In order to prevent flash unit overheating, flash can Automatically stop. If this situation happened, please let flash cooling for at least 15 minutes.Please use a new
Select the flash mode
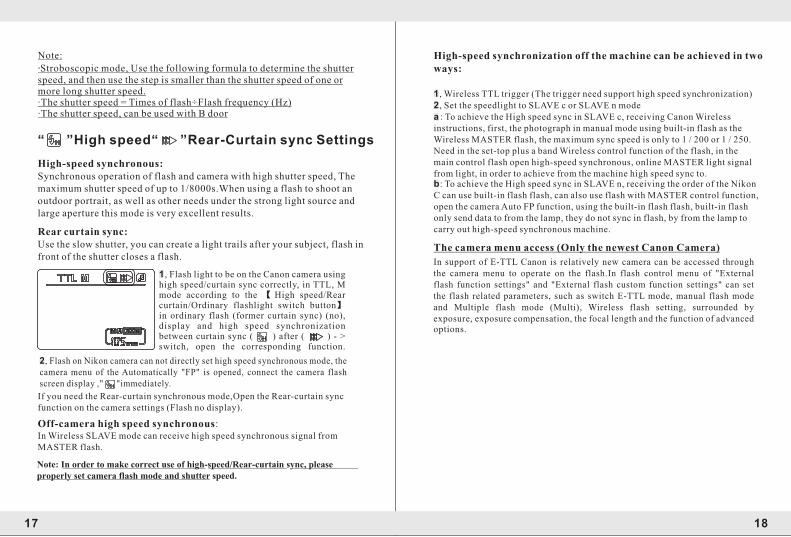
“ ”High speed Rear-Curtain sync Settings“ ”
High-speed synchronous: Synchronous operation of flash and camera with high shutter speed, The maximum shutter speed of up to 1/8000s.When using a flash to shoot an outdoor portrait, as well as other needs under the strong light source and large aperture this mode is very excellent results.
Note:
·Stroboscopic mode, Use the following formula to determine the shutter speed, and then use the step is smaller than the shutter speed of one or more long shutter speed.·The shutter speed = Times of flash÷Flash frequency (Hz)·The shutter speed, can be used with B door
17 18
Rear curtain sync: Use the slow shutter, you can create a light trails after your subject, flash in front of the shutter closes a flash.
1, Flash light to be on the Canon camera using high speed/curtain sync correctly, in TTL, M mode according to the 【 High speed/Rear curtain/Ordinary flashlight switch button】in ordinary flash (former curtain sync) (no), display and high speed synchronization between curtain sync ( ) after ( ) - > switch, open the corresponding function.
2, Flash on Nikon camera can not directly set high speed synchronous mode, the camera menu of the Automatically "FP" is opened, connect the camera flash screen display ," "immediately.
If you need the Rear-curtain synchronous mode,Open the Rear-curtain sync function on the camera settings (Flash no display).
Off-camera high speed synchronous: In Wireless SLAVE mode can receive high speed synchronous signal from MASTER flash.
Note: In order to make correct use of high-speed/Rear-curtain sync, please properly set camera flash mode and shutter speed.
High-speed synchronization off the machine can be achieved in two ways:
1, Wireless TTL trigger (The trigger need support high speed synchronization)2, Set the speedlight to SLAVE c or SLAVE n modea:To achieve the High speed sync in SLAVE c, receiving Canon Wireless instructions, first, the photograph in manual mode using built-in flash as the Wireless MASTER flash, the maximum sync speed is only to 1 / 200 or 1 / 250.Need in the set-top plus a band Wireless control function of the flash, in the main control flash open high-speed synchronous, online MASTER light signalfrom light, in order to achieve from the machine high speed sync to.
b: C can use built-in flash flash, can also use flash with MASTER control function, open the camera Auto FP function, using the built-in flash flash, built-in flash only send data to from the lamp, they do not sync in flash, by from the lamp to carry out high-speed synchronous machine.
To achieve the High speed sync in SLAVE n, receiving the order of the Nikon
The camera menu access (Only the newest Canon Camera)
In support of E-TTL Canon is relatively new camera can be accessed through the camera menu to operate on the flash.In flash control menu of "External flash function settings" and "External flash custom function settings" can set the flash related parameters, such as switch E-TTL mode, manual flash mode and Multiple flash mode (Multi), Wireless flash setting, surrounded by exposure, exposure compensation, the focal length and the function of advanced options.
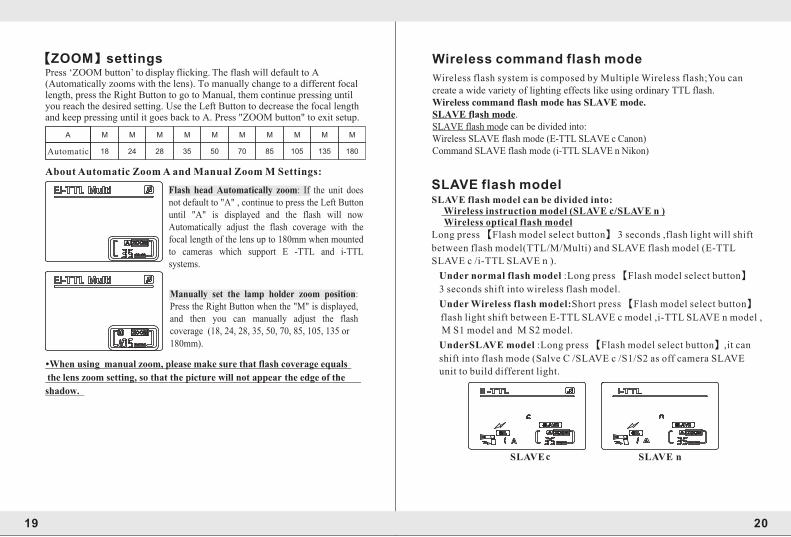
MMMMMMMMMA M
18013510585705035282418
【ZOOM】settingsPress ‘ZOOM button’ to display flicking. The flash will default to A (Automatically zooms with the lens). To manually change to a different focal length, press the Right Button to go to Manual, them continue pressing until you reach the desired setting. Use the Left Button to decrease the focal length and keep pressing until it goes back to A. Press "ZOOM button" to exit setup.
Automatic
About Automatic Zoom A and Manual Zoom M Settings:
Flash head Automatically zoom: If the unit does not default to "A" , continue to press the Left Button until "A" is displayed and the flash will now Automatically adjust the flash coverage with the focal length of the lens up to 180mm when mounted to cameras which support E -TTL and i-TTL systems.
Manually set the lamp holder zoom position: Press the Right Button when the "M" is displayed, and then you can manually adjust the flash coverage (18, 24, 28, 35, 50, 70, 85, 105, 135 or 180mm).
·When using manual zoom, please make sure that flash coverage equals the lens zoom setting, so that the picture will not appear the edge of the
shadow.
19 20
Wireless command flash mode
Wireless flash system is composed by Multiple Wireless flash;You can create a wide variety of lighting effects like using ordinary TTL flash. Wireless command flash mode has SLAVE mode. SLAVE flash mode.SLAVE flash mode can be divided into: Wireless SLAVE flash mode (E-TTL SLAVE c Canon) Command SLAVE flash mode (i-TTL SLAVE n Nikon)
SLAVE c SLAVE n
SLAVE flash model SLAVE flash model can be divided into: Wireless instruction model (SLAVE c/SLAVE n ) Wireless optical flash model Long press 【Flash model select button】 3 seconds ,flash light will shift
between flash model(TTL/M/Multi) and SLAVE flash model (E-TTL
SLAVE c /i-TTL SLAVE n ).
Long press 【Flash model select button】
3 seconds shift into wireless flash model.
Under Wireless flash model:Short press 【Flash model select button】
flash light shift between E-TTL SLAVE c model ,i-TTL SLAVE n model ,
M S1 model and M S2 model.
UnderSLAVE model :Long press 【Flash model select button】,it can
shift into flash mode (Salve C /SLAVE c /S1/S2 as off camera SLAVE
unit to build different light.
Under normal flash model :
21 22
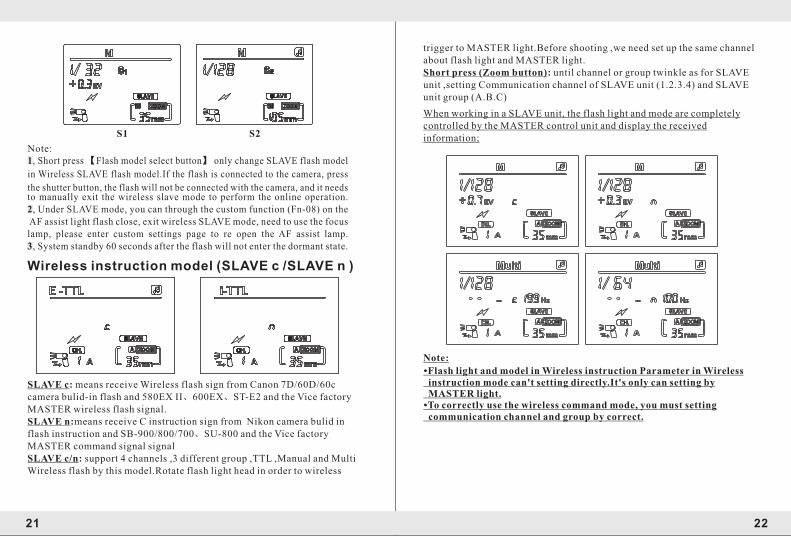
Wireless instruction model (SLAVE c /SLAVE n )
SLAVE c: means receive Wireless flash sign from Canon 7D/60D/60c camera bulid-in flash and 580EX II、600EX、ST-E2 and the Vice factory MASTER wireless flash signal.SLAVE n:means receive C instruction sign from Nikon camera bulid in flash instruction and SB-900/800/700、SU-800 and the Vice factory MASTER command signal signalSLAVE c/n: support 4 channels ,3 different group ,TTL ,Manual and Multi Wireless flash by this model.Rotate flash light head in order to wireless
S1 S2
Note:1, Short press 【Flash model select button】 only change SLAVE flash model
in Wireless SLAVE flash model.If the flash is connected to the camera, press
the shutter button, the flash will not be connected with the camera, and it needs to manually exit the wireless slave mode to perform the online operation.2, Under SLAVE mode, you can through the custom function (Fn-08) on the AF assist light flash close, exit wireless SLAVE mode, need to use the focus lamp, please enter custom settings page to re open the AF assist lamp.3, System standby 60 seconds after the flash will not enter the dormant state.
·To correctly use the wireless command mode, you must setting communication channel and group by correct.
Note:
·Flash light and model in Wireless instruction Parameter in Wireless instruction mode can't setting directly.It's only can setting by MASTER light.
trigger to MASTER light.Before shooting ,we need set up the same channel about flash light and MASTER light.Short press (Zoom button): until channel or group twinkle as for SLAVE unit ,setting Communication channel of SLAVE unit (1.2.3.4) and SLAVE unit group (A.B.C)
When working in a SLAVE unit, the flash light and mode are completely controlled by the MASTER control unit and display the received information;

23 24
Wireless optical flash model(S1,S2)
Rotating the flash lamp, the signal transmitter should toward to the MASTER speedlight in S1,S2 mode.
Setting optical flash model:
1, Press 【Flash model select button】 until LCD display S1/S2 model in Wireless flash model.These two models are suitable for the side effect of the machine, to create a variety of lighting effects. They are suitable for manual flash and TTL flash environment.2, In these two modes, the output brightness is adjusted to the same as the M mode.
S1 model: Suitable for manual flash environment,each flash of induction MASTER flash light and sync trigger falsh.The effect as same as Wireless flash trigger.MASTER flash setting manual model in commom situation,please don't use TTL model of pre-flash and red rey reduction of several flash.
S2 model:Suitable for manual flash environment (pre-flash cancelmodel ).This model can ignone TTL flash Pre flashing signal and main flash sync.It support MASTER flash light in TTL model.
Note: If SLAVE light does't sync flash with MASTER flash light in S1 /S2 model.Pleaes setting optcial model of SLAVE light and power output by correct.Please avoid several situation as below: Avoid MASTER light to use red eye reduction funciton Avoid MASTER light to use model lamp Avoid MASTER light to use instruction model(Nikon) or wireless model (Canon)Avoid MASTER light to use ST-E2 and the vice factory master flashas for flash controler.
(2)Flash light compose three SLAVE unit group 's wireless flash Setting SLAVE unit: SLAVE c and SLAVE n.Setting channel: 1,2,3,4 Setting group: Three flash lights setting group A,B,CSetting MASTER unit: Setting each group's flash model and output power Setting flash light ratio: MASTER unit flash light ratio setting <A: BC>
(1)Flash light compose two salve unit group's wireless flash.
Setting SLAVE unit: SLAVE c and SLAVE n.
Setting channel: 1,2,3,4
Setting group: Two flash lights setting group A ,B
Setting MASTER unit: Setting each group flash model and output power
Setting flash light ratio: Setting MASTER unit flash light ratio A:B or A:
B:C for shooting (for example: Canon instruciton )
Multi lighting applications
1, Wireless optical instrcution light
You can create two or three slave units to complete the multi - position shooting requirement. And by the main TTL auto flash shooting flash set the flash ratio, manual flash output strobe output,
If the camera without a built-in flash (such as Canon's 5D, 5D II, 5D III) is unable to use the c/Slave n S1/S2 or Slave mode separately. Because the Slave c/Slave n or S1/S2 mode is required to use the Master light exposure to use. If you need to use this feature to you need repurchasing the original Canon flash or ST-E2 as a flash controller.
Note:
(For example: Canon instruction ) ,press down test button of MASTER unit to test flash.If the SLAVE unit doesn't flash ,please check the flash light angle and the right distance.
Note: MASTER unit: If setting <RATIO A: B>,setting SLAVE unit of group C will not flash. If the group of three flash light set <A>,they will be controlled by MASTER flash light.
25 26
Voice prompts: Different sound is different working conditions.
2, Wireless optical flash
Using built-in flash light or outlay flash light as MASTER MASTER flash
light.Please put different angel.
wireless channel will be reflect back by wall in indoor.So please choose
more space to put flash light.After improved Wireless trigger inductor ,the trigger induction faster ,S1 and S2 model availbe for outdoor.The distance 15 meters by wireless trigger inductor.Put SLAVE light ,please test S1 or S2 whether is work before shooting.
Note: Please don't put any barrier between MASTER flash light and SLAVE flash light in optical flash.Wireless trigger induction to the MASTER falsh light and don't allow the sunshine directly raying in outdooor. If this request is not good for your shooting ,you can up ordown or left or right to roating the flash light.
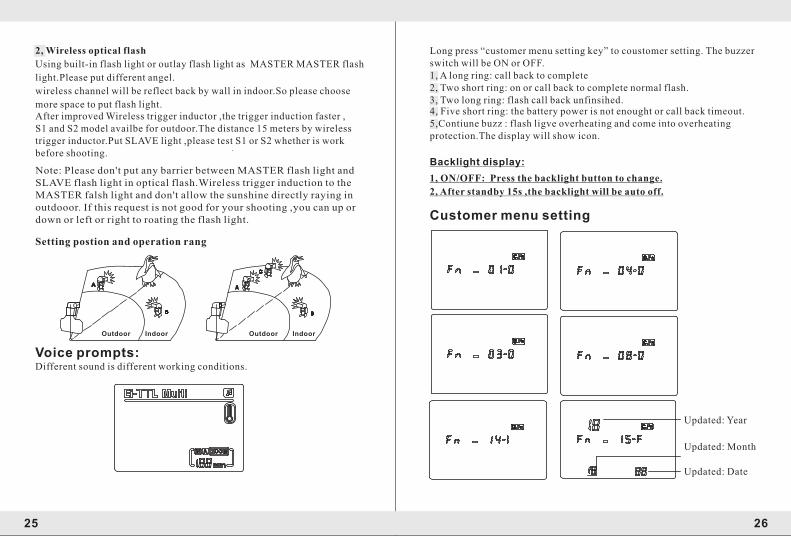
Setting postion and operation rang
Outdoor Indoor Outdoor Indoor
Customer menu setting
Updated: Year
Updated: Month
Updated: Date
1, ON/OFF: Press the backlight button to change.
2, After standby 15s ,the backlight will be auto off.
Long press “customer menu setting key” to coustomer setting. The buzzer switch will be ON or OFF.1, A long ring: call back to complete 2, Two short ring: on or call back to complete normal flash.3, Two long ring: flash call back unfinsihed.4, Five short ring: the battery power is not enought or call back timeout.5,Contiune buzz : flash ligve overheating and come into overheating protection.The display will show icon.
Backlight display:
27 28
- → 0→ +
0→ - → +
1
0
1
0
1
0
1
0
1
0
Fn-14
Fn-08
Fn-04
Fn-03
Fn-01
Fn-15 F
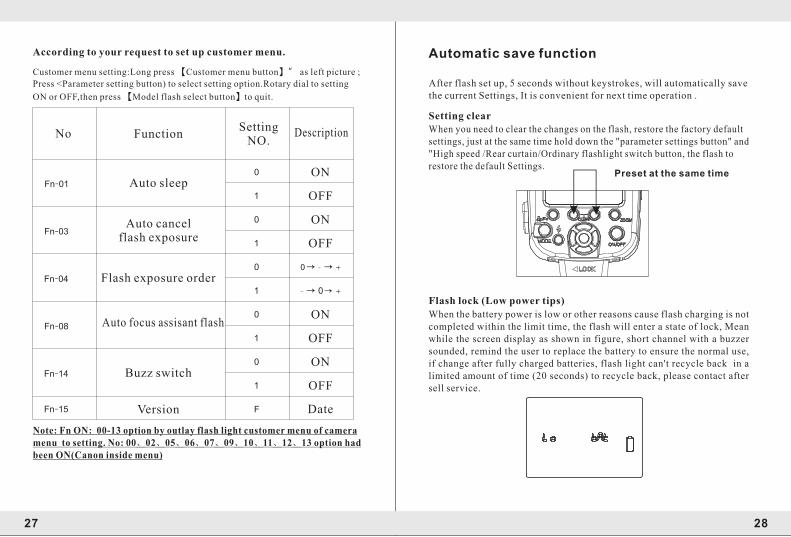
No FunctionSetting
NO.Description
Auto sleep
Auto cancel flash exposure
Flash exposure order
Auto focus assisant flash
Buzz switch
Version
ON
OFF
ON
OFF
ON
OFF
ON
OFF
Date
Note: Fn ON: 00-13 option by outlay flash light customer menu of camera menu to setting. No: 00、02、05、06、07、09、10、11、12、13 option had been ON(Canon inside menu)
According to your request to set up customer menu.
Customer menu setting:Long press 【Customer menu button】” as left picture ;
Press <Parameter setting button) to select setting option.Rotary dial to setting
ON or OFF,then press 【Model flash select button】to quit.
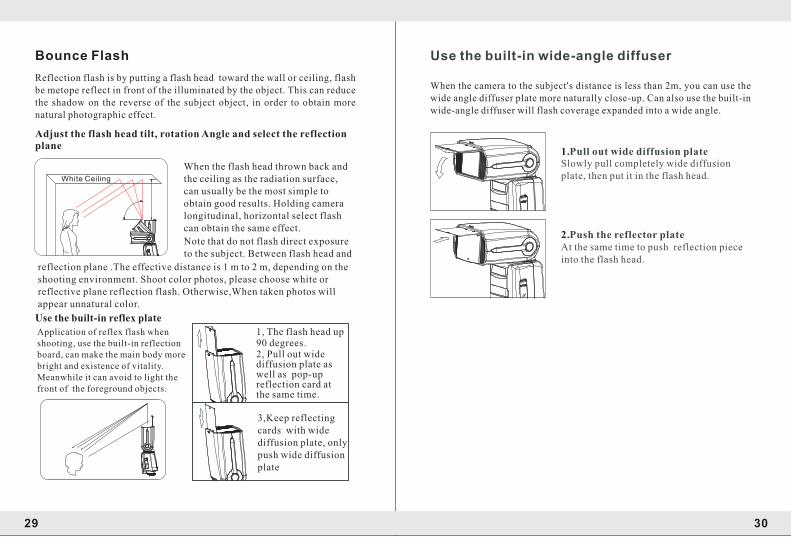
Automatic save function
After flash set up, 5 seconds without keystrokes, will automatically save the current Settings, It is convenient for next time operation .
Setting clearWhen you need to clear the changes on the flash, restore the factory default settings, just at the same time hold down the "parameter settings button" and "High speed /Rear curtain/Ordinary flashlight switch button, the flash to restore the default Settings.
Flash lock (Low power tips)
When the battery power is low or other reasons cause flash charging is not completed within the limit time, the flash will enter a state of lock, Meanwhile the screen display as shown in figure, short channel with a buzzer sounded, remind the user to replace the battery to ensure the normal use, if change after fully charged batteries, flash light can't recycle back in a limited amount of time (20 seconds) to recycle back, please contact after sell service.
Preset at the same time
29 30
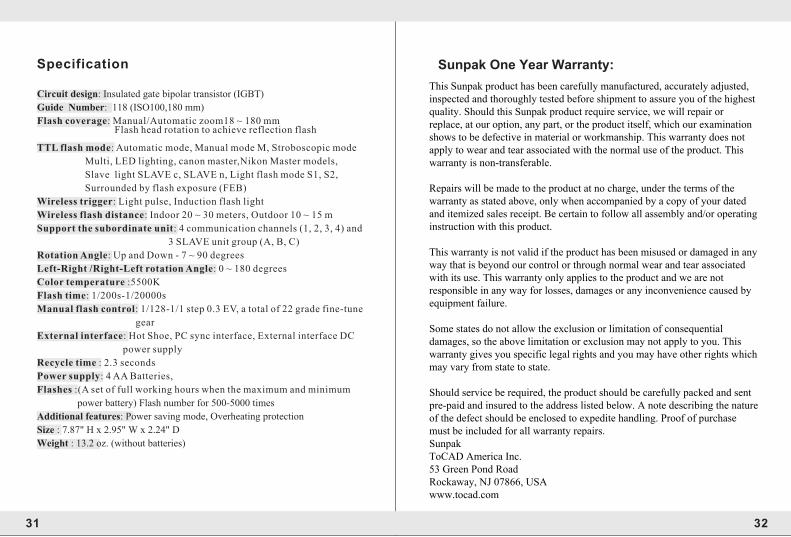
Bounce Flash
Reflection flash is by putting a flash head toward the wall or ceiling, flash be metope reflect in front of the illuminated by the object. This can reduce the shadow on the reverse of the subject object, in order to obtain more natural photographic effect.
Adjust the flash head tilt, rotation Angle and select the reflection plane
When the flash head thrown back and White Ceiling the ceiling as the radiation surface,
can usually be the most simple to obtain good results. Holding camera longitudinal, horizontal select flash can obtain the same effect.
Note that do not flash direct exposure to the subject. Between flash head and
reflection plane .The effective distance is 1 m to 2 m, depending on the shooting environment. Shoot color photos, please choose white or reflective plane reflection flash. Otherwise,When taken photos will appear unnatural color.
Use the built-in reflex plate
Application of reflex flash when shooting, use the built-in reflectionboard, can make the main body more bright and existence of vitality.Meanwhile it can avoid to light the front of the foreground objects.
1, The flash head up 90 degrees.2, Pull out wide diffusion plate as well as pop-up reflection card at the same time.
3,Keep reflecting cards with wide diffusion plate, only push wide diffusion plate
Use the built-in wide-angle diffuser
When the camera to the subject's distance is less than 2m, you can use the wide angle diffuser plate more naturally close-up. Can also use the built-in wide-angle diffuser will flash coverage expanded into a wide angle.
1.Pull out wide diffusion plateSlowly pull completely wide diffusion plate, then put it in the flash head.
2.Push the reflector plateAt the same time to push reflection piece into the flash head.
31 32
Specification
Circuit design: Insulated gate bipolar transistor (IGBT) Guide Number: 118 (ISO100,180 mm)
Flash coverage: Manual/Automatic zoom18 ~ 180 mm
TTL flash mode: Automatic mode, Manual mode M, Stroboscopic mode
Multi, LED lighting, canon master,Nikon Master models,
Slave light SLAVE c, SLAVE n, Light flash mode S1, S2,
Surrounded by flash exposure (FEB)
Wireless trigger: Light pulse, Induction flash light
Wireless flash distance: Indoor 20 ~ 30 meters, Outdoor 10 ~ 15 m
Support the subordinate unit: 4 communication channels (1, 2, 3, 4) and
3 SLAVE unit group (A, B, C)
Rotation Angle: Up and Down - 7 ~ 90 degrees
Left-Right /Right-Left rotation Angle: 0 ~ 180 degrees
Color temperature :5500K
Flash time: 1/200s-1/20000s
Manual flash control: 1/128-1/1 step 0.3 EV, a total of 22 grade fine-tune
gear
External interface: Hot Shoe, PC sync interface, External interface DC
power supply
Recycle time : 2.3 seconds
Power supply: 4 AA Batteries,
Flashes :(A set of full working hours when the maximum and minimum
power battery) Flash number for 500-5000 times Additional features: Power saving mode, Overheating protection Size : 7.87" H x 2.95" W x 2.24" D
Weight : 13.2 oz. (without batteries)
Flash head rotation to achieve reflection flash
Sunpak One Year Warranty:
This Sunpak product has been carefully manufactured, accurately adjusted, inspected and thoroughly tested before shipment to assure you of the highest quality. Should this Sunpak product require service, we will repair or replace, at our option, any part, or the product itself, which our examination shows to be defective in material or workmanship. This warranty does not apply to wear and tear associated with the normal use of the product. This warranty is non-transferable.
Repairs will be made to the product at no charge, under the terms of the warranty as stated above, only when accompanied by a copy of your dated and itemized sales receipt. Be certain to follow all assembly and/or operating instruction with this product.
This warranty is not valid if the product has been misused or damaged in any way that is beyond our control or through normal wear and tear associated with its use. This warranty only applies to the product and we are not responsible in any way for losses, damages or any inconvenience caused by equipment failure.
Some states do not allow the exclusion or limitation of consequential damages, so the above limitation or exclusion may not apply to you. This warranty gives you specific legal rights and you may have other rights which may vary from state to state.
Should service be required, the product should be carefully packed and sent pre-paid and insured to the address listed below. A note describing the nature of the defect should be enclosed to expedite handling. Proof of purchase must be included for all warranty repairs.SunpakToCAD America Inc.53 Green Pond RoadRockaway, NJ 07866, USAwww.tocad.com