Embed Size (px)
Citation preview
DEXcenter
Version 8 User Guide
5303 DuPont Circle, Milford, OH, 45150 | Toll Free USA: 1-888-783-9199
International: +44 (0) 1954 234300 | [email protected] | www.iti-global.com
DEXcenter User’s Guide 2
Table of Contents Chapter 1. DEXcenter Overview 3
Secure Managed File Transfer 3
CAD Processing Engine 3
Chapter 2. Accessing DEXcenter 5
Chapter 3. DEXcenter Help 7
Documents 7
About 7
Java Verification 8
Support 8
Chapter 4. Create Session 9
Sessions 9
Recipients 10
Recipient Selection Method 1 – type in 10
Recipient Selection Method 2 – “To” Dialogue 11
Files 12
File selection method 1: 12
File selection method 2: 12
Titles 12
Type 13
Submit 13
Export Authorization 13
Approval 18
Create Session Completion 19
E-mail Notification 19
Chapter 5. Sessions 21
Transmit Only Session 22
Translation Session 23
Dexlog.html 25
Approval Sessions 26
Session Status 27
Chapter 6. User Profile 28
Contact Information 29
General Preferences 30
Sender Preferences 31
Recipient Preferences 32
DEXcenter User’s Guide 3
DEXcenter is an enterprise web server application providing a convenient, reliable, and secure method
of translating, transmitting, and otherwise validating or manipulating CAD data. DEXcenter allows
organizations to easily and reliably manage and automate the flow of product data with internal and
external users throughout the supply chain.
DEXcenter can be used as a standalone application or integrated into other enterprise applications
such as PLM systems.
Secure Managed File Transfer
DEXcenter provides a secure web portal capability for file exchange. Some key functionality includes:
o Accessible 24 hours per day 7 days a week using a web browser
o Access restricted to only authenticated users
o Unlimited file size
o Secure encrypted transmission
o Export Authorization (ITAR, EAR) compliance
o Intellectual property protection
o Approval
CAD Processing Engine A fully configured DEXcenter can provide all of the capabilities below:
Manage internal and external user exchange requirements
Supports parts, drawings, and assemblies
General CAD model modification and / or translation to derivative forms prior to exchange
Automate the typical multi-step translation process to ensure consistency and reliability
Automate validation of CAD model derivatives (STEP, IGES, PDF, etc) against original native
models
Automated creation of Engineering Change Order documentation
Automated Producibility analysis to determine if models can be manufactured cost effectively
Migration of 3D models and associated drawings to a Model Based Definition form including PMI
Automated migration of models from one CAD system to another
Automate creation of Technical Data Packages
Automate recipient notification of exchanged file availability
Customize to provide processing options that meet specific recipient-unique requirements
Flavoring of IGES drawings to provide greatest compatibility (using ITI IGESWorks or other
applications)
DEXcenter provides several available methods for translation:
- CAD system neutral translators (STEP, IGES, DXF, Parasolid, PDF)
- CADfix direct import and/or export for CATIA V4, V5, NX, Creo and SolidWorks
Chapter 1. DEXcenter Overview
DEXcenter User’s Guide 4
- Proficiency Feature Based and PMI Translations
- Anark translations from native CAD formats to 3D PDF
Model healing and repair
Model simplification
Flavoring of IGES drawings for greatest compatibility (Using ITI IGESworks or other application)
Chapter 1. DEXcenter Overview
DEXcenter User’s Guide 5
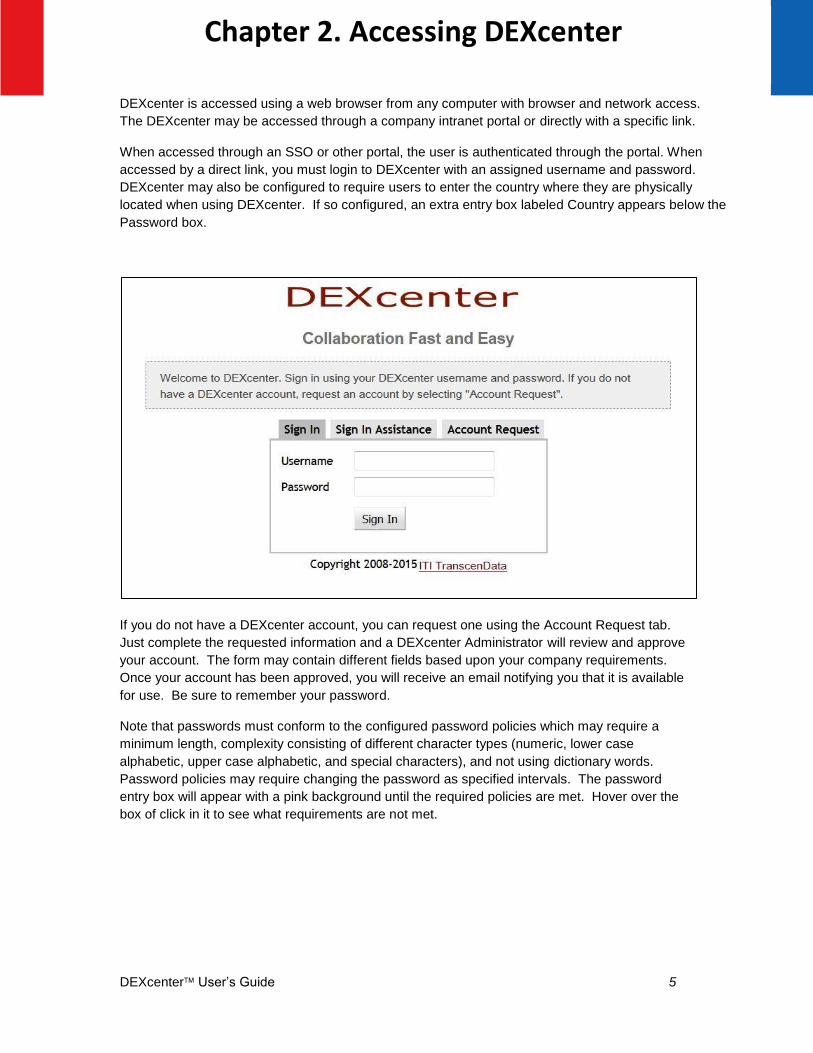
DEXcenter is accessed using a web browser from any computer with browser and network access.
The DEXcenter may be accessed through a company intranet portal or directly with a specific link.
When accessed through an SSO or other portal, the user is authenticated through the portal. When
accessed by a direct link, you must login to DEXcenter with an assigned username and password.
DEXcenter may also be configured to require users to enter the country where they are physically
located when using DEXcenter. If so configured, an extra entry box labeled Country appears below the
Password box.
If you do not have a DEXcenter account, you can request one using the Account Request tab.
Just complete the requested information and a DEXcenter Administrator will review and approve
your account. The form may contain different fields based upon your company requirements.
Once your account has been approved, you will receive an email notifying you that it is available
for use. Be sure to remember your password.
Note that passwords must conform to the configured password policies which may require a
minimum length, complexity consisting of different character types (numeric, lower case
alphabetic, upper case alphabetic, and special characters), and not using dictionary words.
Password policies may require changing the password as specified intervals. The password
entry box will appear with a pink background until the required policies are met. Hover over the
box of click in it to see what requirements are not met.
Chapter 2. Accessing DEXcenter
DEXcenter User’s Guide 6
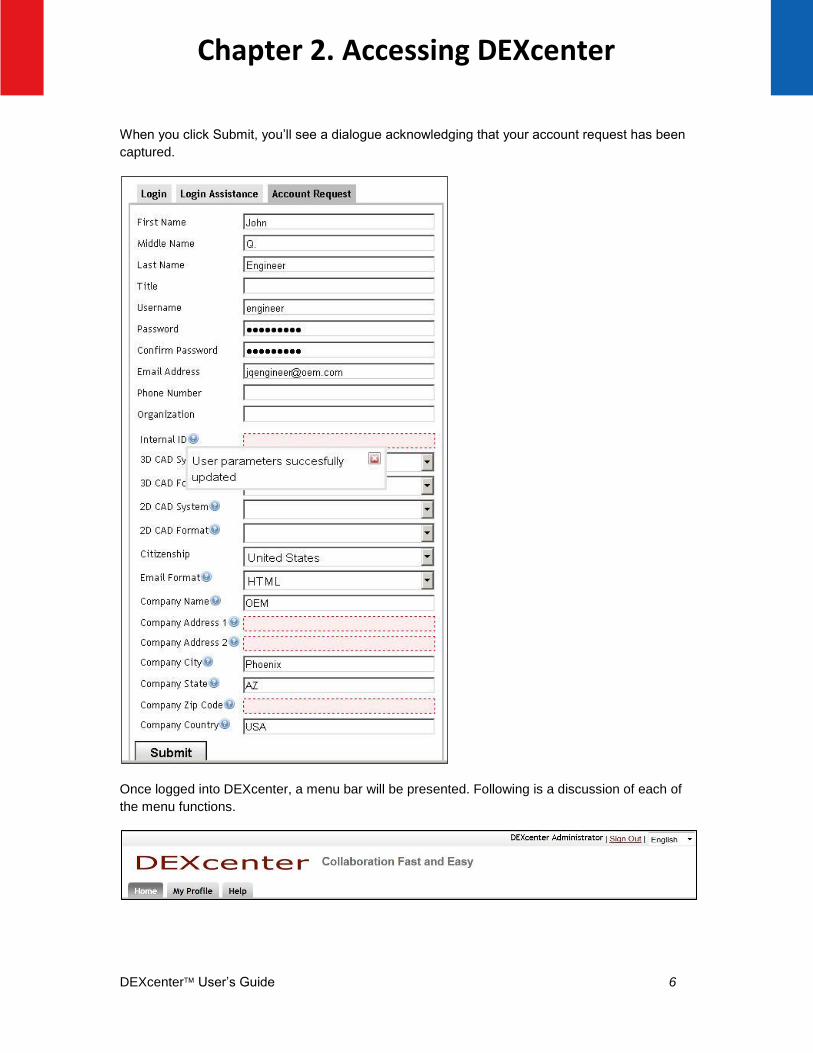
When you click Submit, you’ll see a dialogue acknowledging that your account request has been
captured.
Once logged into DEXcenter, a menu bar will be presented. Following is a discussion of each of
the menu functions.
Chapter 2. Accessing DEXcenter

DEXcenter User’s Guide 7
DEXcenter Help consists of the software version information, links to documentation and a link to
the Customer Support website to e-mail questions or enhancement requests.
Documents
The Documents tab contains the DEXcenter User Guide in PDF format. It can be opened or
downloaded. Other documents pertinent to a particular DEXcenter deployment may also be
included.
About
The about section identifies the DEXcenter version. If you require support for using DEXcenter,
you will need to provide this version information.
Chapter 3. DEXcenter Help
DEXcenter User’s Guide 8
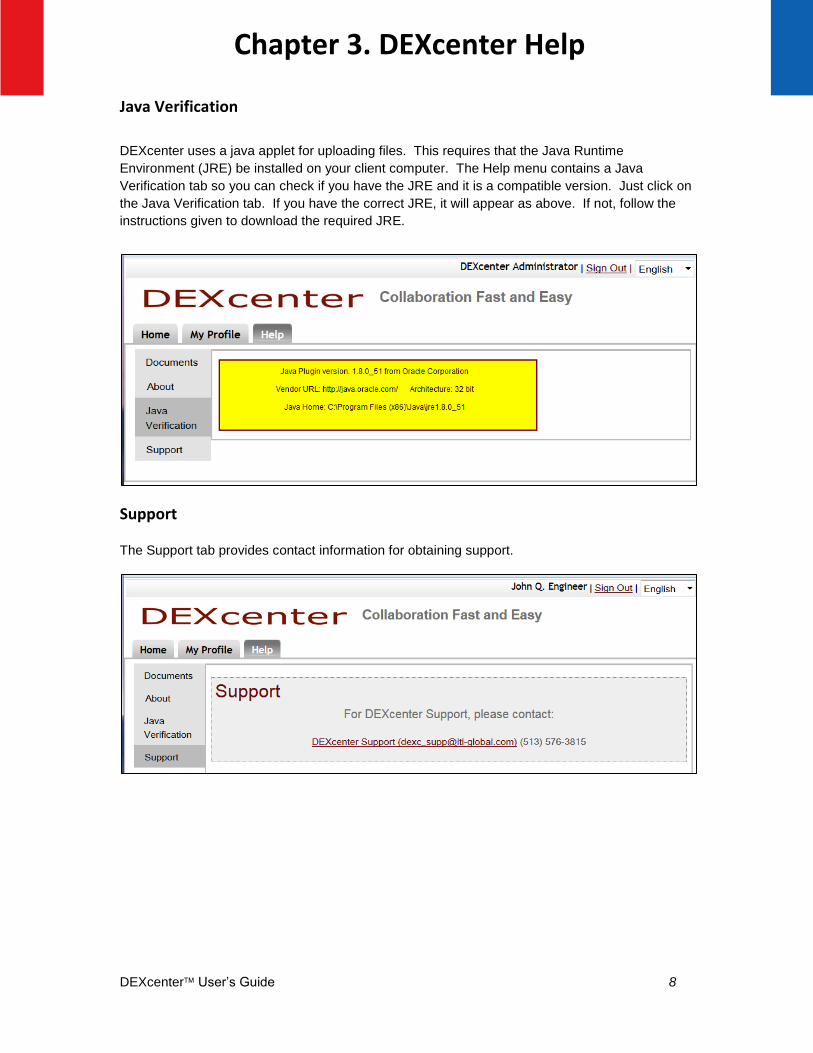
Java Verification
DEXcenter uses a java applet for uploading files. This requires that the Java Runtime
Environment (JRE) be installed on your client computer. The Help menu contains a Java
Verification tab so you can check if you have the JRE and it is a compatible version. Just click on
the Java Verification tab. If you have the correct JRE, it will appear as above. If not, follow the
instructions given to download the required JRE.
Support The Support tab provides contact information for obtaining support.
Chapter 3. DEXcenter Help
DEXcenter User’s Guide 9
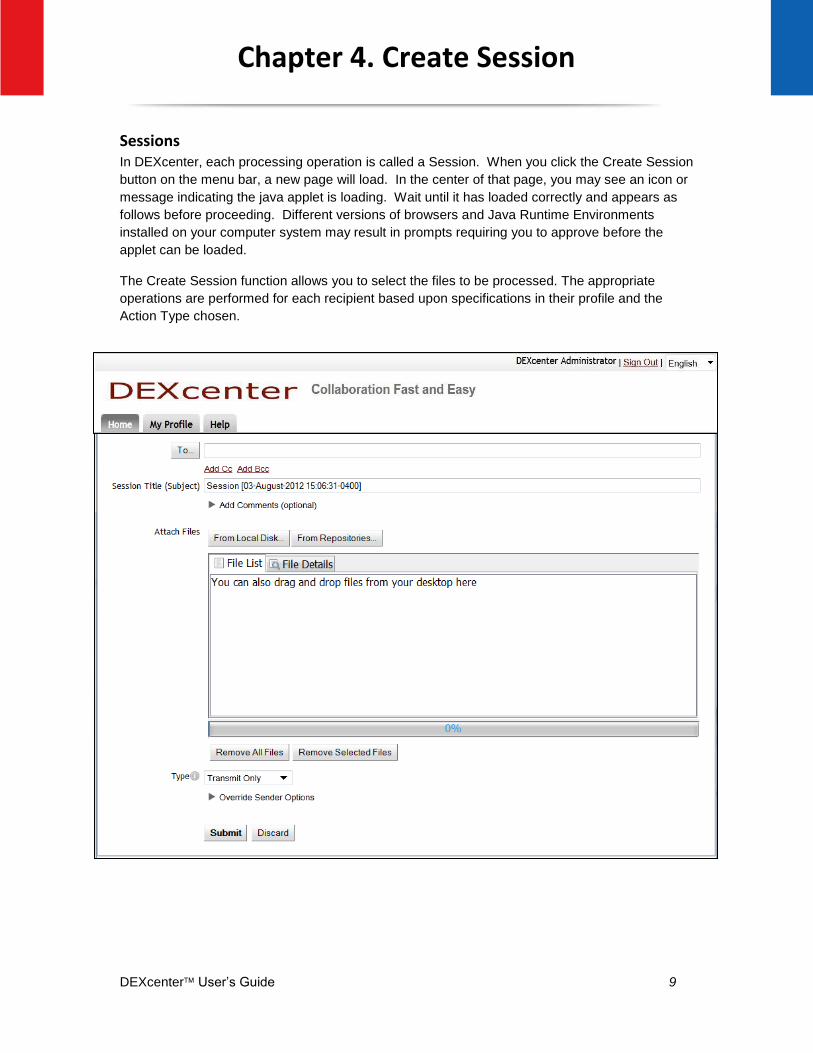
Sessions In DEXcenter, each processing operation is called a Session. When you click the Create Session
button on the menu bar, a new page will load. In the center of that page, you may see an icon or
message indicating the java applet is loading. Wait until it has loaded correctly and appears as
follows before proceeding. Different versions of browsers and Java Runtime Environments
installed on your computer system may result in prompts requiring you to approve before the
applet can be loaded.
The Create Session function allows you to select the files to be processed. The appropriate
operations are performed for each recipient based upon specifications in their profile and the
Action Type chosen.
Chapter 4. Create Session

DEXcenter User’s Guide 10
Recipients Recipients are selected from the set of DEXcenter users. Users may be internal to your company
or external suppliers or customers. You can search for Recipients from all Users or by Groups or
Companies.
You can select Recipients two ways.
Recipient Selection Method 1 – type in
You can type User’s names into the “To” bar. As you do so, a filtered list of users matching the
characters typed will appear. When you see the name you want, simply click on it. It will then
appear in the box. You can select additional Recipients by typing another name.
Chapter 4. Create Session
DEXcenter User’s Guide 11
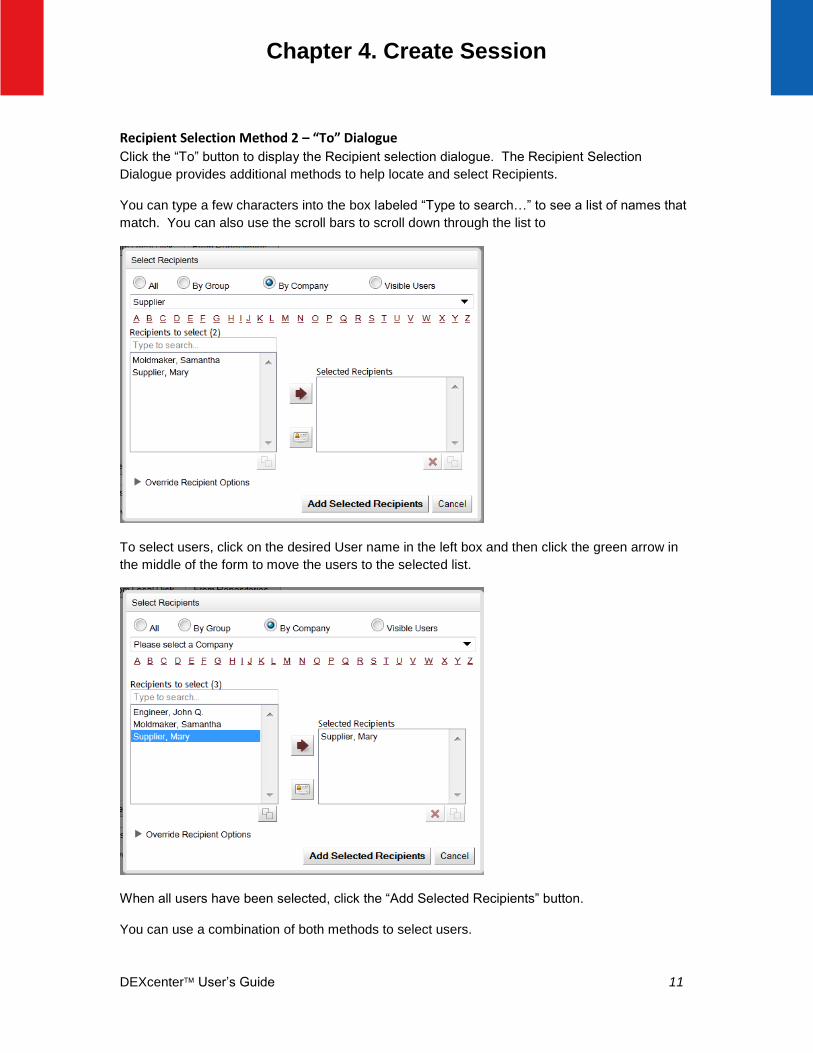
Recipient Selection Method 2 – “To” Dialogue
Click the “To” button to display the Recipient selection dialogue. The Recipient Selection
Dialogue provides additional methods to help locate and select Recipients.
You can type a few characters into the box labeled “Type to search…” to see a list of names that
match. You can also use the scroll bars to scroll down through the list to
To select users, click on the desired User name in the left box and then click the green arrow in
the middle of the form to move the users to the selected list.
When all users have been selected, click the “Add Selected Recipients” button.
You can use a combination of both methods to select users.
Chapter 4. Create Session
DEXcenter User’s Guide 12
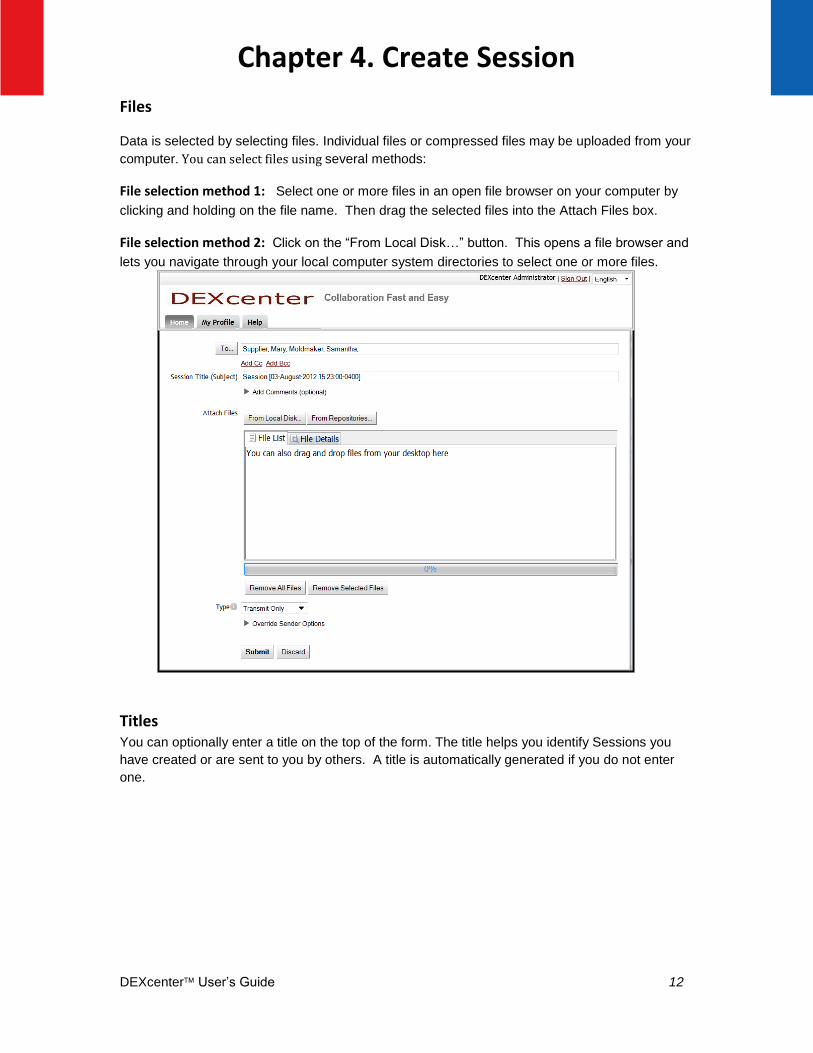
Files
Data is selected by selecting files. Individual files or compressed files may be uploaded from your
computer. You can select files using several methods:
File selection method 1: Select one or more files in an open file browser on your computer by
clicking and holding on the file name. Then drag the selected files into the Attach Files box.
File selection method 2: Click on the “From Local Disk…” button. This opens a file browser and
lets you navigate through your local computer system directories to select one or more files.
Titles You can optionally enter a title on the top of the form. The title helps you identify Sessions you
have created or are sent to you by others. A title is automatically generated if you do not enter
one.
Chapter 4. Create Session

DEXcenter User’s Guide 13
Type DEXcenter supports many types of operations. Each is called an Action Type. The choices are
as follows:
Transmit Only – files are only transmitted without any other processing
Translate – CAD files are translated as required per the recipient profile or as specified
through overrides by the sender.
Compare – A pair of CAD files can be compared to identify differences.
ECO Documentation – An original CAD file and one modified per an ECO operation are
submitted to generate PDF documentation of all the changes.
Producibility – One or more models are analyzed to determine if there are any issues in
the model which may prevent manufacturing or make it too costly.
Generate MBD – Generate an MBD model containing geometry and PMI from separate
3D geometry models and associated drawings
Translate MBD – Translate MBD models containing PMI to a different compatible CAD
system.
Select the desired type from those available in the pull down. Note that not all capabilities may
be available at your site.
Submit Once all recipients, files, and the Action Type have been selected, click the Submit button to
submit it for processing.
Export Authorization If the Recipient requires Export Authorization (US ITAR or EAR, Canadian Defence Production
Act, etc), an Export Authorization form will appear at this time. If no Export Authorization is
required for any recipient, then the forms below will not appear.
First select the name(s) of the Recipient Company that requires Export Authorization. The names
of the Recipient(s) associated with the Companies appear below. If information is being sent to
multiple companies and they require the same authorization, all companies can be selected at
once by using CNTL or SHIFT keys with the right mouse button. If there are different companies
but different authorizations are required, the companies should be selected individually and the
appropriate authorization for each company should be entered.
Chapter 4. Create Session
DEXcenter User’s Guide 14
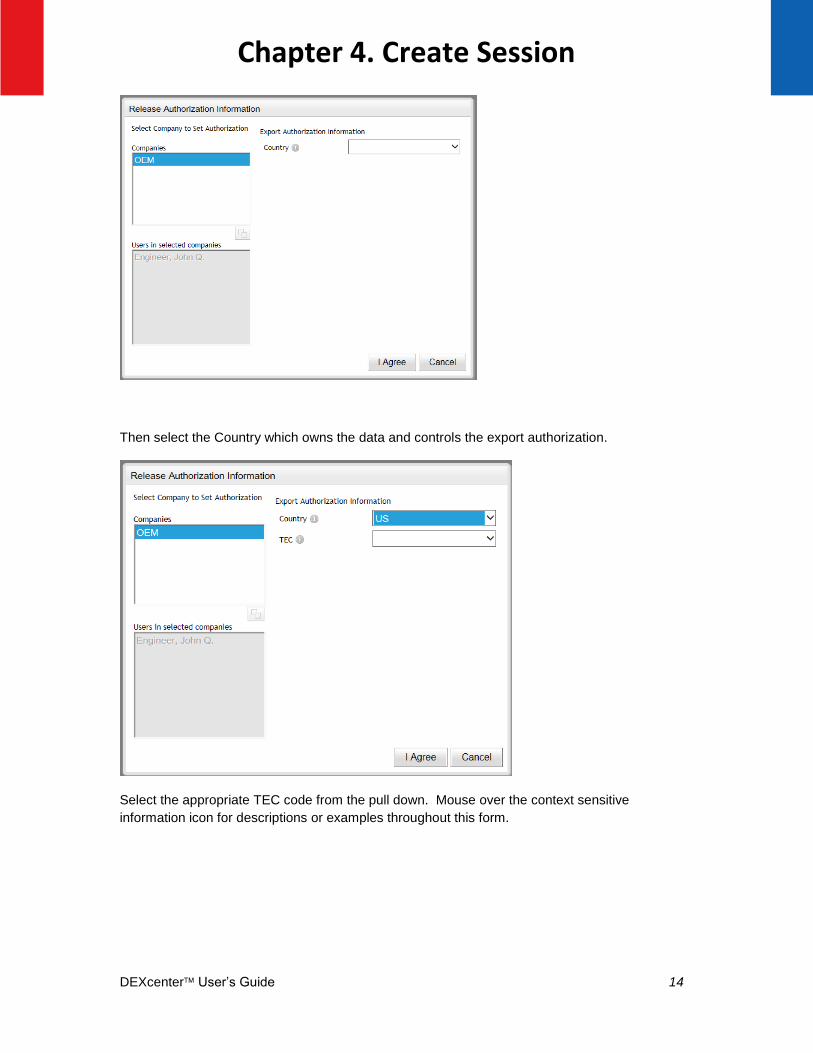
Then select the Country which owns the data and controls the export authorization.
Select the appropriate TEC code from the pull down. Mouse over the context sensitive
information icon for descriptions or examples throughout this form.
Chapter 4. Create Session
DEXcenter User’s Guide 15
Chapter 4. Create Session
DEXcenter User’s Guide 16
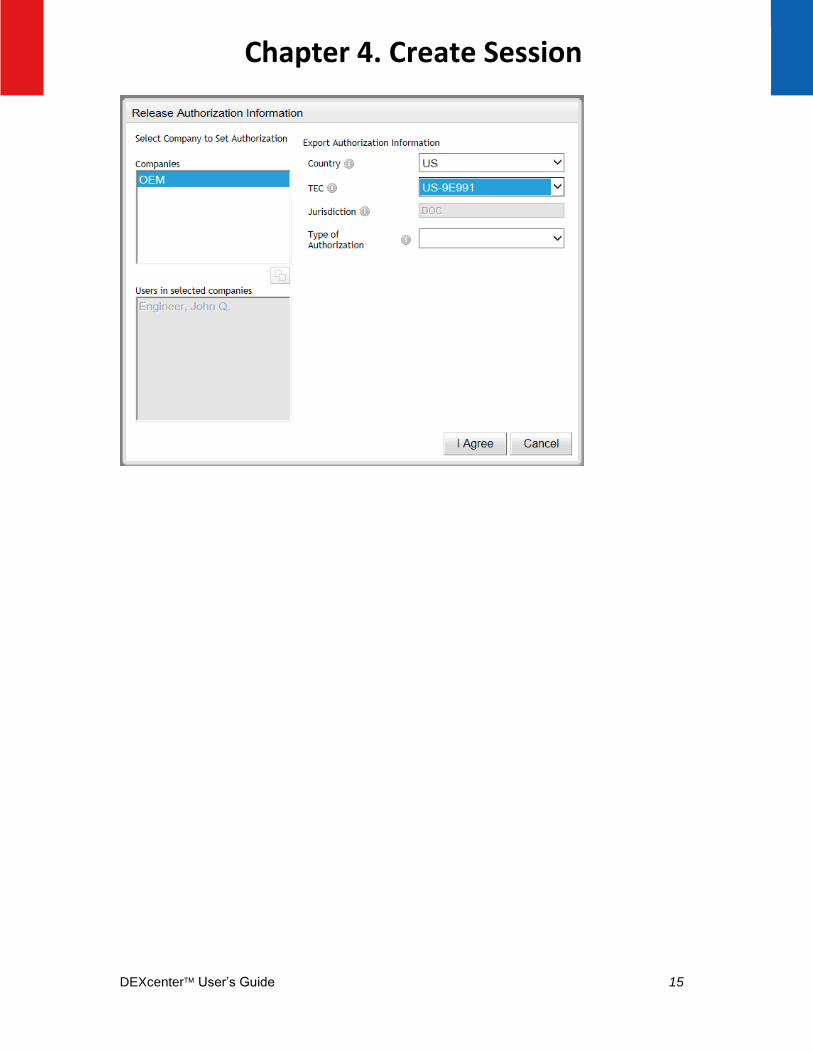
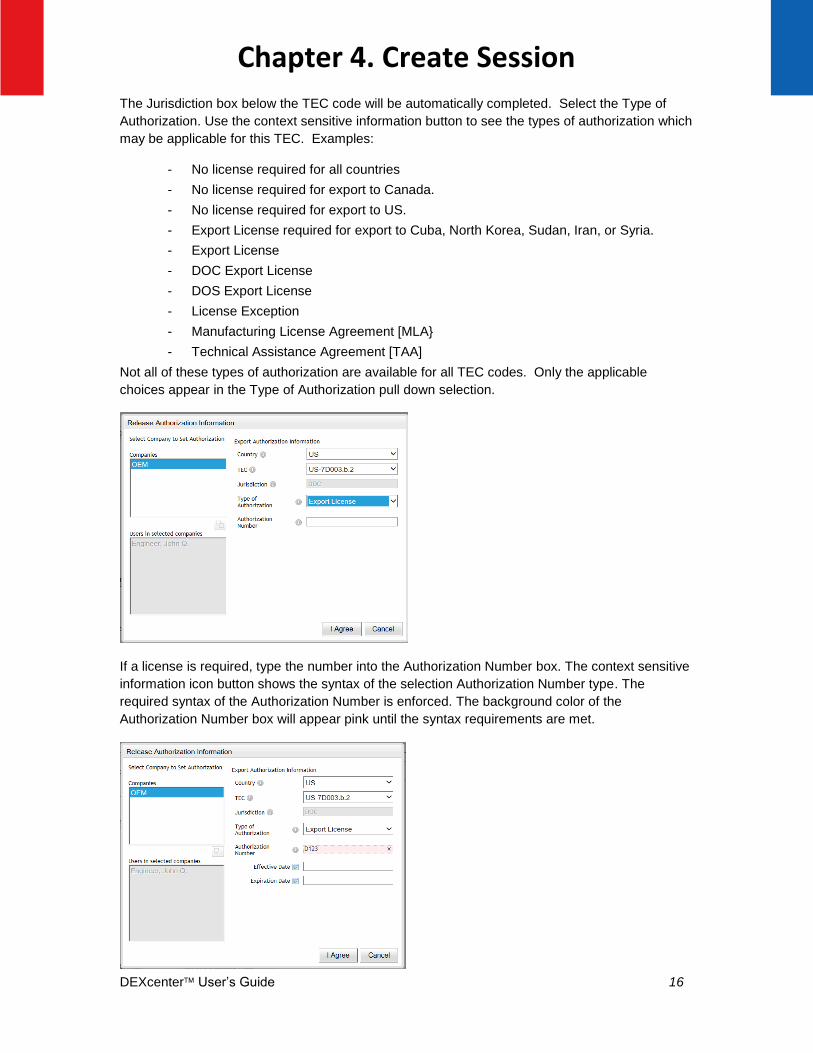
The Jurisdiction box below the TEC code will be automatically completed. Select the Type of
Authorization. Use the context sensitive information button to see the types of authorization which
may be applicable for this TEC. Examples:
- No license required for all countries
- No license required for export to Canada.
- No license required for export to US.
- Export License required for export to Cuba, North Korea, Sudan, Iran, or Syria.
- Export License
- DOC Export License
- DOS Export License
- License Exception
- Manufacturing License Agreement [MLA}
- Technical Assistance Agreement [TAA]
Not all of these types of authorization are available for all TEC codes. Only the applicable
choices appear in the Type of Authorization pull down selection.
If a license is required, type the number into the Authorization Number box. The context sensitive
information icon button shows the syntax of the selection Authorization Number type. The
required syntax of the Authorization Number is enforced. The background color of the
Authorization Number box will appear pink until the syntax requirements are met.
Chapter 4. Create Session
DEXcenter User’s Guide 17
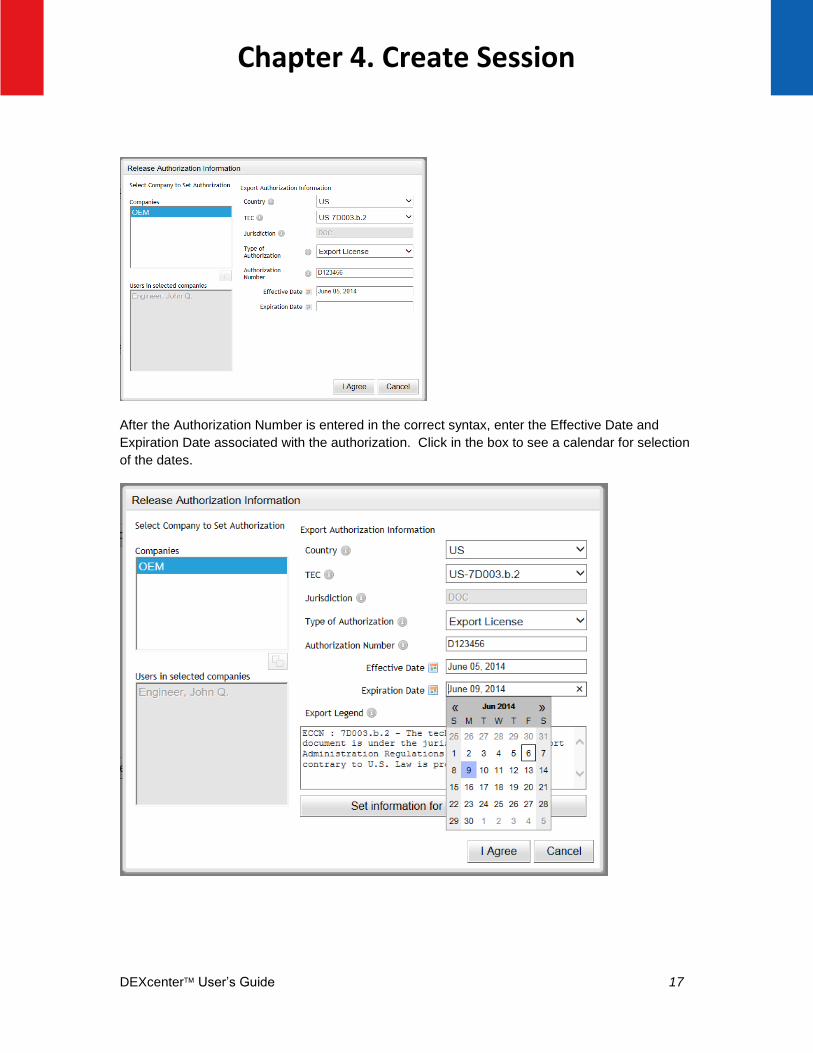
After the Authorization Number is entered in the correct syntax, enter the Effective Date and
Expiration Date associated with the authorization. Click in the box to see a calendar for selection
of the dates.
Chapter 4. Create Session
DEXcenter User’s Guide 18
An Export Legend appropriate to the selections made will appear. Click the button “Set
information for selected company” if everything is correct. If additional companies require
different authorization, then repeat the process starting with selection of the Company. The
session cannot be sent until authorization information for all companies requiring it has been
completed.
When authorization for all companies has been set, an acknowledgement and “I Agree” button
appear. Select “I Agree” to complete the authorization and allow the DEXcenter session data to
be delivered. Selecting “Cancel” will abort the delivery and take you back to the Create Session
page.
Recipients requiring Export Authorization or Proprietary Information Agreement (PIA) will receive
that information in the email notification they receive. The information is also sent as a separate
file in DEXcenter titled “Release Authorization ….”.
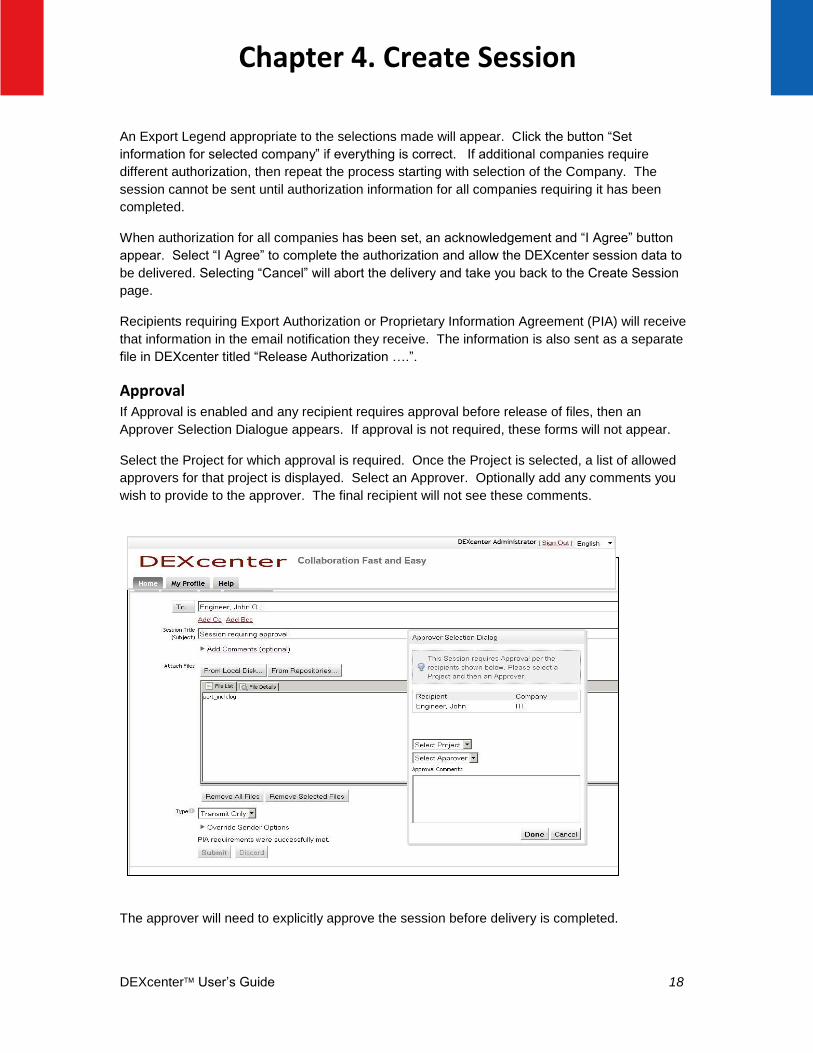
Approval If Approval is enabled and any recipient requires approval before release of files, then an
Approver Selection Dialogue appears. If approval is not required, these forms will not appear.
Select the Project for which approval is required. Once the Project is selected, a list of allowed
approvers for that project is displayed. Select an Approver. Optionally add any comments you
wish to provide to the approver. The final recipient will not see these comments.
The approver will need to explicitly approve the session before delivery is completed.
Chapter 4. Create Session
DEXcenter User’s Guide 19
Create Session Completion
After selecting the Submit button, and if required completing the Export Authorization and
Approval information, the selected files will be uploaded to the DEXcenter server for processing.
When it is completed, the Create Session page will disappear and be replaced with the Home
page which lists all the sessions.
DO NOT LEAVE THE “CREATE SESSION” page until it completes or your session will not
process properly. A progress bar appears at the bottom of the file window to provide upload
status. Large files may take several minutes or even hours to upload depending upon their size
and the network speed between your client computer and the DEXcenter server.
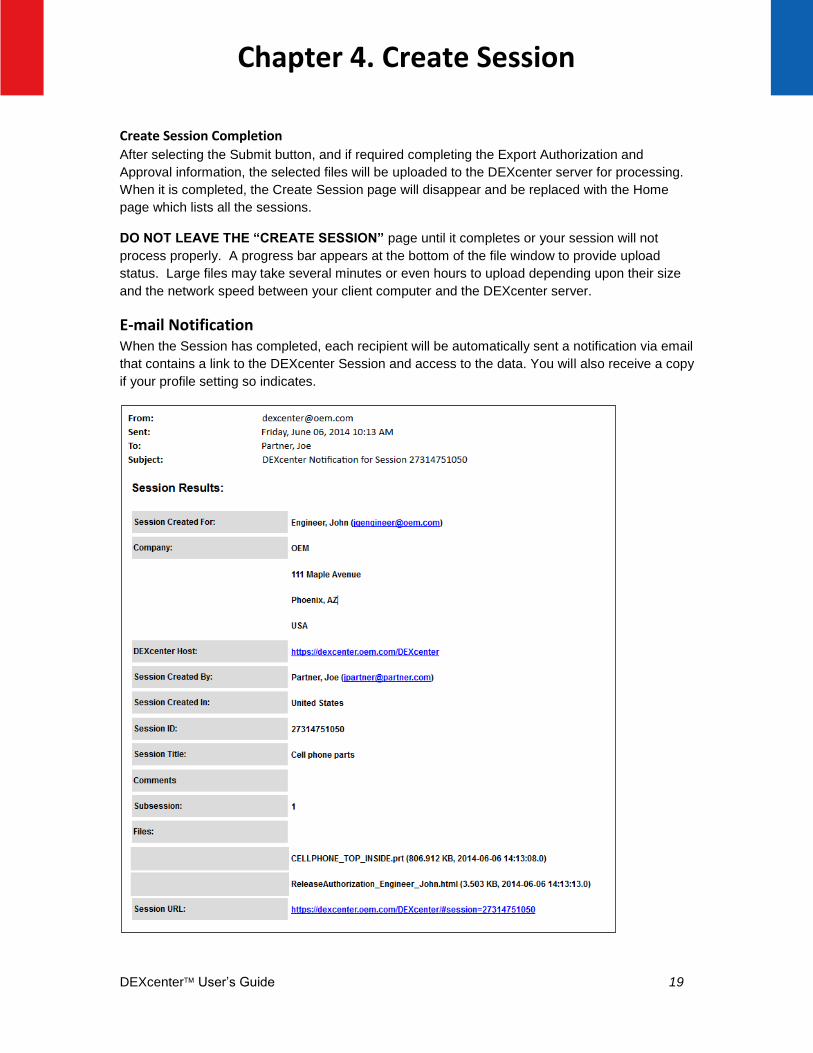
E-mail Notification When the Session has completed, each recipient will be automatically sent a notification via email
that contains a link to the DEXcenter Session and access to the data. You will also receive a copy
if your profile setting so indicates.
Chapter 4. Create Session
DEXcenter User’s Guide 20
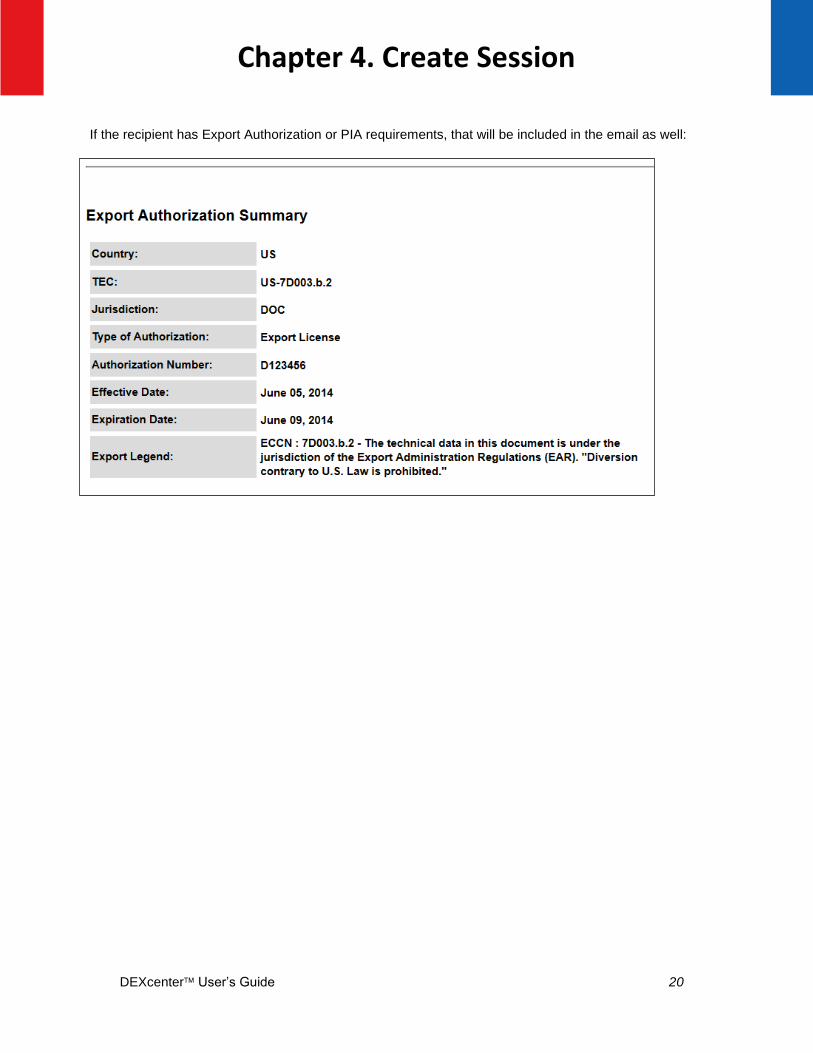
If the recipient has Export Authorization or PIA requirements, that will be included in the email as well:
Chapter 4. Create Session
DEXcenter User’s Guide 21
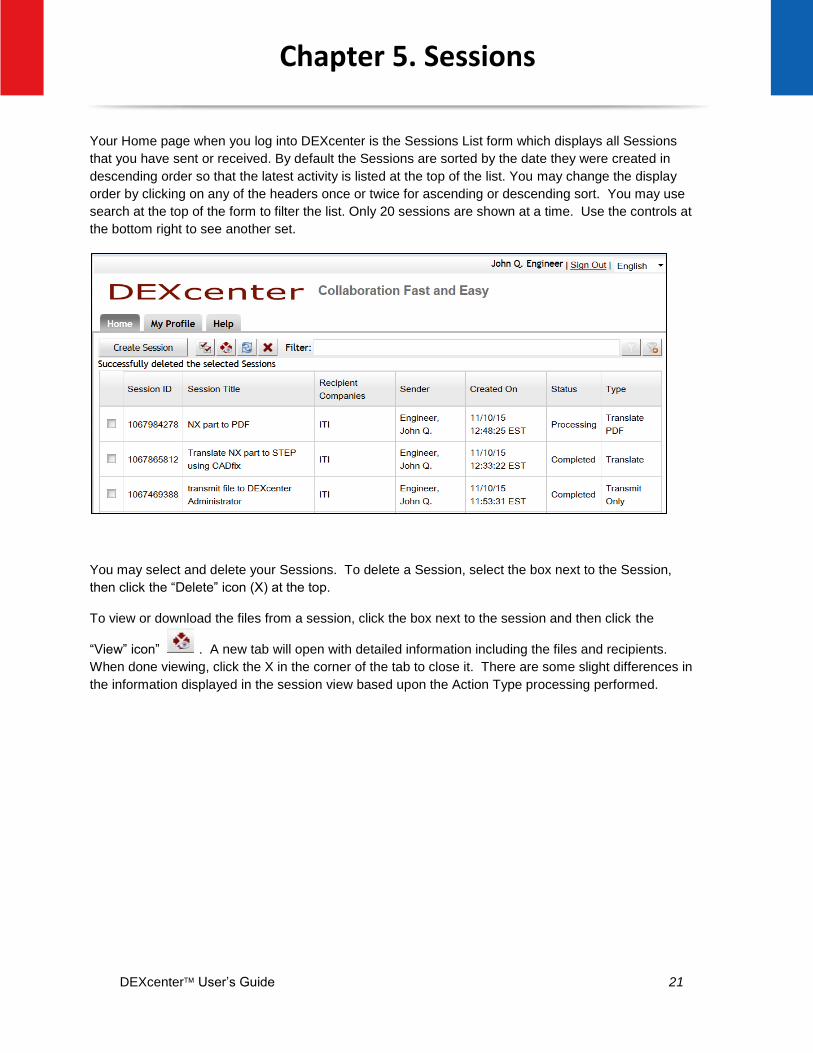
Your Home page when you log into DEXcenter is the Sessions List form which displays all Sessions
that you have sent or received. By default the Sessions are sorted by the date they were created in
descending order so that the latest activity is listed at the top of the list. You may change the display
order by clicking on any of the headers once or twice for ascending or descending sort. You may use
search at the top of the form to filter the list. Only 20 sessions are shown at a time. Use the controls at
the bottom right to see another set.
You may select and delete your Sessions. To delete a Session, select the box next to the Session,
then click the “Delete” icon (X) at the top.
To view or download the files from a session, click the box next to the session and then click the
“View” icon” . A new tab will open with detailed information including the files and recipients.
When done viewing, click the X in the corner of the tab to close it. There are some slight differences in
the information displayed in the session view based upon the Action Type processing performed.
Chapter 5. Sessions
DEXcenter User’s Guide 22
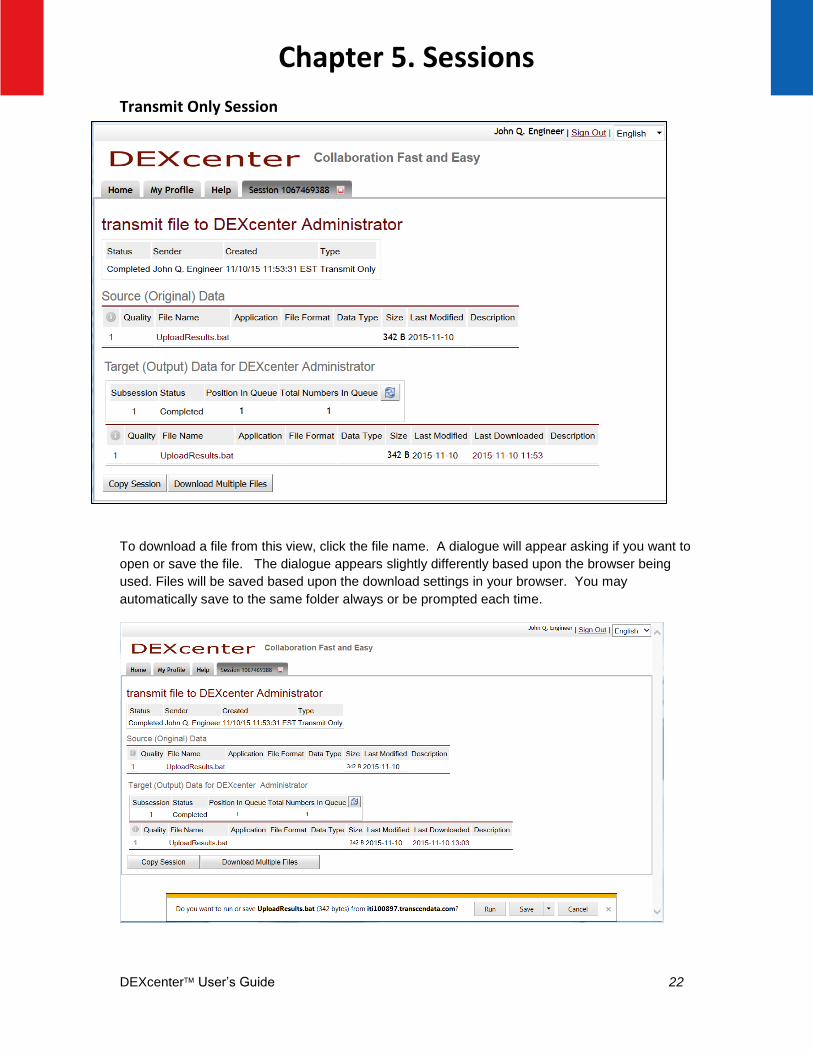
Transmit Only Session
To download a file from this view, click the file name. A dialogue will appear asking if you want to
open or save the file. The dialogue appears slightly differently based upon the browser being
used. Files will be saved based upon the download settings in your browser. You may
automatically save to the same folder always or be prompted each time.
Chapter 5. Sessions
DEXcenter User’s Guide 23
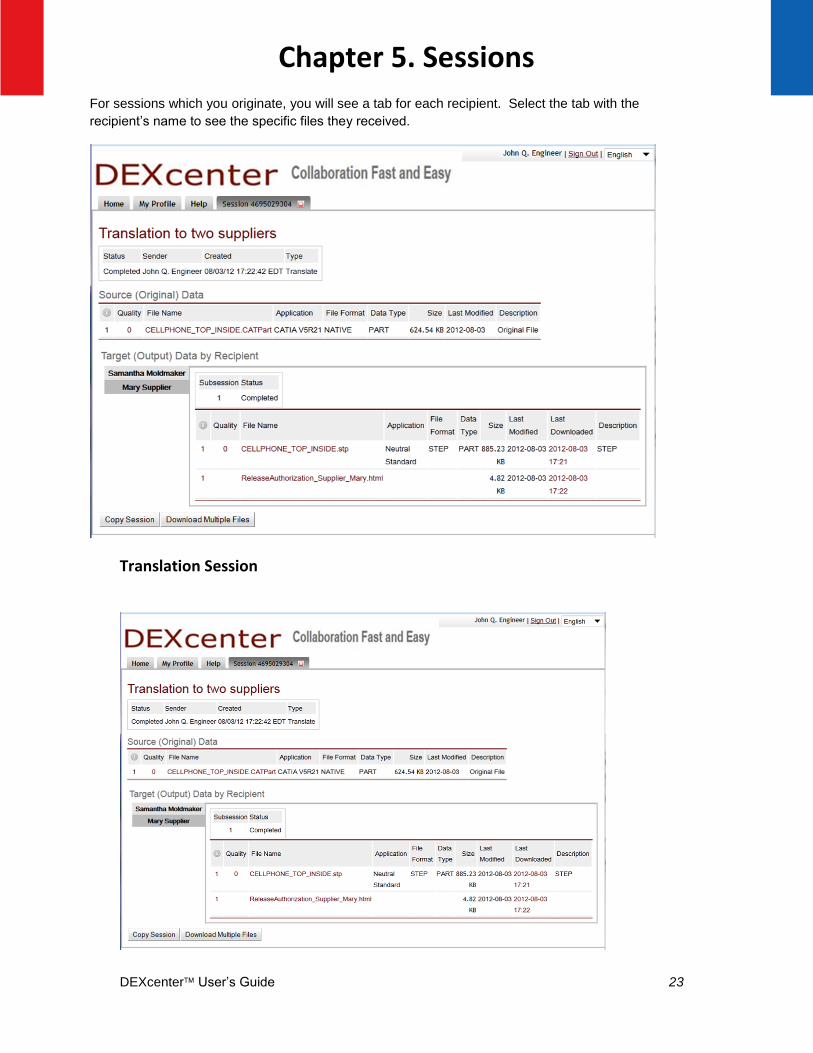
For sessions which you originate, you will see a tab for each recipient. Select the tab with the
recipient’s name to see the specific files they received.
Translation Session
Chapter 5. Sessions
DEXcenter User’s Guide 24
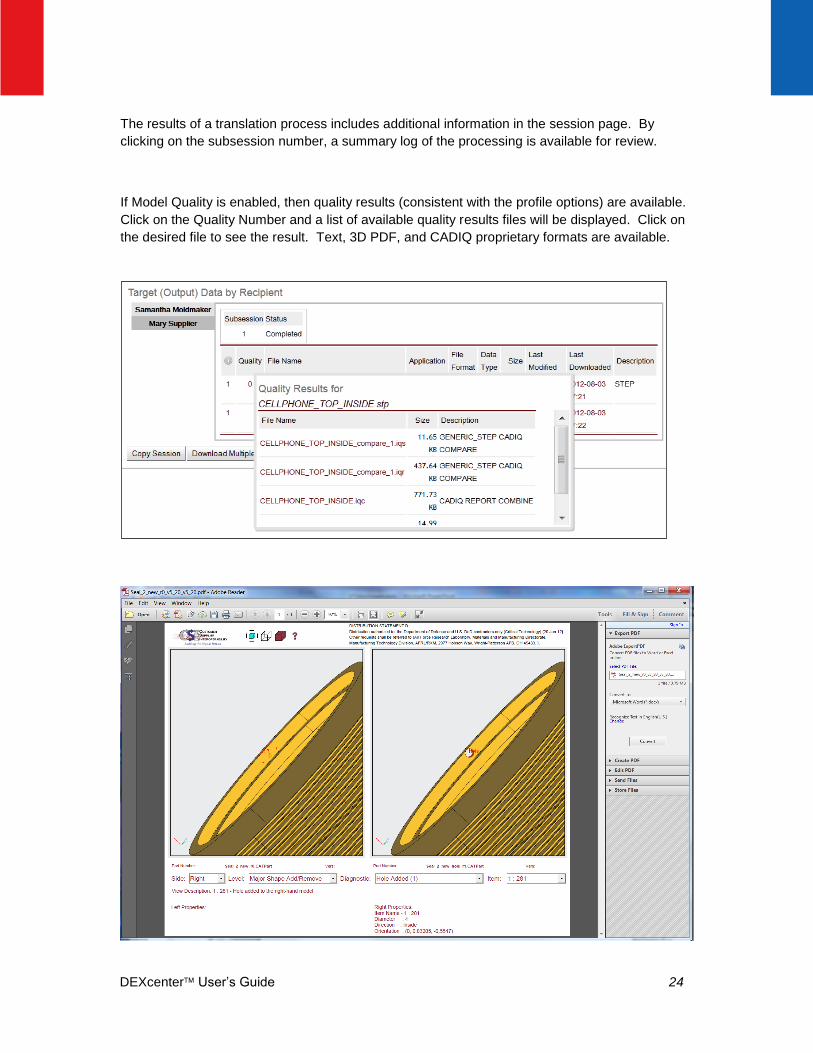
The results of a translation process includes additional information in the session page. By
clicking on the subsession number, a summary log of the processing is available for review.
If Model Quality is enabled, then quality results (consistent with the profile options) are available.
Click on the Quality Number and a list of available quality results files will be displayed. Click on
the desired file to see the result. Text, 3D PDF, and CADIQ proprietary formats are available.
DEXcenter User’s Guide 25
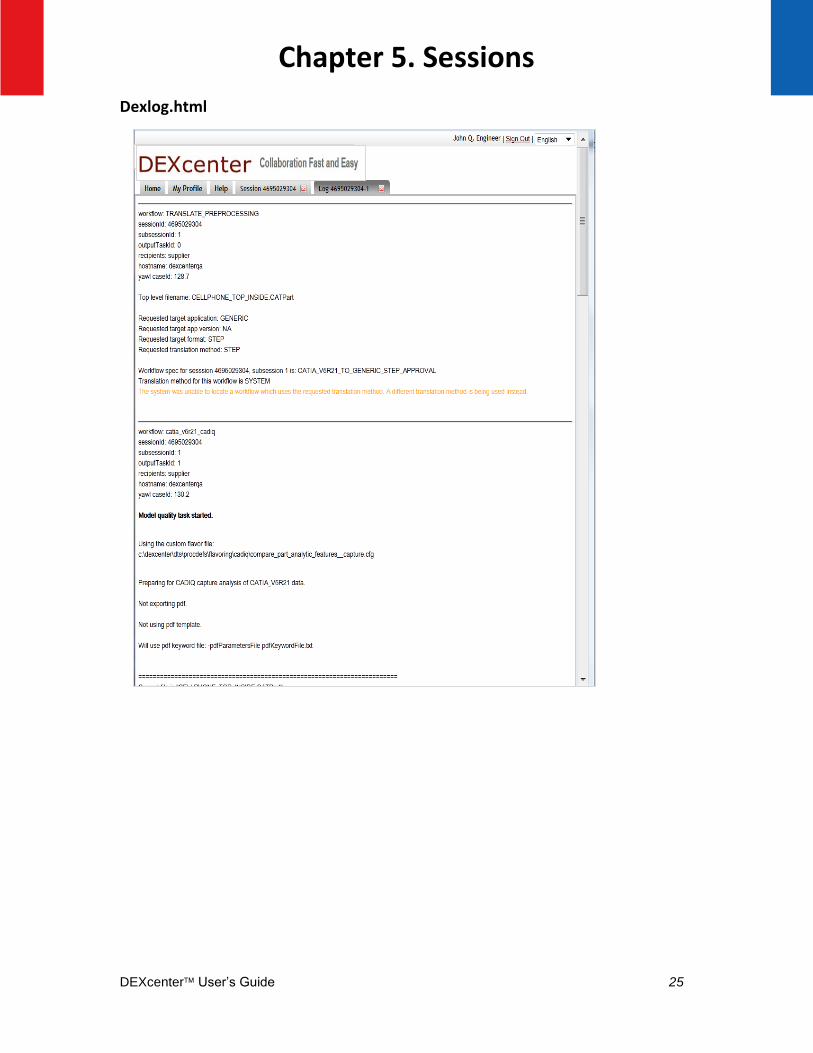
Dexlog.html
Chapter 5. Sessions
DEXcenter User’s Guide 26
Approval Sessions
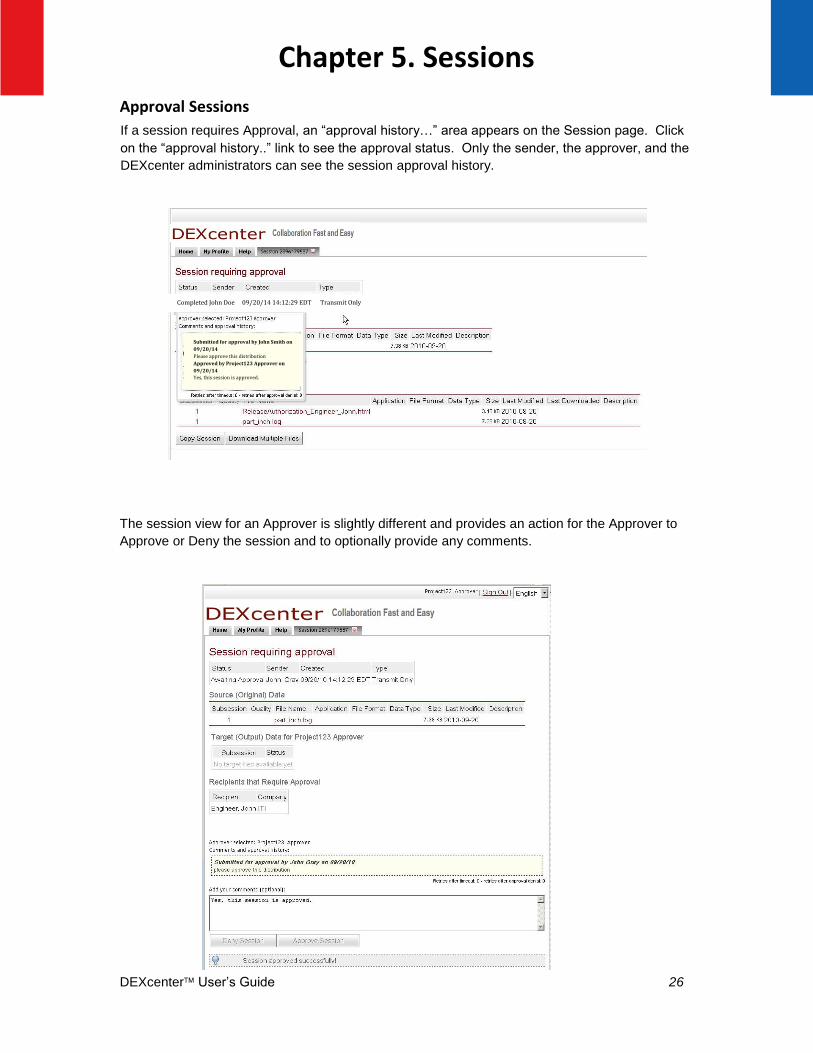
If a session requires Approval, an “approval history…” area appears on the Session page. Click
on the “approval history..” link to see the approval status. Only the sender, the approver, and the
DEXcenter administrators can see the session approval history.
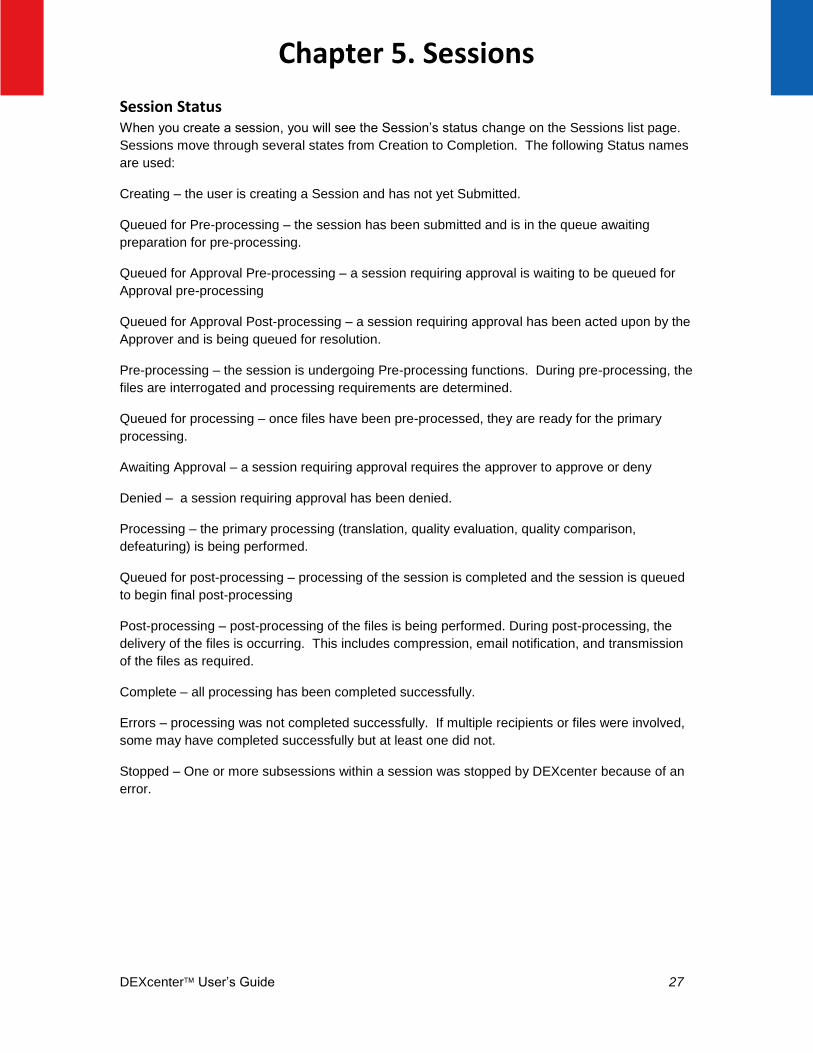
The session view for an Approver is slightly different and provides an action for the Approver to
Approve or Deny the session and to optionally provide any comments.
Chapter 5. Sessions Chapter 5. Sessions
Completed John Doe 09/20/14 14:12:29 EDT Transmit Only
Submitted for approval by John Smith on 09/20/14 Please approve this distribution Approved by Project123 Approver on 09/20/14 Yes, this session is approved.
DEXcenter User’s Guide 27
Session Status When you create a session, you will see the Session’s status change on the Sessions list page.
Sessions move through several states from Creation to Completion. The following Status names
are used:
Creating – the user is creating a Session and has not yet Submitted.
Queued for Pre-processing – the session has been submitted and is in the queue awaiting
preparation for pre-processing.
Queued for Approval Pre-processing – a session requiring approval is waiting to be queued for
Approval pre-processing
Queued for Approval Post-processing – a session requiring approval has been acted upon by the
Approver and is being queued for resolution.
Pre-processing – the session is undergoing Pre-processing functions. During pre-processing, the
files are interrogated and processing requirements are determined.
Queued for processing – once files have been pre-processed, they are ready for the primary
processing.
Awaiting Approval – a session requiring approval requires the approver to approve or deny
Denied – a session requiring approval has been denied.
Processing – the primary processing (translation, quality evaluation, quality comparison,
defeaturing) is being performed.
Queued for post-processing – processing of the session is completed and the session is queued
to begin final post-processing
Post-processing – post-processing of the files is being performed. During post-processing, the
delivery of the files is occurring. This includes compression, email notification, and transmission
of the files as required.
Complete – all processing has been completed successfully.
Errors – processing was not completed successfully. If multiple recipients or files were involved,
some may have completed successfully but at least one did not.
Stopped – One or more subsessions within a session was stopped by DEXcenter because of an
error.
Chapter 5. Sessions
DEXcenter User’s Guide 28
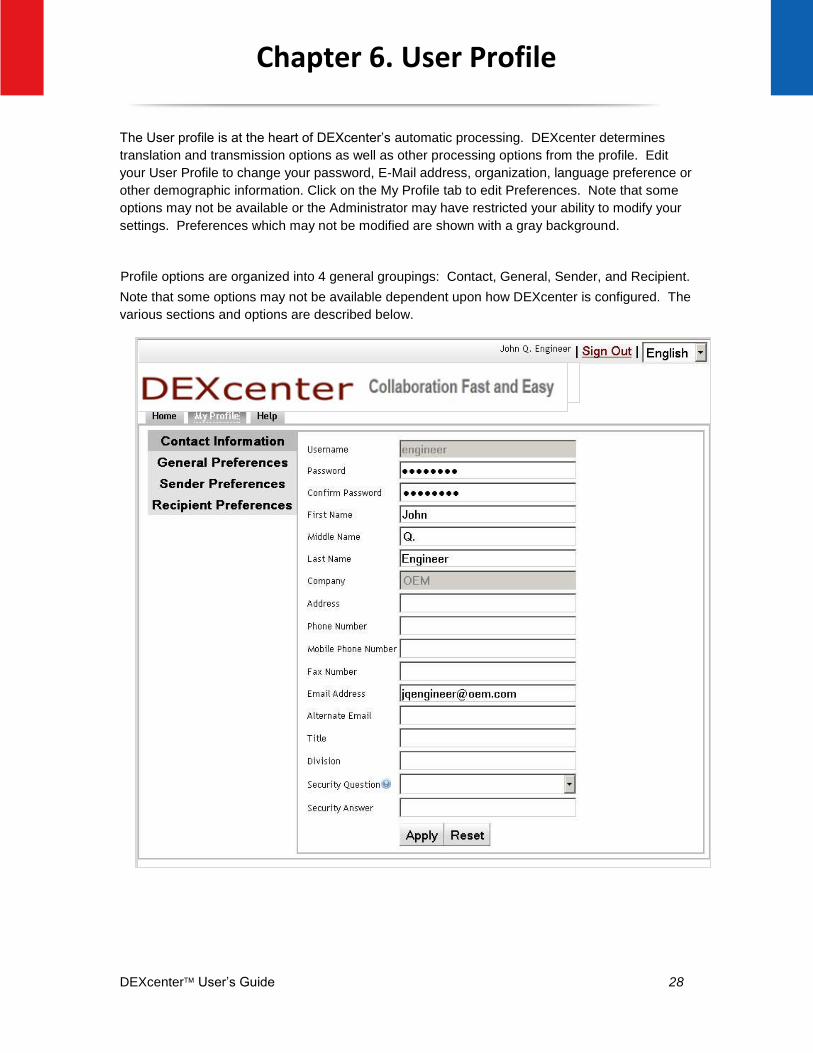
The User profile is at the heart of DEXcenter’s automatic processing. DEXcenter determines
translation and transmission options as well as other processing options from the profile. Edit
your User Profile to change your password, E-Mail address, organization, language preference or
other demographic information. Click on the My Profile tab to edit Preferences. Note that some
options may not be available or the Administrator may have restricted your ability to modify your
settings. Preferences which may not be modified are shown with a gray background.
Profile options are organized into 4 general groupings: Contact, General, Sender, and Recipient.
Note that some options may not be available dependent upon how DEXcenter is configured. The
various sections and options are described below.
Chapter 6. User Profile
DEXcenter User’s Guide 29
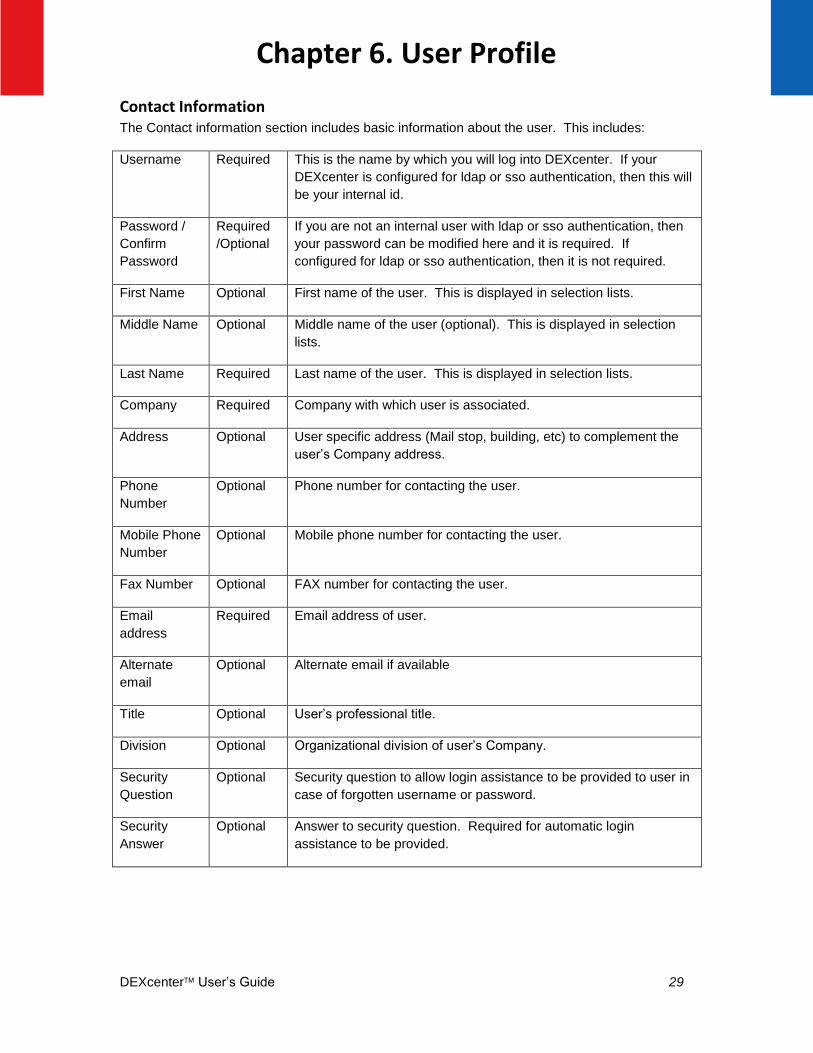
Contact Information The Contact information section includes basic information about the user. This includes:
Username Required This is the name by which you will log into DEXcenter. If your
DEXcenter is configured for ldap or sso authentication, then this will
be your internal id.
Password /
Confirm
Password
Required
/Optional
If you are not an internal user with ldap or sso authentication, then
your password can be modified here and it is required. If
configured for ldap or sso authentication, then it is not required.
First Name Optional First name of the user. This is displayed in selection lists.
Middle Name Optional Middle name of the user (optional). This is displayed in selection
lists.
Last Name Required Last name of the user. This is displayed in selection lists.
Company Required Company with which user is associated.
Address Optional User specific address (Mail stop, building, etc) to complement the
user’s Company address.
Phone
Number
Optional Phone number for contacting the user.
Mobile Phone
Number
Optional Mobile phone number for contacting the user.
Fax Number Optional FAX number for contacting the user.
address
Required Email address of user.
Alternate
Optional Alternate email if available
Title Optional User’s professional title.
Division Optional Organizational division of user’s Company.
Security
Question
Optional Security question to allow login assistance to be provided to user in
case of forgotten username or password.
Security
Answer
Optional Answer to security question. Required for automatic login
assistance to be provided.
Chapter 6. User Profile
DEXcenter User’s Guide 30
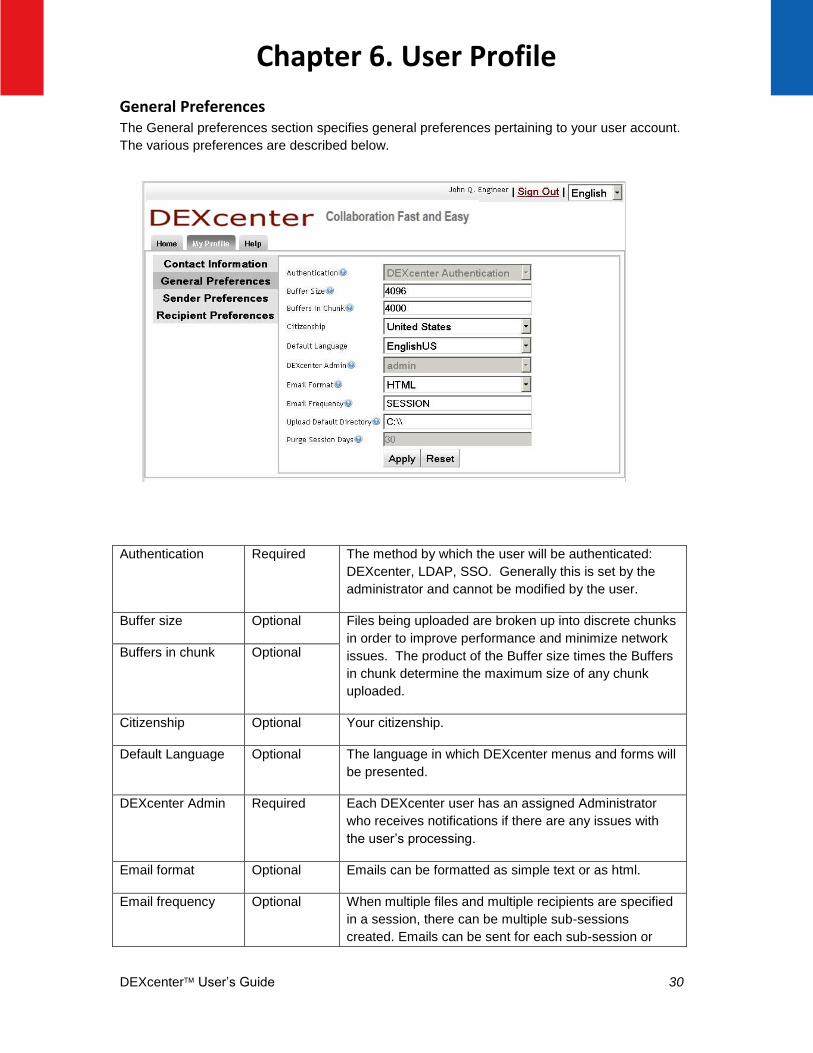
General Preferences The General preferences section specifies general preferences pertaining to your user account.
The various preferences are described below.
Authentication Required The method by which the user will be authenticated:
DEXcenter, LDAP, SSO. Generally this is set by the
administrator and cannot be modified by the user.
Buffer size Optional Files being uploaded are broken up into discrete chunks
in order to improve performance and minimize network
issues. The product of the Buffer size times the Buffers
in chunk determine the maximum size of any chunk
uploaded.
Buffers in chunk Optional
Citizenship Optional Your citizenship.
Default Language Optional The language in which DEXcenter menus and forms will
be presented.
DEXcenter Admin Required Each DEXcenter user has an assigned Administrator
who receives notifications if there are any issues with
the user’s processing.
Email format Optional Emails can be formatted as simple text or as html.
Email frequency Optional When multiple files and multiple recipients are specified
in a session, there can be multiple sub-sessions
created. Emails can be sent for each sub-session or
Chapter 6. User Profile
DEXcenter User’s Guide 31
only upon completion of the entire session.
Upload Default
Directory
Optional When browsing for files in Create Session, the browser
will open to this directory.
Purge Session
days
Optional DEXcenter is not intended to provide permanent file
archival. Sessions can be deleted after the specified
number of days.
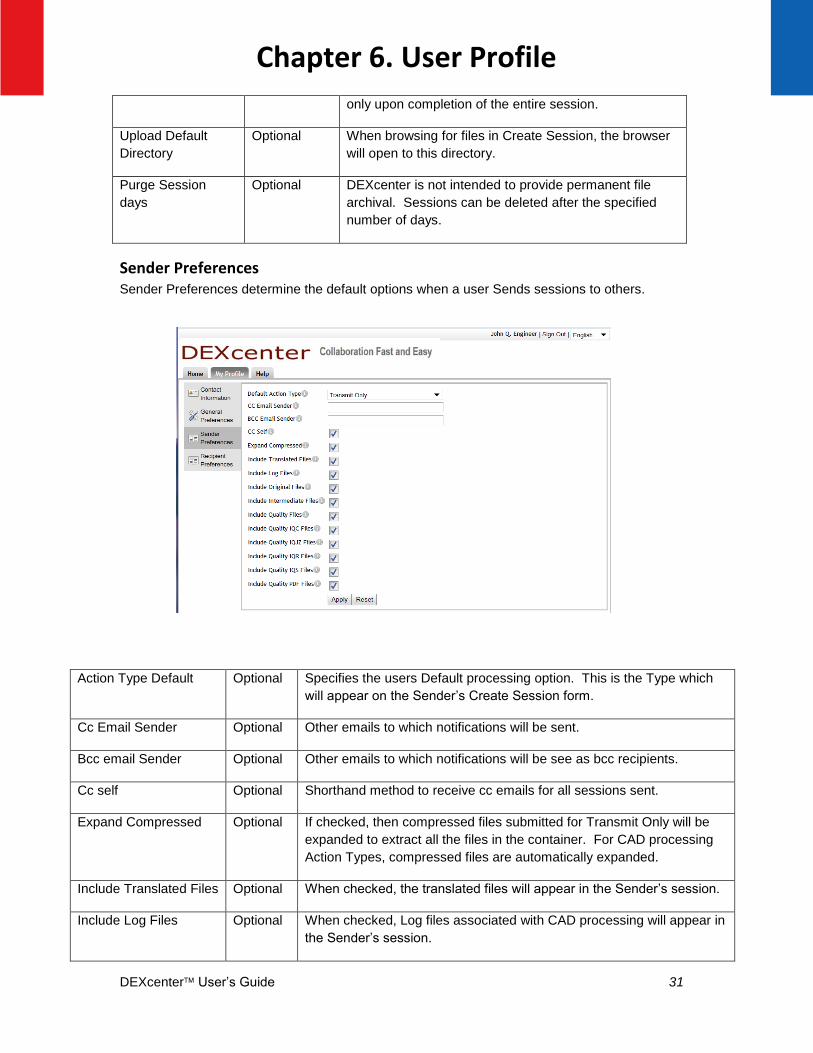
Sender Preferences Sender Preferences determine the default options when a user Sends sessions to others.
Action Type Default Optional Specifies the users Default processing option. This is the Type which
will appear on the Sender’s Create Session form.
Cc Email Sender Optional Other emails to which notifications will be sent.
Bcc email Sender Optional Other emails to which notifications will be see as bcc recipients.
Cc self Optional Shorthand method to receive cc emails for all sessions sent.
Expand Compressed Optional If checked, then compressed files submitted for Transmit Only will be
expanded to extract all the files in the container. For CAD processing
Action Types, compressed files are automatically expanded.
Include Translated Files Optional When checked, the translated files will appear in the Sender’s session.
Include Log Files Optional When checked, Log files associated with CAD processing will appear in
the Sender’s session.
Chapter 6. User Profile
DEXcenter User’s Guide 32
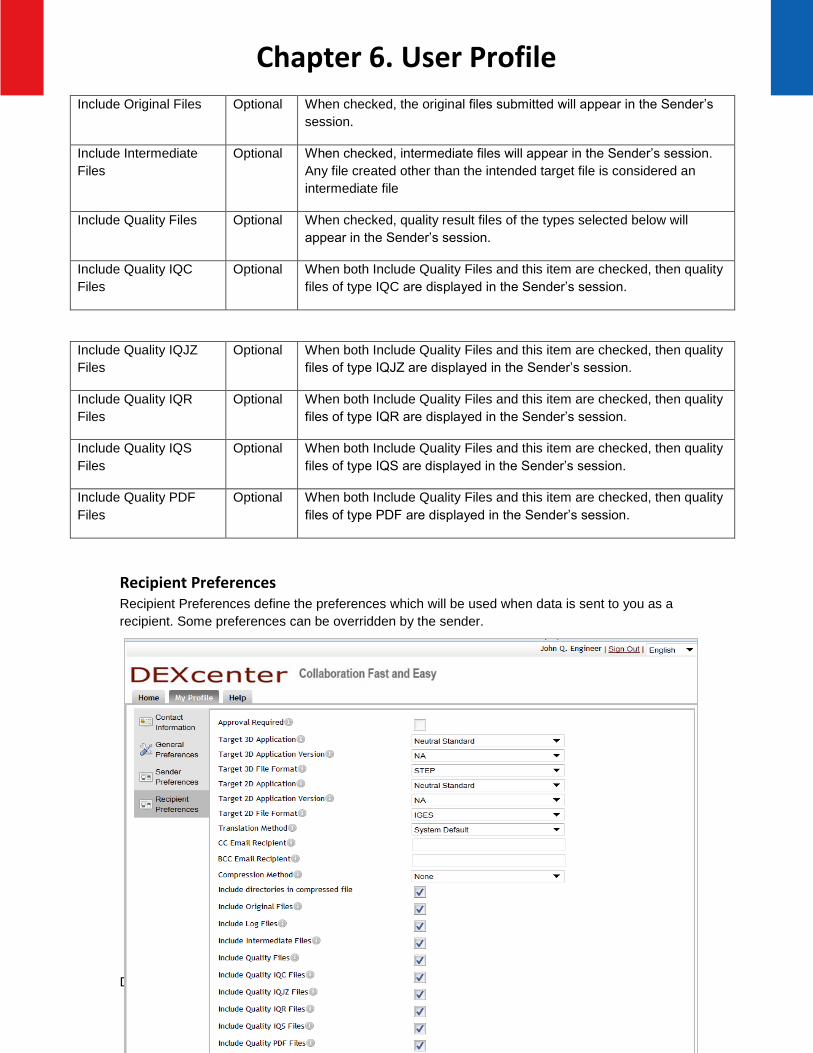
Include Original Files Optional When checked, the original files submitted will appear in the Sender’s
session.
Include Intermediate
Files
Optional When checked, intermediate files will appear in the Sender’s session.
Any file created other than the intended target file is considered an
intermediate file
Include Quality Files Optional When checked, quality result files of the types selected below will
appear in the Sender’s session.
Include Quality IQC
Files
Optional When both Include Quality Files and this item are checked, then quality
files of type IQC are displayed in the Sender’s session.
Include Quality IQJZ
Files
Optional When both Include Quality Files and this item are checked, then quality
files of type IQJZ are displayed in the Sender’s session.
Include Quality IQR
Files
Optional When both Include Quality Files and this item are checked, then quality
files of type IQR are displayed in the Sender’s session.
Include Quality IQS
Files
Optional When both Include Quality Files and this item are checked, then quality
files of type IQS are displayed in the Sender’s session.
Include Quality PDF
Files
Optional When both Include Quality Files and this item are checked, then quality
files of type PDF are displayed in the Sender’s session.
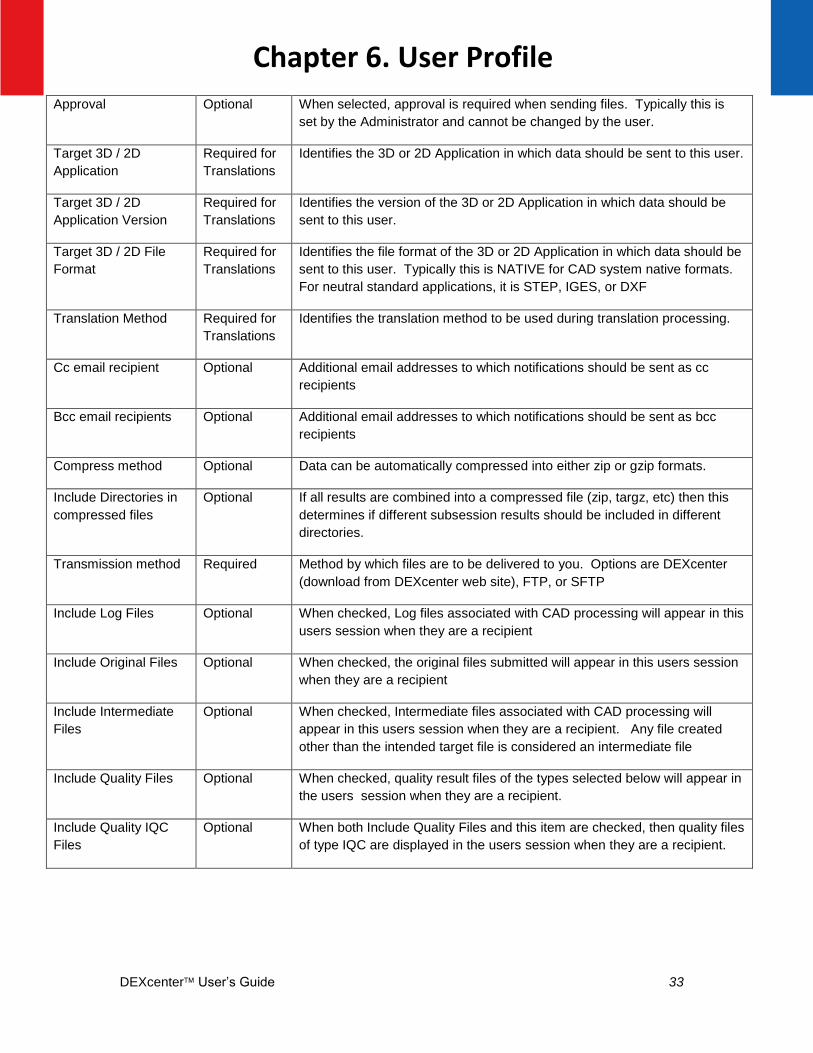
Recipient Preferences Recipient Preferences define the preferences which will be used when data is sent to you as a
recipient. Some preferences can be overridden by the sender.
Chapter 6. User Profile
DEXcenter User’s Guide 33
Approval Optional When selected, approval is required when sending files. Typically this is
set by the Administrator and cannot be changed by the user.
Target 3D / 2D
Application
Required for
Translations
Identifies the 3D or 2D Application in which data should be sent to this user.
Target 3D / 2D
Application Version
Required for
Translations
Identifies the version of the 3D or 2D Application in which data should be
sent to this user.
Target 3D / 2D File
Format
Required for
Translations
Identifies the file format of the 3D or 2D Application in which data should be
sent to this user. Typically this is NATIVE for CAD system native formats.
For neutral standard applications, it is STEP, IGES, or DXF
Translation Method Required for
Translations
Identifies the translation method to be used during translation processing.
Cc email recipient Optional Additional email addresses to which notifications should be sent as cc
recipients
Bcc email recipients Optional Additional email addresses to which notifications should be sent as bcc
recipients
Compress method Optional Data can be automatically compressed into either zip or gzip formats.
Include Directories in
compressed files
Optional If all results are combined into a compressed file (zip, targz, etc) then this
determines if different subsession results should be included in different
directories.
Transmission method Required Method by which files are to be delivered to you. Options are DEXcenter
(download from DEXcenter web site), FTP, or SFTP
Include Log Files Optional When checked, Log files associated with CAD processing will appear in this
users session when they are a recipient
Include Original Files Optional When checked, the original files submitted will appear in this users session
when they are a recipient
Include Intermediate
Files
Optional When checked, Intermediate files associated with CAD processing will
appear in this users session when they are a recipient. Any file created
other than the intended target file is considered an intermediate file
Include Quality Files Optional When checked, quality result files of the types selected below will appear in
the users session when they are a recipient.
Include Quality IQC
Files
Optional When both Include Quality Files and this item are checked, then quality files
of type IQC are displayed in the users session when they are a recipient.
Chapter 6. User Profile
DEXcenter User’s Guide 34
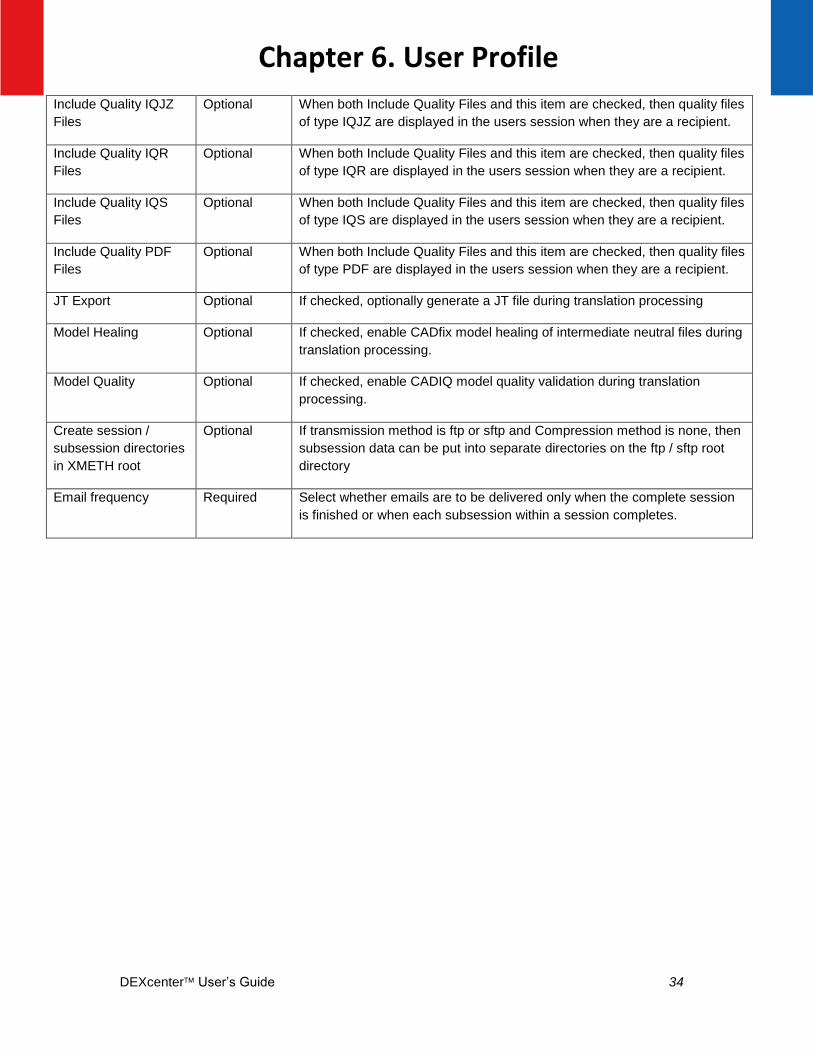
Include Quality IQJZ
Files
Optional When both Include Quality Files and this item are checked, then quality files
of type IQJZ are displayed in the users session when they are a recipient.
Include Quality IQR
Files
Optional When both Include Quality Files and this item are checked, then quality files
of type IQR are displayed in the users session when they are a recipient.
Include Quality IQS
Files
Optional When both Include Quality Files and this item are checked, then quality files
of type IQS are displayed in the users session when they are a recipient.
Include Quality PDF
Files
Optional When both Include Quality Files and this item are checked, then quality files
of type PDF are displayed in the users session when they are a recipient.
JT Export Optional If checked, optionally generate a JT file during translation processing
Model Healing Optional If checked, enable CADfix model healing of intermediate neutral files during
translation processing.
Model Quality Optional If checked, enable CADIQ model quality validation during translation
processing.
Create session /
subsession directories
in XMETH root
Optional If transmission method is ftp or sftp and Compression method is none, then
subsession data can be put into separate directories on the ftp / sftp root
directory
Email frequency Required Select whether emails are to be delivered only when the complete session
is finished or when each subsession within a session completes.
Chapter 6. User Profile