Embed Size (px)
Citation preview
2 DEVIL MAY CRY 4
TABLE OF CONTENTS
AUTHOR’S NOTE
STORY
CONTROLS AND COMBOS
CONTROLS FOR PC
CONTROLS FOR XBOX 360
COMBOS FOR PC
NERO
DANTE
COMBOS FOR XBOX 360
NERO
DANTE
FAQ
ACHIEVEMENTS
BLUE ORB FRAGMENTS
ENEMIES
LESSER DEMONS
BOSS
ITEMS
ARMS
NERO
DANTE
ITEM
KEY ITEM
ORBS
SECRET MISSIONS
WALKTHROUGH
MISSION 01 - BIRDS OF A FEATHER
MISSION 02 – LA PORTE DE L’ENFER
MISSION 03 - THE WHITE WING
MISSION 04 – COLD BLOODED
MISSION 05 – TRISAGION
MISSION 06 – RESURRECTION
MISSION 07 – THE SHE-VIPER
MISSION 08 – PROFESSION OF FAITH
MISSION 09 – FOR YOU
MISSION 10 – WRAPPED IN GLORY
MISSION 11 – THE NINTH CIRCLE
MISSION 12 – A NEW BEGINNING
MISSION 13 - THE DEVIL RETURNS
MISSION 14 – FOREST OF RUIN
MISSION 15 – FORTUNA CASTLE
MISSION 16 – INFERNO
MISSION 17 – ADAGIO FOR STRINGS
MISSION 18 – THE DESTROYER
MISSION 19 – THE SUCCESSOR
MISSION 20 – LA VITA NVOVA
COPYRIGHTS
AUTHOR’S NOTE
• MASTER THE DEVIL BRINGER - One can easily say devil bringer is the main reason for this game to sell 1.4
million copies. And it’s true; devil bringer is the best part in the game. Nero has special type of buster for
every demon; abuse it to beat the crap out of the poor demons and bosses.
• STOP BEING A SHOPPING GEEK – Don’t buy upgrades just because they look cool. Trust me, upgrades like
table hopper and charged shot will never come into use, DON’T BUY THEM. If you have already bought them,
then cancel it to get your red orbs and proud souls back. You need money to buy upgrades like air hike,
3 DEVIL MAY CRY 4
shredder and roulette spin, which are very handy and essential in beating the game. So stop being a shopping
geek, who’ll buy everything they see and save your proud souls.
• BUTTON MASHING – Nero is not the type of character you can play in harder modes; you need to learn how
to perform his combos perfectly. You can easily use button mashing and beat the game as Dante. But it won’t
work for Nero; bosses like Angelo Credo and Sanctus will his kick ass out of the world if you don’t know how to
perform chain combos.
• DEVIL EYES – Always keep an eye for breakable objects, I’ll call you guys stupid and yell at you if you are
playing without collecting red orbs. Red orbs are the life savers in the game; you need plenty of them so always
search the area before leaving it.
• BACK UPS – Always buy a medium star or a gold orb [FOR HARDER MODES] before engaging in a boss fight.
You’ll get enough red orbs to buy them at the end of each level, so stop worrying about saving red orbs and buy
back ups. You can’t beat Sanctus and others without using a healing star so don’t try to hold back, just go
ahead and use them.
STORY
The game starts with Nero rushing towards the opera house to attend a ceremony. Kyrie starts the ceremony as Nero
gets attacked by a couple of demons near the gates, he manages to dispatch them and arrive in the ceremony by the
time Kyrie finishes her song. The ceremony continues as Sanctus, Head of the Order of the Sword starts his speech
about Sparda, The Legendary Dark Knight, who protected the world 2,000 years ago.
Nero gets bored by the prayer and tries to leave but his right arm begins to glow in a strange way. And suddenly Dante
bursts in through the ceiling and kills Sanctus, the Order Knights tries to captures the mysterious assassin but Dante
easily dispatches them. In attempt to save Kyrie, Nero attacks Dante and the two starts fighting. Soon Dante gains
upper hand in the fight forcing Nero to show his demonic arm, with which he tries to kill Dante. At the end, Dante
manages to evade all his attacks unharmed and escapes.
Credo, Leader of the Order’s Knight and Kyrie’s brother, assigns Nero to track down and capture Dante, who has been
last seen in Fortuna Castle. Upon leaving Opera House, the Hell Gates opens in several places and a large horde of
demons pours into the city, Nero manages to kill the demons and reach Fortuna Castle. In mean while, the Order revives
Sanctus using a demon soul and he orders to capture Dante immediately.
In Fortuna Castle, Nero meets Agnus, who severely injures Nero so that he can use him as a test subject and research
on his devil arm. Broken Yamato, which was kept in Agnus’s research facility, responds to Nero’s plead and mends itself
and flies to his hand, triggering the demon residing inside him. Nero easily defeats Agnus and forces him flee back to
the Head Quarters, Agnus informs the Order about Nero’s demonic power and Credo promises to deal with him but
Gloria offers to do the job.
Credo, who has been infused by a demon soul, confronts Nero in the Head Quarters but Nero easily defeats. However,
Kyrie arrives in the spot and sees Nero’s demonic form standing beside her brother. Agnus uses the confusion created
between the trio and kidnaps Kyrie to lure Nero into a trap. While trying to rescue Kyrie, Nero runs into Dante, who has
been pursuing Nero for Yamato, a katana used by his father, Sparda to seal the hell gates, which has been then passed
down to his twin-brother, Vergil. A fight ensues, which results in leaving Dante undefeated. However in the end, Dante
lets Nero have the sword and leaves.
Just as Agnus planned, Nero follows him to his lab, where he defeats him. At the last moment, Sanctus arrives in the
spot and saves Agnus. Nero confronts Sanctus and The Savior, a gigantic statue; the Order is planning to bring to life
using Dante. Using Kyrie as a distraction, Sanctus successfully captures Nero and uses him and Yamato to bring The
Savior to life. Credo tries to save Nero and Kyrie but Sanctus brutally injures him. Dante arrives in the spot and
demands Nero to return his sword but Nero, who has been half absorbed by The Savior, leaves him with a challenge
“come and get it”.
Credo begs Dante and Trish to save Nero and Kyrie and dies in Dante’s hand. Agnus uses Yamato to open the real hell
gates, which were sealed off by Sparda a long time ago. As promised to Credo, Dante fights his way back to the opera
house, destroying all the hell gates on his way. In opera house, Dante kills Agnus and retrieves Yamato, which he uses to
destroy the final Hell Gate opened in the city. Dante then confronts The Savior and defeats it only to find out it’s
invincible from outside and has to be destroyed from the inside.

4 DEVIL MAY CRY 4
Dante inserts Yamato to The Savior and forces it to break through its chest. Nero uses the sword to break free of
Savior’s barrier and confronts Sanctus from the inside, where he defeats him and saves Kyrie. Finally, Nero uses the
devil bringer to destroy The Savior and Sanctus, bringing end to all the disasters they bought to the city. In the end,
Dante leaves Nero have the sword and leaves.
CONTROLS AND COMBOS
CONTROLS PC MELEE ATTACK I
GUN ATTACK J
JUMP K
DEVIL BRINGER L
DEVIL TRIGGER N
LOCK-ON Spacebar
EXCEED Q
TAUNT M
CHANGE TARGET O
RESET CAMERA P
MOVE UP W
MOVE DOWN S
MOVE LEFT A
MOVE RIGHT D
CAMERA UP UP
CAMERA DOWN DOWN
CAMERA LEFT LEFT
CAMERA RIGHT RIGHT
CONTROLS XBOX 360 MELEE ATTACK Y
GUN ATTACK X
JUMP A
DEVIL BRINGER B
DEVIL TRIGGER LB
LOCK-ON RB
EXCEED LT
TAUNT BACK
CHANGE TARGET LS
RESET CAMERA RS
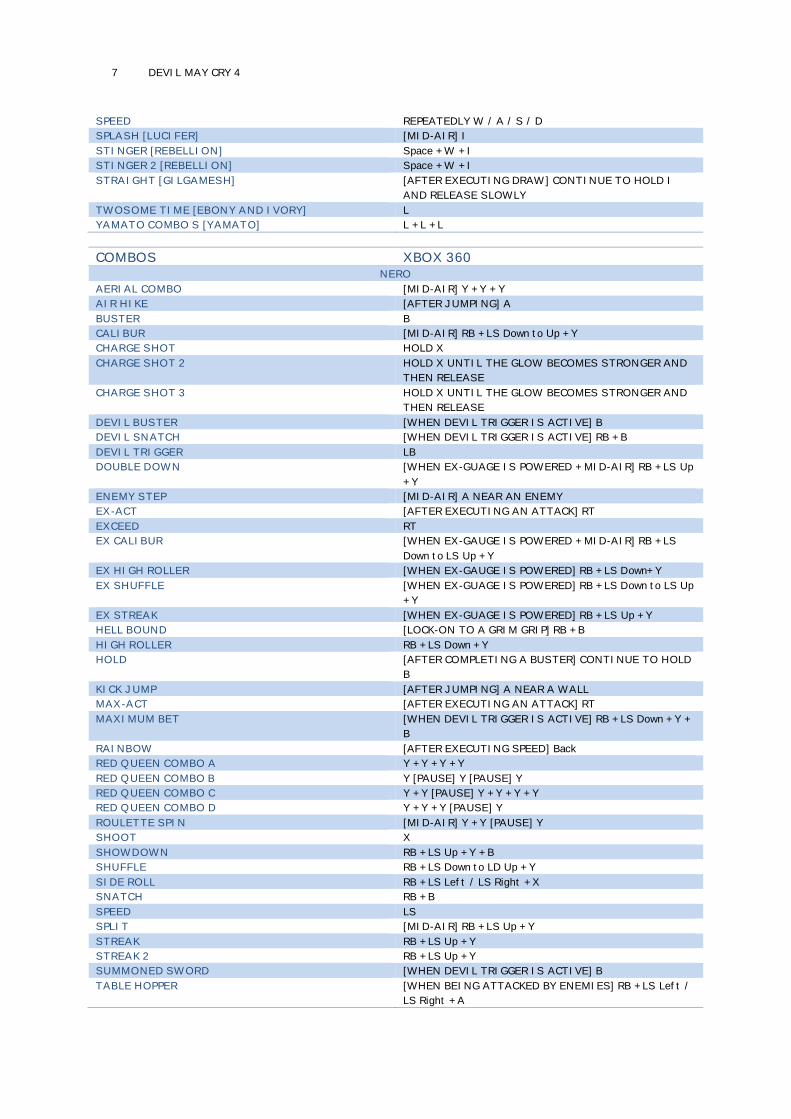
COMBOS PC NERO
AERIAL COMBO [MID-AIR] I + I + I
AIR HIKE [AFTER JUMPING] K
BUSTER L
CALIBUR [MID-AIR] Space + S + W + I
CHARGE SHOT HOLD J
CHARGE SHOT 2 HOLD J UNTIL THE GLOW BECOMES STRONGER AND
THEN RELEASE
CHARGE SHOT 3 HOLD J UNTIL THE GLOW BECOMES STRONGER AND
THEN RELEASE
DEVIL BUSTER [WHEN DEVIL TRIGGER IS ACTIVE] L
DEVIL SNATCH [WHEN DEVIL TRIGGER IS ACTIVE] Space + L
DEVIL TRIGGER L
DOUBLE DOWN [WHEN EX-GUAGE IS POWERED + MID-AIR] Space + W
+ I
ENEMY STEP [MID-AIR] K NEAR AN ENEMY
EX-ACT [AFTER EXECUTING AN ATTACK] Q
EXCEED Q
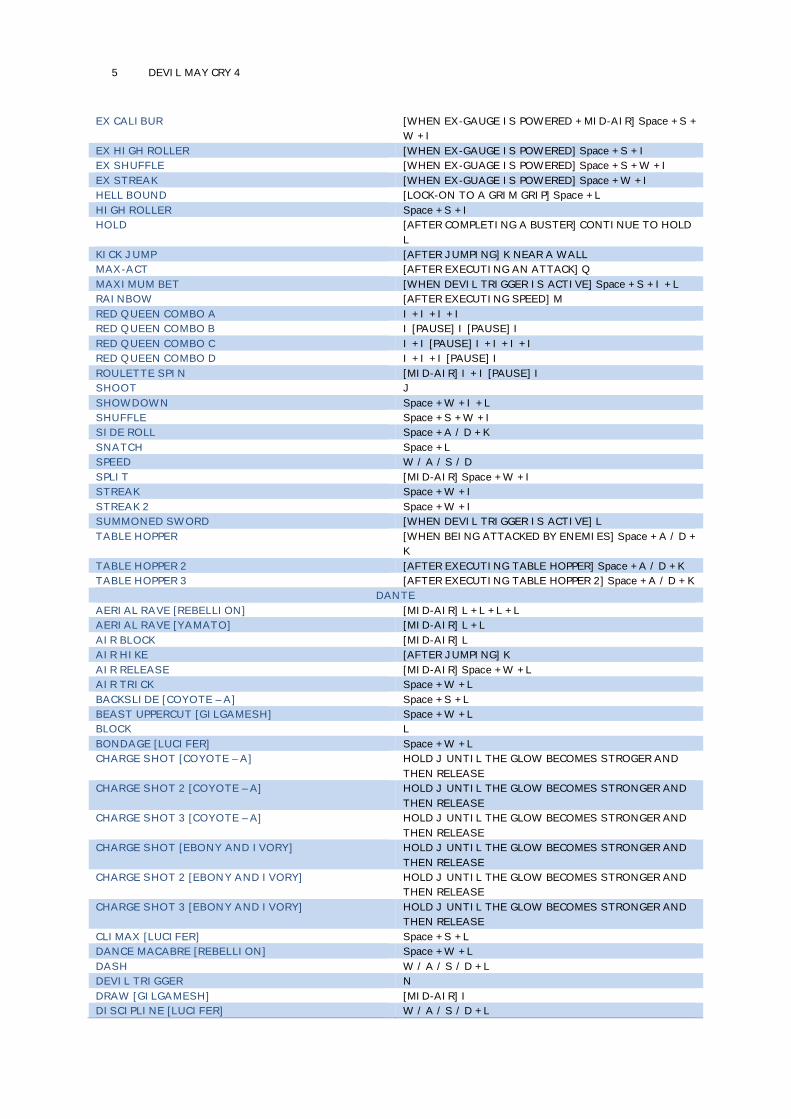
5 DEVIL MAY CRY 4
EX CALIBUR [WHEN EX-GAUGE IS POWERED + MID-AIR] Space + S +
W + I
EX HIGH ROLLER [WHEN EX-GAUGE IS POWERED] Space + S + I
EX SHUFFLE [WHEN EX-GUAGE IS POWERED] Space + S + W + I
EX STREAK [WHEN EX-GUAGE IS POWERED] Space + W + I
HELL BOUND [LOCK-ON TO A GRIM GRIP] Space + L
HIGH ROLLER Space + S + I
HOLD [AFTER COMPLETING A BUSTER] CONTINUE TO HOLD
L
KICK JUMP [AFTER JUMPING] K NEAR A WALL
MAX-ACT [AFTER EXECUTING AN ATTACK] Q
MAXIMUM BET [WHEN DEVIL TRIGGER IS ACTIVE] Space + S + I + L
RAINBOW [AFTER EXECUTING SPEED] M
RED QUEEN COMBO A I + I + I + I
RED QUEEN COMBO B I [PAUSE] I [PAUSE] I
RED QUEEN COMBO C I + I [PAUSE] I + I + I + I
RED QUEEN COMBO D I + I + I [PAUSE] I
ROULETTE SPIN [MID-AIR] I + I [PAUSE] I
SHOOT J
SHOWDOWN Space + W + I + L
SHUFFLE Space + S + W + I
SIDE ROLL Space + A / D + K
SNATCH Space + L
SPEED W / A / S / D
SPLIT [MID-AIR] Space + W + I
STREAK Space + W + I
STREAK 2 Space + W + I
SUMMONED SWORD [WHEN DEVIL TRIGGER IS ACTIVE] L
TABLE HOPPER [WHEN BEING ATTACKED BY ENEMIES] Space + A / D +
K
TABLE HOPPER 2 [AFTER EXECUTING TABLE HOPPER] Space + A / D + K
TABLE HOPPER 3 [AFTER EXECUTING TABLE HOPPER 2] Space + A / D + K
DANTE
AERIAL RAVE [REBELLION] [MID-AIR] L + L + L + L
AERIAL RAVE [YAMATO] [MID-AIR] L + L
AIR BLOCK [MID-AIR] L
AIR HIKE [AFTER JUMPING] K
AIR RELEASE [MID-AIR] Space + W + L
AIR TRICK Space + W + L
BACKSLIDE [COYOTE – A] Space + S + L
BEAST UPPERCUT [GILGAMESH] Space + W + L
BLOCK L
BONDAGE [LUCIFER] Space + W + L
CHARGE SHOT [COYOTE – A] HOLD J UNTIL THE GLOW BECOMES STROGER AND
THEN RELEASE
CHARGE SHOT 2 [COYOTE – A] HOLD J UNTIL THE GLOW BECOMES STRONGER AND
THEN RELEASE
CHARGE SHOT 3 [COYOTE – A] HOLD J UNTIL THE GLOW BECOMES STRONGER AND
THEN RELEASE
CHARGE SHOT [EBONY AND IVORY] HOLD J UNTIL THE GLOW BECOMES STRONGER AND
THEN RELEASE
CHARGE SHOT 2 [EBONY AND IVORY] HOLD J UNTIL THE GLOW BECOMES STRONGER AND
THEN RELEASE
CHARGE SHOT 3 [EBONY AND IVORY] HOLD J UNTIL THE GLOW BECOMES STRONGER AND
THEN RELEASE
CLIMAX [LUCIFER] Space + S + L
DANCE MACABRE [REBELLION] Space + W + L
DASH W / A / S / D + L
DEVIL TRIGGER N
DRAW [GILGAMESH] [MID-AIR] I
DISCIPLINE [LUCIFER] W / A / S / D + L
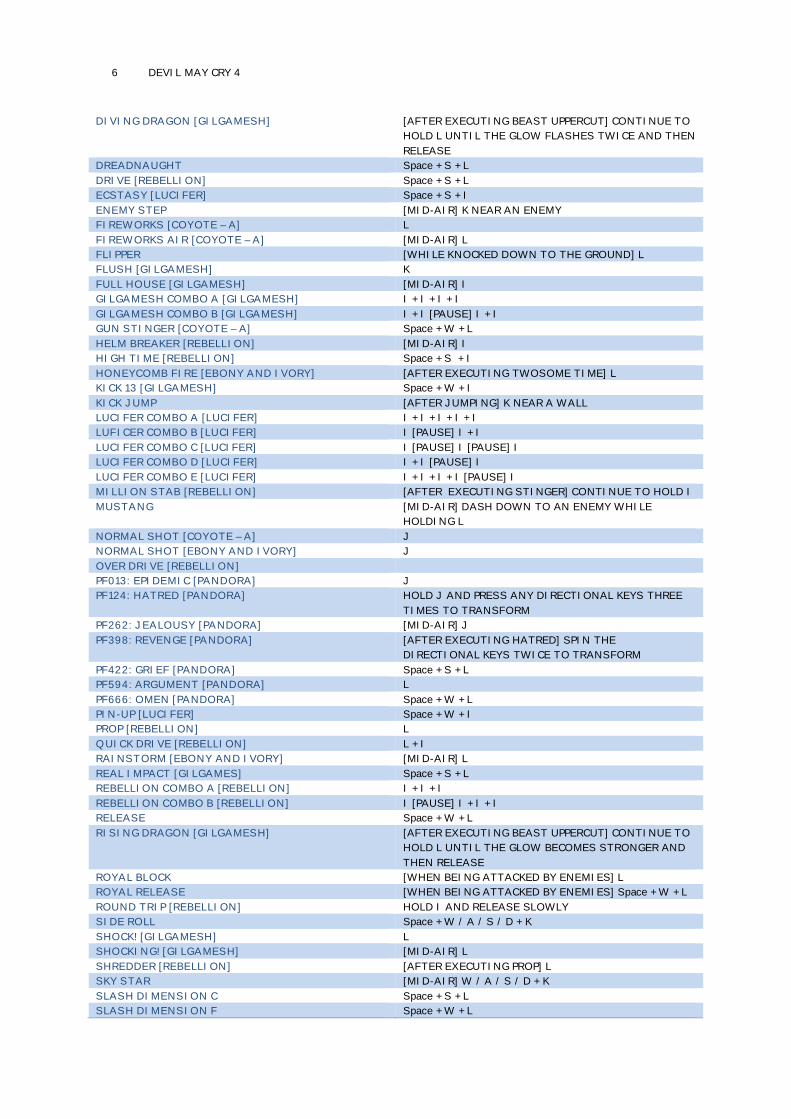
6 DEVIL MAY CRY 4
DIVING DRAGON [GILGAMESH] [AFTER EXECUTING BEAST UPPERCUT] CONTINUE TO
HOLD L UNTIL THE GLOW FLASHES TWICE AND THEN
RELEASE
DREADNAUGHT Space + S + L
DRIVE [REBELLION] Space + S + L
ECSTASY [LUCIFER] Space + S + I
ENEMY STEP [MID-AIR] K NEAR AN ENEMY
FIREWORKS [COYOTE – A] L
FIREWORKS AIR [COYOTE – A] [MID-AIR] L
FLIPPER [WHILE KNOCKED DOWN TO THE GROUND] L
FLUSH [GILGAMESH] K
FULL HOUSE [GILGAMESH] [MID-AIR] I
GILGAMESH COMBO A [GILGAMESH] I + I + I + I
GILGAMESH COMBO B [GILGAMESH] I + I [PAUSE] I + I
GUN STINGER [COYOTE – A] Space + W + L
HELM BREAKER [REBELLION] [MID-AIR] I
HIGH TIME [REBELLION] Space + S + I
HONEYCOMB FIRE [EBONY AND IVORY] [AFTER EXECUTING TWOSOME TIME] L
KICK 13 [GILGAMESH] Space + W + I
KICK JUMP [AFTER JUMPING] K NEAR A WALL
LUCIFER COMBO A [LUCIFER] I + I + I + I + I
LUFICER COMBO B [LUCIFER] I [PAUSE] I + I
LUCIFER COMBO C [LUCIFER] I [PAUSE] I [PAUSE] I
LUCIFER COMBO D [LUCIFER] I + I [PAUSE] I
LUCIFER COMBO E [LUCIFER] I + I + I + I [PAUSE] I
MILLION STAB [REBELLION] [AFTER EXECUTING STINGER] CONTINUE TO HOLD I
MUSTANG [MID-AIR] DASH DOWN TO AN ENEMY WHILE
HOLDING L
NORMAL SHOT [COYOTE – A] J
NORMAL SHOT [EBONY AND IVORY] J
OVER DRIVE [REBELLION]
PF013: EPIDEMIC [PANDORA] J
PF124: HATRED [PANDORA] HOLD J AND PRESS ANY DIRECTIONAL KEYS THREE
TIMES TO TRANSFORM
PF262: JEALOUSY [PANDORA] [MID-AIR] J
PF398: REVENGE [PANDORA] [AFTER EXECUTING HATRED] SPIN THE
DIRECTIONAL KEYS TWICE TO TRANSFORM
PF422: GRIEF [PANDORA] Space + S + L
PF594: ARGUMENT [PANDORA] L
PF666: OMEN [PANDORA] Space + W + L
PIN-UP [LUCIFER] Space + W + I
PROP [REBELLION] L
QUICK DRIVE [REBELLION] L + I
RAINSTORM [EBONY AND IVORY] [MID-AIR] L
REAL IMPACT [GILGAMES] Space + S + L
REBELLION COMBO A [REBELLION] I + I + I
REBELLION COMBO B [REBELLION] I [PAUSE] I + I + I
RELEASE Space + W + L
RISING DRAGON [GILGAMESH] [AFTER EXECUTING BEAST UPPERCUT] CONTINUE TO
HOLD L UNTIL THE GLOW BECOMES STRONGER AND
THEN RELEASE
ROYAL BLOCK [WHEN BEING ATTACKED BY ENEMIES] L
ROYAL RELEASE [WHEN BEING ATTACKED BY ENEMIES] Space + W + L
ROUND TRIP [REBELLION] HOLD I AND RELEASE SLOWLY
SIDE ROLL Space + W / A / S / D + K
SHOCK! [GILGAMESH] L
SHOCKING! [GILGAMESH] [MID-AIR] L
SHREDDER [REBELLION] [AFTER EXECUTING PROP] L
SKY STAR [MID-AIR] W / A / S / D + K
SLASH DIMENSION C Space + S + L
SLASH DIMENSION F Space + W + L
7 DEVIL MAY CRY 4
SPEED REPEATEDLY W / A / S / D
SPLASH [LUCIFER] [MID-AIR] I
STINGER [REBELLION] Space + W + I
STINGER 2 [REBELLION] Space + W + I
STRAIGHT [GILGAMESH] [AFTER EXECUTING DRAW] CONTINUE TO HOLD I
AND RELEASE SLOWLY
TWOSOME TIME [EBONY AND IVORY] L
YAMATO COMBO S [YAMATO] L + L + L
COMBOS XBOX 360 NERO
AERIAL COMBO [MID-AIR] Y + Y + Y
AIR HIKE [AFTER JUMPING] A
BUSTER B
CALIBUR [MID-AIR] RB + LS Down to Up + Y
CHARGE SHOT HOLD X
CHARGE SHOT 2 HOLD X UNTIL THE GLOW BECOMES STRONGER AND
THEN RELEASE
CHARGE SHOT 3 HOLD X UNTIL THE GLOW BECOMES STRONGER AND
THEN RELEASE
DEVIL BUSTER [WHEN DEVIL TRIGGER IS ACTIVE] B
DEVIL SNATCH [WHEN DEVIL TRIGGER IS ACTIVE] RB + B
DEVIL TRIGGER LB
DOUBLE DOWN [WHEN EX-GUAGE IS POWERED + MID-AIR] RB + LS Up
+ Y
ENEMY STEP [MID-AIR] A NEAR AN ENEMY
EX-ACT [AFTER EXECUTING AN ATTACK] RT
EXCEED RT
EX CALIBUR [WHEN EX-GAUGE IS POWERED + MID-AIR] RB + LS
Down to LS Up + Y
EX HIGH ROLLER [WHEN EX-GAUGE IS POWERED] RB + LS Down+ Y
EX SHUFFLE [WHEN EX-GUAGE IS POWERED] RB + LS Down to LS Up
+ Y
EX STREAK [WHEN EX-GUAGE IS POWERED] RB + LS Up + Y
HELL BOUND [LOCK-ON TO A GRIM GRIP] RB + B
HIGH ROLLER RB + LS Down + Y
HOLD [AFTER COMPLETING A BUSTER] CONTINUE TO HOLD
B
KICK JUMP [AFTER JUMPING] A NEAR A WALL
MAX-ACT [AFTER EXECUTING AN ATTACK] RT
MAXIMUM BET [WHEN DEVIL TRIGGER IS ACTIVE] RB + LS Down + Y +
B
RAINBOW [AFTER EXECUTING SPEED] Back
RED QUEEN COMBO A Y + Y + Y + Y
RED QUEEN COMBO B Y [PAUSE] Y [PAUSE] Y
RED QUEEN COMBO C Y + Y [PAUSE] Y + Y + Y + Y
RED QUEEN COMBO D Y + Y + Y [PAUSE] Y
ROULETTE SPIN [MID-AIR] Y + Y [PAUSE] Y
SHOOT X
SHOWDOWN RB + LS Up + Y + B
SHUFFLE RB + LS Down to LD Up + Y
SIDE ROLL RB + LS Left / LS Right + X
SNATCH RB + B
SPEED LS
SPLIT [MID-AIR] RB + LS Up + Y
STREAK RB + LS Up + Y
STREAK 2 RB + LS Up + Y
SUMMONED SWORD [WHEN DEVIL TRIGGER IS ACTIVE] B
TABLE HOPPER [WHEN BEING ATTACKED BY ENEMIES] RB + LS Left /
LS Right + A
8 DEVIL MAY CRY 4
TABLE HOPPER 2 [AFTER EXECUTING TABLE HOPPER] RB + LS Left / LS
Right + A
TABLE HOPPER 3 [AFTER EXECUTING TABLE HOPPER 2] RB + LS Left /
LS Right + A
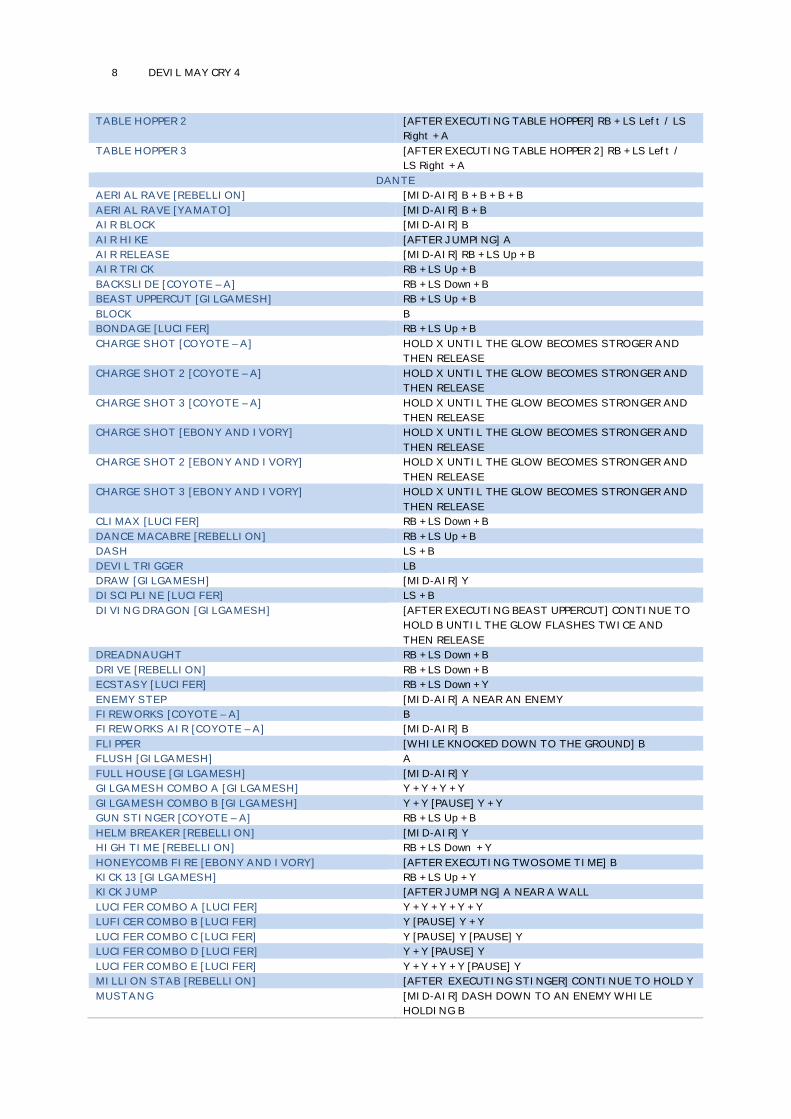
DANTE
AERIAL RAVE [REBELLION] [MID-AIR] B + B + B + B
AERIAL RAVE [YAMATO] [MID-AIR] B + B
AIR BLOCK [MID-AIR] B
AIR HIKE [AFTER JUMPING] A
AIR RELEASE [MID-AIR] RB + LS Up + B
AIR TRICK RB + LS Up + B
BACKSLIDE [COYOTE – A] RB + LS Down + B
BEAST UPPERCUT [GILGAMESH] RB + LS Up + B
BLOCK B
BONDAGE [LUCIFER] RB + LS Up + B
CHARGE SHOT [COYOTE – A] HOLD X UNTIL THE GLOW BECOMES STROGER AND
THEN RELEASE
CHARGE SHOT 2 [COYOTE – A] HOLD X UNTIL THE GLOW BECOMES STRONGER AND
THEN RELEASE
CHARGE SHOT 3 [COYOTE – A] HOLD X UNTIL THE GLOW BECOMES STRONGER AND
THEN RELEASE
CHARGE SHOT [EBONY AND IVORY] HOLD X UNTIL THE GLOW BECOMES STRONGER AND
THEN RELEASE
CHARGE SHOT 2 [EBONY AND IVORY] HOLD X UNTIL THE GLOW BECOMES STRONGER AND
THEN RELEASE
CHARGE SHOT 3 [EBONY AND IVORY] HOLD X UNTIL THE GLOW BECOMES STRONGER AND
THEN RELEASE
CLIMAX [LUCIFER] RB + LS Down + B
DANCE MACABRE [REBELLION] RB + LS Up + B
DASH LS + B
DEVIL TRIGGER LB
DRAW [GILGAMESH] [MID-AIR] Y
DISCIPLINE [LUCIFER] LS + B
DIVING DRAGON [GILGAMESH] [AFTER EXECUTING BEAST UPPERCUT] CONTINUE TO
HOLD B UNTIL THE GLOW FLASHES TWICE AND
THEN RELEASE
DREADNAUGHT RB + LS Down + B
DRIVE [REBELLION] RB + LS Down + B
ECSTASY [LUCIFER] RB + LS Down + Y
ENEMY STEP [MID-AIR] A NEAR AN ENEMY
FIREWORKS [COYOTE – A] B
FIREWORKS AIR [COYOTE – A] [MID-AIR] B
FLIPPER [WHILE KNOCKED DOWN TO THE GROUND] B
FLUSH [GILGAMESH] A
FULL HOUSE [GILGAMESH] [MID-AIR] Y
GILGAMESH COMBO A [GILGAMESH] Y + Y + Y + Y
GILGAMESH COMBO B [GILGAMESH] Y + Y [PAUSE] Y + Y
GUN STINGER [COYOTE – A] RB + LS Up + B
HELM BREAKER [REBELLION] [MID-AIR] Y
HIGH TIME [REBELLION] RB + LS Down + Y
HONEYCOMB FIRE [EBONY AND IVORY] [AFTER EXECUTING TWOSOME TIME] B
KICK 13 [GILGAMESH] RB + LS Up + Y
KICK JUMP [AFTER JUMPING] A NEAR A WALL
LUCIFER COMBO A [LUCIFER] Y + Y + Y + Y + Y
LUFICER COMBO B [LUCIFER] Y [PAUSE] Y + Y
LUCIFER COMBO C [LUCIFER] Y [PAUSE] Y [PAUSE] Y
LUCIFER COMBO D [LUCIFER] Y + Y [PAUSE] Y
LUCIFER COMBO E [LUCIFER] Y + Y + Y + Y [PAUSE] Y
MILLION STAB [REBELLION] [AFTER EXECUTING STINGER] CONTINUE TO HOLD Y
MUSTANG [MID-AIR] DASH DOWN TO AN ENEMY WHILE
HOLDING B
9 DEVIL MAY CRY 4
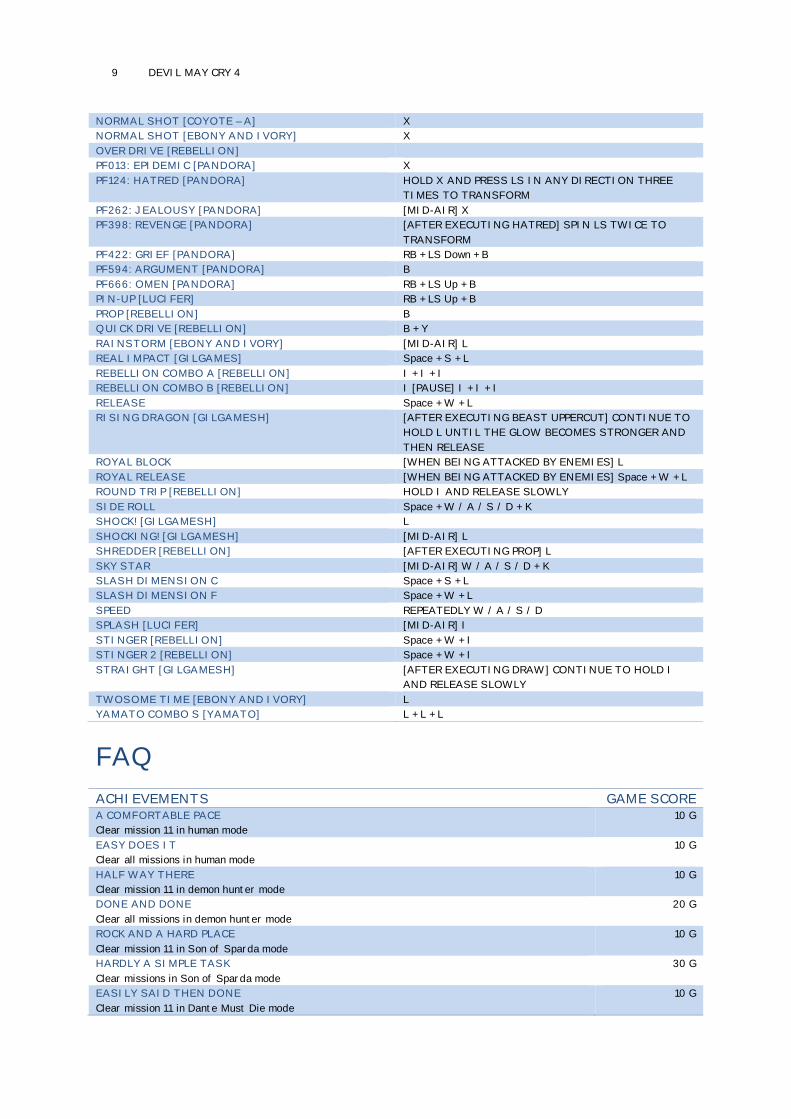
NORMAL SHOT [COYOTE – A] X
NORMAL SHOT [EBONY AND IVORY] X
OVER DRIVE [REBELLION]
PF013: EPIDEMIC [PANDORA] X
PF124: HATRED [PANDORA] HOLD X AND PRESS LS IN ANY DIRECTION THREE
TIMES TO TRANSFORM
PF262: JEALOUSY [PANDORA] [MID-AIR] X
PF398: REVENGE [PANDORA] [AFTER EXECUTING HATRED] SPIN LS TWICE TO
TRANSFORM
PF422: GRIEF [PANDORA] RB + LS Down + B
PF594: ARGUMENT [PANDORA] B
PF666: OMEN [PANDORA] RB + LS Up + B
PIN-UP [LUCIFER] RB + LS Up + B
PROP [REBELLION] B
QUICK DRIVE [REBELLION] B + Y
RAINSTORM [EBONY AND IVORY] [MID-AIR] L
REAL IMPACT [GILGAMES] Space + S + L
REBELLION COMBO A [REBELLION] I + I + I
REBELLION COMBO B [REBELLION] I [PAUSE] I + I + I
RELEASE Space + W + L
RISING DRAGON [GILGAMESH] [AFTER EXECUTING BEAST UPPERCUT] CONTINUE TO
HOLD L UNTIL THE GLOW BECOMES STRONGER AND
THEN RELEASE
ROYAL BLOCK [WHEN BEING ATTACKED BY ENEMIES] L
ROYAL RELEASE [WHEN BEING ATTACKED BY ENEMIES] Space + W + L
ROUND TRIP [REBELLION] HOLD I AND RELEASE SLOWLY
SIDE ROLL Space + W / A / S / D + K
SHOCK! [GILGAMESH] L
SHOCKING! [GILGAMESH] [MID-AIR] L
SHREDDER [REBELLION] [AFTER EXECUTING PROP] L
SKY STAR [MID-AIR] W / A / S / D + K
SLASH DIMENSION C Space + S + L
SLASH DIMENSION F Space + W + L
SPEED REPEATEDLY W / A / S / D
SPLASH [LUCIFER] [MID-AIR] I
STINGER [REBELLION] Space + W + I
STINGER 2 [REBELLION] Space + W + I
STRAIGHT [GILGAMESH] [AFTER EXECUTING DRAW] CONTINUE TO HOLD I
AND RELEASE SLOWLY
TWOSOME TIME [EBONY AND IVORY] L
YAMATO COMBO S [YAMATO] L + L + L
FAQ
ACHIEVEMENTS GAME SCORE A COMFORTABLE PACE
Clear mission 11 in human mode
10 G
EASY DOES IT
Clear all missions in human mode
10 G
HALF WAY THERE
Clear mission 11 in demon hunter mode
10 G
DONE AND DONE
Clear all missions in demon hunter mode
20 G
ROCK AND A HARD PLACE
Clear mission 11 in Son of Sparda mode
10 G
HARDLY A SIMPLE TASK
Clear missions in Son of Sparda mode
30 G
EASILY SAID THEN DONE
Clear mission 11 in Dante Must Die mode
10 G
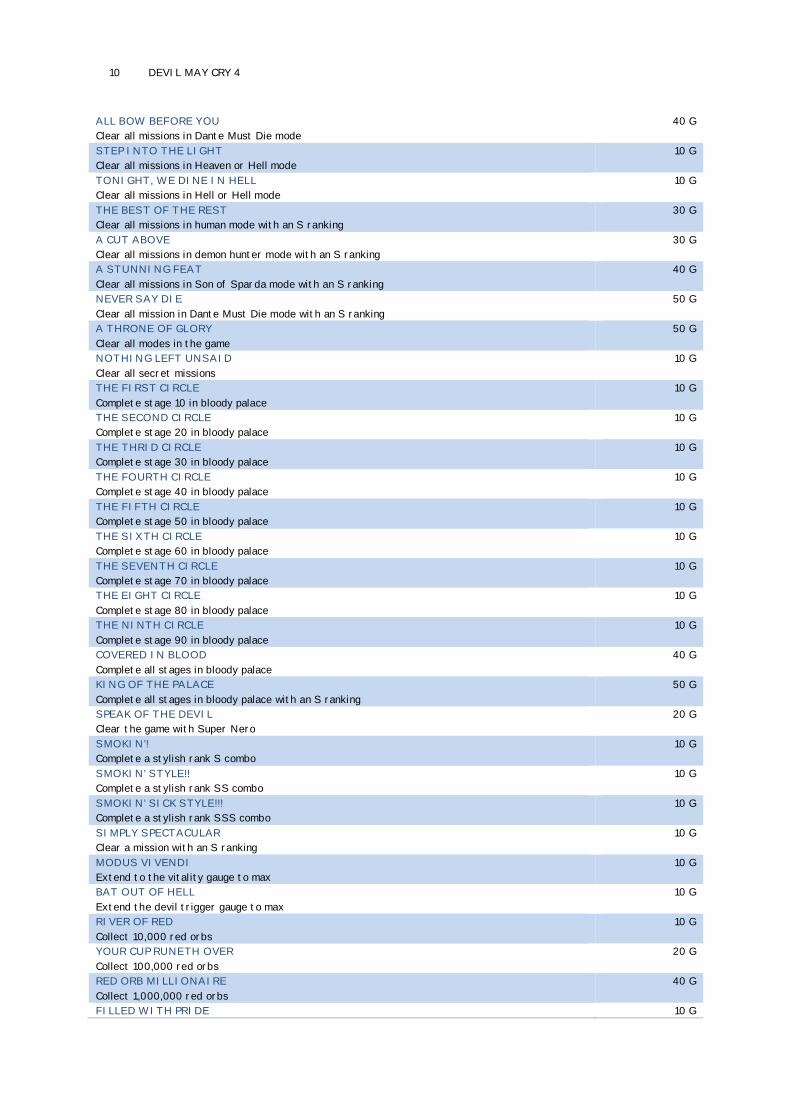
10 DEVIL MAY CRY 4
ALL BOW BEFORE YOU
Clear all missions in Dante Must Die mode
40 G
STEP INTO THE LIGHT
Clear all missions in Heaven or Hell mode
10 G
TONIGHT, WE DINE IN HELL
Clear all missions in Hell or Hell mode
10 G
THE BEST OF THE REST
Clear all missions in human mode with an S ranking
30 G
A CUT ABOVE
Clear all missions in demon hunter mode with an S ranking
30 G
A STUNNING FEAT
Clear all missions in Son of Sparda mode with an S ranking
40 G
NEVER SAY DIE
Clear all mission in Dante Must Die mode with an S ranking
50 G
A THRONE OF GLORY
Clear all modes in the game
50 G
NOTHING LEFT UNSAID
Clear all secret missions
10 G
THE FIRST CIRCLE
Complete stage 10 in bloody palace
10 G
THE SECOND CIRCLE
Complete stage 20 in bloody palace
10 G
THE THRID CIRCLE
Complete stage 30 in bloody palace
10 G
THE FOURTH CIRCLE
Complete stage 40 in bloody palace
10 G
THE FIFTH CIRCLE
Complete stage 50 in bloody palace
10 G
THE SIXTH CIRCLE
Complete stage 60 in bloody palace
10 G
THE SEVENTH CIRCLE
Complete stage 70 in bloody palace
10 G
THE EIGHT CIRCLE
Complete stage 80 in bloody palace
10 G
THE NINTH CIRCLE
Complete stage 90 in bloody palace
10 G
COVERED IN BLOOD
Complete all stages in bloody palace
40 G
KING OF THE PALACE
Complete all stages in bloody palace with an S ranking
50 G
SPEAK OF THE DEVIL
Clear the game with Super Nero
20 G
SMOKIN’!
Complete a stylish rank S combo
10 G
SMOKIN’ STYLE!!
Complete a stylish rank SS combo
10 G
SMOKIN’ SICK STYLE!!!
Complete a stylish rank SSS combo
10 G
SIMPLY SPECTACULAR
Clear a mission with an S ranking
10 G
MODUS VIVENDI
Extend to the vitality gauge to max
10 G
BAT OUT OF HELL
Extend the devil trigger gauge to max
10 G
RIVER OF RED
Collect 10,000 red orbs
10 G
YOUR CUP RUNETH OVER
Collect 100,000 red orbs
20 G
RED ORB MILLIONAIRE
Collect 1,000,000 red orbs
40 G
FILLED WITH PRIDE 10 G
11 DEVIL MAY CRY 4
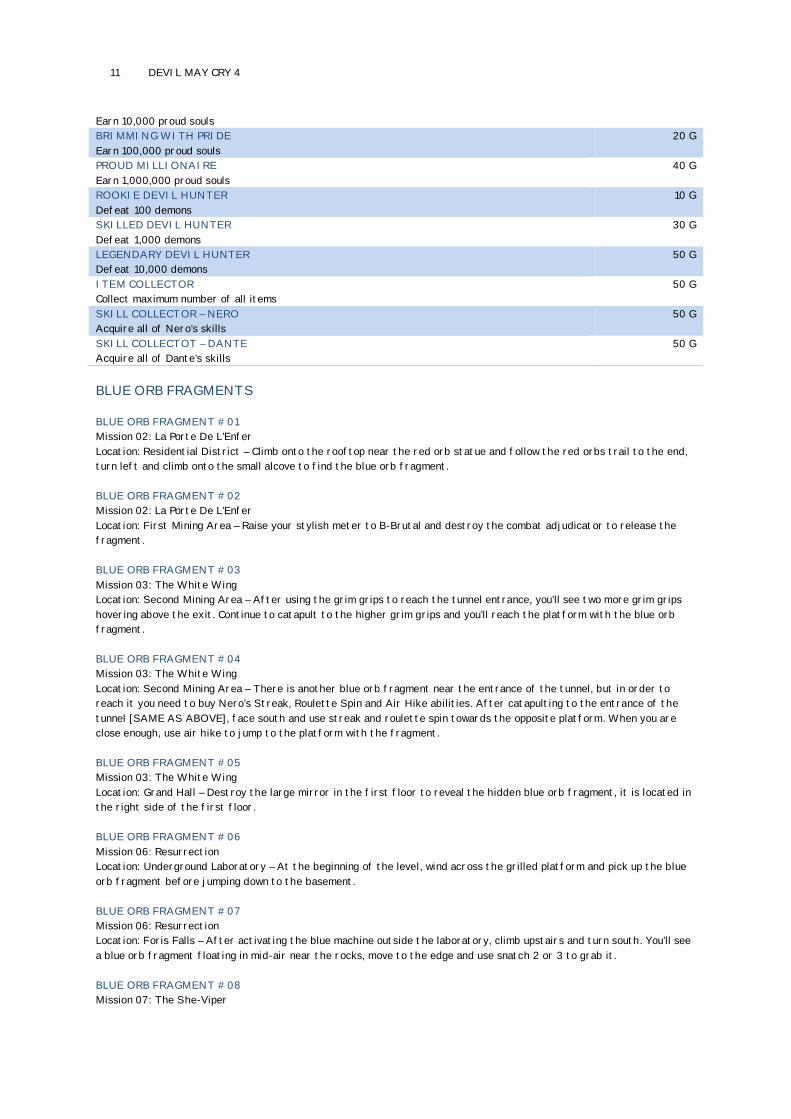
Earn 10,000 proud souls
BRIMMING WITH PRIDE
Earn 100,000 proud souls
20 G
PROUD MILLIONAIRE
Earn 1,000,000 proud souls
40 G
ROOKIE DEVIL HUNTER
Defeat 100 demons
10 G
SKILLED DEVIL HUNTER
Defeat 1,000 demons
30 G
LEGENDARY DEVIL HUNTER
Defeat 10,000 demons
50 G
ITEM COLLECTOR
Collect maximum number of all items
50 G
SKILL COLLECTOR – NERO
Acquire all of Nero’s skills
50 G
SKILL COLLECTOT – DANTE
Acquire all of Dante’s skills
50 G
BLUE ORB FRAGMENTS
BLUE ORB FRAGMENT #01
Mission 02: La Porte De L’Enfer
Location: Residential District – Climb onto the rooftop near the red orb statue and follow the red orbs trail to the end,
turn left and climb onto the small alcove to find the blue orb fragment.
BLUE ORB FRAGMENT #02
Mission 02: La Porte De L’Enfer
Location: First Mining Area – Raise your stylish meter to B-Brutal and destroy the combat adjudicator to release the
fragment.
BLUE ORB FRAGMENT #03
Mission 03: The White Wing
Location: Second Mining Area – After using the grim grips to reach the tunnel entrance, you’ll see two more grim grips
hovering above the exit. Continue to catapult to the higher grim grips and you’ll reach the platform with the blue orb
fragment.
BLUE ORB FRAGMENT #04
Mission 03: The White Wing
Location: Second Mining Area – There is another blue orb fragment near the entrance of the tunnel, but in order to
reach it you need to buy Nero’s Streak, Roulette Spin and Air Hike abilities. After catapulting to the entrance of the
tunnel [SAME AS ABOVE], face south and use streak and roulette spin towards the opposite platform. When you are
close enough, use air hike to jump to the platform with the fragment.
BLUE ORB FRAGMENT #05
Mission 03: The White Wing
Location: Grand Hall – Destroy the large mirror in the first floor to reveal the hidden blue orb fragment, it is located in
the right side of the first floor.
BLUE ORB FRAGMENT #06
Mission 06: Resurrection
Location: Underground Laboratory – At the beginning of the level, wind across the grilled platform and pick up the blue
orb fragment before jumping down to the basement.
BLUE ORB FRAGMENT #07
Mission 06: Resurrection
Location: Foris Falls – After activating the blue machine outside the laboratory, climb upstairs and turn south. You’ll see
a blue orb fragment floating in mid-air near the rocks, move to the edge and use snatch 2 or 3 to grab it.
BLUE ORB FRAGMENT #08
Mission 07: The She-Viper
12 DEVIL MAY CRY 4
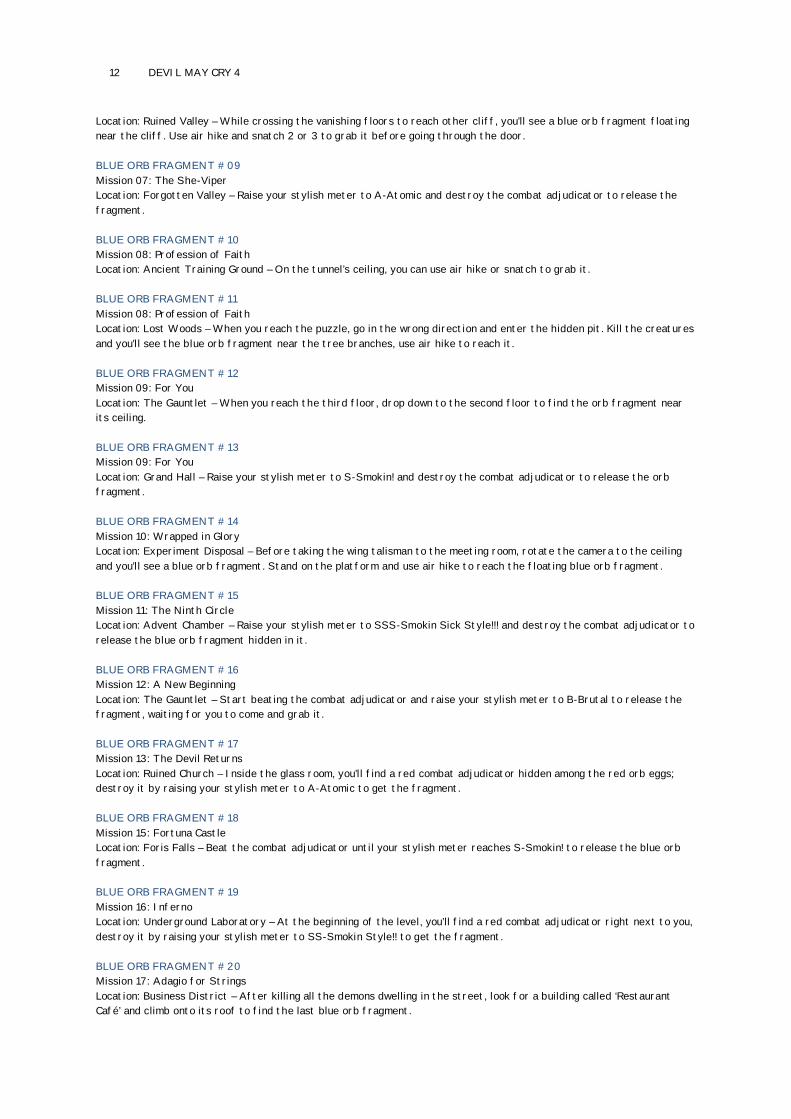
Location: Ruined Valley – While crossing the vanishing floors to reach other cliff, you’ll see a blue orb fragment floating
near the cliff. Use air hike and snatch 2 or 3 to grab it before going through the door.
BLUE ORB FRAGMENT #09
Mission 07: The She-Viper
Location: Forgotten Valley – Raise your stylish meter to A-Atomic and destroy the combat adjudicator to release the
fragment.
BLUE ORB FRAGMENT #10
Mission 08: Profession of Faith
Location: Ancient Training Ground – On the tunnel’s ceiling, you can use air hike or snatch to grab it.
BLUE ORB FRAGMENT #11
Mission 08: Profession of Faith
Location: Lost Woods – When you reach the puzzle, go in the wrong direction and enter the hidden pit. Kill the creatures
and you’ll see the blue orb fragment near the tree branches, use air hike to reach it.
BLUE ORB FRAGMENT #12
Mission 09: For You
Location: The Gauntlet – When you reach the third floor, drop down to the second floor to find the orb fragment near
its ceiling.
BLUE ORB FRAGMENT #13
Mission 09: For You
Location: Grand Hall – Raise your stylish meter to S-Smokin! and destroy the combat adjudicator to release the orb
fragment.
BLUE ORB FRAGMENT #14
Mission 10: Wrapped in Glory
Location: Experiment Disposal – Before taking the wing talisman to the meeting room, rotate the camera to the ceiling
and you’ll see a blue orb fragment. Stand on the platform and use air hike to reach the floating blue orb fragment.
BLUE ORB FRAGMENT #15
Mission 11: The Ninth Circle
Location: Advent Chamber – Raise your stylish meter to SSS-Smokin Sick Style!!! and destroy the combat adjudicator to
release the blue orb fragment hidden in it.
BLUE ORB FRAGMENT #16
Mission 12: A New Beginning
Location: The Gauntlet – Start beating the combat adjudicator and raise your stylish meter to B-Brutal to release the
fragment, waiting for you to come and grab it.
BLUE ORB FRAGMENT #17
Mission 13: The Devil Returns
Location: Ruined Church – Inside the glass room, you’ll find a red combat adjudicator hidden among the red orb eggs;
destroy it by raising your stylish meter to A-Atomic to get the fragment.
BLUE ORB FRAGMENT #18
Mission 15: Fortuna Castle
Location: Foris Falls – Beat the combat adjudicator until your stylish meter reaches S-Smokin! to release the blue orb
fragment.
BLUE ORB FRAGMENT #19
Mission 16: Inferno
Location: Underground Laboratory – At the beginning of the level, you’ll find a red combat adjudicator right next to you,
destroy it by raising your stylish meter to SS-Smokin Style!! to get the fragment.
BLUE ORB FRAGMENT #20
Mission 17: Adagio for Strings
Location: Business District – After killing all the demons dwelling in the street, look for a building called ‘Restaurant
Café’ and climb onto its roof to find the last blue orb fragment.
13 DEVIL MAY CRY 4
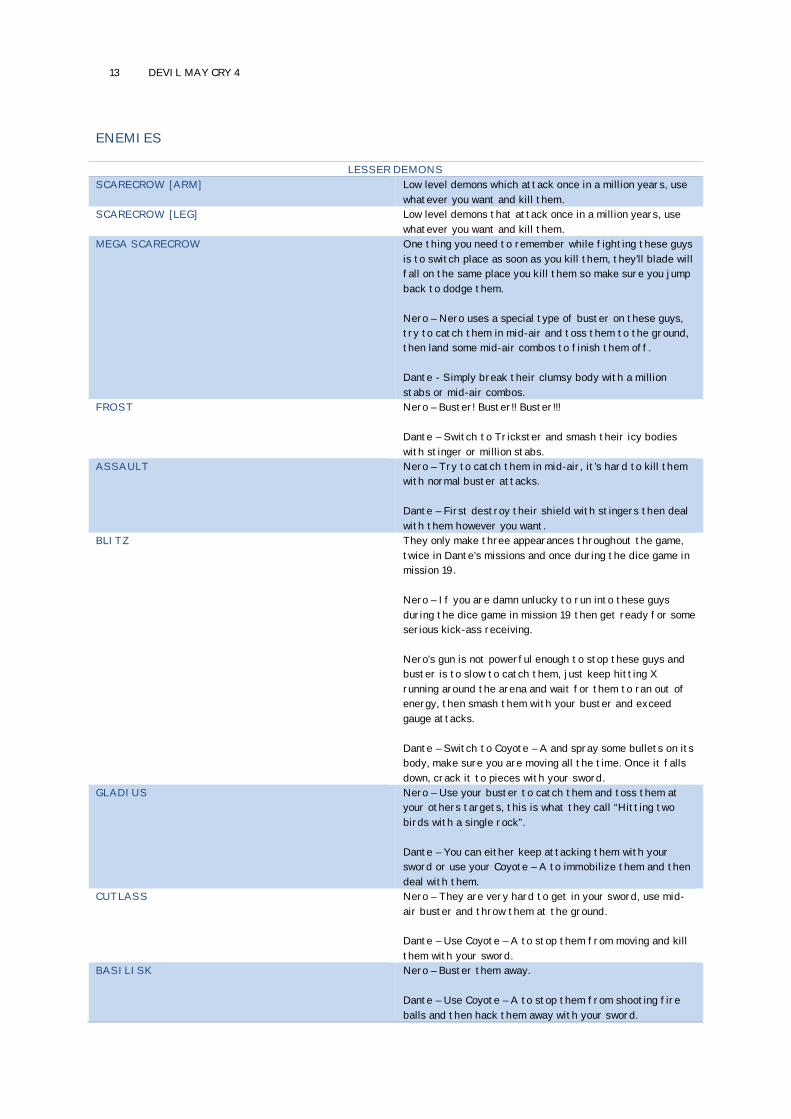
ENEMIES
LESSER DEMONS
SCARECROW [ARM] Low level demons which attack once in a million years, use
whatever you want and kill them.
SCARECROW [LEG] Low level demons that attack once in a million years, use
whatever you want and kill them.
MEGA SCARECROW One thing you need to remember while fighting these guys
is to switch place as soon as you kill them, they’ll blade will
fall on the same place you kill them so make sure you jump
back to dodge them.
Nero – Nero uses a special type of buster on these guys,
try to catch them in mid-air and toss them to the ground,
then land some mid-air combos to finish them off.
Dante - Simply break their clumsy body with a million
stabs or mid-air combos.
FROST Nero – Buster! Buster!! Buster!!!
Dante – Switch to Trickster and smash their icy bodies
with stinger or million stabs.
ASSAULT Nero – Try to catch them in mid-air, it’s hard to kill them
with normal buster attacks.
Dante – First destroy their shield with stingers then deal
with them however you want.
BLITZ They only make three appearances throughout the game,
twice in Dante’s missions and once during the dice game in
mission 19.
Nero – If you are damn unlucky to run into these guys
during the dice game in mission 19 then get ready for some
serious kick-ass receiving.
Nero’s gun is not powerful enough to stop these guys and
buster is to slow to catch them, just keep hitting X
running around the arena and wait for them to ran out of
energy, then smash them with your buster and exceed
gauge attacks.
Dante – Switch to Coyote – A and spray some bullets on its
body, make sure you are moving all the time. Once it falls
down, crack it to pieces with your sword.
GLADIUS Nero – Use your buster to catch them and toss them at
your others targets, this is what they call “Hitting two
birds with a single rock”.
Dante – You can either keep attacking them with your
sword or use your Coyote – A to immobilize them and then
deal with them.
CUTLASS Nero – They are very hard to get in your sword, use mid-
air buster and throw them at the ground.
Dante – Use Coyote – A to stop them from moving and kill
them with your sword.
BASILISK Nero – Buster them away.
Dante – Use Coyote – A to stop them from shooting fire
balls and then hack them away with your sword.
14 DEVIL MAY CRY 4
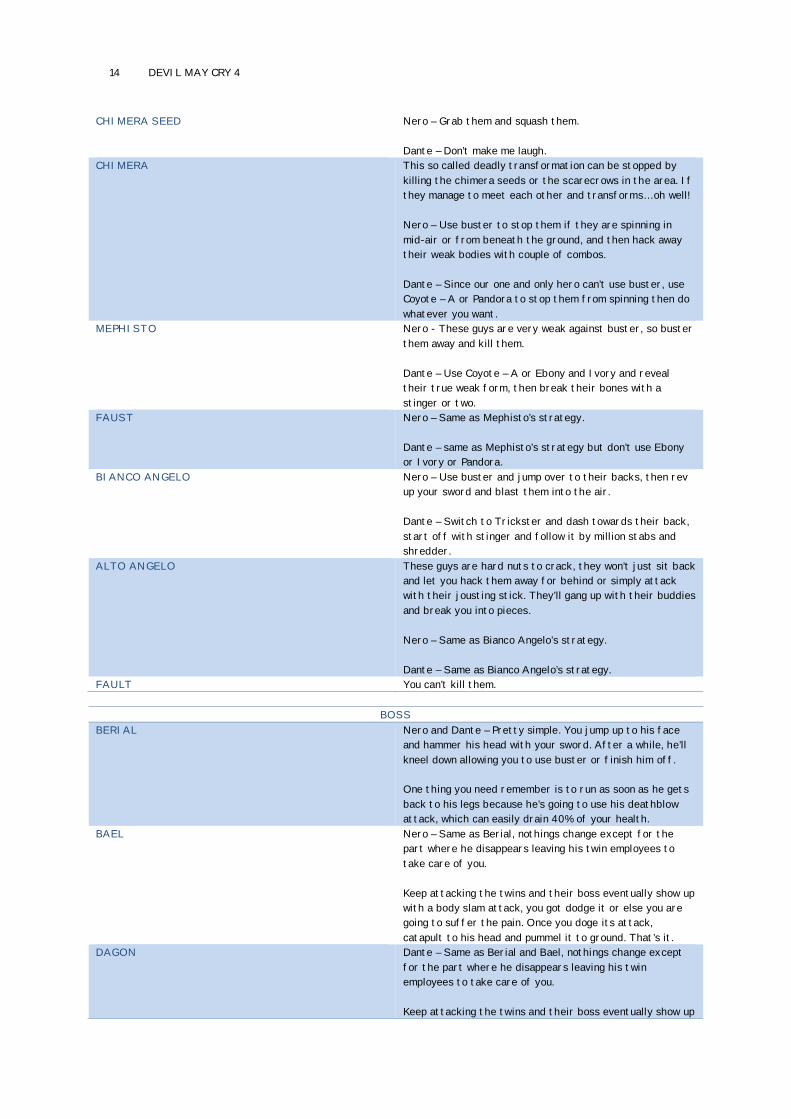
CHIMERA SEED Nero – Grab them and squash them.
Dante – Don’t make me laugh.
CHIMERA This so called deadly transformation can be stopped by
killing the chimera seeds or the scarecrows in the area. If
they manage to meet each other and transforms… oh well!
Nero – Use buster to stop them if they are spinning in
mid-air or from beneath the ground, and then hack away
their weak bodies with couple of combos.
Dante – Since our one and only hero can’t use buster, use
Coyote – A or Pandora to stop them from spinning then do
whatever you want.
MEPHISTO Nero - These guys are very weak against buster, so buster
them away and kill them.
Dante – Use Coyote – A or Ebony and Ivory and reveal
their true weak form, then break their bones with a
stinger or two.
FAUST Nero – Same as Mephisto’s strategy.
Dante – same as Mephisto’s strategy but don’t use Ebony
or Ivory or Pandora.
BIANCO ANGELO Nero – Use buster and jump over to their backs, then rev
up your sword and blast them into the air.
Dante – Switch to Trickster and dash towards their back,
start off with stinger and follow it by million stabs and
shredder.
ALTO ANGELO These guys are hard nuts to crack, they won’t just sit back
and let you hack them away for behind or simply attack
with their jousting stick. They’ll gang up with their buddies
and break you into pieces.
Nero – Same as Bianco Angelo’s strategy.
Dante – Same as Bianco Angelo’s strategy.
FAULT You can’t kill them.
BOSS
BERIAL Nero and Dante – Pretty simple. You jump up to his face
and hammer his head with your sword. After a while, he’ll
kneel down allowing you to use buster or finish him off.
One thing you need remember is to run as soon as he gets
back to his legs because he’s going to use his deathblow
attack, which can easily drain 40% of your health.
BAEL Nero – Same as Berial, nothings change except for the
part where he disappears leaving his twin employees to
take care of you.
Keep attacking the twins and their boss eventually show up
with a body slam attack, you got dodge it or else you are
going to suffer the pain. Once you doge its attack,
catapult to his head and pummel it to ground. That’s it.
DAGON Dante – Same as Berial and Bael, nothings change except
for the part where he disappears leaving his twin
employees to take care of you.
Keep attacking the twins and their boss eventually show up
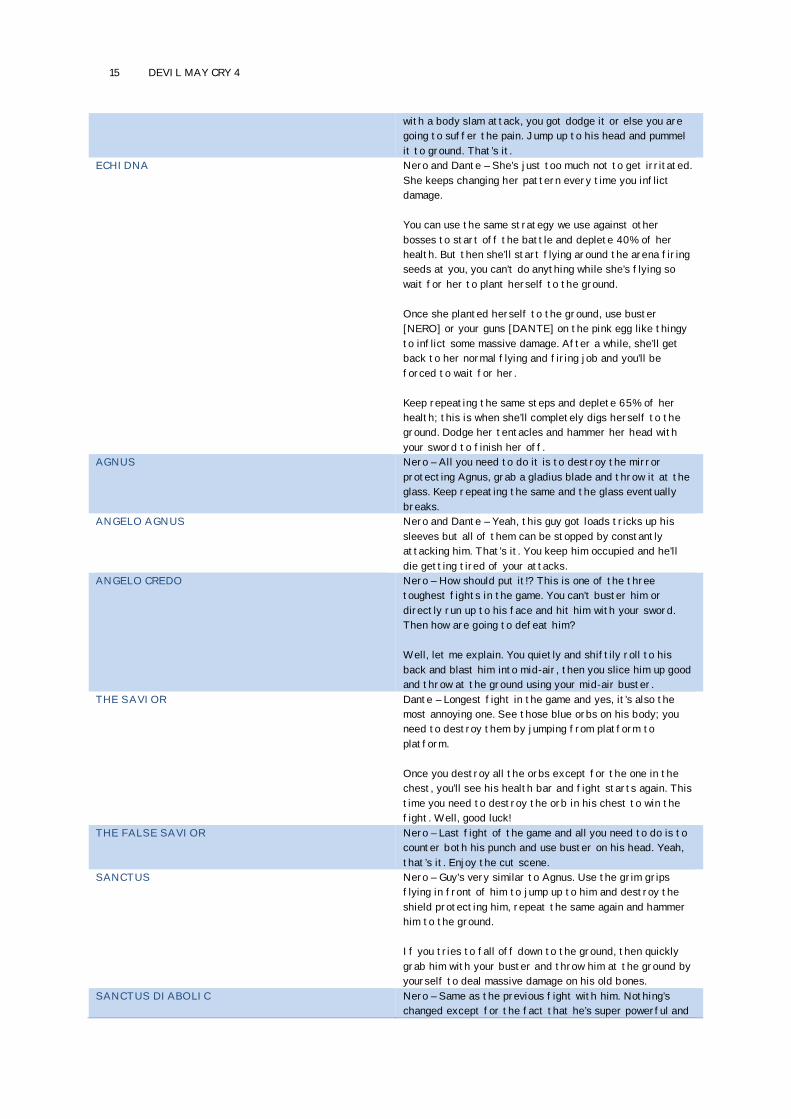
15 DEVIL MAY CRY 4
with a body slam attack, you got dodge it or else you are
going to suffer the pain. Jump up to his head and pummel
it to ground. That’s it.
ECHIDNA Nero and Dante – She’s just too much not to get irritated.
She keeps changing her pattern every time you inflict
damage.
You can use the same strategy we use against other
bosses to start off the battle and deplete 40% of her
health. But then she’ll start flying around the arena firing
seeds at you, you can’t do anything while she’s flying so
wait for her to plant herself to the ground.
Once she planted herself to the ground, use buster
[NERO] or your guns [DANTE] on the pink egg like thingy
to inflict some massive damage. After a while, she’ll get
back to her normal flying and firing job and you’ll be
forced to wait for her.
Keep repeating the same steps and deplete 65% of her
health; this is when she’ll completely digs herself to the
ground. Dodge her tentacles and hammer her head with
your sword to finish her off.
AGNUS Nero – All you need to do it is to destroy the mirror
protecting Agnus, grab a gladius blade and throw it at the
glass. Keep repeating the same and the glass eventually
breaks.
ANGELO AGNUS Nero and Dante – Yeah, this guy got loads tricks up his
sleeves but all of them can be stopped by constantly
attacking him. That’s it. You keep him occupied and he’ll
die getting tired of your attacks.
ANGELO CREDO Nero – How should put it!? This is one of the three
toughest fights in the game. You can’t buster him or
directly run up to his face and hit him with your sword.
Then how are going to defeat him?
Well, let me explain. You quietly and shiftily roll to his
back and blast him into mid-air, then you slice him up good
and throw at the ground using your mid-air buster.
THE SAVIOR Dante – Longest fight in the game and yes, it’s also the
most annoying one. See those blue orbs on his body; you
need to destroy them by jumping from platform to
platform.
Once you destroy all the orbs except for the one in the
chest, you’ll see his health bar and fight starts again. This
time you need to destroy the orb in his chest to win the
fight. Well, good luck!
THE FALSE SAVIOR Nero – Last fight of the game and all you need to do is to
counter both his punch and use buster on his head. Yeah,
that’s it. Enjoy the cut scene.
SANCTUS Nero – Guy’s very similar to Agnus. Use the grim grips
flying in front of him to jump up to him and destroy the
shield protecting him, repeat the same again and hammer
him to the ground.
If you tries to fall off down to the ground, then quickly
grab him with your buster and throw him at the ground by
yourself to deal massive damage on his old bones.
SANCTUS DIABOLIC Nero – Same as the previous fight with him. Nothing’s
changed except for the fact that he’s super powerful and
16 DEVIL MAY CRY 4
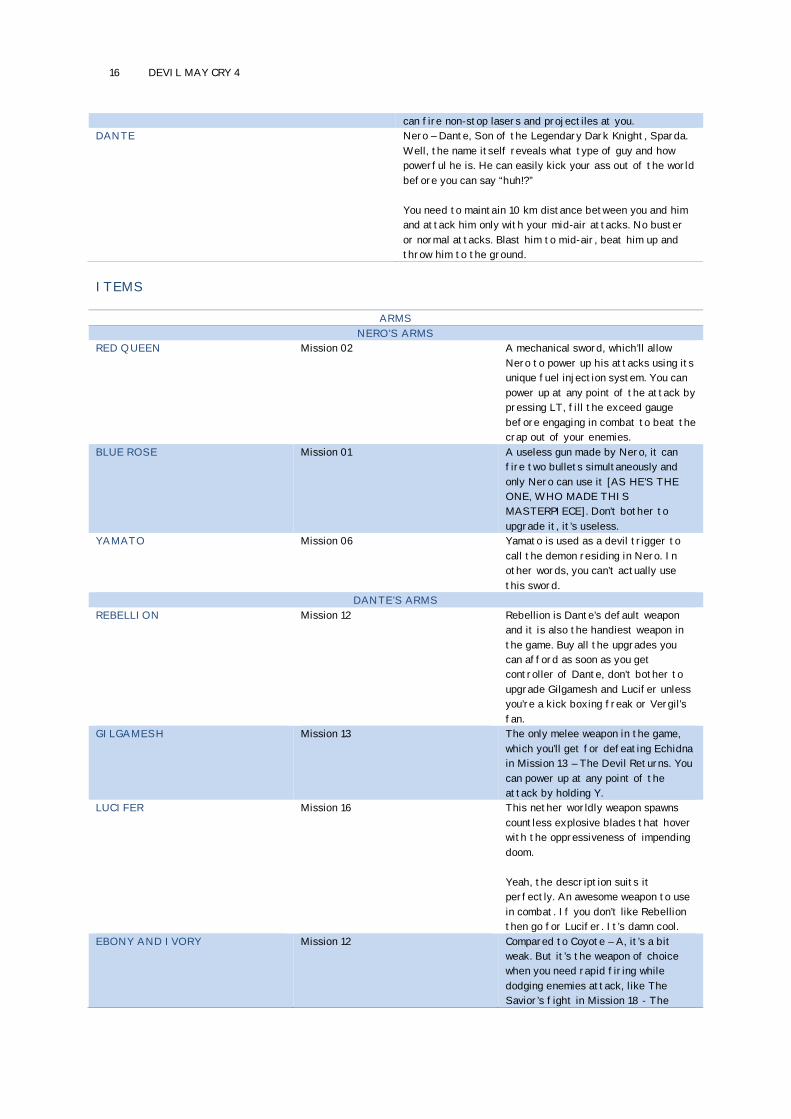
can fire non-stop lasers and projectiles at you.
DANTE Nero – Dante, Son of the Legendary Dark Knight, Sparda.
Well, the name itself reveals what type of guy and how
powerful he is. He can easily kick your ass out of the world
before you can say “huh!?”
You need to maintain 10 km distance between you and him
and attack him only with your mid-air attacks. No buster
or normal attacks. Blast him to mid-air, beat him up and
throw him to the ground.
ITEMS
ARMS
NERO’S ARMS
RED QUEEN Mission 02 A mechanical sword, which’ll allow
Nero to power up his attacks using its
unique fuel injection system. You can
power up at any point of the attack by
pressing LT, fill the exceed gauge
before engaging in combat to beat the
crap out of your enemies.
BLUE ROSE Mission 01 A useless gun made by Nero, it can
fire two bullets simultaneously and
only Nero can use it [AS HE’S THE
ONE, WHO MADE THIS
MASTERPIECE]. Don’t bother to
upgrade it, it’s useless.
YAMATO Mission 06 Yamato is used as a devil trigger to
call the demon residing in Nero. In
other words, you can’t actually use
this sword.
DANTE’S ARMS
REBELLION Mission 12 Rebellion is Dante’s default weapon
and it is also the handiest weapon in
the game. Buy all the upgrades you
can afford as soon as you get
controller of Dante, don’t bother to
upgrade Gilgamesh and Lucifer unless
you’re a kick boxing freak or Vergil’s
fan.
GILGAMESH Mission 13 The only melee weapon in the game,
which you’ll get for defeating Echidna
in Mission 13 – The Devil Returns. You
can power up at any point of the
attack by holding Y.
LUCIFER Mission 16 This nether worldly weapon spawns
countless explosive blades that hover
with the oppressiveness of impending
doom.
Yeah, the description suits it
perfectly. An awesome weapon to use
in combat. If you don’t like Rebellion
then go for Lucifer. It’s damn cool.
EBONY AND IVORY Mission 12 Compared to Coyote – A, it’s a bit
weak. But it’s the weapon of choice
when you need rapid firing while
dodging enemies attack, like The
Savior’s fight in Mission 18 - The
17 DEVIL MAY CRY 4
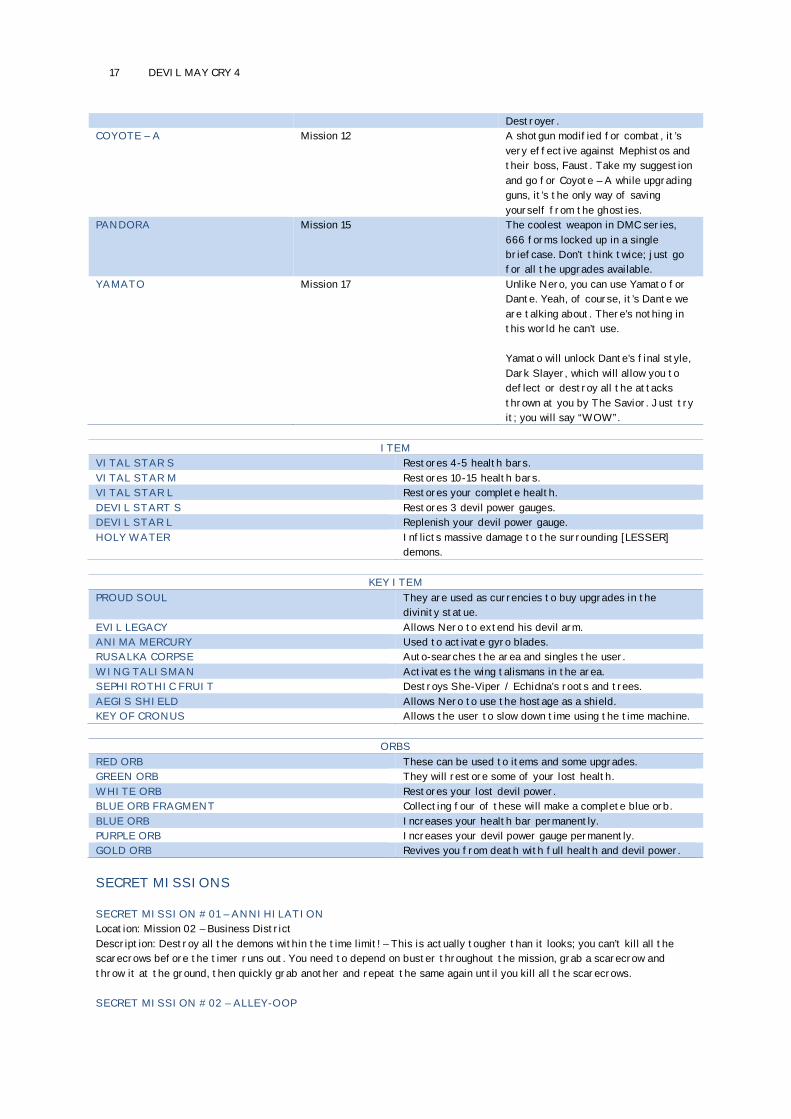
Destroyer.
COYOTE – A Mission 12 A shotgun modified for combat, it’s
very effective against Mephistos and
their boss, Faust. Take my suggestion
and go for Coyote – A while upgrading
guns, it’s the only way of saving
yourself from the ghosties.
PANDORA Mission 15 The coolest weapon in DMC series,
666 forms locked up in a single
briefcase. Don’t think twice; just go
for all the upgrades available.
YAMATO Mission 17 Unlike Nero, you can use Yamato for
Dante. Yeah, of course, it’s Dante we
are talking about. There’s nothing in
this world he can’t use.
Yamato will unlock Dante’s final style,
Dark Slayer, which will allow you to
deflect or destroy all the attacks
thrown at you by The Savior. Just try
it; you will say “WOW”.
ITEM
VITAL STAR S Restores 4-5 health bars.
VITAL STAR M Restores 10-15 health bars.
VITAL STAR L Restores your complete health.
DEVIL START S Restores 3 devil power gauges.
DEVIL STAR L Replenish your devil power gauge.
HOLY WATER Inflicts massive damage to the surrounding [LESSER]
demons.
KEY ITEM
PROUD SOUL They are used as currencies to buy upgrades in the
divinity statue.
EVIL LEGACY Allows Nero to extend his devil arm.
ANIMA MERCURY Used to activate gyro blades.
RUSALKA CORPSE Auto-searches the area and singles the user.
WING TALISMAN Activates the wing talismans in the area.
SEPHIROTHIC FRUIT Destroys She-Viper / Echidna’s roots and trees.
AEGIS SHIELD Allows Nero to use the hostage as a shield.
KEY OF CRONUS Allows the user to slow down time using the time machine.
ORBS
RED ORB These can be used to items and some upgrades.
GREEN ORB They will restore some of your lost health.
WHITE ORB Restores your lost devil power.
BLUE ORB FRAGMENT Collecting four of these will make a complete blue orb.
BLUE ORB Increases your health bar permanently.
PURPLE ORB Increases your devil power gauge permanently.
GOLD ORB Revives you from death with full health and devil power.
SECRET MISSIONS
SECRET MISSION #01 – ANNIHILATION
Location: Mission 02 – Business District
Description: Destroy all the demons within the time limit! – This is actually tougher than it looks; you can’t kill all the
scarecrows before the timer runs out. You need to depend on buster throughout the mission, grab a scarecrow and
throw it at the ground, then quickly grab another and repeat the same again until you kill all the scarecrows.
SECRET MISSION #02 – ALLEY-OOP
18 DEVIL MAY CRY 4
Location: Mission04 – Dining Room
Description: Successfully execute a mid-air buster 5 times without touching the ground – Use the wall and jump up, then
use buster and grab a scarecrow, throw it at the ground and then quickly grab another. Repeat the same five times
without touching the ground to complete the mission. Remember, you have to complete the mission before you ran out of
scarecrows.
SECRET MISSION #03 – NONVIOLENT RESISTANCE
Location: Mission 05 – Soldier’s Graveyard
Description: Raise your stylish meter without using any attacks – For this, its best if you use Dante. Wait for the
creatures to attack and use royal guard to block, keep blocking the attacks until your stylish meter increases.
SECRET MISSION #04 - TRACKING DOWN TREASURE
Location: Mission 06 – Angel Creation
Description: Find all the hidden orbs – Run around the building waiting for your arm to glow, destroy the object its
showing to release the orb. That’s it, collect 99 orbs before the timer runs out to complete the mission.
SECRET MISSION #05 – SKY SCRAPER
Location: Mission 07 – Lapis River
Description: Reach the goal by climbing to the top – Buy air hike and snatch 2 and 3 before starting the mission, use the
grim grips and other objects and jump all the way to the top to reach the goal.
SECRET MISSION #06 - VERMIFUGE
Location: Mission 10 – Security Corridor
Description: Eliminate all the chimera seeds before the scarecrow is taken over – You need to kill the chimera seeds and
protect the scarecrow. Grab the scarecrow and take it far away from the seeds, then activate the gyro blade and let it
rampage the floor to kill the chimera seeds.
SECRET MISSION #07 – FREE RUNNING
Location: Mission 10 – Meeting Room
Description: Reach the goal without falling through the vanishing floor – A very annoying mission; you need to reach the
other side of the cliff without falling off the vanishing floor. There’ll be three mephistos, appointed to make sure you
fall off no matter what. It’s very hard to jump from platform to platform along with attacking the mephistos, so forget
about attacking them and concentrate on reaching the goal.
SECRET MISSION #08 – ROYAL BLOCKER
Location: Mission 14 – Forest Entrance
Description: Successfully execute a royal block 5 times – You need Dante to play this mission so don’t try it in Mission
07 – The She-Viper. Switch to royal guard style and wait for the creatures to attack, then simply block their attacks 5
times to complete the mission.
SECRET MISSION #09 - UNBREAKABLE
Location: Mission 15 – Library
Description: Eliminate all enemies without taking damage and without being captured by fault – I think the description
itself explains what needs to be done; you need to kill all the creatures in the area without taking damage or being
caught by the fault. Compared to the other secret missions, it should be easy.
SECRET MISSION #10 – PUPPET MASTER
Location: Mission 05 – Master’s Chamber
Description: Manipulate the gyro blades and raze everything! – This mission is designed only for Nero so you need to
complete it in Mission 05 – Trisagion. Activate the gyro blades in the area and destroy the five pedestals before the
timer runs out.
SECRET MISSION #11 – POINT OF IMPACT
Location: Mission 16 – Castle Gates
Description: Use Pandora to destroy distant objects – Use Pandora and destroy the two pedestals, buy all the upgrades
for Pandora before starting the mission because you can’t destroy both the statues within the given time.
SECRET MISSION #12 – STEEPLE CHASE
Location: Mission 17 – Opera House Plaza
Description: Reach the goal without taking damage – An almost impossible mission to complete unless you use your head
and think of a way. Buy all upgrades available for Pandora and fill its disaster gauge before starting the mission. Turn
19 DEVIL MAY CRY 4
around and stand facing the door, then jump up using air hike and use Pandora as a rocket to cross the lasers without
taking damage.
WALKTHROUGH
MISSION 01 - BIRDS OF A FEATHER
Watch the opening cut scene and get ready for basic combat tutorials. Some boring instructions will pop-up on the
screen, all you need to do is to test them on the mysterious assassin and enjoy the cut scenes.
1. Attack with your guns without letting your enemy get too close! – Keep moving backwards and repeatedly
press X to attack him with your gun.
0/5
2. Jump to avoid your enemy’s gunfire! – Wait for Dante to fire at you and hit A to jump and dodge the
bullets. Don’t try to shoot while in mid-air, you’ll get hit by his bullets.
0/3
3. Perform a side roll to avoid your enemy’s gunfire! – Wait for Dante to shoot at you and press RB + LS +
A to do a side roll and dodge them.
0/3
4. Blast your enemy with a sword combo! – Approach Dante and hit Y multiple times to slash him with your
sword. Depending on how hard, timing and number of presses, you can perform variety of combos and
bring your enemies to their knees.
0/3
5. Use the high roller technique to blast your enemy into the air! – Approach Dante and press RB + LS down
+ Y to blast him into the air.
0/3
6. Deal big damage with your buster! – Approach Dante and hit B to grab and toss him away like a cheap
toy, you can also perform buster in mid-air. [I CAN’T BELIEVE THEY CALLED DANTE A CHEAP TOY!].
0/3
DANTE
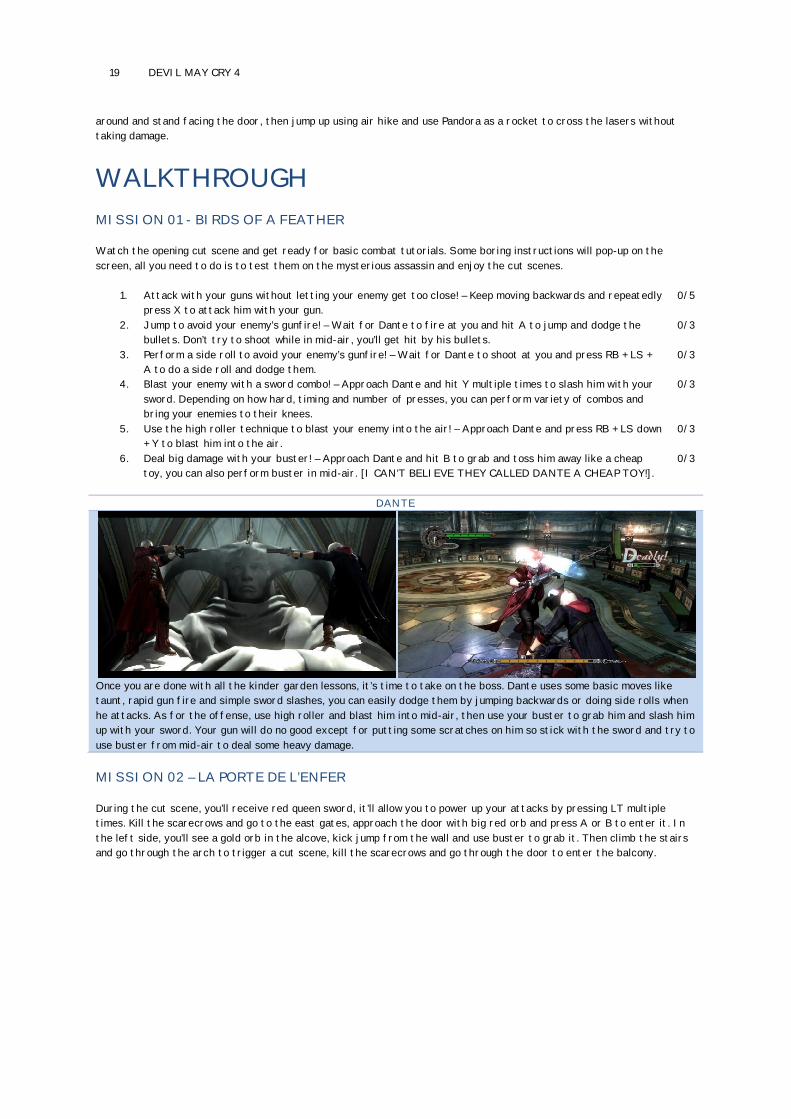
Once you are done with all the kinder garden lessons, it’s time to take on the boss. Dante uses some basic moves like
taunt, rapid gun fire and simple sword slashes, you can easily dodge them by jumping backwards or doing side rolls when
he attacks. As for the offense, use high roller and blast him into mid-air, then use your buster to grab him and slash him
up with your sword. Your gun will do no good except for putting some scratches on him so stick with the sword and try to
use buster from mid-air to deal some heavy damage.
MISSION 02 – LA PORTE DE L’ENFER
During the cut scene, you’ll receive red queen sword, it’ll allow you to power up your attacks by pressing LT multiple
times. Kill the scarecrows and go to the east gates, approach the door with big red orb and press A or B to enter it. In
the left side, you’ll see a gold orb in the alcove, kick jump from the wall and use buster to grab it. Then climb the stairs
and go through the arch to trigger a cut scene, kill the scarecrows and go through the door to enter the balcony.
20 DEVIL MAY CRY 4
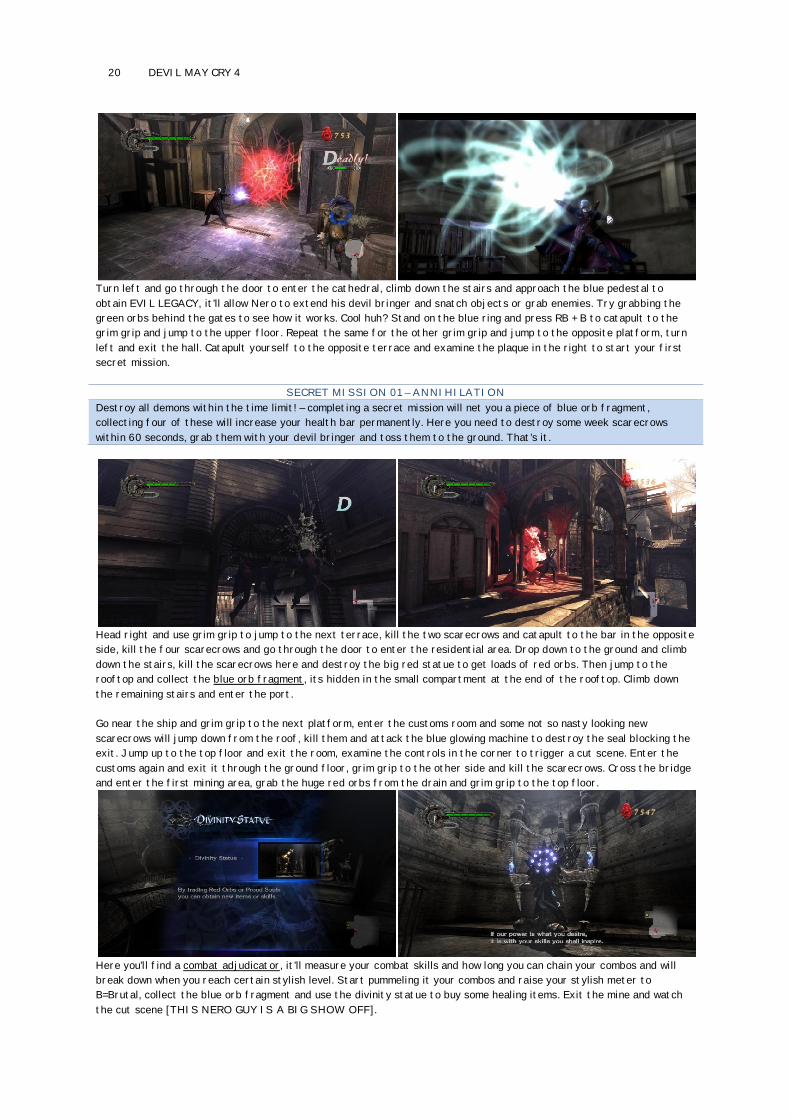
Turn left and go through the door to enter the cathedral, climb down the stairs and approach the blue pedestal to
obtain EVIL LEGACY, it’ll allow Nero to extend his devil bringer and snatch objects or grab enemies. Try grabbing the
green orbs behind the gates to see how it works. Cool huh? Stand on the blue ring and press RB + B to catapult to the
grim grip and jump to the upper floor. Repeat the same for the other grim grip and jump to the opposite platform, turn
left and exit the hall. Catapult yourself to the opposite terrace and examine the plaque in the right to start your first
secret mission.
SECRET MISSION 01 – ANNIHILATION
Destroy all demons within the time limit! – completing a secret mission will net you a piece of blue orb fragment,
collecting four of these will increase your health bar permanently. Here you need to destroy some week scarecrows
within 60 seconds, grab them with your devil bringer and toss them to the ground. That’s it.
Head right and use grim grip to jump to the next terrace, kill the two scarecrows and catapult to the bar in the opposite
side, kill the four scarecrows and go through the door to enter the residential area. Drop down to the ground and climb
down the stairs, kill the scarecrows here and destroy the big red statue to get loads of red orbs. Then jump to the
rooftop and collect the blue orb fragment, its hidden in the small compartment at the end of the rooftop. Climb down
the remaining stairs and enter the port.
Go near the ship and grim grip to the next platform, enter the customs room and some not so nasty looking new
scarecrows will jump down from the roof, kill them and attack the blue glowing machine to destroy the seal blocking the
exit. Jump up to the top floor and exit the room, examine the controls in the corner to trigger a cut scene. Enter the
customs again and exit it through the ground floor, grim grip to the other side and kill the scarecrows. Cross the bridge
and enter the first mining area, grab the huge red orbs from the drain and grim grip to the top floor.
Here you’ll find a combat adjudicator, it’ll measure your combat skills and how long you can chain your combos and will
break down when you reach certain stylish level. Start pummeling it your combos and raise your stylish meter to
B=Brutal, collect the blue orb fragment and use the divinity statue to buy some healing items. Exit the mine and watch
the cut scene [THIS NERO GUY IS A BIG SHOW OFF].
21 DEVIL MAY CRY 4
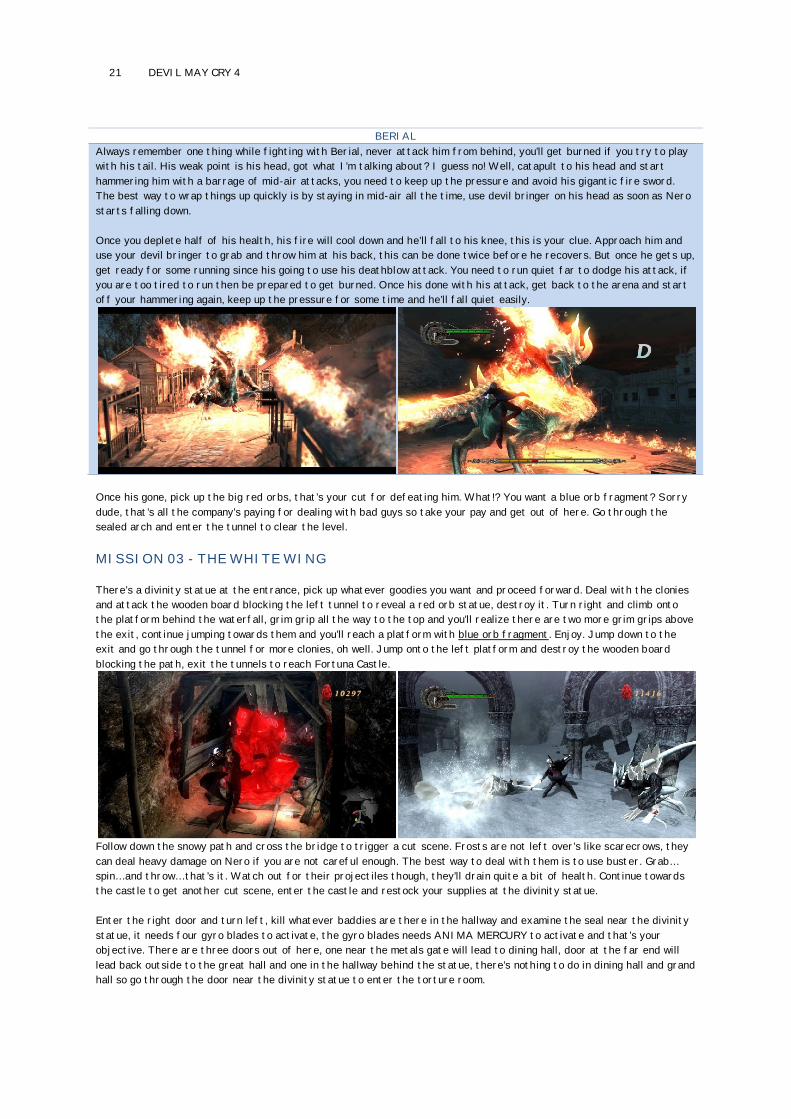
BERIAL
Always remember one thing while fighting with Berial, never attack him from behind, you’ll get burned if you try to play
with his tail. His weak point is his head, got what I’m talking about? I guess no! Well, catapult to his head and start
hammering him with a barrage of mid-air attacks, you need to keep up the pressure and avoid his gigantic fire sword.
The best way to wrap things up quickly is by staying in mid-air all the time, use devil bringer on his head as soon as Nero
starts falling down.
Once you deplete half of his health, his fire will cool down and he’ll fall to his knee, this is your clue. Approach him and
use your devil bringer to grab and throw him at his back, this can be done twice before he recovers. But once he gets up,
get ready for some running since his going to use his deathblow attack. You need to run quiet far to dodge his attack, if
you are too tired to run then be prepared to get burned. Once his done with his attack, get back to the arena and start
off your hammering again, keep up the pressure for some time and he’ll fall quiet easily.
Once his gone, pick up the big red orbs, that’s your cut for defeating him. What!? You want a blue orb fragment? Sorry
dude, that’s all the company’s paying for dealing with bad guys so take your pay and get out of here. Go through the
sealed arch and enter the tunnel to clear the level.
MISSION 03 - THE WHITE WING
There’s a divinity statue at the entrance, pick up whatever goodies you want and proceed forward. Deal with the clonies
and attack the wooden board blocking the left tunnel to reveal a red orb statue, destroy it. Turn right and climb onto
the platform behind the waterfall, grim grip all the way to the top and you’ll realize there are two more grim grips above
the exit, continue jumping towards them and you’ll reach a platform with blue orb fragment. Enjoy. Jump down to the
exit and go through the tunnel for more clonies, oh well. Jump onto the left platform and destroy the wooden board
blocking the path, exit the tunnels to reach Fortuna Castle.
Follow down the snowy path and cross the bridge to trigger a cut scene. Frosts are not left over’s like scarecrows, they
can deal heavy damage on Nero if you are not careful enough. The best way to deal with them is to use buster. Grab…
spin… and throw… that’s it. Watch out for their projectiles though, they’ll drain quite a bit of health. Continue towards
the castle to get another cut scene, enter the castle and restock your supplies at the divinity statue.
Enter the right door and turn left, kill whatever baddies are there in the hallway and examine the seal near the divinity
statue, it needs four gyro blades to activate, the gyro blades needs ANIMA MERCURY to activate and that’s your
objective. There are three doors out of here, one near the metals gate will lead to dining hall, door at the far end will
lead back outside to the great hall and one in the hallway behind the statue, there’s nothing to do in dining hall and grand
hall so go through the door near the divinity statue to enter the torture room.
22 DEVIL MAY CRY 4
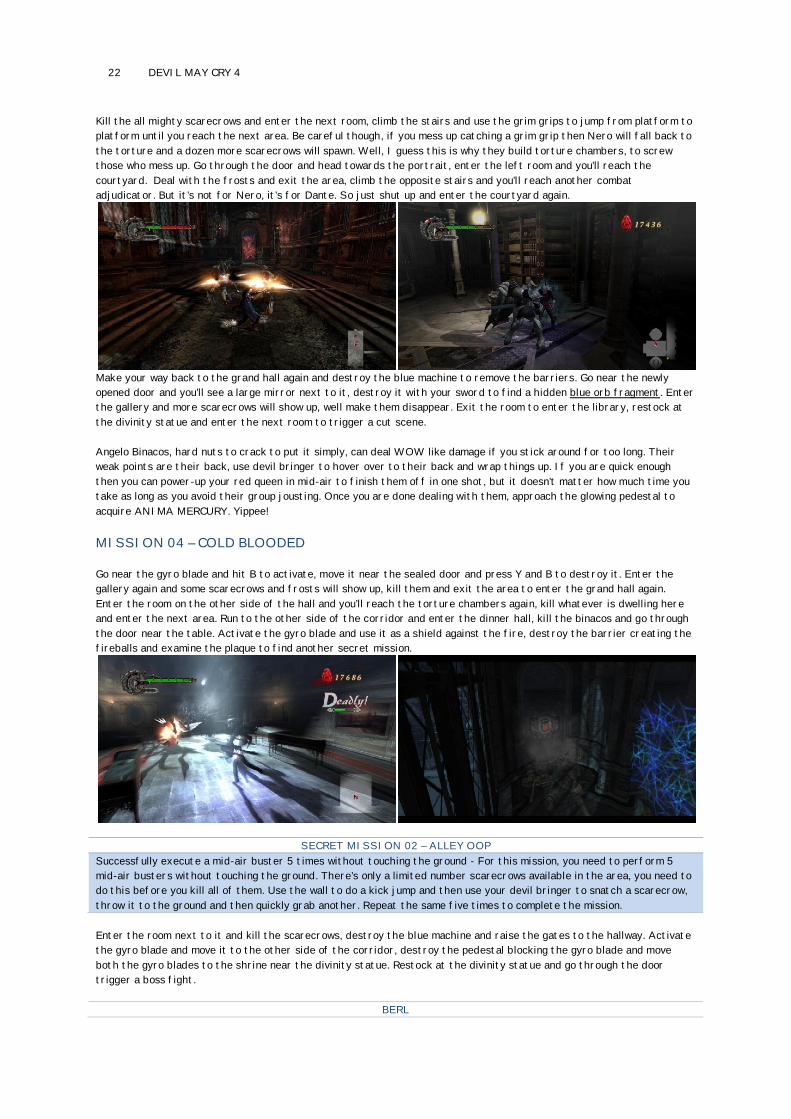
Kill the all mighty scarecrows and enter the next room, climb the stairs and use the grim grips to jump from platform to
platform until you reach the next area. Be careful though, if you mess up catching a grim grip then Nero will fall back to
the torture and a dozen more scarecrows will spawn. Well, I guess this is why they build torture chambers, to screw
those who mess up. Go through the door and head towards the portrait, enter the left room and you’ll reach the
courtyard. Deal with the frosts and exit the area, climb the opposite stairs and you’ll reach another combat
adjudicator. But it’s not for Nero, it’s for Dante. So just shut up and enter the courtyard again.
Make your way back to the grand hall again and destroy the blue machine to remove the barriers. Go near the newly
opened door and you’ll see a large mirror next to it, destroy it with your sword to find a hidden blue orb fragment. Enter
the gallery and more scarecrows will show up, well make them disappear. Exit the room to enter the library, restock at
the divinity statue and enter the next room to trigger a cut scene.
Angelo Binacos, hard nuts to crack to put it simply, can deal WOW like damage if you stick around for too long. Their
weak points are their back, use devil bringer to hover over to their back and wrap things up. If you are quick enough
then you can power-up your red queen in mid-air to finish them off in one shot, but it doesn’t matter how much time you
take as long as you avoid their group jousting. Once you are done dealing with them, approach the glowing pedestal to
acquire ANIMA MERCURY. Yippee!
MISSION 04 – COLD BLOODED
Go near the gyro blade and hit B to activate, move it near the sealed door and press Y and B to destroy it. Enter the
gallery again and some scarecrows and frosts will show up, kill them and exit the area to enter the grand hall again.
Enter the room on the other side of the hall and you’ll reach the torture chambers again, kill whatever is dwelling here
and enter the next area. Run to the other side of the corridor and enter the dinner hall, kill the binacos and go through
the door near the table. Activate the gyro blade and use it as a shield against the fire, destroy the barrier creating the
fireballs and examine the plaque to find another secret mission.
SECRET MISSION 02 – ALLEY OOP
Successfully execute a mid-air buster 5 times without touching the ground - For this mission, you need to perform 5
mid-air busters without touching the ground. There’s only a limited number scarecrows available in the area, you need to
do this before you kill all of them. Use the wall to do a kick jump and then use your devil bringer to snatch a scarecrow,
throw it to the ground and then quickly grab another. Repeat the same five times to complete the mission.
Enter the room next to it and kill the scarecrows, destroy the blue machine and raise the gates to the hallway. Activate
the gyro blade and move it to the other side of the corridor, destroy the pedestal blocking the gyro blade and move
both the gyro blades to the shrine near the divinity statue. Restock at the divinity statue and go through the door
trigger a boss fight.
BERL
23 DEVIL MAY CRY 4
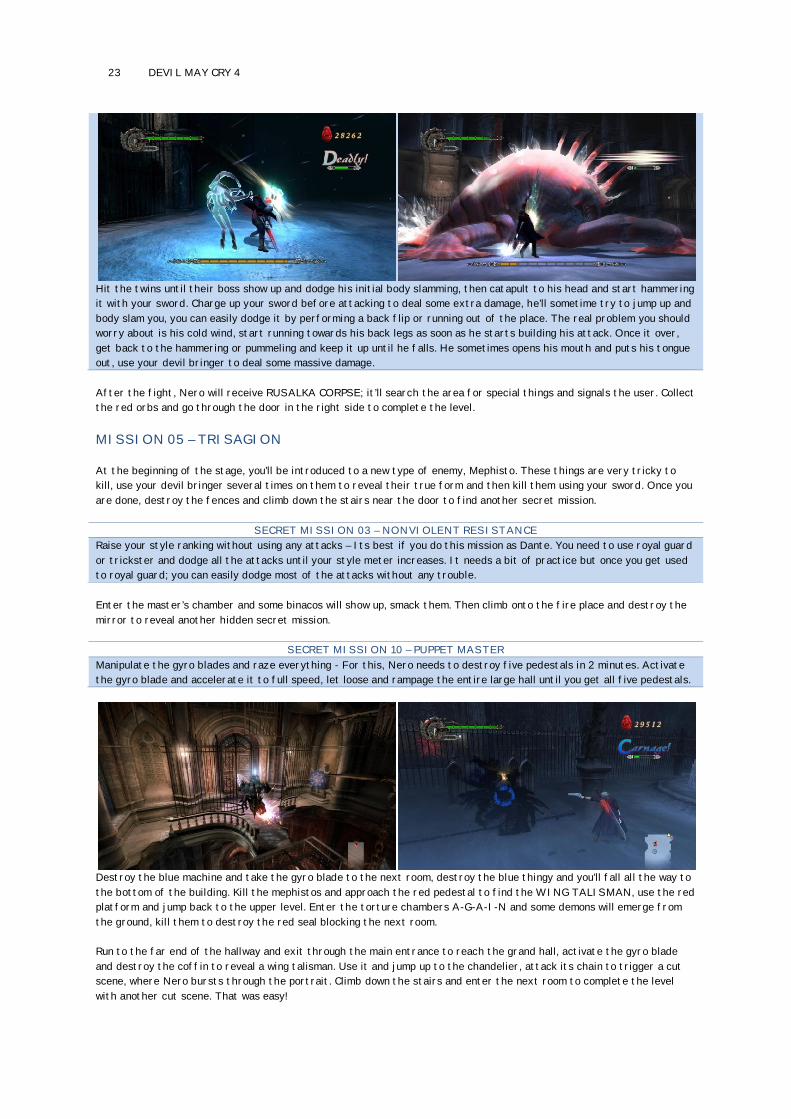
Hit the twins until their boss show up and dodge his initial body slamming, then catapult to his head and start hammering
it with your sword. Charge up your sword before attacking to deal some extra damage, he’ll sometime try to jump up and
body slam you, you can easily dodge it by performing a back flip or running out of the place. The real problem you should
worry about is his cold wind, start running towards his back legs as soon as he starts building his attack. Once it over,
get back to the hammering or pummeling and keep it up until he falls. He sometimes opens his mouth and puts his tongue
out, use your devil bringer to deal some massive damage.
After the fight, Nero will receive RUSALKA CORPSE; it’ll search the area for special things and signals the user. Collect
the red orbs and go through the door in the right side to complete the level.
MISSION 05 – TRISAGION
At the beginning of the stage, you’ll be introduced to a new type of enemy, Mephisto. These things are very tricky to
kill, use your devil bringer several times on them to reveal their true form and then kill them using your sword. Once you
are done, destroy the fences and climb down the stairs near the door to find another secret mission.
SECRET MISSION 03 – NONVIOLENT RESISTANCE
Raise your style ranking without using any attacks – Its best if you do this mission as Dante. You need to use royal guard
or trickster and dodge all the attacks until your style meter increases. It needs a bit of practice but once you get used
to royal guard; you can easily dodge most of the attacks without any trouble.
Enter the master’s chamber and some binacos will show up, smack them. Then climb onto the fire place and destroy the
mirror to reveal another hidden secret mission.
SECRET MISSION 10 – PUPPET MASTER
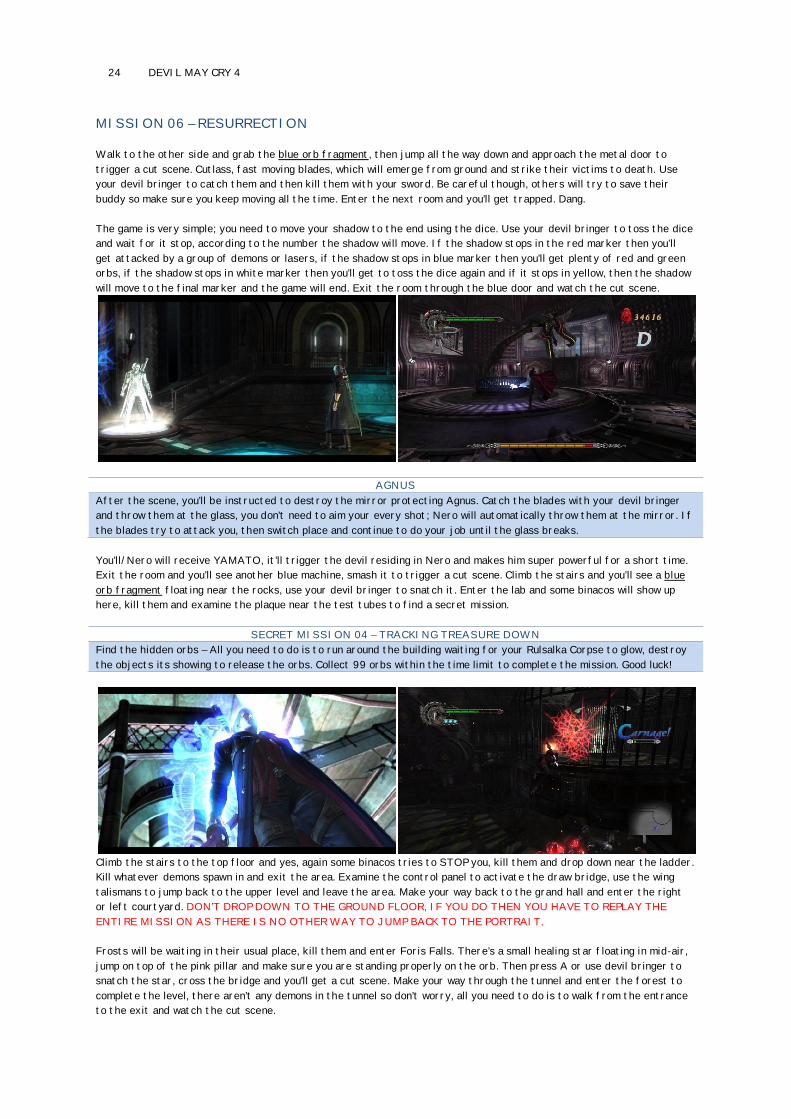
Manipulate the gyro blades and raze everything - For this, Nero needs to destroy five pedestals in 2 minutes. Activate
the gyro blade and accelerate it to full speed, let loose and rampage the entire large hall until you get all five pedestals.
Destroy the blue machine and take the gyro blade to the next room, destroy the blue thingy and you’ll fall all the way to
the bottom of the building. Kill the mephistos and approach the red pedestal to find the WING TALISMAN, use the red
platform and jump back to the upper level. Enter the torture chambers A-G-A-I-N and some demons will emerge from
the ground, kill them to destroy the red seal blocking the next room.
Run to the far end of the hallway and exit through the main entrance to reach the grand hall, activate the gyro blade
and destroy the coffin to reveal a wing talisman. Use it and jump up to the chandelier, attack its chain to trigger a cut
scene, where Nero bursts through the portrait. Climb down the stairs and enter the next room to complete the level
with another cut scene. That was easy!
24 DEVIL MAY CRY 4
MISSION 06 – RESURRECTION
Walk to the other side and grab the blue orb fragment, then jump all the way down and approach the metal door to
trigger a cut scene. Cutlass, fast moving blades, which will emerge from ground and strike their victims to death. Use
your devil bringer to catch them and then kill them with your sword. Be careful though, others will try to save their
buddy so make sure you keep moving all the time. Enter the next room and you’ll get trapped. Dang.
The game is very simple; you need to move your shadow to the end using the dice. Use your devil bringer to toss the dice
and wait for it stop, according to the number the shadow will move. If the shadow stops in the red marker then you’ll
get attacked by a group of demons or lasers, if the shadow stops in blue marker then you’ll get plenty of red and green
orbs, if the shadow stops in white marker then you’ll get to toss the dice again and if it stops in yellow, then the shadow
will move to the final marker and the game will end. Exit the room through the blue door and watch the cut scene.
AGNUS
After the scene, you’ll be instructed to destroy the mirror protecting Agnus. Catch the blades with your devil bringer
and throw them at the glass, you don’t need to aim your every shot; Nero will automatically throw them at the mirror. If
the blades try to attack you, then switch place and continue to do your job until the glass breaks.
You’ll/Nero will receive YAMATO, it’ll trigger the devil residing in Nero and makes him super powerful for a short time.
Exit the room and you’ll see another blue machine, smash it to trigger a cut scene. Climb the stairs and you’ll see a blue
orb fragment floating near the rocks, use your devil bringer to snatch it. Enter the lab and some binacos will show up
here, kill them and examine the plaque near the test tubes to find a secret mission.
SECRET MISSION 04 – TRACKING TREASURE DOWN
Find the hidden orbs – All you need to do is to run around the building waiting for your Rulsalka Corpse to glow, destroy
the objects its showing to release the orbs. Collect 99 orbs within the time limit to complete the mission. Good luck!
Climb the stairs to the top floor and yes, again some binacos tries to STOP you, kill them and drop down near the ladder.
Kill whatever demons spawn in and exit the area. Examine the control panel to activate the draw bridge, use the wing
talismans to jump back to the upper level and leave the area. Make your way back to the grand hall and enter the right
or left courtyard. DON’T DROP DOWN TO THE GROUND FLOOR, IF YOU DO THEN YOU HAVE TO REPLAY THE
ENTIRE MISSION AS THERE IS NO OTHER WAY TO JUMP BACK TO THE PORTRAIT.
Frosts will be waiting in their usual place, kill them and enter Foris Falls. There’s a small healing star floating in mid-air,
jump on top of the pink pillar and make sure you are standing properly on the orb. Then press A or use devil bringer to
snatch the star, cross the bridge and you’ll get a cut scene. Make your way through the tunnel and enter the forest to
complete the level, there aren’t any demons in the tunnel so don’t worry, all you need to do is to walk from the entrance
to the exit and watch the cut scene.
25 DEVIL MAY CRY 4
MISSION 07 – THE SHE-VIPER
There’s a red orb statue right next you, destroy it to get some red orbs. Turn left and you’ll enter windswept valley,
drop down to the ground. At the bottom, you’ll find some chimera seeds; squeeze them with your devil arm. Head
straight up the stairs and enter the fortress to trigger a short cut scene, introducing your next deadly enemy, chimera
scarecrows. Blah. Kill them however you want and head upstairs, smash the blue machine to activate the magical platform
across the gap, use them and exit the building.
Use the grim grips to catapult yourself from platform to platform and destroy the blue machine to activate more
vanishing floors, this time mephistos will there to keep you occupied, so be careful while hitting them with buster and
running from the platform to platform.
By the way, while walking on the vanishing floors, there’s a blue orb fragment floating above you. Kick jump from the
rocks and use your devil bringer to grab it. Go through the door and you’ll reach an old bridge, cross it and head east.
Some scarecrows and chimera seeds will pop up from the ground, destroy the seeds before they transform into chimera
scarecrows. Head left and you’ll find a lone tree, examine it to trigger another secret mission.
SECRET MISSION 05 – SKY SCARPER
Reach the goal by climbing to the top – Make sure you have air hike and snatch 2 and 3 before starting the mission, if
you don’t have them then buy them from the divinity statue. You need to use grim grips and other things and jump all the
way to the top to complete the mission [YEAH, I KNOW IT’S TOUGH, TOOK ME A LOT OF TIME TO COMPLETE IT].
Exit the plaza through east and you’ll be back where you started, windswept valley. Activate the gyro blade and use it to
destroy the blue doors, destroy all three of them and go through the big metal gate. After the cut scene, you’ll be
instructed to run as fast as you can and escape from Echidna. Simply run to the other side of the valley, if you
encounter an obstacle then just destroy it with your sword and continue to run.
Once you reach the other end, go through the door to enter the forgotten ruins. To the right, you’ll find a blue combat
adjudicator, start beating it up and raise your stylish meter to Atomic to release a blue orb fragment. Kill the
scarecrows and chimera seeds or chimera scarecrows [IF YOU ARE TOO LATE TO STOP THE TRANSFORMATION]
and cross the bridge. Restock at the divinity statue and get ready for another boss fighting.
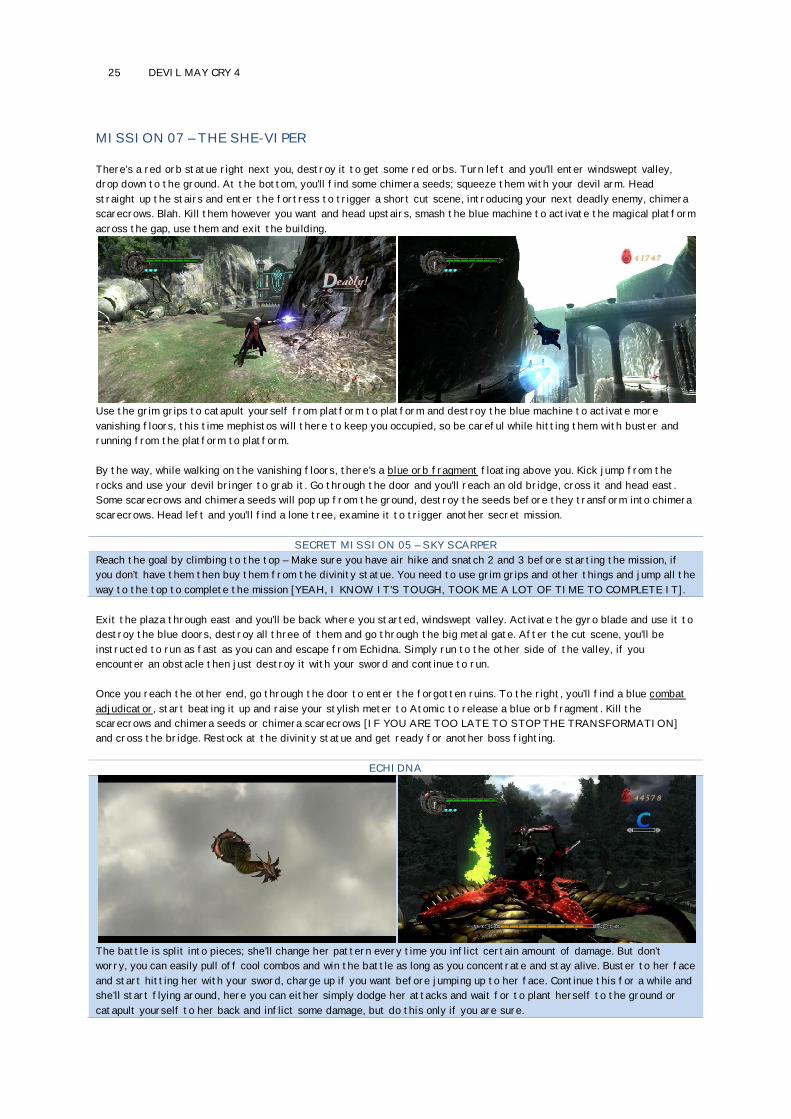
ECHIDNA
The battle is split into pieces; she’ll change her pattern every time you inflict certain amount of damage. But don’t
worry, you can easily pull off cool combos and win the battle as long as you concentrate and stay alive. Buster to her face
and start hitting her with your sword, charge up if you want before jumping up to her face. Continue this for a while and
she’ll start flying around, here you can either simply dodge her attacks and wait for to plant herself to the ground or
catapult yourself to her back and inflict some damage, but do this only if you are sure.
26 DEVIL MAY CRY 4
After all the flying and hammering, she’ll plant herself to the ground and starts laughing, use buster on the pink egg like
thingy to deal some massive damage, you can do this twice every time she plants herself but you need to be quick enough
to dodge her further attacks. I suggest you do it once and put some distance between you and her to dodge her rolling
attack. Repeat the same two or three times and deplete 65% of her health, this is where she’ll complete digs herself to
the ground. Dodge her tentacles or simply use your devil bringer to jump to her, charge up sword completely and shower
her with some serious combos to finish her off.
After the fight, Nero will receive SEPHIROTIC FRUIT [THE NAME MUST HAVE CAME FROM FF7]. Collect the orbs
and examine the red Sephirothic roots blocking the way to complete the level.
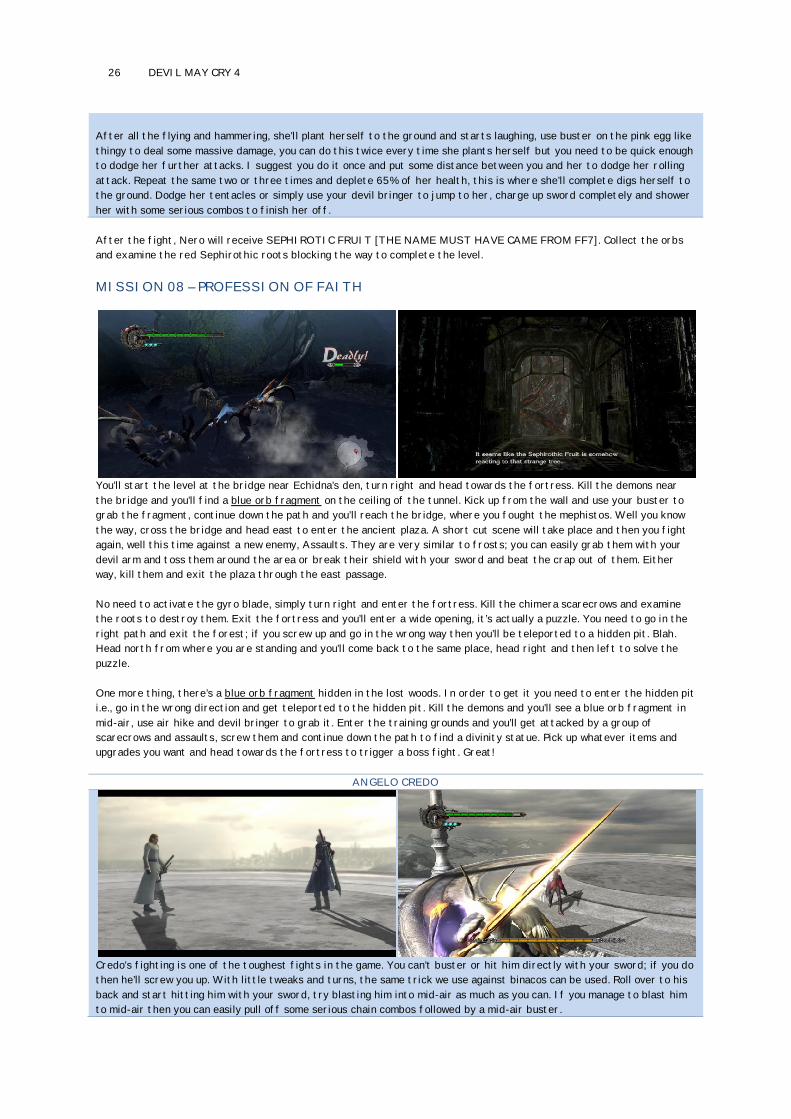
MISSION 08 – PROFESSION OF FAITH
You’ll start the level at the bridge near Echidna’s den, turn right and head towards the fortress. Kill the demons near
the bridge and you’ll find a blue orb fragment on the ceiling of the tunnel. Kick up from the wall and use your buster to
grab the fragment, continue down the path and you’ll reach the bridge, where you fought the mephistos. Well you know
the way, cross the bridge and head east to enter the ancient plaza. A short cut scene will take place and then you fight
again, well this time against a new enemy, Assaults. They are very similar to frosts; you can easily grab them with your
devil arm and toss them around the area or break their shield with your sword and beat the crap out of them. Either
way, kill them and exit the plaza through the east passage.
No need to activate the gyro blade, simply turn right and enter the fortress. Kill the chimera scarecrows and examine
the roots to destroy them. Exit the fortress and you’ll enter a wide opening, it’s actually a puzzle. You need to go in the
right path and exit the forest; if you screw up and go in the wrong way then you’ll be teleported to a hidden pit. Blah.
Head north from where you are standing and you’ll come back to the same place, head right and then left to solve the
puzzle.
One more thing, there’s a blue orb fragment hidden in the lost woods. In order to get it you need to enter the hidden pit
i.e., go in the wrong direction and get teleported to the hidden pit. Kill the demons and you’ll see a blue orb fragment in
mid-air, use air hike and devil bringer to grab it. Enter the training grounds and you’ll get attacked by a group of
scarecrows and assaults, screw them and continue down the path to find a divinity statue. Pick up whatever items and
upgrades you want and head towards the fortress to trigger a boss fight. Great!
ANGELO CREDO
Credo’s fighting is one of the toughest fights in the game. You can’t buster or hit him directly with your sword; if you do
then he’ll screw you up. With little tweaks and turns, the same trick we use against binacos can be used. Roll over to his
back and start hitting him with your sword, try blasting him into mid-air as much as you can. If you manage to blast him
to mid-air then you can easily pull off some serious chain combos followed by a mid-air buster.
27 DEVIL MAY CRY 4
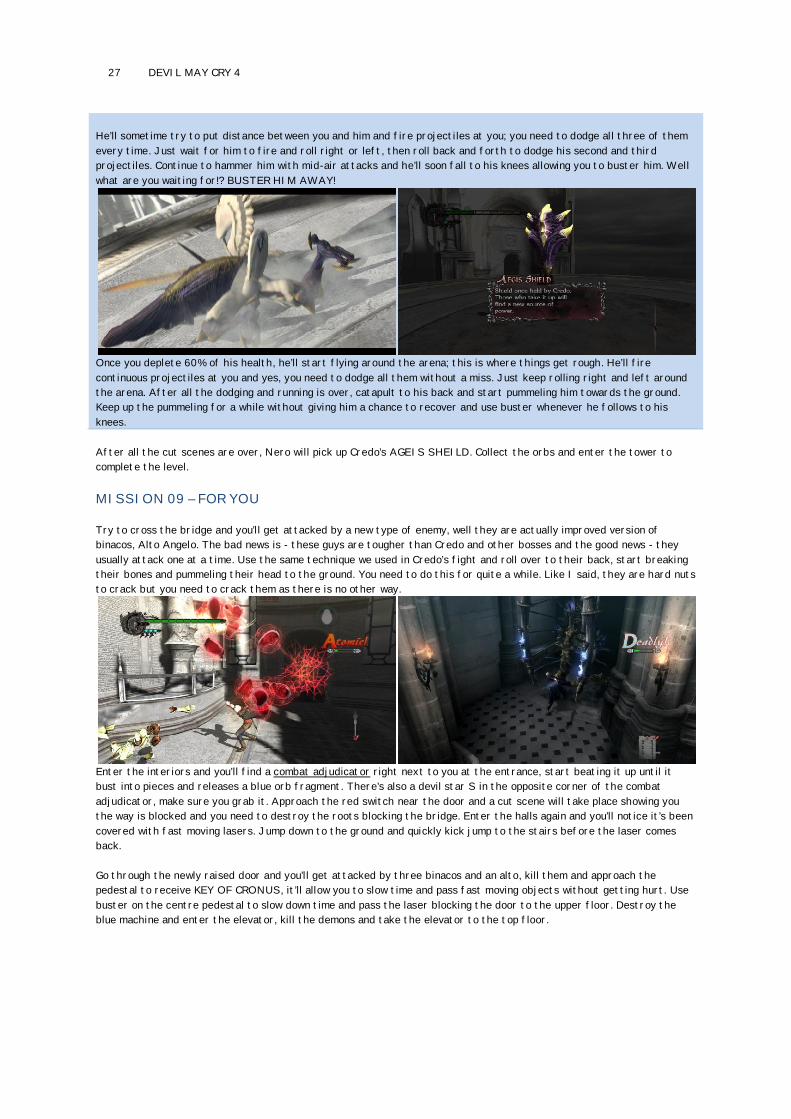
He’ll sometime try to put distance between you and him and fire projectiles at you; you need to dodge all three of them
every time. Just wait for him to fire and roll right or left, then roll back and forth to dodge his second and third
projectiles. Continue to hammer him with mid-air attacks and he’ll soon fall to his knees allowing you to buster him. Well
what are you waiting for!? BUSTER HIM AWAY!
Once you deplete 60% of his health, he’ll start flying around the arena; this is where things get rough. He’ll fire
continuous projectiles at you and yes, you need to dodge all them without a miss. Just keep rolling right and left around
the arena. After all the dodging and running is over, catapult to his back and start pummeling him towards the ground.
Keep up the pummeling for a while without giving him a chance to recover and use buster whenever he follows to his
knees.
After all the cut scenes are over, Nero will pick up Credo’s AGEIS SHEILD. Collect the orbs and enter the tower to
complete the level.
MISSION 09 – FOR YOU
Try to cross the bridge and you’ll get attacked by a new type of enemy, well they are actually improved version of
binacos, Alto Angelo. The bad news is - these guys are tougher than Credo and other bosses and the good news - they
usually attack one at a time. Use the same technique we used in Credo’s fight and roll over to their back, start breaking
their bones and pummeling their head to the ground. You need to do this for quite a while. Like I said, they are hard nuts
to crack but you need to crack them as there is no other way.
Enter the interiors and you’ll find a combat adjudicator right next to you at the entrance, start beating it up until it
bust into pieces and releases a blue orb fragment. There’s also a devil star S in the opposite corner of the combat
adjudicator, make sure you grab it. Approach the red switch near the door and a cut scene will take place showing you
the way is blocked and you need to destroy the roots blocking the bridge. Enter the halls again and you’ll notice it’s been
covered with fast moving lasers. Jump down to the ground and quickly kick jump to the stairs before the laser comes
back.
Go through the newly raised door and you’ll get attacked by three binacos and an alto, kill them and approach the
pedestal to receive KEY OF CRONUS, it’ll allow you to slow time and pass fast moving objects without getting hurt. Use
buster on the centre pedestal to slow down time and pass the laser blocking the door to the upper floor. Destroy the
blue machine and enter the elevator, kill the demons and take the elevator to the top floor.
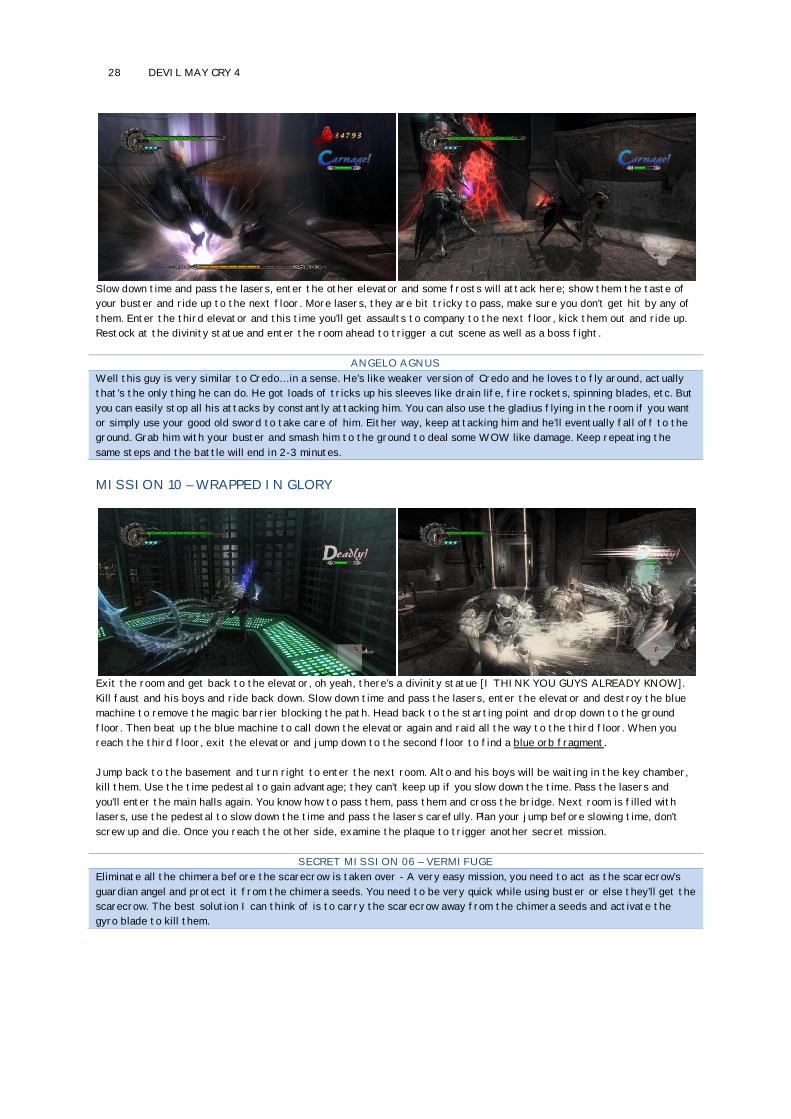
28 DEVIL MAY CRY 4
Slow down time and pass the lasers, enter the other elevator and some frosts will attack here; show them the taste of
your buster and ride up to the next floor. More lasers, they are bit tricky to pass, make sure you don’t get hit by any of
them. Enter the third elevator and this time you’ll get assaults to company to the next floor, kick them out and ride up.
Restock at the divinity statue and enter the room ahead to trigger a cut scene as well as a boss fight.
ANGELO AGNUS
Well this guy is very similar to Credo… in a sense. He’s like weaker version of Credo and he loves to fly around, actually
that’s the only thing he can do. He got loads of tricks up his sleeves like drain life, fire rockets, spinning blades, etc. But
you can easily stop all his attacks by constantly attacking him. You can also use the gladius flying in the room if you want
or simply use your good old sword to take care of him. Either way, keep attacking him and he’ll eventually fall off to the
ground. Grab him with your buster and smash him to the ground to deal some WOW like damage. Keep repeating the
same steps and the battle will end in 2-3 minutes.
MISSION 10 – WRAPPED IN GLORY
Exit the room and get back to the elevator, oh yeah, there’s a divinity statue [I THINK YOU GUYS ALREADY KNOW].
Kill faust and his boys and ride back down. Slow down time and pass the lasers, enter the elevator and destroy the blue
machine to remove the magic barrier blocking the path. Head back to the starting point and drop down to the ground
floor. Then beat up the blue machine to call down the elevator again and raid all the way to the third floor. When you
reach the third floor, exit the elevator and jump down to the second floor to find a blue orb fragment.
Jump back to the basement and turn right to enter the next room. Alto and his boys will be waiting in the key chamber,
kill them. Use the time pedestal to gain advantage; they can’t keep up if you slow down the time. Pass the lasers and
you’ll enter the main halls again. You know how to pass them, pass them and cross the bridge. Next room is filled with
lasers, use the pedestal to slow down the time and pass the lasers carefully. Plan your jump before slowing time, don’t
screw up and die. Once you reach the other side, examine the plaque to trigger another secret mission.
SECRET MISSION 06 – VERMIFUGE
Eliminate all the chimera before the scarecrow is taken over - A very easy mission, you need to act as the scarecrow’s
guardian angel and protect it from the chimera seeds. You need to be very quick while using buster or else they’ll get the
scarecrow. The best solution I can think of is to carry the scarecrow away from the chimera seeds and activate the
gyro blade to kill them.
29 DEVIL MAY CRY 4
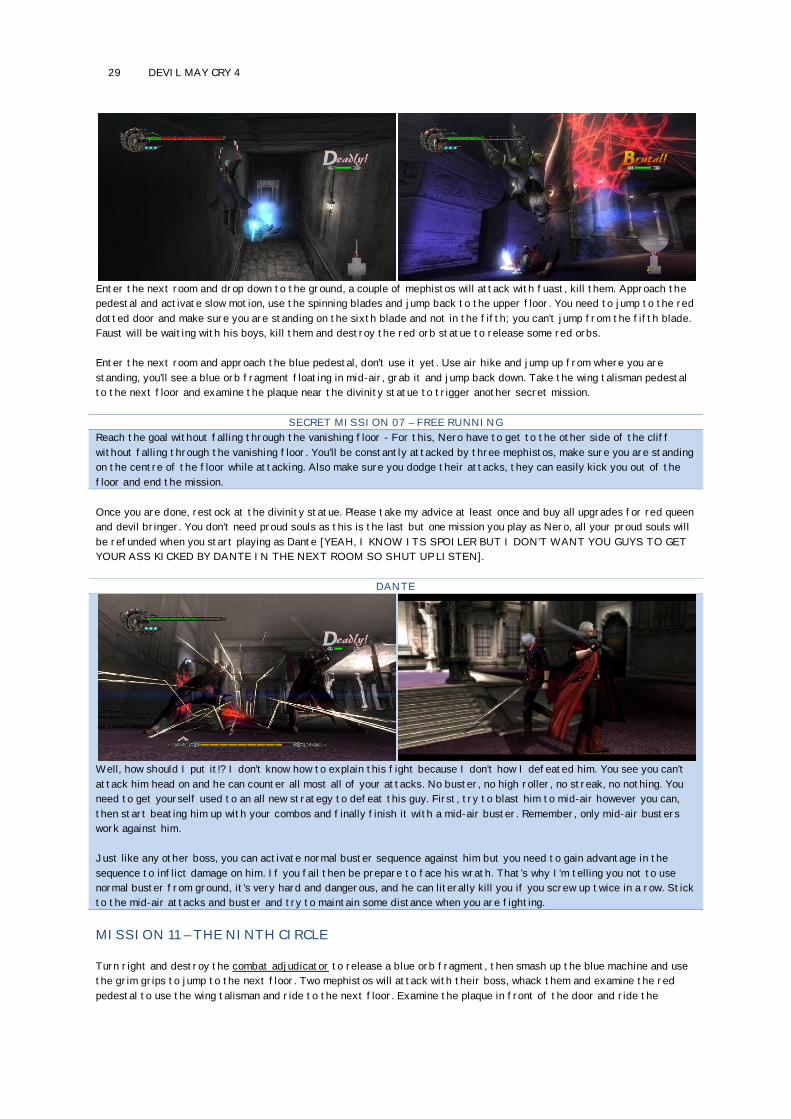
Enter the next room and drop down to the ground, a couple of mephistos will attack with fuast, kill them. Approach the
pedestal and activate slow motion, use the spinning blades and jump back to the upper floor. You need to jump to the red
dotted door and make sure you are standing on the sixth blade and not in the fifth; you can’t jump from the fifth blade.
Faust will be waiting with his boys, kill them and destroy the red orb statue to release some red orbs.
Enter the next room and approach the blue pedestal, don’t use it yet. Use air hike and jump up from where you are
standing, you’ll see a blue orb fragment floating in mid-air, grab it and jump back down. Take the wing talisman pedestal
to the next floor and examine the plaque near the divinity statue to trigger another secret mission.
SECRET MISSION 07 – FREE RUNNING
Reach the goal without falling through the vanishing floor - For this, Nero have to get to the other side of the cliff
without falling through the vanishing floor. You’ll be constantly attacked by three mephistos, make sure you are standing
on the centre of the floor while attacking. Also make sure you dodge their attacks, they can easily kick you out of the
floor and end the mission.
Once you are done, restock at the divinity statue. Please take my advice at least once and buy all upgrades for red queen
and devil bringer. You don’t need proud souls as this is the last but one mission you play as Nero, all your proud souls will
be refunded when you start playing as Dante [YEAH, I KNOW ITS SPOILER BUT I DON’T WANT YOU GUYS TO GET
YOUR ASS KICKED BY DANTE IN THE NEXT ROOM SO SHUT UP LISTEN].
DANTE
Well, how should I put it!? I don’t know how to explain this fight because I don’t how I defeated him. You see you can’t
attack him head on and he can counter all most all of your attacks. No buster, no high roller, no streak, no nothing. You
need to get yourself used to an all new strategy to defeat this guy. First, try to blast him to mid-air however you can,
then start beating him up with your combos and finally finish it with a mid-air buster. Remember, only mid-air busters
work against him.
Just like any other boss, you can activate normal buster sequence against him but you need to gain advantage in the
sequence to inflict damage on him. If you fail then be prepare to face his wrath. That’s why I’m telling you not to use
normal buster from ground, it’s very hard and dangerous, and he can literally kill you if you screw up twice in a row. Stick
to the mid-air attacks and buster and try to maintain some distance when you are fighting.
MISSION 11 – THE NINTH CIRCLE
Turn right and destroy the combat adjudicator to release a blue orb fragment, then smash up the blue machine and use
the grim grips to jump to the next floor. Two mephistos will attack with their boss, whack them and examine the red
pedestal to use the wing talisman and ride to the next floor. Examine the plaque in front of the door and ride the
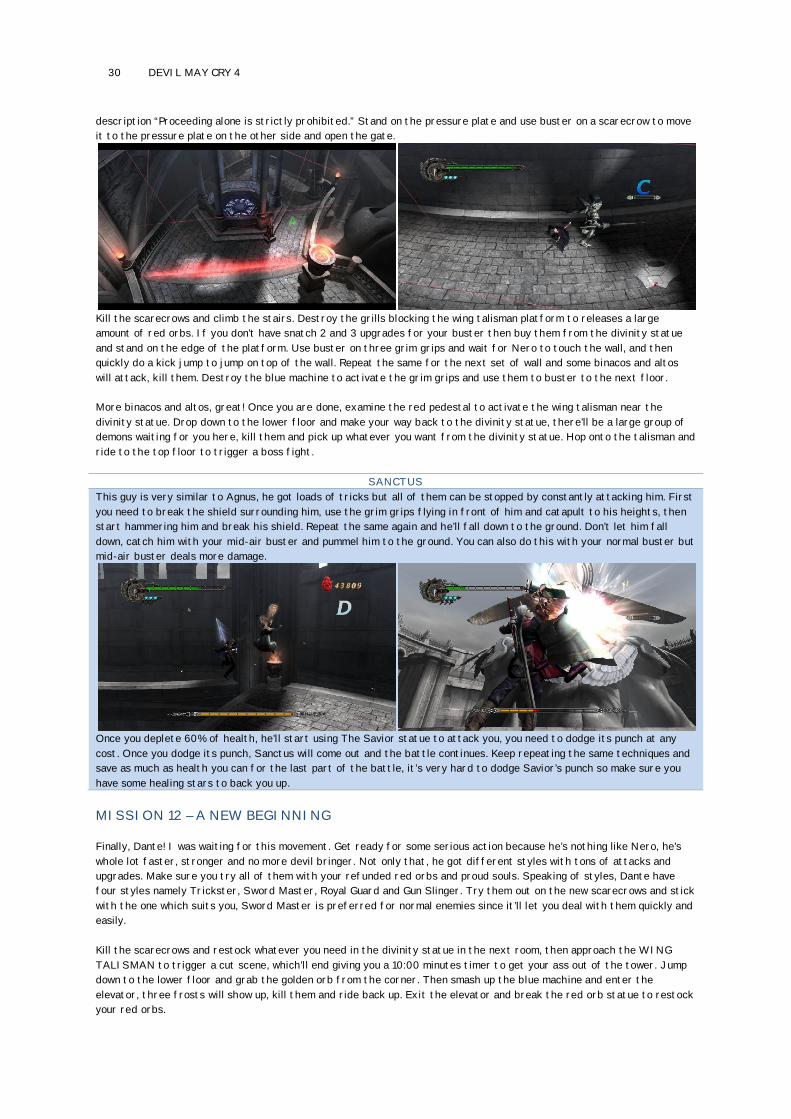
30 DEVIL MAY CRY 4
description “Proceeding alone is strictly prohibited.” Stand on the pressure plate and use buster on a scarecrow to move
it to the pressure plate on the other side and open the gate.
Kill the scarecrows and climb the stairs. Destroy the grills blocking the wing talisman platform to releases a large
amount of red orbs. If you don’t have snatch 2 and 3 upgrades for your buster then buy them from the divinity statue
and stand on the edge of the platform. Use buster on three grim grips and wait for Nero to touch the wall, and then
quickly do a kick jump to jump on top of the wall. Repeat the same for the next set of wall and some binacos and altos
will attack, kill them. Destroy the blue machine to activate the grim grips and use them to buster to the next floor.
More binacos and altos, great! Once you are done, examine the red pedestal to activate the wing talisman near the
divinity statue. Drop down to the lower floor and make your way back to the divinity statue, there’ll be a large group of
demons waiting for you here, kill them and pick up whatever you want from the divinity statue. Hop onto the talisman and
ride to the top floor to trigger a boss fight.
SANCTUS
This guy is very similar to Agnus, he got loads of tricks but all of them can be stopped by constantly attacking him. First
you need to break the shield surrounding him, use the grim grips flying in front of him and catapult to his heights, then
start hammering him and break his shield. Repeat the same again and he’ll fall down to the ground. Don’t let him fall
down, catch him with your mid-air buster and pummel him to the ground. You can also do this with your normal buster but
mid-air buster deals more damage.
Once you deplete 60% of health, he’ll start using The Savior statue to attack you, you need to dodge its punch at any
cost. Once you dodge its punch, Sanctus will come out and the battle continues. Keep repeating the same techniques and
save as much as health you can for the last part of the battle, it’s very hard to dodge Savior’s punch so make sure you
have some healing stars to back you up.
MISSION 12 – A NEW BEGINNING
Finally, Dante! I was waiting for this movement. Get ready for some serious action because he’s nothing like Nero, he’s
whole lot faster, stronger and no more devil bringer. Not only that, he got different styles with tons of attacks and
upgrades. Make sure you try all of them with your refunded red orbs and proud souls. Speaking of styles, Dante have
four styles namely Trickster, Sword Master, Royal Guard and Gun Slinger. Try them out on the new scarecrows and stick
with the one which suits you, Sword Master is preferred for normal enemies since it’ll let you deal with them quickly and
easily.
Kill the scarecrows and restock whatever you need in the divinity statue in the next room, then approach the WING
TALISMAN to trigger a cut scene, which’ll end giving you a 10:00 minutes timer to get your ass out of the tower. Jump
down to the lower floor and grab the golden orb from the corner. Then smash up the blue machine and enter the
elevator, three frosts will show up, kill them and ride back up. Exit the elevator and break the red orb statue to restock
your red orbs.
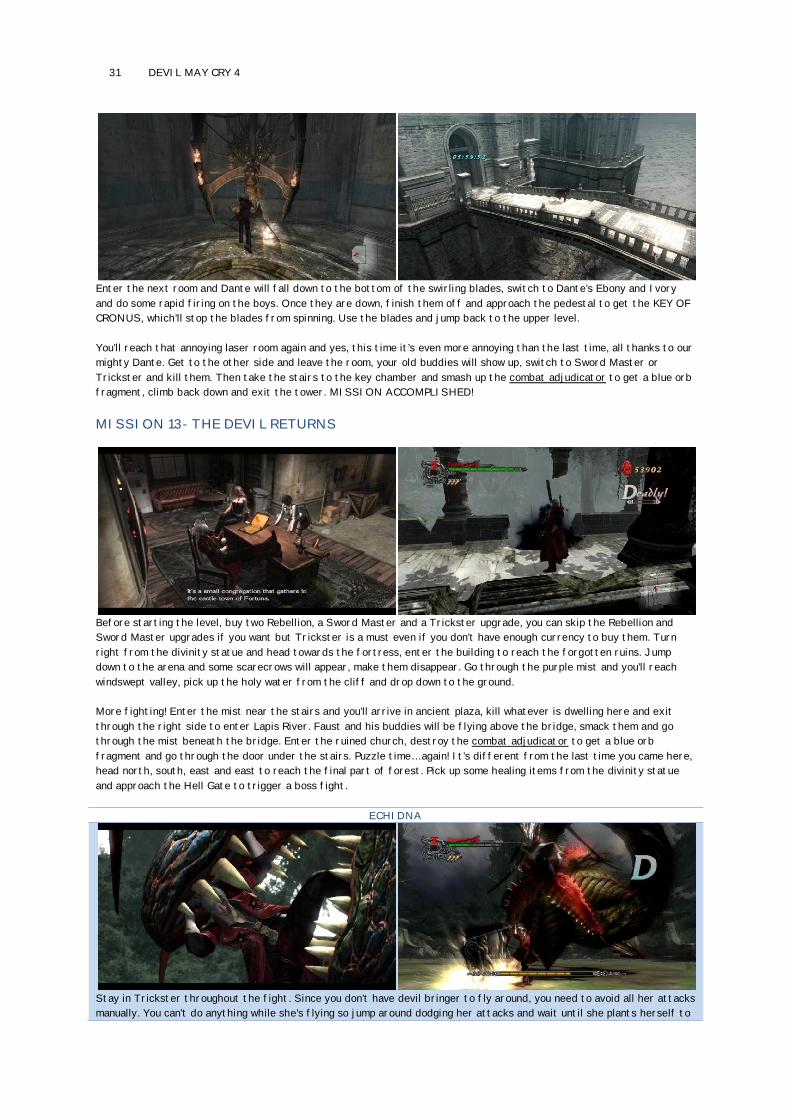
31 DEVIL MAY CRY 4
Enter the next room and Dante will fall down to the bottom of the swirling blades, switch to Dante’s Ebony and Ivory
and do some rapid firing on the boys. Once they are down, finish them off and approach the pedestal to get the KEY OF
CRONUS, which’ll stop the blades from spinning. Use the blades and jump back to the upper level.
You’ll reach that annoying laser room again and yes, this time it’s even more annoying than the last time, all thanks to our
mighty Dante. Get to the other side and leave the room, your old buddies will show up, switch to Sword Master or
Trickster and kill them. Then take the stairs to the key chamber and smash up the combat adjudicator to get a blue orb
fragment, climb back down and exit the tower. MISSION ACCOMPLISHED!
MISSION 13- THE DEVIL RETURNS
Before starting the level, buy two Rebellion, a Sword Master and a Trickster upgrade, you can skip the Rebellion and
Sword Master upgrades if you want but Trickster is a must even if you don’t have enough currency to buy them. Turn
right from the divinity statue and head towards the fortress, enter the building to reach the forgotten ruins. Jump
down to the arena and some scarecrows will appear, make them disappear. Go through the purple mist and you’ll reach
windswept valley, pick up the holy water from the cliff and drop down to the ground.
More fighting! Enter the mist near the stairs and you’ll arrive in ancient plaza, kill whatever is dwelling here and exit
through the right side to enter Lapis River. Faust and his buddies will be flying above the bridge, smack them and go
through the mist beneath the bridge. Enter the ruined church, destroy the combat adjudicator to get a blue orb
fragment and go through the door under the stairs. Puzzle time… again! It’s different from the last time you came here,
head north, south, east and east to reach the final part of forest. Pick up some healing items from the divinity statue
and approach the Hell Gate to trigger a boss fight.
ECHIDNA
Stay in Trickster throughout the fight. Since you don’t have devil bringer to fly around, you need to avoid all her attacks
manually. You can’t do anything while she’s flying so jump around dodging her attacks and wait until she plants herself to
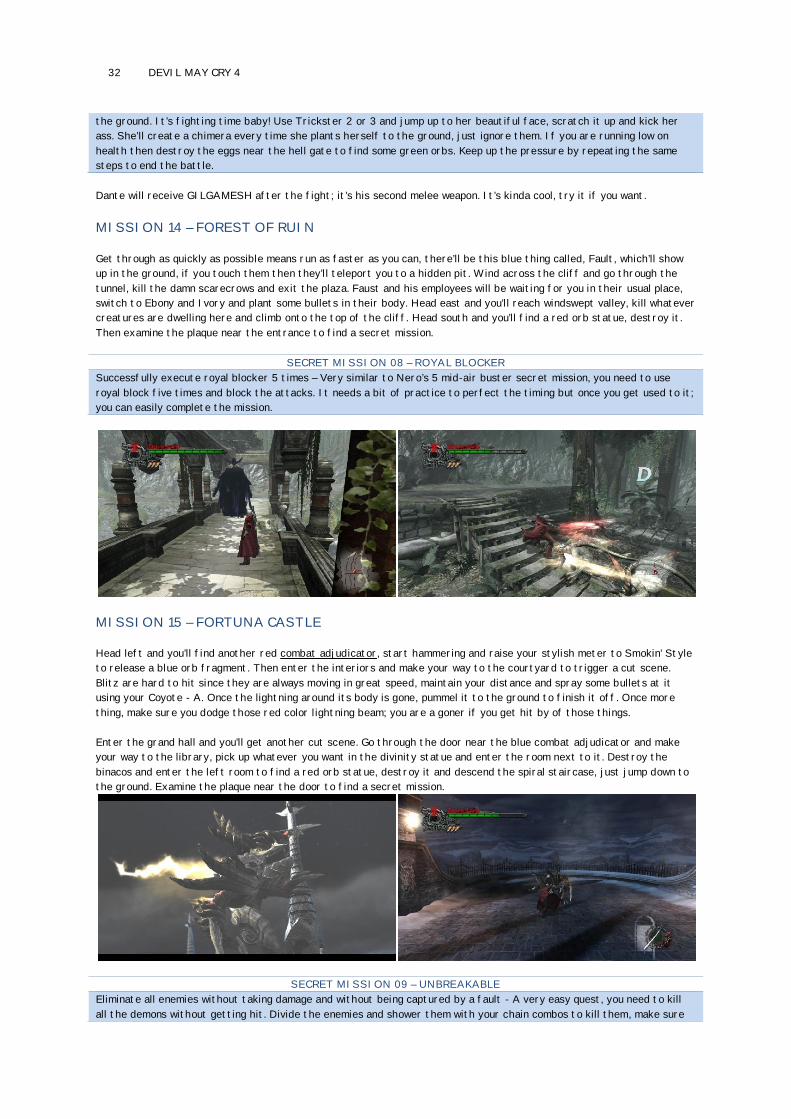
32 DEVIL MAY CRY 4
the ground. It’s fighting time baby! Use Trickster 2 or 3 and jump up to her beautiful face, scratch it up and kick her
ass. She’ll create a chimera every time she plants herself to the ground, just ignore them. If you are running low on
health then destroy the eggs near the hell gate to find some green orbs. Keep up the pressure by repeating the same
steps to end the battle.
Dante will receive GILGAMESH after the fight; it’s his second melee weapon. It’s kinda cool, try it if you want.
MISSION 14 – FOREST OF RUIN
Get through as quickly as possible means run as faster as you can, there’ll be this blue thing called, Fault, which’ll show
up in the ground, if you touch them then they’ll teleport you to a hidden pit. Wind across the cliff and go through the
tunnel, kill the damn scarecrows and exit the plaza. Faust and his employees will be waiting for you in their usual place,
switch to Ebony and Ivory and plant some bullets in their body. Head east and you’ll reach windswept valley, kill whatever
creatures are dwelling here and climb onto the top of the cliff. Head south and you’ll find a red orb statue, destroy it.
Then examine the plaque near the entrance to find a secret mission.
SECRET MISSION 08 – ROYAL BLOCKER
Successfully execute royal blocker 5 times – Very similar to Nero’s 5 mid-air buster secret mission, you need to use
royal block five times and block the attacks. It needs a bit of practice to perfect the timing but once you get used to it;
you can easily complete the mission.
MISSION 15 – FORTUNA CASTLE
Head left and you’ll find another red combat adjudicator, start hammering and raise your stylish meter to Smokin’ Style
to release a blue orb fragment. Then enter the interiors and make your way to the courtyard to trigger a cut scene.
Blitz are hard to hit since they are always moving in great speed, maintain your distance and spray some bullets at it
using your Coyote - A. Once the lightning around its body is gone, pummel it to the ground to finish it off. Once more
thing, make sure you dodge those red color lightning beam; you are a goner if you get hit by of those things.
Enter the grand hall and you’ll get another cut scene. Go through the door near the blue combat adjudicator and make
your way to the library, pick up whatever you want in the divinity statue and enter the room next to it. Destroy the
binacos and enter the left room to find a red orb statue, destroy it and descend the spiral staircase, just jump down to
the ground. Examine the plaque near the door to find a secret mission.
SECRET MISSION 09 – UNBREAKABLE
Eliminate all enemies without taking damage and without being captured by a fault - A very easy quest, you need to kill
all the demons without getting hit. Divide the enemies and shower them with your chain combos to kill them, make sure

33 DEVIL MAY CRY 4
you keep moving all the time to avoid being caught by fault. Yes, I know. They are very annoying.
Enter the next area and restock at the divinity statue, then go through the door behind the statue to enter the torture
chamber. Well, this time the torture is on the poor demons living here, they are going to suffer at the hands of Dante
*evil laugh*. Enter the next room and drop down to the ground, destroy the blue machine behind the gates and use the
blue talisman to jump back to the upper floor. Cross the grilled bridge and enter the next room. Kill the scarecrows and
a blitz will attack, use the same strategy we used before and destroy it. Exit the room through the glass door and jump
over the gills, upgrade some of your skills at the divinity statue and go through the door next to it to trigger a cut
scene.
DAGON
Nothing is changed from the last battle we fought with his brother as Nero, dodge his ice bullets and smack him in the
face for a while. Once you dealt certain amount of damage on him, he’ll vanish into the air leaving you with his two mini
bodyguards. The twins are far more dangerous than the previous battle, their attacks drain a lot of health and some
time they freeze you and attacks. If things get worse, then Dagon will show up behind you and start chewing your frozen
body. Keep pummeling the twins and their boss will eventually show up to save them, start off with the pummeling again
and deplete his health to zero to end the battle.
After the fight, you’ll receive Dante’s super cool handgun, PANDORA.
MISSION 16 – INFERNO
The entire area is filled with poison gas… run for your life! Destroy the red combat adjudicator and grab the blue orb
fragment, then exit the room and three cutlass will pop-up from the ground, use Pandora and smoke them. Exit the
tunnel and go through the blue door in the next room to enter Agnus’s lab but lucky that annoying guy is missing from
the scene. Deal with the binacos and use Pandora to destroy the gladius, if you are quick enough then you can lure the
blades to hit the binacos. After the fight, the glass to Angus’s lab will break, climb onto the window pane and exit the
room.
Climb the stairs and enter the room upstairs, smoke the binacos and climb upstairs. Drop down near the ladder and yes,
a handful of binacos will show up again, kill them and exit the area. Use the wing talisman and fly to the top floor, leave
the room and make your way back to the grand hall. Exit through the main halls and you’ll encounter a new type of
demon, Basilisks. They pose no harm as long as you dodge their fireball; just dodge their initial attack and beat them up.
Turn left and climb on top of the ruined building, turn around here and you’ll find some red orbs. Jump on top of the
ledges using air hike to find a secret mission.
SECRET MISSION 11 – POINT OF IMPACT
Use Pandora to destroy distant objects - For this quest, you need to destroy two statues in 30 seconds. Transform
Pandora to revenge and smash them up to release the blue orb fragment, grab it and get back to the cliff to complete
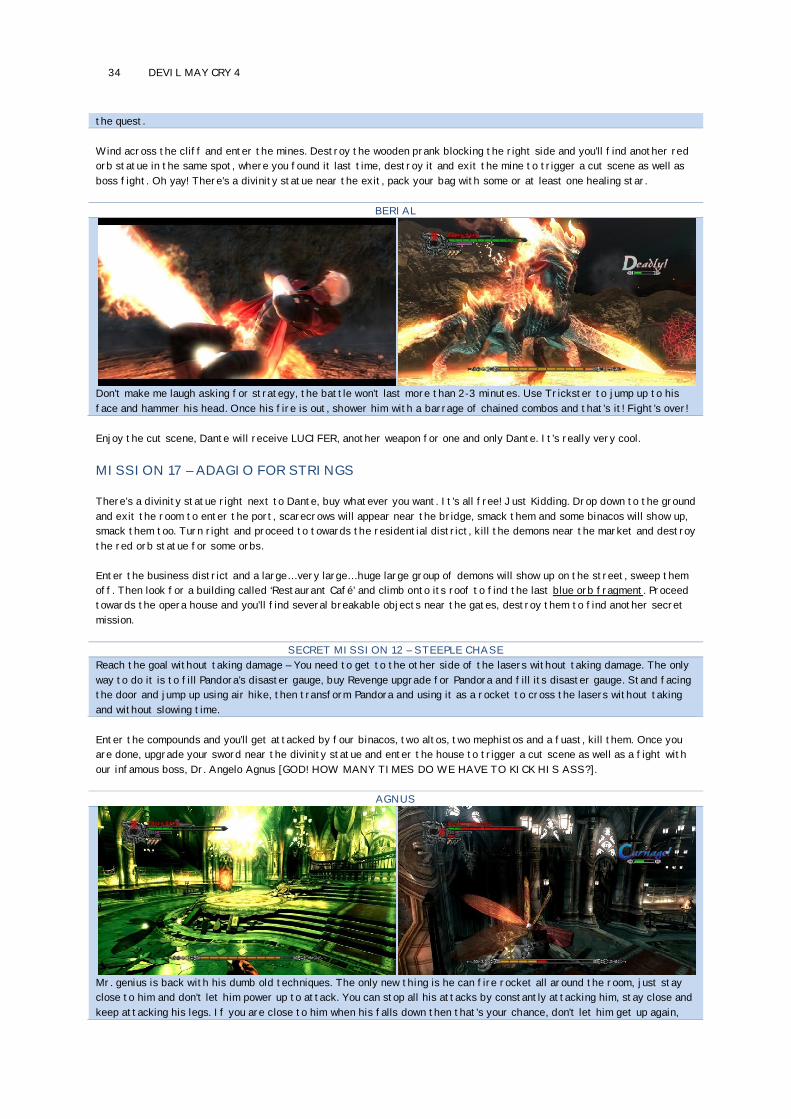
34 DEVIL MAY CRY 4
the quest.
Wind across the cliff and enter the mines. Destroy the wooden prank blocking the right side and you’ll find another red
orb statue in the same spot, where you found it last time, destroy it and exit the mine to trigger a cut scene as well as
boss fight. Oh yay! There’s a divinity statue near the exit, pack your bag with some or at least one healing star.
BERIAL
Don’t make me laugh asking for strategy, the battle won’t last more than 2-3 minutes. Use Trickster to jump up to his
face and hammer his head. Once his fire is out, shower him with a barrage of chained combos and that’s it! Fight’s over!
Enjoy the cut scene, Dante will receive LUCIFER, another weapon for one and only Dante. It’s really very cool.
MISSION 17 – ADAGIO FOR STRINGS
There’s a divinity statue right next to Dante, buy whatever you want. It’s all free! Just Kidding. Drop down to the ground
and exit the room to enter the port, scarecrows will appear near the bridge, smack them and some binacos will show up,
smack them too. Turn right and proceed to towards the residential district, kill the demons near the market and destroy
the red orb statue for some orbs.
Enter the business district and a large… very large… huge large group of demons will show up on the street, sweep them
off. Then look for a building called ‘Restaurant Café’ and climb onto its roof to find the last blue orb fragment. Proceed
towards the opera house and you’ll find several breakable objects near the gates, destroy them to find another secret
mission.
SECRET MISSION 12 – STEEPLE CHASE
Reach the goal without taking damage – You need to get to the other side of the lasers without taking damage. The only
way to do it is to fill Pandora’s disaster gauge, buy Revenge upgrade for Pandora and fill its disaster gauge. Stand facing
the door and jump up using air hike, then transform Pandora and using it as a rocket to cross the lasers without taking
and without slowing time.
Enter the compounds and you’ll get attacked by four binacos, two altos, two mephistos and a fuast, kill them. Once you
are done, upgrade your sword near the divinity statue and enter the house to trigger a cut scene as well as a fight with
our infamous boss, Dr. Angelo Agnus [GOD! HOW MANY TIMES DO WE HAVE TO KICK HIS ASS?].
AGNUS
Mr. genius is back with his dumb old techniques. The only new thing is he can fire rocket all around the room, just stay
close to him and don’t let him power up to attack. You can stop all his attacks by constantly attacking him, stay close and
keep attacking his legs. If you are close to him when his falls down then that’s your chance, don’t let him get up again,
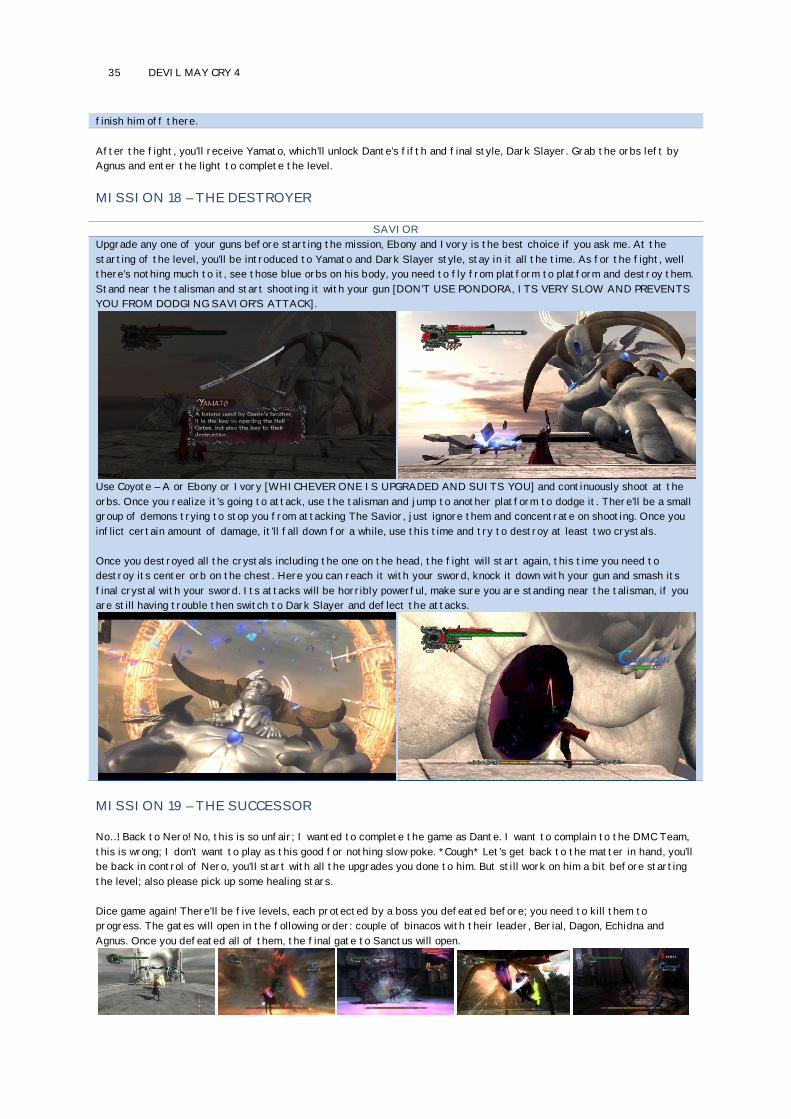
35 DEVIL MAY CRY 4
finish him off there.
After the fight, you’ll receive Yamato, which’ll unlock Dante’s fifth and final style, Dark Slayer. Grab the orbs left by
Agnus and enter the light to complete the level.
MISSION 18 – THE DESTROYER
SAVIOR
Upgrade any one of your guns before starting the mission, Ebony and Ivory is the best choice if you ask me. At the
starting of the level, you’ll be introduced to Yamato and Dark Slayer style, stay in it all the time. As for the fight, well
there’s nothing much to it, see those blue orbs on his body, you need to fly from platform to platform and destroy them.
Stand near the talisman and start shooting it with your gun [DON’T USE PONDORA, ITS VERY SLOW AND PREVENTS
YOU FROM DODGING SAVIOR’S ATTACK].
Use Coyote – A or Ebony or Ivory [WHICHEVER ONE IS UPGRADED AND SUITS YOU] and continuously shoot at the
orbs. Once you realize it’s going to attack, use the talisman and jump to another platform to dodge it. There’ll be a small
group of demons trying to stop you from attacking The Savior, just ignore them and concentrate on shooting. Once you
inflict certain amount of damage, it’ll fall down for a while, use this time and try to destroy at least two crystals.
Once you destroyed all the crystals including the one on the head, the fight will start again, this time you need to
destroy its center orb on the chest. Here you can reach it with your sword, knock it down with your gun and smash its
final crystal with your sword. Its attacks will be horribly powerful, make sure you are standing near the talisman, if you
are still having trouble then switch to Dark Slayer and deflect the attacks.
MISSION 19 – THE SUCCESSOR
No…! Back to Nero! No, this is so unfair; I wanted to complete the game as Dante. I want to complain to the DMC Team,
this is wrong; I don’t want to play as this good for nothing slow poke. *Cough* Let’s get back to the matter in hand, you’ll
be back in control of Nero, you’ll start with all the upgrades you done to him. But still work on him a bit before starting
the level; also please pick up some healing stars.
Dice game again! There’ll be five levels, each protected by a boss you defeated before; you need to kill them to
progress. The gates will open in the following order: couple of binacos with their leader, Berial, Dagon, Echidna and
Agnus. Once you defeated all of them, the final gate to Sanctus will open.
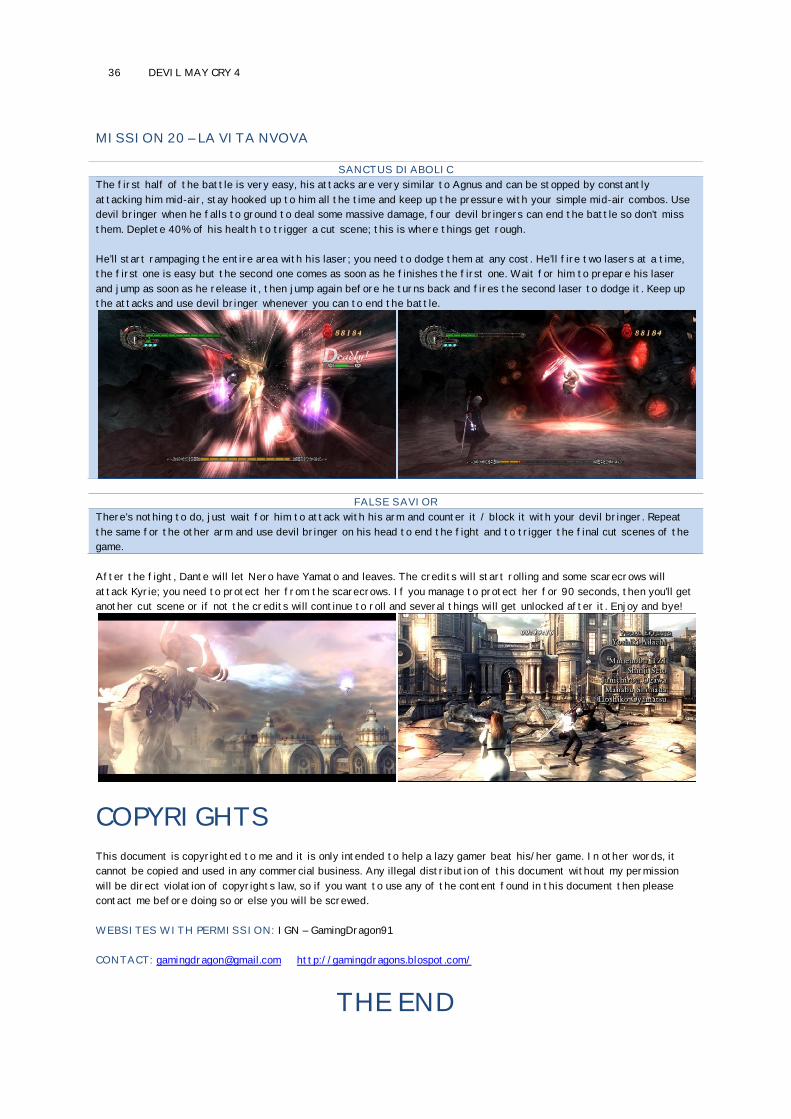
36 DEVIL MAY CRY 4
MISSION 20 – LA VITA NVOVA
SANCTUS DIABOLIC
The first half of the battle is very easy, his attacks are very similar to Agnus and can be stopped by constantly
attacking him mid-air, stay hooked up to him all the time and keep up the pressure with your simple mid-air combos. Use
devil bringer when he falls to ground to deal some massive damage, four devil bringers can end the battle so don’t miss
them. Deplete 40% of his health to trigger a cut scene; this is where things get rough.
He’ll start rampaging the entire area with his laser; you need to dodge them at any cost. He’ll fire two lasers at a time,
the first one is easy but the second one comes as soon as he finishes the first one. Wait for him to prepare his laser
and jump as soon as he release it, then jump again before he turns back and fires the second laser to dodge it. Keep up
the attacks and use devil bringer whenever you can to end the battle.
FALSE SAVIOR
There’s nothing to do, just wait for him to attack with his arm and counter it / block it with your devil bringer. Repeat
the same for the other arm and use devil bringer on his head to end the fight and to trigger the final cut scenes of the
game.
After the fight, Dante will let Nero have Yamato and leaves. The credits will start rolling and some scarecrows will
attack Kyrie; you need to protect her from the scarecrows. If you manage to protect her for 90 seconds, then you’ll get
another cut scene or if not the credits will continue to roll and several things will get unlocked after it. Enjoy and bye!
COPYRIGHTS
This document is copyrighted to me and it is only intended to help a lazy gamer beat his/her game. In other words, it
cannot be copied and used in any commercial business. Any illegal distribution of this document without my permission
will be direct violation of copyrights law, so if you want to use any of the content found in this document then please
contact me before doing so or else you will be screwed.
WEBSITES WITH PERMISSION: IGN – GamingDragon91
CONTACT: [email protected] http://gamingdragons.blospot.com/
THE END

![download.xbox.comdownload.xbox.com/content/4343081e/360_DMCC_PC2.pdf · Xbox 360 D HD AV '—7JRXbox 360 HD AV '—7JÞsXbox 360 VGA HD AV ... one/ 13 Devil May cry 3] rGOLD MODE]](https://img.pdfslide.us/doc/110x75/5f02c5017e708231d405ebed/xbox-360-d-hd-av-a7jrxbox-360-hd-av-a7jsxbox-360-vga-hd-av-one-13-devil.jpg)