Embed Size (px)
Citation preview

User Manual for the HE693DNT350
DeviceNet Master (Scanner)
First Edition 01 February 2002
MAN0403-01


MAN0403-01 01 FEB 2002 PAGE 3
PREFACE This manual explains how to use the Horner APG’s DeviceNet Master (Scanner). Copyright (C) 2002 Horner APG, LLC., 640 North Sherman Drive, Indianapolis, Indiana 46201. All rights reserved. No part of this publication may be reproduced, transmitted, transcribed, stored in a retrieval system, or translated into any language or computer language, in any form by any means, electronic, mechanical, magnetic, optical, chemical, manual or otherwise, without the prior agreement and written permission of Horner APG, LLC. All software described in this document or media is also copyrighted material subject to the terms and conditions of the Horner Software License Agreement. Information in this document is subject to change without notice and does not represent a commitment on the part of Horner APG, LLC. DeviceNet is a trademark of Open DeviceNet Vendors Association (ODVA) Logicmaster, LM90, and SNP are trademarks of GE Fanuc Windows and Windows-95 are trademarks of Microsoft Corporation For user manual updates, contact Horner APG, Technical Support Division, at (317) 916-4274 or visit our website at www.heapg.com.

PAGE 4 01 FEB 2002 MAN0403-01
LIMITED WARRANTY AND LIMITATION OF LIABILITY Horner APG, LLC. ("HE") warrants to the original purchaser that the DeviceNet Master (Scanner) manufactured by HE is free from defects in material and workmanship under normal use and service. The obligation of HE under this warranty shall be limited to the repair or exchange of any part or parts which may prove defective under normal use and service within two (2) years from the date of manufacture or eighteen (18) months from the date of installation by the original purchaser whichever occurs first, such defect to be disclosed to the satisfaction of HE after examination by HE of the allegedly defective part or parts. THIS WARRANTY IS EXPRESSLY IN LIEU OF ALL OTHER WARRANTIES EXPRESSED OR IMPLIED INCLUDING THE WARRANTIES OF MERCHANTABILITY AND FITNESS FOR USE AND OF ALL OTHER OBLIGATIONS OR LIABILITIES AND HE NEITHER ASSUMES, NOR AUTHORIZES ANY OTHER PERSON TO ASSUME FOR HE, ANY OTHER LIABILITY IN CONNECTION WITH THE SALE OF TH IS DEVICENET MASTER (SCANNER). THIS WARRANTY SHALL NOT APPLY TO THIS DEVICENET MASTER (SCANNER) OR ANY PART THEREOF WHICH HAS BEEN SUBJECT TO ACCIDENT, NEGLIGENCE, ALTERATION, ABUSE, OR MISUSE. HE MAKES NO WARRANTY WHATSOEVER IN RESPECT TO ACCESSORIES OR PARTS NOT SUPPLIED BY HE. THE TERM "ORIGINAL PURCHASER", AS USED IN THIS WARRANTY, SHALL BE DEEMED TO MEAN THAT PERSON FOR WHOM THE DEVICENET MASTER (SCANNER) IS ORIGINALLY INSTALLED. THIS WARRANTY SHALL APPLY ONLY WITHIN THE BOUNDARIES OF THE CONTINENTAL UNITED STATES. In no event, whether as a result of breach of contract, warranty, tort (including negligence) or otherwise, shall HE or its suppliers be liable of any special, consequential, incidental or penal damages including, but not limited to, loss of profit or revenues, loss of use of the products or any associated equipment, damage to associated equipment, cost of capital, cost of substitute products, facilities, services or replacement power, down time costs, or claims of original purchaser's customers for such damages. To obtain warranty service, return the product to your distributor with a description of the problem, proof of purchase, post paid, insured and in a suitable package. ABOUT PROGRAMMING EXAMPLES Any example programs and program segments in this manual or provided on accompanying diskettes are included solely for illustrative purposes. Due to the many variables and requirements associated with any particular installation, Horner APG cannot assume responsibility or liability for actual use based on the examples and diagrams. It is the sole responsibility of the system designer utilizing the DeviceNet Master (Scanner) to appropriately design the end system, to appropriately integrate the DeviceNet Master (Scanner) and to make safety provisions for the end equipment as is usual and customary in industrial applications as defined in any codes or standards which apply. It assumed that the system designer is familiar with PLC programming and configuration. Note: The programming examples shown in this manual are for illustrative purposes only. Proper machine operation is the sole responsibility of the system integrator.

MAN0403-01 01 FEB 2002 PAGE 5
TABLE OF CONTENTS CHAPTER 1: DNT350 INTRODUCTION .............................................................................................7
1.1 Overview ..............................................................................................................................7 1.2 HE693DNT350 Features ........................................................................................................7 1.3 Technical Specifications .........................................................................................................8
CHAPTER 2: INSTALLA TION ............................................................................................................9 2.1 Connectors ...........................................................................................................................9
2.1.1 RS-232 Connector ..........................................................................................................9 2.1.2 DeviceNet I/O Connector.................................................................................................9
2.2 LED Indicators.....................................................................................................................10 CHAPTER 3: DEVICENE T NODE, DNT350 & PLC RELATIONSHIPS ................................................13
3.1 General...............................................................................................................................13 3.2 Module to PLC Register Mapping .........................................................................................13 3.3 Node to PLC Register Mapping ............................................................................................13 3.4 Message Packets and Fragmentation ...................................................................................13 3.5 Physical Limitations .............................................................................................................13 3.6 Data Assemblies .................................................................................................................14
3.6.1 Polled Connection.........................................................................................................14 3.6.2 Bit Strobe Connection ...................................................................................................14
3.7 DNT350 Configuration Tool Introduction ...............................................................................15 3.7.1 Configuration Steps ......................................................................................................15 3.7.2 Description of Configuration Parameters ........................................................................15 3.7.3 Scan List......................................................................................................................16
3.8 DeviceNet Node Priority and Implications ..............................................................................17 3.9 Fault Table..........................................................................................................................18
CHAPTER 4: DNT350 REGISTER REQUIREMENTS ........................................................................21 CHAPTER 5: EXPLICIT MESSAGING USING THE DNT350..............................................................25
5.1 General...............................................................................................................................25 5.2 Building Explicit Messages ...................................................................................................25 5.3 How to Interpret Explicit Response Messages .......................................................................26 5.4 Explicit Message Errors .......................................................................................................27
CHAPTER 6: CONFIGURATION ......................................................................................................29 6.1 General...............................................................................................................................29 6.2 DNT350 Module Configuration .............................................................................................29 6.3 PLC Rack Configuration.......................................................................................................29 6.4 DNCFG – The DNT350 Configuration Tool............................................................................30
6.4.1 General ........................................................................................................................30 6.4.2 Configuration Procedures .............................................................................................31 6.4.3 Other Features .............................................................................................................40
CHAPTER 7: DEVELOPING USER SOFTWARE ..............................................................................43 7.1 Software Support for the Polled Connection ..........................................................................43 7.2 Software Support for the Explicit Connection .........................................................................43
APPENDIX A: DNT350 NETWORK OPERATION..............................................................................45 A.1 Sequence of Events.............................................................................................................45 A.2 Establishing a Connection ....................................................................................................45 A.3 Send a Polled Message .......................................................................................................46 A.4 Explicit NOPs......................................................................................................................46
APPENDIX B: DEVICENET TIMING .................................................................................................47 B.1 Message Packet Timing .......................................................................................................47 B.2 Network Scan Time versus PLC Scan Time ..........................................................................47
APPENDIX C: DEVICENET ERROR CODES ....................................................................................49 INDEX .............................................................................................................................................51

PAGE 6 01 FEB 2002 MAN0403-01

MAN0403-01 01 FEB 2002 PAGE 7 CH. 1
CHAPTER 1: DNT350 INTRODUCTION 1.1 Overview The HE693DNT350 DeviceNet Scanner (DNT350) is an intelligent communications interface module. The DNT350 allows a GE Fanuc Series 90-30 PLC to supervise a DeviceNet network. Up to 63 slave devices can be connected via DeviceNet to the DNT350. Depending on baud rate and the cable type used, the DeviceNet slave nodes may be located up to 1,500 feet from the PLC. DNT350 Polled data is mapped directly into the PLC's %I, %Q, %AI and %AQ registers. The ladder programmer can treat the DNT350 and its attached DeviceNet nodes as a large I/O module. Polled data is transferred between the PLCs registers and the DeviceNet slave nodes without any user or ladder code intervention. The DNT350 also supports “Ladder Code Initiated Explicit Messaging (LIEM). LIEM allows the ladder code executing within the PLC to initiate dialogues with DeviceNet nodes through the use of explicit messaging. This enables the PLC to access data beyond that available using the Polled Connection. For LIEM, data is transferred between the DNT350 and the PLC using a technique known as Backplane Mail. Backplane Mail requires considerably more processing time than Polled messaging. LIEM should therefore only be used to access infrequently required data such as device configuration or tuning parameters. The DeviceNet specification provides two methods of establishing communications between a scanner and its nodes. The first method makes use of the “Unconnected Message Manager” (UCMM) and the second is known as “Group 2 Only”. “Group 2 Only” is the simplest. Because of its simplicity, many slave devices only support the “Group 2 Only” method. The DNT350 allows both of these methods to be used simultaneously. Any single DeviceNet slave device can be either a Group 2 Only node or a UCMM node, never both. A DeviceNet network can be made up of a mixture of “Group 2 Only” and UCMM” slave devices. 1.2 HE693DNT350 Features The DNT350 supports the following DeviceNet features: • Baud Rates: 125K, 250K, and 500K • UCMM protocol • Group 2 Only protocol • The Polled Connection • Bit Strobed Connection • The LIEM (explicit messaging) • Fragmentation on both polled and explicit connections • All four Message Body Formats under UCMM When using Polled Messaging, data is read from the PLC’s %Q and %AQ registers by the DNT350, formatted into DeviceNet packets and sent to the DeviceNet nodes. As data produced by the DeviceNet nodes is received by the DNT350, it is converted into PLC register notation and stored in the PLC's %I and %AI registers. This happens automatically without the need for block move, "COMREQ", or other ladder program intervention. When using Bit Strobed messaging, command data is read from %AQ registers and formatted into a DeviceNet packet and sent out. Bit Strobed slaves respond with their produced data and the DNT350 receives the dat a and converts it into PLC register notation and stores it in the PLC's %I and %AI registers. This also happens automatically.

PAGE 8 01 FEB 2002 MAN0403-01 CH. 1
The ladder code running in the PLC can also build Explicit Messages to access any network data that is known to be available through a node’s Explicit Connection. See Chapter 4 for more information on LIEM or explicit messaging. 1.3 Technical Specifications The following are the DNT350 DeviceNet Interface Module specifications. These specifications are subject to change without notice.
Table 1.1 - H3693DNT350 Specifications DeviceNet Network Specifications Parameter Minimum Maximum Units DeviceNet Power Voltage 11 25 V DeviceNet Power Load 65 mA DeviceNet Signal Baud Rate 125 500 KHz DeviceNet Signal Driver Fanout 0 63 Devices PLC Power Load Specifications Parameter Minimum Maximum Units +5Vdc (LOGIC) 0 175 mA +24Vdc (RELAY) 0 0 mA +24Vdc (ISOLATED) 0 0 mA Environmental Specifications Parameter Minimum Maximum Units Operating Temperature 0 +60 Deg C Storage Temperature -40 +85 Deg C Humidity (non-condensing) 5 95 % RH DeviceNet Cable Length vs Network Baud Rate
Maximum Cable Distance DeviceNet Baud Rate
Thick Cable Thin Cable 125KHz 1640 Feet 328 Feet 250KHz 820 Feet 328 Feet 500kHz 328 Feet 328 Feet
Maximum Drop Distance DeviceNet Baud Rate Per Drop Cumulative 125KHz 20 Feet 512 Feet 250KHz 20 Feet 256 Feet 500kHz 20 Feet 128 Feet
See ODVA DeviceNet Specification, Volume 1, Section 9.3 for complete DeviceNet cabling specifications.

MAN0403-01 01 FEB 2002 PAGE 9 CH. 2
CHAPTER 2: INSTALLATION 2.1 Connectors 2.1.1 RS-232 Connector The RS232 port allows the DNT350 to be connected to an RS-232 serial port of a PC. The DNT350 does not accept SNP or Logicmaster commands. The DNT350 must be configured using the DN250CFG.EXE program. IMPORTANT: Do NOT attempt to "talk to" the DNT350 using Logicmaster or SNP Protocol. Although no physical damage will result, the information in the DNT350 could be corrupted such that the DNT350 would appear "dead." A factory update could possibly be required to return the unit to normal operating conditions To connect the DNT350 to a PC, the user must have a straight through 9 pin serial cable. The RS-232 port consists of a 9-pin male D-connector with the following pin descriptions:
Table 2.1 – Configuration Port Pin Out Pin Signal Description 1 RDT Receive line Detect 2 Rx Receive Data 3 Tx Transmit Data 4 DTE DTE ready 5 GND Signal Ground 6 DCE DCE Ready 7 RTS Request to send 8 CTS Clear to Send 9 RI Ring indicator
2.1.2 DeviceNet I/O Connector The DeviceNet I/O connector consists of a 5-pin removable screw terminal with the following terminal descriptions:
Table 2.2 – DeviceNet I/O Connector Pinout Pin Signal Description 1 V- Power - 2 CAN_L Signal - 3 Drain Shield 4 CAN_H Signal + 5 V+ Power +
5 4 3
1 2
Figure 2.2 - DeviceNet I/O Connector
(As Viewed from Front of Module)
Figure 2.1 – RS-232 Connector

PAGE 10 01 FEB 2002 MAN0403-01 CH. 2
A user-supplied 121Ω ¼W 1% resistor is needed for termination at EACH END of the network cabling. Refer to the DeviceNet cabling specifications for proper location of the terminating resistor. 2.2 LED Indicators The HE693DNT350 provides two bi-color (Red/Green) diagnostic LEDs on its front panel.
Table 2.3 - Module Status LED (MS) For this state Module Status LED is Condition No Power Off There is no power applied to the module. Device Operational
Green The module is operating normally.
Device in Standby Flashing Green The module has no configuration. Minor Fault Flashing Red Recoverable Fault Unrecoverable Fault
Red The module has an unrecoverable fault.
Device Self Testing
Flashing Red-Green The module is in Self Test.
Table 2.4 - Network Status LED (NS)
For this state Network Status LED is Condition Not powered or Not On–line
Off The module may not be powered. Module is not on–line. Module has not completed Dup_MAC_ID test.
Module On–line and Connected. Network OK
Green The module is on–line and has connections in the established state.
Module On–line but Not connected
Flashing Green Module has passed the Dup_MAC_ID test and is on–line, but has no established connections to other nodes.
DeviceNet MS
NS
HE693DNT350 Other DeviceNet devices
5 4 3
1 2
V- (BLACK) V+ (RED)
CAN_H (WHITE) CAN_L (BLUE)
SHIELD
Figure 2.3 - DeviceNet Wiring

MAN0403-01 01 FEB 2002 PAGE 11 CH. 2
Table 2.4 - Network Status LED (NS) For this state Network Status LED is Condition
Connection ime–Out
Flashing Red One or more Connections have Timed–Out.
Critical Link Failure
Red Failed communication device.
Device Self Test Flashing Red-Green
Device is in self test
Device in Standby Flashing Red The module has no configuration

PAGE 12 01 FEB 2002 MAN0403-01 CH. 2
NOTES

PAGE 13 01 FEB 2002 MAN0403-01 CH. 3
CHAPTER 3: DEVICENET NODE, DNT350 & PLC RELATIONSHIPS 3.1 General Unless otherwise noted, all numeric radixes are in decimal. In a few cases the notation 0xhh is used to indicate Hexadecimal radix. 3.2 Module to PLC Register Mapping The DNT350 requires the use of four blocks of PLC registers. One block is defined in each of the PLCs %I, %AI, %Q and %AQ register space. Through the use of the configuration utility, the user can specify the starting register and the size of each of these four register blocks. Data from the PLC to the DNT350 (and to the DeviceNet nodes) are passed in the %Q and %AQ registers. Data to the PLC are passed by the DNT350 in the PLCs %I and %AI registers. With respect to the examples in this manual, the PLC Rack register references are set to one. This simplifies our examples by assuming that all of the register reference assignments start at one. That is, the first %I, %Q, %AI and %AQ registers are assigned to PLC register %I1, %Q1, %AI1 and %AQ1. Although these register assignments can be placed anywhere within the PLC register space, we have made these assignments for simplicities sake. 3.3 Node to PLC Register Mapping Additionally, the DNT350 subdivides these register blocks providing individual sub-blocks to each DeviceNet node. This provides mapping between the PLC’s data registers and the data to and from each individual DeviceNet node. As a result, each node’s polled and/or Bit Strobed data is immediately available to the PLC ladder code by accessing the appropriate PLC register(s). Note that the node to PLC register assignments must be contained within the Module register definitions defined in Module to PLC Register Mapping discussed above. 3.4 Message Packets and Fragmentation A DeviceNet message packet can contain from 0 to 8 bytes of data. If more than 8 bytes of data are required, the message must be broken up into two or more packets or fragments. This is called fragmentation. The DNT350 handles this automatically, without any intervention by the user or the ladder program running in the PLC. Fragmentation works differently for Polled messages than Explicit messages. In the case of Polled messages, each message fragment is sent to the receiving party one after the other as fast as possible. In the case of large Explicit messages, the sender will send only the first packet. The sender then waits for an ACK message from the receiver. Upon receiving the ACK, the sender then transmits the next packet and waits for another ACK. This process repeats until all message fragments have been sent. This ACK process requires a considerable amount of time when compared to Polled messages. As a result, LIEM or explicit messaging should be limited to data that needs to be accessed infrequently such as tuning or configuration parameters. 3.5 Physical Limitations There are physical limits on the amount of data that can be transferred between the DNT350 and the PLC. This limit is 254 bytes of input data and 254 bytes of output data. The input limit is computed as the sum of all of the %I registers, in terms of bytes, plus the number of %AI registers times 2. The output limit is computed as the sum of all of the %Q registers, in terms of bytes, plus the number of %AQ registers times 2. Because of this size restriction, the number of data bytes that can appear on the DeviceNet network is also limited accordingly. This is a physical limitation of the Series 9030 PLC backplane.

PAGE 14 01 FEB 2002 MAN0403-01 CH. 3
There are also limits on the number of %I, %Q, %AI and %AQ registers supported based on the PLCs CPU model. Consult the PLC’s documentation for more information. The smallest data item that DeviceNet can handle is one byte. If an application requires only a single %Q output or command bit, a group of 8 %Qs must be allocated. The remaining 7 will be unused (or wasted). The same is true for bit type input data. 3.6 Data Assemblies 3.6.1 Polled Connection For a Polled Connection, the data bytes within the DeviceNet messages must be sent and received in a predetermined order. This order is specified by “Data Assemblies”. Data Assemblies are published by the manufacturer of the DeviceNet node. To properly map the DeviceNet data to or from the PLC, the data assemblies for each DeviceNet node must be available and understood. Consult data sheets from the DeviceNet node manufacturers for specific details on Data Assemblies. From the point of view of the PLC, all input is via %I and %AI registers and all output data is via %Q and %AQ registers. From the point of view of the DeviceNet nodes, all I/O is via streams of data bytes, known as Data Assemblies, that they send and receive. In most DeviceNet nodes, the data assembly formats are fixed, in others they are configurable. Consult data sheets from the DeviceNet node manufacture for details on Data Assemblies. The DNT350 accepts output data from the PLC in the form of %Q and/or %AQ registers. It then translates this data into DeviceNet polled messages, and sends them to the node. The DNT350 receives DeviceNet polled response messages from the addressed DeviceNet node, translates these DeviceNet messages and passes the data on to the PLC where they are stored in the appropriate %I and/or %AI registers. The DNT350 allows up to 4 data blocks of data to be concatenated to form a data assembly. Each block can be configured as either bit data or word data. The number of bits or words within each block is also configurable. Keep in mind that bits must be assigned in groups of 8 bits. The first block can be configured to contain either bit or word type data. The user can configure, for example, that the first block will contain 32 bits, the second block might contain 7 words, the third block might contain 8 bits and the forth block might contain 5 words. This would result in a data assembly that contains: 32 bits followed by 7 words followed by 8 bits followed by 5 words. This example results in a data assembly that contains 29 bytes. The user must define a data assembly for both the input and output data for each node on the network. See the DNT350 Configuration Tool Introduction, below, as well as the DNT350 configuration tool users manual for specific details of how to physically configure the DNT350. 3.6.2 Bit Strobe Connection For the Bit Strobe connection, consumed data for DeviceNet slaves is fixed at 8 bytes. All Bit Strobe command messages from the DNT350 will be 8 bytes. The data for the Bit Strobe command message comes from %AQ registers. Each bit within a Bit Strobe command message corresponds to a single Bit Strobe slave (64 possible MAC IDs / 8 = 8 bytes). Produced data from Bit Strobe slaves is mapped to %I and %AI registers. The DNT350 allows up to 2 data blocks to be concatenated to form an input (To the DNT350 and ultimately the PLC) data assembly. Each block can be configured as either bit data or word data. The number of bits or words within each block is also configurable. Bits must be assigned in groups of 8. Keep in mind that Bit Strobed slaves can only produce up to 8 bytes of data.

PAGE 15 01 FEB 2002 MAN0403-01 CH. 3
3.7 DNT350 Configuration Tool Introduction 3.7.1 Configuration Steps Configuration of the DNT350 is performed using a PC running the configuration program DNCFG.EXE. There are a number of steps required in order to properly configure the DNT350 DeviceNet scanner module. These steps include: Specify the DNT350’s MACID Specify the network baud rate Specify the module’s first %I register number Specify the module’s first %Q register number Specify the module’s first %AI register number Specify the module’s first %AQ register number For each configured node,
Specify the node’s first %I register number Specify the node’s first %Q register number Specify the node’s first %AI register number Specify the node’s first %AQ register number Specify the node’s Polled Expected Packet Rate Specify the node’s Minimum Polled Scan Time Specify the node’s Maximum Polled Response Time Specify the node’s Maximum Explicit Response Time Specify the node’s Polled Input Data Assembly Specify the node’s Polled Output Data Assembly Specify the node’s Polled Delay Time
Specify whether or not the polled connection is enabled. Specify whether or not the Bit Strobe connection is enabled. Specify the node's Bit Strobed Input assembly. Specify the node's Bit Strobed Expected Packet Rate. Specify the node's minimum Bit Strobe scan time. Specify the node's maximum Bit Strobe response time. 3.7.2 Description of Configuration Parameters Each of these items are briefly discussed below. See the DNT350 configuration tool users manual for complete information on the configuration of the DNT350: Specify the DNT350’s MACID.
This is the network address that the DNT350 respond’s to. All nodes on the network, including the DNT350 must be configured with a unique MACID.
Specify the network baud rate.
This is the data bit rate at which all nodes on the network will operate. All nodes on the network must be configured to operate with the same baud rate.
Specify the module’s first %I register number.
This entry specifies the first register in the block of PLC %I registers that is assigned to the DNT350 module.
Specify the module’s first %Q register number.
This entry specifies the first register in the block of PLC %Q registers that is assigned to the DNT350 module.

PAGE 16 01 FEB 2002 MAN0403-01 CH. 3
Specify the module’s first %AI register number.
This entry specifies the first register in the block of PLC %AI registers that is assigned to the DNT350 module.
Specify the module’s first %AQ register number.
This entry specifies the first register in the block of PLC %AQ registers that is assigned to the DNT350 module.
3.7.3 Scan List Before the DNT350 can communicate with any DeviceNet nodes, it must be configured with a Scan List. The Scan List specifies which DeviceNet nodes to query. Only those nodes specified in the Scan List are considered to exist on the network. The DNT350 needs additional information about each of the node in the Scan List. For each node included in the Scan List: Specify the node’s first %I register number.
This entry specifies the first register in the block of PLC %I registers that are assigned to this node. Note that this block must be part of the larger block of %I registers assigned to the DNT350 above.
Specify the node’s first %Q register number.
This entry specifies the first register in the block of PLC %Q registers that are assigned to this node. Note that this block must be part of the larger block of %Q registers assigned to the DNT350 above.
Specify the node’s first %AI register number.
This entry specifies the first register in the block of PLC %AI registers that are assigned to this node. Note that this block must be part of the larger block of %AI registers assigned to the DNT350 above.
Specify the node’s first %AQ register number.
This entry specifies the first register in the block of PLC %AQ registers that are assigned to this node. Note that this block must be part of the larger block of %AQ registers assigned to the DNT350 above.
Specify the node’s Polled Expected Packet Rate.
This entry specifies the Expected Packet Rate that will be loaded into the node when a dialogue is established with the node. The node uses this number multiplied by four as an inactivity timer limit value. The node resets the inactivity timer each time it receives a polled request message from the DNT350. If the timer expires the node will enter the timed-out state, effectively taking itself off-line.
Specify the node’s Minimum Polled Scan Time.
This is the minimum amount of time that the DNT350 will wait between sending polled requests to the node. In effect, this is the minimum time between consecutive scans to the node. Once the system is running, the actual polled scan time can be displayed through the fault table facility in real time.
Specify the node’s Maximum Polled Response Time.
This is the maximum time that the DNT350 will wait for a polled response from the node. If this timer expires, the node is taken off-line. Then at the next opportunity, the DNT350 will attempt to reconnect to the node.

PAGE 17 01 FEB 2002 MAN0403-01 CH. 3
Specify the node’s Maximum Explicit Response Time.
This is the maximum time that the DNT350 will wait for an explicit response from the node. If this timer expires, the node is taken off-line. Then at the next opportunity, the DNT350 will attempt to reconnect to the node.
Specify the node’s Input Data Assembly.
This item specifies the input data assembly for Polled data received from the node. See the configuration tool user’s manual for more details.
Specify the node’s Output Data Assembly. This item specifies the output data assembly for Polled data being sent to the node. See the configuration tool user’s manual for more details.
Specify the node’s Polled Delay Time.
Some older slave nodes can not accept fragmented polled data packets sent at full speed, especially if the baud rate is 500KB. This entry instructs the DNT350 to insert a delay between polled fragmented packets addressed to this node. For most nodes, this entry should be set to zero. If required, try a value of 100 or 200.
Specify whether or not the polled connection is enabled.
This parameter tells the DNT350 to attempt to establish a polled connection to the respective slave node.
Specify whether or not the Bit Strobe connection is enabled.
This parameter tells the DNT350 to attempt to establish a Bit Strobed connection to the respective slave node.
Specify the node's Bit Strobed Input assembly.
This item specifies the input data assembly for Bit Strobed data received from the node. See the configuration tool section of this manual.
Specify the node's Bit Strobed Expected Packet Rate.
This entry specifies the Expected Packet Rate for the Bit Strobe connection that will be loaded into the node when the Bit Strobe connection is established. The node uses this number multiplied by four as an inactivity timer limit value. The node resets the inactivity timer each time it receives a Bit Strobe command message from the DNT350. If the timer expires the node will enter the timed-out state, effectively taking itself off-line.
Specify the node's minimum Bit Strobe scan time.
This is the minimum amount of time that the DNT350 will wait between sending Bit Strobe command messages.
Specify the node's maximum Bit Strobe response time.
This is the maximum time that the DNT350 will wait for a Bit Strobe response from the node. If the timer expires, the node is taken off-line. Then at the next opportunity, the DNT350 will attempt to reconnect to it.
3.8 DeviceNet Node Priority and Implications The DNT350 can carry on conversations with several DeviceNet nodes simultaneously. Because if this, DeviceNet Node Priorities become important. Within the scheme of CAN communications, there is a concept known as Arbitration. If two nodes begin to transmit CAN messages simultaneously, the node with the smallest node address will win. The looser must immediately stop transmitting and try again later.

PAGE 18 01 FEB 2002 MAN0403-01 CH. 3
This gives obvious priority to the node with the lower node address. This can create problems if care is not taken in the assignment of node addresses. Most scanners on the market can only carry on a conversation with one node at a time and then in a half-duplex mode. In this case the node address and it’s inherent priority has no impact on performance because there will usually only be one message being transmitted at a time. In the case of the DNT350, it is recommended that the scanner be located at a node address that is higher than any of the nodes on the network. This will automatically throttle the request messages being sent by the scanner giving respons e messages from the nodes a better chance of successfully sending their response messages. If this is not done, the scanner will have priority over the nodes allowing the scanner to flood the DeviceNet with request messages and the lower priority nodes will not have a chance to send their response messages. This could result in the lower priority nodes to physically time-out. Additionally, consideration should be given to the priorities of the individual nodes. In the design of most networks, there are usually a few nodes that require a higher priority than the rest. These nodes should be assigned the lower node addresses. 3.9 Fault Table The DNT350 provides a fault table that makes available the status of each node on the network. PLC registers %Q3, %Q4, %Q5, %AI5 and %AI6 are used to provide a user interface into the fault table. The table has an entry for each DeviceNet node. The user is provided a single node window into the fault table. There are three command bits (%Q registers) to allow control over the fault table and the entry being displayed. Setting %Q3 causes the first node with a fault to be displayed. Setting %Q4 causes the next node with a fault to be displayed. If the node being displayed is the last node with a fault, then the first node with a fault will be displayed. Setting %Q5 causes all entries the fault table to be cleared. Unpredictable results may occur if more than one of command bit %Q3, %Q4 or %Q5 is simultaneously set. The user is also provided two %AI registers that are used to display fault information about the indicated node. Each of these registers are broken into two bytes as indicated below: • The least significant byte of register %AI5 contains the Node Address of the fault data displayed in
the next 3 bytes.
PAGE 19 01 FEB 2002 MAN0403-01 CH. 3
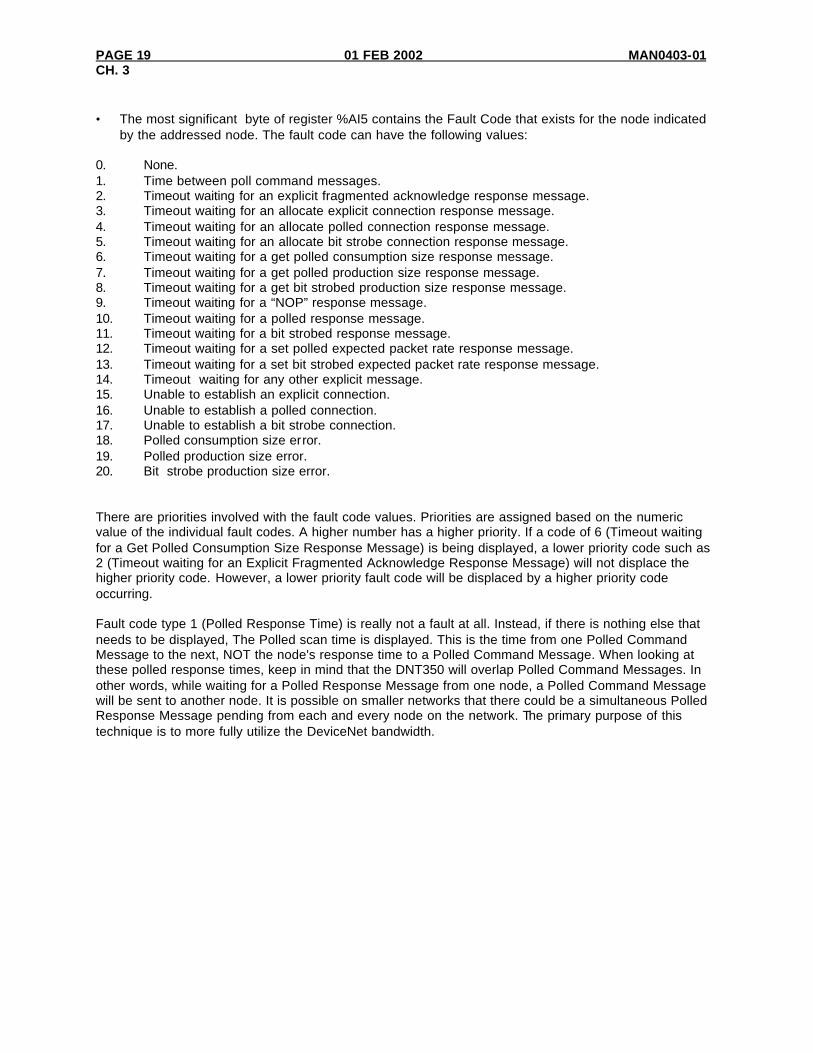
• The most significant byte of register %AI5 contains the Fault Code that exists for the node indicated
by the addressed node. The fault code can have the following values: 0. None. 1. Time between poll command messages. 2. Timeout waiting for an explicit fragmented acknowledge response message. 3. Timeout waiting for an allocate explicit connection response message. 4. Timeout waiting for an allocate polled connection response message. 5. Timeout waiting for an allocate bit strobe connection response message. 6. Timeout waiting for a get polled consumption size response message. 7. Timeout waiting for a get polled production size response message. 8. Timeout waiting for a get bit strobed production size response message. 9. Timeout waiting for a “NOP” response message. 10. Timeout waiting for a polled response message. 11. Timeout waiting for a bit strobed response message. 12. Timeout waiting for a set polled expected packet rate response message. 13. Timeout waiting for a set bit strobed expected packet rate response message. 14. Timeout waiting for any other explicit message. 15. Unable to establish an explicit connection. 16. Unable to establish a polled connection. 17. Unable to establish a bit strobe connection. 18. Polled consumption size error. 19. Polled production size error. 20. Bit strobe production size error. There are priorities involved with the fault code values. Priorities are assigned based on the numeric value of the individual fault codes. A higher number has a higher priority. If a code of 6 (Timeout waiting for a Get Polled Consumption Size Response Message) is being displayed, a lower priority code such as 2 (Timeout waiting for an Explicit Fragmented Acknowledge Response Message) will not displace the higher priority code. However, a lower priority fault code will be displaced by a higher priority code occurring.
Fault code type 1 (Polled Response Time) is really not a fault at all. Instead, if there is nothing else that needs to be displayed, The Polled scan time is displayed. This is the time from one Polled Command Message to the next, NOT the node's response time to a Polled Command Message. When looking at these polled response times, keep in mind that the DNT350 will overlap Polled Command Messages. In other words, while waiting for a Polled Response Message from one node, a Polled Command Message will be sent to another node. It is possible on smaller networks that there could be a simultaneous Polled Response Message pending from each and every node on the network. The primary purpose of this technique is to more fully utilize the DeviceNet bandwidth.

PAGE 20 01 FEB 2002 MAN0403-01 CH. 3
• The most significant byte of register %AI6 contains Fault Data Byte 1. This byte takes on different
meanings depending on the fault code: • if the fault code is Polled Consumption Size Error, this entry displays the consumption size as
reported by the specified node. • if the fault code is Polled Production Size Error, this entry displays the production size as
reported by the specified node. • If the fault code is bit strobe production size error, this entry displays the production size as
reported by the specified node. • if the fault code is Polled Response Time, both bytes of this word (16 bit WORD value)
reports the actual polled response time from this node in milliseconds. • All other fault codes, not used.
• The least significant byte of register %AI6 contains Fault Data Byte 2. This byte takes on different
meanings depending on the fault code: • if fault code is Polled Consumption Size Error, this entry displays the consumption size as
indicated by the DNT350's configuration file for the specified node. • if fault code is Polled Production Size Error, this entry displays the production size as
indicated by the DNT350's configuration file for the specified node. • If the fault code is bit strobe production size error, this entry displays the production size as
indicated by the DNT350’s configuration file for the specified node. • if the fault code is Polled Response Time, both bytes of this word (16 bit WORD value)
reports the actual polled response time from this node. • All other fault codes, not used.
Because it is possible that higher priority faults may be generated during system power up sequences, the following sequence be followed to access the fault table:
1. Allow the system to run for a few seconds. 2. Clear the fault table. 3. Wait a few more seconds. 4. And finally, access the fault table.
This will cause the fault table to be refreshed with current data. Any preexisting high priority entries will be eliminated in favor of the current lower priority data.
MAN0403-01 01 FEB 2002 PAGE 21 CH. 4
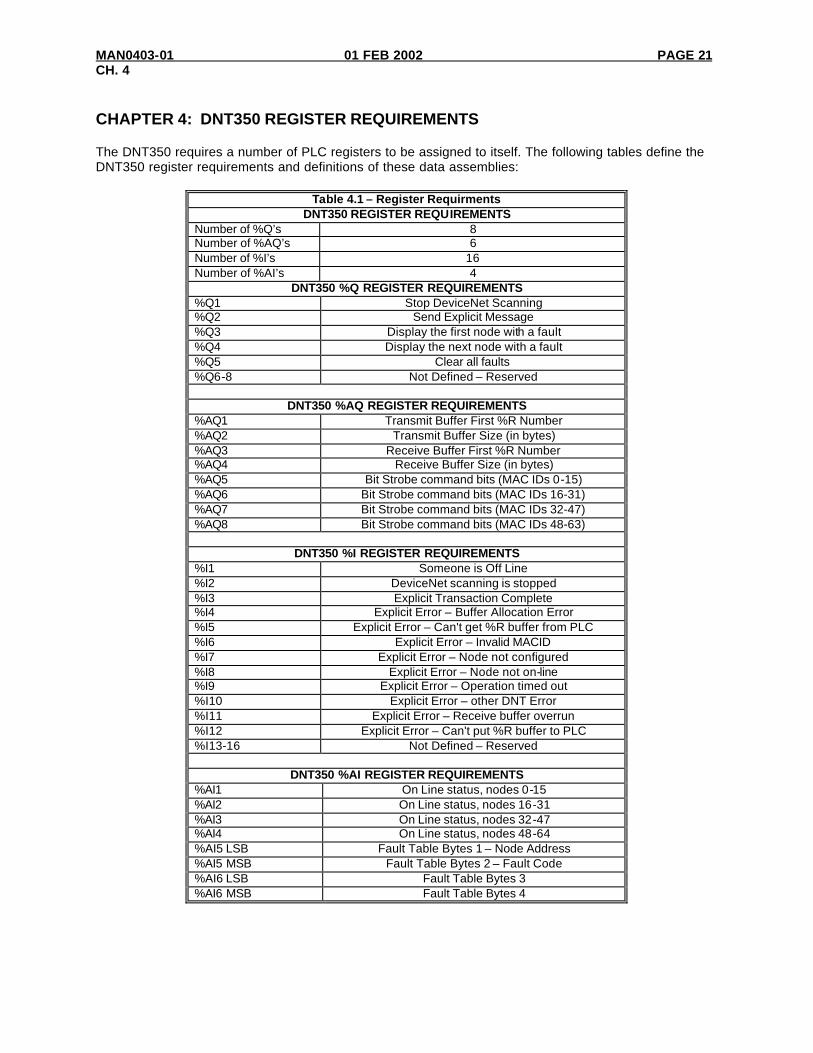
CHAPTER 4: DNT350 REGISTER REQUIREMENTS The DNT350 requires a number of PLC registers to be assigned to itself. The following tables define the DNT350 register requirements and definitions of these data assemblies:
Table 4.1 – Register Requirments DNT350 REGISTER REQUIREMENTS
Number of %Q’s 8 Number of %AQ’s 6 Number of %I’s 16 Number of %AI’s 4
DNT350 %Q REGISTER REQUIREMENTS %Q1 Stop DeviceNet Scanning %Q2 Send Explicit Message %Q3 Display the first node with a fault %Q4 Display the next node with a fault %Q5 Clear all faults %Q6-8 Not Defined – Reserved
DNT350 %AQ REGISTER REQUIREMENTS
%AQ1 Transmit Buffer First %R Number %AQ2 Transmit Buffer Size (in bytes) %AQ3 Receive Buffer First %R Number %AQ4 Receive Buffer Size (in bytes) %AQ5 Bit Strobe command bits (MAC IDs 0-15) %AQ6 Bit Strobe command bits (MAC IDs 16-31) %AQ7 Bit Strobe command bits (MAC IDs 32-47) %AQ8 Bit Strobe command bits (MAC IDs 48-63)
DNT350 %I REGISTER REQUIREMENTS
%I1 Someone is Off Line %I2 DeviceNet scanning is stopped %I3 Explicit Transaction Complete %I4 Explicit Error – Buffer Allocation Error %I5 Explicit Error – Can't get %R buffer from PLC %I6 Explicit Error – Invalid MACID %I7 Explicit Error – Node not configured %I8 Explicit Error – Node not on-line %I9 Explicit Error – Operation timed out %I10 Explicit Error – other DNT Error %I11 Explicit Error – Receive buffer overrun %I12 Explicit Error – Can't put %R buffer to PLC %I13-16 Not Defined – Reserved
DNT350 %AI REGISTER REQUIREMENTS
%AI1 On Line status, nodes 0-15 %AI2 On Line status, nodes 16-31 %AI3 On Line status, nodes 32-47 %AI4 On Line status, nodes 48-64 %AI5 LSB Fault Table Bytes 1 – Node Address %AI5 MSB Fault Table Bytes 2 – Fault Code %AI6 LSB Fault Table Bytes 3 %AI6 MSB Fault Table Bytes 4

PAGE 22 01 FEB 2002 MAN0403-01 CH. 4
%Q1 Stop DeviceNet Scanning
Setting this bit causes the DNT350 to close or release all connections between itself and all DeviceNet nodes. No further communications will occur between the DNT350 and the DeviceNet nodes until the Stop DeviceNet Scanning bit is cleared. While the scanning is stopped, the DeviceNet Scanning is Stopped bit %I2 bit will be set.
%Q2 Send Explicit Message
When this command is issued the DNT350 will attempt a LIEM sequence. The specifics of the LIEM are discussed in chapter 4. %I3 through %I13 are used to report the completion status of this command.
%Q3 Display the first node with a fault
Displays the fault data for the lowest addressed node that has an entry in the fault table. %Q4 Display the next node with a fault
Displays the next node %Q5 Clear all fault codes
Clears all entries in the fault table. %Q6-8 Not Defined - Reserved
These bits are reserved and must not be used for any purpose. %AQ1 Transmit Buffer First %R Number
For LIEM sequences, this register must be loaded with the register number of the first %R register of the explicit message transmit buffer. See chapter 4 for more details.
%AQ2 Transmit Buffer Size (in Bytes)
For LIEM sequences, this register must be loaded with the number of bytes of data contained in the explicit message transmit buffer. See chapter 4 for more details.
%AQ3 Receive Buffer First %R Number
For LIEM sequences, this register must be loaded with the register number of the first %R register of the explicit message receive buffer. See chapter 4 for more details.
%AQ4 Receive Buffer Allocation Size (in Bytes) For LIEM sequences, this register must be loaded with the size in bytes of the explicit message receive buffer. This value can be as large as the programmer likes, but an error will result if the DNT350 receives a message that is larger than will fit in the receive buffer. See Chapter 4 for more details.
%AQ5 Bit Strobe command bits (MAC IDs 0-15) %AQ6 Bit Strobe command bits (MAC IDs 16-31) %AQ7 Bit Strobe command bits (MAC IDs 32-47) %AQ8 Bit Strobe command bits (MAC IDs 48-63) %I1 Someone is Off Line
This status bit indicated that one or more configured nodes are not on line. %I2 DeviceNet Scanning is Stopped
This status bit indicates that the DeviceNet scanning is stopped as a result of the bit %Q1 Stop DeviceNet Scanning having been set by the PLC.

MAN0403-01 01 FEB 2002 PAGE 23 CH. 4
%I3 Explicit Transaction Complete
This status bit indicates that the requested LIEM sequence is complete. Once this bit is set, the PLC should check bits %Q4 through %Q12 which indicate if any errors have occurred.
%I4 Explicit Error – Buffer Allocation Error
If set, this LIEM status bit indicates that the values in %AQ1 and %AQ2 or %AQ3 and %AQ4 are in error. The transmit buffer and/or the receive buffer is/are outside the available %R registers of the specific PLC CPU model.
%I5 Explicit Error – Can’t get %R Buffer from PLC
If set, this LIEM status bit indicates that the DNT350 was unable to read the transmit buffer from the PLC.
%I6 Explicit Error – Invalid MACID
If set, this LIEM status bit indicates that the MACID contained in the transmit buffer is too large. %I7 Explicit Error – Node Not Configured
If set, this LIEM status bit indicates that the MACID contained in the transmit buffer is not configured.
%I8 Explicit Error – Node Not On Line
If set, this LIEM status bit indicates that the MACID contained in the transmit buffer is not On Line.
%I9 Explicit Error – Operation Timed Out
If set, this LIEM status bit indicates that the LIEM sequence timed out. Most likely the target node did not send a response in a timely manner.
%I10 Explicit Error – Other DeviceNet Error
If set, this LIEM status bit indicates that some other miscellaneous DeviceNet error occurred. %I11 Explicit Error – Receive Buffer Overrun
If set, this LIEM status bit indicates that the response message received from the target node was too large to fit in the receive buffer indicated by %R3 and %R4.
%I12 Explicit Error – Can’t put %R Buffer to PLC
If set, this LIEM status bit indicates that the DNT350 was unable to write the receive buffer to the PLC.
%I13-16 Not Defined – Reserved
These bits are reserved and can not be used for any purpose. %AI1 On Line Status of Nodes 00 - 15 %AI2 On Line Status of Nodes 16 - 31 %AI3 On Line Status of Nodes 32 - 47 %AI4 On Line Status of Nodes 48 - 63
These four %AI registers collectively contain 64 individual status bits. One bit is assigned to each of the 64 possible DeviceNet node addresses. Status bits for nodes 0 through 15 are mapped into the first %AI register. Status bits for nodes 16 through 31 are mapped into the second %AI register. Status bits for nodes 32 through 47 are mapped into the third %AI register. Status bits for nodes 48 through 63 are mapped into the fourth %AI register. The status bit for node 0 is placed in the least significant bit position of the first %AI register, with consecutively higher addressed nodes status bits being placed in the next higher bit positions.

PAGE 24 01 FEB 2002 MAN0403-01 CH. 4
Each individual status bit is set TRUE if the corresponding DeviceNet node is On Line. On Line is defined as the node’s Polled connection being in the Established state and the node is communicating Polled data.
%AI5 LSB – Fault Table Byte 1 – Node Address
This byte contains the node address of the fault data displayed in the next 3 bytes. %AI5 MSB – Fault Table Byte 2 – Fault Code
• This byte indicates the type of fault that exists for the node indicated by the addressed node. Note: Many DeviceNet nodes also provide additional diagnostic data within their individual data assemblies.

MAN0403-01 01 FEB 2002 PAGE 25 CH. 5
CHAPTER 5: EXPLICIT MESSAGING USING THE DNT350 5.1 General Explicit Messaging requires a great deal of overhead in both the DNT350 and the PLC. Explicit Messaging uses the Backplane Mail features of the Series 90-30 system to access registers within the PLC. Backplane Mail requests are handled only once per PLC logic scan. Multiple PLC scans may be required to access the required data between the PLC and the DNT350. If the PLC is also doing a significant amount of processing, requesting an Explicit Message can impact the DeviceNet Poll Sequence by several tens of milliseconds. As a result, Explicit Messages should be reserved for access to infrequently needed data, such as configuration or tuning parameters only. The sequence below presents a general description of the process that must be executed to service an Explicit request. 1. The ladder code builds an explicit request message in a group of %R registers. 2. The ladder code plugs the start of and length of the transmit and receive buffers into four %AQ
registers. The transmit and receive buffers must both be located in the %R register space of the PLC. 3. The ladder code then sets the “Send Explicit Message” command bit. 4. The DNT350 periodically checks the “Send Explicit Message” command bit. 5. If the “Send Explicit Message” command bit is set, processing of the explicit request begins. 6. The four %AQ registers are examined and checked for validity. 7. The DNT350 requests the PLC to send the transmit buffer via Backplane mail. 8. The DNT350 then checks the MACID contained in the transmit buffer. Several checks take place,
MACID out-of-range, referenced node not configured and referenced node not On-line. 9. Then the message is formatted and sent to the referenced node. 10. When the response message is received, a check is made to see if the allocated receive buffer is
large enough to accept the response message. 11. Copy the message to the receive buffer via Backplane mail. 12. Set the Explicit Transaction Complete bit. 13. If there were any error detected in any of the previous steps, the process is aborted and the
appropriate error status bit along with the Explicit Transaction Complete bit are set. See Chapter 3 for descriptions of all of the command, status and error bits. 5.2 Building Explicit Messages In the following example, let’s assume that we want to read the polled consumption size from the node at MACID 3, we also want to locate the transmit buffer at %R101, the receive buffer at %R51 and we will also allocate 20 bytes to the receive buffer.
BYTE NUMBER
REGISTER NUMBER DESCRIPTION TRANSMIT
BUFFER DATA 0 R101 LSB MACID (Node Address) 03
1 R101 MSB Service Code (Get Attribute Single) 14 2 R102 LSB 05 3 R102 MSB
Class ID (Connection Class) 00
4 R103 LSB 02 5 R103 MSB
Instance ID (Polled Connection) 00
6 R103 LSB Attribute # (Consumption Size) 07

PAGE 26 01 FEB 2002 MAN0403-01 CH. .5
REGISTER DESCRIPTION VALUE %AQ1 Start of Transmit Buffer 101 %AQ2 Number of Bytes to Transmit 7 %AQ3 Start of Receive Buffer 51 %AQ4 Receive Buffer Allocation Size 20
In the following example we want to write the polled expected packet rate to the node at MACID 3, we also want to locate the transmit buffer at %R101, the receive buffer at %R51, we will also allocate 20 bytes to the receive buffer.
BYTE NUMBER
REGISTER NUMBER DESCRIPTION TRANSMIT
BUFFER DATA 0 R101 LSB MACID (Node Address) 03
1 R101 MSB Service Code (Set Attribute Single) 16 2 R102 LSB 05 3 R102 MSB
Class ID (Connection Class) 00
4 R103 LSB 02 5 R103 MSB
Instance ID (Polled Connection) 00
6 R104 LSB Attribute (Expected Packet Rate) 07 7 R104 MSB Data Value Low Byte E8(Hex) 8 R105 LSB Data Value High Byte 03
REGISTER DESCRIPTION VALUE %AQ1 Start of Transmit Buffer 101 %AQ2 Number of Bytes to Transmit 9 %AQ3 Start of Receive Buffer 51 %AQ4 Receive Buffer Allocation Size 20
5.3 How to Interpret Explicit Response Messages The normal, expected response from an Explicit Message is the Acknowledge Message:
BYTE NUMBER DESCRIPTION EXAMPLE
0 06 1
Number of bytes received 00
2 MACID 01 3 *Service Code 0x90(Hex) 4 Optional Data Xx - Optional Data Xx - Optional Data Xx n Optional Data Xx * Previously sent Service Code (0x10) + 0x80
Note: The Most Significant Bit in the Service Code byte is used as a Response Bit indicating that the command was properly received. [Service Code 0x10 + Response Bit 0x80 = 0x90]. If any extra data needs to be returned, that data will be placed into subsequent bytes.

MAN0403-01 01 FEB 2002 PAGE 27 CH. 5
5.4 Explicit Message Errors In the case that an Explicit Message requests a function that can not be performed by the referenced node, an Explicit Error Message will be returned. An Explicit Error Message takes the following form:
Byte Number Description
Example (values in HEX)
Word Offset
Value (from example)
0 06 1
Number of bytes received 00 %R1 0006
2 MACID 01 3 Service Code 94
%R2 0x9401
4 General Error Code xx 5 Additional Error Code xx %R3 xxxx
An Error is indicated by a 0x94 in the service code byte. This indicates that the referenced node has detected an error and the two bytes following indicate the specifics to that error. The next byte indicates the General Error Code. The last byte contains an Additional Error Code to indicate additional information. See appendix C for a list of and definitions of General and Additional Error Codes. Many DeviceNet manufactures have defined vendor specific error codes. In this case the General error code will be in the range of 0xD0 to 0xFF (Vendor-specific Object and Class errors). In these cases the Additional error code can be anything. Consult the documentation from the node manufacture for more details.

PAGE 28 01 FEB 2002 MAN0403-01 CH. .5
NOTES

MAN0403-01 01 FEB 2002 PAGE 29 CH. 6
CHAPTER 6: CONFIGURATION 6.1 General Before the DNT350 can be used, it must first be configured. This consists of two steps: Module Configuration and PLC Rack Configuration. IMPORTANT: The module configuration must occur prior to configuring the PLC rack. 6.2 DNT350 Module Configuration Included with the DNT350 module is a diskette containing the configuration utility, DNCFG.EXE. DNCFG.EXE is a 32 bit Windows application. It can be installed and run on most Windows 95, Windows 98 or Windows NT based PC. DNCFG.EXE will not run under DOS or Windows 3.1. The PC must be connected to the DNT350 via the module's integral RS-232 serial port. Module operational parameters (i.e. MACID, baud rate, Polled Production size, Polled Consumption size and Expected Packet Rate) are configured on behalf of each node using DNCFG.EXE. This program also allows entire network configurations to be uploaded or downloaded to or from the DNT350, saved to or loaded from a disk, or sent to a printer for hard copy. Exact details of using the DNCFG.EXE configuration utility can be found in section 6.4. Before going there we need to discuss a number of concepts that must be understood before module configuration can be successfully completed: 1. Does the application require the use of LIEM (explicit messaging)? This will determine which data
assembly must be used for the DNT350 itself. 2. At what baud rate does the network need to run? This is needed for the DNT350 module
configuration as well as the configuration of each individual DeviceNet node. All nodes including the DNT350 must be configured for the same baud rate.
3. Is Data Assembly information available for each DeviceNet node in the network? This can be in the form of printed information in the manufactures manual or in the form of a EDS file provided by the manufacture. Note that some EDS files do not provide the nodes’ polled consumption and production sizes. This information will also be required when the PLC Ladder Code is written.
4. Assign MACIDs (node addresses) to each DeviceNet node. The MACIDs assigned to each node it totally arbitrary. The only thing that might have an effect here is the fact that the DNT350 actually scans the nodes in order by MACID. Gaps can be left in the MACID assignments to allow for future nodes to be added, if desired. DeviceNet provides for nodes with lower MACIDs to have a higher network priority. But because of the manner in which the DNT350 scans the network, this priority advantage does not exist. The MACID for the DNT350 can be assigned any unused address. Every node on the network must be assigned a unique MACID.
6.3 PLC Rack Configuration Configuration of the GE Series 90-30 Rack can be accomplished via several methods. In this discussion we will use Logicmaster 90 configuration software. In any case, module configuration (using DNCFG.EXE) must be completed before the rack configuration should be attempted.

PAGE 30 01 FEB 2002 MAN0403-01 CH. 6
The following sequence may be used to configure the PLC rack for a DNT350 module via Logicmaster 90 configuration software: 1. Start up the Logicmaster 90 configuration software. 2. At the Logicmaster 90 software screen select <F2> Configuration Package. 3. Create a program folder at the prompt (to later store data into) and press <ENTER>. 4. At the menu screen select <F1> I/O Configuration. 5. Use arrow keys to select the slot where the DNT350 will reside. 6. If a scanner configuration already exists in the slot you select, delete the old module by using the
<shift F4> key. 7. Press <F8> (Other) to select module. 8. Select Foreign Module by pressing the <F3> key. 9. Using the information you copied or printed from the DNTCFG.EXE program, fill in values for the %I
reference, %I size, %Q reference, %Q size, %AI reference, %AI size, %AQ reference and %AQ size parameters.
10. Exit to main menu by pressing <ESCAPE> key twice. 11. Download the configuration to the PLC rack by pressing the <F9> key. 12. Press the <F2> key to save the configuration to the PLC. Press the <ENTER> key to begin store and
overwrite. 13. Power down the PLC rack. 14. With the rack power off, plug the DNT350 module into the PLC slot selected during Step 5. 15. Power up the PLC rack. If the module ever needs replaced or reconfigured, you must first delete any information appearing at the selected module's position. If you do not, the new configuration may not be properly recognized. 6.4 DNCFG – The DNT350 Configuration Tool Included with the DNT350 is a diskette containing the Configuration utility for the DNT350. This is a stand alone program (DNCFG.EXE) will run on most Win32 (Windows 95/98/NT) based personal computers. 6.4.1 General The diskette distributed with the HE693DNT350 module contains the HE693DNT350 DeviceNet Configuration Utility (DNCFG.EXE) setup program, setup.exe. 1. Insert the diskette into the A: (or B:) drive. 2. As always, it is a good practice to make a back-up copy of the installation diskette. 3. Execute the setup program, setup.exe, on the diskette and follow the instructions for
installation. 4. The DNCFG.EXE utility program will be installed in the installation directory selected
during setup. DNCFG.EXE can work off line, with no module attached. Normally, DNCFG.EXE is attached to a HE693DNT350 module. In order to configure a HE693DNT350 module, the user must first connect it to the PC: 1. With the rack power off, plug the HE693DNT350 module into an open I/O slot of
a GE Fanuc Series 90-30 rack. 3. Plug one end of the 9-pin female D to 9-pin female “straight-through” cable (P/N
HE693CBLSNP) to the 9-pin end of the HE693DNT350. Connect the free end of the cable to the desired COM port on the PC. If the PC is equipped with 25-pin COM ports, use a standard 25-pin female to 9-pin male adapter.
4. Power up the PLC rack.

MAN0403-01 01 FEB 2002 PAGE 31 CH. 6
6.4.2 Configuration Procedures The focus of this example configuration is to show how to configure a new network using the DNCFG.EXE Configuration Utility and creating a Node Template Library. This example shows one approach of configuring the network, but there are numerous approaches that can be used. After a network has been created, many of the same procedures can be used to edit the existing network. 1. Identify all devices (nodes) that are going to be a part of the network. Although not mandatory, it
is highly recommended that the user first create a template library for all the nodes on the network. This is helpful if the user intends to use the nodes in other configurations / applications, because it will decrease re-work. If a template library is not desired, refer to Step 7 for a summary of procedures.
It is also recommended that the user obtain EDS files for each device on the network and place them into a directory. EDS files contain information that is specific to a device, and the EDS file can be obtained from the device’s vendor. If an EDS file cannot be obtained, the user can contact the vendor for the information requested on the General Setup Screen, which is discussed later in the configuration procedure.
2. Copy the DNCFG.EXE Configuration Utility from the disk that is sent with the module. Place the
DNCFG.EXE Configuration Utility into a file. Double-click the DNCFG.EXE Configuration Utility icon in the installation directory.
Note: The title of the screen indicates that the screen is untitled. It remains as such until the configuration is saved with a unique name.
Figure 6.1 – Untitled Default Configuration Screen The screen has two window panes. The left pane is the Product Template View, which is used to store node configuration data in a template library. The user creates the template library as discussed later in the procedure. Once a template library is created, these templates can be dragged to the right pane on the screen. The nodes can then be configured. The right pane is the Network View where the user can build a visual representation of a network depicting the DNT350 Master and all slave nodes (devices). The nodes are configured in this view.

PAGE 32 01 FEB 2002 MAN0403-01 CH. 6
3. Creating a Node Template Library with or without using EDS Files. Note: Creating a template for a node is not to be confused with configuring a node. Creating a Template for a Node using an EDS File Note: Before importing an EDS file, it is recommended to save any changes already done to the network and library. A faulty EDS file can possibly cause malfunction in the program when the file is being “read” by the program. A faulty EDS file refers to one that does not conform to the DeviceNet standard. To import EDS files, press Library, Import from EDS File, or right click anywhere in the left window pane, and press Import from EDS File. The following screen appears. Select the desired EDS file and press Open.
Figure 6.2 – EDS Files Once opened, the following screen appears.
Figure 6.3 – Setup Screen in an EDS File (General Tab Selected)

MAN0403-01 01 FEB 2002 PAGE 33 CH. 6
General Tab: This screen is not edited by the user, but it is recommended that the Catalog Number, Maj. Rev. and Min. Rev. numbers be updated by the user as needed. On the right side of the screen, a Bitmap icon can be double-clicked by using the left mouse button. Upon doing so, a bitmap file associated with the node can be selected (if a bitmap has been created). The bitmap can be changed by pressing Change Bitmap. Now, select the Connection Details tab.
Figure 6.4 – Setup Screen in an EDS File (Connection Details Tab Selected) Connection Details Tab: Each node can have one or more templates associated with it, and the user can select a desired template using the up-down arrows located next to the Template #. The user can enter an identifying name in the Template Name block. Note: The connection details tab is used only for the polled connection. The %I size, %AI size, %Q size, and %AQ size values are values with respect to the PLC that the DNT350 is running on. Thus, %I and %AI values come together to form the production size of the node. These are values going from the node onto the network to the DNT350. %Q and %AQ values come together to form the consumption size of the node. These values are values coming from the network (The DNT350) into the node. The Expected Packet Rate for polled connection is set when the master establishes communication with a node. It sets the timer in the node, and the Expected Packet Rate is used as a basis for a time-out. If the master does not perform a scan within the Expected Packet Rate x 4, the slave node goes off-line until the master establishes communication with the node on the next scan.

PAGE 34 01 FEB 2002 MAN0403-01 CH. 6
When setting up a template, the Data Assemblies needs to be set. There are four parameters in each assembly. Each parameter can be bit data (bits), word data (words), or nothing (none). This value is set in the parameter type drop down window. The count of each parameter is set in the parameter count drop down box. The parameter drop down box is used to select any of the four available parameters within an assembly for editing/viewing. When importing from an EDS file, a default assembly will be given: The first parameter is bit data set to the value of [production size or consumption size (In bytes) * 8] number of bits and the other three parameters are set to none. The default input and output data assemblies follow this format. Refer to section 3.6 of this manual for a further description of data assemblies. Note: Bit data must be in groups of 8. Note: If EDS files have been used, it is recommended not to modify the Production Size or the Consumption Size. However, the data assemblies can be edited as needed.
To delete the template, press Delete Template. In some instances, a node might need more than one template. In that case, press Add Template and repeat the template process. To check each template, the user can use the up-down arrows to select the desired template. Press OK. Be sure to save the configuration with a unique name. Creating a Node Template without EDS Files Right -click anywhere in the left window pane and select Insert New Item. The following generic screen appears.
Figure 6.5 – Setup Screen

MAN0403-01 01 FEB 2002 PAGE 35 CH. 6
General Tab: Although the user does not need to configure this screen, it is extremely useful to do so. To obtain information about the device including product and vendor codes, it may be necessary to contact the vendor. On the right side of the screen, a Bitmap icon can be double-clicked by using the left mouse button. Upon doing so, a bitmap file associated with the node can be selected (if a bitmap has been created) . The bitmap can be changed by pressing Change Bitmap.
NOTE: The “Product Type Code” is used to categorize (within the folder tree view) the template under the right product type folder. The Product type folder is labeled using the “Product Type” field. The “Vendor Code” is used to categorize the template under the right company folder. The company folder is labeled using the “Vendor” field.
Now, select the Connection Details tab: Editing this window is the same as when importing an EDS file, however everything (Production sizes, consumption sizes, %I, %AI, %Q, and %AQ sizes) defaults to zero. Fill in the data assemblies and set the Epected Packet Rate. Once everything is set click OK or add another template. 4. Upon pressing OK and saving the template with a unique name (such as Project X), the following information appears in the Node Template Library on the left pane of the screen.
To create a template for the next node, either select Library, then Insert New Item or Import from EDS File and repeat steps 3 and 4. The user can also right-click on the left pane and select Insert New Item or Import from EDS File.
NOTE: Library files created by an older version of this software will not be able to be opened with this version.
Figure 6.6 – Node Information Displayed on Left Pane 5. After the complete node template library has been created, it is now appropriate to configure
the Network Properties screen (Figure 6.7). Afterwards, the nodes can be placed into the visual display of the network on the right side of the screen, and then each node can be individually configured.

PAGE 36 01 FEB 2002 MAN0403-01 CH. 6
Figure 6.7 – Network Properties
Select Network, Properties or double-click anywhere on the screen in the right window pane. A screen similar to Figure 6.7 appears. Set the scanner type, baud rate, and CPU. The user needs to set the starting Reference Addresses of the registers. Note that the size of the registers are based upon the CPU model selected. The size of the registers are not edited by the user, and they are automatically set by the software. It is important to pay attention to the total Input Bytes and Output Bytes, and the notes shown on the screen regarding byte limits.
6. After configuring the Network Properties screen, it is appropriate to place the nodes (one at a time) into the visual display of the network on the right side of the screen and then configure the nodes individually.
Left-click on Tmpl-1 and drag and drop it to the right side of the screen (Figure 6.8). The node is automatically placed into the appropriate position. If other node templates are contained in the Node Template Library, repeat the drag and drop process.
Figure 6.8 – Left Pane

MAN0403-01 01 FEB 2002 PAGE 37 CH. 6
The node (one master DNT250/350 or one of 63 possible slaves) can now be configured. Double-click Node 1, and the following screen appears in Figure 6.9.
Figure 6.9 – I/O Details Tab
Five tabs within the setup dialog are used in setting up a node’s parameters. Those tabs are: General, I/O Details, Polled Connection, Bit Strobe Connection, Connection Timeouts. The General Tab (Figure 6.5) is used for setting the following parameters: Product name, Product code, Product type, Product type code, Vendor, Vendor code, Catalog number, major revision, and minor revision. The I/O Details Tab (Figure 6.9) is used for setting the following parameters: Node MAC ID, Node name, %I reference address, %Q reference address, %AI reference address, %AQ reference address. Register sizes (%I Size, %AI Size, %Q Size, and %AQ Size) are read only and used to show the total register space used by the node. The software sets the register sizes automatically.

PAGE 38 01 FEB 2002 MAN0403-01 CH. 6
Figure 6.10 – Polled Connection Tab
The Polled Connection Tab (Figure 6.10) is used for setting the following parameters: Input Data Assembly, Output Data Assembly, Poll Scan Time, Poll Delay, and Expected Packet rate. The Production Size and Consumption Size drop down boxes are updated by the software automatically. The Register sizes are updated by the software automatically as well. The register sizes show the register space being used for the polled connection of the node. In order to tell the scanner to establish a polled connection with the node, the “Enable Polled Connection” checkbox must be checked.
Figure 6.11 – Bit Strobe Connection Tab

MAN0403-01 01 FEB 2002 PAGE 39 CH. 6
The Bit Strobe Connection Tab (Figure 6.11) is used for setting the following parameters: Input Data Assembly, Bit Strobe Scan Time, and Bit Strobe Expected Packet Rate. The Production Size drop down box is updated by the software automatically. The register sizes are updated by the software automatically as well. The register sizes show the register space being used for the bit strobe connection of the node. In order to tell the scanner to establish a bit strobe connection with the node, the “Enable Bit Strobe Connection” checkbox must be checked.
Figure 6.12 – Connection Timeouts Tab
The Connection Timeouts Tab (Figure 6.12) is used for setting the following parameters: Explicit Response timeout, Poll Response timeout, Bit Strobe Response timeout.
7. If a Node Template Library is not desired, right-click on the right pane and select Network Properties
(if this has not been configured yet). Refer to Step 5 to configure the Network Properties screen. Then right -click on the right pane again and select Add New Node in order to add new nodes to the network configuration. Left -click on the new node to bring up it’s properties screen: Refer to Step 6 in configuring the node. Note: Refer to Section 3.7 of this manual for a discussion of the connection details. Note: Refer to Section 3.6 of this manual for a discussion on data assemblies.
8. After the network is built, using the mouse, select Network, then Select Com Port. Select an
appropriate communication port.
The configuration can now be downloaded from the PC to the DNT350 by selecting Network, Download. Configuration is now completed.

PAGE 40 01 FEB 2002 MAN0403-01 CH. 6
If a copy of the current configuration within the DNT350 module is needed, the user can select Network, Upload to upload the configuration from the DNT350 to the PC.
To verify the current configuration, select Network, Verify.
Note: While trying to establish communications during upload, download or
verify, an error message may appear. If this happens, try again. If the error persists after two attempts,
a. Check the module-PC connection b. Make sure that the Com Port is not in use by another application. c. Power cycle the PLC.
To document and save information about the node configuration, select Network, Project Summary.
To see a summary of I/O devices, select Network, I/O Summary.
6.4.3 Other Features There are some other features that can be performed by the configuration tool:
Firmware version verify This function displays the connected target and firmware version. It can be found by selecting Module, then Firmware Verify.
Reset module
This function resets the module. It can be found by selecting Module, then Reset Module.
I/O Summary
This option is used to display a summary of the inputs (%Is and %AIs) and outputs (%Qs and %AQs) of every node on the network configuration. It also displays reference addresses. It can be found by selecting Network, then I/O Summary.
Project Summary
This option is useful for documentation purposes. It allows the user to enter in the project name, author, and description. This information is attached to the document, when saved into a file. It also appears when a hard copy is printed out. It can be found by selecting Network, then Project Summary.
Net – Zoom In/Out
These options are used to zoom the network view in and out. They can be found by selecting View, then Net – Zoom In or Net – Zoom Out.

MAN0403-01 01 FEB 2002 PAGE 41 CH. 6
(View / Startup) Options
This option is used to change Network view and application start up settings. The user can set whether the application will start up opening up the most recently used file, or starting up with a new document. The user can also set how the network view expands the network (As nodes are being added). This option can be found by selecting View, then Options.
Printing Options
There are three different documents that can be printed out when a hard copy of the configuration is made. One is the Project Summary, the second is the Network Properties, and the third is the Node Details (All nodes or selected ones). Using this feature a user can select one or all items to be printed. This option can be found by selecting File, then Print Options.

PAGE 42 01 FEB 2002 MAN0403-01 CH. 6
NOTES

MAN0403-01 01 FEB 2002 PAGE 43 CH. 7
CHAPTER 7: DEVELOPING USER SOFTWARE 7.1 Software Support for the Polled Connection When using the Polled Connection and the Bit Strobe Connection, all inputs from and outputs to the DNT350 are handled by normal ladder programming techniques to set appropriate data values and read any resulting data values. Inputs from the DNT350 (and the DeviceNet nodes) can be read from the PLC's %I and %AI registers. Outputs to the DNT350 (and the DeviceNet nodes) are placed in the PLC's %Q and %AQ registers. The specific registers used are a function of the configuration of the DNT350 and of the PLC Rack Configuration. Data is passed via the DeviceNet Polled Connection and Bit Strobe Connection automatically. Data is read from or written to the network devices according to the registers programmed using DNCFG.EXE and the LM90 Configurator Program. No extra ladder programming is required to send or receive data using Polled and Bit Strobe messages. 7.2 Software Support for the Explicit Connection The Explicit Connection requires additional ladder programming support. During PLC operation, the ladder program checks both the SEND EXPLICIT MESSAGE and EXPLICIT TRANSMISSION COMPLETE bits. If both bits are clear, the ladder program may proceed to build the transmit message buffer (in %R registers) and modify the four %AQ registers.
%AQ1 The first %R Register of the Transmit Buffer %AQ2 Size of the Transmit Buffer, in bytes %AQ3 The first %R Register of the Receive Buffer %AQ4 Size of the Receive Buffer, in bytes
The PLC ladder code must be sure to allocate enough receive buffer space (%R registers) to handle the largest expected incoming message. The ladder program then sets the SEND EXPLICIT MESSAGE bit. The ladder program must then monitor the EXPLICIT TRANSMISSION COMPLETE bit. This bit will be set when the command is complete. Fragmentation if required is handled automatically by the DNT350. After the EXPLICIT TRANSMISSION COMPLETE bit is set, the ladder program must check the EXPLICIT ERROR BITS for any possible errors. If any errors exist, they should be processed by the ladder code. If there are any errors are present, any data in the receive buffer should be considered invalid. If there are no Explicit Errors, the ladder program can then process any received message in the receive buffer. Finally, the ladder program must "acknowledge" the completion of the transmission by clearing the SEND EXPLICIT MESSAGE COMMAND bit. The DNT350 will respond by clearing the EXPLICIT TRANSMISSION COMPLETE bit. The HE693DNT350 is now ready for another Explicit Message transmission. Below is a flow chart for the Send Explicit Message command.

PAGE 44 01 FEB 2002 MAN0403-01 CH. 7
Figure 7.1 - Explicit Messaging Flow Chart
Build transmit buffer in %R registers, setup %AQ registers
Set the "Send Explicit" bit
Clear the "Send Explicit" bit.
Are "Send Explicit" and "Explicit Complete" bits
clear ?
NO
YES
Is the "Explicit Complete" bit set
?
NO
YES
Process any incoming message
Are any Error bits set?
Process Errors YES
NO
DONE
DNT350 not responding properly, if at all.
HANDLE ERROR
Is the "Explicit Complete" bit
clear
NO
YES

MAN0403-01 01 FEB 2002 PAGE 45 APPENDIX A
APPENDIX A: DNT350 NETWORK OPERATION A.1 Sequence of Events The DNT350 follows a predetermined sequence of events as it attempts to communicate with all of the nodes connected to the network. In an effort to maximize the available DeviceNet bandwidth, the DNT350 may have message transactions in process with several different nodes at the same time. Defined below is a very generalized sequence of events: 1. The DNT350 steps through each node included in its scan list repeatedly. 2. As each node is examined, several checks are made on the status of the node. These include:
a. Is the node on-line? If not go to Establishing a Connection below. b. Is a message transaction currently in progress with the node? If not, go to Sending a
Polled Message below for Polled Slaves. c. Is there a request for a LIEM (explicit) transaction? If so, process it. See chapters 5 and 7
for more details on LIEM processing. d. If the slave is a bit strobed slave, then is the scanner waiting for a response? If not, then
transition to sending a Bit Strobe command. A.2 Establishing a Connection There are several steps involved in the establishment of connections with DeviceNet nodes. The general steps involved include: 1. Attempt to establish an Explicit connection using the UCMM protocol. If unsuccessful, attempt to
establish an explicit connection using the Group 2 Only protocol. If unsuccessful, return.
2. Attempt to establish a Polled Connection (if enabled) or a Bit Strobe Connection (if enabled). Polled Connection (if enabled) a. Attempt to establish a Polled connection. If unsuccessful, release the Explicit connection and
return. b. Request the node’s Polled Production size. If unsuccessful, release the Explicit and Polled
connections and return. c. Compare the nodes Polled Production size to the configuration file. If different, release the
Explicit and Polled connections and return. d. Request the node’s Polled Consumption size. If unsuccessful, release the Explicit and Polled
connections and return. e. Compare the nodes Polled Consumption size to the configuration file. If different, release the
Explicit and Polled connections and return. f. Set the nodes Polled Expected Packet Rate. If unsuccessful, release the Explicit and Polled
connections and return. g. Set On Line status for the node and return.

PAGE 46 01 FEB 2002 MAN0403-01 APPENDIX A
Bit Strobe Connection (if enabled) a. Attempt to establish a Bit Strobe Connection. If unsuccessful, release the explicit connection and
return. b. Request the node’s Bit Strobed production size. If unsuccessful, release the explicit and Bit
Strobe Connections and return. c. Compare the node’s Bit Strobed Production size to the configuration file. If different, release the
explicit and Bit Strobe connections and return. d. Set on line status for the node and return. A.3 Send a Polled Message a. Read the appropriate %Q and %AQ data from the PLC. b. Build a Polled Command message sequence. c. Sent the message(s) over the network to the node. d. When the Polled response from the node is received, send the response data to the appropriate
PLC %I and %AI registers and return. A.4 Explicit NOPs Every few seconds the DNT350 will send an Explicit message containing a NOP to each on line node. The purpose of this is to keep the nodes Explicit connection from timing out. See ODVA DeviceNet Specifications, Volume I, Chapters 9 and 10, and Appendices A through F for a complete listing of DeviceNet requirements and specification.

MAN0403-01 01 FEB 2002 PAGE 47 APPENDIX B
APPENDIX B: DEVICENET TIMING B.1 Message Packet Timing It is not easy to determine the exact transmission time of the DeviceNet Polled scan time. The table below provides actual timing of single message packets for various baud rates and message sizes. It must be understood that the table does not take into account the dead time between the message packets. There are a number of reasons for this dead time, but be assured that it does exist. The best way to get an accurate handle on the DeviceNet Polled scan time is to connect a good digital oscilloscope or a DeviceNet protocol analyzer to the DeviceNet cable and observe the system’s oper ation. The amount of data to be transmitted determines the "packet size" and number of packets necessary. The baud rate determines the amount of time necessary to transmit one packet.
MESSAGE PACKET TRANSMISSION TIMES Number of Data Bytes in Message 0 1 2 3 4 5 6 7 8
Number of BITS in message packet 47 55 63 71 79 87 95 103 111
Transmission time @ 125K 376 440 504 568 632 696 760 824 888 µS
Transmission time @ 250K
188 220 252 284 316 348 380 412 444 µS
Transmission time @ 500K
94 110 126 142 158 174 190 206 222 µS
Given a message of 'X' bytes, it is first necessary to determine if fragmentation is involved, and if so how many packets will be sent: If the size of the message ('X') is eight (8) bytes or less, use the time given in Table 8. If the size ('X') is more than eight bytes, fragmentation is required: Number of Full Packets = Message Size / 7 Size of additional packet = (remainder of (message size / 7 ) ) + 1 Time for full packets = Time for 8 bytes, taken from table. Time for additional packet = Taken from table Time for full message = Total for all Full Packets + Time for Additional Packet. For example, suppose that a DeviceNet node requires a Poll Command of 27 bytes: B.2 Network Scan Time versus PLC Scan Time The user should not make any assumptions about the relationship between the PLC scan time and the DeviceNet Polled scan time. They are totally asynchronous to each other. Any relationship between the PLC scan time and the DeviceNet Polled scan time can be determined only with a strong knowledge of the program running in the PLC, the DeviceNet configuration or by conducting extensive testing.

PAGE 48 01 FEB 2002 MAN0403-01 APPENDIX B
NOTES

MAN0403-01 01 FEB 2002 PAGE 49 APPENDIX C
APPENDIX C: DEVICENET ERROR CODES The following DeviceNet General Error Codes are defined within the DeviceNet specification and are supported by all DeviceNet nodes.
Table C.1 – General Error Codes Error Code (in hex)
Name Description of error
00 – 01 Reserved 02 Resource
Unavailable Resource needed for the object to perform the requested service were not available
03 – 07 Reserved 08 Service Not
Supported The requested service was not implemented or not defined for this Object Class/Instance
09 Invalid Attribute Value
Invalid attribute data detected
0A Reserved 0B Already in
requested mode The object is already in the requested mode or state requested by the service
0C Object State Conflict
The object can not perform the requested service in it's current mode or state
0D Reserved 0E Attribute Not
Settable A request to modify a non-modifiable attribute was received
0F Privilege Violation Permission/privilege check failed 10 Device State
Conflict The device's current mode or state prohibits the requested service
11 Reply Data Too Large
The data to be transmitted is large than the allocated response buffer
12 Reserved 13 Not Enough Data The service did not supply enough data to perform the
requested service 14 Attribute Not
Supported the attribute specified in the request is not supported
15 Too Much Data The serve supplied more data than was expected 16 Object Does not
Exist The specified object does not exist in the device
17 Reserved 18 No stored attribute
data The attribute data of the object was not stored prior to the requested service
19 store operation failure
The attribute data of this object was not saved by the object
1A – 1E Reserved by DeviceNet 1F Vendor Specific
error A vendor-defined error has occurred. See the Additional Byte for further information
20 Invalid parameter A parameter associated with the service was determined to be not valid
21 – CF Reserved D0 – FF Object Class and
Service Errors Vendor-specific Object and Class errors.

PAGE 50 01 FEB 2002 MAN0403-01 APPENDIX C
Table C.2 – Additional Error Codes Error Code
(in hex) Description of error
01 Predefined Master/Slave Connection Set allocation conflict. This is returned when an Allocate_Master/Slave_Connection_Set request is received and the Slave has already allocated the Predefined Master/Slave Connection Set to another Master.
02 Invalid Allocation/Release Choice parameter. This is returned when an Allocate/Release_Master/Slave_Connection_Set request is received and: 1) The Slave does not support the choice specified in the Choice parameter. 2) The Slave was asked to Allocate/Release connection(s) already allocated/released. The Allocation Choice/Release byte contained all zeros, an invalid combination of bits, or did not contain the Explicit Message Allocation Choice when required.
03 A Group 2 Only Server (UCMM incapable) received a message on the Group 2 Only Unconnected Explicit Request message port that was not an Allocate or Release message.
04 Resource required for use with the Predefined Master/Slave Connection Set is not available.

MAN0403-01 01 FEB 2002 PAGE 51 INDEX
INDEX Additional Error Codes, 50 Configuration Parameters, 15 Configuration Procedures, 31 Configuration Tool, 15 DeviceNet Error Codes, 49 DeviceNet I/O Connector, 9 DeviceNet Node Priority and Implications, 17 DNCFG – The DNT350 Configuration Tool, 30 DNT350 Module Configuration, 29 Establishing a Network Connection, 45 Explicit Message Errors, 27 Explicit Messages, 25 Explicit Messaging Flow Chart, 44 Explicit NOPs, 46 Explicit Response Messages, 26 Fault Table, 18 Features, 7
Fragmentation, 13 LED Indicators, 10 Message Packet Timing, 47 Message Packets, 13 Module to PLC Register Mapping, 13 Network Scan Time vs. PLC Scan Time, 47 Network Sequence of Events, 45 Node to PLC Register Mapping, 13 Physical Limitations, 13 PLC Rack Configuration, 29 Polled Connection (Enabled), 45 RS-232 Connector, 9 Scan List, 16 Sending Polled Message, 46 Software Support Explicit Connection, 43 Software Support Polled Connection, 43 Specifications, 8

PAGE 52 01 FEB 2002 MAN0403-01 INDEX