Embed Size (px)
Citation preview

Development Testing Platform Enginesfor C/C++ User’s Guide
Version 10.3
Parasoft Corporation101 E. Huntington Drive, 2nd FloorMonrovia, CA 91016Phone: (888) 305-0041Fax: (626) 305-9048E-mail: [email protected]: www.parasoft.com
PARASOFT END USER LICENSE AGREEMENTPLEASE READ THIS END USER LICENSE AGREEMENT ("AGREEMENT") CAREFULLY BEFORE USING THE SOFTWARE. PARASOFT CORPORATION ("PARASOFT") IS WILLING TO LICENSE THE SOFTWARE TO YOU, AS AN INDIVIDUAL OR COMPANY THAT WILL BE USING THE SOFT-WARE ("YOU" OR "YOUR") ONLY ON THE CONDITION THAT YOU ACCEPT ALL OF THE TERMS OF THIS AGREEMENT. THIS IS A LEGALLY ENFORCEABLE CONTRACT BETWEEN YOU AND PARASOFT. BY CLICKING THE "ACCEPT" OR "YES" BUTTON, OR OTHERWISE INDICATING ASSENT ELECTRONICALLY, OR BY INSTALLING THE SOFTWARE, YOU AGREE TO THE TERMS AND CONDITIONS OF THIS AGREEMENT AND ALSO AGREE THAT IS IT ENFORCEABLE LIKE ANY WRITTEN AND NEGOTIATED AGREEMENT SIGNED BY YOU. IF YOU DO NOT AGREE TO THESE TERMS AND CONDITIONS, CLICK THE "I DO NOT ACCEPT" OR "NO" BUTTON AND MAKE NO FURTHER USE OF THE SOFTWARE.
1. DEFINITIONS
1.1.“Concurrent User" means a person that has accessed the Software at any given point in time, either directly or through an application.
1.2."Instance" means a single occurrence of initialization or execution of software on one machine.
1.3."Licensed Capacity" means the capacity-based license pricing metrics identified in the Order Instrument, including, without limitation, Concurrent Users, Node Locked machines, and Instances.
1.4."Maintenance" means the maintenance and technical support services for the Software iden-tified in the Order Instrument and provided by Parasoft pursuant to this Agreement.
1.5."Node Locked" means a license for a single machine that has been authorized to run a single Instance of the licensed Software. A Node Locked license requires that users are physically present and not accessing the machine and using the Software from a remote location.
1.6."Software" means Parasoft's software products, in object code form, that are commercially available at the time of Your order and identified on the Order Instrument, and any modifica-tions, corrections and updates provided by Parasoft in connection with Maintenance.
1.7."Territory" means the country or countries in which You have a license to use the Software, as specified in Your order for the Software; or, if no Territory is specified, the country from which Your order has been issued.
1.8."User Documentation" means the user's guide, installation guides, and/or on-line documen-tation applicable to the Software. User Documentation does not include marketing materials or responses to requests for proposals.
2. GRANT OF LICENSE AND USE OF SOFTWARE
2.1.License Grant. Subject to the terms and conditions of this Agreement, Parasoft grants to You a perpetual, non-exclusive license to use the Software within the Territory, in accordance with the User Documentation and in compliance with the authorized Licensed Capacity. You acknowledge and agree that this Agreement only grants a license to the Software as set forth herein and does not constitute a sale of the Software by Parasoft. You have no right to resell the Software, whether by contract or by operation of applicable copyright law.
2.2.Usage Rights. You may only use the Software and/or the User Documentation for Your inter-nal business operations and to process Your data. You shall not (a) permit any third parties or non-licensed entities to use the Software or the User Documentation; (b) process or permit to

be processed any data that is not Your data; (c) use the Software in the operation of a service bureau; (d) sublicense, rent, or lease the Software or the User Documentation to a third party; or (e) perform, publish, or release to any third parties any benchmarks or other comparisons regarding the Software or User Documentation. You shall not make simultaneous use of the Software on multiple, partitioned, or virtual computers without first procuring an appropriate number of licenses from Parasoft. You shall not permit a third party outsourcer to use the Soft-ware to process data on Your behalf without Parasoft's prior written consent.
2.3.License Keys. You acknowledge that the Software contains one or more license keys that will enable the functionality of the Software and third party software embedded in or distributed with the Software. You may only access and use the Software with license keys issued by Parasoft, and shall not attempt to modify, tamper with, reverse engineer, reverse compile, or disassemble any license key. If Parasoft issues a new license key for the Software, You shall not use the previous license key to enable the Software.
2.4.Archival Copies. You may make one copy of the Software for back-up and archival purposes only. You may make a reasonable number of copies of the User Documentation for Your inter-nal use. All copies of Software and User Documentation must include all copyright and similar proprietary notices appearing on or in the originals. Copies of the Software may be stored off-site provided that all persons having access to the Software are subject to Your obligations under this Agreement and You take reasonable precautions to ensure compliance with these obligations. Parasoft reserves the right to revoke permission to reproduce copyrighted and proprietary material if Parasoft reasonably believes that You have failed to comply with its obli-gations hereunder.
2.5.Licensed Capacity. Parasoft licenses Software based on Licensed Capacity for different types of usage, including, without limitation, Concurrent Users and Node Locked machines. A Concurrent User license allows multiple Concurrent Users to share access to and use the Soft-ware, provided that the number of Concurrent Users accessing the Software at any time does not exceed the total number of licensed Concurrent Users. A Node Locked license allows a single specified machine to run a single Instance of the Software. If an application accessing the Software is a multiplexing, database, or web portal application that permits users of such application to access the Software or data processed by the Software, a separate Concurrent User license will be required for each Concurrent User of such application. Regardless of usage type, You shall immediately notify Parasoft in writing of any increase in use beyond the Licensed Capacity. You must obtain a license for any increase in Licensed Capacity, and You agree to pay to Parasoft additional Software license fees, which will be based on Parasoft's then-current list price.
2.6.Third Party Terms. You acknowledge that software provided by third party vendors ("Third Party Software") may be embedded in or delivered with the Software. The terms of this Agree-ment and any other terms that Parasoft may specify will apply to such Third Party Software, and the Third Party Software vendors will be deemed third party beneficiaries under this Agreement. You may only use the Third Party Software with the Software. You may not use the Third Party Software on a stand-alone basis or use or integrate it with any other software or device.
2.7.Evaluation License. This Section 2.7 applies if Parasoft has provided the Software to You for evaluation purposes. Parasoft grants to You a thirty (30) day, limited license solely for the pur-pose of internal evaluation. You are strictly prohibited from using the Software for any produc-tion purpose or any purpose other than the sole purpose of determining whether to purchase a commercial license for the Software that You are evaluating. Parasoft is not obligated to pro-vide maintenance or support for the evaluation Software. YOU ACKNOWLEDGE THAT SOFTWARE PROVIDED FOR EVALUATION MAY (A) HAVE LIMITED FEATURES; (B) FUNCTION FOR A LIMITED PERIOD OF TIME; OR (C) HAVE OTHER LIMITATIONS NOT CONTAINED IN A COMMERCIAL VERSION OF THE SOFTWARE. NOTWITHSTANDING ANYTHING TO THE CONTRARY IN THIS AGREEMENT, PARASOFT IS PROVIDING THE

EVALUATION SOFTWARE TO YOU "AS IS", AND PARASOFT DISCLAIMS ANY AND ALL WARRANTIES (INCLUDING ANY IMPLIED WARRANTIES OF MERCHANTABILITY, FIT-NESS FOR A PARTICULAR PURPOSE, AND STATUTORY WARRANTIES OF NON-INFRINGEMENT), LIABILITIES, AND INDEMNIFICATION OBLIGATIONS OF ANY KIND. In the event of any conflict between this Section 2.7 and any other provision of this Agreement, this Section 2.7 will prevail and supersede such other provision with respect to Software licensed to You for evaluation purposes.
2.8.Education License. If You are an educational or academic institution and are receiving a dis-count from Parasoft, You may use the Software solely for education or academic purposes and You may not use the Software for any commercial purpose. Parasoft may require that You pro-vide proof of your status as an educational or academic institution.
2.9.Audit. You shall maintain accurate business records relating to its use and deployment of the Software. Parasoft shall have the right, not more than once every twelve (12) months and upon ten (10) business days prior written notice, to verify Your compliance with its obligations under this Agreement by auditing Your business records and Your use and deployment of the Software within Your information technology systems. Parasoft and/or a public accounting firm selected by Parasoft shall perform the audit during Your regular business hours and comply with Your reasonable safety and security policies and procedures. Any agreement You may require the public accounting firm to execute shall not prevent disclosure of the audit results to Parasoft. You shall reasonably cooperate and assist with such audit. You shall, upon demand, pay to Parasoft all license and Maintenance fees for any unauthorized deployments and/or excess usage of Software products disclosed by the audit. License fees for such unautho-rized deployments and/or excess usage shall be invoiced to and paid by You at Parasoft's then-current list price, and applicable Maintenance fees shall be applied retroactively to the entire period of the unauthorized and/or excess usage. Parasoft shall be responsible for its own costs and expenses in conducting the audit, unless the audit indicates that You have exceeded its Licensed Capacity or otherwise exceeds its license restrictions, such that the then-current list price of non-compliant Software deployment exceeds five percent (5%) of the total then-current list price of the Software actually licensed by You, in which event You shall, upon demand, reimburse Parasoft for all reasonable costs and expenses of the audit.
3. TITLE. Parasoft retains all right, title and interest in and to the Software and User Documenta-tion and all copies, improvements, enhancements, modifications and derivative works of the Software and User Documentation, including, without limitation, all patent, copyright, trade secret, trademarks and other intellectual property rights. You agrees that it shall not, and shall not authorize others to, copy (except as expressly permitted herein), make modifications to, translate, disassemble, decompile, reverse engineer, otherwise decode or alter, or create derivative works based on the Software or User Documentation. Except as otherwise pro-vided, Parasoft grants no express or implied rights under this license to any of Parasoft's pat-ents, copyrights, trade secrets, trademarks, or other intellectual property rights.
4. TERMINATION
4.1.Default; Bankruptcy. Parasoft may terminate this Agreement if (a) You fail to pay any amount when due under any order You have placed with Parasoft and do not cure such non-payment within ten (10) days of receipt of written notice of non-payment; (b) You materially breach this Agreement and do not cure such breach within thirty (30) days of receipt of written notice of such breach; (c) subject to provisions of applicable bankruptcy and insolvency laws, You become the subject of any involuntary proceeding relating to insolvency and such petition or proceeding is not dismissed within sixty (60) days of filing; or (d) You become the subject of any voluntary or involuntary petition pursuant to applicable bankruptcy or insolvency laws, or request for receivership, liquidation, or composition for the benefit of creditors and such peti-tion, request or proceeding is not dismissed within sixty (60) days of filing.
4.2.Effect of Termination. Upon termination of this Agreement, You shall immediately discon-tinue use of, and uninstall and destroy all copies of, all Software. Within ten (10) days follow-
ing termination, You shall certify to Parasoft in a writing signed by an officer of Yours that all Software has been uninstalled from Your computer systems and destroyed.
5. LIMITED WARRANTY
5.1.Performance Warranty. Parasoft warrants that the Software, as delivered by Parasoft and when used in accordance with the User Documentation and the terms of this Agreement, will substantially perform in accordance with the User Documentation for a period of ninety (90) days from the date of initial delivery of the Software. If the Software does not operate as war-ranted and You have provided written notice of the non-conformity to Parasoft within the ninety (90) day warranty period, Parasoft shall at its option (a) repair the Software; (b) replace the Software with software of substantially the same functionality; or (c) terminate the license for the nonconforming Software and refund the applicable license fees received by Parasoft for the nonconforming Software. The foregoing warranty specifically excludes defects in or non-conformance of the Software resulting from (a) use of the Software in a manner not in accordance with the User Documentation; (b) modifications or enhancements to the Software made by or on behalf of You; (c) combining the Software with products, software, or devices not provided by Parasoft; or (d) computer hardware malfunctions, unauthorized repair, acci-dent, or abuse.
5.2.Disclaimers. THE WARRANTIES SET FORTH IN THIS SECTION 5 ARE EXCLUSIVE AND IN LIEU OF ALL OTHER WARRANTIES, WHETHER EXPRESS OR IMPLIED, AND PARA-SOFT EXPRESSLY DISCLAIMS ALL OTHER WARRANTIES, INCLUDING ANY IMPLIED WARRANTIES OF MERCHANTABILITY, FITNESS FOR A PARTICULAR PURPOSE, AND STATUTORY WARRANTIES OF NON-INFRINGEMENT. PARASOFT DOES NOT WARRANT THAT THE SOFTWARE WILL MEET YOUR REQUIREMENTS OR THAT USE OF THE SOFTWARE WILL BE UNINTERRUPTED OR ERROR FREE. THE REMEDIES SET FORTH IN THIS SECTION 5 ARE YOUR SOLE AND EXCLUSIVE REMEDIES AND PARASOFT'S SOLE AND EXCLUSIVE LIABILITY REGARDING FAILURE OF ANY SOFTWARE TO FUNC-TION OR PERFORM AS WARRANTED IN THIS SECTION 5.
6. INDEMNIFICATION
6.1. Infringement. Parasoft shall defend any claim against You that the Software infringes any intellectual property right of a third party, provided that the third party is located in a country that is a signatory to the Berne Convention, and shall indemnify You against any and all dam-ages finally awarded against You by a court of final appeal, or agreed to in settlement by Para-soft and attributable to such claim, so long as You (a) provide Parasoft prompt written notice of the claim; (b) provide Parasoft all reasonable assistance and information to enable Parasoft to perform its duties under this Section 6; (c) allow Parasoft sole control of the defense and all related settlement negotiations; and (d) have not compromised or settled such claim. If the Software is found to infringe, or if Parasoft determines in its sole opinion that it is likely to be found to infringe, then Parasoft may, at its option (a) obtain for You the right to continue to use the Software; (b) modify the Software to be non-infringing or replace it with a non-infringing functional equivalent, in which case You shall stop using any infringing version of the Software; or (c) terminate Your rights and Parasoft's obligations under this Agreement with respect to such Software and refund to You the unamortized portion of the Software license fee paid for the Software based on a five year straight-line depreciation schedule commencing on the date of delivery of the Software. The foregoing indemnity will not apply to any infringement resulting from (a) use of the Software in a manner not in accordance with the User Documentation; (b) modifications or enhancements to the Software made by or on behalf of You; (c) combination, use, or operation of the Software with products not provided by Parasoft; or (d) use of an alleg-edly infringing version of the Software if the alleged infringement could be avoided by the use of a different version of the Software made available to You.

6.2.Disclaimers. THIS SECTION 6 STATES YOUR SOLE AND EXCLUSIVE REMEDY AND PARASOFT'S SOLE AND EXCLUSIVE LIABILITY REGARDING INFRINGEMENT OR MIS-APPROPRIATION OF ANY INTELLECTUAL PROPERTY RIGHTS OF A THIRD PARTY.
7. LIMITATION OF LIABILITY. IN NO EVENT SHALL PARASOFT OR ITS THIRD PARTY VEN-DORS BE LIABLE TO YOU OR ANY OTHER PARTY FOR (A) ANY SPECIAL, INCIDENTAL, INDIRECT OR CONSEQUENTIAL DAMAGES OR (B) LOSS OF DATA, LOSS OF PROFITS, BUSINESS INTERRUPTION, OR SIMILAR DAMAGES OR LOSS, EVEN IF PARASOFT AND ITS THIRD PARTY VENDORS HAVE BEEN ADVISED OF THE POSSIBILITY OF SUCH DAMAGES. EXCEPT AS LIMITED BY APPLICABLE LAW AND EXCLUDING PARASOFT'S LIABILITY TO YOU UNDER SECTION 6 (INDEMNIFICATION), AND REGARDLESS OF THE BASIS FOR YOUR CLAIM, PARASOFT'S MAXIMUM LIABILITY UNDER THIS AGREEMENT WILL BE LIMITED TO THE LICENSE OR MAINTENANCE FEES PAID FOR THE SOFT-WARE OR MAINTENANCE GIVING RISE TO THE CLAIM. THE FOREGOING LIMITATIONS WILL APPLY NOTWITHSTANDING THE FAILURE OF THE ESSENTIAL PURPOSE OF ANY LIMITED REMEDY
8. CONFIDENTIAL INFORMATION. For purposes of this Agreement, "Confidential Information" will include trade secrets contained within the Software and User Documentation, the terms and pricing of the Software and Maintenance (including any pricing proposals), and such other information (a) identified by either party as confidential at the time of disclosure or (b) that a reasonable person would consider confidential due to its nature and circumstances of disclo-sure ("Confidential Information"). Confidential Information will not include information that (a) is or becomes a part of the public domain through no act or omission of the receiving party; (b) was in the receiving party's lawful possession prior to receiving it from the disclosing party; (c) is lawfully disclosed to the receiving party by a third party without restriction on disclosure; or (d) is independently developed by the receiving party without breaching this Agreement. Each party agrees to maintain all Confidential Information in confidence and not disclose any Confi-dential Information to a third party or use the Confidential Information except as permitted under this Agreement. Each party shall take all reasonable precautions necessary to ensure that the Confidential Information is not disclosed by such party or its employees, agents or authorized users to any third party. Each party agrees to immediately notify the other party of any unauthorized access to or disclosure of the Confidential Information. The receiving party agrees that any breach of this Section 8 may cause irreparable harm to the disclosing party, and such disclosing party shall be entitled to seek equitable relief in addition to all other reme-dies provided by this Agreement or available at law.
9. MAINTENANCE
9.1.Maintenance Period. You are required to purchase first year Maintenance with the Software, and the Maintenance period will commence upon the initial delivery of the Software and con-tinue for a period of one year. The Maintenance period, at Your option, may be renewed pur-suant to subsequent orders. Prior to such renewal, Parasoft may, upon ten (10) business days written notice, require You to provide a report on Your use and deployment of the Software. Such report will be certified by an officer of Yours and will specify, with respect to Your Soft-ware: (a) the type and amount of Licensed Capacity; (b) the version; and (c) the Parasoft license serial number. Parasoft shall issue an annual renewal notice to You at least ninety (90) days prior to the expiration of the then-current Maintenance period. Maintenance fees will be based on the then-current list price and are subject to change without notice.
9.2.Support Coordinators. Maintenance will consist of support services provided by Parasoft to one designated support coordinator of Yours (and one backup coordinator) per Your location, by telephone, email, and website. Support is available during normal business hours in the applicable location within the Territory, Monday through Friday, excluding nationally observed holidays.
9.3.Additional Licensed Capacity. In the event that You purchases additional Licensed Capacity for the Software prior to the annual anniversary date of the Maintenance period, You agree to

pay applicable Maintenance fees based on Parasoft's then-current Maintenance rates. Main-tenance fees will apply from the effective date of such additional Licensed Capacity and con-tinue for a period of one year thereafter, unless otherwise agreed to in writing by the parties, so that Maintenance for Your previously acquired Software and added Licensed Capacity is cote-rminous.
9.4.New Releases. During any period in which You are current on Maintenance, Parasoft shall provide You with any new release of the Software, which may include generally available error corrections, modifications, maintenance patch releases, enhancements (unless priced sepa-rately by Parasoft and generally not included with new licenses for the Software at that time), and the revised User Documentation, if applicable. Notwithstanding the foregoing, stand-alone error corrections that are not part of a new release will not be independently supported but will be incorporated into the next release of the Software. If You install a new release of the Soft-ware, You may continue to use the previous version of the Software for up to ninety (90) days in order to assist You in the transition to the new release. Once You complete its transition to the new release of the Software, You must discontinue use of the previous version of the Soft-ware.
9.5.Supported Releases. Parasoft shall continue to support the immediately preceding release of the Software for a period of twelve (12) months following the discontinuance of such Software or the date on which the new release becomes generally available, provided that You have paid applicable Maintenance fees and incorporated all Maintenance patch releases issued by Parasoft for the release of the Software.
9.6.Reinstatement of Maintenance. If You allow Maintenance to expire, You may, at a later date, renew Maintenance by paying the following: (a) if You have installed the current release of the Software but have failed to pay the applicable renewal fee on or before the ninetieth (90th) day following expiration of the Maintenance period, annual Maintenance fees at Parasoft's then-current rates, plus Parasoft's then-current reinstatement fee; or (b) if You have not installed the current release of the Software or have failed to pay the applicable renewal fee by the ninetieth (90th) day following expiration of the Maintenance period, annual Maintenance fees at Parasoft's then-current rates, plus Parasoft's then-current license update fee for the current release of the Software.
10. GENERAL
10.1.Independent Contractors. The parties acknowledge and agree that each is an independent contractor. This Agreement will not be construed to create a partnership, joint venture or agency relationship between the parties.
10.2.Entire Agreement. The terms and conditions of this Agreement apply to all Software licensed, all User Documentation provided, and all Maintenance purchased hereunder. This Agreement will supersede any different, inconsistent or preprinted terms and conditions in any order form of Yours, purchase order or other ordering document.
10.3.Assignment. You have no right to assign, sublicense, pledge, or otherwise transfer any of Your rights in and to the Software, User Documentation or this Agreement, in whole or in part (collectively, an "Assignment"), without Parasoft's prior written consent, and any Assignment without such consent shall be null and void. Any change in control of Your organization or entity, whether by merger, share purchase, asset sale, or otherwise, will be deemed an Assign-ment subject to the terms of this Section 13.3.
10.4.Force Majeure. No failure, delay or default in performance of any obligation of a party to this Agreement, except payment of license fees due hereunder, will constitute an event of default or breach of the Agreement to the extent that such failure to perform, delay or default arises out of a cause, existing or future, that is beyond the reasonable control of such party, including, without limitation, action or inaction of a governmental agency, civil or military authority, fire, strike, lockout or other labor dispute, inability to obtain labor or materials on time, flood, war,

riot, theft, earthquake or other natural disaster ("Force Majeure Event"). The party affected by such Force Majeure Event shall take all reasonable actions to minimize the consequences of any Force Majeure Event.
10.5.Severability. If any provision of this Agreement is held to be illegal or otherwise unenforce-able by a court of competent jurisdiction, that provision will be severed and the remainder of the Agreement will remain in full force and effect.
10.6.Waiver. The waiver of any right or election of any remedy in one instance will not affect any rights or remedies in another instance. A waiver will be effective only if made in writing and signed by an authorized representative of the applicable party.
10.7.Notices. All notices required by this Agreement will be in writing, addressed to the party to be notified and deemed to have been effectively given and received (a) on the fifth business day following deposit in the mail, if sent by first class mail, postage prepaid; (b) upon receipt, if sent by registered or certified U.S. mail, postage prepaid, with return receipt requested; (c) upon transmission, if sent by facsimile and confirmation of transmission is produced by the sending machine and a copy of such facsimile is promptly sent by another means specified in this Sec-tion 10.7; or (d) upon delivery, if delivered personally or sent by express courier service and receipt is confirmed by the recipient. Notices will be addressed to the parties based on the address stated in the applicable order, to the attention of the Legal Department. A change of address for notice purposes may be made pursuant to the procedures set forth above.
10.8.Export Restrictions. You acknowledge that the Software and certain Confidential Informa-tion (collectively "Technical Data") are subject to United States export controls under the U. S. Export Administration Act, including the Export Administration Regulations, 15 C.F.R. Parts 730 et seq. (collectively, "Export Control Laws"). Each party agrees to comply with all require-ments of the Export Control Laws with respect to the Technical Data. Without limiting the fore-going, You shall not (a) export, re-export, divert or transfer any such Technical Data, or any direct product thereof, to any destination, company, or person restricted or prohibited by Export Control Laws; (b) disclose any such Technical Data to any national of any country when such disclosure is restricted or prohibited by the Export Control Laws; or (c) export or re-export the Technical Data, directly or indirectly, for nuclear, missile, or chemical/biological weaponry end uses prohibited by the Export Control Laws.
10.9.U. S. Government Rights. The Software and User Documentation are deemed to be "com-mercial computer software" and "commercial computer software documentation" as defined in FAR Section 12.212 and DFARS Section 227.7202, as applicable. Any use, modification, reproduction, release, performance, display, or disclosure of the Software and User Documen-tation by the United States government will be solely in accordance with the terms of this Agreement
10.10.Choice of Law; Jurisdiction. This Agreement is governed by and construed in accordance with the laws of the State of California, U. S. A., exclusive of any provisions of the United Nations Convention on Contracts for the International Sale of Goods, including any amend-ments thereto, and without regard to principles of conflicts of law. Any suits concerning this Agreement will be brought in the federal courts for the Central District of California or the state courts in Los Angeles County, California. The parties expressly agree that the Uniform Com-puter Information Transactions Act, as adopted or amended from time to time, shall not apply to this Agreement or the Software and Maintenance provided hereunder.
10.11.Amendment. This Agreement may only be modified by a written document signed by an authorized representative of Parasoft and by You.
10.12.Survival. Any terms of this Agreement which by their nature extend beyond the termination or expiration of this Agreement will remain in effect. Such terms will include, without limitation, all provisions herein relating to limitation of liability, title and ownership of Software, and all general provisions.

Parasoft Corporation
101 East Huntington Drive, 2nd Floor
Monrovia, CA 91016 USA
+1 (626) 256-3680
+1 (888) 305-0041 (USA only)
+1 (626) 256-9048 (Fax)
http://www.parasoft.com
Printed in the U.S.A, January 18, 2017

Table of Contents
Introduction
Static Analysis Engine (SAE) .................................................................5
Unit Test Connector (UTC) .....................................................................5
Code Coverage Engine (CCE) ...............................................................5
Getting Started
System Requirements ............................................................................6
Installing DTP Engines ...........................................................................6
Setting the License .................................................................................7
Connecting to DTP Server ......................................................................7
Connecting to Source Control ................................................................8
Static Analysis Engine
Basic Analysis ........................................................................... 11
Prerequisites ...........................................................................................11
Analyzing a Single File ...........................................................................11
Analyzing a Makefile-based Project .......................................................12
Re-analyzing a Project without Re-building ............................................14
Generating a .csv Report ........................................................................15
Testing a Microsoft Visual Studio Project or Solution .............................15
Specifying Test Data Location ................................................................16
Specifying Test Configurations.................................................. 17
Viewing Available Test Configurations ...................................................17
Built-in Test Configurations ....................................................................18

Creating Custom Rules ..........................................................................20
Compiler Configuration.............................................................. 21
Specifying Multiple Compilers ................................................................21
Working with Custom Compiler Configurations ......................................21
Defining Input Scope ................................................................ 22
Analyzing a Single File ...........................................................................22
Analyzing a Makefile-based Project .......................................................22
Analyzing Code Using Existing Build Data .............................................22
Defining Source File Structures (Modules) .............................................22
Fine-tuning the Input Scope ...................................................................23
Configuring Authorship.............................................................. 25
About Authorship Configuration Priority .................................................25
Configuring How Authorship is Computed ..............................................25
Creating Authorship XML Map Files .......................................................26
Suppressing Violations.............................................................. 27
Line Suppression ....................................................................................27
Flow Analysis ............................................................................ 29
Configuring Depth of Flow Analysis ........................................................29
Setting Timeout Strategy ........................................................................30
Reusing Flow Analysis Data for Desktop Analysis .................................30
Metrics Analysis ........................................................................ 32
Setting Metrics Thresholds .....................................................................32
Code Duplicate Analysis ........................................................... 33
Using DTP Engines in an IDE ................................................... 34
Reporting
Specifying Report Output Location .........................................................35
Specifying Report Format .......................................................................35

Viewing Reports .....................................................................................35
Sending Results to Development Testing Platform (DTP) Server ..........41
Publishing Source Code to DTP Server .................................................41
Unit Test Connector
Google Test Connector ..........................................................................43
CppUnit and CppUtest Connector ..........................................................45
Reporting Assertions ..............................................................................48
Code Coverage Engine
Instrumenting and Building Source Code ...............................................50
Executing Instrumented Code ................................................................51
Generating Reports ................................................................................51
CCE Usage Example ..............................................................................52
Integrating with Make-based Build Systems ...........................................53
Integrating with MSBuild .........................................................................55
Using Coverage Tool for Complex Projects ...........................................56
Annotating Results Stream with Test Start/Stop Information .................57
Code Coverage Engine Runtime Library ................................................58
Customizing the Runtime Library ...........................................................60
Building the Runtime Library ..................................................................65
Customizing DTP Engines for C/C++
Modifying a Single Property ....................................................................70
Viewing Current Settings ........................................................................70
Advanced Configuration .........................................................................70
Using Variables ......................................................................................71

Settings Reference .................................................................................71
Integrations
Integrating with Source Control Systems .................................. 96
Integrating with CI Tools............................................................ 97
Integrating with Jenkins ..........................................................................97
Supported Compilers
Custom-developed and Deprecated Compilers ......................................101
Third-Party Content

5
IntroductionParasoft Development Testing Platform (DTP) Engines for C/C++ are integrated solutions for automating a broad range of best practices to improve productivity and software quality. DTP Engines are a component of the Parasoft Development Testing Platform family of software quality solutions.Please read the following guide for additional information about how DTP Engines integrate into Parasoft’s Development Testing ecosystem:
The Parasoft Development Testing Solution (PDF)
This documentation provides information on how to use the following engines:
Static Analysis Engine (SAE) SAE enforces your coding policy with proven quality practices, such as static analysis and flow analysis, to ensure that your C and C++ applications function as expected. See “Static Analysis Engine”, page 10.
Unit Test Connector (UTC)UTC allows you to run unit tests from open format tools, and report results to Development Testing Platform (DTP) Server. See “Unit Test Connector”, page 43.
Code Coverage Engine (CCE)CCE collects coverage information during a run of the executable and generates reports that can be sent to DTP Server. See “Code Coverage Engine”, page 50.

Getting StartedThis chapter will help you verify that your system meets the requirements for using DTP Engines, as well as help you configure DTP Engines so you can quickly start analyzing code.
System Requirements
Windows 32-bit• Windows 7, Windows 8
• 4GB memory minimum*
• 2GHz or faster processor (x86-compatible), multi-CPU configuration recommended
• Supported C / C++ compiler
Windows 64-bit• Windows 7 (x64), Windows 8 (x64), Windows 10, Windows 2008 Server (x64), Windows
Server 2012
• 4GB memory minimum, 8GB recommended*
• 2GHz or faster processor (x86_64-compatible), multi-CPU configuration recommended
• Supported C / C++ compiler
Linux 32-bit• Linux kernel 2.6 (or newer) with glibc 2.9 (or newer)
• 4GB memory minimum*
• 2GHz or faster processor (x86-compatible), multi-CPU configuration recommended
• Supported C / C++ compiler
Linux 64-bit• Linux kernel 2.6 (or newer) with glibc 2.12 (or newer)
• 4GB memory minimum, 8GB recommended*
• 2GHz or faster processor (x86_64-compatible), multi-CPU configuration recommended
• Supported C / C++ compiler
*DTP Engines for C/C++ may allocate up to 1GB RAM on 32-bit machines or up to 2GB RAM on 64-bit machines for the Java Virtual Machine process. You can change memory allocation for the JVM pro-cess in the [INSTALL_DIR]/etc/cpptestcli.jvm configuration file (-Xmx option). When running an analysis, DTP Engines’ native code analyzers will require additional memory, depending on the test configuration parameters.
Installing DTP Engines1. Unpack the distribution file. A directory ([NSTALL_DIR]) called "cpptest" that contains all DTP
Engine files will be created.
6

2. Add [INSTALL_DIR] to $PATH to enable convenient access to the cpptestcli executable.
3. Add [INSTALL_DIR]/bin to $PATH to enable convenient access to utility tools, including the tool for instrumenting the code for coverage (cpptestcc).
Remove the installation directory from disk to uninstall DTP Engines.
Setting the LicenseDTP Engines can run on either a local or a network license. There are two types of network licenses:
• dtp: This license is stored in DTP. Your DTP license limits analysis to the number of files spec-ified in your licensing agreement. This is the default type when license.use_network is set to true.
• ls: This is a "floating" or "machine-locked" license that limits usage to a specified number of machines. This type of license is stored in DTP in License Server.
Network licenses are also available in three editions that determine what functionality is available:
• desktop_edition: Functionality is optimized for desktop usage.
• server_edition: Functionality configured for high performance usage in server command line mode.
• custom_edition: functionality can be customized.
Local LicenseIn the .properties configuration file:
1. Set the cpptest.license.use_network property to false
2. Set the cpptest.license.local.password property with your password
Obtaining the Machine IDIf you are using a local license, you will need your machine ID to request a license from Parasoft. Run the following command from a command line window to obtain your machine ID:
Network LicenseIn the .properties configuration file:
1. Set the cpptest.license.use_network property to true
2. Set the cpptest.license.network.type
3. Set the cpptest.license.network.edition
Connecting to DTP ServerConnecting to DTP Server is required for licensing, as well as extending other team-working capabili-ties, such as:
• Reporting analysis to a centralized database (see “Sending Results to Development Testing Platform (DTP) Server”, page 41)
• Sharing test configurations
cpptestcli -machineID
7

• Sharing static analysis rules
Modify the following settings in the [INSTALL_DIR]\cpptestcli.properties file to configure the con-nection to DTP Server.
Creating an Encoded PasswordDTP Engines can encrypt your password, which adds a layer of security to your interactions with DTP Server. Run the following command to print an encoded password:
Copy the encoded password that is returned and paste it into the cpptestcli.properties file.
Connecting to Source ControlYou can integrate DTP Engines with any source control system (see the Parasoft Custom Extension Development Guide for more information), but DTP Engines ship with out-of-the-box support for the following SCMs:
dtp.server=[SERVER]
dtp.port=[PORT]
dtp.user=[USER]
dtp.password=[PASSWORD]
-encodepass [MYPASSWORD]
dtp.password=[ENCODED PASSWORD]
Brand Tested Version
AccuRev 4.6, 5.4, 6.2
ClearCase 2003.06, 7.0, 8.0
CVS 1.1.2
Git 1.7
Mercurial 1.8.0 - 3.6.3
Perforce 2006, 2012, 2013, 2014, 2015
Serena Dimensions 9.1, 10.1, 10.3 (2009 R2), 12.2
Star Team 2005, 2008, 2009
Subversion (SVN) 1.2, 1.3, 1.4, 1.5, 1.6, 1.7, 1.8, 1.9
Synergy/CM 6.4, 7.0, 7.1
Microsoft Team Foundation Server 2008, 2010, 2012, 2013, 2015
Visual SourceSafe 5.0, 6.0, 2005
8

Edit the cpptestcli.properties file located in the installation directory to connect to your SCM. Parameters will vary depending on the brand of your SCM. The following example shows the parame-ters required to connect to SVN:
See “Customizing DTP Engines for C/C++”, page 70, for information about configuring your SCM con-nection.
If you have C++test 9.5 or later, you can use its interface to configure integration with source control systems. See “Integrating with Source Control Systems”, page 96 for details.
scontrol.rep.type=svn
scontrol.rep.svn.url=https://svn_server/
scontrol.rep.svn.login=username
scontrol.rep.svn.password=password
scontrol.svn.exec=C:\\path\to\svn.exe
9

10
Static Analysis EngineStatic Analysis Engine (SAE) enforces your coding policy with proven quality practices, such as static analysis and flow analysis, to ensure that your applications function as expected. The following sec-tions describe how to analyze code with SAE.
• Basic Analysis
• Specifying Test Configurations
• Defining Input Scope
• Code Duplicate Analysis
• Using DTP Engines in an IDE

Basic Analysis
Basic AnalysisExecutable Verify that the executable (cpptestcli) is on $PATH. See “Installing DTP Engines”, page 6.
Prerequisites
CompilerStatic Analysis Engine must be configured for use with specific C and C++ compilers and versions before you can analyze code. The configuration should reflect the original compiler and version used for building the code under test. The original compiler executable must be available on $PATH (unless it is specified with a full path).
Use the -compiler switch to specify the compiler configuration identifier:
Alternatively, the cpptest.compiler.family entry could be added to a custom configuration file:
If you are using a single compiler and version for all testing, the compiler identifier can be specified in the cpptestcli.properties global configuration file in either the [INSTALL_DIR] or [USER_HOME] directory.
Compiler DiscoveryPerform one of the following actions to find the configuration for that compiler:
• Use the -detect-compiler switch to auto-detect configuration:
• Use the -list-compilers switch to find the configuration in the list of all supported compilers:
Also see “Compiler Configuration”, page 21, and “Supported Compilers”, page 98, for additional infor-mation.
About Usage ExamplesThe following instructions assume that:
• GNU GCC 3.4 compiler is being used (configuration identifier: gcc_3_4)
• The prerequisites discussed above have been met.
• Users are running commands in the [INSTALL_DIR]/examples/ATM directory.
Analyzing a Single File
cpptestcli -config "builtin://Recommended Rules" -compiler gcc_4_5 -input cpptest.bdf
cpptest.compiler.family=gcc_4_5
cpptestcli -detect-compiler gcc
cpptestcli -list-compilers
11

Basic Analysis
Run an analysis and specify the original compiler command with the -- switch (separator):
Static Analysis Engine will analyze the Bank.cxx file using the original compiler executable and com-piler options and report detected violations to the output console.
All values after -- switch will be interpreted as a compiler command, so options specific to Static Anal-ysis Engine must be specified before -- switch.
Only the specified source files will be analyzed. Header files included by the source files will be excluded from analysis. To broaden the scope of files tested, including header files, see “Defining Input Scope”, page 22.
Analyzing a Makefile-based ProjectRun code analysis and specify the original build command with the -trace switch:
Static Analysis Engine will perform the following tasks:
1. Run the original build (make clean all)
2. Detect which files to test
3. Run the analysis for these files
4. Report results to the output console
5. Store all build information in the cpptest.bdf file for future runs (see “About Build Data Files”, page 12, for additional information about build data files)
All values after -trace will be interpreted as a build command, so options specific to Static Analysis Engine must be specified before -trace. Additionally, Static Analysis Engine will detect a source file for testing only if that file was compiled when running the build command. Only source files from Makefile will be analyzed. Header files included by the source files will be excluded from analysis. To broaden the scope of files tested, including header files, see “Defining Input Scope”, page 22.
About Build Data FilesYou can create a build data file (.bdf), which stores information such as the working directory, com-mand line options for the compilation, and link processes of the original build, so that Static Analysis Engine can analyze a project without having to rebuild it. The following example is a fragment from a build data file:
working_dir=/home/place/project/hypnos/pscomproject_name=pscomarg=g++arg=-carg=src/io/Path.ccarg=-Iincludearg=-I.arg=-oarg=/home/place/project/hypnos/product/pscom/shared/io/Path.o
You can use the -trace switch to create a .bdf (see “Analyzing a Makefile-based Project”, page 12) or use the standalone cpptestscan or cpptesttrace utility located in the [INSTALL_DIR]/bin directory.
cpptestcli -config "builtin://Recommended Rules" -compiler gcc_3_4 -- gcc -I include Bank.cxx
cpptestcli -config "builtin://Recommended Rules" -compiler gcc_3_4 -trace make clean all
12

Basic Analysis
Using cpptestscan and cpptesttrace UtilitiesThe cpptestscan utility is used as a wrapper for the compiler and/or linker during the normal build. To use cpptestscan with an existing build, prefix the compiler/linker executable with cpptestscan when building the code base. This can be done in two ways:
• Modify the build command line to use cpptestscan as the wrapper for the compiler/linker exe-cutables
• If you aren’t able to override the compiler variable on the command line, embed cpptestscan in the actual make file or build script.
To use cpptesttrace with an existing build, prefix the entire build command with cpptesttrace when building the code base. cpptesttrace will trace the compiler and linker processes executed during the build and store them in the build data file.
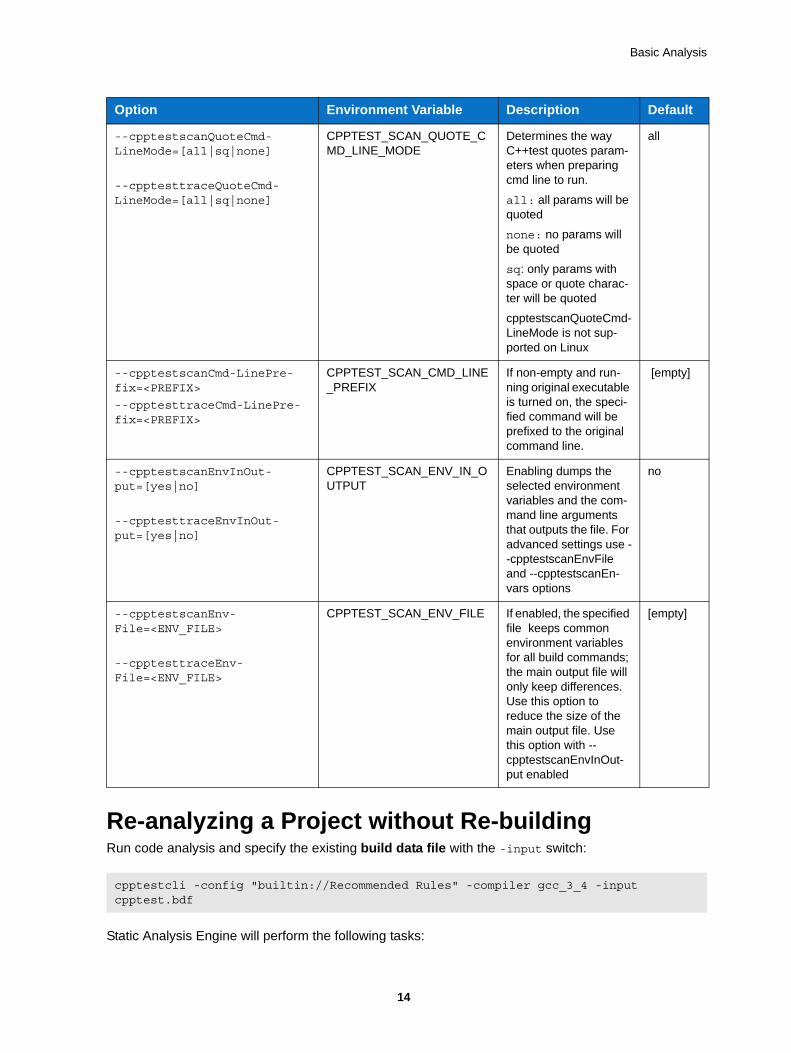
In both cases, you must specify the full path to either utility in your PATH environment variable. Addi-tional options for cpptestscan and cpptesttrace are summarized in the following table. Options can be set directly for the cpptestscan command or via environment variables. Most options can be applied to cpptestscan or cpptesttrace by changing the prefix in command line.
Basic cpptestscan usage:
• Windows: cpptestscan.exe [options] [compile/link command]
• Linux and Solaris: cpptestscan [options] [compile/link command]
Basic cpptesttrace usage:
• Windows: cpptesttrace.exe [options] [build command]
• Linux, Solaris: cpptesttrace [options] [build command]
Option Environment Variable Description Default
--cpptestscanOutput-File=<OUTPUT_FILE>
--cpptesttraceOutput-File=<OUTPUT_FILE>
CPPTEST_SCAN_OUTPUT_FILE
Defines file to append build information to.
cpptestscan.bdf
--cpptestscanProject-Name=<PROJECT_NAME>
--cpptesttraceProject-Name=<PROJECT_NAME>
CPPTEST_SCAN_PROJECT_NAME
Defines suggested name of the C++test project.
name of the cur-rent work-ing directory
--cpptestscanRun-OrigCmd=[yes|no]
--cpptesttraceRun-OrigCmd=[yes|no]
CPPTEST_SCAN_RUN_ORIG_CMD
If set to "yes", original command line will be executed.
yes
13
Basic Analysis
Re-analyzing a Project without Re-buildingRun code analysis and specify the existing build data file with the -input switch:
Static Analysis Engine will perform the following tasks:
--cpptestscanQuoteCmd-LineMode=[all|sq|none]
--cpptesttraceQuoteCmd-LineMode=[all|sq|none]
CPPTEST_SCAN_QUOTE_CMD_LINE_MODE
Determines the way C++test quotes param-eters when preparing cmd line to run.
all: all params will be quoted
none: no params will be quoted
sq: only params with space or quote charac-ter will be quoted
cpptestscanQuoteCmd-LineMode is not sup-ported on Linux
all
--cpptestscanCmd-LinePre-fix=<PREFIX>
--cpptesttraceCmd-LinePre-fix=<PREFIX>
CPPTEST_SCAN_CMD_LINE_PREFIX
If non-empty and run-ning original executable is turned on, the speci-fied command will be prefixed to the original command line.
[empty]
--cpptestscanEnvInOut-put=[yes|no]
--cpptesttraceEnvInOut-put=[yes|no]
CPPTEST_SCAN_ENV_IN_OUTPUT
Enabling dumps the selected environment variables and the com-mand line arguments that outputs the file. For advanced settings use --cpptestscanEnvFile and --cpptestscanEn-vars options
no
--cpptestscanEnv-File=<ENV_FILE>
--cpptesttraceEnv-File=<ENV_FILE>
CPPTEST_SCAN_ENV_FILE If enabled, the specified file keeps common environment variables for all build commands; the main output file will only keep differences. Use this option to reduce the size of the main output file. Use this option with --cpptestscanEnvInOut-put enabled
[empty]
cpptestcli -config "builtin://Recommended Rules" -compiler gcc_3_4 -input cpptest.bdf
Option Environment Variable Description Default
14

Basic Analysis
1. Read the information about which files to test from the existing cpptest.bdf file
2. Run the analysis for these files
3. Report results to the output console
4. The original build will not be executed
Multiple build data files can be specified using multiple -input switches:
Only the source files defined in the build data file will be analyzed. Header files included by the source files will be excluded from analysis. To broaden the scope of files tested, including header files, see “Defining Input Scope”, page 22.
Generating a .csv ReportBe sure the project was already analyzed with Static Analysis Engine and that the cpptest.bdf file exists (see above)
Create an empty configuration file (csv.properties) and add the following line:
Run code analysis and specify the configuration file with -settings switch:
Static Analysis Engine will perform the following tasks:
1. Run the analysis as described above
2. Report results to the output console
3. Create an additional report.csv result file
Testing a Microsoft Visual Studio Project or SolutionStatic Analysis Engine can read Visual Studio project and solution files and analyze all source and included header files from the project or solution. Use the -input switch to specify a Visual Studio project or solution file:
You can specify the build configuration and the platform you want to use during analysis of your project or solution. Append the configuration and platform names to the solution or project file name. Your command may resemble the following:
cpptestcli -config "builtin://Recommended Rules" -compiler gcc_3_4 -input project1.bdf -input project2.bdf
cpptest.report.csv.enabled=true
cpptestcli -config "builtin://Recommended Rules" -compiler gcc_3_4 -settings csv.properties -input cpptest.bdf
cpptestcli -config "builtin://Recommended Rules" -input MyProject.vcproj
cpptestcli -config "builtin://Recommended Rules" -input MyProject.vcproj@Debug|x64
15

Basic Analysis
Alternatively, you can use the following properties to specify the build configuration and the platform you want to use during analysis of all Visual Studio solutions and projects:
For all Microsoft Visual Studio settings, see “Visual Studio Configuration Settings”, page 94.
Make sure that the correct version of Microsoft Visual C++ compiler is available on $PATH before run-ning analysis. Microsoft Visual Studio 6 is not supported.
Specifying Test Data LocationExclusive access to the .cpptest directory is required. The directory is created in the current working directory by default, which is where some of the run-specific data is stored. As a result, only one instance of Static Analysis Engine can run in a directory at a time. You can use the -workspace switch to change the location of the .cpptest directory.
cpptest.input.msvc.config=Debug
cpptest.input.msvc.platform=x64
-workspace <WORKSPACE_LOCATION>
16

Specifying Test Configurations
Specifying Test ConfigurationsTest configurations define how DTP Engines test and analyze code, including which static analysis rules are enabled, which tests to run, and other analysis parameters. DTP Engines ship with built-in test configurations, but users can create and store their own test configurations in the DTP server. You can access the DTP server via the DTP plug-in. If you have administrator-level access in DTP Report Center, you can also create test configurations directly in DTP (administration> Engines> Test Con-figurations).
User-defined test configurations can be downloaded from the DTP server and stored in the [INSTALL_DIR]/configs/user directory as *.properties files.
Use the -config switch to specify which test configuration to run:
The test configuration being executed can be specified in the following ways (by default, the buil-tin://Recommended Rules test configuration is used):
Built-in Configurations
User-defined Configurations
DTP Server-hosted Configurations
Test configurations can also be referenced by filename and URL:
By File Name
By URL
Viewing Available Test ConfigurationsUse the -listconfigs switch to print the available test configurations. Use arguments to filter configu-rations; the use of "*" expresssions is supported.
cpptestcli -config "builtin://Recommended Rules" -compiler gcc_3_4 -input cpptest.bdf
-config "builtin://Recommended Rules"
-config "user://Foo Configuration"
-config "dtp://Foo Team Configuration"
-config "dtp://FooTeamConfig.properties"
-config "C:\Devel\Configs\FooConfig.properties"
-config "http://foo.bar.com/configs/FoodConfig.properties"
-listconfigs
17

Specifying Test Configurations
Built-in Test ConfigurationsThe following table includes the test configurations shipped with DTP Engines in the [INSTALL]/configs/builtin directory.
Configuration Name Description
CERT C Coding Standard Checks rules for the CERT C Secure Coding Standard. This standard provides guidelines for secure coding. The goal is to facilitate the development of safe, reliable, and secure sys-tems by, for example, eliminating undefined behaviors that can lead to undefined program behaviors and exploitable vulnerabilities.
CRules Checks rules that enforce C best practices.
Effective C++ Checks rules from Scott Meyers’ "Effective C++" book. These rules check the efficiency of C++ programs.
Effective STL Checks rules from Scott Meyers’ "Effective STL" book.
Ellemtel Checks rules based on a C++ style guide that originated by Ellemtel Telecom Systems and is used widely in the telecommunications industry.
GoogleTest Analyzes Google Test unit test results.
HIS Source Code Metrics Checks metrics required by the Herstellerinitia-tive Software (HIS) group.
ISO 26262 Recommended Rules Checks rules recommended by the ISO 26262 standard.
Joint Strike Fighter Checks rules that enforce the Joint Strike Fighter (JSF) program coding standards.
MISRA C Checks rules that enforce the MISRA C coding standards.
MISRA C [2004, 2012] Checks rules that enforce the MISRA C 2004 or 2012 coding standards.
MISRA C++ 2008 Checks rules that enforce the MISRA C++ 2008 coding standards.
Parasoft's Recommended FDA C++ Phase 1 Checks the core set of rules recommended for complying with the FDA General Principles for Software Validation.
Parasoft's Recommended FDA C++ Phase 2 Checks a broader set of rules recommended for complying with the FDA General Principles for Software Validation; recommended for organi-zations who have already implemented the phase 1 rule set.
18

Specifying Test Configurations
Parasoft's Recommended FDA C++ Phase 3 Checks a broader set of rules recommended for complying with the
FDA General Principles for Software Validation; recommended for
organizations who have already implemented the phase 2 rule set.
Sutter-Alexandrescu Checks rules based on the book "C++ Coding Standards," by Herb Sutter and Andrei Alexan-drescu.
The Power of Ten Checks rules based on Gerard J. Holzmann’s article "The Power of Ten - Rules for Developing Safety Critical Code."
http://spinroot.com/gerard/pdf/Power_of_Ten.pdf
Recommended Rules The default configuration of recommended rules. Covers most Severity 1 and Severity 2 rules. Includes rules in the Flow Analysis Fast configuration.
Parasoft’s Recommended Rules (Deprecated) The default configuration of recommended rules. Covers most Severity 1 and Severity 2 rules. Includes rules in the Flow Analysis Fast configuration.
Find Duplicated Code Applies static code analysis rules that report duplicate code. Duplicate code may indicate poor application design and lead to maintain-ability issues.
Metrics Computes values for several code metrics.
DISA-STIG Coding Standard Includes rules that find issues identified in the DISA-STIG standard
Flow Analysis Detects complex runtime errors without requir-ing test cases or application execution. Defects detected include using uninitialized or invalid memory, null pointer dereferencing, array and buffer overflows, division by zero, memory and resource leaks, and dead code. This requires a special Flow Analysis license option.
Flow Analysis Aggressive Includes rules for deep flow analysis of code. Significant amount of time may be required to run this configuration.
Flow Analysis Fast Includes rules for shallow depth of flow analysis, which limits the number of potentially accept-able defects from being reported.
Configuration Name Description
19

Specifying Test Configurations
Creating Custom RulesUse RuleWizard to create custom rules. To use the rule in the Static Analysis Engine, it needs to be enabled in a test configuration and the custom rule file must be located in one of the following directo-ries:
• [INSTALL_DIR]\rules\user\
• [DOCUMENTS DIR]\Parasoft\[engine]\rules where [DOCUMENTS DIR] refers to the "My Documents" directory in Windows
CWE-SANS Top 25 Most Dangerous Program-ming Errors
Includes rules that find issues classified as Top 25 Most Dangerous Programming Errors of the CWE-SANS standard.
SAMATE Annex A Source Code Weaknesses Includes rules that find issues identified in the NIST SAMATE standard
OWASP Top 10 Security Vulnerabilities Includes rules that find issues identified in OWASP’s Top 10 standard
Payment Card Industry Data Security Standard Includes rules that find issues identified in PCI Data Security Standard
SecurityRules General test configuration that finds security issues
Coverage Used to generate the code coverage report.
Configuration Name Description
20

Compiler Configuration
21
Compiler ConfigurationYou must configure Static Analysis Engine for specific C and C++ compilers, including compiler ver-sions, before running the analysis. See “Compiler”, page 11, for basic information on configuring com-pilers. For a full list of supported compilers, see “Supported Compilers”, page 98.
Specifying Multiple CompilersIf multiple compilers need to be used during a single test run, they can be configured with the following extended syntax of the -compiler / cpptest.compiler.family option where <COMPILER_COMMAND> is the path to the original compiler executable and ’*’ is match-all character:
Example
Working with Custom Compiler ConfigurationsWhen working with custom compiler configurations, the configuration files should be copied into a directory defined with the cpptest.compiler.dir.user configuration entry:
Each custom compiler should be located in a dedicated subdirectory with unique name:
-compiler <COMPILER_ID>:<COMPILER_COMMAND>;<COMPILER_ID>:<COMPILER_COMMAND>;...
cpptest.compiler.family=<COMPILER_ID>:<COMPILER_COMMAND>;<COMPILER_ID>:<COMPILER_COMMAND>;...
-compiler vc_9_0:*cl.exe;gcc_3_4:/usr/bin/gcc.exe
cpptest.compiler.family=vc_9_0:*cl.exe;gcc_3_4:/usr/bin/gcc.exe
cpptest.compiler.dir.user=/home/custom_compilers
/home/custom_compilers (cpptest.compiler.dir.user configuration entry)
custom_gcc
c.psrc
cpp.psrc
gui.properties
custom_iar
c.psrc
cpp.psrc
gui.properties

Defining Input Scope
Defining Input ScopeThe input scope defines the C and C++ source files to test with Static Analysis Engine. The input scope also provides the full set of information about compiler options and environment, so Static Analysis Engine can re-create the original build environment to provide accurate test results. See “Compiler”, page 11, for information about defining compilers.
Analyzing a Single FileSee “Analyzing a Single File”, page 11, for instructions.
Analyzing a Makefile-based ProjectSee “Analyzing a Makefile-based Project”, page 12, for instructions.
Analyzing Code Using Existing Build DataOnly the source files defined in the build data file will be analyzed. Header files included by the source files will be excluded from analysis. See the following sections for additional information:
• “About Build Data Files”, page 12, describes the concept of the .bdf and how to create it
• “Re-analyzing a Project without Re-building”, page 14, describes the steps for using the .bdf for analysis
• “Defining Source File Structures (Modules)”, page 22, desribes how to broaden the scope of files tested, including header files
Defining Source File Structures (Modules)Static Analysis Engine treats the input scope as a set of unrelated source files. Defining modules allows you to introduce a well-defined source file structure and add additional files, such as header files, into the Input Scope.
Modules are defined by specifying its name and the root directory. All tested files located in the root directory or its sub-directories will belong to the module. All header files located in the root directory or its sub-directories that are included by the tested source files will also belong to the module and be analyzed with the source files.
For all files from the module, a "module-relative path" will be available. A project-relative path is com-puted as a relative path from the module root to the actual file location. In most cases, module-relative paths are independent from machines, so the test results can be easily shared across different machines.
Example of Module StructureThe first block of code describes a simple directory/file structure. In the second block of code, the rela-tionships between the files and module root directory are described, as well as which files will be ana-lyzed:
/home/devel_1/project/src/foo.cpp tested file defined in bdf will be analyzed
/home/devel_1/project/includes/foo.h #included by foo.cpp
/home/devel_1/project/includes/other.h not #included by foo.cpp
22

Defining Input Scope
Assuming module MyApp is defined with /home/devel_1/project root location, the following files will be tested as part of the module:
Defining a Basic Module StructureUse the -[<MODULE_NAME>=]<MODULE_ROOT_LOCATION> switch to define a module. If the name is unspecified, the name of the root directory will be used:
Alternatively, module structures can be defined in a custom configuration file using the cpptest.scope.module.<MODULE_NAME>=<MODULE_ROOT_LOCATION> property:
Defining a Module with Multiple Root LocationsAdd a logical path to the module name that points to the appropriate root location to define multiple, non-overlapping locations:
Fine-tuning the Input ScopeUse the -resource switch to specify a file or set of files for testing.
You can specify the following resources in the path:
• File path (only selected file will be tested)
/home/devel_1/common/common.h #included by foo.cpp
/home/devel_1/project/src/foo.cpp belongs to MyApp as MyApp/src/foo.cpp; will be analyzed
/home/devel_1/project/includes/foo.h belongs to MyApp as MyApp/includes/foo.h; will be analyzed
/home/devel_1/project/includes/other.h not #included; will not be analyzed
/home/devel_1/common/common.h does not belong to MyApp; will not be analyzed
-module MyApp=/home/devel_1/project
-module /home/devel_1/project
-module MyModule=../projects/module1
-module .
cpptest.scope.module.MyApp=/home/devel_1/project
cpptest.scope.module.MyModule=../projects/module1
-module MyApp/module1=/home/devel_1/project -module MyApp/module2=/home/external/module2/src
cpptest.scope.module.MyApp/module1=/home/devel_1/project
cpptest.scope.module.MyApp/module2=/home/external/module2/src
-resource /home/cpptest/examples/ATM/ATM.cxx
-resource /home/cpptest/examples/ATM
-resource ATM.cxx
23

Defining Input Scope
• Directory path (only files from selected directory will be tested)
• File name (only files with selected name will be tested)
Use the -include and -exclude switches to apply additional filters to the scope.
• -include instructs Static Analysis Engine to test only the files that match the file system path; all other files are skipped.
• -exclude instructs Static Analysis Engine to test all files except for those that match the file system path.
If both switches are specified, then all files that match -include, but not those that match -exclude patterns are tested.
The -include and -exclude switches accept an absolute path to a file, with asterisk (*) as an accepted wildcard. .
You can specify a file system path to a list file (*.lst) to include or exclude files in bulk. Each item in the *.lst file is treated as a separate entry.
-include /home/project/src/ATM.cxx
-include /home/project/CustomIncludes.lst
-exclude /home/project/src/*.cxx
-exclude /home/project/CustomExcludes.lst
24

Configuring Authorship
Configuring AuthorshipYou can configure DTP Engines to collect authorship data during analysis to facilitate task assignment. The data can be sent to the DTP server where additional analysis components, such as the Process Intelligence Engine (PIE), can be leveraged to facilitate defect remediation and development optimiza-tion.
You can configure DTP Engines to assign authorship based on information from source control, XML files that directly map sources to authors, and/or the current local user.
About Authorship Configuration PriorityAuthorship priority is determined by reading the settings in the .properties configuration file from top to bottom. If multiple authorship sources are used, the following order of precedence is used:
1. information from source control
2. XML map file
3. current user
if one of the selected options does not determine an author, Authorship will be determined based on the next option selected. If an author cannot be determined, the user is set as "unknown". Likewise, if none of these options is selected, the user is set as "unknown."
Configuring How Authorship is ComputedEdit the cpptestcli.properties configuration file to specify how authorship is determined.
• Setting scope.scontrol to true calculates authorship based on check-in data in source con-trol. This is set to false by default.
• Setting scope.local to true calculates authorship based on the local user and system files modification time. This is set to true by default.
• Setting scope.xmlmap to true calculates authorship based on information stored in an XML map file (see “Creating Authorship XML Map Files”, page 26, for syntax information). This is set to false by default.
• If all properties are set to true, scope.scontrol takes precedence.
Additional Authorship ConfigurationsBy default, author names are case-sensitive, but you can disable case sensitivity:
scope.local=[true or false]
scope.scontrol=[true or false]
scope.xmlmap=[true or false]
authors.ignore.case=true
25

Configuring Authorship
You can set the user name, email, and full name for a user with the authors.user[identifyer] set-ting. For example:
If a user is no longer on team or must transfer authorship to another user, you can use the authors.mapping[x,y] setting:
If you are transferring authorship between users, the author-to-author mapping information can be stored locally or in an a shared XML map file:
If the mapping file is shared, you must specify the location of the shared XML file:
Creating Authorship XML Map FilesThe <authorship> element contains indicates the beginning of the mapping information.
The <file /> element is placed inside the <authorship> element and takes two properties, author and path to map users to files or sets of files:
You can use wildcards to map authors to sets of files. The following table contains examples:
Mapping order matters. The mapping file is read from top to bottom, so beginning with the most spe-cific mapping ensures that authorship will map to the correct files.
authors.user1=john,[email protected],John Doe
authors.mapping1=old_user,new_user
authors.mappings.location=[local or shared]
authors.shared.path=[path to file]
<?xml version="1.0" encoding="UTF-8" ?>
<!DOCTYPE authorship (View Source for full doctype...)>
<authorship>
<!-- assigns all files named: "foo/src/SomeClass.java" to "author1" -->
<file author="author1" path="foo/src/SomeClass.java" />
Wildcard Expression Description
?oo/src/Foo.c Assigns all files that have names starting with any character (except /) and ends with "oo/src/"
**.cs Assigns all *.cs files in any directory
**/src/** Assigns every file whose path has a folder named "src"
src/** Assigns all files located in directory "src"
src/**/Test* Assigns all files in directory "src" whose name starts with "Test" (e.g., "src/some/other/dir/TestFile.c")
26
Suppressing Violations
Suppressing ViolationsSuppressions prevent DTP Engines from reporting additional occurrences of a specific static analysis task (multiple tasks might be reported for a single rule). Suppressions are useful when you want to fol-low a rule, but do not want to receive repeated messages about your intentional rule violations. If you do not want to receive error messages for any violations of a specific rule, disable the rule in the test configuration.
If you are using DTP Engines in an IDE, you can define suppressions using the GUI (see the DTP Plu-gin documentation for your IDE for details), otherwise suppressions are defined in the source code using the following syntax.
Line Suppression<suppression keyword> [<rule category> | <rule category> . <rule id> | <rule category > - <rule severity> | ALL ] <suppression comment>
Line Suppression Examples// parasoft-suppress CODSTA "suppress all rules in category CODSTA"
// parasoft-suppress CODSTA.NEA "suppress rule CODSTA.NEA"
// parasoft-suppress CODSTA-1 "suppress all rules in category CODSTA with severity level 1"
// parasoft-suppress ALL "suppress all rules"
// parasoft-suppress CODSTA FORMAT.MCH JAVADOC-3 "suppress all rules in category CODSTA and rule FORMAT.MCH and all rules in category JAVADOC with severity level 3"
Block Suppression<begin suppression keyword> [<rule category> | <rule category> . <rule id> | <rule category > - <rule severity> | ALL ] <suppression comment>
..... source code block .....
<end suppression keyword> [<rule category> | <rule category> . <rule id> | <rule category > - <rule severity> | ALL ] <suppression comment>
Block Suppression Examples// parasoft-begin-suppress CODSTA "begin suppress all rules in category CODSTA"
.....
// parasoft-end-suppress CODSTA "end suppress all rules in category CODSTA"
// parasoft-begin-suppress CODSTA.NEA "begin suppress rule CODSTA.NEA"
.....
27
Suppressing Violations
// parasoft-end-suppress CODSTA.NEA "end suppress rule CODSTA.NEA"
// parasoft-begin-suppress CODSTA-1 "begin suppress all rules in category CODSTA with severity level 1"
......
// parasoft-end-suppress CODSTA-1 "end suppress all rules in category CODSTA with severity level 1"
//parasoft-begin-suppress ALL "begin suppress all rules"
.....
// parasoft-end-suppress ALL "end suppress all rules"
// parasoft-begin-suppress CODSTA FORMAT.MCH "begin suppress all rules in category CODSTA and rule FORMAT.MCH"
.....
// parasoft-end-suppress CODSTA FORMAT.MCH "end suppress all rules in category COD-STA and rule FORMAT.MCH"
// parasoft-begin-suppress CODSTA "begin suppress all rules in category CODSTA"
.....
// parasoft-end-suppress CODSTA-1 "end suppress all rules in category CODSTA with severity level 1; however rules with severity level 2-5 in category CODSTA are still suppressed."
.....
// parasoft-end-suppress CODSTA "end suppress all rules in category CODSTA"
// parasoft-begin-suppress ALL "begin suppress all rules"
.....
// parasoft-end-suppress CODSTA FORMAT-1 "end suppress all rules in category CODSTA and all rules in category FORMAT with severity level 1; however, others rules in COD-STA and FORMAT-1 are still suppressed."
.....
// parasoft-end-suppress ALL "end suppress all rules"
//parasoft-begin-suppress ALL "begin suppress all rules, since no end suppression comment, all rules will be suppressed starting from this line"
28

Flow Analysis
Flow AnalysisFlow Analysis is a type of static analysis technology that uses several analysis techniques, including simulation of application execution paths, to identify paths that could trigger runtime defects. Defects detected include use of uninitialized memory, null pointer dereferencing, division by zero, memory and resource leaks.
Since this analysis involves identifying and tracing complex paths, it exposes bugs that typically evade static code analysis and unit testing, and would be difficult to find through manual testing or inspection.
Flow Analysis’ ability to expose bugs without executing code is especially valuable for users with leg-acy code bases and embedded code (where runtime detection of such errors is not effective or possi-ble).
Run one of the Flow Analysis test configurations during analysis to execute flow analysis rules:
Configuring Depth of Flow AnalysisFlow Analysis engine builds paths through the analyzed code to detect different kinds of problems. Since the analysis of all possible paths that span through the whole application may be infeasible, you can set up the desired level of depth of analysis. A deeper analysis will result in more findings, but the performance will be slower and the memory consumption will increase slightly.
You can specify the depth of analysis using the following methods:
• By using the test configuration interface in DTP. Go to Report Center> Test Configurations> Static Analysis> Flow Analysis Advanced Settings> Performance> Depth of analysis and choose one of the following options by selecting a radio button:
• Shallowest (fastest): Finds only the most obvious problems in the source code. It is limited to cases where the cause of the problem is located close to the code where the problem occurs. The execution paths of violations found by this type of analysis nor-mally span several lines of code in a single function. Only rarely will they span more than 3 function calls.
• Shallow (fast): Like the "Shallowest" analysis type, finds only the most obvious prob-lems in the source code. However, it produces a greater overall number of findings and allows for examination of somewhat longer execution paths.
• Standard: Finds many complicated problems with execution paths containing tens of elements. Standard analysis goes beyond shallow analysis and also looks for more complicated problems, which can occur because of bad flow in a single function or due to improper interaction between different functions in different parts of the analyzed project. Violations found by this type of analysis often reveal non-trivial bugs in the analyzed source code and often span tens of lines of code.
• Deep (slow): Allows for detection of a greater number of problems of the same com-plexity and nature as those defined for "Standard" depth. This type of analysis is slower than the standard one.
• Thorough (slowest): Finds more complicated problems. This type of analysis will per-form a thorough scan of the code base; this requires more time, but will uncover many very complicated problems whose violation paths can span more than a hundred lines
builtin://Flow Analysis Fast
builtin://Flow Analysis Standard
builtin://Flow Analysis Aggressive
29

Flow Analysis
of code in different parts of the scanned application. This option is recommended for nightly runs.
• By manually editing the test configuration file. Open the test configuration file in an editor and set the com.parasoft.xtest.checker.flowanalysis.depthOfAnalysis property to the value that represents the desired depth of analysis: 0 - Shallowest, 1 - Shallow, 2 - Standard, 3 - Deep, 4 - Thorough.
The depth of Flow Analysis is set to Standard by default.
Setting Timeout StrategyApart from the depth of analysis, Flow Analysis engine uses an additional timeout guard to ensure the analysis completes within a reasonable time. An appropriate strategy can be set using the following methods:
• By using the test configuration interface in DTP. Go to Report Center> Test Configurations> Static Analysis> Flow Analysis Advanced Settings> Performance> Strategy for Time-outs and choose one of the following options by selecting a radio button:
• time: Analysis of the given hotspot is stopped after spending the defined amount of time on it. Note: in some cases, using this option can result in a slightly unstable num-ber of violations being reported.
• instructions: Analysis of the given hotspot is stopped after executing the defined number of Flow Analysis engine instructions.Note: to determine the proper number of instructions to be set up for your environment, review information about timeouts in the Setup Problems section of the generated report.
• off: No timeout. Note: using this option may require significantly more time to finish the analysis.
• By manually editing the test configuration file. Open the test configuration file in an editor and set the com.parasoft.xtest.checker.flowanalysis.hotSpotTimeoutStrategy property to the value that represents the desired timeout strategy:
• time: Analysis of the given hotspot is stopped after spending the defined amount of time on it. Set the com.parasoft.xtest.checker.flowanalysis.hotSpotTimeout-Seconds property to a value representing the number of seconds.
• ticks: Analysis of the given hotspot is stopped after executing the defined number of Flow Analysis engine instructions. Set the com.parasoft.xtest.checker.flow-analysis.hotSpotTimeoutTicks property to a value representing the number of instructions. Note: to determine the proper number of instructions to be set up for your environment, review information about timeouts in the Setup Problems section of the generated report.
• off: No timeout.
The default timeout option is time set to 60 seconds. To get information about the Flow Analysis time-outs that occurred during the analysis, review the Setup Problems section of the report generated after the analysis.
Reusing Flow Analysis Data for Desktop AnalysisOne way to improve desktop performance with Flow Analysis is to reuse the server analysis data on the desktop. To do this, you need to define a mapping that allows Flow Analysis engine to match server file paths with corresponding desktop file paths.
30

Flow Analysis
Additionally, you can reuse data to run the analysis on a small scope (for example, one file) and build paths that include methods defined in files outside the defined scope of analysis, provided that these files have been analyzed.
Please, contact Parasoft Support for more information on how to use this functionality.
31

Metrics Analysis
32
Metrics AnalysisDTP Engines can compute several code metrics, such as code complexity, coupling between objects, and lack of cohesion, which can help you understand potential weak points in the code. Run the Met-rics test configuration during analysis to execute metrics analysis rules:
Metrics analysis is added to the HTML and XML report files generated by DTP Engines. See “Metrics Summary”, page 38, for information about reports.
Setting Metrics ThresholdsYou can set upper and lower boundaries so that a static analysis violation is reported if a metric is cal-culated outside the specified value range. For example, if you want to restrict the number of logical lines in a project, you could configure the Metrics test configuration so that a violation is reported if the Number of Logical Lines metric exceeds the limit.
The Metrics test configuration shipped with DTP Engines includes default threshold values. There are some rules, such as Number of Files (METRIC.NOF), for which thresholds cannot be set.
Metric thresholds can be set using the following methods:
• By using the test configuration interface in DTP (see "Report Center> Test Configurations> Editing Test Configurations> Metrics Tab" in the Development Testing Platform user manual for details).
• By editing the test configuration using the interface in an IDE (see "Working with Test Configu-rations> Creating Custom Test Configurations" in the DTP Plugin manual for your IDE).
• By manually editing the test configuration file:
1. Duplicate the built-in Metrics test configuration ([INSTALL]/configs/builtin) to the user configurations directory ([INSTALL]/configs/user)
2. Open the duplicate configuration in an editor and set the [METRIC.ID].ThresholdEnabled property to true.
3. Configure the lower and upper boundaries in the [METRIC.ID].Threshold property according to the following format:
[METRIC.ID].Threshold=l [lower boundary value] g [upper boundary value]
4. Save the test configuration and run the analysis using the custom metrics test configuration.
builtin://Metrics
Code Duplicate Analysis
33
Code Duplicate AnalysisDTP Engines can check for duplicate code, which may indicate poor application design, as well as increase maintenance costs. During code duplication analysis, the code is parsed into smaller lan-guage elements (tokens). The tokens are analyzed according to a set of rules that specify what should be considered duplicate code. There are two types of rules for analyzing tokens:
• Simple rules for finding single token duplicates, e.g., string literals
• Complex rules for finding mulitple token duplicates, e.g., duplicate methods or statements
Run the Find Duplicated Code test configuration during analysis to execute code duplicates detection rules:
builtin://Find Duplicated Code

Using DTP Engines in an IDE
34
Using DTP Engines in an IDEYou can use DTP Engines within Eclipse or Visual Studio. Integrating with an IDE gives you a desktop interface for executing code analysis locally, viewing results, and leveraging the data and test configu-rations stored in DTP server. You can also import findings from DTP Server into your development environment.
This integration is achieved with the DTP Plugin for Eclipse or Visual Studio and the DTP Engine Plu-gin. See the appropriate DTP Plugin User Guide for installation, usage, and other details stored in the [INSTALL]/integration/[IDE]/ directory.
You can also leverage the IDE plug-ins to integrate the DTP Engines for C/C++ with the Wind River Workbench IDE. See the "DTP Plugin Wind River Integration" guide for more information.

ReportingDTP Engines print results to the output console, as well as save an HTML report to the [WORKING_DIR]/reports directory by default. Data for the HTML report is stored in the directory as an XML file, which can be used for importing results into a supported Parasoft DTP Plugin for the IDE and Parasoft DTP Plugin for C/C++ (see "Parasoft DTP Plugin for [IDE] User’s Guide" for additional infor-mation). For an overview of the HTML report structure, see “Viewing Reports”, page 35.
If the engines are connected to DTP, reports are also sent to the server (see “Sending Results to Development Testing Platform (DTP) Server”, page 41).
Specifying Report Output LocationYou can use the -report switch during analysis to specify an output directory for reports.
You can also use the report.location property to change the location of an HTML report.
A simple .csv report can also be generated by enabling the CVS reporter. See “Generating a .csv Report”, page 15.
Specifying Report FormatYou can also generate a PDF report or a report using a custom extension to the specified directory by setting the report.format property. See “Report Settings”, page 79, for additional information.
Viewing ReportsOpen the report.html or report.pdf file saved to the working directory or location specified with the -report switch. Reports may contain different sections depending on the type of analysis, but the fol-lowing sections are included in all static and flow analysis configurations.
Header
cpptestcli -report /home/reports/html …
report.location=<HTML_REPORT_LOCATION>
report.format=pdf
35

The following information is included:
• Tool used for the analysis
• Build ID
• Test configuration
• Time stamp of the analysis
• Machine name and user name
• Session tag
• Project name
• Number of findings with the highest severity
• Number of failed tests
Static AnalysisThe first part of the report covers the Static Analysis findings and is divided into two main sections.The first section is a summary which shows an overview of findings displayed as a pie chart. The colors indicate different severity types and their corresponding number of findings detected during static anal-ysis.
The second section shows the details of static analysis findings. It starts with a table which includes static analysis results.
The following information is included:
• Name of module
• Number of suppressed rules
• Total number of findings
• Average number of findings per 10,000 lines
• Number of analyzed files
• Total number of files in the module
• Number of code lines analyzed
• Total number of code lines in the module
36

All Findings The All Findings section displays the details of findings organized by category or severity. Click the Severity or Category link to toggle between views.
In category view, findings are reported by rule and grouped by category. A count of how many times each rule was violated in the scope of analysis is also shown.
In severity view, findings are reported and grouped by severity. A count of findings per severity is also included.
These sections are merged in PDF versions of the report.
Findings by Author
37

This section includes a table of authors associated with the analyzed code and a count of findings per each author. Findings are segmented into findings associated with suppressed rules and findings rec-ommended for remediation. Click on an author link to view their finding details.
The details view includes the following information:
• File containing the finding and its location
• Violation message and rule
• Flow analysis reports also mark the cause of the violation (C), violation points (P), thrown exceptions (E), and important data flows (!)
Findings by FileYou can navigate the analyzed code to the reported findings in the Findings by File section. Each node begins with a value that indicates the total number of findings in the node. The value in brackets shows the number of suppressed rules in the node. You can click nodes marked with a plus sign (+) to expand them. PDF versions of the reports are already fully expanded.
Active RulesThe rules enabled during analysis are listed in the Active Rules section.
Metrics Summary
38

If your test configuration includes metrics analysis, a metrics section will appear in the report. See “Metrics Analysis”, page 32, for additional information.
Test ExecutionThe second part of the report covers the Test Execution results and is divided into two sections.The first section is a summary which shows an overview of test failures and coverage displayed as pie charts.
The second section shows the details of test execution. It starts with a table which includes test execu-tion results and coverage information.
The following information is included:
• Module name
• Number of unit test problems which need to be fixed
• Number of exceptions which need to be reviewed
• Number of assertion failures which need to be reviewed
• Number of unit tests successfully executed
• Number of unit tests failures
• Number of incomplete unit tests
• Total number of unit tests
• Line coverage expressed as percentage
All Findings
39

The All Findings section displays the details of all unit test problems detected during test execution.
Findings by AuthorThis section includes a table of authors associated with the analyzed code and shows the total number of findings for each author. Click on an author link to view their finding details.
The details view includes the following information:
• Finding location
• Test name
• Failure message
Executed Tests (Details)You can view the findings in the Executed Tests (Details) section. The nodes where all the test passed are marked with "P" in square brackets. The nodes with test failures begin with a set of values in square brackets. The first value is a count of successfully passed tests and the second indicates the total number of tests executed in the node.The letter "F" indicates the final node where the test failed. You can click nodes marked with a plus sign (+) to expand them.
CoverageThis section shows the details of coverage collected during the test execution. Each node starts with a set of values. The first value shows coverage expressed as percentage. The second value is a count of
40

the number of lines in the node which were covered during the test execution. The third value indicates the total number of lines in the node. You can click nodes marked with a plus sign (+) to expand them.
Test ParametersThe arguments specified during analysis are shown in the Test Parameters section.
Sending Results to Development Testing Platform (DTP) ServerSee “Connecting to DTP Server”, page 7, for information about configuring your connection to DTP Server. Use the -publish switch to report test results to DTP server.
Publishing Source Code to DTP ServerBy default, tested sources are sent to DTP when the report setting is enabled. This enables DTP to present source code associated with findings.
You can use the report.dtp.publish.src setting to disable the publishing of source code, restrict the depth of source code publishing, or enable source code publishing when sending reports to DTP Server is disabled. See “Settings Reference”, page 71, for additional information on DTP Engine set-tings.
The report.dtp.publish.src setting takes one of the following values:
• off: Code is not published to DTP server.
• min: Publishes minimal part of sources. Only source code that has no reference to source con-trol is published.
• full: Publishes all sources associated with the specified scope. This is the default settings.
See the "Development Testing Platform User Guide" for additional information about viewing source code in DTP.
Publishing Sources to DTP Without Running Code Analysis DTP Engines need to execute to send data to DTP Server, but you may want to send sources without running analysis.
cpptestcli -publish . . .
41

1. Create an empty test configuration and save it to [INSTALL_DIR]/configs/user (see “Spec-ifying Test Configurations”, page 17).
2. Run the configuration with appropriate report.dtp.publish.src setting.
42

Unit Test ConnectorUnit Test Connector (UTC) allows you to run unit tests created in open source unit testing tools and report results to DTP. UTC for C/C++ currently ships with out-of-the-box support for the following unit testing tools:
• Google Test
• CppUnit
• CppUtest
Visit the Parasoft Marketplace (http://marketplace.parasoft.com) for additional unit test tool integra-tions.
Unit Test Connector consists of:
• a module that extracts and reports unit test case execution results
• a module which annotates code coverage results to associate test cases with code coverage to evaluate the quality of a particular unit test or collection of tests.
Integrating Unit Test Connector with a testing infrastructure requires minor modifications of the existing test harness code.
Google Test ConnectorUnit Test Connector for Google Test can send test execution results to DTP server, as well as generate a local HTML report using the XML report created by the test framework.
Reporting Google Test Results1. Add the following option to your normal Google Test test driver command:
A Google Test result XML file is generated
2. Run the following test configuration and specify the Google Test result XML file as the input (see “Specifying Test Configurations”, page 17, for additional information about test configura-tions):
This will generate an HTML report, as well as send test results to DTP server if configured (see “Connecting to DTP Server”, page 7, for additional information).
UTE will perform the following actions:
• Associate the test results with the project name specified with the dtp.project property
• Associate test failures with the author specified with the dtp.user property
Improving the Test Case File AssociationThe Google Test result XML file provides limited information and may incorrectly associate passed test cases with the tested file. This may affect how test results are displayed in some DTP Test widgets.
--gtest_output=xml:<result_filename>.xml
cpptestcli -config builtin://GoogleTest -input <result_filename>.xml -publish
43

Use the RecordProperty function inside a test case to force an association between a test case and a file. Use cpptest_filename as the attribute name and the filename as the second argument:
The RecordProperty function is provided by the Google Test framework.
Associating Tests with Code CoverageYou can automatically annotate code coverage results with test start/stop information (see “Annotating Results Stream with Test Start/Stop Information”, page 57). This will allow you to selectively analyze code coverage generated by a specific test or collection of tests.
1. Include a dedicated header file in the source file that contains Google Test main function:
2. Add the following code to the main function after the InitGoogleTest() call and before tests exe-cution:
Alternatively, you can register the C++test listener using the GoogleTest API directly:
For simple setups, your modified main function may resemble the following:
3. Use the -I option to specify the cpptest/gtest.h header file location when compiling the source file with the main function:
4. Use Code Coverage Engine to build test executable (see “Code Coverage Engine”, page 50).
TEST(ExampleTestSuite, ExampleTestCase) {
RecordProperty("cpptest_filename", __FILE__);
}
#include "cpptest/gtest.h"
CppTest_GoogleTestListener::Append();
::testing::TestEventListeners& listeners = ::testing::UnitTest::GetInstance()->listeners();
listeners.Append(new CppTest_GoogleTestListener());
GTEST_API_ int main(int argc, char **argv)
{
// Initializing GoogleTest
testing::InitGoogleTest(&argc, argv);
// Appending CppTest_GoogleTestListener
CppTest_GoogleTestListener::Append();
// Running tests
return RUN_ALL_TESTS();
}
-I <Installation Directory>/runtime/include
44

5. Run the test executable with the following option:
6. Run cpptestcli specifying the GoogleTest result .xml file and coverage log file as the inputs to generate a report:
See “Reporting”, page 35 for details on configuring and publishing reports.
CppUnit and CppUtest ConnectorUnit Test Connector for CppUnit and CppUtest can report test execution results to DTP server, as well as associate tests with code coverage. To integrate CppUnit or CppUtest with Unit Test Connector, you need to install a results listener and a coverage annotator into the existing CppUnit or CppUtest infra-structure.
The typical integration includes both the results listener and the coverage annotator, which give you complete information about tests results and coverage. You may choose to install only the results lis-tener for lightweight tests or for comparing results with and without coverage.
Installing Unit Test Connectors into Test SetupsThis section describes CppUnit and CppUtest setups with both the results listener and the coverage annotator. If you choose to install the results listener only, skip all the lines which mention the coverage annotator.
Installing Unit Test Connector into CppUnit Setup1. Include a dedicated header file in the source file that contains the CppUnit main function.
2. Install the results listener. The installation details will depend on the TestRunner class of the CppUnit framework you use to execute unit tests.
--gtest_output=xml:<result_filename>.xml
cpptestcli -config builtin://GoogleTest -input <result_filename>.xml -input cpptest_results.clog -publish
#include "cpptest/extensions/cppunit/results_listener.h"
#include "cpptest/extensions/cppunit/coverage_annotator.h"
45

For simple setups, your modified main function may resemble the following:
Depending on the class that was used, installation of the modifications may differ. The examples below show installation for two classes of the CppUnit framework.
Installation for the CppUnit::TestRunner class:
Installation for the CppUnit::TextTestRunner class:
3. Modify your build system configuration to specify the results_listener.h header file location with the -I option.
Installing Unit Test Connector into CppUtest Setup
/* required header files */
int main()
{
CPPUNIT_NS::Test *suite = CPPUNIT_NS::TestFactoryRegistry::getRegistry().makeTest();
CPPUNIT_NS::TextUi::TestRunner runner;
runner.addTest( suite );
CppTest_CppUnitResultsOutputter cpptestResListener;
CppTest_CppUnitCoverageAnnotator cpptestCovAnnotator;
runner.eventManager().addListener( &cpptestResListener );
runner.eventManager().addListener( &cpptestCovAnnotator );
runner.setOutputter( new CPPUNIT_NS::CompilerOutputter( &runner.result(), std::cout));
bool wasSucessful = runner.run();
return wasSucessful ? 0 : 1;
CppUnit::TestResult controller;
CppTest_CppUnitResultsListener cpptestResListener;
CppTest_CppUnitCoverageAnnotator cpptestCovAnnotator;
controller.addListener( &cpptestResListener );
controller.addListener( &cpptestCovAnnotator );
CppUnit::TestRunner runner;
runner.addTest(CppUnit::TestFactoryRegistry::getRegistry().makeTest() );
runner.run( controller, testPath );
CppUnit::TextTestRunner runner;
CppTest_CppUnitResultsListener cpptestResListener;
CppTest_CppUnitCoverageAnnotator cpptestCovAnnotator;
runner.eventManager().addListener(&cpptestResListener);
runner.eventManager().addListener(&cpptestCovAnnotator);
-I<C++test Installation Directory>/runtime/include
46

1. Include a dedicated header file in the source file that contains the CppUtest main function.
2. Install the results listener. The installation requires registration of the coverage annotator and the results listener into the TestRegistry class. It also requires use of a C++test supplied TestRunner.
For simple setups, your modified main function may resemble the following:
3. Modify your build system configuration to specify the results_listener.h header file location with the -I option.
Reporting CppUnit and CppUtest Test ResultsThe results listener can record unit test execution results and store the data in a file. By default, execu-tion results are stored in the cpptest_results.utlog file in the current working directory. You can change the default file location by providing the path as an argument to the CppTest_CppUnitResultsListener (CppUnit) or CppTest_CppUtestResultsListener (CppUtest) constructor:
• For CppUnit:
• For CppUtest:
Alternatively, you can use the following definition to specify the location during the test harness build process:
#include "cpptest/extensions/cpputest/results_listener.h"
#include "cpptest/extensions/cpputest/coverage_annotator.h"
#include "cpptest/extensions/cpputest/test_runner.h"
/* required header files */
int main()
{
// Register C++Test cpputest plugins
TestRegistry* registry = TestRegistry::getCurrentRegistry();
TestPlugin* coverageAnnotator = new CppTest_CppUtestCoverageAnnotator();
registry->installPlugin(coverageAnnotator);
TestPlugin* resultsListener = new CppTest_CppUtestResultsListener();
registry->installPlugin(resultsListener);
// run the tests
int result = CppTest_CppUtestTestRunner::RunAllTests(ac, av);
delete coverageAnnotator;
delete resultsListener;
return result;
-I<C++test Installation Directory>/runtime/include
CppTest_CppUnitResultsListener cpptestResListener("c:/myworkspace/cpptest_results.utlog");
CppTest_CppUtestResultsListener cpptestResListener("c:/myworkspace/cpptest_results.utlog");
-DCPPTEST_UT_LOG_FILE=\"c:/home/my_workspace/cpptest_results.utlog\"
47

If you choose to change the default file location, it is important to retain the .utlog file extension.
Once the test executable with the results listener is built, you can execute the scheduled unit tests. In standard setups, the cpptest_results.utlog file generated during test execution will be placed into the directory that contains the executable. If you modified the file path, the file will be created in the speci-fied location.
Unit test execution results can be published to DTP server or a local report can be generated with the following command line:
See “Reporting”, page 35 for details on configuring and publishing reports.
Unit test execution results are typically combined with code coverage results.
Associating Tests with Code CoverageYou can automatically annotate code coverage results with test start/stop information (See “Annotating Results Stream with Test Start/Stop Information”, page 57). This will allow you to selectively analyze code coverage generated by a specific test or a collection of tests. Associating tests with code cover-age requires the installation of both the coverage results annotator and the results listener, along with Code Coverage Engine.
The coverage annotator adds special markers into the code coverage results stream. These markers delimit coverage results for each test case. The coverage annotator adds the markers to the coverage results file, which is managed by Code Coverage Engine. The annotator does not require any input parameters.
Once the test executable with the results listener is installed, you can execute the scheduled unit tests. In standard setups, the cpptest_results.clog file and the cpptest_results.utlog file generated during test execution will be placed into the current working directory.
Run the following command to generate a local report and enable the selective analysis of code cover-age on DTP server:
Reporting AssertionsBy default, UTE does not show details about specific test assertion failures in the generated HTML report. Use the following properties to display test assertion failures in the report:
• report.contexts_details=true
• report.testcases_details=true
Tagging Unique Test RunsUse the session.tag property to define a tag that can be assigned to results from a specific test run. The tag is a unique identifier for the analysis process on a specific module. Using the same session tag overwrites data with results from the most recent run. By default, the tag is set to the name of the exe-cuted test configuration.
cpptestcli -config "builtin://Unit Testing" -input <result_filename>.utlog -publish -report local_report
cpptestcli -config "builtin://Unit Testing" -input cpptest_results.utlog -input cpptest_results.clog -publish -report local_report
session.tag=[name]
48

49

Code Coverage EngineThe DTP Code Coverage Engine (CCE) collects coverage information from unit testing, functional test-ing, as well as other kinds of application execution. CCE supports a range of coverage metrics and can be used for native and cross-application development. Collecting coverage information with CCE involves three phases:
• Instrumenting and building source code
• Executing instrumented code
• Generating a report
The following instructions provide a general description of integrating with a build system. For details on integrating with Make- or MSBuild-based projects, see the following chapters: “Integrating with Make-based Build Systems”, page 53, “Integrating with MSBuild”, page 55.
Instrumenting and Building Source CodeThree steps are performed during this phase:
1. Source code is instrumented
2. Instrumented source code is compiled to the object file
3. All instrumented and non-instrumented objects are linked to the code coverage tool library, as well as any additional libraries required to form the final testable binary artifact
These steps are typically performed during the build process and require that the coverage tool be inte-grated with the user build system.
The cpptestcc tool instruments the source code and compiles it into the object file. The cpptestcc is designed to be used as a compiler prefix in compilation command lines.
Original compilation command line:
Coverage mode compilation command line:
When the coverage mode compilation command line is executed, cpptestcc performs the following operations:
• Compilation command line is analyzed to extract information about source files
• All detected source files are parsed and instrumented for coverage metrics
• Instrumented files are reconstructed in the specified location using the -workspace switch; additional information about the code structure used during report generation is also stored
• Compilation command line is modified and the original source files are substituted with instru-mented versions
• Compilation command line is executed, object(s) files are created in the same location as in case of original command line
cc -I app/includes -D defines -c source.cpp
cpptestcc -compiler gcc_3_4 -line-coverage -workspace /home/test/proj/cov
-- cc -I app/includes -D defines -c source.cpp
50

You can add the [INSTALL_DIR]/bin directory to your PATH variable so that you do not have to use full paths when specifying cpptestcc command. All examples in this documentation assume this has been done.
The following pattern describes the syntax for coverage instrumentation:
cpptestcc -compiler <compiler configuration> <coverage metric specification> -work-space <workspace directory> -- <compilation command line>
• <compiler configuration> refers to a supported compiler configuration, e.g., gcc_3_4. See “Supported Compilers”, page 98, for a list of supported compilers.
• <coverage metric specification> refers to a supported coverage metric, e.g., line-cover-age. For list of supported coverage metrics, see “Command Line Reference for cpptestcc”, page 66.
• The cpptestcc command line is separated from compiler command line with the -- separator.
Linking Instrumented CodeThe original linker command must be modified to include the additional library required by the code coverage instrumentation. The following example shows how this is typically accomplished:
Original compilation command line:
Coverage mode compilation command line:
Executing Instrumented Code Details of the execution environment depend on the application specifics, but the coverage tool imposes the following limited dependencies on execution:
• If the coverage tool library was linked as a shared (dynamic-load) library, then you must ensure that the library can be loaded when instrumented application is started. On Windows, this typi-cally requires adding [INSTALL_DIR]/bin directory to the PATH environment variable. On Linux systems, add [INSTALL_DIR]/runtime/lib to the LD_LIBRARY_PATH variable.
• If the coverage results transport channel was modified, all requirements resulting from the modification have to be fulfilled. For example, if results are sent through TCP/IP socket or rs232 then appropriate listening agents need to be started before the instrumented application executes.
After the instrumented application finishes execution, the collected results must be stored in the file that will be used for report generation.
Generating ReportsFinal coverage report is generated from two types of information:
• Code structure information generated by cpptestcc during build process (stored in work-space)
• Coverage results achieved from instrumented code execution
lxx -L app/lib app/source.o -lsomelib -o app.exe
lxx -L app/lib app/source.o somelib.lib <coverage
tool>/runtime/lib/cpptest.lib -o app.exe
51

Coverage report can be generated in an HTML format or sent to DTP Server. The following example shows the command for generating a report:
In order to properly merge coverage data in DTP, you must specify one or more coverage image tags in the command line or .properties settings file. The coverage image(s) is automatically sent to the con-nected DTP server where it can be associated with a filter.
You can specify a set of up to three tags that can be used to create coverage images in DTP Server with the report.coverage.images property:
Associate coverage images in DTP in the Report Center administration page (administration> Projects> Filters> [click on a filter]).
You can also use the report.coverage.limit property to specify a lower coverage threshold:
Coverage results lower than this value are highlighted in the report. The default value is 40.
CCE Usage ExampleIn this example, the following code is from a c++ source file called main.c:
The normal file compilation command is gcc:
To instrument this file and compile the instrumented code to the object file, the compilation command line must include the cpptestcc command prefix:
Two artifacts are created as s a result of the cpptestcc command invocation:
cpptestcli -config builtin://Coverage -input cpptest_results.clog -workspace /home/test/proj/cov
report.coverage.images=[tag1; tag2; tag3]
report.coverage.limit=[value]
#include <iostream>
int main(int argc, char ** argv) {
if (argc > 1) {
std::cout << "Thank you for arguments" << std::endl;
} else {
std::cout << "Provide some arguments please !" << std::endl;
}
return 0;
}
g++ -c main.c -o main.o
cpptestcc -compiler gcc_3_4 -line-coverage -workspace /home/test/proj/cov
-- g++ -c main.c -o main.o
52
1. object with instrumented code
2. code structure information stored in the directory specified with -workspace option.
Once the source file is instrumented and compiled to the object file it, can be linked to form the final executable. Normally this simple example would be linked with the following command:
Coverage instrumentation requires additional library so the linking command line needs to look as fol-lows:
In this example, the static version of the coverage library was used. The dynamic/shared version, as well as the source code, is also provided for building a customized version. For additional information, see “Code Coverage Engine Runtime Library”, page 58, and “Customizing the Runtime Library”, page 60.
Once the application is linked it can be executed to collect information about code coverage. Run the following command:
The application will output the coverage log file, named cpptest_results.clog by default, in the cur-rent work directory.
Finally, generate the report using the following command:
A report directory will be created containing the HTML report with code coverage information.
Integrating with Make-based Build SystemsIntegrating CCE with a projects based on a GNU Make or similar build tools typically requires modifying the build scripts. In most of the cases the command line invoked by compilation and linking rules should be altered. This may require you to modify the make variables or, in some cases, the compila-tion and linking rules definitions.
Integrating with Make Compilation RulePrefix the compiler command line with the cpptestcc command wrapper to integrate with the Make compilation rule. To determine the best approach, start with analyzing build scripts and locating the def-inition for the compilation rule. In some cases, there are different rules for specific files, such as rules to handle C or C++ files. The following example shows how the compilation rule(s) may be defined:
In this example, the compiler is referenced with a CXX make variable. There are two options:
1. Add the prefix variable to the compilation rule, or
g++ main.o -o app.exe
g++ main.o <coverage tool install dir>/runtime/lib/cpptest.a -o app.exe
./app.exe
cpptestcli -config builtin://Coverage -workspace /home/test/proj/cov -input cpptest_results.clog -report report_dir
$(PRODUCT_OBJ_ROOT)/%$(EXT_OBJ) : %$(EXT_CXX)
$(CXX) $(CXXFLAGS) $(CXXSTATICFLAGS) -DAPPNAME=product
53

2. Overwrite the compiler variable
The following sections describe how to proceed with either approach
Adding the Prefix Variable to the Compilation RuleModify the compilation rule by prefixing the variable that references the compiler with an additional variable:
Additionally, assign a value to the added variable (COV_TOOL) either at the time of the Make invocation (example a) or in build scripts (example b):
Example a
Example b
In this option, the variable would likely be inside a condition dependent on an additional variable:
Overwriting the Compiler VariableIn this approach, the compiler variable is used to specify the coverage tool command line. This can be done either at the time of the Make invocation (example c) or in build scripts (example d) after the orig-inal value of the CXX variable is specified (to avoid overriding coverage tool command with original compiler):
Example c
If your build scripts have separate compilation rules for different types of files, you may need to over-write more than one variable, for example CC and CXX:
Example d
In this option, the variable would likely be inside a condition dependent on an additional variable:
Integrating with Make Linking RuleModify the linking rule to include the additional library required for code instrumentation. The cpptestcc tool library can have different forms depending on specific project requirements. It can be a shared/dynamic library, static library, or an object file. In all cases, the particular linker options may
$(PRODUCT_OBJ_ROOT)/%$(EXT_OBJ) : %$(EXT_CXX)
$(COV_TOOL) $(CXX) $(CXXFLAGS) $(CXXSTATICFLAGS) -
DAPPNAME=product
make COV_TOOL="cpptestcc -compiler gcc_3_4 -line-coverage
-workspace /home/test/proj/cov -- "
ifeq (COV_BUILD,$(BUILD_TYPE))
COV_TOOL="cpptestcc -compiler gcc_3_4 -line-coverage
-workspace /home/test/proj/cov -- "
endif
make CXX="cpptestcc -compiler gcc_3_4 -line-coverage -workspace /home/test/proj/cov -- g++"
ifeq (COV_BUILD,$(BUILD_TYPE))
CXX="cpptestcc -compiler gcc_3_4 -line-coverage -workspace /home/test/proj/cov -- g++"
endif
54

have a different form, but modifying the Makefiles will be done in a very similar manner regardless of the case.
For more details about using different forms of the cpptestcc tool runtime library, see “Using Cover-age Tool for Complex Projects”, page 56. This section focuses on the general approach to modifying linker command lines in Make-like environments.
To find an appropriate place for modification, begin with analyzing build scripts and locating the defini-tion of the linking rule. The following example shows how the linking rule may be defined:
You can either add a special variable for representing the cpptestcc tool library, or append the cover-age library to one of the variables already used in the linking rule.
Adding a Variable to Represent Coverage Tool LibraryThe following example shows what the modified rule may look like:
Additionally, assign a value to the added variable (COV_LIB) either at the time of the Make invocation (example e) or in build scripts (example f):
Example e
Example f
In this option, the variable would likely be inside a condition dependent on an additional variable:
Appending Coverage Library to Existing Variable in the Linking Rule
Integrating with MSBuildYour can integrate Code Coverage Engine with MSBuild. This integration is achieved with parasoft-coverage files shipped with CCE in the [INSTALL_DIR]/integration/msbuild directory.
For more details, see the parasoft_dtp_plugin_msbuild_manual.pdf stored in the [INSTALL_DIR]/inte-gration/msbuild directory.
$(PROJ_EXECUTABLE): $(PRODUCT_OBJ)
$(LXX) $(PRODUCT_OBJ) $(OFLAG_EXE)$(PROJ_EXECUTABLE) $(LXXFLAGS) $(SYSLIB) $(EXECUTABLE_LIB_LXX_OPTS)
$(PROJ_EXECUTABLE): $(PRODUCT_OBJ)
$(LXX) $(PRODUCT_OBJ) $(OFLAG_EXE)$(PROJ_EXECUTABLE) $(LXXFLAGS) $(SYSLIB) $(EXECUTABLE_LIB_LXX_OPTS) $(COV_LIB)
make COV_LIB="<COV_TOOL_INSTALLATION>/runtime/lib/cpptest.a "
ifeq (COV_BUILD,$(BUILD_TYPE))
COV_LIB="<COV_TOOL_INSTALLATION>/runtime/lib/cpptest.a"
endif
ifeq (COV_BUILD,$(BUILD_TYPE))
LXXFLAGS+="<COV_TOOL_INSTALLATION>/bin/engine/lib/cpptest.a"
endif
55

Using Coverage Tool for Complex ProjectsThe examples in this section describe several classes of projects and ways to approach integrating CCE.
• Build includes compilation of multiple source files without static or dynamic libraries
Compilation phase:
For all sources files or selected subsets, compilation should be prefixed with cpptestcc tool with options for enabling the desired coverage metrics.
Linking phase:
The linker command line should be modified to include the coverage tool library. In most of the cases, you will include the static library:
• Build includes compilation of multiple source files and the preparation of multiple static librar-ies, which are linked to the main objects
Compilation phase:
For all sources files or selected subsets, compilation should be prefixed with cpptestcc tool with options for enabling desired coverage metrics. If coverage from static libraries should also be collected, they need to be instrumented, as well.
Linking phase:
The linker command line should be modified to include the coverage tool library. In most of the cases, you will include the static library. It is important to add the coverage tool library only once, usually during executable linking. Static libraries created during the build should not contain the coverage library.
• Build includes compilation of multiple source files and preparation of multiple dynamic/shared libraries which are linked with main objects
Compilation phase:
For all sources files or selected subsets, compilation should be prefixed with cpptestcc tool with options for enabling desired coverage metrics. If coverage from dynamic libraries should also be collected, they need to be instrumented, as well.
Linking phase:
• Linking command lines for dynamic libraries should be modified to include the cover-age tool shared/dynamic-load library.
• Linking command lines for static libraries should not be modified.
• Linking command line for executable should be modified to include coverage tool shared/dynamic library
• Build includes the following:
• Compilation of multiple source files
• Preparation of multiple dynamic/shared libraries linked with main objects
• Multiple static libraries linked with main objects
Compilation phase:
For all sources files or selected subsets, compilation should be prefixed with cpptestcc tool with options for enabling desired coverage metrics. If coverage from dynamic or shared librar-ies should also be collected, they need to be instrumented, as well.
g++ source1.o source2.o <cov tool install dir>/runtime/lib/cpptest.a
56

Linking phase:
• Linking command lines for dynamic libraries should be modified to include the cover-age tool shared/dynamic-load library.
• Linking command lines for static libraries should not be modified.
• Linking command line for executable should be modified to include coverage tool shared/dynamic library
Annotating Results Stream with Test Start/Stop InformationYou can annotate code coverage results with test start/stop information to understand how a particular test scenario affects code execution. Test start notification conveys information about the test name, which can be used when processing test data and generating reports.
Test Start/Stop annotations functionality is available as an API and can be extended to many different scenarios. For example, you can associate code coverage results with unit tests or associate code coverage results with manual test scenarios performed during system testing.
Using the Test Start/Stop APIThe API includes the following functions:
Include a dedicated header file in the source file that will invoke the API functions:
Use the -I option to specify the cpptest.h header file location when compiling the source file:
Specify a valid string as an argument to the CppTest_TestStart function. Null pointers or invalid strings will cause undefined behavior.
Common Applications of the Test Start/Stop ScenariosThe following scenarios illustrate usage of the test start/stop notification API:
• Annotating coverage results with unit test case names
In this scenario, unit test case names are used as an argument specified to CppTest_TestStart function invocation. For some of popular C/C++ unit testing frameworks, dedicated connectors are provided to automate this task. For additional information about unit testing framework connectors, see “Unit Test Connector”, page 43.
Function Description
void CDECL_CALL CppTest_TestStart(const char* testName Sends the notification to the results stream about the beginning of a test with specified name.
void CDECL_CALL CppTest_TestStop(void) Sends the notification to the results stream about the end of previously started test.
#include "cpptest/cpptest.h"
-I <Installation Directory>/runtime/include
57

To use a unit testing framework that does not have a dedicated connector, you can invoke start/stop API functions at the beginning and end of the test case:
• Annotating coverage results with manual test scenario names for system testing sessions. There are a few ways to achieve this goal:
• Calls to test start/stop API can be added directly to the tested source. They can be activated with dedicated macros in the debug or test builds of the tested application. The method for providing the name of the test scenario to the API function call depends on the type of application. In some cases you can add a special option to the menu of the tested application that is only visible in the debug build or the command line. This would enable you to specify the name of the performed test scenario and send the notification to results stream once the name is entered.
• The names of the test cases can be also read from the environmental variable set before starting tested application.
• Use a special module implemented as a separate thread that is started in parallel to the threads of tested application. The module could, for example, listen on the TCP/IP socket and react when test start/stop command is send from external tool.
Code Coverage Engine Runtime LibraryThe CCE runtime library is a collection of helper functions and services used by source code instru-mentation to emit coverage information at application runtime. Instrumented applications can not be linked without the library. The runtime library can be linked to the final testable binary in multiple ways depending on tested project type.
In addition to providing basic services for instrumented code, the library is also used to adapt the code coverage solution to particular development environments, such as supporting nonstandard transport for coverage results between tested embedded device and development host.
Pre-built Versions and Customized BuildsCCE ships with pre-built versions of the runtime library, which are suitable for using on the same plat-form on which CCE is installed. In most of the cases, collecting code coverage information from natively developed applications (i.e., MS Windows or Linux x86 and x86-64) can use pre-built versions of runtime library.
All users developing cross-platform applications will need to prepare a custom build of the runtime library using a suitable cross compiler and possibly linker. Source code of the code coverage runtime library is shipped with CCE.
The process of preparing the runtime library custom build is typically limited to compilation of runtime library source code. In some situations you may need to install some fragments of source code to adapt code coverage to a particular development platform. This process is described in the following sections.
#include "cpptest/cpptest.h"
TEST(TimerTest, smokeTest) {
const char * tcName = testCaseName();
CppTest_TestStart(tcName);
int res = init_timer();
ASSERT_TRUE(res != 0);
CppTest_TestStop();
}
58

Using the Pre-built Runtime LibraryThe following binary files are included with the CCE:
Windows (x86 and x86-64)
Linux (x86 and x86-64)
If you need to use the runtime library in a form not provided as an out-of-the-box solution, prepare a custom build of the runtime library that matches specific development environment requirements. For more details about this please see “Customizing the Runtime Library”, page 60.
Integrating with the Linker Command LineIntegrating the CCE runtime library with a tested application linking process usually requires modifying the linker command line and, in some cases, the execution environment. This describes how to modify the linking process when using the pre-built versions shipped with CCE.
• Static library for Windows Cygwin GNU GCC compilers:
1. Locate the linker command line in your build scripts
2. Modify the build scripts so that the coverage runtime library is specified somewhere in in the linker command line--preferably after all object files.
• Dynamic-link library for MS CL compilers:
1. Locate the linker command line in your build scripts
File Description
[INSTALL_DIR]/runtime/lib/cpptest.a 32-bit static archive to be used with Cygwin GNU GCC compilers. To be added to linking command line
[INSTALL_DIR]/runtime/lib/cpptest.lib 32-bit import library to be used with Microsoft CL compilers. To be added to linking command line
[INSTALL_DIR]runtime/lib/cpptes64.lib 64-bit import library to be used with Microsoft CL compilers. To be added to linking command line
[INSTALL_DIR]/bin/cpptest.dll 32-bit Dynamic-link library to be used with Microsoft CL compilers. [INSTALL_DIR]/bin should be added to PATH environmental variable
[INSTALL_DIR]/bin/cpptest64.dll 64-bit Dynamic-link library to be used with Microsoft CL compilers. [INSTALL_DIR]/bin should be added to PATH environmental variable
File Description
[INSTALL_DIR]/runtime/lib/lib-cpptest.so
32-bit shared library. To be added linking command line. [INSTALL_DIR]/runtime/lib should be added to LD_LIBRARY_PATH
[INSTALL_DIR]/runtime/lib/libcpptest64.so
64 bit shared library. To be added linking command line. [INSTALL_DIR]/runtime/lib should be added to LD_LIBRARY_PATH
59

2. Modify the build scripts so that the coverage runtime library is specified somewhere in in the linker command line--preferably after all object files. For example:
3. Make sure that the [INSTALL_DIR]/bin directory is added to your PATH environment variable so that the library can be located when the tested program is started. You may also consider copying cpptest.dll (or cpptest64.dll) file to the same directory as your executable file or to another location that is scanned for dynamic-link libraries during tested application startup.
• Shared library for Linux GNU GCC compilers
1. Locate the linker command line in your build scripts
2. Modify the build scripts so that the coverage runtime library is specified somewhere in in the linker command line--preferably after all object files. For example:
Note the addition of the -L [INSTALL_DIR]/runtime/lib and -lcpptest options.
3. Make sure that shared library can be found by tested executable by modifying LD_LIBRARY_PATH environmental variable to include [INSTALL_DIR]/runtime/lib location
Customizing the Runtime LibraryYou may need to customize the runtime library as a result of the following conditions:
• Different form of binary file is required
• Enabling a non-default communication channel for results transport
• Installing custom implementation of communication channel for results transport
• Enabling a non-default support for multithreaded applications
• Installing custom implementation of support for multithreaded applications
Library Source Code Structure
The runtime library source code shipped with CCE is in the [INSTALL_DIR]/runtime directory. The following table describes the structure:
$(LXX) $(PRODUCT_OBJ) $(OFLAG_EXE)$(PROJ_EXECUTABLE) $(LXXFLAGS) $(SYSLIB) $(EXECUTABLE_LIB_LXX_OPTS) <INSTALL>/runtime/lib/cpptest.lib
$(LXX) $(PRODUCT_OBJ) $(OFLAG_EXE)$(PROJ_EXECUTABLE) $(LXXFLAGS) $(SYSLIB) $(EXECUTABLE_LIB_LXX_OPTS) -L <INSTALL>/runtime/lib -lcpptest
Component Description
include Directory containing library include files.
include/cpptest.h - library public interface
include/cpptest/* - library private interface
Content of the include directory is not designed for environment spe-cific modifications.
60

Switching Communication Channel SupportThe runtime library supports data collection through various communication channels. The communi-cation channel used depends on the development environment. In most cases, storing results in a file or files is appropriate, but in others TCP/IP sockets or RS232 transport may be required. Specific com-munication channels can be enabled by setting the value to a dedicated macro during cpptest.c library source file compilation. Add -D<MACRO> to the compilation command line to set the value. The following table provides the full list of communication channel control macros:
src Directory containing library source code
src/cpptest.c - main and single source file of the runtime library
This file is designed for modifications and customizations.
Makefile Basic Makefile provided for building runtime library
target Directory containing set of Makefile include files with compiler specific options for preparing runtime library builds for most popular develop-ment environments
channel Directory containing set of Makefile include files with configuration for supported communication channels.
Channel Description
CPPTEST_NULL_COMMUNICATION Empty implementation. If enabled no results will be sent. Suitable for initial test builds and debugging
CPPTEST_FILE_COMMUNICATION File-based implementation. ANSI C File I/O interface is used. If enabled, results will be written to a local drive file.
The following additional configuration macros are also provided:
CPPTEST_LOG_FILE_NAME: Name of the results file; default cpptest_results.clog
CPPTEST_LOG_FILE_APPEND: Creates new results file or appends to existing. Default value is 1 -> append, alternative 0 -> cre-ate new
Component Description
61

CPPTEST_SPLIT_FILE_COMMUNICATION File-based implementation. ANSI C File I/O interface is used. If enabled, results will be written into a series of local drive files.
You can configure this channel with the follow-ing macros:
CPPTEST_LOG_FILE_NAME: Name of the first results file in the series; the default is cpptest_results.clog. Other files will be named in sequence, for example, cpptest_results.clog.0001.
To pass the series to cpptestcli, ensure that all the files in the series are placed in the same directory and provide only the name of the first file as an input. When you run the cpptestcli command, other files will be merged with the first file in the series and removed from the directory.
CPPTEST_MAX_ALLOWED_NUMBER_OF_BYTES_PER_FILE: Specifies the maximum size of one file in the series; default 2000000000 bytes (2 GB).
CPPTEST_UNIX_SOCKET_COMMUNICATION TCP/IP socket based implementation. POSIX API is used. If enabled results are sent to specified the TCP/IP port. The following addi-tional configuration macros are provided:
CPPTEST_LOG_SOCKET_HOST: Specifies host IP address string
CPPTEST_LOG_SOCKET_PORT: Specifies the port number
CPPTEST_GETHOSTBYNAME_ENABLED: If set to 1, the host can be specified by domain name (requires gethostbyname function to be present)
CPPTEST_WIN_SOCKET_COMMUNICATION As above, MS Windows API is used
CPPTEST_UNIX_SOCKET_UDP_COMMUNICATION As above, UDP based implementation
Channel Description
62

If the runtime library is being built with the provided Makefile, then one of the make configuration files provided in the [INSTALL_DIR]/runtime/channel directory can be used. For details see “Integrating with Make-based Build Systems”, page 53.
Installing Support for Custom Communication ChannelIf none of the communication channel implementations fit into your development environment, then a custom implementation can be provided. The following instructions describe how to customize the runt-ime library so that it uses a custom implementation of a communication channel:
1. Make a copy of [INSTALL_DIR]/runtime/src/cpptest.c and open the file for editing
2. Locate the section 1.13 "Custom Communication Implementation"
CPPTEST_RS232_UNIX_COMMUNICATION RS232 based implementation. POSIX API is used. If enabled then results are sent via the specified RS232 system device. The following additional configuration macros are provided:
CPPTEST_RS232_DEVICE_NAME: System device name
CPPTEST_RS232_BAUD_RATE: Transmission baud rate
CPPTEST_RS232_BYTE_SIZE: Byte size
CPPTEST_RS232_PARITY: Parity control
CPPTEST_RS232_STOP_BIT: Stop bit usage
CPPTEST_RS232_TIMEOUT: Transmission time-out value
CPPTEST_RS232_WIN_COMMUNICATION As above. MS Windows API is used.
CPPTEST_RS232_STM32F103ZE_COMMUNICATION STM32F103x USART based implementation. STM Cortex library interface is used (ST/STM32F10x/stm32f10x.h header file is required)
CPPTEST_HEW_SIMIO_COMMUNICATION Renesas HEW simulator specific implementa-tion.
CPPTEST_LAUTERBACH_FDX_COMMUNICATION Lauterbach TRACE32 based implementation (FDX used)
CPPTEST_ITM_COMMUNICATION ARM CoreSight ITM unit based communica-tion. Requires CMSIS header files.
CPPTEST_CUSTOM_COMMUNICATION Enables empty template for custom imple-mentation
Channel Description
63

The custom communication implementation section contains empty templates for four different methods:
3. Provide the implementation for these methods that match your environment requirements.
4. Compile cpptest.c with the following macro definition added to compilation command line:
"-DCPPTEST_CUSTOM_COMMUNICATION"
5. If the generated object file is insufficient, you can process the file even further to meet your needs (e.g., to create a shared library)
Switching Multithreading API SupportThe runtime library contains support for multithreaded applications. POSIX, MS Windows, and VxWorks APIs are supported. You can enable support for a specific multithreading API by adding -D<MACRO> to the compilation command line during cpptest.c compilation. The following table describes the full list of multithreading API support control macros:
Installing Support for Custom Threading APIIf you are using CCE with multithreaded applications that do not use a supported multithreading API, you can customize the runtime library to work with your multithreading API. There are following steps required:
1. Make a copy of [INSTALL_DIR]/runtime/src/cpptest.c and open the file for editing
2. Locate the section 2.5 "Custom Multithreading Implementation"
Function Description
void cpptestInitializeStream(void) This function is responsible initializing the communica-tion channel, for example creating and connecting to a socket or the initialization of UART device.
void cpptestFinalizeStream(void) This function is responsible for finalizing the communi-cation channel. For example, it may be responsible for closing TCP/IP socket.
int cpptestSendData
(const char *data, unsigned size)
This function is responsible for sending size bytes from a data buffer.
void cpptestFlushData(void) This function is responsible for flushing the data. Its meaning depends on the particular transport type. It may have a limited application in some impementa-tions. In this case it should be left empty.
Macro Description
CPPTEST_NO_THREADS Empty implementation. Coverage runtime is not pre-pared to be used together with multithreaded applica-tions
CPPTEST_WINDOWS_THREADS MS Windows multithreading API implementation
CPPTEST_UNIX_THREADS POSIX multithreading API implementation
CPPTEST_VXWORKS_THREADS VxWorks multithreading API implementation
64
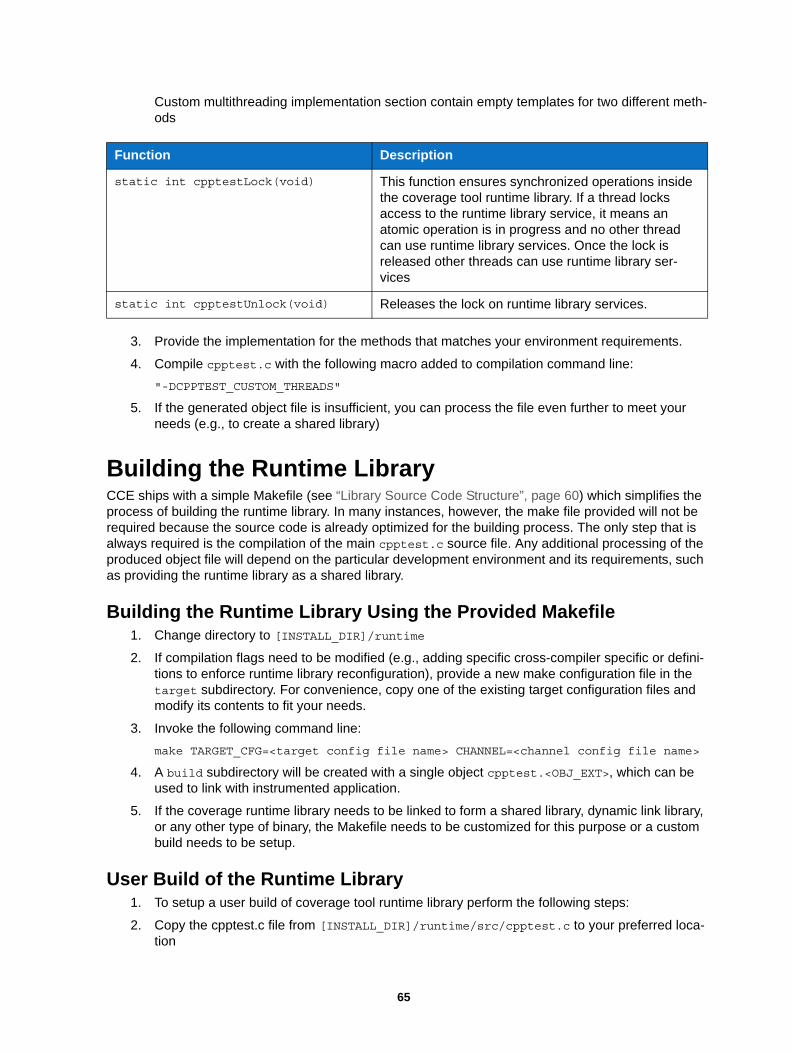
Custom multithreading implementation section contain empty templates for two different meth-ods
3. Provide the implementation for the methods that matches your environment requirements.
4. Compile cpptest.c with the following macro added to compilation command line:
"-DCPPTEST_CUSTOM_THREADS"
5. If the generated object file is insufficient, you can process the file even further to meet your needs (e.g., to create a shared library)
Building the Runtime LibraryCCE ships with a simple Makefile (see “Library Source Code Structure”, page 60) which simplifies the process of building the runtime library. In many instances, however, the make file provided will not be required because the source code is already optimized for the building process. The only step that is always required is the compilation of the main cpptest.c source file. Any additional processing of the produced object file will depend on the particular development environment and its requirements, such as providing the runtime library as a shared library.
Building the Runtime Library Using the Provided Makefile1. Change directory to [INSTALL_DIR]/runtime
2. If compilation flags need to be modified (e.g., adding specific cross-compiler specific or defini-tions to enforce runtime library reconfiguration), provide a new make configuration file in the target subdirectory. For convenience, copy one of the existing target configuration files and modify its contents to fit your needs.
3. Invoke the following command line:
make TARGET_CFG=<target config file name> CHANNEL=<channel config file name>
4. A build subdirectory will be created with a single object cpptest.<OBJ_EXT>, which can be used to link with instrumented application.
5. If the coverage runtime library needs to be linked to form a shared library, dynamic link library, or any other type of binary, the Makefile needs to be customized for this purpose or a custom build needs to be setup.
User Build of the Runtime Library1. To setup a user build of coverage tool runtime library perform the following steps:
2. Copy the cpptest.c file from [INSTALL_DIR]/runtime/src/cpptest.c to your preferred loca-tion
Function Description
static int cpptestLock(void) This function ensures synchronized operations inside the coverage tool runtime library. If a thread locks access to the runtime library service, it means an atomic operation is in progress and no other thread can use runtime library services. Once the lock is released other threads can use runtime library ser-vices
static int cpptestUnlock(void) Releases the lock on runtime library services.
65

3. Introduce any customizations as described in “Customizing the Runtime Library”, page 60
4. Set up a build system of your preference (e.g., IAR Embedded Workbench project or any other type of source code builder)
5. Modify the compilation flags to contain the compiler include flag (typically -I) with the following value:
-I[INSTALL_DIR]/runtime/include
6. Add any required configuration defines (typically -D), for example:
-DCPPTEST_FILE_COMMUNICATION -DCPPTEST_NO_THREADS
7. Invoke the command to run your builder (for example, select build command in the IDE)
8. Locate the resulting object file and use it to link with your instrumented application
Command Line Reference for cpptestcc
Option name Description Notes
-compiler <name|path> Specifies compiler configuration name to be used for code analysis and instrumentation. Compiler configuration name need to be one of the supported compilers names. See “Supported Compilers”, page 98, or use the -listcompilers option
Examples:
cpptestcc -compiler gcc_3_4
cpptestcc -compiler vc_11_0
Configuration file format:
cpptestcc.compiler <name>
-listcompilers Prints out all the names of sup-ported compiler configurations
Configuration file format:
cpptestcc.listCompilers
66

-include <file|pattern>
-exclude <file|pattern>
Includes/excludes file(s) that match the specified pattern into/from instrumentation scope. Options can be speci-fied multiple times.
Final filtering is determined only after all include/exclude entries have been specified in the order of their specification.
The following wildcards are supported:
? - Any character
* - Any sequence of characters
To prevent shells from expand-ing * wildcards to the list of files or directories, you can use the regex: prefix to specify the value.
Example 1:
Assume the following project layout:
<project root>
+ external_libs
+ src
+ include
The following cpptestcc com-mand will cause all the files from the external_libs direc-tory to be excluded from instru-mentation scope.:
cpptestcc -include regex:*/<project root>/* -exclude regex:*/<project root>/external_libs <remaining part of cmd>
Example 2:
Assume the following project:
<project root>
<sourcefiles>.cpp
<headerfiles>.hpp
The following command line will instrument only header files without instrumenting source files:
cpptestcc -include regex:* -exclude regex:*.cpp <remaining part of cmd>
Configuration file format: cpptestcc.include <path|pattern>
Option name Description Notes
67

-ignore <pattern> Ignores all source files match-ing specified <pattern> dur-ing processing. Option can be specified multiple times.
Files matching the specified pattern will not be parsed or instrumented, but they will be compiled in their original form.
The following wildcards are supported:
? - Any character
* - Any sequence of characters
To prevent shells from expand-ing * wildcards to the list of files or directories, you can use the regex: prefix to specify the value.
Use this option to reduce build time overhead by ignoring cov-erage analysis on some sec-tions of the code (e.g., external libraries) or to ignore specific file that expose problems dur-ing processing (e.g., parse error)
Example:
cpptestcc -ignore "*/Lib/*" <remaining part of cmd>
cpptestcc -ignore regex:*/file.c <remain-ing part of cmd>
cpptestcc -ignore c:/proj/file.c <remaining part of cmd>
cpptestcc -ignore "*/MyLib/*.cpp" -ignore file.cpp <remaining part of cmd>
Choosing between -ignore and -include/-exclude:
In some cases, -ignore func-tionality may appear to overlap with the -include/-exclude options. The difference is that the -ignore option completely removes the specified file from processing so that it is not parsed by coverage engine, whereas the -include/-exclude filters are applied after source code is parsed, which allows you to selectively instru-ment or not instrument header files.
Configuration file format: cpptestcc.ignore <path|pattern>
Option name Description Notes
68

-line-coverage Enables line coverage metric Runtime coverage results are written to the results log as the code is executed. This imposes some overhead on the tested code execution time, it but assures that coverage data is collected even if the application crashes. This option can not be used with -optimized-line-coverage.
Configuration file format: cpptestcc.lineCoverage
-optimized-line-coverage Enables optimized line cover-age data
Runtime coverage results are stored in memory and written to the results log either after the application finishes or on user request. This results in better performance, but results may be lost if the application crashes. This option can not be used with -line-coverage.
Configuration file format:
cpptestcc.optimizedLine-Coverage
-workspace <path> Specifies the workspace direc-tory to be used during code analysis and instrumentation.
The workspace location is used to store important code struc-ture information essential for generating the final coverage report. The workspace location must be the same for cpptestcc and cpptestcli. tool invocation.
Configuration file format:
cpptestcc.workspace <path>
-psrc <file> Specifies the configuration file with additional options for cpptestcc tool.
By default, cpptestcc attempts to read the .psrc file located in either the current working directory or in user HOME directory. Use -psrc to specify options inside the con-figuration file.
Configuration file format:
pscom.psrc <file>
-help Prints out help message and exits.
Configuration file format:
cpptestcc.help
Option name Description Notes
69

Customizing DTP Engines for C/C++ Customization options for Static Analysis Engine are specified with a configuration file. The file should be passed to Static Analysis Engine using the -settings switch:
The -settings switch may be specified multiple times. Entries with the same key will be overwritten:
General settings are applied in the following order:
1. [INSTALL_DIR]/etc/cpptestcli.properties; the base configuration file for Static Analysis Engine and should not be modified.
2. [INSTALL_DIR]/cpptestcli.properties; contains templates for commonly used settings (license, reporting etc.)
3. [USER_HOME]/cpptestcli.properties; optional
4. [WORKING_DIR]/cpptestcli.properties; optional
5. Custom settings passed with the command line switch -settings path/to/settings.prop-erties (e.g., -settings ../settings.properties)
Custom settings passed with the command line switch -property [key=value]All of the above set-tings can be overridden by custom settings that are passed with command line switches (e.g. - report, -config, -dtp.share.enabled).
Modifying a Single PropertyYou can quickly modify a single property in a settings configuration file with the -property switch without creating a dedicated configuration:
Viewing Current SettingsUse the -show-settings switch to print the current settings and customizations.
Advanced ConfigurationFor advanced configuration of C++test's native code analyzers, a dedicated configuration file (in a for-mat supported by the analyzers) can be specified with -psrc <CONFIG_FILE> switch. Parasoft Sup-port will provide content for the advanced configuration file.
cpptestcli -settings custom.properties -config "builtin://Recommended Rules" -com-piler gcc_3_4 -input cpptest.bdf
cpptestcli -settings team.properties -settings project.properties -settings user.properties -config "builtin://Recommended Rules" -compiler gcc_3_4 -input cpptest.bdf
cpptestcli -property dtp.server=dtp.parasoft.com.pl
-config "builtin://Recommended Rules" -compiler gcc_3_4 -input cpptest.bdf
70

Using VariablesYou can use the following variables in settings values.
Settings Reference The following tables contain settings that are currently supported in DTP Engines.
Variable Description Example
analysis_type Outputs a comma separated list of enabled analy-sis types (e.g., Static, Generation and Execution)
${analysis_type}
env_var Outputs the value of the environmental variable specified after the colon.
${env_var:HOME}
config_name Outputs the name of executed Test Configuration. ${config_name}
dtp_project Outputs the name of DTP project specified in the settings file using dtp.project option.
${dtp_project}
project_module Outputs the name of the tested project's module. If more than one module is provided as an input, the first tested module name is output followed by an ellipsis (...). The variable can be configured in the settings file with the project.module option.
${module_name}
host_name Outputs the name of the host. ${host_name}
user_name Outputs the name of the current user. ${user_name}
os Outputs the name of the operating system. ${os}
arch Outputs the name of the operating system archi-tecture
${arch}
exec_env Outputs the execution environment. Ths variable is a concatenation of ${os} and ${arch} vari-ables. It can be configured in the sittings file with the exec.env option.
${exec_env}
scontrol_branch Outputs the source control branch name for the tested project. If more than one branch name is detected, the first branch name is output followed by an ellipsis (...). The variable can be configured in the settings file with the scontrol.branch option.
${scontrol_branch}
tool_name Outputs the name of the tool (i.e., Jtest, C++test, dotTEST).
${tool_name}
jvm_prop Outputs the value of the Java vm property speci-fied after the colon.
${jvm_prop:os.name}
71

Base Configuration Settings
Setting Value Description/Notes
console.verbosity.level low
normal
high
Specifies the verbosity level for the Console
low: configures the Console view to show errors and basic information about the current steps and status (done, failed, up-to-date).
normal: (default) also shows com-mand lines and issues reported dur-ing test and analysis.
high: also shows warnings.
parallel.mode disabled
auto
manual
Determines which of the following modes is active:
disabled: configures Parasoft Test to use only one of the available CPUs.
auto: (default) allows Parasoft Test to control parallel processing set-tings.
manual: allows you to manually con-figure parallel processing settings to suit your specific needs.
parallel.no_memory_limit true
falseEnables/disables restrictions (beyond existing system limitations) on the memory consumed by parallel processing.
Default is false
parallel.free_memory_limit [percentage] Specifies the amount of memory that should be kept free in low memory conditions (expressed as a percent-age of the total memory available for the application). This is used to ensure that free memory is available for other processes.
Default is 25
parallel.max_threads [number] Specifies the maximum number of parallel threads that can be executed simultaneously. The actual number of parallel threads is determined by the number of CPUs, available memory, and license settings.
The default value is equal to the number of CPUs
72

file.encoding.mode default
auto
user
Specifies how file encoding is deter-mined.
default: enables use of system properties
auto: enables automatic detection of encoding for the Far-East languages specified with file.encod-ing.lang
user: enables use of specified encoding by file.encoding.name.
file.encoding.lang [code] Allows specify language’s numeric code when file.encoding.mode is set to auto:
Japanese = 1
Chinese = 2
Simplified Chinese = 3
Traditional Chinese = 4
Korean = 5
file.encoding.name [encoding] Allows you to specify the encoding name when file.encoding.mode is set to user:
ASCII-US
UTF-8
UTF-16
UTF-16LE
UTF-16BE
…
settings.validation true
falseEnables/disables settings validation.
settings.rules.file.cpptest path Indicates the path to a file that contains additional rules for settings validation. The file should follow the .properties format and include rules according to the following examples:
engine.path=$ANY
engine.enabled=$BOOLEAN
engine.analysis.deep=$INTEGER
engine.severity.limit=$REGEXP{[1-5]}
engine.verbosity.level=$REGEXP_IC{(low)|(normal)|(high)}
Setting Value Description/Notes
73

Test Configuration Settings
Compiler Settings
Development Testing Platform Settings
Setting Value Description/Notes
cpptest.configuration [test configuration] Specifies the default test config-uration when the -config switch is absent. See “Specify-ing Test Configurations”, page 17.
configuration.dir.builtin [path] Path to directory with built-in test configurations.
configuration.dir.user [path] Path to directory with user-defined test configurations.
configuration.share.path [path] Path on DTP server share with shared test configuration.
cpptest.custom.rule.dir [path to directory] Specifies the location of user-defined coding standard rules.
Default is [INSTALL_DIR]/rules/user
Setting Value Description/Notes
cpptest.compiler.dir.user [path to directory] Specifies the location of custom compiler configuration files.
See “Compiler Configura-tion”, page 21.
cpptest.compiler.family [compiler identifier] Specifies the default compiler configuration to use during anal-ysis, when -compiler switch is absent.
See “Compiler Configura-tion”, page 21.
Setting Value Description/Notes
dtp.server [host] Specifies the host name of the DTP server.
dtp.port [port] Specifies the port number on DTP server port. The default settings is 443.
dtp.user
dtp.password
[username]
[password]Specifies authentication to con-nect to DTP server.
74

dtp.project [project_name] Specifies the name of the DTP project that you want linked to. This settings is optional.
dtp.autoconfig true
falseEnables auto configuration with settings stored on the DTP server. The default is false.
report.dtp.publish true
falseDetermines whether the current installation is reporting test results to DTP server. The default is false.
report.dtp.publish.src off
min
full
Determines whether tested source code is published to DTP server.
off: code is not published to DTP server.
min: publishes minimal part of sources. In most cases, source code without references to source control, e.g., auto-gener-ated code, is published.
full: publishes all sources associated with the specified scope.
The default is full if report.dtp.publish is enabled, otherwise the default is off
dtp.share.enabled true
falseEnables/disables connection to Team Server. The default is false.
cpptest.license.use_network true
falseEnables/disables license retrieval from License Service. The default setting is true.
cpptest.license.network.type dtp
lsSets the network license type.
dtp:file count license that limits usage to a certain number of files as determined by your licensing agreement
ls: floating license (machine locked) that limits usage to a certain number of machines
cpptest.license.local.password [password] Specifies the local license pass-word.
cpptest.license.local.expiration [expiration] Specifies the local license expi-ration date.
Setting Value Description/Notes
75

Scope and Authorship Settings
cpptest.license.network.edition desktop_edition
server_edition
custom_edition
Specifies the type of license that will be retrieve from License Service for this installation. Default is custom_edition
cpptest.license.custom_edition_features [feature_name, ...] Specifies active features for cus-tom license edition.
cpptest.license.wait.for.tokens.time [minutes] Specifies the time that tool will wait for a license if a license is not currently available.
Setting Value Description/Notes
scope.local true
falseEnables/disables code author-ship computation based on the local user and system files mod-ification time. Default is true
scope.scontrol true
falseEnables/disables code author-ship computation based on data from a supported source control system. Default is false
scope.xmlmap true
falseEnables/disables task assign-ment based on an XML mapping file that defines how tasks should be assigned for particular files or sets of files. Default is false
scope.xmlmap.file [path] Specifies the path to XML map-ping file that defines how tasks should be assigned for particular files or sets of files.
cpptest.scope.module.[MODULE_NAME] [path to a module root location]
Defines the module within a root location. See “Defining Source File Structures (Modules)”, page 22.
authors.ignore.case true
falseEnables/disables author name case sensitivity.
Example:
true: David and david are con-sidered the same user.
Default is false
Setting Value Description/Notes
76
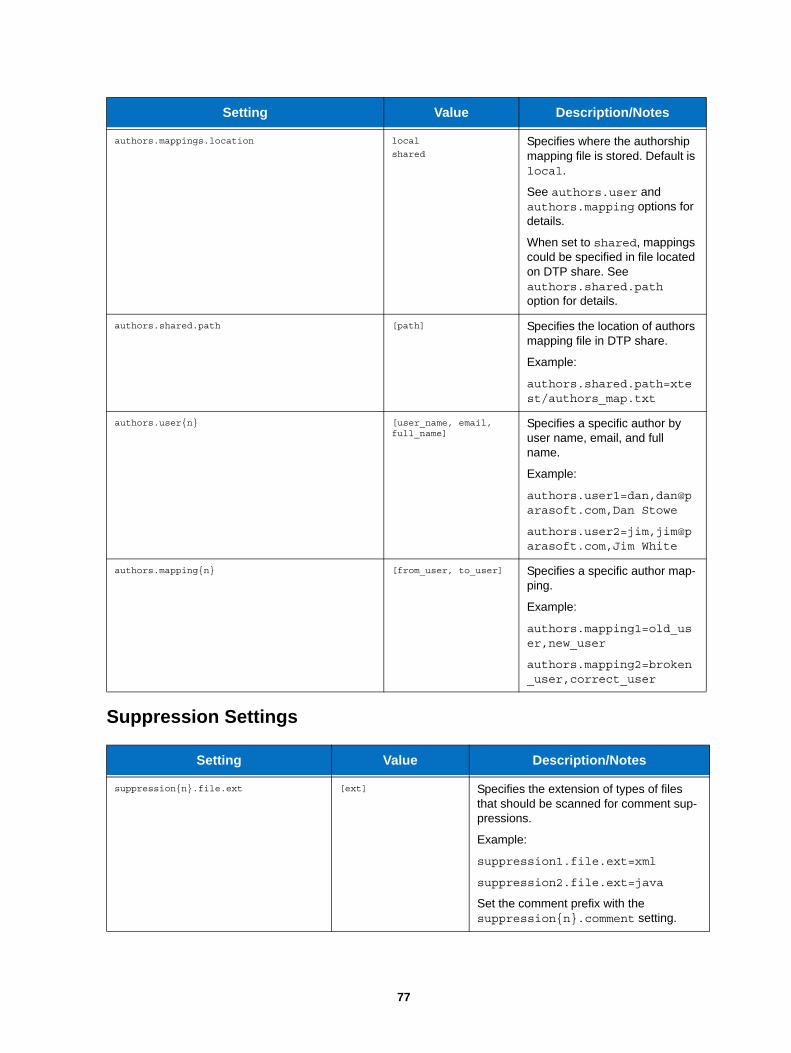
Suppression Settings
authors.mappings.location local
sharedSpecifies where the authorship mapping file is stored. Default is local.
See authors.user and authors.mapping options for details.
When set to shared, mappings could be specified in file located on DTP share. See authors.shared.path option for details.
authors.shared.path [path] Specifies the location of authors mapping file in DTP share.
Example:
authors.shared.path=xtest/authors_map.txt
authors.user{n} [user_name, email, full_name]
Specifies a specific author by user name, email, and full name.
Example:
authors.user1=dan,[email protected],Dan Stowe
authors.user2=jim,[email protected],Jim White
authors.mapping{n} [from_user, to_user] Specifies a specific author map-ping.
Example:
authors.mapping1=old_user,new_user
authors.mapping2=broken_user,correct_user
Setting Value Description/Notes
suppression{n}.file.ext [ext] Specifies the extension of types of files that should be scanned for comment sup-pressions.
Example:
suppression1.file.ext=xml
suppression2.file.ext=java
Set the comment prefix with the suppression{n}.comment setting.
Setting Value Description/Notes
77

Technical Support Settings
suppression{n}.comment [comment] Specifies comment prefix for types of files identified in suppression.file.ext setting.
Example:
suppression1.comment=//
suppression2.comment=<!--
suppression{n}.comment.suffix [comment suffix] Defines the suppression comment suffix when file extensions has been specified with the suppression.file.ext set-ting. If not specified then suppression comments will not be suffixed.
Example:
suppression1.comment.suffix=-->
suppression{n}.block.only true|fales Enables/disables block-only comment suppressions support when file extensions have been specified with the suppression.file.ext setting.
Default is false.
Setting Value Description/Notes
techsupport.enabled true
falseEnables/disables global auto-matic technical support data col-lection is globally enabled with verbose logging.
Default is false
logging.verbose true
falseEnables/disables verbose logs.
Verbose logs are stored in the xtest.log file in the location specified with the local.stor-age.dir setting.
Verbose logging state persists across sessions (restored on application startup).
The log is a rolling file with a fixed maximum size. A backup is created whenever the max size is reached .
Default is false
Setting Value Description/Notes
78

Report Settings
logging.scontrol.verbose true
falseEnables/disables output from source control commands in verbose logs. Note that output from source control may include fragments of analyzed source code.
Default is false
techsupport.create.on.exit true
falseEnables/disables automatic archive creation when the appli-cation is shut down.
The techsupport.enabled setting must also be enabled for packages to be created automat-ically.
Default is false
techsupport.archive.location [path] Specifies the custom directory where support packages should be created.
techsupport.include.reports true
falseEnables/disables the inclusion of reports in the technical support package.
Setting Value Description/Notes
session.tag [name] Specifies a tag for signing results form the test session. The tag is a unique identifier for the specified analysis process made on a specified module. Reports for different test ses-sions should be marked with dif-ferent session tags.
build.id [id] Specifies a build identifier used to label results. It may be unique for each build but may also label more than one test sessions that were executed during a speci-fied build.
The default settings is build-yyyy-MM-dd HH:mm:ss
Setting Value Description/Notes
79

project.module [name] Specifies a custom name for the project's module. The setting may be used to describe unique runs. If unspecified, the tested module is detected automatically based on code provided to anal-ysis.
exec.env [env1;env2...] Specifies a list of tags that describe the environment where the run was executed. Tags may describe operating system (e.g., Windows, Linux), architecture (e.g., x86, x86_64), compiler, browser, etc. The exec.env tags enable the entire session to be described. A detailed descrip-tion of the environment may also be included in the test suite, test, or test case levels via services API.
report.location [path] Specifies the directory where report should be created.
report.format xml
html
csv
custom
Specifies the report format. Use a comma separated list of for-mats to generate multiple for-mats.
Default is xml
report.custom.extension [ext] Specifies the report file exten-sion of the XSL file for a custom format.
Use with report.for-mat=custom and report.custom.xsl.file.
report.custom.xsl.file [path] Specifies the location of the XSL file for a custom format.
Use with report.format=custom and report.custom.extension
report.developer_errors true
falseDetermines whether manager reports include details about developer errors. The default is true.
report.developer_reports true
falseDetermines whether the system generates detailed reports for all developers (in addition to a sum-mary report for managers). The default is false.
Setting Value Description/Notes
80

report.authors_details true
falseDetermines whether the report includes an overview of the number and type of tasks assigned to each developer. The default is true.
report.contexts_details true
falseDetermines whether the report includes an overview of the files that were checked or executed during testing. The default is false.
report.suppressed_msgs true
falseDetermines whether report includes suppressed messages. The default setting is false.
report.metadata true
falseDetermines whether additional metadata about findings should be downloaded from DTP. Only findings that are already present on DTP are affected. The DTP server must also support the metadata service for this settting to have an effect. Default is true.
report.scontrol off
min
full
Specifies if and how much addi-tional information from source control is included in the report:
min: repositories, file paths and revisions
full: includes the same infor-mation as min, as well as task revisions and comments.
Default is off
report.associations true
falseEnables/disables showing requirements, defects, tasks, and feature requests associated with a test in the report. The default is false.
issue.tracking.tags [tag1,tag2,...] Specifies a list of issue tracking tags. The following tags are sup-ported by default: pr, fr, task, asset, req.
report.assoc.url.[tag] [url] Generates link to association inside the HTML report. The URL is a query string containing an [%ID%] placeholder for the PropertyAttribute value.
Setting Value Description/Notes
81

report.active_rules true
falseDetermines if report contains a list of the rules that were enabled for the test. The default setting is false.
report.rules [url] Specifies a directory for storing static analysis rules HTML files (retrieved by clicking the Print-able Docs button in the Test Configuration's Static Analysis tab).
Examples:
report.rules=file:///C:/parasoft/gendoc/
report.rules=../gendoc/
report.test_params true
falseDetermines whether report includes test parameter details.
The default setting is false.
report.testcases_details true
falseEnables/disabled details about specific Google Test assertion failures in the generated HTML report.
Default is false
report.coverage.images [tag1,. . .] Specifies a set of tags that will be used to create coverage images in DTP Server.
DTP supports up to 3 coverage images per report.
report.coverage.limit [limit] Value that specifies the lower coverage threshold. Coverage results lower than this value are highlighted in the report.
Default is 40
report.metrics.attributes [attr1;attr2;...] Specifies a list of additional attributes for metric results. The following attributes are sup-ported by default: module, namespace, type, method.
report.archive true
falseEnables/disables archiving reports into a ZIP file.
report.graph.start_date [MM/dd/yy] Specifies start date for trend graphs that track static analysis task, test execution, and cover-age.
Use with report.graph.period=[?d|?m|?y]
Setting Value Description/Notes
82

report.graph.period [?d|?m|?y] Determines the duration from the start date for trend graphs that track static analysis task, test execution, and coverage.
Use with report.graph.start_date=[MM/dd/yy]
report.mail.enabled true
falseEnables/disables report emails to developers and additional recipients specified with the report.mail.cc setting.
If enabled, all developers that worked on project code will auto-matically be sent a report that contains the errors/results related to his or her work.
The default setting is false.
report.mail.server [host] Specifies the mail server used to send reports.
report.mail.port [port] Specifies the port for SMTP server. The default port is 25.
report.mail.security [security] Specifies SMTP server connec-tion security. STARTTLS and SSL are supported. The default is STARTTLS.
report.mail.subject [subject line] Specifies the subject line of the emails sent.
report.mail.username
report.mail.password
report.mail.realm
[user_name]
[password]
[realm]
Specifies the settings for SMTP server authentication. The realm value is required only for those servers that authenticate using SASL realm.
report.mail.domain [domain] Specifies the mail domain used to send reports.
report.mail.time_delay [time] Specifies a time delay between emailing reports (to avoid bulk email restrictions).
report.mail.from [email|user_name] Specifies the "from" line of the emails sent.
report.mail.attachments true
falseEnables/disables sending reports as attachments. All com-ponents are included as attach-ments; before you can view a report with images, all attach-ments must be saved to the disk.
The default setting is false.
Setting Value Description/Notes
83

report.mail.compact trends
linksSpecifies how report information is delivered in the email.
trends: email contains a trend graph, summary tables, and other compact data; detailed data is not included.
links: email only contains a link to a report available on DTP server.
This setting is not configured by default
report.mail.format html
asciiSpecifies content type for the email. The default setting is html.
report.mail.cc [email; ...] Specifies email address for sending comprehensive man-ager reports. Multiple addresses must separated with a semico-lon. This setting is commonly used to send reports to manag-ers or architects, as well as select developers.
report.mail.include [email, ...] Specifies email addresses of developers that you want to receive developer reports. Multi-ple addresses must separated with a semicolon.
This setting is commonly used to send developer reports to devel-opers if developer reports are not sent automatically (e.g., because the team is not using a supported source control sys-tem).
This setting overrides addresses specified in the 'exclude' list.
report.mail.exclude [email; ...] Specifies email addresses that should be excluded from auto-matically receiving reports.
report.mail.exclude.developers true
falseEnables/disables report emails to developers not explicitly listed in the report.mail.cc set-ting. This setting is used to pre-vent reports from being mailed to individual developers.
The default setting is false.
Setting Value Description/Notes
84

report.mail.unknown [email|user_name] Specifies where to email reports for errors assigned to "unknown".
report.mail.on.error.only true
falseEnables/disables email reports to the manager when an error is found or a fatal exception occurs. Developer emails are not affected by this setting; developer emails are sent only to developers who are responsi-ble for reported errors.
The default setting is false.
report.setup.problems top
bottom
hidden
Determines placement of setup problems section in report.
The default setting is bottom.
report.setup.problems.category_limit [numerical value] Specifies a limit to the number of messages reported in a single setup problem category.
Default is 10
report.setup.problems.display_limit [numerical value] Specifies a limit to the total number of messages displayed in the HTML report in the setup problem section.
Default is 100
report.setup.problems.console true
false
Determines whether setup problems will be printed on the console.
The default setting is true.
report.ue_coverage_details_htmls LC
DCSpecifies type of coverage included in an additional report, which includes source code annotated with line-by-line cov-erage details, when a test's HTML report links to it.
LC: line coverage
DC: decision coverage
report.separate_vm.xmx [size] Specifies how much memory should be used for reports gen-eration. The default is 1024M.
report.separate_vm true
falseEnables/disables generating reports as a separate virtual machine.
Default is false.
report.separate_vm.launch.file [path] Specifies path to launch file which should be used during reports generation.
Setting Value Description/Notes
85

General Source Control Settings
AccuRev Source Control Settings
dupcode.sorting.mode oldest|newest|paths Determines how elements in the code duplication findings are sorted.
oldest: the oldest result appears at the top.
newest: the newest result appears at the top.
paths: sorts by full path names in ascending alphabetical order (A to Z).
The default is paths.
report.coverage.version 1
2Specifies the version of the XML coverage report:
1: the standard version will be used.
2: the size of the XML report will be optimized.
The default value is 1.
Setting Name Value Description/Notes
scontrol.timeout [seconds] Specifies timeout value for oper-ations with source control. The default value is 60.
scontrol.branch [name] Enables you to specify a custom name for the tested branch. This setting may be used to describe unique runs. If it is not specified, the tested branch is detected automatically based on code provided to analysis.
Setting Name Value Description/Notes
scontrol.rep{n}.type accurev AccuRev repository type identi-fier.
scontrol.accurev.exec [path] Path to external client execut-able (accurev).
scontrol.rep{n}.accurev.host [host] AccuRev server host.
scontrol.rep{n}.accurev.port [port] AccuRev server port. Default port is 1666.
scontrol.rep{n}.accurev.login [login] AccuRev user name.
Setting Value Description/Notes
86

ClearCase Source Control Settings
CVS Source Control Settings
scontrol.rep{n}.accurev.password [password] AccuRev password.
Setting Name Value Description/Notes
scontrol.rep{n}.type ccase ClearCase repository type name.
scontrol.ccase.exec [path] Path to external client executable (cleartool).
scontrol.rep{n}.ccase.vob [path] Specifies the VOB's mount point - the path at which the VOB will be accessed by user.
Examples:
scontrol.rep.ccase.vob=X:\myvob
scontrol.rep.ccase.vob=/vobs/myvob
scontrol.rep{n}.ccase.vob_tag [tag] The VOB's unique tag in the ClearCase network region.
Setting Name Value Description/Notes
scontrol.rep{n}.type cvs CVS repository type identifier.
scontrol.rep{n}.cvs.root [root] Full CVSROOT value.
Setting Name Value Description/Notes
87

scontrol.rep{n}.cvs.pass [password] Plain or encoded password. The encoded password should match password in the .cvspass file.
For CVS, use the value in .cvs-pass from within the user's home directory.
For CVSNT, use the value store in the registry under HKEY_CURRENT_USER\Soft-ware\Cvsnt\cvspass
The password is saved in the registry when you first log into the CVS repository from the command line using cvs login. To retrieve the pass-word, go to the registry (using regedit) and look for the value under HKEY_CURRENT_USER->CVSNT> cvspass. This dis-plays your entire login name (e.g., :pserver:exam-pleA@exampleB:/exampleC) and encrypted password value.
scontrol.rep{n}.cvs.useCustomSSHCredentials true
falseEnables/disables using the cvs login and password for EXT/SSH connections. Default is false.
scontrol.rep{n}.cvs.ext.server [cvs] Specifies which CVS application to start on the server side if con-necting to a CVS server in EXT mode. Has the same meaning as the CVS_SERVER variable. Default is cvs.
scontrol.rep{n}.cvs.ssh.loginname [login] Specifies the login for SSH con-nections (if an external program can be used to provide the login).
scontrol.rep{n}.cvs.ssh.password [password] Specifies the password for SSH connection.
scontrol.rep{n}.cvs.ssh.keyfile [file] Specifies the private key file to establish an SSH connection with key authentication.
scontrol.rep{n}.cvs.ssh.passphrase [passphrase] Specifies the passphrase for SSH connections with the key authentication mechanism.
scontrol.rep{n}.cvs.useShell true
falseEnables/disables an external program (CVS_RSH) to estab-lish a connection to the CVS repository. Default is false.
Setting Name Value Description/Notes
88

Git Source Control Settings
Mercurial Source Control Settings
scontrol.rep{n}.cvs.ext.shell [path] Specifies the path to the execut-able to be used as the CVS_RSH program. Command line parameters should be speci-fied in the cvs.ext.params property.
scontrol.rep{n}.cvs.ext.params [parameters] Specifies the parameters to be passed to an external program. The following case-sensitive macro definitions can be used to expand values into command line parameters:
{host} repository host
{port} port
{user} cvs user
{password} cvs password
{extuser} parameter cvs.ssh.loginname
{extpassword} parameter cvs.ssh.password
{keyfile} parameter cvs.ssh.keyfile
{passphrase} parameter cvs.ssh.passphrase
Setting Name Value Description/Notes
scontrol.rep{n}.type git Git repository type identifier.
scontrol.git.exec [path] Path to git executable. If not set, assumes git command is on the path.
scontrol.rep{n}.git.url [url] The remote repository URL (e.g., git://hostname/repo.git).
scontrol.rep{n}.git.workspace [path] The directory containing the local git repository.
Setting Name Value Description/Notes
scontrol.rep{n}.type hg Mercurial reposity type identifyer.
Setting Name Value Description/Notes
89

Perforce Source Control Settings
Serena Dimensions Source Control Settings
scontrol.hg.exec [path] Path to external client execut-able. Devault is hg
scontrol.rep{n}.hg.url [url] The remote repository URL (e.g., http://hostname/path).
scontrol.rep{n}.hg.workspace [path] The directory containing the local Mercurial repository.
Setting Name Value Description/Notes
scontrol.rep{n}.type perforce Perforce repository type identi-fier.
scontrol.perforce.exec [path] Path to external client executable (p4).
scontrol.rep{n}.perforce.host [host] Perforce server host.
scontrol.rep{n}.perforce.port [port] Perforce server port. Default port is 1666.
scontrol.rep{n}.perforce.login [login] Perforce user name.
scontrol.rep{n}.perforce.password [password] Perforce password, optional if ticket is used for authentication.
scontrol.rep{n}.perforce.client [client] The client workspace name as specified in the P4CLIENT envi-ronment variable or its equiva-lents. Root directory for specified workspace should be configured correctly for local machine.
Setting Name Value Description/Notes
scontrol.rep{n}.type serena Serena Dimensions repository type identifier.
scontrol.serena.dmroot [path] Path to the Serena Dimensions exe-cutable. Example:
C\:\\Program Files (x86)\\Serena\\Dimensions 2009 R2\\CM\\
scontrol.rep{n}.serena.login [login] Serena user name.
scontrol.rep{n}.serena.password [password] Password.
scontrol.rep{n}.serena.host [host] Serena Dimensions server host name.
Setting Name Value Description/Notes
90

StarTeam Source Control Settings
scontrol.rep{n}.serena.dbname [name] Name of the database for the product you are working with.
scontrol.rep{n}.serena.dbconn [connection] Connection string for that database.
scontrol.rep{n}.serena.locale [locale] The language used, (e.g., en_US)
scontrol.rep{n}.serena.mapping [mapping] If the project has been downloaded/moved to a location other than default work area, use this option to specify a mapping between the project or stream with the Serena repository and the local project. If you are working in the default work area, you do not need to define mappings.
Setting Name Value Description/Notes
scontrol.rep{n}.type starteam StarTeam repository type identifier.
scontrol.rep{n}.starteam.host [host] StarTeam server host.
sscontrol.rep{n}.starteam.port [port] StarTeam server port. Default port is 49201.
scontrol.rep{n}.starteam.login [login] Login name.
scontrol.rep{n}.starteam.password [password] Password (not encoded).
scontrol.rep{n}.starteam.path [path] Specifies the project, view, or folder that you are currently working with.
You can specify a project name (all views will be scanned when searching for the repository path), project/view (only the given view will scanned) or project/view/folder (only the specified Star Team folder will be scanned). This setting is useful for working with large multi-project repositories.
Examples:
scontrol.rep.starteam.path=proj1
scontrol.rep.starteam.path=proj1/view1
scontrol.rep.starteam.path=proj1/view1/folderA
scontrol.rep.starteam.path=proj1/view1/folderA/folderB
Setting Name Value Description/Notes
91

Subversion Source Control Settings
Synergy/CM Source Control Settings
scontrol.rep{n}.starteam.workdir [path] Specifies a new working directory for the selected view's root folder (if the path represents a view) or a new working directory for the selected folder (if the path represents a folder) when the scontrol.rep.starteam.path set-ting points to a StarTeam view or folder.
Examples:
scontrol.rep.starteam.workdir=C:\\storage\\dv
scontrol.rep.starteam.workdir=/home/storage/dv
Setting Name Value Description/Notes
scontrol.rep{n}.type svn Subversion repository type identi-fier.
scontrol.svn.exec [path] Path to external client executable (svn).
scontrol.rep{n}.svn.url [url] Subversion URL specifies proto-col, server name, port and start-ing repository path. Example:
svn://buildmachine.foobar.com/home/svn
scontrol.rep{n}.svn.login [login] Login name.
scontrol.rep{n}.svn.password [password] Password (not encoded).
Setting Name Value Description/Notes
scontrol.rep{n}.type synergy Synergy/CM repository type iden-tifier.
scontrol.synergy.exec [path] Path to external client executable (ccm).
scontrol.rep{n}.synergy.host [host] Computer on which synergy/cm engine runs. Local host is used when missing. For Web mode, the host must be a valid Synergy Web URL with protocol and port (e.g., http://synergy.server:8400).
scontrol.rep{n}.synergy.dbpath [path] Absolute synergy database path (e.g., \\host\db\name).
Setting Name Value Description/Notes
92

Microsoft Team Foundation Server Source Control Settings
Microsoft Visual SourceSafe Source Control Settings
scontrol.rep{n}.synergy.projspec [specification] Synergy project specification which contains project name and its version (e.g., name-version).
scontrol.rep{n}.synergy.login [login] Synergy user name.
scontrol.rep{n}.synergy.password [password] Synergy password (not encoded).
scontrol.rep{n}.synergy.port [port] Synergy port.
scontrol.rep{n}.synergy.remote_client [client] (UNIX only) Specifies that you want to start ccm as a remote cli-ent. Default value is false. Optional. This is not used for Web mode.
scontrol.rep{n}.synergy.local_dbpath [path] Specifies the path name to which your database information is cop-ied when you are running a remote client session. If null, then the default location will be used. This is not used for Web mode.
Setting Name Value Description/Notes
scontrol.rep{n}.type tfs TFS repository type identifier.
scontrol.rep{n}.tfs.url [url] URL to TFS repository, e.g., http://localhost:8080/tfs
scontrol.rep{n}.tfs.login [login] TFS user name.
scontrol.rep{n}.tfs.password [password] TFS password.
Setting Name Value Description/Notes
scontrol.rep{n}.type vss Visual SourceSafe repository type identifier.
scontrol.vss.exec [path] Path to external client executable (ss).
scontrol.rep{n}.vss.ssdir [path] Path of repository database.
scontrol.rep{n}.vss.projpath [path] VSS project path.
scontrol.rep{n}.vss.login [login] VSS login.
scontrol.rep{n}.vss.password [password] VSS password.
Setting Name Value Description/Notes
93
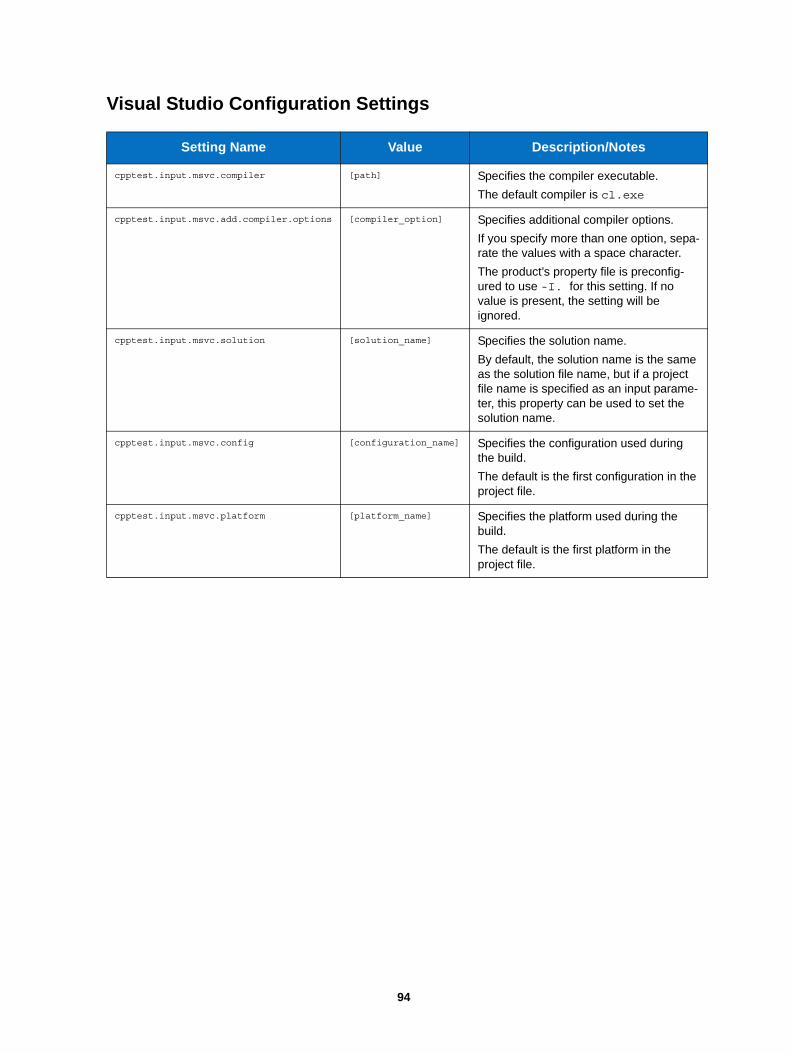
Visual Studio Configuration Settings
Setting Name Value Description/Notes
cpptest.input.msvc.compiler [path] Specifies the compiler executable.
The default compiler is cl.exe
cpptest.input.msvc.add.compiler.options [compiler_option] Specifies additional compiler options.
If you specify more than one option, sepa-rate the values with a space character.
The product’s property file is preconfig-ured to use -I. for this setting. If no value is present, the setting will be ignored.
cpptest.input.msvc.solution [solution_name] Specifies the solution name.
By default, the solution name is the same as the solution file name, but if a project file name is specified as an input parame-ter, this property can be used to set the solution name.
cpptest.input.msvc.config [configuration_name] Specifies the configuration used during the build.
The default is the first configuration in the project file.
cpptest.input.msvc.platform [platform_name] Specifies the platform used during the build.
The default is the first platform in the project file.
94

95
Integrations• Integrating with Source Control Systems
• Using DTP Engines in an IDE
• Integrating with CI Tools

Integrating with Source Control Systems
96
Integrating with Source Control SystemsDTP Engines can collect information from source control systems and use the data to assign owner-ship of violations, filter analyzed files based on time or modification history, and report information about controlled files to DTP Server. Use the C++test 9.5 or later interface to configure integration with source control systems:
1. In your IDE , choose Parasoft > Preferences and click Source Controls
2. Configure your repository and source control client and click Apply.
3. In the Preferences panel menu, click Scope and Authorship
4. Enable the Use source control (modification author) to compute scope option and click Apply.
5. In the Preferences panel menu, click Parasoft
6. Click the share to open the Export to localsettings file panel.
7. Select the Source Controls, Scope and Authorship, and any other options you want to save.
8. Choose a location and click OK.
9. Add the following line to the settings file, which ensures that information on source control details are saved to the report:
10. Either pass the file to the command line or copy the settings in the administration panel of a project in DTP server (Parasoft Test settings tab) if applicable.
11. Run the analysis.
report.scontrol=min

Integrating with CI Tools
97
Integrating with CI Tools
Integrating with JenkinsDTP Engines for C/C++ can be integrated with Jenkins continuous integration software. The Parasoft Findings Plugin for Jenkins allows you to visualize static analysis and test results as trend graphs and warnings.
Parasoft Findings Plugin is available directly in Jenkins. See Parasoft Findings Plugin for details.
You can download the plugin source files form GitHub, see Parasoft Findings Plugin Project. If you need additional information on how to rebuild the plugin, contact Parasoft Support.
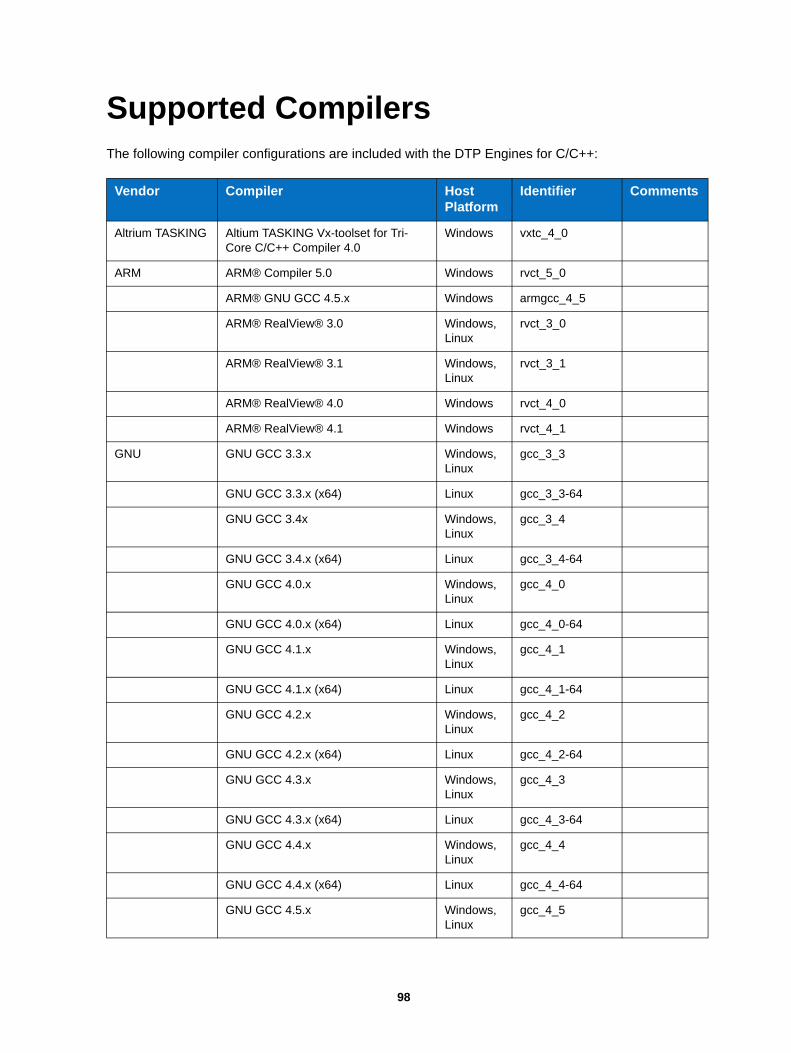
Supported Compilers The following compiler configurations are included with the DTP Engines for C/C++:
Vendor Compiler Host Platform
Identifier Comments
Altrium TASKING Altium TASKING Vx-toolset for Tri-Core C/C++ Compiler 4.0
Windows vxtc_4_0
ARM ARM® Compiler 5.0 Windows rvct_5_0
ARM® GNU GCC 4.5.x Windows armgcc_4_5
ARM® RealView® 3.0 Windows, Linux
rvct_3_0
ARM® RealView® 3.1 Windows, Linux
rvct_3_1
ARM® RealView® 4.0 Windows rvct_4_0
ARM® RealView® 4.1 Windows rvct_4_1
GNU GNU GCC 3.3.x Windows, Linux
gcc_3_3
GNU GCC 3.3.x (x64) Linux gcc_3_3-64
GNU GCC 3.4x Windows, Linux
gcc_3_4
GNU GCC 3.4.x (x64) Linux gcc_3_4-64
GNU GCC 4.0.x Windows, Linux
gcc_4_0
GNU GCC 4.0.x (x64) Linux gcc_4_0-64
GNU GCC 4.1.x Windows, Linux
gcc_4_1
GNU GCC 4.1.x (x64) Linux gcc_4_1-64
GNU GCC 4.2.x Windows, Linux
gcc_4_2
GNU GCC 4.2.x (x64) Linux gcc_4_2-64
GNU GCC 4.3.x Windows, Linux
gcc_4_3
GNU GCC 4.3.x (x64) Linux gcc_4_3-64
GNU GCC 4.4.x Windows, Linux
gcc_4_4
GNU GCC 4.4.x (x64) Linux gcc_4_4-64
GNU GCC 4.5.x Windows, Linux
gcc_4_5
98

GNU GCC 4.5.x (x64) Linux gcc_4_5-64
GNU GCC 4.6.x Windows, Linux
gcc_4_6
GNU GCC 4.6.x (x64) Linux gcc_4_6-64
GNU GCC 4.7.x Windows, Linux
gcc_4_7
GNU GCC 4.7.x (x64) Linux gcc_4_7-64
GNU GCC 4.8.x Windows, Linux
gcc_4_8
GNU GCC 4.8.x (x64) Windows,
Linux
gcc_4_8-64
GNU GCC 4.9.x Windows, Linux
gcc_4_9
GNU GCC 4.9.x (x64) Windows,
Linux
gcc_4_9-64
GNU GCC 5.x Windows, Linux
gcc_5
GNU GCC 5.x (x64) Windows, Linux
gcc_5-64
Green Hills Green Hills® Software Compiler 5.1 V850
Windows ghs_5_1
Green Hills® Software Compiler 5.0 PowerPC
Windows ghs_5_0
Green Hills® Software C/C++ Com-piler v2013.1.x for PowerPC
Windows ghsppc_2013_1
IAR IAR Compiler 5.4x for ARM® Windows iccarm_5_4
IAR Compiler 5.5x for ARM® Windows iccarm_5_5
IAR Compiler 6.1x for ARM® Windows iccarm_6_1 C only
IAR Compiler 6.3x for ARM® Windows iccarm_6_3 C only
IAR Compiler 6.6x for ARM® Windows iccarm_6_6
IAR Compiler 7.4x for ARM® Windows iccarm_7_4
IAR Compiler 5.4x for MSP430® Windows icc430_5_4 SAE only
IAR Compiler for MSP430® v. 6.1x Windows icc430_6_1 SAE only
Keil ARM® Compiler 5.0 for uVision Windows rvct_5_0_uV
ARM® RealView® 3.1 for uVision Windows rvct_3_1_uV
ARM® RealView® 4.0 for uVision Windows rvct_4_0_uV
Vendor Compiler Host Platform
Identifier Comments
99

ARM® RealView® 4.1 for uVision Windows rvct_4_1_uV
Microsoft Microsoft® Visual C++® 9.0 Windows vc_9_0
Microsoft® Visual C++® 9.0 (x64) Windows vc_9_0-64
Microsoft® Visual C++® 10.0 Windows vc_10_0
Microsoft® Visual C++® 10.0 (x64) Windows vc_10_0-64
Microsoft® Visual C++® 11.0 Windows vc_11_0
Microsoft® Visual C++® 11.0 (x64) Windows vc_11_0-64
Microsoft® Visual C++® 12.0 Windows vc_12_0
Microsoft® Visual C++® 12.0 (x64) Windows vc_12_0-64
Microsoft® Visual C++® 14.0 Windows vc_14_0
Microsoft® Visual C++® 14.0 (x64) Windows vc_14_0-64
National Instru-ments
National Instruments LabWindows/CVI 2015 Clang C/C++ Compiler v3.3 for Win32
Windows niclang_3_3 SAE only
Renesas Renesas RX C/C++ Compiler 2.2x Windows renrx_2_2 SAE only
Renesas M16C/R8C C Compiler 5.4x Windows rm16c_5_4 SAE only
Renesas SH SERIES C/C++ Compiler V.9.03.xx
Windows hew_9_3
Renesas SH SERIES C/C++ Compiler V.9.04.xx
Windows hew_9_4
Texas Instru-ments
TI® ARM C/C++ Compiler v5.1.x Linux, Windows
tiarm_5_1
TI® MSP430 C/C++ Compiler v3.2 Windows timsp430_3_2
TI® MSP430 C/C++ Compiler v4.0 Windows timsp430_4_0
TI® TMS320C2000 C/C++ Compiler v4.1
Windows tic2000_4_1 SAE only
TI® TMS320C2000 C/C++ Compiler v5.2
Windows tic2000_5_2
TI® TMS320C2000 C/C++ Compiler v6.0
Windows tic2000_6_0
TI® TMS320C2000 C/C++ Compiler v6.2
Windows tic2000_6_2
TI® TMS320C6x C/C++ Compiler v5.1 Windows tic6000_5_1 SAE only
TI® TMS320C6x C/C++ Compiler v6.0 Windows tic6000_6_0
TI® TMS320C6x C/C++ Compiler v6.1 Windows, Linux
tic6000_6_1
Vendor Compiler Host Platform
Identifier Comments
100

Custom-developed and Deprecated Compilers Configurations for the following custom-developed and deprecated compilers are available for down-load in the Parasoft Marketplace at https://marketplace.parasoft.com.
TI® TMS320C6x C/C++ Compiler v7.3 Windows tic6000_7_3
TI® TMS320C6x C/C++ Compiler v7.4 Windows tic6000_7_4
TI® TMS470 C/C++ Compiler v4.9.x Windows tiarm_4_9
Wind River Wind River® Diab 5.7.x Windows, Linux
diab_5_7
Wind River® Diab 5.8.x Windows, Linux
diab_5_8
Wind River® Diab 5.9.x Windows, Linux
diab_5_9
Wind River® GCC 3.3.x Windows wrgcc_3_3
Wind River® GCC 3.4.x Windows, Linux
wrgcc_3_4
Wind River® GCC 4.1.x Windows, Linux
wrgcc_4_1
Wind River® GCC 4.3.x Windows, Linux
wrgcc_4_3
Vendor Compiler Host Platform
Identifier Comments
Altera Altera Nios II 5.1 b73® GCC 3.4.x Linux nios2gcc_3_4 SAE Only
Altera Nios® GCC 2.9 Linux niosgcc_2_9 SAE Only
Altium TASKING Altium TASKING Vx-toolset for TriCore C/C++ Compiler 2.5
Windows vxtc_2_5 C only
Altium TASKING Vx-toolset for TriCore C/C++ Compiler 3.3
Windows vxtc_3_3
Altium TASKING Vx-toolset for TriCore C/C++ Compiler 3.4
Windows vxtc_3_4
Altium TASKING Vx-toolset for TriCore C/C++ Compiler 3.5
Windows vxtc_3_5
TASKING 80C196 C compiler v6.0 r1 Windows c196_6_0 SAE only
Altium TASKING Classic Compiler for C166/ST10 v. 6.0
Windows tc166_6_0 SAE Only
Analog Devices Analog Devices C/C++ Compiler 7.0 for ADSP SHARC
Windows ad21k_7_0 SAE Only
Vendor Compiler Host Platform
Identifier Comments
101

Analog Devices C/C++ Compiler 7.0 for ADSP TigerSHARC
Windows adts_7_0 SAE Only
ARM ARM® Developer Suite 1.2 Windows, Linux
ads_1_2
ARM® RealView® 2.2 Windows rvct_2_2
Embarcadero/Borland
Borland C++ Compiler 5.6.x for Win32 Windows bcc32_5_6 SAE only
Embarcadero C++ Compiler 6.2x for Win32
Windows bcc32_6_2 SAE only
Embarcadero C++ Compiler 6.9x for Win32
Windows bcc32_6_9 SAE only
Cosmic COSMIC Software ® 68HC08 C Cross Compiler V4.6.x
Windows hc08_4_6 SAE only
eCosCentric eCosCentric® GCC 3.4.x Linux ecosgcc_3_4 SAE only
Freescale Freescale CodeWarrior ANSI-C/cC++ Compiler 5.0.x for HC12
Windows cwhc12_5_0 SAE only
Freescale C/C++ Compiler v. 5.1 for Embedded ARM
Windows cwarm_5_1 SAE Only
Fujitsu FR Family SOFTUNE C/C++ Compiler V6
Windows fr_6_5
GNU GNU GCC 2.9.x Windows, Linux
gcc_2_9
GNU GCC 3.2.x Windows, Linux
gcc_3_2
Green Hills Green Hills® Software Compiler 4.0 Native
Windows ghs_4_0
Green Hills® Software Compiler 4.2 Native
Linux ghs_4_2
Green Hills® Software Compiler 3.4 V850
Windows ghs_3_4
Green Hills Software Compiler for PPC v. 3.5
Windows ghsppc_3_5
Green Hills Software Compiler for PPC v. 4.0.x
Windows ghsppc_4_0
Green Hills Software Compiler for PPC v. 4.2.x
Windows ghsppc_4_2
IAR IAR Compiler 1.4x for STM8® Windows iccstm8_1_40 SAE only
IAR Compiler 5.3x for ARM® Windows iccarm_5_3 C only
IAR Compiler 5.3x for MSP430® Windows icc430_5_3
Vendor Compiler Host Platform
Identifier Comments
102

IAR Compiler for MSP430 v. 4.2x Windows icc430_4_2 SAE only
IAR Compiler for RX v. 2.5x Windows iccrx_2_50
Keil Keil C51 8.x Windows c51_8 SAE only
Keil C166 7.0 Windows kc166_7_0 SAE only
Mentor Graphics/CodeSourcery
CodeSourcery Sourcery G++ Lite 2009q1-203
Windows, Linux
csgccarm_4_3 SAE Only
Microchip Microchip MPLAB® C Compiler for dsPIC v3.2x
Windows pic30_3_23 SAE only
Microchip MPLAB® C32 Compiler for PIC32 v2.0x
Windows pic32_2_0 SAE only
Microsoft Microsoft® Visual C++® 6.0 Windows vc_6_0
Microsoft® Visual C++® 7.1 Windows vc_7_1
Microsoft® Visual C++® 8.0 Windows vc_8_0
Microsoft® Visual C++® 8.0 (x64) Windows vc_8_0-64
Microsoft® Embedded Visual C++® 4.0
Windows evc_4_0
Microsoft® Visual C++® 8.0 for Win-dows Mobile
Windows evc_8_0
Microsoft® Visual C++® 9.0 for Win-dows Mobile
Windows evc_9_0
National Instru-ments
National Instruments LabWindows/CVI 9.0
Windows nicvi_9_0 SAE Only, standard non-third party CVI compiler
National Instruments LabWindows/CVI 2013 Clang C/C++ Compiler v2.9 for Win32
Windows niclang_2_9 SAE only
QNX QNX® GCC 2.9.x Windows qcc_2_9
QNX® GCC 3.3.x Windows qcc_3_3
QNX® GCC 4.2.x Windows qcc_4_2
QNX® GCC 4.4.x Windows qcc_4_4
Renesas Renesas SH SERIES C/C++ Compiler V.5.1x.x
Windows ew_5_1 SAE Only
STMicroelectron-ics
STMicroelectronics® ST20 Windows st20_2_2 SAE only
STMicroelectronics® ST40 Windows st40_3_1 SAE only
Vendor Compiler Host Platform
Identifier Comments
103

Texas Instru-ments
TI® ARM C/C++ Compiler v5.0.x Windows tiarm_5_0 SAE Only
TI® TMS320C54x C/C++ Compiler v4.2
Windows tic54x_4_2 SAE only
TI® TMS320C55x C/C++ Compiler v4.3
Windows tic55x_4_3
Wind River Wind River® Diab 5.5.x Windows, Linux
diab_5_5
Wind River® Diab 5.6.x Windows, Linux
diab_5_6
Wind River® EGCS 2.9 Windows wregcs_2_9
Wind River® GCC 2.9 Windows wrgcc_2_9
Vendor Compiler Host Platform
Identifier Comments
104

Third-Party ContentDTP Engines for C/C++ incorporate items that have been sourced from third parties. The names of the items and their license agreements have been listed in the table. Click the license name to see the details.
Item License
commons-collections.jar Apache License 2.0
commons-vfs.jar Apache License 2.0
avalon-framework.jar Apache License 2.0
batik-all.jar Apache License 2.0
fop.jar Apache License 2.0
chardet.jar Mozilla Public License
bcprov.jar MIT License
saxon.jar Mozilla Public License
jfreechart.jar GNU LGPL License
jcommon.jar GNU LGPL License
cvslib.jar CDDL License
javax.xml.stream_1.0.1.jar Eclipse Public License
javax.activation_1.1.1.jar Apache License 2.0
jakarta-log4j.jar Apache License 2.0
xmlgraphics-commons.jar Apache License 2.0
fst.jar Apache License 2.0
truezip.jar Apache License 2.0
jjawin.jar DevelopMentor OpenSource Soft-ware License
trilead-ssh2.jar Trilead AG License
javanet.staxutils_1.0.0.jar BSD License
commons-codec.jar Apache License 2.0
commons-httpclient.jar Apache License 2.0
org.apache.commons.io_1.4.0.v20081110-1000.jar
Apache License 2.0
org.apache.commons.logging_1.1.3.jar Apache License 2.0
fluent-hc.jar Apache License 2.0
httpclient.jar Apache License 2.0
105
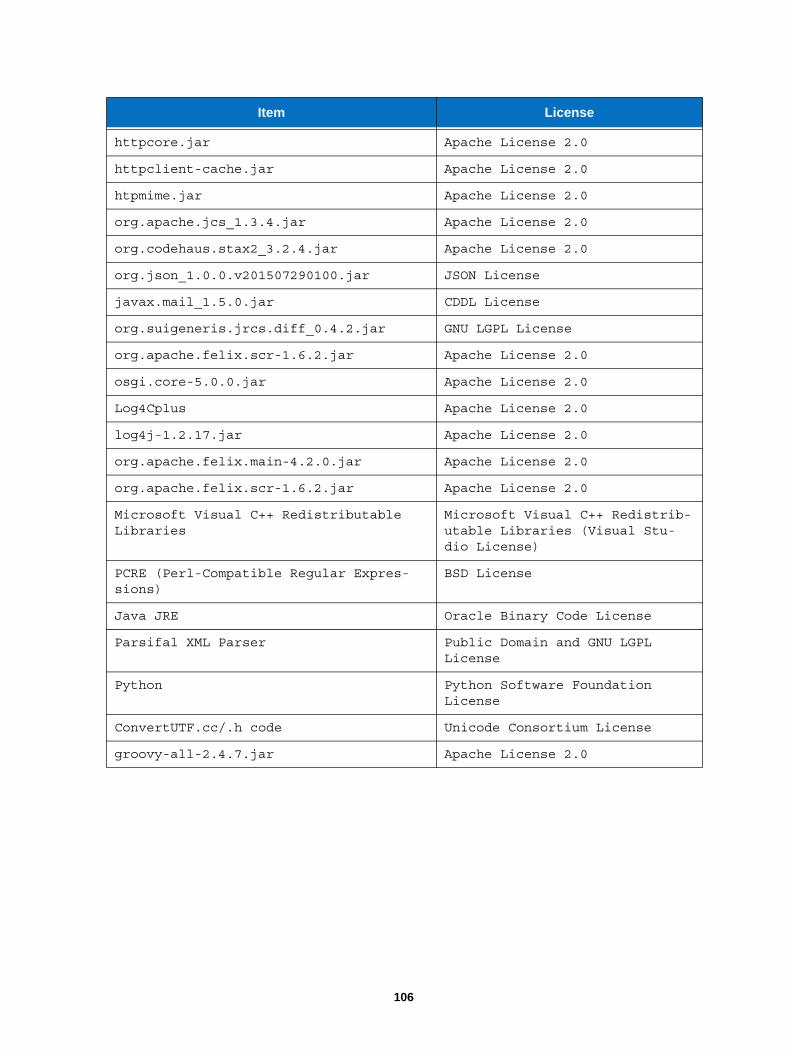
httpcore.jar Apache License 2.0
httpclient-cache.jar Apache License 2.0
htpmime.jar Apache License 2.0
org.apache.jcs_1.3.4.jar Apache License 2.0
org.codehaus.stax2_3.2.4.jar Apache License 2.0
org.json_1.0.0.v201507290100.jar JSON License
javax.mail_1.5.0.jar CDDL License
org.suigeneris.jrcs.diff_0.4.2.jar GNU LGPL License
org.apache.felix.scr-1.6.2.jar Apache License 2.0
osgi.core-5.0.0.jar Apache License 2.0
Log4Cplus Apache License 2.0
log4j-1.2.17.jar Apache License 2.0
org.apache.felix.main-4.2.0.jar Apache License 2.0
org.apache.felix.scr-1.6.2.jar Apache License 2.0
Microsoft Visual C++ Redistributable Libraries
Microsoft Visual C++ Redistrib-utable Libraries (Visual Stu-dio License)
PCRE (Perl-Compatible Regular Expres-sions)
BSD License
Java JRE Oracle Binary Code License
Parsifal XML Parser Public Domain and GNU LGPL License
Python Python Software Foundation License
ConvertUTF.cc/.h code Unicode Consortium License
groovy-all-2.4.7.jar Apache License 2.0
Item License
106