Embed Size (px)
Citation preview

Faculty of Economics, Business Administration and Information Technology
University of Zürich
Development of a light-weight mobile application for The Swiss Feed Database
Report
Submitted by:
Peter R. Niederberger
Weidstrasse 17
CH-6300 Zug
Tel.: +41 41 711 65 55
E-Mail: [email protected]
Swiss matriculation number: 12-707-337
Major: Communication Science
Minor: Computer Science
Professor
Prof. Dr. Michael Böhlen IFI – Departments of Informatics
University of Zürich
Binzmühlestrasse 14
CH-8050 Zürich
Supervisor
Francesco Cafagna
IFI – Departments of Informatics
University of Zürich
Binzmühlestrasse 14
CH-8050 Zürich
Zürich, July 15, 2015

II
Table of Contents
1 Introduction ........................................................................................................................ 1
2 Development Environment ................................................................................................. 2
2.1 Cordova ....................................................................................................................... 2
2.2 Further Software .......................................................................................................... 3
2.3 Web Security ............................................................................................................... 3
3 Project Architecture ............................................................................................................ 4
4 Structure ............................................................................................................................. 5
4.1 Starting Protocol .......................................................................................................... 5
4.2 Page Concept .............................................................................................................. 6
5 Language ........................................................................................................................... 8
6 Login .................................................................................................................................. 9
7 Data Handling ....................................................................................................................10
7.1 Loading by Selection ...................................................................................................10
7.2 Loading by QID ...........................................................................................................12
8 Layout ...............................................................................................................................13
9 Presentation ......................................................................................................................15
9.1 Result Tables ..............................................................................................................15
9.2 Scatter Chart ...............................................................................................................17
9.3 Saved Queries ............................................................................................................18
10 Appearance .....................................................................................................................19
10.1 Text Selection ...........................................................................................................19
10.2 Anchor Element Popout ............................................................................................20
10.3 Dragging of Elements ................................................................................................20
10.4 Zooming ....................................................................................................................20
10.5 Click Delay ................................................................................................................21
11 Distribution ......................................................................................................................21
12 Conclusion ......................................................................................................................21
Bibliography ......................................................................................................................... IV

III
Table of Illustrations
Image 1: Screenshot Mockup 2
Image 2: Project Architecture 4
Image 3: Footer 14

1
1 Introduction
This work was created by Peter R. Niederberger in spring 2015 with the aim of producing a
mobile application for The Swiss Feed Database. This database stores changes of the nutri-
tive values in animal feeds, which are requested by farmers, scientists and others. The app
offers the major features of the online platform www.feedbase.ch while still being light-
weighted. It is supported by android, windows phone, windows, Ubuntu, blackberry, ios and
many others (cf. The Apache Software Foundation 2015). Also the software stays as much
as possible resistant to changes in the database and tries to reuse a lot of the PHP code
already existing.
To keep the app light-weighted and easy to use it was necessary to renounce some features.
The application is produced for users which already are in possession of a user account.
Without this access, users need to go to the main website and can only use the free tools
provided there. Agroscope Switzerland requested that the entire result list and also the statis-
tics have to be visible for mobile users. These features are supported. At the moment users
are able to load their own saved queries or the global top queries. Furthermore, they can
request summary data and detail data on their own and even save the queries. After a re-
quest the phone displays the very same table as it is shown on the webpage, which gives
users the power to choose the type of table by using the dropdown menu.
The development of the application started in the beginning of 2015 and took half a year.
Due to the fact that the used languages (JavaScript, HTML, PHP) were new to the develop-
er, there have been many failed attempts, which have not been documented fully here to
avoid confusion.
2
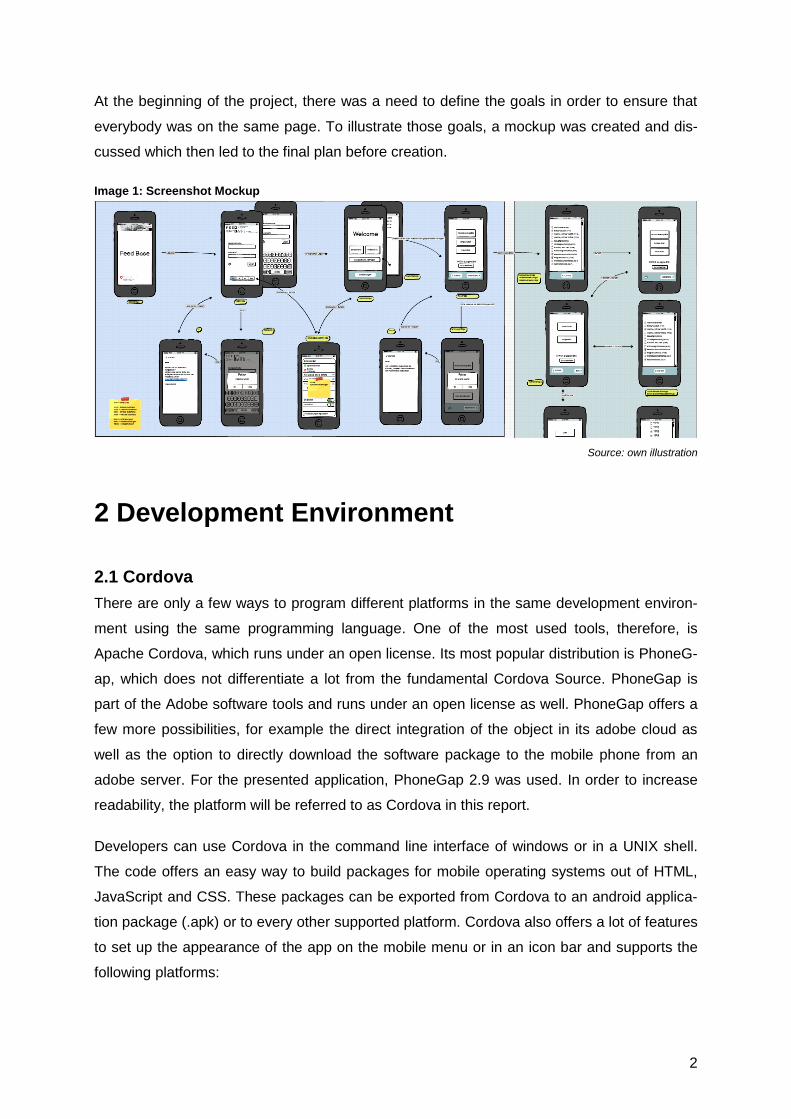
At the beginning of the project, there was a need to define the goals in order to ensure that
everybody was on the same page. To illustrate those goals, a mockup was created and dis-
cussed which then led to the final plan before creation.
Image 1: Screenshot Mockup
Source: own illustration
2 Development Environment
2.1 Cordova
There are only a few ways to program different platforms in the same development environ-
ment using the same programming language. One of the most used tools, therefore, is
Apache Cordova, which runs under an open license. Its most popular distribution is PhoneG-
ap, which does not differentiate a lot from the fundamental Cordova Source. PhoneGap is
part of the Adobe software tools and runs under an open license as well. PhoneGap offers a
few more possibilities, for example the direct integration of the object in its adobe cloud as
well as the option to directly download the software package to the mobile phone from an
adobe server. For the presented application, PhoneGap 2.9 was used. In order to increase
readability, the platform will be referred to as Cordova in this report.
Developers can use Cordova in the command line interface of windows or in a UNIX shell.
The code offers an easy way to build packages for mobile operating systems out of HTML,
JavaScript and CSS. These packages can be exported from Cordova to an android applica-
tion package (.apk) or to every other supported platform. Cordova also offers a lot of features
to set up the appearance of the app on the mobile menu or in an icon bar and supports the
following platforms:

3
Amazon Fire OS (Mac, Linux, Windows)
Android (Mac, Linux, Windows)
BlackBerry 10 (Mac, Linux, Windows)
Windows Phone 8 (Windows)
Windows (Windows)
iOS (Mac)
Firefox OS (Mac, Linux, Windows)
With this multi-platform support, web developers are able to program features for the entire
platform at the same time. However, Cordova also has disadvantages. The developer had to
make compromises because he operates at a higher language level and the app is only cre-
ated in a browser language. Some attempts to make this web design look more like a mobile
application are described in chapter 10.
2.2 Further Software
To create the mobile application, the integrated development environment Eclipse was used.
This software is public licensed and can be used on Mac OS X, Solaris, Linus or Windows. It
highlights HTML, CSS and JavaScript and allows searches in all files (which are not provided
by the operating system windows). For this project it was not used for debugging, but it pro-
vided a useful environment to keep the code files organized. Additional to the IDE, the
chrome browser was used. While chrome was useful to check the network protocols and
functions of the software, the add-on “Ripple Emulator” was used to check more mobile spe-
cific task like deviceReady(). Later the app was tested on an android phone, on which Cor-
dova was able to build and install the application within seconds after turning on the UBS-
Debugging and connecting it to the computer over USB.
To test the modified PHP files it was necessary to run a server on the local machine. There-
fore, Apache 2.4 was installed. It works also on multiple platforms and is free to use.
2.3 Web Security
The Same-origin policy (SOP) is a security restriction for all content JavaScript wants to in-
teract with. If one requests content on a website which comes from another one (for example
in a <iframe> element), the Same Origin Policy ensures that the other website has only ac-
cess to the properties of the element that calls. A mobile application as a Cordova generated
one is an isolated system, and as soon as the app needs some information from a host, it is
requesting a server and is denied to do this. So without any configuration it would not be
possible to access the PHP on the feed-base server. This problem is already shown in the
development when one tests the app in a browser. To avoid this problem Cordova provides a

4
solution in using the config.xml file to enter several domains to a whitelist and allow access to
these domains. Moreover config.xml also provides a lot of other possibilities to configure the
behavior of the application itself like which orientation the HTML is shown in and so on.
During development the cross domain policy was needed in the browser. Therefore the
chrome browser had to be started with the following command from the command prompt.
chrome.exe --disable-web-security
3 Project Architecture
The structure was built in a way that enables other programmers to easily follow the code
using index.html as its main structure. Other files such as the Cordova libraries and con-
fig.xml can then be used to adjust the display rotation, the motion sensors, the software icons
and much more on the meta-level.
Image 2: Project Architecture
Source: own illustration
Each “page” of the application is placed in a <div class=”page”> element in the index.html.
Furthermore, all the other libraries are imported to the main index.html. The four listed trees
above should explain how the application is constructed. Three of the parts belong to the
JavaScript section and one is called layout. Almost all of the files are called directly in the
xml configuration
index.html
layout
images
css
tree libraries
javascript
jquery
tables
chosen
structur
paging
dropdown
tables
explicit functions
md5
login
language
save/load
get data
cordova libraries

5
index.html file. In the following part of the report all the parts of these trees will be explained
in a short and terse way.
In the layout folders, one can find all the images and the CSS files which take care of the
design of the application like a background image or the shape of the buttons. In the existing
web application these files are in the folder CSS and in another folder called lay-
out_ressources which is imported by the web application and helps to build the selection
trees for the nutrients. The JavaScript folders contain the jQuery libraries, which enable the
use of jQuery and its plugins. Moreover, the JavaScript folder also contains the folder struc-
ture which organizes the app navigation (i.e. which page has to be shown, which dropdown
item has to be checked etc.).
The explicit functions are functions that do one specific task. There is, for instance, a function
which handles the login part of the application.
4 Structure
4.1 Starting Protocol
Cordova (cf. The Apache Software Foundation 2015) consists of native and JavaScript
Code. While the native code is loading, index.html shows its own loading page. A Cordova
software should possess one deviceReady() event listener to ensure that the software runs
smoothly while starting. The deviceReady() event fires once Cordova has fully loaded. Once
the event fires, it is safe to do calls to the Cordova API. While developing The Swiss Feed
Database Mobile Application it was necessary to do tests in chrome which does not support
this deviceReady() event. So therefore jQuery was used in startPage.js to first check the
readiness of the document and then distinguish between the mobile version and the web
version which was used for testing and developing the software (see code below). While the
standard deviceReady() event listener was added when using the mobile application, the
software could be started right away when used elsewhere.
//starts only if document is ready
$(document).ready(function() {
//check if device is a mobile phone
if( window.isphone ) {
document.addEventListener("deviceready", onDeviceReady, false);
} else {
onDeviceReady();
}
});
//as soon device ready is called or the website is ready the welcome page is showed
function onDeviceReady() {
startSoftware();
}

6
4.2 Page Concept
The index.html file builds the heart of the application, which after the usual import of scripts
and stylesheets, is more or less a long list of pages. Each page corresponds to a <div> ele-
ment with a page-class. All of them are hidden except of the one with the active-tag. A page
should cover the whole screen and is initiated with the following style attributes:
.page{
display: none;
margin-bottom: 0px;
margin-top: 0px;
margin-left: 0px;
margin-right: 0px;
height: 100%;
width: 100%;
font-family: Helvetica, Arial, sans-serif;
}
.page.active {
display:block;
}
Switch Page by Button
The easiest way to manipulate the HTML of the index.html file was to use jQuery, which is a
small but feature-rich JavaScript library. It simplifies things like HTML manipulation with an
easy-to-use API that works across a multitude of browsers (cf. The jQuery Foundation
2015a).
In the file changePage.js the handling of the switches between the pages is organized. To
navigate through all the pages, a script removes the active-tag from the current page to
make it invisible in order to set it to a requested page which then becomes visible. This script
is executed when someone clicks on an HTML element with the class pageLink. The attrib-
ute data-reference of the <input> element points to the page that should be shown next. With
this function it is easy to spontaneously write down new HTML that links to a page without
changing anything on the function.
//main function
$(function() {
//gets fired if some input element with pageLink class is clicked in the html
$('.pageLink').on('click',function(){
//save page that should be shown next
var pageToShow = $(this).attr('data-references');
//if-sessions to check if all needed checks are done
if (pageToShow == "nutrientsPage"){
//in order to do the checks we have to call the checked options
getTdFeedOptions();
//check if all of the selections of the first tree are empty
if (!td_agridea_feeds.selected && !td_classified_feeds1.selected
&& !td_classified_feeds2.selected){
//do a log entry and exit the hole function
console.log("ERR: Nothing selected, page-to-show-check");

7
return;
[...]
//HERE: all checks are done and everything is fine (no returns)
//hide active page
$('.page.active').fadeOut(200, showNextPage);
//show the next page
function showNextPage(){
//untag old page by removing the active class
$('.active').removeClass('active');
//show new page to user by fading in
$('#'+pageToShow).fadeIn(200, function(){
//tag new page
$(this).addClass('active');
//recalc the window size, so tables fit the new page div
$(window).resize();
});
As can be seen, the JavaScript first starts a number of tests when a pageLink element is
clicked. Depending on the page the users wants to see the script controls if the needed se-
lections are done. This ensures that a change to a new page only happens if all conditions
are fulfilled. The error message for the user is called in another file, which is explained later.
The resize() function is called for having the actual size of the <div class=”page active”> ele-
ment for the DataTable plugin which builds the table up to the screen size.
Switch Page by Dropdown List
Another possibility to change pages without using texts or buttons is the dropdown menu. It
basically provides the same features (because its elements have also the pageLink class)
but can more easily be modified to a larger amount of options if there is a need for it in a later
development step. The dropdown menu not only has to offer the click function as seen
above, it also has to reset the select tag of all the main dropdown menus which appear to the
user as one single menu. If this reset of the select-attribute in the HTML had not been done,
the selected option in the menu of the new page would not have been modified to the
pressed value and still stayed the same it was before. With an each() function a small script
resets all these attributes of the <option> element on the whole page. With this solution the
dropdown menu can be as big as needed without changing this structure function again.
//remove attribute selected of all <option> elements of all mainDropdown-lists
$("option[selected].mainDropdown").removeAttr("selected");
//loop through all options on all mainDropdown-lists
$('option.mainDropdown').each(function(index,value){
//check if the new page (page to show) equals the value of the option
if ($(value).attr('value')==pageToShow){
//set the selected attribute on the right spots
$(value).attr("selected", "selected");
}
})

8
5 Language
One of the challenges was the requirement of a multilingual application. English, French and
German were the languages which had to be provided. The website uses a PHP file with
terms for each language to satisfy this objective. These files on the server are also used by
the mobile application for most of the terms. Each of these three files consists of a long list of
terms. One element of the list looks like this:
$_terms["description"] = htmlspecialchars("Beschreibung", ENT_COMPAT, "UTF-8");
However, with these three files, the mobile application was not yet able to access the terms,
since it would not make sense to have to connect to the server for each term. This was
solved by packing all needed terms into a JSON string and by then sending it to the mobile
application as a language package with only one request. This way the network is not
claimed as long as nobody selects another language.
To gather the right JSON string, a new PHP file was created called json_terms.php. This
PHP only verifies that the selected language is allowed and has a regex expression before
then packing all terms of the requested file in a JSON file using the predefined function
json_encode().
<?php
//get the language requested by the device
$language = $_GET["language"];
//do a safety check that it is an allowed language
if (preg_match("/^(en|fr|de)$/",$language)) {
//catch the one file corresponding to the requested language
include("terms_".$language.".php");
//respond with a json build up from all the values of the file
echo json_encode($_terms);
} else {
//catch the case the language didn’t fit
console.log("ERROR: No valid language selected");
}
?>
On the phone, the file language.js is responsible for all translations and language settings. It
also takes care of the arriving JSON string generated above. This string is processed in the
success of the Ajax request. There, all of the elements with a data-term attribute are trans-
lated. With the same technique as it is used by data-reference in chapter 4.2, the data-term
attribute saves the term value which forms the key of the JSON string. The value itself is
placed in text form inside the element while the data-term attribute is not modified. In the ex-
ample below only the <span> element is translated. However, the real code also contains

9
options, inputs or special cases as long strings. This sample shows a function called in lan-
guage.js which is called right after a new language package arrives by the Ajax protocol.
success: function(data){
//for each span element with a data-term we run the function below
$("span[data-term]").each(function( i, val){
//select whole span-element
val = $(val);
//select the attribute-value of data-term
var term = val.attr("data-term");
//replace text of span-element with translation of attribute-value
val.text(data[term]);
});
[...]
Terms that are not handled by an Ajax request are the warnings that the software has to dis-
play. Moreover, small forms like the naming of a saved query are translated directly where
they are generated (see example below).
if (!stringName){
console.log("ERR: no string name")
if (window.localStorage.getItem("language")=="de")
alert("Bitte geben Sie einen Namen ein!");
else if (window.localStorage.getItem("language")=="fr"){
alert("Entrez un nom, s.v.p.");
}
else{
alert("Please enter a name!");
}
return;
}
As we can see, the language setting is read from local storage. In local storage, we can in-
sert information about the user and his or her preferences, which are then also available after
a restart of the application. The language preferences, the username, the status of the user’s
login (not the password itself) and some helping variables are also saved in local storage.
When a user starts the application, a start protocol checks if there is already set a standard
language. If that is the case, this language is used for all of the terms. If not, German is used
as the standard language as it is done on the website.
6 Login
In the login section, different things can go wrong during the development process. Users, for
instance, do not like to log in every time anew when using the mobile application. However,
they do need an option for logging out. Furthermore, they have to be able to change the lan-
guage even if they are logged out. During the communication procedure it is important to
obtain some rules. Therefore, the password should not be transmitted without any coding.
10
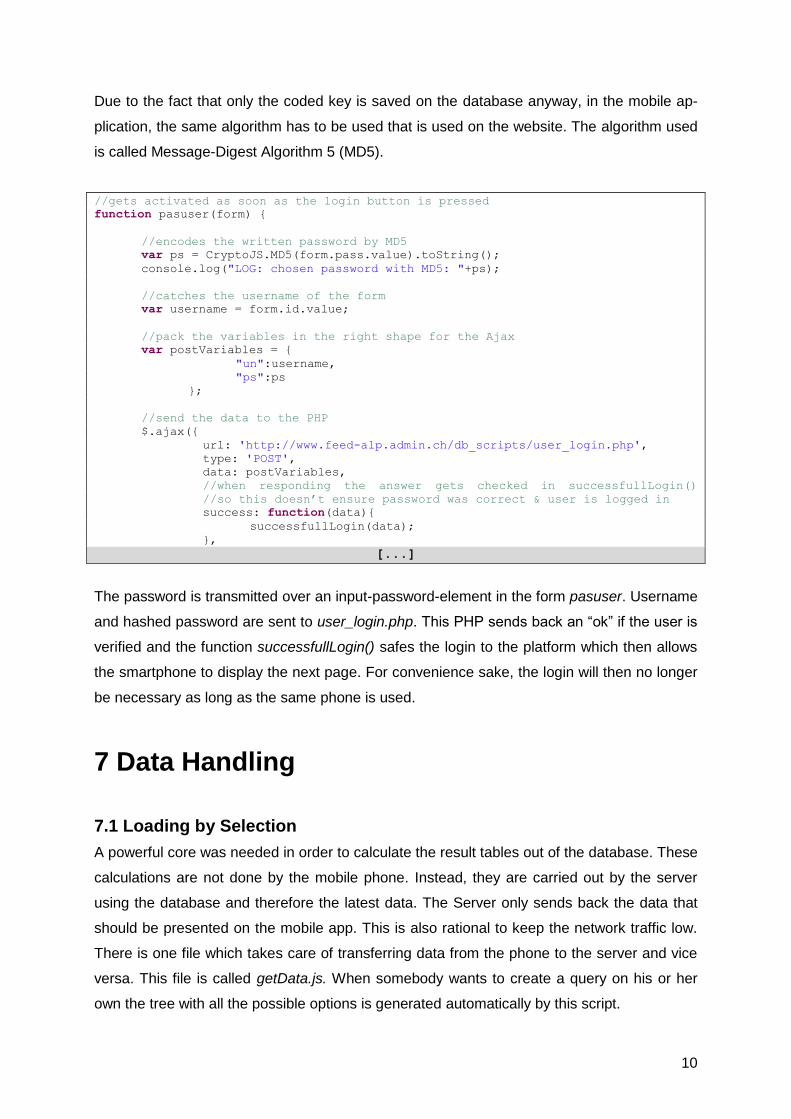
Due to the fact that only the coded key is saved on the database anyway, in the mobile ap-
plication, the same algorithm has to be used that is used on the website. The algorithm used
is called Message-Digest Algorithm 5 (MD5).
//gets activated as soon as the login button is pressed
function pasuser(form) {
//encodes the written password by MD5
var ps = CryptoJS.MD5(form.pass.value).toString();
console.log("LOG: chosen password with MD5: "+ps);
//catches the username of the form
var username = form.id.value;
//pack the variables in the right shape for the Ajax
var postVariables = {
"un":username,
"ps":ps
};
//send the data to the PHP
$.ajax({
url: 'http://www.feed-alp.admin.ch/db_scripts/user_login.php',
type: 'POST',
data: postVariables,
//when responding the answer gets checked in successfullLogin()
//so this doesn’t ensure password was correct & user is logged in
success: function(data){
successfullLogin(data);
},
[...]
The password is transmitted over an input-password-element in the form pasuser. Username
and hashed password are sent to user_login.php. This PHP sends back an “ok” if the user is
verified and the function successfullLogin() safes the login to the platform which then allows
the smartphone to display the next page. For convenience sake, the login will then no longer
be necessary as long as the same phone is used.
7 Data Handling
7.1 Loading by Selection
A powerful core was needed in order to calculate the result tables out of the database. These
calculations are not done by the mobile phone. Instead, they are carried out by the server
using the database and therefore the latest data. The Server only sends back the data that
should be presented on the mobile app. This is also rational to keep the network traffic low.
There is one file which takes care of transferring data from the phone to the server and vice
versa. This file is called getData.js. When somebody wants to create a query on his or her
own the tree with all the possible options is generated automatically by this script.

11
function getFirstTree(language){
//renew the tree of the first selection tree TD
$.ajax({
//protocol type
type:"POST",
//defines the location of the php file and declares the language
url:"[...]/get_td_search_options.php?lng=" + language,
//allows cross Domain origin inside the protocol
crossDomain: true,
//defines the datatype the response should have (html and JSON used)
dataType: "json",
//defines the variables which are sent
data:postVariables,
//function is called if php sends the requested response
success: function(data){
//searches the html element in the file and calls jstree() on it
//jstree() takes the responded data and builds the tree graphically
$("#td_select_agridea_feeds").jstree({
"html_data":{"data": data.af.v},
"search" : {"case_insensitive":true},
"plugins" : ["html_data","checkbox","themes","search"]
});
In order to receive the data from the Webserver, it was important not to freeze the app while
waiting for the response, which is why the Ajax engine (asynchronous JavaScript in XML) by
Java was used. With Ajax, it is also possible to receive query results as a JSON string which
was already provided by the PHP. Due to this, only few changes on the PHP files were nec-
essary.
For each Ajax post there were a few variables passed to the server. These variables were all
placed in one object called postVariables. For these requests coming from a mobile phone,
the variable platform was always set. Thus, the PHP code can always distinguish between
app users and website users if it needs to be modified at one point.
//variables which are sent to the server by Ajax
var postVariables = {
//progress through the selection
load_level:1,
//set platform to mobile phone
platform:"mobile",
//selected feeds as content variables
af:td_agridea_feeds.selected,
cf:selectedClassifiedFeeds
};
Other variables, as for example the load_level, were demanded by the PHP in order to com-
municate on which level one is in the selection process. To reach the next higher trees or the
results, the selected feeds needed to be listed by the mobile phone and send via postVaria-
bles. To find out which selection the user did, the list elements all have an initially class
jstree-unchecked.

12
<li id="1" title="Heu" class="jstree-leaf jstree-unchecked"><ins class="jstree-
icon"> </ins><a href="#"><ins class="jstree-checkbox"> </ins><ins
class="jstree-icon"> </ins>Heu</a> <i> (1)</i> </li>
Jquery.jstree.js listens to the click event on these elements and changes the class to jstree-
checked, when someone clicks on the checkbox. Before the Ajax above is sent, a function
must be called, to list all the selected values (getTdOptions() and others). These functions,
defined in search_options.js, put the selected labels into a variable which is sent to the serv-
er as well. The server responds to most of the requests in a complex and encapsulated
JSON string. As seen in the code above, the jstree() function is called after a successful
communication and is responsible to draw the table which is explained in chapter 9.1. Over-
all, this procedure works exactly as the website.
7.2 Loading by QID
Usually, the application sends the selected values whereupon it receives the calculated re-
sults from the server. However, on the mobile phone, the selected values are not always
known. This problem occurs if one wants to load saved queries or top queries. In these cas-
es, the Ajax for loading the saved and the top queries only contains the name and the Query
ID (QID) of the query. The idea behind that is that users can run the query without selecting
anything. Furthermore, the phone has no idea what the selected items are, which is why the
QID has to suffice.
On the website, the checkboxes are set automatically when one runs the query for a given
QID. Afterwards the calculations are done using these selected options. On the mobile
phone, however, it is not worth setting all the checkboxes and then start a new request for
the statistic table since that would mean a lot of unnecessary traffic, given that the user only
wants to see the results tables and is not able to look at the selected values. Therefore, a
further functionality had to be implemented to the PHP allowing the reception of the result
tables upon one single request while only using the QID.
After inserting ajax-pg-query-where.php and doing the described assignation below, the vari-
ables are set in the PHP directly if it is connected to the mobile application and if one sends a
QID.
//possibility to start by QID (PRN)
//checks if device is a mobile and if mobile sends a QID
if (isset($_POST["qid"])&&isset($_POST["platform"])&&$_POST["platform"]="mobile") {
//setting all the variables based on the QID
$query_cond = new QueryConditions($conn);
$selected_nutrients = $query_cond->sel_nutrients;
$selected_classified_feeds = $query_cond->sel_classified_feeds;
$selected_unclassified_feeds = $query_cond->sel_unclassified_feeds;
$selected_agridea_feeds = $query_cond->sel_agridea_feeds;
$selected_nutrients = $query_cond->sel_nutrients;

13
$selected_derived_nutrients = $query_cond->sel_der_nutrients;
$selected_cantons = $query_cond->sel_cantons;
$selected_altitude = $query_cond->sel_altitude;
$selected_year = $query_cond->sel_year;
$selected_season = $query_cond->sel_season;
}
After the variables are declared, the search query for the database needs to be built in the
same PHP file. This query is built over a long PHP file step by step. During this building pro-
cess, there are a lot of spots over the whole document in which query for mobile users has to
be formatted in a slightly different format. Therefore, there are some QID-Mobile-Insert parts
as shown below. These parts only effect the mobile application but are still located in the
main PHP and build the right string for each platform.
//QID-Mobile-Insert (PRN)
//checks if device is a mobile and if mobile sends a QID
if ($selected_nutrients&& isset($_POST["platform"])&& $_POST["platform"]="mobile"&&
isset($_POST["qid"])){
//extend the where clause by the values
$where_clause.=" nutrient_id in(" . strval($selected_nutrients) . ")";
}
8 Layout
To layout the user interface of the application a few cascade stylesheets were used. Using
multiple CSS files, the order of importing to index.html is important. Files describing an ele-
ment with an opposing style are dominant if they were imported at a later point. So CSS writ-
ten for the phone specifically had to be below the basic libraries for the option trees. Thus,
the open CSS libraries like chosen.css were imported first. In order to organize the basic file
structure the master.css file was used which was responsible for the biggest sections of the
layout like the page element with its three subparts (header, content, footer). The master.css
also ensures that there is no default margin as there often is in browsers for some basic ele-
ments. For exemplification, the footer design section is shown here.
/* Layouting the footer */
footer{
position:fixed; /* always stays at the bottom */
overflow: hidden;
bottom:0;
width:100%;
height:100px; /* Height of the footer */
background: rgba(226,226,226,0.8); /* Last value as alpha value */
}
For the footer, it is important to have a fixed position at the bottom of the display, which stays
there no matter what happens. A user might zoom and scroll, or the content box might grow

14
bigger than the actual available size of the screen. With the attributes position, overflow and
margin it was possible to achieve these needs.
Image 3: Footer
Source: Screenshot
To handle specific contents such as <input> elements, a main.css file was used. This file
controls all the elements that appear sporadically. It is included in the index.html document
right after the master.css because it has more specific layout orders for the elements.
After these two CSS files, some more specific files were imported. They were separated to
group some style options and keep an easy understandable file structure. For example,
startPage.css only takes care of the start page, while dropdown.css only handles the
dropdown menu design. Some designs arrive already preformatted to the phone. Others are
designed at the imported jstree.js library. In these cases, the CSS only overwrites the attrib-
utes, which have to be changed. To ensure that the changes take effect even if someone
changes the code the attribute !important was inserted to increase the priority of the chang-
es. In the example below, the overflow and the unused elements of a received html tree are
shown.
/*cut away text which overflows the screen and prevent from wrapping*/
li.jstree-open{
text-overflow: clip !important;
overflow: hidden !important;
white-space: nowrap !important;
width: 100% !important;
}
li.jstree-closed{
text-overflow: clip !important;
overflow: hidden !important;
white-space: nowrap !important;
width: 100% !important;
}
/*hiding all not used html*/
li.jstree-open > ul > li > a:nth-child(3){
display: none;
}
li.jstree-open > ul > li > i {
display: none;
}
15
9 Presentation
9.1 Result Tables
When requesting a new selection tree from the server, the response is formatted in HTML
and can be inserted into the page almost directly without changing too much. However, for
the presentation of the data the website uses the Google API and builds a Google Table di-
rectly with the data on the server. For the mobile application, the Google Visualization Pack-
age is difficult to get it in the right shape for the screen. For the application, a nice mobile
version with an own JavaScript algorithm was needed. This version needed to handle the
complex JSON string arriving from the server. This very long JSON string contains all the
information nested in key value pairs. This information had to be filtered which the following
code illustrates. After a long research and many barriers, the open source software
DataTable (cf. SpryMedia Ltd 2015) was used to generate a HTML table which fits the dis-
play.
//global variables for the columns (head of table) and content (array of arrays)
var columns = [];
var content = [];
//filter defines further down on which value the scatter chart is drawn
var filter;
//table get called as soon as the table data arrives in getData.js
//data is the incoming server json string
//destination is the spot in the html where the table should be drawn (div-element)
//type defines if it’s a TD or a SD table
function fillTable(data,destination,type){
console.log("LOG: fill table with type: "+type);
//empty column array
columns = [];
//for each columns in the data call the following function
$.each(data.cols, function(key, value ) {
//fill the column-array with the label of the arriving column
columns.push({title:value.label});
});
//empty column array
content = [];
//loop through each row element of the received JSON string
$.each(data.rows, function(key,value) {
//create temporate array for one content line
var tempcontent = [];
//loop through the c-elements of the row-element of the JSON string
$.each(value.c, function(key,value) {
//if there is a f(nicely written c) in a value, take it.
if(!value.f==0 && value.f){
tempcontent.push(value.f);
//if there is only a v, take the v (data but not wellformed)
} else{
tempcontent.push(value.v);
}
});
//push the finished temporary array (one line of content) to the array
content.push(tempcontent);
16
});
console.log("LOG: content array generated for "+type+"-Table.");
//create a new table on the destination spot in the HTML
destination.html( '<table […]></table>');
//recalculate window-size so not the hidden div gets calculated
$(window).resize();
//hide the right columns depending on the type of the request
if (type=="TD"){
var hiddenColumns = [
{
"targets": [0],
"visible": false,
"searchable": false
},
[...]
]
} else {
var hiddenColumns = [];
}
//use the dataTable API to fill the created table with this plugin
$('#mobileTable1').dataTable( {
"scrollY": "500px", //enable scrolling, therefore an extension was needed
"scrollX": "100%",
"paging": false, // show all values in one table
"data": content, // fill it with the array for the content created above
"width": "200px",
"columns": columns, // fill it with the array for the columns created above
"columnDefs": hiddenColumns // don’t show the columns selected above
});
}
The function fillTable() starts this plugin and first reorganizes the incoming JSON in a array
which can then be read by the plugin. The destination in index.html is used as an argument
of that function, in order for fillTable() to be called multiple times for multiple tables.
The type argument defines if one cares about summary data or detail data. Due to the fact
that the server provides too much information, the columns which are of formal nature have
to be hidden (hiddenColumns). The last jQuery function $('#mobileTable1').dataTable() starts
the plugin with the given parameters. With the extension scroll of the plugin it was possible to
look at a table on the phone screen with enough space to see the values and to scroll
through the data with a finger. The search box is a part of this plugin and allows a quick
search by any term the user is looking for. With its instant type and search functionality the
data is filtered immediately. FillTable() is called in getData.js to create the summary data ta-
ble when someone clicks on a button with the class getData_SD or with the class get-
Data_TD. It is illustrated in the following example.

17
$(function() {
//pull a new tree with the nutrients tree
$(document).on('click','.getData_SD',function(){
//spinning circle of death during ajax is waiting
$('.placeholder').html( '<div id="resultTable_TD" […]></div>');
//checks if the request is on a QID
if($(this).attr('data-qid')){
//sets QID as the variable to post
var qid = $(this).attr('data-qid');
var postVariables = {
"qid":qid
};
}
//else it’s a regular request by selected values
else{
getSdFeedOptions();
getSdNutrientsOptions();
if (!sd_nutrients_options.selected){
console.log("ERR: Selection minimal (Code 301)");
return;
}
[...]
//sending AJAX to get the sd data
$.ajax({
type:"POST",
url:'http://www.feed-alp.admin.ch/db_scripts/get_sd_data.php',
crossDomain: true,
dataType: "json",
data:postVariables,
//this function is called on success
success: function(data){
console.log("LOG: data arrived");
//fill table is called by data, destination and type
fillTable(data,$("#resultTable_SD"),"SD");
console.log("LOG: Table created.");
},
[...]
9.2 Scatter Chart
A further functionality added to the project, was the scatter chart of the nutrients as it is
shown on the website. On this chart, which is accessible by the main dropdown menu, one
has the possibility to select the different nutrients. This selection is provided by another
dropdown list, which is generated dynamically depending on the number of columns that are
received by the app. The scatter chart uses the google visualization API located on the
phone and started in mobileTable.js.
function drawChart() {
//builds a new google table not shown in the app
var data = new google.visualization.DataTable();
//create the two axis of the table
data.addColumn('date', 'Datum');
//as long as its type is number the name doesn’t matter
data.addColumn('number', 'Months per Day');
//prepares an empty array for the content
var myRows = [];
18
//loop through the global array created above
$.each(content, function(key, value ) {
//only take the value the users filters on
if (value[filter]){
//reform the string to the google shape
var date=value[3];
//split it by "/"
var dateArray = date.split("/");
//define the year as a variable
var year=dateArray[0];
//define the month as a variable
var month=dateArray[1];
//definie the day as a variable
var day=dateArray[2];
//now push it as google likes the date object
myRows.push([new Date(year,month,day),value[filter]]);
}
});
//this rows can be add to the table now
data.addRows(myRows);
//define the size of the scatter
var scatterHeight = ( parseFloat($( window ).height())*0.6);
var scatterWidth = ( parseFloat($( window ).width()));
//prepare the google table with the needed options
var options = {
legend: {position:"none"},
backgroundColor:"white",
colors:["blue"],
width: scatterWidth,
height: scatterHeight,
//vAxis: nothing set to save some space on the phone
hAxis: {title: columns[3].title},
isStacked: true,
chartArea:{width:"80%"} //with 80% axis text still can be seen
}; //options
// put chart into your div element
var chart =
new google.visualization.ScatterChart(document.getElementById('chart_div'));
chart.draw(data, options);
} // drawChart function
The function getScatter(), which is around the function above, is called the first time the data
from ajax-samples.php arrives and again if someone sets a new filter in the dropdown list of
filters. The argument filter therefore defines the Y-axis while the columns and the content are
globally defined arrays containing the latest build table data from the getData.js. To draw the
chart as big as possible, the legend of the vAxis is hidden.
9.3 Saved Queries
A further challenge was to offer both the saved queries and the global queries to the user. To
save and load user specific queries the JavaScript file queries.js was on duty. Displaying the
queries receiving form display_queries.php was not possible without getting a lot of unusable
HTML in the response, which is why the PHP had to been removed here as well.

19
In display_queries_mobile.php, the PHP builds a list of <div> elements which are already in
the right shape to be processed by the mobile app. One <div> element looks like this:
<div class="queryListElement pageLink getData_TD" data-qid="161" data-
references="resultTablePageTD">14) Essenzielle Aminosäuren</div>
Unfortunately, the triggers that were set on the buttons were not active in the newly generat-
ed HTML content, which posed a problem during development. For this, the JavaScript
needed to be updated from $(".pageLink") to $(document).on(".pageLink"). With this modifi-
cation, the newly generated classes (pageLink, getData_TD, getData_SD) were triggered as
soon as they were placed.
10 Appearance
Working with the Cordova config.xml file already helps already to configure a lot of features
for mobile use. This way, the auto-rotation as well as the overscroll could be disabled when
using the app.
Overscroll describes the way in which the screen of a website on the phone can be pulled. In
regular applications, it does not appear which is why overscroll has been disabled for this
Cordova project. This can be done in the config.xml file.
<preference name="orientation" value="portrait" />
<preference name="DisallowOverscroll" value="true" />
Still, a Cordova Web Application is not at all like a native app. For example, if we tip into a
text field, the mobile phone zooms to the text box and destroys the layout. That said, it is
important to write a styling code into a CSS file to take care of these problems. Most of the
styling ideas were originally proposed by Narayan Prusty (cf. Narayan Prusty 2014) and are
located in the CSS file native.css.
10.1 Text Selection
While it is possible to select text in web applications to copy it and then paste it somewhere
else, this should not be possible in an application. Except for input elements, the selection
should be disabled. In The Swiss Feed Database app, it is done with the following code,
which disables text selection on all elements and enables it again for the input elements.
*{
-webkit-user-select: none;
-khtml-user-select: none;
-moz-user-select: none;
20
-ms-user-select: none;
user-select: none;
}
input{
-webkit-user-select: auto;
-khtml-user-select: auto;
-moz-user-select: auto;
-ms-user-select: auto;
user-select: auto;
}
10.2 Anchor Element Popout Most phones show popouts when somebody presses and holds an anchor element. These
popouts can be disabled by using following code:
*{
-webkit-touch-callout: none;
-moz-touch-callout: none;
-ms-touch-callout: none;
touch-callout: none;
}
10.3 Dragging of Elements
The option to drag elements by holding and moving them was the last part that was taken care of
in the native.css. This option needs to be disabled as well, which is done with the following CSS.
*{
-webkit-user-drag: none;
-moz-user-drag: none;
-ms-user-drag: none;
user-drag: none;
}
10.4 Zooming
On a webpage, sides can be zoomed in and out to by double clicking or by zooming with two
fingers. This behavior cannot be handled in a cascade style sheet but has to be solved di-
rectly in the head of the HTML. By setting both the initial scale, the maximum-scale and the
minimum scale to one, users, on the one hand, will not be able to zoom anymore, and the
mobile application on the other hand, will stop automatically zooming to textboxes and other
boxes.
<meta name="viewport" content="user-scalable=no, initial-scale=1, maximum-scale=1,
minimum-scale=1" />
To satisfy the individual needs of all users, two buttons were implemented which allow zoom-
ing inside the result table. These buttons modify an attribute of the used DataTable plugin.

21
10.5 Click Delay Finally, the touch event-delay has to be disabled. If one simply clicks on a phone, there is a delay
in action, because the phone normally wants to ensure that its user did not want to zoom in or
was holding the button for a different action. Since app users should not zoom anyway (and are
not able to zoom since it was disabled as explained before), there is no need for this delay. Users
should be forwarded as soon as possible. Using a public library called fastclick, one can termi-
nate these delays. However, some delays are unavoidable due to the network communication of
the mobile application.
11 Distribution
Cordova makes it possible to build application packages for all the available platforms. In
order to create these applications, it uses the platforms native tools. As a consequence, the
developer environment has to be available for each application. For example, to run the code
on an ios device, the developer needs an Intel-based Computer with Mac OS X, X code, iOS
6 SDk, an Xcode Command Line Tool and a developer license by Apple. As there are for
Apple, there are rules for Google and Microsoft. If all conditions are fulfilled, one can build an
executable using the command line interface and following orders:
cordova platform add android
cordova build
The executable will be placed in the project folder platform/android/ant-build where it can be
collected. This works for all supported platforms (cf. The Apache Software Foundation 2015).
Overall, this report is not about the distribution of this application due to the fact that it was
not a part of the task. The developer of the app and the project crew will address this issue in
summer 2015. It should be done either using an existing developer license by Agroscope or
over a new one created for the purpose of distributing official software for the University Zü-
rich. Furthermore, it should not be linked to a student.
12 Conclusion
The aim of this project was the development of a light-weight mobile app for The Swiss Feed
Database. The developer had to get familiar with JavaScript, PHP, CSS, HTML and libraries
as JQuery, DataTable, Cordova and more. Apache Cordova, Adobe Code / Phonegap,
Apache Server 24 and pgAdmin III had to be installed. Furthermore, Chrome and Eclipse
had to be set up for the development. Afterwards, a minimal working example was built and

22
improved step by step. Parallel to the application, the PHP on the server was modified. Dur-
ing and after the development, the software was tested on the browser and on Android and
Apple systems. Moreover, the software is also ready to use on platforms other than android
or ios.
The development itself was an extensive and differentiated task. With support from the su-
pervisor and many other friends it was finally possible to manage all the difficulties and get
the software working as it should. Still there are some parts which are improvable and should
be enhanced in a next development part. A big project would be to build the visualization of
the data on a map. In this work it was omitted advisedly, but if there is a way to visualize the
data in a light-weighted way it would be a nice feature. Also the over all design of the app
could be improved by using a linear corporate design for the website and the mobile applica-
tion. Another improvement in design matters would have to be the utilization of the jQuery
Mobile library which provide some great features for an even better native app look (cf. The
jQuery Foundation 2015b).
The code itself can be improved by reducing redundancy. For example, the changePage
section could be minimalized significantly by implementing one main function. The applica-
tion tries to fulfil the concept of no redundancy, which is difficult since other students still
need to be able to follow. The way of doing a minimal working example and improving it step
by step makes the code a bit messy. The same can be seen in the already existing PHP
which many people worked on.
Another smart improvement for the mobile application would be the use of the system lan-
guage as the standardized language, so that the system defines the language the application
is initially shown in. That was not asked, but it is easy to implement and would be nice in a
further update. Furthermore, a small but nice feature would be the switch to a security stand-
ard which is higher than MD5 both on the website and the phone, because the used algo-
rithm is not safe anymore.
Overall, it was a project with a lot of try and error and a constant search for solutions. Now,
there is a multilingual tool which satisfies all demanded issues and builds a great platform for
further programmer to continue the development of The Swiss Feed Database Mobile Appli-
cation.

IV
Bibliography
Narayan Prusty (2014): Phonegap. Cross Platform Mobile App Development. In: http://qnimate.com/making-a-phonegap-look-like-native-app (08.07.2015).
SpryMedia Ltd (2015): DataTables Manual http://datatables.net/manual/index (08.07.2015).
The Apache Software Foundation (2015): Apache Cordova Documentation. In: http://cordova.apache.org/docs/en/5.0.0/ (08.07.2015).
The jQuery Foundation (2015a): jQuery API Documentation. In: http://api.jquery.com/ (08.07.2015).
The jQuery Foundation (2015b): jQuery Mobile API Documentation. In: http://api.jquerymobile.com/ (08.07.2015).