Embed Size (px)
Citation preview

Developing Java EE 5 Applications from Scratch
SAP NetWeaver Application Server, Java™ EE 5 Edition
Developing Java EE 5 Applications from Scratch 2
Copyright © Copyright 2006 SAP AG. All rights reserved. No part of this publication may be reproduced or transmitted in any form or for any purpose without the express permission of SAP AG. The information contained herein may be changed without prior notice. Some software products marketed by SAP AG and its distributors contain proprietary software components of other software vendors. Microsoft, Windows, Outlook, and PowerPoint are registered trademarks of Microsoft Corporation. IBM, DB2, DB2 Universal Database, OS/2, Parallel Sysplex, MVS/ESA, AIX, S/390, AS/400, OS/390, OS/400, iSeries, pSeries, xSeries, zSeries, z/OS, AFP, Intelligent Miner, WebSphere, Netfinity, Tivoli, Informix, i5/OS, POWER, POWER5, OpenPower and PowerPC are trademarks or registered trademarks of IBM Corporation. Adobe, the Adobe logo, Acrobat, PostScript, and Reader are either trademarks or registered trademarks of Adobe Systems Incorporated in the United States and/or other countries. Oracle is a registered trademark of Oracle Corporation. UNIX, X/Open, OSF/1, and Motif are registered trademarks of the Open Group. Citrix, ICA, Program Neighborhood, MetaFrame, WinFrame, VideoFrame, and MultiWin are trademarks or registered trademarks of Citrix Systems, Inc. HTML, XML, XHTML and W3C are trademarks or registered trademarks of W3C®, World Wide Web Consortium, Massachusetts Institute of Technology. Java is a registered trademark of Sun Microsystems, Inc. JavaScript is a registered trademark of Sun Microsystems, Inc., used under license for technology invented and implemented by Netscape. MaxDB is a trademark of MySQL AB, Sweden. SAP, R/3, mySAP, mySAP.com, xApps, xApp, SAP NetWeaver, and other SAP products and services mentioned herein as well as their respective logos are trademarks or registered trademarks of SAP AG in Germany and in several other countries all over the world. All other product and service names mentioned are the trademarks of their respective companies. Data contained in this document serves informational purposes only. National product specifications may vary. These materials are subject to change without notice. These materials are provided by SAP AG and its affiliated companies ("SAP Group") for informational purposes only, without representation or warranty of any kind, and SAP Group shall not be liable for errors or omissions with respect to the materials. The only warranties for SAP Group products and services are those that are set forth in the express warranty statements accompanying such products and services, if any. Nothing herein should be construed as constituting an additional warranty.

SAP NetWeaver Application Server, Java™ EE 5 Edition
Developing Java EE 5 Applications from Scratch 3
Icons in Body Text
Icon Meaning
Caution
Example
Note
Recommendation
Syntax
Additional icons are used in SAP Library documentation to help you identify different types of information at a glance. For more information, see Help on Help → General Information Classes and Information Classes for Business Information Warehouse on the first page of any version of SAP Library.
Typographic Conventions
Type Style Description
Example text Words or characters quoted from the screen. These include field names, screen titles, pushbuttons labels, menu names, menu paths, and menu options.
Cross-references to other documentation.
Example text Emphasized words or phrases in body text, graphic titles, and table titles.
EXAMPLE TEXT Technical names of system objects. These include report names, program names, transaction codes, table names, and key concepts of a programming language when they are surrounded by body text, for example, SELECT and INCLUDE.
Example text Output on the screen. This includes file and directory names and their paths, messages, names of variables and parameters, source text, and names of installation, upgrade and database tools.
Example text Exact user entry. These are words or characters that you enter in the system exactly as they appear in the documentation.
<Example text> Variable user entry. Angle brackets indicate that you replace these words and characters with appropriate entries to make entries in the system.
EXAMPLE TEXT Keys on the keyboard, for example, F2 or ENTER.

SAP NetWeaver Application Server, Java™ EE 5 Edition
Developing Java EE 5 Applications from Scratch 4
Development ...................................................................................................................... 6
Developing Java Persistent Entities ............................................................................... 7
Creating Database Connections ................................................................................. 8
Adding Persistence to Projects ................................................................................. 10
Packaging Persistent Entities ................................................................................... 12
Editing the persistence.xml.................................................................................... 13
Generating Entities from Database Tables............................................................... 14
Creating Persistent Entities....................................................................................... 16
Mapping Entities to Database Tables ....................................................................... 18
Generating Primary Keys.......................................................................................... 21
Modifying Persistence Properties ............................................................................. 23
Mapping Inheritance.................................................................................................. 24
Mapping Relationships.............................................................................................. 25
Obtaining an Entity Manager Instance...................................................................... 30
Managing Entity Instances........................................................................................ 32
Creating and Executing Queries ............................................................................... 34
Native SQL Query Examples ................................................................................ 36
Versioning with read_uncommitted Isolation Level................................................... 38
JPA Implementation Considerations......................................................................... 40
Creating EJB Components ........................................................................................... 43
Creating EJB 3.0 Projects ......................................................................................... 44
Creating Session Beans............................................................................................ 46
Managing Business Methods ................................................................................ 47
Creating Message-Driven Beans .............................................................................. 48
Injecting Environment Resources ............................................................................. 49
Setting Transaction Attributes................................................................................... 50
Using Interceptors ..................................................................................................... 52
Editing the ejb-j2ee-engine.xml................................................................................. 54
Developing Web Components...................................................................................... 55
Creating Dynamic Web Projects 2.5 ......................................................................... 56
Creating Servlets....................................................................................................... 57
Creating Listeners and Filters ................................................................................... 60
Editing the web-j2ee-engine.xml............................................................................... 62
Developing JavaServer Faces (JSF) Web Applications............................................... 63
Setting up JSF Support ............................................................................................. 65
Creating Dynamic Web Projects for JSF Development ............................................ 68
Creating JSF JSP Files ............................................................................................. 70
Describing Page Navigation...................................................................................... 72
Creating Managed Beans ......................................................................................... 74

SAP NetWeaver Application Server, Java™ EE 5 Edition
Developing Java EE 5 Applications from Scratch 5
Implementing Additional Configuration Elements ..................................................... 75
Developing Web Services............................................................................................. 76
Creating Bottom Up Web Services ........................................................................... 77
Creating Standalone Proxies .................................................................................... 79
Creating Deployable Proxies .................................................................................... 81
Creating Web Service Client Applications ................................................................ 83
Creating Connector Components ................................................................................. 85
Creating Application Clients.......................................................................................... 88
Creating Java EE Libraries ........................................................................................... 89
Creating Library Components ................................................................................... 90
Creating Bundled Libraries ....................................................................................... 91
Migrating Old Library Projects................................................................................... 93
Creating Enterprise Applications .................................................................................. 94
Creating Enterprise Application 5 Projects ............................................................... 95
Adding Modules to the Enterprise Application .......................................................... 96
Creating Bundled Libraries ....................................................................................... 97
Editing the application-j2ee-engine.xml .................................................................... 99
SAP NetWeaver Application Server, Java™ EE 5 Edition
Developing Java EE 5 Applications from Scratch 6
Development This section describes how the SAP NetWeaver Developer Studio supports you in developing Java EE 5 applications.
On top of the Eclipse platform, version 3.2, the SAP NetWeaver Developer Studio leverages the development tools delivered by the open-source Web Tools Platform 1.5 (WTP 1.5) and DALI projects, thereby facilitating development based on a well-known tooling foundation. In addition, SAP introduces its own wizards for providing direct support for the development of Java EE 5 components (such as EJB 3.0), as well as annotations support.
The tasks in this section are structured according to the typical layers of a Java EE 5 application, starting from the persistence and business layers (JPA and EJB 3.0 components) to the presentation (JSF, JSP and servlet components) and integration (Web services) layers.
SAP NetWeaver Application Server, Java™ EE 5 Edition
Developing Java EE 5 Applications from Scratch 7
Developing Java Persistent Entities
Purpose The SAP NetWeaver Developer Studio enables you to create and modify entities according to the JPA 1.0 specification. You can also create and modify database tables and export tables to entities.
We recommend that you follow the guidelines outlined in the JPA Implementation Considerations [Page 40] when you develop persistent entities.
Process Flow ...
● Creating EJB 3.0 Projects [Page 44]
● Opening the Persistence Perspective For more information see SAP Online Help at help.sap.com .
● Creating Database Connections [Page 8]
● Adding Persistence to Projects [Page 10]
● Creating Persistent Entities [Page 16]
● Mapping Entities to Database Tables [Page 18]
● Generating Primary Keys [Page 21]
● Modifying Persistence Properties [Page 23]
● Mapping Inheritance [Page 24]
● Mapping Relationships [Page 25]
● Obtaining an Entity Manager Instance [Page 30]
● Managing Entity Instances [Page 32]
● Creating and Executing Queries [Page 34]

SAP NetWeaver Application Server, Java™ EE 5 Edition
Developing Java EE 5 Applications from Scratch 8
Creating Database Connections
Use You use this procedure to create a connection to the database you use for your persistent entities.
Procedure
Creating New Database Connections Choose ...
1. Choose Window → Show View → Other.
2. Choose Data → Database Explorer in the Show View dialog.
3. Choose OK.
4. Select Connections in the Database Explorer.
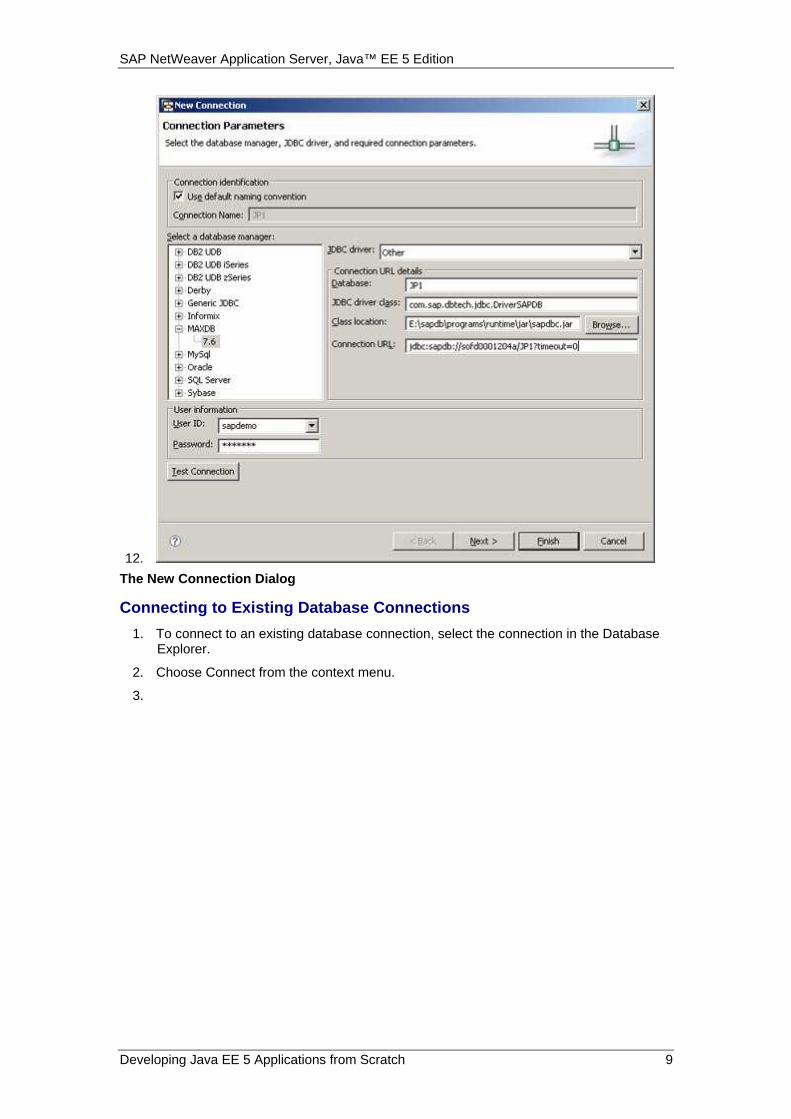
5. Choose New Connection from the context menu. The New Connection dialog opens.
6. Select a database vendor, for example, if you are using the system database server, select MAXDB →→→→ 7.6 .
7. Complete the Connection URL details fields:
a. Enter your database name, for example, if you are using the system database, JP1.
b. Enter the JDBC driver class, for example, the system driver class com.sap.dbtech.jdbc.DriverSapDB .
c. Enter the location of the JDBC driver class on the file system, for example, if you wish to use the system driver, <SAP DB installation location>\programs\runtime\jar\sapdbc.jar .
d. Enter the connection URL, for example, jdbc:sapdb://<DB Host Name>/JP1?timeout=0 .
8. To use the predefined system datasource, enter SAPDEMO as the user name for the database.
9. To use the predefined system datasource, enter SAPDEMO as the password for the database.
If the persistence.xml in your application is empty, the persistence container assumes you are you using the default datasource. Thus, you must supply the SAPDEMO user name and password to use the predefined database schema and access the predefined tables.
10. Choose Finish. The database connection appears in the Connections tree in the Database Explorer.
11.
SAP NetWeaver Application Server, Java™ EE 5 Edition
Developing Java EE 5 Applications from Scratch 9
12.
The New Connection Dialog
Connecting to Existing Database Connections ...
1. To connect to an existing database connection, select the connection in the Database Explorer.
2. Choose Connect from the context menu.
3.

SAP NetWeaver Application Server, Java™ EE 5 Edition
Developing Java EE 5 Applications from Scratch 10
Adding Persistence to Projects
Use You use this procedure to add persistence to EJB 3.0 projects.
Prerequisites You have created an EJB 3.0 Project in the SAP NetWeaver Developer Studio. For more information, see Creating EJB 3.0 Projects [Page 44].
You have created a connection to the database. For more information, see Creating Database Connections [Page 8].
Procedure Select the Project...
1. Select the project in the Package Explorer.
2. Choose Java Persistence → Add Java Persistence from the context menu. The Add Java Persistence dialog opens.
3. Choose a database connection to use from the Connection dropdown list.
4. Choose a database schema to use from the Schema dropdown list.
5. Enter an arbitrary name in the Persistence unit name field. For more information about persistence units and entity packaging, see Packaging Persistent Entities [Page 12].
6. Choose Finish.

SAP NetWeaver Application Server, Java™ EE 5 Edition
Developing Java EE 5 Applications from Scratch 11
The Add Java Persistence Dialog

SAP NetWeaver Application Server, Java™ EE 5 Edition
Developing Java EE 5 Applications from Scratch 12
Packaging Persistent Entities
Use You use this procedure to specify how persistent entities are packaged into persistence units. A persistence unit is a logical grouping persistent classes and holds:
● An entity manager factory and its entity managers
● The set of persistent classes managed by these entity managers
● A persistence.xml file in the META-INF directory of the root of the persistence unit that defines the unit
Persistence units may be packaged into an EJB-JAR file, the WEB-INF/classes directory of a WAR file, a jar file in the WEB-INF/lib directory of a WAR file, a jar file in the root of the EAR, a jar file in the EAR library directory, and in an application client jar file.
The JPA specification requires that persistence units have a persistence.xml . When you specify entity packaging in the SAP NetWeaver Developer Studio, you can choose if you want to create the persistence.xml . If you choose not to create it at this point, you can still create it at a later point. We recommend that you create the persistence.xml when you specify entity packaging.
Prerequisites You have created an EJB 3.0 project. For more information, see Creating EJB 3.0 Projects [Page 44].
You have opened the Java Persistence perspective. For more information, see Java Persistence Perspective at help.sap.com .
Procedure To specify entity packaging, you create a persistence.xml file. ...
1. Select your project in the Package Explorer.
2. Choose Java Persistence → Add Java Persistence.
3. Select the Create persistence.xml checkbox.
4. Complete the following fields:
● Persistence provider: name of the persistence provider’s javax.persistence.spi.PersistenceProvider class.
● Persistence unit name: an arbitrary name to identify the persistence unit. This name is used in the @PersistenceContext and @PersistenceUnit annotations.
5. Choose Finish.
Result The SAP NetWeaver Developer Studio creates the persistence.xml file in the META-INF directory.

SAP NetWeaver Application Server, Java™ EE 5 Edition
Developing Java EE 5 Applications from Scratch 13
Editing the persistence.xml
Use You use this procedure to edit the persistence.xml file.
Prerequisites You have created a persistence.xml file. For more information, see Packaging Persistent Entities [Page 12].
Procedure ...
1. Select the persistence.xml file in the Package Explorer.
2. Choose Open With → Persistence XML Editor.
3. You can add a number of elements to the persistence.xml file, such as transaction type , provider , jta-data-source , non-jta-data-source , mapping-file , jar-file , class , exclude-unlisted-classes , and so on. The only mandatory element is the name element, which the SAP NetWeaver Developer Studio includes in the file automatically. For a complete listing of elements and their semantics, see the JPA specification on Sun Microsystems’ website.
4. The JPA specification requires that entity classes are explicitly denoted as managed persistence classes in order for them to be included within a persistence unit. To add classes to the file, select the file in the Package Explorer.
5. Choose Java Persistence → Synchronize Classes from the context menu. The SAP NetWeaver Developer Studio adds the <class> elements and class names in the file automatically.

SAP NetWeaver Application Server, Java™ EE 5 Edition
Developing Java EE 5 Applications from Scratch 14
Generating Entities from Database Tables
Use You use this procedure to generate entities from database tables.
Prerequisites You have opened the Java Persistence perspective. For more information, see Java Persistence Perspective at help.sap.com .
You have added persistence to your project. For more information, see Adding Persistence to Projects [Page 10].
You are connected to your database. For more information, see Creating Database Connections [Page 8].
Procedure ...
1. To generate entities from database tables, select your project in the Package Explorer.
2. Choose Java Persistence → Generate Entities from the context menu. The Generate Entities dialog opens.
3. Complete the Source Folder and Package fields:
● Source Folder: the folder to contain the java source files.
● Package: an arbitrary name of the package to contain the entities.
4. Choose the database tables to use to generate entities. Choose Finish.

SAP NetWeaver Application Server, Java™ EE 5 Edition
Developing Java EE 5 Applications from Scratch 15
5.
The Generate Entities Dialog
Result The entities appear in the Package Explorer in the folder and package you have selected.

SAP NetWeaver Application Server, Java™ EE 5 Edition
Developing Java EE 5 Applications from Scratch 16
Creating Persistent Entities
Use You use this procedure to create new Java persistent entities or to create persistent entities from existing classes.
Prerequisites You have created an EJB 3.0 Project. For more information, see Creating EJB 3.0 Projects [Page 44].
You have created a connection to your database and you are connected to your database. For more information, see Creating Database Connections [Page 8].
Procedure
Creating New Persistent Entities ...
1. Choose File → New → Other from the main menu.
2. Choose Java Persistence → Entity from the New dialog.
3. Enter a name for the package or browse to a package in the Package field.
4. Enter a name for your entity in the Name field.
5. Choose Finish. The entity appears in the ejbModule project folder.
Creating Persistent Entities From Existing Classes ...
1. Select the file of the class in the Project Explorer, for example TestClass.java .
2. Expand the node.
3. Select the class and choose Java Persistence → Make Java Persistence Entity from the context menu.

SAP NetWeaver Application Server, Java™ EE 5 Edition
Developing Java EE 5 Applications from Scratch 17
4.
Adding Fields to Entities ...
1. Select the entity in the Package Explorer.
2. Choose Open from the context menu.
3. Add the fields for the entity to the source code of the class.
@Entity public class Employee { private Long id ; private String firstNname ; private String lastName ; private String address ; }
4. Choose Save.

SAP NetWeaver Application Server, Java™ EE 5 Edition
Developing Java EE 5 Applications from Scratch 18
Mapping Entities to Database Tables
Use You use this procedure to map entities to database tables. The JPA specification defines two access types for entities:
● Field-based access
With field-based access, the persistent properties of the entity are accessed directly. To map persistent properties for field-based access, you annotate the class properties, that is, entity fields.
● Property-based access
With property-based access, persistent properties are accessed using getter and setter methods. To map persistent properties for property-based access, you annotate the getter methods.
Prerequisites You have opened the Java Persistence perspective. For more information, see Java Persistence Perspective at help.sap.com .
Procedure
Mapping Entities to Database Tables ...
1. Select the entity in the Package Explorer.
2. Choose Open from the context menu.
3. Select the entity in the Persistence Outline. The properties of the entity are listed in the Persistence Properties view.
4. If you wish to map the entity to a specific database table, enter the table name in the Name field of the General tab. If you leave the field with the default setting, the entity is mapped to a table with the same name as the entity.
Mapping Entity Fields to Columns ...

SAP NetWeaver Application Server, Java™ EE 5 Edition
Developing Java EE 5 Applications from Scratch 19
1. Select an entity field in the Persistence Outline.
2. If you wish to map the field to a specific table column, enter the column name in the Name field. If you leave the Name field with the default setting, the entity field is mapped to a column with the same name as the entity field. Thus, you use field-based access. For more information about property-based access, see Accessing the Persistent State [External].
Mapping the Entity Primary Key ...
1. Select the entity field you wish to map as the primary key in the Persistence Outline.
2. Choose Map As → Id in the Persistence Properties view. The SAP NetWeaver Developer Studio updates the source code of the entity field with the @Id annotation.

SAP NetWeaver Application Server, Java™ EE 5 Edition
Developing Java EE 5 Applications from Scratch 20
You can also generate primary keys automatically. For more information, see Generating Primary Keys [Page 21].

SAP NetWeaver Application Server, Java™ EE 5 Edition
Developing Java EE 5 Applications from Scratch 21
Generating Primary Keys
Use You use this procedure to generate primary keys for entities automatically. The JPA specification defines four strategies for primary key generation. These strategies are specified using the @GeneratedValue annotation, for example, @GeneratedValue (strategy=GenerationType. TABLE, generator = "myGrenerator" ).
The generation strategies have the following specifics:
● Auto – the container picks a strategy and takes care of primary key generation.
● Identity – uses a database identity column to generate primary keys.
● Table – uses a dedicated database table to generate and store primary keys.
● Sequence – uses a database sequence to generate primary keys.
The Identity and Sequence strategies are not supported on the SAP NetWeaver Application Server, Java(TM) EE 5 Edition. For more information on ID generation, see JPA Implementation Considerations [Page 40].
Prerequisites You have opened the Java Persistence perspective. For more information, see Java Persistence Perspective at help.sap.com .
You have mapped an entity field as the primary key. For more information, see Mapping Entities to Database Tables [Page 18].
Procedure ...
1. Select the field mapped as a primary key in the Persistence Outline.
2. Choose the PK Generation tab.
3. Choose a generation strategy from the Strategy dropdown list.
4. Choose the Table strategy and complete the following additional fields:
● Generator Name: an arbitrary generator name that can be referenced across the persistent unit.
● Table Generator fields:
○ Table: name of the database table to store the generated primary keys.
○ Primary Key Column: the column in the table generator’s table that contains the primary key.
○ Value Column: the column to store generated IDs.
○ Primary Key Column Value: the value for the primary key column in the generator table.

SAP NetWeaver Application Server, Java™ EE 5 Edition
Developing Java EE 5 Applications from Scratch 22
Using Table Primary Key Generation Strategy

SAP NetWeaver Application Server, Java™ EE 5 Edition
Developing Java EE 5 Applications from Scratch 23
Modifying Persistence Properties
Use You use this procedure to set additional options on the persistent state of an entity. You can set specific attributes on entities and/or their fields.
Prerequisites You have opened the Java Persistence perspective. For more information, see Java Persistence Perspective at help.sap.com .
Procedure ...
1. To modify an entity field, open the entity and select the entity field in the Persistence Outline.
2. Choose the General tab of the Persistence Properties.
If you want to Then
Specify if the field is used in all SQL INSERT statements.
...
1. Choose True from the Insertable dropdown list.
Specify if the field is used in all SQL UPDATE statements
...
1. Choose True from the Updatable dropdown list.
Specify if the value of the field is loaded lazily or fetched eagerly.
...
...
1. Choose Eager or Lazy from the Fetch Type dropdown list.
Specify if the field can be null ...
1. Choose True from the Optional dropdown list.
Specify the field to be one of the following data types: java.util.Date , java.util.Time , or java.util.Timestamp.
…
1. Choose Date, Time, or Timestamp from the Temporal dropdown list.
Specify if operations on the field are cascaded to associated(related) fields.
...
1. Choose the appropriate option from the Cascade Type dropdown list. The cascade types have the following semantics:
● Default – no operations are cascaded.
● All – all merge, persist, and remove operations on the field are cascaded on related fields.
● Merge – All merge operations on the field are cascaded on related fields.
● Persist – All persist operations on the field are cascaded on related fields.
● Remove – All remove operations on the field are cascaded on related fields.

SAP NetWeaver Application Server, Java™ EE 5 Edition
Developing Java EE 5 Applications from Scratch 24
Mapping Inheritance
Use You use this procedure to specify inheritance between classes.
Prerequisites You have created an EJB 3.0 Project. For more information, see Creating EJB 3.0 Projects [Page 44].
You have created your entities. For more information, see Creating Persistent Entities [Page 16].
You have opened the Java Persistence perspective. For more information, see Java Persistence Perspective at help.sap.com .
Procedure ...
1. Select the entity in the Package Explorer.
2. Select the entity in the Persistence Outline.
3. On the Persistence Properties view, choose the Inheritance tab.
4. Select an inheritance strategy from the dropdown list:
● Single Table – all classes in the hierarchy are mapped to a single database table.
● Joined – the root class is mapped to a table, and all other classes are mapped to another table.
The Table per Class strategy is not supported on the SAP NetWeaver Application Server, Java(TM) EE 5 Edition.
5. If you choose single or joined strategy, you must also complete the following fields:
● Discriminator Column: the column in the database table that holds values for identifying the specific subclass to which the instance represented by the table row belongs.
● Discriminator Type: the type of object to use as class discriminator. Possible values are String , Char , and Integer .
● Discriminator Value: specifies the value of the discriminator column for entities of the given type.

SAP NetWeaver Application Server, Java™ EE 5 Edition
Developing Java EE 5 Applications from Scratch 25
Mapping Relationships
Use You use this procedure to create relationships between entities. JPA supports both bidirectional and unidirectional relationships. In contrast to EJB 2.1, bidirectional relationships are not automatically managed by the container but must be explicitly managed on both sides by the application. One side is the owning side of the relationship and the other side is the inverse side. The owning side determines the behavior of the relationship at runtime. A unidirectional relationship has only an owning side.
Prerequisites You have created an EJB 3.0 Project. For more information, see Creating EJB 3.0 Projects [Page 44].
You have created your entities. For more information, see Creating Persistent Entities [Page 16].
You have opened the Java Persistence perspective. For more information, see
Procedure
Mapping One-to-One Unidirectional Relationships ...
To map a unidirectional one-to-one relationship, the owning entity’s database table must include a foreign key column with the IDs from the other entity’s database table.
In a company, employees have profiles with address data. Each employee has only one profile and profiles do not reference employees. The Employee entity has the following fields: @Entity @Table(name= "TMP_EDM_EMPLOYEE") public class Employee { @Id private int employeeId ; private String firstName ; private String lastName ; private Address address ;
}
The PersonalData entity has the following fields: @Entity public class Address { @Id private int Id ; private int Street private int City ; private int Telephone ;
}
1. Select the address field of the Employee entity in the Persistence Outline.
2. On the General tab of the Persistence Properties, choose Map As → One to One.
3. Enter the fully qualified name of the Address entity in the Target Entity field.

SAP NetWeaver Application Server, Java™ EE 5 Edition
Developing Java EE 5 Applications from Scratch 26
The SAP NetWeaver Developer Studio creates a default foreign key join column and updates the Employee entity source code with the @OnetoOne annotation. As the Address entity does not reference the Employee entity, no additional code is necessary there.
Mapping One-to-One Bidirectional Relationships
To make the relationship above bidirectional, you must include a field to reference the Employee entity in the Address entity, for example, private Employee employee . ...
1. Select the address field of the Employee entity in the Persistence Outline.
2. On the General tab of the Persistence Properties, choose Map As → One to One.
3. Select the employee field of the Address entity in the Persistence Outline.
4. On the General tab of the Persistence Properties, choose Map As → One to One.
5. Choose address from the Mapped By dropdown list.
The SAP NetWeaver Developer Studio creates default foreign key join columns for the two entities and updates the Employee entity source code with the @OnetoOne annotation and the Address entity source code with the @OnetoOne annotation with the mappedBy attribute.
@OneToOne(mappedBy= "address" )
private Employee employee ;
Mapping Many-to-One Unidirectional Relationships
In a company, employees work in departments, that is, many employees are related to one department. Each employee works for only one department and departments do not reference employees.
6. The Employee entity is the owning side of the relationship. To map the owning side of the relationship, create a field to hold the foreign keys of the inverse side, for example, employeeDepartment .
7. Select the employeeDepartment field in the Persistence Outline.
8. On the Persistence Properties, choose Map As → Many to One.
The SAP NetWeaver Developer Studio creates a default foreign key join column for the Employee entity and updates the Employee entity source code with the @ManytoOne annotation. As the Department entity does not reference the Employee entity, no additional code is necessary there.
Mapping One-to-Many and Many-to-One Bidirectional R elationships
In a company, employees work in departments, that is, many employees are related to one department. If you create two entities to hold employee and department information respectively, both entities are aware of the relationship, that is, it is a bidirectional relationship. Thus, you manage the relationship on both the owning and the inverse side.
...
1. The Employee entity is the owning side of the relationship. To map the owning side of the relationship, create a field to hold the foreign keys of the inverse side, for example, employeeDepartment .
2. Select the employeeDepartment field in the Persistence Outline.
3. On the Persistence Properties, choose Map As → Many to One.

SAP NetWeaver Application Server, Java™ EE 5 Edition
Developing Java EE 5 Applications from Scratch 27
4. On the Persistence Properties, choose the General tab. Enter the fully qualified name of the Department entity in the Target Entity field. Leave the rest of the fields with their default values.
Mapping Many to One Relationships on the General Tab
5. Choose the Join Columns tab. The SAP NetWeaver Developer Studio provides the default mapping automatically.
6. Choose Override Default. Select the default entry and choose Edit. The Edit Join Column dialog opens.
7. In the Name field, enter DEPARTMENT_ID. Leave the Referenced Column Name field blank and choose OK.
Mapping Many to One Relationships on the Join Columns Tab
The SAP NetWeaver Developer Studio updates the source code of the entity with the following:
@ManyToOne(targetEntity=com.sap.demo.entities.Department. cl
ass )
@JoinColumn (name= "DEPARTMENT_ID")
private int employeeDepartment ;
8. To map the inverse side of the relationship, create a field in the Department entity to hold the employees working for the department, for example, employees .
9. Select the field in the Persistence Outline.
10. On the Persistence Properties, choose Map As → One to Many. The SAP NetWeaver Developer Studio inserts the correct target entity automatically.

SAP NetWeaver Application Server, Java™ EE 5 Edition
Developing Java EE 5 Applications from Scratch 28
11. In the Mapped By field, enter the field to map to from the owning side, employeeDepartment .
12. From the Cascade Type dropdown list, choose All.
13. From the Fetch Type dropdown list, choose Eager.
Mapping One to Many Relationships on the General Tab
The SAP NetWeaver Developer Studio updates the source code of the entity with the following:
@OneToMany(mappedBy= "employeeDepartment" , fetch=FetchType. EAGER, cascade=CascadeType. ALL)
Mapping Many-to-Many Relationships
Each many-to-many relationship has two sides. On the owning side of the relationship, you designate a table to hold columns with foreign keys from both entities. The name element specifies the name of the table in the database. The column to insert in the join table from the owning side is always listed first with the joinColumns element. The value of the joinColumns element is the @JoinColumn annotation that specifies the name of the column from the owning entity. The inverse side is listed second with the inverseJoinColumns element. Again, the value of the element is specified by the @JoinColumn that lists the name of the column from the inverse side to be inserted in the join table.
In a company, employees work on projects, that is, an employee references many project instances and a project references many employee instances. You create two entities to hold employee and project data respectively and both entities are aware of the relationship, that is, it is a bidirectional relationship. Thus, you manage the relationship on both the owning and the inverse side.
The Project entity: ...
@ManyToMany @JoinTable (name = "TMP_EDM_EMP_PRJ", joinColumns = @JoinColumn(name = "PROJECT_ID" ), inverseJoinColumns = @JoinColumn(name = "EMPLOYEE_ID")) public List<Employee> getEmployees() { return employees; } public void setEmployees(List<Employee> employees) { this .employees = employees;
}
The Employee entity:

SAP NetWeaver Application Server, Java™ EE 5 Edition
Developing Java EE 5 Applications from Scratch 29
@ManyToMany(mappedBy = "employees" , fetch=EAGER) public List<Project> getProjectsByParticipant() { return projectsByParticipant;
}

SAP NetWeaver Application Server, Java™ EE 5 Edition
Developing Java EE 5 Applications from Scratch 30
Obtaining an Entity Manager Instance
Use
JPA provides the Entity Manager API (EM), which is the main API for application developers to interact with the database. The EM manages the life cycle and state of entities. It supports create, read, update, and delete (CRUD) operations, finding entities, persisting entities, query execution, and so on.
Prerequisites
An EM instance is associated with a Persistence Context. The Persistence Context defines the scope under which entity instances are managed by the EM. The Persistence Context represents a set of managed entity instances in a data store. There are two types of Persistence Contexts:
● A transaction-scoped Persistence Context ends when the transaction ends
● An Extended Persistence Context may span multiple transactions and ends when it is explicitly closed by the container or by the application
The EJB container supports container-managed and application-managed EMs. The following table summarizes the differences between them:
Container-Managed Application-Managed
Life cycle Managed by the container. Managed by the application.
EM and Persistence Context created and destroyed explicitly by the application.
Persistence Context Propagated by the container to all application components that use the EM instance within a single JTA transaction.
Not propagated across application components. Each EM creates a new, isolated Persistence Context.
Transaction Control Provides only JTA transaction control.
Provides JTA and non-JTA transaction control.
EM instance Obtained using dependency injection.
Obtained from factory.
Procedure ...
1. To obtain a container-managed EM instance, you use the @PersistenceContext annotation to have the EJB container inject an EM instance into the application component using dependency injection:
@PersistenceContext
public EntityManager em;
2. To obtain an application-managed EM instance, you must first obtain an entity manager factory instance:

SAP NetWeaver Application Server, Java™ EE 5 Edition
Developing Java EE 5 Applications from Scratch 31
@PersistenceUnit
EntityManagerFactory emf ;
EntityManager em = emf .createEntityManager();
Result The container injects an entity manager instance into the application component. You can use the entity manager instance to perform operations in entity instances.

SAP NetWeaver Application Server, Java™ EE 5 Edition
Developing Java EE 5 Applications from Scratch 32
Managing Entity Instances
Use To manage entity instances, you invoke Entity Manager (EM) methods on them. Entity instances have one of four states:
● New
An entity instance with this state has no persistent identity and is not associated with a Persistence Context.
● Managed
An entity instance with this state has a persistent identity and is associated with a Persistence Context.
● Detached
An entity instance with this state has a persistent identity but is currently not associated with a Persistence Context.
● Merged
An entity instance with this state has a persistent identity and is associated with a Persistence Context, but is scheduled for removal from the data store.
Entity instances become managed by the EM as a result of a persist, find, or merge operation, or as a result of a query. When the owning Persistence Context is closed, the entity becomes detached. In contrast to EJB 2.1, when entities in EJB 3.0 become detached, they can be passed directly to other components as data transfer objects.
The Java Persistence API also supports a detach and merge mechanism. Entities are detached from the EM at the end of the persistence context or when they get serialized. Detached entities can be manipulated in persistence-unaware environments like plain Java objects. They can also be merged into a different persistence context by the EM.
Prerequisites You have created an EJB 3.0 Project. For more information, see Creating EJB 3.0 Projects [Page 44].
You have created your entities. For more information, see Creating Java Persistent Entities [Page 16].
You have created your session beans. For more information, see Creating Session Beans [Page 46].
Procedure
Persisting Entity Instances ...
1. To make new entity instances managed and persistent, you use the persist() method of the EM.
To persist all projects, you generate a list of all projects and invoke persist() on each one: List<Project> projects= dataDomain.getDemoProjects( );
for (Project project : projects) { em.persist(project);
}

SAP NetWeaver Application Server, Java™ EE 5 Edition
Developing Java EE 5 Applications from Scratch 33
}
Finding Entity Instances
In an application, you may need to identify an entity instance in the database to perform operations on it. ...
1. To find a particular entity instance against its primary key, you use the find() method of the EM.
The EM looks up the employeeId in the database and returns an instance of the employee with the given ID in the employee variable. You can then view and manipulate the data for this particular employee using the instance that is obtained. public Employee findEmployeeById( int employeeId) { Employee employee = em.find(Employee. class , Integer. valueOf(employeeId)); return employee;
}
Updating and Merging Detached Entity Instances ...
1. To update entities, you use the merge() method of the EM.
To update the data of employees of selected departments, you use the getAllDepartments() business method. As the relationship employees of the entity Department is annotated with fetch type EAGER, the employees working in departments are loaded simultaneously with the departments. At the end of the getAllDepartments business method, the JTA transaction ends and the departments as well as the employees become detached. The changed employee data is synchronized with the database by the updateDepartment() business method:
public void updateDepartment(Department updatedDepartment) { em.merge(updatedDepartment);
}
The merge operation does the following: ...
i. Loads the Department entity with the same ID as the given detached Department entity from the database.
ii. Copies all persistent properties from the detached department to the loaded department.
iii. As the relationship employees of the entity Department is annotated with cascade type ALL, the merge operation is cascaded to the detached employees accordingly.
See also:
Mapping Relationships [Page 25]
Modifying Persistence Properties [Page 23]

SAP NetWeaver Application Server, Java™ EE 5 Edition
Developing Java EE 5 Applications from Scratch 34
Creating and Executing Queries
Use JPA supports dynamic queries, native SQL queries, and named queries. JPQL also supports bulk update and deletes and subqueries. All queries are polymorphic by default. Queries accept named parameters, denoted by the : operator, for example :employeeName . You create queries in business methods in session beans.
The default FlushModeType for queries is AUTO. This means that each time a query is executed, the Persistence Context is flushed to the database. To perform this operation, the database locks all table rows to be changed until a commit or rollback of the transaction occurs.
Prerequisites You have created an EJB 3.0 Project. For more information, see Creating EJB 3.0 Projects [Page 44].
You have created your entities. For more information, see Creating Persistent Entities [Page 16].
You have created your session beans. For more information, see Creating Session Beans [Page 46].
You have obtained an entity manager instance. For more information, see Obtaining an Entity Manager Instance [Page 30].
Procedure
Creating Dynamic Queries
A dynamic query is a query that passes parameters dynamically supplied to the container. ...
1. To create a dynamic query, you use the createQuery method of the Entity Manager (EM).
2. You bind the named parameter with the setParameter method.
3. You retrieve the results with getSingleResult (if the query returns a single record) or getResultList (if the query returns a list of records).
public List<Employee> getEmployeesWithGivenIds(Set<Intege r> ids) { if (ids == null || ids.size() == 0) { return Collections.EMPTY_SET; } // create the query text StringBuilder queryText = new StringBuilder( "SELECT e FROM Employee e WHERE e.id IN (?1" ); for ( int i = 2; i <= ids.size(); i++) { queryText.append( ", ?" ); queryText.append(i); } queryText.append( ")" ); // prepare the query Query query = em.createQuery(queryText.toString ()); // bind the parameters

SAP NetWeaver Application Server, Java™ EE 5 Edition
Developing Java EE 5 Applications from Scratch 35
int j = 1; for (Integer id : ids) { query.setParameter(j, id); j++; } // execute the query return query.getResultList();
}
Creating Named Queries
A named query is an JPQL query that is pre-defined and identified against a given name. ...
1. To define a named query, you add the @NamedQuery annotation and supply values for its name and query attributes. All of the named queries are placed inside the @NamedQueries annotation and before the class declaration.
//named queries @NamedQueries( { @NamedQuery(name = "findAllEmployees" , query = "SELECT e FROM Employee e" ), @NamedQuery(name = "findAllDepartments" , query = "SELECT d FROM Department d" ), @NamedQuery(name = "findAllProjects" , query = "SELECT p FROM Project p" ), @NamedQuery(name = "findAllSkills" , query = "SELECT s FROM Skill s" ) })
2. The name attribute identifies the query against a string value. The query attribute defines the query to be executed by the EM. To execute a named query, you use the createNamedQuery() method of the EM:
public List<Department> getAllDepartments() { List<Department> departments = em.createNamedQuery( "findAllDepartments" ).getResultList(); return departments; } public List<Employee> getAllEmployees() { List<Employee> employees = em.createNamedQuery( "findAllEmployees" ).getResultList(); return employees; } public List<Skill> getAllSkills() { List<Skill> skills = em.createNamedQuery( "findAllSkills" ).getResultList(); return skills;
}
Creating Native SQL Queries
By default, native JPQL queries return a single type of entity, include all the columns that correspond to all the fields or properties of the entity returned, and use column names that correspond to the field or property names. ...
1. To create a native SQL query, you use the createNativeQuery() method.
2. You retrieve the results with getSingleResult() (if the query returns a single record) or getResultList() (if the query returns a list of records).
For more information, see Native SQL Query Examples [Page 36].

SAP NetWeaver Application Server, Java™ EE 5 Edition
Developing Java EE 5 Applications from Scratch 36
Native SQL Query Examples
Prerequisites The example queries assume the following entity and mappings: @Entity @Table(name = "TMP_DEP") @NamedNativeQueries ( { @NamedNativeQuery (name = "getDepartmentWithId10SQL_class" , query = "select * from TMP_DEP D where D.ID = 10" , resultClass = Department. class ), @NamedNativeQuery (name = "getDepartmentWithId10SQL_mapping" , query = "select * from TMP_DEP D where D.ID = 10" , resultSetMapping = "departmentByClass" ), @NamedNativeQuery (name = "getDepartmentName" , query = "select name as \"HUTZLIPUTZ\" from TMP_DEP D where D.ID = 10" , resultSetMapping = "departmentNameOnly" ), @NamedNativeQuery (name = "getDepartmentFieldByField" , query = "select id as \"D_ID\", name as \"D_NAME\", version as \"D_VERSION\" from TMP_DEP D where D.ID = 10" , resultSetMapping = "departmentByFields" ) }) @SqlResultSetMappings ( { @SqlResultSetMapping (name = "departmentByClass" , entities = { @EntityResult (entityClass = Department. class ) }), @SqlResultSetMapping (name = "departmentNameOnly" , columns = { @ColumnResult (name = "HUTZLIPUTZ" ) }), @SqlResultSetMapping (name = "departmentByFields" , entities = { @EntityResult (entityClass = Department. class , fields = { @FieldResult (name = "id" , column = "D_ID" ), @FieldResult (name = "name" , column = "D_NAME"), @FieldResult (name = "version" , column = "D_VERSION") }) }) }) public class Department implements Serializable { public void setId( int id) { this . _id = id; } private int _id ; private String _name; @Id public int getId() { return _id ; } public void setName(String aName) { _name = aName; } @Basic public String getName() { return _name; }
}

SAP NetWeaver Application Server, Java™ EE 5 Edition
Developing Java EE 5 Applications from Scratch 37
Example
Dynamic Native Query Using Class-mapping public Department getDepartmentViaDynamicNativeQueryNoMap ping() { Query query = em.createNativeQuery( "select * from TMP_DEP D where D.ID = 10" , Department. class ); return (Department) query.getSingleResult();
}
Dynamic Native Query Using Result Set Mapping with Class-mapping public Department getDepartmentViaDynamicNativeQueryClass Mapping() { Query query = em.createNativeQuery( "select * from TMP_DEP D where D.ID = 10" , "departmentByClass" ); return (Department) query.getSingleResult();
}
Named Native Query with Class-mapping public Department getDepartmentViaNamedNativeQueryNoMappi ng() { Query query = em.createNamedQuery( "getDepartmentWithId10SQL_class" ); return (Department) query.getSingleResult();
}
Named Native Query Using Result Set Mapping with Cl ass-mapping public Department geDepartmenttViaNamedNativeQueryClassMa pping() { Query query = em.createNamedQuery( "getDepartmentWithId10SQL_mapping" ); return (Department) query.getSingleResult();
}
Named Native Query Using Result Set Mapping with Co lumn-mapping public String getNameViaNamedNativeQueryColumnMapping() { Query query = em.createNamedQuery( "getDepartmentName" ); return (String) query.getSingleResult();
}
Named Native Query Using Result Set Mapping Using E ntity-result (defined by field by field) public Department getDepartmentByFieldsViaNamedNativeQueryColumnMappi ng() { Query query = em.createNamedQuery( "getDepartmentFieldByField" ); return (Department) query.getSingleResult();
}

SAP NetWeaver Application Server, Java™ EE 5 Edition
Developing Java EE 5 Applications from Scratch 38
Versioning with read_uncommitted Isolation Level
Use You use this procedure to enable JPA versioning on datasources that have read_uncommitted isolation level. The JPA specification requires that in order to use versioning, you must use a datasource with a read_committed isolation level. To resolve the difference between the specification requirement and the datasource isolation level, you use a version generator. Thus, you can use JPA versioning on datasources with read_uncommitted level. The version generator has the following behavior:
Datasource Isolation Level read_committed read_uncommitted
With Generator Table The container ignores the table and versioning works fine.
The container recognizes the table and uses it. Versioning works fine.
Without Generator Table Versioning works fine. The container recognizes the difference in isolation levels and throws an exception.
The version generator resolves the read_uncommitted versioning problem only. If you use read_uncommitted , other dirty read effects may occur as well. We recommend that you use read_committed isolation level.
Prerequisites You have created your entity.
Your entity uses versioning.
Procedure ...
1. To use JPA versioning on datasources with read_uncommitted isolation, you use a version generator. The version generator needs a database table to work with. You create a table on the database with the following parameters. Column names and types are fixed.
Database table definition for the version generator table:
CREATE TABLE "BC_CR_VERSION_GENERATOR"
(
"GEN_KEY" Varchar (256) UNICODE NOT NULL DEF AULT '0',
"GEN_VALUE" Fixed (19,0) NOT NULL DEFAULT 0 ,
PRIMARY KEY ("GEN_KEY")
)
For more information about creating tables, see Creating Your Own Tables in the MaxDB Database at help.sap.com .
2. For the version generator to work, you must also specify the table name in the persistence.xml:

SAP NetWeaver Application Server, Java™ EE 5 Edition
Developing Java EE 5 Applications from Scratch 39
<persistence-unit name="demos/myDemoApp"> <description> Persistence Unit</description> <jta-data-source>sapdemo</jta-data-source> <properties> <property name="com.sap.engine.services.orpersistence.generat or.versiontablename" value="BC_CR_VERSION_GENERATOR"/> </properties> </persistence-unit>

SAP NetWeaver Application Server, Java™ EE 5 Edition
Developing Java EE 5 Applications from Scratch 40
JPA Implementation Considerations
Automatic Schema Generation The JPA implementation underlying the SAP NetWeaver Application Server, Java(TM) EE 5 Edition does not provide automatic schema generation (forward mapping). Instead, the implementation expects all database table accessed by the application to exist at runtime. This includes all join tables (helper tables) and ID generation tables.
Foreign Key Constraints The JPA implementation underlying the SAP NetWeaver Application Server, Java(TM) EE 5 Edition expects that there are no foreign key constraints on the database. If foreign key constraints exist, the behavior is undefined.
Automatic ID Generation JPA allows for automatic generation of integral ID values. The @GeneratedValue annotation denotes that IDs are generated automatically. JPA defines four strategies for ID generation: TABLE, SEQUENCE, IDENTITY and AUTO . The desired strategy can be specified by the strategy property of the @GeneratedValue annotation.
@Entity public class Employee { @Id @GeneratedValue int id;
}
The property generator of the @GeneratedValue annotation provides the name of the ID generator for the generation strategy.
@Entity public class Employee { @Id @GeneratedValue (strategy=TABLE, generator= "myGen" ) @TableGenerator(name= "myGen" , table= "ID_GEN" ) int id;
}
TABLE
The table ID generation strategy relies on the existence of a database table that manages ID values. The name of the table can be specified using the table property of the @TableGenerator annotation.
If the table name is not explicitly specified, the following rule applies:
If the property com.sap.engine.services.orpersistence.generator.aut o.tablename is specified in the persistence.xml , the value of this property is used as
SAP NetWeaver Application Server, Java™ EE 5 Edition
Developing Java EE 5 Applications from Scratch 41
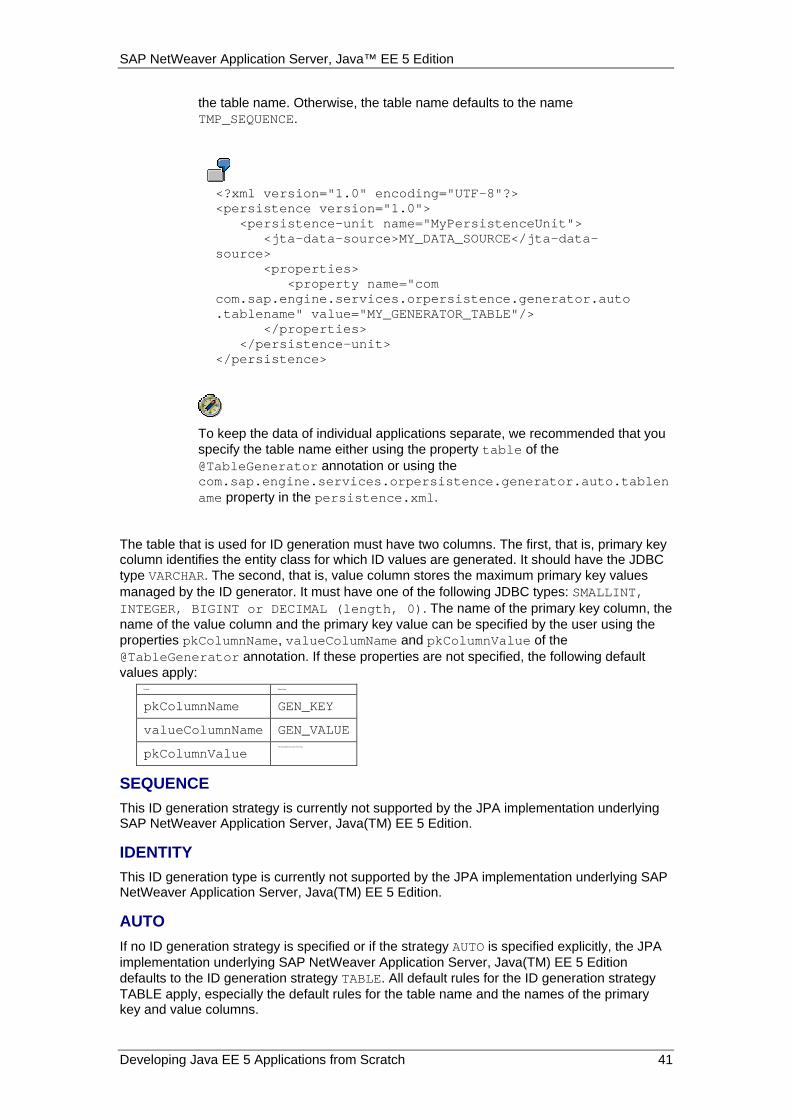
the table name. Otherwise, the table name defaults to the name TMP_SEQUENCE.
<?xml version="1.0" encoding="UTF-8"?> <persistence version="1.0"> <persistence-unit name="MyPersistenceUnit"> <jta-data-source>MY_DATA_SOURCE</jta-data-source> <properties> <property name="com com.sap.engine.services.orpersistence.generator.aut o.tablename" value="MY_GENERATOR_TABLE"/> </properties> </persistence-unit> </persistence>
To keep the data of individual applications separate, we recommended that you specify the table name either using the property table of the @TableGenerator annotation or using the com.sap.engine.services.orpersistence.generator.aut o.tablename property in the persistence.xml .
The table that is used for ID generation must have two columns. The first, that is, primary key column identifies the entity class for which ID values are generated. It should have the JDBC type VARCHAR. The second, that is, value column stores the maximum primary key values managed by the ID generator. It must have one of the following JDBC types: SMALLINT, INTEGER, BIGINT or DECIMAL (length, 0) . The name of the primary key column, the name of the value column and the primary key value can be specified by the user using the properties pkColumnName, valueColumName and pkColumnValue of the @TableGenerator annotation. If these properties are not specified, the following default values apply:
Property Default Value
pkColumnName GEN_KEY
valueColumnName GEN_VALUE
pkColumnValue The fully-qualified class name of the entity.
SEQUENCE
This ID generation strategy is currently not supported by the JPA implementation underlying SAP NetWeaver Application Server, Java(TM) EE 5 Edition.
IDENTITY
This ID generation type is currently not supported by the JPA implementation underlying SAP NetWeaver Application Server, Java(TM) EE 5 Edition.
AUTO
If no ID generation strategy is specified or if the strategy AUTO is specified explicitly, the JPA implementation underlying SAP NetWeaver Application Server, Java(TM) EE 5 Edition defaults to the ID generation strategy TABLE. All default rules for the ID generation strategy TABLE apply, especially the default rules for the table name and the names of the primary key and value columns.
SAP NetWeaver Application Server, Java™ EE 5 Edition
Developing Java EE 5 Applications from Scratch 42
Versioning Version attributes with Java type java.sql.Timestamp are not supported by the JPA implementation underlying SAP NetWeaver Application Server, Java(TM) EE 5 Edition.
Inheritance The inheritance type TABLE_PER_CLASS is not supported by the JPA implementation underlying SAP NetWeaver Application Server, Java(TM) EE 5 Edition.

SAP NetWeaver Application Server, Java™ EE 5 Edition
Developing Java EE 5 Applications from Scratch 43
Creating EJB Components
Use EJB components are essential part of Java EE applications. In the SAP NetWeaver Developer Studio, you create EJB 3.0 components (as of the Java EE 5 specification) in EJB 3.0 Projects.
Procedure 3. Create an EJB 3.0 Project.
See Creating EJB 3.0 Projects [Page 44].
4. Use the corresponding wizards to create enterprise beans and helper classes.
See Creating Session Beans [Page 46] and Creating Message-Driven Beans [Page 48].
5. Implement the source code.
6. (Optional) Edit the EJB deployment descriptors to configure the application.
See Editing the ejb-j2ee-engine.xml [Page 54].
7. If you have not done so initially, add the EJB 3.0 Project to an Enterprise Application.
See Creating Enterprise Application 5 Projects [Page 95].

SAP NetWeaver Application Server, Java™ EE 5 Edition
Developing Java EE 5 Applications from Scratch 44
Creating EJB 3.0 Projects
Use Before you can create an enterprise bean, you need an EJB 3.0 project to which you can assign it. The EJB 3.0 project also contains the deployment descriptors that will be included in the EJB JAR file.
Procedure ...
1. Choose File → New → Project from the main menu.
2. Choose EJB → EJB Project 3.0 on the New Project dialog.
3. Choose Next.
4. Enter a name for your new EJB 3.0 project in the Project name field.
5. Select Create project in the workspace if you want to create your project in the workspace. If you want to specify a different folder, select Create project at external location.
6. If you want to add you project to an EAR, select Add project to an EAR and enter a name for your EAR project in the EAR Project Name field.
7. Choose Finish.
EJB Project 3.0 Settings

SAP NetWeaver Application Server, Java™ EE 5 Edition
Developing Java EE 5 Applications from Scratch 45
Result The project appears in the Project Explorer. It has an ejbModule folder and the SAP-specific deployment descriptor: ejb-j2ee-engine.xml.
The deployment descriptor ejb-jar.xml is no longer created by the Developer Studio. According to the Java EE 5 specification, the information that was previously taken from the deployment descriptors can now be taken from the corresponding annotations in the source code.
You can now add enterprise beans and helper components to the project.
See also:
● Creating Session Beans [Page 46]
● Creating Message-Driven Beans [Page 48]

SAP NetWeaver Application Server, Java™ EE 5 Edition
Developing Java EE 5 Applications from Scratch 46
Creating Session Beans
Prerequisites An EJB 3.0 Project exists.
Procedure 1. Choose New → Other from the context menu of the EJB 3.0 project.
2. Choose EJB → EJB Session Bean 3.0 on the New dialog.
3. Enter the bean settings as required.
4. Choose Finish.
Session Bean Settings
Result You can see the bean class and interfaces in the ejbModule node of the relevant EJB 3.0 project in the Project Explorer.
You can now edit the session bean and its interfaces.
SAP NetWeaver Application Server, Java™ EE 5 Edition
Developing Java EE 5 Applications from Scratch 47
Managing Business Methods
Use Business methods are special methods that provide functionality for the applications accessing the session bean. They are declared as ordinary Java methods in the local interface or remote interface or both, and implemented in the bean class. Depending on the business interfaces in which a business method is available, it is available to local clients, remote clients or both, respectively.
Using the SAP NetWeaver Developer Studio, you can skip working with the bean interfaces, and manage the bean using the bean class only. The context menu in the Outline view allows you to add methods in the bean class to the proper bean interfaces.
Automated removing of business methods from interfaces is not supported in the current version of the Developer Studio.
Prerequisites A session bean exists.
Procedure
Creating Business Methods ...
1. In the Java editor, open the bean class for editing.
2. Create and implement the business methods as ordinary public Java methods.
Adding Business Methods to Bean Interfaces ...
1. In the Outline view (opened using Window → Show View → Outline), select a business method and choose EJB Methods → Add to XXX Interfaces in the context menu.
Alternatively, you can perform the same operation by opening the corresponding bean interface in the Java editor, and choosing EJB Methods → Add from bean classes in the context menu of the Outline view.
See also:
Obtaining an Entity Manager Instance [Page 30]
Managing Entity Instances [Page 32]
Creating and Executing Queries [Page 34]

SAP NetWeaver Application Server, Java™ EE 5 Edition
Developing Java EE 5 Applications from Scratch 48
Creating Message-Driven Beans
Prerequisites An EJB 3.0 Project exists.
Procedure ...
1. In the Project Explorer, select the EJB 3.0 Project.
2. In the context menu, choose New → Message Driven Bean 3.0.
3. Enter the bean settings as required.
4. Choose Finish.
New Message Driven Bean 3.0 Wizard

SAP NetWeaver Application Server, Java™ EE 5 Edition
Developing Java EE 5 Applications from Scratch 49
Injecting Environment Resources Java EE 5 uses annotations extensively. Everything is declared, expressed, and configured using annotations. Annotations are a special type of modifier in the form of metadata. Annotations precede other modifiers and are represented by an @ sign followed by a set of name-value pairs elements in parentheses. They do not affect program semantics directly, but they do affect how libraries and tools treat program code.
Annotations employ declarative programming. Instead of directly specifying a set of rules for the container to execute, annotations supply a set of conditions. The container resolves these conditions and decides how to proceed. To access resources in J2EE 1.4, you specify dependencies in a deployment descriptor and obtain a reference to these resources using a JNDI lookup. With dependency injection, component dependencies are automatically injected in the component by the container using annotations. The container also manages the life cycle of injected resources. Dependency injection can be applied on any component. You do not need to look up resources explicitly. If the name of the resource to be injected is the same as the variable you use, you can omit the name attribute or the @Resource annotations.
To inject a resource in a bean, you use the @Resource annotation.
//injects a data source object
@Resource(name= "jdbc/__default" , type= "DataSource.class" )
DataSource dataSource ;
The type attribute of the @Resource annotation is optional because it defaults to the data type of the resource variable to be injected.
You can also use the @Resource annotation to obtain references to resources such as javax.transaction.UserTransaction, javax.jms.Queue, javax.ejb.SessionContext, org.omg.CORBA.ORB, and so on.
To obtain a reference to the business interface of another bean, you use the @EJB annotation:
@EJB HRServices hrservices ;

SAP NetWeaver Application Server, Java™ EE 5 Edition
Developing Java EE 5 Applications from Scratch 50
Setting Transaction Attributes
Use The EJB 3.0 specification provides both bean-managed and container-managed transaction support. With bean-managed transaction demarcation, the bean controls the boundaries of the transaction. With container-managed transaction demarcation, the container controls the boundaries of the transaction transparently to the bean.
The container applies container-managed transaction demarcation by default. To use bean-managed transaction demarcation, you use the @TransactionManagement(BEAN) annotation.
Procedure
Using Container-Managed Transaction Demarcation for Session Bean Methods ...
1. To use container-manager transactions, you annotate business methods with the @TransactionAttribute annotation and specify the TransactionAttributeType attribute with one of the following values:
● NOT_SUPPORTED
The business method is executed in an unspecified transactional context.
● REQUIRED
The business method is executed in a transactional context. If the client is associated with a transaction then the method is executed in the same transactional context as the client. Otherwise, the container creates a new transactional context .
● SUPPORTS
If a client transactional context exists, the business method is executed in it. If a client transactional context does not exist, the business method is executed in an unspecified transactional context.
● REQUIRES_NEW
Regardless of whether a client transactional context exists, the business method is executed in a new transactional context.
● MANDATORY
The client must already be associated with a transactional context and the business method is executed in the client’s transactional context.
● NEVER
The client must not be associated with a transaction and the business method is executed in an unspecified transactional context.
@TransactionAttribute (TransactionAttributeType. REQUIRES_NEW)
Using Container-Managed Transaction Demarcation for Message-Driven

SAP NetWeaver Application Server, Java™ EE 5 Edition
Developing Java EE 5 Applications from Scratch 51
Beans’ Message Listener Methods ...
1. To use container-manager transactions, you annotate message listener methods with the @TransactionAttribute annotation and specify the TransactionAttributeType attribute with one of the following values:
● NOT_SUPPORTED
The message listener method is executed in an unspecified transactional context.
● REQUIRED
The message listener method is executed in a transactional context. If the client is associated with a transaction then the method is executed in the same transactional context as the client. Otherwise, the container creates a new transactional context .
Using Container-Managed Transaction Demarcation for Message-Driven Beans’ Timeout Callback Methods ...
1. To use container-manager transactions, you annotate timeout callback methods with the @TransactionAttribute annotation and specify the TransactionAttributeType attribute with one of the following values:
● NOT_SUPPORTED
The timeout callback method is executed in an unspecified transactional context.
● REQUIRED
The timeout callback method is executed in a transactional context. If the client is associated with a transaction then the method is executed in the same transactional context as the client. Otherwise, the container creates a new transactional context.
● REQUIRES_NEW
Regardless of whether a client transactional context exists, the timeout callback method is executed in a new transactional context.

SAP NetWeaver Application Server, Java™ EE 5 Edition
Developing Java EE 5 Applications from Scratch 52
Using Interceptors
Use Interceptors enable you to control method invocation flow. Thus, you can inject functionality before or after the invocation of a business method. You can define interceptor methods in a separate class (external interceptor), or in the bean class itself. You can define interceptors to apply to all methods in the bean class, or to a specific method in the class (method-level interceptor). The invocation of interceptor methods occurs within the same transaction and security context as the business method being invoked. Interceptors can throw runtime exceptions or application exceptions defined in the signature of the business method.
You can use the @AroundInvoke annotation only once in a class, regardless of whether you are using it in a dedicated interceptor class or in the bean class.
Prerequisites You have created an EJB 3.0 Project. For more information, see Creating EJB 3.0 Projects [Page 44].
You have created an enterprise bean to use the interceptor. For more information, see Creating Session Beans [Page 46] and Creating Message-Driven Beans [Page 48].
Procedure
Defining Interceptors in a Dedicated Interceptor Cl ass ...
1. To define interceptors for a bean in a dedicated class, you create a plain Java class and add the necessary imports.
import javax.ejb.PostActivate; import javax.ejb.PrePassivate; import javax.interceptor.AroundInvoke;
import javax.interceptor.InvocationContext;
public class TestInterceptor {
2. You create an empty constructor for the class.
public TestInterceptor() { }
3. You add the methods for the class and annotate them with @AroundInvoke , @PostActivate , and @PrePassivate .
@AroundInvoke public Object audit(InvocationContext ic) throws Exception
{ System. out.println( "Invoking method: " + ic.getMethod()); return ic.proceed();
SAP NetWeaver Application Server, Java™ EE 5 Edition
Developing Java EE 5 Applications from Scratch 53
} @PostActivate
public void postActivate(InvocationContext ic) throws Exception {
System. out.println( "Invoking method: " + ic.getMethod()); } @PrePassivate
public void prePassivate(InvocationContext ic) throws Exception {
System. out.println( "Invoking method: " + ic.getMethod());
}
The PrePassivate and PostActivate life cycle callback interceptor methods do not apply to stateless session beans and message driven beans.
4. To define the class as an external interceptor class that applies to all methods in your bean, you add the annotation with the interceptor class before the bean class declaration.
@Stateful @Interceptors (com.sap.demo.interceptors.Test. class )
public class TestBean implements TestLocal
5. To use a method from the external interceptor class as a method-level interceptor, you add the @Interceptors annotation before the method declaration.
@Interceptors(com.sap.demo.interceptors.Test. class )
public void myBusinessMethod(String myString) {
Defining Interceptors in the Bean Class ...
1. To define interceptor methods in the bean class, you add the source code of the method to the bean class and annotate it.
@AroundInvoke public Object audit(InvocationContext ic)
throws Exception { System. out.println( "Invoking method: " + ic.getMethod()); return ic.proceed(); }
Methods annotated with the @AroundInvoke annotation must have one InvocationContext parameter only and must have a return type Object .
2.

SAP NetWeaver Application Server, Java™ EE 5 Edition
Developing Java EE 5 Applications from Scratch 54
Editing the ejb-j2ee-engine.xml
Procedure ...
1. In the Project Explorer, open the ejbModule/META-INF directory of the project, and select the ejb-j2ee-engine.xml node.
2. Choose Open with → XML Editor in the context menu.
3. In the XML Editor, use the context menu to add and remove root elements or child elements to other root elements in the deployment descriptor.
ejb-j2ee-engine.xml in the XML editor
4. When ready, save your changes.
See also:
ejb-j2ee-engine_3_0.xsd – Detailed description of the ejb-j2ee-engine.xml XML schema. For more information see SAP Online Help at help.sap.com .

SAP NetWeaver Application Server, Java™ EE 5 Edition
Developing Java EE 5 Applications from Scratch 55
Developing Web Components
Procedure ...
1. Create a Dynamic Web 2.5 Project.
See Creating Dynamic Web Projects 2.5 [Page 56].
2. Using the corresponding wizards, create the necessary Web components such as servlets, filters, listeners and so on.
See Creating Servlets [Page 57] and Creating Listeners and Filters [Page 60].
3. In the Java editor, implement the Java source code.
4. Optionally, edit the web-j2ee-engine.xml deployment descriptor.
See Editing the web-j2ee-engine.xml [Page 62].
5. If you have not done so initially, add the Dynamic Web 2.5 Project to an Enterprise Application 5 Project.
See Creating Enterprise Application 5 Projects [Page 95] and Adding Modules to the Enterprise Application [Page 96].

SAP NetWeaver Application Server, Java™ EE 5 Edition
Developing Java EE 5 Applications from Scratch 56
Creating Dynamic Web Projects 2.5
Use Before you create Web components (servlets, JSP files, and so on), you need to create a Dynamic Web Project 2.5. The role of this project type is to organize and collect the Web components of a Java EE 5 application. All class files, resources and deployment descriptors that are supposed to be packed in the same Web archive (WAR) are to be created in the same Dynamic Web Project 2.5.
Procedure ...
1. Choose File → New → Project → Web → Dynamic Web Project 2.5.
2. Enter the necessary project settings.
If you want to specify an Enterprise Application Project to wrap the Web project’s archive, you can select the Add project to an EAR option. You can choose an existing Enterprise Application Project or enter the name of a new project (it will be created along with the creation of the Dynamic Web Project).
3. Choose Finish.
New Dynamic Web 2.5 Project wizard
Result You can now use the corresponding wizards to create the necessary servlets, JSP pages and so on.
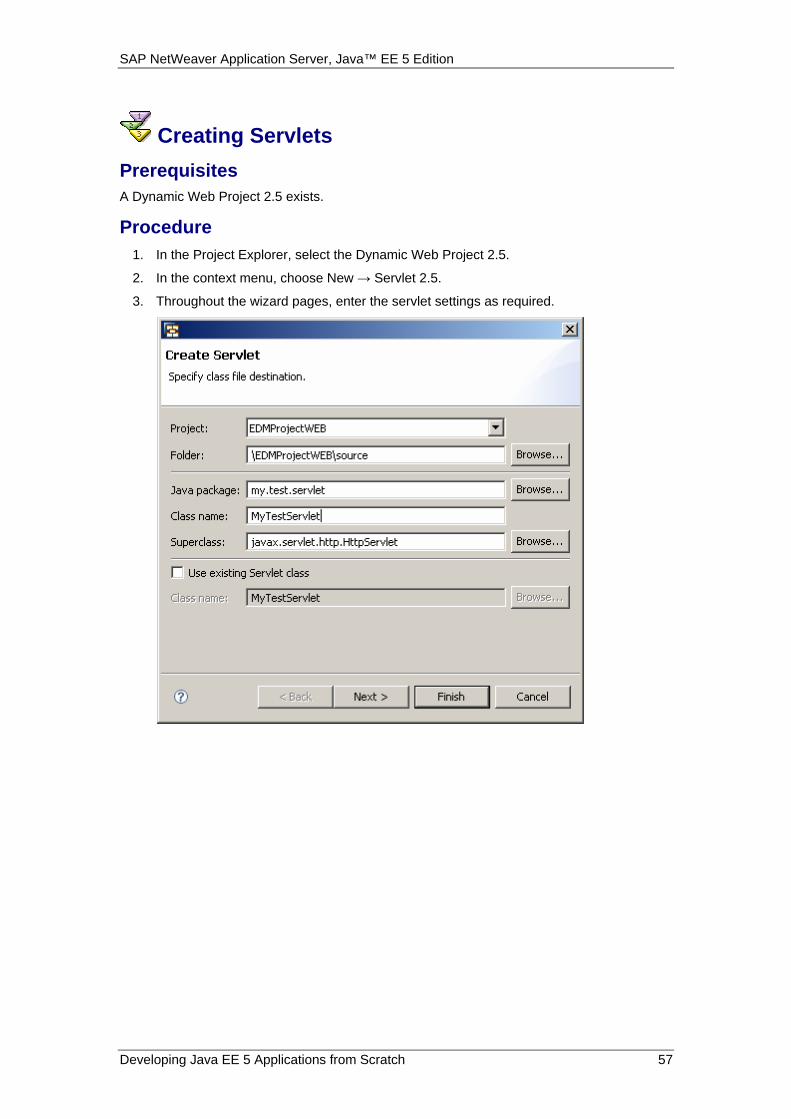
SAP NetWeaver Application Server, Java™ EE 5 Edition
Developing Java EE 5 Applications from Scratch 57
Creating Servlets
Prerequisites A Dynamic Web Project 2.5 exists.
Procedure ...
1. In the Project Explorer, select the Dynamic Web Project 2.5.
2. In the context menu, choose New → Servlet 2.5.
3. Throughout the wizard pages, enter the servlet settings as required.

SAP NetWeaver Application Server, Java™ EE 5 Edition
Developing Java EE 5 Applications from Scratch 58

SAP NetWeaver Application Server, Java™ EE 5 Edition
Developing Java EE 5 Applications from Scratch 59
4. Chose Finish.

SAP NetWeaver Application Server, Java™ EE 5 Edition
Developing Java EE 5 Applications from Scratch 60
Creating Listeners and Filters
Use The SAP NetWeaver Developer Studio allows you to easily create listeners and filters implementing the corresponding interfaces in the javax.servlet package.
Prerequisites A Dynamic Web Project 2.5 exists.
Procedure ...
1. In the Project Explorer, select the Dynamic Web Project.
2. In the context menu, choose New → Filter or New → Listener respectively.
3. In the New Listener or New Filter wizard, enter the settings as required.
New listener settings
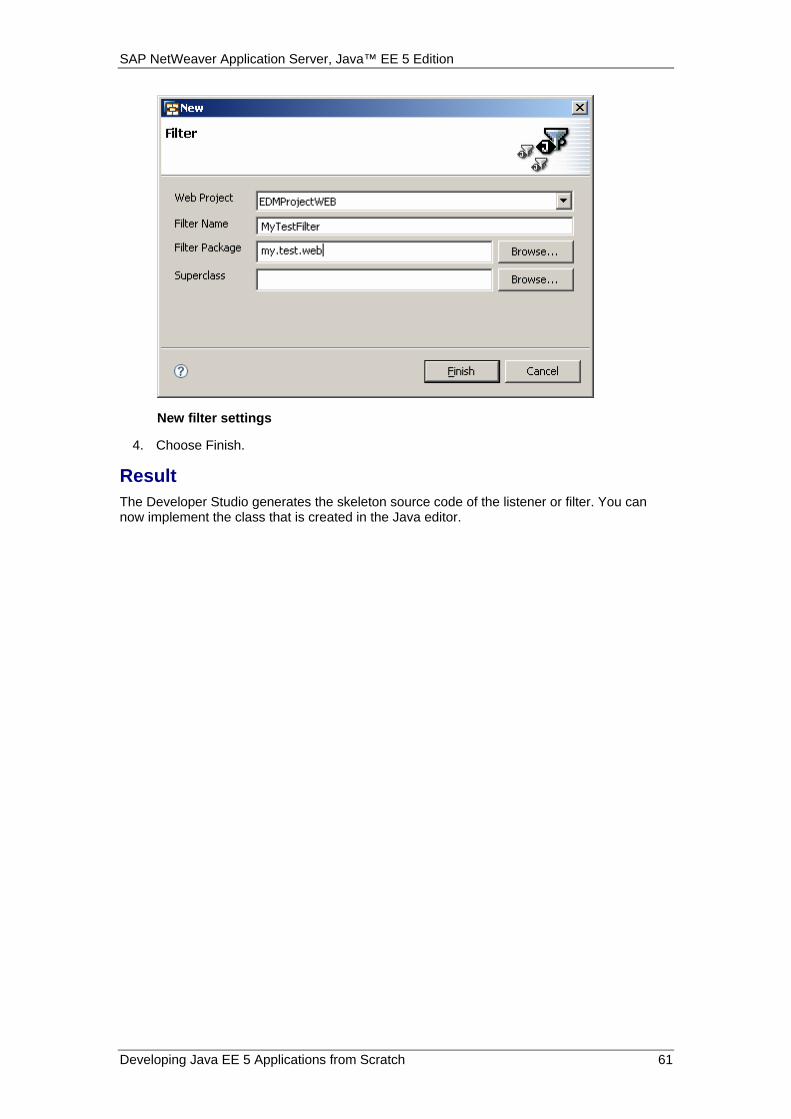
SAP NetWeaver Application Server, Java™ EE 5 Edition
Developing Java EE 5 Applications from Scratch 61
New filter settings
4. Choose Finish.
Result The Developer Studio generates the skeleton source code of the listener or filter. You can now implement the class that is created in the Java editor.

SAP NetWeaver Application Server, Java™ EE 5 Edition
Developing Java EE 5 Applications from Scratch 62
Editing the web-j2ee-engine.xml
Procedure 5. In the Project Explorer, select the Dynamic Web Project 2.5.
6. Open the WEB-INF directory and select the web-j2ee-engine.xml node.
7. Choose Open with → XML Editor in the context menu.
8. In the XML Editor, use the context menu to add and remove root elements or child elements to other root elements in the deployment descriptor.
9. When ready, save your changes.
See also:
web-j2ee-engine.xsdError! Bookmark not defined. – detailed description of the web-j2ee-engine.xml XML schema. For more information see SAP Online Help at help.sap.com .

SAP NetWeaver Application Server, Java™ EE 5 Edition
Developing Java EE 5 Applications from Scratch 63
Developing JavaServer Faces (JSF) Web Applications
The JSF Technology The JavaServer Faces technology allows you to develop a user interface to applications. It is especially suitable for Web development. Due to its numerous advantages, JSF is now one of the most popular Web technologies. Since Java EE 5, JSF is an integral part of the Java EE specification.
For more information, see java.sun.com/javaee/javaserverfaces/ .
JSF Development Tasks
To use JSF tools, you need to download the JSF plugin and set it up in your SAP NetWeaver Developer Studio. For more information, see Setting up JSF Support [Page 65].
You can perform the following tasks:
● Register a custom JSF library
In the Developer Studio, you can use the Sun Reference Implementation or a custom JSF implementation for building your applications.
● Develop JSF JSP pages
The Developer Studio provides JSP page templates, code assistance for tags and attribute values, and JSP page validation according to the syntax of the JSF expression language and attribute values.
● Create managed beans
JSF managed beans are ordinary Java classes with properties (variables) and their getter and setter methods. You can develop managed beans as standard Java classes in the Developer Studio environment, and then describe them in the faces-config.xml easily, using its multipage editor.
● Develop additional configuration elements (listeners, validators, converters, and so on)
Listeners, validators, converters and other components allow you to add further usability to JSF applications. In the Developer Studio, you create such components as ordinary Java classes, and then describe them in the faces-config.xml easily, using its multipage editor.
● Assemble and configure the application using the faces-config.xml
The Developer Studio provides a multipage editor for the faces-config.xml, with a wide range of options for creating or configuring application components and their relationships.
JSF 1.1 Development Process 10. Create a Dynamic Web Project containing the JavaServer Faces facet.
See Creating Dynamic Web Projects for JSF Development [Page 68].
11. Develop all components independently from each other, or use the corresponding create options in the faces-config.xml multipage editor.

SAP NetWeaver Application Server, Java™ EE 5 Edition
Developing Java EE 5 Applications from Scratch 64
See Creating JSF JSP Files [Page 70], Creating Managed Beans [Page 74] and Implementing Additional Configuration Elements [Page 75].
12. (Only for the components created without using the faces-config.xml editor) In the faces-config.xml multipage editor, describe the created components, their properties and the relationship between the components (such as navigation between pages).
See Describing Page Navigation [Page 72].
13. Save the changes.
14. Create an Enterprise Application Project and reference the Dynamic Web Project containing the JSF application.
See Creating Enterprise Application 5 Projects [Page 95].
15. Deploy the Enterprise Application Project.
See Building and Deploying Projects at help.sap.com .
JSF 1.2 Development Process ...
1. Create a Dynamic Web Project 2.5.
See Creating Dynamic Web Projects 2.5 [Page 56]
2. Create each JSF JSP file as a standard JSP file.
See Creating JSP Files [External].
3. Implement the JSF JSP source code using the code assistance and validation functions.
4. Create the managed beans as standard Java classes.
5. Implement all additional configuration elements as standard Java classes.
6. Create a faces-config.xml file in the WebContent/WEB-INF folder of the project.
7. Manually, describe the created JSP pages, managed beans and additional elements in the faces-config.xml according to the XML schema.
8. Add the project to an Enterprise Application Project 5.
You can further configure the application using the deployment descriptors of that project, and deploy the application on the application server.
See Creating Enterprise Application 5 Projects [Page 95].

SAP NetWeaver Application Server, Java™ EE 5 Edition
Developing Java EE 5 Applications from Scratch 65
Setting up JSF Support
Use To be able to develop JSF applications, you need to provide two additional components:
● JSF plug-in
It is downloadable from the JSF download page of the WTP project:
www.eclipse.org/webtools/jsf/download.html
● A JSF library implementation
This could be the Sun reference implementation, downloadable from java.sun.com/javaee/javaserverfaces/download.html , or a custom one.
Procedure ...
1. Download the JSF plug-in from the WTP project site.
2. Place the JSF plug-in in the eclipse/plugin directory folder of the Developer Studio installation.
3. Restart the Developer Studio.
4. Choose Window → Preferences → Web and XML → JSF Libraries.
5. In the JSF Libraries preferences page, choose New.
6. Enter a descriptive name of the JSF library.
Property Value
Library Name <custom descriptive name>
Version Supported v1_1

SAP NetWeaver Application Server, Java™ EE 5 Edition
Developing Java EE 5 Applications from Scratch 66
Is JSF Implementation Selected
7. Using the Add button, select the JSF library implementation.
8. Choose Finish.
The JSF implementation library appears in the list.
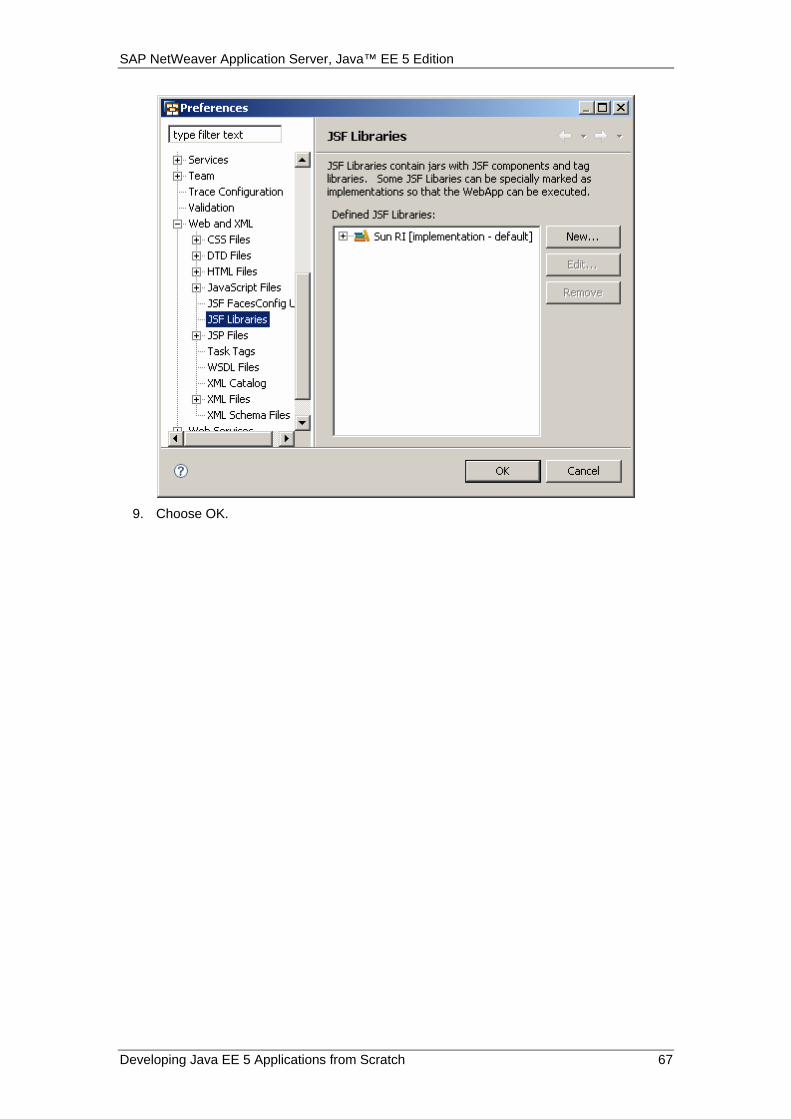
SAP NetWeaver Application Server, Java™ EE 5 Edition
Developing Java EE 5 Applications from Scratch 67
9. Choose OK.

SAP NetWeaver Application Server, Java™ EE 5 Edition
Developing Java EE 5 Applications from Scratch 68
Creating Dynamic Web Projects for JSF Development
Use In the SAP NetWeaver Developer Studio, you create JSF applications using ordinary Dynamic Web Projects, but with an additional project facet: the JavaServer Faces facet.
Prerequisites You have installed the JSF plug-in and have registered a JSF library implementation.
For more information, see Setting up JSF Support [Page 65].
Procedure ...
1. Choose File → New → Project → Web → Dynamic Web Project.
2. Enter the project name, and choose the following settings:
○ SAP Libraries as the Target runtime
○ SAP Web Project as the Configurations

SAP NetWeaver Application Server, Java™ EE 5 Edition
Developing Java EE 5 Applications from Scratch 69
Optionally, you can select the Add project to an EAR option if you want to add the Dynamic Web Project to an Enterprise Application Project simultaneously with its creation.
3. Choose Next.
4. Keeping the default facets in the SAP Web Project configuration, select the JavaServer Faces facet and choose Next.
5. If necessary, enter new project directories and choose Finish.
Result You can now start developing the components of the JSF application, and use the JSF assistance features in the Developer Studio.

SAP NetWeaver Application Server, Java™ EE 5 Edition
Developing Java EE 5 Applications from Scratch 70
Creating JSF JSP Files
Use Typically, JSF user interfaces are JSP pages that contain JSF expression language tags in addition to the HTML and JSP content.
In the SAP NetWeaver Developer Studio, you create JSF-enabled JSP files in the same way in which you create ordinary JSP files. After that, however, you need to describe the JSP files in the faces-config.xml using the multipage editor.
Prerequisites You have a Dynamic Web Project with the JavaServer Faces facet.
For more information, see Creating Dynamic Web Projects for JSF Development [Page 68].
Procedure
Creating the JSP Page File and Source Code ...
1. Create a standard JSP file in the Dynamic Web Project, choosing an appropriate HTML template.
See Creating JSP Files [External].
The Developer Studio generates a JSP file with basic HTML code.
2. Add the taglib description tags in the source code, and save.
The source code with taglib description may look like this: <%@ page language ="java" contentType ="text/html; charset=UTF-8" pageEncoding ="UTF-8" %> <%@ taglib uri ="http://java.sun.com/jsf/html" prefix ="h" %> <%@ taglib uri ="http://java.sun.com/jsf/core" prefix ="f" %> <! DOCTYPE HTML PUBLIC "-//W3C//DTD HTML 4.01 Transitional//EN" > <html > <head > <meta http-equiv ="Content-Type" content ="text/html; charset=UTF-8" > <title >Insert title here </ title > </ head > <body > </ body >
</ html >
3. Using the code assistance and validation options, implement the JSP source code, and save it.
○ Invoking code assistance is done using Ctrl + Space on your keyboard. The following options are the most important code assistance options in JSF JSP files:
■ Tag names

SAP NetWeaver Application Server, Java™ EE 5 Edition
Developing Java EE 5 Applications from Scratch 71
■ Tag attribute names
■ Discreet values of tags (such as “true” or ”false”, or discreet set of numbers)
■ Properties of managed beans (the beans must already be available in the faces-config.xml)
Code assistance for managed bean properties
○ Validation is done automatically as you develop the page source code, or when you use Validate in the context menu of the JSF file in the Project Explorer. Validation evaluates:
■ HTML syntax, JSP syntax and JSF expression language syntax
■ Attribute values (for example, checks if bean names or properties exist)
Validation of referenced bean properties in tag attributes
Adding the JSP Page to the faces-config.xml
4. Open the faces-config.xml for editing.
5. Enter the Navigation tab.
6. In the Palette view (Window → Show View → Other → General → Palette), choose the Page tool and click somewhere in the Navigation tab.
7. Select the page and choose OK.

SAP NetWeaver Application Server, Java™ EE 5 Edition
Developing Java EE 5 Applications from Scratch 72
Describing Page Navigation
Use When you develop JSF applications, you need to describe the rules for transition between pages in their faces-config.xml. A page can lead statically to another page, or the transition can be determined dynamically by the outcome of managed bean methods. The outcome of bean methods are the so called actions, which determine the next loaded page.
In the SAP NetWeaver Developer Studio, you define the navigation between pages using the multipage editor of the faces-config.xml.
Prerequisites You have the JSF JSP pages ready.
See Creating JSF JSP Files [Page 70].
Procedure ...
1. Open the faces-config.xml and enter the Navigation tab.
2. In the Palette view (Window → Show View → Other → General → Palette), use the tools to place page nodes, bean methods, and links between them.
The following tools are available:
Tool Use
Page Adds a JSP or HTML page. After positioning the pages, you need to describe the navigation rules between them.
Action Adds an action generated by a bean method. It can be used as a navigation point between pages.
Link Creates a navigation rule between two pages or between a page and an action.
3. Save the changes.
Example You have three JSP pages: login.jsp, success.jsp and failure.jsp. You want the login.jsp to be the initial page, leading to success.jsp or failure.jsp, depending on whether the login was successful or not. ...
1. In the Palette view, choose the Page tool, and add subsequently all three pages by clicking in the Navigation tab of the faces-config.xml multipage editor.
2. In the Palette view, choose the Action tool, and add an action named doLogin.
3. In the Palette view, choose the Link tool, and drag an arrow starting from the login page, and ending at the doLogin action.
4. In the same way, draw the rest of the links between pages, as follows:
○ From the doLogin action to the success page
○ From the doLogin action to the error page
○ From the error page to the login page.
5. Save the changes.

SAP NetWeaver Application Server, Java™ EE 5 Edition
Developing Java EE 5 Applications from Scratch 73
Resulting navigation between the pages in the example
The Developer Studio generates the following XML content: <navigation-rule > <display-name >login </ display-name > <from-view-id >/login.jsp </ from-view-id > <navigation-case > <display-name >success </ display-name > <from-action >doLogin </ from-action > <to-view-id >/success.jsp </ to-view-id > </ navigation-case > <navigation-case > <display-name >error </ display-name > <from-action >doLogin </ from-action > <to-view-id >/error.jsp </ to-view-id > </ navigation-case > </ navigation-rule > <navigation-rule > <display-name >error </ display-name > <from-view-id >/error.jsp </ from-view-id > <navigation-case > <display-name >login </ display-name > <to-view-id >/login.jsp </ to-view-id > </ navigation-case >
</ navigation-rule >

SAP NetWeaver Application Server, Java™ EE 5 Edition
Developing Java EE 5 Applications from Scratch 74
Creating Managed Beans
Use In the SAP NetWeaver Developer Studio, you can create managed beans in two ways:
● By creating the bean class first, and then adding it to the faces-config.xml
● By creating the bean class from the faces-config.xml editor. This creates the bean class and describes it in the faces-config.xml source code simultaneously.
Prerequisites You have a Dynamic Web Project with the JavaServer Faces facet.
For more information, see Creating Dynamic Web Projects for JSF Development [Page 68].
Procedure
Using the Standard Functions in the Developer Studi o
Create the Bean Class ...
1. In the Project Explorer, select the Dynamic Web Project.
2. In the context menu, choose New → Class.
3. Enter the bean class settings as necessary, and choose Finish.
4. Implement the bean class source code in the Java editor.
Add the Bean Class to the faces-config.xml ...
1. Open the faces-config.xml for editing.
2. Enter the ManagedBean tab.
3. In the left pane, select the managed bean scope and choose Add.
4. Choose the Using an existing Java class option.
5. Type the fully qualified bean class name or select the class using the Browse option.
6. Choose Next.
7. Enter a bean name, scope and description, and choose Next.
8. Check the bean summary for correctness, and choose Finish.
Using the faces-config.xml Editor ...
1. Open for editing the faces-config.xml.
2. Enter the ManagedBean tab.
3. In the left pane, select the managed bean scope and choose Add.
4. Choose the Create a new Java class option.
5. Enter the bean class settings as necessary.
6. Choose Finish.
7. Implement the bean class source code in the Java editor.

SAP NetWeaver Application Server, Java™ EE 5 Edition
Developing Java EE 5 Applications from Scratch 75
Implementing Additional Configuration Elements
Use Besides managed beans, you can add various components such as event listeners, converters, and validators to a JSF application to make it more functional or user-friendly. In the SAP NetWeaver Developer Studio, you create such components as ordinary classes implementing the corresponding interfaces, using the standard functions in the Developer Studio. Then you easily add the components to the JSF application using the multipage editor of the faces-config.xml.
Prerequisites You have a Dynamic Web Project with the JavaServer Faces facet.
For more information, see Creating Dynamic Web Projects for JSF Development [Page 68].
Procedure
I. Create the Component’s Java Class ...
1. In the Project Explorer, select the Dynamic Web Project, and use the standard option New → Class in the context menu to create a Java class representing the component you want to create.
2. In the Java editor, implement the component’s source code.
II. Add it to the faces-config.xml
3. Open the faces-config.xml for editing.
4. In the multipage editor, choose the Component or Other tab, depending on the component type you want to describe.
5. Choose the proper component type and add your component’s Java class there.
6. If necessary, enter all additional settings.
7. Save the changes.

SAP NetWeaver Application Server, Java™ EE 5 Edition
Developing Java EE 5 Applications from Scratch 76
Developing Web Services
Use This procedure enables you to create and consume Web services.
Procedure ...
1. Create a bottom up Web Service [Page 77].
2. Create a Web service proxy.
a. Create a standalone proxy [Page 79].
b. Create a deployable proxy [Page 81].
3. Create a Web service client application [Page 83].

SAP NetWeaver Application Server, Java™ EE 5 Edition
Developing Java EE 5 Applications from Scratch 77
Creating Bottom Up Web Services
Use This procedure enables you to create bottom up Web services from Enterprise JavaBeans 3.0.
Prerequisites
● EJB project 3.0 is created
● Enterprise application project 5 is created separately from the EJB project, this is not in the same creation wizard
● The EJB project is added to the enterprise application project
Procedure ...
1. In the SAP NetWeaver Developer Studio, choose File → New → Other → EJB → EJB Session Bean 3.0.
A dialog box appears.
2. Enter a name and package for the session bean and choose Finish.
3. Add business methods to the bean class.
4. In the Package Explorer of the Java perspective, open the EJB project and select the bean class you have created.
5. From the context menu, choose Web Services → Create Web Service.
A dialog box appears.
6. Move the slider to the Develop service position.
The other positions are not supported.
7. From Configuration, select valid server and Web service runtime.
8. Choose Next.
9. Make sure the business methods that you want to expose with the Web service are selected.
10. Choose Next.
A dialog box appears for publishing the Web service to a UDDI registry. Ignore this dialog box as UDDI publication is not supported.
If you cancel the wizard at this step, the information that you have entered will not be canceled and the Web service will be created.
11. Choose Finish.
Java EE 5 annotations for Web services are added to the bean class.
12. To deploy the Web services, open the Servers view.
a. Choose Window → Show View → Servers.
b. Select SAP Server node and from the context menu, choose Add and Remove Projects.

SAP NetWeaver Application Server, Java™ EE 5 Edition
Developing Java EE 5 Applications from Scratch 78
c. From the dialog box that is displayed, select the EAR project with the Web service.
d. Choose Finish.
e. Select SAP server and from the context menu, choose Publish.
The EAR file is built and deployed on the SAP NetWeaver Application Server, Java(TM) EE 5 Edition. A WSDL file is generated.
13. To view the WSDL, open a Web browser and enter the following data:
http://<host>:<http port>/<bean class name> + “Serv ice“/<bean class name>?wsdl
http://<host>:<port>/TestBeanService/TestBean?wsdl
See also:
Creating Standalone Proxies [Page 79]
Creating Deployable Proxies [Page 81]

SAP NetWeaver Application Server, Java™ EE 5 Edition
Developing Java EE 5 Applications from Scratch 79
Creating Standalone Proxies
Use This procedure enables you to generate a standalone Web services proxy for consuming Web services using the SAP NetWeaver Developer Studio tools.
Prerequisites
● A Java project is created.
● The Java project has at least one Java source folder which can be selected as an output folder for the generated proxy
Procedure ...
1. Select the Java project.
2. From the context menu, choose Import → General → File System → Next and import the WSDL file for which you want to create a Web service proxy.
You can also enter the URL of the WSDL file directly in the wizard (see, Step 6).
3. Select the WSDL file.
4. From the context menu, choose Web Services → Generate Client.
A wizard for creating a Web service proxy starts.
5. Make sure that the Service definition and Client type are correct.
In Service definition, you can enter the URL of the WSDL file.
If you have to access a remote WSDL file over the Internet, make sure the proxy settings in the SAP NetWeaver Developer Studio are set. Choose Window → Preferences → Internet → Proxy Settings and enter the required data.
6. Move the client slider to the Develop position.
The other positions are not supported.
7. From Configuration, select SAP server and SAP NetWeaver Web service runtime.
8. Choose Next.
9. Select a source folder as an output folder.
10. Choose Finish.
Result
● At least two Java classes are generated in the output folder:
○ Service endpoint interface that contains the methods of the Web service to be called.
○ Service implementation.

SAP NetWeaver Application Server, Java™ EE 5 Edition
Developing Java EE 5 Applications from Scratch 80
Other classes might be created that represent the message types used in the WSDL document of the service.
● The WSDL file is downloaded to the chosen source folder.
● The class path is updated with additional JAR files.
See also:
Creating Web Service Client Applications [Page 83]

SAP NetWeaver Application Server, Java™ EE 5 Edition
Developing Java EE 5 Applications from Scratch 81
Creating Deployable Proxies
Use This procedure enables you to generate deployable Web service proxies for consuming Web services using the SAP NetWeaver Developer Studio.
Prerequisites
● A dynamic Web project 2.5 is created
● Enterprise application project 5 is created
● The Web project is added to the enterprise application project
● The Web project has at least one Java source folder which can be selected as an output folder for the generated proxy.
Procedure ...
1. Select the Web project and choose File → New → Other → Web Services → Web Service Client → Next.
A wizard for creating a Web service client starts.
2. In Service definition, enter a valid URL of the WSDL file of the Web service.
If you have to access a remote WSDL file over the Internet, make sure the proxy settings in the SAP NetWeaver Developer Studio are set. Choose Window → Preferences → Internet → Proxy Settings and enter the required data.
3. From Configuration, select SAP server and SAP NetWeaver Web service runtime.
4. Make sure the client project and client EAR project are set correctly.
The name of the EAR project can be entered manually.
5. Move the slider to the Develop client position.
The other positions are not supported.
6. Choose Next.
7. Select a source folder as an output folder.
8. Choose Finish.
The deployable proxy is generated.
Result
● At least two Java classes are generated in the output folder:
○ Service endpoint interface that contains the methods of the Web service to be called.
○ Service implementation.

SAP NetWeaver Application Server, Java™ EE 5 Edition
Developing Java EE 5 Applications from Scratch 82
Other classes might be created that represent the message types used in the WSDL document of the service.
● The WSDL file is downloaded to the chosen source folder.
● The class path is updated with additional JAR files.
See also:
Creating Web Service Client Applications [Page 83]

SAP NetWeaver Application Server, Java™ EE 5 Edition
Developing Java EE 5 Applications from Scratch 83
Creating Web Service Client Applications
Use Use this procedure to invoke a standalone or deployable proxy in your application.
The source code samples used in this topic refer to generating a proxy from the following WSDL file:
http://www.freewebs.com/jimmy_cheng/CurrencyExchang eService.wsdl
Prerequisites
● A standalone proxy is created [Page 79]
Or
● A deployable proxy is created [Page 81]
Invoking Standalone Proxies ...
1. In the Java project, create a new Java class.
2. Invoke the standalone proxy in the main method of the class.
System.setProperty("proxyHost", "proxy.wdf.sap.corp ");
System.setProperty("http.proxyHost", "proxy.wdf.sap .corp");
System.setProperty("proxyPort", "8080");
System.setProperty("http.proxyPort", "8080");
final CurrencyExchangeService service = new CurrencyExchangeService();
final CurrencyExchangePortType port = service.getCurrencyExchangePort();
System.out.print("Exchange rate between Germany and Russia: ");
System.out.println(port.getRate("Germany", "Russia" ));
If the proxy settings are already specified and the proxy has to be bypassed, then the following code has to be used:
System.setProperty("proxyHost", "");
System.setProperty("http.proxyHost", "");
System.setProperty("proxyPort", "");
System.setProperty("http.proxyPort", "");
final CurrencyExchangeService service = new CurrencyExchangeService();
. . . .
3. Run the Java class and the main method will be invoked.
The result is displayed in the Console view. The Console view is accessible from Windows → Show View → Console.

SAP NetWeaver Application Server, Java™ EE 5 Edition
Developing Java EE 5 Applications from Scratch 84
Invoking Deployable Proxies ...
1. In the Web project of the deployable proxy, create a servlet.
2. Invoke the deployable proxy in the doGet method.
System.setProperty("proxyHost", "proxy.wdf.sap.corp ");
System.setProperty("http.proxyHost", "proxy.wdf.sap .corp");
System.setProperty("proxyPort", "8080");
System.setProperty("http.proxyPort", "8080");
final CurrencyExchangeService service = new CurrencyExchangeService();
final CurrencyExchangePortType port = service.getCurrencyExchangePort();
response.getWriter().println("Exchange rate between Germany and Russia: ");
response.getWriter().println(port.getRate("Germany" , "Russia"));
If the proxy settings are already specified and the proxy has to be bypassed, then use the approach from the standalone case.
3. Deploy the EAR file.
a. Choose Window → Show View → Servers.
b. Select SAP Server node and from the context menu, choose Add and Remove Projects.
c. From the dialog box that is displayed, select the EAR project with the Web service client.
d. Choose Finish.
e. Select SAP server and from the context menu, choose Publish.
Open a Web browser and enter the following data:
http://<server>:<http port>/<webproject name>/<serv let name>

SAP NetWeaver Application Server, Java™ EE 5 Edition
Developing Java EE 5 Applications from Scratch 85
Creating Connector Components
Use In the SAP NetWeaver Developer Studio, you create connector components using Connector Projects. This helps you organize the components of the connector module, and its deployment descriptors.
Procedure
Creating a Connector Project Crea...
1. Choose File → New → Project → J2EE → Connector Project.
2. Enter the Connector Project settings as required.
Choose SAP JEE 5.0 Libraries as the Target runtime.
Choose SAP Connector Project as the Configuration.
3. Choose Next.
4. If necessary, change the default project facets (you may want to unselect the SAP Specific Connector Module, if you do not need the SAP-specific deployment descriptor connector-j2ee-engine.xml).
5. Choose Next.
6. If necessary, change the default project directory.
7. Choose Finish.

SAP NetWeaver Application Server, Java™ EE 5 Edition
Developing Java EE 5 Applications from Scratch 86
New Connector Project Wizard
Adding Native Libraries to the Connector ...
1. Select the connectorModule folder of the Connector Project in the Project Explorer.
2. In the context menu, choose Properties → Native Library.
3. In Location path, specify the directory where the native libraries are located.
Use External Folder if the libraries are located outside the Developer Studio.
Use Workspace if their location is within the Developer Studio workspace.
4. Choose OK.
Editing the Deployment Descriptors ...
1. In the connectorModule/META-INF directory of the Connector Project, select the relevant deployment descriptor in the Project Explorer.
2. Choose Open with → XML Editor in the context menu.
3. Using the context menu of the XML Editor, add the necessary elements to the descriptor, and save the changes.
SAP NetWeaver Application Server, Java™ EE 5 Edition
Developing Java EE 5 Applications from Scratch 87
Result You can now add the Connector Project to an Enterprise Application Project to make it deployable on the Application Server Java.

SAP NetWeaver Application Server, Java™ EE 5 Edition
Developing Java EE 5 Applications from Scratch 88
Creating Application Clients
Use In the SAP NetWeaver Developer Studio, you create application client components using Application Client 5 Projects. It helps you organize the components of the application client, and its deployment descriptors.
Procedure
Creating an Application Client 5 Project ...
1. Choose File → New → Project → J2EE → Application Client Project 5.
2. Specify the project name and location.
3. Optionally, you can add the project to an Enterprise Application Project by choosing the Add project to an EAR option.
You can always add the project to an Enterprise Application Project later.
4. Choose Finish.
Adding Native Libraries to the Connector ...
1. Select the appClientModule folder of the Application Client Project in the Project Explorer.
2. In the context menu, choose Properties → Native Library.
3. In Location path, specify the directory where the native libraries are located.
Use External Folder if the libraries are located outside the Developer Studio.
Use Workspace if their location is within the Developer Studio workspace.
4. Choose OK.
Editing the Deployment Descriptors ...
1. In the appClientModule/META-INF directory of the Application Client Project, select the relevant deployment descriptor in the Project Explorer.
2. Choose Open with → XML Editor in the context menu.
3. Using the context menu of the XML Editor, add the necessary elements to the descriptor, and save the changes.
Result If you have not already done so, you can add the Application Client Project to an Enterprise Application Project. In this way, the application client will become part of the enterprise application EAR file.
See also:
appclient-j2ee-engine.xsdError! Bookmark not defined. – Detailed description of the appclient-j2ee-engine.xml XML schema. For more information see SAP Online Help at help.sap.com .

SAP NetWeaver Application Server, Java™ EE 5 Edition
Developing Java EE 5 Applications from Scratch 89
Creating Java EE Libraries In Java EE 5, there are two types of libraries:
● Standard libraries
These provide resources to all enterprise applications deployed on the server. They are packed in EAR files like the enterprise applications.
For more information about creating standard libraries in the Developer Studio, see Creating Library Components [Page 90].
● Bundled libraries
These provide resources only to a single enterprise application, and are packed inside the application's EAR file.
For more information about creating bundled libraries in the Developer Studio, see Creating Bundled Libraries [Page 97].
In earlier releases of the SAP NetWeaver Developer Studio, standard libraries were created in a separate Library project type. If you want to re-use your old library projects in the current version of the Developer Studio, you have to transform them into Enterprise Application Projects 5. For more info, see Migrating Old Library Projects [Page 93].

SAP NetWeaver Application Server, Java™ EE 5 Edition
Developing Java EE 5 Applications from Scratch 90
Creating Library Components
Procedure ...
1. Create an Enterprise Application Project 5.
2. Select the project in the Project Explorer.
3. In the context menu, choose Properties → J2EE Module Dependencies.
4. Choose the library archives you want to add.
If you want to add JAR files located in the Developer Studio workspace, use Add JARs.
If you want to add JAR files located outside the workspace, use Add External JARs.
5. Open the application-j2ee-engine.xml for editing, and manually describe the added JARs within the <reference> tag.

SAP NetWeaver Application Server, Java™ EE 5 Edition
Developing Java EE 5 Applications from Scratch 91
Creating Bundled Libraries
Use Bundled libraries provide resources only to the classloader of the application that contains them.
Prerequisites An Enterprise Application Project 5 exists.
Procedure ...
1. In the Project Explorer, open the Enterprise Application Project 5.
2. Select the Bundled Libraries folder, and choose Add/Remove in the context menu.
3. Add the JAR files of the libraries you want to bundle in the application.
If the JAR file is available in the Developer Studio workspace, use Add JARs.
If the JAR is available outside the workspace, use Add External JARs.

SAP NetWeaver Application Server, Java™ EE 5 Edition
Developing Java EE 5 Applications from Scratch 92

SAP NetWeaver Application Server, Java™ EE 5 Edition
Developing Java EE 5 Applications from Scratch 93
Migrating Old Library Projects
Use Since former Library Projects are not available in the Developer Studio, you have to transform the old Library Projects into Enterprise Application Projects 5. This procedure describes the steps to do it.
Prerequisites You have a Library Project created with an older version of the SAP NetWeaver Developer Studio.
Procedure ...
1. Import the existing Library Project in the Developer Studio (using File → Import).
2. Create an initially empty Enterprise Application Project 5.
3. Select the project in the Project Explorer.
4. In the context menu, choose Properties → J2EE Module Dependencies.
5. Choose Add JARs and select the JAR file archiving the Library Project.
6. Choose OK.
7. Open for editing the application-j2ee-engine.xml of the Enterprise Application Project, and manually describe the library JAR within <reference> tag.
Result When the Enterprise Application Project is built, the library JAR file will be added to the application EAR file.

SAP NetWeaver Application Server, Java™ EE 5 Edition
Developing Java EE 5 Applications from Scratch 94
Creating Enterprise Applications
Use In the SAP NetWeaver Developer Studio, you create enterprise applications in Enterprise Application Projects 5. The goal of this project type is to assemble all Web, EJB, connector and other components (modules) of the application. The application components are, in turn, represented by their corresponding projects (for example, the EJB components of an application are represented by the corresponding EJB 3.0 Project). An Enterprise Application Project 5 also allows you to add bundled libraries to the application.
Procedure ...
1. Create an Enterprise Application Project 5.
See Creating Enterprise Application 5 Projects [Page 95].
2. If you have not done so initially, add the necessary modules.
See Adding Modules to the Enterprise Application [Page 96].
3. If the application is to contain bundles libraries, add them to the project.
See Creating Bundled Libraries [Page 97].
4. If necessary, configure the deployment descriptors.
See Editing the application-j2ee-engine.xml [Page 99].

SAP NetWeaver Application Server, Java™ EE 5 Edition
Developing Java EE 5 Applications from Scratch 95
Creating Enterprise Application 5 Projects
Procedure ...
1. Choose File → New → Project.
2. Choose J2EE → Enterprise Application 5 Project.
3. Specify the project name and location and choose Next.
4. Choose the application modules to be contained in the application.
You can always add additional modules after the project is created.
Adding modules to an Enterprise Application Project 5
5. Choose Finish.
Result You can now add bundled libraries, edit the application deployment descriptors or deploy the enterprise application on the application server.
See also:
Adding Modules to the Enterprise Application [Page 96]
Creating Bundled Libraries [Page 97]
Editing the application-j2ee-engine.xml [Page 99]
Building and Deploying Projects For more information see SAP Online Help at help.sap.com .

SAP NetWeaver Application Server, Java™ EE 5 Edition
Developing Java EE 5 Applications from Scratch 96
Adding Modules to the Enterprise Application
Use The Create New Enterprise Application Project 5 wizard allows you to specify the application modules initially during the creation of the project. This procedure describes how you can also change the set of modules later, after the project is created.
Procedure ...
1. Select the Enterprise Application Project 5 in the Project Explorer.
2. In the context menu, choose Properties → J2EE Module Dependencies.
The Available J2EE Modules section shows all modules of the enterprise application.
Modules in the enterprise application
3. Change the set of modules as required and choose OK.
Result When you deploy the enterprise application, the archives of the application modules will be available in the application EAR file.
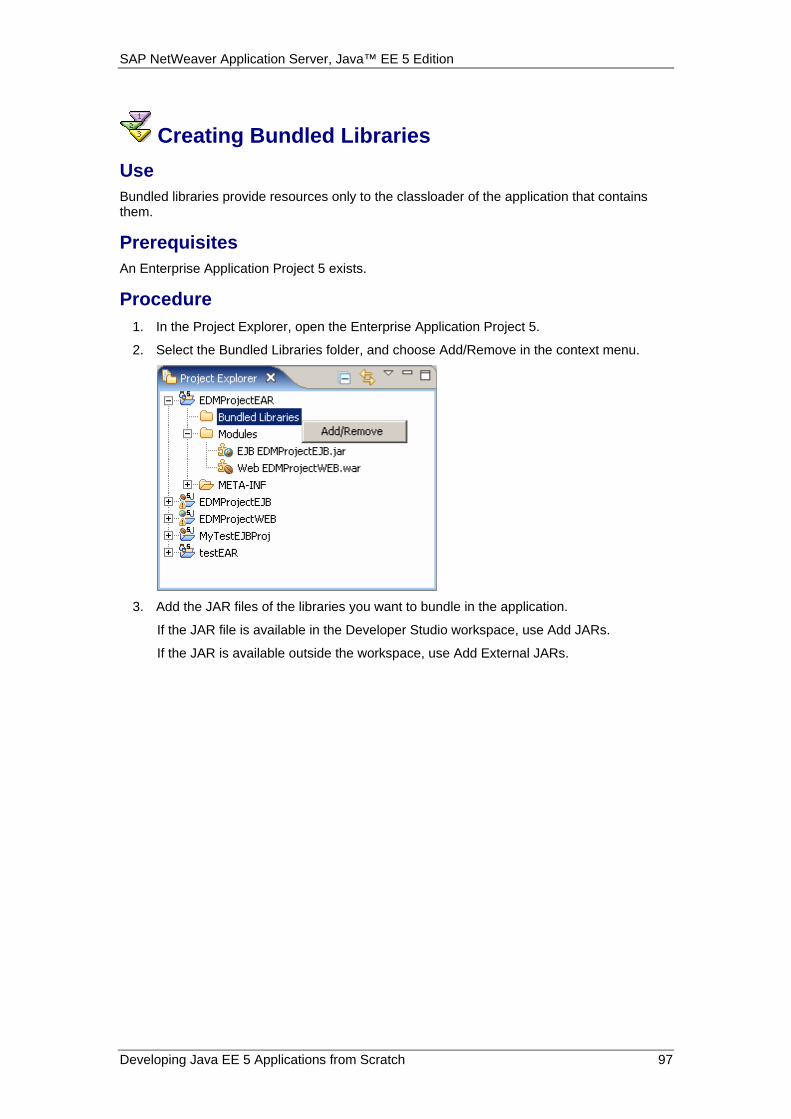
SAP NetWeaver Application Server, Java™ EE 5 Edition
Developing Java EE 5 Applications from Scratch 97
Creating Bundled Libraries
Use Bundled libraries provide resources only to the classloader of the application that contains them.
Prerequisites An Enterprise Application Project 5 exists.
Procedure ...
1. In the Project Explorer, open the Enterprise Application Project 5.
2. Select the Bundled Libraries folder, and choose Add/Remove in the context menu.
3. Add the JAR files of the libraries you want to bundle in the application.
If the JAR file is available in the Developer Studio workspace, use Add JARs.
If the JAR is available outside the workspace, use Add External JARs.

SAP NetWeaver Application Server, Java™ EE 5 Edition
Developing Java EE 5 Applications from Scratch 98

SAP NetWeaver Application Server, Java™ EE 5 Edition
Developing Java EE 5 Applications from Scratch 99
Editing the application-j2ee-engine.xml
Procedure ...
1. In the Project Explorer, open the META-INF directory of the project, and select the application-j2ee-engine.xml node.
2. Choose Open with → XML Editor in the context menu.
3. In the XML Editor, use the context menu to add and remove root elements or child elements to other root elements in the deployment descriptor.
4. When ready, save your changes.
See also:
application-j2ee-engine.xsdError! Bookmark not defined. – Detailed description of the application-j2ee-engine.xml XML schema. For more information see SAP Online Help at help.sap.com .