Embed Size (px)
Citation preview

FOCUS for MainframeDeveloping ApplicationsVersion 7.6
FOCUS_Manual_color.qxd 3/31/2008 2:28 PM Page 1
DN1001057.0308

EDA, EDA/SQL, FIDEL, FOCCALC, FOCUS, FOCUS Fusion, FOCUS Vision, Hospital-Trac, Information Builders, the Information Builders logo, Parlay, PC/FOCUS, SmartMart, SmartMode, SNAPpack, TableTalk, WALDO, Web390, WebFOCUS and WorldMART are registered trademarks, and iWay and iWay Software are trademarks of Information Builders, Inc.
Due to the nature of this material, this document refers to numerous hardware and software products by their trademarks. In most, if not all cases, these designations are claimed as trademarks or registered trademarks by their respective companies. It is not this publisher’s intent to use any of these names generically. The reader is therefore cautioned to investigate all claimed trademark rights before using any of these names other than to refer to the product described.
Copyright © 2008, by Information Builders, Inc and iWay Software. All rights reserved. Patent Pending. This manual, or parts thereof, may not be reproduced in any form without the written permission of Information Builders, Inc.

FOCUS
Contents
1. Customizing Your Environment . . . . . . . . . . . . . . . . . . . . . . . . . . . . . . . . 17The SET Command . . . . . . . . . . . . . . . . . . . . . . . . . . . . . . . . . . . . . . . . . . . . . . . . .18Types of SET Parameters . . . . . . . . . . . . . . . . . . . . . . . . . . . . . . . . . . . . . . . . . . . . .21
Calculations . . . . . . . . . . . . . . . . . . . . . . . . . . . . . . . . . . . . . . . . . . . . . . . . . .22Data and Metadata . . . . . . . . . . . . . . . . . . . . . . . . . . . . . . . . . . . . . . . . . . . . .22Date Manipulation Tasks . . . . . . . . . . . . . . . . . . . . . . . . . . . . . . . . . . . . . . . . .25Graph Tasks . . . . . . . . . . . . . . . . . . . . . . . . . . . . . . . . . . . . . . . . . . . . . . . . . .26Memory Setup and Optimization Tasks . . . . . . . . . . . . . . . . . . . . . . . . . . . . . . .27Report Code, Content, and Processing Tasks . . . . . . . . . . . . . . . . . . . . . . . . . . .28Report Layout and Display Tasks . . . . . . . . . . . . . . . . . . . . . . . . . . . . . . . . . . .31Security Tasks . . . . . . . . . . . . . . . . . . . . . . . . . . . . . . . . . . . . . . . . . . . . . . . . .33Terminal Tasks . . . . . . . . . . . . . . . . . . . . . . . . . . . . . . . . . . . . . . . . . . . . . . . .33
SET Parameter Syntax . . . . . . . . . . . . . . . . . . . . . . . . . . . . . . . . . . . . . . . . . . . . . . .34
2. Querying Your Environment . . . . . . . . . . . . . . . . . . . . . . . . . . . . . . . . . . 123Using Query Commands . . . . . . . . . . . . . . . . . . . . . . . . . . . . . . . . . . . . . . . . . . . .124Displaying Combined Structures . . . . . . . . . . . . . . . . . . . . . . . . . . . . . . . . . . . . . . .126Displaying Virtual Fields . . . . . . . . . . . . . . . . . . . . . . . . . . . . . . . . . . . . . . . . . . . . .127Displaying Available Fields . . . . . . . . . . . . . . . . . . . . . . . . . . . . . . . . . . . . . . . . . . .129Displaying the File Directory Table . . . . . . . . . . . . . . . . . . . . . . . . . . . . . . . . . . . . .130Displaying Field Information for a Master File . . . . . . . . . . . . . . . . . . . . . . . . . . . . .132Displaying Data Source Statistics . . . . . . . . . . . . . . . . . . . . . . . . . . . . . . . . . . . . . .133Displaying Defined Functions . . . . . . . . . . . . . . . . . . . . . . . . . . . . . . . . . . . . . . . . .136Displaying HiperBudget Limits and Usage . . . . . . . . . . . . . . . . . . . . . . . . . . . . . . . .136Displaying HOLD Fields . . . . . . . . . . . . . . . . . . . . . . . . . . . . . . . . . . . . . . . . . . . . .137Displaying JOIN Structures . . . . . . . . . . . . . . . . . . . . . . . . . . . . . . . . . . . . . . . . . . .138Displaying a Multi-Dimensional Index (MDI) . . . . . . . . . . . . . . . . . . . . . . . . . . . . . . .139Displaying National Language Support . . . . . . . . . . . . . . . . . . . . . . . . . . . . . . . . . .141Displaying LET Substitutions . . . . . . . . . . . . . . . . . . . . . . . . . . . . . . . . . . . . . . . . .141Displaying Information About Loaded Files . . . . . . . . . . . . . . . . . . . . . . . . . . . . . . .142Displaying Explanations of Error Messages . . . . . . . . . . . . . . . . . . . . . . . . . . . . . . .142Displaying PF Key Assignments . . . . . . . . . . . . . . . . . . . . . . . . . . . . . . . . . . . . . . .143Querying PTFs for a Release . . . . . . . . . . . . . . . . . . . . . . . . . . . . . . . . . . . . . . . . .143Displaying the Release Number . . . . . . . . . . . . . . . . . . . . . . . . . . . . . . . . . . . . . . .144Displaying Parameter Settings . . . . . . . . . . . . . . . . . . . . . . . . . . . . . . . . . . . . . . . .145Displaying Parameter Values Categorized by Functional Area . . . . . . . . . . . . . . . . . .147
Developing Applications 3

Contents
Displaying Parameters That Cannot Be Set in an Area . . . . . . . . . . . . . . . . . . . . . . .150Displaying Graph Parameters . . . . . . . . . . . . . . . . . . . . . . . . . . . . . . . . . . . . . . . . .151Displaying the Site Code . . . . . . . . . . . . . . . . . . . . . . . . . . . . . . . . . . . . . . . . . . . .153Displaying Command Statistics . . . . . . . . . . . . . . . . . . . . . . . . . . . . . . . . . . . . . . .154Displaying StyleSheet Parameter Settings . . . . . . . . . . . . . . . . . . . . . . . . . . . . . . . .157Displaying Information About the SU Machine . . . . . . . . . . . . . . . . . . . . . . . . . . . . .159Displaying Data Sources Specified With USE . . . . . . . . . . . . . . . . . . . . . . . . . . . . . .159Displaying Global Variable Values . . . . . . . . . . . . . . . . . . . . . . . . . . . . . . . . . . . . . .160
3. Managing Flow of Control in an Application . . . . . . . . . . . . . . . . . . . . . 161Uses for Dialogue Manager . . . . . . . . . . . . . . . . . . . . . . . . . . . . . . . . . . . . . . . . . .162
Dialogue Manager Variables Overview . . . . . . . . . . . . . . . . . . . . . . . . . . . . . . .164Dialogue Manager Processing . . . . . . . . . . . . . . . . . . . . . . . . . . . . . . . . . . . . . . . .165Creating a Procedure . . . . . . . . . . . . . . . . . . . . . . . . . . . . . . . . . . . . . . . . . . . . . . .169
Including Comments in a Procedure . . . . . . . . . . . . . . . . . . . . . . . . . . . . . . . .170Sending a Message to the User . . . . . . . . . . . . . . . . . . . . . . . . . . . . . . . . . . .171Controlling User Access to Data . . . . . . . . . . . . . . . . . . . . . . . . . . . . . . . . . . .173Creating a Startup Procedure . . . . . . . . . . . . . . . . . . . . . . . . . . . . . . . . . . . . .174
Executing and Terminating a Procedure . . . . . . . . . . . . . . . . . . . . . . . . . . . . . . . . . .175Executing Procedures . . . . . . . . . . . . . . . . . . . . . . . . . . . . . . . . . . . . . . . . . . .176Executing Stacked Commands and Continuing the Procedure . . . . . . . . . . . . . .177Executing Stacked Commands and Exiting the Procedure . . . . . . . . . . . . . . . . .178Canceling the Execution of a Procedure . . . . . . . . . . . . . . . . . . . . . . . . . . . . . .179Locking Procedure Users Out of FOCUS . . . . . . . . . . . . . . . . . . . . . . . . . . . . . .180
Navigating a Procedure . . . . . . . . . . . . . . . . . . . . . . . . . . . . . . . . . . . . . . . . . . . . .181Branching Unconditionally . . . . . . . . . . . . . . . . . . . . . . . . . . . . . . . . . . . . . . . .182Branching Conditionally . . . . . . . . . . . . . . . . . . . . . . . . . . . . . . . . . . . . . . . . .183Looping in a Procedure . . . . . . . . . . . . . . . . . . . . . . . . . . . . . . . . . . . . . . . . . .188Incorporating Another Procedure With -INCLUDE . . . . . . . . . . . . . . . . . . . . . . . .192Nesting Procedures With -INCLUDE . . . . . . . . . . . . . . . . . . . . . . . . . . . . . . . . .195Calling Another Procedure With EXEC . . . . . . . . . . . . . . . . . . . . . . . . . . . . . . .196Developing an Open-Ended Procedure . . . . . . . . . . . . . . . . . . . . . . . . . . . . . . .197
Using Variables in a Procedure . . . . . . . . . . . . . . . . . . . . . . . . . . . . . . . . . . . . . . . .198Local Variables . . . . . . . . . . . . . . . . . . . . . . . . . . . . . . . . . . . . . . . . . . . . . . .201Global Variables . . . . . . . . . . . . . . . . . . . . . . . . . . . . . . . . . . . . . . . . . . . . . .202System Variables . . . . . . . . . . . . . . . . . . . . . . . . . . . . . . . . . . . . . . . . . . . . . .203Statistical Variables . . . . . . . . . . . . . . . . . . . . . . . . . . . . . . . . . . . . . . . . . . . .209Special Variables . . . . . . . . . . . . . . . . . . . . . . . . . . . . . . . . . . . . . . . . . . . . . .212Querying the Values of Variables and Parameters . . . . . . . . . . . . . . . . . . . . . . .213
4 Information Builders

Contents
Supplying and Verifying Values for Variables . . . . . . . . . . . . . . . . . . . . . . . . . . . . . .215Supplying a Default Variable Value . . . . . . . . . . . . . . . . . . . . . . . . . . . . . . . . .220Supplying Variable Values in an Expression . . . . . . . . . . . . . . . . . . . . . . . . . . .221Reading Variable Values From and Writing Variable Values to an External File . . .224Supplying Variable Values on the Command Line . . . . . . . . . . . . . . . . . . . . . . .230Prompting Directly for Values With -PROMPT . . . . . . . . . . . . . . . . . . . . . . . . . .233Prompting for Values on Screens With -CRTFORM . . . . . . . . . . . . . . . . . . . . . . .234Prompting for Values on Menus and Windows With -WINDOW . . . . . . . . . . . . . .235Prompting for Values Implicitly . . . . . . . . . . . . . . . . . . . . . . . . . . . . . . . . . . . .235Verifying User-Supplied Values Against a Set of Format Specifications . . . . . . . .236Verifying User Input Against a Pre-Defined List of Values . . . . . . . . . . . . . . . . . .237
Manipulating and Testing Variables . . . . . . . . . . . . . . . . . . . . . . . . . . . . . . . . . . . .240Testing Variables for Length, Type, and Existence . . . . . . . . . . . . . . . . . . . . . .241Replacing a Variable Immediately . . . . . . . . . . . . . . . . . . . . . . . . . . . . . . . . . .244Concatenating Variables . . . . . . . . . . . . . . . . . . . . . . . . . . . . . . . . . . . . . . . . .246Creating an Indexed Variable . . . . . . . . . . . . . . . . . . . . . . . . . . . . . . . . . . . . .247Creating a Standard Quote-Delimited String . . . . . . . . . . . . . . . . . . . . . . . . . . .249Performing a Calculation on a Variable . . . . . . . . . . . . . . . . . . . . . . . . . . . . . .253Changing a Variable Value With the DECODE Function . . . . . . . . . . . . . . . . . . .255Extracting Characters From a Variable Value With the EDIT Function . . . . . . . . .256Removing Trailing Blanks From Variables With the TRUNCATE Function . . . . . . .257Calling a Function . . . . . . . . . . . . . . . . . . . . . . . . . . . . . . . . . . . . . . . . . . . . .259Using Variables to Alter Commands . . . . . . . . . . . . . . . . . . . . . . . . . . . . . . . .261
Debugging a Procedure . . . . . . . . . . . . . . . . . . . . . . . . . . . . . . . . . . . . . . . . . . . . .262Issuing an Operating System Command . . . . . . . . . . . . . . . . . . . . . . . . . . . . . . . . .266Dialogue Manager Quick Reference . . . . . . . . . . . . . . . . . . . . . . . . . . . . . . . . . . . .266
4. Defining a Word Substitution . . . . . . . . . . . . . . . . . . . . . . . . . . . . . . . . 291The LET Command . . . . . . . . . . . . . . . . . . . . . . . . . . . . . . . . . . . . . . . . . . . . . . . .292Variable Substitution . . . . . . . . . . . . . . . . . . . . . . . . . . . . . . . . . . . . . . . . . . . . . . .295Null Substitution . . . . . . . . . . . . . . . . . . . . . . . . . . . . . . . . . . . . . . . . . . . . . . . . . .298Multiple-Line Substitution . . . . . . . . . . . . . . . . . . . . . . . . . . . . . . . . . . . . . . . . . . .299Recursive Substitution . . . . . . . . . . . . . . . . . . . . . . . . . . . . . . . . . . . . . . . . . . . . . .299Using a LET Substitution in a COMPUTE or DEFINE Command . . . . . . . . . . . . . . . . .301Checking Current LET Substitutions . . . . . . . . . . . . . . . . . . . . . . . . . . . . . . . . . . . .302Interactive LET Query: LET ECHO . . . . . . . . . . . . . . . . . . . . . . . . . . . . . . . . . . . . . .303Clearing LET Substitutions . . . . . . . . . . . . . . . . . . . . . . . . . . . . . . . . . . . . . . . . . . .304Saving LET Substitutions in a File . . . . . . . . . . . . . . . . . . . . . . . . . . . . . . . . . . . . . .305Assigning Phrases to Function Keys . . . . . . . . . . . . . . . . . . . . . . . . . . . . . . . . . . . .306
5. Enhancing Application Performance . . . . . . . . . . . . . . . . . . . . . . . . . . . 307FOCUS Facilities . . . . . . . . . . . . . . . . . . . . . . . . . . . . . . . . . . . . . . . . . . . . . . . . . .308
Developing Applications 5

Contents
Loading a File . . . . . . . . . . . . . . . . . . . . . . . . . . . . . . . . . . . . . . . . . . . . . . . . . . . .309Loading Master Files, FOCUS Procedures, and Access Files . . . . . . . . . . . . . . .311Loading a Compiled MODIFY Request . . . . . . . . . . . . . . . . . . . . . . . . . . . . . . .312Loading a MODIFY Request . . . . . . . . . . . . . . . . . . . . . . . . . . . . . . . . . . . . . .313Displaying Information About Loaded Files . . . . . . . . . . . . . . . . . . . . . . . . . . . .313
Compiling a MODIFY Request . . . . . . . . . . . . . . . . . . . . . . . . . . . . . . . . . . . . . . . . .314Saving Master Files in Memory for Reuse . . . . . . . . . . . . . . . . . . . . . . . . . . . . . . . .316Accessing a FOCUS Data Source (MVS Only) . . . . . . . . . . . . . . . . . . . . . . . . . . . . . .319
Using MINIO . . . . . . . . . . . . . . . . . . . . . . . . . . . . . . . . . . . . . . . . . . . . . . . . .320Determining If a Previous Command Used MINIO . . . . . . . . . . . . . . . . . . . . . . .321
Enhancing File Management With HiperFOCUS . . . . . . . . . . . . . . . . . . . . . . . . . . . .323Activating HiperFOCUS . . . . . . . . . . . . . . . . . . . . . . . . . . . . . . . . . . . . . . . . . .324Installing and Configuring HiperFOCUS . . . . . . . . . . . . . . . . . . . . . . . . . . . . . .325Installing HiperBudget on z/OS . . . . . . . . . . . . . . . . . . . . . . . . . . . . . . . . . . . .327Creating Temporary Files in Hiperspaces With HiperFile on z/OS . . . . . . . . . . . .328Creating a Temporary Sort File in Hiperspace on CMS . . . . . . . . . . . . . . . . . . . .332Creating Cache Memory in Hiperspaces on z/OS . . . . . . . . . . . . . . . . . . . . . . .333Controlling HiperFOCUS Use With the HiperRule Facility . . . . . . . . . . . . . . . . . .335
6. Working With Cross-Century Dates . . . . . . . . . . . . . . . . . . . . . . . . . . . . 341When Do You Use the Sliding Window Technique? . . . . . . . . . . . . . . . . . . . . . . . . . .342The Sliding Window Technique . . . . . . . . . . . . . . . . . . . . . . . . . . . . . . . . . . . . . . . .342
Defining a Sliding Window . . . . . . . . . . . . . . . . . . . . . . . . . . . . . . . . . . . . . . .344Creating a Dynamic Window Based on the Current Year . . . . . . . . . . . . . . . . . .345
Applying the Sliding Window Technique . . . . . . . . . . . . . . . . . . . . . . . . . . . . . . . . . .346When to Supply Settings for DEFCENT and YRTHRESH . . . . . . . . . . . . . . . . . . .347Date Validation . . . . . . . . . . . . . . . . . . . . . . . . . . . . . . . . . . . . . . . . . . . . . . .348
Defining a Global Window With SET . . . . . . . . . . . . . . . . . . . . . . . . . . . . . . . . . . . .348Defining a Dynamic Global Window With SET . . . . . . . . . . . . . . . . . . . . . . . . . . . . . .351Querying the Current Global Value of DEFCENT and YRTHRESH . . . . . . . . . . . . . . . .354Defining a File-Level or Field-Level Window in a Master File . . . . . . . . . . . . . . . . . . . .355Defining a Window for a Virtual Field . . . . . . . . . . . . . . . . . . . . . . . . . . . . . . . . . . . .363Defining a Window for a Calculated Value . . . . . . . . . . . . . . . . . . . . . . . . . . . . . . . .370Additional Support for Cross-Century Dates . . . . . . . . . . . . . . . . . . . . . . . . . . . . . . .376
Default Date Display Format . . . . . . . . . . . . . . . . . . . . . . . . . . . . . . . . . . . . . .377Date Display Options . . . . . . . . . . . . . . . . . . . . . . . . . . . . . . . . . . . . . . . . . . .377System Date Masking . . . . . . . . . . . . . . . . . . . . . . . . . . . . . . . . . . . . . . . . . .377Date Functions . . . . . . . . . . . . . . . . . . . . . . . . . . . . . . . . . . . . . . . . . . . . . . .377Date Conversion . . . . . . . . . . . . . . . . . . . . . . . . . . . . . . . . . . . . . . . . . . . . . .378Century and Threshold Information . . . . . . . . . . . . . . . . . . . . . . . . . . . . . . . . .378Date Time Stamp . . . . . . . . . . . . . . . . . . . . . . . . . . . . . . . . . . . . . . . . . . . . . .378
6 Information Builders

Contents
7. Euro Currency Support . . . . . . . . . . . . . . . . . . . . . . . . . . . . . . . . . . . . . . 379Integrating the Euro Currency . . . . . . . . . . . . . . . . . . . . . . . . . . . . . . . . . . . . . . . . .380Converting Currencies . . . . . . . . . . . . . . . . . . . . . . . . . . . . . . . . . . . . . . . . . . . . . .380Creating the Currency Data Source . . . . . . . . . . . . . . . . . . . . . . . . . . . . . . . . . . . . .382Identifying Fields That Contain Currency Data . . . . . . . . . . . . . . . . . . . . . . . . . . . . .385Activating the Currency Data Source . . . . . . . . . . . . . . . . . . . . . . . . . . . . . . . . . . . .387Processing Currency Data . . . . . . . . . . . . . . . . . . . . . . . . . . . . . . . . . . . . . . . . . . .389Querying the Currency Data Source in Effect . . . . . . . . . . . . . . . . . . . . . . . . . . . . . .393Punctuating Numbers . . . . . . . . . . . . . . . . . . . . . . . . . . . . . . . . . . . . . . . . . . . . . .394Selecting an Extended Currency Symbol . . . . . . . . . . . . . . . . . . . . . . . . . . . . . . . . .396
8. Designing Windows With Window Painter . . . . . . . . . . . . . . . . . . . . . . . 399Introduction . . . . . . . . . . . . . . . . . . . . . . . . . . . . . . . . . . . . . . . . . . . . . . . . . . . . .400
How Do Window Applications Work? . . . . . . . . . . . . . . . . . . . . . . . . . . . . . . . .401Window Files and Windows . . . . . . . . . . . . . . . . . . . . . . . . . . . . . . . . . . . . . . . . . .402
Types of Windows You Can Create . . . . . . . . . . . . . . . . . . . . . . . . . . . . . . . . .403Creating Windows . . . . . . . . . . . . . . . . . . . . . . . . . . . . . . . . . . . . . . . . . . . . .412
Integrating Windows and the FOCEXEC . . . . . . . . . . . . . . . . . . . . . . . . . . . . . . . . . .420Transferring Control in Window Applications . . . . . . . . . . . . . . . . . . . . . . . . . . .421Return Values . . . . . . . . . . . . . . . . . . . . . . . . . . . . . . . . . . . . . . . . . . . . . . . .424Goto Values . . . . . . . . . . . . . . . . . . . . . . . . . . . . . . . . . . . . . . . . . . . . . . . . .425Window System Variables . . . . . . . . . . . . . . . . . . . . . . . . . . . . . . . . . . . . . . . .426Testing Function Key Values . . . . . . . . . . . . . . . . . . . . . . . . . . . . . . . . . . . . . .427Executing a Window From the FOCUS Prompt . . . . . . . . . . . . . . . . . . . . . . . . . .429
Tutorial: A Menu-Driven Application . . . . . . . . . . . . . . . . . . . . . . . . . . . . . . . . . . . . .430Creating the Application FOCEXEC . . . . . . . . . . . . . . . . . . . . . . . . . . . . . . . . . .431Creating the Window File . . . . . . . . . . . . . . . . . . . . . . . . . . . . . . . . . . . . . . . .434Executing the Application . . . . . . . . . . . . . . . . . . . . . . . . . . . . . . . . . . . . . . . .454
Window Painter Screens . . . . . . . . . . . . . . . . . . . . . . . . . . . . . . . . . . . . . . . . . . . .455Invoking Window Painter . . . . . . . . . . . . . . . . . . . . . . . . . . . . . . . . . . . . . . . . .455Entry Menu . . . . . . . . . . . . . . . . . . . . . . . . . . . . . . . . . . . . . . . . . . . . . . . . . .456Main Menu . . . . . . . . . . . . . . . . . . . . . . . . . . . . . . . . . . . . . . . . . . . . . . . . . .457Window Creation Menu . . . . . . . . . . . . . . . . . . . . . . . . . . . . . . . . . . . . . . . . . .460Window Design Screen . . . . . . . . . . . . . . . . . . . . . . . . . . . . . . . . . . . . . . . . . .461Window Options Menu . . . . . . . . . . . . . . . . . . . . . . . . . . . . . . . . . . . . . . . . . .465Utilities Menu . . . . . . . . . . . . . . . . . . . . . . . . . . . . . . . . . . . . . . . . . . . . . . . .477
Transferring Window Files . . . . . . . . . . . . . . . . . . . . . . . . . . . . . . . . . . . . . . . . . . .480Creating a Transfer File . . . . . . . . . . . . . . . . . . . . . . . . . . . . . . . . . . . . . . . . .481Transferring the File to the New Environment . . . . . . . . . . . . . . . . . . . . . . . . . .482Editing the Transfer File . . . . . . . . . . . . . . . . . . . . . . . . . . . . . . . . . . . . . . . . .482Compiling the Transfer File . . . . . . . . . . . . . . . . . . . . . . . . . . . . . . . . . . . . . . .489
Developing Applications 7

Contents
A. Master Files and Diagrams . . . . . . . . . . . . . . . . . . . . . . . . . . . . . . . . . . 491Creating Sample Data Sources . . . . . . . . . . . . . . . . . . . . . . . . . . . . . . . . . . . . . . .492EMPLOYEE Data Source . . . . . . . . . . . . . . . . . . . . . . . . . . . . . . . . . . . . . . . . . . . .494
EMPLOYEE Master File . . . . . . . . . . . . . . . . . . . . . . . . . . . . . . . . . . . . . . . . . .495EMPLOYEE Structure Diagram . . . . . . . . . . . . . . . . . . . . . . . . . . . . . . . . . . . . .496
JOBFILE Data Source . . . . . . . . . . . . . . . . . . . . . . . . . . . . . . . . . . . . . . . . . . . . . . .497JOBFILE Master File . . . . . . . . . . . . . . . . . . . . . . . . . . . . . . . . . . . . . . . . . . . .497JOBFILE Structure Diagram . . . . . . . . . . . . . . . . . . . . . . . . . . . . . . . . . . . . . . .498
EDUCFILE Data Source . . . . . . . . . . . . . . . . . . . . . . . . . . . . . . . . . . . . . . . . . . . . .498EDUCFILE Master File . . . . . . . . . . . . . . . . . . . . . . . . . . . . . . . . . . . . . . . . . . .499EDUCFILE Structure Diagram . . . . . . . . . . . . . . . . . . . . . . . . . . . . . . . . . . . . .499
SALES Data Source . . . . . . . . . . . . . . . . . . . . . . . . . . . . . . . . . . . . . . . . . . . . . . . .500SALES Master File . . . . . . . . . . . . . . . . . . . . . . . . . . . . . . . . . . . . . . . . . . . . .500SALES Structure Diagram . . . . . . . . . . . . . . . . . . . . . . . . . . . . . . . . . . . . . . . .501
PROD Data Source . . . . . . . . . . . . . . . . . . . . . . . . . . . . . . . . . . . . . . . . . . . . . . . .502PROD Master File . . . . . . . . . . . . . . . . . . . . . . . . . . . . . . . . . . . . . . . . . . . . .502PROD Structure Diagram . . . . . . . . . . . . . . . . . . . . . . . . . . . . . . . . . . . . . . . .502
CAR Data Source . . . . . . . . . . . . . . . . . . . . . . . . . . . . . . . . . . . . . . . . . . . . . . . . .502CAR Master File . . . . . . . . . . . . . . . . . . . . . . . . . . . . . . . . . . . . . . . . . . . . . . .503CAR Structure Diagram . . . . . . . . . . . . . . . . . . . . . . . . . . . . . . . . . . . . . . . . . .504
LEDGER Data Source . . . . . . . . . . . . . . . . . . . . . . . . . . . . . . . . . . . . . . . . . . . . . .505LEDGER Master File . . . . . . . . . . . . . . . . . . . . . . . . . . . . . . . . . . . . . . . . . . . .505LEDGER Structure Diagram . . . . . . . . . . . . . . . . . . . . . . . . . . . . . . . . . . . . . . .505
FINANCE Data Source . . . . . . . . . . . . . . . . . . . . . . . . . . . . . . . . . . . . . . . . . . . . . .506FINANCE Master File . . . . . . . . . . . . . . . . . . . . . . . . . . . . . . . . . . . . . . . . . . .506FINANCE Structure Diagram . . . . . . . . . . . . . . . . . . . . . . . . . . . . . . . . . . . . . .506
REGION Data Source . . . . . . . . . . . . . . . . . . . . . . . . . . . . . . . . . . . . . . . . . . . . . . .507REGION Master File . . . . . . . . . . . . . . . . . . . . . . . . . . . . . . . . . . . . . . . . . . . .507REGION Structure Diagram . . . . . . . . . . . . . . . . . . . . . . . . . . . . . . . . . . . . . . .507
COURSES Data Source . . . . . . . . . . . . . . . . . . . . . . . . . . . . . . . . . . . . . . . . . . . . .508COURSES Master File . . . . . . . . . . . . . . . . . . . . . . . . . . . . . . . . . . . . . . . . . .508COURSES Structure Diagram . . . . . . . . . . . . . . . . . . . . . . . . . . . . . . . . . . . . .508
EXPERSON Data Source . . . . . . . . . . . . . . . . . . . . . . . . . . . . . . . . . . . . . . . . . . . .509EXPERSON Master File . . . . . . . . . . . . . . . . . . . . . . . . . . . . . . . . . . . . . . . . . .509EXPERSON Structure Diagram . . . . . . . . . . . . . . . . . . . . . . . . . . . . . . . . . . . . .510
EMPDATA Data Source . . . . . . . . . . . . . . . . . . . . . . . . . . . . . . . . . . . . . . . . . . . . .510EMPDATA Master File . . . . . . . . . . . . . . . . . . . . . . . . . . . . . . . . . . . . . . . . . . .510EMPDATA Structure Diagram . . . . . . . . . . . . . . . . . . . . . . . . . . . . . . . . . . . . . .511
TRAINING Data Source . . . . . . . . . . . . . . . . . . . . . . . . . . . . . . . . . . . . . . . . . . . . .511TRAINING Master File . . . . . . . . . . . . . . . . . . . . . . . . . . . . . . . . . . . . . . . . . . .511TRAINING Structure Diagram . . . . . . . . . . . . . . . . . . . . . . . . . . . . . . . . . . . . . .512
8 Information Builders

Contents
COURSE Data Source . . . . . . . . . . . . . . . . . . . . . . . . . . . . . . . . . . . . . . . . . . . . . .512COURSE Master File . . . . . . . . . . . . . . . . . . . . . . . . . . . . . . . . . . . . . . . . . . .512COURSE Structure Diagram . . . . . . . . . . . . . . . . . . . . . . . . . . . . . . . . . . . . . .513
JOBHIST Data Source . . . . . . . . . . . . . . . . . . . . . . . . . . . . . . . . . . . . . . . . . . . . . .513JOBHIST Master File . . . . . . . . . . . . . . . . . . . . . . . . . . . . . . . . . . . . . . . . . . .513JOBHIST Structure Diagram . . . . . . . . . . . . . . . . . . . . . . . . . . . . . . . . . . . . . .514
JOBLIST Data Source . . . . . . . . . . . . . . . . . . . . . . . . . . . . . . . . . . . . . . . . . . . . . .514JOBLIST MASTER File . . . . . . . . . . . . . . . . . . . . . . . . . . . . . . . . . . . . . . . . . . .514JOBLIST Structure Diagram . . . . . . . . . . . . . . . . . . . . . . . . . . . . . . . . . . . . . . .515
LOCATOR Data Source . . . . . . . . . . . . . . . . . . . . . . . . . . . . . . . . . . . . . . . . . . . . . .515LOCATOR MASTER File . . . . . . . . . . . . . . . . . . . . . . . . . . . . . . . . . . . . . . . . . .515LOCATOR Structure Diagram . . . . . . . . . . . . . . . . . . . . . . . . . . . . . . . . . . . . . .516
PERSINFO Data Source . . . . . . . . . . . . . . . . . . . . . . . . . . . . . . . . . . . . . . . . . . . . .516PERSINFO MASTER File . . . . . . . . . . . . . . . . . . . . . . . . . . . . . . . . . . . . . . . . .516PERSINFO Structure Diagram . . . . . . . . . . . . . . . . . . . . . . . . . . . . . . . . . . . . .517
SALHIST Data Source . . . . . . . . . . . . . . . . . . . . . . . . . . . . . . . . . . . . . . . . . . . . . .517SALHIST MASTER File . . . . . . . . . . . . . . . . . . . . . . . . . . . . . . . . . . . . . . . . . .517SALHIST Structure Diagram . . . . . . . . . . . . . . . . . . . . . . . . . . . . . . . . . . . . . .518
PAYHIST File . . . . . . . . . . . . . . . . . . . . . . . . . . . . . . . . . . . . . . . . . . . . . . . . . . . . .518PAYHIST Master File . . . . . . . . . . . . . . . . . . . . . . . . . . . . . . . . . . . . . . . . . . .518PAYHIST Structure Diagram . . . . . . . . . . . . . . . . . . . . . . . . . . . . . . . . . . . . . .519
COMASTER File . . . . . . . . . . . . . . . . . . . . . . . . . . . . . . . . . . . . . . . . . . . . . . . . . . .519COMASTER Master File . . . . . . . . . . . . . . . . . . . . . . . . . . . . . . . . . . . . . . . . .520COMASTER Structure Diagram . . . . . . . . . . . . . . . . . . . . . . . . . . . . . . . . . . . .521
VIDEOTRK, MOVIES, and ITEMS Data Sources . . . . . . . . . . . . . . . . . . . . . . . . . . . . .522VIDEOTRK Master File . . . . . . . . . . . . . . . . . . . . . . . . . . . . . . . . . . . . . . . . . .522VIDEOTRK Structure Diagram . . . . . . . . . . . . . . . . . . . . . . . . . . . . . . . . . . . . .523MOVIES Master File . . . . . . . . . . . . . . . . . . . . . . . . . . . . . . . . . . . . . . . . . . . .524MOVIES Structure Diagram . . . . . . . . . . . . . . . . . . . . . . . . . . . . . . . . . . . . . . .524ITEMS Master File . . . . . . . . . . . . . . . . . . . . . . . . . . . . . . . . . . . . . . . . . . . . .524ITEMS Structure Diagram . . . . . . . . . . . . . . . . . . . . . . . . . . . . . . . . . . . . . . . .525
VIDEOTR2 Data Source . . . . . . . . . . . . . . . . . . . . . . . . . . . . . . . . . . . . . . . . . . . . .526VIDEOTR2 Master File . . . . . . . . . . . . . . . . . . . . . . . . . . . . . . . . . . . . . . . . . .526VIDEOTR2 Structure Diagram . . . . . . . . . . . . . . . . . . . . . . . . . . . . . . . . . . . . .527
Developing Applications 9

Contents
Gotham Grinds Data Sources . . . . . . . . . . . . . . . . . . . . . . . . . . . . . . . . . . . . . . . . .528GGDEMOG Master File . . . . . . . . . . . . . . . . . . . . . . . . . . . . . . . . . . . . . . . . . .529GGDEMOG Structure Diagram . . . . . . . . . . . . . . . . . . . . . . . . . . . . . . . . . . . . .529GGORDER Master File . . . . . . . . . . . . . . . . . . . . . . . . . . . . . . . . . . . . . . . . . .530GGORDER Structure Diagram . . . . . . . . . . . . . . . . . . . . . . . . . . . . . . . . . . . . .530GGPRODS Master File . . . . . . . . . . . . . . . . . . . . . . . . . . . . . . . . . . . . . . . . . .531GGPRODS Structure Diagram . . . . . . . . . . . . . . . . . . . . . . . . . . . . . . . . . . . . .531GGSALES Master File . . . . . . . . . . . . . . . . . . . . . . . . . . . . . . . . . . . . . . . . . . .532GGSALES Structure Diagram . . . . . . . . . . . . . . . . . . . . . . . . . . . . . . . . . . . . . .532GGSTORES Master File . . . . . . . . . . . . . . . . . . . . . . . . . . . . . . . . . . . . . . . . .533GGSTORES Structure Diagram . . . . . . . . . . . . . . . . . . . . . . . . . . . . . . . . . . . .533
Century Corp Data Sources . . . . . . . . . . . . . . . . . . . . . . . . . . . . . . . . . . . . . . . . . .534CENTCOMP Master File . . . . . . . . . . . . . . . . . . . . . . . . . . . . . . . . . . . . . . . . .536CENTCOMP Structure Diagram . . . . . . . . . . . . . . . . . . . . . . . . . . . . . . . . . . . .536CENTFIN Master File . . . . . . . . . . . . . . . . . . . . . . . . . . . . . . . . . . . . . . . . . . .537CENTFIN Structure Diagram . . . . . . . . . . . . . . . . . . . . . . . . . . . . . . . . . . . . . .537CENTHR Master File . . . . . . . . . . . . . . . . . . . . . . . . . . . . . . . . . . . . . . . . . . . .538CENTHR Structure Diagram . . . . . . . . . . . . . . . . . . . . . . . . . . . . . . . . . . . . . . .540CENTINV Master File . . . . . . . . . . . . . . . . . . . . . . . . . . . . . . . . . . . . . . . . . . .541CENTINV Structure Diagram . . . . . . . . . . . . . . . . . . . . . . . . . . . . . . . . . . . . . .541CENTORD Master File . . . . . . . . . . . . . . . . . . . . . . . . . . . . . . . . . . . . . . . . . . .542CENTORD Structure Diagram . . . . . . . . . . . . . . . . . . . . . . . . . . . . . . . . . . . . .543CENTQA Master File . . . . . . . . . . . . . . . . . . . . . . . . . . . . . . . . . . . . . . . . . . . .544CENTQA Structure Diagram . . . . . . . . . . . . . . . . . . . . . . . . . . . . . . . . . . . . . . .545CENTGL Master File . . . . . . . . . . . . . . . . . . . . . . . . . . . . . . . . . . . . . . . . . . . .546CENTGL Structure Diagram . . . . . . . . . . . . . . . . . . . . . . . . . . . . . . . . . . . . . . .546CENTSYSF Master File . . . . . . . . . . . . . . . . . . . . . . . . . . . . . . . . . . . . . . . . . .546CENTSYSF Structure Diagram . . . . . . . . . . . . . . . . . . . . . . . . . . . . . . . . . . . . .547CENTSTMT Master File . . . . . . . . . . . . . . . . . . . . . . . . . . . . . . . . . . . . . . . . .547CENTSTMT Structure Diagram . . . . . . . . . . . . . . . . . . . . . . . . . . . . . . . . . . . . .548
B. Error Messages . . . . . . . . . . . . . . . . . . . . . . . . . . . . . . . . . . . . . . . . . . . 549Accessing Error Files . . . . . . . . . . . . . . . . . . . . . . . . . . . . . . . . . . . . . . . . . . . . . . .550Displaying Messages Online . . . . . . . . . . . . . . . . . . . . . . . . . . . . . . . . . . . . . . . . .551
10 Information Builders

FOCUS
Preface
This documentation describes how to create FOCUS applications. It is meant for the FOCUS developer.
References to z/OS apply to all supported versions of the OS/390, z/OS, and MVS operating environments. References to z/VM apply to all supported versions of the VM/ESA and z/VM operating environments.
The documentation set consists of the following components:
❏ The Creating Reports manual describes FOCUS Reporting environments and features.
❏ The Describing Data manual explains how to create the metadata for the data sources that your FOCUS procedures will access.
❏ The Developing Applications manual describes FOCUS Application Development tools and environments.
❏ The Maintaining Databases manual describes FOCUS data management facilities and environments.
❏ The Using Functions manual describes internal functions and user-written subroutines.
❏ The Overview and Operating Environments manual contains an introduction to FOCUS and FOCUS tools and describes how to use FOCUS in the VM/CMS and MVS (OS/390) environments.
The users' documentation for FOCUS Version 7.6 is organized to provide you with a useful, comprehensive guide to FOCUS.
Chapters need not be read in the order in which they appear. Though FOCUS facilities and concepts are related, each chapter fully covers its respective topic. To enhance your understanding of a given topic, references to related topics throughout the documentation set are provided. The following pages detail documentation organization and conventions.
Developing Applications 11

Preface
How This Manual Is OrganizedThis documentation includes the following chapters:
Chapter/Appendix Contents
1 Customizing Your Environment
Describes how to control your FOCUS environment with the SET command.
2 Querying Your Environment
Describes how to use query commands to retrieve information about the FOCUS environment.
3 Managing Flow of Control in an Application
Describes how to make a report procedure more dynamic using Dialogue Manager commands.
4 Defining a Word Substitution
Describes how to define a string substitution that can be used in a report request.
5 Enhancing Application Performance
Describes FOCUS facilities for increasing the speed of your application.
6 Working With Cross-Century Dates
Describes techniques for assigning a century date to dates with two-digit years.
7 Euro Currency Support
Describes how to perform currency conversions according to the rules established by the European Union.
8 Designing Windows With Window Painter
Describes how to create FOCUS windows and menus that work in conjunction with a procedure.
A Master Files and Diagrams
Contains Master Files and diagrams of same data sources used in documentation examples.
B Error Messages Describes how to obtain additional information about error messages in FOCUS.
12 Information Builders

Preface
Documentation ConventionsThe following conventions apply throughout this manual:
Related PublicationsTo view a current listing of our publications and to place an order, visit our World Wide Web site, http://www.informationbuilders.com. You can also contact the Publications Order Department at (800) 969-4636.
Convention Description
THIS TYPEFACE orthis typeface
Denotes syntax that you must enter exactly as shown.
this typeface Represents a placeholder (or variable) in syntax for a value that you or the system must supply.
underscore Indicates a default setting.
this typeface Represents a placeholder (or variable), a cross-reference, or an important term. It may also indicate a button, menu item, or dialog box option you can click or select.
this typeface Highlights a file name or command.
Key + Key Indicates keys that you must press simultaneously.
{ } Indicates two or three choices; type one of them, not the braces.
[ ] Indicates a group of optional parameters. None are required, but you may select one of them. Type only the parameter in the brackets, not the brackets.
| Separates mutually exclusive choices in syntax. Type one of them, not the symbol.
... Indicates that you can enter a parameter multiple times. Type only the parameter, not the ellipsis points (…).
.
.
.
Indicates that there are (or could be) intervening or additional commands.
Developing Applications 13

Preface
Customer SupportDo you have questions about FOCUS?
Call Information Builders Customer Support Service (CSS) at (800) 736-6130 or (212) 736-6130. Customer Support Consultants are available Monday through Friday between 8:00 a.m. and 8:00 p.m. EST to address all your FOCUS questions. Information Builders consultants can also give you general guidance regarding product capabilities and documentation. Please be ready to provide your six-digit site code (xxxx.xx) when you call.
You can also access support services electronically, 24 hours a day, with InfoResponse Online. InfoResponse Online is accessible through our World Wide Web site, http://www.informationbuilders.com. It connects you to the tracking system and known-problem database at the Information Builders support center. Registered users can open, update, and view the status of cases in the tracking system and read descriptions of reported software issues. New users can register immediately for this service. The technical support section of www.informationbuilders.com also provides usage techniques, diagnostic tips, and answers to frequently asked questions.
To learn about the full range of available support services, ask your Information Builders representative about InfoResponse Online, or call (800) 969-INFO.
Information You Should HaveTo help our consultants answer your questions most effectively, be ready to provide the following information when you call:
❏ Your six-digit site code (xxxx.xx).
❏ The FOCEXEC procedure (preferably with line numbers).
❏ Master file with picture (provided by CHECK FILE).
❏ Run sheet (beginning at login, including call to FOCUS), containing the following information:
❏ ? RELEASE
❏ ? FDT
❏ ? LET
❏ ? LOAD
❏ ? COMBINE
❏ ? JOIN
❏ ? DEFINE
❏ ? STAT
14 Information Builders

Preface
❏ ? SET/? SET GRAPH
❏ ? USE
❏ ? TSO DDNAME OR CMS FILEDEF
❏ The exact nature of the problem:
❏ Are the results or the format incorrect? Are the text or calculations missing or misplaced?
❏ The error message and code, if applicable.
❏ Is this related to any other problem?
❏ Has the procedure or query ever worked in its present form? Has it been changed recently? How often does the problem occur?
❏ What release of the operating system are you using? Has it, FOCUS, your security system, or an interface system changed?
❏ Is this problem reproducible? If so, how?
❏ Have you tried to reproduce your problem in the simplest form possible? For example, if you are having problems joining two data sources, have you tried executing a query containing just the code to access the data source?
❏ Do you have a trace file?
❏ How is the problem affecting your business? Is it halting development or production? Do you just have questions about functionality or documentation?
User FeedbackIn an effort to produce effective documentation, the Documentation Services staff welcomes your opinions regarding this manual. Please use the Reader Comments form at the end of this manual to relay suggestions for improving the publication or to alert us to corrections. You can also use the Documentation Feedback form on our Web site, www.informationbuilders.com.
Thank you, in advance, for your comments.
Information Builders Consulting and TrainingInterested in training? Information Builders Education Department offers a wide variety of training courses for this and other Information Builders products.
For information on course descriptions, locations, and dates, or to register for classes, visit our World Wide Web site (http://www.informationbuilders.com) or call (800) 969-INFO to speak to an Education Representative.
Developing Applications 15

Preface
16 Information Builders

FOCUS
1
Developing App
Customizing Your Environment
You can use the SET command to change parameters that govern your FOCUS environment.
Topics:
❏ The SET Command
❏ Types of SET Parameters
❏ SET Parameter Syntax
lications 17
The SET Command
The SET Command
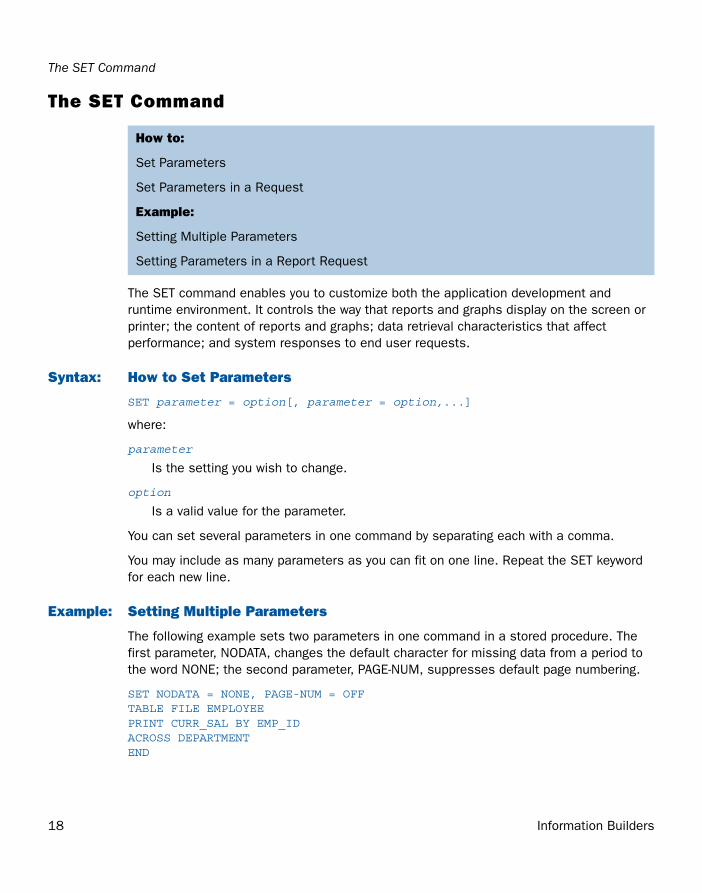
The SET command enables you to customize both the application development and runtime environment. It controls the way that reports and graphs display on the screen or printer; the content of reports and graphs; data retrieval characteristics that affect performance; and system responses to end user requests.
Syntax: How to Set Parameters
SET parameter = option[, parameter = option,...]
where:
parameter
Is the setting you wish to change.
option
Is a valid value for the parameter.
You can set several parameters in one command by separating each with a comma.
You may include as many parameters as you can fit on one line. Repeat the SET keyword for each new line.
Example: Setting Multiple Parameters
The following example sets two parameters in one command in a stored procedure. The first parameter, NODATA, changes the default character for missing data from a period to the word NONE; the second parameter, PAGE-NUM, suppresses default page numbering.
SET NODATA = NONE, PAGE-NUM = OFFTABLE FILE EMPLOYEEPRINT CURR_SAL BY EMP_IDACROSS DEPARTMENTEND
How to:
Set Parameters
Set Parameters in a Request
Example:
Setting Multiple Parameters
Setting Parameters in a Report Request
18 Information Builders

Customizing Your Environment
In the output, NONE appears when there is no salary information for a specific employee because that employee does not work in the department that is referenced. There is no page number at the top of the output.
The output is:
DEPARTMENT MIS PRODUCTIONEMP_ID-------------------------------------------071382660 NONE $11,000.00112847612 $13,200.00 NONE117593129 $18,480.00 NONE119265415 NONE $9,500.00119329144 NONE $29,700.00123764317 NONE $26,862.00126724188 NONE $21,120.00219984371 $18,480.00 NONE326179357 $21,780.00 NONE451123478 NONE $16,100.00543729165 $9,000.00 NONE818692173 $27,062.00 NONE
Syntax: How to Set Parameters in a Request
Many SET parameters that change system defaults can be issued from TABLE and GRAPH requests. SET used in this manner is temporary, affecting only the current request. The syntax is
ON {TABLE|GRAPH} SET parameter value [AND parameter value ...]
where:
parameter
Is the setting you wish to change.
value
Is a valid value for the parameter.
To see a list of parameters that cannot be set within TABLE, issue the following command:
? SET NOT ONTABLE
For details on the SET parameters that you can use to control graphs, see Chapter 20, Creating a Graph, in the Creating Reports manual.
Developing Applications 19

The SET Command
Example: Setting Parameters in a Report Request
In the following example, the command ON TABLE SET changes the default character for missing data from a period to the word NONE and suppresses default page numbering.
TABLE FILE EMPLOYEEPRINT CURR_SAL BY EMP_IDACROSS DEPARTMENTON TABLE SET NODATA NONE AND PAGE-NUM OFFEND
In the output, NONE appears when there is no salary information for a specific employee. There is no page number at the top of the output.
The output is:
DEPARTMENT MIS PRODUCTIONEMP_ID-------------------------------------------071382660 NONE $11,000.00112847612 $13,200.00 NONE117593129 $18,480.00 NONE119265415 NONE $9,500.00119329144 NONE $29,700.00123764317 NONE $26,862.00126724188 NONE $21,120.00219984371 $18,480.00 NONE326179357 $21,780.00 NONE451123478 NONE $16,100.00543729165 $9,000.00 NONE818692173 $27,062.00 NONE
20 Information Builders

Customizing Your Environment
Types of SET ParametersThis topic lists the types of tasks that can be accomplished, and the SET parameters that allow you to perform these tasks. If a single parameter applies to more than one activity, it appears in more than one category. For more detailed descriptions, as well as the syntax for each parameter, see SET Parameter Syntax on page 34.
The following are the types of tasks performed with SET parameters:
Calculations
Affects the way calculations are performed in FOCUS.
Data and Metadata
Determines the way data is stored and processed.
Date Manipulation Tasks
Controls the way dates are processed and displayed in reports.
Graph Tasks
Controls the processing and display of graphs.
Report Code, Content, and Processing Tasks
Determines the content and processing of a request.
Report Layout and Display Tasks
Affects the display of a report.
Security Tasks
Controls users’ access to data sources and procedures.
Terminal Tasks
Specifies the options for display in your terminal.
Developing Applications 21

Types of SET Parameters
Calculations
The following parameters control the behavior of calculations in FOCUS.
Data and Metadata
The following parameters determine the way data is stored and processed.
AGGR[RATIO] Determines the ratio of aggregation based on retrieved records and the final size of the answer set.
CDN Specifies the punctuation used in numerical notation.
COMPUTE Controls the compilation of expressions.
DMPRECISION Specifies precision of numeric values in Dialogue Manager -SET commands to calculate accurate numeric variable values.
MODCOMPUTE Controls compilation of MODIFY calculations.
USERFCHK Controls the level of verification applied to DEFINE FUNCTION arguments and Information Builders-supplied function arguments.
USERFNS Determines whether an Information Builders-supplied function or a locally-written function with the same name used.
ACCBLN Accepts blank or zero values for fields with ACCEPT commands in the Master File.
BLKCALC Enables system-determined blocking for HOLD files written to DASD.
ASNAMES Controls the FIELDNAME attribute in a HOLD Master File.
COUNTWIDTH Expands the default format of COUNT fields from a five byte integer to a nine byte integer.
DATEFORMAT Specifies the order of the date components (month/day/year) when date-time values are entered in a formatted-string or translated-string format.
DEFINES Compiles virtual fields into machine code to improve performance.
DIRECTHOLD Controls whether HOLD Files in FOCUS format are created directly.
DTSTRICT Controls the use of strict processing for date-time fields.
EUROFILE Activates the data source that contains information for the currency you want to convert.
22 Information Builders

Customizing Your Environment
FIELDNAME Controls the use of long and qualified field names.
FOC2GIGDB Enables two-gigabyte FOCUS data sources.
FOCALLOC Automatically allocates FOCUS files.
HIPERCACHE Determines the default CACHE size in 4K pages when HiperFOCUS is activated.
HIPEREXTENTS Determines the permissible number of extents for HiperFOCUS.
HIPERFILE Is the maximum number of 4K pages in an individual hiperspace.
HIPERFOCUS Activates HiperFOCUS.
HIPERINSTALL Installs or disables HiperFOCUS.
HIPERLOCKED Enables processing of user interface commands such as SET HIPERFOCUS.
HIPERSPACE Is the number of 4K pages to aggregate for hiperspace.
HNODATA Controls missing values propagated to a HOLD file.
HOLDFORMAT Determines the default format for HOLD files.
HOLDLIST Determines what fields in a report request are included in the HOLD file.
HOLDMISS Distinguishes between missing data and default data (zeros or blanks) in a HOLD file.
HOLDSTAT Determines if comments and DBA information are included in HOLD Master Files.
INDEX Is the indexing scheme used for indexes.
KEEPDEFINES Controls whether a virtual field created for a host or joined structure is retained after a JOIN command is run.
MASTER Enables use of blank delimited (Fusion) Master File syntax, and provides increased enforcement of syntax rules in comma delimited Master File syntax.
MAXDATAEXCPT Specified the maximum number of data exceptions that can occur before the session is terminated.
MAXLRECL Specifies the maximum length of a record described with the Master File OCCURS attribute.
Developing Applications 23

Types of SET Parameters
MDIENCODING Enables retrieval of output from an MDI file without reading the data source.
MDIPROGRESS Displays messages about the progress of an MDI build.
MDICARDWARN Displays a warning message when a dimension’s cardinality exceeds a specified value.
MINIO Determines whether a block is read more than once when reading or writing to a file.
NULL Enables creation of a variable-length comma or tab delimited HOLD file that differentiates between a missing value and a blank string or zero value.
OLDSTYRECLEN Determines whether the record length, LRECL, is set to the current setting of LRECL=0, or the older setting of LRECL=512.
PCOMMA Enables retrieval of comma delimited files created by a PC application or HOLD FORMAT COM command.
PREFIX Specifies the prefix of existing data sets automatically allocated by FOCUS.
QUALCHAR Specifies the qualifying character to be used in qualified field names.
SAVEDMASTERS Saves a Master File to memory after it has been used in a request.
SHADOW Activates the Absolute File Integrity feature.
SHIFT Controls the use of “shift” strings.
SUSI See Simultaneous Usage for OS/390 and MVS.
SUTABSIZE See Simultaneous Usage for OS/390 and MVS.
TRACKIO In MVS, gathers more pages to fill a track before reading or writing the pages to disk.
WEEKFIRST Specifies what day of the week is the start of the week.
WIDTH Used for communication between 3270 terminals and the operating system.
XRETRIEVAL Controls the retrieval of data when previewing a report.
XFOCUS Enables the use of XFOCUS data sources in addition to FOCUS data sources.
24 Information Builders

Customizing Your Environment
Date Manipulation Tasks
The following parameters control the way dates are processed and displayed in reports.
XFOCUSBINS Defines the number of pages of memory to use as buffers for XFOCUS data sources.
BUSDAYS Specifies which days are considered business days and which are not.
DATEDISPLAY Controls the display of date format fields that contain the value zero.
DATEFNS Activates year 2000-compliant versions of date subroutines.
DATETIME Sets date and time in reports.
DEFCENT Defines a default century for your application.
HDAY Specifies the holiday file from which to retrieve dates that are considered holidays.
LEADZERO Avoids the truncation of leading zeros.
TESTDATE Temporarily alters the system date in order to test a dynamic window.
YRTHRESH Defines the start of a 100-year window.
Developing Applications 25

Types of SET Parameters
Graph TasksThe following parameters control the processing and display of graphs. For information about these parameters, see the Creating Reports Manual.
AUTOTICK Sets the tick mark intervals for graphs.
BARNUMB Places summary numbers at the end of bars on bar charts, or slices on pie charts.
BARSPACE Specifies the number of lines separating the bars on bar charts.
BARWIDTH Specifies the number of lines per bar on bar charts.
BSTACK Specifies whether bar chart bars are stacked or placed side by side.
DEVICE Specifies the plotting device or terminal to be used.
FRAME For GDDM graphics, indicates if you want a frame around your graph.
GCOLOR(or GRIBBON)
Depending on device type, determines black and white or color patterns or ribbons used.
GMISSING Specifies whether variables with the value specified in GMISSVAL are to be ignored.
GMISSVAL Specifies the variable value that represents missing data.
GPROMPT Specified whether FOCUS should prompt for graph parameters.
GRIBBON Same as GCOLOR.
GRID Draws a grid of parallel horizontal lines at the vertical class marks on the graph.
GTREND Specifies the use of basic linear regression to alter the X and Y axis values in a SCATTER graph.
HAUTO Performs automatic scaling of the horizontal axis for the given values.
HAXIS Specifies the width, in characters, of the horizontal axis.
HCLASS Specifies the horizontal interval mark when AUTOTICK is OFF.
HISTOGRAM Draws a histogram instead of a curve when the values on the horizontal axis are not numeric.
HMAX Sets the maximum value on the horizontal axis when automatic scaling is not used (HAUTO=OFF).
26 Information Builders

Customizing Your Environment
Memory Setup and Optimization TasksThe following parameters control the memory and optimization of your application.
HMIN Sets the minimum value on the horizontal axis when automatic scaling is not used (HAUTO=OFF).
HSTACK Stacks the bars on a histogram instead of placing them side by side.
HTICK Sets the horizontal axis interval mark when AUTOTICK is OFF.
PAUSE Specifies whether there is a pause for paper adjustment on the plotter after the request is executed.
PIE Specifies a pie chart.
PLOT Specifies the width and height settings for certain devices.
PRINT Specifes whether the graph is printed or displayed on the terminal.
TERM[INAL] Specifies the plotting device or terminal to be used.
VAUTO Performs automatic scaling of the vertical axis for the given values.
VAXIS Specifies the length of the vertical axis, in lines.
VCLASS Specifies the vertical interval mark when AUTOTICK is OFF.
VGRID Draws a grid at the horizontal and vertical class marks of the graph.
VMAX Sets the maximum value on the vertical axis when automatic scaling is not used (VAUTO=OFF).
VMIN Sets the minimum value on the vertical axis when automatic scaling is not used (VAUTO=OFF).
VTICK Sets the vertical axis interval mark when AUTOTICK is OFF.
VZERO Treats missing values on the vertical axis as zeros.
AUTOINDEX Retrieves data faster by automatically taking advantage of indexed fields in a FOCUS data source.
AUTOPATH Dynamically selects an optimal retrieval path.
AUTOSTRATEGY Determines when FOCUS stops the search for a key field specified in a WHERE or IF test.
BINS Specifies the number of pages of memory used for data source buffers.
Developing Applications 27

Types of SET Parameters
Report Code, Content, and Processing Tasks
The following parameters affect the content or processing of a report.
CACHE Stores FOCUS data source pages in memory and buffers between the data source and BINS.
COMPUTE Controls the compilation of expressions.
DEFINES Compiles virtual fields into machine code to improve performance.
ESTRECORDS Passes the estimated number of records to be sorted in the request.
FIXRET[RIEVE] Enables keyed retrieval of HOLD files.
FOCSTACK Specifies the amount of space, in thousands of bytes, used by FOCUS commands waiting for execution.
HLISUTRACE Records the last 20 events that the FOCUS Database Server performed.
HLISUDUMP Is used for debugging FOCUS Database Server problems.
IBMLE This parameter is no longer functional. FOCUS is fully LE compliant, and all FOCUS applications must be LE compliant.
IMMEDTYPE Tells FOCUS where to send line mode output.
SQLTOPTTF Enables the SQL Translator to generate TABLEF commands instead of TABLE commands.
TEMP[DISK] Assigns temporary files to a specific disk on VM.
ALL Handles missing segment instances in a report.
ALLOWCVTERR Controls the display of a row of data that contains an invalid date format.
ASNAMES Controls the FIELDNAME attribute in a HOLD Master File.
AUTOTABLEF Avoids creating the internal matrix based on the features used in the query.
BUSDAYS Specifies which days are considered business days.
CARTESIAN Generates a report containing all combinations of non-related data instances in a multi-path request containing a PRINT or LIST command.
CDN Specifies punctuation used in numerical notation.
28 Information Builders

Customizing Your Environment
CENT-ZERO Displays a leading zero in decimal-only numbers.
COMPMISS Controls whether the missing attribute is propagated to reformatted fields in a report request.
COMPUTE Controls the compile of expressions.
DATEDISPLAY Controls the display of date format fields that contain the value zero.
DATEFNS Activates year 2000-compliant versions of date subroutines.
DATETIME Sets date and time in a report.
DEFCENT Defines a default century for your application.
DEFECHO Defines a default value for the &ECHO variable for your application.
EMPTYREPORT Controls the output generated when a report request retrieves zero records.
ERROROUT Terminates a request and returns a message when an error is encountered.
ESTRECORDS Passes the estimated number of records to be sorted in the request.
EXL2KLANG Specifies the language used for Microsoft® Excel requests. This language must be the same as the language of Excel on the browser machine.
EXTAGGR Enables aggregation in an external sort.
EXTHOLD Enables you to use an external sort to create HOLD files.
EXTRACT Activates Structured HOLD Files for a request.
EXTSORT Activates the external sorting feature.
FIELDNAME Controls the use of long and qualified field names.
FILE[NAME] Specifies a file to be used, by default, in commands.
FILTER Activates declared filters.
FOC144 Suppresses warning message FOC 144, which reads “Warning Testing in Independent sets of Data."
FORMULTIPLE Allows you to include the same value of a FOR field in multiple rows of the FML matrix.
HNODATA Controls missing values propagated to a HOLD file.
Developing Applications 29

Types of SET Parameters
HOLDATTR[S] Includes the TITLE and ACCEPT attributes from the original Master File in the HOLD Master File.
JOINOPT Ensures proper alignment of report output by correcting for lagging (missing) values.
KEEPDEFINES Controls whether a virtual field created for a host or joined structure is retained after a JOIN command is run.
LEADZERO Avoids the truncation of leading zeros.
MESSAGE Controls the display of informational messages.
MULTIPATH Controls whether a parent segment is included in report output when selection tests are done on independent paths.
NODATA Determines the character string that indicates missing data in a report.
PAUSE Pauses before displaying a FOCUS report on the terminal.
PFnn Assigns a function to a PF key.
PDFLINETERM Determines if an extra space is appended to each record of a PDF output file to facilitate proper file transfer between Windows and UNIX.
QUALCHAR Specifies the qualifying character to be used in qualified field names.
SAVEMATRIX Saves the matrix from your request to protect it from being overwritten when using Dialogue Manager commands.
SORTLIB Tells FOCUS which sort package is installed at your site.
SUMMARYLINES Permits the combination of fields with and without prefix operators on summary lines in one request.
SUMPREFIX Allows users to choose the answer set display order when using an external sort to perform aggregation of alphanumeric or smart date formats.
TITLE Uses predefined column titles in the Master File as column titles in report output.
WARNING Turns off warning messages.
30 Information Builders

Customizing Your Environment
Report Layout and Display Tasks
The following parameters affect the layout and display of a report.
ACROSSLINE Controls underlining of ACROSS objects on report output.
BASEURL Specifies a default location where your browser searches for relative URLs referenced in the HTML documents created by FOCUS.
BLANKINDENT Clarifies relationships within an FML hierarchy by indenting the captions (titles) of values at each level.
BOTTOMMARGIN Sets the bottom boundary for report contents on a page in a styled report.
BYDISPLAY Displays every instance of a vertical (BY) sort field value in a report.
BYPANEL Controls the repetition of BY fields on panels.
BYSCROLL Scrolls report headings and footings along with the report contents.
CENT-ZERO Displays a leading zero in decimal-only numbers.
COLUMNSCROLL Enables you to scroll by column within the panels of a report provided that the report is wider than the screen width.
CSSURL Links an HTML report to an external Cascading Style Sheet (CSS) file in order to style the report.
CURRSYMB Sets a currency symbol to display on the report output when a numeric format specification uses the M or N display options.
FOCFIRSTPAGE Assigns a page number to the first page of output.
HTMLCSS Creates an inline Cascading Style Sheet command in the HTML page that displays the report output.
LANG[UAGE] Specifies the National Language Support (NLS) environment. Sets the language of server error messages. Can also be used to set the language of report titles if the Master File Description contains alternate language TITLE attributes.
LEFTMARGIN Sets the left boundary for report contents on a page in a styled report.
LINES Sets the maximum number of lines of printed output that appear on a page, from the heading at the top to the footing on the bottom.
ONLINE-FMT Determines the format of report output. (Applies to WebFOCUS only.)
Developing Applications 31

Types of SET Parameters
ORIENTATION Specifies the page orientation for styled reports.
PAGE[-NUM] Controls the numbering of output pages.
PAGESIZE Specifies the page size for StyleSheets.
PANEL Sets the maximum line width of a report panel.
PAPER Specifies the length of paper for printed output.
PRINT Specifies the report output destination.
PRINTPLUS Specifies enhancements to display alternatives.
PSPAGESETUP Coordinates the paper source used by a PostScript printer with the PAGESIZE parameter setting.
QUALTITLES Uses qualified column titles in report output when duplicate field names exist in a Master File.
REBUILDMSG Allows direct control over the frequency with which REBUILD issues messages.
RECAP-COUNT Includes lines containing a value created with RECAP when counting the number of lines per page for printed output.
RIGHTMARGIN Sets the right boundary for report contents on a page.
SHOWBLANKS Preserves leading and internal blanks in HTML and EXL2K report output.
SPACES Sets the number of spaces between columns in a report.
SQUEEZE Determines the column width in report output.
STYLEMODE For large report output, displays output in multiple HTML tables where each table is a separate report page.
STYLE[SHEET] Controls the format of report output by accepting or rejecting StyleSheet parameters.
TARGETFRAME Includes the HTML code <BASE TARGET=“framename”> in the heading of the HTML file that is displayed in your browser.
TERM[INAL] Selects the terminal type.
TOPMARGIN Sets the top boundary on a page for report output.
TRANTERM Displays extended currency symbols on TSO.
32 Information Builders

Customizing Your Environment
Security Tasks
The following parameters specify user access to data sources and procedures.
Terminal Tasks
The following parameters specify options for display in your terminal.
UNITS Specifies the unit of measure for page margins, column positions, and column widths.
WEBTAB Encloses CRTFORM display fields in @ signs.
DBACSENSITIV Controls whether password validation is case sensitive.
PASS Enables user access to a data source or stored procedure protected by Information Builders security.
PERMPASS Establishes a permanent user password.
USER IEnables user access to a data source or stored procedure protected by Information Builders security.
DISPLAY Is the PC display mode selection.
EXTTERM Enables the use of extended terminal attributes.
HOTMENU Automatically displays the Hot Screen PF key legend at the bottom of the Hot Screen report.
SBORDER Generates a solid border on the screen for full-screen mode.
SCREEN Selects the Hot Screen facility.
TRMOUT Suppresses all output messages to the terminal.
Developing Applications 33
SET Parameter Syntax
SET Parameter SyntaxThis topic alphabetically lists the SET parameters that control the environment with a description and the syntax.
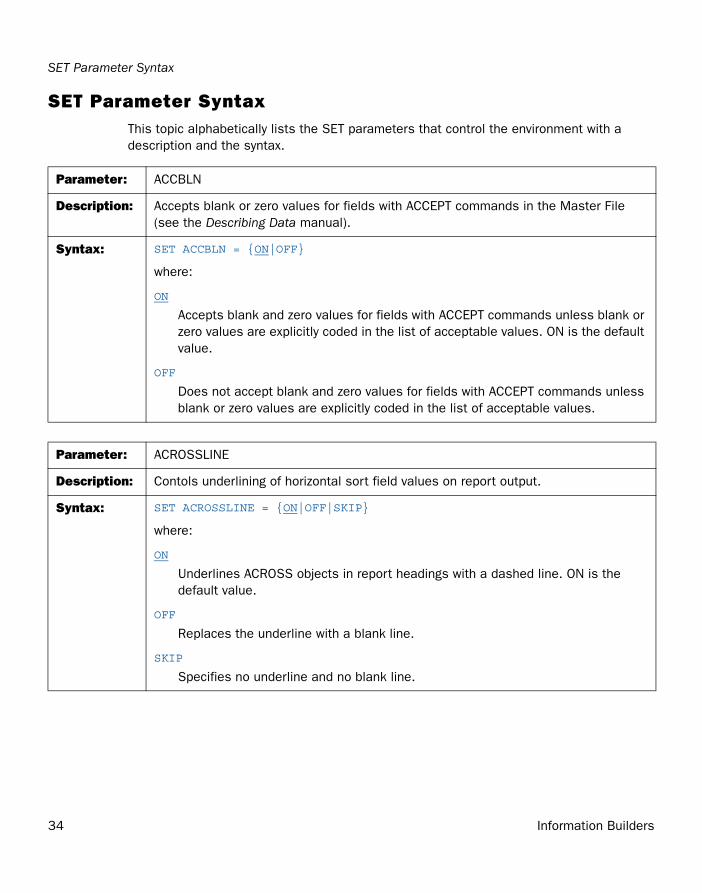
Parameter: ACCBLN
Description: Accepts blank or zero values for fields with ACCEPT commands in the Master File (see the Describing Data manual).
Syntax: SET ACCBLN = {ON|OFF}
where:
ON
Accepts blank and zero values for fields with ACCEPT commands unless blank or zero values are explicitly coded in the list of acceptable values. ON is the default value.
OFF
Does not accept blank and zero values for fields with ACCEPT commands unless blank or zero values are explicitly coded in the list of acceptable values.
Parameter: ACROSSLINE
Description: Contols underlining of horizontal sort field values on report output.
Syntax: SET ACROSSLINE = {ON|OFF|SKIP}
where:
ON
Underlines ACROSS objects in report headings with a dashed line. ON is the default value.
OFF
Replaces the underline with a blank line.
SKIP
Specifies no underline and no blank line.
34 Information Builders

Customizing Your Environment
Parameter: AGGR[RATIO]
Description: Determines the ratio of aggregation based on retrieved records and the final size of the answer set.
Syntax: SET AGGR[RATIO] = {n|1}
where:
n
Is the ratio of aggregation. 1 is the default value.
Parameter: ALL
Description: Handles missing segment instances in a report.
Syntax: SET ALL = {ON|OFF|PASS}
where:
ON
Includes missing segment instances in a report when fields in the segment are not screened by WHERE or IF criteria in the request. The missing field values are denoted by the NODATA character, set with the NODATA parameter (see NODATA).
OFF
Omits missing segment instances from a report. OFF is the default value.
PASS
Includes missing segment instances in a report, regardless of WHERE or IF criteria in the request. This option is not supported when MULTIPATH = COMPOUND (see MULTIPATH).
Developing Applications 35

SET Parameter Syntax
Parameter: ALLOWCVTERR
Description: This parameter applies to non-FOCUS data sources when converting from the way the date is stored (ACTUAL attribute) to the way it is formatted (FORMAT or USAGE attribute).
Controls the display of a row of data that contains an invalid date format (formerly called a smart date). When it is set to ON, the invalid date format is returned as the base date or a blank, depending on the settings for the MISSING and DATEDISPLAY parameters.
Syntax: SET ALLOWCVTERR = {ON|OFF}
where:
ON
Displays a row of data that contains an invalid date format. When ALLOWCVTERR is set to ON, the display of invalid dates is determined by the settings of the MISSING attribute and DATEDISPLAY command.
The results are explained in the following table:
DATEDISPLAY MISSING RESULT
OFF OFF A blank is returned.
ON The value of the NODATA character (a period, by default) is returned. (See NODATA).
ON OFF The base date is returned (either December 31, 1900, for dates with YMD or YYMD format; or January 1901, for dates with YM, YYM, YQ, or YYQ format).
ON The value of the NODATA character (a period, by default) is returned.
OFF
Does not display a row of data that contains an invalid date format and generates an error message. OFF is the default value.
36 Information Builders

Customizing Your Environment
Parameter: ASNAMES
Description: Controls the FIELDNAME attribute in a HOLD Master File. When an AS phrase is used in a TABLE request, the specified literal is used as a field name in a HOLD file. Also controls how field names are specified for the values of an ACROSS field when a HOLD file is created.
Syntax: SET ASNAMES = {ON|OFF|FOCUS}
where:
ON
Uses the AS phrase for the field name, and controls the way ACROSS fields are named in HOLD files in any format.
OFF
Does not use the AS phrase for the field name, or affect the way ACROSS fields are named.
FOCUS
Uses the AS phrase for the field name, and controls the way ACROSS fields are named in HOLD files only in FOCUS format. FOCUS is the default value.
Parameter: AUTOINDEX
Description: Speeds data retrieval by automatically taking advantage of indexed fields or multi-dimensional indexes (MDI) in most cases where TABLE requests contain equality or range tests on those fields or dimensions. Applies only to FOCUS and XFOCUS data sources.
AUTOINDEX is never performed when the TABLE request contains an alternate file view—for example, TABLE FILE filename.fieldname. Indexed retrieval is not performed when the TABLE request contains BY HIGHEST or BY LOWEST phrases and AUTOINDEX is ON.
Syntax: SET AUTOINDEX = {ON|OFF}
where:
ON
Uses indexed retrieval when possible.
OFF
Uses indexed retrieval only when explicitly specified via an indexed view, for example, TABLE FILE filename.indexed-fieldname. OFF is the default value.
Developing Applications 37

SET Parameter Syntax
Parameter: AUTOPATH
Description: Dynamically selects an optimal retrieval path for accessing a FOCUS data source by analyzing the data source structure and the fields referenced, and choosing the lowest possible segment as the entry point. Use AUTOPATH only if your field is not indexed.
Syntax: SET AUTOPATH = {ON|OFF}
where:
ON
Dynamically selects an optimal retrieval path. ON is the default value.
OFF
Uses sequential data retrieval. The end user controls the retrieval path through filename.segname.
Parameter: AUTOSTRATEGY
Description: Determines when FOCUS stops the search for a key field specified in a WHERE or IF test. When set to ON, the search ends when the key field is found, optimizing retrieval speed. When set to OFF, the search continues to the end of the data source.
Syntax: SET AUTOSTRATEGY = {ON|OFF}
where:
ON
Stops the search when a match is found. ON is the default value.
OFF
Searches the entire data source.
38 Information Builders

Customizing Your Environment
Parameter: AUTOTABLEF
Description: Avoids creating the internal matrix based on the features used in the query. Avoiding internal matrix creation reduces internal overhead costs and yields better performance.
Syntax: SET AUTOTABLEF = {ON|OFF}
where:
ON
Does not create an internal matrix. ON is the default value.
OFF
Creates an internal matrix.
Parameter: BASEURL
Description: Specifies a default location where your browser searches for relative URLs referenced in the HTML documents created by FOCUS. This allows you to hyperlink to files using only the file names rather than the full URLs.
Syntax: SET BASEURL = url
where:
url
Is the fully qualified directory in which additional filesreside. If the URL represents a Web server address, it must begin with http:// and end with a slash (/).
Parameter: BINS
Description: Specifies the number of pages of memory (blocks of 4,096 bytes) used for data source buffers.
Syntax: SET BINS = n
where:
n
Is the number of memory pages used for data source buffers. Valid values are 16 to 1024. The default value is 64.
Developing Applications 39

SET Parameter Syntax
Parameter: BLANKINDENT
Description: To clarify relationships within an FML hierarchy, the captions (titles) of values are indented at each level. You can use the BLANKINDENT parameter in an HTML, PDF, or PostScript report to specify the indentation between each level the hierarchy. You can use the default indentation for each hierarchy level or choose your own indentation value. To print indented captions in an HTML report, you must set the BLANKINDENT parameter to ON or to a number.
In PDF and PS reports, you may need to adjust the widths of columns to accommodate the indentations.
Syntax: SET BLANKINDENT = {ON|OFF|n}
where:
ON
Indents FML hierarchy captions 0.125 units for each space normally displayed before the caption. For child levels in an FML hierarchy, it indents 0.125 units for each space that would normally display between this line and the line above it.
OFF
Turns off indentations for FML hierarchy captions in an HTML report. For other formats, uses the default indentation of two spaces. OFF is the default value.
n
Is an explicit measurement in the unit of measurement defined by the UNITS parameter. This measurement is multiplied by the number of spaces that would normally display before the caption. For child levels in an FML hierarchy, it indents n units for each space that would normally display between this line and the line above it. The default number of spaces is two. Zero (0) produces the same report output as OFF. Negative values for n are not supported. They generate the following message, and the request processes as if BLANKINDENT=OFF:
VALID VALUES ARE OFF, ON OR A POSITIVE NUMBER (IN CURRENT UNITS)
40 Information Builders

Customizing Your Environment
Parameter: BLKCALC
Description: This parameter applies only to MVS.
Enables system-determined blocking for HOLD files written to DASD; files written to tape have BLKSIZE 32760, the operating-system maximum.
The SET BLKCALC command must be issued before the TABLE request and cannot be set within a request.
Syntax: SET BLKCALC = {NEW|OLD}
where:
NEW
Calculates optimal blocking factors for both 3380 and 3390 device types. NEW is the default value.
OLD
Uses the method of calculating BLKSIZE that was used prior to FOCUS Release 6.8.
Parameter: BOTTOMMARGIN
Description: Sets the StyleSheet bottom boundary for report contents on a page.
This parameter applies only to PostScript and PS report formats.
Syntax: SET BOTTOMMARGIN = {n|.25}
where:
n
Is the bottom margin, in inches, for report contents on a page. 0.25 inches is the default value.
Developing Applications 41

SET Parameter Syntax
Parameter: BUSDAYS
Description: Specifies which days are considered business days and which days are not if your business does not follow the traditional Monday through Friday week.
Syntax: SET BUSDAYS = {week|_MTWTF_}
where:
week
Is SMTWTFS, representing the days of the week. Any day that you do not want to designate as a business day must be replaced with an underscore in that day’s designated place.
If a letter is not in its correct position, or if you replace a letter with a character other than an underscore, you receive an error message. _MTWTF_ is the default value.
Parameter: BYDISPLAY
Description: Within a vertical sort group, the sort field value displays only on the first line of the rows for its sort group. However, you can display the appropriate BY field on every row in a styled report using the SET BYDISPLAY command. Although SET BYDISPLAY is supported for all styled output formats, it is especially important for making report output more usable by Excel, which cannot sort columns properly when they have blank values in some rows.
This feature may enable you to avoid specifying the sort field twice, once as a display field and once for sorting (with the NOPRINT option).
Syntax: SET BYDISPLAY = {ON|OFF}
where:
OFF
Displays a BY field value only on the first line of the report output for the sort group. OFF is the default value.
ON
Displays the associated BY field value on every line of report output produced in a styled format.
42 Information Builders

Customizing Your Environment
Parameter: BYPANEL
Description: This parameter applies only to HOTSCREEN.
Controls the repetition of BY fields on panels. When BYPANEL is specified, the maximum number of panels is 99. When BYPANEL is OFF, the maximum number of panels is four.
Syntax: SET BYPANEL = option
where:
option
Is one of the following:
ON repeats the sort field values on each report panel.
OFF does not repeat sort field values on each report panel. Fields are displayed only on the first panel, and columns may split between panels. This value is the default.
0 does not repeat sort field values on each report panel, and columns do not split between panels.
n repeats n columns of sort fields on each report panel. The value for n can be equal to or less than the total number of sort fields specified in the request.
Parameter: BYSCROLL
Description: This parameter applies only to HOTSCREEN.
Scrolls report headings and footers along with the report contents.
Syntax: SET {BYSCROLL|BYPANELSCROL} = {ON|OFF}
where:
ON
Scrolls report headings and footings along with report contents.
OFF
Does not scroll report headings and footings along with report contents. OFF is the default value.
Developing Applications 43

SET Parameter Syntax
Parameter: CACHE
Description: Controls the number of cache pages to be allocated. This command cannot be used with ON TABLE SET.
Stores 4K FOCUS data source pages in memory and buffers them between the data source and BINS.
When a procedure calls for a read of a data source page, FOCUS first searches BINS, then cache memory, and then the data source on disk. If the page is found in cache, FOCUS does not have to perform an I/O to disk.
When a procedure calls for a write of a data source page, the page is written from BINS to disk. The updated page is also copied into cache memory so that the cache and disk versions remain the same. Unlike reads, cache memory does not save disk I/Os for write procedures.
FOCSORT pages are also written to cache; when the cache becomes full, they are written to disk. For optimal results, set cache to hold the entire data source plus the size of FOCSORT for the request. To estimate the size of FOCSORT for a given request, issue the ? STAT command, then add the number of SORTPAGES listed to the number of data source pages in memory. Issue a SET CACHE command for that amount. If cache is set to 50, 50 4K pages of contiguous storage are allocated to cache. The maximum number of cache pages can be set at installation.
To clear the CACHE setting, issue a SET CACHE = n command. This command flushes the buffer; that is, everything in cache memory is lost.
Syntax: SET CACHE = {0|n}
where:
0
Allocates no space to cache; cache is inactive. 0 is the default value.
n
Is the number of 4K pages of contiguous storage allocated to cache memory. The minimum is two pages; the maximum is determined by the amount of memory available. If HiperFOCUS is activated, the default cache size is 256 pages (1MB) and the cache is placed in a hiperspace.
44 Information Builders

Customizing Your Environment
Parameter: CARTESIAN
Description: Applies to requests containing PRINT or LIST.
Generates a report containing all combinations of non-related data instances in a multi-path request. ACROSS cancels this parameter.
Syntax: SET CARTESIAN = {ON|OFF}
where:
ON
Generates a report with non-related records.
OFF
Disables the Cartesian product. OFF is the default value.
Developing Applications 45

SET Parameter Syntax
Parameter: CDN
Description: Specifies punctuation used in numerical notation.
Continental Decimal Notation (CDN) is supported for output in TABLE requests. It is not supported in DEFINE or COMPUTE commands.
Syntax: SET CDN = option
where:
option
Is one of the following:
ON uses CDN. ON sets the decimal separator as a comma and the thousands separator as a period. For example, the number 3,045,000.76 is represented as 3.045.000,76. ON should be used for Germany, Denmark, Italy, Spain, and Brazil.
OFF turns CDN off. For example, the number 3,045,000.76 is represented as 3,045,000.76. OFF is the default value. OFF should be used for the USA, Canada, Mexico, and the United Kingdom.
SPACE sets the decimal point as a comma, and the thousands separator as a space. For example, the number 3,045,000.76 is represented as 3 045 000,76. SPACE should be used for France, Norway, Sweden, and Finland.
QUOTE sets the decimal point as a comma and the thousands separator as an apostrophe. For example, the number 3,045,000.76 is represented as 3’045’000,76. QUOTE should be used for Switzerland.
QUOTEP sets the decimal point as a period and the thousands separator as an apostrophe. For example, the number 3,045,000.76 is represented as 3'045'000.76.
Note: If the display format of a report is Excel 2000 or later, Continental Decimal Notation is controlled by the settings on the user's computer. That is, numbers in report output are formatted according to the convention of the locale (location) set in regional or browser language options.
46 Information Builders

Customizing Your Environment
Parameter: CENT-ZERO
Description: Displays a leading zero in decimal-only numbers. The setting of CDN determines whether a decimal point or comma is the decimal separator.
Syntax: SET CENT-ZERO = {ON|OFF}
where:
ON
Displays fractions with a leading zero. The fraction is preceded by either a decimal point or comma, depending on the CDN setting.
OFF
Does not display a leading zero. The fraction is preceded by either a decimal point or comma, depending on the CDN setting. OFF is the default value.
Developing Applications 47

SET Parameter Syntax
Parameter: CNOTATION
Description: Column notation assigns a sequential column number to each column in the internal matrix created for a report request. You can use column notation in COMPUTE and RECAP commands to refer to these columns in your request.
Because column numbers refer to columns in the internal matrix, they are assigned after retrieval and aggregation are completed. Columns not actually displayed on the report output may exist in the internal matrix. For example, calculated values used in the request generate one or more columns in the internal matrix. Fields with the NOPRINT option take up a column in the internal matrix, and a reformatted field generates an additional column for the reformatted value. Certain RECAP calculations such as FORECAST or REGRESS generate multiple columns in the internal matrix.
BY fields are not assigned column numbers but, by default, every other column in the internal matrix is assigned a column number, which means that you have to account for all of the internally generated columns if you want to refer to the appropriate column value in your request. You can change this default column assignment behavior with the SET CNOTATION=PRINTONLY command, which assigns column numbers only to columns that display on the report output, or the SET CNOTATION=EXPLICIT command, which assigns column numbers to columns that are referenced in the request.
Syntax: SET CNOTATION={ALL|PRINTONLY|EXPLICIT}
where:
ALL
Assigns column reference numbers to every column in the internal matrix. ALL is the default value.
PRINTONLY
Assigns column reference numbers only to columns that display on the report output.
EXPLICIT
Assigns column reference numbers to all fields referenced in the request, whether displayed or not..
Note: This setting is not supported in an ON TABLE phrase.
48 Information Builders

Customizing Your Environment
Parameter: COLUMNSCROLL
Description: Enables you to scroll by column within the panels of a report provided that the report is wider than the screen width.
Syntax: SET COLUMNSCROLL = {ON|OFF}
where:
ON
Enables column scrolling to the right and left by pressing the PF10 key and the PF11 key, respectively. To scroll up and down within the same column, use the PF7 key and the PF8 keys.
OFF
Disables column scrolling. OFF is the default value.
Parameter: COMPMISS
Description: Controls whether the missing attribute is propagated to reformatted fields in a report request.
Syntax: SET COMPMISS = {ON|OFF}
where:
ON
Propagates a missing value to a reformatted field. ON is the default value.
OFF
Displays a blank or zero for a reformatted field.
Developing Applications 49

SET Parameter Syntax
Parameter: COMPUTE
Description: Controls the compilation of calculations when a request is executed.
When set to NEW, calculations in a DEFINE or MODIFY COMPUTE command are compiled into machine code at request time. This code is used to perform calculations at run time.
Syntax: SET COMPUTE = {NATV|NEW|OLD}
where:
NATV
Compiles calculations that are referenced at run time using native arithmetic. NATV is the default value.
NEW
Compiles all calculations when a request is parsed.
OLD
Does not compile calculations when a request is executed.
Parameter: COUNTWIDTH
Description: Expands the default format of COUNT fields from a five-byte integer to a nine-byte integer.
Syntax: SET {COUNTWIDTH|LISTWIDTH} = {ON|OFF}
where:
ON
Expands the default format of COUNT fields from a five-byte integer to a nine-byte integer.
OFF
Does not expand the default format of COUNT fields from a five-byte integer to a nine-byte integer. OFF is the default value.
50 Information Builders
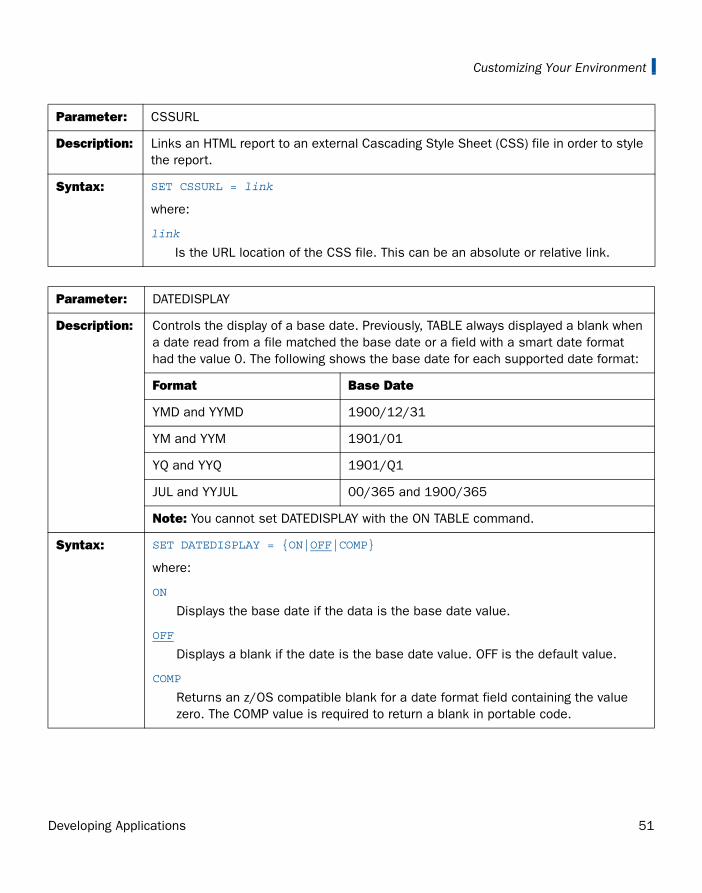
Customizing Your Environment
Parameter: CSSURL
Description: Links an HTML report to an external Cascading Style Sheet (CSS) file in order to style the report.
Syntax: SET CSSURL = link
where:
link
Is the URL location of the CSS file. This can be an absolute or relative link.
Parameter: DATEDISPLAY
Description: Controls the display of a base date. Previously, TABLE always displayed a blank when a date read from a file matched the base date or a field with a smart date format had the value 0. The following shows the base date for each supported date format:
Format Base Date
YMD and YYMD 1900/12/31
YM and YYM 1901/01
YQ and YYQ 1901/Q1
JUL and YYJUL 00/365 and 1900/365
Note: You cannot set DATEDISPLAY with the ON TABLE command.
Syntax: SET DATEDISPLAY = {ON|OFF|COMP}
where:
ON
Displays the base date if the data is the base date value.
OFF
Displays a blank if the date is the base date value. OFF is the default value.
COMP
Returns an z/OS compatible blank for a date format field containing the value zero. The COMP value is required to return a blank in portable code.
Developing Applications 51

SET Parameter Syntax
Parameter: DATEFNS
Description: Activates year 2000-compliant versions of date functions.
Syntax: SET DATEFNS = {ON|OFF}
where:
ON
Activates the date functions that support year-2000 dates. ON is the default value.
OFF
Deactivates the date functions that support year-2000 dates.
Parameter: DATEFORMAT
Description: Specifies the order of the date components (month/day/year) when date-time values are entered in the formatted string and translated string formats. It makes a value’s input format independent of the format of the variable to which it is being assigned.
Syntax: SET DATEFORMAT = datefmt
where:
datefmt
Can be one of the following: MDY, DMY, YMD, or MYD. MDY is the default value for the U.S. English format.
52 Information Builders

Customizing Your Environment
Parameter: DATETIME
Description: Sets time and date in reports. This command is useful for determining (statically or dynamically) exactly when your report was run. You can display the DATETIME value using any FOCUS date variable—for example, YMD, MDY, TOD. If DATETIME is not set, the behavior of the FOCUS date variables remain the same.
Syntax: SET DATETIME = option
where:
option
Is one of the following:
STARTUP is the time and date when you began your session. STARTUP is the default value.
CURRENT|NOW changes each time it is interrogated. For example, if your batch job starts before midnight at 11:59 P.M., it won’t complete until the next day. If DATETIME is set to NOW|CURRENT, any reference to the variable gives the current date, not the date when the job started.
RESET freezes the date and time of the current run for the rest of the session or until another SET DATETIME command is issued.
Parameter: DBACSENSITIV
Description: Determines whether passwords are converted to upper case prior to validation.
Syntax: SET DBACSENSITIV = {ON|OFF}
where:
ON
Does not convert passwords to upper case. All comparisons between the password set by the user and the password in the Master File or FOCEXEC are case sensitive.
OFF
Converts passwords to upper case prior to validation. All comparisons between the password set by the user and the password in the Master File or FOCEXEC are not case sensitive. OFF is the default value.
Developing Applications 53

SET Parameter Syntax
Parameter: DEFCENT
Description: Defines a default century globally or on a field-level for an application that does not contain an explicit century. DEFCENT is used in conjunction with YRTHRESH to interpret the current century according to the given values. When assigned globally, the time span created by these parameters applies to every 2-digit year used by the application unless you specify file-level or field-level values. (See YRTHRESH.)
Note: This same result can be achieved by including the FDEFCENT and FYRTHRESH attributes in the Master File.
Syntax: SET DEFCENT = {cc|19}
where:
cc
Is the default century. 19 is the default value if one is not supplied. The value cc defaults to 19, for the twentieth century.
Parameter: DEFECHO
Description: Defines a default value for the &ECHO variable.
Syntax: SET DEFECHO = {OFF|ON|ALL}
where:
OFF
Establishes OFF as the default value for &ECHO. OFF is the default value.
ON
Establishes ON as the default value for &ECHO. ON displays FOCUS commands that are expanded and stacked for execution.
ALL
Establishes ALL as the default value for &ECHO. ALL displays Dialogue Manager commands and FOCUS commands that are expanded and stacked for execution.
54 Information Builders

Customizing Your Environment
Parameter: DEFINES
Description: Increases the speed of calculations in virtual fields by compiling virtual fields into machine code.
Syntax: SET DEFINES = {COMPILED|OLD}
where:
COMPILED
Implements expression compilation at request run time, compiling only those DEFINEs that are used in the request.
OLD
Leaves expression compilation up to the control of the current value of the SET COMPUTE parameter.
The SET DEFINES command is not supported in an ON TABLE phrase.
Parameter: DIRECTHOLD
Description: Controls whether a HOLD file in FOCUS format is created directly or whether the HOLD file is loaded using an internally generated MODIFY procedure and an intermediate sequential file called FOC$HOLD.
Syntax: SET DIRECTHOLD = {ON|OFF}
where:
ON
Creates a FOCUS HOLD file directly without an intermediate sequential file and MODIFY procedure. ON is the default value.
OFF
Loads a FOCUS HOLD file using an internally generated MODIFY procedure and an intermediate sequential file called FOC$HOLD
Developing Applications 55

SET Parameter Syntax
Parameter: DISPLAY
Description: Is the PC display mode selection.
Syntax: SET DISPLAY = {OFF|PCCOLOR|PCMONO}
where:
option
Is one of the following:
OFF indicates no display mode is selected. OFF is the default value.
PCCOLOR indicates the display mode is color.
PCMONO indicates the display mode is black and white.
Parameter: DTSTRICT
Description: Controls the use of strict processing. Strict processing checks date-time values when they are input by an end user, read from a transaction file, displayed, or returned by a subroutine to ensure that they represent a valid date and time. For example, a numeric month must be between 1 and 12, and the day must be within the number of days for the specified month.
Syntax: SET DTSTRICT = {ON|OFF}
where:
ON
Invokes strict processing. ON is the default value.
OFF
Does not invoke strict processing. Date-time components can have any value within the constraint of the number of decimal digits allowed in the field. For example, if the field is a two-digit month, the value can be 12 or 99, but not 115.
56 Information Builders

Customizing Your Environment
Parameter: DMPRECISION
Description: Specifies numeric precision in Dialogue Manager -SET commands. .
Without this setting, results of numeric calculations are returned as integer numbers, although the calculations themselves employ double-precision arithmetic. To return a number with decimal precision without this setting, you have to enter the calculation as input into subroutine FTOA, where you can specify the number of decimal places returned.
Syntax: SET DMPRECISION = {OFF|n}
where:
OFF
Specifies truncation without rounding after the decimal point. OFF is the default value
n
Is a positive number from 0-9, indicating the point of rounding. Note that n=0 results in a rounded integer value.
Developing Applications 57

SET Parameter Syntax
Parameter: EMPTYREPORT
Description: Controls the output generated when a TABLE request retrieves zero records.
EMPTYREPORT is not supported with TABLEF or Excel. When a TABLEF or Excel request retrieves zero records, an empty report is generated.
Note: Using the IF TOTAL or WHERE TOTAL phrases when EMPTYREPORT is set to OFF may produce an empty report if there is no data that satisfies the TOTAL condition. This occurs because the test for report lines for EMPTYREPORT is applied before the the TOTAL condition is applied.
Syntax: SET EMPTYREPORT={ANSI|ON|OFF}
where:
ANSI
Produces a single-line report and displays the missing data character or a zero if a COUNT is requested. in each case, &RECORDS will be 0, and &LINES will be 1.
If the SQL Translator is invoked, ANSI automatically replaces OFF as the default setting for EMPTYREPORT.
ON
Produces an empty report (column headings with no content). This was the default behavior in prior releases.
OFF
Produces no report output. OFF is the default value except for SQL Translator requests. When the SQL Translator is invoked, ANSI replaces OFF as the default setting for the EMPTYREPORT parameter, so the results are the same as for the ANSI setting.
The command can also be issued from within a request:
ON TABLE SET EMPTYREPORT ANSI
58 Information Builders

Customizing Your Environment
Parameter: ERROROUT
Description: Controls how a batch FOCUS job step responds to an error condition encountered in a procedure. This parameter cannot be set with the ON TABLE SET command.
When ERROROUT is set to ON, any error message generated terminates the job step and issues a return code of 8. Warning messages do not invoke this behavior. When ERROROUT is set to OFF, depending on the specific message, FOCUS determines whether FOCEXEC processing continues. Users can check a Dialogue Manager variable such as &FOCERRNUM and issue the following command to terminate FOCUS and set n as the return code:
-QUIT FOCUS n
On VM, if you include the QUEUE 'FIN' command in your batch FOCUS EXEC, and if FOCUS terminates as a result of the ERROROUT setting, the queued FIN command causes CMS to issue a return code of -3, which overwrites the ERROROUT return code. If you want to see the return code issued by Exit on Error, you can remove the QUEUE 'FIN' command from the EXEC and include the following command immediately after the 'EXEC FOCUS' command to exit and issue the return code:
exit rc
Note: The ERROROUT setting is ignored in an interactive session.
Syntax: SET ERROROUT = {ON|OFF}
where:
ON
When an error message is generated in a batch FOCUS job step, ON sets the return code to 8 and terminates the job step.
In addition, the following message displays to inform the user why the program terminated:
Exiting due to Exit on Error
OFF
Does not set a return code or automatically terminate a job step or procedure in response to any error message. OFF is the default value.
Developing Applications 59

SET Parameter Syntax
Parameter: ESTRECORDS
Description: Passes the estimated number of records to be sorted in the request. FOCUS queries using external sorts and including the parameter ‘FILSZ=En’ can diminish FOC909 errors. This parameter enables the sorting algorithms to estimate SORTWORK space requirements for each sort parameter request.
In order to make an accurate estimate for your ESTRECORDS setting, it is suggested that you run the report without an external sort in order to get a record count. If an attempt is made to SET ESTRECORDS from the FOCUS prompt, FOCPARM, or PROFILE FOCEXEC the following error is generated:
SET ESTRECORDS = n
(FOC36210) THE SPECIFIED PARAMETER CAN ONLY BE SET ON TABLE: ESTRECORDS
For CMS/SyncSort the ‘FILSZ=En’ parameter is ignored. Therefore, SET ESTRECORDS n has no effect.
Syntax: SET ESTRECORDS = n
where:
n
Is the estimated number of records to be sorted.
Parameter: EUROFILE
Description: Activates the data source that contains information for the currency you want to convert. This setting can be changed during a session to access a different currency data source. This parameter cannot be issued in a report request.
Note: You cannot set any additional parameters on the same line as EUROFILE. FOCUS ignores any other parameters specified on the same line.
Syntax: SET EUROFILE = {ddname|OFF}
where:
ddname
Is the name of the Master File for the currency data source you want to use. The ddname must refer to a read-only data source accessible by FOCUS. There is no default value.
OFF
Deactivates the current currency data source and removes it from memory.
60 Information Builders

Customizing Your Environment
Parameter: EXL2KLANG
Description: When included in the NLSCFG ERRORS file on VM or the member NFLCFG in the ERRORS PDS on MVS the EXL2KLANG parameter specifies the language used for Microsoft® Excel requests. This language must be the same as the language of Excel on the browser machine in order to correctly display output.
You can code the SET EXL2KLANG command in a profile or procedure to override the setting in the errors file.
Syntax: EXL2KLANG = {language|ENG}
where:
language
Is the Excel language. Valid values are:
ENG for English. ENG is the default value.
FRE for French.
GER for German.
JPN for Japanese.
KOR for Korean.
SPA for Spanish.
Parameter: EXTAGGR
Description: Uses external sorts to perform aggregation.
Syntax: SET EXTAGGR = {ON|OFF|NOFLOAT}
where:
ON
Allows aggregation by an external sort. ON is the default.
OFF
Does not allow aggregation by an external sort.
NOFLOAT
Allows aggregation if there are no floating data fields present.
Developing Applications 61

SET Parameter Syntax
Parameter: EXTHOLD
Description: Enables you to create a HOLD file using an external sort.
Syntax: SET EXTHOLD = {ON|OFF}
where:
ON
Creates HOLD files using an external sort. ON is the default value.
OFF
Does not create HOLD files using an external sort.
Parameter: EXTRACT
Description: Activates Structured HOLD Files for a request.
This parameter is only supported in a TABLE or TABLEF request using an ON TABLE phrase.
Syntax: ON TABLE SET EXTRACT = {ON|*|OFF}
where:
ON
Activates Structured HOLD Files for this request and extracts all fields mentioned in the request.
*
Activates Structured HOLD Files for this request and indicates that a block of extract options follows. For example, you can exclude specific fields from the Structured HOLD File.
OFF
Deactivates Structured HOLD files for this request. OFF is the default value.
62 Information Builders

Customizing Your Environment
Parameter: EXTSORT
Description: Activates an external sorting feature for use with the TABLE, MATCH, and GRAPH commands.
If the report can be processed entirely in memory, external sorting does not occur.
In order to determine if the report can be processed in memory, issue the ? STAT query after the TABLE, MATCH, or GRAPH command, and check the value of the SORT USED parameter.
When StyleSheets are being used, an external sort does not work.
Syntax: SET EXTSORT = {ON|OFF}
where:
ON
Enables the selective use of an external sorting product to sort report. ON is the default value.
OFF
Uses the internal sorting procedure to sort reports.
Parameter: EXTTERM
Description: Enables the use of extended terminal attributes.
Syntax: SET EXTTERM = {ON|OFF}
where:
ON
Enables the use of attributes. ON is the default value.
OFF
Disables the use of attributes.
Developing Applications 63

SET Parameter Syntax
Parameter: FIELDNAME
Description: Controls whether long and qualified field names are supported.
This command cannot be used with ON TABLE SET.
Syntax: SET FIELDNAME = {NEW|NOTRUNC|OLD}
where:
NEW
Supports long and qualified field names. NEW is the default value.
NOTRUNC
Supports long and qualified field names, but not unique truncations.
OLD
Limits field names to 12 characters. Qualified field names are not supported.
Parameter: FILE[NAME]
Description: Specifies a file to be used, by default, in commands. When you set a default file name, you can use that file without specifying its name.
Syntax: SET FILE[NAME] = filename
where:
filename
Is a default file to be used in commands.
64 Information Builders

Customizing Your Environment
Parameter: FILTER
Description: Assigns screening conditions to a data source for reporting purposes.
Activates and deactivates filters.
The SET FILTER command is limited to one line. To activate more filters to fit on one line repeat the SET FILTER command.
Syntax: SET FILTER= {*|xx[yy zz]} IN file {ON|OFF}
where:
*
Activates all declared filters. * is the default value.
xx, yy, zz
Are the names of filters as declared in the NAME = syntax of the FILTER FILE command.
file
Is the name of the data source you are assigning screening conditions to.
ON
Activates all (*) or specifically named filters for the data source. The maximum number of filters you can activate for a data source is limited by the number of WHERE/IF phrases the filters contain, not to exceed the limit of WHERE/IF criteria in any single report request.
OFF
Deactivates (*) or specifically named filters for the data source. OFF is the default value.
Developing Applications 65

SET Parameter Syntax
Parameter: FIXRET[RIEVE]
Description: Enables keyed retrieval from a HOLD file. That is, the retrieval process stops when an equality or range test on a key holds true. This is accomplished by using the SEGTYPE= parameter in the Master File to specify that the BY fields in the request be used as a logical key for sequential files.
Syntax: SET FIXRET[RIEVE] = {OFF|ON}
where:
ON
Enables keyed retrieval. ON is the default.
OFF
Disables keyed retrieval.
Parameter: FOC144
Description: Suppresses warning message FOC144, which reads:
“Warning: Testing in Independent sets of Data.”
Syntax: SET FOC144 = {NEW|OLD}
where:
NEW
Displays the FOC144 warning message. NEW is the default value.
OLD
Suppresses the FOC144 warning message.
66 Information Builders

Customizing Your Environment
Parameter: FOC2GIGDB
Description: Enables two-gigabyte FOCUS data sources. Must be set in the FOCPARM profile. However, if the data source is in a FOCUS Database Server, FOC2GIGDB must be set in HLIPROF.
Syntax: SET FOC2GIGDB = {ON|OFF}
where:
ON
Enables support for FOCUS data sources larger than one-gigabyte. Note that an attempt to use FOCUS data sources larger than one-gigabyte in a release prior to FOCUS Version 7.1 can cause database corruption.
OFF
Disables support for FOCUS data sources larger than one-gigabyte. OFF is the default value.
Parameter: FOCALLOC
Description: This parameter applies only to MVS.
Automatically allocates FOCUS files. Allocation is done based on prefix.master. FOCUS. The DISP is SHR.
Syntax: SET {FOCALLOC|FALLOC} = {ON|OFF}
where:
ON
Automatically allocates FOCUS files.
OFF
Does not automatically allocate FOCUS files. OFF is the default value.
Developing Applications 67

SET Parameter Syntax
Parameter: FOCFIRSTPAGE
Description: Assigns a page number to the first page of output.
Syntax: SET FOCFIRSTPAGE = {n|1|&FOCNEXTPAGE}
where:
n
Is the number to be assigned to the first page of output. Valid values are integers with one to six characters. 1 is the default value.
&FOCNEXTPAGE
Is a variable whose value is determined by the last page number used by the last report. Its value is one more than the last page number used in the last report.
Parameter: FOCSTACK
Description: This setting is no longer needed, but has been left in the product so that existing applications that included it continue to work. It specified the amount of memory, in thousands of bytes, used by FOCSTACK, the stack of FOCUS commands awaiting execution.
This command cannot be used with ON TABLE SET.
Syntax: SET FOCSTACK [SIZE] = {n|8}
where:
n
Is the maximum amount, in thousands of bytes, that can be used by FOCSTACK. The maximum value depends on your region size.
8
Allows 8000 bytes to be used by FOCSTACK. 8 is the default value.
68 Information Builders

Customizing Your Environment
Parameter: HDAY
Description: Specifies the holiday file from which to retrieve dates that are designated as holidays for use with the date functions DATEDIF, DATEMOV, DATECVT, and DATEADD.The file must be named HDAY, followed by two to four characters.
To clear the holiday file, use:
SET HDAY = OFF
Syntax: SET HDAY = xxxx
where:
xxxx
Are the letters in the name of the holiday file, named HDAYxxxx. This string can be between two and four characters long.
The default is no setting for this parameter.
Parameter: HIPERCACHE
Description: Determines the default CACHE size in 4K pages when HiperFOCUS is activated. Can only be set in the FOCPARM ERRORS profile.
Syntax: SET HIPERCACHE = {cache|256}
where:
cache
Is the default CACHE size in 4k pages when HiperFOCUS is activated. 256 (1M) is the default value.
Parameter: HIPEREXTENTS
Description: Determines the permissible number of extents for HiperFOCUS (on MVS). Can only be set in the FOCPARM ERRORS profile.
Syntax: SET HIPEREXTENTS = {number|127}
where:
number
Is the permissible number of extents. 127 is the default value.
Developing Applications 69

SET Parameter Syntax
Parameter: HIPERFILE
Description: Is the maximum number of (4K) pages in an individual hiperspace. This is equivalent to the IBI Subsystem FILELIM parameter. If both are set, the lower is enforced. Can only be set in the FOCPARM ERRORS profile.
Syntax: SET HIPERFILE = {pages|524287}
where:
pages
Is the number of pages in an individual hiperspace. 524287 (2GB) the default value.
Parameter: HIPERFOCUS
Description: Activates HiperFOCUS. If HiperFOCUS is not installed, this parameter is disabled.
Syntax: SET HIPERFOCUS = {ON|OFF}
where:
ON
Activates HiperFOCUS. ON is the default value.
OFF
Deactivates HiperFOCUS.
Parameter: HIPERINSTALL
Description: Installs or disables HiperFOCUS. Can only be set in the FOCPARM ERRORS profile.
Syntax: SET HIPERINSTSALL = {ON|OFF}
where:
ON
Installs HiperFOCUS.
OFF
Disables HiperFOCUS. OFF is the default value.
70 Information Builders

Customizing Your Environment
Parameter: HIPERLOCKED
Description: Enables or disables processing of user interface commands such as SET HIPERFOCUS. Can only be set in the FOCPARM ERRORS profile.
Syntax: SET HIPERLOCKED = {ON|OFF}
where:
ON
Disables processing of user interface commands.
OFF
Enables processing of user interface commands. OFF is the default value.
Parameter: HIPERSPACE
Description: Is the number of (4K) pages to aggregate for hiperspace. This is equivalent to the IBI Subsystem TCBLIM parameter. If both are set, the lower is enforced. Can only be set in the FOCPARM ERRORS profile.
Syntax: SET HIPERSPACE = {pages|524287}
where:
pages
Is the number of pages to aggregate for hiperspace. 524287 (2GB) is the default value.
Parameter: HLISUTRACE
Description: Used for debugging, records the last 20 events that the FOCUS Database Server (formerly called the sink machine) performed. The information is written to memory and is intended for use when reading a dump of the SU address space. This setting may only be set in the SU profile, HLIPROF.
Syntax: SET HLISUTRACE = {ON|OFF}
where:
ON
Records the last 20 events that the FOCUS Database Server performed. ON is the default value.
OFF
Does not record the last 20 events that the FOCUS Database Server performed.
Developing Applications 71

SET Parameter Syntax
Parameter: HLISUDUMP
Description: This setting is only used for debugging FOCUS Database Server problems and may only be set in the SU profile, HLIPROF.
Syntax: SET HLISUDUMP = n
where:
n
When set to 99999, a dump of the FOCUS Database Server address space occurs for any error on the server. The user abend code is set to 275. The user code is also set to the error number.
72 Information Builders

Customizing Your Environment
Parameter: HNODATA
Description: Controls the missing data characters that are propagated to fields with the MISSING=ON attribute in HOLD FORMAT ALPHA files. Missing values in fields that do not have the MISSING=ON attribute are propagated to a HOLD file as blank (for alphanumeric fields) or zero (for numeric fields).
Syntax: SET HNODATA = {charstring|,$}
where:
charstring
Is a string of up to 12 characters propagated to a HOLD FORMAT ALPHA file for missing values in a field with the MISSING=ON attribute. A period (.) is the default value.
If the string is longer than the length of the field, the value stored in:
❏ An alphanumeric field is the leftmost characters of the string.
❏ A numeric field is a blank string.
When an alphanumeric string other than the default value (the period) is used to populate a missing numeric field, a blank is inserted in the held field to prevent a format error when displaying the data. If you use the default HNODATA value, it is inserted in numeric fields. In this way, a request against the HOLD file can recognize missing data that was propagated to the HOLD file.
If a number with decimal places is specified for HNODATA and the field with missing data is integer, the value is rounded to a whole number and inserted. In a numeric field that supports decimal places, it is rounded and inserted with the correct number of decimal digits.
,$
Indicates that nothing should be placed in the field when there is missing data. This setting can be used to support null values in non-FOCUS data sources.
Developing Applications 73

SET Parameter Syntax
Parameter: HOLDATTR[S]
Description: Controls whether the TITLE and ACCEPT attributes from the original Master File are used in the HOLD Master File. This setting does not affect the way fields are named in the HOLD Master File.
Syntax: SET HOLDATTR = {ON|OFF|FOCUS}
where:
ON
Includes the TITLE attribute from the original Master File in HOLD Master Files for HOLD files of any format. The ACCEPT attribute is included in the HOLD Master File when the HOLD file is in FOCUS format.
OFF
Does not include the TITLE or ACCEPT attributes from the original Master File in the HOLD Master File.
FOCUS
Includes the TITLE and ACCEPT attributes in HOLD Master Files when the HOLD file is in FOCUS format. FOCUS is the default value.
Parameter: HOLDFORMAT
Description: Determines the default format for HOLD files. This value can be overridden for an individual HOLD file by issuing the ON TABLE SET HOLD FORMAT command in a request.
Syntax: SET HOLDFORMAT = {BINARY|ALPHA}
where:
BINARY
Creates HOLD files in binary format. BINARY is the default value.
ALPHA
Creates HOLD files in ALPHA format.
74 Information Builders

Customizing Your Environment
Parameter: HOLDLIST
Description: Controls whether only displayed fields or all fields are included in the HOLD file.
Syntax: SET HOLDLIST = {PRINTONLY|ALL}
where:
PRINTONLY
Includes only those fields in the HOLD file that are specified in the report request.
ALL
Includes all fields referenced in a request in the HOLD file, including both computed fields and fields referenced in a COMPUTE command. ALL is the default value. (OLD may be used as a synonym for ALL.) Note: Vertical sort (BY) fields specified in the request with the NOPRINT option are not included in the HOLD file, even with HOLDLIST=ALL.
Parameter: HOLDMISS
Description: Enables you to distinguish between missing data and default values of blank (for character data) or zero (for numeric data) in a HOLD file.
Syntax: SET HOLDMISS = {OFF|ON}
where:
OFF
Does not allow you to store missing data in a HOLD file. OFF is the default value.
ON
Enables you to store missing data in a HOLD file. When TABLE generates a default value for data not found, it generates missing values.
Developing Applications 75

SET Parameter Syntax
Parameter: HOLDSTAT
Description: Includes comments and DBA information in HOLD Master Files. This information can be from the HOLDSTAT ERRORS file supplied by Information Builders, or a file specified by the user.
Syntax: SET HOLDSTAT = {ON|OFF|name}
where:
ON
Derives comments and DBA information from a HOLDSTAT file. In z/OS, this information is derived from the member HOLDSTAT in the PDS allocated to the ddname MASTER or ERRORS.In CMS, it is derived from the file HOLDSTAT MASTER or HOLDSTAT ERRORS.
OFF
Does not include information from the HOLDSTAT file in the HOLD Master File. OFF is the default value.
name
Specifies a HOLDSTAT file, created by the end user, whose information is included in the HOLD Master File.
Parameter: HOTMENU
Description: Automatically displays the Hot Screen PF key legend at the bottom of the Hot Screen report.
Syntax: SET HOTMENU = {ON|OFF}
where:
ON
Displays the PF key legend.
OFF
Does not display the PF key legend. To see the PF key legend, the user must press PF1. OFF is the default value.
76 Information Builders

Customizing Your Environment
Parameter: HTMLCSS
Description: Creates an internal Cascading Style Sheets command in the HTML display page.
Syntax: SET HTMLCSS = {ON|OFF}
where:
ON
Creates an internal CSS command in the HTML page that displays the report output.
OFF
Does not create an internal CSS command in the HTML page that displays the report output. OFF is the default value.
Parameter: IBMLE
Description: This parameter is no longer functional. FOCUS is fully LE compliant, and all FOCUS applications must be LE compliant.
Parameter: IMMEDTYPE
Description: Used with TOE, tells FOCUS where to send line mode output.
Syntax: SET IMMEDTYPE = {ON|OFF}
where:
ON
Sends all line mode output, such as -TYPE, to the Output Window as it is executed, line by line.
OFF
Buffers all line mode output. The output appears in the Output Window as a new full screen. OFF is the default value.
Developing Applications 77

SET Parameter Syntax
Parameter: INDEX
Description: Determines the indexing scheme used for indexes. Indexes are fields specified with FIELDTYPE=I keywords in the Master Files. The OLD setting for INDEX is no longer supported, but has been left in the product so that applications that included it continue to work.
Syntax: SET INDEX[TYPE] = {NEW|OLD}
where:
NEW
Creates a binary tree index. NEW is the default value.
OLD
Creates a hash index.
Parameter: JOINOPT
Description: If a parent segment has two or more unique child segments so that each has multiple children, the report may incorrectly display a missing value. The remainder of the child values may then be misaligned in the report. These misaligned values are called lagging values. The JOINOPT parameter ensures proper alignment of your output by correcting for lagging values.
Syntax: SET JOINOPT = {NEW|OLD}
where:
NEW
Corrects lagging values when a parent segment has multiple unique child segments.
OLD
Does not correct lagging values. This is the default value.
78 Information Builders

Customizing Your Environment
Parameter: KEEPDEFINES
Description: Controls whether a virtual field created for a host or joined structure is retained after a JOIN command is run. This parameter applies when a DEFINE command precedes the JOIN command.
Syntax: SET KEEPDEFINES = {ON|OFF}
where:
ON
Retains the virtual field after a JOIN command is run.
OFF
Clears the virtual field after a JOIN command is run. OFF is the default value.
Parameter: KEEPFILTERS
Description: By default, filters defined on the host data source are cleared by a JOIN command. However, filters can be maintained when a JOIN command is issued, by issuing the SET KEEPFILTERS=ON command.
Setting KEEPFILTERS to ON reinstates filter definitions and their individual declared status after a JOIN command. The set of filters and virtual fields defined prior to each join is called a context (see your documentation on SET KEEPDEFINES and on DEFINE FILE SAVE for information about contexts as they relate to virtual fields). Each new JOIN or DEFINE FILE command creates a new context.
If a new filter is defined after a JOIN command, it cannot have the same name as any previously defined filter unless you issue the FILTER FILE command with the CLEAR option. The CLEAR option clears all filter definitions for that data source in all contexts.
When a JOIN is cleared, each filter definition that was in effect prior to the JOIN command and that was not cleared, is reinstated with its original status. Clearing a join by issuing the JOIN CLEAR join_name command removes all of the contexts and filter definitions that were created after the JOIN join_name command was issued.
Syntax: SET KEEPFILTERS = {OFF|ON}
where:
OFF
Does not preserve filters issued prior to a join. This is the default value.
ON
Preserves filters across joins.
Developing Applications 79

SET Parameter Syntax
Parameter: LANG[UAGE]
Description: Specifies the National Language Support (NLS) environment. Sets the language of server error messages. Can also be used to set the language of report titles if the Master File Description contains alternate language TITLE attributes. For more information, see the Describing Data manual.
Syntax: SET LANG[UAGE] = [LNG|ln]
where:
LNG
Is the 3-letter abbreviation used to specify a language, from the following list.
ln
Is the 2-letter ISO code used to specify a language, from the following list.
Language Name (Code)
Displayed Language (GUI)
Language Abbreviation
Language ISO code
AMENGLISH orENGLISH orUKENGLISH
English AME orENG orUKE
en
ARABIC Arabic ARB ar
BALTIC Lithuanian BAL lt
CZECH Czech CZE cs
DANISH Danish DAN da
DUTCH Dutch DUT nl
FINNISH Finnish FIN fi
FRENCH French - Standardor Canadian
FRE frfc
GERMAN German - Standardor Austrian
GER deat
GREEK Greek GRE el
HEBREW Hebrew HEB or HEW iw
ITALIAN Italian ITA it
JAPANESE Japanese-JIS or EUC JPN or JPE ja or je
80 Information Builders

Customizing Your Environment
Syntax: (continued)
Language Name (Code)
Displayed Language (GUI)
Language Abbreviation
Language ISO code
KOREAN Korean KOR ko
POLISH Polish POL po
PORTUGUESE Portuguese-Brazil or Portugal
POR brpt
RUSSIAN Russian RUS ru
S-CHINESE Chinese-Simplified GB
PRC zh
SPANISH Spanish SPA es
SWEDISH Swedish SWE sv
T-CHINESE Chinese-Traditional Big-5
ROC tw
THAI Thai THA th
TURKISH Turkish TUR tr
Parameter: LEADZERO
Description: Leading zeros are truncated in Dialogue Manager strings. The functions in FOCUS, when called in Dialogue Manager, may return a numeric result. If the format of the result is YMD and contains a 00 for the year, the 00 is truncated.
Syntax: SET LEADZERO = {ON|OFF}
where:
ON
Allows the display of leading zeros if present.
OFF
Truncates leading zeros if present. OFF is the default value.
Developing Applications 81

SET Parameter Syntax
Parameter: LEFTMARGIN
Description: Sets the StyleSheet left boundary for report contents on a page. This parameter applies to PostScript and PDF reports.
Syntax: SET LEFTMARGIN = {value|.25}
where:
value
Is the left boundary of report contents on a page. 0.25 inches is the default value.
Parameter: LINES
Description: Sets the maximum number of lines of printed output that appear on a page, from the heading to the footing. If this value is less than the value set for PAPER, the difference provides a bottom margin. FOCUS never puts more lines on a page than the LINES parameter specifies, but may put less. The value of LINES can range between 1 and 999999; specify 999999 for continuous forms.
Note: When using SKIP-LINE in a report, always set LINES to at least one less than the value for PAPER. This avoids unintentional page beaks at the bottom of the page.
When the STYLESHEET parameter is in effect, the setting for LINES is ignored.
Syntax: SET LINES = {n|57}
where:
n
Is the maximum number of lines of printed output that appear on a page. 57 is the default value.
82 Information Builders
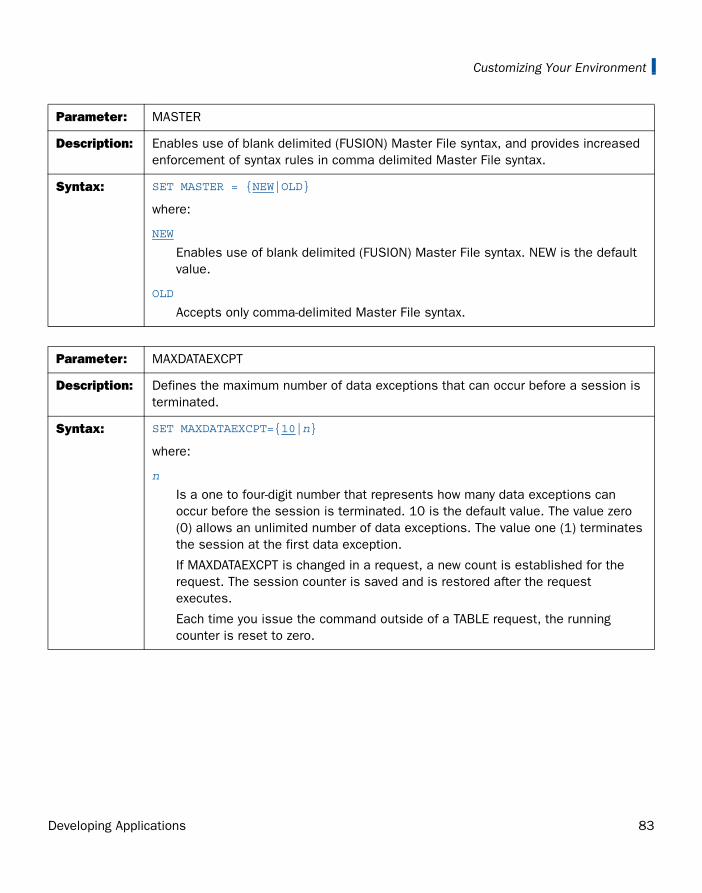
Customizing Your Environment
Parameter: MASTER
Description: Enables use of blank delimited (FUSION) Master File syntax, and provides increased enforcement of syntax rules in comma delimited Master File syntax.
Syntax: SET MASTER = {NEW|OLD}
where:
NEW
Enables use of blank delimited (FUSION) Master File syntax. NEW is the default value.
OLD
Accepts only comma-delimited Master File syntax.
Parameter: MAXDATAEXCPT
Description: Defines the maximum number of data exceptions that can occur before a session is terminated.
Syntax: SET MAXDATAEXCPT={10|n}
where:
n
Is a one to four-digit number that represents how many data exceptions can occur before the session is terminated. 10 is the default value. The value zero (0) allows an unlimited number of data exceptions. The value one (1) terminates the session at the first data exception.
If MAXDATAEXCPT is changed in a request, a new count is established for the request. The session counter is saved and is restored after the request executes.
Each time you issue the command outside of a TABLE request, the running counter is reset to zero.
Developing Applications 83

SET Parameter Syntax
Parameter: MAXLRECL
Description: Defines the maximum record length for an external file that can be read. FOCUS can read a 12K LRECL by default (with the default setting of 0). This may be set to a maximum of 64K. Note that the maximum length of the internal memory area for data fields is still 32K.
Syntax: SET MAXLRECL = {n|0}
where:
n
Is the maximum record length for an external file. 12K (n=0) is the default value.
Parameter: MDICARDWARN
Description: Displays a warning message every time a dimension's cardinality exceeds a specified value, offering you the chance to study the MDI build. When the number of equal values of a dimension's data reaches a specified percent, a warning message is issued. In order for MDICARDWARN to be reliable, the data source should contain at least 100,000 records.
Note: In addition to the warning message, a number displays in brackets. This number is the least number of equal values for the dimension mentioned in the warning message text.
Syntax: SET = MDICARDWARN = n
where:
n
Is a percentage value from 0 to 50.
84 Information Builders

Customizing Your Environment
Parameter: MDIENCODING
Description: Enables retrieval of output from the MDI file without reading the data source.
FOCUS encodes indexed values any time a field or dimension of an MDI has a MAXVALUES attribute specified or is involved in a parent-child relationship. Encoded values are stored in the MDI file at rebuild time and can be retrieved and decoded with a TABLE request that specifies the MDIENCODING command. The MDIENCODING command allows the user to get output from the MDI file itself without having to read the data source.
The following rules apply to fields in a TABLE request that uses MDIENCODING:
❏ Only one MDI can be referred to at a time.
❏ Only dimensions that are part of the same parent-child hierarchy can be used simultaneously in a request. A dimension that is not part of a parent-child relationship can be used as the field in a request if it has a MAXVALUES attribute.
Syntax: SET MDIENCODING = {ON|OFF}
where:
ON
Enables retrieval of output from the MDI file without reading the data source.
OFF
Requires access of the data source to allow retrieval of MDI values.
Note: This command can only be issued in an ON TABLE phrase. It has no default value.
Developing Applications 85

SET Parameter Syntax
Parameter: MDIPROGRESS
Description: Displays messages about the progress of an MDI build. The messages show the number of data records accumulated for every n records inserted into the MDI as it is processed.
Syntax: SET MDIPROGRESS = {n|0}
where:
n
Is an integer greater than 1000, which displays a progress message for every n records accumulated in the MDI build. 100,000 is the default value.
0
Disables progress messages.
Parameter: MESSAGE
Description: Displays or suppresses informational messages.
Syntax: SET {MESSAGE|MSG} = {ON|OFF}
where:
ON
Displays informational messages. ON is the default value.
OFF
Suppresses both informational messages and carets that appear when FOCUS executes commands in procedures. Error messages and the carets that prompt for input are still displayed.
86 Information Builders

Customizing Your Environment
Parameter: MINIO
Description: This parameter applies only to MVS.
Improves performance by reducing I/O operations up to 50% when accessing FOCUS data sources under MVS. This is a buffering technique.
With FOCUS data sources that are not disorganized, MINIO can greatly reduce the number of I/O operations for TABLE and MODIFY commands. The actual I/O reduction varies depending on data source structure and average number of children segments per parent segment. By reducing I/O operations, elapsed time for TABLE and MODIFY commands also drop.
Syntax: SET MINIO = {ON|OFF}
where:
ON
Does not read a block more than once; the number of reads performed is the same as the number of tracks present. This results in an overall reduction in elapsed times when reading and writing. ON is the default value.
OFF
Disables MINIO.
Parameter: MODCOMPUTE
Description: The native compiler for MODIFY processes COMPUTE, IF, and VALIDATE expressions using the arithmetic operations built into the underlying operating system. This native compiler eliminates internal format conversions and speeds up expression processing. It significantly enhances the speed of expressions that use long packed fields and date fields.
Syntax: SET MODCOMPUTE={NATV|NEW|OLD}
where:
NATV
Activates the native compiler for MODIFY expressions. NATV is the default value.
NEW
Compiles MODIFY expressions using the standard FOCUS compilation routines, which use high-precision floating point format for all arithmetic operations.
OLD
Does not compile MODIFY expressions.
Developing Applications 87

SET Parameter Syntax
Parameter: MULTIPATH
Description: Controls whether a parent segment is included in report output when selection tests are done on independent paths. That is, it determines whether WHERE or IF tests on separate paths are treated as if an AND or OR operator connects them.
Syntax: SET MULTIPATH = {SIMPLE|COMPOUND}
where:
SIMPLE
Treats selection tests as if connected by an OR operator. SIMPLE is the default. The parent segment displays if the condition is true for one of the tests. The following message also displays:
Warning. Testing in independent sets of data
COMPOUND
Treats selection tests as if connected by an AND operator. The parent segment displays only if the conditions are true for all tests.
Parameter: NODATA
Description: Determines the character string that indicates missing data in a report.
Syntax: SET {NODATA|NA} = {string|.}
where:
string
Is the character string that indicates missing data in reports. A period (.) is the default value.
88 Information Builders

Customizing Your Environment
Parameter: NULL
Description: Enables you to create a variable-length comma or tab delimited HOLD file that differentiates between a missing value and a blank string or zero value.
The HOLD formats supported for SET NULL=ON are COM, COMT, TAB, and TABT. Missing values in a record are denoted by two consecutive delimiters. A record that starts with a missing value has a delimiter in the first position, and a record that ends with a missing value has a delimiter in the last position.
Syntax: SET NULL = {ON|OFF}
where:
ON
Propagates missing values to a delimited HOLD file when the field has MISSING=ON in the Master File.
OFF
Propagates the value zero for a missing numeric value and blank ("") for a missing alphanumeric value to a delimited HOLD file. OFF is the default value.
Parameter: OLDSTYRECLEN
Description: Determines whether the record length, LRECL, is set to the current setting of LRECL=0, or the older setting of LRECL=512.
Syntax: SET OLDSTYRECLEN = {ON|OFF}
where:
ON
Determines that LRECL=512.
OFF
Determines that LRECL=0. OFF is the default value.
Developing Applications 89

SET Parameter Syntax
Parameter: ORIENTATION
Description: Specifies the page orientation for reports styled with StyleSheets.
Syntax: SET ORIENTATION = {PORTRAIT|LANDSCAPE}
where:
PORTRAIT
Displays the page in portrait style. PORTRAIT is the default value.
LANDSCAPE
Displays the page in landscape style.
Parameter: PAGE[-NUM]
Description: Controls the numbering of output pages.
Syntax: SET PAGE[-NUM] = option
where:
option
Is one of the following:
ON displays the page number on the upper left-hand corner of the page. ON is the default value.
OFF suppresses page numbering.
NOPAGE suppresses page breaks, causing the report to be printed as a continuous page. When PAGE is set to NOPAGE, the LINES parameter controls where column headings are printed. You can use NOLEAD in place of NOPAGE.
TOP omits the line at the top of each page of the report output for the page number and the blank line that follows it. The first line of report output contains the heading, if one was specified, or the column titles if there is no heading.
Note: The settings ON, TOP, and OFF include the carriage control character 1 in the first column of each page.
90 Information Builders

Customizing Your Environment
Parameter: PAGESIZE
Description: Specifies the page size for StyleSheets. For optimal report appearance, the actual paper size must match your setting for PAGESIZE. If it does not, your report is cropped or contains extra blank spaces.
Syntax: SET PAGESIZE = size
where:
size
Specifies the page size. If the actual paper size does not match the PAGESIZE setting, your report is either cropped or contains extra blank space. The options are:
LETTER sets the page size to 8.5 x 11 inches.ENVELOPE-PERSONAL sets the page size to 3.625 x 6.5 inches.ENVELOPE-MONARCH sets the page size to 3.875 x 7.5 inches.ENVELOPE-9 sets the page size to 3.875 x 8.875 inches.ENVELOPE-10 sets the page size to 4.125 x 9.5 inches.ENVELOPE-12 sets the page size to 4.5 x 11 inches.STATEMENT sets the page size to 5.5 x 8.5 inches.EXECUTIVE sets the page size to 7.5 x 10.5 inches.GERMAN-STANDARD-FANFOLD sets the page size to 8.5 x 12 inches.GERMAN-LEGAL-FANFOLD sets the page size to 8.5 x 13 inches.FOLIO sets the page size to 8.5 x 13 inches.LEGAL sets the page size to 8.5 x 14 inches.10X14 sets the page size to 10 x 14 inches.
Developing Applications 91

SET Parameter Syntax
Syntax: (continued)
TABLOID sets the page size to 11 x 17 inches.C sets the page size to 17 x 22 inches.D sets the page size to 22 x 34 inches.E sets the page size to 34 x 44 inches.US-STANDARD-FANFOLD sets the page size to 14.875 x 11 inches.LEDGER sets the page size to 17 x 11 inches.ENVELOPE-DL sets the page size to 4.3 x 8.6 inches.ENVELOPE-ITALY sets the page size to 4.3 x 9.1 inches.ENVELOPE-C6 sets the page size to 4.5 x 6.375 inches.ENVELOPE-C65 sets the page size to 4.5 x 9 inches.A5 sets the page size to 5.8 x 8.25 inches.ENVELOPE-C5 sets the page size to 6.4 x 9 inches.ENVELOPE-B5 sets the page size to 6.9 x 9.8 inches.ENVELOPE-B6 sets the page size to 6.9 x 4.9 inches.B5 sets the page size to 7.2 x 10.1 inches.A4 sets the page size to 8.25 x 11.7 inches.QUARTO sets the page size to 8.5 x 10.8 inches.ENVELOPE-C4 sets the page size to 9 x 12.75 inches.ENVELOPE-B4 sets the page size to 9.8 x 13.9 inches.B4 sets the page size to 9.8 x 13.9 inches.A3 sets the page size to 11.7 x 16.8 inches.ENVELOPE-C3 sets the page size to 12.75 x 18 inches.
92 Information Builders

Customizing Your Environment
Parameter: PANEL
Description: Sets the maximum line width, in characters, of a report panel for a screen or printer. If report output exceeds this value, the output is partitioned into several panels. For example, if you set PANEL to 80, the first 80 characters of a record appear on the first panel, the second 80 characters appear on the second panel, and so on.
When printing a report to your screen, the ideal value for the PANEL parameter is the width of your screen (usually 80). When printing to your printer, the ideal value for PANEL is the print width of your printer (usually 132). If PANEL is larger or set to 0, long report lines wrap around the screen or page.
When the BYPANEL parameter is OFF, a report can be divided into a maximum of 4 panels. If SET BYPANEL has a value other than OFF, the report may be divided into 99 panels.
When the STYLESHEET parameter is in effect, PANEL is ignored.
Syntax: SET PANEL = {0|n}
where:
n
Is the maximum line width, in characters, of a report panel.
0
Does not divide the report into panels. Long report lines wrap around the screen or page. 0 is the default value.
Developing Applications 93

SET Parameter Syntax
Parameter: PAPER
Description: Specifies the physical length of the paper, in lines, for printed output. You derive this value by multiplying the length of the paper, in inches, by the number of lines printed per inch. For example, if your printer prints six lines per inch on standard 11 inch forms, PAPER should be set to 66. If you are placing a footing at the bottom of the page, this value should be less; in this case, 62. Valid values for PAPER are numbers between 1 and 999999. Specify 999999 for continuous forms.
Note: When the STYLESHEET parameter is in effect, the setting for PAPER is ignored.
Syntax: SET PAPER = {n|66}
where:
n
Is the length of paper, in lines, for printed output. Valid values are numbers between 1 and 999999. The value 999999 denotes the use of continuous forms. 66 is the default value.
Parameter: PASS
Description: Enables user access to a data source or stored procedure protected by Information Builders security.
This command cannot be used with ON TABLE SET.
Syntax: SET PASS = password [IN filename]
where:
password
Is the password that allows access to data sources protected by Information Builders database security.
filename
Is a specific FOCUS data source or stored procedure protected by security.
94 Information Builders

Customizing Your Environment
Parameter: PAUSE
Description: Pauses before displaying a FOCUS report on the terminal. When you use a printing terminal, this parameter allows you to adjust the paper before printing the report.
When the SCREEN parameter is ON, the PAUSE parameter is set ON (until you set the PAUSE parameter to OFF). If you set the SCREEN parameter to OFF, the PAUSE parameter is set to OFF. Note that you can change the PAUSE parameter without affecting the SCREEN parameter.
This setting does not affect offline printing (routing output to a system printer).
Syntax: SET PAUSE = {ON|OFF}
where:
ON
Pauses before displaying a report. ON is the default value.
OFF
Does not pause before displaying a report.
Developing Applications 95

SET Parameter Syntax
Parameter: PCOMMA
Description: Enables the retrieval of comma-delimited files created by a PC application or the HOLD FORMAT COM command.
By default, when a Master File specifies SUFFIX=COM, incoming alphanumeric values are not enclosed in double quotation marks, and each record is terminated with a comma and dollar sign (,$) character combination. This format does not support retrieval of most comma-delimited files produced by a PC application.
Syntax: SET PCOMMA = {ON|OFF}
where:
ON
Enables the retrieval of comma-delimited data sources created by a PC application. It indicates that alphanumeric data is enclosed in double quotation marks and each record is completely contained on one line and is terminated with a carriage return and line feed.
OFF
Does not enable the retrieval of comma-delimited data sources created by a PC application. It indicates that alphanumeric data is not enclosed in double quotation marks and each record is terminated with a comma and dollar sign. OFF is the default value.
96 Information Builders

Customizing Your Environment
Parameter: PDFLINETERM
Description: Determines if an extra space is appended to each record of a PDF output file to facilitate proper file transfer between Windows and UNIX.
In Windows systems, the end of each PDF file has a table containing the byte offset, including two line termination characters, a carriage return and a line feed. In UNIX, files are terminated by only one character, a line feed. Transferring files between Windows and UNIX systems requires the proper use of the PDFLINETERM parameter.
Syntax: SET PDFLINETERM = {STANDARD|SPACE}
where:
STANDARD
Creates a PDF file without any extra characters. This file will be a valid PDF file if transferred in text mode to a Windows machine, but not to a UNIX machine. If subsequently transferred from a UNIX machine to a Windows machine in text mode, it will be a valid PDF file on the Windows machine.
SPACE
Creates a PDF file with an extra space character appended to each record. This file will be a valid PDF file if transferred in text mode to a UNIX machine, but not to a Windows machine. If subsequently transferred from an ASCII UNIX machine to a Windows machine in binary mode, it will be a valid PDF file on the Windows machine.
Developing Applications 97

SET Parameter Syntax
Parameter: PERMPASS
Description: The PERMPASS parameter establishes a user password that remains in effect throughout a session or connection. You can issue this setting in any supported profile but is most useful when established for an individual user by setting it in a user profile. It cannot be set in an ON TABLE phrase. It is recommended that it not be set in FOCPARM or FOCPROF because it would then apply to all users. In a FOCUS session, SET PERMPASS can be issued in PROFILE, a FOCEXEC, or at the command prompt.
All security rules established in the DBA sections of existing Master Files are respected when PERMPASS is in effect. The user cannot issue the SET PASS or SET USER command to change to a user password with different security rules. Any attempt to do so generates the following message:
permanent PASS is in effect. Your PASS will not be honored.VALUE WAS NOT CHANGED
Only one permanent password can be established in a session. After it is set, it cannot be changed within the session.
Syntax: SET PERMPASS=userpass
where:
userpass
Is the user password used for all access to data sources with DBA security rules established in their associated Master Files.
Parameter: PFnn
Description: Assigns a function to the PF key specified by nn, enabling you to change the current PF key setting when using FIDEL (and also, under certain conditions, within the Window facility).
The current settings are displayed by the ? PFKEY command.
Syntax: SET PFnn = function
where:
nn
Is the PF key you are assigning a function to.
function
Is the function to assign to the PF key specified by PFnn.
98 Information Builders

Customizing Your Environment
Parameter: POOL
Description: Pools retrieval for consecutive TABLE requests that access the same data source using the same access method.
This parameter cannot be used in ON TABLE SET.
Syntax: SET POOL = {ON|OFF}
where:
ON
Activates pooled tables. ON is the default value.
OFF
Deactivates pooled tables.
Parameter: PREFIX
Description: This parameter applies only to MVS.
Specifies the prefix of existing data sets automatically allocated by FOCUS.
Syntax: SET PREFIX = prefix
where:
prefix
Specifies of the prefix of existing data sets automatically allocated by FOCUS. The default setting in TSO is your user ID; the default setting in batch is FOCUS.
Developing Applications 99

SET Parameter Syntax
Parameter: PRINT
Description: Specifies the report output destination.
Determines whether report output is sent to your screen or to the printer
You can enter ONLINE and OFFLINE as separate commands that have the same effect as specifying ONLINE and OFFLINE as PRINT settings.
Syntax: SET PRINT = {ONLINE|OFFLINE}
where:
ONLINE
Sends report output to the terminal. ONLINE is the default value.
OFFLINE
Sends report output to the system printer .
Parameter: PRINTPLUS
Description: Introduces enhancements to the display alternatives offered by the FOCUS Report Writer. To force a break at a specific spot, you must use NOSPLIT.
PRINTPLUS is not supported with StyleSheets. Problems may be encountered if HOTSCREEN is set to OFFLINE.
Syntax: SET {PRINTPLUS|PRTPLUS} = {ON|OFF}
where:
ON
Handles the PAGE-BREAK internally to provide the correct spacing of pages, NOSPLIT is handled internally and you can perform RECAPs in cases where pre-specified conditions are met. Additionally, a Report SUBFOOT now prints above the footing instead of below it.
OFF
Does not support StyleSheets. OFF is the default value.
100 Information Builders

Customizing Your Environment
Parameter: PSPAGESETUP
Description: Causes the paper source used by a PostScript printer to match the PAGESIZE parameter setting.
Syntax: SET PSPAGESETUP = {OFF|ON}
where:
OFF
Does not include PostScript code for the selection of a PostScript printer paper source. OFF is the default value.
ON
Includes PostScript code that automatically tells a PostScript printer to set its paper source to the size specified by PAGESIZE.
Parameter: QUALCHAR
Description: Specifies the qualifying character to be used in qualified field names.
Syntax: SET QUALCHAR = {character|.}
where:
character
Is a valid qualifying character. They include:
. period (hex 4B): colon (hex 7A)! exclamation point (hex 5A)% percent sign (hex 6C)¦ broken vertical bar (hex 6A)\ backslash (hex E0)
A period (.) is the default value. The use of the other qualifying characters listed above is restricted; they should not be used with 66-character field names.
If the qualifying character is a period, you can use any of the other characters listed above as part of a field name. If you change the default qualifying character to a character other than the period, then you cannot use that character in a field name.
In VM, if the TERM tabchar is ON or if the CMS INPUT command includes the broken vertical bar (hex 6A), then the broken vertical bar cannot be the qualifying character. To query INPUT, type Q INPUT at the CMS prompt.
Developing Applications 101

SET Parameter Syntax
Parameter: QUALTITLES
Description: Uses qualified column titles in report output when duplicate field names exist in a Master File. A qualified column title distinguishes between identical field names by including the segment name.
Syntax: SET QUALTITLES = {ON|OFF}
where:
ON
Uses qualified column titles when duplicate field names exist and FIELDNAME is set to NEW.
OFF
Disables qualified column titles. OFF is the default value.
Parameter: REBUILDMSG
Description: Allows for direct control over the frequency with which REBUILD issues messages.
Syntax: SET {REBUILDMSG|REMSG} = n
where:
n
Is any number.
Parameter: RECAP-COUNT
Description: Includes lines containing a value created with RECAP when counting the number of lines per page for printed output.
The number of lines per page is determined by the LINES parameter.
Syntax: SET RECAP-COUNT = {ON|OFF}
where:
ON
Counts lines containing a value created with RECAP.
OFF
Does not count lines containing a value created with RECAP. OFF is the default value.
102 Information Builders

Customizing Your Environment
Parameter: RIGHTMARGIN
Description: Sets the StyleSheet right boundary for report contents on a page. This parameter applies to PostScript and PDF reports.
Syntax: SET RIGHTMARGIN = {value|.25}
where:
value
Is the right boundary of report contents on a page. 0.25 inches is the default value.
Parameter: SAVEDMASTERS
Description: Saves a Master File in memory after it is used in a request. Saving a Master File prevents re-parsing the Master File when referenced in subsequent requests, resulting in performance improvement.
Up to 99 Master Files can be saved to memory.
This parameter cannot be set in the ON TABLE SET command.
Syntax: SET SAVEDMASTERS = n
where:
n
Is an integer between 0 and 99 that specifies the maximum number of Master Files on the SAVEDMASTERS list. 0 is the default value.
Note that the most recently used Master File is always stored in memory, even with SAVEDMASTERS set to zero. However, the zero setting does not generate the list of saved Master Files.
Developing Applications 103

SET Parameter Syntax
Parameter: SAVEMATRIX
Description: Preserves the internal matrix and keeps it available for subsequent RETYPE, HOLD, SAVE, SAVB, and REPLOT commands when followed by Dialogue Manager commands.
Syntax: SET SAVEMATRIX = {ON|OFF}
where:
ON
Saves the internal matrix from the last report request, preventing it from being overwritten.
OFF
Does not guarantee that the internal matrix is available. OFF is the default value.
Parameter: SBORDER
Description: Generates a solid border on the screen for full-screen mode.
If the screen appears to be generated incorrectly, it is possible that the terminal does not support this new feature; change the setting to OFF to correct the situation.
The amper variable &FOCSBORDER contains the value of the SBORDER setting. &FOCSBORDER may be included in the Dialogue Manager -TYPE command.
Syntax: SET SBORDER = {ON|OFF}
where:
ON
Enables solid borders. ON is the default value.
OFF
Enables dashed (nonsolid) borders.
104 Information Builders

Customizing Your Environment
Parameter: SCREEN
Description: Selects the Hot Screen facility.
When the SCREEN parameter is ON, the PAUSE parameter is set ON (until you set the PAUSE parameter OFF). If you set the SCREEN parameter OFF, the PAUSE parameter is set OFF. Note that you can change the PAUSE parameter without affecting the SCREEN parameter.
Syntax: SET SCREEN = {ON|OFF|PAPER}
where:
ON
Activates the Hot Screen facility. ON is the default value.
OFF
Deactivates the Hot Screen facility.
PAPER
Activates the Hot Screen facility and causes FOCUS to use the settings for LINES and PAPER parameters to format screen display.
Parameter: SHADOW
Description: Activates the Absolute File Integrity feature for FOCUS files (but not XFOCUS files).
Syntax: SET SHADOW [PAGE] = {ON|OFF|OLD}
where:
ON
Activates the Absolute File Integrity feature. The maximum number of pages shadowed is 256K.
OFF
Deactivates the Absolute File Integrity feature. OFF is the default value.
OLD
Indicates that your FOCUS file was created before Version 7.0. This means that the maximum number of pages shadowed is 63,551.
Developing Applications 105

SET Parameter Syntax
Parameter: SHIFT
Description: Controls the use of “shift” strings.
Syntax: SET SHIFT = {ON|OFF}
where:
ON
Specifies a shift string for Hebrew or DBCS (double-byte character support).
OFF
Indicates that SHIFT is not in effect. OFF is the default value.
Parameter: SORTLIB
Description: Tells FOCUS which sort package is installed at your site.
Syntax: SET SORTLIB = {option|DEFAULT}
where:
option
Is one of the following:
DEFAULT is the default setting. It assumes that one of the common sort packages has been set as the site default.
VMSORT is the VMSORT sort package.
SYNCSORT is the SYNCSORT sort package.
DFSORT is the DFSORT sort package.
SITEDEFINED is used for a sort package other than VMSORT, SYNCSORT, or DFSORT. This sort package must be installed in SORTLIB TXTLIB in order for FOCUS to find it.
106 Information Builders

Customizing Your Environment
Parameter: SHOWBLANKS
Description: Preserves leading and internal blanks in HTML and EXL2K report output.
Syntax: SET SHOWBLANKS = {OFF|ON}
where:
OFF
Removes leading and internal blanks in HTML and EXL2K report output. OFF is the default value.
ON
Preserves leading and internal blanks in HTML and EXL2K report output.
Parameter: SPACES
Description: Sets the number of spaces between columns in a report.
This parameter does not work with HTML, PDF, or styled reports.
Syntax: SET SPACES = {AUTO|n}
where:
AUTO
Automatically places either 1 to 2 spaces between columns. AUTO is the default value.
n
Is the number of spaces to place between columns of a report. Valid values are integers between 1 and 8.
Developing Applications 107

SET Parameter Syntax
Parameter: SQLTOPTTF
Description: Enables the SQL Translator to generate TABLEF commands instead of TABLE commands.
Syntax: SET SQLTOPTTF = {ON|OFF}
where:
ON
Generates TABLEF commands when possible. For example, a TABLEREF command is generated if there is no JOIN or GROUP BY command. ON is the default value.
OFF
Always generates TABLE commands.
Parameter: SQUEEZE
Description: This parameter applies only to the StyleSheet feature.
Determines the column width in report output. The column width is based on the size of the data value or column title, or on the field format defined in the Master File.
Syntax: SET SQUEEZE = {ON|OFF|n}
where:
ON
Assigns column widths based on the widest data value or widest column title, whichever is longer. ON is the default .value for
OFF
Assigns column widths based on the field format specified in the Master File. This value pads the column width to the length of the column title or field format descriptions, whichever is greater.
n
Represents a specific numeric value, based on the UNITS parameter setting, to which the column width can be set (valid only in PDF and PS).
108 Information Builders

Customizing Your Environment
Parameter: STYLEMODE
Description: Determines the type of HTML generated for report output.
Note: The SQUEEZE parameter must be set to OFF to align data columns from one page to the next.
Syntax: SET STYLEMODE = {FULL|FIXED|PAGED}
where:
FULL
Displays normal HTML output. FULL is the default value.
FIXED
Generates <PRE tag in HTML to indicate preformatted text which is not to be treated as HTML.
PAGED
Displays report output in multiple HTML tables where each table is a separate report page. These smaller HTML files are retrieved from the Web server quicker than a single large file.
Developing Applications 109

SET Parameter Syntax
Parameter: STYLE[SHEET]
Description: Controls the format of report output by accepting or rejecting StyleSheet parameters. The parameters specify formatting options such as page size, orientation, and margins.
Syntax: SET STYLE[SHEET] = {stylesheet|ON|OFF}
where:
stylesheet
Is the name of the StyleSheet file. For UNIX and Windows, this is the name of the StyleSheet file without the file extension .sty. For MVS, this is the member name in the PDS allocated to ddname FOCSTYLE. For CMS, this is the name of a file with file type FOCSTYLE.
For a PDF or PostScript report, FOCUS uses the page layout settings for UNITS, TOPMARGIN, BOTTOMMARGIN, LEFTMARGIN, RIGHTMARGIN, PAGESIZE, ORIENTATION, and SQUEEZE; the settings for LINES, PAPER, PANEL, and WIDTH are ignored.
ON
Uses the page layout settings for UNITS, TOPMARGIN, BOTTOMMARGIN, LEFTMARGIN, RIGHTMARGIN, PAGESIZE, ORIENTATION, and SQUEEZE; the settings for LINES, PAPER, PANEL, and WIDTH are ignored.
For a PDF or PostScript report, uses the page layout settings for UNITS, TOPMARGIN, BOTTOMMARGIN, LEFTMARGIN, RIGHTMARGIN, PAGESIZE, ORIENTATION, and SQUEEZE; the settings for LINES and WIDTH are ignored.
OFF
Uses the settings for LINES, PAPER, PANEL, and WIDTH; the settings for UNITS, TOPMARGIN, BOTTOMMARGIN, LEFTMARGIN, RIGHTMARGIN, PAGESIZE, ORIENTATION, and SQUEEZE are ignored. OFF is the default value.
110 Information Builders

Customizing Your Environment
Parameter: SUMPREFIX
Description: Allows users to choose the answer set display order when using an external sort to perform aggregation on alphanumeric or smart date formats.
Syntax: SET SUMPREFIX = {FST|LST}
where:
FST
Displays the first value when alphanumeric or smart date data types are aggregated.
LST
Displays the last value when alphanumeric or smart date data types are aggregated. LST is the default value.
Developing Applications 111

SET Parameter Syntax
Parameter: SUMMARYLINES
Description: Allows users to combine fields with and without prefix operators on summary lines in one request. Prefix operator processing is used for all summary lines; fields without prefix operators are processed as though they were specified with the operator SUM.
This command cannot be used with ON TABLE SET.
Syntax: SET SUMMARYLINES = {OLD|NEW|EXPLICIT}
where:
OLD
Propagates all summary operations to the grand total line. Does not allow mixing of fields with and without prefix operators on a summary command when the first field does not have an associated prefix operator. All fields listed in any summary command are populated on all summary lines. OLD is the default value.
NEW
Propagates all summary operations to the grand total line. Uses prefix operator processing for all summary commands (all summary fields without prefix operators are processed as though they had a SUM. operator). Fields listed in a summary command are populated only on summary lines created by that summary command and on summary lines created by propagation of that summary command. Supports display of alphanumeric fields on summary lines.
EXPLICIT
Does not propagate SUBTOTAL and RECOMPUTE to the grand total line. Uses prefix operator processing for all summary commands (all summary fields without prefix operators are processed as though they had a SUM. operator). Fields listed in a summary command are populated only on summary lines created by that summary command and on summary lines created by propagation of that summary command. Supports display of alphanumeric fields on summary lines.
Note: This command is not supported in a request using the ON TABLE SET syntax.
Parameter: SUSI
Description: See the Simultaneous Usage for OS/390 and MVS manual.
112 Information Builders

Customizing Your Environment
Parameter: SUTABSIZE
Description: See the Simultaneous Usage for OS/390 and MVS manual.
Parameter: TARGETFRAME
Description: Includes the HTML code <BASE TARGET=“framename"> in the heading of the HTML file that is displayed in your browser. All hyperlinks from the base report are directed to the specified frame unless overridden by the TARGET attribute in the StyleSheet.
Syntax: SET TARGETFRAME = framename
where:
framename
Is the frame on the Web page in which the output from the hyperlink is displayed. Possible values include standard HTML frame names such as _blank, _self, _parent, _top, or a user-defined name.
Parameter: TEMP[DISK]
Description: Determines the disk FOCUS uses for temporary work space, and to store extract files (HOLD and SAVE)
This parameter does not apply for MVS.
Syntax: SET TEMP[DISK] = disk
where:
disk
Is the disk FOCUS uses for temporary workspace, and to store extract files.
Developing Applications 113

SET Parameter Syntax
Parameter: TERM
Description: Selects the terminal type.
Syntax: SET TERM[INAL] = {type|IBM3270}
where:
type
Is the terminal type. The options are:
IBM3270 is the default value. It does not support DBCS.
IBM5550 specifies an IBM 5550 or a PS/55 terminal. Supports DBCS.
F6650 specifies a Facom F-6650 terminal. Supports DBCS.
H56020 specifies a Hitachi H-560/20 terminal. Supports DBCS.
Parameter: TESTDATE
Description: Temporarily alters the system date in order to test a dynamic window allowing you to simulate clock settings beyond the year 1999 to determine the behavior of your program. Only use TESTDATE for testing purposes with test data. The value of TESTDATE affects all reserved variables that retrieve the current date from the system. Setting TESTDATE also affects anywhere in FOCUS that a date is used (such as CREATE, MODIFY, MAINTAIN) but does not affect the date referenced directly from the system.
TESTDATE can either be equal to TODAY or a date in the format YYYYMMDD. If anything else is entered the following message is displayed:
TESTDATE MUST BE YYYYMMDD OR TODAY
Syntax: SET TESTDATE = {yyyymmdd|TODAY}
where:
yyyymmdd
Is an 8-digit date in the format YYYYMMDD.
TODAY
Is the current date. TODAY is the default value.
114 Information Builders

Customizing Your Environment
Parameter: TITLE
Description: Uses pre-defined column titles in the Master File as column titles in report output.
Syntax: SET TITLE[S] = {ON|OFF}
where:
ON
Uses pre-defined column titles in the Master File as column titles in report output. ON is the default value.
OFF
Uses the field names in the Master File as column titles in report output.
Parameter: TOPMARGIN
Description: Sets the top StyleSheet boundary for report contents on a page.
This parameter applies to PostScript and PDF reports.
Syntax: SET TOPMARGIN = {value|.25}
where:
value
Is the top boundary on a page for report output. 0.25 inches is the default value.
Parameter: TRACKIO
Description: MVS FOCUS gathers more pages to fill a track before reading or writing the pages to disk. This results in significant reductions in I/O requirements and in elapsed time for FOCUS files.
Syntax: SET TRACKIO = {ON|OFF}
where:
ON
Enables FOCUS to fill a track before reading or writing to disk. ON is the default value.
OFF
Does not fill a track before reading and writing to a disk.
Developing Applications 115
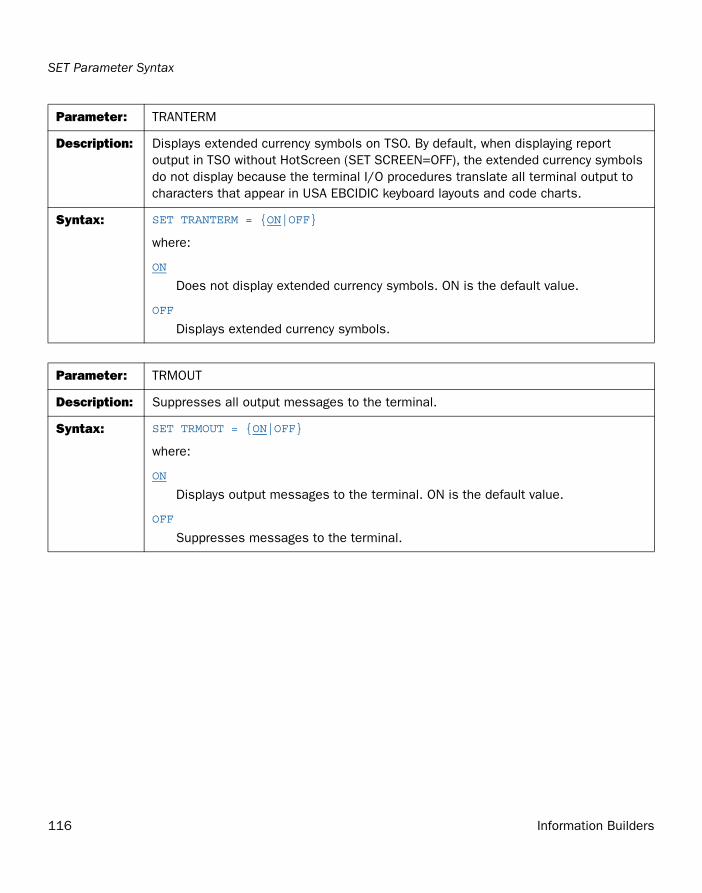
SET Parameter Syntax
Parameter: TRANTERM
Description: Displays extended currency symbols on TSO. By default, when displaying report output in TSO without HotScreen (SET SCREEN=OFF), the extended currency symbols do not display because the terminal I/O procedures translate all terminal output to characters that appear in USA EBCIDIC keyboard layouts and code charts.
Syntax: SET TRANTERM = {ON|OFF}
where:
ON
Does not display extended currency symbols. ON is the default value.
OFF
Displays extended currency symbols.
Parameter: TRMOUT
Description: Suppresses all output messages to the terminal.
Syntax: SET TRMOUT = {ON|OFF}
where:
ON
Displays output messages to the terminal. ON is the default value.
OFF
Suppresses messages to the terminal.
116 Information Builders

Customizing Your Environment
Parameter: UNITS
Description: This parameter applies to PostScript and PDF reports.
Specifies the unit of measure for page margins, column positions, and column widths.
Syntax: SET UNITS = {INCHES|CM|PTS}
where:
INCHES
Uses inches as the unit of measure. INCHES is the default value.
CM
Uses centimeters as the unit of measure.
PTS
Uses points as the unit of measurement. (One inch = 72 points, one cm = 28.35 points).
Parameter: USER
Description: Enables user access to a data source or stored procedure protected by Information Builders security.
Syntax: SET USER = user
where:
user
Is the user name that, with a password, enables access to a data source or stored procedure protected by Information Builders security.
Developing Applications 117

SET Parameter Syntax
Parameter: USERFNS
Description: If your site has a locally written function with the same name as an Information Builders-supplied function, the USERFNS setting determines which function is used.
Parameter verification can be enabled for DEFINE FUNCTIONs and functions supplied by Information Builders.
Syntax: SET USERFNS= {SYSTEM|LOCAL}
where:
SYSTEM
Gives precedence to functions supplied by Information Builders and to those created with the DEFINE FUNCTION command. SYSTEM is the default value.
This setting is required to enable parameter verification. For details, see USERFCHK.
LOCAL
Gives precedence to locally written functions. Parameter verification is not performed with this setting in effect.
118 Information Builders

Customizing Your Environment
Parameter: WEBTAB
Description: Instructs FOCUS to enclose CRTFORM display fields in @ signs.
When the HTML/TP feature of Web390 generates replacement HTML forms for a 3270 screen, it can dynamically account for fields that may or may not be populated with data during execution. HTML/TP can use this technique with turnaround (T.) fields on CRTFORMs because they are enclosed in @ signs. These @-sign markers enable HTML/TP to recognize them and handle them dynamically on a customized HTML form. In contrast, CRTFORM display (D.) fields are not normally enclosed in @ signs.
Note: This setting is only for those MODIFY CRTFORM or Dialogue Manager -CRTFORM applications that are used in conjunction with the HTML/TP feature of Web390. For information about Web390 and the HTML/TP feature, see the Web390 for OS/390 and MVS Developer’s Guide and Installation Manual.
Syntax: SET WEBTAB = {ON|OFF}
where:
ON
Adds @ signs around CRTFORM display fields. These markers may cause the fields displayed on the CRTFORM to shift slightly to the right. Use this setting only for MODIFY CRTFORM or Dialogue Manager -CRTFORM applications that are used in conjunction with the HTML/TP feature of Web390.
OFF
Does not place @ signs around CRTFORM display fields. OFF is the default value.
Developing Applications 119

SET Parameter Syntax
Parameter: WEEKFIRST
Description: Specifies a day of the week as the start of the week. This is used in week computations by the HDIFF, HNAME, HPART, and HSETPT functions, described in the Using Functions manual.
The WEEKFIRST parameter does not change the day of the month that corresponds to each day of the week, but only specifies which day is considered the start of the week.
Syntax: SET WEEKFIRST = {n|7}
where:
n
Is a number from 1 to 7, where 1 represents Sunday and 7 represents Saturday. The default value is 7. It is consistent with the Microsoft SQL Server convention.
Parameter: WIDTH
Description: Specifies the logical record length of your output data set when using a 3270 terminal. It is used only for communication between the operating system and a 3270 terminal. It has no function when used with a terminal emulator.
Syntax: SET WIDTH = n
where:
n
Is the width setting for you terminal. The default value is 130.
Parameter: XFOCUS
Description: Enables the use of XFOCUS data sources in addition to FOCUS data sources.
Syntax: SET XFOCUS = ON
where:
ON
Enables creation and use of XFOCUS data sources. This setting does not inhibit or affect the use of FOCUS data sources; it adds the ability to create and use XFOCUS data sources.
OFF
This setting has been deprecated.
120 Information Builders

Customizing Your Environment
Parameter: XFOCUSBINS
Description: Defines the number of pages of memory to use as buffers for XFOCUS data sources.
Syntax: SET XFOCUSBINS = n
where:
n
Is the number of pages used for XFOCUS data source buffers. Valid values are 16 to 1023. 64 is the default value.
Tip: The memory is not allocated until an XFOCUS data source is used in the session. Therefore, if you issue the ? SET XFOCUSBINS query command, you see the number of pages set for XFOCUS buffers and an indication of whether the memory has been allocated (passive for no, active for yes).
Parameter: XRETRIEVAL
Description: Previews the format of a report without actually accessing any data. This parameter enables you to perform TABLE, TABLEF, or MATCH requests and produce HOLD Master Files without processing the report.
Syntax: SET XRETRIEVAL = {ON|OFF}
where:
ON
Performs retrieval when previewing a report. ON is the default value.
OFF
Specifies that no retrieval is to be performed.
Developing Applications 121

SET Parameter Syntax
Parameter: YRTHRESH
Description: Defines the start of a 100-year window globally or on a field-level. Used with DEFCENT, interprets the current century according to the given values. Two-digit years greater than or equal to YRTHRESH assume the value of the default century. Two-digit years less than YRTHRESH assume the value of one more than the default century. (See DEFCENT.)
Note: This same result can be achieved by including the FDEFCENT and FYRTHRESH attributes in the Master File.
Syntax: SET YRTHRESH = {[-]yy|0}
where:
yy
Is the year threshold for the window. 0 is the default value.
If yy is a positive number, that number is the start of the 100-year window. Any 2-digit years greater than or equal to the threshold assume the value of the default century. Two-digit years less than the threshold assume the value of one more than the default century.
If yy is a negative number (-yy), the start date of the window is derived by subtracting that number from the current year, and the default century is automatically calculated. The start date is automatically incremented by one at the beginning of each successive year.
122 Information Builders

FOCUS
2
Developing App
Querying Your EnvironmentYou can debug a FOCUS application by querying your environment to display information such as status of files, release information, server information, and joins, as well as by identifying files you are using.
Topics:
❏ Using Query Commands
❏ Displaying Combined Structures
❏ Displaying Virtual Fields
❏ Displaying Available Fields
❏ Displaying the File Directory Table
❏ Displaying Field Information for a Master File
❏ Displaying Data Source Statistics
❏ Displaying Defined Functions
❏ Displaying HiperBudget Limits and Usage
❏ Displaying HOLD Fields
❏ Displaying JOIN Structures
❏ Displaying a Multi-Dimensional Index (MDI)
❏ Displaying National Language Support
❏ Displaying LET Substitutions
❏ Displaying Information About Loaded Files
❏ Displaying Explanations of Error Messages
❏ Displaying PF Key Assignments
❏ Querying PTFs for a Release
❏ Displaying the Release Number
❏ Displaying Parameter Settings
❏ Displaying Parameter Values Categorized by Functional Area
❏ Displaying Parameters That Cannot Be Set in an Area
❏ Displaying Graph Parameters
❏ Displaying the Site Code
❏ Displaying Command Statistics
❏ Displaying StyleSheet Parameter Settings
❏ Displaying Information About the SU Machine
❏ Displaying Data Sources Specified With USE
❏ Displaying Global Variable Values
lications 123

Using Query Commands
Using Query CommandsQuery commands display information about your metadata, physical data sources, language environment, and development and run-time environment.
Syntax: How to Issue a Query Command
? query [filename]
where:
query
Is the subject of the query.
filename
Is the name of the file that is the subject of the query. This parameter applies to only some queries.
To list the query commands, type a question mark in a procedure or at the command prompt.
124 Information Builders

Querying Your Environment
Reference: Query Command Summary
The following is a list of query commands. This topic contains a detailed description of each.
Query Command Description
? COMBINE Displays a list of combined file structures.
? DEFINE Displays currently active virtual fields created by the DEFINE command or attribute.
?F Lists fields currently available.
? FDT Displays physical attributes of a FOCUS data source.
?FF Lists field names, aliases, and format information for an active Master File.
? FILE Displays the number of segment instances in a FOCUS data source and the last time the data sources was changed.
? FUNCTION Displays functions created with the DEFINE command.
? HOLD Displays fields described in a HOLD Master File.
? HBUDGET Displays the Hi per space limits specified, and actual utilization statistics.
? JOIN Displays JOIN structures that exist between data sources.
? LANG Displays information about National Language Support.
? LET Displays word substitutions created with the LET command.
? LOAD Provides information about all loaded files: the file type, file name, and resident size.
? MDI Generates statistics and descriptions for multi-dimensional indexes.
? n Displays an explanation of an error message (n represents the number of the error message).
? PFKEY Displays the PF key assignments.
? PTF Displays the Tiffs applied to your version of FOCUS.
? RELEASE Displays the release number of your product.
Developing Applications 125

Displaying Combined Structures
Displaying Combined Structures
The ? COMBINE command displays files that are in the current combined structures.
Syntax: How to Display Combined Structures
? COMBINE [filename]
where:
filename
Is the data source containing the virtual fields. If filename is omitted, the command displays all virtual fields.
? SET Displays parameter settings that control FOCUS.
? SET BY CATEGORY
Displays parameter settings categorized into functional areas.
? SET GRAPH Displays parameter settings that control graphs produced with the GRAPH command.
? SET NOT Produces a list of SET commands that cannot be set in a specific area.
? SITECODE Retrieves the site code.
? STAT Displays statistics about the last command executed.
? STYLE Displays the current settings for StyleSheet parameters.
? SU Is communication available to the SU machine.
? USE Displays data sources specified with the USE command.
? && Displays values of global variables.
Query Command Description
How to:
Display Combined Structures
Example:
Displaying Combined Structures
126 Information Builders

Querying Your Environment
Example: Displaying Combined Structures
Issuing the command
? COMBINE
produces information similar to the following:
COMBINE EDUCFILE AND JOBFILE AS EDJOB>? COMBINE FILE=EDJOB TAG PREFIX EDUCFILE JOBFILE>
Displaying Virtual Fields
The ? DEFINE command lists the active virtual fields used in a request. The fields can be created by either the DEFINE command or DEFINE attribute in the Master File. The command displays field names of up to 32 characters. If a name exceeds 32 characters, a caret (>) in the 32nd position indicates a longer field name.
Syntax: How to Display Virtual Fields
? DEFINE [filename]
where:
filename
Is the data source containing the virtual fields. If filename is omitted, the command displays all virtual fields.
How to:
Display Virtual Fields
Example:
Displaying Virtual Fields
Reference:
? DEFINE Query Information
Developing Applications 127

Displaying Virtual Fields
Example: Displaying Virtual Fields
Assume that you created a virtual field named FULLNAME in a request against the EMPLOYEE database.
Issuing
? DEFINE
produces the following information:
FILE FIELD NAME FORMAT SEGMENT VIEW TYPEEMPLOYEE PROJECTEDSAL D12.2EMPLOYEE FULLNAME A26>
Reference: ? DEFINE Query Information
The following information is listed for each virtual field created with DEFINE:
Option Description
FILE Is the name of the data source containing the virtual field.
FIELD NAME Is the name of the virtual field.
FORMAT Is the format of the virtual field. The notation is the same as that used for the FORMAT attribute in a Master File.
SEGMENT Is the number of the segment in the Master File containing the virtual field. During reporting, your application treats the virtual field as a field in this segment. To relate segment numbers to segment names, use ? FDT.
VIEW Is the root segment of DEFINE that specifies an alternate view. For example:
DEFINE FILE EMPLOYEE.JOBCODE
TYPE Indicates whether the virtual field is created by the DEFINE attribute in the Master File, or by a DEFINE command, identified by MASTER or a blank, respectively.
128 Information Builders

Querying Your Environment
Displaying Available FieldsThe ?F command displays the fields that are currently available.
?F displays entire 66 character field names.
Syntax: How to Display Available Fields
?F filename
where:
filename
Is the name of a data source.
Example: Displaying Available Fields
Issuing the command
?F EMPLOYEE
produces the following information:
FILENAME = EMPLOYEEEMP_INFO EMP_ID LAST_NAME FIRST_NAME HIRE_DATEDEPARTMENT CURR_SAL CURR_JOBCODE ED_HRSBANK_NAME BANK_CODE BANK_ACCT EFFECT_DATEDAT_INC PCT_INC SALARY PAYINFO JOBCODETYPE ADDRESS_LN1ADDRESS_LN2 ADDRESS_LN3 ACCTNUMBERPAY_DATE GROSSDED_CODE DED_AMTJOBSEG JOBCODE JOB_DESCSEC_CLEARSKILLS SKILLS_DESCDATE_ATTEND ATTENDSEG.EMP_IDCOURSE_CODE COURSE_NAME
Developing Applications 129

Displaying the File Directory Table
Displaying the File Directory Table
The ? FDT command displays the file directory table, which lists the physical characteristics of a FOCUS data source.
Each segment and index (those fields designated by the keyword FIELDTYPE=I in the Master File) occupies an integral number of pages. The file directory table shows the amount of space occupied by each segment instance in a page, the starting and ending page numbers, and the number of pages in between for each segment and index.
Syntax: How to Display a File Directory Table
? FDT filename
where:
filename
Is the name of the data source.
How to:
Display a File Directory Table
Example:
Displaying a File Directory Table
Reference:
? FDT Query Information
130 Information Builders

Querying Your Environment
Example: Displaying a File Directory Table
Issuing the command
? FDT EMPLOYEE
produces the following information:
DIRECTORY:EMPLOYEEFOCUS F ON 09/25/1997 AT 09.50.28 DATE/TIME OF LAST CHANGE: 03/30/1999 16.19.22 SEGNAME LENGTH PARENT START END PAGES LINKS TYPE 1 EMPINFO 22 1 1 1 6 2 FUNDTRAN 10 1 2 2 1 2 3 PAYINFO 8 1 3 3 1 3 4 JOBSEG 11 3 4 5 SECSEG 4 4 2 6 SKILLSEG 11 4 2 7 ADDRESS 19 1 4 4 1 2 8 SALINFO 6 1 5 5 1 3 9 DEDUCT 5 8 6 8 3 210 ATTNDSEG 7 1 311 COURSEG 11 10 2
Reference: ? FDT Query Information
The following information is listed in the file directory table:
SEGNAME Is the name of each segment in the file. The segments are also numbered consecutively down the left of the table. Unnumbered entries at the foot of the table are indexes, which belong to fields having the attribute FIELDTYPE=I in the Master File.
LENGTH Is the length in words (units of four bytes) of each segment instance. Divide this number into 992 to get the number of instances that fit on a page.
PARENT Is the parent segment. Each number refers to a segment name in the SEGNAME column.
START Is the page number on which the segment or index begins.
END Is the page number on which the segment or index ends.
PAGES Is the number of pages occupied by the segment or index.
LINKS Is the length, in words, of the pointer portion in each segment instance. Every segment instance consists of two parts, data and pointers. Pointers are internal numbers used to find other instances.
Developing Applications 131
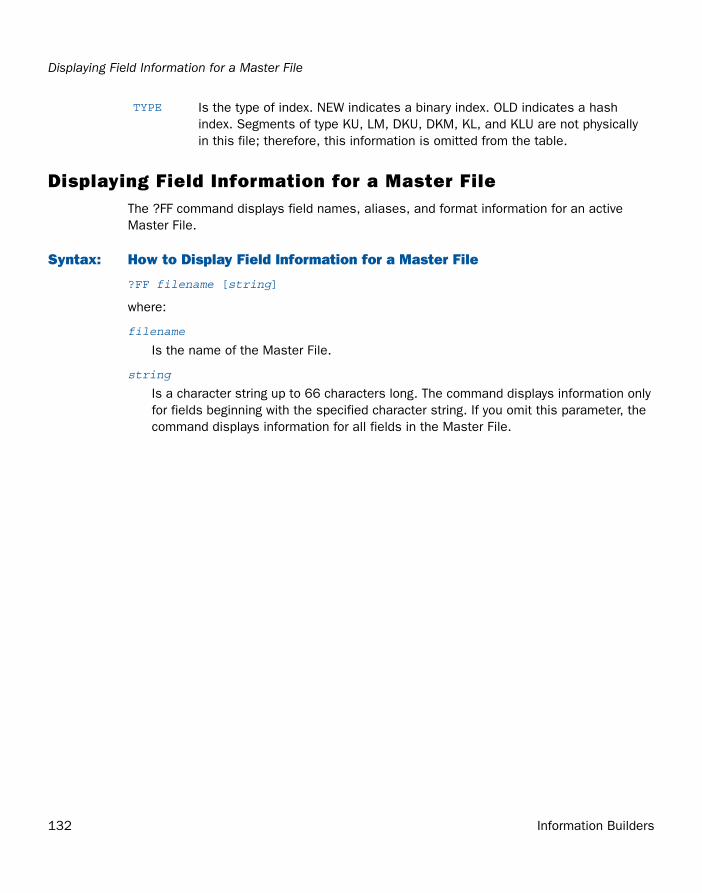
Displaying Field Information for a Master File
Displaying Field Information for a Master FileThe ?FF command displays field names, aliases, and format information for an active Master File.
Syntax: How to Display Field Information for a Master File
?FF filename [string]
where:
filename
Is the name of the Master File.
string
Is a character string up to 66 characters long. The command displays information only for fields beginning with the specified character string. If you omit this parameter, the command displays information for all fields in the Master File.
TYPE Is the type of index. NEW indicates a binary index. OLD indicates a hash index. Segments of type KU, LM, DKU, DKM, KL, and KLU are not physically in this file; therefore, this information is omitted from the table.
132 Information Builders

Querying Your Environment
Example: Displaying Field Information for a Master File
Issuing the command
?FF EMPLOYEE
produces the following information:
FILENAME= EMPLOYEEEMP_INFOEMP_ID EID A9LAST_NAME LN A15FIRST_NAME FN A10HIRE_DATE HDT 16YMDDEPARTMENT DPT A10CURR_SAL CSAL D12.2MCURR_JOBCODE CJC A3ED_HRS OJT F6.2BANK_NAME BN A20BANK_CODE BC I6SBANK_ACCT BA I9SEFFECT_DATE EDATE 16YMDDAT_INC DI I6YMDPCT_INC PI F6.2SALARY SAL D12.2MPAY_INFOJOBCODEJBC A3
Displaying Data Source Statistics
The ? FILE command displays information such as the number of segment instances in a FOCUS data source and when the data source was last changed.
How to:
Display Data Source Statistics
Example:
Displaying Data Source Statistics
Reference:
? FILE Query Information
Developing Applications 133

Displaying Data Source Statistics
Syntax: How to Display Data Source Statistics
? FILE filename
where:
filename
Is the name of the data source.
Example: Displaying Data Source Statistics
Issuing the command
? FILE EMPLOYEE
produces statistics similar to the following:
STATUS OF FOCUS FILE: EMPLOYEEFOCUS A1 ON 03/12/99 AT 12.29.51 ACTIVE DELETED DATE OF TIME OF LAST TRANSSEGNAME COUNT COUNT LAST CHG LAST CHG NUMBER EMPINFO 12 12/21/93 11.01.32 1FUNDTRAN 6 11/16/89 16.19.19 12PAYINFO 19 11/16/89 16.19.20 19ADDRESS 21 11/16/89 16.19.21 21SALINFO 70 11/16/89 16.19.22 448DEDUCT 448 11/16/89 16.19.22 448TOTAL SEGS 576TOTAL CHARS 8984TOTAL PAGES 8LAST CHANGE 01/29/96 11.01.32 1
Reference: ? FILE Query Information
The following data source statistics are listed:
SEGNAME Is the name of each segment in the data source. After the segments, the indexes are listed, if applicable.
Indexes are those fields specified by the attribute FIELDTYPE=I in the Master File.
ACTIVE COUNT Is the number of instances of each segment.
DELETED COUNT Is the number of segment instances deleted, for which the space is not reused.
DATE OF LAST CHG Is the date on which data in a segment instance or index was last changed.
134 Information Builders

Querying Your Environment
If a data source is disorganized by more than 29%, that is, the physical placement of data in the data source is considerably different from its logical or apparent placement, the following message appears
FILE APPEARS TO NEED THE -REBUILD- UTILITYREORG PERCENT IS A MEASURE OF FILE DISORGANIZATION0 PCT IS PERFECT -- 100 PCT IS BADREORG PERCENT IS x%
where:
x
Is a percentage between 30 and 100.
The variable &FOCDISORG also indicates the level of disorganization. Following is an example of how to use &FOCDISORG in a Dialogue Manager -TYPE command:
-TYPE THE AMOUNT OF DISORGANIZATION OF THIS FILE IS: &FOCDISORG
This command, depending on the amount of disorganization, produces a message similar to the following:
THE AMOUNT OF DISORGANIZATION OF THIS FILE IS: 10
When using a -TYPE command with &FOCDISORG, a message is displayed even if the percentage of disorganization is less than 30%.
TIME OF LAST CHG Is the time of day, on a 24-hour clock, when the file’s last update was made for that segment or index.
LAST TRANS NUMBER
Is the number of transactions performed by the last update request to access the segment. If the data source was changed under Simultaneous Usage mode, this column refers to the REF NUMB column of the CR HLIPRINT file.
TOTAL SEGS Is the total number of segment instances in the file (shown under ACTIVE COUNT), and the number of segments deleted when the file was last changed (shown under DELETED COUNT).
TOTAL CHARS Is the number of characters of data in the file.
TOTAL PAGES Is the number of pages in the data source. Pages are physical records in FOCUS data sources.
LAST CHANGE Is the date and time the data source was last changed.
Developing Applications 135

Displaying Defined Functions
Displaying Defined FunctionsThe ? FUNCTION command displays all defined functions and the parameters.
Syntax: How to Display DEFINE Functions
To display defined functions, issue the command:
? FUNCTION
Example: Displaying DEFINE Functions
Issuing the command
? FUNCTION
produces information similar to the following:
Name Format Parameter Format
DIFF D8 VAL1 D8 VAL2 D8
Displaying HiperBudget Limits and UsageThe ? HBUDGET command displays the Hiperspace limits specified and actual utilization statistics, including: limits set at the system, server, user and file levels; the number of busy pages; the number of hiperextents allowed; and the ddnames and sizes of files allocated in hiperspace or spilled to disk.
Syntax: How to Display HiperBudget Limits and Usage
To display HiperBudget Limits and Usage, issue the command:
? HBUDGET
136 Information Builders

Querying Your Environment
Example: Displaying HiperBudget Limits and Usage
Issuing the command
? HBUDGET
produces information similar to the following:
Total system limit is not setTotal server limit is not setTotal hiperspace limit is not setSingle file size limit is 524288 pagesTotal amount of busy pages is 616 pagesNumber of extents is set to 127 DDname :Reserved :Hiperspace : Spilled :Spill DDn
Displaying HOLD FieldsThe ? HOLD command lists fields described in a Master File created by the ON TABLE HOLD command. The list displays the field names, the aliases, and the formats as defined by the FORMAT (USAGE) attribute. The ? HOLD command displays field names up to 32 characters. If a field name exceeds 32 characters, a caret (>) in the 32nd position indicates a longer field name.
Syntax: How to Display HOLD Fields
? HOLD [filename]
where:
filename
Is the name assigned in the AS phrase in the ON TABLE HOLD command. If you omit the file name, it defaults to HOLD.
Example: Displaying HOLD Fields
Issuing the command
? HOLD
produces information similar to the following:
DEFINITION OF HOLD FILE: HOLDFIELDNAME ALIAS FORMAT
COUNTRY E01 A10CAR E02 A16
Developing Applications 137

Displaying JOIN Structures
Displaying JOIN StructuresThe ? JOIN command lists the JOIN structures currently in effect. The command displays field names up to 12 characters.If a field name exceeds 12 characters, a caret (>) in the twelfth position indicates a longer field name.
Syntax: How to Display JOIN Structures
To display JOIN structures, issue the command:
? JOIN
Example: Displaying JOIN Structures
Issuing the command
? JOIN
produces information similar to the following:
JOINS CURRENTLY ACTIVE HOST CROSSREFERENCEFIELD FILE TAG FIELD FILE TAG AS ALL WH----- ---- --- ----- ---- --- -- --- --JOBCODE EMPLOYEE JOBCODE JOBFILE N N
138 Information Builders

Querying Your Environment
Reference: ? JOIN Query Information
The following JOIN information is listed:
Displaying a Multi-Dimensional Index (MDI)
The ? MDI command generates statistics and descriptions for multi-dimensional indexes. You can display information about MDIs for a given FOCUS or XFOCUS Master File that hosts the target of your MDI.
HOST FIELD Is the name of the host field that is joining the data sources.
FILE Is the name of the host data source.
TAG Is a tag name used as a unique qualifier for field names in the host data source.
CROSSREFERENCE FIELD
Is the name of the cross-referenced field used to join the data sources.
FILE Is the name of the cross-referenced data source.
TAG Is a tag name used as a unique qualifier for field names in the cross-referenced data source.
AS Is the name of the joined structure.
ALL Displays Y for a non-unique join and N for a unique join.
WH Specifies whether the join is a conditional join or an equi-join.
How to:
Query a Multi-Dimensional Index
Example:
Displaying MDIs
Developing Applications 139

Displaying a Multi-Dimensional Index (MDI)
Syntax: How to Query a Multi-Dimensional Index
To display MDIs, issue the command
? MDI mastername {mdiname|*} [HOLD [AS holdfile]]
where:
mastername
Is the logical name of the Master File. If you do not include any other parameters, a list of all MDI names specified is displayed with the command TARGET_OF in the Access File for this mastername. If the Access File for the mastername does not have any MDI information, an error message will display.
mdiname
Is the logical name of an MDI. Specifying this parameter displays all the dimensions that are part of this MDI.
mdiname must be specified as TARGET_OF in the Access File for this mastername, or an error message displays. If any of the dimensions are involved in a parent-child structure, a tree-like picture displays.
*
Displays a list of all dimensions, by MDI, whose targets are specified inside the Access File for this mastername.
HOLD
Saves the output in a text file.
holdfile
Is the file in which the output is saved. If the AS phrase is omitted, the file name is HOLD.
Example: Displaying MDIs
Issuing the command
? mdi car *
produces results similar to the following, showing the MDI name and a segment and field for each dimension:
CARMDI COMP.CAR ORIGIN.COUNTRY CARREC.MODEL
140 Information Builders

Querying Your Environment
Displaying National Language SupportThe ? LANG command displays information about National Language Support.
Syntax: How to Display Information About National Language Support
To display information about National Language Support:
? LANG
Example: Displaying Information About National Language Support
Issuing the command
? LANG
produces information similar to the following:
LANGUAGE AND DBCS STATUS Language 01/AMENGLISH ( )Code Page 00037Dollar value 5B($)DBCS Flag OFF(SBCS)
Displaying LET SubstitutionsThe ? LET command lists the active word substitutions created by the LET command. A word in the left column is used in a report request to represent the word or phrase in the right column. For more information on the LET command, see Chapter 4, Defining a Word Substitution.
Syntax: How to Display LET Substitutions
To display word substitutions, issue the command:
? LET
Example: Displaying LET Substitutions
Issuing the command
? LET
produces information similar to the following:
PR PRINT TF TABLE FILE EMPLOYEE
Developing Applications 141

Displaying Information About Loaded Files
Displaying Information About Loaded FilesThe ? LOAD command displays the file type, file name, and resident size of currently loaded files.
Syntax: How to Display Information About Loaded Files
? LOAD [filetype]
where:
filetype
Specifies the type of file (MASTER, FOCEXEC, Access File, FOCCOMP, or MODIFY) on which information displays. To display information on all memory-resident files, omit file type.
Example: Displaying Information About Loaded Files
Issuing the command
? LOAD
produces information similar to the following:
FILES CURRENTLY LOADED CAR MASTER 4200 BYTES EXPERSON MASTER 4200 BYTES CARTEST FOCEXEC 8400 BYTES
Displaying Explanations of Error MessagesThe ? n command displays a detailed explanation of an error message, providing assistance in correcting the error.
Error messages generated by certain data adapters, such as the DB2 and MODEL 204 data adapters, are also accessible through this feature.
Syntax: How to Display Explanations of Error Messages
? n
where:
n
Is the error message number.
142 Information Builders

Querying Your Environment
Example: Displaying Explanations of Error Messages
If you receive the message
(FOC125) RECAP CALCULATIONS MISSING
issuing the command
? 125
produces the following message:
(FOC125) RECAP CALCULATIONS MISSINGThe word RECAP is not followed by a calculation. Either the RECAP should be removed, or a calculation provided.
Displaying PF Key AssignmentsThe ? PFKEY command displays the PF key assignments.
Syntax: How to Display PF Key Assignments
To display the PF key assignments, issue the command:
? PFKEY
Example: Displaying PF Key Assignments
Issuing the command
? PFKEY
produces results similar to the following:
PF01 = HX PF02 = CANCEL PF03 = END PF04 = RETURNPF05 = RETURN PF06 = SORT PF07 = BACKWARD PF08 = FORWARDPF09 = RETURN PF10 = LEFT PF11 = RIGHT PF12 = UNDOPF13 = RETURN PF14 = RETURN PF15 = END PF16 = RETURNPF17 = RETURN PF18 = RETURN PF19 = BACKWARD PF20 = FORWARDPF21 = RETURN PF22 = RETURN PF23 = RETURN PF24 = UNDO
Querying PTFs for a ReleaseThe ? PTF command displays a list of PTFs applied to the version of FOCUS you are currently using.
Syntax: How to Query a List of PTFs
To query a list of PTFs, issue the command:
? PTF
Developing Applications 143

Displaying the Release Number
Example: Querying a List of PTFs
Issuing the command
? PTF
produces results similar to the following:
Note: Dots are used to denote the lack of data if no information exists for a column entry in the resulting report. If there are no PTFs for the version of FOCUS that you are currently running, the following is displayed:
NO PTFS HAVE BEEN APPLIED
Displaying the Release NumberThe ? RELEASE command displays the number of the currently installed release of your product.
Syntax: How to Display the Release Number
To display the release number, issue the command:
? RELEASE
Example: Displaying the Release Number
Issuing the command
? RELEASE
produces information similar to the following:
FOCUS 7.6.4 created 11/07/2007 11.38.32
144 Information Builders

Querying Your Environment
Displaying Parameter Settings
The ? SET command lists the parameter settings that control your FOCUS environment. Your application sets default values for these parameters, but you can change them with the SET command.
SET parameters are described in Chapter 1, Customizing Your Environment.
Syntax: How to Display Parameter Settings
? SET [ALL|[FOR] parameter]
where:
ALL
Displays all possible parameter settings.
parameter
Is a SET parameter. This displays the setting for the specific parameter.
FOR
Includes where the parameter can be set from in addition to the parameter setting.
How to:
Display Parameter Settings
Example:
Displaying Parameter Settings
Displaying a Single Parameter Setting
Displaying Where a Parameter Can Be Set
Developing Applications 145

Displaying Parameter Settings
Example: Displaying Parameter Settings
Issuing the command
? SET
produces information similar to the following:
PARAMETER SETTINGS ALL. OFF FOCSTACK SIZE 8 QUALCHAR .ASNAMES FOCUS FOC2GIGDB OFF QUALTITLES OFFAUTOINDEX ON HDAY REBUILDMSG 1000AUTOPATH ON HIPERFOCUS OFF RECAP-COUNT OFFBINS 64 HOLDATTRS FOCUS SAVEMATRIX OFFBLKCALC NEW HOLDLIST ALL SCREEN ONBUSDAYS _MTWTF_ HOLDSTAT OFF SHADOW PAGE OFFBYPANELING OFF HOTMENU OFF SPACES AUTOCACHE 0 IBMLE OFF SQLENGINECARTESIAN OFF INDEX TYPE NEW SUMPREFIX LSTCDN OFF LANGUAGE AMENGLISH TCPIPINT OFFCOLUMNSCROLL OFF LINES/PAGE 66 TEMP DISK ADATEDISPLAY OFF LINES/PRINT 57 TERMINAL IBM3270DATEFNS ON MESSAGE ON TESTDATE TODAYDATETIME STARTUP/RESET MODE CMS TITLES ONDEFCENT 19 MULTIPATH SIMPLE VIEWNAMESIZE 18EMPTYREPORT OFF NODATA . WIDTH 80EXL2KLANG 1 PAGE-NUM ON WINPFKEY OLDEXTAGGR ON PANEL 0 XFBINS 16 (passive)EXTHOLD ON PAUSE ON XFOCUS OFFEXTSORT ON POOL OFF XRETRIEVAL ONFIELDNAME NEW PRINT ONLINE YRTHRESH 0FOCALLOC OFF PRINTPLUS OFF
Some parameters are listed differently from the way you specify them in the SET command. These include:
SET Parameters Description
FOCSTACK SIZE Is the same as the FOCSTACK parameter.
INDEX TYPE Is the same as the INDEX parameter.
LINES/PAGE Is the same as the PAPER parameter.
LINES/PRINT Is the same as the LINES parameter.
SHADOW PAGES Is the same as the SHADOW parameter.
146 Information Builders

Querying Your Environment
Example: Displaying a Single Parameter Setting
Issuing the command
? SET PAGESIZE
produces the following if the parameter is set to its default value:
PAGESIZE Letter
Example: Displaying Where a Parameter Can Be Set
Issuing the command
? SET FOR EXTSORT
produces the following information:
EXTSORT ON ------------------------------------------------- SETTABLE FROM COMMAND LINE : YES SETTABLE ON TABLE : YES SETTABLE FROM SYSTEM-WIDE PROFILE : YES SETTABLE FROM HLI PROFILE : YES POOL TABLE BOUNDARY : YES>
Displaying Parameter Values Categorized by Functional Area
The ? SET BY CATEGORY query allows users to display settable parameter values grouped by major functional categories.
How to:
Display SET Parameter Values Categorized by Functional Areas
Example:
Viewing Parameters by Functional Category
Developing Applications 147

Displaying Parameter Values Categorized by Functional Area
Syntax: How to Display SET Parameter Values Categorized by Functional Areas
Issue the following command in any supported profile, or in a focexec, or at the command prompt, to display settable parameter values by functional area :
? SET BY CATEGORY
The functional areas available for display are listed below.
MEMORY Options that affect size of memory used.
DATES Options that control date input/output.
SECURITY Security options.
POOLTABLE Options relevant only to POOLTABLE.
SINK Options relevant only to SINK MACHINEs.
SEND SEND command parameters.
COMPUTATION Options that affect computations.
MDI MDI parameters.
EXTERNALSORT External sort parameters.
FOCCALC FOCCALC environmental parameters.
ENVIRONMENT General working environment options.
WEBFOCUS WEBFOCUS environmental parameters.
REPORT Options that affect report appearance.
GRAPH Classical GRAPH control parameters.
STYLESHEET Options that affect STYLESHEET.
RETRIEVAL Parameters that affect data retrieval.
HOLD Options that affect HOLD output.
PLATFORM Platform-dependent options.
MAINFRAME Options relevant only to IBM/MAINFRAME.
MSWINDOWS Options relevant only to MSWINDOWS
148 Information Builders

Querying Your Environment
Example: Viewing Parameters by Functional Category
To view the current values for parameters in all categories, enter:
? SET BY CATEGORY
This displays the existing parameter values in each category (first four of twenty shown).
MEMORY UTILIZATION PARAMETERS BINS 64 CACHE 0 CALCMEMORY 5 LOADLIMIT 64 MDIBINS 8000 POOLMEMORY 16384 XFBINS 16 (passive) DATE CONTROL PARAMETERS ALLOWCVTERR OFF BUSDAYS _MTWTF_ DATEDISPLAY OFF DATEFNS ON DATEFORMAT MDY DATETIME STARTUP/RESET DEFCENT 19 DTSTANDARD OFF DTSTRICT ON HDAY TESTDATE TODAY WEEKFIRST 7 YRTHRESH 0 SECURITY ENVIRONMENT PARAMETERS PASS ?????? PERMPASS ?????? SUSI OFF POOLTABLE RELATED PARAMETERS DEJAVU ???? ESTLINES 0 ESTRECORDS 0 HRATIO ???? MAXADRTABLE ???? MAXEXTSRTS ???? MAXMNM ???? MAXMRGSTRNGS ???? MAXPOOLMEM 32768 MAXSORTS ???? MINADRTABLE ???? MINEXTVSPACE ???? MINMTI ???? MINMTX ???? MTXFDG ???? MXMFOC ???? POOL OFF POOLBATCH OFF POOLFEATURE OFF POOLMEMORY 16384 POOLORDER ???? POOLRESERVE 1024 PTBDBG ???? PTDFCORE ???? ROUNDR ???? SURPRI ???? THRSHF ???? THRSHX ???? TRUST1 ????
Syntax: How to Display SET Parameter Values for a Specific Functional Area
Issue the following commands in any supported profile, in a focexec, or at the command prompt, to display settable parameter values for a specified functional area:
? SET CATEGORY categoryname
where:
categoryname
Is one of the categories.
Developing Applications 149

Displaying Parameters That Cannot Be Set in an Area
Syntax: How to Display the List of Categories
Issue the following command in any supported profile, in a focexec, or at the command prompt, to display settable parameter values for a specified functional area:
? SET CATEGORY HELP
Displaying Parameters That Cannot Be Set in an Area
The ? SET NOT command produces a list of SET commands that cannot be set in a specific area. The areas for which you can find this information are the PROMPT command, report requests, the FOCPARM profile, the HLI profile, and Pooled Tables.
Syntax: How to Determine Where a Command Is Valid
? SET NOT area
where:
area
Is one of the following:
PROMPT is the PROMPT command.
ONTABLE is a report request.
FOCPARM is the FOCPARM profile.
HLIPROF is the HLI profile.
PT is in Pooled Tables.
How to:
Determine Where a Command Is Valid
Example:
Displaying Parameters That Cannot Be Set With ONTABLE
150 Information Builders

Querying Your Environment
Example: Displaying Parameters That Cannot Be Set With ONTABLE
Issuing the command
? SET NOT ONTABLE
produces the following information:
NON-SETTABLE ON TABLE PARAMETER SETTINGS BINS 64 LANGUAGE AMENGLISH REBUILDMSG 1000BLKCALC NEW MAXPOOLMEM 32768 SAVEMATRIX ONBYPANELING OFF MDIBINS 8000 TCPIPINT OFFCACHE 0 MDIPROGRESS 100000 TEMP DISK CCOLUMNSCROLL OFF MODE CMS TRMSD 24DATEDISPLAY OFF MPRINT NEW TRMSW 80DATEFNS ON POOL OFF TRMTYP 1 (3270)DEFCENT 19 POOLBATCH OFF WEBHOME OFFEUROFILE POOLFEATURE OFF WIDTH 130FIELDNAME NEW POOLMEMORY 16384 WINPFKEY OLDFOCSTACK SIZE 8 POOLRESERVE 1024 YRTHRESH 0HTMLMODE OFF PRINTPLUS OFF
Displaying Graph ParametersThe ? SET GRAPH command lists the parameter settings that control graphs produced with the GRAPH command. These parameters are described further in Chapter 1, Customizing Your Environment.
Syntax: How to Display Graph Parameters
To display graph parameters, issue the command:
? SET GRAPH
Developing Applications 151

Displaying Graph Parameters
Example: Displaying Graph Parameters
Issuing the command
? SET GRAPH
produces information similar to the following:
GRAPH PARAMETER SETTINGS AUTOTICK ON HISTOGRAM ONBARNUMB OFF HMAX .00BARSPACE 0 HMIN .00BARWIDTH 1 HSTACK OFFBSTACK OFF HTICK .00DEVICE IBM3270 PIE OFFGMISSING OFF VAUTO ONGMISSVAL .00 VAXIS 66GPROMPT OFF VCLASS .00GRIBBON(GCOLOR) OFF VGRID OFFGRID OFF VMAX .00GTREND OFF VMIN .00HAUTO ON VTICK .00HAXIS 130 VZERO OFFHCLASS .00 >
If you change the PLOT parameter settings, a small table appears at the end of the list:
PLOT TABLE (EBCDIC): ENTER PLOT MODE 0050 (FOR 3284 WIDTH)EXIT PLOT MODE 0018 (FOR 3284 HEIGHT)LEFT 0000RIGHT 0000UP 0000DOWN 0000
The entries in the table at the bottom are:
Ignore the parameters LEFT, RIGHT, UP, and DOWN.
ENTER PLOT MODE Width of graph on IBM 3284 or 3287 printer.
EXIT PLOT MODE Height of graph on IBM 3284 or 3287 printer.
152 Information Builders

Querying Your Environment
Displaying the Site Code
The FOCUS site code is installed as part of the License Management facility.
Once the site code has been installed, you can retrieve its value by issuing the ? SITECODE query command. If the site code has not been installed, you will get a message indicating that the site code is not available.
Syntax: How to Retrieve the Site Code
? SITECODE
Example: Querying the Site Code
Assume you installed the License Management facility with site code A52709b.
Issue the following query command:
? SITECODE
The output is:
SITE CODE A527O9b
If the site code is not installed, the ? SITECODE query returns the following message:
SITE CODE NOT AVAILABLE
How to:
Retrieve the Site Code
Example:
Querying the Site Code
Developing Applications 153

Displaying Command Statistics
Displaying Command Statistics
The ? STAT command lists statistics for the most recently executed command.
Each statistic applies only to a certain command. If another command is executed, the statistic is either 0 or does not appear in the list at all. When you execute commands in stored procedures, these statistics are automatically stored in Dialogue Manager statistical variables. See your Dialogue Manager documentation for details.
Syntax: How to Display Command Statistics
To display command statistics, issue the command:
? STAT
How to:
Display Command Statistics
Example:
Displaying Command Statistics
Reference:
? STAT Query Information
154 Information Builders

Querying Your Environment
Example: Displaying Command Statistics
Issuing the command
? STAT
produces information similar to the following:
STATISTICS OF LAST COMMAND RECORDS = 0 SEGS DELTD = 0LINES = 0 NOMATCH = 0BASEIO = 0 DUPLICATES = 0SORTIO = 0 FORMAT ERRORS = 0SORT PAGES = 0 INVALID CONDTS = 0READS = 0 OTHER REJECTS = 0TRANSACTIONS = 0 CACHE READS = 0ACCEPTED = 0 MERGES = 0SEGS INPUT = 0 SORT STRINGS = 0SEGS CHNGD = 0 INDEXIO = 0 INTERNAL MATRIX CREATED: YES AUTOINDEX USED: NOSORT USED: FOCUS AUTOPATH USED: NOAGGREGATION BY EXT.SORT: NO HOLD FROM EXTERNAL SORT: NO>
Reference: ? STAT Query Information
The following information displays:
RECORDS Is for TABLE, TABLEF, and MATCH commands. It indicates the number of data source records used in the report. The meaning of a record depends on the type of data source used.
LINES Is for TABLE and TABLEF commands. It indicates the number of lines displayed in a report.
BASEIO Is for TABLE,TABLEF,GRAPH, MODIFY, and FSCAN command. It indicates the number of I/O operations performed on the data source.
SORTIO Is for TABLE, TABLEF, GRAPH, and MATCH commands. It indicates the number of I/O operations performed on the FOCSORT file, which is a work file invisible to the end user.
SORTPAGES Is for TABLE and TABLEF commands. It indicates the number of physical records in the FOCSORT file.
Developing Applications 155

Displaying Command Statistics
READS Is for the MODIFY and FSCAN commands. It indicates the number of fixed format records read in external files by the FIXFORM command.
TRANSACTIONS Is for the MODIFY and FSCAN commands. It indicates the number of transactions processed.
ACCEPTED Is for the MODIFY and FSCAN commands. It indicates the number of transactions accepted.
SEGS INPUT Is for the MODIFY and FSCAN commands. It indicates the number of segment instances accepted in the data source.
SEGS CHNGD Is for the MODIFY and FSCAN commands. It indicates the number of segment instances updated in the data source.
SEGS DELTD Is for the MODIFY and FSCAN commands. It indicates the number of segment instances deleted from the data source.
NOMATCH Is for the MODIFY and FSCAN commands. It indicates the number of transactions rejected for lack of matching values in the data source. This occurs on an ON NOMATCH REJECT condition.
DUPLICATES Is for the MODIFY and FSCAN commands. It indicates the number of transactions rejected because the matching field values already exist in the data source. This occurs on an ON MATCH REJECT condition.
FORMAT ERRORS Is for the MODIFY and FSCAN commands. It indicates the number of transactions rejected because field values for data fields do not conform to the field formats defined in the Master File.
INVALID CONDTS Is for the MODIFY and FSCAN commands. It indicates the number of transactions rejected because the values failed validation tests.
OTHER REJECTS Is for the MODIFY and FSCAN commands. It indicates the number of transactions rejected for reasons other than those listed above.
CACHE READS Is the number of cache reads performed. For details, see CACHE in Chapter 1, Customizing Your Environment.
MERGES Is the number of times that merge routines were invoked.
SORT STRINGS Is the number of times that the sort capacity was exceeded.
INTERNAL MATRIXCREATED
Indicates how report sorting was handled. If an external sort handled it entirely, the value is NO; if both the application and an external sort handled it, the value is Y.
156 Information Builders

Querying Your Environment
Displaying StyleSheet Parameter Settings
The ? STYLE command displays the current settings for StyleSheet parameters.
Syntax: How to Display StyleSheet Parameter Settings
? [SET] STYLE
SORT USED Is the type of sort facility used. It can have a value of FOCUS, EXTERNAL, SQL, or NONE. NONE means that the report did not require sorting.
AGGREGATION BY EXT. SORT
Uses external sorts to perform aggregation.
AUTOINDEX USED Automatically takes advantage of indexed fields to speed data retrieval.
AUTOPATH USED Selects an optimal retrieval path for accessing a data source.
HOLD FROM EXTERNAL SORT
Creates hold files with an external sort.
How to:
Display StyleSheet Parameter Settings
Example:
Displaying StyleSheet Parameter Settings
Reference:
? STYLE Query Information
Developing Applications 157

Displaying StyleSheet Parameter Settings
Example: Displaying StyleSheet Parameter Settings
Issuing the command
? STYLE
produces information similar to the following:
ONLINE-FMTOFFLINE-FMT STANDARDSTYLESHEET ONSQUEEZE OFFPAGESIZE LETTERORIENTATION PORTRAITUNITS INCHESLABELPROMPT OFFLEFTMARGIN .250RIGHTMARGIN .250TOPMARGIN .250BOTTOMMARGIN .250STYLEMODE FULLTARGETFRAMEFOCEXURLBASEURL
Note: OFFLINE-FMT is not supported. ONLINE-FMT and FOCEXURL apply to WebFOCUS.
Reference: ? STYLE Query Information
The following StyleSheet information is listed:
STYLESHEET Rejects or accepts StyleSheet parameters that specify formatting options such as page size, orientation, and margins.
LABELPROMPT Specifies on which label of the first page to begin printing a multi-pane report, such as a mailing label report.
STYLEMODE Speeds the retrieval of large report output by displaying output in multiple HTML tables where each table is a separate report page.
ORIENTATION Is the page orientation for styled reports. Can be either portrait or landscape.
UNITS Is the unit of measure for PostScript and PDF report output, as either inches, centimeters, or points.
TOPMARGIN Is the top boundary for a page of report output.
BOTTOMMARGIN Is the bottom boundary for a page of report output.
158 Information Builders

Querying Your Environment
Displaying Information About the SU MachineThe ? SU command displays the communication available to the FOCUS Database Server.
Syntax: How to Display Information About the FOCUS Database Server
? SU [userid|ddname]
where:
userid
Is a sync machine user ID.
ddname
Is a valid ddname.
Example: Displaying Information About the FOCUS Database Server
Issuing the command
? SU SYNCA
produces the following information:
USERID FILEID QUEUE
WIBMLH QUERYWIBJBP CAR
Displaying Data Sources Specified With USEThe ? USE command displays data sources specified with the USE command.
Syntax: How to Display Data Sources Specified With USE
To display data sources specified with the USE, issue the command:
? USE
LEFTMARGIN Is the left boundary for a page of report output.
RIGHTMARGIN Is the right boundary for a page of report output.
TARGETFRAME Is a frame to which all drill-down hyperlinks are directed.
BASEURL Is the default location where the browser searches for relative URLs specified in the HTML documents created by your application.
Developing Applications 159

Displaying Global Variable Values
Example: Displaying Data Sources Specified With USE
Issuing the command
? USE
produces information similar to the following:
DIRECTORIES IN USE ARE:CAR FOCUS FEMPLOYEE FOCUS FLEDGER FOCUS F
Displaying Global Variable ValuesThe ? && command lists Dialogue Manager global variables and the current values. Global variables maintain the values for all procedures executed during a FOCUS session. .
Note: You can query all Dialogue Manager variables (local, global, system, and statistical) from a stored procedure by issuing:
-? &
See your Dialogue Manager documentation for details.
Syntax: How to Display Global Variable Values
? &&
Your site may replace the ampersand (& or &&) indicating Dialogue Manager variables, with another symbol. In that case, use the replacement symbol in your query command. For example, if your installation uses the percent sign (%) to indicate Dialogue Manager variables, list global variables by issuing:
? %%
Example: Displaying Global Variable Values
Issuing the command
? &&
produces information similar to the following:
&&STORECODE 001&&STORENAME MACYS
The maximum length of the file name is 64 characters when using the WHENCE command.
160 Information Builders

FOCUS
3
Developing App
Managing Flow of Control in an Application
Dialogue Manager is the part of the FOCUS language that controls the execution of your application’s components. You can add flexibility to your application design by dynamically managing the flow or control in procedures using Dialogue Manager commands and variables whose values are supplied at run time.
Topics:
❏ Uses for Dialogue Manager
❏ Dialogue Manager Processing
❏ Creating a Procedure
❏ Executing and Terminating a Procedure
❏ Navigating a Procedure
❏ Using Variables in a Procedure
❏ Supplying and Verifying Values for Variables
❏ Manipulating and Testing Variables
❏ Debugging a Procedure
❏ Issuing an Operating System Command
❏ Dialogue Manager Quick Reference
lications 161

Uses for Dialogue Manager
Uses for Dialogue Manager
The following are ways to use Dialogue Manager to control the flow of your application:
❏ Control the execution of a procedure. Use Dialogue Manager control commands to determine the sequence in which FOCUS commands execute and when and how procedures terminate. For details, see Executing and Terminating a Procedure on page 175.
❏ Navigate a procedure. You can conditionally execute requests, repeat execution with program loops, or call another procedure. For details, see Navigating a Procedure on page 181.
❏ Customize a procedure with variables. Dynamically change a procedure’s execution by including variables whose values depend on user input, developer settings, or system information. You can also test a variable’s value, the result of a calculation, the existence of a file, or an operating system condition, and execute or not based on the results of the test. For details, see Using Variables in a Procedure on page 198, Supplying and Verifying Values for Variables on page 215, and Manipulating and Testing Variables on page 240.
❏ Issue operating system commands. You can issue an operating system command to query the environment or load a function and run it. For details on issuing operating system commands, see Issuing an Operating System Command on page 266.
You can also use Dialogue Manager commands and variables to:
❏ Control passwords. You can directly assign and change passwords. For details, see Controlling User Access to Data on page 173.
❏ Send a message to an application user. You can send a message to the user while a procedure is processing to explain the purpose of the procedure, display results, or present other useful information. For details, see Sending a Message to the User on page 171.
❏ Test and debug the application. You can use variables to display command lines as they execute and to test Dialogue Manager command logic. See Debugging a Procedure on page 262.
In this section:
Dialogue Manager Variables Overview
Reference:
Overview of Dialogue Manager Commands
162 Information Builders

Managing Flow of Control in an Application
Reference: Overview of Dialogue Manager Commands
For descriptions and syntax, see Dialogue Manager Quick Reference on page 266.
Command Meaning
-* Is a comment line; it has no action.
-CLOSE ddname Closes the specified -READ or -WRITE file.
-CLOSE * Closes all -READ and -WRITE files currently open.
-CMS Executes a CMS command from within Dialogue Manager.
-CMS RUN In CMS, loads and executes a user-written function.
-CRTCLEAR Clears the screen display.
-CRTFORM Initiates full-screen variable data entry.
-DEFAULT-DEFAULTS
Presets initial values for variable substitution.
-EXIT Executes stacked commands and returns to the FOCUS prompt.
-GOTO Establishes an unconditional branch.
-HTMLFORM For use with the Web Interface to FOCUS.
-IF Tests and branches control based on test results.
-INCLUDE Dynamically incorporates one procedure in another.
-label User-supplied name identifying the target for -GOTO or -IF.
-MVS RUN Same as -TSO RUN.
-PASS Sets password directly.
-PROMPT Types a prompt message on the screen and reads a reply.
-QUIT Exits the procedure without executing stacked commands.
-READ Reads records from a sequential file.
-REPEAT Executes a loop.
-RUN Executes all stacked FOCUS commands and returns to procedure for further processing.
-SET Assigns a value to a variable.
Developing Applications 163

Uses for Dialogue Manager
Dialogue Manager Variables Overview
You can write procedures containing variables which values are unknown until run time, allowing a user to customize the procedure by supplying different values each time it executes. Variables fall into two categories:
❏ Local and global variables. Local and global variable values must be supplied at run time. Local variables retain the values only for one procedure. Global variables retain the values across procedures unless you explicitly clear them. They lose the values when you exit from FOCUS. You create a local variable by choosing a name that starts with a single ampersand (&); you create a global variable by choosing a name that starts with a double ampersand (&&).
❏ System and statistical variables. System and statistical variable values are automatically supplied by the system when a procedure references them. System and statistical variables have names that begin with a single ampersand (&). For example, the variable &LINES indicates how many lines of output were produced, and the variable &DATE indicates the current date.
For complete information, see Using Variables in a Procedure on page 198, Supplying and Verifying Values for Variables on page 215, and Manipulating and Testing Variables on page 240.
-TSO RUN In MVS/TSO, loads and executes a user-written function.
-TYPE Types informative message to screen or other output device.
-WINDOW Invokes Window Painter, transferring control from the procedure to the specified window file.
-WRITE Writes a record to a sequential file.
-"…" Brackets contents for -CRTFORM display line.
-? SET parameter &myvar
Captures the value of a settable parameter in &myvar.
-? &[variablename] Displays the values of currently defined amper variables.
Command Meaning
164 Information Builders

Managing Flow of Control in an Application
Dialogue Manager Processing
Modify your application at run time with user input and environment conditions by using Dialogue Manager stored procedures, which include commands and variables.
In the FOCUS community, stored procedures are often referred to as FOCEXECs. In this document they are referred to as procedures.
The following diagram illustrates how a Dialogue Manager procedure is processed.
Example:
Processing a Procedure
FOCEXECExec
FOCEXECProcessor
Resolve Variables
FOCSTACK
FOCUSCOMMAND
PROCESSOR(Executes FOCSTACK)
TABLE MODIFY FOCEXEC
Terminal(Enter Values)
1
2
4
5
3
6
Developing Applications 165

Dialogue Manager Processing
1. Processing begins from the command processor when a procedure is invoked for execution at the FOCUS prompt (for example, EX SLRPT).
2. The FOCEXEC Processor reads each line of the procedure. Any variables on the line are assigned the current values.
3. If a variable is missing a value, FOCUS issues a prompt. The user then supplies the missing value.
All Dialogue Manager commands execute as soon as Dialogue Manager reads them.
4. When a command line containing no Dialogue Manager commands is fully expanded with any variables resolved (through either a -SET command or prompting), it is placed onto the command execution stack (FOCSTACK).
5. Dialogue Manager execution commands (for example, -RUN) and statistical variables flush the FOCSTACK and route all currently stacked commands to the FOCUS Command Processor.
By the time your FOCSTACK is ready for execution, this has happened:
❏ All variables have received values and these values have been integrated into the command lines containing variables.
❏ Dialogue Manager commands have been used to place FOCUS commands into proper sequential order for execution.
❏ At this point the FOCUS Command Processor no longer sees any Dialogue Manager commands. It only sees FOCUS command lines in the stack.
For an illustration, see Processing a Procedure on page 167, where the FOCUS Command Processor routes execution to the TABLE module and executes the TABLE request that was stacked.
Note: Any FOCUS command can be placed in a procedure, including the EXEC command. When an EXEC command is processed in a procedure, the commands from the new procedure are first stacked and then executed.
166 Information Builders

Managing Flow of Control in an Application
Example: Processing a Procedure
The following example traces the execution process of a procedure. The numbers at the left refer to explanatory notes that follow the example.
1. -TOP2. -PROMPT &WHICHCITY.ENTER NAME OF CITY OR DONE.3. -IF &WHICHCITY EQ 'DONE' GOTO QUIT;4. TABLE FILE SALES SUM UNIT_SOLD BY PROD_CODE IF CITY IS &WHICHCITY END5. -RUN6. -GOTO TOP7. -QUIT
Assume this procedure is stored in a file named SLRPT. To execute it, the user types either of the following:
EXEC SLRPT
or
EX SLRPT
The following describes the individual steps of the procedure:
1. -TOP
This is a label, which serves as a target to which -IF … GOTO or -GOTO commands transfer processing control. Labels call for no special processing, so control passes to the next command.
2. -PROMPT &WHICHCITY.ENTER NAME OF CITY OR DONE.
The prompt “ENTER NAME OF CITY OR DONE” appears on the terminal. Assume the user types “STAMFORD” and the variable value is stored for later use. Processing continues with the next line.
3. -IF &WHICHCITY EQ 'DONE' GOTO QUIT;
Had DONE been entered, control would pass to -QUIT at the bottom of the procedure. This would end processing, cause an immediate exit from this procedure, and return control to the FOCUS prompt. Since STAMFORD was entered, processing continues with the next line.
Developing Applications 167

Dialogue Manager Processing
4. TABLE FILE SALES
. . .
Without a leading hyphen, this is interpreted as a FOCUS command. Only Dialogue Manager commands execute immediately, so the next five lines are placed in the stack where FOCUS commands are kept until executed; this is referred to as FOCSTACK. Note that the value STAMFORD, entered in response to the prompt, is inserted into the FOCUS command line as the value for &WHICHCITY.
At this point the FOCSTACK looks like:
TABLE FILE SALESSUM UNIT_SOLDBY PROD_CODEIF CITY IS STAMFORDEND
Control passes to the next Dialogue Manager command.
5. -RUN
This command sends the stack to FOCUS, which executes the stored request and returns control to the next Dialogue Manager command.
6. -GOTO TOP
Control is now routed back to -TOP, thus establishing a loop. Execution continues from -TOP with the -PROMPT command.
7. -QUIT
This command is reached when the user types DONE in response to the prompt. The procedure is exited and the FOCUS prompt appears.
168 Information Builders

Managing Flow of Control in an Application
Creating a Procedure
You can use the FOCUS integrated text editor, TED, or invoke your system editor from FOCUS with the IEDIT command to create procedures that contain Dialogue Manager functionality. IEDIT is especially useful with variable length files or those whose record lengths are greater than 80 characters.
TED and IEDIT have two valuable features for creating and editing procedures:
❏ If you issue the TED command, or invoke your system editor using the IEDIT command without specifying a procedure name, the last executed procedure is automatically selected. This is convenient when developing and testing new procedures.
❏ Test the execution of the procedure by typing RUN on the command line in TED or in a system editor accessed with the IEDIT command. RUN automatically saves the procedure and executes it. If there is an error in your procedure, type TED or IEDIT to bring you back to the editor. It places you directly on the line in which the error was detected.
For details, see Editing Files With TED and Invoking Your System Editor With IEDIT in the Overview and Operating Environments manual.
These options complement the FILE and SAVE options that are common to other editors.
In addition to Dialogue Manager commands and variables that directly affect an application’s flow of control, you can use commands to:
❏ Add comments to a procedure. See Including Comments in a Procedure on page 170.
❏ Send messages to the terminal. See Sending a Message to the User on page 171.
❏ Control user access to data. See Controlling User Access to Data on page 173.
You can also create a profile procedure that defines startup conditions and can include Dialogue Manager commands. See Creating a Startup Procedure on page 174.
In this section:
Including Comments in a Procedure
Sending a Message to the User
Controlling User Access to Data
Creating a Startup Procedure
Reference:
Rules for Creating Procedures
Developing Applications 169
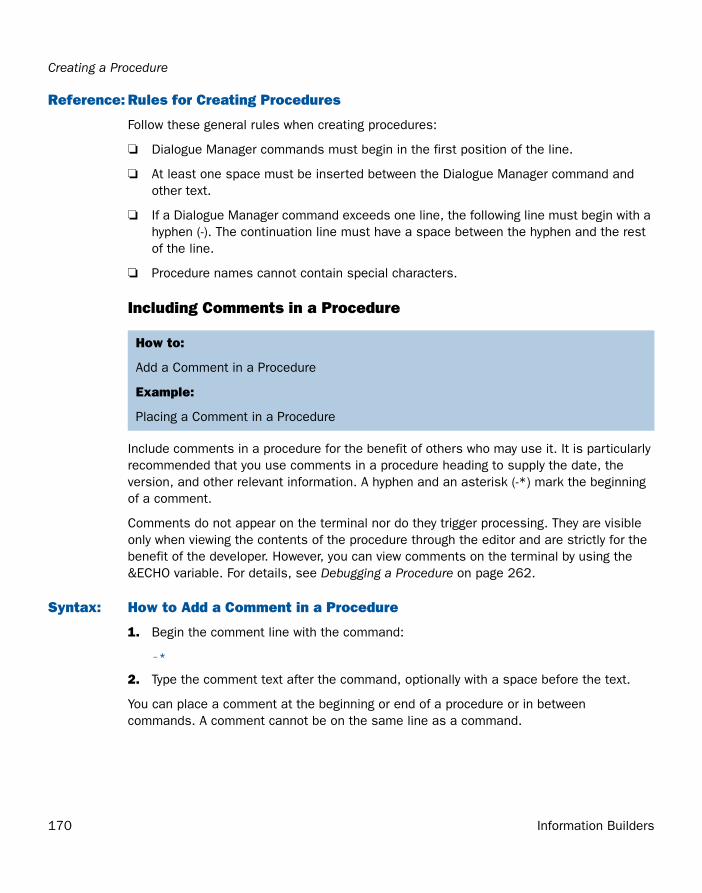
Creating a Procedure
Reference: Rules for Creating Procedures
Follow these general rules when creating procedures:
❏ Dialogue Manager commands must begin in the first position of the line.
❏ At least one space must be inserted between the Dialogue Manager command and other text.
❏ If a Dialogue Manager command exceeds one line, the following line must begin with a hyphen (-). The continuation line must have a space between the hyphen and the rest of the line.
❏ Procedure names cannot contain special characters.
Including Comments in a Procedure
Include comments in a procedure for the benefit of others who may use it. It is particularly recommended that you use comments in a procedure heading to supply the date, the version, and other relevant information. A hyphen and an asterisk (-*) mark the beginning of a comment.
Comments do not appear on the terminal nor do they trigger processing. They are visible only when viewing the contents of the procedure through the editor and are strictly for the benefit of the developer. However, you can view comments on the terminal by using the &ECHO variable. For details, see Debugging a Procedure on page 262.
Syntax: How to Add a Comment in a Procedure
1. Begin the comment line with the command:
-*
2. Type the comment text after the command, optionally with a space before the text.
You can place a comment at the beginning or end of a procedure or in between commands. A comment cannot be on the same line as a command.
How to:
Add a Comment in a Procedure
Example:
Placing a Comment in a Procedure
170 Information Builders

Managing Flow of Control in an Application
The following entry is valid:
.
.
.-*Version 2 06/10/00-RUN
The following is invalid:
-RUN -*Version 2 06/10/00
Example: Placing a Comment in a Procedure
The following example places a comment at the beginning of a procedure.
-* Version 1 08/26/02 HRINFO ProcedureTABLE FILE CENTHR . . .
Sending a Message to the User
You can use the -TYPE command to send a message to the terminal while a procedure is processing. Typically, the message serves the following purposes:
❏ Explains the purpose of the procedure.
❏ Displays the results of a procedure or calculation during testing of a procedure.
❏ Presents other useful information.
❏ Indicates what type of information to supply in response to a prompt.
How to:
Send a Message to the User
Example:
Sending a Message
Developing Applications 171

Creating a Procedure
Syntax: How to Send a Message to the User
-TYPE sends the message to the terminal as soon as it is encountered in the processing of a procedure. The syntax is
-TYPE[+|0|1] text
or
-label TYPE text
where:
text
Is the message to be sent. The message is sent to the screen, followed by a line feed. It remains on screen until scrolled off or replaced by a new screen.
If you include quotation marks around the text, they are displayed as part of the message. (This differs from the use of TYPE in MODIFY, where quotation marks are used as delimiters and must enclose informative text.)
-label
Is the target of a -GOTO or -IF.
+|0|1
Are optional entries that pass printer control characters to the output device. They are particularly useful for character printers. Options + and 1 do not work on IBM 3270-type terminals.
+ suppresses the line feed following the printing of text.0 forces a line feed before the message text is displayed.
1 forces a page eject before the message text is printed.
If supplied, these values must follow -TYPE without a space.
Example: Sending a Message
The following example illustrates the use of -TYPE to inform a user about the content of a report:
-* Version 1 06/26/00 SLRPT Procedure-* Component of Retail Sales Reporting Module-TYPE This report calculates percentage of returns.TABLE FILE SALES . . .END
172 Information Builders

Managing Flow of Control in an Application
Controlling User Access to Data
You can issue and control passwords with the -PASS command. This is especially useful for specifying a password for a particular file or set of files that a given user can read from or write to. Passwords have detailed sets of functions associated with them through the DBA facility.
The procedure that sets passwords can be encrypted so that it and the passwords that it sets cannot be typed and made known.
A variable can also be associated with -PASS so that you can prompt for and assign a password value. You can also check the value of the password and skip or execute a portion of the procedure depending on the value.
Syntax: How to Set a Password in a Procedure
-PASS password
where:
password
Is a password or a variable containing a password.
Since -PASS is a Dialogue Manager command, it executes immediately and is not sent to the FOCSTACK. This means that the user need not issue the password with the SET command.
How to:
Set a Password in a Procedure
Developing Applications 173

Creating a Procedure
Creating a Startup Procedure
You can establish startup conditions in a profile that executes its content immediately upon entry into FOCUS. Using this procedure you can:
❏ Establish standard conditions that apply throughout the subsequent working session. For example, you can predefine environment parameters or automatically compute variables and make them available for later use.
❏ Provide a menu of subsequent user options.
❏ Control use of an application.
You can create a profile using any text editor or the FOCUS editor TED. The file is a procedure (FOCEXEC) named PROFILE.
Note: It is possible to use an alternate procedure as a profile or not to execute a profile at all. For more information, see the Overview and Operating Environments manual.
Example: Creating a Startup Profile
The following example creates a startup profile (under CMS):
USESALES FOCUS A1MASTER FOCUS C1ENDCMS FILEDEF MYSAV DISK SAVE TEMP (LRECL 304 RECFM VDEFINE FILE SALESRATIO/D5.2 = (RETURNS/UNIT_SOLD);END-TYPE FOCUS SESSION ON &DATE MDYY &TOD
LET WORKREPORT=TABLE FILE EMPLOYEESET LINES=57, PAPER=66, PAGE=OFFOFFLINE
Upon entering FOCUS, the profile is executed and a message, introduced by the -TYPE command, displays the current date and time.
Example:
Creating a Startup Profile
174 Information Builders

Managing Flow of Control in an Application
Executing and Terminating a Procedure
You can use Dialogue Manager commands to manage the execution and termination of a procedure. The commands used for these purposes are EXEC, -RUN, -EXIT, -QUIT, and -QUIT FOCUS.
❏ EXEC executes the named procedure.
❏ -RUN causes immediate execution of all stacked commands, closes any external files, and continues the procedure. See Executing Stacked Commands and Continuing the Procedure on page 177 for more information.
❏ -EXIT forces the execution of stacked commands, and closes the procedure. For more information, see Executing Stacked Commands and Exiting the Procedure on page 178.
❏ -QUIT cancels execution of any stacked commands and causes an immediate exit from the procedure. For more information, see Canceling the Execution of a Procedure on page 179.
❏ -QUIT FOCUS terminates a procedure and exits FOCUS. For more information, see Canceling the Execution of a Procedure on page 179.
In this section:
Executing Procedures
Executing Stacked Commands and Continuing the Procedure
Executing Stacked Commands and Exiting the Procedure
Canceling the Execution of a Procedure
Locking Procedure Users Out of FOCUS
Developing Applications 175

Executing and Terminating a Procedure
Executing Procedures
Procedures are generally initiated from the FOCUS prompt (>). Type the EXEC command followed by the name of the procedure to run.
If you wish to supply arguments for the procedure, see Supply a Variable Value on the Command Line on page 231.
You can execute a single procedure or call and execute one procedure from within another one. For details, see Calling Another Procedure With EXEC on page 196.
Syntax: How to Execute a Procedure
EX[EC] procedure
where:
procedure
Is the name of the procedure.
Example: Executing a Procedure
To summon a procedure named SLRPT for execution, enter either:
EXEC SLRPT
or
EX SLRPT
How to:
Execute a Procedure
Example:
Executing a Procedure
176 Information Builders

Managing Flow of Control in an Application
Executing Stacked Commands and Continuing the Procedure
You can execute stacked commands and continue the procedure with the -RUN command.
The -RUN command causes immediate execution of all stacked commands and closes any external files opened with -READ or -WRITE. For related information, see Reading Variable Values From and Writing Variable Values to an External File on page 224.
Following execution of the stacked commands, processing of the procedure continues with the line that follows -RUN.
Example: Executing Stacked Commands and Continuing the Procedure
The following illustrates the use of -RUN to execute stacked code and then return to the procedure. The numbers to the left correspond to the notes explaining the code.
1. TABLE FILE SALES PRINT PROD_CODE UNIT_SOLD BY CITY END2. -RUN TABLE FILE EMPLOYEE PRINT LAST_NAME FIRST_NAME BY DEPARTMENT END
The procedure processes as follows:
1. The first four lines are the report request. Each line is placed on a stack to be executed later.
2. -RUN causes the stacked commands to be executed and the output returned to the terminal. Processing continues with the line following -RUN.
Example:
Executing Stacked Commands and Continuing the Procedure
Developing Applications 177

Executing and Terminating a Procedure
Executing Stacked Commands and Exiting the Procedure
You can execute stacked commands then exit a procedure with the -EXIT command. -EXIT forces the execution of stacked commands as soon as it is encountered.
-EXIT closes all external files, terminates the procedure, and returns to the FOCUS prompt unless the procedure was called by another procedure, in which case control returns to the calling procedure. For related information, see Calling Another Procedure With EXEC on page 196.
Example: Executing Stacked Commands and Exiting the Procedure
In this example, the first report request or the second report request executes, but not both.
1. -SET &PROC = ‘SALES’;2. -IF &PROC EQ 'EMPLOYEE' GOTO EMPLOYEE; -SALES3. TABLE FILE SALES SUM UNIT_SOLD BY PROD_CODE END4. -EXIT -EMPLOYEE TABLE FILE EMPLOYEE PRINT LAST_NAME BY DEPARTMENT END
The procedure processes as follows:
1. Dialogue Manager assigns SALES to &PROC.
2. An -IF test is done, and since the value for &PROC is not EMPLOYEE, the test fails and control is passed to the next line, -SALES.
If the value for &PROC had been EMPLOYEE, control would pass to -EMPLOYEE.
3. The FOCUS code is processed, and stacked to be executed later.
4. -EXIT executes the stacked commands. The output is sent to the terminal and the procedure is terminated.
The request under the label -EMPLOYEE is not executed.
Example:
Executing Stacked Commands and Exiting the Procedure
178 Information Builders

Managing Flow of Control in an Application
This example also illustrates an implicit exit. If the value of &PROC was EMPLOYEE, control would pass to the label -EMPLOYEE after the -IF test, and the procedure would never encounter -EXIT. The TABLE FILE EMPLOYEE request would execute and the procedure would automatically terminate.
Canceling the Execution of a Procedure
You can cancel the execution of a procedure with the -QUIT command. -QUIT cancels execution of any stacked commands and causes an immediate exit from the procedure. Control returns directly to the application regardless of whether the procedure was called by another procedure.
This command is useful if tests or computations generate results that make additional processing unnecessary.
You can use a variation, -QUIT FOCUS, to cancel the execution of a procedure and terminate the FOCUS session. It returns you to the operating system and sets a return code.
Syntax: How to Cancel the Execution of a Procedure
-QUIT
Syntax: How to Cancel the Execution of a Procedure and Exit FOCUS
-QUIT FOCUS [n|8]
where:
n
Is the operating system return code number. It can be a constant or variable. A variable should be an integer. If you do not supply a value or if you supply a non-integer value, the return code posted to the operating system is 8 (the default).
A major function of user-controlled return codes is to detect processing problems. The return code value determines whether to continue or terminate processing. This is particularly useful for batch processing. For related information, see Testing the Status of a Query on page 265.
How to:
Cancel the Execution of a Procedure
Cancel the Execution of a Procedure and Exit FOCUS
Example:
Canceling the Execution of a Procedure
Developing Applications 179

Executing and Terminating a Procedure
Example: Canceling the Execution of a Procedure
The following example illustrates the use of -QUIT to cancel execution based on the results of an -IF test:
1. -DEFAULT &CODE=’B11’;2. -IF &CODE EQ '0' OR &CODE EQ 'DONE' GOTO QUIT;3. TABLE FILE SALES SUM UNIT_SOLD WHERE PROD_CODE EQ &CODE END 4. -QUIT
The procedure processes as follows:
1. The -DEFAULT command sets the default value for &CODE to B11.
2. The value B11 is passed to &CODE.
3. The FOCUS code is processed, and stacked to be executed later.
4. -QUIT cancels the execution of stacked commands and exits the procedure.
Locking Procedure Users Out of FOCUS
Users can respond to a Dialogue Manager value request with QUIT and return to the FOCUS command level or the prior procedure. In situations where it is important to prevent users from entering native FOCUS or QUIT from a particular procedure, the environment can be locked and QUIT deactivated.
Syntax: How to Lock Procedure Users Out of FOCUS
Enter the following command within the procedure:
-SET &QUIT=OFF;
With QUIT deactivated, any attempt to return to native FOCUS produces an error message indicating that “quit" is not a valid value. The user is prompted for another value.
A user can terminate the FOCUS session from inside a locked procedure by responding to a prompt with
QUIT FOCUS
to return to the operating system, not the FOCUS command level.
Note: The default value for &QUIT is ON.
How to:
Lock Procedure Users Out of FOCUS
180 Information Builders

Managing Flow of Control in an Application
Navigating a Procedure
You can navigate a procedure in the following ways:
❏ Unconditional branching. Transfers control to a label. For details, see Branching Unconditionally on page 182.
❏ Conditional branching. Transfers control to a label depending on the outcome of a test. For details, see Branching Conditionally on page 183.
❏ Looping. Performs a function repeatedly in your procedure. For details, see Looping in a Procedure on page 188.
❏ Calling another procedure. Incorporates a whole or partial procedure into your procedure. For details, see Incorporating Another Procedure With -INCLUDE on page 192 and Calling Another Procedure With EXEC on page 196.
In this section:
Branching Unconditionally
Branching Conditionally
Looping in a Procedure
Incorporating Another Procedure With -INCLUDE
Nesting Procedures With -INCLUDE
Calling Another Procedure With EXEC
Developing an Open-Ended Procedure
Developing Applications 181

Navigating a Procedure
Branching Unconditionally
You can perform unconditional branching, which transfers control to a label with the -GOTO command.
The first time through a procedure, Dialogue Manager notes the addresses of all the labels so they can be found immediately if needed again. If Dialogue Manager hasn’t stored the address of the label in the -GOTO command, it searches forward through the procedure for the target label. If no label is found, it begins searching at the top of the procedure.
Dialogue Manager takes no action on labels that do not have a corresponding -GOTO. If a -GOTO does not have a corresponding label, execution halts and an error message is displayed.
Syntax: How to Branch Unconditionally
-GOTO label . . .-label [TYPE text]
where:
-label
Is a user-defined name of up to 12 characters. Do not use embedded blanks or the name of any other Dialogue Manager command except -QUIT or -EXIT. Do not use arithmetic or logical operations, words that can be confused with functions, or reserved words such as CONTINUE.
The label text may precede or follow the -GOTO command in the procedure.
Note: When the label is specified in the -GOTO command, a dash does not precede it.
TYPE text
Sends a message to the terminal.
How to:
Branch Unconditionally
Example:
Branching Unconditionally
182 Information Builders

Managing Flow of Control in an Application
Example: Branching Unconditionally
The following example “comments out” all the FOCUS code using an unconditional branch. This is more efficient that placing -* in front of every line:
-GOTO DONETABLE FILE SALESPRINT UNIT_SOLD RETURNSBY PROD_CODE,CITYEND -RUN -DONE
Branching Conditionally
Conditional branching performs a test of the values of variables and, based on the test, transfers control to a label in the procedure with the -IF... GOTO command. This helps control the execution of requests and builds a dynamic procedure by choosing to execute or not execute parts of a procedure.
For example, you can check whether an extract file was created from a production data source. If the extract file exists, the program runs a set of reports against the extract. If it does not exist, the program branches around the reports and writes a message to a log file.
Note: Generally, an -IF test does not require that each test specify a target label. However, in a compound IF test, where a series of tests are nested within each other, a specified target label is required for each test.
How to:
Branch Conditionally
Example:
Performing Conditional Branching
Conditional Branching Based on Testing of System and Statistical Variables
Conditional Branching Based on User Input
Conditional Branching Based on a Compound -IF Test
Developing Applications 183

Navigating a Procedure
Syntax: How to Branch Conditionally
-IF expression [THEN] GOTO label1 [ELSE IF...] [ELSE GOTO label2] ;
where:
expression
Is a valid expression. Literals do not need to be enclosed in single quotation marks unless they contain embedded blanks or commas.
THEN
Is an optional word that increases readability of the command.
label1
Is a user-defined name of up to 12 characters to which to pass control if the -IF test is true. Do not use embedded blanks or the name of any other Dialogue Manager command except -QUIT or -EXIT. Do not use arithmetic or logical operations, words that can be confused with functions, or reserved words such as CONTINUE.
The label text may precede or follow the -IF criteria in the procedure.
ELSE IF
Specifies a compound -IF test. The command -IF must end with a semicolon to signal that all logic has been specified. For more information see Conditional Branching Based on a Compound -IF Test on page 187.
ELSE GOTO label2
Passes control to label2 when the -IF test fails.
If a command spans more than one line, continuation lines must begin with a hyphen and one or more spaces.
184 Information Builders

Managing Flow of Control in an Application
Example: Performing Conditional Branching
The following example passes control to the label -PRODSALES if &OPTION is equal to S. Otherwise, control passes to the label -PRODRETURNS, the next line in the procedure.
-IF &OPTION EQ 'S' GOTO PRODSALES;-PRODRETURNSTABLE FILE SALESPRINT PROD_CODE UNIT_SOLDBY STORE_CODEEND-EXIT-PRODSALESTABLE FILE SALESSUM UNIT_SOLDBY PROD_CODEEND-EXIT
The following command specifies both transfers explicitly:
-IF &OPTION EQ 'S' GOTO PRODSALES ELSE- GOTO PRODRETURNS;
Notice that the continuation line begins with a hyphen and includes a space after the hyphen.
Example: Conditional Branching Based on Testing of System and Statistical Variables
In the following example, if data (&LINES) is retrieved with the request, then the procedure branches to the label -PRODSALES; otherwise, it terminates.
TABLE FILE SALESSUM UNIT_SOLDBY PROD_CODE BY CITYWHERE TOTAL UNIT_SOLD GE 50ON TABLE HOLDEND -RUN-IF &LINES NE 0 GOTO PRODSALES;-EXIT-PRODSALESTABLE FILE SALESSUM UNIT_SOLDBY PROD_CODE ACROSS CITYEND
Developing Applications 185

Navigating a Procedure
Example: Conditional Branching Based on User Input
In the following example, the first report request or the second report request, but not both, executes. Suppose that for the procedure to run a user must supply a value for a variable named &PROC. The user may enter SALES or EMPLOYEE.
1. -IF &PROC EQ 'EMPLOYEE' GOTO EMPLOYEE;2. -SALES TABLE FILE SALES SUM UNIT_SOLD BY PROD_CODE END3. -EXIT -EMPLOYEE TABLE FILE EMPLOYEE PRINT PLANT_NAME BY DEPARTMENT END
The procedure processes as follows:
1. The user enters the value SALES for &PROC. An -IF test is done, and since the value for &PROC is not EMPLOYEE, the test fails and control is passed to the next line, -SALES
If the value for &PROC had been EMPLOYEE, control would pass to -EMPLOYEE.
2. The FOCUS code is processed, and stacked to be executed later.
3. -EXIT executes the stacked commands. The output is sent to the terminal and the procedure is terminated.
The request under the label -EMPLOYEE is not executed.
186 Information Builders

Managing Flow of Control in an Application
Example: Conditional Branching Based on a Compound -IF Test
A compound -IF test is a series of nested -IF tests nested. In a compound -IF test, each test must specify a target label.
In this example, if the value of &OPTION is neither R nor S, the procedure terminates (-GOTO QUIT). -QUIT serves both as a target label for the GOTO and as an executable command. For the procedure to run, a user must supply a value for a variable named &OPTION.
-IF &OPTION EQ 'R' THEN GOTO PRODRETURNS ELSE IF- &OPTION EQ 'S' THEN GOTO PRODSALES ELSE- GOTO QUIT;-PRODRETURNSTABLE FILE SALESPRINT PROD_CODE UNIT_CODEBY STORE_CODEEND-EXIT-PRODSALESTABLE FILE SALESSUM UNIT_SOLDBY PROD_CODEEND-RUN-QUIT
Developing Applications 187

Navigating a Procedure
Looping in a Procedure
You can perform an action repeatedly by looping in your procedure with the -REPEAT command. Looping can be used for many tasks. For example, you can populate an indexed variable using a loop or use the output of a request in a second request.
A process loop can be executed a designated number of times or until a condition is met. A loop ends when any of the following occurs:
❏ It is executed in its entirety.
❏ A -QUIT or -EXIT command is issued.
❏ A -GOTO is issued to a label outside of the loop.
Note: If you issue another -GOTO later in the procedure to return to the loop, the loop proceeds from the point at which it left off.
Note that the -SET command provides another method for implementing loops. See Controlling Loops With -SET on page 191.
Tip: During loop processing, the search for labels that indicate the target of a -REPEAT or a -GOTO command takes longer in a procedure with variable, rather than fixed (80 character), record lengths. To speed execution in this situation, consider replacing loops with EX or -INCLUDE commands. See Incorporating Another Procedure With -INCLUDE on page 192 and Calling Another Procedure With EXEC on page 196.
How to:
Specify a Loop
Example:
Repeating a Loop
Controlling Loops With -SET
188 Information Builders

Managing Flow of Control in an Application
Syntax: How to Specify a Loop
-REPEAT label n TIMES
or
-REPEAT label WHILE condition
or
-REPEAT label FOR &variable [FROM fromval] [TO toval] [STEP s]
where:
label
Identifies the code to be repeated (the loop). A label can include another loop if the label for the second loop has a different name than the first.
n TIMES
Specifies the number of times to execute the loop. The value of n can be a local variable, a global variable, or a constant. If it is a variable, it is evaluated only once, so you cannot change the number of times to execute the loop. The loop can only be ended early using -QUIT or -EXIT.
WHILE condition
Specifies the condition under which to execute the loop. The condition is any logical expression that can be true or false. The loop executes if the condition is true.
&variable
Is a variable that is tested at the start of each execution of the loop and incremented by s with each execution. It is compared with the value of fromval and toval, if supplied. The loop is executed only if &variable is greater than or equal to fromval or less than or equal to toval.
fromval
Is a constant that is compared with &variable at the start of the execution of the loop. The default value is 1.
toval
Is a value that is compared with &variable at the start of the execution of the loop. The default value is 1,000,000.
STEP s
Is a constant used to increment &variable at the end of the execution of the loop. It may be positive or negative. The default increment is 1.
Note: The parameters FROM, TO, and STEP can appear in any order.
Developing Applications 189

Navigating a Procedure
Example: Repeating a Loop
These examples illustrate each syntactical element of -REPEAT.
-REPEAT label n TIMES
For example:
-REPEAT LAB1 2 TIMES-TYPE INSIDE-LAB1 TYPE OUTSIDE
The output is:
INSIDEINSIDEOUTSIDE
-REPEAT label WHILE condition
For example:
-SET &A = 1;-REPEAT LABEL WHILE &A LE 2;-TYPE &A-SET &A = &A + 1;-LABEL TYPE END: &A
The output is:
12END: 3
-REPEAT label FOR &variable FROM fromval TO toval STEP s
For example:
-REPEAT LABEL FOR &A STEP 2 TO 4-TYPE INSIDE &A-LABEL TYPE OUTSIDE &A
The output is:
INSIDE 1INSIDE 3OUTSIDE 5
190 Information Builders

Managing Flow of Control in an Application
Example: Controlling Loops With -SET
The following example illustrates the use of -SET to control a loop:
1. -DEFAULT &N=02. -START3. -SET &N=&N+1;4. EX SLRPT -RUN5. -IF &N GT 5 GOTO NOMORE;6. -GOTO START5. -NOMORE TYPE EXCEEDING REPETITION LIMIT -EXIT
The procedure executes as follows:
1. The -DEFAULT command gives &N the initial value of 0.
2. -START begins the loop. This is also the target of an unconditional -GOTO.
3. The -SET command increments the value of &N by one each time the loop executes.
4. The FOCUS command EX SLRPT is stacked. -RUN then executes the stacked command.
5. The -IF command tests the current value of the variable &N. If the value is greater than 5, control passes to the label -NOMORE, which displays a message for the end user and forces an exit. If the value of &N is 5 or less, control goes to the next Dialogue Manager command.
6. -GOTO passes control to the -START label, and the loop continues.
Developing Applications 191

Navigating a Procedure
Incorporating Another Procedure With -INCLUDE
You can insert a whole or partial procedure in another procedure with the -INCLUDE command. A partial procedure might contain heading text, or code that should be included at run time based on a test in the calling procedure. It executes immediately when encountered.
A calling procedure cannot branch to a label in a called procedure, and vice versa. When a procedure is included using the -INCLUDE command, the procedure being included has full access to variables defined in the calling procedure.
The -INCLUDE command can be used for the following:
❏ Controlling the environment. For example, the included procedure may set variables such as server name or user name before the calling procedure continues execution.
❏ As a security mechanism. The included procedure can be encrypted and a direct password set.
❏ Shortening the code when there are several possible procedures that may be called. For example, the command -INCLUDE &NEWLINES could be used to determine the called procedure, reducing the number of GOTO commands.
❏ Continuing sections of code used throughout the application such as standard headings and footings. This enables changes made in a single module effect the entire application.
How to:
Incorporate a File
Example:
Incorporating Another Procedure With -INCLUDE
Incorporating a Procedure With a Heading
Incorporating a Procedure for a Virtual Field
192 Information Builders

Managing Flow of Control in an Application
Syntax: How to Incorporate a File
-INCLUDE filename [filetype [filemode]]
where:
filename
Is the name of a FOCUS procedure.
filetype
Is the procedure’s file type on CMS or DDNAME on MVS. If none is included, FOCEXEC is assumed.
filemode
Is the procedure’s file mode on CMS. If none is included, a file mode of A is assumed.
Example: Incorporating Another Procedure With -INCLUDE
In the following example, Dialogue Manager searches for a procedure named DATERPT as specified by the -INCLUDE command.
-IF &OPTION EQ 'S' GOTO PRODSALES ELSE GOTO PRODRETURNS; . . .-PRODRETURNS-INCLUDE DATERPT-RUN . . .
Assume that DATERPT contains the following code, which Dialogue Manager incorporates into the original procedure. Dialogue Manager substitutes a value for the variable &PRODUCT as soon as the -INCLUDE is encountered. -RUN executes the request.
TABLE FILE SALESPRINT PROD_CODE UNIT_SOLDWHERE PROD_CODE EQ '&PRODUCT';END
Developing Applications 193

Navigating a Procedure
Example: Incorporating a Procedure With a Heading
The following incorporates a heading, which is stored as a procedure:
TABLE FILE SALES-INCLUDE SALEHEADSUM UNIT_SOLD AND RETURNS AND COMPUTE . . .
The file SALEHEAD contains:
HEADING"THE ABC CORPORATION""RETAIL SALES DIVISION""MONTHLY SALES REPORT"
This heading is included in the report request.
Example: Incorporating a Procedure for a Virtual Field
The following incorporates a virtual field from a procedure:
-INCLUDE DEFRATIO TABLE FILE SALES-INCLUDE SALEHEAD SUM UNIT_SOLD AND RETURNS AND RATIO BY CITY . . .
The file DEFRATIO creates a virtual field:
DEFINE FILE SALESRATIO/D5.2=(RETURNS/UNIT_SOLD);END
This virtual field is dynamically included before the report request executes.
194 Information Builders

Managing Flow of Control in an Application
Nesting Procedures With -INCLUDE
Any number of different procedures can be invoked from a single calling procedure.
You can also nest a procedure within itself, or recursively. Recursive -INCLUDE commands cannot exceed four levels. For non-recursive -INCLUDE commands, the level of nesting is limited only by the available memory.
Files 1 through 4 are incorporated into the original procedure. All of the included files are viewed as part of the original procedure.
A procedure cannot branch to a label in an included file.
Developing Applications 195
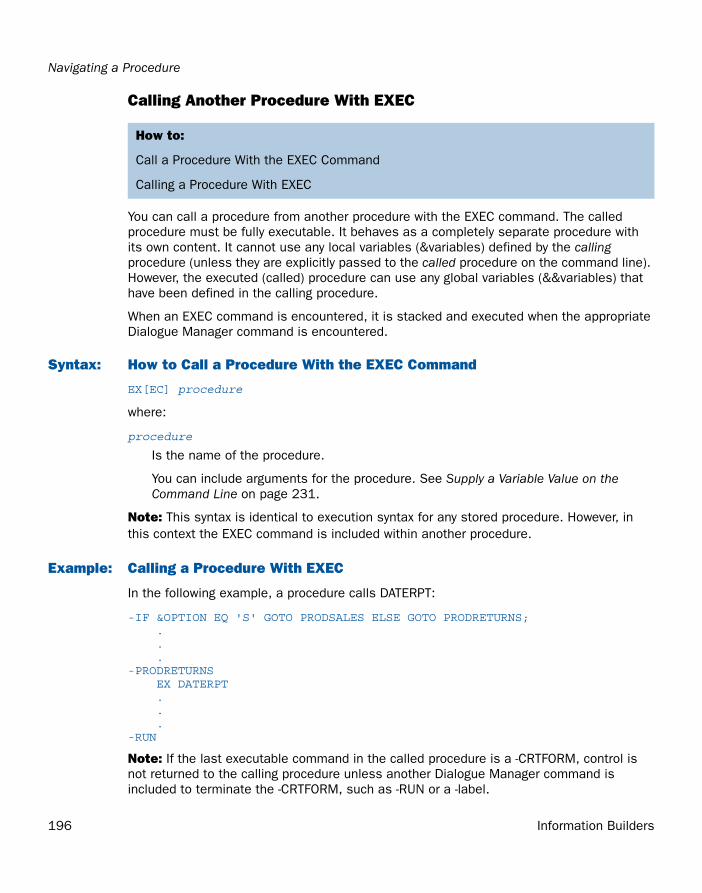
Navigating a Procedure
Calling Another Procedure With EXEC
You can call a procedure from another procedure with the EXEC command. The called procedure must be fully executable. It behaves as a completely separate procedure with its own content. It cannot use any local variables (&variables) defined by the calling procedure (unless they are explicitly passed to the called procedure on the command line). However, the executed (called) procedure can use any global variables (&&variables) that have been defined in the calling procedure.
When an EXEC command is encountered, it is stacked and executed when the appropriate Dialogue Manager command is encountered.
Syntax: How to Call a Procedure With the EXEC Command
EX[EC] procedure
where:
procedure
Is the name of the procedure.
You can include arguments for the procedure. See Supply a Variable Value on the Command Line on page 231.
Note: This syntax is identical to execution syntax for any stored procedure. However, in this context the EXEC command is included within another procedure.
Example: Calling a Procedure With EXEC
In the following example, a procedure calls DATERPT:
-IF &OPTION EQ 'S' GOTO PRODSALES ELSE GOTO PRODRETURNS; . . .-PRODRETURNS EX DATERPT . . .-RUN
Note: If the last executable command in the called procedure is a -CRTFORM, control is not returned to the calling procedure unless another Dialogue Manager command is included to terminate the -CRTFORM, such as -RUN or a -label.
How to:
Call a Procedure With the EXEC Command
Calling a Procedure With EXEC
196 Information Builders

Managing Flow of Control in an Application
Developing an Open-Ended Procedure
A file of stored FOCUS commands without variables looks and executes exactly as though it had been typed interactively into FOCUS from the terminal. However, if there is an error in your procedure file, it will be rejected. If you make an error while typing interactively from the terminal, FOCUS issues prompts to help you correct the error.
If you store a procedure without the END command, you can execute all of the procedure lines. The terminal opens to allow interactive completion of the procedure. You can add additional command lines and enter the END command from the terminal to complete the procedure.
Note that you cannot use amper variables when typing online at a terminal. Open-ended procedures do not support variable substitution in lines entered after the terminal is opened. Variable substitution is supported in the stored portion of the procedure.
Example: Developing and Running an Open-Ended Procedure
Assume the following open-ended procedure is stored as SLRPT:
-TYPE ENTER REST OF PROCEDURE TABLE FILE SALES HEADING CENTER "MONTHLY REPORT" SUM UNIT_SOLD AND RETURNS AND COMPUTE RATIO/D5.2 = 100 * RETURNS/UNIT_SOLD;
You can invoke the procedure by typing EX SLRPT. It executes normally but fails to encounter an END command in the file. It then opens up the terminal displaying the FOCUS prompt. You could supply:
BY STORE_CODEEND
Or, alternatively:
IF CITY IS STAMFORDBY STORE_CODEEND
Example:
Developing and Running an Open-Ended Procedure
Developing Applications 197

Using Variables in a Procedure
Using Variables in a Procedure
Interactive variable substitution is at the heart of Dialogue Manager. You can create procedures that include variables (also called amper variables) and supply values for them at run time. These variables store a string of text or numbers and can be placed anywhere in a procedure. A variable can refer to a field, a command, descriptive text, a file name—literally anything.
Note: A Dialogue Manager variable contains only alphanumeric data. If a function or expression returns a numeric value to a Dialogue Manager variable, the value is truncated to an integer and converted to alphanumeric format before being stored in the variable, unless you specify the precision to use as described in How to Specify Precision for Dialogue Manager Calculations on page 222.
In this section:
Local Variables
Global Variables
System Variables
Statistical Variables
Special Variables
Querying the Values of Variables and Parameters
How to:
Specify a Variable Name
Reference:
Naming Conventions for Local and Global Variables
198 Information Builders
Managing Flow of Control in an Application
Variables fall into two categories:
❏ Local and global variables have values supplied at run time. Local variable values remain in effect for the respective procedure, while global variable values remain in effect for all procedures executed during an entire FOCUS session (that is, from the time you enter FOCUS until you exit with the FIN command).
Leading double ampersands (&&) denote global variables. All other Dialogue Manager variables begin with a single ampersand (&). For this reason, in the FOCUS community they are known as amper variables.
For details, see Local Variables on page 201 and Global Variables on page 202.
❏ System, statistical, and special variables have values that the system automatically resolves whenever you request them.
For details, see System Variables on page 203, Statistical Variables on page 209, and Special Variables on page 212.
The maximum number of local, global, system, statistical, special, and index variables available in a procedure is 1024. Approximately 40 are reserved for use by FOCUS.
Variables can be used only in procedures. They are ignored if you use them while creating reports live at the terminal.
You can query the values of each type of variable you use. For details, see Querying the Values of Variables and Parameters on page 213.
The values for variables may be supplied in a variety of ways. For details, see Supplying and Verifying Values for Variables on page 215.
Reference: Naming Conventions for Local and Global Variables
Local and global variable names are user-defined, while system and statistical variables have predefined names. The following rules apply to the naming of local and global variables:
❏ A local variable name is always preceded by an ampersand (&). The variable can be named or positional.
A positional variable consists of a single ampersand followed by a numeric string (for example, &1). The value of a positional variable is passed to a procedure when it is executed.
❏ A global variable name is always preceded by a double ampersand (&&).
❏ A variable name can consist of up to 100 characters.
Developing Applications 199
Using Variables in a Procedure
❏ Embedded blanks are not permitted in a variable name.
❏ If a value for a variable might contain an embedded blank, comma, or equal sign, enclose the variable in single quotation marks when referred to.
❏ A variable name may be any combination of the characters A through Z, 0 through 9, and the underscore. The first character of the name should be a letter.
❏ You can assign a number instead of a name to a variable to create a positional variable.
❏ The underscore may be included in a variable name, but the following special characters are not permitted: plus sign, minus sign, asterisk, slash, period, ampersand, and semicolon.
Syntax: How to Specify a Variable Name
&[&]name
where:
&
Denotes a local variable. A single ampersand followed by a numeric string denotes a positional variable.
&&
Denotes a global variable.
name
Is the variable name. The name you assign must follow the rules outlined in Naming Conventions for Local and Global Variables on page 199.
200 Information Builders

Managing Flow of Control in an Application
Local Variables
Local variables are identified by a single ampersand (&) preceding the name of the variable. They remain in effect throughout a single procedure.
Example: Using Local Variables
Consider the following procedure, SALESREPORT, in which &CITY, &CODE1, and &CODE2 are local variables:
TABLE FILE SALESHEADING CENTER"MONTHLY REPORT FOR &CITY""PRODUCT CODES FROM &CODE1 TO &CODE2"" "SUM UNIT_SOLD AND RETURNS AND COMPUTERATIO/D5.2 = 100 * (RETURNS/UNIT_SOLD);BY CITYIF CITY EQ &CITYBY PROD_CODEIF PROD_CODE IS-FROM &CODE1 TO &CODE2END
Assume you supply the following values when you call the procedure:
EX SLRPT CITY = STAMFORD, CODE1=B10, CODE2=B20
Dialogue Manager substitutes the values for the variables as follows:
TABLE FILE SALESHEADING CENTER"MONTHLY REPORT FOR STAMFORD""PRODUCT CODES FROM B10 TO B20"" "SUM UNIT_SOLD AND RETURNS AND COMPUTERATIO/D5.2 = 100 * (RETURNS/UNIT_SOLD);BY CITYIF CITY EQ STAMFORDBY PROD_CODEIF PROD_CODE IS-FROM B10 TO B20END
After the procedure executes and terminates, the values STAMFORD, B10, and B20 are lost.
Example:
Using Local Variables
Developing Applications 201

Using Variables in a Procedure
Global Variables
Global variables differ from local variables in that once a value is supplied, it remains current throughout the FOCUS session unless set to another value with -SET or cleared by the LET CLEAR command. For information on LET CLEAR, see Chapter 4, Defining a Word Substitution. Global variables are useful for gathering values at the start of a work session for use by several subsequent procedures. All procedures that use a particular global variable receive the current value until you exit from FOCUS.
Global variables are specified through the use of a double ampersand (&&) preceding the variable name. It is possible to have a local and global variable with the same name. They are distinct and may have different values.
Example: Using Global Variables
The following example illustrates the use of three global variables: &&CITY, &&CODE1, &&CODE2. The values are substituted in the first procedure, PROC1, and the values are retained and passed to the second procedure, PROC2.
TABLE FILE SALESHEADING CENTER"MONTHLY REPORT FOR &&CITY"SUM UNIT_SOLD AND RETURNS AND COMPUTERATIO/D5.2 = 100 * (RETURNS/UNIT_SOLD);BY CITYIF CITY EQ &&CITYBY PROD_CODEIF PROD_CODE IS-FROM &&CODE1 TO &&CODE2ENDEX PROC2
TABLE FILE SALESHEADING CENTER"MONTHLY REPORT FOR &&CITY AND PRODUCT &&CODE1"PRINT UNIT_SOLD AND RETURNS AND COMPUTERATIO/D5.2 = 100 * (RETURNS/UNIT_SOLD);BY CITYIF CITY EQ &&CITYIF PROD_CODE EQ &&CODE1END
Example:
Using Global Variables
202 Information Builders

Managing Flow of Control in an Application
System Variables
FOCUS automatically substitutes values for system variables encountered in a Dialogue Manager request. For example, you can use the system variable &DATE to automatically incorporate the system date in your request.
System-supplied variables should not be overridden. To avoid this possibility, user-supplied variables should not be given system variables names.
Reference: Summary of System Variables
A list of Dialogue Manager system variables follows:
Reference:
Summary of System Variables
Example:
Retrieving the Date Using the System Variable &DATE
Retrieving the Procedure Name Using the System Variable &FOCFOCEXEC
Displaying a Date Using the System Variable &YYMD
Variable Format or Value Description
&DATE MM/DD/YY Returns the current date.
&DATEfmt Any date format. Returns the current date, where fmt can be any valid date format. Because many date format options can be appended to the prefix DATE to form one of these variable names, you should avoid using DATE as the prefix when creating a variable name.
&DMY DDMMYY Returns the current date.
&DMYY DDMMCCYY Returns the current (four-digit year) date.
&FOCCPU milliseconds Calculates the OS CPU time, for MVS only. In CMS, this returns the same value as &FOCTTIME.
&FOCEXTTRM ONOFF
Indicates the availability of extended terminal attributes.
Developing Applications 203

Using Variables in a Procedure
&FOCFEXNAME Returns the name of the FOCEXEC running even if it was executed using an EX command or a -INCLUDE command from within another FOCEXEC. This variable differs from the &FOCFOCEXEC variable because &FOCFOCEXEC returns the name of the calling FOCEXEC only.
&FOCFIELDNAME NEWOLDNOTRUNC
Returns a string indicating whether long and qualified field names are supported. A value of OLD means that they are not supported; NEW means that they are supported; and NOTRUNC means that they are supported, but unique truncations of field names cannot be used.
&FOCFOCEXEC Manages reporting operations involving many similarly named requests that are executed using EX. &FOCFOCEXEC enables you to easily determine which procedure is running. &FOCFOCEXEC can be specified within a request or in a Dialogue Manager command to display the name of the currently running procedure.
&FOCINCLUDE Manages reporting operations involving many similarly named requests that are included using -INCLUDE. &FOCINCLUDE can be specified within a request or in a Dialogue Manager command to display the name of the current included procedure.
&FOCMODE CMSCRJEMSOOSTSO
Identifies the operating environment.
Variable Format or Value Description
204 Information Builders

Managing Flow of Control in an Application
&FOCNEXTPAGE Establishes consecutive page numbering across multiple reports. When a report is processed, the variable &FOCNEXTPAGE is set to the number following the last page number in the report. This value can then be used as the first page number in a subsequent report, making the report output from multiple requests more useful and readable.
&FOCPRINT ONLINEOFFLINE
Returns the current print setting.
&FOCPUTLVL FOCUS PUT level number.
(For example, 9306 or 9310.) &FOCPUTLVL is no longer supported.
&FOCQUALCHAR .:!%|\
Returns the character used to separate the components of qualified field names.
&FOCREL release number Identifies the FOCUS Release number (for example, 6.5 or 6.8).
&FOCSBORDER ONOFF
Whether solid borders are used in full-screen mode.
&FOCSYSTYP HIPERCP/A
CMS system type.
&FOCTMPDSK A … Z Identifies the disk where FOCUS places temporary work files (for example, HOLD files). CMS only.
&FOCTRMSD 24273243
Indicates terminal height. (This can be any value; the examples shown are common settings.)
&FOCTRMSW 80132
Indicates terminal width. (This can be any value; the examples shown are common settings.)
Variable Format or Value Description
Developing Applications 205

Using Variables in a Procedure
&FOCTRMTYP 3270TTYUNKNOWN
Identifies the terminal type.
&FOCTTIME milliseconds Calculates total CPU time. CMS only.
&FOCUSER Returns the connected user ID. Similar to the GETUSER function.
&FOCVTIME milliseconds Calculates virtual CPU time. CMS only.
&HIPERFOCUS ONOFF
Returns a string showing whether HiperFOCUS is on.
&IORETURN Returns the code set by the last Dialogue Manager -READ or -WRITE operation. (0 = successful; 1= unsuccessful.)
&MDY MMDDYY Returns the current date. The format makes this variable useful for numerical comparisons.
&MDYY MMDDCCYY Returns the current (four-digit year) date.
&RETCODE numeric Returns the return code set upon execution of an operating system command. Executes all FOCUS commands in the FOCSTACK just as the -RUN command would.
&SETFILE alphanumeric Contains the value from the SET FILE command.
&TOD HH.MM.SS Returns the current time. When you enter FOCUS, this variable is updated to the current system time only when you execute a MODIFY, SCAN, or FSCAN command. To obtain the exact time during any process, use the HHMMSS function.
&YMD YYMMDD Returns the current date.
&YYMD CCYYMMDD Returns the current (four-digit year) date.
Variable Format or Value Description
206 Information Builders

Managing Flow of Control in an Application
Example: Retrieving the Date Using the System Variable &DATE
The following example incorporates the system variable &DATE into a request. The footing uses the system variable &DATE to insert the current system date at the bottom of the report.
TABLE FILE SALESSUM UNIT_SOLDBY PROD_CODEFOOTING "CALCULATED AS OF &DATE"END
Example: Retrieving the Procedure Name Using the System Variable &FOCFOCEXEC
This example illustrates how to use the system variable &FOCFOCEXEC in a request to display the name of the currently running procedure:
TABLE FILE EMPLOYEE"REPORT: &FOCFOCEXEC -- EMPLOYEE SALARIES"PRINT CURR_SAL BY EMP_IDEND
If the request is stored as a procedure called SALPRINT, when executed it produces the following:
REPORT: SALPRINT -- EMPLOYEE SALARIESEMP_ID CURR_SAL------ --------071382660 $11,000.00112847612 $13,200.00117593129 $18,480.00119265415 $9,500.00119329144 $29,700.00123764317 $26,862.00126724188 $21,120.00219984371 $18,480.00326179357 $21,780.00451123478 $16,100.00543729165 $9,000.00818692173 $27,062.00
&FOCFOCEXEC and &FOCINCLUDE can also be used in -TYPE commands. For example, you have a procedure named EMPNAME that contains the following:
-TYPE &|FOCFOCEXEC is: &FOCFOCEXEC
When EMPNAME is executed, the following output is produced:
&FOCFOCEXEC IS: EMPNAME
Developing Applications 207

Using Variables in a Procedure
Example: Displaying a Date Using the System Variable &YYMD
You can display a date variable containing a 4-digit year without separators. The variables are &YYMD, &MDYY, and &DMYY.
The following example shows a report using &YYMD:
TABLE FILE EMPLOYEEHEADING"SALARY REPORT RUN ON DATE &YYMD"" "PRINT DEPARTMENT CURR_SALBY LAST_NAME BY FIRST_NAMEEND
The resulting output for May 19, 1999 is:
208 Information Builders

Managing Flow of Control in an Application
Statistical Variables
FOCUS posts many statistics concerning overall operations while a procedure executes in the form of statistical variables. As with system variables, FOCUS automatically supplies values for these variables on request.
Reference: Summary of Statistical Variables
A list of Dialogue Manager statistical variables follows:
Reference:
Summary of Statistical Variables
Example:
Controlling Execution of a Request With the Statistical Variable &LINES
Variable Description
&ACCEPTS Indicates the number of transactions accepted. This variable applies only to MODIFY requests.
&BASEIO Indicates the number of input/output operations performed.
&CHNGD Indicates the number of segments updated. This variable applies only to MODIFY requests.
&DELTD Indicates the number of segments deleted. This variable applies only to MODIFY requests.
&DUPLS Indicates the number of transactions rejected as a result of duplicate values in the data source. This variable applies only to MODIFY requests.
&FOCDISORG Indicates the percentage of disorganization for a FOCUS file. You can use the ? FILE command to display or test this variable, even if the value is less than 30% (the level at which ? FILE displays the amount of disorganization).
&FOCERRNUM Indicates the last error number, in the format FOCnnnn, displayed after the execution of a procedure. If more than one occurred, &FOCERRNUM holds the number of the most recent error. If no error occurred, &FOCERRNUM has a value of 0. This value can be passed to the operating system with the line -QUIT FOCUS &FOCERRNUM. It can also be used to control branching from a procedure to execute an error-handling routine.
Developing Applications 209

Using Variables in a Procedure
&FORMAT Indicates the number of transactions rejected as a result of a format error. This variable applies only to MODIFY requests.
&INPUT Indicates the number of segments added to the data source. This variable applies only to MODIFY requests.
&INVALID Indicates the number of transactions rejected as a result of an invalid condition. This variable applies only to MODIFY requests.
&LINES Indicates the number of lines printed in last report. This variable applies only to report requests.
&NOMATCH Indicates the number of transactions rejected as a result of not matching a value in the data source. This variable applies only to MODIFY requests.
&READS Indicates the number of records read from a non-FOCUS file.
&RECORDS Indicates the number of records retrieved in last report. This variable applies only to report requests.
&REJECTS Indicates the number of transactions rejected for reasons other than the ones specifically tracked by other statistical variables. This variable applies only to MODIFY requests.
&TRANS Indicates the number of transactions processed. This variable applies only to MODIFY requests.
Variable Description
210 Information Builders

Managing Flow of Control in an Application
Example: Controlling Execution of a Request With the Statistical Variable &LINES
In the following example, the system calculates the value of the statistical variable &LINES. If &LINES is 0, control passes to the TABLE FILE EMPLOYEE request identified by the label -RPT2. If the value is not 0, control passes to the label -REPTDONE, and processing is terminated.
TABLE FILE SALESHEADING CENTER"MONTHLY REPORT FOR &CITY"SUM UNIT_SOLD AND RETURNS AND COMPUTERATIO/D5.2 = 100 * (RETURNS/UNIT_SOLD);BY CITYIF CITY EQ &CITYBY PROD_CODEIF PROD_CODE IS-FROM &CODE1 TO &CODE2END-RUN -IF &LINES EQ 0 GOTO RPT2 ELSE GOTO REPTDONE;-RPT2TABLE FILE EMPLOYEE . . .END-RUN -QUIT-REPTDONE-EXIT
Developing Applications 211

Using Variables in a Procedure
Special Variables
FOCUS provides special variables that apply to the cursor, function keys, windows, and other features.
Reference: Summary of Special Variables
A list of special variables follow:
Reference:
Summary of Special Variables
Variable Description
&CURSOR Holds the cursor position.
&CURSORAT Reads the cursor position.
&ECHO Controls the display of commands for debugging purposes.
&PFKEY Holds the PF Key function that was pressed or entered.
&QUIT Controls whether the response QUIT, or PF1 in - CRTFORM, to a prompt causes an exit from the procedure.
&STACK Controls whether the entire procedure, or only the Dialogue Manager commands are executed.
&WINDOWNAME Holds the name of the last window activated by the most recently executed -WINDOW command (see Chapter 8, Designing Windows With Window Painter).
&WINDOWVALUE Holds the return value of the last window activated by the most recently executed -WINDOW command (see Chapter 8, Designing Windows With Window Painter).
212 Information Builders

Managing Flow of Control in an Application
Querying the Values of Variables and Parameters
Two Dialogue Manager commands enable you to:
❏ Display the values of all types of local, global, and system variables. See Display the Value of a Variable on page 214.
❏ Store the value of a parameter in a variable. The stored value can then be queried with the ? SET command. See Store Parameter Value Settings on page 214.
In addition, you can issue two QUERY (?) commands from the FOCUS prompt to display the values of:
❏ Global variables. Since global variable values remain current throughout the FOCUS session, it is helpful to be able to display the values on demand. The syntax is
? &&
❏ Statistics stored in variables. You can query the current value of all statistical variables (except &FOCDISORG and &FOCERRNUM). The syntax is:
? STAT
For details about these commands, see Chapter 2, Querying Your Environment.
How to:
Display the Value of a Variable
Store Parameter Value Settings
Example:
Storing a Parameter Value Setting
Developing Applications 213

Using Variables in a Procedure
Syntax: How to Display the Value of a Variable
You can query all Dialogue Manager variables (local, global, system, and statistical) from a stored procedure. The syntax is
-? &[&variablename]
where:
&
Issued alone, displays variables of all types.
variablename
Is a complete amper variable or a partial string of up to 12 characters. Only amper variables starting with the specified string are displayed.
The command displays the following message, followed by a list of currently defined amper variables and the values:
CURRENTLY DEFINED & VARIABLES:
Since local variables do not exist outside a procedure, no similar query is available from the FOCUS command line.
Syntax: How to Store Parameter Value Settings
You can store the current value of a SET parameter in a variable and use the value in a procedure. The syntax is
-? SET parameter &[&]variablename
where:
parameter
Is any valid FOCUS setting that may be queried with the ? SET or ? SET ALL command. For details about these commands, see Chapter 1, Customizing Your Environment.
variablename
Is the name of the variable where the value is to be stored.
Example: Storing a Parameter Value Setting
If you enter
-? SET ASNAMES &ABC-TYPE &ABC
the value stored in &ABC becomes the value of ASNAMES. If you omit &ABC from the command, then a variable called &ASNAMES is created that contains the value of ASNAMES.
214 Information Builders

Managing Flow of Control in an Application
Supplying and Verifying Values for Variables
When you design a Dialogue Manager procedure with variables, you must decide how the variables in the procedure acquires values at run time. You can use and/or combine the following techniques.
You can supply variable values directly in procedures, without prompting users for input, using the following methods:
❏ -DEFAULT[S] or -DEFAULTH to supply default variable values. See Supplying a Default Variable Value on page 220.
❏ -SET to compute a variable value in an expression or to assign a literal value. See Supplying Variable Values in an Expression on page 221.
❏ -READ to supply variable values from an external file. See Reading Variable Values From and Writing Variable Values to an External File on page 224.
❏ EXEC to supply values on the command line when running a procedure. See Supplying Variable Values on the Command Line on page 230.
In this section:
Supplying a Default Variable Value
Supplying Variable Values in an Expression
Reading Variable Values From and Writing Variable Values to an External File
Supplying Variable Values on the Command Line
Prompting Directly for Values With -PROMPT
Prompting for Values on Screens With -CRTFORM
Prompting for Values on Menus and Windows With -WINDOW
Prompting for Values Implicitly
Verifying User-Supplied Values Against a Set of Format Specifications
Verifying User Input Against a Pre-Defined List of Values
Reference:
Rules for Supplying Variable Values
Example:
Supplying Variable Values in a Procedure
Developing Applications 215

Supplying and Verifying Values for Variables
You can prompt users for variable values using the following methods:
❏ -PROMPT to prompt directly for user input. You can request a set of values before they are needed. You can write your own text for these prompts and validate the entered values to confirm that they fit a preset list of acceptable items or match a predefined format. See Prompting Directly for Values With -PROMPT on page 233.
❏ -CRTFORM to prompt for user input on screens. The -CRTFORM command gathers variable values through full-screen data entry. Many values can be input and manipulated at the same time. Several screens can be included in a single procedure and used for a variety of purposes, including the development of menu-driven applications. See Prompting for Values on Screens With -CRTFORM on page 234.
-CRTFORM invokes FIDEL, the FOCUS Interactive Data Entry Language, and incorporates most of its functions. You can also use Screen Painter to design and paint -CRTFORM data entry screens directly on your terminal screen.
Note that the Dialogue Manager command -CRTFORM is used for entering Dialogue Manager amper variable values. The equivalent MODIFY command, CRTFORM (without a hyphen), is used in MODIFY requests to enter field values.
❏ -WINDOW to prompt for user input in windows you design. You can create a series of menus and windows using the Window Painter facility and display them on the screen using the -WINDOW command. When displayed, the menus and windows can collect data by prompting users to select a value, enter a value, or press a program function (PF) key. See Prompting for Values on Menus and Windows With -WINDOW on page 235.
❏ Implicit prompting. FOCUS recognizes variables in a procedure by the leading ampersand (&). If a value has not been provided by some other means, FOCUS automatically requests a value from the terminal when needed. See Prompting for Values Implicitly on page 235.
Verifying user input: For values supplied by users, you can also verify input by comparing it against:
❏ Format specifications. See Verifying User-Supplied Values Against a Set of Format Specifications on page 236.
❏ A pre-defined list of acceptable values. See Verifying User Input Against a Pre-Defined List of Values on page 237.
216 Information Builders

Managing Flow of Control in an Application
Reference: Rules for Supplying Variable Values
The following rules apply to values for variables:
❏ If a value contains an embedded comma, equal sign, or blank, you must enclose the variable name in single quotation marks when you use it in an expression. For example, if the value for &LOCATION is BOS, MA, you must refer to the variable as '&LOCATION' in any expression.
❏ Once a value is supplied for a local variable, it is used throughout the procedure, unless it is changed by -CRTFORM, -PROMPT, -READ, -SET, or -WINDOW.
❏ Once a value is supplied for a global variable, it is used throughout the FOCUS session in all procedures, unless it is changed by -CRTFORM, -PROMPT, -READ, -SET, or -WINDOW, or cleared by LET CLEAR.
❏ Dialogue Manager automatically prompts the terminal if a value has not been supplied for a variable.
❏ The lengths of values stored in Dialogue Manager (amper) variables vary by context:
❏ When used with the commands -READ, -TYPE, and WRITE, the maximum length of a variable is approximately 32,000 characters (32K).
❏ When used with other Dialogue Manager commands or the EX command, a variable value cannot exceed 4,096 character (4K).
In all contexts, Dialogue Manager variable names are limited to 100 characters.
Developing Applications 217

Supplying and Verifying Values for Variables
Example: Supplying Variable Values in a Procedure
This example illustrates the use of the -DEFAULT and -SET commands to supply values for variables. The end user supplies the value B10 for &CODE1, B20 for &CODE2, and SMITH for ®IONMGR, as prompted by Dialogue Manager.
The numbers to the left of the example apply to the notes that follow:
1. -DEFAULT &VERB=SUM2. -SET &CITY=IF &CODE1 GT 'B09' THEN 'STAMFORD' ELSE 'UNIONDALE';3. -TYPE REGIONAL MANAGER FOR &CITY SET PAGE=OFF5. TABLE FILE SALES HEADING CENTER "MONTHLY REPORT FOR &CITY" "PRODUCT CODES FROM &CODE1 TO &CODE2" " " &VERB UNIT_SOLD AND RETURNS AND COMPUTE RATIO/D5.1 = 100 * (RETURNS/UNIT_SOLD); BY PROD_CODE IF PROD_CODE IS-FROM &CODE1 TO &CODE2 FOOTING CENTER4. "REGION MANAGER: ®IONMGR" "CALCULATED AS OF &DATE" END6. -RUN
The procedure executes as follows:
1. The -DEFAULT command sets the value of &VERB to SUM.
2. The -SET command supplies the value for &CITY depending on the value the end user entered in the form for &CODE1. Because the end user entered B10 as the value for &CODE1, &CITY becomes STAMFORD.
3. When the user runs the report, FOCUS writes a message that incorporates the value for &CITY:
REGIONAL MANAGER FOR STAMFORD
4. The user supplied the value for ®IONMGR in response to an implicit prompt. FOCUS supplies the current data at run time.
218 Information Builders

Managing Flow of Control in an Application
5. The FOCUS stack contains the following lines:
TABLE FILE SALESHEADING CENTER"MONTHLY REPORT FOR STAMFORD""PRODUCT CODES FROM B10 TO B20"" "SUM UNIT_SOLD AND RETURNS AND COMPUTERATIO/D5.1 = 100 * (RETURNS/UNIT_SOLD);BY PROD_CODEIF PROD_CODE IS-FROM B10 TO B20FOOTING CENTER"REGION MANAGER: SMITH""CALCULATED AS OF 06/11/03"END
6. The -RUN command causes execution of all commands in the stack. The output from the report request is as follows:
MONTHLY REPORT FOR STAMFORD PRODUCT CODES FROM B10 TO B20 PROD_CODE UNIT_SOLD RETURNS RATIO--------- --------- ------- -----B10 103 13 12.6B12 69 4 5.8B17 49 4 8.2B20 40 1 2.5 REGION MANAGER: SMITH CALCULATED AS OF 06/11/03
Developing Applications 219

Supplying and Verifying Values for Variables
Supplying a Default Variable Value
-DEFAULT commands set default values for local or global variables. This technique ensures that a value is passed to a variable so that the user is not prompted for the value.
You can issue multiple -DEFAULT commands for a variable. If the variable is global, these -DEFAULT commands can be issued in separate FOCEXECs. At any point before another method is used to establish a value for the variable, the most recently issued -DEFAULT command will be in effect.
However, as soon as a value for the variable is established using any other method (for example, by issuing a -SET command, retrieving a value input by the user, or reading a value from a file), subsequent -DEFAULT commands issued for that variable are ignored.
Syntax: How to Supply a Default Value
-DEFAULT[S|H] &[&]name=value [...]
where:
name
Is the name of the variable.
value
Is the default value assigned to the variable.
Example: Supplying a Default Value
In the following example, -DEFAULT sets the default value for &PLANT to Boston (BOS):
-DEFAULT &PLANT=BOSTABLE FILE CENTHR . . .
How to:
Supply a Default Value
Example:
Supplying a Default Value
220 Information Builders

Managing Flow of Control in an Application
Supplying Variable Values in an Expression
You can assign a variable’s value by computing the value in an expression or assigning a literal value to a variable with the -SET command.
You can use this technique to supply dates to Dialogue Manager as variable values. A date supplied to Dialogue Manager in a variable cannot be more than 20 characters long, including spaces. Dialogue Manager variables only accept full-format dates (that is, MDY or MDYY, in any order).
If you are working with cross-century dates that do not include a four-digit year, you can use the SET parameters DEFCENT and YRTHRESH variables to identify the century. For details, see Chapter 6, Working With Cross-Century Dates.
Syntax: How to Assign a Value in an Expression
-SET &[&]name= {expression|value};
where:
name
Is the name of the variable.
expression
Is a valid expression. Expressions can occupy several lines, so you must end the command with a semicolon.
value
Is a literal value, or arithmetic or logical expression assigned to the variable. If the literal value contains commas or embedded blanks, you must enclose the value in single quotation marks.
How to:
Assign a Value in an Expression
Specify Precision for Dialogue Manager Calculations
Example:
Setting Precision for Dialogue Manager Calculations
Setting a Variable Value in an Expression
Setting a Literal Value
Setting the Difference Between Two Dates
Developing Applications 221

Supplying and Verifying Values for Variables
Syntax: How to Specify Precision for Dialogue Manager Calculations
The DMPRECISION setting enables Dialogue Manager -SET commands to calculate accurate numeric variable values without using the FTOA function.
Without this setting, results of numeric calculations are returned as integer numbers, although the calculations themselves employ double-precision arithmetic. To return a number with decimal precision without this setting, you have to enter the calculation as input into subroutine FTOA, where you can specify the number of decimal places returned.
The SET DMPRECISION command gives users the option of either accepting the default truncation of the decimal portion of output from arithmetic calculations, or specifying up to nine decimal places for rounding.
SET DMPRECISION = {OFF|n}
where:
OFF
Specifies truncation without rounding after the decimal point. OFF is the default value.
n
Is a positive number from 0-9, indicating the point of rounding. Note that n=0 results in a rounded integer value.
❏ When using SET DMPRECISION, you must include -RUN after the SET DMPRECISION command to ensure that it is set prior to any numeric -SET commands.
❏ As the actual conversion to double precision follows the rules for the operating system, the values may vary from platform to platform.
Example: Setting Precision for Dialogue Manager Calculations
The following table below shows the result of dividing 20 by 3 with varying DMPRECISION (DMP) settings:
SET DMPRECISION = Result
OFF 6
0 7
1 6.7
2 6.67
9 6.666666667
222 Information Builders

Managing Flow of Control in an Application
Example: Setting a Variable Value in an Expression
In the following example, -SET assigns the value 14Z or 14B to the variable &STORECODE, as determined by the logical IF expression. The value of &CODE is supplied by the user.
-SET &STORECODE = IF &CODE GT C2 THEN '14Z' ELSE '14B'; TABLE FILE SALES SUM UNIT_SOLD AND RETURNS BY PROD_CODE IF PROD_CODE GE &CODE BY STORE_CODE IF STORE_CODE IS &STORECODE END
Example: Setting a Literal Value
The use of single quotation marks around a literal is optional unless the literal contains embedded blanks, commas, or equal signs. In these cases, you must include them as illustrated below:
-SET &NAME='JOHN DOE';
In prior releases, to assign a literal value that included a single quotation mark, you had to place two single quotation marks where you wanted one to appear:
-SET &NAME='JOHN O''HARA';
Although this technique still works, it is no longer required. However, to start or end a string with a single quotation mark, you must specify two single quotation marks.
Example: Setting the Difference Between Two Dates
This example supplies dates to Dialogue Manager as variables. The variable &DELAY is set to the difference in days between &LATER and &NOW and the result is returned to your terminal.
-SET &NOW = 'JUN 30 2002';-SET &LATER = '2002 25 AUG';-SET &DELAY = &LATER - &NOW;-TYPE &DELAY
Developing Applications 223

Supplying and Verifying Values for Variables
Example: Initializing a Variable to a Long String
To set the value of a variable with -SET, you need to specify a character string on the right side of the SET command. Since the character string cannot span multiple lines, if necessary, you can concatenate shorter strings or variables to compose the long string.
The following procedure creates a variable named &LONG that contains a long string:
-SET &LONG = 'THIS IS A LONG AMPER VARIABLE. NOTE THAT IN ORDER '- |'TO SET ITS VALUE USING -SET, YOU MUST CONCATENATE SHORTER STRINGS, '- |'EACH OF WHICH MUST FIT ON ONE LINE.';-TYPE &LONGEND
The output is:
THIS IS A LONG AMPER VARIABLE.NOTE THAT IN ORDER TO SET ITS VALUE USING -SET, YOU MUST CONCATENATE SHORTER STRINGS, EACH OF WHICH MUST FIT ON ONE LINE.
Reading Variable Values From and Writing Variable Values to an External File
You can read variable values from an external file, or write variable values to an external file with the -READ and -WRITE commands.
❏ You can supply variable values with the -READ command. For example, an external file may contain the start and end dates of a reporting period. Dialogue manager can read these values from an external file and use them in a variable in a WHERE command that limits the range of data selected in a report request.
❏ You can save variable values in an external file with the -WRITE command. For example, a request can store the summed total of sales for the day in an external file so that it can be compared to the following day’s total sales.
The external file can be a fixed-format file (in which the data is in fixed columns) or a free-format file (in which the data is comma delimited).
How to:
Retrieve a Variable Value From an External File
Write a Variable Value to an External File
Close an External File
Example:
Reading a Value From an External File
Writing to a File
Reading From and Writing to an External File
224 Information Builders

Managing Flow of Control in an Application
Syntax: How to Retrieve a Variable Value From an External File
-READ ddname[,] [NOCLOSE] &name[.format.][,] …
where:
ddname
Is the logical name of the file as defined to FOCUS using FILEDEF (or, for MVS, ALLOCATE or DYNAM ALLOCATE).
A space after the ddname denotes a fixed format file while a comma denotes a comma-delimited file.
NOCLOSE
Indicates that the file should be kept open even if a -RUN is encountered. The file is closed upon completion of the procedure or when a -CLOSE or subsequent -WRITE command is encountered.
name
Is the variable name. You may specify more than one variable. Using commas to separate variables is optional.
If the list of variables is longer than one line, end the first line with a comma and begin the next line with a dash followed by a blank (-) for comma-delimited files or a dash followed by a comma followed by a blank (-,) for fixed format files. For example:
Comma-delimited files
-READ EXTFILE, &CITY,&CODE1,- &CODE2
Fixed format files
-READ EXTFILE &CITY.A8. &CODE1.A3.,-, &CODE2.A3
format
Is the format of the variable. It may be Alphanumeric (A) or Numeric (I). Note that format must be delimited by periods. The format is ignored for comma-delimited files.
Note: -SET provides an alternate method for defining the length of a variable using the corresponding number of characters enclosed in single quotation marks (‘). For example, the following command defines the length of &CITY as 8:
-SET &CITY=' ';
Developing Applications 225

Supplying and Verifying Values for Variables
Example: Reading a Value From an External File
Assume that EXTFILE is a fixed-format file containing the following data:
STAMFORDB10B20
To detect the end of a file, the following code tests the system variable &IORETURN. When no records remain to be read, a value equal to zero is not found.
-READ EXTFILE &CITY.A8. &CODE1.A3. &CODE2.A3.-IF &IORETURN NE 0 GOTO RESUME; TABLE FILE SALES SUM UNIT_SOLD BY CITY IF CITY IS &CITY BY PROD_CODE IF PROD_CODE IS-FROM &CODE1 TO &CODE2 END-RESUME . . .
Syntax: How to Write a Variable Value to an External File
-WRITE ddname [NOCLOSE] text
where:
ddname
Is the logical name of the file as defined to FOCUS using FILEDEF, ALLOCATE, or DYNAM ALLOCATE. For information about file allocations, see the Overview and Operating Environments manual.
NOCLOSE
Indicates that the file should be kept open even if a -RUN is encountered. The file is closed upon completion of the procedure or when a -CLOSE or subsequent -READ command is encountered.
text
Is any combination of variables and text. To write more than one line, end the first line with a comma (,) and begin the next line with a hyphen followed by a space (-).
-WRITE opens the file to receiving the text and closes it upon exit from the procedure. When the file is reopened for writing, the new material overwrites the old. To reopen to add new records instead of overwriting existing ones, use the attribute DISP MOD when you define the file to the operating system.
226 Information Builders

Managing Flow of Control in an Application
Example: Writing to a File
The following example reopens the file PASS under CMS to add new text:
-CMS FILEDEF PASS DISK PASS DATA (DISP MOD-WRITE PASS &DIV &RED &TEST RESULT IS,- &RECORDS AT END OF RUN
Example: Reading From and Writing to an External File
The following example illustrates reading from and writing to sequential files. It also illustrates the use of operating system commands (in this example, CMS). The numbers in the margin refer to notes that follow the example.
SET HOLDLIST=PRINTONLY-RUN1. -TOP2. -PROMPT &CITY.ENTER NAME OF CITY -- TYPE QUIT WHEN DONE.3. -CMS FILEDEF PASS DISK PASS DATA A (LRECL 80 RECFM FB4. -WRITE PASS &CITY TABLE FILE SALES HEADING CENTER "LOWEST MONTHLY SALES FOR &CITY" " " PRINT DATE PROD_CODE BY LOWEST 1 UNIT_SOLD BY STORE_CODE BY CITY IF CITY EQ &CITY FOOTING CENTER "CALCULATED AS OF &DATE" ON TABLE SAVE AS INFO END5. -RUN6. -CMS FILEDEF LOG DISK LOG DATA A1 (LRECL 80 RECFM FB MODIFY FILE SALES COMPUTE TODAY/I6=&YMD; CITY='&CITY'; FIXFORM X5 STORE_CODE/A3 X15 DATE/A4 PROD_CODE/A3 MATCH STORE_CODE DATE PROD_CODE ON MATCH TYPE ON LOG "<STORE_CODE><DATE><PROD_CODE><TODAY>" ON MATCH DELETE ON NOMATCH REJECT DATA ON INFO END7. -RUN EX SLRPT38. -RUN11. -GOTO TOP12. -QUIT
Developing Applications 227

Supplying and Verifying Values for Variables
The procedure SLRPT3, which is invoked from the calling procedure, contains the following lines:
9. -READ PASS &CITY.A8. TABLE FILE SALES HEADING CENTER "MONTHLY REPORT FOR &CITY" "LOWEST SALES DELETED" " " PRINT PROD_CODE UNIT_SOLD RETURNS DAMAGED BY STORE_CODE BY CITY IF CITY EQ &CITY FOOTING CENTER "CALCULATED AS OF &DATE" END
10. -RUN
The following annotations explain the logic and show the dialogue between the user and the screen. User entries are in lowercase:
1. -TOP marks the beginning of the procedure.
2. -PROMPT sends the following prompt to the screen after the procedure is executed:
ENTER NAME OF CITY -- TYPE QUIT WHEN DONE<STAMFORD
3. FILEDEF defines and opens a file named PASS.
4. -WRITE writes the value of &CITY to the sequential file named PASS. In this case the value written is STAMFORD.
5. -RUN executes the stacked TABLE request. In this case, a sequential file named INFO is created with the SAVE command. This is a sequential file, containing the result of the report request as shown below.
NUMBER OF RECORDS IN TABLE= 8 LINES= 8 (BEFORE TOTAL TESTS)
ALPHANUMERIC RECORD NAMED INFOFIELDNAME ALIAS FORMAT LENGTH UNIT_SOLD SOLD I5 5STORE_CODE SNO A3 3CITY CTY A15 15DATE DTE A4MD 4PROD_CODE PCODE A3 3 TOTAL 30SAVED...
228 Information Builders

Managing Flow of Control in an Application
6. FILEDEF defines a log file for the subsequent MODIFY request.
7. -RUN executes the stacked MODIFY request. The data comes directly from the INFO file created in the prior TABLE request and is entered using FIXFORM. Hence, the product with the lowest UNIT_SOLD is deleted from the file, and logged to a log file.
SALES FOCUS A1 ON 09/04/2003 AT 10.04.35
TRANSACTIONS: TOTAL = 1 ACCEPTED= 1 REJECTED= 0SEGMENTS: INPUT = 0 UPDATED = 0 DELETED = 1
8. The next -RUN executes another procedure called SLRPT3.
9. -READ reads the value for &CITY from the sequential file PASS. In this case the value passed is STAMFORD.
10. The -RUN executes the TABLE request and control is routed back to the calling procedure.
MONTHLY REPORT FOR STAMFORD LOWEST SALES DELETED
STORE_CODE CITY PROD_CODE UNIT_SOLD RETURNS DAMAGED---------- ---- --------- --------- ------- -------14B STAMFORD B10 60 10 6 B12 40 3 3 B17 29 2 1 C7 45 5 4 D12 27 0 0 E2 80 9 4 E3 70 8 9
CALCULATED AS OF 09/04/03
11. -GOTO TOP routes control to the top.
12. When the user types QUIT, processing ends.
Developing Applications 229

Supplying and Verifying Values for Variables
Syntax: How to Close an External File
The -CLOSE command closes an external file opened with the -READ or -WRITE command. The NOCLOSE option keeps a file open even when -RUN is encountered.
-CLOSE {ddname|*}
where:
ddname
Is the ddname of the open file described to FOCUS via an allocation (TSO, MSO) or FILEDEF (CMS) command.
*
Closes all -READ and -WRITE files that are currently open.
Supplying Variable Values on the Command Line
When a user knows the values required by a procedure, some or all of the values can be typed on the command line using the EXEC command following the name of the procedure. This saves time since FOCUS now has values to pass to each local or global variable so the user is not prompted to supply them.
How to:
Supply a Variable Value on the Command Line
Reference:
Rules for Using Named and Positional Variables With EXEC
Example:
Supplying Values on the Command Line
Using Positional Variables
Mixing Named and Positional Variables
230 Information Builders

Managing Flow of Control in an Application
Syntax: How to Supply a Variable Value on the Command Line
EX[EC] procedure [[&&][variable=]value, ...]
where:
procedure
Is the name of the procedure that contains the name/value values.
variable
Is the name of the variable for which you are supplying a value. Omit for a positional variable.
For a local variable, do not include the ampersand in the variable name.For a global amper variable, you must supply the double ampersand in the variable name:
EX SLRPT &&GLOBAL=value, CITY = STAMFORD, CODE1=B10, CODE2=B20
value
Is the value you are giving to the variable.
Name/value pairs must be separated by commas.
When the list of values to be supplied exceeds the width of the terminal, insert a comma as the last character on the line and enter the balance of the list on the following line(s), as shown:
EX SLRPT AREA=S, CITY = STAMFORD, VERB=COUNT, FIELDS = UNIT_SOLD,CODE1=B10, CODE2=B20
Reference: Rules for Using Named and Positional Variables With EXEC
You can mix named and positional variables freely in the EXEC command. Positional variables are unnamed values passed to a procedure when it is invoked.
Follow these rules:
❏ Names must be associated with values for named variables.
It is not necessary to enter the name=value pairs in the order encountered in the procedure.
❏ Values for positional variables must be supplied in the order that those variables are numbered within the procedure.
If the variable is positional (it is a numbered variable), you do not need to specify the variable name in the EXEC command. FOCUS matches the EXEC values to the positional variables as they are encountered in the procedure. For an example, see Using Positional Variables on page 232.
Developing Applications 231

Supplying and Verifying Values for Variables
Example: Supplying Values on the Command Line
Consider the following procedure named SLRPT:
TABLE FILE SALESHEADING CENTER"MONTHLY REPORT FOR &CITY"SUM UNIT_SOLD AND RETURNS AND COMPUTERATIO/D5.2 = 100 * (RETURNS/UNIT_SOLD);BY PROD_CODEIF PROD_CODE IS-FROM &CODE1 TO &CODE2BY CITYIF CITY EQ &CITYEND
You can supply values for the variables as parameters using the EX command as follows:
EX SLRPT CITY=STAMFORD, CODE1=B10, CODE2=B20
Example: Using Positional Variables
Consider the following example:
TABLE FILE SALESHEADING CENTER"MONTHLY REPORT FOR &1"SUM UNIT_SOLD AND RETURNS AND COMPUTERATIO/D5.2 = 100 * (RETURNS/UNIT_SOLD);BY PROD_CODEIF PROD_CODE IS-FROM &2 TO &3BY CITYIF CITY EQ &1END
The EX command that calls the procedure is as follows:
EX SLRPT STAMFORD, B10, B20
This command substitutes STAMFORD for the first positional variable, B10 for the second, and B20 for the third.
232 Information Builders

Managing Flow of Control in an Application
Example: Mixing Named and Positional Variables
The report request SLRPT includes named and positional variables:
TABLE FILE SALESHEADING CENTER"MONTHLY REPORT FOR &CITY"&VERB UNIT_SOLD AND RETURNS AND COMPUTERATIO/D5.2 = 100 * (RETURNS/UNIT_SOLD);BY PROD_CODEIF PROD_CODE IS-FROM &1 TO &2BY CITYIF CITY EQ &CITYEND
The following EX command executes SLRPT and populates the named and positional variables:
EX SLRPT CITY=STAMFORD, B10, B20, VERB=COUNT
&CITY is a named variable whose value is STAMFORD.&1 is a positional variable whose value is B10.&2 is a positional variable whose value is B20.&VERB is a named variable whose value is COUNT.
Prompting Directly for Values With -PROMPT
The Dialogue Manager command -PROMPT solicits values before the variables to which they refer are used in the procedure. The user is prompted for a value as soon as -PROMPT is encountered. If a looping condition is present, -PROMPT requests a new value for the variable, even if a value exists already. Thus, each time through the loop, the user is prompted for a new value.
With -PROMPT you can specify format, text, and lists in the same way as all other variables.
Example:
Prompting for Variable Values
Developing Applications 233

Supplying and Verifying Values for Variables
Example: Prompting for Variable Values
The following is an example of the use of -PROMPT:
-PROMPT &CODE1-PROMPT &CODE2-SET &CITY = IF &CODE1 GT B09 THEN STAMFORD ELSE UNION;-TYPE REGIONAL MANAGER FOR &CITY-PROMPT ®IONMGR TABLE FILE SALES HEADING CENTER "MONTHLY REPORT FOR &CITY" "PRODUCT CODES FROM &CODE1 TO &CODE2" SUM UNIT_SOLD AND RETURNS AND COMPUTE RATIO/D5.2 = 100 * (RETURNS/UNIT_SOLD); BY CITY IF CITY EQ &CITY BY PROD_CODE IF PROD_CODE IS-FROM &CODE1 TO &CODE2 FOOTING CENTER "REGION MANAGER: ®IONMGR" "CALCULATED AS OF &DATE" END
-PROMPT sends the following prompts to the screen. User input is shown in lowercase:
PLEASE SUPPLY VALUES REQUESTED CODE1= > b10CODE2= > b20REGIONAL MANAGER FOR STAMFORDREGIONMGR= > smith
Note how the sequence of supplied values determines the overall flow of the procedure. The value of &CODE1 determines the value of &CITY that gives meaning to the -TYPE command. -TYPE gives the user the necessary information to make the correct choice when supplying the value for ®IONMGR.
By default, all user input is automatically converted to uppercase.
Prompting for Values on Screens With -CRTFORM
-CRTFORM sets up full-screen menus for entering values. The -CRTFORM command in Dialogue Manager and the CRTFORM command in MODIFY are two versions of FIDEL for use in different contexts. The syntax, functions and features are fully outlined in the Maintaining Databases manual.
234 Information Builders

Managing Flow of Control in an Application
Prompting for Values on Menus and Windows With -WINDOW
You can create a series of menus and windows using Window Painter, and then display those menus and windows on the screen using the -WINDOW command. When displayed, the menus and windows collect data by prompting a user to select a value, to enter a value, or to press a program function (PF) key For details, see Chapter 8, Designing Windows With Window Painter.
Prompting for Values Implicitly
If a value for a variable is not supplied by any other means, FOCUS automatically prompts the user for the value. This is known as an implicit prompt. These prompts occur sequentially as each variable is encountered in the procedure.
Example: Automatically Prompting for Variable Values
Consider the following example:
TABLE FILE SALESHEADING CENTER"MONTHLY REPORT FOR &CITY"...BY PROD_CODEIF PROD_CODE IS-FROM &CODE1 TO &CODE2...FOOTING CENTER"REGION MANAGER: ®IONMGR""CALCULATED AS OF &DATE"END
When you execute the procedure, FOCUS prompts for the values for the variables one at a time. The terminal dialogue is as follows. User input is in lowercase:
PLEASE SUPPLY VALUES REQUESTED CODE1= > b10CODE2= > b20REGIONAL MANAGER FOR STAMFORDREGIONMGR= > smith
Example:
Automatically Prompting for Variable Values
Developing Applications 235

Supplying and Verifying Values for Variables
At the point when all variables have values, FOCUS processed the report request.
Verifying User-Supplied Values Against a Set of Format Specifications
You can specify variables with format conditions against which entered values can be compared. If the entered values do not have the specified format, FOCUS prints error messages and prompts the user again for the value(s).
Reference: Format Specifications for Variables
Alphanumeric formats are described by the letter A followed by the number of characters. The number of characters can be from 1 to 3968.
Numeric formats are described by the letter I, followed by the number of digits to be entered. The number of digits can be from 1 to 10 (value must be less than 231-1), and the value supplied for the number can contain a decimal point.
The description of the format must be enclosed by periods.
If you test field names against input variable values, specify formats of the input variables. If you do not, and the supplied value exceeds the format specification from the Master File, the procedure is ended and error messages are displayed. To continue, the procedure must be executed again. However, if you do include the format, and the supplied value exceeds the format, Dialogue Manager rejects the value and the user is prompted again.
Note: FOCUS internally stores all Dialogue Manager variables as alphanumeric codes. To perform arithmetic operations, Dialogue Manager converts the variable value to double-precision floating point decimal and then converts the result back to alphanumeric codes, dropping the decimal places. For this reason, do not perform tests that look for the decimal places in the numeric codes.
Reference:
Format Specifications for Variables
Example:
Using a Format Specification to Verify User Input
236 Information Builders

Managing Flow of Control in an Application
Example: Using a Format Specification to Verify User Input
Consider the following format specification:
&STORECODE.A3.
No special message is sent to the screen detailing the specified format. However, if in the above example the user enters more than three alphanumeric characters, the value is rejected, the error message FOC291 is displayed and the user is prompted again.
Note the following example detailing the dialogue between FOCUS and the user:
PLEASE SUPPLY VALUES REQUESTED STORECODE= > cc14(FOC291) THE VALUE IN THE PROMPT REPLY EXCEEDS THE MAXIMUM LENGTH: 03CHARS:CC14STORECODE=
Verifying User Input Against a Pre-Defined List of Values
You can define values that constitute acceptable responses to prompts. If the user does not enter one of the available options, the terminal displays the list and re-prompts the user. This is an excellent way to limit the values supplied and to provide help information to the screen while prompting.
In addition, you can supply text that either explains what type of value is needed or lists choices of acceptable values on the screen.
How to:
Create a Reply List as a Variable
Example:
Providing a List of Valid Values With -PROMPT
Using a Variable to Provide a Reply List
Supplying Text for Variable Prompting
Developing Applications 237

Supplying and Verifying Values for Variables
Example: Providing a List of Valid Values With -PROMPT
The following lists acceptable responses for &CITY:
-PROMPT &CITY.(STAMFORD,UNIONDALE,NEWARK).
A message is printed if the user does not respond with one of the values on the list. This is followed by a display of the values list. Then, another prompt is issued for the needed value. For example:
PLEASE SUPPLY VALUES REQUESTED CITY= > unionPLEASE CHOOSE ONE OF THE FOLLOWING: STAMFORD,UNIONDALE,NEWARKCITY= >
Syntax: How to Create a Reply List as a Variable
You can provide a reply list as a variable, then prompt for the values you have defined for that variable. The syntax is
-SET &list='value,...';-PROMPT &variable.(&list)[.text.]
where:
list
Is the name of the reply list variable. Note that in the -PROMPT command, the value is substituted between the parentheses and delimited by periods. If the prompt text has parentheses, enclose that text in single quotation marks (‘).
value
Is the desired value. You may list more than one value, separated by commas. Enclose the value(s) in single quotation marks (‘). A semicolon is required when using -SET.
variable
Is the name of the variable for which you are prompting the user for values.
.text
Optionally provides prompting text.
238 Information Builders

Managing Flow of Control in an Application
Example: Using a Variable to Provide a Reply List
In this example, three acceptable values are defined for &CITY:
-SET &CITIES='STAMFORD,UNIONDALE,NEWARK';-PROMPT &CITY.(&CITIES).'(ENTER CITY)'.
The resulting screen is exactly the same as when the list itself is provided in the parentheses. See Providing a List of Valid Values With -PROMPT on page 238.
You can also create more complex combinations. For example:
-SET &CITIES=IF &CODE1 IS B10 THEN 'STAMFORD, NEWARK'- ELSE 'STAMFORD, UNIONDALE, NEWARK';
Example: Supplying Text for Variable Prompting
This example uses customized text to prompt for a values for &CITY, &CODE1, &CODE2, and ®IONMGR:
TABLE FILE SALESHEADING CENTER"MONTHLY REPORT FOR &CITY.ENTER CITY. " . . .BY PROD_CODEIF PROD_CODE IS-FROM &CODE1.A3.BEGINNING CODE. TO &CODE2.A3.ENDING CODE. . . ."REGION MANAGER: ®IONMGR.REGIONAL SUPERVISOR.""CALCULATED AS OF &DATEMDYY"END
Notice that text has been specified for &CITY and ®IONMGR without specification of a format.
Based on the example, the terminal displays the following prompts one by one:
ENTER CITYstamfordBEGINNING CODEb10ENDING CODEb20REGIONAL SUPERVISORsmith
Developing Applications 239

Manipulating and Testing Variables
Manipulating and Testing Variables
You can use a variety of techniques to manipulate and test Dialogue Manager variables.
❏ You can screen a value by adding a suffix to the variable value:
❏ The .LENGTH suffix tests the length of a value.
❏ The .TYPE suffix tests the type of a value.
❏ The .EXIST suffix tests the presence of a value.
❏ The .EVAL suffix replaces a variable with its value.
In this section:
Testing Variables for Length, Type, and Existence
Replacing a Variable Immediately
Concatenating Variables
Creating an Indexed Variable
Creating a Standard Quote-Delimited String
Performing a Calculation on a Variable
Changing a Variable Value With the DECODE Function
Extracting Characters From a Variable Value With the EDIT Function
Removing Trailing Blanks From Variables With the TRUNCATE Function
Calling a Function
Using Variables to Alter Commands
240 Information Builders

Managing Flow of Control in an Application
❏ You can use the -SET command alone or in conjunction with other commands and functions to manipulate the values for variables in order to:
❏ Concatenate variables and/or literals. See Concatenating Variables on page 246.
❏ Create an index for variables. See Creating an Indexed Variable on page 247.
❏ Perform calculations on a variable. See Performing a Calculation on a Variable on page 253.
❏ Change variable values. See Changing a Variable Value With the DECODE Function on page 255.
❏ Extract and insert characters. See Extracting Characters From a Variable Value With the EDIT Function on page 256.
❏ Remove trailing blanks. See Removing Trailing Blanks From Variables With the TRUNCATE Function on page 257.
❏ Call other functions. See Calling a Function on page 259.
❏ You can determine the command structure of a procedure based on the value of a variable. See Using Variables to Alter Commands on page 261.
Testing Variables for Length, Type, and Existence
To ensure that a supplied value is valid and being used properly in a procedure, you can test it for presence, type, and length. For example, you would not want to perform a numerical computation on a variable for which alphanumeric data has been supplied.
How to:
Screen a Variable Value for Length and TYPE
Test for the Presence of a Variable Value
Example:
Testing for Variable Length
Storing the Length of a Variable
Testing for Variable Type
Testing for the Presence of a Variable
Developing Applications 241

Manipulating and Testing Variables
Syntax: How to Screen a Variable Value for Length and TYPE
-IF &name{.LENGTH|TYPE} rest_of_expression GOTO label...;
where:
&name
Is a user-supplied variable.
.LENGTH
Tests for the length of a value. If a value is not present, a zero (0) is passed to the expression. Otherwise, the number of characters in the value is passed.
.TYPE
Tests for the type of a value. The letter N (numeric) is passed to the expression if the value can be interpreted as a number up to 231–1 and stored in four bytes as a floating point format. In Dialogue Manager, the result of an arithmetic operation with numeric fields is truncated to an integer after the whole result of an expression is calculated. If the value could not be interpreted as numeric, the letter A (alphanumeric) is passed to the expression. If the value is not defined, the letter U is passed to the expression.
rest_of_expression
Is the remainder of an expression that uses &name with the specified suffix.
GOTO label
Specifies a label to branch to.
Example: Testing for Variable Length
If the length of &OPTION is more than one character, control passes to the label -FORMAT, which informs the client application that only a single character is allowed.
-IF &OPTION.LENGTH GT 1 GOTO FORMAT ELSE-GOTO PRODSALES; . . .-PRODSALES TABLE FILE SALES . . . END-EXIT-FORMAT-TYPE ONLY A SINGLE CHARACTER IS ALLOWED.
242 Information Builders

Managing Flow of Control in an Application
Example: Storing the Length of a Variable
The following example sets the variable &WORDLEN to the length of the string contained in the variable &WORD.
-PROMPT &WORD.ENTER WORD.-SET &WORDLEN = &WORD.LENGTH;
You can use this technique when you want to use one variable to populate another.
Example: Testing for Variable Type
If &OPTION is not alphanumeric, control passes to the label -NOALPHA, which informs the client application that only alphanumeric characters are allowed.
-IF &OPTION.TYPE NE A GOTO NOALPHA ELSE- GOTO PRODSALES; . . .-PRODSALES TABLE FILE SALES . . . END-EXIT-NOALPHA-TYPE ENTER A LETTER ONLY.
Syntax: How to Test for the Presence of a Variable Value
-IF &name.EXIST GOTO label...;
where:
&name
Is a user-supplied variable.
.EXIST
Tests for the presence of a value. If a value is not present, a zero (0) is passed to the expression. Otherwise, a non-zero value is passed.
GOTO label
Specifies a label to branch to.
Developing Applications 243

Manipulating and Testing Variables
Example: Testing for the Presence of a Variable
If no value is supplied, &OPTION.EXIST is equal to zero and control is passed to the label -CANTRUN. The procedure sends a message to the client application and then exits. If a value is supplied, control passes to the label -PRODSALES.
-IF &OPTION.EXIST GOTO PRODSALES ELSE GOTO CANTRUN; . . .-PRODSALES TABLE FILE SALES . . .
END-EXIT-CANTRUN-TYPE TOTAL REPORT CAN'T BE RUN WITHOUT AN OPTION.-EXIT
Replacing a Variable Immediately
The .EVAL operator enables you to replace a variable with its value immediately, making it possible to change a procedure dynamically. The .EVAL operator is particularly useful in modifying code at run time.
How to:
Replace a Variable Immediately
Example:
Replacing a Variable Immediately
Using .EVAL to Interpret a Variable
244 Information Builders

Managing Flow of Control in an Application
Syntax: How to Replace a Variable Immediately
[&]&variable.EVAL
where:
variable
Is a local or global variable.
When the command procedure is executed, the expression is replaced with the value of the specified variable before any other action is performed. The command that contains this value is then re-evaluated.
Without the .EVAL operator, a variable cannot be used in place of some commands.
Example: Replacing a Variable Immediately
The following example illustrates how to use the .EVAL operator in a record selection expression. The numbers to the left apply to the notes that follow the procedure:
1. -SET &R='IF SALARY GT 100000';2. -IF &Y EQ 'YES' THEN GOTO START;3. -SET &R = '-*'; -START4. TABLE FILE CENTHR SUM SALARY BY PLANT5. &R.EVAL END
The procedure executes as follows:
1. The procedure sets the value of &R to ‘IF SALARY GT 100000’.
2. If &Y is YES, the procedure branches to the START label, bypassing the second -SET command.
3. If &Y is NO, the procedure continues to the second -SET command, which sets &R to ‘-*’, which is a comment.
The report request is stacked.
4. The procedure evaluates the value of &R. If the end user wanted a record selection test, the value of &R is ‘IF SALARY GT 100000’ and this line is stacked.
5. If the end user does not want a record selection test, the value of &R is ‘-*’ and this line is ignored.
Developing Applications 245

Manipulating and Testing Variables
Example: Using .EVAL to Interpret a Variable
Without .EVAL, Dialogue Manager interprets a variable only once. Therefore, in the following example,
-SET &A='-TYPE';&A HELLO
Dialogue Manager does not recognize that &A is the -TYPE command so it does not display the word HELLO and generates the error message:
UNKNOWN FOCUS COMMAND -TYPE
Appending the .EVAL operator to the &A variable enables Dialogue Manager to interpret the variable correctly. The code
-SET &A='-TYPE';&A.EVAL HELLO
produces the following output:
HELLO>>
Concatenating Variables
You can append a variable to a character string or combine two or more variables and/or literals. See the Creating Reports manual for complete information on concatenation. When using variables, it is important to separate each variable from the concatenation symbol (||) with a space.
Syntax: How to Concatenate Variables
-SET &name3 = &name1 || &name2;
where:
&name3
Is the name of the concatenated variable.
&name1 || &name2
Are the variables, separated by a space and the concatenation symbol.
Note: The example shown uses strong concatenation, indicated by the || symbol. Strong concatenation moves any trailing blanks from &name1 to the end of the result. Conversely, weak concatenation, indicated by the symbol |, preserves any trailing blanks in &name1.
How to:
Concatenate Variables
246 Information Builders

Managing Flow of Control in an Application
Creating an Indexed Variable
You can append the value of one variable to the value of another variable, creating an indexed variable. This feature applies to both local and global variables.
If the indexed value is numeric, the effect is similar to that of an array in traditional computer programming languages. For example, if the value of index &K varies from 1 to 10, the variable &AMOUNT.&K refers to one of ten variables, from &AMOUNT1 to &AMOUNT10.
A numeric index can be used as a counter; it can be set, incremented, and tested in a procedure.
Syntax: How to Create an Indexed Variable
-SET &name.&index[.&index...] = expression;
where:
&name
Is a variable.
.&index
Is a numeric or alphanumeric variable whose value is appended to &name. The period is required.
When more than one index is used, all index values are concatenated and the string appends to the name of the variable.
For example, &V.&I.&J.&K is equivalent to &V1120 when &I=1, &J=12, and &K=0.
expression
Is a valid expression. For information on the kinds of expressions you can write, see the Creating Reports manual.
How to:
Create an Indexed Variable
Example:
Using an Indexed Variable in a Loop
Developing Applications 247

Manipulating and Testing Variables
Example: Using an Indexed Variable in a Loop
An indexed variable can be used in a loop. The following example creates the equivalent of a DO loop used in traditional programming languages:
-SET &N = 0;-LOOP-SET &N = &N+1;-IF &N GT 12 GOTO OUT;-SET &MONTH.&N=&N;-TYPE &MONTH.&N -GOTO LOOP-OUT
In this example, &MONTH is the indexed variable and &N is the index. The value of the index is supplied through the command -SET; the first -SET initializes the index to 0, and the second -SET increments the index each time the procedure goes through the loop.
If the value of an index is not defined prior to reference, a blank value is assumed. As a result, the name and value of the indexed variable do not change.
Indexed variables are included in the system limit of 1024, which includes variables reserved by FOCUS.
248 Information Builders

Managing Flow of Control in an Application
Creating a Standard Quote-Delimited String
Character strings must be enclosed in single quotation marks to be handled by most database engines. In addition, embedded single quotation marks are indicated by two contiguous single quotation marks. FOCUS, WebFOCUS, and iWay require quotes around variables containing delimiters, which include spaces and commas.
The QUOTEDSTRING suffix on a Dialogue Manager variable applies the following two conversions to the contents of the variable:
❏ Any single quotation mark embedded within a string is converted to two single quotation marks.
❏ Single quotation marks are added around the string.
Dialogue Manager commands differ in their ability to handle character strings that are not enclosed in single quotation marks and contain embedded blanks. An explicit or implied -PROMPT command can read such a string. The entire input string is then enclosed in single quotation marks when operated on by .QUOTEDSTRING.
Note: When using the -SET command to reference a character string, ensure the character string is enclosed in single quotes to prevent errors.
Syntax: How to Create a Standard Quote-Delimited Character String
&var.QUOTEDSTRING
where:
&var
Is a Dialogue Manager variable.
How to:
Create a Standard Quote-Delimited Character String
Example:
Creating a Standard Quote-Delimited Character String
Converting User Input to a Standard Quote-Delimited Character String
Using Quote-Delimited Strings With Relational Data Adapters
Reference:
Usage Notes for Quote-Delimited Character Strings
Developing Applications 249

Manipulating and Testing Variables
Example: Creating a Standard Quote-Delimited Character String
The following example shows the results of the QUOTEDSTRING suffix on input strings.
-SET &A = ABC;-SET &B = 'ABC';-SET &C = O'BRIEN;-SET &D = 'O'BRIEN';-SET &E = 'O''BRIEN';-SET &F = O''BRIEN;-SET &G = OBRIEN';-TYPE ORIGINAL = &A QUOTED = &A.QUOTEDSTRING-TYPE ORIGINAL = &B QUOTED = &B.QUOTEDSTRING-TYPE ORIGINAL = &C QUOTED = &C.QUOTEDSTRING-TYPE ORIGINAL = &D QUOTED = &D.QUOTEDSTRING-TYPE ORIGINAL = &E QUOTED = &E.QUOTEDSTRING-TYPE ORIGINAL = &F QUOTED = &F.QUOTEDSTRING-TYPE ORIGINAL = &G QUOTED = &G.QUOTEDSTRING
The output is:
ORIGINAL = ABC QUOTED = 'ABC'ORIGINAL = ABC QUOTED = 'ABC'ORIGINAL = O'BRIEN QUOTED = 'O''BRIEN'ORIGINAL = O'BRIEN QUOTED = 'O''BRIEN'ORIGINAL = O'BRIEN QUOTED = 'O''BRIEN'ORIGINAL = O''BRIEN QUOTED = 'O''''BRIEN'ORIGINAL = OBRIEN' QUOTED = 'OBRIEN'''
Note: The -SET command will remove single quotes around a string. Notice in the example above that the result of -SET &B = 'ABC' was changed to ORIGINAL = ABC (as shown in the output), prior to the QUOTEDSTRING conversion.
250 Information Builders

Managing Flow of Control in an Application
Example: Converting User Input to a Standard Quote-Delimited Character String
The following -TYPE command accepts quoted or unquoted input and displays quoted output.
-TYPE THE QUOTED VALUE IS: &E.QUOTEDSTRING
The output is:
PLEASE SUPPLY VALUES REQUESTED
E=O'BRIENTHE QUOTED VALUE IS: 'O''BRIEN'
Example: Using Quote-Delimited Strings With Relational Data Adapters
The following procedure creates an Oracle table named SQLVID from the VIDEOTRK data source.
TABLE FILE VIDEOTRKSUM CUSTID EXPDATE PHONE STREET CITY STATE ZIP TRANSDATE PRODCODE TRANSCODE QUANTITY TRANSTOTBY LASTNAME BY FIRSTNAMEWHERE LASTNAME NE 'NON-MEMBER'ON TABLE HOLDEND-RUNCREATE FILE SQLVID-RUNMODIFY FILE SQLVIDFIXFORM FROM HOLDDATA ON HOLDEND
Consider the following SQL Translator request:
SET TRACEUSER = ONSET TRACEON = STMTRACE//CLIENTSQLSELECT *FROM SQLVID WHERE LASTNAME = &1.QUOTEDSTRING;END
When this request is executed, you must enter a last name, in this case O’BRIEN:
PLEASE SUPPLY VALUES REQUESTED
1=
O'BRIEN
Developing Applications 251

Manipulating and Testing Variables
In the generated SQL request, the character string used for the comparison is correctly enclosed in single quotation marks, and the embedded single quote is doubled:
SELECT SQLCOR01.CIN , SQLCOR01.LN , SQLCOR01.FN ,SQLCOR01.EXDAT , SQLCOR01.TEL , SQLCOR01.STR , SQLCOR01.CITY ,SQLCOR01.PROV , SQLCOR01.POSTAL_CODE , SQLCOR01.OUTDATE ,SQLCOR01.PCOD , SQLCOR01.TCOD , SQLCOR01.NO , SQLCOR01.TTOTFROM SQLVID SQLCOR01 WHERE SQLCOR01.LN = 'O''BRIEN';
The output is:
CIN LN FN ...--- -- -- ...5564 O'BRIEN DONALD ...
The following input variations are translated to the correct form of quoted string demonstrated in the trace.
'O'BRIEN''O''BRIEN'
Any other variation results in:
❏ A valid string that does not match the database value and does not return any rows. For example, O''''BRIEN becomes 'O''''''''BRIEN' in the WHERE predicate.
❏ An invalid string that produces one of the following messages:
Error - Semi-colon or END expected
Error - Missing or Misplaced quotes
Error - (value entered) is not a valid column
Error - Syntax error on line … Unbalanced quotes
Strings without embedded single quotation marks can be entered without quotes or embedded in single quotation marks, either SMITH or 'SMITH'.
If you use &1 without the QUOTEDSTRING suffix in the request, acceptable input strings that retrieve O’Brien’s record are:
'''O'''BRIEN''''''O''''BRIEN'''
Using &1 without the QUITEDSTRING suffix, the acceptable form of a string without embedded single quotation marks is '''SMITH'''.
252 Information Builders

Managing Flow of Control in an Application
To make a string enclosed in single quotation marks acceptable without the QUOTEDSTRING suffix, use '&1' in the request. In this case, in order to retrieve O'Brien’s record, you must enter the string that would have resulted from the QUOTEDSTRING suffix:
'O''''BRIEN'
To enter a string without embedded single quotation marks using '&1', you can either omit the surrounding single quotation marks or include them: SMITH or 'SMITH'.
Note: The form '&1.QUOTEDSTRING' is not supported.
Reference: Usage Notes for Quote-Delimited Character Strings
❏ An unmatched single quotation mark at the beginning of a character string is treated as invalid input and generates the following message:
(FOC257) MISSING QUOTE MARKS: value;
Performing a Calculation on a Variable
You can use -SET to define a value for a substituted variable based on the results of a logical or arithmetic expression or a combination.
How to:
Perform a Calculation on a Variable
Example:
Altering a Variable Value
Developing Applications 253

Manipulating and Testing Variables
Syntax: How to Perform a Calculation on a Variable
-SET &name = expression;
where:
&name
Is a user-supplied variable that has its value assigned with the expression.
expression
Is an expression following the rules outlined in the Creating Reports manual, but with limitations as defined in this topic. The semicolon after the expression is required to terminate the -SET command. For information about setting a precision for Dialogue Manager calculations, see How to Specify Precision for Dialogue Manager Calculations on page 222.
Example: Altering a Variable Value
The following example demonstrates the use of -SET to alter variable values based on tests.
-START-TYPE RETAIL PRICE ABOVE OR BELOW $1.00 IN THIS REPORT?-PROMPT &CHOICE.ENTER A OR B.-SET &REL = IF &CHOICE EQ A THEN 'GT' ELSE 'LT'; TABLE FILE SALES PRINT PROD_CODE UNIT_SOLD RETAIL_PRICE BY STORE_CODE BY DATE IF RETAIL_PRICE &REL 1.00 END
In the example, the &CHOICE variable receives either A or B as the value supplied through -PROMPT. Assuming the user enters the letter A, -SET assigns the string value GT to &REL. Then, the value GT is passed to the &REL variable in the procedure, so that the expanded FOCUS command at execution time is:
IF RETAIL_PRICE GT 1.00
254 Information Builders

Managing Flow of Control in an Application
Changing a Variable Value With the DECODE Function
You can use the DECODE function to change a variable to an associated value.
Example: Changing the Value of a Variable
In this example the variable refers to a label:
1. -PROMPT &SELECT. ENTER CHOICE (A,B,C,D,E).2. -SET &GO=DECODE &SELECT (A ONE B TWO C THREE - D FOUR E FIVE ELSE EXIT);3. -GOTO &GO -ONE . . . -TWO . . .
The example processes as follows:
1. -PROMPT prompts the user at the terminal for a value for the variable &SELECT. Assume the user enters A.
2. -SET defines the variable &GO in terms of the DECODE function. Depending on the value input for &SELECT, DECODE associates a substitution. In this case, ONE is substituted for A.
3. -GOTO &GO transfers control to the label -ONE.
In the example, &GO can be another procedure (see Dialogue Manager Quick Reference on page 266) that is executed, depending on the value that is decoded:
-TOP-TYPE-PROMPT &SELECT.ENTER 1, 2, 3, 4, 5, OR EXIT TO END.-SET &GO=DECODE &SELECT (1 ONE 2 TWO 3 THREE- 4 FOUR 5 FIVE ELSE EXIT);-IF &GO IS EXIT GOTO EXIT;EX &GO-RUN-GOTO TOP-EXIT
Example:
Changing the Value of a Variable
Developing Applications 255

Manipulating and Testing Variables
For more information on DECODE, see the Using Functions manual.
Extracting Characters From a Variable Value With the EDIT Function
You can use the mask option of the EDIT function with amper variables. You can insert characters into an alphanumeric value, or extract certain characters from the value.
Example: Extracting a Character From a Variable
In this example, EDIT extracts a particular character, in this case the J, for comparison in order to branch to the appropriate label. Assume there are nested menus and the user must supply a number to branch to a particular menu. If the first character is a J, the branch is to the label JUMP that enables the user to jump in nested menus (the numbers refer to the explanation below):
1. -TYPE CHOOSE 1 for Edit, 2 for Print, 3 for Math1. -TYPE TO JUMP LEVELS OF MENUS TYPE J1.3 ETC.2. -PROMPT &OPTION.A4.Please enter selection:.3. -SET &XYZ = EDIT(&OPTION, '9$$$');
4. -IF &XYZ EQ J THEN GOTO JUMP; . . .5. -JUMP . . .
The example processes as follows:
1. -TYPE send messages to the screen explaining the options to the user.
2. -PROMPT asks the user to enter a value for the variable &OPTION. It can have as many as four characters.
3. -SET calculates the variable &XYZ, which is the &OPTION variable, using the mask option of EDIT. The first character is screened.
4. -IF determines the branch. If the variable &XYZ is equal to J, processing continues to the label JUMP. Otherwise, processing continues to the next command in the procedure.
5. -JUMP is a label. The coding that follows contains the necessary FOCUS commands to enable the user to jump to the various menus.
Example:
Extracting a Character From a Variable
256 Information Builders

Managing Flow of Control in an Application
Removing Trailing Blanks From Variables With the TRUNCATE Function
The Dialogue Manager TRUNCATE function removes trailing blanks from Dialogue Manager amper variables and adjusts the length accordingly.
The Dialogue Manager TRUNCATE function has only one argument, the string or variable to be truncated. If you attempt to use the Dialogue Manager TRUNCATE function with more than one argument, the following error message is generated:
(FOC03665) Error loading external function 'TRUNCATE'
This function can only be used in Dialogue Manager commands that support function calls, such as -SET and -IF commands. It cannot be used in -TYPE or -CRTFORM commands or in arguments passed to stored procedures.
Note: A user-written function of the same name can exist without conflict.
Syntax: How to Remove Trailing Blanks From Variables
-SET &var2 = TRUNCATE(&var1);
where:
&var2
Is the Dialogue Manager variable to which the truncated string is returned. The length of this variable is the length of the original string or variable minus the trailing blanks. If the original string consisted of only blanks, a single blank, with a length of one is returned.
&var1
Is a Dialogue Manager variable or a literal string enclosed in single quotation marks. System variables and statistical variables are allowed as well as user-created local and global variables.
How to:
Remove Trailing Blanks From Variables
Example:
Removing Trailing Blanks
Developing Applications 257

Manipulating and Testing Variables
Example: Removing Trailing Blanks
The following example shows the result of truncating trailing blanks:
-SET &LONG = 'ABC ' ;-SET &RESULT = TRUNCATE(&LONG);-SET &LL = &LONG.LENGTH;-SET &RL = &RESULT.LENGTH;-TYPE LONG = &LONG LENGTH = &LL-TYPE RESULT = &RESULT LENGTH = &RL
The output is:
LONG = ABC LENGTH = 06RESULT = ABC LENGTH = 03
The following example shows the result of truncating a string that consists of all blanks:
-SET &LONG = ' ' ;-SET &RESULT = TRUNCATE(&LONG);-SET &LL = &LONG.LENGTH;-SET &RL = &RESULT.LENGTH;-TYPE LONG = &LONG LENGTH = &LL-TYPE RESULT = &RESULT LENGTH = &RL
The output is:
LONG = LENGTH = 06RESULT = LENGTH = 01
The following example uses the TRUNCATE function as an argument for EDIT:
-SET &LONG = 'ABC ' ;-SET &RESULT = EDIT(TRUNCATE(&LONG)|'Z','9999');-SET &LL = &LONG.LENGTH;-SET &RL = &RESULT.LENGTH;-TYPE LONG = &LONG LENGTH = &LL-TYPE RESULT = &RESULT LENGTH = &RL
The output is:
LONG = ABC LENGTH = 06RESULT = ABCZ LENGTH = 04
258 Information Builders

Managing Flow of Control in an Application
Calling a Function
Any function name encountered in a Dialogue Manager expression that is not recognized as a system standard name or FOCUS function is assumed to be a function. These functions are externally programmed by users and stored in a library that is available at the time referenced. One or more arguments are passed to the user program, which performs an operation or calculation and returns a single value or character string.
Dialogue Manager variables can receive the values from functions through the -SET command.
Syntax: How to Set a Variable Value Based on the Result From a Function
-SET &name = routine(argument,...,'format');
where:
name
Is the name of the variable in which the result is stored.
routine
Is the name of the function.
argument
Represents the argument(s) that must be passed to the function. Numeric arguments are converted to double-precision (D) format.
format
Is the predefined format of the result. This is used to convert numeric results back to character representation. It must be enclosed in single quotation marks.
How to:
Set a Variable Value Based on the Result From a Function
Load and Execute a Function With -CMS/-TSO/-MVS RUN
Example:
Setting a Variable Value Based on the Result From a Function
Loading and Executing a Function
Developing Applications 259

Manipulating and Testing Variables
Example: Setting a Variable Value Based on the Result From a Function
In the following example, FOCUS invokes the function RATE, adds 0.5 to the calculated value, and then formats the result as a double precision number. This result is then stored in the variable &COST:
-PROMPT &COMPANY.WHAT COMPANY ARE YOU USING?.-PROMPT &DEST.WHERE ARE YOU SENDING THE PACKAGE TO?.-PROMPT &WEIGHT.HOW HEAVY IS THE PACKAGE IN POUNDS?.-SET &COST = RATE(&COMPANY,&DEST,&WEIGHT,'D6.2') + 0.5;-TYPE THE COST TO SEND A &WEIGHT pound PACKAGE-TYPE TO &DEST BY &COMPANY IS &COST
Syntax: How to Load and Execute a Function With -CMS/-TSO/-MVS RUN
These Dialogue Manager commands cause a function to be loaded and executed.
The commands provide an alternative to -SET, which is generally the preferred method for calling user-supplied functions (see Set a Variable Value Based on the Result From a Function on page 259).
However, -CMS/-TSO/-MVS RUN must be used for this purpose when the function being called:
❏ Does not have arguments.
❏ Has no return argument.
❏ Does not accept numeric arguments in double precision format. In this case it is the user’s responsibility to do the appropriate conversion.
The syntax is
{-CMS }RUN routine[, argument,...]{-TSO }RUN routine[, argument,...]{-MVS }RUN routine[, argument,...]
where:
routine
Is the name of the function.
argument
Represents the argument(s) being passed to the function. Arguments that are variables must have sizes predefined in prior -SET commands.
260 Information Builders

Managing Flow of Control in an Application
If you use this syntax, please note the foIlowing:
❏ If the function returns a value that is not alphanumeric, Dialogue Manager is not able to display or interpret the value correctly.
❏ You must convert all numeric arguments to double precision before they are passed to the function. (You can use the ATODBL function to convert them.) However, if any portion of the double precision number can be interpreted as an EBCDIC comma, Dialogue Manager incorrectly interprets this argument as two arguments.
❏ A user-written function may employ an argument for both input and output purposes. It is the responsibility of the user program to move the correct number of characters into the output variables.
Example: Loading and Executing a Function
In this example, the function is CODENAME. The arguments that are variables are either prompted for or set at the beginning of the procedure and values are then supplied for the arguments.
-PROMPT &MYCODE.A3.-SET &MYNAME = '';-SET &MYFACTOR = '' ;-CMS RUN CODENAME,&MYCODE,&MYNAME,&MYFACTOR
Using Variables to Alter Commands
A variable can refer to a FOCUS command or to a particular field. Therefore, the command structure of a procedure can be determined by the value of the variable.
Example:
Using a Variable to Control What the TABLE Command Prints
Developing Applications 261

Debugging a Procedure
Example: Using a Variable to Control What the TABLE Command Prints
In this example, the variable &FIELD determines the field to print in the TABLE request.
In the file named SALES, the variable &FIELD can display the values RETURNS, DAMAGED, or UNIT_SOLD.
TABLE FILE SALES . . .PRINT &FIELDBY PROD_CODE . . .
Debugging a Procedure
You can test and debug your procedure with the following.
❏ The &ECHO variable controls the display of command lines as they execute so you can test and debug procedure.
❏ The &STACK variable enables you to test the logic of Dialogue Manager commands. Setting this variable to OFF lets you run the procedure while preventing the execution of stacked (non-Dialogue Manager) commands. This gives you the ability to view the sequence of commands and see how the variable values are resolved.
How to:
Display Command Lines as They Execute
Specify Precision for Dialogue Manager Calculations
Test Dialogue Manager Command Logic
Example:
Using the &RETCODE Variable to Test the Result of a Command
Reference:
Testing the Status of a Query
262 Information Builders

Managing Flow of Control in an Application
❏ The &RETCODE variable returns a code after a procedure is executed. If the procedure results in normal output or no records are retrieved, the value of &RETCODE is 1. If an error occurs while parsing the procedure, the value of &RETCODE is 8.
&RETCODE can be used to test the result of an operating system command. This retrieves the return code from the operating system.
❏ The &IORETURN variable tests the result of Dialogue Manager -READ and -WRITE commands. After a -READ or -WRITE operation, a non-zero return code indicates an error such as end-of-file being reached.
&IORETURN can be used to test the result of the following:
❏ A -READ command. If &IORETURN equals zero, a value was successfully read from the external file.
❏ A -WRITE command. If &IORETURN equals zero, a value was successfully written to the external file.
Syntax: How to Display Command Lines as They Execute
{-DEFAULT|-SET|EX procname} &ECHO = {ON|ALL|OFF}
where:
procname
Is the procedure to execute.
ON
Displays FOCUS commands that are expanded and stacked for execution.
ALL
Displays Dialogue Manager commands and FOCUS commands that are expanded and stacked for execution.
OFF
Suppresses the display of both stacked commands and Dialogue Manager commands. This value is the default.
Note: If you use -SET or -DEFAULT and place it in the procedure, display begins from that point in the procedure, and can be turned off and on again at any other point in the procedure.
If the procedure is encrypted, &ECHO automatically receives the value OFF, regardless of the value that is assigned explicitly.
By default, any procedure that does not explicitly set the &ECHO variable executes with the value OFF. You can change this default value for &ECHO with the SET DEFECHO command, as described in Establish a Default Value for the &ECHO Variable on page 264.
Developing Applications 263

Debugging a Procedure
Syntax: How to Establish a Default Value for the &ECHO Variable
SET DEFECHO = {OFF|ON|ALL}
where:
OFF
Establishes OFF as the default value for &ECHO. OFF is the default value.
ON
Establishes ON as the default value for &ECHO. ON displays FOCUS commands that are expanded and stacked for execution.
ALL
Establishes ALL as the default value for &ECHO. ALL displays Dialogue Manager commands and FOCUS commands that are expanded and stacked for execution.
Syntax: How to Test Dialogue Manager Command Logic
{-DEFAULT|-SET|EX procname} &STACK = {ON|OFF}
where:
procname
Is the procedure to execute.
ON
Executes stacked commands normally. This value is the default.
OFF
Prevents the execution of stacked commands. In addition, system variables (for example, &RECORDS or &LINES) are not set. Dialogue Manager commands are executed so you can test the logic of the procedure.
Note: &STACK is usually used with &ECHO = ALL for debugging purposes. The terminal displays both the Dialogue Manager commands, as well as the FOCUS commands with the supplied values. You can view the logic of the procedure.
264 Information Builders

Managing Flow of Control in an Application
Example: Using the &RETCODE Variable to Test the Result of a Command
If you are using Simultaneous Usage (SU), you must know if the FOCUS Database Server is available before beginning a particular procedure. The following procedure tests whether SINK1 is available before launching PROC1.
? SU SINK1-RUN-IF &RETCODE EQ 16 GOTO BAD;-INCLUDE PROC1-BAD-EXIT
Reference: Testing the Status of a Query
The system variable &RETCODE returns a code after a query is executed. If the query results in a normal display, the value of &RETCODE is 0. If a display error occurs, or no display results (as can happen when the query finds no data), the value of &RETCODE is 8. (If the error occurs on a ? SU, the value of &RETCODE is 16.)
The value of &RETCODE is set following the execution of any of these queries:
*The &RETCODE value of ? SU means: 0 indicates that the FOCUS Database Server (formerly called the sink machine) is up with one or more users; 8 indicates that the FOCUS Database Server is up with no users; 16 indicates that there is an error in communicating to the FOCUS Database Server.
You can test the status of any of these queries by checking the &RETCODE variable and providing branching instructions in your procedure.
NORMAL NODISPLAY ERROR
? HOLD 0 8
? SU* 0 8 16
? JOIN 0 8
? COMBINE 0 8
? DEFINE 0 8
? USE 0 8
? LOAD 0 8
? FILEDEF 0 8
Developing Applications 265

Issuing an Operating System Command
Issuing an Operating System Command
You can issue an operating system command to set up an environment in which a request must run. For example, a program may allocate files, rename files, copy files, or perform other operations before executing a request.
Syntax: How to Execute an Operating System Command
op_system command
where:
op_system
Specifies the operating system.
-MVS specifies the OS/390 or z/OS operating system.
-TSO specifies the OS/390 or z/OS operating system.
-CMS specifies the CMS operating system
command
Is an operating system command.
Dialogue Manager Quick Reference
This topic provides an alphabetical list of all Dialogue Manager commands, including a description of functions and syntax.
It also provides a grouped list of Dialogue Manager defaults and limits.
Note that this information is also presented throughout the chapter in the context of the task to which it applies.
How to:
Execute an Operating System Command
Reference:
Dialogue Manager Syntax Reference
Dialogue Manager Defaults and Limits
266 Information Builders

Managing Flow of Control in an Application
Reference: Dialogue Manager Syntax Reference
This topic describes all the Dialogue Manager commands in alphabetical order. The following commands are included:
Command: -*
Function: Signals the beginning of a comment line.
Any number of comment lines can follow one another, but each must begin with -*. A comment line may be placed at the beginning or end of a procedure, or in between commands. However, it cannot be on the same line as a command.
Use comment lines liberally to document a procedure so that its purpose and history are clear to others.
Syntax: -* text
where:
text
Is a comment. A space is not required between -* and text.
Command: -?
Function: The command -? displays the current value of a local variable.
Syntax: -? &[variablename]
where:
variablename
Is a variable name of up to 12 characters. If this parameter is not specified, the current values of all local, global, and defined system and statistical variables are displayed.
Developing Applications 267

Dialogue Manager Quick Reference
Command: -CLOSE
Function: -CLOSE closes an external file opened with the -READ or -WRITE NOCLOSE option. The NOCLOSE option keeps a file open until the -READ or -WRITE operation is complete.
Syntax: -CLOSE {ddname|*}
where:
ddname
Is the ddname of the open file described to FOCUS via an allocation (TSO, MSO) or FILEDEF (CMS) command.
*
Closes all -READ and -WRITE files that are currently open.
Command: -CMS
Function: -CMS executes a CMS operating system command from within Dialogue Manager.
Syntax: -CMS command
where:
command
Is a CMS command.
268 Information Builders

Managing Flow of Control in an Application
Command: -CMS RUN
Function: In CMS, loads and executes the specified user-written function.
Note that the preferred way to execute user-written programs is with the -SET command.
Syntax: -CMS RUN function
where:
function
Is a FOCUS user-written function.
Command: -CRTCLEAR
Function: Clears the current screen display.
Syntax: -CRTCLEAR
Developing Applications 269

Dialogue Manager Quick Reference
Command: -CRTFORM
Function: Creates forms to prompt the user for values for variables.
All lines following a -CRTFORM command that begin with a hyphen and enclose text in double quotation marks (“) are part of a single-screen form. Pressing ENTER passes all input data to associated variables.
With -CRTFORM, the first line that does not begin with a -“ signals the end of the form. With -CRTFORM BEGIN, the command -CRTFORM END signals the end of the form.
All FIDEL facilities are available to -CRTFORM except HEIGHT, WIDTH, and LINE.
CRTFORM in MODIFY functions identically to -CRTFORM in Dialogue Manager.
See -PROMPT.
Syntax: -CRTFORM [TYPE n] [BEGIN|END [LOWER|UPPER]]
where:
-CRTFORM
Invokes FIDEL and signals the beginning of the screen form.
TYPE n
Enables you to define the number of lines (n) to reserve for messages. You can specify a number from 1 to 4. The default is 4.
BEGIN
Supports the use of other Dialogue Manager commands to help build the form.
END
Signals the end of the -CRTFORM. Used with -CRTFORM BEGIN.
LOWER
Reads lowercase data from the screen. Once you specify LOWER, every screen thereafter is a lowercase screen until you specify otherwise.
UPPER
Translates lowercase letters to uppercase. This is the default.
270 Information Builders

Managing Flow of Control in an Application
Command: -DEFAULT[S|H]
Function: DEFAULT commands set default values for local or global variables. -DEFAULT guarantees that the variables are always given a value and helps ensure that it executes correctly.
You can issue multiple -DEFAULT commands for a variable. If the variable is global, these -DEFAULT commands can be issued in separate FOCEXECs. At any point before another method is used to establish a value for the variable, the most recently issued -DEFAULT command will be in effect.
However, as soon as a value for the variable is established using any other method, subsequent -DEFAULT commands issued for that variable are ignored.
You can override -DEFAULT values by supplying values for the variables on the command line, by specifically prompting for values with -PROMPT or -CRTFORM, or by supplying a value with -SET subsequent to -DEFAULT.
Default values are provided in other FOCUS modules to anticipate user needs and reduce the need for keystrokes in situations where most users desire a predefined outcome. See also -SET.
Syntax: -DEFAULT[S|H] &[&]name=value [...]
where:
&name
Is the name of the variable.
value
Is the default value assigned to the variable.
Command: -EXIT
Function: Forces a procedure to end. All stacked commands are executed and the procedure exits. If the procedure was called by another one, the calling procedure continues processing.
Use -EXIT for terminating a procedure after processing a final branch that completes the desired task. The last line of a procedure is an implicit -EXIT.
Syntax: -EXIT
Developing Applications 271

Dialogue Manager Quick Reference
Command: -GOTO
Function: Transfers control to a specified label.
If Dialogue Manager finds the label, processing continues with the line following it. If Dialogue Manager does not find the label, processing ends and an error message is displayed.
Syntax: -GOTO label
. . .-label [TYPE text]
where:
label
Is a user-defined name of up to 12 characters that specifies the target of the -GOTO action.
Do not use embedded blanks or the name of any other Dialogue Manager command except -QUIT or -EXIT. Do not use words that can be confused with functions, arithmetic and logical operations, and so on.
TYPE text
Optionally sends a message to the client application.
272 Information Builders

Managing Flow of Control in an Application
Command: -IF
Function: Routes execution of a procedure based on the evaluation of the specified expression.
An -IF without an explicitly specified ELSE whose expression is false continues processing with the line immediately following it.
Syntax: -IF expression [THEN] GOTO label1 [- ELSE GOTO label2][- ELSE IF...];
where:
label
Is a user-defined name of up to 12 characters that specifies the target of the GOTO action.
Do not use embedded blanks or the name of any other Dialogue Manager command except -QUIT or -EXIT. Do not use words that can be confused with functions, arithmetic or logical operations, and so on.
expression
Is a valid expression. Literals need not be enclosed in single quotation marks unless they contain embedded blanks or commas.
THEN
Is an optional keyword that increases readability of the command.
ELSE GOTO
Passes control to label2 when the -IF test fails.
ELSE IF
Specifies a compound -IF test.
The semicolon is required at the end of the command, and continuation lines must begin with a hyphen.
Developing Applications 273

Dialogue Manager Quick Reference
Command: -INCLUDE
Function: Specifies another procedure to be incorporated and executed at run time, as if it were part of the calling procedure. The specified procedure may comprise either a fully developed or partial procedure. Note that a partial procedure does not execute if called outside of the procedure containing -INCLUDE.
When using -INCLUDE, you may not branch to a label outside of the specified procedure.
A procedure may contain more than one -INCLUDE. Any number of -INCLUDEs may be nested, but recursive -INCLUDEs are limited to four levels.
You may use any valid command in a -INCLUDE.
EXEC may also be used to execute a procedure inside another procedure.
Syntax: -INCLUDE filename [filetype [filemode]]
where:
filename
Is the procedure to be incorporated in the calling procedure.
filetype
Is the procedure’s file type on CMS or DDNAME on MVS. If none is included, FOCEXEC is assumed.
filemode
Is the procedure’s file mode on CMS. If none is included, a file mode of A is assumed.
274 Information Builders

Managing Flow of Control in an Application
Command: -label
Function: Is the target of a -GOTO command or -IF criteria.
Syntax: -label [TYPE message]
where:
label
Is a user-supplied name of up to 12 characters that identifies the target for a branch.
Do not use embedded blanks or the name of any other Dialogue Manager command except -QUIT or -EXIT. Do not use words that can be confused with functions, arithmetic or logical operations, and so on.
TYPE message
Sends a message to the client application.
Command: -MVS
Function: -MVS is a synonym for -TSO.
Command: -MVS RUN
Function: Same as -TSO RUN.
Syntax: -MVS RUN
Developing Applications 275

Dialogue Manager Quick Reference
Command: -PASS
Function: Directly issues and controls passwords. This feature is especially useful for specifying a particular file or set of files that a given user can read or write. Passwords have detailed sets of functions associated with them through DBA module.
The procedure that sets passwords should be encrypted so that it and the passwords that it sets cannot be typed and made known.
A variable can be associated with -PASS so that you can prompt for and assign a password value.
The PASS command provides the same function at the command level, as does the PASS parameter of the SET command.
Syntax: -PASS password
where:
password
Is a literal FOCUS password or a variable containing a password.
276 Information Builders

Managing Flow of Control in an Application
Command: -PROMPT
Function: Types a message to the terminal and reads the reply from the user. This reply assigns a value to the variable named.
If a format is specified and the supplied value does not conform, FOCUS displays an error message and prompts the user again for the value.
If a (list) is specified and the user does not reply with a value on the list, FOCUS reprompts and prints the list of acceptable values.
Note: You cannot use format and list together.
In MODIFY, PROMPT specifies additional data input needs.
In GRAPH, when it is set on, GPROMPT automatically prompts for all parameters needed to execute the graph request. This is quite a different function from -PROMPT in Dialogue Manager.
See -CRTFORM.
Syntax: -PROMPT &name [[.format|.(list)] [.text].]
where:
&name
Is a user-defined variable.
format
Optionally specifies alphanumeric or integer data type and length.
text
Optionally specifies prompting text that appears on the screen. Must be delimited by periods.
list
Optionally specifies a range of acceptable responses. Must be enclosed in parentheses.
Developing Applications 277

Dialogue Manager Quick Reference
Command: -QUIT
Function: Forces an immediate exit from the procedure. Stacked lines are not executed. This differs from an -EXIT, which executes all lines that are currently on the stack.
Like -EXIT, -QUIT returns the user to the FOCUS prompt.
-QUIT FOCUS takes the user out of FOCUS altogether and returns the user to the operating system level.
-QUIT can be made the target of a branch, with the same results as those already described.
QUIT can be entered in response to -PROMPT or -CRTFORM to force an exit from the procedure. The QUIT command can, however, be turned off from within Dialogue Manager to prevent the user from exiting FOCUS prompt.
The QUIT command can also be used to exit from MODIFY and TABLE requests as well as Dialogue Manager procedures.
The principle of QUIT remains consistent throughout FOCUS, namely that the exited request or procedure is not executed and the user is returned to the FOCUS prompt.
See also -RUN and -EXIT.
Syntax: -QUIT or -QUIT FOCUS [n]
where:
n
Is the operating system return code. It can be a constant or an integer variable up to 4095. If you do not supply a value or if you supply a non-integer value for n, the return code is 8 (the default value).
278 Information Builders

Managing Flow of Control in an Application
Command: -READ
Function: Reads data from an external (non-FOCUS) file. -READ can access data in either fixed or free form.
See -WRITE.
Syntax: -READ ddname[,] [NOCLOSE] &name[.format.][,] ...
where:
ddname
Is the logical name of the file as defined to FOCUS using FILEDEF (or, for MVS, ALLOCATE or DYNAM ALLOCATE). A space after the ddname denotes a fixed format file while a comma denotes a comma-delimited file.
NOCLOSE
Indicates that the ddname should be kept open even after a -RUN is executed. The ddname is closed upon completion of the procedure or when a -CLOSE or subsequent -WRITE command is encountered.
name
Is the variable name. You may specify more than one variable. Using a comma to separate variables is optional.
If the list of variables is longer than one line, end the first line with a comma and begin the next line with a dash followed by a blank (-) for comma-delimited files or a dash followed by a comma followed by a blank (-,) for fixed format files. For example:
Comma-delimited files
-READ EXTFILE, &CITY,&CODE1,- &CODE2
Fixed format files
-READ EXTFILE &CITY.A8. &CODE1.A3.,-, &CODE2.A3
format
Is the format of the variable. It may be Alphanumeric (A) or Integer (I).Note that format must be delimited by periods. The format is ignored for comma-delimited files.
Developing Applications 279

Dialogue Manager Quick Reference
Command: -REMOTE
Function: Passes execution of the commands within a -REMOTE BEGIN and -REMOTE END command to a server.
For information, see the Overview and Operating Environments Manual.
Syntax: -REMOTE BEGINcommands-REMOTE END
Command: -REPEAT
Function: Allows looping in a procedure.
A loop ends when any of the following occurs:
❏ It is executed in its entirety.
❏ A -QUIT or -EXIT is issued.
❏ A -GOTO is issued to a label outside of the loop. If a -GOTO is later issued to return to the loop, the loop proceeds from the point it left off.
280 Information Builders

Managing Flow of Control in an Application
Syntax: -REPEAT label n TIMES-REPEAT label WHILE condition -REPEAT label FOR &variable [FROM fromval] [TO toval] [STEP s]
where:
label
Identifies the code to be repeated (the loop). A label can include another loop if the label for the second loop has a different name from the first.
n TIMES
Specifies the number of times to execute the loop. The value of n can be a local variable, a global variable, or a constant. If it is a variable, it is evaluated only once, so you cannot change the number of times to execute the loop. The loop can only be ended early using -QUIT or -EXIT.
WHILE condition
Specifies the condition under which to execute the loop. The condition is any logical expression that can be true or false. The loop is run if the condition is true.
&variable
Is a variable that is tested at the start of each execution of the loop and incremented by s with each execution. It is compared with the value of fromval and toval, if supplied. The loop is executed only if &variable is greater than or equal to fromval or less than or equal to toval.
fromval
Is a constant that is compared with &variable at the start of the execution of the loop. The default value is 1.
toval
Is a value that is compared with &variable at the start of the execution of the loop. The default value is 1,000,000.
STEP s
Is a constant used to increment &variable at the end of the execution of the loop. It may be positive or negative. The default increment is 1.
Note: The parameters FROM, TO, and STEP can appear in any order.
Developing Applications 281

Dialogue Manager Quick Reference
Command: -RUN
Function: Causes immediate execution of all stacked FOCUS commands.
Following execution, processing of the procedure continues with the line that follows -RUN.
-RUN is commonly used to do the following:
❏ Generate results from a request that can then be used in testing and branching.
❏ Close an external file opened with -READ or -WRITE. When a file is closed, the line pointer is placed at the beginning of the file for a -READ. The line pointer for -WRITE is positioned depending on the allocation and definition of the file.
Syntax: -RUN
Command: -SET
Function: Assigns a literal value, or a value that is computed in an arithmetic or logical expression, to a variable.
Single quotation marks around a literal value are optional unless it contains an embedded blank, comma, or equal sign, in which case you must include them.
Syntax: -SET &[&]name= {expression|value};
where:
&name
Is the name of the variable.
expression
Is a valid expression. Expressions can occupy several lines, so you should end the command with a semicolon.
value
Is a literal value, or arithmetic or logical expression assigned to the variable. If the literal value contains commas or embedded blanks, you must enclose the value in single quotation marks.
282 Information Builders

Managing Flow of Control in an Application
Command: -TSO
Function: -TSO executes a TSO operating system command from within Dialogue Manager. Only supported with the RUN command.
Syntax: -TSO command
where:
command
Is a TSO RUN command.
Command: -TSO RUN
Function: In TSO, loads and executes the specified user-written function.
Note that the preferred way to execute user-written programs is with the -SET command.
Syntax: -TSO RUN function
where:
function
Is the name of a user-written function.
Developing Applications 283

Dialogue Manager Quick Reference
Command: -TYPE
Function: Transmits informative messages to the user at the terminal. Any number of -TYPE lines may follow one another but each must begin with -TYPE.
Substitutable variables may be embedded in text. The values currently assigned to each variable is displayed in the assigned position in the text.
-TYPE1 and TYPE+ are not supported by IBM 3270-type terminals.
TYPE is used in a variety of ways in FOCUS to send informative messages to the screen. A TYPE command may appear on the same line as a label in Dialogue Manager. In MODIFY, TYPE is used to print messages at the start and end of processes, at selected positions in MATCH or NOMATCH, NEXT or NONEXT, and to send a message after an INVALID data condition.
Syntax: -TYPE[+] text -TYPE[0] text -TYPE[1] text
where:
-TYPE1
Sends the text after issuing a page eject.
-TYPE0
Sends the text after skipping a line.
-TYPE+
Sends the text but does not add a line feed.
text
Is a character string that fits on a line.
284 Information Builders

Managing Flow of Control in an Application
Command: -WINDOW
Function: Executes a window file. When the command is encountered, control is transferred from the procedure to the specified window file. The window specified in the command becomes the first active window. Control remains within the window file until a menu option is chosen, or a window is activated, for which there is no goto value.
The window file, and the windows in it, are created using Window Painter.
Developing Applications 285

Dialogue Manager Quick Reference
Syntax: -WINDOW windowfile windowname [PFKEY|NOPFKEY] [GETHOLD][BLANK|NOBLANK][CLEAR|NOCLEAR]
where:
windowfile
Identifies the file in which the windows are stored. In CMS, this is a file name. The file must have a file type of FMU.
In MVS/TSO, this is a member name. The member must belong to a PDS allocated to ddname FMU.
windowname
Identifies which window in the file is displayed first.
PFKEY
Enables you to test for function key values during window execution.
NOPFKEY
You are unable to test for function key values during window execution.
GETHOLD
Retrieves stored amper variables collected from a Multi-Select window.
BLANK
Clears all previously set amper variable values when -WINDOW is encountered. This is the default setting.
NOBLANK
When -WINDOW is encountered, the values of previously set amper variables are retained.
CLEAR
Clears the screen before displaying the first window. This is the default behavior. When specified in conjunction with the Terminal Operator Environment (TOE), the TOE screen is redisplayed when control is transferred back to the procedure.
NOCLEAR
Displays the specified window directly over the current screen.
286 Information Builders

Managing Flow of Control in an Application
Command: -WRITE
Function: Writes data to a sequential file.
If the command continues over several lines, put a comma at the end of the line and a hyphen at the beginning of each subsequent line.
Unless you specify the NOCLOSE option, an opened file is closed upon termination of the procedure with -RUN, -EXIT, or -QUIT.
In TABLE, WRITE is a synonym for SUM; functionally it is quite different from -WRITE.
See -READ.
Syntax: -WRITE ddname [NOCLOSE] text
where:
ddname
Is the logical name of the file as defined to FOCUS using FILEDEF (or for MVS, ALLOCATE or DYNAM ALLOCATE).
NOCLOSE
Indicates that the file should be kept open even if a -RUN is encountered. The file is closed upon completion of the procedure or when a -CLOSE or subsequent -READ command is encountered.
text
Is any combination of variables and text. To write more than one line, end the first line with a comma (,) and begin the next line with a hyphen followed by a space (-).
Developing Applications 287

Dialogue Manager Quick Reference
Reference: Dialogue Manager Defaults and Limits
This topic provides you with an easier way of locating default values, operating system and FOCUS limits, summary tables, general rules, and tips for ease-of-use.
General rules to follow when you are creating procedures are:
❏ If a Dialogue Manager command exceeds one line, the following line must begin with a hyphen (-).
❏ The hyphen (-) must be placed at the first position of the command line.
❏ The command is usually attached to the hyphen (-), but you may leave space between the hyphen and the Dialogue Manager command.
❏ At least one space must be inserted between the Dialogue Manager command and other text.
Command: -“ “
Function: The -“ “ syntax is associated with the FIDEL -CRTFORM command. All textual data enclosed by the double quotation marks is printed to the screen. You can use position markers and specify variable fields within double quotation marks.
When -CRTFORM is processed, the screen displays a form and the cursor stops at each amper variable date entry field. If a variable has not been declared prior to the -CRTFORM, FOCUS prompts the user for a value to assign to the variable.
In MODIFY, enclosing data in double quotation marks (“ “) without the leading hyphen is used with CRTFORM, or for headings, footings, subheads, and subfoots within a TABLE request.
See -CRTFORM.
Syntax: -" "
where:
" "
Enclose textual information, fields and spot markers.
288 Information Builders

Managing Flow of Control in an Application
General rules for supplying values for variables:
❏ The lengths of values stored in Dialogue Manager (amper) variables vary by context:
❏ When used with the commands -READ, -TYPE, and WRITE, the maximum length of a variable is approximately 32,000 characters (32K).
❏ When used with other Dialogue Manager commands or the EX command, a variable value cannot exceed 4,096 character (4K).
❏ If a value contains an embedded comma (,) or embedded equal sign (=) the value must be enclosed between single quotation marks. For example:
EX SLRPT AREA=S, LOCATION='NY, NY'
❏ Once a value is supplied for a local variable, it is used for that variable throughout the procedure, unless it is changed through a -PROMPT, -SET, or -READ.
❏ Once a value is supplied for a global variable, it is used for that global variable throughout the FOCUS session in all procedures, unless it is changed through a -PROMPT, -SET, or -READ.
❏ Dialogue Manager automatically sends a prompt to the terminal if a value has not been supplied for a variable. Automatic prompts (implied prompting) are identical in syntax and function to the direct prompts created with -PROMPT.
Operating system default values, limits, and format specifications.
❏ The default value for the operating system return code value is 8.
❏ Literals must be surrounded by single quotation marks if they contain embedded blanks or commas. To produce a literal that starts or ends with a single quotation mark, place two single quotation marks where you want one to appear.
❏ Alphanumeric formats are described by the letter A followed by the number of characters. The number of characters can be from 1 to 3968.
❏ Integer formats are described by the letter I followed by the number of digits to be entered. The number can be from one to 10 digits in length, value must be less than 231-1.
❏ A label is a user-defined name of up to 12 characters. You cannot use blanks and should not use the name of any other Dialogue Manager command except QUIT and EXIT. The label may precede or follow GOTO in the procedure.
❏ A date supplied to Dialogue Manager cannot exceed 20 characters, including spaces.
❏ The level of nested -INCLUDE files is limited only by available memory. However, recursive -INCLUDE commands are limited to four levels.
❏ The default setting for &QUIT is ON.
Developing Applications 289

Dialogue Manager Quick Reference
❏ When using Window Painter:
❏ Screens should not begin in row 0, column 0, or column 1.
❏ The maximum screen size is 22 rows by 77 columns.
❏ A File Contents window has a limit of 12K worth of data. This is approximately 150 lines.
❏ The maximum number of menu items is 41.
❏ File Name windows must have a WIDTH of 24 or greater, or meaningless characters will appear.
290 Information Builders

FOCUS
4
Developing App
Defining a Word Substitution
A LET substitution enables you to define a word to represent other words and phrases. By substituting words for phrases, you can reduce the typing necessary to enter requests (especially when entering phrases repeatedly) and make requests easier to understand.
Topics:
❏ The LET Command
❏ Variable Substitution
❏ Null Substitution
❏ Multiple-Line Substitution
❏ Recursive Substitution
❏ Using a LET Substitution in a COMPUTE or DEFINE Command
❏ Checking Current LET Substitutions
❏ Interactive LET Query: LET ECHO
❏ Clearing LET Substitutions
❏ Saving LET Substitutions in a File
❏ Assigning Phrases to Function Keys
lications 291

The LET Command
The LET Command
The LET command enables you to represent a word or phrase with another word. This reduces the amount of typing necessary for issuing requests, and makes the requests easier to understand. A substitution is especially useful when you use the same phrase repeatedly. Note that you cannot use LET substitutions in Dialogue Manager commands, and substitutions cannot be used in a MODIFY or Maintain request.
The LET command has a short form and a long form. Use the short form for one or two LET definitions that fit on one line. Otherwise, use the long form.
When you define a word with LET then use that word in a request, the word is translated into the word or phrase it represents. The result is the same as if you entered the original word or phrase directly. You can substitute any phrase that you enter online unless you are entering a MODIFY request.
A LET substitution lasts until it is cleared or until the request terminates. To clear active LET substitutions, issue the LET CLEAR command. To use the same substitutions in many requests, place the LET commands in a stored procedure. If you want to save currently active LET substitutions, use the LET SAVE facility. These substitutions can then be executed later with one short command.
How to:
Make a Substitution (Short Form)
Make a Substitution (Long Form)
Example:
Making a Substitution (Short Form)
Making a Single Substitution (Long Form)
Making Multiple Substitutions (Long Form)
Defining Substitutions for Translation
292 Information Builders

Defining a Word Substitution
Syntax: How to Make a Substitution (Short Form)
LET word = phrase [;word = phrase...]
where:
word
Is a string of up to 80 characters with no embedded blanks.
phrase
Is a string of up to 256 characters, which can include embedded blanks. The phrase can also include other special characters, but semicolons and pound signs need special consideration. If the word you are defining appears in the phrase you are replacing, you must enclose it in single quotation marks.
More than one substitution can be defined on the same line by placing a semicolon between definitions.
Example: Making a Substitution (Short Form)
The LET command defines the word WORKREPORT as a substitute for the phrase TABLE FILE EMPLOYEE:
LET WORKREPORT = TABLE FILE EMPLOYEE
Issuing the following
WORKREPORTPRINT LAST_NAMEEND
results in this request:
TABLE FILE EMPLOYEEPRINT LAST_NAMEEND
The next command includes TABLE as both the word you are defining and as part of the phrase it is replacing. It is enclosed in single quotation marks in the phrase:
LET TABLE = 'TABLE' FILE EMPLOYEE
More than one word is defined in the following command. The definitions are separated by a semicolon:
LET WORKREPORT=TABLE FILE EMPLOYEE; PR=PRINT
Developing Applications 293

The LET Command
Syntax: How to Make a Substitution (Long Form)
LETword = phrase...END
where:
word
Is a string of up to 80 characters with no embedded blanks.
phrase
Is a string of up to 256 characters, and can include embedded blanks.
END
Is required to terminate the command.
As shown, LET and END must each be on a separate line.
As with the short form, you can define several words on one line by separating the definitions with a semicolon.
Example: Making a Single Substitution (Long Form)
The following example illustrates a single substitution.
LETRIGHTNAME = 'STEVENS' OR 'SMITH' OR 'JONES' OR 'BANNING' OR 'MCCOY' OR 'MCKNIGHT'END
Example: Making Multiple Substitutions (Long Form)
The following example illustrates substitutions that span more than one line. Notice that there is no semicolon after the definition PR = PRINT:
LETWORKREPORT=TABLE FILE EMPLOYEE; PR = PRINTRIGHTNAME='STEVENS' OR 'SMITH' OR 'JONES'END
294 Information Builders

Defining a Word Substitution
Example: Defining Substitutions for Translation
Non-English speakers can use LET commands to translate a request into another language. For example, this request
TABLE FILE CARSUM AVE.RCOST OVER AVE.DCOSTBY CAR ACROSS COUNTRYEND
can be translated into French as:
CHARGER FICHIER CARSOMMER AVE.RCOST SUR AVE.DCOSTPAR CAR TRAVERS COUNTRYFIN
Variable Substitution
Using the LET command, you can define a word that represents a variable phrase. A variable phrase contains placeholder symbols (carets) to indicate missing elements in the phrase. This allows you to give a phrase different meanings in different requests. Placeholders can be parts of words within phrases. They can also be used to represent system commands.
Placeholders can be numbered or unnumbered. If the placeholders are not numbered, then they are filled from left to right: the first word in the request after the LET-defined word fills the first placeholder, the second word fills the second placeholder, and so on to the last placeholder. If they are numbered, the placeholders are filled in numerical order. If you do not supply enough words to fill all the placeholders, the extra placeholders are null.
Example:
Making a Variable Substitution
Making Multiple Variable Substitutions (Unnumbered)
Making Multiple Variable Substitutions (Numbered)
Making a Variable Substitution in a Phrase
Defining a System Command
Developing Applications 295

Variable Substitution
Example: Making a Variable Substitution
The command
LET UNDERSCORE = ON < > UNDER-LINE
contains one placeholder. After issuing this command, you can use the word UNDERSCORE in a request:
TABLE FILE EMPLOYEEPRINT CURR_SAL BY EMP_ID BY HIRE_DATEUNDERSCORE EMP_IDEND
The field name following the LET-defined word supplies the missing value to the placeholder. In the example, EMP_ID follows the defined word UNDERSCORE. This field name is inserted in the placeholder and translates UNDERSCORE EMP_ID as:
ON EMP_ID UNDER-LINE
Example: Making Multiple Variable Substitutions (Unnumbered)
Issuing the LET command
LET TESTNAME = WHERE LAST_NAME IS < > OR < > OR < >
and then including the following line in a request
TESTNAME 'MCKNIGHT' 'STEVENS' 'BLACKWOOD'
translates the line as:
WHERE LAST_NAME IS 'MCKNIGHT' OR 'STEVENS' OR 'BLACKWOOD'
Notice that the variable phrase needs no placeholder at the end, and could also be code as WHERE LAST_NAME IS <> OR <>. Once all the placeholders are filled, the rest of the definition follows. In this example, the words MCKNIGHT and STEVENS would fill the two placeholders. BLACKWOOD would be left over, so it would follow the variable phrase.
If you do not supply enough words to fill in all the placeholders, the extra placeholders are null. For example, issuing this LET command
LET TESTNAME = WHERE LAST_NAME IS < > OR < > OR
and then entering this command
TESTNAME 'MCCOY'
translates the statement into:
WHERE LAST_NAME IS 'MCCOY' OR OR
This statement is illegal and produces an error message.
296 Information Builders

Defining a Word Substitution
Example: Making Multiple Variable Substitutions (Numbered)
The following LET command contains numbered placeholders:
LET TESTNAME = WHERE LAST_NAME IS <1> OR <2> OR <3>
Therefore, the following line
TESTNAME 'STEVENS' 'MCKNIGHT' 'BLACKWOOD'
is translated as follows:
WHERE LAST_NAME IS 'STEVENS' OR 'MCKNIGHT' OR 'BLACKWOOD'
If two placeholders have the same number, both placeholders are filled with the same word. For example, if you issue this LET command
LET RANGE = SUM MAX.<1> AND MIN.<1>
and this line
RANGE SALARY
the translated statement is:
SUM MAX.SALARY AND MIN.SALARY
Example: Making a Variable Substitution in a Phrase
Issuing the following LET command
LET BIGGEST = MAX.< >
and entering the line
WRITE BIGGEST SALARY
translates the statement as:
WRITE MAX.SALARY
Example: Defining a System Command
Each of the following LET commands define a system command in MVS:
LET ALFOC = TSO ALLOC F(< >) DA(< >.FOCUS) SHRLET LISTMEM = TSO LISTDS < > MEMBERS
Developing Applications 297

Null Substitution
Null Substitution
With a null substitution, you can use more than one word to represent a phrase. By using more than one word in a request instead of a single word, you can make the request more readable.
You can define a null word using LET. A null word is ignored by the application.
Syntax: How to Define a Null Word
To define a null word, issue the command
LET word=;
Example: Defining a Null Word
This LET command defines DISPLAY as a null word:
LETDISPLAY=;AVESAL = SUM AVE.SALARY BY DEPARTMENTEND
In the following request, the word DISPLAY is used in the code DISPLAY AVESAL, for readability, to make clear that the request prints the value represented by AVESAL:
TABLE FILE EMPLOYEEDISPLAY AVESALWHERE DEPARTMENT IS 'PRODUCTION'END
The word DISPLAY is ignored and the request is translated as:
TABLE FILE EMPLOYEESUM AVE.SALARY BY DEPARTMENTWHERE DEPARTMENT IS 'PRODUCTION'END
How to:
Define a Null Word
Example:
Defining a Null Word
298 Information Builders

Defining a Word Substitution
Multiple-Line Substitution
Many commands, such as END, must appear on a separate line in a report request. To include such a command in a LET definition, place a number sign (#) and a space before the command to indicate a new line. This allows you to substitute one word for several lines of code.
When using multiple line substitution in CMS, you must be aware that the pound sign (#) used to separate lines in multiple line substitution may also have meaning as the CMS line end character.
Example: Making Multiple-Line Substitutions
This LET command uses the number sign and a space to indicate that a new line is required for the END command:
LET HOLDREP = ON TABLE HOLD # END
The following request
TABLE FILE EMPLOYEESUM AVE.GROSS BY EMP_ID BY PAY_DATEHOLDREP
is translated as:
TABLE FILE EMPLOYEESUM AVE.GROSS BY EMP_ID BY PAY_DATEON TABLE HOLDEND
Recursive Substitution
Recursive substitution allows a phrase in one LET definition to contain a word defined in another LET definition. Recursive substitution can also be used to abbreviate long phrases within LET commands.
Example:
Making Multiple-Line Substitutions
Example:
Making a Recursive Substitution
Abbreviating a Long Phrase
Developing Applications 299

Recursive Substitution
Example: Making a Recursive Substitution
In the following LET command
LETTESTNAME=IF LAST_NAME IS RIGHTNAMERIGHTNAME = STEVENS OR MCKNIGHT OR MCCOYEND
the word RIGHTNAME in the phrase in the first definition is defined in the second definition. (Note that the two phrases in the LET command could be reversed.) This LET command is equivalent to:
LETTESTNAME = IF LAST_NAME IS STEVENS OR MCKNIGHT OR MCCOYEND
Example: Abbreviating a Long Phrase
Consider the following LET command, which illustrates recursive substitution:
LETTESTNAME = STEVENS OR SMITH OR MCCOY OR CONT1CONT1 = BANNING OR IRVING OR ROMANS OR CONT2CONT2 = JONES OR BLACKWOODEND
You can use TESTNAME in this request:
TABLE FILE EMPLOYEEPRINT SALARY BY LAST_NAMEIF LAST_NAME IS TESTNAMEEND
This is the equivalent of:
TABLE FILE EMPLOYEEPRINT SALARY BY LAST_NAMEIF LAST_NAME IS STEVENS OR SMITH OR MCCOY ORBANNING OR IRVING OR ROMANSOR JONES OR BLACKWOODEND
300 Information Builders

Defining a Word Substitution
Using a LET Substitution in a COMPUTE or DEFINE Command
A semicolon must follow an expression in a COMPUTE or DEFINE command. To use a LET substitution in a DEFINE or COMPUTE, you must include two semicolons in the LET syntax. You cannot create a LET substitution for a phrase that contains a semicolon.
Example: Using a LET Substitution in a COMPUTE or DEFINE Command
The following LET syntax includes two semicolons, since the substitution will be made in a COMPUTE command:
LETSALTEST = LEVEL/A4 = IF SALARY GT 35000 THEN HIGHELSE LOW;;END
Issuing the command
AND COMPUTE SALTEST
translates the line into
AND COMPUTE LEVEL/A4 = IF SALARY GT 35000 THEN HIGHELSE LOW;
with one semicolon after the word LOW, as required by the expression in the COMPUTE.
Example:
Using a LET Substitution in a COMPUTE or DEFINE Command
Developing Applications 301

Checking Current LET Substitutions
Checking Current LET Substitutions
The ? LET command displays the currently active LET substitutions.
Syntax: How to Check Current LET Substitutions
? LET [word1 word2 ... wordn]
where:
word1 word 2...wordn
Are the LET-defined words you want to check. If you omit these parameters, ? LET displays a two-column list of all active LET substitutions. The left column contains the LET-defined words; the right column contains the phrases the words represent.
Example: Checking Selected LET Substitutions
Issuing
? LET CHART TESTNAME RIGHTNAME
displays a two-column list of the LET substitutions for CHART, TESTNAME, and RIGHTNAME.
Example: Checking All Current LET Substitutions
Issuing
? LET
displays a list of all current LET substitutions.
How to:
Check Current LET Substitutions
Example:
Checking Selected LET Substitutions
Checking All Current LET Substitutions
302 Information Builders

Defining a Word Substitution
Interactive LET Query: LET ECHO
The LET ECHO facility shows how FOCUS interprets FOCUS statements. This facility is a diagnostic tool you can use when statements containing LET-defined words are not being interpreted the way you expect them to.
When the LET ECHO facility is activated, when you enter a FOCUS statement, LET ECHO displays the statement as interpreted by FOCUS.
Syntax: How to Activate the LET ECHO Facility
To activate the LET ECHO facility, issue the command:
LET ECHO
Syntax: How to Deactivate the LET ECHO Facility
ENDECHO
Reference: Results of LET ECHO Commands
The following explains the results of a LET ECHO command:
❏ If you enter a statement containing no LET-defined words, LET ECHO displays the statement as you entered it.
❏ If you enter a statement containing LET-defined words, LET ECHO displays the statement with the substitutions made.
❏ If the statement contains variable substitutions, LET ECHO displays the substitutions with the placeholders filled in.
❏ If the statement contains multiple-line substitutions, LET ECHO displays the statement with the substitutions on multiple lines.
❏ If the statement contains null substitutions, LET ECHO displays the statement with the LET-defined words deleted.
❏ If the statement contains recursive substitutions, the substitutions appear as they are finally resolved.
How to:
Activate the LET ECHO Facility
Deactivate the LET ECHO Facility
Reference:
Results of LET ECHO Commands
Developing Applications 303

Clearing LET Substitutions
❏ LET ECHO may be coded as the first line of a FOCEXEC and ENDECHO as the last line.
Note: If you enter a statement containing a variable substitution, you must enter as many words after the LET-defined word as there are placeholders in the phrase; otherwise, LET ECHO will wait for additional input.
Clearing LET Substitutions
Use the LET CLEAR command to clear LET substitutions.
Syntax: How to Clear LET Substitutions
LET CLEAR {*|word1 [word2...wordn]}
where:
*
Clears all substitutions.
word1...wordn
Are the LET-defined words that you want to clear.
Example: Clearing LET Substitutions
Issuing the following command
LET CLEAR CHART TESTNAME RIGHTNAME
clears substitutions for CHART, TESTNAME, and RIGHTNAME. If there are no additional LET substitutions in effect, the following command would have the same effect:
LET CLEAR *
How to:
Clear LET Substitutions
Example:
Clearing LET Substitutions
304 Information Builders

Defining a Word Substitution
Saving LET Substitutions in a File
Since LET substitutions only last the duration of a session, saving them is helpful if you need the same substitutions for another request.
To save LET substitutions currently in effect, use the LET SAVE command.
Syntax: How to Save LET Substitutions
LET SAVE [filename]
where:
filename
Is the eight-character name of the file in which you want to save the substitutions. If you do not supply a file name, the default file name is LETSAVE.
How to:
Save LET Substitutions
Developing Applications 305

Assigning Phrases to Function Keys
Assigning Phrases to Function Keys
You can assign a phrase to a function key. Then when you have a blank line and press a function key, that phrase appears as if you actually typed it. This process works only in situations where the LET facility is operative.
Syntax: How to Assign a Phrase to a Function Key
LET !n = [.]phrase
where:
n
Is a function key number from 1 to 24.
.
Suppresses the echo of the phrase when you press the function key.
phrase
Is the phrase that the specified function key represents.
Example: Assigning Phrases to Function Keys
The following assigns values to function keys:
LET !4 = EX DAILYRPTLET !6 = ENDLET !20 = IF RECORDLIMIT EQ 10LET !21 = .EX MYREPORT
How to:
Assign a Phrase to a Function Key
Example:
Assigning Phrases to Function Keys
306 Information Builders
FOCUS
5
Developing App
Enhancing Application Performance
This topic covers FOCUS facilities that are available across command environment boundaries. These facilities are easy to use and, in many cases, step-by-step instructions are provided.
Topics:
❏ FOCUS Facilities
❏ Loading a File
❏ Compiling a MODIFY Request
❏ Saving Master Files in Memory for Reuse
❏ Accessing a FOCUS Data Source (MVS Only)
❏ Enhancing File Management With HiperFOCUS
lications 307

FOCUS Facilities
FOCUS FacilitiesThe FOCUS facilities discussed in this topic are classified as file utilities for FOCUS and external files. They are summarized in the following table:
Command Description
LOAD Loads FOCUS procedures and Master Files into memory (see Loading a File on page 309).
COMPILE Translates MODIFY requests into compiled code ready for execution (see Compiling a MODIFY Request on page 314).
MINIO Note: This facility is for MVS only.
Improves performance by reducing I/O operations when accessing FOCUS data sources (see Accessing a FOCUS Data Source (MVS Only) on page 319).
SET HIPERFOCUS
Improves performance by using hiperspaces.
SET SAVEDMASTERS
Improves performance by saving Master Files in memory.
308 Information Builders

Enhancing Application Performance
Loading a File
Use the LOAD command to load the following types of files into memory for use within a FOCUS session:
❏ Master Files (MASTER).
❏ Access Files.
❏ FOCUS procedures (FOCEXEC).
❏ Compiled MODIFY requests (FOCCOMP).
❏ MODIFY requests (MODIFY).
Using memory-resident files decreases execution time because the files do not have to be read from the disk. Use the UNLOAD command to remove the files from memory.
The LOAD command loads unparsed Master Files into memory. To store parsed Master Files in memory, use the SET SAVEDMASTERS command described in Saving Master Files in Memory for Reuse on page 316.
In this section:
Loading Master Files, FOCUS Procedures, and Access Files
Loading a Compiled MODIFY Request
Loading a MODIFY Request
Displaying Information About Loaded Files
How to:
Load a File
Unload a File
Example:
Loading Multiple Files
Unloading Multiple Files
Developing Applications 309

Loading a File
Syntax: How to Load a File
LOAD filetype filename1... [filename2...]
where:
filetype
Specifies the type of file to be loaded (MASTER, FOCEXEC, FOCCOMP, MODIFY, or Access File). For a list of Access File Types, see Considerations for Loading a Master File, FOCUS Procedure, or Access File on page 311.
filename1...
Specifies one or more files to be loaded. Separate the file type and file name(s) with a space.
Example: Loading Multiple Files
The following command loads four FOCEXECs—CARTEST, FOCMAP1, FOCMAP2, and FOCMAP3—into memory:
>LOAD FOCEXEC CARTEST FOCMAP1 FOCMAP2 FOCMAP3
A subsequent reference to one of these files during the current FOCUS session will use the loaded, rather than the disk version.
Syntax: How to Unload a File
UNLOAD [*|filetype] [*| filename1... [filename2...] ]
where:
filetype
Specifies the type of file to be unloaded (MASTER, FOCEXEC, FOCCOMP, MODIFY, or Access File). For a list of Access File Types, see Considerations for Loading a Master File, FOCUS Procedure, or Access File on page 311.
To unload all files of all types, use an asterisk.
filename1...
Specifies one or more files to be unloaded. Separate the file type and file name(s) with a space. To unload all files of that file type, use an asterisk.
Example: Unloading Multiple Files
The following command unloads two memory-resident FOCEXECs— CARTEST and FOCMAP3:
>UNLOAD FOCEXEC CARTEST FOCMAP3
Any subsequent reference to one of these files will use the disk version.
310 Information Builders

Enhancing Application Performance
Loading Master Files, FOCUS Procedures, and Access Files
Loading Master Files, Access Files, and FOCEXECs into memory eliminates the I/Os required to read each time they are referenced. Whenever FOCUS requires a Master File, Access File, or executes a FOCEXEC, it first looks for a memory-resident MASTER, Access File, or FOCEXEC file. If FOCUS cannot find the file in memory, it then searches for a disk version in the normal way.
Reference: Considerations for Loading a Master File, FOCUS Procedure, or Access File
The following are considerations for loading a Master File, FOCUS procedure, and Access File:
❏ If you load a Master File, Access File, or a FOCEXEC that has already been loaded into memory, the new copy replaces the old copy.
❏ Do not load a Master File, Access File, or a FOCEXEC that you are developing because FOCUS will always use the memory-resident copy of the file (until you reload it), rather than the one you are developing. The copy that you are developing on TED or your system editor is the disk copy, not the memory-resident copy.
❏ A loaded Master File, Access File, or FOCEXEC requires a maximum of 80 bytes of memory for each of its records plus a small amount of control information, rounded up to a multiple of 4200 bytes.
❏ The following are the file types for the various Access Files:
Reference:
Considerations for Loading a Master File, FOCUS Procedure, or Access File
Access File File Type
ADABAS FOCADBS
CA-DATACOM FOCDTCM
DB2 FOCSQL
DB2 for VM (formerly SQL/DS) FOCSQL
FOCUS ACCESS
CA-IDMS FOCIDMS
IDMS/SQL FOCSQL
IMS/DB ACCESS
Developing Applications 311

Loading a File
Loading a Compiled MODIFY Request
When you load a compiled MODIFY request, FOCUS loads the FOCCOMP file from disk into memory, then reads and parses the Master File and binds the description to the FOCCOMP file. You may then run the request by issuing the RUN command. The RUN command causes FOCUS to search for a memory-resident FOCCOMP file. If FOCUS cannot find the file, it searches for a disk version in the normal way.
Loading FOCCOMP files not only eliminates the I/Os required to read large FOCCOMP files and the associated Master Files, but also causes another, more subtle effect. When issuing the RUN command to execute a FOCCOMP file from disk, virtual storage must be paged in to accommodate it. If the FOCCOMP file is large, it may require many pages (and a large virtual storage area) in a very short time. If you load the FOCCOMP file first, the initial surge of paging occurs only once at LOAD time. After that, each execution of the loaded file requires a lower paging rate.
Syntax: How to Execute a Compiled Request
RUN request
where:
request
Is the name of the compiled request stored in memory.
Model 204 ACCESS
ORACLE FOCSQL
TERADATA FOCDBC
How to:
Execute a Compiled Request
Access File File Type
312 Information Builders

Enhancing Application Performance
Loading a MODIFY Request
The LOAD MODIFY command is similar to the COMPILE command (described in the Maintaining Databases manual) except that instead of writing the compiled output to a FOCCOMP file on disk, FOCUS writes the output into memory as a pre-loaded, compiled MODIFY. FOCUS then reads the Master File associated with the MODIFY command from disk and translates it into an internal table that is tightly bound with the compiled MODIFY. Thus the command
>LOAD MODIFY NEWTAX
has substantially the same effect as
>COMPILE NEWTAX>LOAD FOCCOMP NEWTAX
except that the compiled code is never written to disk.
After you enter a LOAD MODIFY command, the resulting compiled MODIFY is indistinguishable from code loaded with LOAD FOCCOMP. Thus the UNLOAD MODIFY and ? LOAD MODIFY commands produce exactly the same results as the UNLOAD FOCCOMP and ? LOAD FOCCOMP commands. Note that the UNLOAD FOCCOMP and UNLOAD MODIFY commands unload the bound Master File as well.
When you issue the RUN command to invoke a MODIFY procedure, FOCUS looks for a memory-resident compiled procedure (created by a LOAD FOCCOMP or LOAD MODIFY command) of that name. If the procedure cannot be found, FOCUS then searches for a disk version of the FOCCOMP file in the normal way.
The benefits of the LOAD MODIFY command are that disk space is not used to store the FOCCOMP file, disk I/Os are reduced, the FOCEXEC cannot get out of step with the compiled version, and the paging rate is reduced as it is with FOCCOMP files.
Displaying Information About Loaded Files
The ? LOAD command displays the file type, file name, and resident size of currently loaded files.
How to:
Display Information About Loaded Files
Example:
Displaying Information About Loaded Files
Developing Applications 313

Compiling a MODIFY Request
Syntax: How to Display Information About Loaded Files
? LOAD [filetype]
where:
filetype
Specifies the type of file (MASTER, Access File, FOCEXEC, FOCCOMP, or MODIFY) on which information will be displayed. For a list of Access File Types, see Considerations for Loading a Master File, FOCUS Procedure, or Access File on page 311.
To display information on all memory-resident files, omit the file type.
Example: Displaying Information About Loaded Files
Issuing the command
? LOAD
produces information similar to the following:
FILES CURRENTLY LOADED CAR MASTER 4200 BYTES EXPERSON MASTER 4200 BYTES CARTEST FOCEXEC 8400 BYTES
Compiling a MODIFY Request
The COMPILE command translates a MODIFY request stored in a FOCEXEC into an executable code module. This module, like an object code module, cannot be edited by a user. However, it loads faster than the original request because the MODIFY commands have already been interpreted by FOCUS (the initialization time of a compiled MODIFY module can be four to ten times faster than the original request). Compiling a request can save a significant amount of time if the request is large and must be executed repeatedly. You compile the request once, and execute the module as many times as you need it.
Enter the COMPILE command at the FOCUS command level (the FOCUS prompt). To execute/run this module, use the RUN command from the FOCUS command level.
How to:
Compile a MODIFY Request
Execute a Module
Reference:
Considerations for Compiling a MODIFY Request
314 Information Builders

Enhancing Application Performance
Syntax: How to Compile a MODIFY Request
COMPILE focexec [AS module]
where:
focexec
Is the name of the FOCEXEC where the request is stored.
module
Is the name of the module. The default is the FOCEXEC name. FOCEXEC names and module names are system dependent.
Syntax: How to Execute a Module
RUN module
where:
module
Is the name of the module.
You will see no difference in execution between the module and the original request, but it will load much faster.
Reference: Considerations for Compiling a MODIFY Request
The following are considerations for compiling a MODIFY request:
❏ The FOCEXEC procedure to be compiled may only contain one MODIFY request. It may not contain any other FOCUS, Dialogue Manager, or operating system commands.
❏ Before compiling a request or executing a module, allocate all input and output files such as transaction files and log files. These allocations must be in effect at run time.
❏ Before compilation, issue any SET, USE, COMBINE, or JOIN commands necessary to run the request.
❏ If the data source you are modifying is joined to another file (using the JOIN command) during compilation, it must be joined to the file at run time.
❏ If you are modifying a combined structure (using the COMBINE command), the structure must be combined both at compilation and at run time.
❏ FOCEXECs prompt for Dialogue Manager variable values at compilation time. These values cannot be changed at run time.
❏ If you are using FOCUS security to prevent unauthorized users from executing the request, the password you set at compilation time must be the same one set at run time.
Developing Applications 315

Saving Master Files in Memory for Reuse
Saving Master Files in Memory for Reuse
You can save up to 99 Master Files in memory after they have been used in a request. The saved Master Files are not re-parsed when referenced in subsequent requests, resulting in a significant performance improvement. The greatest improvement occurs in Master Files with a great many fields, where parsing is slowest.
Saving Master Files in memory is particularly helpful when running multiple requests against several Master Files. The most recently used Master File is stored in memory regardless of this setting. With each request that specifies a new Master File, the prior Master File is moved down on the saved list and the new Master File is placed at the top of the list. Once all of the slots on the list are full, parsing a new Master File causes the one at the bottom to drop off the list. If an already saved Master File is used in a request, it moves to the top of the list.
Only one occurrence of a Master File name is maintained on the list. Therefore, if you use an already saved Master File as the host file in a JOIN, in a HOLD command (with the same AS name), in a USE...AS command, or in a COMBINE command without specifying a unique name, the new version of the Master File replaces the previous version on the list. A JOIN CLEAR or USE CLEAR command purges the parsed Master File from memory.
If a Master File will be re-parsed multiple times, you can save the I/O needed to retrieve it from disk by loading it into memory using the LOAD command described in Loading a File on page 309.
Note: SAVEDMASTERS is not an effective technique to use with massive amounts of data because the amount of time saved by not re-parsing is small in comparison to the time for processing the data.
How to:
Save Parsed Master Files in Memory
Query the SAVEDMASTERS Setting
Example:
Saving and Querying Parsed Master Files
Reference:
Usage Notes for SET SAVEDMASTERS
316 Information Builders

Enhancing Application Performance
Syntax: How to Save Parsed Master Files in Memory
SET SAVEDMASTERS = n
where:
n
Is an integer between 0 and 99 that specifies the maximum number of Master Files on the SAVEDMASTERS list. The default value is 0. Note that the most recently used Master File is always stored in memory, even with SAVEDMASTERS set to zero. However, the zero setting does not generate the list of saved Master Files.
Syntax: How to Query the SAVEDMASTERS Setting
The following query command indicates the number of Master Files allowed on the list of saved Master Files and lists the names of the Master Files on the list.
? SET SAVEDMASTERS
Example: Saving and Querying Parsed Master Files
The following command specifies that up to three parsed Master Files can be saved:
SET SAVEDMASTERS = 3
Issue the Query command:
? SET SAVEDMASTERS
The output of the query command indicates that the list can contain up to three Master Files, but none are currently saved:
SAVEDMASTERS 3
Developing Applications 317

Saving Master Files in Memory for Reuse
The following procedure parses two Master Files, EMPLOYEE and MOVIES:
TABLE FILE EMPLOYEEPRINT LAST_NAME FIRST_NAME BY EMP_IDEND-RUNTABLE FILE MOVIESPRINT TITLE BY DIRECTOREND-RUN
? SET SAVEDMASTERS
In this example, the output of the query command indicates that the list can contain up to three Master Files and that the list currently consists of MOVIES and EMPLOYEE:
SAVEDMASTERS 3 MOVIES EMPLOYEE
Reference: Usage Notes for SET SAVEDMASTERS
❏ Memory resources are used to store the parsed Master Files, reducing the amount of memory available for other processes.
❏ You cannot selectively purge Master Files from the list.
❏ The SAVEDMASTERS parameter is not supported in a request (ON TABLE SET) or in FOCPARM.
❏ The SAVEDMASTERS setting is not supported on a FOCUS Database Server or with a Maintain procedure.
❏ The SAVEDMASTERS setting is not supported with SCAN or FSCAN.
❏ Issuing the CHECK FILE or REBUILD command causes the specified Master File to be re-parsed.
❏ The ?F and ?FF commands only re-parse the Master File when issued outside of a request for a Master File other than the most recently used Master File.
❏ Using an alternate file view (TABLE FILE filename.fieldname) or the AUTOPATH=ON setting re-parses the Master File.
318 Information Builders

Enhancing Application Performance
❏ If the SAVEDMASTERS value is changed between requests:
❏ Raising the number allows more Master Files to be saved as they are parsed.
❏ Lowering the number drops the oldest saved Master Files.
❏ If changes are made to a Master File that is saved, the changes will not be implemented until the Master File is re-parsed.
❏ When only one Master File has been used, it is not placed on the SAVEDMASTERS list.
❏ DEFINE expressions are not stored and, therefore, are re-parsed every time they are used.
❏ Creating a HOLD file erases the Master File name from the list if it is there, and the HOLD command does not place the new Master File on the list.
❏ SAVEDMASTERS is most effective when a Master File has a lot of fields.
❏ The FML Hierarchy LOAD CHART command does not add the Master File to the SAVEDMASTERS list.
Accessing a FOCUS Data Source (MVS Only)
MINIO is a new I/O buffering technique that improves performance by reducing I/O operations when accessing FOCUS data sources under MVS. With MINIO set on, no block is ever read more than once, and therefore the number of reads performed is the same as the number of tracks present. This results in an overall reduction in elapsed times when reading and writing.
With FOCUS data sources that are not disorganized, MINIO can greatly reduce the number of I/O operations for TABLE and MODIFY commands. I/O reductions of up to 50% are achievable with MINIO. The actual reduction varies depending on data source structure and average numbers of children segments per parent segment. By reducing I/O operations, elapsed times for TABLE and MODIFY commands also drop.
In this section:
Using MINIO
Determining If a Previous Command Used MINIO
How to:
Set MINIO
Developing Applications 319

Accessing a FOCUS Data Source (MVS Only)
Syntax: How to Set MINIO
SET MINIO = {ON|OFF}
where:
ON
Does not read a block more than once; the number of reads performed will be the same as the number of tracks present. This results in an overall reduction in elapsed times when reading and writing. This value is the default.
OFF
Disables MINIO.
Using MINIO
MINIO reduces CPU time slightly while slightly raising memory utilization. MINIO requires one track I/O buffer per referenced segment type. Between 40K and 48K of above-the-line virtual memory is needed per referenced segment.
When MINIO is enabled, FOCUS decides for each command whether or not to employ it, and which data sources to use it with. It is possible in executing a single command referencing several data sources that MINIO might be used for some but not for others. Data sources accessed via indexes, or physically disordered through online updates, are not candidates for MINIO buffering. Physical disorganization, in this case, means that the sequence of selected records jumps all over the data source, as opposed to progressing steadily forward. When disorganization occurs, MINIO abandons its buffering techniques and resorts to the standard I/O methodology.
When reading data sources, MINIO is used with TABLE, TABLEF, GRAPH, MATCH and during the DUMP phase of the REBUILD command, provided the target data source is not accessed via an index or is physically disorganized.
When writing to data sources, MINIO is used with MODIFY but never with MAINTAIN, provided there is no CRTFORM or COMMIT subcommand. CRTFORMs indicate online transaction processing, which requires that completed transactions be written out to the data source. COMMITs are explicit orders to do so. These events are incompatible with MINIO minimization logic and therefore rule out its use.
As with reads, using MINIO with MODIFY also requires that a data source be accessed sequentially. Attempts to access an index, or to update physically disorganized data sources can cause MINIO to be disabled. In addition, frequent repositioning to previously accessed records, even within well-organized data sources, will cause MINIO to be disabled.
320 Information Builders

Enhancing Application Performance
Determining If a Previous Command Used MINIO
The ? STAT command is used to determine whether the previous data source access command employed MINIO.
Syntax: How to Determine If a Previous Command Used MINIO
To determine if a previous command used MINIO, issue the command:
? STAT
Example: Determining If a Previous Command Used MINIO
Typing ? STAT generates a screen similar to the following:
STATISTICS OF LAST COMMAND RECORDS = 0 SEGS CHNGD = 0LINES = 0 SEGS DELTD = 0BASEIO = 87 NOMATCH = 0TRACKIO = 16 DUPLICATES = 0SORTIO = 0 FORMAT ERRORS = 0SORT PAGES = 0 INVALID CONDTS = 0READS = 1 OTHER REJECTS = 0TRANSACTIONS = 1500 CACHE READS = 0ACCEPTED = 1500 MERGES = 0SEGS INPUT = 1500 SORT STRINGS = 0 INTERNAL MATRIX CREATED: YES AUTOINDEX USED: NOSORT USED: FOCUS AUTOPATH USED: NOMINIO USED: YES
How to:
Determine If a Previous Command Used MINIO
Example:
Determining If a Previous Command Used MINIO
Reference:
Restrictions for Using MINIO
Developing Applications 321

Accessing a FOCUS Data Source (MVS Only)
In the preceding example MINIO USED is displayed as YES. It may also display NO or DISABLED.
❏ YES means that MINIO buffering has taken place reducing the number of tracks read/written to the FOCUS data source.
❏ NO means that MINIO buffering has not taken place.
❏ DISABLED means that MINIO buffering was started but terminated as no performance gains could be made. This does not mean that the command did not complete successfully. It only indicates that MINIO buffering began and ended during the read/write.
Reference: Restrictions for Using MINIO
Note the following restrictions when you are using the MINIO command:
❏ When MINIO is used with MODIFY, all CHECK subcommands are ignored. If a MODIFY command terminates abnormally, the condition of the data source is unpredictable, and it should be restored from a backup copy and the update repeated. Since MINIO is designed to minimize I/O during large data source loads and updates, it has no checkpoint or restart facility. If this is unacceptable, set MINIO off.
❏ MINIO is not used to access data sources through FOCUS Database Servers (formerly called sink machines) or HLI programs.
❏ MINIO requires the presence of the TRACKIO feature. Meaning, TRACKIO must be set to ON which is the default setting. If TRACKIO is set to OFF, then MINIO is deactivated.
❏ MINIO buffering starts when the FOCUS data source exceeds 64 pages in size. If this size is never reached, MINIO is never activated.
❏ If the file being modified UPDATEs, INCLUDEs, or DELETEs a field that is indexed, MINIO is disabled. In other words, FIELDTYPE=I or INDEX=I is coded in the Master File for this field.
❏ CRTFORM and COMMIT commands disable MINIO.
❏ MAINTAIN procedures will not use MINIO buffering techniques.
❏ MINIO is not enabled if the data source is physically disorganized by transaction processing.
322 Information Builders

Enhancing Application Performance
Enhancing File Management With HiperFOCUS
HiperFOCUS comprises a group of related features that accelerate FOCUS processing by improving file management performance and controlling resources. These features are:
❏ HiperFile. Creates temporary files in hiperspaces. For details, see Creating Temporary Files in Hiperspaces With HiperFile on z/OS on page 328 and Creating a Temporary Sort File in Hiperspace on CMS on page 332.
❏ HiperCache. Under z/OS, which creates FOCUS data source cache memory in a hiperspace. For details, see Creating Cache Memory in Hiperspaces on z/OS on page 333.
❏ HiperRule. Enables you to dynamically control the use of HiperFOCUS. For details, see Controlling HiperFOCUS Use With the HiperRule Facility on page 335.
HiperFOCUS enhances file management operations by making use of hiperspaces to reduce I/O and provide additional memory. These enhancements accelerate application performance.
❏ Under z/OS, HiperFOCUS uses hiperspaces to speed up processing of temporary files and cache memory.
z/OS hiperspaces are page-addressable memory that supplement the primary address space.
❏ Under CMS, HiperFOCUS uses hiperspaces to handle temporary sort files more efficiently.
z/VM hiperspaces are page-addressable storage spaces that supplement the virtual machine’s main memory.
Exploiting these memory facilities avoids writing to disk, thereby saving significant I/O time. It also makes more virtual memory available, and transfers data to and from central storage faster.
In this section:
Activating HiperFOCUS
Installing and Configuring HiperFOCUS
Installing HiperBudget on z/OS
Creating Temporary Files in Hiperspaces With HiperFile on z/OS
Creating a Temporary Sort File in Hiperspace on CMS
Creating Cache Memory in Hiperspaces on z/OS
Controlling HiperFOCUS Use With the HiperRule Facility
Developing Applications 323

Enhancing File Management With HiperFOCUS
The HiperBudget feature of HiperFOCUS on z/OS regulates the use of expanded storage on a system-wide basis. This feature requires that the IBI Subsystem be installed. For information on the subsystem, consult your FOCUS installation guide.
System administrators and application developers can take advantage of the HiperFOCUS options and configuration settings. End users need only activate HiperFOCUS to take advantage of its capabilities.
Activating HiperFOCUS
To use any HiperFOCUS feature, HiperFOCUS must be installed and activated. Once it has been installed, you can activate and deactivate it using the SET HIPERFOCUS command.
If HiperFOCUS is not installed, the SET HIPERFOCUS command is disabled.
You can determine if HiperFOCUS is installed and active by issuing a query command. You can also query the HiperFOCUS facility from Dialogue Manager using the system variable &HIPERFOCUS. This four-character variable has the value ON if HiperFOCUS is installed and active; otherwise, it has the value OFF.
Syntax: How to Activate HiperFOCUS
SET HIPERFOCUS = {ON|OFF}
where:
ON
Activates HiperFOCUS. This is the default.
OFF
Deactivates HiperFOCUS.
Syntax: How to Determine Whether HiperFOCUS Is Activated
? SET HIPERFOCUS
If HiperFOCUS is installed, the command displays the message HIPERFOCUS ON or HIPERFOCUS OFF.
How to:
Activate HiperFOCUS
Determine Whether HiperFOCUS Is Activated
324 Information Builders

Enhancing Application Performance
Installing and Configuring HiperFOCUS
HiperFOCUS is installed and configured using SET parameters. These commands must be set in the FOCPARM profile. You can install HiperFOCUS by simply adding SET HIPERINSTALL=ON to the FOCPARM entries and accepting the defaults. However, since this would not establish limits on the number of hiperspaces that FOCUS could create, establishing operating limits using the HiperFOCUS SET parameters is strongly recommended. For details on these parameters, see HiperFOCUS Installation and Configuration Parameters on page 326.
When installing on VM, HiperFOCUS also requires an XC mode virtual machine. To establish XC mode, issue the following command and then re-IPL CMS:
CP SET MACHINE XC
Once HiperFOCUS has been configured, the end user can activate or deactivate it. No other end-user intervention is required. HiperFOCUS is transparent to normal end-user activity. The only visible change is an increase in application speed.
Reference
HiperFOCUS Installation and Configuration Parameters
Developing Applications 325

Enhancing File Management With HiperFOCUS
Reference: HiperFOCUS Installation and Configuration Parameters
The following parameters can be set only in the FOCPARM ERRORS file. On z/OS, this file is member FOCPARM of the data set allocated to ddname ERRORS. On CMS, it is the file named FOCPARM ERRORS.
Parameter Name Description Default Value
HIPERINSTALL Installs or disables HiperFOCUS. OFF
HIPERSPACE Is the number of (4K) pages to aggregate for hiperspace. This is equivalent to the IBI Subsystem TCBLIM parameter. If both are set, the lower is enforced.
524287 (2GB)
HIPERFILE Is the maximum number of (4K) pages in an individual hiperspace. This is equivalent to the IBI Subsystem FILELIM parameter. If both are set, the lower is enforced.
524287 (2GB)
HIPERCACHE Determines the default CACHE size in 4K pages when HiperFOCUS is activated.
256 (1M)
HIPEREXTENTS Determines the permissible number of extents.
127
HIPERLOCKED Enables or disables processing of user interface commands such as SET HIPERFOCUS.
OFF (allows processing)
326 Information Builders

Enhancing Application Performance
Installing HiperBudget on z/OS
On z/OS, the HiperBUDGET facility is installed as part of the IBI Subsystem installation. (The IBI Subsystem provides communication among address spaces running Information Builders products on the same z/OS system.) HiperBUDGET uses the subsystem to regulate and report on the overall use of hiperspace on that system. It accomplishes this by enforcing pre-defined limits on hiperspace consumption set at the system, server, user, and file levels. Limits set at lower levels may never exceed those set at higher levels. HiperBUDGET parameters must be set using the MVS console or by running a special IBI Subsytem job during installation. For more information on these parameters, see HiperBUDGET Installation Parameters on page 327.
Reference: HiperBUDGET Installation Parameters
The following parameters can be set only in the z/OS console or during IBI Subsytem installation. See your FOCUS installation guide for information.
How to:
Query HiperBUDGET Limits and Usage
Reference:
HiperBUDGET Installation Parameters
Parameter Name Description
MVSLIM Is the maximum number of 4K hiperspace pages for all Information Builders products on the operating system. The value -1 specifies no hiperspace limit checking.
SERVLIM Is the maximum number of 4K hiperspace pages allowed for multiple users on a per server basis. The value -1 specifies no limit/server checking.
TCBLIM Is the maximum number of 4K hiperspace pages/per user. The value -1 specifies no limit/user checking. This is equivalent to the FOCPARM HIPERSPACE parameter. If both are set, the lower is enforced.
FILELIM Is the maximum number of 4K hiperspace pages per individual file. The value -1 specifies no limit/file checking. (This is equivalent to the FOCPARM HIPERFILE parameter. If both are set, the lower is enforced.)
Developing Applications 327

Enhancing File Management With HiperFOCUS
Syntax: How to Query HiperBUDGET Limits and Usage
The ? HBUDGET query shows the Hiperspace limits specified and actual utilization statistics, including: limits set at the system, server, user and file levels; the number of busy pages; the number of hiperextents allowed; and the ddnames and sizes of files allocated in hiperspace or spilled to disk.
>? HBUDGETTotal system limit is not setTotal server limit is not setTotal hiperspace limit is not setSingle file size limit is 524288 pagesTotal amount of busy pages is 616 pagesNumber of extents is set to 127 DDname :Reserved :Hiperspace : Spilled :Spill DDn
Creating Temporary Files in Hiperspaces With HiperFile on z/OS
FOCUS dynamically allocates certain files to simplify file management. HiperFile allocates each of these files to its own hiperspaces. This eliminates the need to access a disk, which saves much I/O time and makes data transfer to and from central storage faster. Together, these efficiencies reduce elapsed time and make applications run more quickly. If a file is too large to be created in a hiperspace, HiperFile creates it on disk instead.
For a complete list of dynamically allocated files, refer to the default space allocation table in member IBITABLA of the partitioned data set FOCCTL.DATA.
In this section:
Determining If a Temporary File Fits in a Hiperspace on z/OS
Determining Where a Temporary File Has Been Allocated
Copying a Hiperspace File to Disk on z/OS
Improving Page Handling on z/OS
How to:
Determine If a Temporary File Fits in a Hiperspace on z/OS
Determine Where a Temporary File Has Been Allocated
Reference:
Explicitly Allocating a Temporary File to Disk
328 Information Builders

Enhancing Application Performance
You can override default allocation attributes by explicitly allocating files yourself. If you do so, you can choose to create the file in a hiperspace or on disk using the DYNAM ALLOCATE command. To control the behavior of HiperFOCUS, you must understand the following:
❏ Under what circumstances a file might exceed the size of a hiperspace. For details, see Determining If a Temporary File Fits in a Hiperspace on z/OS on page 329.
❏ How to explicitly allocate a temporary file to disk. For details, see Explicitly Allocating a Temporary File to Disk on page 330.
❏ How to determine where a file has been allocated. For details, see Determining Where a Temporary File Has Been Allocated on page 331.
❏ How to copy a file from a hiperspace to a disk. For details, see Copying a Hiperspace File to Disk on z/OS on page 331.
❏ How to improve page handling. For details, see Improving Page Handling on z/OS on page 331.
Determining If a Temporary File Fits in a Hiperspace on z/OS
When FOCUS allocates a temporary file in a hiperspace, it first verifies that the file’s primary extent does not exceed your site’s hiperspace limit. If the primary extent is too large, the file is automatically allocated to disk instead.
To determine if the allocation for a temporary file is within your site’s hiperspace limit, you can calculate the file’s size, in 4096-byte pages, using a formula. A hiperspace can be up to two gigabytes. However, your site may have specified smaller limits in one of the following ways:
❏ System exit. In the MVS IEFUSI site-defined system exit.
❏ Installation. When installing HiperFOCUS.
Developing Applications 329

Enhancing File Management With HiperFOCUS
Syntax: How to Determine If a Temporary File Fits in a Hiperspace on z/OS
If you use tracks as your allocation unit, the syntax is
pages=(primary_extent * 12) + ((secondary_extent * operations) * 12)
If you use cylinders as your allocation unit, the syntax is
pages=(primary_extent * 12 * 15) + ((secondary_extent * operations) * 12 * 15)
where:
pages
Are the number of 4096-byte pages, determined by the result of the formula.
primary_extent
Is the initial amount of space to be allocated.
secondary_extent
Is the amount of space to allocate when the previously allocated space is filled.
operations
Is the number of extend operations. The default value is 127, but your site can specify fewer extents when installing HiperFOCUS.
Note: This formula assumes that your storage device has 12 records per track and 15 tracks per cylinder.
Reference: Explicitly Allocating a Temporary File to Disk
On z/OS, HiperFile allocates many of your temporary files to hiperspaces by default. However, you can override default allocations and allocate files on disk rather than in hiperspaces.
When you explicitly allocate a file with the parameter DISP=(NEW,DELETE) for a sequential data set, or DISP=(NEW,DELETE,DELETE) for a partitioned data set, HiperFile verifies that the file’s primary extent does not exceed your site’s hiperspace limit, and then creates the file in a hiperspace.
To allocate one of these files to disk instead of to a hiperspace, you can do so by including the following DYNAM parameters:
❏ If you do not wish to identify a particular unit, specify UNIT NOHIPER. For example:
DYNAM ALLOC FILE TEMPDSN SP 5 5 CYL UNIT NOHIPER
❏ If you do wish to identify a particular unit, specify UNIT unit_type HIPER OFF. For example:
DYNAM ALLOC FILE TEMPDSN SP 5 5 CYL UNIT SYSDA HIPER OFF
See the Overview and Operating Environments manual for general FOCUS file allocation instructions.
330 Information Builders

Enhancing Application Performance
Determining Where a Temporary File Has Been Allocated
On z/OS, you can determine where a temporary file is allocated by issuing a query command. The query command returns information including the following:
❏ DEVICE, which has the value HIPERFILE or DISK depending upon where the file was allocated.
❏ DSNAME, which has the value FOCUS.HIPERFILE.NOT.OPENED if the file was allocated in a hiperspace but has not yet been opened; otherwise, its value is the data set name. If the first qualifier of the data set name is HIPER, this file was created in a hiperspace.
Syntax: How to Determine Where a Temporary File Has Been Allocated
? {MVS|TSO} DDNAME ddname
where:
ddname
Is the ddname for which you want to see the allocation information.
Copying a Hiperspace File to Disk on z/OS
In some situations you may wish to copy a file from a hiperspace to disk. For example, if you create a series of HOLD files, you may need to save one of them to a permanent data set.
You can copy a file from a hiperspace to disk using the DYNAM COPY command, as described in the Overview and Operating Environments manual.
Improving Page Handling on z/OS
FOCUS can write pages to disk after exhausting the expanded storage allocation with the HiperFOCUS Spill to Disk feature. This feature, which eliminates error messages associated with inadequate storage, is activated by setting the TRACKIO parameter to ON.
To check on how many pages are in expanded storage and how many were spilled to disk, issue the ? HBUDGET query command described in Query HiperBUDGET Limits and Usage on page 328.
Note: To preserve performance gains achieved through HiperFOCUS, we recommend that you allow only 10% of the pages to spill to disk. If you find that over 10% are on disk, ask your system administrator to allocate additional space for expanded storage.
Developing Applications 331

Enhancing File Management With HiperFOCUS
Creating a Temporary Sort File in Hiperspace on CMS
Under CMS, HiperFile enhances file-management performance by creating the temporary FOCUS sort file—FOCSORT FOCTEMP—in a hiperspace instead of on disk. This saves I/O time by avoiding disk access, and also makes data transfer to and from central storage faster. Together, these efficiencies reduce elapsed time and make your applications run faster.
Syntax: How to Query VM Hiperspace Use
Issue the following command at the FOCUS command prompt:
CMS CP Q SPACES
Reference: How to Control VM Hiperspace Size
Hiperspaces can be up to two gigabytes. However, your site may have specified a smaller limit in the following ways:
❏ XCONFIG. By including the XCONFIG ADDRSPACE statement in the VM directory entry for a user’s virtual machine.
❏ Installation. By setting a limit when HiperFOCUS is installed.
How to:
Query VM Hiperspace Use
Reference:
How to Control VM Hiperspace Size
332 Information Builders

Enhancing Application Performance
Creating Cache Memory in Hiperspaces on z/OS
With HiperFOCUS activated, FOCUS under z/OS creates FOCUS data source cache memory in a hiperspace.
Standard cache memory stores previously-read FOCUS data source pages in virtual memory, buffering the pages between disk and the internal work area named BINS. When a request needs to read a data source page, it first searches for the page in BINS, followed by cache, and finally looks on disk. By avoiding unnecessary disk I/O, cache accelerates your data retrieval. Cache is most effective when you issue several consecutive requests against the same data source, where the later requests access a subset of the fields accessed by the original request.
HiperFOCUS optimizes FOCUS data source buffering by storing cache pages in a hiperspace instead of in the FOCUS address space. This makes additional memory available, enabling you to store more data source pages in cache; it also reduces the amount of disk I/O and speeds the transfer of data from disk to cache. The end result is faster data source access. When cache is stored in a hiperspace, it is referred to as HiperCache.
In this section:
Controlling HiperCache
How to:
Set Cache
Developing Applications 333

Enhancing File Management With HiperFOCUS
Controlling HiperCache
With HiperFOCUS activated, the default cache buffer size is 256 pages (that is, one megabyte). This differs from standard cache, where the default is 0 pages (that is, cache is turned off). You can change the default for HiperFOCUS cache when HiperFOCUS is installed. You can also control HiperCache in the following ways:
❏ Activation. You can turn HiperCache on and off using the CACHE parameter, described in Set Cache on page 334.
If you turn cache on (SET CACHE = n), but HiperFOCUS is turned off (SET HIPERFOCUS = OFF), the buffer is allocated as standard cache.
❏ Status. You can check how many cache reads were done by issuing the ? STAT command.
❏ Size. You can change the size of the HiperCache buffer using the CACHE parameter, described in Set Cache on page 334.
When resizing cache (either HiperCache or standard cache), you may wish to wait until all applications have completed. Changing cache size while cache is active reallocates the cache buffer, discarding all data currently stored there.
Syntax: How to Set Cache
The syntax for setting HiperCache and standard cache is
SET CACHE = {0|n}
where:
0
Allocates no space to cache; cache is inactive. This value is the default.
n
Is the number of 4K pages of contiguous storage allocated to cache memory. The minimum is two pages; the maximum is determined by the amount of memory available. The default for HiperCache is 256 pages (that is, one megabyte). When CACHE is set to any positive value, the cache facility is on.
334 Information Builders

Enhancing Application Performance
Controlling HiperFOCUS Use With the HiperRule Facility
If you are responsible for managing system resources, you may wish to control which FOCUS users use HiperFOCUS, and the conditions under which they do so. HiperFOCUS enables you to do this with the HiperRule facility.
HiperRule dynamically controls HiperFOCUS use based on user ID, day, time, FOCUS release, and related information. The HiperRule facility controls HiperFOCUS by the following process:
1. Write a rule. A system administrator writes a rule specifying the conditions under which FOCUS users can access HiperFOCUS.
2. Activate the HiperRule facility. The administrator activates the HiperFOCUS HiperRule facility by saving the rule as a file. Each system is governed by a single rule.
3. Evaluate the rule. The HiperRule facility evaluates the rule each time a user begins a FOCUS session to determine if the user is eligible to access HiperFOCUS. If the user is eligible, access is allowed; otherwise, the user receives a warning message (FOC897) and remains in the FOCUS session without HiperFOCUS.
HiperFOCUS rules provide a powerful and flexible way to manage access.
In this section:
Writing a HiperRule
Evaluating a HiperRule
Storing a HiperRule
How to:
Write a HiperFOCUS Rule
Reference:
HiperFOCUS Environment Variables
Example:
Writing a HiperRule
Evaluation of a HiperRule
Developing Applications 335

Enhancing File Management With HiperFOCUS
Writing a HiperRule
A rule is a sequence of rule statements. A rule statement can be:
❏ A condition. Allows a user to access HiperFOCUS. The condition is represented as an expression that is evaluated as true or false. A condition can be of two types: ACCEPT (sufficient conditions) and REQUIRE (necessary, but not sufficient conditions).
❏ A temporary field definition. Subsequent rule statements can refer to the temporary field.
A rule must have at least one ACCEPT statement, and can contain an unlimited number of ACCEPT, REQUIRE, and temporary field statements.
Syntax: How to Write a HiperFOCUS Rule
A rule statement can be one of the following
REQUIRE = expression;
or
ACCEPT = expression;
or
tempfield[/format] = expression;
where:
ACCEPT
Defines a condition that is sufficient for allowing access to HiperFOCUS. The use of ACCEPT statements is described in Evaluating a HiperRule on page 337.
REQUIRE
Defines a condition that—if the HiperRule facility evaluates it—is necessary, but not sufficient, for allowing access to HiperFOCUS.
tempfield
Is the name of the temporary field. It must begin with a letter, and can include any combination of letters, digits, and underscores ( _ ). All letters from A through Z are valid; other letters available in some languages, such as Å and Ç, are not. The name can be up to 66 characters long, and cannot be qualified.
format
Is the field’s format. All formats except TX (text) are supported. The default format is D12.2.
336 Information Builders

Enhancing Application Performance
expression
Is any valid expression, as described in the Creating Reports manual.
Rule expressions can also refer to HiperFOCUS environment variables, such as USERID and HOUROFDAY. These environment variables are described in Evaluating a HiperRule on page 337.
Example: Writing a HiperRule
The following rule permits HiperFOCUS to be used at all times by the site’s FOCUS system administrator, and at non-peak times (before 9:00 AM or after 5:00 PM) by everyone else:
ACCEPT = USERID IS 'FOCSYS';REQUIRE = (HOUROFDAY LE '09') OR (HOUROFDAY GE '17');
Evaluating a HiperRule
The HiperRule facility evaluates rule statements sequentially, beginning with the first statement:
❏ It terminates the evaluation process if it encounters a true ACCEPT statement or a false REQUIRE statement.
❏ All expressions following a true ACCEPT statement or a false REQUIRE statement are not evaluated.
The HiperRule facility permits a user to access HiperFOCUS if all of a rule’s evaluated REQUIRE statements are true and at least one of its ACCEPT statements is true. A statement is true when its expression is true.
In some situations, you may find it helpful to create a rule statement that is always true or always false. Because the value 1 represents true, and the value 0 represents false, the following statement is true under all conditions:
ACCEPT = 1;
The following statement is false under all conditions:
REQUIRE = 0;
Developing Applications 337

Enhancing File Management With HiperFOCUS
Reference: HiperFOCUS Environment Variables
HiperFOCUS provides the following environment variables to use in rule statements.
Example: Evaluation of a HiperRule
Assume that a user with user ID PGM030 tries to execute an application on April 25, 2001, invoking the following application rule:
ACCEPT = USERID IS 'HFUSER1';REQUIRE = TODAYSDATE GE '20010425';REQUIRE = TODAYSDATE LE '20010525';ACCEPT = USERID IS 'PGM030';ACCEPT = USERID IS 'PGM040';
1. The first ACCEPT statement evaluates as false, so evaluation continues.
2. The two REQUIRE statements evaluate as true, so evaluation continues.
3. The next ACCEPT statement evaluates as true, so evaluation halts and the rule is satisfied.
Name Description Format Value
USERNAME User ID. A8 A valid user ID.
TODAYSDATE Current date. YMD yyyy/mm/dd (If you enter a two-digit year as the value, the century value 19 is assumed.)
DAYOFWEEK Current day of the week. A8 SUNDAY, MONDAY, TUESDAY, WEDNESDA, THURSDAY, FRIDAY, SATURDAY
TIMEOFDAY Current time. A8 hh.mm.ss
HOUROFDAY Current hour. A2 00 - 23
OPERATINGSYS Operating system. A8 CMS, TSO, MSO, CRJE (MVS batch)
TERMINALTYPE Terminal type. A8 3270 (full-screen mode), TTY (line mode), UNKNOWN
FOCUSREL FOCUS release number. A16 n.n[n] (for example, 7.2)
338 Information Builders

Enhancing Application Performance
Storing a HiperRule
The way in which you store a rule depends upon your operating system:
❏ In MVS, create the rule as member HIPERULE of the ERRORS partitioned data set.
❏ In CMS, create the rule as file HIPERULE ERRORS. Only one file with this name may exist on the FOCUS production disk; otherwise, the Resource Governor is disabled.
Developing Applications 339

Enhancing File Management With HiperFOCUS
340 Information Builders

FOCUS
6
Developing App
Working With Cross-Century Dates
Many existing business applications use two digits to designate a year, instead of four digits. When they receive a value for a year, such as 00, they typically interpret it as 1900, assuming that the first two digits are 19, for the twentieth century. These applications require a way to handle dates when the century changes (for example, from the twentieth to the twenty-first), or when they need to perform comparisons or arithmetic on dates that span more than one century.
The cross-century date feature described in this topic enables the correct interpretation of the century if it is not explicitly provided, or is assumed to be the twentieth. The feature is application-based, that is, it involves modifications to procedures or metadata so that dates are accurately interpreted and processed. The feature is called the sliding window technique.
Topics:
❏ When Do You Use the Sliding Window Technique?
❏ The Sliding Window Technique
❏ Applying the Sliding Window Technique
❏ Defining a Global Window With SET
❏ Defining a Dynamic Global Window With SET
❏ Querying the Current Global Value of DEFCENT and YRTHRESH
❏ Defining a File-Level or Field-Level Window in a Master File
❏ Defining a Window for a Virtual Field
❏ Defining a Window for a Calculated Value
❏ Additional Support for Cross-Century Dates
lications 341

When Do You Use the Sliding Window Technique?
When Do You Use the Sliding Window Technique?If your application accesses dates that contain an explicit century, the century is accepted as is. Your application can run correctly across centuries, and you do not need to use the sliding window technique.
If your application accesses dates without explicit centuries, they assume the default value 19. Your application will require remediation, such as the sliding window technique, to ensure the correct interpretation of the century if the default is not valid, and to run as expected in the next century.
This topic does not cover remediation options such as date expansion, which requires that data be changed in the data source to accommodate explicit century values. For a list of Information Builders documentation on remediation, see your latest Publications Catalog.
This topic covers the use of the sliding window technique in reporting applications. Details on when to use the sliding window technique are provided later in this topic. It also includes reference information on the use of the technique with FOCUS MODIFY requests. For additional information on implementing this technique with Maintain, see the Maintaining Databases manual.
The Sliding Window Technique
With the sliding window technique, you do not need to change stored data from a 2-digit year format to a 4-digit year format in order to determine the century. Instead, you can continue storing 2-digit years and expand them when accessed.
The sliding window technique recognizes that the earliest and latest values for a single date field in most business applications are within 100 years of one another. For example, a human resources application typically contains a field for the birth date of each active employee. The difference in the birth date (or age) of the oldest active employee and the youngest active employee is not likely to be more than 100.
In this section:
Defining a Sliding Window
Creating a Dynamic Window Based on the Current Year
342 Information Builders

Working With Cross-Century Dates
The technique is implemented as follows:
❏ You define the start of a 100-year sliding window by supplying two values: one for the default century (DEFCENT) and one for the year threshold (YRTHRESH). For example, a value of 19 for the century, combined with a value of 60 for the threshold, creates a window that starts in 1960 and ends in 2059.
❏ The threshold provides a way to assign a value to the century of a 2-digit year:
❏ A year greater than or equal to the threshold assumes the value of the default century (DEFCENT). Using the sample value 19 for the default century and 60 for the threshold, a 2-digit year of 70 is interpreted as 1970 (70 is greater than 60).
❏ A year less than the threshold assumes the value of the default century plus 1 (DEFCENT + 1). Using the same sample values (19 and 60), a 2-digit year of 50 is interpreted as 2050 (50 is less than 60), and a 2-digit year of 00 is interpreted as 2000 (00 is also less than 60).
The conversion rule for this example is illustrated as follows:
Any 2-digit year is assumed to fall within the window. You must handle dates that fall outside the defined window by coding.
Each file or each date field used in an application can have its own conversion rule, which provides the flexibility required by most applications.
0
Century = DEFCENT + 1 (20) Century = DEFCENT (19)
YRTHRESH = 60 99
Developing Applications 343

The Sliding Window Technique
Defining a Sliding Window
You can define a sliding window in several ways, depending on the specific requirements of your application:
❏ Globally. The SET DEFCENT and SET YRTHRESH commands define a window on a global level.
❏ On a file level. The FDEFCENT and FYRTHRESH attributes in a Master File define a window on a file level, allowing the correct interpretation of date fields from multiple files that span different time periods.
❏ On a field level. The DEFCENT and YRTHRESH attributes in a Master File define a window on a field level, allowing the correct interpretation of date fields, within a single file, that span different time periods.
❏ For a virtual field. The DEFCENT and YRTHRESH parameters on a DEFINE command, in either a request or a Master File, define a window for a virtual field.
❏ For a calculated value. The DEFCENT and YRTHRESH parameters on a COMPUTE command define a window for a calculated value.
If you define more than one window using any of the preceding methods, the precedence is as follows:
1. DEFCENT and YRTHRESH on a DEFINE or COMPUTE command.
2. DEFCENT and YRTHRESH field-level attributes in a Master File.
3. FDEFCENT and FYRTHRESH file-level attributes in a Master File.
4. SET DEFCENT and SET YRTHRESH on a global level; if you do not specify values, the defaults are used (DEFCENT = 19, YRTHRESH = 0).
344 Information Builders

Working With Cross-Century Dates
Creating a Dynamic Window Based on the Current Year
An optional feature of the sliding window technique enables you to create a dynamic window, defining the start of a 100-year span based on the current year. The start year and threshold for the window automatically change at the beginning of each new year.
If an application requires that a window’s start year change when a new year begins, use of this feature avoids the necessity of manually re-coding it.
To implement this feature, YRTHRESH or FYRTHRESH is offset from the current year, or given a negative value.
For example, if the current year is 1999 and YRTHRESH is set to -38, a window from 1961 to 2060 is created. The start year 1961 is derived by subtracting 38 (the value of YRTHRESH) from 1999 (the current year). To interpret dates that fall within this window, the threshold 61 is used.
At the beginning of the year 2000, a new window from 1962 to 2061 is automatically created; for dates that fall within this window, the threshold 62 is used. In the year 2001, the window becomes 1963 to 2062, and the threshold is 63, and so on.
With each new year, the start year for the window is incremented by one.
When using this feature, do not code a value for DEFCENT or FDEFCENT, since the feature is designed to automatically calculate the value for the default century. Be aware of the following:
❏ If you do code a value for DEFCENT on the field level in a Master File, or for FDEFCENT on the file level in a Master File, the feature will not work as intended. The value for the century, which is automatically calculated by YRTHRESH by design, will be reset to the value you code for DEFCENT or FDEFCENT.
❏ If you code a value for DEFCENT anywhere other than the field level in a Master File (for example, on the global level), and YRTHRESH is negative, the coded value will be ignored. The default century will be automatically calculated as designed.
Developing Applications 345

Applying the Sliding Window Technique
Applying the Sliding Window Technique
To apply the sliding window technique correctly, you need to understand the difference between a date format (formerly called a smart date) and a legacy date:
❏ A date format refers to an internally stored integer that represents the number of days between a real date value and a base date (either December 31, 1900, for dates with YMD or YYMD format; or January 1901, for dates with YM, YYM, YQ, or YYQ format). A Master File does not specify a data type or length for a date format; instead, it specifies display options such as D (day), M (month), Y (2-digit year), or YY (4-digit year). For example, MDYY in the USAGE (also known as FORMAT) attribute of a Master File is a date format. A real date value such as March 5, 1999, displays as 03/05/1999, and is internally stored as the offset from December 31, 1900.
❏ A legacy date refers to an integer, packed decimal, double precision, floating point, or alphanumeric format with date edit options, such as I6YMD, A6MDY, I8YYMD, or A8MDYY. For example, A6MDY is a 6-byte alphanumeric string; the suffix MDY indicates how Information Builders will return the data in the field. The sample value 030599 displays as 03/05/99.
For details on date fields, see the Describing Data manual.
In this section:
When to Supply Settings for DEFCENT and YRTHRESH
Date Validation
346 Information Builders

Working With Cross-Century Dates
When to Supply Settings for DEFCENT and YRTHRESH
The rest of this topic refers simply to DEFCENT when either DEFCENT or FDEFCENT applies, and to YRTHRESH when either YRTHRESH or FYRTHRESH applies.
Supply settings for DEFCENT and YRTHRESH in the following cases:
❏ When you issue a DEFINE or COMPUTE command to convert a legacy date without century digits to a date format with century digits (for example, to convert the format I6YMD to YYMD). With DEFINE and COMPUTE, DEFCENT and YRTHRESH do not work directly on legacy dates; for example, you cannot use them to convert the legacy date format I6YMD to the legacy date format I8YYMD.
❏ When a DEFINE command, COMPUTE command, or Dialogue Manager -SET command calls a function, supplied by Information Builders, that uses legacy dates, the input date does not contain century digits.
On input, the function will use the window defined for an I6 legacy date field (with edit options). The output format may be I8 (again, with edit options), which includes a 4-digit year.
❏ When data is entered or changed in a date format field in a FOCUS data source, or a SQL date is entered or changed in a Relational Database Management System (RDBMS), and the input date does not contain century digits.
For example, you can use the sliding window technique in applications that use FIXFORM or CRTFORM with MODIFY.
❏ When a data source is read, and the ACTUAL attribute in the Master File is non-date specific (for example, A6, I6, or P6), without century digits, and the FORMAT or USAGE attribute specifies a date format. This case does not apply to FOCUS data sources.
Follow these rules when implementing the sliding window technique:
❏ Specify values for both DEFCENT and YRTHRESH to ensure consistent coding and accurate results, except when YRTHRESH has a negative value. In that case, specify a value for YRTHRESH only; do not code a value for DEFCENT.
❏ Do not use DEFCENT and YRTHRESH with ON TABLE SET.
Finally, keep in mind that the sliding window technique does not change the way existing data is stored. Rather, it accurately interprets data during application processing.
Reference:
Restrictions With MODIFY
Developing Applications 347

Defining a Global Window With SET
Reference: Restrictions With MODIFY
The following results occur when you use the sliding window technique with a MODIFY request or FOCCOMP procedure:
❏ A MODIFY request compiled prior to Version 7.0 Release 6, when run with global SET DEFCENT and SET YRTHRESH settings, or with file-level or field-level settings, yields a FOC1886 error message. You must recompile the MODIFY request.
❏ A MODIFY request compiled in Version 7.0 Release 6, when run with global SET DEFCENT and SET YRTHRESH settings, or with file-level or field-level settings, yields a FOC1885 warning message.
❏ A FOCCOMP procedure, compiled with global SET DEFCENT and SET YRTHRESH settings, and run in releases prior to Version 7.0 Release 6, yields a FOC548 invalid version message. You must recompile the MODIFY request.
❏ A FOCCOMP procedure that contains DEFCENT/YRTHRESH or FDEFCENT/FYRTHRESH attributes in the associated Master File, and run in releases prior to Version 7.0 Release 6, yields a FOC306 description error message.
Date Validation
Date formats are validated on input. For example, 11/99/1999 is rejected as input to a date field formatted as MDYY, because 99 is not a valid day. Information Builders generates an error message.
Legacy dates are not validated. The date 11991999, described with the format A8MDYY, is accepted, even though it, too, contains the invalid day 99.
Defining a Global Window With SET
The SET DEFCENT and SET YRTHRESH commands define a window on a global level. The time span created by the SET commands applies to every 2-digit year used by the application unless you specify file-level or field-level windows elsewhere.
For details on specifying parameters that govern the environment, see Chapter 1, Customizing Your Environment.
How to:
Define a Global Window With SET
Example:
Defining a Global Window With SET
348 Information Builders

Working With Cross-Century Dates
Syntax: How to Define a Global Window With SET
To define a global window, issue two SET commands.
The first command is
SET DEFCENT = {cc|19}
where:
cc
Is the century for the start date of the window. If you do not supply a value, cc defaults to 19, for the twentieth century.
The second command is
SET YRTHRESH = {[-]yy|0}
where:
yy
Is the year threshold for the window. If you do not supply a value, yy defaults to zero (0).
If yy is a positive number, two-digit years greater than or equal to the threshold default to the value of FDEFCENT for the century. Two-digit years less than the threshold assume the value of FDEFCENT + 1.
If yy is a negative number (-yy), the start date of the window is derived by subtracting that number from the current year, and FDEFCENT is automatically calculated. The start date is automatically incremented by one at the beginning of each successive year.
Developing Applications 349

Defining a Global Window With SET
Example: Defining a Global Window With SET
In the following request, the SET command defines a global window from 1983 to 2082.
As SET syntax allows, the command is entered on one line, with the parameters separated by a comma. You do not need to repeat the keyword SET for YRTHRESH.
The DEFINE command converts the legacy date EFFECT_DATE into the date format NEW_DATE. It creates NEW_DATE as a virtual field, derived from the existing field EFFECT_DATE. The format of EFFECT_DATE is I6YMD, which is a 2-digit year. NEW_DATE is formatted as YYMD, which is a 4-digit year. For details on DEFINE, see the Creating Reports manual.
The request is:
SET DEFCENT = 19, YRTHRESH = 83
DEFINE FILE EMPLOYEENEW_DATE/YYMD = EFFECT_DATE;END
TABLE FILE EMPLOYEEPRINT EFFECT_DATE NEW_DATE BY EMP_IDEND
In the report, the value of the 2-digit year 82 is less than the threshold 83, so it assumes the value 20 for the century (DEFCENT + 1) and is returned as 2082 in the NEW_DATE column. The other year values (83 and 84) are greater than or equal to the threshold 83, so the century defaults to the value 19 (DEFCENT); they are returned as 1983 and 1984 under NEW_DATE.
The output is:
PAGE 1 EMP_ID EFFECT_DATE NEW_DATE------ ----------- --------071382660112847612117593129 82/11/01 2082/11/01119265415119329144 83/01/01 1983/01/01123764317 83/03/01 1983/03/01126724188219984371326179357 82/12/01 2082/12/01451123478 84/09/01 1984/09/01543729165818692173 83/05/01 1983/05/01
350 Information Builders

Working With Cross-Century Dates
In the example, missing date values appear as blanks by default. To retrieve the base date value for the NEW_DATE field instead of blanks, issue the command
SET DATEDISPLAY = ON
before running the request.
The base date value for NEW_DATE, which is formatted as YYMD, is returned as 1900/12/31:
PAGE 1 EMP_ID EFFECT_DATE NEW_DATE------ ----------- --------071382660 1900/12/31112847612 1900/12/31117593129 82/11/01 2082/11/01119265415 1900/12/31119329144 83/01/01 1983/01/01123764317 83/03/01 1983/03/01126724188 1900/12/31219984371 1900/12/31326179357 82/12/01 2082/12/01451123478 84/09/01 1984/09/01543729165 1900/12/31818692173 83/05/01 1983/05/01
If NEW_DATE had a YYM format, the base date would appear as 1901/01. If it had a YYQ format, it would appear as 1901 Q1.
If the value of NEW_DATE is 0 and SET DATEDISPLAY = OFF (the default), blanks are displayed. With SET DATEDISPLAY = ON, the base date is displayed instead of blanks. Zero (0) is treated as an offset from the base date, which results in the base date.
For details on SET DATEDISPLAY, see Chapter 1, Customizing Your Environment.
Defining a Dynamic Global Window With SET
This topic illustrates the creation of a dynamic window using the global command SET YRTHRESH. You can also implement this feature on the file and field level, and on a DEFINE or COMPUTE.
Example:
Defining a Dynamic Global Window With SET
Developing Applications 351

Defining a Dynamic Global Window With SET
With this option of the sliding window technique, the start year and threshold for the window automatically changes at the beginning of each new year. The default century (DEFCENT) is automatically calculated.
You can use SET TESTDATE to alter the system date when testing a dynamic window (that is, when YRTHRESH has a negative value). However, when testing a dynamic window defined in a Master File, you must issue a CHECK FILE command each time you issue a SET TESTDATE command. CHECK FILE reloads the Master File into memory and ensures the correct recalculation of the start date of the dynamic window. For details on SET TESTDATE, see your documentation on the SET command. For details on CHECK FILE, see the Describing Data manual.
Example: Defining a Dynamic Global Window With SET
In the following request, the COMPUTE command calls the function AYMD, supplied by Information Builders. AYMD adds one day to the input field, HIRE_DATE; the output field, HIRE_DATE_PLUS_ONE, contains the result. HIRE_DATE is formatted as I6YMD, which is a legacy date with a 2-digit year. HIRE_DATE_PLUS_ONE is formatted as I8YYMD, which is a legacy date with a 4-digit year.
The function uses the YRTHRESH value set at the beginning of the request to create a dynamic window for the input field HIRE_DATE. The start date of the window is incremented by one at the beginning of each new year. Notice that DEFCENT is not coded, since the default century is automatically calculated whenever YRTHRESH has a negative value.
The function inputs a 2-digit year, which is windowed. It then outputs a 4-digit year that includes the century digits.
Sample values are shown in the reports for 1999, 2000, and 2018, which follow the request.
For details on AYMD, see the Using Functions manual.
The request is:
SET YRTHRESH = -18 TABLE FILE EMPLOYEEPRINT HIRE_DATE AND COMPUTE HIRE_DATE_PLUS_ONE/I8YYMD = AYMD(HIRE_DATE, 1, HIRE_DATE_PLUS_ONE);END
352 Information Builders

Working With Cross-Century Dates
In 1999, the window spans the years 1981 to 2080. The threshold is 81 (1999 - 18). In the report, the 2-digit year 80 is less than the threshold 81, so it assumes the value 20 for the century (DEFCENT + 1), and is returned as 2080 in the HIRE_DATE_PLUS_ONE column. The other year values (81 and 82) are greater than or equal to the threshold 81, so the century defaults to the value of DEFCENT (19); they are returned as 1981 and 1982.
The output is:
PAGE 1 HIRE_DATE HIRE_DATE_PLUS_ONE--------- ------------------ 80/06/02 2080/06/03 81/07/01 1981/07/02 82/05/01 1982/05/02 82/01/04 1982/01/05 82/08/01 1982/08/02 82/01/04 1982/01/05 82/07/01 1982/07/02 81/07/01 1981/07/02 82/04/01 1982/04/02 82/02/02 1982/02/03 82/04/01 1982/04/02 81/11/02 1981/11/03
In 2000, the window spans the years 1982 to 2081. The threshold is 82 (2000 - 18). In the report, the 2-digit years 80 and 81 are less than the threshold; for the century, they assume the value 20 (DEFCENT + 1). The 2-digit year 82 is equal to the threshold; for the century, it defaults to the value 19 (DEFCENT).
The output is:
PAGE 1 HIRE_DATE HIRE_DATE_PLUS_ONE--------- ------------------ 80/06/02 2080/06/03 81/07/01 2081/07/02 82/05/01 1982/05/02 82/01/04 1982/01/05 82/08/01 1982/08/02 82/01/04 1982/01/05 82/07/01 1982/07/02 81/07/01 2081/07/02 82/04/01 1982/04/02 82/02/02 1982/02/03 82/04/01 1982/04/02 81/11/02 2081/11/03
Developing Applications 353

Querying the Current Global Value of DEFCENT and YRTHRESH
Running the report in 2018 illustrates the automatic recalculation of DEFCENT from 19 to 20. In 2018, the window spans the years 2000 to 2099. The threshold is 0 (2018 - 18). A 2-digit year greater than or equal to 0 defaults to the recalculated value 20 (DEFCENT).
Since all the values for the HIRE_DATE year are greater than 0, the century defaults to 20.
The output is:
PAGE 1 HIRE_DATE HIRE_DATE_PLUS_ONE--------- ------------------ 80/06/02 2080/06/03 81/07/01 2081/07/02 82/05/01 2082/05/02 82/01/04 2082/01/05 82/08/01 2082/08/02 82/01/04 2082/01/05 82/07/01 2082/07/02 81/07/01 2081/07/02 82/04/01 2082/04/02 82/02/02 2082/02/03 82/04/01 2082/04/02 81/11/02 2081/11/03
Querying the Current Global Value of DEFCENT and YRTHRESH
You can query the current global value of DEFCENT and YRTHRESH.
Syntax: How to Query the Current Global Value of DEFCENT and YRTHRESH
? SET DEFCENT? SET YRTHRESH
where:
DEFCENT
Returns the value for the DEFCENT parameter.
YRTHRESH
Returns the value for the YRTHRESH parameter.
How To:
Query the Current Global Value of DEFCENT and YRTHRESH
Example:
Querying the Current Global Value of DEFCENT and YRTHRESH
354 Information Builders

Working With Cross-Century Dates
Example: Querying the Current Global Value of DEFCENT and YRTHRESH
Enter
? SET DEFCENT? SET YRTHRESH
to query the current global value of DEFCENT and YRTHRESH.
The following is a response to the query:
DEFCENT 19YRTHRESH 0
Defining a File-Level or Field-Level Window in a Master File
In this implementation of the sliding window technique, you change the metadata used by an application. Two pairs of Master File attributes enable you to define a window on a file or field level:
❏ The FDEFCENT and FYRTHRESH attributes define a window on a file level. They enable the correct interpretation of legacy date fields from multiple files that span different time periods.
A file-level window takes precedence over a global window for the dates associated with that file.
❏ The DEFCENT and YRTHRESH attributes define a window on a field level, enabling the correct interpretation of legacy date fields, within a single file, that span different time periods. Each legacy date field in a file can have its own window. For example, in an insurance application, the range of dates for date of birth may be from 1910 to 2009, and the range of dates for expected death may be from 1990 to 2089.
A field-level window takes precedence over a file-level or global window for the dates associated with that field.
How to:
Define a File-Level Window in a Master File
Define a Field-Level Window in a Master File
Example:
Defining a File-Level Window in a Master File
Defining a Field-Level Window in a Master File
Defining a Field-Level Window in a Master File Used With MODIFY
Defining Both File-Level and Field-Level Windows
Developing Applications 355

Defining a File-Level or Field-Level Window in a Master File
For details on Master Files, see the Describing Data manual.
Syntax: How to Define a File-Level Window in a Master File
To define a window that applies to all legacy date fields in a file, add the FDEFCENT and FYRTHRESH attributes to the Master File on the file declaration.
The syntax for the first attribute is
{FDEFCENT|FDFC} = {cc|19}
where:
cc
Is the century for the start date of the window. If you do not supply a value, cc defaults to 19, for the twentieth century.
The syntax for the second attribute is
{FYRTHRESH|FYRT} = {[-]yy|0}
where:
yy
Is the year threshold for the window. If you do not supply a value, yy defaults to zero (0).
If yy is a positive number, two-digit years greater than or equal to the threshold default to the value of DEFCENT for the century. Two-digit years less than the threshold assume the value of DEFCENT + 1.
If yy is a negative number (-yy), the start date of the window is derived by subtracting that number from the current year, and DEFCENT is automatically calculated. The start date is automatically incremented by one at the beginning of each successive year.
356 Information Builders

Working With Cross-Century Dates
Example: Defining a File-Level Window in a Master File
Tip: Use the abbreviated forms of FDEFCENT/FYRTHRESH or DEFCENT/YRTHRESH to reduce keystrokes. The examples in this topic use the abbreviated forms where available (for instance, FDFC instead of FDEFCENT). Maintain supports only the abbreviated forms in certain command syntax (for example, on a COMPUTE or DECLARE command). For details, see the Maintaining Databases manual.
In the following example, the FDEFCENT and FYRTHRESH attributes define a window from 1982 to 2081. The window is applied to all legacy date fields in the file, including HIRE_DATE, DAT_INC, and others, if they are converted to a date format.
The Master File is:
FILENAME=EMPLOYEE, SUFFIX=FOC, FDFC=19, FYRT=82 SEGNAME=EMPINFO, SEGTYPE=S1 FIELDNAME=EMP_ID, ALIAS=EID, FORMAT=A9, $ FIELDNAME=LAST_NAME, ALIAS=LN, FORMAT=A15, $ FIELDNAME=FIRST_NAME, ALIAS=FN, FORMAT=A10, $ FIELDNAME=HIRE_DATE, ALIAS=HDT, FORMAT=I6YMD, $... FIELDNAME=DAT_INC, ALIAS=DI, FORMAT=I6YMD, $...
The DEFINE command in the following request creates two virtual fields named NEW_HIRE_DATE, which is derived from the existing field HIRE_DATE; and NEW_DAT_INC, which is derived from DAT_INC. The format of HIRE_DATE and DAT_INC is I6YMD, which is a legacy date with a 2-digit year. NEW_HIRE_DATE and NEW_DAT_INC are date formats with 4-digit years (YYMD). For details on DEFINE, see the Creating Reports manual.
DEFINE FILE EMPLOYEENEW_HIRE_DATE/YYMD = HIRE_DATE;NEW_DAT_INC/YYMD = DAT_INC;END TABLE FILE EMPLOYEEPRINT HIRE_DATE NEW_HIRE_DATE DAT_INC NEW_DAT_INCEND
The window created in the Master File applies to both legacy date fields. In the report, the year 82 (which is equal to the threshold), for both HIRE_DATE and DAT_INC, defaults to the century value 19 and is returned as 1982 in the NEW_HIRE_DATE and NEW_DAT_INC columns. The year 81, for both HIRE_DATE and DAT_INC, is less than the threshold 82 and assumes the century value 20 (FDEFCENT + 1).
Developing Applications 357
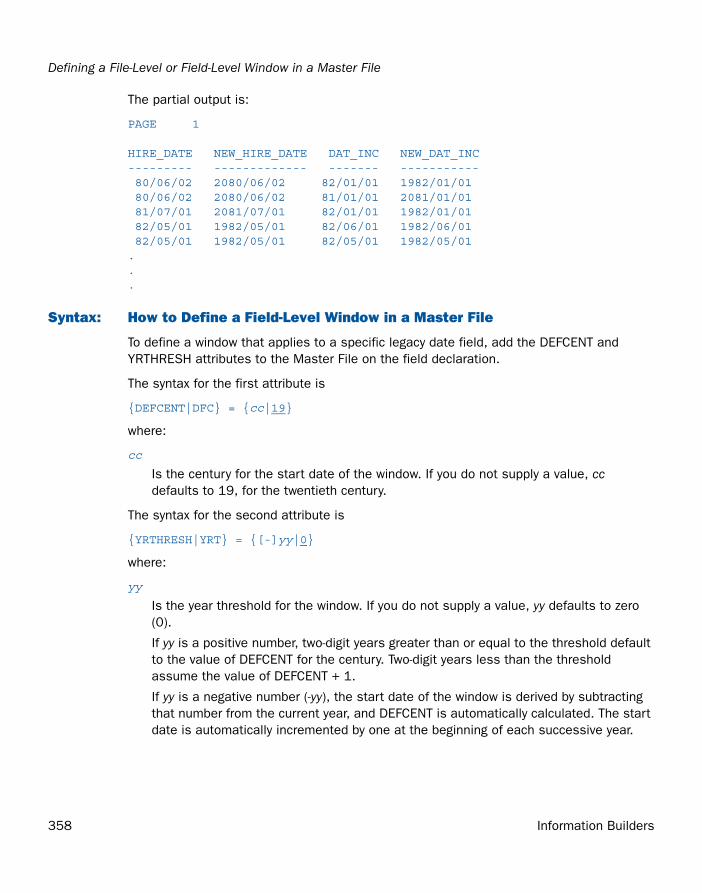
Defining a File-Level or Field-Level Window in a Master File
The partial output is:
PAGE 1 HIRE_DATE NEW_HIRE_DATE DAT_INC NEW_DAT_INC--------- ------------- ------- ----------- 80/06/02 2080/06/02 82/01/01 1982/01/01 80/06/02 2080/06/02 81/01/01 2081/01/01 81/07/01 2081/07/01 82/01/01 1982/01/01 82/05/01 1982/05/01 82/06/01 1982/06/01 82/05/01 1982/05/01 82/05/01 1982/05/01...
Syntax: How to Define a Field-Level Window in a Master File
To define a window that applies to a specific legacy date field, add the DEFCENT and YRTHRESH attributes to the Master File on the field declaration.
The syntax for the first attribute is
{DEFCENT|DFC} = {cc|19}
where:
cc
Is the century for the start date of the window. If you do not supply a value, cc defaults to 19, for the twentieth century.
The syntax for the second attribute is
{YRTHRESH|YRT} = {[-]yy|0}
where:
yy
Is the year threshold for the window. If you do not supply a value, yy defaults to zero (0).
If yy is a positive number, two-digit years greater than or equal to the threshold default to the value of DEFCENT for the century. Two-digit years less than the threshold assume the value of DEFCENT + 1.
If yy is a negative number (-yy), the start date of the window is derived by subtracting that number from the current year, and DEFCENT is automatically calculated. The start date is automatically incremented by one at the beginning of each successive year.
358 Information Builders

Working With Cross-Century Dates
Example: Defining a Field-Level Window in a Master File
In this example, the application requires a different window for two legacy date fields in the same file.
The DEFCENT and YRTHRESH attributes in the Master File define a window for HIRE_DATE from 1982 to 2081, and a window for DAT_INC from 1983 to 2082.
The Master File is:
FILENAME=EMPLOYEE, SUFFIX=FOC SEGNAME=EMPINFO, SEGTYPE=S1 FIELDNAME=EMP_ID, ALIAS=EID, FORMAT=A9, $ FIELDNAME=LAST_NAME, ALIAS=LN, FORMAT=A15, $ FIELDNAME=FIRST_NAME, ALIAS=FN, FORMAT=A10, $ FIELDNAME=HIRE_DATE, ALIAS=HDT, FORMAT=I6YMD, DFC=19, YRT=82, $... FIELDNAME=DAT_INC, ALIAS=DI, FORMAT=I6YMD, DFC=19, YRT=83, $...
The request is the same one used in the previous example (defining a file-level window in a Master File):
DEFINE FILE EMPLOYEENEW_HIRE_DATE/YYMD = HIRE_DATE;NEW_DAT_INC/YYMD = DAT_INC;END TABLE FILE EMPLOYEEPRINT HIRE_DATE NEW_HIRE_DATE DAT_INC NEW_DAT_INCEND
However, the report illustrates the use of two different windows for the two legacy date fields. For example, the year 82 for HIRE_DATE defaults to the century value 19, since 82 is equal to the threshold for the window for this field. The date returned for NEW_HIRE_DATE is 1982.
The year 82 for DAT_INC assumes the century value 20 (DEFCENT + 1), since 82 is less than the threshold for the window for this field (83). The date returned for NEW_DAT_INC is 2082.
Developing Applications 359

Defining a File-Level or Field-Level Window in a Master File
The partial output is:
PAGE 1 HIRE_DATE NEW_HIRE_DATE DAT_INC NEW_DAT_INC--------- ------------- ------- ----------- 80/06/02 2080/06/02 82/01/01 2082/01/01 80/06/02 2080/06/02 81/01/01 2081/01/01 81/07/01 2081/07/01 82/01/01 2082/01/01 82/05/01 1982/05/01 82/06/01 2082/06/01 82/05/01 1982/05/01 82/05/01 2082/05/01..
Example: Defining a Field-Level Window in a Master File Used With MODIFY
This example illustrates the use of field-level DEFCENT and YRTHRESH attributes to define a window used with MODIFY. To run this example yourself, you need to create a Master File named DATE and a procedure named DATELOAD.
The Master File describes a segment with 12 date fields of different formats. The first field is a date format field. The DEFCENT and YRTHRESH attributes included on this field create a window from 1990 to 2089. The window is required because the input data for the first date field does not contain century digits, and the default value 19 cannot be assumed.
The Master File looks like this:
FILENAME=DATE, SUFFIX=FOC SEGNAME=ONE, SEGTYPE=S1 FIELDNAME=D1_YYMD, ALIAS=D1, FORMAT=YYMD, DFC=19, YRT=90, $ FIELDNAME=D2_I6YMD, ALIAS=D2, FORMAT=I6YMD, $ FIELDNAME=D3_I8YYMD, ALIAS=D3, FORMAT=I8, $ FIELDNAME=D4_A6YMD, ALIAS=D4, FORMAT=A6YMD, $ FIELDNAME=D5_A8YYMD, ALIAS=D5, FORMAT=A8YYMD, $ FIELDNAME=D6_I4YM, ALIAS=D6, FORMAT=I4YM, $ FIELDNAME=D7_YQ, ALIAS=D7, FORMAT=YQ, $ FIELDNAME=D8_YM, ALIAS=D8, FORMAT=YM, $ FIELDNAME=D9_JUL, ALIAS=D9, FORMAT=JUL, $ FIELDNAME=D10_Y, ALIAS=D10, FORMAT=Y, $ FIELDNAME=D11_YY, ALIAS=D11, FORMAT=YY, $ FIELDNAME=D12_MDYY, ALIAS=D12, FORMAT=MDYY, $
The procedure (DATELOAD) creates a FOCUS data source named DATE and loads two records into it. The first field of the first record contains the 2-digit year 92. The first field of the second record contains the 2-digit year 88. For details on commands such as CREATE and MODIFY, and others used in this file, see the Maintaining Databases manual.
360 Information Builders

Working With Cross-Century Dates
The procedure looks like this:
CREATE FILE DATEMODIFY FILE DATEFIXFORM D1/8 D2/6 D3/8 D4/6 D5/8 D6/4 D7/4 D8/4 D9/5 D10/2 D11/4 D12/8MATCH D1 ON NOMATCH INCLUDE ON MATCH REJECTDATA 92022900022920000229000229200002290002000100020006000200002292000 88022900022920000229000229200002290002000100020006000200002292000END
The following request accesses all the fields in the new data source:
TABLE FILE DATEPRINT *END
In the report, the year 92 for D1_YYMD defaults to the century value 19, since 92 is greater than the threshold for the window for this field (90). It is returned as 1992 in the D1_YYMD column. The year 88 assumes the century value 20 (DEFCENT + 1), because 88 is less than the threshold. It is returned as 2088 in the D1_YYMD column.
The partial output is:
PAGE 1 D1_YYMD D2_I6YMD D3_I8YYMD D4_A6YMD D5_A8YYMD D6_I4YM D7_YQ D8_YM ...------- -------- --------- -------- --------- ------- ----- -----1992/02/29 00/02/29 20000229 00/02/29 2000/02/29 00/02 00 Q1 00/02 ...2088/02/29 00/02/29 20000229 00/02/29 2000/02/29 00/02 00 Q1 00/02 ...
Developing Applications 361

Defining a File-Level or Field-Level Window in a Master File
Example: Defining Both File-Level and Field-Level Windows
The following Master File defines windows at both the file and field level:
FILENAME=EMPLOYEE, SUFFIX=FOC, FDFC=19, FYRT=83 SEGNAME=EMPINFO, SEGTYPE=S1 FIELDNAME=EMP_ID, ALIAS=EID, FORMAT=A9, $ FIELDNAME=LAST_NAME, ALIAS=LN, FORMAT=A15, $ FIELDNAME=FIRST_NAME, ALIAS=FN, FORMAT=A10, $ FIELDNAME=HIRE_DATE, ALIAS=HDT, FORMAT=I6YMD, DFC=19, YRT=82, $... FIELDNAME=EFFECT_DATE, ALIAS=EDATE, FORMAT=I6YMD, $... FIELDNAME=DAT_INC, ALIAS=DI, FORMAT=I6YMD, $...
The request is:
DEFINE FILE EMPLOYEENEW_HIRE_DATE/YYMD = HIRE_DATE;NEW_EFFECT_DATE/YYMD = EFFECT_DATE;NEW_DAT_INC/YYMD = DAT_INC;END TABLE FILE EMPLOYEEPRINT HIRE_DATE NEW_HIRE_DATE EFFECT_DATE NEW_EFFECT_DATE DAT_INC NEW_DAT_INCEND
When the field HIRE_DATE is accessed, the time span 1982 to 2081 is applied. For all other legacy date fields in the file, such as EFFECT_DATE and DAT_INC, the time span specified at the file level is applied, that is, 1983 to 2082.
For example, the year 82 for HIRE_DATE is returned as 1982 in the NEW_HIRE_DATE column, since 82 is equal to the threshold of the window for that particular field. The year 82 for EFFECT_DATE and DAT_INC is returned as 2082 in the columns NEW_EFFECT_DATE and NEW_DAT_INC, since 82 is less than the threshold of the file-level window (83).
362 Information Builders

Working With Cross-Century Dates
The partial output is:
PAGE 1 HIRE_DATE NEW_HIRE_DATE EFFECT_DATE NEW_EFFECT_DATE DAT_INC NEW_DAT_INC
--------- ------------- ----------- --------------- ------- ----------
80/06/02 2080/06/02 82/01/01 2082/01/01
80/06/02 2080/06/02 81/01/01 2081/01/01
81/07/01 2081/07/01 82/01/01 2082/01/01
82/05/01 1982/05/01 82/11/01 2082/11/01 82/06/01 2082/06/01
82/05/01 1982/05/01 82/11/01 2082/11/01 82/05/01 2082/05/01
.
Missing date values for NEW_EFFECT_DATE appear as blanks by default. To retrieve the base date value for NEW_EFFECT_DATE instead of blanks, issue the command
SET DATEDISPLAY = ON
before running the request. The base date value is returned as 1900/12/31. See Defining a Global Window With SET on page 348 for sample results.
Defining a Window for a Virtual Field
The DEFCENT and YRTHRESH parameters on a DEFINE command create a window for a virtual field. The window is used to interpret date values for the virtual field when the century is not supplied. You can issue a DEFINE command in either a request or a Master File.
The DEFCENT and YRTHRESH parameters must immediately follow the field format specification; the values are always taken from the left side of the DEFINE syntax (that is, from the left side of the equal sign). If the expression in the DEFINE contains a function call, the function uses the DEFCENT and YRTHRESH values for the input field. The standard order of precedence (field level/file level/global level) applies to the DEFCENT and YRTHRESH values for the input field.
How to:
Define a Window for a Virtual Field in a Request
Define a Window for a Virtual Field in a Master File
Example:
Defining a Window for a Virtual Field in a Request
Defining a Window for Function Input in a DEFINE Command
Defining a Window for a Virtual Field in a Master File
Developing Applications 363
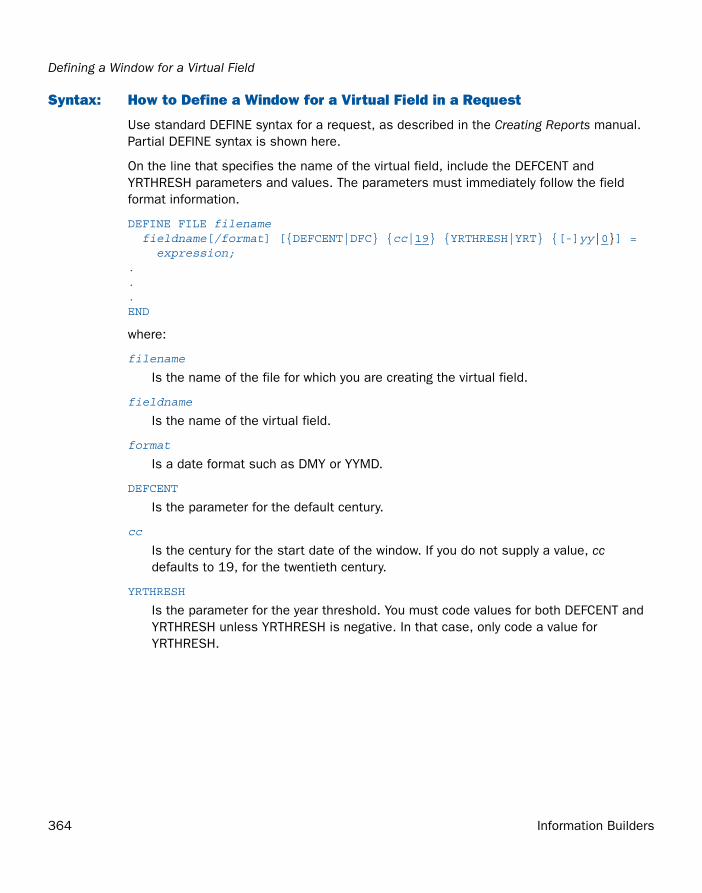
Defining a Window for a Virtual Field
Syntax: How to Define a Window for a Virtual Field in a Request
Use standard DEFINE syntax for a request, as described in the Creating Reports manual. Partial DEFINE syntax is shown here.
On the line that specifies the name of the virtual field, include the DEFCENT and YRTHRESH parameters and values. The parameters must immediately follow the field format information.
DEFINE FILE filename fieldname[/format] [{DEFCENT|DFC} {cc|19} {YRTHRESH|YRT} {[-]yy|0}] = expression;...END
where:
filename
Is the name of the file for which you are creating the virtual field.
fieldname
Is the name of the virtual field.
format
Is a date format such as DMY or YYMD.
DEFCENT
Is the parameter for the default century.
cc
Is the century for the start date of the window. If you do not supply a value, cc defaults to 19, for the twentieth century.
YRTHRESH
Is the parameter for the year threshold. You must code values for both DEFCENT and YRTHRESH unless YRTHRESH is negative. In that case, only code a value for YRTHRESH.
364 Information Builders

Working With Cross-Century Dates
yy
Is the year threshold for the window. If you do not supply a value, yy defaults to zero (0).
If yy is a positive number, two-digit years greater than or equal to the threshold default to the value of DEFCENT for the century. Two-digit years less than the threshold assume the value of DEFCENT + 1.
If yy is a negative number (-yy), the start date of the window is derived by subtracting that number from the current year, and DEFCENT is automatically calculated. The start date is automatically incremented by one at the beginning of each successive year.
expression
Is a valid arithmetic or logical expression, function, or function that determines the value of the virtual field.
END
Is required to terminate the DEFINE command.
Example: Defining a Window for a Virtual Field in a Request
In the following request, the DEFINE command creates two virtual fields, GLOBAL_HIRE_DATE and WINDOWED_HIRE_DATE. Both virtual fields are derived from the existing field HIRE_DATE. The format of HIRE_DATE is I6YMD, which is a legacy date with a 2-digit year. The virtual fields are date formats with a 4-digit year (YYMD).
The second virtual field, WINDOWED_HIRE_DATE, has the additional parameters DEFCENT and YRTHRESH, which define a window from 1982 to 2081. Notice that both DEFCENT and YRTHRESH are coded, as required.
The request is:
DEFINE FILE EMPLOYEEGLOBAL_HIRE_DATE/YYMD = HIRE_DATE;WINDOWED_HIRE_DATE/YYMD DFC 19 YRT 82 = HIRE_DATE;END TABLE FILE EMPLOYEEPRINT HIRE_DATE GLOBAL_HIRE_DATE WINDOWED_HIRE_DATEEND
Assuming that there are no FDEFCENT and FYRTHRESH file-level settings in the Master File for EMPLOYEE, the global default settings (DEFCENT = 19, YRTHRESH = 0) are used to interpret 2-digit years for HIRE_DATE when deriving the value of GLOBAL_HIRE_DATE. For example, the value of all years for HIRE_DATE (80, 81, and 82) is greater than 0; consequently they default to 19 for the century and are returned as 1980, 1981, and 1982 in the GLOBAL_HIRE_DATE column.
Developing Applications 365

Defining a Window for a Virtual Field
For WINDOWED_HIRE_DATE, the window created specifically for that field (1982 to 2081) is used. The 2-digit years 80 and 81 for HIRE_DATE are less than the threshold for the window (82); consequently, they are returned as 2080 and 2081 in the WINDOWED_HIRE_DATE column.
The output is:
PAGE 1 HIRE_DATE GLOBAL_HIRE_DATE WINDOWED_HIRE_DATE--------- ---------------- ------------------ 80/06/02 1980/06/02 2080/06/02 81/07/01 1981/07/01 2081/07/01 82/05/01 1982/05/01 1982/05/01 82/01/04 1982/01/04 1982/01/04 82/08/01 1982/08/01 1982/08/01 82/01/04 1982/01/04 1982/01/04 82/07/01 1982/07/01 1982/07/01 81/07/01 1981/07/01 2081/07/01 82/04/01 1982/04/01 1982/04/01 82/02/02 1982/02/02 1982/02/02 82/04/01 1982/04/01 1982/04/01 81/11/02 1981/11/02 2081/11/02
Example: Defining a Window for Function Input in a DEFINE Command
The following sample request illustrates a call to the function AYMD in a DEFINE command. AYMD adds 60 days to the input field, HIRE_DATE; the output field, SIXTY_DAYS, contains the result. HIRE_DATE is formatted as I6YMD, which is a legacy date with a 2-digit year. SIXTY_DAYS is formatted as I8YYMD, which is a legacy date with a 4-digit year.
For details on AYMD, see the Using Functions manual.
DEFINE FILE EMPLOYEESIXTY_DAYS/I8YYMD = AYMD(HIRE_DATE, 60, 'I8YYMD');END
TABLE FILE EMPLOYEEPRINT HIRE_DATE SIXTY_DAYSEND
366 Information Builders

Working With Cross-Century Dates
The function uses the DEFCENT and YRTHRESH values for the input field HIRE_DATE. In this example, they are set on the field level in the Master File:
FILENAME=EMPLOYEE, SUFFIX=FOC SEGNAME=EMPINFO, SEGTYPE=S1 FIELDNAME=EMP_ID, ALIAS=EID, FORMAT=A9, $ FIELDNAME=LAST_NAME, ALIAS=LN, FORMAT=A15, $ FIELDNAME=FIRST_NAME, ALIAS=FN, FORMAT=A10, $ FIELDNAME=HIRE_DATE, ALIAS=HDT, FORMAT=I6YMD, DFC=19, YRT=82, $...
The function inputs a 2-digit year, which is windowed. It then outputs a 4-digit year that includes the century digits.
The input values 80 and 81 are less than the threshold 82, so they assume the value 20 for the century. The input value 82 is equal to the threshold, so it defaults to 19 for the century.
The output is:
PAGE 1 HIRE_DATE SIXTY_DAYS--------- ---------- 80/06/02 2080/08/01 81/07/01 2081/08/30 82/05/01 1982/06/30 82/01/04 1982/03/05 82/08/01 1982/09/30 82/01/04 1982/03/05 82/07/01 1982/08/30 81/07/01 2081/08/30 82/04/01 1982/05/31 82/02/02 1982/04/03 82/04/01 1982/05/31 81/11/02 2082/01/01
Developing Applications 367

Defining a Window for a Virtual Field
Syntax: How to Define a Window for a Virtual Field in a Master File
Use standard DEFINE syntax for a Master File, as discussed in the Describing Data manual. Partial DEFINE syntax is shown here.
The parameters DEFCENT and YRTHRESH must immediately follow the field format information.
DEFINE fieldname/[format] [{DEFCENT|DFC} {cc|19} {YRTHRESH|YRT} {[-]yy|0}] = expression;$
where:
fieldname
Is the name of the virtual field.
format
Is a date format such as DMY or YYMD.
DEFCENT
Is the parameter for the default century.
cc
Is the century for the start date of the window. If you do not supply a value, cc defaults to 19, for the twentieth century.
YRTHRESH
Is the parameter for the year threshold. You must code values for both DEFCENT and YRTHRESH unless YRTHRESH is negative. In that case, only code a value for YRTHRESH.
yy
Is the year threshold for the window. If you do not supply a value, yy defaults to zero (0).
If yy is a positive number, two-digit years greater than or equal to the threshold default to the value of DEFCENT for the century. Two-digit years less than the threshold assume the value of DEFCENT + 1.
If yy is a negative number (-yy), the start date of the window is derived by subtracting that number from the current year, and DEFCENT is automatically calculated. The start date is automatically incremented by one at the beginning of each successive year.
expression
Is a valid arithmetic or logical expression, function, or function that determines the value of the virtual field.
368 Information Builders

Working With Cross-Century Dates
Example: Defining a Window for a Virtual Field in a Master File
In the following example, the DEFINE command in a Master File creates a virtual field named NEW_HIRE_DATE. It is derived from the existing field HIRE_DATE. The format of HIRE_DATE is I6YMD, which is a legacy date with a 2-digit year. NEW_HIRE_DATE is a date format with a 4-digit year (YYMD).
The parameters DEFCENT and YRTHRESH on the DEFINE command create a window from 1982 to 2081, which is used to interpret all 2-digit years for the virtual field. Notice that both DEFCENT and YRTHRESH are coded, as required.
The field-level window takes precedence over any global settings in effect. There is no file-level setting in the Master File.
The Master File is:
FILENAME=EMPLOYEE, SUFFIX=FOC SEGNAME=EMPINFO, SEGTYPE=S1 FIELDNAME=EMP_ID, ALIAS=EID, FORMAT=A9, $ FIELDNAME=LAST_NAME, ALIAS=LN, FORMAT=A15, $ FIELDNAME=FIRST_NAME, ALIAS=FN, FORMAT=A10, $ FIELDNAME=HIRE_DATE, ALIAS=HDT, FORMAT=I6YMD, $...DEFINE NEW_HIRE_DATE/YYMD DFC 19 YRT 82 = HIRE_DATE;$
The following request generates the values in the sample report:
TABLE FILE EMPLOYEEPRINT HIRE_DATE NEW_HIRE_DATEEND
Since the 2-digit years 80 and 81 are less than the threshold 82, the century assumes the value of DEFCENT + 1 (20), and they are returned as 2080 and 2081 in the NEW_HIRE_DATE column. The 2-digit year 82 is equal to the threshold and therefore defaults to the value of DEFCENT (19). It is returned as 1982.
Developing Applications 369

Defining a Window for a Calculated Value
The output is:
PAGE 1 HIRE_DATE NEW_HIRE_DATE--------- ------------- 80/06/02 2080/06/02 81/07/01 2081/07/01 82/05/01 1982/05/01 82/01/04 1982/01/04 82/08/01 1982/08/01 82/01/04 1982/01/04 82/07/01 1982/07/01 81/07/01 2081/07/01 82/04/01 1982/04/01 82/02/02 1982/02/02 82/04/01 1982/04/01 81/11/02 2081/11/02
Defining a Window for a Calculated Value
Use the DEFCENT and YRTHRESH parameters on a COMPUTE command in a report request to create a window for a temporary field that is calculated from the result of a PRINT, LIST, SUM, or COUNT command. The window is used to interpret a date value for that field when the century is not supplied.
The DEFCENT and YRTHRESH parameters must immediately follow the field format specification; the values are always taken from the left side of the COMPUTE syntax (that is, from the left side of the equal sign). If the expression in the COMPUTE contains a function call, the function uses the DEFCENT and YRTHRESH values for the input field. The standard order of precedence (field level/file level/global level) applies to the DEFCENT and YRTHRESH values for the input field.
You can also use the parameters on a COMPUTE command in a MODIFY or Maintain procedure, or on a DECLARE command in Maintain. For details on the use of the parameters in Maintain, see the Maintaining Databases manual.
How to:
Define a Window for a Calculated Value in a Report
Define a Window for a Calculated Value in a MODIFY Request
Example:
Defining a Window for a Calculated Value
Defining a Window for Function Input in a COMPUTE Command
370 Information Builders

Working With Cross-Century Dates
Syntax: How to Define a Window for a Calculated Value in a Report
Use standard COMPUTE syntax, as described in the Creating Reports manual. Partial COMPUTE syntax is shown here.
On the line that specifies the name of the calculated value, include the DEFCENT and YRTHRESH parameters and values. The parameters must immediately follow the field format information.
TABLE FILE filenamecommand[AND] COMPUTE fieldname[/format] [{DEFCENT|DFC} {cc|19} {YRTHRESH|YRT} {[-]yy|0}] = expression;...END
where:
filename
Is the name of the file for which you are creating the calculated value.
command
Is a command such as PRINT, LIST, SUM, or COUNT.
fieldname
Is the name of the calculated value.
format
Is a date format such as DMY or YYMD.
DEFCENT
Is the parameter for the default century.
cc
Is the century for the start date of the window. If you do not supply a value, cc defaults to 19, for the twentieth century.
YRTHRESH
Is the parameter for the year threshold. You must code values for both DEFCENT and YRTHRESH unless YRTHRESH is negative. In that case, only code a value for YRTHRESH.
Developing Applications 371

Defining a Window for a Calculated Value
yy
Is the year threshold for the window. If you do not supply a value, yy defaults to zero (0).
If yy is a positive number, two-digit years greater than or equal to the threshold default to the value of DEFCENT for the century. Two-digit years less than the threshold assume the value of DEFCENT + 1.
If yy is a negative number (-yy), the start date of the window is derived by subtracting that number from the current year, and DEFCENT is automatically calculated. The start date is automatically incremented by one at the beginning of each successive year.
expression
Is a valid arithmetic or logical expression, function, or function that determines the value of the temporary field.
END
Is required to terminate the request.
Syntax: How to Define a Window for a Calculated Value in a MODIFY Request
Use standard MODIFY and COMPUTE syntax, as described in the Maintaining Databases manual; partial syntax is shown here.
On the line that specifies the name of the calculated value, include the DEFCENT and YRTHRESH parameters and values. The parameters must immediately follow the field format information.
MODIFY FILE filename...COMPUTE fieldname[/format] [{DEFCENT|DFC} {cc|19} {YRTHRESH|YRT} {[-]yy|0}] = expression;...[END]
where:
filename
Is the name of the file you are modifying.
fieldname
Is the name of the field being set to the value of expression.
372 Information Builders
Working With Cross-Century Dates
format
Is a date format such as MDY or YYMD.
DEFCENT
Is the parameter for the default century.
cc
Is the century for the start date of the window. If you do not supply a value, cc defaults to 19, for the twentieth century.
YRTHRESH
Is the parameter for the year threshold. You must code values for both DEFCENT and YRTHRESH unless YRTHRESH is negative. In that case, only code a value for YRTHRESH.
yy
Is the year threshold for the window. If you do not supply a value, yy defaults to zero (0).
If yy is a positive number, two-digit years greater than or equal to the threshold default to the value of DEFCENT for the century. Two-digit years less than the threshold assume the value of DEFCENT + 1.
If yy is a negative number (-yy), the start date of the window is derived by subtracting that number from the current year, and DEFCENT is automatically calculated. The start date is automatically incremented by one at the beginning of each successive year.
expression
Is a valid arithmetic or logical expression, function, or function that determines the value of fieldname.
END
Terminates the request. Do not add this command if the request contains PROMPT statements.
Developing Applications 373

Defining a Window for a Calculated Value
Example: Defining a Window for a Calculated Value
In the following request, the parameters DEFCENT and YRTHRESH on the COMPUTE command define a window from 1999 to 2098. Notice that both DEFCENT and YRTHRESH are coded, as required. The window is applied to the field created by the COMPUTE command, LATEST_DAT_INC.
DAT_INC is formatted as I6YMD, which is a legacy date with a 2-digit year. LATEST_DAT_INC is a date format with a 4-digit year (YYMD). The prefix MAX retrieves the highest value of DAT_INC.
The request is:
TABLE FILE EMPLOYEESUM SALARY AND COMPUTE LATEST_DAT_INC/YYMD DFC 19 YRT 99 = MAX.DAT_INC;END
The highest value of DAT_INC is 82/08/01. Since the year 82 is less than the threshold 99, it assumes the value 20 for the century (DEFCENT + 1).
The output is:
PAGE 1 SALARY LATEST_DAT_INC ------ -------------- $332,929.00 2082/08/01
374 Information Builders

Working With Cross-Century Dates
Example: Defining a Window for Function Input in a COMPUTE Command
The following sample request illustrates a call to the function JULDAT in a COMPUTE command. JULDAT converts dates from Gregorian format (year/month/day) to Julian format (year/day). For century display, dates in Julian format are 7-digit numbers. The first 4 digits are the century. The last three digits represent the number of days, counting from January 1.
For details on JULDAT, see the Using Functions manual.
In the request, the input field is HIRE_DATE. The function converts it to Julian format and returns it as JULIAN_DATE. HIRE_DATE is formatted as I6YMD, which is a legacy date with a 2-digit year. JULIAN_DATE is formatted as I7, which is a legacy date with a 4-digit year.
TABLE FILE EMPLOYEEPRINT DEPARTMENT HIRE_DATEAND COMPUTE JULIAN_DATE/I7 = JULDAT(HIRE_DATE, JULIAN_DATE);BY LAST_NAME BY FIRST_NAMEEND
The function uses the FDEFCENT and FYRTHRESH values for the input field HIRE_DATE. In this example, they are set on the file level in the Master File:
FILENAME=EMPLOYEE, SUFFIX=FOC, FDFC=19, FYRT=82 SEGNAME=EMPINFO, SEGTYPE=S1 FIELDNAME=EMP_ID, ALIAS=EID, FORMAT=A9, $ FIELDNAME=LAST_NAME, ALIAS=LN, FORMAT=A15, $ FIELDNAME=FIRST_NAME, ALIAS=FN, FORMAT=A10, $ FIELDNAME=HIRE_DATE, ALIAS=HDT, FORMAT=I6YMD, $...
The function inputs a 2-digit year, which is windowed. It then outputs a 4-digit year that includes the century digits.
The input values 80 and 81 are less than the threshold 82, so they assume the value 20 for the century. The input value 82 is equal to the threshold, so it defaults to 19 for the century.
Developing Applications 375

Additional Support for Cross-Century Dates
The output follows. By default, the second occurrence of the last name SMITH displays as blanks.
PAGE 1 LAST_NAME FIRST_NAME DEPARTMENT HIRE_DATE JULIAN_DATE--------- ---------- ---------- --------- -----------BANNING JOHN PRODUCTION 82/08/01 1982213BLACKWOOD ROSEMARIE MIS 82/04/01 1982091CROSS BARBARA MIS 81/11/02 2081306GREENSPAN MARY MIS 82/04/01 1982091IRVING JOAN PRODUCTION 82/01/04 1982004JONES DIANE MIS 82/05/01 1982121MCCOY JOHN MIS 81/07/01 2081182MCKNIGHT ROGER PRODUCTION 82/02/02 1982033ROMANS ANTHONY PRODUCTION 82/07/01 1982182SMITH MARY MIS 81/07/01 2081182 RICHARD PRODUCTION 82/01/04 1982004STEVENS ALFRED PRODUCTION 80/06/02 2080154
Additional Support for Cross-Century Dates
The following features apply to the use of dates in your applications.
In this section:
Default Date Display Format
Date Display Options
System Date Masking
Date Functions
Date Conversion
Century and Threshold Information
Date Time Stamp
376 Information Builders
Working With Cross-Century Dates
Default Date Display Format
The default date display format is MM/DD/CCYY, where MM is the month; DD is the day of the month; CC is the first two digits of a 4-digit year, indicating the century; and YY is the last two digits of a 4-digit year.
For example:
02/11/1999
For a table that fully describes the display of a date based on the specified format and user input, see the Describing Data manual.
Date Display Options
The following date display options are available:
❏ You can display a row of data, even though it contains an invalid date field, using the command SET ALLOWCVTERR. The invalid date field is returned as the base date or as blanks, depending on other settings. For details, see your documentation on the SET command. This feature applies to non-FOCUS data sources when converting from the way data is stored (ACTUAL attribute) to the way it is formatted (FORMAT or USAGE attribute).
❏ If a date format field contains the value zero (0), you can display its base date using the command SET DATEDISPLAY = ON. By default, the value zero in a date format field such as YYMD is returned as a blank. For details, see Chapter 1, Customizing Your Environment.
❏ You can display the current date with a 4-digit year using the Dialogue Manager system variables &YYMD, &MDYY, and &DMYY. The system variable &DATEfmt displays the current date as specified by the value of fmt, which is a combination of allowable date options, including a 4-digit year (for example, &DATEYYMD). For details, see Chapter 5, Managing Flow of Control in an Application.
System Date Masking
You can temporarily alter the system date for application testing and debugging using the command SET TESTDATE. With this feature, you can simulate clock settings beyond the year 1999 to determine the way your program will behave. For details, see Chapter 1, Customizing Your Environment.
Date Functions
The date functions supplied with your software work across centuries. Many of them facilitate date manipulation. For details, see the Using Functions manual.
Developing Applications 377

Additional Support for Cross-Century Dates
Date Conversion
You can convert a legacy date to a date format in a FOCUS data source using the option DATE NEW on the REBUILD command. For details, see the Maintaining Databases manual.
Century and Threshold Information
The ALL option, in conjunction with the HOLD option, on the CHECK FILE command includes file-level and field-level default century and year thresholds as specified in a Master File. For details, see the Describing Data manual.
Date Time Stamp
The year in the time stamp for a FOCUS data source is physically written to page one of the file in the format CCYY.
378 Information Builders

FOCUS
7
Developing App
Euro Currency Support
The following topics describe how to create and use a currency data source to convert to and from the new euro currency.
Topics:
❏ Integrating the Euro Currency
❏ Converting Currencies
❏ Creating the Currency Data Source
❏ Identifying Fields That Contain Currency Data
❏ Activating the Currency Data Source
❏ Processing Currency Data
❏ Querying the Currency Data Source in Effect
❏ Punctuating Numbers
❏ Selecting an Extended Currency Symbol
lications 379

Integrating the Euro Currency
Integrating the Euro CurrencyWith the introduction of the euro currency, businesses need to maintain books in two currencies, add new fields to the data source designs, and perform new types of currency conversions. You can perform currency conversions according to the rules specified by the European Union. To do this:
1. Create a currency data source with the currency IDs and exchange rates you will use. See Creating the Currency Data Source on page 382.
2. Identify fields in your data sources that represent currency data. See Identifying Fields That Contain Currency Data on page 385.
3. Activate your currency data source. See Activating the Currency Data Source on page 387.
4. Perform currency conversions. See Processing Currency Data on page 389.
Note: As the euro symbol becomes available to operating systems, Information Builders will support it.
Converting Currencies
Euro currency was introduced in Euroland on January 1, 2002, and on July 1, 2002 it became the only legal tender. All monetary transactions now occur in euro currency.
The European Union has set fixed exchange rates between the euro and the traditional national currency in each of the 12 adopting member nations. Although 12 or more currencies in the European Union use the euro, more than 100 currencies have a recognized status worldwide. In addition, you may need to define custom currencies for other applications.
While the exchange rates within Euroland remain fixed, exchange rates between the euro and non-euro countries continue to vary freely and, in fact, several rates may be in use at one time (for example, actual and budgeted rates).
You identify your currency codes and rates by creating a currency data source. For more information, see Creating the Currency Data Source on page 382.
Example:
Performing Triangulation
Reference:
Currency Conversion Rules
380 Information Builders

Euro Currency Support
Reference: Currency Conversion Rules
The European Union has established the following rules for currency conversions:
❏ The exchange rate must be specified as a decimal value, r, with six significant digits. This rate will establish the following relationship between the euro and the particular national currency:
1 euro = r national units
❏ To convert from the euro to the national unit, multiply by r and round the result to two decimal places.
❏ To convert from the national currency to the euro, divide by r and round the result to two decimal places.
❏ To convert from one national currency to another, first convert from one national unit to the euro, rounding the result to three decimal places (your application rounds to exactly three decimal places). Then convert from the euro to the second national unit, rounding the result to two decimal places. This two-step conversion process is triangulation.
Example: Performing Triangulation
The following example illustrates triangulation. In this case, 10 US dollars (USD) are converted to French francs (FRF).
❏ The 10 USD are converted to EUR by dividing the 10 USD by the EUR exchange rate of 0.8840:
EUR = 10 / 0.8840
This results in 11.3122 euros.
❏ The euros are converted to FRF by multiplying the above result by the exchange rate of FRF for euros (6.55957):
FRF = 11.312 * 6.55957
The result is 74.20. FRF. This means 74.20 FRF are equivalent to 10 USD.
Developing Applications 381

Creating the Currency Data Source
Creating the Currency Data Source
For each type of currency you need, you must supply the following values in your currency data source:
❏ A three-character code to identify the currency, such as USD for US dollars or BEF for Belgian francs. (For a partial list of recognized currency codes, see Sample Currency Codes on page 384.)
❏ One or more exchange rates for the currency.
There is no limit to the number of currencies you can add to your currency data source, and the currencies you can define are not limited to official currencies. Therefore, the currency data source can be fully customized for your applications.
The currency data source can be any type of data source your application can access (for example, FOCUS, FIX, DB2, or VSAM). The currency Master File must have one field that identifies each currency ID you will use and one or more fields to specify the exchange rates.
We strongly recommend that you create a separate data source for the currency data rather than adding the currency fields to another data source. A separate currency data source enhances performance and minimizes resource utilization because the currency data source is loaded into memory before you perform currency conversions.
How to:
Create a Currency Data Source
Example:
Specifying Currency Codes and Rates in a Master File
Reference:
Sample Currency Codes
382 Information Builders

Euro Currency Support
Syntax: How to Create a Currency Data Source
FILE = name, SUFFIX = suffix,$FIELD = CURRENCY_ID,, FORMAT = A3, [ACTUAL = A3 ,]$FIELD = rate_1,, FORMAT = {D12.6|numeric_format1},[ACTUAL = A12,]$ . . .FIELD = rate_n,, FORMAT = {D12.6|numeric_formatn}, [ACTUAL = A12,]$
where:
name
Is the name of the currency data source.
suffix
Is the suffix of the currency data source. The currency data source can be any type of data source your application can access.
CURRENCY_ID
Is the required field name. The values stored in this field are the three-character codes that identify each currency, such as USD for U.S. dollars. Each currency ID can be a universally recognized code or a user-defined code.
Note: The code EUR is automatically recognized; you should not store this code in your currency data source. See Sample Currency Codes on page 384 for a list of common currency codes.
rate_1...rate_n
Are types of rates (such as BUDGET, FASB, ACTUAL) to be used in currency conversions. Each rate is the number of national units that represent one euro.
numeric_format1...numeric_formatn
Are the display formats for the exchange rates. Each format must be numeric. The recommended format, D12.6, ensures that the rate is expressed with six significant digits as required by the European Union conversion rules. Do not use Integer format (I).
ACTUAL An
Is required only for non-FOCUS data sources.
Note: The maximum number of fields in the currency data source must not exceed 255 (that is, the CURRENCY_ID field plus 254 currency conversion fields).
Developing Applications 383

Creating the Currency Data Source
Reference: Sample Currency Codes
On January 1, 1999, Euroland set exchange rates between the euro and other currencies. Countries included in Euroland as of that date are marked with an asterisk (*). The rates are fixed and will not change; the rates for other countries change over time.
Currency Name Currency Code Rate
American dollar USD .974298
Austrian schilling ATS 13.7603
Belgian franc* BEF 40.3399
British pound GBP .625152
Canadian dollar CAD 1.54504
Danish krone DKK 7.42659
Dutch guilder* NLG 2.20371
Dutsche mark* DEM 1.95583
Euro EUR 1
Finnish markka FIM 5.94573
French franc* FRF 6.55957
Greek drachma* GRD 340.750
Irish pound* IEP 0.787564
Italian lira* ITL 1936.27
Japanese yen JPY 118.377
Luxembourg franc* LUF 40.3399
Norwegian kroner NOK 7.34864
Portuguese escudo* PTE 200.482
Spanish peseta* ESP 166.386
Swedish krona SEK 9.20906
Swiss franc CHF 1/4634
384 Information Builders

Euro Currency Support
Example: Specifying Currency Codes and Rates in a Master File
The following Master File for a comma-delimited currency data source specifies two rates for each currency, ACTUAL and BUDGET:
FILE = CURRCODE, SUFFIX = COM,$FIELD = CURRENCY_ID,, FORMAT = A3, ACTUAL = A3 ,$FIELD = ACTUAL, ALIAS =, FORMAT = D12.6, ACTUAL = A12 ,$FIELD = BUDGET, ALIAS =, FORMAT = D12.6, ACTUAL = A12 ,$
The following is sample data for the currency data source defined by this Master File:
FRF, 6.55957, 6.50000,$USD, 0.974298, 1.00000,$BEF, 40.3399, 41.00000,$
Identifying Fields That Contain Currency Data
After you have created your currency data source, you must identify the fields in your data sources that represent currency values. To designate a field as a currency-denominated value (a value that represents a number of units in a specific type of currency) add the CURRENCY attribute to one of the following:
❏ The FIELD specification in the Master File.
❏ The left side of a DEFINE or COMPUTE.
How to:
Identify a Currency Value
Example:
Identifying a Currency-Denominated Field
Developing Applications 385
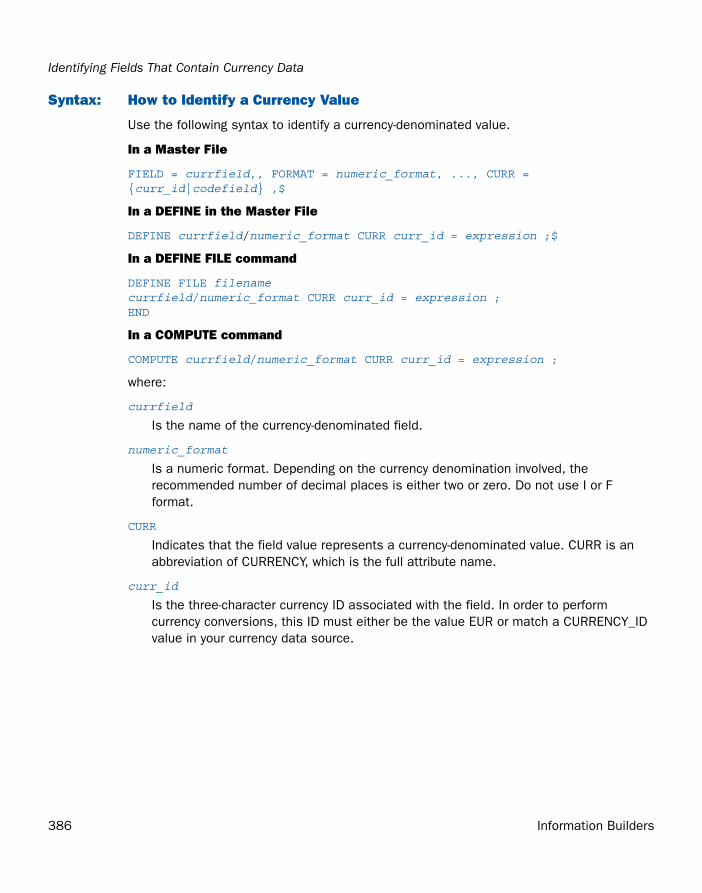
Identifying Fields That Contain Currency Data
Syntax: How to Identify a Currency Value
Use the following syntax to identify a currency-denominated value.
In a Master File
FIELD = currfield,, FORMAT = numeric_format, ..., CURR = {curr_id|codefield} ,$
In a DEFINE in the Master File
DEFINE currfield/numeric_format CURR curr_id = expression ;$
In a DEFINE FILE command
DEFINE FILE filenamecurrfield/numeric_format CURR curr_id = expression ;END
In a COMPUTE command
COMPUTE currfield/numeric_format CURR curr_id = expression ;
where:
currfield
Is the name of the currency-denominated field.
numeric_format
Is a numeric format. Depending on the currency denomination involved, the recommended number of decimal places is either two or zero. Do not use I or F format.
CURR
Indicates that the field value represents a currency-denominated value. CURR is an abbreviation of CURRENCY, which is the full attribute name.
curr_id
Is the three-character currency ID associated with the field. In order to perform currency conversions, this ID must either be the value EUR or match a CURRENCY_ID value in your currency data source.
386 Information Builders

Euro Currency Support
codefield
Is the name of a field, qualified if necessary, that contains the currency ID associated with currfield. The code field should have format A3 or longer and is interpreted as containing the currency ID value in its first three bytes. For example:
FIELD = PRICE,, FORMAT = P12.2C, ..., CURR = TABLE.FLD1,$ . . .FIELD = FLD1,, FORMAT = A3, ...,$
The field named FLD1 contains the currency ID for the field named PRICE.
filename
Is the name of the file for which this field is defined.
expression
Is a valid expression.
Example: Identifying a Currency-Denominated Field
The following Master File contains the description of a field named PRICE that is denominated in U. S. dollars.
FILE=CURRDATA,SUFFIX=COM,$FIELD=PRICE, FORMAT=P17.2 , ACTUAL=A5, CURR=USD,$...
Activating the Currency Data Source
Before you can perform currency conversions, you must specify the currency data source by setting the EUROFILE parameter with the SET command. By default, the EUROFILE parameter is not set.
The SET command can be issued at the FOCUS command prompt, in a procedure, or in any supported profile. It cannot be set within a report request.
How to:
Activate Your Currency Data Source
Reference:
EUROFILE Error Messages and Notes
Developing Applications 387

Activating the Currency Data Source
After a data source is activated, you can access a different currency data source by reissuing the SET command.
Note: The EUROFILE parameter must be set alone. For example, appending an additional SET parameter will cause the additional parameter setting to be lost.
Syntax: How to Activate Your Currency Data Source
SET EUROFILE = {ddname|OFF}
where:
ddname
Is the name of the Master File for the currency data source. The ddname must refer to a data source known to and accessible by your application in read-only mode.
OFF
Deactivates the currency data source and removes it from memory.
Reference: EUROFILE Error Messages and Notes
❏ Issuing the SET EUROFILE command when the currency data source Master File does not exist generates the following error message:
(FOC205) THE DESCRIPTION CANNOT BE FOUND FOR FILE NAMED: ddname
❏ Issuing the SET EUROFILE command when the currency Master File specifies a FOCUS data source and the associated FOCUS data source does not exist generates the following error message:
(FOC036) NO DATA FOUND FOR THE FOCUS FILE NAMED: name
Note for Pooled Table users: The SET EUROFILE command creates a pool boundary.
388 Information Builders

Euro Currency Support
Processing Currency Data
After you have created your currency data source, identified the currency-denominated fields in your data sources, and activated your currency data source, you can perform currency conversions.
Each currency ID in your currency data source generates a virtual conversion function whose name is the same as its currency ID. For example, if you added BEF to your currency data source, a virtual BEF currency conversion function will be generated.
The euro function, EUR, is supplied automatically with your application. You do not need to add the EUR currency ID to your currency data source.
The result of a conversion is calculated with very high precision, 31 to 36 significant digits, depending on platform. The precision of the final result is always rounded to two decimal places. In order to display the result to the proper precision, its format must allow at least two decimal places.
Syntax: How to Process Currency Data
In a procedure
DEFINE FILE filenameresult/format [CURR curr_id] = curr_id(infield, rate1 [,rate2]);END
or
COMPUTE result/format [CURR curr_id] = curr_id(infield, rate1 [,rate2]);
How to:
Process Currency Data
Example:
Using the Currency Conversion Function
Converting U.S. Dollars to Euros, French Francs, and Belgian Francs
Reference:
Currency Calculation Error Messages
Developing Applications 389

Processing Currency Data
In a Master File
DEFINE result/format [CURR curr_id] = curr_id(infield, rate1 [,rate2]);$
where:
filename
Is the name of the file for which this field is defined.
result
Is the converted currency value.
format
Is a numeric format. Depending on the currency denomination involved, the recommended number of decimal places is either two or zero. The result will always be rounded to two decimal places, which will display if the format allows at least two decimal places. Do not use an Integer or Floating Point format.
curr_id
Is the currency ID of the result field. This ID must be the value EUR or match a currency ID in your currency data source; any other value generates the following message:
(FOC263) EXTERNAL FUNCTION OR LOAD MODULE NOT FOUND: curr_id
Note: The CURR attribute on the left side of the DEFINE or COMPUTE identifies the result field as a currency-denominated value which can be passed as an argument to a currency function in subsequent currency calculations. Adding this attribute to the left side of the DEFINE or COMPUTE does not invoke any format or value conversion on the calculated result.
infield
Is a currency-denominated value. This input value will be converted from its original currency to the curr_id denomination. If the infield and result currencies are the same, no calculation is performed and the result value is the same as the infield value.
rate1
Is the name of a rate field from the currency data source. The infield value is divided by its currency’s rate1 value to produce the equivalent number of euros.
If rate2 is not specified in the currency calculation and triangulation is required, this intermediate result is then multiplied by the result currency’s rate1 value to complete the conversion.
In certain cases, you may need to provide different rates for special purposes. In these situations you can specify any field or numeric constant for rate1 as long as it indicates the number of units of the infield currency denomination that equals one euro.
390 Information Builders

Euro Currency Support
rate2
Is the name of a rate field from the currency data source. This argument is only used for those cases of triangulation in which you need to specify different rate fields for the infield and result currencies. It is ignored if the euro is one of the currencies involved in the calculation.
The number of euros that was derived using rate1 is multiplied by the result currency’s rate2 value to complete the conversion.
In certain cases, you may need to provide different rates for special purposes. In these situations you can specify any field or numeric constant for rate2 as long as it indicates the number of units of the result currency denomination that equals one euro.
Reference: Currency Calculation Error Messages
Issuing a report request against a Master File that specifies a currency code not listed in the active currency data source generates the following message:
(FOC1911) CURRENCY IN FILE DESCRIPTION NOT FOUND IN DATA
A syntax error or undefined field name in a currency conversion expression generates the following message:
(FOC1912) ERROR IN PARSING CURRENCY STATEMENT
Example: Using the Currency Conversion Function
Assume that the currency data source contains the currency IDs USD and BEF, and that PRICE is denominated in Belgian francs as follows:
FIELD = PRICE, ALIAS=, FORMAT = P17.2, CURR=BEF,$
❏ The following example converts PRICE to euros and stores the result in PRICE2 using the BUDGET conversion rate for the BEF currency ID:
COMPUTE PRICE2/P17.2 CURR EUR = EUR(PRICE, BUDGET);
❏ This example converts PRICE from Belgian francs to US dollars using the triangulation rule:
DEFINE PRICE3/P17.2 CURR USD = USD(PRICE, ACTUAL);$
First PRICE is divided by the ACTUAL rate for Belgian francs to derive the number of euros rounded to three decimal places. Then this intermediate value is multiplied by the ACTUAL rate for US dollars and rounded to two decimal places.
❏ The following example uses a numeric constant for the conversion rate:
DEFINE PRICE4/P17.2 CURR EUR = EUR(PRICE,5);$
Developing Applications 391

Processing Currency Data
❏ The next example uses the ACTUAL rate for Belgian francs in the division and the BUDGET rate for US dollars in the multiplication:
DEFINE PRICE5/P17.2 CURR USD = USD(PRICE, ACTUAL, BUDGET);$
Example: Converting U.S. Dollars to Euros, French Francs, and Belgian Francs
The following is an example of converting U.S. dollars to Euros, French Francs, and Belgian Francs.
1. Create a currency data source that identifies the currency and one or more exchange rates. (See Creating the Currency Data Source on page 382 for details.) The following sample data source is named CURRCODE:
FILE = CURRCODE, SUFFIX = COM,$FIELD = CURRENCY_ID,, FORMAT = A3, ACTUAL = A3 ,$FIELD = ACTUAL, ALIAS =, FORMAT = D12.6, ACTUAL = A12 ,$FIELD = BUDGET, ALIAS =, FORMAT = D12.6, ACTUAL = A12 ,$
2. Create a data source that contains the values to be converted. (See Identifying Fields That Contain Currency Data on page 385 for details.) The following sample data source is named CURRDATA:
FILE=CURRDATA,SUFFIX=COM,$FIELD=PRICE, FORMAT=P17.2 , ACTUAL=A5, CURR=USD,$
3. Create a request that uses the currency data source to convert the currency values contained in the data source containing these values. The following procedure converts PRICE to euros, French francs, and Belgian francs. The numbers on the left correspond to the notes explaining the code.
-* THE FOLLOWING ALLOCATIONS ARE FOR RUNNING UNDER z/OS1. -* DYNAM ALLOC FILE CURRCODE DA USER1.FOCEXEC.DATA(CURRCODE) SHR REU2. -* DYNAM ALLOC FILE CURRDATA DA USER1.FOCEXEC.DATA(CURRDATA) SHR REU
-* THE FOLLOWING ALLOCATIONS ARE FOR RUNNING UNDER WINDOWS NT1. FILEDEF CURRCODE DISC C:\IBI\APPS\GGDEMO\CURRCODE.COM2. FILEDEF CURRCODE DISC C:\IBI\APPS\GGDEMO\CURRDATA.COM
3. SET EUROFILE = CURRCODE
DEFINE FILE CURRDATA4. PRICEEUR/P17.2 CURR EUR = EUR(PRICE, ACTUAL); END
TABLE FILE CURRDATA PRINT PRICE PRICEEUR AND COMPUTE5. PRICEFRF/P17.2 CURR FRF = FRF(PRICE, ACTUAL); PRICEBEF/P17.2 CURR BEF = BEF(PRICE, ACTUAL); END
392 Information Builders

Euro Currency Support
The report request executes as follows:
1. The FILEDEF or DYNAM command informs the operating system of the location of the CURRCODE data source.
2. The FILEDEF command informs the operating system of the location of the CURRDATA data source.
3. The SET command specifies the currency data source as CURRCODE.
4. This line calls the EUR function, which converts U. S. dollars to euros.
5. The next two lines are the conversion functions that convert euros into the equivalent in French and Belgian Francs.
The output is:
PRICE PRICEEUR PRICEFRF PRICEBEF ----- -------- -------- -------- 5.00 4.26 27.97 172.01 6.00 5.12 33.57 206.42 40.00 34.12 223.78 1376.20 10.00 8.53 55.95 344.06
You cannot use the derived euro value PRICEEUR in a conversion from USD to BEF. PRICEEUR has two decimal places (P17.2), not three, as the triangulation rules require.
Querying the Currency Data Source in EffectYou can issue a query to determine what currency data source is in effect. To do this, issue ? SET ALL or ? SET EUROFILE.
Syntax: How to Determine the Currency Data Source in Effect
? SET EUROFILE
Example: Determining the Currency Data Source in Effect
Assume the currency data source is named CURRCODE.
If you issue the following commands
SET EUROFILE = CURRCODE? SET EUROFILE
the output is:
EUROFILE CURRCODE
Developing Applications 393

Punctuating Numbers
Punctuating Numbers
Countries differ in how they punctuate numbers, and you can reflect these differences in your reports using Continental Decimal Notation (CDN) which is specified with the CDN SET parameter. The CDN SET allows you to choose to punctuate numbers with a combination of commas, decimals, spaces, and single quotation marks.
The CDN SET parameter can be used in a report request but is not supported in DEFINE or COMPUTE commands.
Note: The punctuation specified by the CDN parameter also determines the punctuation used in numbers affected by the CENT-ZERO SET parameter.
Syntax: How to Determine the Punctuation of Large Numbers
SET CDN = option
where:
option
Determines the punctuation used in numerical notation. The options are:
ON uses CDN. For example, the number 3,045,000.76 is represented as 3.045.000,76.
OFF turns CDN off. For example, the number 3,045,000.76 is represented as 3,045,000.76. This value is the default.
SPACE separates groups of three significant digits with a space instead of a comma, and marks a decimal position with a comma instead of a period. For example, the number 3,045,000.76 is represented as 3 045 000,76.
QUOTE separates groups of three significant digits with a single quotation mark instead of a comma, and marks a decimal position with a comma instead of a period. For example, the number 3,045,000.76 is represented as 3’045’000,76.
QUOTEP separates groups of three significant digits with a single quotation mark instead of a comma, and marks a decimal position with period. For example, the number 3,045,000.76 is represented as 3’045’000.76.
How to:
Determine the Punctuation of Large Numbers
Example:
Displaying Numbers Using Continental Decimal Notation
Determining the Punctuation of Large Numbers
394 Information Builders

Euro Currency Support
Example: Displaying Numbers Using Continental Decimal Notation
The following table shows how 1234.56 is displayed depending on the setting of CDN.
Example: Determining the Punctuation of Large Numbers
In the following request, CDN is set to ON which punctuates numbers using a period to separate thousands, and a comma to separate decimals.
SET CDN = ONTABLE FILE EMPLOYEEPRINT LAST_NAME FIRST_NAME CURR_SALEND
The output is:
LAST_NAME FIRST_NAME CURR_SAL--------- ---------- --------STEVENS ALFRED $11.000,00SMITH MARY $13.200,00JONES DIANE $18.480,00SMITH RICHARD $9.500,00BANNING JOHN $29.700,00IRVING JOAN $26.862,00ROMANS ANTHONY $21.120,00MCCOY JOHN $18.480,00BLACKWOOD ROSEMARIE $21.780,00MCKNIGHT ROGER $16.100,00GREENSPAN MARY $9.000,00CROSS BARBARA $27.062,00
CDN Setting Result
OFF 1,234.56
ON 1.234,56
SPACE 1 234,56
QUOTE 1’234,56
QUOTEP 1’234.56
Developing Applications 395

Selecting an Extended Currency Symbol
Selecting an Extended Currency Symbol
You can select a currency symbol for display in report output regardless of the default currency symbol configured for National Language Support (NLS). Use the extended currency symbol format in place of the floating dollar (M) or non-floating dollar (N) display option. When you use the floating dollar (M) or non-floating dollar (N) display option, the currency symbol associated with the default code page is displayed. For example, when you use an American English code page, the dollar sign is displayed. You can also use the SET CURRSYMB command to control the currency symbol that displays when the M or N format options are used.
The extended currency symbol format allows you to display a symbol other than the dollar sign. For example, you can display the symbol for a United States dollar, a British pound, a Japanese yen, or the euro. Extended currency symbol support is available for numeric formats (I, D, F, and P). In Developer Studio, you select these formats in the Formats dialog box.
Use the following character combinations as the final two characters in any numeric display format. The exclamation point (!) and the colon (:) are both acceptable as the first character in the format. However the colon is invariant across code pages, while the exclamation point is not:
Reference:
Extended Currency Symbol Formats
Display Option Description Example
:d or !d Fixed dollar sign. D12.2:d
:D or !D Floating dollar sign. D12.2:D
:e or !e Fixed euro symbol. F9.2:e
:E or !E Floating euro symbol. F9.2:E
:l or !l Fixed British pound sign. D12.1:l
:L or !L Floating British pound sign. D12.1:L
:y or !y Fixed Japanese yen symbol. I9:y
:Y or !Y Floating Japanese yen symbol. I9:Y
396 Information Builders

Euro Currency Support
Reference: Extended Currency Symbol Formats
The following guidelines apply:
❏ A format specification cannot be longer than eight characters.
❏ The extended currency option must be the last option in the format.
❏ The extended currency symbol format cannot include the floating (M) or non-floating (N) display option.
❏ A non-floating currency symbol is displayed only on the first row of a report page. If you use field-based reformatting (as in the example that follows) to display multiple currency symbols in a report column, only the symbol associated with the first row is displayed. In this case, do not use non-floating currency symbols.
❏ Lowercase letters are transmitted as uppercase letters by the terminal I/O procedures. Therefore, the fixed extended currency symbols can only be specified in a procedure.
❏ Extended currency symbol formats can be used with fields in floating point, decimal, packed, and integer formats. Alphanumeric, dynamic, and variable character formats cannot be used.
Developing Applications 397

Selecting an Extended Currency Symbol
398 Information Builders

FOCUS
8
Developing App
Designing Windows With Window Painter
The following topics describe how to create FOCUS menus and windows that work with FOCEXECs.
Topics:
❏ Introduction
❏ Window Files and Windows
❏ Integrating Windows and the FOCEXEC
❏ Tutorial: A Menu-Driven Application
❏ Window Painter Screens
❏ Transferring Window Files
lications 399

Introduction
Introduction
FOCUS Window Painter is a tool that helps you design and create your own menus and screens for attractive and easy-to-use applications.
Many window types and features are available, and you can implement horizontal menus and multi-input windows as part of your FOCUS application. Horizontal menus can also have pulldown menus associated with each menu item.
You can perform a string search in an active window by entering any pattern followed by a blank and pressing Enter. Within the pattern:
❏ An asterisk (*) is a multiple character wildcard.
❏ A question mark (?) is a single character wildcard.
❏ An equal sign (=) repeats the last string.
FOCUS tries to locate the line matching the pattern starting from the line following the current line. The search concludes at the line preceding the current line. If no match is found, a beep sounds and the cursor remains at the current position.
The windows you can design with FOCUS Window Painter look just like the menus and screens you see in the FOCUS Talk Technologies, such as TableTalk and PlotTalk, but you can customize each to fit your application. You can design user-friendly menus and display convenient and eye-catching instructions onscreen.
FOCUS Window Painter itself guides you step by step, using windows like those you created.
On the windows you create, you can prompt users to:
❏ Select menu items from a list.
❏ Enter data.
❏ Select from automatically generated lists of available files and field names.
❏ Register a choice by pressing a function key.
You can also simply display explanations and instructions.
Window Painter is flexible enough to design the many different types of windows you might need for any application written with FOCUS.
In this section:
How Do Window Applications Work?
400 Information Builders

Designing Windows With Window Painter
You can also upload window files from FOCUS running in one operating environment, such as PC/FOCUS, and edit them using Window Painter for use on another operating environment, such as z/OS or CMS.
How Do Window Applications Work?
Window Painter stores the windows you design in window files. Window files work in conjunction with FOCEXEC procedures that use Dialogue Manager.
There are two major parts in any window application, each of which is a step for the developer:
❏ The windows, created with Window Painter, which users see.
❏ The Dialogue Manager FOCEXEC.
You can invoke Window Painter to create and edit windows by typing
WINDOW [PAINT]
at the FOCUS prompt, and pressing Enter.
You can invoke the Window facility in your FOCEXEC by including the Dialogue Manager command -WINDOW in the FOCEXEC. The -WINDOW command provides the name of the window file, and the name of the individual window that should be displayed first. When the -WINDOW command is executed by Dialogue Manager, control in the FOCEXEC passes to the Window facility.
The user is moved through the window file by goto values. A goto value tells the Window facility which window to display next.
You specify goto values when creating the windows with Window Painter. When your window is a menu with several items, you may assign a different goto value for each menu item, so that the next window depends on the user’s selection.
When you create the windows, you also specify return values. As with goto values, you may assign a different return value to each item on a menu. Return values are collected as the user moves through the windows, and are substituted for “amper variables” which can be used later in the window file or in the FOCEXEC when control passes back. (Amper variables are Dialogue Manager variables of the format &variablename.)
When the selected value is inserted in the FOCEXEC, you may test it with a Dialogue Manager IF...THEN command and branch accordingly to a label in the FOCEXEC. In this way, you move the user through a series of windows, collecting return values for amper variables, using only one command in your FOCEXEC.
You can use windows to collect amper variable values in place of any other method of prompting available through Dialogue Manager.
Developing Applications 401

Window Files and Windows
For a complete discussion of the Dialogue Manager facility, see Chapter 3, Managing Flow of Control in an Application. For details of integrating a FOCEXEC with the Window facility using return and goto values, see Integrating Windows and the FOCEXEC on page 420.
Window Files and Windows
Windows—that is, menus and screens—are stored in window files. Windows are included in a specified window file as you create and save them during a Window Painter session.
❏ In CMS, window files have file type FMU, and are created and updated on the A disk automatically by Window Painter.
❏ In z/OS, window files are contained in a partitioned data set (PDS) allocated to ddname FMU. Before any window files can be created, a PDS must be created and ddname FMU must be allocated to it.
Note, however, that creating a PDS is not necessary if you are creating window files to be used only in the current FOCUS session: Window Painter temporarily allocates the PDS. For a full description of allocation requirements, see the appropriate Guide to Operations topic in the FOCUS Overview and Operating Environments manual.
A window file can contain a maximum of 384 windows, and a number of windows may be displayed on the screen at once. All the windows in a single application may be stored together in one window file, or you may create separate window files for different parts of the application such as Help Windows.
You can make an application more attractive by presenting menus in windows containing titles and other design elements, and can make an application easier to use by displaying function key definitions or other useful information.
In this section:
Types of Windows You Can Create
Creating Windows
402 Information Builders

Designing Windows With Window Painter
Types of Windows You Can Create
Window Painter creates 10 different types of windows, each with its own special uses. These windows are described in the following topics.
Vertical Menus
This is a vertical menu:
A menu is a window that lets users select an option from a list. These options are called menu items. A vertical menu lists its menu items one below the other. A user can select an item by moving the cursor down the list with the arrow keys and pressing Enter when the cursor is on the line of the desired item. A user can select more than one item if the window includes the Multi-Select option, which is part of the Window Options Menu. Help information can be specified for each item in the menu by using the menu-item help feature of help windows. For additional information on Multi-Select and Help windows, see Window Options Menu on page 465.
In this section:
Vertical Menus
Horizontal Menus
Text Input WindowsText Display Windows
File Names Windows
Field Names Windows
File Contents Windows
Return Value Display Windows
Execution Windows
Multi-Input Windows
Developing Applications 403

Window Files and Windows
Horizontal Menus
This is a horizontal menu:
A horizontal menu displays its menu items on a line, from left to right. You select an item by using PF11 or the Tab key to move right and PF10 or Shift+Tab to move left across the line, and pressing Enter when the cursor is at the desired item. You can also select an item by employing the search techniques available for FOCUS windows. (Search techniques are not available with pulldown windows).
If you use PF11 at the last item on the menu, the cursor moves to the first item on the menu. If you use PF10 at the first item on the menu, the cursor moves to the last item on the menu, unless there is another screen to scroll to.
An application can display an associated pulldown menu for an item on a horizontal menu when the cursor is on that item. Choose the pulldown option from the Window Options menu as discussed in Creating Windows on page 412. An option to display descriptive text above or below the horizontal menu is also available from the Window Options menu.
You can assign any return value to each item on the menu. When you select a menu item, the corresponding return value is collected.
In a horizontal or vertical menu, you can assign a goto value to each menu item.
Text Input Windows
This is a text input window:
Amper variables can be used in a Windows application. A text input window prompts the user to supply information needed in a FOCEXEC. It is also possible to display an existing value to be edited. Each text input window accepts one line of input up to 76 characters long. You assign the length and format of the field when you create the window. Additional information about creating a text input window is found in Window Creation Menu on page 460.
404 Information Builders

Designing Windows With Window Painter
Text Display Windows
This is a text display window:
A text display window lets you present information such as instructions or messages. No selections can be made from a text display window, and no data can be entered in it.
File Names Windows
This is a file names window:
A file names window presents a list of names of up to 409 files (in CMS) or 1023 PDS members (in z/OS). The user can select one of these names by moving the cursor and pressing Enter when the cursor is on the line of the desired file name. You can specify selection criteria for the displayed file names when the window is created. A user can select more than one file if the window includes the Multi-Select option, which is available on the Window Options Menu.
Developing Applications 405

Window Files and Windows
Note that the maximum number of file (or member) names which can be displayed decreases as the width of the window increases. Narrow windows can display a greater number of names.
Field Names Windows
This is a field names window:
A field names window presents a list of all field names from a Master File; the user can select one by moving the cursor and pressing Enter when the cursor is on the line of the desired field name. A user can select more than one field if the window includes the Multi-Select option, which is available on the Window Options Menu.
You can use a field names window as the next step after a file names window. That way, you can present a selection of files first, followed by the fields in a selected file.
The field names are qualified when duplicates exist. You can use PF10 and PF11 to scroll left and right if a field name exceeds the maximum number of characters allowed on a line in a data field window.
Use PF6 as a three-way toggle to sort the fields in one of the following ways:
1. Display field names in the order in which they appear in the Master File.
2. Display field names in alphabetical order.
3. Display the fully qualified field names in the order in which they appear in the Master File.
406 Information Builders

Designing Windows With Window Painter
File Contents Windows
This is a file contents window:
The file contents window displays the contents of a file. There is no limit on the size of a file contents window. The user can select a line of contents by moving the cursor to it and pressing Enter. Each line can be up to 77 characters long. A user can select more than one line if the window includes the Multi-Select option, which is described as part of the Window Options Menu in Window Options Menu on page 465.
❏ In CMS, the contents of any file (except as noted below) can be displayed. You are prompted for the file name and file type.
❏ In z/OS, the contents of any member of a PDS (except as noted below) can be displayed. Sequential files can also be displayed in TSO. You are prompted for a file name (the ddname) and a file type (the member name). This information should be entered as “member name ddname”.
Note: You cannot display a file with unprintable characters in a file contents window. This includes files such as FOCUS files, HOLD files, SAVB files, FOCCOMP files, and encrypted files.
Return Value Display Windows
This is a return value display window:
Developing Applications 407

Window Files and Windows
The return value display window displays amper variables that have been collected from other windows. No selections can be made from a return value display window, and no data can be entered into it.
Return value display windows are very useful for constructing a command (or any string of words or terms) by working through a series of windows. An example of this type of application is seen when you construct a TABLE request using TableTalk.
Each line of the return value display window is stored in a variable called &windownamexx, where windowname is the name of the window and xx is a line number.
Unless you use the Line-break option to place return values on separate lines, all collected return values are placed on the same line until the end of the line is reached. The length of the line is determined by the size of the window created. A description of the Line-break option on the Window Options Menu can be found in Window Options Menu on page 465.
Only one return value display window may be displayed at a time on the screen. It collects a value from any active window (that is, a window from which a selection is being made or to which text is being entered, or an active text display window) if it is on that window’s display list. A description of the Display lists option on the Window Options Menu can be found in Window Options Menu on page 465.
You can clear the collected values from a return value display window by including it on the hide list of a window that is being used. A description of the Hide lists option on the Window Options Menu can be found in Window Options Menu on page 465.
For a Multi-Select window, the return value display window gives the number of selections, not the values selected. The values can be retrieved by using the -WINDOW command with the GETHOLD option.
408 Information Builders

Designing Windows With Window Painter
Execution Windows
This is an execution window:
The execution window contains FOCUS commands such as Dialogue Manager commands, and TABLE requests.
You can create an execution window by choosing its option on the Window Creation menu.
When this window is first displayed, it has a width of 77 characters, and no heading. You can place FOCUS commands within it. Note that the commands in an execution window appear just as you type them; commands are not automatically converted to uppercase.
The Window Painter Main Menu contains an option that enables you to run a window in order to see any return values collected. If you were to run (not execute) the execution window from the Window Painter Main Menu, you would see the execution window contents, then any windows called, and finally any return values collected by running the windows.
Developing Applications 409

Window Files and Windows
Note the following rules when using execution windows:
❏ When you GOTO an execution window, the contents of the window are executed. In all cases, execution begins at the top of the window.
❏ An execution window is not displayed when executed, although the commands it contains may generate a display.
❏ An execution window can use an amper variable as a goto value.
❏ An execution window clears the screen and the Return Value display window.
❏ Execution windows have no return values.
❏ Execution windows can contain up to 22 lines.
❏ Execution windows can use local variables.
❏ Goto values for execution windows should be assigned at line 1.
❏ Windows called from within execution windows preempt window goto values. For example, a -WINDOW command issued from within an execution window preempts an assigned goto value.
❏ The FOCUS commands within an execution window follow normal Dialogue Manager execution (that is, FOCUS commands are stacked, Dialogue Manager commands are executed immediately). Any windows called from the execution window follow the logic determined by the windows themselves. This substantially affects the application’s transfer of control.
❏ Use -RUN for immediate execution; otherwise requests are performed after leaving the window application.
Normally, FOCUS returns to the window designated by the assigned goto value after the contents of the execution window have been executed. However, when a jump is made to a window from inside an execution window, the commands in the execution window following the jump are skipped (along with any attached gotos). This differs from initiating a window from inside Dialogue Manager, which when finished returns you to the command following the GOTO.
410 Information Builders

Designing Windows With Window Painter
Multi-Input Windows
This is a multi-input window:
A multi-input window prompts you for information used in the application. A multi-input window may include up to 50 input fields, each of which can be up to 76 characters long. You assign the length, name, and format of the field when you create the window.
Use the Tab key to move the cursor between the fields on a multi-input window.
You can supply help information for each field in a multi-input window by using the Help window option. For information on Help windows, see Window Options Menu on page 465.
For a multi-input window, the return value is the name of the input field occupied by the cursor when you pressed Enter or a function key. The name that you supply for each input field is assigned to an amper variable with the same name as the field (each input field has a unique name). The variable &WINDOWVALUE contains the value of the input field occupied by the cursor when you pressed Enter or a function key.
Use a unique name for each field on a multi-input window. To display the field names specified, use the Input Fields option on the Window Options menu.
Developing Applications 411

Window Files and Windows
Creating Windows
The process of creating windows begins with choosing the type of window you want to create from the Window Creation menu. Each type of window requires slightly different instructions. The tutorial in Tutorial: A Menu-Driven Application on page 430 describes how to create and implement text display window, vertical menu, and file names windows. This topic describes how to create horizontal menus (with or without associated pulldown menus) and multi-input windows.
Creating a Horizontal Menu
To create a horizontal menu, begin by placing the cursor at the Menu (horizontal) option on the Window Creation menu:
You are prompted to enter a name and brief description for the window, after which you reach the creation screen. On this screen:
1. Move the cursor to the location in which you want the top left corner of the menu to be displayed. Press Enter.
In this section:
Creating a Horizontal Menu
Pulldown Menus
Creating a Multi-Input Window
412 Information Builders

Designing Windows With Window Painter
2. Next, use the arrow keys to move the cursor down (enough spaces to leave a line for each item you want to display as a menu choice) and to the right (enough spaces to just fit the longest menu item). Press PF4. You see two windows: one is for entering information and the other is the corresponding horizontal menu.
3. Enter the menu items in the window containing the cursor. Press Enter after each item; the item automatically appears on the horizontal menu.
The following is an example of a completed creation screen:
Developing Applications 413

Window Files and Windows
Once you have entered the items on your menu, there are several options you can select for each item. Move the cursor to any item and press PF2 to display the Window Options menu:
Position the cursor on any option you want to select and press Enter.
Two features available for horizontal menus are Menu text and Text line. Menu text is a line of text displayed when the cursor is on a menu item. The line on which the text is displayed is called the text line. You can position the text line one or two lines either above or below the horizontal menu.
414 Information Builders

Designing Windows With Window Painter
The following example illustrates Menu text and Text line. When the cursor is positioned on Vertical in the example below, the following is displayed:
In this example, the Menu text VERTICAL MENU TESTS is positioned at Text line x-1, one line above the menu. To place the Text line two lines above the Menu text, change x-1 to x-2. For Text lines below the menu text, use x+1 or x+2.
You can also select the Pulldown option for a horizontal menu. With this option, you can assign a pulldown menu to be displayed for a horizontal menu item whenever the cursor is positioned on that item.
Pulldown Menus
When you set the Pulldown option ON, you can display an associated pulldown menu for an item in a horizontal menu by positioning the cursor on that item. The default is OFF. To change the setting to ON, position the cursor on the Pulldown option and press Enter. Note that when Pulldown is set ON, Menu Text is automatically set OFF.
The associated pulldown menu must be a vertical menu. When creating the horizontal menu, you must assign a Goto value to point to the pulldown menu. To do so, position the cursor on the goto value, press Enter, and enter the name of the pulldown menu you want to display in the space provided:
You must create the vertical menu, rpts, as you would any other vertical menu. See Tutorial: A Menu-Driven Application on page 430 for examples.
Developing Applications 415

Window Files and Windows
The following example shows a horizontal menu with the Reporting pulldown menu displayed:
The following screen shows the same menu with the Ad hoc pulldown menu displayed:
The following screen shows the same menu with the Maintenance pulldown menu displayed:
Note: To move from item to item in a horizontal menu, use PF10 and PF11.
416 Information Builders

Designing Windows With Window Painter
Creating a Multi-Input Window
To create a multi-input window, begin by placing the cursor at the Multi-Input window option on the Window Creation menu and press Enter. You are then prompted for a name, description and heading. Place the window on the screen and size it as desired.
To place entries on the window:
1. Type the text for display.
2. Press PF6 at the point where the field begins.
3. Space along for the length of the field.
4. Press PF6 again to signify the end of the input area.
5. Enter name and information for the field.
Developing Applications 417

Window Files and Windows
The following example shows a multi-input window, with Name: entered as display text.
This is what the developer’s screen looks like after several fields have been included in the multi-input window:
Note: Text fields may be supplied without headings or instructions. For example, see the city and state portion of the address line.
418 Information Builders

Designing Windows With Window Painter
This is how the window appears when run as part of the application:
The following screen shows what is returned from the window when it is run inside the Window Painter:
Note: To move from field to field in a multi-input window, use the Tab key.
Developing Applications 419

Integrating Windows and the FOCEXEC
Integrating Windows and the FOCEXEC
The windows created with Window Painter are designed for use within an application FOCEXEC. This topic discusses how to integrate the windows into your FOCEXEC.
Syntax: How to Invoke the Window Facility
To invoke the Window facility, insert the following Dialogue Manager command in your FOCEXEC
-WINDOW windowfile windowname [PFKEY|NOPFKEY] [GETHOLD] [BLANK|NOBLANK] [CLEAR|NOCLEAR]
where:
windowfile
Identifies the file in which the windows are stored. In CMS, this is a file name. The file must have a file type of FMU or TRF. In z/OS, this is a member name. The member must belong to a PDS allocated to ddname FMU.
windowname
Identifies which window in the file to display first. Can be set in Window Painter or in first window displayed. This is optional.
PFKEY
Enables testing for function key values during window execution.
NOPFKEY
Prevents testing for function key values during window execution.
In this section:
Transferring Control in Window Applications
Return Values
Goto Values
Window System Variables
Testing Function Key Values
Executing a Window From the FOCUS Prompt
How to:
Invoke the Window Facility
420 Information Builders

Designing Windows With Window Painter
GETHOLD
Retrieves stored amper variables collected from a Multi-Select window. Does not cause window to be displayed.
BLANK
Clears all previously set amper variable values when the -WINDOW command is encountered. This is the default setting.
NOBLANK
No amper variable values are cleared when the -WINDOW command is encountered.
CLEAR
When FOCUS is being used with the Terminal Operator Environment (described in the Overview and Operating Environments manual), the -WINDOW command clears the screen before displaying the first window. The Terminal Operator Environment screen is redisplayed when control is transferred from the Window facility back to the FOCEXEC. This is the default setting.
NOCLEAR
When FOCUS is being used with the Terminal Operator Environment, the window file’s windows are displayed directly over the Terminal Operator Environment screens.
Note: NOBLANK is particularly important in applications that use more than one -WINDOW command.
Transferring Control in Window Applications
When the -WINDOW command is encountered, control in the FOCEXEC is transferred to the Window facility. Control remains with the Window facility until one of the following occurs:
❏ The user makes a selection for which you have assigned no goto value.
❏ The PFKEY option is in effect and the user presses a function key (the function key must be set to RETURN, HX, CANCEL, or END, as described in the Testing Function Key Values on page 427.)
Once control passes back to the FOCEXEC, control only returns to the Window facility if another WINDOW command is encountered.
Example:
Window File in an Application FOCEXEC
Developing Applications 421

Integrating Windows and the FOCEXEC
Example: Window File in an Application FOCEXEC
This example shows an application FOCEXEC and a window file named REPORT which contains three windows: R1, R2, and R3.
The numbers at the left of the example refer to the flow of execution (that is, the order in which the commands and windows are executed).
1. -START2. -WINDOW REPORT R1 PFKEY -*3. -*Control is transferred from the above command -*to window R1 in window file REPORT. -*4. -IF &PFKEY EQ PF05 GOTO LABEL1; -* -*Control returns to the above command from -*window R2 in window file REPORT. . . -LABEL15. -WINDOW REPORT R3 -*6. -*Control is transferred from the above command -*to window R3 in window file REPORT. -*7. -IF &R3 EQ EXIT GOTO EXIT; -* -*Control returns to the above command from -*WINDOW R3 in window file REPORT. . . -EXIT
Note:
❏ At Step 3, the user selects an option from Window R1. This option’s goto value is R2. Control is transferred to Window R2.
❏ The user presses a function key in Window R2. Control is transferred to the FOCEXEC, to the command following the -WINDOW command (Step 4).
❏ At Step 6, the user selects the option to exit; no goto value was set for that option. Control is transferred to the FOCEXEC, to the command following the -WINDOW command (Step 7).
422 Information Builders

Designing Windows With Window Painter
The flow of control has certain implications for the design of your window applications:
❏ Any time you pass control back to the FOCEXEC, the window or menu option must have no goto value, or else must prompt the user to press a function key (as described in Testing Function Key Values on page 427).
❏ At some point in the window session, control should return to the FOCEXEC so that the accumulated return values can be substituted for amper variables, and the variables then used in the FOCEXEC.
❏ Any time you pass control from the FOCEXEC to the Window facility you must insert the -WINDOW command in the FOCEXEC.
❏ Note that it is not necessary to create a new window file for each -WINDOW command; you can simply enter the same file again at any window.
❏ To test for a function key value in the middle of a series of windows, remember that pressing the function key automatically returns control to the FOCEXEC; an -IF test command should follow the -WINDOW command, and a second -WINDOW command should be placed after the -IF command to transfer control back to the window file.
❏ If you want to clear an existing set of variable values, return control to the FOCEXEC and execute another -WINDOW command with the BLANK option in effect.
To back up a step during window execution, the user may press PF12 or PF24. This does not cause control to pass to the FOCEXEC. However, you can force Dialogue Manager to return control to a FOCEXEC by a PF key setting as described in Testing Function Key Values on page 427.
Developing Applications 423

Integrating Windows and the FOCEXEC
Return Values
When the user responds to your window prompt by entering text, selecting an item from a menu, or pressing a function key, this response is the return value that fills in an amper variable in your FOCEXEC.
There are two ways in which amper variables are most commonly used in FOCEXECs:
❏ To collect values to plug into a FOCUS procedure such as a TABLE or GRAPH request so it can run.
❏ To test the value returned in a variable, and branch accordingly to a different part of the FOCEXEC or to another FOCEXEC.
The return value collected can be a character string, a number, the name of a file, a procedure name, or part of a FOCUS command.
A return value amper variable in the FOCEXEC has the same name as the window in which it is collected; that is:
&windowname
For example, the return value collected by the window MAIN supplies a value for the variable &MAIN.
❏ In vertical menu and horizontal menu windows, you assign any return value to each item on the menu. If the user selects that option, that return value is collected.
❏ In text input windows, the return value is the text that the user types.
❏ In text display windows, you can assign one return value to the entire window. Unlike other return values, a text display window return value is collected as soon as control passes to the window, without the user selecting anything.
❏ Return value display windows display return values collected from other types of windows. These return values can be displayed one per line, or several together on a single line. Although this type of window does not have a return value, each line has a corresponding amper variable (&windownamexx, where xx is the line number).
❏ For a multi-input window, the return value is the name of the input field on which the cursor is positioned when you press Enter or a PF key.
❏ In windows with the Multi-Select option, the return value is the number of items selected.
❏ In file names, field names, and file contents windows, the return value is, respectively, the file name, field name, or line of file contents that the user selects from the display.
Example:
Return Value in a Menu-Driven Application
424 Information Builders

Designing Windows With Window Painter
Example: Return Value in a Menu-Driven Application
Assume that you have written a menu-driven application that enables a user to report from any one of a list of files. You have created a series of windows for this application, one of which is a file names window named FILE designed to collect a return value for &FILE. The window displays a list of all the user’s files that meet certain file-identification criteria specified when you created the window.
Your FOCEXEC contains these lines:
-START-WINDOW EXAMPLE FILE...TABLE FILE &FILE
When the user moves the cursor to SALES and presses ENTER, SALES is collected to be substituted for &FILE in the FOCEXEC:
TABLE FILE SALES
Goto Values
When creating your windows, you also assign goto values telling the Window facility which window to display next. These values allow you to move the user through a series of windows, collecting return values for amper variables, without adding lines to your FOCEXEC.
❏ In vertical menu and horizontal menu windows, you assign a goto value for each menu item.
❏ In all other windows, you assign a single goto value.
❏ You can use an amper variable as a GOTO value.
As described in Transferring Control in Window Applications on page 421, if you assign no goto value to a menu option or window, control passes back to the FOCEXEC when the user selects that option or presses Enter at that window.
It is important not to confuse these goto values with the Dialogue Manager -GOTO command. The goto value points your application to a new window in the window file; the -GOTO command transfers control to a label in your FOCEXEC.
In this section:
Returning From a Window to Its Caller
Developing Applications 425

Integrating Windows and the FOCEXEC
Returning From a Window to Its Caller
You can return from a window to its caller via the <ESCAPE> option. If you enter this string as the goto value of a window, control returns to the previous window upon completion of the current window, you must enter the right and left carets as part of the goto value.
Window System Variables
We have already discussed return values: these are specific to each window. Two other Window facility variables, &WINDOWNAME and &WINDOWVALUE, are specific to the -WINDOW session (not to each window) and receive values when the Window facility passes control from a window file back to the FOCEXEC.
&WINDOWNAME
&WINDOWNAME is an amper variable containing the name of the last window that was displayed before the Window facility transferred control back to the FOCEXEC.
This variable can be used in many ways. For example, if the goto values/function key prompts in a window file allow a user to leave the window file from several different windows, you can test &WINDOWNAME in the FOCEXEC to determine which window the user was in last (and, therefore, which path the user navigated through the window file).
&WINDOWVALUE
&WINDOWVALUE is an amper variable containing the return value from the last window that was displayed before the Window facility transferred control back to the FOCEXEC. If the user selected a line for which no return value was set (for example, a blank line between two menu options in a vertical menu window), then &WINDOWVALUE contains the line number of the line that was selected.
This variable can be used in many ways. For example, if the goto values/function key prompts allow a user to leave the window file from several different windows, and you need to know the return value of the last window the user was in before she or he left the file by pressing a function key, you can test &WINDOWVALUE.
In this section:
&WINDOWNAME
&WINDOWVALUE
426 Information Builders

Designing Windows With Window Painter
Testing Function Key Values
To test for function key values, you must specify the PFKEY option on the -WINDOW command line. When the PFKEY option is set and a user presses a function key during window execution, the name of that key is stored in the amper variable &PFKEY.
For example, if the user presses PF1, the 4-character value of &PFKEY is PF01. If PF2, the value is PF02, and so forth. If the user presses Enter, the value is ENTR. The value of &PFKEY is reset each time the user presses a function key.
Note that if the PFKEY option is specified, the Window facility’s default PF key actions are overridden by the general FOCUS PF key settings. This means that when you specify the PFKEY option, if you still want the standard Window facility PF key actions to be available to window users (for example, PF1 = HELP, PF3 = UNDO), you must use the SET command in your application FOCEXEC, followed by a -RUN command, to explicitly set those actions.
For example, if you specify the PFKEY option but you want to retain all of the Window facility’s default PF key actions using the same PF keys, you need to include the following commands before the -WINDOW command in your application FOCEXEC:
SET PF01=HELPSET PF03=UNDOSET PF04=TOPSET PF05=BOTTOMSET PF06=SORTSET PF07=BACKWARDSET PF08=FORWARDSET PF09=SELECTSET PF10=LEFTSET PF11=RIGHTSET PF12=UNDO-RUN
When you specify the PFKEY option, any PF key which you want to test for in the application FOCEXEC must be set to RETURN. (HX, CANCEL, and END also function as RETURN within the Window facility, and can be used in place of it.)
For example, if you design your application so that a user can press PF2 to choose an additional menu option, and therefore you want to test &PFKEY for the value PF02 in your application FOCEXEC, then you must include the following SET command before the -WINDOW command in your application FOCEXEC:
SET PF02=RETURN
The SET PF command is discussed in Chapter 1, Customizing Your Environment, and in the Maintaining Databases manual.
You can list the current general FOCUS PF key settings by issuing the ? PFKEY command. The ? PFKEY command is discussed in Chapter 2, Querying Your Environment.
Developing Applications 427

Integrating Windows and the FOCEXEC
The variable &PFKEY can be tested just like any other amper variable. Note that the name of the variable is always &PFKEY; it is not linked to a window name like other amper variables collected through windows.
You may test the PFKEY variable repeatedly throughout the FOCEXEC. Additional SET commands are not required.
One of the advantages of using the &PFKEY variable is that it enables you to collect two return values from a single menu. You might, for example, create a window called FILES, which prompts the user to enter the name of a file, then press PF7 to produce a graph or PF8 to produce a report. Both the file name as &FILES and the function key value as &PFKEY would be collected as return values.
It is always important to remember that pressing a function key immediately returns control to the FOCEXEC if that key was set to RETURN (or to HX, CANCEL, or END).
Note: If the cursor is on a menu that has a FOCEXEC associated with it, the FOCEXEC is executed and the GOTO value associated with the menu choice is assumed. The PFKEY is ignored.
In the example above, if the user presses a function key before typing the file name, the &FILES variable is not collected. If the key was set to something other than RETURN, HX, CANCEL, or END, then the action it was set to is invoked, and control remains within the Window facility.
428 Information Builders

Designing Windows With Window Painter
Executing a Window From the FOCUS Prompt
You can execute a window directly from the FOCUS command prompt.
Syntax: How to Execute a Window From the FOCUS Prompt
EX 'windowfile FMU' [windowname] [PFKEY|NOPFKEY] [BLANK|NOBLANK] [CLEAR|NOCLEAR]
where:
windowfile
Is the file containing the windows. It must have file type FMU, and appear within single quotation marks.
windowname
Identifies the first window to be executed. If a window name is not specified, FOCUS executes the default start window, or the first window created.
PFKEY
Tells FOCUS you will test for function key values during execution.
NOPFKEY
Tells FOCUS you will not test for function key values during execution.
BLANK
Clears previously set amper variables when the window is called. This is the default setting.
NOBLANK
Retains previously set amper variables.
CLEAR
When FOCUS is being used with the Terminal Operator Environment, the screen is cleared when the EX command is encountered. The Terminal Operator Environment screen is restored when the last window in the chain has been executed. This is the default setting.
NOCLEAR
When FOCUS is being used with the Terminal Operator Environment, the screen is not cleared when the EX command is encountered, and any windows are displayed within the Terminal Operator Environment screens.
How to:
Execute a Window From the FOCUS Prompt
Developing Applications 429

Tutorial: A Menu-Driven Application
For example, to execute the window MAIN in the window file REPORT, you could issue EX ‘REPORT FMU’ MAIN from the FOCUS command prompt, which is equivalent to issuing -WINDOW REPORT MAIN from Dialogue Manager.
Tutorial: A Menu-Driven Application
This tutorial describes a menu-driven system that clerical personnel can use to produce sales reports and graphs at your chain of retail stores. The system must fulfill three major requirements:
❏ Ease of use. Your system must let employees be productive without extensive training.
❏ Functionality. The system has to work properly with only a few steps.
❏ Appearance. There should be continuity between screens, and a general unity of design. The reports and graphs produced must be attractive and easy to read.
The application prompts the user to select reporting or creating a graph.
Then, the user may opt to execute an existing FOCUS request or to create a new one. A user who chooses to execute an existing request is shown an automatically generated list of FOCEXECs from which to pick. A user who chooses to create a new request is placed in either TableTalk or PlotTalk, depending on whether reporting or creating a graph was chosen in the first step.
While the report or graph is being generated, a corresponding message is displayed on the terminal screen. And, after the output is displayed, the user can choose to generate another report or graph, or else to exit.
In this section:
Creating the Application FOCEXEC
Creating the Window File
Executing the Application
430 Information Builders

Designing Windows With Window Painter
The following figure illustrates the logic of the application FOCEXEC.
-START-WINDOW SAMPLE MAIN-*-*Control is transferred from the above command-*to window MAIN in window file SAMPLE.-*-IF &MAIN ...-*-*Control returns to the above command-*from option "Exit?" in window MAIN,-*from option "New Request?" in window EXECTYPE,-*and from every selection in window EXECNAME.-*...-GOTO START-EXIT
Creating the Application FOCEXEC
A FOCEXEC called SAMPLE drives this application.
Begin by using the TED editor to create the FOCEXEC file SAMPLE. At the FOCUS prompt, type
TED SAMPLE
and press Enter. (In CMS, TED assigns the file type FOCEXEC unless you specify another file type. In z/OS, you must specify ddname as follows:
FOCEXEC (SAMPLE)
Window If option selected is... Then go to:
MAIN Report? Graph?Exit?
window EXECTYPEwindow EXECTYPEback to FOCEXEC
EXECTYPE Existing Request?New Request?
window EXECNAMEback to FOCEXEC
EXECNAME The options in this window are a list of report and graph requests from which the user can select.
Control is transferred back to the FOCEXEC.
Developing Applications 431

Tutorial: A Menu-Driven Application
Type in the following FOCEXEC. Note that the numbers on the left refer to explanatory notes. Do not type them in your FOCEXEC file, but read the notes as you go along. All commands that begin with a hyphen, such as -WINDOW, are Dialogue Manager commands, and must begin in the first column. Dialogue Manager is discussed in Chapter 3, Managing Flow of Control in an Application.
Notice that this application determines variable values in two ways: there are variables for which values are collected by windows, and variables which are set within the FOCEXEC using the -SET command.
-START1. -WINDOW SAMPLE MAIN2. -IF &MAIN EQ XXIT GOTO EXIT; -IF &MAIN EQ RPT GOTO GENERATE; -IF &MAIN EQ GRPH GOTO GENERATE; -GOTO START -***************** GENERATE ********************3. -GENERATE4. -IF &EXECTYPE EQ EXIST GOTO RPTEX ELSE GOTO NEWRPT;5. -RPTEX6. EX &EXECNAME7. -SET &FORMAT=IF &MAIN EQ RPT THEN REPORT -ELSE IF &MAIN EQ GRPH THEN GRAPH;8. -TYPE GENERATING &FORMAT9. -RUN10. -GOTO START11. -NEWRPT12. -SET &PROCNAME=IF &MAIN EQ RPT THEN TABLETALK -ELSE IF &MAIN EQ GRPH THEN PLOTTALK;13. &PROCNAME14. -RUN15. -GOTO START -********************** EXIT **********************16. -EXIT
1. The -WINDOW command transfers control to the Window facility. SAMPLE is the name of the window file this application uses and we will create it in this tutorial. MAIN is the window where the procedure begins.
Control does not return to the next line of the FOCEXEC until a window is processed for which no goto value has been assigned, in this case, EXECTYPE or EXECNAME.
2. The return value collected for &MAIN—collected from the window MAIN—is tested. The FOCEXEC branches to a label depending on its value.
If the return value for &MAIN is RPT or GRPH, the FOCEXEC branches to -GENERATE; if XXIT, to -EXIT. Each return value corresponds to a selection on the menu window MAIN.
432 Information Builders

Designing Windows With Window Painter
3. This label begins the GENERATE section of the FOCEXEC.
4. The value collected for &EXECTYPE (from window EXECTYPE) is tested and the FOCEXEC branches accordingly. Note that this value was collected from the window EXECTYPE while the Window facility was in control, without a prompt from Dialogue Manager.
5. This label begins the RPTEX section of the FOCEXEC.
6. The FOCUS command that executes an existing report is stacked. The value of &EXECNAME—the name of the existing report—was collected while the window file was in control. The single quotation marks around &EXECNAME tell FOCUS to treat the value—which may contain more than one word (in CMS, for example, a file name and a file type)—as part of a single file identification.
7. The value of the variable &FORMAT is set according to the return value from the MAIN window. If the value was RPT, &FORMAT is set to REPORT; if the value is GRPH, &FORMAT is set to GRAPH.
8. A message containing the value of &FORMAT is displayed for the user while the stacked FOCUS request is executing.
9. -RUN executes the stacked command(s).
10. When the request output has been displayed, the FOCEXEC branches back to -START, where the user can choose to exit or to create another report or graph. All amper variable values collected in the previous round are cleared when the -WINDOW command is encountered.
11. This label begins the section NEWRPT.
12. This command sets the value of &PROCNAME to TABLETALK if the value of &MAIN is RPT, to PLOTTALK if the value is GRPH.
13. This line stacks the command TABLETALK or PLOTTALK.
14. -RUN executes the stacked command.
15. This command returns to -START, as in note 10.
16. This command ends FOCEXEC execution.
Developing Applications 433

Tutorial: A Menu-Driven Application
Creating the Window File
The -WINDOW command SAMPLE FOCEXEC tells FOCUS to look for a window file named SAMPLE and a window named MAIN. The complete list of windows used in this application is:
All these windows are included in the window file named SAMPLE. Start by building that window file.
❏ In CMS, when using Window Painter to create a window file, the file is automatically created by the system on your A disk.
❏ In z/OS, before you can use Window Painter to create a window file, a PDS must be allocated with ddname FMU, LRECL 4096, and RECFM F. BLKSIZE 4096 is recommended.
You can reach the FOCUS Window Painter Entry Menu by typing
WINDOW [PAINT]
at the FOCUS prompt, and pressing Enter.
In this section:
Creating the Text Display Window Named BORDER
Creating the Text Display Window Named BANNER
Creating the Vertical Menu Window Named MAIN
Creating the Vertical Menu Window Named EXECTYPE
Creating the File Names Window Named EXECNAME
BORDER A text display window used as a background display for the other windows.
BANNER A text display window that introduces the application.
MAIN A vertical menu from which the user can choose to create a graph or a report, or exit the application.
EXECTYPE A vertical menu from which the user chooses to execute an existing procedure or create a new one.
EXECNAME A file names window displaying all FOCEXEC files, from which the user can select one to execute. This window is seen only if the user opts to execute an existing report in EXECTYPE.
434 Information Builders

Designing Windows With Window Painter
The Entry Menu is the first screen you see:
Since you are creating a new window file, choose NEW FILE, and press Enter. The next screen you see prompts you to name the window file.
Since the FOCEXEC looks for a window file named SAMPLE, type
SAMPLE
and press Enter.
Developing Applications 435

Tutorial: A Menu-Driven Application
A screen appears asking for a description of the window file.
Type
Sample file for Window Painter tutorial
and press Enter.
436 Information Builders

Designing Windows With Window Painter
Creating the Text Display Window Named BORDER
Now you are ready to create the first window. The Window Painter Main Menu screen appears. Select
Create a new window
and press Enter.
Developing Applications 437

Tutorial: A Menu-Driven Application
The Window Creation Menu asks what kind of window you want to create.
The BORDER window is the first window you create for the application. BORDER supplies a background border for other windows. It is a text display window, so select
Text display
and press Enter.
438 Information Builders

Designing Windows With Window Painter
Next, you are asked to name the window. Type
BORDER
and press Enter.
The Window Description Screen appears next. This description does not appear when the window is displayed, but becomes part of the document file that Window Painter creates describing all windows in the file. Since the document file is very useful when writing your FOCEXEC, it is a good idea to enter a functional description here. To describe this window, type
This window borders all my screens.
and press Enter. The ability to annotate screens in this manner is very useful when selecting windows to edit.
Developing Applications 439
Tutorial: A Menu-Driven Application
The Window Heading Screen comes next. Since you do not want a heading displayed on this window, simply press Enter to bypass it.
The Window Design Screen displayed now is nearly blank, with a cursor for you to position where you want the upper left-hand corner of BORDER to be. Leave the cursor where it is and press Enter.
A small box appears around the cursor: this is the window. Make the window larger. Using the arrow keys, move the cursor to the right edge of the screen, on the line just above the status line: this is the new lower right corner of the window. Now press PF4 to resize the window. (PF4 functions as the SIZE key in the Window Design Screen.) The window has been resized so that its lower right corner is where you positioned the cursor: the window now fills the entire screen.
When resizing a window, remember that the window’s lower right corner refers to the lower right corner of the window border, which is shown as a plus sign (+) on the screen. It is this corner that you are moving when you resize the window. On the other hand, the last row of the window refers to the last row that can contain data or text: this is the row immediately above the bottom border.
This window’s border forms the background border for the other windows in this application.
440 Information Builders

Designing Windows With Window Painter
If you need help using the keyboard while in the Window Design Screen, press PF1 (the Window Painter Help key) to see the following display:
Developing Applications 441

Tutorial: A Menu-Driven Application
Press Enter to continue.
Now that the window is complete. Press PF3 and save the window.
Press Enter to select Save. You return to the Main Menu.
Creating the Text Display Window Named BANNER
BANNER is also a text display window, but is smaller than BORDER and contains text that identifies this application.
From the Window Painter Main Menu, select
Create a new window
and press Enter. Select
Text Display
and press Enter. The name of this window is
BANNER
and its description is:
Banner for application MAIN menu.
Enter this name and description just as you did for the BORDER window. When prompted for a heading, press Enter.
442 Information Builders

Designing Windows With Window Painter
At the Window Design Screen, use the arrow keys to move the cursor two spaces to the right, and press Enter. Now position the cursor 64 more spaces to the right and two rows down, and press PF4 to resize the window.
Enter text to be displayed in the window. Reposition the cursor on the first line within the window, 10 spaces to the right of the window’s left border, and type:
The Milkmore Farms Weekly Reporting System
Type a line of asterisks (*) across the window’s second line. (Begin at the second column within the window, because the first column of every window is protected.)
Center the banner in the width of the screen. Estimate where the upper left corner of the window would be if the window were centered. Position the cursor there, and then press PF9. The window moves to its new location. Repeat the process if you need to center it more precisely.
The window should look like this:
Press PF3 and save the window.
Developing Applications 443
Tutorial: A Menu-Driven Application
Creating the Vertical Menu Window Named MAIN
You will now create the MAIN vertical menu window, which collects the amper variable &MAIN. Select
Create a new window
and press Enter.
BORDER and BANNER are text display windows, from which no options may be selected. Since MAIN, however, is a menu from which a selection must be made, choose
Menu (vertical)
and press Enter. Name the window:
MAIN
On the Description screen, type
User can report, graph, or exit.
and press Enter.
When prompted for a heading, type 10 spaces, then
Would you like to:
and press Enter.
On the Window Design Screen, move the cursor five rows from the top and 20 columns from the left, and press Enter. The window is created wide enough to contain the heading. Now position the cursor six rows below the window’s bottom edge, and 10 columns to the right of its right edge. Press PF4 and the window is resized.
444 Information Builders

Designing Windows With Window Painter
Type the following menu options as they appear below:
You assign goto and return values for each menu option. To assign either value to an option, the cursor must first be on that option.
Developing Applications 445

Tutorial: A Menu-Driven Application
Move your cursor back to
Create a report?
and press PF2 to display the pop-up Window Options Menu.
Assigning a goto value tells the Window facility to display another window when this item is selected during execution.
In the next window of this application, the user is prompted to either execute an existing report or create a new one. The window that displays the prompt is called EXECTYPE, so the goto value of the first two menu options is EXECTYPE.
Move the cursor to
Goto value
and press Enter.
446 Information Builders

Designing Windows With Window Painter
In the space provided, type
EXECTYPE
and press Enter.
The return value collected by this window—&MAIN—is tested in the FOCEXEC:
-START-WINDOW SAMPLE MAIN-IF &MAIN EQ XXIT GOTOEXIT;-IF &MAIN EQ RPT GOTO GENERATE;-IF &MAIN EQ GRPH GOTO GENERATE;...
Now move the cursor to
Return value
and press Enter.
Developing Applications 447

Tutorial: A Menu-Driven Application
Type the value
RPT
as shown, and press Enter.
Exit the Window Options Menu by moving the cursor to
Exit this menu
and pressing Enter.
Set the values for:
Create a graph?
Move the cursor to the second menu item, and press PF2.
Repeat the steps you just performed, assigning the goto value
EXECTYPE
and the return value:
GRPH
Leave the Window Options menu and move the cursor to
EXIT?
For this option, you do not assign a goto value. Since it exits to the FOCEXEC, there is no other window to be displayed.
448 Information Builders

Designing Windows With Window Painter
Repeat the steps to assign the return value:
XXIT
With the Window Options Menu still on the screen, move the cursor to
Display list
and press Enter.
The display list may specify up to 16 windows to be displayed when this window is visible during execution. Since you want BORDER and BANNER to be displayed with MAIN, you must add each to the list.
Select:
Add to the list
A list of windows appears, from which you select by moving the cursor and pressing Enter. The windows must be selected in the order in which they should appear, because they are overlaid one on top of another when displayed. Select BORDER and BANNER for MAIN’s display list, being certain to select BORDER first so that it is displayed behind BANNER.
Developing Applications 449

Tutorial: A Menu-Driven Application
When you have finished, choose Quit to return to the Window Options Menu.
Quit the Window Options Menu and press PF3 to save MAIN.
Before moving on, look at what you have done so far. Select
Run the window file
and press Enter.
Select
MAIN
as the starting screen. Press Enter, and the following appears:
Position the cursor on the “Create a report” line. When you press Enter to continue the display, you see an error message because EXECTYPE—the goto value—has not been created yet. Ignore it, and press Enter to continue. You see a screen displaying amper variables for this window and the values. Press Enter to return to the Main Menu.
450 Information Builders

Designing Windows With Window Painter
Creating the Vertical Menu Window Named EXECTYPE
So far you have created two text display windows and a vertical menu. The next window we create is also a vertical menu.
Select
Create a new window
from the Main Menu, and choose
Menu (vertical)
from the Window Creation Menu. Enter
EXECTYPE
as the window name.
When prompted for a description, type
Create a new FOCEXEC or run existing one
and press Enter. When prompted for a heading, press Enter.
When the Window Design Screen appears, move the cursor 12 rows down the screen and 22 columns to the right, and press Enter. Now reposition the cursor four rows beneath the bottom edge of the window and 32 columns to the right of the right edge of the window, and press PF4 to resize it.
Type the following two menu options as they appear below:
Developing Applications 451

Tutorial: A Menu-Driven Application
When you created the MAIN window, you used the Window Options Menu to set each return value and goto value. There is an easier way to set return and goto values using the PF6 and PF5 keys.
Pressing PF5 prompts you successively for a Return value, a GOTO value, and a FOCEXEC name. When prompted for the Return value, enter EXIST and press PF5. You are prompted for A GOTO value. Press Enter, and you are prompted for a FOCEXEC name. Press Enter.
If you select
... using an existing request.
from the EXECTYPE menu, the file names window EXECNAME displays next. EXECNAME contains a list of existing FOCEXEC files from which you may choose.
Move the cursor to the second menu item.
Consider the return and goto values for this option.
If you choose to create a new report or graph request, EXECNAME is not displayed. Rather, control must pass back to the FOCEXEC, which executes these lines:
.
.
.-IF &EXECTYPE EQ EXIST GOTO RPTEX ELSE GOTO NEWRPT;...-NEWRPT-SET &PROCNAME=IF &MAIN EQ RPT THEN TABLETALKELSE IF &MAIN EQ GRPH THEN PLOTTALK;&PROCNAME-RUN
For control to pass to the FOCEXEC if this option is chosen, do not assign a goto value to it. Remember that during execution, control passes to the FOCEXEC when an option without a goto value is selected.
The return value may be anything other than EXIST. For now, press PF6, and enter
NEXIST
Rather than create display and hide lists for EXECTYPE, make a pop-up window. A pop-up window is displayed like any other window, but disappears when the user presses Enter. EXECTYPE pops up in front of MAIN.
Press PF2 to display the Window Options Menu, move the cursor to
Popup(Off)
and press Enter. (Off) changes to (On).
452 Information Builders

Designing Windows With Window Painter
Exit the Window Options Menu, press PF3, and save the window.
Creating the File Names Window Named EXECNAME
Your final window is the file names window that displays a list of existing FOCUS report requests. On the Window Creation Menu, select:
File names
Name the window
EXECNAME
and type in the description:
Select an existing FOCEXEC from list.
Enter an explanatory heading:
Select the request you want to execute and press ENTER:
You are prompted for file-identification criteria. Type
* FOCEXEC
and press Enter.
❏ In CMS, when the application is executed, this selects all files having the file type FOCEXEC.
❏ In z/OS, when the application is executed, this selects all members of ddname FOCEXEC.
On the Window Design Screen, move the cursor two rows down and press Enter. Use PF9 to center the window on the screen. Resize the window: reposition the cursor two columns to the right of the window’s right edge and 10 rows below the window’s bottom edge, and press PF4.
Developing Applications 453

Tutorial: A Menu-Driven Application
Since only BORDER should be displayed with this window, add BANNER, MAIN, and EXECTYPE to the hide list and add BORDER to the display list.
When the user selects a file name from this window during execution, that file name is automatically collected as the return value. You cannot set the return value any other way for this type of window.
In the FOCEXEC, that return value is plugged into the line
EX &EXECNAME
and the report or graph request is executed.
In order for this to happen, you must return control to the FOCEXEC assigning no goto value to this window.
To change the file identification criteria of a file names window (or of a field names or file contents window) after it has been created, change the “return value.” Although these two window types cannot have actual return values set when the window is created or edited, the “return value” that can be set is actually the window’s file identification criteria. You can change the file identification criteria just as you would change the actual return value of a vertical menu window.
Exit from the Window Options Menu, press PF3, and save the window. The window file is complete. Exit from Window Painter.
Executing the Application
To execute the SAMPLE FOCEXEC, at the FOCUS prompt, type
EX SAMPLE
and press Enter. When prompted to choose a new or existing FOCEXEC, select
... using a new request.
unless you have created one in an earlier FOCUS session. The application executes PlotTalk or TableTalk. If you save the request you create, you can try the SAMPLE FOCEXEC again, and execute the new request by selecting:
... using an existing request.
This completes the tutorial.
454 Information Builders

Designing Windows With Window Painter
Window Painter Screens
The creation of windows is itself an automated window-driven process. There are six major screens:
❏ The Entry Menu
❏ The Main Menu
❏ The Window Creation Menu
❏ The Window Design Screen
❏ The Window Options Menu
❏ The Utilities Menu
These screens assist you whenever you create or edit windows.
Invoking Window Painter
To invoke Window Painter, type the WINDOW PAINT command at the FOCUS prompt and press Enter.
Syntax: How to Invoke Window Painter
WINDOW [PAINT [filename]]
where:
PAINT
Is optional.
In this section:
Invoking Window Painter
Entry Menu
Main Menu
Window Creation Menu
Window Design Screen
Window Options Menu
Utilities Menu
How to:
Invoke Window Painter
Developing Applications 455

Window Painter Screens
filename
Is the name of the window file that you want to work with.
In CMS, this is a file name. The file must have a file type of FMU.
In z/OS, this is a member name. The member must belong to ddname FMU.
If you do not specify file name, you begin your Window Painter session at the Entry Menu where you can choose a window file to use or create a new window file. If you do specify file name, you skip the Entry Menu and begin your Window Painter session at the Main Menu working with the window file you specified.
If the file name does not exist, you are asked if you want to create a new file. If not, the Window Painter Entry Menu is displayed.
Entry Menu
You can reach the Window Painter Entry Menu by typing
WINDOW [PAINT]
at the FOCUS prompt, and pressing Enter.
The Entry Menu is the first screen you see:
The Entry Menu invites you to choose a window file in which to work. If you are creating windows for a new application, you should start a new window file. If you are maintaining or creating windows for an existing application, use the window file that corresponds to your application.
456 Information Builders

Designing Windows With Window Painter
When you become comfortable working with windows, you can write FOCEXECs that include branching between window files. Refer to Transferring Control in Window Applications on page 421 for a detailed discussion on branching and transferring control.
Main Menu
Once you have selected a window file from the Entry Menu, or entered the WINDOW PAINT command with the file name option, the Main Menu appears:
Developing Applications 457

Window Painter Screens
The following table summarizes the options on the Main Menu, along with illustrations of screens that appear when you select the options:
Menu Option Description
Create a new window
Brings up the Window Creation Menu. You can select the type of window to create.
Edit an existing window
Brings up a list of windows in your current window file. You can select the one to edit.
458 Information Builders
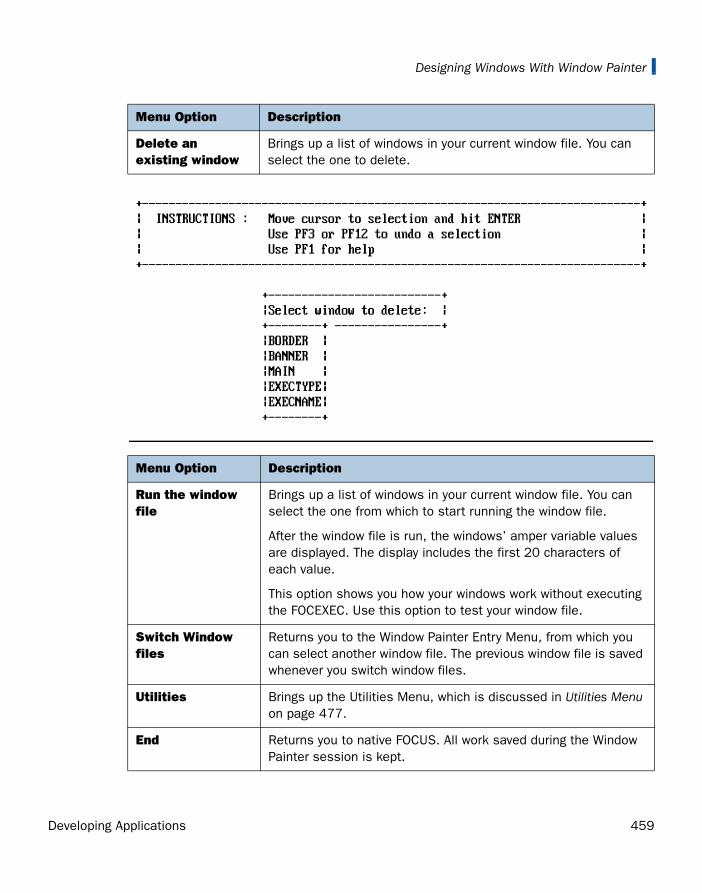
Designing Windows With Window Painter
Menu Option Description
Delete an existing window
Brings up a list of windows in your current window file. You can select the one to delete.
Menu Option Description
Run the window file
Brings up a list of windows in your current window file. You can select the one from which to start running the window file.
After the window file is run, the windows’ amper variable values are displayed. The display includes the first 20 characters of each value.
This option shows you how your windows work without executing the FOCEXEC. Use this option to test your window file.
Switch Window files
Returns you to the Window Painter Entry Menu, from which you can select another window file. The previous window file is saved whenever you switch window files.
Utilities Brings up the Utilities Menu, which is discussed in Utilities Menu on page 477.
End Returns you to native FOCUS. All work saved during the Window Painter session is kept.
Developing Applications 459

Window Painter Screens
Window Creation Menu
You can reach the Window Creation Menu by selecting
Create a New Window
from the Main Menu. The following screen appears:
You need to select the type of window to create. You are asked to enter an 8-character name and an optional 40-character description. These are for your use only and do not appear in the window during execution.
For a vertical menu, horizontal menu, text input, text display, file names, field names, file contents, multi-input, or return value display window, you are prompted to supply a 60-character heading.
Quit without saving
Returns you to native FOCUS. All work saved during the Window Painter session is discarded.
Menu Option Description
460 Information Builders

Designing Windows With Window Painter
For a text input window, you are prompted to choose the format of the text entry field (alphanumeric, with all text translated to uppercase; alphanumeric, with no case translation; or numeric). Later, in the Window Design Screen, you can make the length of the text entry field shorter than the window’s header length by typing a single character in the window immediately following the last desired field position, or by typing characters continuously from the first field position to the last desired field position.
For a file names, field names, or file contents window, you are prompted to produce file-identification criteria that can consist of an amper variable, a complete file identification, or (for file names windows) a file specification which includes an asterisk (for example, * MASTER).
The asterisk is used as a wildcard character indicating that any character or sequence of characters can occupy that position. In CMS, an asterisk used in file-identification criteria can be embedded (for example, *DEPT FOCEXEC); the asterisk can be used in the file name, the file type, and the file mode. In z/OS, the asterisk can be used as the member name but not in the ddname.
If an amper variable is used, you can prompt for the file identification criteria at run time.
❏ File-identification criteria in CMS must specify the file name first, the file type second, and an optional file mode third. If the file mode is not specified, it defaults to an asterisk.
❏ File-identification criteria in z/OS must specify the member name first and the ddname second.
If you are creating a field names window, your file-identification criterion is the name of a Master File.
In addition, you can create execution windows containing FOCUS commands such as Dialogue Manager commands or TABLE requests. You are prompted for the window name and heading. Once a window has been specified, the Window Design screen opens.
For complete information about the types of windows you can create in Window Painter, see Types of Windows You Can Create on page 403.
The next screen displayed is the Window Design Screen, discussed in the next section. This screen enables you to enter information, and position and size your window.
Window Design Screen
In this screen you design the appearance and functionality of your windows. It appears during the window creation process, when you press Enter after typing the heading of your window.
Developing Applications 461

Window Painter Screens
The Window Design Screen consists of a blank screen, a cursor, and text asking you to move the cursor to the starting position for the window. This starting position becomes the upper left corner of the window. Use the cursor arrow keys to move the cursor to the place where you want the upper left corner of the window to be, and press Enter.
The window appears with its heading at the top. You can enlarge it, type text in it, and move it around the screen.
The Window Design Screen allows you to use the keyboard to manipulate the window you are creating.
462 Information Builders
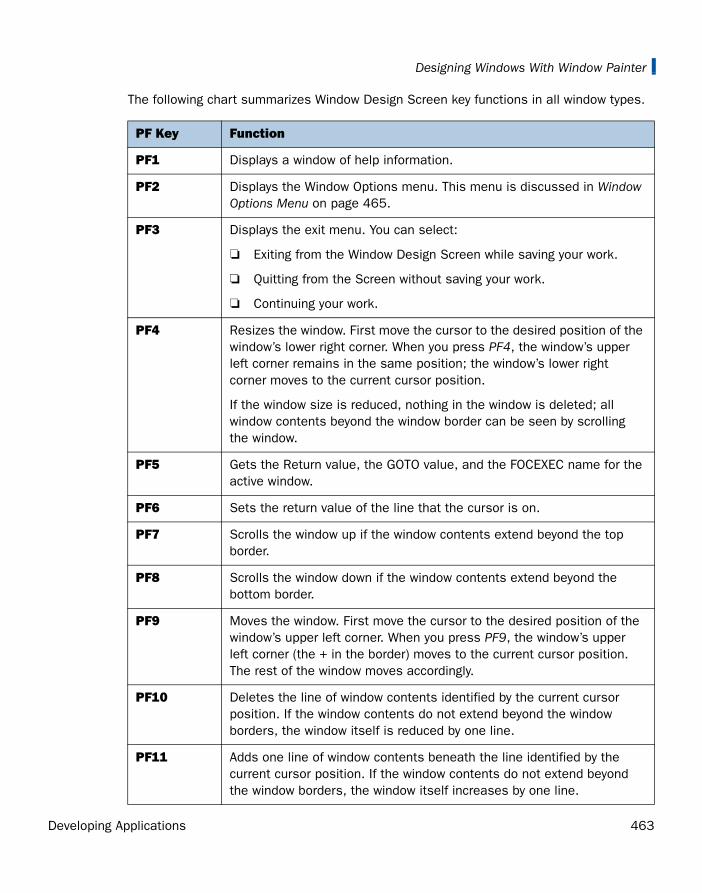
Designing Windows With Window Painter
The following chart summarizes Window Design Screen key functions in all window types.
PF Key Function
PF1 Displays a window of help information.
PF2 Displays the Window Options menu. This menu is discussed in Window Options Menu on page 465.
PF3 Displays the exit menu. You can select:
❏ Exiting from the Window Design Screen while saving your work.
❏ Quitting from the Screen without saving your work.
❏ Continuing your work.
PF4 Resizes the window. First move the cursor to the desired position of the window’s lower right corner. When you press PF4, the window’s upper left corner remains in the same position; the window’s lower right corner moves to the current cursor position.
If the window size is reduced, nothing in the window is deleted; all window contents beyond the window border can be seen by scrolling the window.
PF5 Gets the Return value, the GOTO value, and the FOCEXEC name for the active window.
PF6 Sets the return value of the line that the cursor is on.
PF7 Scrolls the window up if the window contents extend beyond the top border.
PF8 Scrolls the window down if the window contents extend beyond the bottom border.
PF9 Moves the window. First move the cursor to the desired position of the window’s upper left corner. When you press PF9, the window’s upper left corner (the + in the border) moves to the current cursor position. The rest of the window moves accordingly.
PF10 Deletes the line of window contents identified by the current cursor position. If the window contents do not extend beyond the window borders, the window itself is reduced by one line.
PF11 Adds one line of window contents beneath the line identified by the current cursor position. If the window contents do not extend beyond the window borders, the window itself increases by one line.
Developing Applications 463

Window Painter Screens
If a window’s contents extend beyond a top or bottom border, then the message
(MORE)
is displayed on that border to remind you of more lines of contents hidden beyond that border. You can view these lines by scrolling toward the border. When the window is used in an application, the user can also scroll the window to see all of the contents.
The display line at the bottom of the Window Design Screen shows instructions or information. When you first see the Window Design Screen, the display line tells you to move the cursor and press Enter. The display line shows the name of the window file, and the name and type of window being created; it also tells which keys to press for the HELP function, the SIZE function, and the Window Options Menu.
PF12 Provides the same function as the PF3 key.
PF13 - PF24 These keys provide the same functions as the corresponding keys PF1 - PF12.
PF Key Function
464 Information Builders

Designing Windows With Window Painter
Window Options Menu
When the Window Design Screen is displayed, pressing PF2 brings up the following Window Options Menu:
Developing Applications 465

Window Painter Screens
The following table summarizes the options on this menu, along with illustrations of screens that appear when you select some of the options:
Menu Option Description
Goto value Selecting this option allows you to specify the next window in the path from this selection field or window. You are asked to supply the name of the window. (It does not matter whether or not this window exists. You can create it later, but remember the name chosen.)
In menu windows, goto values are assigned to each menu item. In other windows, there is a single goto value for the entire window.
To assign a goto value, your cursor must be on the proper line when the Window Options Menu is brought up. Select Goto value from the Window Options Menu. You are prompted to enter the name of the window that is the target of the goto. Type the name in the space provided and press Enter again. The goto value is assigned.
466 Information Builders

Designing Windows With Window Painter
Menu Option Description
Return value The return value supplies a value for an amper variable. If the user selects this field during execution, the return value you have assigned is plugged into the amper variable in your FOCEXEC. Return values are assigned to each menu item in menu windows, and one per window for other window types. The only exceptions are the multi-input window, where the return value is the name of the input field occupied by the cursor when you pressed Enter or a PF key, and the return value display window, which does not have a return value but instead displays other windows’ return values. The return value for a Multi-Select window is the number of selections.
To assign a return value, your cursor must be on the proper line. Select Return value from the Window Options Menu and you are prompted to enter a return value. Note that for file names, field names, and file contents windows, the value that you enter is the file-identification criterion for that window. Type the value in the space provided and press Enter again to assign the return value .
Developing Applications 467

Window Painter Screens
Menu Option Description
FOCEXEC name Attaches a FOCEXEC to each menu selection of the window. The FOCEXEC is executed when the menu item is selected.
Heading Changes the heading of any window you are working on. You can also add or remove a heading.
Description Changes the description of any window you are working on.
Show a window Used only during window editing, brings another window onto the screen for reference. You cannot edit the second window.
Unshow a window Removes the shown window from the display.
468 Information Builders

Designing Windows With Window Painter
Menu Option Description
Display list Enables you to specify a list of up to 16 windows that are visible when this window is displayed during execution. Note that if part of a window on the display list extends beyond the window border or does not fit on the screen, it cannot be scrolled.
As many as 16 windows can be displayed on the screen at one time. This applies to all windows on the screen (that is, a window displayed during execution, windows displayed when executed previously and not hidden afterward, and windows displayed because specified on a display list). The window facility interprets each window heading as a separate window: if all of the windows have headings, 16 can be displayed on the screen at one time.
Developing Applications 469

Window Painter Screens
Menu Option Description
Hide list Allows you to specify windows that does not appear when this window is displayed during execution. You can specify up to 16 specific windows or all windows in the window file. If you select “All”, all the windows are hidden except those in the display list. If you do not hide a window that was displayed, it remains on the screen until another window that includes it on a hide list is displayed during execution.
Menu Option Description
Popup (Off/On) Makes the window disappear when the user presses Enter during execution. Defaults to OFF, which leaves the window on screen. Set Popup to OFF with text display windows as they do not work even if set to ON.
470 Information Builders

Designing Windows With Window Painter
Help window Allows you display information about a window or a menu item when a user presses PF1 (the Window facility HELP key) during execution. The information displayed is text within a specified Help window.
Note that if the PFKEY option is specified in the -WINDOW command, you have to explicitly set a PF key as the HELP key, as described in Testing Function Key Values on page 427.
When selecting the Help window option, you are asked to supply the name of the Help window file that contains the Help window. Next, you are asked to supply the name of the Help window itself. The Help window can be an existing window, or one that you created.
If the Help window displays field names, it qualifies duplicates with the segment name.
You can use any window type for a Help window. A text display window is easiest, except when supplying different help information for each item in a vertical menu, horizontal menu (that is, item-specific help).
To assign item-specific help, use a file contents window that displays a file containing text in the following format
=>HELPFILE=> menu item this is the Help message you want the user to see.
where:
=>
Is entered with an equal sign (=) and a greater-than sign (>).
HELPFILE
Must be uppercase.
menu item
Is the exact text of the menu item. Any blank spaces that precede this text in the menu must also precede this text here in the Help file. Note that at least one blank space always precedes the menu item text in a vertical menu, horizontal menu, or multi-input window.
Menu Option Description
Developing Applications 471

Window Painter Screens
Help window (continued)
For example, if the first three lines of a vertical menu are
(1) Generate a sales report(2) Generate a stock report
and there are three blank spaces between the left border of the window and the beginning of the text, the file containing help text could look like this:
=>HELPFILE=> (1) Generate a sales reportThis option displays a list of existing sales reportrequests, and lets you select one of these requeststo execute.=> (2) Generate a stock reportThis option displays a list of existing stock reportrequests, and lets you select one of these requeststo execute.
The lines immediately following the menu item text are displayed when the user positions the cursor on the menu item and presses PF1.
In some cases you may assign topic-specific help, but want the help text for some of the topics to be contained in a separate file. In this case, on the line following the menu item text, replace the help message with the file identification of the file containing that menu item’s help message.
In CMS, use this file-identification format:
FILENAME= filename filetype [filemode]
In z/OS, use this file-identification format:
FILENAME= membername ddname
Menu Option Description
472 Information Builders

Designing Windows With Window Painter
Help window (continued)
To assign one set of instructions that can be used for multiple menu items, use the following syntax:
=>DEFAULTThis text appears when you have not writtentopic-specific help.
The DEFAULT text must be the last section in the Help file.
Lines beginning with an asterisk (*) are comment lines that are not displayed.
What follows is an example of a topic-specific Help file for the Main Menu used in the tutorial.
=>HELPFILE*Help file for tutorial/Main Menu=> Create a report?Choose this option if you wish to create a new report.=> Create a graph?Select this option if you wish to create pie charts, bar charts or other graphics.=> Exit?If you wish to leave the application, choose this option.
Menu Option Description
Developing Applications 473

Window Painter Screens
Line-break Formats the contents of the return value display window. This option is set when designing the windows from which you collect the return value(s) to be displayed.
When you select this option, you see:
NoneNew line before valueNew line after valueBoth
where:
None
Places return value directly after preceding value. If there is not enough room on this line, return value is placed on the next line.
New line before value
Places return value on the next line.
New line after value
Places return value on the same line as preceding value. Places next return value on next line.
Both
Places return value on a line by itself.
Menu Option Description
474 Information Builders

Designing Windows With Window Painter
Multi-Select Enables you to select multiple items from one window. The number of items you select is collected as the return value from that window; each selected item’s return value is stored in a temporary file in memory. You can later retrieve these stored values for use in a FOCEXEC. Values for up to 8 windows can be stored at one time.
When you select this option, you see:
-Select Multi(On )
During execution, the user selects individual values by pressing PF9. After all selections have been made, the user presses Enter.
Note that when the -WINDOW command is issued with the PFKEY option, the PF9 key cannot be used to make selections unless a SET command is issued before the -WINDOW command. For example:
SET PF09=SELECT
You can also set a different PF key for selecting multiple items.
A Multi-Select window can have no more than one goto value. Although in a vertical menu window you can assign a different goto value to each menu item, only the value assigned to the first item is effective.
The return value collected for a window using the Multi-Select option is the number of values selected by the user.
To retrieve the individual values, issue a special WINDOW call, as follows
-WINDOW windowfile windowname GETHOLD
where:
windowfile
Is the name of the window file.
windowname
Is the name of the Multi-Select window.
GETHOLD
Is the special parameter that retrieves one value at a time from the temporary file.
Menu Option Description
Developing Applications 475

Window Painter Screens
Multi-Select (continued)
The value is assigned to the variable &windowname.
The GETHOLD option requires at least two -WINDOW commands in your FOCEXEC. The first -WINDOW command (without the GETHOLD option) transfers control to the Window facility where a Multi-Select window is used. The second and subsequent -WINDOW commands use the GETHOLD option to retrieve the stored amper variables collected in a particular Multi-Select window.
For each value to be retrieved, you need a -WINDOW command with the GETHOLD option. Each value is stored in &windowname. To use this value, assign it to another variable. For example, if the return value has the value 4, issue the special -WINDOW command four times; each time you would collect the value from &windowname. Alternatively, you could perform a loop.
Note that -WINDOW with the GETHOLD option does not transfer control from the FOCEXEC to the Window facility.
Quit Returns you to the Window Painter Entry Menu.
Input fields Input fields pertain to Multi Input Windows. Selecting the field takes you to that field.
Menu text Specifies a line of descriptive text, up to 60 characters long, for items on a horizontal menu. Use the Text line option to position the text.
Text line (x+1) On a horizontal menu, positions descriptive text one or two lines above or below the menu. Valid values are x+1 or x+2 to place the text above the horizontal menu, x-1 or x-2 to place the text below the horizontal menu. Use the Menu text option to define the descriptive text.
Pulldown (off/on) If the setting is ON, placing the cursor on an item in a horizontal menu can display an associated pulldown menu. The default setting is OFF. Turn the setting ON by positioning the cursor on this option and pressing Enter. The pulldown menu must be a vertical menu and must be assigned as the goto value for the horizontal menu item. Note that setting Pulldown ON automatically shuts off Menu Text.
Menu Option Description
476 Information Builders

Designing Windows With Window Painter
Utilities Menu
If you select the Utilities option from the Window Painter Main Menu, the Utilities Menu is displayed:
Switch window Enables you to work on and move between two windows. When you select this option, you can create a new window or edit an existing window without returning to the Main Menu.
Menu Option Description
Developing Applications 477

Window Painter Screens
The following table summarizes the options on this menu, along with illustrations of screens that appear when you select some of the options:
Menu Option Description
Document the file When you select this utility, Window Painter creates documentation of the window file. You can display the document on the screen using TED or another system editor, or send it to a printer or disk file.
In CMS, this option creates a file with file type TRF on your A disk. In z/OS, this option creates a member of the TRF PDS; that PDS must have already been allocated. However, creating a PDS is not necessary if you are only going to use the documentation file during the current FOCUS session: Window Painter temporarily allocates the PDS.
This document contains detailed information about all the windows in the window file. It shows you the kinds of windows, the structure and format, and any options you have assigned from the Window Options Menu, including return and goto values. The text you enter when prompted for a window file description or individual window description is part of this document. The document is especially useful when creating a FOCEXEC, since it provides return and goto values in addition to other information.
Note: If you create another file with the same name, the file is not overwritten. It is appended.
478 Information Builders

Designing Windows With Window Painter
Menu Option Description
Change the file description
Changes the description of the current window.
Compress the file This utility is provided to help you save space in memory. It allows space made available by deleted or edited windows to be reused.
Rename a window When you select this utility, you see a list of the windows in the current window file. You can change the name of any of these windows.
Copy a window This function copies a window from one window file to another, or duplicates it within the same file.
The copy function is useful when you create a new application, or need to add windows to an existing application, and want the windows to look like those you have already created. You can copy any window and edit it to conform to the new application.
Developing Applications 479

Transferring Window Files
Transferring Window Files
If you use FOCUS in more than one operating environment, you can transfer an existing window file from one environment to be used in another environment. For example, if you have a fully-developed window application in PC/FOCUS, and you want to develop a similar application in mainframe FOCUS, you can transfer the PC/FOCUS window file to mainframe FOCUS.
You can transfer a window file to a new environment in four simple steps:
1. Create a transfer file from the original window file using Window Painter.
2. Transfer the new file to the new environment using FTP.
3. Edit the transferred file in TED, if necessary.
4. Compile the transferred file using the WINDOW COMPILE command.
These steps are described in the following topics.
Select the start window
Enables you to choose a default start window. This window is the first to be entered if a specific window is not selected upon startup. If a default start window is not explicitly chosen, FOCUS selects the first window created to be the start window.
Create a transfer file
Creates a file to be transferred for use with the Window facility in another FOCUS environment.
In CMS, this option creates a file with file type TRF on your A disk.
In z/OS, this option creates a member of the TRF PDS; that PDS must have already been allocated.
Quit the utilities menu
Returns you to the Main Menu.
Menu Option Description
In this section:
Creating a Transfer File
Transferring the File to the New Environment
Editing the Transfer File
Compiling the Transfer File
480 Information Builders

Designing Windows With Window Painter
Creating a Transfer File
The window files that you design in Window Painter are compiled files; before a window file can be transferred to another environment, a user-readable source code version must be created. This user-readable file is called a transfer file, and is created using the transfer file option of Window Painter.
❏ In CMS, this Window Painter option automatically creates a transfer file with a file type of TRF on your A disk.
❏ In z/OS, this Window Painter option automatically creates a new member of the PDS allocated to ddname TRF; the PDS must already have been allocated (with LRECL between 80 and 132 and RECFM FB). However, it is not necessary to create the PDS if you use the transfer file during the current FOCUS session: Window Painter temporarily allocates the PDS.
❏ For information about the transfer files created by FOCUS Window Painter in other operating environments, see the appropriate FOCUS Users Manual for those environments.
To convert a window file to a transfer file, go to the Window Painter Utilities Menu and select:
Create a transfer file
You are prompted for the name of the new transfer file. Enter a name; it can have the same name as the window file, or an entirely new name. In CMS the name that you enter is the file name; in z/OS it is the member name.
Note that you should not give the transfer file a name already assigned to a window documentation file. Also, you should not give the transfer file a name already assigned to an existing transfer file unless you want to merge the two files. See the appropriate operating environment topic in the Overview and Operating Environments manual for more information about duplicate window transfer and window documentation file names.
You are asked to select which window(s) you want to transfer. Select
All
to transfer all of the windows in the current window file, or select any single window in the file. This is the last step in creating a transfer file.
Note that you can merge transfer files: if a transfer file already exists for your window file, and you only need to add a new window to it, you can give the new transfer file the same name as the old one, and select the new window. Window Painter merges the source code for the new window into the existing file, so that you have a single complete transfer file.
Developing Applications 481

Transferring Window Files
Transferring the File to the New Environment
Once the transfer file exists, it can be transferred to the new environment using FTP.
Editing the Transfer File
Window facility features introduced in one FOCUS release may not be fully supported in earlier releases. Because different operating environments may be running different releases of FOCUS, the transfer file created by the FOCUS Window facility in one environment may contain features not fully supported by the Window facility in another environment.
If your transfer file contains Window facility features not fully supported in the new environment, you may need to remove or fine-tune those features. If the new environment supports features are not supported in the original environment, you can add those features to the transfer file. Adding, removing, and fine-tuning features can be done by simply editing the transfer file.
The Format of the Transfer File
The transfer file is a user-readable source code listing of all of the windows and features that were included from the original window file. You can remove or fine-tune an unsupported feature by simply editing or deleting the appropriate line in the transfer file. You can accomplish this by using TED or any other editor.
Each transfer file contains:
❏ One set of window file attributes describing the file.
❏ For each window defined in the file, one set of window attributes describing that window.
In this section:
The Format of the Transfer File
Operating Environment Considerations
Example:
Sample Transfer File
Reference:
Transfer File Syntax: Window File Attributes
Transfer File Syntax: Window Attributes
Transfer File Syntax: Window Line Attributes
482 Information Builders

Designing Windows With Window Painter
❏ For each line in each window, one set of attributes describing that line.
If any attribute is not specified in the transfer file, it defaults to a value of zero or blank (depending on whether the value is normally numeric or alphanumeric).
Reference: Transfer File Syntax: Window File Attributes
Attribute Description
FILENAME The name of the original window file.
DESCRIPTION A comment field describing the file.
WINDOWNAME The name of the window.
TYPE The type of window:
1. Vertical menu
2. Text input window
3. Text display window
4. Horizontal menu
5. File names window
6. Field names window
7. File contents window
8. Return value display window
9. Execution window
10. Multi-input window
COMMENT A comment field describing the window.
TRANSLATE Type of input for text input windows (Type 2).
0 Allow mixed-case input.
1 Allow numeric input only.
2 Translate input to uppercase.
ROW The row number of the upper left corner of the window.
COLUMN The column number of the upper left corner of the window.
Developing Applications 483

Transferring Window Files
Reference: Transfer File Syntax: Window Attributes
HEIGHT The height of the window data (the number of lines of window data, not the height of the actual window frame).
If there are more data lines than what fits in the window frame, use the PF7 and PF8 keys to scroll the window.
TEXT LINE Position of menu text. Values are: +1, +2, -1, -2.
WIDTH The width of the window frame, not including the border.
INPUT FIELDS Fields for multi-input windows.
WINDOW The number of lines in the actual window frame (not the number of lines of window data). This does not include borders.
POPUP Sets the pop-up feature.
0 This is not be a pop-up window.
1 This is a pop-up window.
Attribute Description
Attribute Description
BORDER Sets the window border.
0 There is no window border.
1 There is a window border.
2 There is a window border.
Options 1 and 2 both result in a basic window border.
HEADLEN Length of the window heading. If this value is 0, there is no heading.
RETURN Sets the line break feature for use with return value display windows.
0 Line break is not used.
1 New line before this return value.
2 New line after this return value.
3 New line before and after this value.
484 Information Builders

Designing Windows With Window Painter
Reference: Transfer File Syntax: Window Line Attributes
MULTI Sets the multi-select feature.
0 This is not a multi-select window.
1 This is a multi-select window.
HEADING The text of the window heading.
HELP The name of the help window for this window.
HELPFILE The name of the window file that contains the help window.
DISPLAY The name of a window to be displayed at the same time this one is displayed. There can be up to 16 DISPLAY values for each window. This attribute is optional.
HIDE The name of a window to be hidden when this one is displayed. There can be up to 16 HIDE values for each window. This attribute is optional.
Attribute Description
Attribute Description
DATA A line to be displayed in the window (for example, a menu choice in a vertical menu Window, or a line of text in a text display window). The data can include amper variables (including &windowname).
GOTO The name of the window to go to if this line is selected by the user. The value can be an amper variable (including &windowname). If the value is blank, and this line is selected, Windows returns to Dialogue Manager.
Developing Applications 485

Transferring Window Files
Operating Environment Considerations
When you transfer a window file to a mainframe operating environment from a different environment, differences in hardware and operating software may require that you make changes to the file. These changes are discussed below.
❏ Screen position. Windows should not begin in row 1 or in column 1. If you transfer a window with these row or column positions, truncation occurs. Adjust the ROW and COLUMN attributes if necessary.
❏ Screen size. Windows should not have more than 22 rows or 77 columns. Windows that extend beyond the end of the terminal screen is automatically truncated without any warning message.
This is important to note if you are transferring a window file from an environment where the screen size differs from that in the mainframe environment. Adjust the ROW and COLUMN attributes if necessary.
❏ Window Position. Column 1 of vertical menu, horizontal menu, multi-input and text display windows cannot be used. Window text must begin to the right of column 1.
❏ Function keys. Windows transferred from other environments may refer to function keys not present in the mainframe environment. Change function key references if necessary.
❏ Blank lines. Blank line are acknowledged by Window Painter.
❏ Colors and Border Types. The use of colored windows and background and multiple border types is not supported.
VALUE The return value supplied if this line is selected by the user. This value is placed in the amper variable &windowname, where windowname is the name of the window.
For file names windows (TYPE = 5), this is the file selection criteria (including asterisks) of the file names to be displayed.
For field names windows (TYPE = 6), this is the name of the Master File whose fields are displayed.
For file contents windows (TYPE = 7), this is the name of the file whose contents are to be displayed.
Attribute Description
486 Information Builders

Designing Windows With Window Painter
❏ File Naming Conventions. File naming conventions differ in different operating environments. When transferring a file from some environments, the Window facility automatically translates references to FOCEXECs, Master Files, and error files, as shown below. You must change other file references yourself when you edit the transfer file.
PC or UNIX Extension Mainframe File Type or ddname
.FEX FOCEXEC
.MAS MASTER
.ERR ERRORS
Developing Applications 487

Transferring Window Files
Example: Sample Transfer File
To illustrate the transfer file format, part of the transfer file for the SAMPLE window file is shown below (SAMPLE is described in the tutorial). The MAIN and EXECNAME windows from the file are included in the example.
FILENAME=SAMPLEDESCRIPTION='Sample file for windows tutorial'WINDOWNAME=MAIN,TYPE=1COMMENT='User can report, graph, or exit.'ROW= 6,COLUMN=23,HEIGHT= 7,WIDTH=38,WINDOW= 7,POPUP= 0,BORDER= 2,HEADLEN=28RETURN=0MULTI=0HEADING='Would you like to:'DATA=' '$DATA=' Create a report?'GOTO='EXECTYPE',VALUE='RPT '$DATA=' '$DATA=' Create a graph?'GOTO='EXECTYPE',VALUE='GRPH'$DATA=' '$DATA=' Exit?'GOTO=' ',VALUE='XXIT'$DATA=' '$DISPLAY=BORDER ,$DISPLAY=BANNER ,$WINDOWNAME=EXECNAME,TYPE=5COMMENT='Select an existing FOCEXEC from list.'ROW= 4,COLUMN=11,HEIGHT=11,WIDTH=57,WINDOW=11,POPUP= 0,BORDER= 2,HEADLEN=55,RETURN=0MULTI=0HEADING='Select the request you want to execute and press ENTER:'DATA=' 'GOTO=' ',VALUE='* FOCEXEC'$DISPLAY=BORDER,$HIDE=BANNER,$HIDE=MAIN,$HIDE=EXECTYPE,$
488 Information Builders

Designing Windows With Window Painter
Compiling the Transfer File
The transfer file can be executed in its current format, but it may execute slowly, and uses a large amount of memory. You can make your window application more efficient, requiring less time and memory for execution, by compiling it.
You can compile a transfer file using the WINDOW COMPILE command. This produces a new compiled window file, in the same format as the window files produced by Window Painter.
Note that before you can issue this command in z/OS, a PDS with LRECL 4096 and RECFM F must have already been allocated to ddname FMU. However, you do not need to create this PDS if you are only going to use the transfer file during the current FOCUS session: Window Painter temporarily allocates the PDS.
Syntax: How to Compile a Transfer File
WINDOW COMPILE windowfile
where:
windowfile
Is the name of the transfer file.
In CMS, this must be the file name of a file with file type TRF.
The command creates a new file with the file name specified in the command, and a file type of FMU, on the A disk. Once created, you can move the file to any disk.
In z/OS, this must be a member name of a member of a PDS allocated to ddname TRF.
The command creates a new member of the PDS allocated to ddname FMU, with the same member name specified in the command.
When a Dialogue Manager -WINDOW command is encountered in a FOCEXEC, FOCUS searchs for a compiled window file (an FMU file) with the specified file name. If the compiled file is not found, the transfer file (TRF file) with the same file name is used.
Note that if you compile a transfer file and later make changes to it, you need to recompile the updated transfer file: otherwise, FOCUS continues to use the older, unchanged compiled file.
How to:
Compile a Transfer File
Developing Applications 489

Transferring Window Files
490 Information Builders

FOCUS
A
Developing AppDeveloping App
Master Files and DiagramsThis appendix contains descriptions and structure diagrams for the sample data sources used throughout the documentation.
Topics:
❏ Creating Sample Data Sources
❏ EMPLOYEE Data Source
❏ JOBFILE Data Source
❏ EDUCFILE Data Source
❏ SALES Data Source
❏ PROD Data Source
❏ CAR Data Source
❏ LEDGER Data Source
❏ FINANCE Data Source
❏ REGION Data Source
❏ COURSES Data Source
❏ EXPERSON Data Source
❏ EMPDATA Data Source
❏ TRAINING Data Source
❏ COURSE Data Source
❏ JOBHIST Data Source
❏ JOBLIST Data Source
❏ LOCATOR Data Source
❏ PERSINFO Data Source
❏ SALHIST Data Source
❏ PAYHIST File
❏ COMASTER File
❏ VIDEOTRK, MOVIES, and ITEMS Data Sources
❏ VIDEOTR2 Data Source
❏ Gotham Grinds Data Sources
❏ Century Corp Data Sources
lications 491lications 491
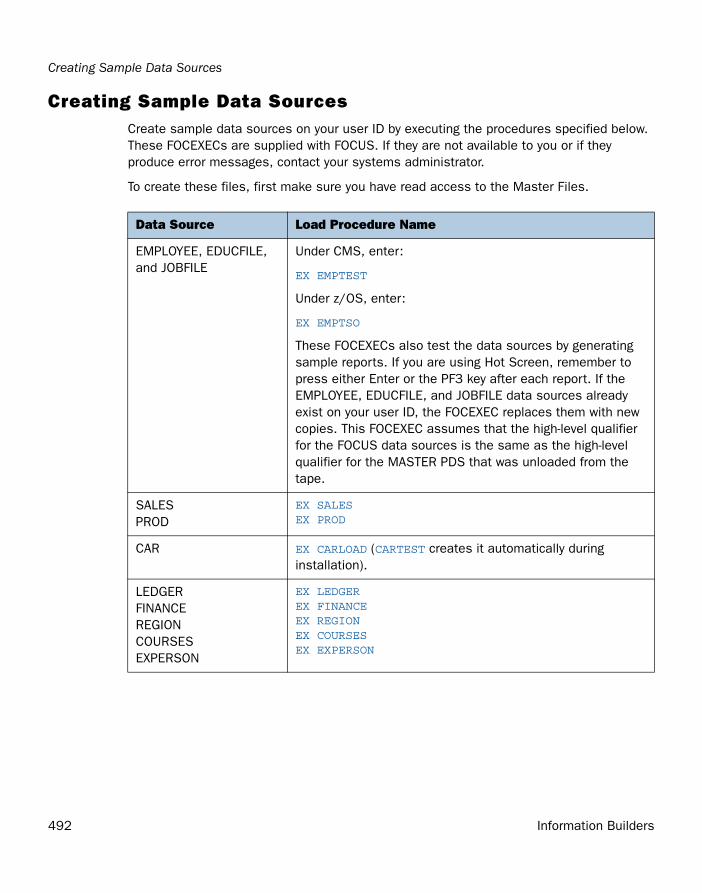
Creating Sample Data Sources
Creating Sample Data SourcesCreate sample data sources on your user ID by executing the procedures specified below. These FOCEXECs are supplied with FOCUS. If they are not available to you or if they produce error messages, contact your systems administrator.
To create these files, first make sure you have read access to the Master Files.
Data Source Load Procedure Name
EMPLOYEE, EDUCFILE, and JOBFILE
Under CMS, enter:
EX EMPTEST
Under z/OS, enter:
EX EMPTSO
These FOCEXECs also test the data sources by generating sample reports. If you are using Hot Screen, remember to press either Enter or the PF3 key after each report. If the EMPLOYEE, EDUCFILE, and JOBFILE data sources already exist on your user ID, the FOCEXEC replaces them with new copies. This FOCEXEC assumes that the high-level qualifier for the FOCUS data sources is the same as the high-level qualifier for the MASTER PDS that was unloaded from the tape.
SALESPROD
EX SALESEX PROD
CAR EX CARLOAD (CARTEST creates it automatically during installation).
LEDGERFINANCEREGIONCOURSESEXPERSON
EX LEDGEREX FINANCEEX REGIONEX COURSESEX EXPERSON
492 Information Builders

Master Files and Diagrams
EMPDATATRAININGCOURSEJOBHISTJOBLISTLOCATORPERSINFOSALHIST
EX LOADPERS
PAYHIST None (PAYHIST DATA is a sequential data source and is allocated during the installation process).
COMASTER None (COMASTER is used for debugging other Master Files).
VIDEOTRK, MOVIES, and ITEMS
EX LOADVTRK
VIDEOTR2 EX LOADVID2
Gotham Grinds EX DBLGG
Century Corp:CENTCOMPCENTFINCENTHRCENTINVCENTORDCENTQACENTGLCENTSYSFCENTSTMT
EX LOADCOMEX LOADFINEX LOADHREX LOADINVEX LOADORDEX LOADCQAEX LDCENTGLEX LDCENTSYEX LDSTMT
Data Source Load Procedure Name
Developing Applications 493

EMPLOYEE Data Source
EMPLOYEE Data Source
EMPLOYEE contains sample data about a company’s employees. Its segments are:
EMPINFO
Contains employee IDs, names, and positions.
FUNDTRAN
Specifies employees’ direct deposit accounts. This segment is unique.
PAYINFO
Contains the employees’ salary history.
ADDRESS
Contains employees’ home and bank addresses.
SALINFO
Contains data on employees’ monthly pay.
DEDUCT
Contains data on monthly pay deductions.
EMPLOYEE also contains cross-referenced segments belonging to the JOBFILE and EDUCFILE files, also described in this appendix. The segments are:
JOBSEG (from JOBFILE)
Describes the job positions held by each employee.
SKILLSEG (from JOBFILE)
Lists the skills required by each position.
SECSEG (from JOBFILE)
Specifies the security clearance needed for each job position.
ATTNDSEG (from EDUCFILE)
Lists the dates that employees attended in-house courses.
COURSEG (from EDUCFILE)
Lists the courses that the employees attended.
In this section:
EMPLOYEE Master File
EMPLOYEE Structure Diagram
494 Information Builders

Master Files and Diagrams
EMPLOYEE Master File
FILENAME=EMPLOYEE, SUFFIX=FOC SEGNAME=EMPINFO, SEGTYPE=S1 FIELDNAME=EMP_ID, ALIAS=EID, FORMAT=A9, $ FIELDNAME=LAST_NAME, ALIAS=LN, FORMAT=A15, $ FIELDNAME=FIRST_NAME, ALIAS=FN, FORMAT=A10, $ FIELDNAME=HIRE_DATE, ALIAS=HDT, FORMAT=I6YMD, $ FIELDNAME=DEPARTMENT, ALIAS=DPT, FORMAT=A10, $ FIELDNAME=CURR_SAL, ALIAS=CSAL, FORMAT=D12.2M, $ FIELDNAME=CURR_JOBCODE, ALIAS=CJC, FORMAT=A3, $ FIELDNAME=ED_HRS, ALIAS=OJT, FORMAT=F6.2, $ SEGNAME=FUNDTRAN, SEGTYPE=U, PARENT=EMPINFO FIELDNAME=BANK_NAME, ALIAS=BN, FORMAT=A20, $ FIELDNAME=BANK_CODE, ALIAS=BC, FORMAT=I6S, $ FIELDNAME=BANK_ACCT, ALIAS=BA, FORMAT=I9S, $ FIELDNAME=EFFECT_DATE, ALIAS=EDATE, FORMAT=I6YMD, $ SEGNAME=PAYINFO, SEGTYPE=SH1, PARENT=EMPINFO FIELDNAME=DAT_INC, ALIAS=DI, FORMAT=I6YMD, $ FIELDNAME=PCT_INC, ALIAS=PI, FORMAT=F6.2, $ FIELDNAME=SALARY, ALIAS=SAL, FORMAT=D12.2M, $ FIELDNAME=JOBCODE, ALIAS=JBC, FORMAT=A3, $ SEGNAME=ADDRESS, SEGTYPE=S1, PARENT=EMPINFO FIELDNAME=TYPE, ALIAS=AT, FORMAT=A4, $ FIELDNAME=ADDRESS_LN1, ALIAS=LN1, FORMAT=A20, $ FIELDNAME=ADDRESS_LN2, ALIAS=LN2, FORMAT=A20, $ FIELDNAME=ADDRESS_LN3, ALIAS=LN3, FORMAT=A20, $ FIELDNAME=ACCTNUMBER, ALIAS=ANO, FORMAT=I9L, $ SEGNAME=SALINFO, SEGTYPE=SH1, PARENT=EMPINFO FIELDNAME=PAY_DATE, ALIAS=PD, FORMAT=I6YMD, $ FIELDNAME=GROSS, ALIAS=MO_PAY, FORMAT=D12.2M, $ SEGNAME=DEDUCT, SEGTYPE=S1, PARENT=SALINFO FIELDNAME=DED_CODE, ALIAS=DC, FORMAT=A4, $ FIELDNAME=DED_AMT, ALIAS=DA, FORMAT=D12.2M, $ SEGNAME=JOBSEG, SEGTYPE=KU, PARENT=PAYINFO, CRFILE=JOBFILE, CRKEY=JOBCODE,$ SEGNAME=SECSEG, SEGTYPE=KLU, PARENT=JOBSEG, CRFILE=JOBFILE, $ SEGNAME=SKILLSEG, SEGTYPE=KL, PARENT=JOBSEG, CRFILE=JOBFILE, $ SEGNAME=ATTNDSEG, SEGTYPE=KM, PARENT=EMPINFO, CRFILE=EDUCFILE, CRKEY=EMP_ID,$ SEGNAME=COURSEG, SEGTYPE=KLU, PARENT=ATTNDSEG, CRFILE=EDUCFILE,$
Developing Applications 495

EMPLOYEE Data Source
EMPLOYEE Structure DiagramSECTION 01 STRUCTURE OF FOCUS FILE EMPLOYEE ON 05/15/03 AT 10.16.27 EMPINFO 01 S1 ************** *EMP_ID ** *LAST_NAME ** *FIRST_NAME ** *HIRE_DATE ** * ** *************** ************** I +-----------------+-----------------+-----------------+-----------------+ I I I I I I FUNDTRAN I PAYINFO I ADDRESS I SALINFO I ATTNDSEG 02 I U 03 I SH1 07 I S1 08 I SH1 10 I KM ************** ************** ************** ************** .............. *BANK_NAME * *DAT_INC ** *TYPE ** *PAY_DATE ** :DATE_ATTEND :: *BANK_CODE * *PCT_INC ** *ADDRESS_LN1 ** *GROSS ** :EMP_ID ::K *BANK_ACCT * *SALARY ** *ADDRESS_LN2 ** * ** : :: *EFFECT_DATE * *JOBCODE ** *ADDRESS_LN3 ** * ** : :: * * * ** * ** * ** : :: ************** *************** *************** *************** :............:: ************** ************** ************** .............: I I I EDUCFILE I I I I I I I JOBSEG I DEDUCT I COURSEG 04 I KU 09 I S1 11 I KLU .............. ************** .............. :JOBCODE :K *DED_CODE ** :COURSE_CODE : :JOB_DESC : *DED_AMT ** :COURSE_NAME : : : * ** : : : : * ** : : : : * ** : : :............: *************** :............: I JOBFILE ************** EDUCFILE I +-----------------+ I I I SECSEG I SKILLSEG 05 I KLU 06 I KL .............. .............. :SEC_CLEAR : :SKILLS :: : : :SKILL_DESC :: : : : :: : : : :: : : : :: :............: :............:: JOBFILE .............: JOBFILE
496 Information Builders

Master Files and Diagrams
JOBFILE Data Source
JOBFILE contains sample data about a company’s job positions. Its segments are:
JOBSEG
Describes what each position is. The field JOBCODE in this segment is indexed.
SKILLSEG
Lists the skills required by each position.
SECSEG
Specifies the security clearance needed, if any. This segment is unique.
JOBFILE Master File
FILENAME=JOBFILE, SUFFIX=FOC SEGNAME=JOBSEG, SEGTYPE=S1 FIELDNAME=JOBCODE, ALIAS=JC, FORMAT=A3, INDEX=I,$ FIELDNAME=JOB_DESC, ALIAS=JD, FORMAT=A25 ,$ SEGNAME=SKILLSEG, SEGTYPE=S1, PARENT=JOBSEG FIELDNAME=SKILLS, ALIAS=, FORMAT=A4 ,$ FIELDNAME=SKILL_DESC, ALIAS=SD, FORMAT=A30 ,$ SEGNAME=SECSEG, SEGTYPE=U, PARENT=JOBSEG FIELDNAME=SEC_CLEAR, ALIAS=SC, FORMAT=A6 ,$
In this section:
JOBFILE Master File
JOBFILE Structure Diagram
Developing Applications 497

EDUCFILE Data Source
JOBFILE Structure Diagram
SECTION 01
STRUCTURE OF FOCUS FILE JOBFILE ON 05/15/03 AT 14.40.06 JOBSEG 01 S1 ************** *JOBCODE **I *JOB_DESC ** * ** * ** * ** *************** ************** I +-----------------+ I I I SECSEG I SKILLSEG 02 I U 03 I S1 ************** ************* *SEC_CLEAR * *SKILLS ** * * *SKILL_DESC ** * * * ** * * * ** * * * ** ************** ************** *************
EDUCFILE Data Source
EDUCFILE contains sample data about a company’s in-house courses. Its segments are:
COURSEG
Contains data on each course.
ATTNDSEG
Specifies which employees attended the courses. Both fields in the segment are key fields. The field EMP_ID in this segment is indexed.
In this section:
EDUCFILE Master File
EDUCFILE Structure Diagram
498 Information Builders

Master Files and Diagrams
EDUCFILE Master File
FILENAME=EDUCFILE, SUFFIX=FOC SEGNAME=COURSEG, SEGTYPE=S1 FIELDNAME=COURSE_CODE, ALIAS=CC, FORMAT=A6, $ FIELDNAME=COURSE_NAME, ALIAS=CD, FORMAT=A30, $ SEGNAME=ATTNDSEG, SEGTYPE=SH2, PARENT=COURSEG FIELDNAME=DATE_ATTEND, ALIAS=DA, FORMAT=I6YMD, $ FIELDNAME=EMP_ID, ALIAS=EID, FORMAT=A9, INDEX=I, $
EDUCFILE Structure Diagram
SECTION 01
STRUCTURE OF FOCUS FILE EDUCFILE ON 05/15/03 AT 14.45.44 COURSEG 01 S1 ************** *COURSE_CODE ** *COURSE_NAME ** * ** * ** * ** *************** ************** I I I I ATTNDSEG 02 I SH2 ************** *DATE_ATTEND ** *EMP_ID **I * ** * ** * ** *************** **************
Developing Applications 499

SALES Data Source
SALES Data Source
SALES contains sample data about a dairy company with an affiliated store chain. Its segments are:
STOR_SEG
Lists the stores buying the products.
DAT_SEG
Contains the dates of inventory.
PRODUCT
Contains sales data for each product on each date. The PROD_CODE field is indexed. The RETURNS and DAMAGED fields have the MISSING=ON attribute.
SALES Master File
FILENAME=KSALES, SUFFIX=FOC SEGNAME=STOR_SEG, SEGTYPE=S1 FIELDNAME=STORE_CODE, ALIAS=SNO, FORMAT=A3, $ FIELDNAME=CITY, ALIAS=CTY, FORMAT=A15, $ FIELDNAME=AREA, ALIAS=LOC, FORMAT=A1, $ SEGNAME=DATE_SEG, PARENT=STOR_SEG, SEGTYPE=SH1, FIELDNAME=DATE, ALIAS=DTE, FORMAT=A4MD, $ SEGNAME=PRODUCT, PARENT=DATE_SEG, SEGTYPE=S1, FIELDNAME=PROD_CODE, ALIAS=PCODE, FORMAT=A3, FIELDTYPE=I,$ FIELDNAME=UNIT_SOLD, ALIAS=SOLD, FORMAT=I5, $ FIELDNAME=RETAIL_PRICE,ALIAS=RP, FORMAT=D5.2M,$ FIELDNAME=DELIVER_AMT, ALIAS=SHIP, FORMAT=I5, $ FIELDNAME=OPENING_AMT, ALIAS=INV, FORMAT=I5, $ FIELDNAME=RETURNS, ALIAS=RTN, FORMAT=I3, MISSING=ON,$ FIELDNAME=DAMAGED, ALIAS=BAD, FORMAT=I3, MISSING=ON,$
In this section:
SALES Master File
SALES Structure Diagram
500 Information Builders

Master Files and Diagrams
SALES Structure Diagram
SECTION 01 STRUCTURE OF FOCUS FILE SALES ON 05/15/03 AT 14.50.28 STOR_SEG 01 S1 ************** *STORE_CODE ** *CITY ** *AREA ** * ** * ** *************** ************** I I I I DATE_SEG 02 I SH1 ************** *DATE ** * ** * ** * ** * ** *************** ************** I I I I PRODUCT 03 I S1 ************** *PROD_CODE **I *UNIT_SOLD ** *RETAIL_PRICE** *DELIVER_AMT ** * ** *************** **************
Developing Applications 501

PROD Data Source
PROD Data SourceThe PROD data source lists products sold by a dairy company. It consists of one segment, PRODUCT. The field PROD_CODE is indexed.
PROD Master File
FILE=KPROD, SUFFIX=FOC, SEGMENT=PRODUCT, SEGTYPE=S1, FIELDNAME=PROD_CODE, ALIAS=PCODE, FORMAT=A3, FIELDTYPE=I, $ FIELDNAME=PROD_NAME, ALIAS=ITEM, FORMAT=A15, $ FIELDNAME=PACKAGE, ALIAS=SIZE, FORMAT=A12, $ FIELDNAME=UNIT_COST, ALIAS=COST, FORMAT=D5.2M, $
PROD Structure Diagram
SECTION 01 STRUCTURE OF FOCUS FILE PROD ON 05/15/03 AT 14.57.38 PRODUCT01 S1***************PROD_CODE **I*PROD_NAME ***PACKAGE ***UNIT_COST *** ***************** **************
CAR Data Source
CAR contains sample data about specifications and sales information for rare cars. Its segments are:
ORIGIN
Lists the country that manufactures the car. The field COUNTRY is indexed.
COMP
Contains the car name.
CARREC
Contains the car model.
In this section:
CAR Master File
CAR Structure Diagram
502 Information Builders

Master Files and Diagrams
BODY
Lists the body type, seats, dealer and retail costs, and units sold.
SPECS
Lists car specifications. This segment is unique.
WARANT
Lists the type of warranty.
EQUIP
Lists standard equipment.
The aliases in the CAR Master File are specified without the ALIAS keyword.
CAR Master File
FILENAME=CAR,SUFFIX=FOC SEGNAME=ORIGIN,SEGTYPE=S1 FIELDNAME=COUNTRY,COUNTRY,A10,FIELDTYPE=I,$ SEGNAME=COMP,SEGTYPE=S1,PARENT=ORIGIN FIELDNAME=CAR,CARS,A16,$ SEGNAME=CARREC,SEGTYPE=S1,PARENT=COMP FIELDNAME=MODEL,MODEL,A24,$ SEGNAME=BODY,SEGTYPE=S1,PARENT=CARREC FIELDNAME=BODYTYPE,TYPE,A12,$ FIELDNAME=SEATS,SEAT,I3,$ FIELDNAME=DEALER_COST,DCOST,D7,$ FIELDNAME=RETAIL_COST,RCOST,D7,$ FIELDNAME=SALES,UNITS,I6,$ SEGNAME=SPECS,SEGTYPE=U,PARENT=BODY FIELDNAME=LENGTH,LEN,D5,$ FIELDNAME=WIDTH,WIDTH,D5,$ FIELDNAME=HEIGHT,HEIGHT,D5,$ FIELDNAME=WEIGHT,WEIGHT,D6,$ FIELDNAME=WHEELBASE,BASE,D6.1,$ FIELDNAME=FUEL_CAP,FUEL,D6.1,$ FIELDNAME=BHP,POWER,D6,$ FIELDNAME=RPM,RPM,I5,$ FIELDNAME=MPG,MILES,D6,$ FIELDNAME=ACCEL,SECONDS,D6,$ SEGNAME=WARANT,SEGTYPE=S1,PARENT=COMP FIELDNAME=WARRANTY,WARR,A40,$ SEGNAME=EQUIP,SEGTYPE=S1,PARENT=COMP FIELDNAME=STANDARD,EQUIP,A40,$
Developing Applications 503

CAR Data Source
CAR Structure DiagramSECTION 01 STRUCTURE OF FOCUS FILE CAR ON 05/15/03 AT 10.16.27 ORIGIN 01 S1 ************** *COUNTRY **I * ** * ** * ** * ** *************** ************** I I I I COMP 02 I S1 ************** *CAR ** * ** * ** * ** * ** *************** ************** I +-----------------+-----------------+ I I I I CARREC I WARANT I EQUIP 03 I S1 06 I S1 07 I S1 ************** ************** ************** *MODEL * *WARRANTY ** *STANDARD ** * * * ** * ** * * * ** * ** * * * ** * ** * * * ** * ** ************** *************** *************** ************* ************** ************** I I I I BODY 04 I S1 ************** *BODYTYPE ** *SEATS ** *DEALER_COST ** *RETAIL_COST ** * ** *************** ************** I I I I SPECS 05 I U ************** *LENGTH ** *WIDTH ** *HEIGHT ** *WEIGHTT ** * ** *************** **************
504 Information Builders

Master Files and Diagrams
LEDGER Data Source
LEDGER contains sample accounting data. It consists of one segment, TOP. This data source is specified primarily for FML examples. Aliases do not exist for the fields in this Master File, and the commas act as placeholders.
LEDGER Master File
FILENAME=LEDGER, SUFFIX=FOC,$ SEGNAME=TOP, SEGTYPE=S2,$ FIELDNAME=YEAR , , FORMAT=A4, $ FIELDNAME=ACCOUNT, , FORMAT=A4, $ FIELDNAME=AMOUNT , , FORMAT=I5C,$
LEDGER Structure Diagram
SECTION 01
STRUCTURE OF FOCUS FILE LEDGER ON 05/15/03 AT 15.17.08 TOP 01 S2 ************** *YEAR ** *ACCOUNT ** *AMOUNT ** * ** * ** *************** **************
In this section:
LEDGER Master File
LEDGER Structure Diagram
Developing Applications 505

FINANCE Data Source
FINANCE Data Source
FINANCE contains sample financial data for balance sheets. It consists of one segment, TOP. This data source is specified primarily for FML examples. Aliases do not exist for the fields in this Master File, and the commas act as placeholders.
FINANCE Master File
FILENAME=FINANCE, SUFFIX=FOC,$ SEGNAME=TOP, SEGTYPE=S2,$ FIELDNAME=YEAR , , FORMAT=A4, $ FIELDNAME=ACCOUNT, , FORMAT=A4, $ FIELDNAME=AMOUNT , , FORMAT=D12C,$
FINANCE Structure Diagram
SECTION 01
STRUCTURE OF FOCUS FILE FINANCE ON 05/15/03 AT 15.17.08 TOP 01 S2 ************** *YEAR ** *ACCOUNT ** *AMOUNT ** * ** * ** *************** **************
In this section:
FINANCE Master File
FINANCE Structure Diagram
506 Information Builders

Master Files and Diagrams
REGION Data Source
REGION contains sample account data for the eastern and western regions of the country. It consists of one segment, TOP. This data source is specified primarily for FML examples. Aliases do not exist for the fields in this Master File, and the commas act as placeholders.
REGION Master File
FILENAME=REGION, SUFFIX=FOC,$ SEGNAME=TOP, SEGTYPE=S1,$ FIELDNAME=ACCOUNT, , FORMAT=A4, $ FIELDNAME=E_ACTUAL, , FORMAT=I5C,$ FIELDNAME=E_BUDGET, , FORMAT=I5C,$ FIELDNAME=W_ACTUAL, , FORMAT=I5C,$ FIELDNAME=W_BUDGET, , FORMAT=I5C,$
REGION Structure Diagram
SECTION 01
STRUCTURE OF FOCUS FILE REGION ON 05/15/03 AT 15.18.48 TOP 01 S1 ************** *ACCOUNT ** *E_ACTUAL ** *E_BUDGET ** *W_ACTUAL ** * ** *************** **************
In this section:
REGION Master File
REGION Structure Diagram
Developing Applications 507

COURSES Data Source
COURSES Data SourceCOURSES contains sample data about education courses. It consists of one segment, CRSESEG1. The field DESCRIPTION has a format of TEXT (TX).
COURSES Master File
FILENAME=COURSES, SUFFIX=FOC, $ SEGNAME=CRSESEG1, SEGTYPE=S1, $ FIELDNAME=COURSE_CODE, ALIAS=CC, FORMAT=A6, FIELDTYPE=I, $ FIELDNAME=COURSE_NAME, ALIAS=CN, FORMAT=A30, $ FIELDNAME=DURATION, ALIAS=DAYS, FORMAT=I3, $ FIELDNAME=DESCRIPTION, ALIAS=CDESC, FORMAT=TX50, $
COURSES Structure Diagram
SECTION 01
STRUCTURE OF FOCUS FILE COURSES ON 05/15/03 AT 12.26.05 CRSESEG1 01 S1***************COURSE_CODE **I*COURSE_NAME ***DURATION ***DESCRIPTION **T* ***************** **************
508 Information Builders

Master Files and Diagrams
EXPERSON Data Source
EXPERSON Master File
The EXPERSON data source contains personal data about individual employees. It consists of one segment, ONESEG. EXPERSON Master File
FILE=EXPERSON ,SUFFIX=FOC SEGMENT=ONESEG, $ FIELDNAME=SOC_SEC_NO ,ALIAS=SSN ,USAGE=A9 ,$ FIELDNAME=FIRST_NAME ,ALIAS=FN ,USAGE=A9 ,$ FIELDNAME=LAST_NAME ,ALIAS=LN ,USAGE=A10 ,$ FIELDNAME=AGE ,ALIAS=YEARS ,USAGE=I2 ,$ FIELDNAME=SEX ,ALIAS= ,USAGE=A1 ,$ FIELDNAME=MARITAL_STAT ,ALIAS=MS ,USAGE=A1 ,$ FIELDNAME=NO_DEP ,ALIAS=NDP ,USAGE=I3 ,$ FIELDNAME=DEGREE ,ALIAS= ,USAGE=A3 ,$ FIELDNAME=NO_CARS ,ALIAS=CARS ,USAGE=I3 ,$ FIELDNAME=ADDRESS ,ALIAS= ,USAGE=A14 ,$ FIELDNAME=CITY ,ALIAS= ,USAGE=A10 ,$ FIELDNAME=WAGE ,ALIAS=PAY ,USAGE=D10.2SM ,$ FIELDNAME=CATEGORY ,ALIAS=STATUS ,USAGE=A1 ,$ FIELDNAME=SKILL_CODE ,ALIAS=SKILLS ,USAGE=A5 ,$ FIELDNAME=DEPT_CODE ,ALIAS=WHERE ,USAGE=A4 ,$ FIELDNAME=TEL_EXT ,ALIAS=EXT ,USAGE=I4 ,$ FIELDNAME=DATE_EMP ,ALIAS=BASE_DATE ,USAGE=I6YMTD ,$ FIELDNAME=MULTIPLIER ,ALIAS=RATIO ,USAGE=D5.3 ,$
In this section:
EXPERSON Master File
EXPERSON Structure Diagram
Developing Applications 509

EMPDATA Data Source
EXPERSON Structure Diagram
SECTION 01
STRUCTURE OF FOCUS FILE EXPERSON ON 05/15/03 AT 14.50.58 ONESEG 01 S1 ************** *SOC_SEC_NO ** *FIRST_NAME ** *LAST_NAME ** *AGE ** * ** *************** **************
EMPDATA Data Source
EMPDATA contains sample data about a company’s employees. It consists of one segment, EMPDATA. The PIN field is indexed. The AREA field is a temporary field.
EMPDATA Master File
FILENAME=EMPDATA, SUFFIX=FOC SEGNAME=EMPDATA, SEGTYPE=S1 FIELDNAME=PIN, ALIAS=ID, FORMAT=A9, INDEX=I, $ FIELDNAME=LASTNAME, ALIAS=LN, FORMAT=A15, $ FIELDNAME=FIRSTNAME, ALIAS=FN, FORMAT=A10, $ FIELDNAME=MIDINITIAL, ALIAS=MI, FORMAT=A1, $ FIELDNAME=DIV, ALIAS=CDIV, FORMAT=A4, $ FIELDNAME=DEPT, ALIAS=CDEPT, FORMAT=A20, $ FIELDNAME=JOBCLASS, ALIAS=CJCLAS, FORMAT=A8, $ FIELDNAME=TITLE, ALIAS=CFUNC, FORMAT=A20, $ FIELDNAME=SALARY, ALIAS=CSAL, FORMAT=D12.2M, $ FIELDNAME=HIREDATE, ALIAS=HDAT, FORMAT=YMD, $$DEFINE AREA/A13=DECODE DIV (NE 'NORTH EASTERN' SE 'SOUTH EASTERN'CE 'CENTRAL' WE 'WESTERN' CORP 'CORPORATE' ELSE 'INVALID AREA');$
In this section:
EMPDATA Master File
EMPDATA Structure Diagram
510 Information Builders

Master Files and Diagrams
EMPDATA Structure Diagram
SECTION 01
STRUCTURE OF FOCUS FILE EMPDATA ON 05/15/03 AT 14.49.09 EMPDATA 01 S1 ************** *PIN **I *LASTNAME ** *FIRSTNAME ** *MIDINITIAL ** * ** *************** **************
TRAINING Data Source
TRAINING contains sample data about training courses for employees. It consists of one segment, TRAINING. The PIN field is indexed. The EXPENSES, GRADE, and LOCATION fields have the MISSING=ON attribute.
TRAINING Master File
FILENAME=TRAINING, SUFFIX=FOC SEGNAME=TRAINING, SEGTYPE=SH3 FIELDNAME=PIN, ALIAS=ID, FORMAT=A9, INDEX=I, $ FIELDNAME=COURSESTART, ALIAS=CSTART, FORMAT=YMD, $ FIELDNAME=COURSECODE, ALIAS=CCOD, FORMAT=A7, $ FIELDNAME=EXPENSES, ALIAS=COST, FORMAT=D8.2, MISSING=ON $ FIELDNAME=GRADE, ALIAS=GRA, FORMAT=A2, MISSING=ON, $ FIELDNAME=LOCATION, ALIAS=LOC, FORMAT=A6, MISSING=ON, $
In this section:
TRAINING Master File
TRAINING Structure Diagram
Developing Applications 511

COURSE Data Source
TRAINING Structure Diagram
SECTION 01
STRUCTURE OF FOCUS FILE TRAINING ON 05/15/03 AT 14.51.28 TRAINING 01 SH3 ************** *PIN **I *COURSESTART ** *COURSECODE ** *EXPENSES ** * ** *************** **************
COURSE Data Source
COURSE contains sample data about education courses. It consists of one segment, CRSELIST.
COURSE Master File
FILENAME=COURSE, SUFFIX=FOC SEGNAME=CRSELIST, SEGTYPE=S1 FIELDNAME=COURSECODE, ALIAS=CCOD, FORMAT=A7, INDEX=I, $ FIELDNAME=CTITLE, ALIAS=COURSE, FORMAT=A35, $ FIELDNAME=SOURCE, ALIAS=ORG, FORMAT=A35, $ FIELDNAME=CLASSIF, ALIAS=CLASS, FORMAT=A10, $ FIELDNAME=TUITION, ALIAS=FEE, FORMAT=D8.2, MISSING=ON, $ FIELDNAME=DURATION, ALIAS=DAYS, FORMAT=A3, MISSING=ON, $ FIELDNAME=DESCRIPTN1, ALIAS=DESC1, FORMAT=A40, $ FIELDNAME=DESCRIPTN2, ALIAS=DESC2, FORMAT=A40, $ FIELDNAME=DESCRIPTN2, ALIAS=DESC3, FORMAT=A40, $
In this section:
COURSE Master File
COURSE Structure Diagram
512 Information Builders

Master Files and Diagrams
COURSE Structure Diagram
SECTION 01
STRUCTURE OF FOCUS FILE COURSE ON 05/15/03 AT 12.26.05 CRSELIST 01 S1***************COURSECODE **I*CTITLE ***SOURCE ***CLASSIF *** ***************** **************
JOBHIST Data Source
JOBHIST contains information about an employee’s jobs. Both the PIN and JOBSTART fields are keys. The PIN field is indexed.
JOBHIST Master File
FILENAME=JOBHIST, SUFFIX=FOCSEGNAME=JOBHIST, SEGTYPE=SH2 FIELDNAME=PIN, ALIAS=ID, FORMAT=A9, INDEX=I ,$ FIELDNAME=JOBSTART, ALIAS=SDAT, FORMAT=YMD, $ FIELDNAME=JOBCLASS, ALIAS=JCLASS, FORMAT=A8, $ FIELDNAME=FUNCTITLE, ALIAS=FUNC, FORMAT=A20, $
In this section:
JOBHIST Master File
JOBHIST Structure Diagram
Developing Applications 513

JOBLIST Data Source
JOBHIST Structure Diagram
SECTION 01 STRUCTURE OF FOCUS FILE JOBHIST ON 01/22/08 AT 16.23.46
JOBHIST 01 SH2 ************** *PIN **I *JOBSTART ** *JOBCLASS ** *FUNCTITLE ** * ** *************** **************
JOBLIST Data Source
JOBHIST contains information about jobs. The JOBCLASS field is indexed.
JOBLIST MASTER File
FILENAME=JOBLIST, SUFFIX=FOCSEGNAME=JOBSEG, SEGTYPE=S1 FIELDNAME=JOBCLASS, ALIAS=JCLASS, FORMAT=A8, INDEX=I ,$ FIELDNAME=CATEGORY, ALIAS=JGROUP, FORMAT=A25, $ FIELDNAME=JOBDESC, ALIAS=JDESC, FORMAT=A40, $ FIELDNAME=LOWSAL, ALIAS=LSAL, FORMAT=D12.2M, $ FIELDNAME=HIGHSAL, ALIAS=HSAL, FORMAT=D12.2M, $
DEFINE GRADE/A2=EDIT (JCLASS,'$$$99');$DEFINE LEVEL/A25=DECODE GRADE (08 'GRADE 8' 09 'GRADE 9' 10'GRADE 10' 11 'GRADE 11' 12 'GRADE 12' 13 'GRADE 13' 14 'GRADE 14');$
In this section:
JOBLIST MASTER File
JOBLIST Structure Diagram
514 Information Builders

Master Files and Diagrams
JOBLIST Structure Diagram
SECTION 01 STRUCTURE OF FOCUS FILE JOBLIST ON 01/22/08 AT 16.24.52
JOBSEG 01 S1 ************** *JOBCLASS **I *CATEGORY ** *JOBDESC ** *LOWSAL ** * ** *************** **************
LOCATOR Data Source
JOBHIST contains information about an employee’s location and phone number. The PIN field is indexed.
LOCATOR MASTER File
FILENAME=LOCATOR, SUFFIX=FOCSEGNAME=LOCATOR, SEGTYPE=S1, FIELDNAME=PIN, ALIAS=ID_NO, FORMAT=A9, INDEX=I, $ FIELDNAME=SITE, ALIAS=SITE, FORMAT=A25, $ FIELDNAME=FLOOR, ALIAS=FL, FORMAT=A3, $ FIELDNAME=ZONE, ALIAS=ZONE, FORMAT=A2, $ FIELDNAME=BUS_PHONE, ALIAS=BTEL, FORMAT=A5, $
In this section:
LOCATOR MASTER File
LOCATOR Structure Diagram
Developing Applications 515

PERSINFO Data Source
LOCATOR Structure Diagram
SECTION 01 STRUCTURE OF FOCUS FILE LOCATOR ON 01/22/08 AT 16.26.55
LOCATOR 01 S1 ************** *PIN **I *SITE ** *FLOOR ** *ZONE ** * ** *************** **************
PERSINFO Data Source
PERSINFO contains an employee’s personal information. The PIN field is indexed.
PERSINFO MASTER File
FILENAME=PERSINFO, SUFFIX=FOCSEGNAME=PERSONAL, SEGTYPE=S1 FIELDNAME=PIN, ALIAS=ID, FORMAT=A9, INDEX=I, $ FIELDNAME=INCAREOF, ALIAS=ICO, FORMAT=A35, $ FIELDNAME=STREETNO, ALIAS=STR, FORMAT=A20, $ FIELDNAME=APT, ALIAS=APT, FORMAT=A4, $ FIELDNAME=CITY, ALIAS=CITY, FORMAT=A20, $ FIELDNAME=STATE, ALIAS=PROV, FORMAT=A4, $ FIELDNAME=POSTALCODE, ALIAS=ZIP, FORMAT=A10, $ FIELDNAME=COUNTRY, ALIAS=CTRY, FORMAT=A15, $ FIELDNAME=HOMEPHONE, ALIAS=TEL, FORMAT=A10, $ FIELDNAME=EMERGENCYNO, ALIAS=ENO, FORMAT=A10, $ FIELDNAME=EMERGCONTACT, ALIAS=ENAME, FORMAT=A35, $ FIELDNAME=RELATIONSHIP, ALIAS=REL, FORMAT=A8, $ FIELDNAME=BIRTHDATE, ALIAS=BDAT, FORMAT=YMD, $
In this section:
PERSINFO MASTER File
PERSINFO Structure Diagram
516 Information Builders

Master Files and Diagrams
PERSINFO Structure Diagram
SECTION 01 STRUCTURE OF FOCUS FILE PERSINFO ON 01/22/08 AT 16.27.24
PERSONAL 01 S1 ************** *PIN **I *INCAREOF ** *STREETNO ** *APT ** * ** *************** **************
SALHIST Data Source
SALHIST contains an information about an employee’s salary history. The PIN field is indexed. Both the PIN and EFFECTDATE fields are keys.
SALHIST MASTER File
FILENAME=SALHIST, SUFFIX=FOCSEGNAME=SLHISTRY, SEGTYPE=SH2 FIELDNAME=PIN, ALIAS=ID, FORMAT=A9, INDEX=I, $ FIELDNAME=EFFECTDATE, ALIAS=EDAT, FORMAT=YMD, $ FIELDNAME=OLDSALARY, ALIAS=OSAL, FORMAT=D12.2, $
In this section:
SALHIST MASTER File
SALHIST Structure Diagram
Developing Applications 517

PAYHIST File
SALHIST Structure Diagram
SECTION 01 STRUCTURE OF FOCUS FILE SALHIST ON 01/22/08 AT 16.28.02
SLHISTRY 01 SH2 ************** *PIN **I *EFFECTDATE ** *OLDSALARY ** * ** * ** *************** **************
PAYHIST FileThe PAYHIST data source contains the employees' salary history. It consists of one segment, PAYSEG. The SUFFIX attribute indicates that the data file is a fixed-format sequential file.
PAYHIST Master File
FILENAME=PAYHIST, SUFFIX=FIX SEGMENT=PAYSEG,$ FIELDNAME=SOC_SEC_NO, ALIAS=SSN, USAGE=A9, ACTUAL=A9, $ FIELDNAME=DATE_OF_IN, ALIAS=INCDATE, USAGE=I6YMTD, ACTUAL=A6, $ FIELDNAME=AMT_OF_INC, ALIAS=RAISE, USAGE=D6.2, ACTUAL=A10,$ FIELDNAME=PCT_INC, ALIAS=, USAGE=D6.2, ACTUAL=A6, $ FIELDNAME=NEW_SAL, ALIAS=CURR_SAL, USAGE=D10.2, ACTUAL=A11,$ FIELDNAME=FILL, ALIAS=, USAGE=A38, ACTUAL=A38,$
518 Information Builders

Master Files and Diagrams
PAYHIST Structure Diagram
SECTION 01
STRUCTURE OF FIX FILE PAYHIST ON 05/15/03 AT 14.51.59 PAYSEG 01 S1 ************** *SOC_SEC_NO ** *DATE_OF_IN ** *AMT_OF_INC ** *PCT_INC ** * ** *************** **************
COMASTER FileThe COMASTER file is used to display the file structure and contents of each segment in a data source. Since COMASTER is used for debugging other Master Files, a corresponding FOCEXEC does not exist for the COMASTER file. Its segments are:
❏ FILEID, which lists file information.
❏ RECID, which lists segment information.
❏ FIELDID, which lists field information.
❏ DEFREC, which lists a description record.
❏ PASSREC, which lists read/write access.
❏ CRSEG, which lists cross-reference information for segments.
❏ ACCSEG, which lists DBA information.
Developing Applications 519

COMASTER File
COMASTER Master File
SUFFIX=COM,SEGNAME=FILEID FIELDNAME=FILENAME ,FILE ,A8 , ,$ FIELDNAME=FILE SUFFIX ,SUFFIX ,A8 , ,$ FIELDNAME=FDEFCENT ,FDFC ,A4 , ,$ FIELDNAME=FYRTHRESH ,FYRT ,A2 , ,$SEGNAME=RECID FIELDNAME=SEGNAME ,SEGMENT ,A8 , ,$ FIELDNAME=SEGTYPE ,SEGTYPE ,A4 , ,$ FIELDNAME=SEGSIZE ,SEGSIZE ,I4 , A4,$ FIELDNAME=PARENT ,PARENT ,A8 , ,$ FIELDNAME=CRKEY ,VKEY ,A66, ,$SEGNAME=FIELDID FIELDNAME=FIELDNAME ,FIELD ,A66, ,$ FIELDNAME=ALIAS ,SYNONYM ,A66, ,$ FIELDNAME=FORMAT ,USAGE ,A8 , ,$ FIELDNAME=ACTUAL ,ACTUAL ,A8 , ,$ FIELDNAME=AUTHORITY ,AUTHCODE ,A8 , ,$ FIELDNAME=FIELDTYPE ,INDEX ,A8 , ,$ FIELDNAME=TITLE ,TITLE ,A64, ,$ FIELDNAME=HELPMESSAGE ,MESSAGE ,A256, ,$ FIELDNAME=MISSING ,MISSING ,A4 , ,$ FIELDNAME=ACCEPTS ,ACCEPTABLE ,A255, ,$ FIELDNAME=RESERVED ,RESERVED ,A44 , ,$ FIELDNAME=DEFCENT ,DFC ,A4 , ,$ FIELDNAME=YRTHRESH ,YRT ,A4 , ,$SEGNAME=DEFREC FIELDNAME=DEFINITION ,DESCRIPTION ,A44, ,$SEGNAME=PASSREC,PARENT=FILEID FIELDNAME=READ/WRITE ,RW ,A32, ,$SEGNAME=CRSEG,PARENT=RECID FIELDNAME=CRFILENAME ,CRFILE ,A8 , ,$ FIELDNAME=CRSEGNAME ,CRSEGMENT ,A8 , ,$ FIELDNAME=ENCRYPT ,ENCRYPT ,A4 , ,$SEGNAME=ACCSEG,PARENT=DEFREC FIELDNAME=DBA ,DBA ,A8 , ,$ FIELDNAME=DBAFILE , ,A8 , ,$ FIELDNAME=USER ,PASS ,A8 , ,$ FIELDNAME=ACCESS ,ACCESS ,A8 , ,$ FIELDNAME=RESTRICT ,RESTRICT ,A8 , ,$ FIELDNAME=NAME ,NAME ,A66, ,$ FIELDNAME=VALUE ,VALUE ,A80, ,$
520 Information Builders

Master Files and Diagrams
COMASTER Structure DiagramSECTION 01 STRUCTURE OF EXTERNAL FILE COMASTER ON 05/15/03 AT 14.53.38 FILEID01 S1***************FILENAME ***FILE SUFFIX ***FDEFCENT ***FYRTHRESH *** ***************** ************** I +-----------------+ I I I RECID I PASSREC 02 I N 07 I N************* **************SEGNAME ** *READ/WRITE ***SEGTYPE ** * ***SEGSIZE ** * ***PARENT ** * *** ** * **************** ************** ************* ************* I +-----------------+ I I I FIELDID I CRSEG 03 I N 06 I N************* **************FIELDNAME ** *CRFILENAME ***ALIAS ** *CRSEGNAME ***FORMAT ** *ENCRYPT ***ACTUAL ** * *** ** * **************** ************** ************* ************* I I I I DEFREC 04 I N************* *DEFINITION *** *** *** *** **************** ************* I I I I ACCSEG 05 I N************* *DBA ***DBAFILE ***USER ***ACCESS *** **************** *************
Developing Applications 521

VIDEOTRK, MOVIES, and ITEMS Data Sources
VIDEOTRK, MOVIES, and ITEMS Data Sources
VIDEOTRK contains sample data about customer, rental, and purchase information for a video rental business. It can be joined to the MOVIES or ITEMS data source. VIDEOTRK and MOVIES are used in examples that illustrate the use of the Maintain facility.
VIDEOTRK Master File
FILENAME=VIDEOTRK, SUFFIX=FOC SEGNAME=CUST, SEGTYPE=S1 FIELDNAME=CUSTID, ALIAS=CIN, FORMAT=A4, $ FIELDNAME=LASTNAME, ALIAS=LN, FORMAT=A15, $ FIELDNAME=FIRSTNAME, ALIAS=FN, FORMAT=A10, $ FIELDNAME=EXPDATE, ALIAS=EXDAT, FORMAT=YMD, $ FIELDNAME=PHONE, ALIAS=TEL, FORMAT=A10, $ FIELDNAME=STREET, ALIAS=STR, FORMAT=A20, $ FIELDNAME=CITY, ALIAS=CITY, FORMAT=A20, $ FIELDNAME=STATE, ALIAS=PROV, FORMAT=A4, $ FIELDNAME=ZIP, ALIAS=POSTAL_CODE, FORMAT=A9, $SEGNAME=TRANSDAT, SEGTYPE=SH1, PARENT=CUST FIELDNAME=TRANSDATE, ALIAS=OUTDATE, FORMAT=YMD, $SEGNAME=SALES, SEGTYPE=S2, PARENT=TRANSDAT FIELDNAME=PRODCODE, ALIAS=PCOD, FORMAT=A6, $ FIELDNAME=TRANSCODE, ALIAS=TCOD, FORMAT=I3, $ FIELDNAME=QUANTITY, ALIAS=NO, FORMAT=I3S, $ FIELDNAME=TRANSTOT, ALIAS=TTOT, FORMAT=F7.2S, $SEGNAME=RENTALS, SEGTYPE=S2, PARENT=TRANSDAT FIELDNAME=MOVIECODE, ALIAS=MCOD, FORMAT=A6, INDEX=I, $ FIELDNAME=COPY, ALIAS=COPY, FORMAT=I2, $ FIELDNAME=RETURNDATE, ALIAS=INDATE, FORMAT=YMD, $ FIELDNAME=FEE, ALIAS=FEE, FORMAT=F5.2S, $
In this section:
VIDEOTRK Master File
VIDEOTRK Structure Diagram
MOVIES Master File
MOVIES Structure Diagram
ITEMS Master File
ITEMS Structure Diagram
522 Information Builders

Master Files and Diagrams
VIDEOTRK Structure Diagram
SECTION 01
STRUCTURE OF FOCUS FILE VIDEOTRK ON 05/15/03 AT 12.25.19 CUST 01 S1***************CUSTID ***LASTNAME ***FIRSTNAME ***EXPDATE *** ***************** ************** I I I I TRANSDAT 02 I SH1***************TRANSDATE *** *** *** *** ***************** ************** I +-----------------+ I I I SALES I RENTALS 03 I S2 04 I S2************** ***************PRODCODE ** *MOVIECODE **I*TRANSCODE ** *COPY ***QUANTITY ** *RETURNDATE ***TRANSTOT ** *FEE *** ** * ***************** *************** ************** **************
Developing Applications 523

VIDEOTRK, MOVIES, and ITEMS Data Sources
MOVIES Master File
FILENAME=MOVIES, SUFFIX=FOC SEGNAME=MOVINFO, SEGTYPE=S1 FIELDNAME=MOVIECODE, ALIAS=MCOD, FORMAT=A6, INDEX=I, $ FIELDNAME=TITLE, ALIAS=MTL, FORMAT=A39, $ FIELDNAME=CATEGORY, ALIAS=CLASS, FORMAT=A8, $ FIELDNAME=DIRECTOR, ALIAS=DIR, FORMAT=A17, $ FIELDNAME=RATING, ALIAS=RTG, FORMAT=A4, $ FIELDNAME=RELDATE, ALIAS=RDAT, FORMAT=YMD, $ FIELDNAME=WHOLESALEPR, ALIAS=WPRC, FORMAT=F6.2, $ FIELDNAME=LISTPR, ALIAS=LPRC, FORMAT=F6.2, $ FIELDNAME=COPIES, ALIAS=NOC, FORMAT=I3, $
MOVIES Structure Diagram
SECTION 01
STRUCTURE OF FOCUS FILE MOVIES ON 05/15/03 AT 12.26.05 MOVINFO 01 S1***************MOVIECODE **I*TITLE ***CATEGORY ***DIRECTOR *** ***************** **************
ITEMS Master File
FILENAME=ITEMS, SUFFIX=FOC SEGNAME=ITMINFO, SEGTYPE=S1 FIELDNAME=PRODCODE, ALIAS=PCOD, FORMAT=A6, INDEX=I, $ FIELDNAME=PRODNAME, ALIAS=PROD, FORMAT=A20, $ FIELDNAME=OURCOST, ALIAS=WCOST, FORMAT=F6.2, $ FIELDNAME=RETAILPR, ALIAS=PRICE, FORMAT=F6.2, $ FIELDNAME=ON_HAND, ALIAS=NUM, FORMAT=I5, $
524 Information Builders

Master Files and Diagrams
ITEMS Structure Diagram
SECTION 01
STRUCTURE OF FOCUS FILE ITEMS ON 05/15/03 AT 12.26.05 ITMINFO 01 S1***************PRODCODE **I*PRODNAME ***OURCOST ***RETAILPR *** ***************** **************
Developing Applications 525

VIDEOTR2 Data Source
VIDEOTR2 Data Source
VIDEOTR2 contains sample data about customer, rental, and purchase information for a video rental business. It consists of four segments.
VIDEOTR2 Master File
FILENAME=VIDEOTR2, SUFFIX=FOC SEGNAME=CUST, SEGTYPE=S1 FIELDNAME=CUSTID, ALIAS=CIN, FORMAT=A4, $ FIELDNAME=LASTNAME, ALIAS=LN, FORMAT=A15, $ FIELDNAME=FIRSTNAME, ALIAS=FN, FORMAT=A10, $ FIELDNAME=EXPDATE, ALIAS=EXDAT, FORMAT=YMD, $ FIELDNAME=PHONE, ALIAS=TEL, FORMAT=A10, $ FIELDNAME=STREET, ALIAS=STR, FORMAT=A20, $ FIELDNAME=CITY, ALIAS=CITY, FORMAT=A20, $ FIELDNAME=STATE, ALIAS=PROV, FORMAT=A4, $ FIELDNAME=ZIP, ALIAS=POSTAL_CODE, FORMAT=A9, $ SEGNAME=TRANSDAT, SEGTYPE=SH1, PARENT=CUST FIELDNAME=TRANSDATE, ALIAS=OUTDATE, FORMAT=HYYMDI, $ SEGNAME=SALES, SEGTYPE=S2, PARENT=TRANSDAT FIELDNAME=TRANSCODE, ALIAS=TCOD, FORMAT=I3, $ FIELDNAME=QUANTITY, ALIAS=NO, FORMAT=I3S, $ FIELDNAME=TRANSTOT, ALIAS=TTOT, FORMAT=F7.2S, $ SEGNAME=RENTALS, SEGTYPE=S2, PARENT=TRANSDAT FIELDNAME=MOVIECODE, ALIAS=MCOD, FORMAT=A6, INDEX=I, $ FIELDNAME=COPY, ALIAS=COPY, FORMAT=I2, $ FIELDNAME=RETURNDATE, ALIAS=INDATE, FORMAT=YMD, $ FIELDNAME=FEE, ALIAS=FEE, FORMAT=F5.2S, $
In this section:
VIDEOTR2 Master File
VIDEOTR2 Structure Diagram
526 Information Builders

Master Files and Diagrams
VIDEOTR2 Structure Diagram
SECTION 01 STRUCTURE OF FOCUS FILE VIDEOTR2 ON 05/15/03 AT 16.45.48 CUST 01 S1 ************** *CUSTID ** *LASTNAME ** *FIRSTNAME ** *EXPDATE ** * ** *************** ************** I I I I TRANSDAT 02 I SH1 ************** *TRANSDATE ** * ** * ** * ** * ** *************** ************** I +-----------------+ I I I SALES I RENTALS 03 I S2 04 I S2 ************** ************** *TRANSCODE ** *MOVIECODE **I *QUANTITY ** *COPY ** *TRANSTOT ** *RETURNDATE ** * ** *FEE ** * ** * ** *************** *************** ************** **************
Developing Applications 527

Gotham Grinds Data Sources
Gotham Grinds Data Sources
Gotham Grinds is a group of data sources that contain sample data about a specialty items company.
❏ GGDEMOG contains demographic information about the customers of Gotham Grinds, a company that sells specialty items like coffee, gourmet snacks, and gifts. It consists of one segment, DEMOG01.
❏ GGORDER contains order information for Gotham Grinds. It consists of two segments, ORDER01 and ORDER02.
❏ GGPRODS contains product information for Gotham Grinds. It consists of one segment, PRODS01.
❏ GGSALES contains sales information for Gotham Grinds. It consists of one segment, SALES01.
❏ GGSTORES contains information for each of Gotham Grinds’ 12 stores in the United States. It consists of one segment, STORES01.
In this section:
GGDEMOG Master File
GGDEMOG Structure Diagram
GGORDER Master File
GGORDER Structure Diagram
GGPRODS Master File
GGPRODS Structure Diagram
GGSALES Master File
GGSALES Structure Diagram
GGSTORES Master File
GGSTORES Structure Diagram
528 Information Builders

Master Files and Diagrams
GGDEMOG Master File
FILENAME=GGDEMOG, SUFFIX=FOC SEGNAME=DEMOG01, SEGTYPE=S1 FIELD=ST, ALIAS=E02, FORMAT=A02, INDEX=I,TITLE='State', DESC='State',$ FIELD=HH, ALIAS=E03, FORMAT=I09, TITLE='Number of Households', DESC='Number of Households',$ FIELD=AVGHHSZ98,ALIAS=E04, FORMAT=I09, TITLE='Average Household Size', DESC='Average Household Size',$ FIELD=MEDHHI98, ALIAS=E05, FORMAT=I09, TITLE='Median Household Income', DESC='Median Household Income',$ FIELD=AVGHHI98, ALIAS=E06, FORMAT=I09, TITLE='Average HouseholdIncome', DESC='Average Household Income',$ FIELD=MALEPOP98,ALIAS=E07, FORMAT=I09, TITLE='Male Population', DESC='Male Population',$ FIELD=FEMPOP98, ALIAS=E08, FORMAT=I09, TITLE='Female Population', DESC='Female Population',$ FIELD=P15TO1998,ALIAS=E09, FORMAT=I09, TITLE='15 to 19', DESC='Population 15 to 19 years old',$ FIELD=P20TO2998,ALIAS=E10, FORMAT=I09, TITLE='20 to 29', DESC='Population 20 to 29 years old',$ FIELD=P30TO4998,ALIAS=E11, FORMAT=I09, TITLE='30 to 49', DESC='Population 30 to 49 years old',$ FIELD=P50TO6498,ALIAS=E12, FORMAT=I09, TITLE='50 to 64', DESC='Population 50 to 64 years old',$ FIELD=P65OVR98, ALIAS=E13, FORMAT=I09, TITLE='65 and over', DESC='Population 65 and over',$
GGDEMOG Structure Diagram
SECTION 01
STRUCTURE OF FOCUS FILE GGDEMOG ON 05/15/03 AT 12.26.05 GGDEMOG 01 S1***************ST **I*HH ***AVGHHSZ98 ***MEDHHI98 *** ***************** **************
Developing Applications 529

Gotham Grinds Data Sources
GGORDER Master File
FILENAME=GGORDER, SUFFIX=FOC,$ SEGNAME=ORDER01, SEGTYPE=S1,$ FIELD=ORDER_NUMBER, ALIAS=ORDNO1, FORMAT=I6, TITLE='Order,Number', DESC='Order Identification Number',$ FIELD=ORDER_DATE, ALIAS=DATE, FORMAT=MDY, TITLE='Order,Date', DESC='Date order was placed',$ FIELD=STORE_CODE, ALIAS=STCD, FORMAT=A5, TITLE='Store,Code', DESC='Store Identification Code (for order)',$ FIELD=PRODUCT_CODE, ALIAS=PCD, FORMAT=A4, TITLE='Product,Code', DESC='Product Identification Code (for order)',$ FIELD=QUANTITY, ALIAS=ORDUNITS, FORMAT=I8, TITLE='Ordered,Units', DESC='Quantity Ordered',$SEGNAME=ORDER02, SEGTYPE=KU, PARENT=ORDER01, CRFILE=GGPRODS, CRKEY=PCD,CRSEG=PRODS01 ,$
GGORDER Structure Diagram
SECTION 01
STRUCTURE OF FOCUS FILE GGORDER ON 05/15/03 AT 16.45.48 GGORDER 01 S1 ************** *ORDER_NUMBER** *ORDER_DATE ** *STORE_CODE ** *PRODUCT_CODE** * ** *************** ************** I I I I ORDER02 02 I KU .............. :PRODUCT_ID :K :PRODUCT_DESC: :VENDOR_CODE : :VENDOR_NAME : : : :............:
530 Information Builders

Master Files and Diagrams
GGPRODS Master File
FILENAME=GGPRODS, SUFFIX=FOC SEGNAME=PRODS01, SEGTYPE=S1 FIELD=PRODUCT_ID, ALIAS=PCD, FORMAT=A4, INDEX=I, TITLE='Product,Code', DESC='Product Identification Code',$ FIELD=PRODUCT_DESCRIPTION, ALIAS=PRODUCT, FORMAT=A16, TITLE='Product', DESC='Product Name',$ FIELD=VENDOR_CODE, ALIAS=VCD, FORMAT=A4, INDEX=I, TITLE='Vendor ID', DESC='Vendor Identification Code',$ FIELD=VENDOR_NAME, ALIAS=VENDOR, FORMAT=A23, TITLE='Vendor Name', DESC='Vendor Name',$ FIELD=PACKAGE_TYPE, ALIAS=PACK, FORMAT=A7, TITLE='Package', DESC='Packaging Style',$ FIELD=SIZE, ALIAS=SZ, FORMAT=I2, TITLE='Size', DESC='Package Size',$ FIELD=UNIT_PRICE, ALIAS=UNITPR, FORMAT=D7.2, TITLE='Unit,Price', DESC='Price for one unit',$
GGPRODS Structure Diagram
SECTION 01
STRUCTURE OF FOCUS FILE GGPRODS ON 05/15/03 AT 12.26.05 GGPRODS 01 S1***************PRODUCT_ID **I*PRODUCT_DESC**I*VENDOR_CODE ***VENDOR_NAME *** ***************** **************
Developing Applications 531

Gotham Grinds Data Sources
GGSALES Master File
FILENAME=GGSALES, SUFFIX=FOC SEGNAME=SALES01, SEGTYPE=S1 FIELD=SEQ_NO, ALIAS=SEQ, FORMAT=I5, TITLE='Sequence#', DESC='Sequence number in database',$ FIELD=CATEGORY, ALIAS=E02, FORMAT=A11, INDEX=I, TITLE='Category', DESC='Product category',$ FIELD=PCD, ALIAS=E03, FORMAT=A04, INDEX=I, TITLE='Product ID', DESC='Product Identification code (for sale)',$ FIELD=PRODUCT, ALIAS=E04, FORMAT=A16, TITLE='Product', DESC='Product name',$ FIELD=REGION, ALIAS=E05, FORMAT=A11, INDEX=I, TITLE='Region', DESC='Region code',$ FIELD=ST, ALIAS=E06, FORMAT=A02, INDEX=I, TITLE='State', DESC='State',$ FIELD=CITY, ALIAS=E07, FORMAT=A20, TITLE='City', DESC='City',$ FIELD=STCD, ALIAS=E08, FORMAT=A05, INDEX=I, TITLE='Store ID', DESC='Store identification code (for sale)',$ FIELD=DATE, ALIAS=E09, FORMAT=I8YYMD, TITLE='Date', DESC='Date of sales report',$ FIELD=UNITS, ALIAS=E10, FORMAT=I08, TITLE='Unit Sales', DESC='Number of units sold',$ FIELD=DOLLARS, ALIAS=E11, FORMAT=I08, TITLE='Dollar Sales', DESC='Total dollar amount of reported sales',$ FIELD=BUDUNITS, ALIAS=E12, FORMAT=I08, TITLE='Budget Units', DESC='Number of units budgeted',$ FIELD=BUDDOLLARS, ALIAS=E13, FORMAT=I08, TITLE='Budget Dollars', DESC='Total sales quota in dollars',$
GGSALES Structure Diagram
SECTION 01
STRUCTURE OF FOCUS FILE GGSALES ON 05/15/03 AT 12.26.05 GGSALES 01 S1***************SEQ_NO ***CATEGORY **I*PCD **I*PRODUCT **I* ***************** **************
532 Information Builders

Master Files and Diagrams
GGSTORES Master File
FILENAME=GGSTORES, SUFFIX=FOC SEGNAME=STORES01, SEGTYPE=S1 FIELD=STORE_CODE, ALIAS=E02, FORMAT=A05, INDEX=I, TITLE='Store ID', DESC='Franchisee ID Code',$ FIELD=STORE_NAME, ALIAS=E03, FORMAT=A23, TITLE='Store Name', DESC='Store Name',$ FIELD=ADDRESS1, ALIAS=E04, FORMAT=A19, TITLE='Contact', DESC='Franchisee Owner',$ FIELD=ADDRESS2, ALIAS=E05, FORMAT=A31, TITLE='Address', DESC='Street Address',$ FIELD=CITY, ALIAS=E06, FORMAT=A22, TITLE='City', DESC='City',$ FIELD=STATE, ALIAS=E07, FORMAT=A02, INDEX=I, TITLE='State', DESC='State',$ FIELD=ZIP, ALIAS=E08, FORMAT=A06, TITLE='Zip Code', DESC='Postal Code',$
GGSTORES Structure Diagram
SECTION 01
STRUCTURE OF FOCUS FILE GGSTORES ON 05/15/03 AT 12.26.05 GGSTORES 01 S1***************STORE_CODE **I*STORE_NAME ***ADDRESS1 ***ADDRESS2 *** ***************** **************
Developing Applications 533

Century Corp Data Sources
Century Corp Data Sources
Century Corp is a consumer electronics manufacturer that distributes products through retailers around the world. Century Corp has thousands of employees in plants, warehouses, and offices worldwide. Their mission is to provide quality products and services to their customers.
Century Corp is a group of data sources that contain financial, human resources, inventory, and order information. The last three data sources are designed to be used with chart of accounts data.
❏ CENTCOMP contains location information for stores. It consists of one segment, COMPINFO.
❏ CENTFIN contains financial information. It consists of one segment, ROOT_SEG.
In this section:
CENTCOMP Master File
CENTCOMP Structure Diagram
CENTFIN Master File
CENTFIN Structure Diagram
CENTHR Master File
CENTHR Structure Diagram
CENTINV Master File
CENTINV Structure Diagram
CENTORD Master File
CENTORD Structure Diagram
CENTQA Master File
CENTQA Structure Diagram
CENTGL Master File
CENTGL Structure Diagram
CENTSYSF Master File
CENTSYSF Structure Diagram
CENTSTMT Master File
CENTSTMT Structure Diagram
534 Information Builders

Master Files and Diagrams
❏ CENTHR contains human resources information. It consists of one segment, EMPSEG.
❏ CENTINV contains inventory information. It consists of one segment, INVINFO.
❏ CENTORD contains order information. It consists of four segments, OINFO, STOSEG, PINFO, and INVSEG.
❏ CENTQA contains problem information. It consists of three segments, PROD_SEG, INVSEG, and PROB_SEG.
❏ CENTGL contains a chart of accounts hierarchy. The field GL_ACCOUNT_PARENT is the parent field in the hierarchy. The field GL_ACCOUNT is the hierarchy field. The field GL_ACCOUNT_CAPTION can be used as the descriptive caption for the hierarchy field.
❏ CENTSYSF contains detail-level financial data. CENTSYSF uses a different account line system (SYS_ACCOUNT), which can be joined to the SYS_ACCOUNT field in CENTGL. Data uses "natural" signs (expenses are positive, revenue negative).
❏ CENTSTMT contains detail-level financial data and a cross-reference to the CENTGL data source.
Developing Applications 535

Century Corp Data Sources
CENTCOMP Master File
FILE=CENTCOMP, SUFFIX=FOC, FDFC=19, FYRT=00 SEGNAME=COMPINFO, SEGTYPE=S1, $ FIELD=STORE_CODE, ALIAS=SNUM, FORMAT=A6, INDEX=I, TITLE='Store Id#:', DESCRIPTION='Store Id#', $ FIELD=STORENAME, ALIAS=SNAME, FORMAT=A20, WITHIN=STATE, TITLE='Store,Name:', DESCRIPTION='Store Name', $ FIELD=STATE, ALIAS=STATE, FORMAT=A2, WITHIN=PLANT, TITLE='State:', DESCRIPTION=State, $ DEFINE REGION/A5=DECODE STATE ('AL' 'SOUTH' 'AK' 'WEST' 'AR' 'SOUTH' 'AZ' 'WEST' 'CA' 'WEST' 'CO' 'WEST' 'CT' 'EAST' 'DE' 'EAST' 'DC' 'EAST' 'FL' 'SOUTH' 'GA' 'SOUTH' 'HI' 'WEST' 'ID' 'WEST' 'IL' 'NORTH' 'IN' 'NORTH' 'IA' 'NORTH' 'KS' 'NORTH' 'KY' 'SOUTH' 'LA' 'SOUTH' 'ME' 'EAST' 'MD' 'EAST' 'MA' 'EAST' 'MI' 'NORTH' 'MN' 'NORTH' 'MS' 'SOUTH' 'MT' 'WEST' 'MO' 'SOUTH' 'NE' 'WEST' 'NV' 'WEST' 'NH' 'EAST' 'NJ' 'EAST' 'NM' 'WEST' 'NY' 'EAST' 'NC' 'SOUTH' 'ND' 'NORTH' 'OH' 'NORTH' 'OK' 'SOUTH' 'OR' 'WEST' 'PA' 'EAST' 'RI' 'EAST' 'SC' 'SOUTH' 'SD' 'NORTH' 'TN' 'SOUTH' 'TX' 'SOUTH' 'UT' 'WEST' 'VT' 'EAST' 'VA' 'SOUTH' 'WA' 'WEST' 'WV' 'SOUTH' 'WI' 'NORTH' 'WY' 'WEST' 'NA' 'NORTH' 'ON' 'NORTH' ELSE ' ');, TITLE='Region:', DESCRIPTION=Region, $
CENTCOMP Structure Diagram
SECTION 01 STRUCTURE OF FOCUS FILE CENTCOMP ON 05/15/03 AT 10.20.49 COMPINFO 01 S1 ************** *STORE_CODE **I *STORENAME ** *STATE ** * ** * ** *************** **************
536 Information Builders

Master Files and Diagrams
CENTFIN Master File
FILE=CENTFIN, SUFFIX=FOC, FDFC=19, FYRT=00 SEGNAME=ROOT_SEG, SEGTYPE=S4, $ FIELD=YEAR, ALIAS=YEAR, FORMAT=YY, WITHIN='*Time Period', $ FIELD=QUARTER, ALIAS=QTR, FORMAT=Q, WITHIN=YEAR, TITLE=Quarter, DESCRIPTION=Quarter, $ FIELD=MONTH, ALIAS=MONTH, FORMAT=M, TITLE=Month, DESCRIPTION=Month, $ FIELD=ITEM, ALIAS=ITEM, FORMAT=A20, TITLE=Item, DESCRIPTION=Item, $ FIELD=VALUE, ALIAS=VALUE, FORMAT=D12.2, TITLE=Value, DESCRIPTION=Value, $ DEFINE ITYPE/A12=IF EDIT(ITEM,'9$$$$$$$$$$$$$$$$$$$') EQ 'E' THEN 'Expense' ELSE IF EDIT(ITEM,'9$$$$$$$$$$$$$$$$$$$') EQ 'R' THEN 'Revenue' ELSE 'Asset';, TITLE=Type, DESCRIPTION='Type of Financial Line Item',$ DEFINE MOTEXT/MT=MONTH;,$
CENTFIN Structure Diagram
SECTION 01 STRUCTURE OF FOCUS FILE CENTFIN ON 05/15/03 AT 10.25.52 ROOT_SEG 01 S4 ************** *YEAR ** *QUARTER ** *MONTH ** *ITEM ** * ** *************** **************
Developing Applications 537

Century Corp Data Sources
CENTHR Master File
FILE=CENTHR, SUFFIX=FOC, SEGNAME=EMPSEG, SEGTYPE=S1, $ FIELD=ID_NUM, ALIAS=ID#, FORMAT=I9, TITLE='Employee,ID#', DESCRIPTION='Employee Indentification Number', $ FIELD=LNAME, ALIAS=LN, FORMAT=A14, TITLE='Last,Name', DESCRIPTION='Employeee Last Name', $ FIELD=FNAME, ALIAS=FN, FORMAT=A12, TITLE='First,Name', DESCRIPTION='Employee First Name', $ FIELD=PLANT, ALIAS=PLT, FORMAT=A3, TITLE='Plant,Location', DESCRIPTION='Location of the manufacturing plant', WITHIN='*Location', $ FIELD=START_DATE, ALIAS=SDATE, FORMAT=YYMD, TITLE='Starting,Date', DESCRIPTION='Date of employment',$ FIELD=TERM_DATE, ALIAS=TERM_DATE, FORMAT=YYMD, TITLE='Termination,Date', DESCRIPTION='Termination Date', $ FIELD=STATUS, ALIAS=STATUS, FORMAT=A10, TITLE='Current,Status', DESCRIPTION='Job Status', $ FIELD=POSITION, ALIAS=JOB, FORMAT=A2, TITLE=Position, DESCRIPTION='Job Position', $ FIELD=PAYSCALE, ALIAS=PAYLEVEL, FORMAT=I2, TITLE='Pay,Level', DESCRIPTION='Pay Level', WITHIN='*Wages',$ DEFINE POSITION_DESC/A17=IF POSITION EQ 'BM' THEN 'Plant Manager' ELSE IF POSITION EQ 'MR' THEN 'Line Worker' ELSE IF POSITION EQ 'TM' THEN 'Line Manager' ELSE 'Technician'; TITLE='Position,Description', DESCRIPTION='Position Description', WITHIN='PLANT',$ DEFINE BYEAR/YY=START_DATE; TITLE='Beginning,Year', DESCRIPTION='Beginning Year', WITHIN='*Starting Time Period',$
538 Information Builders

Master Files and Diagrams
DEFINE BQUARTER/Q=START_DATE; TITLE='Beginning,Quarter', DESCRIPTION='Beginning Quarter', WITHIN='BYEAR', DEFINE BMONTH/M=START_DATE; TITLE='Beginning,Month', DESCRIPTION='Beginning Month', WITHIN='BQUARTER',$ DEFINE EYEAR/YY=TERM_DATE; TITLE='Ending,Year', DESCRIPTION='Ending Year', WITHIN='*Termination Time Period',$ DEFINE EQUARTER/Q=TERM_DATE; TITLE='Ending,Quarter', DESCRIPTION='Ending Quarter', WITHIN='EYEAR',$ DEFINE EMONTH/M=TERM_DATE; TITLE='Ending,Month', DESCRIPTION='Ending Month', WITHIN='EQUARTER',$ DEFINE RESIGN_COUNT/I3=IF STATUS EQ 'RESIGNED' THEN 1 ELSE 0; TITLE='Resigned,Count', DESCRIPTION='Resigned Count',$ DEFINE FIRE_COUNT/I3=IF STATUS EQ 'TERMINAT' THEN 1 ELSE 0; TITLE='Terminated,Count', DESCRIPTION='Terminated Count',$ DEFINE DECLINE_COUNT/I3=IF STATUS EQ 'DECLINED' THEN 1 ELSE 0; TITLE='Declined,Count', DESCRIPTION='Declined Count',$ DEFINE EMP_COUNT/I3=IF STATUS EQ 'EMPLOYED' THEN 1 ELSE 0; TITLE='Employed,Count', DESCRIPTION='Employed Count',$ DEFINE PEND_COUNT/I3=IF STATUS EQ 'PENDING' THEN 1 ELSE 0; TITLE='Pending,Count', DESCRIPTION='Pending Count',$ DEFINE REJECT_COUNT/I3=IF STATUS EQ 'REJECTED' THEN 1 ELSE 0; TITLE='Rejected,Count', DESCRIPTION='Rejected Count',$ DEFINE FULLNAME/A28=LNAME||', '|FNAME; TITLE='Full Name', DESCRIPTION='Full Name: Last, First', WITHIN='POSITION_DESC',$
Developing Applications 539

Century Corp Data Sources
DEFINE SALARY/D12.2=IF BMONTH LT 4 THEN PAYLEVEL * 12321 ELSE IF BMONTH GE 4 AND BMONTH LT 8 THEN PAYLEVEL * 13827 ELSE PAYLEVEL * 14400;, TITLE='Salary', DESCRIPTION='Salary',$ DEFINE PLANTLNG/A11=DECODE PLANT (BOS 'Boston' DAL 'Dallas' LA 'Los Angeles' ORL 'Orlando' SEA 'Seattle' STL 'St Louis' ELSE 'n/a');$
CENTHR Structure Diagram
SECTION 01 STRUCTURE OF FOCUS FILE CENTHR ON 05/15/03 AT 10.40.34 EMPSEG 01 S1 ************** *ID_NUM ** *LNAME ** *FNAME ** *PLANT ** * ** *************** **************
540 Information Builders

Master Files and Diagrams
CENTINV Master File
FILE=CENTINV, SUFFIX=FOC, FDFC=19, FYRT=00 SEGNAME=INVINFO, SEGTYPE=S1, $ FIELD=PROD_NUM, ALIAS=PNUM, FORMAT=A4, INDEX=I, TITLE='Product,Number:', DESCRIPTION='Product Number', $ FIELD=PRODNAME, ALIAS=PNAME, FORMAT=A30, WITHIN=PRODCAT, TITLE='Product,Name:', DESCRIPTION='Product Name', $ FIELD=QTY_IN_STOCK, ALIAS=QIS, FORMAT=I7, TITLE='Quantity,In Stock:', DESCRIPTION='Quantity In Stock', $ FIELD=PRICE, ALIAS=RETAIL, FORMAT=D10.2, TITLE='Price:', DESCRIPTION=Price, $ FIELD=COST, ALIAS=OUR_COST, FORMAT=D10.2, TITLE='Our,Cost:', DESCRIPTION='Our Cost:', $ DEFINE PRODCAT/A22 = IF PRODNAME CONTAINS 'LCD' THEN 'VCRs' ELSE IF PRODNAME CONTAINS 'DVD' THEN 'DVD' ELSE IF PRODNAME CONTAINS 'Camcor' THEN 'Camcorders' ELSE IF PRODNAME CONTAINS 'Camera' THEN 'Cameras' ELSE IF PRODNAME CONTAINS 'CD' THEN 'CD Players' ELSE IF PRODNAME CONTAINS 'Tape' THEN 'Digital Tape Recorders' ELSE IF PRODNAME CONTAINS 'Combo' THEN 'Combo Players' ELSE 'PDA Devices'; WITHIN=PRODTYPE, TITLE='Product Cateogory:' ,$ DEFINE PRODTYPE/A19 = IF PRODNAME CONTAINS 'Digital' OR 'DVD' OR 'QX' THEN 'Digital' ELSE 'Analog';,WITHIN='*Product Dimension', TITLE='Product Type:',$
CENTINV Structure Diagram
SECTION 01 STRUCTURE OF FOCUS FILE CENTINV ON 05/15/03 AT 10.43.35 INVINFO 01 S1 ************** *PROD_NUM **I *PRODNAME ** *QTY_IN_STOCK** *PRICE ** * ** *************** **************
Developing Applications 541

Century Corp Data Sources
CENTORD Master File
FILE=CENTORD, SUFFIX=FOC, SEGNAME=OINFO, SEGTYPE=S1, $ FIELD=ORDER_NUM, ALIAS=ONUM, FORMAT=A5, INDEX=I, TITLE='Order,Number:', DESCRIPTION='Order Number', $ FIELD=ORDER_DATE, ALIAS=ODATE, FORMAT=YYMD, TITLE='Date,Of Order:', DESCRIPTION='Date Of Order', $ FIELD=STORE_CODE, ALIAS=SNUM, FORMAT=A6, INDEX=I, TITLE='Company ID#:', DESCRIPTION='Company ID#', $ FIELD=PLANT, ALIAS=PLNT, FORMAT=A3, INDEX=I, TITLE='Manufacturing,Plant', DESCRIPTION='Location Of Manufacturing Plant', WITHIN='*Location',$ DEFINE YEAR/YY=ORDER_DATE;, WITHIN='*Time Period',$ DEFINE QUARTER/Q=ORDER_DATE;, WITHIN='YEAR',$ DEFINE MONTH/M=ORDER_DATE;, WITHIN='QUARTER',$ SEGNAME=PINFO, SEGTYPE=S1, PARENT=OINFO, $ FIELD=PROD_NUM, ALIAS=PNUM, FORMAT=A4,INDEX=I, TITLE='Product,Number#:', DESCRIPTION='Product Number#', $ FIELD=QUANTITY, ALIAS=QTY, FORMAT=I8C, TITLE='Quantity:', DESCRIPTION=Quantity, $ FIELD=LINEPRICE, ALIAS=LINETOTAL, FORMAT=D12.2MC, TITLE='Line,Total', DESCRIPTION='Line Total', $ DEFINE LINE_COGS/D12.2=QUANTITY*COST;, TITLE='Line,Cost Of,Goods Sold', DESCRIPTION='Line cost of goods sold', $ DEFINE PLANTLNG/A11=DECODE PLANT (BOS 'Boston' DAL 'Dallas' LA 'Los Angeles' ORL 'Orlando' SEA 'Seattle' STL 'St Louis' ELSE 'n/a'); SEGNAME=INVSEG, SEGTYPE=DKU, PARENT=PINFO, CRFILE=CENTINV, CRKEY=PROD_NUM, CRSEG=INVINFO,$ SEGNAME=STOSEG, SEGTYPE=DKU, PARENT=OINFO, CRFILE=CENTCOMP, CRKEY=STORE_CODE, CRSEG=COMPINFO,$
542 Information Builders

Master Files and Diagrams
CENTORD Structure Diagram
SECTION 01 STRUCTURE OF FOCUS FILE CENTORD ON 05/15/03 AT 10.17.52 OINFO 01 S1 ************** *ORDER_NUM **I *STORE_CODE **I *PLANT **I *ORDER_DATE ** * ** *************** ************** I +-----------------+ I I I STOSEG I PINFO 02 I KU 03 I S1 .............. ************** :STORE_CODE :K *PROD_NUM **I :STORENAME : *QUANTITY ** :STATE : *LINEPRICE ** : : * ** : : * ** :............: *************** JOINED CENTCOMP ************** I I I I INVSEG 04 I KU .............. :PROD_NUM :K :PRODNAME : :QTY_IN_STOCK: :PRICE : : : :............: JOINED CENTINV
Developing Applications 543

Century Corp Data Sources
CENTQA Master File
FILE=CENTQA, SUFFIX=FOC, FDFC=19, FYRT=00 SEGNAME=PROD_SEG, SEGTYPE=S1, $ FIELD=PROD_NUM, ALIAS=PNUM, FORMAT=A4, INDEX=I, TITLE='Product,Number', DESCRIPTION='Product Number', $ SEGNAME=PROB_SEG, PARENT=PROD_SEG, SEGTYPE=S1, $ FIELD=PROBNUM, ALIAS=PROBNO, FORMAT=I5, TITLE='Problem,Number', DESCRIPTION='Problem Number', WITHIN=PLANT,$ FIELD=PLANT, ALIAS=PLT, FORMAT=A3, INDEX=I, TITLE=Plant, DESCRIPTION=Plant, WITHIN=PROBLEM_LOCATION,$ FIELD=PROBLEM_DATE, ALIAS=PDATE, FORMAT=YYMD, TITLE='Date,Problem,Reported', DESCRIPTION='Date Problem Was Reported', $ FIELD=PROBLEM_CATEGORY, ALIAS=PROBCAT, FORMAT=A20, $ TITLE='Problem,Category', DESCRIPTION='Problem Category', WITHIN=*Problem,$ FIELD=PROBLEM_LOCATION, ALIAS=PROBLOC, FORMAT=A10, TITLE='Location,Problem,Occurred', DESCRIPTION='Location Where Problem Occurred', WITHIN=PROBLEM_CATEGORY,$ DEFINE PROB_YEAR/YY=PROBLEM_DATE;, TITLE='Year,Problem,Occurred', DESCRIPTION='Year Problem Occurred', WITHIN=*Time Period,$ DEFINE PROB_QUARTER/Q=PROBLEM_DATE; TITLE='Quarter,Problem,Occurred', DESCRIPTION='Quarter Problem Occurred', WITHIN=PROB_YEAR,$ DEFINE PROB_MONTH/M=PROBLEM_DATE; TITLE='Month,Problem,Occurred', DESCRIPTION='Month Problem Occurred', WITHIN=PROB_QUARTER,$ DEFINE PROBLEM_OCCUR/I5 WITH PROBNUM=1;, TITLE='Problem,Occurrence' DESCRIPTION='# of times a problem occurs',$ DEFINE PLANTLNG/A11=DECODE PLANT (BOS 'Boston' DAL 'Dallas' LA 'Los Angeles' ORL 'Orlando' SEA 'Seattle' STL 'St Louis' ELSE 'n/a');$ SEGNAME=INVSEG, SEGTYPE=DKU, PARENT=PROD_SEG, CRFILE=CENTINV, CRKEY=PROD_NUM, CRSEG=INVINFO,$
544 Information Builders

Master Files and Diagrams
CENTQA Structure Diagram
SECTION 01 STRUCTURE OF FOCUS FILE CENTQA ON 05/15/03 AT 10.46.43 PROD_SEG 01 S1 ************** *PROD_NUM **I * ** * ** * ** * ** *************** ************** I +-----------------+ I I I INVSEG I PROB_SEG 02 I KU 03 I S1 .............. ************** :PROD_NUM :K *PROBNUM ** :PRODNAME : *PLANT **I :QTY_IN_STOCK: *PROBLEM_DATE** :PRICE : *PROBLEM_CAT>** : : * ** :............: *************** JOINED CENTINV **************
Developing Applications 545

Century Corp Data Sources
CENTGL Master File
FILE=CENTGL ,SUFFIX=FOC SEGNAME=ACCOUNTS, SEGTYPE=S1 FIELDNAME=GL_ACCOUNT, ALIAS=GLACCT, FORMAT=A7, TITLE='Ledger,Account', FIELDTYPE=I, $ FIELDNAME=GL_ACCOUNT_PARENT, ALIAS=GLPAR, FORMAT=A7, TITLE=Parent, PROPERTY=PARENT_OF, REFERENCE=GL_ACCOUNT, $ FIELDNAME=GL_ACCOUNT_TYPE, ALIAS=GLTYPE, FORMAT=A1, TITLE=Type,$ FIELDNAME=GL_ROLLUP_OP, ALIAS=GLROLL, FORMAT=A1, TITLE=Op, $ FIELDNAME=GL_ACCOUNT_LEVEL, ALIAS=GLLEVEL, FORMAT=I3, TITLE=Lev, $ FIELDNAME=GL_ACCOUNT_CAPTION, ALIAS=GLCAP, FORMAT=A30, TITLE=Caption, PROPERTY=CAPTION, REFERENCE=GL_ACCOUNT, $ FIELDNAME=SYS_ACCOUNT, ALIAS=ALINE, FORMAT=A6, TITLE='System,Account,Line', MISSING=ON, $
CENTGL Structure Diagram
SECTION 01 STRUCTURE OF FOCUS FILE CENTGL ON 05/15/03 AT 15.18.48 ACCOUNTS 01 S1 ************** *GL_ACCOUNT **I *GL_ACCOUNT_>** *GL_ACCOUNT_>** *GL_ROLLUP_OP** * ** *************** **************
CENTSYSF Master File
FILE=CENTSYSF ,SUFFIX=FOC SEGNAME=RAWDATA ,SEGTYPE=S2 FIELDNAME = SYS_ACCOUNT , ,A6 , FIELDTYPE=I, TITLE='System,Account,Line', $ FIELDNAME = PERIOD , ,YYM , FIELDTYPE=I,$ FIELDNAME = NAT_AMOUNT , ,D10.0 , TITLE='Month,Actual', $ FIELDNAME = NAT_BUDGET , ,D10.0 , TITLE='Month,Budget', $ FIELDNAME = NAT_YTDAMT , ,D12.0 , TITLE='YTD,Actual', $ FIELDNAME = NAT_YTDBUD , ,D12.0 , TITLE='YTD,Budget', $
546 Information Builders

Master Files and Diagrams
CENTSYSF Structure Diagram
SECTION 01 STRUCTURE OF FOCUS FILE CENTSYSF ON 05/15/03 AT 15.19.27 RAWDATA 01 S2 ************** *SYS_ACCOUNT **I *PERIOD **I *NAT_AMOUNT ** *NAT_BUDGET ** * ** *************** **************
CENTSTMT Master File
FILE=CENTSTMT, SUFFIX=FOCSEGNAME=ACCOUNTS ,SEGTYPE=S1 FIELD=GL_ACCOUNT, ALIAS=GLACCT, FORMAT=A7, TITLE='Ledger,Account', FIELDTYPE=I, $ FIELD=GL_ACCOUNT_PARENT, ALIAS=GLPAR, FORMAT=A7, TITLE=Parent, PROPERTY=PARENT_OF, REFERENCE=GL_ACCOUNT, $ FIELD=GL_ACCOUNT_TYPE, ALIAS=GLTYPE, FORMAT=A1, TITLE=Type,$ FIELD=GL_ROLLUP_OP, ALIAS=GLROLL, FORMAT=A1, TITLE=Op, $ FIELD=GL_ACCOUNT_LEVEL, ALIAS=GLLEVEL, FORMAT=I3, TITLE=Lev, $ FIELD=GL_ACCOUNT_CAPTION, ALIAS=GLCAP, FORMAT=A30, TITLE=Caption, PROPERTY=CAPTION, REFERENCE=GL_ACCOUNT, $SEGNAME=CONSOL, SEGTYPE=S1, PARENT=ACCOUNTS, $ FIELD=PERIOD, ALIAS=MONTH, FORMAT=YYM, $ FIELD=ACTUAL_AMT, ALIAS=AA, FORMAT=D10.0, MISSING=ON, TITLE='Actual', $ FIELD=BUDGET_AMT, ALIAS=BA, FORMAT=D10.0, MISSING=ON, TITLE='Budget', $ FIELD=ACTUAL_YTD, ALIAS=AYTD, FORMAT=D12.0, MISSING=ON, TITLE='YTD,Actual', $ FIELD=BUDGET_YTD, ALIAS=BYTD, FORMAT=D12.0, MISSING=ON, TITLE='YTD,Budget', $
Developing Applications 547

Century Corp Data Sources
CENTSTMT Structure Diagram
SECTION 01 STRUCTURE OF FOCUS FILE CENTSTMT ON 11/06/03 AT 16.11.59 ACCOUNTS
01 S1***************GL_ACCOUNT **I*GL_ACCOUNT_>***GL_ACCOUNT_>***GL_ROLLUP_OP*** ***************** ************** I I I I CONSOL 02 I S1***************PERIOD ***ACTUAL_AMT ***BUDGET_AMT ***ACTUAL_YTD *** ***************** **************
548 Information Builders

FOCUS
B
Developing App
Error Messages
To see the text or explanation for any error message, you can display it online in your FOCUS session, or find it in a standard FOCUS ERRORS file. All FOCUS error messages are stored in eight system ERRORS files.
Topics:
❏ Accessing Error Files
❏ Displaying Messages Online
lications 549

Accessing Error Files
Accessing Error FilesFor CMS, the ERRORS files are:
For MVS, these files are the following members in the ERRORS PDS:
❏ FOT004
❏ FOG004
❏ FOM004
❏ FOS004
❏ FOA004
❏ FSQLXLT
❏ FOCSTY
❏ FOB004
❏ FOT004 ERRORS
❏ FOG004 ERRORS
❏ FOM004 ERRORS
❏ FOS004 ERRORS
❏ FOA004 ERRORS
❏ FSQLXLT ERRORS
❏ FOCSTY ERRORS
❏ FOB004 ERRORS
550 Information Builders

Error Messages
Displaying Messages OnlineTo display a message online, issue the following query at the FOCUS command level:
? n
where:
n
is the message number.
The message number and text display, along with a detailed explanation of the message, if one exists. For example, issuing the following:
? 210
displays:
(FOC210) THE DATA VALUE HAS A FORMAT ERROR:
An alphabetic character has been found where all numerical digits are required.
Developing Applications 551

Displaying Messages Online
552 Information Builders

FOCUS
Index
Developing A
Symbols
&ACCEPTS variable 209
&BASEIO variable 209
&CHNGD variable 209
&CURSOR variable 212
&CURSORAT variable 212
&CURSORAT variablespecial variables&CURSORAT 212
&DATE variable 203, 207
&DATEfmt variable 203, 377
&DELTD variable 209
&DMY variable 203
&DMYY variable 203, 208, 377
&DUPLS variable 209
&ECHO variable 212, 262 to 263
&FOCCPU variable 203
&FOCDISORG variable 209
&FOCERRNUM variable 209
&FOCEXTTRM variable 203
&FOCFIELDNAME variable 204
&FOCFOCEXEC variable 204, 207
&FOCINCLUDE variable 204
&FOCMODE variable 204
&FOCNEXTPAGE variable 205
&FOCPRINT variable 205
&FOCPUTLVL variable 205
&FOCQUALCHAR variable 205
&FOCREL variable 205
&FOCSBORDER variable 205
&FOCSYSTYP variable 205
&FOCTMPDSK variable 205
&FOCTRMSD variable 205
&FOCTRMSW variable 205
&FOCTRMTYP variable 206
&FOCTTIME variable 206
&FOCUSER variable 206
&FOCVTIME variable 206
&FORMAT variable 210
&HIPERFOCUS variable 206
&INPUT variable 210
&INVALID variable 210
&IORETURN variable 206, 262
&LINES variable 210
&MDY variable 206
&MDYY variable 206, 208, 377
&myvar 164
&NOMATCH variable 210
pplications 553

Index
&PFKEY variable 212, 427
&QUIT variable 180, 212
&READS variable 210
&RECORDS variable 210
&REJECTS variable 210
&RETCODE variable 206, 262, 265
&SETFILE variable 206
&STACK variable 212, 262, 264
&TOD variable 206
&TRANS variable 210
&WINDOWNAME variable 212, 426
&WINDOWVALUE variable 212, 426
&YMD variable 206
&YYMD variable 206, 208, 377
-* command 163, 170, 267
.EVAL operator 245
.EVAL suffix 241
.EXIST suffix 241
.LENGTH suffix 241
.TYPE suffix 241
? && command 160
-? &[string] command 213
-? &[variablename] commands 164, 213
? COMBINE command 126 to 127
-? command 267
? DEFINE command 127 to 128
? FDT command 130 to 131
? FILE command 133 to 134
? FUNCTION command 136
? HOLD command 137
? JOIN command 138 to 139
? LET command 302
? LOAD command 313
? MDI command 139 to 140
? n command 142 to 143
? NLS command 141
? RELEASE command 144
? SET command 145 to 147
? SET EUROFILE command 393
? SET GRAPH command 151 to 152
? SET NOT command 150 to 151
-? SET SETCOMMAND &myvar 164
? STAT command 154 to 155
? STYLE command 157 to 158
? SU command 159
? USE command 159 to 160
?F command 129
?FF command 132 to 133
Numerics
3D parameter 26
A
ACCBLN parameter 22, 34
ACCEPT attribute 74
554 Information Builders

Index
Access Files 311loading 311
access to data 173
ACCESSIBLE parameter 31
accessing data sources 319
accessing FOCUS data sources 319
ACROSSLINE parameter 31, 34
activating HiperFOCUS 324
ADDRSPACE 332
AGGR[RATIO] parameter 35
ALL parameter 28, 35
allocating files 330 to 331
ALLOWCVTERR parameter 28, 36
amper variables 164, 198, 240, 255 to 257quote-delimited 249return values 424
applications 454controlling memory 27optimizing 27running 454
AS phrase 37
ASNAMES parameter 22, 28, 37
AUTODRILL parameter 31
AUTOINDEX parameter 27, 37
AUTOPATH parameter 27, 38
AUTOSTRATEGY parameter 27, 38
AUTOTABLEF parameter 28, 39
AUTOTICK parameter 26
B
BARNUMB parameter 26
BASEURL parameter 31
BINS parameter 27, 39
BLANKINDENT parameter 31, 40
BLKCALC parameter 22, 41
BOTTOMMARGIN parameter 31, 41
branching 163, 181 to 182conditional 183 to 187unconditional 182 to 183
branching procedures 182unconditional 182
BSTACK parameter 26
buffering techniques 319
BUSDAYS parameter 25, 28, 42
BYDISPLAY parameter 31, 42
BYPANEL parameter 31, 43
BYSCROLL parameter 31, 43
C
CACHE parameter 27, 44, 156, 334
calculated values 370MODIFY requests and 372, 374sliding window 370 to 371
calculations 22controlling with SET parameters 22
canceling a procedure 179 to 180
CAR data source 502 to 504
CARTESIAN parameter 28, 45
Developing Applications 555

Index
CDN (Continental Decimal Notation) 394 to 395punctuating large numbers 394
CDN parameter 22, 28, 46
CENTCOMP data source 536
CENTFIN data source 534
CENTGL data source 546
CENTHR data source 534
CENTINV data source 534
CENTORD data source 534
CENTQA data source 534
CENTSTMT 547
CENTSYSF data source 547
Century Corp data sources 534, 536 to 538, 540 to 545
CENT-ZERO parameter 28, 31, 47
CHECK FILE command 351
-CLOSE command 163, 230, 268
-CLOSE ddname command 163
-CMS command 163, 266, 268 to 269
-CMS RUN command 163, 260
CNOTATION SET parameter 48
column notation 48
column numbers 48using in a request 48
COLUMNSCROLL parameter 31, 49
command lines 263displaying 263
command statistics 154? STAT 154
commands 18, 347, 351? LET 302changing with variables 261CHECK FILE 351COMPUTE 370DEFINE 347, 363Dialogue Manager 163, 266 to 267displaying during execution 263ENDECHO 303EXEC 176executing 175LET ECHO 303LOAD 309LOAD MODIFY 313nesting 195operating system 266QUIT 180RUN 177SET 18stacked 165testing results 262, 265UNLOAD 309WINDOW COMPILE 489WINDOW PAINT 455
comments 170 to 171adding 170including in procedures 163, 171
COMPILE command 314 to 315
COMPILE facility 308
compiled requests 312running 312
compiling expressions in MODIFY 87
COMPMISS parameter 49
compound -IF tests 187
556 Information Builders
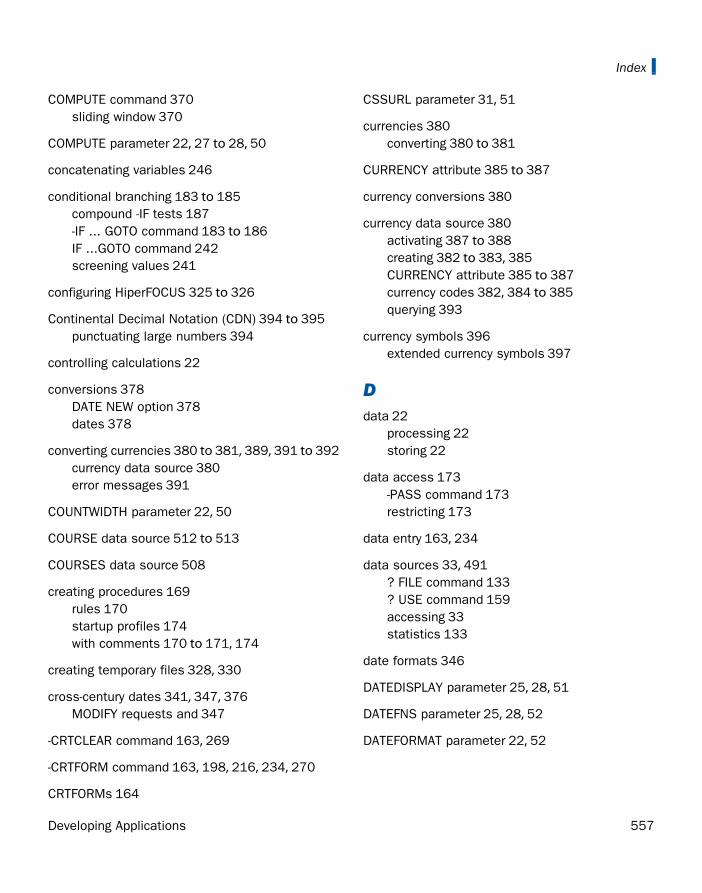
Index
COMPUTE command 370sliding window 370
COMPUTE parameter 22, 27 to 28, 50
concatenating variables 246
conditional branching 183 to 185compound -IF tests 187-IF ... GOTO command 183 to 186IF ...GOTO command 242screening values 241
configuring HiperFOCUS 325 to 326
Continental Decimal Notation (CDN) 394 to 395punctuating large numbers 394
controlling calculations 22
conversions 378DATE NEW option 378dates 378
converting currencies 380 to 381, 389, 391 to 392currency data source 380error messages 391
COUNTWIDTH parameter 22, 50
COURSE data source 512 to 513
COURSES data source 508
creating procedures 169rules 170startup profiles 174with comments 170 to 171, 174
creating temporary files 328, 330
cross-century dates 341, 347, 376MODIFY requests and 347
-CRTCLEAR command 163, 269
-CRTFORM command 163, 198, 216, 234, 270
CRTFORMs 164
CSSURL parameter 31, 51
currencies 380converting 380 to 381
CURRENCY attribute 385 to 387
currency conversions 380
currency data source 380activating 387 to 388creating 382 to 383, 385CURRENCY attribute 385 to 387currency codes 382, 384 to 385querying 393
currency symbols 396extended currency symbols 397
D
data 22processing 22storing 22
data access 173-PASS command 173restricting 173
data entry 163, 234
data sources 33, 491? FILE command 133? USE command 159accessing 33statistics 133
date formats 346
DATEDISPLAY parameter 25, 28, 51
DATEFNS parameter 25, 28, 52
DATEFORMAT parameter 22, 52
Developing Applications 557

Index
dates 25, 223, 342converting 378default display format 377display options 377displaying 208functions and subroutines 377setting 223system 377time stamp 378validating 348
DATETIME parameter 25, 28, 53
DBA security rules 98
DBACSENSITIV parameter 53
debugging procedures 262 to 263
DECODE function 255
default century 378
-DEFAULT command 163, 215, 220, 271
default variable values 220, 271-DEFAULT command and 220, 271
DEFCENT parameter 25, 28, 54, 342, 344, 347 to 348
COMPUTE command 370, 372DEFINE command 363MODIFY requests and 347 to 348querying 354 to 355
DEFECHO parameter 54, 264
DEFINE command 347sliding window 347, 363
DEFINE parameter 27
defined functions 136displaying 136
DEFINES parameter 22, 55
Dialogue Manager 162calling procedures 192commands 163, 242, 266 to 267comments 170debugging procedures 262looping procedures 188messages 171 to 172operating system commands 266passwords 173processing 165, 167reading files 224stacked commands 165, 178uses 162writing files 224
Dialogue Manager commands 161, 163, 167, 266 to 267
-* 163, 170, 267-? 267-? & 164, 213-? SETCOMMAND &myvar 164-CLOSE 163, 230, 268-CLOSE ddname 163-CMS 163, 268 to 269-CMS RUN 163-CRTCLEAR 163, 269-CRTFORM 163, 234, 270-DEFAULT 163, 271-EXIT 163, 175, 178, 271-GOTO 163, 181 to 182, 272-HTMLFORM 163-IF 163, 181, 273-IF ... GOTO 183 to 184-INCLUDE 163, 192 to 194, 274-label 163, 275-MVS RUN 163, 275-PASS 163, 173, 276-PROMPT 163, 198, 233, 277-QUIT 163, 175, 179 to 180, 278-QUIT FOCUS 175, 179-READ 163, 224, 226, 279
558 Information Builders

Index
Dialogue Manager commands (continued)-REMOTE 280-REPEAT 163, 280-RUN 163, 175, 177, 282-SET 163, 240, 253, 282syntax reference 242testing 264-TSO 283-TSO RUN 164, 283-TYPE 164, 171 to 172, 284-WINDOW 164, 198, 235, 285, 401-WRITE 164, 224, 287
Dialogue Manager procedures 165creating 169debugging 262processing commands and variables 165
Dialogue Manager processing 165, 167
Dialogue Manager variables 161, 164, 217, 249evaluating 244 to 246manipulating values 240naming 199 to 200positional 231 to 232quote-delimited 249screening values 240supplying dates 223supplying values 217 to 218, 221, 230verifying 236
direct prompting 215, 233, 277
DIRECTHOLD parameter 55
DISPLAY parameter 33, 56
displaying command lines 263
displaying dates 25
displaying defined functions 136
displaying fields 126? COMBINE command 126
? DEFINE command 127?F command 129
DMPRECISION parameter 22, 57
DMPRECSION parameter 222rounding 222
DTSTRICT parameter 22, 56
dynamic window 345, 351 to 352
E
EDIT function 256
EDUCFILE data source 498 to 499
EMPDATA data source 510 to 511
EMPLOYEE data source 494 to 496
EMPTYREPORT parameter 28, 58
EMPTYREPORT SET parameter 58
ENDECHO command 303
Entry Menu 456
environment variables 338
error files 549CMS 550MVS 550
error messages 142, 549? n command 142displaying 551displaying explanations 142
ERROROUT parameter 28, 59
ESTRECORDS parameter 27 to 28, 60
euro currency 380converting 380 to 381, 389, 391 to 392
Developing Applications 559

Index
EUROFILE parameter 22, 60, 387 to 388error messages 387 to 388restrictions 387
evaluating rule statements 337 to 338
evaluating variables 244 to 246
EX command 176
EXEC command 176, 196, 215, 230 to 232calling procedures 196
execution windows 409
EXIST operator 243
-EXIT command 163, 175, 178, 271
exiting from FOCUS 179
EXL2KLANG parameter 61
expressions, compiling in MODIFY 87
EXTAGGR parameter 28, 61
extended currency symbols 396 to 397formats 397
external files 224closing 230reading from 224, 226writing to 224
EXTHOLD parameter 28, 62
EXTRACT parameter 62
EXTSORT parameter 28, 63
EXTTERM parameter 33, 63
F
FDEFCENT attribute 344, 355
field names windows 406
field variables 262
field-level sliding window 355, 358DEFCENT attribute 358MODIFY requests and 360YRTHRESH attribute 358
FIELDNAME parameter 22, 28, 64
fields 126?FF command 132displaying 126
file contents windows 407
file directory table 130? FDT command 130
file management 323
file names windows 405creating 453
file utilities 308
FILE[NAME] parameter 28, 64
file-level sliding window 355FDEFCENT attribute 356FYRTHRESH attribute 356
files 308closing 163displaying information for 313 to 314loading 309 to 310reading from 227unloading 309 to 310writing to 226 to 227
FILTER parameter 28, 65
filters 79maintaining across joins 79
FINANCE data source 506
FIXRET[RIEVE] parameter 27
FIXRETRIEVE parameter 66
560 Information Builders

Index
flow of control 163, 175
FOC144 parameter 28, 66
FOC2GIGDB parameter 22, 67
FOCALLOC parameter 22, 67
FOCCOMP file 312
FOCFIRSTPAGE parameter 31, 68
FOCSTACK parameter 27, 68
FOCUS facilities 308performance enhancement 307
format specifications 236 to 237
formatting currency 396
FORMULTIPLE parameter 28 to 29
full-screen data entry 198, 234
function keys 427assigning phrases to 306
functions 240calling 259 to 261running 163 to 164
functions and subroutines 366calling 259DECODE 255EDIT 256for dates 377sliding window and 347, 366, 375TRUNCATE 257
FYRTHRESH attribute 344, 355
G
GETUSER function 206
GGDEMOG data source 528
GGORDER data source 528
GGPRODS data source 528
GGSALES data source 528
GGSTORES data source 528
global sliding window 348 to 350
global variables 164, 198, 202naming 199 to 200querying 213
Gotham Grinds data sources 528 to 533
-GOTO command 163, 181 to 183, 272
goto values 401, 425, 465
GRAPHEDIT parameter 26
graphs 26displaying 26processing 26
GRAPHSERVURL parameter 26
GRID parameter 26
GRMERGE parameter 31
GRWIDTH parameter 31
H
HAUTO parameter 26
HAXIS parameter 26
HCLASS parameter 26
HDAY parameter 25, 69
HiperBUDGET facility 327installing 327limits 327 to 328
HiperBUDGET installation parameters 327
HiperCache option 323, 333 to 334
Developing Applications 561

Index
HIPERCACHE parameter 22, 69
HIPEREXTENTS parameter 22, 69
HiperFile option 323, 328, 330allocating files explicitly 329creating temporary sort files 332hiperspaces 329
HIPERFILE parameter 22, 70
HiperFOCUS configuration parameters 326
HiperFOCUS environment variables 338
HiperFOCUS installation parameters 326
HiperFOCUS option 323 to 324, 331, 333 to 335configuring 325 to 326installing 325 to 326limiting use of hiperspace 329
HIPERFOCUS parameter 22, 70, 324
HIPERINSTALL parameter 22, 70
HIPERLOCKED parameter 22, 71
HiperRule option 323, 335 to 339environment variables 338
HIPERSPACE parameter 22, 71
Hiperspace usage 332
hiperspaces 323, 329 to 330, 333controlling size 332
HISTOGRAM parameter 26
HLISUDUMP parameter 27, 72
HLISUTRACE parameter 27, 71
HMAX parameter 26
HMIN parameter 26
HNODATA parameter 28, 73
HOLD fields 137
HOLDATTR[S] parameter 28, 74
HOLDFORMAT parameter 22, 74
HOLDLIST parameter 22, 75
HOLDMISS parameter 22, 75
HOLDSTAT parameter 22, 76
horizontal menus 404creating 412
HOTMENU parameter 33, 76
HSTACK parameter 26
HTICK parameter 26
HTMLCSS parameter 31, 77
-HTMLFORM command 163, 216
I
IBMLE parameter 27
-IF ... GOTO command 183 to 187
-IF command 163, 181, 183 to 185, 273
-IF tests 187, 241 to 242compound 187operators and functions 185
IMMEDTYPE parameter 27, 77
implicit prompting 216
implied prompting 198, 235
-INCLUDE command 163, 192 to 195, 274nesting procedures 195
Include component 192
INDEX parameter 22, 78
indexed variables 247 to 248creating 247
562 Information Builders

Index
installing HiperBUDGET 327
installing HiperFOCUS 325 to 326
interactive data entry 198
ITEMS data source 524 to 525
J
JOBFILE data source 497 to 498
JOBHIST data source 513
JOBLIST data source 514
JOIN CLEAR command 79
JOIN command 79maintaining filters 79
join structures 138displaying 138
JOINOPT parameter 28, 78
JSURL parameter 28
K
KEEPDEFINES parameter 22, 28, 79
KEEPFILTERS SET parameter 79
L
-label command 163, 275
LANG[UAGE] parameter 28, 80
LEADZERO parameter 25, 28, 81
LEDGER data source 505
LEFTMARGIN parameter 31, 82
legacy dates 346sliding window and 346
LET command 291 to 295, 298, 301, 306
LET ECHO command 303
LET substitutions 291debugging 303displaying 302
limiting hiperspace size on VM 332
LINES parameter 31, 82
LOAD command 309 to 310
LOAD facility 308
LOAD MODIFY command 313
load procedures 491
loaded files 313 to 314
loading files 309 to 310Access Files 311FOCCOMP files 312Master Files 311MODIFY requests 312 to 313
loading procedures 311
local variables 164, 198, 201naming 199 to 200
LOCATOR data source 515
LOOKGRAPH parameter 26
looped procedures 188-REPEAT command 188 to 190-SET command 188, 191
looping 163, 188 to 190
M
Main Menu 457
manipulating dates 25
mask option of EDIT function 256
Developing Applications 563

Index
Master Files 355 to 357, 491defining sliding windows in 355 to 360loading 311parsing 316 to 318running multiple requests 316 to 317saving 318saving in memory 316 to 317virtual fields 368 to 369
MASTER parameter 22, 83
MAXDATAEXCPT parameter 83
MAXLRECL parameter 22, 84
MDICARDWARN parameter 84
MDIENCODING parameter 85
MDIPROGRESS parameter 86
memory 27controlling 27
menus 402creating 400horizontal 404, 412pulldown 415vertical 403
MESSAGE parameter 28, 86
messages 171 to 172displaying 163 to 164, 171 to 172
metadata 22processing 22storing 22
MINIO facility 308
MINIO parameter 22, 87, 319 to 322
MODCOMPUTE parameter 87
MODIFY 87compiling expressions 87
MODIFY requests 312, 342compiling 314 to 315DEFCENT parameter 347loading 313YRTHRESH parameter 347
modules 315running 315
MOVIES data source 524
multi-input windows 411creating 417
MULTIPATH parameter 28
-MVS command 266
-MVS RUN command 163, 260, 275
N
National Language Support (NLS) 141
native compiler 87
natural date literals 223
NATV compiler for MODIFY 87
navigating procedures 181branching 182 to 183calling another procedure 196incorporating another procedure 192looping 188
nesting procedures 195
NLS (National Language Support) 141? NLS command 141
NODATA parameter 28, 88
non-FOCUS files 163 to 164reading 163
NULL parameter 22, 89
564 Information Builders

Index
O
OFFLINE-FMT parameter 31
OLDSTYRECLEN parameter 89
ONLINE-FMT parameter 31
open-ended procedures 197
operating system commands 266
ORIENTATION parameter 31, 90
P
page handling 331
PAGE[-NUM] parameter 31
PAGE-NUM parameter 90
PAGESIZE parameter 31, 91
PANEL parameter 31, 93
PAPER parameter 31, 94
parameter settings 150displaying 150
parameter values 213querying settings 213 to 214
parameters 34querying value settings 214setting 18 to 20
-PASS command 163, 173, 276
PASS parameter 33, 94
passwords 173permanent 98setting 163, 173unchangeable 98
PAUSE parameter 28, 95
PCOMMA parameter 22, 96
PDFLINETERM parameter 97
PERMPASS SET parameter 98
PERSINFO data source 516
PF keys 427
PFnn command 427
PFnn parameter 28, 98
POOL parameter 99
positional variables 231 to 232
PREFIX parameter 22, 99
PRINT parameter 31, 100
PRINTPLUS parameter 33, 100
procedures 33, 162, 311branching 182 to 183calling 176, 192 to 194, 196canceling 179 to 180comments in 170 to 171creating 169, 197debugging 262 to 263exiting 163, 178including 163, 193including comments 171loading 311looping 188navigating 181 to 183nesting 195 to 196prompting 198rules for creating 170running 165, 167, 175 to 177, 179SAMPLE 431sample in Window Painter 454screening values in 241security 173, 180startup 174variables and 198, 242
Developing Applications 565

Index
processing data 22
processing Dialogue Manager procedures 165, 167
-PROMPT command 163, 216, 233 to 234, 277
prompting for variable values 198, 216, 233, 235supplying text 239
PSPAGESETUP parameter 31, 101
pull-down menus 415
punctuating large numbers 394 to 395
Q
QUALCHAR parameter 22, 28, 101
QUALTITLES parameter 31, 102
query commands 124 to 125, 153, 354? && 160? COMBINE 126? COMBINE command 126 to 127? DEFINE 127 to 128? FDT 130 to 131? FILE 133 to 134? FUNCTION 136? HOLD 137? JOIN 138 to 139? LOAD 313? MDI 139 to 140? n 142 to 143? NLS 141? RELEASE 144? SET 145 to 147? SET EUROFILE 393? SET GRAPH 151 to 152? SET NOT 150 to 151? STAT 154 to 155? STYLE 157 to 158? SU 159? USE 159 to 160
?F 129?FF 132 to 133SET BY CATEGORY 147SITECODE 153
querying Hiperspace usage 332
querying procedure status 262, 265
-QUIT command 163, 175, 179 to 180, 278
QUIT command 180
-QUIT FOCUS command 175, 179
quote-delimited 249
quote-delimited string 249
QUOTEDSTRING 249
R
-READ command 163, 215, 224 to 227, 279
REBUILDMSG parameter 31, 102
RECAP-COUNT parameter 31, 102
RECORDLIMIT parameter 27
records 163, 224accessing 163reading from a file 224writing 164writing to a file 224
REGION data source 507
release number 144
-REMOTE command 280
-REPEAT command 163, 188 to 190, 280
reports 28displaying 31
requests 295translating 295
566 Information Builders

Index
resources 318
return value display windows 407
return values 424
RIGHTMARGIN parameter 31, 103
rounding using DMPRECSION 222
RPAGESET parameter 31
rules for supplying values 217
-RUN command 163, 175, 177, 282
S
SALES data source 500 to 501
SALHIST data source 517
sample data sources 491CAR 502 to 504CENTGL 546CENTSYSF 547Century Corp 534, 536 to 538, 540 to 545COURSE 512 to 513COURSES 508EDUCFILE 498 to 499EMPLOYEE 494 to 496FINANCE 506Gotham Grinds 528 to 533ITEMS 524 to 525JOBFILE 497 to 498JOBHIST 513JOBLIST 514LEDGER 505LOCATOR 515MOVIES 524PERSINFO 516REGION 507SALES 500 to 501SALHIST 517TRAINING 511 to 512, 519
VIDEOTR2 526 to 527VideoTrk 522 to 523
SAVEDMASTERS parameter 22, 103, 316 to 317limitations 318querying 317saving in memory 318
SAVEMATRIX parameter 28, 104
saving Master Files in memory 316 to 318
SBORDER parameter 33, 104
SCREEN parameter 33, 105
screening values with -IF tests 242 to 244
screens 163, 455clearing 163Entry Menu 456Main Menu 457Utilities Menu 477Window Creation Menu 460Window Design Screen 461Window Options Menu 465
security 33
-SET command 163, 180, 188, 191, 215, 221, 223, 254, 259 to 260, 282
SET command 18 to 20parameters 21
SET HIPERFOCUS facility 308
SET parameter types 21
SET parameters 18 to 20ACCBLN 34ACROSSLINE 34AGGR[RATIO] 35ALL 35ALLOWCVTERR 36, 377ASNAMES 37AUTOINDEX 37
Developing Applications 567

Index
SET parameters (continued)AUTOPATH 38AUTOSTRATEGY 38AUTOTABLEF 39BINS 39BLANKINDENT 40BLKCALC 41BOTTOMMARGIN 41BUSDAYS 42BY CATEGORY query 147BYDISPLAY 42BYPANEL 43BYSCROLL 43CACHE 44, 334CARTESIAN 45CDN 46CENT-ZERO 47CNOTATION 48COLUMNSCROLL 49COMPMISS 49COMPUTE 50COUNTWIDTH 50CSSURL 51DATEDISPLAY 51, 377DATEFNS 52DATEFORMAT 52DATETIME 53DBACSENSITIV 53DEFCENT 54, 348DEFECHO 54, 264DEFINES 55DIRECTHOLD 55DISPLAY 56displaying in categories 147displaying settings 145DMPRECISION 57DTSTRICT 56EMPTYREPORT 58ERROROUT 59ESTRECORDS 60EUROFILE 60, 387
EXL2KLANG 61EXTAGGR 61EXTHOLD 62EXTRACT 62EXTSORT 63EXTTERM 63FIELDNAME 64FILE[NAME] 64FILTER 65FIXRETRIEVE 66FOC144 66FOC2GIGDB 67FOCALLOC 67FOCFIRSTPAGE 68FOCSTACK 68FORMULTIPLE 29HDAY 69HIPERCACHE 69HIPEREXTENTS 69HIPERFILE 70HIPERFOCUS 70, 324HIPERINSTALL 70HIPERLOCKED 71HIPERSPACE 71HLISUDUMP 72HLISUTRACE 71HNODATA 73HOLDATTR[S] 74HOLDFORMAT 74HOLDLIST 75HOLDMISS 75HOLDSTAT 76HOTMENU 76HTMLCSS 77IMMEDTYPE 77INDEX 78JOINOPT 78KEEPDEFINES 79KEEPFILTERS 79LANG[UAGE] 80LEADZERO 81
568 Information Builders

Index
SET parameters (continued)LEFTMARGIN 82LINES 82MASTER 83MAXDATAEXCPT 83MAXLRECL 84MDICARDWARN 84MDIENCODING 85MDIPROGRESS 86MESSAGE 86MINIO 87, 319 to 322MODCOMPUTE 87NODATA 88NULL 89OLDSTYRECLEN 89ORIENTATION 90PAGE-NUM 90PANEL 93PAPER 94PASS 94PAUSE 95PCOMMA 96PDFLINETERM 97PERMPASS 98PFnn 98POOL 99PREFIX 99PRINT 100PRINTPLUS 100PSPAGESETUP 101QUALCHAR 101QUALTITLES 102REBUILDMSG 102RECAPCOUNT 102RIGHTMARGIN 103SAVEDMASTERS 103, 316 to 318SAVEMATRIX 104SBORDER 104SCREEN 105SHADOW 105SHIFT 106
SHOWBLANKS 107SORTLIB 106SPACES 107SQLTOPTIF 108SQUEEZE 108STYLE[SHEET] 110STYLEMODE 109SUMMARYLINES 112SUMPREFIX 111SUSI 112SUTABSIZE 113TARGETFRAME 113TEMP[DISK] 113TERM 114TERMTRAN 116TESTDATE 114, 351TITLE 115TOPMARGIN 115TRACKIO 115, 331TRMOUT 116UNITS 117USER 117USERFNS 118WEBTAB 119WEEKFIRST 120WIDTH 120XCF 120XFBINS 121XRETRIEVAL 121YRTHRESH 122
SET SAVEDMASTERS facility 308
SET SQUEEZE parameter 108
setting parameters 18 to 20setting multiple parameters 18
SHADOW parameter 22, 105
SHIFT parameter 22, 106
SHOWBLANKS parameter 107
Developing Applications 569

Index
SITECODE query command 153
sliding window 341 to 342calculated value 370 to 372, 374date format 346date options 376DEFCENT parameter 347defining in a Master File 355 to 359defining with SET 348 to 352dynamic window 345, 351 to 352field-level 355, 358 to 360, 362file-level 355 to 357, 362global 348 to 350legacy dates 346subroutines and 366, 375YRTHRESH parameter 347
SORTLIB parameter 28, 106
SPACES parameter 31, 107
special variables 212&CURSOR 212&ECHO 212&PFKEY 212&QUIT 212&STACK 212&WINDOWNAME 212&WINDOWVALUE 212
specifying value ranges 238
SQLTOPTTF parameter 27, 108
SQUEEZE parameter 31
stacked commands 165, 167, 186executing 163, 177 to 178
startup procedures 174
statistical variables 164, 198, 209, 211querying 213testing 185
storing data 22
storing parsed Master Files in memory 316 to 317
storing rules 339
strings 249
structure diagrams 491
STYLE[SHEET] parameter 31, 110
STYLEMODE parameter 31, 109
StyleSheets 157? STYLE 157
subroutines 164calling 259running 164
substitutions 291 to 298assigning to function keys 306debugging 303
SUMMARYLINES SET parameter 112
SUMPREFIX parameter 28, 111
supplying default variable values 220
supplying variable values 215
SUSI parameter 22, 112
SUTABSIZE parameter 22, 113
sync machines 159
system date 377
system defaults 288
system variables 164, 198, 203, 207 to 208, 262&DATE 207&DATEfmt 203&DMY 203&DMYY 203&FOCBORDERS 205&FOCCPU 203&FOCEXTTRM 203
570 Information Builders

Index
system variables (continued)&FOCFIELDNAME 204&FOCFOCEXEC 207&FOCINCLUDE 204&FOCMODE 204&FOCNEXTPAGE 205&FOCPRINT 205&FOCPUTLVL 205&FOCQUALCHAR 205&FOCSUER 206&FOCTRMSD 205&FOCTRMSW 205&FOCTRMTYP 206&FOCTTIME 206&FOCVTIME 206&HIPERFOCUS 206&MDYY 206&RETCODE 206&SETFILE 206&TOD 206&YYMD 206, 208testing 185
T
TARGETFRAME parameter 31, 113
TED (text editor) 169
TEMP parameter 27
TEMP[DISK] parameter 27, 113
TEMPDIR parameter 27
TEMPERASE parameter 22
temporary files 328allocating 330 to 331creating 328moving 331
TERM[INAL] parameter 31, 114
TERMTRAN parameter 116
TESTDATE parameter 25, 114, 351
testing procedures 263
text display windows 405creating 437, 442
text input windows 404
TEXTFIELD parameter 22
TITLE parameter 28, 115
TOPMARGIN parameter 31, 115
TRACKIO parameter 22, 115, 331
trailing blanks 257deleting 258
TRAINING data source 511 to 512, 519
TRANTERM parameter 31
TRMOUT parameter 33, 116
TRUNCATE function 257 to 258
-TSO command 266, 283
-TSO RUN command 164, 260, 283
-TYPE command 164, 171 to 172, 284
U
unconditional branching 163, 182-GOTO command 182 to 183
UNITS parameter 31, 117
UNLOAD command 309 to 310
unloading files 309 to 310
USER parameter 33, 117
USERFNS parameter 118
Utilities Menu 477
Developing Applications 571

Index
V
valid values 238 to 239
values 253, 401default 288defining 253 to 255goto 425, 465prompting for 235, 239querying 213 to 214screening 242 to 244setting 260specifying ranges 237supplying 198, 217, 223, 225, 230 to 231, 233
to 239valid 237 to 239
variable name length 217
variable types 164amper 198global 164, 198, 202local 164, 198, 201positional 231special 212statistical 164, 198, 209system 164, 198, 203
variable values 230 to 231? && 160dates 223-DEFAULT command and 220, 271length 217querying 160supplying 215, 217 to 218, 221, 223, 225, 230
to 234, 236 to 239, 282supplying default 220verifying 215
variables 198, 240, 249appending values 247assigning values to 163, 260changing commands 261 to 262computing 253 to 255
concatenating 246evaluating 245procedures and 198querying 213 to 214quote-delimited 249setting 163substitution 198supplying values 217, 223, 225, 230 to 231,
233 to 234, 236 to 239
VAUTO parameter 26
VAXIS parameter 26
VCLASS parameter 26
vertical menus 403creating 444, 451
VGRID parameter 26
VIDEOTR2 data source 526 to 527
VideoTrk data source 522 to 523
virtual fields 127, 363? DEFINE command 127defining windows for 363 to 365, 368 to 369displaying 127
VMAX parameter 26
VMIN parameter 26
VTICK parameter 26
VZERO parameter 26
W
WEBTAB parameter 31, 119
WEEKFIRST parameter 22, 120
WIDTH parameter 22, 120
window applications 421
-WINDOW command 164, 198, 216, 235, 285, 401
572 Information Builders

Index
WINDOW COMPILE command 489
Window Creation Menu 460
Window Design Screen 461
Window facility 421
window files 401 to 402creating 434
Window Options Menu 465Display list 469Heading 468Help window 471, 476Hide list 470Line break 474Multi-select 475Popup 470Quit 476Show a window 468Unshow a window 468
WINDOW PAINT command 455
Window Painter 164, 400goto values 401invoking 455main menu 437screens 455tutorial 430window files 401
Window Painter tutorial 430SAMPLE 431window file 434
windows 402, 409&WINDOWNAME variable 426&WINDOWVALUE variable 426creating 400, 412field names 406file contents 407file names 405horizontal 404, 412
multi-input 411, 417procedures 420return value display 407returning to caller 426running 429text display 405text input 404types 403vertical menu 403
word substitutions 291 to 298assigning to function keys 306debugging 303
-WRITE command 164, 224, 226 to 227, 287
writing rules 336 to 337
X
XCF parameter 120
XCONFIG ADDRSPACE 332
XFBINS parameter 121
XRETRIEVAL parameter 22, 121
Y
YRTHRESH parameter 25, 122, 342, 344, 347 to 348
COMPUTE command 370DEFINE command 363MODIFY requests and 347 to 348querying 354 to 355with COMPUTE 372
Developing Applications 573

Index
574 Information Builders
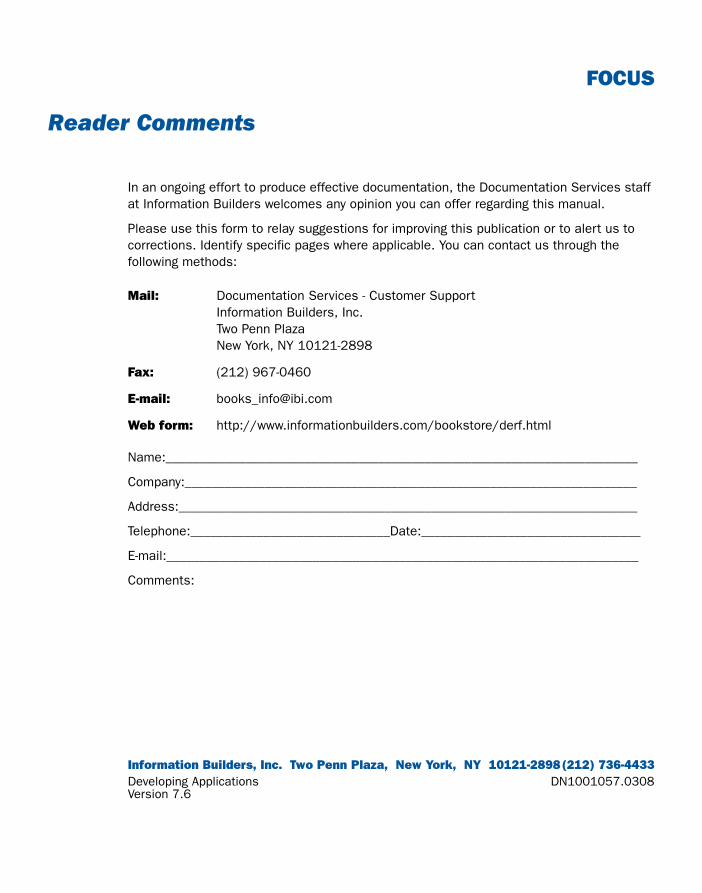
FOCUS
Reader Comments
In an ongoing effort to produce effective documentation, the Documentation Services staff at Information Builders welcomes any opinion you can offer regarding this manual.
Please use this form to relay suggestions for improving this publication or to alert us to corrections. Identify specific pages where applicable. You can contact us through the following methods:
Name:_______________________________________________________________________
Company:____________________________________________________________________
Address:_____________________________________________________________________
Telephone:______________________________Date:_________________________________
E-mail:_______________________________________________________________________
Comments:
Mail: Documentation Services - Customer SupportInformation Builders, Inc. Two Penn Plaza New York, NY 10121-2898
Fax: (212) 967-0460
E-mail: [email protected]
Web form: http://www.informationbuilders.com/bookstore/derf.html
Information Builders, Inc. Two Penn Plaza, New York, NY 10121-2898(212) 736-4433Developing Applications DN1001057.0308Version 7.6

Reader Comments
Information Builders, Inc. Two Penn Plaza, New York, NY 10121-2898(212) 736-4433Developing Applications DN1001057.0308Version 7.6