Embed Size (px)
Citation preview

Detecting Disease: Ebola
Part 1: The Steps of an ELISA
Summary
A common test used to detect if a patient has been exposed to a virus, such as Ebola, is called an
ELISA (Enzyme Linked Immunosorbent Assay). This test takes advantage of the interactions between
antigens and antibodies. Often compared to a lock and key, an antigen/antibody interaction is very
specific. In this activity, students match diagrams with text descriptions to understand the steps of
an ELISA.
Time Estimate: 15-45 minutes, depending on prior knowledge
Learning Styles: Visual, kinesthetic, auditory
Vocabulary
Antibody – protein produced by B cells in response to an antigen to neutralize the foreign protein (antigen); also called immunoglobulin
Antigen – any substance that is foreign to the body and stimulates an immune response
ELISA – Enzyme Linked Immunosorbent Assay – antigen/antibody assay
Primary Antigen – the first bound antibody in an ELISA
Secondary Antigen – the second bound antibody in an ELISA, used to increase the sensitivity of the test
Student Learning Objectives The student will be able to:
Define ELISA
Sequence the steps of an ELISA
Explain the use of an ELISA to aid in disease diagnosis
Describe and diagram antigen/antibody interactions Standards
SC.912.L.14.52 – Explain the basic functions of the human immune system, including specific/ nonspecific immune response, vaccines, and antibiotics. SC.912.L.16.10 – Evaluate the impact of biotechnology on the individual, society and the environment, including medical and ethical issues. SC.912.L.18.1 – Describe the basic molecular structures and primary functions of the four major categories of biological macromolecules.
Background Information The ELISA has been used as a diagnostic tool in medicine and plant pathology, as well as a
quality-control check in various industries. In simple terms, in ELISA, an unknown amount of antigen is affixed to a surface, and then a specific antibody is applied over the surface so that it can bind to the antigen. This antibody is linked to an enzyme, and, in the final step, a substance containing the enzyme’s substrate is added. The subsequent reaction produces a detectable signal, most commonly a color change in the substrate.
Performing an ELISA involves at least one antibody with specificity for a particular antigen. The sample with an unknown amount of antigen is immobilized on a solid support (usually a polystyrene microtiter plate) either non-specifically (via adsorption to the surface) or specifically (via capture by another antibody specific to the same antigen, in a “sandwich” ELISA). After the antigen is immobilized, the detection antibody is added, forming a complex with the antigen. The detection antibody can be covalently linked to an enzyme, or can itself be detected by a secondary antibody that is linked to an enzyme through bioconjugation. Between each step, the plate is typically washed with a mild detergent solution to remove any proteins or antibodies that are not specifically bound. After the final wash step, the plate is developed by adding an enzymatic substrate to produce a visible signal, which indicates the quantity of antigen in the sample
Advance Preparation Project the image of antibodies and antigens. You may want to make this into a file folder game. Affix the Steps of an ELISA student worksheet to the inside left and right sides of a file folder. Laminate for repeated use. Color copy the ELISA cards, laminate, and cut. Using small pieces of Velcro, place one side on the ELISA cards and the other in the center of each step on the worksheet.
Procedure and Talking Points (with time estimates)
1. Review or introduce the following key points about antibodies and antigens:
Antigens are foreign proteins which cause the immune system to generate antibodies.
Specific antibodies are produced for each antigen. They bind like a lock and key.
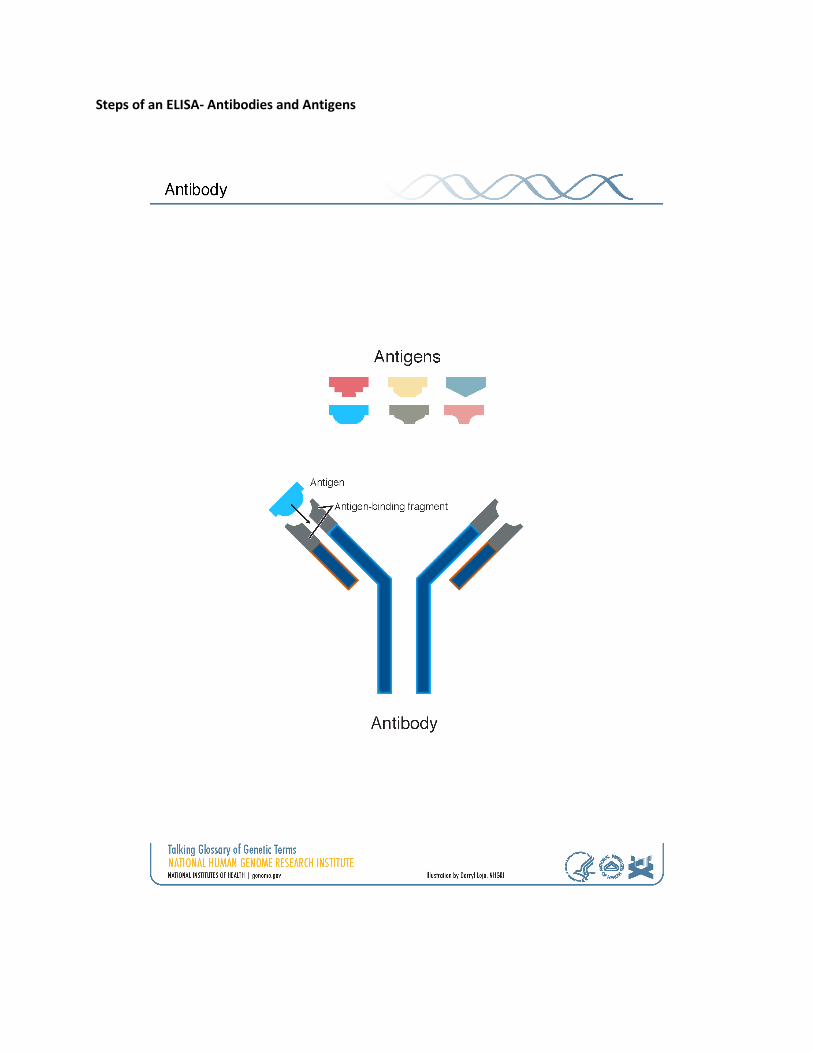
There are different antibodies produced by the human immune system (IgG, IgM, IgE, etc) but all have the same basic starting structure: a Y. At the top of the Y is the part that recognizes a specific antigen.
The part of the antigen that binds with the antibody is referred to as the epitope. In this picture, it is the orange parts.
Show the students that the tops of the antibody “Y” fits with certain epitopes on the antigens. Some antigens have multiple epitopes, so they are recognized by different antibodies (kind of like a back-up system).
Tell students scientists have developed diagnostic assays that utilize the unique and specific binding properties of antibodies and antigens.
Introduce the idea that antibodies can serve as antigens as well and in diagnostic assays we create antibodies that recognize other antibodies as antigens or a protein which it is specific for.

Primary antibodies recognize the original antigen we are testing against. Secondary antibodies recognize the first (primary) antibody. Using both increases sensitivity.
2. Arrange students in pairs. 3. Distribute Steps of an ELISA cards and student worksheets to each pair. 4. Tell them to follow the directions on the worksheet. 5. (5-10 minutes) Allow student pairs to complete activity. 6. Review the steps together, clarifying as needed. 7. (2 minutes) Show the video to reinforce how an ELISA is performed.
http://www.youtube.com/watch?v=RRbuz3VQ100&feature=related ASSESSMENT SUGGESTIONS: Instructor can visually observe correct completion of the activity. Optional assessment questions are also provided at the end of the lesson. EXTENSIONS:
Antibody/antigen matching game to illustrate specificity of bonding through epitopes.
Candy Antigens and Antibodies (http://www.cmaste.ualberta.ca:82/en/TeacherResources/~/media/cmaste/Documents/Outreach/AlbertaIngenuityResources/Carbohydrate/AICCSLabActivityCandyBloodCellsTR.pdf)
RESOURCES/REFERENCES: ELISA video: http://www.youtube.com/watch?v=RRbuz3VQ100&feature=related Centers for Disease Control: http://www.cdc.gov/vhf/ebola/

Steps of an ELISA: Student Worksheet
A common test used to detect if a patient has been exposed to a virus such as HIV, Ebola, or West Nile is
called an ELISA (Enzyme Linked Immunosorbent Assay). This test takes advantage of the interactions
between antigens and antibodies. Often compared to a lock and key, an antigen/antibody interaction is
very specific. ELISA tests usually take place in plastic plates containing wells, or depressions.
Match the statements and images below to sequence the steps of an ELISA.
Virus proteins (antigens) are added to wells of a 96-well plate.
The antigens bind to the plastic, coating the bottom of the wells.
The primary antibody is added to the well. In the case of the ebola ELISA, the primary antibodies (IgM) are from the patient’s serum sample.

Excess antibody is washed away, leaving only antibodies bound to the antigens behind. This wash removes excess antibodies that are unbound and prevents non-specific binding.
A secondary antibody is added to the wells. This antibody recognizes the patient IgM antibodies, bound to the antigens. The secondary antibody also has a colorimetric tag attached.
Excess secondary antibody is washed away, leaving only secondary antibodies, bound to the patient IgM antibodies. This wash removes excess antibodies that are unbound.
A substrate is added to the wells.
Bound secondary antibody containing a colorimetric tag will cause a color change when exposed to the substrate. A color change indicates a positive reaction.

Steps of an ELISA – Student Cards
Make one set of eight cards for each group. Cut on both sides of arrows and between rows to separate
into eight cards, each representing a step in the ELISA reaction. Laminate for repeated use.

Steps of an ELISA- Teacher Answer Key
A common test used to detect if a patient has been exposed to a virus such as HIV, Ebola, or West Nile is
called an ELISA (Enzyme Linked Immunosorbent Assay). This test takes advantage of the interactions
between antigens and antibodies. Often compared to a lock and key, an antigen/antibody interaction is
very specific. ELISA tests usually take place in plastic plates containing wells, or depressions.
Match the statements and images below to sequence the steps of an ELISA test.
Virus proteins (antigens) are added to wells of a 96-well plate.
The antigens bind to the plastic, coating the bottom of the wells.
The primary antibody is added to the well. In the case of the ebola ELISA, the primary antibodies (IgM) are from the patient’s serum sample.
Excess antibody is washed away, leaving only antibodies bound to the antigens behind. This wash removes excess antibodies that are unbound and prevents non-specific binding.

A secondary antibody is added to the wells. This antibody recognizes the patient IgM antibodies, bound to the antigens. The secondary antibody also has a colorimetric tag attached.
Excess secondary antibody is washed away, leaving only secondary antibodies, bound to the patient IgM antibodies. This wash removes excess antibodies that are unbound.
A substrate is added to the wells.
Bound secondary antibody containing a colorimetric tag will cause a color change. A color change indicates a positive reaction.
Steps of an ELISA- Antibodies and Antigens

Part 2: Testing for Ebola
Summary
Simulating an ELISA, students will test patient serum samples for the presence of ebola antibodies, and record their results on the epidemiological report. A commercial, classroom-friendly version is also available (Bio-Rad’s Biotechnology Explorer ELISA Immunoexplorer Kit Catalog #166-2400EDU, Protocol III — Antibody test. All necessary consumables are included in the Bio-Rad kit). Time Estimate: 45 minutes
Learning Styles: Visual and kinesthetic
Vocabulary
Antibody – protein produced by B cells in response to an antigen to neutralize the foreign protein (antigen); also called immunoglobulin
Antigen – any substance that is foreign to the body and stimulates an immune response
ELISA – Enzyme Linked Immunosorbent Assay – antigen/antibody assay
Primary Antigen – the first bound antibody in an ELISA
Secondary Antigen – the second bound antibody in an ELISA, used to increase the sensitivity of the test
Student Learning Objectives The student will be able to:
Understand (Explain) the use of biotechnology to diagnose disease
Know (Recognize) that an ELISA is an antibody-based test rather than nucleic acid
Perform an ELISA test
Explain the steps of an ELISA
Consider (Propose) other uses of an ELISA
Standards
SC.912.L.16.10 – Evaluate the impact of biotechnology on the individual, society and the environment, including medical and ethical issues. SC.912.L.16.11 – Discuss the technologies associated with forensic medicine and DNA identification, including RFLP analysis. SC.912.L.16.12 – Describe how basic DNA technology (gel electrophoresis, polymerase chain reaction, ligation, and transformation) is used to construct recombinant DNA molecules (DNA cloning). SC.912.L.18.1 – Describe the basic molecular structures and primary functions of the four major categories of biological macromolecules.

Background Information General ELISA background information can be found in the preceding lesson, as well as in
the BioRad Laboratory Manual to accompany this experiment. There are several different types of ELISA. For our ebola example, we are indirectly measuring the presence of ebola virus in the patient’s serum by capturing antibodies. The steps of an “indirect” ELISA follow the mechanism below:
1. A buffered solution of the antigen to be tested for is added to each well of a microtiter plate, where it is given time to adhere to the plastic through charge interactions. 2. A solution of non-reacting protein, such as bovine serum albumin or casein (non-fat milk powder is sometimes used), is added to block any plastic surface in the well that remains uncoated by the antigen. 3. Next the primary antibody is added, which binds specifically to the test antigen that is coating the well. This primary antibody could also be in the serum of a donor to be tested for reactivity towards the antigen. 4. Afterwards, a secondary antibody is added, which will bind the primary antibody. This secondary antibody often has an enzyme attached to it, which has a negligible effect on the binding properties of the antibody. 5. A substrate for this enzyme is then added. Often, this substrate changes color upon reaction with the enzyme. The color change shows that secondary antibody has bound to primary antibody, which strongly implies that the donor has had an immune reaction to the test antigen. This can be helpful in a clinical setting, and in research and development. 6. The higher the concentration of primary antibody present in the serum, the stronger the color change. Often a spectrometer is used to give quantitative values for color strength. IgM antibody capture ELISA (MAC-ELISA) format is most commonly employed in diagnostic
laboratories and commercially available diagnostic kits. The assay is based on capturing human IgM antibodies on a microtiter plate. Ebola virus specific antigen (EBOV) is first coated on the plate, followed by the addition of the patient serum sample containing IgM antibodies against ebola (primary antibody). To detect the bound IgM antibodies, anti-human-IgM antibody (the secondary antibody) is added to the plate. The enzyme-linked anti-human antibody will bind to the patient IgM. Once substrate is added, the enzyme is released causing a color change. The antigens used for this assay are derived from the envelope protein of the virus. One of the limitations of this testing is the cross reactivity between other circulating filoviruses such as Marburg Virus. This limitation must be considered when working in regions where multiple filoviruses co-circulate. IgM detection is not always useful for ebola serotype determination due to cross-reactivity of the antibody; often, RT-PCR is used to determine serotype.
Advance Preparation
Copy Student Worksheet with ELISA Procedure for each student or student pair.
The simulation instructions presented here are modeled after the Bio-Rad kit, Protocol III. Therefore, students will follow the same steps whether they are performing the simulation or the authentic Bio-Rad ELISA.
All directions for performing the Bio-Rad ELISA are not presented here, but they can be found in the instruction manual accompanying the Bio-Rad kit. Please make sure to follow the preparation instructions included in the kit if performing the commercial version.

1. Prepare the ELISA plates. If using 12-well microplate strips, use a Sharpie or other permanent marker to number the wells at the top 1-12. If using 96-well plates, they should come with columns and rows marked. 2. Using a fluorescent ink pen, “paint” the bottom of wells 1-3 (positive serum) and wells 7-9 (patient serum). Allow to dry prior to use. 3. Prepare student station reagents using the chart below. Note: This provides quantities for 8 student workstations, each with 2-4 students. To allow students to work in smaller groups, but without increasing prep time alliquoting reagents, two student groups (2 microstrip plates) can use 1 set of reagents.
Tubes (number needed)
Description Label Contents (Each Tube)
Violet tubes, 8 Positive controls + 0.5ml water
Blue tubes, 8 Negative controls - 0.5ml water
Green tubes, 8 Purified antigen AG 1.5ml water
Orange tubes, 8 Secondary antibody SA 1.5ml water
Brown tubes, 8 Enzyme substrate SUB 1.5ml water
Clear tubes, 8 Patient sample PAT 0.25ml water
4. Prepare wash buffer Add 5ml clear or white unscented dish soap to 1000ml water. Mix well. Aliquot 50ml wash buffer per student group (Beakers, conical tubes, or cups work well.) 5. Assemble student workstations, or have students collect the items below from a common station.
Item (Label) Contents Number per station
( )
Yellow tube (PAT) Patient sample (0.25ml) 1
Violet tube (+) Positive control (0.5ml) 1
Blue tube (-) Negative control (0.5ml) 1
Green tube (AG) Purified antigen (1.5ml) 1
Orange tube (SA) Secondary antibody (1.5ml) 1
Brown tube (SUB) Enzyme substrate (1.5ml) 1
Beaker of wash buffer 1
12-well microplate strip 1
Disposable transfer pipette
7 (only 1 needed for wash buffer if using P200)
20-200ul micropipette 1 (if available)
20-200ul tips 1 box (if available)
Stack of paper towels 1

Implementation tips:
Use P200 if available to add samples to the wells.
Use disposable pipettes to add the wash buffer.
Ensure students know how to use both the adjustable volume pipette as well as the disposable pipettes. Bubbles are not friendly in this experiment, and improper use of the pipettes has led to many wells bubbling over.
Use absorbent towels. The brown paper towel standard in many schools does not adequately absorb liquid, causing samples to splash back and contaminate adjacent wells. This isn’t a big problem with the simulation, but is with an actual ELISA.
Avoid rehydrating the antibodies, particularly the secondary antibody, until just prior to use.
If possible, when performing the actual ELISA, keep all solutions and reagents cold until use. Procedure and Discussion Questions (with time estimates)
The lab procedure is well outlined in the Bio-Rad manual, which is what was used to create the student worksheet. The
ASSESSMENT SUGGESTIONS: Optional questions (and answers) provided. EXTENSIONS:
Reading: Article from San Jose Mercury News on the evolution of the Ebola virus as well as new rapid-testing procedures
Video: From CBS San Francisco (related to above article), discussing the need for a rapid test for Ebola as well as development (and fast-track approval) of an Ebola vaccine.
RESOURCES/REFERENCES: Centers for Disease Control: http://www.cdc.gov/vhf/ebola/ Bio-Rad Immuno Explorer Module: http://www.bio-rad.com/en-us/product/elisa-immuno-explorer-kit Extension Article: http://www.mercurynews.com/science/ci_26811343/ebolas-evolving-threat-studied-ucsf-lab Extension Video: http://sanfrancisco.cbslocal.com/2014/10/17/bay-area-scientists-work-on-test-to-find-ebola-virus-early-ebola-outbreak-ucsf-dr-charles-chiu-symptoms-rapid-diagnostic-test-vaccine/

Testing for Ebola
Background Information
Ebola, also known as ebola virus disease or Ebola hemorrhagic fever, is a rare and deadly
disease caused by infection with one of the Ebola virus strains. Ebola can cause disease in humans
and nonhuman primates (monkeys, gorillas, and chimpanzees).
Ebola is caused by infection with a virus of the family Filoviridae, genus Ebolavirus. There are
five identified Ebola virus species, four of which are known to cause disease in humans: Ebola virus
(Zaire ebolavirus); Sudan virus (Sudan ebolavirus); Taï Forest virus (Taï Forest ebolavirus,
formerly Côte d’Ivoire ebolavirus); and Bundibugyo virus (Bundibugyo ebolavirus). The fifth, Reston
virus (Reston ebolavirus), has caused disease in nonhuman primates, but not in humans.
Ebola viruses are found in several African countries. Ebola was first discovered in 1976 near
the Ebola River in what is now the Democratic Republic of the Congo. Since then, outbreaks have
appeared sporadically in Africa. The 2014 Ebola epidemic is the largest in history, affecting multiple
countries in West Africa (Guinea, Liberia, and Sierra Leone). There were a small number of cases
reported in Nigeria and a single case reported in Senegal; however, these cases are considered to be
contained, with no further spread in these countries.
The natural reservoir host of Ebola virus remains unknown. However, on the basis of
evidence and the nature of similar viruses, researchers believe that the virus is animal-borne and
that bats are the most likely reservoir. Four of the five virus strains occur in an animal host native to
Africa.
The 2014 Ebola epidemic (caused by the Zaire ebolavirus strain) is the largest in history,
affecting multiple countries in West Africa. Although the disease has been contained in Nigeria and
Senegal, Ebola continues to spread through Guinea, Liberia, and Sierra Leone. Two imported cases,
including one death, and two locally acquired cases in healthcare workers have been reported in the
United States. As of November 14th, there have been 14413 cases, 8920 of which are laboratory-
confirmed cases, and 5177 deaths.
Clinical Test
In the previous activity, you learned about the steps of an ELISA. You will now put that
information to good use to actually perform an ELISA, using serum samples from patients who may
have been exposed to Ebola Zaire. Don’t forget to answer the post-lab questions at the end!

Testing for Ebola: Student Worksheet
1. Review the student workstation checklist to ensure you have all needed reagents and supplies.
Item (Label) Contents Number per station
Yellow tube (PAT) Patient sample (0.25ml) 1
Violet tube (+) Positive control (0.5ml) 1
Blue tube (-) Negative control (0.5ml) 1
Green tube (AG) Purified antigen (1.5ml) 1
Orange tube (SA) Secondary antibody (1.5ml) 1
Brown tube (SUB) Enzyme substrate (1.5ml) 1
Beaker of wash buffer 1
12-well microplate strip 1
Disposable transfer pipette
7 (only 1 needed for wash buffer if using P200)
20-200ul micropipette 1 (if available)
20-200ul tips 1 box (if available)
Stack of paper towels 1
2. Label wells 1-3 with a + (positive control); label wells 4-6 with – (negative control); label wells 7-9 with
Pat (patient sample).
3. Use a fresh pipette tip to transfer 50ul of the purified antigen (AG) into
wells 1-9 of the microplate strip.
4. Wait 2 minutes for the purified ebola virus antigen to bind to the
plastic wells.

5. Wash:
a. Tip the microplate strip upside down onto the paper towels, and tap the strip a few times upside
down. Make sure to avoid splashing sample back into wells.
b. Discard the top paper towel.
c. Use your transfer pipette to fill each well (1-9) with wash
buffer, taking care not to spill over into neighboring wells.
Note: the same transfer pipette is used for all washing steps.
Be sure to only draw up wash buffer, and not the contents of
the wells.
d. Tip the microplate strip upside down onto the paper towels and
tap.
e. Discard the top 2-3 paper towels.
6. Use a fresh pipette tip to transfer 50ul of the positive control (+) into
wells 1-3.
7. Use a fresh pipette tip to transfer 50ul of the negative control (-) into
wells 4-6.
8. Use a fresh pipette tip to transfer 50ul of the patient serum (PAT) into
wells 7-9.
9. Leave wells 10-12 empty.
10. Wait 2 minutes for the antibodies to bind to their targets.
11. Wash the unbound primary antibody out of the wells by repeating all of wash step 5.
(Wash once.)
12. Use a fresh pipette tip to transfer 50ul of secondary antibody (SA)
into wells 1-9 of the microplate strip.
13. Wait 2 minutes for the antibodies to bind to their targets.
14. Wash the unbound secondary antibody out of the wells by
repeating wash step 5. (Wash one time.)
15. Use a fresh pipette tip to transfer 50ul of enzyme substrate (SUB)
into wells 1-9 of the microplate strip.
16. Wait 2 minutes. Use a UV light to observe. Record the results on
your epidemiological report.

Testing for Ebola: Post-Lab Questions
1. What does ELISA stand for?
2. Describe the difference between antigens and antibodies.
3. Why is it important to include positive and negative control samples, in addition to the patient samples?
4. Did your serum have antibodies to Ebola?
5. What reasons could there be for a positive test if the patient does not actually have the disease?
6. Why are the samples tested in triplicate?
7. When serum is added to the wells, what happens to the serum antibodies if the sample is positive? When the sample is negative?
8. Why is it important to wash the wells after every step?
9. When secondary antibody is added to the wells, what happens to the serum antibodies if the sample is positive? If the sample is negative?

Testing for Ebola: Answers to Post-Lab Questions
1. What does ELISA stand for? Enzyme linked immunosorbent assay.
2. Describe the difference between antigens and antibodies.
Antibodies, also called immunoglobulins, are proteins manufactured by the body that help fight against foreign substances called antigens.
3. Why is it important to include positive and negative control samples, in addition to the patient samples? Controls are needed to make sure the experiment worked. If there are no positive controls and the sample is negative, we can’t know if the sample was truly negative or if the experiment just didn’t work. Without a negative control, there is no way of knowing if all samples (positive or not) would have given a positive result.
4. Did your serum have antibodies to Ebola? Students explain using data from their results.
5. What reasons could there be for a positive test if the patient does not actually have the disease? 1) False positive – not all assays are specific for a single disease agent. 2) Experimental error, e.g. putting the sample in the wrong well. 3) Past exposure to the disease
6. Why are the samples tested in triplicate? This is another control for the experiment – if the same result is not seen in all three wells, there may be a problem with the experimental technique or there was a pipetting error. In a clinical laboratory, the experiment would have to be repeated.
7. When serum is added to the wells, what happens to the serum antibodies if the sample is positive? When the sample is negative? If the sample was positive, serum antibodies that recognize the purified antigen in the wells bound to the antigen. If the sample was negative, no antibodies bound.
8. Why is it important to wash the wells after every step? Washing removes any proteins that have not bound to the plastic wells as well as any antibodies that have not bound to their targets, thus preventing unbound proteins (either antibodies or antigens) from giving false positive results.
9. When secondary antibody is added to the wells, what happens to the serum antibodies if the sample is positive? If the sample is negative? If the sample was positive, the secondary antibody bound to the serum antibodies (which are bound to the purified antigen adsorbed to the wells). If the sample was negative, there were no serum antibodies bound in the wells and therefore the secondary antibody had nothing to bind to and was washed away.