Embed Size (px)
Citation preview
1
Detailed presentation of SEPA
direct debits Version 2.1 - 20-12-2012
2
Contents.
1 Introduction.................................................................................................................................................................. 2
2 Creation of SEPA Direct Debits .................................................................................................................................. 3
2.1 Input of a mandate. .................................................................................................................................................. 5
2.2 Input of encashment based on the mandate. ............................................................................................................. 7
3 Group creation of europeen SEPA direct debits. ......................................................................................................... 8
3.1 Creation of groups of mandates. .............................................................................................................................. 9
3.1.1 List of mandates. .................................................................................................................................................... 9
3.1.2 Managing groupes. .............................................................................................................................................. 10
3.2 Receipts by group mandates. .................................................................................................................................. 13
4 Creating a European direct debit SEPA from a migrated mandate............................................................................ 17
4.1 Entering the migrated madate. ................................................................................................................................ 17
4.2 Entering the collection based on the migrated mandate. ........................................................................................ 19
5 Change the sequence after the first collection ........................................................................................................... 20
6 Amendment of mandates. .......................................................................................................................................... 21
6.1 Modify mandates. ................................................................................................................................................... 21
6.2 Amendments. .......................................................................................................................................................... 21
6.3 Rejection because of a wrong amandment. ............................................................ Error! Bookmark not defined.
7 What happens if the encashments aren’t executed? ................................................................................................... 23
7.1 REJECTS (refusal before the debtor has been debited). ......................................................................................... 23
7.2 Refusal after the debtor has been debited. .............................................................................................................. 23
3
1 Introduction.
In the context of the single Single Euro Payment Area (SEPA), the existing national receipt
systems in the SEPA countries will be replaced by a unique europeen system.
This europeen system is called Sepa Direct Debit (short name: SDD).In Luxembourg it is
denominated under the name «SEPA direct debits».
Only the europeen system will be admitted as of February 1st, 2014.
For any additional information about the europeen SEPA direct debits, please feel free to surf on the
website www.abbl.lu http://www.abbl.lu/dossiers/sepa or by contacting your bank.
2 Creation of a SEPA Direct Debit.
In the SEPA direct debit management you are the creditor :
who has to send the europeen authorization form to your debtor and the latter sends back
directly the signed form to you;
Please note! The debtor of the mandates in the B2B («Business to Business») system needs beforehand the
confirmation of the concerned authorization by his bank ! Indeed, the bank must verify if the account
which has to be debited is a professionnel account number (the B2B is a regime exclusively
reserved to business users), and wich acts that no reimbursement can be asked for this
authorization. Without this confirmation, your encashments B2B will be refused.
who has to preserve the authorization (paper documents);
who has to procede to the encashments.
After having introduced the basic operation data ( amount, message to the debtor, account number
and name of the debtor, creditor identifier, account number to be credited, processing date), the
europeen system requests to send for every encashment the following data about the mandate to
the bank (MRI = mandate related information) :
a mandate reference (this reference must be unique in order to allow the identification
of the concerned mandate (authorization));
an indication of the encashment sequences. At the first presentation/encashment of a
new mandate (just as for differnent later modifications), you hav to indicate «First» in
the sequence. After the execution of the encashment, you have to modify the value of
the sequence in the managing mandates and indicate «Next»;
4
the signature date from the mandate;
the payment scheme. The are two :
o «CORE» (also called «B2C», «Business to Consumer») : base system (standard);
o «B2B» («Business to Business») : reserved for encashments with business
customers (the debtor has no rights for reimbursment, other delays of
processing…);
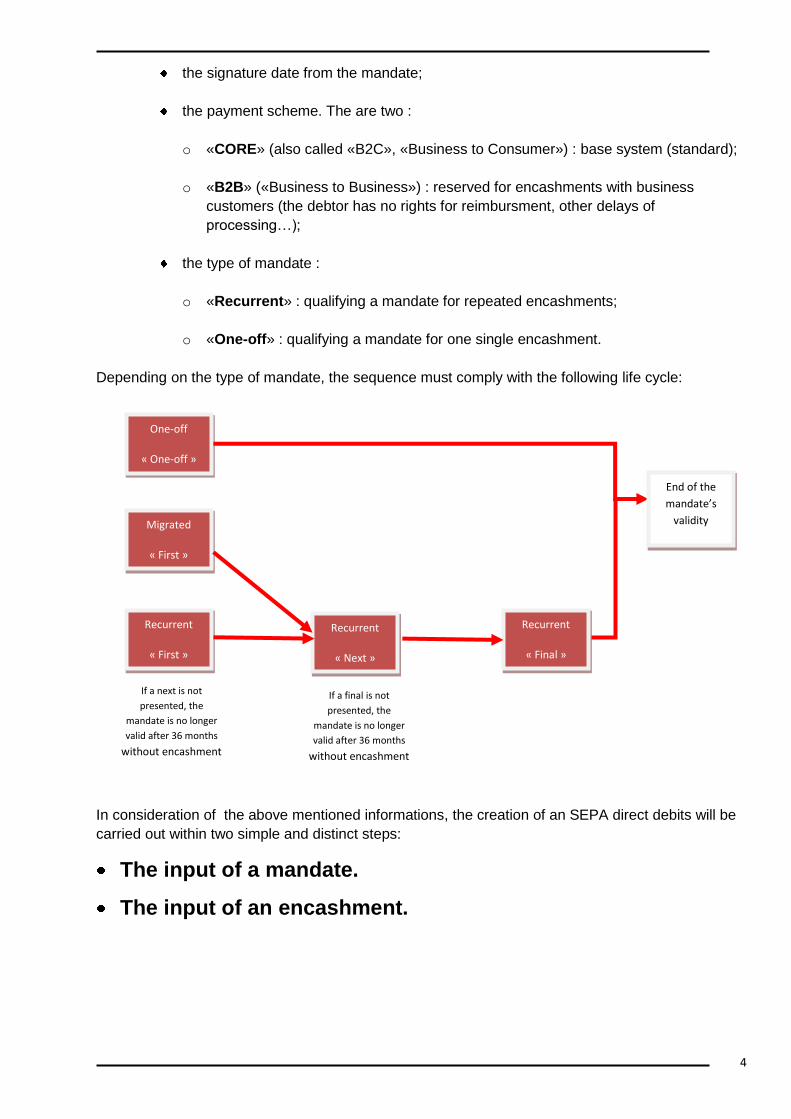
the type of mandate :
o «Recurrent» : qualifying a mandate for repeated encashments;
o «One-off» : qualifying a mandate for one single encashment.
Depending on the type of mandate, the sequence must comply with the following life cycle:
In consideration of the above mentioned informations, the creation of an SEPA direct debits will be
carried out within two simple and distinct steps:
The input of a mandate.
The input of an encashment.
One-off
« One-off »
«
Recurrent
« First »
«
Recurrent
« Next »
«
Recurrent
« Final »
«
End of the
mandate’s
validity
« Final »
«
If a next is not
presented, the
mandate is no longer
valid after 36 months
without encashment
« Final »
«
If a final is not
presented, the
mandate is no longer
valid after 36 months
without encashment
« Final »
«
Migrated
« First »
«
5
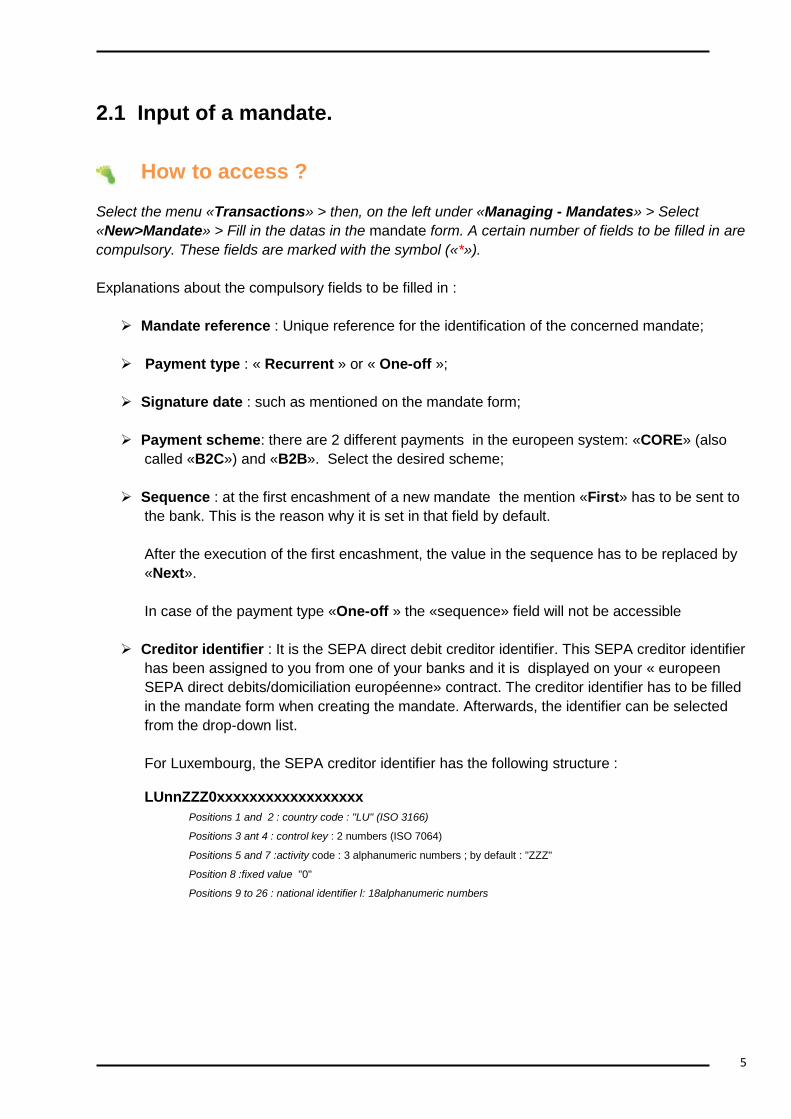
2.1 Input of a mandate.
How to access ?
Select the menu «Transactions» > then, on the left under «Managing - Mandates» > Select
«New>Mandate» > Fill in the datas in the mandate form. A certain number of fields to be filled in are
compulsory. These fields are marked with the symbol («*»).
Explanations about the compulsory fields to be filled in :
Mandate reference : Unique reference for the identification of the concerned mandate;
Payment type : « Recurrent » or « One-off »;
Signature date : such as mentioned on the mandate form;
Payment scheme: there are 2 different payments in the europeen system: «CORE» (also
called «B2C») and «B2B». Select the desired scheme;
Sequence : at the first encashment of a new mandate the mention «First» has to be sent to
the bank. This is the reason why it is set in that field by default.
After the execution of the first encashment, the value in the sequence has to be replaced by
«Next».
In case of the payment type «One-off » the «sequence» field will not be accessible
Creditor identifier : It is the SEPA direct debit creditor identifier. This SEPA creditor identifier
has been assigned to you from one of your banks and it is displayed on your « europeen
SEPA direct debits/domiciliation européenne» contract. The creditor identifier has to be filled
in the mandate form when creating the mandate. Afterwards, the identifier can be selected
from the drop-down list.
For Luxembourg, the SEPA creditor identifier has the following structure :
LUnnZZZ0xxxxxxxxxxxxxxxxxx
Positions 1 and 2 : country code : "LU" (ISO 3166)
Positions 3 ant 4 : control key : 2 numbers (ISO 7064)
Positions 5 and 7 :activity code : 3 alphanumeric numbers ; by default : "ZZZ"
Position 8 :fixed value "0"
Positions 9 to 26 : national identifier l: 18alphanumeric numbers
6
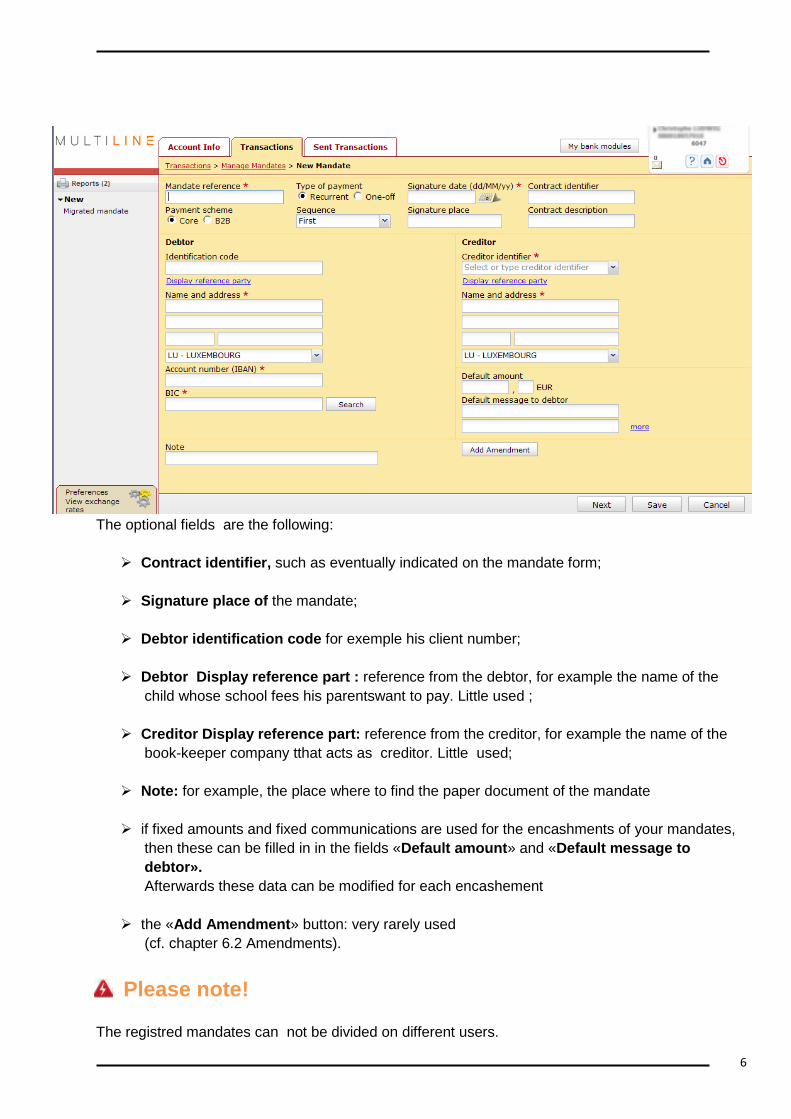
The optional fields are the following:
Contract identifier, such as eventually indicated on the mandate form;
Signature place of the mandate;
Debtor identification code for exemple his client number;
Debtor Display reference part : reference from the debtor, for example the name of the
child whose school fees his parentswant to pay. Little used ;
Creditor Display reference part: reference from the creditor, for example the name of the
book-keeper company tthat acts as creditor. Little used;
Note: for example, the place where to find the paper document of the mandate
if fixed amounts and fixed communications are used for the encashments of your mandates,
then these can be filled in in the fields «Default amount» and «Default message to
debtor».
Afterwards these data can be modified for each encashement
the «Add Amendment» button: very rarely used
(cf. chapter 6.2 Amendments).
Please note!
The registred mandates can not be divided on different users.
7
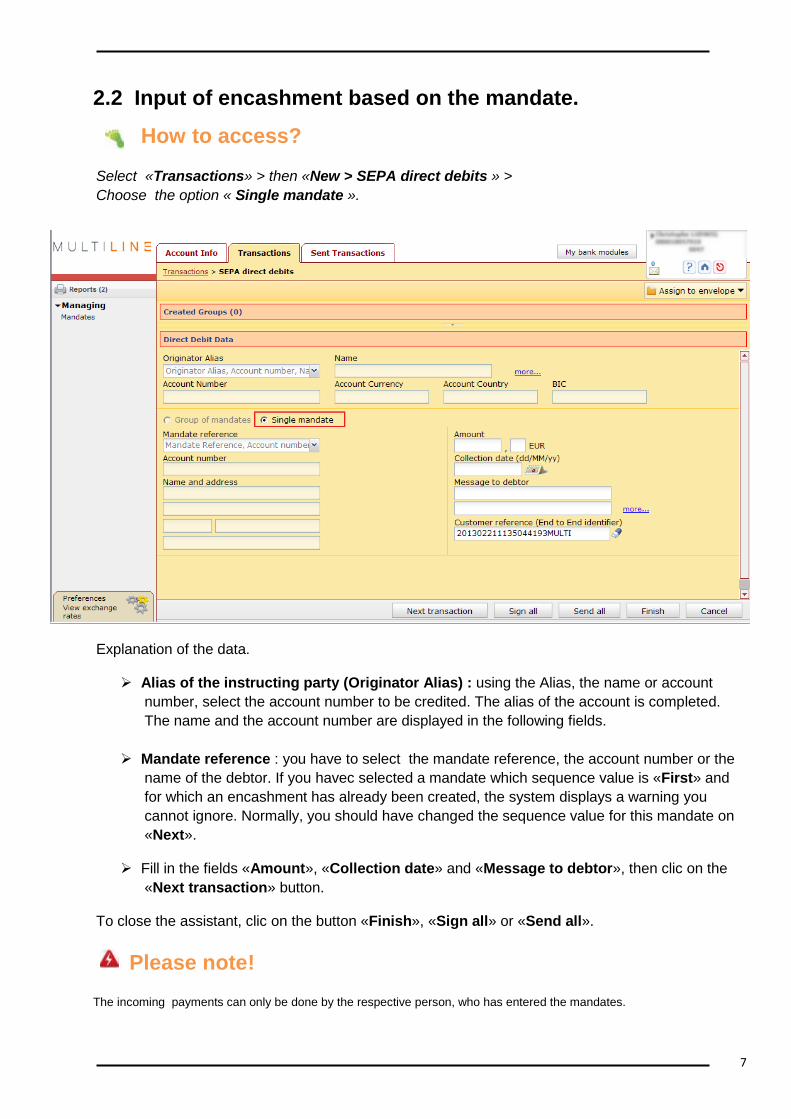
2.2 Input of encashment based on the mandate.
How to access?
Select «Transactions» > then «New > SEPA direct debits » >
Choose the option « Single mandate ».
Explanation of the data.
Alias of the instructing party (Originator Alias) : using the Alias, the name or account
number, select the account number to be credited. The alias of the account is completed.
The name and the account number are displayed in the following fields.
Mandate reference : you have to select the mandate reference, the account number or the
name of the debtor. If you havec selected a mandate which sequence value is «First» and
for which an encashment has already been created, the system displays a warning you
cannot ignore. Normally, you should have changed the sequence value for this mandate on
«Next».
Fill in the fields «Amount», «Collection date» and «Message to debtor», then clic on the
«Next transaction» button.
To close the assistant, clic on the button «Finish», «Sign all» or «Send all».
Please note! The incoming payments can only be done by the respective person, who has entered the mandates.
8
3 Creation of SEPA direct debits group.
The fact that you can attribute mandates to groups enables you to classify them by topics, but also
to prepare future encashments.
Indeed, the «SEPA direct debits» assistant has especially been created to work with groups of
mandates.
Example of permanent groups of mandates and work group of mandates.
In order to collect school invoices and other fees a school uses the europeen SEPA Direct Debits.
The office of the institution assignes the mandates to a permanent group by classes.
Once a quarter, the bills are taken once, per trimester by the office from each school-class (= by permanent
groups of mandates).
But, during school year, there are also activities for which students can register themselves and whose registration
fees will not be collected by the trimestrial school invoices. The office then will assign an additional group,
called « work group » to the mandates of all enrolled students. So they may easily recover, in one
single operation, the total of the « work group » of mandates.
The creation of SEPA direct debits groups will take place in two simple and distinct steps :
Creation of a group of mandates.
Input of encashment by group of mandates.
9
3.1 Creating groups of mandates.
3.1.1 List of mandates.
How to access?
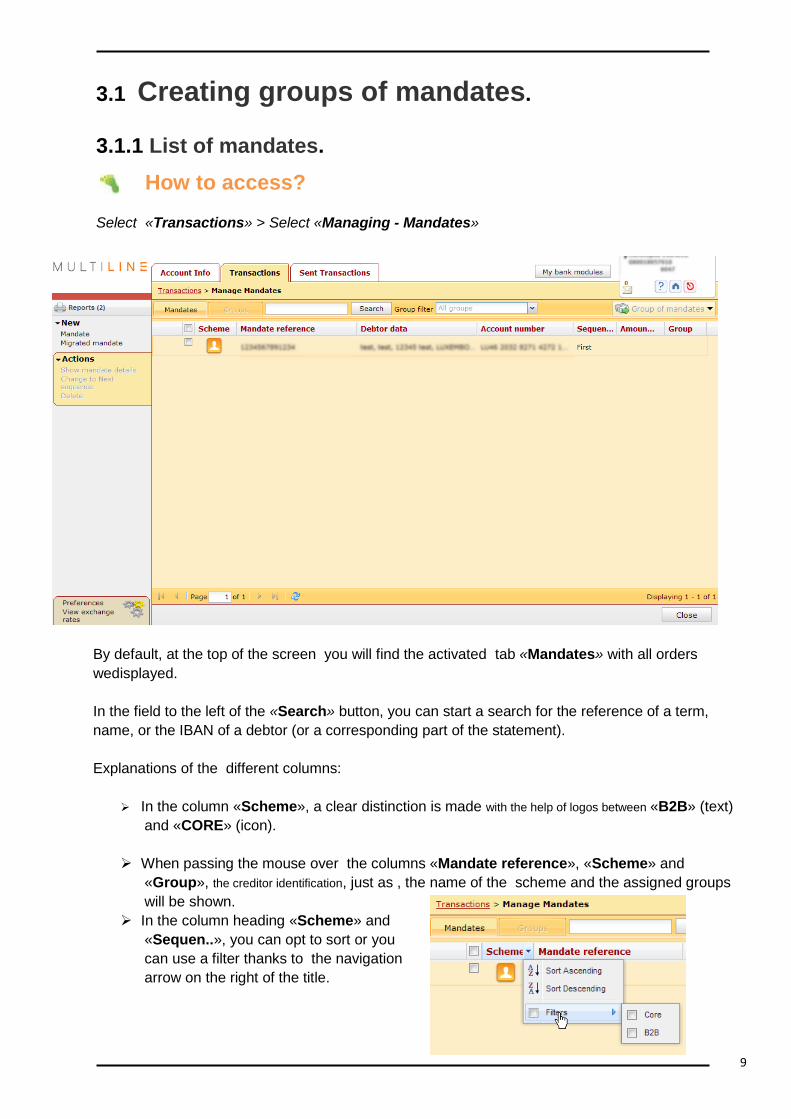
Select «Transactions» > Select «Managing - Mandates»
By default, at the top of the screen you will find the activated tab «Mandates» with all orders
wedisplayed.
In the field to the left of the «Search» button, you can start a search for the reference of a term,
name, or the IBAN of a debtor (or a corresponding part of the statement).
Explanations of the different columns:
In the column «Scheme», a clear distinction is made with the help of logos between «B2B» (text)
and «CORE» (icon).
When passing the mouse over the columns «Mandate reference», «Scheme» and
«Group», the creditor identification, just as , the name of the scheme and the assigned groups
will be shown.
In the column heading «Scheme» and
«Sequen..», you can opt to sort or you
can use a filter thanks to the navigation
arrow on the right of the title.
10
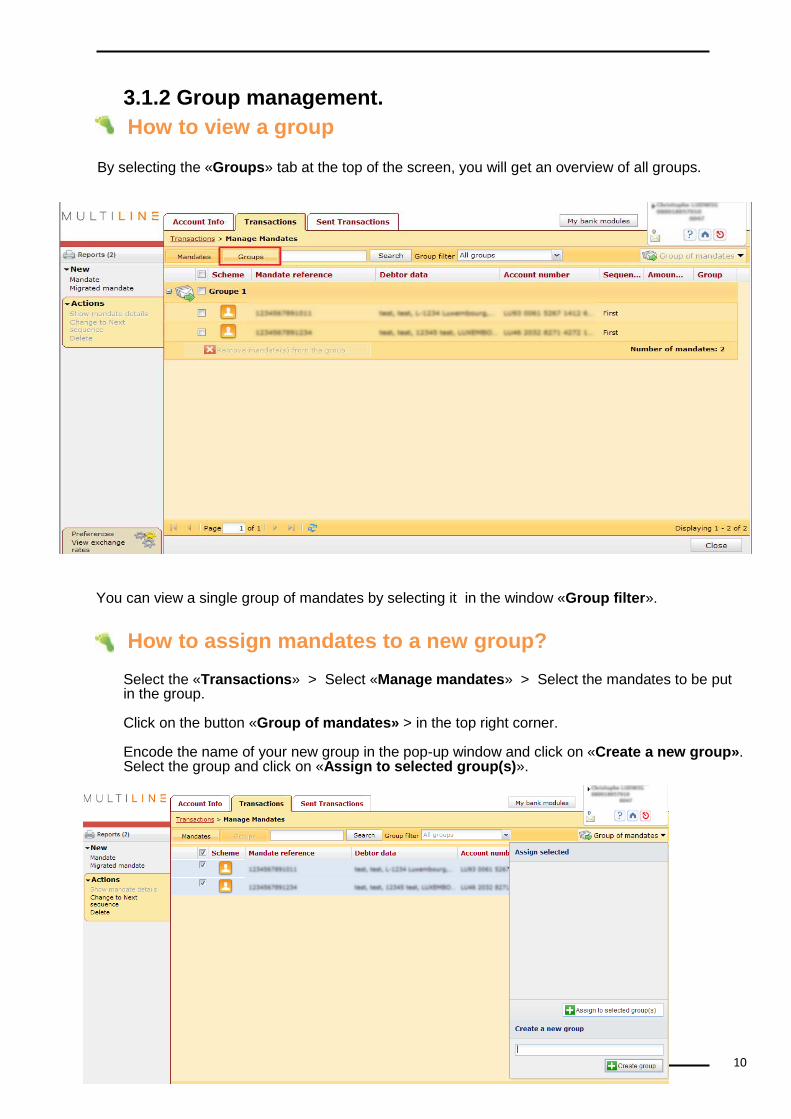
3.1.2 Group management.
How to view a group
By selecting the «Groups» tab at the top of the screen, you will get an overview of all groups.
You can view a single group of mandates by selecting it in the window «Group filter».
How to assign mandates to a new group?
Select the «Transactions» > Select «Manage mandates» > Select the mandates to be put in the group. Click on the button «Group of mandates» > in the top right corner. Encode the name of your new group in the pop-up window and click on «Create a new group». Select the group and click on «Assign to selected group(s)».
11
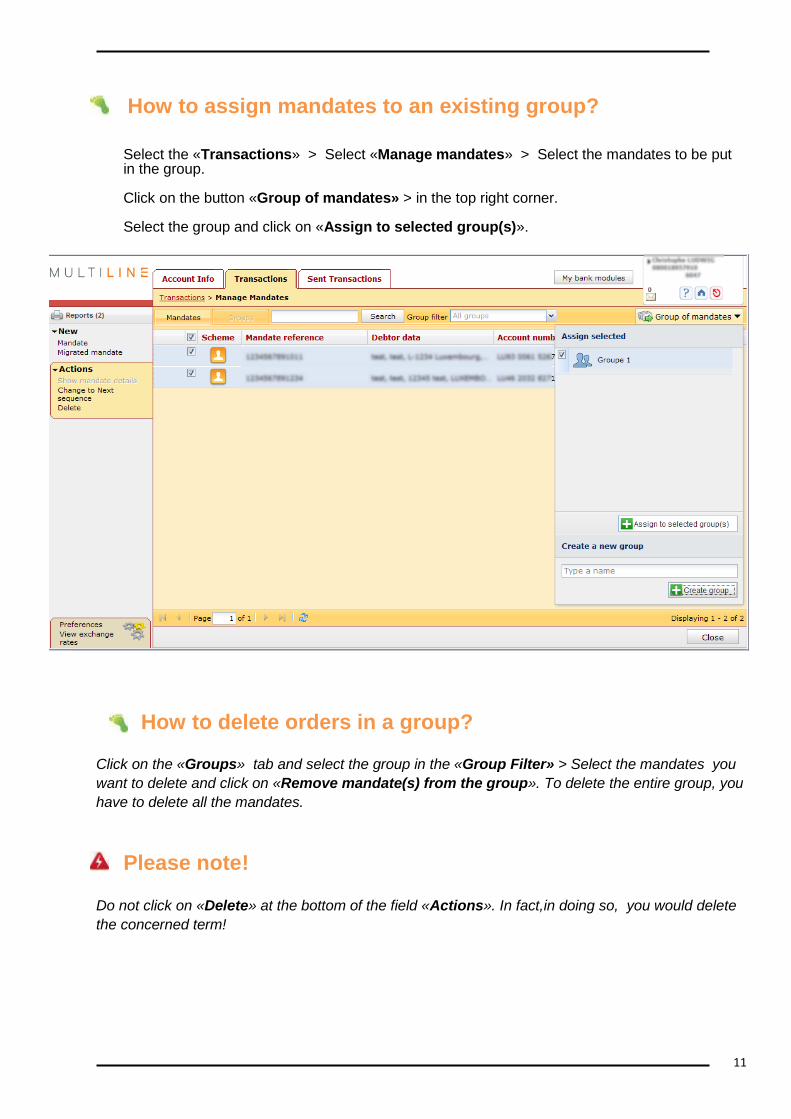
How to assign mandates to an existing group?
Select the «Transactions» > Select «Manage mandates» > Select the mandates to be put in the group. Click on the button «Group of mandates» > in the top right corner. Select the group and click on «Assign to selected group(s)».
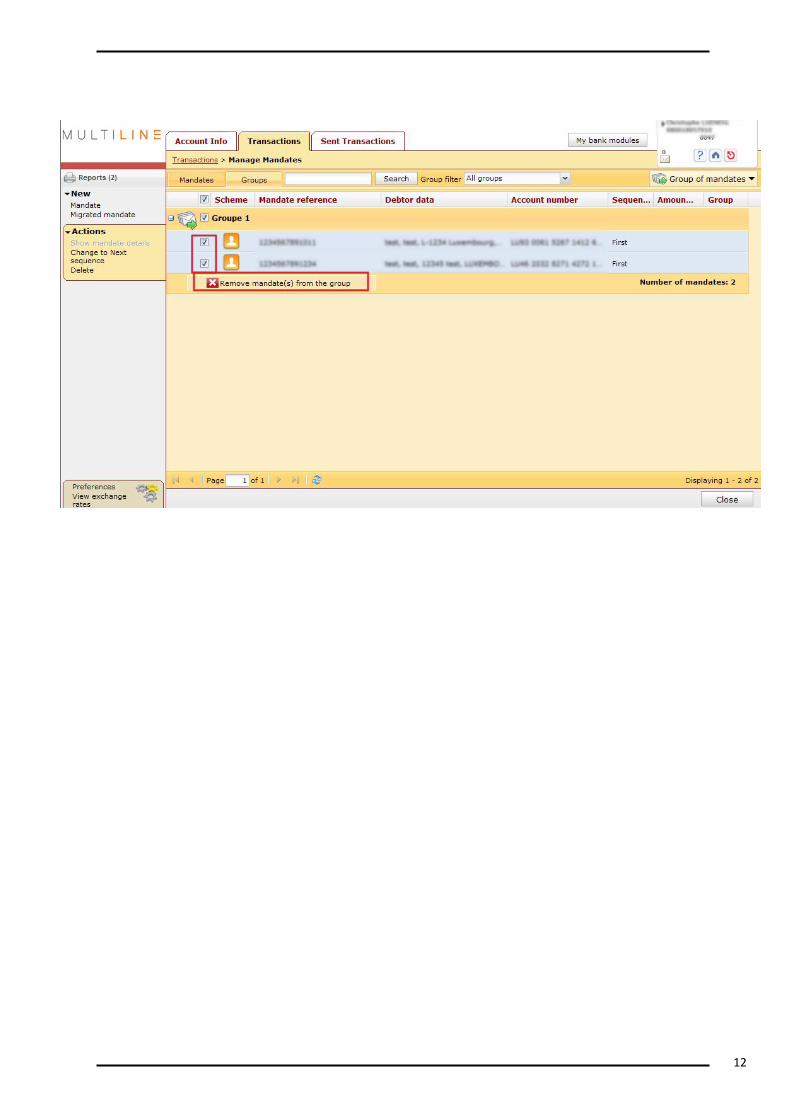
How to delete orders in a group?
Click on the «Groups» tab and select the group in the «Group Filter» > Select the mandates you
want to delete and click on «Remove mandate(s) from the group». To delete the entire group, you
have to delete all the mandates.
Please note!
Do not click on «Delete» at the bottom of the field «Actions». In fact,in doing so, you would delete
the concerned term!
12
13
3.2 Payment receipts by group mandates.
If you have created at least one group of mandates, the wizard automatically enables the option
«Group of mandates».
The wizard will apply the following criteria in order to create automatically separate groups of
receipts:
by account number and currency code of the creditor;
by creditor identifier;
by execution date;
by «Sequence» («First», «Next», ...);
by payment type («Recurrent», «One-off»)
by scheme («CORE», «B2B»).
Indeed, it is forbidden to send a combination of the above criteria in a single group of encashments.
In most cases, it is appropriate to allocate in advance receipts you want to executed through the
management of orders to a working group:
by creating a working group with all new orders (sequences «First»). After the receipt, it will
be easier to set the field «Sequence» to the value «Next»;
Maybe you run also periodic payments. During the current period, you can already assign in advance mandates on which you will make a cash basis to a working group;
Working Group is also handy for receipts with amount and fixed communication.It is also
convenient to work with working groups in case of payments with fixed amounts and
releases.
14
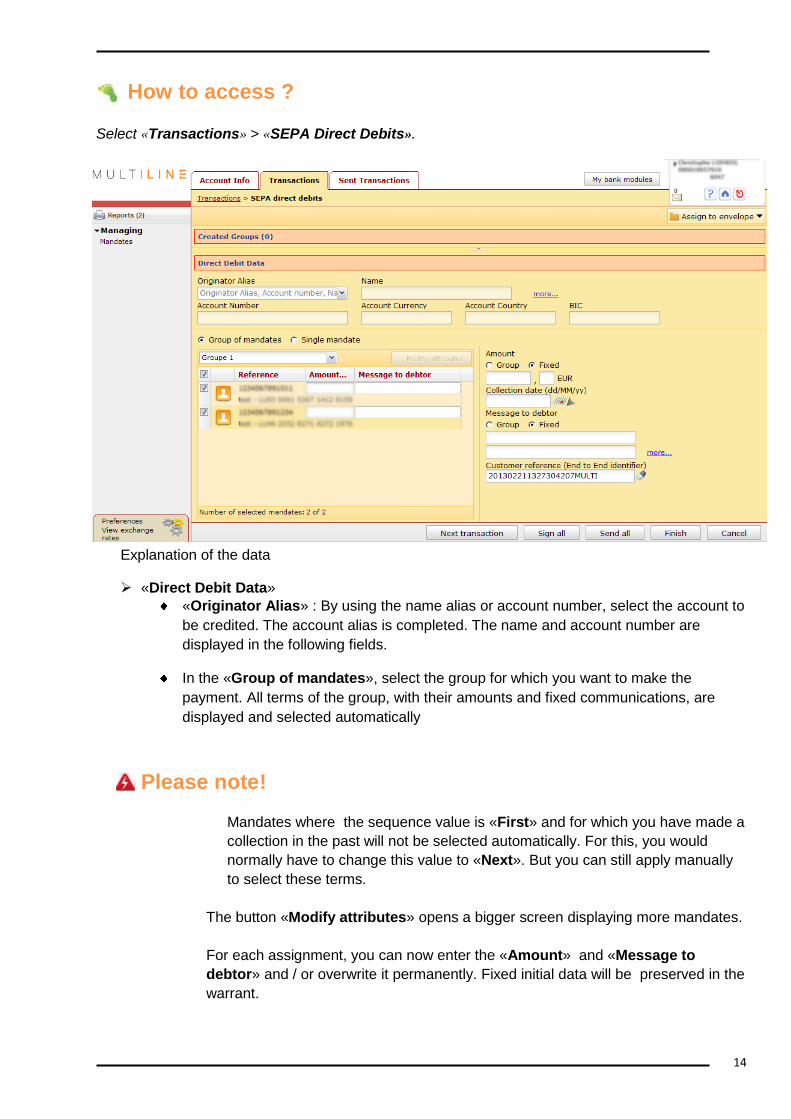
How to access ?
Select «Transactions» > «SEPA Direct Debits».
Explanation of the data
«Direct Debit Data»
«Originator Alias» : By using the name alias or account number, select the account to
be credited. The account alias is completed. The name and account number are
displayed in the following fields.
In the «Group of mandates», select the group for which you want to make the
payment. All terms of the group, with their amounts and fixed communications, are
displayed and selected automatically
Please note!
Mandates where the sequence value is «First» and for which you have made a
collection in the past will not be selected automatically. For this, you would
normally have to change this value to «Next». But you can still apply manually
to select these terms.
The button «Modify attributes» opens a bigger screen displaying more mandates.
For each assignment, you can now enter the «Amount» and «Message to
debtor» and / or overwrite it permanently. Fixed initial data will be preserved in the
warrant.
15
«Amount»
o «Group» : The mentioned amounts are the amounts entered when creating
mandates. You can increase or decrease i these amounts by modifying the given
value 100%.
o Example: If the amount is EUR 2.00 and the rate up to 110%, then the amount of
the deposit will be EUR 2.20.
o «Fixed» : You can enter an amount that will replace the amount of each group's
mandate.
«Message to the debtor» :
o «Group» : list of the messages mentioned in the group mandates.
o «Fixed» : In this field, you can enter a fixed message, applicable to all mandates
affected by this encashment operation.
«Collection date»: Select the desired date in the calendar.
o The encashments «First» and «Next» should be sent within a specific
timeframe (see your creditor bank for more details).
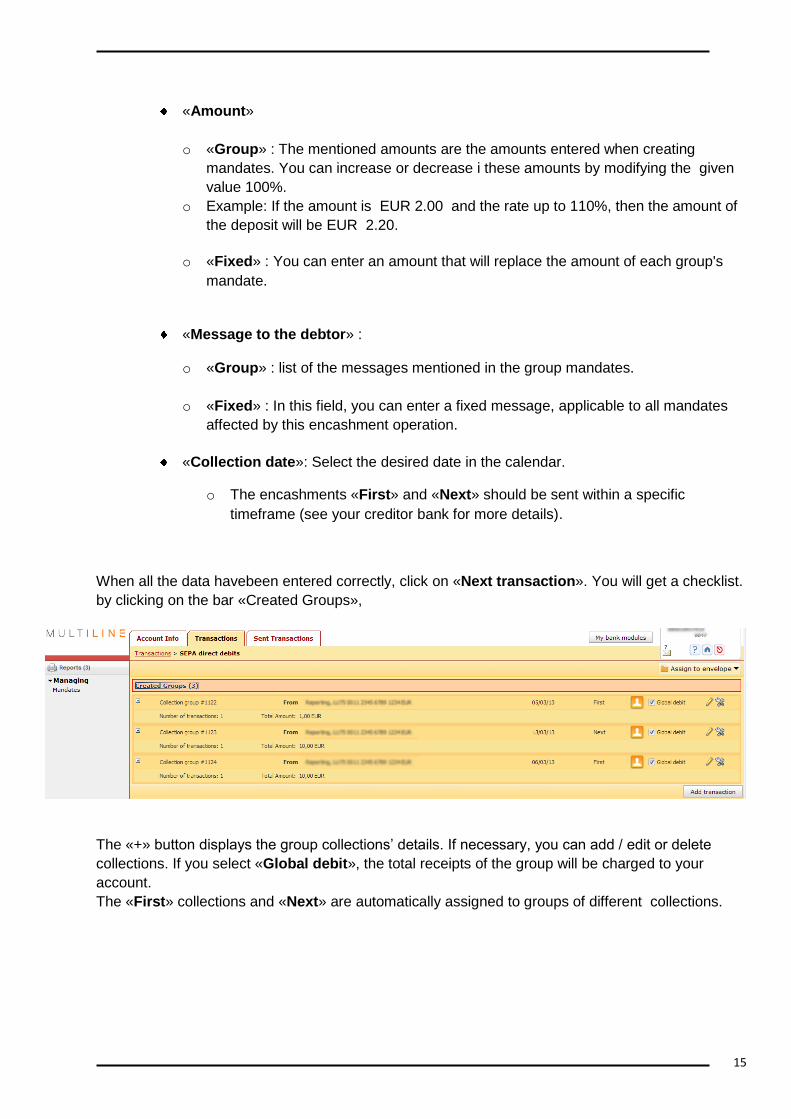
When all the data havebeen entered correctly, click on «Next transaction». You will get a checklist.
by clicking on the bar «Created Groups»,
The «+» button displays the group collections’ details. If necessary, you can add / edit or delete
collections. If you select «Global debit», the total receipts of the group will be charged to your
account.
The «First» collections and «Next» are automatically assigned to groups of different collections.
16
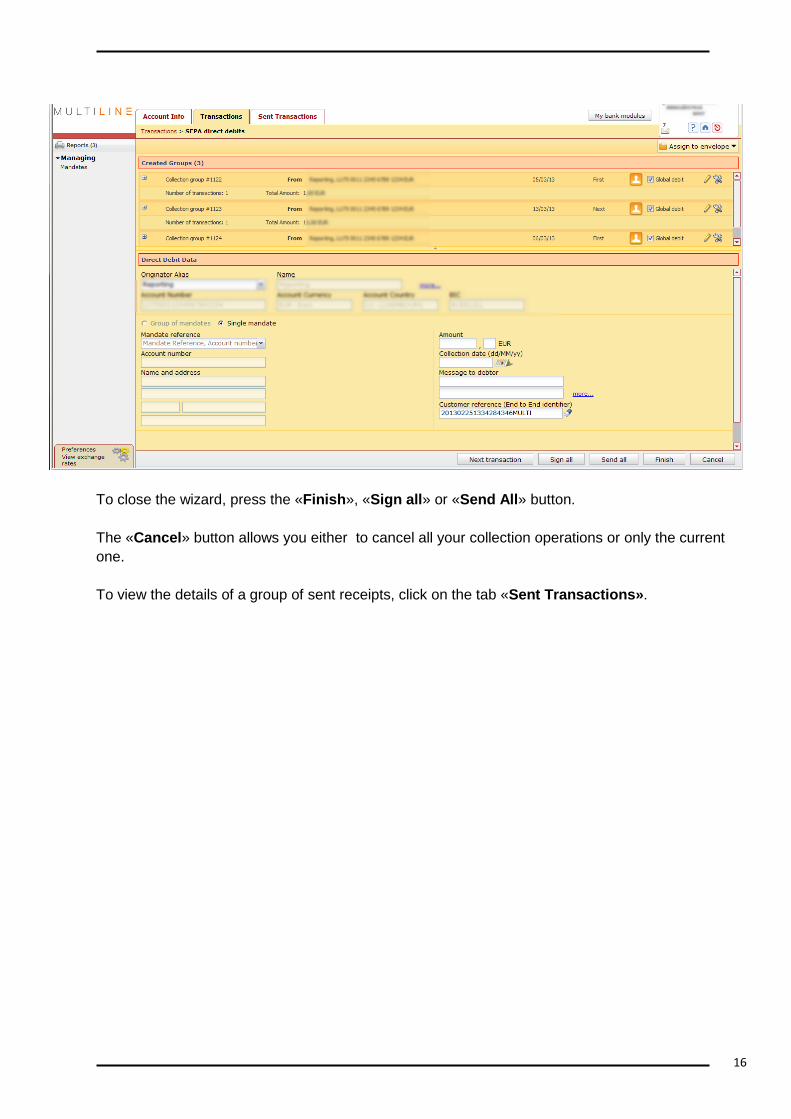
To close the wizard, press the «Finish», «Sign all» or «Send All» button.
The «Cancel» button allows you either to cancel all your collection operations or only the current
one.
To view the details of a group of sent receipts, click on the tab «Sent Transactions».
17
4 Creating a European direct debit SEPA from from a
migrated mandate. Your existing mandates used in the current system «DOM2009» are still valid for SDS. Therefore, for
existing debit numbers, you do not need to sign new European mandates.
During the first presentation of a migrated mandate, the old debit number and the old creditor number are
also sent, so that the debtor's bank will bes notified of the migration of this mandate to the European system.
From this moment on, you ahave to execute all future receipts in the European system. Receipts in the
DOM2009 system for the concerned debit number will be refused.
After the first accepted encashment, the mandate will follow the sequence of a normal term.
The creation of a European SEPA direct debit from an existing mandate requires the management of the
migrated mandates in the application system and to follow the two next steps:
The migrated mandate entry. Entering the collection based on the migrated mandate.
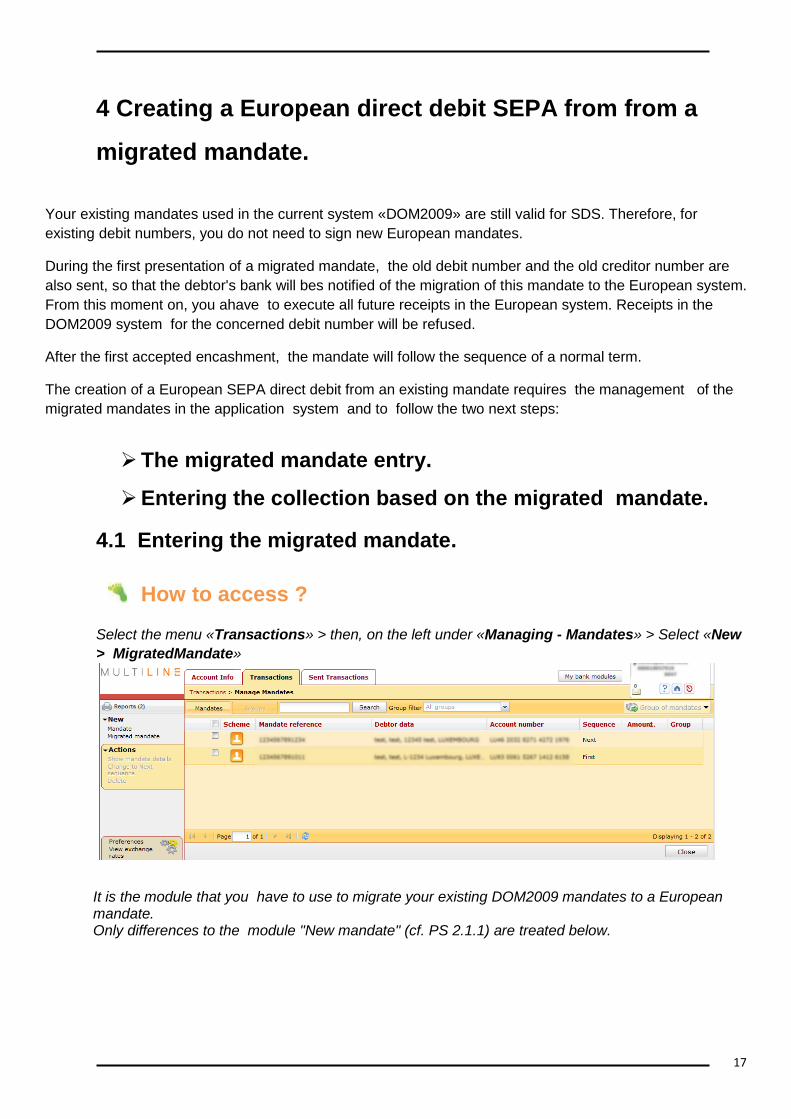
4.1 Entering the migrated mandate.
How to access ?
Select the menu «Transactions» > then, on the left under «Managing - Mandates» > Select «New
> MigratedMandate»
It is the module that you have to use to migrate your existing DOM2009 mandates to a European mandate. Only differences to the module "New mandate" (cf. PS 2.1.1) are treated below.
18
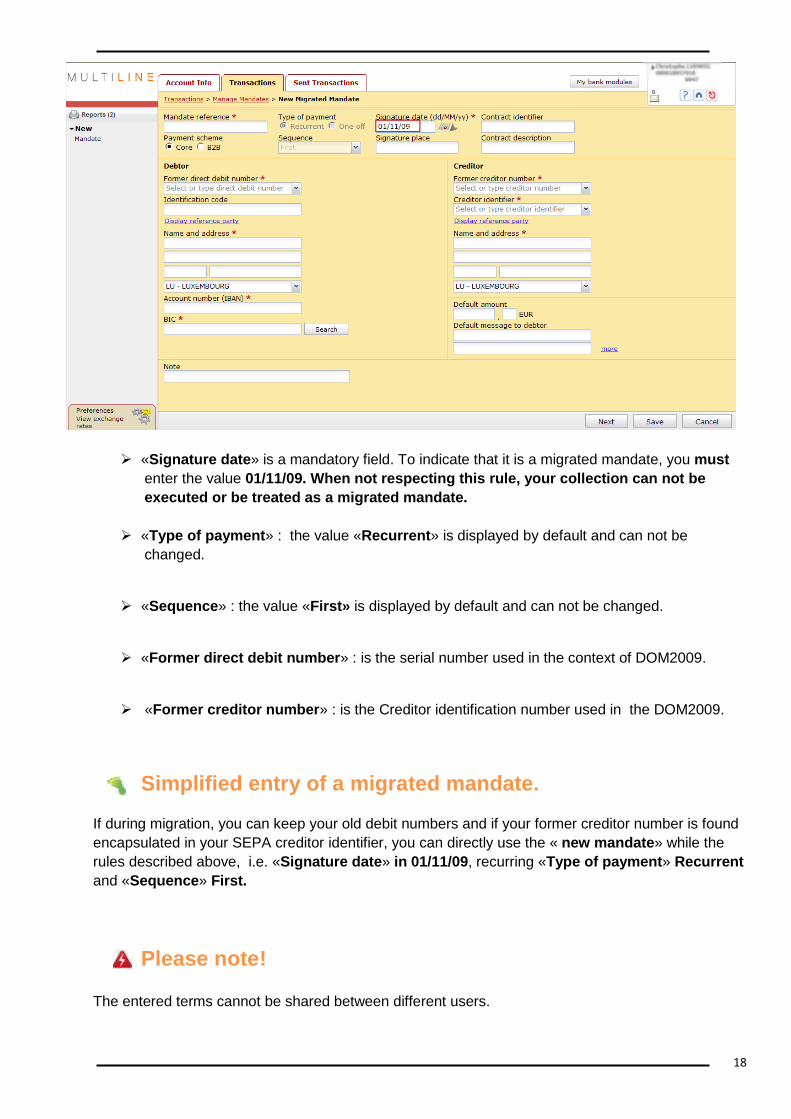
«Signature date» is a mandatory field. To indicate that it is a migrated mandate, you must
enter the value 01/11/09. When not respecting this rule, your collection can not be
executed or be treated as a migrated mandate.
«Type of payment» : the value «Recurrent» is displayed by default and can not be
changed.
«Sequence» : the value «First» is displayed by default and can not be changed.
«Former direct debit number» : is the serial number used in the context of DOM2009.
«Former creditor number» : is the Creditor identification number used in the DOM2009.
Simplified entry of a migrated mandate.
If during migration, you can keep your old debit numbers and if your former creditor number is found
encapsulated in your SEPA creditor identifier, you can directly use the « new mandate» while the
rules described above, i.e. «Signature date» in 01/11/09, recurring «Type of payment» Recurrent
and «Sequence» First.
Please note!
The entered terms cannot be shared between different users.
19
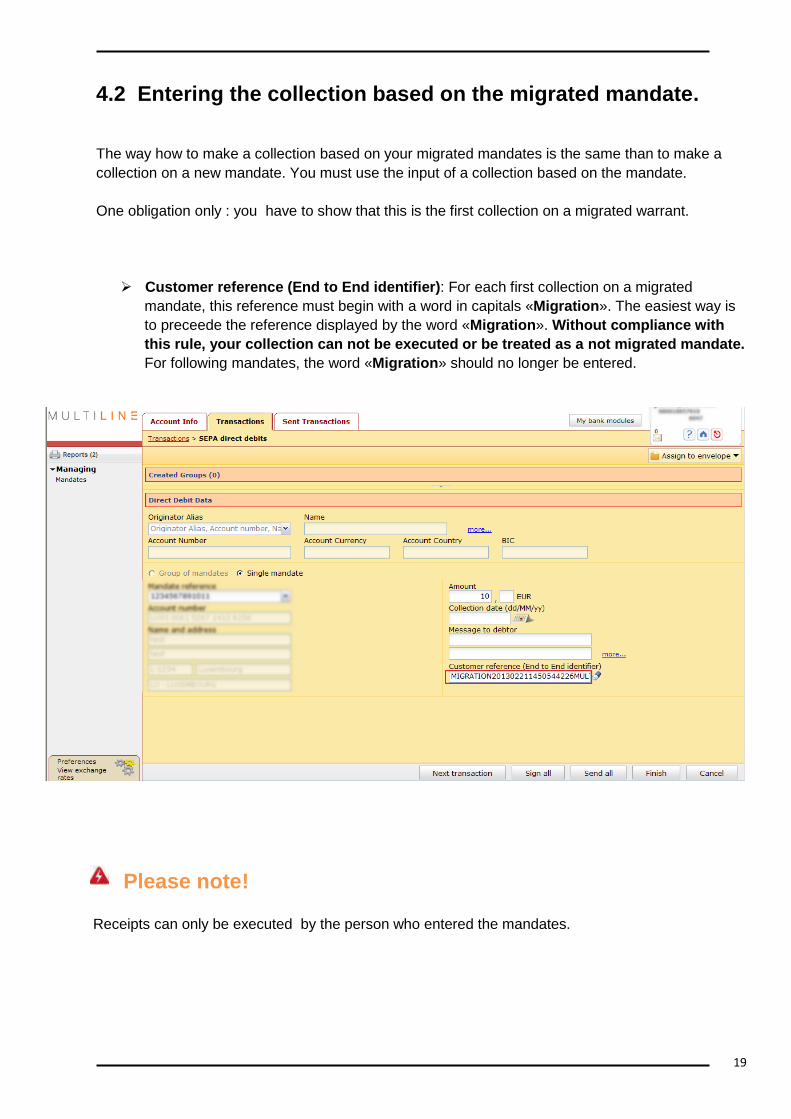
4.2 Entering the collection based on the migrated mandate.
The way how to make a collection based on your migrated mandates is the same than to make a
collection on a new mandate. You must use the input of a collection based on the mandate.
One obligation only : you have to show that this is the first collection on a migrated warrant.
Customer reference (End to End identifier): For each first collection on a migrated
mandate, this reference must begin with a word in capitals «Migration». The easiest way is
to preceede the reference displayed by the word «Migration». Without compliance with
this rule, your collection can not be executed or be treated as a not migrated mandate.
For following mandates, the word «Migration» should no longer be entered.
Please note!
Receipts can only be executed by the person who entered the mandates.
20
5 Changing the sequence after the first collection.
In entering a new mandate or a migrated mandate or different amendments, the sequence will get
automatically the value «First».
After an encashment, the sequence of the encashed mandate must swich to «Next».
This modification can be done individually, but if you completed the encashment in using a group of
mandates, you can proceed very fast for the whole group.
How to access ?
Select the menu «Transactions» > then on the left under «Managing - Mandates»
To i modify the mandates individuallty, activate the tab «Mandates» :
1) Search the concerned mandate by using the «Search» button in the detailed
list containing the printed encashments;
2) Check the mandate and select «Actions > Change to Next sequence».
To modify a group for which you performed encashments, select the group by the filter group.
Please note!
Make sure you have selected a corresponding group for which you performed encashments ;
otherwise you risk to modify mandates whose tvalue is «First» and for who an encashment was
never done !
Then click on the directional arrow at the right of the column nameed «Sequence» and select the
filter «First».
At present, only mandates matching with the «First» value are displayed.
Select all mandates (check the box in the header)
Select «Actions > Change to Next sequence». All encashed mandates of the group with the value
«First» are switched to value «Next».
Then, don’t forget to deactivate the filtre in the «Sequence» column.
21
6 Amendment of mandates.
6.1 Modifying mandates.
The modification of mandates are initiated by the creditor, for example to assign them. an other
reference, or from the debtor, for example, to change the IBAN number.
How to access ?
Select the menu «Transactions» > then select «Mandates > Managing - Mandates»
Search the mandate to be modified and select it on the list
The mandate opens allowing to be edited.
Now you can modify all its data.
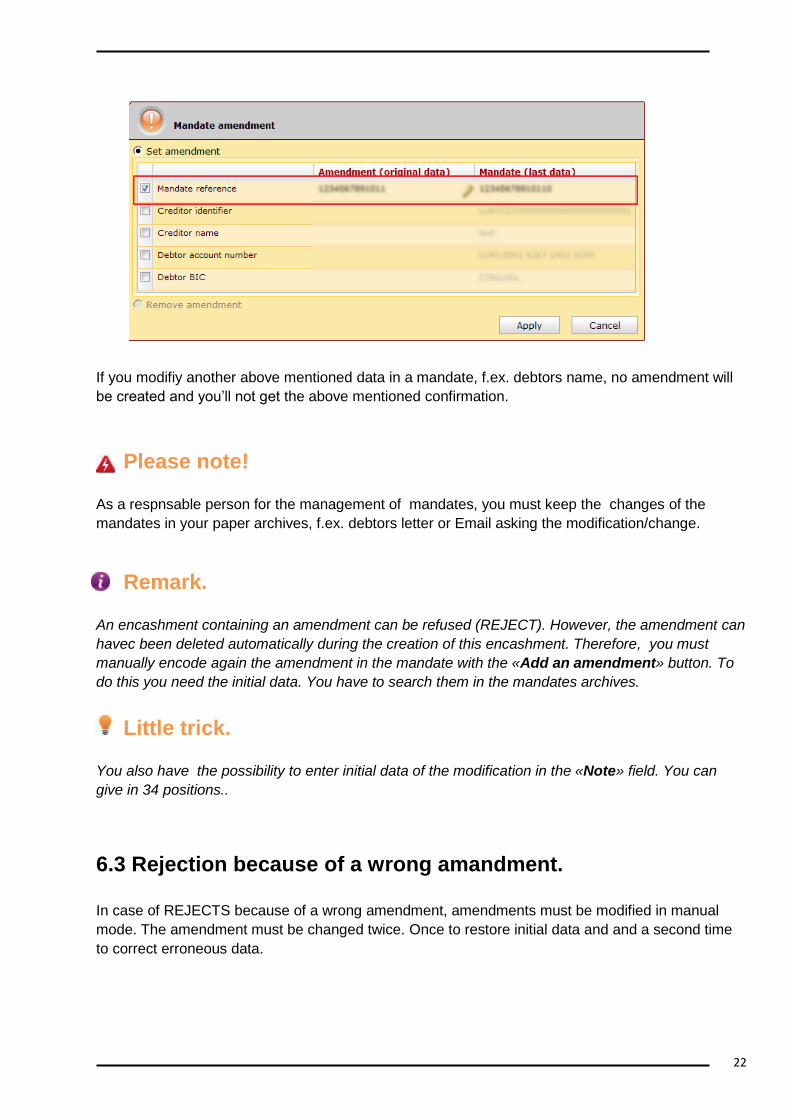
6.2 Amendments.
When changing certain fields of a mandate, the initial data of the mandate must be sent during the
next encashment. For this we use an «Amendment», which is joined to the mandat until the next
encashment.
Changes/modifications will concern the following elements :
«Mandate reference»;
«Creditor identifier» and «Name of creditor»;
«Account Number of debtor» : if we choose another IBAN from the same debtor bank;
«BIC of debtor» : if modification of the debtors bank. In this case, the IBAN will also change,
but its initial value cannot be included in the amendment. The «Sequence» will switch on
«First». Following this change, it’s not the initial BIC which is stored in the amendment, but
the mention « Same mandate New Debtor Agent » (agent = bank)
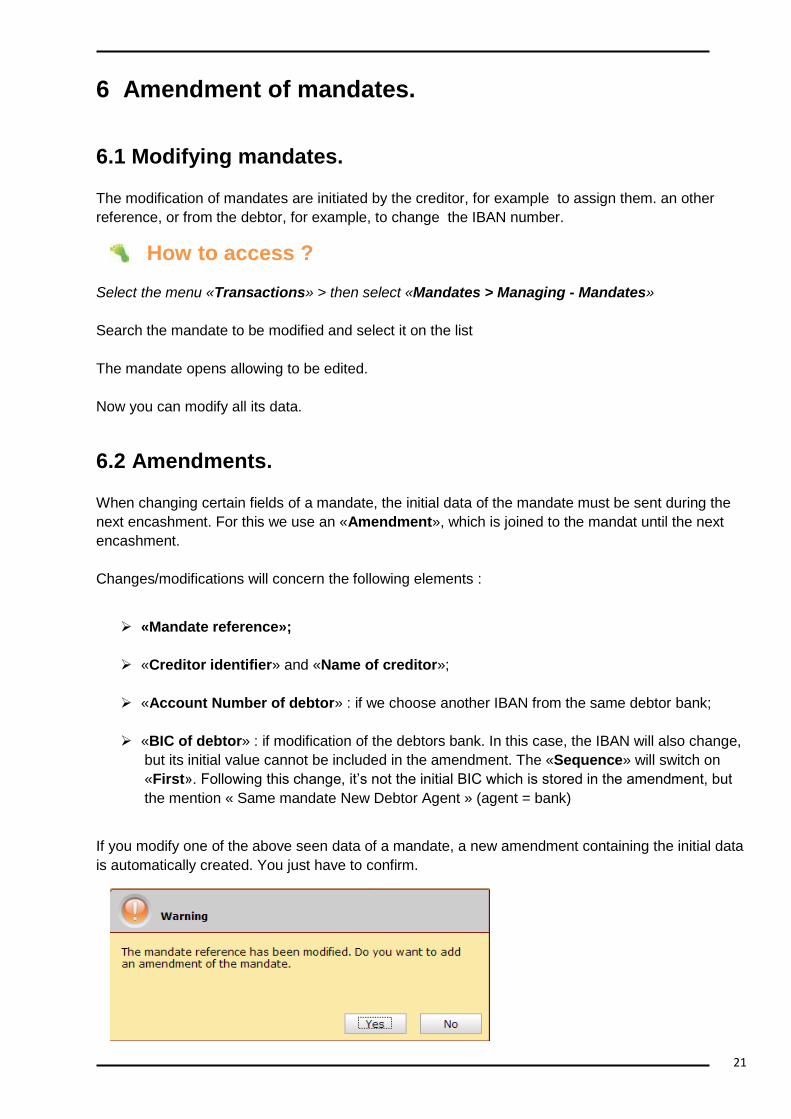
If you modify one of the above seen data of a mandate, a new amendment containing the initial data
is automatically created. You just have to confirm.
22
If you modifiy another above mentioned data in a mandate, f.ex. debtors name, no amendment will
be created and you’ll not get the above mentioned confirmation.
Please note!
As a respnsable person for the management of mandates, you must keep the changes of the
mandates in your paper archives, f.ex. debtors letter or Email asking the modification/change.
Remark.
An encashment containing an amendment can be refused (REJECT). However, the amendment can
havec been deleted automatically during the creation of this encashment. Therefore, you must
manually encode again the amendment in the mandate with the «Add an amendment» button. To
do this you need the initial data. You have to search them in the mandates archives.
Little trick.
You also have the possibility to enter initial data of the modification in the «Note» field. You can
give in 34 positions..
6.3 Rejection because of a wrong amandment.
In case of REJECTS because of a wrong amendment, amendments must be modified in manual
mode. The amendment must be changed twice. Once to restore initial data and and a second time
to correct erroneous data.

23
7 What happens if the encashments aren’t executed?
7.1 REJECTS (refusal before the debtor has been debited).
The REJECTS (non executable europeen direct debits) designate encashments which were refused
and where no debit was done, (incorrect reference, block by the debtor, inactive/closed account,
migrated data is not correct…).
The debtors bank sends all REJECTS at your bank, who has to inform you.
As no debit exists for REJECTS, no mandate update has been done by the debtors bank, f.e.x. the
value «First» of the «Sequence» field wasn’t saved. Thus in this case, you should not change the
value «First». You should resend it during the next encashment
7.2 Refusal after the debtor has been debited.
This time, the debtors bank updated the mandate.
Mandates of encashments with the « First » sequence must bemanually switched to the «Next»
sequence.


![SEPA BUSINESS TO BUSINESS DIRECT DEBIT …...SEPA Business-to-Business Direct Debit Scheme C2B Implementation Guidelines EPC [13] EPC329-08 Guide to the Adherence Process for the SEPA](https://img.pdfslide.us/doc/110x75/5f464dac58a62135061269b5/sepa-business-to-business-direct-debit-sepa-business-to-business-direct-debit.jpg)


![SEPA CORE DIRECT DEBIT SCHEME CUSTOMER-TO-BANK ... · SEPA Core Direct Debit Scheme E-Mandate Service Implementation Guidelines . EPC [9] ISO 11649 : Structured creditor reference](https://img.pdfslide.us/doc/110x75/5c0a09ce09d3f23c1a8b46e3/sepa-core-direct-debit-scheme-customer-to-bank-sepa-core-direct-debit-scheme.jpg)


![SEPA BUSINESS TO BUSINESS DIRECT DEBIT SCHEME ......SEPA B2B Direct Debit Scheme E-Mandate Service Implementation Guidelines EPC [15] EPC064-08 Criteria for Participation in SEPA EPC](https://img.pdfslide.us/doc/110x75/60ab14659e99547cf11a97fd/sepa-business-to-business-direct-debit-scheme-sepa-b2b-direct-debit-scheme.jpg)